

Page 1
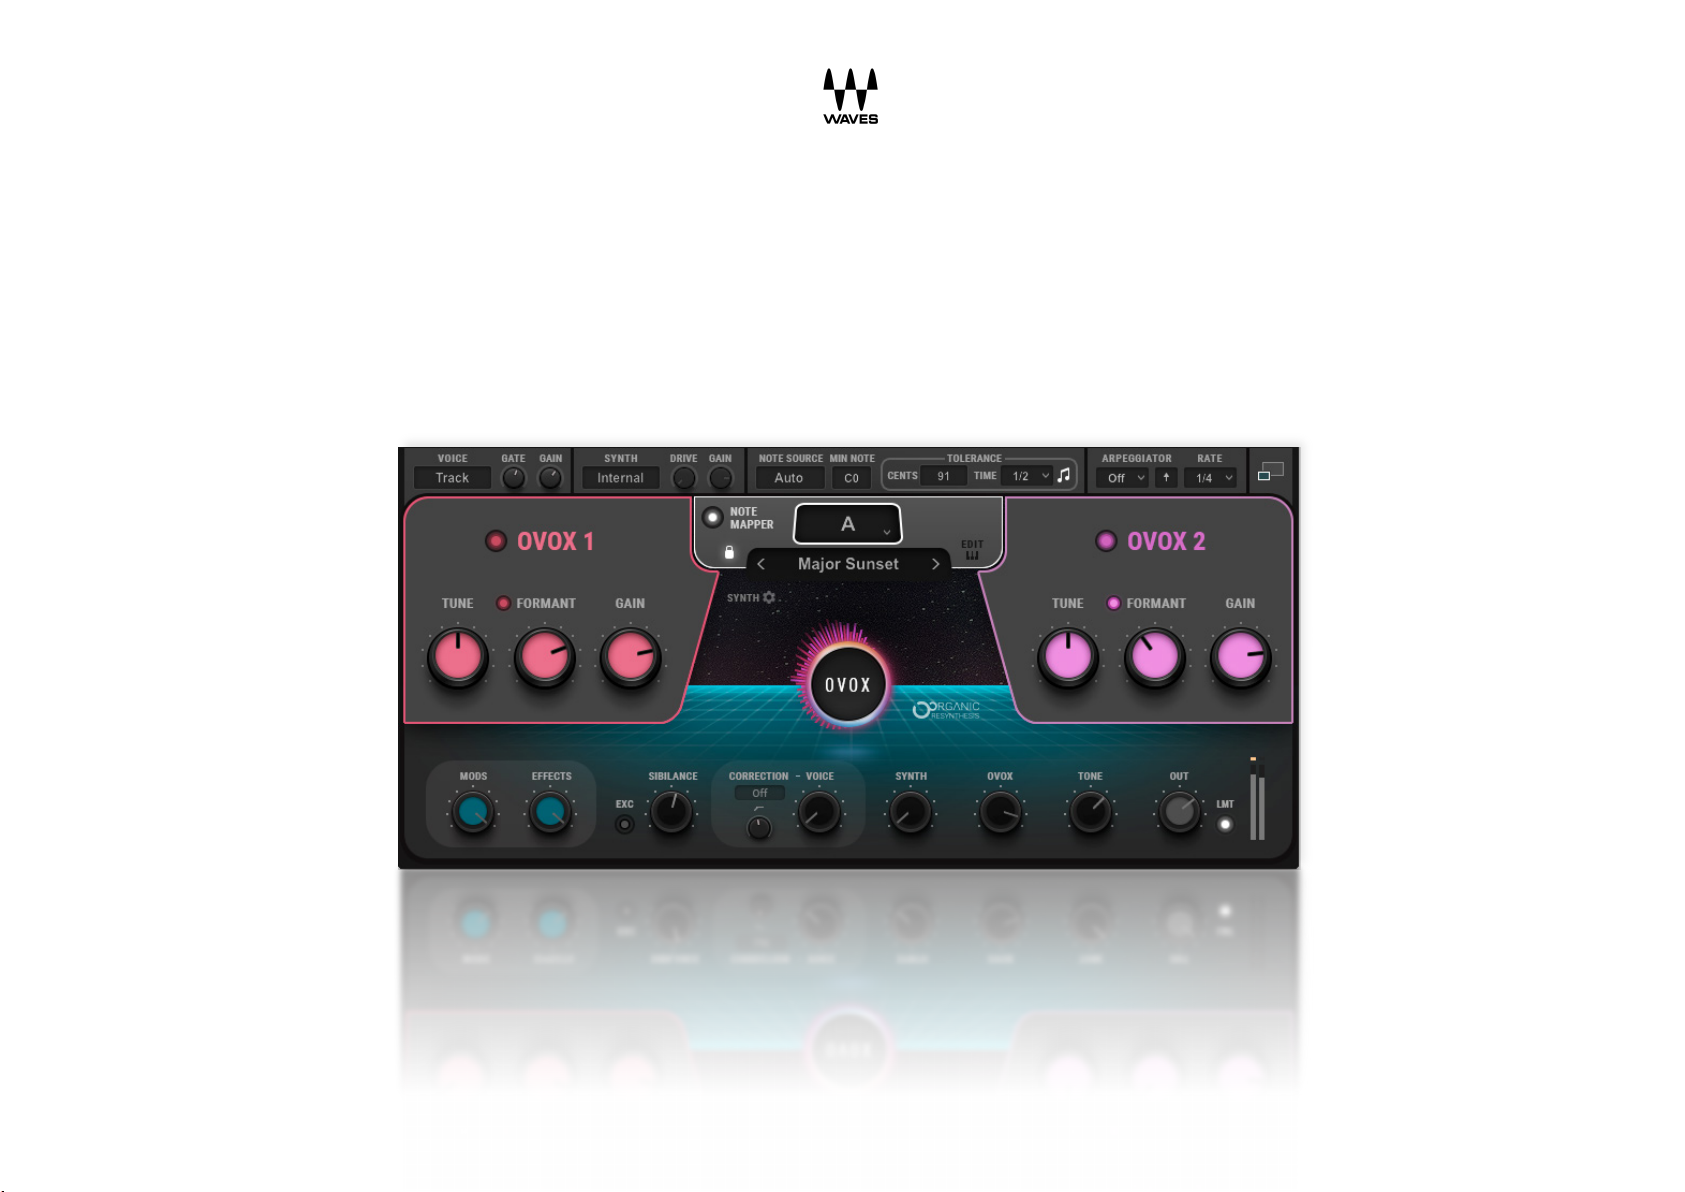
OVox
User Guide
Vocal ReSynthesis
Page 2

2
Contents
Introduction ......................................................................................................................... 3
Getting Started with OVox ................................................................................................... 4
Setup ............................................................................................................................................................................................. 4
Learning OVox .............................................................................................................................................................................. 5
Signal Flow ........................................................................................................................... 6
Interface: Two Views ........................................................................................................... 7
OVox Main View ........................................................................................................................................................................... 7
OVox Expanded View .................................................................................................................................................................... 8
Components .................................................................................................................................................................................. 8
Controls Common to Both Views ........................................................................................ 9
Top Bar .......................................................................................................................................................................................... 9
Top Bar: Input Section ................................................................................................................................................................................ 9
Top Bar: Notes Generator ........................................................................................................................................................................ 10
Top Bar: Arpeggiator ............................................................................................................................................................................... 11
Note Mapper .............................................................................................................................................................................. 12
Note Map Editor ....................................................................................................................................................................................... 13
Main View Controls............................................................................................................ 15
OVox 1 and OVox 2 ..................................................................................................................................................................... 15
Mixer Section .............................................................................................................................................................................. 16
Expanded View Controls .................................................................................................... 18
OVox 1 and OVox 2 ..................................................................................................................................................................... 18
Formant Filter Section ................................................................................................................................................................ 20
Synth Settings Section ................................................................................................................................................................ 22
Mixer Section .............................................................................................................................................................................. 23
Modulators ................................................................................................................................................................................. 26
Modulation Types ....................................................................................................................................................................... 27
MODs 1–4 ................................................................................................................................................................................................. 28
ADSR 1 and ADSR 2 .................................................................................................................................................................................. 31
ORS Modulators ....................................................................................................................................................................................... 32
EQ ................................................................................................................................................................................................ 34
MIDI Control Change Modulation .............................................................................................................................................. 35
Effects.......................................................................................................................................................................................... 36
Macros ........................................................................................................................................................................................ 37
Waves OVox / User Guide
Page 3

3
Introduction
Waves OVox is a next-generation vocal processing and synthesizing suite that combines flexibility and unsurpassed
sound quality. Built on Waves Organic ReSynthesis technology (ORS), OVox lets you create voice-based musical
effects without using a keyboard. OVox uses the human voice to modulate another sound—typically a synthesizer—
to create a new sound that tracks the voice and preserves its characteristics. This is called vocoding, a familiar vocal
effect that’s been used on countless rock and pop recordings. But vocoding is just the beginning— OVox combines
several processing sections, which together open up a new world of vocal processing. Pitch correction, doubling,
automatic harmonization, and chord building from voice signals are easily achieved. OVox is also a great tool for
sound design and postproduction voice effects.
How Does it Work?
The OVox input section detects what makes up a note, based on pitch and time values. These incoming notes can
be mapped to other notes (or to several notes, to map a chord or harmonic) and then processed. There are two main
processing units. Each unit includes an oscillator, noise generator, formant filter, and dynamic control. The formant
filter analyzes the formant of the modulator (what we call Voice). This is used to generate a complex filter, which is
then applied to the carrier signal (what we call Synth).
The original amplitude envelope of the voice can be forced onto the carrier. This creates an effect similar to
vocoding with further adjustment possibilities. The vocal cords of the vocalist are effectively replaced by oscillators.
The influence of the amplitude envelope of the modulator can, on the other hand, be reduced. This emphasizes
more of the carrier and produces a looser correlation with the voice. Rich EQ, modulation, and effects processors
can be applied to the carrier to construct a very wide array of unique sounds.
The combination of advanced ORS processing and powerful, flexible controls makes Waves OVox a voice processor
unlike any other.
Waves OVox / User Guide
Page 4

4
Getting Started with OVox
Setup
PLUG AND PLAY
The fastest way to get started with OVox is to simply open the plugin on an audio track and let it automatically
generate the carrier signal for you. No additional routing is needed. Use the Voice Input controls, Gate, and Gain, to
avoid low level artifacts, spill, mic feedback, and to set the input level. You can also use OVox in conjunction with a
MIDI controller.
USING A MIDI KEYBOARD/CONTROLLER
To use OVox as an instrument:
1. Open OVox on a MIDI/Instrument track.
2. Set the Note Source to MIDI or leave it set to Auto.
3. Set the Voice Source to Sidechain.
4. In your DAW, route the vocal track to the plugin’s sidechain input.
To use OVox as a MIDI-controlled audio plugin:
1. Open OVox on an audio track.
2. Set the Note Source to MIDI.
3. In your DAW, open a new MIDI/Instrument track.
4. Route the MIDI track to the plugin’s MIDI input.
USING AN EXTERNAL CARRIER
OVox can also be used to manipulate external carriers. This option will turn off the plugin’s built-in synthesizer. It
allows you to patch any instrument and manipulate it using the vocals—much like a talk box.
1. Open OVox on an audio track.
2. Set the Synth Source to Sidechain.
3. In your DAW route the external carrier to the plugin’s sidechain input.
4. Use the Synth Input controls, Drive, and Gain to adjust the level and the harmonic content of the carrier.
Waves OVox / User Guide
Page 5
5
Learning OVox
There are two ways to get familiar with OVox:
• Insert OVox on a DAW audio track, play some voice material, and experiment with the controls. You’ll likely
manage just fine.
• You can also use factory presets to set up a number of common, and not so common, voice effects. Adjust
from there.
Either way, you’ll get to the same place; it’s just a matter of how you like to work.
PRESETS
Presets are very handy. In many cases, you’ll find just the right effect by loading a
preset whose name sounds like (or “feels” like) what you’re looking for. Starting
with a preset has two advantages:
It’s fast. Begin with a preset whose name makes sense for what you want to
do. This might be all you need.
It’s a good way to learn. Load a preset and see how the controls are set.
Listen, change some settings, and notice how it affects the sound. Load
another preset, note the settings, make some changes, and listen. Do this a
few times and you’ll understand what the controls do and how the sections
work together.
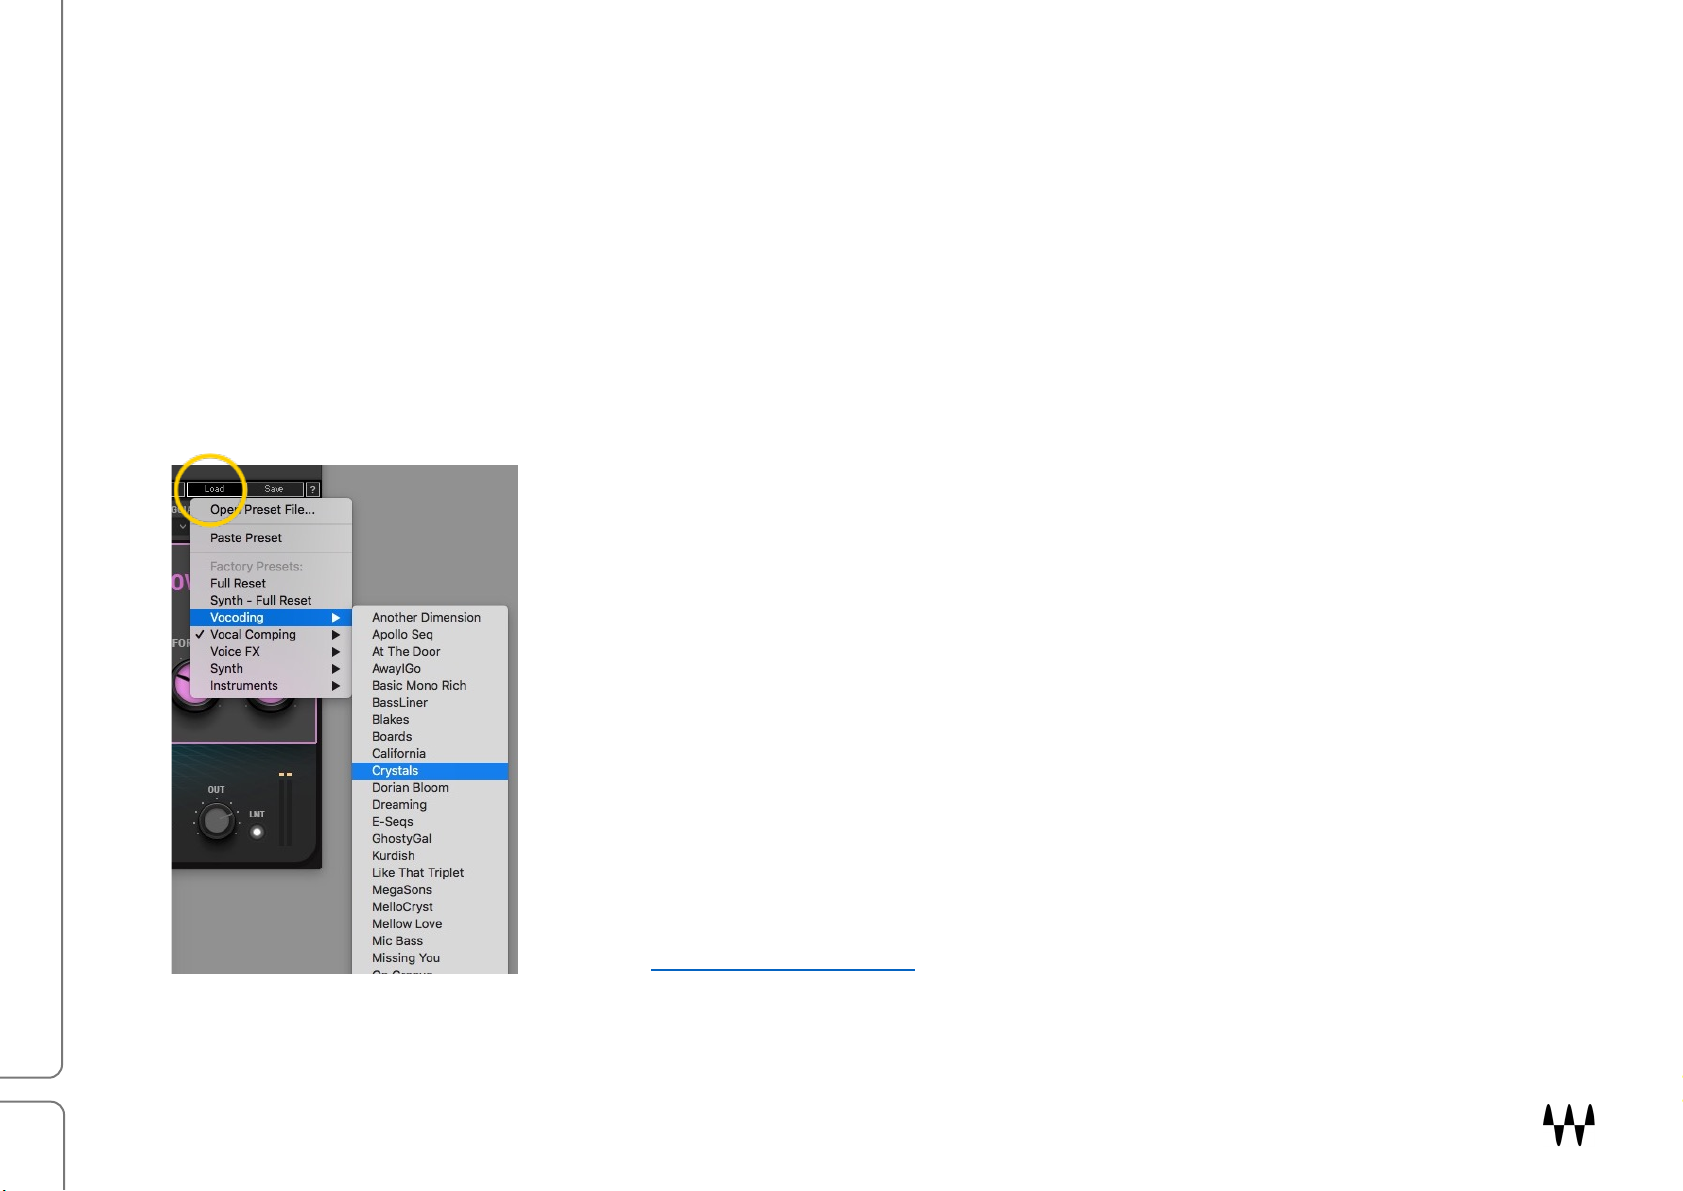
Load and save presets with the WavesSystem Toolbar, which is just above the
OVox interface (circled here). Download the WaveSystem Toolbar user guide
from the Waves Download Page on our web site.
Waves OVox / User Guide
Page 6
6
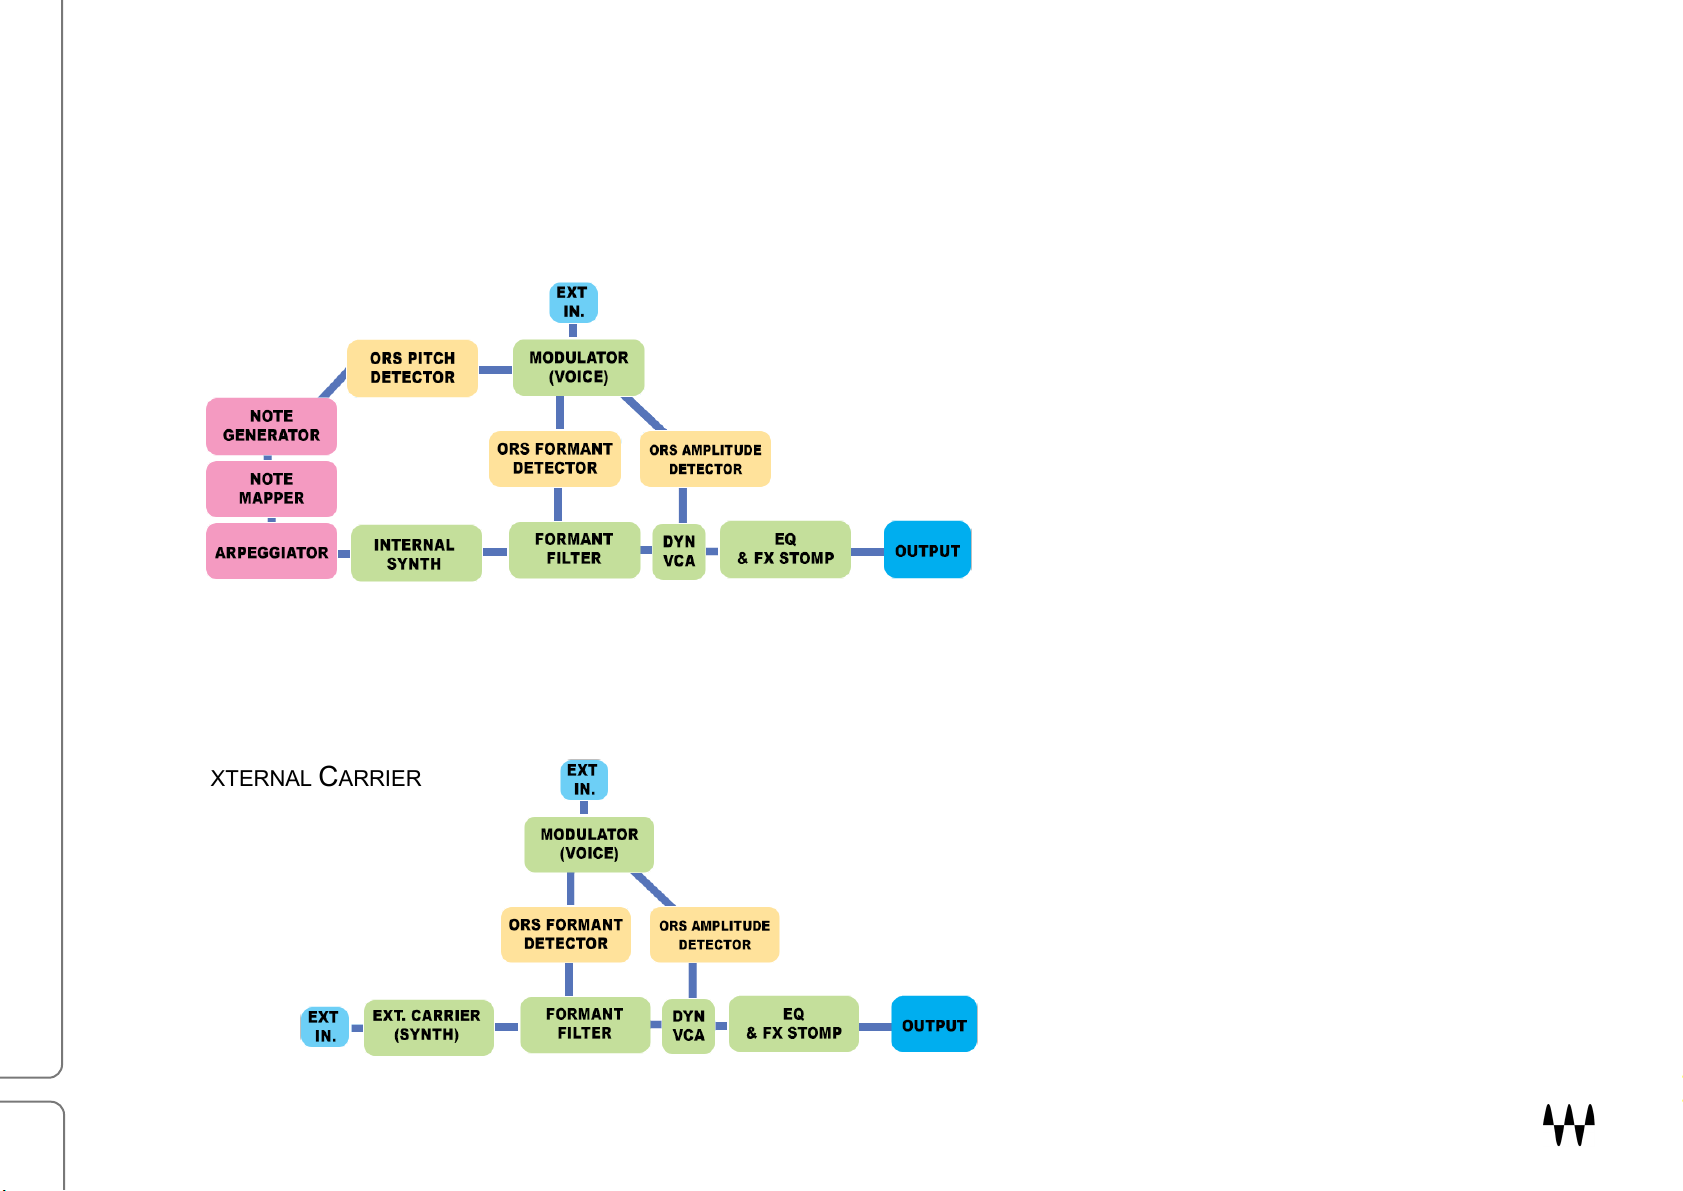
INTERNAL SYNTH
Signal Flow
OVox can operate as a plugin to process audio signals without special routing requirements, using its built-in
modules. It can also accept external input signals to provide further control and manipulation. Signal flow is the
same for both carrier models, aside from sync note generation and pitch detection.
EXTERNAL CARRIER
Waves OVox / User Guide
Page 7
7
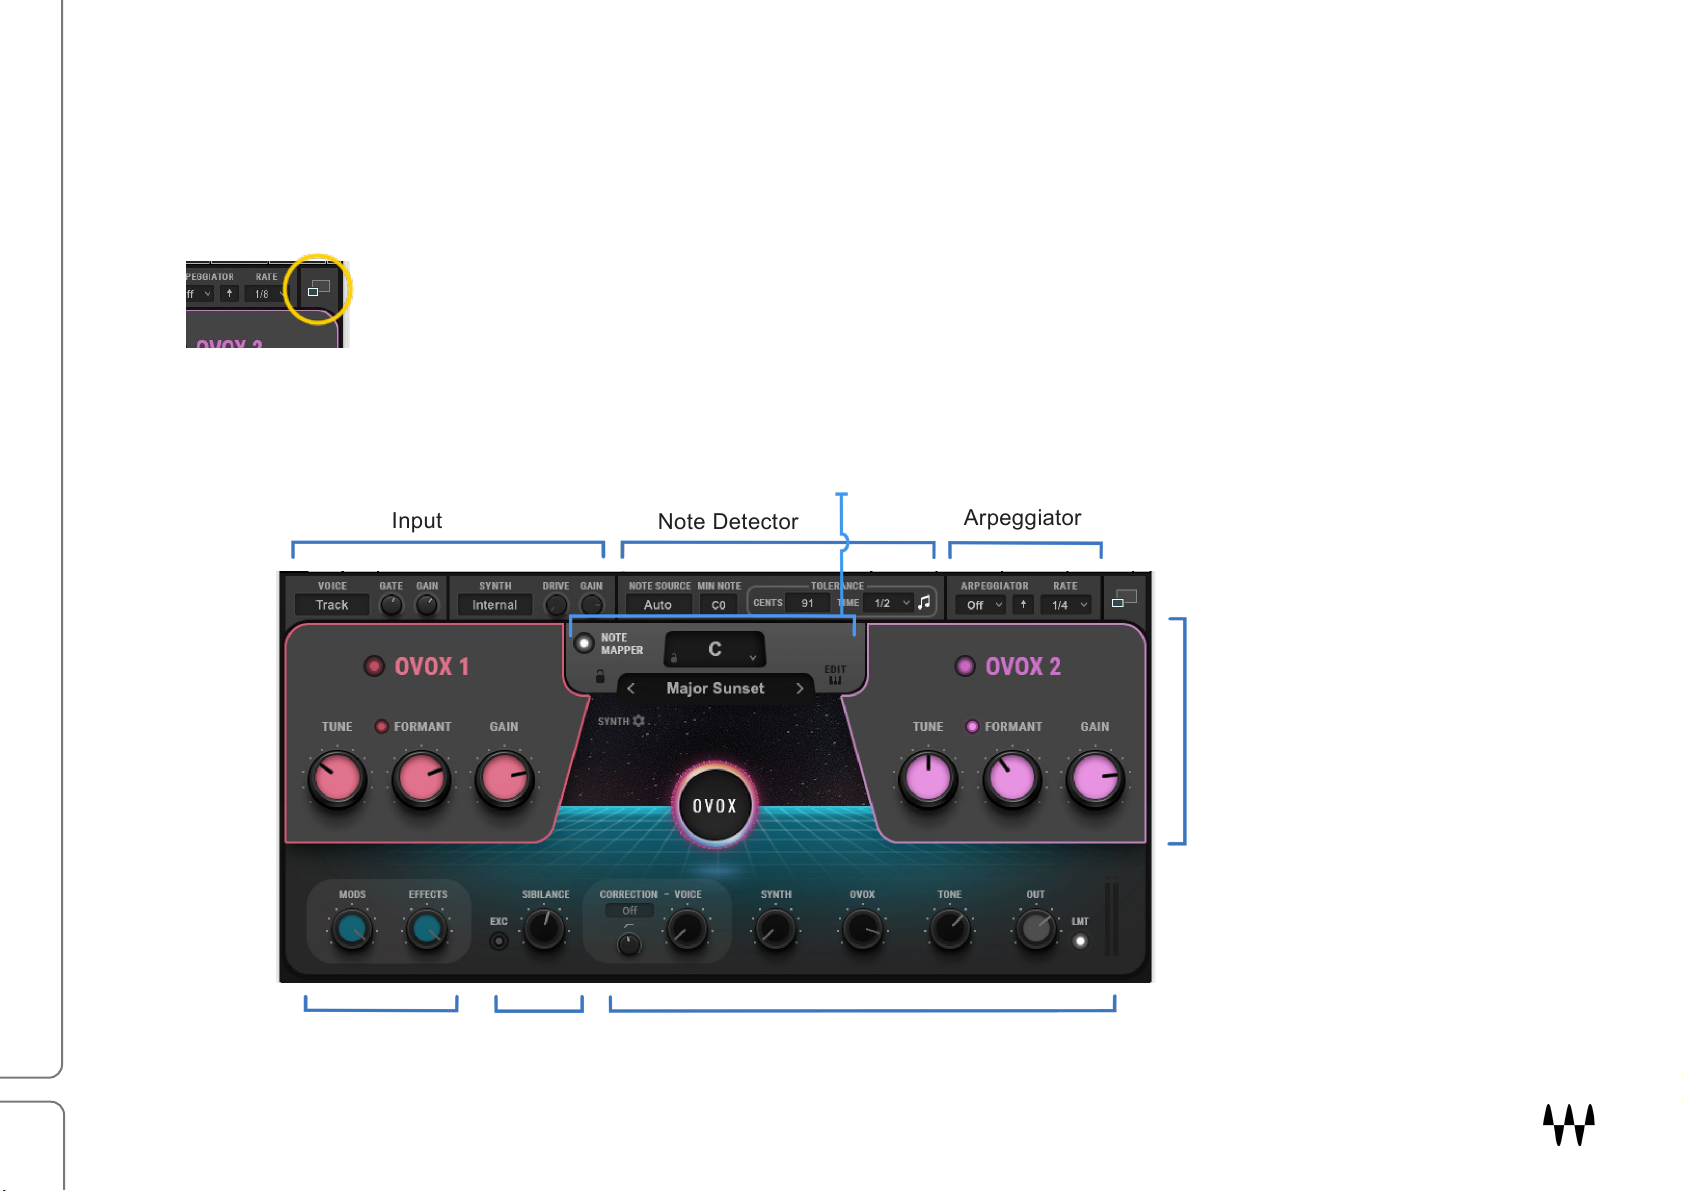
Input
Note Detector
Arpeggiator
Mod/FX Levels
Sibilance
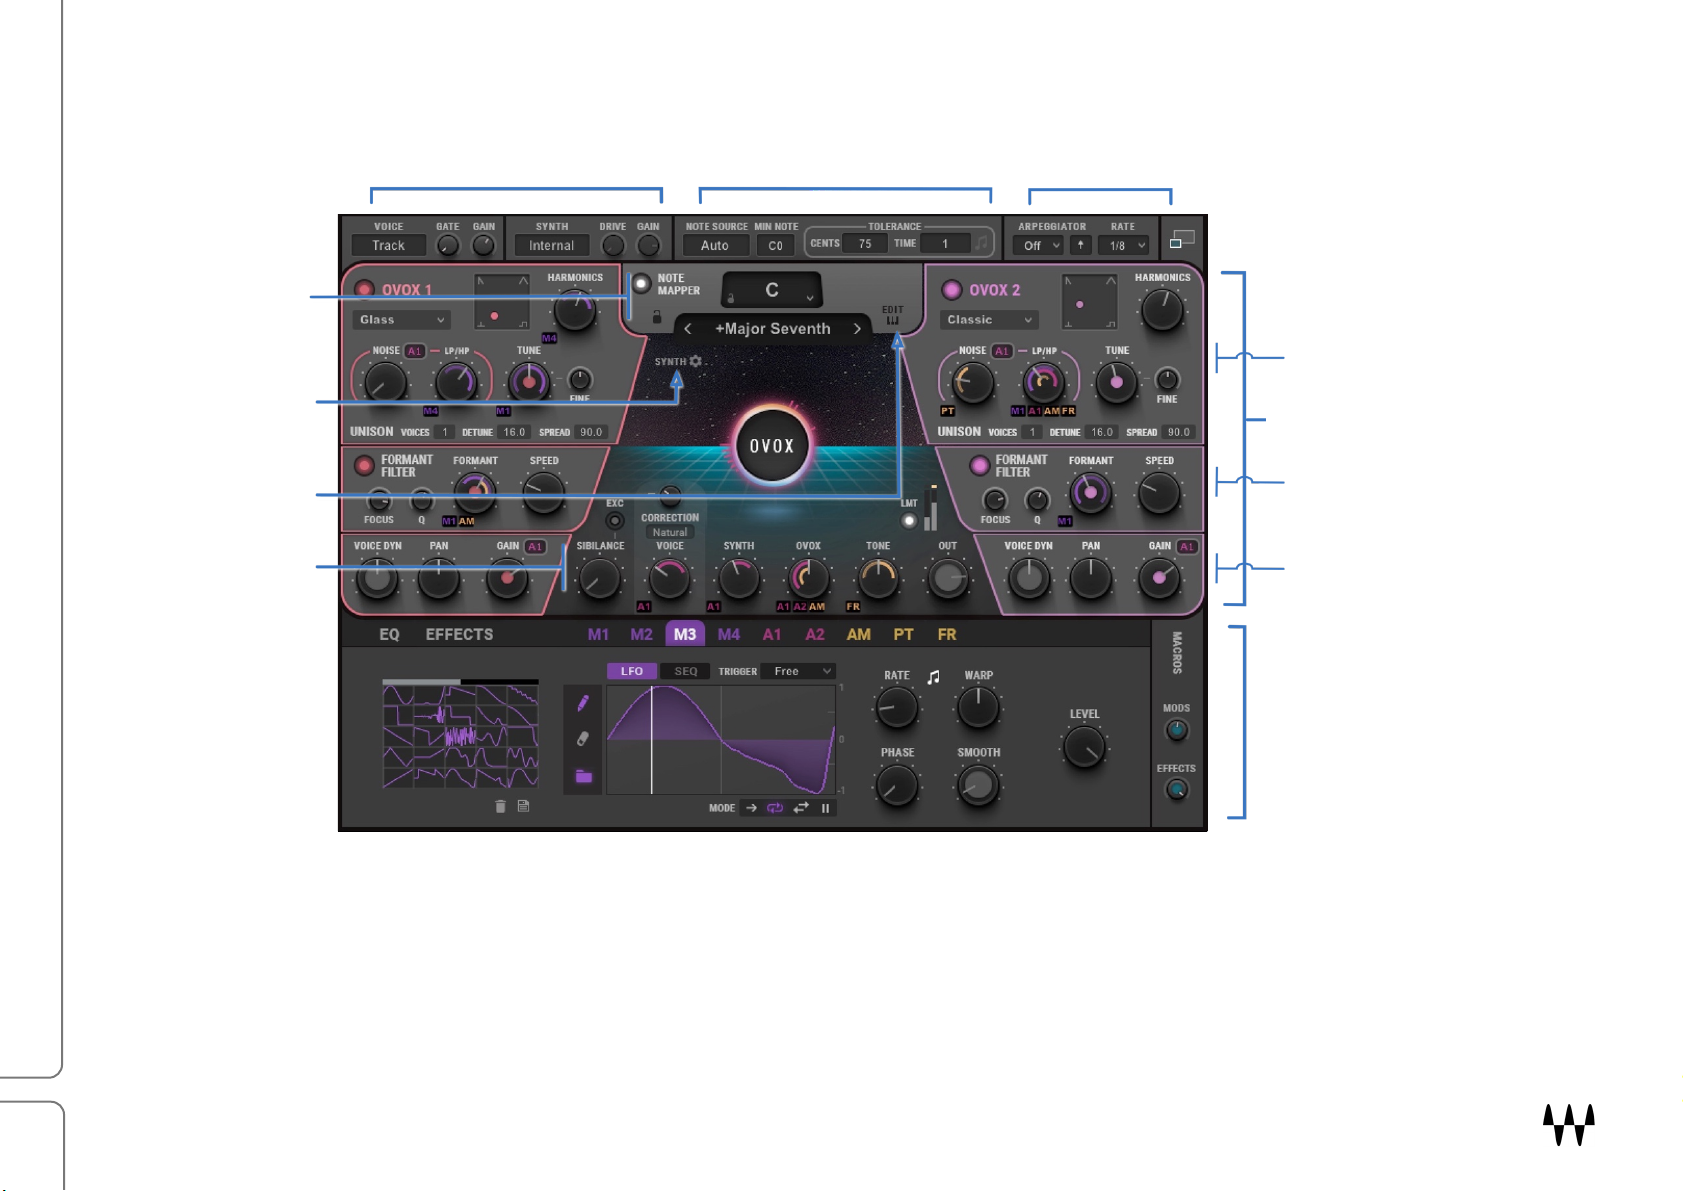
Interface: Two Views
OVox has two views: A Main view with the essential controls that you need to create and manipulate most voice
effects, and an Expanded view that includes advanced features for greater control. Both views use the OVox Top
Bar for input, synth source, notes detection, and arpeggiation.
Toggle between views with the Expand/Collapse button in the upper-right corner.
OVox Main View
Note Mapper
Main Processing Units
Mix and Output
Waves OVox / User Guide
Page 8
8
Input
Note Detector
Note Mapper
Arpeggiator
Main Processing Units (2)
Oscillators
Dynamics
Formant Controls
Access Synth
Controls
Access Note
Editor
OVox Expanded View
Top Bar
Mixer
Components
There are two Vocal ReSynthesis components: Stereo and Mono-to-Stereo. Their interfaces are identical. There is
also a standalone application, that lets you use OVox without a DAW.
EQ, Effects, and Modulators
Waves OVox / User Guide
Page 9
9
Controls Common to Both Views
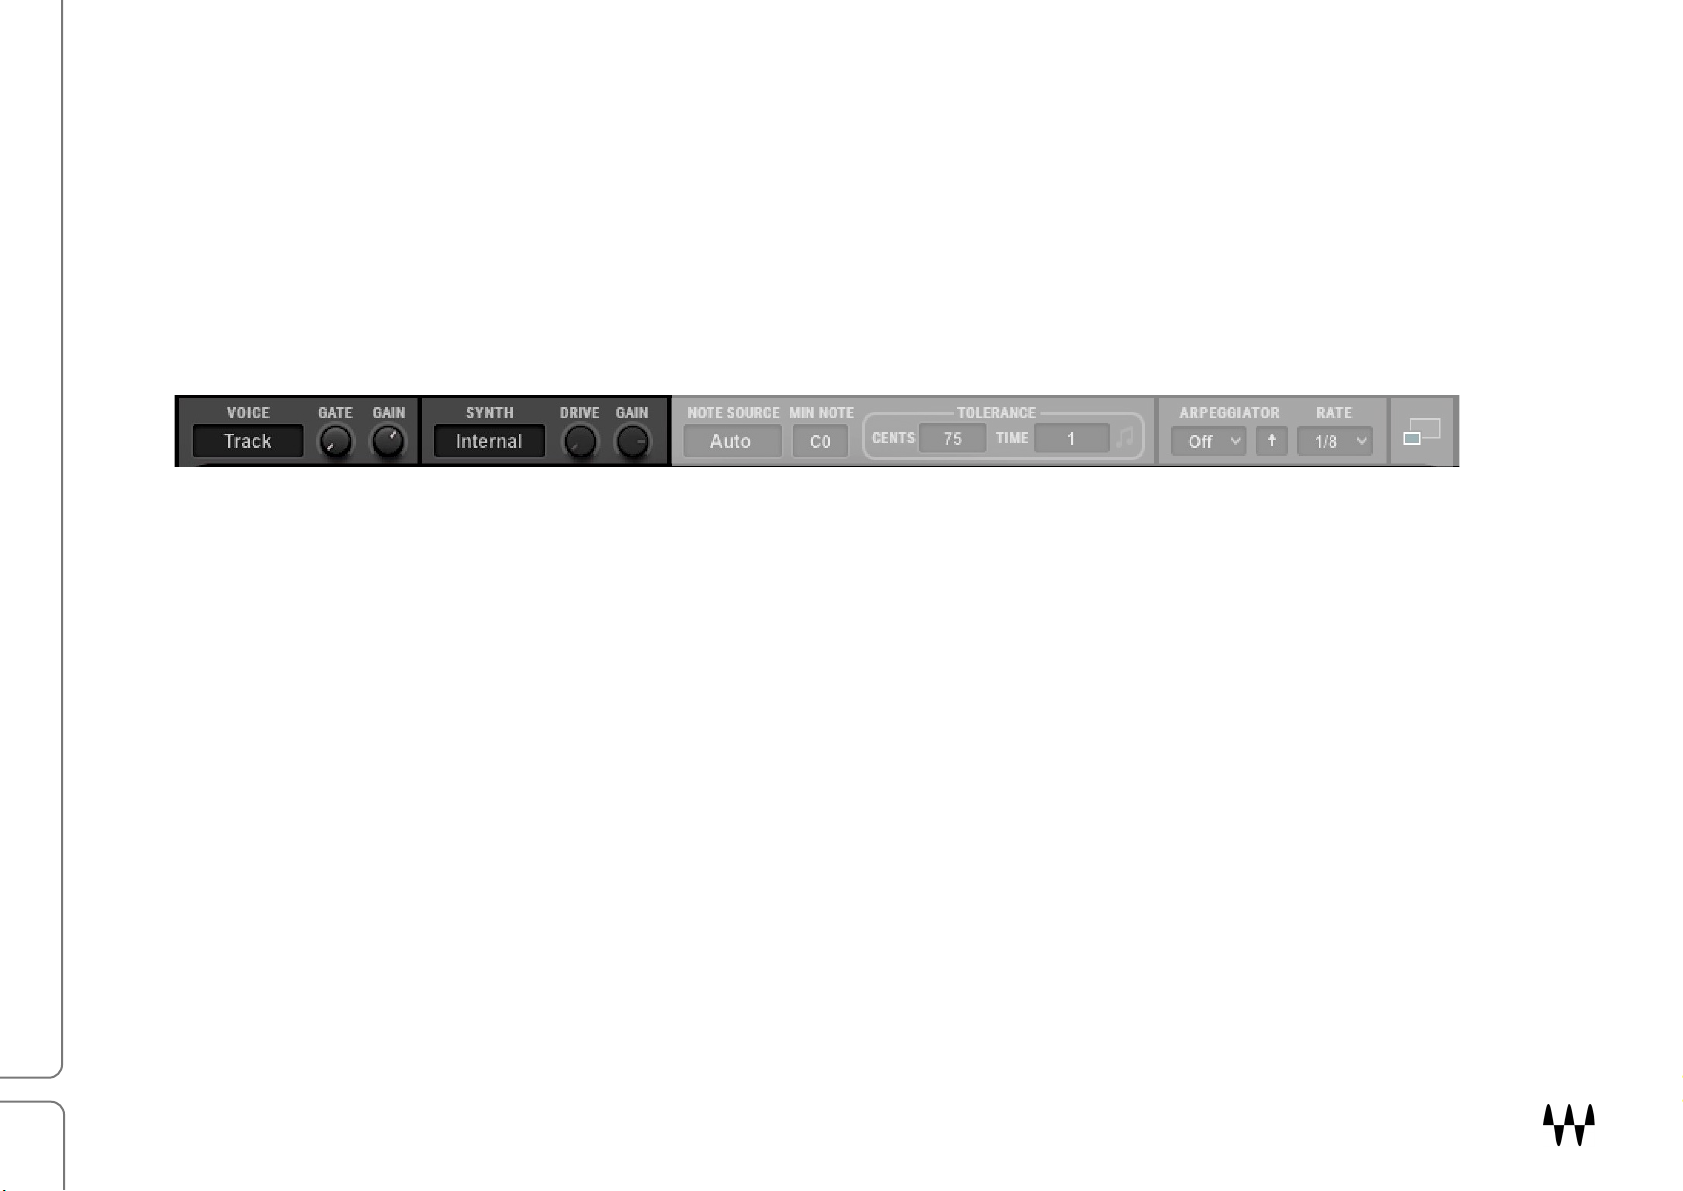
Top Bar
The Top Bar serves three purposes: the left side controls the input of the modulator and the carrier; the middle
section governs note source attributes and conditions for note generation, and on the right are the arpeggiator
controls.
Top Bar: Input Section
OICE INPUT
V
Selects the signal to be used as the modulator: Track or Sidechain.
Range: Track or Sidechain
GATE
Applies a gate to the input signal to provide better detection when voice signal is noisy.
Range: -144 dB to 0 dB
GAIN
Controls the input gain of the modulator: Track or Sidechain.
Range: -30 dB to +18 dB
SYNTH INPUT
Determines which signal will be used as the carrier. Traditionally, the carrier is the internal synthesizer sound. The built-in
synth (Internal) has many features, such as note generation, note mapping, and the character filters— designed to provide an
interesting and rich soundscape. You can, however, use other signals as the carrier (e.g., guitars, drums, or other
instruments).
When Synth is set to Track or Sidechain, the Note Generator, Note Mapper, Arpeggiator, and built-in Synth are unavailable.
Range: Internal, Track, Sidechain
Waves OVox / User Guide
Page 10
10
Note: Note Generation is about defining what a note is.
GAIN AND DRIVE
The Gain and Drive controls are active when Synth is set to Track or Sidechain. They control the texture of the carrier input.
Drive lets you push the input signal into clipping, which generates more harmonics. This makes the carrier richer, with greater
definition, when processed by the modulator (Voice Input). Gain sets the input level of the modulator input.
Drive and Gain controls are unavailable when Synth Input is set to Internal.
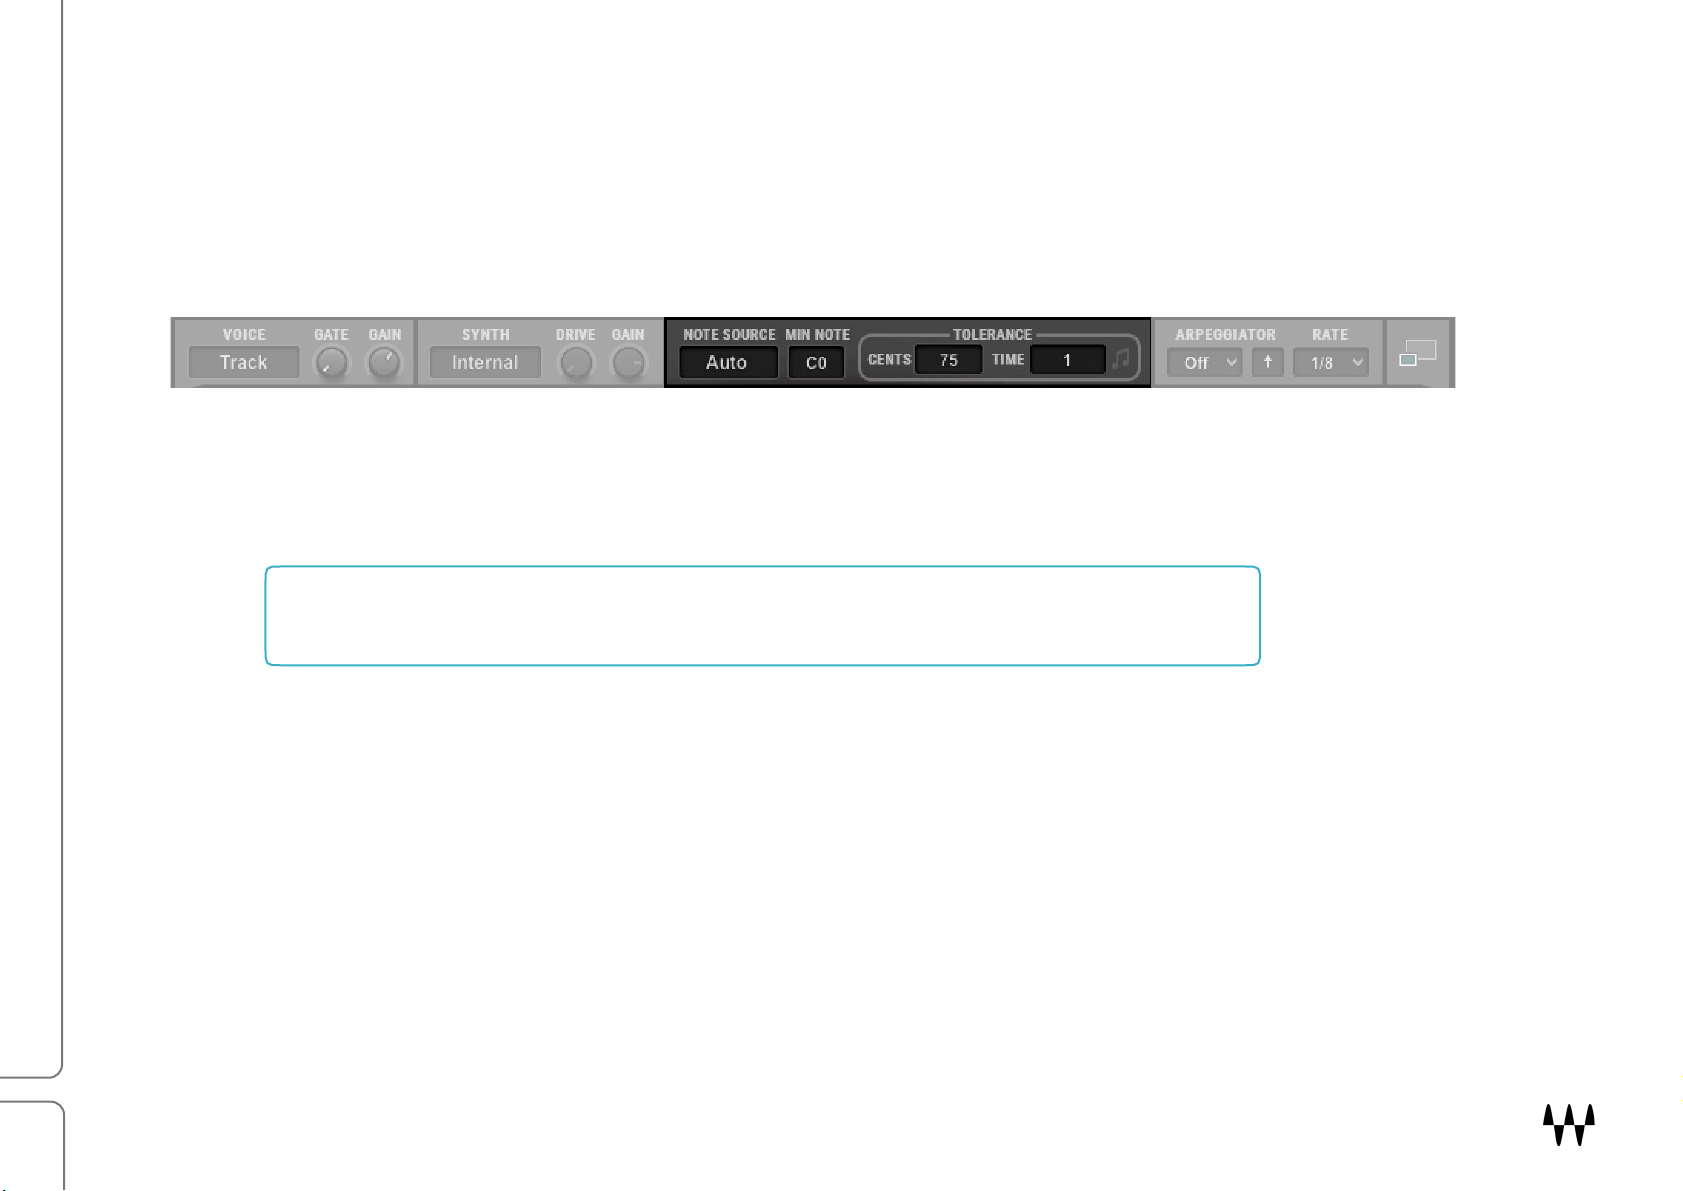
Top Bar: Notes Generator
New notes will always be generated when energy greater than complete silence is detected (unpitched audio). The
Note Generator allows you to further control what is defined as a note in order to determine which notes are sent to
the Note Mapper, built-in Synth, and ADSR envelopes.
Note Mapping concerns what to do with notes once they’ve been defined.
NOTE SOURCE
Selects the source of the notes that feed the synth.
• When Voice is selected, the pitch detector analyses the pitch of the voice input and then generates notes that are sent
to the synth. You can control the sensitivity using the Tolerance controls.
• Choose MIDI when you connect a MIDI keyboard/controller to the plugin. Route a MIDI track to the plugin (make sure
your host supports it). In some hosts you can simply open the plugin on an instrument track.
• Auto mode is a mix of MIDI and Voice note sources. When a voice signal is detected, the plugin generates notes based
on the input signal. When incoming MIDI notes are detected (including the Note Mapper), they will take over the voicegenerated notes and straight away be played by the synth.
Waves OVox / User Guide
Page 11
11
MIN NOTE
Determines the lowest note that will be detected. Low-frequency notes below this value will not be played, which can help the
pitch detector achieve more reliable results.
Example: the singer never sings in the lowest register. Set the Min Range to C1. This can reduce the likelihood of artifacts
during note detection.
Range: C0 to C2
TOLERANCE CENTS
Determines the difference (in cents) from the currently playing note that is required for a new note to be generated.
Example: If Cents Tolerance is set to 100 or higher, the currently playing note is C1 and the incoming pitch is C#1. A new note
will not be generated, since the incoming pitch is within the range of tolerance. If, however, the incoming pitch is D1 (a
difference of 200 cents), a new note will be generated: D1.
Range: 50 cents to 200 cents, Off
TOLERANCE TIME
Determines the minimum time that has to pass (in milliseconds or in note intervals when synced) from the moment the pitch
detector exceeds the Cents range before generating a new note.
Range: (time) 1 millisecond to 1000 milliseconds
(note intervals) 1/64T to 4 bars
Toggle between time and note intervals using the note symbol on the right.
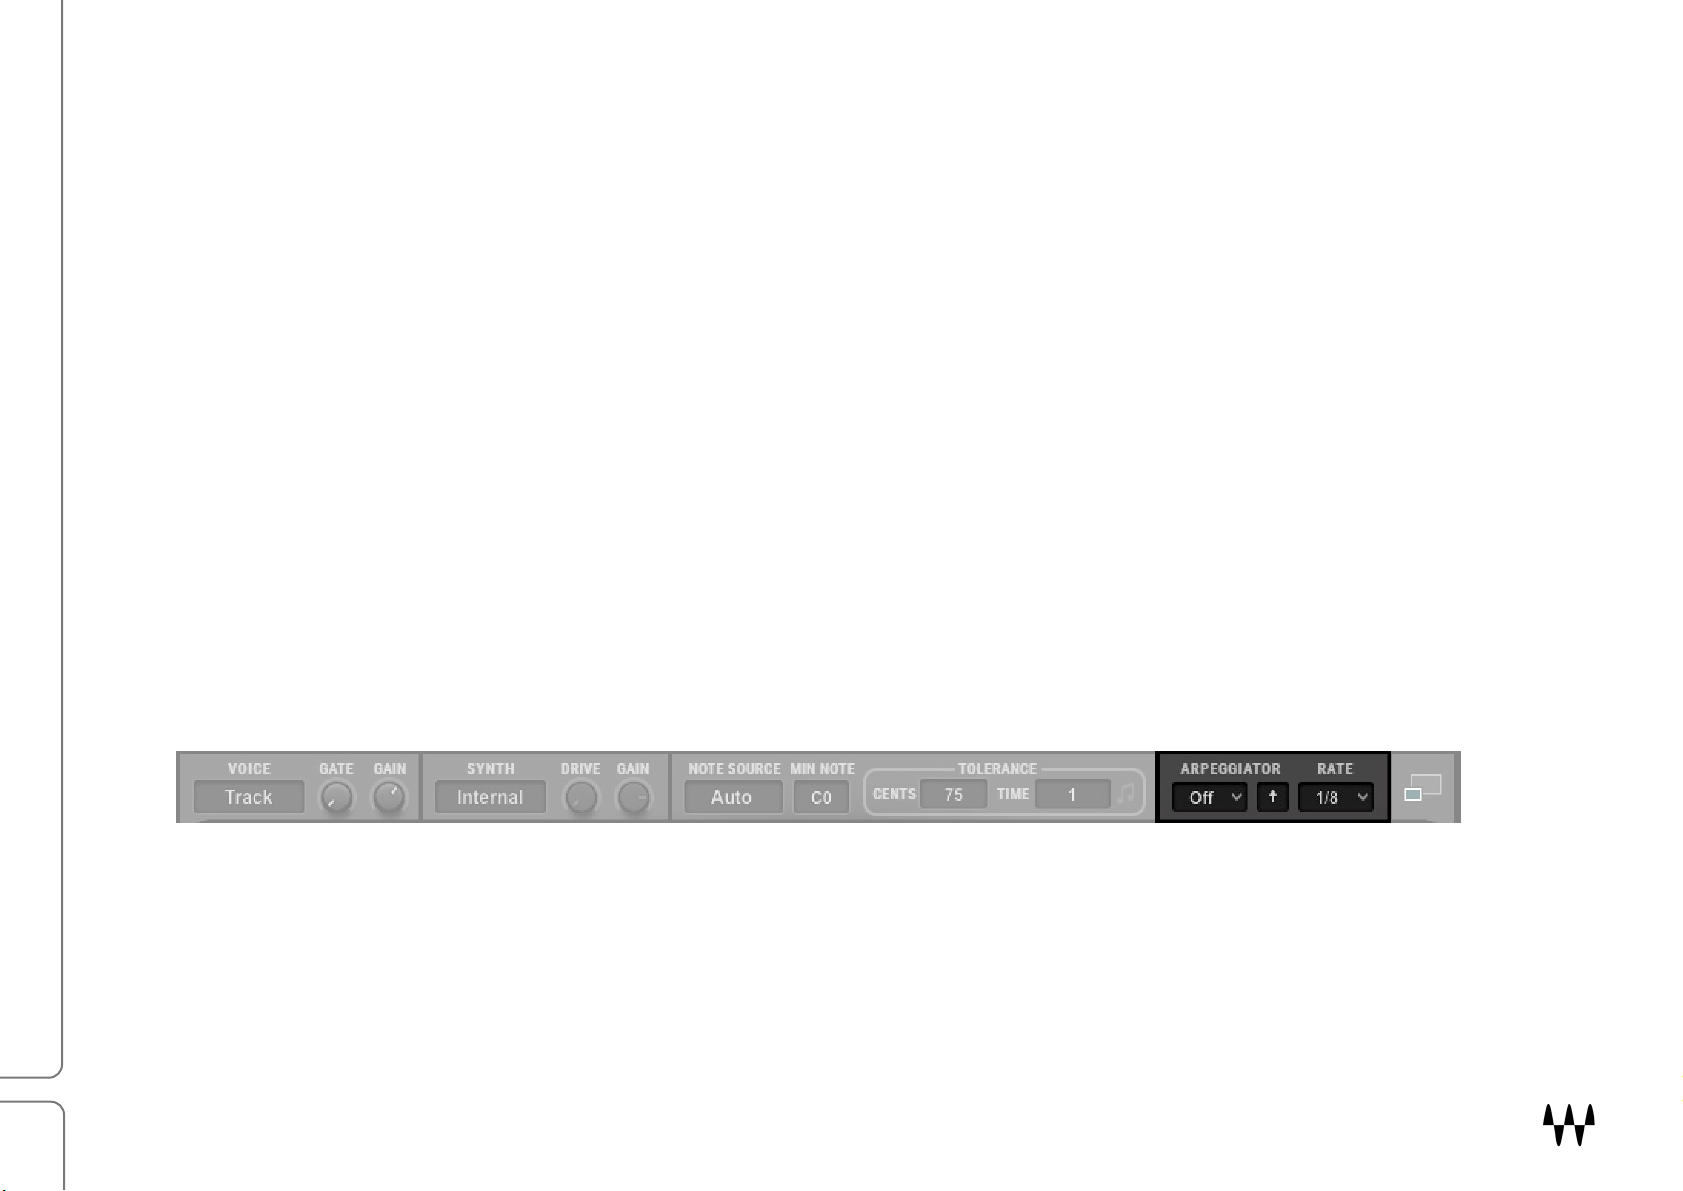
Top Bar: Arpeggiator
The Arpeggiator receives a chord or a note and generates a melody pattern based on its mode, direction, and rate.
ARP MODE
Determines the range in which the arpeggiator operates.
When choosing 1 Octave, the arpeggiator will generate melody based only on the notes that are currently played.
When choosing 2 Octave or above, the arpeggiator will generate the notes played, as well as their corresponding notes in the
upper octaves.
Range: Off, 1 Oct, 2 Oct, 3 Oct, 4 Oct
Waves OVox / User Guide
Page 12

12
Up
Plays notes from lowest to highest.
Down
Plays notes from highest to lowest.
Up Down
Plays Up pattern, and then Down pattern.
Down Up
Plays Down pattern, and then Up pattern.
Up Down 2
Same as Up Down, but it plays the highest note only once.
Down Up 2
Same as Down Up, but it plays the lowest note only once.
ARP DIRECTION
Defines the direction of arpeggiation.
ARP RATE
Determines the rate of arpeggiator note generation.
Range: 1/64T to 4 bars
Note Mapper
The Note Mapper section enables you to map a single incoming sung note or MIDI note to one or more notes. It
determines how notes will be sent to the built-in synth and the voice pitch corrector. Depending on note mapper
settings, an input note can be:
• Left unchanged
• Assigned to another note
• Used to create chord, scales, and harmonies
To turn Note Mapping on or off, click the white button to the left of the Root Scale display.
NOTE MAPPER ROOT
Slide vertically over the Root Note value box to transpose the map according to the
selected root. Set this value to fit the key of your song.
ROOT LOCK
Prevents the selected root from changing when loading plugin presets.
Waves OVox / User Guide
Page 13

13
NOTE MAPS PRESETS MENU
Note maps are factory presets that provide chords, scales, and harmonies that map input notes to one or more
triggered notes. Click between the arrows to access the Mapping drop-down menu. There are four categories:
• Presets in the Chords category will output chords from single notes, usually within
a certain scale.
• The presets in the Scales category are made to quantize incoming notes into the
selected musical scales.
• The presets in Harmonies generate the same intervals for every incoming note,
regardless of the selected Root.
• User Library presets
Note Map Editor
The Note Map Editor allows you to decide what note(s) will play when receiving any incoming note, whether from MIDI input
or generated from a voice.
Notes on the keyboard can be mapped to up to eight
notes at a time. This allows you to quantize the pitch to
a certain scale by mapping out-of-scale notes to legal
ones, or to play chords or harmonies from a single note.
Click on the “EDIT” button control to open and
close the editor.
In the example above, the pink key, C#, identifies the current Note Map selection. The blue boxes above the keys
show what notes are triggered when receiving this note.
NOTE MAP SELECTION
1. Click the pink square above a note to enable that note for editing (you can also use “Ctrl + MIDI note").
Waves OVox / User Guide
Page 14

14
2. Click on the keys of the notes that you want to map to the input note (or playing the triggered notes from a MIDI
controller). Each Note Map will be assigned automatically to the corresponding notes across all octaves.
3. Once you finish editing this note, click on the pink square of the next note you want to map and repeat step number 2.
4. When done, click again on the selected Note Map button to exit the assign mode.
5. Play input voice signal. Played notes are white and triggered notes are blue.
Notes that are not mapped will play unaltered.
VELOCITY
When a Note Map is selected, the velocity values of the triggered notes appear below the keyboard. Use these values to set
the velocity for each of the triggered notes. Notice that these values will be scaled to the incoming velocity when played back.
SPREAD/FOLD
Control the behavior of the Note Map spread across octaves.
When Spread is selected, all mapped notes follow the octave transposition in relation to the
incoming note. For example, if you map C#1 to trigger C1, and the incoming note is C#2, then the
triggered note will be C2. This mode is useful when working with scales and harmonies.
In Fold mode, triggered notes will always play where they were initially set to, regardless of the octave of the incoming note.
Using the above example, it doesn’t matter if the incoming note is C#2, C#3 or C#4: they will all trigger C1.
This is useful when triggering chords that you don’t want to transpose to the incoming notes.
ERASE
Clears the entire Note Mapper preset. Use this to start a new note mapping from scratch.
SAVE
Saves your Note Mapper preset (without the root). The saved preset will appear in the User Library submenu of the Note Map
drop-down menu. To delete a single user preset, hold Ctrl and click on the Note Mapper window.
Saved Note Map user presets are located in the Waves plug-ins settings folder:
Mac: /Users/Shared/Waves/Plug-in Settings/OVox/Note Mapping
PC: C:\Users\Public\Waves Audio\Plug-in Settings\OVox\Note Mapping
Here you can delete multiple Note Map user presets, as well as copy or archive them. These presets include only Note Map
parameters, and differ from user presets in the WaveSystem Toolbar, which include parameters for the entire plugin.
MAPPER LOCK
Prevents Note Mapper preset values from changing while you are browsing presets.
Waves OVox / User Guide
Page 15

15
All Top Bar controls: voice input, synth source, note detection, arpeggiator
Load and save presets
Oscillator on/off
Control the pitch of each oscillator
The output gain of the synthesizers, before modulation
Formant shift shifting
Mix of synth, modulation, and effects (mixer)
Main View Controls
The Main view includes the essential OVox controls. Use it when you want simply to load a preset and adjust the
basic parameters to your liking. In the Main view you can control the following:
OVox 1 and OVox 2
OVOX ON/OFF (THE SMALL BUTTON NEXT TO PROCESSOR NAME)
Turns the OVox section on or off.
TUNE
Controls the pitch of the oscillator.
Range: -24 semitones to +24 semitones (two octaves up and two octaves down)
FORMANT
Controls the frequency shift of the formant. The small button above the control turns the Formant Filter section on or off.
Range: -12 semitones to +12 semitones
GAIN
Sets the output gain of the OVox unit.
Range: -infinity to +20 dB
Waves OVox / User Guide
Page 16

16
Mixer Section
MODULATION (MACRO)
Controls the overall level of all of the plugin’s modulators (except ADSRs). At the minimum setting, there is no modulation in
the plugin, which results in rather static sounds.
Range: 0 to 100
EFFECTS (MACRO)
Controls the overall dry/wet balance for the entire Effects section.
Range: 0 to 100
EXCLUSIVE (EXC)
Mutes the OVox signal when sibilance is detected. If the carrier synth is rich in harmonics, there may be an unpleasant high
buzzing sound when the formant filter is driven by sibilants. This control allows the filter to ignore these sounds, which results
in a more natural-feeling effect.
SIBILANCE LEVEL
Controls the level of the original sibilant sounds detected from the input Voice signals. Some sibilant sounds (such as “ess”) do
not have a distinctive pitch, but they are essential for the overall clarity of the vocal. In the case of vocoding, words with many
sibilants can sound less intelligible. Mix in the original sibilance of your vocal track for more comprehensible results.
Range: -infinity to +18 dB
VOICE CORRECTION
Applies pitch correction to the dry vocal path.
Natural: quantizes the pitch according to the Note Mapper, with respect to the detected pitch. In cases where there is
more than a single note played (when loading chord maps), the pitch is quantized to the closest legal note. When Note
Mapper is turned off, chromatic correction is applied.
Hard: same as Natural, but with faster transition time between notes.
Waves OVox / User Guide
Page 17

17
Notes: forces the pitch correction to the incoming notes (including the Note Generator, Note Mapper, and Arpeggiator).
Use this state for creative effects, such as forcing the vocal to be hard-tuned to one of the playing voices of the synth, or
even to control the pitch shifting of the voice via a MIDI keyboard.
Off: no correction.
Use the small knob to the right to set the Voice Tune high-pass filter.
Range: 20 Hz to 20,000 Hz
VOICE LEVEL
Mixes in the original voice, as it was set in the Voice Input.
Range: -infinity to +6 dB
SYNTH LEVEL
Mixes in the two synth sections (from OVox1 and OVox 2) before the formant filter.
Range: -infinity to +6 dB
OVOX LEVEL
The sum of OVox 1 and OVox 2. This is the main “vocoded” signal. It mixes the synths through the formant filters.
Range: -infinity to +6 dB
TONE
Controls the overall tone of the plugin. It functions as a “tilt filter” at the output of the plugin.
Use this control to fine-tune the brightness or fatness of the output.
Range: -30 to +30
OUTPUT LEVEL
Controls the stereo output of the plugin.
Range: -30 dB to +6 dB
LIMITER ON/OFF
The very last stop of the plugin; the limiter threshold is fixed at 0 dBFS for output protection.
METERS
Peak meters are at the output of the plugin. When the limiter is on, a yellow LED indicates that limiting is taking place. When
the limiter is off, consistent Red indicates that the output signal has exceeded 0 dBFS, which may result in clipping later in your
chain. Reduce the output level.
Waves OVox / User Guide
Page 18

18
Expanded View Controls
OVox 1 and OVox 2
The built-in synth consists of two identical internal oscillators, which are normally
routed to their respective formant filters. They act as very effective carrier signals,
especially suited for vocoding purposes. While typically smooth when used in
conjunction with the formant filter, they can produce rough and harsh sounds when
used independently as a synth.
OSC
SHAPE
The OSC Shape panel lets you modify the generated harmonics. You can create traditional
waveforms like Square and Saw, as well as very rich and bright waveforms, such as a pulse spike.
On the vertical axis, you can move from square to triangle and roll off of the generated harmonics.
On the horizontal axis, you control the pulse width of the wave and add even harmonics.
OSC CHARACTER
The Character drop-down menu selects an IR filter that provides further control over the shape of
the oscillator. When any Character other than Classic is chosen, the horizontal axis of the shape
pad becomes a filter “shift” that will stretch and shrink the filter across the frequency spectrum.
Waves OVox / User Guide
Page 19

19
HARMONICS
Determines the finite number of harmonics that will be generated by the oscillator. It behaves like a very steep and accurate
low-pass filter. At maximum settings, the oscillator generates the full spectrum of the chosen shape. At minimum, only the first
harmonic will be generated, resulting in a sine wave.
Range: 1 harmonic (fundamental only) to 1023 harmonics
TUNE
Controls the shift of the oscillator.
Range: (Tune knob): -24 semitones to +24 semitones (two octaves up and two octaves down)
(Fine tune knob) -100 cents to +100 cents)
UNISON
Multiplies the number of voices playing in parallel for each note sent to the oscillator.
Voices provides control over the number of voices that play together. Range: 1 voice to 4 voices
Detune controls the pitch difference between the unison voices. Range: 0 cents to 100 cents
Spread controls the spread of unison voices within the stereo field. Each voice is given a different panning, where 90
is the widest.
Hold+drag vertically to adjust these three controls.
NOISE LEVEL
Sets the level of the noise signal that is sent from the noise generator to the Formant filter. The Noise Level control
is independent of the OVox processor gain and can be used when applying an external synth.
The control connects to ADSR 1 or ADSR 2, as indicated in the box above the control. Right-click on the box to
toggle between the two ADSRs.
Range: -infinity to 0 dBFS.
NOISE LP/HP
Controls the color of the noise signal.
Range: -1 to +1
Waves OVox / User Guide
Page 20

20
Note
Formant Filter Section
The Formant Filter section is the key component of the OVox plugin and of ORS technology in general. This is what
enables our synth to mimic the human voice so accurately. Think of this formant filter as a very detailed EQ curve
that is constantly changing to follow the frequency response of an incoming signal. As we extract the filter from the
vocal signal, traditionally referred to as the “modulator,” we can apply it onto a carrier signal, such as a synth.
F
OCUS FREQUENCY
Determines the frequency range where the formant detector analyzes in most detail. Adjust it to suit the singer’s tone. When
dealing with vocals, you will usually want to limit detection to the mid-range frequencies. This setting does not affect the overall
scope of the filter; it always spans the entire frequency spectrum.
Range: 500 Hz to 5000 Hz
Q
Sets the steepness of the Focus Frequency filter. Low values bring about wide and unfocused detection, which results in a
muffled-sounding filter. High values create a steep filter that closely tracks the original signal of the modulator.
Range: 0.1 to 10
: Very high Q values can create sharp boosts in the detected fundamental frequency of the modulator. This can clash with
the carrier’s pitch and result in dissonance.
Waves OVox / User Guide
Page 21

21
FORMANT SHIFT
Shifts the entire formant filter across the spectrum. A change in these settings imitates the effect of different sizes of vocal
folds. Negative values yield deeper-sounding results, akin to a male voice. High positive settings can result in sounds like a
child’s voice, becoming squeaky at the maximum range.
Range: -12 semitones to +12 semitones
SPEED
Controls the time it takes for the formant filter to “morph” between one state to another. At the fastest Speed setting, the filter is
very sharp and accurate. Slow settings will yield some smear, making the filter smoother and less intelligible.
Range: 0.1 ms to 5000 ms
VOICE DYNAMICS
Controls how the amplitude of the modulator (voice) will be transposed onto the carrier. When Dynamics is set to its maximum
value, the amplitude envelope of the input voice signal is forced completely onto the carrier. The carrier will track the modulator
precisely. As the Dynamics value decreases, the modulator’s amplitude envelope has less impact on the carrier. The carrier
tracks the voice more loosely and it becomes more prominent.
Range: 0 to 200
PAN
Pans the OVox unit effect.
Range: -45º to +45º
GAIN
Controls the output gain of the OVox unit.
Range: -infinity to +20 dB
Waves OVox / User Guide
Page 22

22
Synth Settings Section
Click the Gear button to open the Synth Settings section, which controls
global synth settings.
MONO
Forces one synth voice. When Mono is selected, “Mono” is shown on right side of the section. This persists even when the
Synth section is hidden.
Range: on or off
FOLLOW PITCH
When Follow Pitch is on, the original pitch curve of the modulator, including its nuances, is forced onto the built-in synthesizer.
This sounds very convincing when used on a single voice or when doubling. However, if particular note scaling, chords, or
other MIDI notes are used on the carrier, the pitch differences may create dissonance.
When set to Auto, Follow Pitch is activated only by voice-generated notes. When the Note Mapper is On or MIDI is played into
the plugin, Follow Pitch is automatically deactivated.
Range: off, on, auto
BEND RANGE
Sets the range of pitch bending controlled by the MIDI keyboard pitch wheel.
Range: 0 semitones to 48 semitones
PORTAMENTO
Enables pitch sliding from one note to the next.
Legato resets the envelopes when playing legato between two distinct notes.
Always slurs between all notes, as defined by the time value.
Off does not add portamento processing.
PORTAMENTO TIME
Sets the time value for pitch gliding.
Range: 0.1 ms to 5000 ms
Waves OVox / User Guide
Page 23

23
Note: This setting also influences the pitch correction.
GLOBAL PITCH
Transposes the entire corrected vocals (in semitones).
Range: -48 semitones to +48 semitones
Fine adjust: -100 cents to +100 cents
Mixer Section
SIBILANCE LEVEL
Controls the level of the original sibilant sounds detected from the input Voice signals. Some sibilant sounds (such as “ess”) do
not have a distinctive pitch, but they are essential for the overall clarity of the vocal. In the case of vocoding, words with many
sibilants can sound less intelligible. Mix in the original sibilance of your vocal track for more comprehensible results.
Range: -infinity to +18 dB
EXCLUSIVE (EXC)
Mutes the OVox signal when sibilance is detected. If the carrier synth is rich in harmonics, there may be an unpleasant high
buzzing sound when the Formant Filter is driven by sibilants. This control allows the filter to ignore these sounds, which results
in a more natural feeling. As these sounds don’t have a pitch in nature, it makes sense to let them pass only when trying to
create a particular effect.
Waves OVox / User Guide
Page 24

24
VOICE LEVEL
Mixes in the original voice, as it was set in the Voice Input.
Range: -infinity to +6 dB
VOICE TUNE
Applies pitch correction to the dry vocal path.
Natural: quantizes the pitch according to the Note Mapper, with respect to the detected pitch. In cases where there is
more than a single note played (when loading chord maps), the pitch is quantized to the closest legal note. When Note
Mapper is turned off, chromatic correction is applied.
Hard: same as Natural, but with faster transition time between notes.
Notes: forces the pitch correction to the incoming notes (including the Note Generator, Note Mapper, and Arpeggiator).
Use this state for creative effects, such as forcing the vocal to be hard-tuned to one of the playing voices of the synth, or
even to control the pitch shifting of the voice via a MIDI keyboard.
Off: No correction.
SYNTH LEVEL
Mixes in the two synth sections (from OVox1 & OVox 2) prior to the formant filter.
Range: -infinity to +6 dB
OVOX LEVEL
The sum of the two OVox units: OVox 1 and OVox 2. This is the main “vocoded” signal. It mixes the synths through the formant
filters and the dynamic envelope, after gain and panning.
Range: -infinity to +6 dB
TONE
Controls the overall tone of the plugin. It functions as a “tilt filter” at the output of the plugin.
Use this control to fine-tune the brightness or fatness of the output.
Range: -30 to +30
OUTPUT LEVEL
Controls the stereo output of the plugin.
Range: -30 dB to +6 dB
LIMITER ON/OFF
The very last stop of the plugin; the limiter threshold is fixed at 0 dBFS for output protection.
Waves OVox / User Guide
Page 25

25
METERS
Output peak meters. When the LED is yellow, some limiting is taking place. Red indicates excessive limiting—reduce the
output level.
MACROS
MODULATION
Controls the overall level of all of the plugin’s modulators (except ADSRs). At the minimum setting, there is no modulation in
the plugin, which results in a static sound.
Range: 0 to 100
EFFECTS
Controls the overall dry/wet balance of the entire Effects section.
Range: 0 to 100
Waves OVox / User Guide
Page 26

26
Modulators
OVox offers many ways to alter and modulate its controls. In the bottom bar of the plugin, there’s a list of the
available modulators: M1–M4, A1–A2, PT, FR, and AM. You can use these modulators to manipulate in real time
almost any control on the plugin.
HOW TO USE MODULATIONS
ASSIGN MODULATION
Grab and move a modulator’s label. The controls that are
available for modulation will appear in blue frames
Drop the label of the modulator onto any available control. In this
example, “M1” is being assigned to the Formant Shift control.
Once the modulator is dropped, it will appear in the first
modulation slot below the modulated control
Click and drag vertically over this populated slot to adjust the
modulation depth.
The depth of modulation applied to the control is shown above
the control knob. You can see this value when you hover over
the slot or adjust the depth.
You can also directly access the modulation slots by hovering with the mouse below the controls.
Click to open a list of the available modulation sources. Right-click if the slot is already assigned.
Waves OVox / User Guide
Page 27

27
A small arc is drawn inside the modulated control knob indicates the applied depth for each
modulator. The arcs are color-coded to match the modulator label.
To remove a modulation assignment, right click on the populated slot to open the drop-down menu. Select “None.”
Modulation Types
In OVox, there are four types of modulators that can be used throughout the plugin:
MODS 1–4
These modulators can be set to LFO or Sequencer. You can determine their Rate and Shape and decide how they are
triggered.
ADSR 1 AND ADSR 2
These act as traditional envelope modulators that are triggered by incoming notes. Note that A1 is normally connected to the
gain of the internal oscillators and the noise generators, as they control opening and shutting the synth voices.
Options: A1, A2
ORS MODULATORS
AM, or Amplitude, lets you use the amplitude envelope of the Voice signal to manipulate other controls of the plugin.
PT, or Pitch, extracts the pitch detection from the voice.
FR, or Formant, extracts the average value out of the formant detector’s data.
ORS modulators are described in detail later in this user guide.
Waves OVox / User Guide
Page 28

28
MODs 1–4
TYPE
You can change the behavior of a modulator by switching it between LFO and Sequencer. Most of the controls remain the
same, but certain behaviors are different, depending on the Type selection.
• The sequencer’s values are quantized to whole numbers between -24 and +24. They represent semitones when the
modulator is assigned to “Tune” or “Frequency” when the modulation depth is set to 100%.
• When LFO is selected, “Rate” determines the time it takes to complete a full cycle, whereas in Sequencer, it determines
the time to complete a single step.
Range: LFO/SEQ
S
HAPE CONTROLS
There are several ways to shape the modulator:
Draw Mode (pencil) allows you to manually draw the shape you
want.
Erase resets the currently loaded shape to “None.”
Browse opens a factory library of LFO shapes and sequencer
patterns, depending on the current Type. Click on a shape to
replace the one you’re currently using. To undo, use the arrows on
left side of the WaveSystem toolbar.
Waves OVox / User Guide
Page 29

29
SAVE (DISK ICON)
Click on the icon to save the current user-drawn modulator shape to an empty cell. User shapes appear in blue, factory shapes
are purple. You can manage and access the saved shapes at:
Mac: /Users/Shared/Waves/Plug-in Settings/OVox/LFOShapes
PC: C:\Users\Public\Waves Audio\Plug-in Settings\OVox\SEQShapes
DELETE (TRASHCAN)
Click the Trashcan icon, then click on the user shape you wish to delete. You cannot delete factory shapes.
TRIGGER
Determines when the modulator resets its position. It has five states:
Sync locks the modulator to the host. It syncs to BPM as well as transport position.
Retrigger resets the modulator every time a new note is received.
Legato resets the modulator whenever a new note is received, unless another note is already playing.
Poly triggers a new modulator per voice for each new note. When patched to polyphonic destinations
(e.g., the internal synth controls), an independent modulation will be applied to each voice.
Free sets the modulator to be free running, never reset.
Range: Sync, Retrigger, Legato, Poly, Free
PLAY MODE
There are four play modes:
One Shot: the modulator completes a single cycle and stops running.
Loop: the modulator plays continuously in a loop.
Seesaw: the modulator moves back and forth within its cycle.
Hold: the modulator pauses at its current location. You can use the Phase control to alter its relative position.
STEPS
Only in SEQ Mode
Determines the number of sequencer steps.
Range: 1–16 steps
Waves OVox / User Guide
Page 30

30
RATE
Sets the rate of the modulator. Display units and range are dependent on the Rate Sync setting.
Range: 0.1 Hz to 30 Hz or 1/64 bar to 8 bars
RATE SYNC ON/OFF
Toggles the Rate knob values. When On, the rate of the LFO is calculated by the Host BPM and displayed in musical notation.
When Off, values are displayed in Hz.
PHASE
Controls the starting position of the modulator.
WARP
Warps the speed of the modulator but keeps the overall timing of the cycle. When Warp value is lower than 1, modulation will
start at a slow pace and increase its speed toward the end of the cycle. When set above 1, the pace is fast at start and then
slows down at the end. Essentially, this is applying pulse width modulation on the rate of the modulator.
Range: 0.1 to 100 (a value of 1 is linear)
SMOOTH
Applies smoothing to the modulation curve. Low settings result in distinguishable onsets and may result in clicks. High settings
smooth the overall modulation curve, and in some settings may result very low energy.
Range: 1 ms to 1000 ms
LEVEL
The overall level of the modulator. When the Level of a modulator is set to 0, no modulation takes place.
Range: 0 to 1
Waves OVox / User Guide
Page 31

31
ADSR 1 and ADSR 2
ATTACK
Sets the attack time of the ADSR envelope.
Range: 0.1 ms to 10,000 ms
DECAY
Sets the decay time of the ADSR envelope.
Range: 0.1 ms to 10,000 ms
Two traditional ADSR envelopes,
triggered by incoming notes, provide
control over the Attack, Decay, Sustain,
and Release of a note and its curves.
SUSTAIN
Sets the sustain level of the ADSR envelope.
Range: 0 to 1
RELEASE
Sets the release time of the filter’s envelope.
Range: 0.1 ms to 10,000 ms
CURVE
(available for Attack, Decay, and Release)
Sets the curve of the time function. A setting of 1 results a linear behavior. Values lower than 1 yield logarithmic curves, and
values higher than 1 have an exponential behavior.
Range: 0.1 to 10
Waves OVox / User Guide
Page 32

32
ORS Modulators
ORS modulators enable you to use the characteristics of the input signal to modulate most plugin controls.
AM (AMPLITUDE)
The AM modulator lets you to use the amplitude envelope of the voice signal to manipulate other controls of the
plugin. This works much like an envelope follower.
Attack is the time it takes the modulator to rise when positive level values are detected.
Range: 0.1 ms to 1000 ms
Release is the time it takes the modulator to fall back to minimum once an attenuation is detected.
Range: 0.1 ms to 1000 ms
Level is the overall level of the modulator. When this is set to 0, no modulation takes place.
Range: 0 to +2
Waves OVox / User Guide
Page 33

33
PT (PITCH)
Extracts the pitch detection from the voice. You can use this, for example, to create a “Surf EQ” effect when
modulating the frequencies of the EQ bands and then forcing a certain band to follow the input pitch.
SMOOTH
The time it takes for the modulator to respond to any change in detected pitch. The effect is similar to pitch gliding.
Range: 0.1 ms to 1000 ms
OFFSET
Applies a steady offset to the overall modulation curve.
Range: -1 to 1
LEVEL
The overall level of the modulator. When this is set to 0, no modulation takes place.
Range: 0 to +2
FR
(FORMANT)
Waves OVox / User Guide
Page 34

34
Extracts the average value out of the formant detector’s data. This is valuable for detecting the most energy-
dominant area in the frequency spectrum. One example of using this is to detect harsh or sibilant sounds.
SMOOTH
The time it takes for the modulator to respond to any change in detected pitch. The effect is similar to pitch gliding.
Range: 1 ms to 1000 ms
OFFSET
Applies a steady offset to the overall modulation curve.
Range: -1 to 1
LEVEL
The overall level of the modulator. When this is set to 0, no modulation takes place.
Range: 0 to +2
EQ
The built-in EQ sits on the output of the plugin and has four bands that can be fully modulated.
BAND ON/OFF
Activates and deactivates the band. Turn a band on or off in the parametric section or by double-clicking on the graph marker.
Waves OVox / User Guide
Page 35

35
BAND TYPE
There are two ways to select a band type:
Click on the Type icon in the parametric section or hold CMD (Mac) or WIN (PC) while clicking on a band marker to toggle
through the available types.
Turn a band on or off in the parametric section or by double-clicking on the graph marker.
Range: Bell, LoShelf, HiShelf, HP, LP
GAIN (G)
Boosts or attenuates the EQ band.
Range: -30 dB to +30 dB
FREQUENCY (F)
Determines the center frequency, or the cutoff frequency when using filters for each band.
20 Hz to 20,000 Hz
Q
Determines the width of the filter or band. The higher the Q setting, the narrower the band.
Range: 0.26 to 13
MIDI Control Change Modulation
MIDI CC modulation sources use the information from incoming MIDI control change messages. They are not
available from the bottom bar of the plugin interface. To assign one of these you need to select it from the
modulation dropdown list by clicking on a modulation slot.
Range: Velocity, Keyboard, Pitch Wheel, Mod Wheel, AfterTouch, Poly AfterTouch
Note: Polyphonic aftertouch works only with compatible MIDI controllers.
Waves OVox / User Guide
Page 36

36
Effects
There are seven effects designed for OVox. Each effect has two controls of its own, plus a mix control. You can
insert up to five effects per plugin instance. Grab and slide an effect to change the order.
AVAILABLE EFFECTS
• AutoPan
• Chorus
• Compressor
• Delay
• Distortion
• Reverb
TO ADD AN EFFECT TO AN EMPTY SLOT
Click on the “+” sign to open up the plugin list menu (shown above on the right). Choose an effect from the Plugin list.
The Plugin list includes other important menu items:
ADD EFFECT
Click on the “+” sign to open up the stomp menu (shown above on the right). Choose an effect from the Plugin list.
BYPASS EFFECT
Bypasses the effect for quick in/out toggle.
DISABLE EFFECT
Disables the effect and removes it from CPU. Settings are preserved.
REMOVE EFFECT
Removes the effect from the slot. Unsaved settings are lost.
EFFECT FLAVOR
Click on the small down arrow next to the effect name to access the Flavor menu, a list of the internal presets of specific effect.
Selecting a new effect flavor will result in different sounds and is dependent on the effect used. The Limiter effect does not
have a Flavor control.
Waves OVox / User Guide
Page 37

37
MIX
A Dry/Wet mix for the effect. All Mix controls can be modulated.
Range: 0% to 100%
Macros
MODULATION (MACRO)
Controls the overall level of all of the plugin’s modulators (except ADSRs). At the minimum setting, there is no modulation in
the plugin, which results in a rather static sound.
Range: 0 to 100
EFFECTS (MACRO)
Controls the dry/wet balance for the entire Effects section.
Range: 0 to 100
Waves OVox / User Guide
 Loading...