


®
PROFESSIONAL Rotisserie
TURKEY FRYER/Steamer
TF200B
For your safety and continued enjoyment of this product, always read the instruction book carefully before using.
Table of contents |
|
Important Safeguards............................................................... |
2–3 |
Important Safety Tips................................................................... |
4 |
Parts & Assembly.......................................................................... |
5 |
Before First Use............................................................................ |
6 |
How to Use Your Waring® Professional Turkey Fryer/Steamer... |
6–12 |
Rotisserie Frying....................................................................... |
6–7 |
Preparing the Turkey................................................................. |
7–9 |
Basket Frying.............................................................................. |
10 |
Filtering & Changing the Oil......................................................... |
11 |
Steaming & Boiling................................................................. |
11–12 |
Safety Features........................................................................... |
14 |
Timer Operation.......................................................................... |
14 |
Hints & Tips............................................................................ |
14–15 |
Frying Frozen Food..................................................................... |
15 |
Turkey Frying Chart..................................................................... |
15 |
IMPORTANT SAFEGUARDS
When using electrical appliances, basic safety precautions should always be followed, including the following:
1.READ ALL INSTRUCTIONS
2.Unplug from outlet when not in use and before cleaning.
Allow to cool before putting on or taking off parts and before cleaning appliance.
3.Do not touch hot surfaces. Use handles and knobs. When using rotisserie function, use oven mitts or pot holders.
4.To protect against electrical shock, do not immerse control panel, cord, plug, or fryer in water or other liquids.
5.This appliance is not for use by children. Close supervision is necessary when any appliance is used near children.
6.Never leave appliance unattended when connected to the power outlet.
2
7.Always attach breakaway cord to appliance first, then plug into wall outlet. To disconnect, turn the toggle switch to OFF and turn the temperature control knob to STANDBY, then remove plug from wall outlet.
8.To reduce the risk resulting from becoming entangled in or tripping over a longer cord, do not use an extension cord or longer detachable cord with this appliance.
9.Do not operate any appliance with a damaged cord or plug, or after appliance malfunctions or has been damaged in any manner. Return appliance to the nearest authorized service center for examination, repair or adjustment.
10.The use of attachments not recommended or sold by the manufacturer may result in fire, electrical shock or injury.
11.Do not use outdoors.
12.Do not let cord hang over the edge of table or counter, or touch hot surfaces.
13.Do not place on or near a hot gas or electric burner, or in a heated oven.
14.Extreme caution must be used when moving a fryer containing hot oil or other hot liquids.
15.Do not use this appliance for other than intended use.
16.Do not operate your appliance in an appliance garage or under a wall cabinet. When storing in an appliance garage, always unplug the unit from the electrical outlet. Not doing so could create a risk of fire, especially if the appliance touches the walls of the garage or the door touches the unit as it closes.
SAVE THESE INSTRUCTIONS FOR HOUSEHOLD USE ONLY
3
IMPORTANT SAFETY TIPS
1.Always keep lid closed while fryer is cooking food.
2.Use basket handles to raise and lower basket. Always raise basket out of hot oil and rest on top rim to allow food to drain before moving.
3.BEWARE OF STEAM WHEN OPENING LID.
4.Wet food should be dried first with paper towels. Remove loose ice from frozen foods and allow food to completely thaw. Close lid when frying. Beware of oil splatter when food is put into the oil.
5.Keep appliances at least 4 inches away from walls or other objects during operation. Do not place any objects on top of appliance while it is operating.
6.Be sure reservoir is filled to at least the minimum oil level. Do not fill above the maximum oil level. Do not operate appliance without oil or with an insufficient amount of oil. Never pour oil into heated oil reservoir.
7.Do not operate this appliance if the lid and the reservoir are not completely dry of excess water. Dry thoroughly after cleaning.
CAUTION: To prevent damage to countertop or table finish, use a nonflammable, heat-resistant placemat between the appliance and the countertop or tabletop surface. Never place on carpet, furniture, or other combustible materials.
4

PARTs & Assembly
1. |
Lid |
|
1 |
|
2. |
Rotisserie and Spits (2 parts) |
|
||
|
|
|||
3. |
Frying/Steaming |
|
|
|
|
Basket |
|
2 |
|
4. |
Heating Element/ |
|
||
|
|
|||
|
Control Panel |
|
|
|
5. |
Temperature Control Knob |
|
|
|
6. |
Timer |
|
|
|
7. |
Power ON and Ready |
|
|
|
|
Indicator Lights |
3 |
|
|
8. |
Rotisserie ON/OFF |
|
|
|
|
Toggle Switch |
|
7 |
|
9. |
Stainless Steel |
|
8 |
|
|
6 |
|||
|
Reservoir |
|
5 |
|
10. |
Breakaway |
|
13 |
|
|
|
|||
|
Power Cord |
|
4 |
|
11. |
Draining Spigot |
|
|
|
12. |
Stainless Steel Housing |
|
|
|
13. |
Reset Button |
|
14 |
|
14. |
Basket Support |
|
|
|
15. |
Drain Hose |
|
|
|
16. |
Butchers Twine (not shown) |
|
9 |
|
17. |
Meat Thermometer (not shown) |
|||
|
||||
15
12
10
11 
5
This appliance has a polarized plug (one blade is wider than the other). To reduce the risk of electric shock, this plug is intended to fit into a polarized outlet only one way. If the plug does not fit fully into the outlet, reverse the plug. If it still does not fit, contact a qualified electrician. Do not attempt to modify the plug in any way.
This appliance is for 120 volt and should not be used with a converter.
BEFORE FIRST USE
For a video demonstration please watch the DVD included in the Gift Box or visit us at www.waringpro.com.
1.Before your Rotisserie Turkey Fryer/Steamer is used for the first time, remove all packaging materials. Clean the outer surface of the heating element with a damp cloth containing a mild soap solution or clean water. Hand wash the basket, lid, rotisserie, reservoir and housing with warm soapy water. PARTS ARE NOT DISHWASHER SAFE.
2.Place heating element/control panel in the unit. Please make sure that the heating element control panel is properly inserted into the housing. This unit is equipped with an interlock safety feature that will prevent it from turning on until the heating element/control panel is in place.
HOW TO USE YOUR WARING® PROFESSIONAL ROTISSERIE TURKEY FRYER/STEAMER
ROTISSERIE FRYing
1.Be sure that the oil draining spigot is closed before adding oil. Turn clockwise until secure.
2.Pour approximately 2½ gallons of good-quality vegetable, corn, canola, soybean, or peanut oil into reservoir until it reaches between the MIN and MAX marks inside container. DO NOT OVER OR UNDER-FILL. DO NOT MIX OILS.
Oil Warning
Do not use any solid/hydrogenated oil, shortening, olive oil, grapeseed oil or lard in this turkey fryer. Do not mix oils, as they have different smoke points. Use good-quality oil that has a smoke point of 420ºF or higher.
6
3.Make sure the toggle switch is in the OFF position and the temperature control knob is in the standby location.
4.To turn on your fryer, attach breakaway cord to back of the appliance, then plug into outlet.
5.The power ON light will illuminate to show that the unit is on.
6.Set the temperature control knob to the desired temperature. The ready light will turn green once the oil has reached the desired temperature. (It will take approximately 30 minutes for 2½ gallons of good quality oil to reach the desired temperature.)
7.Place lid onto unit to shorten heat-up time.
8.While the oil is heating, prepare the food to be fried as follows:
Preparing the Turkey
If frying a whole turkey, remove the neck and giblets and cut the tail. Make sure the turkey is thawed completely and contains no ice crystals. Dry the food with paper towels.
NOTE: If your turkey came with a plastic thermometer or plastic piece holding the legs together, remove these before putting the turkey on the rotisserie spit.
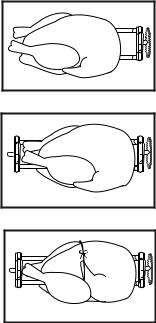
1. Take the rotisserie and spits and remove the bar from the spits. Carefully insert the rotisserie into the center of the turkey. Be sure to position it so that it’s centered with the breast.
2. Once the spits come through the other side, push the bar firmly onto the spits to secure it.
3. Use good quality butchers twine to tie the wings to the body and cut the excess twine. You may need to tuck the wings underneath the twine so they do not interfere with the rotation.
7
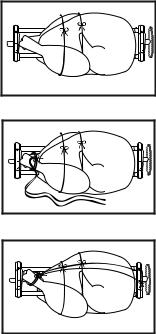
4.Cut another piece of butchers twine and tie the thighs to the body. Cut the excess twine.
5.With a longer piece of twine, securely tie the legs of the turkey to one another.
6.Pull the twine tightly over the top of the turkey and bring it underneath the bar and through each eyelet and tie the string around the bar.
7.Place the assembled rotisserie spit with turkey into the basket. Check that the turkey rotates completely without touching the sides of the basket.
8.When the oil is hot and the green READY indicator is on, place the basket on the unit over the reservoir. Rotisserie gear must be lined up with the control panel side.
•Grasp both basket handles and squeeze to retract the safety bars.
•Slowly lower basket past the basket support so that it is fully inside the reservoir. The basket’s safety bars will
support the basket on the rim of the reservoir and the ends of the rotisserie spit will engage the rotisserie guides at the front and back of the reservoir.
9.Turn the toggle switch to the Rotisserie On position and watch the rotisserie rotate to make sure the turkey does not contact any part of the basket or reservoir. This will make sure the turkey will cook properly.
10.Place the lid on the unit.
11.Set timer to the desired cooking time.
8
Note: Be sure to check the turkey throughout the cooking cycle to be sure it’s rotating properly and that the twine has not come undone.
Important Note: If you notice that your turkey has come undone; turn the toggle switch to the Off position. Raise the basket to drain on the edge of the reservoir for a few minutes. Using oven mitts remove the rotisserie from the basket and retie the turkey as necessary (use caution as parts will be hot). Replace the turkey and continue the cooking process. The timer will be off set, so please use the thermometer to be sure that the turkey has reached the proper temperature at the end of the cooking cycle.
12.Timer will ring when the food is ready.
13.To check for turkey doneness: Turn toggle switch to OFF and insert thermometer into the thickest part of the turkey thigh. Do not let it touch the bone. Remove thermometer from turkey. If the turkey is not done turn the rotisserie to ON to complete frying. Refer to turkey frying chart on page 13.
14.If the turkey is done, carefully lift the basket and set it on the rim of the reservoir to drain. Using the handles, carefully tilt the basket slightly to drain oil from the turkey cavity. Allow the turkey and parts to cool for a few minutes.
15.After the turkey has drained and cooled, remove the basket and, using oven mitts, remove the turkey from the rotisserie.
NOTE: To preserve oil quality, do not add salt or spices to the food until after it has been removed from the fryer.
16.When cooking is finished, shut down the fryer by turning temperature control knob to STANDBY and unplugging the breakaway cord from the wall outlet. WARNING: The timer does not switch the appliance off.
17.Allow oil to cool to room temperature before cleaning or storing.
9
 Loading...