

Page 1
Professional Drink mixer
PDm series
For your safety and continued enjoyment of this product,
always read the instruction book carefully before using.
Page 2

CONTENTS
Important Safeguards . . . . . . . . . . . . . . . . . . . . . . . . . . . . 1
Grounding Instructions . . . . . . . . . . . . . . . . . . . . . . . . . . . 3
How To Use Your Drink Mixer. . . . . . . . . . . . . . . . . . . . . . 3
Cleaning. . . . . . . . . . . . . . . . . . . . . . . . . . . . . . . . . . . . . . . 4
Maintenance . . . . . . . . . . . . . . . . . . . . . . . . . . . . . . . . . . . 5
Helpful Hints . . . . . . . . . . . . . . . . . . . . . . . . . . . . . . . . . . . 5
Recipes . . . . . . . . . . . . . . . . . . . . . . . . . . . . . . . . . . . . . . . 6
IMPORTANT: Always unplug the Waring ProTM
Professional Drink Mixer from outlet when
disassembling and assembling.
IMPORTANT SAFEGUARDS
When using electrical appliances, basic safety precautions should always be followed, including the following.
1. READ ALL INSTRUCTIONS:
2. To protect against risk of electrical hazards, do not
immerse the Waring ProTM Professional Drink Mixer in
water or other liquid.
3. Close supervision is necessary when any appliance is
used by or near children.
4. Unplug from outlet when not in use and before
cleaning the outside of the unit.
5. Avoid contact with moving parts.
6. Do not operate the Waring ProTM Professional Drink
Mixer or any other electrical equipment with a damaged cord or plug, or after the unit malfunctions, or is
dropped or damaged in any manner. Return it to the
nearest authorized service facility for examination,
repair, or adjustment.
7. The use of attachments not recommended or sold by
Waring may cause fire, electric shock, or injury.
1
Page 3

8. Do not use outdoors.
9. Do not let cord hang over edge of table or counter, or
touch hot surfaces.
10. Keep hands and utensils out of container to reduce
the risk of injury to persons or damage to the mixer.
11. Never add ingredients to container while motor is
running.
12. Container must be properly in place before starting
the motor.
13. Put this list in a safe place; do not discard.
SAVE THESE INSTRUCTIONS
FOR HOUSEHOLD USE ONLY
2
Page 4
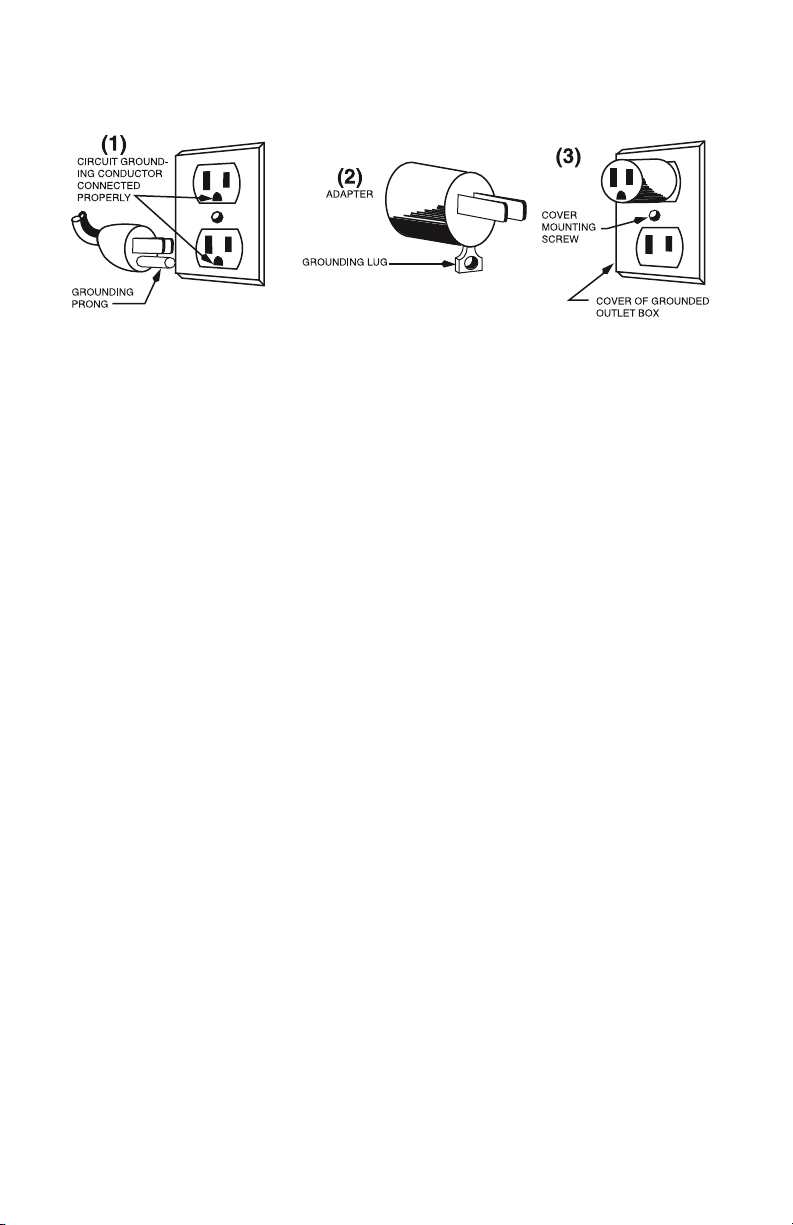
GROUNDING INSTRUCTIONS
For your protection, your drink mixer is provided with a
3-conductor cord and a grounding type plug.
Always plug the mixer into a grounding-type outlet. Do
not defeat the grounding capability of the provided cord
set.
If a grounding-type outlet is not available, one must be
installed by a licensed electrician in accordance with your
local electrical code before your mixer can be used.
HOW TO USE YOUR DRINK MIXER
1. Clean the drink mixer thoroughly before initial use.
2. Use the control switch to turn the unit off (O) or to
select either low (I) or high (II) speed. Always set the
control switch to off (O) before plugging in the mixer.
3. Plug the drink mixer into a properly grounded outlet.
4. Put recipe ingredients into the mixing cup. (Do not
fill beyond the top fill mark on the side of the mixing cup, which represents 1¾ cups (420 ml). This will
help to prevent the mixture from splashing out during
mixing.
5. Attach the mixing cup to the drink mixer by sliding
the lip of the mixing cup up under the cup holder
and setting the bottom edge of the mixing cup on
the cup rest.
3
Page 5

6. Operate the drink mixer only when the mixing cup is
attached.
7. Set the control switch to low speed and mix for
3 seconds. If your recipe requires high speed, switch
to high speed after mixing 3 seconds on low speed;
otherwise, continue on low speed until finished.
8. When mixing is complete, always set the control
switch to off (O) before removing the mixing cup.
Operating Cycle: 3 min. ON / 1 min. OFF
CLEANING
1. Not for water jet cleaning.
2. Clean the drink mixer before initial use, and immedi
ately after each use.
3. Clean the spindle, agitator, and mixing cup by filling
the mixing cup to the top fill mark with warm soapy
water. Attach the mixing cup to the drink mixer and
run it on low speed for about 30 seconds. Turn the
unit off (O), empty the mixing cup, and repeat with
4
-
Page 6

rinse water. Turn the unit off (O) again, empty the
mixing cup, and allow it to dry.
4. Unplug the drink mixer before cleaning the outside of
the unit.
5. Clean the outside of the unit by using a cloth moist
ened with a mild soap and water solution. Rinse the
cloth and wipe the unit again. Prevent liquid from
running into the housing by wringing all excess moisture from the cloth before using it. Wipe the housing
dry after rinsing.
Do not immerse the unit in water or any other
liquid.
MAINTENANCE
MOTOR: The motor requires no greasing or oiling.
Sealed-in lubrication gives the unit lifetime, smooth
operation.
HELPFUL HINTS
1. Always be sure the control switch is in the off (O)
position before plugging in the drink mixer and before
removing the mixing cup when mixing has been
completed.
2. For best mixing results, add wet recipe ingredients to
the mixing cup before dry recipe ingredients.
-
3. The mixing times of beverages containing ice creamtype ingredients will vary according to the hardness
of the ingredients. Softer ingredients work better.
4. If your recipe calls for ice, use only crushed ice in the
drink mixer.
5. Do not mix hot ingredients with your drink mixer.
6. Operate the drink mixer only when the cup is
attached.
7. In general, start mixing on low speed for about
3 seconds. Finish mixing on low speed if all your
5
Page 7

ingredients are liquid, to avoid splashing. If your
recipe includes solid ingredients (ice cream,
powdered milk, etc.) or if you need to whip cream
or aerate eggs, switch to high speed after the first
3 seconds of mixing on low speed, and continue on
high speed until mixing is completed.
RECIPES
All recipes make one serving unless otherwise noted.
HEALTH COCKTAILS
Sweet Iron
6 ounces reduced fat cold milk
½ cup soft vanilla ice cream
2 tablespoons unsulphured molasses
Combine in mixing cup. Mix on low speed for 3 seconds
and high speed for 45 seconds.
Nutritional information per serving:
Calories 314 (29% from fat) • carb. 49g • pro. 8g • fat 10g
• chol. 42mg • sod. 1580mg • calc. 414mg • fiber 0g
BREAKFAST DRINKS AND ENTREES
Breakfast Shake
½ cup orange juice
1 cup fat-free vanilla yogurt
Combine in mixing cup. Mix on low speed for 3 seconds
and high speed for 60 seconds. Makes generous size
breakfast.
Nutritional information per serving:
Calories 250 (11% from fat) • carb. 44g • pro. 12g • fat 3g
• chol. 11mg sod. 150mg • calc. 402mg • fiber 0g
6
Page 8

Pancakes
1 egg
1 tablespoon vegetable oil
¾ cup reduced fat milk
¾ cup pancake mix
Put ingredients in mixing cup. Mix on low speed for
3 seconds and high speed for 30 seconds. Turn off and
scrape sides of cup with a spatula, if necessary. Mix
again until well blended. Cook on preheated greased or
nonstick griddle or fry pan. Makes 6 six-inch (or 12
three- inch) pancakes. Serve with syrup, jam, jelly or
stewed fruit.
Nutritional information per serving:
Calories 152 (11% from fat) • carb. 44g • pro. 12g • fat 3g
• chol. 11mg • sod. 151mg • calc. 402mg • fiber 0g
Plain Omelette
4 eggs
2 tablespoons milk
1 tablespoon butter
salt and pepper to taste
(see note below)
Place all ingredients except butter in mixing cup. Mix on
low speed for 3 seconds and high speed for 30 seconds
or until well mixed. Melt butter in a 6-inch omelette pan
on medium-high heat until butter bubbles. Then add egg
mixture and cook, pushing edges back with a spatula as
they set to let the uncooked portion run down to pan’s
surface. When mixture is set, but still moist, spoon on
one of the fillings shown below, fold over, and serve, or
serve plain. Serves 2.
For flavoring and fillings to give variety, try one of these,
or combine them to your taste:
7
Page 9

• Jellies, jams or cooked fruits, fresh or canned
• Cheeses: shredded, sliced, cottage or cream
• Cooked sausage, bacon, ham or fish
• Sautéed onions, peppers, mushrooms, tomatoes or
celery
NOTE: Add a quarter teaspoon of basil, oregano, tarragon or marjoram to your eggs, and give a new, exciting
taste to your omelette.
Nutritional information per serving:
Calories 240 (75% from fat) • carb. 2g • pro. 13g • fat 20g
• chol. 431mg • sod. 473mg • calc. 70mg • fiber 0g
SHAKES
Banana Shake
1 ripe banana, mashed
½ cup vanilla ice cream
1 cup reduced fat milk
Combine in mixing cup. Mix on low speed for 3 seconds
and high speed for 1 minute.
Nutritional information per serving:
Calories 361 (30% from fat) • carb. 54g • pro. 12g • fat 12g
• chol. 48mg • sod. 181mg • calc. 391mg • fiber 2g
Orange Frosty
1 cup orange juice
½ cup vanilla ice cream
Combine in mixing cup. Mix on low speed for 3 seconds
and high speed for 1 minute.
Nutritional information per serving:
Calories 246 (27% from fat) • carb. 42g • pro. 4g • fat 8g
• chol. 30mg • sod. 61mg • calc. 115mg • fiber 1g
8
Page 10

Basic Shake
2
/3 cup ice cream
1 cup reduced fat milk
1 tablespoon syrup (flavor of choice)
Combine in mixing cup. Mix on low speed for
3 seconds and high speed for 1 minute.
Variation: Use sherbet instead of ice cream.
Nutritional information per serving:
Calories 349 (36% from fat) • carb. 45g • pro. 12g • fat 14g
• chol. 58mg • sod. 211mg • calc. 413mg • fiber 0g
Coffee Frosty
½ cup strong cold coffee
2 tablespoons coffee syrup
2
/3 cup coffee or chocolate ice cream
Combine in mixing cup. Mix on low speed for 3 seconds
and high speed for 1 minute.
Nutritional information per serving:
Calories 259 (32% from fat) • carb. 42g • pro. 4g • fat 10g
• chol. 30mg • sod. 69mg • calc. 97mg • fiber 0g
Eskimo Pie Burt Wolf, New York City
1 cup chocolate chip ice cream
½ ounce Kahlúa (optional)
¼ cup chocolate milk
Combine in mixing cup. Mix on low speed for 3 seconds
and high speed for 30 seconds to 1 minute, or until you
have a chunky but drinkable mixture.
Nutritional information per serving:
Calories 383 (36% from fat) • carb. 49g • pro. 7g • fat 16g
• chol. 49mg • sod. 139mg • calc. 215mg • fiber 1g
9
Page 11

Mocha Madness Grande Bretagne Hotel, Athens, Greece
1 cup frozen chocolate yogurt
½ cup hot coffee, sweetened to taste
Combine in mixing cup. Mix on low speed for 3 seconds
and high speed for 30 seconds to 1 minute, or until you
have a chunky but drinkable mixture.
Nutritional information per serving:
Calories 286 (26% from fat) • carb. 42g • pro. 6g • fat 9g
• chol. 7mg • sod. 145mg • calc. 214mg • fiber 0g
DESSERT TOPPING
NOTE: Creams mixed in the drink mixer will not become quite as
stiff as those whipped by other methods.
Softly Whipped Cream
1 cup heavy cream
1 teaspoon vanilla
2 tablespoons confectioners’ sugar
Place all ingredients in mixing cup. Mix on low speed for
5 seconds and high speed for about 30 seconds, or until
cream holds its shape.
Nutritional information per serving:
Calories 48 (88% from fat) • carb. 1g • pro. 0g • fat 5g
• chol. 18mg • sod. 5mg • calc. 9mg • fiber 0g
Whipped Fruit Cream
1 cup heavy cream
2 tablespoons fruit preserves
Place all ingredients in mixing cup. Mix on low speed for
5 seconds and high speed for about 30 seconds, or until
cream holds its shape.
Nutritional information per serving:
Calories 48 (88% from fat) • carb. 1g • pro. 0g • fat 5g
• chol. 18mg • sod. 5mg • calc. 9mg • fiber 0g
10
Page 12

BAR DRINKS
Grasshopper
3 ounces crème de menthe
3 ounces white crème de cacao
3 ounces heavy cream
Combine in mixing cup and mix on low speed for
30 seconds. Serve over cracked ice. Serves 2.
Nutritional information per serving:
Calories 435 (32% from fat) • carb. 33g • pro. 1g • fat 16g
• chol. 58mg • sod. 22mg • calc. 28mg • fiber 0g
Alexander
3 ounces brandy
3 ounces heavy cream
3 ounces crème de menthe
Combine in mixing cup and mix on low speed for
30 seconds. Serve over cracked ice. Serves 2.
Nutritional information per serving:
Calories 432 (33% from fat) • carb. 22g • pro. 1g • fat 16g
• chol. 58mg • sod. 19mg • calc. 27mg • fiber 0g
Sunny Sunshine
1 cup orange juice
2 ounces vodka
1 ounce curaco or grand marnier
®
Combine in mixing cup and mix on low speed for
30 seconds. Serve over cracked ice.
Nutritional information per serving:
Calories 186 (1% from fat) • carb. 19g • pro. 1g • fat 0g
• chol. 0mg • sod. 2mg • calc. 14mg • fiber 0g
11
Page 13

Any trademarks or service marks of third parties referred to herein are the
trademarks or service marks of their respective owners.
©2008
Waring Consumer Products
150 Milford Road
East Windsor, NJ 08520
www.waringproducts.com
Printed in USA
08WR202
026182
 Loading...