

Page 1
PROFESSIONAL DEEP FRYER
DF250B
For your safety and continued enjoyment of this product,
always read the instruction book carefully before using.
Page 2

CONTENTS
Important Safeguards ................................1
Parts..............................................4
How to Use Your Deep Fryer ..........................6
Cleaning Instructions ................................7
Safety Features ..................................... 8
Hints..............................................9
Frying Frozen Foods .................................9
Filtering and Changing the Oil ........................10
Recipes ..........................................10
IMPORTANT SAFEGUARDS
When using electrical appliances, basic safety precautions
should always be followed, including the following:
1. READ ALL INSTRUCTIONS.
2. Unplug from outlet when not in use and before
cleaning. Allow to cool before putting on or taking off
parts, and before cleaning the appliance.
3. Do not touch hot surfaces. Use handles and knobs.
4. To protect against electric shock, do not immerse
heating element, cord, plug or deep fryer in water
or other liquids.
5. This appliance should not be used by or near children or
individuals with certain disabilities.
6. Never leave appliance unattended when it is connected
to the power outlet.
7. Always attach breakaway cord to appliance rst, then
plug into wall outlet. To disconnect, turn the switch
off, then remove plug from wall outlet.
8. Do not operate any appliance with a damaged cord or
plug, or after the appliance malfunctions or has been
damaged in any manner. Return appliance to the
nearest authorized service center for examination,
repair or adjustment.
9. The use of attachments not recommended or sold
by the manufacturer may result in re, electric shock
or injury.
10. Do not use outdoors.
11. Do not let cord hang over edge of table or counter, or
touch hot surfaces.
12. Do not place on or near a hot gas or electric burner, or
in a heated oven.
13. Extreme caution must be used when moving the
Deep Fryer if it contains hot oil or other liquids.
14. The appliance will automatically shut off if operation
exceeds 12 minutes without oil. If this occurs, use the reset
button to reset the appliance.
15. If appliance still does not function after following
reset instructions, please contact a Waring Certied
Customer Service Center for assistance at
1-800-4WARING (492-7464).
16. Be sure handles are properly attached to basket and
locked in place. See detailed assembly instructions.
17. Do not use this appliance for other than intended use.
18. Periodically check for looseness of screws or nuts and
retighten them. CAUTION: Overtightening can result in
stripping of screws or nuts or cracking of handle or feet.
19. Do not exceed 60 minutes ON time within a period of 2
hours.
20. Do not operate your appliance in an appliance garage
or under a wall cabinet. When storing in an appliance
garage, always unplug the unit from the electrical
outlet. Not doing so could create a risk of re, especially if
the appliance touches the walls of the garage or the door
touches the unit as it closes.
SAVE THESE INSTRUCTIONS
FOR HOUSEHOLD USE ONLY
1 2
Page 3
IMPORTANT SAFETY TIPS
1. Always keep lid closed while deep fryer is cooking food.
Use basket handle to raise and lower basket. Always raise
basket out of hot oil and rest on basket hook, to allow food
to drain completely before removing.
2. BEWARE OF STEAM WHEN OPENING LID.
3. Wet food should be dried rst with paper towels. Remove
loose ice from frozen foods. Close the lid when frying.
Beware of oil splattering when food is put into the oil.
4. Keep appliance at least 4 inches away from walls or other
objects during operation. Do not place any objects on top
of appliance while it is operating.
5. Be sure oil container is lled to at least the minimum oil
level. Do not ll above the maximum. Do not operate
appliance without oil or with an insufcient amount of oil.
Never pour oil into heated oil container.
6. Do not operate this appliance if the lid and the oil container
are not completely dry.
7. Keep this fryer out of reach of children while in use and
away from edges of countertops where it could be pulled
off or pushed over by children.
8. DO NOT use any solid/hydrogenated oil, shortening, olive
oil, grapeseed oil or lard in this deep fryer. DO NOT MIX
OILS, as they may have different smoke point.
USE GOOD-QUALITY OIL that has a smoke point of
400°F or higher.
CAUTION: To prevent damage to countertop or tabletop
nish, use a nonammable, heat-resistant coaster or placemat
between the appliance and the countertop or tabletop surface.
Never place on carpet, furniture, or other combustible materials.
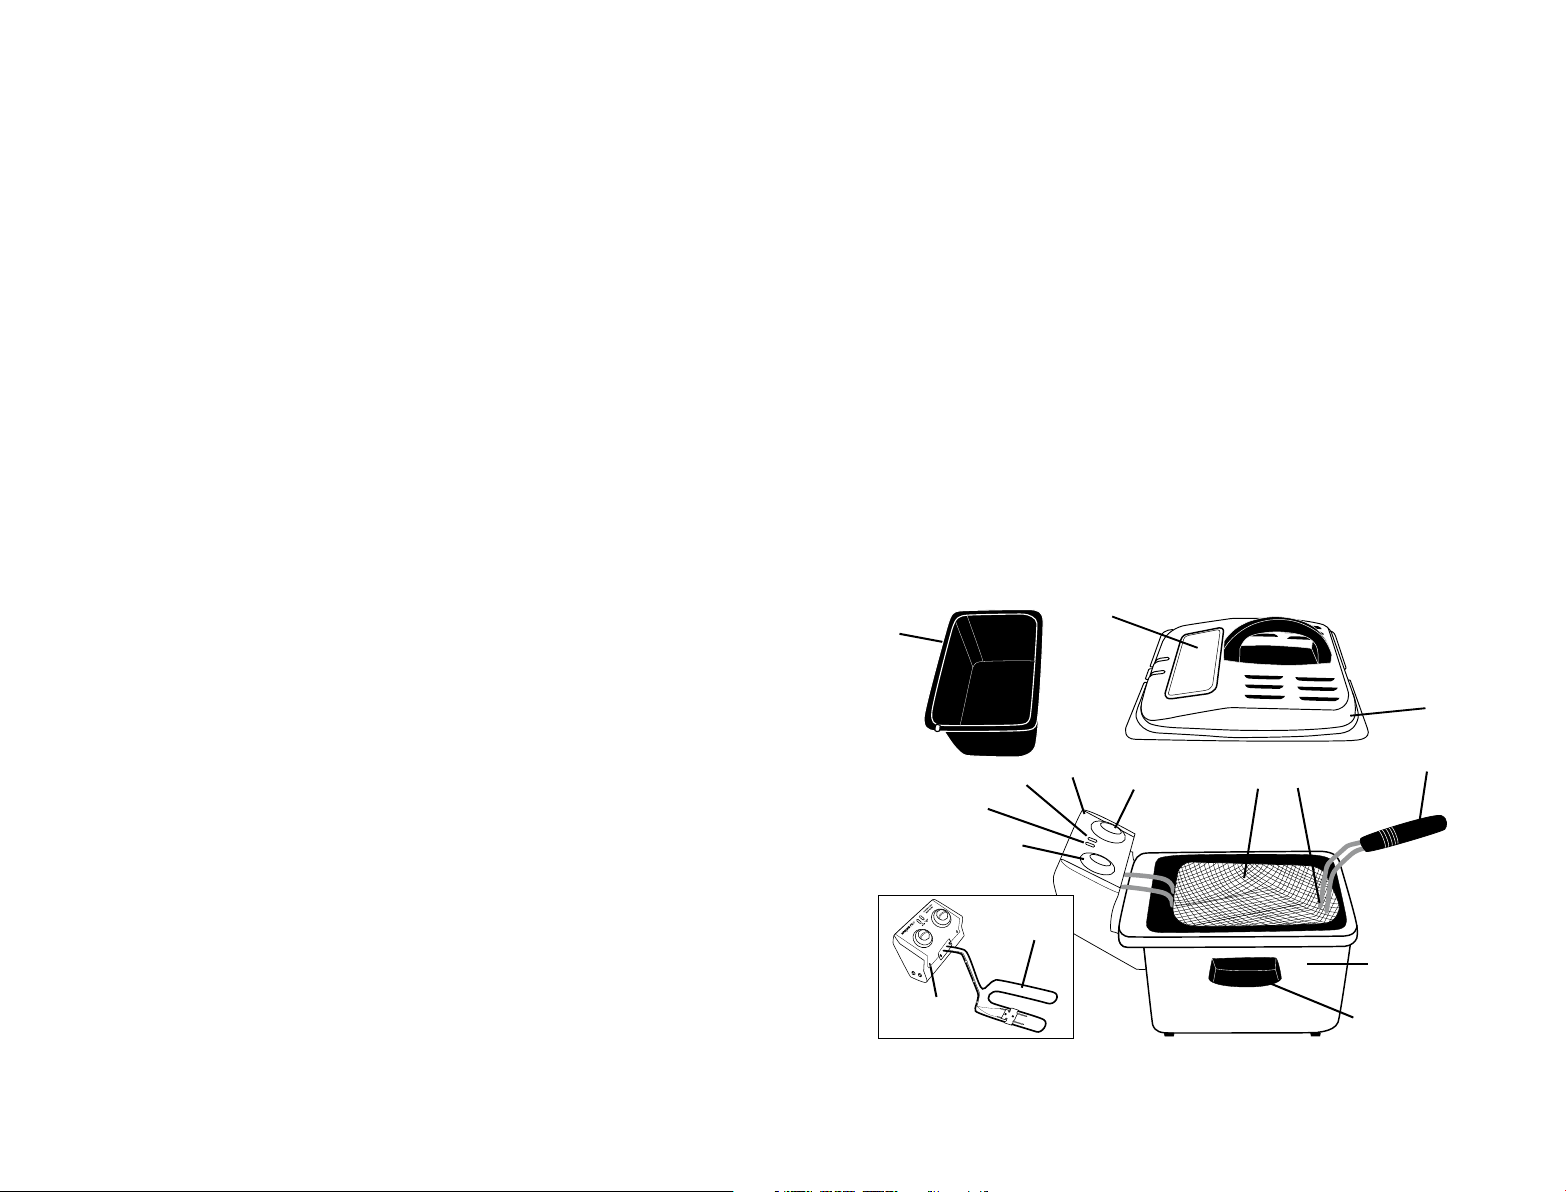
PARTS
1. Stainless steel housing
2. Viewing window
3. Collapsible basket handle
4. Lid
5. Basket
6. Basket hook (not shown)
7. Oil container
8. Handles
9. Timer
10. Temperature control knob
11. Oil Ready indicator light
12. Power On indicator light
13. Heating element
14. Breakaway cord (not
shown; refer to page 4)
15. Reset button
16. Control panel
16
2
10
7
11
12
9
5
(not shown)
6
4
3
13
15
3 4
1
8
Page 4
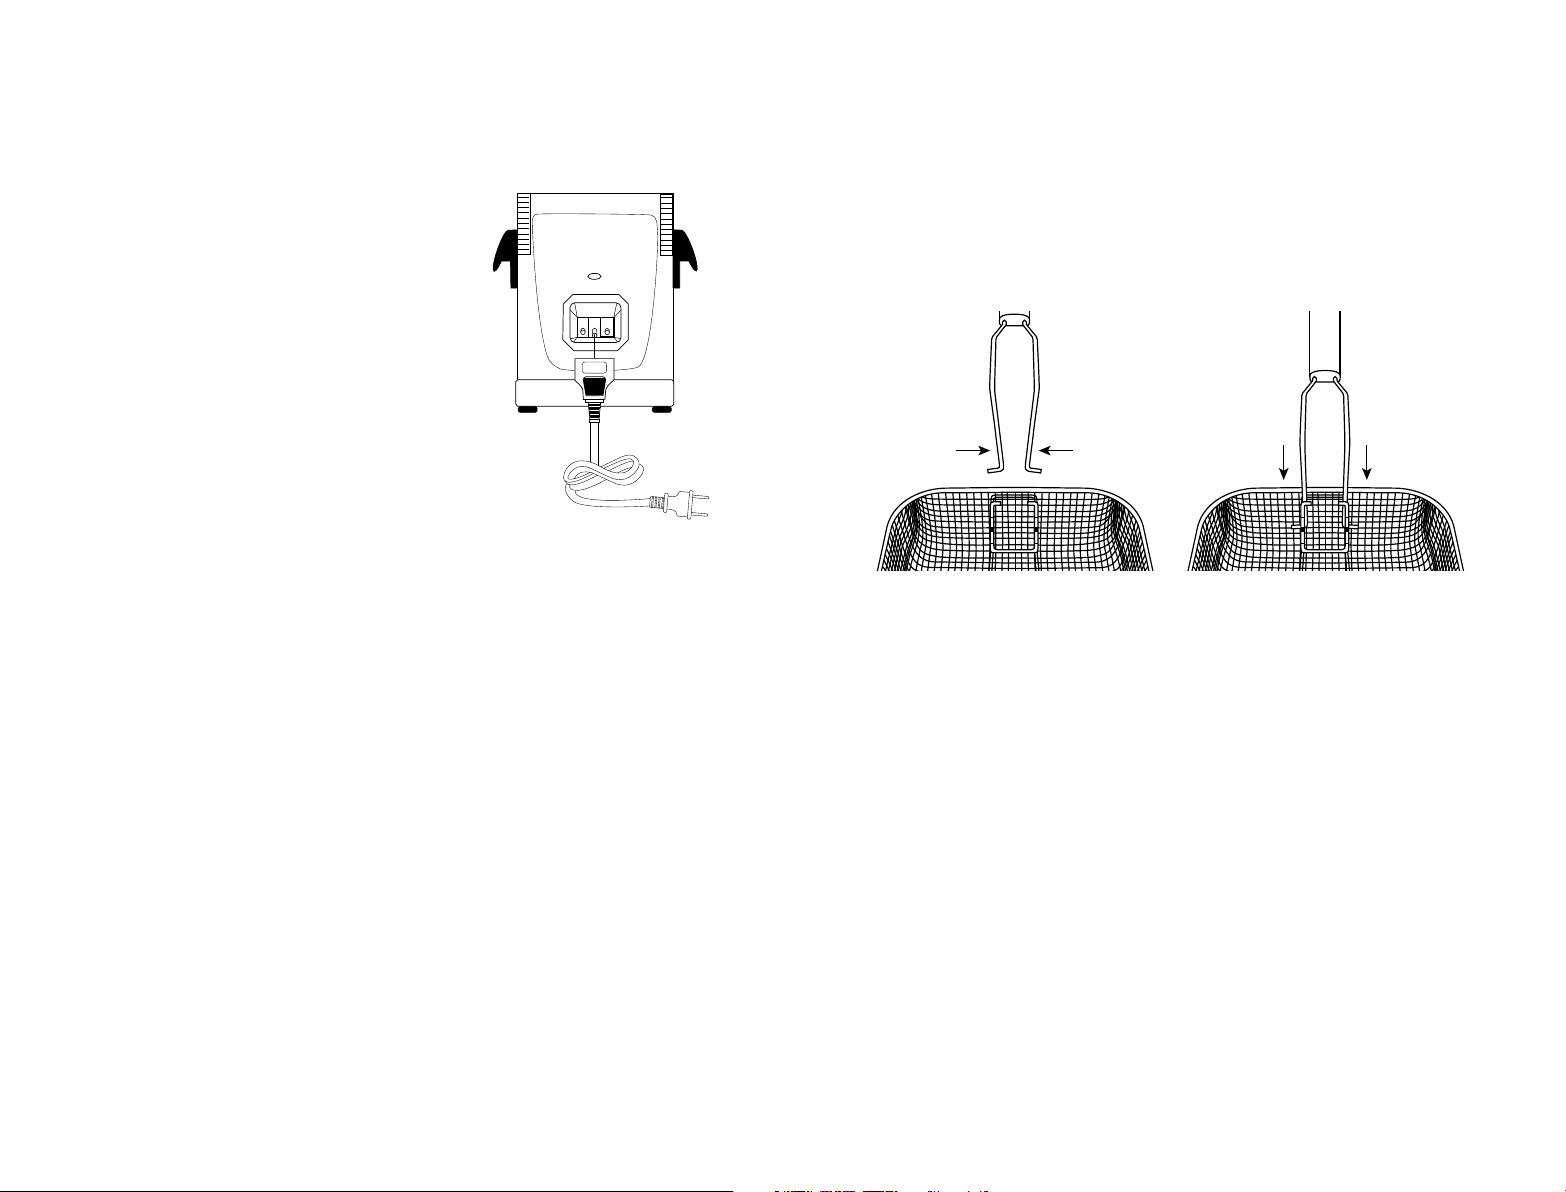
Breakaway Cord and Polarized Plug
This appliance features a breakaway cord and polarized plug
(one blade is wider than the other). The breakaway cord is
designed to quickly disconnect from the appliance
when a pulling force is applied.
NOTE: The breakaway cord can t into
the appliance in only one direction.
Please refer to printing on the cord
connector that states “this side up.”
To reduce the risk of electric shock,
a polarized plug is used. This plug is
intended to t only into a polarized outlet.
If the plug does not t into the outlet,
reverse the plug. If it still does not t,
contact a qualied electrician. Do not
attempt to modify the plug in any manner.
SHORT CORD INSTRUCTIONS
CAUTION: A short power supply cord is provided to reduce the
risk of personal injury resulting from becoming entangled in or
tripping over a long cord.
EXTENSION CORD USE
An extension cord or longer detachable cord is not
recommended for use with deep fryers.
ELECTRIC POWER
If the electrical circuit is overloaded with other appliances,
your appliance may not operate. It should be operated on an
electrical circuit that is free from other appliances. If you are
not sure of the reason for overloading or cannot nd a separate
circuit, contact a qualied electrician.
This appliance is for 120 volts only and should not be used with
a converter.
HOW TO USE YOUR DEEP FRYER
1. This appliance is designed for household use only.
It is not intended for commercial use.
2. Before using this deep fryer for the rst time, remove all
packaging materials.
3. Lift off lid covering oil container.
4. Remove basket from oil container. Attach handle to basket
by squeezing posts and assembling as shown in diagram.
5. Before adding oil, wash the oil container and basket with
warm soapy water. Be sure that they are completely dry
before assembling.
6. Pour approximately one gallon of good quality vegetable,
corn, canola, soybean, or peanut oil into oil container until it
reaches between the MIN and MAX marks inside container.
DO NOT OVER- OR UNDER-FILL. DO NOT MIX OILS.
7. Put lid on deep fryer.
8. Attach breakaway cord to the back of the appliance,
then plug into outlet.
9. When unit is plugged in, the power On indicator light will
turn on.
10. Set the temperature control knob to the desired
temperature. The oil Ready indicator light will turn green
once the oil has reached the desired temperature.
11. Lift lid and set basket onto the oil container using the
basket hook. Put food into basket. Do not exceed the MAX
ll line on the basket. Lower basket into oil and place the lid
on top.
CAUTION: Oil is hot. Please use caution when placing food
into hot oil.
5 6
Page 5

12. Set timer (up to 30 minutes) to cooking time specied,
depending on what you are cooking.
13. Timer will ring when set time has elapsed. Remove lid and
raise the basket to see if the food has reached the required
golden color. If the food is done, carefully lift and hang
basket on the oil container. Allow oil to drain completely
before removing the basket. Remove cooked food from
basket and place onto absorbent paper towels.
NOTE: To preserve oil quality, do not add salt or spices to
the food until after it has been removed from the fryer.
14. WARNING: The timer does not switch appliance off.
15. When cooking is nished, turn temperature control to
Standby. Unplug the breakaway cord from the wall
outlet before detaching from the appliance.
CLEANING & MAINTENANCE INSTRUCTIONS
1. Always unplug appliance, detach the breakaway cord and
let the oil cool down to room temperature before cleaning.
2. The control panel should never be immersed in
water or other liquids. Clean the outer surface of the
heating element with a damp cloth containing mild soap
solution or plain water.
3. Once oil has cooled, use spout on the oil container to pour
oil into suitable container.
4. The frying basket should be seasoned in oil before going
into the dishwasher for the rst time. Lid and oil container
are dishwasher safe. Dry parts thoroughly after cleaning
and before assembling.
5. The stainless steel housing is submersible and should be
washed by hand with warm soapy water.
6. Ensure that both the lid and the oil container are completely
dry after washing and before use.
7. After cleaning, reassemble oil container, heating element,
basket and lid onto deep fryer. The heating element must
be seated properly or appliance will not operate.
8. Warning: When cleaning, use care – under-edge of
deep fryer is sharp.
9. For storage, basket handle can be folded down to t
inside container.
7 8
10. Tip: For ease in cleaning, wipe control panel with damp
microber cloth. Microber cloths are available in most
kitchenware stores.
NOTE: Oil staining on the heating element and oil
container can be easily cleaned with a plastic
scrubbing pad.
Any other servicing should be performed by an authorized
service representative.
SAFETY FEATURES
The Waring Pro® Professional Deep Fryer is equipped with the
following features to ensure safety:
• Safety Interlock – The control panel/heating element
must be properly seated or deep fryer will not operate.
• Breakaway Cord – The cord is designed to quickly
disconnect from the appliance when a pulling force is
applied.
• Thermostat Overload Protection – Your Waring Pro
Professional Deep Fryer is equipped with a thermostat
overload protection. If the unit heats up beyond the
recommended temperature level, the deep fryer will
automatically turn off. To reset, unplug the unit from the
wall outlet and allow it to cool down. Remove the control
panel and heating element from the unit.
CAUTION: Heating element is extremely hot. Allow it
to cool thoroughly before
removing it. You will nd a
reset button on the front
of the control panel below
controls. Using a toothpick
or another long, thin object,
push the reset button and
properly place the control
panel back into position.
NOTE: The unit will not work if the control panel is not
properly mounted. Plug the unit back in, turn on and
continue use. If the unit still does not operate, repeat the
steps above or call a Waring Certied Customer Service
Center for assistance.
®
Page 6

HINTS
• Whencookingfoodsdippedinfreshbatter,rstlower
basket. Using tongs, add food directly to oil. Use basket
to lift out food when nished cooking.
• DonotexceedtheMAXlllineinthebasket.Thishelps
maintain temperature of oil for better cooking results.
• Sortorcutfoodintopiecesofuniformsize.Allthe
food will then be cooked in the same amount of time.
To reduce splattering, remove excess moisture or ice
from food.
• Storeoilinoilcontainerforalimitedtime.Whenoil
has cooled to room temperature, pour into a suitable
container with lid and refrigerate.
• Forbestresults,changeoilindeepfryeraftera
maximum of ten uses.
• Itisimportanttofollowthetemperaturerecommendation
for every recipe. If the temperature is too low, the fried
food absorbs oil. If the temperature is too high, a crust
quickly forms on the outside while the inside remains
uncooked.
• Forbestresults,dropfreshlyslicedfoodintobasketone
piece at a time.
FRYING FROZEN FOODS
• Duetotheirextremelylowtemperature,frozenfoods
inevitably lower the temperature of the oil. For best
results, do not overload the basket with frozen foods.
• Followtheinstructionsonthefrozenfoodpackagefor
cooking time and temperature.
• Frozenfoodsarefrequentlycoveredwithacoatingofice
crystals, which should be removed before frying. Lower
the basket very slowly into the oil in order to ensure that
oil does not boil over.
FILTERING AND CHANGING THE OIL
• MakesuretheWaringPro® Professional Deep Fryer is
unplugged and the oil has cooled before cleaning or
storing.
• Theoildoesnotneedtobechangedaftereachuse.In
general, the oil will be tainted rather quickly when frying
food containing a lot of protein (such as poultry, meat
or sh). When oil is mainly used to fry potatoes and it
is ltered after each use, it can be used 8 to 10 times.
However, do not use the oil for longer than 6 months.
• WARNING:Alwaysremovetheplugfromwallsocket
before cleaning. Allow the Waring Pro
®
Professional Deep
Fryer and the oil to cool completely (approximately 2
hours) before cleaning. Never immerse the control panel,
cord or plug in water or any other liquid.
RECIPES
Tips for Frying Breads
Heat oil to 375°F unless recipe species otherwise. A cube
of bread should brown in approximately 60 seconds. Correct
temperature is extremely important. If the temperature is too
high, breads will brown before the insides have cooked; if it is
too low, the bread will absorb the fat and become soggy and
greasy.
Cook only as much as will oat easily in the oil. Too much
added to the Waring Pro
temperature to drop, and the food will be difcult to turn. Turn
bread when it rises to the top of the oil, taking care not to pierce
it. Lift cooked breads from the fryer; allow them to drain for a
moment, then place on paper towels to drain.
®
Professional Deep Fryer will cause the
Applesauce Spice Doughnuts
Makes about 24
3¹⁄3 cups unbleached, all-purpose flour, divided
1 tablespoon baking powder
½ teaspoon salt
¾ teaspoon cinnamon
¼ teaspoon ground allspice
¹⁄
8
teaspoon freshly grated/ground nutmeg
¾ cup granulated sugar
2 tablespoons vegetable shortening
9 10
Page 7

1 cup applesauce
2 large eggs
flour for dusting
oil for frying
powdered or granulated sugar for dusting
Put the flour, baking powder, salt, and spices in a medium bowl and
stir with a whisk to blend; reserve. Put the sugar and shortening in a
large bowl. Using an electric mixer on low speed, beat to blend and
break up the shortening. Add the applesauce and eggs; beat until
smooth. Add the flour mixture in two additions and blend on medium
speed until mixed. Cover dough and chill for a least 1 hour.
Divide dough into two equal portions. Place one portion of dough on
a generously floured surface and dust with flour. Roll out to ½-inch
thickness. Cut dough with a floured doughnut cutter and place
doughnuts on a waxed paper lined baking sheet or tray. Repeat with
remaining dough. Re-roll scraps and repeat.
Heat vegetable oil in Waring Pro
®
Professional Deep Fryer until it
reaches 375°F. Carefully lower 3 doughnuts into the hot oil – do not
overcrowd! Fry on each side, about 1½ to 2 minutes, turning with a
slotted spoon or wire skimmer. Remove and drain on layered paper
towels. Pat gently to remove any excess oil, and sprinkle with desired
amount of sugar.
Hush Puppies
Makes about 20 to 30
oil for frying
1½ cups cornmeal
½ teaspoon salt
¼ teaspoon baking soda
¼ cup finely chopped white or green onion
¼ cup buttermilk
¹⁄
3
cup water
Heat oil in Waring Pro
While the oil is heating, make the Hush Puppy batter.
Combine cornmeal, salt and baking soda in a medium bowl. Stir in
onion. Add buttermilk and water – stir just to moisten the dry
ingredients. Make into rounded tablespoonfuls and drop carefully into
the hot oil and fry until golden brown, turning once with a slotted
spoon or wire skimmer. Remove from the oil. Drain on layers of paper
towels. Serve immediately.
®
Professional Deep Fryer until it reaches 375°F.
Spicy Buffalo Wings
Makes 24 pieces
12 chicken wings
½ cup unsalted butter, melted
5 to 8 tablespoons “Louisiana style” hot sauce
(such as Frank’s Louisiana Red Hot!™)
1 tablespoon cider vinegar
oil for frying
blue cheese dressing and celery sticks, carrot sticks,
zucchini sticks
Cut wing tips from wings and discard or reserve for making chicken
stock. Split each wing at the joint and cut through so there are 2
pieces from each wing. Rinse and dry completely. In a large bowl,
combine the melted butter, hot sauce and cider vinegar and stir until
completely blended.
Heat oil until it is 375°F. Put half the wings into the Waring Pro
®
Professional Deep Fryer and cook until browned and crispy, about 12
to 15 minutes. Remove wings; drain briefly on layered paper towels.
Then stir hot, crispy wings into the hot sauce mixture. Repeat with
remaining wings. Serve hot with cold vegetable sticks and blue
cheese dressing.
Note: If you have some guests who do not appreciate hot and spicy,
fry the wings as instructed and toss with your favorite BBQ sauce or
honey mustard sauce. For “suicidal” strength wings, add Tabasco® or
other hot sauce along with the Louisiana style hot sauce.
Blue Cheese Dressing
½ cup mayonnaise (regular or lowfat)
½ cup sour cream (regular or lowfat)
½ cup crumbled blue cheese
1 teaspoon finely chopped garlic
¼ cup finely chopped parsley
1 to 2 tablespoons finely chopped onion
1 tablespoon fresh lemon juice
Put all ingredients in a bowl and stir well to blend. Cover and
refrigerate for at least 30 minutes before serving to allow flavors
to blend.
11 12
Page 8

Fried Calamari
Herbed Beer Batter Onion Rings
Makes about 4 servings
2½ pounds cleaned calamari, including some tentacles
vegetable oil for frying
2 cups unbleached, all-purpose flour
1 tablespoon finely chopped parsley
1 teaspoon granulated garlic
1 teaspoon each: kosher salt and freshly ground pepper
marinara sauce for dipping
fresh lemon wedges for garnish
Rinse and drain the calamari; place on thick layers of paper towels,
pressing and blotting them completely dry with another layer of paper
towels on top. Cut the bodies into ½-inch rings, and cut tentacles into
halves or quarters if large.
Heat oil to 360°F in the Waring Pro
the oven to 500°F. Line 2 cookie sheets with a triple thickness of
paper towels.
Put the flour, parsley, granulated garlic, salt, and pepper in a jumbo
resealable food storage bag. Working with about a quarter of the
calamari at a time, drop calamari into the bag, seal and shake.
Squeeze the sides of the bag to completely coat the calamari. Take
care that the pieces are individually coated and not stuck together.
Remove from the bag and place on a baking sheet lined with plastic
wrap. Repeat until all the calamari has been coated evenly with flour
mixture.
Gently add calamari to hot oil, about 1 to 1½ cups at a time, trying to
let all the pieces drop in separately. Do not crowd the calamari,
because crowding will drop the temperature of the oil. The calamari
will be pale golden and just cooked in about 40 to 60 seconds. Do not
overcook – they will become tough. Lift the calamari out using a
slotted spoon or metal skimmer, and drain in a single layer on
prepared cookie sheets. Repeat with the remaining calamari. When all
the calamari have been fried, reheat them in the 500°F oven for
several minutes. Sprinkle lightly with a little more salt, and serve with
warm marinara sauce for dipping.
®
Professional Deep Fryer. Preheat
Makes 2 to 4 servings
¾ cup + 2 tablespoons lager or ale
1 cup unbleached, all-purpose flour
½ cup chopped fresh parsley
1 tablespoon chopped fresh thyme
1 teaspoon finely chopped fresh garlic
¾ teaspoon kosher salt
1 to 2 onions (about 1 pound total)
flour for dusting
vegetable oil for frying
kosher salt for sprinkling
In a medium bowl, whisk the beer into the flour until smooth. Stir in
the parsley, thyme, and garlic. Let batter stand 30 minutes. Stir in salt.
Cut onion crosswise into ½-inch thick slices. Remove and discard
skin, stem and root ends. Separate slices into rings. Toss lightly with
flour.
Heat vegetable oil in Waring Pro
reaches 375°F. Working with about 4 or 5 rings at a time, dip each ring
into batter, and allow excess to drip off. Carefully lower coated onion
rings into deep fryer, one at a time. Fry until golden, turning as
needed, about 1 to 2 minutes. Lift out with tongs and place on layered
paper towels to drain. Sprinkle with kosher salt while hot, and serve.
®
Professional Deep Fryer until it
13 14
Page 9

Better than Fast Food French Fries
Makes about 6 servings
peanut or vegetable oil for frying
2 russet potatoes
kosher salt and freshly ground pepper to taste
Heat oil in Waring Pro® Professional Deep Fryer to 325°F.
Cut potatoes into french fry-cut uniform sticks (about 6 x 6 mm) or
into slices ¼ inch or less thick. As you cut, place the potatoes in a
bowl of ice water to keep them from turning brown.
Drain and dry the potato strips completely and thoroughly. They
cannot be at all wet, or the oil will spatter and spit. Fry the potatoes in
small batches. Cook for about 3 minutes, remove and drain on layers
of paper towels.
Increase temperature of oil to 375°F. In small batches again, fry the
potatoes for a second time, this time about 4 minutes, until golden
and crispy. Drain on fresh layers of paper towels. Season to taste and
serve immediately.
Seasoning suggestions: herb blends, Cajun or Creole seasonings, and
chili powder.
Crispy Chicken Fingers
with Honey Mustard Sauce
Makes 6 servings
3 tablespoons kosher salt
3 tablespoons brown sugar
1 cup boiling water
12 ice cubes
4 skinless, boneless chicken breast halves
1 cup unbleached, all-purpose flour
½ teaspoon kosher salt
¼ teaspoon freshly ground pepper
¼ teaspoon paprika
¼ teaspoon granulated garlic powder
oil for frying
¾ cup buttermilk or regular milk
Honey Mustard Sauce
½ cup honey
¼ cup Dijon mustard (regular or grainy)
Combine salt, sugar and boiling water in a medium-large heat-proof
bowl. Stir until sugar and salt are completely dissolved. Add ice. Cut
chicken into ½ x 2-inch strips. Place cut chicken in the chilled brine
mixture and refrigerate for 30 to 60 minutes.
Combine the flour with the salt, pepper, paprika, and granulated
garlic in a shallow bowl; reserve. Blend honey and mustard to make
honey mustard sauce.
When ready to cook, drain chicken and pat completely dry. Heat oil in
Waring Pro
dried chicken strips in buttermilk and roll in flour mixture to coat well.
Place the strips on a plate. Carefully place the chicken strips in the
hot oil in batches. Cook, turning once, for about 3 to 4 minutes per
side. Drain on layers of paper towels and serve with honey mustard
sauce.
®
Professional Deep Fryer to 375°F. Dip the drained and
15 16
Page 10

DEEP FRYING GUIDE – Fresh or Uncooked Foods
Fresh indicates food prepared from a recipe or purchased
fresh, not frozen. Read package label to determine if prepared,
packaged foods are NOT precooked. If frozen, do not thaw;
place foods directly from package into preheated oil. If there are
ice granules around prepared foods, set pieces on a paper towel
and pat dry. Moist vegetables will cause the oil to splatter.
Frying times may vary because of food temperature, quantity
and size of pieces. Best results are obtained when food is
cooked in small batches and size of pieces is uniform. Check
deep-fried foods at the shortest times given; deep fry until
heated through.
DEEP FRYING GUIDE – Prepared Foods
Prepared foods listed in this chart are breaded and cooked
prior to packaging. If frozen, do not thaw; place foods directly
from package into preheated oil. If there are frozen ice granules
around prepared foods, set pieces on a paper towel and pat dry.
Use this chart as a guide to deep frying times. Best results are
obtained when food is cooked in small batches and size of
pieces is uniform. Check deep fried foods at the shortest times
given; deep-fry until heated through.
Low heat 325°F
Onion rings . . . . . . . . . . . . . . . . . . . . . . . 5–6 min.
Low heat 325°F
Turkey thighs, bone in, skin on . . . . . . . . . . . . 20 –22 min.
Turkey breast, bone up, skin down . . . . . . . . . . 30–35 min.
Breaded eggplant . . . . . . . . . . . . . . . . . . . . 5–6 min.
Breaded portabella mushrooms . . . . . . . . . . . 4½–5 min.
Medium heat 350°F
Frozen chicken nuggets . . . . . . . . . . . . . . . . 5½– 6 min.
Breaded chicken tender . . . . . . . . . . . . . . . 3½–4½ min.
Breaded, boneless chicken breasts . . . . . . . . . . 5½–6 min.
Breaded bone-in pork chops . . . . . . . . . . . . . 7½–8 min.
Egg rolls . . . . . . . . . . . . . . . . . . . . . . . . . . . 5 min.
Chimichangas . . . . . . . . . . . . . . . . . . . . . .7–7½ min.
Large shrimp . . . . . . . . . . . . . . . . . . . . . . 1–2 min.
High heat 375°F
Red potato chips . . . . . . . . . . . . . . . . . . . . 2–3 min.
Yam potato chips . . . . . . . . . . . . . . . . . . . 2–2½ min.
American fries . . . . . . . . . . . . . . . . . . . . . . 5–6 min.
Thin french fries . . . . . . . . . . . . . . . . . . . . 3–3½ min.
Thick french fries . . . . . . . . . . . . . . . . . . . 3½–4 min.
Curly french fries . . . . . . . . . . . . . . . . . . . 4½–5 min.
Egg rolls . . . . . . . . . . . . . . . . . . . . . . . . 6½–7 min.
Medium heat 350°F
Chicken tenders . . . . . . . . . . . . . . . . . . . . 5½–6 min.
Chicken nuggets . . . . . . . . . . . . . . . . . . . . 3–4 min.
Chicken pieces . . . . . . . . . . . . . . . . . . . . . 7–8 min.
Small mushrooms . . . . . . . . . . . . . . . . . . . 2½–3 min.
Medium shrimp . . . . . . . . . . . . . . . . . . . . 2–2½ min.
Small shrimp pops . . . . . . . . . . . . . . . . . . . 1–2 min.
High heat 375°F
Large or fantail shrimp . . . . . . . . . . . . . . . . . 1–2 min.
Mozzarella sticks . . . . . . . . . . . . . . . . . . . . 2–3 min.
Halibut sh llets . . . . . . . . . . . . . . . . . . . 3–3½ min.
Halibut sh balls . . . . . . . . . . . . . . . . . . . . . 2–3 min.
17 18
Page 11

Any trademarks or service marks of
third parties referred to herein are the trademarks
or service marks of their respective owners.
©2012 Waring Consumer Products
150 Milford Road
East Windsor, NJ 08520
www.waringpro.com
Printed in China
DF250B IB
12WR134355
IB- 8118 B
 Loading...