

Page 1
Quick Start Guide • Guide de démarrage rapide • Guía Rápida para comenzar
TURBOROLL
pOweRed painT ROLLeR
Owner’s Manual (page 2)
Read this manual for complete instructions
Plunger tube assembly • Assemblage pour le piston • Ensamblaje para el émbolo
™
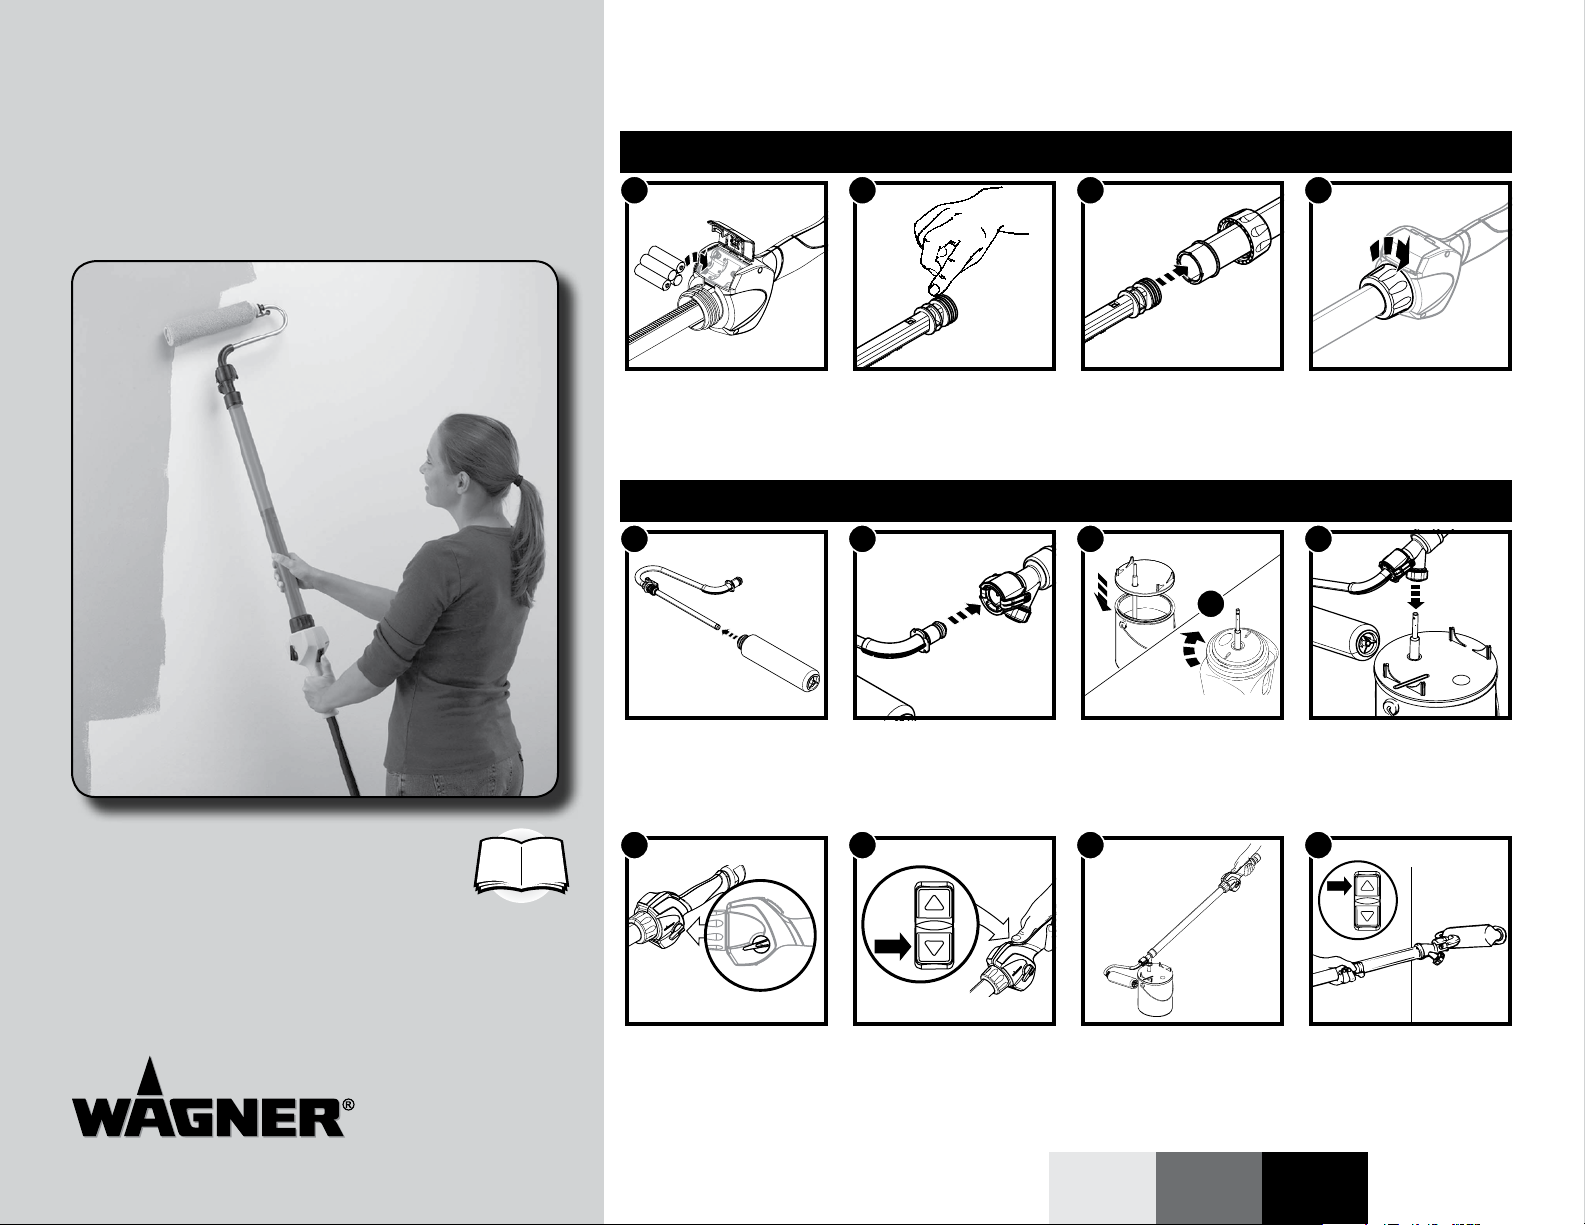
1
2
3
4
™
Install batteries
Installer les piles
Instale las baterías
Setup • Montage • Disposición
1
Attach roller cover assembly
Fixer l’ensemble du manchon
du rouleau
Acople el conjunto de cubierta
del rodillo
5
Lubricate plunger O-rings
Lubrier les joints toriques du
piston
Lubrique las juntas tóricas del
émbolo
2
Attach roller arm
Fixer le bras du rouleau
Acople el brazo del rodillo
6
Insert plunger into main tube
Insérer le piston dans le manche
réservoir
Inserte el émbolo en el tubo
principal
3
or
Mount ll tube / lid
Installer le tube de remplissage
et le couvercle
Monte el tubo y la tapa de
llenado
7
Tighten locking collar securely
Serrer solidement la bague de
blocage
Ajuste rmemente el collar de
sujeción
4
Press ll valve onto tube
Insérer la valve de remplissage
dans le tube
Presione la válvula de llenado
en el tubo
8
Manuel de l’utilisateur (page 8)
Lire ce manuel pour obtenir des directives complètes
Manual del usario (página 14)
Lea este manual para obtener las instrucciones completas
0911 • Form No. 0271823C
Patent pending
Turn lever to POWER
Mettre la manette à POWER
Gire la palanca a POWER
Press switch
Appuyer sur le commutateur
Presione el interruptor
Hold switch until tube is full
Maintenir le commutateur
enfoncé jusqu’à ce que le
manche réservoir soit plein
Mantenga el interruptor presion-
ado hasta que el tubo esté lleno
Press switch and begin rolling
Appuyer sur le commutateur et
commencer à peindre
Presione el interruptor y
comience a hacerlo rodar
Español Français English
Page 2
Getting
Quick-release
tabs
Roller arm
assembly
Spatter
guard
Roller
core
Fill valve
Fill tube
Locking
collar
Manual
override
lever
Plunger
Motor switch
Motor housing
Head
Main
tube
Standard
container lid
Non-standard
container lid (not
included with
all models)
Roller
cover
Roller cap
Started
Parts and Components
Start
• The TurboRoll™ requires four (4) high-
• Make sure the type of paint you use can
• It is a good idea to have drop cloths
different battery type, inserted backwards or
disassembled. Replace all batteries at the
same time with new batteries. Do not carry
batteries loose in your pocket or purse. Do
not remove battery label.
IMPORTANT: Some oil-based paints require
a stronger cleaning solution than mineral
spirits and should not be used with the
TurboRoll™. Using a cleaning solution
stronger than mineral spirits may cause
damage to the TurboRoll™. Check with
your paint supplier to be sure the oil-based
paint you have can be cleaned with mineral
spirits.
Questions?
Call Wagner Technical Service at:
1-800-760-3844
Register your product online at:
www.wagnerspraytech.com
2
Before you begin:
quality, alkaline, AA size batteries.
be cleaned with either mineral spirits (for
oil-based paints) or a warm water and soap
solution (for latex paints).
protecting your oors and furnishings in
case of accidental spatters.
Batteries may explode or leak and
cause skin burns if recharged,
disposed of in fire, mixed with a
English
Assembly
1 2
1. Install batteries.
Remove plastic bag
from plunger.
5 6 7
5. Attach the roller cover assembly to
the roller arm.
2. Lubricate the
plunger O-rings with
petroleum jelly.
6. Press the quick-release tabs on the
unit and attach the roller arm.
3 4
3. Insert the plunger into the main
tube. Make sure O-rings do
not twist or cut.
4. Tighten the locking collar.
7. If painting a ceiling, attach the
spatter guard.
Page 3
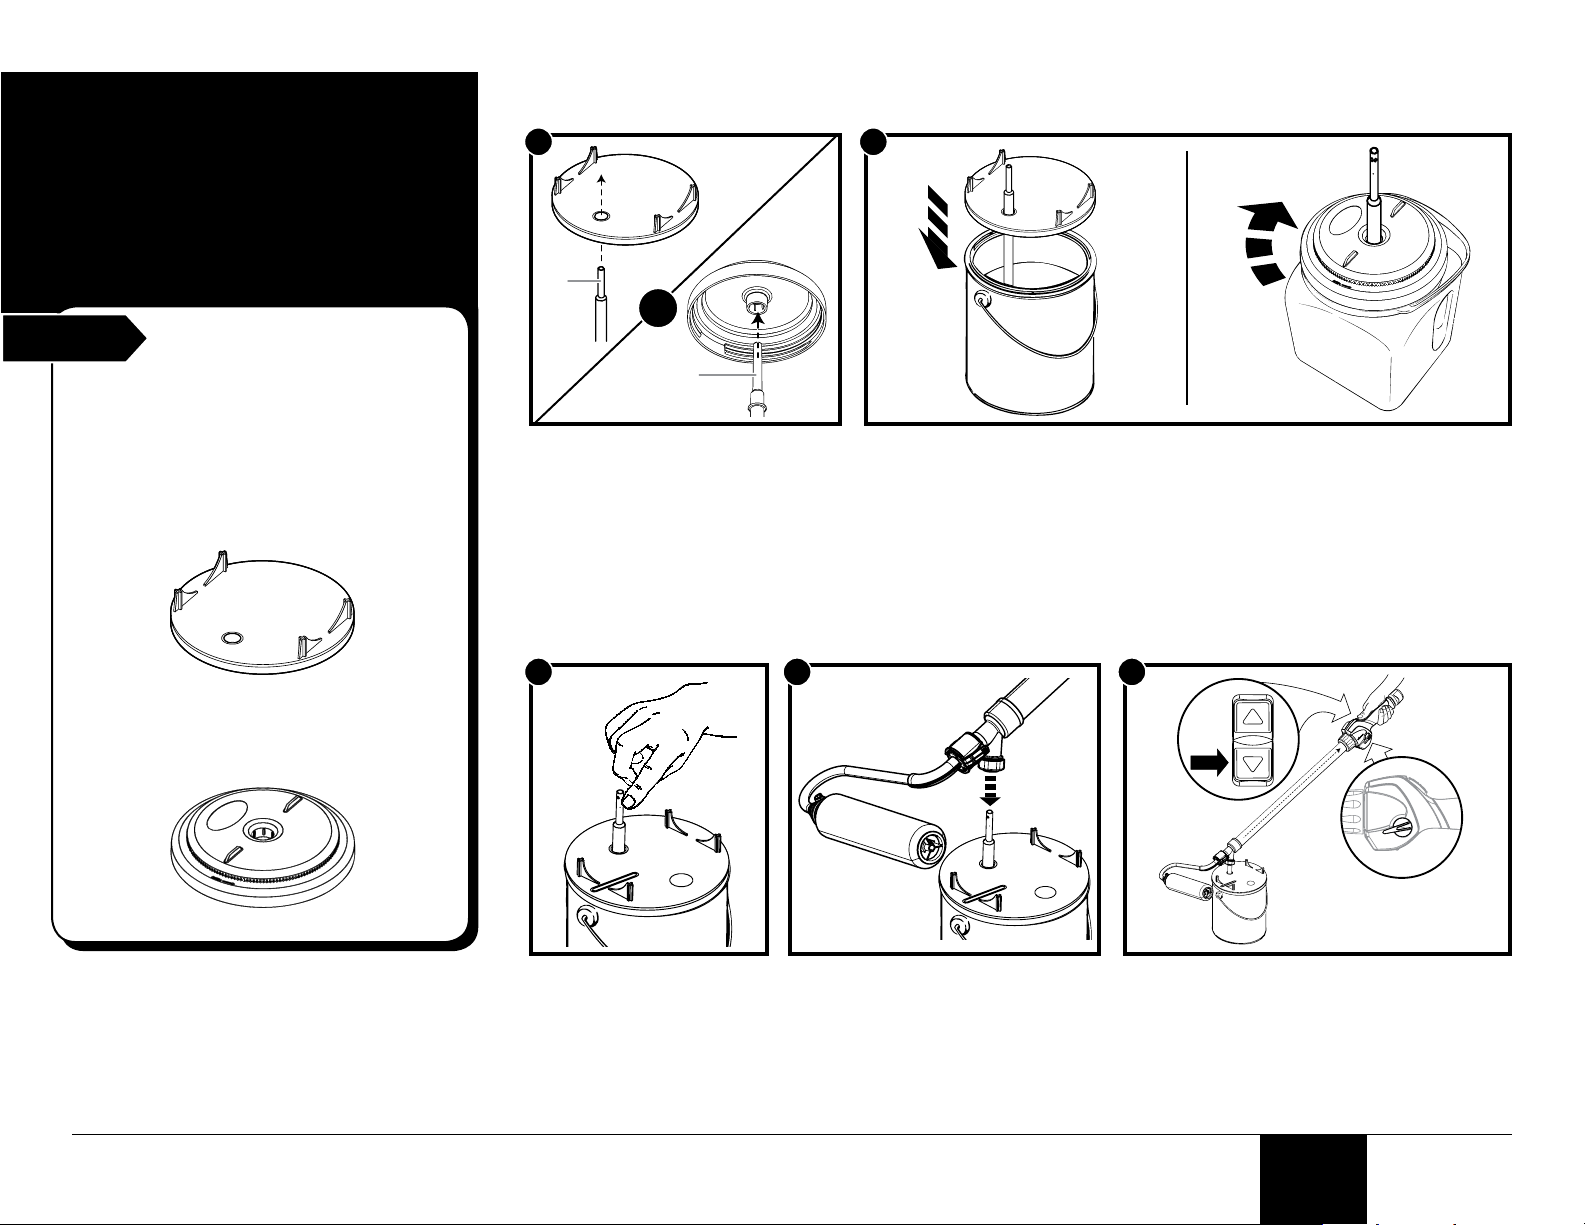
Attaching the container lid / fill tube
(a)
(a)
(b)
(c)
1. Filling the
main tube
Start
Your TurboRoll™ can be used with two types
of container lids that are used to allow you to
pull material from the material container into the
TurboRoll™.
The lid below is desiged for use with standard,
one-gallon, round material containers. This lid
comes standard with your TurboRoll™.
Use the lid shown below if you are using
something other than a standard, one-gallon,
round material container. *Not included with
all models.
Before filling:
1
OR
1. Slide the small end of the ll tube
(a) through the hole in the container
lid you plan to use.
Filling the main tube
1
2 3
2
2a. Standard containers - Attach the
container lid with ll tube securely
to the material container.
2b. All other containers - Thread the
container lid with ll tube onto the
material container.
1. Apply a thin layer of
3
petroleum jelly to the ll
tube. This will help the ll
valve slide easily off the ll
tube.
2. Press down and rmly hold the ll
valve onto the ll tube.
3. Make sure lever is switched to POWER (b).
Push the lower part of the switch (c) to draw
the plunger out and ll the tube. When the
tube is full, you are ready to begin rolling.
English
Page 4

2. Usage
General Rolling Tips:
Preparing the room
Remove all pictures, mirrors, and decorations
from the walls and draperies from the
windows. Remove all nails, hardware and
switch and receptacle covers. Cover furniture
and oor with drop cloths.
Surface Preparation
• Always remove wallpaper before painting.
Wash off old adhesive and rinse with
water. Allow the walls to dry before
painting.
• Wash and rinse dirt, grease and oil build-
up off the walls with soap and water.
• Fill all nail holes, joints and cracks with
patching paste. Let dry and sand the
surface until smooth. Clean sanded area
with a damp cloth.
• Spot prime all patched areas and any
marker and/or pen marks before applying
rst coat.
TIP: Write the important information from
your paint can (color, formula, brand and
paint type) on the back of a switch plate for
future reference.
Painting the Room
TIP: If you need more than one gallon of
paint to do the room’s walls, mix them
together to ensure color uniformity.
• Always make sure to open a window or
door to ensure proper ventilation. If you are
painting both the ceiling and walls in your
room, start with the ceiling rst and then
move to the walls.
Ceilings:
• To minimize spills and spatters, use the
spatter guard and paint across the short
width of the ceiling.
Walls:
• Tape off around base and window and
door trim.
• Paint one wall at a time.
• Pick an area to start where you can
saturate the roller cover and evenly
distribute the paint. Working in threefoot sections, begin by cutting-in around
windows, doors, cabinets, base and other
breaks in the wall surface with a pad or
brush.
• Press the switch until paint appears
through the roller cover.
• Start painting at one end of a wall and roll
out the letter “W”. Fill it in with crosswise
strokes, working your way across the wall
in 3’ x 3’ sections. Finish the sections by
painting one solid swipe from ceiling to
oor. This will give you a nice even paint
nish.
• Press the switch as needed for more paint.
Be careful not to over-saturate the roller
cover as it may drip, slide on the wall or
spatter.
• Make sure to run the roller cover over
the areas you cut-in around the trim and
baseboards to even out the texture.
• If you need to stop and take a break; nish
painting the entire wall, or stop at a break
in the wall such as a doorway or corner to
prevent lap marks.
Loading the roller
1
1. Push upper part of the switch to push the plunger forward and bring
material to the roller. When you start to see material come out of the roller,
you are ready to begin rolling.
2. Push the switch as necessary to bring additional material to the roller.
3. Rell as needed (see Filling the Main Tube, page 3).
PINCH CAUTION - Keep your hand away
from the area between the rear of the
handle and the plunger cap. The geardriven plunger can pinch.
TIP: During extended break periods, place a plastic bag around the
roller cover and ll valve to keep it from drying out.
TIP: For best results, maintain a steady ow of material to the roller.
cover and avoid rolling it dry.
TIP: Do not reverse plunger direction during rolling. This will cause air
build-up in the main tube and cause spatters.
TIP: If batteries run out during rolling, ip the lever to MANUAL.
Material can be brought to the roller by pushing the plunger forward.
4
English
Page 5

Returning excess material to material container
x5
x5
x5
3. Cleanup
Start
When cleaning the TurboRoll™, make sure to
use the appropriate cleaning solution for the
type of material used.
• If you used latex-based materials, use
• If you used oil-based materials, use mineral
IMPORTANT: DO NOT submerge the motor
housing and avoid dripping any cleaning
solution on it!
You will need:
• A large bucket or other container that will
Before you begin cleaning:
warm, soapy water to clean the TurboRoll™.
spirits.
hold cleaning solution.
1
1. Push the lower part of
the switch to draw any
remaining material from
the roller arm back into
the main tube.
Cleaning the TurboRoll™
1
2 3 4
2. Press the ll valve onto
the ll tube. Push upper
part of the switch to push
excess material back into
the container.
2
3. Remove the spatter
guard. Press locking tab
and remove roller cover
assembly from the roller
arm.
3
4. Remove the roller cap.
Push the roller core out
the other end. Place
spatter guard, cap, core
and cover in a bucket of
the appropriate cleaning
solution.
TIP: A large laundry tub lled with warm,
soapy water is ideal for cleanup if you used
latex-based materials.
5
1. Remove ll tube from the container
lid. Install end of the ll tube into the
valve housing.
4
4. Remove the ll tube. Submerge the
ll valve and roller arm and pull the
plunger in and out a minimum of 5
times.
2. Flip lever toward MANUAL. This
will allow you to manually slide the
plunger back and forth.
5
5. Remove the roller arm. Submerge
the head of the TurboRoll™ and the
ll valve and pull the plunger in and
out a minimum of 5 times.
3. Submerge the ll tube into the
appropriate cleaning solution
and pull the plunger in and out a
minimum of 5 times.
6
6. Clean the remaining parts (cap,
core, cover and spatter guard) by
hand using the appropriate cleaning
solution.
English
Page 6

Lubricating the components
(a)
(b)
(c)
4. Storage
Start
Proper cleaning and lubrication of certain
components of the TurboRoll™ are critical to
prolonging the life of the components.
If after extended use the plunger has a
tendency to stick, apply a generous amount
of petroleum jelly located on the end of the
plunger (see Lubricating the components,
step 2).
IMPORTANT: When storing the
TurboRoll™, make sure the ll valve is
pointing downward, and never store the
TurboRoll™ with the ll tube inserted into
the ll valve.
IMPORTANT: Remove the batteries when
storing the TurboRoll™ for a prolonged
period of time.
Storage notes:
1
1. Turn the locking collar as shown until
the main tube slides easily off of the
plunger.
4
4. Lubricate the inside of the ll valve
housing on the main tube with
petroleum jelly.
2
2. Lubricate around and in between the
plunger O-rings with petroleum jelly.
5
5. Clean and lubricate with petroleum
jelly the indicated areas on the roller
arm.
Connecting areas
Seal
O-ring
3
3. Re-insert the plunger back inside the
main tube. Make sure the O-rings
do not twist or cut. Tighten the
locking collar.
6
6. Reassemble roller cover. Place
back onto roller arm.
Cleaning the fill valve
1. Unscrew the locking cap (a) on the valve housing.
Cleaning the fill valve note:
The inner parts of the ll valve should be
cleaned ONLY if you are experiencing leakage
problems, or if you are unable to draw material
into the main tube.
6
English
2. Remove the retainer disk (b) and the duckbill (c) from the
valve housing.
3. Clean these parts using the appropriate cleaning solution.
4. Replace the duckbill (c) and the retainer disk (b).
5. Screw the locking cap (a) back onto the valve housing.
Page 7

Troubleshooting
Problem A: There is leakage on the roller arm assembly.
Cause Solution
1. The roller arm seal is backwards. Turn the seal around.
2. The roller arm seal was not properly cleaned. Clean and properly lubricate.
3. The O-ring and the connecting areas on the roller arm were not cleaned properly. Clean and properly lubricate (see Cleaning the TurboRoll™ and Lubricating
4. Residue on the connecting area inside of the head. Clean out any remaining residue inside the head of the TurboRoll™.
5. The O-ring on the roller arm is damaged or missing. Clean or replace*.
6. The roller cover is worn or damaged. Replace the roller cover*.
7. The roller core or cap is worn or damaged. Replace the roller core or cap*.
Problem B: Plunger does not move.
Cause Solution
1. The lever is set to MANUAL. Flip lever to POWER.
2. The batteries are weak. Replace with new batteries.
3. The batteries are improperly installed. Reinstall. Follow the graphic on the inside of the battery door.
4. The plunger O-rings are not lubricated. Lubricate the plunger O-rings (see Lubricating the components, page 6)
the TurboRoll™, pages 5-6).
Problem C: The main tube will not fill, or there is leakage from the fill valve.
Cause Solution
1. Residue on the ll valve components. a) Insert the ll tube into the ll valve and twist the ll tube several times to break
Have you tried the recommendations above and
are still having problems? In the United States, to
speak to a customer service representative, call
our Technical Service at 1-800-760-3844 Monday
through Friday between 8:00 AM and 4:30 PM
Central time.
Product Registration
Register your product online at www.wagnerspraytech.com.
Proper registration will serve as proof of purchase in the
event your original receipt becomes misplaced or lost.
7
up the residue.
b) If the problem persists, refer to Cleaning the ll valve, page 6.
Wagner one year limited warranty - Keep on le
This product, manufactured by Wagner Spray Tech Corporation (Wagner) is warranted against defects in material
and workmanship for one year following date of purchase if operated in accordance with Wagner’s printed
recommendations and instructions. This warranty does not cover damage resulting from improper use, accidents,
user’s negligence or normal wear. This warranty does not cover any defects or damages caused by service or
repair performed by anyone other than a Wagner Authorized Service Center.
ANY IMPLIED WARRANTY OF MERCHANTABlLITY OR FITNESS FOR A PARTICULAR PURPOSE IS LIMITED
TO ONE YEAR FOLLOWING DATE OF PURCHASE. THIS PRODUCT IS DESIGNED FOR HOME USAGE ONLY.
IF USED FOR COMMERCIAL OR RENTAL PURPOSES, THIS WARRANTY APPLIES ONLY FOR 30 DAYS
FROM DATE OF PURCHASE. WAGNER SHALL NOT IN ANY EVENT BE LIABLE FOR ANY INCIDENTAL OR
CONSEQUENTIAL DAMAGES OF ANY KIND, WHETHER FOR BREACH OF THIS WARRANTY OR ANY OTHER
REASON. THIS WARRANTY DOES NOT APPLY TO ACCESSORIES.
If any product is defective in material and/or workmanship during the applicable warranty period, return it with proof
of purchase, transportation prepaid, to any Wagner Authorized Service Center. Call the Wagner Technical Service
at 1-800-760-3844 Monday through Friday between 8:00 AM and 4:30 PM Central time.
English
Page 8

Parts List • Liste de pièces • Lista de piezas
1
2
4
5
12
6
3
11
10
7
8
9
Optional Accessories • Accessoires Optional • Accesorios Opciónal
Part No.
Nº de piéce
Pieza No.
0155206C 3/8” nap roller
0155208C 3/4” nap roller
0284001G GlassMask™ GlassMask™ GlassMask™
0513030 Trim It™ Trim It™ Trim It™
0284112B Roller Cleanup
0284051A 5 gallon paint
0284419 Non-standard
English
Description
cover
cover
Kit™
adapter
container lid
Français
Description
Manchon de rouleau à
grain de 3/8 ” (1 cm)
Manchon de rouleau à
grain de 3/4 ” (1,9 cm)
Roller Cleanup Kit™ Roller Cleanup Kit™
Adaptateur pour
contenant à peinture
de 5 gallons (19 l)
Couvercle de
contenant spécial
Español
Descripción
Cubierta del rodillo con
lanilla de 3/8”
Cubierta del rodillo con
lanilla de 3/4”
Adaptador para pintura
de 5 gallones
Tapa de recipiente no
estándar
Item
Article
Articulo
1 0514118 Roller core and cap* Corps du rouleau et capuchon* Centro y tapa del rodillo* 1
2 0155206C 3/8” nap roller cover Manchon de rouleau à grain de 3/8 ” (1 cm) Cubierta del rodillo con lanilla de 3/8” 1
3 0514230 Spatter guard Garde-éclaboussures Protección contra salpicaduras 1
4 0514150 Roller arm assembly (includes item 5) Ensemble de bras de rouleau (inclut l’article 5) Conjunto del brazo del rodillo (incluye el artículo 5) 1
5 0514112 Seal and O-ring* Joint d’étanchéité et joint torique* Sello y junta tórica* 1
6 0284136 Plunger O-rings Joints toriques du piston Juntas tóricas del émbolo 2
7 0284398 Locking cap Capuchon de blocage Tapa de sujeción 1
8 0284395 Retainer disk Disque de retenue Disco retenedor 1
9 0271434 Duckbill valve Valve bec de canard Válvula pico de pato 1
10 0284443 Standard container lid Couvercle de contenant normal Tapa de recipiente estándar 1
11 0284432 Fill tube Tube de remplissage Tubo de llenado 1
12 0284419 Non-standard container lid** Couvercle de contenant spécial** Tapa de recipiente no estándar** 1
20
Part No.
Nº de piéce
Pieza No.
English
Description
* Can only be purchased together and not separately.
** Not included with all models
English Français Español
Français
Description
* Forment un ensemble et ne peuvent pas être
** Non inclus avec tous les modèles.
achetés séparément.
Español
Descripción
* Sólo se puede comprar junto, no por separado.
** No se incluye con todos los modelos.
Quantity
Quantite
Cantidad
 Loading...