

Page 1

Contents
Index
1
User’s manual
Cintiq 24HD touch (DTH-2400)
Cintiq 24HD (DTK-2400)
Setting up
Using the display stand
Using the pen
Customizing the pen
Navigating with multi-touch
Customizing multi-touch
Using the pen display
Customizing the pen display
Using the Radial Menu
Application-specific settings
FAQs
Troubleshooting
Contents Index
1
Page 2

Contents
Index
2
Cintiq 24HD
User’s Manual
Version 2.0, Rev C1412
Copyright © Wacom Co., Ltd., 2012
All rights reserved. No part of this manual may be reproduced except for your express personal use.
Wacom reserves the right to revise this publication without obligation to provide notification of such changes.
Wacom does its best to provide current and accurate information in this manual. However, Wacom reserves the right
to change any specifications and product configurations at its discretion, without prior notice and without obligation
to include such changes in this manual.
The above year indicates when this manual was prepared. However, the date of release to the users of the “manual”
is simultaneous with the introduction into the market of the applicable Wacom product.
Cintiq and Wacom are registered trademarks of Wacom Co., Ltd.
Adobe and Photoshop are either registered trademarks or trademarks of Adobe Systems Incorporated in the United
States and/or other countries. Microsoft, Windows, and Vista are either registered trademarks or trademarks of
Microsoft Corporation in the United States and/or other countries. Apple, the Apple logo, and Mac are trademarks of
Apple, Inc., registered in the U.S. and other countries.
Any additional company and product names mentioned in this documentation may be trademarked and/or registered
as trademarks. Mention of third-party products is for informational purposes only and constitutes neither an
endorsement nor a recommendation. Wacom assumes no responsibility with regard to the performance or use of
these products.
ExpressKey is a registered trademark of Ginsan Industries, Inc., and is used with permission.
Contents Index
2
Page 3

Contents
Index
3
TABLE OF CONTENTS
About the manual 5
UNPACKING YOUR CINTIQ 6
Unpacking your product 6
Box contents 8
SETTING UP YOUR CINTIQ 10
System requirements 10
Step 1: Hardware installation 11
Step 2: Software installation 14
GETTING TO KNOW YOUR CINTIQ 15
Pen display features 15
Front view, Cintiq 24HD touch 16
Rear view 17
Front view, Cintiq 24HD 18
Pen features 19
USING THE CINTIQ DISPLAY STAND 20
Display stand features 21
Display stand location 22
Adjusting display height and incline 25
Using a keyboard with Cintiq 27
Cable replacement 28
WORKING WITH YOUR CINTIQ 31
Setting up your work area 32
Configuring Cintiq for handedness 33
Using the Grip Pen 34
Holding the pen 35
Positioning 36
Clicking 36
Dragging 37
Using the side switch 37
Working with pressure sensitivity 37
Drawing with tilt 38
Erasing 38
Pen display controls 39
Using the hardware control buttons 41
Using the ExpressKeys 42
Using the Touch Rings 44
Working with multiple monitors 45
Adjusting the display 46
Factory presets, auto-sync, and user settings 46
On Screen Display (OSD) settings 47
OSD controls, Cintiq 24HD touch 48
Brightness/Contrast controls 48
Auto Adjust (analog input only) 49
Image controls 49
Color control systems 51
Tools 5 2
Menu tools 53
ECO Information 54
Information 55
OSD Warning 55
Using the Picture Mode function 55
Advanced OSD 57
OSD controls, Cintiq 24HD 67
Power saving 69
THE MULTI-TOUCH EXPERIENCE WITH CINTIQ 70
Navigating with multi-touch 71
Customizing multi-touch 79
Setting multi-touch options 80
Choosing standard multi-touch functions 81
Choosing custom multi-touch functions 82
Disabling multi-touch 83
Testing multi-touch 84
CUSTOMIZING YOUR CINTIQ 85
Manage your control panel settings 86
Control panel overview 87
Calibrating the pen display 89
Contents Index
3
Page 4

Contents
Index
4
Customizing the pen 90
Adjusting tip feel and double-click 91
Adjusting eraser feel 92
Advanced tip and eraser pressure settings 92
Customizing tool buttons 93
Customizing tilt sensitivity 94
Customizing pen display functions 94
Customizing the ExpressKeys 95
Customizing the Touch Rings 96
Button functions 97
Using and customizing the Radial Menu 104
Working with Display Toggle 105
Application-specific settings 106
Creating an application-specific setting 107
Changing application-specific settings 108
Removing application-specific settings 108
Working with multiple tools 109
Renaming the tablet in the tablet list 110
TROUBLESHOOTING 111
Testing Cintiq 112
Testing controls and input tools 114
Testing the hardware control buttons 115
Testing the ExpressKeys 115
Testing the Touch Rings 115
Testin g a pen 116
Display troubleshooting 117
General display problems 117
VGA problems 120
Pen tablet troubleshooting 121
General problems 121
Pen problems 123
Multi-touch problems 126
Windows-specific problems 127
Mac-specific problems 128
Technical support options 130
Obtaining software updates 131
FREQUENTLY ASKED QUESTIONS 132
CARE AND MAINTENANCE 134
Caring for Cintiq 134
Replacing the pen nib 135
OTHER USEFUL INFORMATION 137
Removing Cintiq from the display stand 138
Mounting Cintiq on the display stand 141
Using an alternate mount or stand 144
Uninstalling Cintiq 145
Managing preferences 146
Installing multiple tablets 147
Using applications integrated for tablet control 148
Importing expert settings 149
Pen and digital ink capabilities in Windows 150
Product information 151
Ordering parts and accessories 152
Available parts and accessories 152
GLOSSARY 153
INDEX 156
Contents Index
4
Page 5

Contents
Contents
Index
topic
Index
5
ABOUT THE MANUAL
This manual provides quick access to information about your Cintiq 24HD or Cintiq 24HD touch.
The information is common to Windows and Mac computers. Windows screen captures are shown unless
otherwise noted.
• Go directly to table of contents
• Use the navigation controls to move through the manual.
Go to table of contents. Page back, or page forward.
Go to index. Go back to previous view.
or index topics by clicking on them.
Go to front page.
Go to topic. Topic continued.
• Use your .pdf viewer zoom-in tool to increase the size of the manual on your display screen. See the
viewer application help for information on any additional tools that help you use and print the manual.
MALL CAPITAL LETTERS are used to identify the names of keyboard keys, dialog boxes, and control panel
•S
options.
• Be sure to see also the Important Product Information guide for Cintiq, located on the Installation CD.
The guide includes product safety precautions, specifications, and your license agreement.
• The following information is not included with this product: information about your specific computer
hardware or operating system, or information about your application software. Your best source for this
information is the set of manuals and discs that came with your hardware, operating system, or
application.
Wacom’s philosophy is to continually improve all of its products. As a result, engineering changes and
improvements are made from time to time. Therefore, some changes, modifications, and improvements
may not be covered in this manual.
Contents Index
5
Page 6

Contents
• Fully raise the display and
support arms to a vertical
position where they will lock in
place.
• Locate the incline levers on each
side of the unit. Grasp the pen
display on both sides at
approximately the same height
as the levers.
• Use your fingertips to gently
squeeze the upper levers. As
you squeeze, gently rotate the
display to a flat position.
Index
6
UNPACKING YOUR CINTIQ
Your Cintiq 24HD interactive pen display comes pre-assembled with the pen display mounted on the Cintiq
display stand. The product parts and accessories are packed together in the accessories box. To avoid
damage, see the instructions on the following pages before setting up and using Cintiq.
Unpacking your product
Box contents
UNPACKING YOUR PRODUCT
Carefully unpack and place all items on a stable surface.
1. Open the box cover
• Remove the plastic joiners from the lower corners of the product box. Then lift away the upper
portion of the box.
• Fold open the lower side flaps.
• Remove the accessory parts box.
• Move the cabling to the side of the box and lift away the cabling enclosure.
• Remove the side packing blocks and any other packing materials from around the interactive pen
display and stand.
.
2. Lock the display in place
.
Contents Index
6
Page 7
Contents
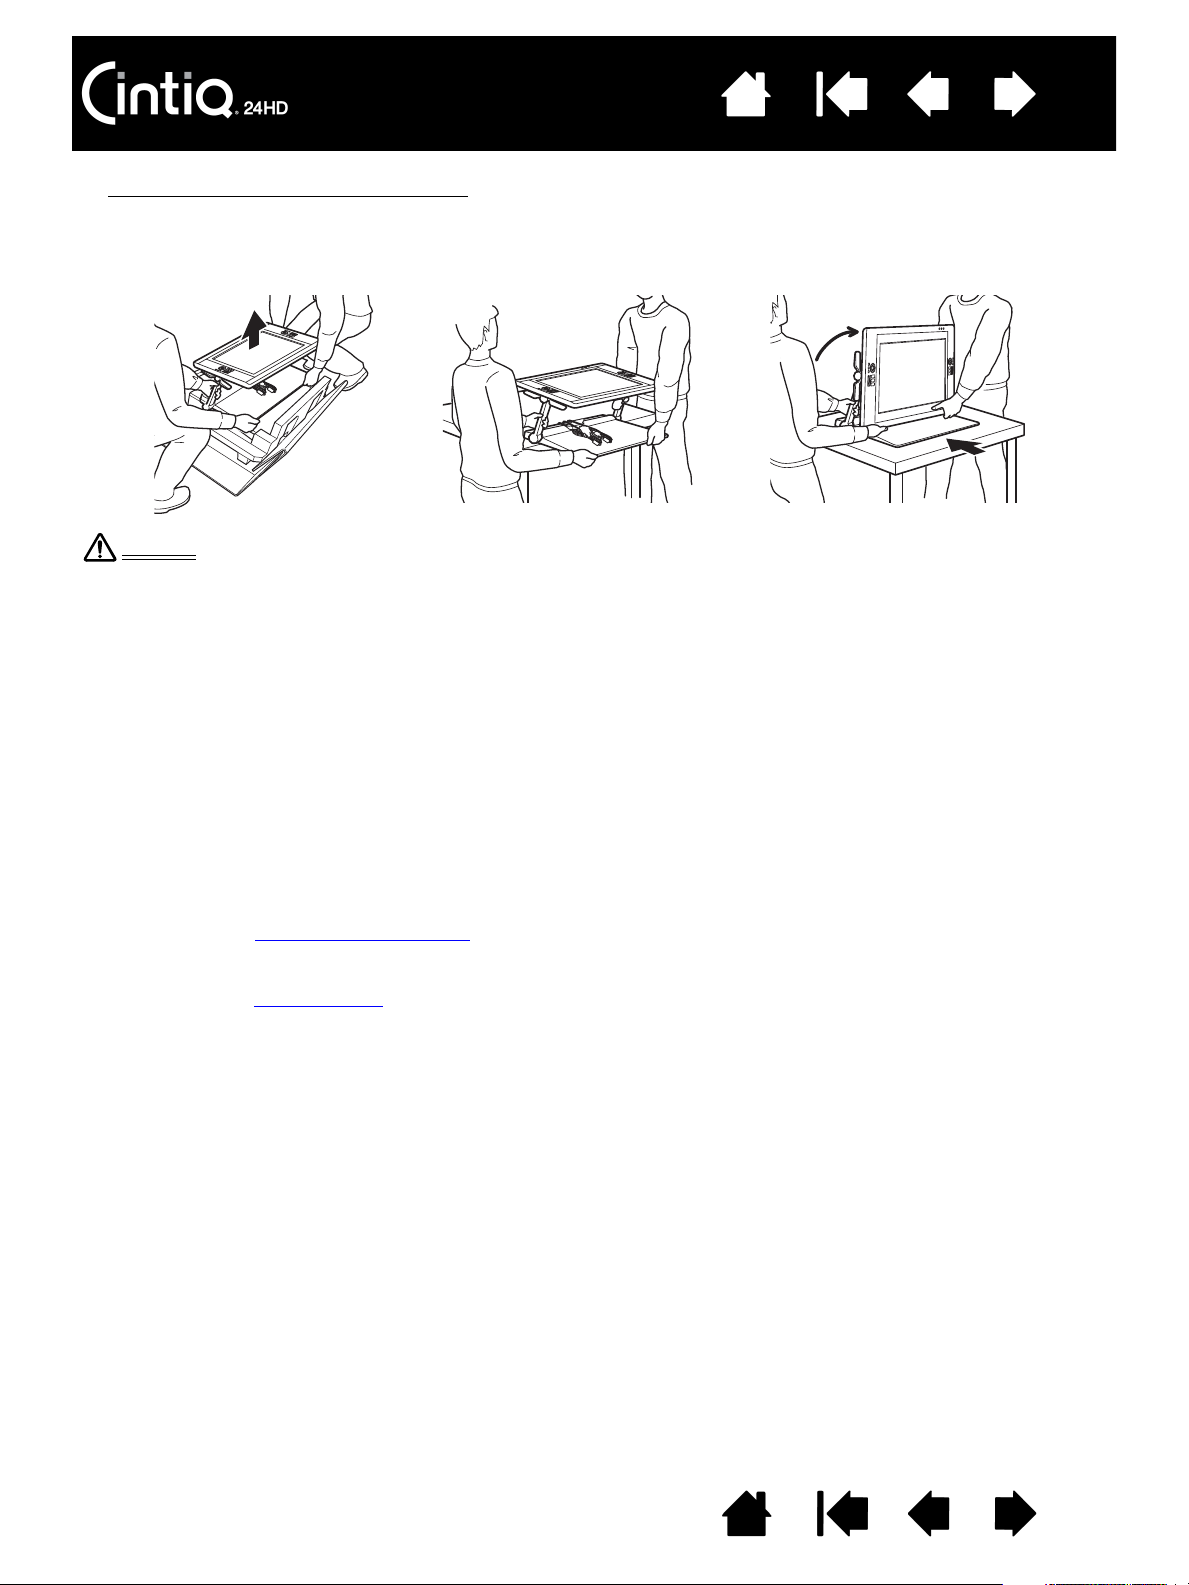
Warning
Request assistance from another person or persons when removing, lifting, or moving this product.
Physical damage or personal injury may result from a single person attempting to lift or carry this product.
Use care not to let the pen display fall backward. Doing so may cause personal injury or damage to your
product. Request assistance from another person if needed.
Avoid catching your finger in the gaps of the movable portions of the stand.
Locate the cables on top of the stand base, and ensure they do not hang free. Tripping over loose cables
can cause physical damage or personal injury.
Do not lift by the incline levers or upper portion of the support arms. Improper operation may lead to
physical injury or damage to the stand. Avoid catching your finger in the gaps of the movable portions of
the stand.
Place your product completely and securely on a level, stable surface. Do not allow any portion of the
display stand base to protrude from the installation surface. Otherwise, Cintiq may fall and cause physical
damage or personal injury.
Index
7
3. Carefully remove Cintiq from the box
. Holding the lower part of the display support arms near the
display stand base, lift and move this product while also supporting the base of the stand.
Important: Do not attempt to lift Cintiq by yourself. Each person should use both hands to securely
grasp the product. The assembly is heavy. Work together, and lift carefully.
4. Place the Cintiq assembly in a stable position on your desktop or other work surface so that it will not
tip or fall. See display stand location
.
5. When in place, use the incline levers to rotate the display back to a vertical position.
6. Inventory your box contents
Contents Index
.
7
Page 8

Contents
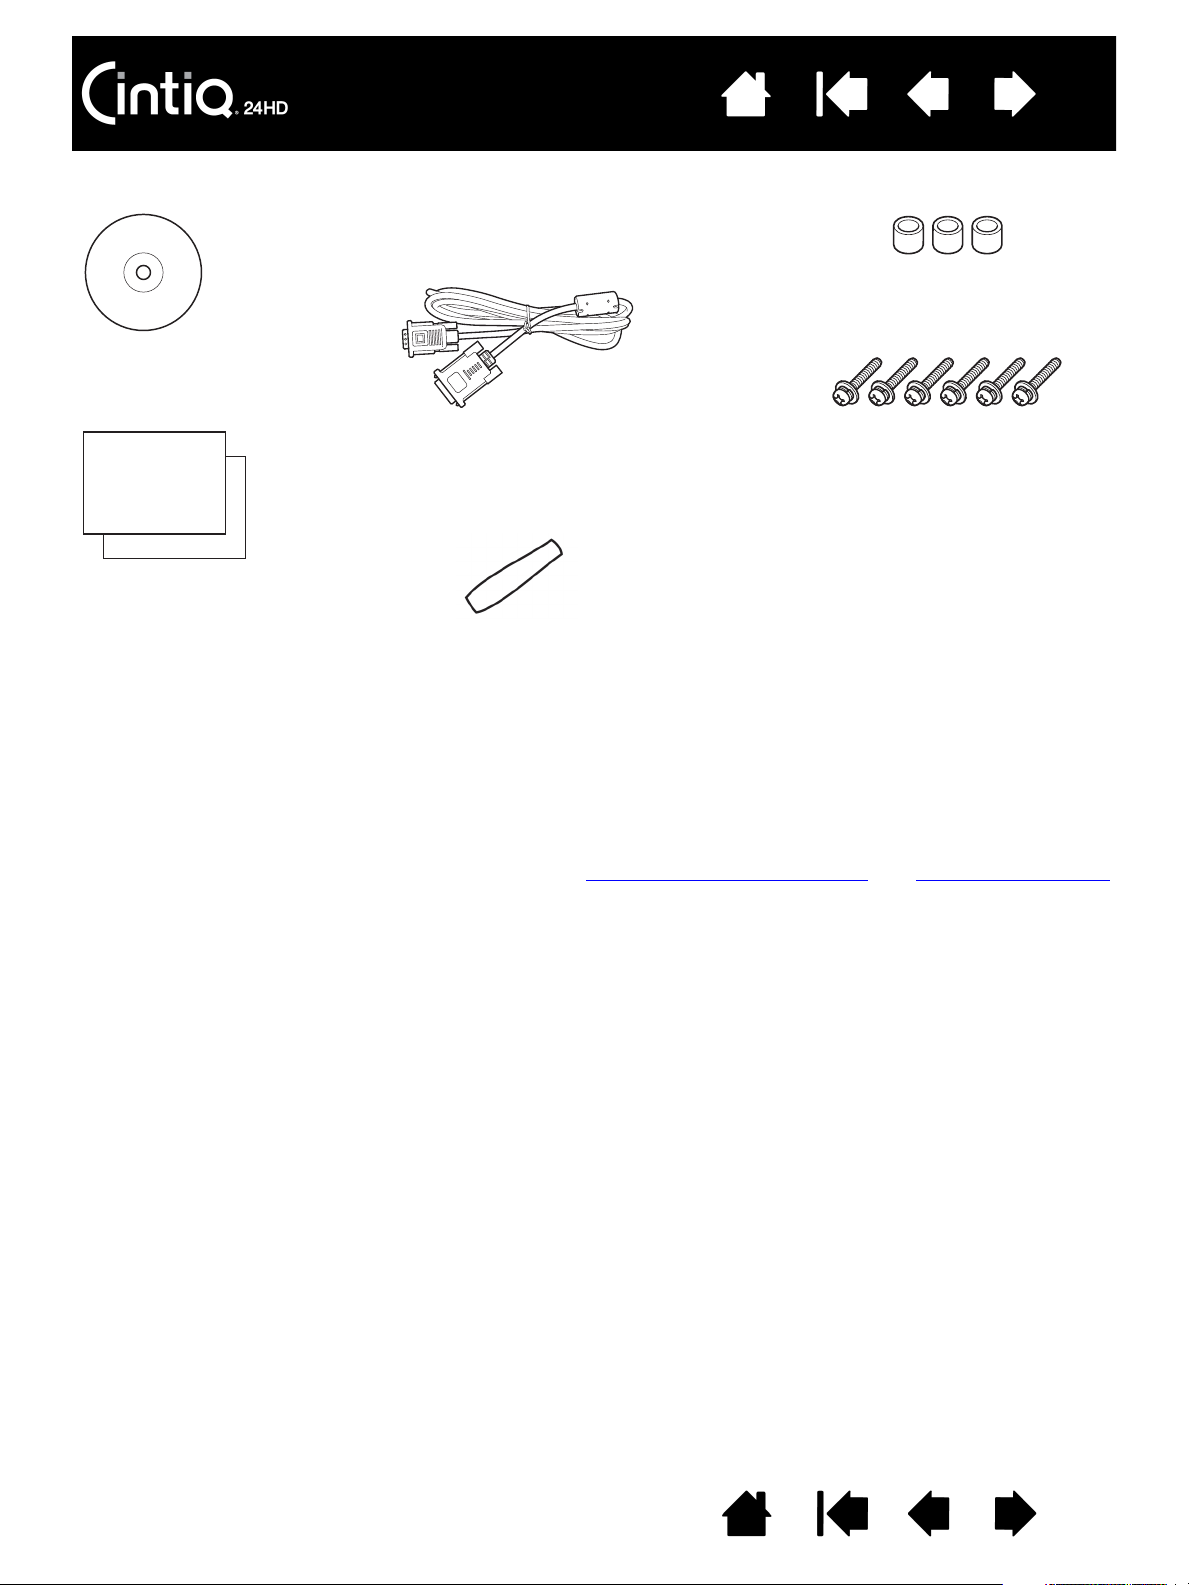
Pen, with personalization rings
To personalize your pen, unscrew
the tip cone and replace the ring
with a different color.
Pen stand
AC power adapter and cable
Cintiq 24HD interactive pen display & Cintiq display stand,
pre-assembled
(DVI-D, DisplayPort, and USB cables are pre-installed.
DisplayPort cable is stored within the Cintiq display stand.)
Index
BOX CONTENTS
After unpacking your product, ensure the box contents are complete.
8
Contents Index
8
Page 9
Notes:
DVI-I to VGA cable
(DVI-D, DisplayPort, and USB cables
are pre-installed. DisplayPort cable is
stored within the Cintiq display stand.)
Installation CD
Includes the software driver and
Important Product Information guide.
Quick Start Guide
and
Warranty
Pen grip, wide bodied
May not be included in some product configurations.
Spacers, qty 3, for VESA mount
Screws, qty 6, for VESA mount
Contents
Index
9
Some configurations may include additional CDs or DVDs containing application software.
To install, see the instructions for those CDs or DVDs.
Save the packing materials and package box for use when shipping or storing Cintiq.
When packing Cintiq for transport, adjust incline to a flat position. Always pack Cintiq in the original
containers and protective cushions.
Before installing, take some time to learn about your Cintiq interactive pen display
and Cintiq display stand.
Contents Index
9
Page 10

Contents
Index
SETTING UP YOUR CINTIQ
Your Cintiq 24HD interactive pen display functions as both a display and a pen tablet. Follow the
instructions below to complete the hardware and software installation.
System requirements
Step 1: Hardware installation
Step 2: Software installation
SYSTEM REQUIREMENTS
Make sure your computer meets the following minimum system requirements:
•PC
.
Cintiq 24HD touch
Available USB port and CD-ROM drive.
Cintiq 24HD
DVI, DisplayPort, or VGA port. Available USB port and CD-ROM drive.
: Windows 7, Vista (SP2 or later), XP (SP3 or later). 32 or 64-bit configurations.
: Windows 7 or later. 32 or 64-bit configurations. DVI, DisplayPort, or VGA port.
10
•Mac
Cintiq supports digital (DVI or DisplayPort) and analog (VGA) video signals. For optimum performance,
connect Cintiq to a digital video card. VGA connection is not recommended as the display quality will not
be as good as with a digital connection.
Notes:
. OS X, v10.5.8 or later. Intel-based platforms only are supported. DVI, DisplayPort, or VGA port,
or appropriate Mini DisplayPort to DVI adapter. Available USB port and CD-ROM drive.
You may be able to set up Cintiq as a mirrored, extended, or independent display. When working
with more than one monitor, Cintiq will map to the monitors based upon how your system is
configured. By default, if you are in mirror mode, the pen display will map to the entire space on
each monitor. See your hardware and operating system documentation for details on configuring
your system for use with multiple monitors.
A Display Toggle
toggle the screen cursor between Cintiq and your other displays.
function is available for use with multiple display systems. This enables you to
Contents Index
10
Page 11

Contents
DVI-I
DVI-D
DisplayPort
VGA
Index
11
STEP 1: HARDWARE INSTALLATION
In this step, install the video, USB, and power cables.
Important: Never connect or disconnect the video or power cables while your computer or pen
display are powered on. This can damage the display or video card.
1. Turn off your computer.
2. Determine if your computer has a digital (DVI or DisplayPort) or analog (VGA) port. If your computer has
only one video port, unplug your previous monitor or add a second video card. For best results,
connect Cintiq to a DVI-D or DisplayPort card.
3. Follow the below instructions for your video port. Make sure to tighten any connector thumbscrews.
See – A – in the connection diagram
For DVI operation, use the DVI-D video cable connector located at the base of the Cintiq
display stand. Connect the cable to the DVI port located on your computer video card.
Cintiq can be connected to either a DVI-D or a DVI-I card.
.
For DisplayPort operation
of the display stand. Access the DisplayPort cable by removing the rear cover from the
display stand. See cable replacement
Connect the DisplayPort cable to your computer video card.
For VGA operation
the provided DVI-I to VGA cable. See cable replacement
If connecting to a Mac Mini DisplayPort
adapter cable, such as those offered by Kanex, Apple, or other manufacturers.
Check with your local product retailer or an online outlet for availability.
Connect the adapter between the Cintiq DVI-D cable connector and your Mac.
, you will need to completely remove the DVI-D cable and replace it with
, use the DisplayPort cable. The cable is located within the base
for details.
for details.
, you will need to obtain an appropriate DVI
4. Using the USB cable located at the base of the Cintiq display stand, connect to an available USB port
on your computer or USB hub attached to your computer. See – B – in the connection diagram
.
5. Connect the power adapter to the display stand extension cable for power. See – C – in the
connection diagram
6. Connect the adapter power cable and plug into an AC outlet. See – D – in the connection diagram
.
.
7. Turn on the pen display. The power LED will glow orange.
Contents Index
11
Page 12

Contents
– A –
DVI-D, DisplayPort, or DVI-I to VGA
Video card:
DVI, DisplayPort, or VGA
– C –
DC input. Connect to
display stand extension
cable.
AC
– D –
Power adapter
Caution
Do not connect or disconnect the video or power cables while Cintiq or your computer are turned on.
This can damage the display or computer video card.
Only use a power adapter specified for use with your pen display. Use of an improper power adapter may
damage the pen display.
For optimum performance, the display refresh rate should use a vertical frequency of 60 Hz. Make sure the
refresh rate does not exceed the maximum vertical frequency (85 Hz) that Cintiq can support. See the
Important Product Information guide for specifications.
Connection cables are pre-installed.
•DVI-D
. Connector located at display stand base.
•DisplayPort
. Remove cover to access cable. See cable replacement.
•VGA
. Requires removal of DVI-D cable and replacement with the provided
DVI-I to VGA cable. See cable replacement
.
•USB
. Connector located at display stand base.
– B –
USB
Index
12
Cintiq cabling diagram
Contents Index
12
Page 13

Contents
Index
13
8. Turn on your computer. The interactive pen display will automatically install as a default monitor.
9. As necessary, configure the display control panel settings for the proper size and color resolution.
For best results, set Cintiq to the maximum (native) resolution of 1920x1200. See the Important
Product Information guide located on the Installation CD for details about resolution sizes that can be
used with Cintiq. The display size and color resolution may be constrained by the capabilities of your
video card. To fine-tune, see adjusting the display
Windows
: If you are using Cintiq as a secondary display, you may first need to enable Cintiq in your
.
display properties control panel.
After the LCD monitor portion of the installation is working to your satisfaction, move on to step 2: software
installation.
Notes:
Each LCD panel is produced under very stringent quality standards. Production techniques
cannot guarantee an absolutely perfect display. Wacom does not allow any pixel to be always white.
A small number of subpixels are allowed to show a wrong color for some parts of the color
spectrum. See the Important Product Information guide for more information.
If an image has fine striping (such as screen stripes), it may appear to flicker or display a moiré
pattern.
Do not apply excessive pressure on the display screen surface, it may cause the appearance of a
moiré or pooling pattern. If this occurs, use less pressure on the display screen when working with
the pen.
When a still image is displayed for a long period of time, an after-image may remain for a short time.
To prevent this, use a screen saver or other power management feature.
To extend the life of the pen display backlight, set your computer’s power management to turn off
the display when not in use for extended periods of time.
Your eyes may feel more comfortable if you reduce the display screen brightness when working with
Cintiq for extended periods of time. This will also extend the life of the backlight and reduce the
heat felt on the display screen surface.
Some models may include a color profile on the Installation CD. To activate for use with Cintiq, first
identify Cintiq as a pen display in the system display settings control panel. Then select the Cintiq
profile in the color management control panel. For details, see the color management information in
your operating system and application documentation.
For troubleshooting tips, see troubleshooting
.
Contents Index
13
Page 14

Contents
Index
14
STEP 2: SOFTWARE INSTALLATION
Save your work and close all open applications. Temporarily disable any virus protection programs.
1. Insert the Installation CD into your computer’s CD-ROM drive. If the software installer menu does not
automatically display, double-click on the I
also download and install the latest software driver from the Wacom web site for your region.)
2. Click I
NSTALL TABLET and follow the prompts to install the driver software.
3. Reactivate your virus protection program.
4. After completing the software installation, make sure you can use your pen on the Cintiq display screen
to move the screen cursor.
When you place the pen tip on the display screen, the screen cursor should immediately jump to a
corresponding position approximately beneath the pen tip. Lift the pen tip and place it on the display
screen surface in a different location. The screen cursor should again jump to the new position. This is
known as absolute positioning, and enables you to position the screen cursor without having to drag
your pen across the display screen surface. If your product model supports multi-touch, the screen
cursor will immediately jump to a position beneath your finger tip when you touch the display screen
surface.
5. Check the Read Me file for updated information. Review also the Important Product Information guide
located on the Installation CD for cautions and warnings. If you have trouble installing Cintiq, see
troubleshooting
.
6. Next, precisely align the screen cursor with the pen tip position. See calibrating the pen display
NSTALL icon located on the CD. (When available, you can
.
Notes:
User-specific preferences are supported. After logging on, each user can customize their personal
settings in the Wacom Tablet control panel. Switching to another user (either by logging on or fast
user switching methods) will automatically load the settings for that user.
If the pen display does not respond properly or you lose cursor control, the pen display preferences
may be corrupted. See managing preferences
to delete the current preference settings and return
the pen display to its factory default condition.
Driver installation automatically activates the pen input functions available within Microsoft
Windows 7, Vista, and Office 2007 or later (except for Windows 7 Starter and Home Basic, and
Windows Vista Home Basic). See pen and digital ink capabilities in Windows
.
The Cintiq 24HD touch does not support operation on Windows Vista or XP systems.
To download a new software driver (when available) from the Internet, see obtaining software
updates.
To uninstall the software driver, see uninstalling Cintiq
.
Contents Index
14
Page 15

Contents
Index
15
GETTING TO KNOW YOUR CINTIQ
The Cintiq 24HD interactive pen display combines the benefits of a Liquid Crystal Display (LCD) with the
control, comfort, and productivity of Wacom’s cordless, battery-free pen technology. This gives you a
direct pen-on-screen interface for your computer. Cintiq 24HD touch also supports multi-touch.
The basic components of your Cintiq include a Wacom pen tablet internally mounted behind a high quality
IPS color display, the Wacom Grip Pen, and the Cintiq display stand
This manual describes how to set up
customize your pen and pen display settings. To learn more, see customizing
Pen display features
Pen features
and use your Cintiq. The Wacom Tablet control panel enables you to
PEN DISPLAY FEATURES
Take some time to familiarize yourself with the features and components of your Cintiq interactive pen
display. Although they will appear as separate devices to your operating system, the display and tablet
sensor function as an integrated output and input device. The tablet sensor reports pen coordinates,
pressure, tilt, switch, eraser, and other information. If your product model also supports multi-touch, a
touch sensor reports the appropriate information related to your touch actions or gestures.
• Many applications have built-in support for pen display features (such as pressure sensitivity, tilt, and
rotation). Visit the Wacom web site to learn about applications that support these features. See product
information.
• For information on how best to use pen display features within a specific application, see the
instructions in that application’s manuals.
.
.
Each product model within the Cintiq family has a specific feature set. Not all models or accessories are
available in all regions.
PEN DISPLAY MODEL MULTI-TOUCH PEN INPUT EXPRESSKEYS TOUCH RINGS
Cintiq 24HD touch
Cintiq 24HD
You will find that icons are located near some of the topic headings in this manual. Use them to quickly
identify sections that have information specific to multi-touch or pen input. Icons will not be used in
sections that commonly apply to all Cintiq models. Model-specific notes may be used as necessary.
• Multi-touch is identified by this icon:
• Pen input is identified by this icon:
X XXX
XXX
Contents Index
15
Page 16

Contents
Status LED
• When using pen in active area of the pen
display, lights blue when the pen tip, eraser,
or side switch are pressed. Learn about
using the Grip Pen
.
• Lights when you touch the pen display
screen. Learn about the multi-touch
experience with Cintiq.
• LED will not light unless the USB cable is
plugged into an active USB port and a video
signal is present.
Power LED
• Lights blue when power has been supplied to
Cintiq and a video signal is present.
• Glows orange when no video signal is
detected. (e.g., The computer is turned off,
starting up, or has entered a power
management mode in which video signals are
not sent.)
ExpressKeys
See pen display controls
.
Touch Ring
mode buttons
Press to choose a
Touch Ring function.
Status LEDs show the
active mode.
See pen display
controls.
Hardware control buttons
See pen display controls
.
Touch Ring
See pen display
controls.
USB accessory port
FRONT VIEW, CINTIQ 24HD TOUCH
Index
16
See also rear view.
Contents Index
16
Page 17

REAR VIEW
On Screen Display (OSD) controls
Use for adjusting the display
settings.
Security slot
Pen tether
attachment point
One on each side.
Connection ports,
DVI-I and DisplayPort
Pre-installed cables are
routed to enter here.
Remove cover if access
is required. See cable
replacement.
Connection ports,
USB and power
Pre-installed cables
are routed to enter
here.
Remove cover if
access is required.
See cable
replacement.
Support legs
See using a keyboard with Cintiq
.
Power switch
Push to turn the pen
display on or off.
Contents
Index
17
See also front view, Cintiq 24HD touch or Cintiq 24HD.
Next steps:
• Review the pen features
• If your product model supports multi-touch, learn about the multi-touch experience
• Then, if you have not already done so, move on to setting up your Cintiq
and learn about the Cintiq display stand.
with Cintiq.
.
Contents Index
17
Page 18

Contents
Status LED
• When using pen in active area of the pen
display, lights blue when the pen tip, eraser,
or side switch are pressed.
• LED will not light unless the USB cable is
plugged into an active USB port and a video
signal is present.
Power LED
• Lights blue when power has been supplied to
Cintiq and a video signal is present.
• Glows orange when no video signal is
detected. (e.g., The computer is turned off,
starting up, or has entered a power
management mode in which video signals are
not sent.)
ExpressKeys
See pen display controls
.
Touch Ring
mode buttons
Press to choose a
Touch Ring function.
Status LEDs show the
active mode.
See pen display
controls.
Hardware control buttons
See pen display controls
.
Touch Ring
See pen display
controls.
USB accessory port
FRONT VIEW, CINTIQ 24HD
Index
18
See also rear view.
Contents Index
18
Page 19

PEN FEATURES
Eraser: When brought within proximity of the pen display screen,
the tablet portion of the display reports the pen location.
Pressure information is reported as you press down on the eraser.
By default, the function is set to E
RASE.
Side switch
: Be sure the customizable side switch is in a convenient
location where you can toggle it with your thumb or forefinger but not
accidentally press it while using the pen.
You can use the switch whenever the pen tip is within proximity of the
display screen. You do not need to touch the pen tip to the display
surface.
Toggle the switch in either direction to activate the button functions.
By default, the upper switch is set to D
OUBLE CLICK and the lower
switch is set to R
IGHT CLICK.
Pen tip (replaceable nib)
: The pen activates as soon as it is brought
within proximity of the pen display screen. This allows you to
position the screen cursor without touching the pen tip to the
display screen.
When pressure is applied to the pen tip, the pen simulates a primary
mouse button click. Tip click pressure can be adjusted in the
Wacom Tablet control panel.
Tips:
• The pen enters proximity when the tip or eraser is brought within
5 mm (0.2 inch) of the pen display screen surface.
• To resume operations after the pen display has entered auto
sleep mode, bring the pen tip within proximity or touch the pen
tip on the pen display screen.
Contents
Index
19
Important:
• Use only the pen that came with your product, or a Wacom accessory pen specified for use with
Cintiq. Other pens may not function properly. See available parts and accessories
pen tip is specifically designed for use with the Cintiq pen display. The tips on other pens could
damage the Cintiq display screen.
• When not in use, place the pen in the pen stand or lay it flat on your desk. To maintain the
sensitivity of your pen, do not store it in a container where it will rest on the tip or eraser.
Improper storage may damage pen tip pressure sensor(s).
. Also, the Cintiq
Contents Index
19
Page 20

Contents
Adjust the display position as needed to emulate
an easel, animator’s table, or drafting table.
Adjust Cintiq to a more vertical position when a large
amount of keyboard input is required. This position
is also useful when presenting your work to coworkers or clients. Extend the pen display support
legs to place a keyboard beneath the pen display
.
For a more immersive experience, position
the display to overhang your desktop
.
Cintiq can also be used vertically upright
as a display.
Index
20
USING THE CINTIQ DISPLAY STAND
The Cintiq display stand is designed to support the weight of your Cintiq interactive pen display.
• Cintiq can accommodate a variety of uses and working styles. Use the stand to adjust the working
position of Cintiq so as to best meet your needs throughout the day.
• You can move or slide Cintiq to different locations on your desktop. Remember that you may need to
adjust the height or incline to which you have positioned Cintiq before moving the unit.
Display stand features
Display stand location
Adjusting display height and incline
Using a keyboard with Cintiq
Cable replacement
Contents Index
20
Page 21

Contents
Incline levers
One on each side. Use to adjust display height
and incline.
Release latch
Frees the display support arms when in locked position.
Support the pen display with one hand and lift slightly
while using your other hand to pull the latch toward you.
See adjusting display height and incline
.
Display support arms
One on each side. Movable arms create a smooth
transition when adjusting Cintiq. Locked when in
vertical position.
Do not lift by the incline levers or upper portion of the display support arms. Improper operation may lead
to physical injury or damage to the stand. Avoid catching your finger in the gaps of the movable portions of
the stand.
Always place Cintiq securely on a level, stable desktop or other working surface. Do not allow any portion
of the display stand base to protrude from the installation surface. Otherwise, Cintiq may fall and cause
physical damage or personal injury.
Do not place on any unsteady surface or table. Do not place on slanted areas, unstable areas, or areas
where vibration is present. Physical damage or personal injury may result if this product falls from an
unsuitable surface.
Warning
Connection cables
DVI-D, DisplayPort, USB, and power. See step 1:
hardware installation.
Note: Remove cover to access the DisplayPort
cable. See cable replacement
.
Security slot
Display stand base
Index
21
DISPLAY STAND FEATURES
Locate Cintiq on your desktop or other stable work surface. Select a level display stand location where
Cintiq will not tip or fall. Take some time to familiarize yourself with the display stand components.
Contents Index
21
Page 22

Contents
Do not lift by the incline levers or upper portion of the display support arms. Improper operation may lead
to physical injury or damage to the stand. Avoid catching your finger in the gaps of the movable portions
of the stand.
Place Cintiq securely on a level, stable desktop or other working surface. Do not allow any portion of the
display stand base to protrude from the installation surface. Otherwise, Cintiq may fall and cause physical
damage or personal injury.
Do not place this product on any unsteady surface or table. Do not place on slanted areas, unstable areas,
or areas where vibration is present. Physical damage or personal injury may result if this product falls from
an unsuitable surface.
Do not place this product on any wet surface or table. Doing so may cause the pads on the base of this
product to slip, allowing the product to fall.
Warning
Index
22
DISPLAY STAND LOCATION
Select a location on your desktop or other work surface that is level and stable. This product weighs
approximately 29 kg (64 lbs). Any table or platform on which this product is installed must be able to
support the combined weight of the Cintiq interactive pen display and Cintiq display stand.
• Before moving Cintiq, adjust the pen display height and incline
locked upright, with Cintiq positioned horizontally. Place all cables on top of the stand base and ensure
they do not hang free. Tripping over loose cables can cause physical damage or personal injury.
• Request assistance from another person or persons. Each person should securely grasp the lower part
of a display support arm near the display stand base. With the other hand, grasp the base of the stand
at the front corner. Using care, lift and carefully move this product while supporting the base of the
stand.
Important: The assembly is heavy. Do not attempt to lift Cintiq by yourself. Each person should use
both hands to securely grasp the product. Grasp the stand base at the corner areas to avoid any
sharp edging. DO NOT lift the pen display itself, otherwise damage might occur to the LCD if it
flexes during movement. Also, the pen display does not have sufficient strength to support the load
of the stand hanging freely from it. Work together, and lift carefully.
• Locate Cintiq on a desktop or other working surface that is flat, clean, and free of any moisture or oily
film. Taking care not to pinch your fingers, do this by first placing the rear half portion of the stand onto
the table surface. Then slide the stand fully into place so that it will not tip or fall.
• When in place, use the incline levers to rotate the display back to a vertical position.
so the display stand support arms are
Contents Index
22
Page 23

Contents
Slide the display stand on your desktop. Turn from side to side.
Prepare by adjusting the display to a
lowered, horizontal (flat) position.
Using a smooth motion, pull Cintiq toward you. If you
feel an increase in friction, stop
pulling. Check to
ensure the display stand base does not extend
beyond desktop edge.
Caution
Use care when adjusting the working position. Use a smooth, horizontal motion when pulling Cintiq toward
you. Do not lift the stand from the desktop. You can move the stand base to align with the edge of your
desktop. DO NOT let the stand base protrude over the desktop.
If you pull too far, and as the front of the stand moves over the edge of your desktop, the friction of the base
pads will increase and “lock” the stand in place. Do not pull beyond this point or past the base pads.
Push the display stand back onto the working surface until the front edge of the stand base aligns with the
edge of the installation surface.
Improper movement or pulling beyond the tipping point will prevent the friction lock from engaging, and
could cause personal injury or damage to the pen display if it were to fall. Cintiq is heavy. Use care when
moving the unit.
Index
23
After placing Cintiq in its primary location, you can shift the unit to different positions.
For those who prefer a more immersive environment, Cintiq has been designed so that you can work with
the pen display overhanging your desktop.
1. Adjust height and incline
so the pen display is slightly above and overhanging the display stand edge.
2. Pull Cintiq toward you. As the front of the stand moves over the edge of your desktop, the friction of
the base pads will increase.
Contents Index
23
Page 24

Contents
Readjust height and incline.
Important: Push Cintiq fully back
onto desktop when done working.
Caution
When using Cintiq in a position where the display overhangs your desktop, do not push or lean against the
bottom edge of the display. This could cause the stand to disengage and possibly result in personal injury
or damage to the pen display if it were to fall. When you are done working, always move Cintiq fully back
onto the desktop.
Index
24
3. Readjust the pen display height and incline as needed.
4. When you are done working, use the incline levers to raise the pen display and then push Cintiq back
onto your desktop. Always make sure this product is fully supported by your desktop when you are not
actively working with Cintiq.
Contents Index
24
Page 25

Contents
Index
25
ADJUSTING DISPLAY HEIGHT AND INCLINE
You can adjust the pen display height and incline to best meet your needs throughout the day.
To change incline or viewing angle
approximately the same height as the incline levers. Use your fingertips to gently squeeze or pull the
incline levers toward the pen display. This will release a clutch mechanism. As you squeeze the levers, tilt
the pen display to adjust the viewing angle.
• Squeeze the incline levers on both sides of the pen display at the same time. For example: squeeze
both lower levers, or squeeze both upper levers.
• For a flatter incline
• For a more vertical incline
• As you tilt the pen display, the support arms may travel to follow your movements.
• Release the incline levers to lock in place.
• Pay attention to how the pen display feels as you adjust incline or viewing angle. You may find
instances where it is easier to use the upper levers instead of the lower, and vice versa.
Notes:
The incline levers exhibit some natural play before the clutch mechanism engages.
When tilting the display upward to a more vertical position, you may notice the stand wanting to slip
forward. Use the upper incline levers and pull Cintiq slightly toward you as you tilt the display
upward.
, squeeze the lower levers and gently rotate Cintiq down to the desired position.
, face the front of the pen display and grasp it on the left and right side at
, squeeze the upper levers and gently rotate Cintiq up to the desired position.
Contents Index
25
Page 26

Contents
Warning
Use care when unlocking the support arms, and always support the pen display with one hand as you do
so. The display comes down when the lock is released. DO NOT hold the support arms when releasing the
lock. Improper release of the support arms from a locked position may allow the pen display to fall, and
could cause personal injury or damage to the pen display.
Index
26
When repositioning Cintiq
•Use the incline levers
, face the front of the pen display and grasp it on both sides.
to adjust height and viewing angle.
• The viewing angle will change as the pen display moves through an arc created by the support arms.
• The display support arms lock in place when moved to a vertical position.
Important: The support arms lock in place ONLY when moved to a vertical position.
To unlock the support arms
:
1. As necessary, use the incline levers to slightly raise the lower part of the pen display so you can access
the release latch.
2. Support the pen display with one hand and lift slightly
. Using your other hand, pull the release latch
toward you. This will unlock and release the support arms for movement.
3. Carefully lower the pen display until its lower edge rests on the display stand or your desktop.
Tip
: You can extend the pen display support legs to slightly raise the pen display or allow for placement
of a keyboard beneath the pen display. See using a keyboard with Cintiq
Contents Index
.
26
Page 27

Contents
Index
27
USING A KEYBOARD WITH CINTIQ
Extend the pen display support legs to allow for placement of a keyboard or other input tools beneath the
pen display.
• The support legs are located beneath the pen display, one at each lower corner. Flip out and then push
up slightly on each leg until it clicks into place.
• Adjust height and incline
• Slide your keyboard or other input device into the opening beneath the pen display.
as needed. The legs should rest evenly on your desktop or work surface.
Contents Index
27
Page 28

Contents
Screw type: Phillips, flat fillister head,
M3-6, black
Index
28
CABLE REPLACEMENT
The connection cables (DVI-D, DisplayPort, USB, and power) come pre-installed on your Cintiq.
If using a DisplayPort connection
display stand.
1. Remove the screws (qty 4, Phillips) from the back cover of the display stand. Remove the back cover.
2. Extract the DisplayPort cable and set it within the center cable channel. Tuck the DVI-D cable into the
stand for a clean appearance.
, access the DisplayPort cable by removing the back cover from the
3. Replace the back cover and secure using the original screws.
Contents Index
28
Page 29

Contents
Power
DisplayPort
DVI-D
USB
Index
29
There may be times when you will need to remove or replace a connection cable. For example:
• When using a VGA connection
, you must remove the DVI-D cable and replace it with the provided
DVI-I to VGA cable.
• When mounting Cintiq on a VESA mounting arm, and you wish to use the existing cables that come
with Cintiq.
• When replacing a suspected bad cable.
To remove a cable
:
1. Remove the back cover of the display stand as described above.
2. Determine which cable to remove. Cable track locations are as follows:
Contents Index
29
Page 30

Contents
Screw type: Phillips, flat fillister head,
M3-17, black
Important: When installing or replacing a cable,
properly route the cable through the support arm
pivots where the arm joins the pen display and the
base of the stand. Proper routing will prevent the
cable from getting caught in the pivot mechanism.
Index
30
3. Remove the screws (qty 2, Phillips) from the support arm cover which houses the cable you wish
to remove.
4. Raise the display support arms to the vertical locked position. Adjust the pen display incline as needed
for adequate clearance. From the rear of the pen display, unclip and lift away the cable connector
covering.
5. Carefully disconnect the cable and unthread it from the support arm cable track.
6. Install or replace a cable by reversing this procedure.
Contents Index
30
Page 31

Contents
Index
31
WORKING WITH YOUR CINTIQ
The Cintiq 24HD interactive pen display and Cintiq display stand were designed for a wide range of
flexibility and ergonomic work approach. The design allows you to quickly adjust Cintiq to a different
height and position whenever the need arises. Experiment by adjusting display height and incline
determine which best fits your particular working style and tasks.
As you work with Cintiq you can rest your hand lightly on the display screen, just as if it were a drawing
board or sheet of paper.
Cintiq 24HD touch models allow you to work simultaneously with the pen and multi-touch. This enables
you to use a pen with one hand and use your other hand for touch gestures within supporting applications.
• The pen has priority over touch. For example:
If you are using touch to drag an icon across the desktop and then bring the pen into proximity of the
display screen surface, the pen will take control of the screen cursor.
If you are working with the pen and then want to use touch, first lift the pen away from the display
screen surface.
to
• Your hand holding the pen is not recognized as a touch gesture. For best results remember to bring the
pen tip into proximity before resting your hand and wrist on the display screen surface.
Because the Cintiq pen display surface will be a little higher than your desk, consider adjusting the height
of your desk or chair to assure comfortable use of the device.
Setting up your work area
Configuring Cintiq for handedness
Using the Grip Pen
Pen display controls
Working with multiple monitors
Adjusting the display
See also the multi-touch experience with Cintiq.
Contents Index
31
Page 32

Contents
Adjust Cintiq to a position that best meets your
creative needs.
Index
32
SETTING UP YOUR WORK AREA
To minimize fatigue, organize your work area to create a comfortable environment. Position Cintiq, the pen,
and your keyboard for easy access without unnecessary reaching. The pen display and any other displays
should be positioned so you can view them comfortably with minimum eyestrain.
• If you have not already done so, be sure to configure Cintiq
• When using Cintiq as a display, align the top of the pen display in line with the level of your eyes.
• If working with a keyboard, consider locating the keyboard slightly below the desk surface in an
adjustable keyboard tray. Otherwise, see using a keyboard with Cintiq
• Maintain a good posture at all times.
• Periodically shift your gaze from your computer and focus on other objects within the room. This will
help to relax your eyes.
• Use a gentle grip when working with the pen. Take short breaks between tasks to stretch and relax
your muscles.
• Alternate tasks throughout the day. Minimize awkward postures and repetitive movements.
• Change your position if you feel any discomfort.
• Alternate between different modes of use. For example, every few hours adjust the Cintiq display stand
to a different working position.
• Study the rest of this chapter to learn more about working with Cintiq.
• Learn about the basics of customizing
Cintiq for the way you like to work.
for your preferred handedness.
.
:
Tips
• Do not pull the cabling from their computer connections by accidentally moving the pen display too
far from the computer.
• Cintiq can also be mounted to articulated arms or other third-party stands meeting the VESA
MIS-E 100/200 (6 screw) specification for monitor stands. See using an alternate mount or stand
Note regarding Repetitive Stress Injury (RSI): Wacom makes no representation, promise or guarantee that Wacom
products will cure or prevent, in whole or in part, mouse-induced repetitive stress symptoms, injuries or
conditions. Individual results may vary. Always obtain competent medical advice to determine the most
appropriate treatment for your specific situation.
Contents Index
32
.
Page 33

Contents
To reconfigure for left- or right-handed users:
1. Open the Wacom Tablet control panel and click
O
PTIONS....
2. Choose the appropriate setting for your preferred
handedness.
3. Click OK. The existing ExpressKey and Touch Ring
mode settings are swapped (or flipped) between
left and right.
Notes:
The hardware control buttons are not affected
when you change the handedness setting.
This procedure does not affect the default
orientation. At the system log on and user
switching screens, the pen display uses the
default configuration you chose during the install
process. To change the default configuration,
you must re-install the Wacom driver.
Index
33
CONFIGURING CINTIQ FOR HANDEDNESS
During the installation process, you were prompted to choose a default configuration for Cintiq based on
whether you are right- or left-handed. The configuration you chose was used to determine the default
settings for the ExpressKeys and Touch Rings.
However, you can use the Wacom Tablet control panel to easily reconfigure Cintiq for left- or right-handed
users at any time. The ExpressKey and Touch Ring settings are automatically reconfigured when you
change the handedness setting.
Contents Index
33
Page 34

Contents
Index
34
USING THE GRIP PEN
The cordless, battery-free pen senses the amount of pressure and tilt you apply to the tip. There are four
basic techniques for using the pen: pointing, clicking, double-clicking, and dragging. If you are unfamiliar
with using the pen, see the following pages.
Note: For Cintiq models that support both pen and multi-touch, you can simultaneously use the pen and
touch when working within a supporting application. For example, you might use multi-touch with
the pen when mixing colors in Photoshop. Remember, the pen has priority over touch whenever the
pen tip or eraser is within proximity of the pen display screen. Lift the pen and your hand away from
the display screen surface to enable touch.
If you experience unintended touch actions, manually disable touch by pressing an ExpressKey that
has been set to T
the pen, press the ExpressKey to enable touch. You can also use the Wacom Tablet control panel to
disable multi-touch
Holding the pen
Positioning
Clicking
Dragging
Using the side switch
Working with pressure sensitivity
Drawing with tilt
Erasing
OUCH ON/OFF. See customizing pen display functions. When done working with
.
Contents Index
34
Page 35

Contents
If you are working in a multi-user
environment or otherwise want to
personalize your pen, unscrew the tip
cone and replace the colored ring with
one of another color (included).
You can customize
the pen settings at
any time.
Nib removal tool
Replacement nibs
Cintiq 24HD touch
10 standard nibs
Cintiq 24HD
6 standard nibs
3 hard felt nibs
1 stroke nib
Unscrew the base of the pen stand to access the nib removal
tool and assorted replacement nibs.
Important: To maintain the sensitivity of your pen, do not store it in a container where it will rest on the tip or
eraser. Improper storage may damage the pen tip pressure sensor(s).
Index
35
HOLDING THE PEN
Hold the pen as you would a normal pen or pencil. Adjust your grip so that the side switch is in a
convenient location where you can toggle it with your thumb or forefinger. Be careful not to accidentally
press the switch while drawing or positioning with the pen. Tilt the pen in any way that feels most
comfortable. As you work with Cintiq you can rest your hand lightly on the display screen.
Place the pen stand within easy reach. When not in use, place the pen in the pen stand or lay it flat on your
desk. The stand allows for vertical or horizontal placement of the pen.
Contents Index
35
Page 36

POSITIONING
To position the screen cursor, move the pen slightly above
the Cintiq display screen without touching the screen
surface. Press the pen tip on the display screen to make a
selection.
Note: Calibrating the pen display
ensures correct alignment
of the screen cursor with the pen tip. If the screen
cursor does not jump to a position near the pen tip
when you place the pen on the display screen, then
the pen display software driver may not be installed
or is not loading. Install the driver software if
necessary. Otherwise, see troubleshooting
.
Tap the display screen once with the pen tip, or touch the pen to
the display screen with enough pressure to register a click.
Tip
: Configure Windows to select when hovering the pen over
an icon and to launch the icon with a single click. To turn
on this feature, first open a folder.
Windows 7 and Vista
: From the ORGANIZE pull-down menu
choose F
OLDER AND SEARCH OPTIONS. From the GENERAL
tab select S
INGLE-CLICK TO OPEN AN ITEM (POINT TO SELECT).
Windows XP
: From the TOOLS pull-down menu choose
F
OLDER OPTIONS.... From the GENERAL tab select SINGLE-
CLICK TO OPEN AN ITEM (POINT TO SELECT).
Press the upper side switch
(when set to D
OUBLE CLICK),
or quickly tap the display
screen twice in the same
place with the pen tip.
Double-clicking is easier
when using the pen
perpendicular to the pen
display screen.
CLICKING
Contents
Index
36
Contents Index
36
Page 37

Contents
Select an object, then slide the pen tip across the display
screen to move the object.
DRAGGING
USING THE SIDE SWITCH
Index
37
The pen comes equipped with a side switch. This switch has two customizable functions that can be
selected by rocking the switch in either direction. You can use the side switch whenever the pen tip is
within proximity (5 mm (0.2 inch)) of the display screen surface. You do not need to touch the pen tip to the
display surface in order to use the switch. By default, the upper switch is set to D
lower switch is set to R
Tablet control panel.
IGHT CLICK. You can customize or disable the switch functions using the Wacom
OUBLE CLICK, and the
WORKING WITH PRESSURE SENSITIVITY
The pen responds to the nuance and inflection of your hand movements, enabling you to create naturallooking pen and brush strokes within applications that support this feature.
To draw, ink, or write with pressure sensitivity, move the pen along the display screen surface while
applying various amounts of pressure downward on the tip of the pen. Press hard for thick lines or dense
color. Press gently for thin lines or softer color. Some applications require that you first select a pressuresensitive tool from the application tool palette.
To adjust tip feel, see adjusting tip feel and double-click
Visit the Wacom web site to learn about applications that support pressure. See product information
.
.
Contents Index
37
Page 38

Contents
In supporting applications the pen eraser works
like the eraser on a pencil. In text applications, use
the eraser to select text and then lift the eraser
from the pen display screen to delete the text.
Visit the Wacom web site to learn about
applications that support the eraser. See product
information. If the eraser is not supported in an
application, you can still use the eraser for
positioning, drawing, or annotation.
Index
DRAWING WITH TILT
The pen display recognizes when you tilt the pen from vertical to incline positions. Tilt can be used to
control line shape and thickness in supporting applications.
Visit the Wacom web site to learn about applications that support tilt. See product information
.
ERASING
38
Contents Index
38
Page 39

Contents
Touch Rings
Slide your finger over the Touch
Rings to zoom, scroll, or issue
assigned keystroke actions.
See using the Touch Rings
.
ExpressKeys
Press the customizable keys to perform frequently used functions or keystrokes, or to emulate
button clicks or modifier keys. See using the ExpressKeys
.
A Display Toggle
function is available for use on multiple monitor systems. This feature enables
you to toggle the screen cursor between Cintiq and your other displays. For example: Cintiq can
be used as a pen display where the cursor is positioned at the pen tip location, or toggled for
use as a standard Wacom tablet where the cursor can be moved across the entire desktop or
any display on your system.
Touch Ring mode buttons
Press to choose a Touch
Ring function.
Status LEDs show the
active mode.
As you press each button,
an overlay appears briefly
on your display screen to
show the button function
assignments.
Hardware control buttons
Press a button to activate the assigned function.
See using the hardware control buttons
.
Active area
Index
39
PEN DISPLAY CONTROLS
To improve your workflow in graphics or other applications, Cintiq features ExpressKeys and Touch Rings.
While using your dominant hand for multi-touch or pen input, you can simultaneously use your other hand
to operate the ExpressKeys or Touch Rings.
Contents Index
39
Page 40

Contents
Multi-touch
On touch-sensitive models you can:
• Use your finger(s) on the display screen surface to position the
screen pointer. The cursor jumps to wherever you touch the screen
surface.
• Click or right-click.
• Scroll and zoom.
• Move between pages in most web browsers, document, or picture
viewers.
• Display the Radial Menu.
• Switch between applications and perform other desktop functions.
•Save your work.
• View your Cintiq settings.
Some gestures can be customized.
Learn about the multi-touch experience with Cintiq
.
For models that support both pen and multi-touch
:
You can simultaneously work with the pen and touch in supporting
applications. For example, you might use touch to turn a 3D object
while using the pen to sculpt a surface texture. Remember, the pen has
priority over touch whenever the pen tip or eraser is within proximity of
the pen display screen. Lift the pen and your hand away from the
display screen surface to enable touch.
Pen input
Wherever you place the pen on the display screen surface, the screen
pointer will jump to the corresponding point.
Learn about using the Grip Pen
.
Index
Depending on your product model, Cintiq can accept pen input or both pen and multi-touch input.
40
Contents Index
40
Page 41

Contents
Cintiq 24HD touch: Toggles touch on or off.
Cintiq 24HD
: Launches the Wacom Tablet control panel.
Press to close the control panel when open.
Launches the on-screen keyboard. Press to close the
keyboard when open.
Shows (on your display screen) a diagram of the pen
display ExpressKey, Touch Ring, and pen settings.
The current functions for each control are shown.
Press to dismiss the diagram.
Index
USING THE HARDWARE CONTROL BUTTONS
Press a button to:
• Toggle multi-touch on or off.
• Launch the Wacom Tablet control panel or an on-screen keyboard.
• Display a diagram of your current Cintiq settings.
Press the button again to toggle off the function.
41
Notes:
You may notice a slight delay in response time, depending on the speed of your computer.
The control buttons cannot be customized.
Contents Index
41
Page 42

Contents
1. SHIFT
2. ALT/OPT
3. RADIAL MENU
4. CTRL/COMMAND
5. PAN/SCROLL (space)
1. U
NDO (CTRL/COMMAND+Z)
2. R
EDO (CTRL/COMMAND+Y)
3. B
RUSH PANEL (F5)
4. P
RECISION MODE
5. DISPLAY TOGGLE
Right-handed configuration shown. For left-handed configuration, the ExpressKey settings are swapped (or flipped)
between left and right.
Note: The ExpressKeys can be operated in combination with one another. For example, customize one key for the
C
TRL function and another for ALT. When you press both keys at the same time a CTRL+ALT function is
initiated.
Index
42
USING THE EXPRESSKEYS
Press individual keys to perform frequently used functions or keystrokes. ExpressKeys can also be used to
modify your pen, touch, or other input tool properties as you work. If your product supports multi-touch
you can also use gestures to perform many of these functions.
Default settings are shown by ExpressKey number below.
,
Contents Index
42
Page 43

Index
Settings may vary depending on your product model.
Tips
:
•Use the Radial Menu
Contents
to expand the functionality of your Cintiq.
• Display an interactive diagram of the current pen display settings by pressing the appropriate
hardware control button
tool button set to S
at the top of the pen display. You can also press an ExpressKey or other
ETTINGS.
43
Consider some of these other ways to use the ExpressKeys:
• Set a key to a commonly used keyboard shortcut.
• Set a key to launch a commonly used file or application.
• If you prefer not to (or cannot) use the side switches on your Grip Pen, then set a key to right- or
double-click.
• Choose from any of the other available functions
. See customizing the ExpressKeys.
Important: Some applications can override and control the ExpressKey functions. For details, see
using applications integrated for tablet control
.
Use the Wacom Tablet control panel to customize the ExpressKey options.
Manage your control panel settings
Control panel overview
Customizing the ExpressKeys
Contents Index
43
Page 44

Contents
Example of zooming in
Move your finger clockwise along the ring to zoom in or scroll down in most
applications. Tap the upper portion of the Touch Ring for single increment changes
based on the assigned function.
Example of zooming out
Move your finger counter-clockwise to zoom out or scroll up. Tap the lower portion of
the Touch Ring for single increment changes.
Default settings are the same for both Touch Rings. Right-handed configuration shown:
Note: In some regions the defaults may vary, depending on application and operating
system differences. See customizing the Touch Rings
to modify how the Touch
Rings work.
For left-handed configuration, the Touch Ring mode settings are swapped (or flipped)
between left and right.
Top button: A
UTO SCROLL/ZOOM. Sets the ring to zoom in graphics applications and
scroll in other applications.
Some applications may interpret zooming as scrolling, or may completely ignore
zooming. Similarly, scrolling may be interpreted as zooming, or ignored completely.
Middle button: B
RUSH SIZE. Sets the ring to increase or decrease the brush size of
your drawing tool when working in Adobe Photoshop.
Bottom button: C
ANVAS ROTATION. Enables you to rotate or flip an entire image when
working in Adobe Photoshop CS4 or later.
Tap upper or lower
portion of ring for
incremental changes.
Press a Touch Ring mode button to switch between three
customizable states. Status LEDs show the active mode.
As you press each button, an overlay appears briefly on
your display screen to show the button assignments.
Index
44
USING THE TOUCH RINGS
Slide your finger around the ring to zoom in or out, scroll up or down, or to issue the assigned keystroke
functions.
Important: Some applications can override and control the Touch Ring functions. For details, see
using applications integrated for tablet control
Use the Wacom Tablet control panel to customize the Touch Ring options.
Manage your control panel settings
Control panel overview
Customizing the Touch Rings
Contents Index
.
44
Page 45

Contents
Index
45
WORKING WITH MULTIPLE MONITORS
When working with Cintiq and additional monitors on the same system, the screen cursor movement on the
standard monitors will depend on your system configuration.
If a second monitor is connected in mirror mode, both Cintiq and the other monitor will show identical
images and screen cursor movement.
If you are using Cintiq with other monitors in extended monitor mode, you have several options for
navigating on the other monitors:
• Set an ExpressKey or pen side switch to the D
toggle the screen cursor between Cintiq and your other displays.
For example: Cintiq can be used as a pen display where the screen cursor is positioned at the pen tip
location on the pen display screen surface. Display Toggle
Wacom tablet where the screen cursor can be moved across the entire desktop or additional displays.
ISPLAY TOGGLE function. You can then press the button to
enables you to use Cintiq as a standard
• Set a pen side switch or an ExpressKey to M
ODE TOGGLE. You can then quickly switch between pen
mode for working on Cintiq and mouse mode for working on the other monitors.
You can also purchase an Intuos5 tablet and use it to work on the other monitors in P
work on both Cintiq and the tablet.
EN mode. The pen will
Contents Index
45
Page 46

Contents
Index
46
ADJUSTING THE DISPLAY
Use the Cintiq controls to adjust a variety of display settings.
Factory presets, auto-sync, and user settings
On Screen Display (OSD) settings
OSD controls, Cintiq 24HD touch
OSD controls, Cintiq 24HD
Power saving
FACTORY PRESETS, AUTO-SYNC, AND USER SETTINGS
Factory presets: For optimal display quality, set your video card to a resolution of 1920x1200. This is the
maximum (native) resolution that can be used with Cintiq. See the Important Product Information guide for
details.
Auto-sync
horizontal and vertical screen position, as well as pitch and phase. Auto-sync will function between the
supported horizontal and vertical frequency ranges. See the Important Product Information guide for
details.
If Cintiq does not automatically synchronize with the incoming signal, you can use the OSD A
option to initiate display synchronization. Further screen display adjustments can be manually made using
the On Screen Display (OSD) controls.
Color calibration
default settings will override the color profile used with Cintiq.
: Cintiq automatically synchronizes to the incoming signal. The auto-sync function sets the
UTO ADJUST
: Changing the color, color temperature, contrast, brightness, or backlight from their
Contents Index
46
Page 47

Contents
Index
ON SCREEN DISPLAY (OSD) SETTINGS
The OSD function enables you to optimize a variety of pen display settings at the touch of a button.
Use the OSD controls, located on the upper edge of the pen display, to make adjustments.
• To open or exit the OSD menu, press the M
• Use the selection buttons to navigate and select an option.
• To choose an option, press the S
ELECT button.
BUTTON FUNCTION
SELECT Activates the selected OSD menu option.
MENU Opens or exits the OSD menu.
left/right Navigates to the left or right through the OSD menu.
up/down Navigates up or down through the OSD menu. Increases or decreases
selected item values.
RESET Returns the OSD back to factory settings.
ENU button.
47
Notes:
The OSD menu will automatically close after a few moments of inactivity. You can also press the
MENU button to close the menu. All settings are automatically saved when the OSD menu closes
and will be used the next time the pen display receives a similar video signal. This is applicable to all
display modes.
If you make changes to the display appearance and cannot return to the original settings, use the
RESET option to return the pen display to its original factory defaults.
OSD controls, Cintiq 24HD touch
OSD controls, Cintiq 24HD
Contents Index
47
Page 48

Contents
Index
OSD CONTROLS, CINTIQ 24HD TOUCH
Menu and other control options are available when you open the On Screen Display.
Brightness/Contrast controls
Auto Adjust (analog input only)
Image controls
Color control systems
Tools
Menu tools
ECO Information
Information
OSD Warning
Using the Picture Mode function
Advanced OSD
48
BRIGHTNESS/CONTRAST CONTROLS
BRIGHTNESS. Adjusts the overall image and background screen brightness.
Notes:
The brightness level is adjusted using the backlight output. The display will digitally compensate for
low or high brightness levels. If digital compensation occurs, the brightness value on the OSD will
change to magenta.
Optimal display performance will be in the range where the OSD brightness value is black.
When the display cannot achieve the desired brightness, the numerical brightness value on the OSD
will blink.
For low brightness settings, the display will automatically compensate by adjusting the screen
contrast to achieve the desired brightness. This will result in a reduced contrast ratio and the OSD
indicator will change to magenta.
For high brightness settings, the display will automatically compensate by turning down uniformity
compensation in order to achieve the desired brightness. The OSD indicator will change to magenta
and this may result in decreased uniformity.
ONTRAST (analog input only). Adjusts the overall image and background screen brightness by input signal
C
level.
Note: It is recommended that you use B
consumption and improved image quality.
RIGHTNESS to adjust screen brightness for lower power
Contents Index
48
Page 49

Contents
H.SIZE value is wrong. H.SIZE value is improved. H.SIZE value is correct.
Index
49
ECO M
B
ODE. Decreases the amount of power consumed by reducing the brightness level.
FF: No function.
O
M
ODE1: Decreases the brightness range up to 200 cd/m
M
ODE2: Decreases the brightness range up to 100 cd/m
LACK. Adjusts the black luminance. When low settings are selected that cannot be displayed, the
2
.
2
.
indicator on the OSD will turn magenta.
AUTO ADJUST (ANALOG INPUT ONLY)
AUTO ADJUST (analog input only). Automatically adjusts the Image Position, H.SIZE settings, and FINE
settings.
UTO CONTRAST (analog input only). Adjusts the image displayed for non-standard video inputs.
A
IMAGE CONTROLS
LEFT / RIGHT. Controls Horizontal Image Position within the display area of the LCD.
OWN / UP. Controls Vertical Image Position within the display area of the LCD.
D
IZE (V. S IZE) (analog input only). Adjusts the horizontal size by increasing or decreasing this setting.
H.S
If the A
performed using the H.S
function may alter the width of the picture. Use Left/Right Menu to center the image on the screen. The
image should be homogeneous.
UTO ADJUST function does not give you a satisfactory picture setting, a further tuning can be
IZE (or V.SIZE) function (dot clock). For this, a moiré test pattern may be used. This
Contents Index
49
Page 50

Contents
FINE value is wrong. FINE value is correct.
Index
50
F
INE (analog input only). Improves focus, clarity, and image stability by increasing or decreasing this
setting.
If the A
tuning can be performed using the F
UTO ADJUST function and the H.SIZE function do not give you a satisfactory picture setting, a fine
INE function. For this, a moiré test pattern may be used. The image
should be homogeneous.
A
UTO FINE (analog input only). This function automatically and periodically adjusts the FINE setting for
change in signal condition. This function adjusts approximately every 33 minutes.
XPANSION. Sets the zoom method.
E
ULL: The image is expanded to 1920 x 1200, regardless of the resolution.
F
SPECT: The image is expanded without changing the aspect ratio.
A
FF: The image is not expanded.
O
USTOM: See the advanced OSD menu for detailed instructions.
C
HARPNESS. This function is digitally capable of keeping a crisp image at any time. It is continuously
S
adjustable to get as distinct or as soft an image as you prefer and is set independently by different timings.
Contents Index
50
Page 51

Contents
Index
COLOR CONTROL SYSTEMS
PICTURE MODE. Change the picture mode that is most suitable for the type of content that is shown.
You can change up to 5 types. See advanced OSD
function for more information.
HITE. Adjust the white temperature by NATIVE, or by increasing or decreasing this setting. A lower color
W
temperature will make the screen reddish and a higher color temperature will make the screen bluish.
ATIVE is the default color temperature of the LCD panel. 6500K is recommended for general graphic
N
design. 5000K is recommended for print matching.
DJUST.
A
H
UE: Adjusts the hue of each color
*1
. The change in color will appear on screen and the menu color
bars will show the amount of adjustment.
S
ATURATION: Adjusts the color depth of each color
increases.
O
FFSET: Adjusts the color brightness of each color
increases.
*1
RED, YELLOW, GREEN, CYAN, BLUE and MAGENTA.
DVANCED SETTING.
A
Shows the A
DVANCED MENU. See advanced OSD for detailed information. Set PICTURE MODE in detail using
Tag1 options.
Tag1 PICTURE MODE and using the Picture Mode
*1
. Press the right button and the color vividness
*1
. Press the right button and the color brightness
51
Contents Index
51
Page 52

Contents
OFF PICTURE BY PICTURE - ASPECT PICTURE BY PICTURE - FULL
PIP
(Picture In Picture)
Index
52
TOO LS
PIP MODE. Select PIP MODE, OFF/PIP/PICTURE BY PICTURE - ASPECT/PICTURE BY PICTURE - FULL. You can
select an individual P
PIP I
NPUT. Selects the PIP input signal.
EFT/RIGHT. When you select “PIP” in PIP MODE, you can control the horizontal position of PIP display
PIP L
area.
OWN/UP. When you select “PIP” in PIP MODE, you can control the vertical position of PIP display area.
PIP D
IZE. Selects the size of the sub-picture used in PIP MODE.
PIP S
ELECTION. Allows you to choose an appropriate mode for the video connection in use: DIGITAL,
DVI S
A
NALOG, or AUTO. You can also set the DVI selection in the advanced OSD menu, Tag6.
EDID E
XTENSION (digital input only). A communication setting with input device, containing signal timing.
ORMAL: When a PC or other computer equipment is connected, select “Normal”.
N
NHANCED: Alternate setting for non-PC devices such as DVD players or game consoles. When a DVD
E
player or other type of high definition device is connected, select “Enhanced”.
Note: Interlaced signals (480i, 576i, 1080i) are not supported. If you have any problems, see
Troubleshooting
restarted.
IDEO DETECT. Selects the method of video detection when more than one video input is connected.
V
IRST: When the current video input signal is not present, then the display searches for a video signal
F
from the other video input port. If the video signal is present in the other port, then the display switches
the video source input port to the new found video source automatically. The display will not look for
other video signals while the current video source is present.
AST: When the display is showing a signal from the current source and a new secondary source is
L
supplied to the display, then the display will automatically switch to the new video source.
When current video input signal is not present, then the display searches for a video signal from the
other video input port. If the video signal is present in the other port, then the display switches the
video source input port to the new found video source automatically.
ONE: The display will not search the other video input port unless the display is turned on.
N
ICTURE MODE in each screen. This unit can display 2 inputs at a time.
. When EDID EXTENSION has been changed, the connected equipment has to be
Contents Index
52
Page 53

Contents
Index
53
O
FF TIMER. Display will automatically power-down when you have selected a pre-determined amount of
time. Before powering off, a message will appear on the screen asking if you want to delay the turn off time
by 60 minutes. Press any OSD button to delay the power-down time.
FF MODE. The Intelligent Power Manager allows the display to enter into a power saving mode after a
O
period of inactivity. O
FF: Display does not go into power save mode when the input signal is lost.
O
TANDARD: Display enters power save mode automatically when the input signal is lost.
S
FF MODE has three settings:
When in power save mode, the LED on the front of the display blinks orange. While in power save mode,
push any of the OSD control buttons, except for P
OWER and SELECT to return to normal.
MENU TOOLS
LANGUAGE. OSD control menus are available in eight languages.
OSD L
Selecting OSD Location allows you to manually adjust the position of the OSD control menu left or right.
OSD D
Selecting OSD Location allows you to manually adjust the position of the OSD control menu Up or Down.
OSD T
display waits after the last touch of a button to shut off the OSD control menu. The preset choices are
10-120 seconds by 5-second increments.
OSD L
activate OSD controls while in the Lock Out mode, a screen will appear indicating the OSD controls are
locked out. There are four types of OSD L
OSD T
EFT/RIGHT. You can choose where you would like the OSD control image to appear on your screen.
OWN/UP. You can choose where you would like the OSD control image to appear on your screen.
URN OFF. The OSD control menu will stay on as long as it is in use. You can select how long the
OCK OUT. This control completely locks out access to all OSD control functions. When attempting to
OCK OUT:
OSD L
and hold down simultaneously. To deactivate the OSD L
OCK OUT with no control: To activate the OSD LOCK OUT function, press SELECT, then right button
OCK OUT, press SELECT, then right button and
hold down simultaneously while in the OSD menu. No controls can be adjusted while in the lock out
mode.
OSD L
then the down and left buttons and hold down simultaneously. To deactivate the OSD L
S
B
C
OCK OUT with BRIGHTNESS (only) control: To activate the OSD LOCK OUT function, press SELECT,
OCK OUT, press
ELECT, then the down and left buttons and hold down simultaneously while in the OSD menu.
RIGHTNESS can be adjusted while in this lock out mode.
USTOM: Refer to the advanced OSD menu.
RANSPARENCY. Adjusts the transparency of the OSD menu.
Contents Index
53
Page 54

Contents
Index
54
R
ESOLUTION NOTIFIER. This optimal resolution is 1920 x 1200. If ON is selected, a message will appear on
the screen after 30 seconds, notifying you that the resolution is not at 1920 x 1200.
OT KEY. You can adjust the brightness directly. When this function is set to ON, you can adjust the
H
brightness with the left or right buttons while the OSD menu is off. The standard OSD can be accessed
with the M
ACTORY PRESET. Selecting FACTORY PRESET allows you to reset all OSD control settings back to the factory
F
settings. Individual settings can be reset by highlighting the control to be reset and pressing the R
ENU button. When this function is set to OFF, some display buttons are disabled.
ESET
button.
ECO INFORMATION
CARBON SAVINGS: Displays the estimated carbon savings information in kg.
OST: Displays the electricity cost savings in balance.
C
ARBON CONVERT SETTING: Adjusts the carbon footprint factor in the carbon saving calculation. This initial
C
setting is based on the OECD (2008 Edition).
URRENCY SETTING: Displays electricity pricing (available in 6 currency units).
C
C
URRENCY CONVERT SETTING: Allows for localization of the electricity costs for accurate information in the
electrical rate savings.
Note: How to change
is Currency setting = US$ and the Currency Convert setting = $0.11. This setting can be changed
using the ECO I
1. Open menu by pressing the M
right button.
2. Select C
3. The French currency unit is Euro ( ). Adjust the currency setting to Euro icon ( ) from US dollar ($)
icon using the left or right button in the Current setting item.
4. Select C
5. This initial Euro ( ) setting is Germany of OECD (2007 Edition).
6. Check receipt of French’s electricity prices or OECD data for French. French of OECD (2007
Edition) was 0.12.
7. Adjust the C
CURRENCY SETTING & CURRENCY CONVERT SETTING for Cost Meter. The initial setting
NFORMATION menu. If you want to use the French setting, refer to the steps below:
ENU button and select the ECO INFORMATION menu using the left or
URRENCY SETTING item by pressing the up or down button.
URRENCY CONVERT SETTING item using the up or down button.
URRENCY CONVERT SETTING item using the right or left button.
Contents Index
54
Page 55

Contents
Index
55
INFORMATION
Provides information about the current resolution display (main picture), current input setting and technical
data including the preset timing being used and the horizontal and vertical frequencies. Indicates the
model and serial numbers of your display.
OSD WARNING
OSD warning menus disappear with use of the MENU button.
O SIGNAL: This function gives a warning when there is no Horizontal or Vertical Sync. After power is
N
turned on or when there is a change of input signal, the N
ESOLUTION NOTIFIER: This function warns if resolution other than the optimized resolution is used.
R
After power is turned on or when there is a change of input signal or the video signal does not have
proper resolution, the R
M
ENU TOOLS.
UT OF RANGE: This function gives a recommendation of the optimized resolution and refresh rate.
O
ESOLUTION NOTIFIER window will open. This function can be disabled in the
After the power is turned on or there is a change of input signal or if the video signal does not have
proper timing, the O
UMINANCE WARNING: When the backlight cannot display the desired luminance, a message will appear
L
on the display. To avoid this, reduce the B
NTERLACED SIGNALS ARE NOT SUPPORTED: This function gives a warning when the interlace signal is
I
UT OF RANGE menu will appear.
RIGHTNESS level.
used. While the image is visible, change the signal of the device from interlaced to progressive (noninterlaced). See display troubleshooting
.
If you need detailed information about the controls, use the advanced OSD
O SIGNAL window will appear.
menu.
USING THE PICTURE MODE FUNCTION
Choose the picture mode that is most suitable for the type of content that is shown. Modes include: SRGB,
Adobe®RGB, DCI, REC-B
• To access the picture mode, press the R
• Each P
V
advanced OSD
ICTURE MODE includes BRIGHTNESS, WHITE, color gamut, GAMMA, BLACK, UNIFORMITY, COLOR
ISION EMU, METAMERISM, RESPONSE IMPROVE settings. You can change these settings in Tag1 of the
menu.
T709, NATIVE, FULL, DICOM, PROGRAMMABLE, eciRGB_v2.
ESET button while the OSD menu is not showing.
Contents Index
55
Page 56

Contents
sRGB / REC-Bt709
Adobe® RGB
DCI
REF: PRINTER (CMYK)
RED
GREEN
BLUE
0.9
0.8
0.7
0.6
0.5
0.4
0.3
0.2
0.1
0
0
0.80.70.60.50.40.30.20.1
FULL / NATIVE / DICOM /
PRESET GAMUT
Notes:
When selected, P
ICTURE MODE is different from your computer’s ICC
color profile. You may experience inaccurate color reproduction.
Color Calibration Software, developed by Wacom, is highly
recommended to provide extended color management features such as
ICC profile Emulation and Printer Emulation. Contact your supplier for
more information about this software.
It is recommended to do so within the first 1000 hours of display usage,
when using calibration hardware for the first time.
When P
ICTURE MODE is locked, “PICTURE MODE IS LOCKED” appears on
screen. To unlock P
ICTURE MODE settings, press the SELECT and up
buttons at the same time.
Index
56
Type of P
RESET
PRESET PURPOSE
SRGB Standard color space used for the Internet, Windows operating systems and
digital cameras. Recommended setting for general color management.
Adobe®RGB Provides a standard color space used in high-end graphics applications such as
digital still cameras and imaging. It provides the highest level of color matching
to other output devices. Recommended setting for applications that support
color management features such as Mac or Adobe.
DCI Color setting for digital cinema.
REC-B
N
F
DICOM Medical settings for X-ray imaging view.
PROGRAMMABLE
eciRGB_v2 Color setting intended mainly for the print and publishing industry.
T709 Color setting for High-definition television.
ATIVE Factory setting. Highest brightness setting. Provides lowest power
consumption when kept at factory setting.
ULL Well-balanced image performance settings. Native panel color gamut.
For Color Calibration Software or the Hardware Calibration settings (some OSD
settings are disabled).
Contents Index
56
Page 57

Contents
Index
57
ADVANCED OSD
If you need detailed information about the controls, use the advanced menu. There are two ways to use
the advanced menu.
Way 1: Using the advanced menu
• Press the MENU button to access the OSD menu. Use the OSD buttons to move the cursor to the
A
DVANCED SETTING in Color control systems. Press the SELECT button to display the advanced menu.
Way 1: Exiting the advanced menu
• Press the MENU button.
Way 2: Using the advanced menu
• Turn off your display.
• Turn on your display by pushing the P
second simultaneously. Then press the control buttons (M
• You will see the Advanced menu. This menu is larger than the normal OSD.
Way 2: Exiting the advanced menu
• Turn off and restart your display in the normal way.
OWER and SELECT buttons at the same time for at least one
ENU, left, right, up, down).
To make an adjustment, ensure the tag is highlighted, then press S
To move to another tag, press M
Ta g1 P ICTURE MODE Sets PICTURE MODE PRESET, 1 to 5.
P
RESET Selects PICTURE MODE.
B
RIGHTNESS Adjusts the overall image and screen background brightness.
W
HITE Adjusts the white color by temperature or xy setting. A lower color temperature
ENU, then press the left or right button to highlight another tag.
will make the screen reddish and a higher color temperature will make the
screen bluish. A stronger x makes the screen reddish, a stronger y makes it
greenish and weak xy makes it a bluish white.
0.43
0.40
0.35
y
6500K
0.30
15000K
0.25
0.25 0.30 0.35 0.40 0.45
ELECT.
WHITE RANGE
5000K
WHITE TEMPERATURE
x
3000K
0.48
Contents Index
57
Page 58

Contents
SAMPLE OF PRESET GAMMA
0
20
40
60
80
100
0 64 128 192
GRAY STEP [0-255]
LUMINANCE [cd/m
2
]
L*
sRGB
DICOM
Custom 1.8
Custom 2.2
255
Index
58
Ta g1
GAMMA Allows you to manually select the brightness level of grayscale.
(cont.)
B
LACK Adjusts the black luminance. When low settings are selected that cannot be
There are four selections: sRGB, L Star, DICOM, and C
USTOM. We recommend
you show grayscale image data on screen.
sRGB: G
L Star: G
AMMA setting for sRGB.
AMMA for Lab color space.
DICOM: DICOM GSDF (Grayscale Standard Display Function) is possible for
medical imaging.
C
USTOM: Below items can be adjusted when CUSTOM is selected as the GAMMA
S
ELECTION setting.
Custom Value: The gamma value is selected from the rate of 0.5 to 4.0 by 0.1
steps.
displayed, the indicator on the OSD will turn magenta.
Contents Index
58
Page 59

Contents
Index
59
Ta g1
(cont.)
Ta g2 S
RED
GREEN
Adjusts color gamut. Magenta warns of color saturation when outside of LCD
gamut.
BLUE
C
OLOR VISION EMU Emulates color visions for difference color sense. P, D, T is for dicromats and
Grayscale is for contrast regibility checking.
U
NIFORMITY This function electronically compensates for slight variations in the white
uniformity level as well as for deviations in color that may occur throughout the
display area of the screen. These variations are characteristic of LCD panel
technology. This function improves the color and evens out the luminance
uniformity of the display.
Note: Using the U
NIFORMITY feature reduces the overall peak luminance of the
display. If greater luminance is desired over the uniform performance of
the display, then U
NIFORMITY should be turned off. A higher number
produces a better effect, but may also reduce contrast ratio.
When B
RIGHTNESS is shown in magenta, the UNIFORMITY setting is
automatically changed.
HARPNESS This is a digital capability for keeping a crisp image at all signal timings.
It continuously adjusts to maintain as distinct or as soft an image as you prefer,
and is set independently according to different timings.
R
ESPONSE IMPROVE Turns the RESPONSE IMPROVE function on or off. Response improve may reduce
blurring that occurs in some moving images.
ECO M
ODE Decreases the amount of power consumed by reducing the brightness level.
FF: No function.
O
ODE1: Decreases the brightness up to 200 cd/m
M
ODE2: Decreases the brightness up to 100 cd/m
M
2
.
2
.
Contents Index
59
Page 60

Contents
Index
60
Ta g2
METAMERISM Improves color matching with other monitors. Mostly affects whites.
(cont.)
6 - A
S
HORTCUT CUSTOM You can select the PICTURE MODE which is displayed in the PICTURE MODE
Ta g3 R -H .
(analog input only)
G-H.
(analog input only)
B-H.
(analog input only)
R-F
(analog input only)
G-F
(analog input only)
B-F
(analog input only)
XIS ADJUST HUE:
POSITION
POSITION
POSITION
INE
INE
INE
Adjusts the hue of each color
*1
. The change in color will appear on screen and
the menu color bars will show the amount of adjustment.
S
ATURATION: Adjusts the color depth of each color
*1
. Press the right button and
the color vividness increases.
O
FFSET: Adjusts the color brightness of each color
*1
. Press the right button
and the color brightness increases.
*1
RED, YELLOW, GREEN, CYAN, BLUE and MAGENTA.
shortcut menu.
Adjusts the position of the RED component of the image.
Adjusts the position of the GREEN component of the image.
Adjusts the position of the BLUE component of the image.
Adjusts the FINE setting of the RED component of the image.
Adjusts the FINE setting of the GREEN component of the image.
Adjusts the F
INE setting of the BLUE component of the image.
Contents Index
60
Page 61

Contents
H-size, Fine, H/V Position Contrast
S
IMPLE OX
F
ULL OO
Size, Fine,
Position
Contrast Black
Level
Time
S
IMPLE OXX1 second
F
ULL O O X 1.5 seconds
D
ETAIL* O O O 5 seconds
Index
61
Ta g3
(cont.)
Ta g4 A
R-SHARPNESS
(analog input only)
G-S
HARPNESS
(analog input only)
B-S
HARPNESS
(analog input only)
DVI L
ONG CABLE
(DVI input only)
UTO ADJUST
(analog input only)
S
IGNAL ADJUST
(analog input only)
UTO ADJUST LEVEL
A
(analog input only)
Adjusts the sharpness of the RED component of the image.
Adjusts the sharpness of the GREEN component of the image.
Adjusts the sharpness of the BLUE component of the image.
Compensates for image degradation caused by using a long DVI cable.
There are 4 possible settings, with “0” being the lowest level of compensation
and “3” being the highest level. The default setting is “1”.
Automatically adjusts the Image Position and H.S
Press S
ELECT to activate auto adjustment. Use the test pattern, which is
IZE settings and FINE settings.
included with your Color Calibration Software.
Determines when the auto adjustment is activated automatically. The choices
are SIMPLE and FULL. Press the left or right buttons to select.
O: Automatic Adjustment
X: No Automatic Adjustment
Note: Automatic Adjustment does not work at resolutions less than 800x600
resolution.
Determines the automatic adjustment level for A
S
IMPLE, FULL and DETAIL. Press the left or right buttons to select.
UTO ADJUST. The choices are
O: Automatic Adjustment
X: No Automatic Adjustment
* D
ETAIL activates automatic long cable (skew, peaking) adjustment.
Contents Index
61
Page 62

Contents
Index
62
Ta g4
(cont.)
A-NTAA SW
(analog input only)
A
UTO CONTRAST
(analog input only)
C
ONTRAST Adjusts the image brightness and contrast in relation to the background.
A
UTO BLACK LEVEL
(analog input only)
B
LACK LEVEL
(analog input only)
Ta g5 H .P
V. P
H.S
(analog input only)
F
INE
(analog input only)
A
UTO FINE
(analog input only)
H.R
The Advanced No Touch Auto Adjust function is able to recognize new signals
even when neither the resolution nor the refresh rate has changed. If several
PCs are connected to the monitor, and each transmit very similar (or even the
same) signals in terms of resolution and refresh rates, the monitor recognizes
there is a new signal and automatically optimizes the picture without the need
for any action on your part.
O
FF: A-NTAA is disabled.
N: If a change in signal is detected, A-NTAA will adjust the monitor to the
O
optimal settings for the new signal. If no change in the signal is detected then
A-NTAA does not activate. The screen will be blank while the monitor
optimizes the signal.
O
PTION: Functions the same as ON, except that the screen does not go blank
when the monitor makes adjustments for changes in signal, allowing the
monitor to display the new signal faster. When using an external switching
device to connect 2 or more PCs to the monitor, using the O
N or OPTION
settings is suitable.
Adjusts the image displayed for non-standard video inputs. Press S
ELECT to
adjust. Any adjustment requires the image to have white portions.
Automatically adjusts the black level. Any adjustment requires the image to
have black portions. Press SELECT to activate AUTO ADJUST.
Adjusts the RGB black level by input signal level.
OSITION Controls Horizontal Image Position within the display area of the LCD.
OSITION Controls Vertical Image Position within the display area of the LCD.
IZE
Adjusts the horizontal size of the screen.
If the A
UTO ADJUST function does not give you a satisfactory picture setting, a
further tuning can be performed using the H.S
IZE (V.SIZE) function (dot clock).
For this a moiré test pattern may be used. This function may alter the width of
the picture. Use left/Right Menu to center the image on the screen. The image
should be homogeneous.
Improve focus, clarity and image stability by increasing or decreasing this
setting. If the A
satisfactory picture setting, a fine tuning can be performed using the F
UTO ADJUST function and the H.SIZE function do not give you a
INE
function. For this a moiré test pattern may be used. The image should be
homogeneous.
This function automatically and periodically adjusts the FINE setting for change
in signal condition. This function adjusts approximately every 33 minutes.
ESOLUTION Adjusts the horizontal size by increasing or decreasing the setting. Press the
right button to expand the width of the image on the screen. Press the left
button to narrow the width of the image on the screen.
Contents Index
62
Page 63

Contents
Index
63
Ta g5
V. R ESOLUTION Adjusts the vertical size by increasing or decreasing the setting. Press the right
(cont.)
E
XPANSION Sets the zoom method.
S
IDE BORDER COLOR Adjusts the side black bars color between black and white.
Tag6 DVI S
EDID E
(digital input only)
V
IDEO DETECT Selects the method of video detection when more than one computer is
O
FF TIMER Display will automatically turn off after the preset time period from power on
button to expand the height of the image on the screen. Press the left button to
narrow the height of the image on the screen.
ULL: The image is expanded to full screen regardless of the resolution.
F
SPECT: The image is expanded without changing the aspect ratio.
A
FF: The image is not expanded.
O
USTOM: When CUSTOM is selected as the expansion mode, it becomes
C
possible to adjust the H. Z
ELECTION Allows you to choose an appropriate mode for the video connection in use:
D
IGITAL, ANALOG, or AUTO.
XTENSION
A communication setting with input device, containing signal timing.
ORMAL: When a PC or other computer equipment is connected, select
N
OOM., V. ZOOM, and ZOOM POS.
“Normal”.
Enhanced: Alternate setting for non-PC devices such as DVD players or game
consoles.
Note: Interlaced signals (480i, 576i, 1080i) are not supported. If you have any
problems, see Troubleshooting
. When EDID EXTENSION has been
changed, the connected equipment has to be restarted.
connected.
F
IRST: When current video input signal is not present, then the display searches
for a video signal from the other video input port. If the video signal is present
in the other port, then the display switches the video source input port to the
new found video source automatically. The display will not look for other video
signals while the current video source is present.
L
AST: When the display is showing a signal from the current source and a new
secondary source is supplied to the display, then the display will automatically
switch to the new video source. When current video input signal is not present,
then the display searches for a video signal from the other video input port.
If the video signal is present in the other port, then the display switches the
video source input port to the new found video source automatically.
N
ONE: The display will not search the other video input port unless the display
is turned on.
with the O
N/OFF function. When you select “On”, press SELECT and the left or
right button to adjust. Before powering off, a message will appear on the
screen asking if you want to delay the turn off time by 60 minutes. Press any
OSD button to delay the turn off time.
Contents Index
63
Page 64

Contents
Index
64
Ta g6
(cont.)
Ta g7 L
OFF MODE The Intelligent Power Manager allows the display to enter into a power saving
mode after a period of inactivity. The O
FF: Display does not go into power save mode when the input signal is lost.
O
TANDARD: Display enters power save mode automatically when the input
S
FF MODE has three settings.
signal is lost.
LED B
RIGHTNESS Controls the brightness of the power LED on the display.
F
AN CONTROL Enables you to set the fan speed.
ANGUAGE OSD control menus are available in eight languages.
OSD H.P
OSITION You can choose where you would like the OSD control image to appear on your
screen. Selecting OSD Location allows you to manually adjust the position of
the OSD control menu left or right.
OSD V.P
OSITION You can choose where you would like the OSD control image to appear on your
screen. Selecting OSD Location allows you to manually adjust the position of
the OSD control menu up or down.
OSD T
URN OFF The OSD control menu will stay on as long as it is use. You can select how long
the display waits after the last touch of a button to shut off the OSD control
menu. The preset choices are 10-120 seconds by 5 second steps.
OSD L
OCK OUT This control completely locks out access to all OSD control functions.
When attempting to activate OSD controls while in the Lock Out mode, a
screen will appear indicating the OSD controls are locked out.
There are three types of OSD L
OCK OUT with no control: To activate the OSD LOCK OUT function, press
OSD L
S
ELECT, then right button and hold down simultaneously. To deactivate the
OSD L
OCK OUT, press SELECT, then right button and hold down simultaneously
OCK OUT:
while in the OSD menu. No controls can be adjusted while in the lock out
mode.
OSD L
OCK OUT with BRIGHTNESS (only) control: To activate the OSD LOCK OUT
function, press S
simultaneously. To deactivate the OSD L
ELECT, then the down and left buttons and hold down
OCK OUT, press SELECT, then the down
and left buttons and hold down simultaneously while in the OSD menu.
B
RIGHTNESS can be adjusted while in the lock out mode.
USTOM: Press RESET and MENU to enter the CUSTOM Menu. Select ENABLE or
C
D
ISABLE for POWER KEY, INPUT SEL, HOT KEY (BRIGHTNESS), PICTURE MODE,
W
ARNING (RESOLUTION NOTIFIER/OSD LOCK OUT). To Deactivate the OSD LOCK
O
UT function, press RESET and MENU to bring up the LOCK OUT warning.
Press S
ELECT, SELECT, <, >, <, >, MENU.
Contents Index
64
Page 65

Contents
Index
65
Ta g7
OSD TRANSPARENCY Adjusts the transparency of the OSD menu.
(cont.)
S
IGNAL INFORMATION Signal information can be displayed in the corner of the screen.
R
ESOLUTION NOTIFIER The optimal resolution is 1920 x 1200. If ON is selected, a message will appear
H
OT KEY When this function is activated, the brightness of the display can be adjusted
F
ACTORY PRESET Selecting FACTORY PRESET allows you to reset all OSD control settings back to
Tag8 PIP M
PIP I
PIP L
PIP D
PIP S
B
LANK SIGNAL SKIP Skip no signal inputs when you change input signal with SELECT button.
OSD R
M
AIN IMAGE ROTATION OFF: The display image is not rotated. IMAGE ROTATION is set to OFF by default.
S
UB IMAGE ROTATION Available when using PIP mode. Allows rotation of the PIP sub-image.
S
IGNAL INFORMATION is either On/Off.
on the screen after 30 seconds, notifying you that the resolution is not set to
1920 x 1200.
without entering the OSD menu by using the front buttons. The left or right
buttons adjust the brightness level. When this function is set to O
FF, some
buttons are disabled.
the factory settings. Highlighting the control to be reset and pressing the R
ESET
button can reset individual settings.
ODE Selects PIP MODE, OFF/PIP/PICTURE BY PICTURE - ASPECT/PICTURE BY PICTURE -
F
ULL.
NPUT Selects the PIP input signal.
EFT/RIGHT When you select “PIP” in PIP MODE, you can control the horizontal position of
the PIP display area.
OWN/UP When you select “PIP” in PIP MODE, you can control the vertical position of the
PIP display area.
IZE Selects the size of the sub-picture used in PIP MODE.
OTATION LANDSCAPE: Display the OSD with landscape mode.
ORTRAIT: Display the OSD with portrait mode.
P
N: The display image is always rotated.
O
FF: The PIP image is not rotated. SUB IMAGE ROTATION is set to OFF by default.
O
N: The PIP image is always rotated.
O
Contents Index
65
Page 66

Contents
Index
66
Ta g8
(cont.)
Ta g9 I
Ta gA C
Ta gB I
DDC/CI DDC/CI ENABLE/DISABLE: Turns on or off the two-way communication and
control with the connected PC by video cable.
S
CREEN SAVER Use the SCREEN SAVER to reduce the risk of image persistence.
OTION (default OFF): Screen image moves periodically in 4 directions in order
M
to reduce the risk of image retention. Timing for M
OTION can be set so the
screen image moves in intervals from every 10 to 900 seconds. Timing is set in
10-second increments.
O
PTION (default REDUCED): There are two optional selections.
EDUCED: Screen image is reduced to 95% size and is moved periodically in 4
R
directions. Screen may appear slightly less sharp than normal. The full image
appears on the display.
Note: Some input signals may not be supported by R
ULL: Screen image is set to FULL and is moved periodically in 4 directions.
F
EDUCED.
Screen image goes outside of the display area in the direction that it shifts so
that a portion of the image may appear to be cut off.
NPUT SETTING Video Band Width (analog input only): Reduce the visual “noise” level of the
input signal.
Sync Threshold (analog input only): Adjusts the slice level of a synchronization
signal. Press S
the separate or composite input signals. Try this option if the F
ELECT to move the adjustment menu. Adjusts the sensitivity of
INE adjustment
does not successfully eliminate the noise.
SOG Threshold (analog input only): Adjusts the sensitivity of the Sync On Green
input signals. Adjusts the slice level when separating synchronization from
Sync On Green signal input.
Clamp position: Operating your monitor at a non-standard timing may cause
images to appear darker than normal or have color distortion. Use of the
Clamp position control will adjust images to their normal state.
ARBON SAVING Displays the estimated carbon savings information in kg.
C
OST Displays the electricity cost savings in balance.
C
ARBON CONVERT
S
ETTING
C
URRENCY SETTING Displays electricity pricing (available in 6 currency units).
C
URRENCY CONVERT
S
ETTING
H
OURS RUNNING Shows total running time.
NFORMATION Provides information about the current display resolution Technical data,
Adjusts the carbon footprint factor in the carbon savings calculation. This
initial setting is based on the OECD (2008 Edition).
Adjusts electricity prices-electric energy equivalent in the electrical rate savings
calculation.
including the preset timing currently being used. The horizontal and vertical
frequencies are also displayed.
Contents Index
66
Page 67

Contents
Index
OSD CONTROLS, CINTIQ 24HD
Menu options are available when you open the On Screen Display.
ANGUAGE options allow you to choose the language in which to display the OSD menu.
L
OSD P
•V
•H
•T
D
•C
•B
•B
C
• 5000K, 6500K, 9300K. Enables you to adjust the pen display color temperature, in degrees Kelvin.
•D
•C
OSITION options include:
ERTICAL. Adjusts the vertical position of the OSD menu window.
ORIZONTAL. Adjusts the horizontal position of the OSD menu window.
RANSPARENCY. Changes the opaqueness of the OSD menu background.
ISPLAY options include:
ONTRAST. Increases or decreases image contrast. Changes in contrast may affect color accuracy.
RIGHTNESS. Increases or decreases the image brightness.
ACKLIGHT. Increases or decreases the backlight brightness level.
OLOR options include:
IRECT displays the colors directly from the video card without any adjustment. When selected,
contrast or brightness cannot be adjusted.
USTOM enables you to independently adjust the RED, GREEN, and BLUE display colors.
Any changes you manually make to the color settings will override the color profile settings.
67
CALING options include:
S
ULL. Resizes the image to fill the whole screen.
•F
SPECT. Resizes the image to fill as much of the screen as possible while maintaining the correct
•A
aspect ratio.
• 1:1. Displays the image at the actual resolution.
Contents Index
67
Page 68

Contents
O
THER options include:
HASE. (VGA only.) Synchronizes the signal timing of the pen display to that of your graphics card.
•P
Index
Use when you experience an unstable or flickering image, or horizontal distortion lines.
ITCH. (VGA only.) Changes the display data frequency to match that of your graphics card. Use when
•P
you experience an unstable or flickering image, or vertical distortion lines.
ERTICAL. (VGA only.) Changes the vertical position of the image. To automatically adjust, use the AUTO
•V
A
DJUST option.
ORIZONTAL. (VGA only.) Changes the horizontal position of the image. To automatically adjust, use the
•H
A
UTO ADJUST option.
UTO ADJUST. (VGA only.) Choose this function to automatically optimize the display screen image.
•A
R
ESET returns the display parameters of the current mode to their factory default settings.
XIT dismisses the OSD without making changes.
E
68
Contents Index
68
Page 69

Contents
Index
69
POWER SAVING
Cintiq conforms to VESA power saving guidelines.
When used with a Display Power Management Signaling (DPMS) compliant computer or video card, the
display will automatically comply with the power saving parameters shown below.
When power-saving functions are in effect, the screen display is darker than usual.
COMPUTER MODE H-SYNC V-SYNC VIDEO POWER LED
Power ON Yes Yes Active Blue
Standby mode No Yes Blanked Orange
Suspend mode Yes No Blanked Orange
OFF mode No No Blanked Off
Contents Index
69
Page 70

Contents
Index
70
THE MULTI-TOUCH EXPERIENCE WITH CINTIQ
The Cintiq 24HD interactive pen display is designed to enhance the way you work. Multi-touch enables
you to interact with a computer using only your fingertips on the Cintiq display screen surface.
You can use touch on Cintiq as you would on any other Mac or Windows device, such as phones,
trackpads, and notebooks. First learn the basic actions to navigate and perform typical mouse operations.
Then learn how to scroll, zoom, and rotate.
Touch is activated whenever you touch the display screen surface.
• When using touch, you can generally position your fingers as far apart as is comfortable.
However, placing your fingers too closely together may be interpreted by Cintiq as input from a single
finger, or Cintiq may confuse which finger initiated or performed an action or gesture. Your fingers must
remain within the active area of the screen surface.
• Experiment with touch to see what works best for you. Take care to prevent accidental touches on the
display screen when making gestures. For example, if your small finger touches the display screen
surface when zooming or scrolling, then you may trigger an unanticipated right-click.
Note: For product models that support both pen and multi-touch, you can simultaneously work with the
pen and touch in supporting applications. For example, you might use touch to turn a 3D object
while using the pen to sculpt a surface texture. The pen has priority over touch whenever the pen tip
or eraser is within proximity of the pen display screen. Lift the pen and your hand away from the
display screen surface to enable touch.
Navigating with multi-touch
Customizing multi-touch
Testing multi-touch
Contents Index
70
Page 71

Contents
Uncheck to disable touch.
Touch can be completely disabled (and again
enabled) from any of the touch function tabs
in the Wacom Tablet control panel.
MY GESTURES tab shown.
Windows screen capture shown. Available options may
vary, depending on your operating system and version.
Windows
: This tab is visible only after you select the USE
W
ACOM GESTURES option in the TOUCH OPTIONS tab.
Index
71
NAVIGATING WITH MULTI-TOUCH
The multi-touch feature of your Cintiq interactive pen display enables you to control a computer using only
your fingertips on the display screen surface.
Touch options can be individually enabled or disabled within the Wacom Tablet control panel. Touch is on
when selected in the T
• Use basic actions to navigate and perform typical mouse operations.
• Use gestures to scroll, zoom, rotate, and perform other functions.
OUCH OPTIONS, STANDARD GESTURES, or MY GESTURES tab.
You can customize your touch experience
functions.
Contents Index
and also customize the ExpressKeys to perform some touch
71
Page 72

Contents
Index
Note: In the following descriptions, two-finger actions and gestures apply primarily to Mac.
Although some gestures may be similar, Windows systems use the Windows standard two-finger
gestures by default. For a consistent experience across applications, select the U
gestures option in the Wacom Tablet control panel T
OUCH OPTIONS tab.
SE WACOM
BASIC FUNCTIONS
72
Navigate
. Use a single finger to position the screen cursor.
The screen cursor jumps to the position where you touch
the display screen surface.
Double-click
. Using a single finger, select an item. Move your
Drag
. Using a single finger, tap twice on an item.
finger across the display screen surface to drag your
selection. Lift your finger to release the item.
Tip
:
You can select and drag multiple items on the system
desktop:
Windows
: Press the CTRL or SHIFT key as you tap to
select multiple items.
: Press the SHIFT or COMMAND key as you tap to
Mac
select multiple items.
Contents Index
72
Page 73

Contents
APPLICATION-SPECIFIC FUNCTIONS
Index
73
A
DD TAP TO RIGHT CLICK
Using a single finger, select an item. Then with a second
finger touch and release to the right of that finger.
Releasing your finger issues a right-click and brings up a
context menu at the screen cursor position.
You can then select an option in the menu with the touch of
a finger.
Note: If Cintiq is configured for left-handed use, touch to
the left of the primary finger.
AP TO RIGHT CLICK
T
To right-click and bring up a context menu at the screen
cursor position, tap the display screen surface with two
fingers spaced slightly apart.
You can then select an option in the menu with the touch of
a finger.
CROLL
S
Place two fingers on the display screen surface. Using a
smooth motion, move your fingers together in parallel.
• Scroll up by moving your fingers in an upward motion.
• Scroll down by moving your fingers in a downward
motion.
• Scroll left by moving your fingers in a leftward motion.
• Scroll right by moving your fingers in a rightward motion.
Fast scroll
. Quickly move (or flick) two fingers together,
lifting your fingers at the end of the motion.
• Fast scroll up by flicking your fingers in an upward
motion.
• Fast scroll down by flicking your fingers in a downward
motion.
Note: Fast scrolling works only for vertical scrolling.
Contents Index
73
Page 74

Contents
Index
74
Z
OOM
First place two fingers on the display screen surface.
• Zoom-in by moving (expanding) your fingers away from
one another.
• Zoom-out by moving (pinching) your fingers toward one
another.
Note: If zoom functions do not operate correctly within
®
Adobe
CROLL WHEEL function is not selected within the
S
Photoshop P
Photoshop®, verify that the ZOOM WITH
REFERENCES options.
Contents Index
74
Page 75

Contents
Index
75
R
OTATE
Two finger rotate. Place two fingers diagonally on the
display screen surface and then rotate them clockwise or
counter-clockwise.
For best recognition of this gesture, start with your fingers
positioned diagonally on the display screen and keep them
at least 25 mm (1 inch) apart.
Note: The rotate gesture may work differently depending on
the application you are working with. Rotation may
work smoothly, in 90-degree increments, or not at all.
Rotate around finger
. Place two fingers diagonally on the
display screen surface. Keep one finger stationary and
move the other finger around it.
For best recognition of this gesture, start with your fingers
positioned diagonally on the display screen and keep them
at least 25 mm (1 inch) apart.
Note: The rotate gesture may work differently depending on
the application you are working with. Rotation may
work smoothly, in 90-degree increments, or not at all.
S
WIPE LEFT/RIGHT TO NAVIGATE
Forward or Back (swipe right or left). Swipe using three
fingers spaced slightly apart, lifting your fingers at the end of
the motion.
• Send a ‘Forward’ command in most browsers and
picture viewers by swiping to the right.
• Send a ‘Back’ command in most browsers and picture
viewers by swiping to the left.
:
Tips
• Swiping is similar to using the right and left arrow
keys in document viewers.
• Use the swipe gestures to page forward or back in
most web browsers.
Contents Index
75
Page 76

Contents
Index
76
S
WIPE LEFT/RIGHT TO SWITCH APPLICATIONS
Using four fingers spaced slightly apart, move your fingers
left or right to open the application switcher. Then use a
single finger to select an application.
Mac OS 10.7.x
. Using four fingers, swipe them left or right
to switch between full-screen apps.
S
WIPE UP to SHOW DESKTOP
Using four fingers spaced slightly apart, swipe up to show
the desktop. Swipe up again to move your open windows
back to the desktop.
Mac OS 10.7.x
. Swipe up for Mission Control and view all
of the open windows on your Mac. Swipe up again to exit
Mission Control.
This gesture can be customized. See choosing custom
multi-touch functions.
Contents Index
76
Page 77

Contents
Index
77
S
WIPE DOWN for FLIP 3D/EXPOSÉ/APP EXPOSÉ
Using four fingers spaced slightly apart, swipe down.
• Flip 3D (Windows)
: Your first swipe opens Flip 3D.
Swipe down again to close Flip 3D. Swipe left or right to
move through the open windows. Use a single finger
tap to select.
• Exposé (Mac)
: Your first swipe opens Exposé.
Swipe down again to close Exposé. Use a single finger
tap to select.
• App Exposé (Mac OS 10.7.x)
: Swipe down to preview
the open windows of the app you are working with.
Swipe down again to exit App Exposé.
This gesture can be customized. See choosing custom
multi-touch functions.
INCH FOR LAUNCHPAD
P
Mac OS 10.7.x only. Place your thumb and three fingers on
the display screen surface, then pinch them together to fade
your open windows and display all of your apps.
S
PREAD TO SHOW DESKTOP
Mac OS 10.7.x only. Place your thumb and three fingers on
the display screen surface, then spread them apart to show
the desktop view.
Contents Index
77
Page 78

Contents
Express Key Preferences
double click
eraser
right click
Pen Preferences
lcd settings
wacom tablet preferences
show settings
cycle layers
brush size
rotate
auto scroll/zoom
pan/scroll
undo
precision mode
option
display toggle
touch strip toggle
radial menu
cmd (this should be icon for mac)
cycle layers
brush size
rotate
auto scroll/zoom
copy merged
redo
tab
fit on screen
save
new layer
touch strip toggle
keyboard
brush panel
WACOM-SPECIFIC FUNCTIONS
Index
78
T
AP to display RADIAL MENU
Using three fingers spaced slightly apart, tap them on the
display screen surface. This action will open the Radial
Menu.
This gesture can be customized. See choosing custom
multi-touch functions.
S
WIPE DOWN to show SETTINGS
Using five fingers spaced slightly apart, swipe down to
activate (on your display screen) an interactive diagram of
the current ExpressKey, Touch Ring, and pen settings.
Click on a section of the diagram to open the appropriate
Wacom Tablet control panel tab. You can then adjust
settings as needed.
Swipe down again to dismiss the diagram, or click
anywhere outside of the diagram.
This gesture can be customized. See choosing custom
multi-touch functions.
T
AP to show ON-SCREEN KEYBOARD
Using five fingers spaced slightly apart, tap them on the
display screen surface. This action will launch the onscreen keyboard.
Close the keyboard by again tapping five fingers on the
display screen surface.
This gesture can be customized. See choosing custom
multi-touch functions.
Contents Index
78
Page 79

Contents
Index
79
CUSTOMIZING MULTI-TOUCH
Use the Wacom Tablet control panel to customize your product for the way you like to interact with multitouch on your Cintiq and computer. Select the T
to customize, and change settings using the available options. See also navigating with multi-touch
Manage your control panel settings
Control panel overview
Setting multi-touch options
Choosing standard multi-touch functions
Choosing custom multi-touch functions
Application-specific settings
Disabling multi-touch
OUCH icon in the TOOL list. Then select an appropriate tab
.
Contents Index
79
Page 80

Contents
DOUBLE-TAP TIME adjusts how fast you must tap
to register a double-click. To test your setting,
tap twice on the T
EST area. Not available for
Windows.
Note: The D
OUBLE-TAP TIME setting is
independent of system settings.
Changes you make to this setting in the
Wacom Tablet control panel do not affect
similar system settings. However,
changes made to similar system settings
may affect your Cintiq setting.
For Windows 7 or later, only
.
Choose an option to use Windows standard
gestures or Wacom gestures. The default is to
use Windows gestures.
This is a global option and will apply to all of
your applications.
Tip
:Choose USE WACOM GESTURES for a
consistent experience across
applications. When selected, all
Windows standard gestures are
available, as well as the customizable
gestures shown on the M
Y GESTURES tab
of the Wacom Tablet control panel.
Mac screen capture shown.
SETTING MULTI-TOUCH OPTIONS
Select the TOUCH OPTIONS tab.
Index
80
Contents Index
80
Page 81

Contents
Multi-touch actions and gestures are available
when selected.
So that you may work in different ways, some
functions (such as a right-click) can be
performed using different actions or gestures.
Position the screen cursor over a touch option
to see a static image of that function.
If you do not choose a specific option to view,
then the control panel will display each option
sequentially, from top to bottom.
See also navigating with multi-touch
and
choosing custom multi-touch functions
.
Mac screen capture shown. Available options may vary,
depending on your operating system and version.
Index
CHOOSING STANDARD MULTI-TOUCH FUNCTIONS
To customize Cintiq for your touch preferences, select the STANDARD GESTURES tab.
Note: This tab is not available for Windows systems. The Windows standard two-finger actions and
gestures are always available.
81
Contents Index
81
Page 82

Contents
Multi-touch gestures are modified based on
your selection from the drop-down menus, and
are available when selected.
Position the screen cursor over a touch option
to see a static image of that function.
If you do not choose a specific option to view,
then the control panel will display each option
sequentially, from top to bottom.
See also navigating with multi-touch
and
choosing standard multi-touch functions
.
Windows screen capture shown. Available options may
vary, depending on your operating system and version.
Windows
: This tab is visible only after you select the USE
W
ACOM GESTURES option in the TOUCH OPTIONS tab.
Index
CHOOSING CUSTOM MULTI-TOUCH FUNCTIONS
To create custom touch gestures, select the MY GESTURES tab.
82
Contents Index
82
Page 83

Contents
• Deselect to disable multi-touch.
You can still work with the ExpressKeys
and pen.
• Select to E
NABLE TOUCH.
• This option can also be changed by
pressing an ExpressKey to which the
T
OUCH ON/OFF function has been
assigned.
M
Y GESTURES tab shown.
Click TOUCH PROPERTIES...
to access your touch
settings in the Wacom
Tablet control panel.
Index
DISABLING MULTI-TOUCH
Choose the STANDARD GESTURES, MY GESTURES, or TOUCH OPTIONS tab to disable and enable touch.
83
Press an ExpressKey or other tool button configured for the S
diagram of the current Cintiq settings on your display screen.
ETTINGS option to display an interactive
Contents Index
83
Page 84

Contents
Index
84
TESTING MULTI-TOUCH
If you encounter problems with multi-touch, it is a good idea to first check the assigned touch functions or
reset them to their default conditions.
To further test touch:
1. Attempt to move the screen cursor by touching your finger in different places on the display screen
surface. Touch to select an item. The status LED should brighten when you touch the display screen
surface. See also testing Cintiq
2. Open the Wacom Tablet control panel and click on the A
click D
IAGNOSE.... The DIAGNOSTICS dialog box shows dynamic information about Cintiq, your Cintiq
tool(s), and appropriate information for touch-sensitive product models. See also testing controls and
input tools.
3. With the D
IAGNOSTICS dialog box open, touch the display screen surface with first one, then with two
fingers. Each time you touch the display screen surface, the tablet status LED should brighten and the
OUCH INFO state should change.
T
4. When you are done, click the C
.
BOUT button. In the dialog box that appears,
LOSE button to exit the dialog box.
Contents Index
84
Page 85

Contents
Index
85
CUSTOMIZING YOUR CINTIQ
After mastering the basics of using your pen and Cintiq 24HD interactive pen display, you may want to
customize the way Cintiq works. This chapter describes how to adjust your pen display and input tool
settings.
Advanced users can learn how to further optimize Cintiq by creating application-specific settings
Manage your control panel settings
Control panel overview
Calibrating the pen display
Customizing the pen
Customizing multi-touch
Customizing pen display functions
Button functions
Using and customizing the Radial Menu
Working with Display Toggle
Application-specific settings
Working with multiple tools
Renaming the tablet in the tablet list
.
Contents Index
85
Page 86

Contents
Click on any section of the
diagram to open the appropriate
Wacom Tablet control panel tab.
Settings may vary depending on
your product model.
Index
MANAGE YOUR CONTROL PANEL SETTINGS
Open the Wacom Tablet control panel using the pen on the pen display:
•Windows
and choose the W
•Mac
folder. Then click on the W
. Click on the Windows START button and choose ALL PROGRAMS. Then select WACOM TABLET
ACOM TABLET PROPERTIES option.
. Open SYSTEM PREFERENCES from either the Dock, the Apple menu, or from the APPLICATIONS
ACOM TABLET icon.
86
You can begin customizing Cintiq after opening the control panel. See control panel overview
.
Note: User-specific preferences are supported. After logging on, each user can customize their personal
settings in the Wacom Tablet control panel. Switching to another user will automatically load the
settings for that user.
Tips:
• Display an interactive diagram of the current pen display settings by pressing the appropriate
hardware control button
at the top of the pen display.
• Cintiq 24HD
control button.
: Launch the Wacom Tablet control panel by pressing the appropriate Cintiq hardware
Contents Index
86
Page 87

Contents
Tabs display
customizable settings
for the selected T
OOL.
Displays information
dialog, and option to
D
IAGNOSE... your
product.
Resets the selected
tab to its default
settings.
Icons represent your pen display (T
ABLET),
T
OOL, and APPLICATION settings.
Choose F
UNCTIONS to
customize the
ExpressKey, Touch
Ring, and Radial
Menu settings.
Display Toggle
options are available
on multiple monitor
systems.
For touch-sensitive
models, choose
T
OUCH to customize
your touch settings.
See customizing
multi-touch.
Choose G
RIP PEN to
customize the pen
settings. The icon is
available after you
have used a pen on
the pen display.
Displays advanced options
.
Downloads or
displays this manual.
Index
87
CONTROL PANEL OVERVIEW
Use the Wacom Tablet control panel to customize your Cintiq or Grip Pen. When you open the control
panel, an icon for the Grip Pen or other input tool is displayed in the T
displayed for product models that support multi-touch. The appropriate tabs are displayed.
To customize, make changes to the tab controls. Experiment with different settings to find what works best
for you. Any changes you make will take effect immediately. Click D
OOL list. A TOUCH icon is also
EFAULT to return to the factory settings.
Tool Tips are available for most control panel items. Position the screen cursor over an item and let it rest
there. The appropriate Tool Tip will pop up in a few moments.
Your keyboard tab and arrow keys can also be used to navigate the control panel.
Contents Index
87
Page 88

Contents
The TABLET list displays an icon for any
supported pen display or tablet that has been
installed on your system and is currently
connected. All settings shown below the list
apply to the selected pen display or tablet.
• The control panel will not launch unless a
supported pen display or tablet is connected
to the computer.
• Settings can only be viewed or changed for
an attached pen display or tablet.
• A pen display or tablet cannot be deleted
from the control panel list unless it is
attached to the computer.
See also installing multiple tablets
and renaming
the tablet in the tablet list.
Current selections are highlighted.
The TOOL list displays icons for the pen display FUNCTIONS and for the different tools that have been used on the
pen display. The T
OUCH icon is displayed for touch-sensitive models.
To customize settings for a tool, click on its icon within the T
OOL list. The appropriate tabs will be displayed.
See customizing pen display functions
, customizing the pen, and customizing multi-touch.
Note: The pen will be automatically added to the T
OOL list when first used on the pen display, and functions
using the default settings.
See also working with multiple tools
.
Use the A
PPLICATION list to define TOOL settings that apply only to a specific application. See application-
specific settings.
Index
88
Control panel lists and tabs
: The control panel TABLET, TOOL, and APPLICATION lists allow you to select the
pen display or tablet, tool, or application for which you want to change settings.
Note: The A
PPLICATION list is optional. It is not necessary to select or add applications in order to
customize your Cintiq tool(s).
Contents Index
88
Page 89

Contents
Important: If using a VGA
connection, first R
ESET the pen
display. See On Screen Display
(OSD) settings.
1. Open the Wacom Tablet control panel.
If more than one pen display is installed
on your system, select the pen display
you are working with from the T
ABLET list.
2. Select G
RIP PEN from the TOOL list.
Then select the C
ALIBRATE tab.
3. If you are working with multiple monitors,
select the M
ONITOR corresponding to
your Cintiq. Only monitors that are set to
one of the resolutions supported by
Cintiq will appear in the list.
4. Click C
ALIBRATE... to activate the
calibration screen.
5. Hold the pen and position your head as
you normally do when working with the
pen display. Use the pen tip to click on
the center of the crosshairs in the upperleft corner.
6. Then click on the center of the crosshairs
that are displayed in the upper-right,
lower left, and lower right corners.
7. Test the alignment by positioning the pen
at a few different points on the display.
Click OK to accept the calibration.
Click T
RY AGAIN to recalibrate.
Crosshairs
Index
89
CALIBRATING THE PEN DISPLAY
For optimum performance, you must calibrate the pen display to align the screen cursor with the position
of the pen on the display screen. This is required to compensate for viewing angle, and to adjust for
parallax
. Set Cintiq in its working position, then follow the below procedure.
Tip
: To see the screen cursor slightly offset from the actual position of the pen tip, calibrate by clicking
on a spot showing that offset from the crosshairs. For example, to have the screen cursor appear
2.5 mm (1/10th of an inch) above and to the left of the pen tip, calibrate by clicking on a spot 2.5 mm
(1/10th of an inch) below and to the right of the crosshairs.
Contents Index
89
Page 90

Contents
Adjusting eraser feel
Adjusting tip feel and double-click
Advanced tip and eraser pressure settings
Application-specific settings
Customizing tilt sensitivity
Customizing tool buttons
Index
90
CUSTOMIZING THE PEN
Use the pen when opening the Wacom Tablet control panel. The pen will be selected in the TOOL list and
the appropriate tabs will be displayed. If not automatically selected, choose the pen from the T
Select a tab and choose from the available options.
OOL list.
Wacom offers a number of optional pens, such as the Art Pen and Airbrush, that are compatible for use
with Cintiq.
• The Art Pen features a pressure-sensitive tip and eraser, as well as sensitivity to tilt and rotation.
Rotating the barrel in supporting applications creates a unique effect.
• The Airbrush is a true digital airbrush. It features a pressure-sensitive tip and eraser, tilt sensitivity, and
a fingerwheel to control the application of digital paint.
These tools are fully supported in the Wacom driver software. They will appear in the T
OOL list of the
Wacom Tablet control panel after you touch the pen display screen with the tip of the tool. The control
panel will automatically update to show the new tool and the options available for customization.
In supporting applications you can adjust the functionality of the Art Pen rotation or the Airbrush
fingerwheel within the application. See the documentation that came with your application for details.
To learn more about these and other optional tools that can be used with Cintiq, visit www.wacom.com and
choose the Wacom web site for your region. On the web site you can also learn about applications that
currently support the advanced features of these tools.
Contents Index
90
Page 91

Contents
Customizes the amount of pressure
needed to click, draw, or ink.
To create broad brush strokes or to click
with a light touch, use a S
OFT tip setting.
For maximum control while drawing thin
lines, use a F
IRM tip setting.
With your screen cursor positioned over
an empty area of the control panel, press
down on the pen display screen with your
pen tip. Use the pressure bar to
determine how hard you must press on
the pen to reach maximum pressure.
Click to further customize
the tip sensitivity.
Tips
:
• Use a soft T
IP FEEL for a wider range of pressure values in most pressure-sensitive applications.
• In some applications a soft pressure setting can make the pen overreact so that slight pressure on the pen
will be magnified on the screen. If you experience this, try a firmer T
IP FEEL setting.
• To make double-clicking easier, expand the tap area that accepts a double-click (the double-click distance).
• A large double-click distance may cause a delay at the beginning of brush strokes in some drawing
applications. This may also cause a delay at the beginning of a drag action or inking stroke. If you notice
such effects, try setting a smaller double-click distance and using the side switch to double-click. You can
also set an ExpressKey to double-click
.
Adjusts the size of the double-click
area. Drag slider to O
FF if you do not
want double-click assist
.
Index
ADJUSTING TIP FEEL AND DOUBLE-CLICK
To adjust the tip sensitivity of your pen, select the PEN tab.
91
Contents Index
91
Page 92

Contents
Customizes the amount of
pressure needed to erase.
Click to further customize
the eraser sensitivity.
With your screen cursor positioned over an
empty area of the control panel, press down
on the pen display screen with your pen
eraser. Use the pressure bar to determine
how hard you must press on the eraser to
reach maximum pressure.
Select the function to perform when
using the eraser.
Using your pen tip or
eraser, make several
strokes within the box
to test the results of
your changes.
Graphically displays the selected pressure
sensitivity curve and click threshold settings.
Move the pressure controls to change the
sensitivity curve.
•C
LICK THRESHOLD determines the amount
of force required to register pressure or
generate a tip click.
• Use the S
ENSITIVITY control to change the
slope of the pressure response curve.
•M
AX PRESSURE determines how hard you
must press the pen tip to reach maximum
pressure.
A curve that increases quickly makes the pen
feel more sensitive.
Index
ADJUSTING ERASER FEEL
To adjust the eraser sensitivity of your pen, select the ERASER tab.
92
ADVANCED TIP AND ERASER PRESSURE SETTINGS
To further customize tip or eraser pressure settings, select the PEN or ERASER tab and click on the
USTOMIZE... button. Options within the PEN FEEL DETAILS dialog box enable you to independently change
C
the tip or eraser pressure sensitivity and click threshold settings.
Important: In the P
RASER FEEL slider, which override the advanced pressure settings.
or E
EN and ERASER tabs, these settings are adjusted simultaneously with the TIP FEEL
Contents Index
92
Page 93

Contents
Select the function to perform when
pressing the upper or lower side switch.
The selected function occurs when you
bring the pen tip within 5 mm (0.20 inch) of
the display screen surface without touching
the screen and then press the upper or
lower side switch.
Tip
: To make double-clicking easier, set
the side switch to D
OUBLE CLICK.
Double-click here to change the pen tip function.
• At least one tool button should be set to the C
LICK function.
• The tip must be set to C
LICK in order to draw in most graphics
applications.
You can change the S
IDE SWITCH
M
ODE to best fit the way you like to
use the pen when making right-clicks
or other click functions. Click on the
control panel O
PTIONS... button.
Select:
•H
OVER CLICK to perform click
functions without touching the
pen tip to the display screen
surface. This is the default
setting for all except Tablet PCs.
•C
LICK & TAP to enable the precise
placement of click functions.
When selected, you must first
press the side switch then touch
the pen tip to the display screen
surface in order perform the
function.
Hover click
Click tap
Index
CUSTOMIZING TOOL BUTTONS
Select the PEN tab to change the functions assigned to the side switches and tip of your pen.
93
Contents Index
93
Page 94

Contents
Drag to increase or decrease TILT
S
ENSITIVITY. Test the new setting in an
application that supports tilt.
The tilt setting applies to both the tip and
eraser of your tool.
Tilt is direction sensitive and can be used in
some applications to control brush
orientation or other characteristics.
Using and customizing the Radial Menu
Customizing the Touch Rings
Customizing the ExpressKeys
Working with Display Toggle
Application-specific settings
Index
94
CUSTOMIZING TILT SENSITIVITY
To adjust the tilt sensitivity of your pen, select the PEN tab. Tilt sensitivity determines how far you have to
tilt the tool to produce the maximum tilt effect. You need to tilt the pen less at high sensitivity than at low
sensitivity.
Visit the Wacom web site to learn about applications that currently support tilt. See product information
CUSTOMIZING PEN DISPLAY FUNCTIONS
To customize the interactive pen display, open the Wacom Tablet control panel and select the FUNCTIONS
icon in the T
OOL list. Select a tab to customize, and change settings using the available options.
.
Contents Index
94
Page 95

Contents
Choose a function to perform when the key
is pressed.
ExpressKey functions can be defined for
use with specific applications
.
See using the ExpressKeys
for more
information.
Index
95
CUSTOMIZING THE EXPRESSKEYS
To customize the ExpressKeys, select the EXPRESSKEYS tab. Each key can be customized to perform a
Display Toggle, modifier, keystroke, or other function.
Important: Some applications can override and control the ExpressKey functions. For details, see
using applications integrated for tablet control
.
Contents Index
95
Page 96

Contents
Tips:
• To customize the ring for other actions, select the K
EYSTROKE... option and define a custom keystroke
function. To learn which keystroke shortcuts are supported by a particular application, see the
documentation that came with the application.
•Choose S
KIP to set the Touch Ring mode button to skip the function state.
• To zoom images at the current position of the screen cursor in Adobe Photoshop CS3 or later, open the
Adobe Photoshop general preferences pane. Check the Z
OOM WITH SCROLL WHEEL option and click OK.
Choose a function
to perform when using
the Touch Ring. Each Touch Ring can be
customized for three different modes.
Adjust S
PEED to control the rate at which
zooming and scrolling occurs, or the speed
at which keystroke events are sent to an
application.
Touch Ring functions can be defined for
use with specific applications
.
See using the Touch Rings
for more
information.
Enables or disables display of the Touch
Ring settings diagram.
Index
96
CUSTOMIZING THE TOUCH RINGS
To customize the Touch Rings, select the TOUCH RING tab. Touch Ring functions can be modified to
perform various zooming, scrolling, or custom keystroke actions. For example, you might set a Touch Ring
function to cycle layers when working in Adobe Photoshop.
Important: Some applications can override and control the Touch Ring functions. For details, see
using applications integrated for tablet control
Contents Index
.
96
Page 97

Contents
Index
97
BUTTON FUNCTIONS
Customize Cintiq for the way you like to work. Simply use the Wacom Tablet control panel to change the
button function that is assigned to a pen button, ExpressKey, Touch Ring, or Radial Menu setting.
Button function options may vary, depending on your pen display model. Not all options are available for
all controls or pen display models.
FUNCTION NAME DESCRIPTION
CLICKS
•CLICK Simulates a primary mouse button click. Be sure at least one button performs this
function so you can always navigate and click.
•R
IGHT CLICK Simulates a right mouse button click, which displays a context menu.
•M
IDDLE CLICK Simulates a middle mouse button click.
•D
OUBLE CLICK Simulates a double-click. For easier double-clicking, use this function instead of
tapping twice with the pen tip.
•C
LICK LOCK Simulates holding down the primary mouse button. Press the pen button once to
initiate click lock. Press the button again to release click lock. Click lock is useful
for dragging objects or selecting blocks of text.
•4
TH CLICK Simulates a 4th mouse button click.
•5
TH CLICK Simulates a 5th mouse button click.
Contents Index
97
Page 98

Contents
Deletes the last entry in the
keystroke entry box.
Clears the entry box.
To learn which keystroke shortcuts
are supported by a particular
application, see the documentation
that came with the application.
Choose one or more modifier options.
Choose a C
LICKS option to simulate pressing
a button of the selected type on a mouse.
Index
FUNCTION NAME DESCRIPTION
KEYSTROKE... Enables you to simulate keystrokes Select this option to display the DEFINE
K
EYSTROKE dialog box.
Enter a keystroke or keystroke combination in the K
Keystroke combinations can include letters, numbers, function keys (such as F3)
and modifier keys (such as S
COMMAND, and CONTROL for Mac). You can also choose special keystrokes or
keystroke combinations from the A
HIFT, ALT, or CTRL for Windows, or SHIFT, OPTION,
DD SPECIAL drop-down menu.
After defining a keystroke or keystroke sequence, click OK.
Important: Because the E
NTER (Windows) and RETURN (Mac) keys
can be selected as a defined keystroke, they cannot be used to select OK.
You must use your pen to click on the OK button.
Enter a name for the keystroke definition. The name will be displayed with the
respective control or in the Radial Menu, as applicable.
You can create different keystroke functions for different applications.
See application-specific settings
.
EYS entry box.
98
M
ODIFIER... Enables you to simulate modifier key(s) (such as SHIFT, ALT, or CTRL for Windows,
Contents Index
or
SHIFT, OPTION, COMMAND, and CONTROL for Mac). Many applications use modifier
keys to constrain the size or placement of objects.
98
Page 99

Contents
When you select PAN/SCROLL, you are
prompted to set a scrolling speed for use
in applications that do not support
grabber hand (pixel-level) panning.
• A slower setting reduces the scroll
rate and is useful for close-up and
detail work where you need precise
control of the image.
• As you move the pen tip, the
document or image is repositioned to
follow the direction of pen movement
on the pen display screen surface.
• Release the button or lift the pen tip
from the display screen surface when
you are done.
• In some application windows the
document will precisely follow the
screen cursor as you move the pen
tip, while in others it will simply move
in the same general direction as the
screen cursor.
Index
FUNCTION NAME DESCRIPTION
RADIAL MENU Displays the Radial Menu on your screen. Each level of the hierarchical menu
consists of eight menu slices which may contain various features and options to
choose from.
B
ACK Simulates the BACK command in browser applications.
F
ORWARD Simulates the FORWARD command in browser applications.
P
AN/SCROLL... Enables you to position a document or image in any direction within the active
pane. Do this by pressing a pen button set for P
the pen tip across the pen display screen.
AN/SCROLL and then dragging with
99
S
HOW DESKTOP Minimizes all open windows to display a clean desktop.
S
WITCH APPLICATION Brings up the application switching dialog box with focus on the next open
Contents Index
application. On Windows 7 or Vista systems running Aero, Flip 3D will be
activated with focus on the next open application.
99
Page 100

Contents
Click BROWSE... to locate an
application, file, or script to
launch. The selection you make
appears in the N
AME box.
Click OK to accept the selection.
The dialog box will close and the O
PEN/RUN... option you have selected will be
assigned as the pen button option. Simply press the pen button to launch the
assigned option.
If your selection is for the Radial Menu, it will be displayed there.
Index
100
FUNCTION NAME DESCRIPTION
OPEN/RUN... Opens a dialog box where you can select a specific application, file, or script to
launch.
T
OUCH ON/OFF Available only for Cintiq 24HD touch models. TOUCH ON/OFF is useful when
you are working with an input tool and want to exclusively use pen mode.
Temporarily disable multi-touch by pressing an ExpressKey to which you have
assigned the T
touch. See also customizing the ExpressKeys
I
NK TOGGLE (Mac only.) Toggles the “ink in any application” function of Ink on and off.
Ink automatically recognizes and converts your handwriting into text and inserts it
into a document. Handwriting recognition must be turned on for this function to
work. See your Mac help for information on working with Ink.
O
N SCREEN KEYBOARD Launches the on-screen keyboard when you press the button to which this
function is assigned. Press the button to close the keyboard when open.
E
XPOSÉ (Mac only.) Tiles all open windows. To access this option, first choose
K
EYSTROKE... and then click on the ADD SPECIAL menu within the dialog box.
P
RESSURE HOLD Locks the pressure at the current pressure level until the button is released.
For example, you can paint with pressure sensitivity until you reach the brush size
that you like. You can then press the button and continue painting with the same
size brush until the button is released.
OUCH ON/OFF function. Press the ExpressKey again to enable
.
Contents Index
100
 Loading...