

Page 1
Installation instructions
1068340-R02
1
Heat pump dryer
One-family household
For Service and Spare Part Information please contact: V-ZUG AUSTRALIA Pty. Ltd. Tel+61732096822
The appliance should be installed by qualified personnel only.
Each step must be carried out and checked in full in the order specified.
Validity
The installation instructions apply to the models: 12011–12013
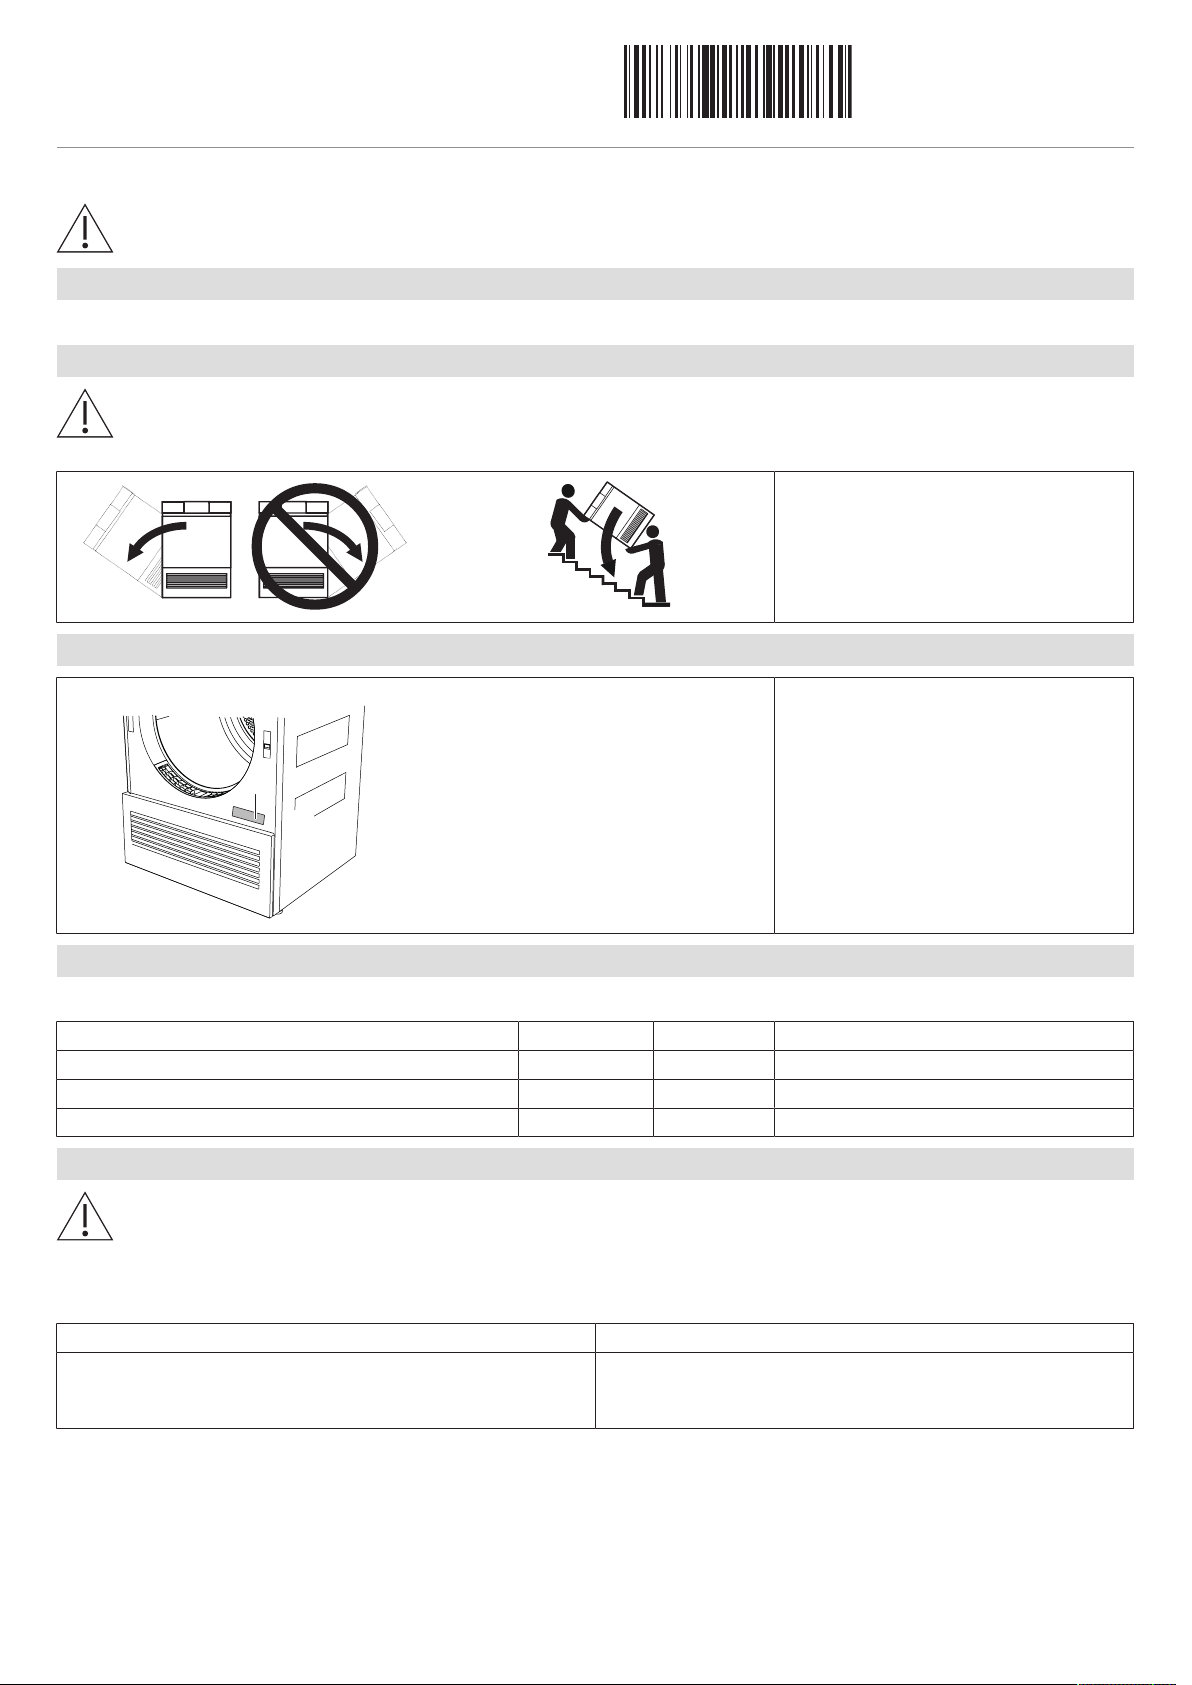
Transport
Transport the appliance in an upright position only! Transporting it in any other position will result in damage to the
appliance! When carried carefully without being shaken, the appliance may be tilted a maximum of 90° to the left
(viewed from the front).
1068340-R02
22/05/2019
Identification plate
▸ Open the appliance door.
– The identification plate 1 is located
bottom right.
Supplied installation accessories
The necessary installation accessories are located in the washing drum and in the appliance packaging.
Designation Article no. Number See installation step
Installation plate (incl. double-sided adhesive tape) W40653 1 2. Positioning the installation plate
Tower panel W55687 1 2. Positioning the installation plate
Condensate drain set (incl. screw material) W56298 1 6. Connecting condensate drain
Room conditions/Ventilation
Keep all ventilation slits on the appliance clear and unobstructed. Otherwise an adequate supply of air is not guaranteed.
▸ Ventilate the room well. Ensure that the temperature of the room is between 5–35°C.
▸ The room temperature must be kept between the range of 15–25°C to ensure the economic running of the appliance.
Room size <10m² (<20m³) Room size ≥10m² (≥20m³)
▸ Room must be ventilated: There must be air inlet and outlet
openings to the adjacent room or to the outside, e.g. open window, ventilation grille or slits in the door, ventilation system.
▸ Condensation may form on thermal bridges! The room must
therefore be aired after running several consecutive drying programmes, e.g. by opening a window or door to the room.
1
Page 2
Installation instructions
1068340-R02
1160
1200*
180°
180°
1200*
1160
595
70
15
600
500 50
57.5
3
6
1
5
(126)444280
850
2
4
550
458
71
Left-hand opening Right-hand opening
Heat pump dryer
One-family household
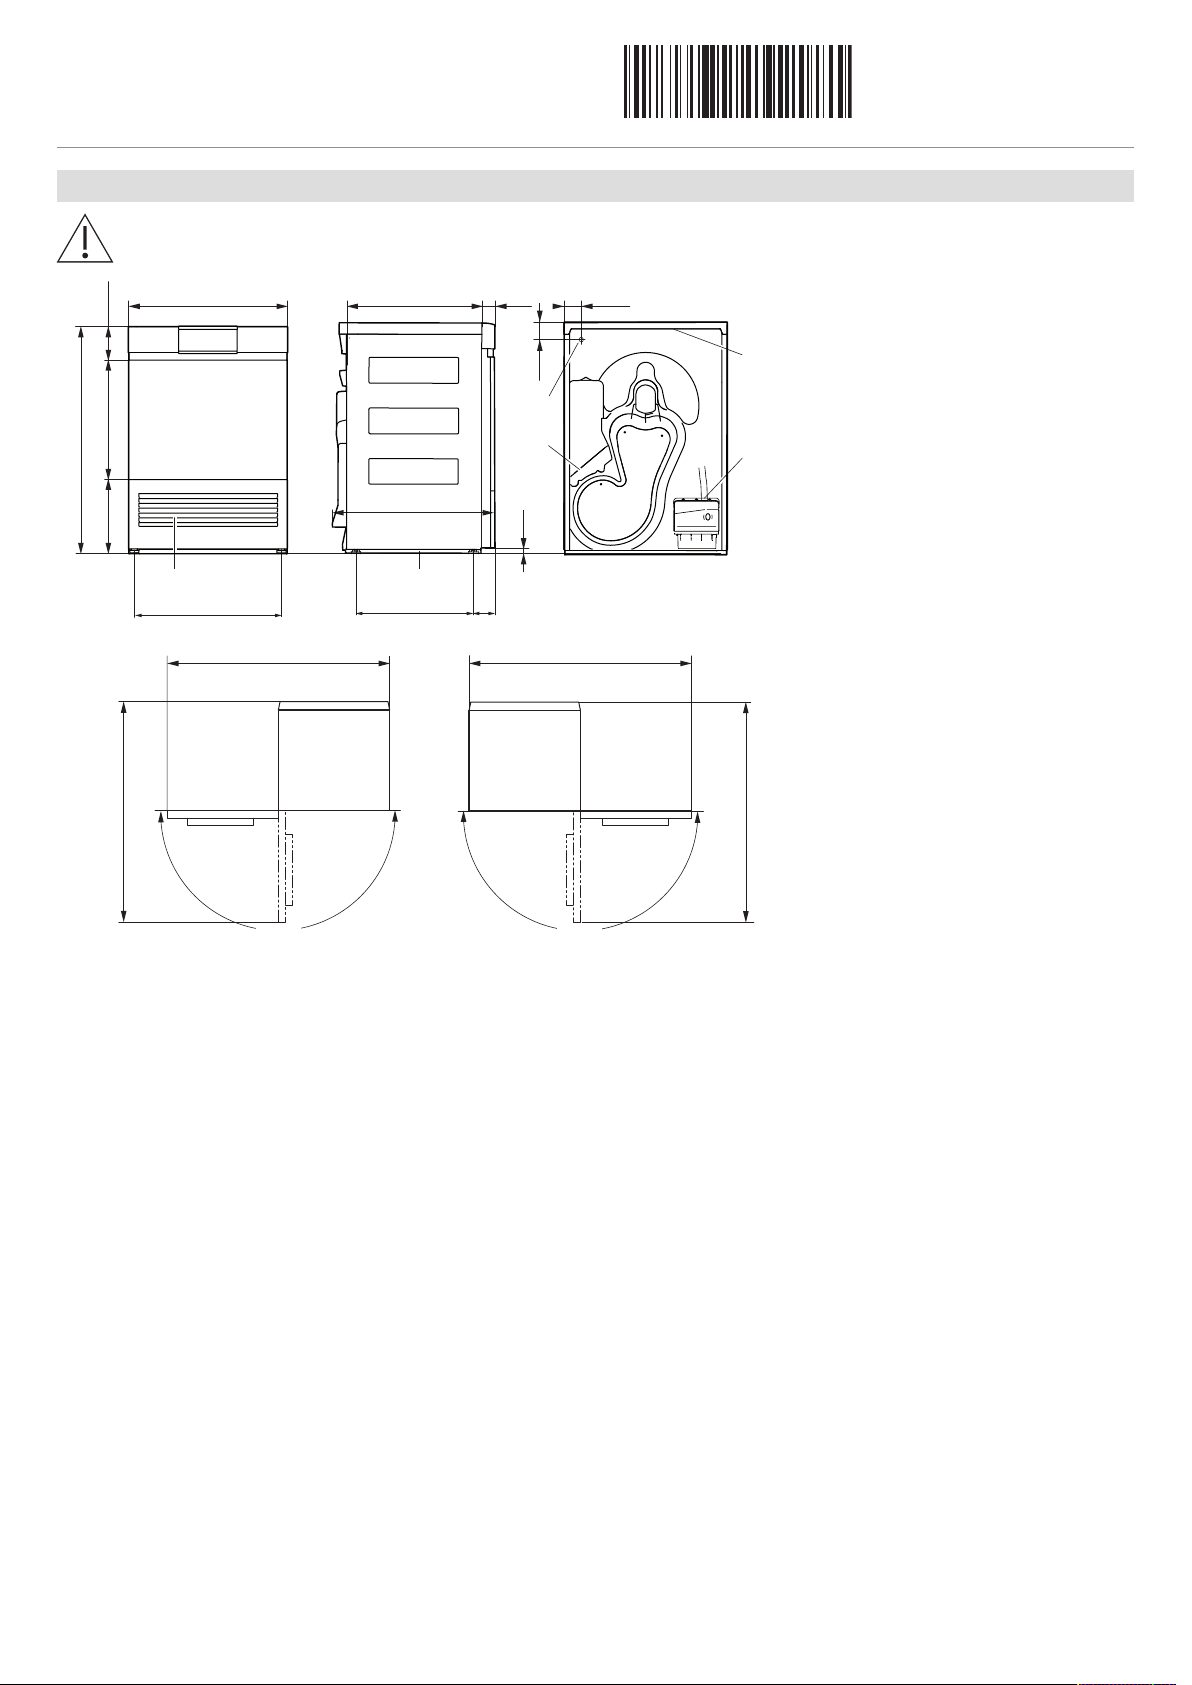
1. Dimensions
The stated dimensions do not include distances from walls. To prevent disturbing noise and vibration the appliances
must not come into contact with the surrounding walls of their installation location.
1068340-R02
22/05/2019
1 Cooling air inlet
2 Cooling air outlet
3 Installation plate
4 Tower panel
5 Electrical connection cable outlet,
length: 1.8 m, with plug
6 Condensate drain
drainage connection: ø10.5 mm
pumping height for drain pump:
1.2 m
condensate drain kit,
length:2m
* Clearance space across the whole width of the front
2
Page 3
Installation instructions
1068340-R02
1
E
D
45
3×
1
2
2
ø6
Heat pump dryer
One-family household
2. Positioning the installation plate
General tips
Use the installation plate supplied to install the appliance. It fixes the appliance in position, and is for use with both
free-standing appliances and appliances positioned in a niche.
In case of underfloor heating, do not drill holes in the floor! Adhere installation plate into place!
1068340-R02
22/05/2019
▸ Fold out spacers D in order to keep dis-
tance to the back wall.
Variant 1: Without underfloor heating:
▸ Fasten installation plate to the floor with
3screws.
▸ Dampen mounting slots E with water to
make the appliance easier to push in.
Variant 2: With underfloor heating:
▸ Holes must not be drilled in the floor if
the room has underfloor heating. The
installation plate must be adhered to the
floor.
▸ Dampen mounting slots E with water to
make the appliance easier to push in.
When installing the washer-dryer tower, do not drill any holes in the washing machine! Adhere installation plate into
place!
▸ If a tumble dryer has to be installed on
top of a washing machine, no holes
must be drilled in the washing machine.
The installation plate must be adhered to
the floor.
3
Page 4

Installation instructions
1068340-R02
K
S
1
2
3
U
S
P
P
P
1
2
B
U
12 mm
6 mm
3
4
Heat pump dryer
One-family household
Washer-dryer towers
Failure to use the correct installation plate can result in damage to the appliance!
Use the installation plate supplied to install the washing machine. The use of an unsuitable installation plate or a soft, soundinsulating underlay can cause damage to the appliance which does not fall within the scope of the manufacturer’s guarantee.
Tumble dryer 12011–12013
Washing machine 11001–11006, 11010–11014, 11021, 11023, 11025
1068340-R02
22/05/2019
▸ Take out the double-sided adhesive tape
S and adhere to the mounting surfaces
K.
Tumble dryer 12011–12013
Washing machine 265, 266, 268, 269
▸ Turn over the installation plate. Push to
the front edge of the washing machine
cover plate (see arrow) and adhere into
place.
▸ Take the tower panel out of its fixture on
the back of the tumble dryer.
▸ Install the tower panel on the mounted
installation plate.
▸ Click in the six positioning cams P.
▸ Cut out the mounts U.
▸ Adhere the double-sided adhesive tape
S to both sides of the mounts U.
▸ Turn over the installation plate.
▸ Adhere the mounts U to the 4 mounting
surfaces B precisely.
▸ Turn over the installation plate. Push to
the front edge of the washing machine
cover plate (see arrow) and adhere into
place.
▸ Take the tower panel out of its fixture on
4
the back of the tumble dryer.
▸ Install the tower panel on the mounted
installation plate.
Page 5

Installation instructions
1068340-R02
3
1
00
1
00
2
1
≥605
≥860
≥1710
≥45
4
A
D
B
C
D
=
50
A
≥
605
1
2
D
=
83
A
≥
645
A
B
C
D
Heat pump dryer
One-family household
Positioning in a niche
If a tumble dryer or a washer-dryer tower is installed in a niche, a 130° door stop must be provided (article no.
W54086).
If the niche is fitted with a door, it must be ensured that the door is left open for the duration of the process. The
niche door and the appliance door must be hinged on the same side.
1068340-R02
22/05/2019
▸ Centre the installation plate in the niche.
▸ Distance to the back wall: ≥45mm
▸ Cut-out for lateral connections (left or
right): ≥100 × 100mm
▸ Niche height for tumble dryer: ≥860mm
▸ Niche height for washer-dryer tower:
≥1710mm
Variant 1: Tumble dryer door C is flush with
niche front B:
▸ Niche depth A≥605mm
▸ Installation offset for installation plate
D=50 mm
Variant 2: Washing machine door C is flush
with niche front B:
▸ Niche depth A≥645mm
▸ Installation offset for installation plate
D=83mm
The condensed water hose must not be crushed between the rear of the appliance and the building wall.
5
Page 6

Installation instructions
1068340-R02
1
45
5
595
510
5
555
D
1
≥400 cm²
≥1710
≥
50
≥400 cm²
≥860
L
1
Heat pump dryer
One-family household
Free-standing position
If a tumble dryer and a washing machine are positioned side by side, keep a distance of min. 5mm between the installation plates and to the walls at the side and min. 45mm to the back wall. The installation plates for the washing
machine and tumble dryer are the same.
3. Inserting the ventilation grille
1068340-R02
22/05/2019
▸ Fold out spacers D in order to keep dis-
tance to the back wall.
▸ Dimensions 45 and 555 only apply if no
plumbing fittings are to be installed behind the appliance.
▸ The heat given off from the rear of the
appliance must be conducted out of the
niche.
▸ Insert 2 ventilation grilles P33002 or a
ventilation cross-section of min. 400 cm2 .
▸ Ensure there is a supply of fresh air via
the connection opening.
The condensed water hose must not be crushed between the rear of the appliance and the building wall.
4. Levelling
To ensure fault-free operation, the appliance must stand level with all 4 feet firmly on the installation plate and not
wobble.
▸ Roughly adjust the height of the front and
rear adjuster feet.
▸ Use a spirit level L to level the appliance.
▸ Slide the appliance onto the installation
plate.
▸ Finely adjust the front adjuster feet.
▸ The appliance must not wobble!
6
Page 7

Installation instructions
1068340-R02
1
2
A
C
B
D
3
Heat pump dryer
One-family household
5. Electrical connections
Electrical connections
Electrical connections must be carried out by qualified personnel in accordance with the guidelines and standards
for low-voltage installations and the specifications of the local electricity supply companies.
A plug-in appliance may only be connected to a socket outlet with earthing contact, installed according to specifications. An
all-pole mains isolating device with 3 mm contact opening should be provided in the house wiring system. Switches, plug and
socket devices, circuit breakers and fusible cut-outs which are accessible after installation and which have all-poles switching
are permissible as isolating devices. Effective earthing and separately installed neutral and earth conductors ensure safe and
fault-free operation. After installation, live parts and cables with basic insulation must not be accessible. Check old installations.
▸ The appliance is designed for use up to a max. altitude of 2000 m above sea level.
▸ Refer to the identification plate for information on the required mains voltage, current type and fuse protection.
The mains plug must not be cut off.
1068340-R02
22/05/2019
Connection cable
Valid for all washing machines and tumble dryers in the Adora, AdoraWash and AdoraDry model range.
The mains cable may only be replaced by the manufacturer, its Customer Services or a similarly qualified person.
Error messages «U1»
Disconnect the appliance from the mains and control the wiring.
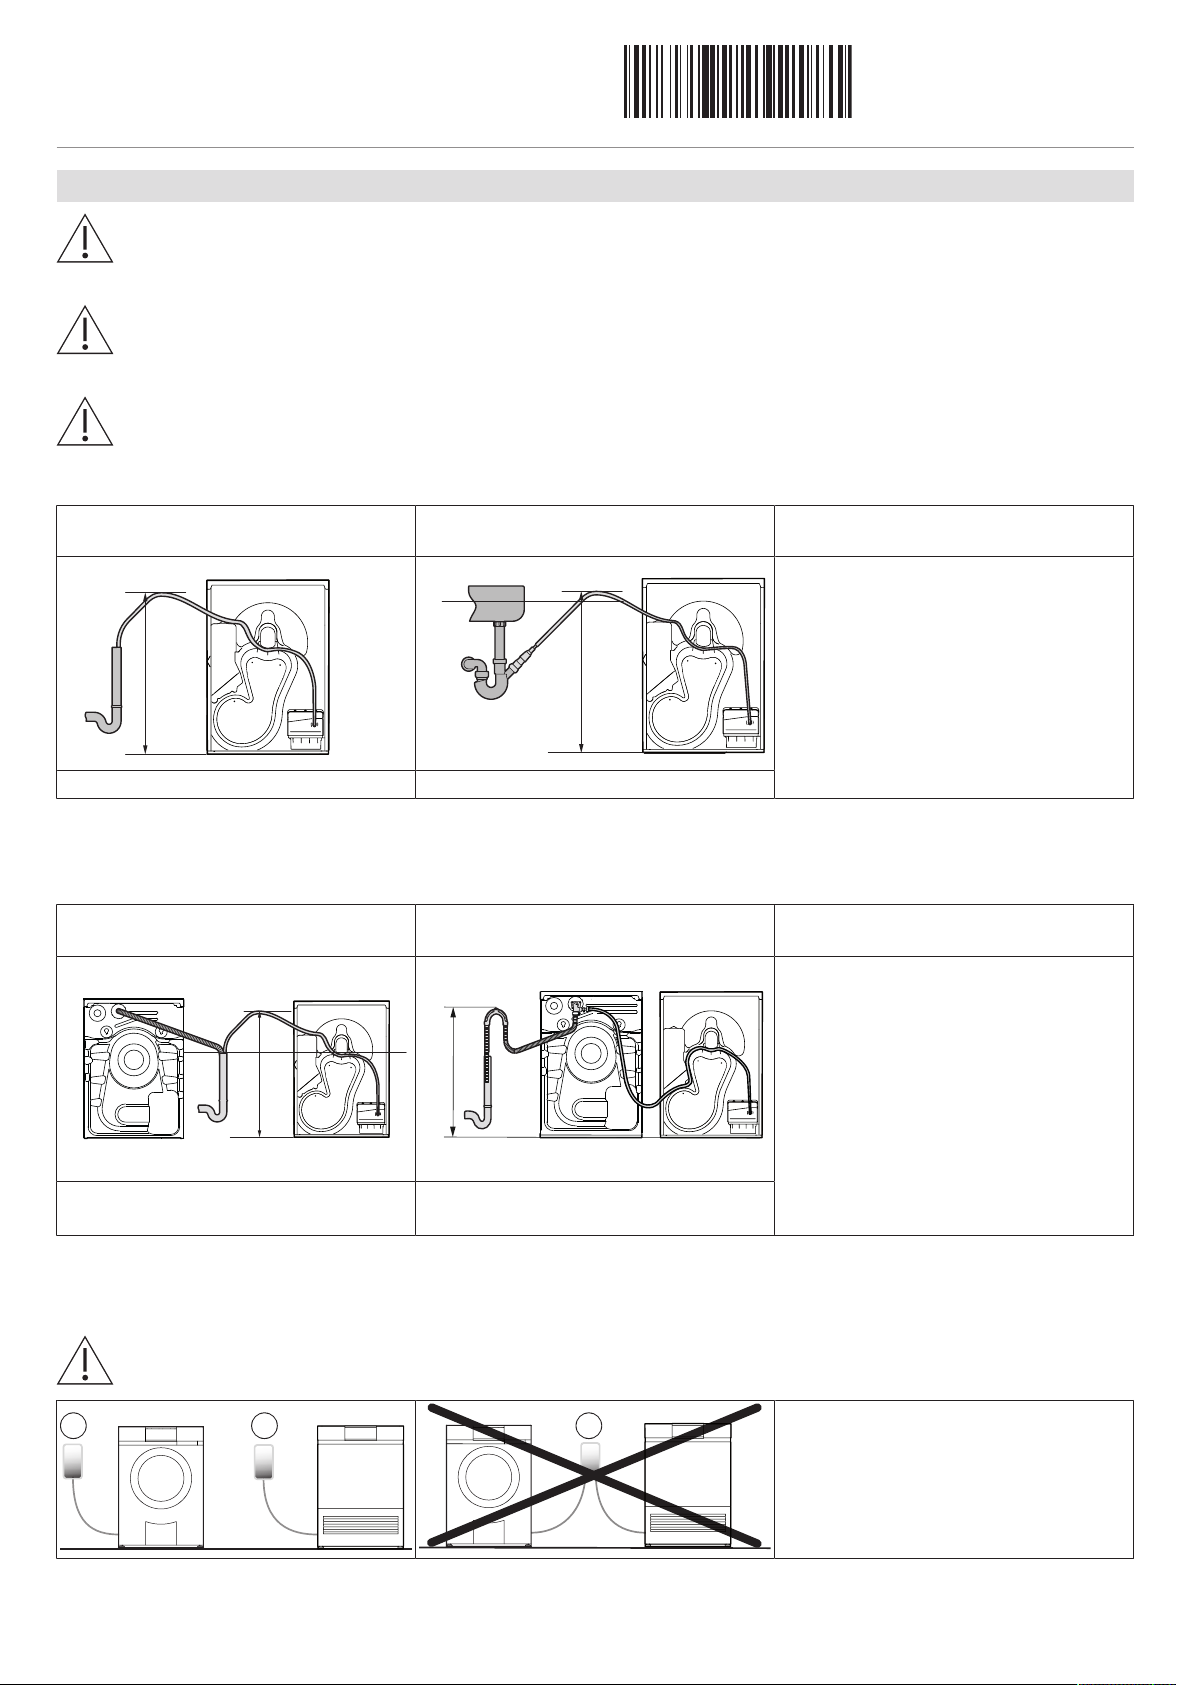
6. Connecting condensate drain
Fastening the drain hose
When installing the drain hose, protect it against damage and kinks!
Fasten the drain hose before plugging in the mains cable.
▸ Remove the pump cover A.
▸ Fasten the drain hose B to nozzle D us-
ing the hose clip C.
▸ Put back the pump cover A.
▸ Plug in the mains cable.
7
Page 8
Installation instructions
1068340-R02
≤1200
≤1200
U
≤1200
U
≤700
Y X
X
Heat pump dryer
One-family household
Connecting condensate drain
The drain hose for the tumble dryer must not be lengthened!
Otherwise water from the drain hose of the tumble dryer can flow into the condensate tank of the tumble dryer when the condensate pump is switched off.
Never connect the drain hose from a tumble dryer to the drain hose from a washing machine so that it is watertight
(hydraulically)!
Otherwise water from the drain hose of the washing machine can flow into the condensate tank of the tumble dryer!
Do not immerse the end of the drain hose from the tumble dryer in the water in the drain trap!
Otherwise water in the drain-trap bend can flow into the condensate tank when the condensate pump is switched off.
Single connections
1068340-R02
22/05/2019
Drainage into fixed upright outflow pipe
(W56298)
Connection to sink drain trap (W53070) Work steps
▸ Use an open-top fixed upright outflow
pipe with the drain trap.
▸ Leave a gap of ≥5cm between the end
of the drain hose from the tumble dryer
and the level of the water in the drain
trap.
▸ Position the drain hose from the tumble
dryer above the overflow line U. Do not
Max. pumping height: 1200mm Max. pumping height: 1200mm
exceed the maximum pumping height!
Tumble dryer positioned next to washing machine (open-top fixed upright outflow pipe)
Fixed upright outflow pipe with separately routed drainage pipe
Fixed upright outflow pipe with combi
drainage set (W55969)
Work steps
▸ Use an open-top fixed upright outflow
pipe with the drain trap.
▸ Leave a gap of ≥5cm between the end
of the drain hose from the tumble dryer
and the level of the water in the drain
trap.
▸ Insert the drain hoses from both appli-
ances into the riser pipe of the drain trap.
▸ Position the drain hose from the tumble
Max. pumping height: 1200mm Max. pumping height: 700mm
dryer above the overflow line U. Do not
exceed the maximum pumping height!
Tumble dryer positioned next to washing machine (GEBERIT concealed drain trap)
Cannot be connected to a concealed double drain trap! There must be a separate concealed drain trap for each appliance.
8
▸ Washing machine: Use concealed drain
trap GEBERIT UP Y (GEBERIT art. no.
152.236.00.1).
▸ Tumble dryer: Use concealed drain trap
GEBERIT UP X (GEBERIT art. no.
152.237.00.1).
Page 9

Installation instructions
1068340-R02
≤700
≤700
Heat pump dryer
One-family household
Washer-dryer towers
1068340-R02
22/05/2019
Fixed upright outflow pipe with separately routed drainage pipe
Fixed upright outflow pipe with combi
drainage set (W55969)
Work steps
▸ Can be connected to a concealed double
drain trap.
Max. pumping height: 700mm Max. pumping height: 700mm
7. Using for the first time
If the location of the appliance is changed, because of the heat pump it must stand in its final position for around 2
hours before it can be operated again. Failure to do this can result in damage to the appliance.
When the appliance is connected to the power supply for the first time, it is possible to carry out a function test. The purpose of the
function test is to check the installation. It takes about 3 minutes. As the heat pump is not tested, the function test can be started immediately after installation. It cannot be aborted by interrupting the power supply. Once the function test has been run or aborted, it can
no longer be selected and the appliance enters the normal selection mode.
Carrying out the function test Interrupting the function test Aborting/skipping the function test
▸ Insert plug into mains socket.
– In the display appears: «Language:
English»
▸ Select language for function test.
▸ Touch .
– Appliance is ready for function test.
– In the display appears: «Function
test – Start with button
Skip with button »
▸ To interrupt the function test, touch .
– In the display appears: «Function
test – Continue with button
Abort with button »
▸ To continue the function test, touch .
▸ To abort or skip the function test, touch
.
▸ To start the function test, touch .
– The function test starts.
– In the display appears: «Function
test 0h03»
After the function test:
▸ Select the user language, see the operating instructions.
▸ Select viewing angle, see the operating instructions.
▸ Select V-ZUG-Home mode, see the operating instructions.
9
 Loading...