

VXL Instruments TC1512-z User Manual [en, fr, de, es]
Ref
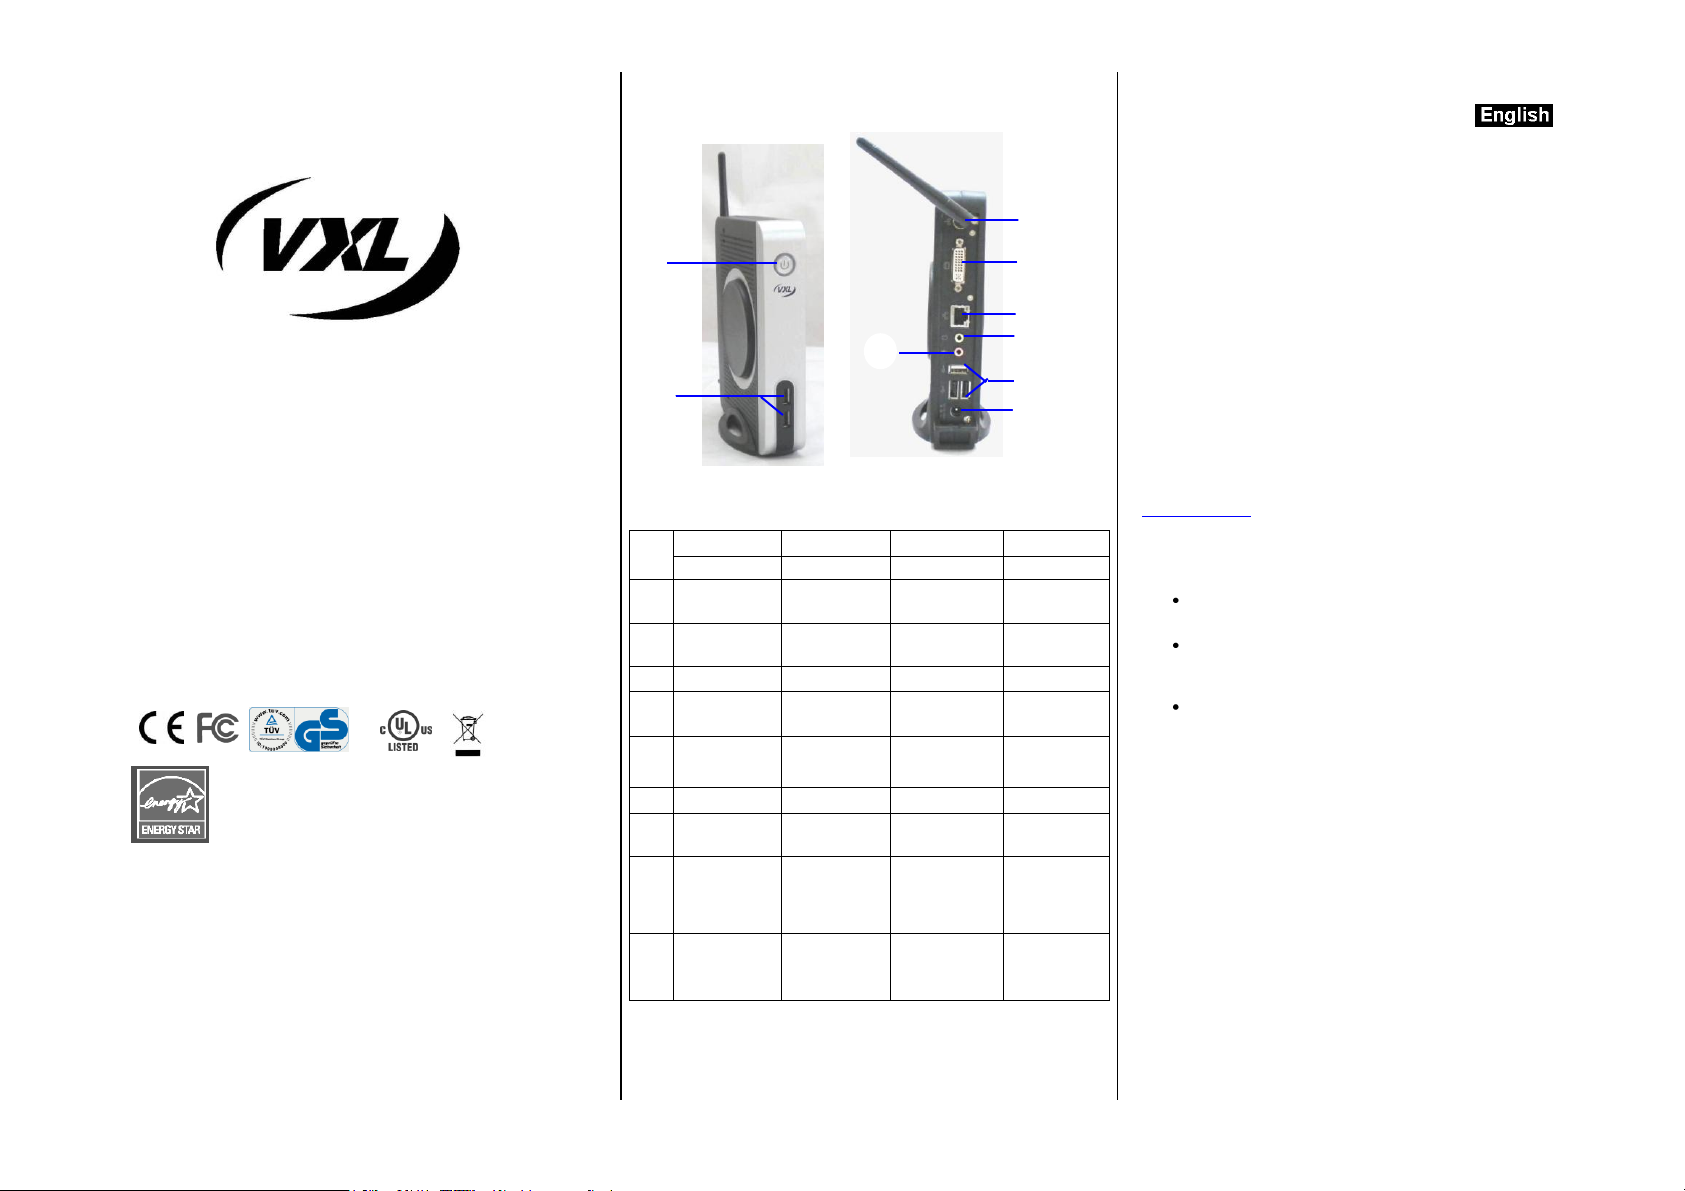
English
Français
Deutsch
Español
Components
Composantes
Bestandteile
Componentes
1
Power Button
Bouton
marche/ arrêt
Einschaltknopf
Botón de
Encendido
2
2 USB Ports
2 Ports USB
2 USB Ports
2 Puertos
USB
3
DVI-I Port
Port DVI-I
DVI-I Port
Puerto DVI-I
4
Ethernet Port
Port Ethernet
Ethernet Port
Puerto
Ethernet
5
LINE-OUT
SORTIE son
LINE-OUT
Salida de
línea
6
MIC
MIC
MIC
MICRÓFONO
7
3 USB Port
3 Ports USB
3 USB Port
3 Puertos
USB
8
DC Power In
16V / 2.5A
Prise
d’alimentation
16V / 2.5A
Netzteil
Anschluss
DC12V/2A
Entrada de
alimentación
DC 16V /
2.5A
9
Wireless LAN
( Optional )
WLAN
(en option)
WLAN
(optional)
WLAN
(Opcional )
1
2 3 4 5 6
7 8 9
RoHS
Xtona TC1512-z Series Thin Client
Hardware Installation Guide
This Class B digital apparatus complies with Canadian ICES-003.
Cet appareil numérique de la classe B est conforme à la norme
NUM- 003 du Canada.
©2012 VXL Instruments Limited.
600011052135 A02
Page: 2
Xtona TC1512-z Series Thin Client
Hardware Installation Guide
The TC1512-z package consists of several items, which are listed below:
TC1512-z Thin client
Power adapter 16V / 2.5A
Pedestal
This manual
Power cord applicable to your country ( Optional )
We use our best possible efforts to ensure that all the items that should
be in the package are in fact there. However if something is missing we
do sincerely apologise and request you to either return the product to
where you obtained it from, or contact VXL at any of their sales offices for
assistance.
In order that the TC1512-z performs in accordance with expectations, you
must ensure that you install it correctly.
This guide covers the installation of the hardware, and does not cover the
configuration of Software. For software configuration refer
(http://www.vxl.net).
Precautions
While installing the TC1512-z hardware in your network infrastructure you
must ensure some simple precautions:
Do not install the hardware in areas where the unit could be
splashed with liquids or where it may be liable to become wet.
Always ensure 4 Inch space around the unit. Failure to
achieve adequate ventilation could result in damage to the
unit.
Always place the unit vertical.
Setting up the TC1512-z
The following steps will ensure that your new TC1512-z is perfectly set up
and operational.
1. Unpack the unit taking care not to drop the product whilst
removing from the packaging.
2. Please retain the packaging for possible future use.
3. You will immediately need the following items:
a. Power cord
b. Mouse
c. Keyboard
d. Monitor DVI
Page: 3

4. Place the TC1512-z on the desktop as shown in figure. Where
the cable from the monitor is not overstretched to reach the
video port.
It is now time for you to connect the power cord, keyboard, mouse,
monitor and network to the TC1512-z in order to make it fully operational.
Please follow the following steps:
1. Connect the USB keyboard.
2. Connect the USB mouse.
3. Connect the network cable to the network (Ethernet Port)
RJ45 connector shown on.
4. Now connect monitor to DVI-I Port.
5. Connect the power chord from Power adapter In Socket to the
AC socket on the wall.
Powering the TC1512-z
Press the power button as indicated in the Fig. This will power on the
TC1512-z. For details refer to the User Guide available at our website
(download area).
Reporting a problem
1. Go to http://www.vxl.net/Support/Online-support.aspx
Select “Click Here” from the desired support required
i.e. (RMA Request or Report a problem) OR
visit a URL https://support.vxl.net/
2. Provide your e-mail ID.
3. Click on "Submit Request"
4. Fill all the Information along with the Problem description,
and Click “Save”
Your call is registered and you will receive an e-mail with ticket no.
You can reply to this mail for further communication.
Checking the status of your ticket
1. Go to http://www.vxl.net/Support/Online-support.aspx
Select “Click Here” from the desire support required
i.e. (RMA Request or Report a problem) OR
visit a URL https://support.vxl.net/
2. Provide your e-mail ID.
3. Click on View My Request.
Page: 4
Guide d’installation du client
léger TC1512-z
Le carton de l’TC1512-z contient les éléments suivant :
Client léger TC1512-z
Un boitier d’alimentation 16V / 2.5A
Un piédestal
Ce manuel
Un cordon d’alimentation correspondant à votre pays (en
option)
l’TC1512-z doit être installé correctement afin d’assurer son bon
fonctionnement.
Ce guide détaille l’installation du matériel, mais pas sa configuration
logicielle. Pour la configuration du système, référez-vous à
(http://www.vxl.net).
Précautions
Lorsque vous installez l’TC1512-z dans votre infrastructure réseau,
assurez-vous que les conditions suivantes soient réunies :
N’installez pas le terminal dans un endroit humide où l’unité
pourrait être en contact avec des liquides.
Assurez-vous toujours d’avoir un espace de 10 cm autour du
terminal afin d’en assurer le refroidissement par convection
naturelle. Un manque de ventilation risque d’endommager le
terminal.
Placez toujours l’unité verticalement.
Installation de l’TC1512-z
Les étapes suivantes vous permettent de vous assurer que votre
TC1512-z est bien installé et opérationnel.
1. Prenez soin de ne pas faire tomber l’unité pendant le
déballage.
2. Veuillez conserver l’emballage pour une éventuelle utilisation
future.
3. Vous aurez immédiatement besoin de ce qui suit :
a. Cordon d’alimentation
b. Souris
c. Clavier
d. Moniteur DVI
4. Placez l’TC1512-z sur votre bureau comme indiqué en fig. Le
câble de votre moniteur ne devra pas être trop tendu Pour
atteindre le port video
Page: 5
Vous pouvez maintenant brancher votre cordon d’alimentation, le clavier,
la souris, le moniteur et le réseau à TC1512-z de façon à ce qu’il soit
complètement opérationnel.
Veuillez suivre les étapes suivantes :
1. Branchez le clavier USB.
2. Branchez la souris USB.
3. Branchez le câble de réseau au réseau (Port Ethernet) et sur
le connecteur RJ45 indiqué.
4. Maintenant, branchez le moniteur au Port DVI-I.
5. Branchez le cordon d’alimentation de la prise d’entrée d’Itona
dans la prise murale.
Allumer l’TC1512-z
Appuyer sur le bouton d’alimentation 1 comme indiqué dans le Fig. Cela
allumera l’TC1512-z. Pour plus de détails, vous pouvez vous référer à
notre Guide pour utilisateurs disponible sur notre site Internet (dans la
zone des téléchargements).
Rapporter un problème
1. Aller à http://www.vxl.net/Support/Online-support.aspx
Sélectionner “Cliquer ici” correspondant au service d'aide
souhaité c'est-à- dire (RMA Rapporter un problème) OU
visiter l'URL https://support.vxl.net/
2. Inscrire votre e-mail
3. Cliquer sur "Soumettre ma Requête"
4. Fournir toutes les informations nécessaires ainsi que la description du
problème at cliquer “Sauvegarder”
Votre demande est ainsi enregistrée et vous recevrez un email
contenant votre n° de ticket.
Vous pouvez répondre à ce mail pour formuler toute requête
ultérieure.
Vérifier le statut de votre ticket
1. Aller à http://www.vxl.net/Support/Online-support.aspx
Sélectionner “Cliquer ici” correspondant au service d'aide souhaité
c'est-à dire (RMA Rapporter un problème) OU visiter l'URL
https://support.vxl.net/
2. Inscrire votre e-mail.
3. Cliquer sur “Visualiser Ma Requête”.
Page : 6
 Loading...