

Page 1
Ref
English
Français
Deutsch
Español
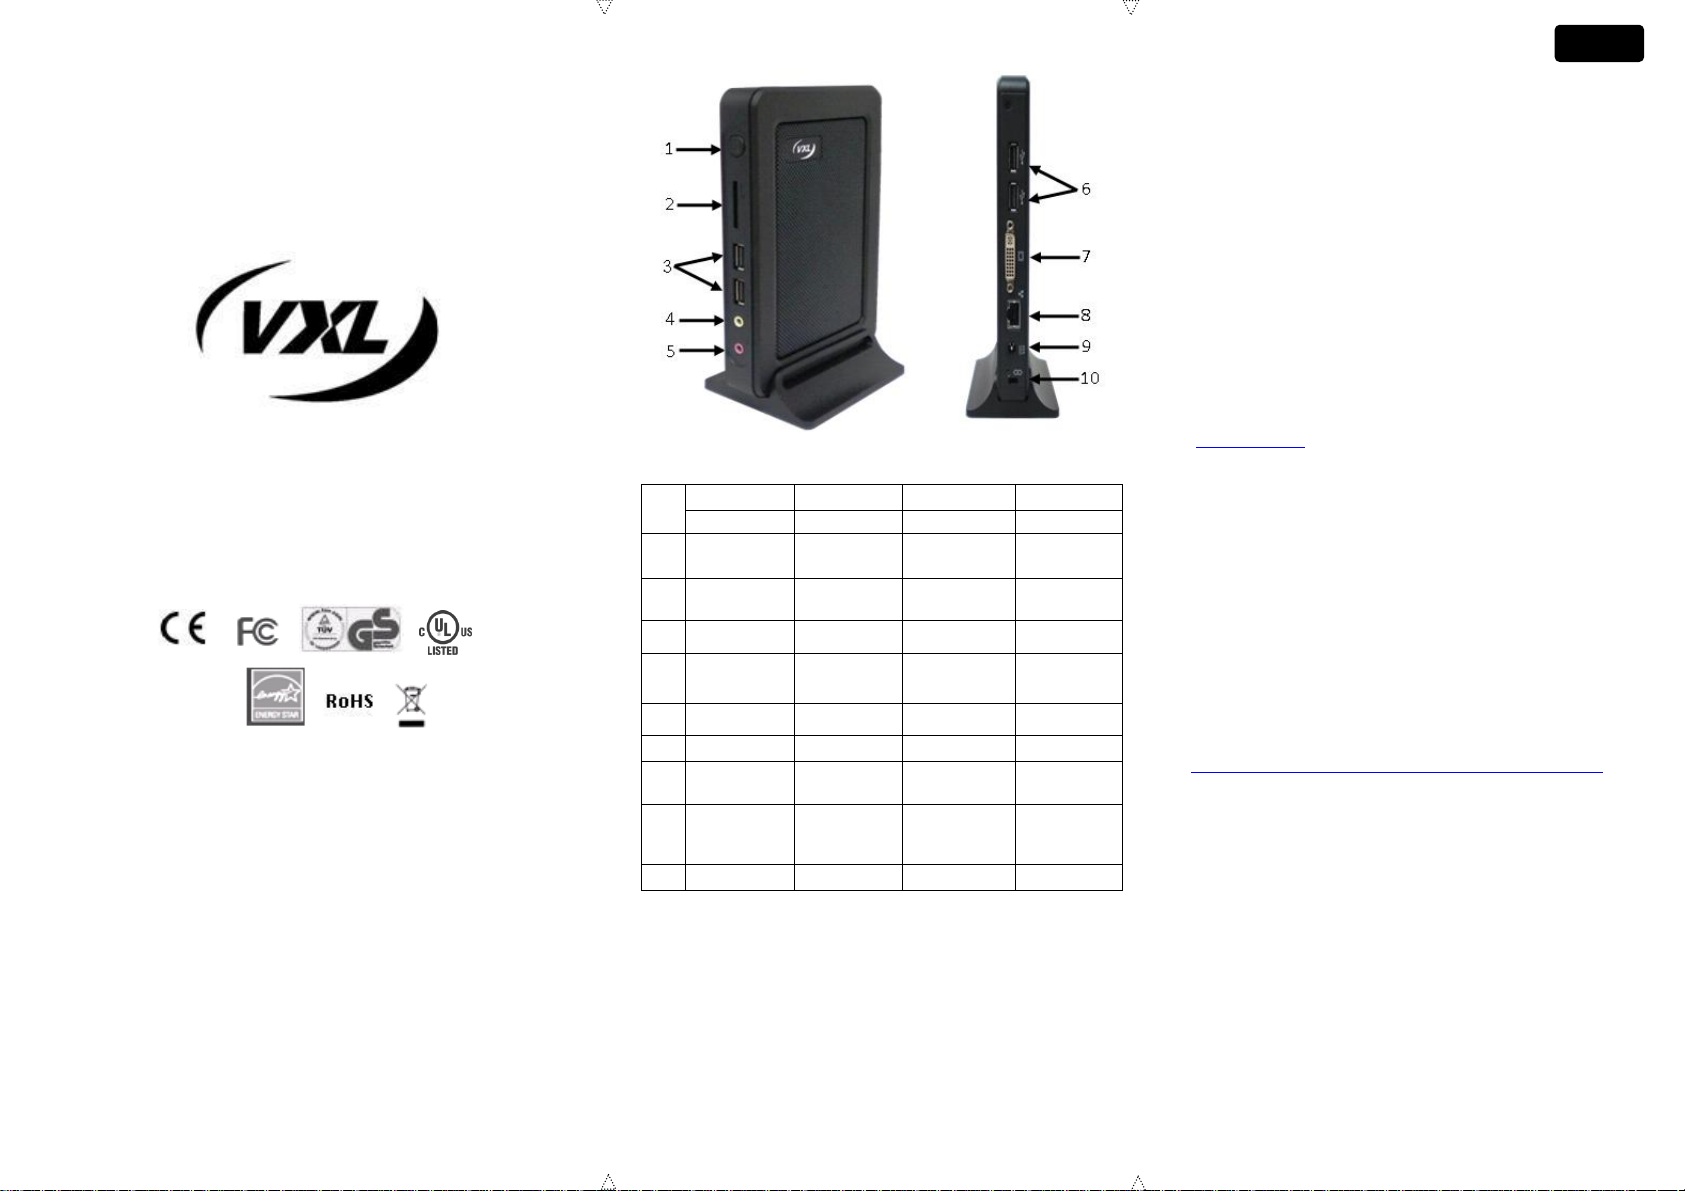
Components
Composantes
Bestandteile
Componentes
1
Power Button
Bouton
marche/ arrêt
Einschaltknopf
Botón de
Encendido
2
SD card slot
Fente pour
carte SD
SD-Kartenslot
Ranura para
tarjeta SD
3,6
USB Ports
Ports USB
USB Ports
Puertos USB
4
LINE-OUT
SORTIE son
LINE-OUT
Salida de
línea
5
MIC
MIC
MIC
MICRÓFONO
7
DVI-I Port
Port DVI-I
DVI-I Port
Puerto DVI-I
9
Ethernet Port
Port Ethernet
Ethernet Port
Puerto
Ethernet
9
DC Power In
DC12V/3A
Prise
d’alimentation
DC12 /3A
DC Power IN
DC12V/3A
Entrada de
alimentación
DC12v /3A
10
Pedestal
Un Piedestal
Plastikfuss
Pedestal
English
Itona K Series Thin Client
Hardware Installation Guide
This Class B digital apparatus complies with Canadian ICES-003
Cet appareil numérique de la classe B est conforme à la norme NMB003 du Canada.
©2012 VXL Instruments Limited.
600011052786 A01
Front View Rear View
Itona K Series Thin Client
Hardware Installation Guide
The Itona K Series package consists of the items listed below:
Itona K series Thin client
Power Adapter 12V/3.0A
Pedestal
This manual
DVI-I to VGA Adapter
Power cord applicable to your country ( Optional )
Every endeavour is made to ensure that all the above items are included in
each box. However, should an item be missing, don’t hesitate to contact
VXL at the website below for assistance.
In order that the Itona K series performs in accordance with expectations,
you must ensure that you install it correctly.
This guide covers the installation of the hardware, and does not cover the
configuration of Software. For software configuration refer
(http://www.vxl.net).
Safety Instruction
In order to provide protection from potential hazards, create a safer work
environment and to increase the reliability of the product, please follow the
instructions given below while installing a VXL Product:
Use Approved 3 Pin Grounded power cord only. If you have not
been provided with a power cord for your product, you should
purchase a power cord that is approved for use in your country.
The product fits into a grounded 3 pin electrical outlet
Allow approx 4 Inch space around the Product for effective
ventilation. Avoid objects that restrict airflow on top.
Always place the product in the recommended orientation.
Do not operate this equipment in corrosive or explosive
atmosphere.
For more information about safety instructions please visit:
http://www.vxl.net/Support/Product Safetyguidelines.aspx
Setting up the Itona K Series
The following steps will ensure that your new Itona K Series is perfectly set
up and operational.
1. Unpack the unit taking care not to drop the product whilst
removing from the packaging.
2. Please retain the packaging for possible future use.
3. You will immediately need Power cord, Mouse, Keyboard and
Monitor DVI.
4. Place the Itona K Series on the desktop such that the cable
from the monitor is not overstretched to reach the video port.
1 2
Page 2
It is now time for you to connect the power cord, keyboard, mouse, monitor
Francais
and network to the Itona K Series in order to make it fully operational.
Please follow the following steps:
1. Connect the USB keyboard
2. Connect the USB mouse.
3. Connect the network cable to the network (Ethernet Port) RJ45
connector.
4. Now connect monitor to DVI-I port.
5. Connect the power cord from Power Adapter-In Socket to the
AC socket on the wall.
Powering the Itona K Series
Press the power button item 1 in the figure to power on the Itona K Series
thin client . For details refer to the User Guide available at our website
(download area).
Reporting a problem
1. Go to http://www.vxl.net/Support/Online-support.aspx
Select Click Here from the desire support required
i.e. (RMA Request or Report a problem). Or visit
https://support.vxl.net/.
2. Provide your e-mail ID.
3. Click Submit Request.
4. Fill all the Information along with the Problem description, and
click Save.
Your call is registered and you will receive an e-mail with ticket no.
You can reply to this mail for further communication.
Checking the status of your ticket
1. Go to http://www.vxl.net/Support/Online-support.aspx Select
Click Here from the desire support required i.e. (RMA Request
or Report a problem) OR visit https://support.vxl.net/.
2. Provide your e-mail ID.
3. Click View My Request.
For more details about Product Warranty, please visit:
http://www.vxl.net/Support/Product-Warranty-Terms.aspx
Guide d’installation du hardware
du client léger Itona K Series
Le carton de Itona K Series contient les éléments suivant :
Client léger Itona K Series
Un boitier d’alimentation 12V/3.0A
Un piédestal
Ce manuel
DVI-I vers VGA
Un cordon d’alimentation correspondant à votre pays (en
option)
Tous les efforts sont faits pour garantir que les éléments ci-dessus se
trouvent dans chaque boîte. Cependant, si l'un d'entre eux venait à
manquer, n'hésitez pas à contacter VXL sur le site Internet ci-dessous
pour être aidé.
Itona K Series doit être installé correctement afin d’assurer son bon
fonctionnement.
Ce guide détaille l’installation du matériel, mais pas sa configuration
logicielle. Pour la configuration du système, référez-vous à
(http://www.vxl.net).
Consignes de sécurité
Afin de vous protéger des dangers, de travailler dans un lieu plus sûr et de
rendre le produit plus fiable, veuillez observer les consignes indiquées cidessous en installant le VXL.
N’utiliser que le 3Pin cordon d’alimentation homologué, relié à
la terre et à trois broches. Si vous n’avez pas encore de cordon
d’alimentation pour votre appareil, vous devriez en acheter un
dont l’utilisation soit homologuée dans votre pays. Le produit
s’enfonce dans une prise mise à la terre.
Laisser environ 10 cm d’espace autour du produit à titre de
ventilation. Eviter les objets bloquant le débit d’air au sommet
et autour de l’appareil.
Ne pas loger le produit dans un boîtier externe. Ceci affecte le
débit d’air et peut entrainer une panne prématurée
Ne pas utiliser ce matériel en environnements explosifs ou
corrosifs
Pour de plus amples consignes de sécurité,
http://www.vxl.net/Support/Product Safetyguidelines.aspx
Installation de Itona K Series
Les étapes suivantes vous permettent de vous assurer que votre Itona K
Series est bien installé et opérationnel.
1. Prenez soin de ne pas faire tomber l’unité pendant le
déballage.
2. Veuillez conserver l’emballage pour une éventuelle utilisation
future.
3. Vous aurez immédiatement Cordon d’alimentation, Souris
Clavier & Moniteur.
4. Placez Itona K Séries sur votre bureau comme indiqué en
figure. Le câble de votre moniteur ne devra pas être trop tiré
trop tendu pour atteindre le port vidéo.
Vous pouvez maintenant brancher votre cordon d’alimentation, le clavier,
la souris, le moniteur et le réseau à Itona K Series de façon à ce qu’il soit
complètement opérationnel.
Veuillez suivre les étapes suivantes :
1. Branchez le clavier USB.
2. Branchez la souris USB.
3. Branchez le câble de réseau au réseau (Port Ethernet) avec le
connecteur RJ45 indiqué.
4. Maintenant, branchez le moniteur au Port DVI-I.
5. Branchez le cordon d’alimentation de la prise d’entrée d’ dans
la prise murale.
Allumer l’ Itona K Series
Appuyer sur le bouton d’alimentation comme indiqué dans le Figure. Cela
allumera l’ Itona K Series. Pour plus de détails, vous pouvez vous référer à
notre Guide pour utilisateurs disponible sur notre site Internet (dans la
zone des téléchargements).
Rapporter un problème
1. Aller à http://www.vxl.net/Support/Online-support.aspx
Sélectionner Cliquer ici correspondant au service d'aide
souhaité c'est-à- dire (RMA Rapporter un problème) OU
visiter l'URL https://support.vxl.net/.
2. Inscrire votre e-mail.
3. Cliquer sur Soumettre ma Requête.
4. Fournir toutes les informations nécessaires ainsi que la
description du problème at cliquer Sauvegarder .
Votre demande est ainsi enregistrée et vous recevrez un
email contenant votre n° de ticke.
Vous pouvez répondre à ce mail pour formuler toute requête ultérieure.
Vérifier le statut de votre ticket
1. Aller à http://www.vxl.net/Support/Online-support.aspx
Sélectionner Cliquer ici correspondant au service d'aide
souhaité c'est-à- dire (RMA Rapporter un problème) OU
visiter l'URL https://support.vxl.net/.
2. Inscrire votre e-mail.
3. Cliquer sur Visualiser Ma Requête.
Pour de plus amples informations sur la garantie sur le
produit,
http://www.vxl.net/Support/Product-Warranty-Terms.aspx
3 4 5
Page 3

Installationshandbuch für Itona K Series
Deutsch
Espanol
Thin Client Hardware
Die Lieferung der Itona K Series besteht aus folgenden Teilen:
Itona K Series Thin Client
Netzteil 16V/3.0A
Plastikfuss
Dieses Handbuch
DVI-I auf VGA Adapter
Landesspezifisches Netzkabel (optional)
Wir versuchen nach bestem Vermögen sicherzustellen, dass die obigen
Posten in jedem Karton enthalten sind. Sollte jedoch ein Posten fehlen,
zögern Sie nicht, VXL auf der unten angegebenen Website zu
kontaktieren.
Für die korrekte Funktion ist die richtige Installation der Itona K Series
nötig. Deshalb wird hier kurz gezeigt, wie das Gerät hardwareseitig
aufgestellt werden muss. Die Systemeinstellungen finden Sie hier nicht.
Wir verweisen hierzu auf unsere Web-Seite (http://www.vxl.net) bzw. auf
das entsprechende Benutzerhandbuch.
Sicherheitsanweisungen
Befolgen Sie bei der Installation eines VXL Produkts bitte die folgenden
Anweisungen zu Ihrem eigenen Schutz, um eine sicherere
Arbeitsumgebung zu schaffen und die Zuverlässigkeit des Produkts zu
erhöhen:
Es darf nur ein zugelassenes 3-stiftiges, geerdetes Kabel
benutzt werden. Wenn mit Ihrem Produkt kein Stromkabel
mitgeliefert wurde, kaufen Sie bitte ein Stromkabel, das für den
Gebrauch in Ihrem Land zugelassen ist. Das Produkt ist an
einer dreipoligen, geerden Steckdose anzuschließen.
Lassen Sie um das Produkt herum einen Freiraum von 10cm
für effektive Lüftung. Vermeiden Sie Gegenstände, die die
Belüftung oberhalb des Produkts beeinträchtigen könnten.
Positionieren Sie das Produkt stets in der empfohlenen
Ausrichtung.
Dieses Gerät darf nicht in einer korrosiven oder explosiven
Weitere Einzelheiten über Sicherheitsanweisungen finden
Sie unter
http://www.vxl.net/Support/Product Safetyguidelines.aspx
Installation der Itona K Series
Die folgenden Schritte stellen sicher, dass ihre neue Itona K Series korrekt
aufgestellt und betriebsbereit ist.
Umluft betrieben werden.
1. Packen Sie das Gerät vorsichtig aus.
2. Bitte bewahren Sie die Verpackung für möglich zukünftige
Verwendung.
3. Folgendes sollte zusätzlich bereit Netzkabel, Maus,Tastatu &
Monitor.
4. Stellen Sie die Itona K Series auf den Tisch, wie in der
Abbildung gezeigt. Das Monitorkabel sollte locker liegen.
Jetzt schliessen Sie Netzkabel, Tastatur, Maus ,Monitor und das EthernetKabel an die Itona K Series an, um sie im Betrieb zu nehmen.
Bitte befolgen Sie die nachstehenden Schritte:
1. Verbinden Sie die Tastatur & Maus mit einem USB Port.
2. Stecken Sie das Ethernet-Kabel in den Ethernet Port (RJ45
Buchse). (ODER) Verwenden Sie WLAN im Falle einer
integrierten WLAN Option.
3. Schliessen Sie den Primär-Monitor an den DVI-I Port an
4. Stecken Sie das Stromkabel vom AC Strom in die Steckdose
Einschalten der Itona K Series
Drücken Sie die Einschalt-Taste, wie in der Abbildung zu sehen. Dadurch
wird das Gerät in Betrieb genommen. Mehr Einzelheiten finden Sie im
Benutzerhandbuch bzw. auf unserer Web-Seite im Download Bereich.
Ein Problem melden
1. Gehen Sie zu http://www.vxl.net/Support/Online-support.aspx
Wählen Sie „Click Here („Klicken Sie hier“) der
gewünschten Unterstützung d.h. (RMA beantragen) ODER
besuchen Sie den URL https://support.vxl.net/.
2. Geben Sie Ihre E-Mail ID ein.
3. Klicken Sie auf Submit Request („ Antrag abschicken“)
4. Füllen Sie die komplett erforderte Information aus
zusammen mit der Problem-Beschreibung, und klicken Sie
Save („Speichern“)
Ihr Antrag ist registriert und Sie werden eine E-Mail mit Ticket-nr. Erhalten
Sie können diese Mail beantworten für weitere Kommunikation
Überprüfung des Status Ihres Tickets
1. Gehen Sie zu http://www.vxl.net/Support/Online-support.aspx
Wählen Sie „Click Here“ (Klicken Sie hier) der gewünschten
Unterstützung d.h. (RMA beantragen) ODER besuchen Sie
den URL https://support.vxl.net/.
2. Geben Sie Ihre E-Mail ID ein.
3. Klicken Sie auf View My Request („Meinen Antrag
ansehen“)
Weitere Einzelheiten über Produktgarantieanweisungen
finden Sie unter
http://www.vxl.net/Support/Product-Warranty-Terms.aspx
Guía de Instalación del Equipo
Itona K Series Thin Client
El paquete Itona K Series consiste de varios ítems, que se listan a
continuación:
Itona K Series Thin client
Power Adapter 12V/3.0A
Pedsetsl
Este manual
DVI-I a VGA
Cable de alimentación correspondiente a su país (Opcional )
Procuramos por todos los medios que cada embalaje contenga todos los
artículos arriba citados. Sin embargo, si faltara alguno de estos artículos,
no dude en pedírnoslo. Contacte con VXL a través de nuestra página web,
cuya dirección figura más abajo.
Para asegurarse de que el Itona K Series se desempeñe de acuerdo con
lo esperado, debe usted asegurarse de haberlo instalado de manera
correcta.
Esta guía cubre la instalación del hardware, y no cubre la configuración del
Software. Para la configuración del software diríjase a (http://www.vxl.net).
Instrucciones de seguridad
Al instalar un producto VXL, siga siempre nuestras instrucciones; se
evitará riesgos, creará un entrono de trabajo más seguro e incrementará la
fiabilidad del producto.
Use exclusivamente cable de alimentación con toma de tierra
de 3 conductores debidamente homologado. Si su producto no
lleva incluido el cable de alimentación, adquiera uno que esté
homologado en su país. Este producto debe conectarse a un
tomacorriente conectado a tierra.
Deje una holgura de aproximadamente 10 cm alrededor del
producto para que se ventile correctamente. No coloque
encima del dispositivo objetos que dificulten la circulación del
aire.
Coloque siempre el producto orientado de la manera
recomendada.
No utilice este aparato en entornos corrosivos o explosivos.
Para más información sobre instrucciones de seguridad,
visite
http://www.vxl.net/Support/Product Safetyguidelines.aspx
Configurando el Itona K Series
Los siguientes pasos le asegurarán que su nuevo Itona K Series
está perfectamente configurado y operativo.
1. Desempaque la unidad teniendo cuidado de no dejar caer el
producto mientras lo remueve de su empaquetado.
2. Por favor conserve el empaquetado para un posible uso futuro.
3. Usted necesitará inmediatamente los siguientes Cable de
alimentación,Ratón, Teclado & Monitor.
6 7 8
Page 4

4. Itona K Series en el escritorio como se muestra en la
figureDonde el cable desde el monitor no esté demasiado
tirante para alcanzar el puerto de video.
Ahora es el momento para que usted conecte el cable de alimentación,
teclado, ratón, monitor y red al Itona K Series a fin de de hacerlo
completamente operativo.
Por favor, siga los pasos a continuación:
1. Conecte el teclado USB.
2. Conecte el ratón USB.
3. Conecte el cable de red al conector de red (Puerto Ethernet)
RJ45 que se muestra.(O) use WLAN en caso de modelos con
WLAN integrada.
4. Conecte ahora el monitor primario al puerto DVI-I.
5. Conecte el cable de alimentación desde el panel de entrada de
alimentación AC al tomacorriente en la pared.
Alimentación del Itona K Series
Presione el botón de alimentación como se indica en la Figure Esto
encenderá el Itona K Series. Para detalles dirigirse a la Guía de Usuario
disponible en nuestro sitio web (área de descarga).
Informar de un problema
1. Ir a http://www.vxl.net/Support/Online-support.aspx
seleccionar “Haz clic aquí” del apoyo requerido deseado es
decir, (RMA solicitud para informar de un problema) O ir a
https://support.vxl.net/
2. Facilitar la dirección de su correo electrónico.
3. Haz clic en Submit Request (Entregar Solicitud).
4. Rellenar toda la información junto con la descripción del
problema y haz clic en Save (guardar).
Su llamada se queda registrada y recibirá un correo electrónico con el
número de incidencia.
Se puede responder a este correo para más conersaciones.
Revisando el estado de su incidencia
1. Ir a http://www.vxl.net/Support/Online-support.aspx Seleccionar
“Haz clic aquí ” del apoyo requerido deseado es decir, (RMA
solicitud para informar de un problema) O ir a
https://support.vxl.net/
2. Facilitar la dirección de su correo electrónico.
3. Haz clic en View My Request. (Ver mi solicitud).
Para más información sobre la garantía del producto, visite
http://www.vxl.net/Support/Product-Warranty-Terms.aspx
9
 Loading...