

Page 1
•
Utmost speed and powerful 1.7GHz Dual Core CPU
•
1 x Smartcard Readers (Xcrypt)
•
1 x Common Interface
•
4K UHD Hardware Decoding
•
Pluggable for Dual FBC(Full Band Capture) DVB-S/S2 or FBC DVB-C Tuner system
(up to 8 tuners supported)
•
2GB DDR4 RAM and 4GB NAND Flash Memory
•
Gigabit Ethernet
•
2 x USB 3.0
•
HDMI 2.0 In & HDMI Out
•
RS232 (External IR Sensor)
•
SPDIF for digital bit stream out (optical)
•
Power On/Off Switch
•
EPG Support
•
Automatic & Manual Service Scan supports
•
Multiple LNB control (DiSEqC) supports
•
Skin change supports
•
Advanced Linux Operating System
•
Various Plug-ins supports
•
2.4" Front Mini TV
•
The easiest way of Detachable HDD (2.5")
AD ONLY
DOWNLO
Page 2

+
Vu User Manual
Contents
(A) PRECAUTION!!!
(B) Packaging Contents
(C) Product Descriptions
(D) Conditional Access
(E) Remote Control
(F) Main Features
(G) Technical Data
I. Installation of Vu+
1. Connecting Signal Cable
2. Connecting TV
3. Connecting Power
4. Power ON/OFF
II. First Time Installation (using Wizard)
Step 1. Video Input Selection
Step 2. Video Mode Selection
Step 3. Language Selection
Step 4. Configuring Tuner Connection
Step 5. Installing Default Satellite List and Channel Scan
Step 6. Parental Control Option
III. Basic Operations
1. Switching Channel
2. Volume Control
3. Selecting Audio Track
4. Subtitle
5. Teletext
6. Program Information (Infobar)
7. Channel List
8. Electronic Program Guide (Event View)
9. Timeshift
10. Recording
11. Recording Play
12. Managing Recording Files
13. Media Player
14. Plug-ins
15. Sleep Timer
16. Mini TV
17. Fast Channel Change
DOWNLO
4
6
7
9
11
13
14
15
16
17
17
18
AD ONLY
18
19
19
23
25
26
26
27
27
28
29
30
32
35
36
40
41
42
43
44
44
45
+
2
Your Smart Linux TV Player
Vu :
Page 3

+
Vu User Manual
IV. System Configuration
1.Main Menu
2.System Setup
1) Service Searching
A. Tuner Configuration
B. Loading Default Service Lists
C. Automatic Scan of Services
D. Manual Scan of Services
E. Tuner Configuration (for DVB-C)
2) System Configuration
A. A/V Settings
B. Language Selection
C. Customization
D. Selecting Time Zone
E. Hard Disk Set Up
F. Network Setup
G. Skin Change
3) Checking CAM
4) Parental Control
5) Factory Reset
6) Checking H/W and S/W Information
A. Service Information
B. System Information
7) Inserting Tuner
8) HDD Mounting
9) Remote Control Unit(RCU) Set-up
A. User Guide of Vu+ Universal RCU
B. TV Code List
V. Copyright - GNU GPL
VI. Menu Structure
VII. Troubleshooting
VIII. Glossary
46
47
47
47
48
48
49
51
53
53
55
55
57
58
58
AD ONLY
61
61
62
64
65
65
66
67
68
69
69
71
82
86
87
88
DOWNLO
3
Page 4

+
Vu User Manual
(A) PRECAUTION!!!
This Product has been designed and manufactured in compliance with EU consumer safety requirements (CE).
Please read the following safety precautions carefully.
1. Connecting Power
•
This product operates only in the range of AC100-240V and 50Hz/60Hz. Please check first your power
supply to see if it fits this range.
•
Please be noted that you need to disconnect from the mains before you start any maintenance or
installation procedures.
•
Make sure that the power cord is placed in a position where it is easy to unplug it from the mains in an
emergency.
2. Overloading
•
Do not overload a wall outlet, extension cord or adapter as this may cause electrical fire or shock.
3. Liquid
•
This product is not water-proof and should not be exposed to dripping, splashing, or any type of liquid.
•
No objects filled with liquid such as base shall be placed on the product.
•
Please do not clean the product with wet cloth, which may cause a short circuit.
•
No wet objects should be placed near the product.
AD ONLY
4. Ventilation
•
Allow a sufficient space between the product and other objects to make sure air ventilation of the product.
•
Do not block the top or rear of the product with an object, which will close the ventilation holes and lead to
a high temperature of the system. This may cause a failure of the product.
•
Do not stack other electronic devices on top of the product.
•
Do not insert any kind of pointed objects like screw, gimlet, etc. into the ventilation holes of the product.
This will damage the product.
5. Connecting the Satellite Cable.
•
Disconnect the power of the product before you connect the satellite cable to the product.
Otherwise, it may cause damage to the LNB.
6. Grounding
•
The LNB must be earthed to the system earth for the satellite dish.
7. Location
•
Place the product indoor.
•
Do not expose the product to rain, sun or lightening.
•
Do not place the product near any heat appliances as a radiator.
•
Ensure that there is more than 10 cm distance from any electrical devices and wall.
DOWNLO
+
4
Your Smart Linux TV Player
Vu :
Page 5

+
Vu User Manual
8. Lightening, Storm or Not In Use.
•
Unplug the product and disconnect the antenna cable during a thunderstorm or lightening, especially
when left unattended and unused for a long period of time. This will prevent possible damages from
power surges or lightening.
9. Replacement of Parts
•
Unauthorized part replacements, especially by one who is not a qualified technician may result in
damage to the product.
•
Ensure that when part replacements are necessary qualified technicians perform the task using the
components specified by the manufacturer.
10. Hard Disk Drive
•
Do not move the product or turn the power off suddenly while the Hard Disk Drive (HDD) is still running.
This may result in damage to the HDD and thus the system.
•
The company shall not be liable for any corruption of data on the HDD caused by careless use or
misuse of users.
11. Battery
•
There is danger of explosion if batteries are incorrectly replaced.
•
Replace batteries only with the same or equivalent type.
AD ONLY
"WEEE" Symbol instructions.
This product should not be disposed with other household wastes at the end of its
working life.
Please separate this from other types of wastes and recycle it responsibly to promote
the sustainable reuse of material resources. This will help prevent harm to the
environment or human health from uncontrolled waste disposal.
DOWNLO
5
Page 6
+
Vu User Manual
(B) Packaging Contents
English
AD ONLY
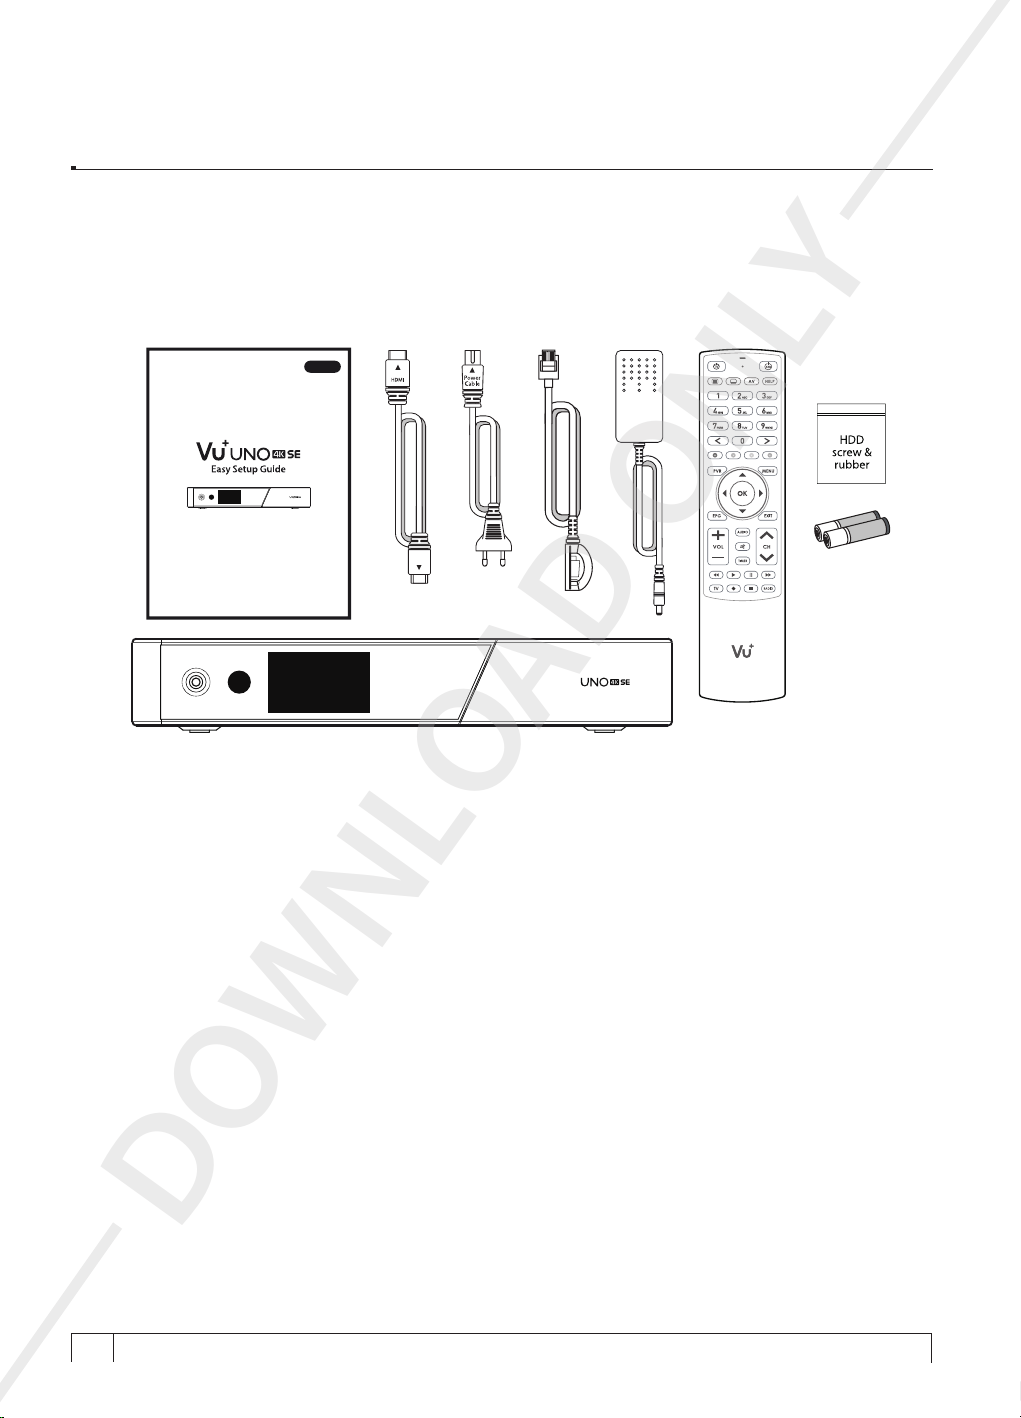
Please check all package contents before using your product.
• Standard RCU
• Easy Set up Guide
• HDMI Cable
• Power Cable
• Power Adapter
• External IR Sensor
• HDD Screw
• RCU Battery
DOWNLO
+
6
Your Smart Linux TV Player
Vu :
Page 7
(C) Product Descriptions
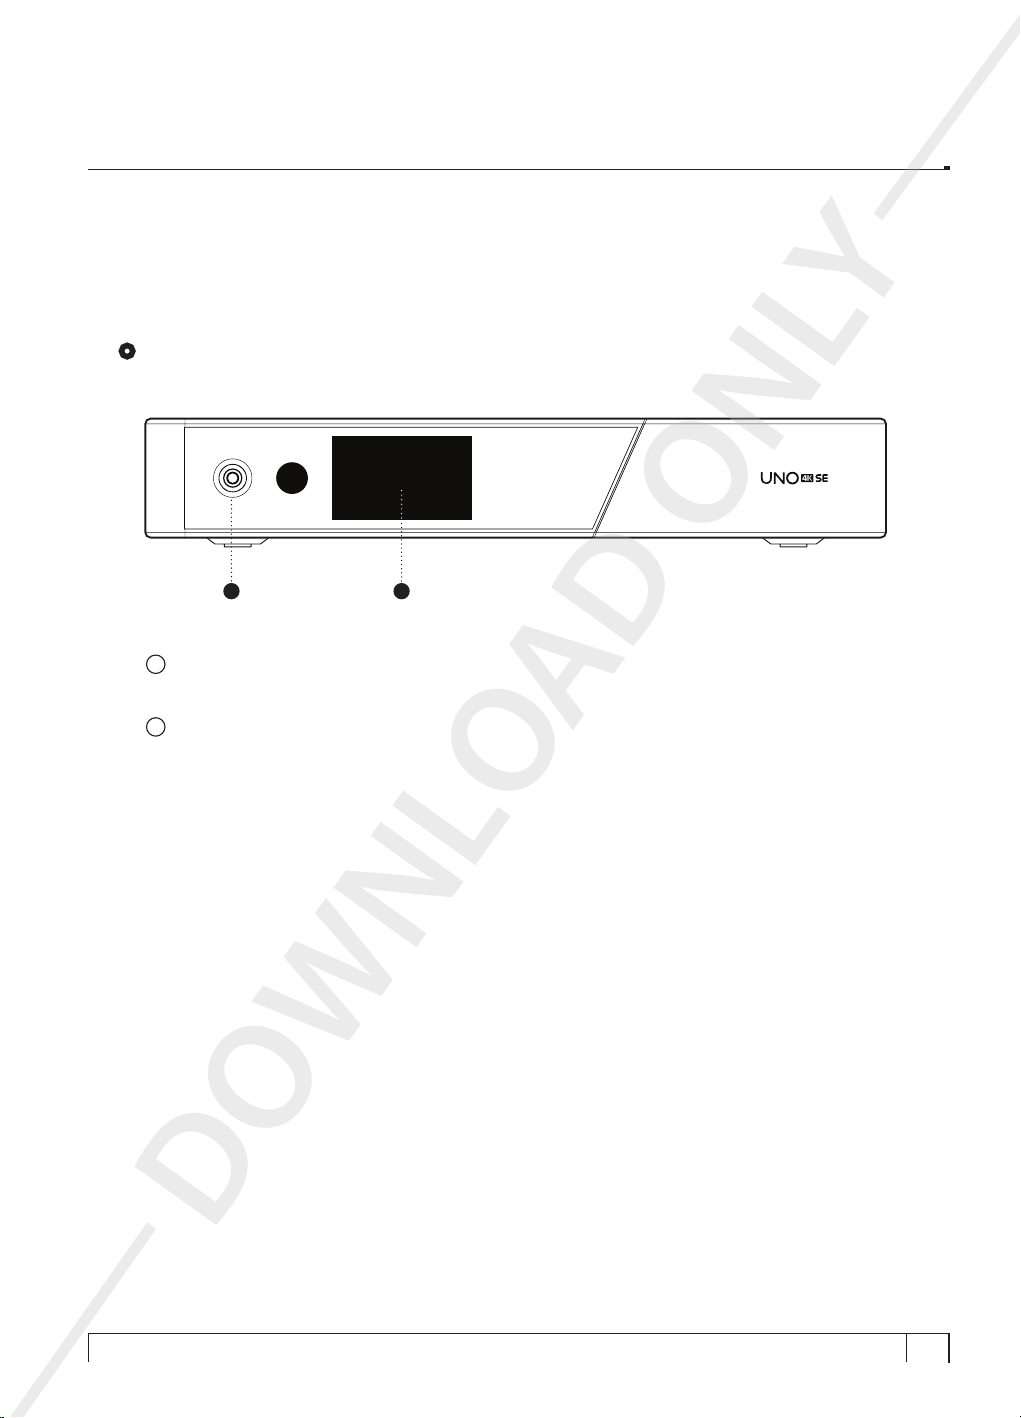
Front Panel
1 2
1
Standby LED
2
Mini TV
Displays TV streaming, graphic logo of channels and uploaded user`s favorite
images on 2.4” LCD.
+
Vu User Manual
AD ONLY
DOWNLO
7
Page 8
+
Vu User Manual
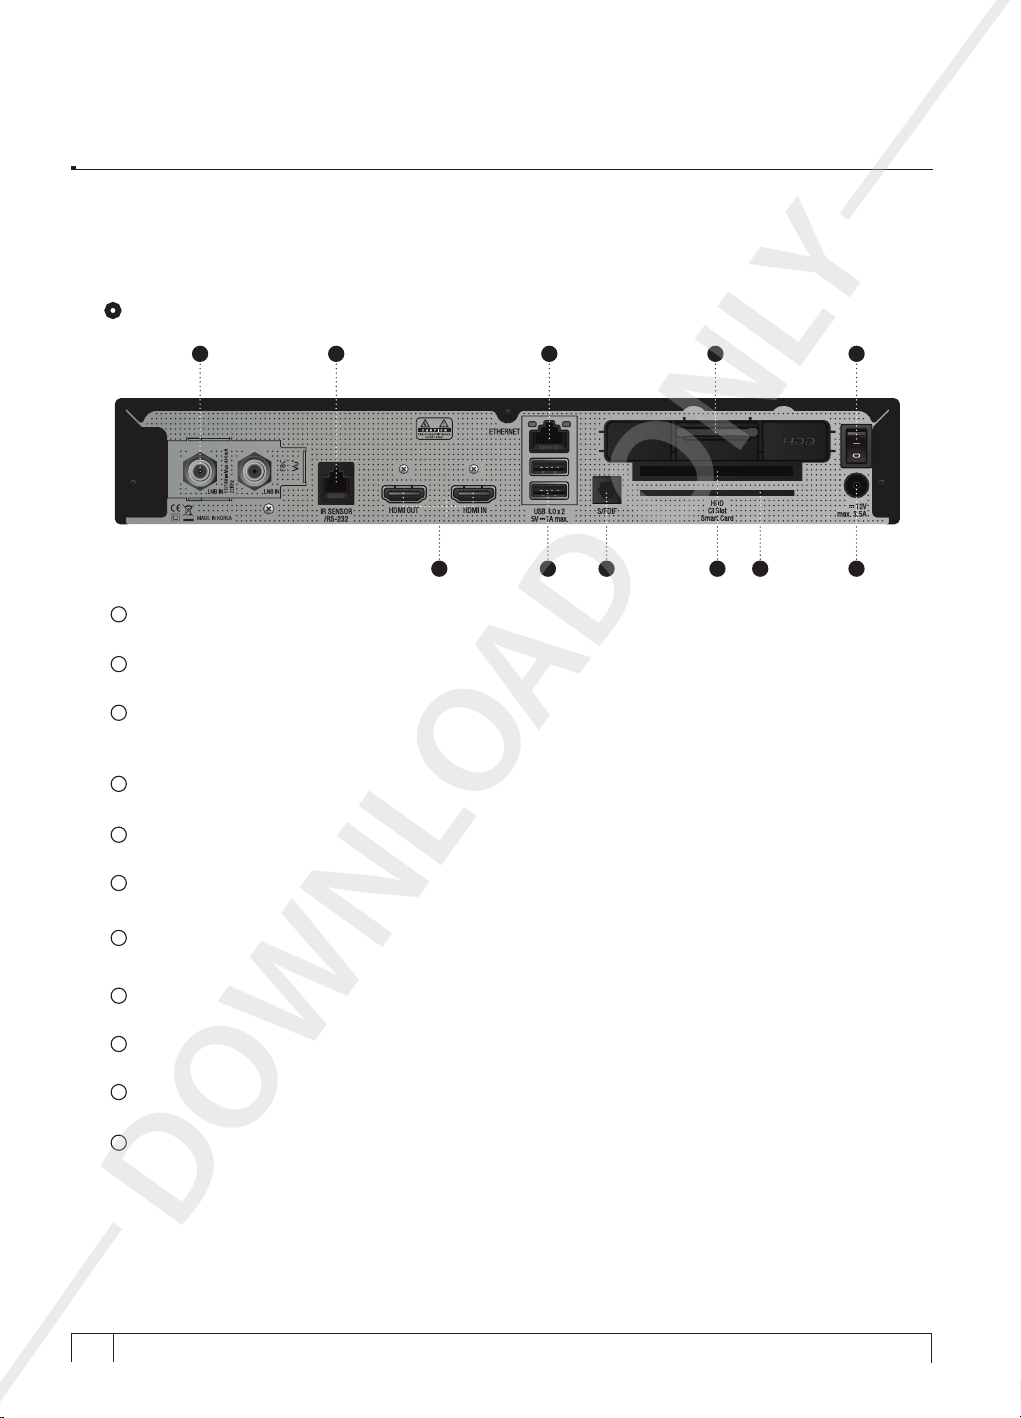
Rear Panel
1 2 4
3 5 6 8 9 11
1
FBC Pluggable Tuner Slot
Pluggable Type FBC Dual DVB-S/S2 or FBC DVB-C Tuner available. (up to 8 tuners)
2
RS232
RS232 data ports is provided.
3
HDMI In/Out
Connects to TV using a HDMI Cable for both audio and video signals, also for using other devices
connected to HDMI In port.
4
Gigabit Ethernet
Connects the PC or another set top box of Vu+.
5
USB 3.0
Connects the USB memory stick or external HDD.
6
S/PDIF
Connects to a digital audio system using S/PDIF cable.
7
Detachable 2.5" HDD BRKT
Connects the Detachable HDD (2.5").
CI Module Slot
8
One CI module slot is provided.
9
Smartcard Reader Slot
One Smartcard slot is provided.
10
On/Off Switch
Powers on/off.
11
Power Adaptor Input
Connects the provided power adaptor for the main power.
AD ONLY
7 10
DOWNLO
+
8
Your Smart Linux TV Player
Vu :
Page 9
+
Vu User Manual
(D) Conditional Access
Amongst the channels that are scanned via Vu+, some channels can be properly tuned in only with the
corresponding Smartcard and/or CAM (Conditional Access Module). Vu+ UNO 4K SE provides one
Smartcard Reader slot and one Conditional Interface slot and users need to purchase those Smartcards
and CAMs that are required for viewing such subscription based services.
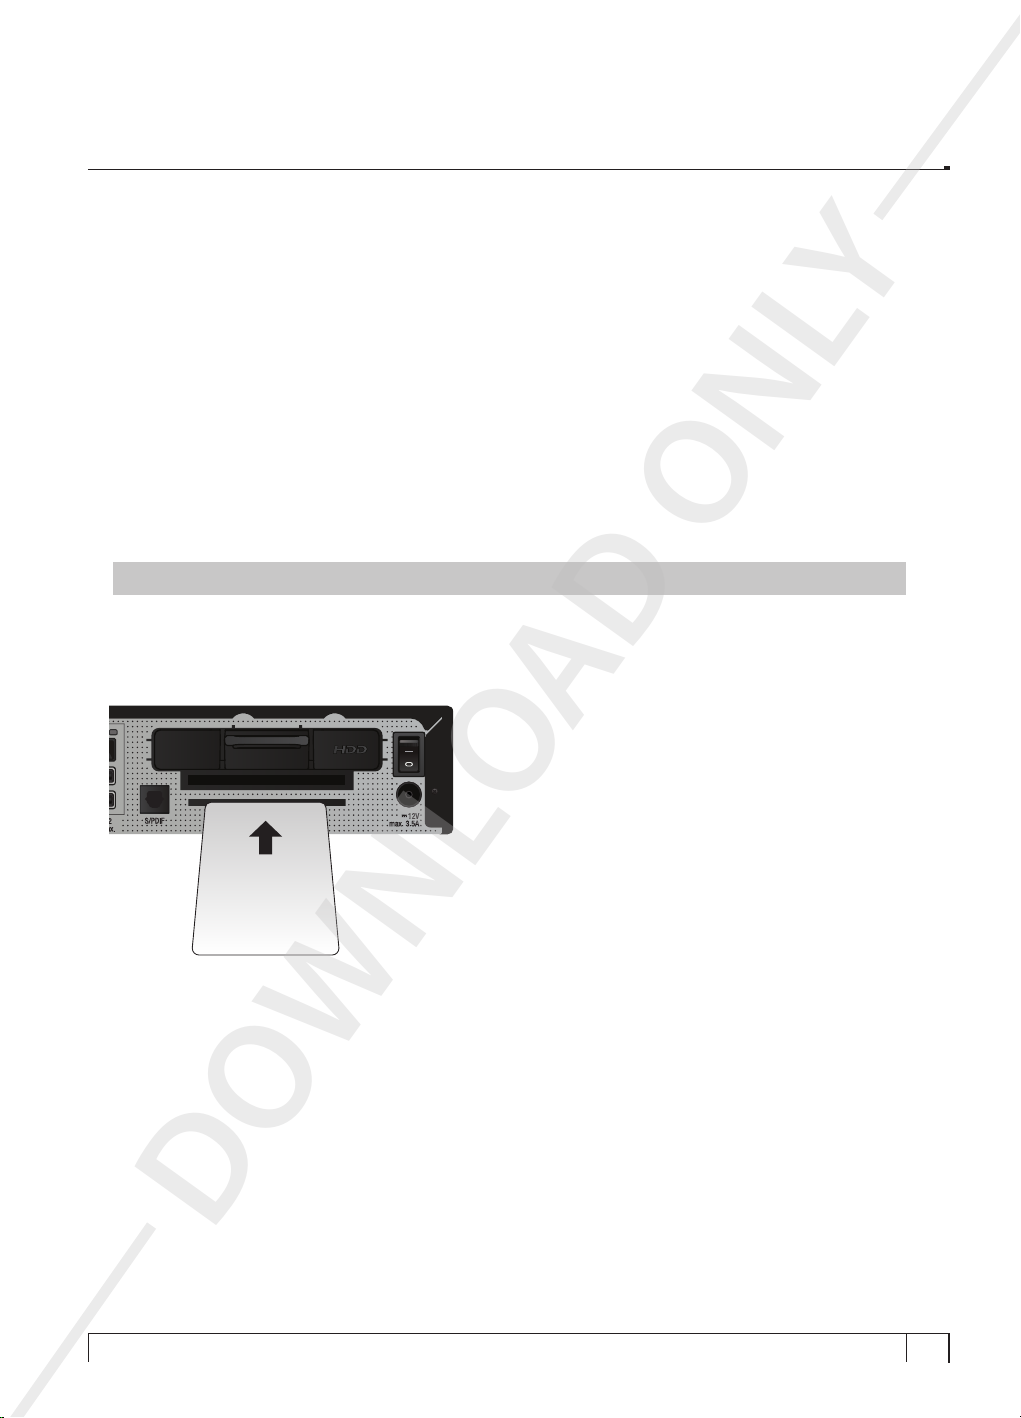
Insertion of Smartcard
Vu+ supports Xcript. Users need to buy only these Smartcards without having to buy additional CAMs to
watch those channels that are encrypted in Xcrypt.
- Open the door on the left side.
- Insert Xcrypt Smartcard as in the following instruction.
- Make sure that the Smartcard remains inserted while viewing.
Insert the card while the smart card IC is downward.
NOTE :
Insertion
AD ONLY
Smartcard
DOWNLO
9
Page 10
+
Vu User Manual
Insertion of CAM (Conditional Access Module)
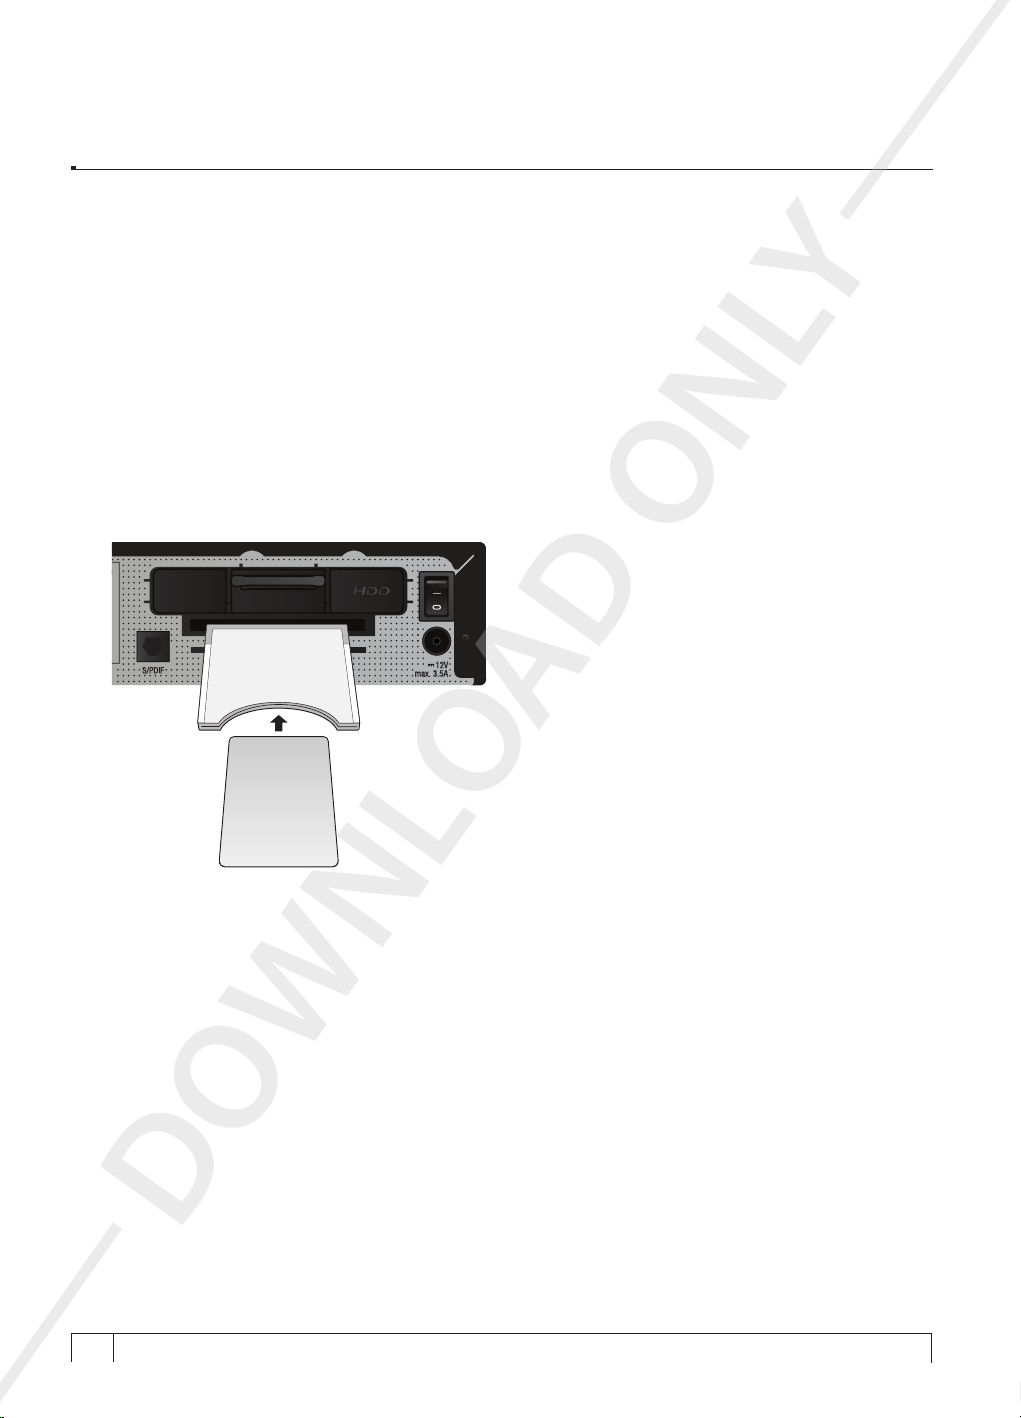
There are several Conditional Access Systems (CAS), other than Xcrypt that Vu+ supports. To be able
to watch channels that are encrypted in such CAS as Nagravision, NDS, Irdeto, Viaccess, etc, users
need to purchase a CAM that is corresponding to each CAS, as well as Smartcard to decrypt those
encrypted channels.
- Insert a Smartcard into the CAM as in the below picture.
- Once the Smartcard inserted into the CAM, insert the CAM into the CI slot.
- Make sure that the CAM remains inserted while viewing.
Insertion
CI-Module
AD ONLY
Smartcard
DOWNLO
+
10
Your Smart Linux TV Player
Vu :
Page 11
(E) Remote Control
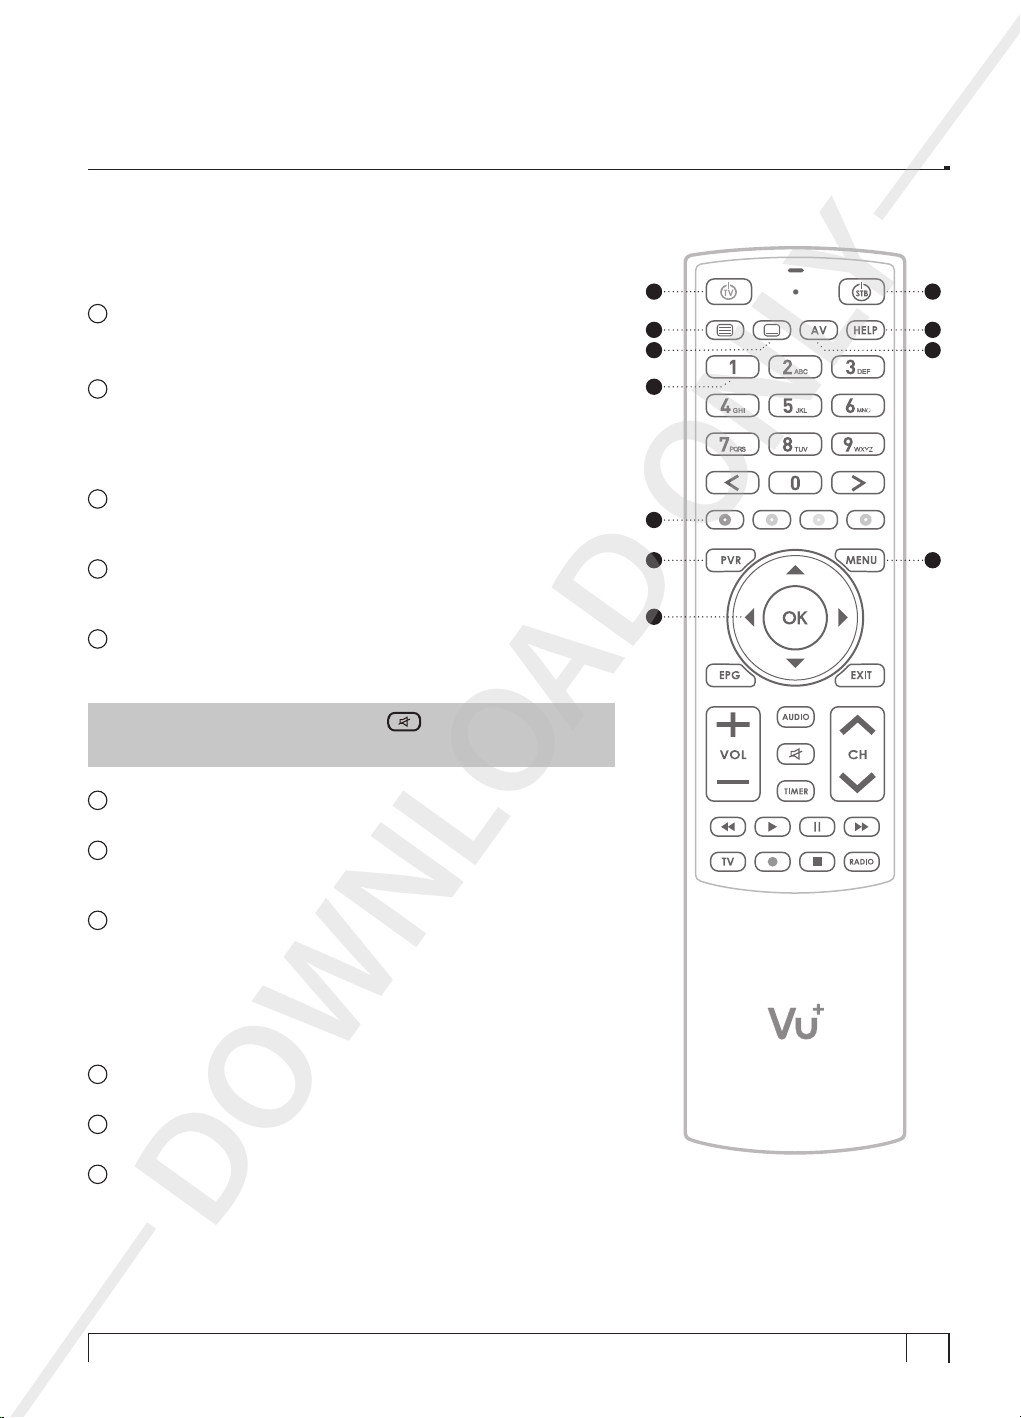
Vu+ UNO 4K SE remote control (RCU) is a universal one that can be
used for TV and STB both.
1
TV Power
Once configured for TV remote control, this button is for TV power
on/off.
2
STB Power
When the STB is turned on, normal press of this button puts the
STB into standby mode instantly. When the STB is turned off,
normal press of this button turns the STB on instantly.
Long press activates Standby /Restart menu.
3
Teletext
Displays the teletext information of the current channel if the
channel provides subtitles.
4
Help
Displays major important operation methods of Vu+.
This provides users with a quick guide of using Vu+.
5
Subtitle
Displays the subtitle of the current channel if the channel provides
subtitle.
+
Vu User Manual
1
3
5 6
7
8
9
11
2
4
10
NOTE :
toggling between the Teletext page and the live mode.
6
AV
This button is used when selecting video source of TV.
7
Numeric Keys
Enters a channel number or numbers required to be input according
to menu options.
8
Color Keys
Each key is assigned a specific function that may be different in
each menu.
• Red – mainly used for REC, Cancel, etc.
• Green – mainly used for OK
• Yellow
• Blue – activate Fast Zapping and Mini TV
9
Recording List
Displays the list of recordings stored on the internal HDD if any.
10
Menu
Displays the main menu.
11
Navigation Keys
Navigates up/down and left/right on the menu options.
Up/down keys are used to call up the channel list.
when Teletext is activated, key is also used when
AD ONLY
DOWNLO
11
Page 12
+
Vu User Manual
12
13
16
20
22
24
26
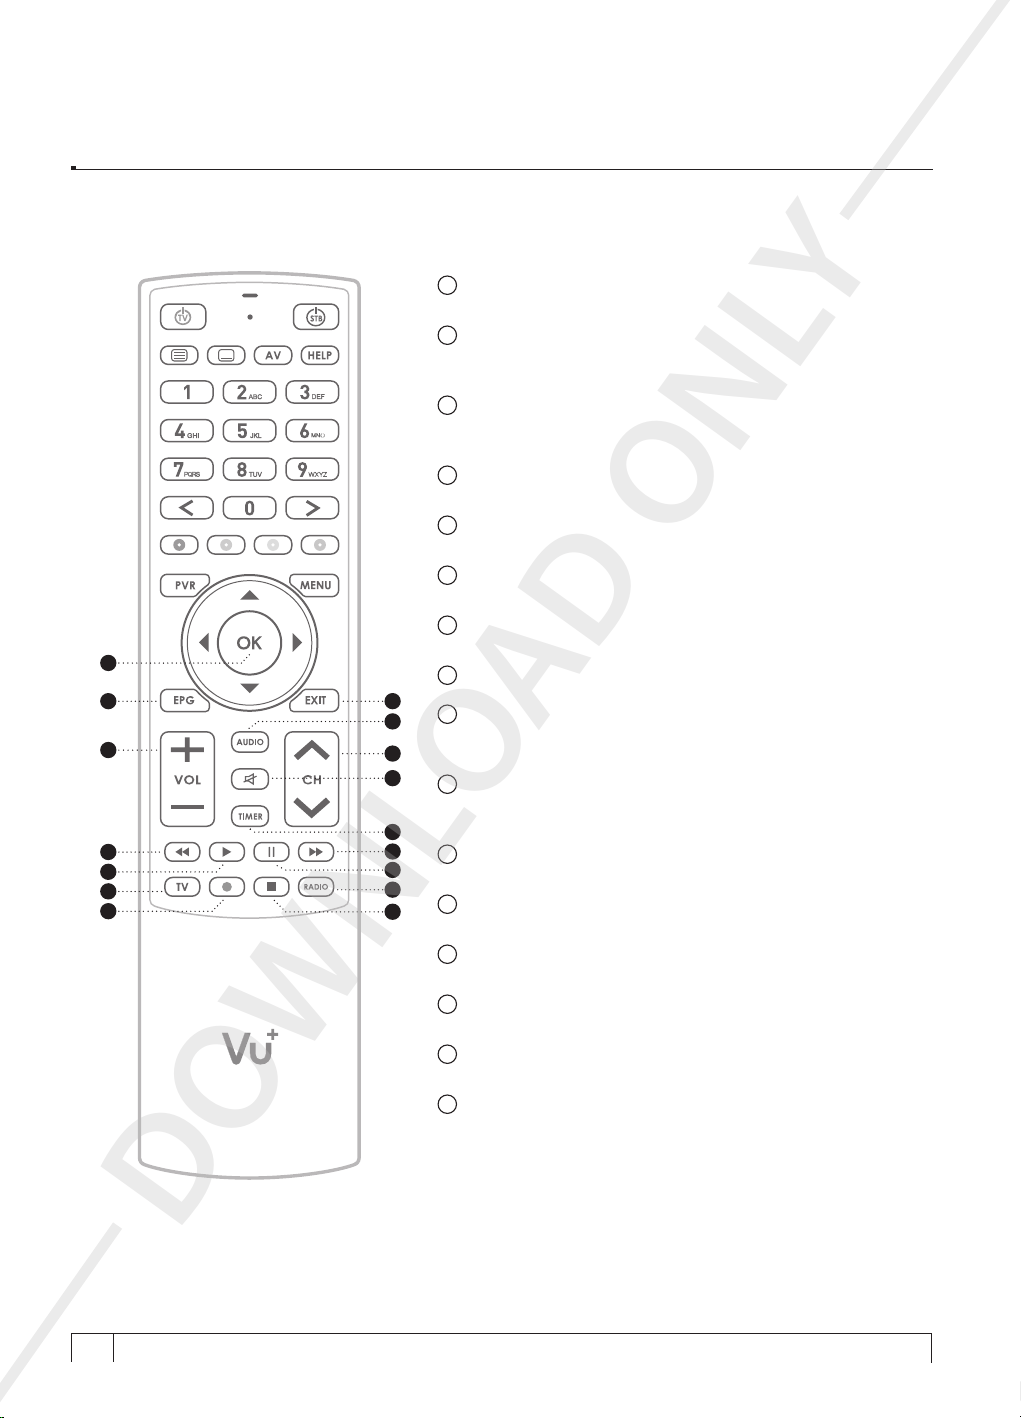
12
OK
Confirms the selected menu option.
13
EPG
Displays the Electronic Program Guide (EPG) information if
provided.
14
EXIT
Exits the current menu option into the live mode, or switches
one step back of the menu.
15
Audio
Displays the audio track option to choose (e.g. ACS, Stereo).
16
Volume + / -
Adjusts the audio volume.
17
Channel + / -
Navigates through the scanned channel list.
18
Mute
Silences the audio temporarily.
19
14
20
15
17
18
21
19
21
22
23
25
23
27
24
25
26
27
Timer
Fast Rewind
Fast rewinds at up to 128 times faster than the normal speed
(x2 / 4 / 8 / 16 / 32 / 64 / 128).
Fast Forward
Fast forwards at up to 128 times faster than the normal speed
(x2 / 4 / 8 / 16 / 32 / 64 / 128).
Play
Plays the selected file (e.g. recording) at the normal speed.
Pause
Pauses the live program or recording play.
TV
Displays the TV Channel list.
Radio
Displays the Radio channel list.
Recording
Displays instantly the recording menu.
Stop
Stops playing of a recording and goes to the live mode.
AD ONLY
DOWNLO
+
12
Your Smart Linux TV Player
Vu :
Page 13

(F) Main Features
•
Utmost speed and powerful 1.7GHz Dual Core CPU
•
1 x Smartcard Readers (Xcrypt)
•
1 x Common Interface
•
4K UHD Hardware Decoding
•
Pluggable for Dual FBC(Full Band Capture) DVB-S/S2 or FBC DVB-C Tuner system (up to 8
tuners supported)
•
2GB DDR4 RAM and 4GB NAND Flash Memory
•
Gigabit Ethernet
•
2 x USB 3.0
•
HDMI 2.0 In & HDMI Out
•
RS232 (External IR Sensor)
•
SPDIF for digital bit stream out (optical)
•
Power On/Off Switch
•
EPG Support
•
Automatic & Manual Service Scan supports
•
Multiple LNB control (DiSEqC) supports
•
Skin change supports
•
Advanced Linux Operating System
•
Various Plug-ins supports
•
2.4" Front Mini TV
•
The easiest way of Detachable HDD (2.5")
+
Vu User Manual
AD ONLY
DOWNLO
13
Page 14
+
Vu User Manual
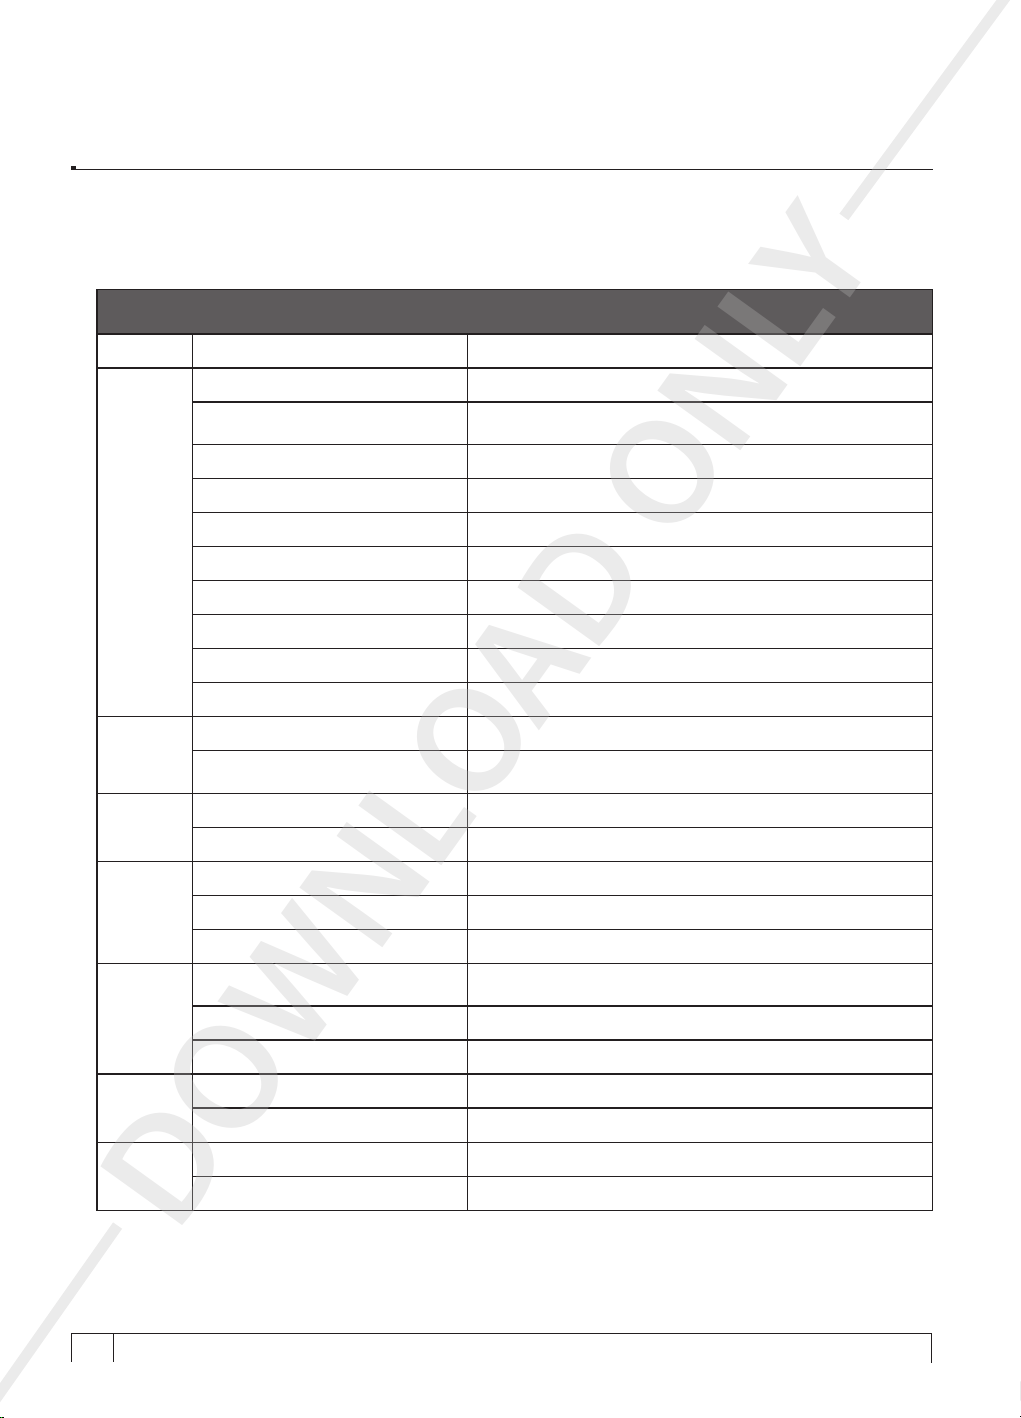
(G) Technical Data
Vu+ Technical Specifications
Front Panel
Rear
Panel
Power
RF(FBC)
Video
Display Status LED (white)
Power switch 1
RF input/out
CI Slot 1
Smart Card Slot 1
Ethernet (Giga bit) 1
USB 3.0 2
Video/audio output (digital) 1 X HDMI
Video/audio Input (digital) 1 X HDMI
Audio output (digital) Standard optical (SPDIF)
RS232 (Ext. IR slot) 1
Adaptor AC 100-240V / 50-60Hz
"Power consumption
Max./typ. Operation / Standby"
RF range (DVB-S2,S / DVB-C) 950-2,150 MHz / 51 - 858 MHz
Modulation, FEC, de-multiplexer DVB-S/DVB-S2/DVB-C Standard
Video resolution CCIR 601 (720 x 576 lines), 576p, 720p, 1080p, 2160p
Video decoding MPEG-2, MPEG-4, H.265/HEVC compatible
1 X Pluggable FBC Tuner - Dual DVB-S2/S, DVB-C
(with RF out)
AD ONLY
42 / 20 / 0.5W
14
S/N > 53dB
Audio decoding
Audio
LNB
General
Sampling rate 16/32/44.1/48 kHz
S/N > 65dB
LNB supply (horiz./vert.) 14/18V / Max. 400mA
Control signal 22kHz ; ToneBurst ; DiSEqCTM1.0/1.1/1.2
Dimensions(W x H x D) 280 x 45 x 198.3 mm
Weight 1350g
DOWNLO
+
Your Smart Linux TV Player
Vu :
MPEG-4(AAC-HE), MPEG-1, Layer1,2 and 3(MP3), SRS(3D
sound), WMA, AC4
Page 15
+
i
Vu User Manual
NOTE :
means Remote control operation order.
I. Installation of Vu+
This chapter will guide you through the whole installation process of Vu+. Please read each section
carefully to make sure that the system runs properly.
1. Connecting Signal Cable
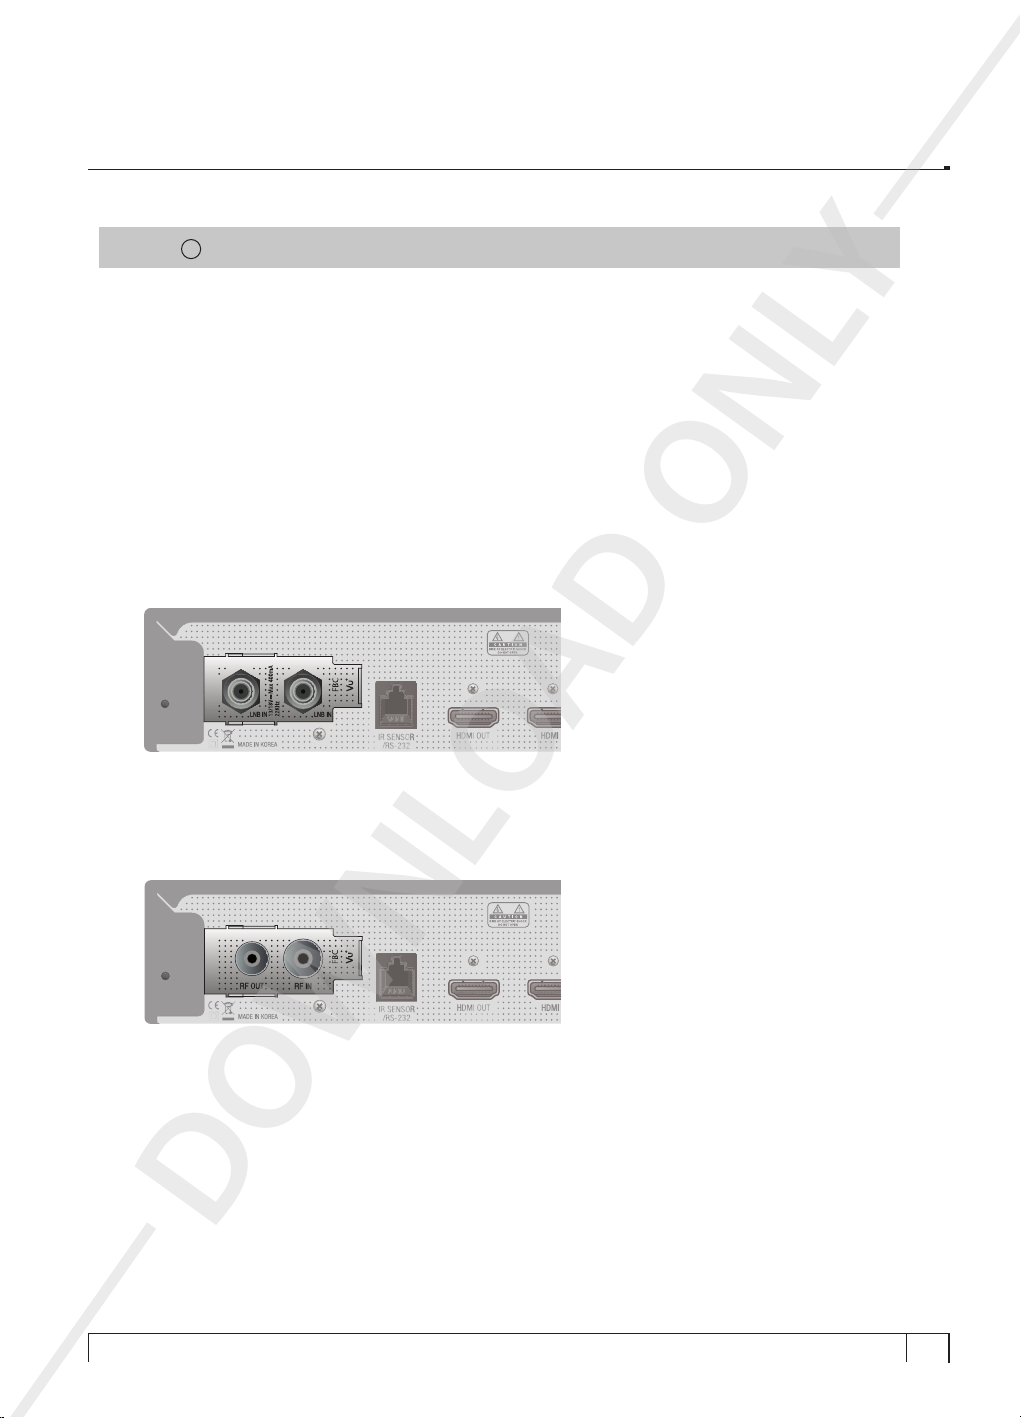
Vu+ UNO 4K SE is designed to integrate Pluggable Dual FBC(Full-Band Capture) DVB-S/S2 tuner or
FBC DVB-C(Cable) Tuner which supports up to 8 demodulators. For the best use of Vu+ UNO 4K SE
the following under combination are recommended.
1) Dual FBC DVB-S/S2 Tuner
AD ONLY
2) FBC DVB-C Tuner (Cable)
DOWNLO
15
Page 16
+
Vu User Manual
2. Connecting TV
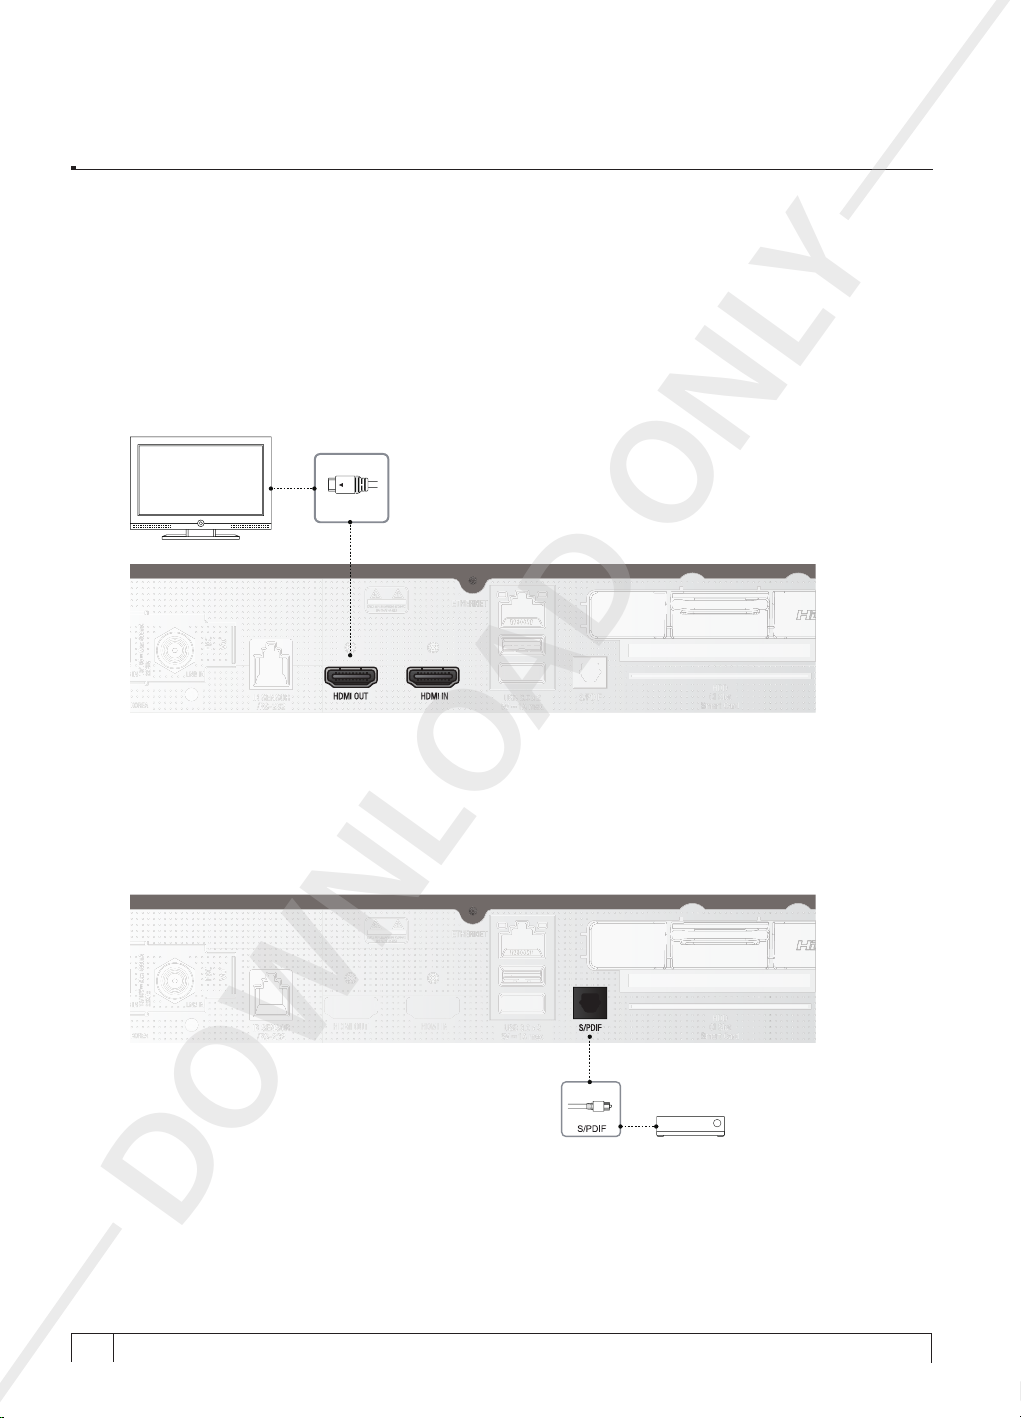
Vu+ provides a variety of audio/video connection methods.
1) Connecting TV via HDMI cable
For the sake of the best picture quality, especially for digital TV, HDMI connection is recommended.
Most HDTVs have HDMI connectors to ensure the highest picture quality. In the rear panel of Vu+
one HDMI connector is available for this purpose. Connect your TV to Vu+ using a HDMI cable as
follows.
AD ONLY
2) Connecting TV vis S/PDIF connection
Vu+ provides S/PDIF connectors. When you have an A/V receiver with S/PDIF digital audio input,
this connection is recommended to enjoy the best audio quality.
DOWNLO
+
16
Your Smart Linux TV Player
Vu :
Page 17
+
i
i
Vu User Manual
3. Connecting Power
A power cord is provided as one of the basic accessories of Vu+.
Connect the power cord to the connector at the rear panel of Vu+.
-
Connect the power cord to a power outlet.
-
Turn on the power switch at the rear panel.
-
NOTE : DC input condition
• 12V 5A
NOTE :
means Remote control operation order.
4. Power ON/OFF
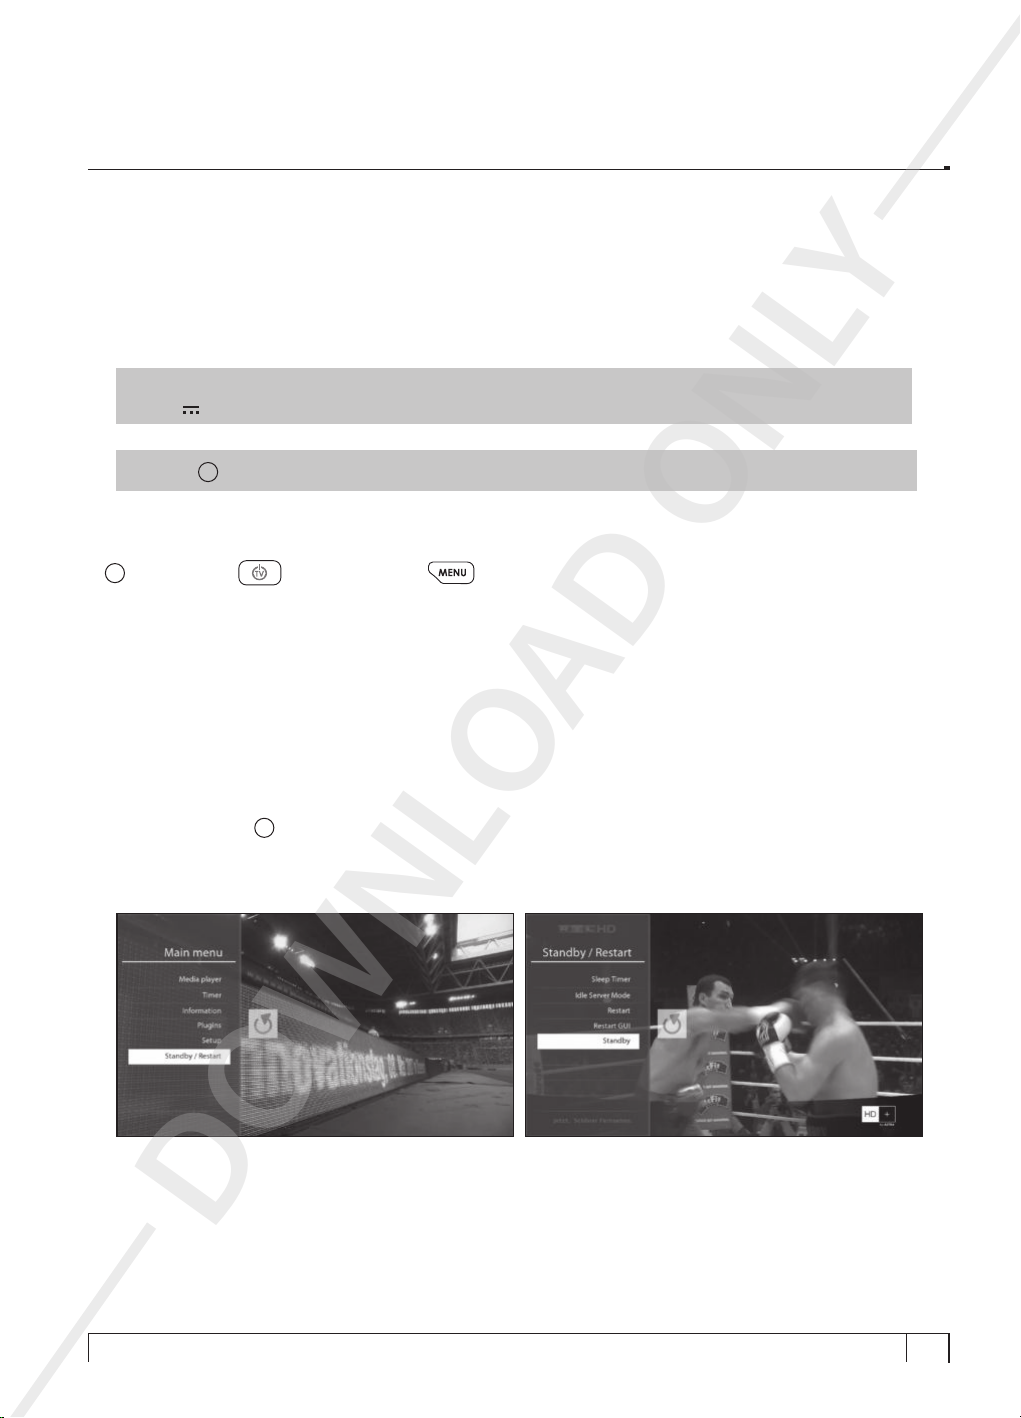
[i : Press Power key / Press MENU key > Select Idle Server Mode/Reset]
There are several ways to turn your Vu+ ON or OFF.
� Complete Power Shutdown
There is a Power Switch in the rear panel and once it is ON, you do not need to turn it on or off each time.
It takes a longer time to boot the system if you turn it off by this switch.
�
Idle Server Mode
POWER
switches your Vu+ off or on. In this mode, the system is not completely shutdown and thus it takes a
shorter time to turn it on and off.
key is normally used to turn the power of Vu+ on or off. If you press
AD ONLY
POWER
key, it instantly
: Menu > Idle Server Mode/Restart > Standby]
Standby Mode
�
Standby is used to reduce the standby power consumption. Vu+ is designed to be energy-efficient
and to guarantee the power consumption to be under 1W in the
[
standby mode.
DOWNLO
17
Page 18
+
Vu User Manual
II. First Time Installation (using Wizard)
When you turn on Vu+ for the first time after purchase, an installation wizard will begin step by step.
NOTE : OK key is used for confirmation and turns to the next step. Press
previous page.
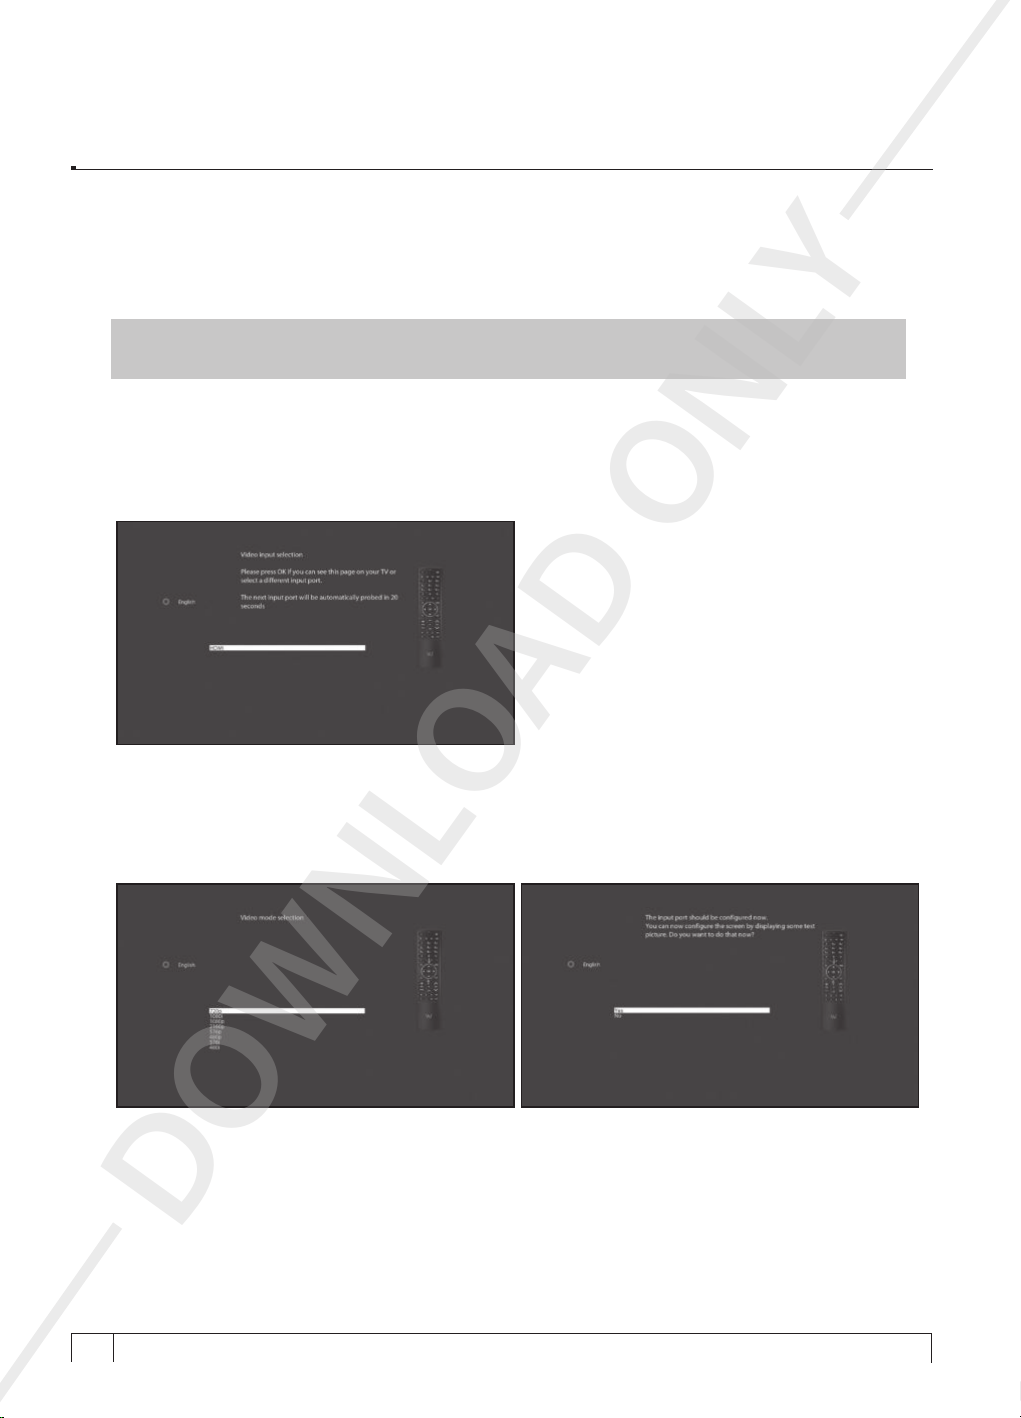
Step 1. Video Input Selection
Vu+ provides various I/O for video connection and here you can choose the main video connection port for
your Vu+. Use
UP/DOWN
key to scroll up and down to find the video connection port you want.
key to return to the
EXIT
AD ONLY
Step 2. Video Mode Selection
Vu+ provides various modes for video and here you can choose the video mode for your Vu+. Use
key to scroll up and down to find the video mode you want.
UP/DOWN
DOWNLO
+
18
Your Smart Linux TV Player
Vu :
Page 19
+
Vu User Manual
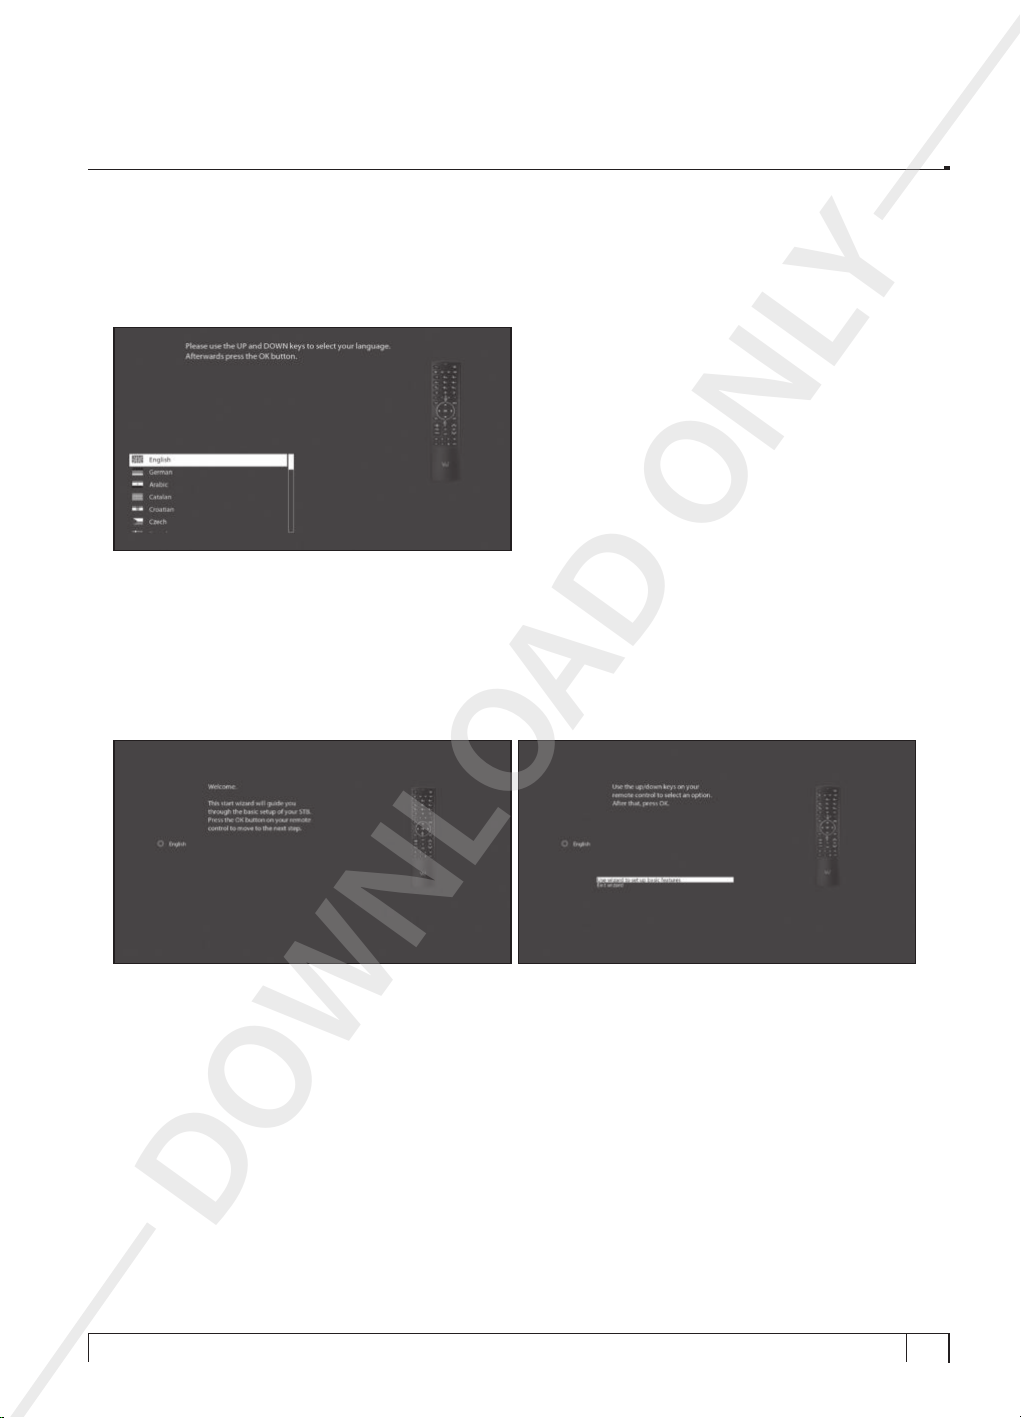
Step 3. Language Selection
Vu+ provides various languages and here you can choose the main language for your Vu+. Use
key to scroll up and down to find the language you want.
Step 4. Configuring Tuner Connection
From now on you need to configure the tuner connection. You have two options:
• Use wizard to set up basic features
• Exit wizard
You are strongly recommended to use wizard as it is designed to guide you through the configuration process.
UP/DOWN
AD ONLY
DOWNLO
19
Page 20
+
Vu User Manual
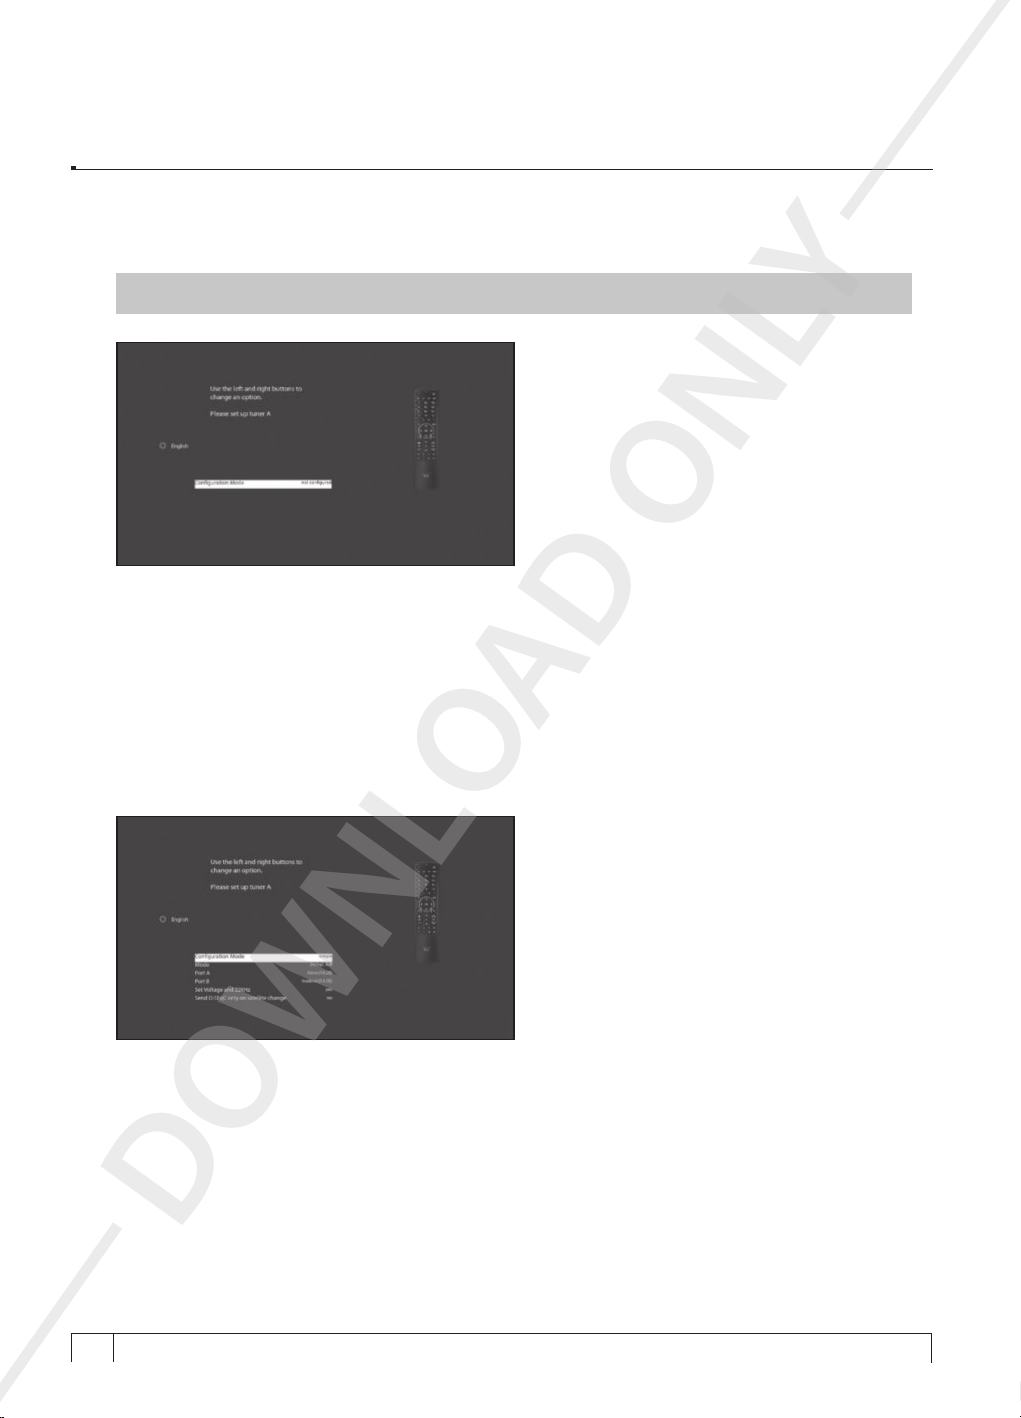
A. Configuring Tuner DVB-S2
NOTE : If DVB-S2 tuner is mounted, read the following instructions.
Using
LEFT/RIGHT
• Not configured
• Simple
• Loop through to: mode to make the LNB1 be internally connected to the LNB2 in.
• Equal to: mode to use the same configuration as that of Tuner B.
• Advanced: for an advanced user configuration.
If you choose Simple configuration mode, the following picture will appear.
key, you can choose one of the following Configuration Modes:
AD ONLY
DOWNLO
+
20
Your Smart Linux TV Player
Vu :
Page 21
+
Vu User Manual
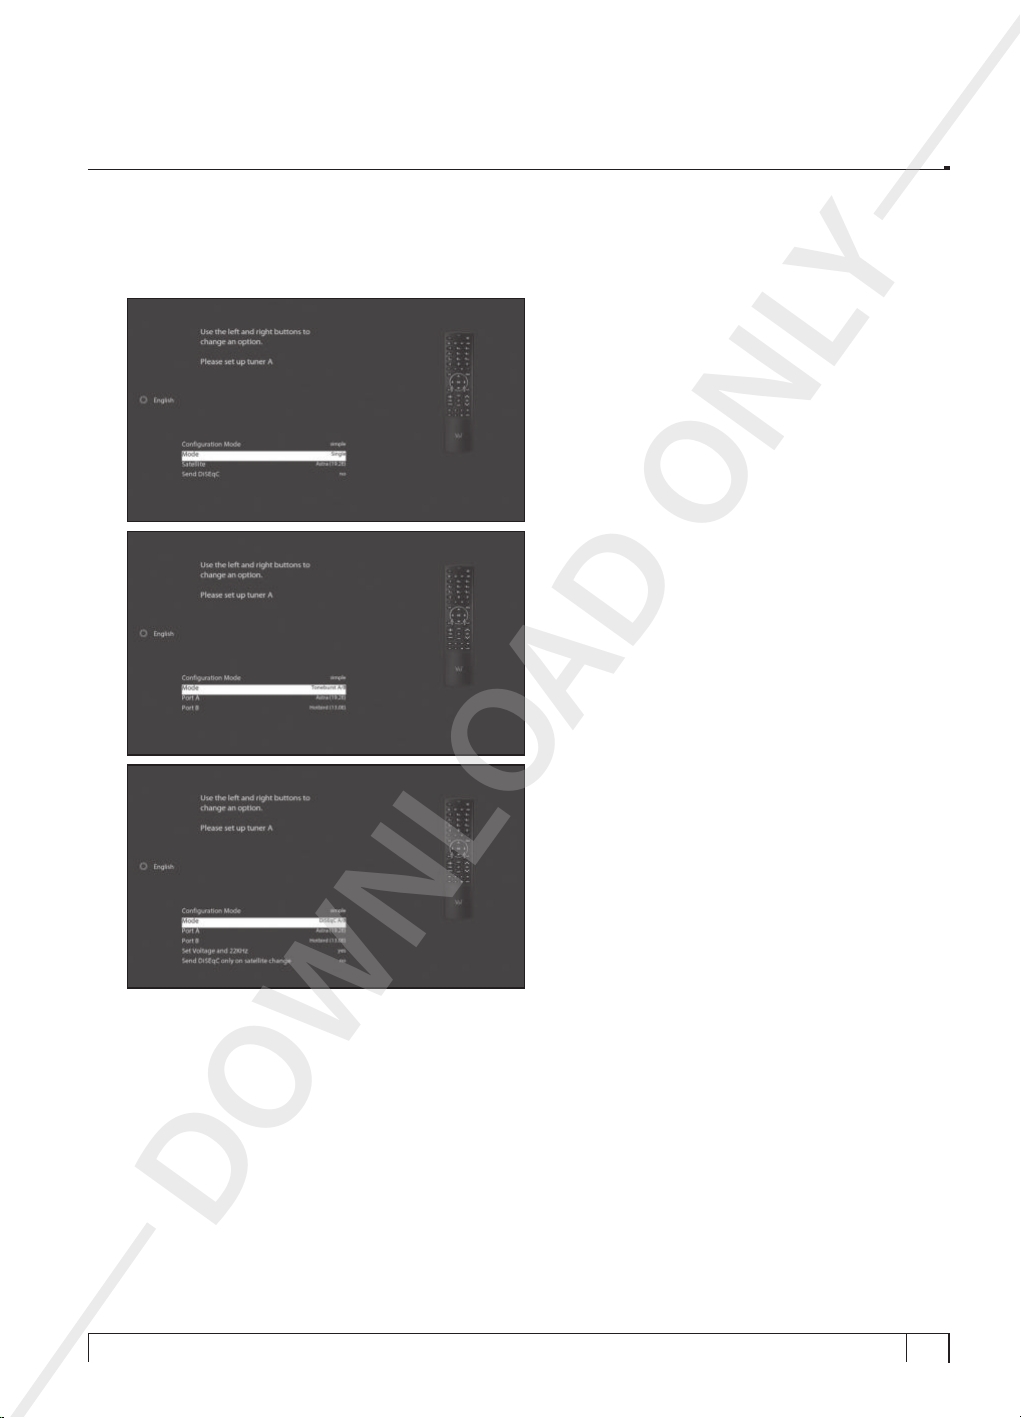
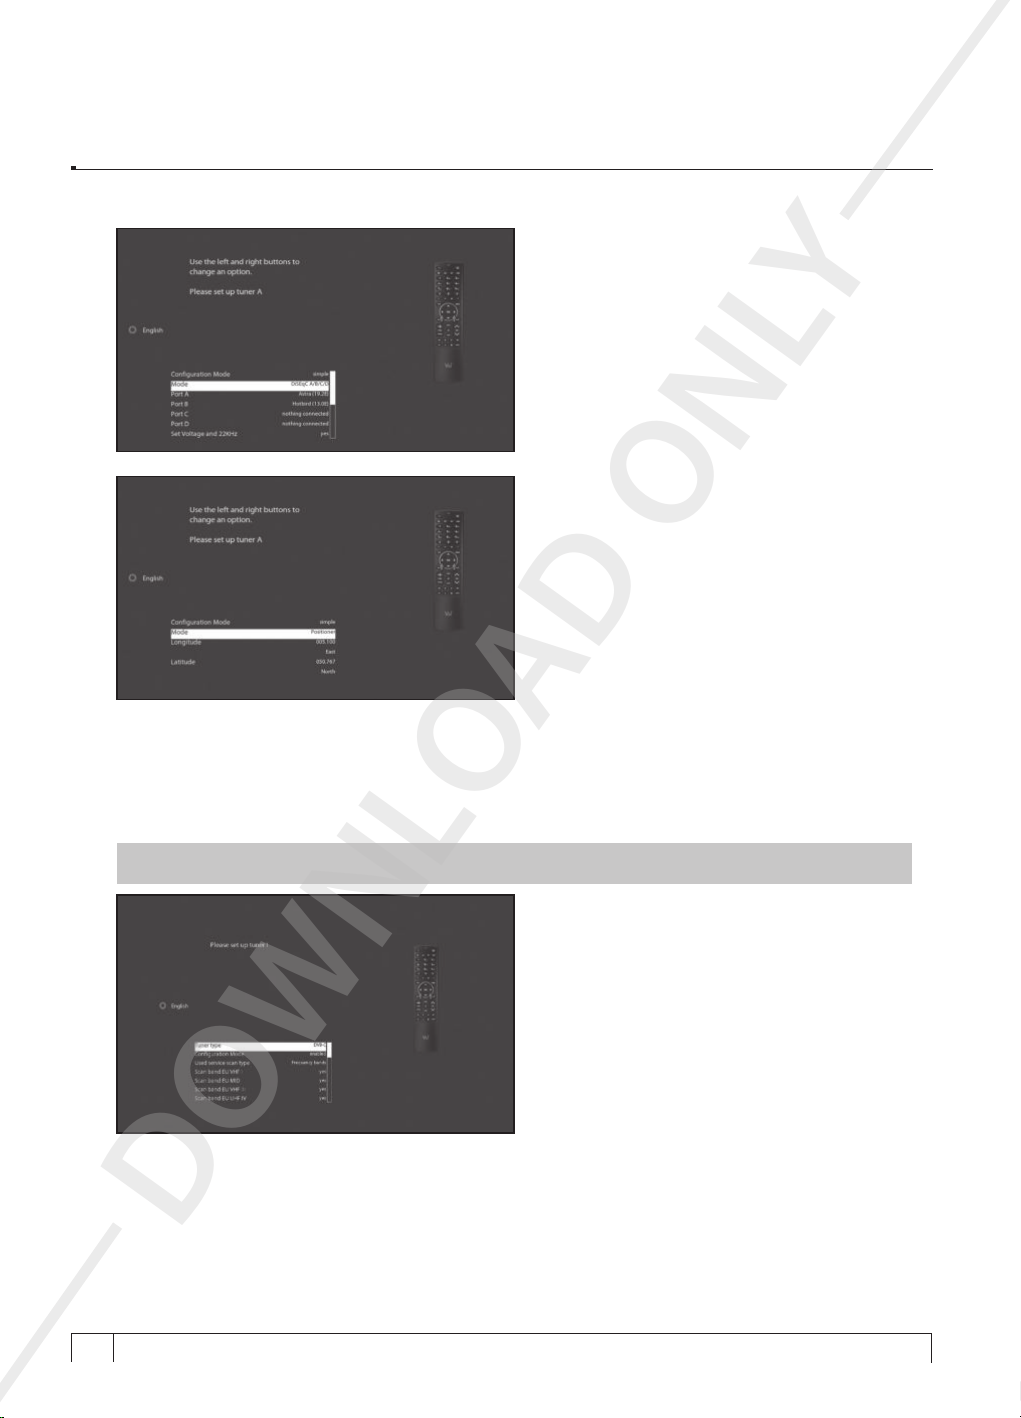
The five modes are available for the satellite cable connection between LNB and your Vu+ as below :
� Single
This option is used to receive a single satellite
with a single LNB. The cable from LNB is directly
connected to Vu+.
� Toneburst A/B
This option is used if you want to receive two
satellites using a Toneburst switch.
AD ONLY
� DiSEqC A/B
This option allows you to configure two satellites
in Port A and Port B.
DOWNLO
21
Page 22
+
Vu User Manual
� DiSEqC A/B/C/D
This option allows you to configure four
satellites in Port A, Port B, Port C and
Port D.
� Positioner
This option is used when you have a
motorized satellite antenna.
AD ONLY
B. Configuring Tuner DVB-C
NOTE : If DVB-C tuner is mounted, read the following instructions.
DOWNLO
+
22
Your Smart Linux TV Player
Vu :
• Conguring DVB-C Tuner
This option allows you to decide whether
to scan each of the various scan band in
the list.
Page 23
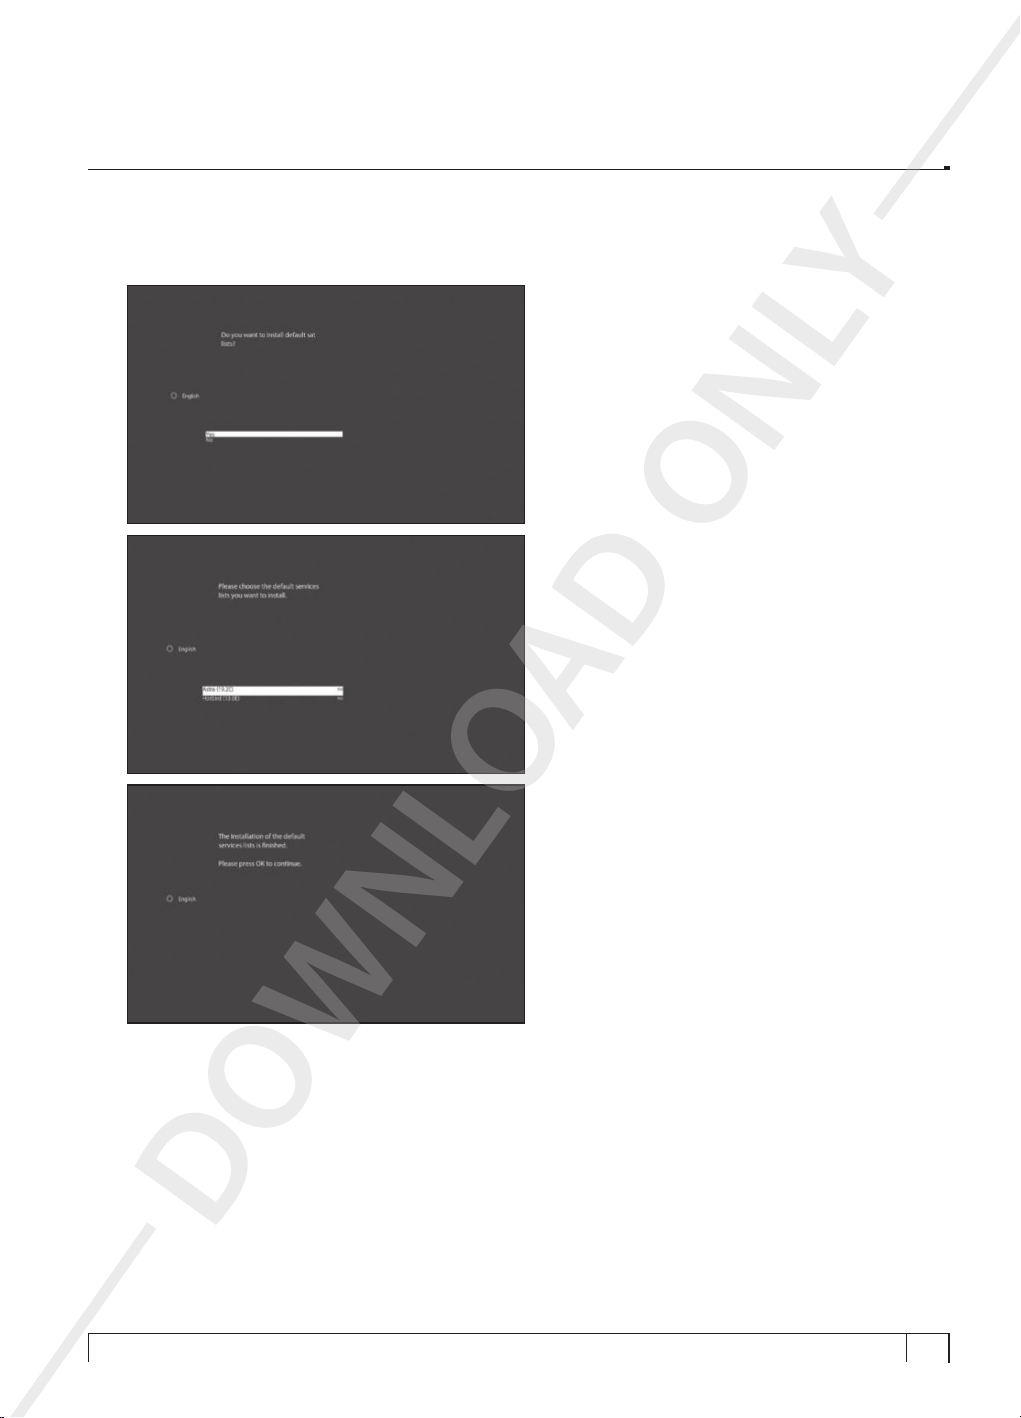
Step 5. Installing Default Satellite List and Channel Scan
� Installing default channel list
Here you can decide whether to install the
default channel lists or not.
� Choosing Satellite Service List
With the available satellite service lists on the
screen, you can choose to get which satellite
service lists you want by using
AD ONLY
+
Vu User Manual
LEFT/RIGHT
key.
DOWNLO
23
Page 24
+
Vu User Manual
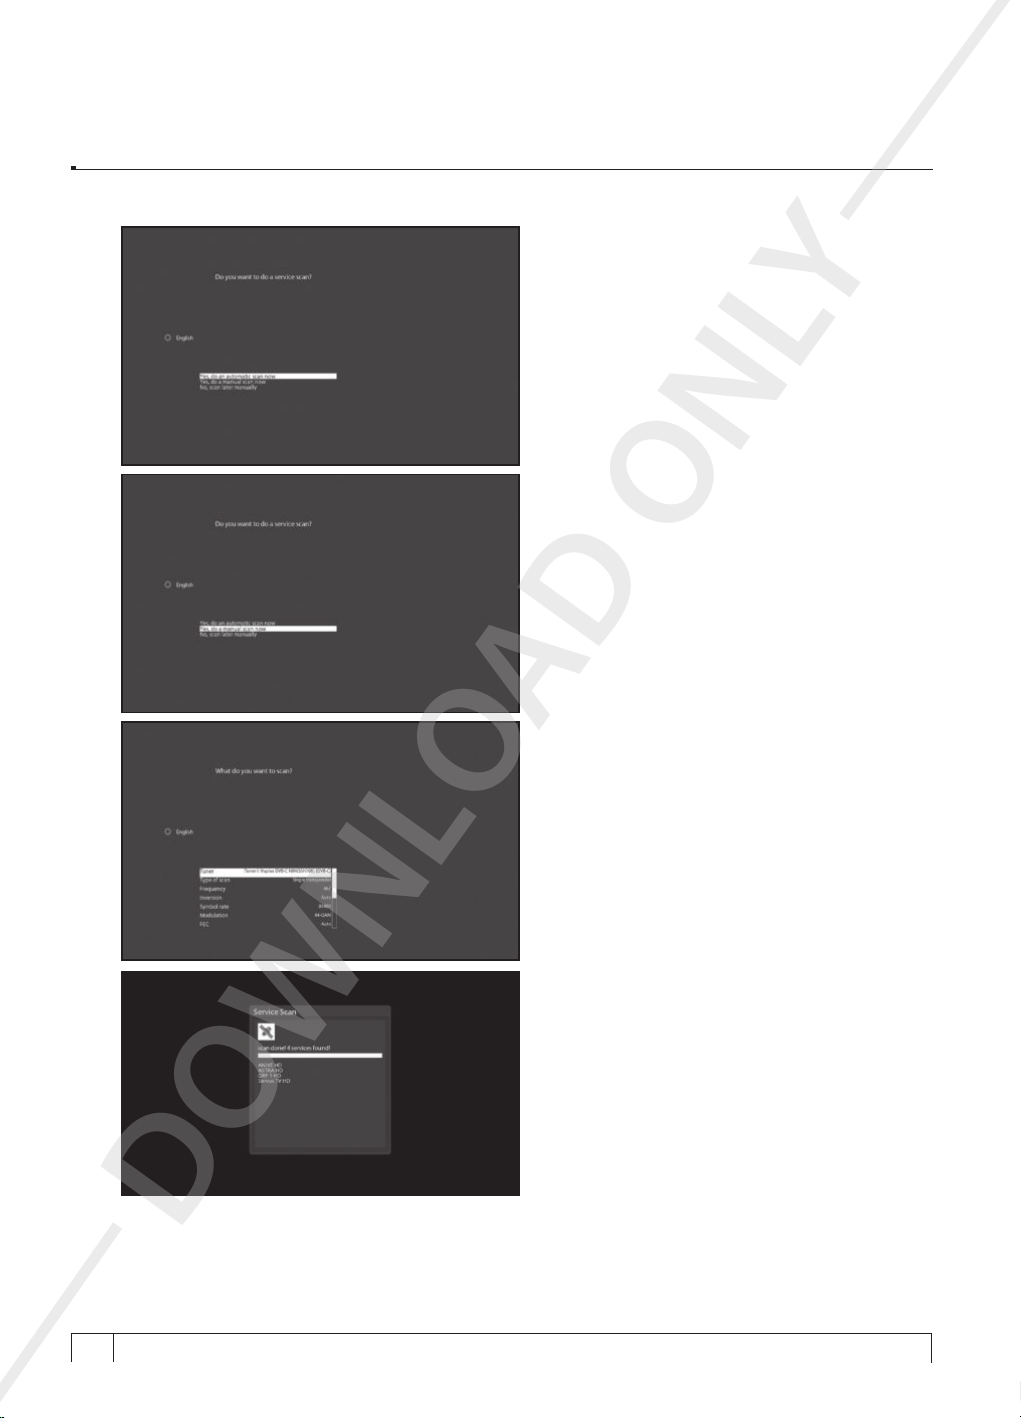
� Selecting Scan Mode - Automatic Scan /
Manual Scan
Channel scanning is possible either in Automatic
Scan mode or Manual Scan mode.
� Automatic Scan
If you choose Automatic Scan, you will be asked
whether to erase all the existing channels before
scaninig.
AD ONLY
� Manual Scan
You can select the type of scan between
Complete and Single Transponder.
Press
� Channel Scanning
The scanned channels will be displayed if the
previous configurations have been done correctly.
key to initiate the channel scan.
OK
DOWNLO
+
24
Your Smart Linux TV Player
Vu :
Page 25

+
Vu User Manual
Step 6. Parental Control Option
Here you can choose whether to enable the parental control option. If you press OK key, you will be asked
to enter PIN number.
AD ONLY
DOWNLO
25
Page 26
+
i
i
Vu User Manual
III. Basic Operations
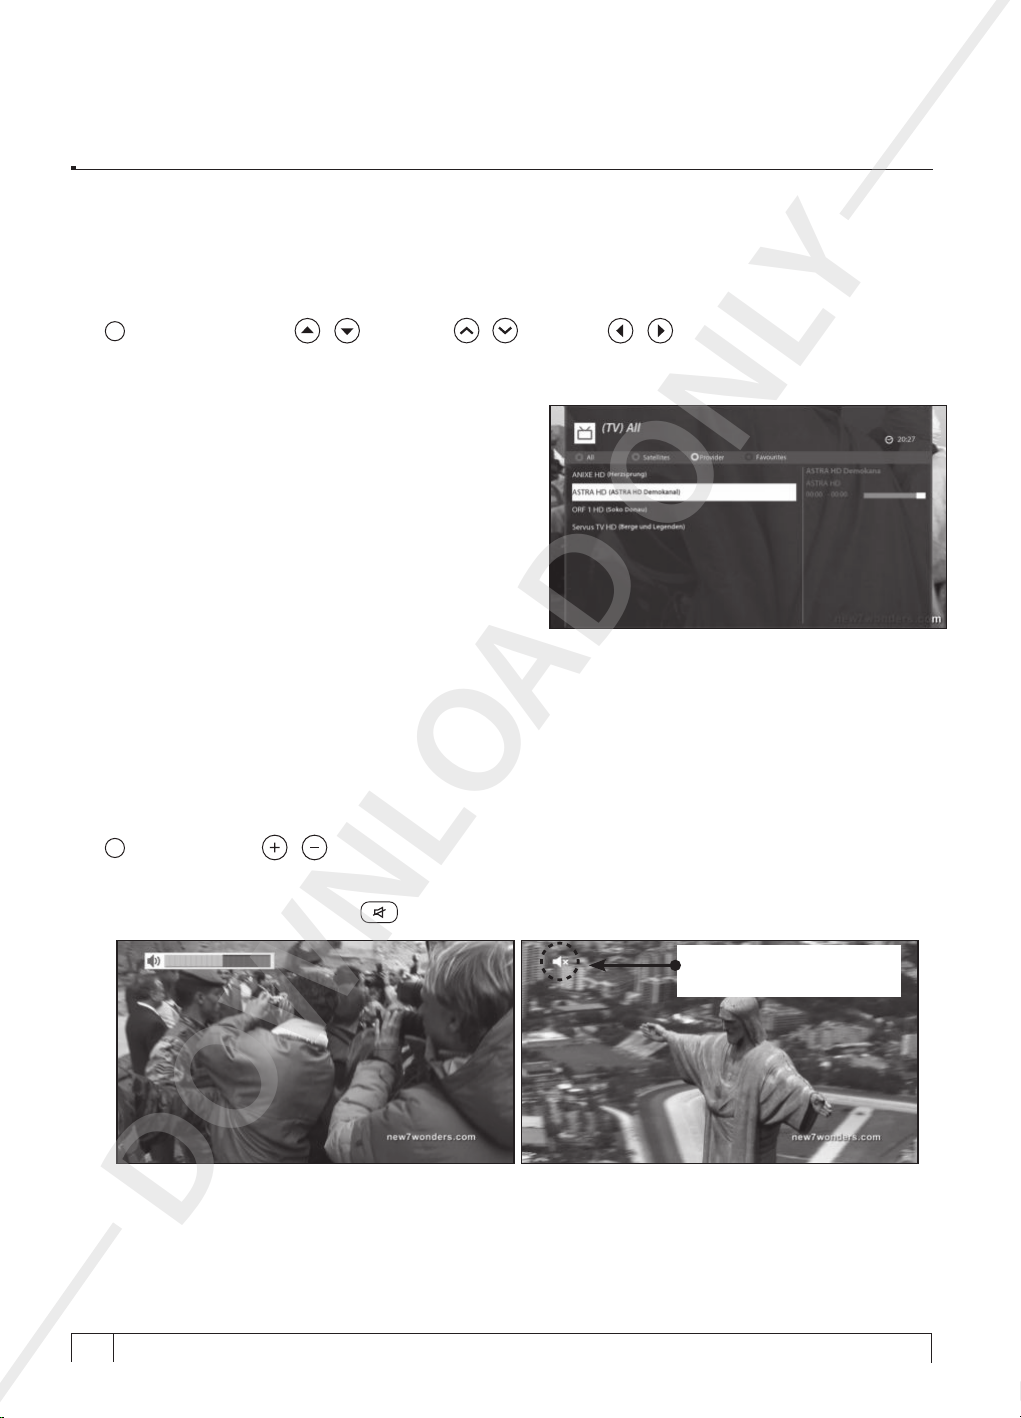
1. Switching Channel
[
: Press NAVIGATION
Vu+ offers various channel zapping methods. You can switch the current channel by pressing.
•
UP/DOWN
If you press UP or
menu appears.
You can move up and down to select the channel
that you want to tune into.
•
LEFT/RIGHT
If you press
subsequent channel of the current channel is tuned in.
•
CHANNEL
If you press
Channel Selection
•
Channel Number
Enter a channel number, and it will instantly tune into
the channel.
key
key
LEFT
+/-
key
CHANNEL
/ , CHANNEL / key / Press / key to move to the next channels]
Channel Selection
key,
DOWN
or
menu.
key, the previous or
RIGHT
+ or – key, this will call up the
AD ONLY
2. Volume Control
[
: Press VOLUME
You can adjust the audio volume by pressing
temporarily by pressing
/ key]
(
MUTE
DOWNLO
+
26
Your Smart Linux TV Player
Vu :
) key.
VOLUME
+/-
key. You can also mute or unmute the audio
Mute icon is on when the
audio is muted.
Page 27
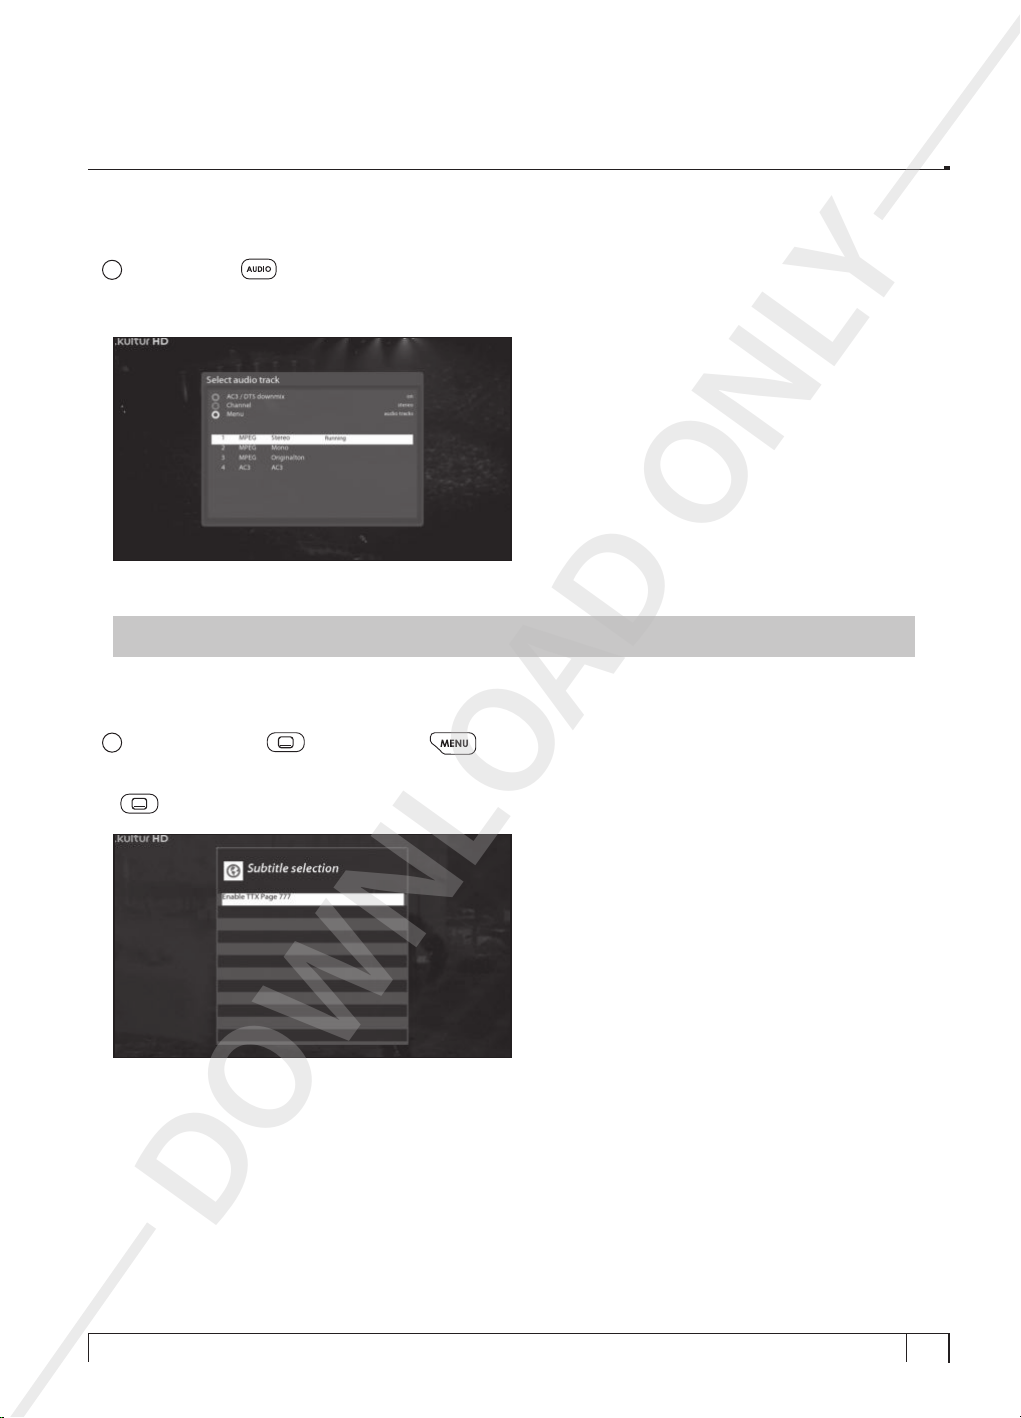
3. Selecting Audio Track
i
i
[
: Press AUDIO key]
+
Vu User Manual
You can check what audio tracks are available to choose by pressing
By using
4. Subtitle
[
You can view the subtitle of the current program if the program provides the subtitle. Press
( )
UP/DOWN
NOTE : Available options on this menu will differ depending on the service.
: Press SUBTITLE or Press MENU key > Subtitle]
key and
key and
Subtitle selection
COLOR
key, you can select a different audio language or Stereo sound.
AD ONLY
menu appears as below.
AUDIO
key.
SUBTITLE
Available subtitles, if any, will display. By using
want to play and press
key to activate it.
OK
UP/DOWN
key navigate the list to select a subtitle that you
DOWNLO
27
Page 28
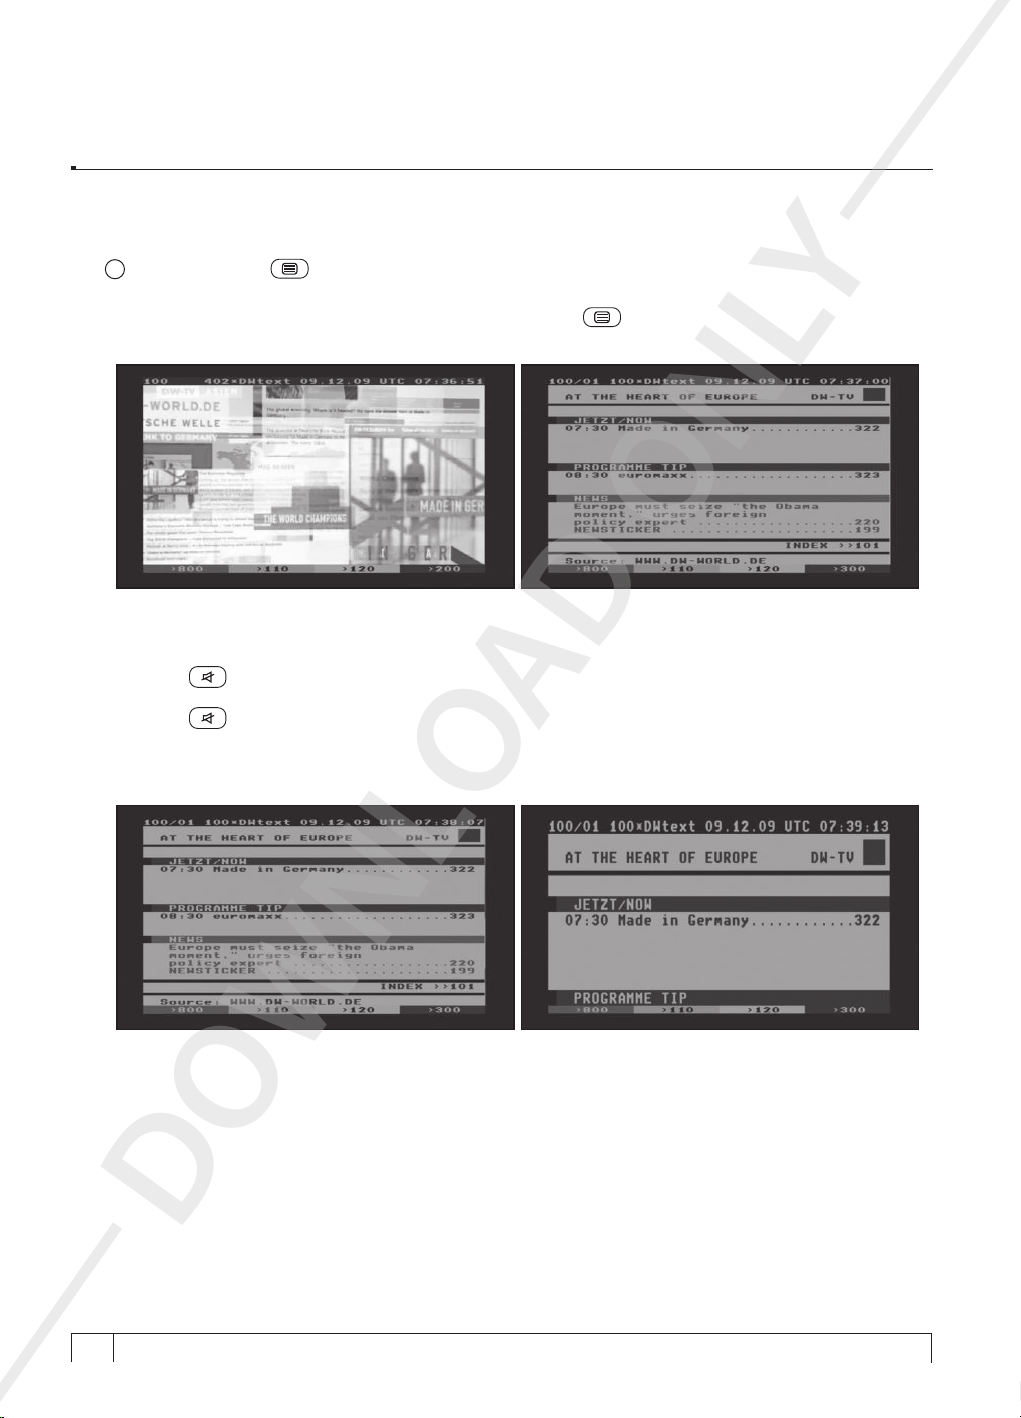
+
Vu User Manual
5. Teletext
[i : Press TELETEXT key]
You can call up Teletext information by pressing
information.
You can navigate through the Teletext page by using
enter the page number that you want to read.
•
Once you activated Teletext, you can toggle between the live mode and the Teletext page by pressing
•
If you want to enlarge the page, press
( ) key
MUTE
( ) key instantly. In this case, loading of the Teletext page takes place instantly.
MUTE
VOLUME +
key
VOLUME +
TELETEXT
( ) key. It will take some time to load all the
UP/DOWN
key to select a text page. Also, just simply
AD ONLY
key.
DOWNLO
+
28
Your Smart Linux TV Player
Vu :
Page 29
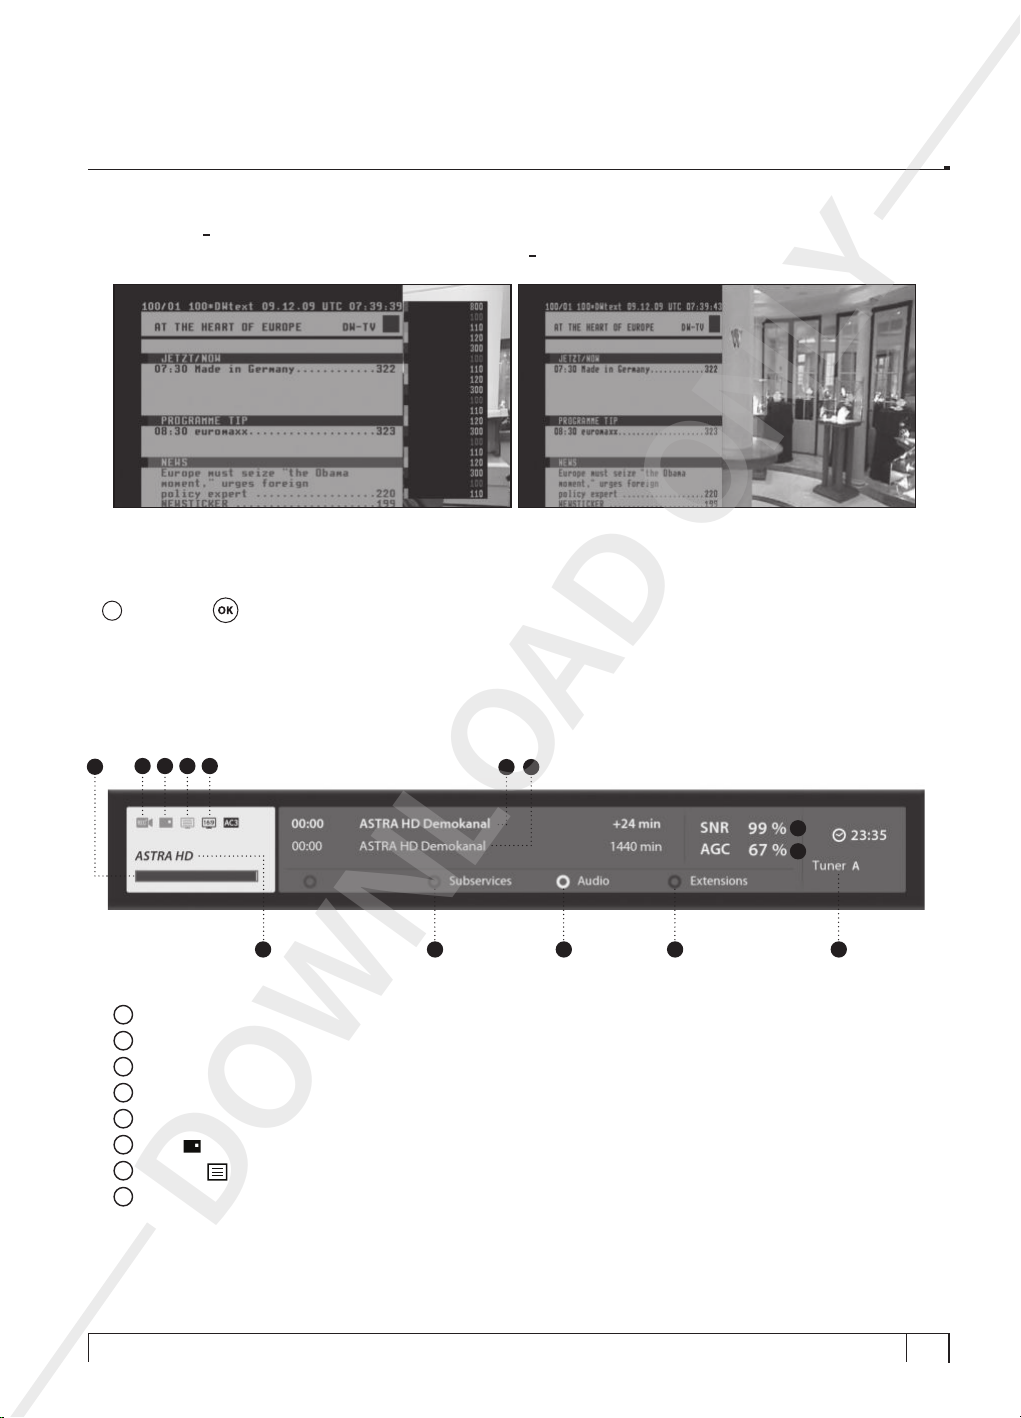
+
Vu User Manual
•
VOLUME
If you want to reduce the page size, press
key
VOLUME
key.
6. Program Information (Infobar)
[i : Press OK key]
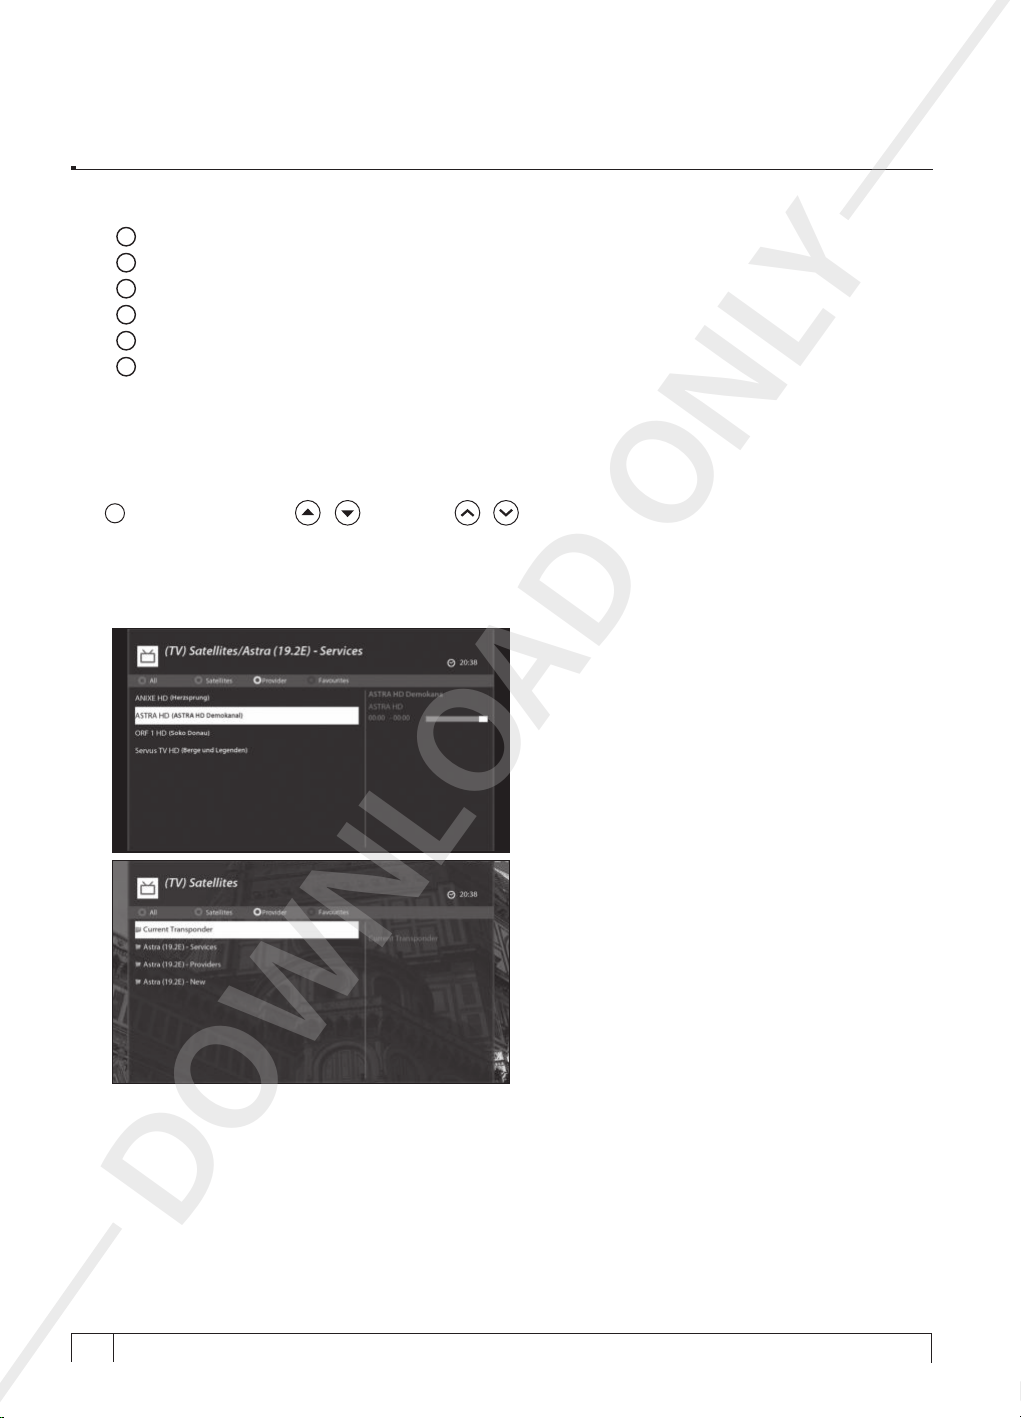
Whenever you change the channel, infobar is always displayed for 5 seconds (default setting). Infobar is
designed to provide you comprehensive information of the channel that you are currently watching.
1
• Press
5 6 7 8
key to call up infobar.
OK
AD ONLY
3 4
9
10
2 11 12 13 14
1
Remaining time of the current program.
2
The name of the current channel.
3
The current program.
4
The next program.
5
: Highlighted in red when recording is in progress.
REC
6
CAS
7
Teletext
8
16:9
) : Encrypted program.
(
) : Highlighted when the program provides Teletext.
(
: Screen ratio.
DOWNLO
29
Page 30
+
i
Vu User Manual
9
(Signal to Noise Ratio) : Signal Level.
SNR
10
(Automatic Gain Control) : Signal Strength.
AGC
11
GREEN
12
Audio
13
Extensions
14
Tuner
: to call up Subservices, if available.
: to display available audio tracks.
: to call up a Picture in Picutre.
: The tuner being used for the current channel.
A
7. Channel List (Channel Selection Menu)
[
: Press NAVIGATION
/ , CHANNEL / key]
If press
Four types of the channel lists are available to help you manage your channel selection.
•
UP/DOWN
key, this will activate
Channel Selection
RED
Menu as below.
displays the list of all scanned channels.
AD ONLY
•
Per each satellite, channels are arranged according
to
GREEN
displays the list of all scanned satellites.
Services, Provider
, and
New
.
DOWNLO
+
30
Your Smart Linux TV Player
Vu :
Page 31
+
Vu User Manual
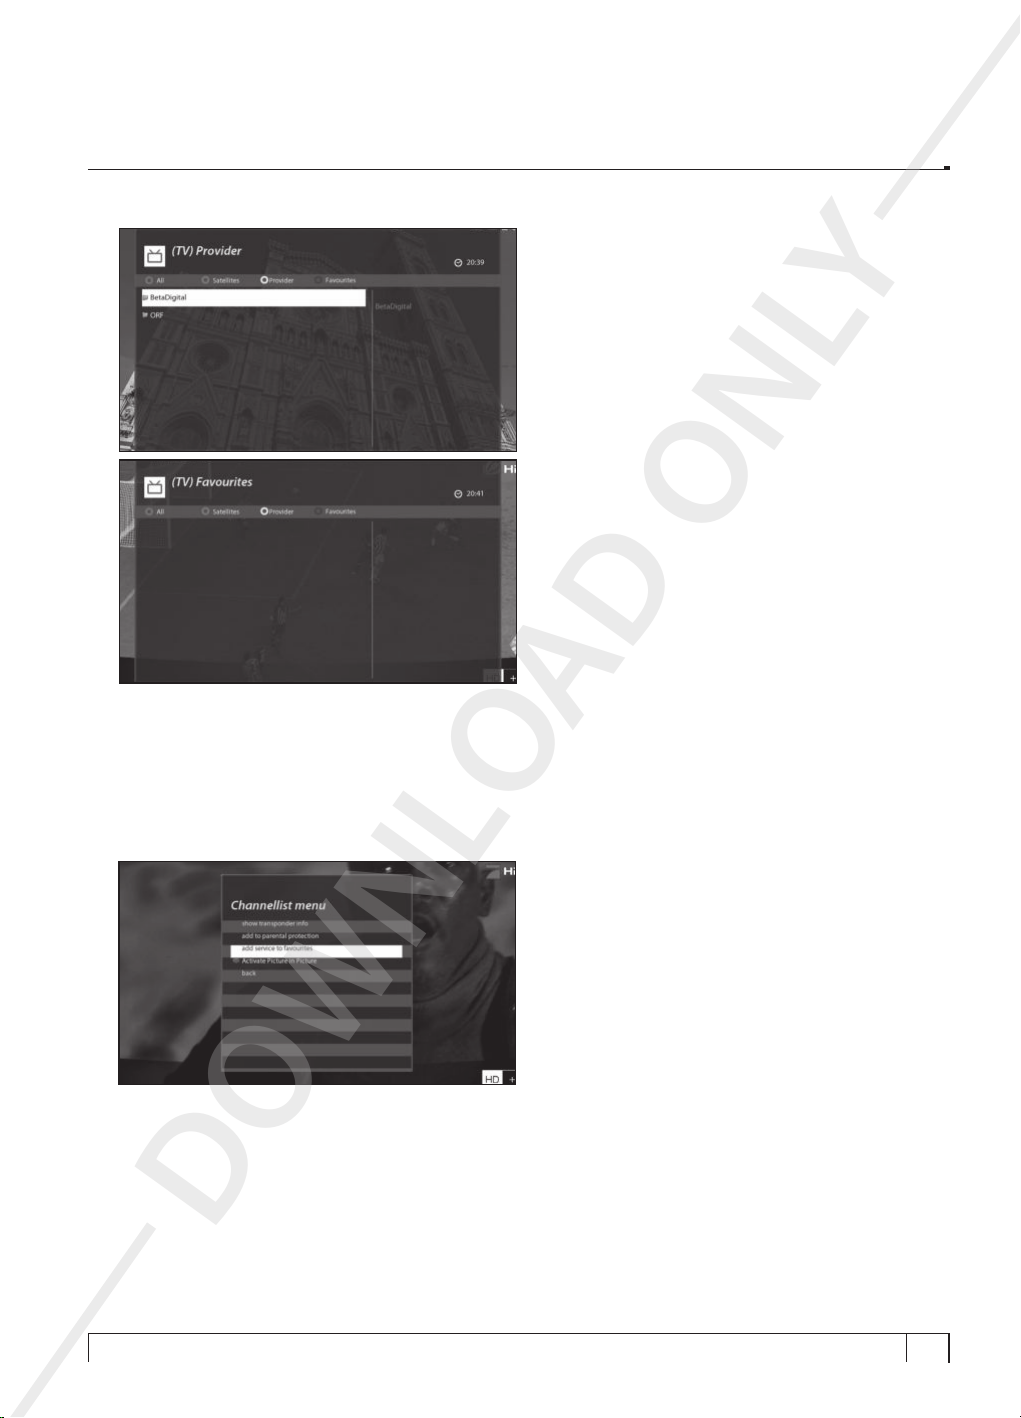
In order for you to add certain channels to this
Call up the
-
Go to the
-
Select the channel that you want to add to the
-
Press
-
Channel Selection
All
list by pressing
key on the selected channel and the following menu appears.
MENU
list by pressing UP or
key.
RED
•
•
Favourites
DOWN
Favourites
YELLOW
BLUE
list,
displays the list of providers.
displays the list of your favorite channels.
AD ONLY
key.
list.
DOWNLO
31
Page 32
+
Vu User Manual
Choose “
-
Go to the
-
in the list.
8. Electronic Program Guide (Event View)
[i : Press EPG key]
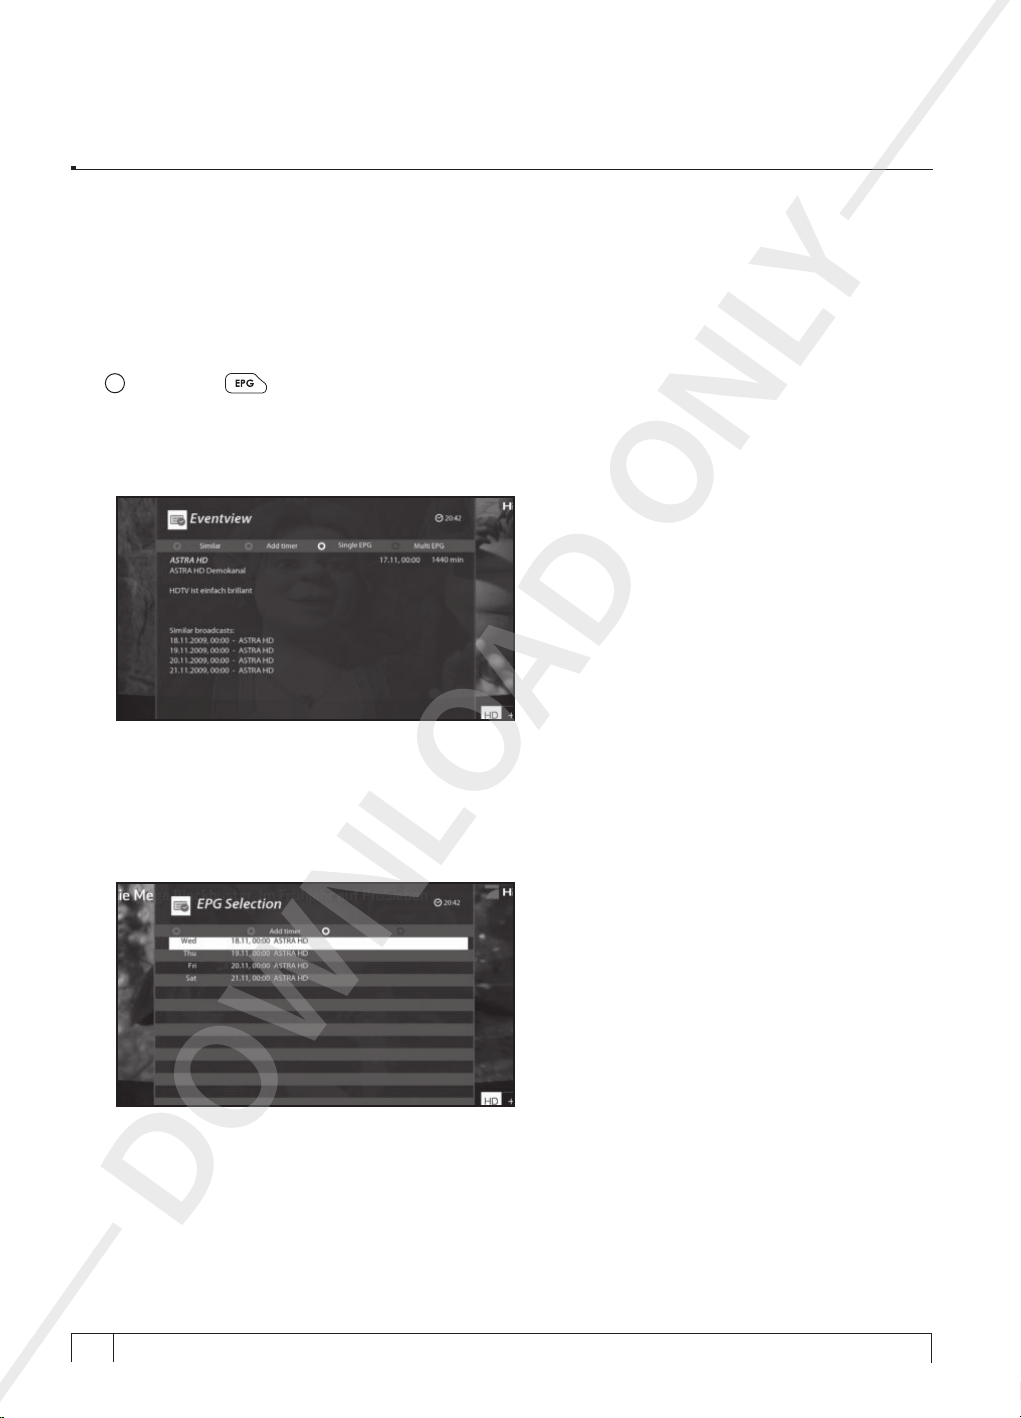
The Electronic Program Guide (EPG) displays the program information of each channel, if provided, in time
and date order. You can view the detailed program information by pressing
menu,
add service to favourites
Favourites
Eventview
list by pressing
appears.
” and press OK key.
key to confirm that the selected channel is correctly included
BLUE
key and the following
EPG
AD ONLY
Detailed information of the current channel will be displayed on EPG. On this menu, three options are
provided.
� RED (Similar)
This option helps you find similar programs. If there are one or more programs that are similar to the
current program,
EPG Selection
window displays them as below.
DOWNLO
+
32
Your Smart Linux TV Player
Vu :
Page 33
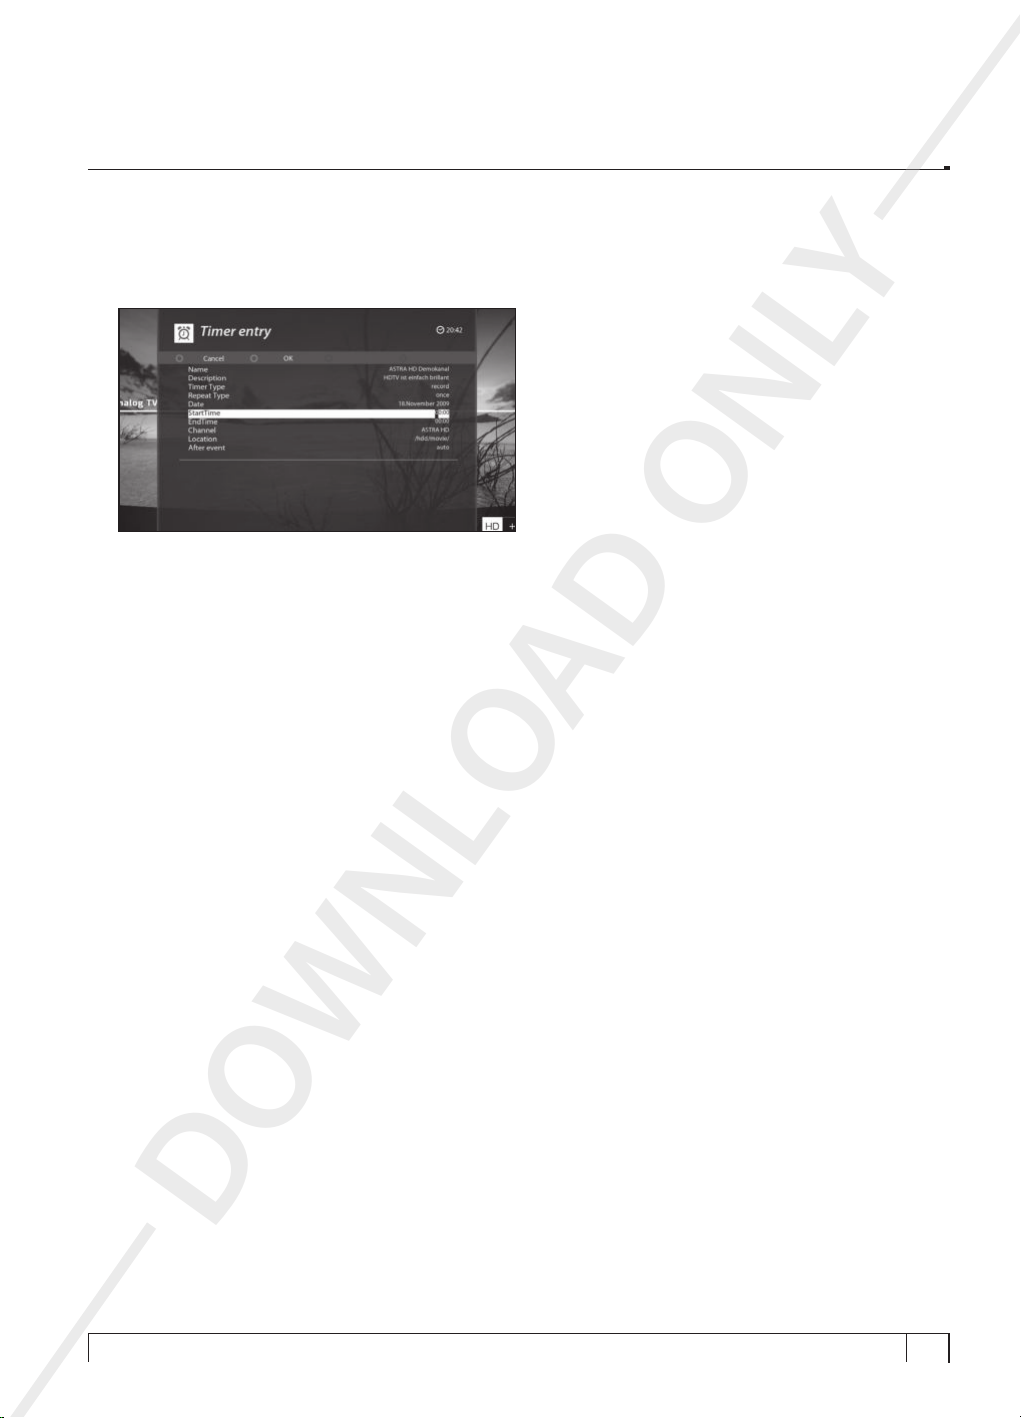
� GREEN (Add Timer)
If you press
for recording or zapping.
- Name
Displays the name of the selected program.
- Description
Displays a short description of the selected program.
- Timer Type
• Select
•
Select
- Repeat Type
• Select
•
Select
•
Repeats - This option is given only when you selected
You can reserve zapping or recording per Daily / Weekly / Mon-Fri / User-defined.
- Date
Displays the current date. This entry is on when you selected
- Start Time
You can set the time to begin recording or zapping.
- End Time
You can set the time to end recording or zapping
- Channel
This entry allows you to change the channel. Press
You can select a different channel from this list using this option. To return to
press
- After event
This option allows you to choose from auto, do nothing, go to
the timer event is done.
GREEN
Zap
for channel tuning reservation.
Record
for recording reservation.
Once
for one time of zapping or recording reservation.
Repeated
key.
EXIT
Timer entry
key,
menu appears as below. This option is used to set up a new timer
AD ONLY
for repeated zapping or recording reservation.
"Repeated"
Once
LEFT/RIGHT
Idle Server Mode, and go to standby after
in the Repeat Type.
, in the Repeat Type.
key to call up
Channel Selection
Timer entry
DOWNLO
+
Vu User Manual
menu,
menu.
33
Page 34
+
Vu User Manual
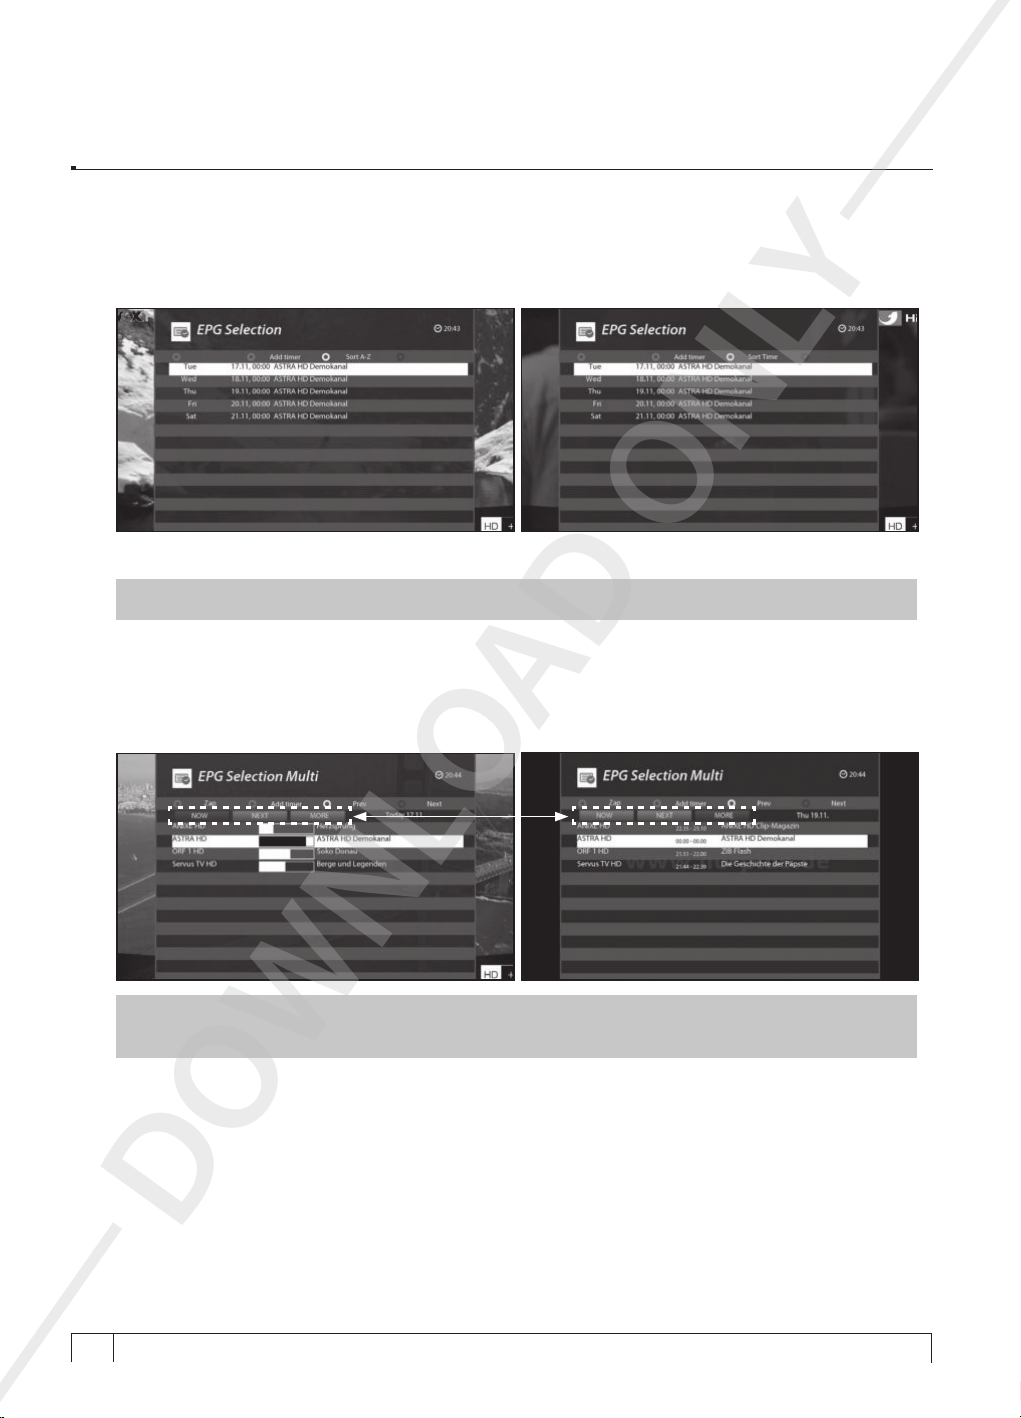
� YELLOW (Single EPG)
Press
YELLOW
channel.
key while
Eventview
menu is on, to call up the program event schedules of the selected
In this state, you can sort the list according to A-Z order or Time by pressing
NOTE :
� BLUE (Multi EPG)
Press
- You can move the previous or next program within the same channel by using
BLUE
NOTE :
displayed except for the channel name.
- You can switch to another channel by using
-
-
To add a timer for recording or zapping, press
key to activate
BLUE
key (Next).
Not all channels provide EPG information and thus in case of no EPG data, nothing will be
key is used to instantly tune into the selected channel.
RED
key is used to reserve recording or zapping of the selected program.
GREEN
EPG Selection Multi
window.
UP/DOWN
GREEN key.
AD ONLY
key.
YELLOW
YELLOW
key.
key (Previous)/
DOWNLO
+
34
Your Smart Linux TV Player
Vu :
Page 35
+
Vu User Manual
9. Timeshift
[i : Press PLAY or PAUSE key]
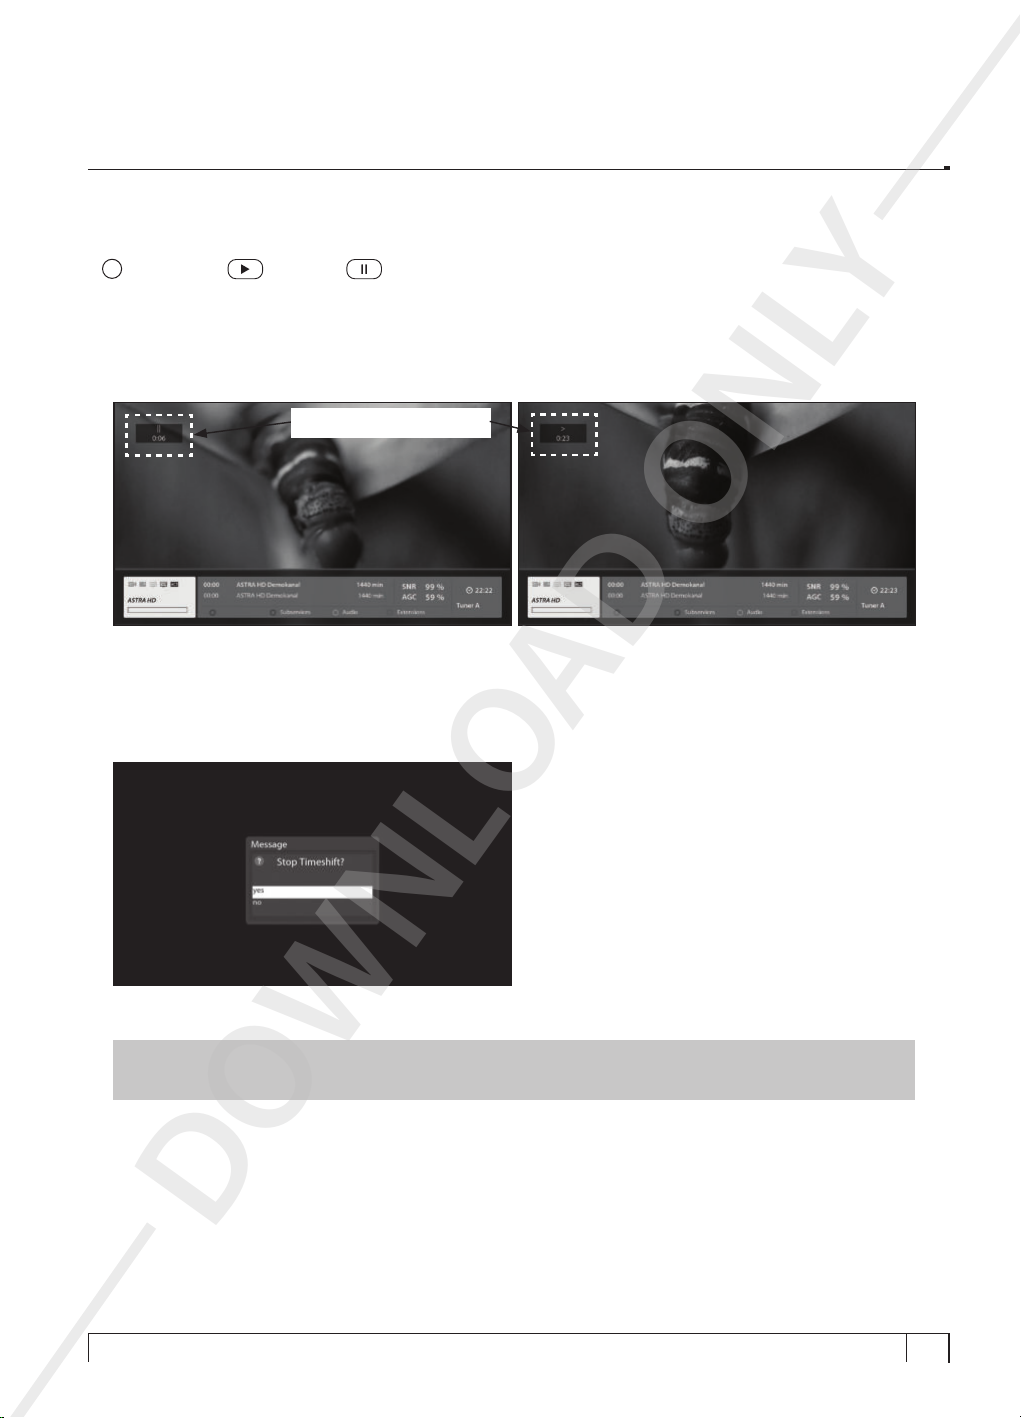
For your information, Timeshift is an instant recording of the current program that you are watching. Press
or
PLAY
displaying elapsed time information will appear on the left upper side of the screen as below.
key, it will instantly pause the audio and video of the program, and a small window
PAUSE
elapsed time information
In this state, Timeshifted recording is running until you press either
restart viewing of the program.
If you want to stop Timeshifted recording and to return to the live mode, press
You will be asked of
NOTE :
stored on HDD. If you stop Timeshift, you cannot replay the Timeshifted recording.
What is different from normal recording is that Timeshifted recording is not meant to be
Ye s
or No to stop Timeshift.
AD ONLY
PLAY
or
PAUSE
DOWNLO
key again. You can
key.
STOP
35
Page 36
+
i
Vu User Manual
10. Recording
Vu+ UNO 4K SE supports multiple recordings up to 16 at the same time.
1) Instant Recording
[
: Press REC key]
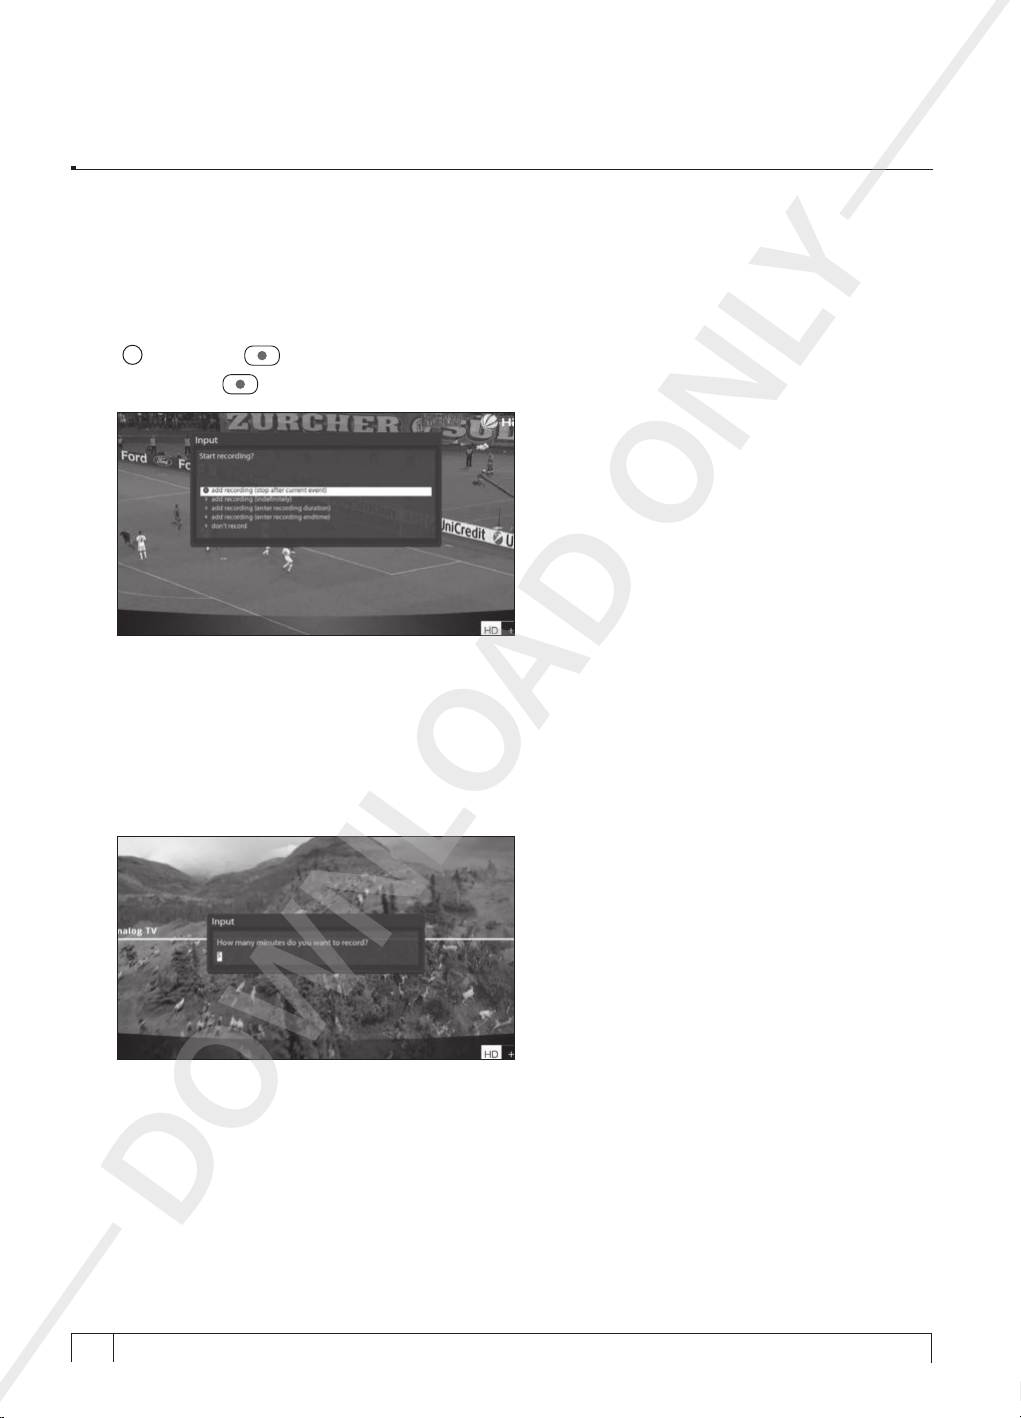
Press
Five recording options are given.
- Add recording (stop after current event)
This option is used when you want to end recording when the current program ends.
- Add recording (enter recording duration)
This option is used when you want to manually set the length of recording by entering a certain number as
below:
( ) key to start the recording of the current program.
REC
AD ONLY
DOWNLO
+
36
Your Smart Linux TV Player
Vu :
Page 37
+
i
Vu User Manual
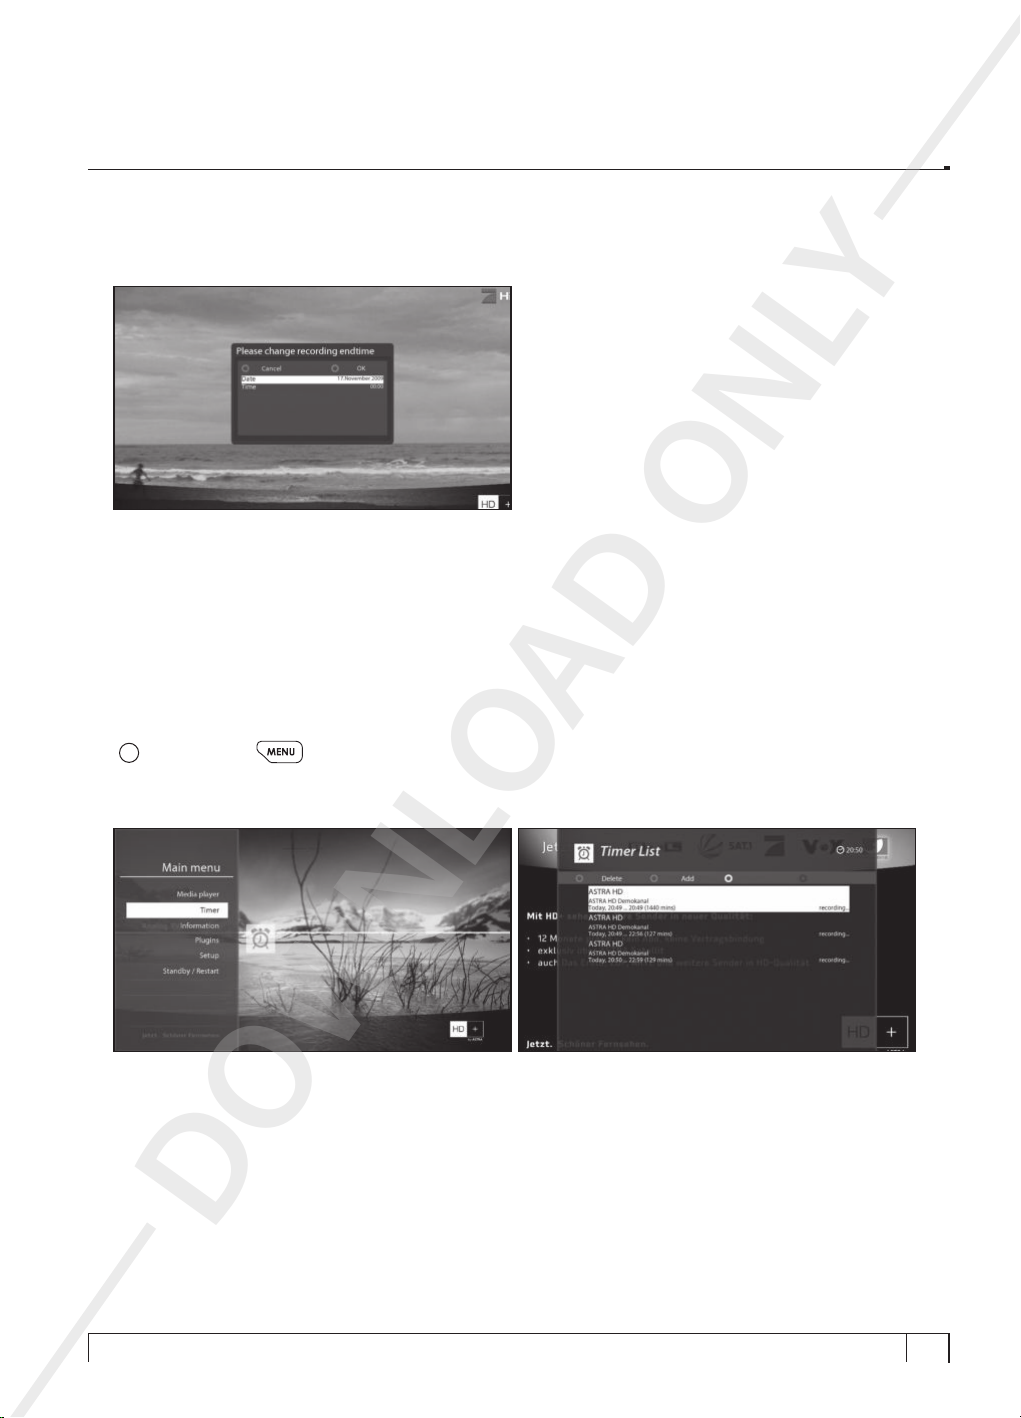
- Add recording (enter recording end time)
This option is used when you want to define a certain date and time when the recording is stopped.
- Add recording (indenitely)
This option is used when you want to keep recording running without a specific end time. Recording will
continue unless you stop it.
- Don’t record
This option is used to exit from this menu without recording.
2) Recording by Timer
:
[
Press MENU key > Select Timer]
You can manage recording process using
menu.
DOWNLO
Timer List
AD ONLY
menu. Press
key and select
MENU
Timer
on the
37
Page 38
+
Vu User Manual
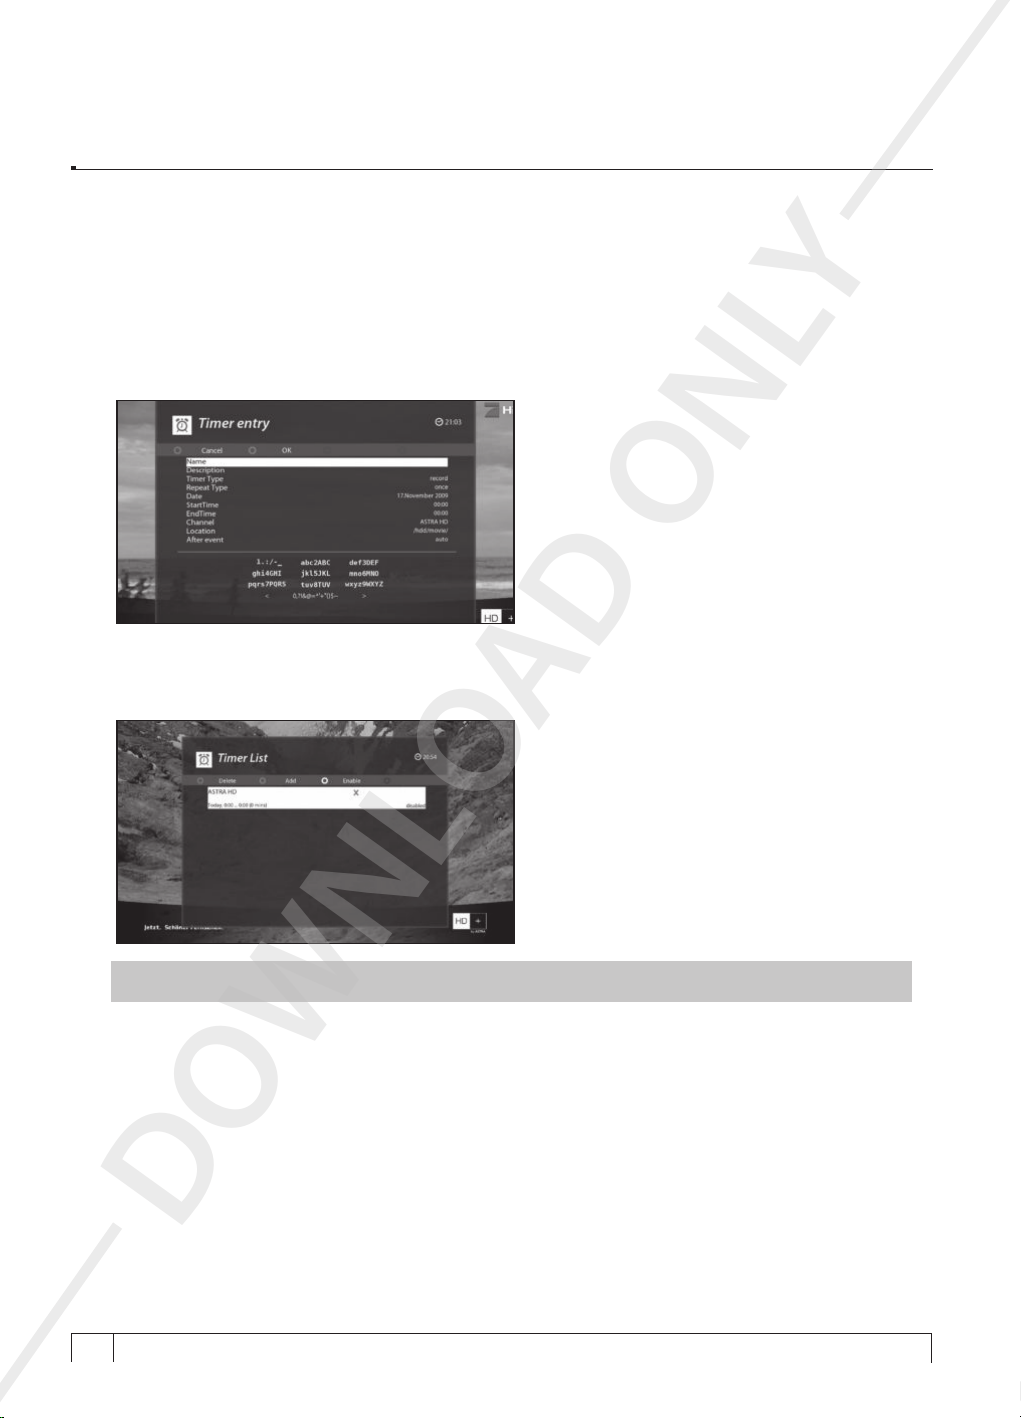
In this menu,
- RED (Delete)
This option is used to delete a timer.
- GREEN (Add)
This option is used to add a timer.
- YELLOW (Disable)
This option is used to disable the timer and X mark will appear.
COLOR
keys are assigned for each different function.
AD ONLY
38
if you want to enable the disabled timer, press
NOTE :
DOWNLO
+
Your Smart Linux TV Player
Vu :
YELLOW
key again.
Page 39
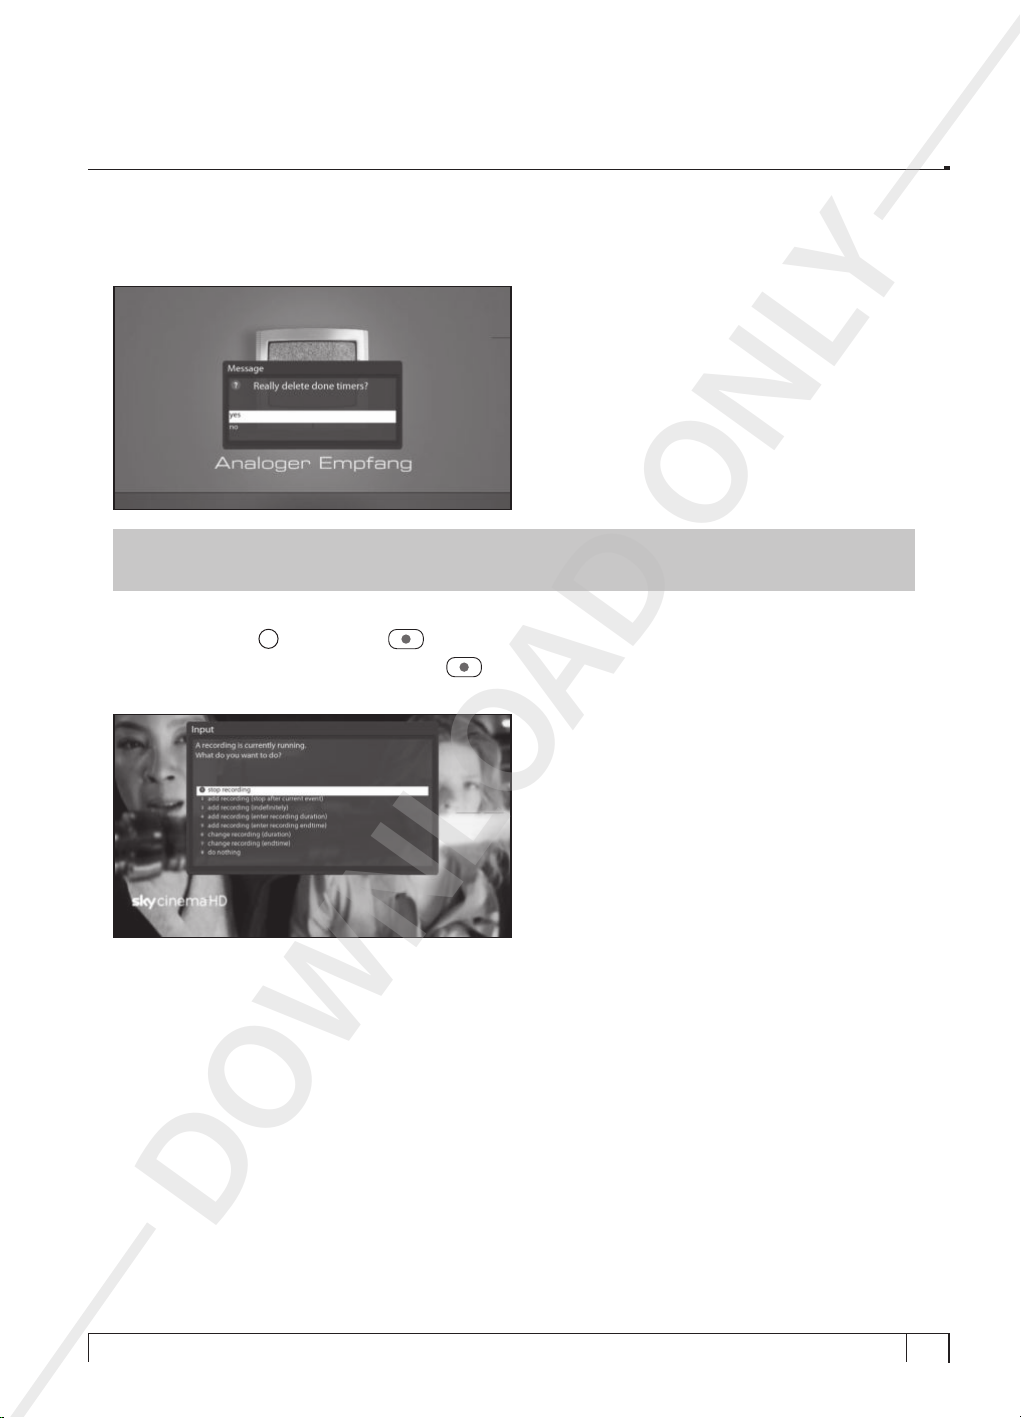
- BLUE (Cleanup)
i
This option is used to remove those finished timers from the
Timer List
+
Vu User Manual
.
NOTE :
free space on the HDD is not sufficient, recording might stop before the defined end time.
- Stop Recording [
If you want to stop recording, press
Recording
Make sure that the HDD on your Vu+ has enough free space available for recording. If the
: Press REC key > Select “Stop Recording”]
.
REC ( )
key again while recording is running. Select
AD ONLY
Stop
DOWNLO
39
Page 40
+
Vu User Manual
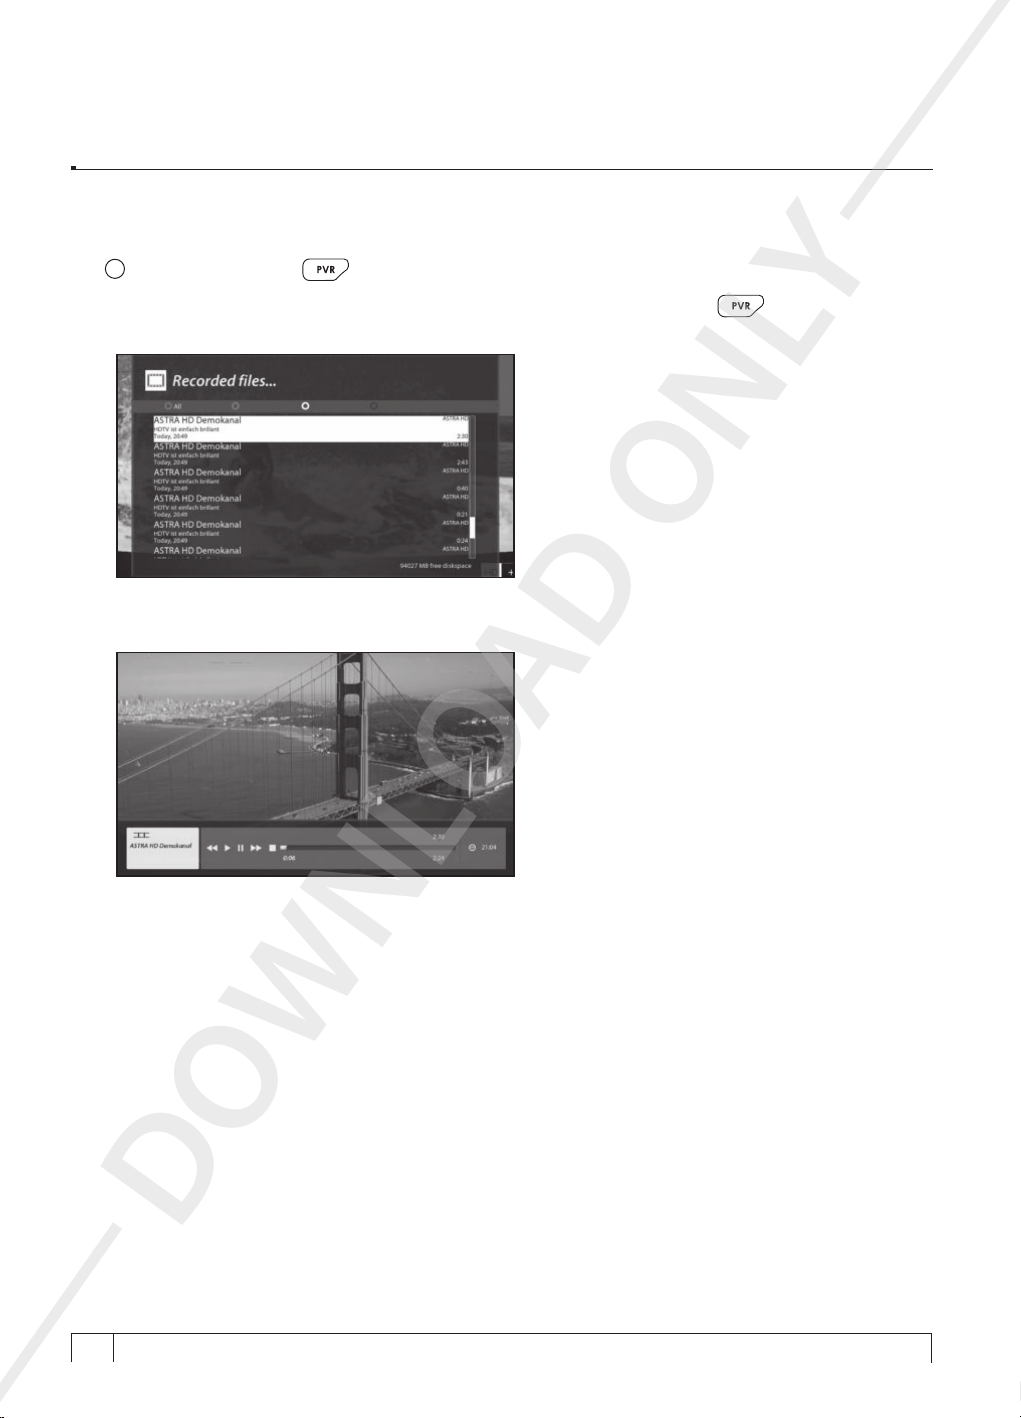
11. Recording Play
[i : Press Recording List key]
You can view recorded files on the
.
menu
Select the file that you want to play. It will instantly replay the file and display the recording infobar.
Recorded files
menu. Press
Recording List
(
) key to activate this
AD ONLY
This infobar gives you the following information of the recording.
1) Title of the recording
2) Total duration of recording
3) Remaining time
4) Progressive bar
5) Elapsed time
DOWNLO
+
40
Your Smart Linux TV Player
Vu :
Page 41
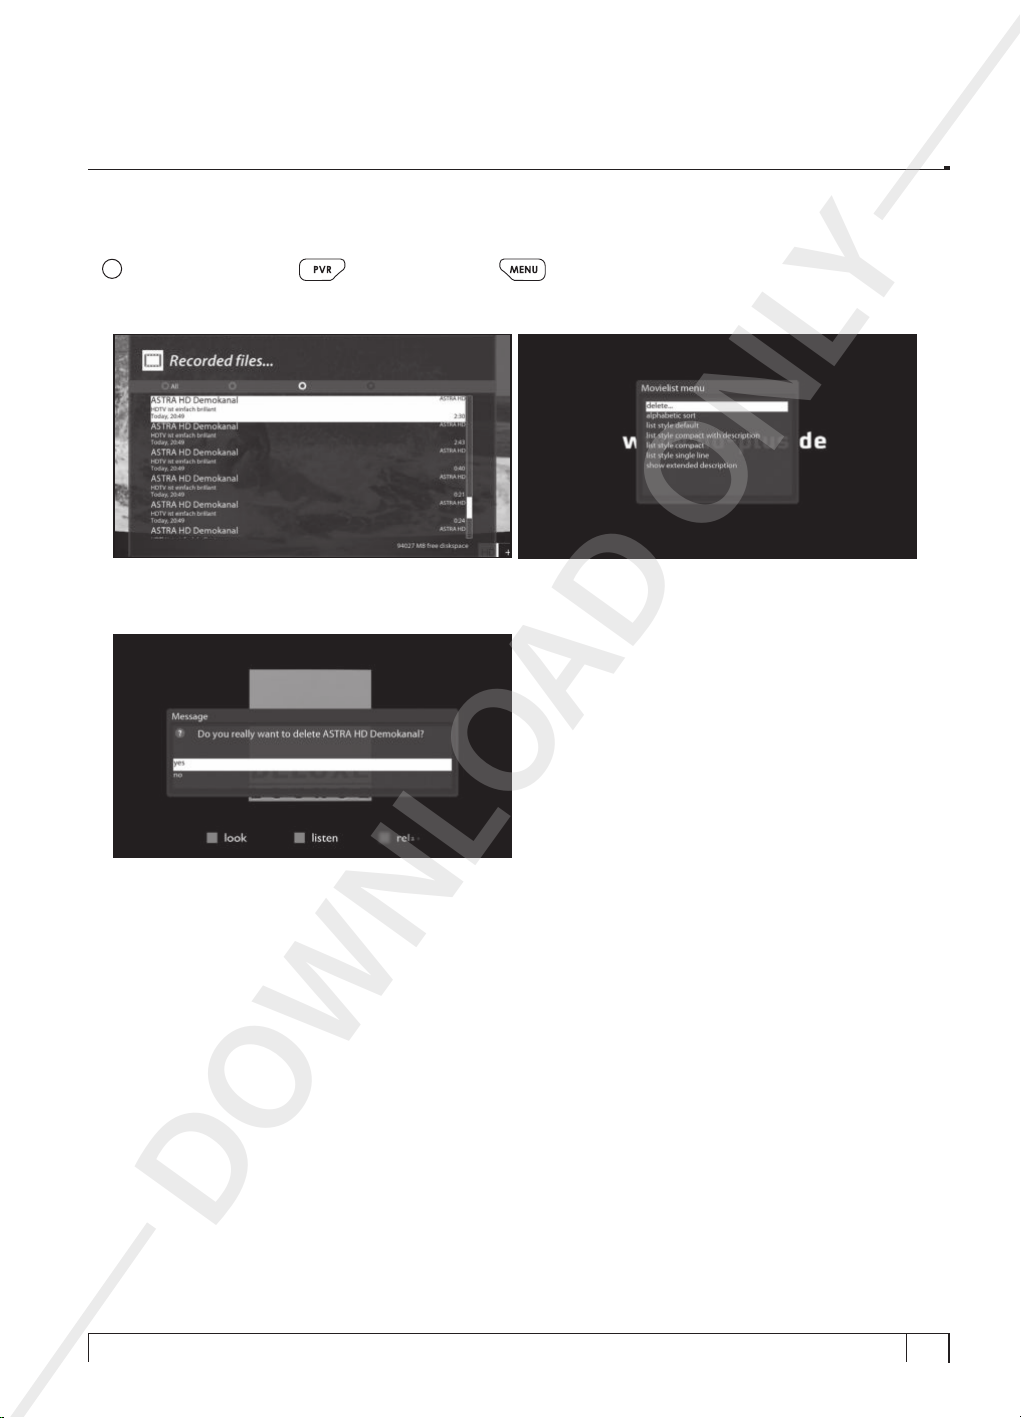
12. Managing Recording Files
[i : Press Recording List key > Press MENU key]
+
Vu User Manual
If you want to delete a recording file, press
delete
Select “
” and confirm OK to delete.
MENU
key while
Recorded files
menu is on.
AD ONLY
Other than “
- Sort by date
- List style default
- List style compact with description
- List style compact
- List style single line
- Hide extended description.
delete
”, in this menu, you have options in sorting and listing of the recording files.
DOWNLO
41
Page 42
+
Vu User Manual
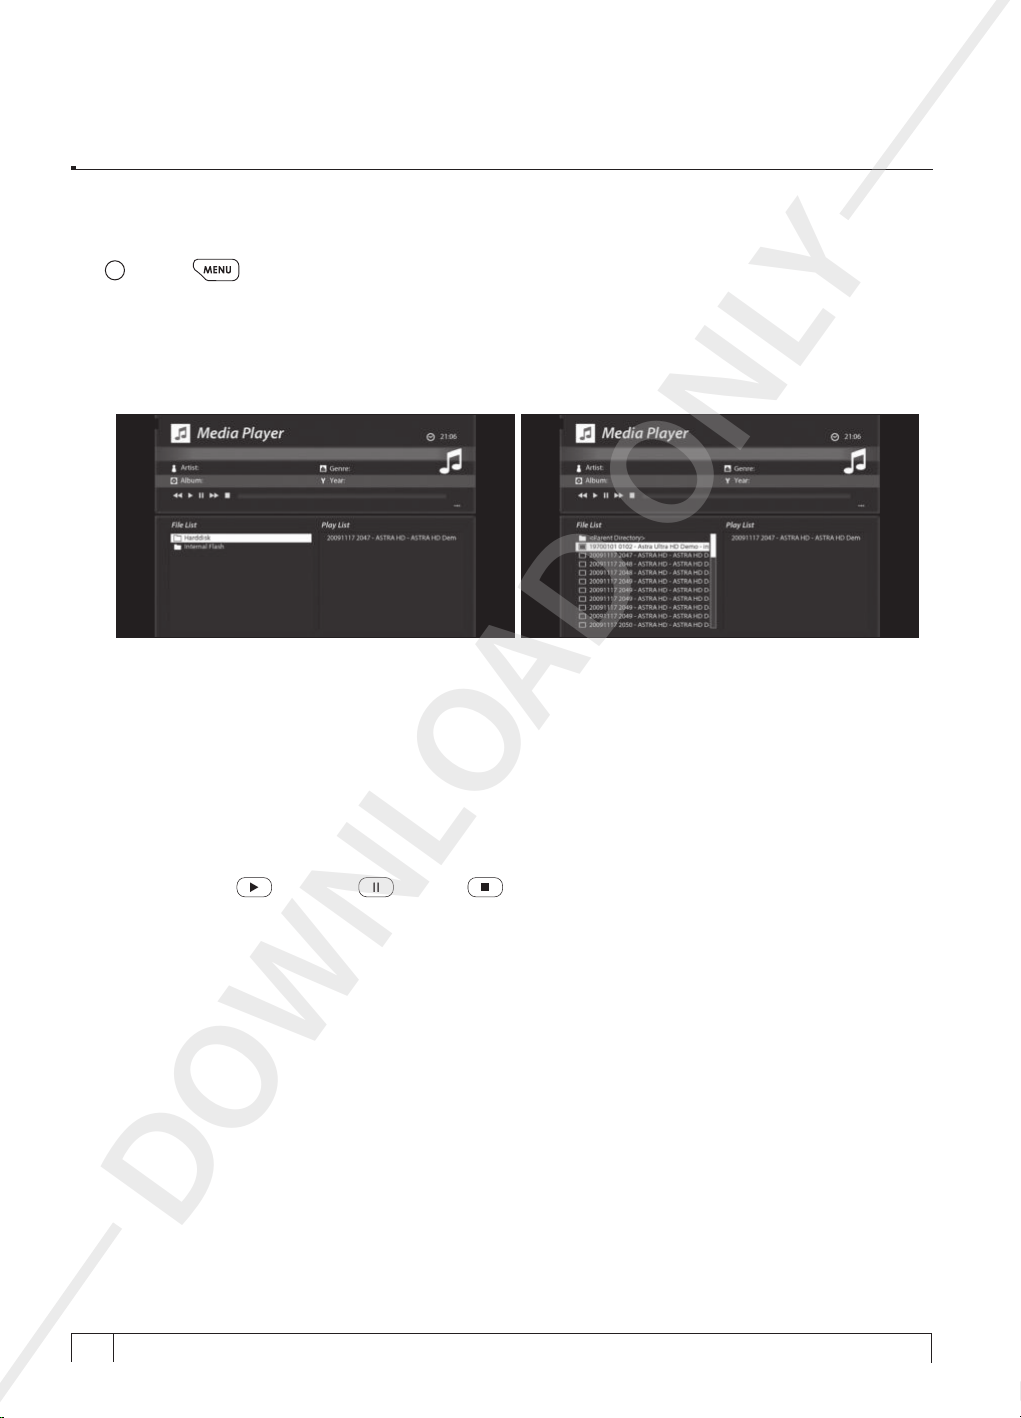
13. Media Player
[i : MENU > Media Player]
Vu+ is truly a multimedia receiver capable of playing media contents. Using Media Player, you can enjoy
Music, Photo and Video contents stored on the internal HDD and/or an USB memory stick plugged into
Vu+.
- Press
- Press
- Press
Media Player
File List
File List
key to go into
CH-
+
key to go into
CH
Media Player
( ),or
Play
, the following player will appear.
to play and press
and
Play List
File List
window
( ) or
Pause
Play List
and press
Play List
Stop
OK
key. The selected file will be displayed in the
OK
( ) key.
key.
AD ONLY
If you play
1) Go into any directory of the HDD or plugged USB.
2)
Select a file in the
* Supported formats are mainly JPG, MP3, AVI, etc.
3) In the same way, you can play the recording files stored on the HDD.
4)
To move between
5)
To call up
To play
6)
- Select a file in the
PlayList
.
DOWNLO
+
42
Your Smart Linux TV Player
Vu :
Page 43
+
Vu User Manual
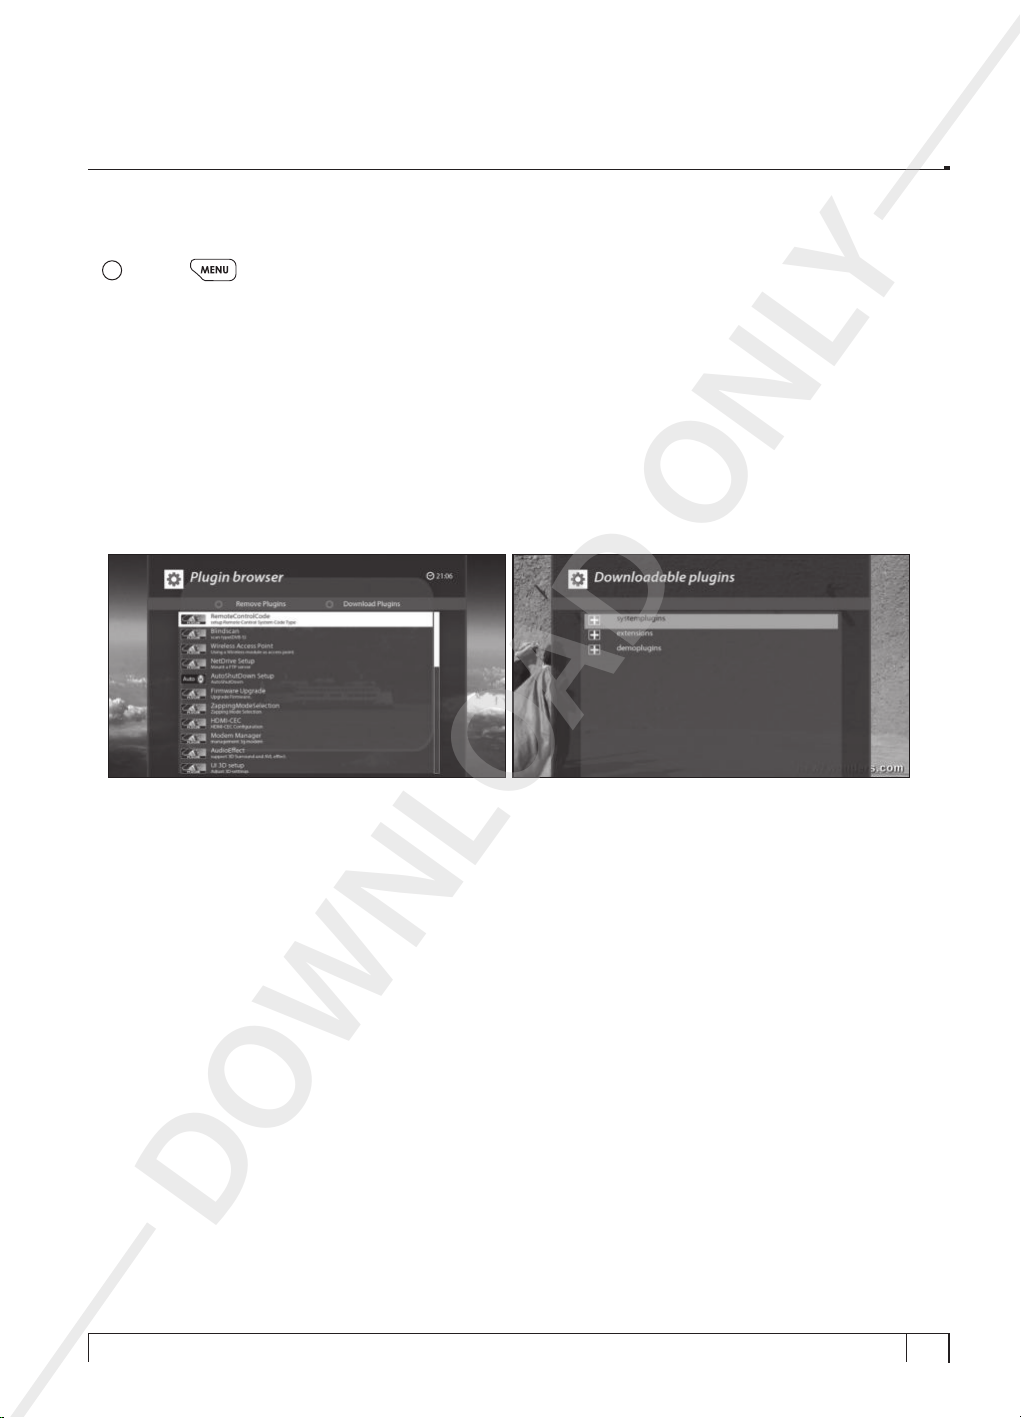
14. Plug-ins
[i : MENU > Plugins]
Vu+ is integrated with Gigabit Ethernet with RJ 45 connector. You are recommended to use this network
capability of Vu+ to fully enjoy the system. If your Vu+’s network connection is established, you can directly
download plug-ins from a designated website of Vu+.
1)
Press
2)
Press
3)
Once the download is done, a list of plug-ins will be displayed.
4)
Select a plug-in to download.
5)
You can check if the download is done properly on the Plugin browser
From this site, you can check available plug-ins to download as below.
key and select
MENU
key to download a list of plug-ins available.
GREEN
Plugins
menu to active
Plugin browser
.
AD ONLY
DOWNLO
43
Page 44
+
Vu User Manual
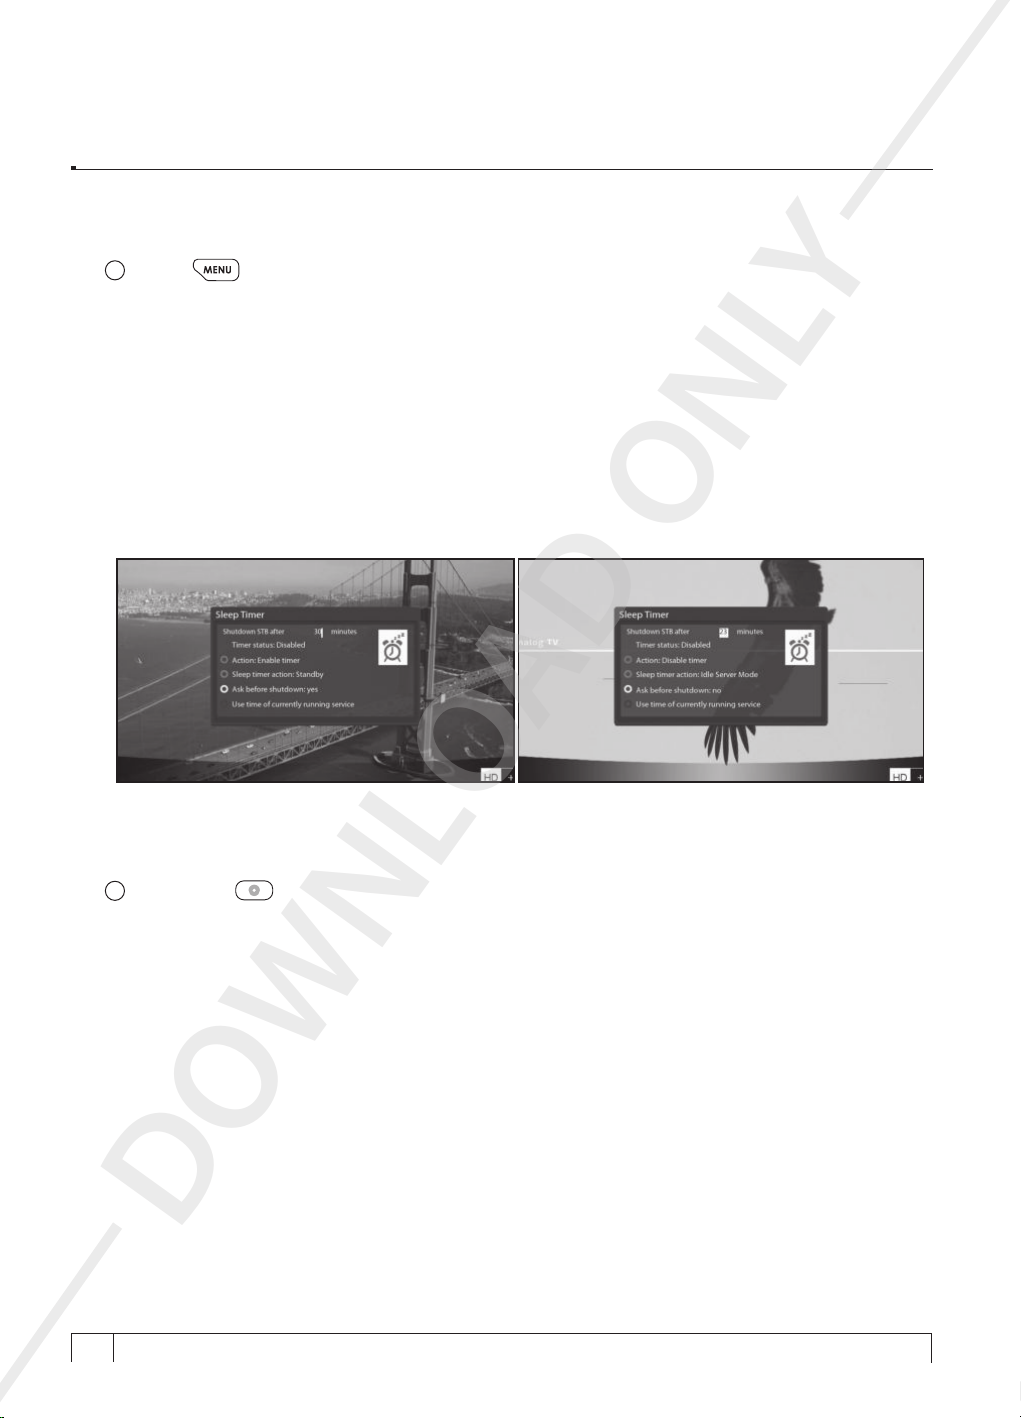
15. Sleep Timer
[i : MENU > Idle Server Mode/ Restart > Sleep Timer]
You can set a specific time when your Vu+ goes into
Three
1) RED
This option is used to enable or disable
2) GREEN
This option is used to choose between
3) YELLOW
This option is used to choose whether to be asked of confirmation before system shutdown.
keys are used to set up this sleep timer.
COLOR
Sleep Timer
Idle Server Mode
Idle Server Mode or Standby mode, using this menu.
.
Standby mode
and
.
AD ONLY
16. Mini TV
[i : Press
BLUE
key]
You can enjoy vivid streaming with MiniTV on front 2.4" TFT LCD.
1) Press
2) Press OK key to activate MiniTV
key on remote control
BLUE
DOWNLO
+
44
Your Smart Linux TV Player
Vu :
Page 45
+
Vu User Manual
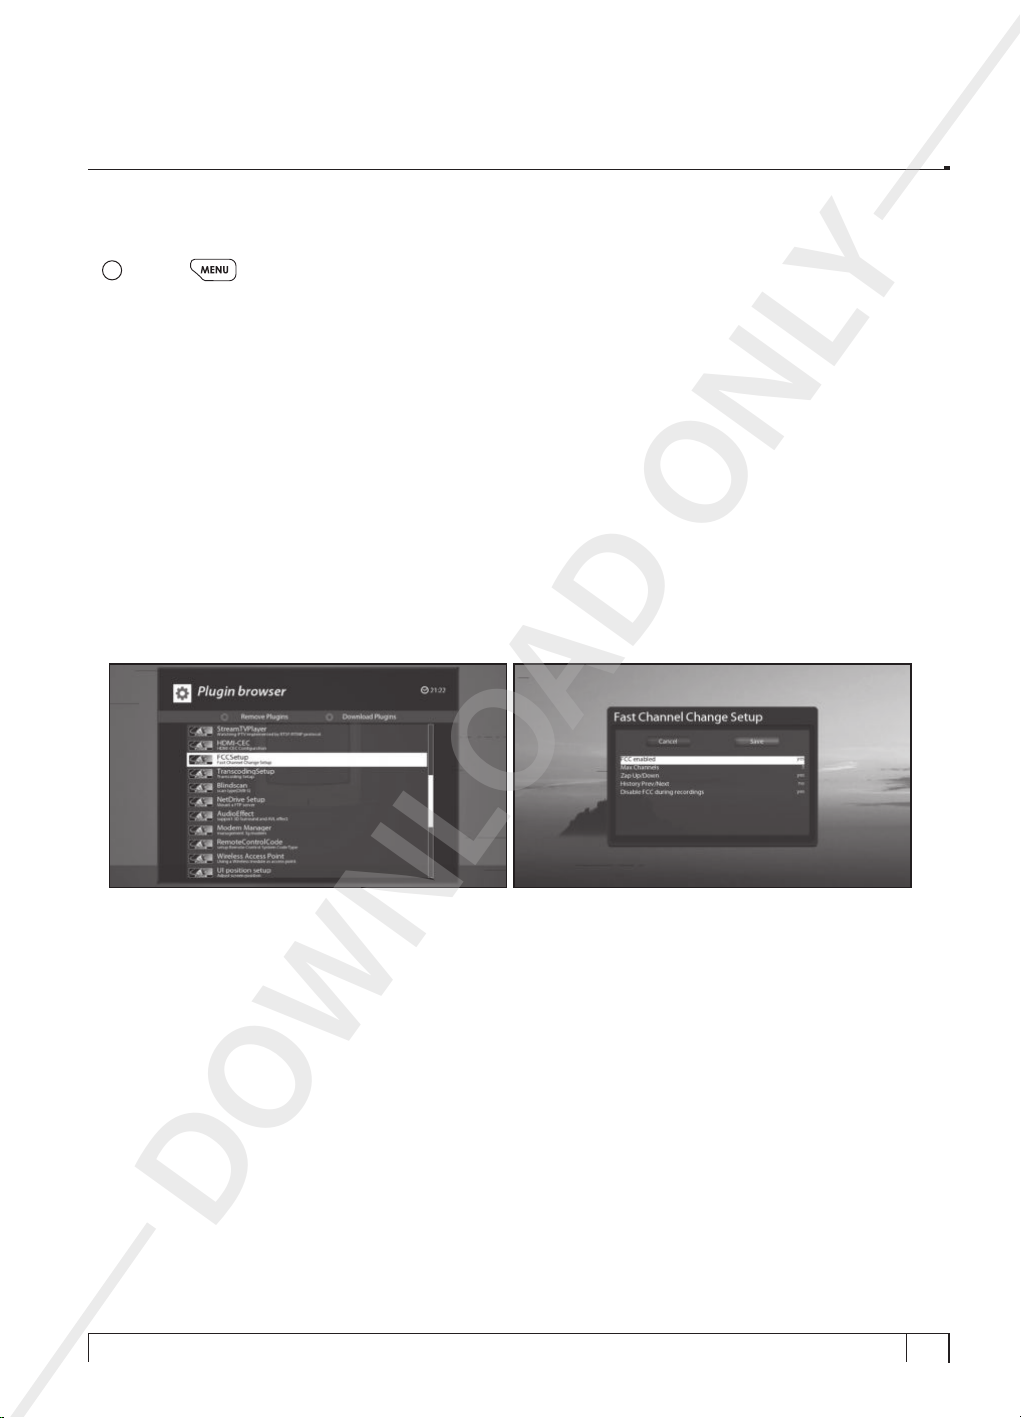
17. Fast Channel Change
[i : MENU > Plugin > FCC Setup]
UNO 4K SE supports FCC(Fast Channel Change) feature which makes you not to have any delay with
channel zapping.
1) FCC enabled
enable/disable
2) Max Channels
You can select usable channel for FCC feature including the current channel you are watching.
3) Zap Up/Down
You can make enable or disable FCC for the PREV/NEXT channels in channel list.
4) History Prev/Next
You can make enable or disable FCC for the PREV/NEXT channels in channel history.
5) Disable FCC during recordings
You can make enable or disable recording function while you are using FCC feature.
AD ONLY
DOWNLO
45
Page 46
+
i
Vu User Manual
IV. System Configuration
Vu+ is a very sophisticated device designed to allow users a variety of system setting options. You can finetune your Vu+ to be your OWN system to fit your taste. This chapter will guide you through the entire menu of
system configuration.
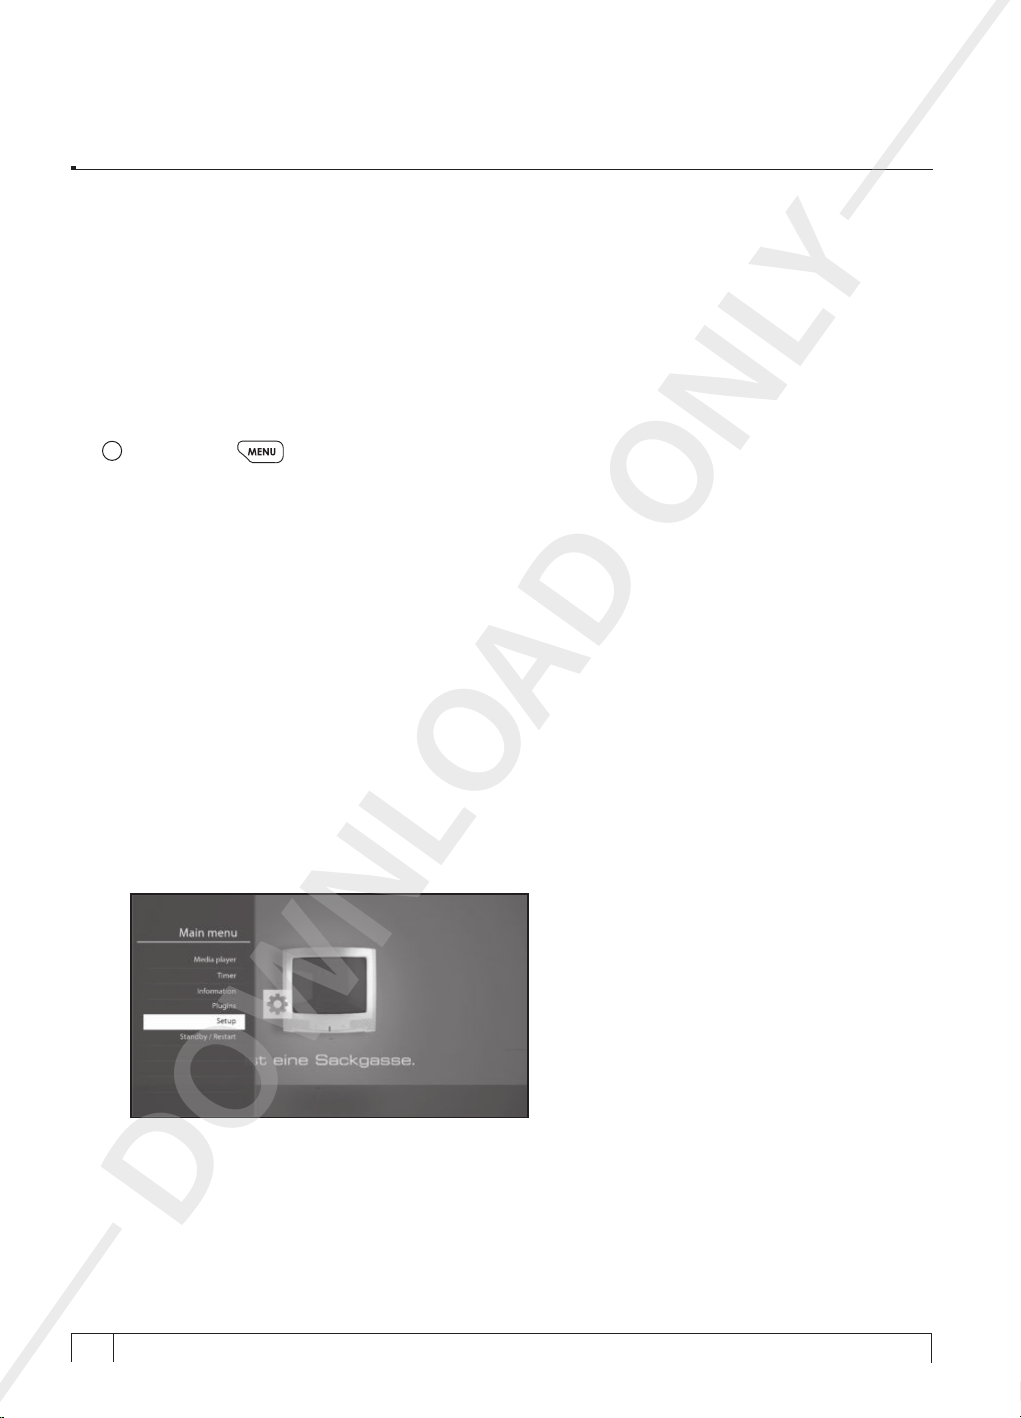
Prior to System Configuration, please take a notice on the menu structure of Vu+ first.
1. Main Menu
: Press MENU key]
[
The main menu of Vu+ consists of the following sub menus.
1) Media player
Activate Media player of Vu+. For more information, please refer to Media Player section.
2) Timer
Activate Media player of Vu+. For more information, please refer to Media Player section.
3) Information
Has two sub menus for
channel.
4) Plugins
Activates Plugin browser of Vu+. Using this browser, you can log onto the designated website and you
can download a variety of new plug-ins.
5) Setup
Provides all of the system settings.
6) Standby / Restart
Provides options for power on/off and sleep timer.
About
menu provides the detailed information of the H/W and S/W system of your Vu+.
Service / About. Service
menu provides the detailed information of the current
AD ONLY
DOWNLO
+
46
Your Smart Linux TV Player
Vu :
Page 47
+
i
i
i
Vu User Manual
2. System Setup
: Press MENU key > Select Setup]
[
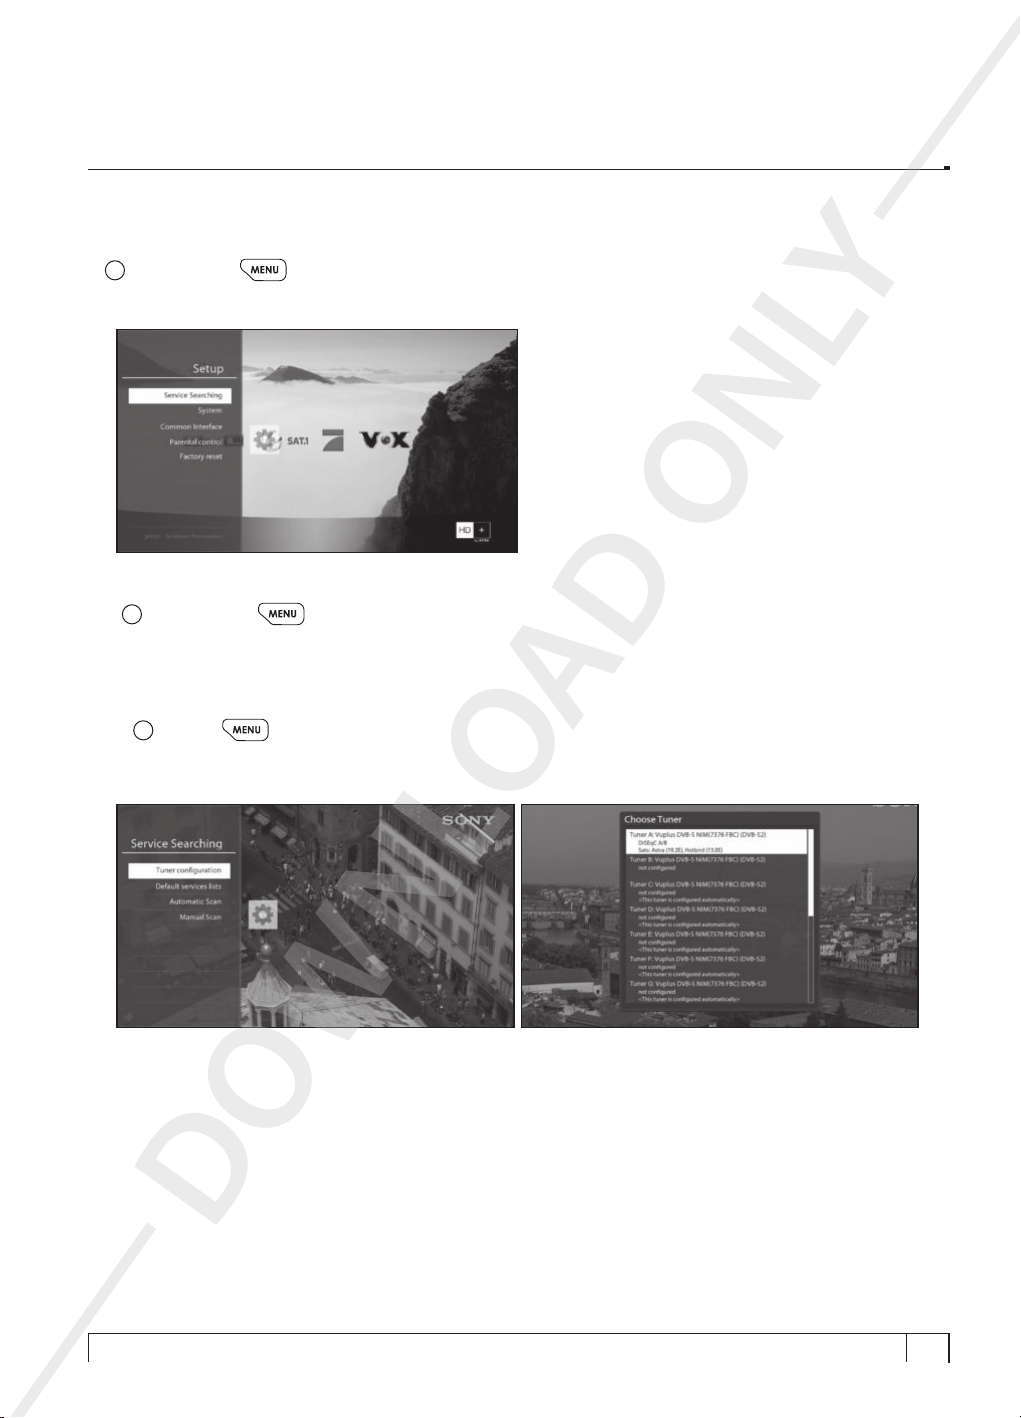
The Setup menu consists of the following sub-menus.
1) Service Searching
[
: Press MENU
Here you set up the tuners of your Vu+ and run channel scanning automatically or manually.
A. Tuner Conguration
[
: MENU
If you run the First Time Installation process, the Tuner A/B is already configured. You can check the
information of Tuner A/B and which satellites are scanned, as follows.
- Service Searching
- System
- Common Interface
- Parental Control
- Factory reset
key > Setup > Service Searching]
key > Setup > Service Searching > Tuner Configuration]
AD ONLY
DOWNLO
47
Page 48
+
i
i
Vu User Manual
B. Loading Default Service Lists
[
: MENU
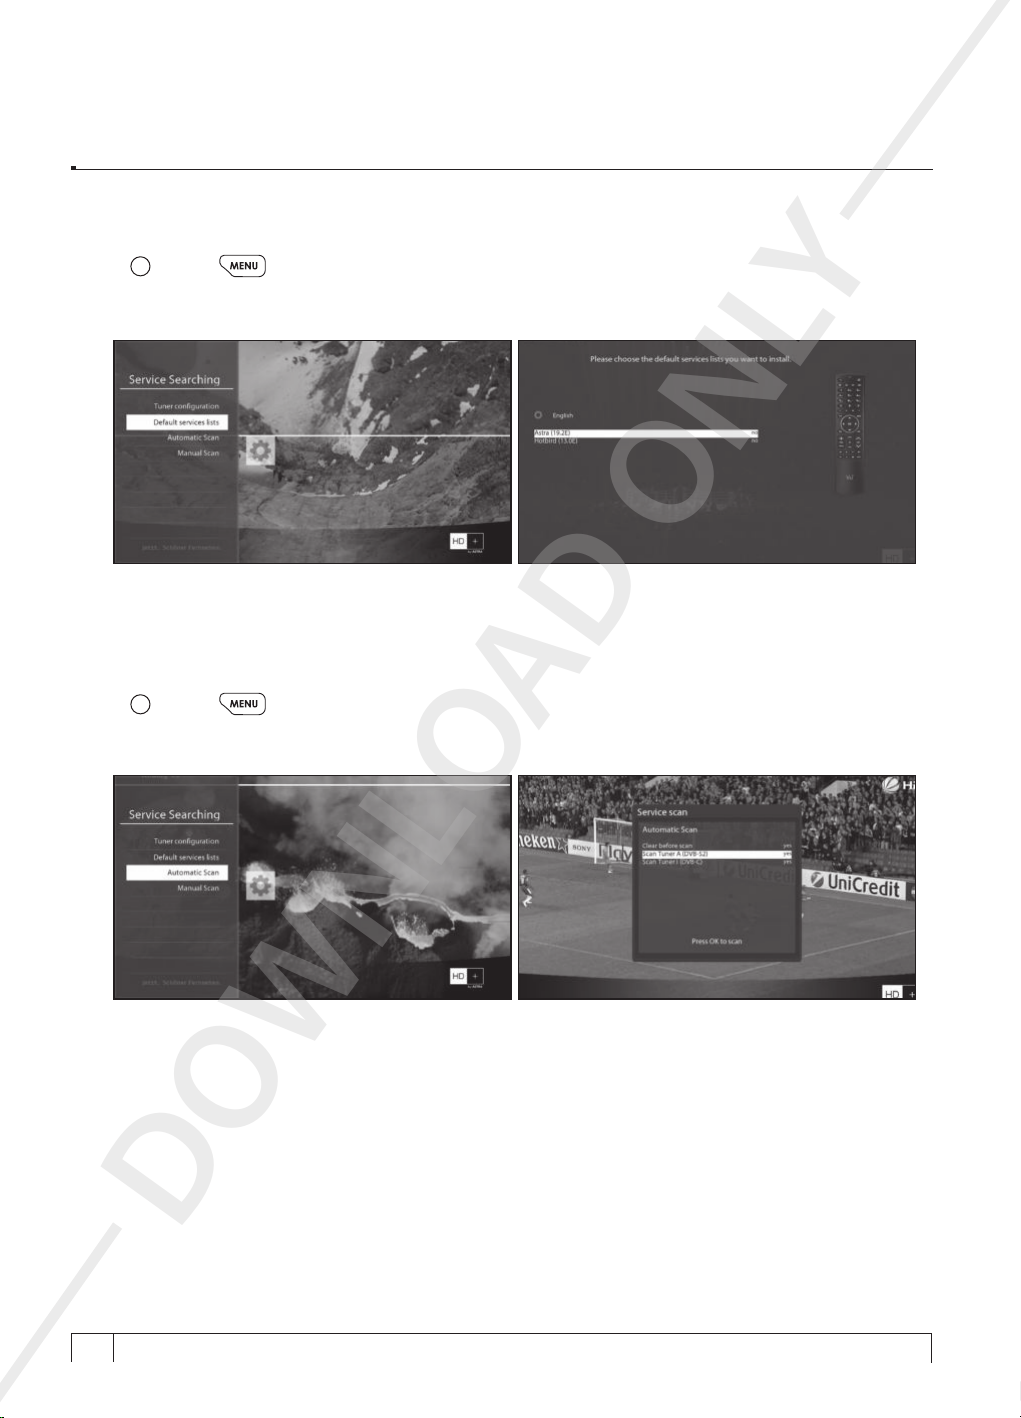
In case there are service lists available for certain satellites, for example, Astra or Hotbird, you can
install the lists in the channel list of your Vu+.
If default service lists are not available, you can run the service scan automatically or manually to add TV
and radio channels into the channel list of your Vu+.
C. Automatic Scan of Services
[
: MENU
The easiest way to scan services is to use
options to choose from as below.
> Setup > Service Searching > Default Service List]
> Setup > Service Searching > Automatic Scan]
Automatic Scan
AD ONLY
. In the
Automatic Scan
menu, there are two
•
Clear Before Scan
YES
is used when you want to delete the existing channel list before you start the automatic scan.
If you want to keep the existing list, select NO.
DOWNLO
+
48
Your Smart Linux TV Player
Vu :
Page 49
+
i
Vu User Manual
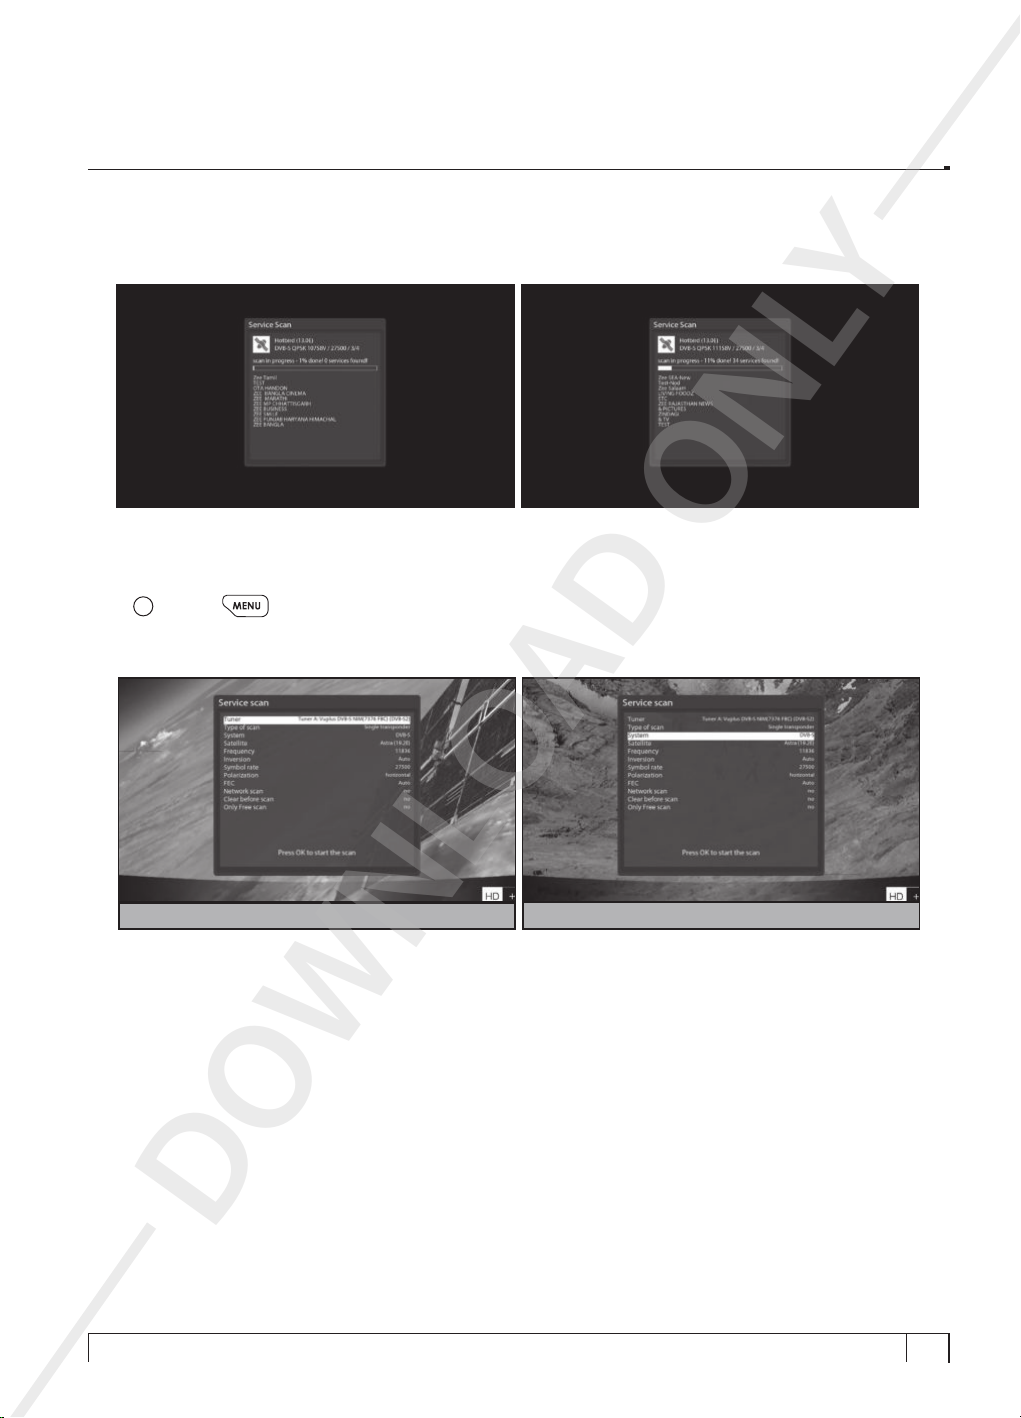
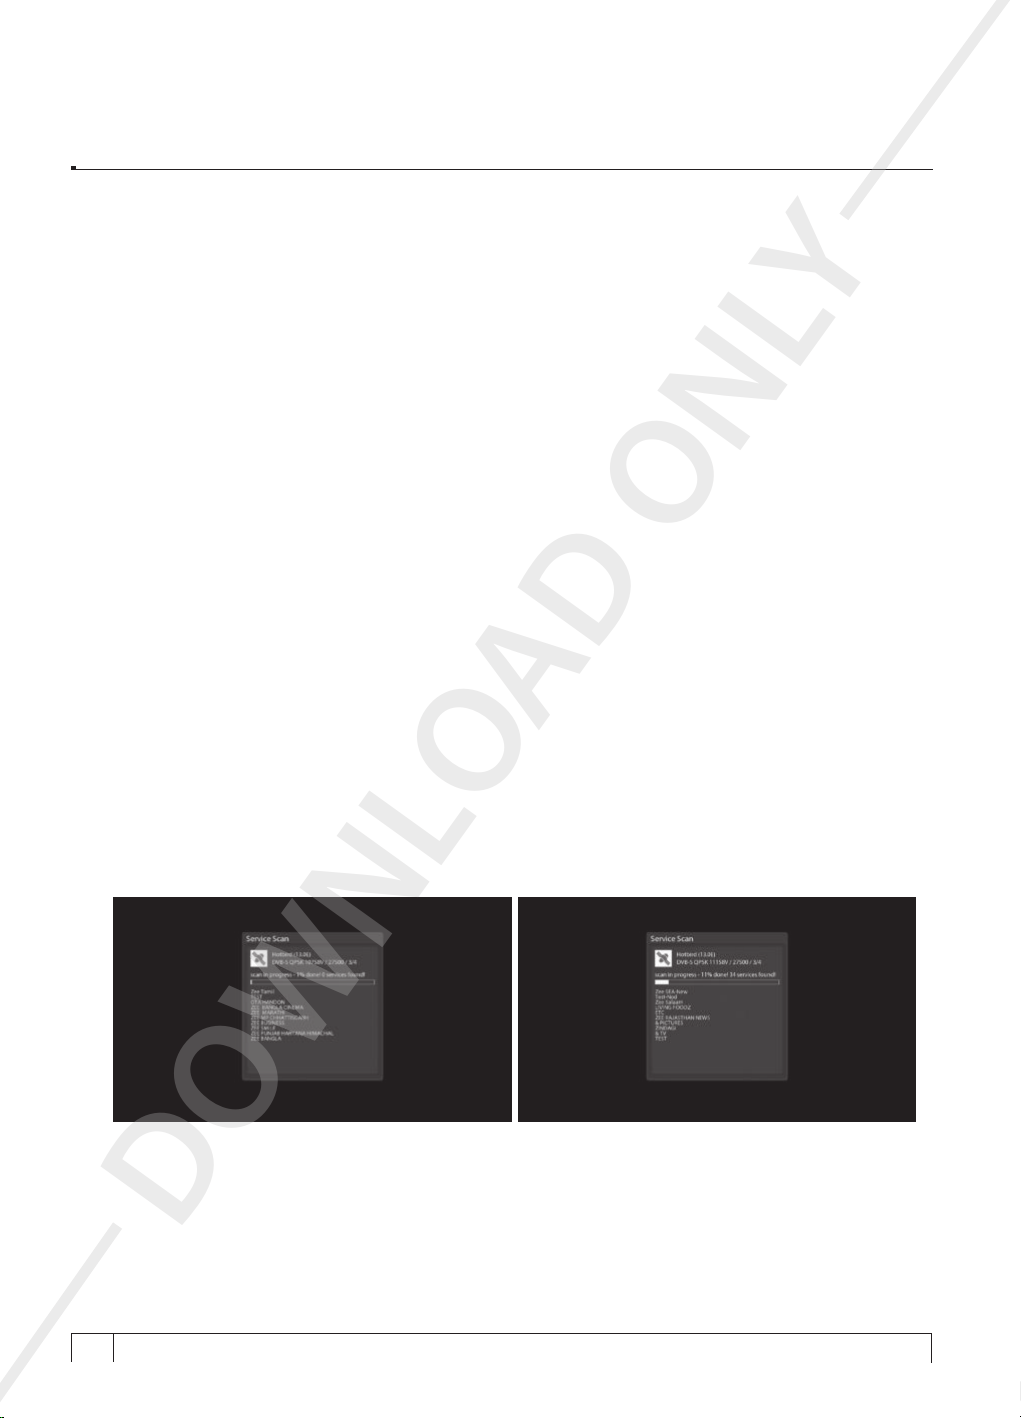
Press OK key to activate the automatic scan. This will take some minutes. As the scan proceeds, you will
see the progressive bar and the newly found services underneath.
D. Manual Scan of Services
[
: MENU
If you know well enough to configure each exact setting required for manual search of services, you can
do manual scan as well. There are many parameter values that you need to decide as below.
> Setup > Service Searching > Manual Scan]
AD ONLY
For DVB-S2 (High Definition)
Amongst other things, the below parameters are what you need to decide prior to manual scan.
A) Tuner
B) System
You need to decide which tuner you want to use for manual scan.
Here you have two options between DVB-S (SD) and DVB-S2 (HD), if DVB-S2 tuner is mounted.
For DVB-S (Standard Definition)
DOWNLO
49
Page 50
+
Vu User Manual
C) Frequency
You need to enter the exact frequency of the transponder that you want to scan.
D) Symbol Rate
You need to enter the exact symbol rate of the transponder that you want to scan.
E) Polarity
F) FEC (Forward Error Correction)
G) Modulation
H) Network Scan
I) Clear Before Scan
YES
you want to keep the existing list, select NO.
J) Only Free Scan
Here you have two options for
encryption, select
Here, you have options for Horizontal, Vertical, Circular Left and Circular Right. You need to know the
polarity of the transponder that you want to scan.
You need to enter the exact FEC value of the transponder that you want to scan.
Here you have two options for QPSK (SD) and 8PSK (HD).
Here you have two options for
data that your Vu+ currently has.
but also using new TP data, if there is TP data newly transported from the TP. Naturally,
takes longer while it may results in a better scan result.
is used when you want to delete the existing channel list before you start the automatic scan. If
YES
and NO. NO is used to scan the transponder (TP) based on the
YES
is used to scan the TP not just based on the existing TP data
AD ONLY
YES
YES
. Otherwise, select NO to scan all FTA and CAS channels.
NO
and
. If you want to scan only Free To Air channels without any
YES
option
Press OK key to activate the manual scan. This will take some minutes. As the scan proceeds, you will
see the progressive bar and the newly found services underneath.
DOWNLO
+
50
Your Smart Linux TV Player
Vu :
Page 51
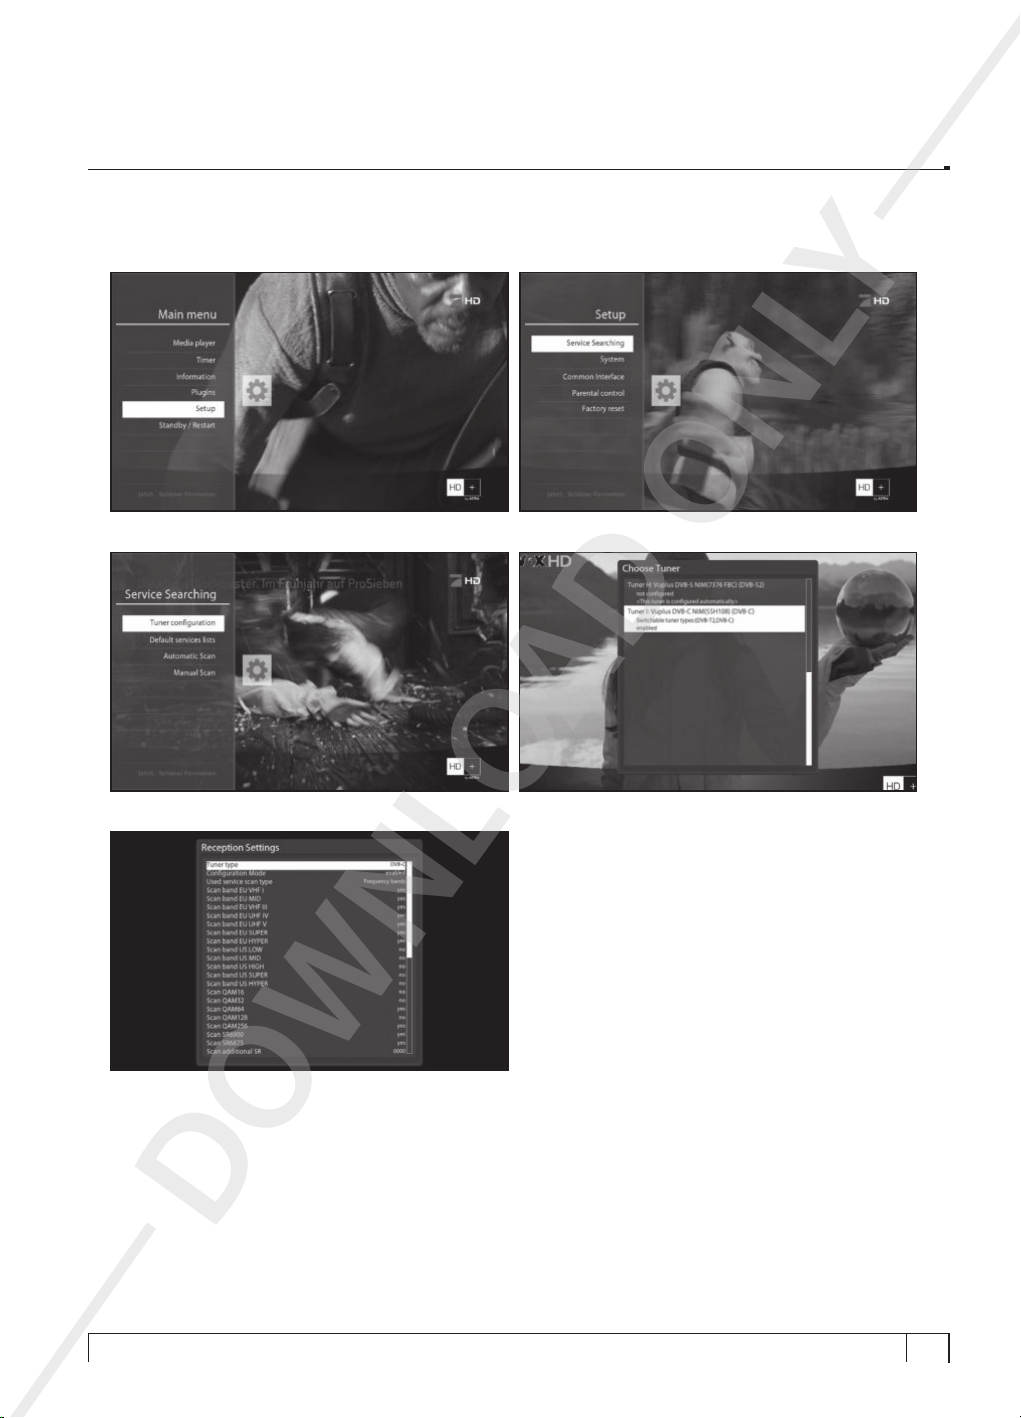
E. Tuner Conguration (for DVB-C)
A)
Go to Setup => Service Searching => Tuner Configuration
+
Vu User Manual
AD ONLY
B)
Press OK key to activate Tuner A window. C) Press OK key again Reception Setting window.
D)
You can decide whether to scan each of the various scan band in the list.
DOWNLO
51
Page 52
+
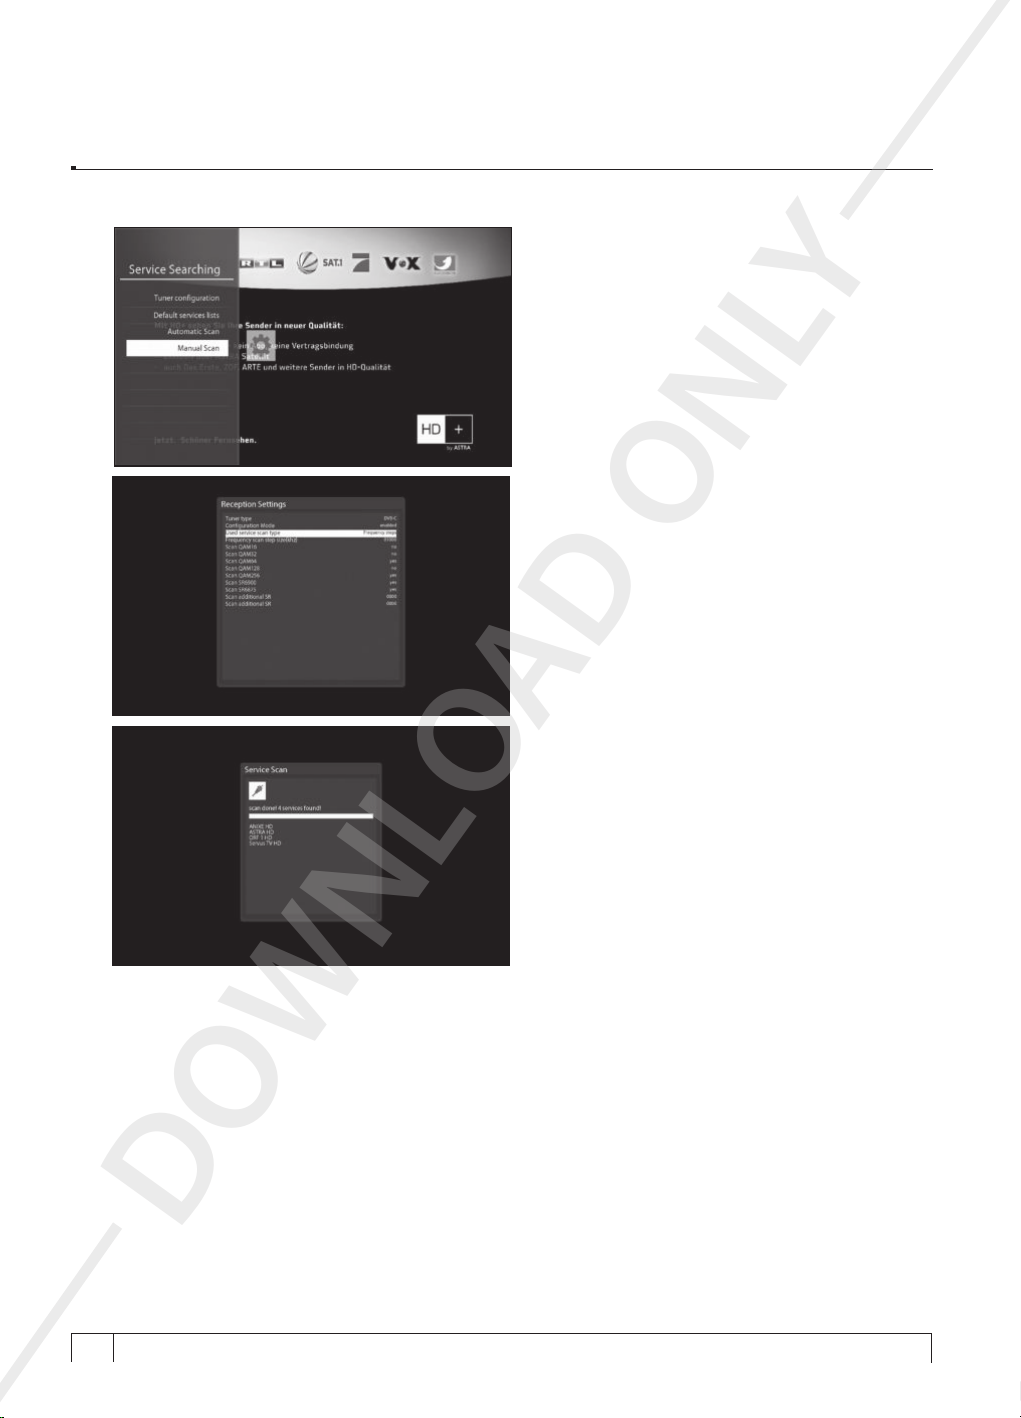
Vu User Manual
E)
Go to Setup => Service Searching
For the channel scan, you can select between
Automatic Scan and Manual Scan.
F)
Press OK key to call up Service Scan window.
AD ONLY
G)
Press OK key to begin the channel scan.
Once the scan is done, the scan results will be
displayed.
DOWNLO
+
52
Your Smart Linux TV Player
Vu :
Page 53
+
i
i
Vu User Manual
2) System Configuration
[
: Press MENU
Here you can find most of the necessary settings that you might need to optimize your Vu+ in the way you
like it. Please read the followings carefully.
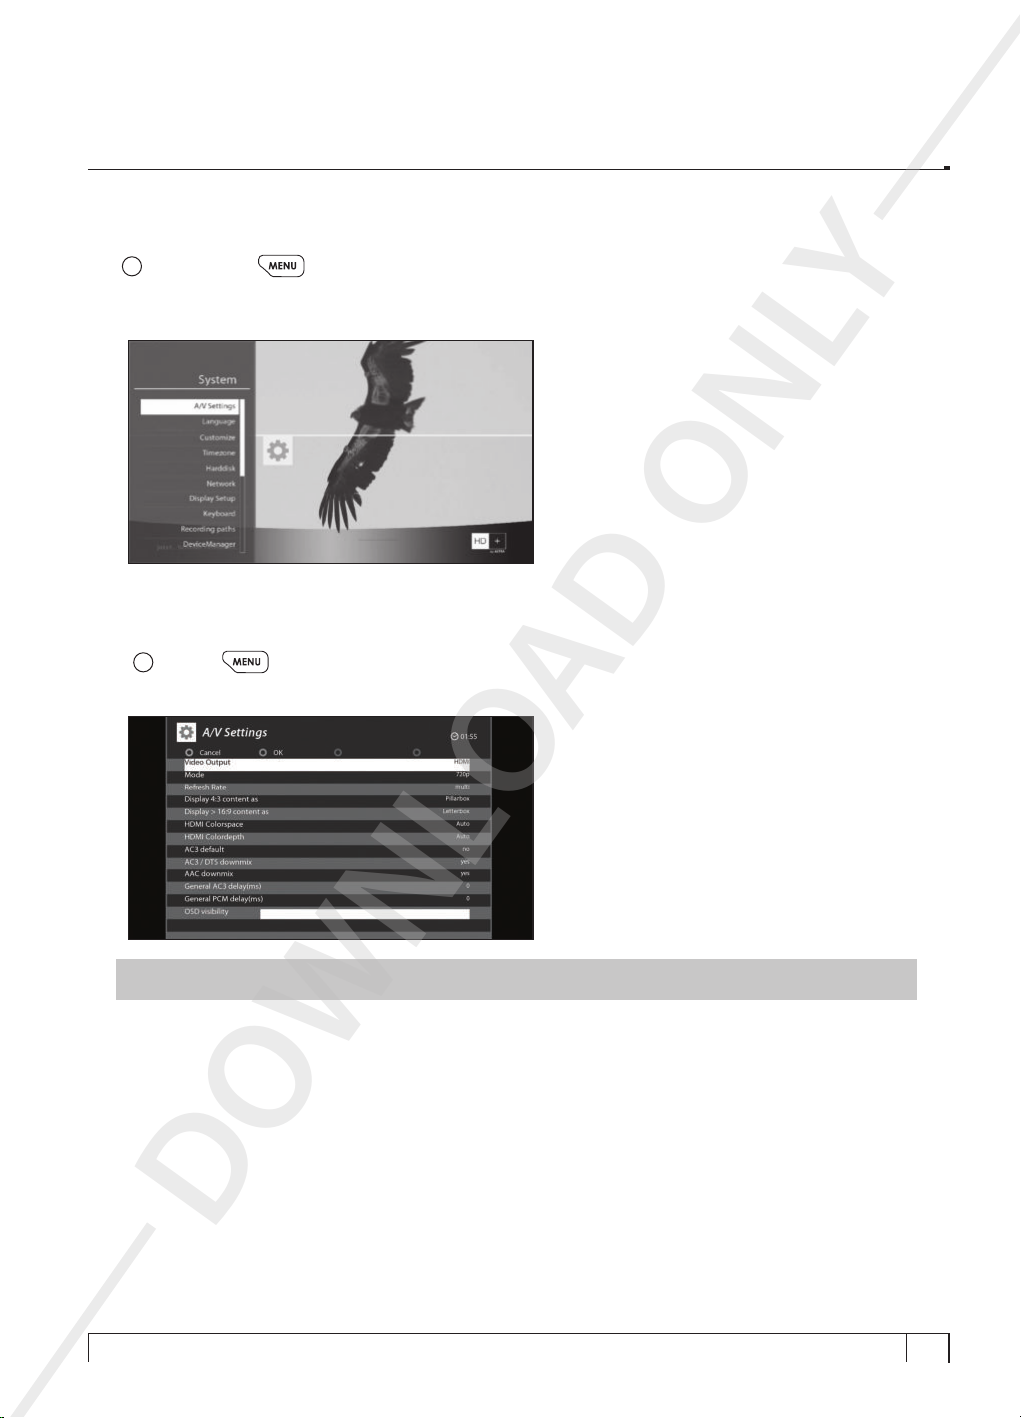
A. A/V Settings
[
: MENU
Here you will find options necessary to set up the audio and video configuration of your Vu+.
key > Setup > System]
> Setup > System > A/V Settings]
AD ONLY
NOTE :
RED is for cancel and GREEN is OK. OK key of RCU is not working in this mode.
DOWNLO
53
Page 54

+
Vu User Manual
Amongst the parameters given in this menu, the following ones are generally what you need to decide for
the audio and video.
A) Video output
Here you need to decide which video output you want to use between your TV and Vu+.
The available options are as below.
•
HDMI
B) Mode
You need to decide which resolution to use according to the video output above and your TV amongst
the following options.
Resolution
HDMI
2160p
1080p
1080i
720p
576p
576i
480p
480i
AD ONLY
DOWNLO
+
54
Your Smart Linux TV Player
Vu :
Page 55
+
i
i
Vu User Manual
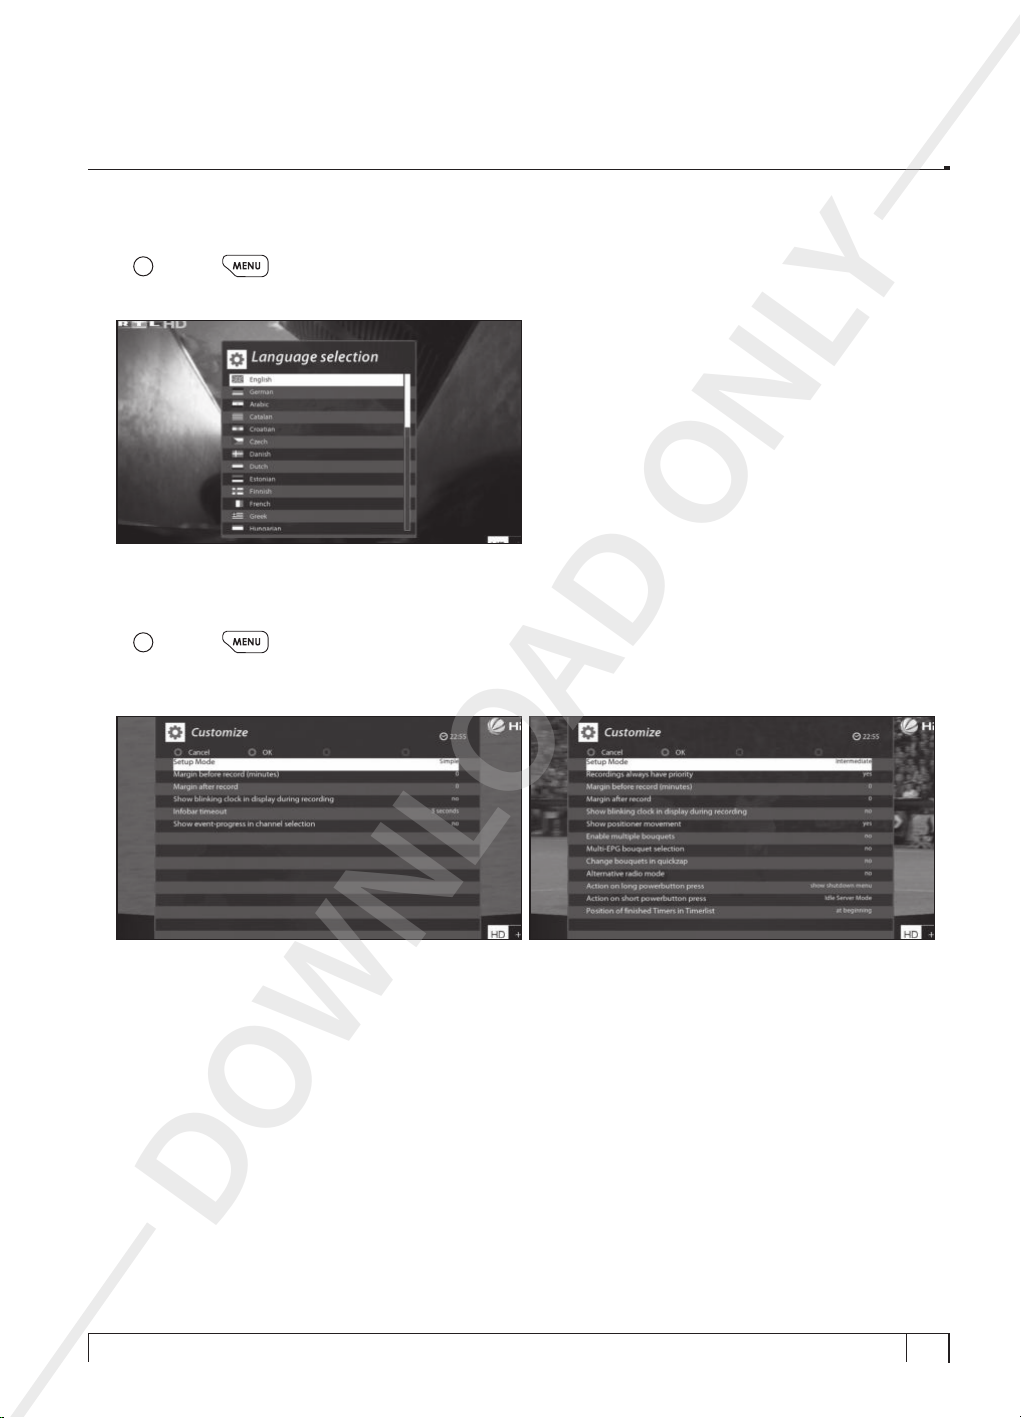
B. Language Selection
[
: MENU
A variety of languages are available for the OSD(On-Screen Display) of Vu+.
C. Customization
[
: MENU
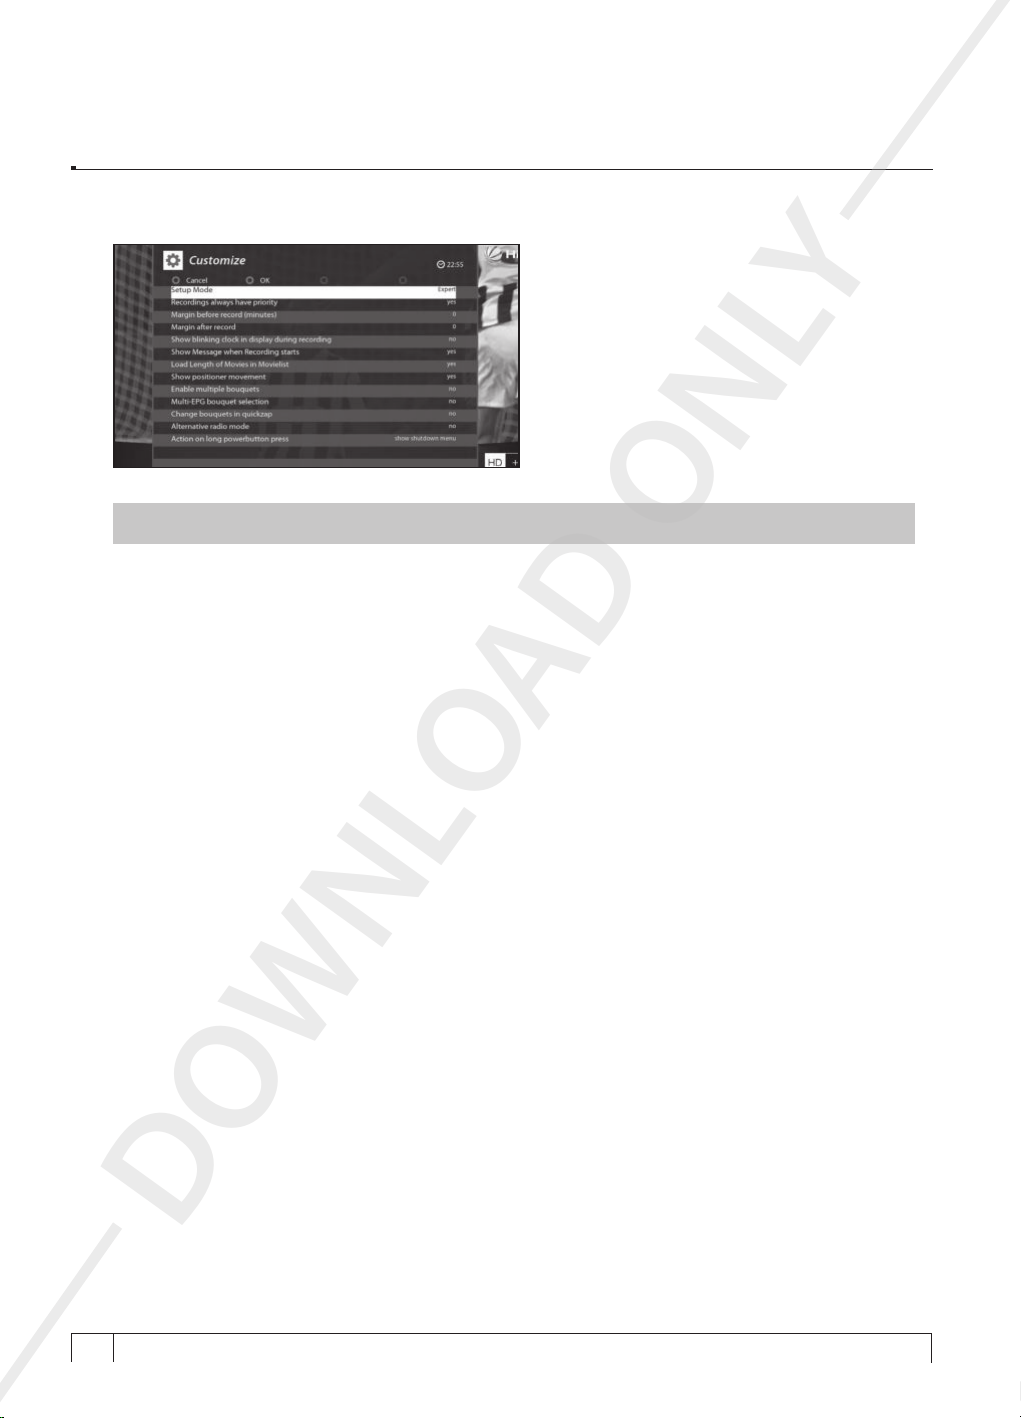
In this menu you will find various customization options and this menu can be displayed in three different
formats:
Simple, Intermediate
> Setup > System > Language]
> Setup > System > Customize]
Expert
, and
.
AD ONLY
DOWNLO
55
Page 56
+
Vu User Manual
NOTE :
Amongst the options given in this menu, the following ones are generally what you may need to know.
A) Recording always have priority
YES
conflict between a timer and a recording in progress, the recording has a priority over the timer. If you
set this option at NO, you will be asked whether to switch to the service to record or not.
B) Margin before record (minutes)
If you enter a number here, for example, 5, the recording will begin 5 minutes before the defined time. If
it is “0”, it means that the recording starts exactly at the defined time. This option comes in handy, just in
case that a program starts earlier than the original schedule.
C) Margin after record
If you enter a number here, for example, 5, the recording will stop 5 minutes after the defined time. If it
is “0”, it means that the recording stops exactly at the defined time. This option comes in handy, just in
case that a program ends later than the original schedule.
RED is for cancel and GREEN is OK. OK key of RCU is not working in this mode.
option is used to set the recording to have a priority over any existing timer. If there occurs a
AD ONLY
DOWNLO
+
56
Your Smart Linux TV Player
Vu :
Page 57
+
i
Vu User Manual
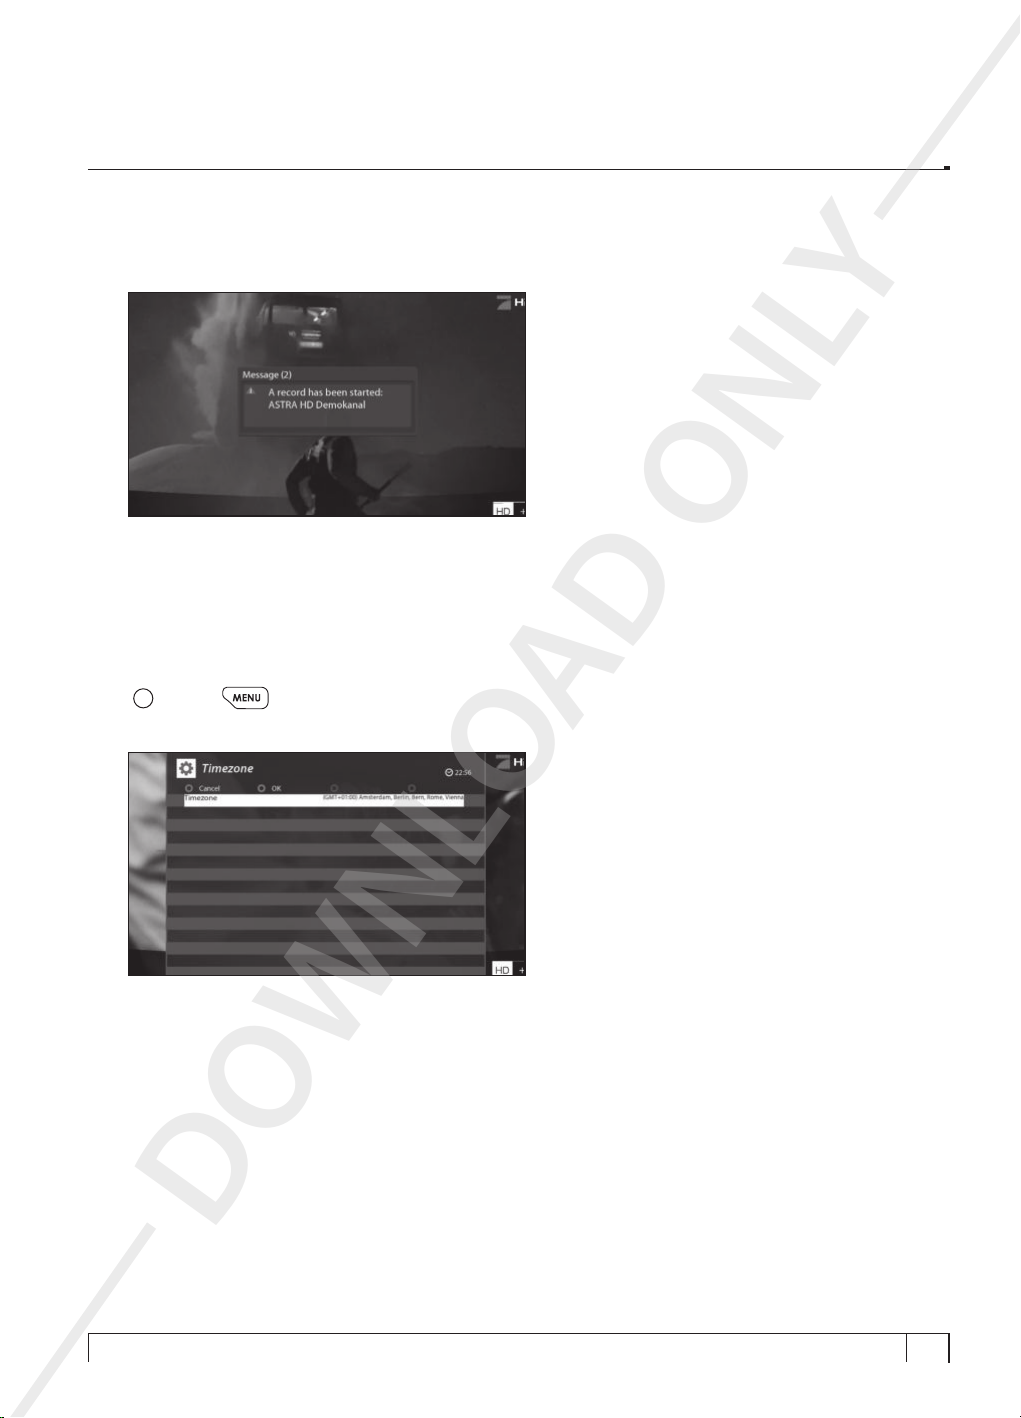
D) Show Message when Recording starts
If you set this option at
E) Enable multiple bouquets
If you set this option at
D. Selecting Time Zone
[
: MENU
You can set your time zone in this menu.
YES
, a message saying that a recording has started appears as below.
YES
, it will enable multiple bouquets.
> Setup > System > Timezone]
AD ONLY
Using
LEFT/RIGHT
time zone, press
key, you can find a time zone that you want to use for your Vu+. After selecting a
GREEN
key to confirm and save the changed setting.
DOWNLO
57
Page 58
+
i
i
Vu User Manual
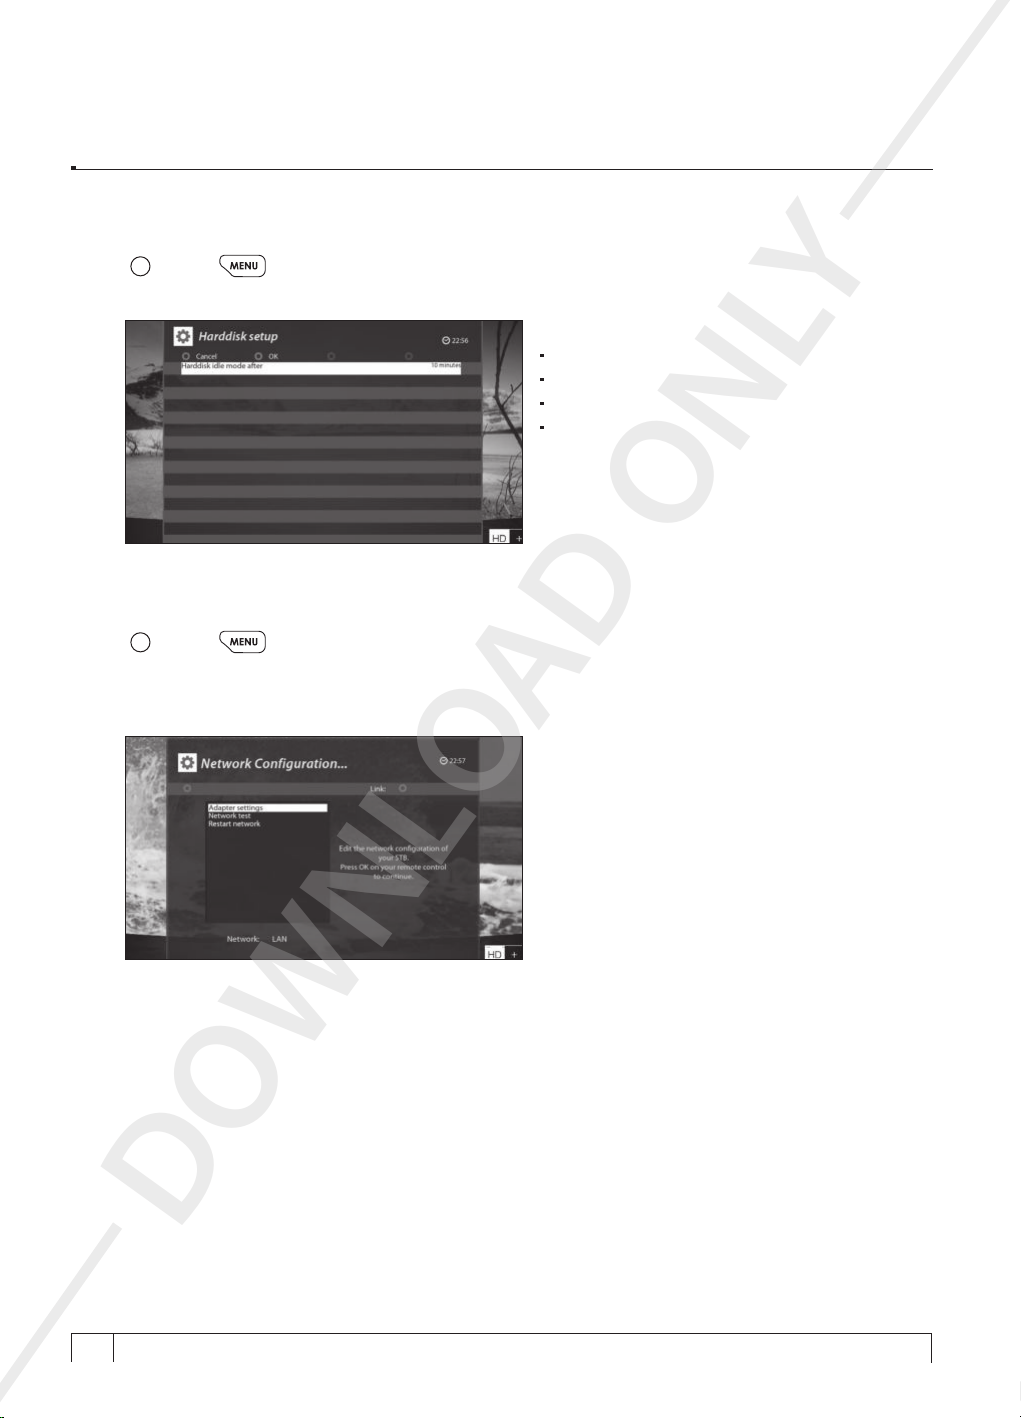
E. Hard Disk Set Up
[
: MENU
You can set the duration of time after which HDD is to be put into
> Setup > System > Harddisk > Harddisk setup]
Here, you can choose from
No Idle Server Mode
10 or 30 seconds
1, 2, 5,10, 20, 30 minutes
1, 2, 4 hours.
Idle Server Mode.
Once you set this option, press
confirm the change.
F. Network Setup
[
: MENU
Vu+ is integrated with Gigabit Ethernet with RJ 45 connector. You are recommended to use this network
capability of Vu+ to fully enjoy the system. You can set up the network settings through this
Configuration
> Setup > System > Network]
menu.
GREEN
key to
Network
AD ONLY
Network Configuration
In the
menu, you will see five sub menus as follows:
A) Adapter settings
Through this menu, you can set the basic Ethernet configuration.
DOWNLO
+
58
Your Smart Linux TV Player
Vu :
Page 59
+
Vu User Manual
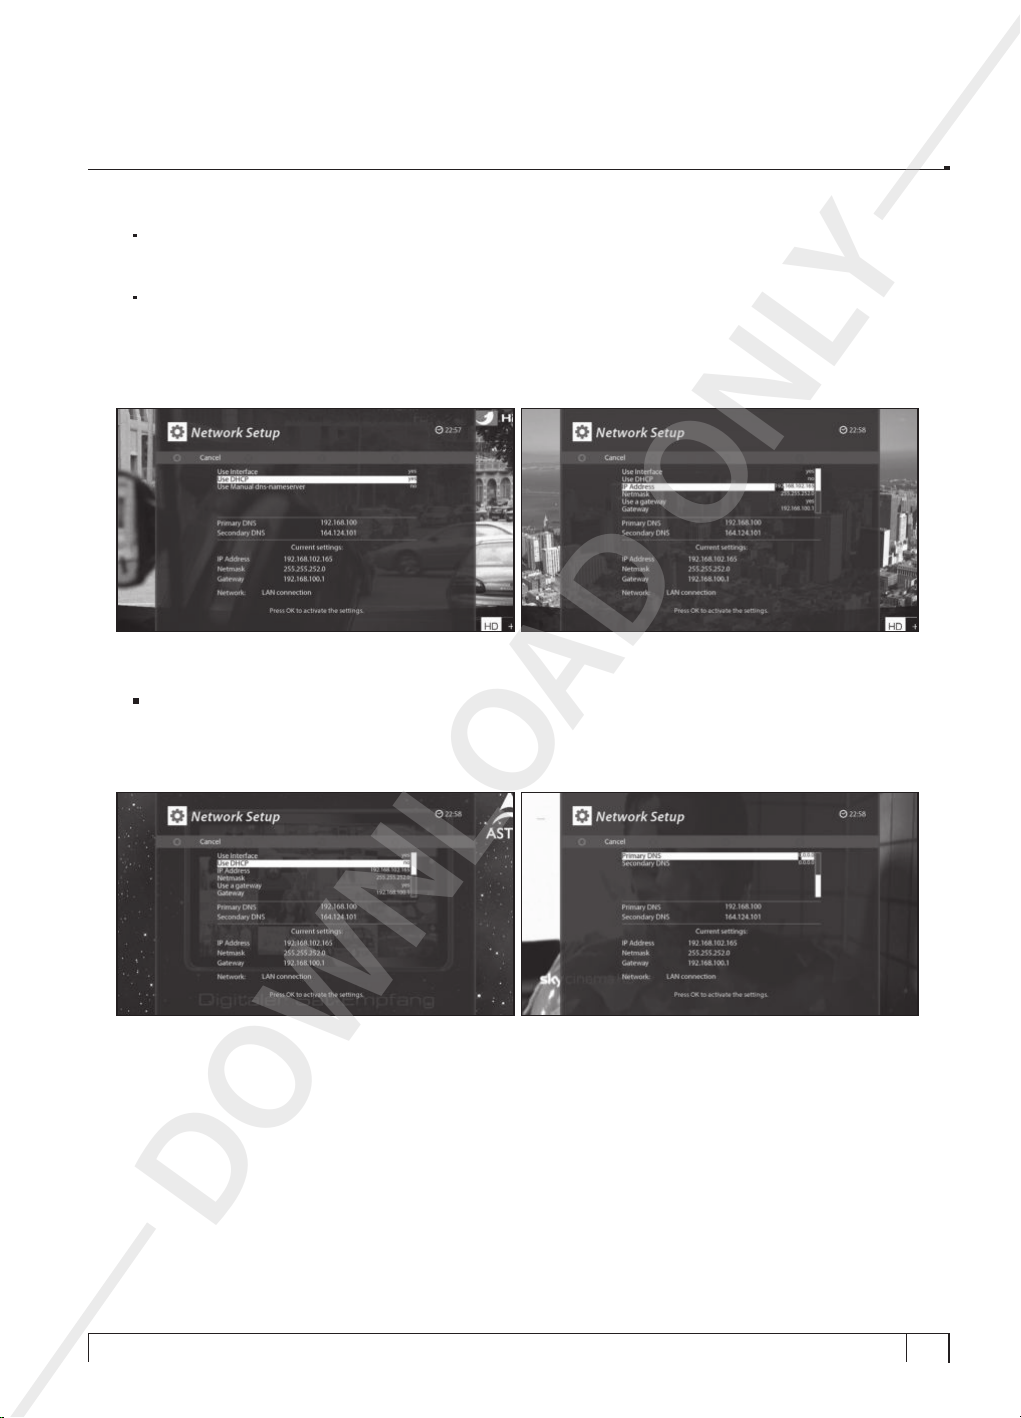
User Interface
YES
is used to activate the Ethernet. If you set this option at NO, the Ethernet will not work.
Use DHCP
YES
is used to use
will automatically detect the correct IP address. NO is used when you want to use a certain fixed IP
address. In this case, you need to enter correct addresses in each field.
Use Primary Domain Name Server
This option is required when you select No for DHCP. You need to type the IP Address for using the
Primary Domain Name Server (DNS).
DHCP (Dynamic Host Configuration Protocol)
AD ONLY
. If you set this option at
YES
, it
DOWNLO
59
Page 60
+
Vu User Manual
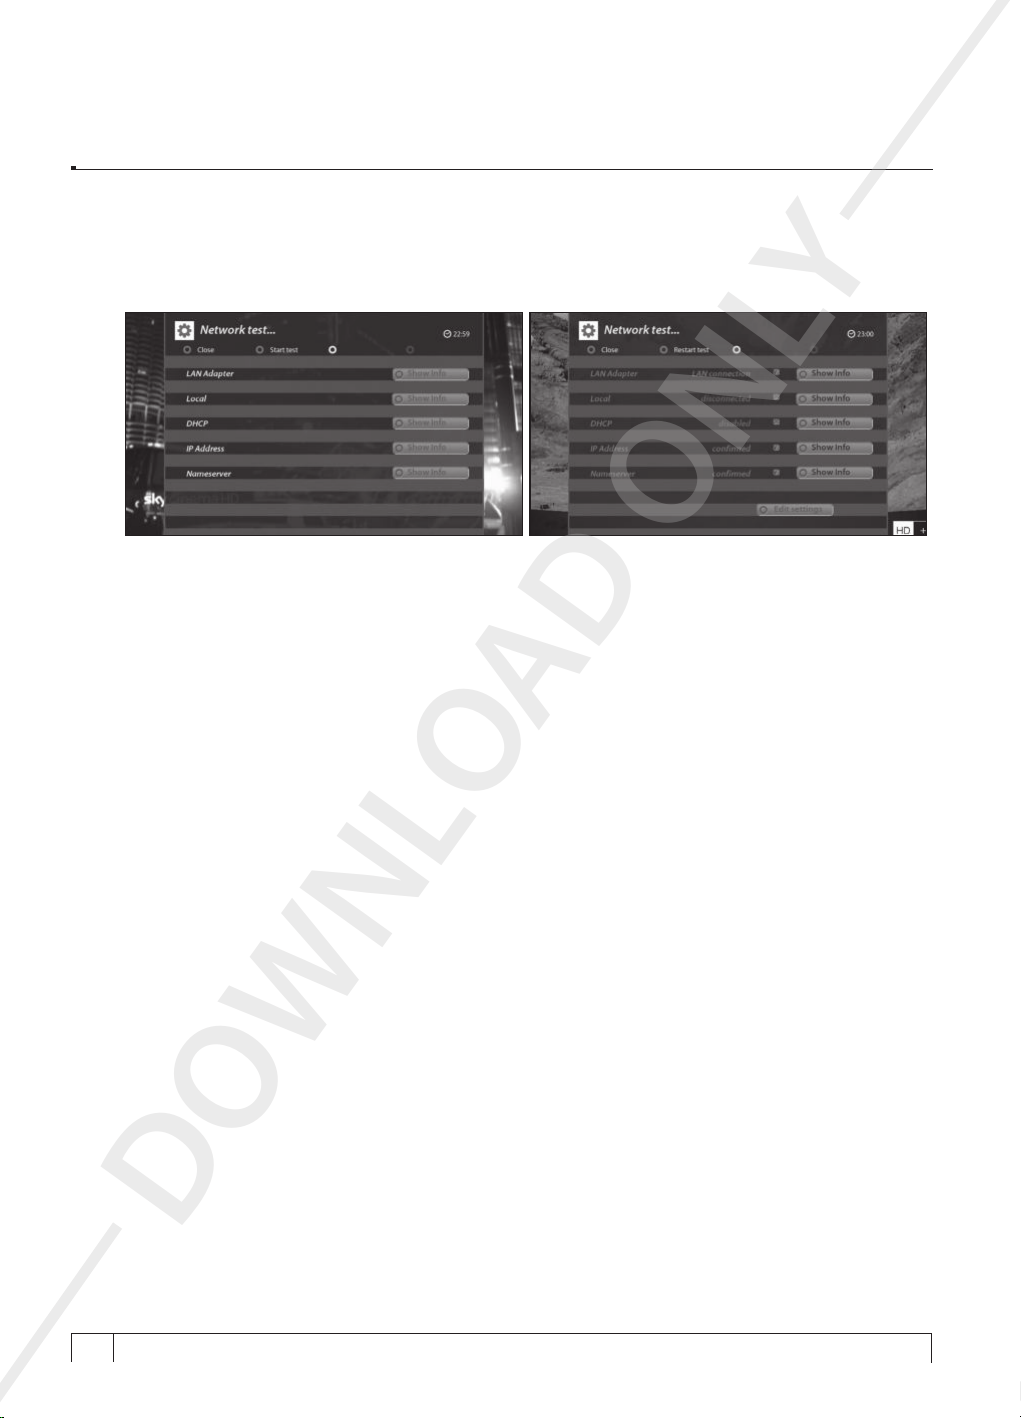
B) Network test
When you are not sure whether the network configuration has been done correctly or not, you can run
this test.
C) Restart Network
This option is used when you want to reboot the Ethernet of your Vu+.
AD ONLY
DOWNLO
+
60
Your Smart Linux TV Player
Vu :
Page 61
+
i
i
Vu User Manual
G. Skin Change
[
: MENU
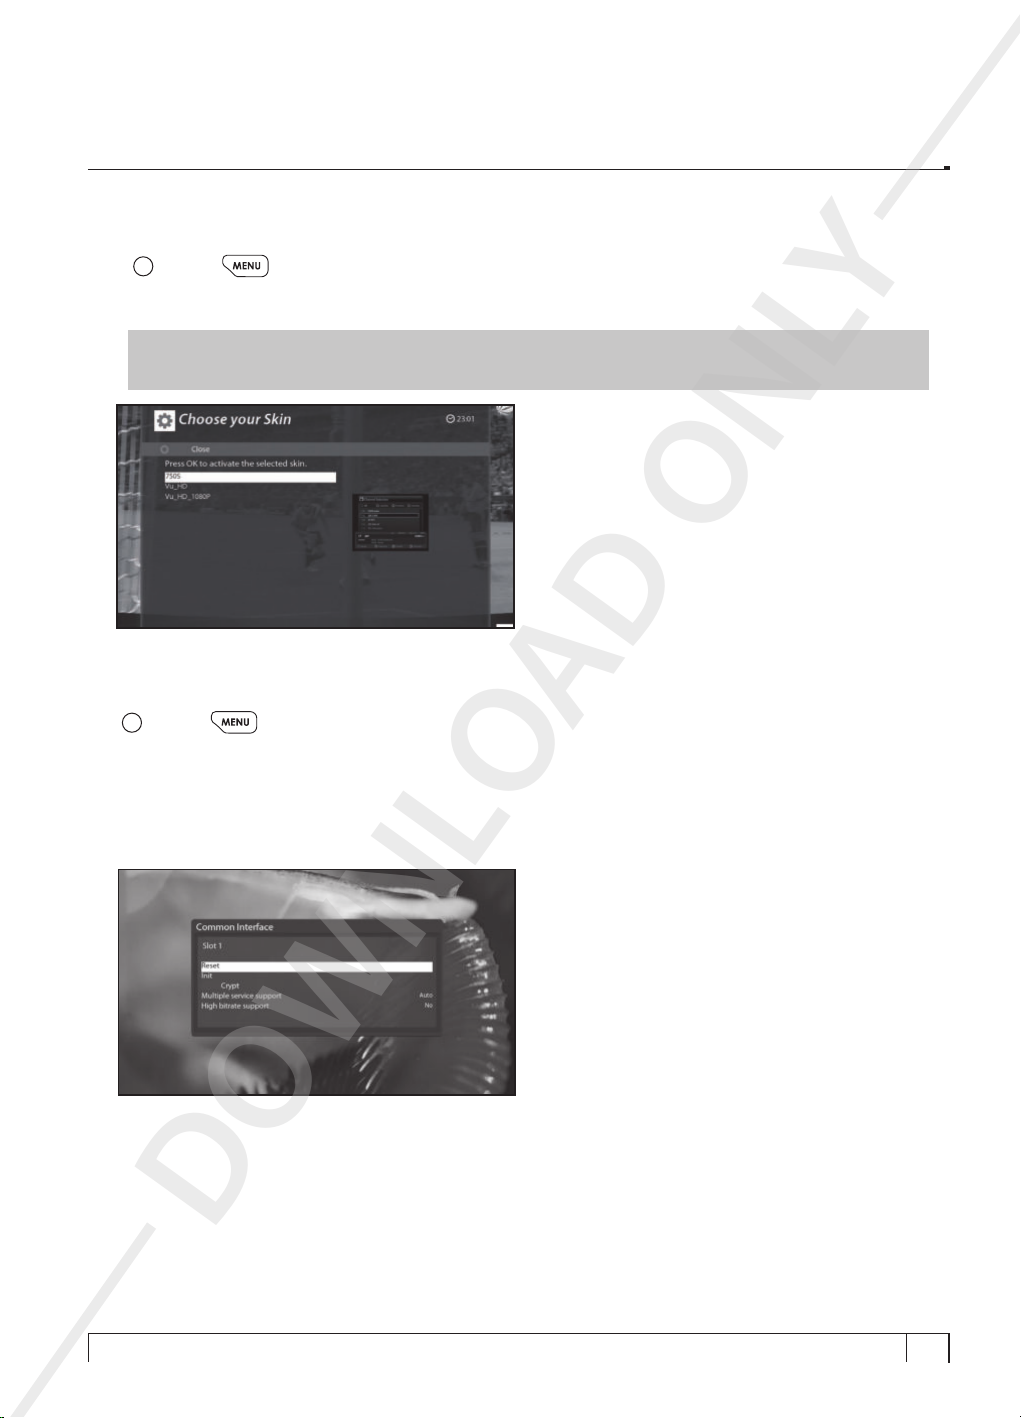
Vu+ is a Linux based set top box and there are a lot of Skins available for Linux set top box. Using this
menu, you can use a different Skin other than the default one.
> Setup > System > Skin]
NOTE :
Please wait patiently until the system reboots with a newly selected Skin.
3) Checking CAM
[
: MENU
To be able to watch CAS channels, you need to have a proper CAM and a Smartcard. Vu+ is integrated
with two Common Interface slots. If you have two CAM modules and keep them inserted in your Vu+, it
will reduce the trouble of changing CAM.
If you have inserted one or two CAMs, you can check the information of the inserted CAMs, through this
menu as below:
It takes some minutes since the change of Skin requires a complete system shutdown.
> Setup > Common Interface]
AD ONLY
DOWNLO
61
Page 62
+
i
Vu User Manual
4) Parental Control
[
: MENU
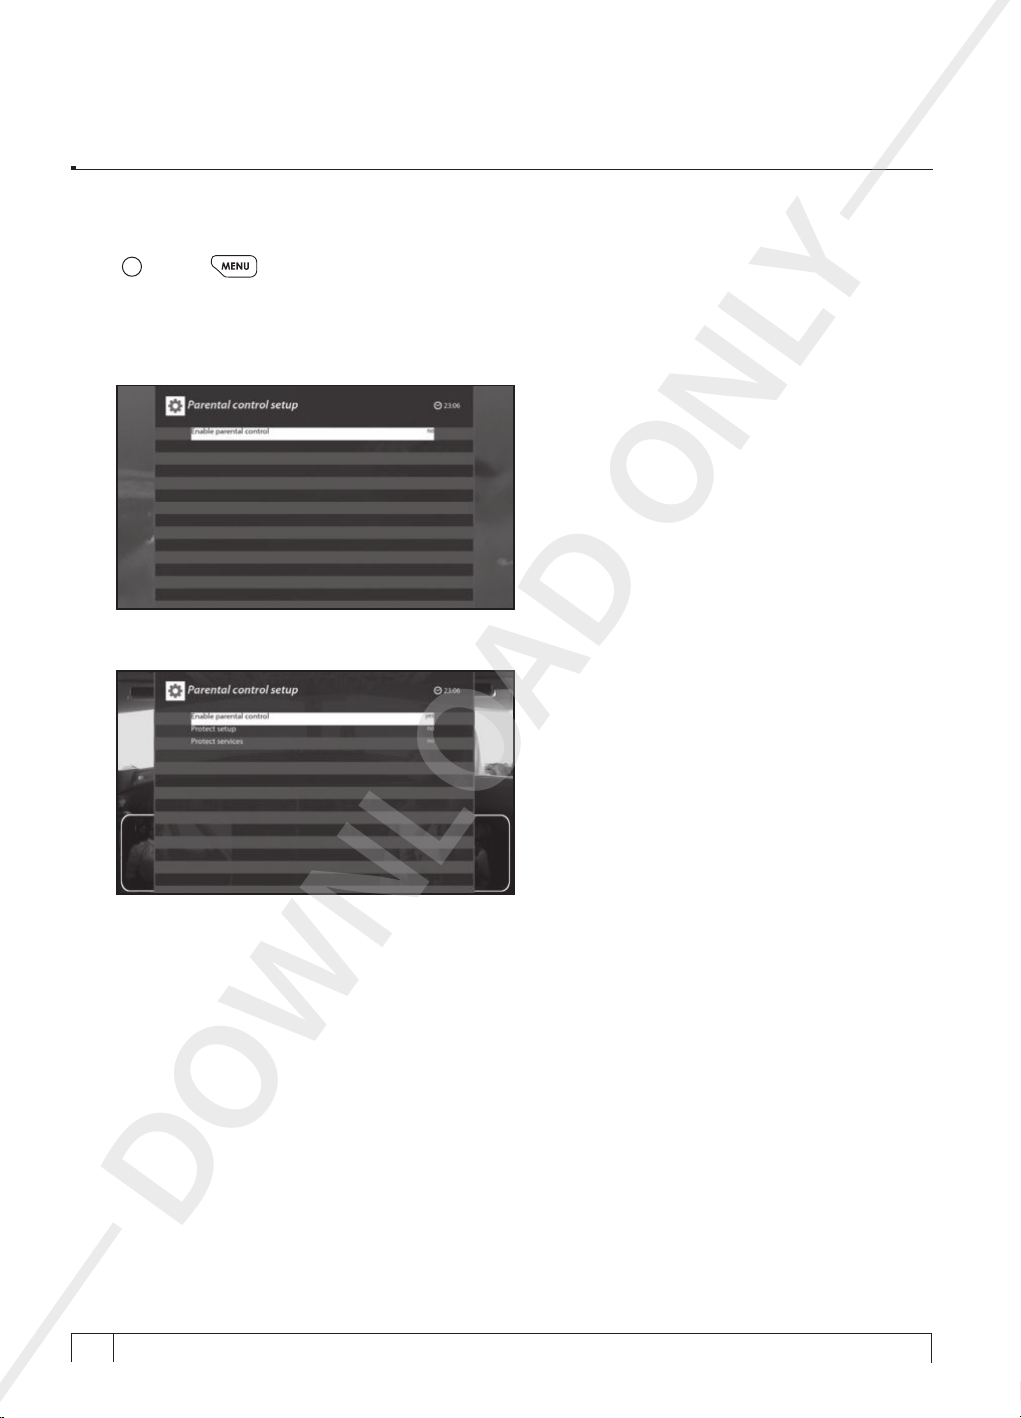
If you want to prevent certain channels from being accessed by others, you can do so using this menu.
Go to Parental Control menu by pressing MENU > Setup > Parental Control.
A.
> Setup > Parental Control]
Set the parental control option at
B.
YES
using
LEFT/RIGHT
AD ONLY
key. The menu will change as below.
DOWNLO
+
62
Your Smart Linux TV Player
Vu :
Page 63
+
Vu User Manual
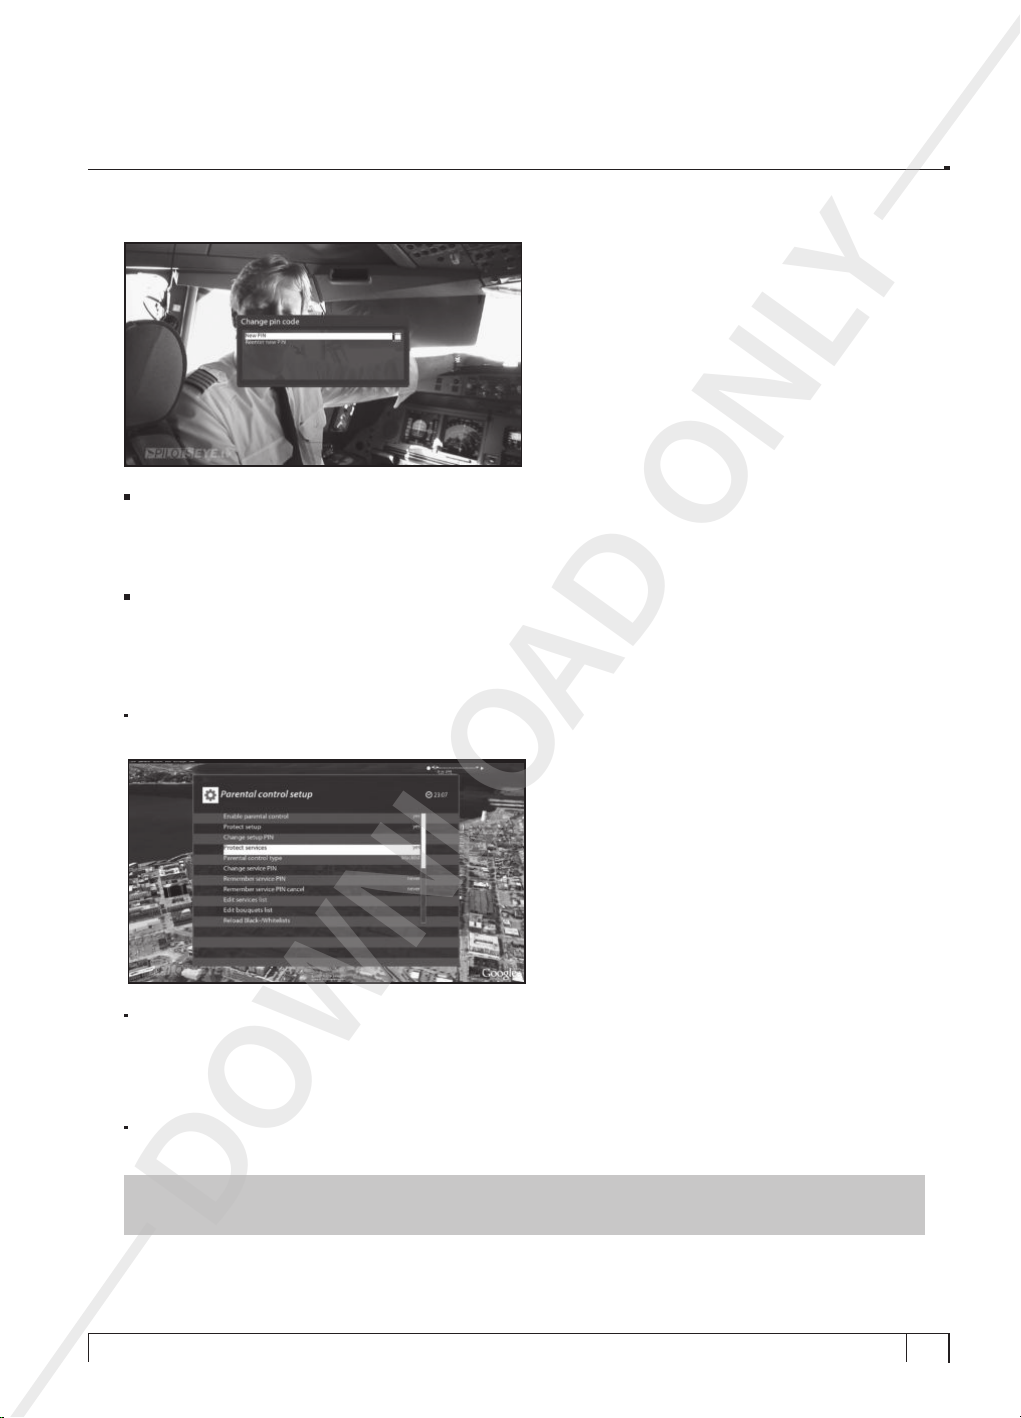
Protect setup
If you set this option at
enter PIN code when you enter this
setup
menu.
Change setup pin
If you want to change the existing PIN code for
Parental setup, you can do so using this menu.
You need to enter a new PIN code twice.
Protect services
You need to set this option at
Parental control type
This option will be activated only when you set
White list
-
Black list
-
: This option is used to block all channels except those channels in the parental control list.
: This option is used to block only those channels included in the parental control list.
YES
, you will be asked to
Parental
YES
, if you want to lock certain channels with PIN code.
AD ONLY
Protect services
YES
at
. Here there are two options:
Change service pin
Here you can define a PIN code required to change services to be included in the parental control list.
NOTE:
different from that used for
PIN code here is used for Change service and thus you are recommended to use a PIN code
DOWNLO
Protect services.
63
Page 64
+
i
Vu User Manual
Edit service list
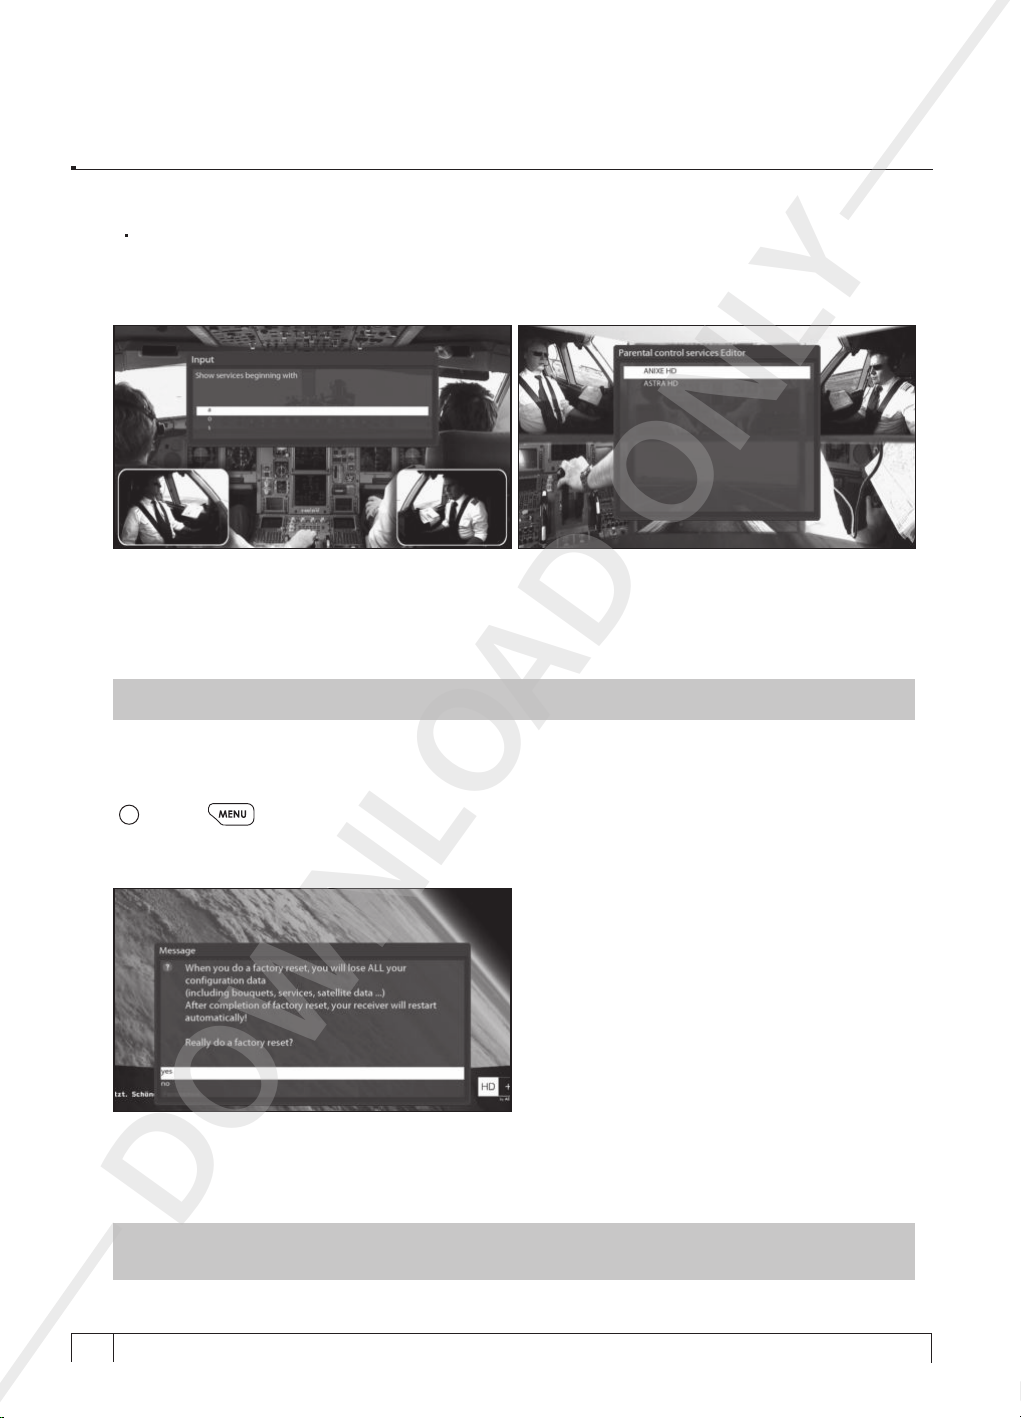
Here you can add services that you want to lock with PIN code. Services will be arranged in the
alphabetical order and you can select an alphabet to enter into the list where you can find the channel
that you want to lock.
Here, T is selected and TV5 is locked in the list as an example.
Next time when you or anyone else want to tune into this service, the menu asking for PIN code will
appear instantly as below.
NOTE :
It is very important not to lose this PIN code.
AD ONLY
5) Factory Reset
[
: MENU
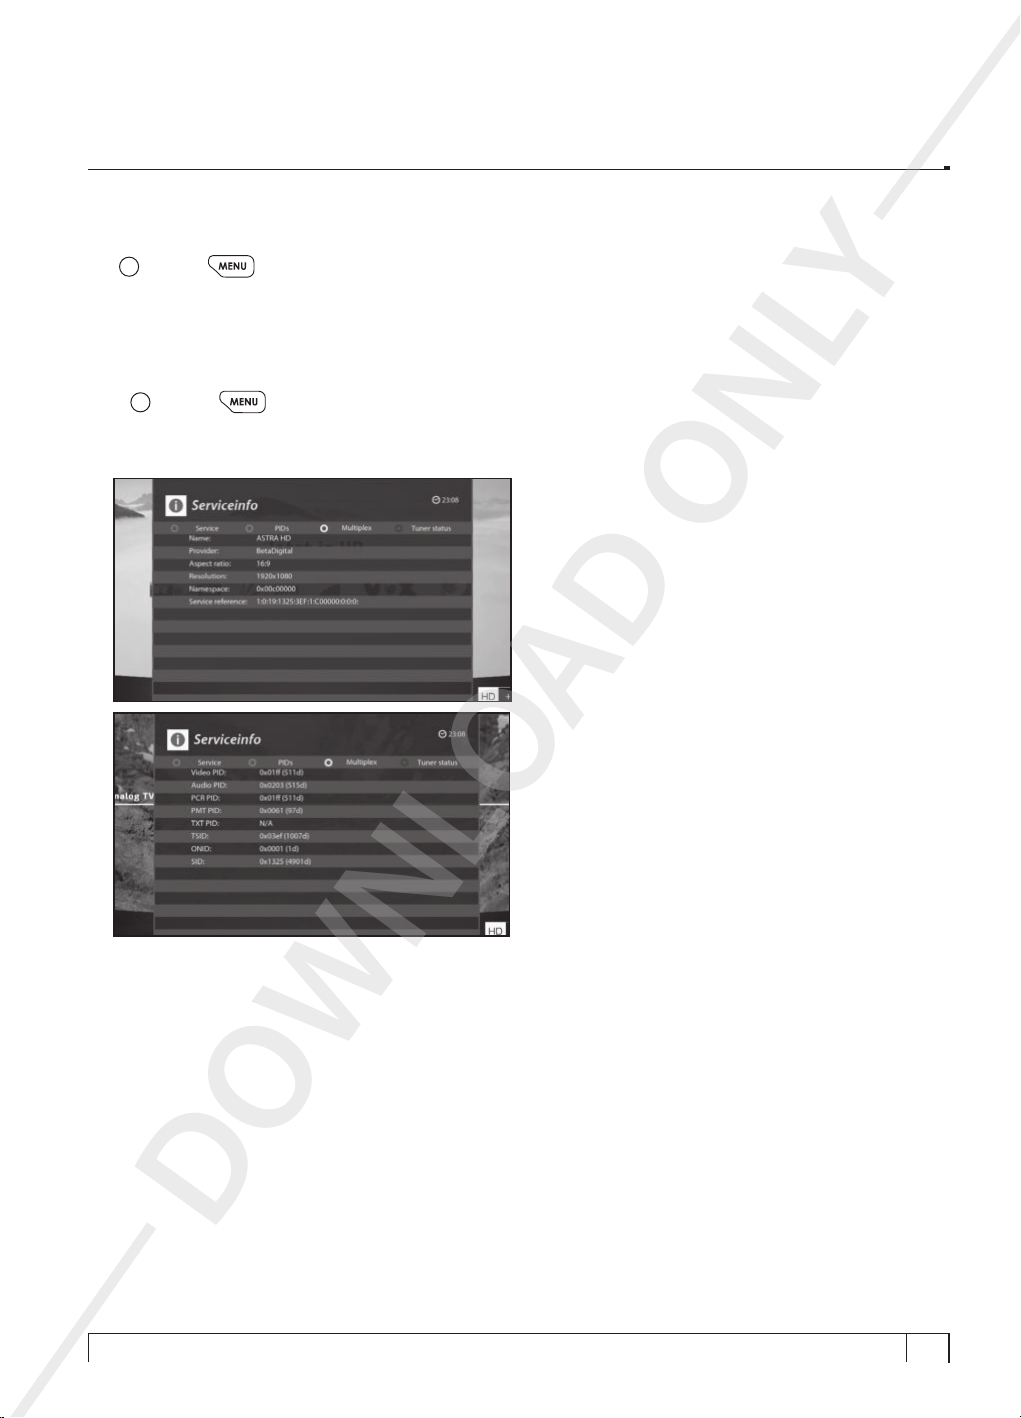
If you want to erase all installed service list as well as all configurations, run the
YES
Select
Upon the completion of factory reset process, your Vu+ will reboot automatically and start the
Installation
DOWNLO
NOTE :
satellite parameters, and so on will be erased.
> Setup > Factory Reset]
Factory Reset
in the below menu to run the factory reset.
process.
If you do this factory reset, all of your configuration data including bouquets, service lists,
process.
First Time
+
64
Your Smart Linux TV Player
Vu :
Page 65
+
i
i
Vu User Manual
6) Checking H/W & S/W Information
[
: MENU
If you want to check the H/W or S/W system of your Vu+, this is the menu that you need to use. Also, here
you can check very detailed information of a specific service.
A. Service Information
[
: MENU
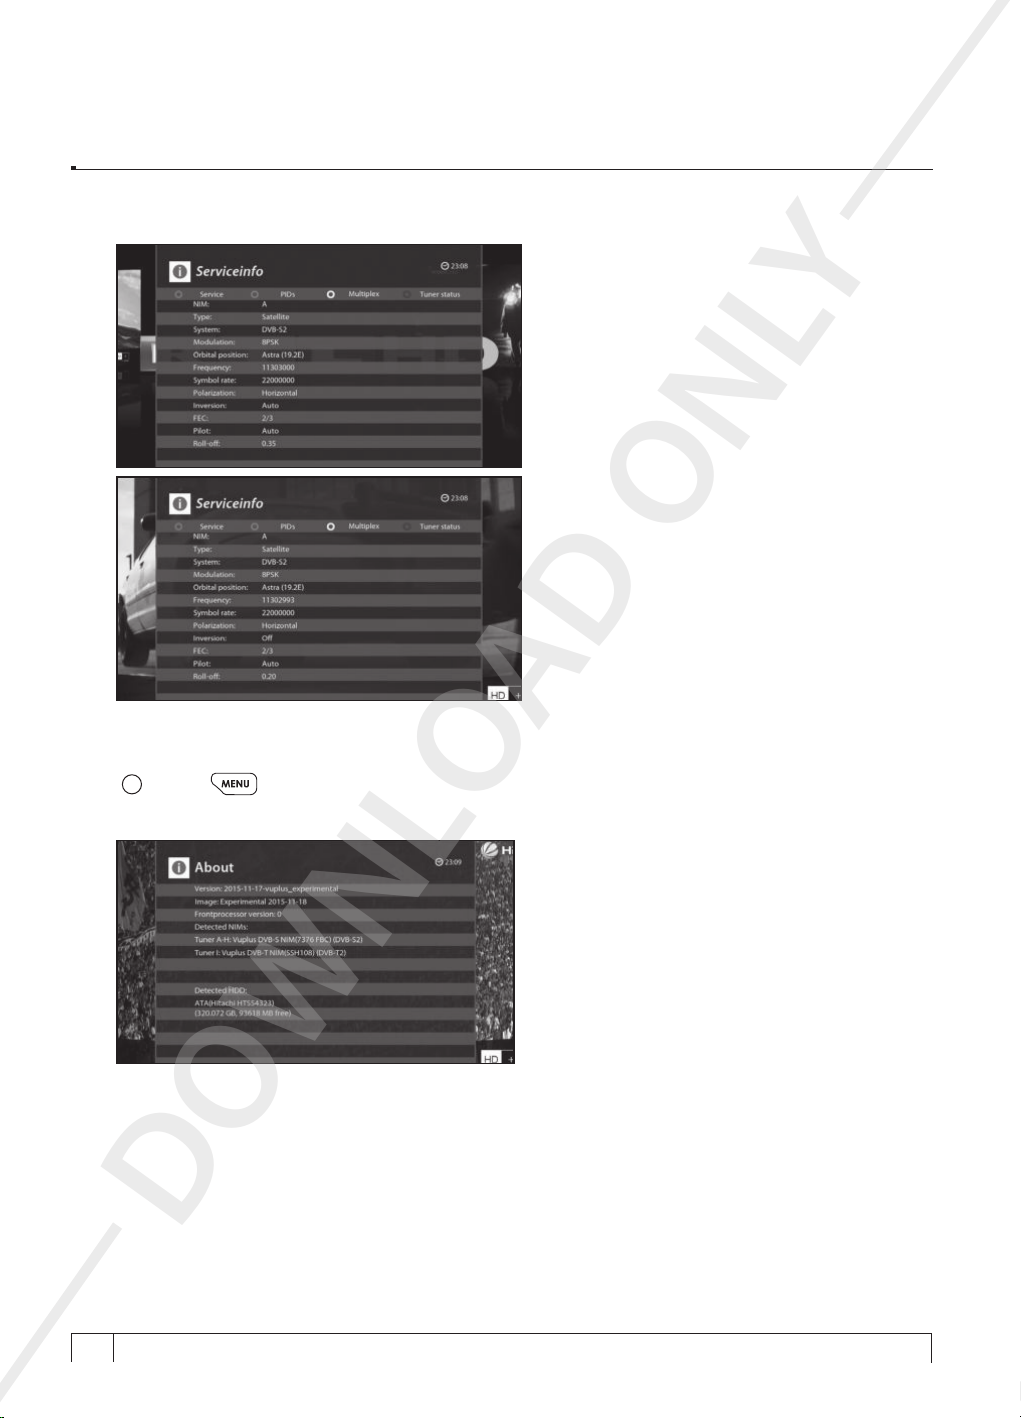
In this menu, you can see all the parameter data of the current channel. The service information is well
arranged in four sections as below:
> Information]
> Information > Service]
A) Service info
B) PIDs
AD ONLY
DOWNLO
65
Page 66
+
i
Vu User Manual
C) Multiplex
D) Tuner Status
AD ONLY
B. System Information
[
: MENU
This menu is for you to check the current system of your Vu+. You can see the following information:
> Information > About]
A) S/W version
B) Detected NIMs
C) Detected HDD
DOWNLO
+
66
Your Smart Linux TV Player
Vu :
Page 67
+
Vu User Manual
7) Inserting Tuner
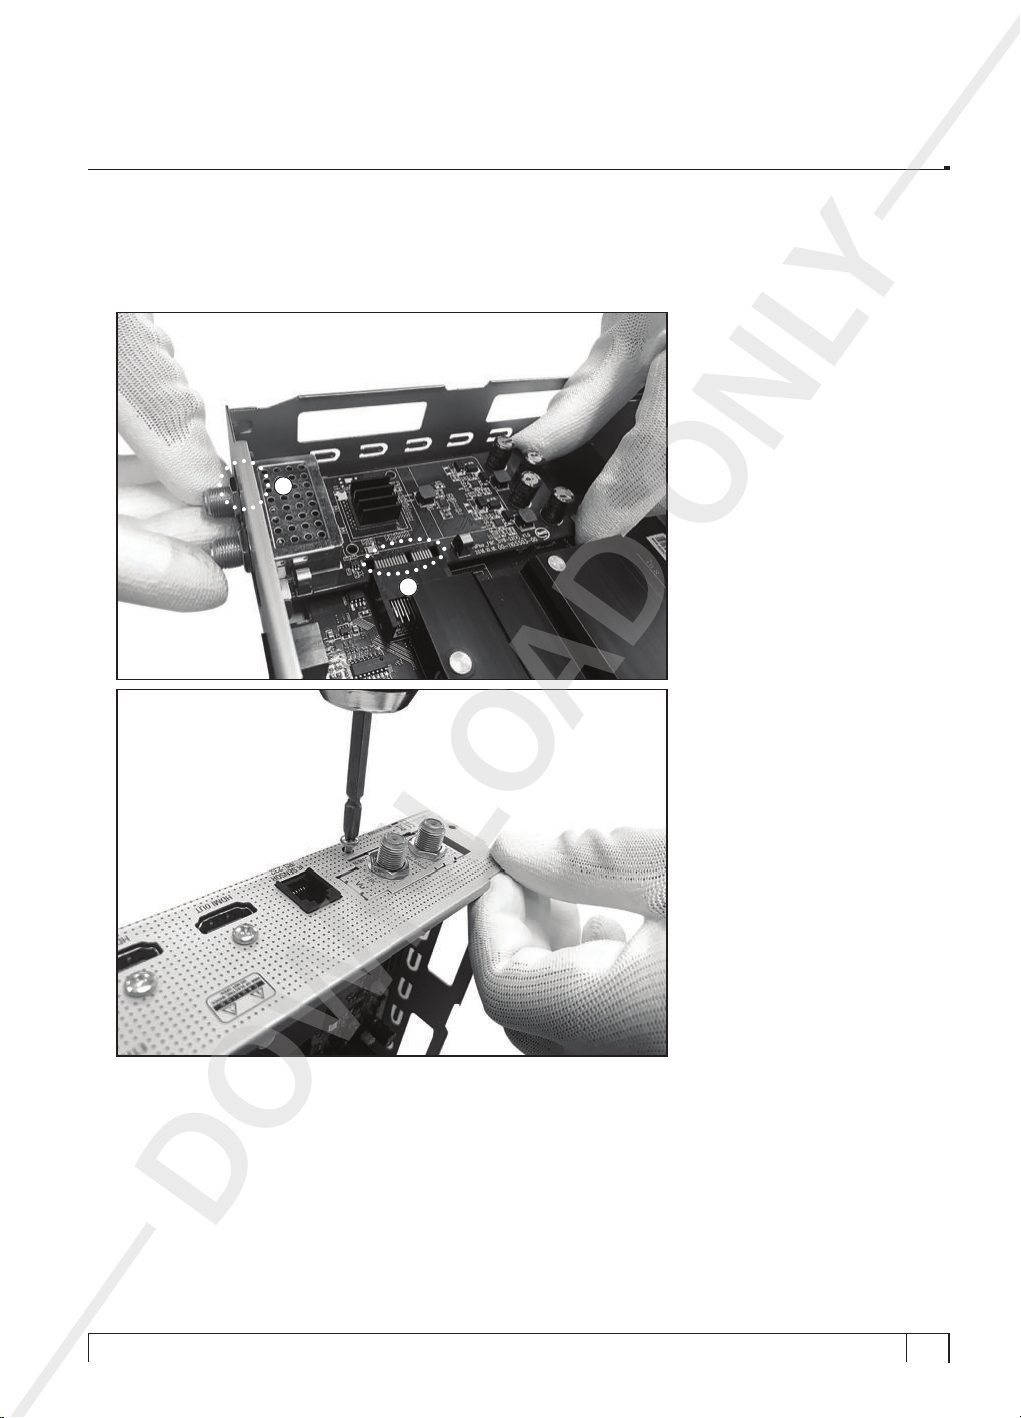
Vu+ UNO 4K SE has one additional tuner slot which support Dual DVB-S2 and Dual DVB-C/T2. You can
additionally purchase Dual DVB-S2 tuner and Dual DVB-C/T2 tuner.
A
B
AD ONLY
When you intall a new tuner, please make sure that two points described in A and B be correctly
mounted.
DOWNLO
67
Page 68
+
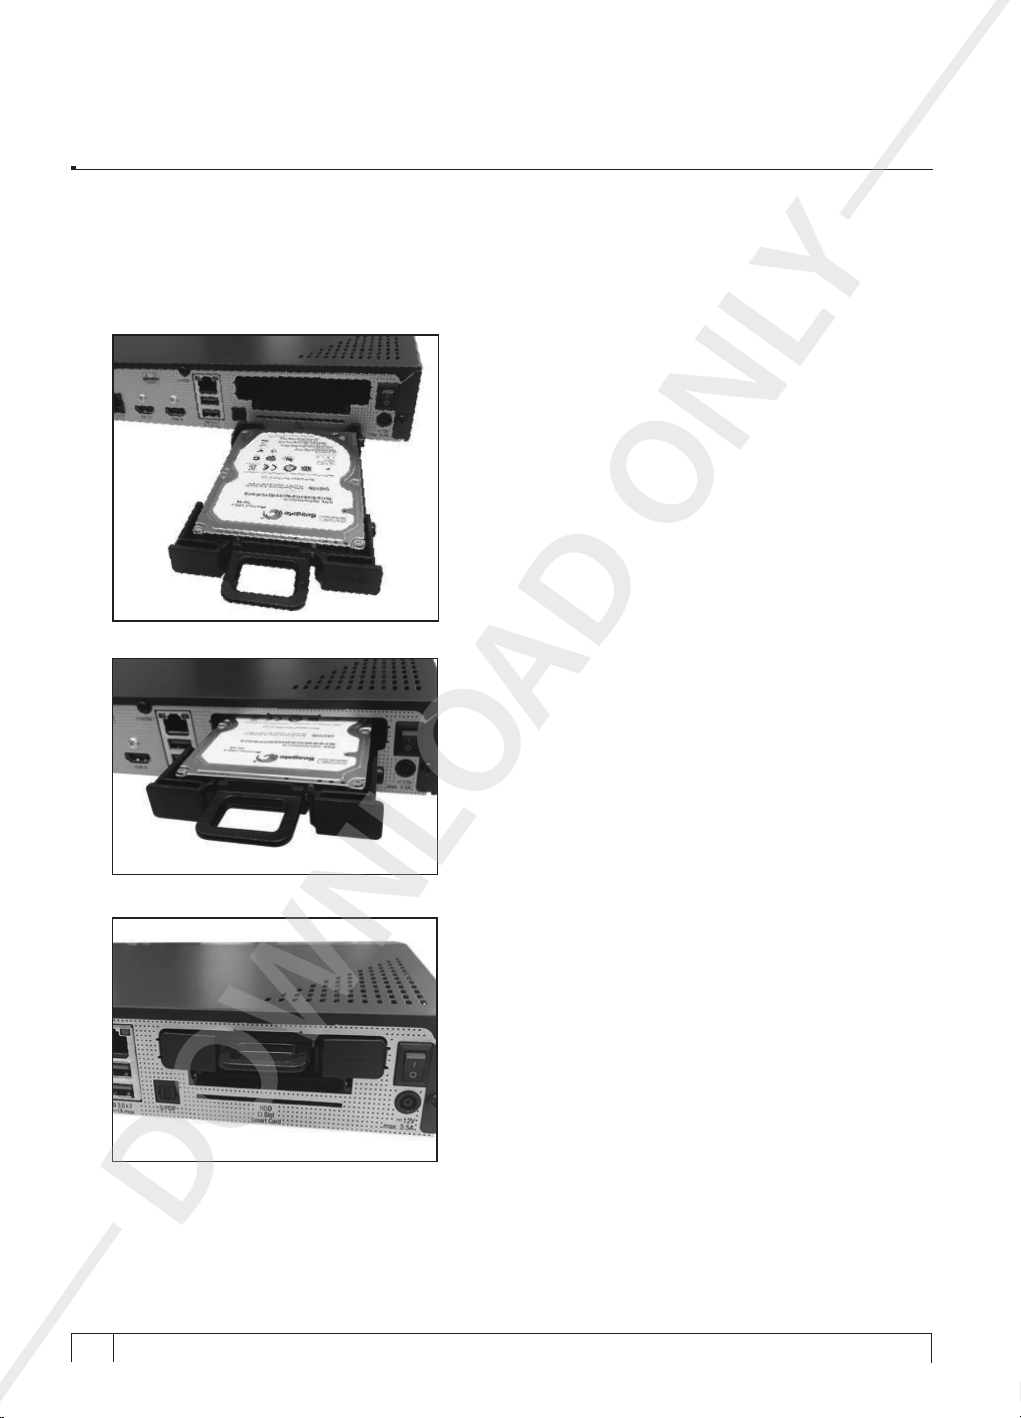
Vu User Manual
8) HDD Mounting
Vu+ UNO 4K SE has detachable HDD for 2.5" HDD, you could easily put your own HDD into UNO 4K SE
and take out easily.
You can use your own 2.5” HDD and put into HDD bracket
which is provided.
Simply put into UNO 4K SE.
AD ONLY
Press down to take out HDD Bracket.
DOWNLO
+
68
Your Smart Linux TV Player
Vu :
Page 69

9) Remote Control Unit (RCU) Set-up
A. User Guide of Vu+ RCU
A) RCU keys for TV
a. Keys for TV only:
b. Keys switchable between TV and STB:
c. All the other keys are for STB only
B) Volume Punch (Volume +/-, Mute key setup)
a. Default Volume and Mute Control : STB
b. Setup
c. Setup
Volume /
a) Press
b) Press
c) RED LED blinks 2 times, then off.
a) Press
b) Press
c) RED LED blinks 2 times, then off.
TV Power
STB Power
Volume /
TV Power + OK
TV Power
Power ( ) , AV ( )
and
MUTE ( ) key
+ OK keys at the same time for 3 seconds or press until RED LED is on.
key.
and
MUTE ( ) key
keys at the same time for 3 seconds or press until RED LED is on.
key.
Volume /
to STB mode
to TV mode
key
and
MUTE ( ) key
+
Vu User Manual
C) TV Setup
a. 5-Digit Code Setting
a) Turn on the TV.
b) Press
c) Press 5-digit Code for TV vendor : LED will blink 1 time when you press 5-digit code and if the digit
d) Once RCU recognize the TV code properly, RED LED blinks once and then it will be on. : If you
e) If the code is not valid one, RCU does not send Power IR code. And RED LED will be off for 0.5
f) After set-up TV vendor, Volume Punch(
b. Auto Search Setting
a) Turn on the TV.
b) Press
c) Press
d) When you press OK key, LED blinks 2 times and then it will be off.
e) After set-up TV vendor, Volume Punch(
c. You cannot use with IR code for
TV Power
code set up properly, the signal for TV power-on will be out once.
press OK key, LED blinks 2 times and the code will be saved.
seconds and it turns on again. You can press other code or press OK key for finishing set-up 5-digit
mode.
mode.
TV Power + OK
CH up
signal for TV power will be out at the same time with pressing
mode.
DOWNLO
+ OK keys at the same time for 3 seconds or press until RED LED is on.
Volume +/-, Mute
at the same time for 3 seconds or press until RED LED is on.
or CH down key. LED blinks once when you press
Volume +/-, Mute
Power ( ), AV ( )
AD ONLY
keys) will be automatically set up to TV
or
CH up
CH up
keys) will be automatically set up to TV
keys unless the user setup TV.
or
CH down
CH down
key and the
.
69
Page 70

+
Vu User Manual
D) STB Setup (System code change)
a. The default system code is Mode 2.
b. 5-Digit Code Setting
a) Press
b) RED LED will be still on even you release
c) Press 5-Digit Code.(Default : 00002)
d) LED will blink 1 time then it is on when you press 5-digit code properly and if you press OK keys LED
e) If the code is not valid one, RED LED will be off for 0.5 seconds and it turns on again. You can press
E) Factory Reset
a. Press + keys at the same time for 5 seconds.
b. The RED LED will blink 3 time after 5 seconds and all IR setup data including RCU pairing will be
cleared.
F) Low Battery
a. If the battery level is low, RCU will be working as "Low Battery mode". The RED LED will blink 5
times when you press any keys on RCU and you need to change the batteries to new one.
b. All the data you setup of IR will not be cleared even if the batteries are removed.
STB Power
00001 Mode 1
00002 Mode 2
00003 Mode 3
00004 Mode 4
blinks 2 time and all the setup will be saved automatically.
other code or press OK key for finishing set-up 5-Digit mode.
+ OK keys at the same time for 3 seconds or press until RED LED is on.
STB Power
+ OK keys.
AD ONLY
DOWNLO
+
70
Your Smart Linux TV Player
Vu :
Page 71
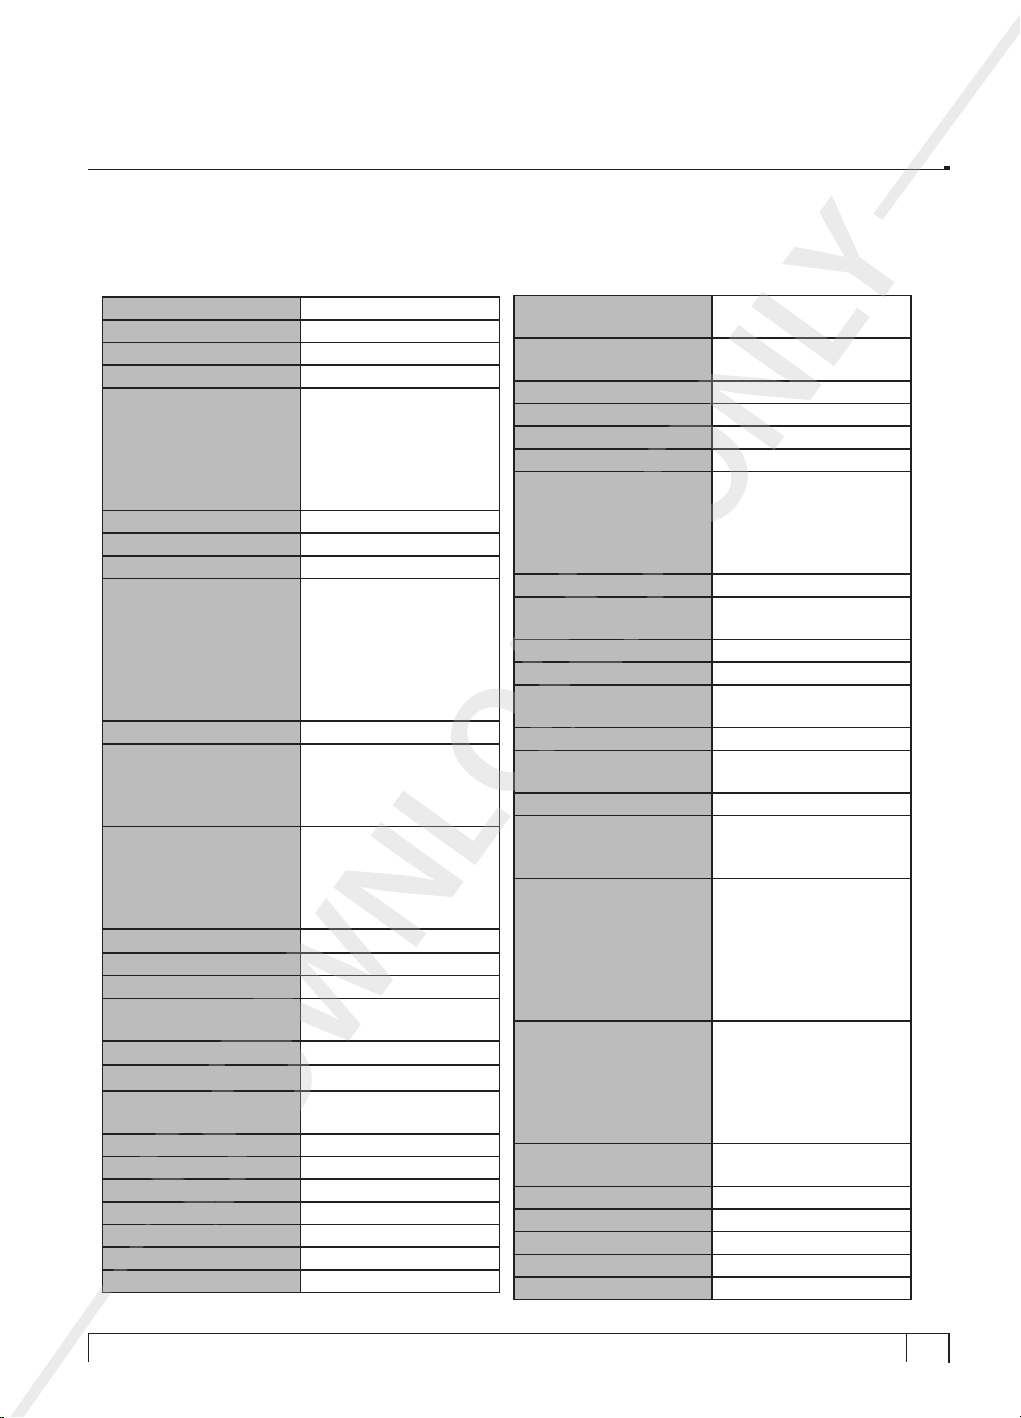
B. TV Code List
Brand ID for Device TV:
+
Vu User Manual
ACER
ADL
ADMIRAL
ADYSON
AEG
AG
AGFAPHOTO
AHB TVISIONS
AKAI
AKITA
AKURA
ALBA
ALIEN
ALLSTAR
ALTUS
AMSTRAD
ANAM
ANDERSSON
ANITECH
ANSONIC
ANTECNO
AOC
ARCELIK
ARDEM
ARENA
ARGOS
DOWNLO
10746, 10640
10299
10204, 10058
10219
10759, 10673, 10652,
10643, 10642, 10572,
10533, 10532, 10319,
10286, 10282, 10263,
10249, 10123, 10109,
10031
10282
10655
10131
10679, 10648, 10636,
10517, 10287, 10280,
10279, 10275, 10251,
10250, 10249, 10155,
10108, 10106, 10104,
10103, 10097, 10093,
10074, 10036, 10027
10085
10624, 10542, 10541,
10430, 10429, 10428,
10174, 10171, 10108,
10086, 10074, 10064
10713, 10307, 10264,
10250, 10249, 10202,
10175, 10172, 10127,
10108, 10074, 10069,
10064, 10060
10264
10251, 10108
10250
10286, 10249, 100171,
100123, 10074, 10025
10285
10123
10277, 10267, 10251,
10219, 10185, 10108
10786, 10732, 10108
10064
10016
10296, 10086, 10085
10250, 10085
10250, 10127
10250
ARISTONA
ASA
ASBERG
ASORA
ASTROSOUND
ATLANTIC
AUDIOSONIC
AURORA
AUTOVOX
AWA
AWATRON
AXXION
AD ONLY
BAIER
BAIRD
BANG & OLUFSEN
BASIC LINE
BAUR
BEKO
BELSON
BELSTAR
BEST
BESTAR
BLACK DIAMOND
BLACK PANTHER
10230, 10122, 10119,
10111, 10109
10234, 10105, 10102,
10087
10267, 10185
10171
10108
10197, 10089
10269, 10267, 10263,
10250, 10218, 10185,
10171, 10164, 10110,
10108, 10090, 10085,
10074
10219, 10171, 10170
10282, 10249, 10197,
10163, 10123
10108
10171
10726, 10724, 10698,
10681, 10628, 10546
10751
10750, 10733, 10578,
10524, 10188, 10032
10204
10277, 10264, 10249,
10170, 10120, 10108,
10033
10266, 10256, 10251,
10233, 10217, 10216,
10212, 10211, 10171,
10143, 10131, 10111,
10108, 10097, 10096,
10092, 10074, 10045,
10042, 10036
10691, 10690, 10510,
10296, 10263, 10255,
10250, 10225, 10195,
10130, 10117, 10108,
10090, 10086, 10085,
10049
10741, 10686, 10685,
10580
10249, 10116, 10108
10282
10249, 10108, 10086
10249, 10120
10185
71
Page 72
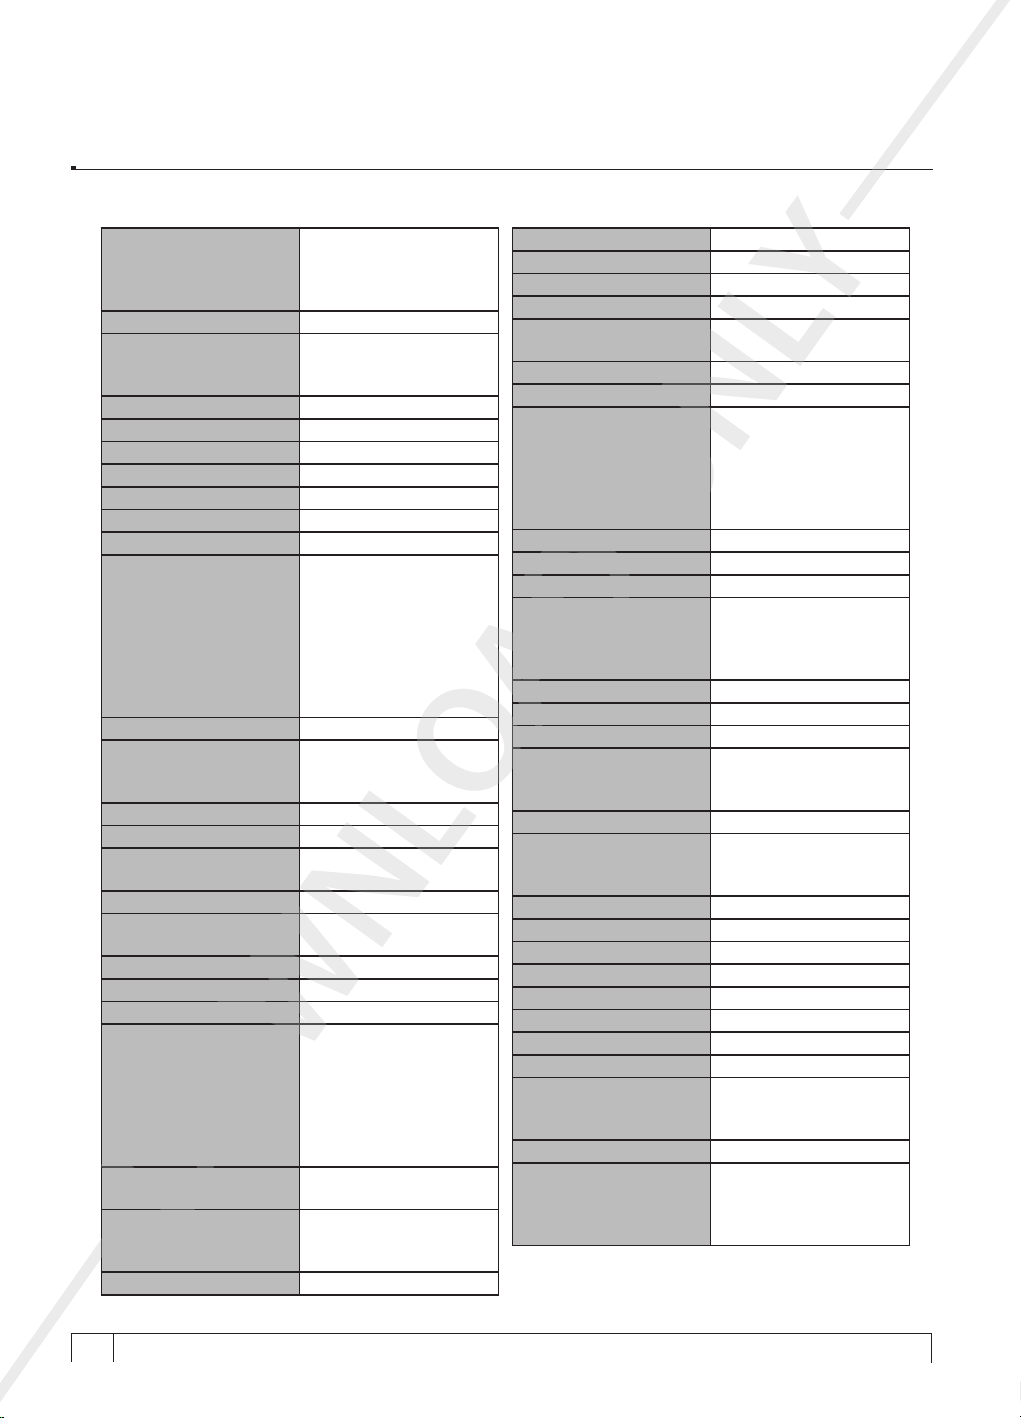
+
Vu User Manual
10723, 10599, 10256,
BLAUPUNKT
BLUSENS
BLUE SKY
BLUESTAR
BOMANN
BONDSTEC
BRANDT
BRIONVEGA
BROKSONIC
BRUNS
BUSH
CAMPER
CELLO
CENTURY
CGE
CGM
CHANGHONG
CIE
CINERAL
CINEX
CLARIVOX
CLATRONIC
CMX
DOWNLO
CONDOR
CONIC
10253, 10119, 10099,
10097, 10096, 10092,
10091
10787, 10654, 10611
10286, 10282, 10273,
10264, 10250, 10249,
10172, 10109
10108, 10063
10282
10163
10270, 10195, 10193
10204
10285
10204
10774, 10766, 10725,
10568, 10314, 10303,
10287, 10286, 10283,
10264, 10250, 10249,
10232, 10202, 10123,
10121, 10115, 10108,
10074, 10069, 10063,
10031
10085
10536, 10434, 10318,
10315, 10312, 10311,
10310, 10301
10204, 10165
10267, 10260, 10165
10264, 10108, 10086,
10085
10717
10171, 10170, 10166,
10108, 10064, 10025
10272
10294, 10031
10258, 10232
10742, 10296, 10294,
10286, 10282, 10267,
10260, 10255, 10250,
10249, 10218, 10185,
10171, 10165, 10164,
10110, 10108, 10074,
10064
10770, 10765, 10763,
10591, 10589
10267, 10260, 10255,
10229, 10171, 10109,
10108
10219
CONRAC
CONTEC
CONTI
CONTINENTAL
CONTINENTAL
EDISON
COSMOS
CROSLEY
CROWN
CS-ELECTRONICS
CURTIS
D-VISION
DAEWOO
DANSAI
DANTAX
AD ONLY
DAYTEK
DECCA
DELTON
DENVER
DESMET
DGM
DIBOSS
DIGIFUSION
DIGINUM
DIGITREX
DIGIX
DISNEY
DMTECH
DOMUS
DUAL
10225
10277, 10171
10263, 10250
10172
10193, 10172
10108
10267, 10204, 10165
10764, 10286, 10282,
10274, 10267, 10264,
10263, 10255, 10250,
10249, 10185, 10171,
10108, 10090, 10086,
10085, 10063
10163, 10064
10260, 10111
10108
10720, 10598, 10540,
10519, 10431, 10269,
10170, 10127, 10120,
10108
10219
10250, 10074
10194
10190, 10189, 10184,
10128, 10108, 10069,
10066, 10063
10249
10703, 10638, 10625,
10596, 10282, 10171,
10074
10108
10669, 10426
10621
10225
10031
10586
10187
10062
10778, 10529, 10320,
10308, 10304, 10286,
10249
10108
10293, 10286, 10279,
10250, 10249, 10248,
10233, 10127, 10123,
10108
+
72
Your Smart Linux TV Player
Vu :
Page 73
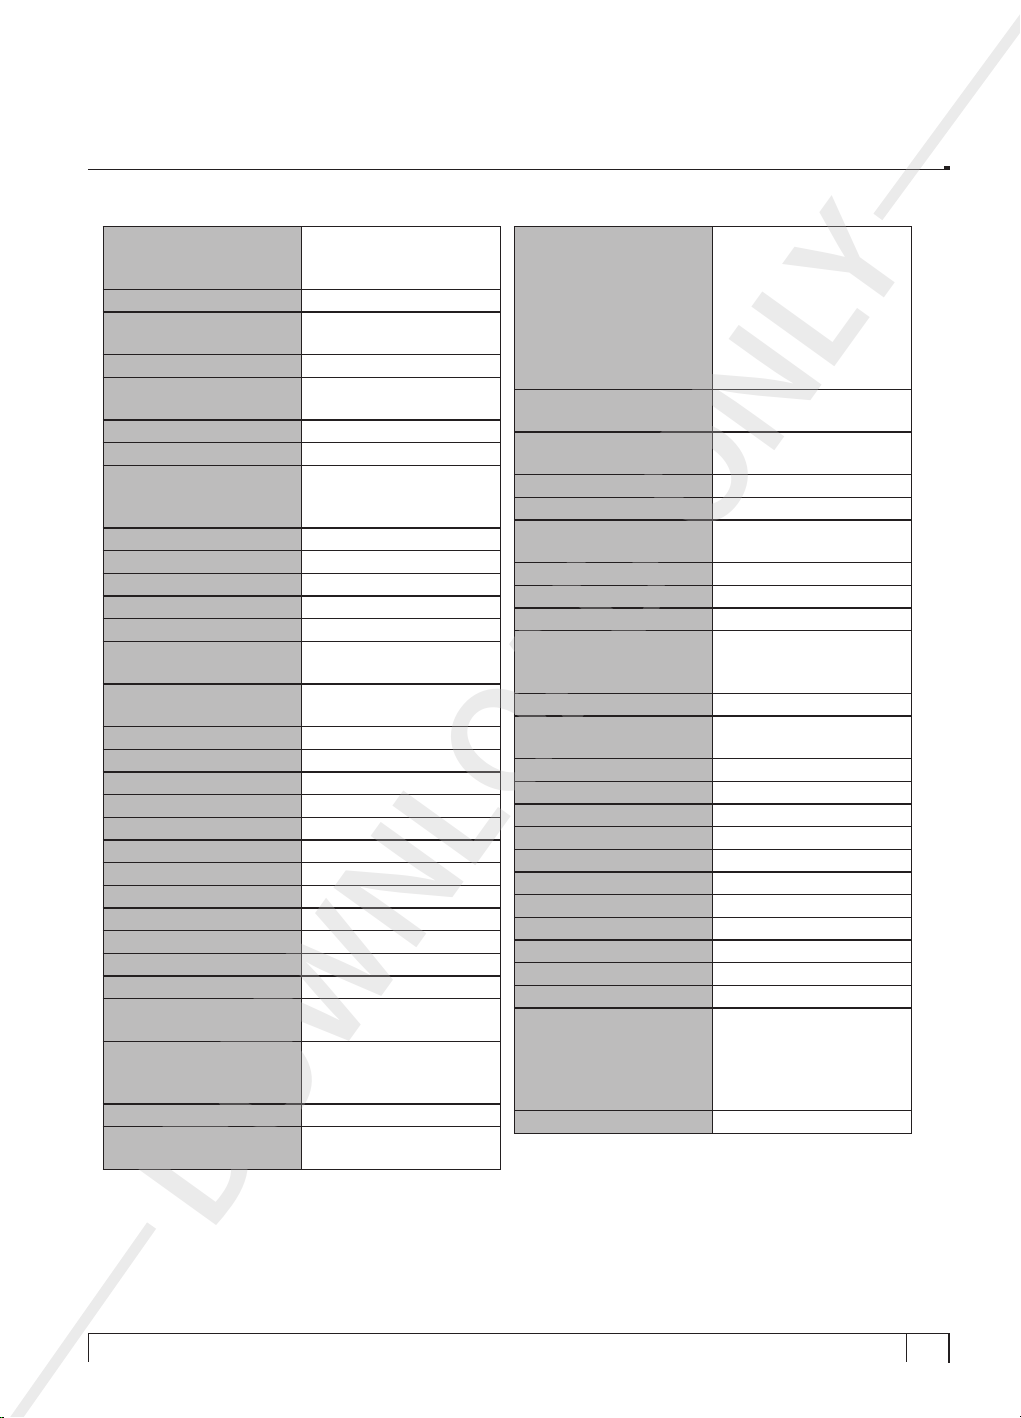
+
Vu User Manual
DUMONT
DURABRAND
DYON
E-MAX
ECG
EDISON
EDISON MINERVA
ELBE
ELBIT
ELCIT
ELECTRIC
ELECTRIC CO
ELEKTA
ELEKTRONIKA
ELEMIS
ELIN
ELITE
ELMAN
ELTA
EMERSON
ESC
EUROLINE
EUROPHON
EUROSKY
EVELUX
EXPERT (I)
EXQUISIT
FENNER
FERGUSON
FIDELIS
FINLANDIA
10267, 10234, 10204,
10185, 10110, 10109,
10105, 10102, 10087
10282, 10249
10754, 10666, 10664,
10618, 10610
10194
10751, 10250, 10117,
10069
10172
10172
10273, 10229, 10209,
10185, 10120, 10108,
10074, 10058
10248, 10108
10164
10109
10250
10171, 10108
10274, 10116, 10108,
10086
10294, 10282, 10074,
10031
10108, 10087
10467, 10064
10185
10171, 10108
10204, 10108, 10086
10108
10286
10185, 10033
10249
10116, 10108
10089
10110, 10108
10251, 10249, 10171,
10108
10594, 10549, 10548,
10544, 10507, 10270,
10195, 10078, 10032
10108
10195, 10189, 10105,
10104, 10033
10290, 10279, 10276,
10275, 10251, 10234,
10229, 10225, 10189,
FINLUX
FIRST-LINE
FISHER
FLINT
FORCE
FORMENTI
FRABA
FRONTECH
FUJITSU GENERAL
FUNAI
F&U
AD ONLY
GALAXIS
GALAXY
GALERIA
GBC
GEC
GELOSO
GENERAL
GENERAL TECHNIC
GERICOM
GOLDFUNK
GOLDHAND
GOLDLINE
GOLDSTAR
GOODING
10128, 10116, 10108,
10107, 10105, 10104,
10103, 10102, 10087,
10074, 10069, 10066,
10031
10294, 10273, 10264,
10251, 10249, 10108
10233, 10221, 10086,
10052, 10051
10273
10286, 10194, 10123
10229, 10110, 10109,
10108
10248, 10108
10220, 10171, 10166
10554, 10197, 10088
10755, 10629, 10617,
10293, 10286, 10264,
10249
10555
10260, 10255, 10185,
10108
10255
10171
10269, 10267, 10171
10189
10171, 10164, 10064
10171
10171
10300, 10225, 10187
10264, 10249
10171
10273
10288, 10268, 10263,
10250, 10237, 10219,
10191, 10171, 10166,
10163, 10110, 10108,
10090, 10074, 10038
10172
DOWNLO
73
Page 74
+
Vu User Manual
10605, 10543, 10321,
10316, 10306, 10305,
10287, 10286, 10285,
10275, 10270, 10269,
10268, 10264, 10251,
10250, 10249, 10225,
GOODMANS
GORENJE
GPM
GRADIENTE
GRAETZ
GRAN PRIX
GRANADA
GRANDIN
GREAT WALL
GRUNDIG
DOWNLO
GRUNKEL
H&E
10224, 10195, 10194,
10187, 10176, 10171,
10170, 10123, 10120,
10115, 10110, 10109,
10108, 10103, 10074,
10068, 10064, 10063,
10031
10286, 10274, 10249,
10116, 10108, 10090,
10086
10064
10038
10296, 10263, 10250,
10249, 10172, 10108
10734, 10696, 10294,
10127, 10031
10270, 10251, 10224,
10218, 10208, 10195,
10189, 10184, 10167,
10128, 10119, 10111,
10109, 10108, 10105,
10104, 10103, 10090,
10086, 10085, 10082,
10081, 10079, 10078,
10075, 10054, 10051,
10049, 10045, 10043,
10042, 10041, 10039,
10036, 10033, 10032,
10029, 10027, 10022
10273, 10069
10074
10790, 10789, 10777,
10691, 10690, 10552,
10527, 10510, 10287,
10253, 10250, 10232,
10210, 10202, 10194,
10187, 10172, 10155,
10130, 10117, 10116,
10101, 10100, 10097,
10096, 10095, 10094,
10093, 10092, 10091,
10073, 10069, 10063,
10031
10785, 10732, 10545
10282
HAIER
HANNSPREE
HANSEATIC
HARWA
HB
HB INGELEN
HCM
HINARI
HISAWA
HISENSE
HIT
AD ONLY
HITACHI
HITSU
HL
HOHER
HOSHAI
HUMAX
HYPER
HYPSON
HYUNDAI
ICE
IDEAL
IMPERIAL
10774, 10733, 10313
10706, 10602
10308, 10296, 10277,
10269, 10251, 10250,
10248, 10229, 10225,
10220, 10191, 10171,
10127, 10120, 10110,
10108, 10100, 10085,
10060
10297
10282
10172
10277, 10171, 10108
10224, 10171, 10108,
10064
10273
10772, 10753, 10752,
10551, 10302
10204
10744, 10659, 10581,
10515, 10422, 10295,
10286, 10279, 10276,
10269, 10266, 10249,
10219, 10193, 10189,
10186, 10143, 10128,
10127, 10123, 10120,
10119, 10108, 10104,
10057, 10056, 10055,
10054, 10053, 10041,
10040, 10039, 10035,
10030, 10029, 10028,
10024, 10023, 10022
10273
10251, 10195, 10108
10250, 10249, 10123,
10117, 10069
10264
10776, 10577, 10576
10171, 10163
10293, 10264, 10263,
10250, 10249, 10118,
10108, 10074, 10069,
10063
10317, 10235, 10180,
10155, 10152
10171, 10108, 10064
10264
10267, 10260, 10255,
10229, 10165, 10110,
10109, 10108
+
74
Your Smart Linux TV Player
Vu :
Page 75
+
Vu User Manual
INGELEN
INGERSOLL
INNO HIT
INTERCORD
INTERFUNK
INTERVISION
IPOSTAR
IRRADIO
IRT
ISKRA
ITL
ITS
ITT
I-JOY
JAY-TECH
JETPOINT
JMB
JOCEL
JTC
JVC
KAISUI
KAMACROWN
KAPSCH
KARCHER
KATHREIN
KENDO
KENNEDY
KENNEX
KEYMAT
KIOTO
KITON
KNEISSEL
KOERTING
DOWNLO
10279, 10273
10171
10249, 10237, 10189,
10127
10233
10265, 10255, 10251,
10165, 10108, 10067
10191, 10166, 10108,
10086, 10085
10171
10264, 10249, 10237,
10163, 10108, 10074
10446, 10440, 10439,
10437
10085
10171
10171, 10064
10784, 10268, 10250,
10117, 10032, 10031
10667
10761
10268
10063
10283, 10282, 10074,
10069
10761
10604, 10588, 10575,
10278, 10169, 10120
10280, 10273, 10249,
10127
10064
10197, 10089
10289, 10282, 10274,
10273, 10250, 10185,
10117, 10109, 10108,
10074, 10031
10187
10296, 10273, 10270,
10249, 10229, 10127,
10108, 10060
10197
10264, 10249, 10108
10235, 10207
10442, 10441, 10439,
10438, 10436
10293, 10264, 10249
10273, 10264, 10249,
10229, 10108, 10058
10274, 10204, 10086
KOGAN
KUBA ELECTRONIC
LAZER
LECSON
LENCO
LENOIR
LEVEL
LG
LIESENKOETTER
LIFETEC
AD ONLY
LOEWE
LOGIK
LUMA
LUMATRON
LUXOR
M ELECTRONIC
M.D.C.
MACROLUX
MAGNADYNE
MAGNAFON
MAGNASONIC
MAGNAVOX
MAGNUM
MANHATTAN
MARANTZ
10758
10233
10074
10116
10721, 10689, 10684,
10682, 10628, 10593,
10546, 10249, 10170,
10110, 10108
10264, 10249
10612, 10425
10708, 10707, 10634,
10592, 10553, 10512,
10511, 10509, 10504,
10503, 10502, 10501,
10288, 10286, 10283,
10263, 10250, 10181,
10110, 10108, 10090,
10069, 10038, 10015,
10014, 10013
10108
10293, 10264, 10249,
10171, 10170, 10127,
10118, 10108, 10074,
10064
10608, 10204, 10142,
10138, 10131
10757, 10680, 10649,
10630, 10606, 10587,
10264, 10187, 10070
10249, 10229, 10197
10249, 10229
10279, 10276, 10275,
10267, 10251, 10249,
10237, 10186, 10128,
10116, 10105, 10104,
10103, 10074, 10066,
10032
10276, 10127, 10120,
10105, 10104, 10103
10074
10069
10204, 10185, 10164,
10163, 10108
10185
10108
10251
10294, 10263, 10250,
10074, 10031
10264, 10249
10108
75
Page 76
+
Vu User Manual
MARSHAL
MASCOM
MASTERS
MATSUI
MAXELL
MAXIM
MEDION
MEGAS
MEMORY
METEOR
METZ
MICROMAXX
MIKOMI
MINERVA
MIRAI
MITSAI
MITSUBISHI
MIVAR
MMC2
MORAVA
MOSAIC
MT LOGIC
DOWNLO
MTC
MULTITEC
10064
10279, 10074, 10031
10108
10587, 10250, 10249,
10202, 10196, 10172,
10171, 10116, 10108,
10100, 10096, 10074,
10070, 10069, 10063,
10062, 10060, 10051,
10032, 10025
10249
10031
10788, 10779, 10771,
10745, 10722, 10699,
10683, 10605, 10570,
10293, 10287, 10283,
10279, 10264, 10251,
10250, 10249, 10225,
10194, 10187, 10127,
10110, 10108, 10074,
10031
10273
10286
10185
10736, 10265, 10264,
10254, 10249, 10219,
10108, 10101, 10100,
10097, 10096, 10092,
10074
10293, 10282, 10264,
10250, 10249, 10074
10516, 10286
10232, 10172, 10100,
10097, 10092
10582
10110
10249, 10224, 10204,
10120, 10119, 10097,
10077, 10076, 10075,
10071
10781, 10267, 10262,
10259, 10223, 10209
10003, 10002, 10001
10249, 10152, 10109
10264, 10249
10773, 10718, 10590,
10250
10131,10086
10264, 10249
10267, 10185, 10171,
MULTITECH
MURPHY
MURYUANA
NAKIMURA
NECKERMANN
NEI
NEUFUNK
NEX
NEXIUS
NIKE
NIKKAI
NIKKEI
NIKKO
AD ONLY
NISSAN
NOBLIKO
NOKIA
NORDMENDE
NORM N
NORTEK
NOVA
NOVATRONIC
OCEANIC
ODYS
OKANO
ONWA
OPERA
OR AVA
10108, 10090, 10085,
10031
10536, 10232
10251
10170
10274, 10256, 10255,
10251, 10250, 10233,
10217, 10216, 10212,
10211, 10204, 10169,
10143, 10119, 10118,
10108, 10101, 10100,
10096, 10093, 10092,
10084, 10074, 10060,
10059, 10043, 10037
10108, 10064
10250, 10249, 10109
10448
10282
10108
10219
10264, 10249
10108
10268
10267, 10232, 10185
10719, 10653, 10645,
10279, 10276, 10275,
10251, 10106, 10105,
10104, 10103, 10102,
10074, 10032
10657, 10518, 10296,
10282, 10270, 10261,
10249, 10195, 10193,
10069
10108
10264, 10249
10087
10108
10276, 10104, 10103,
10032
10782, 10727, 10697,
10677, 10674, 10656,
10647, 10642, 10633,
10632, 10610, 10566,
10526, 10525, 10519
10255, 10108
10280, 10108, 10064
10250
10150, 10108, 10098,
10090
+
76
Your Smart Linux TV Player
Vu :
Page 77
+
Vu User Manual
ORBITER
ORION
ORION (H)
ORMOND
OSAKI
OTAKE
OTF
OTTO-VERSAND
OVP
PACIFIC
PALLADIUM
PANASONIC
PEAQ
PHILCO
DOWNLO
10086
10760, 10675, 10665,
10662, 10660, 10515,
10507, 10296, 10251,
10250, 10249, 10236,
10219, 10205, 10202,
10196, 10194, 10187,
10185, 10118, 10108,
10074, 10070, 10069,
10064, 10063, 10062,
10060, 10059, 10025
10249, 10228, 10116,
10108, 10074, 10062
10249
10108
10196, 10060, 10059
10282, 10204, 10108,
10090
10277, 10270, 10269,
10251, 10250, 10233,
10230, 10217, 10216,
10213, 10212, 10211,
10205, 10202, 10195,
10193, 10185, 10171,
10168, 10167, 10163,
10152, 10143, 10131,
10127, 10119, 10118,
10116, 10111, 10110,
10108, 10101, 10100,
10097, 10096, 10093,
10092, 10084, 10083,
10082, 10081, 10074,
10069, 10063, 10060,
10059, 10040, 10036,
10027, 10026
10108, 10098, 10090
10250, 10249, 10236,
10109, 10063
10293, 10276, 10260,
10255, 10250, 10249,
10229, 10171, 10165,
10143, 10127, 10118,
10108, 10031
10639, 10740, 10595,
10508, 10254, 10168,
10167
10716, 10668
10267, 10260, 10255,
10204, 10165, 10108
10735, 10710, 10700,
10678, 10650, 10635,
10631, 10627, 10626,
10580, 10539, 10534,
10251, 10230, 10122,
PHILIPS
PHOCUS
PHOENIX
PIONEER
PIONIER
PLAYSONIC
POWERPOINT
PRANDONI
PREMIER
PRIMA
PRIME
PRIMUS
AD ONLY
PRO 2
PROFEX
PROFILO
PROFITRONIC
PROLINE
PROSONIC
PROTECH
PROVISION
PYE
QMEDIA
QUADRO
10119, 10116, 10112,
10111, 10109, 10108,
10092, 10069, 10067,
10065, 10021, 10020,
10019, 10009, 10008,
10007
10250, 10225, 10130,
10117
10110, 10108, 10090
10193, 10108
10090
10250, 10090
10172
10069, 10066
10069
10219
10697, 10249
10251
10031
10267, 10171
10294, 10108, 10074,
10031
10185, 10108
10286, 10285, 10270,
10269, 10249, 10229,
10205, 10189, 10128,
10120, 10109
10637, 10636, 10625
10264, 10249, 10219,
10108, 10074
10282, 10120, 10109,
10108, 10066
10251, 10109, 10108
10775, 10737, 10728,
10676
10293, 10286, 10249,
10123
77
Page 78
+
Vu User Manual
10261, 10257, 10255,
10251, 10237, 10234,
10232, 10229, 10221,
10219, 10218, 10217,
10216, 10213, 10212,
10211, 10205, 10204,
10197, 10195, 10185,
10171, 10169, 10168,
10167, 10165, 10163,
QUELLE
RADIOLA
RADIOMARELLI
RADIONETTE
RADIOTONE
RANK
RECC0
RECOR
REDSTAR
REFLEX
REFLEXION
REOC
REVOX
REX
RFT
RM 2000
ROADSTAR
ROBOTRON
ROSITA
ROWA
ROYAL
DOWNLO
ROYAL LUX
SABA
10142, 10131, 10119,
10118, 10116, 10112,
10111, 10108, 10105,
10102, 10101, 10100,
10097, 10096, 10092,
10090, 10088, 10087,
10086, 10074, 10072,
10060, 10059, 10043,
10042, 10040, 10036,
10027, 10025
10251, 10108, 10067,
10065
10164, 10108
10181
10294, 10249, 10171,
10108, 10085, 10074
10232
10441
10249, 10108
10282
10293, 10264, 10249,
10108
10596
10250
10131
10197, 10164, 10089,
10088
10204, 10116, 10085,
10064
10264, 10249, 10108
10286, 10280, 10264,
10263, 10251, 10250,
10249, 10117, 10108,
10090, 10069, 10063
10204
10171
10283, 10249
10277
10282
10270, 10249, 10195,
10193, 10074
SAGEM
SAISHO
SAKIO
SALORA
SAMBERS
SAMSUNG
SANKYO
SANSUI
SANY
AD ONLY
SANYO
SCHAUB LORENZ
SCHNEIDER
SCHNEIDER (F)
SCOTT
SEELVER
SEG
SEITECH
10273, 10206
10205, 10070, 10069,
10060, 10025
10171
10767, 10751, 10687,
10590, 10535, 10279,
10276, 10275, 10251,
10249, 10237, 10143,
10128, 10116, 10105,
10104, 10103, 10074,
10066, 10032
10267, 10185
10743, 10738, 10712,
10693, 10692, 10607,
10601, 10550, 10514,
10506, 10505, 10284,
10268, 10257, 10237,
10220, 10171, 10126,
10108, 10086, 10045
10108
10264, 10249, 10108
10193
10286, 10249, 10221,
10218, 10189, 10123,
10108, 10087, 10086,
10074, 10052, 10051,
10033, 10032, 10032
10537, 10531, 10296,
10277, 10275, 10264,
10250, 10249, 10171,
10117, 10116, 10108,
10074
10702, 10621, 10324,
10282, 10269, 10264,
10251, 10250, 10249,
10233, 10163, 10152,
10127, 10116, 10108,
10088, 10069, 10064,
10063
10251, 10067, 10065
10648, 10638, 10593
10069
10756, 10747, 10655,
10573, 10560, 10559,
10517, 10293, 10286,
10269, 10267, 10264,
10249, 10219, 10185,
10171, 10165, 10123,
10115, 10108, 10064
10282
+
78
Your Smart Linux TV Player
Vu :
Page 79
+
Vu User Manual
SELECO
SELECT
SENCOR
SENTRA
SERINO
SET
SHARP
SHINTOM
SHINTOSHI
SHIVAKI
SIAREM
SIEMENS
SIERA
SILVA SCHNEIDER
SILVER
SILVERCREST
SIM2
SINGER
SINUDYNE
SKY
SLX
SMARAGD
SONIX
SONOKO
SONTEC
SONY
DOWNLO
10251, 10249, 10229,
10226, 10197, 10195,
10110, 10109, 10089,
10088
10264
10117
10064, 10049
10273
10074
10646, 10749, 10748,
10714, 10644, 10568,
10567, 10558, 10557,
10556, 10432, 10423,
10224, 10171, 10084,
10083, 10082, 10081,
10073
10249, 10108
10108
10264, 10249, 10108
10204, 10185
10554, 10294, 10256,
10221, 10219, 10218,
10101, 10100, 10097,
10096, 10093, 10092,
10074
10069
10597, 10294, 10286,
10282, 10074, 10031
10277, 10224, 10171,
10074, 10064
10780
10226
10251, 10204, 10185,
10164, 10108, 10069
10282, 10251, 10249,
10212, 10204, 10196,
10185, 10118, 10074,
10069, 10063, 10062,
10025
10207, 10194, 10187
10264
10172
10194
10249
10108
10739, 10538, 10217,
10216, 10215, 10214,
10213, 10212, 10211,
10072
SOUNDCOLOR
SOXO
SPECTRA
STANDARD
STARLITE
STARLUX
STARS
STERN
STRONG
SUNGOO
SUNKAI
SUNSTAR
SUNSTECH
SUPERIOR
SUPERTECH
SUPRATECH
SUPREMA
SWISSTEC
AD ONLY
TADISTAR
TANDBERG
TASHIKO
TATUNG
TAURAS
TCL
TCM
TD DESIGN
TEAC
TEC
TECHLINE
TECHNICA
TECHNIKA
TECHNISAT
TECHWOOD
TECNIMAGEN
10264, 10249, 10108,
10074
10545
10170
10108
10264, 10171, 10108
10171
10251
10229, 10197, 10089,
10088
10286, 10123, 10115,
10672
10273
10171, 10108, 10074,
10783, 10671
10286
10249, 10171, 10108,
10074
10670, 10620, 10619,
10273
10704, 10603, 10574,
10309, 10207, 10194,
10187
10108
10254
10224, 10218
10286, 10282, 10189,
10184, 10128, 10118,
10108, 10079, 10070,
10069, 1066, 10063
10762, 10282
10716, 10668, 10565,
10564, 10563, 10562,
10561, 10152,
10127
10131
10661
10264, 10249, 10171,
10170, 10166, 10165,
10108
10293, 10264, 10249,
10185, 10123, 10108
10286, 10282, 10249
10715, 10600, 10585,
10584, 10547
10695, 10694, 10571,
10248, 10118, 10108
10249, 10123, 10115
10251, 10069
79
Page 80
+
Vu User Manual
TECNISON
TECSONIC
TEKON
TELEFUNKEN
TELEOPTA
TELERENT
TELESTAR
TELETECH
TELETON
TELEVIEW
TELRA
TENSAI
TENSON
TESLA
TEVION
THOMSON
THOMSON IR2000
THOMSON REC 80
THORN
DOWNLO
THORN-FERGUSON
TOBO
10249, 10171, 10108
10249
10268, 10171
10688, 10679, 10530,
10270, 10261, 10225,
10195, 10193
10171
10233, 10131
10294, 10282, 10227,
10108, 10074, 10031
10264, 10249, 10171,
10165, 10108
10197, 10089, 10088
10031
10294, 10108, 10074,
10031
10264, 10249, 10191,
10171, 10127, 10120,
10110, 10108, 10064
10171
10282, 10273, 10264,
10263, 10250, 10249,
10229, 10204, 10150,
10127, 10116, 10109,
10108, 10090, 10074,
10069
10771, 10583, 10294,
10287, 10264, 10250,
10249, 10225, 10127
10716, 10668, 10565,
10564, 10563, 10562,
10561, 10270, 10261,
10195, 10193
10006, 10005, 10004
10012, 10011, 10010
10270, 10251, 10232,
10224, 10216, 10213,
10211, 10195, 10189,
10188, 10170, 10169,
10168, 10128, 10120,
10116, 10110, 10108,
10107, 10106, 10105,
10102, 10097, 10087,
10079, 10078, 10075,
10072, 10067, 10065,
10052, 10049, 10045,
10043, 10036, 10033,
10032, 10028, 10026
10195, 10188
10171
TOKYO
TOPLINE
TOPVISION
TOSHIBA
TOSUMI
TOWADA
TRANS-CONTINENTS
TRILUX
TRISTAR
TRIUMPH
TVE
TWF
AD ONLY
UHER
ULTRAVOX
UMC
UNIMOR
UNITED
UNIVERSUM
UNIVOX
10268
10264, 10249
10085
10663, 10769, 10768,
10729, 10711, 10616,
10615, 10614, 10613,
10523, 10522, 10520,
10284, 10268, 10250,
10249, 10232, 10208,
10203, 10202, 10100,
10092, 10063, 10050,
10049, 10048, 10047,
10045, 10043, 10042,
10037, 10036, 10027,
10026
10250
10185
10069
10292, 10264, 10120
10064
10234, 10219, 10025
10249
10320
10249, 10233, 10197,
10185, 10131, 10108,
10089
10204, 10185, 10164,
10108
10723, 10715, 10704,
10661, 10609, 10606,
10603, 10600, 10599,
10585, 10584, 10579,
10547, 10528
10086, 10085
10705, 10610, 10596,
10286, 10282, 10263,
10250, 10170, 10108,
10090, 10063
10293, 10286, 10279,
10276, 10275, 10274,
10270, 10264, 10260,
10249, 10237, 10234,
10229, 10227, 10219,
10218, 10171, 10123,
10116, 10109, 10108,
10105, 10104, 10103,
10102, 10100, 10097,
10087, 10086, 10074,
10025
10204
+
80
Your Smart Linux TV Player
Vu :
Page 81
VESTEL
VESTL
VIDEOCON
VIDEOSAT
VIDEOSEVEN
VIDEOTON
VIEWSON
VIEWPIA
VISION
VISIONMAGIC
VOG
VOXSON
WALKER
WALTHAM
WATSON
WATT RADIO
WEGAVOX
WELLTECH
WELTBLICK
WHARFEDALE
WHITE
WESTINGHOUSE
WIEWPIA
WILSON
WINSON
WORTEN
XENIUS
XIRON
YAMO
YOKO
ZANELA
ZANUSSI
10701, 10513, 10303,
10293, 10286, 10264,
10249, 10123, 10121,
10115, 10108
10433
10658, 10657, 10651,
10424
10165
10194, 10187
10249, 10193
10450, 10449, 10447,
10445, 10444, 10443,
10730, 10641
10249, 10108
10187
10069
10204
10286
10171
10293, 10264, 10249,
10194, 10171, 10127,
10108, 10074, 10064
10185
10282, 10264, 10249
10250
10110, 10108
10524, 10313
10260, 10110, 10108
10427
10569, 10249
10250
10273, 10229, 10120,
10110
10298
10731,10303
10064
10274, 10171, 10170,
10164, 10108, 10064
10224
10197
+
Vu User Manual
AD ONLY
DOWNLO
81
Page 82

+
Vu User Manual
V. Copyright - GNU GPL
GNU GENERAL PUBLIC LICENSE
Version 2, June 1991
Copyright (C) 1989, 1991 Free Software Foundation, Inc.
51 Franklin Street, Fifth Floor, Boston, MA 02110-1301, USA
Everyone is permitted to copy and distribute verbatim copies of this license document, but changing it is not
allowed.
Preamble
The licenses for most software are designed to take away your freedom to share and change it. By contrast,
the GNU General Public License is intended to guarantee your freedom to share and change free software-
-to make sure the software is free for all its users. This General Public License applies to most of the Free
Software Foundation's software and to any other program whose authors commit to using it. (Some other Free
Software Foundation software is covered by the GNU Lesser General Public License instead.) You can apply
it to your programs, too.
When we speak of free software, we are referring to freedom, not price. Our General Public Licenses are
designed to make sure that you have the freedom to distribute copies of free software (and charge for this
service if you wish), that you receive source code or can get it if you want it, that you can change the software
or use pieces of it in new free programs; and that you know you can do these things.
To protect your rights, we need to make restrictions that forbid anyone to deny you these rights or to ask you
to surrender the rights. These restrictions translate to certain responsibilities for you if you distribute copies of
the software, or if you modify it.
AD ONLY
For example, if you distribute copies of such a program, whether gratis or for a fee, you must give the
recipients all the rights that you have. You must make sure that they, too, receive or can get the source code.
And you must show them these terms so they know their rights.
We protect your rights with two steps: (1) copyright the software, and (2) offer you this license which gives
you legal permission to copy, distribute and/or modify the software.
Also, for each author's protection and ours, we want to make certain that everyone understands that there
is no warranty for this free software. If the software is modified by someone else and passed on, we want its
recipients to know that what they have is not the original, so that any problems introduced by others will not
reflect on the original authors' reputations.
Finally, any free program is threatened constantly by software patents. We wish to avoid the danger that
redistributors of a free program will individually obtain patent licenses, in effect making the program
proprietary. To prevent this, we have made it clear that any patent must be licensed for everyone's free use or
not licensed at all.
The precise terms and conditions for copying, distribution and modification follow.
TERMS AND CONDITIONS FOR COPYING, DISTRIBUTION AND MODIFICATION
0. This License applies to any program or other work which contains a notice placed by the copyright holder
saying it may be distributed under the terms of this General Public License. The "Program", below, refers to
any such program or work, and a "work based on the Program" means either the Program or any derivative
work under copyright law: that is to say, a work containing the Program or a portion of it, either verbatim
or with modifications and/or translated into another language. (Hereinafter, translation is included without
limitation in the term "modification".) Each licensee is addressed as "you".
82
DOWNLO
+
Your Smart Linux TV Player
Vu :
Page 83

+
Vu User Manual
Activities other than copying, distribution and modification are not covered by this License; they are outside
its scope. The act of running the Program is not restricted, and the output from the Program is covered only
if its contents constitute a work based on the Program (independent of having been made by running the
Program). Whether that is true depends on what the Program does.
1. You may copy and distribute verbatim copies of the Program's source code as you receive it, in any
medium, provided that you conspicuously and appropriately publish on each copy an appropriate copyright
notice and disclaimer of warranty; keep intact all the notices that refer to this License and to the absence of
any warranty; and give any other recipients of the Program a copy of this License along with the Program.
You may charge a fee for the physical act of transferring a copy, and you may at your option offer warranty
protection in exchange for a fee.
2. You may modify your copy or copies of the Program or any portion of it, thus forming a work based on the
Program, and copy and distribute such modifications or work under the terms of Section 1 above, provided
that you also meet all of these conditions:
a) You must cause the modified files to carry prominent notices stating that you changed the files and the
date of any change.
b) You must cause any work that you distribute or publish, that in whole or in part contains or is derived from
the Program or any part thereof, to be licensed as a whole at no charge to all third parties under the terms
of this License.
c) If the modified program normally reads commands interactively when run, you must cause it, when
started running for such interactive use in the most ordinary way, to print or display an announcement
including an appropriate copyright notice and a notice that there is no warranty (or else, saying that
you provide a warranty) and that users may redistribute the program under these conditions, and telling
the user how to view a copy of this License. (Exception: if the Program itself is interactive but does
not normally print such an announcement, your work based on the Program is not required to print an
announcement.)
These requirements apply to the modified work as a whole. If identifiable sections of that work are not
derived from the Program, and can be reasonably considered independent and separate works in
themselves, then this License, and its terms, do not apply to those sections when you distribute them as
separate works. But when you distribute the same sections as part of a whole which is a work based on
the Program, the distribution of the whole must be on the terms of this License, whose permissions for
other licensees extend to the entire whole, and thus to each and every part regardless of who wrote it.
Thus, it is not the intent of this section to claim rights or contest your rights to work written entirely by you;
rather, the intent is to exercise the right to control the distribution of derivative or collective works based
on the Program.
In addition, mere aggregation of another work not based on the Program with the Program (or with a work
based on the Program) on a volume of a storage or distribution medium does not bring the other work
under the scope of this License.
AD ONLY
3. You may copy and distribute the Program (or a work based on it, under Section 2) in object code or
executable form under the terms of Sections 1 and 2 above provided that you also do one of the following:
a) Accompany it with the complete corresponding machine-readable source code, which must be distributed
under the terms of Sections 1 and 2 above on a medium customarily used for software interchange; or,
b) Accompany it with a written offer, valid for at least three years, to give any third party, for a charge no
more than your cost of physically performing source distribution, a complete machine-readable copy of
the corresponding source code, to be distributed under the terms of Sections 1 and 2 above on a medium
customarily used for software interchange; or,
DOWNLO
83
Page 84

+
Vu User Manual
c) Accompany it with the information you received as to the offer to distribute corresponding source code.
(This alternative is allowed only for noncommercial distribution and only if you received the program in
object code or executable form with such an offer, in accord with Subsection b above.)
The source code for a work means the preferred form of the work for making modifications to it. For an
executable work, complete source code means all the source code for all modules it contains, plus any
associated interface definition files, plus the scripts used to control compilation and installation of the
executable. However, as a special exception, the source code distributed need not include anything that
is normally distributed (in either source or binary form) with the major components (compiler, kernel, and
so on) of the operating system on which the executable runs, unless that component itself accompanies
the executable.
If distribution of executable or object code is made by offering access to copy from a designated place,
then offering equivalent access to copy the source code from the same place counts as distribution of the
source code, even though third parties are not compelled to copy the source along with the object code.
4. You may not copy, modify, sublicense, or distribute the Program except as expressly provided under
this License. Any attempt otherwise to copy, modify, sublicense or distribute the Program is void, and will
automatically terminate your rights under this License. However, parties who have received copies, or rights,
from you under this License will not have their licenses terminated so long as such parties remain in full
compliance.
5. You are not required to accept this License, since you have not signed it. However, nothing else grants you
permission to modify or distribute the Program or its derivative works. These actions are prohibited by law if
you do not accept this License. Therefore, by modifying or distributing the Program (or any work based on the
Program), you indicate your acceptance of this License to do so, and all its terms and conditions for copying,
distributing or modifying the Program or works based on it.
AD ONLY
6. Each time you redistribute the Program (or any work based on the Program), the recipient automatically
receives a license from the original licensor to copy, distribute or modify the Program subject to these terms
and conditions. You may not impose any further restrictions on the recipients' exercise of the rights granted
herein. You are not responsible for enforcing compliance by third parties to this License.
7. If, as a consequence of a court judgment or allegation of patent infringement or for any other reason (not
limited to patent issues), conditions are imposed on you (whether by court order, agreement or otherwise) that
contradict the conditions of this License, they do not excuse you from the conditions of this License. If you
cannot distribute so as to satisfy simultaneously your obligations under this License and any other pertinent
obligations, then as a consequence you may not distribute the Program at all. For example, if a patent license
would not permit royalty-free redistribution of the Program by all those who receive copies directly or indirectly
through you, then the only way you could satisfy both it and this License would be to refrain entirely from
distribution of the Program.
If any portion of this section is held invalid or unenforceable under any particular circumstance, the balance
of the section is intended to apply and the section as a whole is intended to apply in other circumstances.
It is not the purpose of this section to induce you to infringe any patents or other property right claims or to
contest validity of any such claims; this section has the sole purpose of protecting the integrity of the free
software distribution system, which is implemented by public license practices. Many people have made
generous contributions to the wide range of software distributed through that system in reliance on consistent
application of that system; it is up to the author/donor to decide if he or she is willing to distribute software
through any other system and a licensee cannot impose that choice.
This section is intended to make thoroughly clear what is believed to be a consequence of the rest of this
License.
84
DOWNLO
+
Your Smart Linux TV Player
Vu :
Page 85

+
Vu User Manual
8. If the distribution and/or use of the Program is restricted in certain countries either by patents or by
copyrighted interfaces, the original copyright holder who places the Program under this License may add an
explicit geographical distribution limitation excluding those countries, so that distribution is permitted only in
or among countries not thus excluded. In such case, this License incorporates the limitation as if written in the
body of this License.
9. The Free Software Foundation may publish revised and/or new versions of the General Public License
from time to time. Such new versions will be similar in spirit to the present version, but may differ in detail to
address new problems or concerns.
Each version is given a distinguishing version number. If the Program specifies a version number of this
License which applies to it and "any later version", you have the option of following the terms and conditions
either of that version or of any later version published by the Free Software Foundation. If the Program
does not specify a version number of this License, you may choose any version ever published by the Free
Software Foundation.
10. If you wish to incorporate parts of the Program into other free programs whose distribution conditions are
different, write to the author to ask for permission. For software which is copyrighted by the Free Software
Foundation, write to the Free Software Foundation; we sometimes make exceptions for this. Our decision
will be guided by the two goals of preserving the free status of all derivatives of our free software and of
promoting the sharing and reuse of software generally.
No warranty
11. Because the program is licensed free of charge, there is no warranty for the program, to the extent
permitted by applicable law. Except when otherwise stated in writing the copyright holders and/or other
parties provide the program "as is" without warranty of any kind, either expressed or implied, including, but
not limited to, the implied warranties of merchantability and fitness for a particular purpose. The entire risk as
to the quality and performance of the program is with you. Should the program prove defective, you assume
the cost of all necessary servicing, repair or correction.
AD ONLY
12. In no event unless required by applicable law or agreed to in writing will any copyright holder, or any other
party who may modify and/or redistribute the program as permitted above, be liable to you for damages,
including any general, special, incidental or consequential damages arising out of the use or inability to use
the program (including but not limited to loss of data or data being rendered inaccurate or losses sustained
by you or third parties or a failure of the program to operate with any other programs), even if such holder or
other party has been advised of the possibility of such damages.
End of terms and conditions
DOWNLO
85
Page 86
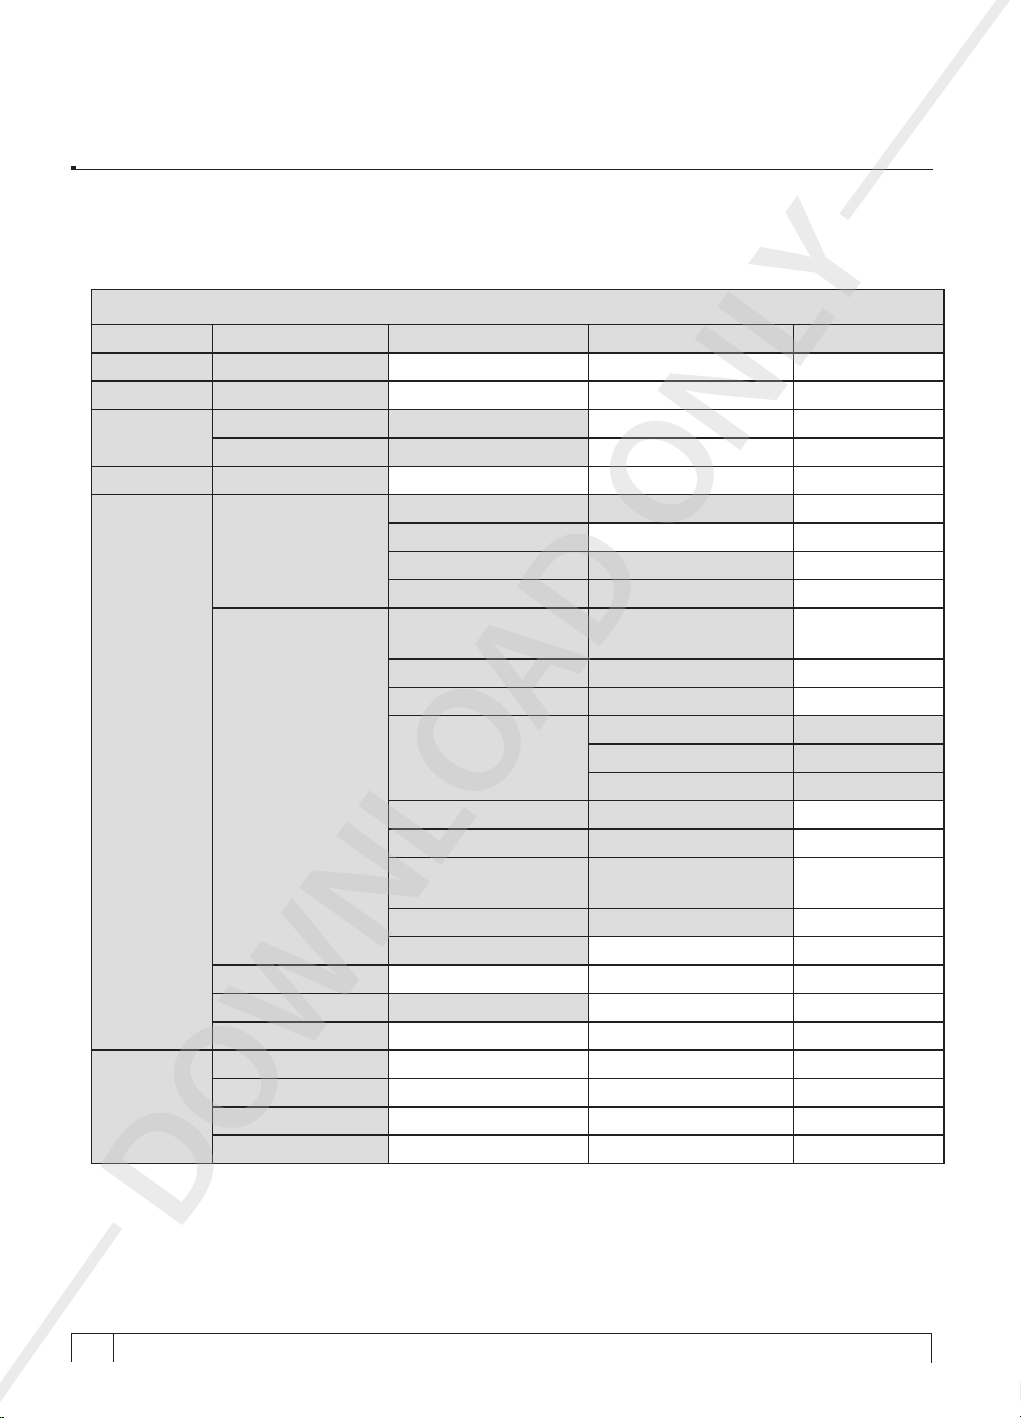
+
Vu User Manual
VI. Menu Structure
Main menu
1st level 2nd level 3nd level 4nd level 5nd level
Media player Media Player
Timer Timer List
Information
Plugins Plugin browser
Setup
Idle Server
/ Restart
Mode
Service Service info
About About
Tuner Configuration Tuner A,B,C
Service Searching
Common Interface
Parental control Parental control setup
Factory reset
Sleep Timer
Idle Server Mode
Restart
Standby
Default Service lists
Automatic Scan Service scan Window
Manual Scan Service scan Window
Language
Customize Customize Window
Timezone Timezone Window
Harddisk
A/V Settings A/V Settings Window
Display Setup Display Setup Window
Network
Keyboard Keyboard Setup Window
Skin
Language Selection
Window
AD ONLY
Harddisk setup Harddisk setup
Initialization Initialization
Filesystem Check Filesystem Check
Network Configuration
Window
DOWNLO
+
86
Your Smart Linux TV Player
Vu :
Page 87

VII. Troubleshooting
Before you contact your local service center, please read the following tips carefully.
+
Vu User Manual
NOTE :
audio and video may become temporarily poor. If you experience poor audio and video quality due
to bad weather conditions, please check if your satellite antenna is oriented in the original direction.
And see if it is covered by snow. Also, check if your LNB is not damaged.
1. No video on TV
•
•
•
•
•
2. Problem with audio quality
•
•
•
•
if the antenna is covered with snow or the RF signal is weakened by heavy rain, the quality of
Check first if the product is powered on and in operation mode.
Check if the video cable is properly connected between TV and Vu+.
Check if the satellite cable is properly connected to Vu+.
Check if the selected channel is currently on air.
Check if the selected channel is encrypted and if you have a corresponding access smartcard.
Check if your audio cable is connected correctly.
Check the volume level of your TV and Vu+.
Check if Vu+ or TV is on mute.
Check the audio option if it is correctly selected for the program that you are currently watching.
AD ONLY
3. Remote control problem
•
Check if the batteries are correctly mounted.
•
If your remote control has been used for long, change the batteries.
•
Point the remote control directly toward Vu+.
•
Make sure that nothing blocks the front panel display.
4. Channel search problem
•
Make sure if tuner configurations are all correctly made.
•
Check if the antenna cable(s) are properly connected.
5. Encrypted channel viewing problem
•
Check if you have the appropriate Smartcard and/or CAM.
•
Take the Smartcard and CAM out and re-insert them to re-initialize.
•
Check if your system correctly detects the smartcard and CAM.
6. Recording problem
•
Check if the HDD has a sufficient space for recording.
•
Check if there is a conflict between recording timer.
7. Noise
•
when HDD is running, you may hear a noise.
DOWNLO
87
Page 88
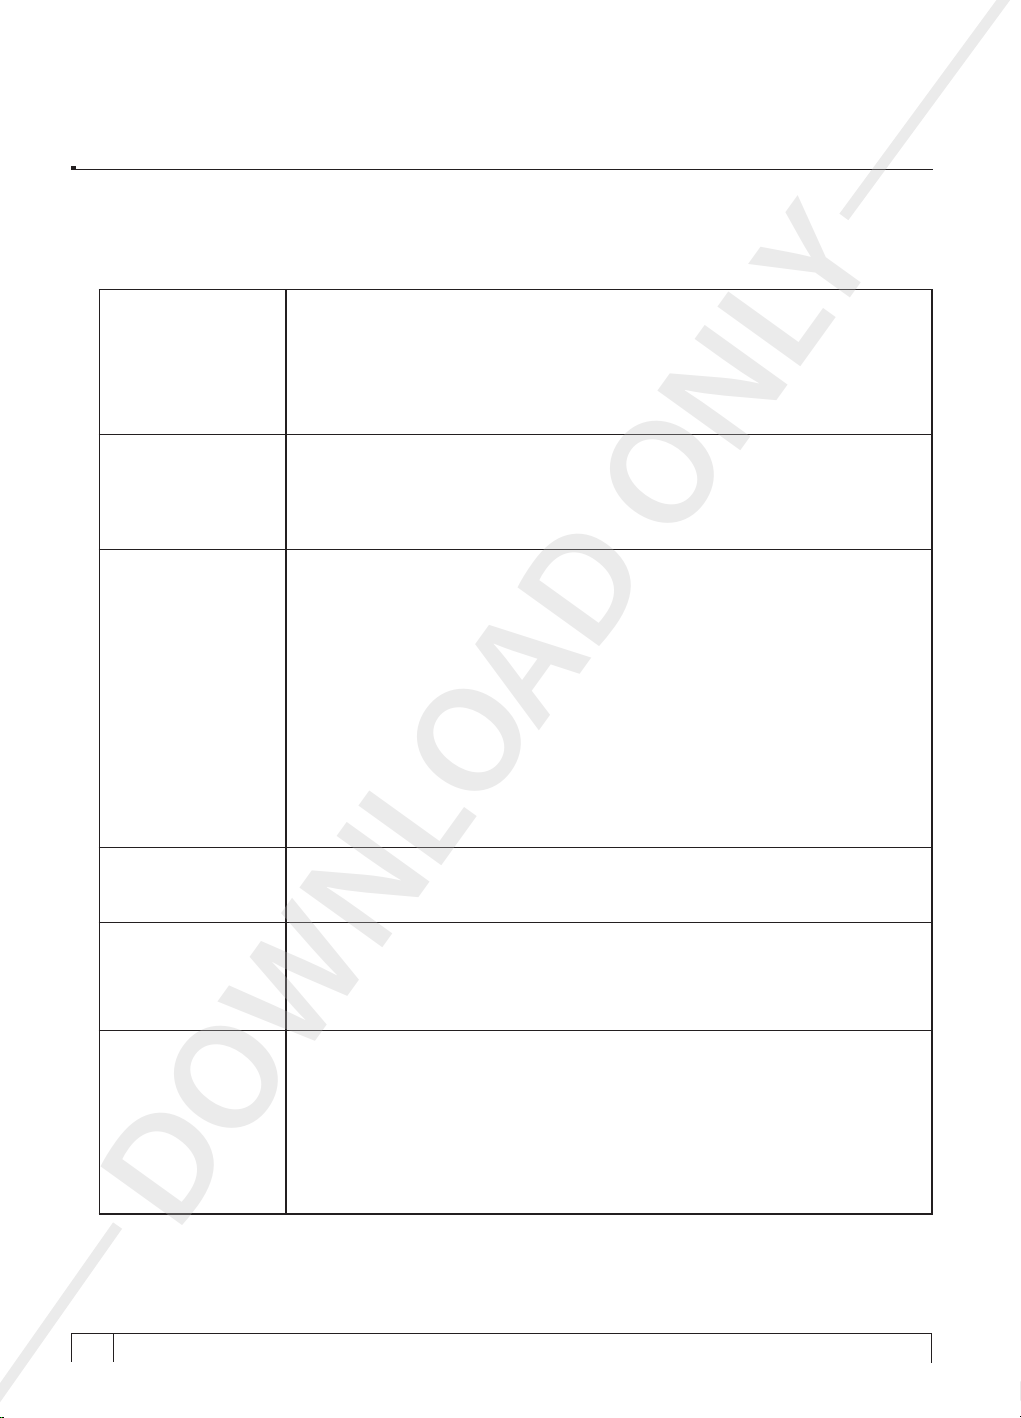
+
Vu User Manual
VIII. Glossary
8-PSK is usually the highest order PSK constellation deployed. With more than
8 phases, the error-rate becomes too high and there are better, though more
8PSK
CAM
Composite Video
complex, modulations available such as quadrature amplitude modulation (QAM).
Although any number of phases may be used, the fact that the constellation must
usually deal with binary data means that the number of symbols is usually a power
of 2 — this allows an equal number of bits-per-symbol.
Conditional Access Module is an electronic device, usually incorporating a slot
for a smart card, which equips an Integrated Digital Television or set-top box with
the appropriate hardware facility to view conditional access content that has been
encrypted using a conditional access system. They are normally used with direct
broadcast satellite (DBS) services.
Composite video is the format of an analog television (picture only) signal before
it is combined with a sound signal and modulated onto an RF carrier. Composite
video is often designated by the CVBS acronym, meaning "Color, Video, Blank
and Sync". In German (with PAL being a German invention by Telefunken's Walter
Bruch) the abbreviation FBAS (Farbe-Bild-Austastung-Synchron) means the same.
It is usually in standard formats such as NTSC, PAL, and SECAM. It is a composite
of three source signals called Y, U and V (together referred to as YUV) with sync
pulses. Y represents the brightness or luminance of the picture and includes
synchronizing pulses, so that by itself it could be displayed as a monochrome
picture. U and V represent hue and saturation or chrominance; between them they
carry the color information. They are first modulated on two orthogonal phases of
a color carrier signal to form a signal called the chrominance. Y and UV are then
combined. Since Y is a baseband signal and UV has been mixed with a carrier,
this addition is equivalent to frequency-division multiplexing.
AD ONLY
Conditional Access
System
DiSEqC
EPG
DOWNLO
+
88
Your Smart Linux TV Player
Vu :
Several companies provide competing Conditional Access Systems; Irdeto
Access, Nagravision, Viaccess, Verimatrix and NDS are among the most
commonly used CAS systems.
Stands for Digital Satellite Equipment Control. It is a special communication
protocol for use between a satellite receiver and a device such as a multi-dish
switch or a small dish antenna rotor. DiSEqC was developed by European satellite
provider Eutelsat, which now acts as the standards agency for the protocol.
Electronic Program Guide is a digital guide to scheduled broadcast television or
radio programs, typically displayed on-screen with functions allowing a viewer to
navigate, select, and discover content by time, title, channel, genre, etc. by use of
their remote control, a keyboard, or other input devices such as a phone keypad.
Content can also be scheduled for future recording by a personal video recorder
(PVR). The on-screen information may be delivered by a dedicated channel or
assembled by the receiving equipment from information sent by each program
channel.
Page 89

eSATA
FEC
HDMI
+
Vu User Manual
A variant of SATA meant for external connectivity with the following characteristics:
* Minimum transmit potential: Range is 500–600 mV. * Minimum receive potential:
Range is 240–600 mV. * Identical protocol and logical signaling (link/transportlayer and above), allowing native SATA devices to be deployed in external
enclosures with minimal modification.
Stands for Forward Error Correction. This is a system of error control for data
transmission, whereby the sender adds redundant data to its messages, also
known as an error-correction code. This allows the receiver to detect and correct
errors (within some bound) without the need to ask the sender for additional data.
The advantages of forward error correction are that a back-channel is not required
and retransmission of data can often be avoided (at the cost of higher bandwidth
requirements, on average).
Stands for High-Definition Multimedia Interface. It is a compact audio/video
interface for transmitting uncompressed digital data. HDMI connects digital audio/
video sources—such as set-top boxes, Blu-ray Disc players, personal computers
(PCs), video game consoles (such as the PlayStation 3 and some models of Xbox
360), and AV receivers—to compatible digital audio devices, computer monitors,
and digital televisions. As an uncompressed connection, HDMI is independent of
the various digital television standards used by individual devices, such as ATSC
and DVB, as these are encapsulations of compressed MPEG video streams (which
can be decoded and output as an uncompressed video stream on HDMI).
AD ONLY
LNB
PID
Polarization
S/PDIF
DOWNLO
Stands for Low-Noise Block converter. This is the (receiving, or downlink) antenna
of what is commonly called the parabolic satellite dish commonly used for satellite
TV reception. The LNB is usually fixed on or in the satellite dish. The purpose of
the LNB is to take a wide block (or band) of relatively high frequencies, amplify
and convert them to similar signals carried at a much lower frequency (called
intermediate frequency or IF). These lower frequencies travel through cables
with much less attenuation of the signal, so there is much more signal left on the
satellite receiver end of the cable. It is also much easier and cheaper to design
electronic circuits to operate at these lower frequencies, rather than the very high
frequencies of satellite transmission.
Stands for Packet Identifier. This is a set of numbers identifying stream packets
contained within a single data stream
The orientation of the electrical and magnetic fields of a signal. Satellites use
mainly vertical and horizontal polarization.
Stands for Sony/Philips Digital Interconnect Format. A common use for the S/PDIF
interface is to carry compressed digital audio as defined by the standard IEC
61937. This mode is used to connect the output of a DVD player to a home theater
Another common use is to carry uncompressed digital audio from a CD player to
a receiver. This specification also allows for the coupling of personal computer
digital sound (if equipped) via optical or coax to receivers.
89
Page 90
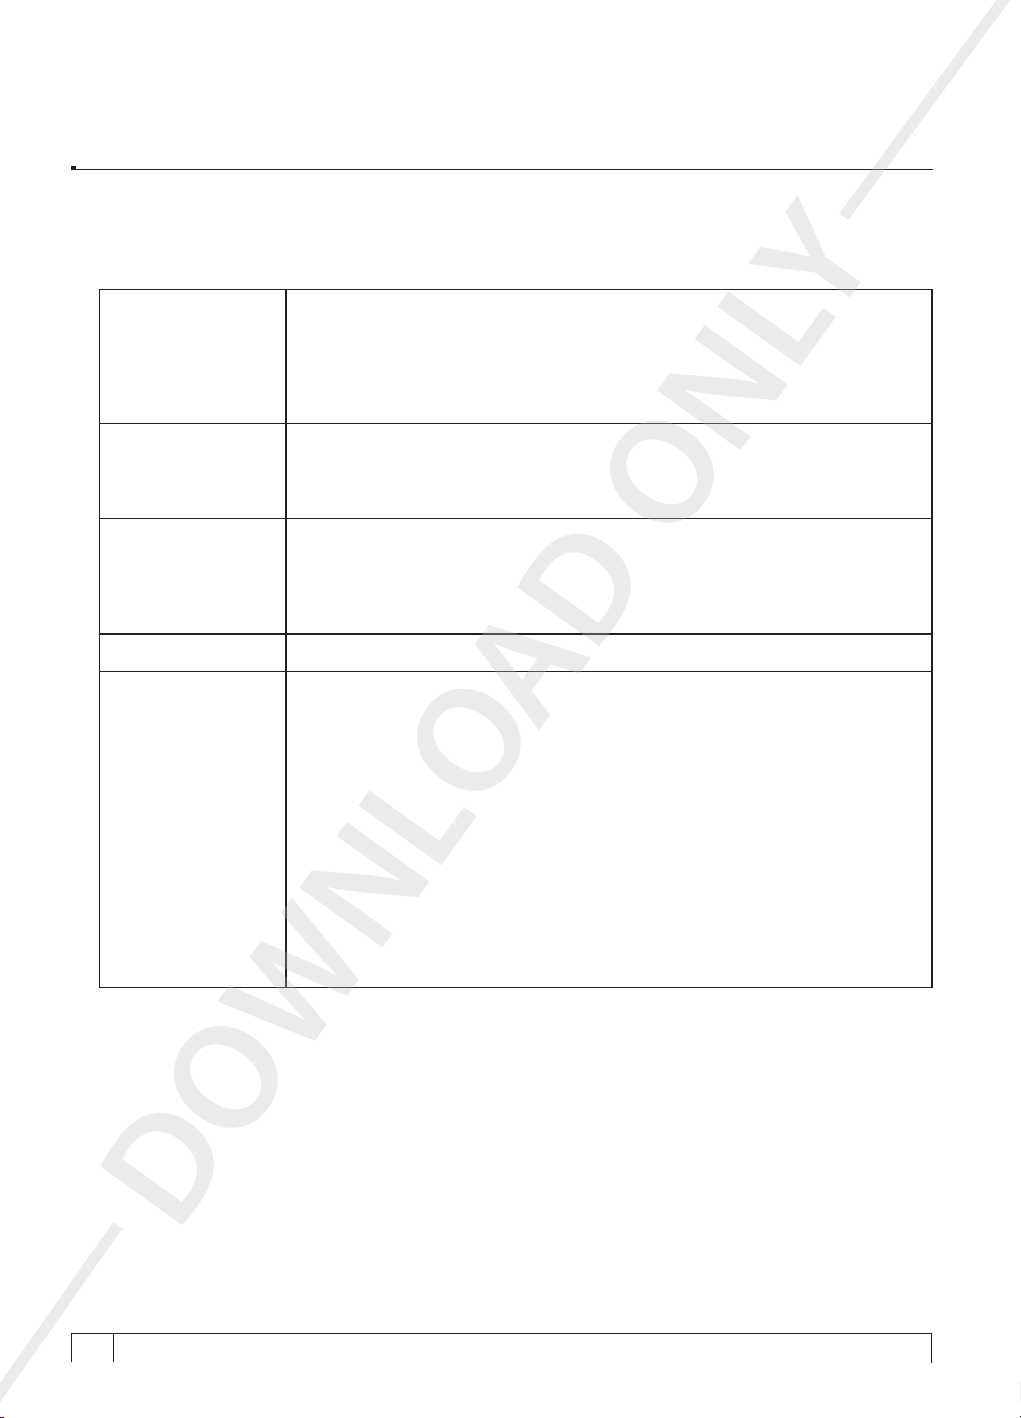
+
Vu User Manual
SCART
Smartcard
Teletext
Xcrypt One of the Conditional Access Systems by Xcrypt.
YPbPr
A French-originated standard and associated 21-pin connector for connecting
audio-visual (AV) equipment together. SCART is one of the most common method
of connecting audio-visual equipment together. However, transferring analogue
standard-definition content, SCART is becoming obsolete with the introduction of
new digital standards such as HDMI, which can also carry high-definition content
and multichannel audio.
A pocket-sized card with embedded Integrated Circuits which can process data.
It can receive input which is processed and delivered as an output. The card may
embed a hologram to avoid counterfeiting. It is used for accessing encrypted TV
channels or services.
A television information retrieval service developed in the United Kingdom in the
early 1970s. It offers a range of text-based information, typically including national,
international and sporting news, weather and TV schedules. Subtitle (or closed
captioning) information is also transmitted in the teletext signal, typically on page
888 or 777.
A color space used in video electronics, in particular in reference to component
video cables. YPbPr is the analog version of the YCBCR color space; the two are
numerically equivalent, but YPBPR is designed for use in analog systems whereas
YCBCR is intended for digital video.YPbPr is commonly called "component video",
but this is a misnomer, as there are many other types of component video (mostly
RGB with sync either on green or one or two separate signals).
YPbPr is converted from the RGB video signal, which is split into three
components, Y, PB, and PR.
* Y carries luma (brightness) and sync information.
* PB carries the difference between blue and luma (B - Y).
* PR carries the difference between red and luma (R - Y).
Sending a green signal would be redundant, as it can be derived using the blue,
red and luma information.
AD ONLY
DOWNLO
+
90
Your Smart Linux TV Player
Vu :
 Loading...