

Page 1

LITTLE SMART
USER’S MANUAL
© VTECH
Printed in China
91-01380-000
Page 2

Dear Parent:
At VTech
®
we know that a child has the ability to do
great things. That’s why all of our electronic learning
products are uniquely designed to develop a child’s mind
and allow them to learn to the best of their ability.
Whether it’s learning about letters, numbers, geography
or algebra, all VTech
®
learning products incorporate
advanced technologies and extensive curriculum to
encourage children of all ages to reach their potential.
When it comes to providing interactive products that
enlighten, entertain, and develop minds, at VTech
®
we
see the potential in every child.
1
Page 3

INTRODUCTION
Thank you for purchasing the VTech® Little Smart Mouseland™
Laptop learning toy! We at VTech® are committed to providing the
best possible products to entertain and educate your child. Should you
have any questions or concerns, please call our Consumer Services
Department at 1-800-521-2010 in the U.S., 1-800-267-7377 in Canada
or 01235-546810 in the U.K.
The Little Smart Mouseland™ Laptop learning toy invites preschoolers
to learn about computers with a fun, child-friendly mouse design. Basic
curriculum includes letters, mathematics, mouse skills, logic games,
music and more! A real roller-ball mouse, change button, transparent
turning dial and exciting animations enhance computer skills in a fun
and entertaining manner. With a carrying handle that allows for learning
at any time and any place, you can help to prepare your child for
tomorrow’s technology!
LCD screen
Contrast
control switch
Light-up
mouse display
Keyboard
Transparent
rotating disc
2
Change button
Volume control
switch
Roller-ball mouse
with retractable
cord
Page 4
MOUSE
A retractable mouse is specially designed for the Little Smart
Mouseland™ Laptop learning toy. Please follow the instructions below
for proper usage of the mouse.
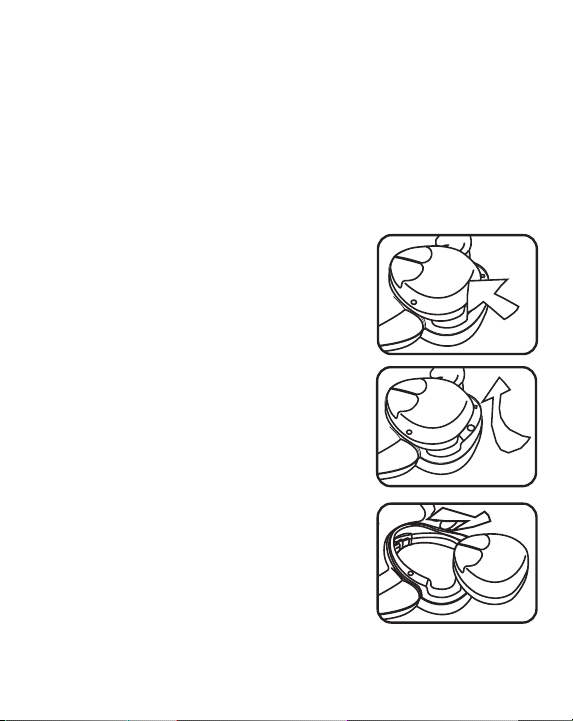
Removing the Mouse from the Main Unit
Follow these steps in removing the mouse from the main unit (please
note the mouse should not detach completely from the unit. It is tethered
by a retractable cord, and is intended to be used only while attached to
the unit).
1. Push the mouse towards the front of the
holder.
2. Lift it up starting from its back end.
3. Remove it from the small hinge.
Mouse Buttons
For most activities, the 2 buttons on the mouse operate the same, except
Mouse Skills and Flying Shapes.
3
Page 5
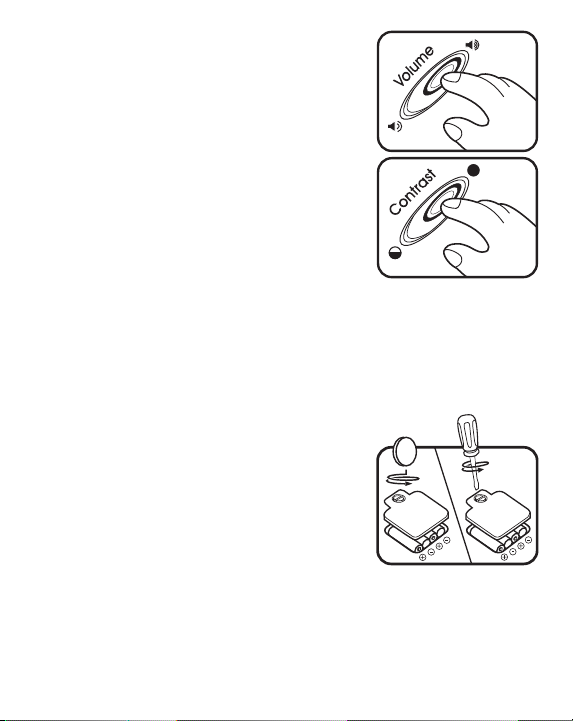
VOLUME CONTROL SWITCH
The Volume Control Switch allows you to raise
or lower the level of sound.
CONTRAST CONTROL SWITCH
Use the Contrast Control Switch to adjust the
light/dark contrast on the LCD screen.
LIGHT-UP MOUSE DISPLAY
The light-up mouse display will light up when the on-screen cursor moves
to the effective area enhancing the educational elements of this product
through additional visual stimulation and entertainment.
BATTERY
Battery Installation
1. Make sure the unit is off.
2. Locate the battery cover on the bottom of
the unit and open it.
3. Insert 4 “AA” batteries as illustrated.
(The use of new, alkaline batteries is
recommended for maximum performance.)
4. Replace the battery cover.
Battery Notice
• Install batteries correctly observing the polarity (+, -) signs to avoid
leakage.
• Always replace an entire set of batteries at one time.
4
Page 6

• Do not use batteries of different types.
• Remove batteries when unit will not be used for an extended period
of time.
• Do not dispose of batteries in fire.
• Do not attempt to recharge ordinary batteries.
• Do not short-circuit the supply terminals.
We do not recommend the use of rechargeable batteries.
NOTE: If for some reason the program/activity stops working, please
follow these steps:
1. Please turn the unit off.
2. Interrupt the power supply by removing the batteries.
3. Let the unit stand for a few minutes, then replace the batteries.
4. Turn the unit on. The unit will now be ready to play again.
If the problem persists, please call our Consumer Services Department
at 1-800-521-2010 in the U.S., 1-800-267-7377 in Canada or 01235546810 in the U.K.
AUTOMATIC SHUT-OFF
If there is no input for 30 seconds, the Little Smart MouselandTM Laptop
learning toy will play a phrase inviting the child to play a game. After 5
minutes without input, the unit will shut off automatically.
HOW TO BEGIN PLAYING ACTIVITIES
1. Press the On key to turn on the unit.
2. The Little Smart MouselandTM Laptop learning toy will show an opening
animation.
3. After the opening animation, an activity graphic will be displayed on
the LCD screen.
5
Page 7

Activity Selecting Instructions
There are 2 methods of choosing activities:
1. Press the LETTER key with an activity icon on the keyboard.
2. Scroll through the activities shown on the LCD screen using the
MOUSE or the CURSOR key.
3. Press the ENTER key or click the on-screen Enter icon to select the
activity shown on the LCD screen.
KEYBOARD DESCRIPTION AND FUNCTIONS
Press this key to turn the unit on.
On
Press this key to turn the unit off.
Off
Press this key to change the background music or to change the
letters between uppercase and lowercase.
Activity
Press this key to go to the activity menu.
Enter
Press this key to confirm the selected activity or answer.
Press this key to select either the one-player or two-player mode.
Player
Level
1
Player
2
3
Demo
These keys are used in the two-player mode.
4
Press this key to select the level of difficulty. There are four skill
levels for many of the activities. Each time you press this key, the
level of difficulty will change: Level one Level two Level
three Level four Level one ......
Press this key to demonstrate how the activity is played. This
feature can be used to demonstrate the current activity or to
demonstrate activities one by one from the main menu.
6
Page 8

Press ACTIVITY key and then press a letter key with an icon to select
the desired activity or input the letters in the letter related activities.
Mouse Skills Counting Challenge
Mouse Maze Grouping
Fish Catch Falling Addition
Drag ‘n Build Flying Subtraction
Magnify It Road Builder
Letter Hunt Treasure Hunt
Typing Song Flying Shapes
Letter Order Memory Challenge
Fishing For Letters Comparisons
Word Clamp Golf
Password Hunt Crazy Combo
Bowling Drip Dodge
7
Page 9

Hidden Mouse Melody Master
Music Genius Play It Back
Mouse Paint Crazy Face Maker
Press these keys to select numbers in number related activities. These
keys can also be used as music note keys in the Music Activities.
redotilasofamiredo
Repeat
Press this key to have a question or phrase repeated for you.
Answer
Press this key to reveal the answer to the current question.
Erase
Press this key to delete the character in the cursor position.
Hint
Press this key for a helpful hint in answering the current question.
Play
Press this key to play the selected music or the new sequence
animation in the PLAY IT BACK activity.
Pause
Press this key to pause the current activity.
Use these keys to move the on-screen objects or cursor.
8
Page 10

LEVELS
The Little Smart MouselandTM Laptop learning toy provides 4 levels
of difficulty for a fun and challenging learning experience. When you
have entered into an activity, you can change the level at any time by
pressing the LEVEL key. Each press of the LEVEL key will increase
one level.
NOTE: The following activities do not have different levels:
Mouse Skills Melody Master
Music Genius Mouse Paint
Play It Back Crazy Face Maker
TWO-PLAYER MODE
The Little Smart MouselandTM Laptop provides an exciting two-player
mode for many activities. There are two types of playing modes for the
two-player option. One is a competition mode and the other mode
involves both players taking turns to answer questions.
A. Competition Mode
When a question is displayed, each player is required to press their
corresponding player keys, PLAYER 1 or PLAYER 2, as quickly as
possible in order to earn the chance to answer the question. The first
player to press his/her key gets to answer first. If the first player answers
incorrectly, the other player will get a chance to answer. The HINT button
does not work in the two-player competitive mode.
B. Take Turn Mode
The player will play the game one by one, similar to a one-player game.
However, the unit will save the score of the 2 players and display who
the winner is at the end of two players.
Two-player mode in different activities
9
Page 11

Activity
1. Mouse Skills
2. Mouse Maze
3. Fish Catch
4. Drag ‘n Build
5. Magnify It
6. Letter Hunt
7. Typing Song
8. Letter Order
9. Fishing for
Letters
10. Word Clamp
11. Password Hunt
12. Counting
Challenge
13. Grouping
14. Falling Addition
15. Flying
Subtraction
Mode
No 2 player mode
Take turn mode
No 2 player mode
Take turn mode
No 2 player mode
Take turn mode
No 2 player mode
Compete mode
Compete mode
Compete mode
Compete mode
Compete mode
Compete mode
Take turn mode
Compete mode
Activity
16. Road Builder
17. Treasure Hunt
18. Flying Shapes
19. Memory Challenge
20. Comparisons
21. Golf
22. Crazy Combo
23. Bowling
24. Hidden Mouse
25. Drip Dodge
26. Melody Master
27. Music Genius
28. Mouse Paint
29. Play It Back
30. Crazy Face Maker
Compete mode
Compete mode
Take turn mode
Compete mode
Compete mode
Take turn mode
Compete mode
Take turn mode
Compete mode
No 2 player mode
No 2 player mode
No 2 player mode
No 2 player mode
No 2 player mode
No 2 player mode
TIME LIMIT
A. One-Player Mode
Some activities include time limits. They are the following:
Activity Level Time limit
1
2. Mouse Maze
6. Letter Hunt
13. Grouping
17. Treasure Hunt
2
3
4
4
4
4
15 sec.
15 sec.
20 sec.
20 sec.
20 sec.
20 sec.
20 sec.
Activity Level Time limit
1
16. Road Builder
20. Comparisons
22. Crazy Combo
2
3
4
4
4
10
Mode
15 sec.
20 sec.
15 sec.
20 sec.
25 sec.
20 sec.
Page 12

B. Two-Player Mode
In the following activities, there will be a time limit for the two-player
competition mode:
Activity Level
1. Mouse Skills
2. Mouse Maze
3. Fish Catch
4. Drag n’ Build
5. Magnify It
6. Letter Hunt
7. Typing Song
8. Letter Order
9. Fishing for Letters
10. Word Clamp
11. Password Hunt
Time limit when
waiting for someone
to earn a chance to
answer
N/A
1
2
3
4
1
2
3
4
1
2
3
4
1
2
N/A
Take Turn
N/A
Take Turn
N/A
Take Turn
N/A
20 sec.
20 sec.
20 sec.
20 sec.
20 sec.
20 sec.
20 sec.
20 sec.
20 sec.
20 sec.
20 sec.
20 sec.
20 sec.
20 sec.
11
Time limit after one
of the players gets
a chance to answer
N/A
N/A
N/A
N/A
20 sec.
20 sec.
20 sec.
20 sec.
40 sec.
35 sec.
30 sec.
25 sec.
85 sec.
80 sec.
75 sec.
70 sec.
10 sec.
10 sec.
Page 13

11. Password Hunt
12. Counting Challenge
13. Grouping
14. Falling Addition
15. Flying Subtraction
16. Road Builder
17. Treasure Hunt
18. Flying Shapes
19. Memory Challenge
20. Comparisons
3
4
1
2
3
4
1
2
3
4
1
2
3
4
1
2
3
4
1
2
3
4
1
2
3
4
20 sec.
20 sec.
20 sec.
20 sec.
20 sec.
20 sec.
20 sec.
20 sec.
20 sec.
20 sec.
Take Turn
20 sec.
20 sec.
20 sec.
20 sec.
Take Turn
20 sec.
20 sec.
20 sec.
20 sec.
Take Turn
20 sec.
20 sec.
20 sec.
20 sec.
20 sec.
20 sec.
20 sec.
20 sec.
10 sec.
10 sec.
15 sec.
35 sec.
35 sec.
35 sec.
10 sec.
10 sec.
10 sec.
10 sec.
10 sec.
10 sec.
10 sec.
10 sec.
20 sec.
20 sec.
30 sec.
25 sec.
20 sec.
20 sec.
25 sec.
20 sec.
20 sec.
25 sec.
30 sec.
25 sce.
12
Page 14

21. Golf
22. Crazy Combo
23. Bowling
24. Hidden Mouse
25. Drip Dodge
26. Melody Master
27. Music Genius
28. Mouse Paint
29. Play It Back
30. Crazy Face Maker
1
2
3
4
1
2
3
4
N/A
N/A
N/A
N/A
N/A
ACTIVITY DESCRIPTION
List of the 30 Activities
Take Turn
20 sec.
20 sec.
20 sec.
20 sec.
Take Turn
20 sec.
20 sec.
20 sec.
20 sec.
N/A
N/A
N/A
N/A
N/A
N/A
20 sec.
20 sec.
20 sec.
20 sec.
20 sec.
20 sec.
20 sec.
20 sec.
N/A
N/A
N/A
N/A
N/A
N/A
Mouse Operation
Mouse Skills
Mouse Maze
Fish Catch
Drag ‘n Build
Magnify It
Games
Golf
Crazy Combo
Bowling
Hidden Mouse
Drip Dodge
13
Letter And Word
Letter Hunt
Typing Song
Letter Order
Fishing for Letters
Word Clamp
 Loading...