

Page 1
ENGLISH
2-WIRE INTERCOM SYSTEM
USER MANUAL
2
TALK
MONITOR
MENU
DT-ENG-DT16D3-V2
Page 2

Page 3

Precautions
●●Slots● or● openings● in● the●back●of●the●monitor,●are●provided●for●
ventilation●and●to●ensure●reliable●operation●of●the●video●monitor●
or●equipment●and●to●protect●if●from●overheating.●These●openings●
must●not●be●blocked●or●covered.●The●monitor●●should●never●be●
placed●near●or●over●a●radiator●or●heat●register●and●should●not●be●
placed●in●a●built-in●installation●such●as●a●bookcase●unless●proper●
ventilation●is●provided.
●●All●parts●should●be●protected●from●violence●vibration.●And●not●
allow●be●impacting,●knocking●and●dropping.
●●For●clean●the●LCD●screen,●using●hands●or●wet●cloth●is●forbidden.
●●Please●do●the●cleanness●with●soft●cotton●cloth,●please●do●not●use●the●
organic●or●chemical●clean●impregnate.●If●necessary,●please●use●pure●
water●or●dilute●soap●water●to●clean●the●dust.
●●Image●distortion●may●occur●if●the●video●door●phone●is●mounted●
too●close●to●magnetic●field●e.●g.●Microwaves,●TV,●computer●etc.
●●Please● keep● away● the● video●door● monitor● from● wet,●high●
temperature,●dust,●and●caustic●and●oxidation●gas●in●order●to●avoid●
any●unpredictable●damage.
●●Do●NOT●open●the●device●in●any●condition,●call●the●administrator●
for●help●if●there●is●any●problem●or●mulfunction●happens.●
Page 4

Contents
1.Parts and Functions ........................................................................1
2.Monitor Mounting .......................................................................... 1
3. Basic Door Release Operation ......................................................2
4.Intercom Function .......................................................................... 2
5.Basic Setup Instructions ................................................................. 3
5.1 How to Enter Main Menu Page .................................................. 3
5.2 Ring Tone Settings ......................................................................3
5.3 Date and Time Setting .................................................................4
5.4 Slave Address and Guard Unit .................................................... 4
5.5 Restore to Default ....................................................................... 4
6.Screen and Volume Adjustment ..................................................... 5
7. Specications ................................................................................ 5
Please●read●this●manual●carefully●before●using●the●product,●and●keep●it●well.
Page 5

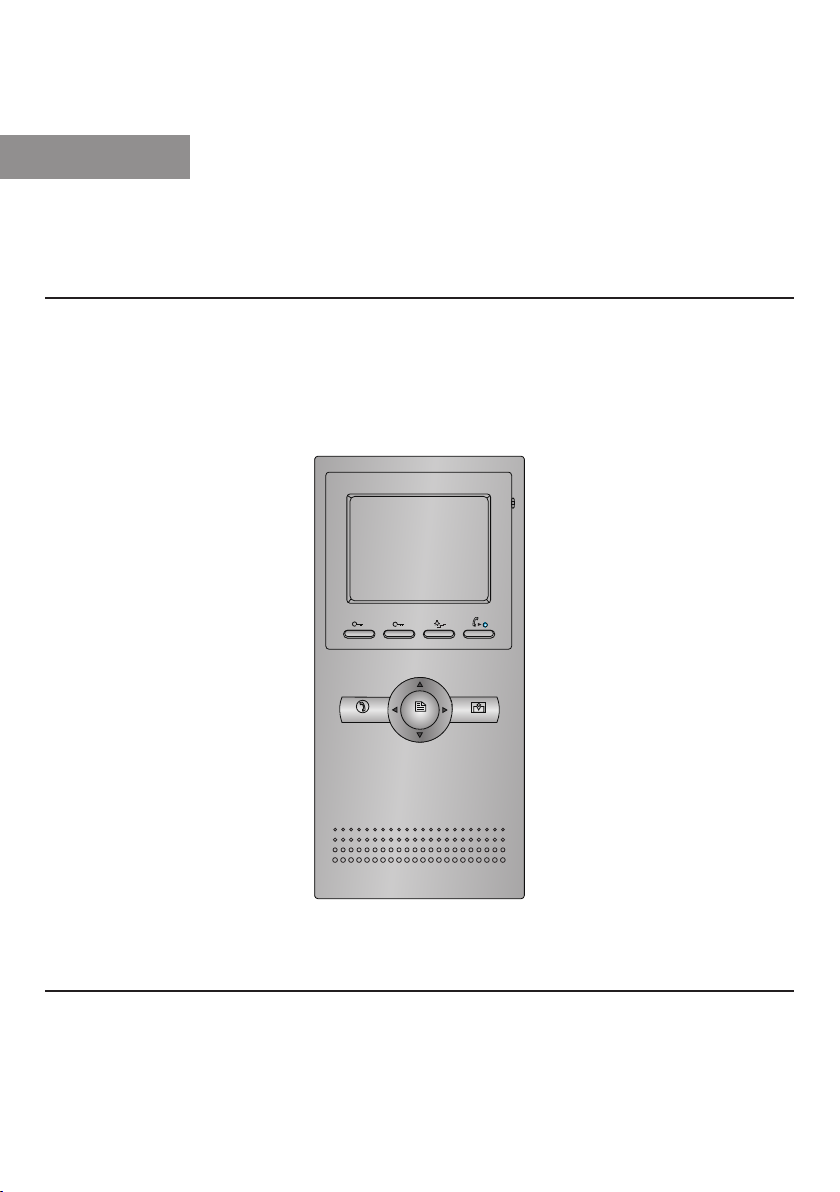
1.Parts and Functions
2
TALK
MONITOR
MENU
2.Monitor Mounting
LCD Screen
Microphone
UNLOCK Button
Second UNLOCK Button
Staircase Light Button
LED Indicator
CALL Button
MENU Button
MONITOR Button
Direction Button
TALK Button
Speaker
1
Mounting Hook
Connection Port
ON
1 2 3 4 5 6
Extend Port
DIP Switches
145~160 cm
1.● Use●the●screws●to●fix●the●Mounting●Bracket●on●the●mounting●box.(fitting●accesories●
includes●a●Bracket●(Two●pieces●of●4X25●screws●are●needed●for●fastening●the●Mounting●
Bracket),●Special●2●wire●cables●to●connect●with●Monitor)
2.● Wire●the●system●correctly(see●the●later●connection●chapter)●then●hang●the●Monitor●on●
the●Mounting●Bracket●firmly.
Page 6

3. Basic Door Release Operation
2
1.● Press● C ALL● button● on●out door● station
,●the●
Monitor●rings,●at●the●same●time,●the● screen●
displays●the●visitor●image.
2.● Press● TALK●Button● on●monitor,●
communicate●hands●free● with●the●visitor●for●90●
seconds.After● finishing●communication,press●
"TALK"●button●again●to●end●the●communication
you●can●
.●If●
nobody●answers●the●phone,●the●screen●will●be●
turned●off●automatically●after●40●seconds.●
3.● During●talking●state,●Press● ●UNLOCK●Button●to●release●the●first●door,press● 2●
button●to●release●the●second●door.
4.● When●the●monitor●is●in●standby●mode,●press●MONITOR●Button(or●select● item●on●
main●menu●page),●The●screen●will●show●the●icon●●
1
4
2
●,●if●multi●door●stations●are●installed.
3
press ▲●button●to●choose●the●first●camera,the●screen●will●display●the●image●from●●the●
first●door●camera.Similarly,●Press ●button●to●choose●the●second●one,Press ▼●button●
to●choose●the●third●one,●Press●● button●to●choose●the●fourth●one.●●●
button●again●to●end●monitoring.
Press"MONITOR"●
4.Intercom Function
When●the●monitor●is●in●standby●mode,●press●CALL●
Button●to●enter●Intercom●Function●page(or●select●
item●on●main●menu●page).●Use●●● ▲●●/● ▼●Button●to●
move●upward●/●downward●to●select●the●item●you●want,●
press●MENU●Button●to●enter.●
Intercom Function
Intercom Call
Inner Call
Direct Dial Guard Unit
Exit
Int erc om Call
1.●
:●User●in● one●apartment●can●call●
other●apartments●in●the● system.●the●namelist●will●
be● created● automatically● by●the●system.●Selete●a●
name●on●the● screen●then●press●CALL●Button●to●
call.(Note:1.●Press●"CALL"●button●again●to●redial.●●●●●●●●●●●●
2.●Press●"TALK"● button●to●cancel●the●call.●3.The●
DIP●switches● code●of●the● monitors●are●not● the●
same.)
[01] Mr A
[02] Mr B
[03] Mr C
[04] Mr D
[05] Mr E
- Name List -
Page 7

Inner Call
2.●
:●If●multi●Monitors●are●installed●in●the● same●apartment,●select●Inner●Call,●
all●the●other●Monitors●will●ring●at●the●same●time,●whichever●Monitor●answers●the●call,●
conversation●is●started.and●the●other●monitors●will●stop●ringing●at●the●same●time.(note:the●
DIP●switches●setting●of●all●monitors●must●be●same.●)
Direct Dial Guard unit
3.●
:●A●Monitor●can●be●assigned●as●Guard●Unit●Monitor;●when●the●
Guard●Unit●Monitor●answers●the●call,●conversation●with●the●guard●person●is●started..
5.Basic Setup Instructions
5.1 How to Enter Main Menu Page
1.● Press● MENU●Button●in●standby●mode,●the●date/time●page●will●be●showed.●(the●
date/time●page●will●be●closed●in●3●munite●if●no●operation)
2.● Press●●MENU●Button●again,●main●menu●page●will●be●showed.
3
5.2 Ring Tone Settings
Select●
●●item●on●main●menu●page●to●enter●setup●page.There●are●12●pieces●ring●tones●
setup
can●be● selected.use●
immediatelly.
Outdoor Tone
:set● the●ring●tone●calling●from●outdoor●
station.
Intercom Tone
:set● the●ring●tone●calling● from● other●
apartments.
●/ ●Button●to●select●last/next●ring●tone,it● will● perform●
Outdoor Tone -- 01
Intercom Tone -- 05
Monitor Time -- 1min
Advanced Set...
Auto Record -- OFF
Exit
Page 8

5.3 Date and Time Setting
4
1.● Select●
page,then●use●▲●/●▼●button●to●select●
●●item●on●main●menu●page●to●enter●setup●
setup
Advanced set...
item.●A●password●will●be●asked●before●enter●next●sub●
menu.the●password●is●2008,●use● ▲●/● ▼●Button●to●
increase●/●decrease●the●value;●use●
●/●● ●Button●to●
select●last/next●digital.●After●inputing,press●MENU●
Button●to●confirm●and●enter●the●sub●menu●page.
2.● Select●
Date and Time Set...
item.●Input●date● and●
time●by●pressing●●the● ▲●/● ▼●Button●to●increase●/●
decrease●the●value●and●
●/●● ●Button●to●select●last/
next●digital,After●finishing,press●MENU●Button●to●
confirm.
5.4 Slave Address and Guard Unit
1.● According●to●5.3.●The
Slave Addr Set
●item●is●for●the●master●and●slave●user●code●
setting,●it●is●set●by●installer.●
Guard Unit Set:
2.●
●if●the●item●is●set●to●1,●the●Monitor●is●assigned●as●a●Guard●Unit●
Monitor,●for●normal●users,●it●should●be●set●to●0.
Slave Addr Set -- 0
Guard Unit Set -- 0
Date/Time Set...
Other Settings...
Information...
Exit
:
1 0 3 2
Time
2 0 1 0 0 3 3 1
Date
5.5 Restore to Default
According●to●5.3●,●select●●
will● show●the●
hardware/software
information●of●the●Monitor.●Select●
Information...
●version●and●voltage●
Restore to default
item,● this●item●
item●
,then●press●MENU●button.●All●settings●will●be●restored●●
to●default.(Note●that●the●restore●to●default●operation●will●
not●change●the●time●setting●and●the●datas.)
Hardware ver 0302
Software ver 0168
Voltage 22.4V
Manufacture 00.0T
Restore to default
Exit
Page 9
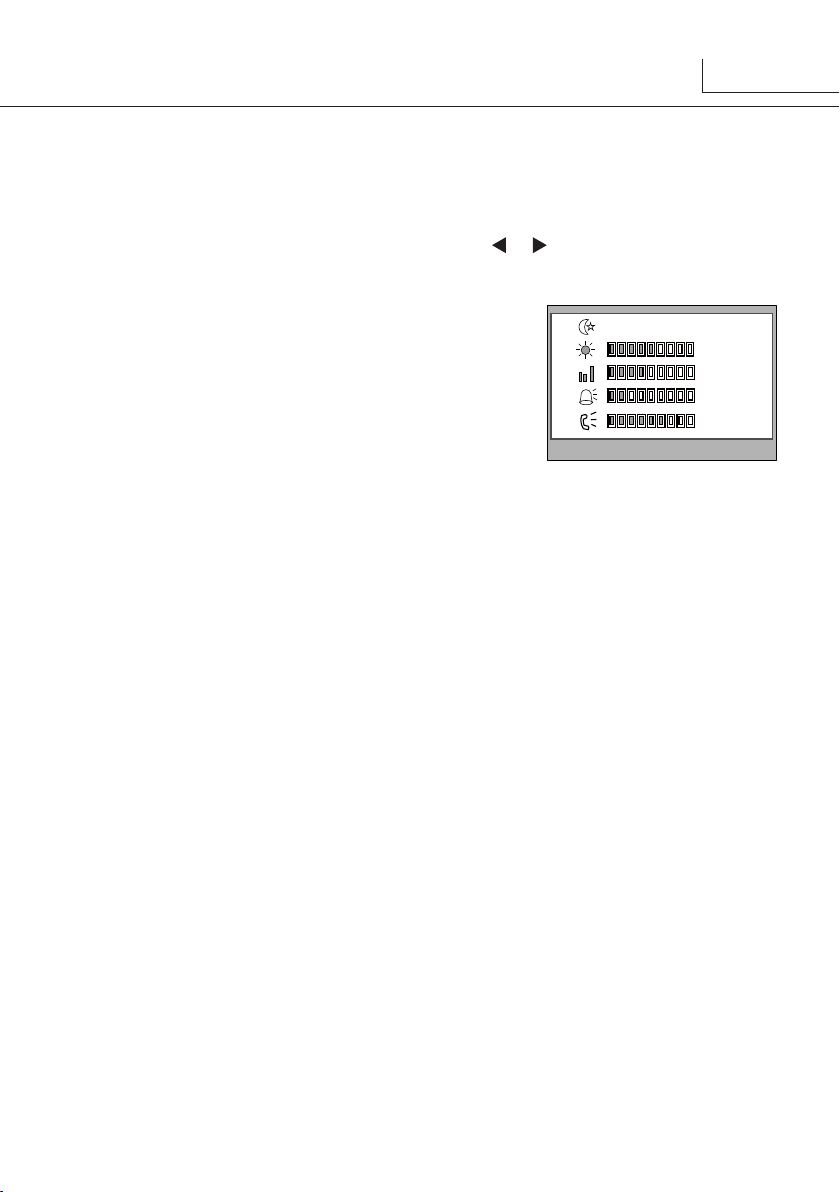
6.Screen and Volume Adjustment
5
During●monitoring●or●talking,●press●MENU●Button,the●
ADJUST MENU
●will●be●displayed.
Use●●▲●/●▼●Button●to●select●the●adjustment●item;●use●● ●●/●● ●Button●to●decrease●/●increase●
the●value.
1.● The● first●item●is●Scene● mode●selection:● Total●4●
screen●modes●can●be●selected●in●sequence:●
Us er, S oft
Brightness
Br ight .
●and●
colour, Scene
●or●
Whenever●you● modify●
item● will●be●set●to●
mode●automatically.●
2.● The●
Brightness
●and●
Colour
●item● is●for●the●image●
Normal,
User
●
user
scene
Brightness
RGB
Colour
Ring Volume
Talk Volume
5
4
2
6
quality●setting,●adjust●the●value●to●get●the●best●image●
you●like.
3.● The●
Ring Volume
Talk Volume
●and●
●items●are●●ring●tone●and●talking●volume●adjustment.
4.● Note●that●all● the●modifications●will●be●done●immediately● after●the●operation.●Press●
"MENU"●button●to●quit●the●adjust●page.
7. Specications
●●Power●supply●for●indoor●monitor:●● ● DC●24V●
●●Power●consumption:● ●● Standby●2W;●Working●status●5W
●●Monitor●screen:● ● 3.5●Inch●color●LCD
●●Display●Resolutions:● ● 320(R,●G,●B)●x●240●pixels
●●Video●signal:● ● 1Vp-p,●75Ω,●CCIR●standard
●●Wiring:● ● 2●wires,●non-polarity
●●Monitor●time:● ● 40●seconds
●●Talking●time:● ● 90●seconds
●●Dimensions:● ● 220(H)×105(W)×20(D)mm
Page 10

Note
6
Page 11

Page 12

The●design●and●specifications●can●be●changed●without●notice●to●the● user.●Right●to●
interpret●and●copyright●of●this●manual●are●preserved.
DT-ENG-DT16D3-V2
 Loading...