

Page 1

NOTES
TIP
NOTES
NOTES
NOTE
NOTE
NOTES
NOTE
NOTES
NOTE
NOTE
Go to www.vtechphones.com
T
Compatible with
Hearing Aid T-Coil
TIA-1083
a
b
c
d
e
f
g
h
i
j
n
p
o
k
l
m
a
THIS SIDE UP
THIS SIDE UP
THIS SIDE UP
a
b
c
d
e
f
g
h
i
j
k
l
A
to register your product for
enhanced warranty support and
latest VTech product news.
Caller I D
Announce
Abridged user’s manual
DS6621
DS6621-2
DS6621-3
DS6621-4
DECT 6.0 cordless telephone with
BLUETOOTH® wireless technology
BC
Congratulations
on purchasing your new VTech product. Before
using this product, please read Important
safety instructions.
This abridged user’s manual provides you with
basic installation and use instructions. A limited
set of features are described in abbreviated form.
Please refer to the online Complete user’s
manual for a full set of installation and operation
instructions at www.vtechphones.com.
Telephones identified with this
logo have reduced noise and
interference when used with
most T-coil equipped hearing
aids and cochlear implants.
The TIA-1083 Compliant
Logo is a trademark of the
Telecommunications Industry
Association. Used under license.
The ENERGY STAR® program
(www.energystar.gov) recognizes
and encourages the use of
products that save energy and
help protect our environment. We
are proud to mark this product
with the ENERGY STAR® label
indicating it meets the latest
energy efficiency guidelines.
What’s in the box
Your product package contains the following
items. Save your sales receipt and original
packaging in the event warranty service is
necessary.
1 set for
DS6621;
2 sets for
DS6621-2;
3 sets for
DS6621-3
1 set for DS6621-2;
2 sets for DS6621-3
Quick start guide
Abridged user’s
manual
Important Safety
Instructions
Handset overview
1 – Handset earpiece
2 – LCD display
3 – MENU/SELECT
• Show the menu.
• While in a menu, press to select an item,
or save an entry or setting.
4 – OFF/CANCEL
Hang up a call.
•
Silence the ringer temporarily while the
•
handset is ringing.
Press and hold to erase the missed call
•
indicator while the phone is not in use.
Press to return to the previous menu; or
•
press and hold to return to idle mode,
without making changes.
5 –
Press repeatedly to show other dialing
•
options when reviewing a caller ID log
entry.
6 – MUTE/DELETE
Mute the microphone during a call.
•
Delete digits or characters while using
•
the dialing keys.
Silence the ringer temporarily while the
•
handset is ringing.
7 – REDIAL/PAUSE
• Press repeatedly to review the redial list.
• Press and hold to insert a dialing pause
while entering a number.
8 – Microphone
9 –
• Make or answer a call using the handset
speakerphone.
• During a call, press to switch between the
speakerphone and the handset.
10 –
Press to add a space when entering
•
names.
11 –
• While you have set the dial mode to
pulse and on a call, press to switch to
tone dialing temporarily.
12 – 1
• Press repeatedly to add or remove 1
in front of the caller ID log entry before
dialing or saving it to the phonebook.
• Press and hold to set or dial your
voicemail number.
/HOME/FLASH
13 –
• Make or answer a home call.
• Answer an incoming home call when you
hear a call waiting alert.
14 – /CELL
• Make or answer a cell call.
• Answer an incoming cell call when you
hear a call waiting alert.
15 – VOLUME/ /
• Review the phonebook when the phone
is not in use.
• Increase the listening volume during a
call.
• Scroll up while in a menu, or in the
phonebook, caller ID log, or redial list.
• Move the cursor to the right when
entering numbers or names.
VOLUME/ /CID
Review the caller ID log when the phone is
•
not in use.
Decrease the listening volume during a
•
call.
Scroll down while in a menu, or in the
•
phonebook, caller ID log, or redial list.
Move the cursor to the left when entering
•
numbers or names.
16 – CHARGE light
• On when the handset is charging.
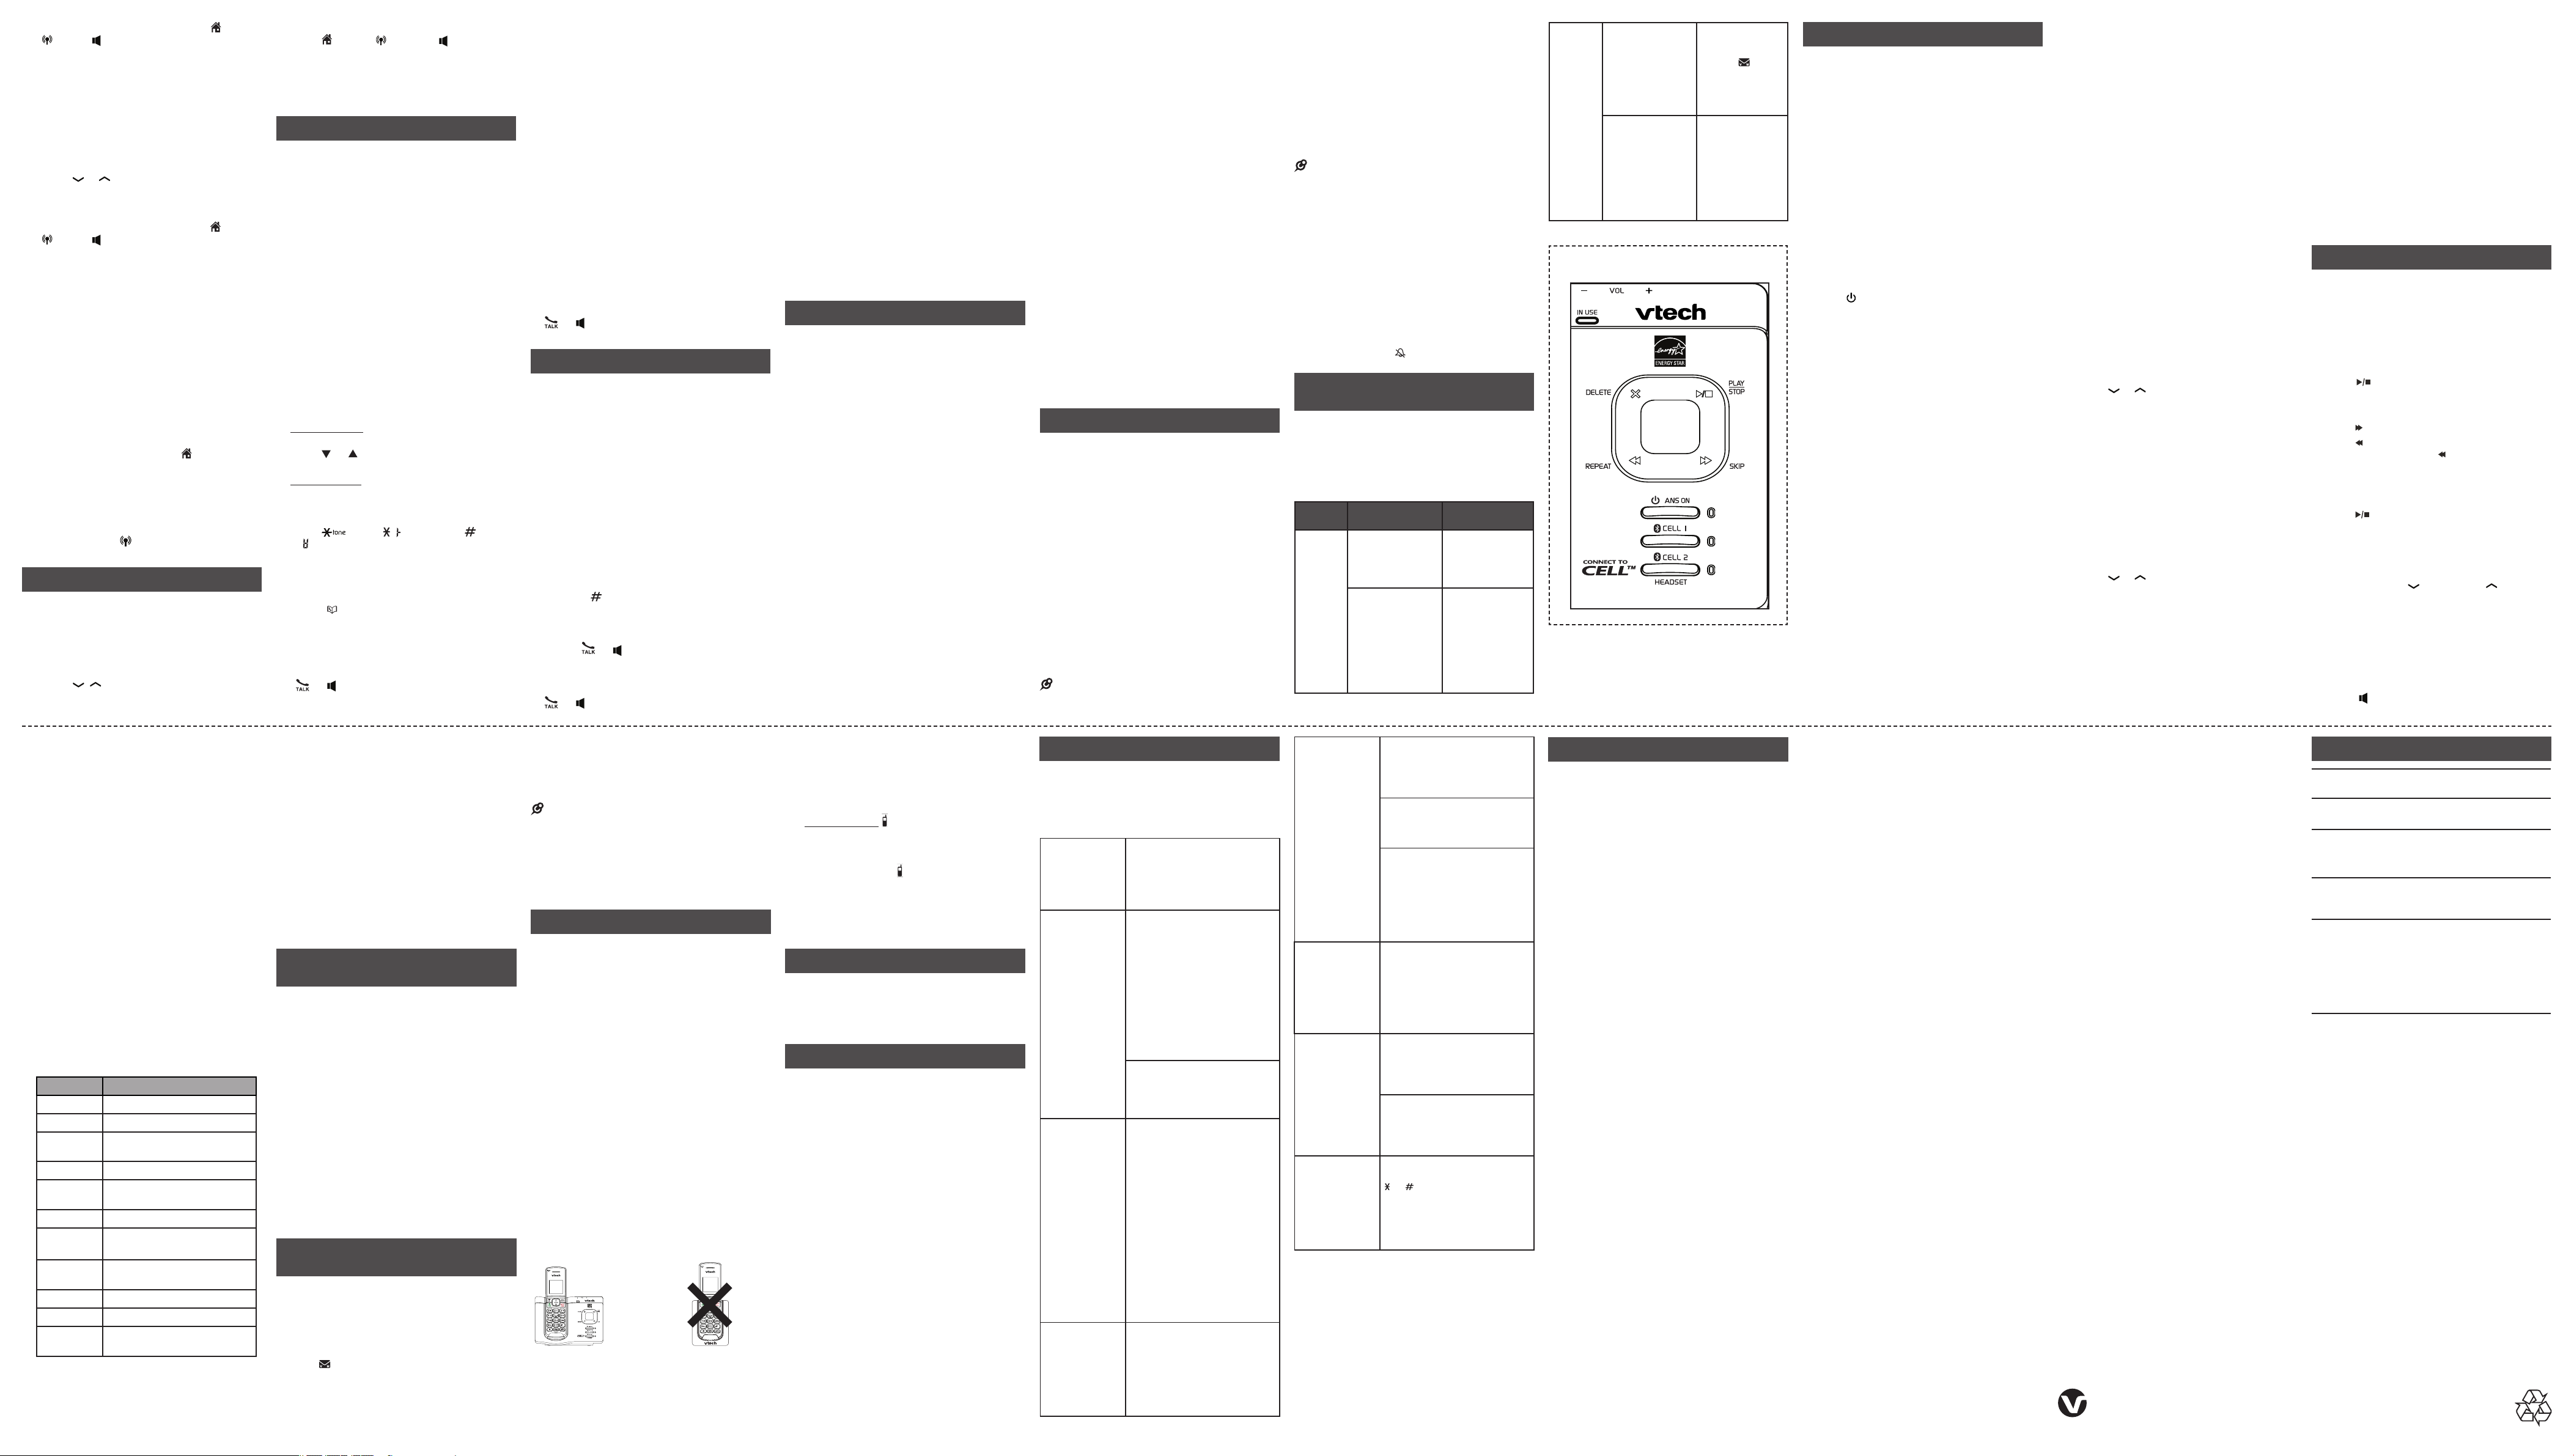
Telephone base overview
1 – – /VOL/
• Press to adjust the volume during mes-
• Press to adjust the telephone base ringer
2 – X/DELETE
• Press to delete the playing message.
• When the phone is not in use, press twice
3 – /PLAY/STOP
• P
• P
4 – Message window
• Shows the number of messages, and
5 – /SKIP
• Press to skip to the next message.
6 – /REPEAT
• Press to repeat a message.
• Press twice to play the previous message.
7 – /ANS ON light
• On when the answering system is on.
+
sage playback.
volume when the phone is not in use.
to delete all previously reviewed messages.
ress to play messages.
ress to stop message playback.
other information of the answering system
or telephone base.
8 – CELL 1 and
CELL 2/HEADSET lights
• On when the telephone base is paired
and connected with a Bluetooth device
• Flashes when the telephone base is in
discoverable mode.
9 – CELL 1 and CELL 2/HEADSET
• Press to connect the paired cell Bluetooth
device.
• Press and hold to add or replace a Bluetooth device.
10 – /ANS ON
• Press to turn the answering system on or
off.
11 – /FIND HANDSET
• Press to page all system handsets.
12 – IN USE light
• On when the handset is in use, or the
answering system is answering a call.
• Flashes when there is an incoming call, or
another telephone sharing the same line
is in use.
Charger overview
1 – Charging pole
Display icons overview
The battery icon flashes when the
battery is low and needs charging.
The battery icon animates when
the battery is charging.
The battery icon becomes solid
when the battery is fully charged.
ECO
1
2
NEW
ANS ON
1/25
The ECO mode activates
automatically to reduce power
consumption when the handset is
within range from the telephone
base.
There are new voicemail received
from your telephone service
provider.
On when the home line is in use
or there is an incoming home call.
Flashes when there is an
incoming home waiting call.
There are Bluetooth devices
connected on the cell devices list.
On when the cell line is in use or
there is an incoming cell call.
Flashes when there is an
incoming cell waiting call.
There are new caller ID log
entries.
The answering system is turned
on.
The handset ringer is off.
The message number currently
playing and total number of
new/old messages recorded.
Connect
You can choose to connect the telephone base
for desktop usage or wall mounting.
.
Use only the adapters provided.
•
Even if you do not subscribe to any conventional
•
telephone service, you can pair a Bluetooth
enabled cell phone to your telephone base (see
Bluetooth), and use the cell line alone without
plugging in a telephone line cord.
If you subscribe to digital subscriber line (DSL)
•
high-speed Internet service through your telephone
line, make sure you install a DSL filter (not
included) between the telephone line cord and
telephone wall jack. Contact your DSL service
provider for more information.
Connect the telephone base
Connect the charger
Mount the telephone base
Route the telephone line cord through the
1.
rectangular hole on the wall mount bracket.
Then plug the two ends of the telephone line
cord into the telephone base and the wall
outlet as shown.
2 Align the holes on the bracket with the
standard wall plate and slide the bracket
down until it clicks securely in place.
3. Align the grooves on the telephone base with
the tabs on the wall mount bracket, and then
slide it down until it clicks securely in place.
Connect the power adapter to the telephone
4.
base and an electrical outlet not controlled
by a wall switch.
Install and charge the battery
Install the battery
Install the battery as shown below.
Use only supplied battery.
•
If the handset will not be used for a long time,
•
disconnect and remove the batter y to prevent
possible leakage.
Charge the battery
Place the handset in the telephone base or the
charger to charge.
CHAR GE l ight
remain s on
when charg in g.
Once you have installed the battery, the
handset LCD display indicates the battery
status (see the table below).
For best performance, keep the handset in the
•
telephone base or charger when not in use.
The battery is fully charged after 12 hours of
•
continuous charging.
Battery
indicators
The screen
is blank, or
shows Put in
charger and
flashes.
The screen
shows Low
battery and
flashes.
The screen
shows
HANDSET X.
Battery status Action
The batter y has
no charge or very
little charge. The
handset cannot
be used.
The battery has
enough charge
to be used for a
short time.
The batter y is
charged.
Charge without
interruption
(at least 30
minutes).
Charge without
interruption
(at least 30
minutes).
To keep the
battery charged,
place it in the
telephone base
or charger when
not in use.
Before use
After you install your telephone or power returns
following a power outage, the handset will prompt
you to set the date and time, and the answering
system through voice guide.
Set date and time
Make sure you set the date and time including the
•
year correctly; otherwise the answering system
does not announce the correct day of the week for
your recorded messages time stamp.
Use the dialing keys (0-9) to enter the
1.
month (MM), date (DD) and year (YY).
Then press SELECT.
2. Use the dialing keys (0-9) to enter the hour
(HH) and minute (MM). Then press or
to choose AM or PM.
3. Press SELECT to save.
After the setting for the date and time, the
handset will display Voice guide to... and set
up Ans sys? alternatively.
Set answering system through voice guide
This feature assists you to do the basic setup of
the answering system. You can follow the voice
guide to record your own announcement, set the
number of rings and the message alert tone.
Press SELECT to start the voice guide
1.
for the answering system setup. You hear
the voice prompt “Hello! This voice guide
will assist you with the basic setup of your
answering system.”
Setup your answering system by inputting
2.
the designated numbers as instructed in
the voice guide.
Check for dial tone:
Press /HOME. If you hear a dial tone, the
installation is successful.
If you do not hear a dial tone:
Make sure the installation procedures
•
described above are properly done.
It may be a wiring problem. If you have
•
changed your telephone service to digital
service from a cable company or a VoIP
service provider, the telephone line may
need to be rewired to allow all existing
telephone jacks to work. Contact your cable/
VoIP service provider for more information.
Operating range
This cordless telephone operates with the
maximum power allowed by the Federal
Communications Commission (FCC). Even
so, this handset and telephone base can
communicate over only a certain distance
- which can vary with the locations of the
telephone base and handset, the weather, and
the layout of your home or office.
When the handset is out of range, the handset
displays Out of range or and no pwr at base
alternately.
If there is a call while the handset is out of
range, it may not ring, or if it does ring, the call
may not connect well when you press /HOME
or /CELL. Move closer to the telephone base,
and then press /HOME or /CELL to answer
the call. If the handset moves out of range
during a telephone conversation, there may be
interference. To improve reception, move closer
to the telephone base.
Bluetooth
To use a Bluetooth enabled cell phone or
headset with your DS6621, you must first pair
and connect your Bluetooth cell phone or headset
with the telephone base.
Bluetooth wireless technology operates within
a short range (a maximum of approximately 30
feet). When you pair a Bluetooth cell phone to
the telephone base, place your Bluetooth cell
phone closer to the telephone base to maintain
sufficient signal strength.
For optimal performance, keep your cell phone
within 15 feet of the telephone base while using
the cell line.
Pair and connect your Bluetooth enabled
cell phone
Choose a slot to pair the cell phone.
1.
Press and hold CELL 1 or
CELL 2/HEADSET on the telephone
base until you hear a confirmation tone,
and the CELL 1 or CELL 2/HEADSET
light flashes.
Turn on the Bluetooth feature of your cell
2.
phone. Once your cell phone finds your
VTech phone (VTech DS6621), press
appropriate key on your cell phone to
continue the pairing process.
Your cell phone may prompt you to enter
•
the PIN of the telephone base. The default
PIN of the telephone base is 0000.
When the cell phone is connected to the
telephone base, the corresponding status icon
(1 or 2) displays. The corresponding device
light ( CELL 1 or CELL 2/HEADSET) turns on.
If the pairing fails, turn off the Bluetooth feature
on your cell phone and on the DS6621 by
pressing CELL 1 or CELL 2/HEADSET.
Then repeat the steps above to pair and
connect again. In some cases, it may take you a
few attempts to complete the pairing process.
Pair and connect your Bluetooth enabled
headset
Press MENU on the phone when it is not in use.
1.
Press or to scroll to Bluetooth, and
2.
then press SELECT.
Press or to scroll to Add BT headset,
3.
and then press SELECT. The screen displays
Search headset...
4. Set your headset to discoverable mode. Once
your handset finds your headset, press SELECT.
Enter the PIN of your headset if required.
•
The PIN for most Bluetooth devices is
0000 (refer to the user’s manual of your
headset), and then press SELECT.
When the headset is successfully paired and
connected to the telephone base, the 2 icon
displays. The CELL 2/HEADSET light turns on.
VTech Connect to CellTM application
This application helps you integrate
your Android phones with your DS6621.
For more information and application
download, scan the QR code on the
right, or go to
http://www.vtechphones.com/app_connect_to_cell.
Download contacts from your Bluetooth
cell phone
Press MENU when the phone is not in use.
1.
Scroll to Bluetooth, and then press SELECT.
2.
Scroll to Download PB, and then press
3.
SELECT.
Scroll to select the desired cell phone, and
4.
then press SELECT.
For cer tain cell phones, you may need to press a
•
key on your cell phone to confirm the phonebook
download.
The performance of phonebook download feature
•
depends on the compatibility of your Bluetooth
cell phone. Refer to the user’s manual of your cell
phone for more information about how that device
uses Bluetooth connectivity.
Certain cell phones do not support SIM card
•
download. If this is the case, transfer the contacts
from your SIM card to your cell phone memory first.
Then download from your cell phone memory. For
more information on how to transfer contacts from
your SIM card to your cell phone memory, see the
user’s manual of your cell phone.
For Android cell phones, you may also
•
download your cell phone contacts to
your DS6621 via the
VTech Contact Share application.
Scan the QR code on the right, or
go to
www.vtechphones.com/apps/contact_share for
application download.
Using the handset menu
Press MENU when the phone is not in use.
1.
2.
Press
or
until the screen displays the
desired feature menu.
Press SELECT to enter that menu.
3.
To return to the previous menu, press CANCEL.
•
To return to idle mode, press and hold CANCEL.
•
Configure your telephone
Set language
The LCD language is preset to English. You can
select English, French or Spanish to be used in
all screen displays.
Press MENU when the handset is not in use.
1.
Scroll to Settings, and then press
2.
SELECT twice.
Scroll to choose English, Français or
3.
Español.
Press SELECT to save.
4.
Set date and time
Make sure you set the date and time including the
•
year correctly; otherwise the answering system
does not announce the correct day of the week for
your recorded messages time stamp.
Press MENU when the handset is not in use.
1.
Scroll to Set date/time, and then press
2.
SELECT.
Use the dialing keys (0-9) to enter the
3.
month (MM), date (DD) and year (YY).
Then press SELECT.
4. Use the dialing keys (0-9) to enter the hour
(HH) and minute (MM). Then press or
to choose AM or PM.
5. Press SELECT to save.
Temporary tone dialing
If you have pulse (rotary) service only, you can
switch from pulse to tone dialing temporarily
during a call.
During a call, press .
1.
Use the dialing keys to enter the relevant
2.
number. The telephone sends touch-tone
signals. It automatically returns to pulse
dialing mode after you end the call.
Telephone operation
Handset control key panel:
Make a home call
Press /HOME or , and then dial the
•
telephone number.
-OR-
Enter the telephone number on the handset
•
or base, and then press /HOME or to
dial.
Make a cell call
Press /CELL on the handset or base.
•
Enter the telephone number, and then press
/CELL to dial.
-OR-
Enter the telephone number on the handset
•
or base, and then press /CELLto dial.
After first pressing /CELL, you may need to
•
choose a cell device. Scroll to select the desired cell
device when necessary, and then press SELECT.
While using the cell line, place your cell phone
•
closer to the base, and make sure that there are no
physical obstacles between the base and the cell
phone, such as large furniture or thick walls.
Answer a home/cell call
Press /HOME, /CELL, , or any dialing
•
key.
End a home/cell call
Press OFF on the handset, or put the handset
•
to the base or charger.
Speakerphone
During a call, press on the handset to switch
•
between speakerphone and normal handset
use.
Volume
During a call, press /VOLUME/ on the
•
handset to adjust the listening volume.
The handset earpiece volume setting and speakerphone
volume setting are independent.
Mute
The mute function allows you to hear the other
party but the other party cannot hear you.
During a call, press MUTE on the handset or
1.
telephone base. The screen displays Muted.
Press MUTE again to resume the
2.
conversation. The screen displays
Microphone ON.
Call waiting
When you subscribe to call waiting service from
your telephone service provider, you hear an
alert tone if there is an incoming call while you
are on another call.
Call waiting on the home line:
Press FLASH to put the current call on hold
•
and take the new call.
Press FLASH to switch back and forth
•
between calls.
Call waiting on the cell line:
Press /CELL 1 or /CELL 2, to put the
•
current call on hold and take the new call.
Press /CELL 1 or /CELL 2 to switch
•
back and forth between calls.
Find handset
Use this feature to find all system handsets.
To start paging:
Press /FIND HANDSET on the telephone
•
base. All idle handsets ring and display **
Paging **.
To end paging:
Press /FIND HANDSET again on the
•
telephone base.
-OR-
Press /HOME, /CELL, , CANCEL, or
•
any dialing key on the handset.
-OR-
Place the handset in the telephone base or
•
charger.
Do not press and hold /FIND HANDSET for
more than four seconds. It may lead to handset
deregistration.
Join a call in progress
You can use up to two system handsets
at a time on a home line call. You can buy
additional expansion handsets (DS6600) for
this telephone base. You can register up to five
handsets to the telephone base.
When a handset is on a home call, press
•
/HOME or on another handset to join the
call.
Press OFF to exit the call. The call continues
•
until all handsets hang up.
Intercom
Use the intercom features for conversations
between two devices.
Press MENU on your handset when not in
1.
use.
2.
Press
or
to scroll to Intercom, and
then press SELECT. Use the dialing keys to
enter a destination device number.
Page 2
NOTE
To answer the intercom call, press /HOME,
NOTE
NOTE
3.
/CELL, , or any dialing key on the
destination handset.
To end the intercom call, press OFF or place
4.
the handset back in the telephone base or
charger.
Transfer a call
While on an outside call, you can use the
intercom feature to transfer the call from one
handset to another.
Press MENU on your handset during a call.
1.
2.
Press
or
to scroll to Intercom, and
then press SELECT. The current call is
put on hold. Use the dialing keys to enter a
destination device number.
To answer the intercom call, press /HOME,
3.
/CELL, , or any dialing key on the
destination handset. You can now have a
private conservation before transferring the
call.
To transfer the call, press OFF on the
4.
initiating handset or place the initiating
handset back in the telephone base or
charger.
To end the call, press OFF on the
5.
destination handset or place the destination
handset back in the telephone base or
charger.
Answer an incoming call during an
intercom call
If you receive an incoming call during an
intercom call, there is an alert tone.
To answer a home call, press /HOME. The
•
intercom call ends automatically.
To end the intercom call without answering
•
the outside call, press OFF. The intercom call
ends and the telephone continues to ring.
To answer a cell call, press OFF to end the
•
intercom call. The telephone continues to
ring. Then press /CELL.
Redial list
Each handset stores the last 10 telephone
numbers dialed. When there are already 10
entries, the oldest entry is deleted to make room
for the new entry.
Review the redial list
Press REDIAL when the handset is not in use.
1.
Press , , or REDIAL repeatedly until the
2.
desired entry displays.
Dial a redial list entry
Press /HOME, /CELL, or to dial.
•
Delete a redial list entry
When the desired redial entry displays, press
DELETE.
Phonebook
The phonebook can store up to 1000 entries,
which are shared by all handsets. Each entry
may consist of a telephone number up to
30 digits, and a name up to 15 characters.
Add a phonebook entry
Press MENU when the phone is not in use.
1.
Scroll to Phonebook then press SELECT.
2.
Press SELECT again to choose Add new
3.
entry.
Enter the number.
4.
Use the dialing keys to enter the number
•
(up to 30 digits).
5. Press SELECT to move to the name.
6. Use the dialing keys to enter the name (up to
15 characters). Additional key presses show
other characters of that particular key.
7. Press SELECT to save.
While entering numbers and names, you
can:
Press DELETE to erase a digit or character.
•
Press and hold DELETE to erase the entire
•
entry.
Press or to move the cursor to the left
•
or right.
Press and hold PAUSE to insert a dialing
•
pause (for entering phone numbers only).
Press 0 to add a space (for entering names
•
only).
Press to add ( appears) or to add
•
# ( appears)
only)
.
Review the phonebook
Entries are sorted alphabetically.
Press when the phone is not in use.
1.
Scroll to browse through the phonebook, or
2.
use the dialing keys to start a
name search (you can enter up to
3 characters for the search).
When the desired entry appears, press
3.
or to dial.
(for entering phone numbers
Delete a phonebook entry
When the desired entry displays, press
1.
DELETE.
When the screen displays Delete entry?,
2.
press SELECT.
Delete all phonebook entries:
Press MENU when the phone is not in use.
1.
Scroll to Phonebook, and then press SELECT.
2.
Scroll to Delete all, and then press SELECT
3.
When the screen displays Delete all?, press
4.
SELECT.
Edit a phonebook entry
When the desired entry displays, press
1.
SELECT.
Use the dialing keys to edit the number, and
2.
then press SELECT.
Use the dialing keys to edit the name, and
3.
then press SELECT to save.
Dial a phonebook entry
When the desired entry appears, press
•
or to dial.
Caller ID
If you subscribe to caller ID service, information
about each caller appears after the first or
second ring. If you answer a call before the caller
information appears on the screen, it will not be
saved in the caller ID log.
The caller ID log stores up to 50 entries. Each
entry has up to 24 digits for the phone number
and 15 characters for the name.
If the telephone number has more that 15 digits,
only the last 15 digits appear. If the name has more
than 15 characters, only the first 15 characters are
shown and saved in the caller ID log.
Review a caller ID log entry
Press CID when the phone is not in use.
1.
Scroll to browse through the caller ID log.
2.
When the desired entry appears:
Press repeatedly to show different
•
dialing options.
Press 1 repeatedly if you need to add or
•
remove 1 in front of the phone number.
Press or to dial the displayed number.
3.
Dial a caller ID log entry
When the desired entry appears, press
•
or to dial.
Save a caller ID log entry to the
phonebook
When the desired caller ID log entry
1.
displays, press SELECT.
2. Scroll to To Phonebook then press
SELECT.
3. Use the dialing keys to modify the number,
and then press SELECT.
4. Use the dialing keys to modify the name,
and then press SELECT to save.
Delete a caller ID log entry
When the desired caller ID log entry displays,
•
press DELETE.
Delete all caller ID log entries
Press MENU when the phone is not in
•
use. Scroll to Caller ID log and then press
SELECT. Scroll to Delete all and then press
SELECT twice.
Call block
If you subscribe to caller ID service, you can
set the telephone to block unknown calls and
certain undesired calls.
The call block list stores up to 20 entries.
Block unknown calls
Press MENU when the phone is not in use.
1.
Scroll to Call block, and then press SELECT.
2.
Scroll to Calls w/o num, and then press
3.
SELECT.
Scroll to choose Not block or Block, and
4.
then press SELECT.
Add a call block list entry
1. Press MENU when the phone is not in use.
2. Scroll to Call block, and then press SELECT.
3. Scroll to Block list, and then press SELECT.
4. Scroll to Add new entry, and then press
SELECT.
5. Enter the number.
• Use the dialing keys to enter the number
(up to 30 digits).
6. Press SELECT to move to the name.
7. Use the dialing keys to enter the name (up to
15 characters). Additional key presses show
other characters of that particular key.
8. Press SELECT to save.
Review call block list
Press MENU when the phone is not in use.
1.
Scroll to Call block, and then press
2.
SELECT.
Scroll to Block list, and then press
3.
SELECT.
Press SELECT to choose Review.
4.
Edit a call block list entry
When the desired entry displays, press
1.
SELECT.
Use the dialing keys to edit the number, and
2.
then press SELECT.
Use the dialing keys to edit the name, and
3.
then press SELECT to save.
Save a caller ID log entry to call block list
1. When the desired caller ID log entry
displays, press SELECT.
2. Scroll to To Call block then press SELECT.
3. Use the dialing keys to modify the number,
and then press SELECT.
4. Use the dialing keys to modify the name,
and then press SELECT to save.
Delete a call block list entry
When the desired call block list entry
•
displays, press DELETE.
Sound settings
Key tone
You can choose from different ringer tones.
Press MENU when the handset is not in use.
1.
Scroll to Settings, and then press SELECT.
2.
Scroll to choose Key tone, and then press
3.
SELECT.
Scroll to choose On or Off, and then press
4.
SELECT to save.
Ringer tone
You can choose from different ringer tones.
Press MENU when the handset is not in use.
1.
Scroll to Ringers, and then press SELECT.
2.
Scroll to choose Home ringtone or Cell
3.
ringtone, and then press SELECT.
Scroll to sample each ringer tone, and then
4.
press SELECT to save.
If you turn off the ringer volume, you will not hear ringer
tone samples.
Ringer volume (handset)
You can adjust the ringer volume level, or turn
the ringer off.
Press MENU when the handset is not in use.
1.
Scroll to Ringers, and then press SELECT.
2.
Scroll to choose Home volume or Cell
3.
volume, and then
press SELECT.
Scroll to adjust the volume, and then press
4.
SELECT to save.
If the handset ringer volume is set to off, that handset
is silenced for all incoming calls except paging tone.
Ringer volume (telephone base)
You can adjust the telephone base volume
level by pressing – /VOL/ + on the top of the
telephone base when idle.
Temporary ringer silencing
When the telephone is ringing, you can
temporarily silence the ringer of the handset
without disconnecting the call. The next call rings
normally at the preset volume.
Press OFF or MUTE on the handset. The
•
handset displays .
About answering system and
voicemail service
For message recording, your telephone has a
built-in answering system, and it also support
voicemail service offered by your telephone
service provider (subscription is required, and
fee may apply).
The main differences between them are as
follows:
Category
Storage
Built-in answering
system
Messages are
stored in the
telephone base.
Your messages
will not be deleted
automatically.
You have to delete
your messages
manually.
Voicemail from
telephone service
Messages are
stored in a server
or system provided
by your telephone
service.
Your messages
may be
automatically
deleted after a
period of time.
Contact your
telephone service
provider for more
details.
Method
to retrieve
messages
When you received
new messages,
handset displays
XX new messages
and the message
window on the
telephone base
flashes.
To retrieve
messages, usually
there are two ways:
Press a button
•
on the telephone
base; or
Access remotely
•
with an access
code.
Telephone base control key panel:
When you received
new messages,
the handset
displays and
New voicemail.
To retrieve
messages, you
need an access
number and/or a
passcode provided
by your telephone
service provider.
Set your built-in answering system
Your answering system has various features,
read below for the basic settings.
The answering system can record and store
up to 99 messages. Each message can be up
to three minutes in length. The total storage
capacity for the announcement, messages and
memos is approximately 23 minutes. The actual
recording time depends on individual message
characteristics.
Your answering system allows you to set your
announcement, to save and delete messages,
activate call screening, to set number of rings
before pick up, to access remotely, and to
control the recording time.
Turn the answering system on or off
The answering system must be turned on to
answer and record messages.
To turn on or off with the telephone base:
Press /ANS ON on the telephone base to turn
•
the built-in answering system on or off.
To turn on or off with the handset:
Press MENU when the phone is not in use.
1.
Scroll to highlight Answering sys, and then
2.
press SELECT.
Scroll to highlight Answer on/off, and then
3.
press SELECT.
Scroll to highlight On or Off, and then press
4.
SELECT to save. You hear a confirmation tone.
Default announcement
The telephone is preset with a greeting that
answers calls with “Hello, please leave a
message after the tone.” You can use this preset
announcement, or replace it with your own.
Record your own announcement
The announcement can be up to 90 seconds in
length.
Press MENU when the phone is not in use.
1.
Scroll to Answering sys and then press
2.
SELECT twice.
The handset announces, “Announcement,
3.
press play or press record.”
Press 7 to record. The handset announces,
4.
“Record after the tone. Press STOP when you
are done.” After the tone, speak towards the
handset microphone. Then, press 5 when done.
Play the announcement
Press MENU when the phone is not in use.
1.
Scroll to Answering sys and then press
2.
SELECT twice.
The handset announces, “Announcement,
3.
press play or press record.”
Press 2 to play the announcement.
4.
Delete the announcement
Press MENU when the phone is not in use.
1.
Scroll to Answering sys and then press
2.
SELECT twice.
The handset announces, “Announcement,
3.
press play or press record.”
Press 3 to delete your own recorded
4.
announcement.
Set number of rings
You can set the answering system to answer an
incoming call after 2, 3, 4, 5 or 6 rings; or toll saver. If
you choose toll saver, the answering system answers
a call after 2 rings when you have new messages, or
after 4 rings when you have no new messages.
Press MENU when the phone is not in use.
1.
Scroll to Answering sys then press SELECT.
2.
Scroll to Ans sys setup then press SELECT.
3.
Scroll to # of rings then press SELECT.
4.
5.
Press
or
to choose 2, 3, 4, 5, 6 or Toll
saver.
press SELECT to save and you hear a
6.
confirmation tone.
Message alert tone
When the message alert tone is set to on,
and there is at least one new message, the
telephone base beeps every 10 seconds. The
message alert tone is preset to off.
Press MENU when the phone is not in use.
1.
Scroll to Answering sys then press SELECT.
2.
Scroll to Ans sys setup then press SELECT.
3.
Scroll to Msg alert tone then press SELECT.
4.
Press
5.
Press SELECT to save and you hear a
6.
or
to choose On or Off.
confirmation tone.
Voice guide
This feature is an alternative way for you to
do the basic setup of the answering system.
You can follow the voice guide to record your
own announcement, set the number of rings
and the message alert tone.
Press MENU when the phone is not in use.
1.
Scroll to scroll to Answering sys, and then
2.
press SELECT.
Scroll to highlight Voice guide, and then
3.
press SELECT. You hear the voice prompt
“Hello! This voice guide will assist you with
the basic setup of your answering system.”
Setup your answering system by inputting
4.
designated numbers as instructed in the
voice guide.
Use your built-in answering system
New message indication
When there are new answering system
messages, The handset displays XX new
messages and the message window on the
telephone base flashes.
Message playback
To playback messages at the telephone base:
Press /PLAY when the phone is not in use.
•
Options during playback:
Press – /VOL/ + to adjust the speaker volume.
•
Press /SKIP to skip to the next message.
•
Press /REPEAT to repeat the message
•
currently playing. Press /REPEAT twice to
listen to the previous message.
Press X/DELETE to delete the playing
•
message. The system advances to the next
message.
Press /STOP to stop.
•
To playback messages at the handset:
Press MENU to choose Play messages.
•
Press SELECT.
Options during playback:
Press VOLUME/ or VOLUME/ to adjust
•
the message playback volume.
Press 6 to skip to the next message.
•
Press 4 to repeat the message. Press 4
•
during the time and day announcement to
hear the previous message.
Press 3 to delete the playing message.
•
Press OFF to stop the playback.
•
Press to switch between speakerphone
•
mode and handset mode.
Delete all old messages at the telephone
base
To delete all old messages at the telephone
base:
Press X/DELETE twice when the phone is not
in use.
To delete all old messages on a handset:
Press MENU when the phone is not in use.
1.
Scroll to Answering sys, and then press
2.
SELECT.
Scroll to Delete all old, and then press
3.
SELECT twice. You hear a confirmation tone.
Remote access
A two-digit security code is required to access
the answering system remotely from any
touch-tone telephone. The preset code is 19.
You can use this preset code, or set your own.
Dial your telephone number from any
1.
touch-tone telephone.
When the system plays your announcement,
2.
enter the two-digit security code.
You can enter one of the following remote
3.
commands.
Command Description
1
2
3
Play all messages.
Play new messages.
Delete the current message
(during playback).
33
4
Delete all old messages.
Repeat the current message
(during playback).
5
*5
Stop.
Hear a list of remote
commands.
6
Skip to the next message
(during playback).
*7
8
0
Record a new announcement.
End the call.
Turn the answering system
on or off.
Hang up or press 8 to end the call.
4.
Remote access code
A two-digit security code is required to access
the answering system remotely from any touchtone telephone. The preset code is 19. You can
set the code from 00 to 99.
Press MENU when the phone is not in use.
1.
Scroll to Answering sys then press SELECT.
2.
Scroll to Ans sys setup then press SELECT.
3.
Scroll to Remote code, and then press
4.
SELECT.
Use the dialing keys to enter a two-digit number.
5.
-OR-
Scroll to a desired two-digit number.
Press SELECT to save and you hear a
6.
confirmation tone.
Use the built-in answering system
and voicemail service
You can use your answering system and
voicemail service together by setting your
answering system to answer before voicemail
service answers as described below. To learn
how to program your voicemail settings, contact
your telephone service provider.
If you are on a call, or if the answering system
is busy recording a message and you receive
another call, the second caller can leave a
voicemail message.
Set your answering system to answer calls
at least two rings earlier than your voicemail
service is set to answer. For example, if your
voicemail service answers after six rings, set
your answering system to answer after four
rings. Some voicemail service providers may
program the delay before answering calls in
seconds instead of rings. In this case, allow
six seconds per ring when determining the
appropriate setting.
Retrieve voicemail from
telephone service
Voicemail is a feature available from most
telephone service providers. It may be included
with your telephone service, or may be optional.
Fees may apply.
Retrieve voicemail
When you received a voicemail, the handset
displays and New voicemail. To retrieve,
you typically dial an access number provided by
your telephone service provider, and then enter
a security code. Contact your telephone service
provider for instructions on how to configure the
voicemail settings and listen to messages.
Turn off the new voicemail indicators
If you have retrieved your voicemail while away
from home, and the handset still displays the new
voicemail indicators, use this feature to turn off
the indicators.
This feature turns off the indicators only, it does not
delete your voicemail messages.
Press MENU when the handset is not in use.
1.
Scroll to Settings, and then press SELECT.
2.
Scroll to Clr voicemail, and then press
3.
SELECT.
Expand your telephone system
Add and register a handset
You can add new cordless handsets (DS6600),
DECT 6.0 cordless headset or speakerphone to
your telephone system (purchased separately).
Visit www.vtechphones.com for a list of
compatible devices. Your telephone system
supports a maximum of five devices.
Additional devices registered to the telephone
system are assigned numbers in the sequential
order. Register each device with the telephone
base before use.
When first purchased and properly charged,
each expansion handset shows To register
HS... and ...see manual alternately. Charge the
handset before registering it to the telephone
base.
To register a DECT 6.0 cordless headset or
speakerphone to this telephone system, please
refer to the user’s manual of the respective
product for more details. To register a cordless
handset, see below.
To register a handset:
Place the new or non-registered handset
•
in the telephone base. The handset shows
Registering...
Do not place the handset
in the charger.
The handset shows Registered and you hear a
beep when the registration process completes.
The registration process takes about 90 seconds
to complete.
Deregister all devices
To replace a handset or reassign the designated
handset number of a registered handset, you
must deregister all devices and then individually
register each handset.
To deregister all devices:
Press and hold /FIND HANDSET on the
1.
telephone base for about 10 seconds until
the IN USE light on the telephone base
flashes.
Immediately press /FIND HANDSET again.
2.
All handsets show To register HS... and ...see
manual alternately when the deregistration
process completes. The deregistration process
takes about 10 seconds to complete.
ECO mode
This power conserving technology reduces power
consumption for optimal battery performance. The ECO
mode activates automatically whenever the handset is
synchronized with the telephone base.
General product care
Taking care of your telephone
Your cordless telephone contains sophisticated
electronic parts, so it must be treated with care.
Avoid rough treatment
Place the handset down gently. Save the original
packing materials to protect your telephone if you ever
need to ship it.
Avoid water
Your telephone can be damaged if it gets wet. Do not
use the handset outdoors in the rain, or handle it with
wet hands. Do not install the telephone base near a
sink, bathtub or shower.
Electrical storms
Electrical storms can sometimes cause power surges
harmful to electronic equipment. For your own safety, take
caution when using electrical appliances during storms.
Cleaning your telephone
Your telephone has a durable plastic casing that should
retain its luster for many years. Clean it only with a
dry non-abrasive cloth. Do not use dampened cloth or
cleaning solvents of any kind.
Frequently asked questions
The following are the questions most frequently asked
about the cordless telephone. If you cannot find the
answer to your question, visit our website at
www.vtechphones.com or call 1 (800) 595-9511 for
customer service. In Canada, go to
www.vtechcanada.com or call 1 (800) 267-7377.
My telephone
does not work
at all.
The display
shows No line. I
cannot hear the
dial tone.
I cannot add and
connect my cell
phone or headset
to the telephone
base.
The cell phone
reception in my
house is poor
and I cannot
connect it to my
DS6621.
Make sure the telephone base is
installed properly, and battery is
installed and charged correctly.
For optimum daily performance,
return the handset to the
telephone base after use.
Disconnect the telephone line
cord from your telephone and
connect it to another telephone.
If there is no dial tone on that
other telephone either, then
the telephone line cord may be
defective. Try installing a new
telephone line cord.
If changing telephone line cord
does not help, the wall jack
(or the wiring to this wall jack)
may be defective. Contact your
telephone service provider.
You may be using a new cable
or VoIP service, the existing
telephone jacks in your home
may no longer work. Contact your
service provider for solutions.
Make sure you have cellular
coverage and the Bluetooth
function of your cell phone or
headset is turned on. See the
user’s manual of your cell phone
or headset for more information.
Make sure that the telephone
base is in discoverable mode.
Carefully follow the pairing
instructions in this manual. Make
sure that your Bluetooth cell phone
or headset is not connected to
any other Bluetooth device, and is
connected to the telephone base
and active on the device list.
Turn off your cell phone or
headset, and then turn it on again.
If there is a location in your
house with better reception, you
can leave your cell phone at
that location while you use the
DS6621 cell line. In order for
this to work, the telephone base
must be within 30 feet of the cell
phone.
The answering
system does
not record
messages.
The answering
system does
not announce
the correct day
of the week
for recorded
messages time
stamp.
The messages
on the answering
system are
incomplete.
I accidentally
set my LCD
language to
Spanish or
French, and I
don’t know how
to change it back
to English.
Make sure the answering system
is on. When the answering system
is on, ANS ON should display on
the handset and the telephone
base.
When the answering machine
memory is full, it does not record
new messages until some old
messages are deleted.
If you subscribe to voicemail
service, change the number of
rings so that your answering
system answers before your
voicemail service answers. To
determine how many rings activate
your voicemail service, contact your
telephone service provider.
Make sure you have set the date
and time. See Configure your
telephone section.
If a caller leaves a very long
message, part of it may be lost
when the answering system
disconnects the call after the
preset recording time.
If the memory on the answering
system becomes full during a
message, the answering system
stops recording and disconnects
the call.
While the handset is not in use,
press MENU and then enter
364 to change the handset
LCD language back to English.
Limited warranty
What does this limited warranty cover?
The manufacturer of this VTech Product warrants to
the holder of a valid proof of purchase (“Consumer” or
“you” ) that the Product and all accessories provided
in the sales package ( “Product”) are free from
defects in material and workmanship, pursuant to the
following terms and conditions, when installed and
used normally and in accordance with the Product
operating instructions. This limited warranty extends
only to the Consumer for Products purchased and
used in the United States of America and Canada.
What will VTech do if the Product is not free from
defects in materials and workmanship during
the limited warranty period (“Materially Defective
Product”)?
During the limited warranty period, VTech’s authorized
service representative will repair or replace at VTech’s
option, without charge, a Materially Defective Product. If
we repair the Product, we may use new or refurbished
replacement parts. If we choose to replace the Product,
we may replace it with a new or refurbished Product
of the same or similar design. We will retain defective
parts, modules, or equipment. Repair or replacement
of the Product, at VTech’s option, is your exclusive
remedy. VTech will return the repaired or replacement
Products to you in working condition. You should expect
the repair or replacement to take approximately 30 days.
How long is the limited warranty period?
The limited warranty period for the Product extends for
ONE (1) YEAR from the date of purchase. If VTech
repairs or replaces a Materially Defective Product
under the terms of this limited warranty, this limited
warranty also applies to the repaired or replacement
Product for a period of either (a) 90 days from the
date the repaired or replacement Product is shipped to
you or (b) the time remaining on the original one-year
warranty; whichever is longer.
What is not covered by this limited warranty?
This limited warranty does not cover:
Product that has been subjected to misuse,
1.
accident, shipping or other physical damage,
improper installation, abnormal operation or
handling, neglect, inundation, fire, water or other
liquid intrusion; or
Product that has been damaged due to repair,
2.
alteration or modification by anyone other than an
authorized service representative of VTech; or
Product to the extent that the problem experienced
3.
is caused by signal conditions, network reliability,
or cable or antenna systems; or
Product to the extent that the problem is caused
4.
by use with non-VTech accessories; or
Product whose warranty/quality stickers, product
5.
serial number plates or electronic serial numbers
have been removed, altered or rendered illegible; or
Product purchased, used, serviced, or shipped for
6.
repair from outside the United States of America
or Canada, or used for commercial or institutional
purposes (including but not limited to Products
used for rental purposes); or
Product returned without a valid proof of purchase
7.
(see item 2 on the next page); or
Charges for installation or set up, adjustment
8.
of customer controls, and installation or repair of
systems outside the unit.
How do you get warranty service?
NOTE: Before calling for service, please review the
user’s manual - a check of the Product’s controls and
features may save you a service call.
Except as provided by applicable law, you assume the
risk of loss or damage during transit and transportation
and are responsible for delivery or handling charges
incurred in the transport of the Product(s) to the service
location. VTech will return repaired or replaced Product
under this limited warranty. Transportation, delivery
or handling charges are prepaid. VTech assumes no
risk for damage or loss of the Product in transit. If the
Product failure is not covered by this limited warranty,
or proof of purchase does not meet the terms of this
limited warranty, VTech will notify you and will request
that you authorize the cost of repair prior to any further
repair activity. You must pay for the cost of repair and
return shipping costs for the repair of Products that are
not covered by this limited warranty.
What must you return with the Product to get
warranty service?
Return the entire original package and contents
1.
including the Product to the VTech service location
along with a description of the malfunction or
difficulty; and
Include a “valid proof of purchase” (sales receipt)
2.
identifying the Product purchased (Product model)
and the date of purchase or receipt; and
Provide your name, complete and correct mailing
3.
address, and telephone number.
Other limitations
This warranty is the complete and exclusive agreement
between you and VTech. It supersedes all other
written or oral communications related to this Product.
VTech provides no other warranties for this Product.
The warranty exclusively describes all of VTech’s
responsibilities regarding the Product. There are no
other express warranties. No one is authorized to make
modifications to this limited warranty and you should not
rely on any such modification.
State/Provincial Law Rights: This warranty gives you
specific legal rights, and you may also have other rights,
which vary from state to state or province to province.
Limitations: Implied warranties, including those of
fitness for a particular purpose and merchantability (an
unwritten warranty that the Product is fit for ordinary
use) are limited to one year from the date of purchase.
Some states/provinces do not allow limitations on how
long an implied warranty lasts, so the above limitation
may not apply to you. In no event shall VTech be liable
for any indirect, special, incidental, consequential,
or similar damages (including, but not limited to lost
profits or revenue, inability to use the Product or
other associated equipment, the cost of substitute
equipment, and claims by third parties) resulting from
the use of this Product. Some states/provinces do
not allow the exclusion or limitation of incidental or
consequential damages, so the above limitation or
exclusion may not apply to you.
Please retain your original sales receipt as
proof of purchase.
The Bluetooth® word mark and logos are owned by
Bluetooth SIG, Inc. and any use of such marks by VTech
Holdings Limited is under license. VTech Holdings Limited
is a member of Bluetooth SIG, Inc. Other trademarks and
trade names are those of their respective owners.
Specifications are subject to change without notice.
© 2014 for VTech Communications, Inc.
All rights reserved. 05/14. DS6621_ ACIB_V5.0
Document order number: 91-007312-050-100
Technical specifications
Transmit
frequency
Channels DECT: 5
Nominal
effective
range
Power
requirements
Memory Phonebook:
DECT frequency: 1921.536-1928.448 MHz
Bluetooth frequency: 2402.000-2480.000 MHz
Bluetooth: 79
Maximum power allowed by FCC and
IC. Actual operating range may vary
according to environment conditions at
the time of use.
Handset: 2.4V Ni-MH battery
Telephone base: 6V DC @ 400mA
Charger: 6V AC @ 300mA
1000 memory locations (shared
between home and cell lines); up to 30
digits and
15 characters
Caller ID log:
50 memory locations; up to 24 digits and
15 characters
 Loading...