

Page 1

Go to
www.vtechphones.com
to register your product for
enhanced warranty support and
the latest VTech product news.
CM18445/
AM18447
4-Line
Small Business System
Main Console
User’s manual
Page 2

Congratulations
on your purchase of this VTech product. Before using this product, please read
the Important safety information.
This user’s manual provides you with the complete installation, setup and
operation instructions.
For customer service or product information, visit our website at
www.vtechphones.com or call 1 (800) 595-9511. In Canada, please dial
1 (800) 267-7377.
Model number: CM18445/AM18447
Type: 4-Line Small Business System Main Console
Serial number:
Purchase date:
Place of purchase:
Both the model and serial numbers of your VTech product can be found on the
bottom of the console.
Save your sales receipt and original packaging in case it is necessary to return
your telephone for warranty service.
Telephones identified with this logo have reduced noise and interference when
used with most T-coil equipped hearing aids and cochlear implants. The TIA-1083
Compliant Logo is a trademark of the Telecommunications Industry Association.
Used under license.
Page 3

Phone lines
CM18445 console
(Ext. 0)
CM18245 deskset
(Ext. 1, 2, 3...)
CM18045 handset
(Ext. 1, 2, 3...)
IS6100 headset
(Ext. 9, 8, 7...)
TL80133 speakerphone
(Ext. 9, 8, 7...)
DECT
DECT
DECT
DECT
DECT
Introduction
System Overview
The CM18445/AM18447 is the main console of your new 4-line telephone
system. It can be used as a standalone telephone when a single user monitors
up to four telephone lines provided by your telephone service provider.
You can also expand the system by adding a combination of up to nine
cordless handsets (VTech model CM18045/AM18047), cordless desksets
(VTech model CM18245/AM18247), cordless headsets (VTech model IS6100)
and cordless speakerphones (AT&T model TL80133).
As the cordless devices communicate with the console over the wireless DECT
technology, there is no need to plug telephone lines into the cordless devices.
All telephone lines only connect to the console.
Purchase up to nine cordless
accessories:
Cordless handsets (VTech model
•
CM18045/AM18047)
DECT 6.0 expansion desksets
•
(VTech model CM18245/AM18247)
Cordless headsets (VTech model
•
IS6100)
Cordless speakerphones (AT&T
•
model TL80133)
To order them, visit our website at
www.vtechphones.com or call
1 (800) 595-9511. In Canada, please
dial 1 (800) 267-7377.
CM18445/AM18447 console
(Ext. 0)
Optional
corded headset
(purchased
separately)
Optional
cordless
accessories
(purchased
separately)
CM18245/AM18247
deskset
(Ext. 1, 2, 3...)
CM18045/AM18047
handset
(Ext.1, 2, 3...)
IS6100 headset
(Ext. 9, 8, 7...)
TL80133 speakerphone
(Ext. 9, 8, 7...)
NOTES:
Each telephone system contains a maximum of 10 stations, consisting of one console and up to
•
any nine of the mentioned cordless DECT devices. Each station has a unique extension number,
used to identify each device for system operations such as intercom, paging, and call transfer.
Each system supports up to four traditional POTs or PSTN lines. To allow proper operation of
•
the digital answering system and auto attendant, you should connect only one telephone system
to the desired telephone lines.
If you have cordless accessories, for optimum range and better reception, place the console in a
•
central and open location.
Page 4

Introduction
System Overview
The following pages illustrate two possible scenarios of how your 4-line
telephone system can be setup in your workplace. The actual setup depends
on the environment and settings in your workplace.
Scenario 1
4-single-line connection, with four CM18245/AM18247 desksets and five
CM18045/AM18047 handsets
Your CM18445/AM18447 console is placed in the reception. There are only
single-line wall jacks in your workplace. The 4 single-line cords (model RJ11;
purchased separately) are connected to L1, L2, L3, and L4 jacks of the console
and 4 single-line wall jacks.
Your CM18445/AM18447 console is pre-assigned Ext. 0.
In your workplace, there are four CM18245/AM18247 deskets (Ext. 1, 2, 3, and
4) and five CM18045/AM18047 handsets (Ext. 5, 6, 7, 8, and 9) registered to
the console.
You can use any of the ten stations (Ext. 0, and 1-9) to make and receive a
call with any line from LINE 1, LINE 2, LINE 3, or LINE 4, according to your
preference and need.
NOTE: If your workplace is using two-line wall jacks, please refer to Scenario 2. For three-line wall
jacks, you must first split the lines into 3 single-lines to be connected to L1/2, L2, and L3/4 ports
respectively, or a two-line plus a single line to be connected to L1/2 and L3/4 ports respectively.
Page 5

Introduction
System Overview
Scenario 2
2-double-line connection, with three CM18445/AM18447 desksets, two CM18045/
AM18047 handsets, two IS6100 headsets, and two AT&T model TL80133 speakerphones
Your CM18445/AM18447 console is placed in the reception. There are twoline wall jacks in your workplace. Two of the telephone line cords provided are
connected to L1/2 and L3/4 jacks of the console and 2 two-line wall jacks.
Your CM18445/AM18447 console is pre-assigned Ext. 0.
In your workplace, there are three CM18245/AM18247 Deskets (Ext. 1, 2, and 3), two
CM18045/AM18047 handsets (Ext. 4 and 5), two IS6100 headsets (Ext. 6 and 7), and
two AT&T model TL80133 speakerphone (Ext. 8 and 9) registered to the console.
You can link IS6100 Headset(s) and/or AT&T model TL80133 speakerphone(s)
to any extensions occupied by the console, and any desket and handset.
You can use any of the ten stations (Ext. 0, and 1-9) to make and receive a
call with any line from LINE 1, LINE 2, LINE 3, or LINE 4, according to your
preference and need.
Before you make or receive a call at IS6100 Headsets or AT&T model TL80133
Speakerphone, you will first need to choose a line at the Main Console or a
specific Deskset/Handset, where the Headsets/Speakerphone are linked.
NOTE: If your workplace is using three-line wall jacks, you must first split the lines into 3 singlelines to be connected to L1/2, L2, and L3/4 ports respectively, or a two-line plus a single line to
be connected to L1/2 and L3/4 ports respectively. Make sure there is no more than total of 4
lines connect to the L1/2, L2, L3/4, and L4 ports; otherwise, the lines cannot function normally.
Page 6

Parts checklist
Your telephone package contains the following items. Save your sales receipt
and original packaging in the event warranty service is necessary.
User’s manual
Console
Mounting bracket
Quick start guide
Power adapter
Two directory cards
Addendum sheet
(IS6100 & TL80133)
Audio cable
(Music On Hold)
Extension number
label for cordless
headset and
speakerphone
Handset with coiled
cord installed
Four telephone line
cords (4-conductor)
i
i
Page 7

Table of contents
Installation setup .................................... 1
Insert backup battery ................................2
Assemble your new console .....................3
Connect your new console ....................... 4
Mount your new console (optional) ...........6
Tabletop to wall installation ................... 6
Wall to tabletop installation ....................9
Register devices to your new
console .................................................. 10
Add and register a cordless deskset ......10
Add and register a cordless handset ......11
Add and register other cordless
accessories ......................................... 12
Adding a corded headset (optional) ........13
Answering system basic setup............14
Date and time for messages ...................14
Set date and time ................................ 14
Line mode for unanswered calls ............. 15
Set Line mode ..................................... 15
Auto attendant setup ..............................16
Activate auto attendant ........................16
Number of rings (auto attendant) ........16
Announcement (auto attendant) .......... 17
Auto attendant operation ........................ 21
Using the auto attendant .................... 21
Auto attendant (AA) flow chart ............22
General mailbox setup ............................23
Activate general mailbox ..................... 23
Number of rings (general mailbox) ......23
Announcement (general mailbox) .......24
Announce only setup ..............................26
Activate announce only ....................... 26
Number of rings (announce only) ........26
Announcement (announce only) .........27
Telephone operation basic setup........28
Calls management ..................................28
Ring group ........................................... 28
Call privacy .......................................... 29
Music on hold (M.O.H.) .......................30
Overview ................................................ 33
Console overview ................................... 33
Table 1 - Main menu (Press MENU/
SELECT in idle screen) ........................36
Table 2 - Answering system setup
sub-menu (Select Ans sys setup in
main menu) ......................................... 37
Console screen icons ............................. 39
Alert tones and lights ..............................40
Telephone settings ............................... 41
Console setup .........................................41
Menu settings ......................................41
Ringer volume ..................................... 41
Ringer tone .......................................... 42
Do not disturb (DND) ........................... 42
LCD contrast .......................................43
Key tone .............................................. 43
LCD language .....................................44
Primary line .........................................44
Area codes .......................................... 45
Console name ..................................... 46
Hold reminder ...................................... 46
Dial mode ............................................ 47
User support ........................................ 47
Console info ........................................48
Telephone operation ............................ 49
Console operation ..................................49
Line indicators ..................................... 49
Making and ending a call .....................49
On hook dialing (predialing) ................50
Full-duplex speakerphone ...................50
Answering a call .................................. 50
Temporary ringer silencing .................. 50
ii
Page 8

Options while on calls ............................. 51
Call waiting ..........................................51
Volume control ....................................51
Mute ....................................................51
Temporary tone dialing ........................51
Hold .....................................................52
Switching between lines ......................52
Recording a call ...................................53
Chain dialing ........................................54
Redial .....................................................55
View the 10 most recently dialed
numbers .............................................. 55
Redial a number ..................................55
Copy a redial entry to directory ...........55
Delete a number .................................. 56
Auto-redial ...........................................56
Conference call .......................................57
Establish a conference call ..................57
Options during a conference call ......... 58
Intercom ..................................................59
Make an intercom call to an extension 59
Answer an intercom call ...................... 59
End an intercom call ............................ 59
Answer an incoming call during an
intercom call ........................................60
Hold an intercom call ........................... 60
Handle an intercom call by the general
mailbox ................................................ 60
Call transfer ............................................ 61
Blind transfer ....................................... 61
Call transfer using intercom .................... 62
Transfer a call and speak to the
receiving party ..................................... 62
Paging ....................................................63
Make a paging call to an extension .....63
Make a paging call to multiple
extensions ...........................................63
Set and edit a group for paging calls ... 64
Delete the group settings ....................64
End a paging call ................................ 64
Speed dial ...............................................65
Assign a speed dial entry .................... 65
Dial a speed dial entry ......................... 67
Delete a speed dial entry .....................67
COVM ..................................................... 68
COVM (central office voicemail) .......... 68
COVM reset .........................................68
Directory ................................................ 69
About the directory .................................69
Capacity ..............................................69
Exit the directory ..................................69
Create directory entries .......................... 70
Create a new directory entry ............... 70
Review directory entries ......................71
Search directory .....................................72
Search by name .................................. 72
Dial, delete or edit entries ....................... 73
Display dial ..........................................73
Delete an entry ....................................73
Edit an entry ........................................ 73
Call history ............................................ 74
About the caller ID ..................................74
Information about caller ID with call
waiting .................................................74
Caller ID information ............................... 75
How the caller ID information works .... 75
Caller ID operation ..................................76
Memory match .....................................76
Missed (new) calls indicator ................ 76
Review the caller ID information ..........76
View dialing options .............................77
Dial a call history entry ........................ 77
Caller ID operation ..................................78
Save a caller history entry to the
directory ..............................................78
Delete entries ...................................... 78
Reasons for missing caller ID
iii
Page 9

information .............................................. 79
Limited warranty ..................................107
Answering system.................................80
About the answering system ..................80
Answering system capacity .................81
Answering system setup .........................83
Call screening ......................................83
Message length ...................................83
Call intercept .......................................84
Set remote access code ...................... 84
Message alert tone .............................. 85
Voice language ....................................85
Answering system operation ..................86
New message indication .....................86
Call screening ......................................86
Call intercept .......................................86
Message playback ...............................86
Options during playback ...................... 87
Transfer messages ..............................87
Delete all general mailbox messages ..88
Record and deliver memos .................88
Remaining time ...................................88
Remote access ....................................... 89
Technical specifications .....................109
Index .....................................................110
Frequently asked questions.................93
Top questions for installation ...............93
Top questions for operations ............... 94
Top questions for features ...................96
Top questions related to telephone
service providers .................................98
Common cure for electronic
equipment. ...........................................99
Maintenance .........................................100
Important safety information..............101
FCC part 15 ..........................................104
For C-UL compliance only ..................105
iv
Page 10

Installation setup
Install the console close to the telephone jacks and a power outlet not
controlled by a wall switch. The console can be placed on a flat surface or
vertically mounted on the wall (pages 6-9).
NOTE: If you subscribe to high-speed Internet service (DSL - digital subscriber line) through
your telephone lines, you must install DSL filters between the telephone line cords and the
telephone wall jacks (see page 4 or page 5). The filter prevents noise and caller ID problems
caused by DSL interference. Please contact your DSL service provider for more information
about DSL filters.
Your product may be shipped with a protective sticker covering the console
display - remove it before use.
For customer service or product information, visit our website at
www.vtechphones.com or call 1 (800) 595-9511. In Canada, please dial
1 (800) 267-7377.
Avoid placing the console too close to:
Communication devices such as television sets, VCRs, or other
•
cordless telephones.
Excessive heat sources.
•
Noise sources such as a window with traffic outside, motors, microwave
•
ovens, refrigerators, or fluorescent lighting.
Excessive dust sources such as a workshop or garage.
•
Excessive moisture.
•
Extremely low temperature.
•
Mechanical vibration or shock such as on top of a washing machine or
•
work bench.
1
Page 11

Getting started
Backup battery installation
To maintain normal system operation in the event of a power failure, please
purchase and install four AA alkaline batteries to this console before use. If
power fails with working batteries installed, all functions work properly except for
the display illumination.
Install the batteries, as shown below:
Press the tab and pull to remove the battery compartment cover. Insert four
1.
AA alkaline batteries (purchased separately) following the polarity markings
in the battery compartment.
Align the cover flat against the battery compartment, then press down until it
2.
clicks into place.
NOTES:
appears steadily on the screen when backup batteries are installed.
•
When the backup battery is running low, the low battery icon displays and flashes on the
•
screen.
2
Page 12

Installation setup
Assemble your new console
Install the mounting bracket for tabletop use.
1.
Low tabletop position: Insert the fixed tabs of the mounting bracket into slots
and . Press the flexible tabs into slots and until they click into place.
Low tabletop position
High tabletop position: Insert the fixed tabs of the mounting bracket into slots
and . Press the flexible tabs into slots and until they click into place.
High tabletop position
2. Connect the telephone line cord(s) and the power cord to the console.
See the illustration on the next page to connect to four single-line wall jacks;
or see page 5 to connect to two 2-line wall jacks.
3
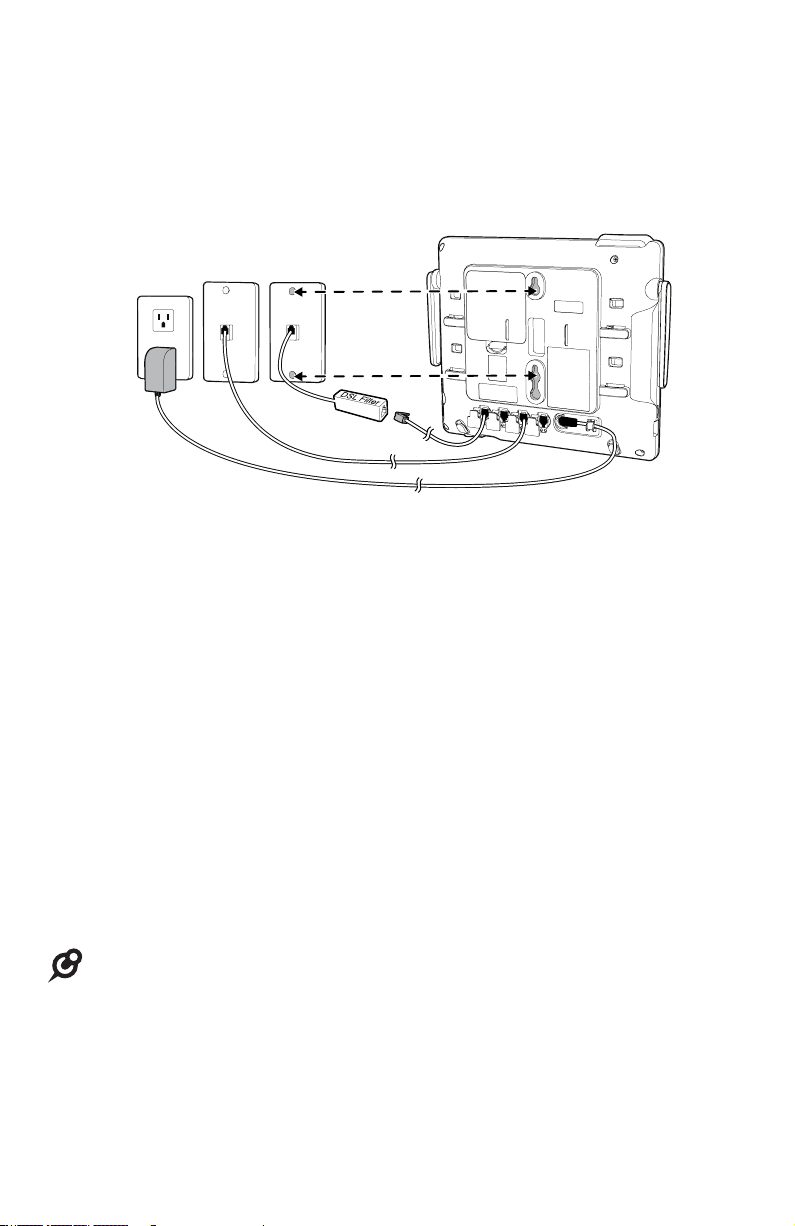
Page 13

Installation setup
Connect your new console
Option 1: If you have four single-line wall jacks, install your console, as shown
below.
Line 3 Line 2Line 4
One end of the coiled telephone line cord has already been plugged into the
1.
Line 1
handset. Make sure it is plugged in firmly. Plug the other end of the coiled
handset cord into the left side of the console.
Open the line jack covers and plug one end of the telephone line cords into
2.
the telephone line jacks of the console.
Plug the other end of the telephone line cords into the single-line telephone
3.
wall jacks, as shown above.
Insert the connector of the power adapter to the power jack on the back of
4.
the console.
Connect the plug head of the power adapter to the power outlet that is not
5.
controlled by a wall switch.
Once the installation is successful, you can make and receive calls on the
console. Now, you can also register your cordless devices or start to configure
your console.
NOTES:
Use only the power adapter supplied with this product. To order a replacement power adapter,
•
visit our website at www.vtechphones.com or call 1 (800) 595-9511. In Canada, please dial
1 (800) 267-7377.
If you are installing less than four telephone line cords to the console, plug the telephone line
•
cords in ascending order starting from the L1/2 jack. Avoid having unoccupied telephone jack
between other occupied telephone jacks.
4
Page 14
Installation setup
Connect your new console
Option 2: If you have two 2-line wall jacks, install your console, as shown below.
Line 1/2Line 3/4
One end of the coiled telephone line cord has already been plugged into the
1.
handset. Make sure it is plugged in firmly. Plug the other end of the coiled
handset cord into the left side of the console.
Open the line jack covers and plug one end of the telephone line cords into
2.
the L1/2 and L3/4 jacks on the back of the console.
Plug the other end of the telephone line cords into the 2-line telephone wall jacks.
3.
Insert the connector of the power adapter to the power jack on the back of
4.
the console.
Connect the plug head of the power adapter to the power outlet that is not
5.
controlled by a wall switch.
Once the installation is successful, you can make and receive calls on the
console. Now, you can also register your cordless devices or start to configure
your console.
NOTES:
Use only the power adapter supplied with this product. To order a replacement power adapter,
•
visit our website at www.vtechphones.com or call 1 (800) 595-9511. In Canada, please dial
1 (800) 267-7377.
A 2-line wall jack supports two telephone numbers in one wall jack. Contact your telephone
•
service provider for details.
The spared L2 and L4 jacks can be connected to non-system telephones, sharing those
•
particular telephone lines. Do not connect a fifth or sixth telephone line to the L2 and L4 jacks as
it is not the intended purpose of those jacks.
5
Page 15

Installation setup
Mount your new console (optional)
Tabletop to wall installation
To install your console in the wall installation position, make sure you first
unplug the power adapter from the electrical outlet and the telephone line cords
from the wall outlet.
Place your corded handset aside. Use a coin to rotate the handset tab
1.
180 degrees. The protruding edge holds the corded handset when the
console is mounted on the wall.
Protruding edge
Handset tab
2. Press in the direction indicated by the arrows to release and remove the
mounting bracket from the console.
Low tabletop position High tabletop position
3. Place the corded handset back to the console. Plug the small end of the
power adapter cord into the power jack on the back of the console.
6
Page 16

Installation setup
Mount your new console (optional)
4. Plug the telephone line cords into the wall jacks.
Option 1: If you have four single-line wall jacks, connect the telephone line
cords, as shown below.
Line 1
Line 3Line 2 Line 4
Option 2: If you have two 2-line wall jacks, connect the telephone line cords,
as shown below.
Line 1/2
Line 3/4
7
Page 17

Installation setup
Mount your new console (optional)
5. Wrap the telephone line cords, as shown below. Mount the telephone on the
mounting plate until it is held securely into position. Plug the large end of the
power adapter into an electrical outlet not controlled by a wall switch.
8
Page 18

Installation setup
Mount your new console (optional)
Wall to tabletop installation
To return the console from wall installation to tabletop position:
Unwrap the telephone line cords. Remove the console from the wall. Unplug
1.
the telephone line cords from the telephone wall jack and the power adapter
cord from the electrical outlet.
2. Place the corded handset aside. Use a coin to rotate the handset tab
180 degrees.
3. Follow the steps in Console installation on pages 3-5 to install your console
for tabletop use.
9
Page 19

Register devices to your new console
Add and register a cordless deskset
You can add desksets (CM18245/AM18247,
purchased separately) to your console. Each deskset
must be registered with the console before use.
The desksets are assigned with available extension
numbers starting from 1 in ascending order (1 to 9).
You can register a maximum of nine cordless devices
to the console.
To register a deskset to your console
The CM18245/AM18247 deskset shows 1) Press MENU
on Console ->Registration ->Register Ext. and 2) Press
# on this extension to register. alternately before you
begin registration.
1. On the console, press MENU/SELECT.
2. Press or to scroll to Registration, then press
MENU/SELECT or SKIP .
3. Press MENU/SELECT or SKIP again to select
Register Ext.
4. On the deskset, press #. The deskset shows
Registering....
5. You hear a beep when the registration is successful.
Both the console and the deskset show Deskset X
registered. (X represents the extension number,
ranged from 1 to 9). It takes up to 60 seconds to
complete the registration.
6. Lift the handset. If you hear a dial tone, the registration
was successful.
NOTES:
If the registration is not successful, the console screen displays
•
Registration failed. Try the registration process again.
You can continue to register a second deskset by following step 3
•
on the console and step 4 on the deskset. If no action is taken, the
console will return to idle mode.
CM18245/AM18247:
CM18445/AM18447:
10
Page 20

Register devices to your new console
Add and register a cordless handset
You can add cordless handsets (CM18045/AM18047, purchased
separately) to your console. Each handset must be registered with
the console before use. The handsets are assigned with available
extension numbers starting from 1 in ascending order (1 to 9).
Make sure the cordless handset is properly installed before you
begin registration. Refer to the user’s manual of the cordless
handset for details. If the handset does not have enough power to
proceed with the registration, you need to charge the new handset
for at least five minutes.
To register a handset to your console
Make sure the CM18045/AM18047 handset is out of the
CM18045/AM18047:
charger and the screen shows 1) Press MENU on Console
->Registration ->Register Ext. 2) Press # on this
extension to register. before you begin registration.
1. On the console, press MENU/SELECT.
2. Press or to scroll to Registration, then press
MENU/SELECT or SKIP .
3. Press MENU/SELECT or SKIP again to select
CM18445/AM18447:
Register Ext.
4. On the handset, press #. The handset shows The handset shows
Registering....
5. The handset beeps once and begins registering to
the console. It takes up to 60 seconds to complete
the registration. There is a beep sound when the
registration is successful. Both the console and the
handset show Handset X registered. (X represents
the extension number, ranged from 1 to 9). It takes up
to 60 seconds to complete the registration.
6. Press a line key (LINE 1 - LINE 4). If you hear a dial
tone, the registration was successful.
NOTES:
If the registration is not successful, the console screen displays
•
Registration failed. Try the registration process again.
You can continue to register a second handset by following step 3 on the console and step 4 on
•
the handset. If no action is taken, the console will return to idle mode.
11
Page 21

Register devices to your new console
Add and register other cordless accessories
You can add cordless headsets (VTech model IS6100), or cordless
speakerphones (AT&T model TL80133) to the console. The cordless
accessories are sold separately.
Make sure the cordless headset or speakerphone is charged before use. Refer
to the corresponding user’s manual for details. You can register a maximum
of nine cordless devices to the console. The registered cordless headsets and
speakerphones are assigned with available extension numbers starting from 9
in descending order (9 to 1), and they behave as individual stations.
After registration, you have an option to link them with the console, deskset
or cordless handset. As cordless headsets and speakerphones rely on other
stations within the system to make outgoing calls, linking them with other
extensions allows you to make a call handsfree. Besides, information about
which line the cordless headset or speakerphone is operating will display on
the screen of the linked extension.
For details about registration, linking and operations of the cordless accessories,
refer to the separate addendum sheet that comes with the package.
VTech IS6100 AT&T TL80133
12
Page 22

Register devices to your new console
Adding a corded headset (optional)
You can use this console handsfree when you install any industry-standard
2.5mm corded telephone headset (purchased separately). See page 50 for
instructions on using the corded headset with this telephone.
To add a corded headset to the console
Side view of the console
Lift open and rotate the plastic cover.
1.
Plug a 2.5 mm headset into the CORDED HEADSET ( ) jack on the side of
2.
the console.
NOTE: If you have corded and cordless headsets connected to yourIf you have corded and cordless headsets connected to your
console, the HEADSET button only controls the corded headset.
For more details on the operation of the corded headset, refer to the
user’s manual for the corded headset.
13
Page 23

Answering system basic setup
Date and time for messages
Set date and time
The answering system displays the date and time of the message while playing
messages. Before using the answering system, follow the steps below to set
the month, day, year and time.
When the console is idle, press MENU/SELECT.
1.
Press or to scroll to Date and time, then press MENU/SELECT or
2.
/SKIP.
Use the dialing keys to enter the month (MM), day (DD) and year (YY), or
3.
press or to increase or decrease the digits, then press MENU/SELECT.
Press /REPEAT or /SKIP to scroll between month, day and year.
Press MENU/SELECT to move to the time setting.
4.
Use the dialing keys to enter the hour and minute, or press or to
5.
increase or decrease the digits, then press MENU/SELECT. Press or to
toggle between am and pm, then press MENU/SELECT. Press /REPEAT or
/SKIP to scroll between the hour (HH), minute (MM) and am/pm.
If you enter digits larger then 12 in the hour field, the system automatically
•
converts to the 12-hour time format.
6. Press MENU/SELECT to save the setting and return to the previous menu.
To exit without making changes, press CANCEL.
NOTES:
If the date and time are not set when a message is recorded, the system does not display date
•
and time on the screen while playing messages.
The date and time settings on the console are synchronized with other extensions automatically.
•
14
Page 24

Answering system basic setup
Line mode for unanswered calls
Set Line mode
Use this feature to set each of the telephone lines to respond to unanswered
incoming calls in one of the four possible line modes, as shown in the chart below.
Incoming call - the called
line flashes and rings on
every extension
Call not answered -
Line mode becomes active
The caller is prompted to leave a message
Line mode:
Gen MB only
Line mode:
Auto attendant
in the general mailbox, which a person at
any deskset or handset can review.
The general mailbox stores incoming
messages, memos and call conversations
(see pages 86-88 for more information).
Caller can select an extension, leave a
message in the general mailbox or listen to
the user-recorded directory.
When the auto attendant directs a call to
an extension but it is not answered, the
auto attendant prompts the caller to leave a
message for that extension.
Line mode:
Announce only
The answering system plays an
announcement only and then the call
is dropped. You can use the default
announcement or record your own
announcement.
Line mode:
No answer
The system does not respond to the
incoming call. The call rings until the caller
hangs up.
To select the line mode:
When the console is idle, press MENU/SELECT.
1.
Press or to scroll to Line mode, then press MENU/SELECT or /SKIP.
2.
3. Press or to select the desired line (Line 1, Line 2, Line 3 or Line 4) or
All lines, then press MENU/SELECT or /SKIP.
4. Press or to choose the desired line mode (Gen MB only, Auto
attendant, Announce only or No answer).
5. Press MENU/SELECT oror /SKIP to confirm. To exit without making changes,
press CANCEL or /REPEAT.
15
Page 25

Answering system basic setup
Auto attendant setup
You can set up the auto attendant to answer outside calls, provide callers with
a company directory, direct calls to a specified extension, and enable callers
to record voice messages by forwarding the calls to the console’s general
mailbox. You can use the default announcement or record up to two outgoing
announcements and one directory announcement. For details on how to use
the auto attendant features, see the Auto attendant operation on page 21 of
this user’s manual.
Activate auto attendant
The console displays AuAt above the line key(s) when the auto attendant is
turned on for the particular line(s).
When the console is idle, press MENU/SELECT.
1.
Press or to scroll to Line mode, then press MENU/SELECT or /SKIP.
2.
3. Press or to select the desired line (Line 1, Line 2, Line 3 or Line 4) or
All lines, then press MENU/SELECT or /SKIP.
4. Press or to scroll to Auto attendant, then press MENU/SELECT or
/SKIP.
NOTE: The auto attendant settings, including number of rings and announcement, apply to all
lines where the corresponding line mode is activated.
Number of rings (auto attendant)
Use this feature to set the number of times the system rings before the auto
attendant picks up a call.
When the console is idle, press MENU/SELECT.
1.
Press or to scroll to Ans sys setup, then press MENU/SELECT or
2.
/SKIP.
Press or to scroll to Auto att setup, then press MENU/SELECT or
3.
/SKIP.
Press MENU/SELECT or /SKIP again to select No. of rings.
4.
Press or to choose the desired number of rings (2-7 or Toll saver).
5.
Toll saver - the answering system answers a call after two rings when
•
there are new messages, and after four rings when there are no new
messages. This enables you to check for new messages without paying
for a toll call.
6. Press MENU/SELECT or /SKIP to save the setting and return to the
previous menu.
16
Page 26

Answering system basic setup
Auto attendant setup
Announcement (auto attendant)
Use this feature to record up to three new announcements so that you
can have different announcements for daytime and after hours, and an
announcement for the company directory. You can easily switch among the
recorded announcements. Each announcement can be up to 90 seconds.
You can record an announcement for daytime recording (Daytime annc) and
an announcement for after hours recording (Night time annc). You can also
record a directory announcement, which provides an extension list of your
company to the caller.
Daytime announcement - The default announcement is “Hello. Thank you
for calling our company. If you know any party’s extension, you may dial it
followed by # (pound key). To leave a message at the general mailbox, press
(star key) twice.”
Night time announcement - The default announcement is “Hello. Thank
you for calling our company. We are currently closed. If you know any party’s
extension, you may dial it followed by # (pound key). To leave a message at
the general mailbox, press (star key) twice.”
Directory announcement - If you have many extensions, record a separate
extension list in the Record directory menu item and reference it in your
auto attendant announcement as shown in Sample announcement 1 below.
If you have only a few extensions, you can list them in the auto attendant
announcement as shown in Sample announcement 2 below without the
separate extension list.
Sample announcement 1: “Hello, you have reached XYZ Corp. Please enter
your party’s extension. To hear a list of extensions, dial # (pound key) twice.”
Sample announcement 2: “Hello, you have reached XYZ Corp. For sales,
press 2 pound; for service, press 3 pound; for shipping, press 4 pound; or
press 0 pound for the receptionist.”
If you have recorded a directory announcement, the caller hears “For
company directory, dial # (pound key) twice” after the daytime or night time
announcement.
17
Page 27

Answering system basic setup
Auto attendant setup
To record the daytime or nighttime announcement:
When the console is idle, press MENU/SELECT.
1.
Press or to scroll to Ans sys setup, then press MENU/SELECT or
2.
/SKIP.
Press or to scroll to Auto att setup, then press MENU/SELECT or
3.
/SKIP.
Press or to choose Daytime annc, Night time annc, then press
4.
MENU/SELECT or /SKIP.
The pointer (>) indicates whether the default or user-recorded
5.
announcement is used currently. Press or to scroll to User anncment,
then press MENU/SELECT or /SKIP.
If you have recorded your own announcement before, press or to
•
scroll to Change, then press MENU/SELECT or /SKIP.
6. Press MENU/SELECT to start recording. Lift the handset or face the console
to record your announcement.
7. Press MENU/SELECT again to stop recording. You hear the playback of the
recording.
8. Press or to choose OK to save the recording, or choose Change to
record again if desired. Pressress MENU/SELECT or /SKIP.
To record a directory announcement:
Follow steps 1-3 above.
1.
Press or to choose Record directory, then press MENU/SELECT or
2.
/SKIP.
If you have recorded your own announcement before, press or to
•
scroll to Change, then press MENU/SELECT or /SKIP.
3. Press MENU/SELECT to start recording. Lift the handset or face the console
to record your announcement.
4. Press MENU/SELECT again to stop recording. You hear the playback of the
recording.
5. Press or to choose OK to save the recording, choose Change to
record again if desired, or choose Clear to clear the recording. Pressress
MENU/SELECT or /SKIP.
18
Page 28

Answering system basic setup
Auto attendant setup
To set the start and end time of auto attendant announcement:
You can set the start and end time of the daytime announcement. The system
plays the nighttime announcement in the rest of the time.
When the console is idle, press MENU/SELECT.
1.
Press or to scroll to Ans sys setup, then press MENU/SELECT or
2.
/SKIP.
Press or to scroll to Auto att setup, then press MENU/SELECT or
3.
/SKIP.
Press or to choose Set annc time, then press MENU/SELECT or
4.
/SKIP.
Press /REPEAT or /SKIP to scroll between the hour (HH), minute (MM)
5.
and AM/PM of start time and end time.
Press or to increase or decrease the digits and toggle between am and
6.
pm. You can also press the dialing keys to enter the correct digits.
If you enter digits larger then 12 in the hour field, the system automatically
•
converts to the 12-hour time format.
7. Press MENU/SELECT to save the setting.
NOTE: The start time and the end time of the daytime announcement cannot be the same.
Otherwise, the setting cannot be saved.
19
Page 29

Answering system basic setup
Auto attendant setup
To play the recorded auto attendant announcement:
When the console is idle, press MENU/SELECT.
1.
Press or to scroll to Ans sys setup, then press MENU/SELECT or
2.
/SKIP.
Press or to scroll to Auto att setup, then press MENU/SELECT or
3.
/SKIP.
Press or to choose Daytime annc, Night time annc or Record
4.
directory, then press MENU/SELECT or /SKIP.
If you choose Record directory, the current announcement plays.
•
If you select Daytime annc or Night time annc, pressress or to scroll
•
to User anncment, then press MENU/SELECT or /SKIP to play the
announcement.
To play and select the default auto attendant announcement:
When the console is idle, press MENU/SELECT.
1.
Press or to scroll to Ans sys setup, then press MENU/SELECT or
2.
/SKIP.
Press or to scroll to Auto att setup, then press MENU/SELECT or
3.
/SKIP.
Press or to choose Daytime annc or Night time annc, then press
4.
MENU/SELECT or /SKIP.
Press MENU/SELECT or /SKIP again to choose Default. The default
5.
announcement plays.
Press MENU/SELECT or /SKIP to save the setting.
6.
To clear the recorded directory announcement:
When the console is idle, press MENU/SELECT.
1.
Press or to scroll to Ans sys setup, then press MENU/SELECT or
2.
/SKIP.
Press or to scroll to Auto att setup, then press MENU/SELECT or
3.
/SKIP.
Press or to choose Record directory, then press MENU/SELECT or
4.
/SKIP.
The current directory announcement plays. Press or to choose Clear,
5.
then press MENU/SELECT or /SKIP to clear the recording.
20
Page 30

Answering system basic setup
Auto attendant operation
Using the auto attendant
When auto attendant is on, it automatically picks up the ringing line after the
number of rings you programmed (see Number of rings (auto attendant) on
page 16), and plays the appropriate auto attendant announcement. You can
choose from one of the following options.
Enter the extension number you want to call after the auto attendant
•
announcement is played. The system plays, “Please wait.”
If the mailbox of the destination extension is off and user does not pick
up the call after five rings, the system announces, “Extension X is
not available to answer your call right now.” The auto attendant
announcement will replay. If no command is entered after the second
replay of the auto attendant announcement, the call will be dropped.
If the mailbox on the destination extension is on and user does not pick
up the call after the number of rings set in the extension, the extension
announces, “Extension X is not available to answer your call right
now. Please leave a message after the tone,” then you can record a
private message in that extension mailbox.
If the mailbox on the destination extension is on and the Announce
only answer mode is selected, the system announces, “Extension X is
not available to answer your call right now. Please call again later.
Goodbye.”
Press (star key) twice to enter the general mailbox and leave a message.
•
If you have recorded a directory announcement, press # (pound key)
•
twice to play the directory announcement. The caller can enter the desired
extension number anytime during the directory announcement is being
played.
Enter the remote access code when the auto attendant announcement is
•
being played to access the answering system remotely.
If the caller does not enter a command after about five seconds, the auto
attendant announcement will replay. If no command is entered after the second
replay of the auto attendant announcement, the call will be dropped.
21
Page 31

Answering system basic setup
Auto attendant operation
Auto attendant (AA) flow chart
Incoming
call
AA answers and plays
outgoing announcement
Caller dials
twice
AA records
message
in general
mailbox
Normal call
Extension
mailbox
records
message
or plays
announcement
Caller dials
# twice
AA plays
user-
recorded
directory
announcement
Yes
Yes
Caller dials
extension
number
AA calls
extension
User picks up
the call
No
Extension
mailbox picks up
the call
No
Caller enters another
extension or records
a message in general
mailbox
Caller enters
remote access
code
Answering
system
remote
access
No
command
entered
AA replays
outgoing
announcement
No command
entered after
the 2nd replay
Call ends
NOTE: Extension mailbox is not available in cordless headsets or speakerphones.
22
Page 32

Answering system basic setup
General mailbox setup
This console has a general mailbox that can answer calls and record messages
when it is turned on. It also picks up unanswered intercom calls and calls
forwarded from the auto attendant. Apart from being the general mailbox of the
system, it also acts as the extension mailbox of the console.
The general mailbox answers the call after the number of rings you set in the
Number of rings (general mailbox) section below.
When the general mailbox is full, callers hear “Hello. This is the general
mailbox. Mailbox is full. Please call again later. Goodbye.”
Activate general mailbox
The console displays MB above the line key(s) when the general mailbox is
turned on for the particular line(s).
When the console is idle, press MENU/SELECT.
1.
Press or to scroll to Line mode, then press MENU/SELECT or /SKIP.
2.
3. Press or to select the desired line (Line 1, Line 2, Line 3 or Line 4) or
All lines, then press MENU/SELECT or /SKIP.
4. Press MENU/SELECT or /SKIP again to select Gen MB only.
NOTE: The general mailbox settings, including number of rings and announcement, apply to
all lines where the corresponding line mode is activated.
Number of rings (general mailbox)
Use this feature to set the number of times the system rings before the general
mailbox picks up a call.
When the console is idle, press MENU/SELECT.
1.
Press or to scroll to Ans sys setup, then press MENU/SELECT or
2.
/SKIP.
Press MENU/SELECT or /SKIP to select Gen MB setup.
3.
Press MENU/SELECT or /SKIP again to select No. of rings.
4.
Press or to choose the desired number of rings (2-7 or Toll saver).
5.
Toll saver - the answering system answers a call after two rings when
•
there are new messages, and after four rings when there are no new
messages. This enables you to check for new messages without paying
for a toll call.
6. Press MENU/SELECT or /SKIP to save the setting and return to the
previous menu.
23
Page 33

Answering system basic setup
General mailbox setup
Announcement (general mailbox)
An announcement plays when calls are answered by the general mailbox.
The system has a default announcement, “Hello. This is the general mailbox.
Please leave a message after the tone.” You can use this announcement or
record your own.
You can record an announcement up to 90 seconds.
To record the general mailbox announcement:
When the console is idle, press MENU/SELECT.
1.
Press or to scroll to Ans sys setup, then press MENU/SELECT or
2.
/SKIP.
Press MENU/SELECT or /SKIP to select Gen MB setup.
3.
Press or to choose Anncment setup, then press MENU/SELECT or
4.
/SKIP.
The pointer (>) indicates whether the default or user-recorded
5.
announcement is used currently. Press or to scroll to User anncment,
then press MENU/SELECT or /SKIP.
If you have recorded your own announcement before, press or to
•
scroll to Change, then press MENU/SELECT or /SKIP.
6. Press MENU/SELECT to start recording. Lift the handset or face the console
to record your announcement.
7. Press MENU/SELECT again to stop recording. You hear the playback of the
recording.
8. Press or to choose OK to save the recording, or choose Change to
record again if desired. Pressress MENU/SELECT or /SKIP.
24
Page 34

Answering system basic setup
General mailbox setup
To play the recorded general mailbox announcement:
When the console is idle, press MENU/SELECT.
1.
Press or to scroll to Ans sys setup, then press MENU/SELECT or
2.
/SKIP.
Press MENU/SELECT or /SKIP to select Gen MB setup.
3.
Press or to choose Anncment setup, then press MENU/SELECT or
4.
/SKIP.
Press or to scroll to User anncment, then press MENU/SELECT or
5.
/SKIP. The current announcement plays.
To play and select the default general mailbox announcement:
When the console is idle, press MENU/SELECT.
1.
Press or to scroll to Ans sys setup, then press MENU/SELECT or
2.
/SKIP.
Press MENU/SELECT or /SKIP to select Gen MB setup.
3.
Press or to choose Anncment setup, then press MENU/SELECT or
4.
/SKIP.
Press MENU/SELECT or /SKIP again to choose Default. The default
5.
announcement plays.
Press MENU/SELECT or /SKIP to save the setting.
6.
25
Page 35

Answering system basic setup
Announce only setup
If announce only is turned on, when there is an incoming call, the system plays
an announcement after the number of rings you set in the Number of rings
(announce only) section below. Then, the call is dropped.
Activate announce only
The console displays Annc above the line key(s) when the announce only
mode is turned on for the particular line(s).
When the console is idle, press MENU/SELECT.
1.
Press or to scroll to Line mode, then press MENU/SELECT or /SKIP.
2.
3. Press or to select the desired line (Line 1, Line 2, Line 3 or Line 4) or
All lines, then press MENU/SELECT or /SKIP.
4. Press or to select Announce only, then press MENU/SELECT or /SKIP
to save the setting.
NOTE: The announce only settings, including number of rings and announcement, apply to all
lines where the corresponding line mode is activated.
Number of rings (announce only)
Use this feature to set the number of times the system rings before the system
picks up a call.
When the console is idle, press MENU/SELECT.
1.
Press or to scroll to Ans sys setup, then press MENU/SELECT or
2.
/SKIP.
Press or to scroll to Annc only setup, then press MENU/SELECT or
3.
/SKIP.
Press MENU/SELECT or /SKIP again to select No. of rings.
4.
Press or to choose the desired number of rings (2-7 or Toll saver).
5.
Toll saver - the answering system answers a call after two rings when
•
there are new messages, and after four rings when there are no new
messages. This enables you to check for new messages without paying
for a toll call.
6. Press MENU/SELECT or /SKIP to save the setting and return to the
previous menu.
26
Page 36

Answering system basic setup
Announce only setup
Announcement (announce only)
An announcement plays when calls are answered by the announce only mode.
The system has a default announcement, “Hello. Thank you for calling our
company. We are not available to answer your call right now. Please call
again later. Goodbye.” You can use this announcement or record your own.
You can record an announcement up to 90 seconds.
To record the announce only announcement:
When the console is idle, press MENU/SELECT.
1.
Press or to scroll to Ans sys setup, then press MENU/SELECT or
2.
/SKIP.
Press or to scroll to Annc only setup, then press MENU/SELECT or
3.
/SKIP.
Press or to choose Anncment setup, then press MENU/SELECT or
4.
/SKIP.
The pointer (>) indicates whether the default or user-recorded
5.
announcement is used currently. Press or to scroll to User anncment,
then press MENU/SELECT or /SKIP.
If you have recorded your own announcement before, press or to
•
scroll to Change, then press MENU/SELECT or /SKIP.
6. Press MENU/SELECT to start recording. Lift the handset or face the console
to record your announcement.
7. Press MENU/SELECT again to stop recording. You hear the playback of the
recording.
8. Press or to choose OK to save the recording, or choose Change to
record again if desired. Pressress MENU/SELECT or /SKIP.
27
Page 37

Telephone operation basic setup
Calls management
Ring group
Use this feature to specify which extensions ring and display the caller ID
information when there is incoming call on a certain telephone line. By default,
all extensions ring on all lines. You can exclude some extensions from the
ring group, however, they can still be used to make outgoing calls on the nonringing line.
1.
When the console is idle, press MENU/SELECT.
Press or to scroll to Ringer setting, then press MENU/SELECT or
2.
/SKIP.
Press or to scroll to Ring group, then press MENU/SELECT or /SKIP.
3.
4.
Press or to review the ring groups of different line (Line 1-Line 4).
Press MENU/SELECT or SKIP to edit the group member. Use the dial pad
5.
to press the number of the extension (0, 1, 2, 3, 4, 5, 6, 7, 8, 9) that you
want to remove, or press the number again to add it back to the ring group.
The non-existing extensions are represented by X.
6.
Press MENU/SELECT or SKIP to save the setting and return to the previous
menu. To exit without making changes, press CANCEL.
NOTES:
•
0 represents the console.
All registered cordless headsets or speakerphones are bound to be in all ring groups.
•
28
Page 38

Telephone operation basic setup
Calls management
Call privacy
The call privacy is set to Off by default. The console allows other extensions to
join a call in progress.
To turn call privacy on when the console is not in use:
If you do not expect any other extension to join in the conversation when you
are on a call, you can turn this setting on when the console is not in use to
ensure that only one device uses a line at a time.
When the console is idle, press MENU/SELECT.
1.
2. Press or to scroll to Console setup, then press MENU/SELECT or
/SKIP.
3. Press or to scroll to Call privacy, then press MENU/SELECT or /SKIP.
4. Press or to scroll to On or Off.
5. Press MENU/SELECT or /SKIP to save the setting and return to the
previous menu. To exit without making changes, press CANCEL or
/REPEAT.
To turn call privacy off during a call:
During a call, you can temporarily change the call privacy setting to allow or
disallow other extensions to join the call. The original setting is automatically
restored after you hang up or resume the call you put on hold.
While on a call, press MENU/SELECT.
1.
Press or to choose Private, then press MENU/SELECT oror /SKIP.
2.
Other extensions can now join the call by pressing the corresponding line key
(LINE 1-LINE 4).
To turn call privacy back on during a call:
While on a call, press MENU/SELECT.
1.
Press or to choose Private, then press MENU/SELECT oror /SKIP. The
2.
console displays -Priv.
No extension can join the call now. If another extension tries to access the line
you are using, it displays Private call.
29
Page 39

Telephone operation basic setup
Calls management
Music on hold (M.O.H.)
You can choose what callers hear when being placed on hold.
You have four options:
If you want callers to hear the hold reminder tone, select Hold tone in the
•
M.O.H. source menu (page 30).
If you want callers on hold to hear one of the three default music that comes
•
with the telephone, select the desired music (M.O.H. 1 - M.O.H. 3) in the
M.O.H. source menu (page 30).
If you want callers on hold to hear audio or music from an audio source that
•
you recorded in the console using the audio cable, select Recorded M.O.H.
in the M.O.H. source menu (pages 31-32).
If you want callers to hear audio directly streamed into the telephone,
•
connect an audio source, such as a computer, mobile phone or MP3 player,
to the console using the audio cable (page 30).
NOTES:
Source of default music files: FreeMusicArchive.org. Used under open license.
•
If user of other extension holds a call while the console is reviewing or recording M.O.H., the far
•
end will hear the double-beep hold tone. Release the hold and hold the call again to apply the
M.O.H..
Review and select music on hold source:
When the console is idle, press MENU/SELECT.
1.
Press or to scroll to Music on hold. Press MENU/SELECT or /SKIP.
2.
Press or to scroll to M.O.H. source, then press MENU/SELECT or /SKIP.
3.
The default music or tone plays while you press or to highlight a music
4.
on hold source.
5. Press MENU/SELECT or /SKIP to select a highlighted M.O.H. source and
return to the previous menu.
If you select Aux. in device but no audio device is connected to the
•
MUSIC ON HOLD ( ) jack, the screen displays No device is connected
to the M.O.H. jack at console. Connect an audio device to the MUSIC
ON HOLD ( ) jack (page 31), then choose Aux. in device again.
If you select Recorded M.O.H. but no recorded music is available, the
•
screen displays Record M.O.H.: [SELECT] to rec.. Refer to pages 31-32
for details on recording music.
6. To exit without making changes, press CANCEL or /REPEAT.
NOTE: You cannot make any changes to the settings of M.O.H. source while a call is currently
on hold. The screen displays M.O.H. currently in use. Please try again later.
30
Page 40

Telephone operation basic setup
Calls management
Record music or a voice message:
You can record audio or music from an audio source such as a computer, mobile
phone or MP3 player with a 3.5mm audio jack using the audio cable provided.
The recording can be up to three minutes long and plays repeatedly while a call
is on hold.
NOTE: It is the user’s responsibility to comply with the copyright laws and to provide lawfully
acquired music for the music on hold feature. Unlawful use of copyright protected music and/or
lyrics may subject the user to fines and other legal action.
Record music or a message using an audio device:
When the console is idle, press MENU/SELECT.
1.
Press or to scroll to Music on hold, then press MENU/SELECT or
2.
/SKIP.
Press MENU/SELECT or /SKIP again to select Record M.O.H..
3.
Plug one end of the audio cable into the MUSIC ON HOLD (( ) jack on thejack on the
4.
console and plug the other end of the audio cable into the 3.5mm audio
output jack on your audio device, as shown below.
When your audio device is ready to play, press MENU/SELECT on the
5.
console. You hear the voice prompt “Record after the tone. Press
SELECT when you are done.” Start playing the music or message on your
audio device after the beep. The audio plays through the speakerphone and
a counter on the screen shows the elapsed time. The maximum record time
is three minutes, at which time the console automatically stops recording.
You can press CANCEL or /REPEAT to abort recording without saving.
Press MENU/SELECT to stop recording. You hear the playback of the
6.
recording.
Press or to choose OK to save the recording, or choose Change to
7.
record again if desired. Press MENU/SELECT or /SKIP.
31
Page 41

Telephone operation basic setup
Calls management
NOTES:
If you want to record a piece of new music while the music on hold is in use, M.O.H. currently in
•
use. Please try again later. displays on the screen.
If you fail to record a message, ensure that the audio cable is fully plugged into the MUSIC ON
•
HOLD ( ) jack.jack.
Change the music on hold volume:
The music on hold volume can only be changed at the audio device.
Place a call to your console.
1.
Press HOLD on the console to place the call on hold. Listen to the music on
2.
hold to determine if the volume is desirable.
If you are want to make adjustments to the volume on the audio device and
3.
record the audio again, start again with step 1 of Record music or a message
using an audio device.
-OR-
If you get streaming audio from a device and want to make adjustments to
the volume, change the volume on the audio device while the call is on hold
until you find the desired volume. When you finish listening to the audio, hang
up both telephones.
32
Page 42

Getting started
Console overview
LINE 1-LINE 4 keys
Press to make or
•
answer a call on the
desired line.
DELETE
While playing a message,
•
press to delete the message.
While reviewing the call
•
history, press to delete an
individual entry.
While predialing, press to
•
delete digits.
MESSAGE WAITING
indicator
Turns on when there are new
•
messages in the general
mailbox.
MAIL BOX
When in idle mode, press
•
to enter the general
mailbox menu.
CALL HISTORY
Press to view caller ID
•
information.
DIRECTORY
Press to view directory
•
information.
MENU/SELECT
Press to enter the menu.
•
While in the menu, press to
•
select an item or save an
entry or setting.
CANCEL
While in a menu, press to
•
cancel an operation and exit
the menu display.
Navigation keys
While in menus, press or to scroll through the menus.
•
Press /SKIP to enter the highlighted item or save changes, or
press /REPEAT to return to the previous menu.
While entering names or numbers, press /REPEAT or /SKIP
•
to move the cursor to the left or right.
While playing back messages, press /REPEAT to repeat the
•
message, or press /SKIP to skip to the next message.
33
Page 43

Getting started
Console overview
Speed dial keys
•
Press to dial the desired
speed dial number.
LOWER
When assigning or dialing a
•
speed dial number, press to
switch to the lower location
(the second 16 locations) of a
speed dial key.
MIC
MUTE
During a call, press to
•
mute the microphone.
HEADSET
When a corded headset is
•
connected to the console,
press to make, answer or
hang up a call.
FLASH
During a call, press to
•
answer an incoming call
when you receive a call
waiting alert.
AUTO REDIAL
Press to view the last
•
10 numbers dialed.
INTERCOM
When in idle mode,
•
press to initiate an
intercom call.
PAGE
Press to begin a one-
•
to-one or one-to-group
broadcast.
DND (do not disturb)
Press to turn the feature
on. Press again to turn off.
SPEAKER
Press to turn on the
•
speakerphone. Press again
to turn it off.
HOLD
Press to place an outside
•
call or intercom call on hold.
TRANSFER
Press to transfer a call to
•
an extension.
During message playback,
•
press to transfer the
message to an extension.
CONFERENCE
Press to add another
•
extension or outside line to
an existing call.
+
-
/VOL/
During a call, press to
•
adjust the listening volume.
During message playback,
•
press to adjust the
playback volume.
Press to adjust the ringer
•
volume when in idle mode.
34
Page 44

Getting started
Console overview
Directory card
To write names on the directory card,
follow the steps mentioned below:
Write the information on a directory card
1.
that comes with the package.
Insert the edge of the directory card
2.
in the slot at the front of the console,
under the plastic cover.
Main menu
The > symbol highlights a menu item.
Main menu
Directory
•
Call history
•
Ringer setting
•
Console setup
•
Line mode
•
Ans sys setup
•
Registration
•
Music on hold
•
COVM
•
Date and time
•
Speed dial
•
Dial mode
•
User support
•
HDST/SPK
•
Factory reset
•
Console info
•
Using menus
Press MENU/SELECT to show the main menu.
•
Press or to scroll through menu items.
•
Press MENU/SELECT or press /SKIP to select
•
a highlighted menu item.
Press MENU/SELECT to save changes.
•
Press CANCEL to cancel an operation, exit the
•
menu display or return to the idle screen.
35
Page 45

Overview
Console overview
The following tables provides you with more details on the main menu and
answering system setup sub-menu of the console.
Table 1 - Main menu (Press MENU/SELECT in idle screen)
Menu Description Reference
Directory Review, add or delete directory entries. Pages 69-73
Call history Review, delete call history entries, or copy an
entry to directory.
Ringer
setting
Console
setup
Line mode Set how the answering system responds to
Ans sys
setup
Set the ringer volume, ringer tone, and ring
group*.
*Ring group defines which extension(s) will ring
when there is an incoming call.
Set LCD contrast, key tone, LCD language,
primary line*, call privacy**, area codes,
console name, and hold reminder.
*Primary line defines which line is automatically
selected each time you pick up the corded
handset or press the speakerphone.
**Call privacy defines whether other extensions
can barge in to join a call in progress.
incoming calls on each line:
General mailbox for callers to leave
•
messages on the console’s general mailbox.
Auto attendant for directing incoming calls
•
to different extensions.
Announce only for informing callers that no
•
one is available to answer the call.
No answer for turning off both the general
•
mailbox and auto attendant.
Set up the answering system of the console,
including general mailbox, auto attendant and
announce only. Refer to Table 2 for details.
Pages 74-79
Pages 28,
41-42
Pages 43-46
Page 15
Pages 16-87
Registration Add cordless deskset, cordless handset or
other cordless accessories into the system.
Music on
hold
Select different music for far end callers to hear
during a hold call, and record your own music.
36
Pages 10-12
Pages 30-32
Page 46

Overview
Console overview
Table 1 - Main menu (Press MENU/SELECT in idle screen) (Continued)
Menu Description Reference
COVM Set whether the console will display if Central
Office has voicemail for you.
Date and
time
Speed dial Program the desired telephone numbers or
Dial mode Set pulse dialing or tone dialing. Page 47
User
support
HDST/SPK Review, change or remove the linkage of
Factory
reset
Console info View the current console settings. Page 48
Table 2 - Answering system setup sub-menu (Select Ans sys setup in
main menu)
Set the date and time of the console. If you
have subscribed to Caller ID Type I service, you
can ignore this setting.
extension numbers into the speed dial keys.
Display a website for you to get extra support. Page 47
cordless headset or speakerphone with any
system extensions.
Reset all settings of the console to the factory
default.
Page 68
Page 14
Pages 65-67
Addendum
sheet
Page 10
Menu Description Reference
Gen MB
setup
Set up the console’s general mailbox.
This mode allows callers on a particular line
to leave messages in the console’s general
mailbox. You can set the number of rings before
the system answers the incoming calls and
record your own greeting announcements.
Line mode has to be set to Gen MB only for
these features to function.
37
Pages 23-25
Page 47

Overview
Console overview
Table 2 - Answering system setup sub-menu (Select Ans sys setup in
main menu) (Continued)
Menu Description Reference
Auto att
setup
Annc only
setup
Call
screening
Message
length
Call
intercept
Set up the auto attendant.
This mode allows callers on a particular line to
reach any extensions within the system without
the need to forward the call manually. You
can set the number of rings before the system
picks up the call, and record your own greeting
announcements and company directory.
Line mode has to be set to Auto attendant for
the features to function.
Set up the announce only answer mode.
This mode allows playing an announcement to
callers that no one is available to take the call.
You can set the number of rings before the
system picks up the call and record your own
greeting announcements.
Line mode has to be set to Announce only for
the features to function.
Set whether the console user hears the caller
whenever a voice recording is taking place.
Set the maximum duration allowed for any voice
messages recorded.
Set whether users of other system extensions
can intercept and stop a recording in console’s
general mailbox and talk to the caller.
Pages 16-20
Pages 26-82
Page 83
Page 83
Page 84
Remote
access
Msg alert
tone
Voice
language
Modify the passcode for users to access
console’s general mailbox remotely by making a
call to one of the telephone lines.
Set whether a tone is played in idle mode when
there are unattended messages in the general
mailbox.
Set the language of voice prompts used in the
system.
38
Page 84
Page 85
Page 85
Page 48

Overview
Console screen icons
On when any corresponding extensions are in use.
Ringer off - On steadily when the ringer volume is set to off or the do not disturb
function is on.
Headset - On steadily when using a corded headset.
COVM
-Mute
-Priv
-Rec
Conf.
LOWER
There is new voicemail for the telephone line(s) next to the COVM indicator.
Announce only is on for the telephone line below the Annc indicator.
Auto attendant is on for the telephone line below the AuAt indicator.
The general mailbox is turned on for the telephone line below the MB indicator.
On when the console is running on backup battery.
Microphone is muted.
Call privacy is on.
A call is being recorded.
A conference call is active.
The lower location of the speed dial keys is active.
39
Page 49

Getting started
Alert tones and lights
Alert tones
One beep The console is recording an announcement or memo.
Two beeps You have set the hold reminder on; a call has been on hold for
more than three minutes.
-OR-
You have set the message alert tone on.
-OR-
There is an incoming call waiting.
Lights
MESSAGE WAITING
Turns on when there
•
are new messages.
Large lighted display
LINE 1/LINE 2/LINE 3/LINE 4
On when the telephone line is in use.
•
Flashes slowly when the telephone line is
INTERCOM
On when the
•
console is on an
intercom call.
Flashes slowly when
•
the console is holding
an intercom call.
Flashes quickly when
•
there is an incoming
intercom call.
MUTE
On when the
•
microphone is muted.
PAGE
On when a one-
•
to-one or one-togroup broadcast is
established.
•
on hold.
Flashes quickly when there is an incoming
•
call or a transfer call.
HEADSET
On when the corded
•
headset is in use.
SPEAKER
On when the
•
speakerphone is on.
DND
On when the do not
•
disturb function is on.
40
Page 50

Telephone settings
Console setup
Menu settings
Use this menu to change the telephone system settings.
Press MENU/SELECT when in idle mode (when the console is not in use) toconsole is not in use) to is not in use) to
1.
enter the main menu.
Press or to scroll to the feature to be changed. Theto scroll to the feature to be changed. The > symbol indicates
2.
the selected menu item.
Press MENU/SELECT or /SKIP to select the menu item.
3.
Press CANCEL to exit setup without making changes.
4.
NOTE: Press CANCEL to cancel an operation, exit the menu display, or return to idle mode.
Ringer volume
Use this feature to set the ringer volume to one of the six levels or turn the
ringer off. When the ringer is off, the icon appears on the console screen.
The console stores the volume setting for all lines.
When the console is idle, press MENU/SELECT.
1.
Press or to scroll to Ringer setting, then press MENU/SELECT or
2.
/SKIP.
Press MENU/SELECT or /SKIP again to select Ringer volume.
3.
Press , , or +/VOL/-/VOL/- on the console to adjust the ringer volume.
4.
Press MENU/SELECT or /SKIP to save the setting and return to the
5.
previous menu. To exit without making changes, press CANCEL or
/REPEAT.
-OR-
When the console is idle, press +/VOL/-/VOL/- to adjust the ringer volume, then press
MENU/SELECT to save.
NOTES:
The ringer volume also determines the ringer volume for intercom calls. If the console ringer
•
volume is set to off, it is silenced for all incoming calls, including intercom calls.
While you are using the answering system setup, general mailbox, line mode or music on hold
•
menu of the console and there is an incoming call, the console does not ring.
41
Page 51

Telephone settings
Console setup
Ringer tone
Use this feature to choose one of the ten ringer tones for incoming calls. You
can choose different ringer tones for different lines so you can easily identify
which line is calling.
When the console is idle, press MENU/SELECT.
1.
Press or to scroll to Ringer setting, then press MENU/SELECT or
2.
/SKIP.
Press or to scroll to Ringer tone, then press MENU/SELECT or /SKIP.
3.
Press or to select the desired line (Line 1-Line 4), then press
4.
MENU/SELECT or /SKIP.
Press or to select the desired ringer tone.
5.
Press MENU/SELECT or /SKIP to save the setting and return to the
6.
previous menu. To exit without making changes, press CANCEL or
/REPEAT.
Repeat steps 4-6 above to choose ringer tones for other lines if desired.
7.
Do not disturb (DND)
Use this feature to silence your console. When you activate the do not disturb
function, the icon appears on the console screen. You will not receive any
paging call and you will not hear rings of incoming call or intercom call.
Instead, the LINE 1-LINE 4 indicator flashes to signal an incoming call. If you
receive an intercom call, the extension number of that intercom call appears on
the screen display.
Press DND to prevent interruptions. The DND indicator turns on.
1.
Press DND again to resume normal call alerts. The DND indicator turns off.
2.
42
Page 52

Telephone settings
Console setup
LCD contrast
Use this feature to adjust the screen contrast to one of five levels to optimize
readability in different lighting conditions.
1.
When the console is idle, press MENU/SELECT.
Press or to scroll to Console setup, then press MENU/SELECT or
2.
/SKIP.
Press or to scroll to LCD contrast, then press MENU/SELECT or
3.
/SKIP.
Press or to choose the desired screen contrast level.
4.
5.
Press MENU/SELECT or /SKIP to save the setting and return to the
previous menu. To exit without making changes, press CANCEL or
/REPEAT.
Key tone
The console is set to beep with each key press. If you turn off the key tone,
there are no beeps when you press keys.
When the console is idle, press MENU/SELECT.
1.
2.
Press or to scroll to Console setup, then press MENU/SELECT or
/SKIP.
Press or to scroll to Key tone, then press MENU/SELECT or /SKIP.
3.
4.
Press or to choose On or Off.
5.
Press MENU/SELECT or /SKIP to save the setting and return to the
previous menu. To exit without making changes, press CANCEL or
/REPEAT.
43
Page 53

Telephone settings
Console setup
LCD language
This feature allows you to change the language used for all screen displays.
The LCD language settings on the console, desksets and cordless handsets
are independent. By default, the language is set to English.
When the console is idle, press MENU/SELECT.
1.
Press or to scroll to Console setup, then press MENU/SELECT or
2.
/SKIP.
Press or to scroll to LCD Language, then press MENU/SELECT or
3.
/SKIP.
Press or to select English, Francais or Espanol.
4.
Press MENU/SELECT or /SKIP again to save the setting and return to the
5.
previous menu. To exit without making changes, press CANCEL or
/REPEAT.
Primary line
Use this feature, also known as automatic line selection, to choose which line is
automatically selected each time you make an outside call. The console comes
factory set for Auto selectable line, which chooses any available line starting
from Line 1.
When the console is idle, press MENU/SELECT.
1.
Press or to scroll to Console setup, then press MENU/SELECT or
2.
/SKIP.
Press or to scroll to Primary line, then press MENU/SELECT or /SKIP.
3.
Press or to select Auto, Line 1, Line 2, Line 3 or Line 4.
4.
Press MENU/SELECT or /SKIP again to save the setting and return to the
5.
previous menu. To exit without making changes, press CANCEL or
/REPEAT.
44
Page 54

Telephone settings
Console setup
Area codes
Use this feature to program this system to recognize one home area code and
up to four local area codes. This feature makes it easy for you to place a call
from the caller ID log.
If you dial seven digits to make a local call (no area code required), enter your
area code into the telephone as the home area code. When you receive a call
from within your home area code, the caller ID information only displays the
seven digits of the telephone number, and when you dial from the call log, only
seven digits are dialed.
If you must dial 10 digits (the area code and telephone number) for local
calls, enter 000 for the home area code and enter your area code as a local
area code. Then, if you receive a call from within your area code, the screen
displays all 10 digits of the telephone number, and when you dial from the call
log, all 10 digits are dialed.
If you have more than one area code for your region, enter those area codes as
local area codes.
When the console is idle, press MENU/SELECT.
1.
Press or to scroll to Console setup, then press MENU/SELECT or
2.
/SKIP.
Press or to scroll to Area codes, then press MENU/SELECT or /SKIP.
3.
Press or to scroll to Home area or Local area 1- Local area 4. Press
4.
MENU/SELECT to edit it.
Use the dial pad keys to enter a three-digit area code. Enter 000 for your
5.
home area code if you always dial ten-digit numbers.
Press DELETE to delete a digit.
•
Press and hold DELETE to delete all digits.
•
Press /REPEAT or /SKIP to move the cursor to the left or right.
•
Press or to move the cursor to the beginning or end.
•
6. Press MENU/SELECT to save the setting and return to the previous menu. To
exit without making changes, press CANCEL.
45
Page 55

Telephone settings
Console setup
Console name
Use this feature to rename the console.
When the console is idle, press MENU/SELECT.
1.
Press or to scroll to Console setup, then press MENU/SELECT or
2.
/SKIP.
Press or to scroll to Console name, then press MENU/SELECT or
3.
/SKIP.
Use the dialing keys to change the name (up to 10 characters).
4.
Press DELETE to delete a character.
•
Press and hold DELETE to delete all characters.
•
Press /REPEAT or /SKIP to move the cursor to the left or right.
•
Press or to move the cursor to the beginning or end.
•
Press 0 to add a space.
•
Press MENU/SELECT to save the setting and return to the previous menu.
5.
To exit without making changes, press CANCEL.
Hold reminder
When the console holds an outside call or an intercom call for more than three
minutes, it gives you a double beep every 30 seconds. You can set its volume
to one of the six levels or mute the hold reminder.
When the console is idle, press MENU/SELECT.
1.
Press or to scroll to Console setup, then press MENU/SELECT or
2.
/SKIP.
Press or to scroll to Hold reminder, then press MENU/SELECT or
3.
/SKIP.
Press , , or +/VOL/- to choose the desired volume or mute the feature.
4.
Press MENU/SELECT or /SKIP to save the setting and return to the
5.
previous menu. To exit without making changes, press CANCEL or
/REPEAT.
46
Page 56

Telephone settings
Console setup
Dial mode
The dial mode is preset to tone dialing. If you have pulse (rotary) service, you
must change the dial mode to pulse dialing before using the telephone.
When the console is idle, press MENU/SELECT.
1.
Press or to scroll to Dial mode, then press MENU/SELECT or
2.
/SKIP.
Press or to scroll to Touch-tone or Pulse.
3.
Press MENU/SELECT or /SKIP to save the setting and return to the
4.
previous menu. To exit without making changes, press CANCEL or
/REPEAT.
User support
Use this feature to display the VTech website.
When the console is idle, press MENU/SELECT.
1.
Press or to scroll to User support, then press MENU/SELECT or
2.
/SKIP.
Press CANCEL or /REPEAT to return to the main menu.
3.
47
Page 57

Telephone settings
Console setup
Console info
Use this feature to view the current settings of the console. No editing is
available in this menu.
When the console is idle, press MENU/SELECT.
1.
Press or to scroll to Console info, then press MENU/SELECT or
2.
/SKIP.
Press or to scroll to the desired setting, then press MENU/SELECT or
3.
/SKIP.
In each individual setting, you can press or to browse the last or next
4.
setting.
48
Page 58

Telephone operation
Console operation
The console comes programmed to select a line automatically for calls when
you do not press a line key. To override the automatic line selection setting,
see Primary line on page 44 for details. When you answer a call, the console
automatically selects the ringing line.
Line indicators
Each of the four indicators on LINE 1-LINE 4 indicate
the state of the corresponding telephone line.
On when the corresponding line is in use.
•
Flashes slowly when the line is on hold.
•
Flashes quickly when there is a transferred call on
•
the corresponding line.
Flashes quickly when there is an incoming auto attendant transferred call on
•
the corresponding line.
Flashes quickly when there is an incoming call on the corresponding line.
•
Making and ending a call
To make a call using the console:
Lift the handset or press SPEAKER .
1.
-OR-
To override automatic line selection, press LINE 1-LINE 4 for the desired
line, then lift the handset.
2. Wait for a dial tone, then enter the telephone number. The screen displays
the elapsed time as you talk (in hours, minutes and seconds).
To end a call using the console:
Place the handset on the console to hang up.
•
-OR-
If you are using the speakerphone, press SPEAKER to hang up.
•
NOTE: The elapsed time is not affected by accessing services from your telephone
service provider.
49
Page 59

Telephone operation
Telephone operation
Console operation
Console operation
To make a call using a corded headset:
Make sure a corded headset is connected to the console (page 13).
Press HEADSET on the console.
1.
Wait for a dial tone, then dial the number.
2.
To hang up, press HEADSET.
3.
To make a call using a cordless headset or speakerphone:
You can make a call using a registered cordless headset or speakerphone after
it is linked with an extension device. For more details, refer to the addendum
sheet that comes with the package.
On hook dialing (predialing)
Enter the telephone number. Press DELETE to make corrections.
1.
Lift the handset or press SPEAKER to dial.
2.
-OR-
To override automatic line selection, press LINE 1-LINE 4 for the desired
line, then lift the handset.
Full-duplex speakerphone
During a call, press SPEAKER to switch between handsfree speakerphone
and normal handset use. Press SPEAKER again if you are using
speakerphone or place the handset on the console to hang up.
Answering a call
Lift the handset, or press the corresponding line key (LINE 1-LINE 4),
SPEAKER , HEADSET on the console to answer an incoming call.
Temporary ringer silencing
When the console is ringing, you can temporarily silence the ringer of the
console without disconnecting the call. Press MUTE to silence the ringer. The
next call rings normally at the preset volume.
50
Page 60

Telephone operation
Options while on calls
Call waiting
If you subscribe to call waiting service with your telephone service provider,
and someone calls while you are in the middle of a call, you hear two beeps.
Press FLASH to put your current call on hold and take the
•
new call.
Press FLASH at any time to switch back and forth
•
between calls.
Volume control
Use this feature to independently set the listening volume to one of six
levels for each of the listening options (corded handset, corded headset and
speakerphone).
All settings are independent. While on a call, press
+/VOL/- to adjust the listening volume.
Mute
Use this feature during a telephone conversation to silence the microphone.
You can hear the caller, but the caller cannot hear you.
To mute a call:
Press MUTE. When mute is on, the MUTE button lights up;
•
the screen also displays MUTE.
To take a call off mute:
Press MUTE again and resume speaking.
•
Temporary tone dialing
If you have pulse (rotary) service only, use this feature to temporarily switch
pulse to touch-tone dialing during a call by pressing TONE .
Press TONE during a call.
1.
Use the dialing keys to enter the desired number. The telephone sends
2.
touch-tone signals.
The telephone automatically returns to pulse dialing mode after you end
the call.
51
Page 61

Telephone operation
Telephone operation
Options while on calls
Options while on calls
Hold
Use this feature to hold one line while accessing another, or as part of the
conference feature.
While on a call, press HOLD. The corresponding line key
(LINE 1-LINE 4) indicator for the line on hold flashes slowly.
After the call has been put on hold for more than three
minutes, a double beep sounds every 30 seconds.
(To adjust the volume or turn off the reminder beep, see
Hold reminder on page 46).
If you are using the speakerphone, the speakerphone turns off and the
SPEAKER key turns off automatically after you press HOLD. If you are
using the corded headset, the headset turns off and the HEADSET key turns
off automatically after you press HOLD.
To release the hold, press the line key (LINE 1-LINE 4) of the line being put
on hold.
Music on hold (M.O.H.) feature is available. When you put a call on hold, the
caller will hear the music you set in the console. To change the setting and for
more details, see Music on hold on pages 30-32.
Apart from holding outside lines, you can also hold internal intercom calls. See
page 60 for details.
NOTES:
The call privacy setting in Console setup menu remains unchanged after the call is put on hold.
•
The call ends automatically after it is put on hold for 15 minutes.
•
Switching between lines
Use this feature to switch between lines during an outside call:
Press the desired line key (LINE 1-LINE 4) of the telephone line you want to
1.
make or answer call. The current call is put on hold automatically.
To return to the first call, press the line key (LINE 1-LINE 4) of the original
2.
call. The second line is put on hold automatically.
52
Page 62

Telephone operation
Options while on calls
Recording a call
Use this feature to record two-way phone conversations, conferences or
intercom calls. The recording is treated the same as memos and is marked as
a new message in the general mailbox. Listen to recorded conversation the
same way as incoming messages or memos (see Message playback on
page 86).
To record a call:
While on a call, press MENU/SELECT.
1.
Press MENU/SELECT oror /SKIP to start recording.
2.
The recording starts and the screen shows -Rec. Both the console user and
3.
the far-end party hear a beep sound.
NOTE: To ensure that you are in compliance with any federal or state regulations regarding
recording a telephone call, you should start the recording process and then inform the other
party that you are recording the call.
To stop recording:
Place the corded handset back to the console, or press SPEAKER to hang
up if you are using the speakerphone.
-OR-
Press MENU/SELECT twice during the recording. The system saves the
conversation into the general mailbox.
53
Page 63

Telephone operation
Options while on calls
Chain dialing
While you are on a call, you can initiate a dialing sequence from the numbers
in the directory, caller ID history, redial list or speed dial memory.
Chain dialing can be useful if you wish to access other numbers (such as bank
account numbers or access codes) from the directory, caller ID history, redial
list or speed dial memory.
To access the directory while on a call:
Press DIRECTORY, then press or toto scroll to the desired entry.
1.
Press MENU/SELECT to dial the desired number. To exit without making
2.
changes, press CANCEL and continue with the conversation.and continue with the conversation.
To access the call history while on a call:
Press CALL HISTORY, then press or toto scroll to the desired entry.
1.
Press MENU/SELECT to dial the desired number. To exit without making
2.
changes, press CANCEL and continue with the conversation.and continue with the conversation.
To access the redial list while on a call:
Press AUTO REDIAL, then press or toto scroll to the desired entry.
1.
Press MENU/SELECT to dial the desired number. To exit without making
2.
changes, press CANCEL and continue with the conversation.and continue with the conversation.
To access the speed dial memory while on a call:
Press the desired speed dial key for the number in the upper location.
-OR-
Press LOWER, then press the desired speed dial key for the number in the
lower location.
NOTE: If the speed dial location is assigned with an extension number, pressing the speed
dial key while on a call will hold the current call and initiate an intercom call with the assigned
extension.
54
Page 64

Telephone operation
Redial
The last 10 telephone numbers dialed (up to 32 digits) are stored in the console.
View the 10 most recently dialed numbers
Press AUTO REDIAL to enter the redial list and display
1.
the most recently called number.
Press or to view other recently called numbers.
2.
Press CANCEL to exit the redial list.
3.
Redial a number
Lift the handset, press SPEAKER or the corresponding line key (LINE 1-
1.
LINE 4), then press AUTO REDIAL to enter the redial list.
Press or to select desired number, then press MENU/SELECT to dial.
2.
-OR-
Press AUTO REDIAL to enter the redial list.
1.
Press or to select desired number, then lift the handset, press
2.
SPEAKER or the corresponding line key (LINE 1-LINE 4) to dial.
Copy a redial entry to directory
Press AUTO REDIAL to enter the redial list and display the most recently
1.
called number.
Press or to view other recently called numbers.
2.
Press /REPEAT or /SKIP to choose Add to DIR, then press MENU/SELECT.
3.
4. The console displays Edit number. Use the dialing keys to enter the number
(up to 32 digits).
Press DELETE to delete a digit.
•
Press and hold DELETE to delete all digits.
•
Press /REPEAT or /SKIP to move the cursor to the left or right.
•
Press or to move the cursor to the beginning or end.
•
You can store the flash signal required by some special services as part
•
of a dialing sequence. Press FLASH and an F appears on the screen.
5. Press MENU/SELECT to save. The console displays Enter Name. Use the
dialing keys to enter the name (up to 24 characters).
Press DELETE to delete a character.
•
Press and hold DELETE to delete all characters.
•
Press /REPEAT or /SKIP to move the cursor to the left or right.
•
Press or to move the cursor to the beginning or end.
•
Press 0 to add a space.
•
55
Page 65

Operation
Redial
Copy a redial entry to directory (continued)
Press MENU/SELECT to save. To exit without making changes, press
6.
CANCEL to return to the previous menu.
Delete a number
While the screen displays the desired number, press DELETE to delete the
number from the redial memory.
Auto-redial
Use this feature to automatically redial a number twice, with a 30-second
countdown in between the two dials.
Press AUTO REDIAL to enter the redial list and display the most recently
1.
called number.
Press or to view other recently called numbers.
2.
While the screen displays the desired number, press /REPEAT or /SKIP
3.
to choose Auto redial, then press MENU/SELECT.
The telephone calls the desired number using the speakerphone.
4.
When the other party answers, you will need to take an action to speak
5.
with the other party and stop the auto-redial attempts. Press MUTE on the
console, then lift the handset to speak with the other party.
After a call is placed, if the line is busy, you will hear a busy tone for a few
•
seconds before the console hangs up. The console returns to idle screen
and displaysdisplays Auto redial -XXs. The call will be redialed 30 seconds later.
If the line is still busy at the second attempt, no more attempts are made.
If the line is ringing but no party answers, the console hangs up, returns
•
to idle screen and displaysdisplays Auto redial -XXs. The call will be redialed
30 seconds later. If there is no answer at the second attempt, no more
attempts are made.
If you want to turn off the auto-redial feature during the 30-second waiting
•
time, press CANCEL.
56
Page 66

Telephone operation
Conference call
The system can support 6-party conference with a maximum of four outside calls
and two system extensions (including the initiating party).
Establish a conference call
There are two ways to establish a conference call.
Hold an intercom call
A.
After establishing an intercom call with another system extension, the initiating
party holds the intercom call and invites an external party to join the conference
by making an outside call. Only one pair of intercom call can be held.
1. Press INTERCOM. Press or to scroll to the desired extension, then
MENU/SELECT or /SKIP. The called extension picks up the intercom call.
-OR-
Press the speed dial key assigned with the desired extension number. The
called extension picks up the intercom call.
2. Press an available line key to make an outside call. The original intercom
call is put on hold. When the external party picks up, you can have a private
conversation with that party.
3. Press CONFERENCE at any time to begin the conference call.
4. If necessary, repeat step 2 and step 3 above to invite another external party
to join the conference until the maximum capacity is reached.
Hold an outside call or join a call in progress
B.
After establishing the first outside call, the party can invite another system
extension to join the conference by using intercom.
Any system extension can also join a call in progress by pressing the line key
which is currently in use to set up a conference.
1. Make or answer an outside call on the console.
2. Press another available line key to make another outside call. The original
call is put on hold. When the external party picks up, you can have a private
conversation with that party.
-ORPress INTERCOM. Press or to scroll to the desired extension, then
MENU/SELECT or /SKIP. The called extension picks up the intercom call.
-OR-
Any system extension can press the line key currently in use to create a
conference with the console and the external party.
If the call privacy of your console is set to On, follow the instructions of
•
To turn call privacy off during a call on page 29 to turn off the setting
temporarily.
57
Page 67

Operation
Conference call
Establish a conference call (Continued)
3. Press CONFERENCE at any time to begin the conference call.
4. If necessary, repeat step 2 (make another outside call) and step 3 above
to invite another external party to join the conference until the maximum
capacity is reached.
NOTES:
After a conference call is established, other extensions are not allowed to actively barge-in the
•
conference in progress.
The flash signal in a dialing sequence is not available during a conference call.
•
The system does not support an internal conference of more than two system extensions.
•
Options during a conference call
To talk privately with one external party:
Press LINE 1-LINE 4 to talk privately with the person on that line. The
1.
intercom call is automatically placed on hold.
Press CONFERENCE to resume the conference call.
2.
To talk privately with one internal party:
Press INTERCOM to talk privately with the person on that extension. The
1.
external line(s) is/are automatically placed on hold.
Press CONFERENCE to resume the conference call.
2.
To drop an outside line:
Pressress MENU/SELECT twice to choose End line.
1.
Press or to choose End Line X (X represents the line number that you
2.
want to drop. Press MENU/SELECT or /SKIP to confirm.to confirm.
To drop an intercom call:
Press INTERCOM to activate the intercom call that you want to drop.
1.
The external line(s) is/are automatically placed on hold. Place the corded
handset on the console or press SPEAKER .
If there is only one external line on hold, press LINE 1-LINE 4 to resume the
2.
external call and lift the corded handset on the console. If there are multiple
external lines on hold, press CONFERENCE to resume the conference call.
To end a conference call:
Place the corded handset on the console or press SPEAKER . The call
•
does not terminate until all parties hang up.
58
Page 68

Telephone operation
Intercom
You can use the intercom feature for conversations between
the console and an accessory device, or between two
accessory devices. When the system is on one or more
external calls, accessory devices can make intercom
calls with each other. If you have a cordless headset or
speakerphone, it can only receive intercom calls.
Each device that is registered to the console is assigned an
extension. Cordless desksets and handsets are assigned numbers in the order
they are registered (1 to 9), whereas cordless headsets and speakerphones
are assigned numbers starting from 9 in descending order (9 to 1). See pages
10-12 for information on Add and Register devices to your new console.
Make an intercom call to an extension
1. Press INTERCOM on the console when it is idle.
2. Press or to scroll to a desired extension, then press MENU/SELECT oror
/SKIP.
3. The screen displays Calling: XX (XX represents the name and extension
number of the destination device).
-OR-
If you have assigned extension numbers as speed dial entries (see Assign a
speed dial entry on pages 65-66), you can initiate an intercom by pressing the
desired speed dial key.
1. When the console is idle, press the desired speed dial key, or press LOWER
followed by the desired speed dial key.
2. The console displays Calling: XX (XX represents the name and extension
number of the destination device).
NOTES:
If there is only one registered extension, pressing INTERCOM immediately calls the extension.
•
Before the intercom call is answered, you can cancel the intercom by pressing SPEAKER or
•
lifting and resetting the corded handset on the console.
Press MUTE to temporarily silence the intercom ringer.
•
If a line is in use, pressing INTERCOM places the line on hold and activates the intercom call.
•
You cannot intercom an extension that is currently on an intercom call.
•
Answer an intercom call
When you receive an intercom call, you hear a ringing tone and your screen
displays ---Intercom--- XX (XX represents the name and extension number of
the calling device). Press INTERCOM, SPEAKER or lift the corded handset
to answer.
End an intercom call
Place the corded handset back to the console or press SPEAKER if you are
using the speakerphone.
59
Page 69

Operation
Intercom
Answer an incoming call during an intercom call
If you receive an incoming outside call during an intercom call, there is an
alert tone.
To answer the call, press the corresponding line key (LINE 1-LINE 4). The
intercom call is hold automatically.
Hold an intercom call
During an intercom call, press HOLD.
After the call has been put on hold for more than three minutes, a double beep
sounds every 30 seconds. (To adjust the volume or turn off the reminder beep,
see Hold reminder on page 46).
The far-end party of the held intercom call will hear the music on hold (M.O.H)
you set in the console. To change the setting and for more details, see Music
on hold on pages 30-32.
NOTES:
You can only hold one pair of intercom call.
•
The intercom call on hold is dropped after 15 minutes.
•
Handle an intercom call by the general mailbox
The console’s general mailbox handles unanswered intercom calls as to how it
handles calls forwarded from the auto attendant.
When the console receives an intercom call and there is no answer after the
programmed number of rings (see Number of rings (general mailbox) on
page 23), the caller is prompted to leave a message in the general mailbox.
60
Page 70

Telephone operation
Call transfer
You can transfer a call to any other system telephone. Only the recipient
extension can answer the transferred call.
Blind transfer
While on a call, you can transfer a call directly without notifying the
desired extension:
Press TRANSFER on the console while on a call.
1.
Press or to scroll to the desired extension, thento scroll to the desired extension, then
2.
press MENU/SELECT or /SKIP. The outside call is
automatically transferred to the desired extension.
The destination device rings. You can resume the call
3.
by pressing the corresponding flashing line key (LINE 1LINE 4) on the console before the destination device answers the call.
NOTES:
You cannot transfer or forward a call to any external number without subscription of call
•
forwarding services from your telephone services provider.
If the mailbox of the destination extension is off, the transferred call will only ring five times on
•
the destination extension. If the destination extension does not answer within that period, the
transferred call rings back the initiating device. If the initiating device does not answer the call.
The call ends after it has been in the transfer process for 10 minutes.
The selection of line mode does not affect this process.
•
61
Page 71

Telephone operation
Call transfer using intercom
Transfer a call and speak to the receiving party
You can transfer a call and speak to the receiving party before completing the
transfer while on a call:
Press INTERCOM on the console while on a call.
1.
Press or to scroll to a desired extension, then press MENU/SELECT or
2.
/SKIP. The outside call is put on hold.
The destination extension rings and the call is answered. You can now
3.
announce the call. This is an intercom call between the console and the
extension.
Press TRANSFER to transfer the call to the destination extension. The
4.
console returns to idle.
NOTE: If you decide not to transfer the call and end the intercom call, press the corresponding
flashing line key (LINE 1-LINE 4) to resume the outside call.
62
Page 72

Telephone operation
Paging
You can directly broadcast messages to the speakerphone
of any extension deskset and handset. The extension(s) you
called can respond by pressing the PAGE key to begin a
two-way communication.
Make a paging call to an extension
Press PAGE on the console when it is idle.
1.
Press or to scroll to a desired extension, then press MENU/SELECT.
2.
3. The screen displays Paging.... When the connection is made, both the caller
and the destination party hear a beep. Both devices display Press and hold
[PAGE] to talk.
4. Press and hold the PAGE key. A chirp indicates your microphone is on.
Speak towards the console while continuing to hold down the PAGE key.
Your voice is broadcast to the desired extension. While you are speaking, the
console displays Paging... Ext X (X represents the extension number of the
destination party).
5. Release the PAGE key after speaking. Both devices beep again and the
screens display Press and hold [PAGE] to talk, then you can press and hold
PAGE to continue speaking or the destination party can respond.
NOTES:
Before the paging call is answered, you can cancel the paging by pressing CANCEL.
•
You cannot page an extension that is on a call.
•
If all four telephone lines are in use, the paging feature is not available.
•
Make a paging call to multiple extensions
Press PAGE on the console when it is idle.
1.
Press or to scroll to Group or All, then press MENU/SELECT or /SKIP.
2.
If you choose Group, press or to scroll to a desired group of
•
extensions. Then, press MENU/SELECT or /SKIP.
3. When the connection is made, the caller and the destination parties hear a
beep and their screens display Press and hold [PAGE] to talk.
4. Press and hold the PAGE key when you want to speak. Your voice is
broadcast to the desired extensions.
5. Release the PAGE key after speaking. Any destination extension can reply.
NOTES:
Paging all extensions will create a paging call that only involves the console and the first five
•
system devices.
If any of the first five system devices is busy, it will not receive the paging call.
•
63
Page 73

Telephone operation
Paging
Set and edit a group for paging calls
Use the group setting if you want to broadcast your voice to a group of
extensions. When you page a group, only the selected extensions hear your
voice. You can create up to three paging groups.
Press PAGE on the console when it is idle.
1.
Press or to scroll to Group, then press MENU/SELECT or /SKIP.
2.
Press or to scroll to Define groups, then press MENU/SELECT or /SKIP.
3.
Press or to select a desired group (Group 1-Group 3), then press
4.
MENU/SELECT or /SKIP.
The registered extensions (apart from cordless headset and speakerphone)
5.
display. Use the dial pad to press an extension number if you want to add it
to the group.
To remove an extension number, press the same number again.
•
6. Press MENU/SELECT to save the setting and return to the previous menu. To
exit without making changes, press CANCEL.
-OR-
Follow steps 1-2 above.
1.
Press or to select a desired empty group, then press MENU/SELECT or
2.
/SKIP.
Press MENU/SELECT to set the group.
3.
The registered extensions (apart from cordless headset and speakerphone)
4.
display. Use the dial pad to press an extension number if you want to add it
to the group.
To remove an extension number, press the same number again.
•
5. Press MENU/SELECT to save the setting and return to the previous menu. To
exit without making changes, press CANCEL.
NOTE: Each group can contain a maximum of four other system extensions (excluding the
initiating extension).
Delete the group settings
Press PAGE on the console when it is idle.
1.
Press or to scroll to Group, then press MENU/SELECT or /SKIP.
2.
Press or to scroll to Clear groups, then press MENU/SELECT or /SKIP.
3.
The console displays Clear all group settings?. Press or to select
4.
Yes, then press MENU/SELECT. To exit without making changes, press
CANCEL or /REPEAT.
End a paging call
Press CANCEL to end the paging call.
64
Page 74

Telephone operation
Speed dial
This console has 32 speed dial locations where you
can store and dial phone numbers or system extension
numbers. You can store up to 32 digits in each location.
You can access the first 16 locations using only the
speed dial keys. To access the remaining 16 locations,
press LOWER and then the speed dial key for the
desired location. You might wish to write the names,
telephone numbers, or extension numbers of the speed
dial entries on the directory card, using the light gray
spaces for the upper 16 locations and the white spaces
for the lower 16 locations.
NOTE: By default, pressing speed dial keys 1 to 10 will make an intercom call to the
corresponding registered extension, as shown on the directory card.
Assign a speed dial entry
You can assign speed dial entries to dial a number in directory or call an
extension. If you add a new phone number, it will also be saved to directory.
To copy an entry from directory or select an extension:
When the console is idle, press MENU/SELECT.
1.
Press or to scroll to Speed dial, then press MENU/SELECT or /SKIP.
2.
The screen displays Speed dial: Press a speed dial key to edit.
3.
Press the desired speed dial key, or press LOWER followed by the desired
4.
speed dial key, then press MENU/SELECT.
Press or to choose Add from DIR or Call extension, then press
5.
MENU/SELECT or /SKIP.
Press or to choose a desired entry.
6.
Press MENU/SELECT or /SKIP to save the setting and return to the
7.
previous menu. To exit without making changes, press CANCEL or
/REPEAT.
65
Page 75

Telephone operation
Speed dial
Assign a speed dial entry (continued)
To add a new phone number:
When the console is idle, press MENU/SELECT.
1.
Press or to scroll to Speed dial, then press MENU/SELECT or /SKIP.
2.
The screen displays Speed dial: Press a speed dial key to edit.
3.
Press the desired speed dial key, or press LOWER followed by the desired
4.
speed dial key, then press MENU/SELECT.
Press MENU/SELECT again to choose New number.
5.
Use the dialing keys to enter a telephone number (up to 32 digits).
6.
Press DELETE to delete a digit.
•
Press and hold DELETE to delete all digits.
•
Press /REPEAT or /SKIP to move the cursor to the left or right.
•
Press or to move the cursor to the beginning or end.
•
You can store the flash signal required by some special services as part
•
of a dialing sequence. Press FLASH and an F appears on the screen.
7. Press MENU/SELECT to move on to the name.
The display shows Number already saved if the number is already in the
•
directory. Go to the previous step and choose Add from DIR to assign
the speed dial entry.
8. When the screen displays Enter name, use the dialing keys to enter the
name (up to 24 characters).
Press DELETE to delete a character.
•
Press and hold DELETE to delete all characters.
•
Press /REPEAT or /SKIP to move the cursor to the left or right.
•
Press or to move the cursor to the beginning or end.
•
Press 0 to add a space.
•
9. Press MENU/SELECT to save and return to the previous menu. To exit
without making changes, press CANCEL or /REPEAT.
NOTES:
The newly added phone number will also be saved to the directory.
•
If you want to edit the phone number of the speed dial entry, you need to edit it in directory.
•
66
Page 76

Telephone operation
Speed dial
Dial a speed dial entry
When the console is idle, press the desired speed dial key for the destination
party in the upper location.
-OR-
When the console is idle, press LOWER followed by the speed dial key for the
destination party in the lower location.
The console dials the speed dial number using the speakerphone.
NOTE: After you press LOWER, the lower location function of the speed dial key will be
dismissed in five seconds.
Delete a speed dial entry
When the console is idle, press MENU/SELECT.
1.
Press or to scroll to Speed dial, then press MENU/SELECT or /SKIP.
2.
Press the desired speed dial key, or press LOWER followed by the desired
3.
speed dial key.
Press DELETE to remove the speed dial entry. To exit without making
4.
changes, press CANCEL or /REPEAT.
NOTES:
Deleting a speed dial entry will not delete the corresponding entry in the directory.
•
If you delete the speed dial entry for keys 1 to 10, it will reset to the default setting and serve as
•
an intercom key to the corresponding registered extension.
67
Page 77

Telephone operation
COVM
COVM (central office voicemail)
If you subscribe to voicemail service with your telephone service provider, turn
on the COVM feature. When the console receives new voicemail messages on
a particular line, the screen displays COVM Line X in idle mode (X represents
the line number).
If you do not subscribe to voicemail service or want to disable the indicator,
turn off the COVM feature.
When the console is idle, press MENU/SELECT.
1.
Press or to scroll to COVM. Press MENU/SELECT or /SKIP.
2.
Press MENU/SELECT or /SKIP again to select COVM On/Off.
3.
Press or to select On or Off.
4.
Press MENU/SELECT or /SKIP to save the setting and return to the
5.
previous menu. To exit without making changes, press CANCEL or
/REPEAT.
COVM reset
Use this feature when the console indicates there is new voicemail but there is
none. For example, when you have accessed your voicemail while away from
the building. This feature only turns off the COVM indicator; it does not delete
your voicemail messages. As long as you have new voicemail messages, your
telephone service provider continues to send the signal to turn on the indicator.
You can reset COVM indicators individually or for all the telephone lines using
the All COVM reset command.
When the console is idle, press MENU/SELECT.
1.
Press or to scroll to COVM. Press MENU/SELECT or /SKIP.
2.
Press or to scroll to COVM reset. Press MENU/SELECT or /SKIP.
3.
Press or to scroll to COVM 1 reset-COVM 4 reset to clear the COVM
4.
indicator of a telephone line, or scroll to All COVM reset to clear the
indicators for all the lines.
Press MENU/SELECT or /SKIP to execute the command and return to
5.
the previous menu. To exit without making changes, press CANCEL or
/REPEAT.
NOTE: For information about using your voicemail service, contact your telephone service
provider for assistance.
68
Page 78

Directory
About the directory
Use the directory to store names and phone numbers. Directory entries are
not shared with other extensions. The console and each deskset have their
own directories.
Capacity
The directory of this console can store up to 100 entries, with a maximum of
24 alphanumeric characters (including spaces) for names and 32 digits for
telephone numbers. A convenient search feature can help you quickly find and
dial numbers (page 72).
If there are already 100 entries, the screen shows Directory full when you
try to create a new directory entry. You cannot store a new number until you
delete one. If you try to view the directory when there are no entries, the screen
displays Directory empty.
Exit the directory
On the console, press CANCEL to cancel an operation and return to previous
screen.
69
Page 79

Directory
Create directory entries
Create a new directory entry
Use the following steps to store a name and number in the directory.
When the console is idle, enter the telephone number (up to 32 digits).
1.
Press MENU/SELECT. Use the dialing keys to edit the number, if necessary.
2.
Press DELETE to delete a digit.
•
Press and hold DELETE to delete all digits.
•
Press /REPEAT or /SKIP to move the cursor to the left or right.
•
Press or to move the cursor to the beginning or end.
•
You can store the flash signal required by some special services as part
•
of a dialing sequence. Press FLASH and an F appears on the screen.
3. Press MENU/SELECT to save. The screen displays Enter name. Use the
dialing keys to enter the name (up to 24 characters). Each time you press
a key, the character on that key appears. When entering a name in the
directory, the first letter of each word is automatically capitalized. Additional
key presses produce other characters on that key. See the chart below.
Press DELETE to delete a character.
•
Press and hold DELETE to delete all characters.
•
Press /REPEAT or /SKIP to move the cursor to the left or right.
•
Press or to move the cursor to the beginning or end.
•
Press 0 to add a space.
•
Dialing
keys
1
2
3
4
5
6
7
8
9
0
*
#
1 2 3 4 5 6 7 8 9 10 11
1 . -
a b c A B C 2
d e f D E F 3
g h i G H I 4
j k l J K L 5
m n o M N O 6
p q r s P Q R S 7
t u v T U V 8
w x y z W X Y Z 9
Space
0
Characte rs by number of key p re sses
4. Press MENU/SELECT to save.
,
( ) * # & / ,
70
Page 80

Directory
Create directory entries
Create a new directory entry (continued)
-OR-
When the console is idle, press DIRECTORY.
1.
When a directory entry appears, press MENU/SELECT.
2.
If the directory is empty, press MENU/SELECT and then go to step 4.
•
3. Press or to scroll to Add contact, then press MENU/SELECT or /SKIP.
The screen displays Enter number. Use the dialing keys to enter the
4.
number (up to 32 digits).
5. Press MENU/SELECT to save. The screen displays Enter name. Use the
dialing keys to enter the name (up to 24 characters).
6. Press MENU/SELECT to save. To exit without making changes, press
CANCEL to return to the previous menu.
Review directory entries
When the console is idle, press DIRECTORY. The
1.
screen displays the first entry in the directory.
Press or to browse through the directory.
2.
Entries appear alphabetically by the first letter in the
name.
Press CANCEL to return to idle mode.
3.
-OR-
When the console is idle, press MENU/SELECT.
1.
Press MENU/SELECT or /SKIP to choose Directory.
2.
Press MENU/SELECT or /SKIP to choose Review. The screen displays the
3.
first entry in the directory.
Press or to browse through the directory. Entries appear alphabetically
4.
by the first letter in the name.
Press and hold CANCEL to return to idle mode.
5.
71
Page 81

Directory
Search directory
Search by name
The names appear in alphabetical order. Follow the steps below to search for
directory entries on the console.
Press DIRECTORY on the console. The screen displays the first entry in the
1.
directory.
Press or to browse through the directory.browse through the directory.
2.
Use the dial pad keys (2-9) to enter a letter to start a name search.
3.
If there is an entry matching the letter you press, the directory shows the
•
first name beginning with that letter.
If there is no entry matching the letter you press, the directory shows the
•
next closest entry or the last entry.
For example, if you have the names Jennifer, Jessie, Kevin and Linda in your
directory:
If you press 5 (JKL) once, you see Jennifer.
•
If you press 5 (JKL) twice, you see Kevin.
•
If you press 5 (JKL) three times, you see Linda.
•
To view Jessie, press while Jennifer is displayed.
•
72
Page 82

Directory
Dial, delete or edit entries
You can dial, delete or edit a directory entry (name and number) when it is
shown on the console screen. You can use the directory review (page 71) or
name search (page 72) to show an entry.
Display dial
When a number is displayed on the screen, you can dial the number by lifting
the corded handset, or pressing SPEAKER or the desired line key (LINE 1-
LINE 4).
Delete an entry
When a directory entry appears, press DELETE, then press MENU/SELECT to
confirm.
Edit an entry
When a directory entry appears, press MENU/SELECT.
1.
2. Press MENU/SELECT again to select Edit. The screen displays Edit
number. Use the dialing keys to enter the number (up to 32 digits). If you
only want to edit the name, skip to step 3.
Press DELETE to delete a digit.
•
Press and hold DELETE to delete all digits.
•
Press /REPEAT or /SKIP to move the cursor to the left or right.
•
Press or to move the cursor to the beginning or end.
•
You can store the flash signal required by some special services as part
•
of a dialing sequence. Press FLASH and an F appears on the screen.
3. Press MENU/SELECT to save. The screen displays Edit name. Use the
dialing keys to edit the name (up to 24 characters).
Press DELETE to delete a character.
•
Press and hold DELETE to delete all characters.
•
Press /REPEAT or /SKIP to move the cursor to the left or right.
•
Press or to move the cursor to the beginning or end.
•
Press 0 to add a space.
•
4. Press MENU/SELECT to save. To exit without making changes, press
CANCEL.
73
Page 83

Call history
About the caller ID
This console supports caller ID services that most telephone service providers
offer. Caller ID allows you to see the name, number, date and time of calls.
Depending on your service subscription, you might see the caller’s number, or
the caller’s name and number from the telephone service provider after the first
or second ring. Caller ID information might not be available for every incoming
call. Callers may intentionally block their names and/or telephone numbers.
This product can provide information only if both you and the caller are in areas
offering caller ID service and if both telephone service providers use compatible
equipment.
Information about caller ID with call waiting
Caller ID with call waiting lets you see the name and telephone number of the
caller before answering the telephone, and while on another call.
It might be necessary to change telephone service to use this feature. Contact
your telephone service provider if:
You have both caller ID and call waiting, but as
•
separate services (you might need to combine these
services).
You only have caller ID service, or only call waiting
•
service.
You do not subscribe to caller ID or call waiting
•
services.
There are fees for caller ID services. In addition, services
may not be available in all areas.
This product can provide information only if both you and the caller are in areas
offering caller ID service and if both telephone service providers use compatible
equipment. The time and date, along with the call information, are from the
telephone service provider.
NOTES:
You can use this product with regular caller ID service, or you can use this product’s other
•
features without subscribing to caller ID or combined caller ID with call waiting service.
The format of telephone numbers displayed depends on the home area code you set (See Area
•
codes on page 45 for explanations and instructions on area code settings).
74
Page 84

Call history
Caller ID information
How the caller ID information works
The console stores caller ID information for the last 50 incoming calls in the
console. Entries are stored in reverse chronological order. The console deletes
the oldest entry when the log is full to make room for new calls.
Each extension has independent caller ID information. Deleting the caller ID
information on any one extension does not affect the caller ID information on
other extensions.
If you answer a call before the information appears on the screen, it does not
show in the caller ID information.
Review the caller ID information to determine who called, to easily return the
call, or to copy the caller’s name and number into your directory or speed dial
memory.
The time and date of the call and the caller’s name and telephone number are
included in the display.
Caller ID information appears on the screen as the telephone rings, the caller
hangs up, the call has been answered at another extension, or until the call
ends.
If you subscribe to caller ID service, this phone automatically resets the time
and date using the caller ID information from the first incoming call after initial
setup, or each time the power resumes after a power outage.
NOTES:
The caller ID information might not be available for every incoming call. Callers might
•
intentionally block their names and/or telephone numbers.
Each entry can store up to 24 digits for the telephone number and 16 characters for the name.
•
75
Page 85

Call history
Caller ID operation
Memory match
If the incoming telephone number is an exact match with a telephone
number in your directory, the name that appears on the screen matches the
corresponding name in your directory.
For example, if Christine Smith calls, her name appears as Chris if this is how
you entered it into your directory.
NOTE: The number you see on your caller ID is in the format from the telephone service
provider. It usually delivers 10-digit telephone numbers (area code plus telephone number).
The telephone system ignores the area code when searching for a match and displays the
name of the first corresponding number from the directory.
Missed (new) calls indicator
When there are new or missed calls and you try to review the caller ID log by
pressing CALL HISTORY, the screen shows XX Missed call(s).
All new or missed entries are counted as new calls. Each time you review a call
history entry with the icon New, the missed calls message goes away.
Review the caller ID information
When the console is idle, press CALL HISTORY.
1.
The console displays XX Missed calls.
Press or to review the caller ID information.
2.
The caller ID entries are stored in reverse
chronological order starting with the most recent
entry.
To exit without making changes, press CANCEL
3.
or /REPEAT.
-OR-
When the console is idle, press MENU/SELECT.
1.
Press or to scroll to Call history, then press MENU/SELECT or /SKIP.
2.
The screen displays the XX Missed calls.
Press or to review the caller ID information. The caller ID entries are
3.
stored in reverse chronological order starting with the most recent entry.
Press CANCEL twice to return to idle mode.
4.
76
Page 86

Caller history
Caller ID operation
View dialing options
Although the incoming call history entries
have 10 digits (the area code plus the
seven-digit number), in some areas, you
may need to dial the seven digits only,
1 plus the seven digits, or 1 plus the
area code plus the seven digits. You can
change and store the number of digits that
you dial in the call history.
While reviewing the call history, press
# (pound key) repeatedly on the console to
show different dialing options for local and
long distance numbers before dialing or
saving the telephone number in the directory.
Dial a call history entry
When in the caller ID history, press or to browse the number you wish
1.
to call.
Lift the handset or press SPEAKER .
2.
-OR-
To override automatic line selection, press the desired line key (LINE 1-
LINE 4), then lift the handset to call.
77
Page 87

Call history
Caller ID operation
Save a caller history entry to the directory
When in the caller ID history, press or to browse the number you wish
1.
to save.
2. Press MENU/SELECT. The screen displays Edit number. Use the dialing
keys to enter the number (up to 32 digits).
Press DELETE to delete a digit.
•
Press and hold DELETE to delete all digits.
•
Press /REPEAT or /SKIP to move the cursor to the left or right.
•
Press or to move the cursor to the beginning or end.
•
You can store the flash signal required by some special services as part
•
of a dialing sequence. Press FLASH and an F appears on the screen.
3. Press MENU/SELECT to save. The screen displays Edit name. Use the
dialing keys to edit the name (up to 24 characters).
Press DELETE to delete a character.
•
Press and hold DELETE to delete all characters.
•
Press /REPEAT or /SKIP to move the cursor to the left or right.
•
Press or to move the cursor to the beginning or end.
•
Press 0 to add a space.
•
4. Press MENU/SELECT to save. To exit without making changes, press
CANCEL.
NOTE: You will need to change how a caller ID number is dialed if the entry does not appear
in the correct format. Caller ID numbers might appear with an area code that is not necessary
for local calls, or without a 1 that is necessary for long distance calls (see View dialing
options on the previous page for more information).
Delete entries
To delete a call history entry:
When in the caller ID history, press or to scroll to the number you wish
1.
to delete.
Press DELETE to delete the shown entry from the caller ID history.
2.
The screen displays Deleted.
3.
To delete all caller ID history entries:
When the console is idle, press CALL HISTORY.
1.
Press DELETE, then press or to scroll to Yes.
2.
Press MENU/SELECT or /SKIP to confirm. The screen displays All calls
3.
deleted.
78
Page 88

Call history
Reasons for missing caller ID information
Reasons for missing caller ID information
There are also occasions when other information or no information shows for
various reasons:
On-screen message Reason
The number has been set as private.
The name has been set as private.
Both the name and number have been set as
private.
The number has been set as out of area.
The name has been set as out of area.
Both the name and number have been set as out of
area.
79
Page 89

Answering system
About the answering system
Your console has separate indicators for two different types of voice messages:
those left on its built-in answering system and those left at your service
provider’s voicemail (fees may apply). Your console’s built-in answering system
messages and voicemail messages are separate. Each alerts you to new
messages differently.
If you turn on the COVM feature (See COVM on page 68 for more
•
information) and the COVM message displays on the console screen, your
telephone service provider is indicating that it has new voicemail for you. To
listen to your voicemail, dial an access number provided by your telephone
service provider, followed by a security code or PIN.
To listen to messages recorded on your digital answering system, press
•
MAIL BOX on the console (page 86).
Some service providers bundle or combine multiple services like voicemail and
call waiting, so you may not be aware that you have voicemail. To check what
services you have and how to access them, contact your telephone service
provider.
To use your voicemail service rather than the answering system, turn off the
answering system for that telephone line (see Set Line mode on page 15 for
more information). To use the answering system rather than the voicemail
service, contact your telephone service provider to deactivate the voicemail
service. Use your telephone answering system and voicemail together by
setting your built-in answering system to answer before voicemail, as described
below. To learn how to program your voicemail settings, contact your telephone
service provider. Then, if you are on a call, or if the answering system is busy
recording a message and you receive another call, the second caller can leave
a voicemail message.
Set your answering system to answer calls at least two rings earlier than your
voicemail is set to answer. For example, if your voicemail answers after six
rings, set your answering system to answer after four rings. Some voicemail
providers may program the delay before answering calls in seconds instead
of rings. In this case, allow six seconds per ring when determining the
appropriate setting.
80
Page 90

Answering system
About the answering system
Answering system capacity
Apart from the default announcements, you can record up to five new
announcements for use in the answering system. Each announcement can be
up to 90 seconds.
The announcements of auto attendant, announce only answer mode, and
general mailbox all require system memory to record, so we suggest recording
brief announcements in order to leave more space for messages.
The maximum recording time of all extensions is 180 minutes and the
maximum number of messages for is 150 for general mailbox and 99 for each
of the extension mailbox. The actual recording time depends on individual
message characteristics. Individual messages can be up to three minutes.
Messages remain available for review until you delete them.
If the system memory is full, the screen displays Memory full, and you cannot
record new messages until old ones have been deleted. Check remaining
system space frequently to maintain availability of space for incoming
messages.
NOTE: You cannot record an announcement when the telephone system is out of space. You
will hear a two-beep alert tone. Please refer to Remaining time on page 88.
81
Page 91

Answering system
Announce only setup
To play the recorded announce only announcement:
When the console is idle, press MENU/SELECT.
1.
Press or to scroll to Ans sys setup, then press MENU/SELECT or
2.
/SKIP.
Press or to scroll to Annc only setup, then press MENU/SELECT or
3.
/SKIP.
Press or to choose Anncment setup, then press MENU/SELECT or
4.
/SKIP.
Press or to scroll to User anncment, then press MENU/SELECT or
5.
/SKIP. The current announcement plays.
To play and select the default announce only announcement:
When the console is idle, press MENU/SELECT.
1.
Press or to scroll to Ans sys setup, then press MENU/SELECT or
2.
/SKIP.
Press or to scroll to Annc only setup, then press MENU/SELECT or
3.
/SKIP.
Press or to choose Anncment setup, then press MENU/SELECT or
4.
/SKIP.
Press MENU/SELECT or /SKIP again to choose Default. The default
5.
announcement plays.
Press MENU/SELECT or /SKIP to save the setting.
6.
82
Page 92

Answering system
Answering system setup
All feature settings below apply to the auto attendant, announce only and
general mailbox answer modes.
Call screening
Use this feature to choose whether incoming messages can be heard over the
speaker when they are being recorded. This feature is set to On by default. You
hear the incoming message on your console when a call comes in.
When the console is idle, press MENU/SELECT.
1.
Press or to scroll to Ans sys setup, then press MENU/SELECT or
2.
/SKIP.
Press or to scroll to Call screening, then press MENU/SELECT or
3.
/SKIP.
Press or to choose On or Off.
4.
Press MENU/SELECT or /SKIP to save the setting and return to the
5.
previous menu. To exit without making changes, press CANCEL or
/REPEAT.
Message length
Use this feature to set the maximum length of each recorded message. The
caller can record a message up to that specific time period.
When the console is idle, press MENU/SELECT.
1.
Press or to scroll to Ans sys setup, then press MENU/SELECT or
2.
/SKIP.
Press or to scroll to Message length, then press MENU/SELECT or
3.
/SKIP.
Press or to choose 1 minute, 2 minutes or 3 minutes.
4.
Press MENU/SELECT or /SKIP to save the setting and return to the
5.
previous menu. To exit without making changes, press CANCEL or
/REPEAT.
83
Page 93

Answering system
Answering system setup
Call intercept
When a caller is leaving a message on your general mailbox, you can stop the
recording and talk to the caller by pressing the corresponding line key (LINE 1LINE 4). Choose whether private incoming messages can be intercepted by the
console during recording.
When the console is idle, press MENU/SELECT.
1.
Press or to scroll to Ans sys setup, then press MENU/SELECT or
2.
/SKIP.
Press or to scroll to Call intercept, then press MENU/SELECT or
3.
/SKIP.
4. Press or to choose On or Off.
5. Press MENU/SELECT or /SKIP to save the setting and return to the
previous menu. To exit without making changes, press CANCEL or
/REPEAT.
Set remote access code
Use this code to select a three-digit number to allow remote access of the
answering system from another telephone. You can change the code to any
number from 000-999. This code is 000 by default.
When the console is idle, press MENU/SELECT.
1.
Press or to scroll to Ans sys setup, then press MENU/SELECT or
2.
/SKIP.
Press or to scroll to Remote access, then press MENU/SELECT or
3.
/SKIP.
4. Use the dialing keys to enter a three-digit remote code.
Press DELETE to delete a digit.
•
Press /REPEAT or /SKIP to move the cursor to the left or right.
•
Press MENU/SELECT to save the setting and return to the previous menu.
5.
To exit without making changes, press CANCEL.
84
Page 94

Answering system
Answering system setup
Message alert tone
Use this feature to turn the audible message alert on or off.
If the message alert tone is on, the console beeps every 10 seconds when
there are new messages in the general mailbox.
1.
When the console is idle, press MENU/SELECT.
Press or to scroll to Ans sys setup, then press MENU/SELECT or
2.
/SKIP.
3.
Press or to scroll to Msg alert tone, then press MENU/SELECT or
/SKIP.
4.
Press or to choose On or Off.
Press MENU/SELECT or /SKIP to save the setting and return to the
5.
previous menu. To exit without making changes, press CANCEL or
/REPEAT.
NOTE: You can press any keys on the console to temporarily silence the message alert tone
when it is playing. The message alert tone resumes when a new message is recorded.
Voice language
This feature allows you to change the language of voice prompts used in the
console and all registered desksets and cordless handsets. By default, the
voice language is set to English.
1.
When the console is idle, press MENU/SELECT.
2.
Press or to scroll to Ans sys setup, then press MENU/SELECT or
/SKIP.
Press or to scroll to Voice language, then press MENU/SELECT or
3.
/SKIP.
Press or to select English or Francais.
4.
5.
Press MENU/SELECT or /SKIP again to save the setting and return to the
previous menu. To exit without making changes, press CANCEL or
/REPEAT.
85
Page 95

Answering system
Answering system operation
New message indication
The
console
or memos in the general mailbox.
The MESSAGE WAITING indicator on the console turns on when there are
new messages in the general mailbox.
Call screening
If the answering system and call screening are turned on (see Call screening
on page 83), the incoming message broadcasts at the console when a call
arrives. During message recording, press +/VOL/-/VOL/-- to adjust the volume, or
press CANCEL to stop call screening.
If the do not disturb function is activated, you need to press MENU/SELECT to
start call screening.
Call intercept
When a caller is leaving a message on your general mailbox, you can stop the
recording and talk to the caller by pressing the corresponding line key
(LINE 1-LINE 4). To turn this feature on or off, see Call intercept on page 84.
displays XX New messages when there are new messages and/
Message playback
From the console, you can play the messages in the general mailbox.
You can choose to play the new or old messages.
When the playback begins, the total number of messages is announced. Before
each message, the system announces the date and time of the recording
before playing each message. After the last message, you hear, “End of the
messages.”
NOTE: A maximum of two stations can listen to message playback in their mailbox at the
same time.
To listen to messages in the general mailbox:
While the console is idle, press MAIL BOX.
1.
Press MENU/SELECT or /SKIP to choose Play
2.
messages.
If you have only new messages or only old
3.
messages, the console plays the messages directly.
-OR-
If you have both new and old messages, press or to choose New
messages to play the new messages only, or Old messages to play the old
messages in the general mailbox. Press MENU/SELECT or /SKIP.
86
Page 96

Answering system
Answering system operation
Options during playback
When a message is playing, you can adjust the playback volume, skip, repeat,
delete the message, or switch between speakerphone and handset earpiece.
When a message is playing on the console:
Press +/VOL/-/VOL/-- to adjust the message playback volume.
•
Press /SKIP after the date and time announcement to skip to the
•
next message.
Press /REPEAT to repeat the current message. Immediately pressImmediately presspress
•
/REPEAT after the date and time announcement to hear the previous
message.
Press DELETE after the date and time announcement to delete the
•
message. The system announces “Message deleted.”
Lift the corded handset to listen to the message playback through the
•
handset earpiece. Press SPEAKER to switch back to speakerphone.
Transfer messages
When a message is playing, you can transfer the message to a desired
extension.
When a message is playing on the console:
Press TRANSFER.
1.
Press or to choose a desired extension, then press
2.
MENU/SELECT or /SKIP. The console displays Message
transferred to extension X and announces, “Message
transferred to extension mailbox X.”
NOTE: Messages transferred to another extension will not have a copy saved in the
originated mailbox.
87
Page 97

Answering system
Answering system operation
Delete all general mailbox messages
You can delete all messages stored in the general mailbox.
When the console is idle, press MAIL BOX.
1.
Press or to scroll to Delete all old, then press MENU/SELECT or
2.
/SKIP.
The console displays Delete all old messages?. Press or to scroll to
3.
Yes, then press MENU/SELECT or /SKIP to confirm. The screen displays
All old msgs deleted.
Record and deliver memos
Memos are messages you record into the general mailbox. You can save,
play back, and delete them like incoming messages. You can record a memo
as a reminder to yourself, or send a message to other extensions using the
answering system.
When the console is idle, press MAIL BOX.
1.
Press or to scroll to Record memo, then press MENU/SELECT or
2.
/SKIP.
Press or to scroll to a desired extension, then press MENU/SELECT or
3.
/SKIP.
Press MENU/SELECT to start recording. Lift the corded handset or face the
4.
console to record your memo.
Press MENU/SELECT again to stop recording. You hear the playback of the
5.
recording.
Press or to choose OK to save the recording, or choose Change to
6.
record again if desired. Press MENU/SELECT or /SKIP.
NOTES:
Memos delivered to another extension will not have a copy saved in the originated mailbox.
•
Only one station can record memo at a time.
•
Remaining time
You can check the amount of space currently in the system for the estimated
remaining recording time and number of messages that can be recorded.
When the console is idle, press MAIL BOX.
1.
Press or to scroll to Remaining time, then press MENU/SELECT or
2.
/SKIP. The remaining time and message capacity display.
After checking the screen display, press CANCEL or /REPEAT to return to
3.
the previous menu.
88
Page 98

Answering system
Remote access
Use this feature to reach your answering system remotely by calling any
telephone line connected this console from any touch-tone telephone. Make
sure the auto attendant, the announce only mode, or the general mailbox of
the console is turned on for this feature to work. Remote access can only play
messages stored in the general mailbox.
To remotely reach the answering system:
Dial any telephone line connected to this console from any touch-tone
1.
telephone.
Once the system answers, enter the three-digit remote access code (000 is
2.
the default code; see Set remote access code on page 84 to change it).
You can enter the following remote commands.
3.
Remote commands:
1
2
3
4
5
6
8
#
Hang up to end the call.
5.
NOTES:
If you do not enter the valid remote access code after you enter the answering system
•
successfully, the system responds according to the selected line mode.
When there is no new message or all the new messages are played during remote access, you
•
hear a help menu listing all features and commands. If there is no command after the help menu
is played three times, the call ends automatically.
Press to play all messages in the general mailbox.
Press to delete all old messages in the general mailbox.
Press to delete the current message (during playback).
Press to repeat the current message (during playback).
Within five seconds of message playback, press 4 again to listen
to the previous message (during playback).
Press to stop and return to the remote commands (during
playback).
Press to skip the current message (during playback).
Press to transfer the current message (during playback).
Press to end the call.
89
Page 99

Appendix
Console display screen messages
All Caller ID history entries are deleted.
All group settings for paging call are cleared.
All old messages in the general mailbox
are deleted.
There are no entries in the caller ID history.
The console is making an intercom call.
A directory entry is deleted.
A number is saved to the directory.
A Caller ID history entry is deleted.
The console is deleting the mailbox
messages of the selected extension(s) during
deregistration. Do not power off the console
during this period.
The cordless deskset is deregistered from the
telephone system.
The cordless deskset registration
is successful.
There are no directory entries.
The directory is full. You cannot save new
entries unless you delete some current entries.
You have just ended a call.
The destination extension is on an intercom
call.
The cordless handset is deregistered from the
telephone system.
The cordless handset registration
is successful.
The cordless headset or speakerphone is
deregistered from the telephone system.
The cordless headset or speakerphone
registration is successful.
90
Page 100

Appendix
Console display screen messages
You have detached the cordless headset or
speakerphone from an extension.
The cordless headset or speakerphone
you linked with the console is in use on a
telephone line.
The cordless headset or speakerphone you
linked with the console is in a conference call.
The cordless headset or speakerphone you
linked with the console is in an intercom call.
The console is on an intercom call.
There is an intercom call coming in.
The console is holding an intercom call and
cannot barge-in a line.
You cannot barge-in an established
conference call.
The extension on the desired line is holding
an intercom call. You cannot barge-in it at the
moment.
The telephone line X is in use.
There is an incoming call from Line X.
The console is transferring a call to a system
extension.
The console, cordless deskset or handset is
holding a call. You cannot change, review,
record or change the M.O.H. source.
A message is transferred from the general
mailbox to the private mailbox of extension X.
The destination extension does not answer the
intercom call.
The audio device is not connected to the
MUSIC ON HOLD (( ) jack while the M.O.H.jack while the M.O.H.
source is set to Aux. in device or you start
recording an M.O.H..
91
 Loading...