

Vox VX50 GTV, VX50 GT Owner`s Manual [en, fr, de, es, jp]
VX50 GTV
VX15 GT
En
Owner’s Manual
Fr
Manuel d’utilisation
De
Bedienungsanleitung
Es
Manual del usuario
Ja
取扱説明書
p.6, p.15)
(
→
(→p.4, p.7)
(→p.4, p.9)
(→s.5, s.11)
(→p.6, p.13)
Vox Amplification Ltd.
1 Harrison Close, Knowlhill, Milton Keynes, MK5 8PA. UK
© 2019 VOX AMPLIFICATION LTD.
Thank you for purchasing the VOX VX50 GTV/VX15 GT modeling guitar amplifier. To help you get the most out of your new
instrument, please read this manual carefully.
Merci d’avoir choisi l’amplificateur de guitare à modélisation VX50 GTV/VX15 GT de VOX. Afin de pouvoir exploiter au mieux
toutes les possibilités offertes par l’instrument, veuillez lire attentivement ce manuel.
Vielen Dank, das Sie sich für ein VX50 GTV/VX15 GT Modeling-Gitarrenverstärkers von VOX entschieden haben. Bitte lesen Sie
sich diese Anleitung vollständig durch, um bei der Bedienung alles richtig zu machen.
Gracias por comprar el amplificador de modelado de guitarra VOX VX50 GTV/VX15 GT. Por favor, lea este manual atentamente y
guárdelo para futuras consultas.
このたびは、VOXモデリング・ギター・アンプ VX50 GTV/VX15 GTをお買い上げいただきまして、まことにありがとうございます。本製品を末永くご愛用い
ただくためにも、取扱説明書をよくお読みになって正しい方法でご使用ください。
En
Location
Using the unit in the following locations can result in a malfunction.
• In direct sunlight
• Locations of extreme temperature or humidity
• Excessively dusty or dirty locations
• Locations of excessive vibration
• Close to magnetic fields
Power supply
Please connect the designated AC adapter to an AC outlet of the correct voltage.
Do not connect it to an AC outlet of voltage other than that for which your unit
is intended.
Interference with other electrical devices
Radios and televisions placed nearby may experience reception interference. Operate this unit at a suitable distance from radios and televisions.
Handling
To avoid breakage, do not apply excessive force to the switches or controls.
Care
If the exterior becomes dirty, wipe it with a clean, dry cloth. Do not use liquid
cleaners such as benzene or thinner, or cleaning compounds or flammable polishes.
Keep this manual
After reading this manual, please keep it for later reference.
Keeping foreign matter out of your equipment
Never set any container with liquid in it near this equipment. If liquid gets into the
equipment, it could cause a breakdown, fire, or electrical shock. Be careful not to
let metal objects get into the equipment. If something does slip into the equipment,
unplug the AC adapter from the wall outlet. Then contact your nearest VOX dealer
or the store where the equipment was purchased.
NOTE: This equipment has been tested and found to comply with the limits
for a Class B digital device, pursuant to Part 15 of the FCC Rules. These limits
are designed to provide reasonable protection against harmful interference
in a residential installation. This equipment generates, uses, and can radiate
radio frequency energy and, if not installed and used in accordance with
the instructions, may cause harmful interference to radio communications.
However, there is no guarantee that interference will not occur in a particular
installation. If this equipment does cause harmful interference to radio or
television reception, which can be determined by turning the equipment off
and on, the user is encouraged to try to correct the interference by one or more
of the following measures:
● Reorient or relocate the receiving antenna.
● Increase the separation between the equipment and receiver.
●
Connect the equipment into an outlet on a circuit different from that to which
the receiver is connected.
● Consult the dealer or an experienced radio/TV technician for help.
If items such as cables are included with this equipment, you must use those
included items.
Unauthorized changes or modification to this system can void the user’s authority
to operate this equipment.
THE FCC REGULATION WARNING
Precautions
(for USA)
When this “crossed-out wheeled bin” symbol is displayed on the
product, owner’s manual, battery, or battery package, it signifies that
when you wish to dispose of this product, manual, package or battery
you must do so in an approved manner. Do not discard this product,
manual, package or battery along with ordinary household waste.
Disposing in the correct manner will prevent harm to human health
and potential damage to the environment. Since the correct method
of disposal will depend on the applicable laws and regulations in
your locality, please contact your local administrative body for details.
If the battery contains heavy metals in excess of the regulated amount, a
chemical symbol is displayed below the “crossed-out wheeled bin” symbol
on the battery or battery package.
SUPPLIER’S DECLARATION OF CONFORMITY (for USA)
Responsible Party : KORG USA INC.
Address : 316 SOUTH SERVICE ROAD, MELVILLE, NY
Telephone : 1-631-390-6500
Equipment Type : MODELING GUITAR AMPLIFIER
Model : VX50 GTV / VX15 GT
This device complies with Part 15 of FCC Rules.
Operation is subject to the following two conditions:
(1) This device may not cause harmful interference,and
(2) this device must accept any interference received,
including interference that may cause undesired operation.
This product has been manufactured according to strict specifications and
voltage requirements that are applicable in the country in which it is intended
that this product should be used. If you have purchased this product via the
internet, through mail order, and/or via a telephone sale, you must verify
that this product is intended to be used in the country in which you reside.
WARNING: Use of this product in any country other than that for which it
is intended could be dangerous and could invalidate the manufacturer’s or
distributor’s warranty. Please also retain your receipt as proof of purchase
otherwise your product may be disqualified from the manufacturer’s or
distributor’s warranty.
* Apple, iPad, iPhone, and iPod touch are trademarks of Apple Inc., registered in
the U.S. and other countries.
* All product names and company names are the trademarks or registered trade-
marks of their respective owners.
1
Published 01/2019 Printed in Vietnam
Notice regarding disposal (EU only)
IMPORTANT NOTICE TO CONSUMERS
www.voxamps.com
Ja
安全上のご注意
ご使用になる前に必ずお読みください
ここに記載した注意事項は、製品を安全に正しくご使用いただき、あなたや他の方々
への危害や損害を未然に防ぐためのものです。
注意事項は誤った取り扱いで生じる危害や損害の大きさ、または切迫の程度によっ
て、内容を「警告」、「注意」の2つに分けています。これらは、あなたや他の方々の安全
や機器の保全に関わる重要な内容ですので、よく理解した上で必ずお守りください。
火災・感電・人身障害の危険を防止するには
図記号の例
記号は、注意(危険、警告を含む)を示しています。記号の中
には、具体的な注意内容が描かれています。左の図は「一般的な注
意、警告、危険」を表しています。
記号は、禁止(してはいけないこと)を示しています。記号の
中には、具体的な注意内容が描かれることがあります。左の図は
「分解禁止」を表しています。
記号は、強制(必ず行うこと)を示しています。記号の中には、
具体的な注意内容が描かれることがあります。左の図は「電源プラ
グをコンセントから抜くこと」を表しています。
以下の指示を守ってください
警告
この注意事項を無視した取り扱いをすると、死亡や重傷を負う可能性があります。
・ ACアダプターのプラグは、必ずAC100Vの電源コンセントに差し込む。
・ ACアダプターのプラグにほこりが付着している場合は、ほこりを拭き取る。
感電やショートの恐れがあります。
・ 本製品はコンセントの近くに設置し、ACアダプターのプラグへ容易に手
が届くようにする。
・ 次のような場合には、直ちに電源を切ってACアダプターのプラグをコン
セントから抜く。
○ ACアダプターが破損したとき
○ 異物が内部に入ったとき
○ 製品に異常や故障が生じたとき
修理が必要なときは、お客様相談窓口へ依頼してください。
・ 本製品を分解したり改造したりしない。
・ 修理、部品の交換などで、取扱説明書に書かれてること以外は絶対にしない。
・ ACアダプターのコードを無理に曲げたり、発熱する機器に近づけない。ま
た、ACアダプターのコードの上に重いものをのせない。
コードが破損し、感電や火災の原因になります。
・ 大音量や不快な程度の音量で長時間使用しない。
大音量で長時間使用すると、難聴になる可能性があります。万一、聴力低下
や耳鳴りを感じたら、専門の医師に相談してください。
・ 本製品に異物(燃えやすいもの、硬貨、針金など)を入れない。
・ 温度が極端に高い場所(直射日光の当たる場所、暖房機器の近く、発熱する
機器の上など)で使用や保管をしない。
・ 振動の多い場所で使用や保管をしない。
・ ホコリの多い場所で使用や保管をしない。
・ 風呂場、シャワー室で使用や保管をしない。
・ スイッチやツマミなどに必要以上の力を加えない。
故障の原因になります。
・ 外装のお手入れに、ベンジンやシンナー系の液体、コンパウンド質、強燃性
のポリッシャーを使用しない。
・ 不安定な場所に置かない。
本製品が落下してお客様がけがをしたり、本製品が破損したりする恐れがあ
ります。
・ 本製品の上に乗ったり、重いものをのせたりしない。
本製品が落下または損傷してお客様がけがをしたり、本製品が破損したり
する恐れがあります。
* Apple、iPad、iPhone、iPod touchは、米国および他の国々で登録されたApple
Inc.の商標です。
* その他すべての商品名または規格名は関係各社の商標または登録商標です。
保証規定(必ずお読みください)
本保証書は、保証期間中に本製品を保証するもので、付属品類(ヘッドホンなど)は保
証の対象になりません。保証期間内に本製品が故障した場合は、保証規定によって無
償修理いたします。
1. 本保証書の有効期間はお買い上げ日より1か年です。
2. 次の修理等は保証期間内であっても有償となります。
• 消耗部品(電池、スピーカー、真空管、フェーダーなど)の交換。
• お取扱い方法が不適当のために生じた故障。
• 天災(火災、浸水等)によって生じた故障。
• 故障の原因が本製品以外の他の機器にある場合。
• 不当な改造、調整、部品交換などにより生じた故障または損傷。
• 保証書にお買い上げ日、販売店名が未記入の場合、または字句が書き替えられて
いる場合。
• 本保証書の提示がない場合。
尚、当社が修理した部分が再度故障した場合は、保証期間外であっても、修理した
日より3か月以内に限り無償修理いたします。
3. 本保証書は日本国内においてのみ有効です。
This warranty is valid only in Japan.
4. お客様が保証期間中に移転された場合でも、保証は引き続きお使いいただけます。
詳しくは、お客様相談窓口までお問い合わせください。
5. 修理、運送費用が製品の価格より高くなることがありますので、あらかじめお客様
相談窓口へご相談ください。発送にかかる費用は、お客様の負担とさせていただき
ます。
6. 修理中の代替品、商品の貸し出し等は、いかなる場合においても一切行っておりま
せん。
本製品の故障、または使用上生じたお客様の直接、間接の損害につきましては、弊社は
一切の責任を負いかねますのでご了承ください。
本保証書は、保証規定により無償修理をお約束するためのもので、これよりお客様の
法律上の権利を制限するものではありません。
■お願い
1. 保証書に販売年月日等の記入がない場合は無効となります。記入できないときは、
お買い上げ年月日を証明できる領収書等と一緒に保管してください。
2. 保証書は再発行致しませんので、紛失しないように大切に保管してください。
アフターサービス
修理または商品のお取り扱いについてのご質問、ご相談は、お客様相談窓口へお問い合
わせください。
・ 雨天時の野外のように、湿気の多い場所や水滴のかかる場所で、使用や保
管をしない。
・ 本製品の上に、花瓶のような液体が入ったものを置かない。
・ 本製品に液体をこぼさない。
・ 濡れた手で本製品を使用しない。
注意
この注意事項を無視した取り扱いをすると、傷害を負う可能性
または物理的損害が発生する可能性があります。
・ 正常な通気が妨げられない所に設置して使用する。
・ ラジオ、テレビ、電子機器などから十分に離して使用する。
ラジオやテレビ等に接近して使用すると、本製品が雑音を受けて誤動作す
る場合があります。また、ラジオ、テレビ等に雑音が入ることがあります。
本製品をテレビ等の横に設置すると、本製品の磁場によってテレビ等の故
障の原因になることがあります。
・ 外装のお手入れは、乾いた柔らかい布を使って軽く拭く。
・ ACアダプターをコンセントから抜き差しするときは、必ずプラグを持つ。
・ 長時間使用しないときは、ACアダプターをコンセントから抜く。
・ 付属のACアダプターは、他の電気機器で使用しない。
付属のACアダプターは本製品専用です。他の機器では使用できません。
・ 指定のACアダプター以外は使用しない。
・ 他の電気機器の電源コードと一緒にタコ足配線をしない。
本製品の定格消費電力に合ったコンセントに接続してください。
お客様相談窓口
受付時間: 月曜~金曜 10:00~17:00(祝祭日、窓口休業日を除く)
※ PHS等一部の電話ではご利用できません。固定電話または携帯電話からおか
けください。
サービス・センター:
輸入販売元: KORG Import Division 〒206-0812 東京都稲城市矢野口4015-2
VOX VX50 GTV
VX15 GT
本保証書は、保証規定により無償修理をお約束するものです。
お買い上げ日 年 月 日
販売店名
2
〒168-0073 東京都杉並区下高井戸1-18-16 2F
www.korg-kid.com
保証書
Fr
Emplacement
L’utilisation de cet instrument dans les endroits suivants peut en entraîner
le mauvais fonctionnement.
• En plein soleil
• Endroits très chauds ou très humides
• Endroits sales ou fort poussiéreux
• Endroits soumis à de fortes vibrations
• A proximité de champs magnétiques
Alimentation
Branchez l’adaptateur secteur mentionné à une prise secteur de tension
appropriée. Evitez de brancher l’adaptateur à une prise de courant dont
la tension ne correspond pas à celle pour laquelle l’appareil est conçu.
Interférences avec d’autres appareils électriques
Les postes de radio et de télévision situés à proximité peuvent par
conséquent souffrir d’interférences à la réception. Veuillez dès lors faire
fonctionner cet appareil à une distance raisonnable de postes de radio et
de télévision.
Maniement
Pour éviter de les endommager, manipulez les commandes et les boutons
de cet instrument avec soin.
Entretien
Lorsque l’instrument se salit, nettoyez-le avec un chiffon propre et sec. Ne
vous servez pas d’agents de nettoyage liquides tels que du benzène ou du
diluant, voire des produits inflammables.
Conservez ce manuel
Après avoir lu ce manuel, veuillez le conserver soigneusement pour toute
référence ultérieure.
Evitez toute intrusion d’objets ou de liquide
Ne placez jamais de récipient contenant du liquide près de l’instrument.
Si le liquide se renverse ou coule, il risque de provoquer des dommages,
un court-circuit ou une électrocution. Veillez à ne pas laisser tomber des
objets métalliques dans le boîtier (trombones, par ex.). Si cela se produit,
débranchez l’alimentation de la prise de courant et contactez votre revendeur korg le plus proche ou la surface où vous avez acheté l’instrument.
Note concernant les dispositions (Seulement EU)
Quand un symbole avec une poubelle barrée d’une croix apparait sur le produit, le mode d’emploi, les piles ou le pack de
piles, cela signifie que ce produit, manuel ou piles doit être
déposé chez un représentant compétent, et non pas dans une
poubelle ou toute autre déchetterie conventionnelle. Disposer
de cette manière, de prévenir les dommages pour la santé
humaine et les dommages potentiels pour l’environnement.
La bonne méthode d’élimination dépendra des lois et règle-
ments applicables dans votre localité, s’il vous plaît, contactez
votre organisme administratif pour plus de détails.
Si la pile contient des métaux lourds au-delà du seuil réglementé, un
symbole chimique est affiché en dessous du symbole de la poubelle
barrée d’une croix sur la pile ou le pack de piles.
Ce produit a été fabriqué suivant des spécifications sévères et des besoins en tension applicables dans le pays où ce produit doit être utilisé.
Si vous avez acheté ce produit via l’internet, par vente par correspon-
dance ou/et vente par téléphone, vous devez vérifier que ce produit
est bien utilisable dans le pays où vous résidez.
ATTENTION: L’utilisation de ce produit dans un pays autre que celui
pour lequel il a été conçu peut être dangereuse et annulera la garantie
du fabricant ou du distributeur. Conservez bien votre récépissé qui
est la preuve de votre achat, faute de quoi votre produit ne risque de
ne plus être couvert par la garantie du fabricant ou du distributeur.
* Apple, iPad, iPhone et iPod sont des marques de Apple Inc. déposées
aux États-Unis et dans d’autres pays.
* Tous les noms de produits et de sociétés sont des marques commerciales
ou déposées de leur détenteur respectif.
De
Aufstellungsort
Vermeiden Sie das Aufstellen des Geräts an Orten, an denen.
• es direkter Sonneneinstrahlung ausgesetzt ist;
• hohe Feuchtigkeit oder Extremtemperaturen auftreten können;
• Staub oder Schmutz in großen Mengen vorhanden sind;
• das Gerät Erschütterungen ausgesetzt sein kann.
• in der Nähe eines Magnetfeldes.
Stromversorgung
Schließen Sie das optionale Netzteil nur an eine geeignete Steckdose an.
Verbinden Sie es niemals mit einer Steckdose einer anderen Spannung.
Störeinflüsse auf andere Elektrogeräte
Dieser kann bei in der Nähe aufgestellten Rund-funkempfängern oder
Fernsehgeräten Empfangsstörungen hervorrufen. Betreiben Sie solche
Geräte nur in einem geeigneten Abstand von diesem Erzeugnis.
Bedienung
Vermeiden Sie bei der Bedienung von Schaltern und Reglern unangemessenen Kraftaufwand.
REMARQUE IMPORTANTE POUR LES CLIENTS
Précautions
Vorsichtsmaßnahmen
Reinigung
Bei auftretender Verschmutzung können Sie das Gehäuse mit einem trockenen, sauberen Tuch abwischen. Verwenden Sie keinerlei Flüssigreiniger
wie beispielsweise Reinigungsbenzin, Verdünnungs- oder Spülmittel.
Verwenden Sie niemals brennbare Reiniger.
Bedienungsanleitung
Bewahren Sie diese Bedienungsanleitung gut auf, falls Sie sie später noch
einmal benötigen.
Flüssigkeiten und Fremdkörper
Stellen Sie niemals Behältnisse mit Flüssigkeiten in der Nähe des Geräts auf.
Wenn Flüssigkeit in das Gerät gelangt, können Beschädigung des Geräts,
Feuer oder ein elek-trischer Schlag die Folge sein.
Beachten Sie, daß keinerlei Fremdkörper in das Gerät gelangen. Sollte ein
Fremdkörper in das Gerät gelangt sein, so trennen Sie es sofort vom Netz.
Wenden Sie sich dann an Ihren VOX-Fachhändler.
Hinweis zur Entsorgung (Nur EU)
Wenn Sie das Symbol mit der „durchgekreuzten Mülltonne“ auf
Ihrem Produkt, der dazugehörigen Bedienungsanleitung, der
Batterie oder dem Batteriefach sehen, müssen Sie das Produkt in
der vorgeschriebenen Art und Weise entsorgen. Dies bedeutet, dass
dieses Produkt mit elektrischen und elektronischen Komponenten
nicht mit dem normalen Hausmüll entsorgt werden darf. Für
Produkte dieser Art existiert ein separates, gesetzlich festgelegtes
Entsorgungssystem. Gebrauchte elektrische und elektronische
Geräte müssen separat entsorgt werden, um ein umweltgerechtes
Recycling sicherzustellen. Diese Produkte müssen bei benannten Sammelstellen abgegeben werden. Die Entsorgung ist für den Endverbraucher
kostenfrei! Bitte erkundigen sie sich bei ihrer zuständigen Behörde, wo sie
diese Produkte zur fachgerechten Entsorgung abgeben können. Falls ihr
Produkt mit Batterien oder Akkumulatoren ausgerüstet ist, müssen sie
diese vor Abgabe des Produktes entfernen und separat entsorgen (siehe
oben). Die Abgabe dieses Produktes bei einer zuständigen Stelle hilft ihnen,
dass das Produkt umweltgerecht entsorgt wird. Damit leisten sie persönlich
einen nicht unerheblichen Beitrag zum Schutz der Umwelt und der menschlichen Gesundheit vor möglichen negativen Effekten durch unsachgemäße
Entsorgung von Müll. Batterien oder Akkus, die Schadstoffe enthalten, sind
auch mit dem Symbol einer durchgekreuzten Mülltonne gekennzeichnet.
In der Nähe zum Mülltonnensymbol befindet sich die chemische Bezeichnung des Schadstoffes. Cd oder NiCd steht für Cadmium, Pb für Blei und
Hg für Quecksilber.
Dieses Produkt wurde unter strenger Beachtung von Spezifikationen
und Spannungsanforderungen hergestellt, die im Bestimmungsland
gelten. Wenn Sie dieses Produkt über das Internet, per Postversand
und/oder mit telefonischer Bestellung gekauft haben, müssen Sie
bestätigen, dass dieses Produkt für Ihr Wohngebiet ausgelegt ist.
WICHTIGER HINWEIS FÜR KUNDEN
WARNUNG: Verwendung dieses Produkts in einem anderen Land als
dem, für das es bestimmt ist, verwendet wird, kann gefährlich sein und
die Garantie des Herstellers oder Importeurs hinfällig lassen werden.
Bitte bewahren Sie diese Quittung als Kaufbeleg auf, da andernfalls
das Produkt von der Garantie des Herstellers oder Importeurs ausgeschlossen werden kann.
* Apple, iPad, iPhone, und iPod touch sind in den USA und anderen Ländern
registrierte Markenzeichen von Apple Inc.
* Alle Produkt- und Firmennamen sind Warenzeichen oder eingetragene Wa-
renzeichen der betreffenden Eigentümer.
Es
Ubicación
El uso de la unidad en las siguientes ubicaciones puede dar como resultado
un mal funcionamiento:
• Expuesto a la luz directa del sol
• Zonas de extremada temperatura o humedad
• Zonas con exceso de suciedad o polvo
• Zonas con excesiva vibración
• Cercano a campos magnéticos
Fuente de alimentación
Por favor, conecte el adaptador de corriente designado a una toma de
corriente con el voltaje adecuado. No lo conecte a una toma de corriente
con voltaje diferente al indicado.
Interferencias con otros aparatos
Las radios y televisores situados cerca pueden experimentar interferencias en la recepción. Opere este dispositivo a una distancia prudencial de
radios y televisores.
Manejo
Para evitar una rotura, no aplique excesiva fuerza a los conmutadores o
controles.
Cuidado
Si exterior se ensucia, límpiese con un trapo seco. No use líquidos limpiadores como disolvente, ni compuestos inflamables.
Guarde este manual
Después de leer este manual, guárdelo para futuras consultas.
Precauciones
3
Mantenga los elementos externos alejados del equipo
34
2
1
785910
6
13
12
11
16
17 18
15
14
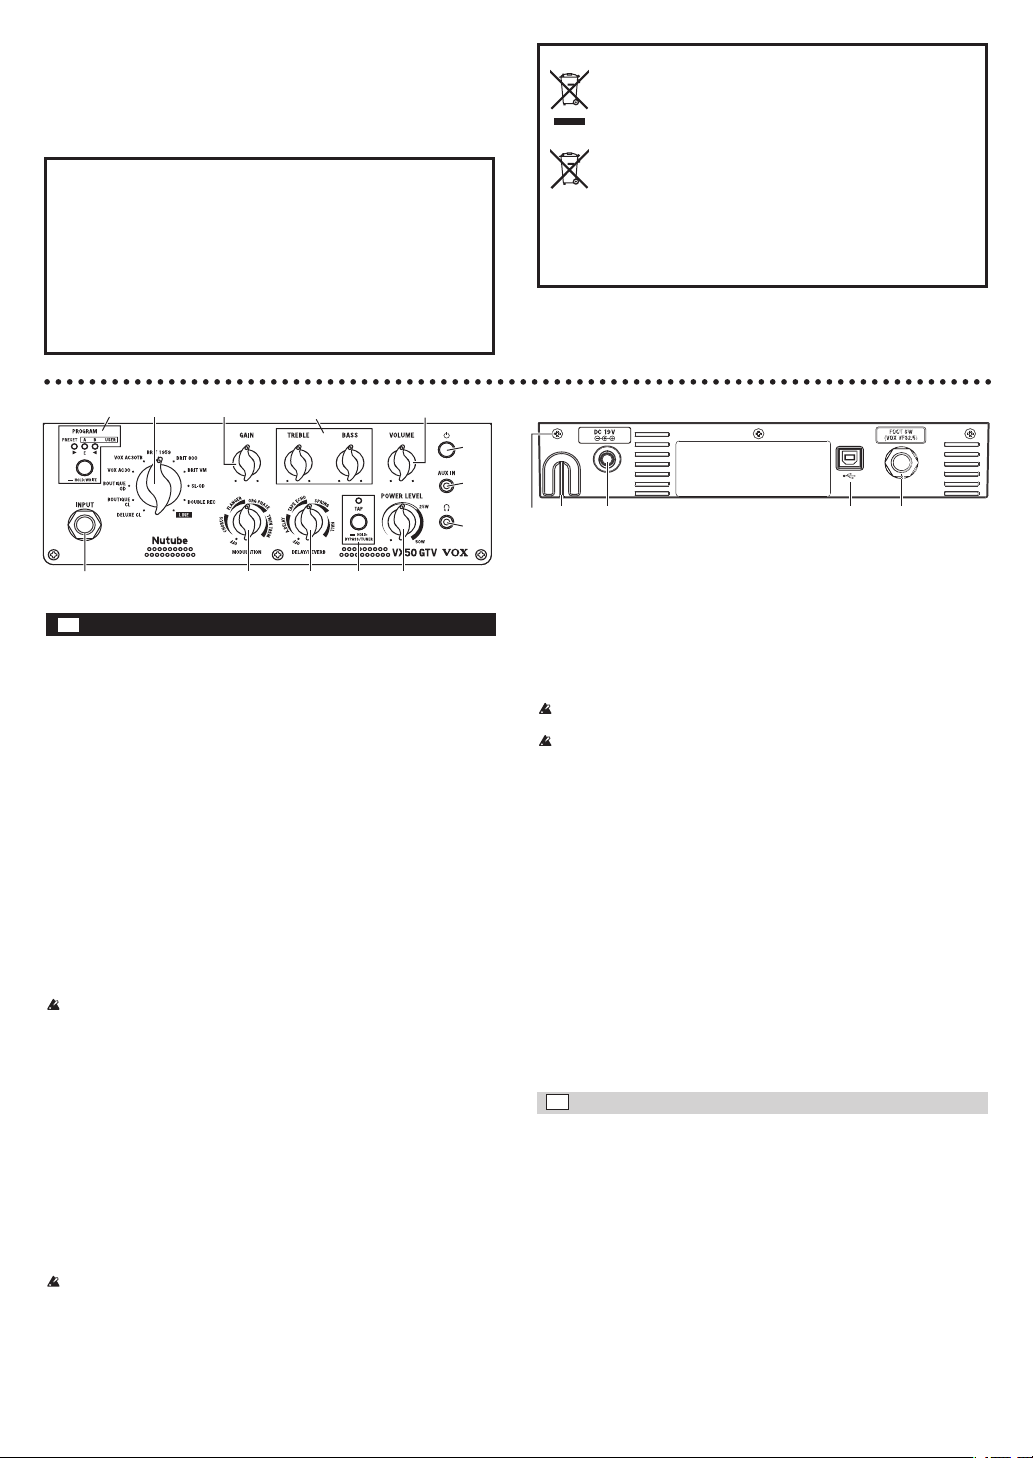
*ThispanelsshowstheVX50GTV.
*CettepanneauxafficheleVX50GTV.
*DiesePlattenzeigtdieVX50GTV.
*EstepanelesmuestraelVX50GTV.
※このパネル図はVX50GTVのものです。
Nunca coloque ningún recipiente con líquido cerca de este equipo, podría
causar un cortocircuito, fuero o descarga eléctrica. Cuide de que no caiga
ningún objeto metálico dentro del equipo. Si cae algo dentro del equipo,
desenchufe el adaptador de CA de la toma de corriente. A continuación,
póngase en contacto con el distribuidor VOX más cercano o con el establecimiento donde compró el producto.
Este producto ha sido fabricado de acuerdo a estrictas especificaciones
y requerimientos de voltaje aplicables en el país para el cual está destinado. Si ha comprado este producto por internet, a través de correo,
y/o venta telefónica, debe usted verificar que el uso de este producto
está destinado al país en el cual reside.
AVISO: El uso de este producto en un país distinto al cual está destinado
podría resultar peligroso y podría invalidar la garantía del fabricante
o distribuidor. Por favor guarde su recibo como prueba de compra ya
que de otro modo el producto puede verse privado de la garantía del
fabricante o distribuidor.
NOTA IMPORTANTE PARA EL CONSUMIDOR
Nota respecto a residuos y deshechos (solo UE)
Cuando aparezca el símbolo del cubo de basura tachado
sobre un producto, su manual del usuario, la batería, o el
embalaje de cualquiera de éstos, significa que cuando quiere
tire dichos artículos a la basura, ha de hacerlo en acuerdo con
la normativa vigente de la Unión Europea. No debe verter
dichos artículos junto con la basura de casa. Verter este producto de manera adecuada ayudará a evitar daños a su salud
pública y posibles daños al medioambiente. Cada país tiene
una normativa específica acerca de cómo verter productos
potencialmente tóxicos, por tanto le rogamos que se ponga en contacto con su oficina o ministerio de medioambiente para más detalles. Si
la batería contiene metales pesados por encima del límite permitido,
habrá un símbolo de un material químico, debajo del símbolo del cubo
de basura tachado.
* Apple, iPad, iPhone y iPod touch son marcas comerciales de Apple Inc.,
registradas en EE. UU. y en otros países.
* Todos los nombres de productos y compañías son marcas comerciales o
marcas registradas de sus respectivos propietarios.
En
1.
PROGRAM button and PROGRAM/TUNER LED
Use this buon to choose a program. Each press of the PROGRAM buon
switches the seing in the following order: PRESET -> USER A -> USER B -> OFF
-> PRESET... (Refer to “Preset programs and user programs”, “Manual mode”.)
This buon is also used to save new programs. (Refer to “Saving a program”.)
When the tuner function is turned on, the LEDs will display the tuning status.
(Refer to “Using the tuner”.)
2.
INPUT jack
This is where you plug in your guitar.
3.
AMP selector
Use this selector to choose the amp model. The characteristics and location of the
gain and tone controls in the circuit are all switched according to the amp model
that is selected.
When “PRESET” is selected with the PROGRAM buon, you can recall preset
programs that include sounds and eect seings typical of each amp model.
4.
GAIN knob
This adjusts the pre-amp gain of the selected amp model.
5.
TREBLE, BASS knob
These adjusts the tone for the high and low-frequency ranges. The changes that
are produced dier depending on the selected amp model.
6.
VOLUME knob
This adjusts the volume that is output from the pre-amp to the power amp.
When the volume is increased, there may be some unnatural distortion in
the output from the headphones jack or the audio output from the USB port.
7.
MODULATION knob
Use this knob to select a modulation eect. This knob also controls the speed of
the selected eect. When this knob is fully turned to the left, all eects are o.
8.
DELAY/REVERB
Use this knob to select a type of delay or reverb eect. This knob also controls
the depth, or intensity, of the selected eect.
When this knob is fully turned to the left, all eects are o.
9.
TAP button and LED
This sets the time for delay/reverb eects. The interval between two presses of the button will be set as the time. The LED will blink in accordance with the specied time.
Tip To set a precise delay time that matches the tempo of a song, press the
button several times along with the beat of the song.
10.
POWER LEVEL knob
This adjusts the output level of the power amp while maintaining the level of
power amp distortion.
The POWER LEVEL seing is not saved with the programs.
Tip This adjusts the output level from the headphones jack when headphones
are plugged into the jack.
11.
Power button
Hold down this buon to turn the VX15 GT / VX50 GTV on or o.
12.
AUX IN jack
Connect the analog output of an audio device to this jack. You can connect an audio
player to this jack, then play along on your guitar while listening to your favorite songs.
Panel description and functions
knob
13.
Headphones jack
Use this jack if you want to output directly to a mixer or recording device, or
when you want to use headphones. Adjust the output level from this jack by
using the POWER LEVEL knob.
When a device is connected to this jack, no sound will be output from the
internal speaker.
Be sure to connect a stereo plug to this jack.
14.
Grounding Screw (For the VX15 GT)
Use this screw to ground the unit. To do so, loosen the screw and aach a
grounding wire.
Tip Depending on how the unit is connected to other devices, you may feel a
slight electrical stimulation if a soft part of your skin touches a connected
guitar or a metal part of the unit. This is caused by a very weak current
that is harmless to humans. If this bothers you, use this grounding screw to
ground the unit to an external earth.
15.
Cable hook
Wrap the AC adapter cable around this hook to prevent the AC adapter from
being accidentally disconnected.
16.
DC12V (VX15 GT) jack, DC19V (VX50 GTV) jack
Connect the included AC adapter here.
17.
USB (Type B) port (VX50 GTV only)
Connect the computer or iOS device to this jack. For details, refer to “Connecting
to a computer via USB (VX50 GTV only)”.
18.
FOOT SW jack
You can connect an optional VOX VFS2 or VFS5 foot switch here. For more information on using the VOX VFS2 or VFS5, please refer to “Using the foot switch”.
Fr
1.
Bouton PROGRAM et témoin PROGRAM/TUNER
Appuyez sur ce bouton pour choisir un programme. Chaque pression sur le bou-
ton PROGRAM change le type de programme comme suit: PRESET -> USER A
-> USER B -> Désactivé -> PRESET... (Pour plus de détails, voyez “Programmes
d’usine et programmes utilisateur”, “Mode manuel”.) Ce bouton sert aussi à
mémoriser vos programmes perso. (Pour plus de détails, voyez “Mémorisation
d’un programme”.)
Quand la fonction accordeur est active, les témoins indiquent l’accord de l’instrument. (Pour plus de détails, voyez “Travail avec l’accordeur”.)
2.
Prise INPUT
C’est ici que vous branchez votre guitare.
3.
Sélecteur AMP
Choisissez le modèle d’ampli avec ce sélecteur. Les caractéristiques et l’emplacement des commandes de gain et de tonalité au sein du circuit varient selon le
modèle d’ampli choisi ici.
Quand “PRESET” est sélectionné avec le bouton PROGRAM, vous pouvez char-
ger des programmes d’usine («Preset») proposant des sons et réglages d’eets
typiques de chaque ampli modélisé.
4
Description des commandes et fonctions

1.
Commande GAIN
Cee commande règle le gain du préampli du modèle sélectionné.
2.
Commande TREBLE, BASS
Ces commandes déterminent le timbre en réglant l’aigu et le grave. L’eet de
cee commande varie selon le modèle d’ampli choisi.
3.
Commande VOLUME
Règle le niveau du signal transmis du préampli à l’amplicateur de puissance.
Quand le volume augmente, il se pourrait que de la distorsion non naturelle soit présente dans le signal à la prise casque ou la sortie audio via le
port USB.
4.
Commande MODULATION
Permet de choisir un eet de modulation. Ce sélecteur règle aussi la vitesse de
l’eet de modulation choisi. Pour couper tous les eets, tournez ce sélecteur à
fond à gauche.
5.
Commande
Permet de choisir le type d’eet de retard (delay) ou de réverbération. Ce sélecteur règle aussi la profondeur (ou encore intensité) de l’eet choisi.
Pour couper tous les eets, tournez ce sélecteur à fond à gauche.
6.
Bouton et témoin TAP
Règle la vitesse (l’intervalle entre les répétitions) de l’eet de retard/la durée
de l’eet de réverbération. L’intervalle entre deux pressions successives sur ce
bouton détermine la vitesse/durée de l’eet. Le témoin clignote conformément
à la vitesse/durée dénie.
Astuce Pour caler parfaitement les répétitions de l’effet de delay sur le tempo
d’un morceau, appuyez plusieurs fois sur ce bouton en vous basant sur le
tempo du morceau en question.
7.
Commande POWER LEVEL
Règle le niveau de sortie de l’ampli de puissance tout en préservant la quantité
de distorsion.
Le réglage de la commande POWER LEVEL n’est pas mémorisé dans les
programmes.
Astuce Cette commande règle le niveau du signal à la prise casque quand un casque
d’écoute est branché.
8.
Bouton d’alimentation
Maintenez ce bouton enfoncé pour mere le VX15 GT / VX50 GTV sous/hors
tension.
9.
Prise AUX IN
Branchez la sortie analogique d’une source audio à cee prise. Vous pouvez y
brancher un lecteur audio et accompagner vos morceaux favoris à la guitare ou
encore travailler des solos.
10.
Prise casque
Permet de brancher l’ampli directement à une console de mixage ou un enregistreur, ou encore de travailler au casque. La commande POWER LEVEL règle le
niveau du signal à cee prise.
Quand une che est branchée à cee prise, le haut-parleur interne ne
produit aucun son.
Veillez à brancher une che stéréo à cee prise.
11.
Vis de terre (Pour le VX15 GT)
Utilisez cee vis pour relier l’appareil à la terre. Pour cela, desserrez la vis et
xez un l de mise à la terre.
Astuce Selon la façon dont cet appareil est branché à d’autres appareils, vous
pouvez sentir une infime décharge électrique quand vous touchez une
guitare branchée ou une partie métallique de l’appareil. Ce phénomène
est dû au passage d’un courant très faible, absolument inoffensif pour les
êtres humains. Si cela vous dérange néanmoins, utilisez la vis de terre pour
relier l’appareil à une terre externe.
12.
Crochet pour câble
Enroulez le câble de l’adaptateur secteur autour de ce crochet pour éviter toute
déconnexion accidentelle.
13.
Prise DC12V (VX15 GT), Prise DC19V (VX50 GTV)
Branchez l’adaptateur secteur fourni à cee prise.
14.
Port USB (de type B) (VX50 GTV uniquement)
Branchez un ordinateur ou dispositif iOS à ce port. Pour plus de détails, voyez
“Connexion à un ordinateur via le port USB (VX50 GTV uniquement)”.
15.
Prise FOOT SW
Branchez un pédalier VOX VFS2 ou VFS5 en option à cee prise. Pour plus
de détails sur l’utilisation d’un pédalier VOX VFS2 ou VFS5, voyez “Utiliser
un pédalier”.
De
1.
PROGRAM-Taster und PROGRAM/TUNER-Diode
Mit diesem Taster können Sie einen Sound auswählen. Bei jeder Betätigung des
PROGRAM-Tasters ändert sich die Einstellung wie folgt: PRESET -> USER A ->
USER B -> OFF -> PRESET... (Siehe „Presets und eigene Sounds“, „Manual-Mo-
dus“.) Mit diesem Taster können Sie ebenfalls neue Sounds speichern. (Siehe
„Programmieren eines Sounds“.)
Bei aktivierter Stimmfunktion zeigen die Dioden den Stimmstatus an. (Siehe
„Verwendung der Stimmfunktion (Tuner)“.)
2.
INPUT-Buchse
Hier müssen Sie Ihre Gitarre anschließen.
DELAY/REVERB
Beschreibung und Funktion des Bedienfelds
5
3.
AMP-Wahlschalter
Mit diesem Wahlschalter können Sie ein Verstärkermodell auswählen. Die
Merkmale und Anordnung der Gain- und Tonregler im Schaltkreis werden
entsprechend dem ausgewählten Verstärkermodell umgeschaltet.
Wenn mit dem PROGRAM-Taster „PRESET“ ausgewählt wurde, können Sie
Presets aufrufen, welche die typischen Ton- und Eekteinstellungen einzelner
Verstärkermodelle aufweisen.
4.
GAIN-Regler
Hiermit kann die Pegelanhebung vor dem gewählten Verstärkermodell eingestellt werden.
5.
TREBLE-, BASS-Regler
Hiermit können Sie den Niederfrequenzbereich und Hochfrequenzbereich
regeln. Die erzielten Änderungen hängen vom Verstärkermodell ab.
6.
VOLUME-Regler
Hiermit können Sie den Lautstärkepegel des Vorverstärkers zum Leistungsverstärker regeln.
Wenn die Lautstärke aufgedreht wird, kann eine ungewöhnliche Verzerrung
der Audioausgabe an der Kopörerbuchse oder am USB-Port auftreten.
7.
MODULATION-Regler
Mit diesem Regler können Sie einen Modulations-Eekt auswählen. Mit
diesem Regler können Sie ebenfalls die Geschwindigkeit des ausgewählten
Eekts regeln. Wenn dieser Regler ganz nach links gedreht wird, sind alle
Eekte deaktiviert.
8.
DELAY/REVERB-Regler
Mit diesem Regler können Sie einen Delay- oder Halleekt auswählen. Mit
diesem Regler können Sie die Stärke bzw. den Anteil des ausgewählten Eekts
regeln. Wenn dieser Regler ganz nach links gedreht wird, sind alle Eekte
deaktiviert.
9.
TAP-Taster und -Diode
Hiermit stellen Sie das Tempo des Delay-/Halleekts ein. Das Intervall zwischen
zwei Tasterbetätigungen bestimmt das Tempo. Die Diode blinkt entsprechend
dem eingestellten Tempo.
Tipp Um die Verzögerung genau auf den Song abzustimmen, drücken Sie den
Taster wiederholt im Takt des Songs.
10.
POWER LEVEL-Regler
Hiermit können Sie den Ausgangspegel des Leistungsverstärkers regeln, ohne
den Verzerrungspegel zu beeinussen.
Die POWER LEVEL-Einstellung wird nicht mit den Sounds gespeichert.
Tipp Bei angeschlossenen Kopfhörern wird hiermit der Ausgangspegel der
Kopfhörerbuchse geregelt.
11.
Netztaste
Halten Sie diese Taste gedrückt, um den VX15 GT / VX50 GTV ein- oder auszuschalten.
12.
AUX IN-Buchse
Diese Buchse können Sie mit dem analogen Ausgang eines Audiogeräts verbinden. Sie können an dieser Buchse einen Audioplayer anschließen und dann Ihre
Lieblingssongs auf der Gitarre begleiten.
13.
Kopfhörerbuchse
Über diese Buchse können Sie das Ausgangssignal entweder direkt an einen
Mixer oder an ein Aufnahmegerät leiten oder mit Kopörern abhören. Den Ausgangspegel dieser Buchse können Sie mit dem POWER LEVEL-Regler einstellen.
Wenn an dieser Buchse ein Gerät angeschlossen ist, wird der verstärkereige-
ne Lautsprecher stummgeschaltet.
Sie müssen an dieser Buchse ein Stereokabel anschließen.
14.
Masseschraube (für die VX15 GT)
Über diese Schraube kann das Gerät geerdet werden. Lösen Sie die Schraube
und schließen Sie ein Erdungskabel an.
Tipp Bei
der Verbindung dieses Geräts mit bestimmten anderen Geräten spüren Sie
eventuell eine leichte elektrische Reizung, wenn Sie mit einem zarten Hautbereich
eine angeschlossene Gitarre oder ein Metallteil des Gerätes berühren. Das liegt an einer geringfügigen Strommenge, die für Men¬schen völlig harmlos ist. Wenn Sie das
aber als un¬angenehm empfinden, können Sie das Gerät über diese Schraube erden.
15.
Kabelhalter
Wickeln Sie das Neadapter-Kabel um diesen Halter, sodass es nicht versehentlich gelöst werden kann.
16.
DC12V (VX15 GT)-Buchse, DC19V (VX50 GTV)-Buchse
Hier wird der Neadapter angeschlossen.
17.
USB (Typ B)-Port (nur VX50 GTV)
Sie können an dieser Buchse einen Computer oder ein iOS-Gerät anschließen.
Alles Weitere hierzu nden Sie unter „Anschluss an Computer miels USB
(nur VX50 GTV)“.
18.
FOOT SW-Buchse
Hier können Sie einen optionalen Fußtaster VOX VFS2 oder VFS5 anschließen.
Weitere Informationen zur Verwendung des Fußtasters VOX VFS2 oder VFS5
nden Sie unter „Verwendung eines Fußtasters“.
 Loading...