

Page 1

Jam and Practice Tool for Guitar
Owner’s Manual
E 3
Page 2

Table of contents
Quick Start .................................................... 1
Step 1 Listen to the sound of the eect programs ...........1
Step 2 Play back a song and cancel the guitar part .........2
Step 3 Perform along with the song ..................................3
Basic operation ............................................. 4
Knobs ................................................................................... 4
Sliders .................................................................................. 4
Switches and buttons ......................................................... 4
/ (Inc/Dec) buttons .......................................................5
Popup menus ......................................................................5
Items in the screen........................................6
Downloading eect programs from JamVOX-Online ...... 8
Use the Audition function to hear an eect program without
having to play your guitar .................................................9
Performing with your guitar .............................................. 9
Tuning your guitar — Tuner ..................................................................................9
Changing the character of your guitar — Pick-up Selector .....................10
Adjusting the volume of the eect program ...............................................10
Using the metronome — Metronome .............................................................10
Using the Drum Player – Drum Player ..............................................................11
Adjusting the master volume – Master Output Level ................................11
Connecting a mic ..............................................................11
Creating your own sounds ......................... 12
How to create your own sounds ......................................12
How an eect program is structured................................................................12
Creating a sound by editing a preset program .............................................12
Creating a new sound ............................................................................................12
Performing .................................................... 8
Selecting an eect program ..............................................8
Using the program select buttons (/)to select a program .................8
Using the popup menu to select a program ...................................................8
Using the list to select a program ........................................................................ 8
ii
Saving an eect program .................................................13
Save (overwrite) .......................................................................................................13
Save As .........................................................................................................................13
Uploading eect programs to JamVOX-Online ..............14
Page 3

Table of contents
Music player ................................................15
Importing songs ...............................................................15
Playing a song ...................................................................16
Adjusting the song’s volume ...............................................................................16
Adjusting the song’s pitch ....................................................................................16
Adjusting the song’s tempo .................................................................................16
Changing the displayed range of a wave shape ..........................................16
Playing a looped region in a song .....................................................................16
Connecting to the Internet ..................................................................................16
Using the GXT function .........................................................................................17
Switching effect programs while the song plays — Auto Change
function .......................................................................................................................17
Jam Set ..............................................................................18
Saving a Jam Set le ...............................................................................................18
Reading Jam Set les ..............................................................................................18
Uploading Jam Sets to JamVOX-Online ..........................................................18
Searching for Jam Sets ...........................................................................................18
Editing Jam Set information ................................................................................18
Recording ..........................................................................19
Making GXT settings ........................................................22
Canceling a guitar part ..........................................................................................22
Extracting/emphasizing the guitar part ..........................................................23
Saving a GXT program......................................................23
Save (overwrite) .......................................................................................................23
Save As .........................................................................................................................23
Downloading GXT programs from JamVOX-Online ......24
Uploading GXT programs to JamVOX-Online ................24
List ...............................................................25
Items in the screen ............................................................25
Local Disk ....................................................................................................................25
JamVOX-Online ........................................................................................................25
List .................................................................................................................................25
Taking advantage of lists .................................................25
Searching for data ...................................................................................................25
Editing information ..........................................................26
Editing information in the list .............................................................................26
GXT (Guitar XTracktion) function .............. 20
GXT parameters ................................................................20
GXT display ................................................................................................................20
Edit parameters ........................................................................................................21
Choosing the columns shown in the list .........................26
Sorting the data in the list ...............................................27
iii
Page 4

JamVOX Owner's manual
Preference settings .....................................28
General ..............................................................................28
Hardware ...........................................................................28
Audio Device .............................................................................................................28
Vocal Mic .....................................................................................................................28
Recording ..........................................................................28
JamVOX-Online ................................................................. 29
JamVOX Account .....................................................................................................29
Plug-in .........................................................30
Using JamVOX as a plug-in ..............................................30
Supported plug-in formats ..................................................................................30
Starting the JamVOX plug-in ...............................................................................30
Using the JamVOX plug-in ...................................................................................30
iv
Page 5
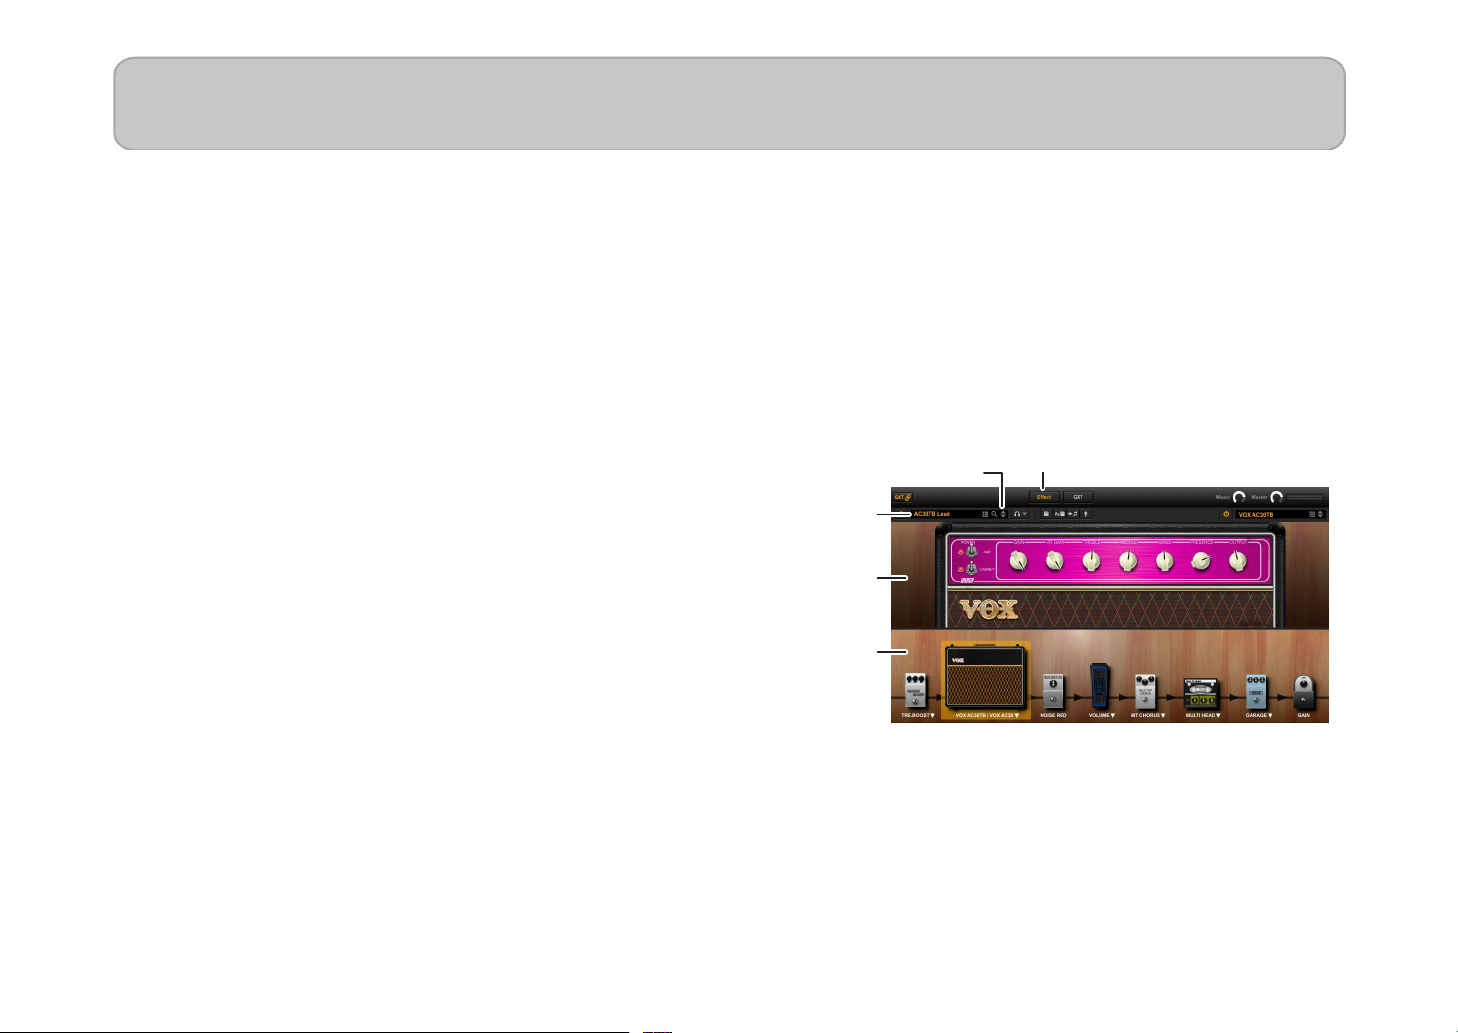
Quick Start
Eect button
In this section we’ll explain the basics of using JamVOX by taking you through the actual steps of operation.
Step 1 Listen to the sound of the eect programs
1
Click the Eect buon.
The Amp/Eect control panel and Eect routing will appear in the center of the screen.
2
Click the Program Select buons (/) located at the right of the Eect program name.
Clicking these buons will move up or down through the programs one
by one. Play your guitar to try out each program.
You can also use other ways to select programs. (See “Selecting an eect
program” on page 8)
Program Select buttons
Eect
program
name
3
Click the Amp name displayed above the Eect routing section.
In the menu that appears, you can change the amp.
You can also change the eect units in the same way.
4
Try dragging and dropping an eect device to the location where you want
to connect it.
You are free to change the connected order of all of the eect units.
The amp/cabinet and eect units can be adjusted in the Amp/Eect
control panel. The Amp/Eect control panel is shown for the amp or
eect device that you select by clicking.
Amp/Eect
control panel
Eect
routing
1
Page 6
JamVOX Owner’s manual
Record buttonPlay buttonGXT button
Playback location indicator
GXT display
Step 2 Play back a song and cancel the guitar part
1
Drag and drop the tracks that you have saved on your computer into the music player.
The following formats of song data can be played: WAV (.wav/.wave), AIFF (.aif/.ai), MP3 (.mp3), Windows Media Audio (.wma,
supported only in Windows), and AAC (m4a, supported only if QuickTime 7 is installed). Song data protected by DRM (Digital Rights
Management) cannot be played.
2
Cick the Play buon.
The song will play.
3
Drag the pointer of the playback location indicator to search for and playback a guitar solo.
4
Click the GXT buon on the music player.
The guitar solo will be canceled. The eectiveness of the cancellation will depend on how
the guitar solo is mixed. On the GXT display, drag the guitar to adjust the cancellation
eects.
2
You can use the Extract buon in the GXT display to isolate and emphasize the guitar
solo in the playback. Using this in conjunction with the Tempo change function (which
lets you slow down the playback speed without aecting the pitch) can be helpful when
you’re practicing.
For details about the GXT function, refer to “GXT (Guitar XTracktion) function” on page 20.
Page 7

Quick Start
Step 3 Perform along with the song
Now you can simply play your guitar along with the song!
JamVOX lets you adjust the tempo of the currently-playing song without aecting its pitch, which can help you to learn dicult phrase.
1
Click the Tempo buon.
2
Use the - buon or + buons to adjust the tempo.
You can adjust the tempo in a range of -50%–+150%.
To return to the original tempo, click the 0 buon.
JamVOX lets you adjust the pitch of the currently-playing song without aecting its tempo. This is also convenient if your guitar is tuned in regular
tuning and you’re playing along with a song that is detuned.
1
Click the Pitch buon.
2
Use the # button and b buttons to adjust the pitch.
You can adjust the pitch in a range of -5 semitones–+5 semitones.
To return to the original pitch, click the 0 buon.
JamVOX has many other convenient functions such as Loop or Chain playback of songs, automatic changing of eect programs, and downloading/
uploading of various programs. Not only can you record your songs and guitar performances, but you can also video record your own performances
by using a computer with a built-in webcam or one that has a webcam connected to it. With this feature you can enjoy checking your playing style
as well as uploading your videos to video sites so that you can show your performances to guitarists around the world.
3
Page 8
Basic operation
You can use JamVOX’s controllers and parameters with your computer’s
mouse and keyboard as follows.
Knobs
Drag
Drag to adjust the value of the knob. The method of dragging will depend
on the “Knob Operation Method” seing in the “Preferences...” of the
Option menu. By default, you’ll drag in a straight line to adjust a value.
Mouse wheel
You can place the cursor on a knob or slider and use the mouse wheel
to adjust the value.
Double-click
Double-click to reset a knob to its default seing.
NOTE: “Default seing” means the value or seing that was set at the
factory
Use your computer’s keyboard to adjust the value
Click the knob to select it, and use your computer’s up/down/le/right
cursor keys to adjust the value. Use the up/down keys to make coarse
adjustments, and the le/right keys to make ne adjustments.
When there is a horizontal row of multiple knobs shown in the panel,
you can use your computer’s [Tab] key to move to the knob located at
the right of the currently-operated knob. Press [Shi]-[Tab] to move back
to the knob located at the le.
4
Sliders
Click a slider
Click the control to set its value to the location at which you clicked.
Drag a slider left/right.
Drag the control to adjust its value.
Mouse wheel
You can place the cursor on a knob or slider and use the mouse wheel
to adjust the value.
Double-click
Double-clicking will reset the slider to its default seing.
Switches and buttons
Click
Click a switch or buon to change the seing each time you click it.
Page 9
/ (Inc/Dec) buttons
Click
The value will increase or decrease each time you click the buon.
Press
Press a buon to continuously increase or decrease the value.
Popup menus
Click
Then select the desired seing from the menu that appears.
Basic operation
5
Page 10
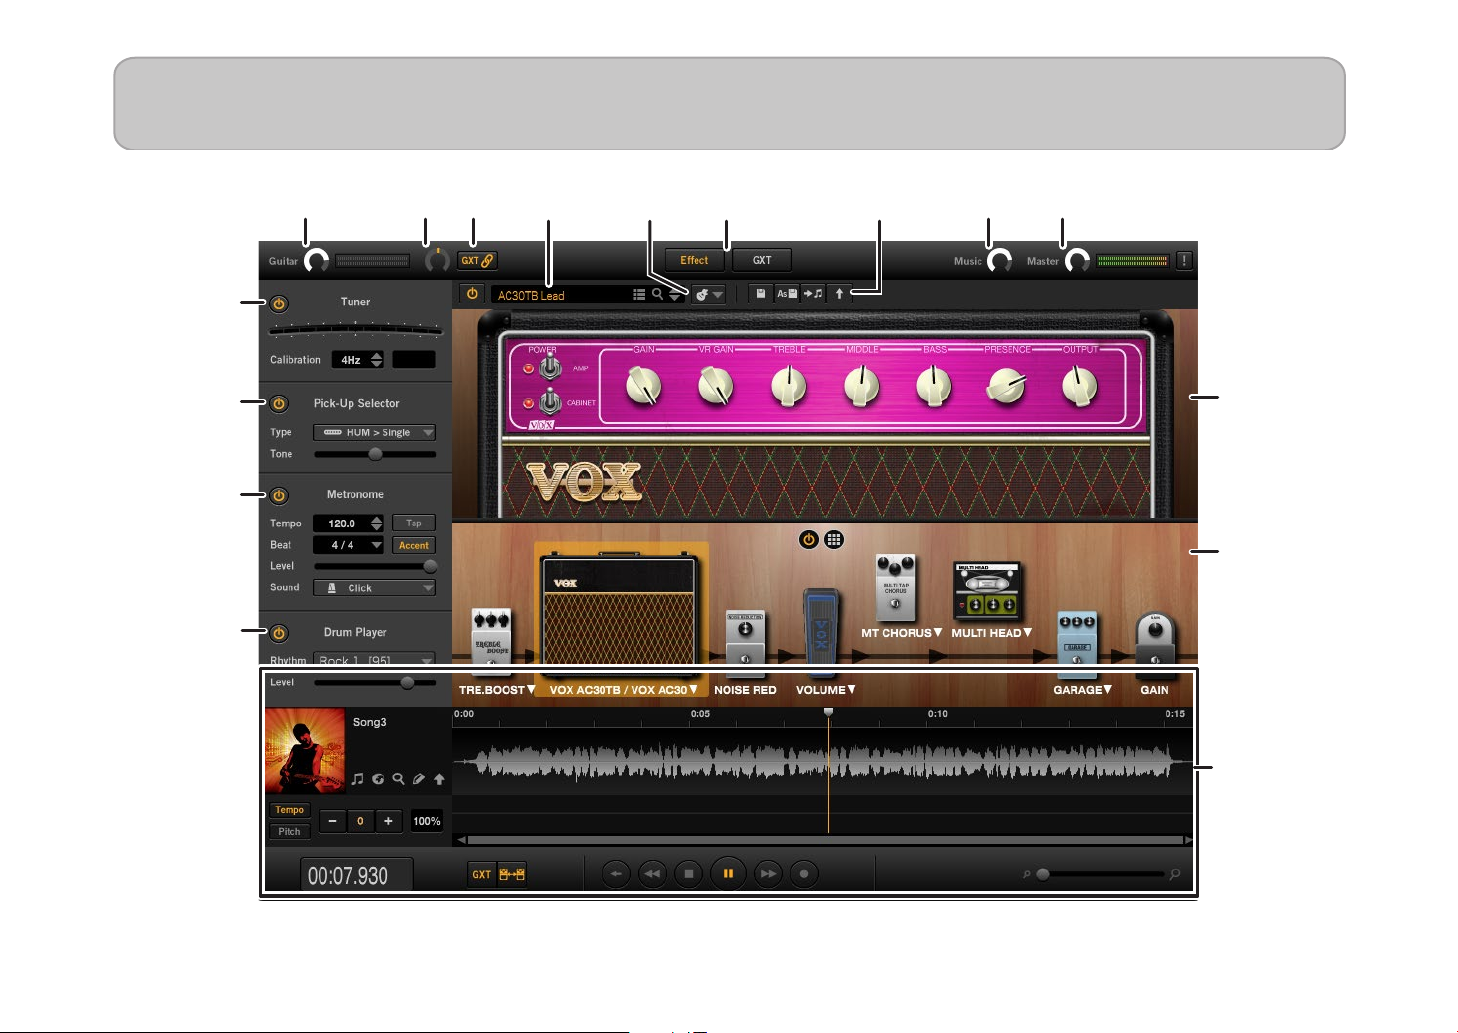
Items in the screen
456 7, 8, 9
1
23 1110
14
15
16
17
6
12
13
18
Page 11
Items in the screen
1. Guitar (Guitar Output Level)
Here you can adjust the volume of the guitar.
2. Pan (Guitar Panpot)
This adjusts the panning of the guitar output.
3. GXT Link
This buon links the panning of the GXT program and the guitar output.
4. Program select (program name, List button, button,
/ buttons)
Here you can view and select the program.
5. Audition button
Click this buon to loop playback of the audition ri (guitar phrase).
6. Eect/GXT buttons
If you click the Eect buon, the Amp/Eect control panel will appear
in the center of the screen.
If the GXT buon is clicked, the GXT display will appear in the center
of the screen.
7. Save button, Save As button
The Save buon saves edited programs and the Save As buon saves
programs under dierent names.
8. Set to Song button
This buon sets the eect program or GXT program for a track.
9. Upload button
This buon uploads the eect programs you created to JamVOX-Online.
10. Music knob (Music Output Level)
This adjusts the output level of music player.
11. Master knob (Master Output Level)
This adjusts the master volume level.
12. Amp/eect control panel
Here you can select and adjust the amp model and eect module.
13. Eect routing
The eect routing shows the various eect modules are arranged.
14. Tuner
Here you can operate the auto chromatic tuner when this is turned on.
The calibration seing range is 410 to 480 Hz.
15. Pick-up Selector
This simulates the guitar’s pickup.
16. METRONOME
Here you can turn the metronome on/o, and specify its tempo and
time signature.
17. Drum player
Here you can playback the drum paern when this is turned on.
18. Music player
Here you can play back or record songs.
7
Page 12

Performing
Selecting an eect program
JamVOX contains one hundred programs or more.
To select a program, click the Eect buon and then select the program
as described below.
Using the program select buttons (/)to select
a program
You can use the program select buons to step through programs one
by one.
1
Click one of the program select buons (/) located at the right
of the program name.
The buon selects the next program, and the program selects
the preceding program.
Using the popup menu to select a program
You can use the popup menu to make a selection while browsing a list
of eect program names.
Click the program name, and choose a program from the menu that
appears.
Using the list to select a program
1
Click the LIST buon ( ) to select a program.
The eect programs saved on your computer will be shown in
the list.
2
To select an eect program shown in the list, double-click its name.
Downloading effect programs from JamVOX-Online
You can create your own eect programs in JamVOX and upload them
to JamVOX-Online, or download and use eect programs that were
created and uploaded by other users.
Here’s how to download eect programs.
In order to use JamVOX-Online, your computer must be connected
to the Internet.
You’ll need to register as a user in order to audition or download
eect programs. If you haven’t registered as a user, you’ll only be
able to search.
8
Page 13

1
In the list, click JamVOX-Online to select it.
The list will show popular eect programs and GXT programs.
Performing
Performing with your guitar
2
If the program you want to use is not shown, enter a song title or
artist name in the Search eld and press your computer’s Return key.
The search results are shown in the list. If you don’t get the results
you want, try changing the terms you enter in the Search eld.
3
You can download a displayed program by double-clicking it.
The downloaded program will be saved to “Local Disk.”
If you haven’t registered as a user, proceed with registration as
directed by the dialog box that appears.
Use the Audition function to hear an eect
program without having to play your guitar
The Audition function uses one of the provided audition ri loops (guitar
phrases) to audition the sound of the eect program you’ve selected, so
you can hear the program without having to play your guitar.
1
Click the Audition buon.
An audition ri will play.
2
Click the located at the right of the Audition buon, and choose
a phrase from the menu that appears.
3
The audition ri will stop when you click the Audition buon again.
Tuning your guitar — Tuner
1
Click the Tuner power buon to turn the tuner on.
2
If necessary, click the Calibration buons ( /) to specify the
calibration.
The calibration is the reference frequency used for tuning
(expressed as the frequency of the middle A note of a piano,
A4). You can adjust this in a range of 410–480 Hz. By default,
this is 440 Hz.
3
Play a single note on your guitar, and tune the pitch approximately,
so that the desired note name appears in the display.
The display will show the note name that is closest to the pitch
you played.
4
Use the LED meter to tune your guitar precisely.
Tune the string so that only the center LED is lit. The illumination
in the LED meter will move to the right of center if the pitch is
sharp, or to the le if the pitch is at.
9
Page 14

JamVOX Owner's manual
Changing the character of your guitar — Pick-up Selector
The pickup selector simulates the characteristics of various guitar pickups,
allowing you to modify the pickup tone of your connected guitar.
button
Turns the pickup selector on/o.
If this is on, the pickup selector will be enabled for all eect programs.
Type
Selects the type of pickup.
Hum (Humbucker) > Single: Transforms the sound of a humbucking
pickup to that of a single coil pickup.
Single > Hum (Humbucker): Transforms the sound of a single coil pickup
to that of a humbucking pickup.
Half Tone: Produces a “half tone” sound.
Adjusting the volume of the eect program
Here you can adjust the volume of the eect program. The default
seing is 0 dB.
Using the metronome — Metronome
button
Turns the metronome on/o.
When turned on, the metronome will function according to the Tempo
and Beat seings.
Phase Out: Produces the sound of pickups wired out of phase.
Tone
Adjusts the sound of the pickup type selected by “TYPE.” The result
will depend on the pickup type.
10
Tempo
Adjusts the tempo.
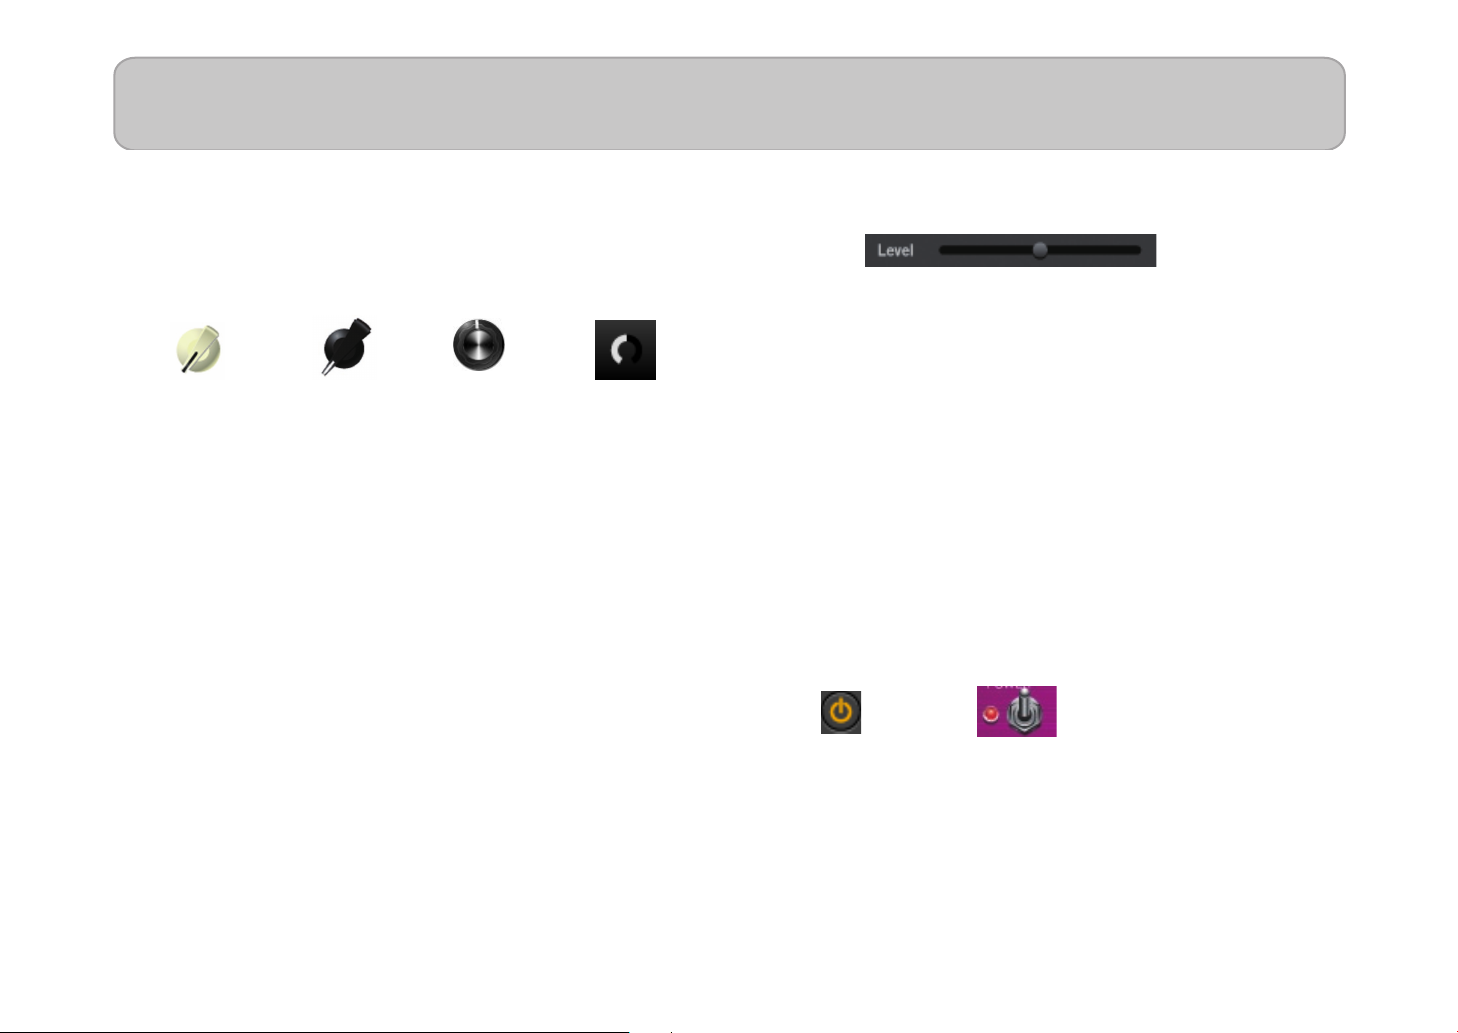
Level
Adjusts the metronome’s volume.
Tap
Adjusts the tempo by clicking it multiple times.
Page 15

Performing
Beat
Species the metronome’s time signature.
Sound
Species the sound of the metronome.
Click: The typical metronome click sound.
Side Stick: A snare drum’s side stick sound.
Cowbell: Cowbell.
Hi-Hat: Hi-hat.
Accent
Species whether an accent is placed at the head of a bar.
Using the Drum Player – Drum Player
button
Turns the drum player on or o. When turned on, you can perform the
drum paern that is selected in Rhythm.
Adjusting the master volume – Master Output Level
Here you can adjust the master volume.
Connecting a mic
1
Connect a dynamic mic to the jack that is specied as Input 2ch in
Preference – Hardware.
2
Adjust the mic input level.
Talk into the mic and adjust it so that the Master level meter does
not light up red.
3
Adjust the volume balance of the guitar and mic.
Play your guitar or the music player while vocalizing into the
mic, and make adjustments as desired.
Rhythm
Selects the drum paern.
The performance tempo of a drum paern cannot be changed.
Level
Adjusts the volume of the drum player.
11
Page 16

Creating your own sounds
Eec
How to create your own sounds
You can create a sound in either of two ways. You can choose an existing
preset program that’s close to the sound you want, and then edit the
program as necessary. Or, you can create your sound “from scratch,”
starting from a “blank” state.
How an eect program is structured
The eect section of the JamVOX soware is broadly divided into eect
routing, and amp/eect control panel.
Routing includes amps and eects, which you can drag and drop to
freely change the way that they’re connected.
In JamVOX you can use this eect routing area and amp/eect control
panel to edit the sound of the amp and eects.
Amp/Eect
control panel
t routing
Creating a sound by editing a preset program
If you want to create your sound by editing an existing program, choose
a program that’s close to the sound you want, and then edit the amp and
eect parameters to create the desired sound. For example, you might start
with a modern crunch sound, and raise the gain to create a contemporary
lead sound that’s louder with a more emphasized mid-range.
HINT: Even if you exit the JamVOX application during your editing,
the edited state of the program can be recovered the next time
you start up the application.
Creating a new sound
Here’s how to create a sound from scratch.
1
Choose Initial Program from the list.
2
Click the amp name indicated on the eect routing and select the
amp model.
For details on the types of amp model, refer to “JamVOX Eect
guide” (PDF).
3
Use the control knobs in the amp/eect control panel to adjust the
sound of the amp.
For details on the amp parameters, refer to “JamVOX Eect
guide” (PDF).
12
Page 17

4
To change the eect connection order, drag and drop the eect.
5
Click an eect that you want to edit.
The effect panel that was selected appears above the effect
routing.
Creating your own sounds
Saving an eect program
Here’s how to save an eect program you’ve edited.
If you switch to a dierent program without saving the one you’ve
edited, your changes to the edited program will be lost.
Save (overwrite)
If you click the utility Save buon, the current seings will be saved by
overwriting them onto the program that is saved in the list.
6
Click the eect name that appears above the eect routing, and then
select the eect model.
7
Use the control knobs of the amp/eect control panel to edit the
eect parameters.
For details on the available parameters, refer to “JamVOX Eect
guide” (PDF).
8
You can edit other eect models as described in steps 6 and 7.
9
Click the Save buon or Save As buon to save the eect program .
See “Saving an eect program” on page 13.
Save As
This will save the program to the list as a new program, separately from
the currently-edited program.
1
Click the utility Save As buon.
A dialog box will appear, allowing you to enter information
about the program.
2
Enter the information as necessary.
3
Click the OK buon.
The edited seings will be saved as a new program, and added
to the list.
13
Page 18

JamVOX Owner's manual
Uploading eect programs to JamVOX-Online
You can create your own eect programs in JamVOX and upload them
to JamVOX-Online, or download and use eect programs that were
created and uploaded by other users.
Here’s how to upload eect programs.
In order to use JamVOX-Online, your computer must be connected
to the Internet.
You’ll need to register as a user in order to upload eect programs.
1
Click the Upload buon ( ) above the Amp/Eect control panel.
If you haven’t registered as a user, proceed with registration as
directed by the dialog box that appears.
2
Note the content, edit it if necessary, and then click OK. The eect
program will be uploaded. If you decide to cancel, click Cancel.
14
Page 19

Music player
JamVOX contains a music player. You can use it to play audio data that’s
saved on your computer, or to record your guitar or other performances.
The music player can play back the following types of data.
• WAV (.wav/.wave)
• AIFF (.aif/.ai)
• MP3 (.mp3)
• WMA (.wma): Supported only in Windows.
• AAC (m4a)
Songs protected by DRM (Digital Rights Management) cannot be
played.
The music player provides the following functions that are ideal for
practicing or for learning songs by ear.
• Loop playback within a song.
• Adjustable playback speed and adjustable pitch.
• GXT function that lets you cancel or extract the guitar part from the
song that’s playing.
Auto Change function that lets you assign a marker to a location within
•
a song, causing the eect to switch automatically.
• Record songs and performance.
Importing songs
You can import songs to the music player. This feature allows you to
play back songs on the JamVOX music player.
1
Click the Import buon ( ) on the le of the music player.
The import screen will appear.
2
Select the import method to import the song.
To import the song, you can select from Drag and Drop to drag
and drop the selected song, Folder to select the song you want
to import, or Open Recent to select the songs that were recently
opened.
NOTE: The iTunes import function is only available for Windows and
macOS 10.14 or lower. Additional setup is required for macOS 10.15
or later. Please check out the link below for further information.
hps://jamvox-online.com/support/faq/detail.aspx?id=1087
15
Page 20

JamVOX Owner's manual
Playing a song
1
Drag and drop the audio data le into the music player.
2
Click the PLAY/PAUSE buon.
You can pause the playback by clicking the PLAY/PAUSE buon.
Adjusting the song’s volume
Use the Music knob adjust the volume of the currently-playing song.
Adjusting the song’s pitch
JamVOX lets you adjust the pitch of the currently-playing song without
aecting its tempo.
1
Click the Pitch buon.
Adjusting the song’s tempo
JamVOX lets you adjust the tempo of the currently-playing song without
aecting its pitch.
1
Click the Tempo buon.
2
Use the - buon or + buons to adjust the tempo.
You can adjust the tempo in a range of -50%–+150%.
To return to the original tempo, click the 0 buon.
Changing the displayed range of a wave shape
You can change the range of the displayed wave shape with the slider
on the lower right of the screen.
Playing a looped region in a song
Click the wave shape at the start of the loop and drag it to the end of the
loop. The loop is played at the set interval.
NOTE: Only one loop region can be specied for each song.
16
2
Use the # button and b (flat) buttons to adjust the pitch.
You can adjust the pitch in a range of -5 semitones–+5 semitones.
To return to the original pitch, click the 0 buon.
Connecting to the Internet
You can browse the Internet on the window that opens when the Web
buon ( ) on the le of the music player is clicked.
You can also look up information about your favorite artists or watch
their performances on a video site.
Page 21

Music player
Intro part A
part B
guitar solo
Using the GXT function
The GXT function allows you to easily cancel, extract or emphasize the
guitar part of your favorite track.
1
Click the GXT buon.
The GXT eect will be obtained from the track that’s being
played. For the GXT function, refer to “GXT (Guitar XTracktion)
function” on page 20.
Switching eect programs while the song plays —
Auto Change function
The Auto Change function automatically switches eect programs or
GXT programs while the song plays.
guitar program 1
At the desired locations in a song, you can assign Auto Change markers
containing your favorite eect programs or GXT programs so that these programs
will automatically be selected when the song playback reaches those points.
Assigning a marker
You can assign the eect program or GXT program to the current playback
location by clicking the Set to Song buon ( ) on the Amp/Eect
control panel. When a marker is assigned, the marker icon will appear
under the playback location indicator.
guitar program 2
guitar program 3
guitar program 4
…
: Eect program marker
: GXT program marker
When you assign a marker, the Auto Change function will turn on, and
the Auto Change buon (
Clicking this to make it go dark will turn o the Auto Change function.
) located on the music player will light.
Editing a marker
You can move a marker by dragging it.
Deleting a marker
1
Click the marker that you want to delete.
2
Press your computer’s [delete] key.
17
Page 22

JamVOX Owner's manual
Jam Set
You can save the playback track as a Jam Set with the eect program
and GXT program marker information.
Saving a Jam Set le
1
Create a track that has an assigned eect program or GXT program
marker.
2
Click the File menu, and choose a “Save As” from the menu that
appears.
3
Select the save location on the dialog box that appears and save the le.
The Jam Set le with the extension “jamset” will be saved in the
specied location.
HINT: To save a Jam Set le that was edited, choose a “Save”
from the menu that appears.
Reading Jam Set les
1
Click the File menu, and choose a “Open Jam Set” from the menu
that appears.
Here’s how to upload Jam Sets.
In order to use JamVOX-Online, your computer must be connected
to the Internet.
You’ll need to register as a user in order to upload Jam Sets.
1
Click the Jam Set Upload buon ( ) on the le of the music player.
If you haven’t registered as a user, proceed with registration as
directed by the dialog box that appears.
2
Note the content, edit it if necessary, and then click OK. The Jam Set
will be uploaded. If you decide to cancel, click Cancel.
Searching for Jam Sets
You can enter a keyword and search for Jam Sets or GXT programs within
your own computer or on JamVOX-Online.
1
To search for a Jam Set, click the Jam Set Search buon ( ) on the
le of the music player.
2
Click to select the Search eld, and enter the characters you want
to nd.
Each character you enter will narrow the search and display the
results in the list.
2
Select the Jam Set le on the dialog box that appears.
The Jam Set le will be read by the music player.
Uploading Jam Sets to JamVOX-Online
You can create your own Jam Sets in JamVOX and upload them to
JamVOX-Online, or download and use Jam Set that were created and
uploaded by other users.
18
Editing Jam Set information
You can edit the information of a Jam Set.
1
Click the Edit buon ( ) on the le of the music player.
The Jam Set information will appear.
2
Click the column you want to edit and enter the text.
Page 23

Recording
JamVOX lets you record your own performance. In this example, we’ll
record your guitar performance along the song playback.
1
Adjust the recording level. Click the buon to play back the song,
and perform on your guitar.
While viewing the level meter at the top right, adjust the guitar
and track level.
2
When you’ve nished adjusting the recording level, click the
buon to stop.
3
Click the buon to play the song. When you reach the point
at which you want to start recording, click the buon. Or,
click the playback location indicator to move the recording
start position, and then click the buon the buon to start
recording.
Recording will begin. Play your guitar along with the song playback.
4
When you’ve nished performing, click the buon to stop
recording.
As the format for the recorded data, you can choose WAV, AIFF,
WMA (Windows only), or AAC (Mac only). Use the Preference
seings to select the format (See “Preference seings” on page
28).
Music player
NOTE: The movie recording function is no longer available from version
3.0.4. Please check out the link below for further information.
hps://jamvox-online.com/support/faq/detail.aspx?id=1089
19
Page 24

GXT (Guitar XTracktion) function
GXT: Guitar XTracktion is revolutionary technology developed by Korg
that lets you cancel or extract/emphasize a desired guitar part from an
existing song.
With simple operations you can cancel or extract/emphasize the guitar
part from your favorite songs so that you can practice or play along on
your guitar. This section explains the various functions of GXT so that
you’ll be able to take full advantage of it.
GXT works by determining the sound’s “stereo position” (panning)
and “frequency band.” This means that it won’t be eective on
monaural songs. Furthermore, other sounds in the same stereo
position and frequency band will be cancelled as well. Also, the
eect may be dicult to notice on some songs depending on how
the guitar part has been mixed.
GXT parameters
Click GXT on the Eect/GXT buon at the top of the screen to display
the GXT display.
GXT Link
The pan seing of the guitar output will be linked to the DIRECTION
and AREA parameters of the GXT program. This allows you to layer
the sound of your guitar onto the location of the guitar part that you
cancelled using the GXT function.
select the template for the channel where you want to apply an eect,
and ne tune the parameter by dragging the instrument of that channel
to the right or le.
button
Turns the GXT function on/o.
Program select
Here you can view and select the GXT program.
Save button
The Save buon saves edited GXT programs.
Save As button
The Save As buon saves programs under dierent names.
GXT display
The three instruments shown in the GXT display show the le channel,
center channel and right channel. When the seing to cancel the sound
has been set, the “ ” mark will be shown on the instrument. You can
20
Set to Song button
This buon sets the GXT program to a track.
Page 25

GXT (Guitar XTracktion) function
Upload button
This buon uploads the GXT programs you have created to JamVOX-
Online.
Reduce/Extract button
Click Reduce to cancel the guitar part.
Click Extract to extract/emphasize the guitar part.
Template Select buttons
You can select the corresponding template of the eect seings you want
to obtain from the buons. The type of the instrument displayed may
change according to the template that was selected.
Instruments
Shows the instrument that matches the template
selected in Template select buons. Also, by
dragging instruments to the le and right, related
parameter is ne tuned and you can obtain your
target eect.
L&R button
This buon cancels, extracts or emphasizes both the le and right channels.
When this buon is turned on, instruments will be shown on the le
and right.
Detail button
When turned on, this buon displays the edited parameters.
Edit parameters
Target Guitar Freq. Bands sliders
These specify the frequency band of the guitar part that you want to
cancel or extract/emphasize. Use the Lo slider at le to specify the lowest
frequency of the target sound, and use the Hi slider at right to specify
the highest frequency.
21
Page 26

JamVOX Owner's manual
Area buttons
: Select this if you want to cancel or extract/emphasize a guitar
part that’s panned to the le side of the song.
: Select this if you want to cancel or extract/emphasize a
guitar part that’s panned to the center of the song.
: Select this if you want to cancel or extract/emphasize a
guitar part that’s panned to the le and right sides of the
song.
: Select this if you want to cancel or extract/emphasize a guitar
part that’s panned to the right side of the song.
Direction slider
This adjusts the panning of the area in which you want to cancel or
extract/emphasize a guitar part.
Width slider
This adjusts the width of the area in which you want to cancel or extract/
emphasize a guitar part.
Gain slider
This adjusts the gain of the area in which you want to cancel or extract/
emphasize a guitar part.
HINT: It’s convenient to use the arrow keys (↑, ↓, ←, →) of your computer
to make detailed adjustments to the graph or sliders.
Lo-Hi Boost slider
This boosts the low frequency and high frequency of a track being played
on the music player.
Depending on the track that’s being played, the track may be distorted
if the Lo-Hi Boost is increased. If this occurs, lower the track volume.
Making GXT settings
Canceling a guitar part
Here we’ll explain the basic method for using GXT to cancel a guitar part.
1
Play back the song, and listen to determine where in the song (le
side, center, right side, both sides) the guitar part you want to cancel
is panned.
This will be easier to determine if you use headphones.
2
When you’ve determined where the guitar part to be canceled is
located, press the GXT buon on the music player.
The GXT eect will turn on.
3
Select the GXT program from the Program select section.
Select the program where you want the target guitar part to be
canceled.
Depending on the selected program, the type and position of
the instrument that’s shown on the screen is changed, and the
seings of the GTX program are applied to the playback audio.
NOTE: Depending on the track that’s being played, you may not
obtain a very dramatic eect.
4
You should be able to hear the result of cancelling the guitar part.
Furthermore, you can adjust the parameter by dragging the instrument
to the le and right.
5
You should be able to hear the result of canceling the guitar part. If
you want to obtain the best possible cancellation eect, adjust the
Target Guitar Freq. Bands, Direction, Width, and Gain as appropriate
for the song.
22
Page 27

GXT (Guitar XTracktion) function
First, use the sliders to find the most effective settings for
Direction, Width, and Gain while you listen to the cancellation
of the guitar part.
Next, use the Target Guitar Freq. Bands sliders to specify the
frequency range of the guitar part.
It’s best to adjust the TTarget Guitar Freq. Band seings in the
following ways.
Lo slider: Press the Extract buon, and while auditioning the
extracted/emphasized guitar part, lower the frequency until you
no longer hear the sound of the bass part. Then press the Reduce
buon, and raise or lower the frequency to obtain the appropriate
cancellation for the low notes of the guitar part.
Hi slider: Press the Extract buon, and while auditioning the
extracted/emphasized guitar part, lower the frequency until you
hear as lile as possible of the hi-hat and snare aacks. Then press
the Reduce buon, and gradually raise the frequency so that the
guitar part is cancelled as much as possible. Repeat this process
to make the appropriate adjustments.
HINT: When adjusting the GXT parameters, minimizing
the eect on the drum sounds is an important part of
obtaining the most natural-sounding cancellation. For
example if you’ve set the Width fairly wide, set the Hi
slider as low as possible so that the hi-hat is excluded
from the cancellation eect. Conversely if you’ve set the
Width quite narrow, hi-hat sound will remain outside
the grey area, so you’ll be able to raise the Hi slider.
Extracting/emphasizing the guitar part
Aer you’ve made the seings described above, you can press the Extract
buon to extract/emphasize the corresponding guitar part.
If you’re learning a phrase by ear, and would like to obtain the best
possible extraction/emphasis eect, adjust Target Guitar Freq. Bands,
Direction, Width, and Gain as described in “Canceling a guitar part.”
HINT: If you’re copying or practicing a phrase, it’s especially useful to
use this in conjunction with the Tempo Change function that
lets you slow down the tempo without aecting the pitch.
Saving a GXT program
Here’s how to save a GXT program you’ve edited.
If you switch to a dierent program without saving the one you’ve
edited, your changes to the edited program will be lost.
Save (overwrite)
If you click the Save buon in the GXT edit panel, the current seings will
be saved by overwriting them onto the program that is saved in the list.
Save As
This will save the program to the list as a new program, separately from
the currently-edited program.
1
Click the Save As buon in the GXT edit panel.
A dialog box will appear, allowing you to enter information
about the program.
2
Enter the information as necessary.
23
Page 28

JamVOX Owner's manual
3
Click the OK buon.
The edited seings will be saved as a new program, and added
to the list.
Downloading GXT programs from JamVOX-Online
You can create your own GXT programs in JamVOX and upload them to
JamVOX-Online, or download and use GXT programs that were created
and uploaded by other users.
Here’s how to download GXT programs.
In order to use JamVOX-Online, your computer must be connected
to the Internet.
You’ll need to register as a user in order to audition or download
GXT programs. If you haven’t registered as a user, you’ll only be
able to search.
1
Click JamVOX-Online to select it.
The list will show popular eect programs and GXT programs.
Uploading GXT programs to JamVOX-Online
You can create your own GXT programs in JamVOX and upload them to
JamVOX-Online, or download and use GXT programs that were created
and uploaded by other users.
Here’s how to upload GXT programs.
In order to use JamVOX-Online, your computer must be connected
to the Internet.
You’ll need to register as a user in order to upload GXT programs.
1
Click the Upload buon ( ).
If you haven’t registered as a user, proceed with registration as
directed by the dialog box that appears.
2
Note the content, edit it if necessary, and then click OK. The GXT
program will be uploaded. If you decide to cancel, click Cancel.
24
2
If the program you want to use is not shown, enter a song title or
artist name in the Search eld and press your computer’s Return key.
The search results are shown in the list. If you don’t get the results
you want, try changing the terms you enter in the Search eld.
3
You can download a displayed program by double-clicking it.
The downloaded program will be saved to “Local Disk” (See
“List” on page 25).
If you haven’t registered as a user, proceed with registration as
directed by the dialog box that appears.
Page 29
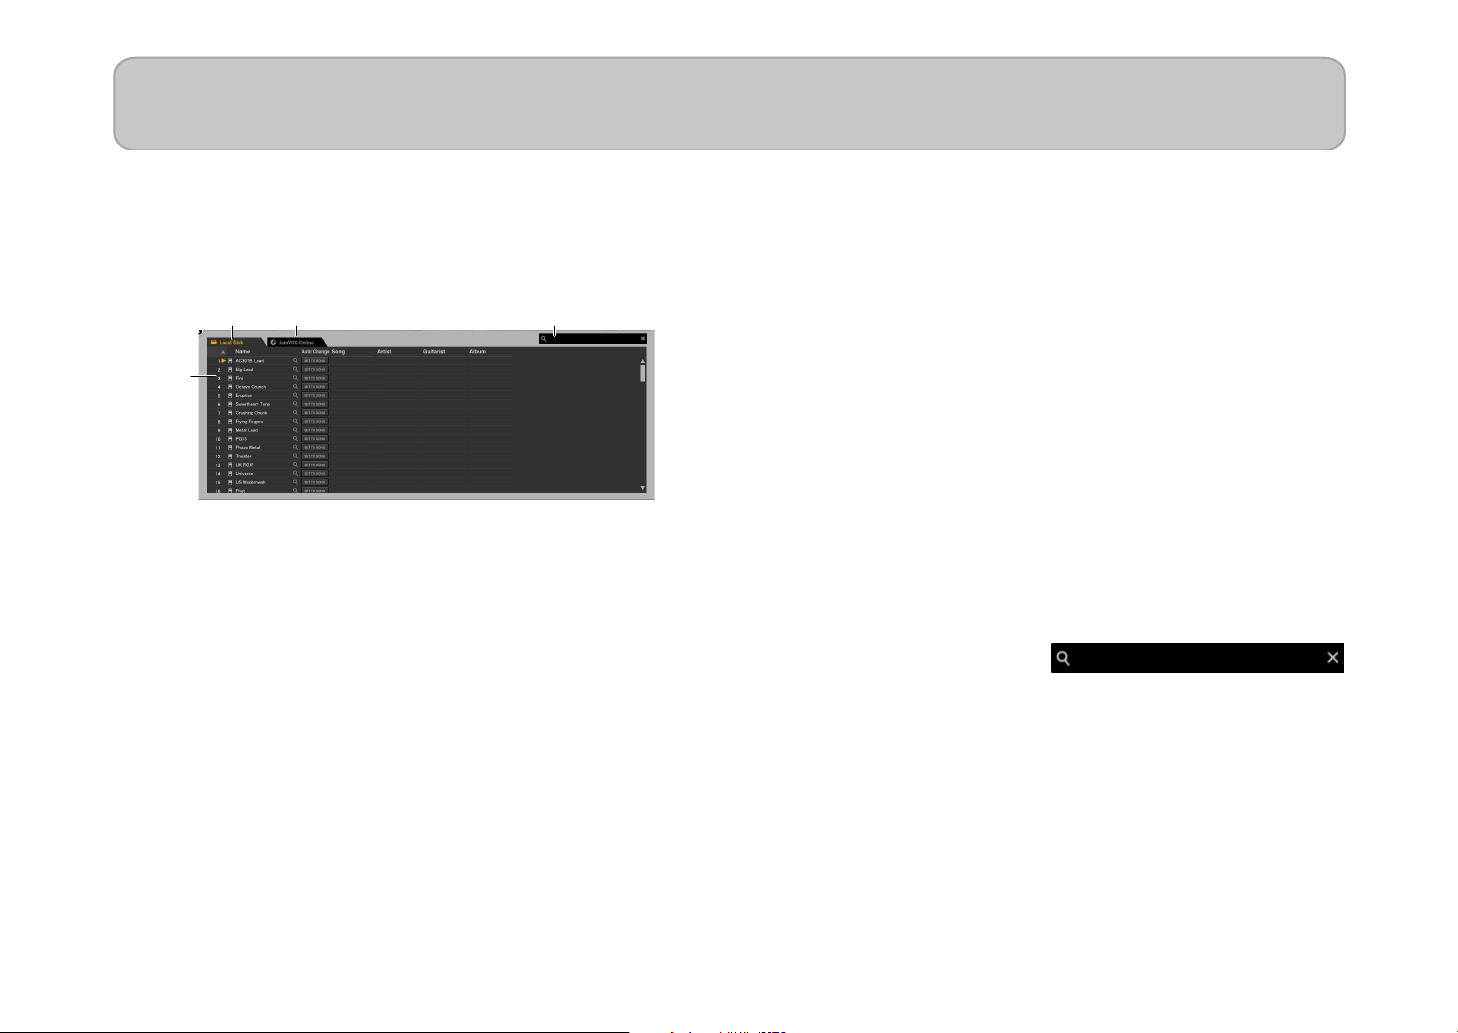
List
Local Disk
JamVOX-Online
List
Search eld
In the List you can edit and manage eect programs, GXT program data,
and program information.
Items in the screen
Local Disk
Here you can manage the eect programs and GXT programs that are
saved on your computer.
JamVOX-Online
Here you can search, audition, and download eect programs and
GXT programs that have been uploaded to JamVOX-Online. If you’ve
clicked here to make a selection, popular eect programs or GXT
programs will appear in the main. (“Downloading eect programs from
JamVOX-Online,” “Downloading GXT programs from JamVOX-Online”)
List
This shows data such as eect programs and GXT programs. The data
will be shown in a list when the local disk or JamVOX-Online is selected
and clicked.
Taking advantage of lists
Searching for data
You can enter a keyword and search for eect programs or GXT programs
within your own computer or on JamVOX-Online.
1
To search for an eect program, click the Eect buon. To search for
a GXT program, click the GXT buon.
2
Click to select the Search eld, and enter the characters you want
to nd.
Each character you enter will narrow the search and display the
results in the list.
Using JamVOX-Online
You can search for programs that other users uploaded to JamVOX-Online.
1
Click JamVOX-Online to select it.
Popular programs will be shown in the list.
2
If you don’t see the program you want, enter the song title or artist
name in the Search eld and press your computer’s Return key.
25
Page 30

JamVOX Owner's manual
The search results will appear in the list. If you don’t get the
desired results, try entering dierent items in the Search eld.
Editing information
Editing information in the list
Here’s how to edit items in the list within the list itself.
1
In the list, click the row that contains the item you want to edit.
2
Click the item that you want to edit.
The item will become editable.
3
Edit the item and press the Return key.
Choosing the columns shown in the list
You can choose the columns of information that will be shown in the
list. Your choices are saved for each list.
1
Right-click the column title area of the list. (Mac: Control-click)
The display option list will appear, showing the items that can
be shown.
26
2
Select each item that you want to see, so that a check mark is shown
by it.
Items for which there is a check mark will be shown in the list.
If you remove a check mark, that item will not be shown in the list.
Page 31

List
Sorting the data in the list
You can sort the items in the list. The sorting criteria are saved for each list.
1
Click a column title in the list.
The data in the list will be sorted by the column you clicked. For
example if you clicked “Name” in the Eect programs, the list
will be sorted by name.
2
Click the triangle symbol shown at the right of the column title.
The sorting order will be reversed.
In this way, eect programs in the list that have the same genre
or guitarist etc. can be brought together in the list.
NOTE: If the item by which you want to sort is not shown,
right-click the column title to access the option list, and
check the item for the column that you want to see. (See
“Choosing the columns shown in the list” on page 26)
27
Page 32

Preference settings
The Preference seings allow you to specify things like the appearance
of the JamVOX soware or the mode of knob operation as appropriate
for your system or your taste.
From the Option menu, choose “Preferences…” to access the Preferences
dialog box, click the appropriate tab, and make the desired seings.
General
Knob Operation Method
Choose how you want the knobs to operate.
Linear: Operate knobs by dragging them up or down. This is the default
seing.
Circular: Operate knobs by dragging them in a circular direction.
Default Website
Set the URL of the website that appears when the Web buon ( ) on
the le of the music player is clicked.
Show hints
When you place the cursor over a knob or switch, a simple explanation
or the value of the parameter will be shown.
Hardware
Vocal Mic
On/O
Set to On when you want to use the mic.
Level
Adjust the mic output level. Adjust the level while checking the Master
Level meter.
ECHO
Adjust the mic output echo.
Recording
Audio Format
Select the data format in which audio will be recorded: WAV, AIFF, WMA
(Windows only), or AAC (Mac only).
Audio Quality
Select the quality in which audio will be recorded. This is valid only if
you’ve selected WMA (Windows only) or AAC (Mac only) as the audio
format.
NOTE: These seings are also used when you load a music CD.
Audio Device
Select the audio interface that will be used.
NOTE: To play the guitar easily, a low-latency audio interface is required.
28
Page 33

JamVOX-Online
JamVOX Account
Verify your JamVOX account or log-in to JamVOX-Online.
Log in
Connect to JamVOX-Online. You must have already completed user
registration.
User Registration
Create a JamVOX account and register as a user. Proceed with registration
in the Web browser that will start up.
Preference settings
29
Page 34

Plug-in
Using JamVOX as a plug-in
Supported plug-in formats
• VST (Virtual Studio Technology)
• AU (Audio Units)
The JamVOX plug-in supports The JamVOX plug-in supports both 32bit and 64-bit DAW soware on Windows, and 64-bit DAW soware
on macOS.
Starting the JamVOX plug-in
For information on starting the JamVOX plug-in, refer to the owner’s
manual of your DAW application.
Using the JamVOX plug-in
For more information on selecting an eect program or using a guitar
eect with the JamVOX plug-in, refer to the “Selecting an eect program”
on page 8 and “Creating your own sounds” on page 12 .
The JamVOX plug-in can also support general plug-in functions such
as automation.
NOTE:
•
The JamVOX plug-in allows you to create specialized music with guitar
eects. The JamVOX plug-in allows you to use the eects sections,
however, the music player, GXT programs, or JamVOX-Online for
uploading and downloading cannot be used.
30
Page 35

Plug-in
31
Page 36

© 2012 VOX AMPLIFICATION LTD.
Published 01/2020
 Loading...