

Page 1
THERMOMIX
USER’S GUIDE
Page 2

IMPORTANT SAFEGUARDS
Read all instructions carefully before beginning to use yourThermomix. This will
help you achieve a high level of safety and security.
1. Close supervision is necessary when the appliance is used by or near children.
2. Do not use the Thermomix for anything other than its intended use.
3. Do not place the Thermomix on or near a hot gas or electric burner, or in a heated
oven.
4. Do not use outdoors.
5. Do not let cord hang over edge of table or counter or touch hot surfaces.
6. Unplug from outlet when not in use, before putting on or taking off parts, and before
cleaning.
7. Do not operate any appliance with a damaged cord or plug or after the appliance
malfunctions, or is damaged in any manner. Return appliance to the nearest
authorized service facility for examination, repair or adjustment.
8.To protect against risk of electrical shock do not immerse the main appliance in water.
9. Use only Thermomix accessory attachments in the mixing bowl while blending.
The use of accessories or attachments not recommended by Thermomix may cause
injuries.
10.The mixing bowl must be properly in place before operating the Thermomix.
11. Blades are sharp. Handle carefully.
12. Avoid contacting moving parts.
13. Do not operate the Thermomix on any heat setting when the mixing bowl is empty.
14. Do not touch hot surfaces.
15. If you use hot liquids, do not press the Turbo button.
16.When blending hot liquids, always put the Thermomix measuring cup in place
on the lid.
17. Extreme caution must be used when moving the appliance containing hot liquids.
18. Do not clean the coating of the heating element with cleanser or metal scouring pad.
19.To avoid spillage, do not fill the mixing bowl above the recommended maximum
capacity.
20. Follow the important safeguards on page 24 regarding using the Varoma.
SAVE THESE INSTRUCTIONS
Page 3

Contents
3
Description of parts 4
Cleaning before your first use 5
Assembling your Thermomix 6
Description of functions 7 - 10
Working with your Thermomix 11 - 16
Tips on individual recipes 17
Cleaning your Thermomix 18
Using and caring for your Varoma 19 - 20
Cooking with your Varoma 21 - 22
Using your Varoma 23
Important Varoma Safeguards 24
Troubleshooting tips 25
Technical specifications 26
Recipes 28
Tables of cooking times 29
Vegetables and accompaniments 30
Fish, poultry and meat 33
Desserts 38
Page 4
4
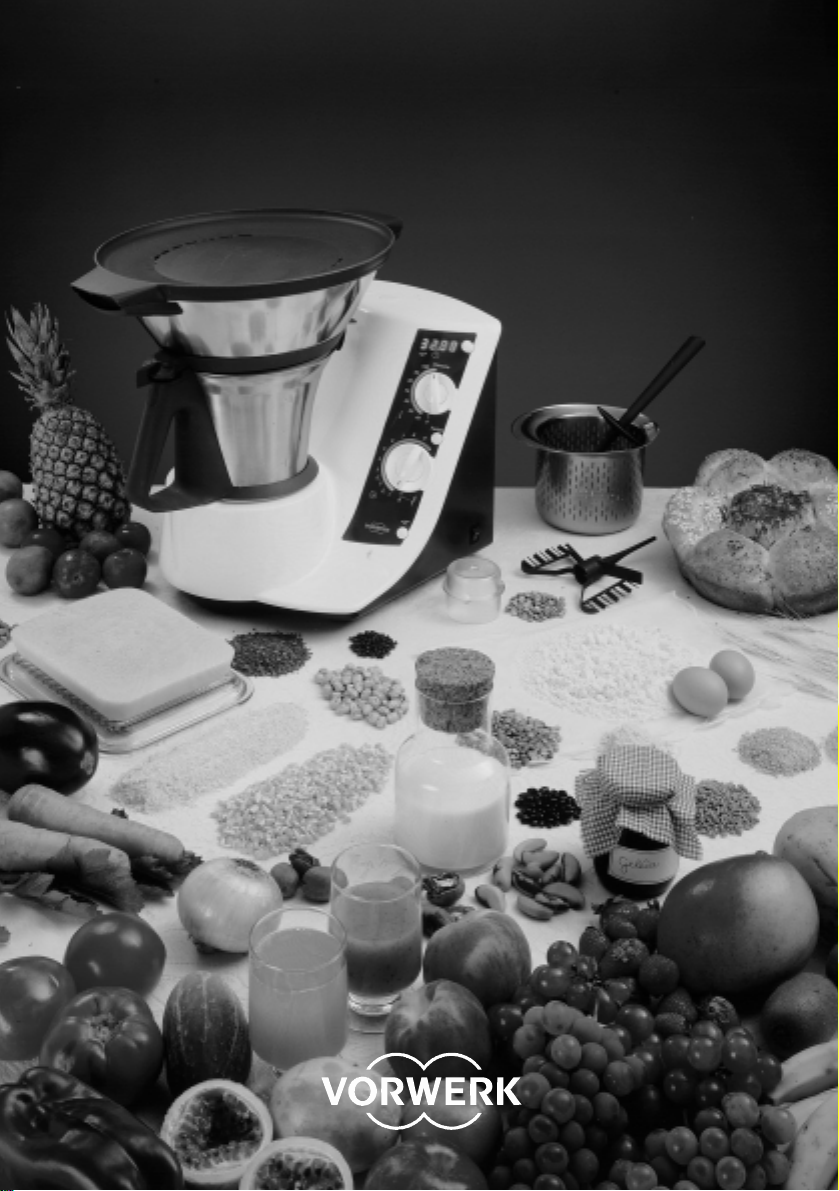
Description
After opening the package, take the parts out
of the box and spread them out on the table to
familiarize yourself with the description of the
parts as shown below.The following items
should be included.
l Thermomix TM 21 including mixing bowl
and lid
l Basket
l Stirring attachment (butterfly/whisk)
l Thermomix measuring cup
l Spatula
l Varoma (lid and inner tray)
l Recipe book
l User’s guide
Details of the TM 21
1 = Main switch (lower, right side)
2 = Time selector
3 = Temperature selector
4 = Turbo button
5 = Speed selector
6 = Time/Scale display
7 = Electronic scale button
8 = Housing
9 = Temperature sensor
10 = Drain opening
11 = Motor speed setting
12 = Temperature setting
Accessories
13 = Mixing bowl
14 = Locking lever
15 = Handle
16 = Cutting/mixing blade unit
(blades are sharp)
17 = Sealing ring for
cutting/mixing blade unit
18 = Mixing bowl foot & blade
unit retainer
19 = Basket
20 = Stirring attachment
(butterfly/whisk)
21 = Spatula
22 = Lid
23 = Sealing ring for lid
24 = Thermomix measuring cup
6
3
12
11
9
10
15
17
18
21
22
23
24
19
20
13
16
14
4
5
7
8
1
2
Page 5
5
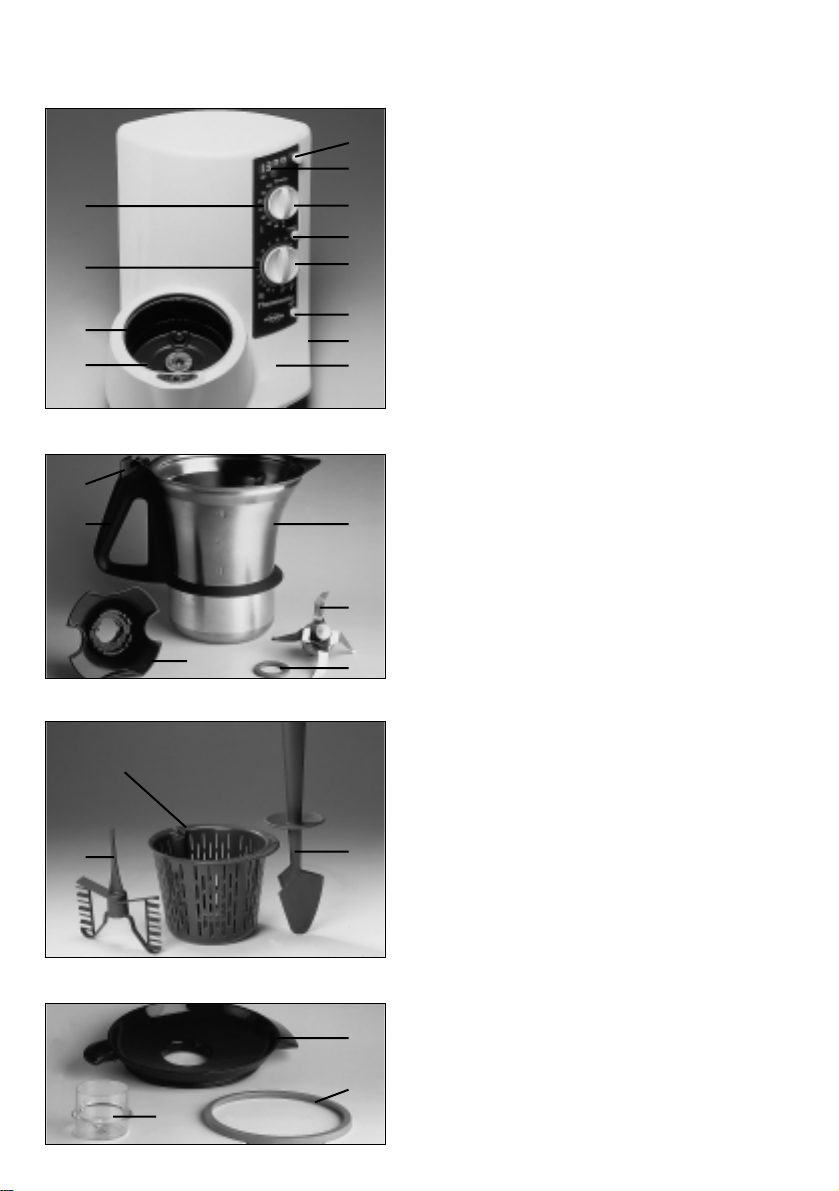
Cleaning before your first use
The Thermomix must be thoroughly cleaned
before it is assembled and used for the first
time.To clean the mixing bowl (13) turn the
locking lever (14) to the right and remove the
lid (22). Next, remove the stirring attachment
(20), the Thermomix measuring cup (24) and
the basket (19). Now remove the mixing bowl
(13) from the appliance. Remove the
cutting/mixing blade unit (16) next. To do this,
turn the foot of the mixing bowl (18) 180° to
the left and remove it by pulling downwards.
This will enable you to carefully pull out the
cutting/mixing blade unit (16) with the
sealing ring (17) from the inside of the mixing
bowl (13).
Thoroughly clean the mixing bowl (13) with a
stainless steel cleaning agent and rinse. Then,
clean the outside of the mixing bowl (13) with
the same cleaner and rinse.
Carefully clean the cutting/mixing blade unit
(16) under running water by using a sponge or
brush.
Caution
Blades are sharp. Handle carefully.
Important
1. Do not leave the cutting/mixing blade unit in
water for any length of time or clean in a
dishwasher because the detergents may
have an adverse affect on the sealing ring
or the cutting/mixing blade unit itself.
2. To avoid scratches, use only a soft, moist
cloth to clean the non-stick coated heating
ring.
Page 6
6
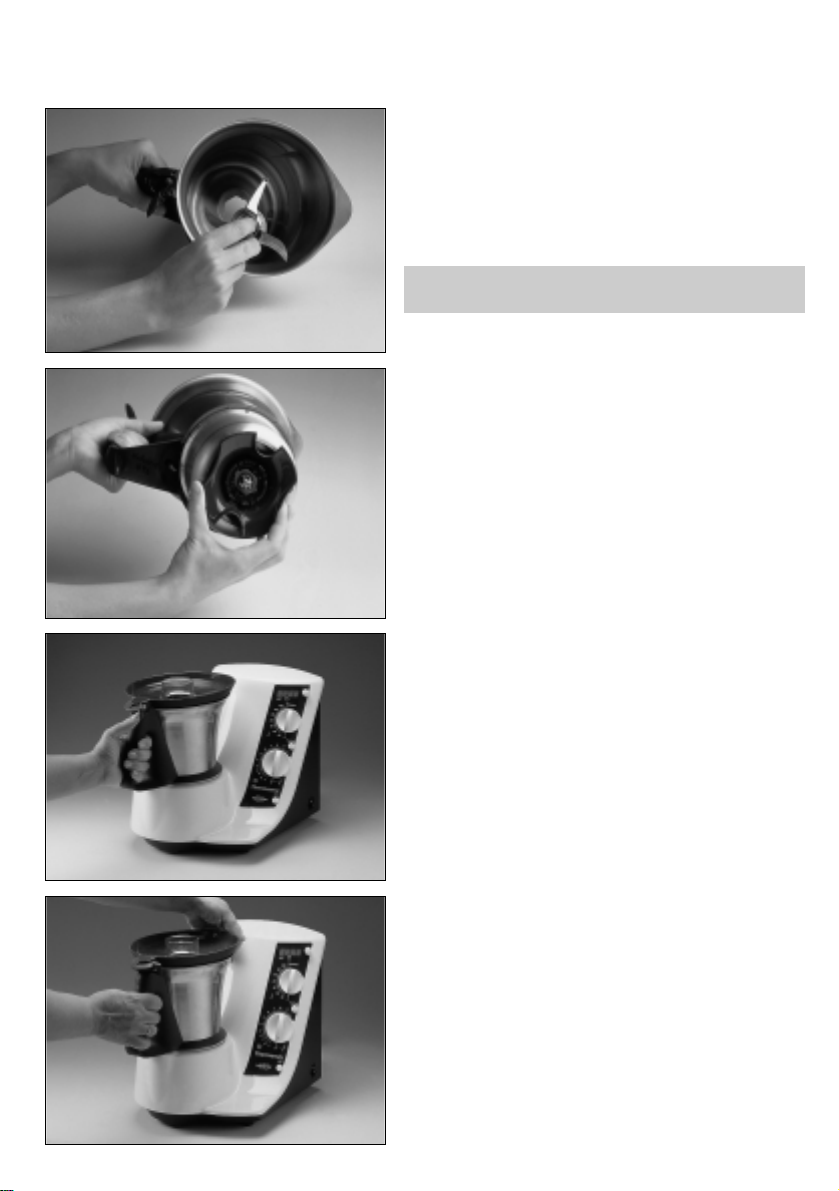
Assembling yourThermomix
1. Fitting the cutting/mixing blade
unit (16)
Before assembling the mixing bowl, check to
make sure that the sealing ring is correctly
fitted to the cutting/mixing blade unit.Now
carefully insert the cutting/mixing blade unit
into the mixing bowl.
Caution
Blades are sharp. Handle carefully.
Now attach the mixing bowl foot to the
cutting/mixing blade unit from below.This
foot is secured by turning it 180° to the right
until it will go no further. Now the mixing bowl
is ready to place in the base unit.
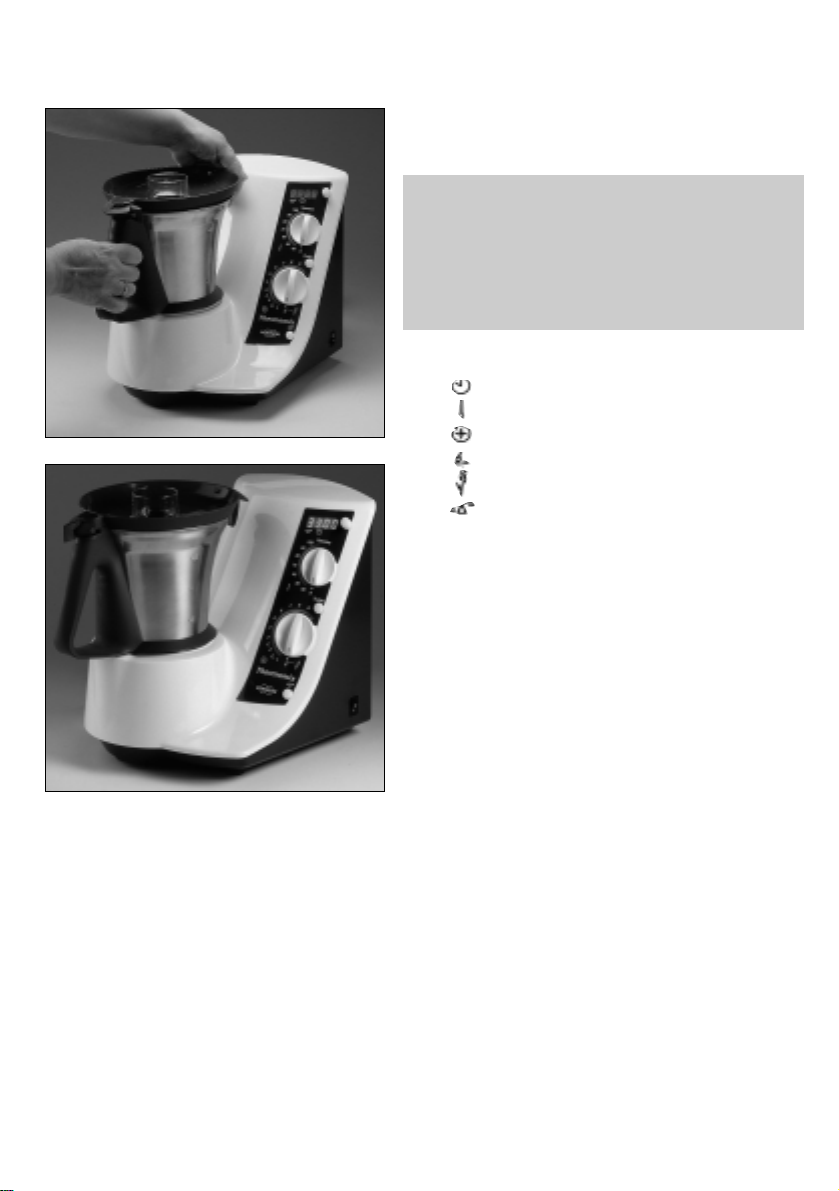
2. Inserting the mixing bowl (13)
Check to see that the locking lever is pushed
fully to the right. Insert the mixing bowl into
the base unit with the handle to the front.
Make sure that the mixing bowl is securely
seated in the base unit.
Fit the lid into the spout of the mixing bowl
and push it down gently until it slips into place.
Push the locking lever fully to the left until it
can go no further.
The Thermomix will not turn on unless the
mixing bowl is in place and the lid is fitted and
locked properly.
Page 7
7
Description of functions
Thermomix measuring cup (24)
The measuring cup has three functions:
1.To close the lid opening to avoid heat loss
when heating.
2.To prevent food from splashing out when
being processed.
3.To measure ingredients. The content of the
measuring cup when full to the rim with
liquids is 1 dl (100 ml).
Always insert the measuring cup with the open
end up.
Liquids can be added in small amounts without
having to remove the measuring cup by pouring them directly on the lid. Other ingredients
can be added during mixing simply by lifting
the measuring cup.
Lid (22)
When working with the Thermomix, the lid
together with the sealing ring must be properly
positioned on the mixing bowl.
Caution
The lid and the sealing ring must be properly
fitted to prevent contents from splashing out
between the mixing bowl lid and the mixing
bowl itself. When properly fitted, you will see
the grooved side of the sealing lip (see picture
on left). If fitted incorrectly, there is a risk of
scalding.
Page 8
8
Mixing bowl (13)
The maximum capacity of the mixing bowl is 2
liters.Do not under any circumstances
exceed this amount.
There are 4 marks on the inside of the mixing
bowl. Each mark stands for approx. ½ litre.
Important
Make sure to remove the cutting/mixing
blade unit before cleaning the mixing bowl
in a dishwasher.
Basket (19)
The basket has multiple functions.
For example:
1. It will filter fruit and vegetable juices.To do
this, after the juice is made, place the basket
in the mixing bowl. Insert the spatula into the
groove in the basket. Pour the juice out by
holding the basket in place with the spatula.
2. It will hold ingredients for heating or cooking.
To do this, place any ingredients that you do
not want to be brought into contact with the
cutting/mixing blade unit into the basket.
Then place the basket into the mixing bowl.
To remove the basket, insert the spatula into
the groove and pull it out gently.Practice
carrying the basket with the spatula before
doing this with hot food inside.
Page 9
9
Mixing bowl foot (18)
The mixing bowl foot serves to secure the
cutting/mixing blade unit in the mixing bowl.
The mixing bowl foot is made of a
heat-insulating plastic material so that the hot
mixing bowl can be safely placed on any
kitchen surface.
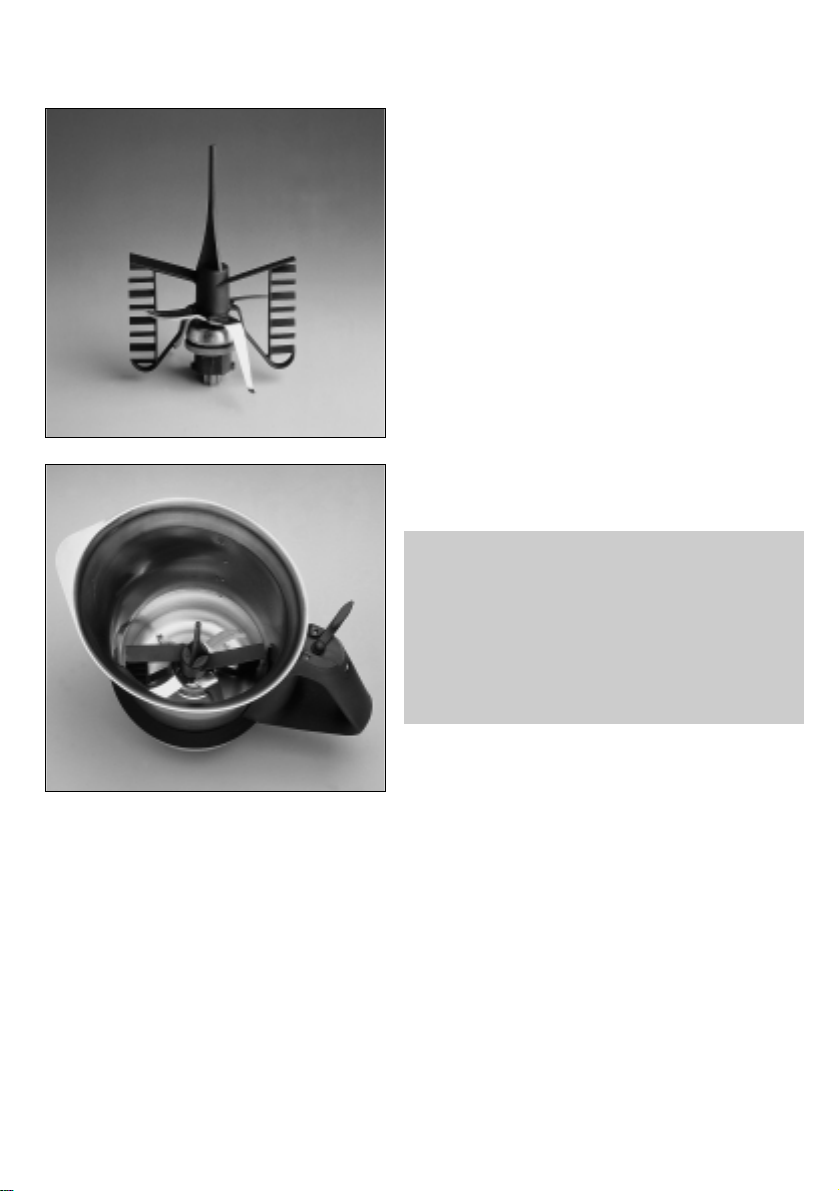
Spatula (21)
You can insert the spatula through the lid
opening during mixing to stir ingredients.
The safety disk prevents any contact with the
blades.
The special shape of the spatula makes it
suitable for scraping the mixing bowl.
You can also use the spatula to lift out the
basket as well as to hold the basket down
when pouring out juices.
The scraper (bottom portion of the spatula) can
be pulled off from the shaft for cleaning.
Caution
For safety reasons never insert any other
objects (spoons, forks, etc.) into the mixing
bowl. Only insert the spatula from the opening
in the lid.
Caution
The mixing bowl foot must be tightened until it will go no further. If this is not done, the
temperature sensor will not be in contact with the mixing bowl and the appliance will not
function properly.Improper seating of the mixing bowl could lead to damage to the Thermomix.
Page 10
10
Stirring attachment (butterfly/whisk) (20)
The stirring attachment is normally used to
make such items as whipped cream and
whipped egg whites. It may also be used to
prevent burning or scalding of liquids when
heating them at low motor speeds (speed
settings 1-3). When using the stirring
attachment, always increase speed gradually.
To use the stirring attachment simply push it
onto the upper part of the cutting/mixing blade
unit and push it down gently until seated.
Caution
1. Never use the spatula when the stirring
attachment is attached.
2.When using the stirring attachment, do not
exceed the speed setting of 3. Increase
speed gradually.
3. Only turn on the speed setting after fitting
the stirring attachment.
Cooking with Varoma (see also pages 19 - 24)
The Varoma is a unique cooking method designed to steam fruit, vegetables, poultry, fish and
other meats. The heating of the liquid in the mixing bowl combined with the turning action of
the blades produces condensed steam which cooks the food in the Varoma while retaining
the vitamins and minerals in the food.
When working with the Varoma, the lid (22) together with the sealing ring must be properly
positioned on the mixing bowl. To use the Varoma, first remove the TM measuring cup from
the lid and place the Varoma on top of the lid of the mixing bowl. Generally, the Varoma
inner tray is used for steaming fruits and vegetables and the Varoma (bottom tray) is used for
poultry, fish and other meats.
To cook with the Varoma, select the Varoma setting on the temperature selector. On the
Varoma setting, temperatures of up to 100°C may be achieved.
Page 11
11
Working with your Thermomix
The Thermomix should be placed on a
permanent, level surface in your kitchen so it
can be used frequently and easily.
Important
1. Always make sure that the air vents on the
back of the appliance are not covered or
blocked to prevent overheating of the
appliance.
2. Never carry the Thermomix by the handle of
the mixing bowl.
Explanation of symbols:
= Time selector
= Temperature selector
= Speed selector
= Stirring mode
= Bread mode
= Scales
Putting your Thermomix into operation
The electrical cord can be pulled out of the
appliance and pushed back in again depending
upon your needs. Plug in the appliance to a 230
Volt / 50 Hz outlet.
Turn on the main switch (I = ON, O = OFF).
The time display and the decimal point on the
digital display should now be illuminated. The
Thermomix is now ready for operation.
Useful hints
1. Always turn on the operating elements (switches, buttons) by starting at the top and
working down. For example, set the time selector first, then the temperature selector and
then the speed selector.
2. An audible signal is emitted if the mixing bowl is not properly fitted and a safety interlock
prevents the Thermomix from starting. Set the speed selector to 0 again and properly lock
in the mixing bowl.
3.The scale works correctly when the appliance is within 5° - 40°C. However, do not worry if
the appliance cools down to below 0°C. For example, this could happen when you
transport your Thermomix in the winter. Simply wait until it has warmed up to room
temperature before using the scale.
4. Unplug the Thermomix when it is not in use for extended periods.
Page 12

12
Time selector (2) and time display (6)
The timer can either 1) count up and be turned
off manually, or 2) be preset and turn off
automatically. A time period must be selected
in order to heat.The time selector can also be
used for cold mixing functions.
Time selection
The operating period can be set for up to a
maximum of 60 minutes by using the time
selector.The timer can be set as follows:
0 to 59 seconds in 1 second increments,
1 to 10 minutes in 30 second increments,
10 to 60 minutes in 60 second increments.
To set the time, turn the time selector to the
right to the desired time.
If you preset the timer, a countdown of the
operating time is shown in 1-second
increments to zero. In hot mixing operations
or heating, at the end of the preset time period,
the mixer continues to rotate at a speed of 100
r.p.m. to prevent the food from burning. In cold
mixing operations (temperature must be set at
0) the mixer switches off and an audible signal
indicates that the food has been
processed.
Changing or interrupting the pre-selected time
The time indicated can be changed during
either cold or hot mixing operations simply by
turning the time selector to the right or to the
left.
If during operation the appliance is switched off
at the speed selector before the selected time
has expired, the remaining time blinks in the
display until the appliance is switched on again.
To stop mixing, first turn the speed selector to
0 and then turn the time selector to the left until
0 appears.
Timer function (only for cold mixing operations)
If you do not pre-select a time period,the
Thermomix will automatically shut itself off after
60 minutes.
Page 13

13
Temperature selector (3) and temperature
setting (12)
Temperatures of between 40°C and 100°C can
be set for hot mixing operations by means of
the temperature selector.
Make sure that the temperature selector is at
0 before beginning cold mixing operations.
Remember the Thermomix will not heat unless
you select a time setting and a motor speed
setting.
The temperature settings are displayed in color.
The color and shade of the display changes
with the ever-increasing temperature from
yellow to red.
By selecting the Varoma mode on the
temperature selector, temperatures of up to
100°C may be achieved.
Important
Make sure there is at least ½ litre of liquid in
the mixing bowl when the Varoma
temperature setting is selected, otherwise there
is the risk of total evaporation.This could lead
to a premature switching off of the appliance
due to overheating (see pages 19 - 24).
At the end of the pre-selected time, the heating
is automatically switched off and an audible
signal is emitted. The cutting/mixing blade unit
continues to turn at minimum r.p.m.regardless
of the pre-selected speed.
This prevents any contents from burning.
To complete the function return the speed
selector to the 0 setting.
Soft start (above 60°C)
When the Turbo mode is selected/activated and
the temperature in the mixing bowl is above
60°C, the electronic sensor prevents food from
splashing out by increasing the motor speed
gradually.
Caution
If you use hot liquids or foods heated
elsewhere, do not press the Turbo
button. If you wish to further process
food or liquids heated elsewhere, you
should only increase the motor speed
slowly and in small steps. Under no
circumstances should the Turbo mode
be activated. Use of the Turbo mode
with food or liquids heated elsewhere
could result in a risk of scalding.
Page 14

14
Speed selector (5) and motor speed setting (11)
The Thermomix is switched on as soon as the
speed selector is activated.The speed selector
has 4 general speed ranges.
Function Setting R.P.M.
Stirring 1 - 3 100 - 1,000
Mixing 4 - 9 2,000 - 9,100
Turbo mixing Turbo 12,000
Bread setting Pulsed
(approx. 6,000)
Stirring
This low speed setting (100 - 1,000 r.p.m.) is
particularly well suited for cooking and mixing
foods gently.
Mixing
This speed setting serves to chop, grind and
blend the ingredients.
Turbo speed setting and Turbo button (4)
This maximum speed can be activated by
either 1) pushing the Turbo button or 2) turning
the speed selector to the highest setting.This
mode enables ingredients that have to be
pulverized to be mixed in immediately and
thoroughly. The Turbo button only functions at
the 0 setting or at and above setting 4.
Bread setting =
The setting Ÿ just to the right of the 0 setting is
suitable for making dough. To activate this
mode, the speed selector has to be pulled out
a little and turned to the right until it will go no
further.The pulsed mode of operation ensures
that the dough is evenly processed.
Caution
Always turn the speed selector slowly to the
desired speed. This will prevent any contents
from splashing out.
Page 15

Useful information
Ingredients may be accurately removed or
subtracted before the electronic scale button is
reset. If ingredients are subtracted after the
electronic scale button has been pushed, the
display will indicate a blinking error message:
Filling of the mixing bowl with more than the
maximum 2.5 kg weight results in an overload
and the display will indicate a blinking error
message:
15
Scale display (6) and electronic scale
button (7)
With the Thermomix you can weigh any
required ingredients directly in the mixing
bowl.When weighing, please follow these
steps:
1. Fit the mixing bowl into the appliance.
The display shows
2. Push the electronic scale button. The
display now switches from time mode
to scale mode and shows
3. Put in the first ingredient (up to a max.
of 2,5 kg) and read the weight on the
scale display. As additional ingredients
are added, weight will automatically
increase.
4.To reset the scale to zero, press the
electronic scale button.When the
appliance is activated with the speed
selector, the scale display automatically
switches back to time mode.
Add and Weigh Function
It is sometimes useful to add consecutive
ingredients to the mixing bowl, yet weigh each
ingredient individually. This can be done using
the Add and Weigh function as follows:
1.Weigh the first ingredient following steps 1-3
on the left of this page.
2. Press the electronic scale button. The
display will reset to zero.
3. Add the desired amount of the next
ingredient and note the weight.
4. Press the electronic scale button to reset
the scale to zero.
5. Add the next ingredient. And so on.
During a cooking/stirring process with a
pre-selected time, you can use the scale
function without deleting the remaining
cooking/stirring time.Follow these steps: 1)
Stop the machine by turning the speed selector
to 0 and push the electronic scale button. 2)
After weighing your ingredients, continue the
cooking/stirring process by turning the speed
selector back to the desired speed.
.0 0
8
8
88
--
--
Caution
If you use hot liquids or foods heated elsewhere, do not press the Turbo button. If you wish
to further process food or liquids heated elsewhere, you should only increase the motor
speed slowly and in small steps. Under no circumstances should the Turbo mode be
activated. Use of the Turbo mode with food or liquids heated elsewhere could result in a
risk of scalding.
.0
Page 16

16
Temperature sensor (9)
The temperature sensor is located in a
recess in the base unit.
The temperature of the food being cooked is
constantly monitored by an electronic sensor.
Should the temperature become too high, the
heating element is switched off. When it
becomes too low, it automatically switches on
again. An additional temperature safety control
protects the unit against overheating.
Important
1. Make sure there are no food particles on
the sensor or on the bottom of the mixing
bowl that might impair the function of the
temperature sensor.
2. To avoid scratches, only use a moist, soft
cloth to clean the non-stick coated heating
ring. Do not clean the center of the heating
element with cleanser or metal scouring pad.
Automatic motor protection switch
None of the recipes in the Thermomix recipe
book should lead to a triggering of the
protective devices if the instructions are
observed. However, even if the requirements
on quantities (e.g. more than 600 g of flour) are
exceeded, an automatic motor shut-down
should prevent any damage occurring to the
appliance.
Should a motor shut-down occur, follow these
steps:
l return the speed selector setting to 0,
l take the mixing bowl out of the appliance,
l reduce the quantity in the mixing bowl and/or
add a little liquid,
l wait about 5 minutes (cooling period),
l put the mixing bowl back in again,
l switch on the appliance again by using the
speed selector.
Note
If the motor is under great strain it is possible
that the appliance not only will shut down
because of the motor protection switch, but that
you may notice an odor due to overheating of
the motor. However, this is no reason for
concern. The appliance should be in full
working order again after the above-mentioned
5 minute cooling period has elapsed.
Page 17

Tips on individual recipes
17
1.The order of the recipe ingredients
When preparing meals from your own
recipes, you should consider the order in
which the ingredients have to be processed
and whether any heating is necessary.
2.Weighing ingredients
The scale has to be set to 0 before the first
ingredients for the recipe are weighed. Make
sure that the mixing bowl is properly aligned
in the appliance.
3. Correct order for setting the control
switches
Remember to activate the switches and
buttons by starting at the top and working
downwards.Example: if a temperature of
100°C and a speed setting of 1 for a 5
minute hot mixing operation are suggested,
set:
a) Time selector to 5 minutes
b) Temperature selector to 100°C
c) Speed selector to 1
4. Heating times
The heating times depend on
a) the initial temperature of the ingredients to
be heated,
b) the quantity, weight and volume of the
ingredients,
c) the conductivity of the food itself,
d) the heat setting,
e) the speed,
f) the use of an accessory (with or without
basket).
5.Thermomix heat settings
The heating process functions in the
temperature range of 40 - 100°C. This
changes when the setting Varoma is
selected.The heating time is shortened in
this mode because the energy supply is
increased.
6. Use of the Thermomix basket (19)
The cooking time is longer when the basket
is used in conjunction with quantities of
1,25 litres or more in the mixing bowl.
The basket has a different conductivity than
that of the juices from the food. Also, the
volume of the total amount to be heated
increases. Finally, heat exchange between
hot liquids at the bottom of the mixing bowl
and somewhat cooler foods at the top
surface of the liquid is impeded since rising
and falling liquids must pass through the
basket slits.
Note
When the Turbo mode is selected/activated
and the temperature in the mixing bowl is
above 60°C, the electronic sensor prevents
food from splashing out by increasing the
motor speed gradually.
Caution
If you use hot liquids or foods heated
elsewhere, do not press the Turbo button.
If you wish to further process food or liquids
heated elsewhere, you should only increase
the motor speed slowly and in small steps.
Under no circumstances should the Turbo
mode be activated. Use of the Turbo mode
with food or liquids heated elsewhere could
result in a risk of scalding.
The speed setting selected affects the time it
takes to heat the contents of the mixing
bowl.The higher the speed selected, the
longer it takes to heat up the food.
For Varoma, see pages 19 - 24.
Page 18

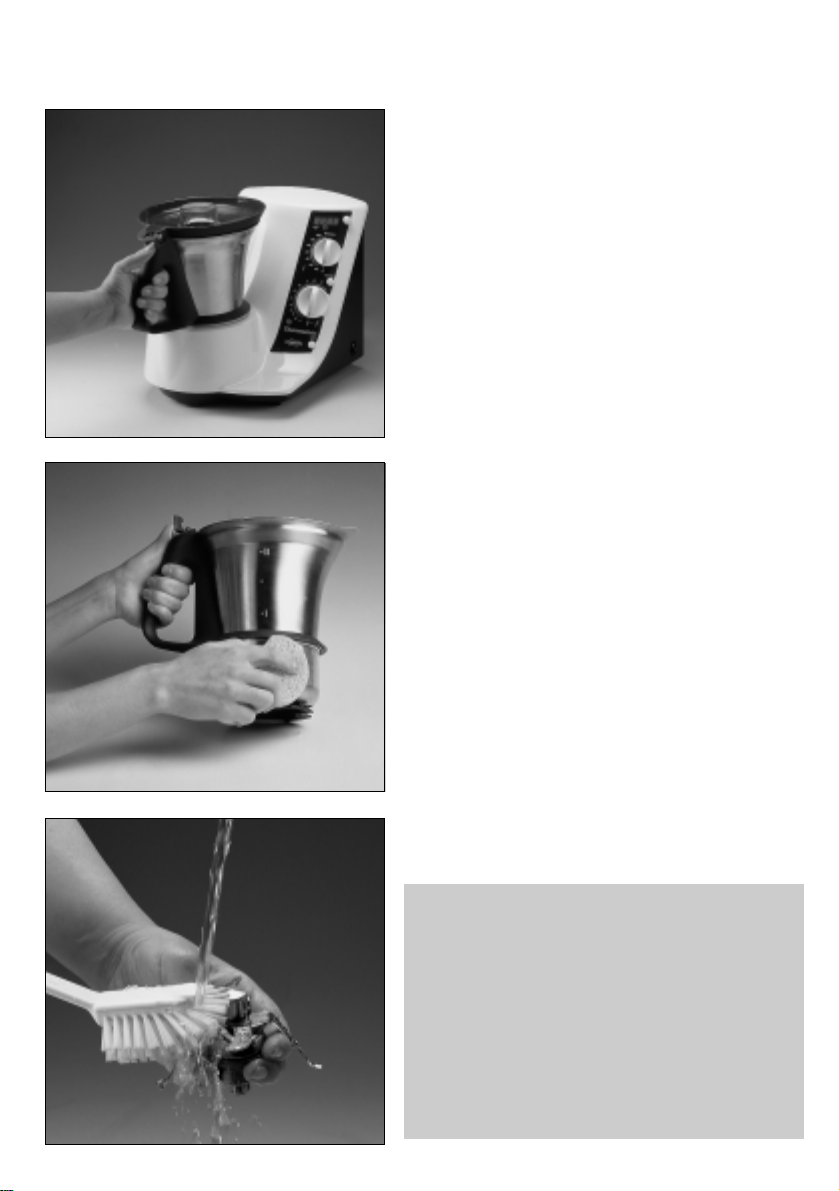
Cleaning yourThermomix
18
Turn off and unplug the Thermomix
before cleaning it.To protect against risk
of electrical shock do not immerse the
main appliance in water.
Wipe down the basic appliance with a moist
cloth using a mild cleaning agent.
The surfaces of the aluminum base of the
mixing bowl, the heating ring and the
temperature sensor should be clean to
ensure trouble-free functioning of the
temperature control. Remove any soiling
from the base of the mixing bowl (outside
only) by using a metal scouring pad.To
avoid scratches, only use a moist, soft cloth
to clean the non-stick coated heating ring.
Important
All individual parts - with the exception of
the cutting/mixing blade unit - can be
cleaned in the dishwasher.The aluminum
base of the mixing bowl and some plastic
parts may discolor slightly in this process.
The cutting/mixing blade unit should be
cleaned with a sponge or brush under
running water. Under no circumstances
leave the cutting/mixing blade unit for a
long period in water or clean it in the
dishwasher.
Take great care when re-assembling the
Thermomix (see initial cleaning and
assembly). It is important that the locking
mechanism be clean.
Helpful Hints
Whenever the mixing bowl or other parts
are only slightly dirty, you can simply add a
few drops of detergent with water and mix
on high speed for a few seconds.Then rinse
in clean water. Use a stainless steel
cleaning agent for more persistent cleaning
problems.
Do not store the mixing bowl with the
measuring cup inserted on the lid.This will
ensure better ventilation for the appliance
and help avoid any food residue odors.
We recommend that you switch off the
Thermomix at the main switch when it is not
in use.
Page 19

19
Your VAROMA
Start by checking that you have a full set of
VAROMA parts.
You should have three parts:
1. the actual VAROMA unit made in top quality
stainless steel
2. an inner Varoma tray and
3. a lid, both made from top quality, foodcompatible plastic.
Cleaning your VAROMA
...is easy and uncomplicated. Before using your
VAROMA for the first time, you should wash all
the parts carefully in warm, soapy water.
You can preserve the beautiful shine on the
stainless steel unit by using a liquid stainless
steel cleaner from time to time. Avoid using
sharp objects or metal scouring pads, as these
are likely to cause unsightly scratches.You will
not need to use anything more than your usual
detergents and cleaning materials for the lid
and inner tray.
All VAROMA parts are dishwasher-proof.
1
2
3
Using and caring for yourVaroma
Page 20

20
How to combine yourVAROMA parts
You can use your VAROMA in either of the
following combinations:
Combination 1:
Stainless steel unit plus lid.
This is the best combination for cooking large
amounts of the same food, e.g. vegetables,
potatoes or large pieces of meat and fish or
sausages.
Combination 2:
Stainless steel unit, plus inner tray,plus lid.
This is the best combination for cooking
different foods, e.g. vegetables with meat or
fish.
Important: whichever combination you use,
always use the lid. If the lid is not on flat, the
steam will escape and the food inside the unit
will not cook properly.
Page 21

21
Your VAROMA is an accessory designed for the
Thermomix TM 21. It can only be used with a
Thermomix TM 21.You will therefore need to
set up your Thermomix correctly before you can
use the VAROMA (see Instructions for use:
Thermomix TM 21):
Step 1: The ThermomixTM 21
Fill the Thermomix TM 21 mixing bowl with at
least ½ litre of water or at least ½ litre of other
liquid ingredients as your recipe indicates (eg.,
soup, sauce, etc.). Position the bowl as usual,
put on the lid and lock it in place with the safety
lever. Do everything up to this point in exactly
the same way as you would normally.
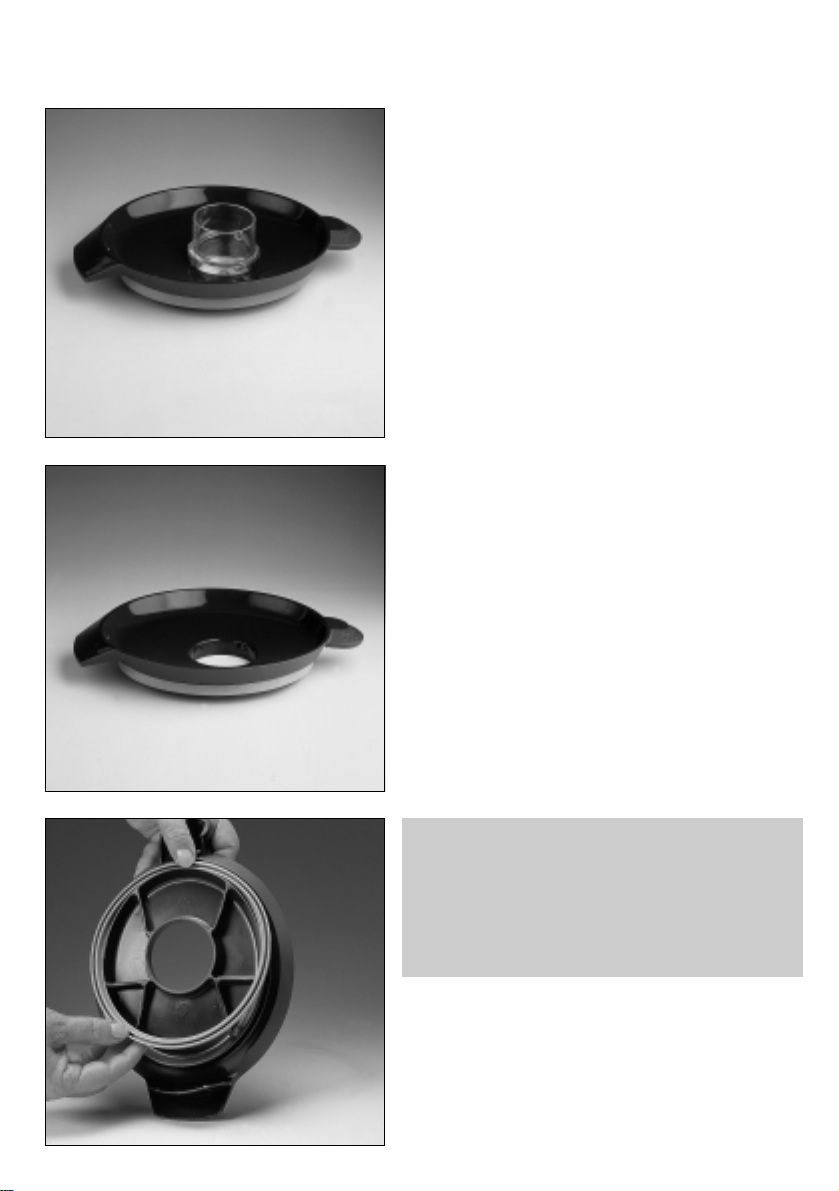
Step 2: The VAROMA
Each step involved in using your VAROMA
follows logically from the last one.
The best way to use your VAROMA:
a) Put the lid upside down on your work surface
and position the stainless steel unit on top - it
will fit accurately into the groove.
b) Now fill the stainless steel unit with food.The
lid underneath the unit will stop the liquid
from e.g. washed vegetables, ripe fruit, raw
meat or fish from wetting your work surface.
Cooking with your Varoma
Page 22

22
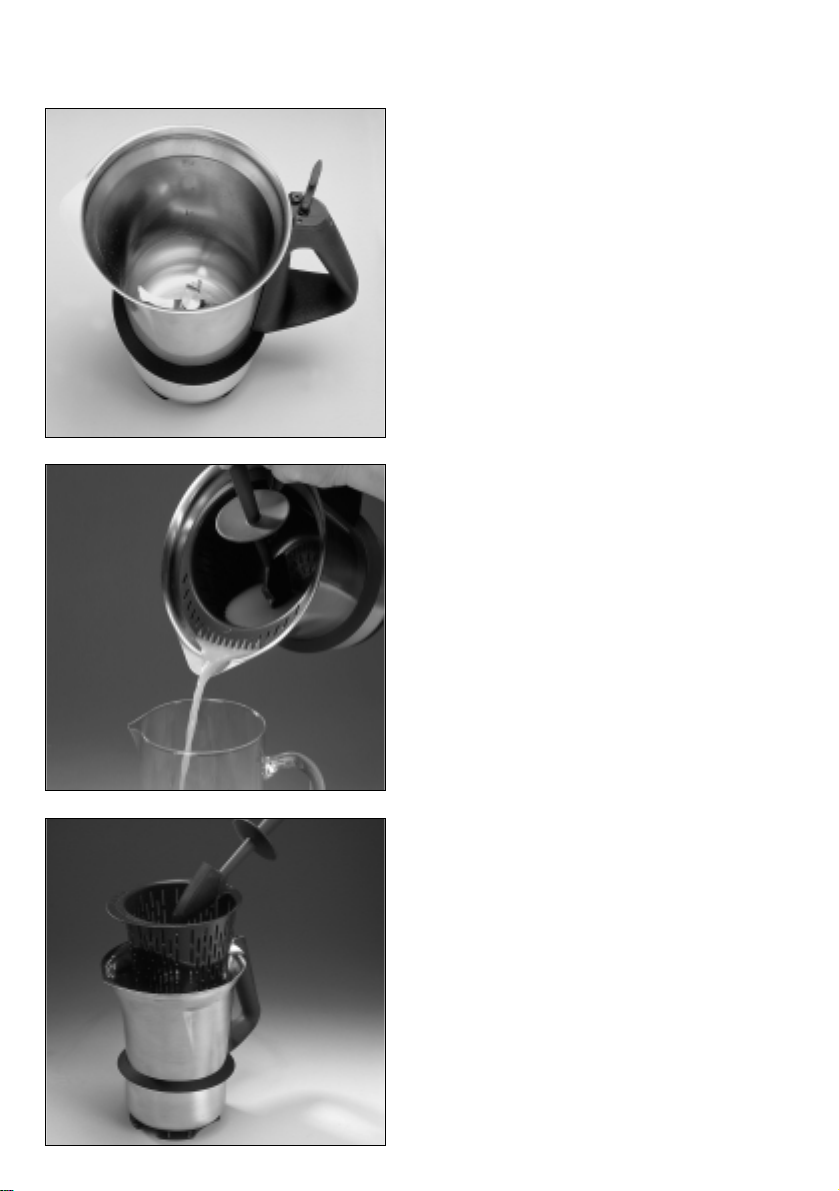
As you fill yourVAROMA, put food requiring
longer cooking at the bottom, and food
requiring shorter cooking at the top.
c) If necessary, you can use the inner tray and
put food on top of that, as well.
d) Having filled your VAROMA, position it
upright on your locked Thermomix TM 21 and
put on the lid. All you have to do now is
program the cooking time and select the
VAROMA heat setting on your Thermomix.
Step 3: Cooking with your VAROMA
The cooking process begins when you start the
timer and select the heat setting. The water or
other liquid in the mixing bowl heats up to over
100°C and hot steam develops and rises up
through the opening in the lid of the Thermomix
TM 21 into the VAROMA unit.The food is
cooked slowly and gently in the hot steam.
It is very important that the stainless steel unit
and the lid of the VAROMA fit ”snugly” i.e. that
they fit on absolutely flat.
Important: If these two elements are not
positioned properly, not enough steam will rise
up into the VAROMA.This will slow down the
cooking process and there may be a
considerable risk of scalding from steam
escaping in an uncontrolled way.
Never leave the measuring cup in the mixing
bowl lid when using the VAROMA.
Page 23

23
Now that you know how to use the Varoma
correctly, you will find that your Thermomix
TM 21 and VAROMA are a valuable help to
you in the kitchen every day.We know how
important it is that the food you prepare with
your Thermomix and VAROMA looks good
and tastes delicious. In the TM Cookbook,
you will find detailed, tried and tested recipes
that will make a real ”feast” of your ”all in
one” Varoma meals!
Please remember a few basic rules if you
use your own recipes:
l Put enough water or other liquid
ingredients in the mixing bowl. ½ litre of
water is likely to evaporate completely
during long cooking times (over 30 min.),
and the mixing bowl can heat up so much
that it could damage the appliance.
Important: use at least ½ litre water for
cooking times up to 30 minutes and
½ - 1 litre for cooking times over 30
minutes.
l Use speed settings 1-2 or 4-5 only when
cooking with your VAROMA.Setting 3, the
soft-speed setting, will only prolong the
cooking process unnecessarily.Settings 69 or Turbo may cause the liquid to froth up.
Important: With the mixer function:
setting 5 is the maximum.
l The bottom of the stainless steel unit and
the inner tray both have an even pattern of
small slots in them to guarantee an even
distribution of steam in the VAROMA.The
food should always be positioned so that
as many slots as possible remain ”free”.
Laying the food in ”loosely” is usually
enough to ensure this.
l You can cook foods of different
consistency and hardness at the same
time. Put the food requiring longer cooking
at the bottom, and the food requiring less
cooking at the top.
l Do not thicken your sauces and soups
until after they are cooked. Thickeners may
stop steam from forming evenly in the
mixing bowl and slow down the overall
cooking process.
Using your Varoma
Page 24

24
In addition to the important safeguards
for your TM21, please note these
additional safeguards when using your
Varoma.
l Your VAROMA is easy and safe to use, but
please never forget that you are working
with hot steam which can cause scalding if
you use your VAROMA incorrectly. Take
care to place your Thermomix TM 21
safely and securely on a flat work surface,
especially when using your VAROMA with
it.When you use the appliance, ensure
that there is sufficient clearance at the top
(suspended cupboards, shelving) and
around the sides. Please be careful that
you do not place the appliance too close
to the edge of your work surface.
l For safety reasons, you should keep
children away from the appliance when
working with your VAROMA, and warn
them about the dangers of the steam and
the hot condensation that can escape from
the VAROMA.
Caution: Always use oven gloves to pick up
the VAROMA when hot, and never use it
without the lid.When you take off the lid, hold
it so that the rising steam or hot dripping liquid
cannot come into contact with you. Please
remember that when you remove the entire
VAROMA unit, hot steam will continue to rise
up out of the opening in the lid of the mixing
bowl.
l Always ensure that the steam openings in
the lid remain free, otherwise there may be
an uncontrolled escape of steam.
l Important: Vorwerk products are
designed and manufactured to provide you
with a high degree of safety and reliable
performance. In the event any repairs are
needed, such repairs should only be
performed by an authorized service
technician of the Vorwerk-Distributor.
Unauthorized repairs or incorrect use can
put the user at considerable risk and void
the warranty.
Important Varoma safeguards
Page 25

25
The problem: Possible solution:
The appliance cannot be switched on - check whether the main switch is activated
(time display must be illuminated)
- check whether the locking lever has
been properly closed
The appliance does not heat - check whether the time selector has
been preset
The appliance heats too much - check whether the temperature sensor
and its contact area on the mixing bowl
are clean
The appliance stops during operation - see automatic motor protection switch section
Malfunction display One special feature of the Thermomix is a built-in
diagnostic system. The display will indicate the
14 most significant malfunctions.They are
displayed on the time/scale display in square
brackets.Turn off the Thermomix and contact the
Vorwerk-Distributor’s customer service
department whenever any of the following
malfunctions are indicated:
[0] [1] [2] [3] [4] [5] [6]
[7] [8] [9] [A] [b] [c] [d]
Troubleshooting tips
Page 26

Technical specifications
26
Thermomix TM 21
Safety CCA Certificate / CB Certificate
Motor Maintenance-free, Vorwerk universal motor,
600 W rated power.
Continuous speed adjustments from
100 to 12,000 r.p.m. / Turbo mode.
Special speed setting (phased mode) for
making dough.
Special safety feature Protected against overload through a motor
protection switch.
Heating Power input: 1,350 W
Special safety feature Protected against overheating.
Housing High-grade plastic.
Mixing bowl Stainless steel with a base constructed of
high-grade aluminum alloy.
Maximum capacity is 2 litres
Electrical power Only for A.C. 230 V / 50 Hz
Max. consumption 1950W
Length of the connection cord: 1 m.
Dimensions and weight Height 30 cm
Width 27 cm
Depth 42 cm
Weight 7.6 kg
Varoma
Material Stainless steel
Handles, inner tray and lid
top quality food compatible plastic
Dimensions and weight Length 40 cm
Width 27,5 cm
Depth 10,3 cm
Weight 930 g
Page 27

27
Page 28

28
Recipes
Varoma recipes : from easy to demanding
The cooking times in these VAROMA recipes
are guide values. They may change depending
on the quantity and size of the pieces of
vegetables and fruits, and on personal
preference.
Please take a little time to get used to
working with your VAROMA.These recipes
will help you. If you use your own recipes,
start with simple ones first. Have a go at
preparing boiled potatoes in your VAROMA,
for example, then try potatoes with
vegetables to familiarize yourself with
different cooking times.
As you put food in your VAROMA, put the food
requiring more cooking at the bottom, and the
food requiring less cooking at the top.
The cooking times quoted in these recipes are
for fresh products. If you use frozen products
straight from the freezer you will have to add a
few minutes to the cooking times depending on
the type and size of the food you intend to
cook.
Fill your VAROMA loosely so that enough
steam can rise up through the base. If,
exceptionally, you have to pack your VAROMA
very full, turn the food over from time to time to
ensure even cooking.
Do not use your VAROMA to prepare food that
is usually cooked in a lot of water, e.g. rice or
noodles. Use your VAROMA to prepare the
accompaniments instead, and cook the rice or
noodles in the basket or the mixing bowl of
your TM 21.You will find very clear instructions
in the VAROMA recipes.
The cooking times are based on ½ litre of
liquid. If you add more water to the mixing
bowl, e.g. for soup or similar, you will need to
cook the food for slightly longer.
A special tip for steam-cooking with your
VAROMA: Add some tasty herbs and spices to
the cooking water.The flavour will be absorbed in
the vapour and give your food that ”special
something”.
Use the tips and tricks of the ”ancient Chinese” to
prepare meat in your VAROMA: They liked
wrapping fish and meat in salad or cabbage
leaves, or put meat in noodle and rice dough for
steam cooking.
Fine sauces are delicious with meat – quick and
easy to whip up in your Thermomix after the rest
of the food is cooked.
And here's another advantage of your VAROMA:
From time to time you may find you have leftover
noodles, rice or potatoes. And even though
everyone knows that reheating is bad for any
remaining vitamins and nutrients, they still do it,
because no-one wants to just throw the food
away…
But with your VAROMA, you can reheat potatoes,
rice, noodles and vegetables gently, without your
food tasting or looking ”heated up”.
Page 29

29
Tables of cooking times
The cooking times below are guide values.You can adapt them depending on the quantity and size of
the pieces of vegetables and fruits, and your personal preference.
The cooking times quoted in these recipes are for fresh products. If you use frozen products straight
from the freezer you will have to add a few minutes to the cooking times depending on the type and size
of the food.
If you have to fill your VAROMA very full, turn the food over after 2/3 of the time to ensure even cooking.
Always fill the mixing bowl with at least ½ litre of water.
Food Quantity Cooking time Comments
Vegetables
Cauliflower 500 g 25 to 35 minutes in florets
Broccoli 500 g 25 to 35 minutes in florets
Mushrooms 500 g 25 to 30 minutes in slices
Pak-choi 500 g 30 to 35 minutes in strips
Fennel 500 g 30 to 40 minutes in slices
Green beans 500 g 30 to 45 minutes whole
Peas 500 g 25 to 30 minutes large peas
Peas (frozen) 500 g 20 to 25 minutes unthawed
Porree (leek) 500 g 25 to 35 minutes in strips
Asparagus 500 g 30 to 40 minutes medium-thick stems
Spinach 500 g 30 to 35 minutes
Potatoes 500 g 40 to 50 minutes new, medium-large
Kohlrabi 500 g 35 to 40 minutes in slices
Carrots 500 g 30 to 40 minutes in short, thin strips
Carrots 500 g 30 to 35 minutes whole carrots, very tender
Cabbage 500 g 35 to 40 minutes in strips
Courgettes / zuchini 500 g 25 to 35 minutes in slices 1 cm thick
Peppers 500 g 30 to 35 minutes in slices 1 cm thick
Fruit
Pears 500 g 15 to 18 minutes in halves, ripe fruit
Apples 500 g 20 to 23 minutes in quarters
Apricots 500 g 15 to 20 minutes whole, with stone
Cherries 500 g 15 to 20 minutes whole, with stone
Peaches 500 g 20 to 25 minutes in halves
Plums 500 g 20 to 25 minutes whole, with stone
Fruit cooking times will depend a lot on how ripe the fruit is.
Meat and sausage
Chicken leg 2 40 to 45 minutes
Chicken breast 250 g 25 to 35 minutes
Meatballs 500 g 30 to 35 minutes Apricot size
Turkey escalope 250 g 25 to 30 minutes
Fresh sausages 4 25 to 35 minutes Blanched beforehand in boiling
water
Bockwurst 5 25 minutes
Fish and seafood
Sea salmon 200 g 15 to 25 minutes
Salmon 200 g 15 to 25 minutes
Trout 2 30 to 45 minutes
Shrimps 200 g 15 to 20 minutes
Mussels in shells 500 g 20 to 30 minutes deep frozen
Note: Volumes of liquid are given in ml. Remember that you can measure out your liquid in the
Thermomix measuring cup: 1 MC = 100 ml; 2 MC = 200 ml; ½ MC = 50 ml etc.
Page 30

30
Assorted vegetables
(4 persons)
Ingredients
150 g potatoes
150 g carrots
150 g kohlrabi
150 g beans
150 g cauliflower
150 g broccoli
Herb-béchamel sauce:
½ l milk
60 g butter
40 g flour
pinch of nutmeg
pinch of white pepper
½ tsp. salt
60 g cheese spread with herbs
Recipe
l Wash vegetables and cut into slices; divide up
broccoli and cauliflower into florets.
l Fill the mixing bowl with 500 ml water.
l Put potatoes, carrots and kohlrabi in the basket
and the beans, cauliflower and broccoli in the
VAROMA.
l Insert the basket, lock the mixing bowl, position
the VAROMA on top.Cook for approx.40-45
min. / Varoma / setting 1.
l Transfer and arrange vegetables on a serving
dish and keep warm.
l Pour away the water and attach the whisk to
the knives.
l Put all the ingredients for the sauce in the
mixing bowl and cook for 6 min. / 90°C / setting
2. After 4 minutes, add the cheese through the
opening in the lid.
l Serve vegetables and sauce in a gratin dish.
Vegetables and
accompaniments
Page 31

31
New potatoes with kohlrabi in a
sauce Mornay
(4 persons)
Ingredients
750 g potatoes
600gkohlrabi
Sauce:
½ l milk
80 g Emmental cheese
30 g butter
½ tsp. pepper
3 tbs. flour
½ tsp. salt
pinch of nutmeg
Recipe
l Clean potatoes (leave unpeeled) carefully and
put in the basket.
l Clean the kohlrabi, cut into slices and place in
layers in the VAROMA
l Fill the mixing bowl with 700 ml water and
insert the basket. Lock the mixing bowl and
position the VAROMA on top. Cook for approx.
30-35 min. / Varoma / setting 1.
l Remove the basket and keep potatoes warm.
l Pour the water out of the mixing bowl.
l Put all the ingredients for the sauce in the
mixing bowl and blend for 5 sec./turbo setting.
l Then cook for 4 min. / 100°C / setting 4.
l Peel the potatoes and arrange with the kohlrabi
on a dish, pour the sauce over and serve at
once.
Broccoli and potatoes with a cheese
sauce
(4 persons)
Ingredients
600 g broccoli
750 g potatoes
For the sauce:
100 g Emmental cheese
40 g butter
200 ml cream
3 tbs. flour
1 tsp. instant stock
½ tsp. pepper
pinch of nutmeg
Recipe
l Divide broccoli up into florets, wash and put in
the VAROMA.
l Peel potatoes, cut into pieces and put in the
basket.
l Fill the mixing bowl with 700 ml water, insert
basket and lock. Position the VAROMA on top
and cook everything for 25 min. / Varoma /
setting 1.
l At the end of the cooking time, remove the
basket, keep back 300 ml of liquid in the mixing
bowl, add the cheese and blend for 5 sec./turbo
setting. Add in the other ingredients for the
sauce and blend for 5 sec. / setting 6. Attach
the whisk to the knives and cook for 5 minutes /
100°C / setting 3.
Page 32

32
Fish, poultry and meat
Mixed vegetables nitsuke
Ingredients
400 g green beans
150 g carrots
150 g zuchini / courgettes
3 spring onions
180 g basmati rice
½ measuring cup corn oil
½ measuring cup soy sauce
1 measuring cup sherry or white wine
2 tbs honey
7 measuring cup water
corn oil for frying
1 clove garlic
1 clove fresh ginger
Recipe
l Peel the beans and cut them in 3 or 4 pieces
depending on their size. Peel the carrots and
cut them in long but not very thin slices. Repeat
with zuchini and onions.
l Put enough corn oil for frying in the mixing
bowl to cover the blades.Add ginger and garlic
and heat for 4 minutes / 100°C / speed 1.
l Put the beans in the bowl and fry for 5 minutes
/ temperature Varoma / speed 1.
l Remove the beans from the bowl. Put the
remaining vegetables in the mixing bowl and
heat for 3 minutes / 100°C / speed 1.
l Keep in the bowl ½ measuring cup of the oil
you have used for frying and empty the rest.
Add soy sauce, sherry or wine, honey and 8
measuring cups water. Heat for 6 minutes /
temperature Varoma / speed 1.
l Put rice in the basket and place the basket in
the bowl. Place the green beans in the Varoma
lower tray and the other vegetables in the
upper tray.
l Put the Varoma on the mixing bowl and heat 40
minutes/temperature Varoma/speed 1.
l When the time is up switch the appliance off
and do not open the Varoma for 5 minutes.
l Serve the vegetables on top of the rice and
cover with the sauce from the mixing bowl.
l Note: If the fresh beans are a little hard then
use one or two minutes additional frying time at
the beginning and cook them separately for 5
more minutes at the end after you have
removed the rice and the other vegetables.
Page 33

33
Tasty chicken breast wrapped in
savoy cabbage with creamy potato
puree
Ingredients
4 large savoy cabbage leaves
1 chicken breast (approx. 320 g)
250 g fresh mushrooms
1 carrot (approx. 70 g)
½ parsley root (approx.70 g)
1 onion (approx. 70 g)
2 tbs. butter
50 g crème fraîche
1 egg yolk
2 tbs. parsley (approx. 4 stalks)
Salt and pepper to season
Creamy potato puree:
1 kg firm-cooking potatoes
200 g cream
1 tsp. salt
½ tsp. ground nutmeg
Garnish:
2 tbs. butter
50 g hazelnuts
Recipe
l Peel potatoes and cut into large pieces.
l Coarsely chop hazelnuts for 4 sec. / setting 6
and transfer.
l Finely chop parsley for 4 sec. / setting 6 and
transfer.
l Rinse out the mixing bowl.
l Wash mushrooms, peel the onion, carrot and
parsley root and cut into large pieces.Then
drop ingredients into the blender with the motor
running for 4-6 sec. / setting 6.
l Add 2 tbs. butter to the mixing bowl and cook
for 6 min. / 80°C / setting 2 and then set
temperature selector to 0.
l Add crème fraîche, salt, pepper, egg yolk and
parsley to the mixing bowl and blend for 10 - 15
sec. / setting 2, transfer and rinse out the
mixing bowl. (The mixture should have a firm,
creamy consistency.Thicken with a few
breadcrumbs if necessary).
l Wash cabbage leaves, blanch in boiling water,
rinse briefly in cold water, cut the centre stem
flat and pat dry.
l Cut chicken breast in half, cut into 4 fillets and
season.
l Put 1 heaped tbs. of the mushroom mixture into
the middle of each leaf. Place chicken fillet on
top, spoon on some more mushroom stuffing
and roll leaf up tightly.
l Place packet seam downward into the
VAROMA.
l Fill the mixing bowl with 6 measuring cup (MC)
of water, add 1 tsp.salt and lock. Position the
VAROMA on top and cook for 30-35 min. /
Varoma / setting 1.
l About 15 min. before the end of the cooking
time remove the VAROMA and add the pieces
of potato to the mixing bowl through the
opening in the lid.
l At the end of the cooking time, put the
VAROMA aside, pour the water out of the
mixing bowl, add the cream to the cooked
potatoes and blend at setting 2 to a creamy
potato puree. Season with salt and nutmeg.
l Put 2 tbs. butter into a small pan and lightly
roast the chopped hazelnuts.Season with salt
and pepper.
l Arrange the savoy cabbage rolls on a plate with
the creamy potato puree and sprinkle with the
roasted hazelnuts.
Page 34

34
Meatballs with peppers, rice and
curry sauce
(4 persons)
Ingredients
600 g minced beef
1 egg
1 shallot
1 garlic clove
½ old baked bread roll
½ tsp. salt
½ tsp. pepper
½ tsp. marjoram
1 tsp. mustard
600 g peppers (yellow, red, green)
Serve with:
280grice
Sauce:
½ l water
2 tsp. (condensed) chicken stock
30 g butter
3 tbs. flour
2 tsp. curry
pepper
pinch of sugar
1 tbs. lemon juice
1 MC cream
Recipe
l Peel the shallot and garlic clove and drop into
the mixer with the motor running on setting 6.
l Soak the ½ a bread roll in warm milk, press it
thoroughly and add it to the mixing bowl with
the meat and the other ingredients. Blend for
20 sec. / setting 4 with the aid of the spatula.
l Shape the mass into 8 meatballs and put them
in the VAROMA.
l Wash the peppers, remove the seeds, cut into
strips 1 cm wide and spread over the meatballs
in the VAROMA.
l Rinse out the mixing bowl and fill with 900 ml
water, put the rice in the basket and insert the
basket. Lock the bowl. Position the VAROMA
on top and cook for 30 min. /Varoma /
setting 1.
l Keepback½lofliquid in the mixing bowl for
the sauce. Pour the rest away.
l Insert the whisk for the sauce.
l Put all the ingredients except the cream in the
mixing bowl and cook for 6 min. / 100°C /
setting 2.
l After 5 minutes, pour the cream through the
opening in the lid.
l Season, transfer and serve together with the
meatballs and the vegetables.
Chicken casserole with fresh
vegetables and rice
(4 persons)
Ingredients
4 chicken legs (approx. 800 g)
3 leeks (300 g)
1 celery (300 g)
2 carrots
2 spring onions
Sauce:
200 ml of cooking liquid
1 MC dry white wine
30 g butter
3 tsp. (condensed) instant chicken stock
3 tbs. cornflour
2 egg yolks
200 g whipping cream
1 bunch of fresh mixed herbs
freshly ground white pepper and nutmeg
Serve with:
250grice
Recipe
l Chop herbs for 4 sec. / setting 6 and transfer.
l Cut chicken legs in half, remove skin, season
and put in the VAROMA.
l Fill the mixing bowl with 700 ml water and
insert the basket (empty), position the
VAROMA on top and cook for 15 min. / Varoma
/ setting 1.
l Wash, rinse and drain vegetables: cube the
carrots, cut the spring onions into slices. Cut
the leeks into thick slices, peel the celery and
cut into finger-thick2–3cmpieces.
l At the end of the 15-min. cooking time, remove
the VAROMA (be careful of escaping steam),
place on a large plate and pour the rice into the
basket through the opening in the lid.
l Arrange the washed vegetables inside the
VAROMA, on top of the chicken legs. Cook
everything for another 25 min. / Varoma /
setting 2.
l Keep rice and VAROMA warm.
l Keep back 200 ml of the liquid in the mixing
bowl for the sauce. Insert the whisk.
l Add the cornflour (dissolved in the wine), butter
and chicken stock to the mixing bowl and cook
for 4 min. / 100°C / setting 2. Set the
temperature selector to 0 at the end of the
cooking time.
l Add the herbs, egg yolks and the cream and
blend for 8 sec. / setting 2. Season with pepper
and nutmeg.
The weights in grams are for skinned chicken
legs and vegetables that have been washed and
prepared for cooking.
Page 35

35
Shrimps with baby corn cobs
(As a main course for 2 persons or a starter for 4
persons)
Ingredients (Main course for 2 persons)
2 sticks of celery
200 g tinned baby corn cobs
4 spring onions
1/3 of an iceberg lettuce
250 g peeled shrimps
2 tsp. grated lemon rind
For the marinade:
1 crushed garlic clove
2 tbs. medium-dry sherry
3 tbs. soya sauce
Ingredienst (Starter for 4 persons )
2 sticks of celery
300 g tinned baby corn cobs (halved)
6 spring onions
1/3 of an iceberg lettuce
250 g peeled shrimps
2 tsp. grated lemon rind
For the marinade:
1 crushed garlic clove
4 tbs. medium-dry sherry
5 tbs. soya sauce
Recipe
l Rinse the vegetables, cut the baby corn cobs in
half lengthways, cut the spring onions into thin
strips and the iceberg lettuce and celery into
bite size pieces.
l Stir the garlic, soya sauce and sherry together
in a bowl. Add the corn cobs and stir well to
cover them in marinade.Cover and lea
vefor at
least two hours.
l Put the spring onions and the celery in the
VAROMA. Remove the corn cobs from the
marinade and set the marinade aside. Add
corn cobs to the VAROMA. Layer the iceberg
lettuce on top. Mix the shrimps with the grated
lemon rind and place on the slot-in base. Fill
the mixing bowl with 500 ml water, lock,
position the VAROMA on top and cook
everything for 18 min. / Varoma / setting 1.
l At the end of the cooking time place the
vegetables and shrimps in a serving bowl, pour
over the marinade and stir in. Serve with rice.
Steamed salmon with creamy
mushroom sauce
(4 persons)
Ingredients
600 g skinned salmon fillet
1 untreated lemon
salt, freshly ground pepper
Butter for the aluminium foil
Serve with:
Green noodles (to be prepared separately)
Sauce:
300 g mushrooms
2 shallots
1 tbs. butter
1 MC dry white wine
200 g whipped cream
200 g soft cheese
pinch of freshly ground nutmeg
Recipe
l Check the salmon fillet carefully for any bones
and remove with tweezers. Cut fillet into 8
strips.
l Wash the lemon and dry it. Grate half the
lemon peel and set aside for the mushrooms.
Then press the lemon and drip the juice over
the pieces of salmon. Season with salt and
pepper.
l Line the VAROMA unit with buttered aluminium
foil and leave the ends of the foil standing up.
Put the pieces of salmon on the foil and then
scrunch the foil shut.
l Rinse and cut the mushrooms into slices and
add to the VAROMA. Put the aluminium foil
packet containing the salmon on the slot-in
base.
l Fill the mixing bowl with 500 ml water, lock the
bowl, position the VAROMA on top and cook
for 20 min. / Varoma / setting 1. (Turn the
packet over after 12 min.).
l Take out the salmon and keep warm (in the
oven at 50 – 75°C) and empty the mixing bowl.
l Peel the shallots, cut into quarters and drop
into the mixer with the motor running at setting
6.
l Insert the whisk, add the butter and cook both
for 1 min. / 90°C / setting 1. Remove the whisk.
l Add the white wine, cream, soft cheese and
half the mushrooms and heat for 3 min. / 100°C
/ setting 4.
l Add the grated lemon rind, ground nutmeg and
the rest of the mushrooms and mix in for 30
sec. / 100°C / setting 1.
l Season with salt and freshly ground pepper.
l Serve the salmon fillets and creamy mushroom
sauce on nests of flat green noodles.
Page 36

36
Salmon with vegetables
Ingredients
5 salmon fillets
1 onion
3 cloves garlic
½ measuring cup olive oil
¼ measuring cup corn oil
2 measuring cups dry white win
7 measuring cups water
2 cubes vegetable stock
3 carrots
3 zuchini / courgettes
½ cabbage
salt, pepper
3-4 sprigs parsley
2 sprigs celery
50 g butter
1 tbs corn flour
To marinate the salmon
½ measuring cup soy sauce
¼ measuring cup olive oil
2 lemons
rosemary
2 bay leaves
1 sliced onion
Recipe
l Wash and drain the salmon.
l Put all the ingredients for marinating the
salmon in a bowl. Add the salmon and leaveto
marinate for one hour.
l Put onion cut in four and garlic in the mixing
bowl. Mix at speed 3,5 for 15 seconds.
l Attach the whisk to the blades. Add olive oil
and corn oil and heat for 3 minutes/90°/speed
2. Remove the whisk
l Cut zuchini and carrots in cubes and slice the
cabbage. Put most of the quantity of the
vegetables in the basket and keep the rest
aside.
l Put 2 salmon fillets in the lower Varoma tray
covering them with chopped parsley and celery.
Place the vegetables that you have kept aside
around the salmon. Put the remaining 3 salmon
fillets on the upper Varoma tray.
l Put water, wine stock, salt and peper in the
mixing bowl and heat for 5 minutes/Varoma
temperature/speed 1.
l Place the basket in the bowl.
l Put the Varoma in place and set for
40 minutes / Varoma temperature / speed 1.
l Wait for 5 minutes before you open the
Varoma.Put 10 g butter on each fillet. Remove
the basket from the bowl and put the Varoma
on the bowl once more. Heat for another 5
minutes / Varoma temperature / speed 1.
l Remove the Varoma and add the corn flour
diluted in ½ measuring cup cold water to the
sauce. Heat for 3 minutes / 90C° / speed 2.
l Serve the sauce with the fish or the vegetables
or both, as you prefer.
Strips of turkey with broccoli and
cashew nuts
(4 persons)
Ingredients
100 g turkey escalope
300 g broccoli florets
80 g unsalted cashew nuts
300 g tinned bamboo shoots
6 spring onions
1 tbs. sesame oil
1 tbs. sesame seeds
For the sauce:
2 tsp. (condensed) instant chicken stock
3 tbs. cornflour
7 tbs. dry sherry
10 tbs. soya sauce
200 ml of the cooking liquid
Recipe
l Rinse the broccoli and spring onions. Drain
bamboo shoots and cut into thin slices or strips.
Divide broccoli into florets, cut the spring onions
into thin strips and layer in the VAROMA
together with the bamboo shoots.
l Cut the turkey into thin strips, mix with the
sesame oil, sesame seeds and the cashew
nuts and place on the slot-in base.
l Fill the mixing bowl with 5 MC water, lock,
position the VAROMA on top and cook
everything for 25-30 min. / Varoma / setting 1.
l At the end of the cooking time, keep back 200
ml of the cooking liquid in the mixing bowl.
Insert the whisk. Dissolve the cornflour in the
sherry and soya sauce and add to the mixing
bowl together with the instant stock. Cook for 2
min. / 100°C / setting 2.
l Mix the turkey, vegetables and sauce together
in a large bowl and serve with rice.
Page 37

37
Trout with basil sauce
Ingredients
4 trout
½ measuring cup olive oil
2 onions
1 clove garlic
2 tomatoes
1 measuring cup dry white wine
2 measuring cups water
4 measuring cups tomato juice
1 bay leaf
5-6 sprigs parsley
4 sprigs basil
3 green peppers cut in slices
Recipe
l Put oil in mixing bowl and heat for 3 minutes /
Varoma temperature / speed 2.
l Switch on at speed 4 and drop the onions and
garlic on the blades mixing for 15 seconds.
l Attach the whisk on the blades and set for 2
minutes / Varoma temperature / speed 1.
Remove the whisk and put the tomatoes cut in
4 in the bowl. Mix at speed 4 for 12 seconds.
l Take out a little of the mixture to spread on the
fish.
l Put wine, water, tomato juice, bay leaf, parsley
and basil in the bowl and heat for 5 minutes /
Varoma temperature / speed 1.
l Spread the fish with the tomato mixture.
l Cover the fish with the green peppers. Place
the Varoma in the bowl and heat for
40 minutes / Varoma temperature / speed 1.
Cod fillets with mushrom sauce
Ingredients
40 g butter
1 onion
150 g mushrooms
5 measuring cup dry white wine
2 cubes vegetable stock
4-5 medium potatoes
salt, pepper
lemon
olive oil
2 tbs corn flour
800 cod or haddock fillets (could be frozen)
Recipe
l Put butter, onion cut in four and mushrooms in
the mixing bowl and mix at speed 4 for 5
seconds.
l Adjust the whisk onto the blades and heat for 3
minutes/90°/speed 2. Remove the whisk and
add water, wine, stock, salt and pepper. Heat
for 5 minutes / Varoma temperature / speed 1.
l Defrost and wash the fish. Season with lemon,
salt and pepper. Cut each fillet in two servings
and place them in the two Varoma trays.
Sprinkle with olive oil.
l Peel and cut the potatoes in big pieces. Put
them in the basket and place the basket in the
bowl.
l Put the Varoma on the bowl and set for 25
minutes / Varoma temperature / speed 1.
l Remove the Varoma and the basket from the
bowl.Wait for 5 minutes before opening the
Varoma.
l Add corn flour diluted in ½ measuring cup cold
water to the sauce in the mixing bowl and heat
for 3 minutes / 90° / speed 2.
l Serve the fish with potatoes. You may pour the
sauce on top of the fish or serve separately.
Page 38

38
Desserts
Pear-Hélène
(4 persons)
Ingredients
4 pears
Juice of half a lemon
4 scoops of vanilla ice-cream
Chocolate sauce:
½ l sweet cream
30 g honey
½ stick of vanilla
200 g chocolate (couverture or dark chocolate)
Recipe
l Peel and halve the pears and sprinkle with
lemon juice.
l Put the pears in the VAROMA, fill the mixing
bowl with 400 ml water, lock, position the
VAROMA on top and cook for 20
min./Varoma/setting 1. Pour the water away.
l Add the cream, honey and ½ stick of vanilla to
the mixing bowl and heat for 4min. / 90°C /
setting 2.
l Break the chocolate up into largish pieces,
drop in through the opening in the lid and blend
in for 1 min. / 40°C / setting 4 with the help of
the spatula.
l Arrange 2 pear halves with 1 scoop of vanilla
ice-cream on each glass dish and pour the hot
chocolate sauce over.You might like to add a
dollop of whipped cream.
Page 39

39
Peaches with blackberry puree
(4 persons)
Ingredients
4 peaches
500 g blackberries
4 tsp. sugar
Recipe
l Peel and halve the peaches and put them in the
VAROMA.
l Fill the mixing bowl with 500 ml water, put the
blackberries in the basket, insert the basket,
lock the bowl and position the VAROMA on top.
l Cook everything for 25 min. / Varoma /
setting 1.
l Remove the peaches and pour the water away.
l Put the blackberries and the sugar into the
mixing bowl and puree for 10 sec. / setting 4.
Add sugar to taste.
l Leave the peaches to cool down and then
arrange them on top of the fruit puree in a dish
and serve with a dollop of whipped cream.
Our tip
The peaches should not be too ripe. Instead of
peeling them, you can pour boiling water over
them and then pull the skin off.
Instead of blackberries you can also use
redcurrants or any other type of berries.
Steamed apples in cider-zabaglione
(4 persons)
Ingredients
4 apples (Boskop or Braeburn)
Juice of half a lemon
Cider-zabaglione:
2eggs
4 egg yolks
130 g sugar
300 ml dry cider (apple wine)
Recipe
l Peel, core and quarter the apples, then cut into
slices.
l Press the lemon and sprinkle the juice over the
apples.
l Put the apples in the VAROMA, fill the mixing
bowl with 400 ml water, lock the bowl, position
the VAROMA on top and steam for 20 min. /
Varoma / setting 1.
l Allow the apples to cool down and arrange on
a plate.
l Add all the ingredients for the cider-zabaglione
to the mixing bowl and blend for 4½ min. / 70°C
/ setting 5.
l Pour the zabaglione around the apples and
serve at once.
Page 40

 Loading...