

Page 1
INSTRUCTION MANUAL
Kobold VK150
Vacuum cleaner
and accessories
Page 2

CONTENTS
Product overview ..................4
Preliminary remark ................ 5
1 For your safety .......... 7
1.1 Intended use ...................7
1.2 Hazards warnings ..............10
1.3 Danger levels ..................14
2 Geing started ...............15
2.1 Aaching the accessory part .....15
2.2 Standby position and
power seing ..................16
2.3 Mains connection ..............18
2.4 Adjusting the height ............20
2.5 Carrying the device ............21
2.6 Switching the device on and off,
seing the power
performance level ..............22
3 Operation ..................23
3.1 Kobold HD50 Hard floor
aachment ...................24
3.2 Kobold EB370 Electronic brush ..25
3.2.1 Brush-suction .................26
3.2.2 Carpet cleaning with the
Kobold FK370 Freshener kit .....29
3.2.3 Cleaning maresses ............35
3.3 Kobold SP530 Hard floor cleaner .38
3.3.1 Accessories for Kobold SP530
Hard floor cleaner .............39
3.3.2 Switching the Kobold SP530 Hard
floor cleaner on/off ............41
3.4 Kobold ESS150 Electronic
suction hose ..................48
3.5 Kobold TR15 Telescopic tube .....49
3.6 Kobold PB430 Polsterboy .......50
3.7 Kobold GD15 Window cleaning kit 52
3.7.1 Operating the Kobold Window
cleaning kit ...................54
3.7.2 Cleaning window panes .........55
3.7.3 Allow Koboclear to dry .........56
3.7.4 Vacuum dried Koboclear .......56
3.8 Additional accessories ..........58
3.8.1 Kobold VD15 Variable nozzle .....58
3.8.2 Kobold SD15 So nozzle ........60
3.8.3 Kobold FD15 Flexo nozzle .......61
4 Maintenance ................ 63
4.1 Spare parts and consumable
materials .....................64
4.2 Maintaining Kobold VK150
Vacuum cleaner ...............66
4.2.1 Exchange Premium Filter bag
Kobold FP140/150 .............66
4.2.2 Cleaning and exchaning the
Kobold VK150 Motor
protection filter ................68
4.3 Kobold EB370 Electronic brush ..70
4.3.1 Checking and cleaning ..........70
4.3.2 Exchaning the brushes .........71
4.4 Kobold SP530 Hard floor cleaner . 72
4.4.1 Checking and cleaning the
sealing lip frame ...............73
4.4.2 Checking the suction channel ....74
4.5 Kobold PB430 Polsterboy .......75
4.6 Kobold Window cleaning kit .....76
4.7 Additional accessories ..........77
5 Troubleshooting ............. 78
6 Disposal and environmental
protection .................. 88
6.1 Disposing of the device .........88
6.2 Disposing of the packaing ......88
6.3 Information on environmental
protection ....................89
7 Warranty ................... 91
8 Services .................... 91
9 Technical details ............92
10 EU energy label classification* . 96
Page 3
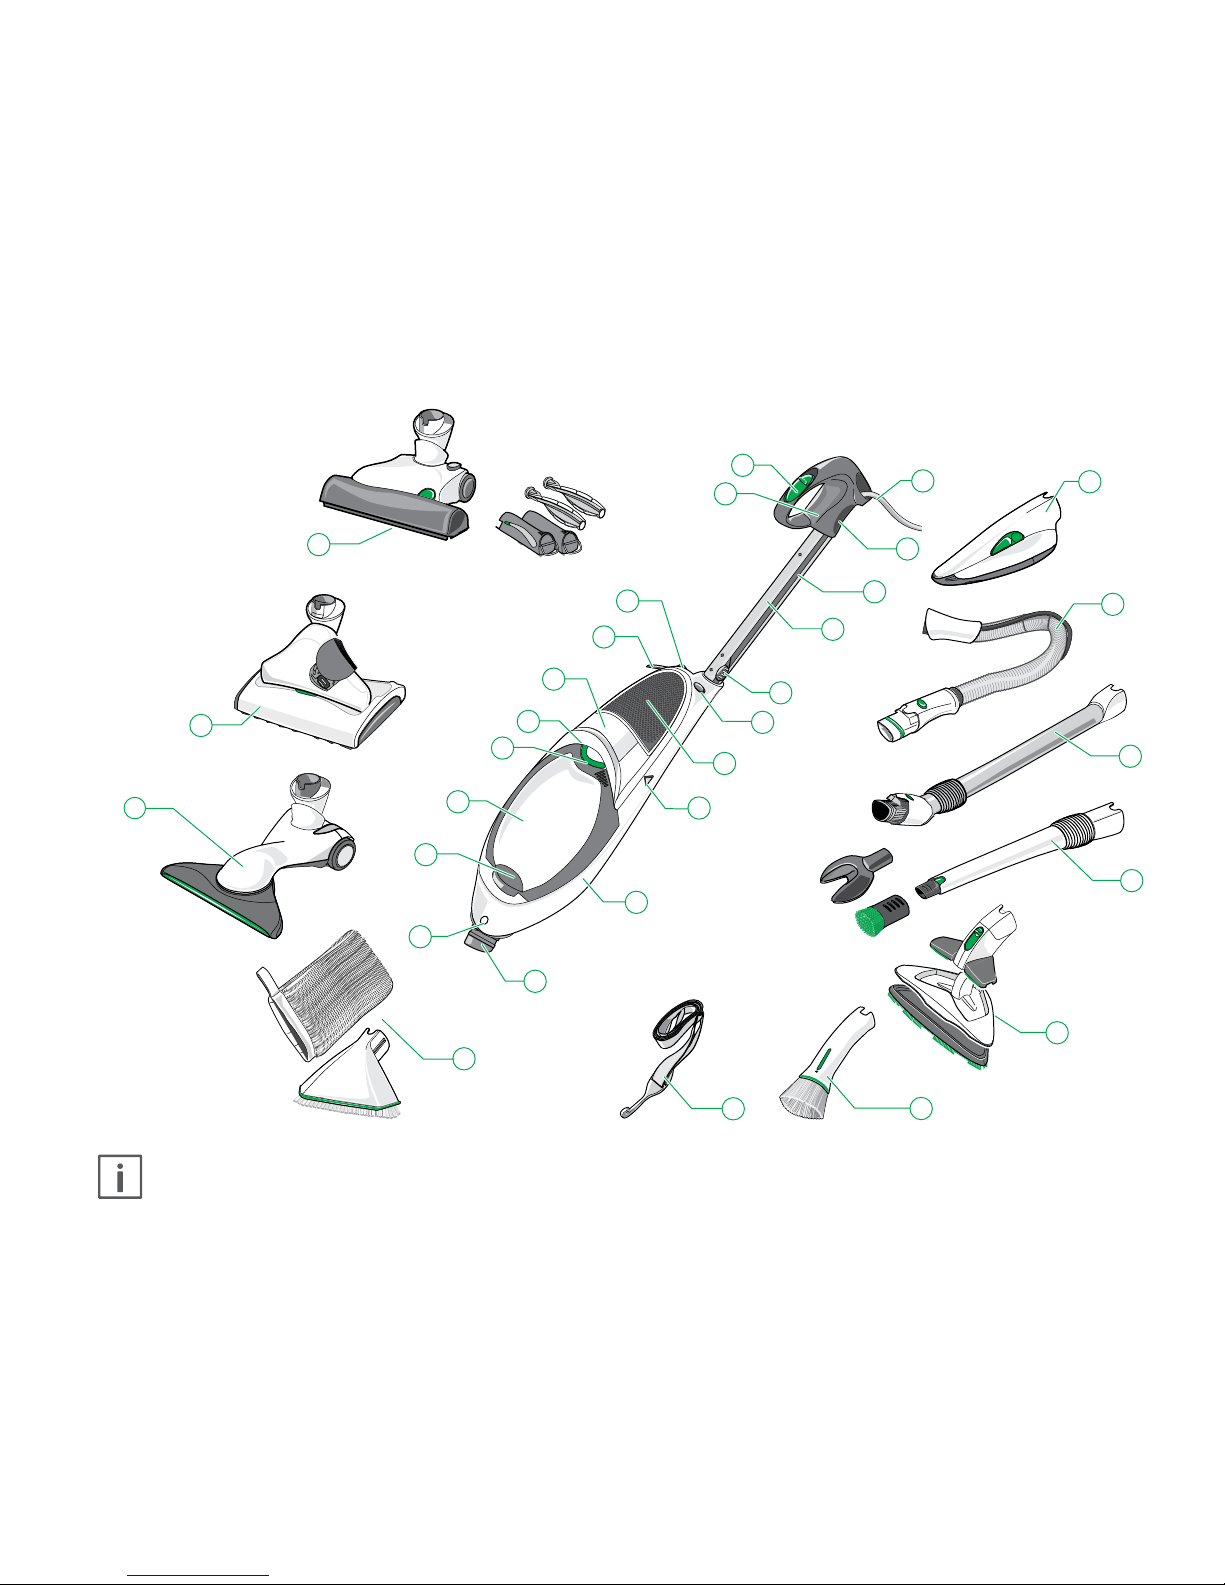
PRODUCT OVERVIEW
Nature and extent of the accessories included may vary. Accessories can be purchased separately and may not be available in
each country. The illustrations shown in this manual are meant to illustrate the functions of the Kobold VK150 Vacuum cleaner
and its accessories. The illustrations may differ with respect to detail and proportions of the actual product.
13
14
15
20
19
17
18
16
12
22
11
24
2
3
1
5
4
8
9
10
23
6
7
25
26
27
28
29
30
21
31
Page 4
LEGEND
Item Kobold VK150 Vacuum cleaner
1
Power cord
2
Cable hook (covered), rotatable
3
Cable channel
4
Telescopic rod handle
5
Connector plug
6
Release key
- for adjusting the handle
7
Air outlet
8
Suction value display
9
Rotating switch (on the back)
10
Aachment socket
11
Release buon
- for electronic accessory parts and other accessories
12
Recessed grip boom
13
Filter cover
14
Lever
- to open the filter cover
15
Recessed grip top
16
Motor housing
17
Cable hook (folding)
18
Remote release for electronic accessory
parts and other accessories
19
Grip
20
Main switch
Item Floor care accessory parts
Non-electronic accessories:
21
Kobold HD50 Hard floor aachment
- for hard floor vacuuming
Electronic accessories:
22
Kobold SP530 Hard floor cleaner
- for vacuuming and wet cleaning of hard floors
23
Kobold EB370 Electronic brush with Kobold FK370
Freshener kit and Kobold MB370 Maress brushes
- for vacuuming and cleaning carpets and maresses
Item Additional accessories
Electronic accessories:
24
Kobold PB430 Polsterboy
25
Kobold ESS150 Electronic suction hose
Non-electronic accessories:
26
Kobold TR15 Telescopic tube
27
Kobold VD15 Variable nozzle with
drilling dust aachment and brush
28
Kobold FD15 Flexo nozzle with cleaning plate
29
Kobold SD15 So nozzle
30
Shoulder strap
31
Kobold GD15 Window cleaning kit with Kobold
GD15 Glass nozzle, Kobold GT15 Glass cloth
Page 5

Page 6
PRELIMINARY REMARK
Congratulations on the purchase of your new vacuum cleaner, the Kobold VK150 Vacuum cleaner. Delivering brilliance
and cleanliness, the light and easily manoeuvrable Kobold
will stay true to you and your household for many years. Its
unique and practical accessories will bring joy to cleaning
your household.
BEFORE GETTING STARTED
• Read the instruction manual carefully before using the
Kobold for the first time.
• Keep the instruction manual for future use. It is an im-
portant part of the Kobold and must be kept with it if you
pass it on to someone else.
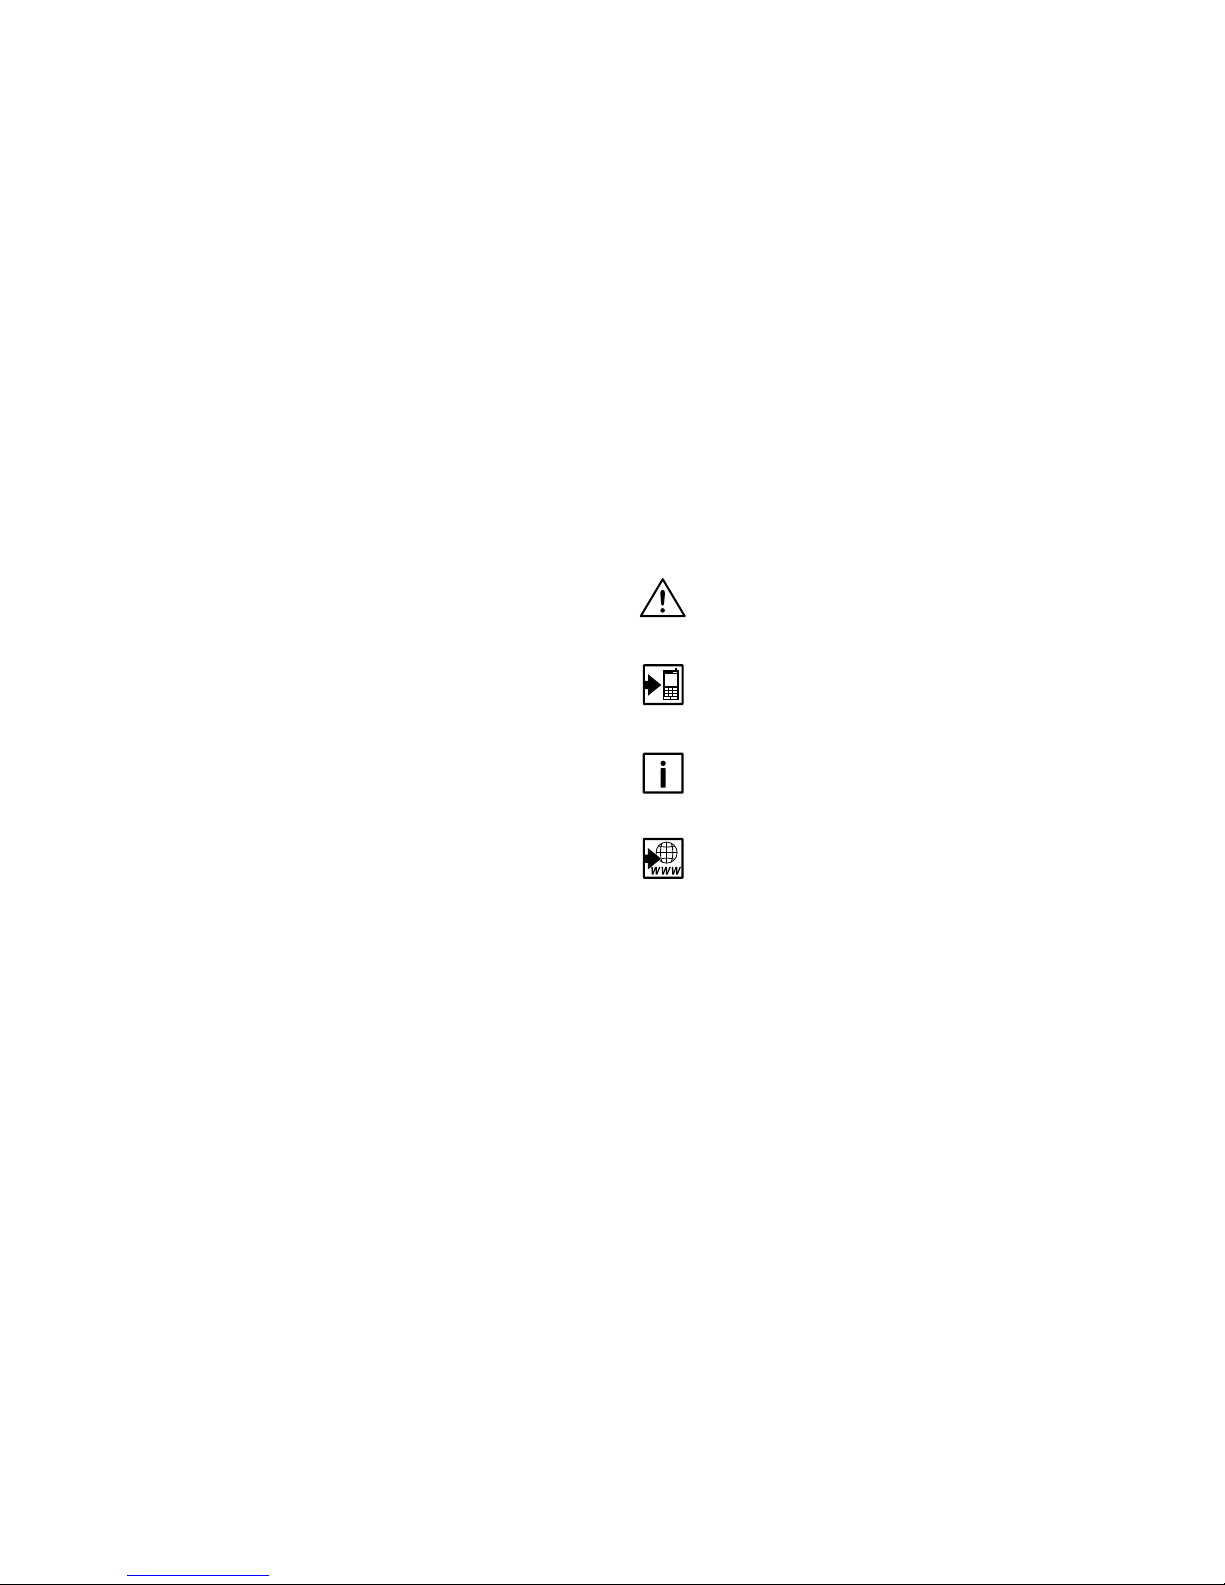
CHARACTERS AND SYMBOLS
The symbols which appear in this instruction manual have
the following meanings:
Warning symbol
Reference to Vorwerk’s customer
service department/support
Symbol for a helpful tip
Reference to Vorwerk’s
Internet website
• Instructions
Page 7
6
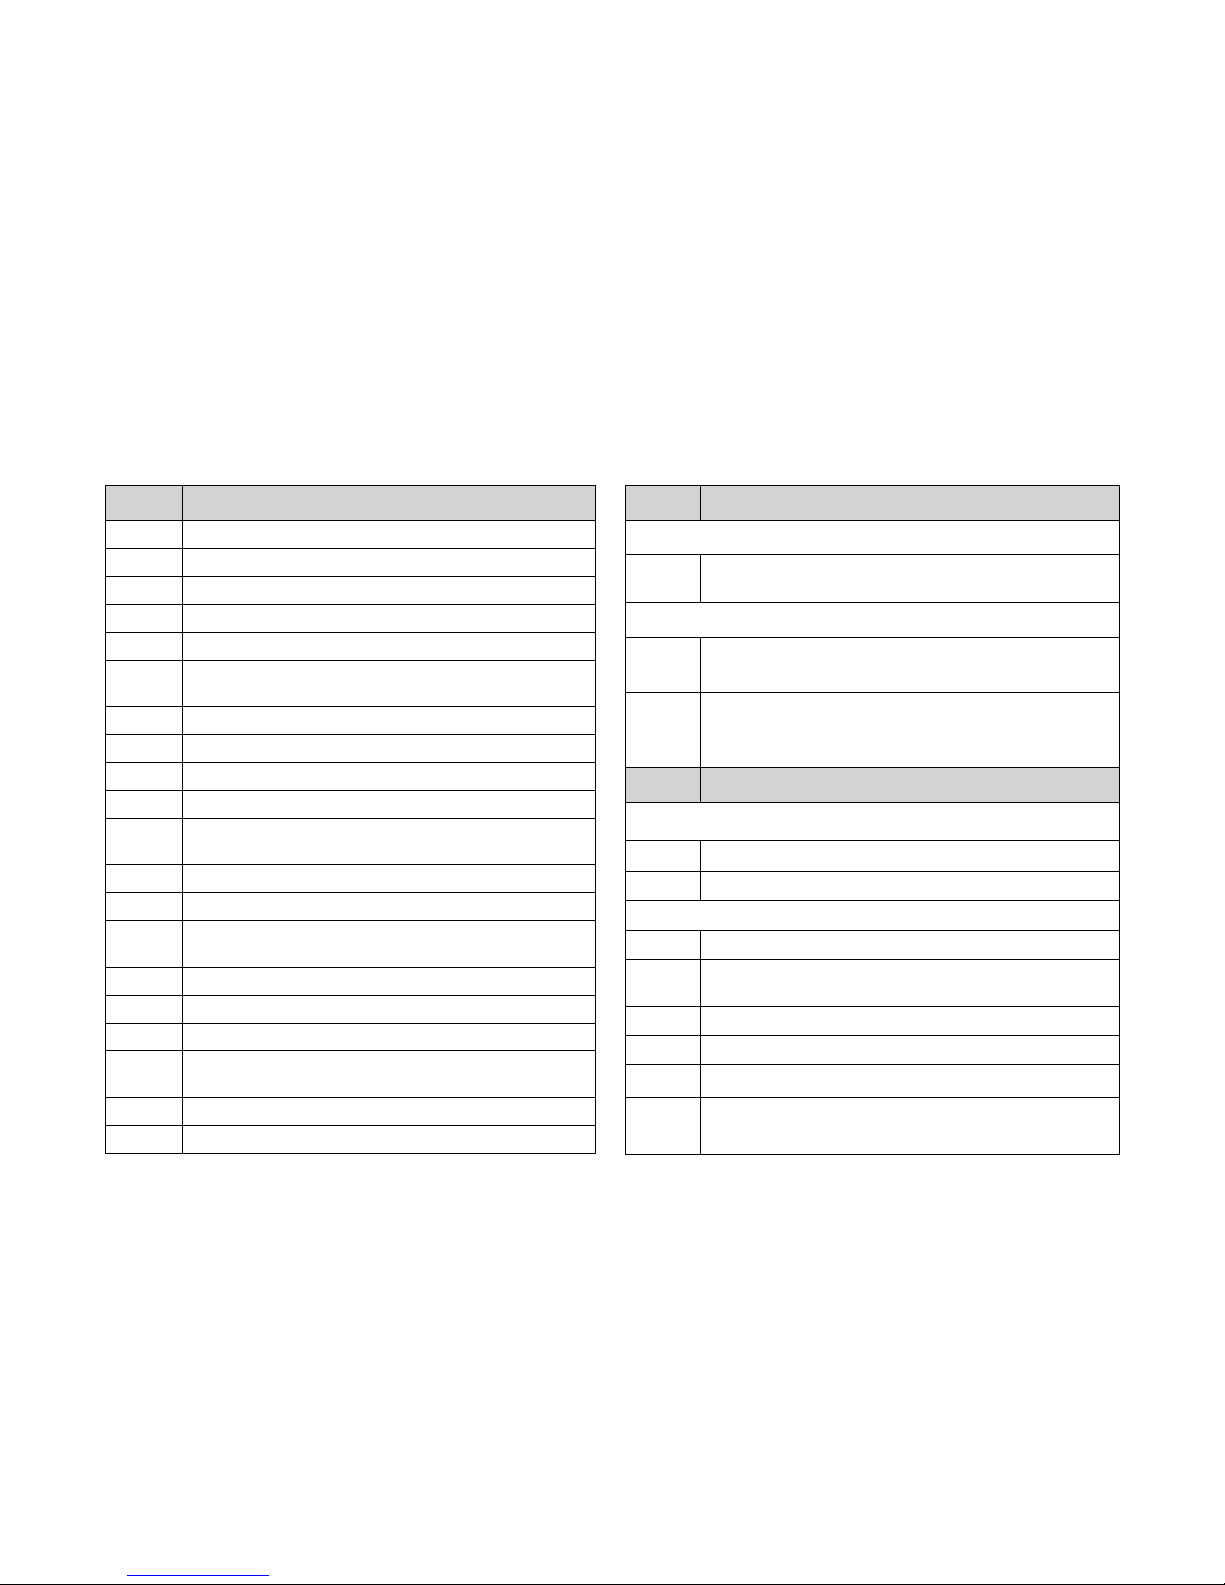
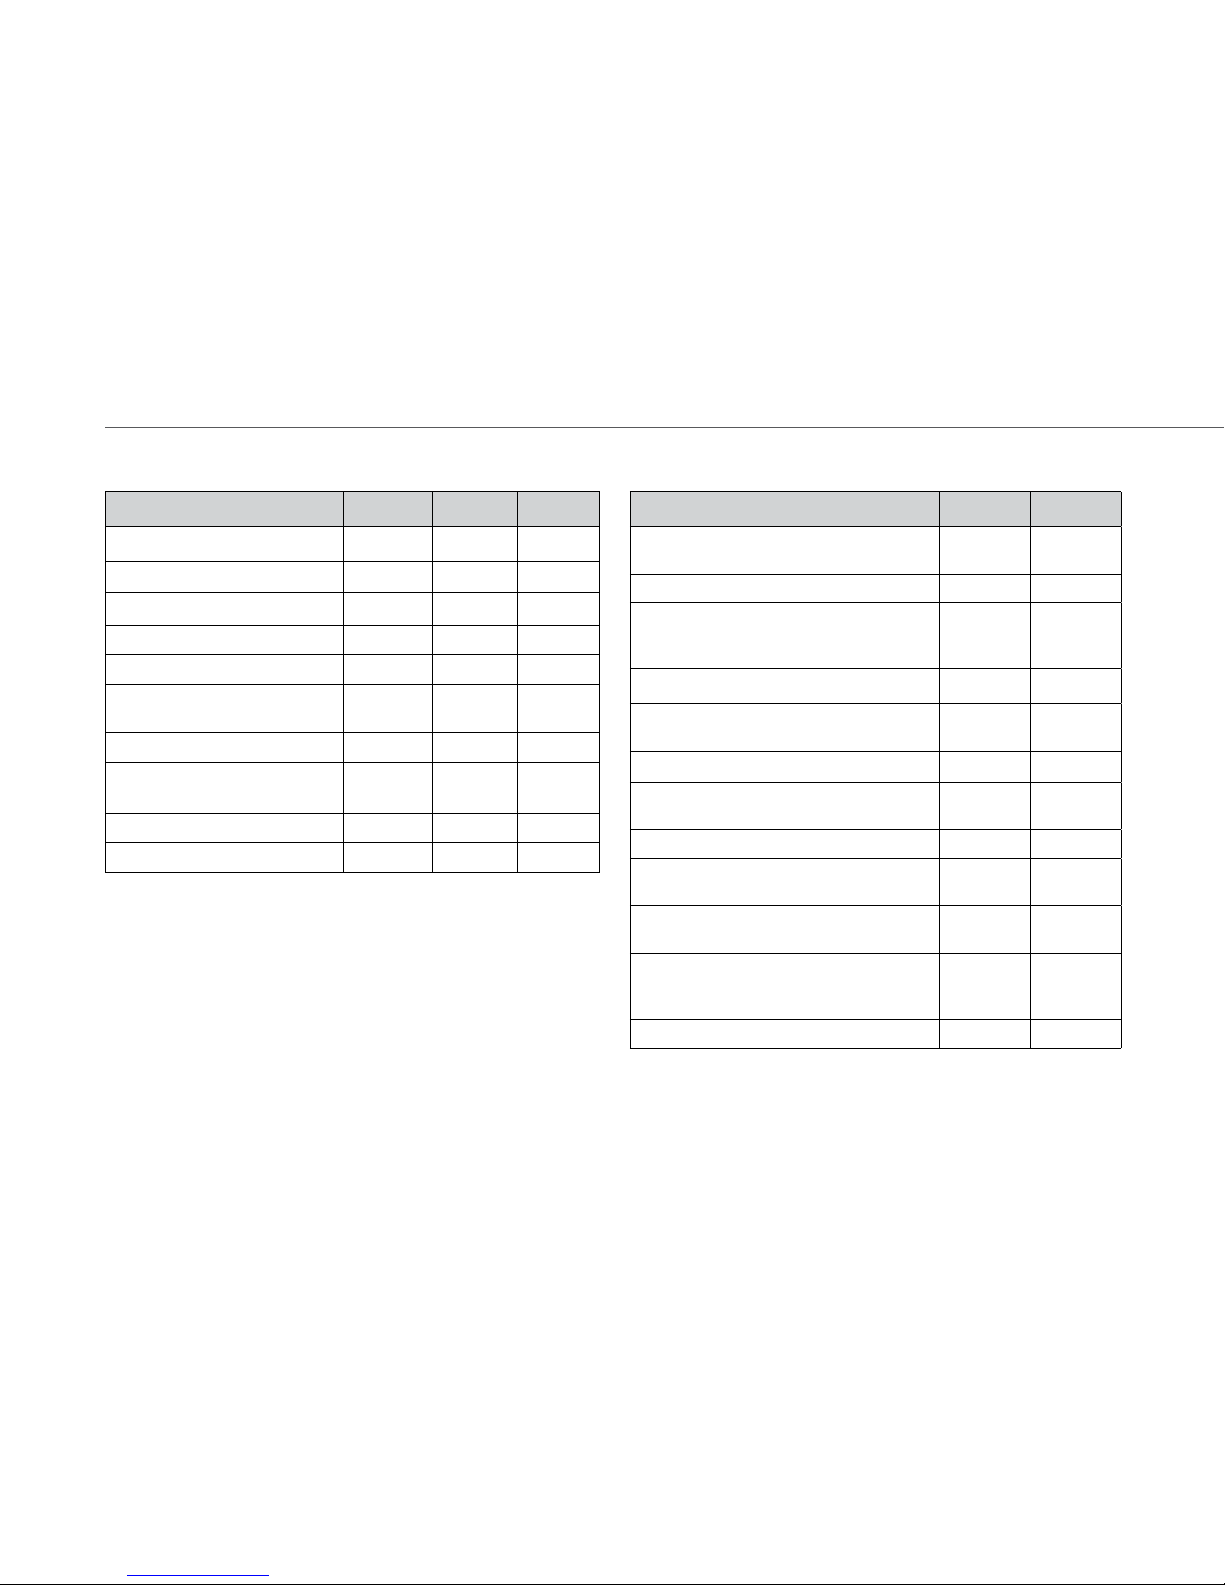
SUITABILITY OF THE DEVICES FOR FLOORS
Carpet type EB370 SP530 HD50
Velour carpeting ++ - -
Loop pile carpeting ++ - -
Berber carpeting +* - -
Sisal carpeting +* - -
light, loose carpets +* - -
Deep-pile carpeting (>1.5 cm) +* - -
Silk carpeting +* - -
Carpets with long,
interwoven fibres (Saxony)
- - -
Loosely woven carpeting - - -
Flokati, fur - - -
*)
with so function
Tab. 1.1 Suitability of accessory parts for carpet types
The symbols indicate:
++ excellent suitability
+ very good suitability
- not suitable
Note!
• Follow the detailed application instructions in the
following chapters.
Hard floor type SP530 HD50
Sealed wooden flooring (e.g.
parquet, beech or oak floorboards)
++
1
+
Laminate ++ +
Oiled wooden flooring
(e.g. floorboards, parquet
made of beech or oak)
++
1
+
PVC, CV, linoleum ++ +
Natural stone flooring (e.g.
marble, granite, slate)
++
2
+
Clay flooring (e.g. terracoa) ++
2
+
Ceramic tiles and fine stoneware ++ +
Sealed cork flooring ++
1
+
Sensitive natural stone flooring
(e.g. Solnhofer stone)
++
2
+
Ruged concrete flooring
(e.g. washed concrete)
- +
Unsealed wooden flooring made
of sowood (e.g. pine, spruce)
++
1
+
Unsealed cork flooring ++
1
+
1
) suitable for dry cleani ng with cleaning clot h Kobold MF520/530 Dry
2
) with c leaning cloth Kobold MF520/530 So
Tab. 1.2 Suitability of accessory parts for hard wood types
Page 8

7
For your safety
1 FOR YOUR SAFETY
Greatest possible safety is a characteristic of Vorwerk products. The product
safety of the Kobold VK150 Vacuum cleaner and its accessories can however only
be ensured if this chapter is followed.
1.1 Intended use
Note!
The appliance is not to be used by children younger than
8 years. Children from 8 years on or persons with reduced
physical, sensory or mental capabilities, or lack of experience and knowledge may only use this appliance in case they
have been given supervision or instruction about how to use
it safely and they understand what risks are involved. Children should be supervised to ensure they do not play with
the appliance. Cleaning and maintenance may not be performed by children without supervision.
Page 9

8
For your safety
KOBOLD VK150 VACUUM CLEANER
The Vacuum cleaner is solely intended for removing dust within domestic areas.
The vacuum cleaner may only be used with the corresponding Vorwerk accessories.
• To find out which carpet and hard floors are suitable for using the accessory
parts, refer to tables 1.1 and 1.2 (see page 6).
KOBOLD EB370 ELECTRONIC BRUSH
The Electronic brush may only be used in connection with a Kobold Vacuum
cleaner. It is exclusively intended for carpet and maress maintenance.
The Electronic brush shall only be used for the carpet described in Tab. 1.1.
The Electronic brush must under no circumstances be used with the following
carpet types: Furs, flokati, carpets with long, interwoven fibres (Saxony), loosely
woven carpets, extreme deep-pile carpets, unsealed cork flooring.
KOBOLD FK370 FRESHENER KIT AND KOBOLD MB370 MATTRESS
BRUSHES
The Freshener kit and the maress brushes may only be used in connection with
the Electronic brush and a vacuum cleaner by Vorwerk.
The Freshener kit and the maress brushes are solely intended for use with dry
cleaning powder such as Kobosan or Lavenia. They must not be used with liquid,
foam or damp cleaning agents.
Page 10

9
For your safety
KOBOLD HD50 HARD FLOOR ATTACHMENT
The hard floor aachment is only intended for cleaning even hard floors in
domestic areas.
KOBOLD SP530 HARD FLOOR CLEANER
The hard floor cleaner may only be used on the hard floor types listed in Tab. 1.2.
The following flooring types must never be wet cleaned: untreated cork flooring,
untreated tile floors, untreated sowood floors.
KOBOLD GD15 WINDOW CLEANING KIT
The Kobold GD15 Window cleaning kit is exclusively intended for cleaning and
maintenance of smooth, non-treated glass surfaces. Suitable are window panes
without special fiings due to coatings (e.g. lotus effect), mirrors or winter gardens made of glass.
Not suitable are ma finished or structured glass surfaces (e.g. frosted glass in
the bathroom, glass with ornaments) or plastic surfaces (e.g. Plexiglass, monitors, TV), as well as windows with open-pored window frames such as auto
panes.
Page 11

10
For your safety
1.2 Hazards warnings
Note!
• Read the instruction manual carefully before using the
Kobold VK150 Vacuum cleaner for the first time.
• Observe the following notes in particular.
• Keep the instruction manual for future use. It is an important part of the
Kobold and must be kept with it if you pass it on to someone else.
Risk of electric shock!
• Always switch the device off before all retrofitting, cleaning and maintenance work and disconnect the mains
power cord from the socket.
• Never disconnect the mains power cord from the mains by pulling the connecting cable, but rather by pulling the mains plug connector from the socket.
• Unplug the mains power cord from the socket so the connecting cable can be
retracted by the cable winder.
• Do not vacuum either fluids or damp dirt nor damp floor mats or carpets.
• Do not use the device in moist environments.
• You should never use the electronic accessories on wet surfaces or outdoors.
• Never clean your device or your electronic accessories, especially the electrical connections of the Kobold Electronic suction hose, with water or damp
cleaners.
• When using your motorised accessory parts, Kobold EB370 Electronic brush
and Kobold SP530 Hard floor cleaner, make sure not to pass over the connecting cable or other cables lying on the floor.
Page 12

11
For your safety
Warning! The Electronic suction hose contains electricalconnections.
• Do not use it to vacuum water.
• Do not submerge in water for cleaning purposes.
• The hose must be checked regularly and should not be
used if damaged.
Risk of electric shock!
• Never perform repairs on your device yourself. Repairs to electric devices may
only be carried out by the responsible Vorwerk customer service department.
• Do not insert any pointed objects into the electric contacts.
• Do not change the contacts.
• Never carry the device by the connecting cable.
• Do not operate the electrical devices or the connecting cable any further if
they are damaged.
• Contact your nearest Vorwerk customer service department in the event of
damage.
Fire hazard!
• Do not vacuum glowing ash or burning cigarettes.
Explosion hazard!
• Do not vacuum explosive or easily inflammable substances.
Page 13

12
For your safety
Risk of injury
• Do not vacuum any body parts. Do not vacuum near children or pets.
• Do not vacuum hair with the Polsterboy.
Pinching hazard!
• Stay clear of the rotating parts of the electronic accessory
parts.
• Pull the power plug out of the socket before storing the
device or leaving it unattended.
Choking hazard!
• Keep small parts such as the Dovina fragrance chips or the cover of the revision opening of the hard floors attachment away from children.
Loss of suitability for allergy sufferers!
• Use only original Vorwerk filters and filter bags. Do not reuse spent filter
bags.
Page 14

13
For your safety
Note! Risk of damage from improper use!
• Use original Vorwerk parts only.
• Only operate the device with alternating current voltage and at a connection
that was properly installed by a specialist.
• Use the device with the alternating current voltage stated on the type plate.
• Use the device only with the Motor protection filter installed.
• Never use the hard floor cleaner without cloth.
The device fulfils the safety instructions of the country in which it was sold by
an authorised Vorwerk organisation. When using the device in another country,
compliance with local safety standards cannot be guaranteed. Vorwerk therefore
rejects any resulting safety risks for the user.
Page 15
14
For your safety
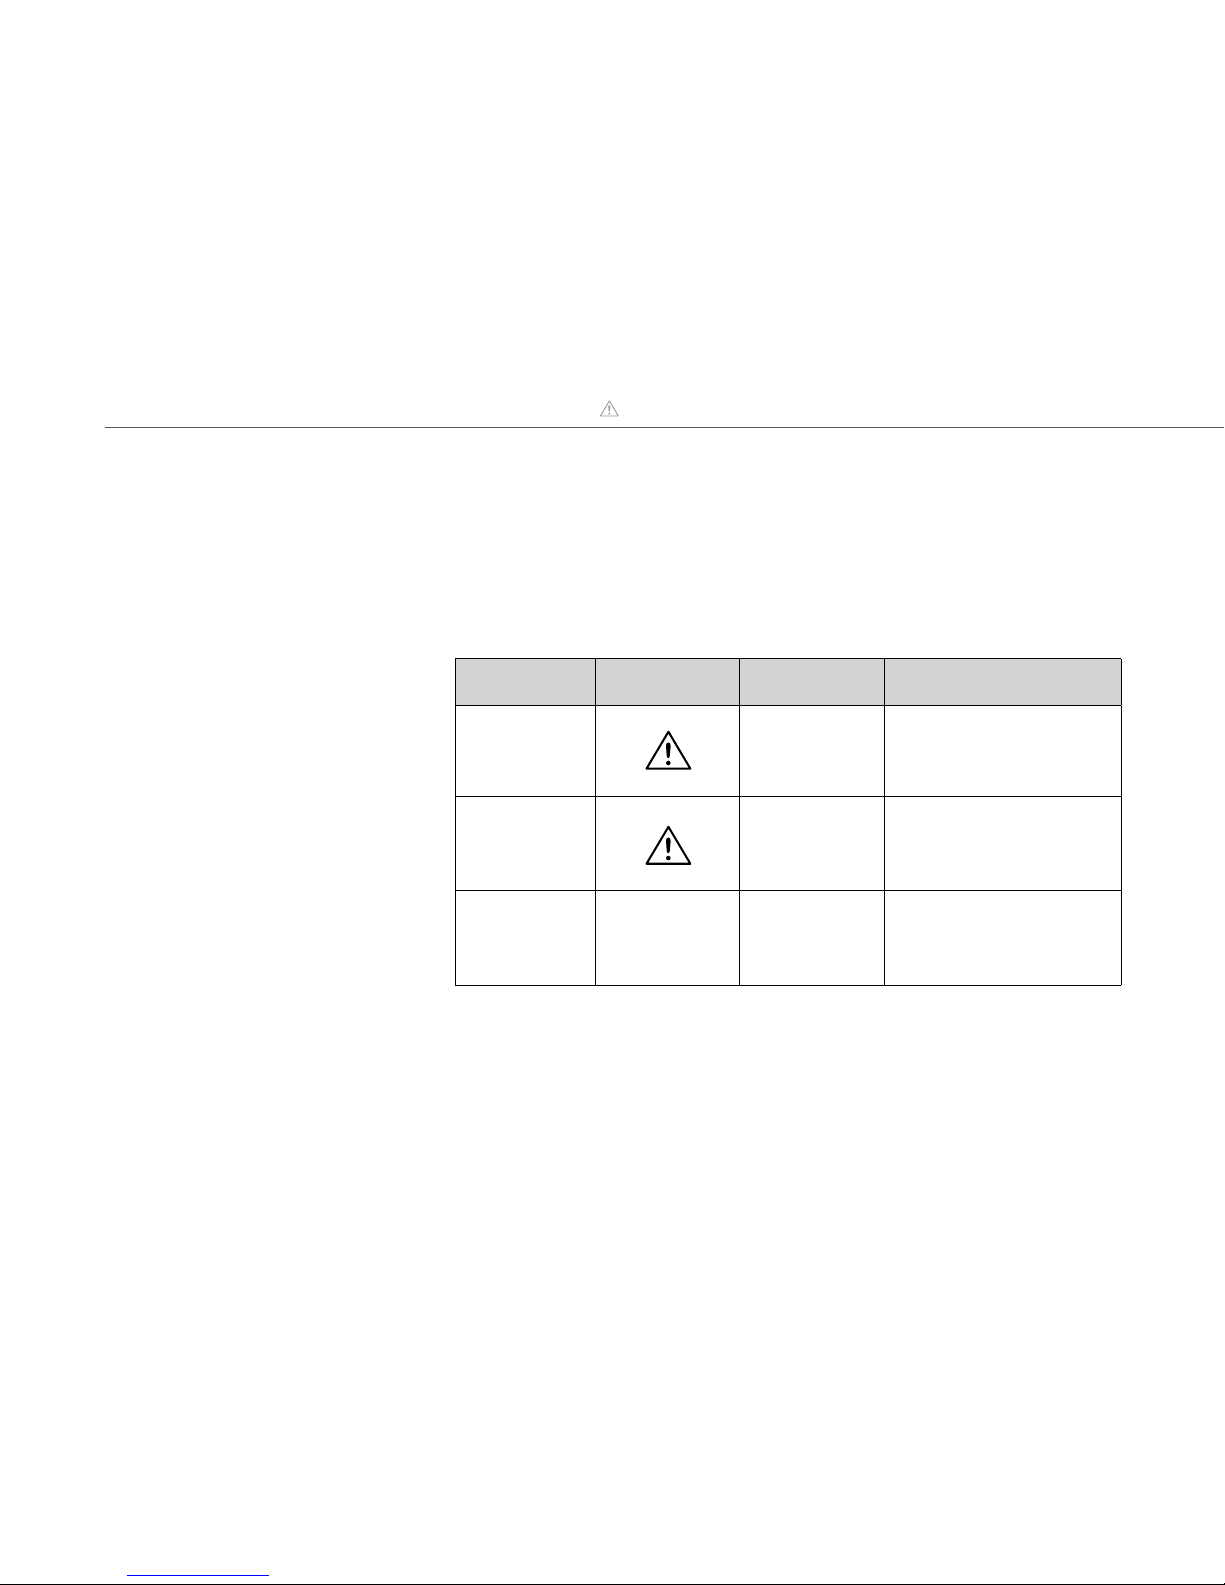
1.3 Danger levels
• For your safety, also observe the hazard warnings specified in the following
sections.
You can identify the hazard warnings in the following sections by the warning
symbol and/or a signal word indicating the danger level:
Danger level
Warning
symbol
Signal word Possible risks
3
Warning!
- Risk of electric shock
- Fire hazard
- Explosion hazard
2
Caution! - Risk of injury
1 Note!
- Risk of damage from
improper use
- Material damage
from improper use
Page 16
15
Getting started
2 GETTING STARTED
In this chapter you will learn how to set up your Kobold VK150 Vacuum cleaner
for use. You will come to know the basic functions of your Vacuum cleaner and
how to handle it properly.
Want to use your Vacuum
cleaner for floor care?
• Start with chapter “2.1 Aaching
the accessory part” on page 15.
Or would you like to use your
Kobold above the floor, e.g. for
upholstery, curtains or furniture?
• Then start with chapter
“2.3 Mains connection” on page 18.
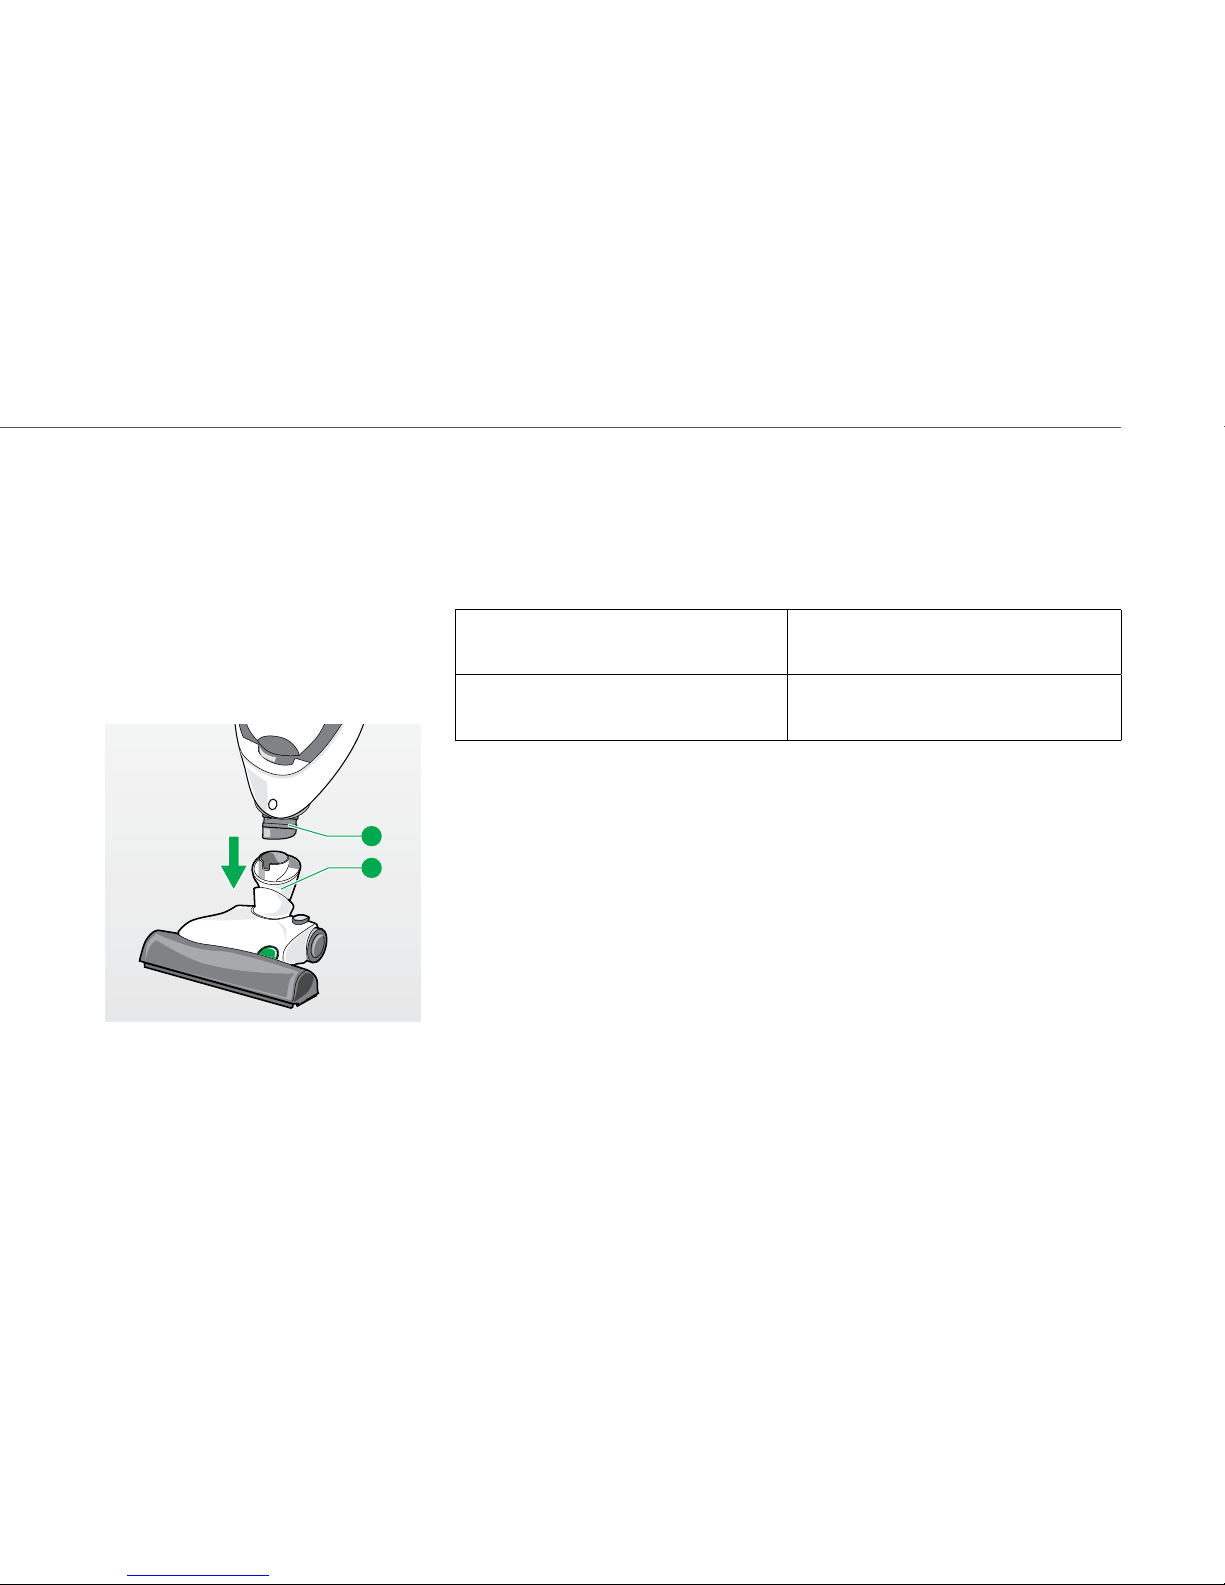
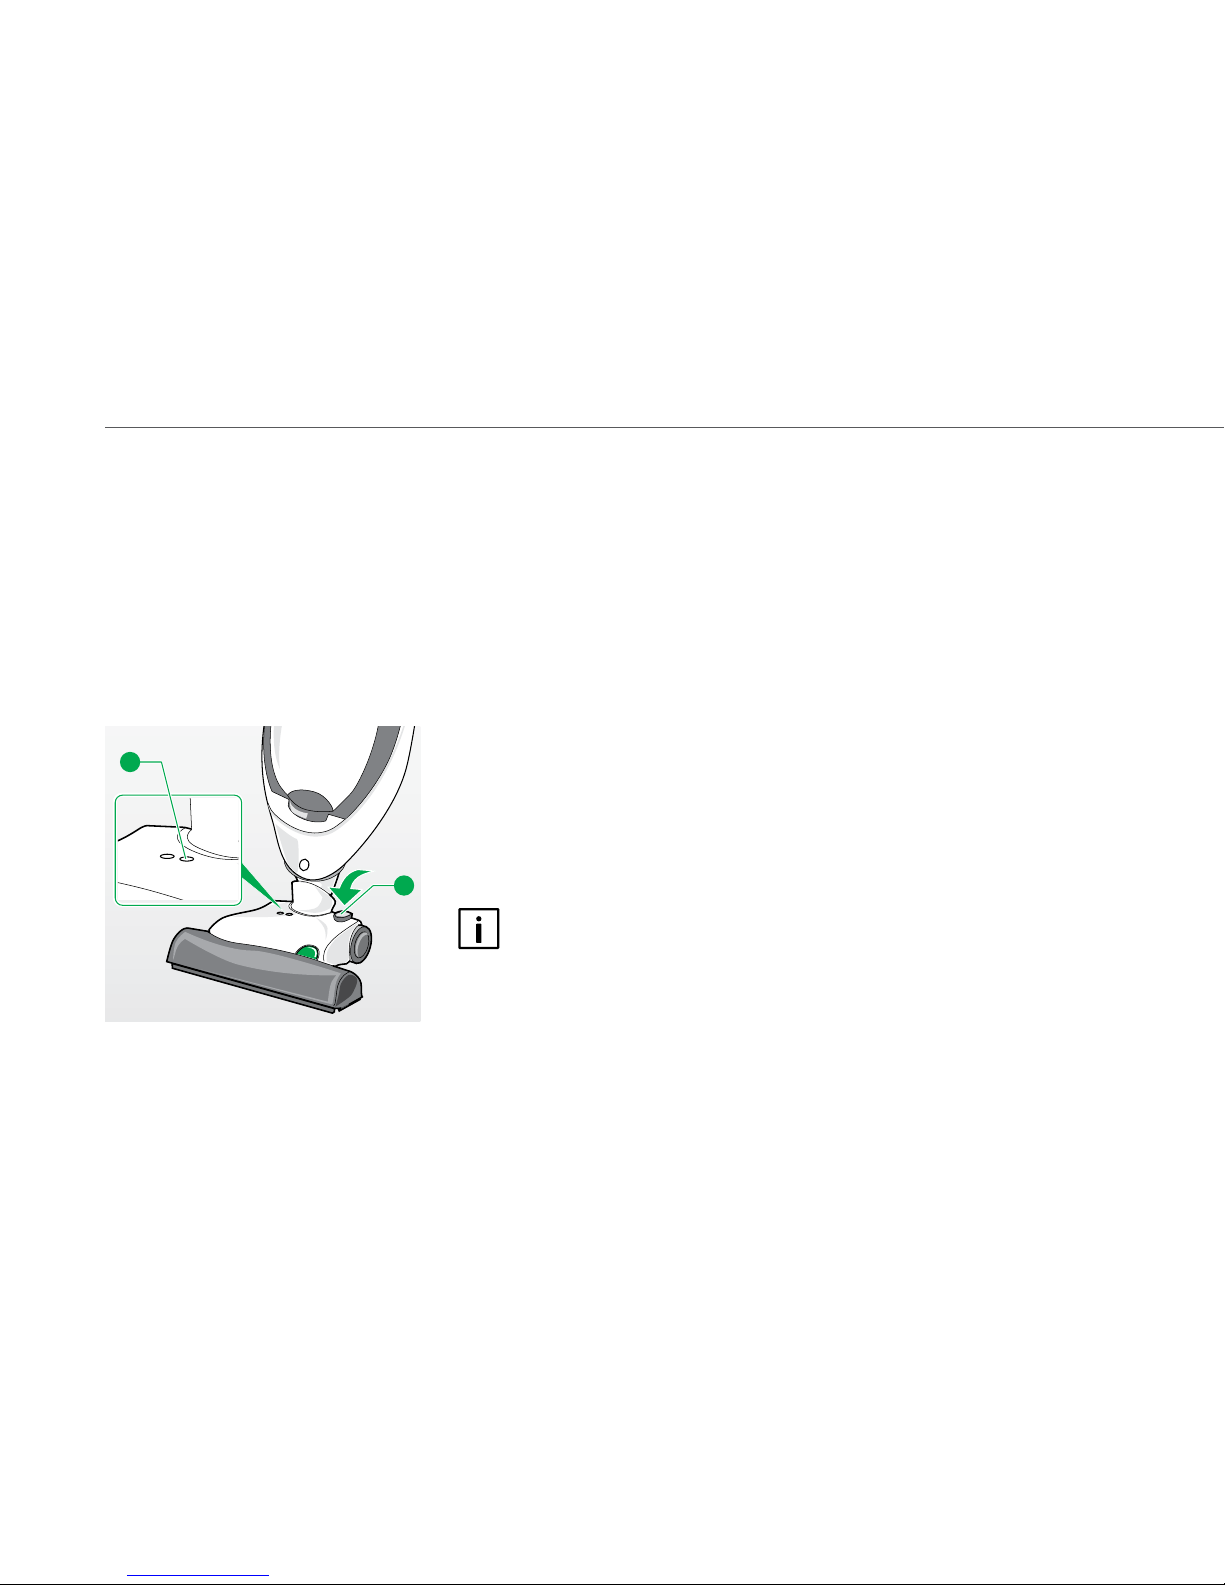
2.1 Attaching the accessory part
For floor care purposes, you can use one of the following accessory parts:
- Kobold EB370 Electronic brush
- Kobold HD50 Hard floor aachment
- Kobold SP530 Hard floor cleaner
The aachment process is the same for all three accessory parts:
• Connect the attachment socket
of the Vacuum cleaner to the pivot on the
accessory part
.
• Make sure that you can hear the attachment socket snap into the pivot.
2
1
Fig. 2.1 Aaching the accessory part
(here: Electronic brush)
Page 17
16
Getting started
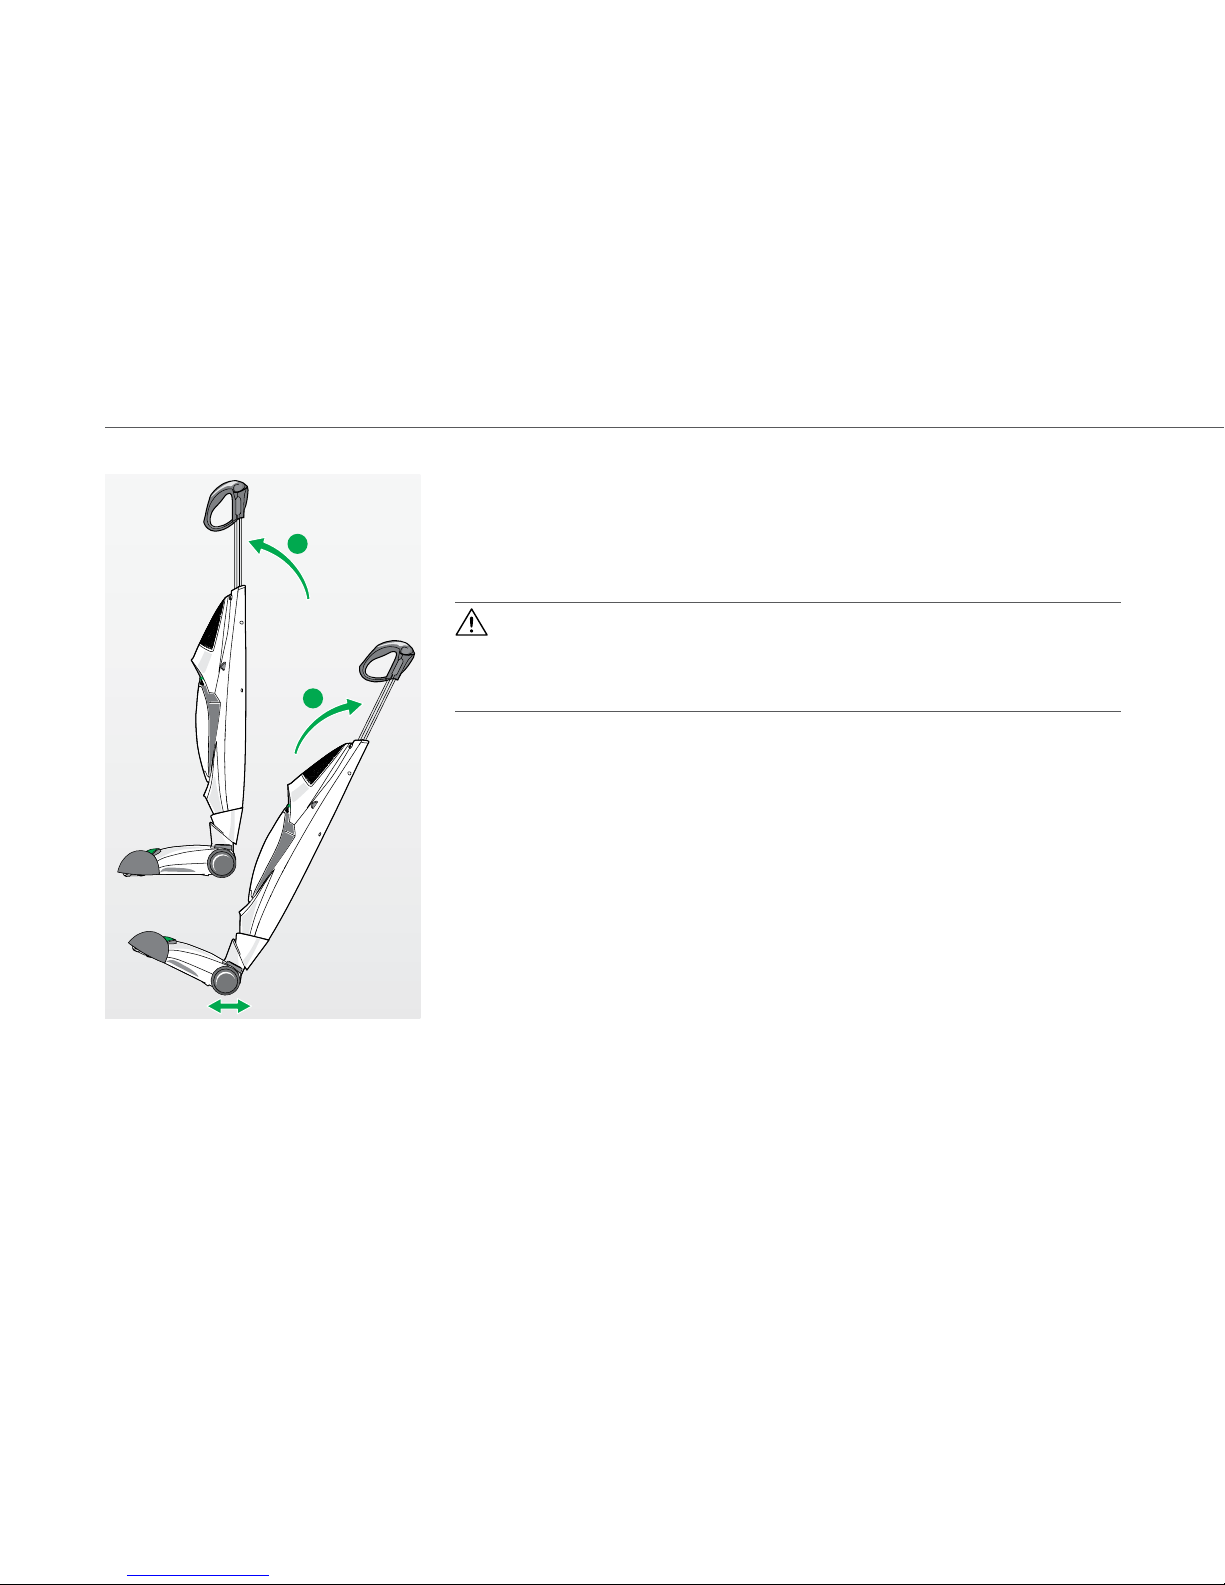
2.2 Standby position and power setting
Once you have connected the Kobold VK150 Vacuum cleaner to one of the accessory parts, you can set the device into standby position or keep it in power
seing.
Caution! Risk of injury from toppling device!
The standby position is used to turn off the device after finishing cleaning.
• In standby position, place the Vacuum cleaner with the accessory part
only on horizontal surfaces.
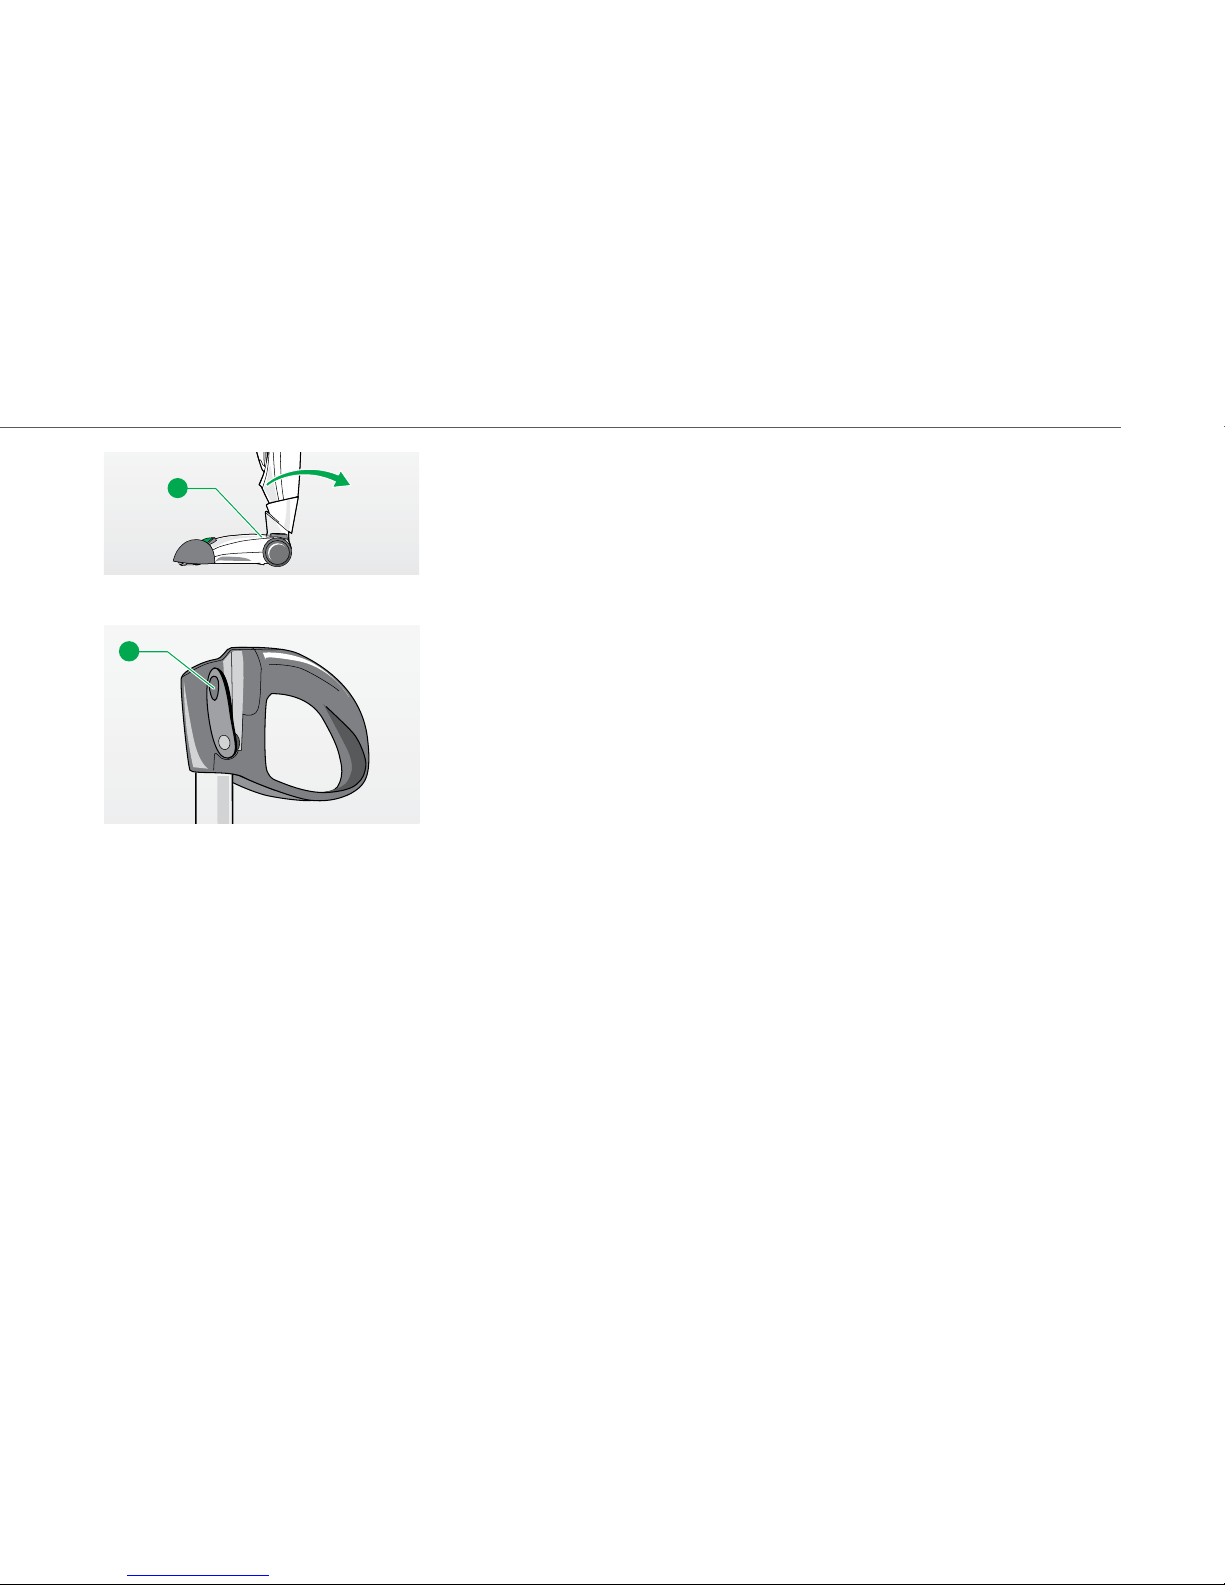
SETTING THE DEVICE INTO STANDBY POSITION
In standby position, the device stands upright and firmly on the ground.
If you wish to put the device away for a quick break or if you have finished
vacuuming, set it into standby position by completing the following steps:
• Move the telescopic handle forward
until it stands upright and you can
hear it snap into the pivot.
ROLLING THE DEVICE
Also, you can conveniently roll the device in standby position to move it to different places:
• To do this, tilt the device backward
in standby position so that it stands on
the rollers.
• Then roll it in the desired direction.
1
2
Fig. 2.2 Standby position
Page 18
17
Getting started
SETTING THE DEVICE INTO POWER SETTING
In power seing, the Kobold VK150 Vacuum cleaner can be moved freely into all
directions on the ground. The following steps describe how to set the device from
standby position into power seing:
• Hold the accessory part
firmly in place with your foot and tilt the telescop-
ic handle backwards so that you can hear it snap out of the standby position.
HANGING UP THE DEVICE
To store the Vacuum cleaner, it is possible to hang it on the wall.
• To do this, leave the device in the power setting position.
• Hang the device with the upper opening of the cable hook
onto the wall.
The accessory part thereby hangs pointing downward.
1
Fig. 2.3 Power seing
2
Fig. 2.4 Cable hook for haning
Page 19
18
Getting started
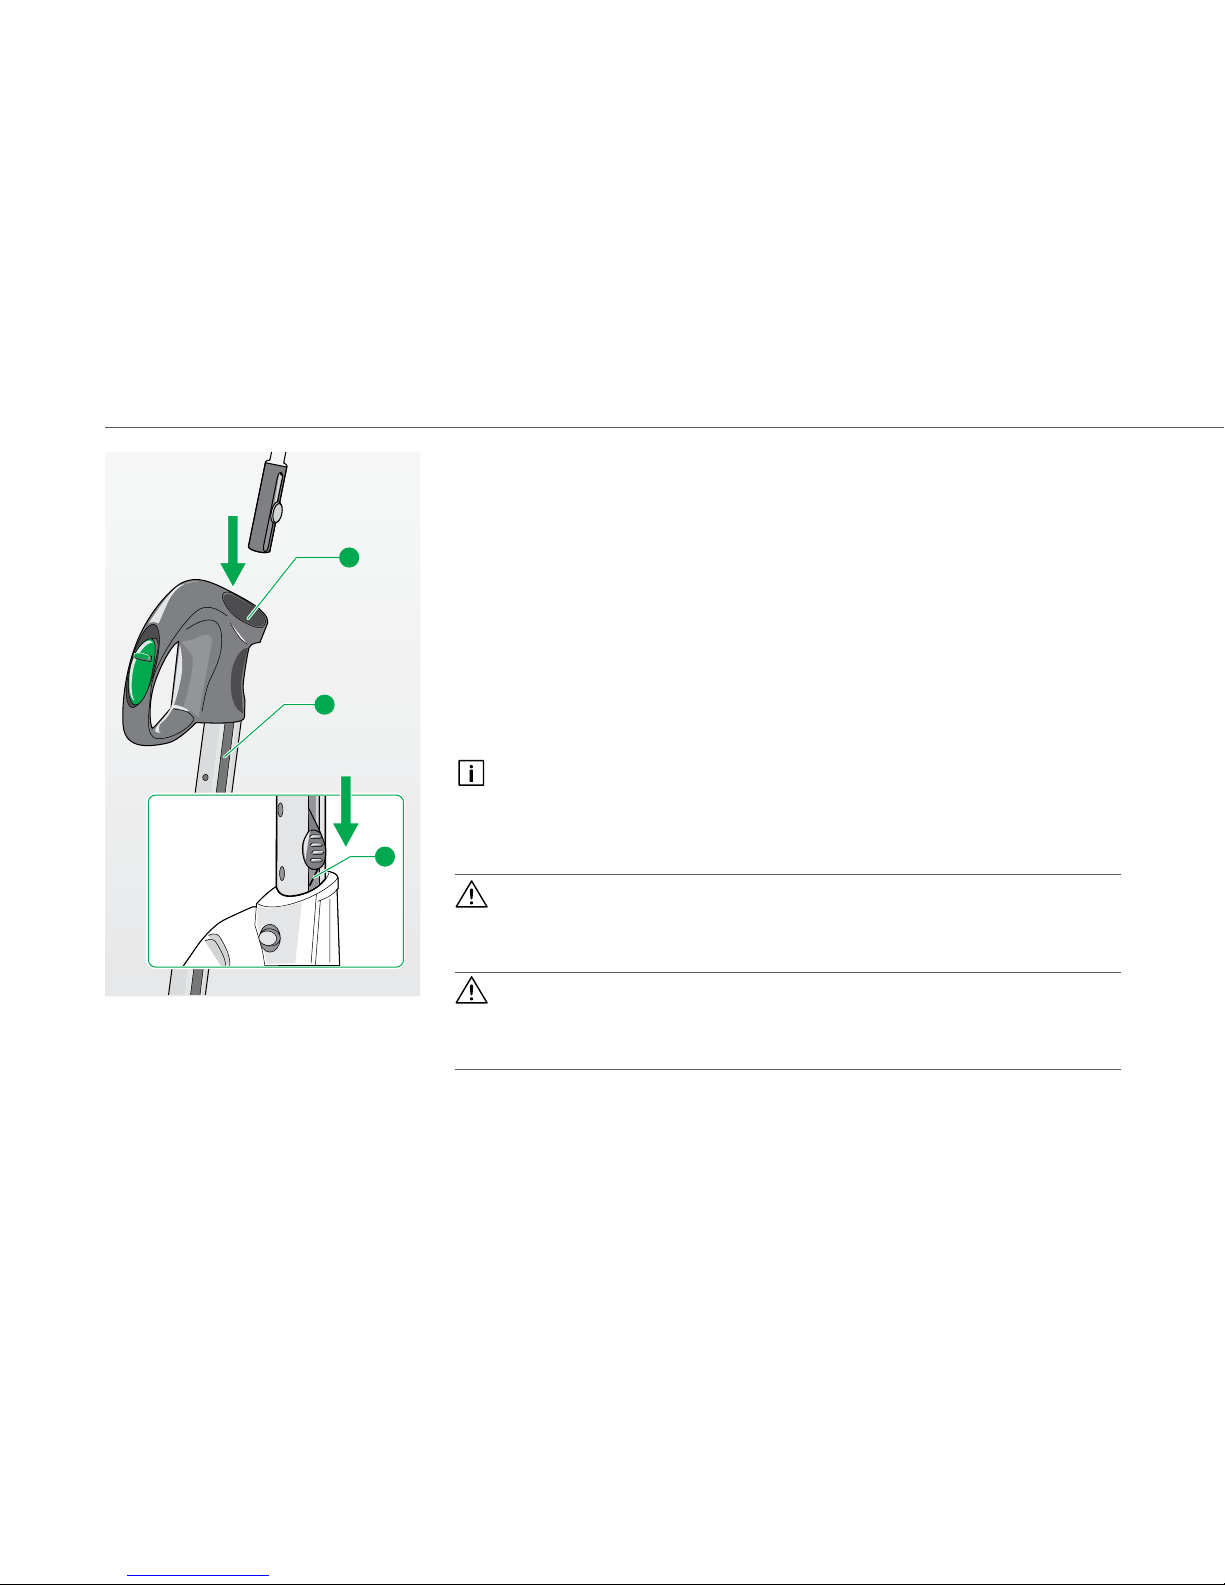
2.3 Mains connection
INSERTING THE CONNECTING CABLE
The connecting cable can best be inserted when the telescopic handle
is
slightly pulled out. Before using the Kobold for the first time, insert the connecting cable as follows:
• Lead the connecting cable through the handle
.
• Pull the connecting cable through the cable channel on the telescopic handle
downwards.
• Plug the connector plug into the connection socket
until you can hear it
engage.
After inserting the connecting cable, leave it connected to the device. Only
remove the connecting cable when you replace it.
WINDING UP AND UNWINDING THE CONNECTING CABLE
Warning! Risk of electric shock!
• Disconnect the mains power cord from the socket before you wind up
the connecting cable.
Caution! Danger of damaging electrical parts!
• Make sure not to damage the device and the connecting cable while
winding up.
Fig. 2.5 Inserting the connecting cable
1
2
3
Page 20
19
Getting started
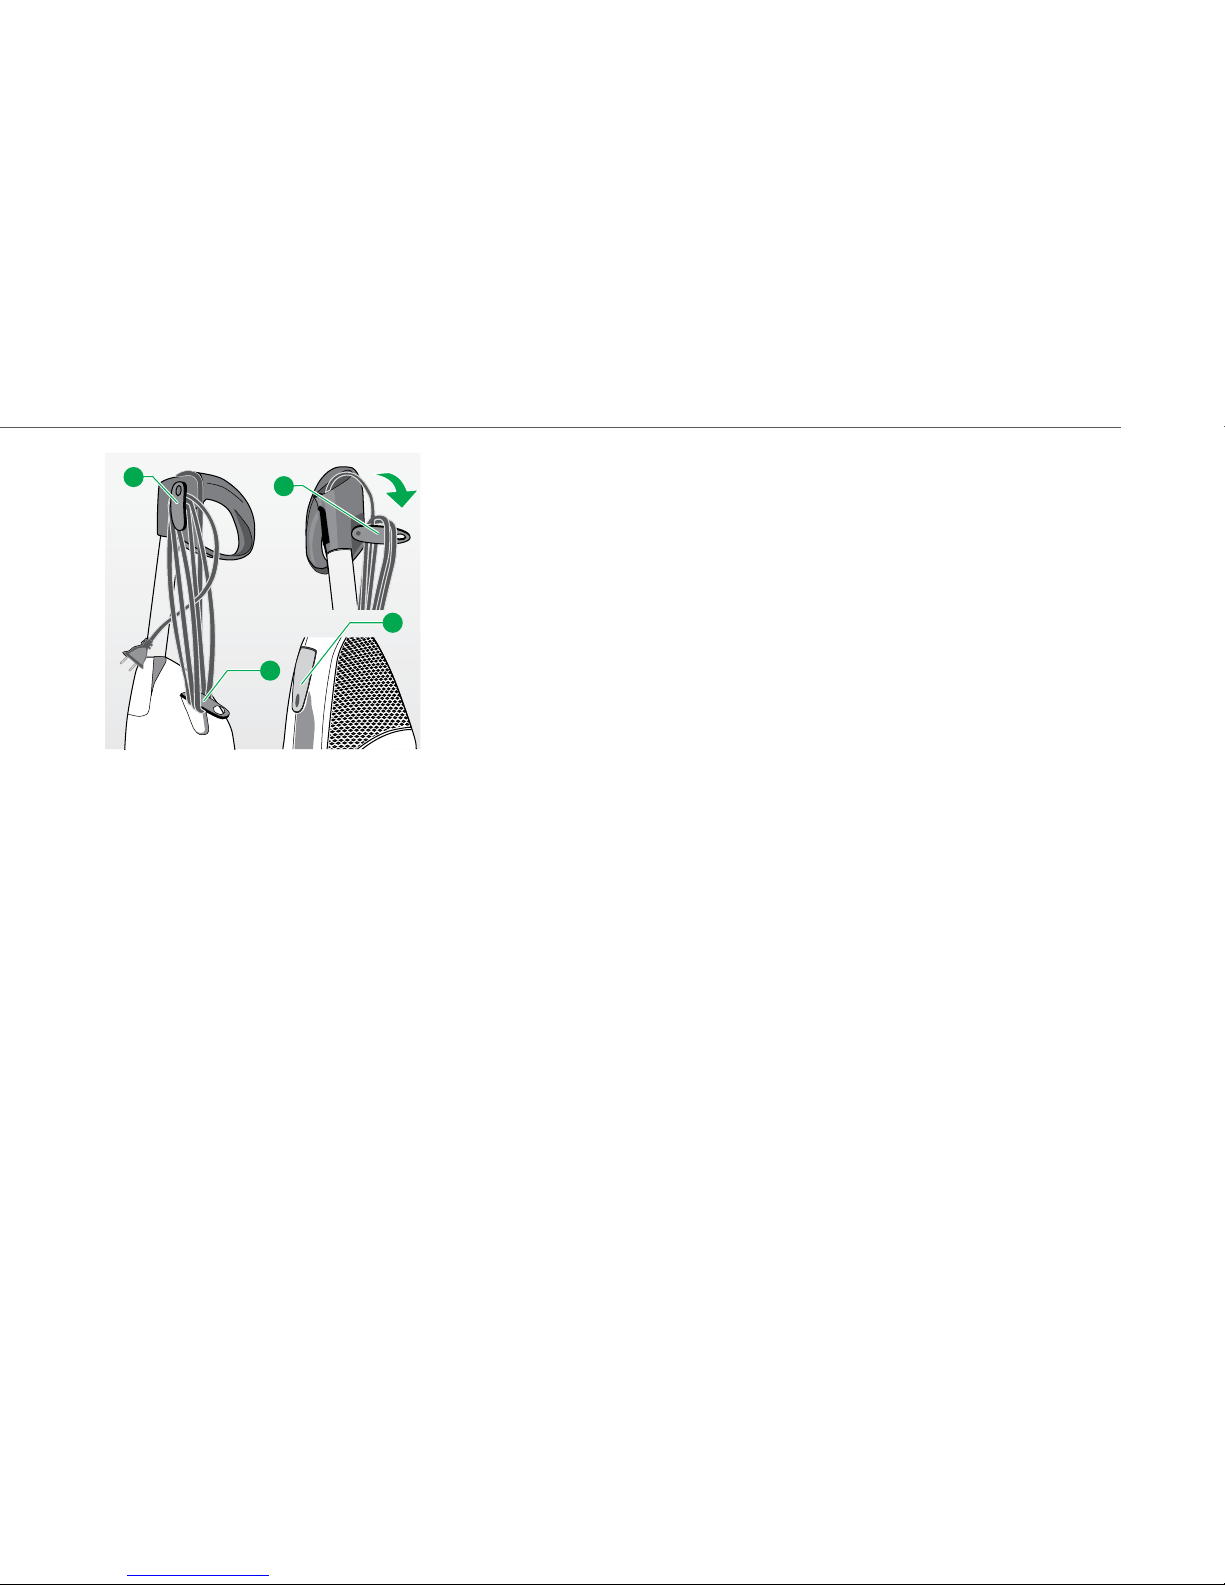
Wind up the connecting cable when not using the Kobold VK150 Vacuum cleaner.
• Push in the cable hook
so that it opens and pull it out.
• Wrap the connecting cable around the cable hook
and the cable hook
on the grip.
Unwind the connecting cable when you would like to use the Vacuum cleaner
again.
• To unwind the connecting cable, turn the cable hook
to the right.
The connecting cable will detach from the cord wrap.
• Fold the cable hook
in again.
CONNECTING THE CONNECTING CABLE
• Plug the mains power cord into the socket.Fig. 2.6 Winding up and unwinding the
connecting cable
3
1
4
2
Page 21
20
Getting started
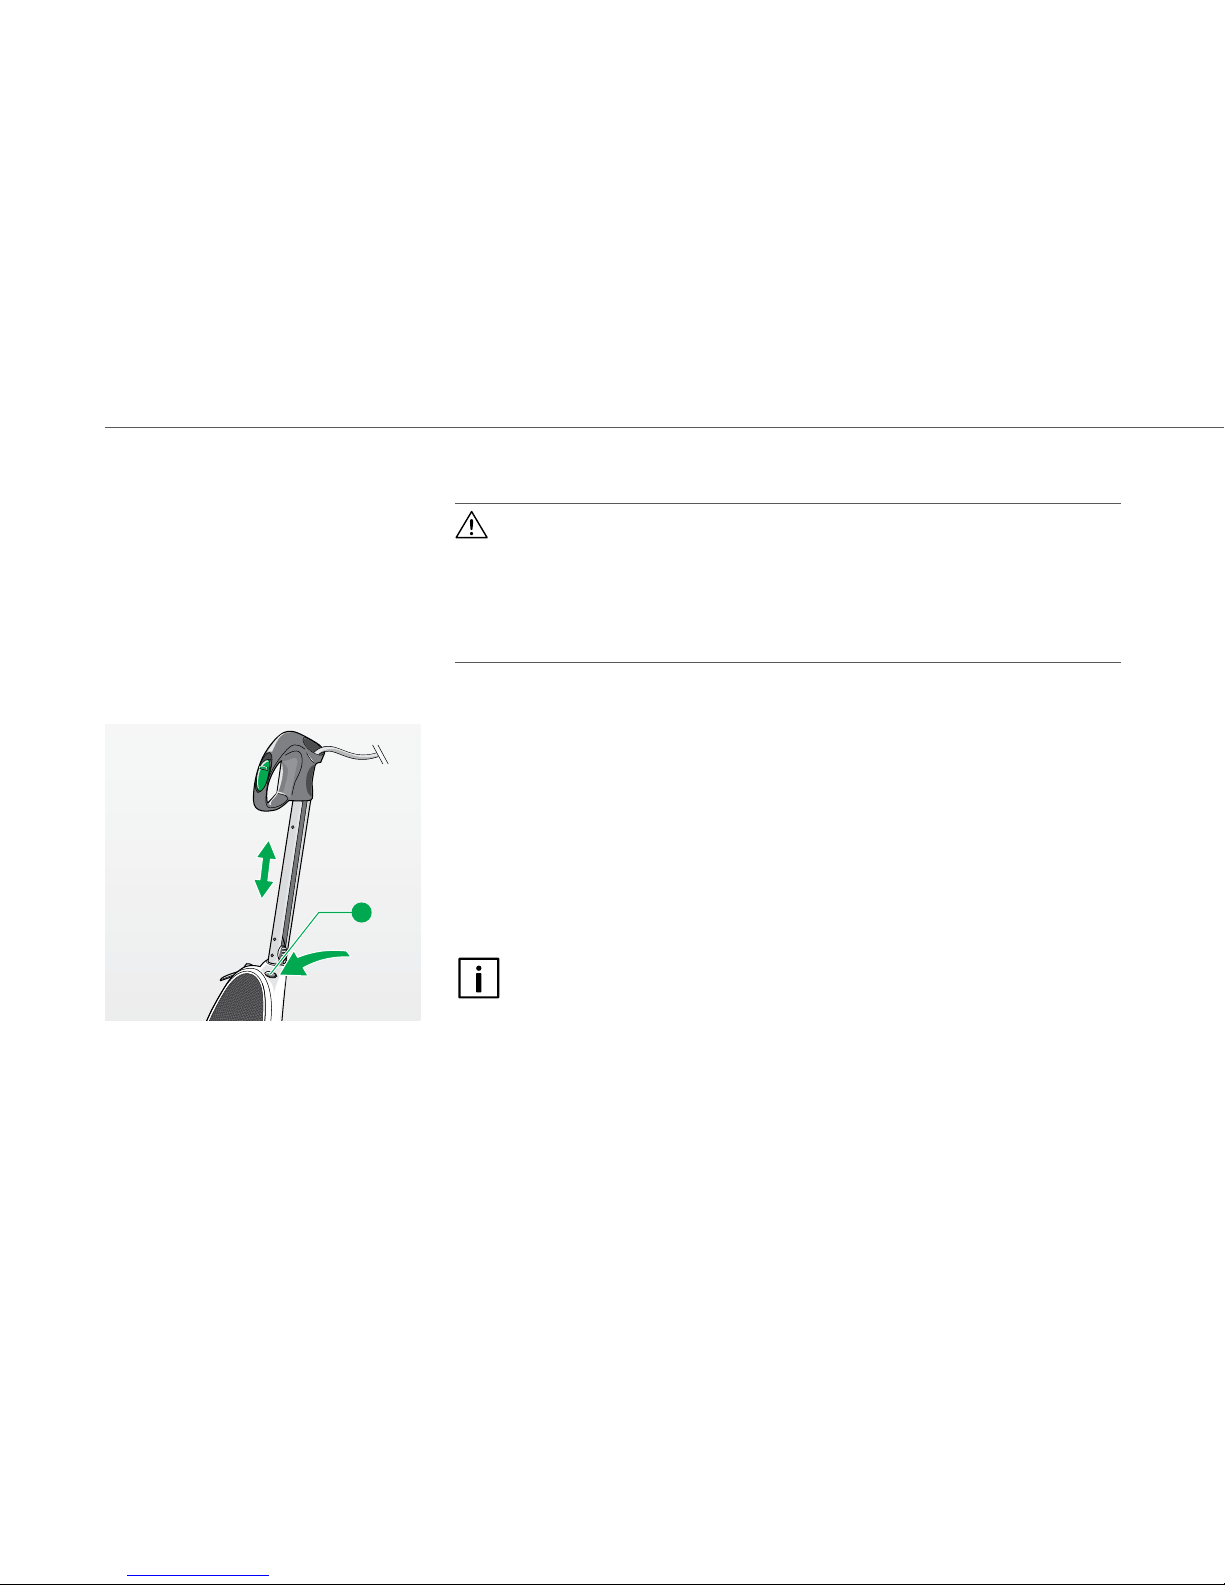
2.4 Adjusting the height
Caution! Danger of damaging electrical parts!
• Ensure that the connecting cable is freely movable inside the cable
channel when telescoping the tube.
• Do not hold the connecting cable when telescoping.
• Ensure that the connecting cable does not get jammed inside the
telescopic handle.
ADJUSTING THE HEIGHT
For floor maintenance, use the release key
to pull the telescopic handle up-
wards. Complete the following steps:
• Press and hold the release key
.
• Pull out the telescopic handle until you reach the desired height.
• Now release the release key
.
• Make sure that you can hear the telescopic handle engage.
• If at first it does not engage, move the telescopic handle slightly up or down.
If you wish to turn off the Kobold VK150 Vacuum cleaner or use it for
cleaning work above the floor, move the telescopic handle to the lowest
position in the previously mentioned fashion.
1
Fig. 2.7 Release key for adjusting the
handle
Page 22

21
Getting started
2.5 Carrying the device
Warning! Risk of electric shock!
• Never carry the device by the connecting cable.
Before carrying the device, push in the telescopic handle all the way.
USING THE RECESSED GRIPS
To transport the Kobold VK150 Vacuum cleaner or to use it on stairs, maresses
or other areas in the room, you can li it by using both recessed grips
:
• To carry the Vacuum cleaner in upright position, lift it by using the recessed
grip on the top
.
• To carry the Vacuum cleaner in reverse position, lift it by using the recessed
grip on the bottom
.
USING THE SHOULDER STRAP (WITH ESS ELECTRIC SUCTION HOSE)
To use the Vacuum cleaner above the floor, you can also carry it by using the
separate shoulder strap:
• Hang the shoulder strap with the hook into the bottom opening
.
• Hang the shoulder strap with the hook into the cable hook
.
USING THE SHOULDER STRAP (WITH SGS NON-ELECTRONIC SUCTION HOSE)
To use the Vacuum cleaner above the floor, you can also carry it by using the
shoulder strap:
• Unwind the shoulder strap that is coiled into the recess at the end of the
SGS Suction hose.
• Hook the shoulder strap onto the cable hook and hang it over your shoulder.
• When removing from shoulder, simply use the autowind when feeding back
into recess.
Fig. 2.8 Carrying by the recessed grips
1
2
4
3
Fig. 2.9 Hook in shoulder strap
Page 23
22
Getting started
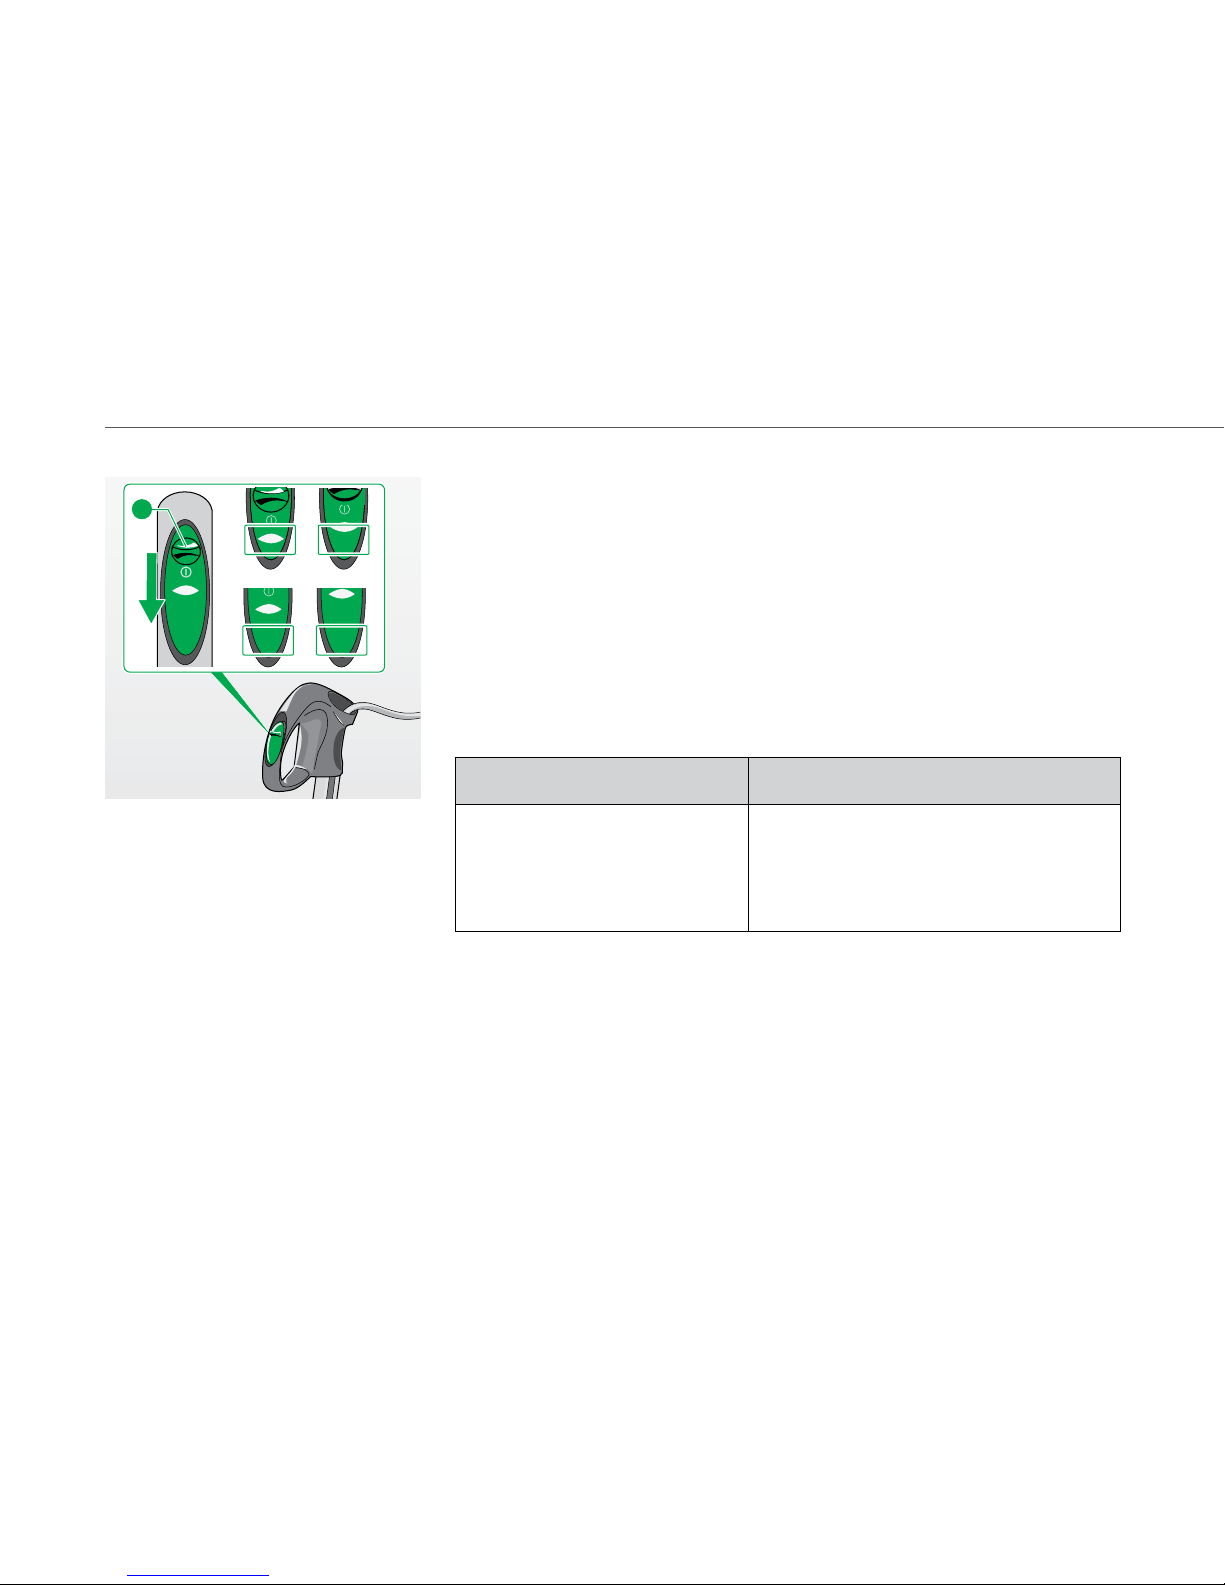
2.6 Switching the device on and off, setting the power
performance level
SWITCHING ON THE DEVICE
• To switch on the Kobold VK150 Vacuum cleaner, slide the main switch
forwards.
SETTING THE POWER PERFORMANCE LEVEL
In general, we recommend power performance level A (Automatic).
Using the main switch
, you can set the device to the following power perfor-
mance levels:
When using the
Kobold EB370 Electronic brush
When using all other
accessory parts or accessories:
- A - Automatic suction performance - 1. Level - minimal performance,
- 2. Level - medium performance,
- 3. Level - maximum performance.
(A - in this case A corresponds to
the minimal performance)
SWITCHING OFF THE DEVICE
• To switch off the Vacuum cleaner, slide the main switch
all the way back.
Fig. 2.10 Switching on and seing the
power performance level
1
2
3
1
A
A
1
A
2
1
A
1
2
3
1
A
1
Page 24
23
Operation
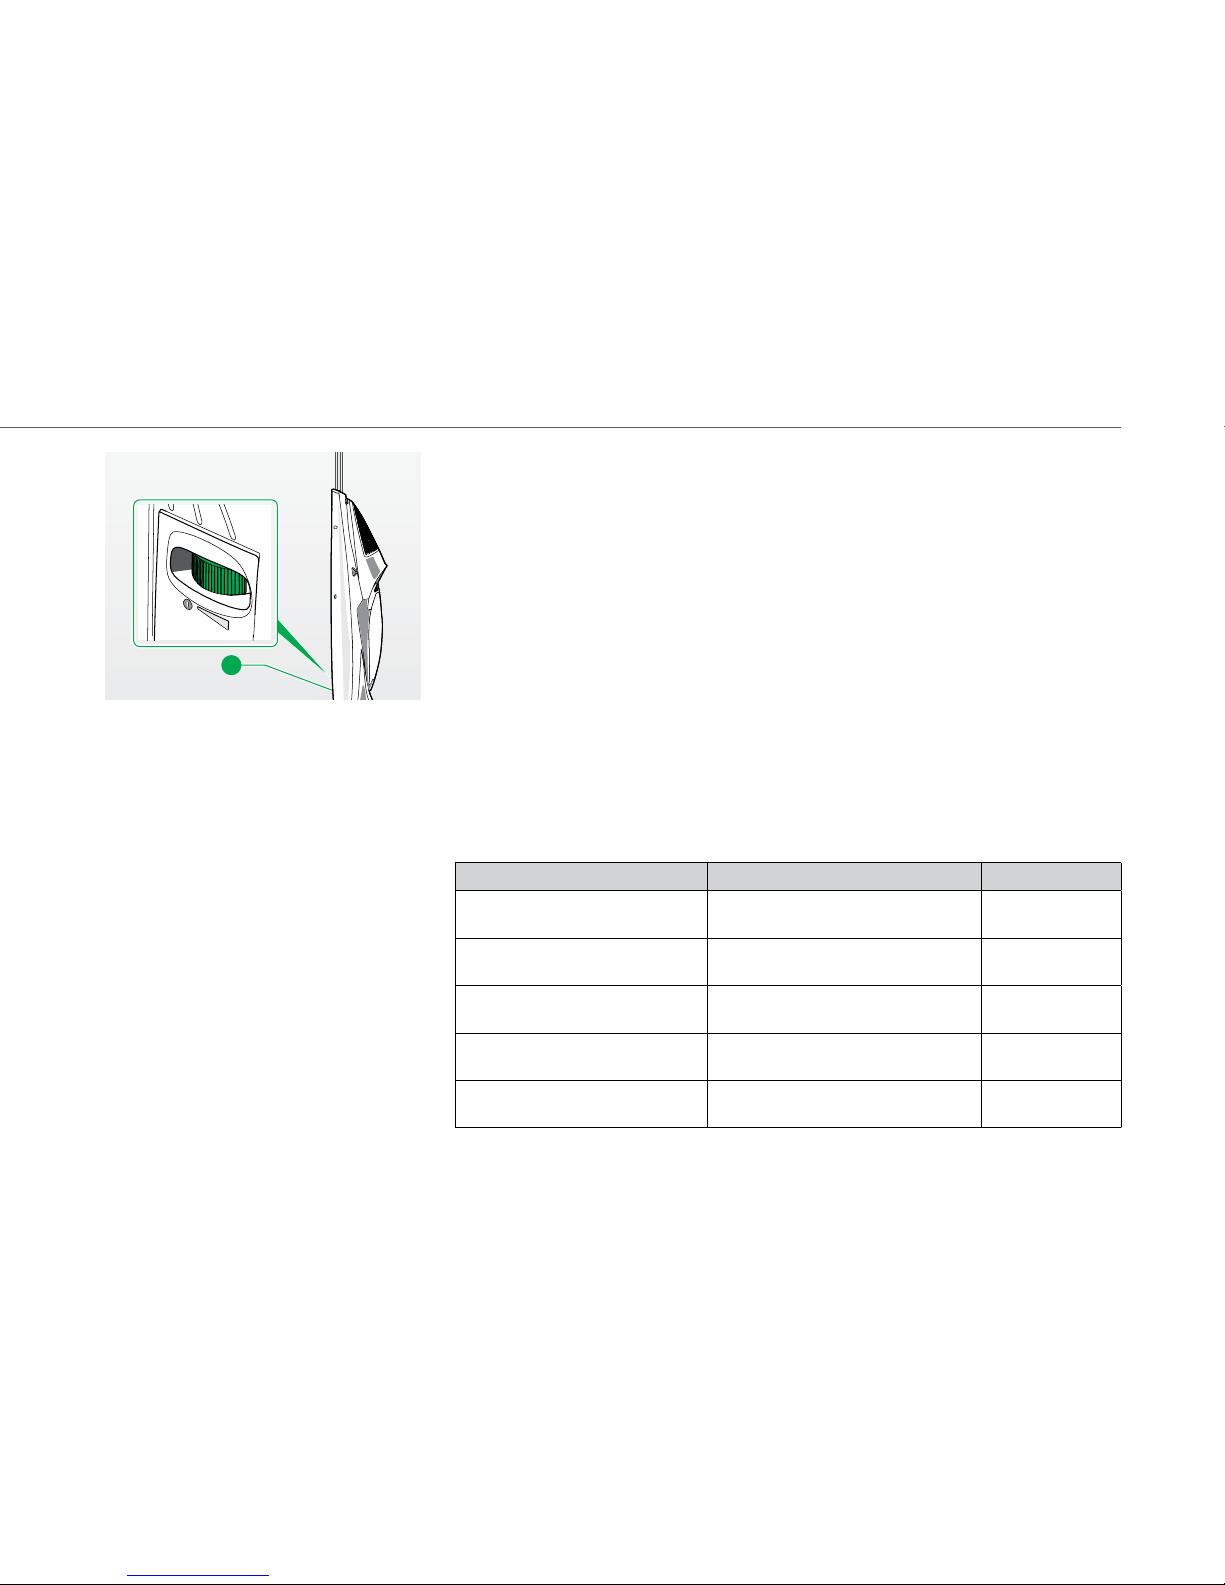
USING THE ROTATING SWITCH
• When carrying the device with the shoulder strap, you can alternately use the
rotating switch
on the backside of the device:
• To switch on the device, turn the rotating switch
to the right.
• To set the device to power performance level A or 1 - 3, turn the rotating
switch
either forward or backward to the corresponding level.
• To switch off the device, turn the rotating switch back into its initial position.
3 OPERATION
Depending on which accessory part or accessory you are using, continue
operation. The following table shows you with which chapter to continue:
Accessory part Case of application Chapter / Page
Kobold HD50
Hard floor aachment
Vacuuming even hard floors 3.1 on page 24
Kobold EB370 Electronic brush
Vacuuming and cleaning
carpets and maresses
3.2 on page 25
Kobold SP530
Hard floor cleaner
Vacuuming and wet
cleaning of hard floors
3.3 on page 38
Kobold PB430 Polsterboy
Vacuuming upholstery surfaces
and upholstery joints
3.6 on page 50
Additional accessories
Vacuuming furniture surfaces,
corners, joints, etc.
3.8 on page 58
Fig. 2.11 Using the rotating switch
2
Page 25
24
Operation
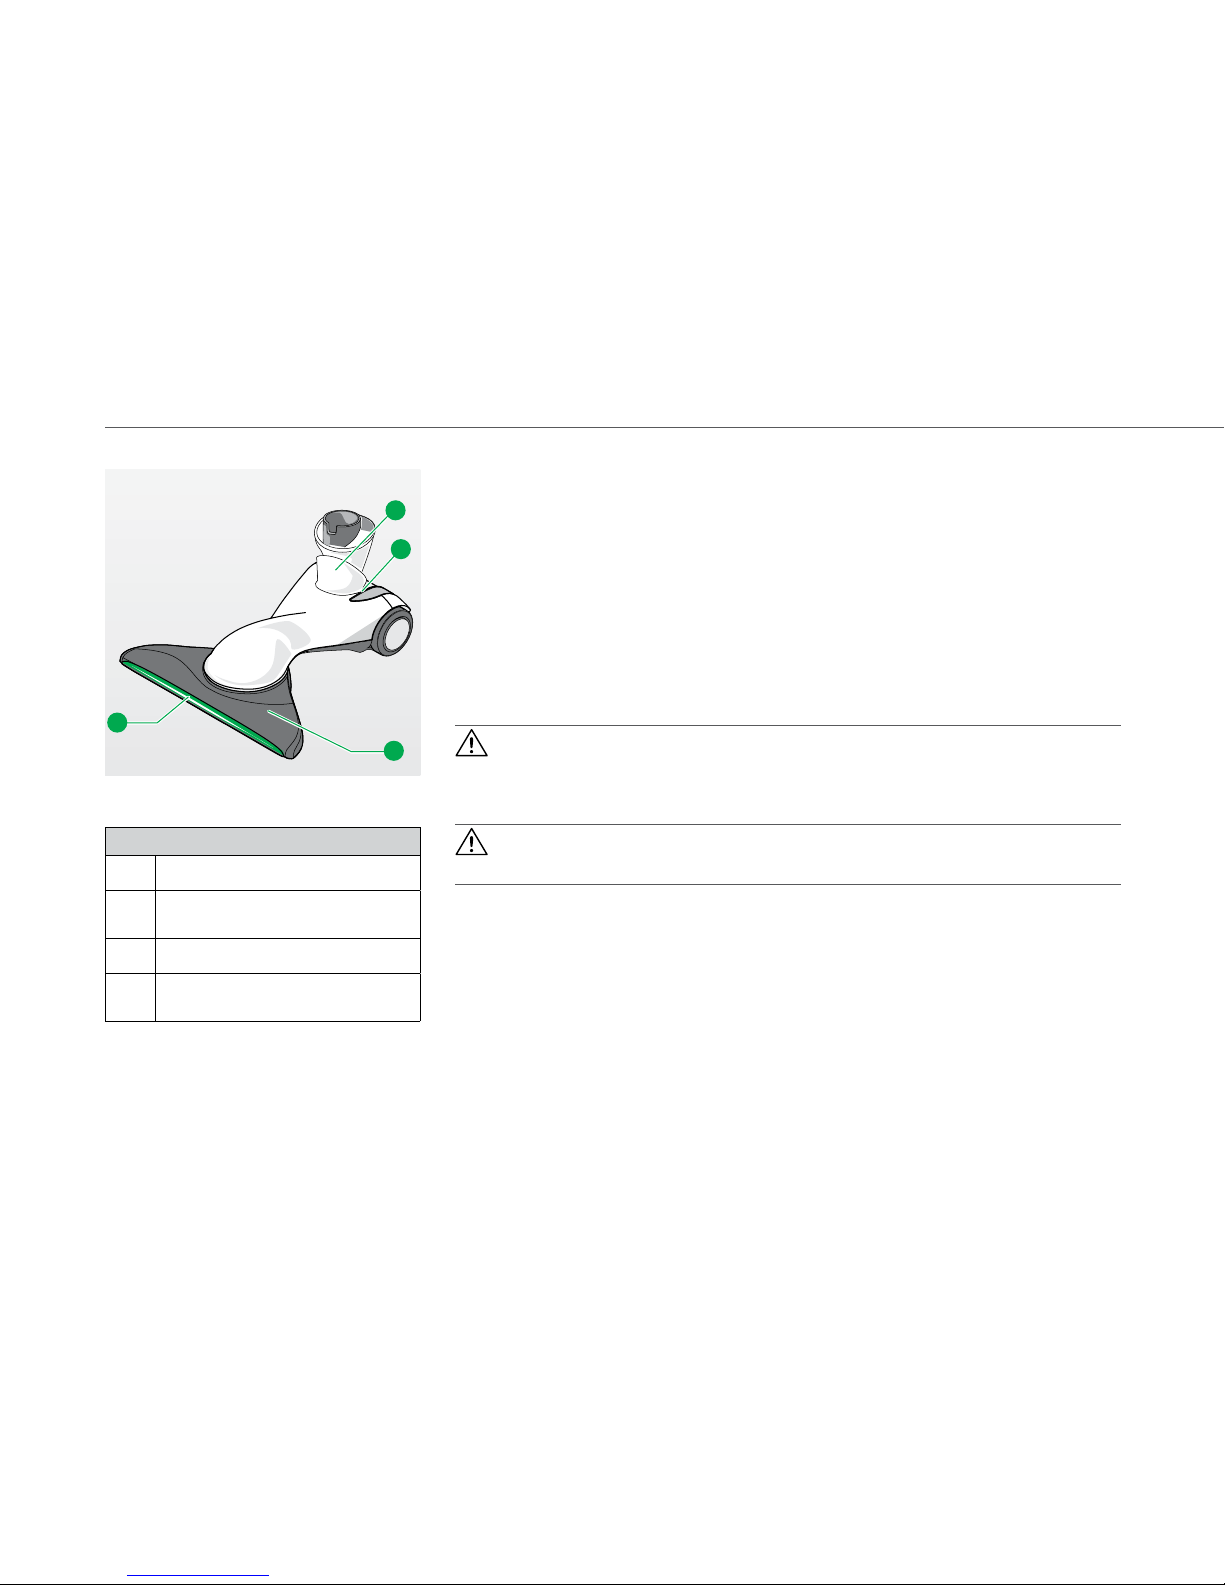
3.1 Kobold HD50 Hard floor attachment
The Hard floor aachment is a special nozzle that allows for cleaning even hard
floors of various types. In contrast to other commercially available hard floor
nozzles, this nozzle is also suited for removing coarse dirt. It can easily move
around furniture or stands and vacuums evenly along all skirting boards.
The Hard floor nozzle can be used as a special nozzle for most floorings.
• It is still recommended that you check if the usage of the hard floor nozzle is
also suited for your flooring (Table 1.1 and Table 1.2 on page 6).
Caution! Choking hazard from swallowing small parts!
• Keep small parts such as the cover of the revision opening away from
children.
Caution! Risk of injury from inner components!
• Do not turn the Kobold HD50 Suction nozzle beyond the end stop.
APPLICATION
• Set the power performance level.
• To vacuum efficiently, move the device back and forth in an even motion.
For an optimal cleaning of hard floors with deep joints or cracks, we
recommend using the Kobold EB370 Electronic brush.
3
2
1
4
Fig. 3.1 Hard floor aachment
Legend
Hinge
Revision opening cover –
Opening for removing blockages
Suction nozzle
Bristle – covered plate
(removable)
Page 26
25
Operation
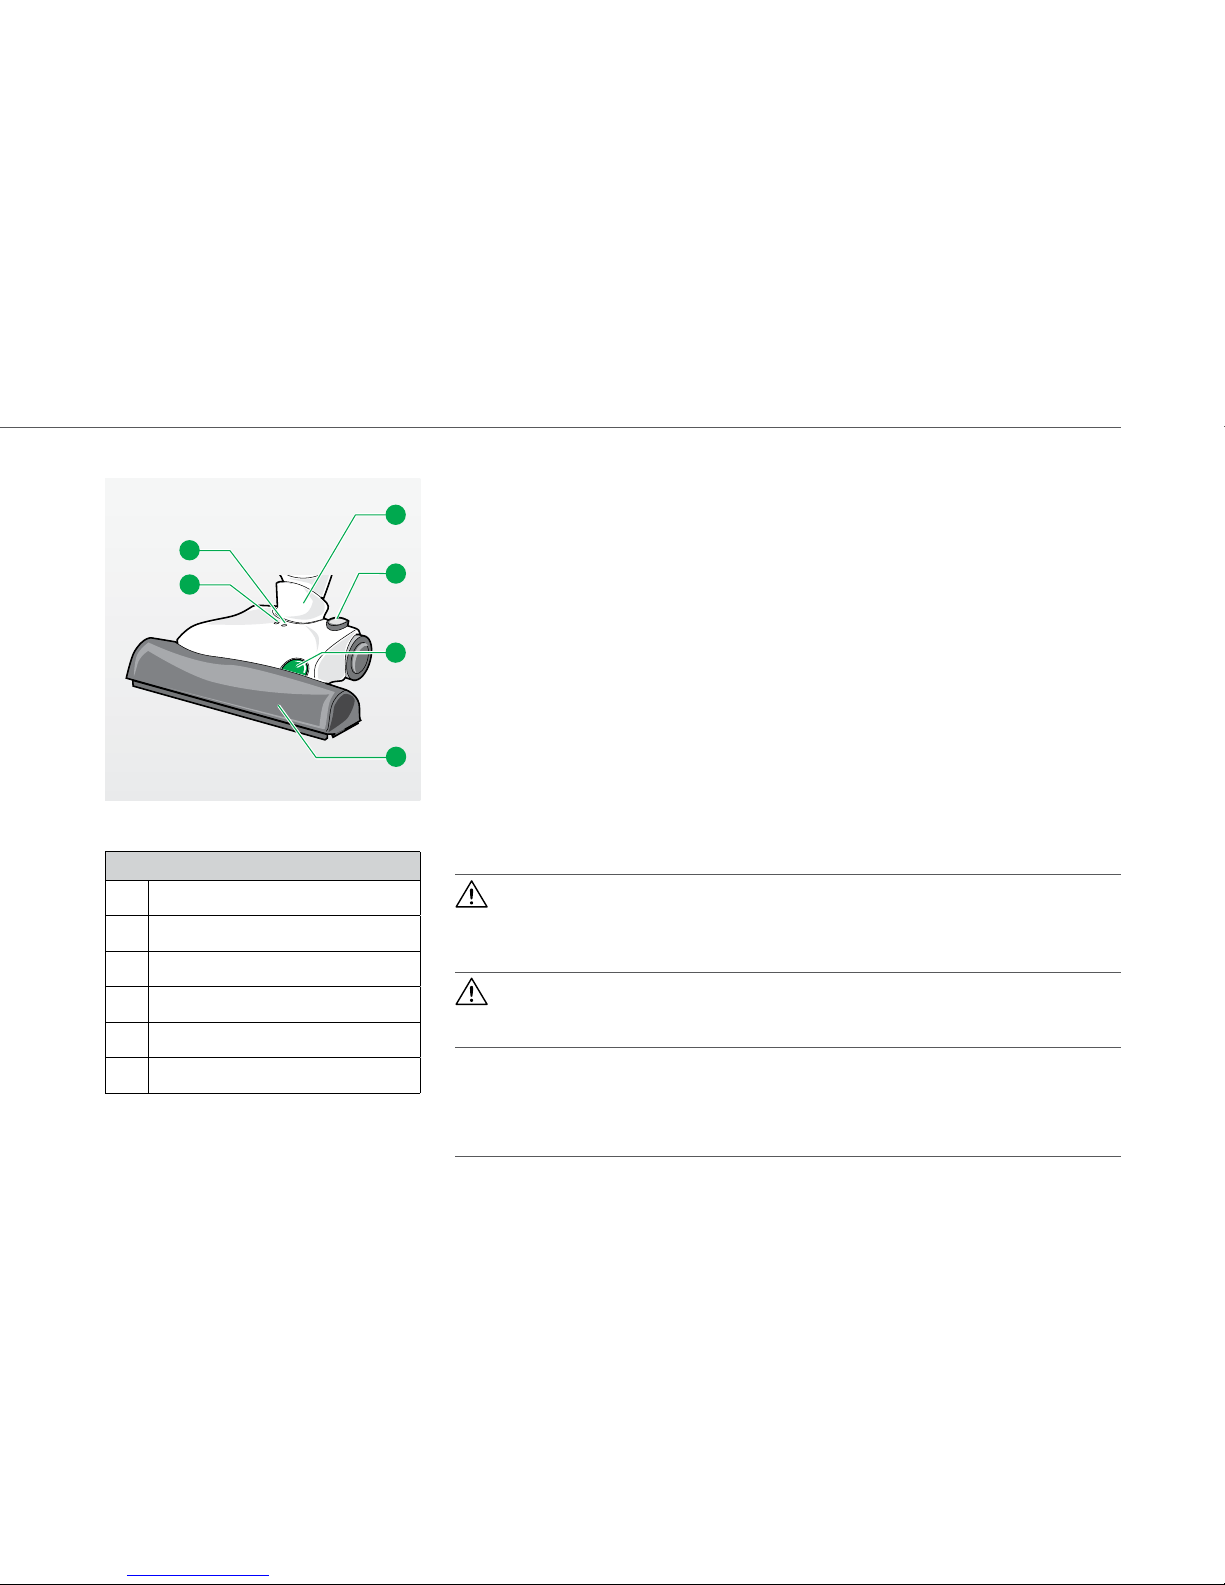
3.2 Kobold EB370 Electronic brush
Are you using your Kobold VK150 Vacuum cleaner with the Electronic brush?
Then this chapter is for you! The electric brush can be used on carpets and hard
floors. Here you will learn everything about its basic function and the bristle
suction on carpets and matresses. Furthermore, you will be introduced to the
two special functions: carpet cleaning and maress cleaning.
In order to clean carpets more thoroughly, the Electronic brush is equipped with
a motor, which drives the integrated roller brushes. The figure on the le with
the legend displays the Electronic brush and its operation elements.
The Electronic brush with its multi-purpose functionality can be used on most
carpets.
• It is still recommended that you check if the usage of the Electronic brush is
also suited for your carpet (Table 1.1 on page 6).
Warning! Risk of electric shock!
• When using your Electronic brush, make sure not to pass over the connecting cable or other cables lying on the floor.
Caution! Risk of injury from moving parts!
• Stay clear of the moving parts of the Electronic brush.
Note! Risk of damage from improper use!
• Avoid working with the device on one specific spot for a prolonged
period of time.
• Avoid the suction of loose carpets/fringes.
1
2
4
3
5
6
Fig. 3.2 Electronic brush
Legend
Hinge
Foot switch so/normal function
Release key
Front cowling
Operation display
So function control display
Page 27
26
Operation
3.2.1 Brush-suction
The brush-suction process with the Kobold EB370 Electronic brush is the more
thorough alternative to conventional vacuuming. The Electronic brush not only
vacuums dust and dirt, it also “combs” through the carpet at the same time by
applying the rotating roller brushes. This enables the device to li ingrained dirt
from between the carpet fibres. This chapter explains how to operate during the
brush-suction process.
• Before you start the brush-suction process, read the following notes in order
to select the correct settings for your carpets.
NORMAL AND SOFT FUNCTION
You can set the normal or the so function on the Electronic brush itself. The
normal function is suited for a number of floorings with normal wear resistance.
For less wear-resistant, sensitive surfaces, the so function, which has a smaller
rotational speed, is the more suitable option.
Activate the soft function before you pass over sensitive surfaces. Switch
on the soft function each time you turn on the device, as it is automatically
deactivated once the vacuum cleaner is turned off.
• To switch between the normal and the soft function, press the foot switch
on the Electronic brush.
The so function control indicator
lights up yellow and indicates that the so
function is activated.
2
1
Fig. 3.3 Switching between normal and
so function
Page 28
27
Operation
SETTING
In general, we recommend power performance level A (Automatic).
• Select the appropriate setting for your flooring according to “Tab. 3.1 Settings
for floor types” on page 28.
• Set the power performance level accordingly.
• Set the normal or soft function accordingly.
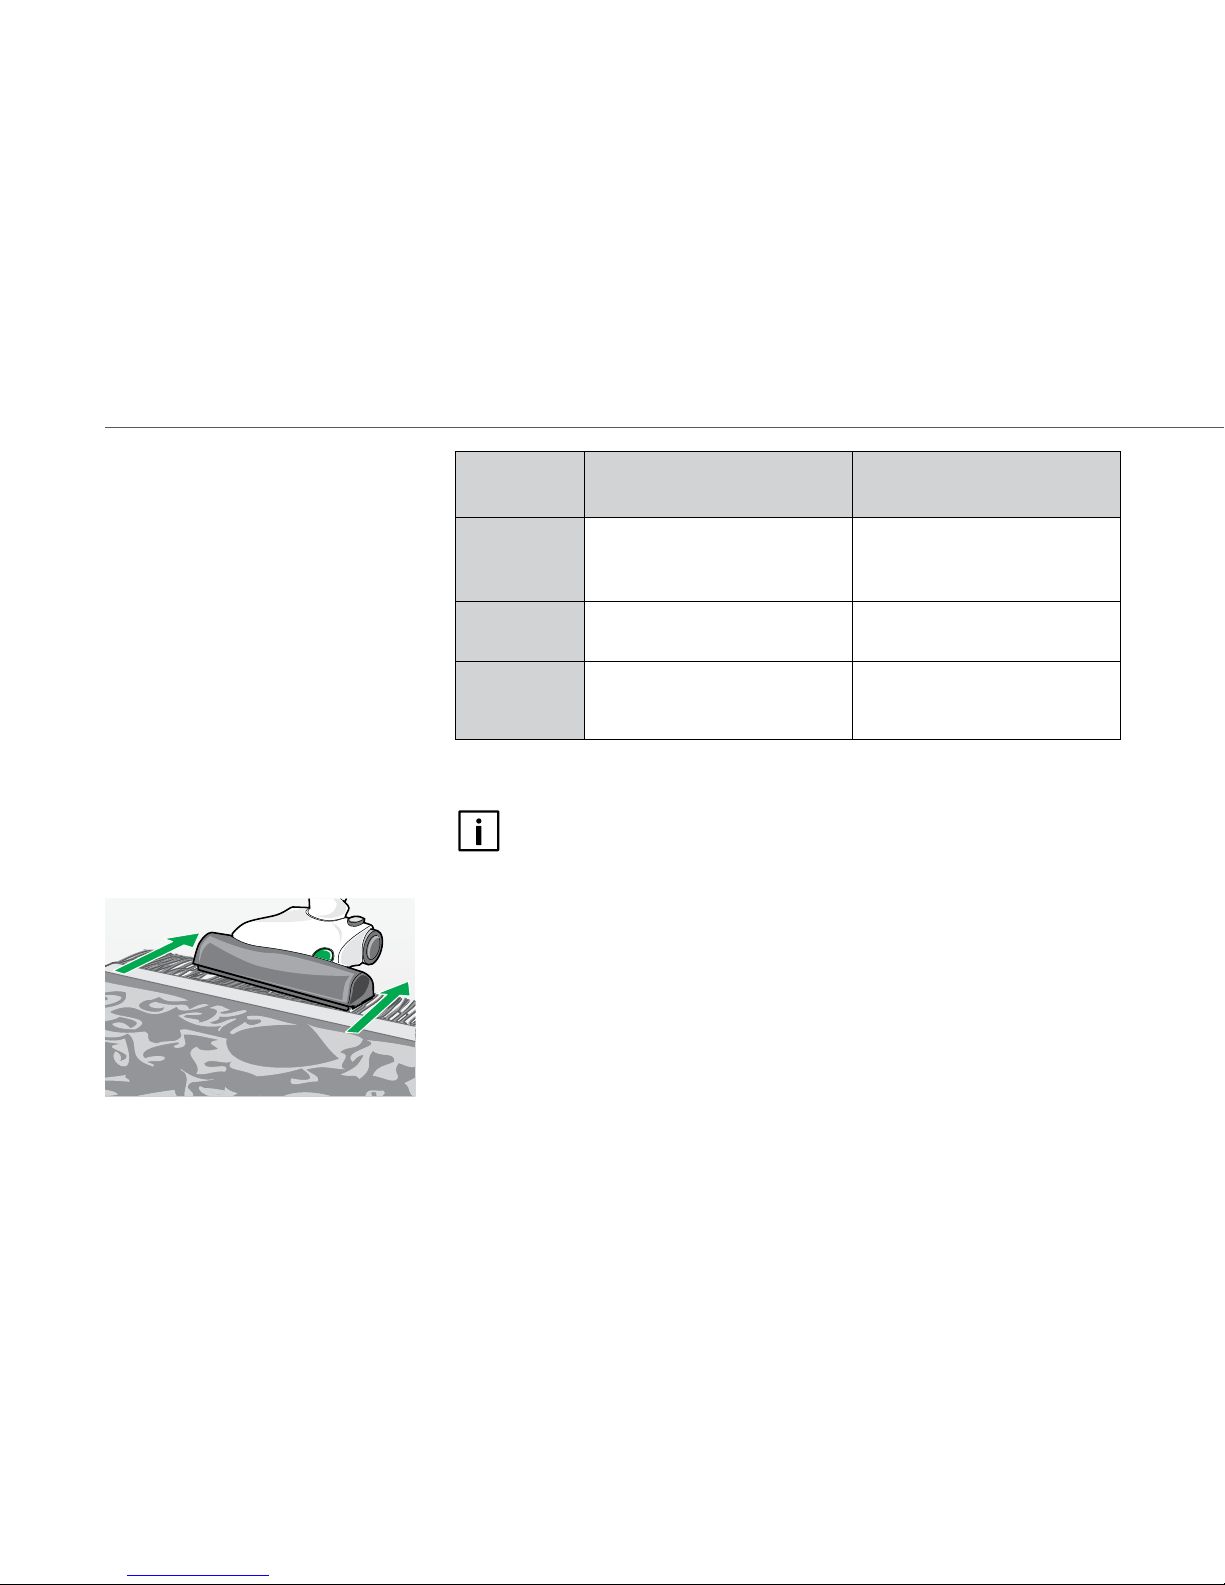
TIPS FOR BRUSH SUCTION
• For an efficient brush-suction process, move the device back and forth in an
even motion.
• To vacuum under furniture with little ground clearance, set the Kobold EB370
Electronic brush to power setting and tilt the Kobold flat on the ground.
Should you switch the vacuum cleaner into standby position, the rotating
brushes will turn off automatically.
Caution! Risk of injury from debris flying out from under the brush!
• Avoid abruptly placing the device on loose, coarse debris (e.g. glass
shards), especially at eye level.
• Use the soft function when vacuuming such debris.
• Switch off the Electronic brush before lifting.
Page 29
28
Operation
Power
performance
level
with normal function
for the following floor types:
with soft function
for the following floor types:
1
- silk carpeting
- light, loose carpets
- loose carpets with fringes
A or 1-2
- deep-pile carpeting
- very dense velour carpeting
A or 2-3
- conventional velour carpeting
- loop pile carpeting
- Berber-style pile carpeting
- Sisal carpeting
- sensitive deep-pile carpeting
Tab. 3.1 Seings for floor types
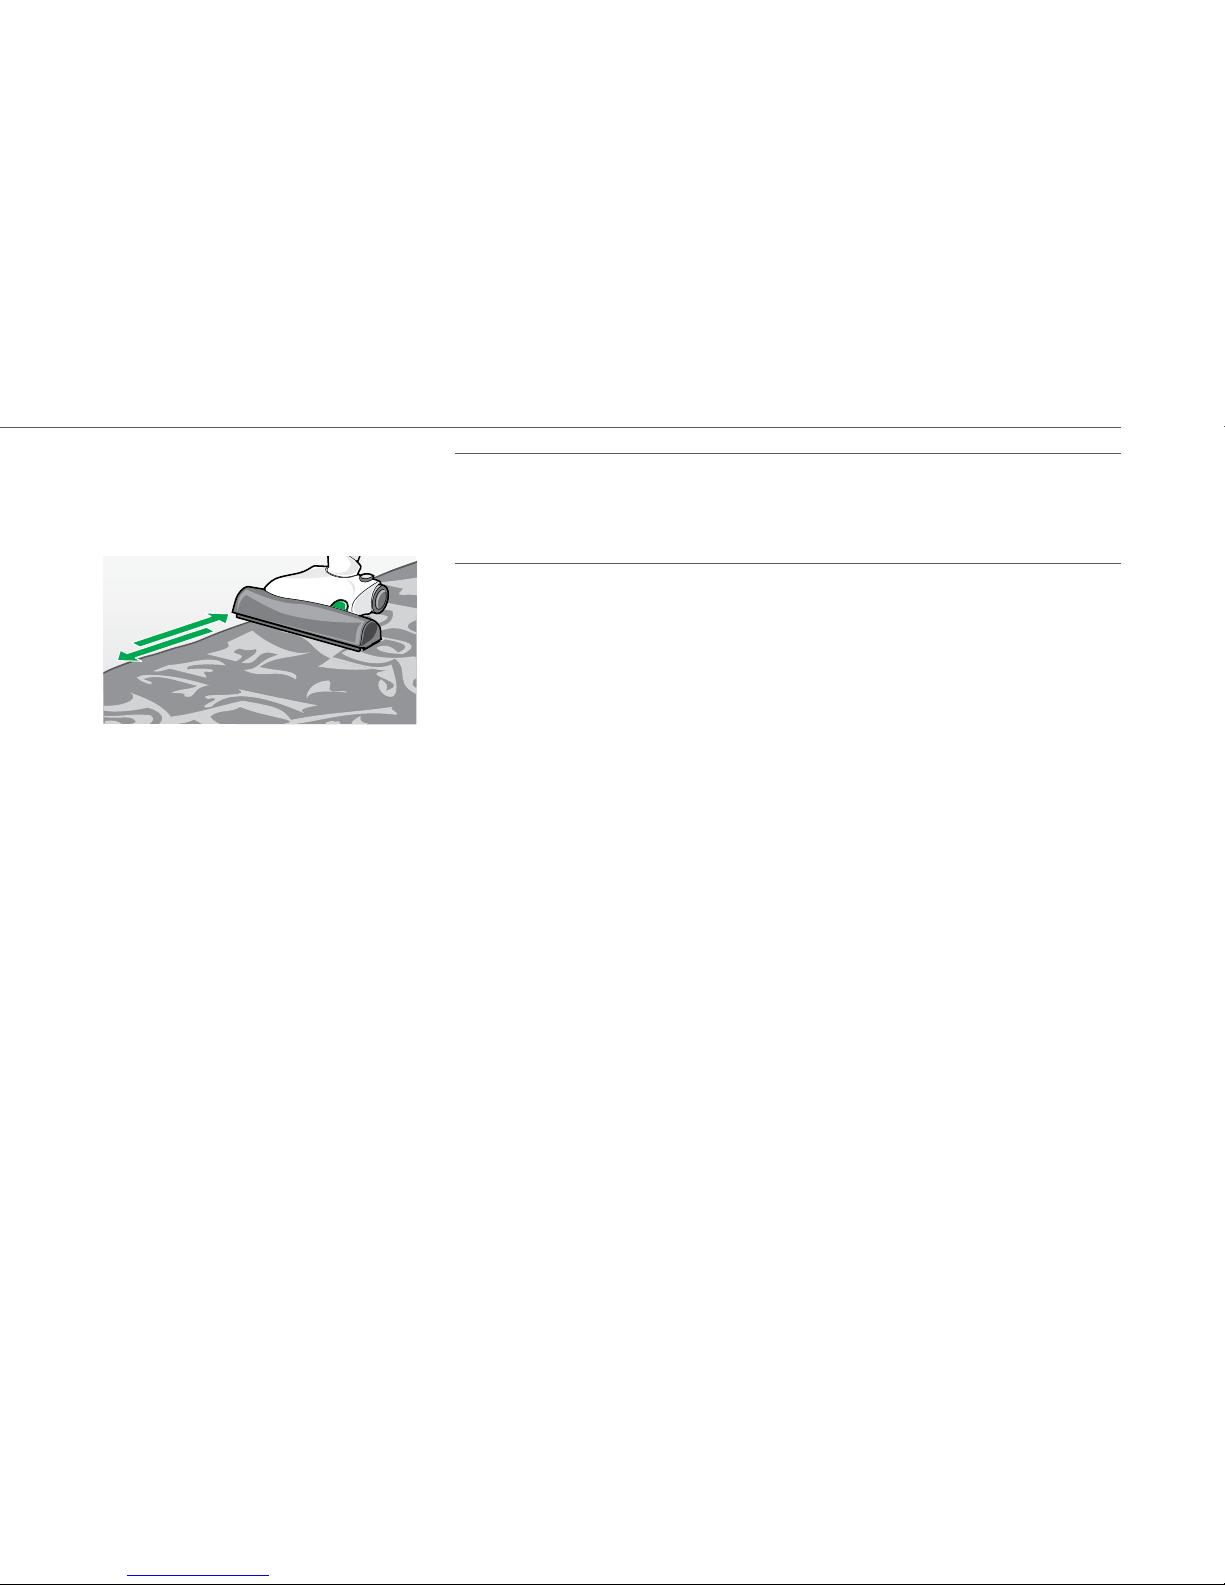
The rotating roller brushes can also mechanically process and finely split
the fringes with the soft function. Only pull the Kobold EB370 Electronic
brush away from the carpet when passing over the fringes.
EXAMPLE OF APPLICATION: BRUSH-SUCTION OF CARPETS AND TEXTILE
FLOORINGS
• Select the appropriate setting for your flooring according to the overview
“Tab. 3.1 Settings for floor types” on page 28.
• Set the power performance level accordingly.
• If necessary, set the Electronic brush to soft function or normal function by
using the foot switch.
• When vacuuming sensitive surfaces, set the Kobold EB370 Electronic brush to
soft function with the foot switch before you start the cleaning process.
• Move the device back and forth in an even motion.
Fig. 3.4 Vacuum fringes using only
reverse motions
Page 30
29
Operation
Note! Risk of damage from improper use!
• Avoid working with the device on one specific spot for a prolonged
period of time.
• Avoid the suction of loose carpets/fringes.
• Do not leave the device working on one specific spot for a prolonged period of
time, otherwise you might damage the carpet.
• Always move the device in a constant back and forth motion during operation.
• Make sure that the brushes clean right up to the margin of the front and sides.
• Therefore only vacuum the carpet margins parallel to the edge.
3.2.2 Carpet cleaning with the Kobold FK370 Freshener kit
Simply exchange the roller brushes of the Electronic brush with the Freshener
kit and you are ready to clean the carpet like an expert. This chapter explains
how to proceed.
Fig. 3.5 Vacuum carpet edge parallel
Page 31

30
Operation
Depending on the degree of strain on your carpet, we recommend cleaning
the carpet every 1 - 4 months.
If you wish to work on a larger surface, the best thing to do is to remove all
movable furniture beforehand.
To clean carpets and carpet floorings, we recommend using Kobosan ac-
tive. It contains the so-called “Anti-Soil” formula. This formula prevents
carpets from absorbing dry dirt too quickly, which keeps it clean for a
longer period of time. Kobosan active received the TÜV NORD certificate
“Suitable for Allergic People“.
One bag of Kobosan active is enough for 3,5 - 7 square metres of carpet,
depending on the degree of soiling.
Kobosan active can be purchased from your customer representative or at
the service centre (see chapter “8 Services” on page 91).
Kobosan active can also be obtained at our online shop
at .vorwerk-kobold.com
Warning! Risk of electric shock!
• Never use the Freshener kit with liquid, foam or damp cleaning agents.
• Only use dry cleaning powder such as Kobosan active.
• Always switch the device off and disconnect the mains power cord from
the socket before all brush replacement, cleaning and maintenance
work.
Fig. 3.6 Kobosan
Page 32

31
Operation
• Never disconnect the mains power cord from the mains by pulling the
connecting cable, but rather by unplugging the mains power cord from
the socket.
Note! Risk of damage from improper use!
• Test the colour fastness of the carpet against Kobosan active at an
inconspicuous spot before application.
• Do not use the Kobold FK370 Freshener kit on carpet fringes as these
could be damaged by the Freshener kit.
• Do not use the Freshener kit with the following floorings:
- carpets with a pile height > 1.5 cm
- needled felt and similar flooring
- coco or sisal flooring.
• Please note that a larger amount of wool abrasion can occur with wool
carpets or berber-style pile carpeting.
• Before you start cleaning the carpet, apply the brush-suction process with the
normal roller brushes of the Kobold EB370 Electronic brush as you usually
do.
• Afterwards, proceed according to the following instructions:
REMOVING THE ROLLER BRUSHES
• Push the green release key
.
The front cover will disengage.
• Hold the release key
and open the front cover on both sides.
• Pull the grey roller brushes
on the left and right hand side out of brush
housing.
1
2
3
Fig. 3.7 Removing the roller brushes
Page 33

32
Operation
INSERTING THE KOBOLD FK370 FRESHENER KIT
The Freshener kit consists of two cartridges and two grey roller brushes.
• Insert the Freshener kit cartridge
with the green arrow into the side with
the green symbol on the grey cover and the other Freshener kit cartridge into
the opposite side.
• Make sure that you can hear the cartridges engage.
• Push the front cover down using both hands to the original position. Make
sure that you can hear the front cover engage.
WORKING IN KOBOSAN ACTIVE
• Distribute Kobosan active evenly onto your carpet.
• Switch on the device. The suction motor will automatically remain disacti-
vated with the Freshener kit in place.
• Move the Kobold EB370 Electronic brush with the Freshener kit back and
forth in adjacent streaks.
• Then move the Electronic brush laterally over the surface covered with
Kobosan active.
• Depending on the degree of contamination, work in the Kobosan active for up
to 3 minutes per square metre.
• Then leave it dry with a window opened. Depending on the type of carpet and
the room temperature, it should take around half an hour to dry.
Before vacuuming Kobosan active:
• Switch the device off and unplug the mains power cord from the socket.
• Insert the grey roller brushes again as follows:
4
Fig. 3.8 Inserting the Freshener kit
Page 34

33
Operation
REMOVING THE KOBOLD FK370 FRESHENER KIT
• Push the green release key
. The front cover will disengage.
• Hold the release key
and unfold the front cover on both sides.
• Hold the Freshener kit cartridges
by the metal brackets and pull them out
of the tunnel.
INSERTING THE ROLLER BRUSHES
• Insert the grey roller brush with the green end into the side with the green
symbol on the grey cover and the other roller brush into the opposite side.
• Push the front cover back down
using both hands. Make sure that you can
hear the front cover engage.
VACUUM KOBOSAN ACTIVE
• Vacuum Kobosan active with the bound contamination by using the Kobold
EB370 Electronic brush as usual. Potential residue in the carpet is not harmful. It will removed over time during daily maintenance.
Replace the filter bag in the Kobold VK150 Vacuum cleaner in due time. To
do this, observe the suction value display.
1
2
3
Fig. 3.9 Removing the Freshener Kit
Fig. 3.10 Inserting the roller brushes
Page 35

34
Operation
REMOVING OLD STAINS
Note! Risk of damage from improper use!
• Test the colour fastness of the carpet against Kobotex at an
inconspicuous spot before application.
Old stains might become more visible aer the carpet was cleaned. In most cases
Kobotex will be able to remove these.
• Remove the stains with Kobotex
according the instructions on the bottle.
CLEANING THE KOBOLD FK370 FRESHENER KIT
The Freshener kit must be cleaned immediately aer use.
Warning! Risk of electric shock!
• Never insert the Freshener kit into the Kobold EB370 Electronic brush
if it is not fully dried after the cleaning process.
Note! Damage to the device as a result of improper cleaning!
• Never use cleaning agents, solvents or alcohol to clean the Freshener
kit.
• Do not dry the Freshener kit near heaters or in direct sunlight, as the
plastic may heat up and deform.
1
Fig. 3.11 Using Kobotex
Page 36

35
Operation
• Pull the Kobold FK370 Freshener kit out of the Kobold EB370 Electronic brush
before cleaning.
• To do this, lift the freshener brushes
out of the Freshener kit with your
fingers.
• Hold the freshener brushes in such a way that water cannot flow into the
drive openings
.
• Rinse off the cartridges
and the freshener brushes under cold or
lukewarm water.
• To remove the water, shake the Freshener kit.
• Place the freshener brushes onto the drive opening
to dry.
• Make sure to place the freshener brushes with the yellow bristles into the
cartridge with the green arrow when reinserting.
3.2.3 Cleaning mattresses
To clean maresses, exchange the normal, grey roller brushes of the Electronic
brush with the maress brushes and you are ready to go. For more intensive
cleaning, use the Freshener kit as well. In this chapter you will learn how to
proceed.
We recommend Lavenia for cleaning maresses. Lavenia not only easily
removes dust, but also bacteria, mite faeces and mould spores to a large
extent. Lavenia received the TÜV NORD certificate “Suitable for Allergic
People“.
Lavenia can be used with all maresses with textile and solid surfaces.
One bag of Lavenia is enough for a thorough cleaning of a 1 × 2 m mat-
tress.
2
1
3
Fig. 3.12 Cleaning the Freshener kit
Fig. 3.13 Lavenia
Page 37

36
Operation
Lavenia can be purchased at your customer representative or at the
service centre (see chapter “8 Services” on page 91).
Lavenia can also be obtained at our online shop
at .vorwerk-kobold.com
Note! Risk of damage as a result of incompatible cleaning agents!
• Test the colour fastness of the mattress against Lavenia at an inconspicuous spot before application.
Note! Risk of damage from improper use!
• Avoid working with the device on one specific spot for a prolonged
period of time (max. 5 sec.).
• Under no circumstances should you use the Kobold EB370 Electronic
brush and the Kobold FK370 Freshener kit to clean special or sensitive
surfaces (e.g. jersey).
REMOVING THE ROLLER BRUSHES
• Push the green release key
. The front cover will disengage.
• Hold the release key
and unfold the front cover on both sides.
• Pull the grey roller brushes
on the left and right hand side out of the
brush housing.
1
2
3
Fig. 3.14 Removing the roller brushes
Page 38

37
Operation
INSERTING THE KOBOLD MB370 MATTRESS BRUSHES
• Insert the Mattress brush
with the green end into the side with the green
symbol on the grey cover and the other roller brush into the opposite side.
• Applying a slight twist, push the Mattress brushes onto the drive shaft until
they are completely inserted.
• Push the front cover back down using both hands. Make sure that you can
hear the front cover engage.
CLEANING MATTRESSES
• First, vacuum the mattress using power performance level 1.
• Distribute Lavenia evenly onto your matress.
• Exchange the mattress brushes with the Freshener kit
(chapter “Inserting the Kobold FK370 Freshener kit” on page 32).
• Switch on the device.
• Move the Kobold EB370 Electronic brush back and forth in adjacent streaks.
• Then move the Electronic brush laterally over the covered surface.
• Depending on the degree of contamination, work in Lavenia using the
Freshener kit for 2 - 3 min. per 1 x 2 m.
• Allow the powder to dry for 30 min.
• Exchange the Freshener kit with the mattress brushes
(chapter “Removing the Kobold FK370 Freshener Kit” on page 33).
• Switch the device to power performance level 1.
• Remove Lavenia with the Mattress brushes.
Fig. 3.15 Inserting the Maress brushes
4
Page 39

38
Operation
3.3 Kobold SP530 Hard floor cleaner
The Hard floor cleaner enables vacuum cleaning and wet cleaning of hard floors
in only one step – with significant savings in time and effort. Additionally, the
hard floor cleaner offers the possibility of dry cleaning.
The Hard floor cleaner cleans hard floors particularly efficiently. For a
particularly thorough cleaning, the Hard floor cleaner has its own motor which
drives the cloth holder with Cleaning cloth. The figure with the legend shows the
Hard floor cleaner as well as its operating elements.
The Hard floor cleaner can be used on almost all hard floor types.
• Nevertheless, before using the Hard floor cleaner, make sure that the device is
suited for your floor (Tab. 1.1 and Tab. 1.2 on page 6).
Warning! Risk of electric shock!
• With the Hard floor cleaner, never run over power cords or cables lying
on the floor.
• Do not vacuum liquids.
Caution! Risk of injury from moving parts!
• Keep away from the moving parts of the Hard floor cleaner.
3
1
2
6
4
5
Fig. 3.16 The Hard floor cleaner
Legend
1
Joint
2
Secondary air flap
3
Holding magnet
4
Side cover
5
LED display
6
Cloth holder with cloth
Page 40

39
Operation
3.3.1 Accessories for Kobold SP530 Hard floor cleaner
CONCENTRATED CLEANING AGENT KOBOCLEAN
Koboclean is suitable for cleaning various waterproof floors. Thanks to its high
cleaning power, even stubborn dirt can be removed reliably. Koboclean meets all
legal requirements rearding environmental compatibility and biodegradability.
Koboclean is available as Koboclean Parquet which has been especially
developed for cleaning wood surfaces (cork, parquet floors and laminate) and
also as Koboclean Universal for cleaning all other wet wipeable surfaces (e.g.
tiles, PVC). The concentrated cleaning agent Koboclean must be diluted before
being used. It must not be applied directly.
KOBOLD MF520/530 CLEANING CLOTH
The Cleaning cloths have been especially developed for the Hard floor cleaner.
The Cleaning cloth is available in the following four types:
- “MF520/530 Parquet” for wet-cleaning wooden floors (cork, parquet,
la minate),
- “MF520/530 Universal” for all other wet-wipeable surfaces
(e.g. tiles, PVC; also suited for extremely rough surfaces)
- and “MF530 Dry” for dry cleaning hard floors (see Tab. 3.2 on page 40).
- The “MF520/530 Universal so” Cleaning cloth is particularly suited for
open-pored floors.
The Parquet, Dry and Universal So Cleaning cloths are not included in the
scope of delivery of the basic set.
Fig. 3.17 Concentrated cleaning agent
Koboclean
Fig. 3.18 Kobold MF520/530 Cleaning
cloth
Page 41

40
Operation
SUITABILITY OF KOBOLD MF520/530 CLEANING CLOTHS FOR DIVERSE
HARD FLOOR TYPES
MF520/530
Universal
MF520/530
Universal
Soft
MF520/530
Dry
MF520/530
Parquet
Moistening (ml) 100 80 - 60-80*
Sealed wooden floors/cork
(e.g. parquet, floor boards)
+ +
1
++ ++
Oiled, waxed wooden
floors/cork (e.g. parquet,
floor boar ds)
+ +
1
++ ++
Unsealed wooden
floors/cork
- - + -
Laminate + ++ ++ ++
Stone floors (e.g. marble,
granite, Jura limestone,
artificial stone)
++ ++
2
++ -
open-pored natural stone
(e.g. Solnhofen stone,
slate, clinker plates)
+ ++
2
++ -
Clay floors (e.g. terracoa,
clinker, brick clay tiles)
+ ++
2
++ -
ceramic tiles, glazed ++ +
2
++ -
elastic floors ++ ++ ++ -
rough concrete plates - - - -
Tab. 3.2 Suitability of Cleaning cloths
Meaning of symbols:
++ excellently suited
+ suitable
- unsuitable
* Follow the cleaning and
care information issued
by the manufacturer.
Cloths contain microfiber; follow
the cleaning and care instructions
of the manufacturer. Follow the
cleaning and care information
issued by the manufacturer.
2
On rough floors, an increased
degree of wear is possible.
Page 42

41
Operation
3.3.2 Switching the Kobold SP530 Hard floor cleaner on/off
Warning! Risk of electric shock!
• Do not vacuum liquids.
Caution! Risk of injury from moving parts!
• Keep away from the moving parts of the hard floor cleaner.
Note! Risk of damage from improper use!
• Before activating the device, make sure that there are no small stones,
granulates such as cat litter or other pointed or sharp-edged objects
under the Cleaning cloth.
• Never work on the same spot for more than 10 seconds.
• Never leave the device standing on the floor with a wet cloth for a
longer period of time (more than 30 seconds). Otherwise, delicate
floors may be damaged.
• Never use the Hard floor cleaner without cloth.
• Never leave the Hard floor cleaner standing on floors which are
particularly sensitive to moisture.
SWITCHING ON
In order to activate the Hard floor cleaner, the Kobold VK150 Vacuum cleaner
must be switched on first:
• Switch on the Vacuum cleaner. The LED display marked with “On”
5a
located
at the Hard floor cleaner will light up green, and the Hard floor cleaner will be
ready to operate.
• Put the Vacuum cleaner in the vacuuming position.
Fig. 3.19 Switching on the Hard floor
cleaner
2
5b
5a
Page 43

42
Operation
• Now, close the secondary air flap on the device by stepping onto the flap from
behind. The Hard floor cleaner will start when the flap has been closed.
SWITCHING OFF
In order to deactivate the Kobold SP530 Hard floor cleaner, the Kobold VK150
Vacuum cleaner must be switched off.
• Switch off the Vacuum cleaner.
The secondary air flap
2
will open automatically.
The secondary air flap will remain open when the Vacuum cleaner is
switched off.
If you want to put down the Hard floor cleaner for a short period of time only
(less than 30 seconds), it is sufficient to put the Vacuum cleaner in its parking
position.
• Put the Vacuum cleaner in its parking position and leave it switched on. The
Hard floor cleaner will deactivate automatically.
• Put the Vacuum cleaner in the vacuuming position again. The Hard floor
cleaner will be switched on automatically.
Note! Risk of damage from improper use!
• Never use the Hard floor cleaner without cloth.
• When working with the Hard floor cleaner, never use acid cleaning
agents (e.g. vinegar-based cleaner) or highly alkaline cleaning agents
(e.g. chlorine bleaching).
Note!
• Please also refer to the care instructions issued by the floor
manufacturer.
Fig. 3.20 Switching off the Hard floor
cleaner
2
Page 44

43
Operation
REMOVING THE CLOTH HOLDER SP520/530 FROM THE DEVICE
Warning! Risk of electric shock!
• For your own safety, switch off the Kobold VK150 Vacuum cleaner at its
handle each time that the cloth is replaced and pull out the power plug
in addition.
In order to be able to fix the cloth at the Cloth holder, the Cloth holder must be
removed from the device first.
• Put the Vacuum cleaner in the parking position.
• Hold the Vacuum cleaner at its handle grip and tilt it towards the left-hand
side (A).
• Fold the side cover
4
upwards in order to open it (B).
• Pull the Cloth holder diagonally downwards
10
at the handle grip (green)
10a
in order to unlock it (C). The Cloth holder can now be extracted from the device
without any problems (D).
MOISTENING THE KOBOLD MF520/530 CLEANING CLOTH
Note! Cloth treatment prior to first use!
• For optimised cleaning performance, we recommend washing the
Cleaning cloths before their first use.
Note! Repeated application when first used!
• Due to the special cleaning performance of the Kobold SP530 Hard
floor cleaner, it is possible that, when using the device for the first
time, floors will have to be cleaned several times in order to remove
engrained dirt.
Fig. 3.21 Removing the Cloth holder from
the device
4
10a
10
D
B
C
A
Page 45

44
Operation
Afterwards, the Hard floor cleaner will deliver a convincing cleaning
performance after each application.
Note! Material damage when used on unsuitable floors!
• For sensitive floors, such as floors which are not permanently sealed
(oiled cork, oiled parquet, coated, oiled stoneware), it is recommendable to test the device at a hidden spot first in order to prevent damage
to the floor.
• Please also refer to the cleaning and care information issued by the
floor manufacturer.
Note! Material damage from standing moisture!
• In the case of floors which are extremely sensitive to moisture, rewipe
the floors with a dry Kobold MF520/530 Parquet Cleaning cloth and the
Kobold VK150 Vacuum cleaner at full power.
• You should also rewipe the floor with a dry Parquet Cleaning cloth and
the Vacuum cleaner at full power if the floor is too moist, e.g. because
you have used an incorrect quantity of water.
For cleaning the hard floor with the Kobold SP530 Hard floor cleaner, Kobold
MF520/530 Cleaning cloths, which have been specially developed for this application, are used. You can use both wet (MF520/530 Universal, Universal so and
Parquet) and Dry (MF520/530 Dry) Cleaning cloths.
For wet cleaning, the Cleaning cloth is to be moistened before.
The especially-developed SP520/530 Dosing bole for simple, fast and hygienic
moistening of cloths enables an exact dosing of the water quantity and the
Koboclean cleaning agent.
Fig. 3.22 Filling the SP520/530 Dosing
bole
max.
5 ml
5 ml
500 ml
12
11
Page 46

45
Operation
For processed wood surfaces (e.g. oiled/waxed cork, parquet, laminate), please
use the Kobold MF520/530 Parquet.
• Open the Dosing bottle
11
.
• Take the lower part of the Dosing bottle and hold it diagonally so that the 5 ml
mark is the lowest point.
• Add 5 ml of Koboclean Parquet cleaner
12
(up to the 5 ml mark).
• Fill the Dosing bottle with water up to the “max” mark and close it.
• Press the lower part of the Dosing bottle together (A) in order to pump the
liquid into the upper part of the Dosing bottle.
• Equally distribute 60-80 ml of the liquid over the back of the Cleaning cloth by
pressing (B) the lower part of the Dosing bottle
13
. Avoid applying the liquid
onto the front/cleaning side.
During the cleaning process, the Cleaning cloth will equally dispense the moisture required to the floor.
For all other floors suited for wet cleaning (e.g. tiles, PVC), please use the
“MF520/530 Universal” or “Universal so” Cleaning cloth.
• Open the Dosing bottle
11
.
• Take the lower part of the Dosing bottle and hold it diagonally so that the 5 ml
mark is the lowest point.
• Add 5 ml of Koboclean universal cleaner
12
(up to the 5 ml mark).
• Fill the Dosing bottle with water up to the “max” mark and close it.
• Press the lower part of the Dosing bottle together (A) in order to pump the
liquid into the upper part of the Dosing bottle.
• Equally distribute 100 ml of the liquid over the back of the Cleaning cloth by
pressing (B) the lower part of the Dosing bottle.
13
Avoid applying the liquid
onto the front/cleaning side.
During the cleaning process, the Cleaning cloth will equally
dispense the moisture required to the floor.
Fig. 3.23 Moistening the cloth
max
.
max.
13
11
A
B
Page 47

46
Operation
FIXING THE KOBOLD MF520/530 CLEANING CLOTH AT THE KOBOLD CLOTH
HOLDER
Note! Risk of damage from improper use!
• When fixing the cloth at the Cloth holder, please ensure that the cloth is
fastened in an even position. Avoid an excessive inclination of the cloth
towards the Cloth holder at all times.
• In order to fix the Cleaning cloth at the Cloth holder, slide the Cloth holder
10
into the bag
13a
of the cloth (A) first.
• Then, put the grip
13b
of the cloth over the handle grip (green)
10a
of the Cloth
holder and fix it on the velcro strip provided at the handle grip (B).
INSERTING THE CLOTH HOLDER INTO THE DEVICE
Warning! Risk of electric shock!
• For your own safety, switch off the Vacuum cleaner at its handle each
time that the cloth is replaced and pull out the power plug in addition.
Note! Risk of damage from improper use!
• Avoid forced insertion and extraction of the Cloth holder.
• Hold the Kobold VK150 Vacuum cleaner at its handle grip, and tilt the Vacuum
cleaner towards the left-hand side.
Fig. 3.24 Fixing the cloth holder at the
cloth
A
B
10
13a
13b
10a
Fig. 3.25 Inserting the cloth holder into
the device
A
B
10a
4
Page 48

47
Operation
• Hold the Kobold SP520/530 Cloth holder at its handle grip (green)
10a
and,
while the side cover is open, slide it
4
into the device until it has reached the
end position (A).
• Cause the Cloth holder to latch by pulling the handle grip upwards.
• Now, close the side cover by folding it downwards, and causing the cover to
latch audibly (B).
CLEANING WITH THE KOBOLD SP530HARD FLOOR CLEANER
Caution! Risk of injury from ejected suction material!
• Avoid moving the Hard floor cleaner laterally towards loose coarse
particles (e.g. glass splinters).
• Do not clean at eye level while using the Hard floor cleaner (e.g. on
stairs or platforms).
• Switch off the Hard floor cleaner before lifting it.
Note! Risk of damage from improper use!
• If the device hooks into objects or gets jammed, the Vacuum cleaner is
to be switched off immediately in order to avoid damages.
We recommend always operating the device set to suction stage 3.
• Move the Hard floor cleaner in regular paths.
• Ensure that the Hard floor cleaner is constantly in motion.
Page 49

48
Operation
REPLACING THE KOBOLD MF520/530CLEANING CLOTH
Note! Risk of damage from improper use!
• Never leave a wet cloth in the device when storing it.
If the Cleaning cloth is too dry or too dirty, remove it from the Kobold
SP530 Hard floor cleaner and insert a new Cleaning cloth.
The service life of a Cleaning cloth depends on how dirty the floor is and on the
floor type.
• Clean used Cleaning cloths in the washing machine at 60 °C without fabric
softener.
3.4 Kobold ESS150Electronic suction hose
The Electronic suction hose can be used in a number of ways in connection with
the Kobold.
ATTACHING THE KOBOLD ESS150ELECTRONIC SUCTION HOSE
• Insert the Electronic suction hose port
into the attachment socket of the
Kobold.
The handle of the Electronic suction hose can be connected to the
Kobold PB430 Polsterboy, the Kobold FD15 Flexo nozzle, the Kobold
VD15 Variable nozzle or to the Accessory parts.
Using the Polsterboy with the Electronic suction hose is especially
convenient as the Polsterboy can be guided and used in a more precise way.
1
2
Fig. 3.26 Electronic suction hose
Page 50

49
Operation
3.5 Kobold TR15Telescopic tube
Our Telescopic tube makes it possible to work on areas that are high up in the
room. You can easily vacuum spider webs, dust in corners or dusty curtain rods
without the hassle of having to use a ladder.
Caution! Risk of injury from non-sealed tube!
• Make sure to lock the handle before using the Telescopic tube.
Used with our Kobold FD15 Flexo nozzle, you can easily, conveniently and
safely clean curtains or tapestry way up under the ceiling.
Thanks to the Kobold SD15 So nozzle, you can now easily remove dust
from ceiling lamps and chandeliers.
CONNECTING THE TELESCOPIC TUBE
To use the Telescopic tube, the Kobold ESS150 Electronic suction hose must be
connected to the Kobold VK150 Vacuum cleaner.
• Insert the adaptor of the Telescopic tube
into the handle of the Electronic
suction hose.
ADJUST LENGTH AND LOCK
• Turn the handle
into the direction marked “open” (identifiable through the
symbol
) and adjust the Telescopic tube to the desired length.
• Turn the handle
into the direction marked “close” to lock the telescopic
handle in the adjusted length.
1
Fig. 3.27 Telescopic tube
Fig. 3.28 Adjusting the length
2
3
Page 51

50
Operation
3.6 Kobold PB430Polsterboy
The Polsterboy removes dust from your upholstered furniture in no time.
Furthermore, it cleans upholstery faster than any other device because it
vacuums and brushes it at the same time. This chapter explains how to operate
the Polsterboy.
CONNECTING THE POLSTERBOY
• Connect the Electronic suction hose to the Kobold VK150 (chapter “3.4 Kobold
ESS150 Electronic suction hose” on page 48).
• Connect the Polsterboy to the Electronic suction hose. To do this, slide the
handle of the Electronic suction hose into the attachment socket
of the
Polsterboy.
Caution! Risk of injury from moving parts!
• Do not vacuum any body parts. Do not vacuum near children or pets.
• Do not vacuum hair with the Polsterboy.
• Do not operate the Polsterboy without the Suction nozzle.
Caution! Risk of injury from ejected, previously absorbed material!
• Avoid abruptly placing the device on loose, coarse particles (e.g. glass
shards), especially at eye level.
• Switch on the Vacuum cleaner. The Polsterboy is automatically switched on as
well.
3
2
5
1
4
Fig. 3.29 Polsterboy
Legend
Aachment socket
Recessed grips
Suction nozzle
Suction nozzle opening for joints
Slider
Page 52

51
Operation
REGULATING THE SUCTION FORCE
• Regulate the suction force as usual on the Kobold VK150 Vacuum cleaner.
• Select power performance level 2 on your Vacuum cleaner in normal case.
• Select power performance level 1 on your Vacuum cleaner when dealing with
loose and/or sensitive material.
VACUUMING SURFACES
• Move the green slide
into the position “Vacuum surface” .
• During the cleaning process, place the suction openings of the Kobold PB430
Polsterboy completely on the upholstery.
• Pass over the upholstery easily and without applying pressure.
VACUUMING JOINTS
• Move the green slider into the position “Vacuum joint”
.
To vacuum residues in areas that are difficult to reach, such as joints, grooves or
similar areas, use maximum suction force.
• To do this, set the Vorwerk vacuum cleaner to maximum suction force (power
performance level 3).
Fig. 3.30 Slider
1
3
2
Page 53

52
Operation
3.7 Kobold GD15 Window cleaning kit
Used with your Kobold VK150 Vacuum cleaner, the Window cleaning kit removes
dirt and dust from your windows and other even glass surfaces in no time.
The Kobold Window cleaning kit cleans your windows thoroughly and streakfree.
Caution! Risk of injury from improper use of the cleaning suspension!
• Make sure that the cleaning suspension Koboclear is kept out of reach
of children!
• Prevent the contact of cleaning suspension Koboclear with eyes.
If the cleaning suspension Koboclear comes in contact with eyes,
immediately wash the eyes with water!
• Prevent the swallowing of the cleaning suspension Koboclear.
In case of swallowing, consult a doctor immediately and show him or
her the packaging or lable!
• Use the cleaning suspension Koboclear only in properly ventilated
rooms!
Risk of damage from improper use!
• Apply the cleaning suspension Koboclear only on smooth and
nontreated glass surfaces.
• Avoid contact with sealants, window sills, window frames or floors.
• Do not use Koboclear for windows with open-pored window frames.
Page 54

53
Operation
KOBOCLEAR CLEANING SUSPENSION
Koboclear mainly consists of water, alcohol and calcium carbonate (chalk).
Koboclear fulfils the legally specified guidelines in terms of environmental
friendliness and biodegradability. The cleaning suspension is suited for all
nontreated, even glass surfaces. The dirt on the window panes is dissolved from
the surface due to the cleaning suspension and bound with calcium carbonate
(chalk). The alcohol content of about 10 percent ensures that the cleaning suspension dries up quickly aer application on the window panes.
A bole of Koboclear is sufficient for about 100 m².
The cleaning suspension Koboclear can be used for about 2 years aer
opening the packing.
Koboclear can be purchased at your customer representative or at the
Vorwerk shops or at the service centre
(see chapter “8 Services” on page 91).
Koboclear can also be obtained at our online shop
at .vorwerk-kobold.com
Fig. 3.31 Koboclear cleaning suspension
Page 55

54
Operation
KOBOLD GLASS CLOTH GT15
The Glass cloth is made up of a special microfibre, which was selected specially
for working with Koboclear cleaning suspension. Apply the cleaning suspension
on the window panes by wearing the glass cloth and spreading it while applying
lile pressure.
KOBOLD GLASS NOZZLE GD15
Using the Glass nozzle, remove the remaining, dry chalk powder (calcium
carbonate) from the window panes. The chalk powder must be dry before
vacuuming it with Glass nozzle. With the help of the bristles of the Glass nozzle
Koboclear can easily be vacuumed off the pane. The Glass nozzle can reach each
corner since the so bristles are spread over the entire breadth of the Glass nozzle. The Glass nozzle is thus used as a hand brush, which cleans the pane and
simultaneously vacuums the dust.
3.7.1 Operating the Kobold Window cleaning kit
This chapter explains how to operate the Kobold GD15 Window cleaning kit.
PREPARATION OF WINDOW CLEANING
Using the Kobold ESS150 Electronic suction hose or the Kobold TR15 Telescopic
tube, the Glass nozzle can be lead excellently and can be used flexibly as well as
accurately.
• Connect the Electronic suction hose (chapter “3.4 Kobold ESS150 Electronic
suction hose” on page 48).
• Connect the Telescopic tube (chapter “3.5 Kobold TR15 Telescopic tube” on
page 49) to the Electronic suction hose.
Fig. 3.32 Microfibre cloth
Fig. 3.33 Glass nozzles
Page 56

55
Operation
CONNECT THE KOBOLD GLASS NOZZLE GD15 ONTO THE KOBOLD VK150
VACUUM CLEANER
• Attach the Glass nozzle to the Kobold ESS150 Electronic suction hose or the
Kobold TR15 Telescopic tube. To do this, push the connection port of the
Glass nozzle above the connection port of the Electronic suction hose or the
Telescopic tube.
• Make sure that the Glass nozzle engages audibly in the connection socket of
the Electronic suction hose or the Telescopic tube.
DETACH GLASS NOZZLE FROM VACUUM CLEANER
• Press the button on the Electronic suction hose or Telescopic tube handle and
pull out simultaneously the Glass nozzle from the connection piece.
3.7.2 Cleaning window panes
Vigorously shake the Koboclear cleaning suspension before using it!
Koboclear is highly efficient. Use it sparingly.
THE KOBOLD WINDOW CLEANING TAKES PLACE IN THREE STEPS:
APPLY KOBOCLEAR
• Spread about 20 to 30 ml of cleaning fluid over the entire area of application
of the Glass cloth when applied for the first time.
• Spread the cleaning suspension Koboclear evenly with the Glass cloth on the
(nontreated) window pane, so that covered film remains on the window pane.
Fig. 3.34 Insert Glass nozzle onto the
Electronic suction hose
Fig. 3.35 Insert Glass nozzle onto the
Telescopic tube
Fig. 3.36 Apply Koboclear on cloth
Page 57

56
Operation
• For each further m of glass surface, apply a smaller amount (1 to 2 squirts) of
the Koboclear cleaning suspension onto the Kobold Glass cloth GT15.
3.7.3 Allow Koboclear to dry
The alcohol content of the cleaning suspension ensures that the window
pane dries quickly. The drying time depends on the external conditions (air
humidity, room and external temperature) and on the applied quantity of the
cleaning suspension. White chalk powder (calcium carbonate) remains on the
window pane.
3.7.4 Vacuum dried Koboclear
Using the Kobold Glass nozzle GD15, you can easily and quickly remove the white
chalk powder without leaving any residue or streaks behind. Time-consuming
polishing is not required.
• Allow Koboclear to dry.
• Leave the Glass nozzle with its suction openings placed completely on the
glass surface while vacuuming.
• Push the Glass nozzles over the entire window pane in even motions and
vacuum the chalk powder.
Fig. 3.37 Apply Koboclear
Fig. 3.38 Allow Koboclear to dry
Fig. 3.39 Vacuum Koboclear
Page 58

57
Operation
VACUUMING BY CONNECTING THE KOBOLD TR15TELESCOPIC TUBE
You can adjust the length of the Telescopic tube at the handle.
• Turn the handle
to “open” (identifiable through symbol ).
• Adjust the length of the Telescopic tube.
• Turn the handle to “close” (identifiable through the symbol
) to lock the
Telescopic tube.
REGULATE SUCTION FORCE
• Regulate the suction force on the Kobold VK150 Vacuum cleaner as usual.
• Select power performance level 3 in normal case of your Vacuum cleaner.
Fig. 3.40 Vacuum Koboclear with
Telescopic tube
Fig. 3.41 Adjusting and locking the length
of the Telescopic tube
2
3
Page 59

58
Operation
3.8 Additional accessories
If you are using the nozzle product line, you will have the perfect solution for
every case. This chapter will give you an overview of the different nozzles and
their areas of application.
You can aach the accessories directly to the Kobold ESS150 Electronic suction
hose or to the Kobold TR15 Telescopic tube/Electronic suction tube.
3.8.1 Kobold VD15Variable nozzle
Your Variable nozzle is extremely versatile. It has two aachments that can be
used for different tasks.
• Attach the socket
of the Variable nozzle to the Electronic suction hose.
The Variable nozzle is provided with a joint
so that you are able to vacuum at
an angle of 90 degrees. The extendable and flexible tip
allows you to reach
even those corners and spots that are hard to reach or very narrow. In addition,
you can provide the tip with one of the aachments,
either with the Drilling
dust aachment or with the Bristle brush.
ADJUSTING THE LENGTH
• Pull out the tip
.
• To slide the extension back in again, push the spring button
and then slide
the tip back.
1
2
3
Fig. 3.42 Variable nozzle
Legend
Socket
Joint
Tip (extractable)
Spring buon
Fig. 3.43 Adjusting the length
3
4
Page 60

59
Operation
DRILLING DUST ATTACHMENT
The Drilling dust aachment allows you to collect drilling dust. You can drill a
hole into the wall without having to worry about dust polluting your apartment.
• Connect the Drilling dust attachment to the tip of the Kobold VD15 Variable
nozzle.
• Switch on the Kobold VK150 Vacuum cleaner.
• Place the drilling dust attachment with the back seal against the wall.
Due to the suction force of the Vacuum cleaner, the Drilling dust aachment
will adhere to the wall by itself, provided it is completely even. This way you can
freely use your hands to drill the hole.
Remove the Drilling dust aachment from the wall before switching off
the Vacuum cleaner.
BRISTLE BRUSH
The Bristle brush enables your Variable nozzle to access even the smallest spaces
and the tightest places. It is perfectly suited for vacuuming skirting boards and
spaces between furniture and shelves.
• To do this, connect the Bristle brush to the tip of your Variable nozzle.
Fig. 3.44 Drilling dust aachment
Fig. 3.45 Bristle brush
Page 61

60
Operation
3.8.2 Kobold SD15Soft nozzle
Your So nozzle can either be used for vacuuming loose dust in a gentle manner
or to remove adherent dirt. You can modify the bristle ring length and thereby
adjust it to the type of surface. It is especially well-suited to vacuum uneven
surfaces such as keyboards, bookshelves, lampshades and all types of furniture
surfaces.
• Connect the Soft nozzle to the Kobold ESS150 Electronic suction hose.
• By using the slider
you can adjust the bristle length.
• In the case of light dust or sensitive objects, increase the bristle length. To do
this, move the slider
forward.
• Decrease the bristle length by pulling the slider
back if you wish to work
on adherent dirt and non-sensitive surfaces.
1
Fig. 3.46 So nozzle
Page 62

61
Operation
3.8.3 Kobold FD15Flexo nozzle
Your Flexo nozzle is a multi-purpose accessory that can be used on different
surfaces. In order to do this you can adjust the nozzle for the different areas of
application:
Nozzle setting for vacuuming
Flexo nozzle – complete
- Furniture surfaces and stairs
- Wall s, doors
Flexo nozzle – top part - Upholstery, fabrics, car seats
Flexo nozzle – folded
- Joints, corners
- between upholstery
Cleaning plate without Bristle plate - Tapestry, wall fabrics
FLEXO NOZZLE – COMPLETE
You can use the completely assembled Flexo nozzle to vacuum furniture surfaces
or stairs.
For more functions, only use individual parts of the Flexo nozzle depending on
the intended use:
3
4
5
2
1
Fig. 3.47 Flexo nozzle
Legend
Cleaning plate
Slider
Flexo nozzle – top part
Release lever
Bristle plate
Page 63

62
Operation
KOBOLD FD15FLEXO NOZZLE – TOP PART
You would like to vacuum dust, threads and hair from upholstery, fabrics or the
inside of your car?
• Then remove the nozzle‘s cleaning plate.
• To do this, push the release lever
on the backside of the attachment down.
• Slide the Flexo nozzle top part
upwards and out.
• Connect the nozzle to the Kobold ESS150 Electronic suction hose.
FLEXO NOZZLE – FOLDED
You would like to vacuum dust from joints, corners or between upholstery?
• Remove the nozzle‘s cleaning plate.
• Push the release lever
on the backside of the attachment down.
• Slide the Flexo nozzle top part
upwards and out.
• Move the slider
down so that the nozzle‘s wings fold in.
• Connect the nozzle to the Electronic suction hose.
CLEANING PLATE
You would like to clean larger areas such as furniture surfaces or stairs, walls
and doors? Then use the nozzle‘s cleaning plate.
• Mount the Cleaning plate
to the top part of the Kobold FD15 Flexo
nozzle.
• Make sure all parts are correctly fitted.
• Connect the Nozzle to the Electronic Suction hose.
• To clean tapestry or textile wall coverings, remove the Bristle plate
.
• To remove the Bristle plate
, push up the bracket on the backside of the
attachment and remove the white Bristle plate with a quick pull.
Fig. 3.48 Flexo nozzle – top part
3
4
2
Fig. 3.49 Flexo nozzle – folded
5
3
1
Fig. 3.50 Cleaning plate
Page 64

63
Maintenance
4 MAINTENANCE
Maintain your Kobold VK150 Vacuum cleaner regularly, so it can bring you maximum pleasure and proper functioning at all times. In the following chapter you
will learn how to maintain the different devices and accessory parts and how to
exchange parts.
Device / Accessories Step Time/Frequency
Kobold VK150
Vacuum Cleaner
Exchange the
Premium filter bag
Suction value display
(yellow), only when the
device is operated in level 3
Cleaning the Motor
protection filter
if dirty
Exchange the Motor
protection filter
if very dirty
Cleaning the filter unit if dirty
Kobold EB370
Electronic brush
Check and clean Once a month
Exchange brushes if worn
Kobold SP530 Hard
floor cleaner
Checking and cleaning
the sealing lip frame
if required
Checking the
suction channel
if required
Kobold PB430
Polsterboy
Clean if dirty
Window cleaning kit
(Kobold GD15 Glass
nozzle and Kobold
GT15 Glass cloth)
Clean if dirty
Additional accessories Clean if dirty
Page 65

64
Maintenance
Warning! Risk of electric shock!
• Always switch the device off before all retrofitting, cleaning and
maintenance work and disconnect the mains power cord from the
socket.
4.1 Spare parts and consumable materials
You have purchased a quality product from Vorwerk. To keep you as satisfied in
the future with your Kobold device as you were the first day, we recommend you
take advantage of our reorder options for original care products and original
consumables in time.
Page 66

65
Maintenance
Vorwerk has made reorders easy:
Either in person at your customer representative or at the service centre
(see chapter “8 Services” on page 91).
At our online shop
at .vorwerk-kobold.com
Certified quality can be identified by
the Original Quality Logo!
ORIGINAL
QUALITY
Fig. 4.1 Consumables that can be reordered f.l.t.r.: Kobotex, Koboclear, Koboclean, Lavenia, Kobosan active,
Dovina fragrance chip, Premium filter bag FP 140/150, Kobold MF520/530 Cleaning cloth
Page 67

66
Maintenance
4.2 Maintaining Kobold VK150 Vacuum cleaner
4.2.1 Exchange Premium Filter bag KoboldFP140/150
Caution! Loss of suitability for allergy-sufferers!
• Use original Vorwerk filters and filter bags only.
• Do not reuse spent Filter bags.
Note! Risk of damage from improper use!
Dampness in the filter area can damage the device.
• Should the filter area be damp, make sure to dry it before using the
device any further.
• Exchange the filter bag and the Motor protection filter.
Vorwerk Premium filter bags can be purchased at your customer
representative or at the service centre (see chapter “8 Services” on
page 91).
Vorwerk Premium filter bags can also be obtained at our online shop
at .vorwerk-kobold.com
OPENING THE FILTER UNIT
• Pull the green lever
and open the cover of the filter unit.
1
Fig. 4.2 Opening the filter unit
Page 68

67
Maintenance
REMOVING THE PREMIUM FILTER BAG KOBOLDVK140/150
• Fold the green ring
forwards so that the hatch of the filter snaps out of the
base plate.
• Remove the filter bag and dispose of the filter bag with the household waste.
INSERTING THE DOVINA FRAGRANCE CHIPS
Caution! Choking hazard from swallowing small parts!
• Keep small parts such as the Dovina fragrance chips away from
children.
• Remove the Dovina fragrance chip
from the packaging and place it in the
holder
on the side of of the hatch .
INSERTING THE NEW PREMIUM FILTER BAG
Note! Risk of damage from improper use!
• Avoid inserting the Filter bag forcefully.
• Hold the Filter bag with the hatch
facing down.
• First, stick the two noses
of the hatch into corresponding openings .
• Push the top part of the hatch
against the metal clip of the frame and
connect the hatch to the frame
so that you can hear it snap in.
• Push the corners of the Filter bag between the leads at the filter cover of the
Kobold VK150 Vacuum cleaner.
• Ensure that the filter bag is placed completely under the filter cover.
1
Fig. 4.3 Removing the Premium filter bag
3
1
2
Fig. 4.4 Inserting the Dovina fragrance
chips
4
5
1
3
2
Fig. 4.5 Inserting the Premium filter bag
Page 69

68
Maintenance
CLOSING THE FILTER UNIT
• Push the filter cover shut until the cover lock engages.
If the Premium Filter bag Kobold VK140/150 is not placed in the frame correctly
or if it is not placed in the frame at all, the Kobold‘s filter unit will not close. The
same applies if a wrong filter is inserted.
• If the filter cover can only be closed with difficulty, do not use force. Instead,
ensure that the filter bag has been inserted correctly.
4.2.2 Cleaning and exchanging the Kobold VK150Motor
protection filter
The Motor protection filter serves to protect your Kobold VK150 Vacuum cleaner
from pollution. To ensure a long service life for your Vacuum cleaner, make sure
to maintain the Motor protection filter regularly.
Note! Risk of damage from improper use!
• Use the device only with the inserted Motor protection filter.
The Motor protection filter can be cleaned as many times as necessary. It must
only be exchanged if the filter bag has been damaged or if the Motor protection
filter is extremely dirty.
• Pull the green lever
and open the cover of the filter unit.
• Press the shackle
of the frame of the motor protection filter until the
Motor protection filter is released from the fastening device (see Fig. 4.8 on
page 69).
Fig. 4.6 Closing the filter unit
1
Fig. 4.7 Opening the filter unit
2
3
Page 70

69
Maintenance
Fig. 4.8 Motor protection
2
3
CLEANING THE KOBOLD VK150MOTOR PROTECTION FILTER
Note! Risk of damage from improper use!
• Do not clean the Motor protection filter with water or other fluids.
EXCHANGING THE MOTOR PROTECTION FILTER
• If the Motor protection filter has been damaged or is extremely dirty, insert a
new one.
The Motor protection filter can be purchased at your customer representa-
tive or at the service centre (see chapter “8 Services” on page 91).
Motor protection filters can also be obtained at our online shop
at .vorwerk-kobold.com
INSERTING THE MOTOR PROTECTION FILTER
• Insert the Motor protection filter. Make sure that the Motor protection filter
snaps into place.
• Close the filter unit.
Note! Risk of damage as a result of improper use!
• Use the device only with the inserted Motor protection filter.
Page 71

70
Maintenance
4.3 Kobold EB370 Electronic brush
Warning! Risk of electric shock!
• Always switch off the device before all retrofitting, cleaning and maintenance work and disconnect the mains power cord from the socket.
Caution! Risk of injury from moving parts!
• Stay clear of the moving parts of the Electronic brush.
4.3.1 Checking and cleaning
BOTTOM SIDE
• Check the bottom side every once in a while to prevent damage to the device
and floor.
FRONT NOZZLES
Should small stones get stuck in the front nozzles
, you can best remove these
objects using a pointed object such as a screwdriver.
ROLLER BRUSHES
If threads have coiled around the roller brushes, you can simply cut them using
scissors.
• To do this, move the scissors inside the slot
along the side wall of the roller
brushes.
• Cut the threads and remove them.
• In case the threads are heavily entangled, remove the brushes first and then
the threads.
1
2
3
Fig. 4.9 Checking and cleaning the roller
brushes
Page 72

71
Maintenance
CHECKING ROLLER BRUSHES
The green tus of bristles must be longer than the yellow tus
(
, Fig. 4.9 on page 70). Otherwise the Kobold EB370 Electronic brush will
not have the desired brushing effect.
• Check from time to time if the green tufts of bristles are still longer than the
yellow tufts (
, Fig. 4.9).
• If they are not, exchange the roller brushes.
4.3.2 Exchanging the brushes
REMOVING THE ROLLER BRUSHES
• Push the green release key
. The front cowling will disengage.
• Hold the release key
and open the front cowling on both sides.
• Pull the grey roller brushes
on the left and right hand side out of the
tunnel.
• Clean the carrier shaft
if necessary.
INSERTING THE ROLLER BRUSHES
• Insert the roller brush with the green end into the side with the green symbol
on the grey cover and the other roller brush into the opposite side.
• Always change both roller brushes. Applying a slight twist, push the roller
brushes onto the drive shaft until they are completely inserted.
• Check if the brushes are still firmly in place on the drive shaft.
• Close the front cowling using both hands. Make sure that you can hear the
front cowling engage.
• If the front cowling will not close, then the roller brushes are not inserted far
enough.
3
4
1
2
Fig. 4.10 Removing the roller brushes
Page 73

72
Maintenance
Roller brushes can be purchased at your customer representative or at the
service centre (see chapter “8 Services” on page 91).
Roller brushes can also be obtained at our online shop
at .vorwerk-kobold.com
4.4 Kobold SP530Hard floor cleaner
Warning! Risk of electric shock!
• Always deactivate the Hard floor cleaner before performing any refitting, cleaning or maintenance work. Before cleaning and maintenance
work, the power plug must also be pulled out.
• Never clean electrical connections with water, wet cleaning agents or
the wet Vorwerk Cleaning cloths.
• Never pour water over the device. Never rinse it with running water.
Caution! Risk of injury through trapping of body parts!
• Keep away from the moving parts of the Hard floor cleaner.
Page 74

73
Maintenance
4.4.1 Checking and cleaning the sealing lip frame
Check the condition of the sealing lips regularly; if required, remove fluff balls,
hairs, etc.
DISMOUNTING THE SEALING LIP FRAME
In order to be able to clean the sealing lips thoroughly, the frames can be
dismounted from the device.
Position the device on the floor or on a table so that the side to be cleaned
(the underside) is turned upwards.
• Grip the centre of the Sealing lip frame
9
and pull it towards you so that it
detaches from its catch mechanism.
• If required, clean the sealing lip frame with running water.
MOUNTING THE SEALING LIP FRAME
Before remounting the Sealing lip frames in the device, they must have dried
completely. Due to their different enagement hooks, each sealing lip frame only
fits at one side of the device. Here, the end-to-end sealing lip of the frame must
be directed inwards.
• Put the sealing lip frame
9
with its engagement hooks in the intended catch
mechanism at the device, at first at only one side
9a
.
• Slightly press the sealing lip frame together so that you are also able to insert
the second side.
Fig. 4.11 Dismounting the sealing lip
frame
Fig. 4.12 Mounting the sealing lip frame
9
9
9
9a
9a
9
Page 75

74
Maintenance
4.4.2 Checking the suction channel
Regularly check the suction channels for blockage.
• To remove blockages, remove the suction channel
7
from the device at the
lower end.
• Remove any objects
15
blocking the device.
• Re-insert the suction channel by pressing it into the aperture in the device
until you can feel it latching.
The suction channel has reached its correct position when the bracket
6
can be
moved freely after having been inserted.
Fig. 4.13 Extracting the suction channel
Fig. 4.14 Removing objects
7
6
15
7
Page 76

75
Maintenance
4.5 Kobold PB430 Polsterboy
Warning! Risk of electric shock!
• Always switch the device off before all retrofitting, cleaning and
maintenance work and disconnect the mains power cord from the
socket.
• Never clean the Polsterboy or the suction nozzle with water or damp
cleaning agents.
Caution! Risk of injury from ejected, previously absorbed material!
• Avoid abruptly placing the device on loose, coarse particles (e.g. glass
shards), especially at eye level.
• Unplug the Polsterboy from the suction hose.
• Hold the suction nozzle by the finger grooves
on the suction opening.
• Pull off the Suction nozzle by pulling it downwards.
• Brush or wipe the device dry.
• Check the suction nozzle every once in a while to ensure that no threads or
hairs have coiled around the roller brushes.
• If so, remove the suction nozzle.
• Cut the threads or hairs with small scissors.
• When inserting the suction nozzle, place the tips of the nozzle into the
intended openings first.
• Push the suction nozzle at the finger grooves
firmly against the device.
Make sure that you can hear the suction nozzle engage.
1
Fig. 4.15 Remove suction nozzle
Page 77

76
Maintenance
4.6 Kobold Window cleaning kit
Warning! Risk of electric shock!
• Always switch the Kobold VK150 Vacuum cleaner off before all
retrofitting, cleaning and maintenance work and disconnect the mains
power cord from the socket.
• Never insert the Kobold Glass nozzle GD15 into the Vacuum cleaner,
if the Glass nozzle is still wet after cleaning.
Note! Risk of damage from improper use!
• Do not dry the Glass nozzle near the heating bodies or in direct sun,
since the plastic may distort.
Device/
accessories
Time/Frequency Step
Kobold GD15
Glass nozzle
aer every window
cleaning
• Unplug the Glass nozzle from the suction
hose or Kobold TR15 Telescopic tube.
• Vacuum the bristles of the Glass
nozzle by using the Vacuum cleaner.
if required in
between
• Unplug the Glass nozzle from the
suction hose or Telescopic tube.
• Clean the Glass nozzle under
flowing water to rinse off the chalk
powder residue from the nozzle.
• Allow the Glass nozzle to dry
completely before using it again.
Fig. 4.16 Vacuum Glass nozzle
Fig. 4.17 Rinse Glass nozzle
Page 78

77
Maintenance
Device/
accessories
Time/Frequency Step
Kobold GD15
Glass cloth
aer every window
cleaning
• Thoroughly wash the Glass
cloth under flowing water.
if required • Wash the Glass cloth in the wash machine
at max. 60 °C without fabric conditioner,
as specified on the Glass cloth label.
4.7 Additional accessories
The following chapter applies for the following accessories:
- Kobold HD50 Hard floor aachment
- Kobold VD15 Variable nozzle
- Kobold FD15 Flexo nozzle
- Kobold SD15 So nozzle
• The accessory parts can be rinsed off under flowing water.
• Allow the accessory parts to dry off before reinserting them.
• Clean the bristles of the Soft nozzle with soap and lukewarm water.
Page 79

78
Troubleshooting
5 TROUBLESHOOTING
Warning! Risk of electric shock and injury!
• Never perform repairs on your device yourself.
Repairs to electric devices may only be carried out by the responsible
Vorwerk customer service department.
If your device is not working properly, it may be due to one of the following
causes:
Fault Possible causes and rectification
Filter cover has
become detached
from the device.
It is possible you have bumped against the opened cover.
Reinsert the cover:
• Lay the Kobold VK150 Vacuum cleaner
horizontally on the floor.
• Place the filter cover
in a 60° angle
onto the pivots of the device.
• Strongly push the filter cover
with the studs
into the pivots until they snap in with a click.
The Vacuum
cleaner releases an
unpleasant odour.
The Premium Filter bag FP140/150 has lost the
ability to retain odours even though it is not full.
• Exchange the Premium Filter bag and insert
a new Dovina fragrance chip.
• Thoroughly clean the suction channel of the
Vacuum cleaner and/or the connected device
as well as the Motor protection filter.
KOBOLD VK150 VACUUM CLEANER
2
1
1
3
Fig. 5.1 Reinsert the cover
Page 80

79
Troubleshooting
Fault Possible causes and rectification
The Vacuum
cleaner suction
force is declining.
The Premium Filter bag FP140/150 is probably full.
• Exchange the Premium Filter bag.
The Suction channel of the Vacuum cleaner or
that of another connected device is blocked.
• Clean the Suction channel of the Vacuum cleaner
and/ or that of the connected device.
• Ensure that the suction value display in level 3 does not light
up yellow. Otherwise exchange the Premium Filter bag.
The Motor protection filter is extremely dirty.
• Clean or exchange the Motor protection filter
(chapter “4.2.2 Cleaning and exchaning the Kobold
VK150 Motor protection filter” on page 68).
The Vacuum
cleaner will set
itself to a different
performance
level and will
become louder.
Aer prolonged use, with high ambient temperature or
when the Filter bag is full or blocked, the Kobold will
set itself to a different performance level as a result of
overheating so that the suction performance can no longer
be regulated. In this case the valve will open automatically
allowing air to flow directly into the inside of the motor.
• Check the Suction channel and the connected
accessory parts.
• Remove the blockages and exchange the
Premium Filter bag if necessary.
• Let the motor cool down.
Device is not
working.
The connector plug of the connecting cable
may not be properly enaged.
• Ensure the a connection has been
established correctly (clicking).
KOBOLD VK150 VACUUM CLEANER
Page 81

80
Troubleshooting
Fault Possible causes and rectification
The Kobold EB370
Electronic brush
is too loud.
The roller brushes are not correctly inserted.
• Check if the roller brushes are correctly inserted.
The roller brushes must always be aligned with the
corresponding coloured symbol (green to green).
• Always exchange both brushes.
Maybe original Kobold accessories were not used,
which can lead to bearing or motor failure.
• Use original Kobold roller brushes only.
An object might have got stuck in the
area around the roller brushes.
• Remove the object.
It can get noisy when used on hard flooring.
Threads have
coiled around the
roller brushes.
• Cut the threads as described in the maintenance
chapter “4.3 Kobold EB370 Electronic brush” and
“4.3.1 Checking and cleaning” on page 70.
The Electronic
brush will switch off
automatically, the
operation display
is flashing.
A vacuumed object is blocking the
brushes of the Electronic brush.
• Switch the device off and unplug the
mains power cord from the socket.
• Remove the object.
Threads block the Electronic brush.
• Cut the threads as described in the chapter on
maintenance “4.3 Kobold EB370 Electronic brush”
and “4.3.1 Checking and cleaning” on page 70.
KOBOLDEB370
ELECTRONIC BRUSH
1
Fig. 5.2 The operation display is flashing
Page 82

81
Troubleshooting
Fault Possible causes and rectification
The cowling
will not close.
The roller brushes are not pushed in far
enough or have been mixed up.
Slide in the roller brushes all the way to the end.
• Check if the roller brushes have been
inserted on the correct side.
The Suction channel
of the Electronic
brush is blocked.
• Open the inspection flap
on the boom
side of the Electronic brush.
• Remove the blockage.
• To do this, use an appropriate object (e.g.
screwdriver, crochet needle).
The Electronic brush
can only be moved
with great difficulty.
You might have set the power performance level too high.
• Use the main switch on the Kobold VK150 Vacuum cleaner
handle to set the device to a lower power performance
level or use the automatic seing in general.
The device will
not work aer
exchaning the
roller brushes.
The Electronic brush is not connected
properly to the base device.
• Check if the plug connection between the Electronic
brush and the base device is correctly enaged.
The roller brushes are not correctly inserted.
• Place the roller brushes exactly onto the drive axles.
Fault Possible causes and rectification
The Kobold FK370
Freshener kit does
not fit into the
Electronic brush.
If the Freshener kit was placed on a heater or in direct
sunlight, then it might have become warped as a result thereof.
• Buy a new Freshener kit.
KOBOLDEB370
ELECTRONIC BRUSH
1
Fig. 5.3 Inspection flap on the boom
side of the Electronic brush
KOBOLD FK370 FRESHENER KIT
Page 83

82
Troubleshooting
Fault Possible cause and correction
The Kobold SP530
Hard floor cleaner
is automatically
switched off,
the operation
indicator “ON” is
flashing green.
It is possible that the motor is overstrained.
• Switch off the Kobold VK150 Vacuum cleaner.
• Switch on the Vacuum cleaner and close the
secondary air flap of the Hard floor cleaner.
The Hard floor
cleaner is swivelling
excessively.
The Kobold MF520/530 Cleaning cloth is not fi xed properly.
• Check whether the Cleaning cloth is sufficiently
and evenly fixed at the Cloth holder.
The cloth holder is not inserted correctly.
• Check whether the Cloth holder has been inserted
and latched into the Hard floor cleaner correctly.
It is possible that no original Cleaning cloths have been used.
• Only use original Cleaning cloths.
The joint connector
of the Hard floor
cleaner is blocked.
• Remove the blockage with a suitable tool
(e.g. screw driver, crochet hook).
The suction channel
of the Hard floor
cleaner is blocked.
• Remove the blockage.
• Use a suitable tool (e.g. screw driver, crochet hook).
KOBOLD SP530
HARD FLOOR CLEANER
Page 84

83
Troubleshooting
Fault Possible cause and correction
The Hard floor
cleaner has switched
off by itself; the red
operation indicator
“STOP” is flashing
while the Vacuum
cleaner switches off
at the same time.
Moisture has been sucked in.
• Switch off the Vacuum cleaner.
• Aer the device has dried completely, switch
on the Vacuum cleaner and close the secondary
air flap of the Hard floor cleaner.
• It is possible that this step will need
to be repeated several times.
The Hard floor
cleaner is making
noises.
It is possible that the device has not been closed correctly
or that the cloth holder has not been mounted correctly.
• Check if the side cover
4
is present and properly
closed. If not, insert and close the side cover.
• Check the seat and the catch mechanism of the cloth holder.
The vacuuming
result of the Hard
floor cleaner is
insufficient.
It is possible that the Sealing lip frames are dirty and jammed.
• Remove and clean the sealing lip frames.
It is possible that the Kobold MF370 Cleaning cloth
has been fixed in a diagonal position on the cloth
holder and collides with the sealing lip frames.
• Check whether the Cleaning cloth is
evenly fixed in the cloth holder.
The secondary
air flap does not
close/does not
remain closed.
It is possible that the holding magnet is dirty.
• Clean the surface of the magnet.
The Hard floor
cleaner causes
streaks/marks
on the floor.
It is possible that the supporting feet touch the floor.
• In this case, remove the supporting feet
14
.
KOBOLD SP530
HARD FLOOR CLEANER
Fig. 5.4 Reinserting the side cover
4
Fig. 5.5 Removing the supporting feet
14
Page 85

84
Troubleshooting
Fault Possible cause and correction
The cleaning
performance of
the Hard floor
cleaner worsens.
It is possible that the Kobold MF370
Cleaning cloth is soiled excessively.
• Replace the cloth.
It is possible that the Cleaning cloth is too dry.
• Replace the cloth.
The Cleaning cloth is not evenly moistened.
• When moistening the Cleaning cloth, ensure
an equal distribution of the liquid.
The Hard floor
cleaner cleans edges
insufficientl y.
It is possible that the Cleaning cloth has
been moistened insufficiently.
• Repeat the cleaning process with a new cloth.
• When moistening the Cleaning cloth, ensure
an equal distribution of the liquid.
It is possible that the Cleaning cloth
has not been fixed properly.
• Check whether the Cleaning cloth is sufficiently
and evenly fixed at the Cloth holder.
When the Kobold
VK150 Vacuum
cleaner is switched
on, the red operation
indicator “Stop”
is blinking.
The secondary air flap was operated before
the Vacuum cleaner was switched on.
• Switch off the Vacuum cleaner and switch
it back on again aerwards.
KOBOLD SP530
HARD FLOOR CLEANER
Page 86

85
Troubleshooting
Fault Possible cause and correction
The system is
streaking.
It is possible that the Cleaning agent has been overdosed.
• Repeat the cleaning process with a new cloth and clear water.
It is possible that there are residual quantities of old
care products and cleaning agents on the floor.
• Repeat the cleaning process until it improves;
a basic cleaning might be required.
It is possible that the Kobold MF520/530
Cleaning cloth is soiled excessively.
• Replace the cloth.
The moisture film does not dry evenly.
• Remove residual liquid quantities with a
dry cloth in a second cleaning step.
There are marks. The grip of the cloth is not fixed properly.
• Check the fixture of the grip of the cloth.
A dirt film remains
on the floor.
It is possible that the Cleaning cloth is soiled excessively.
• Replace the cloth.
The stain removal
is insufficient.
It is possible that the Cleaning cloth is soiled excessively.
• Replace the cloth.
The moisture
film is uneven.
It is possible that the Cleaning cloth has
been moistened insufficiently.
• Repeat the cleaning process with a new cloth.
• When moistening the Cleaning cloth, ensure
an equal distribution of the liquid.
KOBOLD SP530
HARD FLOOR CLEANER
Page 87

86
Troubleshooting
Fault Possible cause and correction
The floor is
geing too wet.
It is possible that the Kobold MF520/530 Cleaning cloth
was moistened excessively.
• Please observe the dosing instructions.
• If required, remove residual liquid quantities
with a dry cloth in a second cleaning step.
Aer cleaning,
the floor looks
tarnished.
It is possible that there are residual quantities of old, polished
and shining care products and cleaning agents on the floor.
• Repeat the cleaning process, and change the
cloth if required until it improves.
Fault Possible causes and rectification
The Polsterboy
will not operate.
The Polsterboy was connected to the Kobold TR15 Telescopic
tube or the suction hose without the power cord.
• Connect the Polsterboy to the Kobold ESS150
Electronic suction hose.
The Kobold VK150 Vacuum cleaner is not switched on.
• Switch on the device.
The bristles of the
Polsterboy are
deformed or maed.
Fringes or fabrics were sucked in and pulled again.
• Exchange the Suction nozzle.
KOBOLD SP530
HARD FLOOR CLEANER
KOBOLD PB430
POLSTERBOY
Page 88

87
Troubleshooting
Fault Possible causes and rectification
The brushes of
the Polsterboy no
longer rotate.
The Vacuum cleaner is not switched on.
• Switch on the device.
The Suction nozzle is not correctly inserted.
• Make sure to enage the Suction nozzle properly.
Something was sucked in that is blocking the brushes.
• Switch the device off and unplug the
mains power cord from the socket.
• Remove the object.
• Switch the device back on.
Fault Possible causes and rectification
The Flexo nozzle‘s
wings are unhooked.
• Reaach the wings.
If the fault cannot be rectified, please contact Vorwerk‘s customer service
department (see Section “8 Services” on page 91).
KOBOLD PB430
POLSTERBOY
KOBOLD FD15 FLEXO NOZZLE
Fig. 5.6 Reaach the wings
Page 89

88
Disposal and environmental protection
6 DISPOSAL AND ENVIRONMENTAL PROTECTION
6.1 Disposing of the device
As an owner of an electric and electronic device, it is not permied by law (under
EU Directive 2002/96/EC of 27 January 2003 on electric and electronic devices
and the Electrics and Electronics Act of 16.3.2005) to dispose of this device or its
electric/electronic accessories via unsorted domestic waste.
• Instead, use the free collection centres intended for this purpose.
• Contact your city or municipal administration for information.
6.2 Disposing of the packaging
The packaing is an important part of our product: it protects our devices from
damage during transportation and reduces the risk of a device fault. For this
reason, we cannot avoid using packaing. If you need to return or send in your
device during the warranty period, or aer, to the service or customer service
department, the original packaing is the best protection against damages in
transit.
If you nevertheless wish to dispose of the packaing, you can do this at any time
and without limitation via your regional facilities (waste paper skip, yellow skip,
recycling depot, waste paper collection etc.). To this end, Vorwerk commissions
legally authorised licensees.
Page 90

89
Disposal and environmental protection
If you have any questions, please contact your corresponding service centre
(see chapter “8 Services” on page 91).
6.3 Information on environmental protection
Preserving nature and protecting the environment: At Vorwerk, environmental
protection is an important company objective.
LESS PACKAGING
We use only environmentally friendly material, which is recycled if disposed of
correctly. We are actively involved in cuing back on waste packaing during the
development stages and are commied to its disposal and recycling.
SAVING ENERGY
Vorwerk products protect the environment: They only use a small amount of
energy with high suction performance.
ENVIRONMENTALLY FRIENDLY PRODUCTION
We aach a great deal of importance to environmental protection when
manufacturing our products. We use recyclable plastics and colours. We
deliberately avoid using polluting flame retardants.
For our filter bags we use solvent-free adhesives, unbleached paper or
nonhazardous plastic. Our instruction manuals are made from sustainably
managed forests and are bleached without chlorine.
Page 91

90
Disposal and environmental protection
REUSABLE MATERIAL
The material for our products can nearly be completely recycled. We largely
avoid using PVC.
When manufacturing our products, we ensure “sorted” materials:
The substances used can later be separated accordingly at modern facilities
without much energy expenditure. To make them even easier for recycling, we
have labelled most of our plastic components.
Page 92

91
Warranty
7 WARRANTY
Any warranty services can be found in the order note or purchase contract.
8 SERVICES
Either in person with your customer representative
or at the service centre
or .vorwerk-kobold.com
; Services
Page 93

92
Technical details
9 TECHNICAL DETAILS
Kobold VK150 Vacuum cleaner
Safety signs
Housing High-grade recyclable plastic
Motor Maintenance-free reluctance motor with ball
bearings with electronic performance control
at a nominal rotation speed of 60,000 rpm.
Blower Single-stage radial fan
Voltage 220-240 volts alternating current 50/60 Hertz
Nominal output 800 was (max. 1200 was nominal output with
auxiliary equipment)
Electrical power output
without electronic
accessory part or nozzle
Level A 1
st
Level 2nd Level 3rd Level
130 - 800 was 130 was 450 was 800 was
Radius of action Min. 10 m according to IEC 60312-1
max. underpressure 175 hPa
max. air quantity 39,5 l/s
max. suction performance 260 was with a clean filter in ccordance with IEC 60312-1
max. degree of efficiency 32%
Premium filter bag volume
2.5 l in accordance with IEC 60312-1
Dust emission Approx. 0.001 mg/m
3
in accordance with EN 60312
Weight
Approx. 3 kg (without
accessories)
Dimensions Height: approx. 14 cm; width: approx. 21 cm;
length: approx. 72/109 cm
Noise emission 81 dB(A) re 1pW sound power level with Kobold EB370
according to EN 60704-3
KOBOLD VK150
VACUUM CLEANER
Page 94

93
Technical details
Kobold EB370 Electronic brush
Safety signs
Housing High-grade recyclable plastic
Motor Maintenance-free DC motor and
maintenance-free belt drive
Voltage 220-240 volts alternating current 50/60 Hertz
Nominal output 100 was (only for use in combination with Kobold
vacuum cleaners)
Brushes Exchangeable rotating brushes
Working width 300 mm
Rotational speed
of the brushes
Approx. 6200 R/min
So function 800 R/min
Bristle height adjustment Automatic
Rotational speed
with Freshener kit
Approx. 1700 R/min
Weight 1.6 kg
Dimensions Height: approx. 7 cm (with horizontal joint)
Width: approx. 30 cm
Length: approx. 33 cm (with horizontal joint)
Noise emission 81 dB(A) re 1pW sound power level with Kobold VK150
according to EN 60704-3
KOBOLD EB370
ELECTRONIC BRUSH
Page 95

94
Technical details
Kobold SP530 Hard Floor Cleaner
Safety signs
Housing High-quality, recyclable plastic
Gear unit 1
st
Stage - spur / worm gear
2
nd
Stage - maintenance-free toothed belt drive 1350 rpm.
Motor Maintenance-free DC brush motor
Voltage 220 – 240 volts alternating current, 50/60 hertz
Nominal output 100 was (only for use in combination with Kobold vacuum
cleaners)
Weight approx. 3 kg
Dimensions Height: approx. 12 cm (with horizontal joint)
Width: approx. 31 cm
Length: approx. 36 cm (with horizontal joint)
Noise emission 87 dB(A) re 1pW sound power level with Kobold VK150 based
on EN 60704-3 on smooth tiles
KOBOLD SP530
HARD FLOOR CLEANER
Page 96

95
Technical details
Kobold PB430 Polsterboy
Safety signs
Housing High-quality plastic with detachable suction
nozzle made of shaer-proof polyamide
Motor Maintenance-free DC motor with direct transmission
Brush mechanics 2 counter-rotating roller brushes with approx.
4000 rpm, stored maintenance-free
Voltage 220-240 volts alternating current 50/60 Hertz
Power output 50 was
Weight 600 g
Dimensions Height: approx. 11 cm
Width: approx. 8 cm
Length: approx. 25 cm
Noise emission 87 dB(A) re 1pW sound power level with Kobold VK150 based
on EN 60704-3 on upholstery fabric
KOBOLD PB430
POLSTERBOY
Page 97

96
EU energy label classification*
10 EU ENERGY LABEL CLASSIFICATION*
Manufacturer/supplier Vorwerk Elektrowerke GmbH & Co.
KG, Wuppertal, Germany
Model Kobold VK150 with Kobold EB370
Energy efficiency class B
Indicative annual
energy consumption
32.9 kWh/year based on 50 cleaning cycles. The
actual annual energy consumption depends on how
the device is used.
Cleaning performance (carpet) B
Cleaning performance
(hard flooring)
A
Dust re-emission class A
Sound power level 81 dB(A) re 1 pW
Nominal power input 800 + 100 was
Certification as universal vacuum
Manufacturer/supplier Vorwerk Elektrowerke GmbH & Co.
KG, Wuppertal, Germany
Model Kobold VK150 with Kobold HD50
Energy efficiency class A
Indicative annual
energy consumption
26.7 kWh/year based on 50 cleaning cycles. The
actual annual energy consumption depends on how
the device is used.
Cleaning performance (carpet) supplied nozzle not suitable for use on carpets
Cleaning performance
(hard flooring)
C
Dust re-emission class A
Sound power level 84 dB(A) re 1 pW
Nominal power input 800 W
Certification as vacuum for hard flooring
KOBOLD VK150
UPRIGHT VACUUM
WITH
KOBOLD EB370
ELECTRIC BRUSH
KOBOLD VK150
UPRIGHT VACUUM
IN COMBINATION WITH
KOBOLD HD50
HARD FLOOR NOZZLE
*
The applied measuring and calculation met hods for
the verification of the product data i n the table shown
here meet the requirements of Europea n Parliament
and Cou ncil Direc tive 2010/30/EU.
Applic able standards: EN 60312-1; EN
60335-2-2; EN 60704-2-1; EN 60704-3
Page 98

ORIGINAL
QUALITY
Choose quality.
Vorwerk quality
Vorwerk UK Limited
Thorp Building
Whitmore Lane
Sunningdale
Berkshire
SL5 0NS
United Kingdom
VK150 Vacuum cleaner
21092, VK150eco, 2014_01, EN_UK
 Loading...