

Page 1
Congratulations on your Crossfire!
At Vortex, your love for the outdoors is the driving force behind
all we do. Our commitment to you, our customers and dealers,
is unmatched in the industry—and is the strength of our success.
From impressive images to durable construction, our carefully
designed and field-tested optics are the culmination of an
unwavering dedication to deliver quality, reliability and superior
performance to you, our valued customer.
Caution!
Rifl escopes are not intended for looking at the sun or any other intense light
source. Such use could damage the retina and cornea of your eyes—even to the
point of causing blindness.
Please read this entire manual before mounting your rifl escope.
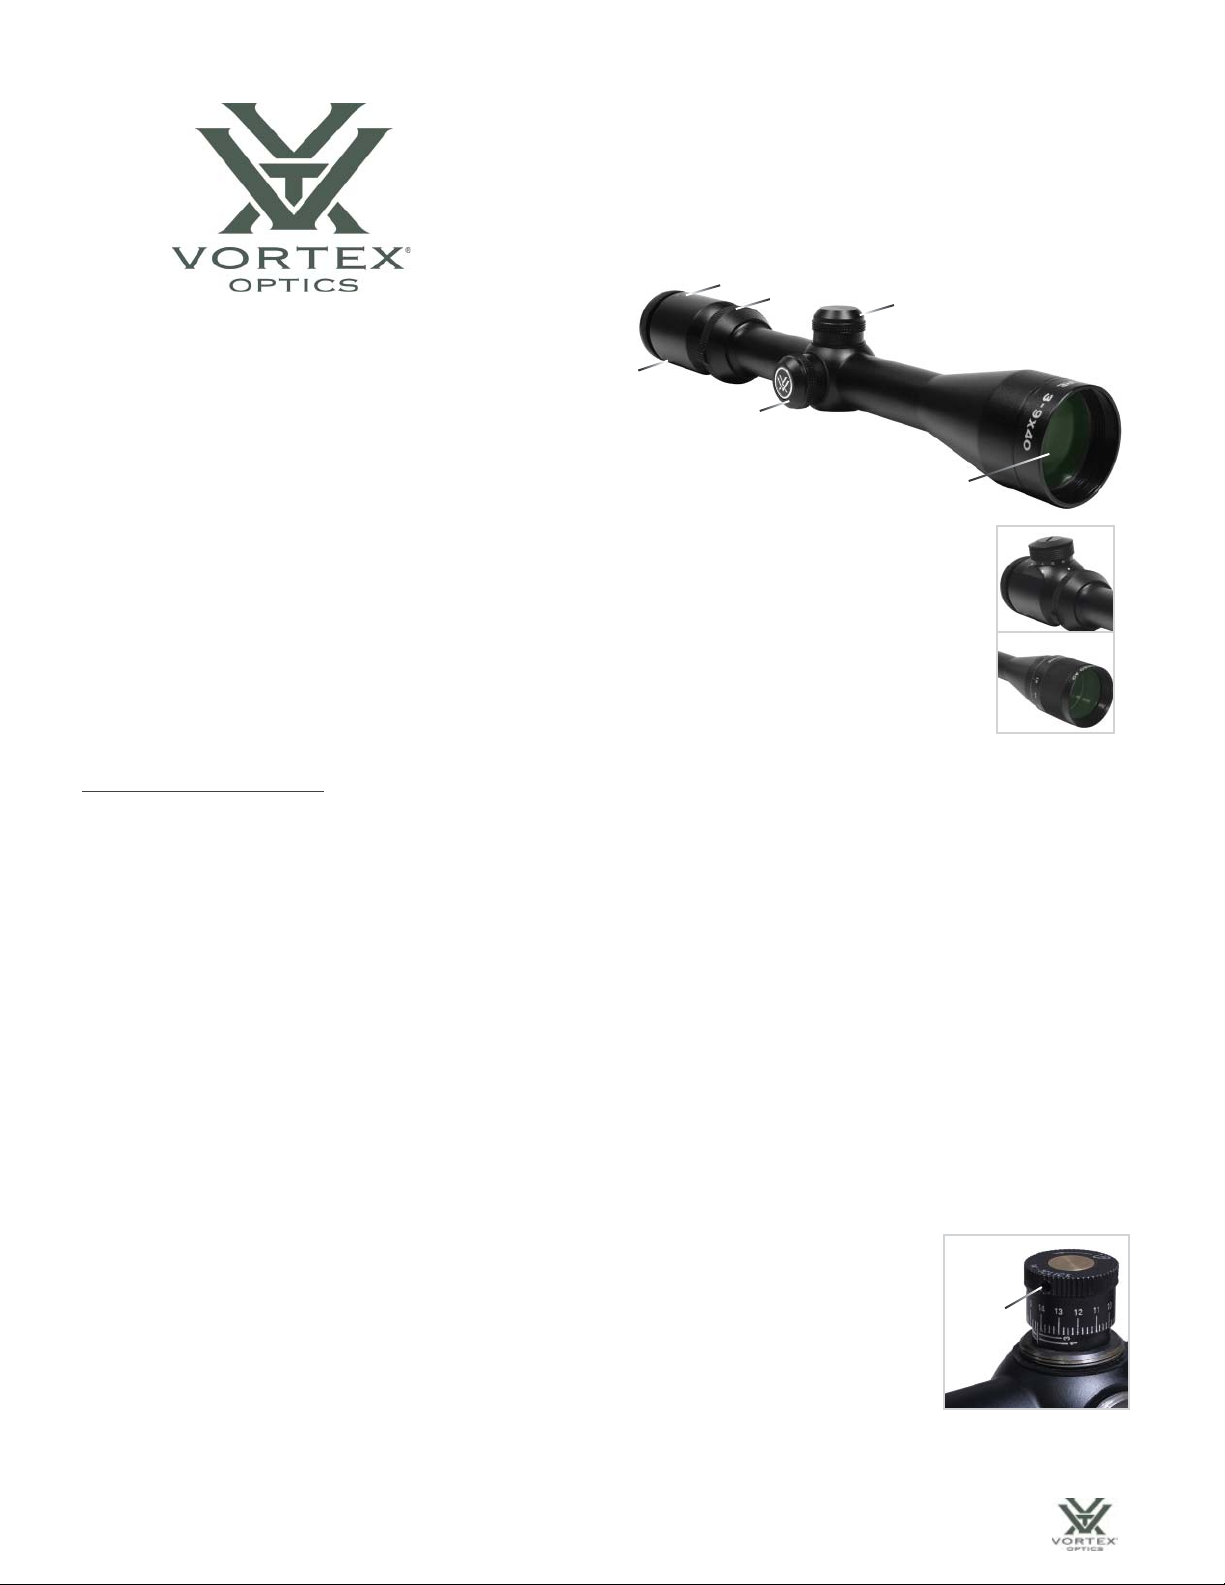
Vortex Crossfire Series Riflescopes
A
B
C
D
A. Fast Focus Ring
B. Magnification Ring
C. Eyepiece
D. Windage Dial
E. Elevation Dial
F. Objective Lens
G. Illuminated Reticle Knob (on select models)
H. Adjustable Objective (AO models only)
E
F
G
H
Riflescope Adjustments
1. Reticle Focusing
To set the reticle focus, begin by allowing your eyes to focus on
a distant object for several moments—not looking through the
scope. Then, hold the scope up to the sky and quickly look through
it. Never look directly into the sun! Pay attention to the sharpness
of the reticle, and adjust the eyepiece focus until it is as sharp as
possible. The reticle image should be crisp and sharp immediately
when you look. Since your eyesight may change over time, it’s a
good idea to periodically re-check this adjustment.
2. Windage and Elevation Adjustment
Vortex Crossfire riflescopes incorporate fingertip-adjustable
elevation and windage dials with tactile and audible clicks. Each
audible click moves the bullet’s point-of-impact a fraction of
a minute of angle (MOA)—either 1/4 or 1/8 MOA. Refer to
markings on the inner turret knob for click movement.
• 1/4 MOA* closely corresponds to 1/4 inch at 100 yards, 1/2 inch
at 200 yards, 3/4 inch at 300 yards...taking four (4) clicks to move
the bullet’s point-of-impact one inch at 100 yards.
• 1/8 MOA* closely corresponds to 1/8 inch at 100 yards, 1/4 inch
at 200 yards, 3/8 inch at 300 yards...taking eight clicks to move the
bullet’s point-of-impact one inch at 100 yards.
How to Adjust Windage and Elevation Settings
Begin adjusting the windage and elevation settings by first
removing the outer covers. Folowing the indicator arrows, move
the turret dials in the direction you wish the bullet’s point-of-
impact to change. To make the adjustments, turn the adjustment
dial in the appropriate direction (up/down or left/right) as
indicated by the arrows.
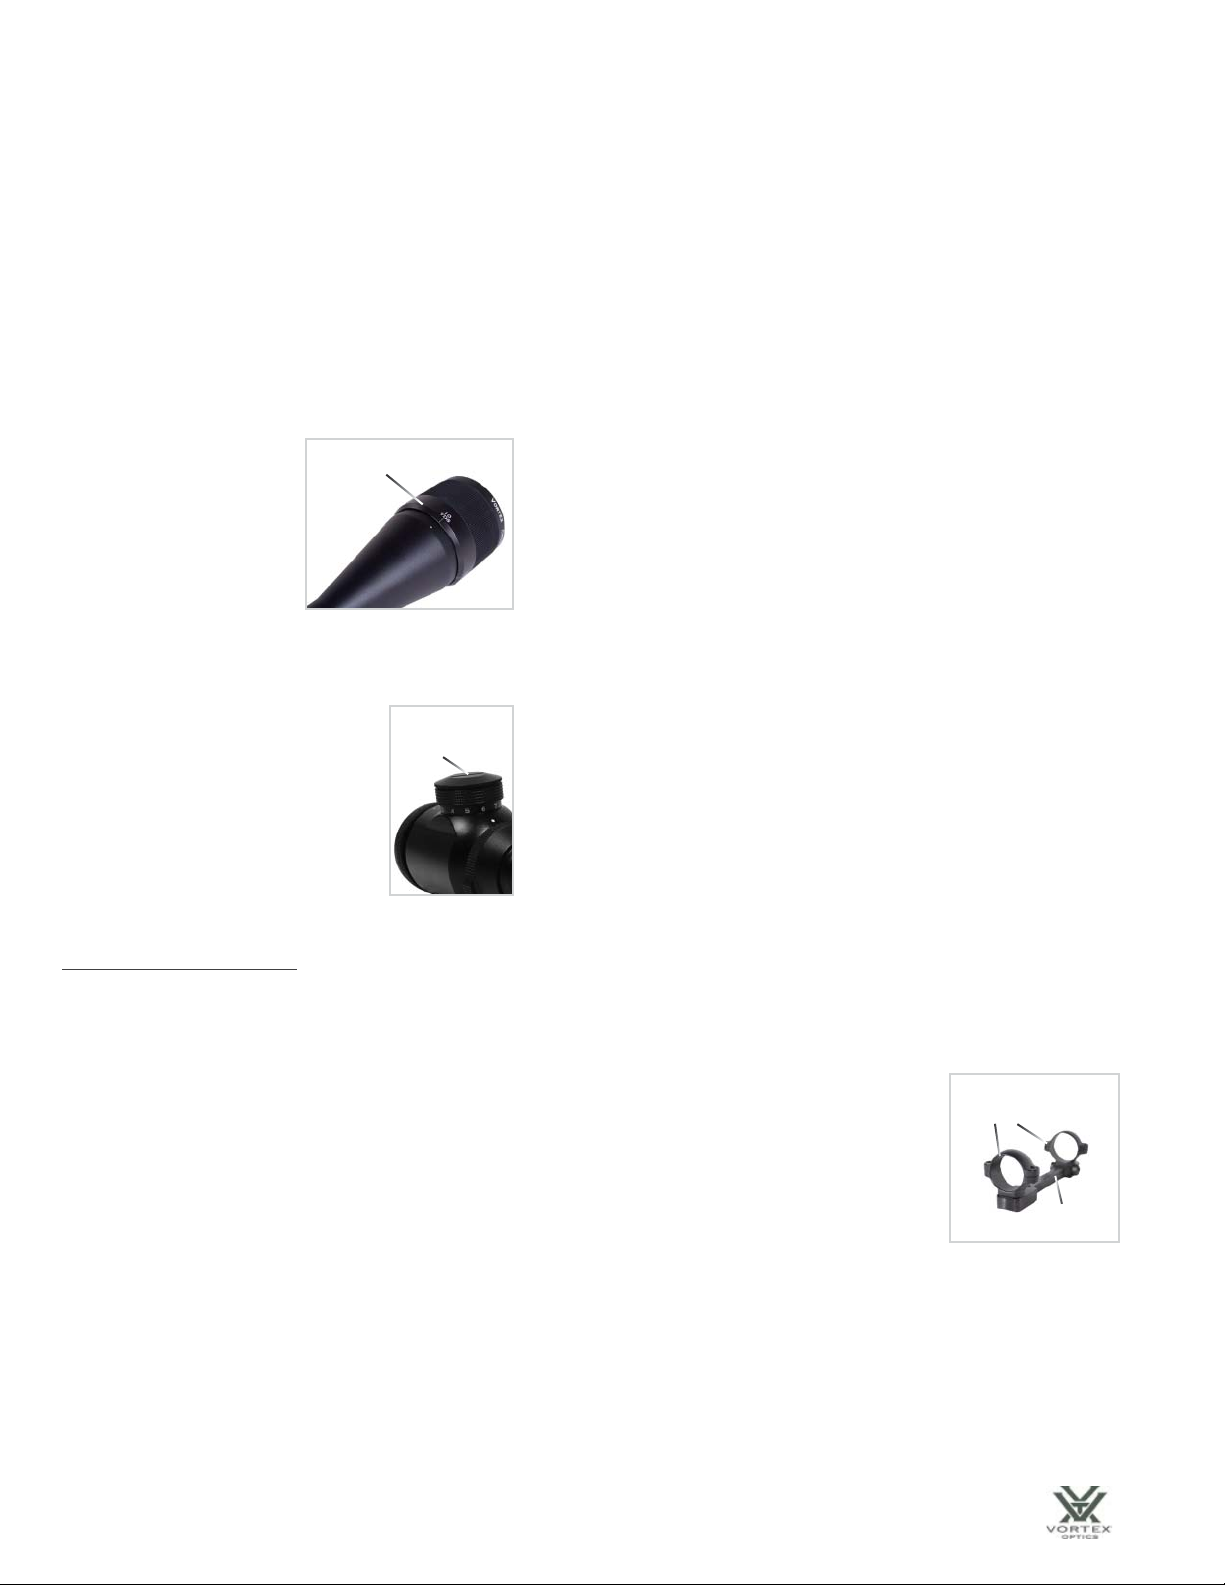
Tall Target Turret Models
Some Crossfire adjustable objective (AO) models use tall target
turrets for improved adjustability of windage and elevation. These
turrets will also allow you to re-index the zero indicator after
sight-in—without disturbing your settings. This very handy
feature allows you to return quickly to your original zero if
temporary corrections are used in the field.
1. After final sight-in is complete,
remove the inner turret knob by
loosening the three small screws
located on top of the turret with a
Loosen
the 3
screws.
1.5mm hex wrench.
2. Carefully rotate the outer dial until
the zero mark is re-aligned with the
indicator line.
3. Re-tighten the small screws.
www.vortexoptics.com
Page 2
3. Variable Magnification Adjustments
To change the power, turn the magnification ring to the desired level. Use lower powers (which offer a wider field of view) when you may need to
make a quick shot at closer distances.
A fi xed-power rifl escope has no magnifi cation adjustment.
4. Parallax Adjustments
Parallax is a phenomenon that results when the target image does not quite fall on the same optical plane as the reticle within the riflescope.
When the shooter’s eye is not precisely centered in the eyepiece, there can be an apparent movement of the target in relation to the reticle which
can cause a small shift in the point of aim.
Adjustable Objective (AO) Lens
Parallax causes the greatest problem on small targets at
high magnification as with varmint and target shooting.
Selected models come with
an adjustable objective (AO).
Adjustable Objective
Most other models are set at
the factory to be parallax-free
at 100 yards; Rimfire models
are parallax-free at 50 yards.
Setting the adjustable objective lens on the AO models is very easy.
1. Be sure that the reticle is properly focused (see page 6).
2. Match the range number on the objective lens barrel(distance you are
shooting) as closely as possible to the indicator arrow on the riflescope body.
For the best accuracy, use a laser rangefinder to measure distances.
3. Check the setting by moving your head up/down and left right while
looking through the scope. The setting is correct if there is no apparent
movement between the reticle and target. If there is movement, continue
adjusting the lens slightly until the movement is eliminated.
5. Illuminated Reticle Adjustment
Select riflescopes in the Crossfire series
use a variable intensity reticle illumination
knob. Rotate the knob in a clockwise
rotation to increase the illumination
intensity; adjust the dial on the knob to
turn the illumination off and on.
Illuminated
Reticle
Knob
Battery Operation
Use a coin to remove the outer cover and
replace the battery. The battery operates
on one CR 2032 Lithium battery; typical
life is up to 1,000 hours (Level 1), 70 hours
(Level 6), 25 hours (Level 11).
Riflescope Installation
To get the best results from your Crossfire riflescope, proper mounting is essential. Although not extremely difficult, the correct steps must be
followed. If you are unsure of your abilities, it would be best to use the services of a qualified gunsmith.
1. Centering the Reticle
Your Crossfire riflescope is pre-set at the factory with the
reticle centered in both adjustment ranges; this is the ideal
position to begin sight-in. If you have changed the settings and
wish to re-center the reticle, follow this procedure:
A. Turn either dial (windage or elevation) as far as you can in
one direction until it stops.
B. Turn the dial in the other direction until it stops, carefully
counting the rotations as you turn the dial.
C. Turn the dial back again to half the number of rotations counted
in Step B —the reticle will be centered for that adjustment only.
D. Repeat for the other adjustment so that the reticle is centered
in both the windage and elevation settings.
2. Mount As Low as Possible
Using high quality, appropriately-sized (1-inch
or 30mm, depending on riflescope model) rings
Rings
and bases matched to your rifle, mount the
scope as low as possible on the rifle. Be sure to
follow manufacturer instructions supplied with
Base
the rings and mounting base. Whether you use
high, medium, or low rings will depend on the riflescope model and your
particular firearm. A lower mounting will help assure proper cheek weld,
and aid in a solid shooting position and fast target acquisition.
We recommend using the lowest rings that will give complete clearance of
the riflescope and rifle. Avoid any contact with the barrel, receiver, bolt
handle, or any other part of the rifle. Work the riflescope’s zoom ring and
rifle’s action to assure no contact.
www.vortexoptics.com
Page 3

3. Adjust for Maximum Eye Relief
Before the final tightening of the scope rings, adjust for
maximum eye relief to avoid injury from recoil.
A. With the riflescope set at the lowest magnification, slide the scope
as far forward as possible in the rings.
B. While viewing through the scope in the normal shooting position,
slowly slide the scope back towards you. When you feel you
hit the full field of view, stop. Without disturbing the front-back
setting, slowly rotate the scope until the elevation dial is at the
top of the scope and the vertical crosshair of the reticle matches
the vertical axis of the rifle. Using a visual vertical reference such
as the edge of a building or telephone pole can help with this.
C. Tighten rings per the manufacturer’s instructions.
just
4. Bore Sighting
Initial bore sighting of the riflescope at a distance of 50 yards will
save you time and money at the range. This can be done using a bore
sighting tool, following the manufacturer’s instructions. If you have a
bolt action rifle, you can bore sight without a tool.
Place the rifle solidly on a bench, remove the bolt, sight through
the bore, and center the target inside the barrel. With the bulls-eye
centered in the bore, make windage and elevation adjustments until
the reticle crosshair is also centered over the bulls-eye. If possible,
make initial windage adjustments using the mounting base rather
than the riflescope’s windage dial.
5. Base Adjustments and Shimming
You will get maximum adjustablility and performance from your Crossfire riflescope if the windage and elevation adjustments are near center.
Though Vortex riflescopes come centered from the factory, you will need to make some adjustments when initially sighting in your scope. Many
ring and base setups allow you to adjust windage at the base mount. If possible, use these adjustments for initial windage change. Though not
usually necessary, you can correct the elevation adjustments using shims under the base mount.
Assuming typical ring spacing of 3.25”, a shim of .001” will
yield 1” at 100 yards, 2” at 200 yards, and so on.
Shim under the front base for more down adjustability and under
If large windage/elevation corrections have been made using bases or shims, it may be
necessary to have the rings lapped. Consult a qualifi ed gunsmith if you’re unsure of
this procedure.
the rear base (nearest shooter) for more up adjustability.
6. The Final Range Sight-In
Final sight-in should be done at the range using the exact
ammunition you expect to hunt or shoot with. Set the parallax
adjustment on AO models to match the distance being used for
sight-in. After the scope has been bore-sighted:
A. Fire a shot or two to check that you’re roughly on target. If necessary, adjust the
reticle to put you near the center of the target (see page 7).
B. Next, fire a three-shot group as precisely as possible. Using the center of this
group as a reference, make any necessary correction adjustments for windage and
elevation. Adjust the dials in the direction you wish the group to move.
C. Fire a final three-shot group to confirm your adjustment and repeat until you
achieve satisfactory results.
Riflescope Maintenance
Your Crossfire riflescope will require very little routine maintenance other than periodically cleaning the exterior lenses. All components of
Vortex riflescopes are permanently lubricated so no additional lubricant should be applied.
Lens Care
When cleaning the lenses, be sure to use products such as the
Vortex Lens Pen or the Fog Free lens cleaning kits that are designed
for use on coated optical lenses. Be sure to blow away any dust or
grit on the lenses prior to wiping the surfaces. Using your breath, a
Avoid storage in direct sunlight or hot locations since high
temperatures can adversely affect internal lubricants. Do not
attempt to disassemble any components of your rifl escope.
very small amount of water, or pure alcohol can help remove oil and
dried water spots.
Riflescope Body Care
Clean the exterior of the riflescope by wiping with the soft, dry
cleaning cloth provided with the Crossfire riflescope.
www.vortexoptics.com
Page 4

Riflescope Troubleshooting
Please check the following before returning a riflescope for
service. Many times, the problems thought to be with the rifl escope are
actually with the rifl escope’s mount.
1. Be sure the mounts are tight to the rifle and that the scope is
secure in the rings; you should not be able to twist or move
the scope in the rings.
2. Insufficient windage or elevation adjustment range can indicate
alignment problems with base mount holes drilled in the rifle’s
receiver or riflescope base; this may also indicate alignment
problems with barrel and receiver. Re-center the reticle
(see page 11) and then check the bore sight. If the reticle is way
off while centered, base adjustment or shimming may be needed.
Consult a qualified gunsmith if unsure of correct procedure.
3. If a rifle fails to group well, be sure the rifle’s action is bedded
correctly and that all mounting screws are properly tightened.
The rifle’s barrel and action must be clean and free of excessive
oil or copper fouling. Be sure the ammunition works well with
the rifle—try a type known to have grouped well in the rifle.
The VIP Warranty
This Vortex riflescope is built with
our commitment to your absolute
satisfaction; it is engineered to last and
is unconditionally guaranteed. Vortex
pledges this Very Important Promise to
you, a Very Important Person—and that’s why we call it the
VIP warranty.
In the event that your Crossfire riflescope requires service,
no matter the cause*, Vortex Optics will repair or replace
(at our discretion) the riflescope at no charge to you. What’s
more, there is no time limit on our promise.
*The VIP warranty does not include loss, theft, deliberate damage, or damage
because of unauthorized repair, modification, or disassembly. Vortex Optics
reserves the right to replace warranted product with a product of similar value
and/or with similar specifications in the event that the original product is no
longer manufactured or has been discontinued. With no warranty card to fill out,
the VIP warranty is completely transferable.
Vortex makes optics, not just riflescopes!
See our complete line of binoculars, spotting scopes,
tripods, and accessories at your nearest Vortex dealer.
To receive your free Vortex product literature, simply
call or e-mail Vortex Optics:
(800) 426-0048
info@vortexoptics.com
Vortex Optics Technical Service
For technical service questions, call the Vortex Optics Technical
Service telephone number at (800) 426-0048 or send an e-mail to
service@vortexoptics.com.
If your scope requires warranty service, please follow these
practical instructions before shipping:
1. Remove the rings and any other accessories from the scope.
2. Include a note with your name, shipping address, daytime
phone, e-mail, and a description of the problem.
3. Add padding around the rif lescope, then pack inside a shipping
carton to avoid damage during the shipping process.
Send all service repairs to:
Vortex Optics
2120 West Greenview Drive
Middleton, WI 53562
(800) 426-0048
info@vortexoptics.com
www.vortexoptics.com
 Loading...