


Workshop Manual
Technical Data
TAD1240GE, TAD1241GE/VE
TAD1242GE/VE, TWD1240VE
>| Ecu - Repair - Manual |<

>| Ecu - Repair - Manual |<
Technical data
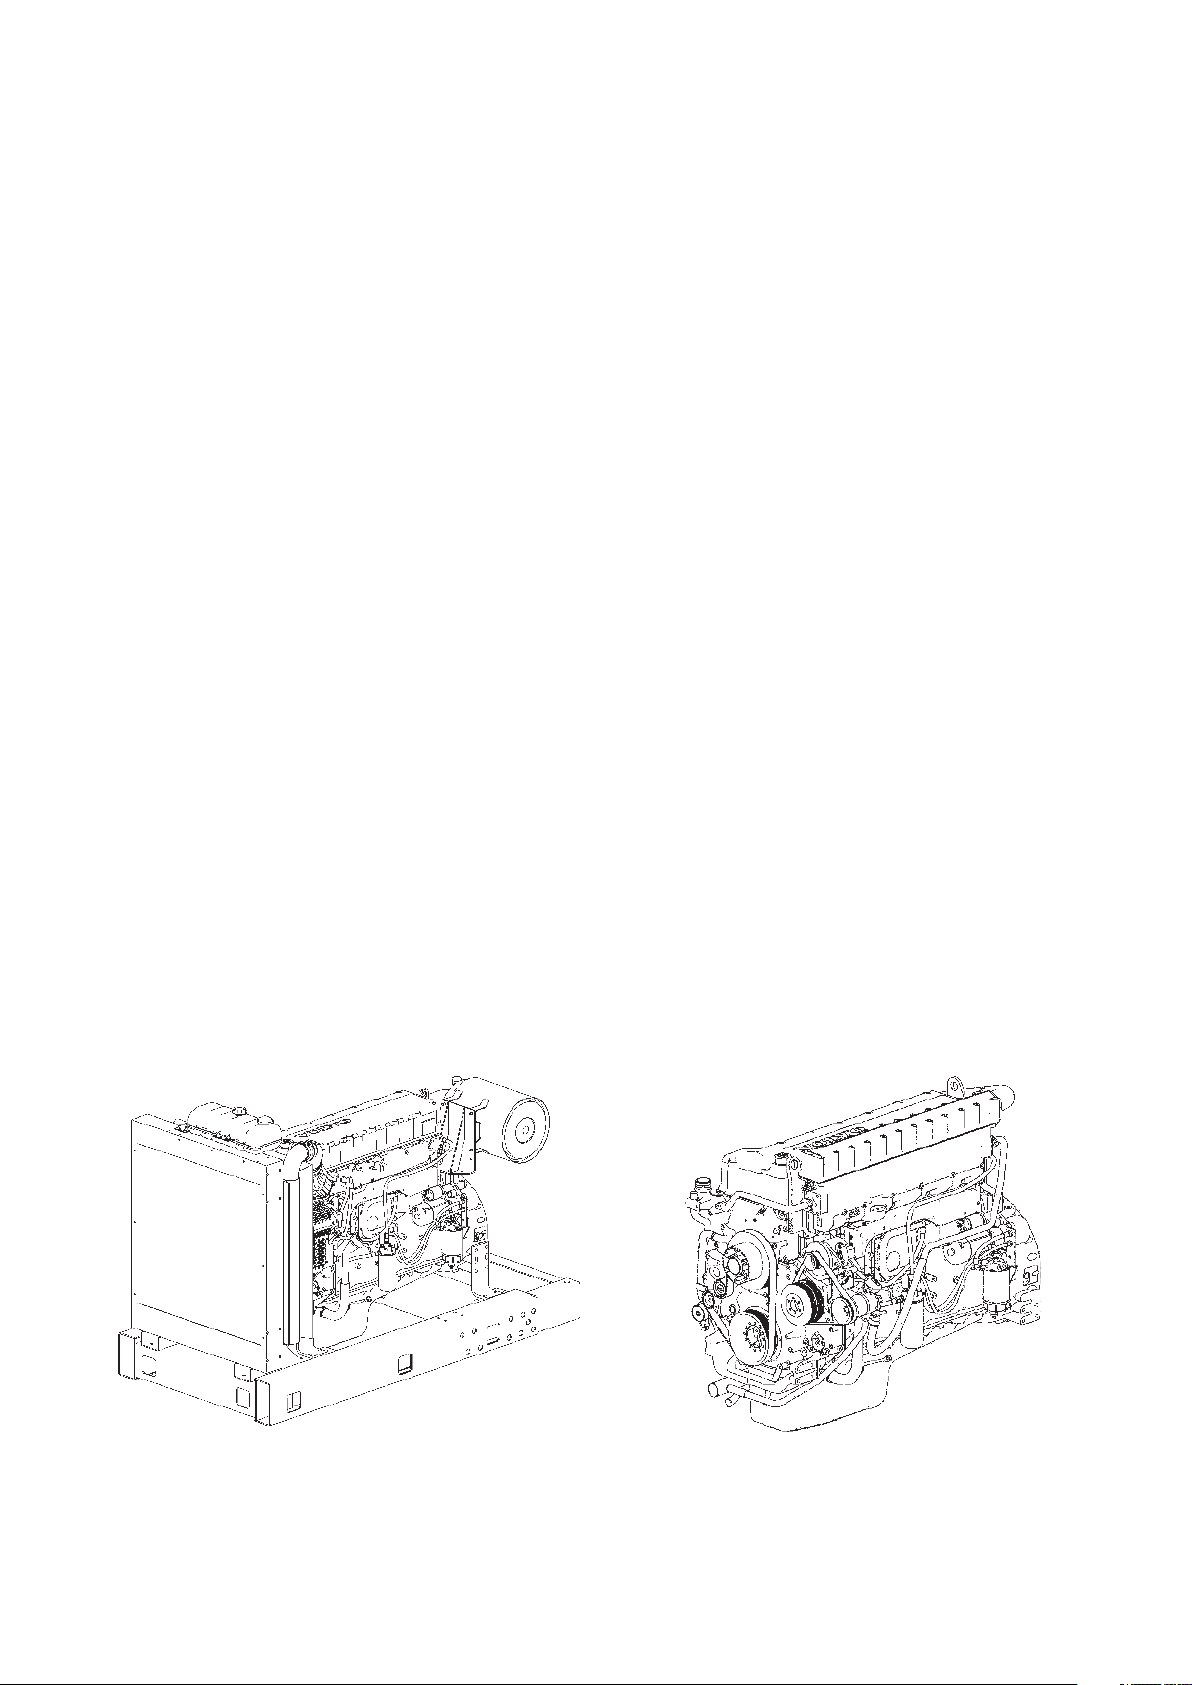
Engine
TAD1240GE, TAD1241GE/VE
TAD1242GE/VE, TWD1240VE
Contents
Safety information ................................................ 2
Introduction ......................................................... 2
Important ............................................................ 2
General information ............................................. 5
About the Service Manual ................................... 5
Spare parts ......................................................... 5
Certificated engines ............................................ 5
Technical data ...................................................... 6
References to Service Bulletins .......................... 31
>| Ecu - Repair - Manual |<

Safety information
Group 20
The Service Manual contains technical data,
descriptions and repair instructions relating to the
Volvo Penta products or product versions included in
the list of contents. Make sure you use the right
workshop literature.
Read the safety information, “General
information” and “Repair instructions” carefully
before starting any service work.
Important
The following special warning symbols occur in the
Service Manual and on the product.
WARNING! Warns of the risk of injury and
extensive damage to the product or property,
or that serious functional faults could arise if
the instructions are not followed.
IMPORTANT! Used to draw attention to anything that could cause damage to the product or
property or functional disorders in the same.
NOTE: Used to draw attention to important information
for facilitating work operations or handling.
If work is carried out near an engine that is running, an incautious movement or a dropped tool
could in the worst case lead to bodily harm. Be
mindful of hot surfaces (exhaust pipes, the
turbocharger, charge air pipes, starter elements,
etc.) and hot liquids in lines and hoses on an
engine that is running or has just been stopped.
Before starting the engine, refit all guards and
protective elements that were removed in the
course of carrying out service work.
Make sure that the warning and/or information
decals affixed to the product are always in plain
sight. Replace decals that are damaged or have
been painted over.
Never start the engine unless the air filter is
fitted. The rotating impeller in the turbo could
cause serious injuries. Foreign objects in the inlet line could additionally cause machinery damage.
To provide an overview of the risks you should always
be aware of and the precautionary measures that
should always be adopted, we have listed them here.
Make it impossible for the engine to start. Turn
off the current by means of the main switch (or
switches) and lock it (them) in the OFF position
before starting service work. Affix a warning
sign in the driver’s area.
As a rule, all service work should be carried out
when the engine is stationary. Some work,
including certain adjustments, nonetheless
requires the engine to be running. Approaching
an engine that is running could be dangerous.
Bear in mind that loose-fitting clothes or long
hair may get caught in rotating parts and cause
serious injury.
Never use a starter spray or the like to help start
the engine. It could cause an explosion in the inlet manifold. Danger of injury.
Start the engine in well-ventilated premises only.
If the engine is run in a confined space, exhaust
gases and crankcase gases should be conducted away from the engine bay or workshop area.
Avoid opening the coolant filler cap when the
engine is still hot. Steam or hot coolant could
squirt out while the built-up pressure will be lost.
If necessary, open the filler cap slowly and release the pressure in the cooling system. Be
extremely careful if a cock, plug or coolant line
has to be removed while the engine is still hot.
Steam or hot coolant could squirt out in an unexpected direction.
>| Ecu - Repair - Manual |<

General instructionsGroup 20
Hot oil can cause burns, Avoid getting hot oil on
your skin. Make sure that the lubricating system
is depressurized before starting any work on it.
Never start or run the engine with the oil filler
cap removed as oil under pressure could then
escape.
Stop the engine before doing any work on the
cooling system.
Always use protective goggles when carrying
out work where splinters, grinding sparks and
splashes of acid or other chemicals could occur.
The eyes are especially sensitive and an injury
could result in loss of sight.
Avoid getting oil on your skin. Prolonged or recurring contact with oil can remove the skin’s
natural moisture with irritation, dehydration, eczema and other skin disorders as a result. From
a hygienic point of view, used oil is more harmful than fresh oil. Wear protective gloves and
avoid clothes and rags ingrained with oil. Wash
yourself regularly, particularly before mealtimes.
Use skin lotion intended for this purpose to
avoid dehydration and to facilitate cleansing of
the skin.
WARNING! Under no circumstances should the
engine’s pressure pipes be bent or reshaped.
Damaged pipes must be changed.
All fuels and many chemicals are flammable.
Make sure that they cannot be ignited by a
naked flame or spark. Petrol, certain diluents
and hydrogen from batteries, when mixed with
air in the right proportions, are highly flammable
and explosive. No smoking! Arrange for adequate ventilation and take the necessary safety
measures prior to the start of welding or grinding work in the vicinity. Always keep a fire extinguisher easily accessible at the workplace.
Ensure that rags saturated with oil and fuel, as
well as used fuel and oil filters, are kept in a
safe place prior to their disposal. Under certain
conditions, spontaneous combustion can occur
in oil-ingrained rags. Used fuel and oil filters
comprise environmentally hazardous waste and,
together with used lubricating oil, contaminated
fuel, residual paint, solvents, degreasants and
residual detergents, should be taken to a suitable plant for destruction.
Most chemicals intended for the product (such
as engine and transmission oils, glycol, petrol
and diesel oil) or chemicals for workshop use
(such as degreasants, paints and solvents) are
injurious to the health. Carefully read the instructions on the package. Always follow the
prescribed safety rules (such as the use of respirators, protective goggles, gloves, etc.). Make
sure that other personnel are not exposed without their knowledge to substances that are injurous to health, such as through the air they
breathe. Make provision for good ventilation.
Deal with used and surplus chemicals in the prescribed manner.
Exercise great care when detecting leaks in the
fuel system and testing fuel nozzles. Wear protective goggles. The jets from a fuel nozzle are
under very high pressure and have great penetrative power; the fuel can penetrate deep into
body tissues and cause serious injury. Risk of
blood poisoning.
Batteries should never be exposed to naked
flames or electric sparks. Never smoke near the
batteries. When the batteries are being charged
they give off hydrogen which, when mixed with
air, forms oxyhydrogen gas. This gas is highly
flammable and extremely explosive. A spark,
which can occur if the batteries are connected
incorrectly, could cause a battery to explode
with injury and damage as a result. Do not disturb the connections when attempting to start
(risk of sparks) and do not lean over any of the
batteries.
Never mistake the positive and negative terminals for each other when installing the batteries. If this happens it could cause serious
damage to the electrical equipment. Compare
with the wiring diagram.
>| Ecu - Repair - Manual |<
General instructions
Group 20
Always wear protective goggles when charging
and handling batteries. The battery electrolyte
contains highly corrosive sulphuric acid. If it
gets on your skin, wash the affected area with
soap and plenty of water. If the electrolyte gets
in your eyes, rinse them at once with plenty of
water and see a doctor as soon as possible.
Stop the engine and cut off the current with the
main switch (or switches) before starting to work
on the electrical system.
The clutch should be adjusted with the engine
switched off.
Use the lifting eyes mounted on the engine
when lifting it. Always check that all lifting
equipment is in good condition and that it has
the right capacity for the job (engine weight plus
reversing gear and extra equipment, if any). To
ensure safe handling and to avoid damaging
components mounted on the top of the engine,
it should be lifted using an adjustable lifting
beam or one suitably adapted to the engine. All
chains or cables should run parallel to each
other and as perpendicular as possible to the
top of the engine.
If other equipment that has been connected to
the engine changes its centre of gravity, special
lifting devices may be needed to obtain the right
balance and ensure safe handling.
Never carry out any work on an engine that is
suspended solely from a lifting device (hoist, etc.).
Never work alone when heavy components are
to be removed, not even when a safe lifting device like a lockable block and tackle is used.
Even when a lifting device is used two people
will generally be required, one to handle the lifting device and the other to make sure that the
components go clear and are not damaged when
lifted away.
Always make sure in advance that there is sufficient space for dismantling to be carried out in
the area with no danger of it causing injury or
material damage.
WARNING! Electrical system and fuel system
components on Volvo Penta products are designed and manufactured to minimize the risk of
explosion and fire. The engine must not be run
in environments where they will be surrounded
by explosive media.
Always use fuel recommended by Volvo Penta.
See the Owner’s Manual. The use of a poorer
grade of fuel could damage the engine. On a
diesel engine, a poor grade of fuel could lead to
binding of the control rod and overrevving of the
engine with a consequent risk of injury and damage. Poor fuel can also give rise to higher maintenance costs.
Bear in mind the following when cleaning with
high-pressure equipment: never direct the jet of
water on seals, rubber hoses or electrical components. Never use the high-pressure function
when cleaning the engine.
4
>| Ecu - Repair - Manual |<

Group 20
General information
About the Service Manual
This Service Manual contains technical data for the
standard versions of the TAD1240GE, TAD1241GE/VE,
TA1242GE/VE and TWD1240VE engines.
All references from the service manuals containing
repair instructions for the TAD1240GE, TAD1241GE/
VE, TAD1242GE/VE and TWD1240VE engines will be
found in the “Technical data” Service Manual.
The Service Manual is primarily produced for Volvo
Penta’s service workshops and their qualified personnel. It is therefore assumed that persons using the
manual have the necessary basic knowledge and can
carry out work of a mechanical/electrical nature that
forms part of their occupational duties.
Volvo Penta is continuously developing its products
and we therefore reserve the right to introduce
changes and modifications. All the information in this
manual is based on product data available up to the
time of going to press. Any changes of vital importance that have been introduced in product or service
methods after that date will be announced in the form
of Service Bulletins.
Spare parts
Spare parts for the electrical and fuel systems are
subject to different national safety requirements. Volvo
Penta Original Spare Parts meet these require-ments.
All types of damage occurring as a result of using
non-original Volvo Penta spare parts for the pro-duct
in question will not be covered under the terms of
warranty as undertaken by Volvo Penta.
Certificated engines
For engines that are certificated in compliance with
national and regional environmental legislation the
manufacturer undertakes to ensure that the environmental requirements are fulfilled both in new engines
and those already in use. The product must correspond to the specimen product that was approved for
certification. For Volvo Penta as the manufacturer to
be answerable for ensuring that engines in use meet
the stipulated environmental requirements, the following requirements in regard to service and spare parts
must be fulfilled:
€
€ The service intervals and maintenance measures
recommended by Volvo Penta must be followed.
€
€ Only Volvo Penta Original Spare Parts intended
for the certificated engine version may be used.
€
€ Service embracing injection pumps, pump set-
tings and injectors must always be carried out by
an authorized Volvo Penta workshop.
€
€ The engine must not be rebuilt or modified in any
way, except for the accessories and service kits
that Volvo Penta has developed for the engine in
question.
€
€ Installation changes to exhaust pipes and supply
air ducts for the engine bay (ventilation ducts)
must not be made indiscriminately as this could
affect exhaust emission levels.
€
€ Security seals, if any, must not be broken by non-
authorized personnel.
In other respects the general instructions for driving,
operation and maintenance given in the Owner’s Manual are applicable.
IMPORTANT! When spare parts are required,
use only Volvo Penta Original Spare Parts.
If non-original spare parts are used, AB Volvo
Penta will no longer be responsible for ensuring that the engine corresponds to the certificated version.
All types of injury, damage and/or costs arising
due to the use of non-original Volvo Penta Original
Spare Parts for the product in question will not be
covered under the terms of warranty as undertaken by Volvo Penta.
>| Ecu - Repair - Manual |<
5

Technical data
Group 20
General
Type designation .................................................... TAD1240GE TAD1241/42GE TWD1240VE TAD1241/42VE
Number of cylinders ............................................... 6
Cylinder bore ..........................................................131 mm (5.16")
Stroke ....................................................................150 mm (5.91")
Swept volume ........................................................12.13 dm3 (740.20 inch3)
Number of valves ................................................... 24
Direction of rotation (viewed from front) ..................Clockwise
Compression ratio .................................................. 18.5:1 17.5:1 18.5:1 17.5:1
Firing order .............................................................1-5-3-6-2-4
Slow idling speed (rpm) .......................................... 600-1200 600-1200 600-900 600-900
Fast idling speed (rpm)........................................... 1500-1620 1500-1620 2100 1000
........................................................................... /1800-1920 /1800-1920
Highest full-load engine speed (rpm) ...................... 1500/1800 1500/1800 2100 1800
Dry weight (kg) ......................................................1230* 1230* 1270 1230*
........................................................................... (2706 lbs) (2706 lbs) (2794 lbs) (2706 lbs)
*Weight TAD engines without radiator assembly and air filter
Engine block
Cylinder head
Type ..................................................................... One cylinder head for all cylinders with single overhead camshaft
Length ................................................................... 1078 mm (42.44")
Width ..................................................................... 397 mm (15.63")
Height ....................................................................135 mm (5.32")
Max. surface unevenness (bottom surface) .......... 0.1 mm (0.004")
Cylinder head bolts
Number of bolts per cylinder head ......................... 38
Thread size ........................................................... M16
Length ................................................................... 200 mm (7.87")
6
>| Ecu - Repair - Manual |<
Group 20
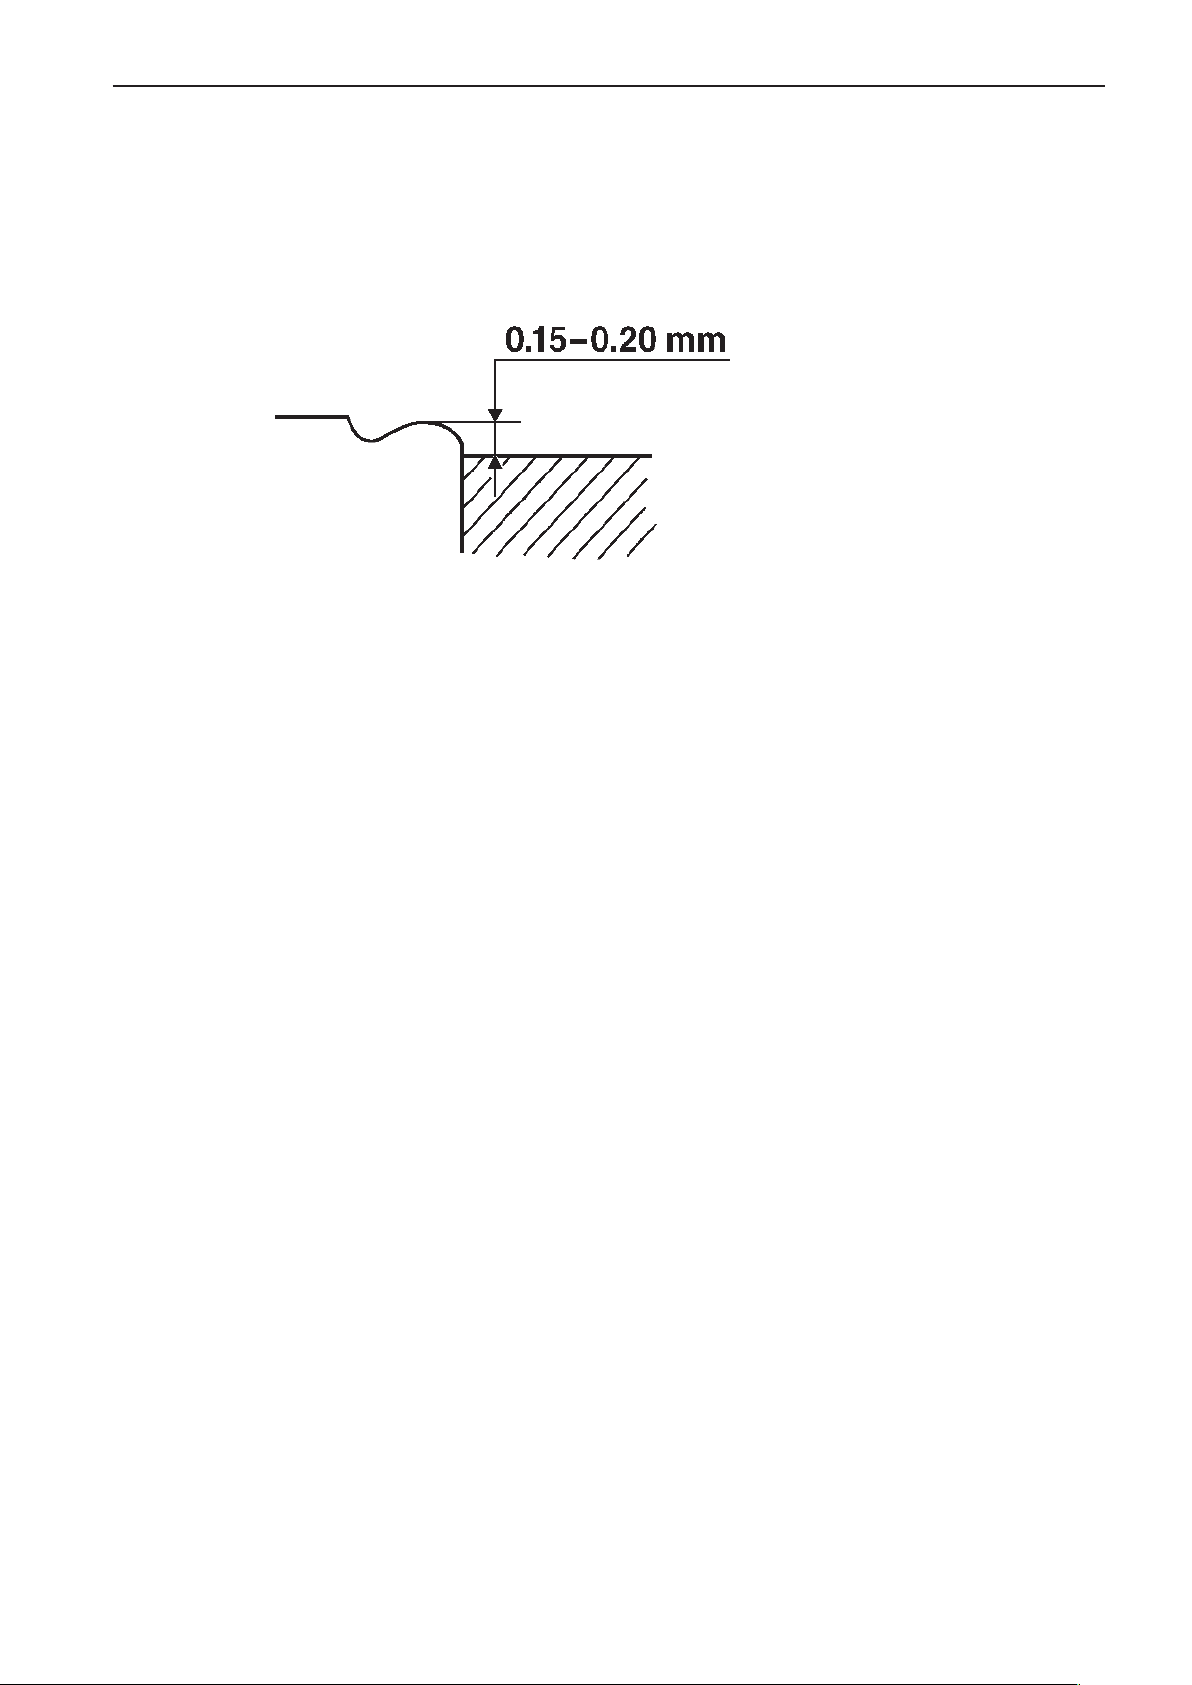
Cylinder liners
Type ...................................................................... Wet, replaceable
Sealing surface height above block surface ...........0.15–0.20 mm (0.006–0.0079")
Number of sealing rings per cylinder liner ............... 4
Technical data
Pistons
Height above cylinder block surface ....................... 0.05-0.45 mm (0.002–0.018")
Diameter, combustion chamber .............................. 89 mm (3.5")
Depth, piston bowl ................................................. 18.55 mm (0.73") (E=17.5:1) 17.14 (E=18.5:1)
Number of ring grooves .........................................3
Front marking ........................................................Arrow pointing forwards
Gudgeon pin diameter ........................................... 55 mm (2.17")
Piston rings
Compression rings
Number .................................................................. 2
Piston ring clearance in groove:
upper compression ring ....................................... Trapezoidal section, no clearance
lower compression ring, vertical .......................... 0.05-0.08 mm (0.002–0.0031")
Piston ring gap:
upper compression ring ....................................... 0.425-0.575 mm (0.0167–0.0226")
wear tolerance .................................................. 1 mm (0.04")
lower compression ring ....................................... 0.8 mm (0.032")
wear tolerance .................................................. 1.3 mm (0.051")
Oil control ring
Number .................................................................. 1
Width, incl. spring ..................................................4.3 mm (0.17")
Piston ring clearance, vertical ................................ 0.03-0.08 mm (0.0012–0.0031")
Piston ring gap ....................................................... 0.35-0.75 mm (0.014–0.03")
>| Ecu - Repair - Manual |<
7
Technical data
Valve mechanism
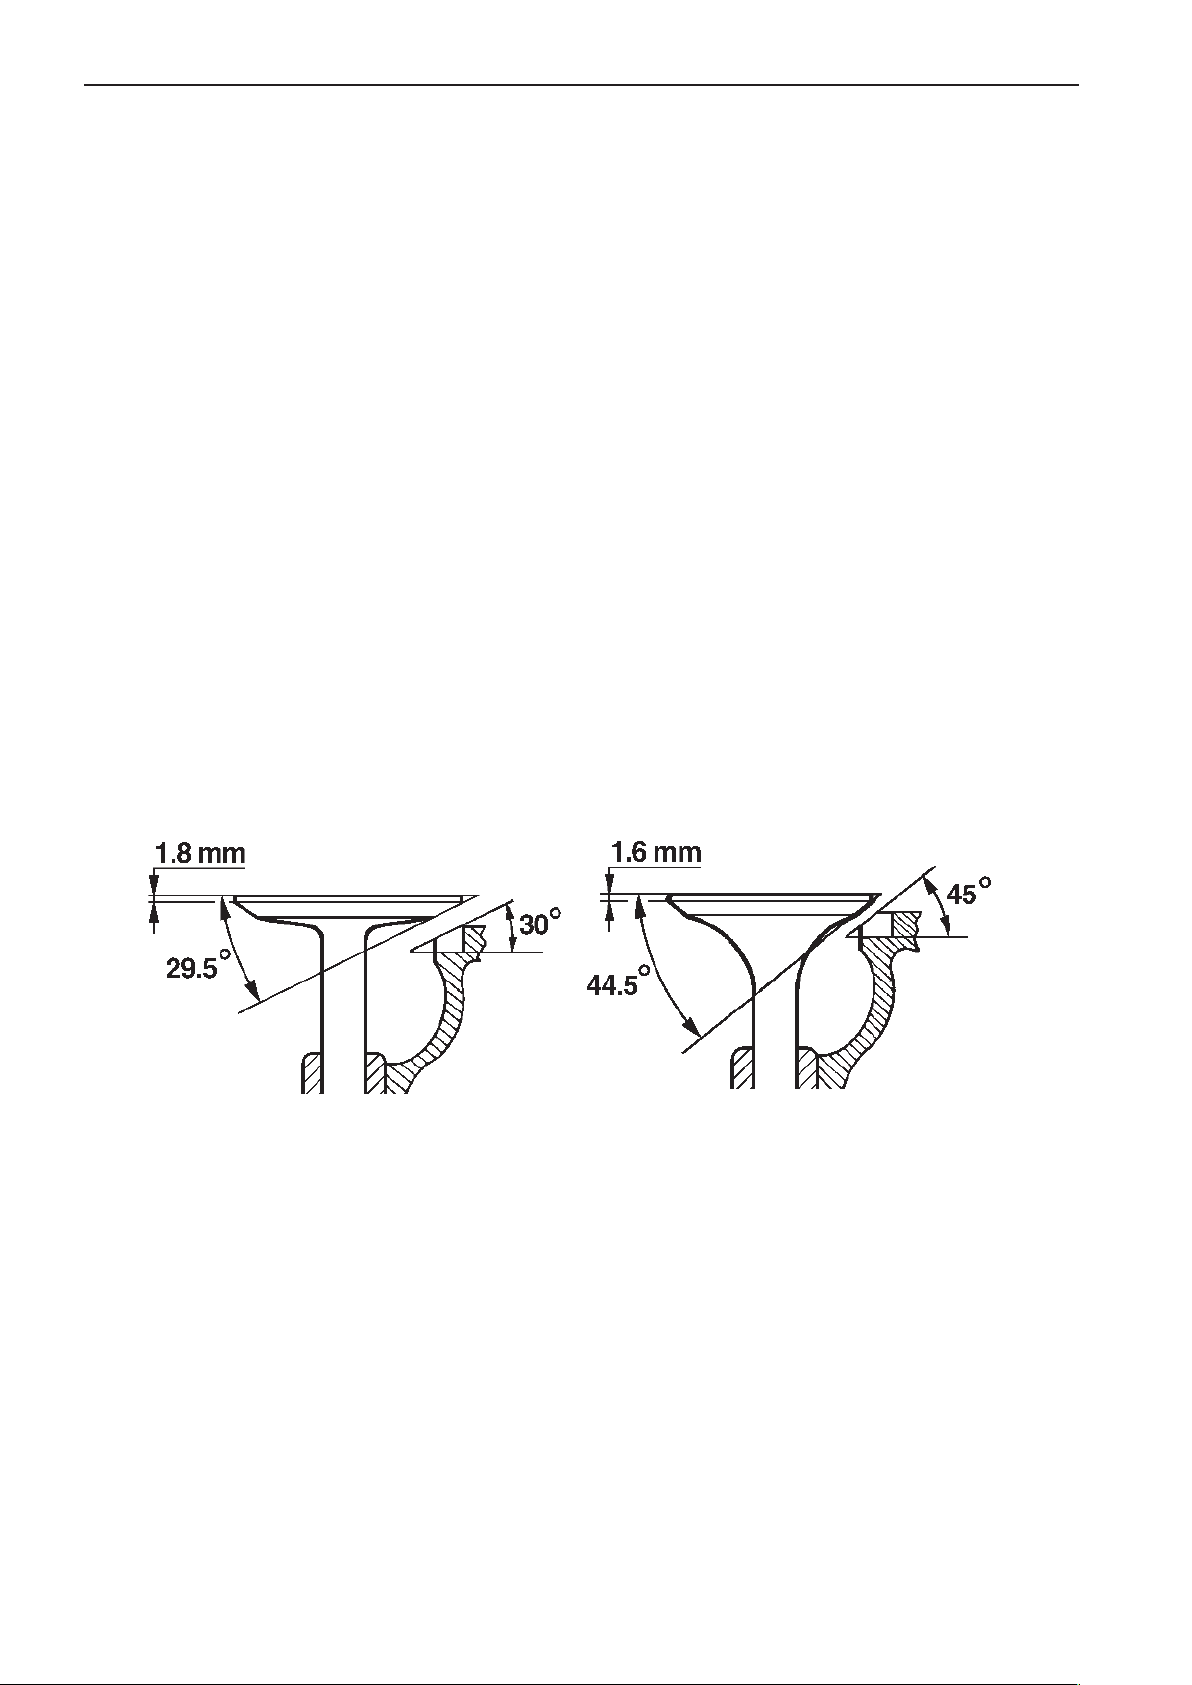
Valves
Valve head diameter
Inlet .................................................................... 40 mm (1.58")
Exhaust .............................................................. 40 mm (1.58")
Stem diameter
Inlet .................................................................... 7.960–7.975 mm (0.3134–0.3140")
Exhaust .............................................................. 7.947–7.962 mm (0.3129–0.3135")
Valve face angle
Inlet .................................................................... 29.5°
Exhaust .............................................................. 44.5°
Valve head face, (see illustration below)
Inlet (new valve) .................................................. Min.1.8 mm (0.07")
wear tolerance ..................................................... 1.4 mm (0.055")
Exhaust (new valve) ........................................... Min.1.6 mm (0.063")
wear tolerance ..................................................... 1.2 mm (0.0472")
Seat angle in cylinder head
Inlet .................................................................... 30°
Exhaust .............................................................. 45°
The valve seat should be ground down until
the distance from the valve head (new valve)
to the cylinder head surface is:
Inlet ...................................................................... 0.9–1.4 mm (0.035–0.055")
wear tolerance ..................................................... Max. 1.5 mm (0.06")
Group 20
Exhaust .............................................................. 1.2–1.7 mm (0.047–0.067")
wear tolerance ..................................................... Max. 1.8 mm (0.071")
If the distance is greater the valve seats
must be changed.
Valve clearances, cold engine, setting value
Inlet .................................................................... 0.2 mm (0.008")
Exhaust .............................................................. 0.5 mm (0.020")
Valve clearance, cold engine, check value
Inlet .................................................................... 0.15–0.25 mm (0.006–0.010")
Exhaust .............................................................. 0.45–0.55 mm (0.018–0.022")
8
>| Ecu - Repair - Manual |<
Group 20
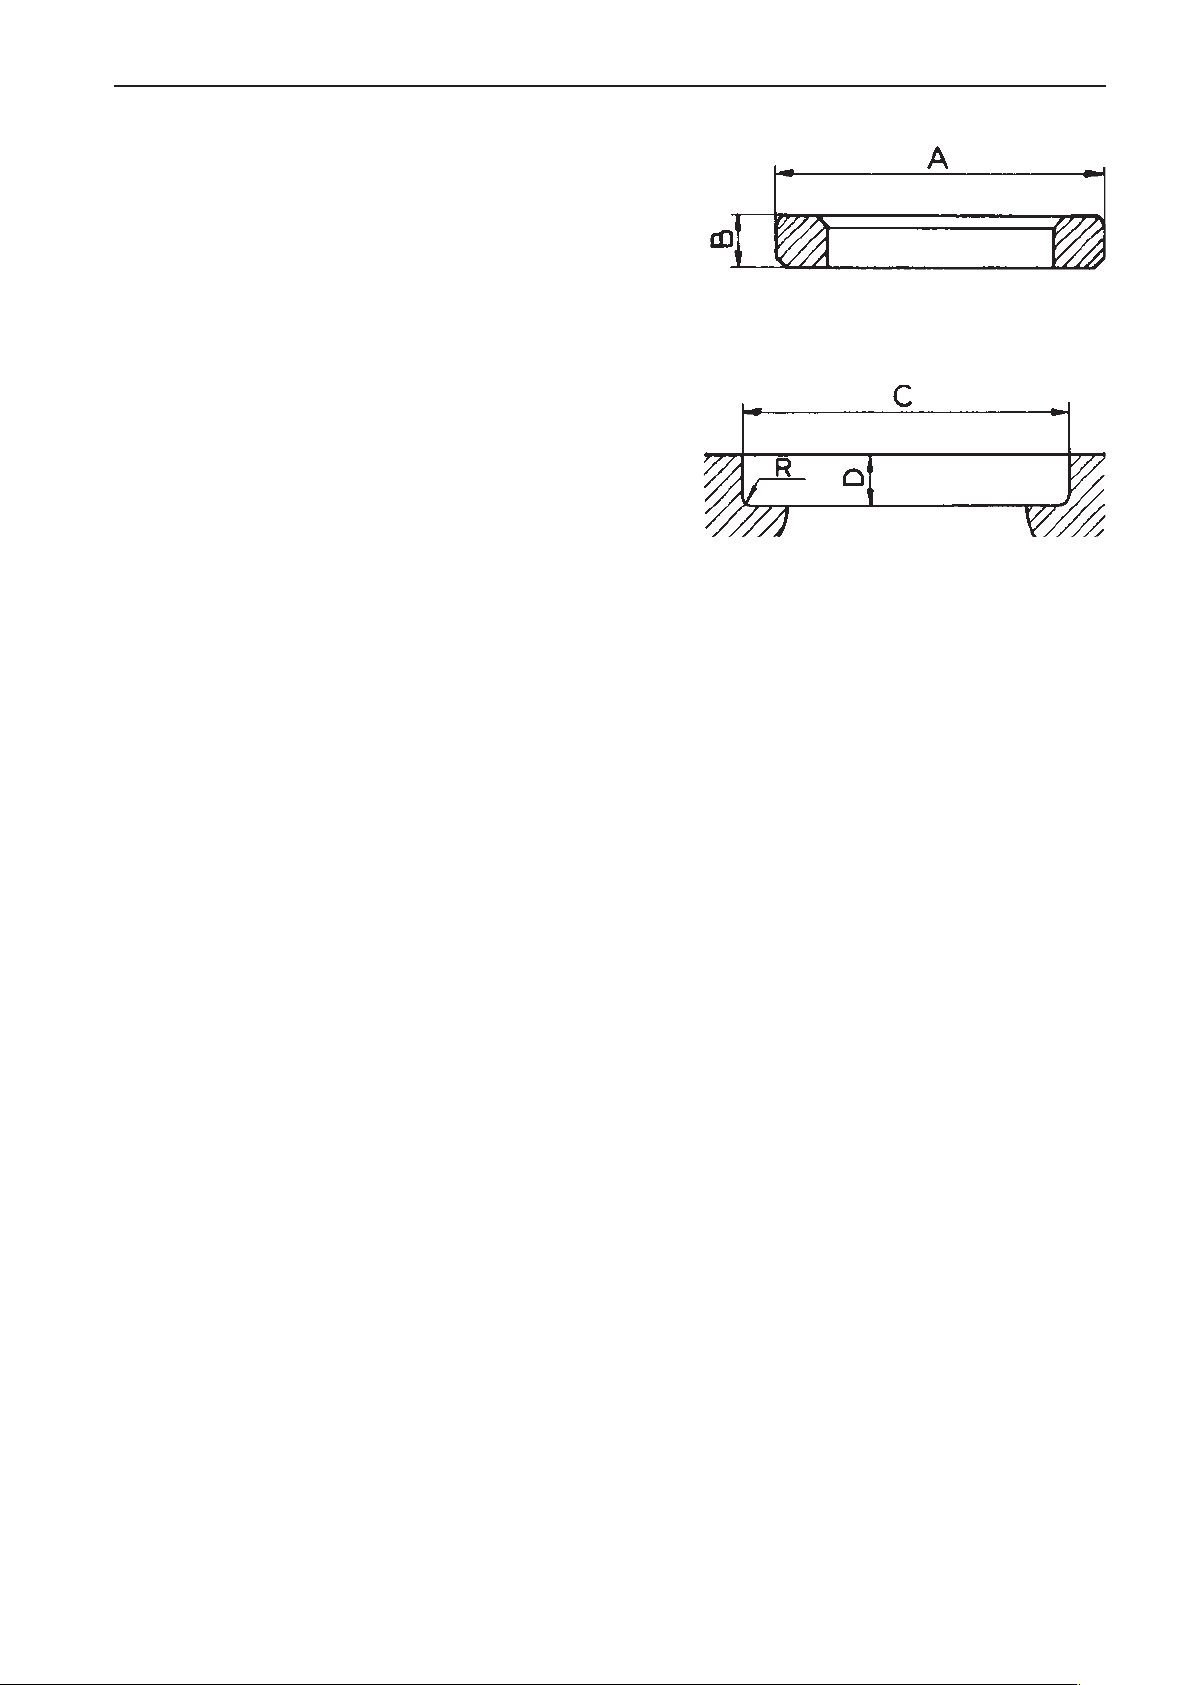
Valve seats
Outer diameter (dimension A) Standard:
Inlet .................................................................... 43.1 mm (1.697")
Exhaust .............................................................. 43.1 mm (1.697")
Oversize:
Inlet .................................................................... 43.3 mm (1.710")
Exhaust .............................................................. 43.3 mm (1.710")
Height (dimension B):
Inlet .................................................................... 8.4-8.6 mm (0.331–0.339")
Exhaust .............................................................. 7.9-8.1 mm (0.311–0.319")
Valve face seat
Diameter (dimension C) standard:
Inlet .................................................................... 43 mm (1.69")
Exhaust .............................................................. 43 mm (1.69")
Diameter (dimension C) oversize:
Inlet .................................................................... 43.200–43.225 mm (1.701–1.702")
Exhaust .............................................................. 43.200–43.225 mm (1.701–1.702")
Depth (dimension D):
Inlet .................................................................... 11.2±0.1 mm (0.441±0.004")
Exhaust .............................................................. 11.2±0.1 mm (0.441±0.004")
Seat bottom radius (dimension R):
Inlet. max. .......................................................... 0.8 mm (0.032")
Exhaust, max. .................................................... 0.8 mm (0.032")
Dimension between valve head and
cylinder head surface:
Inlet .................................................................... 0.9–1.4 mm (0.035–0.055")
Exhaust .............................................................. 1.2–1.7 mm (0.047–0.067")
Technical data
Valve guides
Length:
Inlet .................................................................... 83.2–83.5 mm (3.28–3.29")
Exhaust .............................................................. 83.2–83.5 mm (3.28–3.29")
Inner diameter:
Inlet .................................................................... 8.0 mm (0.032")
Exhaust .............................................................. 8.0 mm (0.032")
Height above cylinder head spring plane:
Inlet .................................................................... 26.5±0.4 mm (1.04±0.016")
Exhaust .............................................................. 18.5±0.4 mm (0.73±0.016")
Clearance, valve stem - guide:
Inlet .................................................................... 0.03–0.05 mm (0.001–0.002")
Wear tolerance ...................................................0.2 mm (0.008"
Exhaust .............................................................. 0.04-0.07 mm (0.002–0.003")
Wear tolerance ...................................................0.3 mm (0.012"
1
Max. permissible clearance between valve stem and valve guide:
(according to the method described in ”Service Manual Engine Group 21: valve guides, inspection”)
)1
)1
>| Ecu - Repair - Manual |<
9
Technical data
Valve springs
Valve springs, exhaust/inlet
Valve springs:
Length without load ............................................. 72-73 mm (2.8-2.9")
With 600 N (61.2 kgfm (134.6 lbs)) load ..............56 mm (2.2")
With 1076 N (109.7 kgfm (241.3 lbs)) load........... 43 mm (1.7")
Rigid length max. ................................................ 41 mm (1.6")
Inner valve spring (exhaust):
Length without load ............................................. 67-68 mm (2.6-2.7")
With 243 N (24.8 kgfm (54.6 lbs)) load ................ 52 mm (2.1")
With 447 N (45.6 kgfm (100.3 lbs)) load ..............39 mm (1.5")
Rigid length max. ................................................ 36 mm (1.4")
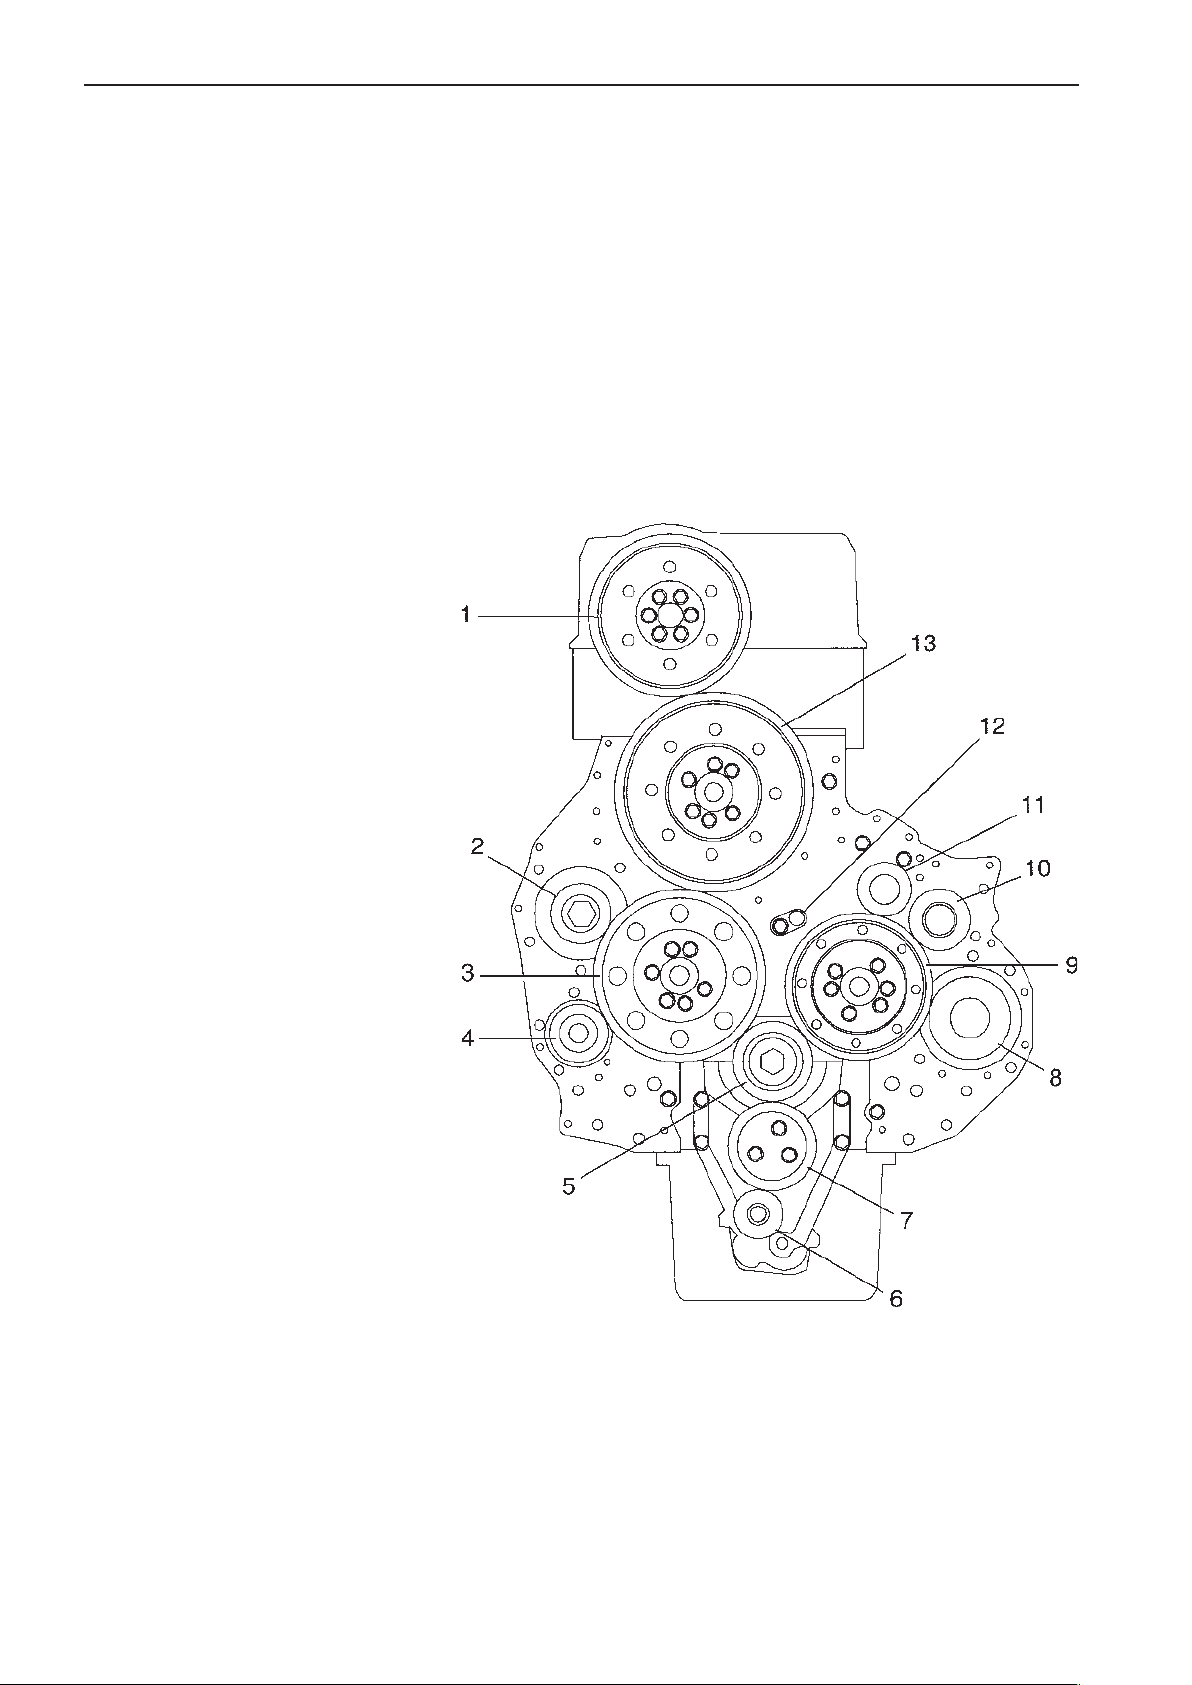
Timing
Group 20
1. Drive, camshaft (z=76)
2. Drive, compressor (z=29)
3. Idler (z=83)
4. Drive, coolant pump (z=27)
5. Drive, crankshaft (z=38)
6. Drive, lubricating oil pump (z=23)
7. Idler (z=44)
8. Drive, hydraulic pump (z=39)
9. Idler (z=71)
10. Drive to belt and fuel pump (z=27)
11. Drive, servo pump (z=23)
12. Spray nozzle, drive lubrication
13. Idler, adjustable (z=97)
Flank clearance, adjustable intermediate gear (13) .. 0.05–0.17 mm (0.0020–0.0067")
Intermediate gear shaft journal, diameter ............... 99.99±0.01 mm (3.937±0.0004")
Intermediate gear bush, diameter ........................... 100.04±0.01 mm (3.939±0.0004")
Radial clearance for intermediate, max. diameter ...0.03–0.07 mm (0.0012–0.0028")
Axial clearance for intermediate gear ..................... 0.07–0.17 mm (0.0028–0.0067")
10
>| Ecu - Repair - Manual |<

Group 20
Technical data
Camshaft
Checking camshaft setting. The engine should be cold and the No. 1 cylinder valves should be adjusted to a
clearance of 0. At a flywheel position of 6° ATDC the No. 1 cylinder inlet valve should have opened 1.6±0.3 mm
(0.063±0.012").
When checking this the timing mechanism must be rotated in the right direction (clockwise viewed from the front)
to take up any backlash.
NOTE: Do not forget to adjust the valve clearance back to the correct value after the test.
Drive ...................................................................... Gears
Number of bearings ................................................ 7
Diameter of journals, standard ................................ 70 mm (2.76 ")
Diameter of journals, undersize:
0.25 .................................................................... 69.720–69.780 mm (2.7449–2.7472")
0.50 .................................................................... 69.470–69.530 mm (2.7350–2.7374")
0.75 .................................................................... 69.220–69.280 mm (2.7252–2.7276")
Wear tolerances
Axial clearance, max. ............................................ 0.35 mm (0.0014")
Radial clearance, max............................................ 0.01 mm (0.0004")
Valve lift:
Inlet .................................................................... 13.1 mm (0.516")
Exhaust .............................................................. 13.1 mm (0.516")
Unit injector (stroke) ...............................................17 mm (0.669")
Camshaft bearings
Camshaft bearing thickness, standard: .................. 1.9 mm (0.075")
Oversize:
0.25 .................................................................... 2.0 mm (0.079")
0.50 .................................................................... 2.2 mm (0.087")
0.75 .................................................................... 2.3 mm (0.091")
Diameter, camshaft bearing housings:
Bearings 1-7 ........................................................ 73.9 mm (2.91")
>| Ecu - Repair - Manual |<
11

Technical data
Crank movement
Crankshaft
Length .................................................................... 1203 mm (47.36")
Crankshaft axial clearance1.................................... 0.10–0.40 mm (0.0039–0.0157")
Main bearing radial clearance1................................ 0.01–0.15 mm (0.0004–0.0059")
Max. permissible ovality
of main bearing journals and crankpins .................. 0.08 mm (0.003")
Max. permissible conicity
of main bearing journals and crankpins .................. 0.05 mm (0.002")
Max. runout of centre bearing ................................. 0.15 mm (0.006")
1
The dimensions apply to oiled parts
Group 20
Main bearing journals
Diameter (Ø) for machining, standard ..................... 108.0 mm (4.25")
Undersize:
0.25 mm (0.010") ................................................107.73–107.75 mm (4.2413–4.2421")
0.50 mm (0.020") ................................................107.48–107.50 mm (4.2315–4.2323")
0.75 mm (0.030") ................................................107.23–107.25 mm (4.2216–4.2224")
1.00 mm (0.040") ................................................106.98–107.0 mm (4.2118–4.2126")
1.25 mm (0.050") ................................................106.73–106.75 mm (4.2020–4.2027")
Surface finish, main bearing journal ....................... Ra 0.25
Surface finish, radius ............................................. Ra 0.4
Width, thrust bearing journal (A) standard ............... 47.0 mm (1.85")
Oversize:
0.2 mm (0.008") (thrust bearing 0.1) .................... 47.175–47.225 mm (1.8573–1.8592")
0.4 mm (0.016") (thrust bearing 0.2) .................... 47.375–47.425 mm (1.8652–1.8651")
0.6 mm (0.024") (thrust bearing 0.3) .................... 47.575–47.625 mm (1.8730–1.8750")
Fillet radius (R)....................................................... 3.75–4.00 mm (0.148–0.158")
Thrust washers (thrust bearing)
Width (B) standard ................................................. 3.1–3.2 mm (0.122–0.126")
Oversize:
0.1 mm (0.004") .................................................. 3.2–3.3 mm (0.126–0.130")
0.2 mm (0.008") .................................................. 3.3–3.4 mm (0.130–0.134")
0.3 mm (0.012") .................................................. 3.4–3.5 mm (0.134–0.138")
12
>| Ecu - Repair - Manual |<

Group 20
Main bearing shells
Type ...................................................................... replaceable
Outer diameter (C) ................................................. 113.0 mm (4.45")
Thickness (D) standard .......................................... 2.5 mm (0.098")
Oversize:
0.25 mm (0.010") ................................................ 2.6–2.7 mm (0.102–0.106")
0.50 mm (0.020") ................................................ 2.7–2.8 mm (0.106–0.110")
0.75 mm (0.030") ................................................ 2.8–2.9 mm (0.110–0.114")
1.00 mm (0.040") ................................................ 2.9–3.0 mm (0.114–0.118")
1.25 mm (0.050") ................................................ 3.1–3.2 mm (0.122–0.126")
Crankpins
Diameter (Ø) for machining, standard ..................... 92.0 mm (3.62")
Undersize:
0.25 mm (0.010") ................................................ 91.73–91.75 mm (3.6114–3.612")
0.50 mm (0.020") ................................................ 91.48–91.50 mm (3.6016–3.6024")
0.75 mm (0.030") ................................................ 91.23–91.25 mm (3.5917–3.5925")
1.00 mm (0.040") ................................................ 90.98–91.00 mm (3.5819–3.5827")
1.25 mm (0.050") ................................................ 90.73–90.75 mm (3.5720–3.5728")
Surface finish, crankpin ......................................... Ra 0.25
Surface finish, radius ............................................. Ra 0.4
Width (A) thrust bearing journal .............................. 56.9–57.0 mm (2.240–2.244")
Fillet radius (R) (5.25–5.5) ...................................... 3.75–4.00 mm (0.148–0.158")
Technical data
Big-end bearing shells
Outside diameter (B) .............................................. 96.85 mm (3.8130")
Thickness (C) standard .......................................... 2.39–2.40 mm (0.0941–0.0945")
Oversize:
0.25 mm (0.010") ................................................ 2.51–2.52 mm (0.0988–0.0992")
0.50 mm (0.020") ................................................ 2.64–2.65 mm (0.1039–0.1043")
0.75 mm (0.030") ................................................ 2.76–2.77 mm (0.1087–0.1091")
1.00 mm (0.040") ................................................ 2.89–2.90 mm (0.1138–0.1142")
1.25 mm (0.050") ................................................ 3.01–3.02 mm (0.1185–0.1189")
Diameter, bearing shell seat (D) ............................. 96.84–96.85 mm (3.8126–3.8130")
>| Ecu - Repair - Manual |<
13

Technical data
Group 20
Connecting rod
Length, centre-to-centre (E) .................................... 260 mm (10.236")
Marking:
Connecting rod and cap1........................................ 1 to 6
”FRONT” on the shank to face ...............................Forwards
Connecting rod bush inside diameter (G) ................ 55 mm (2.165")
Axial clearance, big-end - crankshaft, max.2.......... 0.35 mm (0.014")
Big-end bearing, radial clearance, max.2................. 0.10 mm (0.004")
Straightness, max. deviation per 100 mm (3.94")
measured length .................................................... 0.06 mm (0.002")
Warping, max. deviation per 100 mm (3.94")
measured length .................................................... 0.15 mm (0.006")
1
Marking on same side
2
The measurements apply to oiled parts
Flywheel. fitted
Max. permissible axial runout,
test radius 150 mm (5.91") ...................................... 0.20 mm (0.008")
Number of teeth on starter ring ...............................153
Sensor grooves on flywheel ...................................3 x 18
14
>| Ecu - Repair - Manual |<

Group 20
Lubricating system
Oil grade Fuel sulphur content in per cent by weight
up to 0.5 % 0.5 - 1.0 % more than 1.0 %
Oil change interval: in operation whichever reached first
Technical data
VDS-3 600 hours or 12 months 300 hours or 12 months 150 thours or 12 months
VDS-2 and ACEA: E7
VDS-2 and ACEA: E5
VDS-2 and Global DHD-1
VDS-2 and API: CI-4
VDS-2 and API: CH-4
VDS and ACEA: E3
2)
2)
2)
2)
2)
2)
400 hours or 12 months 200 hours or 12 months 100 hours or 12 months
ACEA: E7, E5, E4 200 hours or 12 months 100 hours or 12 months 50 hours or 12 months
API: CI-4, CH-4, CG-4
NOTE! Mineral based oil, either fully or semi-synthetic, can be used on condition that it complies with the quality
requirements above.
NOTE! For 6 and 7-liter engines equipped with low profile type oil pans, the oil change interval must be halved.
1)
If the sulfur content is > 1.0% by weight, use oil with TBN > 15
2)
The engine oil must fullfil both requirements. For markets outside Europe, API: CG-4 and CH-4 can be used instead of
ACEA: E3.
VDS = Volvo Drain Specification
ACEA = Association des Constructeurs Européenne d’Automobiles
API = American Petroleum Institute
Global DHD = Global Diesel Heavy Duty
TBN = Total Base Number
Viscosity
The viscosity should be selected from the adjacent
table. Note: the temperatures refer to constant outside
air temperature.
* Refers to synthetic or synthetic-based oil.
Oil
Change volume including changing three filters:
For horizontal installation ....................................... 35 litres (9.2 US gal)
Oil pressure
Operating engine speed 1100 rpm or higher ........... 400–550 kPa (58–80 psi)
Idling speed, minimum ........................................... 175 kPa (25 psi)
Oil filters
Number .................................................................. 3
Full-flow filter (tightened 1/2–3/4 turn after fitting) ... 2
Bypass filter (tightened 3/4–1 turn after fitting) ....... 1
Oil pump
Type ...................................................................... Gear driven
>| Ecu - Repair - Manual |<
15

Technical data
Oil valves
Group 20
1. Safety valve
Marking ..................................................................Yellow
Safety valve opening pressure ............................... 700 kPa (101 psi)
2. Delivery valve, oil cooler
Marking ..................................................................124
Delivery valve, oil cooler, opening pressure ........... 300 kPa (43 psi)
3, 5. Overflow valve, oil filter, full-flow/by-pass
Marking on spring................................................... Blue/yellow
Overflow valve, oil filter, opening pressure ............. 110 kPa (16 psi)
Free length .............................................................68.8 mm (2.71")
Loaded with 25–29 N (2.5–2.9 kgf (5.5–6.4 lbs)) .....40.0 mm (1.58")
4. Piston cooling valve
Marking ..................................................................Orange
Piston cooling valve, opening pressure .................. 200 kPa (29 psi)
6. Pressure reducing valve
Marking ..................................................................Blue
Pressure reducing valve, opening pressure ............ 480 kPa (70 psi)
16
>| Ecu - Repair - Manual |<

Group 20
Fuel system
Technical data
Injection order
Injection order ........................................................1-5-3-6-2-4
Feed pump
Feed pressure after fuel filter at 1000 rpm, min. ..... 350 kPa (51 psi)
Feed pressure after fuel filter at full load, min. ....... 350 kPa (51 psi)
Overflow valve
Opening pressure ................................................... 400–450 kPa
(58–65 psi)
Sensor spacing
Camshaft ............................................................... 0.3–1.0 mm (0.012–0.040")
Flywheel ................................................................ 0.75–2.1 mm (0.030–0.083")
Unit injectors
Prestress (setting with gauge) ................................68.9±0.1 mm (2.712±0.004")
>| Ecu - Repair - Manual |<
17

Technical data
Group 20
Inlet and exhaust system
Engine ................................................................... TAD1240GE TAD1241GE/VE
TWD1240VE TAD1242GE/VE
Turbocharger
Manufacturer and type ........................................... 3K/Warner K31 3971 QXAKB K31 3971 QXAKB
24.20 DCAYD 27.20 DCAYD
Lubrication system ................................................ Force-feed lubrication
Max. permissible axial clearance ........................... 0.16 mm (0.0063")
Max. permissible radial clearance
(turbocharger side) ................................................ 0.45 mm (0.0177")
Pressure drop indicator
Air filter TAD1240-42GE TAD1241-42VE
TWD1240VE
Level for indication (vacuum) ................................. 500 mm (19.7") w.g.
Exhaust back pressure
Exhaust back pressure, max................................. 10 kPa 15 kPa
(1.5 psi) (2,2 psi)
Cooling system
General
Type ......................................................................Overpressure, closed
Pressure cap valve opens at ................................. 75 kPa (11 psi)
Capacity (engine) .................................................. 20 litres (5.3 US gal)
Capacity (engine + radiator and hoses) ................. 44 litres (11.6 US gal)
Thermostat TAD1240-42GE TWD1240VE
TAD1241-42VE
Type ......................................................................Piston thermostat
Number.................................................................. 1
Opening temperature ............................................. 82° C 75° C
(187°F) (167°F)
Coolant filter
Number.................................................................. 1
Coolant pump
Type ......................................................................Geared centrifugal pump
18
>| Ecu - Repair - Manual |<

Group 20
Technical data
Coolant
Type ...................................................................... Volvo Penta Coolant
Consisting of ..........................................................Ethylene glycol + corrosion inhibiting additives
Colour .................................................................... Blue-green
Mixed with .............................................................. Pure water
IMPORTANT! Coolant must be mixed with pure water, use distilled - de-ionized water. The water must fulfill the requirements specified by Volvo Penta, see “Water quality”.
IMPORTANT! Coolant must be used all year round. This applies even if there is never any risk for frost , to
ensure that the engine has an adequate protection against corrosion. Using anti-corrosion aditive exclusively
is not permitted in Volvo Penta’s engines. Never use water by itself as coolant.
Future warranty claims on the engine and additional equipment may be rejected if an unsuitable coolant has
been used or if the instructions concerning coolant mixing have not been followed.
Water quality
ASTM D4985:
Total solid particles ...................................... < 340 ppm
Total hardness: ............................................ < 9.5° dH
Chloride ......................................................... < 40 ppm
Sulfate ........................................................... < 100 ppm
pH value........................................................ 5,5– 9
Silica (acc. ASTM D859) .............................. < 20 mg SiO2/l
Iron (acc. ASTM D1068) .............................. < 0.10 ppm
Manganese (acc. ASTM D858) ................... < 0.05 ppm
Conductivity (acc. ASTM D1125) ................ < 500 µS/cm
Organic content, CODMn (acc. ISO8467) .... < 15 mg KMnO4/l
>| Ecu - Repair - Manual |<
19

Technical data
Tightening torques
General tightening torques Nm (kgfm)
M6 standard bolt 8.8 .............................................. 10±1.5 (1.0±0.15)
M8 standard bolt 8.8 .............................................. 24±4 (2.4±0.4)
M10 standard bolt 8.8 ............................................ 48±8 (4.8±0.8)
M12 standard bolt 8.8 ............................................ 85±15 (8.5±1.5)
M14 standard bolt 8.8 ............................................ 140±25 (14.0±2.5)
Special tightening torques Nm (kgfm) Angle tightening
Group 21
Front engine mounting, crossmember (M14) .......... 180±15 (18.0±1.5)
Front engine mounting (M16) .................................. 220±35 (22.0±3.5)
Rear engine mounting, flywheel housing (M16) ....... 220±35 (22.0±3.5)
Main bearings
Stage 1 .................................................................. 150±20 (15.0±2.0)
Stage 2 .................................................................. 120°±5°
Big-end cap ............................................................ 275±12 (27.5±1.2)
Flywheel
(see tightening diagram ”Flywheel” page 22) ........... 245 +24.5
Flywheel housing ................................................... 140±14 (14.0±1.4)
Vibration damper, inner (2 socket cap screws)
Stage 1 .................................................................. 60±5 (6.0±0.5)
Stage 2 .................................................................. 90°±5°
Vibration damper outer or Pulley
(10 bolts, see tightening diagram
”Outer vibration damper” page 24)
Stage 1 .................................................................. 60±5 (6.0±0.5)
Stage 2 .................................................................. 90°±5°
Rocker cover (see tightening diagram
”Rocker cover” page 22) ......................................... 20±2 (2.0±0.2)
Stud, rocker cover ................................................. 40±3 (4.0±0.3)
Cylinder head (see tightening diagram
”Cylinder head” page 23)
Stage 1 .................................................................. 60±10 (6.0±1.0)
Stage 2 (check tightening) ..................................... 60±10 (6.0±1.0)
Stage 3 .................................................................. 90°±5°
Stage 4 .................................................................. 90°±5°
Clean-out plugs, cylinder head ............................... 60±10 (6.0±1.0)
Lock nut, valve adjustment bolt ............................. 38±4 (3.8±0.4)
- 0
+25
- 0
+2,5
Group 20
20
>| Ecu - Repair - Manual |<

Group 20
Special tightening torques
Bolts for camshaft bearing caps should be tightened in 5 stages, see tightening diagram “Bearing caps, camshaft/
rocker arm shaft” page 23.
Timing cover, upper (see tightening diagram ”Timing cover, upper” page 25)
Timing gear incl. toothed wheel (see tightening diagram ”Timing gear” page 25)
Nm (kgfm) Angle tightening
Timing plate (see ”Timing plate” page 24) ............. 34±4 (3.4±0.4)
Group 22
Oil nozzle in timing gear
(see ”Timing gear” page 25).................................... 34±4 (3.4±0.4)
Oil cooler, retaining bolts ........................................ 27±4 (2.7±0.4)
Cover, oil cooler (see tightening diagram
”Cover, oil cooler” page 27) ................................... 24±4
Delivery oil pipe (see ”Delivery oil pipe” page 26) .. 180° new pipe 60° used pipe
Bolt, piston cooling nozzle
(see Piston cooling nozzle” page 26) ...................... 24±4 (2.4±0.4)
Drain plug, oil sump ............................................... 60±10 (6.0±1.0)
Technical data
Group 23
Bolt, retaining yoke, unit injector
(new copper sleeve)
First tightening
Stage 1 .................................................................. 20±5 (2.0±0.5)
Stage 2 .................................................................. 180°±5°
Undo the bolt for the unit injector retaining yoke
before the second tightening
Second tightening
Stage 1 .................................................................. 20±5 (2.0±0.5)
Stage 2 .................................................................. 60°±5°
Bolt, retaining yoke, unit injector
(old copper sleeve)
Stage 1 .................................................................. 20±5 (2.0±0.5)
Stage 2 .................................................................. 60°±5°
Lock nut for adjusting screw, unit injector .............. 52±4 (5.2±0.4)
Nut, connection, unit injector .................................. 1.5±0.5 (0.15±0.05)
Clamping and tightening torques for fuel lines
(see ”Fuel lines” page 28).
IMPORTANT! Pay attention and do NOT tighten the nut for the electrical
connections (on the unit injector) to a higher torque than specified above.
>| Ecu - Repair - Manual |<
21

Technical data
Tightening diagram
Flywheel
Group 20
Rocker cover
22
>| Ecu - Repair - Manual |<

Group 20
Cylinder head
Technical data
Bearing caps, camshaft/rocker arm shaft
NOTE: Tightening in stage 2 should be carried out gradually to ensure that the rocker arm shaft bottoms against
the bearing housings without bending.
NOTE: In stage 4 undo the marked bolts before continuing to stage 5. If the rocker arm shaft has been loosened
or removed, only the bolts retaining the shaft should be tightened according to the diagram on refitting.
>| Ecu - Repair - Manual |<
23

Technical data
Timing plate
Group 20
Centre the plate using tool 9998267. No special tightening sequence for marked bolts.
Outer vibration damper
24
>| Ecu - Repair - Manual |<

Group 20
Timing cover, upper
Technical data
Timing
>| Ecu - Repair - Manual |<
25

Technical data
Piston cooling nozzle
NOTE: The piston cooling nozzle retaining bolt has a
friction coating and can be used only once.
IMPORTANT! Incorrect piston cooling always
leads to seizing of the piston or pistons. If it is
suspected that the piston cooling nozzle could
be damaged or deformed it must be changed.
This applies to new nozzles also. Always check
that the piston cooling nozzle is correctly located in the hole in the cylinder block and that the
retaining plate lies flat against the cylinder block.
If the piston cooling nozzle is not correctly fitted, engine breakdown when under load will be
the immediate result.
Delivery oil pipe
Tighten to ”0 clearance” and then angle tighten 60º for
a used delivery oil pipe and 180º for a new delivery oil
pipe.
Group 20
26
>| Ecu - Repair - Manual |<

Group 20
Cover, oil cooler
Always use locating pins when positioning the cover on the engine.
Technical data
1 Insert screws A and B to align the cover.
2 Tighten screws C and D.
3 Insert all screws, tighten the screws in numerical order from the center outwards, in accordance with the
diagram (1 - 4).
4 Check screws C and D for tightness.
>| Ecu - Repair - Manual |<
27

Technical data
Fuel lines TAD
Group 20
A. Banjo bolt 34±4 Nm (25±3 lbf. ft)
B. Nipple 14±3 Nm (10±2.2 lbf. ft)
C. Overflow valve 55±5 Nm (41±3.7 lbf. ft)
D. Banjo bolt 35±4 Nm (26±3 lbf. ft)
E. Nut 65±5 Nm (48±3.7 lbf. ft)
F. Nut 65±5 Nm (48±3.7 lbf. ft)
G. Banjo bolt 15±2.5 Nm (11±1.8 lbf. ft)
1 H. Bolt 55±5 Nm (41±3.7 lbf. ft)
28
>| Ecu - Repair - Manual |<

Group 20
Fuel lines TWD
Technical data
A. Overflow valve 55±5 Nm (41±3.7 lbf ft)
B. Banjo bolt 35±5 Nm (26±3.7 lbf ft)
C. Nut 65±5 Nm (48±3.7 lbf ft)
D. Nut 65±5 Nm (48±3.7 lbf ft)
E. Banjo bolt 15±2 Nm (11±1.5 lbf ft)
1 F. Banjo bolt 34±4 Nm (25±3 lbf ft)
2 G. Hose connection 55±5 Nm (41±3.7 lbf ft)
>| Ecu - Repair - Manual |<
29

Exhaust manifold
Stage 1. Tighten bolts 1 to 10 Nm (0.7 to 7.4 lbf.ft) (max.)
Stage 2. Tighten bolts 2 to 10 Nm (1.5 to 7.4 lbf.ft) (max.)
Stage 3. Tighten bolts 3 to 52 ±4 Nm (2.2 to 38 ±3 lbf.ft)
Stage 4. Tighten bolts 2 to 52 ±4 Nm (1.5 to 38 ±3 lbf.ft)
Group 20
Stage 5. Tighten bolts 4 to 52 ±4 Nm (3.0 to 38 ±3 lbf.ft)
Stage 6. Tighten bolts 1 to 52 ±4 Nm (0.7 to 38 ±3 lbf.ft)
Intercooler (TWD)
Tightening diagram
Tightening is done in two stages, in accordance with the tightening diagram.
Stage 1. Insert all of the screws; screw them down until they touch the surface.
Stage 2. Tighten the screws in accordance with the tightening diagram, to a torque of 20 ±2 Nm (14.7 ±1.5 lb. ft.).
30
>| Ecu - Repair - Manual |<

Group 20
References to Service Bulletins
Group No. Date Concerning
.........................................................................................................................................................................................
.........................................................................................................................................................................................
.........................................................................................................................................................................................
.........................................................................................................................................................................................
.........................................................................................................................................................................................
.........................................................................................................................................................................................
.........................................................................................................................................................................................
.........................................................................................................................................................................................
.........................................................................................................................................................................................
.........................................................................................................................................................................................
.........................................................................................................................................................................................
.........................................................................................................................................................................................
.........................................................................................................................................................................................
.........................................................................................................................................................................................
.........................................................................................................................................................................................
.........................................................................................................................................................................................
.........................................................................................................................................................................................
.........................................................................................................................................................................................
.........................................................................................................................................................................................
.........................................................................................................................................................................................
.........................................................................................................................................................................................
.........................................................................................................................................................................................
.........................................................................................................................................................................................
.........................................................................................................................................................................................
.........................................................................................................................................................................................
.........................................................................................................................................................................................
.........................................................................................................................................................................................
.........................................................................................................................................................................................
.........................................................................................................................................................................................
.........................................................................................................................................................................................
.........................................................................................................................................................................................
.........................................................................................................................................................................................
.........................................................................................................................................................................................
>| Ecu - Repair - Manual |<
31

Group 20
Notes
.........................................................................................................................................................................................
.........................................................................................................................................................................................
.........................................................................................................................................................................................
.........................................................................................................................................................................................
.........................................................................................................................................................................................
.........................................................................................................................................................................................
.........................................................................................................................................................................................
.........................................................................................................................................................................................
.........................................................................................................................................................................................
.........................................................................................................................................................................................
.........................................................................................................................................................................................
.........................................................................................................................................................................................
.........................................................................................................................................................................................
.........................................................................................................................................................................................
.........................................................................................................................................................................................
.........................................................................................................................................................................................
.........................................................................................................................................................................................
.........................................................................................................................................................................................
.........................................................................................................................................................................................
.........................................................................................................................................................................................
.........................................................................................................................................................................................
.........................................................................................................................................................................................
.........................................................................................................................................................................................
.........................................................................................................................................................................................
.........................................................................................................................................................................................
.........................................................................................................................................................................................
.........................................................................................................................................................................................
.........................................................................................................................................................................................
.........................................................................................................................................................................................
.........................................................................................................................................................................................
.........................................................................................................................................................................................
.........................................................................................................................................................................................
.........................................................................................................................................................................................
.........................................................................................................................................................................................
32
>| Ecu - Repair - Manual |<

Group 20
Notes
.........................................................................................................................................................................................
.........................................................................................................................................................................................
.........................................................................................................................................................................................
.........................................................................................................................................................................................
.........................................................................................................................................................................................
.........................................................................................................................................................................................
.........................................................................................................................................................................................
.........................................................................................................................................................................................
.........................................................................................................................................................................................
.........................................................................................................................................................................................
.........................................................................................................................................................................................
.........................................................................................................................................................................................
.........................................................................................................................................................................................
.........................................................................................................................................................................................
.........................................................................................................................................................................................
.........................................................................................................................................................................................
.........................................................................................................................................................................................
.........................................................................................................................................................................................
.........................................................................................................................................................................................
.........................................................................................................................................................................................
.........................................................................................................................................................................................
.........................................................................................................................................................................................
.........................................................................................................................................................................................
.........................................................................................................................................................................................
.........................................................................................................................................................................................
.........................................................................................................................................................................................
.........................................................................................................................................................................................
.........................................................................................................................................................................................
.........................................................................................................................................................................................
.........................................................................................................................................................................................
.........................................................................................................................................................................................
.........................................................................................................................................................................................
.........................................................................................................................................................................................
.........................................................................................................................................................................................
.........................................................................................................................................................................................
>| Ecu - Repair - Manual |<
33

Group 20
34
>| Ecu - Repair - Manual |<

Report form
Do you have any complaints or other comments about this manual. Please
make a copy of this page, write your comments down and send them to us. The
address is at the bottom. We would prefer you to write in English or Swedish.
From: ............................................................................
......................................................................................
......................................................................................
......................................................................................
Refers to publication:.............................................................................................................................................
Publication No.: ............................................................. Date of issue: .................................................................
Proposal/motivation: ..............................................................................................................................................
..............................................................................................................................................................................
..............................................................................................................................................................................
..............................................................................................................................................................................
..............................................................................................................................................................................
..............................................................................................................................................................................
..............................................................................................................................................................................
..............................................................................................................................................................................
..............................................................................................................................................................................
Date: ................................................................
Signed: .............................................................
AB Volvo Penta
Technical Information
Dept. 42200
SE-405 08 Göteborg
Sweden
>| Ecu - Repair - Manual |<

>| Ecu - Repair - Manual |<
7741112 English 05–2006
 Loading...