

Page 1

W E B E D I T I O N
S E N S U S I N F O T A I N M E N T
Page 2

Page 3

WELCOME TO THE WORLD-WIDE FAMILY OF VOLVO OWNERS.
We trust that you will enjoy many years of safe
driving in your Volvo, an automobile designed
with your safety and comfort in mind. We encourage you to familiarize yourself with the equipment
descriptions and operating instructions in this
manual.
We also urge you and your passengers to wear
seat belts at all times in this (or any other) vehicle.
And, of course, please do not operate a vehicle if
you may be affected by alcohol, medication or
any impairment that could hinder your ability to
drive.
Your Volvo is designed to meet all applicable federal safety and emission standards. If you have
any questions regarding your vehicle, please contact your Volvo retailer or see the article "Contacting Volvo" for information on getting in touch with
Volvo in the United States and Canada.
Page 4

Contents
01 Introduction
Introduction................................................. 7
Volvo Sensus.............................................. 8
On-board owner's manual.......................... 9
Change of ownership................................ 11
Information on the Internet....................... 11
Volvo ID..................................................... 12
01
02 MY CAR
My Car – introduction............................... 14
MY CAR paths.......................................... 15
MY CAR menus........................................ 15
MY CAR vehicle settings.......................... 17
MY CAR driver support settings............... 19
MY CAR system settings.......................... 20
MY CAR voice control settings................. 21
MY CAR climate system settings............. 21
MY CAR Internet settings......................... 22
MY CAR information settings................... 23
02
03 Infotainment
Infotainment.............................................. 25
Infotainment – overview............................ 26
Infotainment – operating the system........ 27
On-screen symbols................................... 31
Favorites................................................... 32
Infotainment – audio settings.................... 32
Infotainment – general sound settings...... 33
Infotainment - advanced audio settings... 34
Adjusting the equalizer.............................. 34
Automatic volume control......................... 35
Radio......................................................... 35
Radio station search................................. 36
Automatic station search.......................... 36
List of radio stations................................. 36
Manual radio station search...................... 37
03
Preset radio stations................................. 37
HD Radio™reception (U.S. models only).. 38
HD Radio™ - switching on and off........... 39
HD Radio™ - sub-channels...................... 40
HD Radio™ - limitations........................... 41
SiriusXM™ satellite radio*......................... 42
SiriusXM™ satellite radio* - selecting
categories/channels.................................. 44
2
* Option/accessory, for more information, see Introduction.
Page 5

Contents
SiriusXM™ satellite radio* - weather........ 45
Radio text.................................................. 47
Media Player............................................. 48
CD/DVD..................................................... 48
Fast forward/reverse................................. 49
Shuffle....................................................... 50
Media Search............................................ 50
Playing and navigating in DVDs................ 51
Camera angle while playing DVD videos.. 52
Screen settings......................................... 52
Media player – compatible file formats..... 53
External audio sources via the AUX/USB
sockets...................................................... 54
Connecting an external audio source via
the AUX/USB sockets............................... 55
03
External audio source volume................... 56
Media Bluetooth®...................................... 56
Connecting and disconnecting a
Bluetooth® device..................................... 57
Connecting a Bluetooth® device............... 57
Pairing a Bluetooth® device...................... 59
Automatically connect a Bluetooth
device........................................................ 60
Switching to another Bluetooth® device... 60
®
Disconnecting a Bluetooth® device.......... 61
Deleting a Bluetooth® device.................... 61
Bluetooth® hands-free system.................. 62
Bluetooth® hands-free system – over-
view........................................................... 63
Call Management...................................... 63
Bluetooth® hands-free phones – audio
settings..................................................... 64
Phone book............................................... 65
Quick phonebook searches...................... 65
Phone book – character table for the
center console keypad.............................. 66
Searching for phone book contacts......... 66
Voice control - introduction...................... 67
Voice control language............................. 68
03
Voice control help functions..................... 69
Voice control settings............................... 69
Voice control commands.......................... 70
Voice control command shortcuts............ 70
Cell phone voice control........................... 71
Radio voice control................................... 71
Multimedia voice control........................... 72
Internet connection................................... 73
Car modem*.............................................. 75
Applications.............................................. 77
Browser..................................................... 78
Infotainment menu overview..................... 80
AM radio menus........................................ 81
FM radio menus........................................ 81
Audio CD/DVD menus.............................. 82
Video DVD menus..................................... 82
iPod® menus............................................. 83
USB menus............................................... 83
Media Bluetooth® menus.......................... 84
AUX menus............................................... 84
Bluetooth® hands-free menus.................. 85
Web browser menus................................. 85
Disclaimers................................................ 87
Type approval........................................... 90
03
* Option/accessory, for more information, see Introduction.
3
Page 6

Contents
04 Index
Index......................................................... 92
04
4
Page 7

Contents
5
Page 8

INTRODUCT I O N
Page 9
01 Introduction
Introduction
This supplement complements your vehicle's
owner's information.
If you are uncertain as to any of your vehicle's
features or functions, consult your printed
owner'smanual or the on-board owner's
information. If you have any further questions,
please contact a Volvo retailer or other representative of the Volvo Car Corporation.
All information, illustrations and specifications
contained in this owner's information are
based on the latest product information available at the time of publication. Volvo reserves
the right to make model changes at any time,
or to change specifications or design without
notice and without incurring obligation.
© Volvo Car Corporation
Options and accessories
Optional or accessory equipment described
in this manual is indicated by an asterisk.
Optional or accessory equipment may not be
available in all countries or markets. Please
note that some vehicles may be equipped differently, depending on special legal requirements.
Contact your Volvo retailer for additional
information.
NOTE
Do not export your Volvo to another
•
country before investigating that country's applicable safety and exhaust
emission requirements. In some cases
it may be difficult or impossible to
comply with these requirements. Modifications to the emission control system(s) may render your Volvo not certifiable for legal operation in the U.S.,
Canada and other countries.
All information, illustrations and speci-
•
fications contained in this manual are
based on the latest product information available at the time of publication. Please note that some vehicles
may be equipped differently, depending on special legal requirements.
Optional equipment described in this
manual may not be available in all markets.
Some of the illustrations shown are
•
generic and may not depict the exact
model for which this manual is
intended.
Volvo reserves the right to make model
•
changes at any time, or to change
specifications or design without notice
and without incurring obligation.
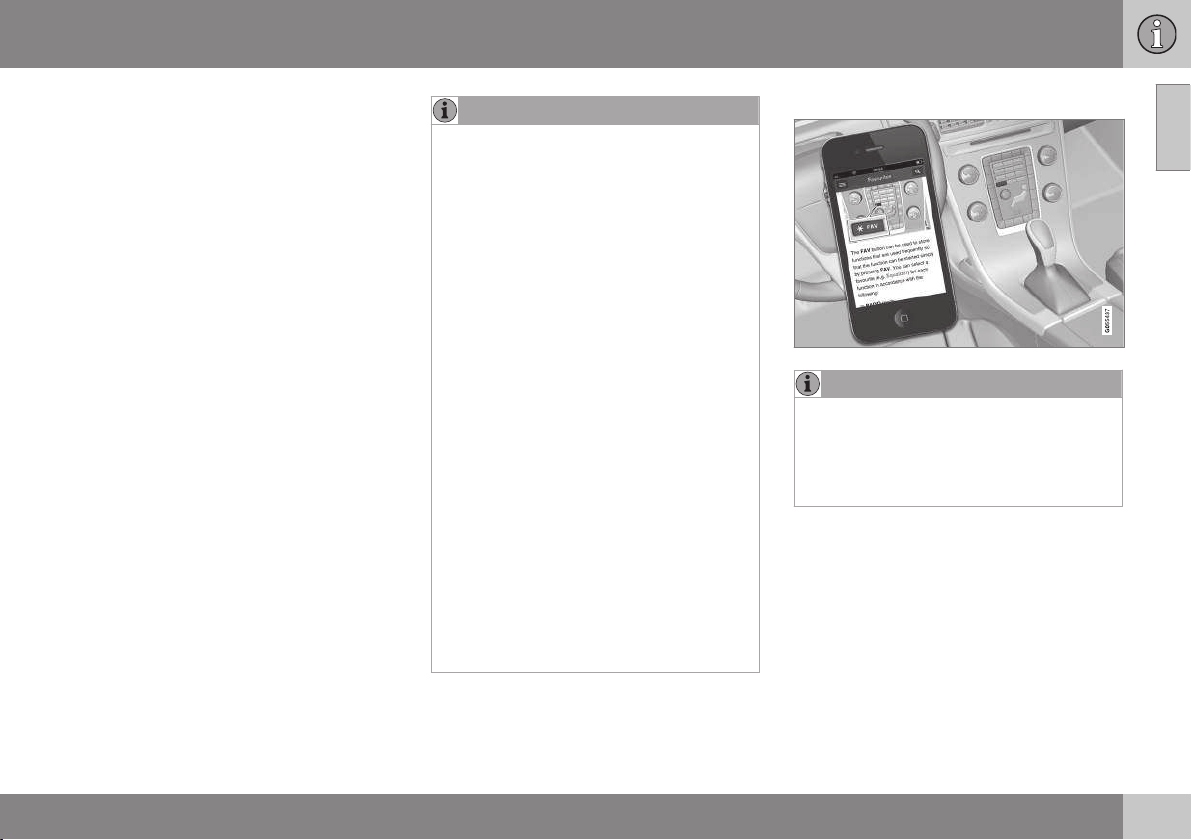
The owner's manual in mobile devices
NOTE
The owner's manual mobile app can be
downloaded at www.volvocars.com.
The mobile app also contains videos and
searchable content, and provides easy
navigation between the various articles.
01
7
Page 10
01 Introduction
01
Volvo Sensus
Volvo Sensus is the core of the contact interface with your vehicle. Sensus provides information, entertainment and offers access to
functions that make owning and operating a
Volvo easier.
Volvo Sensus is the operating system in your
vehicle and it enables you to interact intuitively with the vehicle’s various features and
functions, including accessing the Internet,
when it suits you.
Volvo Sensus uses the center console screen
to display information and menus, and to
offer a user interface that enables you to
make personalized settings for e.g., vehicle,
infotainment and climate system functions.
The buttons on the center console or the
steering wheel keypad are used to activate/
deactivate functions and change numerous
settings.
Pressing the MY CAR button on the center
console displays all of the settings related to
driving and operating the vehicle, such as
City Safety, lock and alarm functions, automatic blower speed, setting the clock, etc.
Pressing the source buttons on the center
console (RADIO, MEDIA, TEL,
CAM*, etc.) make it possible to select e.g.,
AM or FM radio, play a CD or DVD, use the
Bluetooth® hands-free feature, the navigation
system* or the park assist camera*.
See your on-board owner’s manual or the
separate printed supplements for detailed
information about the functionality offered by
Volvo Sensus.
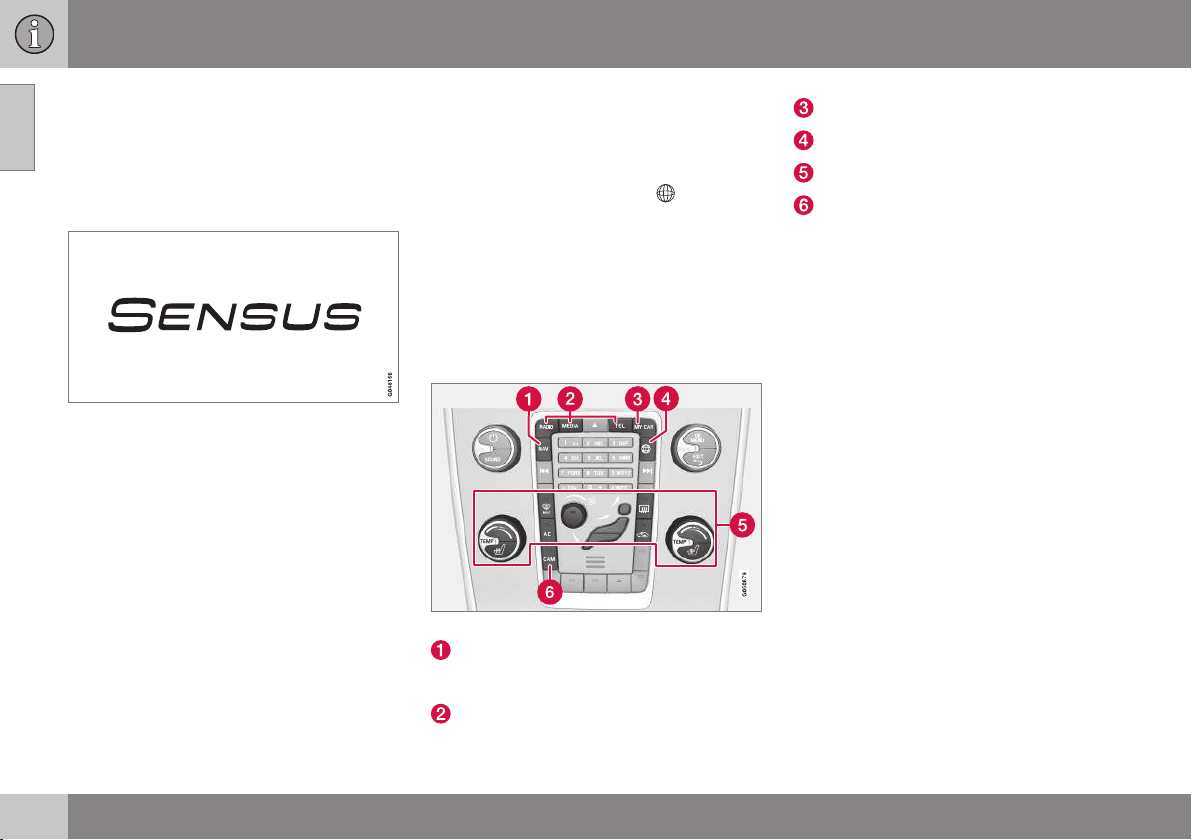
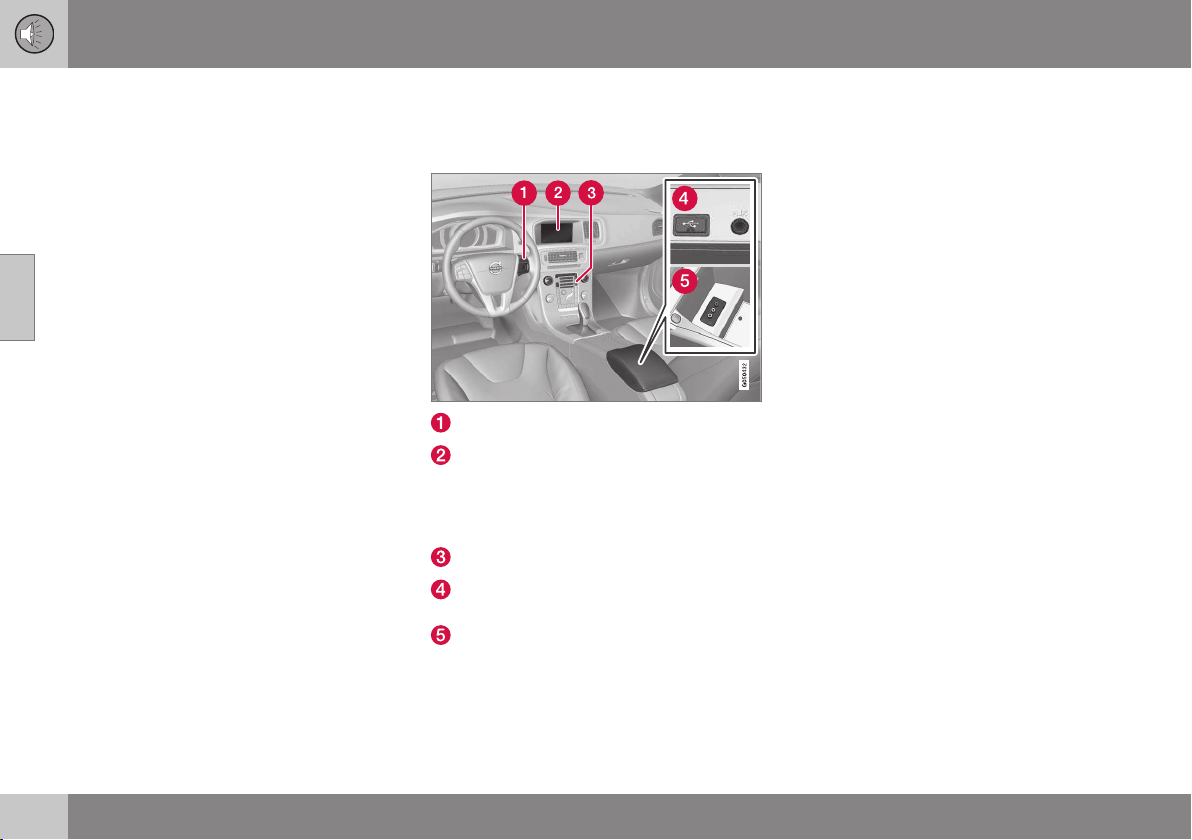
Center console control panel
Volvo Navigation System (VNS)* – NAV:
see the separate VNS manual for operating instructions.
Infotainment (RADIO, MEDIA, TEL)
, NAV* and
Vehicle-related settings - MY CAR.
Internet connected vehicle.
Climate system.
Park assist camera - CAM*.
Related information
My Car – introduction (p. 14)
•
Internet connection (p. 73)
•
8
* Option/accessory, for more information, see Introduction.
Page 11

01 Introduction
On-board owner's manual
The owner's manual can be displayed on the
center console screen and you can carry out
searches for the information that you require.
To open the owner's manual, press the MY
CAR button on the center console, press OK/
MENU and select
For basic information, see "Infotainment operating the system." The following sections
also provide more detailed information.
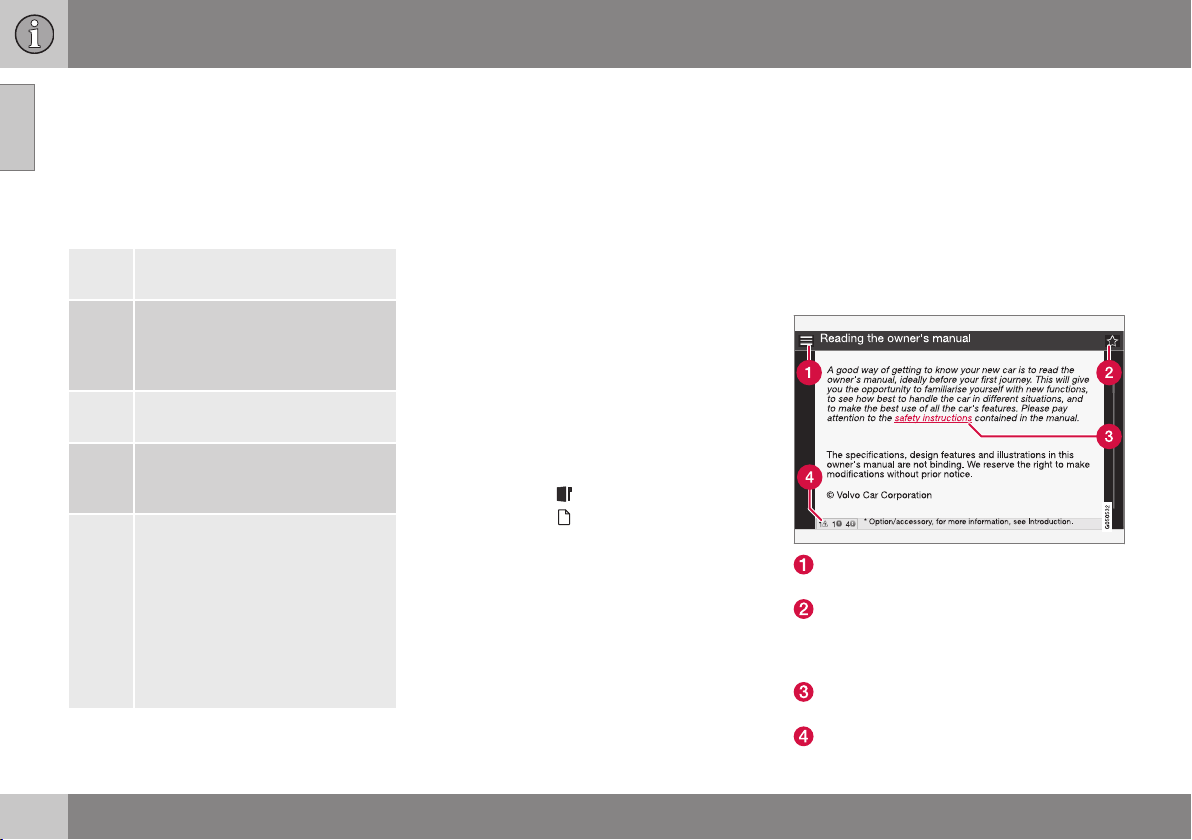
The on-board owner's manual start page
There are four ways of finding information
articles in the on-board owner's manual:
Searching: search for an article.
•
Categories: All of the articles are sorted
•
by category.
Favorites: Quick access to frequently
•
read articles.
Owner's manual.
Quick Guide: A selection of articles cov-
•
ering commonly used functions.
Select the symbol in the lower right-hand corner for additional information about the onboard owner's manual.
NOTE
The on-board owner's manual cannot
•
be accessed while the vehicle is moving.
Specifications regarding your vehicle
•
are not found in the on-board information. This information is listed in the
printed owner's manual.
Searching for information
Searching using the text wheel
List of characters
Switching between character entry
modes (see the following table)
Surf history
Use the text wheel to enter a web address.
1. Turn TUNE to the desired letter and press
OK/MENU to confirm. The number/letter
keys on the center console can also be
used.
2. Continue to the next letter, etc. The
results of the search will be displayed in
the phone book.
01
}}
9
Page 12
01 Introduction
||
01
3. To switch from letter entry mode to the
entry mode for numbers or special characters, or to go view surf history, turn
TUNE to one of the selections (see the
explanation in the following table) in the
list for switching character entry mode (2)
and press OK/MENU.
123/A
BC
=>
Go
a|A
| | }
Toggle between letters and numbers by pressing OK/MENU.
This leads to surf history. Turn
TUNE to select a web address
and press OK/MENU to go to the
website.
Go to the website by pressing
OK/MENU.
Toggle between upper and lower
case letters by pressing OK/
MENU.
Switch from the text wheel to the
Address: field. Use TUNE to
move the cursor and erase characters by pressing EXIT. Press
OK/MENU to return to the text
wheel.
The number/letter keys on the
center console can also be used
to edit the
Address: field.
Press EXIT briefly to erase a single character.
Press and hold EXIT to erase all characters.
Pressing a number key on the center console
while the text wheel is displayed (see the previous illustration) will display a list of characters. Press the desired key repeatedly to
enter the desired letter and continue to the
next letter, etc.
To enter a number, press and hold the button.
Categories
The articles in the on-board owner's manual
are divided into main categories and sub-categories. The same article may be listed in
several applicable categories to help make
searches easier.
Turn TUNE to navigate in the category structure and press OK/MENU to open a category
(indicated by the
(indicated by the
return to the previous view.
symbol) or an article
symbol). Press EXIT to
Favorites
Articles that have been marked as favorites
can be found here. For information about
marking an article as a favorite, see "Navigating in an article" below.
Turn TUNE to navigate in the list of favorites
and press OK/MENU to open an article.
Press EXIT to return to the previous view.
Quick Guide
This is a selection of articles that will help you
become familiar with some of the vehicle's
most common functions. These articles can
also be found in their respective categories
but are listed here for quick access.
Turn TUNE to navigate in the Quick Guide
and press OK/MENU to open an article.
Press EXIT to return to the previous view.
Navigating in an article
Home: Returns you to the owner's man-
ual start page.
Favorites: Add/remove an article from
the list of favorites. This can also be done
by pressing the FAV button on the center
console keypad.
Highlighted link: takes you to the linked
article.
Important information: if the article contains warnings, cautions or notes, sym-
10
Page 13
01 Introduction
bols for these types of information and
the number of such texts in the article will
be displayed here.
Turn TUNE to navigate among the links or
scroll in an article. When you have scrolled to
the beginning/end of an article, you can
return to the start page or a favorite by scrolling one additional step up/down. Press OK/
MENU to activate a selection or highlighted
link. Press EXIT to return to the previous
view.
Related information
Information on the Internet (p. 11)
•
Change of ownership
When the vehicle changes owners, all personal settings should be reset to the factory
defaults.
To reset, press the MY CAR button in the
center console followed by OK/MENU and
Settings Reset to factory settings.
select
User data e.g., for apps, the web browser
and for personal settings in menus such as
the climate system and vehicle settings
should be reset to factory defaults.
For vehicles equipped with the optional Volvo
On Call with Sensus Connect (VOC), personal
settings stored in the vehicle should be
deleted, see Changing ownership of a vehicle
with Volvo On Call.
Related information
Volvo ID (p. 12)
•
Information on the Internet
Additional information regarding your vehicle
can be found at www.volvocars.com.
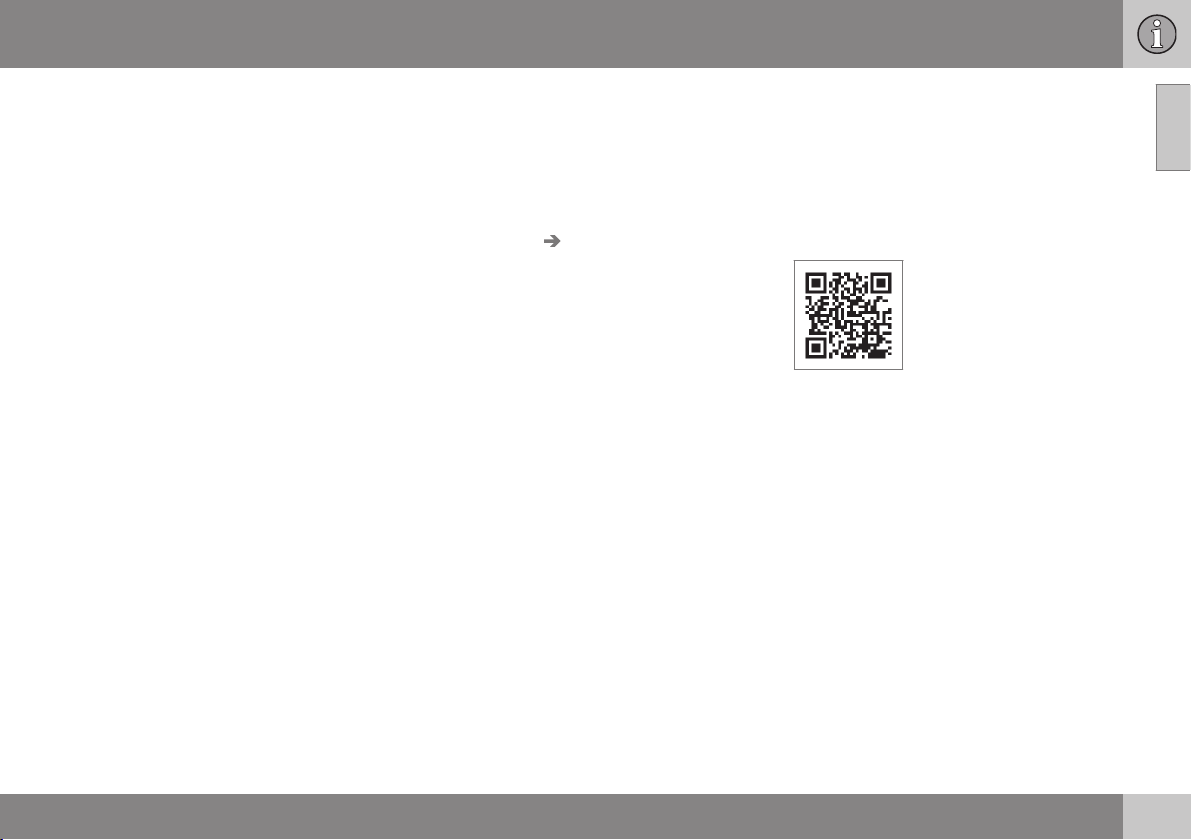
Support on the Internet
Go to support.volvocars.com or use the QR
code below to visit the site, which is available
in most markets.
QR code to the support site
The information on the support site is searchable and is grouped into different categories.
It includes support for e.g., Internet-based
services and functions, Volvo On Call (VOC),
the navigation system* and apps. Video and
step-by-step instructions explain various procedures such as how to connect the vehicle
to the Internet via a cell phone.
Downloadable information
Maps
Sensus Navigation system* maps can be
downloaded from the support site.
Mobile apps
For certain model year 2014 and 2015 Volvos,
the owner's manual is available in the form of
an app. The VOC* app can also be found
here.
01
}}
* Option/accessory, for more information, see Introduction.
11
Page 14

01 Introduction
||
01
Owner's manuals for earlier model Volvos
Owner's manuals for earlier model Volvos are
available in PDF format. Quick Guides and
supplements can also be found on the support site. Select a model and a model year
and download the desired information.
Contact
Contact information for customer support and
the nearest Volvo retailer are available on the
site.
Volvo ID
This is your personal ID that can be used to
access a number of services
1
Creating a Volvo ID
To create a Volvo ID, provide your personal
email address and then follow the instructions
provided in the email that you will receive
from Volvo. This can be done from:
From an Internet-connected vehicle:
•
Enter your email address in the app that
requires a Volvo ID and follow the instructions provides or press the Internet con-
) button on the center console
nect (
and select
instructions provided.
Volvo On Call (VOC*): download the latest
•
version of the VOC app and create a
Volvo ID on the start page.
Apps, Settings and follow the
1
These services vary and may be subject to change. Consult your Volvo retailer.
12
* Option/accessory, for more information, see Introduction.
Page 15
MY CAR
Page 16
02 MY CAR
My Car – introduction
The MY CAR menu system provides access
to menus for operating many of the vehicle's
functions, such as setting the clock, door mir-
02
rors, lock and alarm settings, etc.
Some of the features or functions are standard; others are optional and vary according to
model/market.
Operation
Use the buttons on the center console or the
steering wheel keypad to navigate in the
menus.
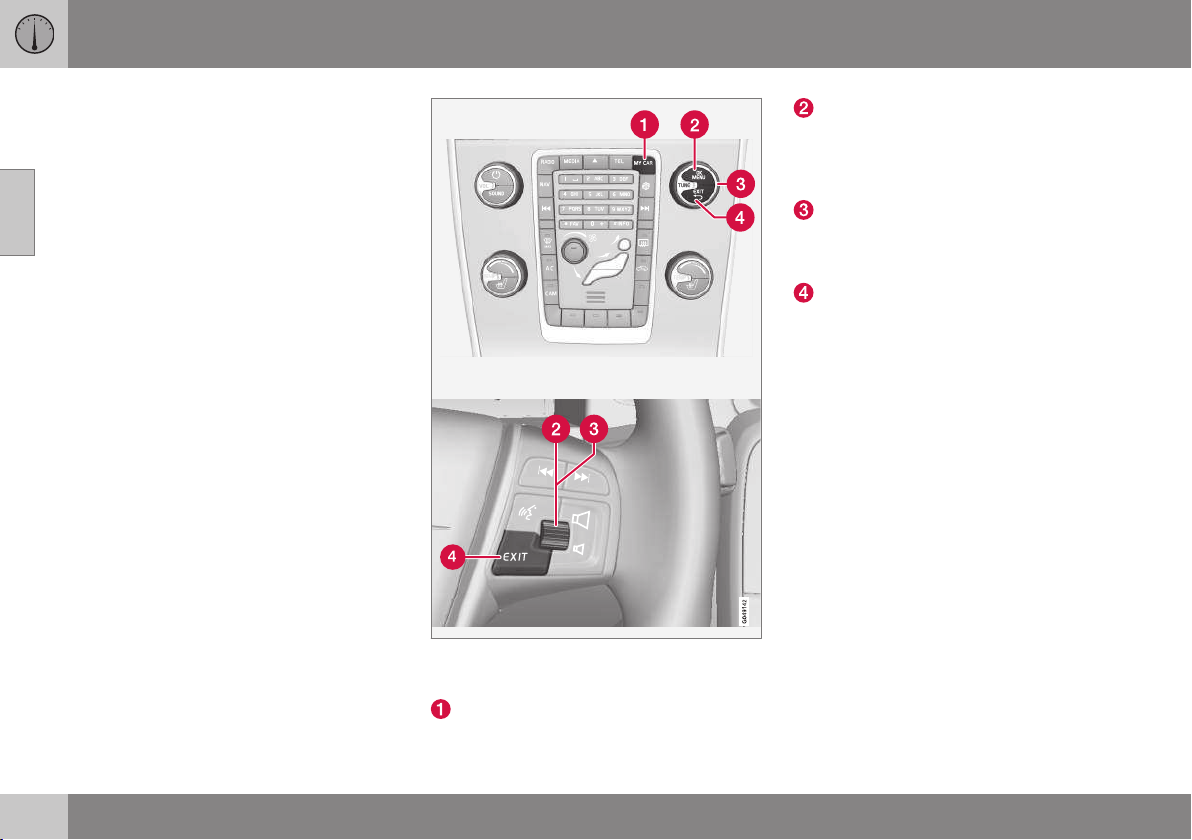
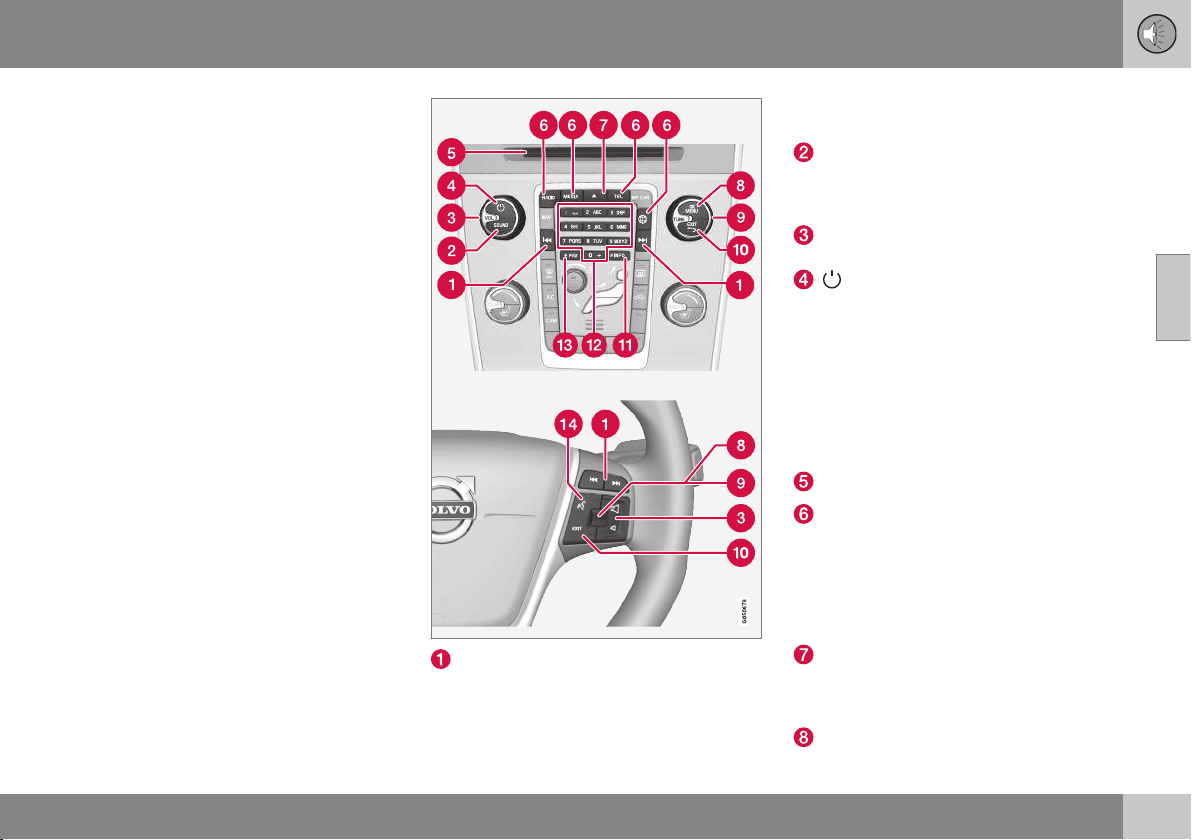
The center console control panel and the steering wheel keypad. The illustration is generic and
the appearance/location of the buttons may vary.
MY CAR: opens the MY CAR menu system.
OK/MENU: Press the button on the center console or the thumb wheel on the
steering wheel keypad to select a menu
alternative or to store a selected function
in the system's memory.
TUNE: Turn this control on the center
console or the thumb wheel on the steering wheel keypad to navigate up/down in
a menu.
EXIT
EXIT functions
Depending on which function the cursor is
pointing to and the menu level, briefly pressing EXIT will result in:
An in-coming phone call will be rejected
•
The current function will be cancelled
•
Characters entered will be erased
•
The most recent selection will be cancel-
•
led
Go back/up in the menu system
•
Pressing and holding EXIT takes you to the
normal view for MY CAR. If you are already in
normal view, this will take you to the main
source menu.
14
Page 17
02 MY CAR
MY CAR paths
MY CAR is a menu source where settings can
be made for many of the vehicle's functions
such as setting the clock, door mirror settings, locks, etc.
The current menu level (path) is shown at the
top of the center console screen. The following is an example of how the paths to the
menu system's functions are displayed:
Settings Vehicle settings Lock
settings
then all
The following is an example of how to search
for a function and change a setting using the
steering wheel keypad:
1. Press the MY CAR button on the center
2. Press the thumb wheel on the steering
3. Turn the thumb wheel to scroll to e.g.,
4. Scroll to the desired sub-menu, e.g.,
5.
Doors unlock Driver door,
.
console.
wheel keypad.
Settings and then press the thumb
wheel to open a list of sub-menus.
Vehicle settings and press the thumb
wheel to open a new list of sub-menus.
Scroll to
thumb wheel to open a new sub-menu.
Lock settings and press the
6.
Scroll to
thumb wheel to open a drop-down menu
with settings that can be selected.
7. Turn the thumb wheel to scroll among the
settings All doors and Driver door, then
Doors unlock and press the
all and press the thumb wheel to select a
setting.
8. Conclude by backing out of the menus
one at a time by briefly pressing EXIT or
by pressing and holding EXIT.
The procedure is the same using the center
console controls OK/MENU, EXIT and
TUNE.
Related information
MY CAR menus (p. 15)
•
MY CAR menus
MY CAR is a group of menus where settings
can be made for many of the vehicle's functions such as setting the clock, door mirror
settings, locks, etc.
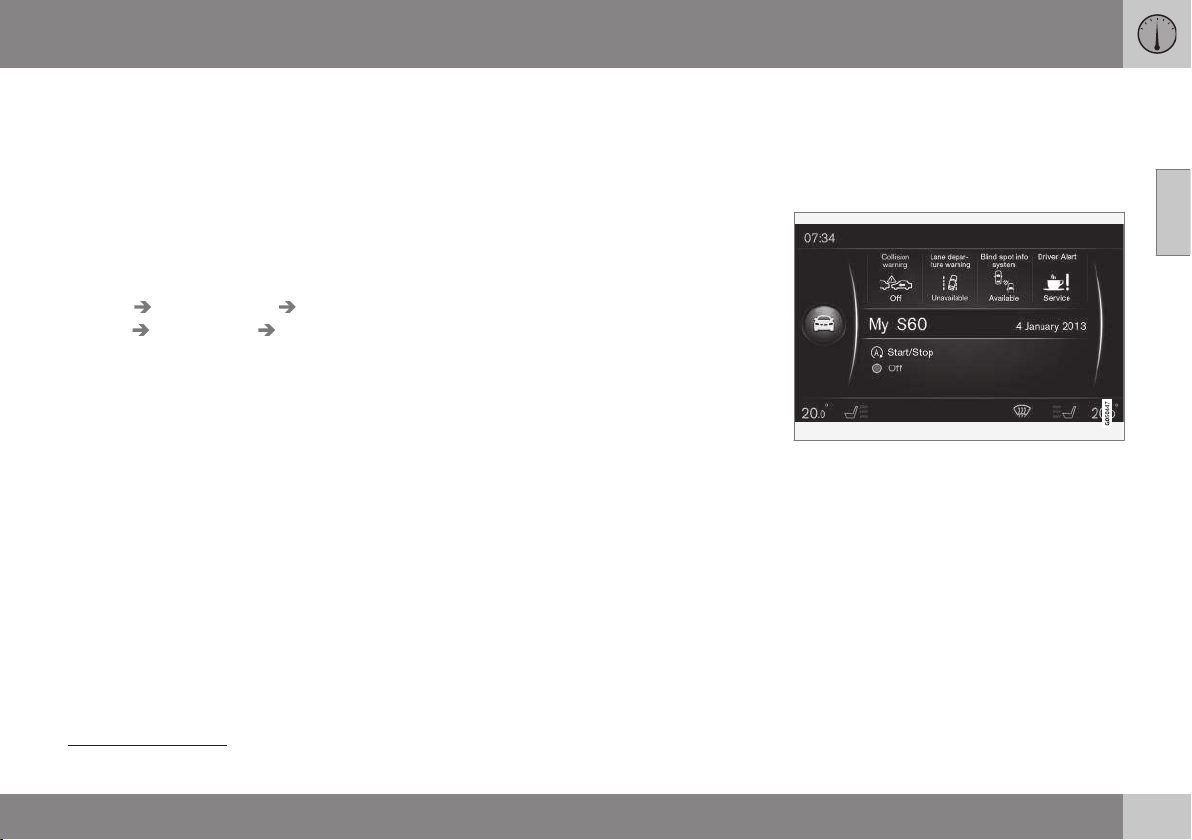
Example of a normal view in MY CAR
Press the MY CAR button on the center console to display the normal view for MY CAR.
This view shows the status of some of the
vehicle's driver support systems in the upper
section of the screen along with the status for
the Start/Stop* function in the screen's lower
section.
Pressing OK/MENU gives you access to the
My Car menus with the following alternatives:
•
•
1
My S60
Trip statistics
02
1
Differs according to model.
* Option/accessory, for more information, see Introduction.
}}
15
Page 18

02 MY CAR
||
Drive-E
•
Tire pressure
•
Settings
•
Maintenance & repair
•
02
Owner's manual
•
1
My S60
My Car My S60
The screen displays all of the driver support
systems installed in the vehicle. This is where
they can be activated/deactivated.
1
Trip statistics
My Car Trip statistics
This shows a bar graph with average fuel
consumption.
Drive-E
My Car Drive-E
This section provides a description of Volvo's
Drive-E concept. Choose among the following:
Start/Stop
•
Information about the Start/Stop function.
ECO driving guide
•
Provides tips on driving economically.
Tire pressure
My Car Tire pressure/Tire monitoring,
depending on the version of this system
installed in your vehicle.
General information about the tire pressure
monitoring function in your vehicle.
Settings
My Car Settings
The structure of the menus is as follows:
Menu level 1
Menu level 2
Menu level 3
Menu level 4
These are the first four menu levels found
Settings. Some of these functions are
under
standard; others are optional.
A box will be displayed in cases where a
function can be activated/turned On or deactivated/turned Off:
On: the box is marked
Off: the box is empty
Choose
•
On/Off by pressing OK/MENU,
exit by pressing EXIT.
Submenus found under the heading Settings
Vehicle settings, see MY CAR vehicle
•
settings (p. 17)
Driver support system, see MY CAR
•
driver support settings (p. 19)
System options, see MY CAR system
•
settings (p. 20)
Voice control settings, see MY CAR
•
voice control settings (p. 21)
Climate settings, see MY CAR climate
•
system settings (p. 21)
Internet settings, see MY CAR Internet
•
settings (p. 22)
Volvo On Call, see the on-board
•
Owner's Manual.
FAV key options: store a commonly
•
used function in MY CAR for the FAV button, see Favorites (p. 32)
Information, see MY CAR information
•
settings (p. 23)
Reset to factory settings: reset all
•
menus to their original factory settings.
Maintenance and repairs
My Car Maintenance & repair
This displays service and workshop information about the vehicle and any workshop
appointments that may have been booked.
1
Differs according to model.
16
Page 19

02 MY CAR
Owner's manual
My Car Owner's manual
The screen will display the on-board owner's
manual (p. 9).
MY CAR vehicle settings
The vehicle settings in the MY CAR menus
control many of the vehicle functions such as
car key memory, lock settings, etc.
Vehicle settings
Car key memory
On
Off
Lock settings
Automatic door locking
On
Off
Doors unlock
All doors
Driver door, then all
Keyless entry unlock
All doors unlock
Any door
Doors on same side
Both front doors
Audible confirmation
On
Off
Door lock confirmation light
On
Off
Unlock confirmation light
On
Off
Side mirror settings
Fold mirrors when locking
On
Off
Tilt left mirror on reverse gear
On
Off
02
}}
17
Page 20

02
02 MY CAR
||
Tilt right mirror on reverse gear
On
Off
Light settings
Interior light
Floor lights
Ambiance lights
Ambiance colors
Approach light duration
Off
30 sec
60 sec
90 sec
Home safe light duration
Off
30 sec
60 sec
90 sec
Triple indicator
On
Off
Daytime running lights
On
Off
Active bending lights
On
Off
Auxiliary lights
On
Off
Active high beam
On
Off
Cornering lights
On
Off
Tire pressure
Calibrate tire pressure
Tire monitoring
On
Off
Steering force level
Low
Medium
High
Speed in infotainment display
On
Off
Location service
On
Off
Reset vehicle settings
All
Vehicle settings will be reset to the
factory defaults.
18
Page 21

02 MY CAR
MY CAR driver support settings
The driver support settings in the MY CAR
menus control functions such as collision
warning, driver alert, etc.
Driver support system
Collision warning
Collision warning
On
Off
Warning distance
Short
Normal
Long
Warning sound
On
Off
Lane Departure Warning
Lane Departure Warning
On
Off
On at startup
On
Off
Increased sensitivity
On
Off
Lane Keeping Aid
Lane Keeping Aid
On
Off
Assistance mode
Full function
Steering assist only
Vibration only
Road sign information
Road sign information
On
Off
Speed alert
On
Off
ESC OFF
On
Off
City Safety
On
Off
BLIS
On
Off
Distance alert
On
Off
Driver Alert
On
Off
02
19
Page 22

02 MY CAR
MY CAR system settings
The system settings in the MY CAR menus
control functions such as setting the clock,
changing display languages, etc.
02
System options
Time settings
This is the setting for adjusting the
clock.
24-hour clock
On
Off
Daylight savings time
Auto
On
Off
Auto time
On
Off
Location
Language
Select that language to be used in the
instrument panel and center console
screen.
Language: Driver display
Select the language to be used in the
instrument panel.
Distance and fuel units
MPG(US)
km/l
l/100km
Temperature unit
Celsius
Fahrenheit
Select the temperature unit to be used
for showing the ambient temperature
and in the climate system.
Screen saver
On
Off
The screen will go black after several
minutes of inactivity if this setting is
selected.
The information on the screen will reappear if any screen-related buttons are
pressed or controls are used.
Show help text
On
Off
Help texts for the current information on
the screen will be displayed if this setting is selected.
Reset system options
System options will be reset to their
All
factory settings.
Related information
MY CAR menus (p. 15)
•
20
Page 23

02 MY CAR
MY CAR voice control settings
The voice control settings in the MY CAR
menus control functions such as giving voice
commands, the list of voice commands, etc.
Voice control settings See
Tutorial
Command list
Global commands
Navigation commands
Radio commands
Media commands
Phone commands
Navigation commands only
apply if Volvo's navigation system* is installed.
User setting
Default
Trained user
(p. 69)
(p. 70)
(p. 69)
Speaker adaptation
Read out speed
Fast
Medium
Slow
Related information
Voice control - introduction (p. 67)
•
MY CAR menus (p. 15)
•
(p. 69)
(p. 69)
MY CAR climate system settings
The climate system settings in the MY CAR
menus control functions such as air conditioning, recirculation, etc.
02
Climate settings
Auto fan
Normal
High
Low
Recirculation timeout
On
Off
Auto rear defrost
On
Off
Auto driver seat heater
On
Off
Auto steering wheel heater
On
Off
* Option/accessory, for more information, see Introduction.
}}
21
Page 24

02 MY CAR
02
Interior air quality system
On
Off
Reset climate settings
Reset all
tory defaults.
Climate settings to their fac-
MY CAR Internet settings
The Internet settings in the MY CAR menus
control functions such as Bluetooth
Fi.
Internet settings See
Connect through
Car modem
Bluetooth
Wi-Fi
None
Car modem
Data usage
Current network operator
Data roaming
Lock SIM card
Access Point Name
Bluetooth
Wi-Fi
Car Wi-Fi hotspot
®
and Wi-
(p. 73),
(p. 75)
and
(p. 57)
(p. 75)
(p. 57)
(p. 73)
(p. 75)
Car Wi-Fi hotspot
On
Off
Name
Password
Related information
MY CAR menus (p. 15)
•
Internet connection (p. 73)
•
22
Page 25

MY CAR information settings
The information settings in the MY CAR
menus provide information about the number
of keys and the VIN number.
Information
Number of keys
VIN number
02 MY CAR
02
23
Page 26

INFOTAINM E N T
Page 27
03 Infotainment
Infotainment
The infotainment system consists of a radio,
media player and has the capacity to communicate with a cell phone, which in some cases
can be voice controlled. It is also possible to
connect to the Internet to e.g., stream audio
content via apps.
Information is presented on a 7-inch screen in
the upper section of the center console and
the system can be controlled using the steering wheel keypad, center console controls or
in some cases, voice commands.
If the infotainment system is on when the
ignition is switched off, it will be activated
again when the ignition is put into mode I or
higher and will continue in the same mode
that was being used (e.g., radio). The driver's
door also has to be closed on model with
keyless drive*.
The infotainment system can be used for
15 minutes at a time without the remote key
in the ignition slot by pressing the on/off button.
While the engine is being started, the infotainment system will be temporarily interrupted
and will resume when the engine has started.
NOTE
To help avoid excessive battery drain,
remove the remote key from the ignition
slot if the infotainment system is used
while the engine is switched off.
Gracenote
Gracenote, Gracenote logo and logotype,
"Powered by Gracenote" and Gracenote
MusicID are either registered trademarks or
trademarks of Gracenote, Inc in the United
States and/or other countries.
®
Dolby Digital, Dolby Pro Logic*
03
Manufactured under license from Dolby
Laboratories. Dolby, Pro Logic, MLP Lossless
and the double-D symbol are trademarks of
Dolby Laboratories.
Dirac Live
Dirac Live technology has been used in the
development and tuning of the sound in order
to ensure a world-class sound experience.
Dirac Live and the D-symbol are registered
trademarks of Dirac Research AB.
* Option/accessory, for more information, see Introduction.
}}
25
Page 28
03 Infotainment
||
Related information
Infotainment – operating the system
•
(p. 27)
03
Infotainment – overview
This is an overview of the main components in
the infotainment system.
Steering wheel keypad.
Display. The display's layout and appearance may change according to the theme
chosen for the instrument panel. Refer to
the Owner's Manual supplement for more
information.
Center console control panel.
AUX/USB sockets for external audio
sources (e.g., iPod® or mp3 player).
A/V-AUX socket.
26
Page 29
03 Infotainment
Infotainment – operating the system
The infotainment system can be operated
from the center console and certain functions
can also be operated from the steering wheel
keypad or by using voice commands.
Left/right arrow keys – short press
moves between preset radio stations,
tracks on a disc or chapters on a DVD.
Press and hold to search within tracks or
to tune to the next/previous available
radio station.
SOUND – press to access the menu for
adjusting bass, treble, etc. For additional
information, see general sound settings (p. 33).
VOL – turn to raise or lower the volume
level.
ON/OFF/MUTE – short press -
switch the system ON. Press and hold
(until the screen turns black) - switch
the system OFF. A short press when the
infotainment system is on will mute/
unmute the sound. The entire infotainment system, including the navigation*
and telephone functions, is switched
on/off at the same time by using this button.
CD/DVD* slot.
Mode buttons – press to select a mode
(e.g., RADIO, MEDIA, TEL, etc.) by
pressing its button on the center console.
The most recent source in the selected
mode (e.g., FM in RADIO mode) will be
displayed. From a mode, pressing its
mode button will display a shortcut menu.
Eject a disc. An ejected disc that is not
removed from the slot after approx.
12 seconds will be drawn back into the
player.
OK/MENU – press the thumb wheel on
the steering wheel keypad or this button
03
}}
* Option/accessory, for more information, see Introduction.
27
Page 30
03
03 Infotainment
||
on the center console to confirm a menu
selection or accept an incoming phone
call. From a mode's main view, pressing
this button displays a menu for the
selected source (e.g., FM in RADIO
mode). Arrows at the right of the screen
indicate submenus.
TUNE – turn the thumb wheel on the
steering wheel keypad or this button on
the center console to scroll among
tracks/folders, radio stations, phone con-
tacts or to navigate among the alternatives shown on the screen.
EXIT – short press - go upward in the
menu system, cancel a current function,
Interrupt or reject a phone call, or erase
characters that have been entered on the
screen. Press and hold - to go to the
mode's main view. From a mode’s main
view, pressing and holding EXIT takes
you to the infotainment system's main
view, which enables you to access the
same modes as by pressing the respec-
tive mode buttons on the center console
(6).
# INFO – if more information is available
than is currently displayed on the screen,
press # INFO to display the remaining
information.
Keypad for entering text/numbers, storing
preset radio stations, etc.
* FAV – this button can be used to store a
shortcut to a commonly used function,
see Favorites (p. 32).
Voice control – press to activate voice
commands.
28
Page 31

Menu navigation
03 Infotainment
03
An example of menu navigation (the illustration is generic and the function shown may not be available in all markets)
}}
29
Page 32

03 Infotainment
||
Mode button – press to change modes
or from within an active mode, to display
its shortcut menu.
Normal view – a mode's normal view.
Shortcut menu – displays the mode's
most common alternatives.
Quick scroll menu – menu displayed by
03
turning TUNE to e.g., change tracks,
radio stations, etc.
Source menu – the selected mode's
functions and settings.
Source selection menu1 – displays the
sources that can be selected.
Main mode menu – displays the main
modes. A mode can also be selected by
pressing its button on the center console
(1).
These views vary depending on the mode
and source selected, the optional equipment
in the vehicle, settings, etc.
Select a mode by pressing its button on the
center console (1) (e.g., RADIO, MEDIA, etc.).
To navigate in the mode's menus, use the
TUNE, OK/MENU, EXIT buttons or the
modes button (1).
If a menu text is grayed-out, this means that it
cannot currently be selected. This may be
because the function is not installed in the
vehicle, that the source is not currently connected or is connected but is empty.
For a list of the available functions, see Infotainment menu overview (p. 80).
30
1
Only in modes with several sources.
Page 33

03 Infotainment
On-screen symbols
The following is an overview of the symbols
that may be displayed in the screen's activity/
status field.
Activity/status field
Active current functions and in certain cases,
their status, are displayed in the activity/
status field. Due to limited space, not all
activity/status symbols will be displayed at all
times.
Symbol Explanation
Connecting to the Internet via
Bluetooth®.
Connected to the Internet via
Bluetooth®.
No Internet connection via
Bluetooth®.
Symbol Explanation
Connecting to the Internet via
Wi-Fi.
Connected to the Internet via
Wi-Fi.
No Internet connection via WiFi.
Connected to the Internet via
Wi-Fi via roaming (for connections in other countries).
Connecting to the Internet via
the integrated modem*A.
The number of bars illuminated
indicates the strength of the
signal. The type of connection
is indicated under the bars.
Connected to the Internet via
the integrated modem*A.
No Internet connection via the
integrated modem*A.
The integrated modem*A is
connected to the Internet via
roaming (for connections in
other countries).
Symbol Explanation
This symbol is displayed when
the vehicle's position is being
transmitted.
Cell phone connected.
Missed call(s).
Call in progress.
Unread text message.
Microphone muted.
Audio muted.
SOS service A active.
ON CALL service A active.
A
Models with Volvo On Call only.
Related information
Internet connection (p. 73)
•
•
Bluetooth® hands-free system (p. 62)
03
* Option/accessory, for more information, see Introduction.
31
Page 34

03 Infotainment
Favorites
The * FAV button can be used to store frequently used functions (create a shortcut),
making it possible to start the stored function
in the main modes (radio, media, MY CAR
and the web browser if the vehicle is connected to the Internet) by simply pressing * FAV.
03
Storing a shortcut
1. Select a main mode (e.g., RADIO,
MEDIA) by pressing its button on the
center console.
2.
Select a source (e.g.,
3. In the source's normal view, press OK/
MENU and select its FAV menu or press
and hold the * FAV button until the menu
is displayed.
AM, Bluetooth).
4. From the menu, select the function to be
stored in the * FAV button as a shortcut.
>
When the source (e.g.,
Bluetooth) is active (selected),
press * FAV briefly to start the stored
function.
AM,
Related information
Infotainment (p. 25)
•
Radio (p. 35)
•
Media Player (p. 48)
•
Internet connection (p. 73)
•
Infotainment – audio settings
The audio system is precalibrated for optimal
sound reproduction and can be adjusted to
your preferences.
Optimal sound reproduction settings
The audio system is precalibrated for optimal
sound reproduction using digital signal processing.
This calibration takes into account the speakers, amplifier, cabin acoustics, listener position, etc., for each combination of vehicle and
infotainment system.
Dynamic calibration is also available, which
monitors the setting of the volume control,
radio reception and the vehicle's speed.
The sound settings described in this owner's
information, such as
Equalizer, are only intended to help the lis-
tener adapt sound reproduction to his/her
personal preferences.
Bass, Treble and
Sound quality for streaming Internet audio
The amount of data being transmitted
depends on the services or apps being used
in the vehicle. For example, streaming audio
means that large amounts of data are transferred, which calls for a good Internet connection and a strong signal. Sound quality
can be adjusted in certain apps; choosing
high quality increases download times or may
result in interruptions in the audio stream. For
32
Page 35

03 Infotainment
this reason, it may be advisable to select a
lower sound quality in order to help ensure a
consistent listening experience.
Related information
Internet connection (p. 73)
•
Infotainment – general sound settings
The following are general infotainment sound
settings.
Press SOUND to access the menu for general sound settings such as
etc. Turn TUNE to go to the various alternatives (e.g.,
select.
Adjust the setting by turning TUNE and save
the new setting by pressing OK/MENU.
Please note that the volume can only be
adjusted within a comfortable range. When a
function is active (e.g., the optional navigation
system), adjust its volume by turning VOL.
Continue turning TUNE to access the other
sound alternatives:
•
•
•
•
•
•
•
•
Treble) and press OK/MENU to
Premium sound – Infotainment -
advanced audio settings (p. 34).
Bass: Bass level.
Treble: Treble level.
Fader: Balance between the front and
rear speakers.
Balance: Balance between the right and
left speakers.
Equalizer: Sound levels for different fre-
quencies.
Navigation volume: Volume for naviga-
tion system* guidance.
Voice control volume: Volume for the
voice control system's responses.
Bass, Treble,
Ringtone volume: Volume for a con-
•
nected cell phone's ringing signal.
Park assist volume: Volume for the park
•
assist system*.
Cross Traffic Alert-vol.: Volume for the
•
CTA system*.
Volume compensation: Speed-related
•
volume compensation.
Reset audio settings: Reset to factory
•
settings.
Related information
Infotainment – operating the system
•
(p. 27)
03
* Option/accessory, for more information, see Introduction.
33
Page 36

03 Infotainment
Infotainment - advanced audio settings
Sound settings for the radio and other media
sources can be adjusted to your preferences.
To access the advanced sound settings,
press SOUND to open the menu. Turn TUNE,
Premium sound and press OK/MENU.
go to
Sound stage
03
Sound reproduction can be optimized for different sections of the passenger compartment. The sound stage can be set for the
Driver seat, the Rear seats or the Whole
car.
1.
Turn TUNE to go to
press OK/MENU.
2. Select a profile by turning TUNE and confirm by pressing OK/MENU.
Sound stage and
Surround
When switched on, the system will automatically select settings for the best sound qual-
ity, which is normally DPL II and
appear on the screen. If the recording was
made using Dolby Digital technology, playback will be provided with this setting and
will appear on the screen. If Surround is switched off, audio will be provided
using 3 channel stereo.
1.
Turn TUNE to go to
OK/MENU.
Surround and press
will
2. Surround can be switched on or off by
pressing OK/MENU
The Surround level can be adjusted separately when the function is on.
1. Turn TUNE to go to the level setting and
confirm by pressing OK/MENU.
2. Select a Surround level by turning TUNE
and confirm by pressing OK/MENU.
Subwoofer
The subwoofer's sound level can be adjusted
separately.
1.
Turn TUNE to go to
press OK/MENU.
2. Select a sound level by turning TUNE and
confirm by pressing OK/MENU.
Subwoofer and
Center speaker
The center speaker's sound level can be
adjusted separately. If Surround is on,
center level will be selected; otherwise 3
channel center level is selected.
1.
Turn TUNE to go to
OK/MENU.
2. Select a sound level by turning TUNE and
confirm by pressing OK/MENU.
Center and press
DPL II
Related information
Infotainment – operating the system
•
(p. 27)
External audio source volume (p. 56)
•
Adjusting the equalizer
Adjust the equalizer and adapt the sound level
separately for each radio waveband.
1. Press SOUND to access the sound settings. Turn TUNE to select
press OK/MENU.
2. Select the waveband by turning TUNE
and confirm by pressing OK/MENU.
3. Make the settings by turning TUNE and
confirm by pressing OK/MENU or cancel
by pressing EXIT. Do the same for the
other wavebands.
4. When the settings have been made,
press EXIT to confirm and return to the
normal view.
Equalizer and
Related information
Infotainment – operating the system
•
(p. 27)
34
Page 37

03 Infotainment
Automatic volume control
The infotainment system compensates for
disrupting noises in the passenger compartment.
The system increases the volume to compensate for the speed of the vehicle. Sound level
compensation can be set at
High or Off.
1. Press SOUND to open the sound settings
menu. Turn TUNE to go to
compensation and press OK/MENU.
2. Select a level by turning TUNE and confirm by pressing OK/MENU.
Related information
Infotainment – operating the system
•
(p. 27)
Low, Medium,
Volume
Radio
Your vehicle's radio offers AM, FM and
SiriusXM™ satellite radio*.
If the vehicle is connected to the Internet, it
may also be possible to listen to web radio,
see Applications (p. 77).
Radio controls on the center console
Shortcuts to certain functions can be stored
in the FAV button. A shortcut can then be
activated by pressing the FAV button, see
Favorites (p. 32).
AM/FM radio
Radio station search (p. 36)
•
Preset radio stations (p. 37)
•
SiriusXM™ satellite radio*
Preset radio stations (p. 37)
•
SiriusXM™ satellite radio* (p. 42)
•
Web radio
Applications (p. 77)
•
Related information
AM radio menus (p. 81)
•
FM radio menus (p. 81)
•
Internet connection (p. 73)
•
03
* Option/accessory, for more information, see Introduction.
35
Page 38
03 Infotainment
Radio station search
The radio automatically compiles a list of stations of the strongest stations that it is currently receiving.
An automatic station search utilizes the compiled list of stations. It is also possible to perform a manual station search.
You can set the default type of station
03
search. To do so:
1. In FM mode's normal view, press
OK/MENU and select
2.
Turn TUNE to
tuning and select by pressing OK/
MENU.
Tune station by.
Station list or Manual
Automatic station search
The radio automatically compiles a station list
that is used by the automatic station search
function.
If the automatic station search function is
activated, it is possible to search from the
normal view and in the list of stations.
Station searches in normal view
1.
In FM mode, press
the center console or the steering wheel
keypad.
> The radio will change to the next/previ-
ously stored station.
2.
In FM mode, Press and hold
on the center console or the steering
wheel keypad.
> The radio will switch to the next/previ-
ous available station.
/ briefly on
/
Searching in the station list
1.
In FM mode, turn TUNE:
will be displayed.
2. Turn TUNE to a station and select it by
pressing OK/MENU.
Switch between automatic and manual radio
station searching in the station list by pressing INFO on the center console.
FM station list
List of radio stations
The radio automatically compiles a list of the
strongest stations that it is currently receiving.
This enables you to listen to a station in an
area where you are not familiar with the stations or their frequencies.
The automatic station search utilizes the
compiled list of stations.
NOTE
This list will only display the frequencies of
the stations currently being received, not a
complete list of all radio frequencies on the
currently selected waveband.
36
Page 39

03 Infotainment
Manual radio station search
The radio automatically compiles a list of
radio stations but it is also possible to search
for stations manually.
If manual searching is set, these searches
can be made from the normal view and in a
list of radio frequencies.
Searching for stations from normal view
1. In FM mode, press the arrow keys
/ briefly in the center console or
the steering wheel keypad.
> The radio will switch to the previous/
next stored station.
2. In FM mode, press and hold the arrow
keys
the steering wheel keypad.
> The radio will switch to the previous/
/ in the center console or
next available station.
Searching for stations in a list of frequencies
1.
In FM mode, turn TUNE:
be displayed.
2. Turn TUNE to a frequency and select it
by pressing OK/MENU.
Toggle between manual and automatic station searches in the list of frequencies by
pressing the INFO button in the center console.
FM tuning will
Preset radio stations
Radio stations that you listen to frequently
can be stored as presets and can be tuned by
pressing the appropriate number key on the
center console.
Preset (number) keys
AM/FM radio
Ten preset stations can be stored for each
waveband (
Stored preset stations are selected using the
number keys on the center console.
1. Tune to a station, see Radio station
2. Press and hold one of the number keys to
A list of preset stations can be displayed.
AM/FM, etc.)
search (p. 36).
store the station on that key.
– In AM/FM's normal view, press
OK/MENU and select
to activate (or deactivate) this function.
Show Presets
Related information
Infotainment – operating the system
•
(p. 27)
03
37
Page 40

03 Infotainment
HD Radio™reception (U.S. models only)
HD radio is a brand name registered by the
Ibiquity digital corporation2. They are the
developer of a broadcasting technology
called IBOC or In Band On Channel, which
refers to the method of transmitting a digital
radio broadcast signal centered on the same
frequency as the AM or FM station's present
03
frequency.
Introduction
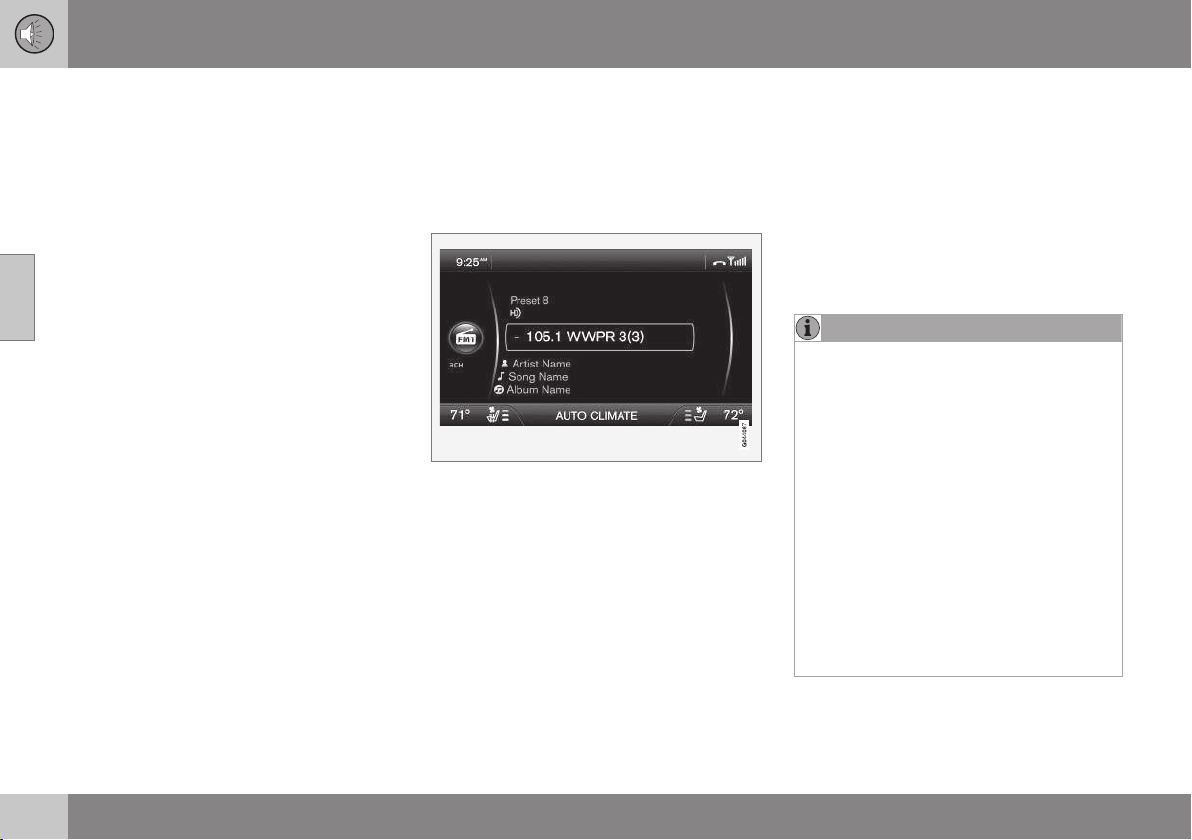
Display when the radio is receiving an HD Radio
broadcast
NOTE
HD Radio volume may fade in and out at
times due to coverage limitations.
HD radio is a brand name registered by the
Ibiquity digital corporation3. They are the
developer of a broadcasting technology
called IBOC or In Band On Channel, which
refers to the method of transmitting a digital
radio broadcast signal centered on the same
frequency as the AM or FM station's present
frequency.
The IBOC system is referred to as a "hybrid"
since it is both analogue and digital. During
hybrid operation, receivers still continue to
receive the analogue (non-digital) signal. HD
radio receivers incorporate both modes of
reception, where the receiver will automatically switch to the analogue signal if the digital signal cannot be decoded or is lost by the
receiver.
When you have tuned to an HD Radio station,
the
ment system display. The symbol will be displayed in different colors:
symbol will appear in the infotain-
Grayed-out symbol: HD Radio is in
•
standby mode
White symbol: the radio is actively
•
receiving an HD broadcast
Orange symbol: the radio is receiving an
•
HD broadcast with digital sound
More information about HD radio and IBOC
can be found on Ibiquity's website,
www.hdradio.com and www.ibiquity.com.
Benefits of digital broadcasting
Better sound (FM sounds near CD quality
•
and AM as analogue FM).
Some FM frequencies offer a greater
•
number of listening choices through “multicasting” (consisting of a frequency's
main channel and any sub-channels that
may also be available on that particular
frequency. See also the section "Subchannels" below).
When receiving a digital signal there is no
•
multipath disturbance or hisses/pops/
crackling due to outside influences.
How HD broadcasting works
HD Radio works similarly to conventional
radio and broadcasts of this type are available in many areas of the United States. However, there are a few key differences:
38
2
HD Radio (TM) technology is manufactured under license from iBiquity Digital Corp. U.S. and Foreign Patents. HD Radio(TM) and the HD and HD Radio logos are proprietary trademarks of
iBiquity Digital Corp.
3
HD Radio (TM) technology is manufactured under license from iBiquity Digital Corp. U.S. and Foreign Patents. HD Radio(TM) and the HD and HD Radio logos are proprietary trademarks of
iBiquity Digital Corp.
Page 41

03 Infotainment
Instead of transmitting one analogue sig-
•
nal, stations send out a bundled signal –
both analogue and digital.
An HD radio receiver can receive both
•
digital and analogue broadcasts.
Depending on the terrain and location of
the vehicle (which will influence the signal
strength), the receiver will determine
which signal to receive.
Benefits of digital broadcasting
Better sound (FM sounds near CD quality
•
and AM as analogue FM).
Some FM frequencies offer a greater
•
number of listening choices through “multicasting” (consisting of a frequency's
main channel and any sub-channels that
may also be available on that particular
frequency. See also the section "Subchannels" below).
When receiving a digital signal there is no
•
multipath disturbance or hisses/pops/
crackling due to outside influences.
How HD broadcasting works
HD Radio works similarly to conventional
radio and broadcasts of this type are available in many areas of the United States. However, there are a few key differences:
Instead of transmitting one analogue sig-
•
nal, stations send out a bundled signal –
both analogue and digital.
An HD radio receiver can receive both
•
digital and analogue broadcasts.
Depending on the terrain and location of
the vehicle (which will influence the signal
strength), the receiver will determine
which signal to receive.
Related information
HD Radio™ - sub-channels (p. 40)
•
HD Radio™ - limitations (p. 41)
•
HD Radio™ - switching on and off
•
(p. 39)
Radio (p. 35)
•
HD Radio™ - switching on and off
The factory setting for HD radio is off.
Switching HD on or off
If HD radio is switched on when driving
through areas with weak HD signals (fringe
areas), you may experience that the radio
repeatedly switches between analogue/digital
and digital/analogue reception. If this happens, it may be desirable to switch HD off.
To do so:
1. Be sure the infotainment system is
switched on and in one of the AM or FM
modes.
2. Press OK/MENU in the center console
control panel.
3.
Turn TUNE and move the marker to
Radio.
4. Press OK/MENU to turn HD off (the X will
disappear from the box on the display
screen).
This will disable the radio's capability to
receive digital broadcasts but it will continue
to function as a conventional (analogue)
AM/FM receiver. Please note that when HD is
switched off, it will not be possible to tune to
sub-channels (see the following section for a
more detailed explanation of sub-channels).
Repeat steps 2-4 above to reactivate HD (an
X will appear in the box on the display
screen). Please note that this will only switch
HD
03
}}
39
Page 42
03 Infotainment
||
HD on or off for the selected waveband (AM,
FM1, etc.).
Related information
HD Radio™reception (U.S. models only)
•
(p. 38)
Radio station search (p. 36)
•
03
HD Radio™ - sub-channels
In many cases, a main HD Radio station (FM
wavebands only) will also have sub-channels
offering additional types of programming or
music.
Sub-channels
Example of an HD Radio station with sub-channels
If any sub-channels are available, the “-”
symbol will be displayed to the left of the frequency number and a number will be displayed to the right of the frequency number
indicating that the currently tuned frequency
has at least one sub-channel.
Selecting sub-channels
To listen to a station's sub-channel(s), press
and hold the right arrow key on the center
console or on the steering wheel keypad for
approximately 1 second. To go back to the
main channel, press and hold the left arrow
key on the center console or on the steering
wheel keypad for approximately 1 second. To
go to subchannel 2 (if available), press and
hold the right arrow key on the center console
or on the steering wheel keypad for approximately 1 second.
If you are currently tuned to a frequency's
main channel, pressing and holding the left
arrow key for approximately 1 second will
tune to the next lower radio frequency.
NOTE
When the radio has gone into HD
•
mode, it may take several seconds
before the ">" symbol (if the current
frequency has any sub-channels) is
displayed to the left of the frequency.
Pressing and holding the arrow keys
for approximately 1 second before the
main-/sub-channel icon is displayed
will cause the radio to tune to the next
available radio station, not to the current station's sub-channels.
When you are no longer in broadcast-
•
ing range of the currently tuned sub-
channel,
played. The radio will then be muted
and it will be necessary to tune to or
search for a new radio station.
Sub-channels can also be stored as presets,
see Preset radio stations (p. 37).
No reception will be dis-
40
Page 43

03 Infotainment
If you press a sub-channel's preset button, it
may take up to 6 seconds before the channel
becomes audible. If you press this button
while you are out of digital range of the transmitter,
No reception will be displayed.
HD Radio™ - limitations
Certain factors may limit HD radio reception.
Limitations
Main channel vs. sub-channels (FM
•
only): The main channel is the only channel that can receive in hybrid mode (both
digital and analogue). If a frequency has
sub-channels, they are broadcast in digital mode only. The main FM channel will
be displayed as, for example, 93.9 WNYC
(Volvo uses the symbol ">" to indicate
there are sub-channels available) The
sub-FM channels will be displayed as
93.9 – 2 WNYC, 93.9 - 3 WNYC, etc.
Reception coverage area: Due to cur-
•
rent IBOC transmitter power limitations,
the reception coverage area in digital
mode is somewhat more limited than the
station's analogue coverage area. Please
be aware that as with any radio broadcast
technology, terrain, time of day, foliage
level and building location can have positive or negative effects on radio reception.
Analogue to digital/digital to analogue
•
blending: Analogue to digital blending
will occur as the signal strength reaches a
preset threshold in the receiver. This will
be noticeable in fringe areas (areas with
weak reception) and is normal.
NOTE
There may be a noticeable difference in
sound quality when a change from analogue to digital or digital to analogue
occurs, such as:
Volume increase or decrease
•
Equalizer settings, i.e., Bass/ Mid-
•
range/Treble cut or boost
Time alignment (Digital program mate-
•
rial in extreme cases can be as much
as 8 seconds behind the analogue).
This will noticeable as a "stuttering"
effect.
The above items are dependant on the
broadcaster's equipment settings and
do not indicate a fault in the vehicle's
radio receiver or antenna systems.
Related information
HD Radio™reception (U.S. models only)
•
(p. 38)
03
41
Page 44

03 Infotainment
SiriusXM™ satellite radio*
The SiriusXM™ satellite system consists of a
number of high elevation satellites in geosynchronous orbit.
Listening to satellite radio
The digital signals from the satellites are lineof-sight, which means that physical obstructions such as bridges, tunnels, etc, may tem-
03
porarily interfere with signal reception.
Avoid any obstructions, such as metallic
objects transported on roof racks or in a ski
box, or other antennas that may impede signals from the SiriusXM™ satellites.
Selecting SiriusXM™ radio mode
1. With the infotainment system switched
on, press RADIO.
2. Turn TUNE or the thumb wheel on the
steering wheel keypad to scroll to
and press OK/MENU or the thumb wheel
on the steering wheel keypad.
Activating SiriusXM™ radio
1. Tune to a satellite channel that has no
audio, which means that the channel is
unsubscribed and the text
update needed
"Selecting a channel").
2. Call SiriusXM™ at 1-888-539-7474.
is displayed (see also
Sirius
Subscription
3. If you tune to an unsubscribed channel,
the SiriusXM™ ID will be displayed (see
"SiriusXM™ ID" below for an alternative
method of displaying the ID).
4.
Updating subscription will be displayed
while the subscription is being updated,
after which the display will return to the
normal view.
Traffic information
This feature interrupts regular programming
to provide you with information about traffic
jams, accidents, etc.
To activate:
1. With Sirius activated, press the thumb
wheel on the steering wheel keypad or
OK/MENU on the center console to display the Sirius menu.
2.
Scroll to
press the thumb wheel on the steering
wheel keypad or OK/MENU on the center
console to open a list where you can
switch this feature on or off, or select an
area from which you would like to receive
traffic information.
> If you have activated the function, a
3. Press EXIT to leave this list.
Traffic announcement and
curved arrow symbol will appear under
the Sirius symbol on the left side of the
screen - see the following illustration.
You will then receive traffic information
from the traffic channel in the area
that you have selected (i.e., the radio
will switch from the current channel to
the traffic channel), regardless of which
mode (RADIO, MEDIA, etc.) that you
are currently using.
42
* Option/accessory, for more information, see Introduction.
Page 45

03 Infotainment
If the current radio programming is interrupted by a traffic announcement:
Press the thumb wheel on the steering
•
wheel keypad or OK/MENU on the center
console. The pop-up window on the
screen will close but the traffic announcement will continue.
Press EXIT to close the pop-up window
•
and reject the traffic announcement. The
radio will return to the previous radio
broadcast.
Traffic channel toggling
If the radio program that you are listening to
is interrupted too often by traffic information,
do as follows:
1. Save the channel that you are currently
listening to (or the channels that you frequently listen to) as a preset (p. 44).
2. Activate the traffic function if you have
not already done so (see the information
above)
3. The first time your current channel is
interrupted by traffic information, accept
by pressing the thumb wheel or
OK/MENU.
> The radio will switch automatically to
the traffic channel in the area that you
have selected.
4. Save the traffic channel as a preset.
5. Toggle at any time between the channels
("your" channel and the traffic channel)
using the keys used to store the presets
on the center console.
SiriusXM™ ID
The SiriusXM™ ID (sometimes referred to as
the Electronic Serial Number or ESN) is
required when contacting the SiriusXM™ Call
Center. It is used to activate your account
and when making any account transactions.
To display the ID
1. With Sirius activated, press the thumb
wheel on the steering wheel keypad or
OK/MENU on the center console to display the Sirius menu.
2.
Scroll to
wheel on the steering wheel keypad or
OK/MENU on the center console.
Sirius ID and press the thumb
Sirius menus
From the main Sirius screen, press the thumb
wheel on the steering wheel keypad or
OK/MENU on the center console to open the
Sirius menu screen. The following alternatives
are available:
Browse categories
See SiriusXM™ satellite radio* - selecting categories/channels(p. 44).
Show
Scroll to Show and press the thumb wheel
on the steering wheel keypad or OK/MENU
on the center console to open a drop-down
menu offering the following selections:
Radio text: this displays information
•
describing the channel that you are currently listening to.
Presets: this displays a list of preset
•
channels and the numbers of the keys on
the center console under which they have
been stored. Press the respective keys to
tune to the stored channels.
None: No text will be displayed.
•
Scroll to your choice, press the thumb wheel
on the steering wheel keypad or OK/MENU
on the center console to select.
NOTE
Pressing the FAV button on the center
console enables you to toggle between the
selections above (see also the section
key functions for details.)
FAV
03
* Option/accessory, for more information, see Introduction.
}}
43
Page 46

03 Infotainment
||
Channel list information
Scroll to Channel list information and press
the thumb wheel on the steering wheel keypad or OK/MENU on the center console to
open a drop-down menu offering the following selections:
Channel name: the channel list will dis-
•
03
play the name of the current channel.
Artist: the channel list will display the
•
name of the artist that you are currently
listening to.
Title: the channel list will display the
•
name of the track that you are currently
listening to.
Scroll to your choice, press the thumb wheel
on the steering wheel keypad or OK/MENU
on the center console to select.
The information that you have selected will
also be displayed on the screen.
NOTE
Pressing the INFO button on the center
console while the channel list is displayed
enables you to toggle between the selections above.
Sirius ID
See the section "SiriusXM™ ID" above for
detailed information.
FAV key options
Scroll to FAV key options and press the
thumb wheel on the steering wheel keypad or
OK/MENU on the center console to open a
pop-up menu offering the selections:
Toggle radio text or Presets: press FAV
•
to toggle between radio text and a list of
preset channels.
No function
•
Scroll to your choice, press the thumb wheel
on the steering wheel keypad or
on the center console to select and press
EXIT.
OK/MENU
Related information
SiriusXM™ satellite radio* - selecting cat-
•
egories/channels (p. 44)
SiriusXM™ satellite radio* - selecting
categories/channels
Channel categories are lists of stations offering similar types of programming.
Selecting a channel category
To select a channel category:
1. From the main Sirius screen, press the
thumb wheel on the steering wheel keypad or OK/MENU on the center console
to display the Sirius menu.
2.
If necessary, scroll to
categories and press the thumb wheel
on the steering wheel keypad or OK/
MENU on the center console.
3. Scroll to the category of your choice and
press the thumb wheel on the steering
wheel keypad or OK/MENU on the center
console.
> The channels in the selected category
are displayed.
Browse
Selecting a channel
From the selected category:
1. Turn the thumb wheel on the steering
wheel keypad or TUNE on the center
console to scroll through the category to
the channel of your choice.
2. Press the thumb wheel on the steering
wheel keypad or OK/MENU on the center
console to select and listen to the channel.
44
* Option/accessory, for more information, see Introduction.
Page 47

03 Infotainment
Channel presets
Sirius channels can be stored as presets on
the number keys on the center console for
easy access. This can be done in two ways:
Method 1: Tune to a channel
1. Tune to a channel as described in the
previous sections.
2. Press and hold a number key for several
seconds to store the channel.
> When listening to Sirius satellite radio,
pressing the selected number key will
tune to the channel stored as a preset
on that key.
Method 2: Directly from the channel list
1. Turn the thumb wheel on the steering
wheel keypad or TUNE on the center
console to scroll through the category to
the channel of your choice.
2. Press and hold a number key for several
seconds to store the channel.
Toggle radio text or presets has been
If
selected in the FAV key options, press FAV
on the center console to display the favorites
list. This will show the channels that have
been stored on the various number keys.
Direct channel entry
The SiriusXM™ satellite channels are in
numerical order throughout all of the categories. To access a channel directly:
1. Turn the thumb wheel on the steering
wheel keypad or TUNE to access the
channel list.
2. Use the keypad buttons to enter the
channel's number (or scroll to the channel).
3. Press OK/MENU. The radio will tune to
this channel, even if it belongs to a category other than the currently selected
one.
Related information
SiriusXM™ satellite radio* (p. 42)
•
SiriusXM™ satellite radio* - weather
Sirius Weather is a feature that provides information about the weather forecast in the area
of your choice, along your current route, at a
ski resort, etc.
This feature is only available in vehicles equipped with the optional Volvo navigation system.
Using Sirius weather
Radio mode's main screen
To open this feature, turn the thumb wheel on
the steering wheel keypad or TUNE on the
center console to scroll to
and press the thumb wheel on the steering
wheel keypad or OK/MENU on the center
console. If this feature has been used before,
it will open using your previously chosen settings (e.g., forecast location, today, etc.).
Sirius weather
03
* Option/accessory, for more information, see Introduction.
}}
45
Page 48

03 Infotainment
||
If your subscription has not been activated,
you will be prompted on-screen to call Sirius,
see also SiriusXM™ satellite radio* (p. 42).
Weather forecast information
Weather forecasts can be selected for various
periods of time or for a ski area. Scroll to
Forecast and press the thumb wheel on the
steering wheel keypad or OK/MENU on the
03
center console. The following choices are
available:
Current
•
Today
•
5-day
•
Ski info
•
Scroll to your choice and and press the
thumb wheel on the steering wheel keypad or
OK/MENU on the center console to confirm.
NOTE
If the ignition has been switched off for
•
more than one hour, it may take several minutes to load weather forecast
information when the ignition is
switched on again, depending on the
strength of the signal from the satellite
in the vehicle's current location.
If no weather data is available for the
•
chosen location,
available will be displayed.
Device error is displayed, weather
If
•
information is not available and the
menu will be grayed out. Contact a
trained and qualified Volvo service
technician for assistance.
No weather data
Selecting a location or area
From the main Sirius weather screen, scroll to
Select area and press OK/MENU or from
any normal Sirius weather screen view, press
OK/MENU to open a menu where you can
select an area. The following alternatives will
be displayed:
Current location
•
•
Near destination
Select on map
•
Search winter sport area
•
4
Scroll to the alternative of your choice and
press OK/MENU.
Map view
Selecting this alternative opens a map showing your route. Turn the thumb wheel on the
steering wheel keypad or TUNE on the center
console to zoom in or out. See the separate
navigation system manual for detailed information about selecting locations on the map.
With the map displayed on the screen, press
the thumb wheel or OK/MENU to open an
additional menu displaying:
Storm information
•
Show on map
•
Legend
•
Time stamp
•
Pressing OK/MENU from any of the selections above opens sub-menus with various
alternatives.
NOTE
In order to obtain storm information, move
the cursor to a point on the map where a
Storm icon is displayed and press the
thumb wheel on the steering wheel keypad
or OK/MENU on the center console. See
also the information about weather icons
in the menu selection
Legend.
4
Only available if a route has been set in the navigation system.
46
* Option/accessory, for more information, see Introduction.
Page 49

03 Infotainment
Select winter sport area
Press OK/MENU to open a list of ski areas.
Scroll to the area of your choice and press
OK/MENU. Scroll to an area and press OK/
MENU again to open a menu of more local
ski areas.
5
Presets
When a location and type of forecast have
been selected, this information can be stored
as a preset. Up to 10 presets can be stored.
Scroll to
MENU to add the location to the list.
If the preset list is full and you would like to
add a new one, you will be prompted to
removed one of the existing presets before
the new one can be added.
Save as preset and press OK/
Favorites
The * FAV button can be used to create a
shortcut. To do so from the Sirius weather
normal view:
Location of the FAV button
1.
Scroll to
thumb wheel on the steering wheel keypad or OK/MENU on the center console.
2.
Scroll to: No function, Toggle forecast
or Toggle presets and press the thumb
wheel on the steering wheel keypad or
OK/MENU on the center console to
select.
3.
Press
If you have chosen
•
pressing the * FAV button repeatedly will
change the weather forecast displayed.
If you have chosen
•
pressing the * FAV button repeatedly will
display any preset areas that have been
stored.
FAV key options and press the
EXIT to leave the menu.
Toggle forecast,
Toggle presets
Radio text
Some FM or SiriusXM™ satellite radio* stations transmit information about program content, artists, etc., which can be shown on the
display.
– To display this information, in FM/
SiriusXM™ normal view, press
OK/MENU and select
(or deactivate) this function.
Show to activate
03
5
This is only available if you have requested a weather forecast for a ski area.
* Option/accessory, for more information, see Introduction.
47
Page 50

03 Infotainment
Media Player
The media player can play audio and video
files from CDs/DVDs and external devices
connected to the AUX/USB sockets. Audio
files can also be streamed from Bluetooth
enabled devices. Certain media players can
also communicate with cell phones via
Bluetooth
03
Connecting to the Internet may also make it
possible to listen to web radio, audio books
and to use music services, see Applications
(p. 77).
Media player controls
For more information about listening to music
and navigating in the menus, see Infotainment – operating the system (p. 27).
Certain functions can be stored in the FAV
button. A stored function can then be started
easily by pressing FAV, see Favorites (p. 32).
®
.
Gracenote MusicID
Gracenote MusicID® is the industry standard
for music recognition. This technology is used
®
to identify and provide cover art and music
information for CDs, digital music files on
-
media players and Internet music services.
®
Related information
Infotainment (p. 25)
•
Cell phone voice control (p. 71)
•
Media player – compatible file formats
•
(p. 53)
CD/DVD
The media player can play commercially purchased discs as well as ones that you have
burned yourself.
The media player supports and can play the
following types of discs and files:
Purchased CDs/DVDs (CD/DVD Audio).
•
Purchased DVDs (DVD Video).
•
Home-burned CDs/DVDs containing
•
audio files.
For more information about compatible file
formats, see Media player – compatible file
formats (p. 53).
In order to play, a disc may not contain more
than 5,000 files (including playlists).
NOTE
The media player may not be able to read
all copyrighted or home-burned audio files.
The FAV button can be used to store frequently used functions. The stored function
can then be started by pressing FAV, see
Favorites (p. 32).
Playing an audio CD/DVD and navigating menus
From the disc´s normal view, press OK/
MENU and turn TUNE to display the disc's
menu structure. Navigate through this structure by turning TUNE.
48
Page 51

03 Infotainment
Play a track by pressing OK/MENU.
Playing an home-burned CD/DVD and navigating menus
If a disc with audio/video files is inserted, its
folder structure will be read by the system. It
may take several seconds until the disc
begins playing, depending on its quality and
the amount of information it contains.
From the disc´s normal view, press OK/
MENU and turn TUNE to access the disc's
folder structure or to search among categories. Navigate in this structure by turning
TUNE and select a folder by pressing OK/
MENU. Leave the structure by pressing EXIT.
Play a file by pressing OK/MENU.
When the file is finished, the next one will
begin playing. When all of the files in a folder
have been played, the media player will automatically select another folder.
Playing a DVD video and navigating menus
For information about playing video DVDs,
see Playing and navigating in DVDs (p. 51).
Media searches
Searches can be performed on all of your
devices (USB, CD, etc.). For more information
about the search functions.
Related information
Infotainment – operating the system
•
(p. 27)
Fast forward/reverse (p. 49)
•
Shuffle (p. 50)
•
Audio CD/DVD menus (p. 82)
•
Video DVD menus (p. 82)
•
Fast forward/reverse
The fast forward/reverse feature can be used
for audio/video files6.
Press and hold the
forward or reverse.
This is done at one speed for audio files but
several speeds can be chosen for video files.
Press the
increase the speed; release to return to normal viewing speed.
/ buttons repeatedly to
/ buttons to fast
Related information
Infotainment – operating the system
•
(p. 27)
03
6
CD/DVD, USB and iPod® only.
49
Page 52

03 Infotainment
Shuffle
This function plays the tracks/audio files in
random order (shuffle).7.
To listen to tracks in random order for the
selected source:
1. In the selected source's normal view,
press OK/MENU.
03
2.
Turn TUNE to
3. Press OK/MENU to activate or deactivate
the function.
Shuffle.
Related information
Infotainment – operating the system
•
(p. 27)
•
Media Bluetooth® (p. 56)
Media Search
You can search for music in your connected
devices. The search includes USB and discs.
To start a search, press OK/MENU from the
source’s normal view and select
Media
search.
Search functions
Search using the text wheel
Character list
Switch between character entry modes
(see the following table)
The text wheel can be used to enter text. To
use it:
1. Turn TUNE to the desired letter and press
OK/MENU to confirm. The number/letter
keys on the center console can also be
used.
To switch from letter entry mode to the
entry mode for numbers or special characters, or to go to the list of results, turn
TUNE to one of the selections (see the
explanation in the following table) in the
list for switching character entry mode (2)
and press OK/MENU.
2. Continue entering the remaining characters in the same way.
3. When you have finished entering the
search criteria, select
> The search will be conducted. The
results will be displayed and grouped
in the following categories: artist,
album track, year and composer.
4. Turn TUNE to a category and press OK/
MENU.
5. Turn TUNE to select a device and press
OK/MENU to begin playback.
Search.
50
7
Not video DVDs. For external devices, shuffle is available for USB and iPod®. It is not supported by all cell phones.
Page 53

03 Infotainment
123/AB
C
MORE
Search
| | }
Press EXIT briefly to erase a single character.
Press and hold EXIT to erase all of the characters that have been entered.
If a number key on the center console is
pressed while the text wheel is displayed (see
the previous illustration), a list of characters
will be displayed. Press repeatedly on the key
to access the desired letter. Continue with the
next letter, etc. When a key has been
pressed, this will be confirmed when the next
key is pressed.
Toggle between letters and
numbers by pressing OK/
MENU.
Switch to special characters by
pressing OK/MENU.
Start the media search.
Switch from the text wheel to
Keyword: field. Move the
the
cursor by turning TUNE. Erase
any characters by pressing
EXIT. Press OK/MENU to
return to the text wheel.
Please note that the letter/
number keys on the center
console can be used to make
changes in the
Keyword: field.
Playing and navigating in DVDs
While a video DVD is playing, a disc menu
may appear on the screen that enables you to
make additional settings such as selecting
subtitles, language and choice of scenes.
For basic information about playback and
navigating in menus, see Infotainment – operating the system (p. 27).
NOTE
Videos can only be played when the vehicle is stationary or moving at a speed
under 4 mph (6 km/h). When the vehicle
reaches a speed of approx. 5 mph
(8 km/h), the video will no longer be shown
Video unavailable at this speed will
and
be displayed. However, the film's audio
can still be heard. The video will resume
playing when the vehicle's speed goes
below 4 mph (6 km/h).
Navigating in a DVD's menus
03
Buttons in the center console control panel,
shown in the illustration, are used to navigate
in a DVD's menus.
Changing chapters or title
Turn TUNE to access the list of chapters and
navigate in this list (the film will pause if it is
currently playing). Press OK/MENU to
choose a chapter and return to the normal
view in the display (if a film was playing, it will
resume). Press EXIT to access the list of
titles.
In the list of titles, turn TUNE to make a
selection and press OK/MENU to confirm.
This also returns you to the list of chapters.
Press OK/MENU to confirm and return to the
normal view (if a film was playing, it will
resume). Press EXIT to cancel and return to
the normal view (without having made a
selection).
}}
51
Page 54

03 Infotainment
||
It is also possible to change chapters by
pressing
control panel or on the steering wheel keypad.
Related information
Infotainment – operating the system
•
(p. 27)
Camera angle while playing DVD videos
•
03
(p. 52)
Fast forward/reverse (p. 49)
•
Shuffle (p. 50)
•
Media player – compatible file formats
•
(p. 53)
/ on the center console
Camera angle while playing DVD videos
If supported by the DVD, this function makes
it possible to select the camera angle from
which a certain scene is viewed.
From the disc’s normal view, press OK/
MENU and selcet
Angles.
Related information
Infotainment – operating the system
•
(p. 27)
Playing and navigating in DVDs (p. 51)
•
Advanced settings
Screen settings
Certain screen settings, such as brightness
and contrast, can be adjusted (while the vehicle is not moving).
1. In play mode, press OK/MENU and
2. Turn TUNE to scroll to the desired setting
3. Adjust the setting by turning TUNE and
Press OK/MENU or EXIT to return to the list
of settings.
Related information
•
•
Image settings. Confirm by press-
select
ing OK/MENU.
and press OK/MENU.
confirm by pressing OK/MENU.
Infotainment – operating the system
(p. 27)
Infotainment (p. 25)
52
Page 55
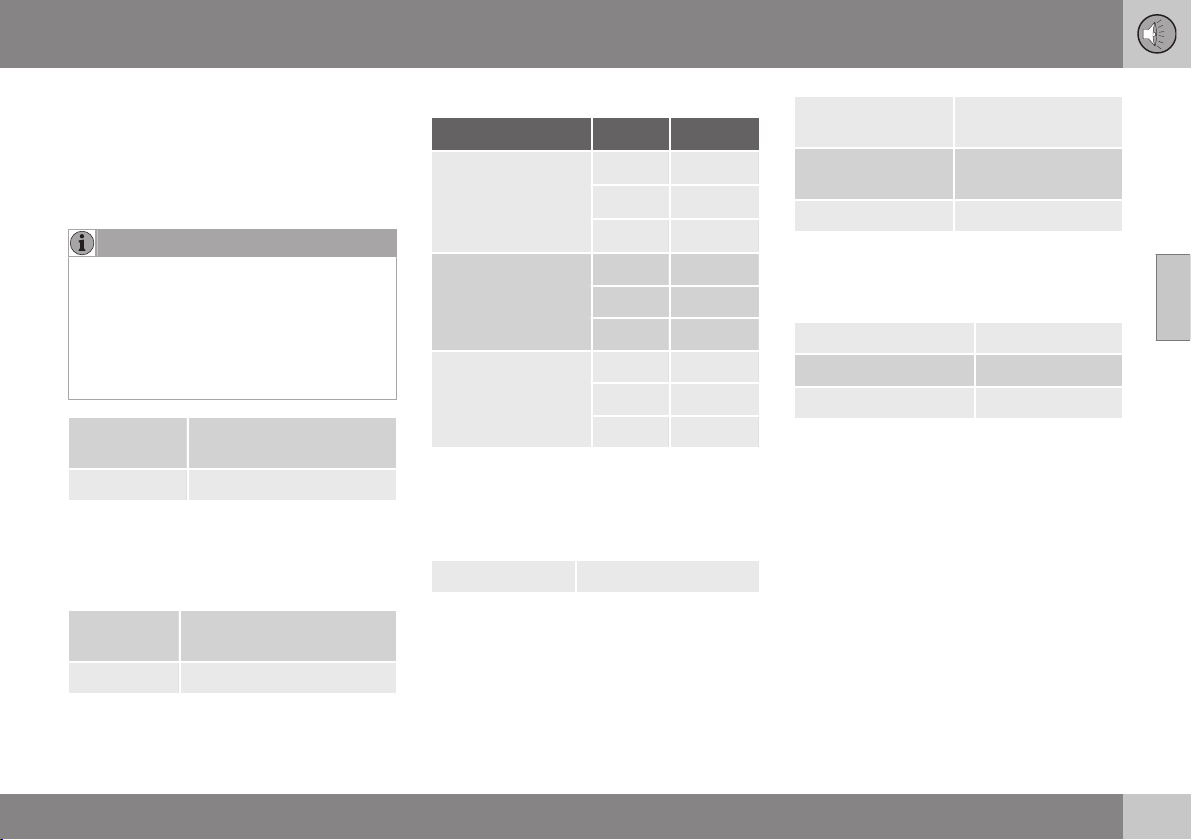
03 Infotainment
Media player – compatible file formats
The media player supports a number of different types of files that are listed in the following tables.
Compatible CD/DVD formats
NOTE
Dual format (double-sided discs) such as
DVD Plus or CD-DVD are thicker than normal discs and may not play in your infotainment system.
If a disc containing both CDDA and MP3
tracks is played, all MP3 tracks will be
ignored.
Audio formats CD-Audio, mp3, wma,
aac, m4a
Video formats DVD-Video
Compatible USB formats
The audio and video files in the following
table are supported by the system for playback through the USB socket.
Audio format mp3, mp4, wma, aac, m4a,
m4b
Video format –
MP3 audio specifications
Format kHz kbps
MPEG-1/Audio 32
44.1
48
MPEG-2/Audio 16 8–160
22.05 8–160
24 8–160
MPEG-2.5/Audio 8 8-64
11.025 8-64
12 8-64
A
Not 144 kbps.
32–320
32–320
32–320
A
A
A
WMA audio specifications
In order to play, a file must meet the following
criteria:
WMA version 8.x, 9.x, 10.x, Pro
AAC audio specifications
In order to play, a file must meet the following
criteria:
Audio format MPEG-2 and
Audio sampling
rate
Channels (ch) 1ch and 2ch
MPEG-4
8–96 kHz
WAV audio specifications
In order to play, a file must meet the following
criteria:
Audio sampling rate Up to 44.1 kHz
Channels (ch) 1ch and 2ch
Audio bit rate 16 kbps for 1ch
The .wav format also supports the PCM format.
Related information
Playing and navigating in DVDs (p. 51)
•
03
53
Page 56

03 Infotainment
External audio sources via the AUX/USB sockets
External audio sources such as an iPod® or an
mp3 player can be connected to the infotainment system.
03
A device with rechargeable batteries can be
recharged when it is connected to the USB
socket (if the ignition is on or the engine is
running).
The FAV button can be used to store frequently used functions. The stored function
can then be started by pressing FAV, see
Favorites (p. 32).
Listening and navigating menus
An audio source connected to the USB
socket can be operated using the infotainment controls. This is not the case for a
device connected via the AUX socket.
From the source’s normal view, turn TUNE to
access the folder structure or to search
among categories. Navigate in this structure
by turning TUNE and select a folder by pressing OK/MENU. Leave the structure by pressing EXIT.
Play a file by pressing OK/MENU.
When the file is finished, the next one will
begin playing. When all of the files in a folder
have been played, another folder will automatically be selected.
Media searches
Searches can be performed on all of your
devices (USB, CD, etc.). For more information
about the search functions, see Media Search
(p. 50).
USB flash drive
To simplify the use of a USB flash drive, it is
advisable to only store music files on it. It will
take considerably longer for the system to
index the files on the drive if it contains anything other than compatible music files.
NOTE
The system supports removable media
that uses the USB 2.0 standard and the
FAT32 file system.
NOTE
When using a longer type of USB device,
connecting it with a USB adapter cable will
help reduce mechanical wear on the USB
socket and on the device.
Technical specifications
Max. number of files 15,000
Max. number of folders 1,000
Max. number of folder levels 8
Max. number of playlists 100
Max. number of tracks in a playlist
Subfolders No limit
1,000
Mp3 player
Many MP3 players have a file indexing system that is not supported by the vehicle's
infotainment system. In order to use an MP3
player, the system must be set to
USB
Removable device/Mass Storage Device.
®
iPod
NOTE
The system will only play audio files from
an iPod®.
54
Page 57

03 Infotainment
NOTE
To start playback, the source should be
set to iPod® (not USB).
When iPod® is used as a sound source,
the infotainment system has a menu structure similar to the one in the iPod®.
Related information
Infotainment – operating the system
•
(p. 27)
Media player – compatible file formats
•
(p. 53)
Connecting an external audio source via the AUX/USB sockets
External audio sources such as an iPod® or
mp3 player can be connected to the infotainment system via the AUX and USB sockets in
the center console storage compartment (see
the illustration).
AUX/USB sockets
To connect an audio source:
1. Connect your device to one of the sockets.
2. From the media’s normal view, press
MEDIA, turn TUNE to the desired audio
source, e.g.,
press OK/MENU.
Reading USB will appear in the center con-
sole display as the system reads the device's
file structure. The amount of time required for
USB, iPod or AUX and
this depends on the file structure and number
of files.
NOTE
The system supports a number of
•
iPod® models produced in 2005 or
later.
In order to help avoid damage to the
•
USB socket, it will be switched off if
there is a short circuit or if the connected device uses too much current
(which can happen if the device does
not comply with the USB standard).
The USB socket will reactivate the
next time the ignition is switched on if
the problem no longer exists. If the
problem persists, contact a trained
and authorized Volvo service technician.
03
55
Page 58

03 Infotainment
External audio source volume
Set the volume for an external audio device. If
the external sound source's volume is too low
or high, the quality of the sound may be
impaired.
If an external device such as an MP3 player
or an iPod ® is connected to the AUX socket,
the device's volume may be different than the
03
volume of the infotainment system's internal
sound sources such as the radio. To help
prevent this, adjust the input volume of the
external audio source. To do so: From the
AUX’s normal view, press OK/MENU. Select
AUX input and select Standard or Boost.
NOTE
Sound quality may be affected if the MP3
player is being charged while the system is
in AUX mode. To help prevent this, avoid
charging the MP3 player in a 12-volt
socket while it is being played.
Related information
Infotainment - advanced audio settings
•
(p. 34)
Infotainment – operating the system
•
(p. 27)
Media Bluetooth
The media player is equipped with Bluetooth
for streaming audio files from external
Bluetooth
phones, tablets, etc.
The device must be paired with and connect
to the infotainment system.
For more information about listening to music
and navigating in the menus, see Infotainment – operating the system (p. 27). The following provides detailed information.
Certain functions can be stored in the FAV
button. A stored function can then be started
easily by pressing FAV, see Favorites (p. 32).
®
-enabled devices such as cell
®
Playback and navigation
Playback and navigation are controlled using
the buttons in the center console or the steering wheel keypad. It is also possible to
change tracks from certain external devices.
When a cell phone is connected to the infotainment system, it is also possible to
remote-control some of the phone's features,
see Bluetooth® hands-free system (p. 62).
Toggle between TEL and MEDIA modes to
control the various devices' functions.
®
•
Bluetooth® devices must support
Audio/Video Remote Control Profile
(AVRCP) and Advanced Audio Distribution Profile (A2DP). The phone must
use AVRCP version 1.3 and A2DP 1.2.
If older versions of these standards are
used, certain features may not function
properly.
Not all cell phones or other devices are
•
fully compatible with the Bluetooth
function in the vehicle's media player.
A list of compatible phones and other
devices is available at you Volvo
retailer.
The media player can only play audio
•
files via Bluetooth®.
Related information
Shuffle (p. 50)
•
NOTE
®
56
Page 59

03 Infotainment
Connecting and disconnecting a
Bluetooth
Sensus infotainment offers Bluetooth®, which
makes it possible to establish wireless connections with other Bluetooth
they have been paired and connected.
Up to 15 Bluetooth® devices can be paired
and this procedure only needs to be done
once for each device. After pairing has been
completed, the device no longer needs to be
visible or discoverable; its Bluetooth® feature
only needs to be activated.
When Bluetooth® is active and the most
recently connected device is within range, it
will be connected automatically when the
ignition is switched on. The device's name
will be displayed in the sound source's normal view. To connect a different device, press
OK/MENU and select Change device.
When the Bluetooth® device is out of range of
the vehicle, it will be automatically disconnected. To manually disconnect the device,
switch off its Bluetooth function.
To unpair a Bluetooth® device, see Deleting a
Bluetooth® device (p. 61). When this has
been done, the infotainment system will no
longer automatically search for the device.
Two Bluetooth® devices can be connected at
the same time, for example a cell phone
®
device
®
devices after
and a media player , which makes it possible to switch between these devices.
Example: a cell phone is connected as a phone
and as a media player
Related information
Infotainment – operating the system
•
(p. 27)
•
Bluetooth® hands-free system (p. 62)
Connecting a Bluetooth® device
Two Bluetooth® devices (a cell phone and a
media player) can be connected at the same
time and you can toggle between them. It is
also possible to make a phone call and stream
audio files at the same time, and a cell phone
can be used to connect the vehicle to the
Internet .
Up to 15 Bluetooth® devices can be paired to
the infotainment system and the pairing procedure only needs to be done once for each
device. After pairing has been completed, the
device no longer needs to be visible or discoverable; its Bluetooth® feature only needs
to be activated.
NOTE
If your cell phone's operating system is
updated, this may break the connection
between the phone and the vehicle. If this
happens, delete the phone from the list of
paired phones (Deleting a Bluetooth
device (p. 61)) and repeat the pairing
procedure described in this article.
The procedure for connecting an external
device varies, depending on whether the
device has been paired previously.
Both of the following connection methods
assume that the device has not yet been
paired to the system.
®
03
}}
57
Page 60

03 Infotainment
||
The examples are based on pairing a cell
phone but pairing another device is done in
the same way. However, it is done from
MEDIA mode (press the MEDIA button on
the center console to enter this mode).
There are two ways of pairing a device:
By searching for the external device using
•
03
the infotainment system's menus.
By searching for the vehicle (infotainment
•
system) using the external device’s
Bluetooth® function.
If you are not already in telephone mode,
press the TEL button on the center console.
An example of telephone mode's normal view
Method 1: search for the external device using the infotainment system's menus
1. Make the external device discoverable/
visible using its Bluetooth® function. Refer
to the device's user's guide if necessary
or go to www.volvocars.com.
2. From the telephone's normal view, press
OK/MENU and select
Search new
phone (for media players, Search new
device).
> The infotainment system will now
search for Bluetooth® devices that are
in range, which may take up to
1 minute.
3.
Select a Bluetooth® device from the list
and press OK/MENU.
4. Be sure that the code displayed in the
device is the same as the one shown on
the infotainment screen. If so, accept the
code in both places.
5. From the cell phone, accept or reject any
choices regarding its phone book and
messages.
> The external device is now paired to
the infotainment system.
If this method has not succeeded, press EXIT
and pair the device using method 2.
Method 2: search for the vehicle using
the external device’s Bluetooth
®
function
1. From the telephone's normal view, press
OK/MENU and select
Make car
discoverable. Confirm by pressing OK/
MENU.
2.
Search for Bluetooth® devices (i.e., the
infotainment system) from the external
device, which may take up to 1 minute.
3. Select the vehicle's name on the external
device's screen.
4. Be sure that the code displayed in the
device is the same as the one shown on
the infotainment screen. If so, accept the
code in both places.
5. From the cell phone, accept or reject any
choices regarding its phone book and
messages.
> The external device is now paired to
the infotainment system.
When the external device has been paired
and selected, its Bluetooth® name will appear
on the infotainment system's screen and the
device can be controlled from the vehicle.
Related information
Infotainment – operating the system
•
(p. 27)
Connecting and disconnecting a
•
Bluetooth® device (p. 57)
58
Page 61

03 Infotainment
Pairing a Bluetooth® device
Two Bluetooth® devices (a cell phone and a
media player) can be connected at the same
time and you can toggle between them. It is
also possible to make a phone call and stream
audio files at the same time, and a cell phone
can be used to connect the vehicle to the
Internet .
Up to 15 Bluetooth® devices can be paired to
the infotainment system and the pairing procedure only needs to be done once for each
device. After pairing has been completed, the
device no longer needs to be visible or discoverable; its Bluetooth® feature only needs
to be activated.
NOTE
If your cell phone's operating system is
updated, this may break the connection
between the phone and the vehicle. If this
happens, delete the phone from the list of
paired phones (Deleting a Bluetooth
device (p. 61)) and repeat the pairing
procedure described in this article.
The procedure for connecting an external
device varies, depending on whether the
device has been paired previously.
Both of the following connection methods
assume that the device has not yet been
paired to the system.
®
The examples are based on pairing a cell
phone. Connecting a media player is done in
the same way. However, it is done from
MEDIA mode (press the MEDIA button on
the center console to enter this mode).
There are two ways of pairing a device:
By searching for the external device using
•
the infotainment system's menus.
By searching for the vehicle (infotainment
•
system) using the external device’s
Bluetooth® function.
If you are not already in telephone mode,
press the TEL button on the center console.
An example of telephone mode's normal view
Method 1: search for the external device using the infotainment system's menus
1. Make the external device discoverable/
visible using its Bluetooth® function. Refer
to the device's user's guide if necessary
or go to www.volvocars.com.
2. From the telephone’s normal view, press
OK/MENU and select
Search new
phone (for media players, Search new
device).
> The infotainment system will now
search for Bluetooth® devices that are
in range, which may take up to
1 minute.
3.
Select a Bluetooth® device from the list
and press OK/MENU.
4. Be sure that the code displayed in the
device is the same as the one shown on
the infotainment screen. If so, accept the
code in both places.
5. From the cell phone, accept or reject any
choices regarding its phone book and
messages.
> The external device is now paired to
the infotainment system.
If this method has not succeeded, press EXIT
and pair the device using method 2.
03
}}
59
Page 62

03 Infotainment
||
Method 2: search for the vehicle using
the external device’s Bluetooth
function
1. From the telephone’s normal view, press
OK/MENU and select
discoverable. Confirm by pressing OK/
MENU.
2.
03
Search for Bluetooth® devices (i.e., the
infotainment system) from the external
device, which may take up to 1 minute.
3. Select the vehicle's name on the external
device's screen.
4. Be sure that the code displayed in the
device is the same as the one shown on
the infotainment screen. If so, accept the
code in both places.
5. From the cell phone, accept or reject any
choices regarding its phone book and
messages.
> The external device is now paired to
the infotainment system.
When the external device has been paired
and selected, its Bluetooth® name will appear
on the infotainment system's screen and the
device can be controlled from the vehicle.
Related information
Infotainment – operating the system
•
(p. 27)
Connecting and disconnecting a
•
Bluetooth® device (p. 57)
Make car
®
Automatically connect a Bluetooth
device
When a Bluetooth® device has been paired to
the infotainment system, it will automatically
be connected when the ignition is switched
on.
When Bluetooth® is active and the most
recently connected device is within range, it
will be connected automatically. If this device
is not within range, the system will attempt to
connect another previously paired device.
To connect a different paired device, press
EXIT, select to connect a new device or
switch to another Bluetooth device.
Related information
Infotainment – operating the system
•
(p. 27)
Connecting and disconnecting a
•
Bluetooth® device (p. 57)
®
Switching to another Bluetooth
device
If more than one device is connected at the
same time, you can switch between these
devices. Before this is possible, they must
first be paired with the infotainment system.
Switching media players
1. Be sure that the external device's
Bluetooth® function is activated. Refer to
the devices's user's guide if necessary.
2.
From the media Bluetooth® ´s normal
view, press OK/MENU and select
Change device.
> The infotainment system will search for
previously connected devices. The
Bluetooth® names of the devices found
will appear in the center console display.
3. Select the desired device.
> The selected device will be connected.
®
Switching cell phones
1. Be sure that the external device's
Bluetooth® function is activated. Refer to
the devices's user's guide if necessary.
60
Page 63

03 Infotainment
2. From the telephone’s normal view, press
OK/MENU and select
> The infotainment system will search for
previously connected phones. The
Bluetooth® names of the phones found
will appear in the center console display.
3. Select the desired device.
> The selected device will be connected.
Change phone.
Related information
Infotainment – operating the system
•
(p. 27)
Connecting and disconnecting a
•
Bluetooth® device (p. 57)
Disconnecting a Bluetooth® device
When a Bluetooth® device is out of range, it is
automatically disconnected.
If a cell phone is moved out of range during a
call, the call will switch to the phone's
speaker and microphone.
The hands-free function is deactivated when
the ignition is switched off and the driver's
door is opened.
To remove (unpair) a Bluetooth® device, see
Deleting a Bluetooth® device (p. 61). The
infotainment system will no longer search for
the unpaired device.
Related information
Infotainment – operating the system
•
(p. 27)
Connecting and disconnecting a
•
Bluetooth® device (p. 57)
•
Media Bluetooth® (p. 56)
•
Bluetooth® hands-free system (p. 62)
Deleting a Bluetooth® device
Paired Bluetooth® devices can be deleted
(unpaired) from the infotainment system,
which means that the system will no longer
search for these devices.
Deleting a media player
From the media Bluetooth®’s normal view,
press OK/MENU and select Change device
Delete device.
Deleting a cell phone
From the telephone’s normal view, press OK/
MENU and select
device
.
Change phone Delete
Related information
Infotainment – operating the system
•
(p. 27)
Connecting and disconnecting a
•
Bluetooth® device (p. 57)
•
Media Bluetooth® (p. 56)
•
Bluetooth® hands-free system (p. 62)
03
61
Page 64

03 Infotainment
Bluetooth® hands-free system
A Bluetooth®-enabled cell phone or other
device can be wirelessly connected to the
infotainment system.
03
Overview of center console Bluetooth® controls
The device must first be paired and connected to the infotainment system.
A hands-free connection to the infotainment
system makes it possible to remotely control
many of a cell phone's functions. The
phone's controls can also be used at any
time, even it is connected to the infotainment
system.
When a cell phone or other device is connected, audio can be streamed to the infotainment system, see Media Bluetooth
(p. 56). Toggle between the devices by press-
ing the TEL and MEDIA buttons to access
the respective sources' functions.
Reading text messages
The infotainment system will show the con-
8
nected phone's messages.
NOTE
Not all cell phones are fully compatible
with the hands-free system. A list of compatible phones is available at your Volvo
retailer or at www.volvocars.us
Activating
Press TEL briefly to activate the most
recently connected phone. If a phone is
already connected, pressing TEL will display
a shortcut menu listing commonly used
phone functions. The
symbol in the dis-
play indicates that a phone is connected.
Making a call
1.
Ensure that the
symbol is visible at
the top of the display and that the handsfree function is in telephone mode.
2. Dial the desired number or in normal
view, turn TUNE clockwise to access the
phone book or counter-clockwise to
access the call list. Scroll to the desired
contact/name.
3. Press OK/MENU to initiate the call.
®
End the call by pressing EXIT.
If the connected cell phone receives a text
message, the
symbol will appear at the
top of the display.
1. Press TEL followed by OK/MENU to
access the
2.
Turn TUNE to
Phone menu.
Messages and pressOK/
MENU.
3. Turn TUNE to scroll to the desired message and press OK/MENU.
> The message will be displayed.
4. Press OK/MENU to access the text message menu to e.g., let the system's textto-speech function read the message,
call the message's sender or delete the
message.
If TEL mode is already active, a pop-up menu
with new messages will be displayed. By
pressing OK/MENU, the selected message
will be displayed and the text-to-speech
function will read it. Cancel reading by pressing EXIT.
The pop-up-menu and the message can be
turned off in
notifications
Phone menu Message
.
62
8
Not supported by all cell phones.
Page 65

03 Infotainment
NOTE
In order to show the connected cell
phone's messages on the infotainment
system's display, the cell phone has to
accept mirroring when it is connected.
Depending on the phone, the following will
occur:
A pop-up window or notification will
•
be displayed and accepted in the
phone.
Accept mirroring in the settings for the
•
phone's Bluetooth® connection to the
infotainment system.
It may be necessary to disconnect and
reconnect the phone from the infotainment
for mirroring to take place.
Related information
•
Bluetooth® hands-free phones – audio
settings (p. 64)
•
Bluetooth® hands-free menus (p. 85)
Bluetooth® hands-free system – overview
The illustration provides an overview of the
Bluetooth
System overview
®
hands-free system.
Cell phone
Microphone
Steering wheel keypad
Center console controls
Related information
Infotainment – operating the system
•
(p. 27)
Connecting and disconnecting a
•
Bluetooth® device (p. 57)
Call Management
These functions help to manage phone calls.
Incoming calls
– Press OK/MENU (or the thumb wheel on
the steering wheel keypad) to answer a
call, even if the infotainment system is in
e.g., RADIO or MEDIA mode.
Reject or end a call by pressing EXIT.
Call menu
From the telephone’s normal view, press OK/
MENU while a call is in progress to access
the following functions:
Mobile phone – the call is transferred
•
from the hand-free function to the cell
phone. The connection will be broken on
certain phones, which is normal. The
hands-free will prompt you to reconnect.
Mute microphone – Infotainment system
•
sound is muted.
Dial number – call a third party using the
•
number keys while another call is in progress (the call in progress will be put on
hold).
Call list
The call list is shared and updated with the
hands-free function each time a phone is
connected. From the telephone’s normal
view, turn TUNE counter-clockwise to display
this list.
03
}}
63
Page 66

03 Infotainment
||
From the telephone’s normal view, press OK/
MENU and select
rently connected phone's call list.
NOTE
In order to display the connected cell
phone's call list in the infotainment system,
information sharing must be accepted in
03
the phone when it is connected. Depending on the phone, the following will occur:
A pop-up window or notification is dis-
•
played and accepted in the phone.
Accept information sharing in the
•
phone's settings for a Bluetooth® connection to the infotainment system.
In certain cases, the phone must be disconnected and reconnected to the infotainment system before information sharing is possible.
Related information
Infotainment – operating the system
•
(p. 27)
Cell phone voice control (p. 71)
•
•
Bluetooth® hands-free system (p. 62)
•
Bluetooth® hands-free phones – audio
settings (p. 64)
Phone book (p. 65)
•
Call list to see the cur-
Bluetooth® hands-free phones – audio settings
Volume settings can be made for phone calls,
the infotainment system and for when the
phone rings.
Phone call volume
Phone call volume can only be changed while
a call is in progress. Use the steering wheel
keypad or the VOL control on the center console.
Infotainment system volume
While no phone calls are in progress, the infotainment system's volume can be adjusted in
the normal way using the steering wheel keypad or the VOL control on the center console.
If a sound source is active when a call is
received, it will be muted automatically.
Ringing volume
This volume can be changed by pressing the
SOUND button, turning TUNE to
volume and pressing OK/MENU. Set the vol-
ume by turning TUNE and save the setting by
pressing OK/MENU.
Ringtone
Ringing tones
The cell phone's ringing tone will be used
when a call is received.
NOTE
In certain cases, the connected cell
phone's ringing tone may not be switched
off when one of the hands-free system's
ringing tones is used.
Related information
Infotainment – operating the system
•
(p. 27)
•
Bluetooth® hands-free system (p. 62)
64
Page 67

03 Infotainment
Phone book
The list of contacts (phone book) displayed on
the infotainment system's screen mirrors the
phone book in the currently connected cell
phone.
The
top of the infotainment system's screen and
the hands-free system must be in telephone
mode before the phone book can be used.
For incoming calls, if the phone book contains information about the caller, it will be
displayed on the screen.
symbol must be displayed at the
NOTE
Mirroring (syncing contacts) must be activated when a cell phone is connected to
the infotainment system before the phone
book can be displayed on the center console screen. Depending on the type of
phone, the following may happen:
A pop-up window or notification will
•
be displayed and accepted in the
phone.
Accept mirroring (activate "Sync con-
•
tacts" or similar) in the phone's
Bluetooth® settings.
It may be necessary to disconnect and
reconnect the phone from the infotainment
for mirroring to take place.
Related information
Infotainment – operating the system
•
(p. 27)
•
Bluetooth® hands-free system (p. 62)
Quick phonebook searches
From the telephone’s normal view, turn TUNE
clockwise to display the list of contacts (phonebook).
Turn TUNE to scroll to a contact and press
OK/MENU to make a call.
The primary phone number will be displayed
below the contact's name. If there is a ▼ symbol to the right of the contact's name, this
indicates that there are other phone numbers
stored for this contact. Press OK/MENU to
display these numbers. Turn TUNE to select
one of the other phone numbers and press
OK/MENU to make a call.
Search the phone book by entering the
beginning of the contact's name using the
center console keypad, see also Phone book
– character table for the center console keypad (p. 66).
Related information
Infotainment – operating the system
•
(p. 27)
•
Bluetooth® hands-free system (p. 62)
03
65
Page 68

03 Infotainment
Phone book – character table for the center console keypad
The following table shows the characters that
can be accessed by pressing the respective
keys on center console. Press once for the
number on the key and continue pressing to
reach the desired letter on the key.
03
Button Function
Space . , - ? @ : ; / ( ) 1
A B C Å Ä Æ À Ç 2
D E F È É 3
G H I Ì 4
J K L 5
M N O Ö Ø Ñ Ò 6
P Q R S ß 7
T U V Ü Ù 8
W X Y Z 9
Button Function
+ 0 p w
# *
Related information
Infotainment – operating the system
•
(p. 27)
•
Bluetooth® hands-free system (p. 62)
Searching for phone book contacts
The following is the procedure for searching
for contacts in you're your phone book
Search using the text wheel
Character list
Switch between character entry modes
(see the following table)
List of phone book contacts
To search for contacts in telephone´s normal
view, press OK/MENU and select
1. Turn TUNE to the desired letter and press
OK/MENU to confirm. The number/letter
keys on the center console can also be
used.
2. Continue with the remaining characters in
the contact's name. The search results
will be listed in the phone book (3).
Contacts.
66
Page 69

03 Infotainment
3. To switch from letter entry mode to the
entry mode for numbers or special characters, or to go to the pone book, turn
TUNE to one of the selections (see the
explanation in the following table) in the
list for switching character entry mode (2)
and press OK/MENU.
123/ABC
MORE
=>
First
name/
Last
Toggle between letters and
numbers by pressing OK/
MENU.
Switch to special characters
by pressing OK/MENU.
This leads to the phone book
(3). Turn TUNE to select a
contact and press OK/MENU
to display the contact's information.
Toggle between first-/last
name sort order in the phone
book.
name
Press EXIT briefly to erase a single character.
Press and hold EXIT to erase all of the characters that have been entered.
If a number key on the center console is
pressed while the text wheel is displayed (see
the previous illustration), a list of characters
will be displayed. Press repeatedly on the key
to access the desired letter. Continue with the
next letter, etc. When a key has been
pressed, this will be confirmed when the next
key is pressed.
Related information
Infotainment – operating the system
•
(p. 27)
•
Bluetooth® hands-free system (p. 62)
Voice control - introduction
Voice control enables the driver to voice-activate certain functions in the infotainment system, a Bluetooth
the optional navigation system.
®
-connected cell phone or in
NOTE
The information about phone com-
•
mands in this section applies to a
Bluetooth
See Bluetooth® hands-free system
(p. 62) for more detailed information.
Volvo' optional navigation system has
•
a separate user's guide containing that
system's specific voice commands.
Voice control offers convenience and enables
the driver to keep his/her hands on the steering wheel and concentrate on driving.
®
-connected cell phone.
WARNING
As the driver, you have full responsibility
for operating the vehicle safely and adhering to all applicable traffic regulations.
Input to the system is in dialog form: commands from the driver and a response from
the system. The voice control system uses
the same microphone as the Bluetooth
hands-free system, see Bluetooth® handsfree system – overview (p. 63) and system
®
03
}}
67
Page 70

03 Infotainment
||
responses come via the infotainment system's speakers.
Getting started
03
Right side steering wheel keypad
Voice control button
Press the button (1) to activate the sys-
•
tem and initiate a command dialog. The
most common commands will then be
displayed on the center console screen.
While using the voice control system, keep
the following in mind:
When giving commands, speak at your
•
usual speed and in a normal tone of voice
after the tone
Avoid speaking while the system is
•
responding. Commands cannot be processed during a response.
The vehicle's doors, windows and moon-
•
roof* should be closed when using the
voice control system
Avoid background noises in the cabin
•
when using the system
NOTE
If you are uncertain of the commands that
you can use, saying
system to provide a number of commands
that can be used in a specific situation.
Commands can be cancelled by:
Saying
•
•
cancel
Pressing EXIT or any of the mode buttons (Tel, MEDIA, etc.).
help will prompt the
Cell phones
Before any phone-related voice commands
can be used, a Bluetooth®-enabled cell
phone must be paired with and connected to
the infotainment system. If a command is
given and no phone is connected, the system
will inform you of this. See Connecting a
Bluetooth® device (p. 57) for information
about pairing and connecting a cell phone.
Voice control language
The languages available for voice control can
be selected in the MY CAR menu system.
Sample list of languages
Voice control is not available in all languages.
The languages supported are marked by the
icon in the list of languages and may vary
according to the country/area in which you
live. Language changes are made in the MY
CAR menu system.
NOTE
Changing the language for voice controls
also changes the language used in the
entire infotainment system.
Related information
Voice control help functions (p. 69)
•
Voice control settings (p. 69)
•
68
* Option/accessory, for more information, see Introduction.
Page 71

03 Infotainment
Voice control help functions
These functions help you get started using
the voice control system (p. 67) and improve
the system's voice recognition.
Voice tutorial: helps acquaint you with
•
the system and the procedure for giving
voice commands.
Voice training: A function that helps the
•
system improve its voice recognition
(learn to identify your voice and pronunciation). This also makes it possible to set a
user profile.
Brief instruction: A function that reads a
•
brief instruction about how the system
works.
NOTE
These instructions are only available when
the vehicle is parked.
Tutorial
The tutorial can be started in the normal view
for MY CAR, by press OK/MENU and select
Settings Voice control settings
Tutorial.
The tutorial is divided into 3 lessons that take
a total of about 5 minutes to complete. By
default, the system begins with the first lesson. To skip a lesson and go to the next one,
press . Go to the previous lesson by
pressing .
Leave the tutorial by pressing EXIT.
Speaker adaptation
The system will display a number of phrases
for you to say. Adaptation can be started in
the normal view for MY CAR, by press OK/
MENU and select
settings
When this has been completed, remember to
select a
Trained user profile under User
setting.
Settings Voice control
Speaker adaptation.
Brief instruction
The system will read a brief instruction about
voice control. To start, press the voice control
button on the steering wheel keypad and say
Brief instruction".
"
Voice control settings
There are a number of settings that can be
made for the voice control system (p. 67).
User settings: A voice (user) profile can
•
be set in the normal view for MY CAR, by
press OK/MENU and select
Voice control settings User setting.
The choices are:
user. Trained user can only be selected
if voice training (p. 69) has been completed.
Synthetic voice speed: The speed of the
•
systems's dynamic (not prerecorded)
text-to-speech voice can be changed in
the normal view for MY CAR, by press
OK/MENU and select
control settings
Choose between
Slow.
Voice control volume: Volume can be
•
adjusted by pressing the SOUND button
and turning TUNE to
volume and pressing OK/MENU. Adjust
the volume by turning TUNE and save the
new setting by pressing OK/MENU.
Default or Trained
Read out speed.
Fast, Medium and
Settings
Settings Voice
Voice control
03
69
Page 72

03 Infotainment
Voice control commands
Voice control enables the driver to voice-activate certain functions in the infotainment system, a Bluetooth
the optional navigation system.
The driver initiates a voice command dialog
by pressing the voice control button on the
steering wheel keypad.
03
When a dialog has begun, the most common
commands will be displayed on the center
console screen.
Once you become familiar with the system,
you can speed up the command dialogue by
briefly pressing the voice control button to
skip prompts from the system.
®
-connected cell phone or in
Commands can be given in several ways
For example, the command for searching for
a track on a CD can be given as several short
commands or as one command:
Media search > Track: Say Media
•
search, wait for the system's response
and then say Track.
or
Media search track without paus-
Say
•
ing.
Related information
Voice control command shortcuts
•
(p. 70)
Cell phone voice control (p. 71)
•
Radio voice control (p. 71)
•
Multimedia voice control (p. 72)
•
Voice control command shortcuts
The system provides lists of voice command
shortcuts (p. 67).
Global commands for the infotainment system functions and cell phone can by found in
the normal view for MY CAR, by press OK/
MENU and select
settings
commands
commands, Radio commands and
Navigation commands*.
Help texts for each command explain if the
command can be used in all media sources
or is specific to one particular source.
Settings Voice control
Command list Global
, Phone commands, Media
70
* Option/accessory, for more information, see Introduction.
Page 73

03 Infotainment
Cell phone voice control
Voice commands (p. 67) can be used to control many of the most common functions in a
Bluetooth
The following command dialogs are only
examples; the system's responses may very
according to the situation.
®
-connected cell phone.
Dialing a number
The system understands the digits 0 (zero) to
9 (nine). These numbers can be spoken indi-
vidually, in groups of several digits at a time,
or the entire phone number can be given at
once. Numbers above nine will not be recognized.
The following is an example of a voice command dialog for dialing a number.
1.
The user begins by saying
>
The system's response is
Dial number.
Number
please.
2. Begin speaking the digits in the phone
number individually
etc.
> If you pause, the system will repeat the
most recently spoken group of digits.
3. Continue saying the remaining digits.
When you have given the entire number,
conclude by saying
> The system will initiate the call.
The number can be changed by saying
Six-eight-seven,
Ok.
Correction (which will delete the last group
of digits spoken) or
the entire phone number). By saying Repeat,
the system will repeat the entire phone number.
Delete (which will erase
Calling a contact
The following dialogue enables you to call a
contact in your cell phone's phone book.
1.
The user begins by saying
>
The system's response is
Call contact.
Name
please.
2. Say the contact's number in the list displayed.
> If only one contact is found, the call
will be initiated. Otherwise, the system
will continue to prompt you for more
information.
If there is more than one phone number for a
particular contact, specify the number to call
by saying
Mobile,Work, etc.
Other commands
Additional cell phone voice commands can
be found in the MY CAR normal view by
pressing OK/MENU and selecting Settings
Voice control settings Command list
Phone commands.
Radio voice control
Radio voice commands (p. 67) can be used to
e.g., change stations.
The following command dialogs are only
examples; the system's responses may very
according to the situation.
Changing stations
The dialog lets you change radio stations.
1.
The user begins by saying
Select
station.
> The system will prompt you for the sta-
tion's name.
2. Say the station's name.
> The system will tune to the selected
station.
Changing frequencies
The system understands frequency numbers
between 87.5 (eighty-seven point five) and
108.0 (one-hundred-eight point oh).
This dialog lets you change radio frequencies.
1.
The user begins by saying
> The system will prompt you for the fre-
quency number.
2. Say a number between 87.5 and 108.0
megahertz.
> The system will tune to the selected
frequency.
Frequency.
03
}}
71
Page 74

03 Infotainment
||
Other commands
Additional radio voice commands can be
found in the MY CAR normal view by press-
ing OK/MENU and selecting
Voice control settings Command list
Radio commands.
Related information
Radio (p. 35)
•
03
Settings
Multimedia voice control
Voice commands (p. 67) can be used to control the multimedia functions such as changing audio sources or tracks.
The following command dialogs are only
examples; the system's responses may very
according to the situation.
Changing sources
The following is a voice command for changing media sources.
–
The user begins by saying Disc.
> The system switches to the CD/DVD
player.
Switch to other sources by saying e.g.,
Bluetooth", "AUX, USB, etc. The sources
available depend on the devices currently
connected and whether or not the device
contains playable files. If a media source is
not available, the system will provide an
explanation.
Changing tracks
The system understands the digits 0 (zero) to
99 (ninety-nine). Numbers above ninety-nine
will not be recognized.
The following is a voice command for chang-
ing tracks.
1.
The user begins by saying:
> The system will prompt you for the
track number.
Select track.
2. Say the track's number (one number only,
e.g., twenty-three, not two-three).
> The system will switch to the selected
track on the active media source.
Searching for media
The following is a voice command for searching for media sources.
1. The user begins the dialog by saying
Media search.
> The system will display a numbered list
of all possible search categories and
will prompt you to say a line number or
category.
2. Say the line number or search category.
> The system will continue to provide
instructions.
Other commands
Additional multimedia voice control commands can be found in the MY CAR normal
view by pressing OK/MENU and selecting
Settings Voice control settings
Command list Media commands.
Related information
Media Player (p. 48)
•
72
Page 75
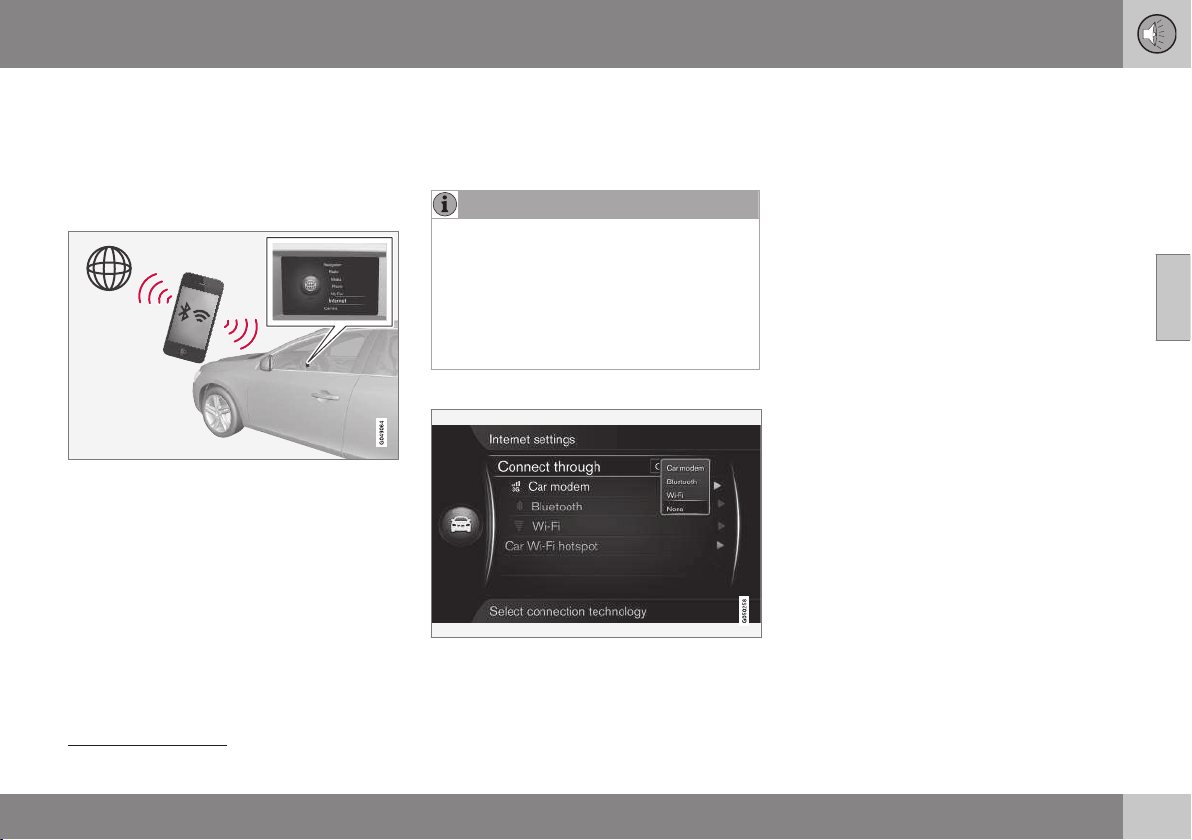
03 Infotainment
Internet connection
Connecting the vehicle to the Internet makes
it possible to utilize navigation services, web
radio and to stream music via apps (p. 77)
and to use the integrated web
browser (p. 78).
The system's integrated apps can be used
when the vehicle is connected to the Internet.
The apps available may vary and may include
navigation services, social media, web radio
and music services. The vehicle has a basic
web browser to search for and display Internet content.
If an Internet connection is through a cell
phone, other mobile functions are also available, such as reading text messages and making calls, see Bluetooth® hands-free system
(p. 62).
The cell phone and your service provider
must support tethering (sharing an Internet
connection) and your subscription must
include data communication.
NOTE
Data is transmitted while the vehicle is
online, which may result in additional
charges from your service provider.
Data roaming may result in additional
charges.
Contact your service provider for information about costs/fees, etc.
Connecting the vehicle to the Internet
Internet connection settings
The default Internet connection setting is
"none." When one of the other connection
methods has been selected, this will be
stored and the vehicle will attempt to connect
automatically using this method whenever a
network is available. To change this setting,
choose one of the other connection methods.
To stop automatic connection, see the section "Disconnecting" below.
Choose a connection method - Bluetooth®,
Wi-Fi or integrated modem.
Integrated modem*
To connect using the modem, see Car
modem* (p. 75).
9
03
9
Only models with Volvo On Call
* Option/accessory, for more information, see Introduction.
}}
73
Page 76

03 Infotainment
||
Bluetooth
1. The cell phone must first be paired with
2. Activate tethering (portable/personal hot-
3. From MY CAR’s normal view, press OK/
03
The system will then automatically connect
via Bluetooth® when a network is available.
A symbol on the screen (p. 31) will show the
current status of the connection.
To disconnect, see the section "Disconnecting."
The vehicle can store information on a maximum of 10 Bluetooth® networks. If another
network is added, the oldest network and
password will be removed from the list.
Wi-Fi
®
and connected to the infotainment system (p. 57).
spot) via the cell phone's Bluetooth
function.
MENU and select
settings
> The vehicle is now connected.
Settings Internet
Bluetooth.
3.
Select
1. Activate tethering (portable/personal hotspot) in the cell phone.
2. From MY CAR’s normal view, press OK/
MENU and select
®
settings
> This starts a search for available Wi-Fi
networks.
3. Select your network.
4.
Select
Connect.
5. Enter the network password.
> The vehicle will attempt to connect to
the network.
The system will then automatically connect
via Wi-Fi when the network is available.
A symbol on the screen (p. 31) will show the
current status of the connection.
To disconnect, see the section "Disconnecting".
The vehicle can store information on a maximum of 10 Bluetooth® networks. If another
network is added, the oldest network and
password will be removed from the list.
Settings Internet
Wi-Fi.
Removing a saved Wi-Fi network
1. Press the MY CAR button to display the
source's normal view.
2.
Press OK/MENU and select
Internet settings.
Settings
4. Select the network to be removed from
5.
Removing all networks
All networks can be removed simultaneously.
Please note that this will also reset all user
data and system settings to the factory
defaults.
To return to the factory defaults, from MY
CAR’s normal view, press OK/MENU. Select
Settings Reset to factory settings.
Wi-Fi technology and security
The vehicle can be connected to a Wi-Fi network at a frequency of 2.4 GHz. If several
devices are using this frequency simultaneously, this may result in reduced performance.
•
•
•
Wi-Fi.
> A list of available networks will be dis-
played.
the list.
Forget.
Select
> The system will no longer automatically
connect to this network.
Frequency: 2.4 GHz.
Standards: 802.11 b / g / n.
Encryption protocol: WPA2-AES-CCMP.
74
Page 77

03 Infotainment
Disconnecting
From MY CAR’s normal view, press OK/
MENU and select
settings
nect to the Internet.
Settings Internet
None. The vehicle will not con-
Internet connection problems
The amount of data being transferred is
determined by the services or apps being
used in the vehicle. For example, streaming
audio may require large of amounts of data to
be transferred, which requires a good connection and a strong signal.
Cell phone to the infotainment system
•
The Bluetooth® connection's speed can vary,
depending on the location of the cell phone in
the vehicle. Moving the phone closer to the
infotainment system can help increase signal
strength. Be sure that there are no obstructions between the phone and the system.
Cell phone to the network service pro-
•
vider
The speed of the mobile network varies
depending on your location and some areas
may provide poor reception (in tunnels, driving in deep valleys, indoors). The speed may
also be linked to your service subscription.
NOTE
Contact your service provider if data communication problems occur.
Related information
On-screen symbols (p. 31)
•
Change of ownership (p. 11)
•
Car modem*
The vehicle is equipped with a modem that
can be used to connect to the Internet. This
connection can also be shared via Wi-Fi.
10
Internet connection
SIM card holder in the glove compartment
03
* Option/accessory, for more information, see Introduction.
}}
75
Page 78

03 Infotainment
||
1. Insert your personal SIM card in the
holder located in the glove compartment.
2. Press the MY CAR button on the center
console to display this mode’s normal
view. Press OK/MENU and select
Settings Internet settings Car
modem
.
3. Enter the SIM card's PIN code.
03
> The vehicle will now connect to the
Internet and the various on-line functions can be used, see Internet connection (p. 73).
NOTE
The data subscription in the vehicle
•
must be active in order to connect to
the Internet.
To avoid having to enter the PIN code
•
each time the ignition is switched on,
the SIM card can be unlocked in the
menu system. To do so, press the
MY CAR button on the center console
to display this mode’s normal view.
Press OK/MENU and select
Internet settings Car modem.
Deselect (unmark) the
box.
From MY CAR’s normal view, press OK/
MENU and select Settings Internet
Settings
Lock SIM card
settings
nection.
None to turn off the Internet con-
Sharing a Wi-Fi hotspot (tethering)
When an Internet connection has been established using the modem, this connection (a
Wi-Fi hotspot) can be shared (tethered) to
enable other devices in the vehicle to use the
modem.
1. From MY CAR’s normal view, press OK/
MENU and select
settings
Enter a name for the Wi-Fi network (SSID)
and specify a password. The name must
contain 6-32 characters and the password must contain 10-63 characters. The
name and password can be changed at
any time.
Settings Internet
Car Wi-Fi hotspot
2. Activate the vehicle's Wi-Fi hotspot by
checking the box on the screen.
> External devices can now connect to
the vehicle's Wi-Fi hotspot.
To deactivate, remove the check from the
box.
Up to 8 devices can be connected to the
vehicle's Wi-Fi hotspot. To view the number
of devices connected, from MY CAR’s normal view, press OK/MENU and select
Settings Internet settings.
Number of devices connected to the Wi-Fi hotspot
For certain connected devices, from
MY CAR’s normal view, press OK/MENU
and select
Car Wi-Fi hotspot.
Settings Internet settings
76
10
Models equipped with Volvo On Call with Sensus Connect* only.
Page 79

03 Infotainment
Wi-Fi hotspot technical specifications and
security
Wi-Fi hotspot tethering uses a frequency of
2.4 GHz. If several devices use this frequency
simultaneously, this may result in slower
access times.
Frequency: 2.4 GHz.
•
Standards: 802.11 b / g / n.
•
Security certificate: WPA2-AES-CCMP.
•
The antenna for the vehicle's modem is
•
located on the roof.
No or poor Internet connection
See Internet connection (p. 73).
Related information
Internet connection (p. 73)
•
On-screen symbols (p. 31)
•
Applications
Applications (apps) are services that can be
used when the vehicle is connected to the
Internet. The apps available vary and include
services related to navigation, social media,
web radio and music.
For basic information on using the infotainment system, see operating the system (p. 27).
Before any apps can be used, the vehicle has
to be connected to the Internet (p. 73).
A symbol (p. 31) will be displayed in the upper
right corner of the screen when the vehicle is
connected. If no Internet connection is available, a message will be displayed.
NOTE
Data is transmitted while the vehicle is
online, which may result in additional
charges from your service provider.
Data roaming may result in additional
charges.
Contact your service provider for information about costs/fees, etc.
Press the button on the center console
and select
currently available. Select one from the list
and start it by pressing OK/MENU.
The apps are downloaded to the vehicle and
are updated each time they are started. This
means that an Internet connection is required
each time an app is used.
Certain apps require sharing location information. The
ever this takes place.
Apps to display the apps that are
symbol will be displayed when-
Logging in
There are two types of apps/services that
require you to log in:
Ones that require registration by a service
•
provider. Follow the instructions on the
03
}}
77
Page 80

03 Infotainment
||
screen when starting apps of this type or
use an existing account to log in.
Certain apps require a personal Volvo ID.
•
Register an ID (see Volvo ID (p. 12)) or
use an existing one to access useful
functions such as sending an address
from a map service on the Internet to a
navigation app or to Volvo's Sensus Navi-
03
gation system*.
Navigation services
Navigation services provide guidance to a
preset destination. However, in certain situations beyond the system's control (e.g., very
recent road construction, etc.), this guidance
may not be accurate.
WARNING
Always use good judgment when fol-
•
lowing navigation system guidance,
and do not follow guidance that seems
contrary to your own best judgment.
Never use the navigation system or
•
any other feature in your vehicle in a
way that distracts you from the task of
driving safely. Distraction can lead to a
serious accident.
Set and make changes in your naviga-
•
tion system only with the vehicle
parked.
Be aware of the current traffic situa-
•
tion.
Always comply with relevant traffic
•
regulations.
NOTE
The optional Sensus Navigation system
can be installed (activated) in your vehicle
at any time, giving you access to additional functions and map information. Consult your Volvo retailer.
Browser
The infotainment system has an integrated
web browser for searching for and displaying
Internet content.
The web browser supports the HTML 4
standard for text and graphics. However, it
does not support animations, video or audio.
Information cannot be downloaded or saved.
In order to use the web browser, the vehicle
must first be connected to the Internet(p. 73) .
NOTE
Data is transmitted while the vehicle is
online, which may result in additional
charges from your service provider.
Data roaming may result in additional
charges.
Contact your service provider for information about costs/fees, etc.
NOTE
The web browser is not available while the
vehicle is moving.
78
* Option/accessory, for more information, see Introduction.
Related information
On-screen symbols (p. 31)
•
Change of ownership (p. 11)
•
Browser (p. 78)
•
Press the Internet button ( ) on the center
console and select Web browser.
For Bluetooth® Internet connections, the
Bluetooth® symbol will appear in the upperright corner of the display.
Page 81

03 Infotainment
If no Internet connection is available, a message indicating this will be displayed.
Searching for information
Searching using the text wheel
List of characters
Switching between character entry
modes (see the following table)
Surf history
Use the text wheel to enter a web address.
1. Turn TUNE to the desired letter and press
OK/MENU to confirm. The number/letter
keys on the center console can also be
used.
2. Continue to the next letter, etc. The
results of the search will be displayed in
the phone book.
3. To switch from letter entry mode to the
entry mode for numbers or special characters, or to go view surf history, turn
TUNE to one of the selections (see the
explanation in the following table) in the
list for switching character entry mode (2)
and press OK/MENU.
123/A
BC
=>
Go
a|A
| | }
Toggle between letters and numbers by pressing OK/MENU.
This leads to surf history. Turn
TUNE to select a web address
and press OK/MENU to go to the
website.
Go to the website by pressing
OK/MENU.
Toggle between upper and lower
case letters by pressing OK/
MENU.
Switch from the text wheel to the
Address: field. Use TUNE to
move the cursor and erase characters by pressing EXIT. Press
OK/MENU to return to the text
wheel.
The number/letter keys on the
center console can also be used
to edit the
Address: field.
Press EXIT briefly to erase a single character.
Press and hold EXIT to erase all characters.
Pressing a number key on the center console
while the text wheel is displayed (see the previous illustration) will display a list of characters. Press the desired key repeatedly to
enter the desired letter and continue to the
next letter, etc.
To enter a number, press and hold the button.
Navigating in the web browser
Turn TUNE to navigate among links or to
scroll on a web page. Press OK/MENU to
activate the selection/link.
Moving the cursor on a web page
The buttons on the center console can be
used to move the cursor on a web page.
A pop-up menu can be accessed by pressing
button 5 on the center console or by moving
03
}}
79
Page 82

03 Infotainment
||
the cursor to a non-clickable area and pressing OK/MENU.
Functions
The available functions can be accessed by
pressing button 5 on the center console or by
moving the cursor to a non-clickable area and
pressing OK/MENU.
Back – Return to the previous page.
•
03
Forward – If Back has been used, press
•
forward to return to the page.
Reload – Refresh the page.
•
Stop – Stop loading a page.
•
New tab – Creates a new tab/page. Up
•
to 4 tabs can be open at the same time.
Close tab – Close a tab/page.
•
Zoom in/Zoom out.
•
Add bookmark/Delete bookmark –
•
Add or delete a bookmark. Up to 20
bookmarks can be saved.
Settings – Adapt the way that the
•
browser displays and handles information. See the following section for more
information.
Settings
Bookmarks – Rename, Reorder or
•
Delete.
Content filtering – Adapt the way in
•
which web pages are displayed. The following can be activated/deactivated:
Show images, Block pop-ups and
Enable JavaScript.
Accept cookies – Cookies are small text
•
files that are stored and make it possible
e.g., to use various functions on web
pages and enable the page's owner to
compile surf statistics.
Text size – Change the size of the text:
•
Large, Medium or Small.
Clear browsing data – Cookies,
•
browsing history and cache will be
cleared
.
FAV key options – Certain functions can
•
be programmed in the FAV button. The
stored function can then be started by
merely pressing FAV, see Favorites
(p. 32).
Related information
Web browser menus (p. 85)
•
On-screen symbols (p. 31)
•
Change of ownership (p. 11)
•
Infotainment menu overview
This is a general overview of the selections
and settings that can be made in the infotainment system's menus.
If a menu text is grayed-out, this means that it
cannot currently be selected. This may be
because the function is not installed in the
vehicle, that the source is not currently connected or is connected but is empty.
RADIO
AM (p. 81)
•
FM (p. 81)
•
MEDIA
CD/DVD (p. 82)
•
DVD Video (p. 82)
•
iPod (p. 83)
•
USB (p. 83)
•
Media Bluetooth® (p. 84)
•
AUX (p. 84)
•
TEL
Bluetooth® hands-free (p. 85)
•
Web browser (p. 85)
•
Related information
Infotainment – operating the system
•
(p. 27)
80
Page 83

03 Infotainment
AM radio menus
The following is an overview of the settings
that can be made for AM radio.
AM menu
Show presets
FAV key options
No function
Show presets (p. 37)
See
(p. 37)
(p. 32)
Related information
Infotainment – operating the system
•
(p. 27)
Infotainment menu overview (p. 80)
•
FM radio menus
The following is an overview of the settings
that can be made for FM radio.
FM menu
Alternative frequency
Show
Radio text (p. 47)
Presets (p. 37)
None
Tune station by
Station list (p. 36)
Manual tuning (p. 37)
FAV key options
No function
Toggle radio
text or presets
See
(p. 36)
(p. 32)
(p. 47) and
Preset radio
stations
(p. 37)
Related information
Infotainment – operating the system
•
(p. 27)
Infotainment menu overview (p. 80)
•
03
81
Page 84

03 Infotainment
Audio CD/DVD menus
The following is an overview of the settings
that can be made for audio CDs/DVDs.
Disc menu
Play/Pause
03
Stop
A
Media search
Shuffle
Gracenote® options
Gracenote® database
Gracenote® results
FAV key options
No function
Play/Pause (p. 48)
Shuffle (p. 50)
See
(p. 48)
(p. 50)
(p. 50)
(p. 32)
Related information
Infotainment – operating the system
•
(p. 27)
Infotainment menu overview (p. 80)
•
Video DVD menus
The following is an overview of the settings
that can be made for video DVDs.
DVD video menu
Play/Pause
DVD disc menu
Stop
Subtitles
Audio tracks
Advanced settings
Angles (p. 52)
Screen ratios
FAV key options
No function
Play/Pause (p. 51)
See
(p. 51)
(p. 51)
(p. 51)
(p. 51)
(p. 51)
(p. 32)
82
A
DVDs only.
Page 85

03 Infotainment
Next subtitle (p. 51)
Next audio track (p. 51)
Video DVD pop-up menu
PressOK/MENU while a video is playing to
access the pop-up menu.
Image settings
Video DVD menu
DVD disc menu
(p. 52)
(p. 27)
(p. 51)
Related information
Infotainment – operating the system
•
(p. 27)
Infotainment menu overview (p. 80)
•
iPod® menus
The following is an overview of the settings
that can be made for an iPod
iPod menu
Play/Pause
Shuffle
FAV key options
No function
Play/Pause (p. 54)
Shuffle (p. 50)
®
.
See
(p. 54)
(p. 50)
(p. 32)
Related information
Infotainment – operating the system
•
(p. 27)
Infotainment menu overview (p. 80)
•
USB menus
The following is an overview of the settings
that can be made for USB.
USB menu
Play/Pause
Media search
Shuffle
Select USB partition
FAV key options
No function
Play/Pause (p. 54)
Shuffle (p. 50)
See
(p. 54)
(p. 50)
(p. 50)
(p. 32)
Related information
Infotainment – operating the system
•
(p. 27)
Infotainment menu overview (p. 80)
•
03
83
Page 86

03 Infotainment
Media Bluetooth® menus
The following is an overview of the settings
that can be made for Media Bluetooth
Bluetooth menu
Play/Pause
03
Shuffle
Change device
Search new device
Make car discoverable
FAV key options
No function
Play/Pause (p. 56)
Shuffle (p. 50)
Device 1
Device 2
etc.
®
.
See
(p. 56)
(p. 50)
(p. 60)
(p. 32)
Connect for media
Delete device
Related information
Infotainment – operating the system
•
(p. 27)
Infotainment menu overview (p. 80)
•
(p. 56)
(p. 61)
AUX menus
The following is an overview of the settings
that can be made for AUX.
AUX menu
AUX input
Standard
Boost
See
(p. 56)
Related information
Infotainment – operating the system
•
(p. 27)
Infotainment menu overview (p. 80)
•
84
Page 87

03 Infotainment
Bluetooth® hands-free menus
The following is an overview of the settings
that can be made for the Bluetooth
free function.
Phone menu
Call list
Contacts
Messages
Message notifications
Change phone
Search new phone
Make car discoverable
Device 1
Device 2
etc.
Connect for phone
®
hands-
See
(p. 63)
(p. 65)
(p. 62)
(p. 62)
(p. 60)
(p. 62)
Related information
Infotainment – operating the system
•
(p. 27)
Infotainment menu overview (p. 80)
•
Web browser menus
The following is an overview of the settings
that can be made for the web browser.
Web browser
This menu is displayed in the normal view if no tab is open.
Enter address
Settings
Displays the web browser's settings menu, see below.
Bookmark 1
Bookmark 2
etc.
Browser pop-up menu
Press key 5 on the center console
while a website is displayed to
access the pop-up menu.
Back
Forward
Reload
See
(p. 78)
(p. 78)
See
(p. 78)
(p. 78)
(p. 78)
03
Delete device
(p. 61)
}}
85
Page 88

03
03 Infotainment
||
Stop
New tab
Close tab
Zoom in
or
Zoom out
Add bookmark
or
Delete bookmark
Settings
Displays the web browser's settings menu, see below.
(p. 78)
(p. 78)
(p. 78)
(p. 78)
(p. 78)
Rename
Reorder
Delete
Content filtering
Accept cookies
Show images
Block pop-ups
Enable JavaScript
(p. 78)
(p. 78)
FAV key options
No function
Add/delete bookmark (p. 78)
New tab (p. 78)
Close tab (p. 78)
Related information
Infotainment – operating the system
•
(p. 27)
Infotainment menu overview (p. 80)
•
(p. 32)
Web browser settings menu
Press
Settings in one of the two
menus above to access the settings menu.
Bookmarks
Bookmark 1
Bookmark 2
etc.
86
See
(p. 78)
Text size
Large
Medium
Small
Clear browsing data
(p. 78)
(p. 78)
Page 89

03 Infotainment
Disclaimers
The following disclaimers apply to your infotainment system.
camellia:1.2.0
Copyright (c) 2006, 2007
NTT (Nippon Telegraph and Telephone
Corporation). All rights reserved.
Redistribution and use in source and binary
forms, with or without modification, are
permitted provided that the following
conditions are met:
1. Redistributions of source code must
retain the above copyright notice, this list
of conditions and the following disclaimer
as the first lines of this file unmodified.
2. Redistributions in binary form must
reproduce the above copyright notice,
this list of conditions and the following
disclaimer in the documentation and/or
other materials provided with the
distribution.
THIS SOFTWARE IS PROVIDED BY NTT ``AS
IS'' AND ANY EXPRESS OR IMPLIED
WARRANTIES, INCLUDING, BUT NOT
LIMITED TO, THE IMPLIED WARRANTIES OF
MERCHANTABILITY AND FITNESS FOR A
PARTICULAR PURPOSE ARE DISCLAIMED.
IN NO EVENT SHALL NTT BE LIABLE FOR
ANY DIRECT, INDIRECT, INCIDENTAL,
SPECIAL, EXEMPLARY, OR
CONSEQUENTIAL DAMAGES (INCLUDING,
BUT NOT LIMITED TO, PROCUREMENT OF
SUBSTITUTE GOODS OR SERVICES; LOSS
OF USE, DATA, OR PROFITS; OR BUSINESS
INTERRUPTION) HOWEVER CAUSED AND
ON ANY THEORY OF LIABILITY, WHETHER
IN CONTRACT, STRICT LIABILITY, OR TORT
(INCLUDING NEGLIGENCE OR OTHERWISE)
ARISING IN ANY WAY OUT OF THE USE OF
THIS SOFTWARE, EVEN IF ADVISED OF THE
POSSIBILITY OF SUCH DAMAGE.
Sensus software
This software uses parts of sources from
clib2 and Prex Embedded Real-time OS Source (Copyright (c) 1982, 1986, 1991,
1993, 1994), and Quercus Robusta (Copyright
(c) 1990, 1993), The Regents of the University
of California. All or some portions are derived
from material licensed to the University of
California by American Telephone and
Telegraph Co. or Unix System Laboratories,
Inc. and are reproduced herein with the
permission of UNIX System Laboratories, Inc.
Redistribution and use in source and binary
forms, with or without modification, are
permitted provided that the following
conditions are met: Redistributions of source
code must retain the above copyright notice,
this list of conditions and the following
disclaimer. Redistributions in binary form
must reproduce the above copyright notice,
this list of conditions and the following
disclaimer in the documentation and/or other
materials provided with the distribution.
Neither the name of the <ORGANIZATION>
nor the names of its contributors may be
used to endorse or promote products derived
from this software without specific prior
written permission. THIS SOFTWARE IS
PROVIDED BY THE COPYRIGHT HOLDERS
AND CONTRIBUTORS "AS IS" AND ANY
EXPRESS OR IMPLIED WARRANTIES,
INCLUDING, BUT NOT LIMITED TO, THE
IMPLIED WARRANTIES OF
MERCHANTABILITY AND FITNESS FOR A
PARTICULAR PURPOSE ARE DISCLAIMED.
IN NO EVENT SHALL THE COPYRIGHT
OWNER OR CONTRIBUTORS BE LIABLE
FOR ANY DIRECT, INDIRECT, INCIDENTAL,
SPECIAL, EXEMPLARY, OR
CONSEQUENTIAL DAMAGES (INCLUDING,
BUT NOT LIMITED TO, PROCUREMENT OF
SUBSTITUTE GOODS OR SERVICES; LOSS
OF USE, DATA, OR PROFITS; OR BUSINESS
INTERRUPTION) HOWEVER CAUSED AND
ON ANY THEORY OF LIABILITY, WHETHER
IN CONTRACT, STRICT LIABILITY, OR TORT
(INCLUDING NEGLIGENCE OR OTHERWISE)
ARISING IN ANY WAY OUT OF THE USE OF
THIS SOFTWARE, EVEN IF ADVISED OF THE
POSSIBILITY OF SUCH DAMAGE.
This software is based in part on the work of
the Independent JPEG Group.
This software uses parts of sources from
"libtess". The Original Code is: OpenGL
Sample Implementation, Version 1.2.1,
released January 26, 2000, developed by
Silicon Graphics, Inc. The Original Code is
03
}}
87
Page 90

03 Infotainment
||
Copyright (c) 1991-2000 Silicon Graphics,
Inc. Copyright in any portions created by third
parties is as indicated elsewhere herein. All
Rights Reserved. Copyright (C) [1991-2000]
Silicon Graphics, Inc. All Rights Reserved.
Permission is hereby granted, free of charge,
to any person obtaining a copy of this
software and associated documentation files
(the "Software"), to deal in the Software
03
without restriction, including without limitation
the rights to use, copy, modify, merge,
publish, distribute, sublicense, and/or sell
copies of the Software, and to permit persons
to whom the Software is furnished to do so,
subject to the following conditions: The
above copyright notice including the dates of
first publication and either this permission
notice or a reference to http://oss.sgi.com/
projects/FreeB/ shall be included in all copies
or substantial portions of the Software. THE
SOFTWARE IS PROVIDED "AS IS",
WITHOUT WARRANTY OF ANY KIND,
EXPRESS OR IMPLIED, INCLUDING BUT
NOT LIMITED TO THE WARRANTIES OF
MERCHANTABILITY, FITNESS FOR A
PARTICULAR PURPOSE AND
NONINFRINGEMENT. IN NO EVENT SHALL
SILICON GRAPHICS, INC. BE LIABLE FOR
ANY CLAIM, DAMAGES OR OTHER
LIABILITY, WHETHER IN AN ACTION OF
CONTRACT, TORT OR OTHERWISE,
ARISING FROM, OUT OF OR IN
CONNECTION WITH THE SOFTWARE OR
THE USE OR OTHER DEALINGS IN THE
SOFTWARE. Except as contained in this
notice, the name of Silicon Graphics, Inc.
shall not be used in advertising or otherwise
to promote the sale, use or other dealings in
this Software without prior written
authorization from Silicon Graphics, Inc.
This software is based in parts on the work of
the FreeType Team.
This software uses parts of SSLeay Library:
Copyright (C) 1995-1998 Eric Young
(eay@cryptsoft.com). All rights reserved
Linux software
This product contains software licensed
under GNU General Public License (GPL) or
GNU Lesser General Public License (LGPL),
etc.
You have the right of acquisition,
modification, and distribution of the source
code of the GPL/LGPL software.
You may download Source Code from the
following website at no charge: http://
www.embedded-carmultimedia.jp/linux/oss/
download/TVM_8351_013
The website provides the Source Code "As
Is" and without warranty of any kind.
By downloading Source Code, you expressly
assume all risk and liability associated with
downloading and using the Source Code and
complying with the user agreements that
accompany each Source Code.
Please note that we cannot respond to any
inquiries regarding the source code.
Unicode: 5.1.0
COPYRIGHT AND PERMISSION NOTICE
Copyright c 1991-2013 Unicode, Inc. All
rights reserved. Distributed under the Terms
of Use in http://www.unicode.org/
copyright.html.
Permission is hereby granted, free of charge,
to any person obtaining a copy of the
Unicode data files and any associated
documentation (the "Data Files") or Unicode
software and any associated documentation
(the "Software") to deal in the Data Files or
Software without restriction, including without
limitation the rights to use, copy, modify,
merge, publish, distribute, and/or sell copies
of the Data Files or Software, and to permit
persons to whom the Data Files or Software
are furnished to do so, provided that (a) the
above copyright notice(s) and this permission
notice appear with all copies of the Data Files
or Software, (b) both the above copyright
notice(s) and this permission notice appear in
associated documentation, and (c) there is
clear notice in each modified Data File or in
the Software as well as in the documentation
associated with the Data File(s) or Software
that the data or software has been modified.
THE DATA FILES AND SOFTWARE ARE
PROVIDED "AS IS", WITHOUT WARRANTY
OF ANY KIND, EXPRESS OR IMPLIED,
88
Page 91

03 Infotainment
INCLUDING BUT NOT LIMITED TO THE
WARRANTIES OF MERCHANTABILITY,
FITNESS FOR A PARTICULAR PURPOSE
AND NONINFRINGEMENT OF THIRD PARTY
RIGHTS. IN NO EVENT SHALL THE
COPYRIGHT HOLDER OR HOLDERS
INCLUDED IN THIS NOTICE BE LIABLE FOR
ANY CLAIM, OR ANY SPECIAL INDIRECT
OR CONSEQUENTIAL DAMAGES, OR ANY
DAMAGES WHATSOEVER RESULTING
FROM LOSS OF USE, DATA OR PROFITS,
WHETHER IN AN ACTION OF CONTRACT,
NEGLIGENCE OR OTHER TORTIOUS
ACTION, ARISING OUT OF OR IN
CONNECTION WITH THE USE OR
PERFORMANCE OF THE DATA FILES OR
SOFTWARE.
Except as contained in this notice, the name
of a copyright holder shall not be used in
advertising or otherwise to promote the sale,
use or other dealings in these Data Files or
Software without prior written authorization of
the copyright holder.
Gracenote® End User License Agreement
This application or device contains software
from Gracenote, Inc. of Emeryville, California
(“Gracenote”). The software from Gracenote
(the “Gracenote Software”) enables this application to perform disc and/or file identification and obtain music-related information,
including name, artist, track, and title information (“Gracenote Data”) from online servers or
embedded databases (collectively, “Gracenote Servers”) and to perform other functions.
You may use Gracenote Data only by means
of the intended End-User functions of this
application or device.
You agree that you will use Gracenote Data,
the Gracenote Software, and Gracenote Servers for your own personal non-commercial
use only. You agree not to assign, copy,
transfer or transmit the Gracenote Software
or any Gracenote Data to any third party.
YOU AGREE NOT TO USE OR EXPLOIT
GRACENOTE DATA, THE GRACENOTE
SOFTWARE, OR GRACENOTE SERVERS,
EXCEPT AS EXPRESSLY PERMITTED
HEREIN.
You agree that your non-exclusive license to
use the Gracenote Data, the Gracenote Software, and Gracenote Servers will terminate if
you violate these restrictions. If your license
terminates, you agree to cease any and all
use of the Gracenote Data, the Gracenote
Software, and Gracenote Servers. Gracenote
reserves all rights in Gracenote Data, the
Gracenote Software, and the Gracenote Servers, including all ownership rights. Under no
circumstances will Gracenote become liable
for any payment to you for any information
that you provide. You agree that Gracenote,
Inc. may enforce its rights under this Agreement against you directly in its own name.
The Gracenote service uses a unique identifier to track queries for statistical purposes.
The purpose of a randomly assigned numeric
identifier is to allow the Gracenote service to
count queries without knowing anything
about who you are. For more information, see
the web page for the Gracenote Privacy Policy for the Gracenote service.
The Gracenote Software and each item of
Gracenote Data are licensed to you “AS IS.”
Gracenote makes no representations or warranties, express or implied, regarding the
accuracy of any Gracenote Data from in the
Gracenote Servers. Gracenote reserves the
right to delete data from the Gracenote Servers or to change data categories for any
cause that Gracenote deems sufficient. No
warranty is made that the Gracenote Software or Gracenote Servers are error-free or
that functioning of Gracenote Software or
Gracenote Servers will be uninterrupted.
Gracenote is not obligated to provide you
with new enhanced or additional data types
or categories that Gracenote may provide in
the future and is free to discontinue its services at any time.
GRACENOTE DISCLAIMS ALL WARRANTIES
EXPRESS OR IMPLIED, INCLUDING, BUT
NOT LIMITED TO, IMPLIED WARRANTIES OF
MERCHANTABILITY, FITNESS FOR A PARTICULAR PURPOSE, TITLE, AND NONINFRINGEMENT. GRACENOTE DOES NOT
WARRANT THE RESULTS THAT WILL BE
OBTAINED BY YOUR USE OF THE GRACENOTE SOFTWARE OR ANY GRACENOTE
03
}}
89
Page 92

03 Infotainment
SERVER. IN NO CASE WILL GRACENOTE
BE LIABLE FOR ANY CONSEQUENTIAL OR
INCIDENTAL DAMAGES OR FOR ANY LOST
PROFITS OR LOST REVENUES.
© Gracenote, Inc. 2009
03
Type approval
The following is a declaration of conformity.
Wi-Fi
Declaration of Conformity for the audio and navigation systems
90
Page 93

03 Infotainment
03
91
Page 94

04 Index
A
Applications (apps).................................... 77
Audio
surround............................................... 34
Audio system............................................. 25
HD digital radio................... 38, 39, 40, 41
SiriusXM® Satellite radio ................ 42, 44
voice control......................................... 71
AUX input................................................... 26
04
B
Bluetooth
connecting devices......................... 57, 60
menu..................................................... 85
Bluetooth
Bluetooth cell phone connection............... 63
Browser..................................................... 78
®
changing devices.................................. 60
hands-free............................................ 62
media.................................................... 56
microphone........................................... 63
streaming audio.................................... 56
C
CD.............................................................. 48
Cell phone.................................................. 61
disconnecting....................................... 61
hands-free............................................ 62
Pairing................................................... 59
pairing/connecting................................ 57
Cell phone voice control............................ 71
D
DVD............................................................ 48
DVD video
camera angle........................................ 52
E
Equalizer.................................................... 34
H
HD digital radio........................ 38, 39, 40, 41
switching on and off............................. 39
I
ID, Volvo.................................................... 12
Infotainment (Infotainment system)........... 25
Infotainment system................ 38, 39, 40, 41
AUX menu............................................. 84
Bluetooth media menu......................... 84
CD/DVD/external device - shuffle......... 50
CD/DVD menus.................................... 82
Cell phone contacts.............................. 65
disclaimers............................................ 87
DVD video menu................................... 82
entering phonebook contacts............... 66
external device volume......................... 56
general sound settings......................... 33
introduction........................................... 25
iPod menu............................................ 83
manual radio station searches.............. 37
media player......................................... 48
operating the system............................ 27
overview................................................ 26
playing video DVDs.............................. 51
radio...................................................... 35
screen settings..................................... 52
searching for phonebook contacts....... 66
searching for radio stations.................. 36
sound reproduction.............................. 32
speed compensated volume................ 35
type approval........................................ 90
USB menu............................................ 83
92
Page 95

04 Index
using menus................................... 27, 80
voice control......................................... 71
web browser......................................... 85
Internet
connect................................................. 57
modem.................................................. 75
Internet connected car
browser................................................. 78
Internet connection.................................... 73
applications (apps)............................... 77
M
Media Bluetooth®....................................... 56
Media player.............................................. 48
compatible file formats......................... 53
Media searches......................................... 50
Microphone................................................ 63
My Car
car settings........................................... 17
climate system settings........................ 21
driver support settings.......................... 19
information settings.............................. 23
Internet settings.................................... 22
menu selections.................................... 15
paths..................................................... 15
system settings..................................... 20
voice control......................................... 21
O
Ownership, changing................................. 11
P
Phone
receiving calls....................................... 63
R
Radio
AM menu.............................................. 81
automatic station search...................... 36
FM menu............................................... 81
radio text............................................... 47
SiriusXM® Satellite radio................. 42, 44
Radio functions
HD digital radio................... 38, 39, 40, 41
S
Sensus......................................................... 8
Sirius weather............................................ 45
SiriusXM® Satellite radio
traffic information.................................. 42
SiriusXM™ satellite radio........................... 44
Sound Profile............................................. 34
Surround.................................................... 34
Symbols
on-screen.............................................. 31
T
Telephone
disconnecting....................................... 61
pairing................................................... 59
U
USB/AUX connection.......................... 54, 55
04
93
Page 96

04 Index
V
Vehicle information.................................... 11
Voice control
cell phones........................................... 71
giving commands................................. 70
global commands................................. 70
help functions....................................... 69
introduction........................................... 67
multimedia devices............................... 72
radio...................................................... 71
04
selecting a language............................. 68
settings................................................. 69
Volume
cell phone/media player....................... 64
Volvo ID..................................................... 12
Volvo Sensus............................................... 8
W
Wi-Fi.......................................................... 75
94
Page 97

Page 98

TP 19223 (USA & Canada), AT 1517, MY16, Printed in Sweden, Göteborg 2015, Copyright © 2000-2015 Volvo Car Corporation
 Loading...