

VOLVO S60
RoAD AND TRAFFIC INFORMATION SYSTEM (rti)
OPERATING MANUAL
1
Road and Traffic Information
RTI is a traffic information and navigation system developed by Volvo.
The system navigates to a specified destination and gives access to
traffic information along the route. The system informs on situations
that can complicate the journey and provides the opportunity to select
a better route.
It is possible to set an itinerary, search for facilities along the route,
store a special location etc. The system indicates the car’s current
position and can always make its way to the destination in the event
of wrong-turns.
The RTI system contributes towards an improved environment by facilitating arrival.
RTI.book Page 1 Tuesday, February 26, 2008 1:29 PM

2
END USER LICENSE AGREEMENT
You have acquired a device (ROAD & TRAFFIC
INFORMATION SYSTEM) which includes software
licensed by Volvo Car Corporation from one or more
software licensors. Such software products, as well as
associated media, printed materials, and “online” or
electronic documentation (NAVIGATION
SOFTWARE) are protected by international intellectual property laws and treaties. The SOFTWARE
is licensed, not sold. All rights reserved.
IF YOU DO NOT AGREE TO THIS END USER
LICENSE AGREEMENT (“EULA”), DO NOT USE
THE DEVICE OR COPY THE SOFTWARE.
INSTEAD, PROMPTLY CONTACT VOLVO CAR
CORPORATION FOR INSTRUCTIONS ON
RETURN OF THE UNUSED DEVICE(S) FOR A
REFUND. ANY USE OF THE SOFTWARE,
INCLUDING BUT NOT LIMITED TO USE ON
THE DEVICE, WILL CONSTITUTE YOUR
AGREEMENT TO THIS EULA (OR RATIFICATION OF ANY PREVIOUS CONSENT).
GRANT OF SOFTWARE ARE LICENSE. This
EULA grants you the following license:
You may use the SOFTWARE only on the DEVICE.
Connectivity Software. Your Device package may
include desktop connectivity software contained on a
CD-ROM disk. You may install and use the
component(s) of the software contained on the CDROM disk on a computer or computing device with
which you exchange information with the Device, in
accordance with the terms of the end user license
agreement provided with such component(s). If no
separate end user license agreement is provided, you
may install and use only one (1) copy of such
component(s) on a single computer or computing
device with which you use the Device.
NOT FAULT TOLERANT. THE SOFTWARE IS
NOT FAULT TOLERANT. VOLVO CAR CORPORATION HAS INDEPENDENTLY DETERMINED
HOW TO USE THE SOFTWARE IN THE DEVICE,
AND MS HAS RELIED UPON VOLVO CAR
CORPORATION TO CONDUCT SUFFICIENT
TESTING TO DETERMINE THAT THE
SOFTWARE IS SUITABLE FOR SUCH USE.
NO W ARRANTIES FOR THE SOFTW ARE. THE
SOFTWARE is provided “AS IS” and with all faults.
THE ENTIRE RISK AS TO SATISFACTORY
QUALITY, PERFORMANCE, ACCURACY, AND
EFFORT (INCLUDING LACK OF NEGLIGENCE)
IS WITH YOU. ALSO, THERE IS NO
WARRANTY AGAINST INTERFERENCE WITH
YOUR ENJOYMENT OF THE SOFTWARE OR
AGAINST INFRINGEMENT. IF YOU HAVE
RECEIVED ANY W ARRANTIES REGARDING
THE DEVICE OR THE SOFTWARE, THOSE
WARRANTIES DO NOT ORIGINATE FROM,
AND ARE NOT BINDING ON, MS.
No Liability for Certain Damages. EXCEPT AS
PROHIBITED BY LAW, MS SHALL HAVE NO
LIABILITY FOR ANY INDIRECT, SPECIAL,
CONSEQUENTIAL OR INCIDENTAL
DAMAGES ARISING FROM OR IN
CONNECTION WITH THE USE OR PERFOMANCE OF THE SOFTWARE. THIS
LIMITATION SHALL APPLY EVEN IF ANY
REMEDY FAILS OF ITS ESSENTIAL
PURPOSE. IN NO EVENT SHALL MS BE
LIABLE FOR ANY AMOUNT IN EXCESS OF
U. S. TWO HUNDRED FIFTY DOLLARS
(U.S.$250.00-).
Limitations on Reverse Engineering, Decompilation, and Disassembly. You may not reverse
engineer, decompile, or disassemble the
SOFTWARE, except and only to the extent that such
activity is expressly permitted by applicable law
notwithstanding this limitation.
SOFTWARE TRANSFER ALLOWED BUT
WITH RESTRICTIONS. You may permanently
transfer rights under this EULA only as part of a
permanent sale or transfer of the Device, and only if
the recipient agrees to this EULA. If the SOFTWARE
is an upgrade, any transfer must also include all prior
versions of the SOFTWARE.
EXPORT RESTRICTIONS. Y ou acknowledge that
SOFTW ARE is subject to U.S. jurisdiction. Y ou agree
to comply with all applicable international and
national laws that apply to the SOFTWARE,
including the U.S. Export Administration Regulations, as well as end-user, end-use and destination
restrictions issued by U. S. and other governments.
For additional information see
http://www.microsoft.com/exporting/.
The specifications, design details and illustrations in the Owner’s Manual are not binding.
We reserve the right to make alterations without
prior notification.
© Volvo Car Corporation
RTI.book Page 2 Tuesday, February 26, 2008 1:29 PM

3
Contents
Introduction 5
Menu structure 13
Destination 21
Itinerary and guidance 37
Map 43
Traffic information 49
Navigation settings 57
Symbols on the map 61
TV reception (option) 65
Questions and answers 69
Alphabetical index 73
RTI.book Page 3 Tuesday, February 26, 2008 1:29 PM

4
RTI.book Page 4 Tuesday, February 26, 2008 1:29 PM

5
Introduction
Overview 6
DVD disc/DVD player 8
Navigator (keypad) and remote control 9
Before starting 10
Quick start 11
Map image 12
RTI.book Page 5 Tuesday, February 26, 2008 1:29 PM
6
Introduction
Overview
RTI.book Page 6 Tuesday, February 26, 2008 1:29 PM

7
Introduction
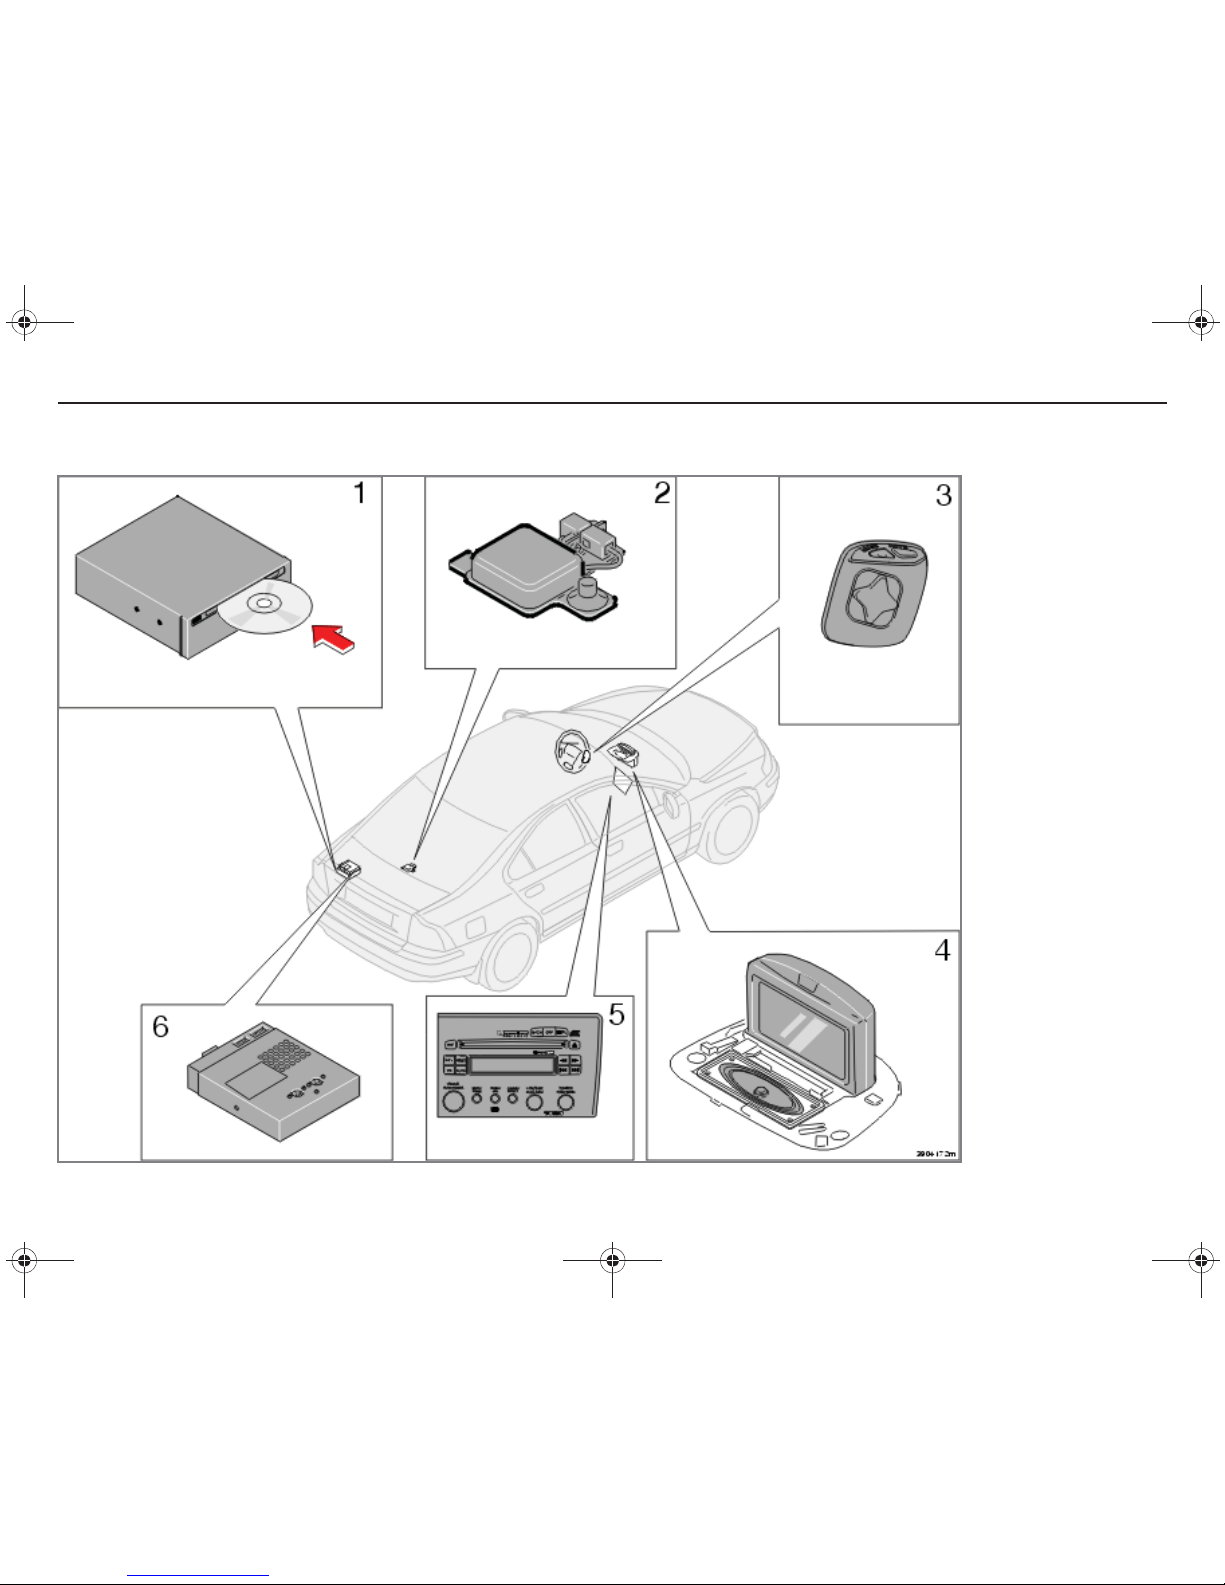
1. Main unit with map disc and TMC
receiver
The main unit which is only designed for
Volvo map discs, is located in the cargo
compartment.
The main unit includes the following
functions:
• Calculating the car’s position.
• Route calculation to specified destination and decoding traffic messages.
• Voice guidance.
The map information does not always correspond with the real situation. (Volvo is not
responsible for the accuracy of the map
material or the TMC information.)
TMC (Traffic Message Channel) is a standardised coding system for traffic information.
The TMC receiver searches for the relevant
frequency. The transmission takes place via
FM frequencies.
2. GPS antenna
The car’s speed sensor and a gyro calculate
the current position and the direction of travel
of the car using signals from the GPS satellite
system.
3. Navigator (keypad)
Different menu options can be scrolled and
selected using the navigator.
4. Screen
The screen displays maps and provides
detailed information on route options,
distance etc.
The IR receiver for the remote control is
located in the top of the screen frame.
5. Radio
The radio is used to provide voice messages
via the driver door loudspeaker and to control
the TV.
6. TV receiver
The TV receiver is optional.
RTI.book Page 7 Tuesday, February 26, 2008 1:29 PM
8
Introduction
DVD disc
Contents of the DVD disc
Each map disc contains the same European
road network. Detailed information such as
addresses, facilities etc. is divided into the
relevant map disc for the geographic area.
A message on the screen indicates when a
disc should be changed. If the disc is not
changed then the road network will still be
available, but not detailed information such as
petrol stations, restaurant facilities etc.
Map discs with additional information are
issued continuously. Contact a Volvo dealer
for the latest issue.
See also www.volvocars.com/navi for further
information on maps etc.
WARNING!
For the sake of traffic safety, the greatest
care must be taken with continuous
attention paid to prevailing traffic conditions when using the RTI system whilst
driving. Always comply with traffic regulations in force.
DVD player
Changing a DVD/upgrading
The DVD player is located in the cargo
compartment, see overview.
1. Press the eject button and pull down the
cover to remove the DVD (the ignition
must be on)
2. Load the new DVD.
If the DVD contains new software then the
screen will become black and the text:
Loading new program - please wait
is
displayed in the lower edge of the screen
.
The entire procedure can take up to five
minutes. Once programming is complete, the
start screen is displayed.
Care of the DVD disc
Be careful when handling DVDs. Make sure
that they are not exposed to dirt or damp.
When the discs are not being used they must
be stored in their packaging. Avoid storing
them in strong heat, direct sunlight or in dusty
surroundings.
Care of the screen
Clean the screen with a soft, lintless, lightly
dampened cloth, or a cloth with a mild
window cleaning agent.
DVD disc/DVD player
RTI.book Page 8 Tuesday, February 26, 2008 1:29 PM
9
Introduction
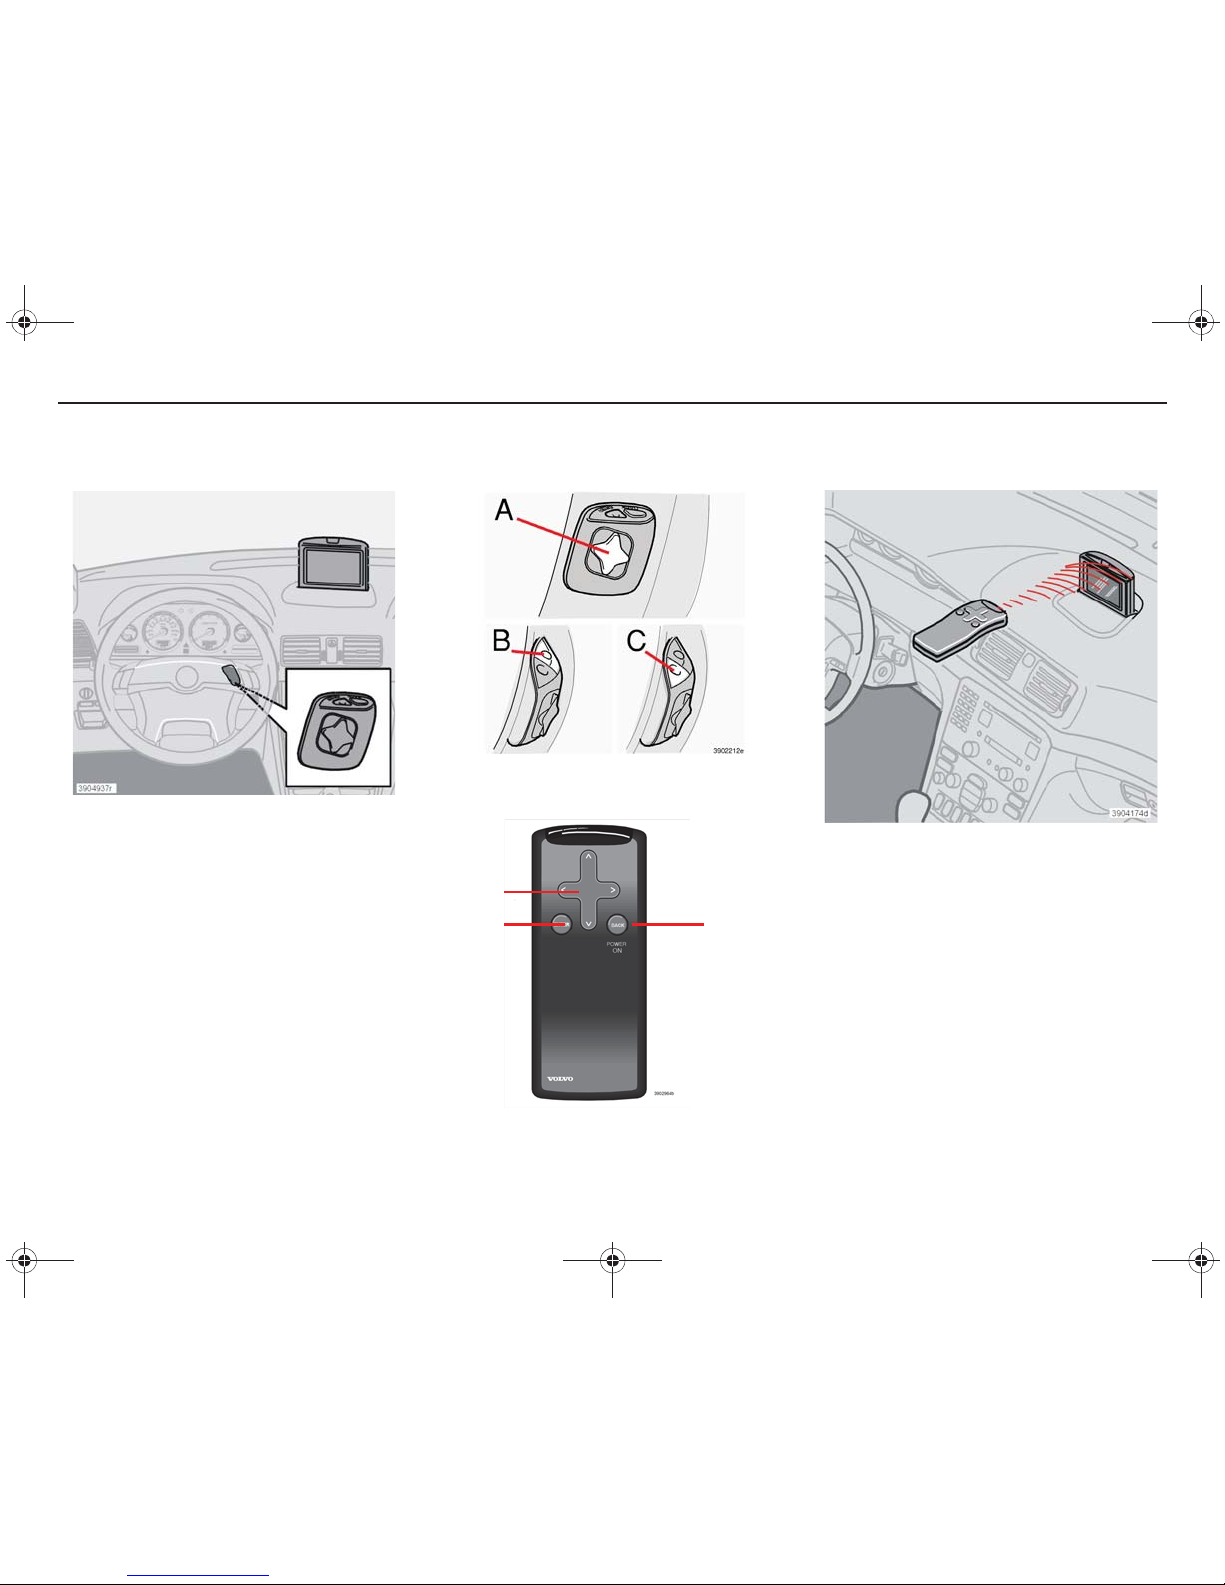
The navigator’s location on the steering
wheel.
A. Navigator
Press UP, DOWN, RIGHT or LEFT to choose
between the different menu options, traffic
messages etc.
B. BACK
Press BACK to return to the previous menu or
to undo a choice.
C. ENTER
Press ENTER to confirm options or to activate
different menus.
NOTE!
The remote control has the same
functions as the keypad.
Navigator (keypad) and remote control
Navigator
Remote control
IR receiver
(Infrared Receiver)
Always direct the remote control towards the
screen. (The IR eye is located uppermost in
the screen frame.)
A
C
B
NOTE!
The remote control contains AAA or
R03 batteries. If the remote control ceases to
function, try changing the batteries first.
RTI.book Page 9 Tuesday, February 26, 2008 1:29 PM

10
Introduction
On
The ignition key must be in position I or II.
Press on one of the buttons on the remote
control or the steering wheel keypad. The
system may need several seconds to sense
the car’s position when you have turned on
the ignition.
Off
Scroll the navigator to
[Shut down]
and press
ENTER.
NOTE!
The system is also accessible when
the engine is switched off. Remember to turn
the ignition key to position 0 when the system
is not being used as the battery can
otherwise discharge.
Basic functions
Navigator - Moving up, down, right or left
between different menu options.
ENTER - Confirms or activates options.
BACK - Return to menu structure or to undo
a choice.
Settings
Each settings menu for System, Screen,
Route options and Traffic information is
reached under
Navigation settings
.
Before starting
Demo
The demo demonstrates the system (when
the car is stationary) by simulating a journey
to a specified destination. The navigation is
demonstrated on the screen, see page 60.
Manual structure
The manual is divided into chapters/
functions. At the end of the manual is an
alphabetical register, before which is a page
of usual questions and answers.
The manual outlines the use of the keypad in
the steering wheel, but the remote control
can be used instead as it has the same
functions.
Search path
Menu options are outlined in the manual in
brackets, i.e.
[Destination].
Menus are
outlined without brackets, i.e.
Main menu.
The search path with menus and successive
menu options is outlined as i. e.
Main menu [Settings] [System]
.
RTI.book Page 10 Tuesday, February 26, 2008 1:29 PM

11
Introduction
On
The ignition key must be in position I or II.
Press on one of the buttons on the remote
control or the steering wheel keypad. The
system may need several seconds to sense
the car’s position and motion when you have
turned on the ignition.
Off
Scroll the navigator to [
Shut down
] and press
ENTER.
NOTE!
The system is also accessible when
the engine is switched off. Remember to turn
the ignition key to position 0 when the system
is not being used as the battery can
otherwise discharge.
Basic functions
Navigator - Moving up, down, right or left
between different menu options.
ENTER - Confirms or activates options.
BACK - Return to menu structure or to undo
a choice.
NOTE!
The remote control has the same
functions as the keypad.
Quick start
Guidance to street address
1. Start from main menu. Select
Destination
and press ENTER.
2. Select
Street address
and press ENTER.
3. Scroll the navigator to the required
letters to specify the country and city for
the street address.
4. If the selected address has a street
number then this can also be stated to
obtain a more precise navigation. Instead
of street number, a junction (crossroads)
can be specified.
5. Select
Start guidance
and press ENTER.
In a few seconds the system calculates the
route and distance to the destination entered.
The system guides to the specified destination and provides voice messages on route
options and junctions.
For smaller localities there are no street
addresses stored in the system. The centre of
the locality should always be selected as the
destination.
Guidance to facility
1. Start from main menu. Select
Desti-
nation
. Press ENTER.
2. Select
Facilities
and press ENTER.
Select
Facilities
in the submenu and
press ENTER.
3. Scroll the navigator to the required
letters to specify the country and city for
the facility. Press ENTER.
4. Choose type of facility, such as petrol
station, restaurant or Volvo Dealer. Scroll
DOWN to the list. Select facility type
with UP or DOWN and press ENTER.
5. Scroll DOWN to the list. Select facility
name using UP or DOWN and press
ENTER.
6. Select
Start guidance
and press ENTER.
In a few seconds the system calculates the
route and distance to the destination entered.
The system guides to the specified facility
and gives voice messages on route options
and junctions.
RTI.book Page 11 Tuesday, February 26, 2008 1:29 PM
12
Introduction
1 2 3 4 5 6 7 8 9
10 11 12 13 14 15 16 17 18
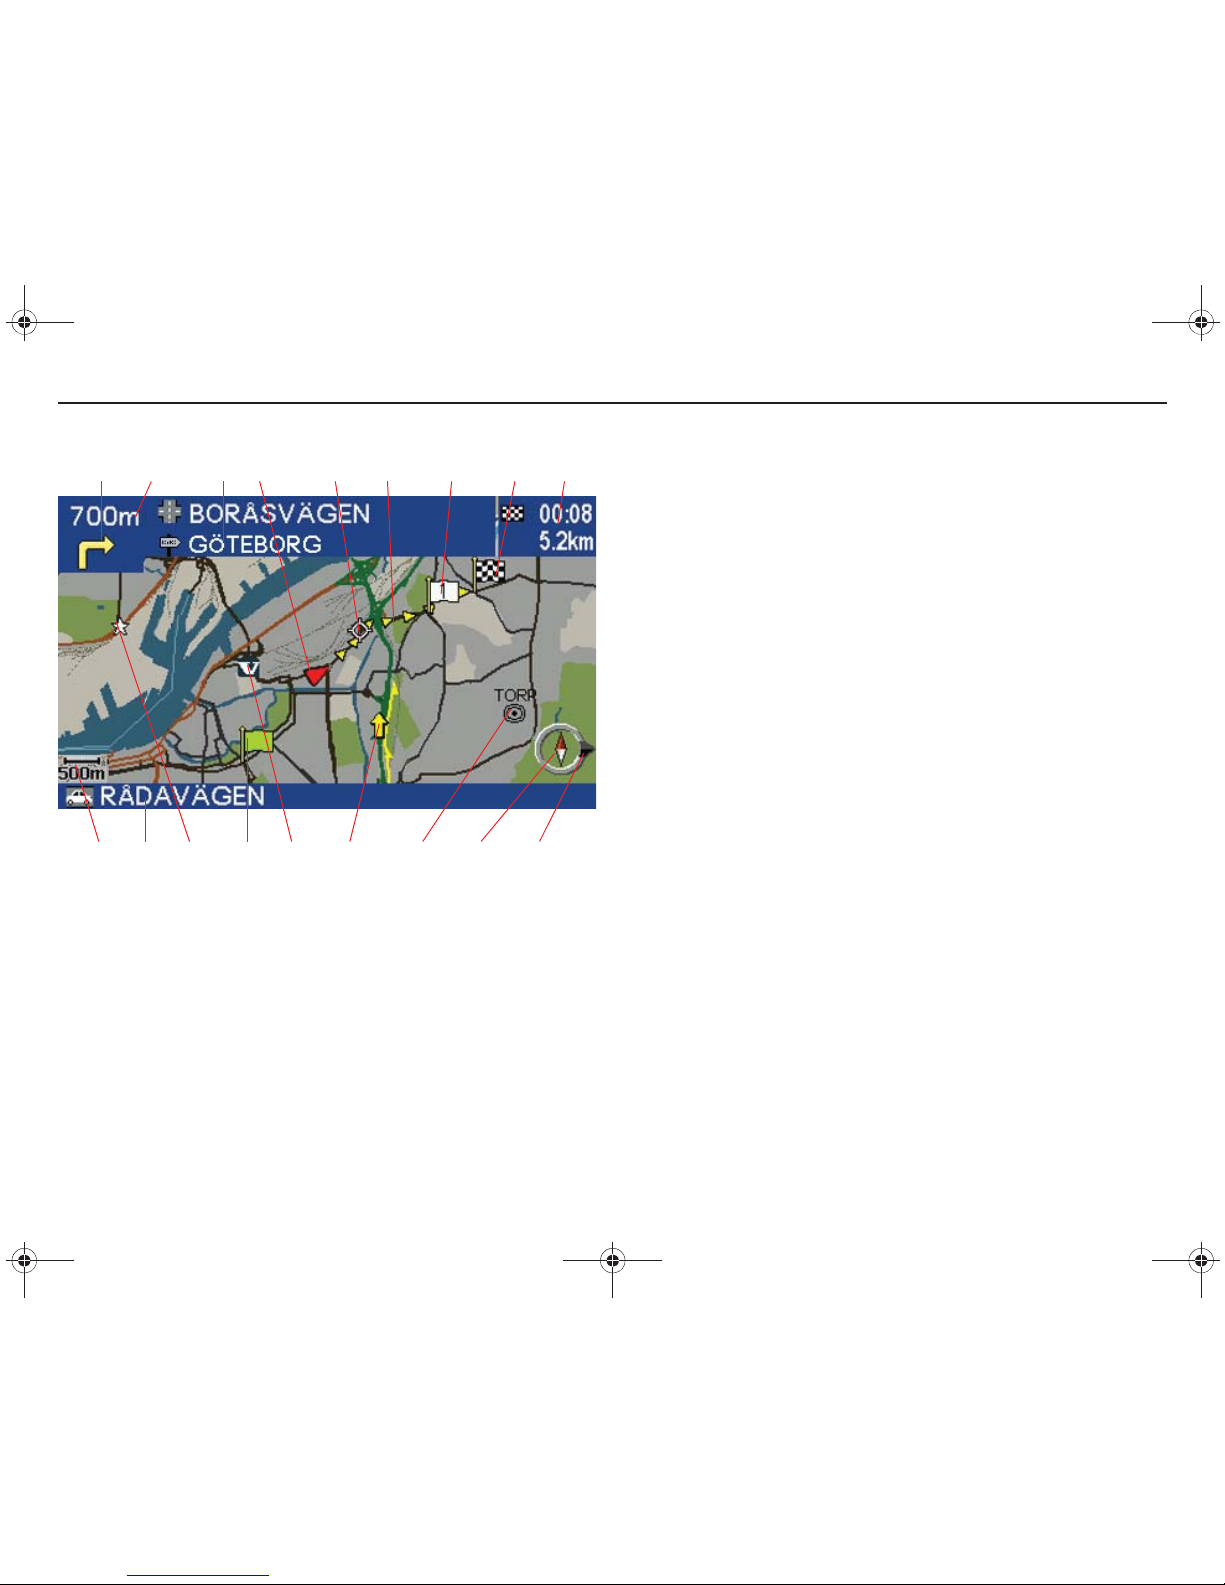
Map image
1. Next guidance
2. Distance to and name of next road/street along the route.
3. Road sign information
4. Position of the car
5. Next guidance point
6. Route
7. Intermediate destination
8. Destination
9. Remaining travel time and distance to destination
10. Map scale
11. Present position
12. Stored location
13. Starting point
14. Symbol for Volvo Dealer
15. Symbol for TMC (traffic message)
16. Symbol for city centre
17. Compass indicates the orientation of the map
18. Destination bearing
Road types
Motorway - green
Main road - red
Smaller main road - brown
Normal road - dark grey
Local road - dark green
Compass
The red tip of the compass needle points to north on the map and the
white tip points to south. The destination arrow in the outer ring of the
compass points in the direction of the destination.
Under the
Screen
option in the Settings menu the compass and
destination arrow can be set at show/hide.
RTI.book Page 12 Tuesday, February 26, 2008 1:29 PM

13
Menu structure
Start/shut down the system 14
Help texts 14
Main menu 15
Main menu with icons 15
Destination menu 16
Map scale 16
Map scroll 17
Guidance 17
Map menu 18
Diversion menu 18
Settings menu 19
RTI.book Page 13 Tuesday, February 26, 2008 1:29 PM
14
Menu structure
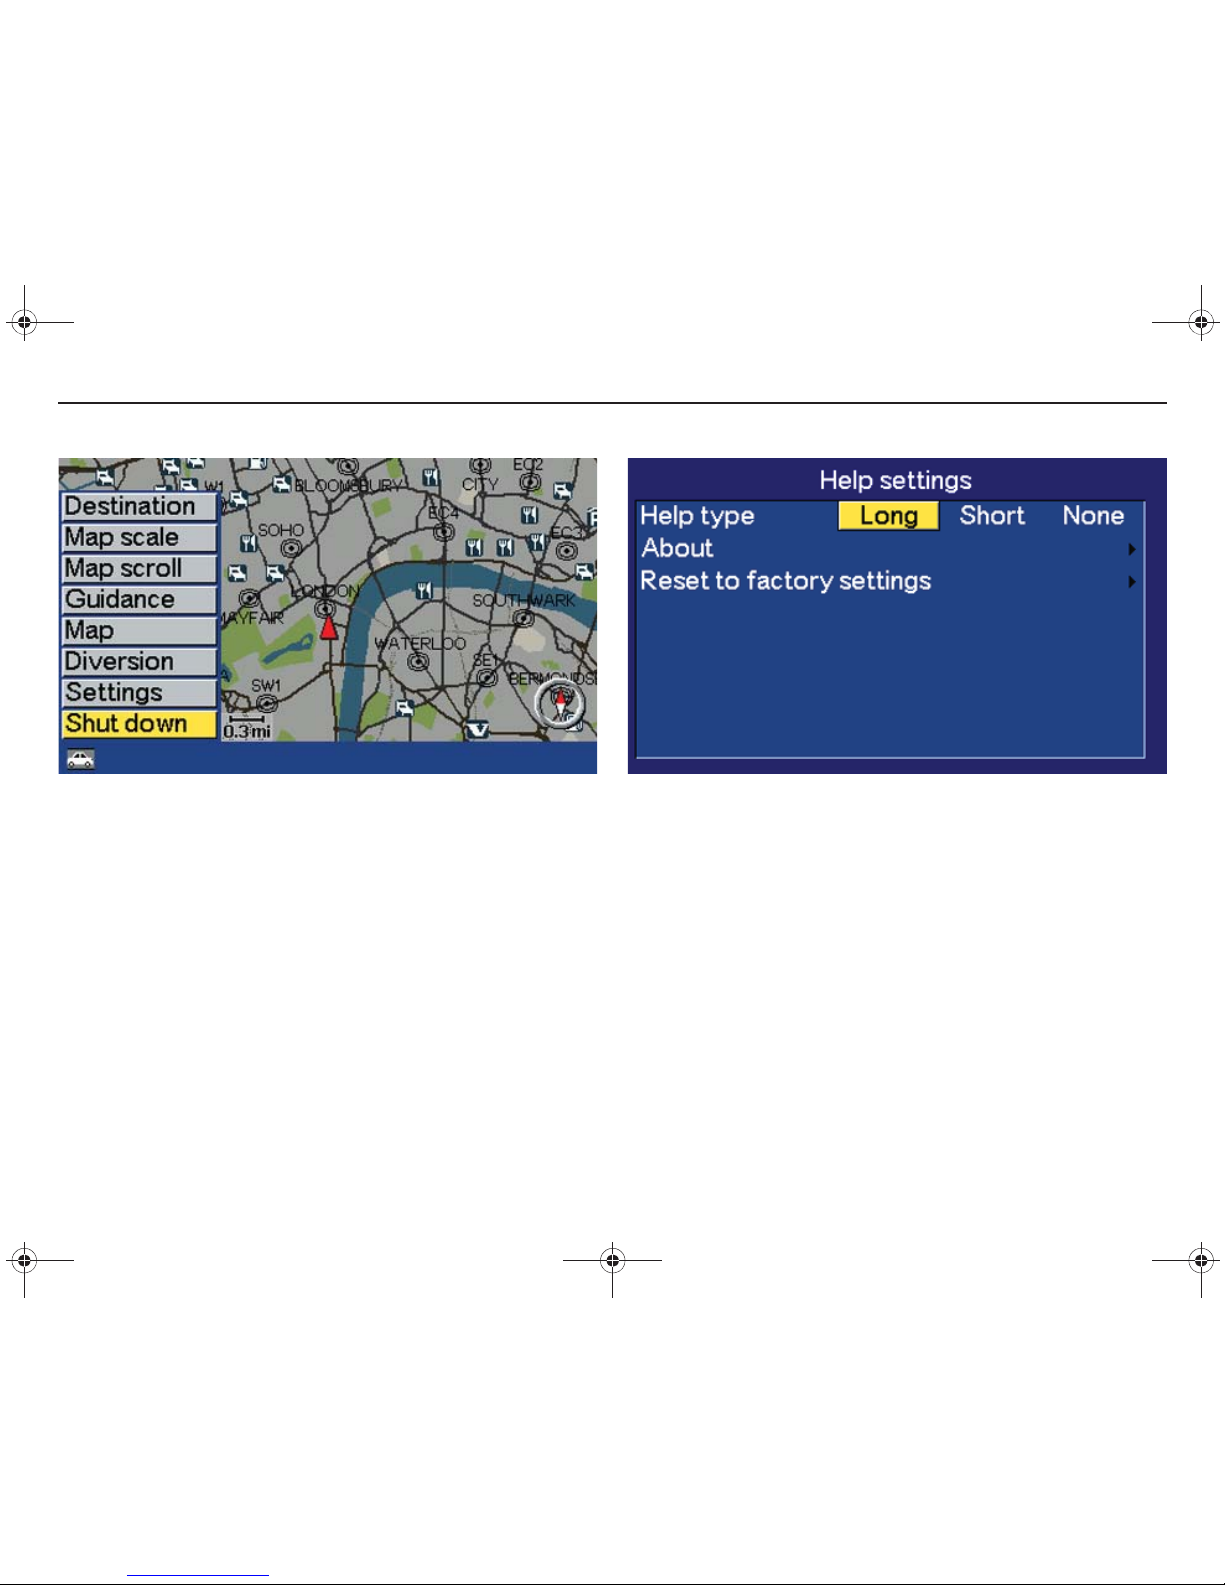
[Shut down]
Start/shut down the system
Starting the system: Turn the ignition key to position I or II, then press
ENTER, BACK or the navigator.
Shut down the system: Select
Shut down
from the main menu and
press ENTER.
If the system is in operation when the car’s ignition is switched off, it
restarts when the ignition is turned on. If the system is shut down
when the car’s ignition is switched off then it will remain shut down
when the ignition is turned on.
[Settings] [Help]
Help texts
The help texts give abbreviated information about the functions. A
choice can be made between
Long, Short
or
None
for help text. Scroll
RIGHT or LEFT to the required option and press ENTER.
The white help text panel is displayed when an option is selected but
then disappears automatically after a few seconds.
RTI.book Page 14 Tuesday, February 26, 2008 1:29 PM
15
Menu structure
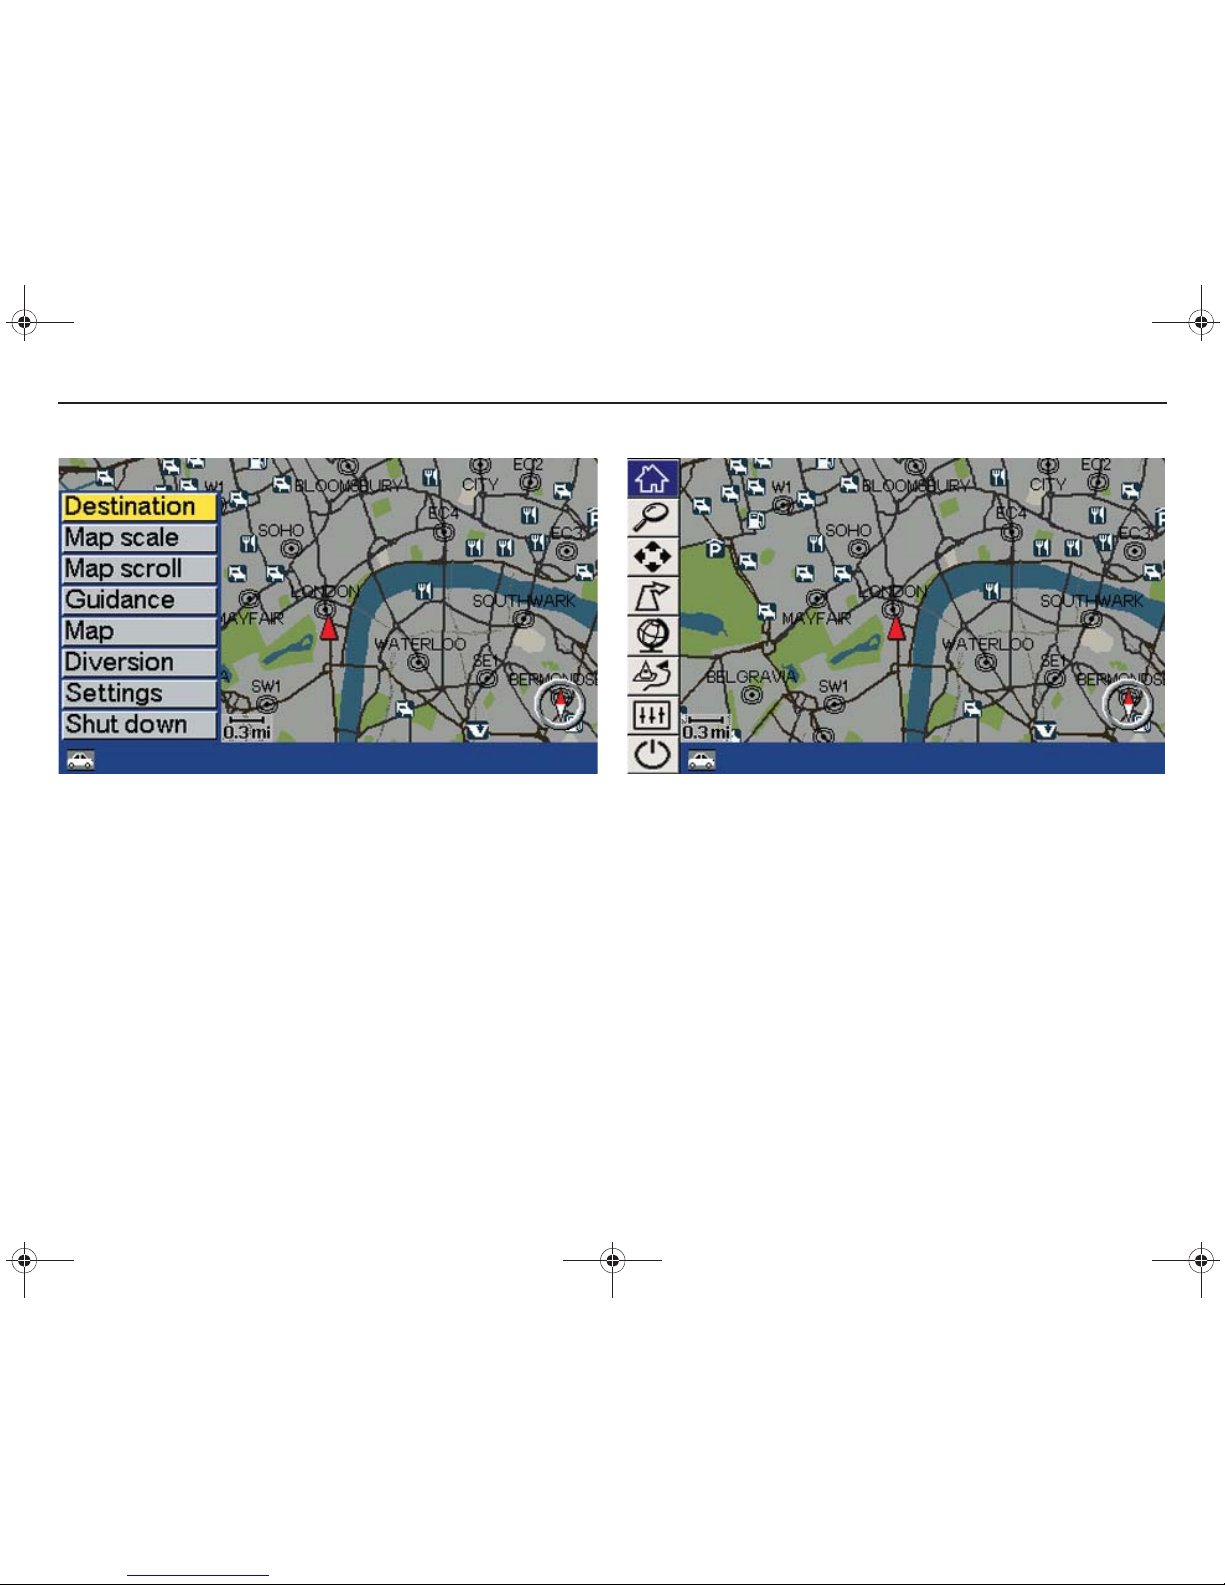
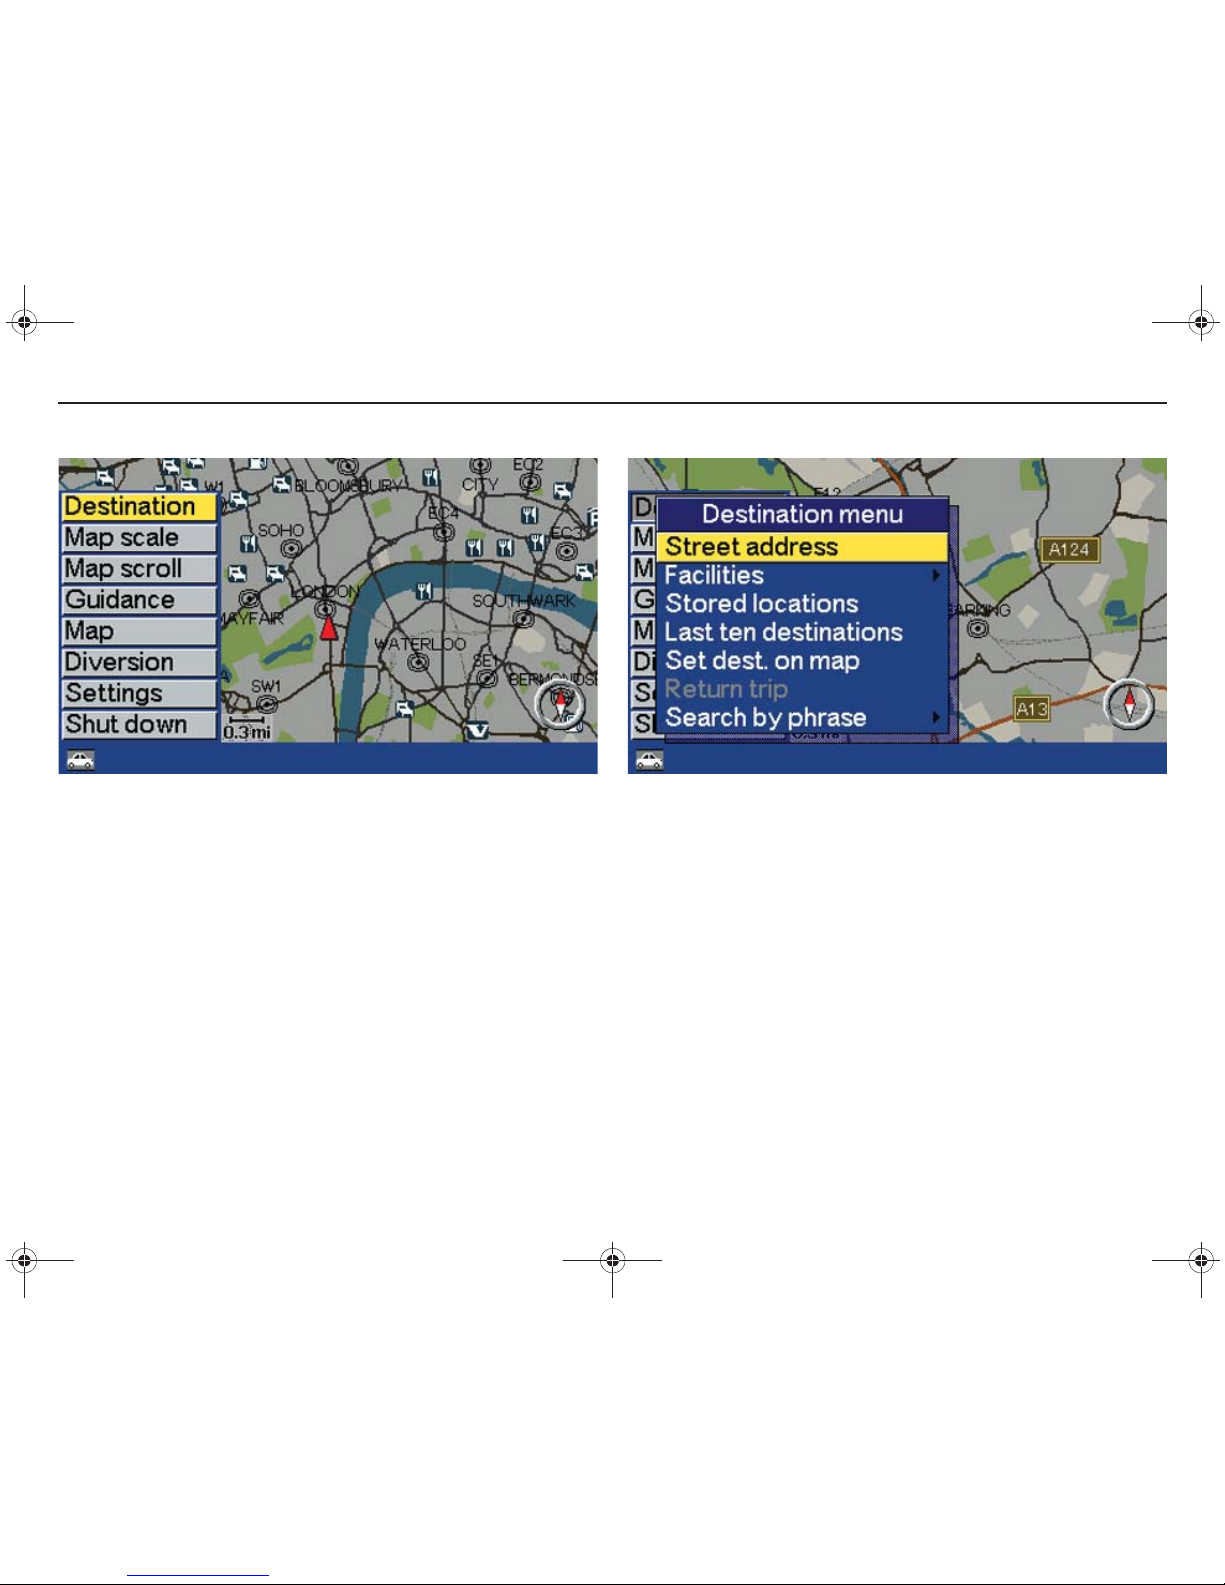
[Destination]
Main menu
The main menu and the different submenus provide access to the
functions of the system. Return to the main menu can always be made,
irrespective of which screen image is displayed, by pressing BACK
one or more times. The main menu is displayed for several seconds
and then disappears automatically if a menu option is not selected.
[Settings] [Screen] [First menu] [Text/icons]
Main menu with icons
The main menu can be displayed with a choice of icons or text.
RTI.book Page 15 Tuesday, February 26, 2008 1:29 PM
16
Menu structure
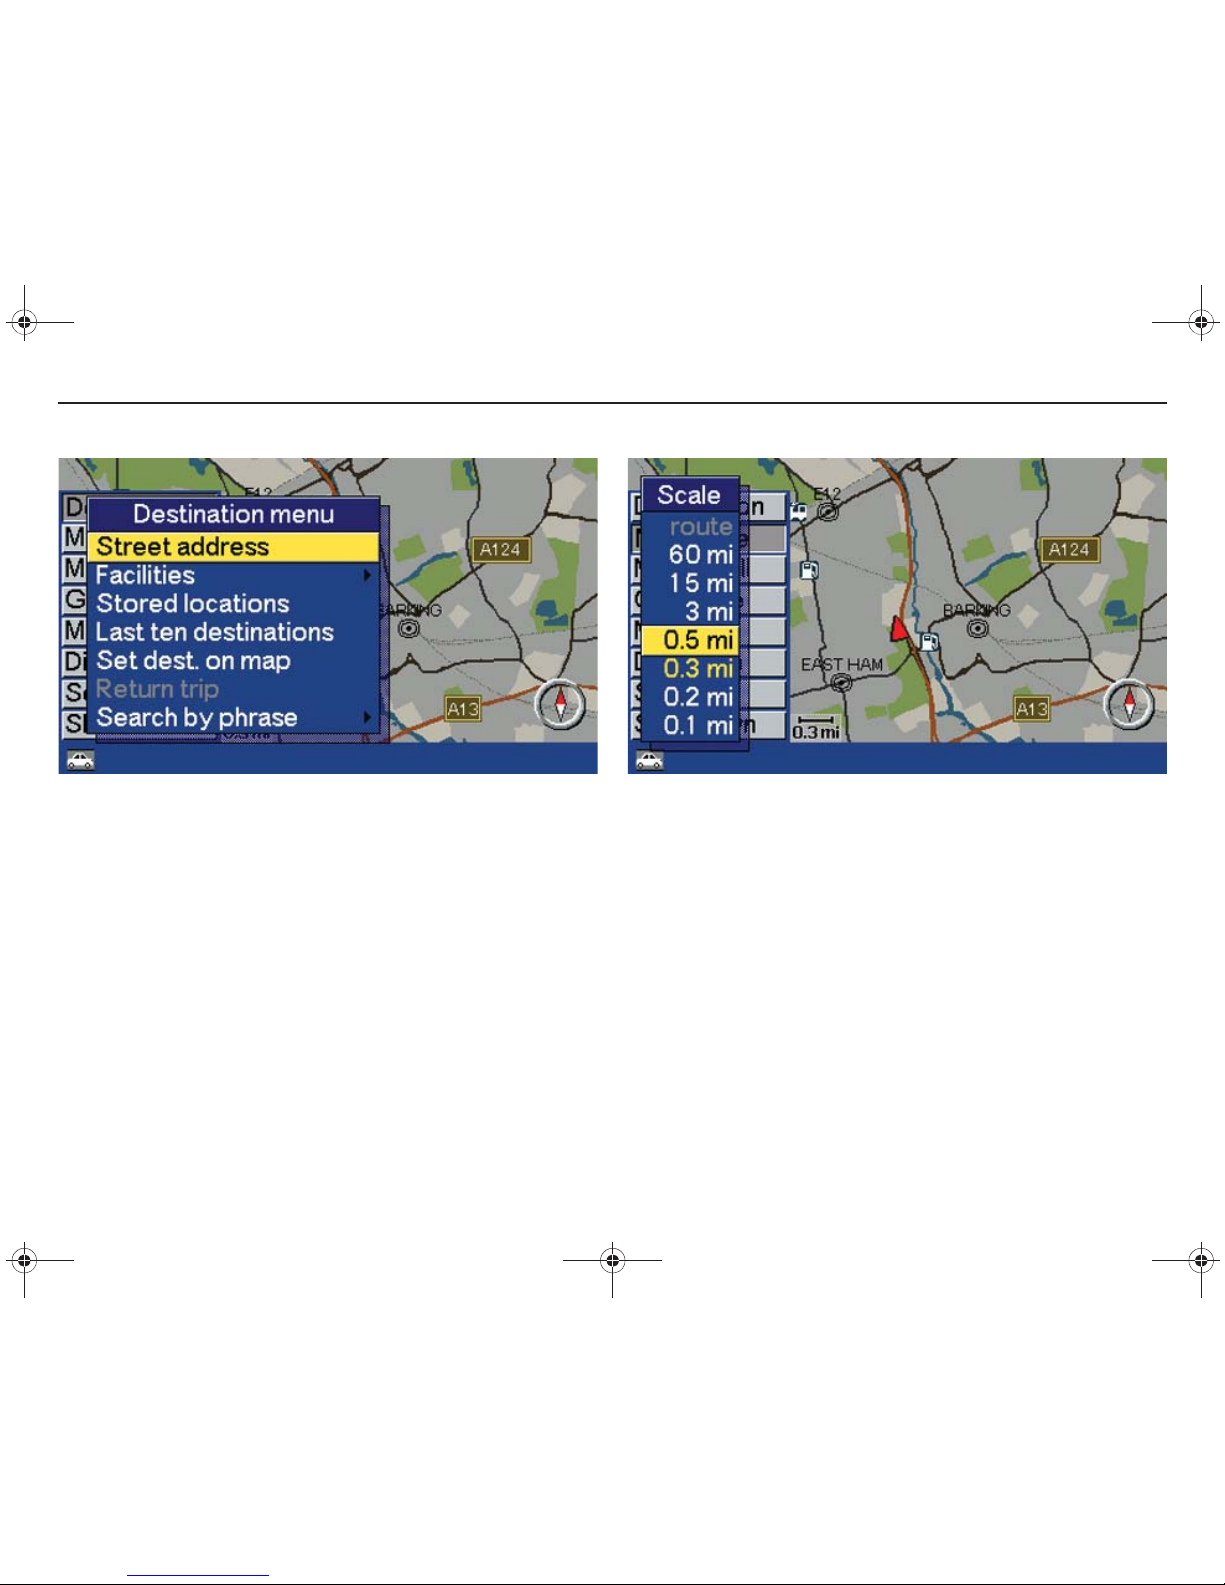
[Destination] [Street address]
Destination menu
There are several search options in the destination menu for specifying the destination. Select the option in the menu using UP or
DOWN and press ENTER. Press BACK to return to the main menu.
Read more on the different types of destination and search paths on
page 22.
[Map scale]
Map scale
Scroll UP or DOWN using the navigator to change the map’s scale of
an area, see page 44. Confirm with ENTER.
RTI.book Page 16 Tuesday, February 26, 2008 1:29 PM

17
Menu structure
[Map scroll]
Map scroll
Using the navigator the hairline cross moves freely on the map for
indicating a destination for example, see page 33. Displayed on the
lower part of the map is the name of the address the hairline cross
rests on.
[Guidance]
Guidance
Select
Guidance
from the main menu to repeat voice guidance, see
page 39.
RTI.book Page 17 Tuesday, February 26, 2008 1:29 PM
18
Menu structure
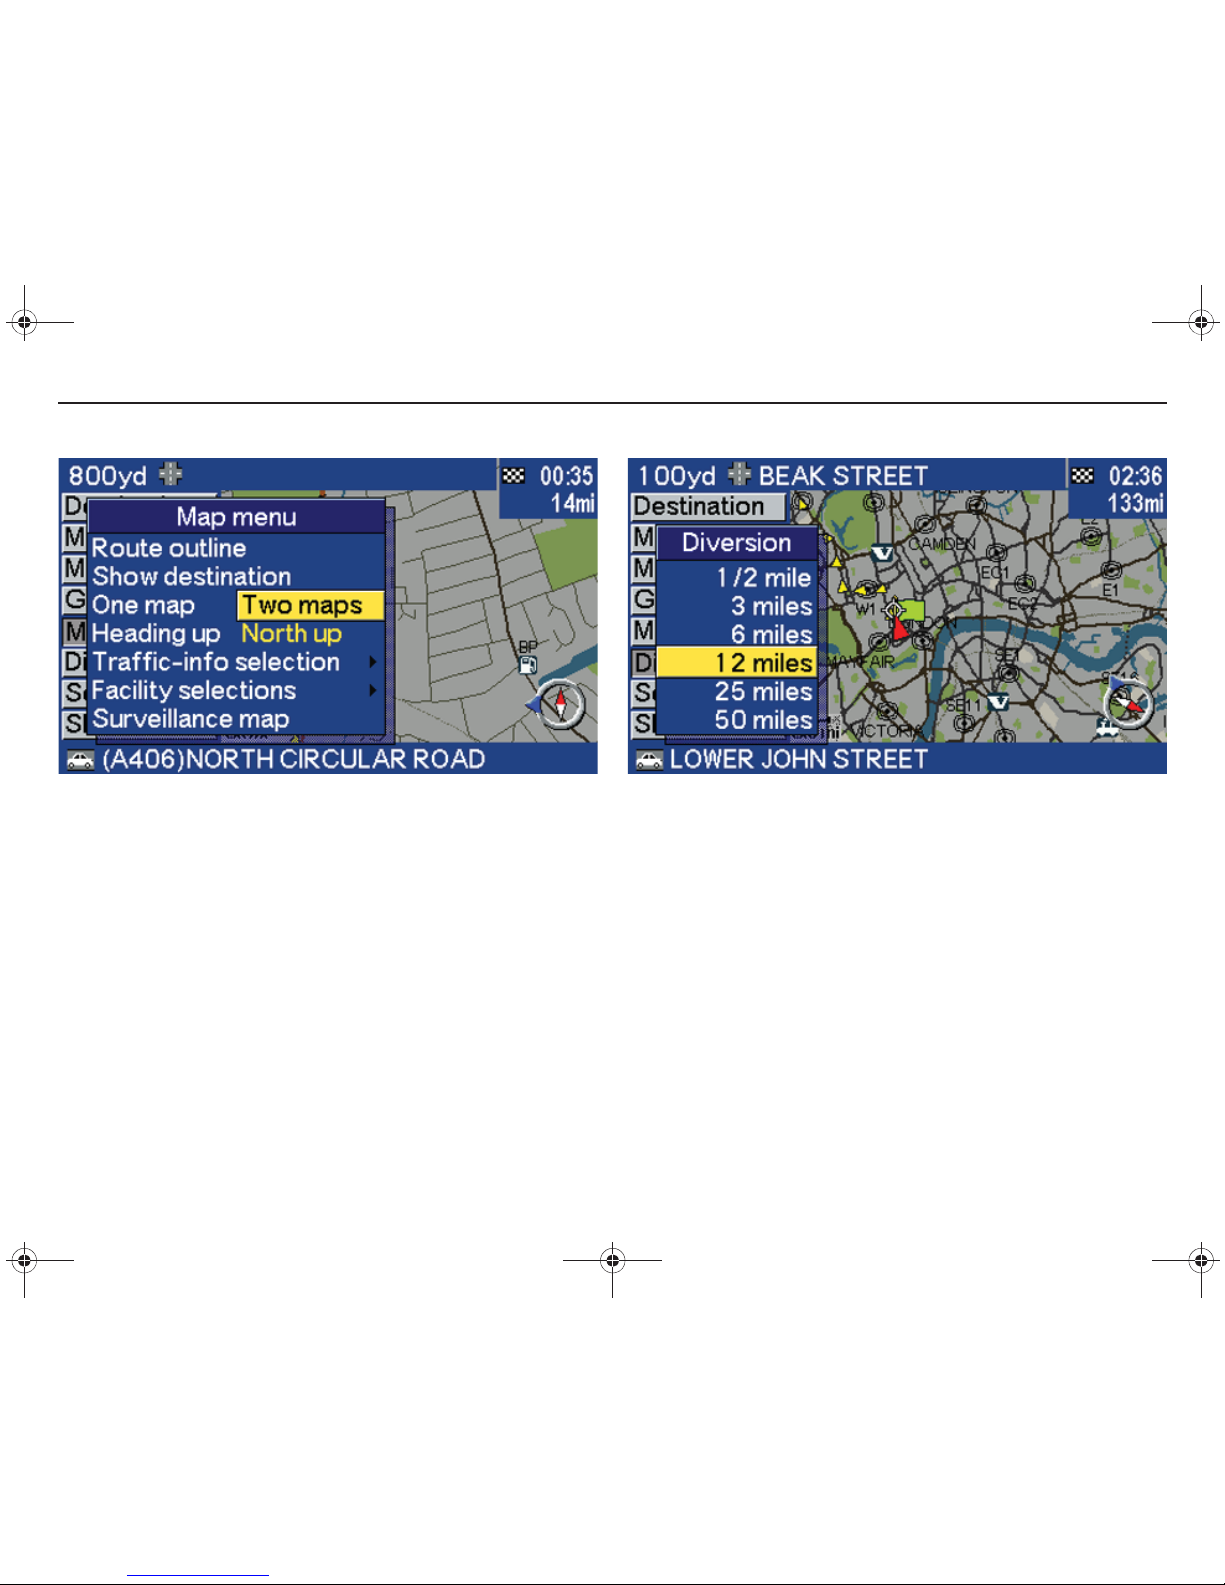
[Map]
Map menu
In the map menu there is the choice between displaying one or two
maps for example or between displaying the map in the
Heading up
or
with
North up.
See also the chapter
Map
.
[Diversion]
Diversion menu
From the diversion menu it is possible to avoid sections of the
calculated route, such as roadworks. The system then calculates an
alternative route, see page 42.
RTI.book Page 18 Tuesday, February 26, 2008 1:29 PM
19
Menu structure
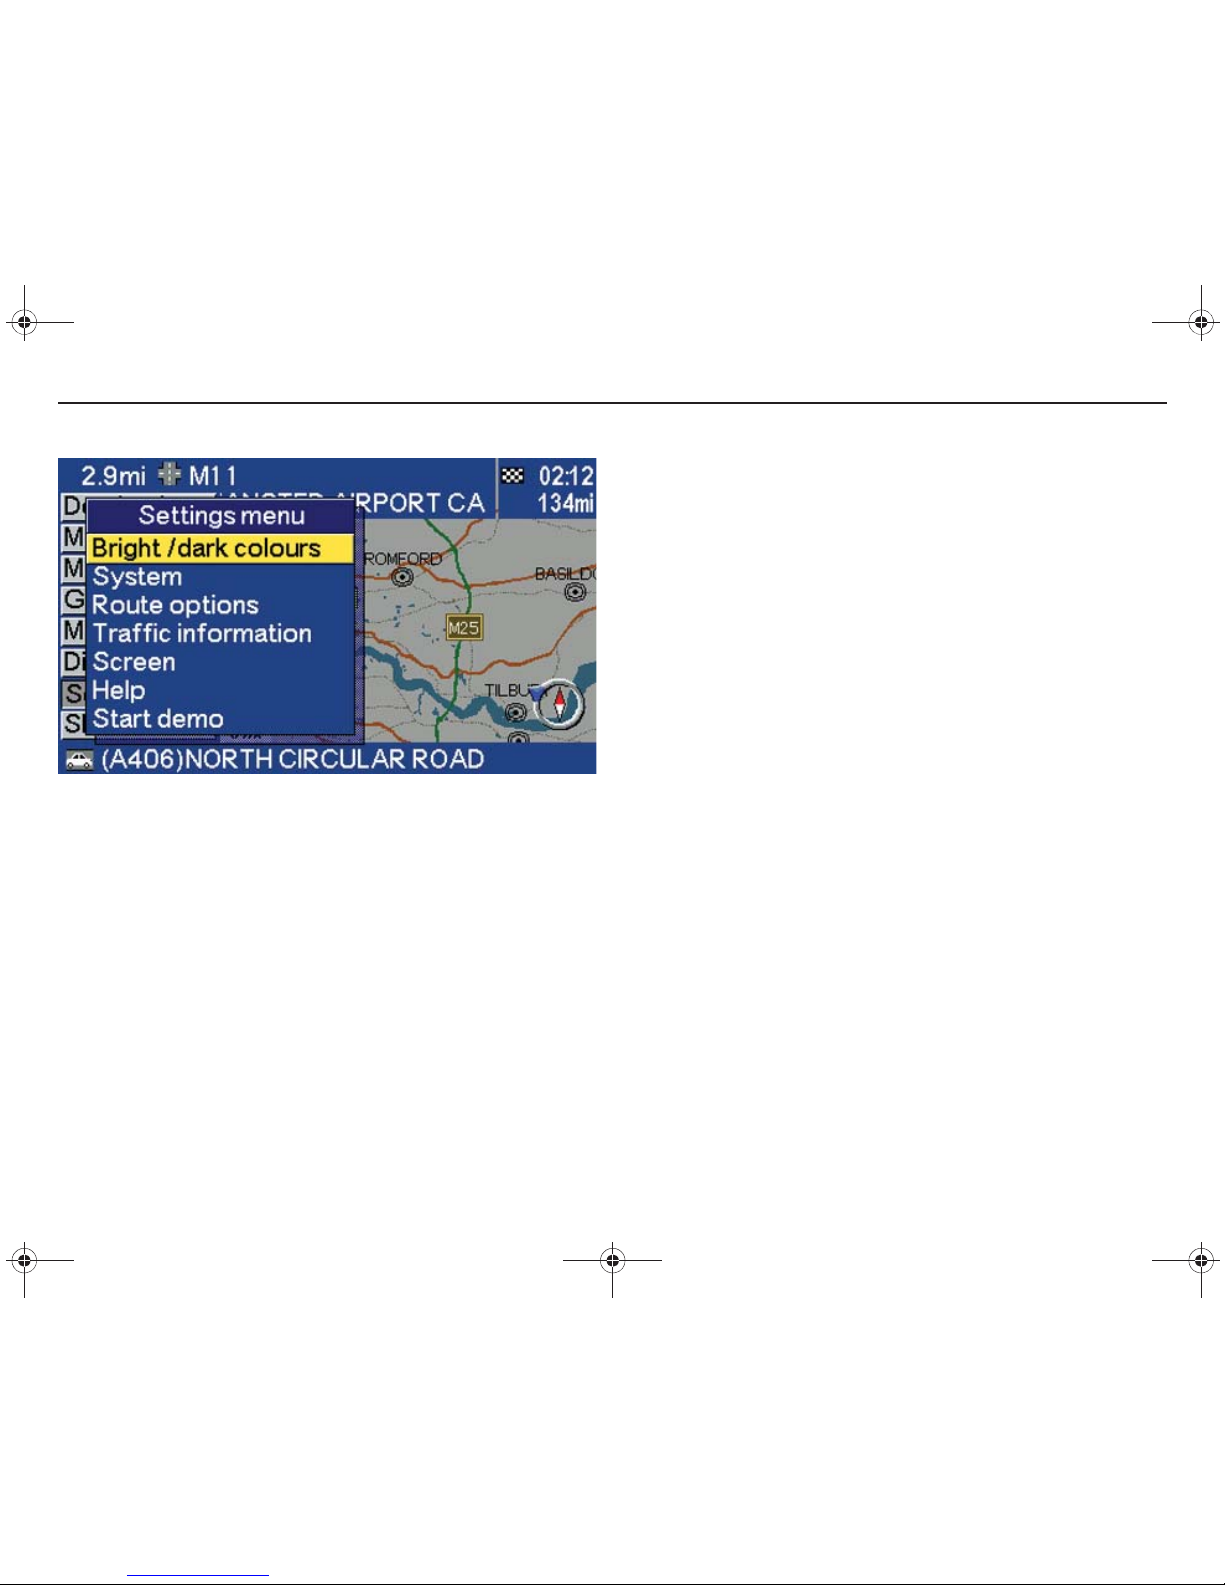
[Settings]
Settings menu
The settings menu provides access to the system’s different settings,
see page 58.
RTI.book Page 19 Tuesday, February 26, 2008 1:29 PM

20
Menu structure
RTI.book Page 20 Tuesday, February 26, 2008 1:29 PM

21
Destination
Set destination 22
Search by phrase 27
Facilities 29
Facility types 30
Destination on the map 33
Last ten destinations 34
Return trip 34
Store a location 35
Stored locations 36
RTI.book Page 21 Tuesday, February 26, 2008 1:29 PM
22
Destination
[Destination]
Set destination
Specify an address as destination
Select
Destination
using UP or DOWN and press ENTER to obtain
the destination types menu.
If a destination is already specified, then the menu with destination
types is obtained, as per the following search path:
[Destination] [Add
to itinerary]
[Destination] [Street address]
Destination types
Select
Street address
using UP or DOWN and press ENTER.
Street address: Specify a destination by entering letters.
Facilities: Specify a facility as destination. Choose a hotel or a
restaurant, see page 29.
Stored locations: Choose a saved location as destination, see
page 35.
Last ten destinations: Select one of the last specified destinations, see
page 34.
Set dest. on map: Specify a location as a destination directly from the
map, see page 33.
Return trip: Choose the location where the last choice was made
Start
guidance,
see page 34.
Search by phrase: Search by part of a street address or facility, see
page 27.
RTI.book Page 22 Tuesday, February 26, 2008 1:29 PM

23
Destination
[Destination] [Street address] [Country]
Specify country/city for destination
Country
and
City
are preset and correspond to the position of the last
destination entered.
Scroll to
Country
or
City
using UP or DOWN and press ENTER.
Choose country and city by entering letters or scrolling DOWN and
choosing directly from the menu list.
The scrolling list on the right-hand side indicates that there are more
options in the list. The figure gives the number of options.
[Destination] [Street address] [City]
Specify country/city or select from the list
Select letters using the navigator and press ENTER. (When there are
no further options the system fills in the remaining letters itself).
Displayed on the lower part is a list of the first three countries/cities
matching the letters entered. The scrolling list on the right-hand side
indicates that there are more options in the list. Scroll DOWN and
choose directly from the menu list. Select using UP or DOWN and
press ENTER.
Return to the character chart using BACK. Delete the letters entered
one at a time by pressing BACK.
The definition of what a city or area involves can vary from country to
country, and also within the same country. In some cases a metropolitan area is indicated, and in others an individual suburb.
RTI.book Page 23 Tuesday, February 26, 2008 1:29 PM

24
Destination
[Destination] [Street address]
Specify a street address for the destination
Select letters using the navigator and press ENTER.
There is also the option to search street addresses in the whole
country without specifying a particular city. Scroll UP to
City
and press
ENTER. Then scroll to
Street
and press ENTER. Enter a street name.
For smaller localities there are no street addresses stored in the
system. The centre of the locality should always be selected as the
destination.
The scrolling list on the right-hand side indicates that there are more
options in the list. The figure gives the number of options.
Return to the character chart using BACK. Delete the letters entered
one at a time by pressing BACK.
[Destination] [Street address] [Street]
Choose the street address from the list
Displayed on the lower part is a list of the first three addresses
matching the letters entered. The scrolling list on the right-hand side
indicates that there are more options in the list.
Choose between the addresses found by scrolling DOWN to the list.
Select address using UP or DOWN and press ENTER.
Return to the character chart using BACK.
RTI.book Page 24 Tuesday, February 26, 2008 1:29 PM

25
Destination
[Destination] [Street address] [Number]
Specify street number or junction
If the selected address has a street number then this can also be
stated to obtain a more precise navigation. Instead of street number,
a junction (crossroads) can be specified. Scroll to the line for
Number
or
Junction
and press ENTER.
It is also possible to scroll directly DOWN to
Start guidance
and press
ENTER.
[Destination] [Street address] [Number]
Specify street number
Scroll to
Number
and press ENTER. The existing street number is
displayed on the figures line. Select figures using RIGHT or LEFT and
press ENTER.
Return to the character chart using BACK.
RTI.book Page 25 Tuesday, February 26, 2008 1:29 PM

26
Destination
[Destination] [Street address] [Junction]
Select junction
Scroll DOWN to
Junction
and press ENTER. The roads which
intersect the street chosen are displayed in a list. Select from the
streets using UP or DOWN and press ENTER.
[Destination] [Street address] [Junction] [Start guidance]
Start guidance
If neither the street number nor the crossroads is specified the system
guides to the middle of the street chosen.
Start guidance: Starts guidance to the destination.
Add to itinerary: Puts the address in the itinerary and provides the
option to enter further destinations.
Information: Gives details of the destination.
RTI.book Page 26 Tuesday, February 26, 2008 1:29 PM

27
Destination
[Destination] [Search by phrase]
Search by phrase
Street address/facilities
Search by part of a street name or a facility.
Select
Search by phrase
using UP or DOWN and press ENTER.
Read more on the different types of destination and search paths on
page 22.
[Destination] [Search by phrase] [Street address]
Street address
Select
Street address
using UP or DOWN and press ENTER
.
RTI.book Page 27 Tuesday, February 26, 2008 1:29 PM

28
Destination
[Destination] [Search by phrase] [Street address] [Street]
Start searching by phrase
Enter the part of the name you know using the navigator and ENTER.
Scroll DOWN to
Start searching
and press ENTER.
[Destination] [Search by phrase] [Street address] [Street]
[Start searching]
Select option
Scroll using UP or DOWN to required option and press ENTER. The
scrolling list on the right-hand side indicates that there are more
options in the list. The figure indicates the number of options. Press
BACK to return to the previous screen.
RTI.book Page 28 Tuesday, February 26, 2008 1:29 PM

29
Destination
[Destination] [Facilities]
Facilities
Specify a facility as destination
Facilities is a collective name for petrol stations, hotels, restaurants,
Volvo Dealers, hospitals, car parks etc.
Select
Facilities
using UP or DOWN and press ENTER to obtain a
submenu with different search options.
Read more on the different types of destination and search paths on
page 22.
[Destination] [Facilities] [Facilities]
Search options for facilities
Select
Facilities
using UP or DOWN and press ENTER.
Facilities: Enter the name of a facility, or choose between types of
facility from the list in the menu. The list only displays the facilities in
the selected city or area.
Search around the car: The system searches in a circle of at least 2 km
radius. If fewer than 40 facilities are found the radius is increased to a
maximum of 100 km.
Search along the route: The system searches in a 2 km wide area,
approx. 100 km ahead.
Search around map point: The system searches in the same way as
Search around the car
, but around a chosen point on the map.
RTI.book Page 29 Tuesday, February 26, 2008 1:29 PM

30
Destination
[Destination] [Facilities] [Facilities] [Type]
Facility types
Specify facility type
Select letters using the navigator and press ENTER or scroll DOWN
and choose a facility type directly from the menu list. Select using UP
or DOWN and press ENTER.
There is also the option to search by facilities throughout the whole
country without specifying a particular city. Scroll UP to
City
and press
ENTER. Scroll to
Type
or
Name
and press ENTER. Select letters
using the navigator or scroll DOWN and choose a facility directly from
the list.
Return to the character chart using BACK. Delete the letters entered
one at a time by pressing BACK.
[Destination] [Facilities] [Facilities] [Name]
Specify facility name
Select letters using the navigator and press ENTER or scroll DOWN
and choose a facility directly from the menu list.
Return to the character chart using BACK. Delete the letters entered
one at a time by pressing BACK.
RTI.book Page 30 Tuesday, February 26, 2008 1:29 PM

31
Destination
[Destination] [Facilities] [Facilities] [Type]
Subcategories
For certain facilities (petrol stations, restaurants, hotels and car parks)
there are subcategories. Choose a
RESTAURANT
for example and
press ENTER.
[Destination] [Facilities] [Facilities] [Type]
Specify category
The different subcategories there are for restaurants are displayed in
the list.
Select letters using the navigator and press ENTER or scroll DOWN
and choose a subcategory directly from the menu list. Select
ALL
TYPES
to be able to see all facilities irrespective of category. Choose
amongst the options using UP or DOWN and press ENTER.
The restaurants included in the category are displayed in the list.
Scroll DOWN to the required option and press ENTER.
Return to the character chart using BACK.
RTI.book Page 31 Tuesday, February 26, 2008 1:29 PM

32
Destination
[Destination] [Facilities] [Facilities] [Start guidance]
Facility and guidance
Start guidance: Starts guidance to the facility.
Add to itinerary: Puts the facility in the itinerary and provides the option
to enter further destinations.
Information: Gives details of the facility.
[Destination] [Facilities] [Facilities] [Information]
Information on the facility
The address, coordinates and telephone number of the facility are
displayed under information. Select Map and press ENTER to view the
location of the facility on the map.
RTI.book Page 32 Tuesday, February 26, 2008 1:29 PM

33
Destination
[Map scroll]
Destination on the map
Specify destination on the map using the NAVIGATOR
Select
Map scroll
with UP or DOWN and press ENTER.
Using the navigator the hairline cross can be moved freely over a large
area of detailed scale. The centre point of the hairline cross specifies
the location moved onto on the map. Displayed on the lower part of the
map is the name of the address the hairline cross rests on.
The function can also be obtained via
Destination
in the main menu.
Read more on the different types of destination and search paths on
page 22.
[Map scroll]
Map scrolling menu
Move the hairline cross using the navigator to the required position on
the map and press ENTER to obtain the map scrolling menu. Scroll
using UP or DOWN to
Set as destination
and press ENTER.
RTI.book Page 33 Tuesday, February 26, 2008 1:29 PM

34
Destination
[Destination] [Last ten destinations]
Last ten destinations
Entered destination
Select
Last ten destinations
and press ENTER to view the last ten
destinations. The scrolling list on the right-hand side indicates that
there are more options in the list.
Select destination using UP or DOWN and press ENTER or RIGHT
to obtain the submenu.
Add to itinerary: Puts the destination in the itinerary and provides the
option to enter further destinations.
Information: Gives details of the destination.
Delete location: Deletes the destination.
Read more on the different types of destination and search paths on
page 22.
[Destination] [Last ten destinations]
Return trip
Back to starting point
Scroll using UP or DOWN to
Return trip
and press ENTER. Select
Start guidance
and press ENTER.
The system starts guidance back to the location where
Start guidance
was last chosen.
RTI.book Page 34 Tuesday, February 26, 2008 1:29 PM

35
Destination
[Destination]
Store a location
Save a specified destination
A destination can be stored to save entering the same destination
again. Up to one hundred destinations can be stored.
Scroll to a destination using UP or DOWN and press ENTER or
RIGHT to obtain the submenu. Select
Store location
using UP or
DOWN and press ENTER.
A location can also be stored using the function
Map scroll
, see
page 45.
[Destination] [Store location]
Symbols and names
The stored locations are marked on the map by symbols. Scroll UP to
the symbols to select and press ENTER. The name of the stored destination is indicated automatically. The original name can be deleted
using BACK and a new name specified.
Scroll to
Store location
using UP or DOWN and press ENTER.
RTI.book Page 35 Tuesday, February 26, 2008 1:29 PM

36
Destination
[Destination]
Stored locations
Saved destinations
Select
Stored locations
using UP or DOWN and press ENTER. A
stored location is a destination saved earlier (place of work, favourite
restaurant, rest area, home etc.).
Read more on the different types of destination and search paths on
page 22.
[Destination] [Stored locations]
Submenu for stored locations
Choose between the stored locations using UP or DOWN and press
RIGHT to obtain the submenu.
Add to itinerary: Puts the stored location into the itinerary.
Information: Gives details of the stored location.
Rename: Change icon or name of stored location.
Delete location: Deletes a stored location.
RTI.book Page 36 Tuesday, February 26, 2008 1:29 PM

37
Itinerary and guidance
Enter an itinerary 38
Delete itinerary 39
Route calculation 39
Intersection 40
List 40
Arrow navigation 41
Voice message 41
Diversion/alternative route 42
RTI.book Page 37 Tuesday, February 26, 2008 1:29 PM

38
Itinerary and guidance
[Destination]
Enter an itinerary
Destination/intermediate destination
Enter an itinerary with several intermediate destinations to avoid specifying destination after destination during the journey. Up to seven intermediate destinations and one final destination can be specified.
Start guidance: Starts guidance to the destination.
Add to itinerary: Provides the option to enter further destinations.
Route options: Route prioritising options.
Clear itinerary: Deletes the itinerary.
[Destination]
Arrange the itinerary
Scroll using UP or DOWN to required destination and press ENTER
or RIGHT to obtain the submenu.
Information: Gives details of the destination.
Delete: Deletes the destination from the itinerary.
Travel order: Change the position in the list of the destination.
Adjust on map: Change the destination location on the map.
Store location: Store the destination.
Select options in the submenu using UP or DOWN and press ENTER.
RTI.book Page 38 Tuesday, February 26, 2008 1:29 PM

39
Itinerary and guidance
[Destination] [Clear itinerary]
Delete itinerary
Delete entered itinerary
Select
Clear itinerary
and press ENTER to delete the whole itinerary.
Destinations deleted remain in the
Last ten destinations
, see page 34.
[Destination] [Start guidance]
Route calculation
Guidance
When
Start guidance
is selected, the system starts to calculate the
route and distance to the destination (during this time a yellow-orange
symbol is displayed at the top of the screen).
If the planned route is left during the journey, the system automatically
calculates a new route.
RTI.book Page 39 Tuesday, February 26, 2008 1:29 PM

40
Itinerary and guidance
[Guidance]
Intersection
Guidance
When an intersection is approaching, voice guidance is provided in
good time on the distance and type of manoeuvre. At the same time a
detailed intersection map is displayed. The voice guidance is repeated
nearer the intersection.
At the top of the map, the name of, and distance to the next exit is
displayed. Road sign information is displayed on the line below. When
there is a road number and exit number or exit name then these are
also displayed. On the lower part of the map the current position is
displayed.
A requirement for obtaining voice guidance is that this option is
selected in system settings, see page 58.
[Map] [Route]
List
Guidance
The next guidance point is marked in a light blue panel. Below this
follows a list of the remaining guidance points. Farthest down the list
the destination is displayed. Apart from the road name the distance
between the guidance points is displayed along with an arrow which
indicates the type of manoeuvre. The guidance points are deleted as
they are passed. If there is a deviation from the specified route the
system calculates a new route.
RTI.book Page 40 Tuesday, February 26, 2008 1:29 PM

41
Itinerary and guidance
[Settings] [Screen] [Map] [Show/Hide]
Arrow navigation
Guidance
Guidance can be displayed without a map. The system instead
displays an arrow in the direction to be turned.
Select
Hide
using LEFT or RIGHT and press ENTER.
[Guidance]
Voice message
Guidance
Select
Guidance
using UP or DOWN and press ENTER to obtain
voice guidance. Also select
Guidance
to repeat a voice guidance
message.
If the distance to the next guidance point is greater than 50 km, the
message: Continue straight ahead, is obtained.
Press ENTER to repeat a voice guidance message.
The system always gives voice guidance irrespective of which menu is
active. A requirement for obtaining voice guidance is that this option is
selected in system settings, see page 58.
RTI.book Page 41 Tuesday, February 26, 2008 1:29 PM

42
Itinerary and guidance
[Diversion]
Diversion/alternative route
Avoid part of the journey
Select
Diversion
with UP or DOWN and press ENTER.
By means of
Diversion
the system can be asked to calculate an alternative route to avoid part of the journey. The system starts the calculation from the current position.
[Diversion]
Diversion – submenu
Select the length of the diversion using UP or DOWN and press
ENTER.
NOTE!
The function is only available when a destination is specified.
RTI.book Page 42 Tuesday, February 26, 2008 1:29 PM

43
Map
Map scale 44
Scale 44
Map scroll 45
Map menu 47
Two maps 47
RTI.book Page 43 Tuesday, February 26, 2008 1:29 PM

44
Map
[Map scale]
Map scale
One or two maps
Select
Map scale
using UP or DOWN and press ENTER.
Choose between different levels, from the most detailed 100 metre
scale up to the 100 kilometre scale. The scale is displayed on the
lower part of the map.
Select scale using UP and DOWN and press ENTER.
If a change of scale is required when two maps are displayed on the
screen, scroll to the map whose scale is to be changed using RIGHT
or LEFT.
[Map scale] [route]
Scale
Route
Select
Route
in
Map scale
using UP or DOWN and press ENTER to
view the whole route from start to destination.
The thick red line indicates the route.
RTI.book Page 44 Tuesday, February 26, 2008 1:29 PM

45
Map
[Map scroll]
Map scroll
Move the hairline cross using the NAVIGATOR
Select
Map scroll
to view an area outside the screen image. Scroll
using UP or DOWN and press ENTER.
[Map scroll]
Hairline cross
The hairline cross can be freely moved across the whole of the map in
a detailed scale using the navigator. The centre point of the hairline
cross specifies the location moved onto on the map. Displayed on the
lower part of the map is the name of the location the hairline cross
rests on.
Move the hairline cross using the navigator to the required location on
the map and press ENTER to obtain the map scrolling menu.
RTI.book Page 45 Tuesday, February 26, 2008 1:29 PM

46
Map
[Map scroll] Scroll Menu
Map scrolling menu
Select options using UP or DOWN and press ENTER
Scale: Function to temporarily change the scale. Press BACK to
return to the original scale, and to return to the position of the car on
the map.
Set as destination: Choose location on the map as a destination or
intermediate destination.
Facilities around: The system searches for facilities around a chosen
point on the map. The system searches in a circle of 2 kilometres
radius. If fewer than 40 facilities are localised the radius is increased
to a maximum of 100 kilometres.
Traffic information: Change using the navigator to choose between the
traffic messages displayed on the screen, see page 52.
Set for surveillance: Here an area on the map is specified which is
then easy to survey, see page 55.
Store location: Save a location on the map.
RTI.book Page 46 Tuesday, February 26, 2008 1:29 PM

47
Map
[Map]
Map menu
Select in map menu
Select
Map
using UP or DOWN and press ENTER to obtain the map
menu.
Route outline: Displays a list of the approaching guidance points.
Show destination: Displays a map image around the destination.
One map/Two maps: Choose between displaying one or two map
images.
Heading up/North up: Choose whether north or the direction of travel
is to be uppermost on the map.
Traffic-info selection: Choose which traffic information is to be
displayed on the map image.
Facility selections: Choose which facility symbols are to be displayed
on the map image.
Surveillance map: Displays map image of particular area specified in
advance, see page 55.
[Map] [Two maps]
Two ma ps
Different degrees of magnification over an area
Scroll to
One map/Two maps
using UP or DOWN. Select
Two maps
using RIGHT and press ENTER to obtain two map images.
Different degrees of magnification can be selected for each map
image of the same area. This can be of benefit for obtaining information on the immediately surrounding area and a larger area at the
same time.
The system selects the original map image upon the return to a map
image.
RTI.book Page 47 Tuesday, February 26, 2008 1:29 PM

48
Map
RTI.book Page 48 Tuesday, February 26, 2008 1:29 PM

49
Traffic information
Setting of automatic diversion 50
Avoid traffic messages 50
Traffic symbols on the map 51
Detailed traffic information 52
Setting of TMC filter 53
Automatic diversion 54
Set for surveillance 55
Symbols - traffic information 56
RTI.book Page 49 Tuesday, February 26, 2008 1:29 PM

50
Traffic information
[Settings] [Traffic information]
Setting of automatic diversion
Alternative route in the event of a traffic problem
Auto diversion: Select
Yes
to obtain the option to choose an alternative route past any traffic problems.
Scroll to
Auto diversion
using UP or DOWN and select
Yes
or
No
using RIGHT or LEFT. Press ENTER to confirm the choice.
Traffic-info selection: Choose which traffic information is to be
displayed on the map image, see page 53.
Traffic-info, manual search & selection: Search and select transmitter
station for traffic information.
Reset to factory settings: Reset to basic settings.
[Settings] [Route options]
Avoid traffic messages
Avoid roads with traffic disruption
Av. traffic msg.: Select
No
for the system not to avoid roads with traffic
messages (traffic disruption) at route calculation.
Select
Yes
for the system to avoid roads with traffic messages at route
calculation.
If new traffic messages arise along the route the system can offer
automatic diversion (see left-hand column).
Scroll to
Av. traffic msg.
using UP or DOWN and select
Yes
or No
using RIGHT or LEFT. Press ENTER to confirm the selection.
Read more on
Route options settings
on page 59.
RTI.book Page 50 Tuesday, February 26, 2008 1:29 PM

51
Traffic information
Map mode
Traffic symbols on the map
Traffic information during the journey
The system provides traffic information during the journey if such information is transmitted within the current area. If several traffic
messages occur within the same area displayed on the map, then
these are marked with symbols. The symbols can be in two colours.
Yellow means important information and red means very important
information.
Change the scale to access traffic information in a larger or smaller
area. There is always access to traffic information even if no destination is specified.
NOTE!
Traffic information is not available in all areas.
Map mode
Read/switch between messages
Press the navigator to scroll between different traffic messages. A red
or a yellow frame relates to the current message. Press ENTER to read
specified message. Press BACK to be able to scroll between current
messages again.
RTI.book Page 51 Tuesday, February 26, 2008 1:29 PM

52
Traffic information
Map mode
Detailed traffic information
Read traffic message
Press ENTER to obtain detailed traffic information. The number of
messages currently within the map area is indicated on the screen. It
also displays detailed information on the traffic problem.
The extent of the incident and the distance to it from the current
position is indicated at the top. The extent to which the following
details are available is also displayed: Duration, limitations to speed,
vehicle width, vehicle height, roads affected etc.
Scroll between the arrows using RIGHT or LEFT and press ENTER to
alternate between available messages.
The scale of the map determines how large a quantity of traffic information there is access to (larger area - more information).
Map mode [Map] [Scale]
Traffic information - scale
Scroll to
Map
using RIGHT or LEFT and press ENTER. Press ENTER
again to obtain the map scrolling menu. Select
Scale
and press
ENTER to change scale or zoom into a specific traffic message on the
map. Select required scale using UP or DOWN and press ENTER.
Press BACK to return to the previous image.
RTI.book Page 52 Tuesday, February 26, 2008 1:29 PM

53
Traffic information
[Settings] [Traffic information] [Traffic-info selection]
Setting of TMC filter
Select traffic information symbols
Traffic information which is repeated day after day during a longer
period can be deselected, roadworks for example.
Scroll using UP or DOWN to
Select
and press RIGHT.
It is also possible to obtain these settings via
Map
in the main menu.
[Settings] [Traffic information] [Traffic-info selection] [Select]
Use or ignore
Choose which traffic information symbols the system is to display on
the map image.
Scroll using UP or DOWN to choose between the symbols. Select
Use
or
Ignore
using LEFT or RIGHT. Symbols marked with a red cross
are not displayed. The scrolling list on the right-hand side indicates
that there are more options in the list. Press ENTER to confirm the
selections.
RTI.book Page 53 Tuesday, February 26, 2008 1:29 PM

54
Traffic information
Map mode
Automatic diversion
Alternative route
When a traffic message along the planned route is received there is
the option to allow the system to calculate an alternative route.
Yes: The system calculates an alternative route which avoids the
traffic problem.
No: The system guides according to the original route.
Map: Displays map scrolling mode. Scroll between different
messages.
The scrolling list on the right-hand side indicates that there is more
information in the list.
Map mode [Yes]
New or old route
If the system calculated an alternative route the new proposal is
displayed in orange and the original in yellow. Information on the
length of both routes is displayed along with calculated journey time
to the destination. The system announces if there is no alternative
route.
New: The system selects the new alternative route (orange).
Old: The system selects the original route (yellow).
Map: Displays the alternative and original routes on the map.
RTI.book Page 54 Tuesday, February 26, 2008 1:29 PM

55
Traffic information
[Map scroll] [Map scrolling menu] [Set for surveillance]
Set for surveillance
Survey traffic situation
For quickly checking how the traffic situation appears in an area there
is the option to survey a section of the route. For example, a section of
the route passed every day where there is a risk for queues forming.
Select
Map scroll
in the main menu to adjust the map to the area to be
surveyed. Using the navigator the hairline cross moves over the map.
Set the hairline cross above the area to be surveyed and press ENTER
to obtain the map scrolling menu. Scroll DOWN to
Set for surveillance
and press ENTER.
[Map] [Surveillance map]
Show stored surveillance map
Select
Surveillance map
in the map menu using UP or DOWN and
press ENTER to view the surveyed area with any traffic messages.
Press BACK to return to the main menu.
RTI.book Page 55 Tuesday, February 26, 2008 1:29 PM

56
Traffic information
Symbols - traffic information
Escalation
Some traffic messages transmitted also
contain information on escalation. On all
scales up to 5 km a yellow or red line along
the route is also displayed (in addition to the
symbol). The length of this line corresponds
to the extent of the traffic problem.
NOTE!
Traffic information is not available in
all areas.
Other danger
Queue
Road narrows
Traffic diversion
Oncoming traffic
Incident
Slippery road surface
Slow traffic
Road works
Slow traffic in both directions
Accident
Area message
Information
Other information
Parking information
RTI.book Page 56 Tuesday, February 26, 2008 1:29 PM

57
Navigation settings
Settings menu 58
System settings 58
Route options settings 59
Screen settings 59
Help settings 60
Demo (simulation) 60
RTI.book Page 57 Tuesday, February 26, 2008 1:29 PM

58
Navigation settings
[Settings]
Settings menu
The RTI system is supplied with basic settings which can be changed.
Select
Settings
using UP or DOWN and press ENTER.
Bright/dark colours: Press ENTER to confirm change of light intensity.
Light intensity can also be set using the control for the instrument
lighting.
System: See
System settings.
Route options: See page 59.
Traffic information: See page 52.
Screen: See page 59.
Help: See page 60.
Start demo: See page 60.
Select options in each settings menu using UP or DOWN. Press
RIGHT to obtain submenus which are indicated by a black arrow.
Select settings using the navigator. Confirm with ENTER.
[Settings] [System]
System settings
Voice Volume: 1 is minimum and 5 is maximum volume. Select Off to
switch off guidance with voice messages.
Guiding voice: Choose between a female or male voice for voice
messages.
Distance Unit: Choose between kilometres or miles.
Language: Choose the language for voice messages and menus.
Screen saver: If the screen saver is activated the screen goes blank
after 30 seconds and relights automatically with guidance for
example.
Colours: Select colours. Bright colours are suitable in daylight. Dark
colours are suitable for darkness and with strong sunlight.
GPS Information: Displays how many satellites the system is presently
receiving signals from as well as current position.
Reset to factory settings: Reset to basic settings.
RTI.book Page 58 Tuesday, February 26, 2008 1:29 PM

59
Navigation settings
[Settings] [Route options]
Route options settings
Route type: Select fastest or shortest route at route calculation. If
Route type Fast
is selected the system chooses the biggest roads. If
Route type Short
is selected the system prioritises route length above
road quality and road size.
Avoid toll roads: Choose whether toll roads are to be avoided at route
calculation.
Av. motorways: Choose whether motorways are to be avoided at route
calculation.
Avoid ferries: Choose whether car ferries are to be avoided at route
calculation.
Av. traffic msg.: Choose whether the system is to register traffic
messages at route calculation, see page 50.
Reset to factory settings: Reset to basic settings.
For technical reasons the system only uses big roads at route calculation for longer distances. When
NO
is selected for toll roads and
motorways they will be avoided as far as possible and only used if no
other reasonable alternative is available.
[Settings] [Screen]
Screen settings
Facility selection: The facility symbols the system is to show or hide on
the map are selected from a submenu.
Navigation menu: Choose between displaying the main menu with
Text or Icons.
Compass: Choose whether the compass is to be displayed on the
screen.
Dest. compass: Points in the direction of the destination.
Time/dist. to go: Indicates calculated journey time and distance to the
destination.
Current location: Choose whether the name of the street being
negotiated is to be displayed on the lower part of the screen.
Next guidance: Information on the next guidance point such as
distance to it, street name, road sign information and type of
manoeuvre.
Map: If the map is hidden the system guides with an arrow.
Reset to factory settings: Reset to basic settings.
RTI.book Page 59 Tuesday, February 26, 2008 1:29 PM

60
Navigation settings
[Settings] [Help]
Help settings
Help type: Select setting for help texts.
About: Displays information on software, map version etc.
Reset to factory settings: Reset to basic settings.
[Settings]
Demo (simulation)
Select
Start demo
using UP or DOWN and press ENTER. Demo
demonstrates the system when the car is stationary by simulating a
journey to a specified destination. It is possible to apply all settings
during the demonstration.
Stop demo
interrupts the simulation.
NOTE!
For the demonstration to work a destination must be specified
and the car must be stationary.
RTI.book Page 60 Tuesday, February 26, 2008 1:29 PM

61
Symbols on the map
Symbols - facilities 62
RTI.book Page 61 Tuesday, February 26, 2008 1:29 PM

62
Symbols on the map
Petrol station Outdoor area
Railway station/
Local railway station
Public flying club
Automobile club Ferry terminal Casino Parking garage
Car hire Liquid petroleum gas Shopping centre Parking
Cinema Golf course Museum Park & ride
Bowling Historical monument
Conven./exhibi. centre
Rest area
Bus station Hotel Night life/Music club Restaurant
City centre Sports complex Compress. natural gas Hospital
Airport Ice skating Amusement park Ski resort
Symbols - facilities
RTI.book Page 62 Tuesday, February 26, 2008 1:29 PM

63
Symbols on the map
Marina Volvo Dealer
City hall/Community
centre
Toll booth
Large company
Theatre/Opera
Tourist attraction
Tourist information
University/college
Winery
RTI.book Page 63 Tuesday, February 26, 2008 1:29 PM

64
Symbols on the map
RTI.book Page 64 Tuesday, February 26, 2008 1:29 PM

65
TV reception (option)
General 66
Automatic channel programming 66
Manual channel programming 66
Adjusting the picture 66
Remote control 67
Audio system 67
Steering wheel keypad 67
RTI.book Page 65 Tuesday, February 26, 2008 1:29 PM

66
TV reception (option)
General
Settings can be made using the controls on
the audio system, the remote control and the
steering wheel keypad.
NOTE!
TV reception is only available when
the car is stationary.
NOTE!
If the TV is on when the engine is
switched off then the car battery can be
discharged, depending on how well-charged
it is and for how long the TV is used.
Off/On
Press POWER (10) and select TV using
SOURCE (4).
Select TV channel
Press PROGRAMS (2) on the remote control
or turn PRESET/CD on the audio system to
change channel.
Volume
Adjust the volume using VOLUME (2) on the
audio system or VOL (2) on the remote
control. The steering wheel keypad can also
be used for this purpose.
Automatic channel
programming
Press AUTO (6) for the system to search for
the ten strongest channels. The channel with
the strongest signal is allocated number one
and then the others are rank-ordered
according to signal strength.
A TV channel can be on different frequencies
depending on location. Search through the
frequencies to obtain the best picture.
Manual channel programming
Use button (1) or (5).
Storing a channel
Press MEMORY (3). Select a position using
PROGRAMS (2). Press MEMORY (3). The
current channel is stored.
Channels can also be stored using PRESET/
CD on the audio system. Briefly press
PRESET/CD and then select a position by
turning it. Press again. The current channel is
stored.
Adjusting the picture
Aim the remote control at the screen.
COLOUR: Press PICTURE ( 7), then adjust
the colour settings using the + (8) and - (9)
buttons.
CONTRAST: Press PICTURE (7), then
adjust the contrast using the + (8) and - (9)
buttons.
DISPLAY MODE: Press PICTURE (7) to
change the size of the TV picture. Switch
between four modes: wide, full, normal and
cinema using the + (8) and - (9) buttons.
GROUP SELECT: For good TV reception in
some countries the system must first be set
to the country’s TV standard.
Press PICTURE (7) to use the + (8) and - (9)
buttons to browse the three groups of
countries.
Press PICTURE (7) again to reset.
RTI.book Page 66 Tuesday, February 26, 2008 1:29 PM

67
TV reception (option)
Remote control
Radio and TV remote control
The remote control can also be used to
control the radio functions when the TV is
switched off. (Applies to radio models with IR
function).
Audio system
4
10, 2
6
1, 5
3, 2
Steering wheel keypad
RTI.book Page 67 Tuesday, February 26, 2008 1:29 PM

68
TV reception (option)
RTI.book Page 68 Tuesday, February 26, 2008 1:29 PM

69
Questions and answers
Questions and answers 70
RTI.book Page 69 Tuesday, February 26, 2008 1:29 PM

70
Questions and answers
Questions and answers
Position of the car on the map is
incorrect or jumps
The GPS system indicates the position of the
car with an accuracy of about 20 metres.
There is a greater chance of error when
driving on roads lying parallel to another road,
winding roads, roads on several levels and
after driving a long distance without making
any distinctive turns. High mountains,
buildings, tunnels, viaducts, over/underpasses etc. also have a negative affect on the
reception of GPS signals, which means that
accuracy in calculating the position of the car
may decrease.
The RTI system does not always
calculate the fastest/shortest road
When calculating a route, distance, width of
road, type of road, number of right or left
turns, roundabouts etc. are all taken into
account in order to produce the best
theoretical route. Experience and local
knowledge may however lead to a more
effective choice of route.
The RTI system uses toll roads,
motorways and ferries even though I
chose to avoid them
For technical reasons the system only uses
big roads at route calculation for longer
distances. When NO is selected for toll roads
and motorways they will be avoided as far as
possible and only used if no other reasonable
alternative is available.
The position of the car on the map is
incorrect after transportation
If the car is transported, for example by ferry
or train, or in such a way as to impede the
reception of GPS signals, it can take up to 5
minutes before the position of the car is
correctly calculated.
The position of the car on the map is
incorrect after the car battery has been
disconnected
If power has been cut from the GPS antenna,
it can take more than 15 minutes for the GPS
signals to be received correctly and the
position of the car to be calculated.
The map image does not correspond
with the real situation
Factors such as the constant expansion and
rebuilding of the road network, new traffic
regulations constantly being introduced etc.
means that the digital map database is not
always complete. The information stored in
the maps is constantly being developed and
updated. Your Volvo Dealer can provide
further information.
See also www.volvocars.com/navi for further
information on maps etc.
The scale of the map sometimes
changes
The scale is affected by the speed of the car.
At speeds in excess of 140 km/h, the largest
degree of magnification is 250 metres. When
speed is reduced to 120 km/h, the system
can once again show all degrees of magnification.
If no detailed map information is available,
the largest degree of magnification is 500
metres, regardless of speed.
The expected menu option is missing
Check the settings applied. Select Reset to
factory settings to return to the settings originally applied.
The system indicates the route I am
already travelling when I request
Calculate new route or Diversion
The system cannot find a good alternative to
the current route.
The car symbol on screen jumps
forwards or spins
The system may need a few seconds to
sense the position and movement of the car
before driving off. Switch off both the system
and the engine. Start again, but remain
stationary for a while before starting to drive.
I’m going to make a long journey but
do not want to specify a special
destination to the cities I am thinking of
travelling through. How do I most easily
create an itinerary?
Specify the destination directly on the map
using the hairline cross. The system automatically guides you to the final destination even
though you are driving beside the intermediate destination.
RTI.book Page 70 Tuesday, February 26, 2008 1:29 PM

71
Questions and answers
What do I do to choose a destination/
intermediate destination that is not on
the map?
Specify the destination as usual. The system
will tell you if you need to change to another
DVD disc. (The complete road network is
available on all discs, but the detailed information is divided into the relevant discs.)
There are several map discs for the
system. How do I know which to use?
Primarily use the disc containing the detailed
information of your local area. This disc is
indicated by the disc case and the disc
printing.
The system will tell you when the disc needs
to be changed.
If you are planning to drive abroad then you
should have all discs available in the car.
Does my itinerary disappear when I
change map disc?
No, the itinerary remains available until you
delete it.
Why do I not always receive traffic
messages?
The function is not accessible, fully
developed or not available in all markets.
Check also that the correct settings are made
under [
Settings] [Route options settings].
My map discs are not up-to-date
Contact your Volvo Dealer regarding the
updating of map data.
See also www.volvocars.com/navi
Why are street addresses not available
for a destination abroad?
Each map disc contains the same European
road network. Detailed information such as
addresses, facilities etc. is divided into the
relevant map disc for the geographic area.
Check that the correct DVD disc is loaded.
RTI.book Page 71 Tuesday, February 26, 2008 1:29 PM

72
Questions and answers
RTI.book Page 72 Tuesday, February 26, 2008 1:29 PM

73
Alphabetical index
A
Address as destination ...............22
Alternative route ..................42, 54
Arrange the itinerary ..................38
Automatic diversion .............50, 54
B
BACK ....................................9, 11
Basic functions .....................10, 11
Batteries .......................................9
C
Channel programming,
automatic ....................................66
Channel programming,
manual ........................................66
Colours on the map ....................58
Compass ...............................12, 59
Country/city for destination .......23
D
Delete itinerary ..........................39
Demo (simulation) .....................60
Dest. compass ......................12, 59
Destination ...........................12, 21
Destination menu .......................16
Destination on the map ..............33
Destination types .......................22
Destination/intermediate
destination .................................38
Distance unit ..............................58
Diversion ...................................42
Diversion menu .........................18
DOWN ........................................9
DVD disc, care ............................8
DVD disc, contents .....................8
E
ENTER ...................................9, 11
Enter an itinerary .......................38
Entered destination ....................34
Escalation ..................................56
F
Facilities ...............................11, 29
Facilities, symbols .....................62
Facility as destination ................ 29
Facility name ............................. 30
Facility type ...............................30
Ferries, avoid .............................59
G
GPS ..............................................7
Guidance .........................17, 26, 39
Guidance, arrow navigation ...... 41
Guidance, intersection .............. 40
Guidance, list ............................ 40
Guidance, voice message .......... 41
H
Hairline cross ............................ 45
Help texts .................................. 14
I
Icons .......................................... 15
Information on the facility ........ 32
Intermediate destination ............ 12
Intersection ...........................25, 26
Introduction ................................. 5
IR receiver ................................... 9
Itinerary and guidance .............. 37
L
Language ................................... 58
Last ten destinations .................. 34
LEFT ........................................... 9
M
Main unit with map disc ............. 7
Manual structure ....................... 10
Map ........................................... 43
Map disc, contents .................8, 71
Alphabetical index
RTI.book Page 73 Tuesday, February 26, 2008 1:29 PM

74
Alphabetical index
Map menu ............................18, 47
Map scale ............................. 12, 44
Map scroll ............................17, 45
Map scrolling menu .............33, 46
Menu structure ...........................13
Motorways, avoid ......................59
N
Navigation settings ....................57
Navigator ............................... 9, 11
Next guidance ............................12
Next guidance point ...................12
O
Off ..............................................10
On ........................................10, 11
P
Position of the car ................12, 70
Present position ..........................12
Q
Questions and answers ...............70
Quick start ..................................11
R
Remote control ...........................67
Return trip ..................................34
RIGHT .........................................9
Road sign information ...............12
Road types ................................. 12
Route ....................................12, 44
Route calculation ....................... 39
Route options .............................59
Route options settings ...............59
S
Saved destinations .....................36
Scale, route ................................ 44
Screen saver ...............................58
Screen settings ......................59, 60
Screen, care .................................8
Search by phrase ........................27
Search path ................................10
Settings menu ............................19
Shut down ..................................14
Start the system .........................14
Steering wheel keypad ...........9, 67
Store a location .......................... 35
Store a TV channel ....................66
Stored location ...........................12
Street address ........................11, 24
Street number ............................25
Subcategories - facilities ........... 31
Surveillance .............................. 55
Symbols and names .................. 35
Symbols on the map .................. 61
Symbols, traffic information ..... 56
System settings ......................... 58
T
Toll roads .................................. 59
Traffic information ................... 49
Traffic information filter ........... 53
Traffic information
symbols ................................53, 56
Traffic information,
detailed ...................................... 52
Traffic messages, avoid ............ 50
Traffic symbols on
the map .................................12, 51
Traffic-info selection ................ 50
Travel time ................................ 12
TV channel ................................ 66
TV reception ............................. 66
U
UP ............................................... 9
V
Voice setting ............................. 58
RTI.book Page 74 Tuesday, February 26, 2008 1:29 PM

Volvo Car Corporation TP 103 ( ), AT 0820, Printed in Sweden, Göteborg 2008, Copyright © 2000-2008 Volvo Car Corporation
English*,
 Loading...