

Page 1

W E B E D I T I O N
R O A D A N D T R A F F I C I N F O R M A T I O N – R T I
Page 2
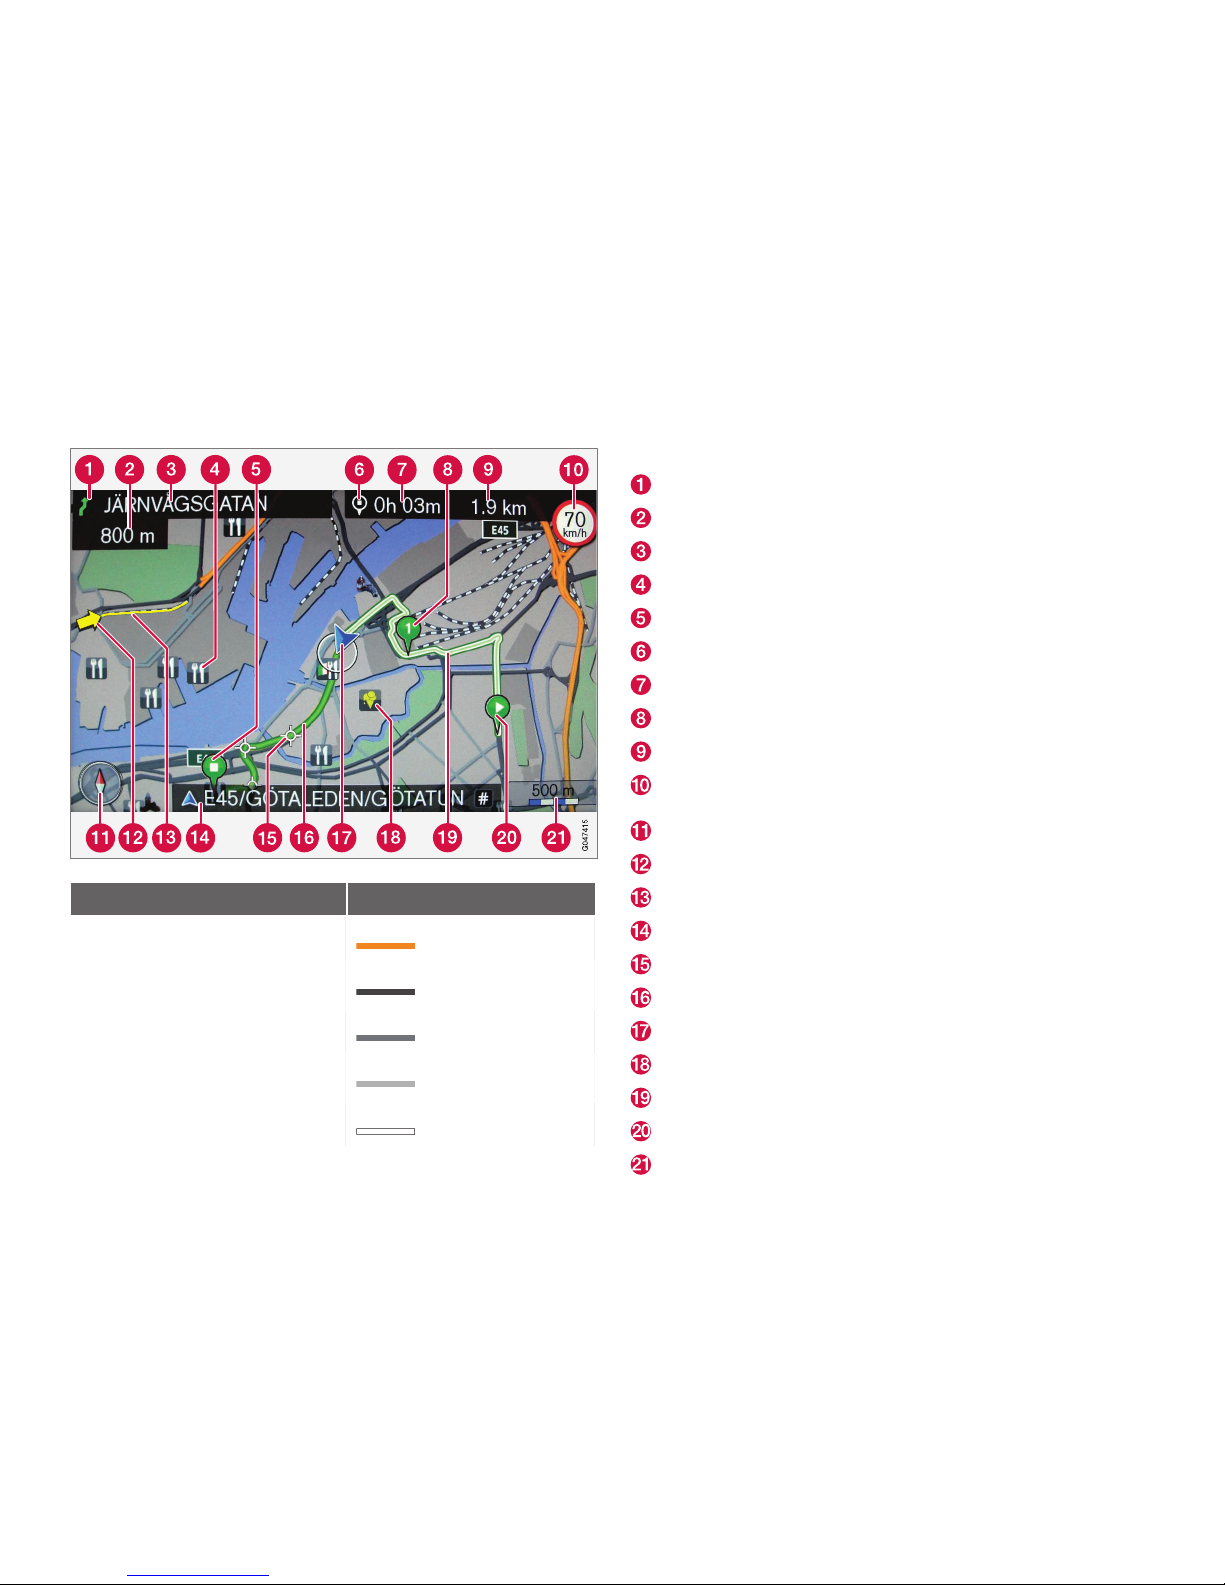
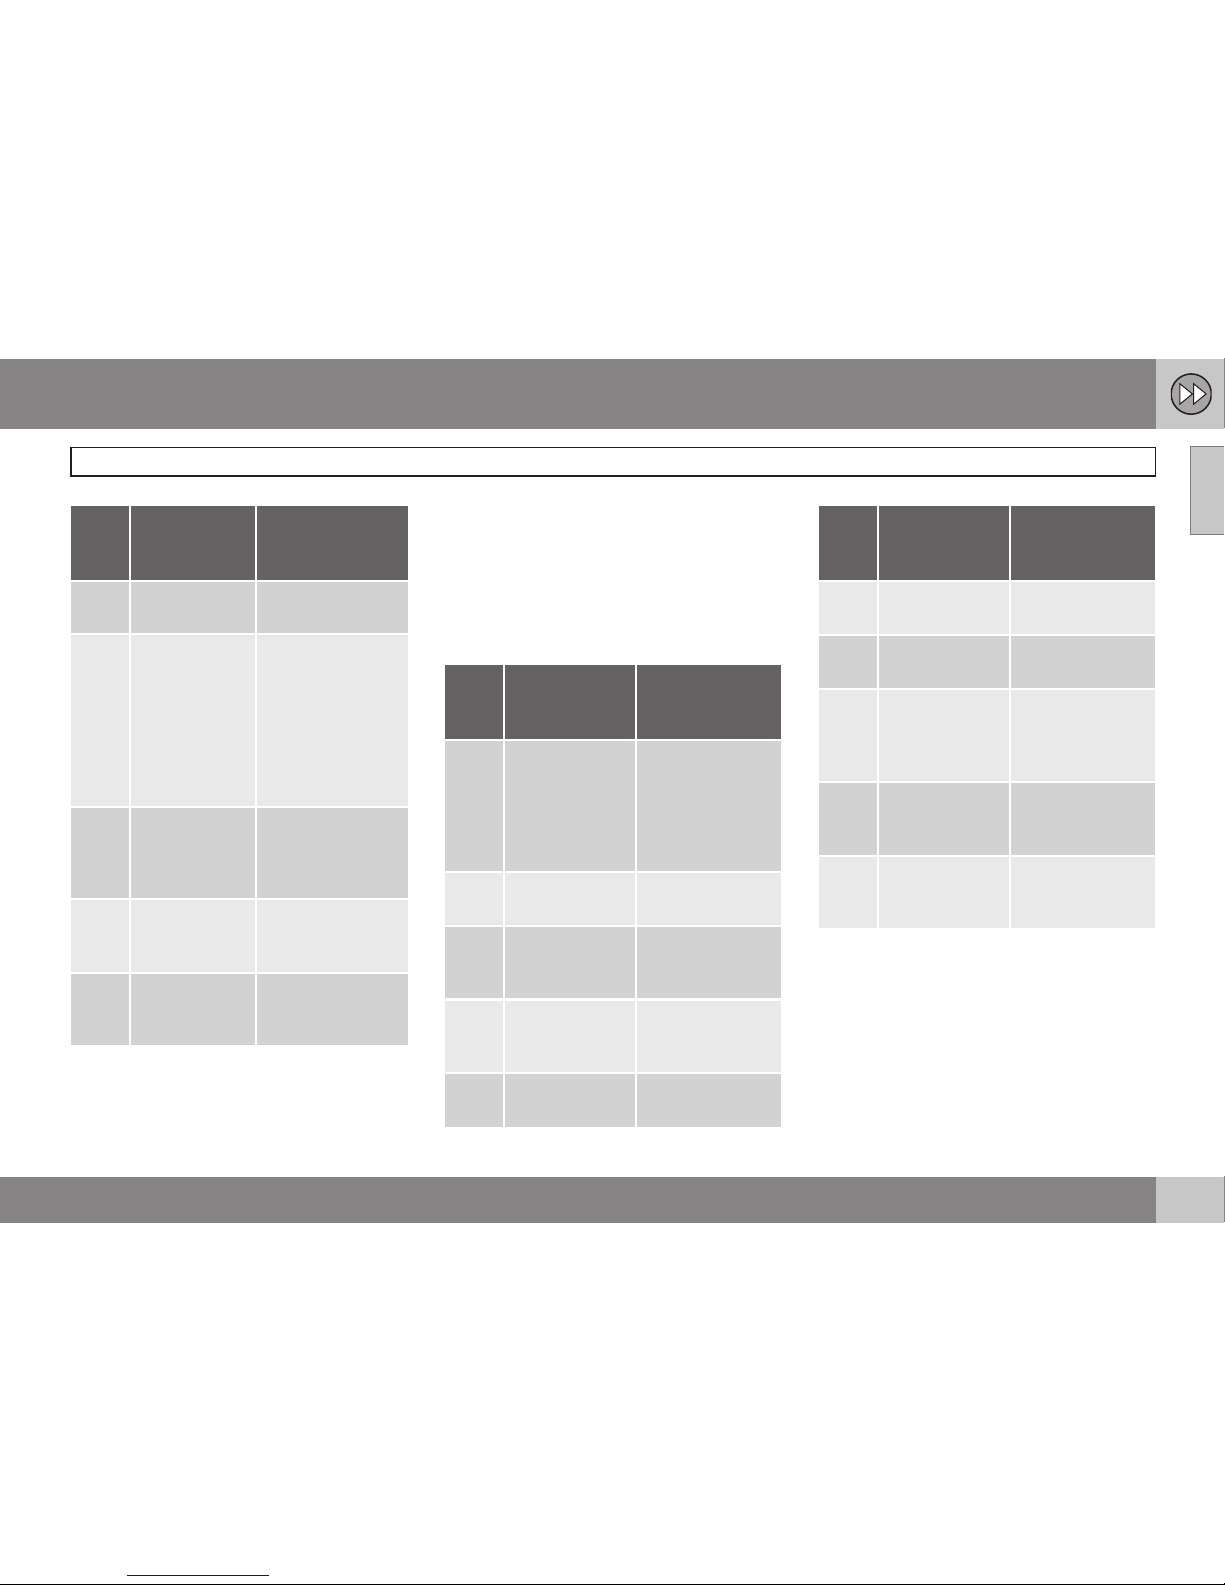
Road type Colour
Motorway
Orange
Primary road
Dark grey
Smaller primary road
Grey
Ordinary road
Light grey
Local road
White
Text and symbols on screen
Event at next guidance point
Distance to next guidance point
Name of next road/street
Facility (Restaurant)
Planned route final destination
Symbol for destination/final destination
Calculated arrival time at final destination
Planned route waypoint
Calculated remaining distance to destination
Maximum permitted speed - at car's current position (17) [Not in
cars with RSI.]
Compass
Traffic information
Section covered by traffic information
Current road/street name - at car's current position (17)
Next guidance point
Planned route
The car's current position
Stored location
Completed planned route
Planned route start
Map scale
Page 3
ROAD AND TRAFFIC INFORMATION - RTI
Volvo's navigation system is a traffic information and road navigation system devel-
oped by Volvo. The system guides you to a
destination and gives information along the route.
It informs of situations that can affect the drive,
such as accidents, road works and shows alternative routes.
It is possible to create an itinerary, search for
facilities along the route, store special places etc.
The system displays the car's exact position and
in event of a wrong turning always corrects to
guide you to the destination.
You will see just how intuitive it is to use. Try it
out. In order to get along with the system we recommend that you familiarise yourself with the
information in this manual.
By facilitating accessibility and shortening driving
distances, Volvo's navigation system contributes
to a better environment.
License agreement NAVTEQ DATABASE
For information for the end user - see page 78.
Page 4

Table of contents
2
01
01 Quick Guide
Quick start................................................... 8
02
02 Get to know your navigation
system
Manual...................................................... 12
Before starting.......................................... 14
Overview................................................... 16
Controls.................................................... 19
Voice recognition...................................... 22
Keyboard................................................... 25
DVD disc, screen...................................... 27
Maps, road types and compass............... 30
Menus....................................................... 32
Menu tree in three levels........................... 34
03
03 Planning your trip
Specify a destination................................ 40
Itinerary..................................................... 47
Current position........................................ 50
Settings..................................................... 51
Simulation................................................. 60
Page 5

Table of contents
3
04
04 Traffic information
General...................................................... 64
Reading information.................................. 66
Handling traffic problems.......................... 68
05
05 Symbols on the map
Facilities.................................................... 72
06
06 Questions and answers
Frequently asked questions...................... 76
EULA - License agreement....................... 78
Copyright.................................................. 80
Page 6

Table of contents
4
07
07 Alphabetical Index
Alphabetical Index.................................... 82
Page 7
Table of contents
5
Page 8

6
Quick start................................................................................................. 8
Page 9

Q U I C K G U I D E
Page 10
01 Quick Guide
Quick start
01
8
Activating the system
The car's electrical system must first be activated:
1. Press the remote control key into the ignition switch and activate key position I
(see the owner's manual for the car).
2. If the navigation system does not start
within a few seconds - press the centre
console's NAV button.
Disclaimer
When the navigation system is started the
display screen shows a text which must be
confirmed:
•
Press the OK button.
For more information, see page 14.
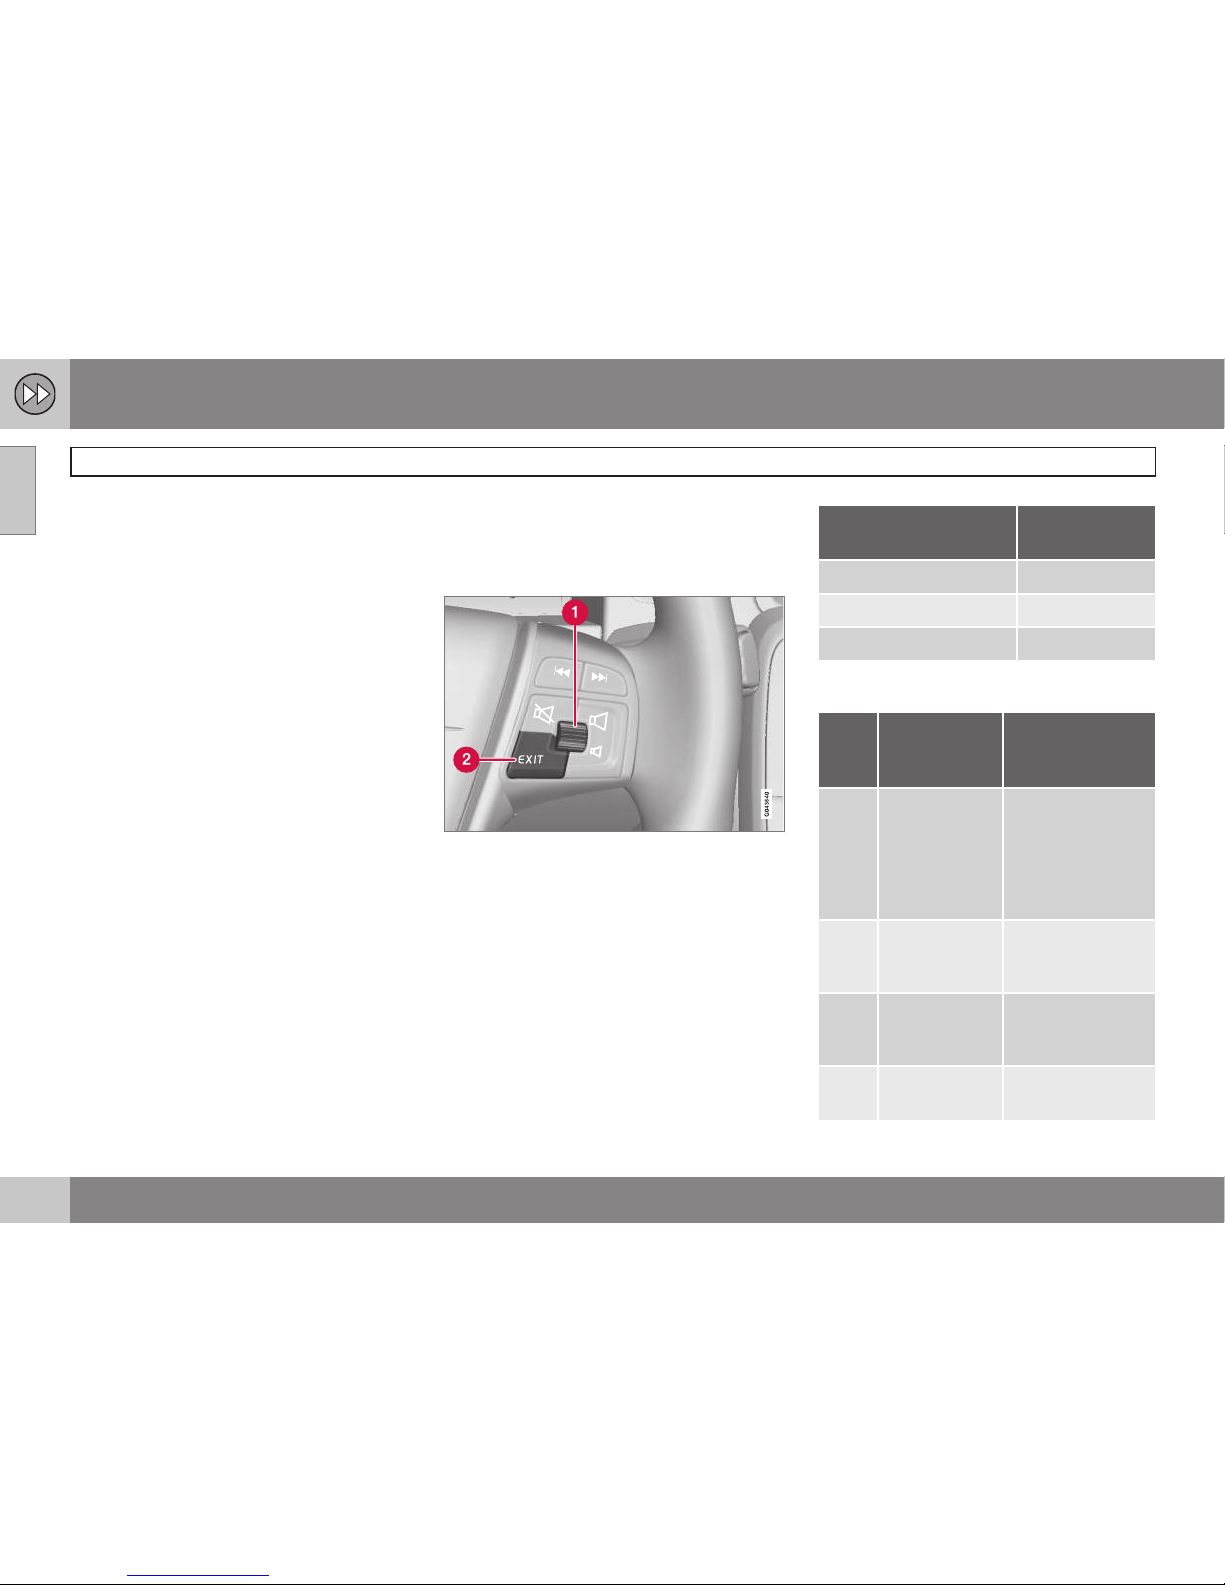
Controls
Volvo's GPS navigator can be operated in
several ways:
•
With the steering wheel's right-hand keypad
•
With the controls in the centre console
•
With a remote control
•
With voice recognition.
For a functional description, see page 19.
Main commands
The steering wheel keypad is used in the following two examples to give guidance to an
Address or Facility.
•
Scroll/select in the menus with the
Thumbwheel (1).
•
Activate selections with a brief press on
the Thumbwheel (abbreviated in the following example with "+ OK".
•
Go back in menus and/or undo using
EXIT (2).
Centre console controls
If the centre console keypad is used instead
of the steering wheel keypad then the following applies:
Keypad in steering
wheel
Centre console
Turn the Thumbwheel Turn TUNE
Press the Thumbwheel Press OK
Press EXIT Press EXIT
Guidance to a street address
Step Display
screen/
menu
Action
1 If the display
screen does
not show a
map image,
proceed as
follows:
Press the centre
console button
NAV.
2 Map Press NAV to dis-
play the "Shortcuts" menu.
3 Shortcuts
menu, see
page 32.
Select Set
address
+ OK.
4
Set destination
Select Address +
OK.
Page 11
01 Quick Guide
Quick start
01
9
Step Display
screen/
menu
Action
5
Address: Select City: +
OK.
6 Daisy wheel -
see
page 25.
Turn the Thumb-
wheel to select
characters and
enter it by clicking OK - a list of
options emerges
on the display
screen.
7 Daisy wheel Select the appro-
priate district
from the list +
OK.
8
Navigation
menu
Select Set single
destination +
OK.
9 Map Guidance starts -
follow the instructions.
The navigation system calculates the route,
travel time and distance to the selected desti-
nation. The system provides guidance and
instructions on junctions etc.
If there is a deviation from the planned route
outline during the journey then the system
automatically calculates a new route outline.
Guidance to a facility (POI)
Step Display
screen/
menu
Action
1 If the display
screen does
not show a
map image,
proceed as follows:
Press the centre
console button
NAV.
2 Map Press NAV to
bring up a menu.
3 Shortcuts
menu, see
page 32.
Select Set Point
Of Interest +
OK.
4
Set destination
Select Point of
interest (POI) +
OK.
5
Point of interest (POI)
Select e.g. Near
the car + OK.
Step Display
screen/
menu
Action
6
Latest 5 POI
types
Select e.g. All
types + OK.
7
All POI types Select e.g. Air-
port + OK.
8
Results list
Select the
desired option
from the list +
OK.
9
Navigation
menu
Select Set sin-
gle destination
+ OK.
10 Map Guidance starts
- follow the
instructions.
Page 12

10
Manual.................................................................................................... 12
Before starting........................................................................................ 14
Overview................................................................................................. 16
Controls................................................................................................... 19
Voice recognition.................................................................................... 22
Keyboard................................................................................................. 25
DVD disc, screen.................................................................................... 27
Maps, road types and compass............................................................. 30
Menus..................................................................................................... 32
Menu tree in three levels......................................................................... 34
Page 13

G E T T O K N O W Y O U R NAVIGATION S Y S T E M
Page 14
02 Get to know your navigation system
Manual
02
12
Heading level 1
Heading level 2
The content under this heading is part of
Heading level 1.
Heading level 3
The content under this heading is part of
Heading level 2.
Heading level 4
The content under this heading is part of
Heading level 3.
General information on the manual
There is a quick guide for the user who wants
to get started right away - see page 8.
For a more in-depth description of the operation and options as well as the selection of
settings to the destination, the recommendation is to read the manual in combination with
practical use.
Menu options/Search paths
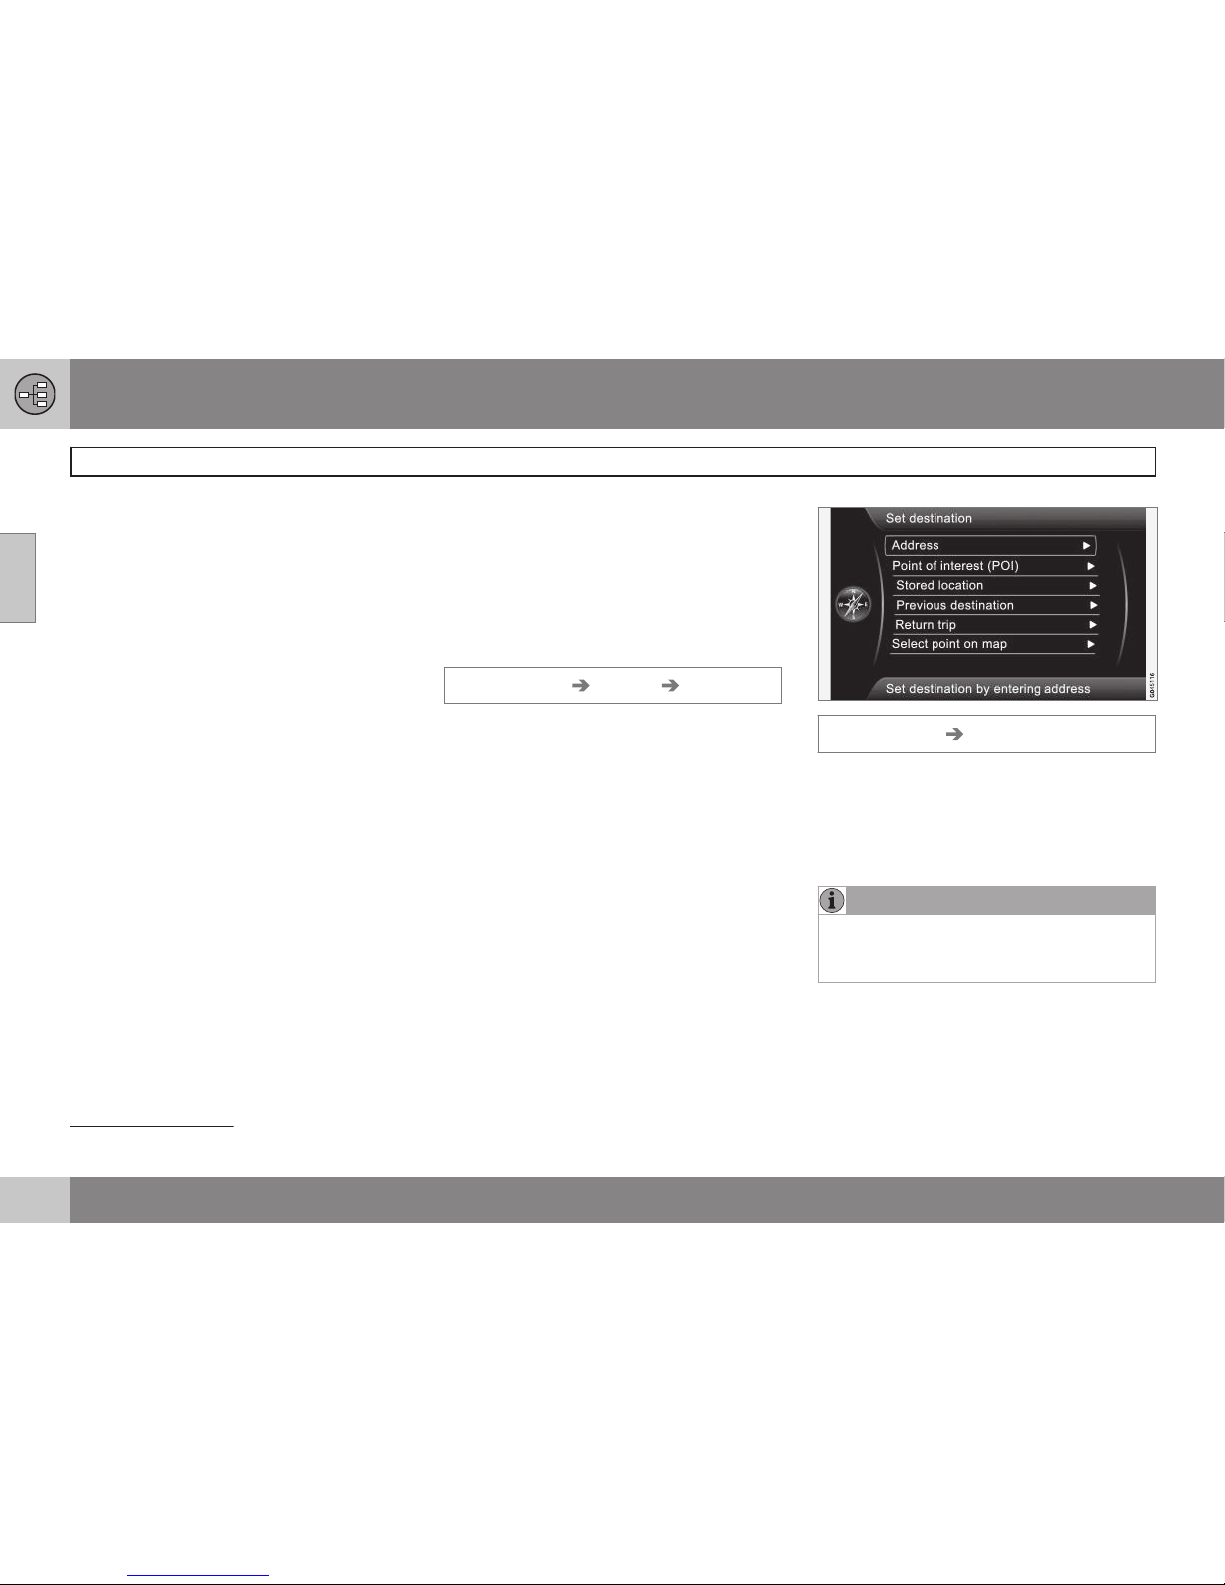
All options that can be selected on the display screen are marked in this manual with
slightly larger and grey-shaded text, e.g.
Set
destination.
Search paths in the menu tree are stated as
e.g.:
Set destination Address City:
English text
The manual's images are common to all markets and languages so where they contain
text it is mainly in English.
In order to facilitate the user's understanding
of the images and their menu options with
search paths connected to the manual's text,
the English word for the image is in brackets
immediately after the intended text/phrase in
the language of the manual:
Set destination Address
(Set destination > Address)
1
Special text
NOTE
NOTE
Texts marked with NOTE provide advice or
tips to facilitate use of e.g. features and
functions.
Footnote
There is information in the manual that is
added as a footnote at the bottom of the
page or in direct association with a table. This
1
Not in English manuals - but shown here as an example.
Page 15
02 Get to know your navigation system
Manual
02
13
information is a supplement to the text to
which it refers via the footnote number/letter.
Options
All types of options/accessories are marked
with an asterisk (*).
In addition to standard equipment, this manual also describes options (factory fitted
equipment) and certain accessories (retrofitted extra equipment).
The equipment described in this owner's
manual is not available in all cars - they have
different equipment depending on adaptations for the needs of different markets and
national or local laws and regulations.
In the event of uncertainty over what is standard or an option/accessory - contact a Volvo
dealer.
Changes in the manual
The specifications, design features and illustrations in this owner's manual are not binding.
We reserve the right to make modifications
without prior notice.
© Volvo Car Corporation
Page 16
02 Get to know your navigation system
Before starting
02
14
General
The Volvo navigation system uses reference
system WGS84, which gives longitude and
latitude positions.
The car's navigation system can be used
without a destination being selected.
Map position
Upon start-up, the navigation system shows
an on-screen text message, which must be
confirmed by pressing the OK/MENU button.
The text is as follows:
•
This system provides route
information to help you reach your
destination. Due to road conditions,
some recommendations may not be
accurate. Obey all traffic laws and
drive based on your own good
judgement. Always concentrate on
your driving by keeping your eyes and
mind on the road.
Then a map of the current geographic area is
shown where the car is symbolised by a blue
triangle.
Settings
The system is supplied with default settings,
but starts with the settings last used.
There is a function that resets all settings to
default settings simultaneously, see
page 58.
On/Off
On
1. Push the remote control key into the ignition switch.
2. The screen activates automatically in the
key position I (see the car's manual).
3. Press the centre console's button NAV if
the navigation system does not start
automatically.
4. Press OK when the "Start up" text
appears on-screen, see previous section
"Map mode".
The system may need a few seconds in order
to detect the position and movement of the
car.
Off
The navigation system is shut down when the
remote control key is removed from the ignition switch.
The Navigator cannot be switched off manually, but always works in the background
after the "Start up" sequence. If the navigation system is not to be switched on:
•
Press EXIT at the "Start up" sequence,
see section "Map mode".
NOTE
The navigation system is also available
when the engine is switched off. When the
battery level gets too low the system
switches off.
Demo (simulated guidance)
To see how the system works, guidance to an
indicated destination can be simulated onscreen - see page 60.
Page 17
02 Get to know your navigation system
Before starting
02
15
Page 18
02 Get to know your navigation system
Overview
02
16
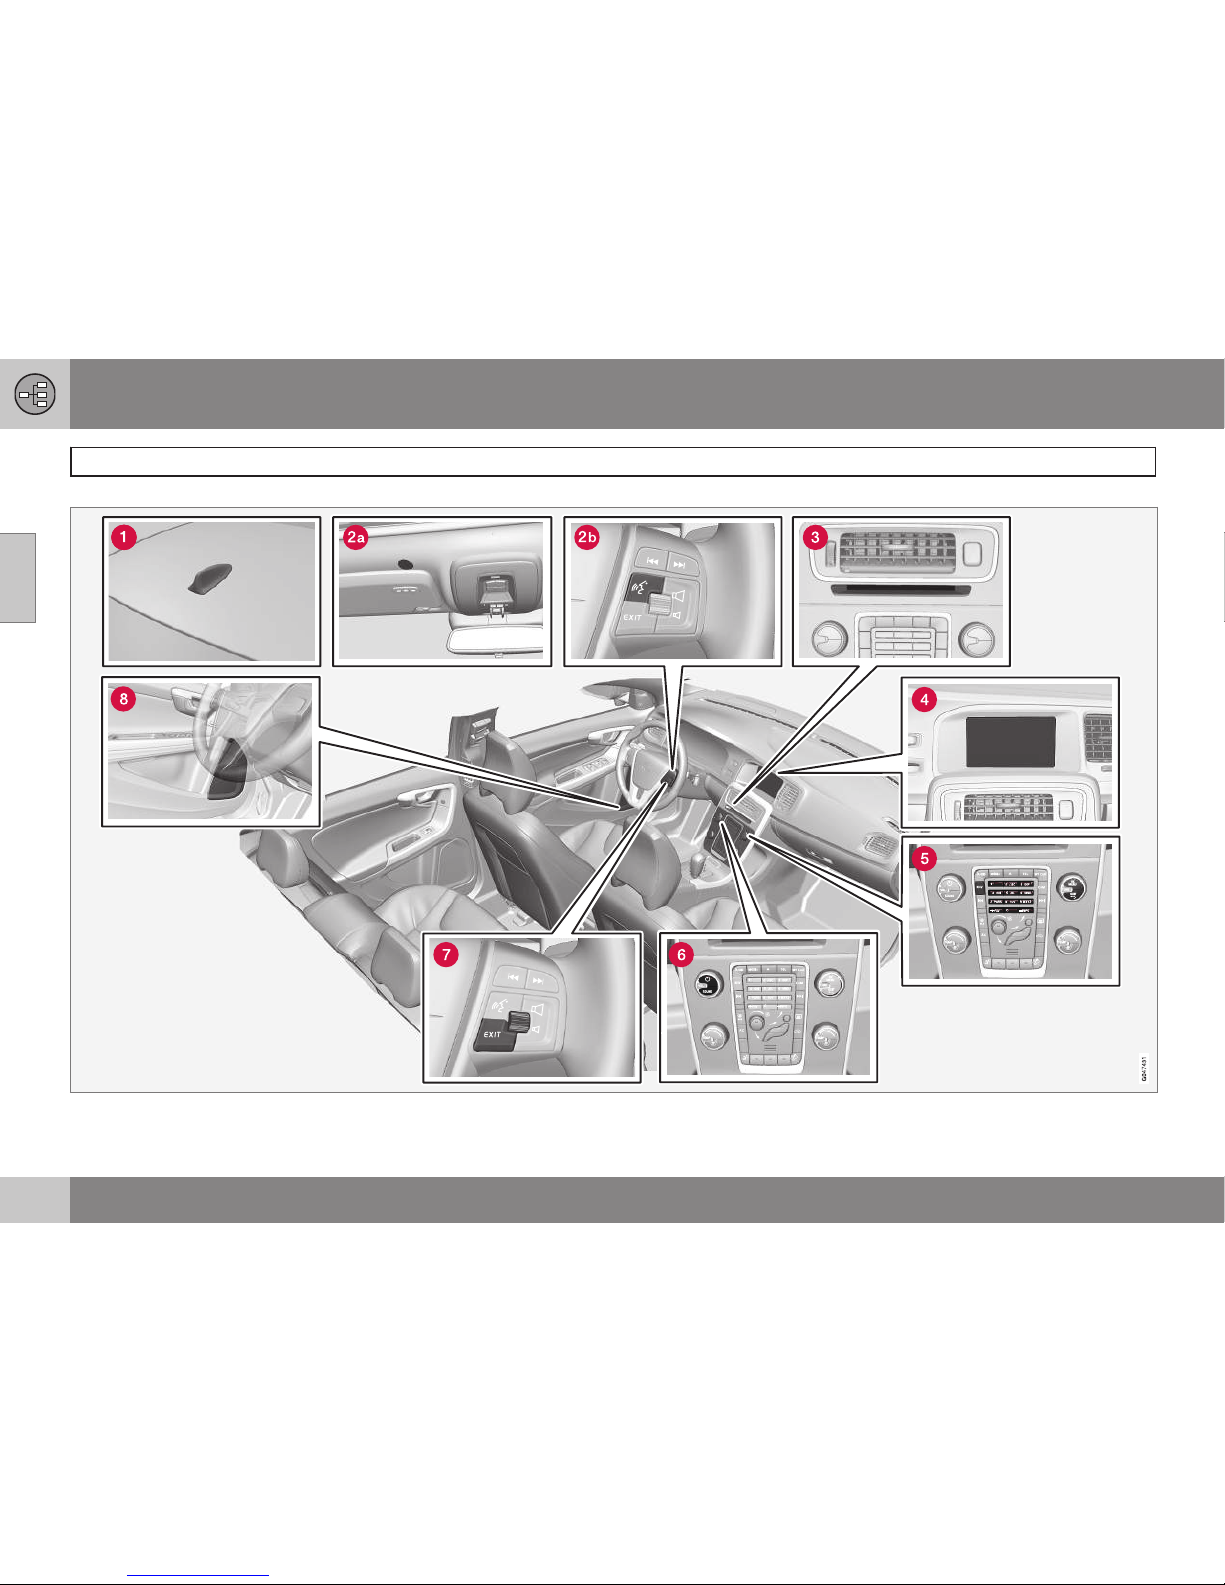
NOTE: The picture is schematic - some details may vary depending on car model and market.
Page 19
02 Get to know your navigation system
Overview
02
}}
17
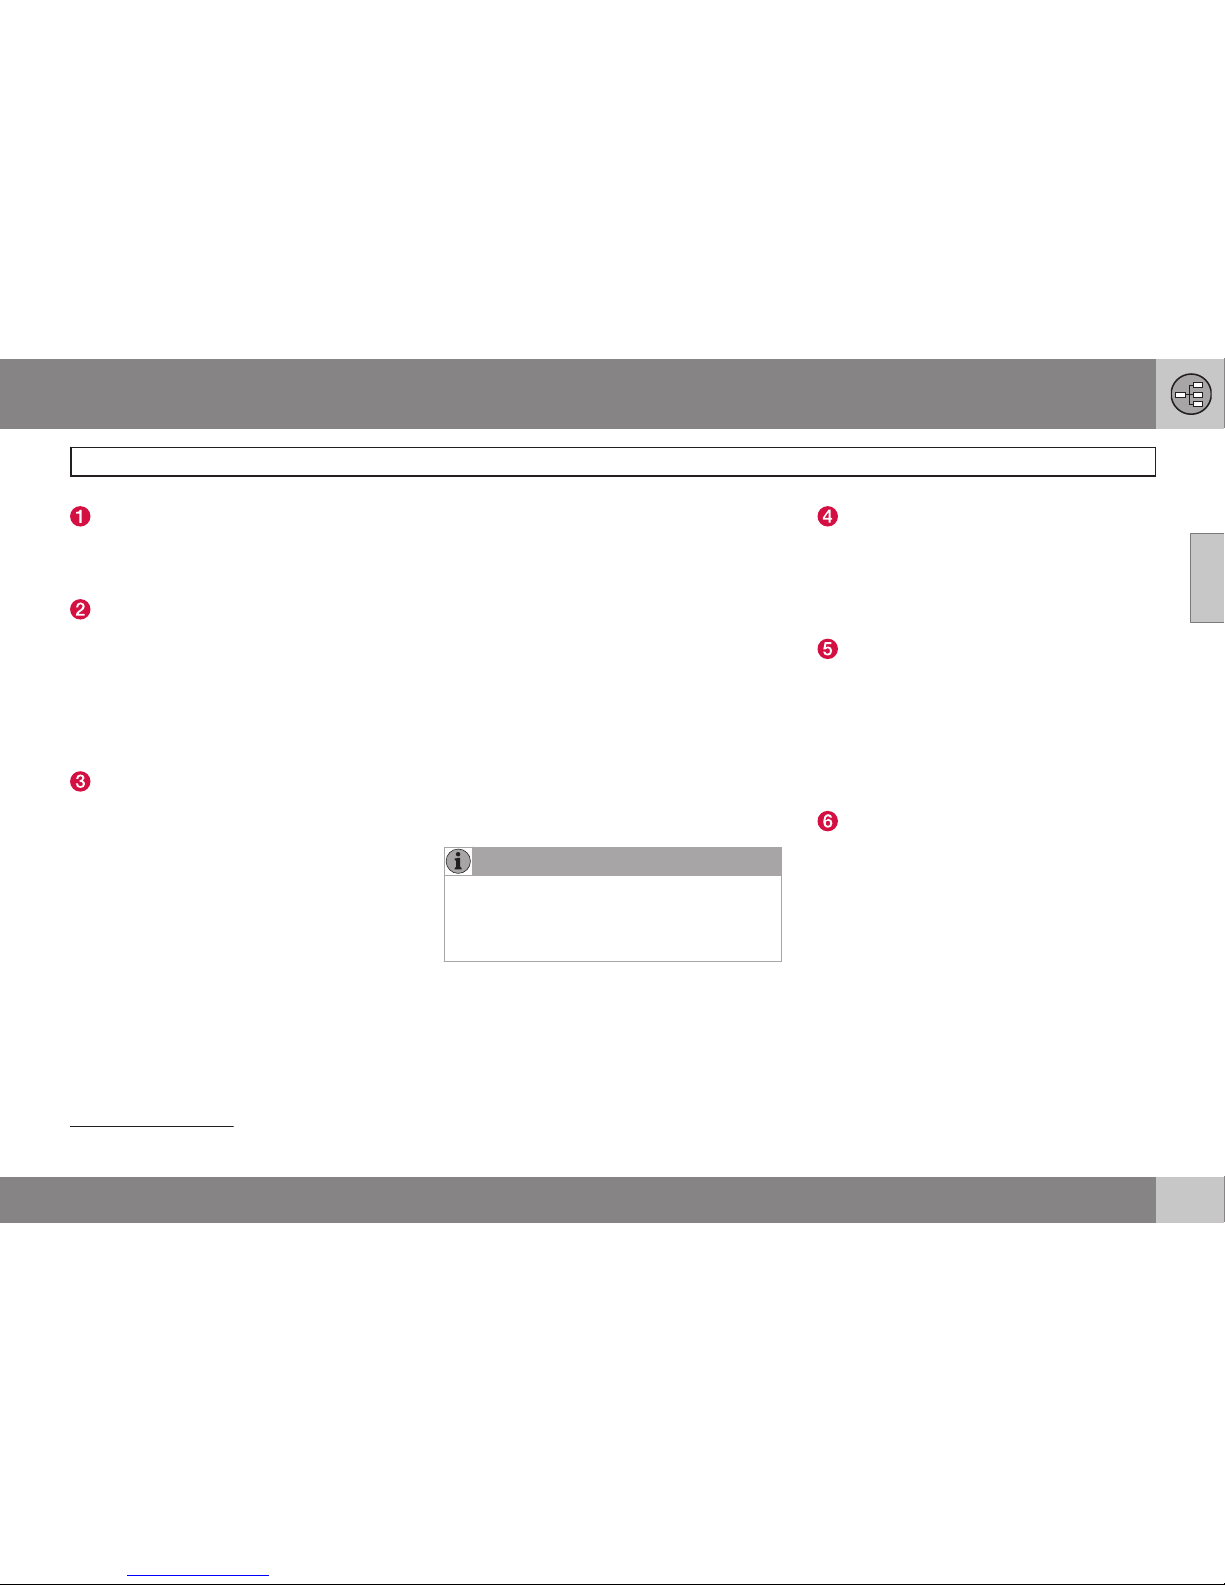
Antenna for GPS
The antenna is integrated into the roof
antenna.
Voice recognition
Some procedures in the Navigation system
can also be voice controlled. The microphone
(2a) is fitted in the ceiling and the activation
button (2b) is located on the right-hand keypad on the steering wheel. For more information, see page 22.
Main unit
The main unit is fitted in and behind the centre console and includes the following functions:
•
Calculating the position of the car
•
Calculating the route to the specified destination
•
Handling traffic information
•
Voice guidance
•
DVD player
Receiver for GPS and traffic information
(TMC1) is integrated into the main unit.
Positioning
The car's speed sensor and a gyro calculate
the current position and the direction of travel
of the car using signals from the GPS satellite
system.
The advantage of this concept is that the
Navigation system registers and calculates
the route outline even if the GPS signal is
temporarily lost, e.g. when driving through a
tunnel.
Traffic information
TMC1 is a standardised coding system for
traffic information. The receiver automatically
searches for the correct frequency. Reception
takes place via the FM antenna.
NOTE
TMC is not available in all areas/countries.
The system's coverage area is under constant construction and updating may
sometimes be necessary.
For information about updating map data and
software, see page 27.
Screen
The screen displays maps and provides
detailed information on route type, distance,
menus etc. For information screen care, see
page 28.
Keypad, centre console
As an alternative to the steering wheel keypad, the centre console's numerical keypad
can be used in combination with buttons OK/
MENU, TUNE and EXIT to scroll between different menu options, confirm options or go
back in menus, see page 19.
Volume control and IR receiver
Use the audio unit's volume control during
ongoing voice messages to adjust the volume, see page 31. The volume can also be
adjusted in the menu system.
Point the remote control towards the centre
console during use - its IR receiver is located
there.
1
Traffic Message Channel
Page 20

02 Get to know your navigation system
Overview
02
18
Keypad, steering wheel
A keypad is located on the right-hand side of
the steering wheel. Use it to scroll between
different menu options, to confirm selections
or to move back in menus, see page 19.
Speakers
Navigation system audio uses the front loudspeakers.
Page 21
02 Get to know your navigation system
Controls
02
}}
* Option/accessory, for more information, see Introduction.
19
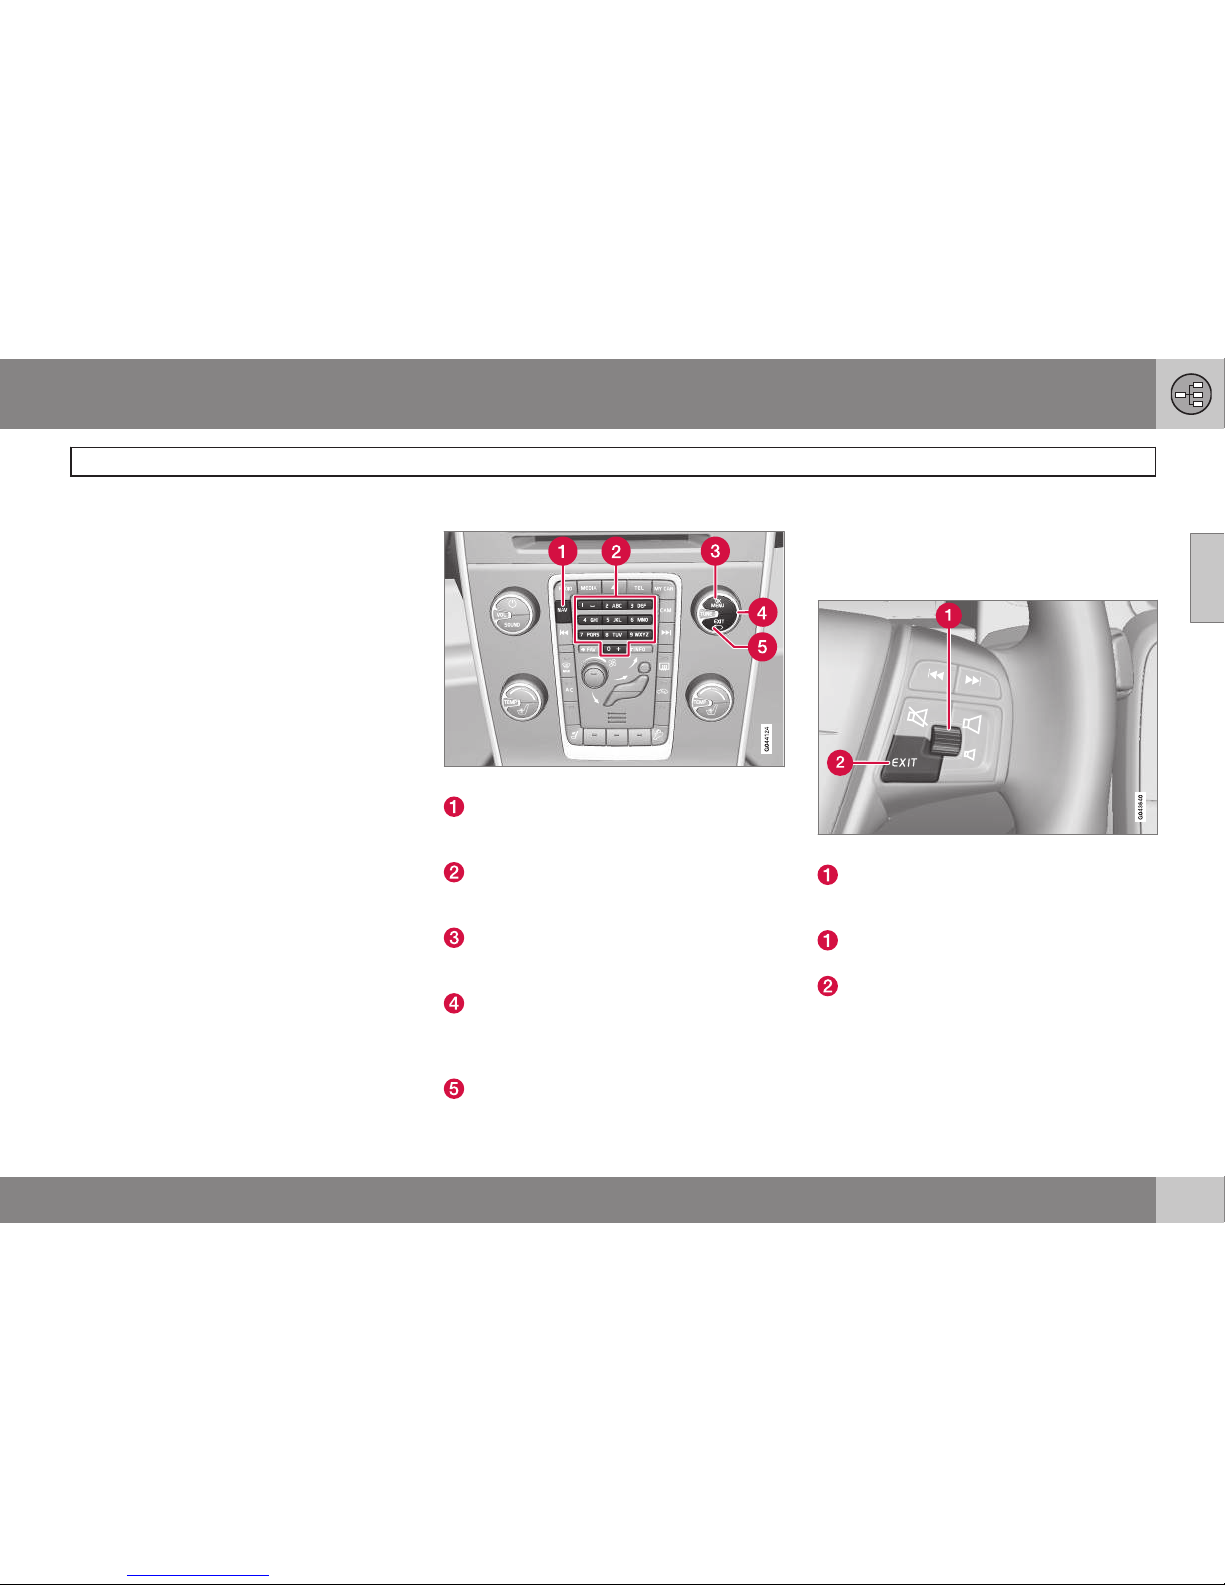
General information about controls
The navigation system is operated by controls on the centre console, the steering
wheel keypad or using a remote control*. The
three different control unit keypads have
common functions but differ in appearance
and operation. The design may also vary
depending on market.
The system can also be controlled by voice
recognition using specific commands - see
page 22.
Centre console
Centre console keypad.
NAV activates the GPS navigator on the
display screen. With GPS activated, a
quick menu opens/closes, see page 32.
Numerical keys enter information for
address and name search, and scroll on
the map, see pages 25 and 32.
Press OK/MENU once to confirm or activate a selection. Described in this manual
with the "OK button" or "+ OK".
Turning TUNE scrolls between different
menu options or zooms when the map
image is shown. Described in this manual
with the "TUNE knob".
Press EXIT once to go back in the menu
structure or undo a selection.
Steering wheel
The steering wheel's keypad is available in
several versions depending on market and
selection of audio system.
Steering wheel right-hand keypad.
Turn the thumbwheel to scroll between
different menu options or zoom when the
map image is shown.
Press the thumbwheel to confirm/activate a selection.
EXIT goes back in the menu structure or
undoes a selection.
Page 22
02 Get to know your navigation system
Controls
02
20
Voice recognition
See page 22.
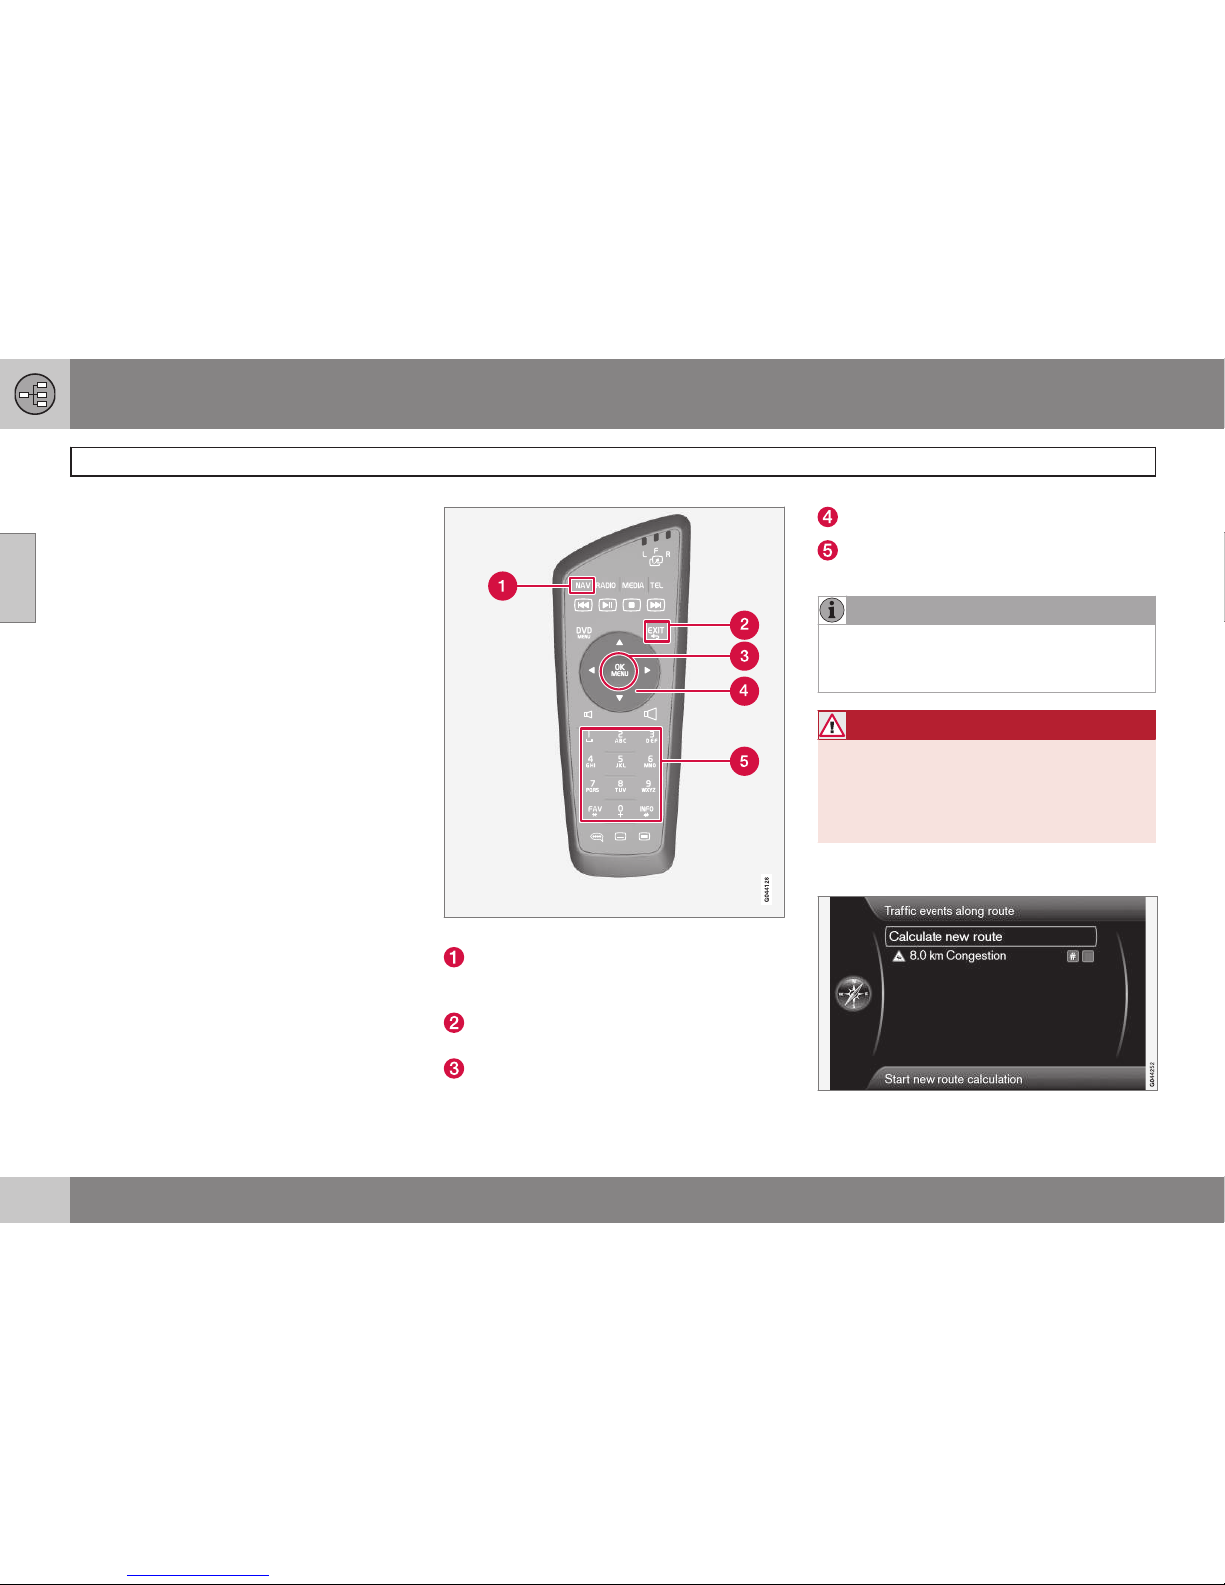
Remote control
The remote control can be used to control/
operate several different functions in the car only the related navigation system is described here.
•
Point the remote control at the centre
console during use.
Remote control keypad.
NAV activates the GPS navigator on the
display screen. With GPS activated, a
quick menu opens/closes, see page 32
EXIT goes back in the menu structure or
undoes a selection.
OK/MENU confirms or activates a selection. Described in this manual with the
"OK button" or "+ OK".
Arrow keys move the menu cursor.
Numerical keys enter data for address
and name search, and scroll on the map.
NOTE
If the remote control does not work, try
replacing with new AA/LR6 batteries first
of all.
WARNING
Store the remote control and other similar
objects in one of the storage compartments - in the event of sudden braking or
a collision such objects could cause personal injury or material damage.
Additional information
Page 23
02 Get to know your navigation system
Controls
02
21
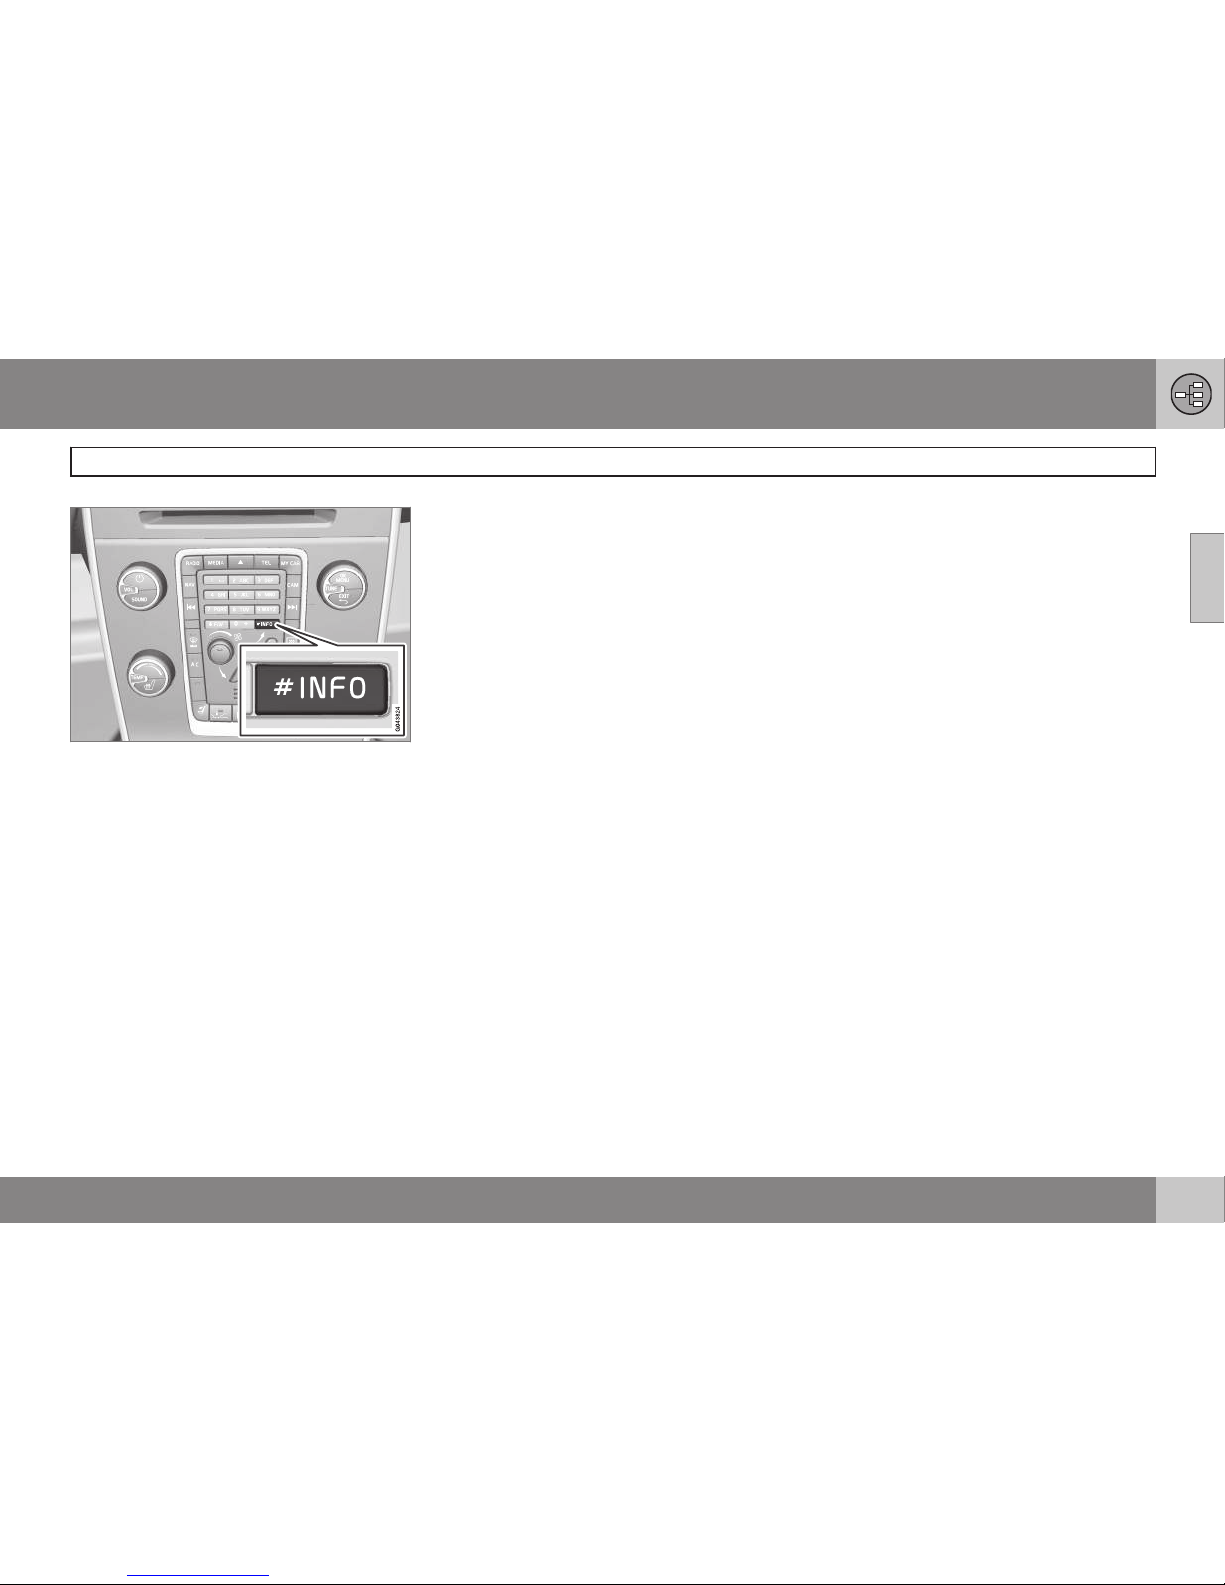
Sometimes there is more information available than can fit on the menu bar - the line
then ends with the character: "#".
To view the rest of the information:
•
Press the INFO button.
Page 24
02 Get to know your navigation system
Voice recognition
02
22
General about Voice control
Voice control means that certain functions in
the navigation system can be activated by the
spoken word.
The Voice commands offer comfort and help
the driver to avoid distraction - instead the
driver can concentrate on driving and focus
attention on the road and traffic situation.
WARNING
The driver always holds overall responsibility for driving the vehicle in a safe manner
and complying with all applicable rules of
the road.
The Voice control uses the common microphone of the hands-free system - the driver
receives responses to the Voice control
through the vehicle's loud speakers.
The microphone is positioned in the ceiling in
front of the driver for optimal take-up of the
driver's speech - it can however be disturbed
by/pick up loud voices from passengers.
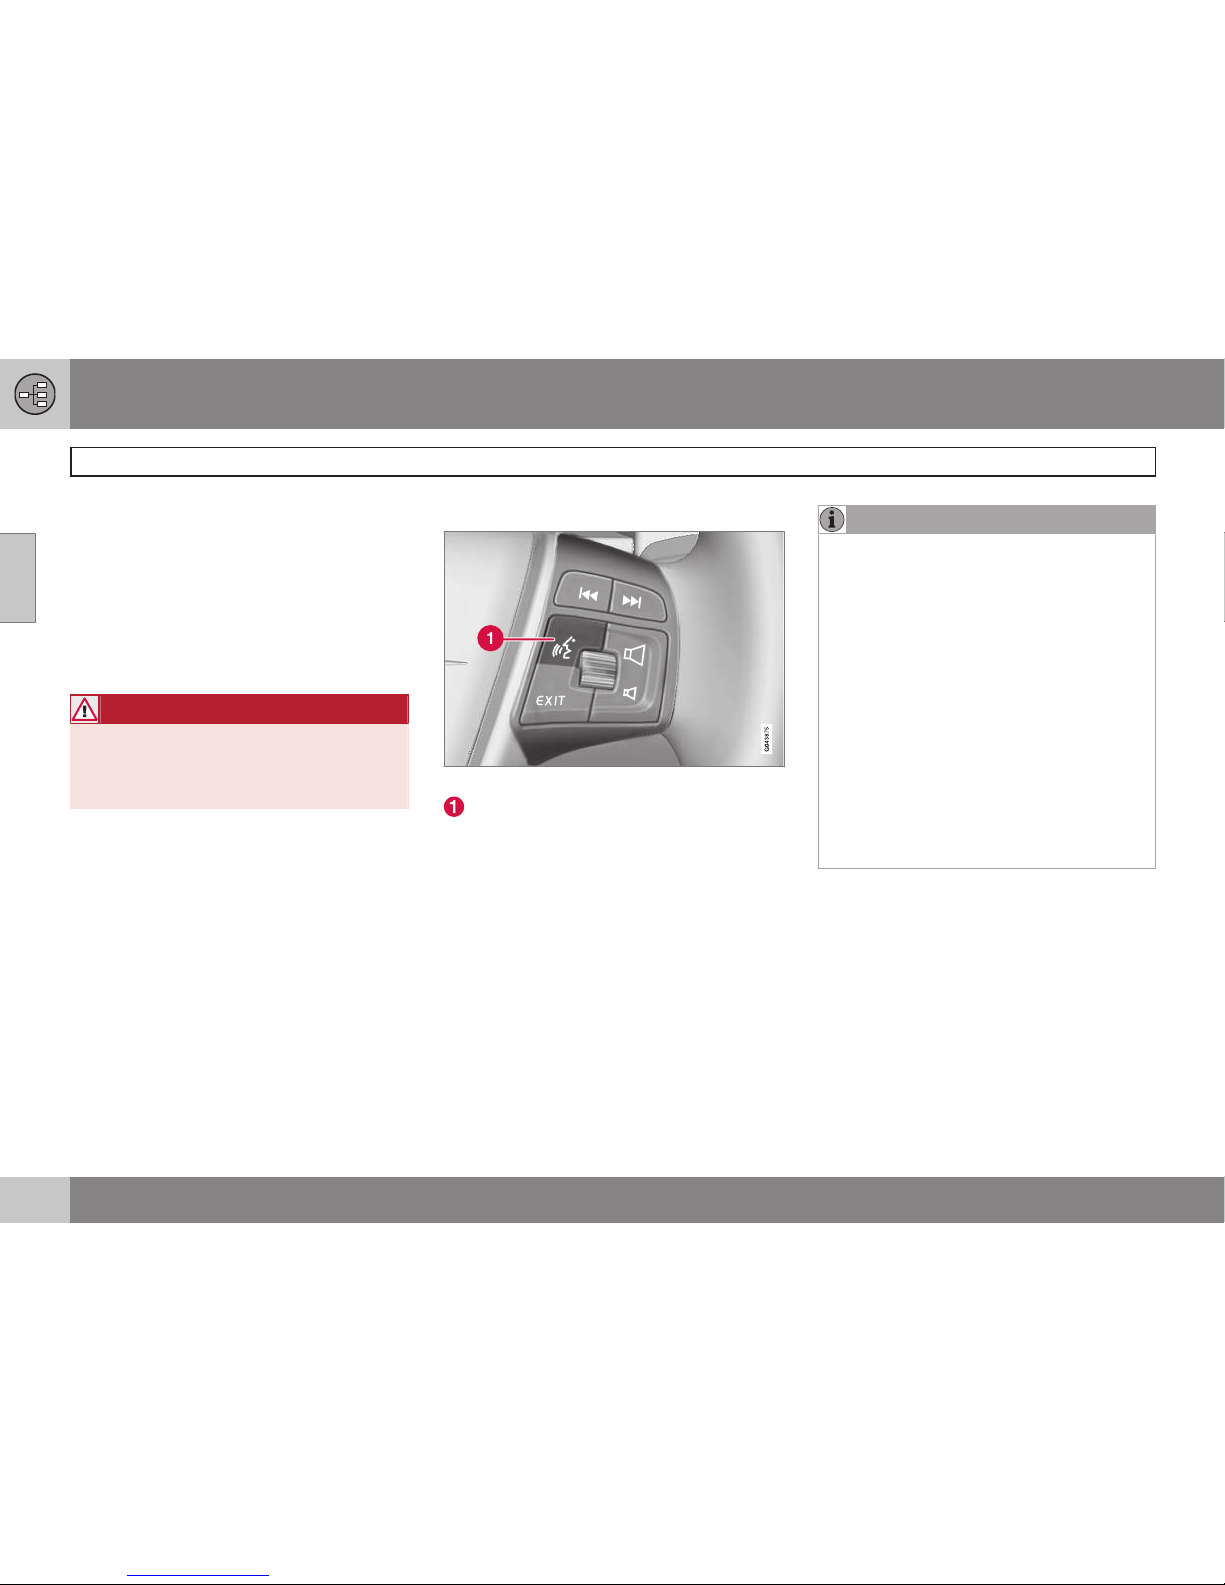
Handling
Keypad in steering wheel.
Button for voice control
Activating the system
•
A short press on the steering wheel button (1) activates the voice recognition
system - a voice command can be given
after the tone.
Think of the following when using the voice
recognition system:
•
For commands - Speak after the tone
with a normal voice at a normal tempo
•
The car's doors, windows and sunroof
must be closed
•
Avoid background noise in the passenger
compartment.
NOTE
If the driver is unsure of which command
to use, he/she can say "
Help" - the sys-
tem then responds with several different
commands which can be used in the current situation.
Voice commands can be disabled by:
•
not speaking
•
saying "
Cancel"
•
hold the steering wheel button for
Voice recognition depressed for a couple of seconds
•
press EXIT
•
press one of the centre console's buttons NAV, RADIO, MEDIA, MY CAR
or CAM.
Use the voice command
Entering information in the navigation system
using the voice command is very simple
because the screen lists the frequently occurring commands to be used in the relevant situation.
Starting
A voice command is started as follows:
Page 25
02 Get to know your navigation system
Voice recognition
02
}}
23
1. Press the steering wheel button for Voice
control - the display lists examples of
possible commands.
2.
For example, select "
Navigation" - wait
for the tone and state the word clearly
and in normal conversational tone.
3.
The screen shifts to the option "
Repeat
instruction/Navigation go to address/
Itinerary" - Select and say "Itinerary".
Note that greyed out text and text in brackets
is not included in the spoken command.
NOTE
Greyed-out menu bars and options on the
screen are temporarily not selectable.
The command can be given in several
ways
The command "Navigation go to address"
can be stated as:
•
"
Navigation > Go to… > Address" - Say
"Navigation", wait for the system
response in the form of suitable onscreen options. Continue by saying, for
example, "Go to…" and conclude with
"Address".
or
•
Say the whole command in one sequence
- "
Navigation go to address".
Tips
Some good advice:
•
Give a command by first pressing the
voice button and then speaking naturally
after the tone.
•
To respond to the voice recognition system - speak after the tone at the end of
the question.
•
To interrupt the voice session - press and
hold the voice button or press the EXIT
button.
•
The driver can obtain help during a dialogue by saying "
Help" after a listening
tone.
•
The dialogue with the system can be
speeded up - Interrupt the system's
speech with a short press on the button's
voice button, wait for a tone and then
start talking.
•
The voice recognition system asks up to
3 times for an answer. If no answer is
given by the driver during this time then
the session is concluded.
Example
Here are some normal commands:
•
Navigation go to address
•
Navigation go to POI
•
Navigation delete next waypoint
•
Navigation cancel guidance.
NOTE
A complete list of quick commands is
available in the MY CAR menu - Go to
Settings Voice settings Voice
command list
Navigation commands.
Help functions and settings
In the menu system MY CAR there are programs where the driver can practice the different functions in the voice recognition system. To describe the menu system MY CAR see the car's normal instruction manual.
The better the driver knows the voice recognition system, the more comfortable the
driver will be using the functions. Practicing
using the integrated practice programs is
therefore recommended.
NOTE
The exercise programs are only accessible
when the car is stationary with the parking
brake applied.
Introduction to voice control
The program Voice tutorial gives the driver
step by step instructions in the use of the
voice recognition system and is a simple way
Page 26
02 Get to know your navigation system
Voice recognition
02
24
of becoming familiar with the methods of giving commands.
The program can be started in two ways:
•
Press the steering wheel button for voice
control and say "
Voice tutorial".
or
•
Activate the program in MY CAR - Go to
Settings Voice settings Voice
tutorial
.
Voice training
The program Voice training teaches the
voice recognition system to recognise the
driver's voice and speech pattern. It is also
possible to create a second user profile - an
advantage if more than one person is likely to
use the car/system regularly.
•
The voice training is started in MY CAR Go to
Settings Voice settings
Voice training User 1 or User 2.
NOTE
Menu option Default setting can only be
changed to
User 1 after a lesson on Voice
training has been completed.
More settings in MY CAR
•
User profile - 2 x different user profiles
can be set. Go to
Settings Voice
settings
Voice user setting. Tick one
of the options
Default setting, User 1 or
User 2.
•
Voice volume - Go to
Settings Voice
settings
Voice output volume and
select the desired level.
The system's voice volume can also be
adjusted using the centre console TUNE
knob when the system is speaking.
Language
The voice recognition system is under constant development and at time of printing the
following languages were available:
•
English (UK)
•
English (US)
•
French (CAN)
•
French (FRA)
•
Dutch
•
Italian
•
Spanish (EU)
•
Spanish (US)
•
Swedish
•
German
NOTE
The voice recognition system in combination with GPS navigation only works with
the languages listed here.
To change the language - Go to Settings
System options Language and select.
The languages that are included in the
voice recognition system have this
icon in the language list.
Language dependent user profile
The voice recognition system only understands the language set in
System options.
Say that user profile User 1 is stored by a
Swedish speaking driver with the system set
in Swedish. If the driver changes the car language to English the user profile User 1 will
no longer be selectable because the system
now only understands, and expects English
speech - instead the option Default setting
becomes active.
To improve the system's understanding of the
driver's English speech the solution is to
teach and store the driver's English speech in
User 2 with the system set to English (to
have both variants available) or to replace the
Swedish language profile in User 1 with an
English profile.
Page 27
02 Get to know your navigation system
Keyboard
02
}}
25
Entering and selecting options
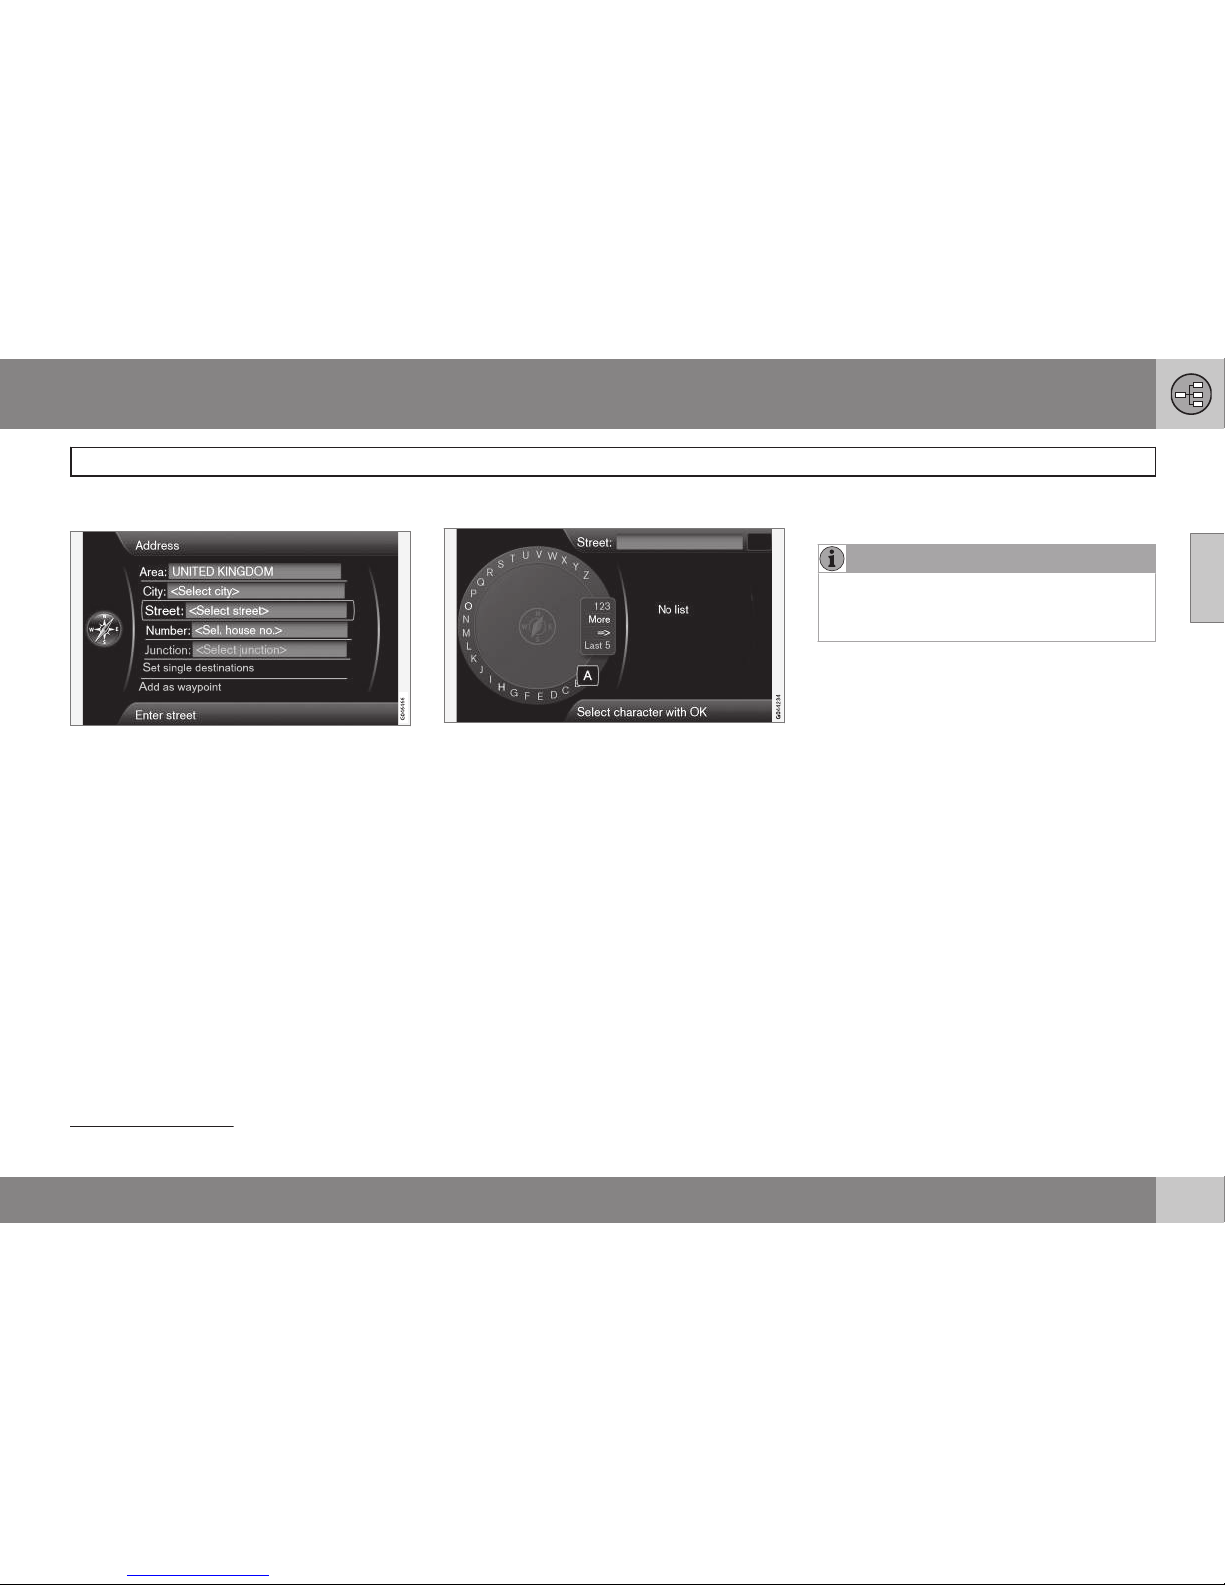
Screen view with text field or optional text.
This navigation system uses a "daisy wheel"
to enter specific information, e.g. type of
facility, place/town, area/country, address,
street or post code.
Activate an option
After marking a desired function/menu bar
using the thumb wheel or the TUNE knob,
press the thumb wheel/OK to see the next
level of functions/options.
Enter as follows
The daisy wheel.
1. Mark a text field.
2. Press OK to call up the "daisy wheel":
3. Select the characters using the thumb
wheelTUNE knob and enter them by
pressing thumb wheelOK.
Numerical keyboard
Another way of entering characters is using
the centre console's buttons 0-9, * and #.
When 9 is pressed, a bar appears with all
characters1 under the buttons, e.g.
W, x, y, z
and 9. Quick press the move/"loop" cursor
through these characters.
•
Stop using the cursor on the desired
character to select it - the character is
shown on the enter line.
•
Delete/change using EXIT.
More options
NOTE
Faded characters cannot be selected in
combination with the currently input characters.
In the daisy wheel's inset menu there are further options that have more characters and
digits:
•
More (More) + OK - alternative charac-
ters appear in the wheel.
•
123 + OK - digits appear in the wheel.
•
=> + OK - the cursor moves to the list on
the right-hand side of the screen where
selections using OK can be made.
•
Last 5 (Last 5) + OK - lists the most
recent searches. Mark one of them + OK.
1
The character for each button may vary depending on market/state/language.
Page 28
02 Get to know your navigation system
Keyboard
02
26
List of options
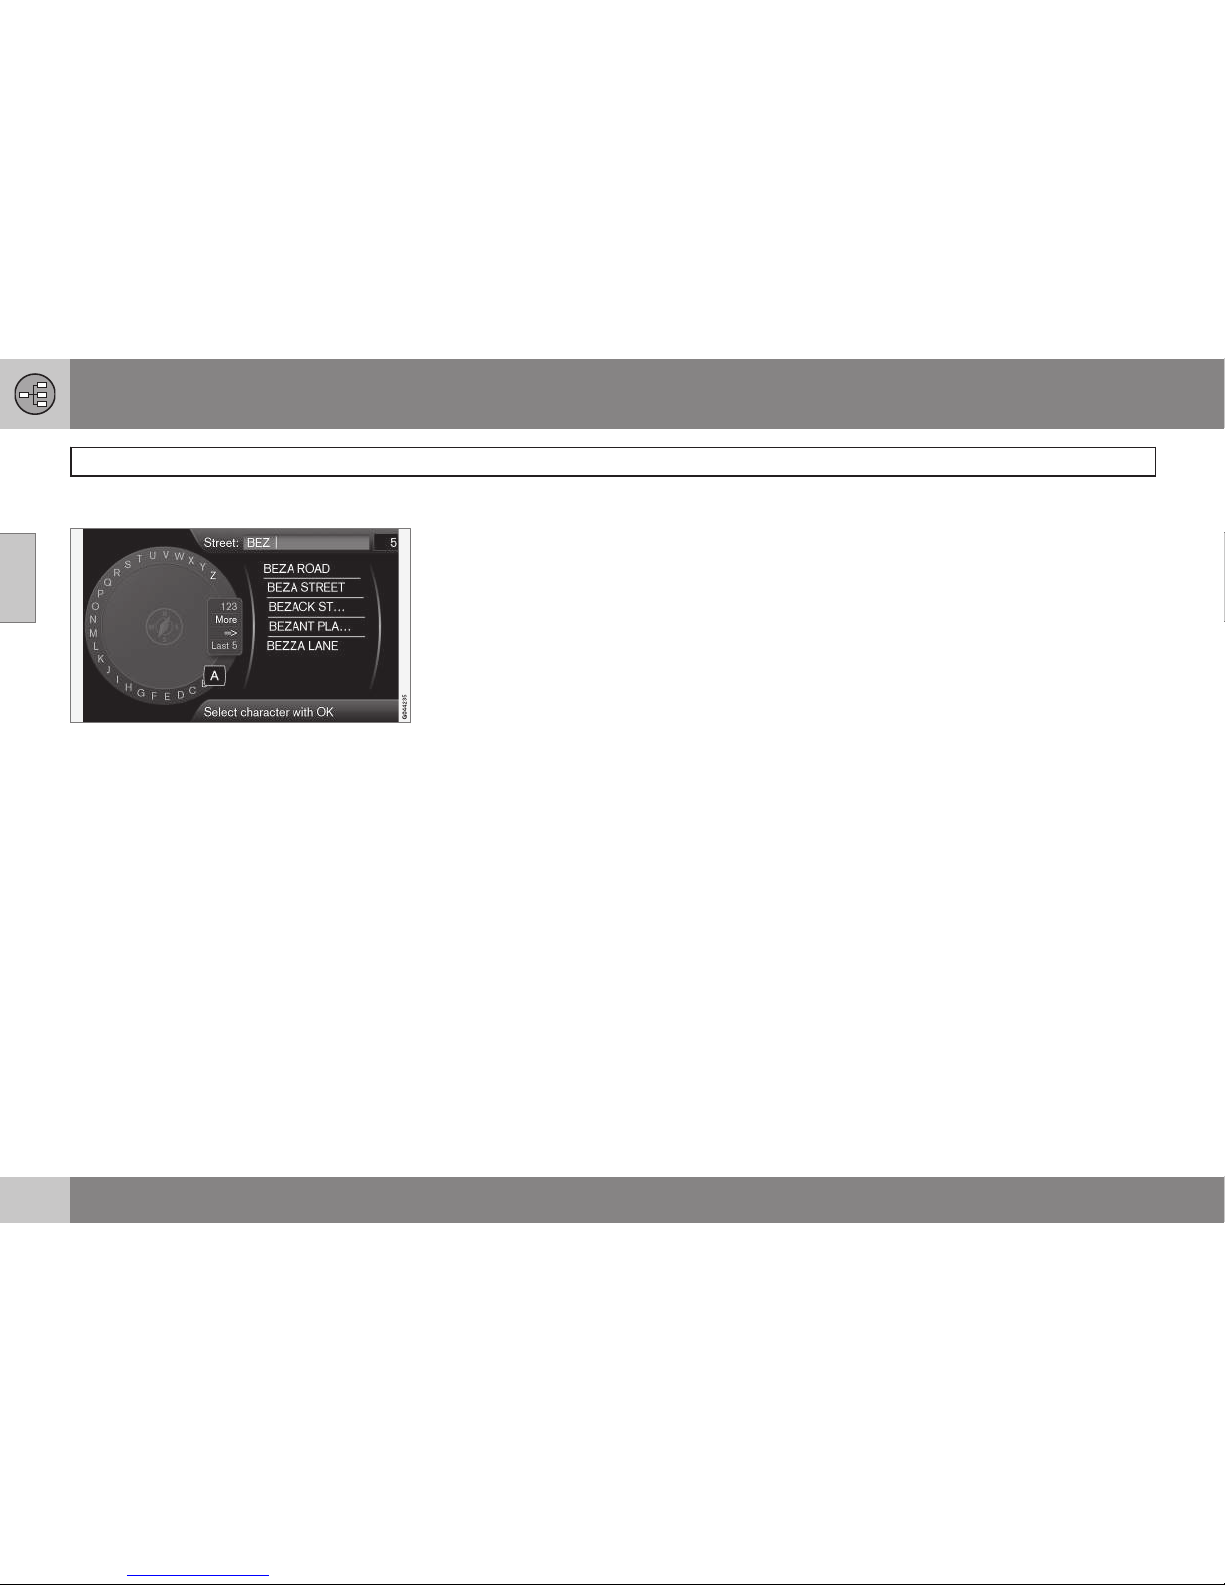
List that matches entered characters.
The digit
5 in the screen's top right-hand cor-
ner indicates that the list contains 5 possible
options that match the entered letters BEZ.
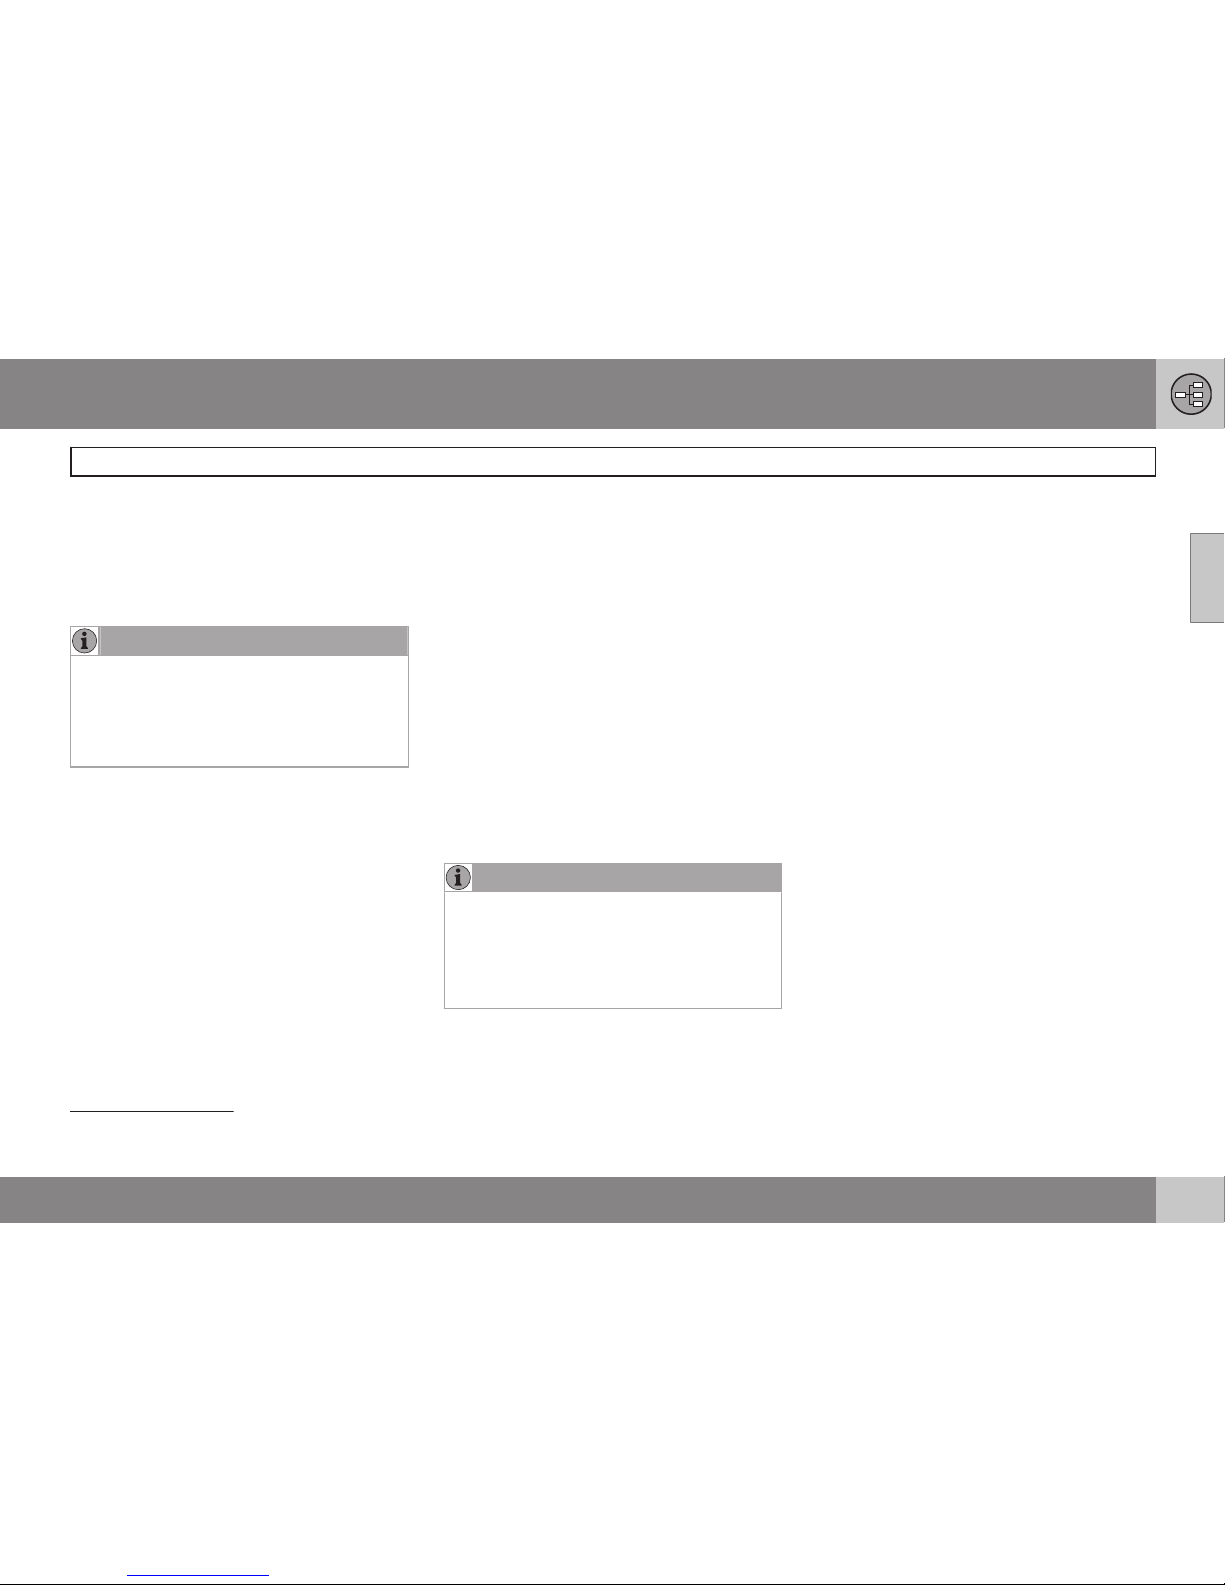
No list
An empty list and the characters *** in the
upper right-hand corner's digit window, mean
that the available options with current entered
characters are more than 1000 - when the
amount is less, the current options are shown
automatically.
To reduce the number of options in the list:
•
Enter more characters on the text line.
Page 29
02 Get to know your navigation system
DVD disc, screen
02
}}
27
DVD contents
DVDs with updated map data and related
enhanced information are being developed
continually. Contact a Volvo dealer for information on the latest issue.
NOTE
Map data does not have 100 percent coverage in all areas/countries.
The system's coverage area is under constant construction and updating may
sometimes be necessary.
See also www.volvocars.com/navi for further
information on maps etc.
Map areas
The car's map system varies depending on
market. The following main maps are available:
•
Australia & New Zealand (Pacific)
•
Europe
•
Hong Kong
•
Japan
•
China
•
Middle East
•
North America
•
Russia
•
South Africa
•
South America
•
Southeast Asia
•
Turkey.
Should you need to modify the navigation
system's map area - contact a Volvo dealer
for information on how to proceed.
Updating the map data
When updating, DVDs are used to transfer
new information to your car's navigation system. This is done using the car's regular DVD
player.
NOTE
•
A number of the Infotainment functions
are disabled or reduced during updating.
•
Before an update begins - read
through the instructions first.
In the event of any questions about updating
- contact a Volvo dealer.
License code
To be able to activate an update, a licence
code has to be entered first. This code can
be found on the Internet.
1.
Open the website1 "Activate your navigation system".
2. Enter your car's VIN number and the
owner's e-mail address in the relevant
entry fields, then click to close the website.
3. Note the licence code which is then displayed on screen. This licence code is
also sent to the specified e-mail address.
Updating
How to update the navigation system:
1. Start the engine.
2. Insert the first disc in the DVD player and
follow the instructions on screen. An
update is often distributed on several
discs2 - insert the discs in the logical/
numerical order.
1
The Internet address from which the licence code is generated comes with the update DVDs.
2
The number of discs depends on the market.
Page 30
02 Get to know your navigation system
DVD disc, screen
02
28
3.
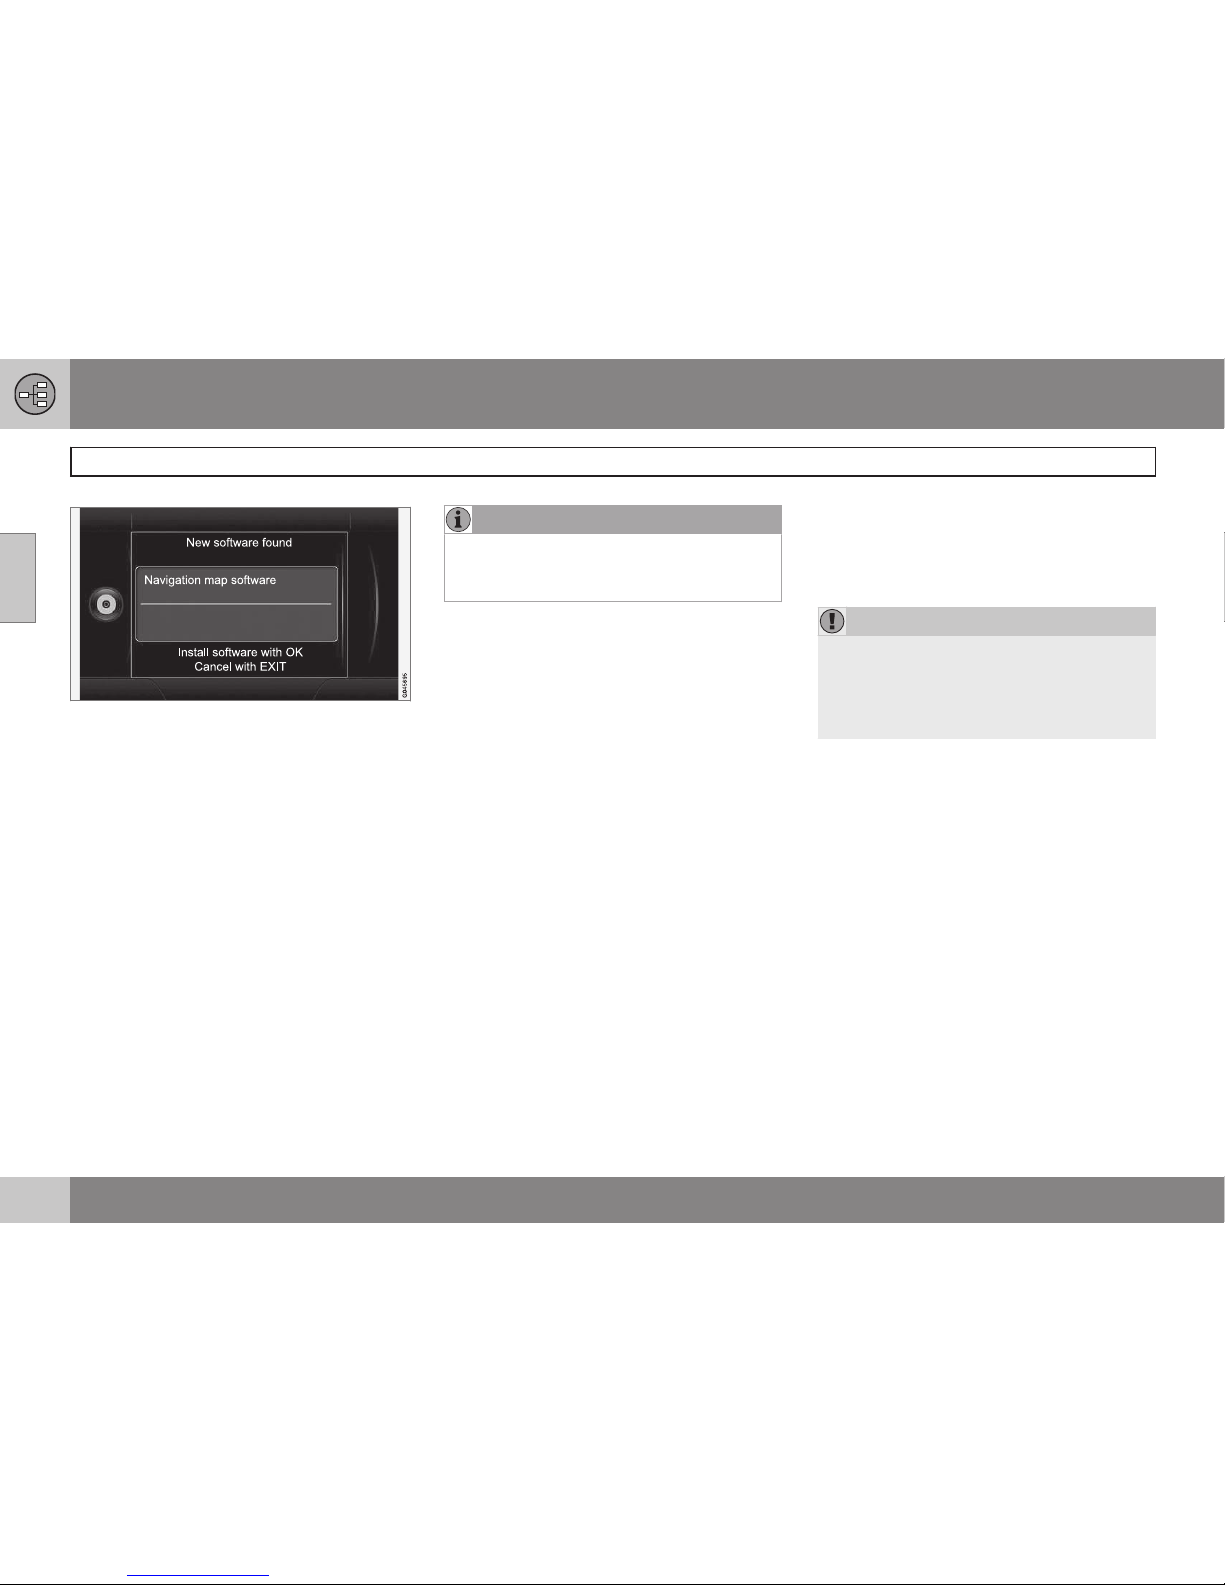
The screen shows
New software
found - start the update by pressing OK.
(Cancel by pressing EXIT).
4.
The screen shows
Please enter licence
code: - input the licence code using the
numeric keypad, see page 19.
5. Follow the instructions on screen, which
continuously show the progress of the
update and the approximate time remaining.
•
The update has to be enabled once all
DVDs have been loaded. This is done by
switching off the engine and waiting
5 minutes before restarting. The update is
then complete and the navigation system
can be used again.
NOTE
In certain cases updating map data may
also add new functions in the system,
which are not described in this manual.
Continue an interrupted update
If the update is not complete when the engine
is switched off, the process continues from
where it left off the next time you start the
engine. Proceed as follows to restart an interrupted update:
•
If the disc is inserted into the DVD player:
Start the engine - the update is resumed
automatically. Follow the instructions on
screen.
•
If the disc is removed: Start the engine
and insert the disc into the DVD player the update is resumed automatically. Follow the instructions on screen.
Care of DVD discs
Handle DVD discs with care.
When they are not in use they must be stored
in their packaging. Avoid storing them in
damp, high temperature, direct sunlight or
dusty surroundings.
Screen care
Clean the screen with a soft, lint-free rag,
lightly moistened with a mild window cleaning
agent.
IMPORTANT
Do not place any objects in front of the
GPS navigator's display screen - the surface could then be scratched. Mobile
phones can also interfere with the display
screen's function.
Page 31
02 Get to know your navigation system
DVD disc, screen
02
29
Page 32
02 Get to know your navigation system
Maps, road types and compass
02
30
NOTE: The images are schematic - some details may vary depending on software version and market.
Page 33
02 Get to know your navigation system
Maps, road types and compass
02
31
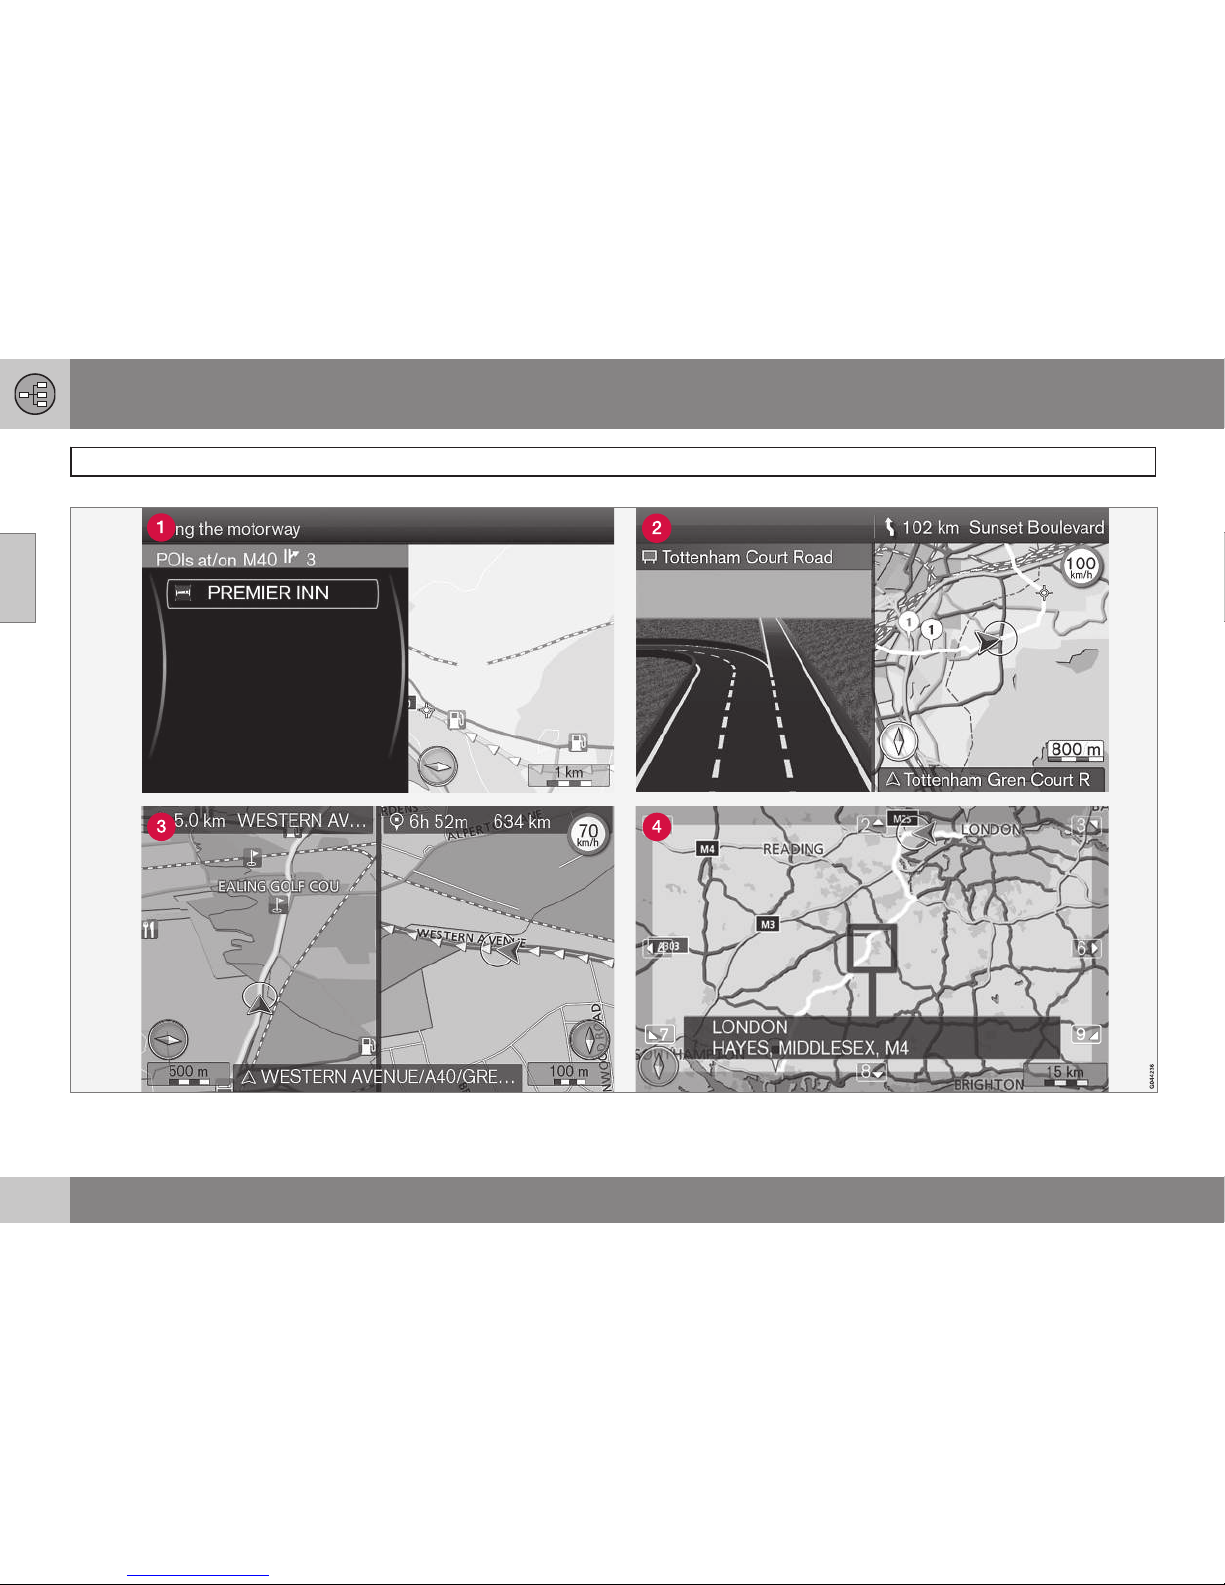
Map image of current position
The appearance of the screen image depends
on geographic position and the settings
made, e.g. map scale, facilities selected for
display etc.
Explanations for the text, signs and symbols
that may appear on the display are available
on the front of the cover.
POIs along the motorway - see
page 42.
Detailed junction map - the left-hand section of the display screen shows a
detailed enlargement of the next junction1. The situation is always supplemented with a voice message, see next section.
Two maps can be selected as display
mode. The screen shows the same map
image but in two different scales. 2D or
3D display can also be selected - see
page 53.
Scroll mode - see page 32.
Voice guidance
After a destination has been entered and the
car approaches a junction or exit, a voice
message sounds stating distance and type of
the next manoeuvre. At the same time a
detailed map of the junction is displayed. The
voice guidance message is repeated closer to
the junction.
The volume can be adjusted with the audio
unit's volume button (during ongoing voice
message).
To repeat a message:
•
Press twice on the OK button.
Also see
Settings Guidance options
Voice guidance - see page 55.
NOTE
There is no voice guidance during a current call with a Bluetooth-connected
mobile phone.
To select male or female voice and language:
•
Go to the menu system in MY CAR - see
the car's manual. The voice volume can
also be adjusted there.
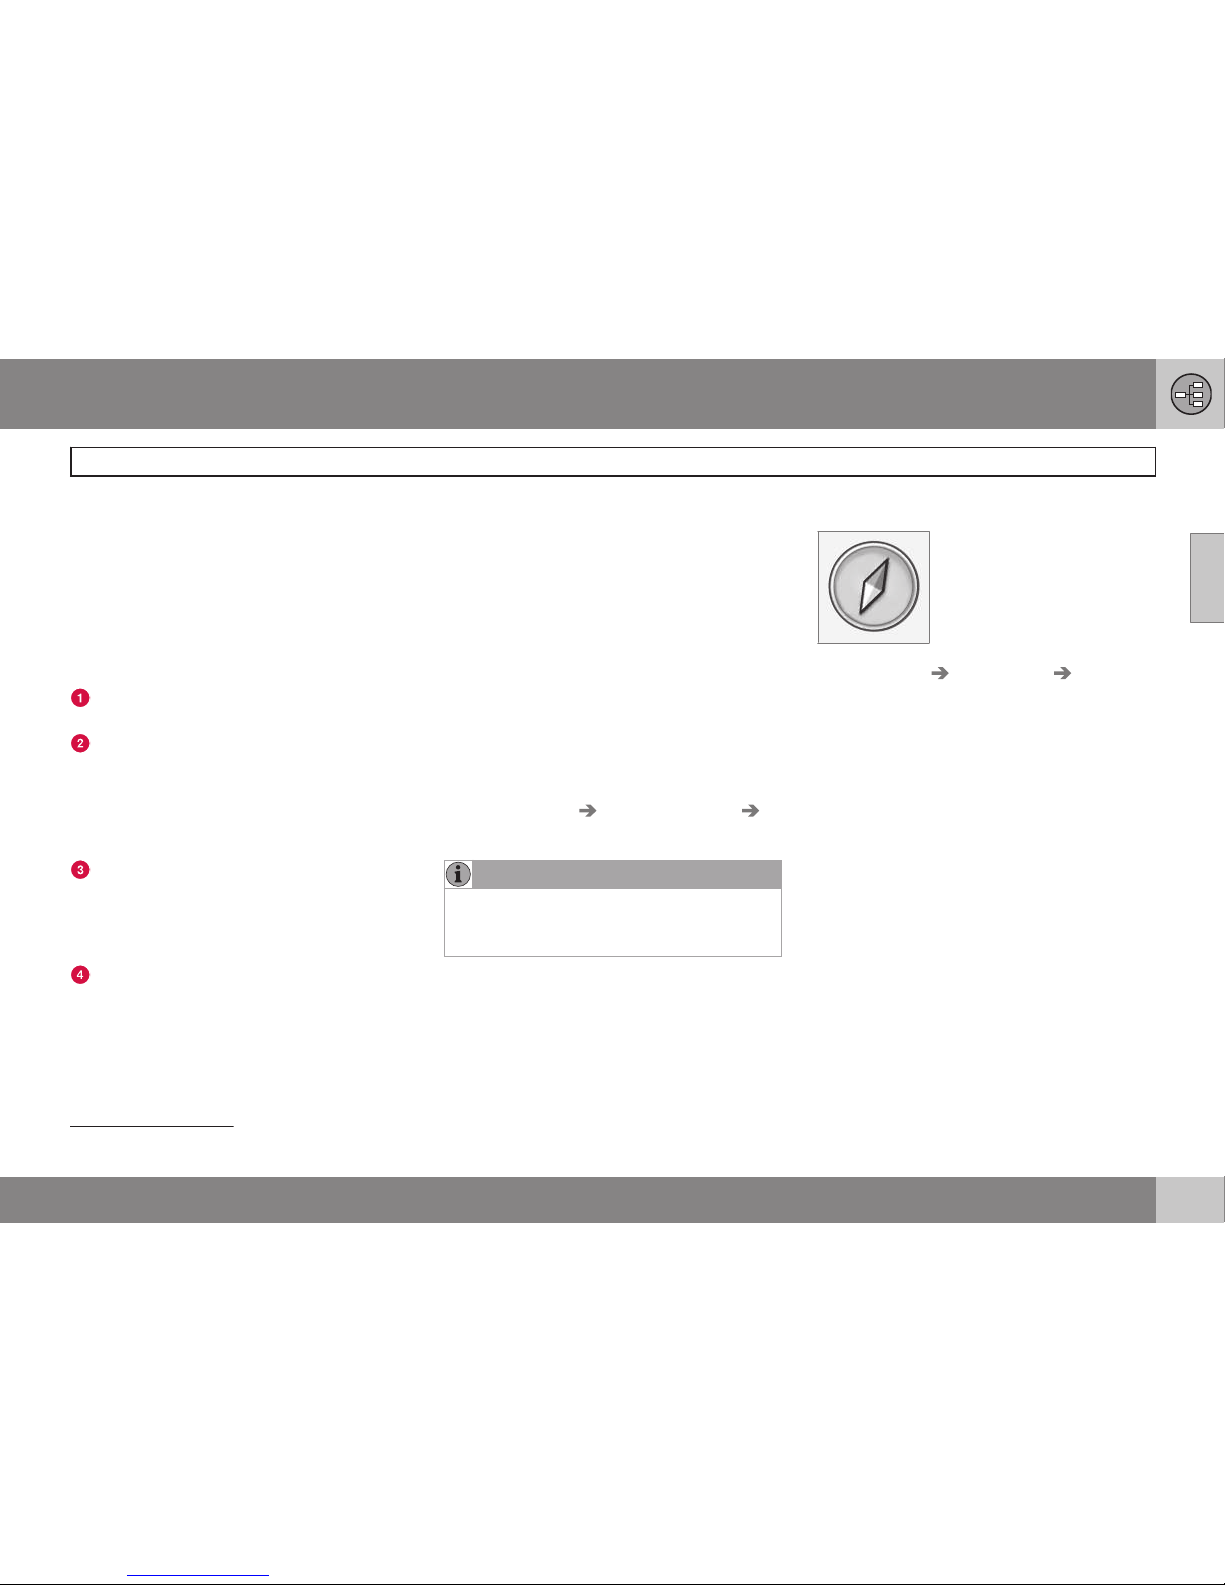
Compass
The red tip of the compass
needle points north and the
white end points south.
Go to Settings Map options Compass
to select a different view or so that the compass is not shown - see page 54.
1
This function can be expanded - see page 56.
Page 34
02 Get to know your navigation system
Menus
02
32
Menu system
All menus and options are presented in the
relevant section of the manual.
NOTE
Greyed-out menu bars and options on the
screen are temporarily not selectable.
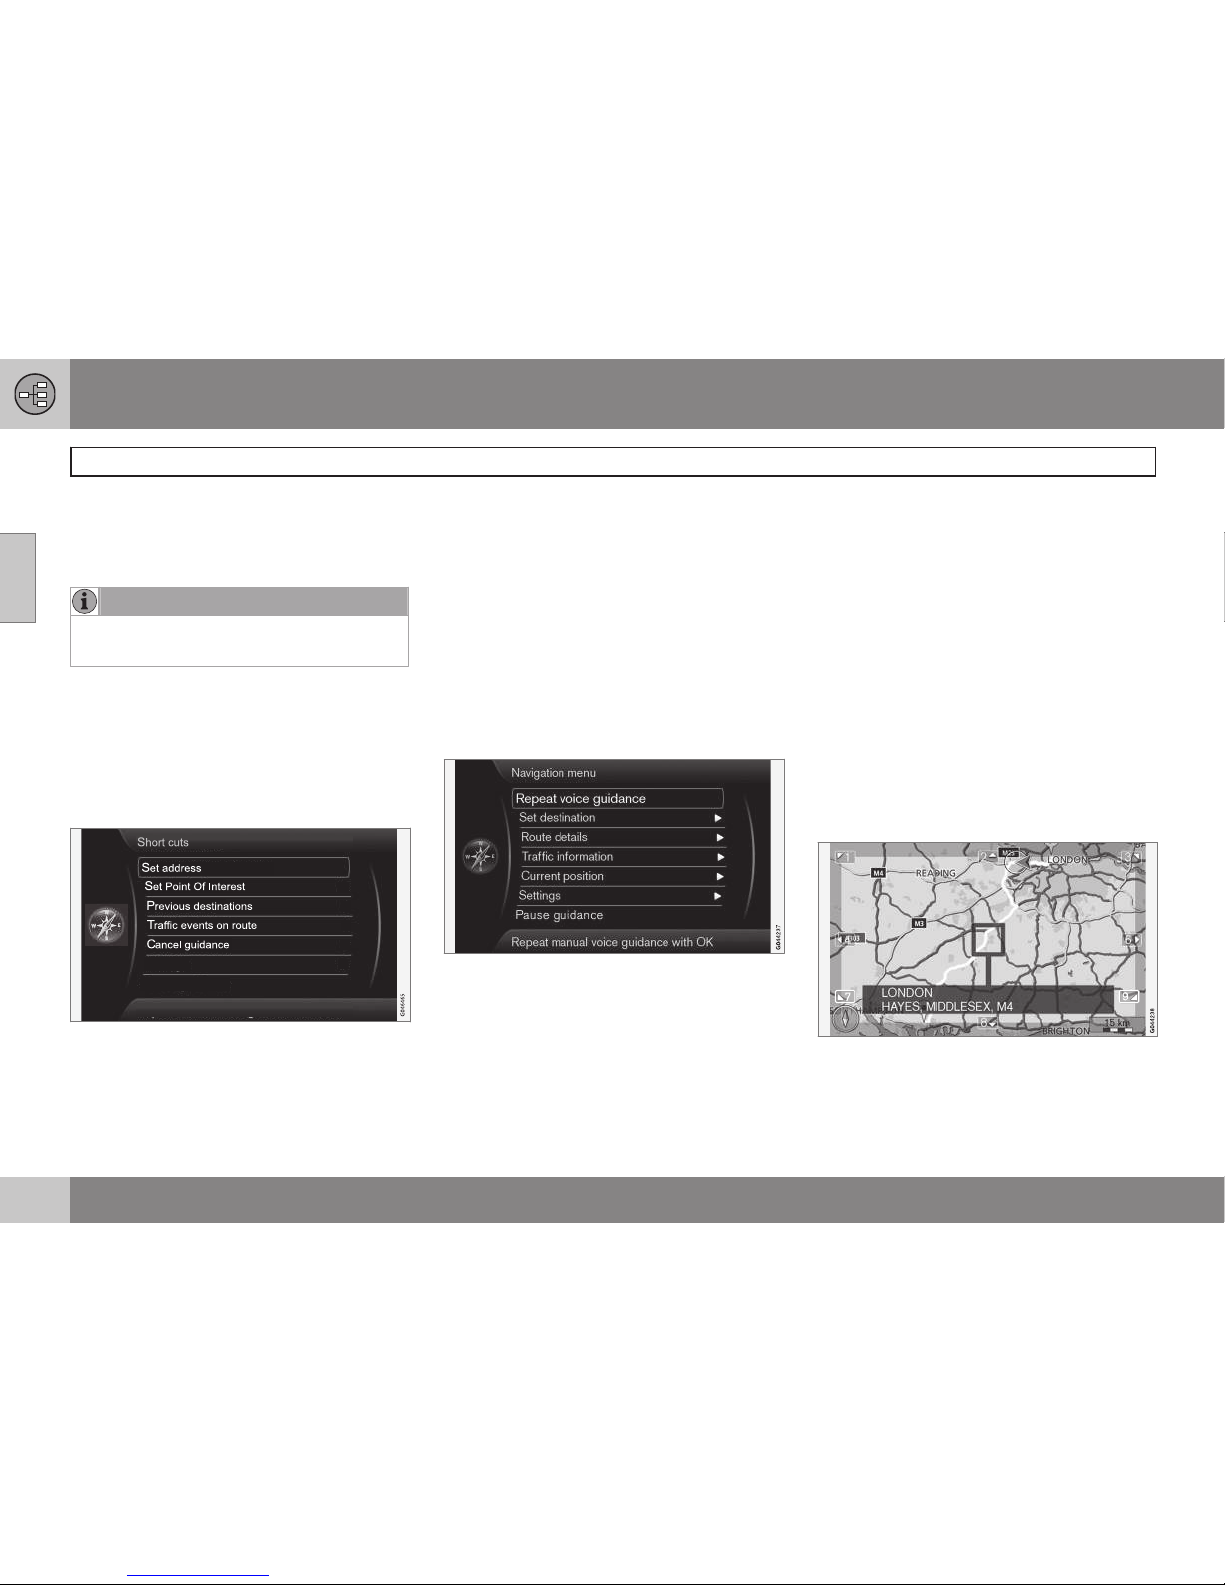
Shortcuts
After pressing the NAV button to start the
navigation system, the next press on the NAV
button will bring up the first menu for the
user, with shortcuts to the most frequently
used functions.
The shortcuts are:
•
Enter address – see also page 40.
•
Enter facility – see also page 41.
•
Previous destinations – see also page
44.
•
Traffic info on the route – see also page
68.
•
Cancel guidance – deletes the current
itinerary. Also located there is the option
Pause guidance, see page 33.
To the shortcuts from map mode
•
Press the NAV button.
Main menu
The main menu is located at the top of the
navigation system's menu tree.
To the main menu from map mode
•
Press the OK MENU button.
To the main menu from another menu
•
Press NAV and then OK MENU.
or
•
Press EXIT repeatedly until it is shown.
Back to the Main menu
Regardless of where the user is in the menu
structure, the Main menu can always be
accessed by pressing once or more on the
EXIT button.
Back to the map
There is an easy way to quickly bring up the
map on the screen again, no matter how
deep into the menu system the user is:
•
Hold in EXIT for a few seconds.
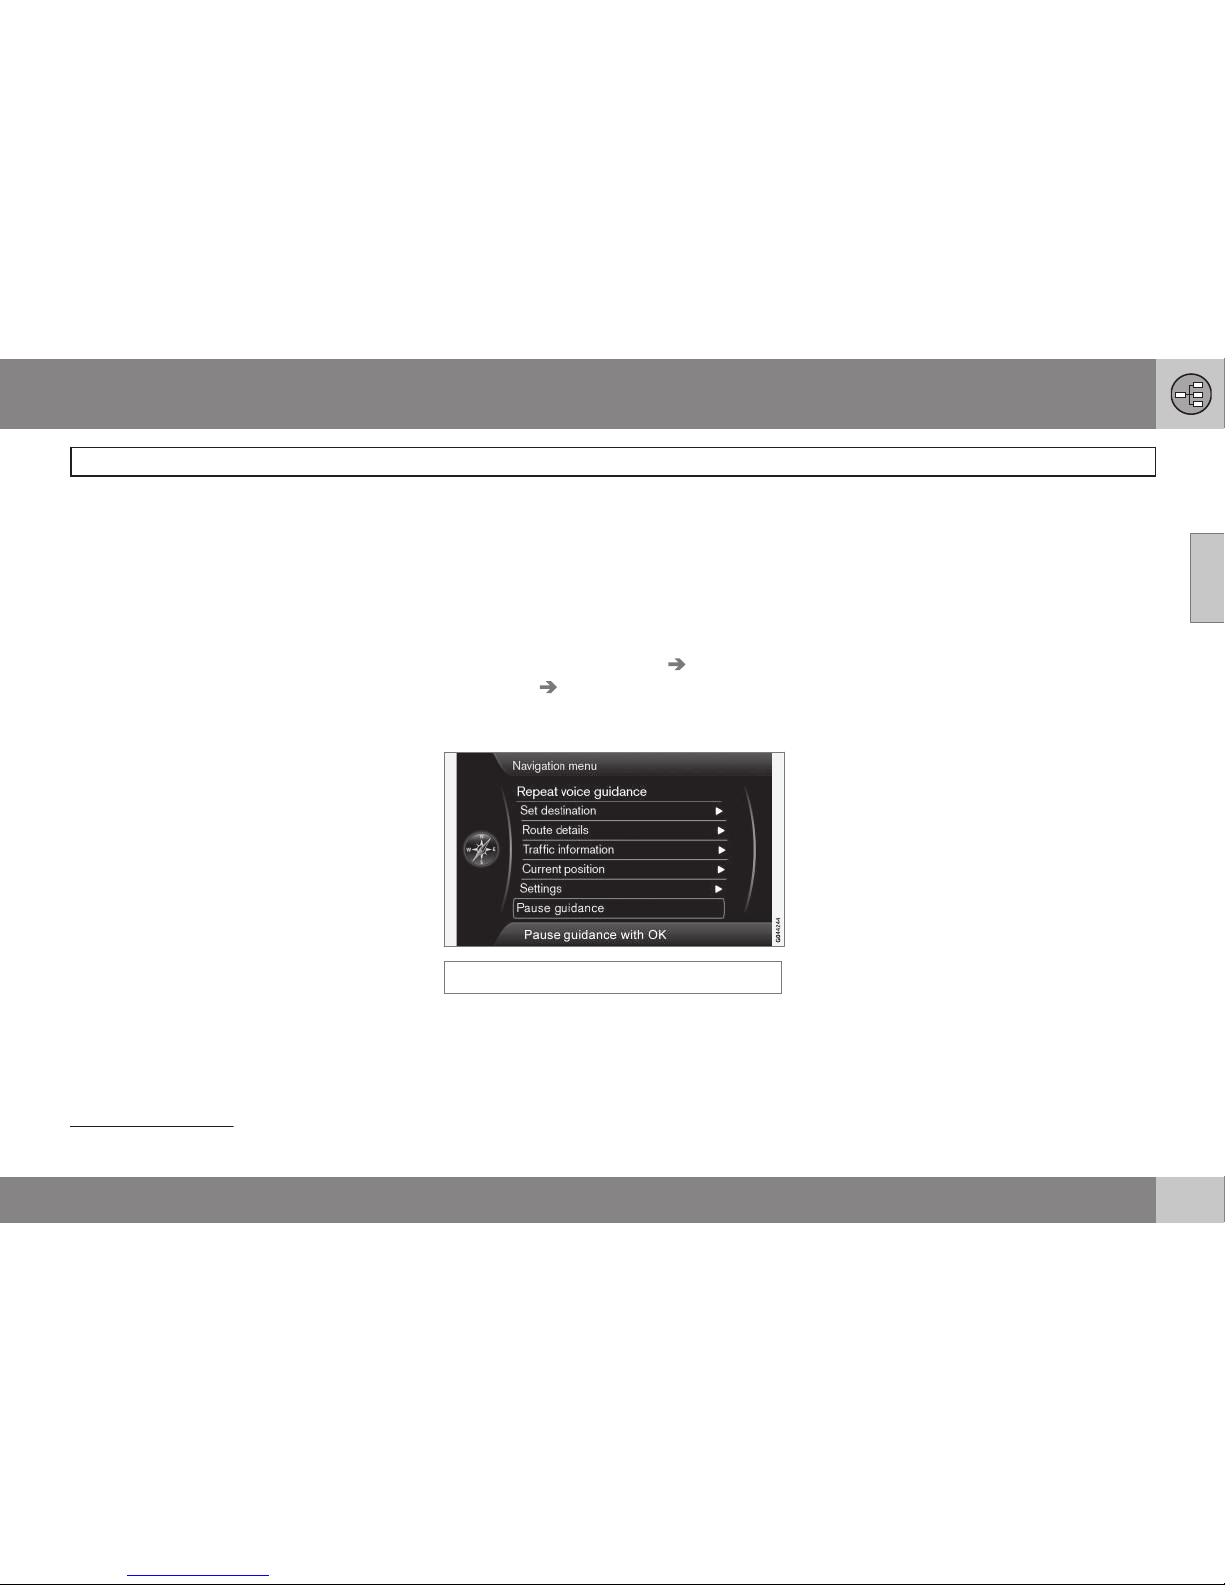
Scroll menu
In Scroll mode a crosshair is moved over the
map image with the centre console's numerical keys.
Page 35
02 Get to know your navigation system
Menus
02
33
Activating Scroll mode in normal map
mode
•
Press one of the numerical keys 0-9.
Scrolling
•
Press one of the numerical digit keys
1-2-3-4-6-7-8-9 - a directional arrow is
shown in the margins combined with the
number that will be used to scroll the
map in the desired direction.
Zooming out/in
•
Turn the TUNE knob.
Exiting from Scroll mode
•
Press EXIT.
Crosshair
Press OK MENU once to show a menu for
the point on the map, which the centre of the
crosshair points to:
•
Set single destination - Deletes any
previous destinations in the itinerary, and
starts guidance on the map.
•
Add waypoint - Adds the selected point
to the itinerary.
•
POIs nearby - Allows you to search/view
available facilities around the selected
location.
•
Read traffic message - Allows you to
view traffic messages1 around the
selected location.
•
Information - Shows information availa-
ble about the selected location.
•
Store location - Allows you to store the
selected location in the memory. (Opens
the menu
Set destination Stored
location
Edit - see page 44).
Pause guidance
Pause guidance
With the cursor on Pause guidance + OK
MENU the guidance can be switched off tem-
porarily after which neither visual nor acoustic
guidance is given - at the same time the
menu-bar changes to
Resume guidance.
However, the system's car symbol continues
to show the car's actual position on the map.
Resuming guidance
•
Select
Resume guidance + OK MENU.
1
The service is not available for all areas/markets/states.
Page 36

02 Get to know your navigation system
Menu tree in three levels
02
34
Shown here are three of the menu tree's levels. Several of the menus at level 3 have further submenus - these are described in more
detail in each respective section.
The menus are structured as follows:
Menu level 1
Menu level 2
Menu level 3
Menu level 4
p. x
Menus and functions
Repeat voice guidance
page
31
Set destination
page
40
Address
Area:
City:
Street:
Number:
Junction:
Set single destination
Add as waypoint
Information
page
40
Point of interest (POI)
By name
Near the car
Along the route
Around point on map
Along the street
Along the motorway
MyPOI near the car
MyPOI around
point on map
page
41
Stored location
Set single destination
Add as waypoint
Information
Edit
Sort by
Delete
page
43
Previous destination
Set single destination
Add as waypoint
Information
Store
Delete
Delete all
page
44
Return trip
Start guidance
Add as waypoint
Edit itinerary
page
45
Postcode
page
45
Page 37
02 Get to know your navigation system
Menu tree in three levels
02
}}
35
Latitude & longitude
page
46
Select point on map
page
46
Route details
page
47
Itinerary
Start guidance
Add another waypoint
Edit itinerary
page
47
Avoid
page
48
Next destination
page
48
Route instructions
page
49
Map of entire route
page
49
Map of remaining route
page
49
Start demo
or
Stop demo
page
60
Traffic information
A
page
64
Read traffic message
page
66
Traffic events on route
or
Traffic events ahead
page
68
Avoided traffic events
page
68
Current position
page
50
Settings
page
51
Traffic information
A
Traffic message
page
51
Route options
Route type
Route proposals
Customise route
Route learning
Reset route learning
page
51
Map options
Map colours
Show dual map mode
Single map settings
Right map settings
Left map settings
POI on map
Show full-screen map
POI on map
Compass
Show current
road name
Show speed limits
B
page
53
Page 38

02 Get to know your navigation system
Menu tree in three levels
02
36
* Option/accessory, for more information, see Introduction.
Guidance options
Voice guidance
Voice output volume
Street names in
voice guidance
Turn-by-turn
navigation *
Time of arrival format
Always show
intersection map
MyPOI Alert
page
55
System information
GPS information
Map version:
Map loading progress
page
56
Import/edit MyPOI
page
57
Reset navigation settings
page
58
Delete all user data
page
58
Pause guidance
or
Resume guidance
page
33
A
Not available in all areas/markets/states.
B
Not in cars with Road Sign Information (RSI – Road Sign
Information).
Page 39
02 Get to know your navigation system
02
37
Page 40

38
Specify a destination............................................................................... 40
Itinerary................................................................................................... 47
Current position...................................................................................... 50
Settings................................................................................................... 51
Simulation............................................................................................... 60
Page 41

P L A N N I N G Y O U R T RIP
Page 42
03 Planning your trip
Specify a destination
03
40
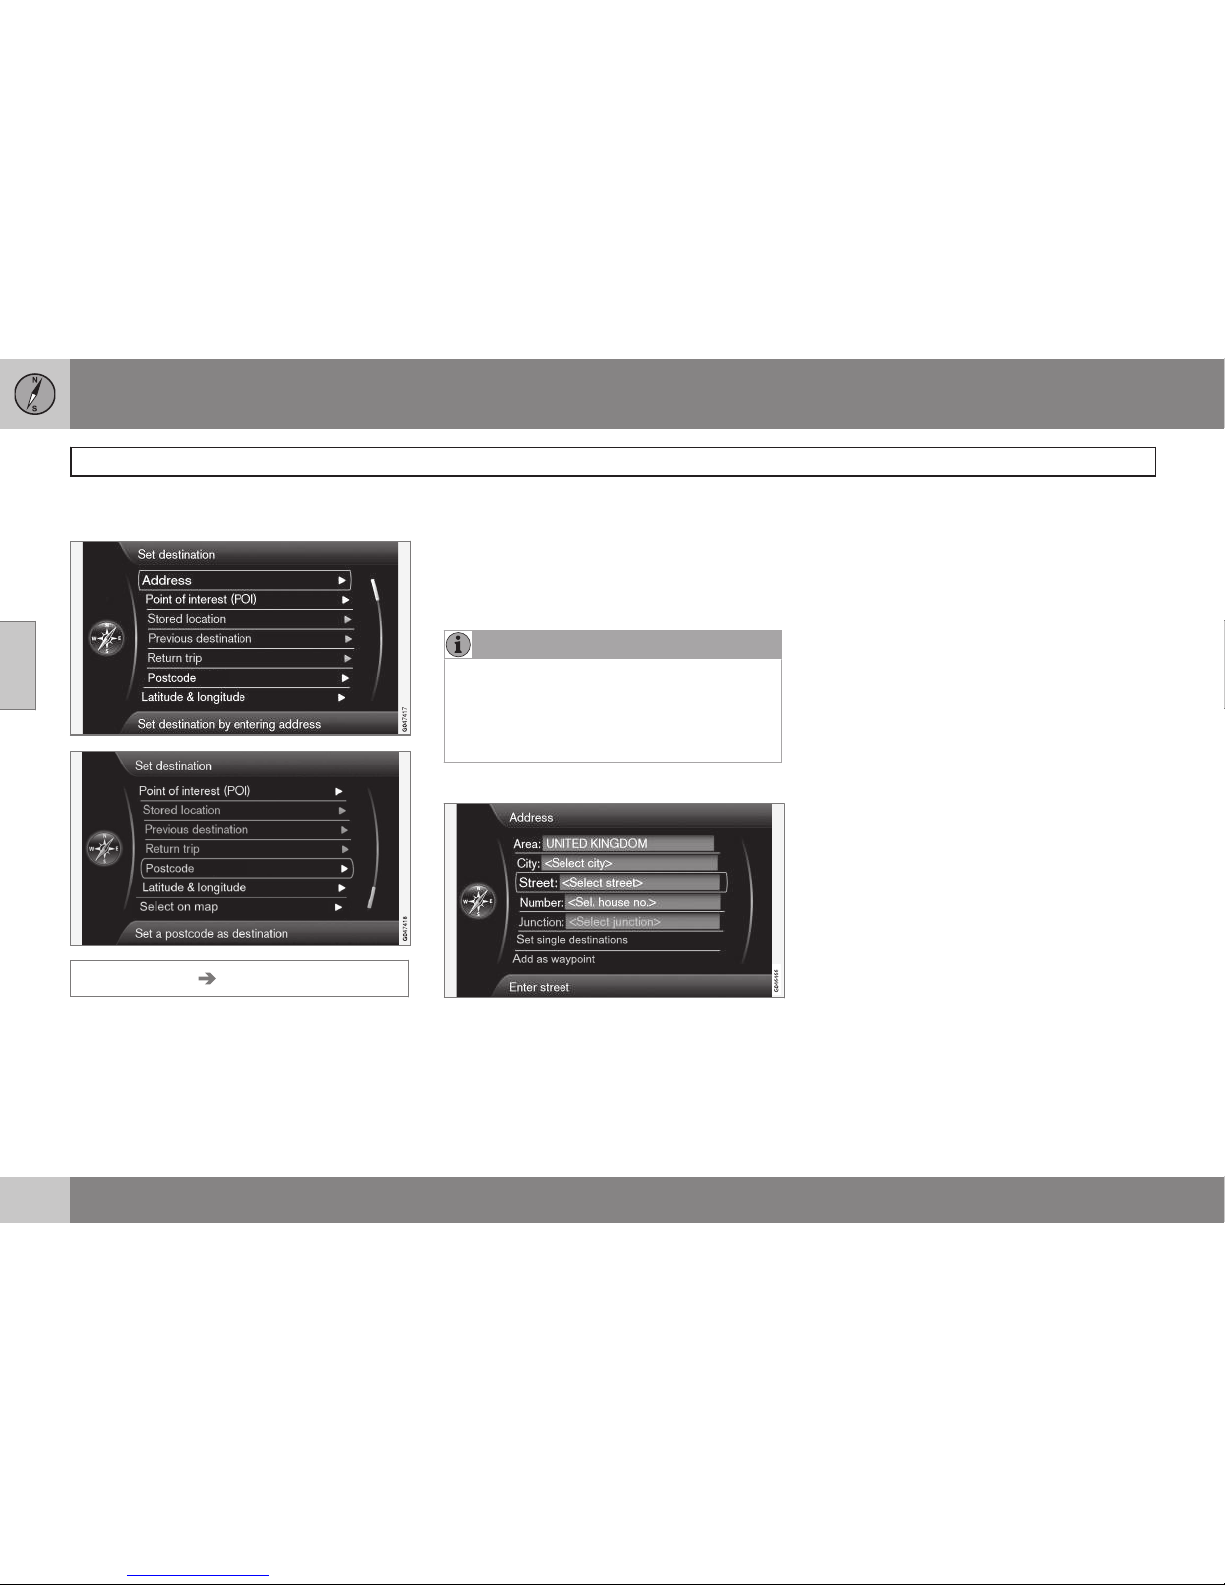
Address
Set destination Address
There are several different ways to program a
destination.
It is sufficient to simply specify a district/city
and start the journey - it leads to the centre of
the district/city.
If a destination's latitude and longitude are
known then these can be entered.
See page 25 for information on how characters are written/entered into the system's various text fields.
NOTE
The definition of city or area may vary from
country to country and even within the
same country. In some cases, it refers to a
municipality and in others it refers to a district.
City or street
The cursor first rests on Street.
How to search and locate a destination:
1. With the previous image view on the display screen - Press OK to activate the
preset text box.
2.
Enter the street's name
Street: with the
"daisy wheel" (see page 25) and then
select a desired City:.
3.
Or
City: + OK and start by entering it.
The following search criteria can be used:
•
Area: - Enter a country.
•
City: - Enter a district/city.
•
Postcode: - Under City: the search can
also be made using a post code.
•
Street: - Enter the street address.
•
Number: - Select one of the street's
house numbers.
•
Junction: - Select a destination based on
where the two streets/roads intersect.
•
Set single destination - Deletes any
destinations in the itinerary and starts
guidance to the current destination.
•
Add as waypoint - Select + OK to add
the address to the itinerary.
•
Information - Select + OK to view infor-
mation about the selected destination.
Page 43
03 Planning your trip
Specify a destination
03
}}
41
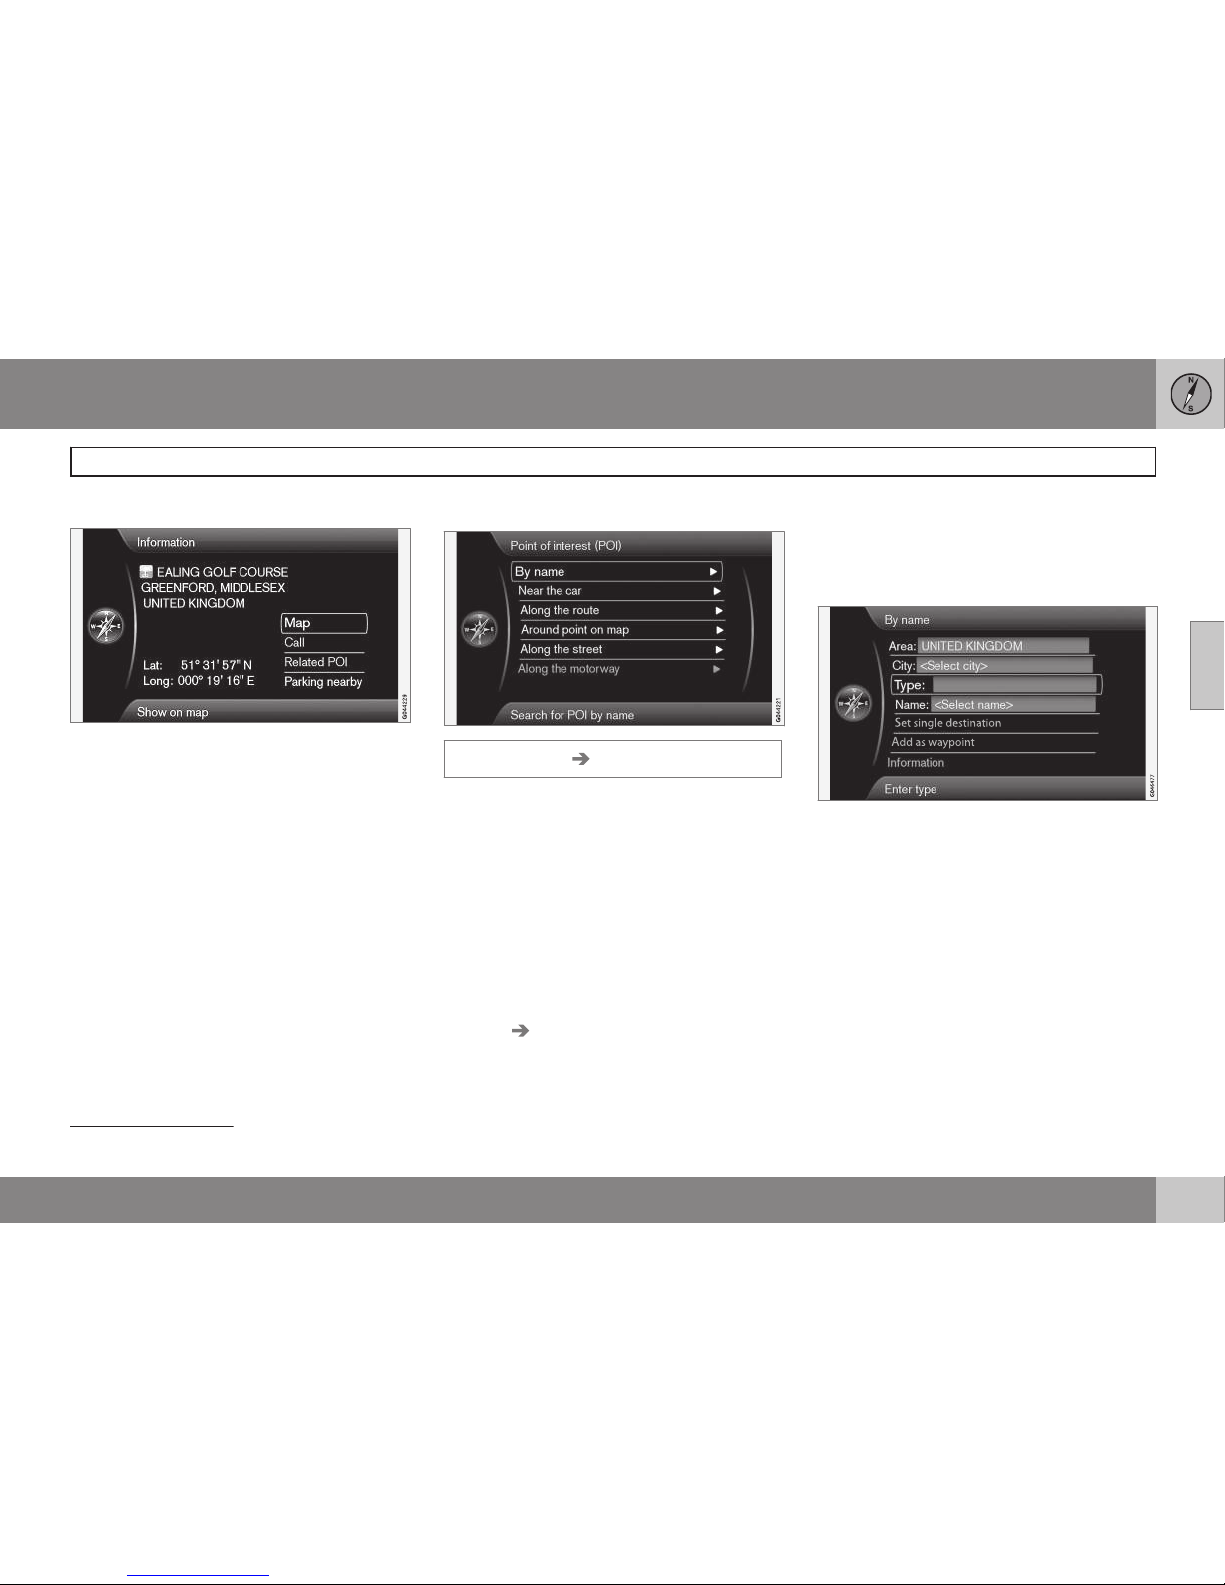
More about Information
Select an address/street + OK - then the following can be selected:
•
Map - Shows where on the map the loca-
tion can be found - sometimes with additional information.
•
Call
1
- Calls the facility if a telephone
number is given.
•
Related POI - Lists the facilities associ-
ated with the current/selected facility.
•
Parking nearby - Lists parking where
appropriate around the selected location,
with distance.
Facilities
Set destination Point of interest (POI)
The system contains a large number of
searchable facilities which can be specified
as destinations. The list of desired facilities
can be shortened by specifying which facility/
facilities the current search relates to:
•
Select
Type: and specify which facilities
should be covered by the search (it is the
same approach as described on page
54).
To select which facilities should be permanently visible on the map, go to the menu
Settings POI on map - see page 54.
All searches are made in the manner described in the previous section City or street:
1.
Specify
Area:/City:/Type:/Name:.
2.
Then select
Set single destination, Add
as waypoint or Information + OK.
With name
By name
In addition to searching with main group,
such as Restaurant, the company name of
the facility can also be used, e.g. "Peppes
Bodega". The procedure is the same as when
searching with Address, see page 40.
When searching with
Name: with e.g. "Lon-
don Airport", all combinations with "London"
will be shown when "Lo" is entered. The more
letters you input the more specific the reply.
A search with "Lo" also produces reply alternatives such as "Restaurant Lou Trivalou" for
1
Requires connected mobile phone.
Page 44
03 Planning your trip
Specify a destination
03
42
example, as alternatives containing several
words separated by spaces are also included
in the search.
NOTE
There are subcategories of restaurants to
simplify searches.
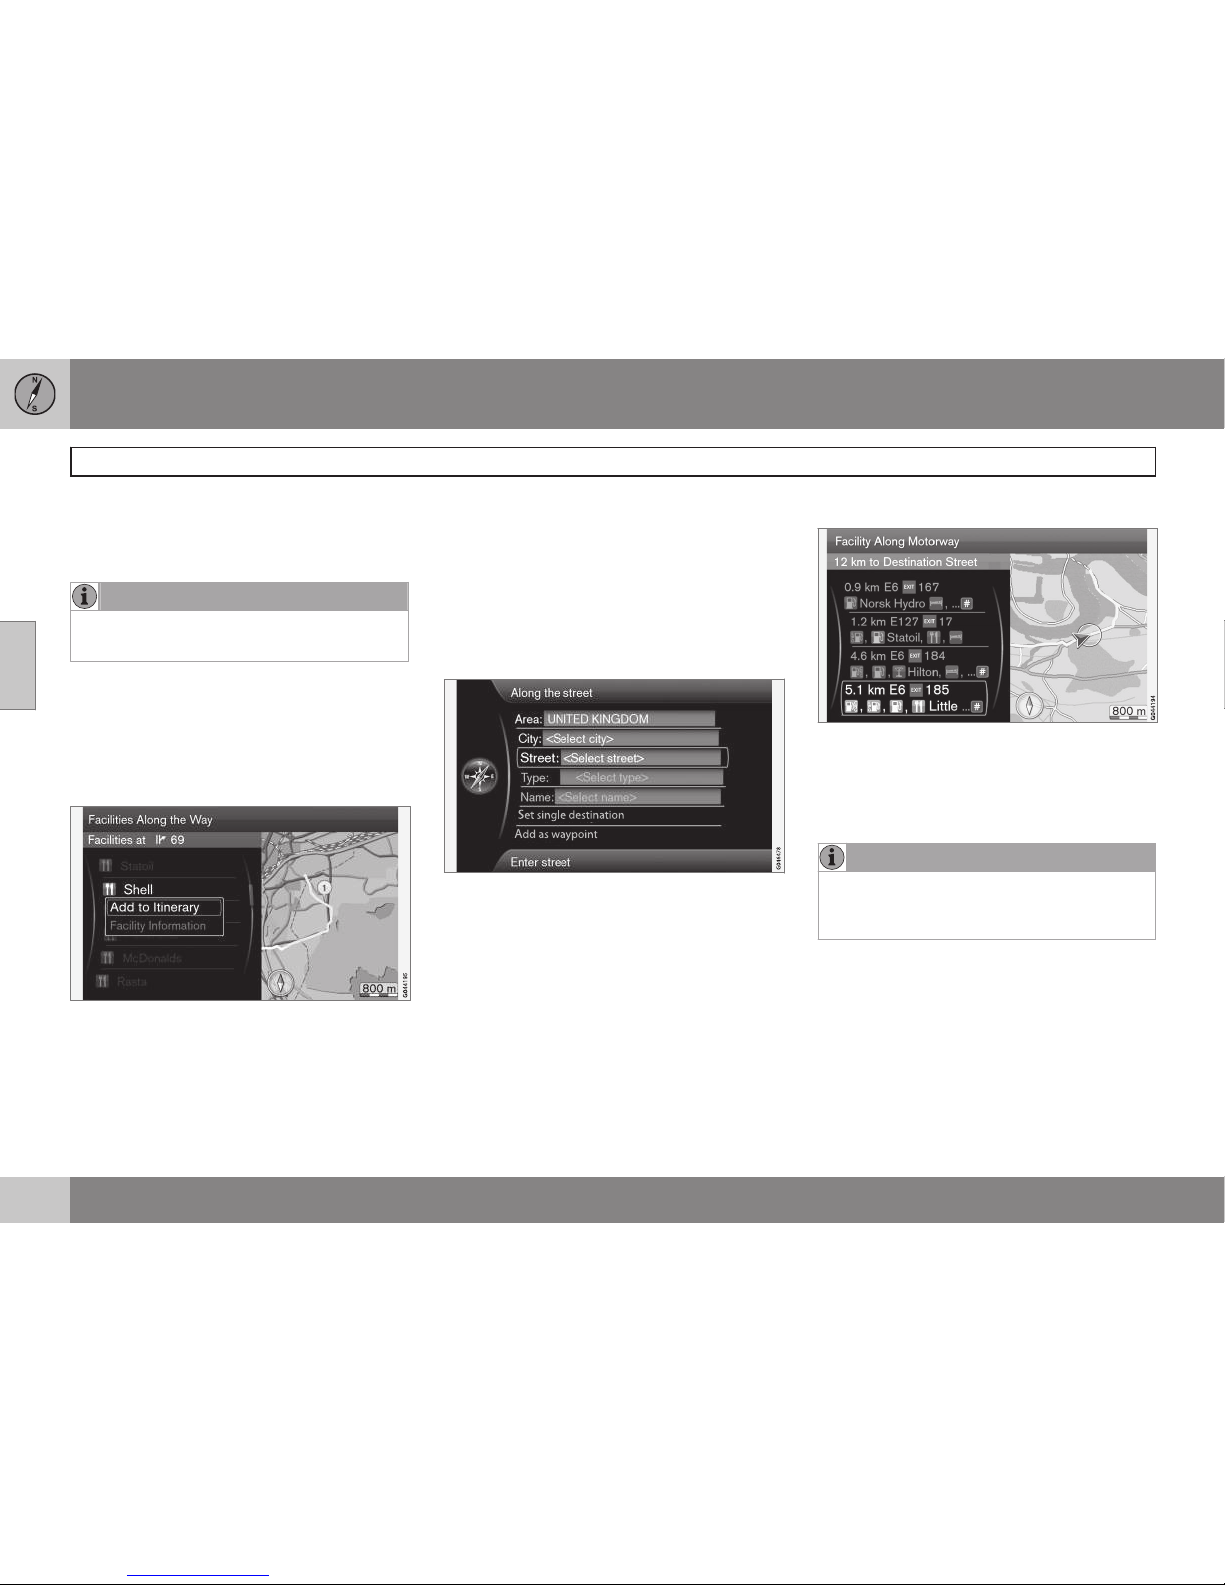
Around the car
Near the car
Search of facility refers to the area around the
car's current position.
Along the route
Along the route
Search of facility refers to the area along the
set itinerary.
Around point on map
Around point on map
Search of facility is made with the Scroll function crosshair - see page 32.
•
The scroll map is shown - place the
crosshair at the desired location + OK
Along the street
Along the street
Search of facility refers to the area along a
specific street/road.
Along the motorway
Along the motorway
This search lists the facilities easy to reach
from the motorway, e.g. service stations
along the motorway or at the exits.
NOTE
The car must be on the motorway in question for the list to be available for presentation.
Page 45
03 Planning your trip
Specify a destination
03
}}
43
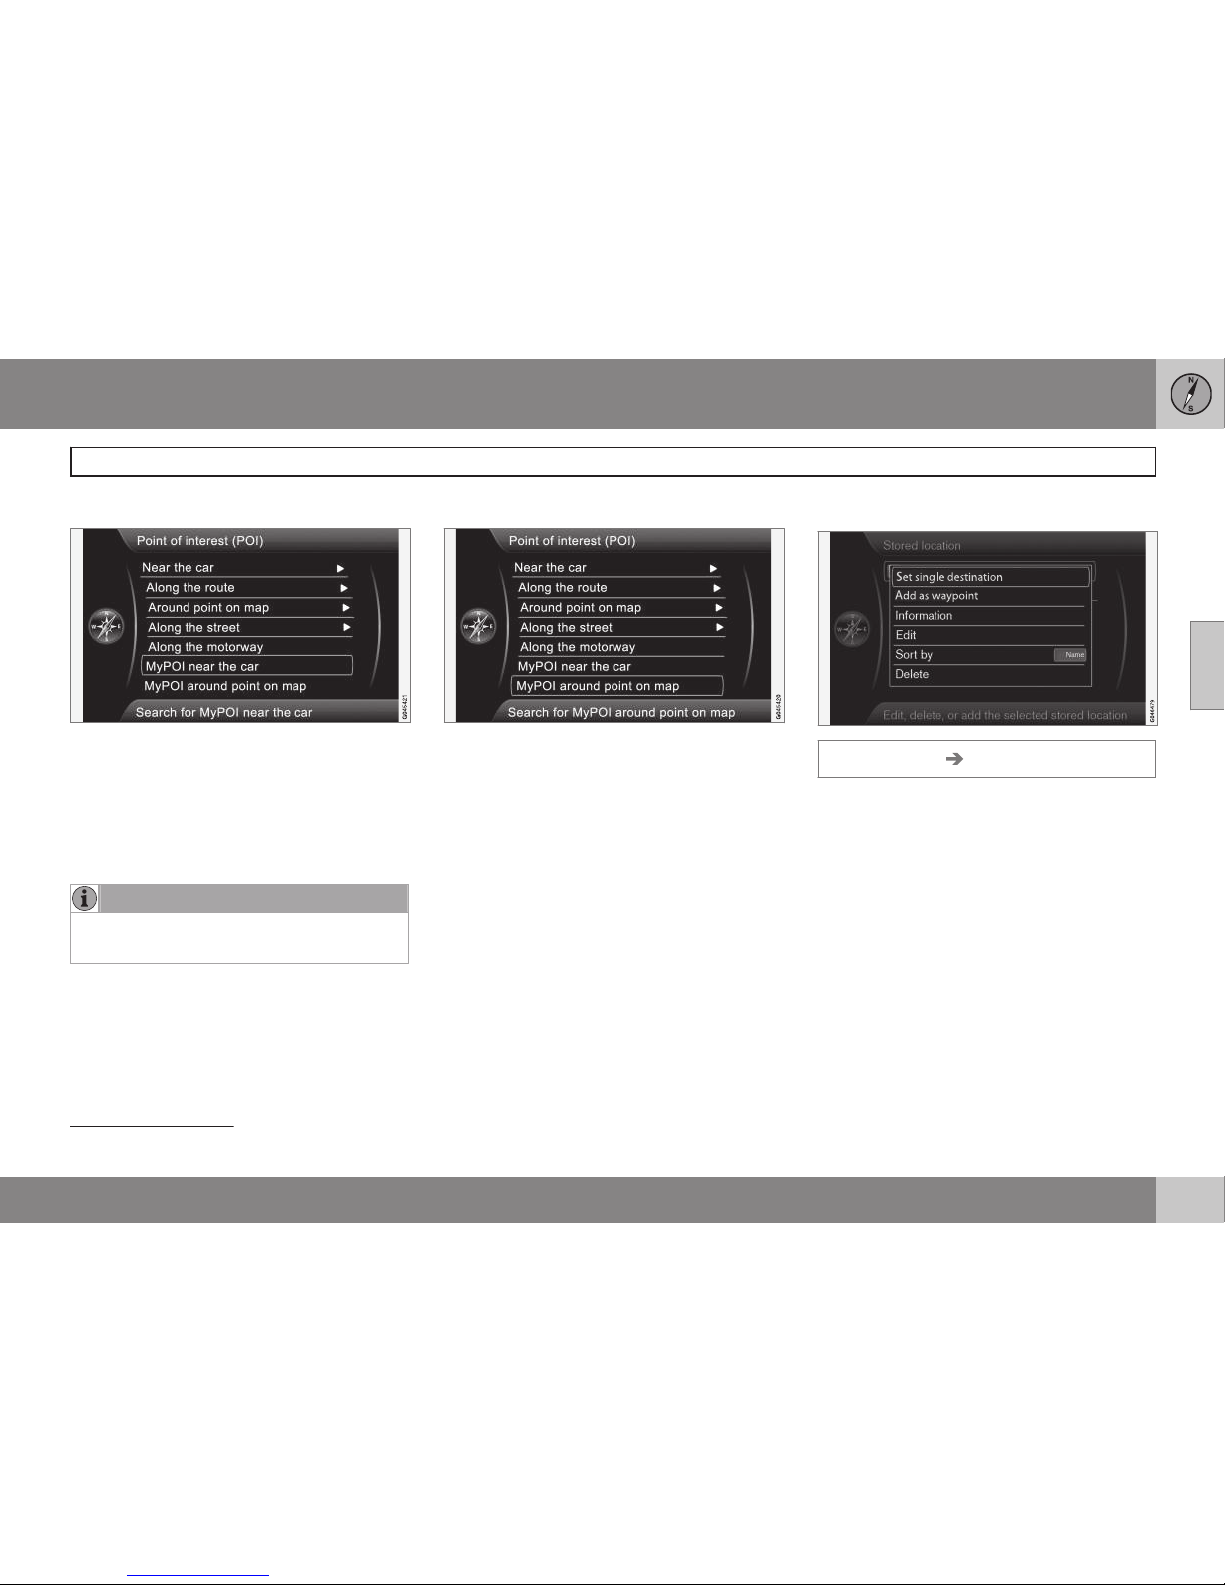
My POI around the car
MyPOI near the car
This function allows facilities that the user has
entered into the system - My POI2 - to be
searched for in the area around the car's current position. The search is made within a
radius of approx. 32 km.
NOTE
My POI icons are shown on the map from
and including scale "1.0 km" and lower.
My POI around point on map
MyPOI around point on map
Facilities that the user has entered into the
system - My POI2 - are searched for here
around the cursor position on the map. The
search is made within a radius of
approx. 32 km.
The search is made with the Scroll function's
crosshair - see page 32.
•
The scroll map is shown - position the
crosshair on the desired My POI + OK
Stored location
Set destination Stored location
The driver can store a large number of his/her
own locations in the system. They can then
be used to quickly draw up/supplement an
itinerary.
Storing a location
To store a chosen location:
1. Use the Scroll function (see page 32) and
select the location to be stored.
2. Press OK to display the "crosshair"
menu.
3.
Select
Store location + OK - now the
location is stored and is included in the
list Stored location.
2
For information about how individual facilities (My POI) can be added to the map database - see page 57.
Page 46
03 Planning your trip
Specify a destination
03
44
Mark a stored location in the list + OK and
choose between the following options/headings:
Set single destination
Set single destination
This option deletes any previous destinations
in the itinerary, and starts guidance on the
map.
Add waypoint
Add as waypoint
Opens the same window as for Set
destination
Address Add as waypoint
- see page 47.
Information
Information
Opens the same window as for Set
destination
Address Add as waypoint
Information - see page 41.
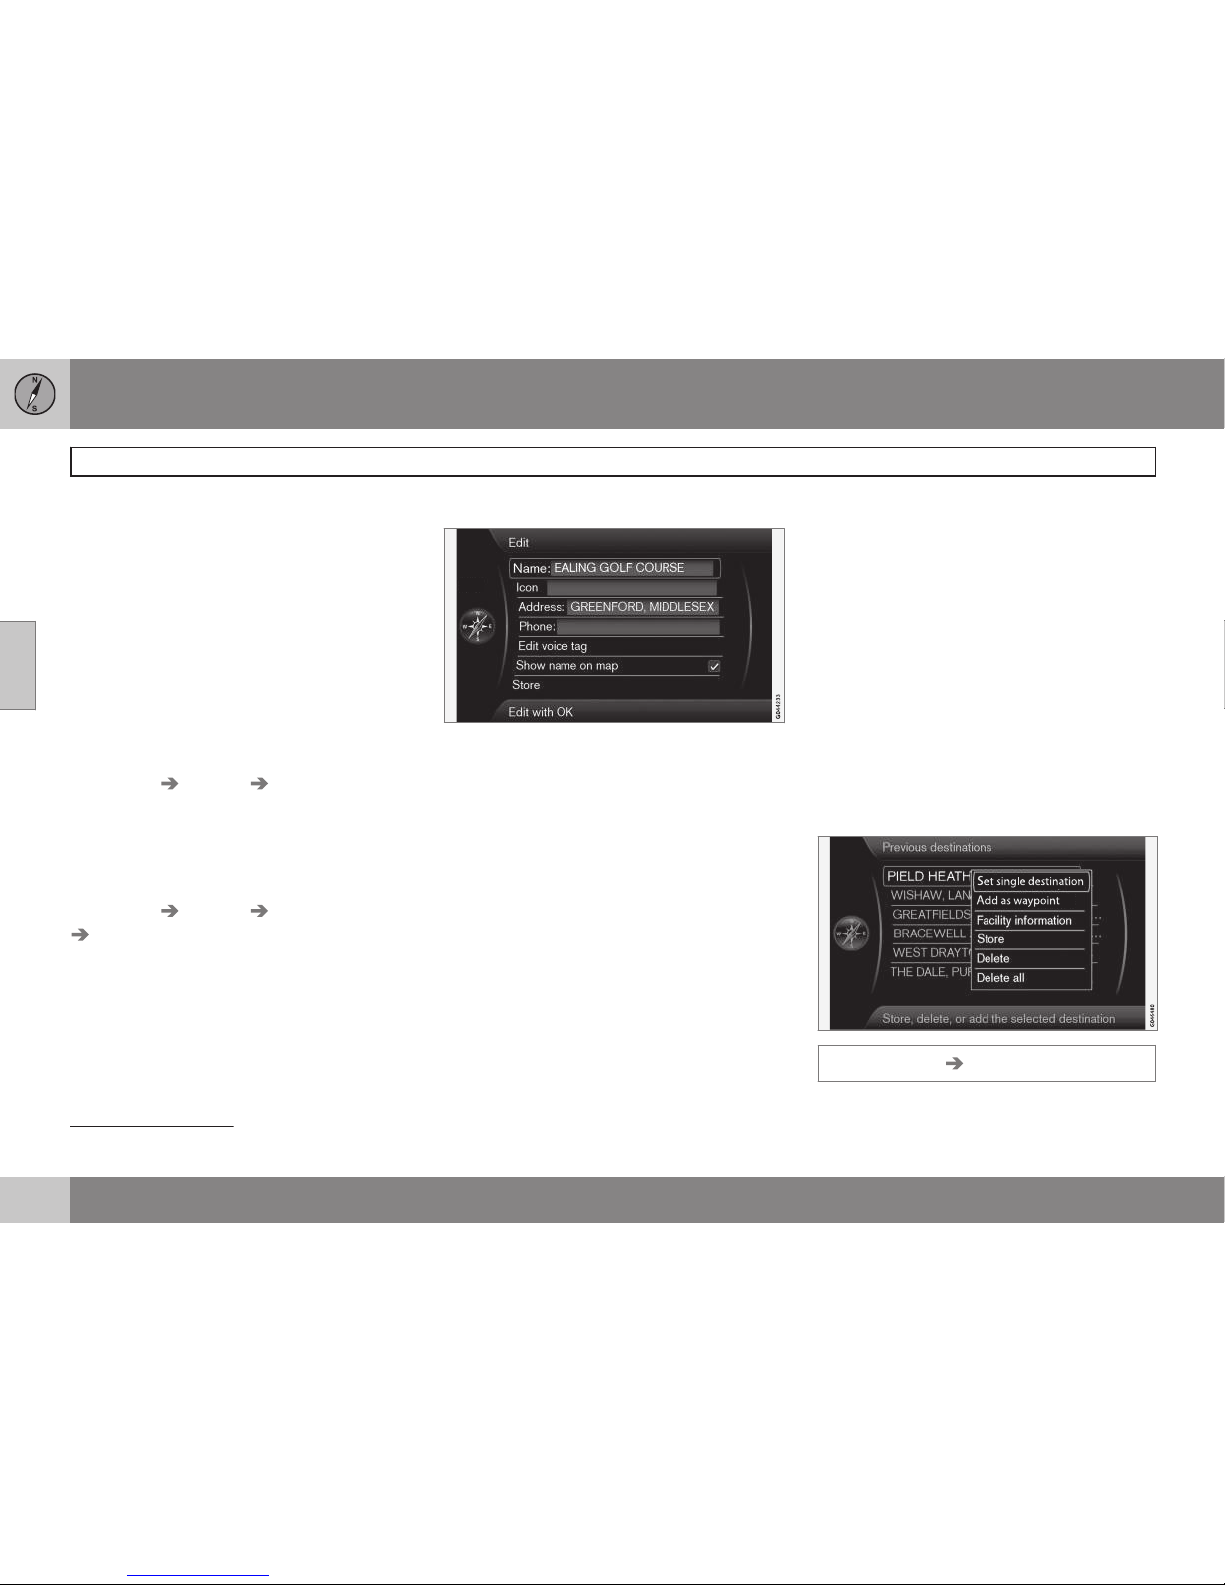
Edit
Edit
Opens selected "Stored location" and allows
you to change/update the following:
•
Name - Enter a name for the location.
•
Icon - Select the symbol to represent the
current location.
•
Address - Opens the map to adjust the
location's geographical position.
•
Phone: - Enter a telephone number.
•
Edit voice tag - Record own sound
3
.
Follow the on-screen instructions.
•
Show name on map - Untick if the loca-
tion name is not to be displayed on the
map.
•
Store - Save changes with OK.
Sort by
Sort by
Select whether stored locations are to be sorted by:
•
Name
•
Icon
•
Distance
•
Chronological
Clear
Delete
•
Delete a marked stored location.
Previous destinations
Set destination Previous destination
3
Only in combination with audio system "High Performance" or "Premium".
Page 47
03 Planning your trip
Specify a destination
03
}}
45
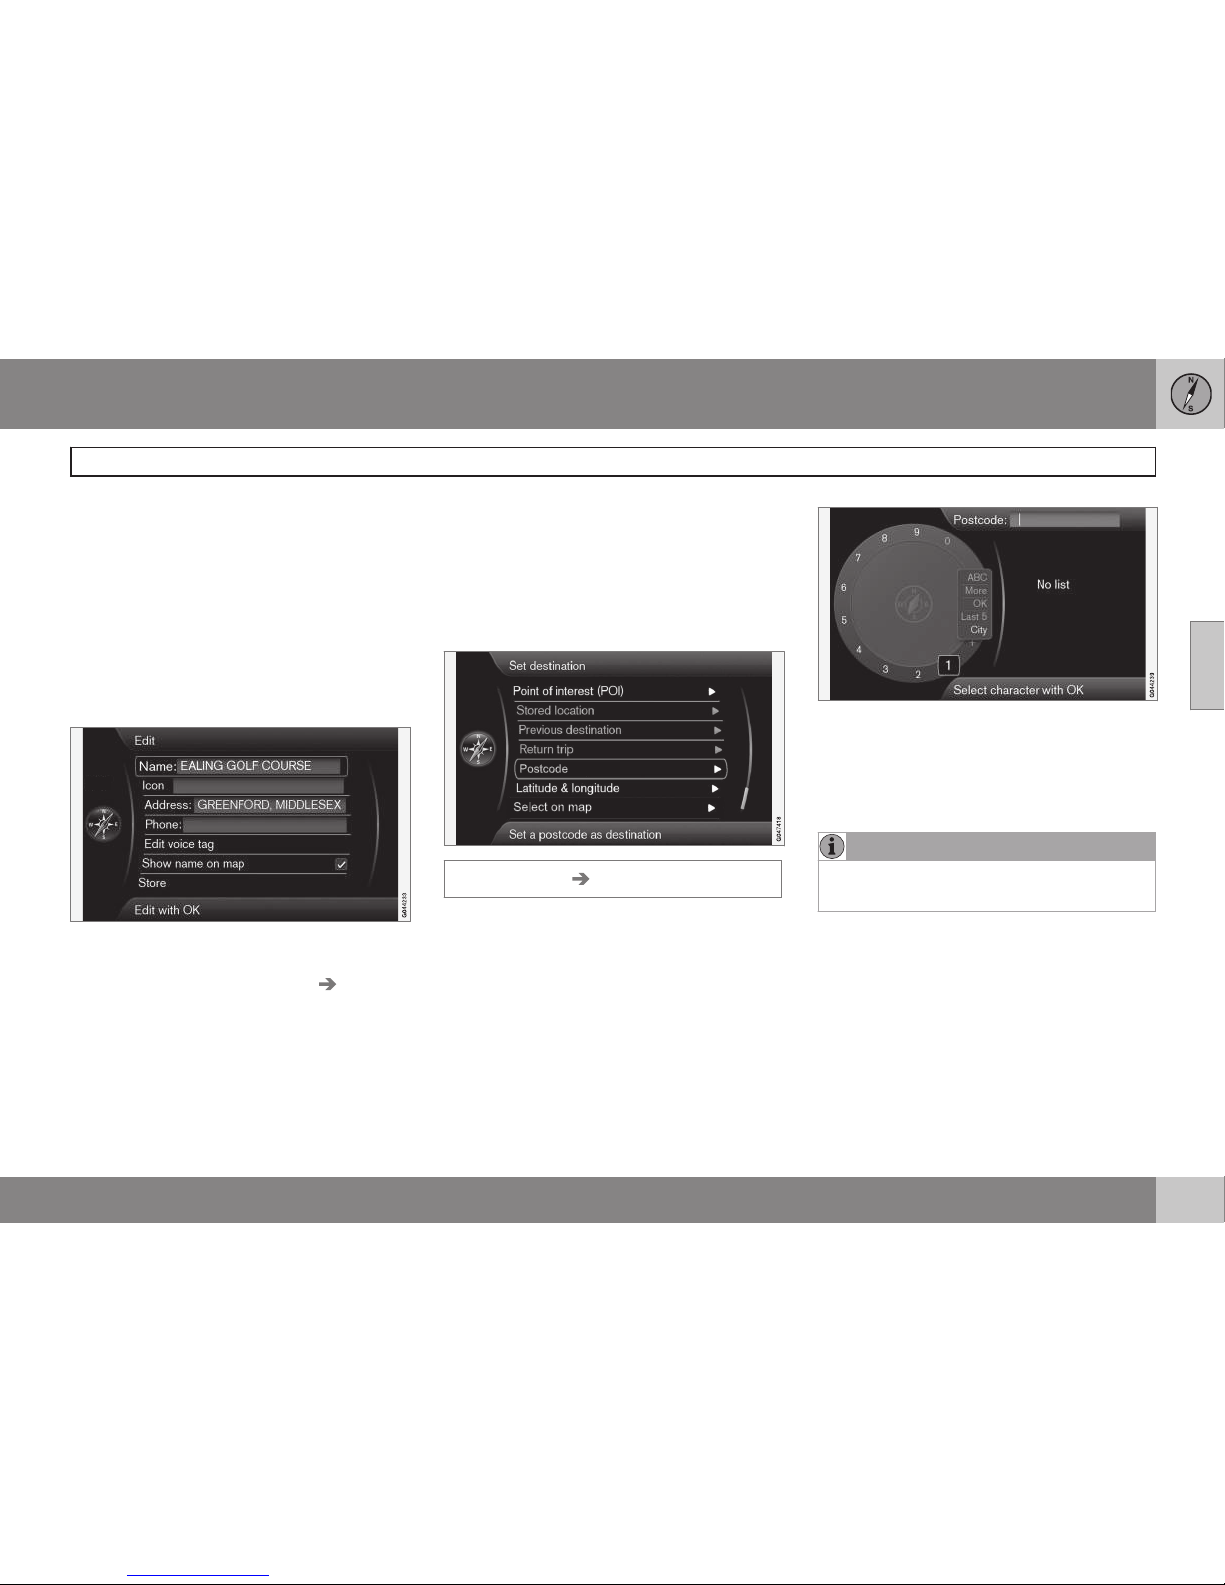
Previously used destinations are stored here.
Mark one of them and then select between:
•
Set single destination
•
Add as waypoint
•
Information
•
Store - see more about this option after
the next image.
•
Delete
•
Delete all.
The Store option presents this Edit menu.
The
Store menu option leads to the same
Edit menu as for
Stored location Edit.
For more information - see page 43.
•
To add/change information for the destination - Mark
Store + OK.
Return trip
Return trip
Goes back to the itinerary starting point. Can
be selected anywhere/anytime in the itinerary.
Post code
Set destination Postcode
Search destination by post code:
1.
Highlight
Postcode: + OK to view the
"daisy wheel".
2. Select characters with the TUNE knob
and type/enter them by pressing OK. (Or
type/enter characters using the centre
console's numerical buttons - see
page 25).
NOTE
Presentation of post code may differ
between different markets/areas.
Page 48
03 Planning your trip
Specify a destination
03
46
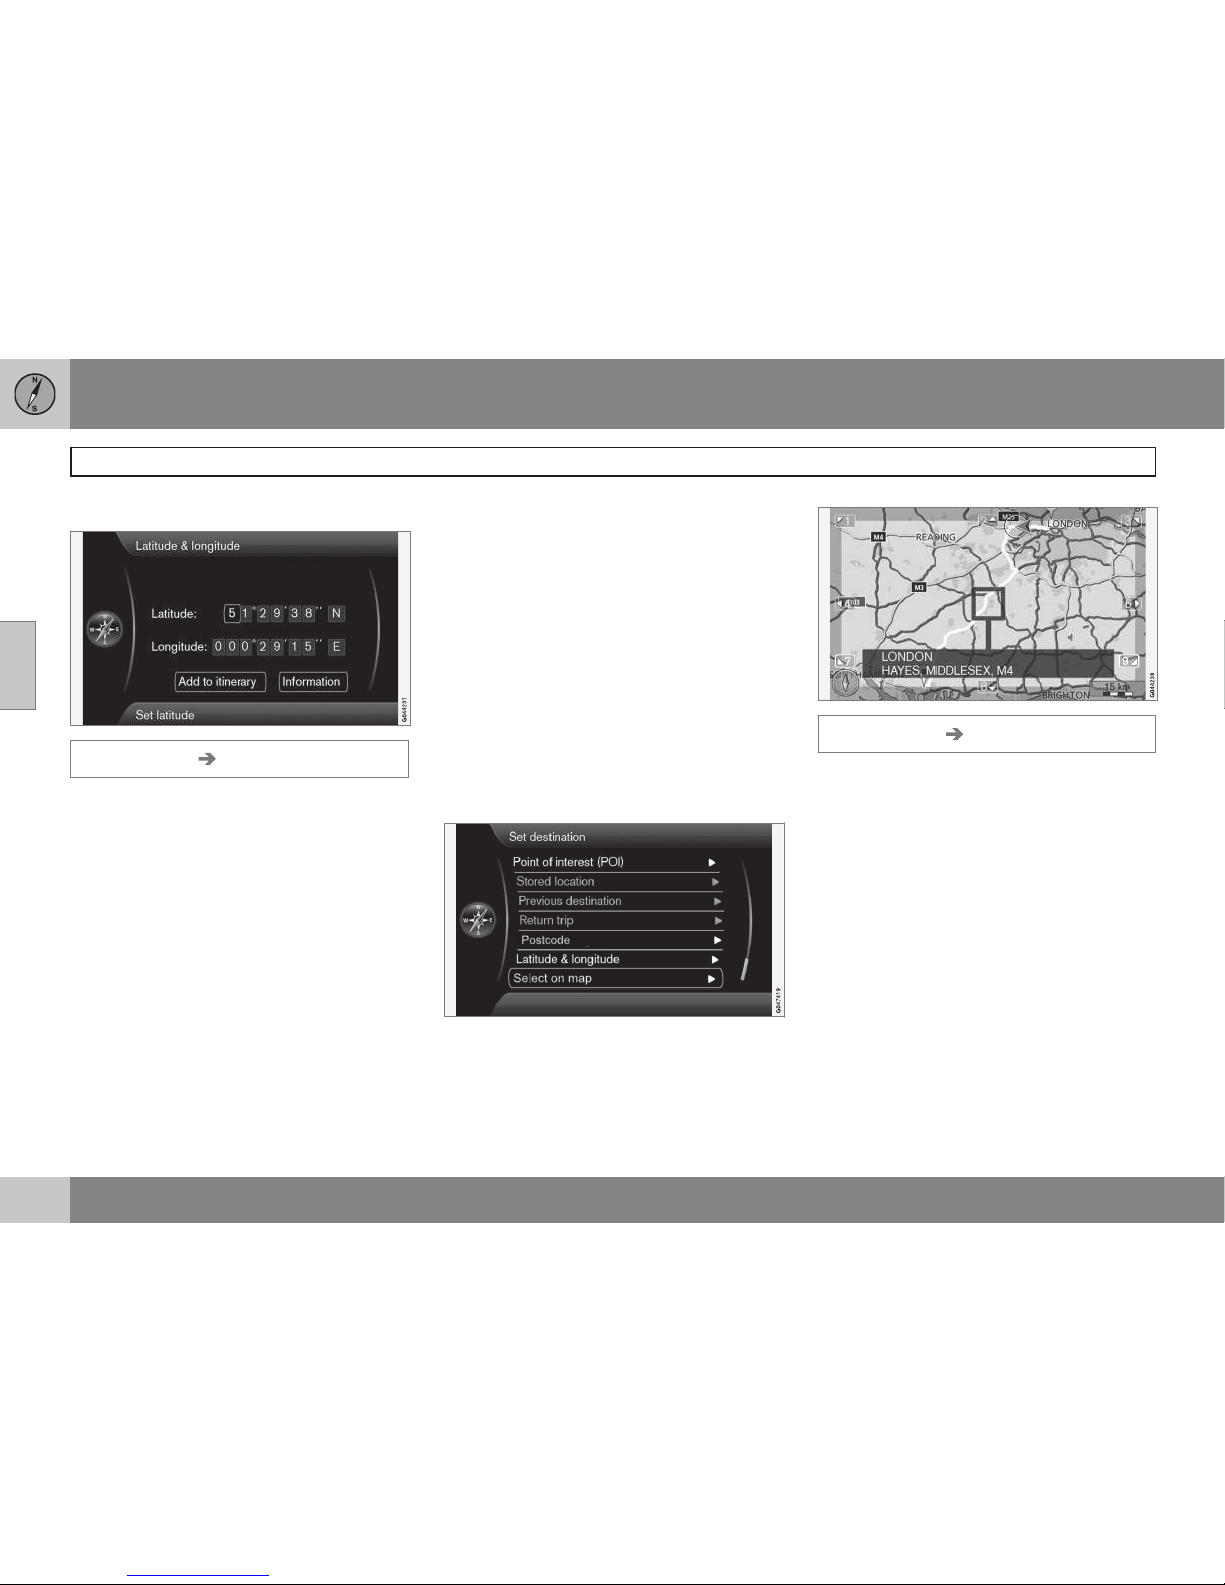
Search via Latitude/Longitude
Set destination Latitude & longitude
Select destination with GPS coordinates:
1. Place the cursor on the character to be
changed and press OK - the character
window becomes "active".
2. Enter a digit using the centre console's
numerical buttons (or turn TUNE) - finish
with OK or place the cursor on the next
character - previous character window is
"deactivated".
3. Move the cursor to the next character
location to be changed and repeat.
4. With the cursor in both windows to the far
right, (or turn TUNE) the letters for the
cardinal points -
N = 6, S = 7, W = 9 and
E = 3 are entered.
5. When both coordinates are entered mark
Add as waypoint + OK to add the
location to the itinerary.
Add to itinerary
Add as waypoint
Add the location of the selected coordinates
on the map to the itinerary.
Information
Information
Shows information available about the location.
Search via point on map
Set destination Select point on map
Shows maps with current location pointed
out by a cursor.
•
Turn TUNE to change the scale.
1. Move the crosshair using the centre console's numerical keys: [6 MNO] moves to
the right, [8 TUV] moves down, etc. - see
page 32.
2. When the desired location has been
found - Press OK.
Page 49
03 Planning your trip
Itinerary
03
}}
47
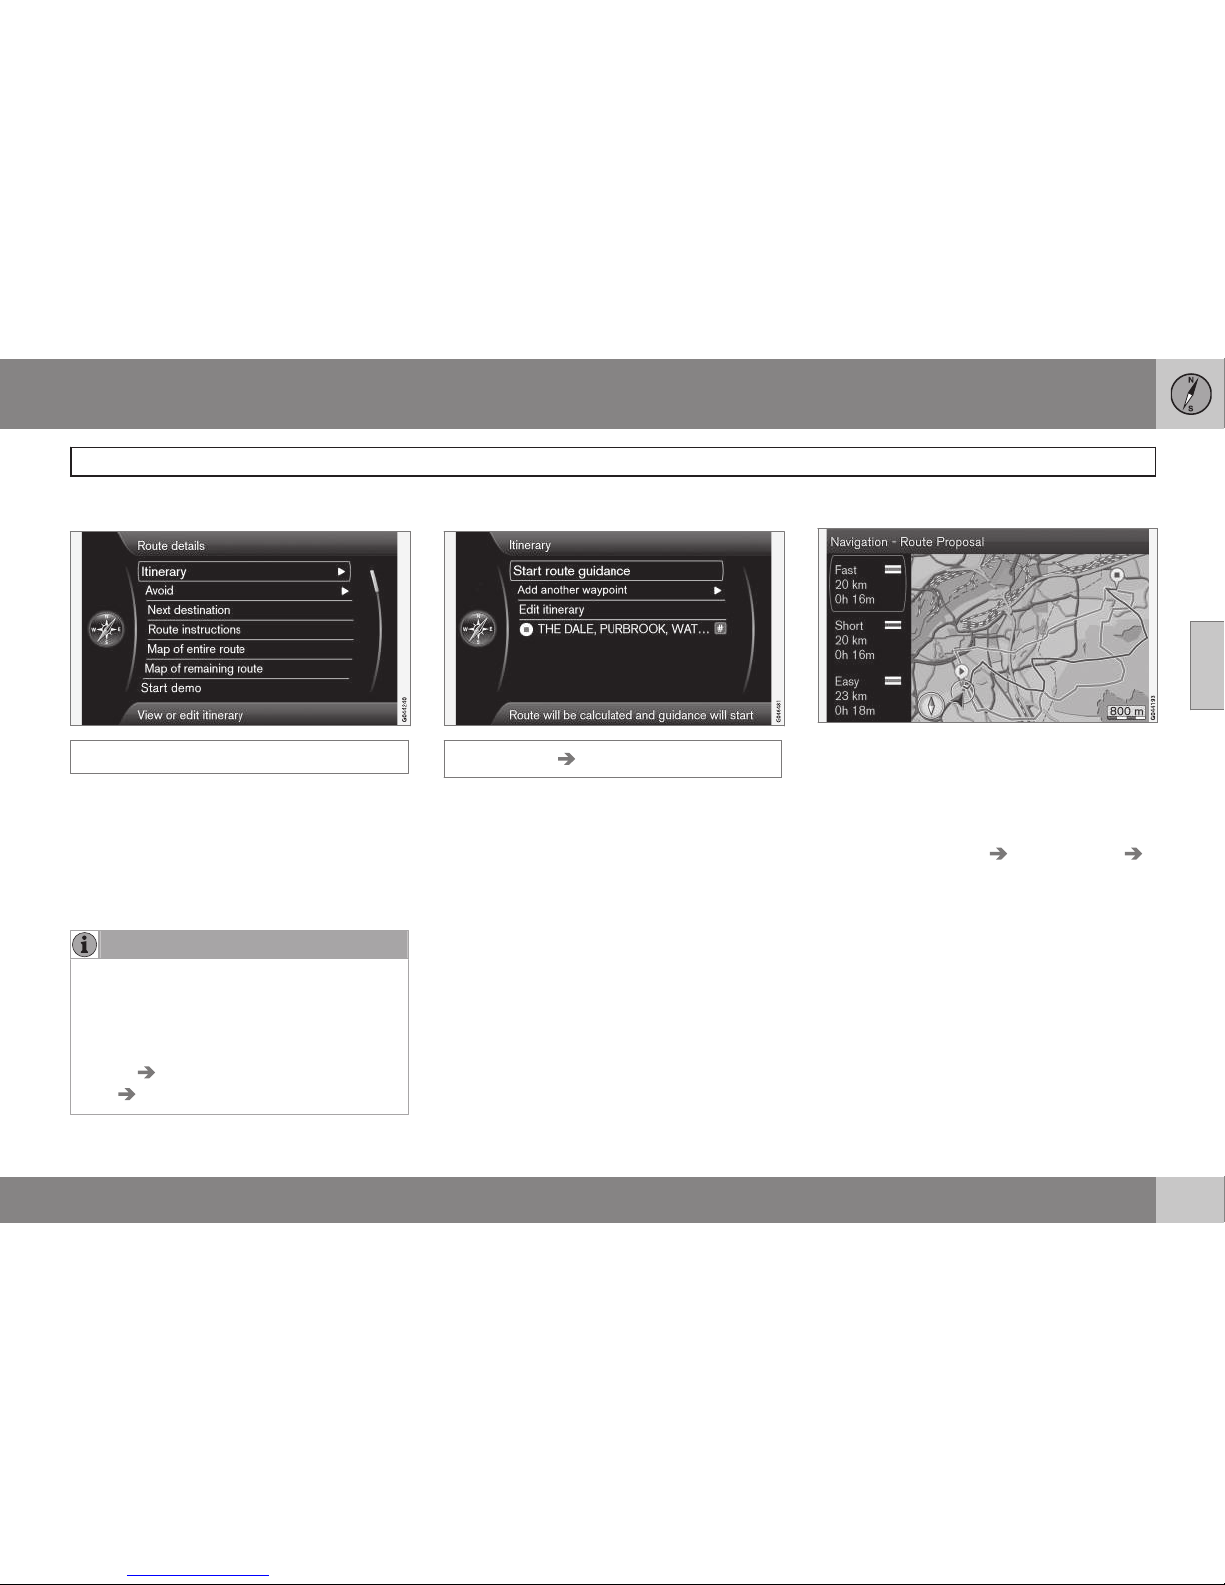
Menu overview
Route details
The system handles one itinerary at a time
with a maximum of 8 intermediate destinations.
The first specified destination is the journey's
Final destination - subsequent input destinations are Intermediate destinations.
NOTE
The last added destination will always be
Waypoint-1 - the previous Waypoint is
raised one step: So "Old" Waypoint-1 will
be Waypoint-2, etc.
If a new order is required - Go to
Route
details Itinerary, Mark a way point
and Move in list.
Enter an itinerary
Route details Itinerary
Draw up an itinerary with several stops to
avoid entering destination after destination
during your trip.
One final destination with up to 8 intermediate destinations can be specified.
Start guidance
Results with "Route proposal 3" ticked.
Cursor on
Start guidance + OK activates
current itinerary.
If the display of 3 alternative itineraries is preset then the driver can select one of them,
see the menu
Settings Route options
Route proposals, page 52.
Add waypoint
Adds an intermediate destination. Gives the
same menu as in "
Set destination" - see
page 40.
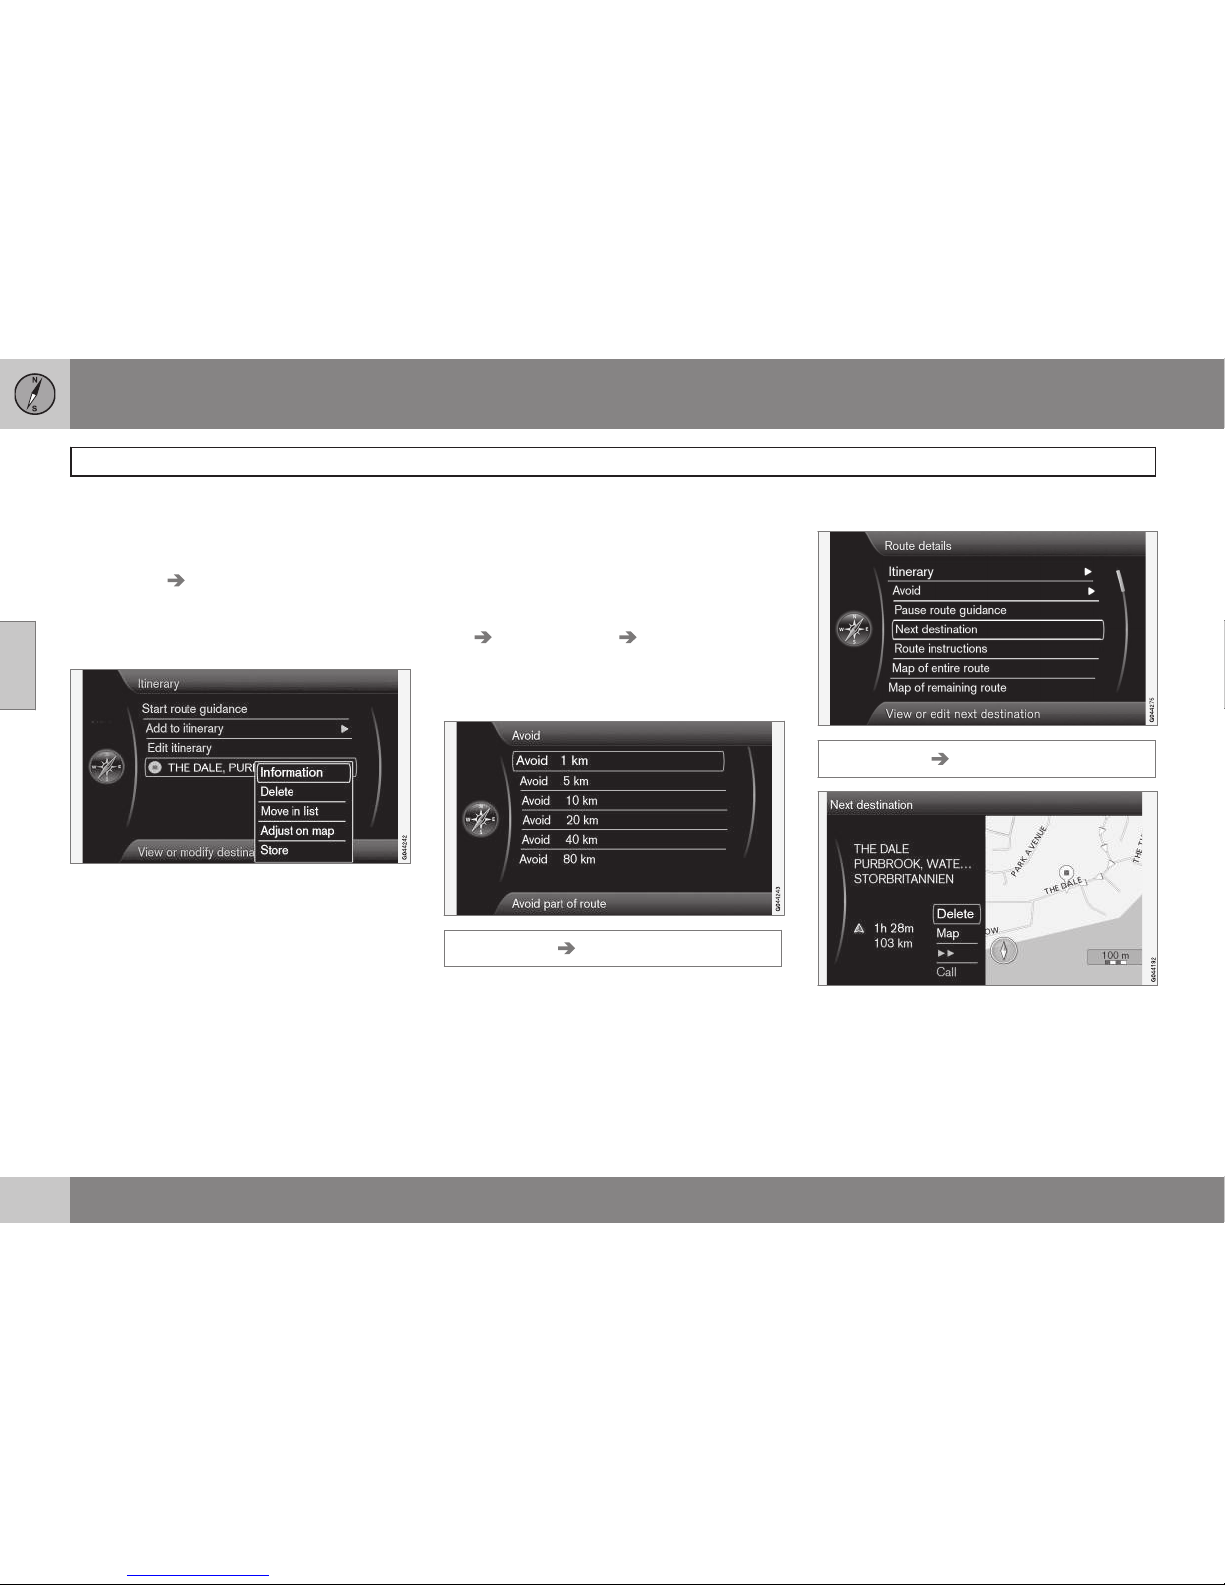
Edit itinerary
Gives the options:
Page 50
03 Planning your trip
Itinerary
03
48
•
Clear itinerary - deletes the current itin-
erary.
•
Route options - opens a shortcut to
Settings Route options - see
page 51.
Intermediate destinations in the
itinerary
By selecting intermediate destination + OK
each intermediate destination in the itinerary
can be updated.
•
Information - Full name and address,
and Latitude and Longitude. In addition, a
facility can be Called up and any Facilities
around the location and Car parking in
the vicinity can be seen.
•
Delete - deletes the intermediate desti-
nation.
•
Move in list - changes the order in the
itinerary.
•
Adjust on map - shows the location on
the map with a crosshair. Another location there be scrolled forward and
selected with OK, see more about the
Scroll function on page 32.
•
Store - opens the menu Set destination
Stored location Edit - see page
see page 44).
Avoid
Route details Avoid
A distance in the itinerary can be deselected
here. The alternative distances are calculated
from the car's current position. The system
then selects another route.
•
Select the desired option + OK.
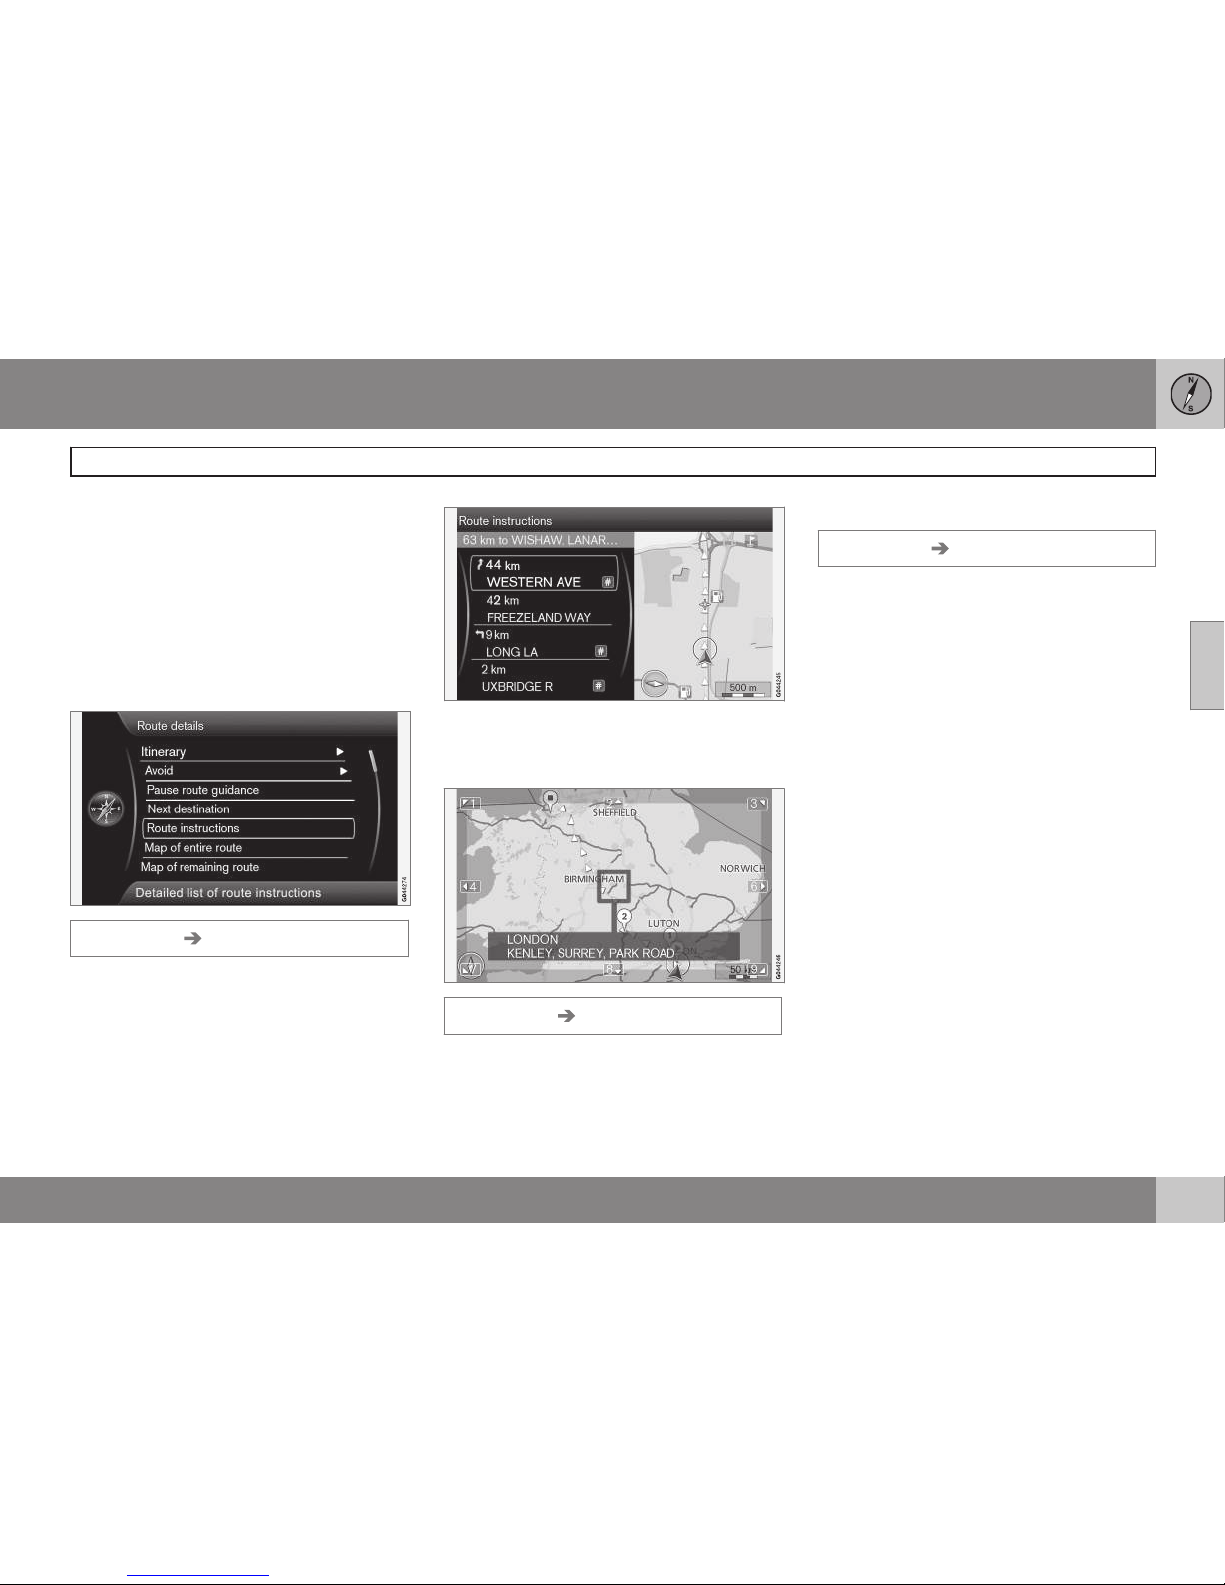
Next destination
Route details Next destination
Shows the next intermediate destination's
position on the map, name, address, estimated time of arrival and distance there. Also
gives the options:
Page 51
03 Planning your trip
Itinerary
03
49
•
Delete - deletes the current intermediate
destination and shows the next one.
•
Map - shows the position on the map in
the Scroll menu, see page 32.
•
>> - scrolls to the next intermediate des-
tination in the itinerary, in a loop.
•
Call - calls up the facility if possible.
Route instructions
Route details Route instructions
The itinerary's waypoints are listed here.
Map of entire route
Route details Map of entire route
The whole itinerary is shown here - scaled
down to fit on the display screen.
Otherwise, the same functions as in the Scroll
menu, see page 32.
Map of the remaining route
Route details Map of remaining route
Shows screen image similar to the one in the
previous section, but here only with the itinerary's remaining distance from the car's current position.
Otherwise, the same functions as in the Scroll
menu, see page 32.
Page 52
03 Planning your trip
Current position
03
50
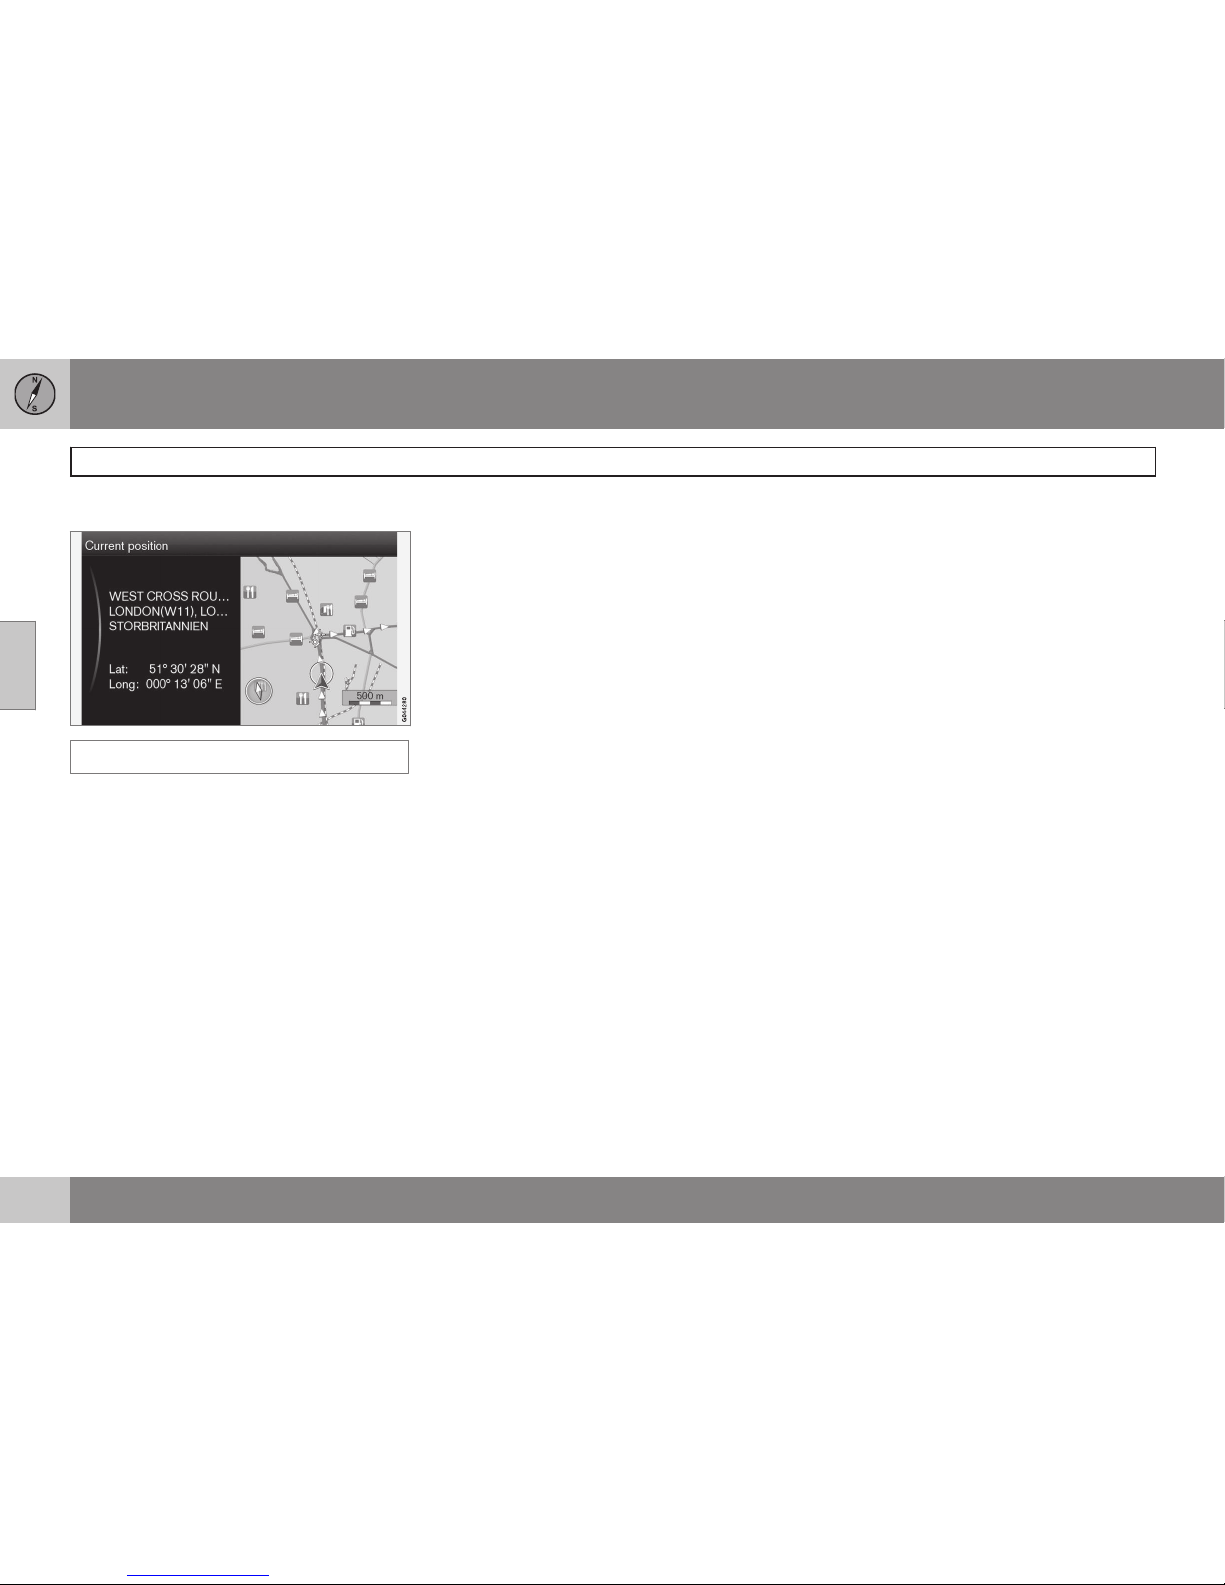
Where am I?
Current position
Displays a map with the car's current position
and information on the location, such as
name and coordinates.
Page 53
03 Planning your trip
Settings
03
}}
51
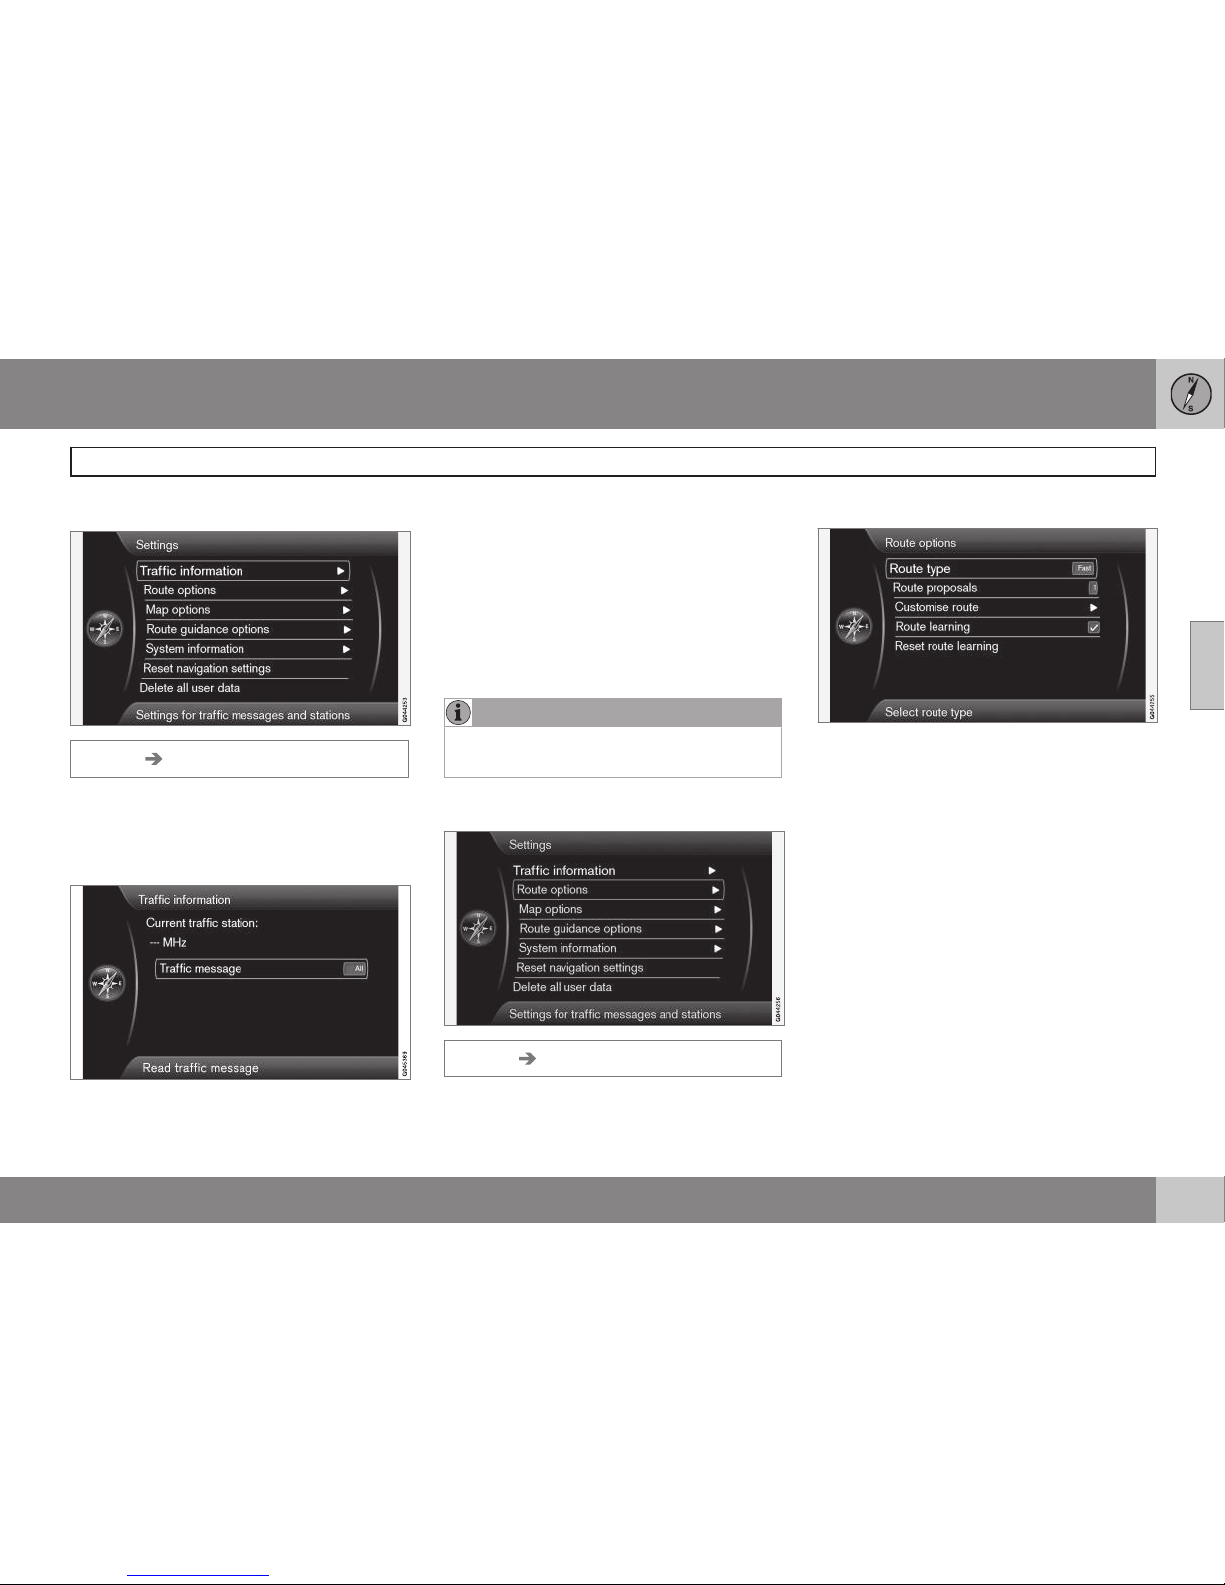
Traffic information
Settings Traffic information
Further settings that affect traffic information
can be made, in addition to those described
here - see page 68.
Traffic message
Traffic message
Certain traffic message sorting can be done
here:
•
All - all reported traffic disruptions
appear.
•
Most serious - indicates, for example,
closed roads due to accidents or other
large/long-term disruption.
•
None - indication of traffic problem off.
NOTE
This setting does not affect the calculation
of a route.
Route options
Settings Route options
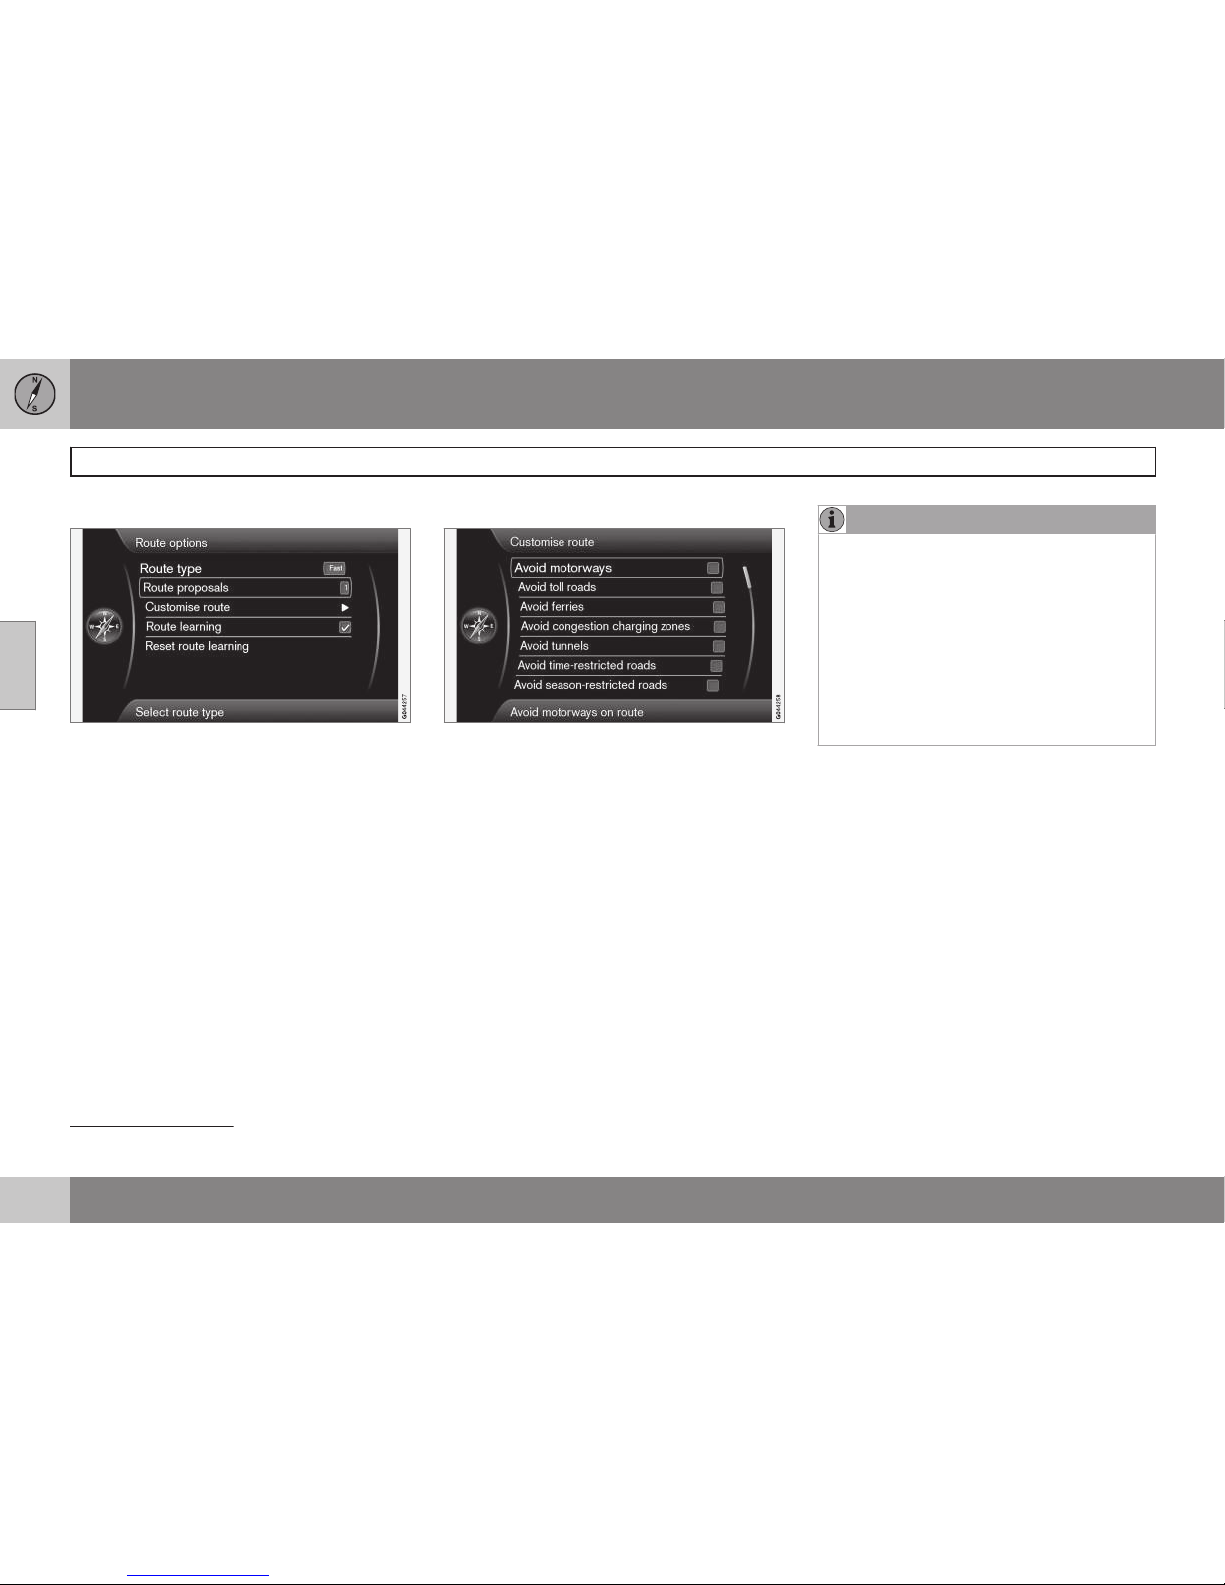
Route type
Route type
Three types of route can be selected here:
•
Fast - major and fast roads such as e.g.
motorways are prioritised. In some cases
this is neither the shortest travel time nor
route.
•
Short - short route prioritised. In some
cases the route uses minor roads.
•
Easy - minimum number of junctions and
similar traffic systems prioritised.
Page 54
03 Planning your trip
Settings
03
52
Route proposals
Route proposals
At the command Start guidance there may
be several similar suitable options. Select this
if the driver should be asked in case there are
several options to choose from:
•
Select
1 if the route type shall be selected
based on the option under Route type in
the previous section.
•
Select
3 if the driver shall select between
the three route types before guidance is
started.
See more information on page 47.
Customise route
Customise route
Here you can deselect certain traffic suggestions. Tick to avoid the following element
1
along the route:
•
Avoid motorways
•
Avoid toll roads
•
Avoid ferries
•
Avoid congestion charging zones
•
Avoid tunnels
•
Avoid time-restricted roads
•
Avoid season-restricted roads
•
Avoid car trains
•
Avoid unverified roads
•
Avoid borders
NOTE
•
If an itinerary is entered when these
selections are made then there may be
a certain delay after an option has
been ticked/unticked since the itinerary must be recalculated.
•
If tunnels, toll roads and motorways
are not selected then these are avoided as far as possible and are only
used if no other reasonable alternative
is available.
Route learning
Route learning
The basic condition is a stored itinerary. If the
driver deviates from the proposed route and
takes a different route to the final destination
than the system recommends, the system
memorises the driver's choice.
If the same itinerary is used again 2 times and
the driver repeats the route choice, the system will instead show the path that the driver
selected.
Ticked window means that a route that is
driven 3 times is stored as route instead of
the original route.
1
Available options vary depending on market/area/state.
Page 55
03 Planning your trip
Settings
03
}}
53
Reset route learning
Reset route learning
Erase driving history.
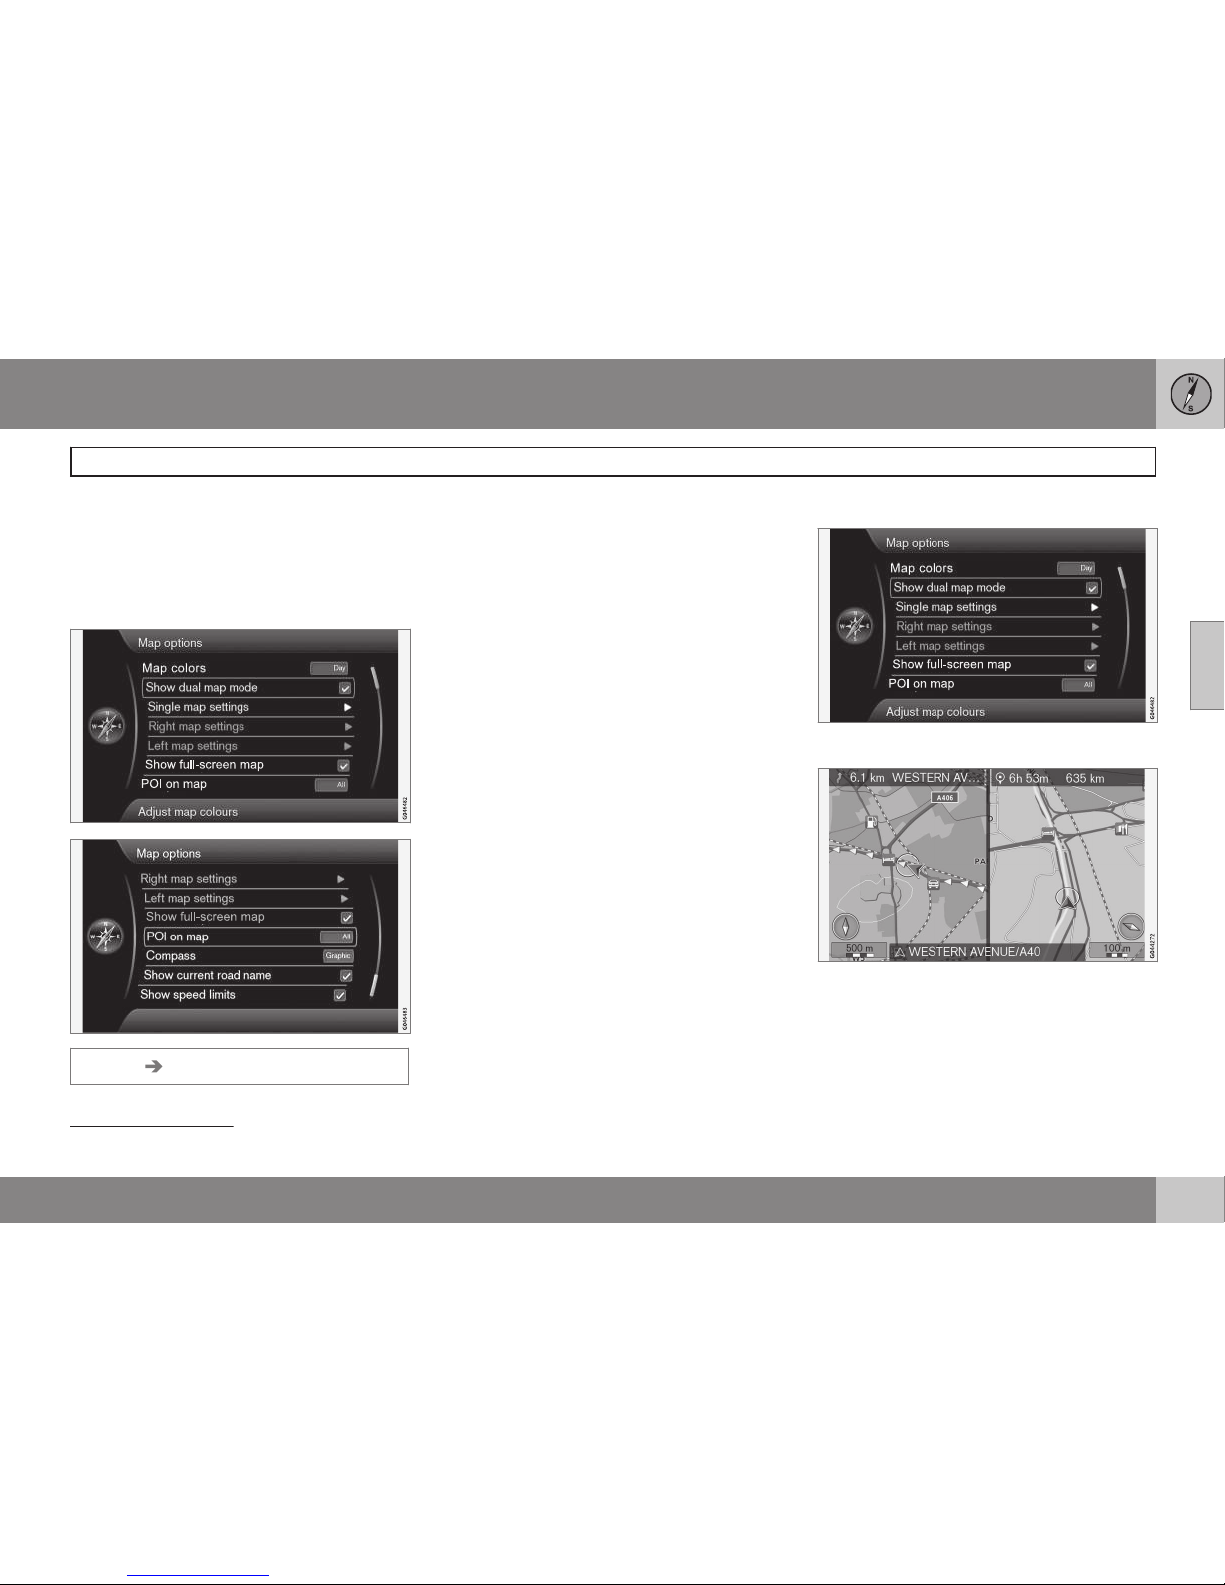
Map options
Settings Map options
Map colours
Map colours
Choose between:
•
Automatic - a light sensor detects
whether it is day or night.
•
Day (in previous image)
•
Night
Single map settings
Single map settings
•
Map orientation - Select Heading or
North.
North - the map always shows North at the
top of the screen. The car symbol moves in
the relevant direction on the screen.
Heading - the car symbol is in the centre and
always points up on the screen. The map
image rotates under the car symbol in relation
to how the road bends.
•
Map view - Select 2D or 3D.
2D - car symbol and map image seen at right
angles straight from above.
3D
2
- car symbol and map image seen obli-
quely from the side/above.
Show dual map mode
Show dual map mode
The screen can display the map of the entire
image area or the same map view in 2 different scales on each left and right half.
Select by ticking in the box by
Show dual
map mode
+ OK and EXIT.
2
Only if Map orientation>Heading is selected.
Page 56
03 Planning your trip
Settings
03
54
Adjust the map scale in dual map mode
To view both maps with different map scales,
they can be adjusted individually as follows:
1. Start from map view mode. Turn the
TUNE knob to the left and right - one
screen half is surrounded by a colour
frame.
2. Press OK - selected screen half is now
"active".
3. Turn the TUNE knob to adjust the scale.
4. Press OK again - done, the screen half is
"deactivated".
Left map settings
Left map settings
•
Map orientation - Select Heading or
North.
•
Map view - Select 2D or 3D.
Right map settings
Right map settings
Same as for left map - see previous section.
Show full-screen map
Cursor on Show full-screen map + OK ticks
the function that shows the map image
across the whole of the display screen. This
removes the information fields in the bottom
and top of the screen with information on e.g.
passenger compartment temperature.
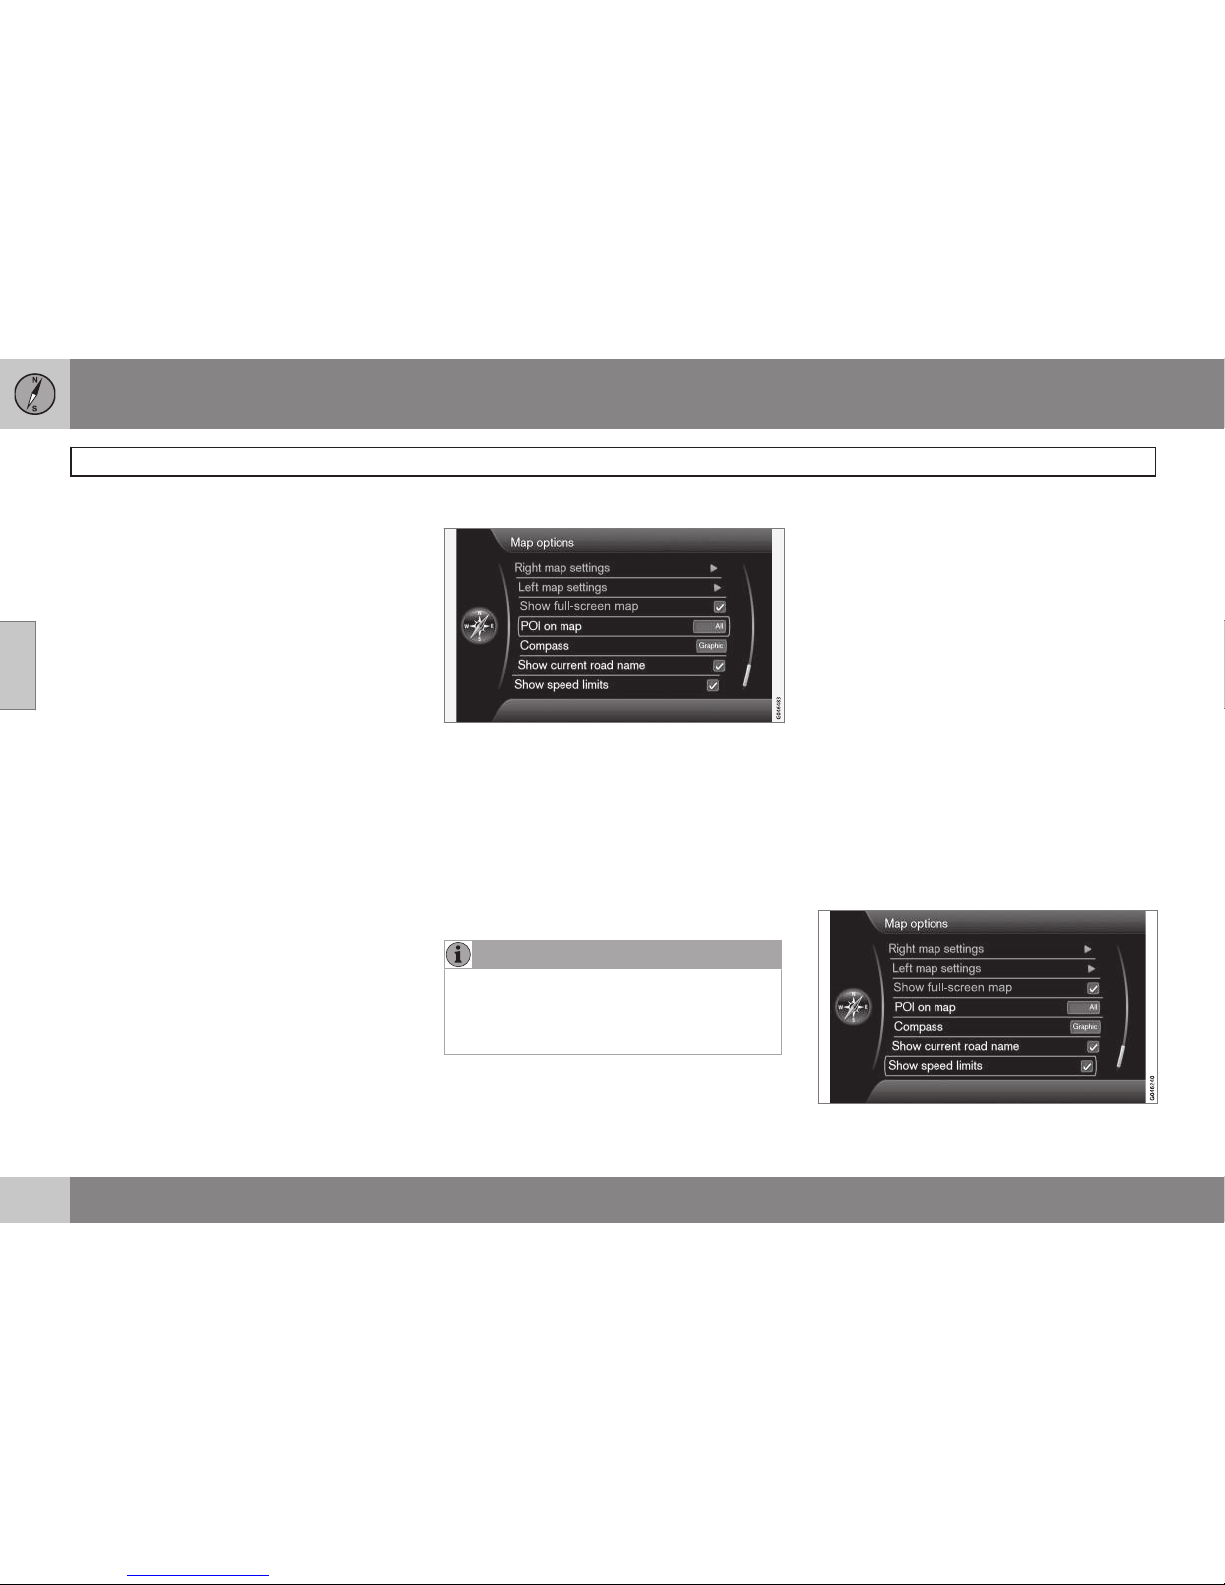
Facility on map
POI on map
Tick the desired option for how many facilities
are to be shown on the map:
•
All - all facilities appear.
•
None - no facilities appear.
•
Selected - A menu with all facilities
appears: Tick the facilities that you want
to appear on the map.
NOTE
If a POI category with many symbols on
the map is deselected/switched off, more
POIs from other categories can be shown/
viewed on the screen.
Possible facilities are listed on page 72.
Compass
Compass
Select the type of compass you want to
appear on the map image:
•
Graphic
•
Text - compass direction (upwards on
the display screen) is indicated by a letter, e.g. N for "North".
•
None.
See more information about the compass on
page 31.
Show current road name
Cursor on Show current road name + OK
ticks the function that shows the name of the
street/road where car is located in the lower
edge of the display screen.
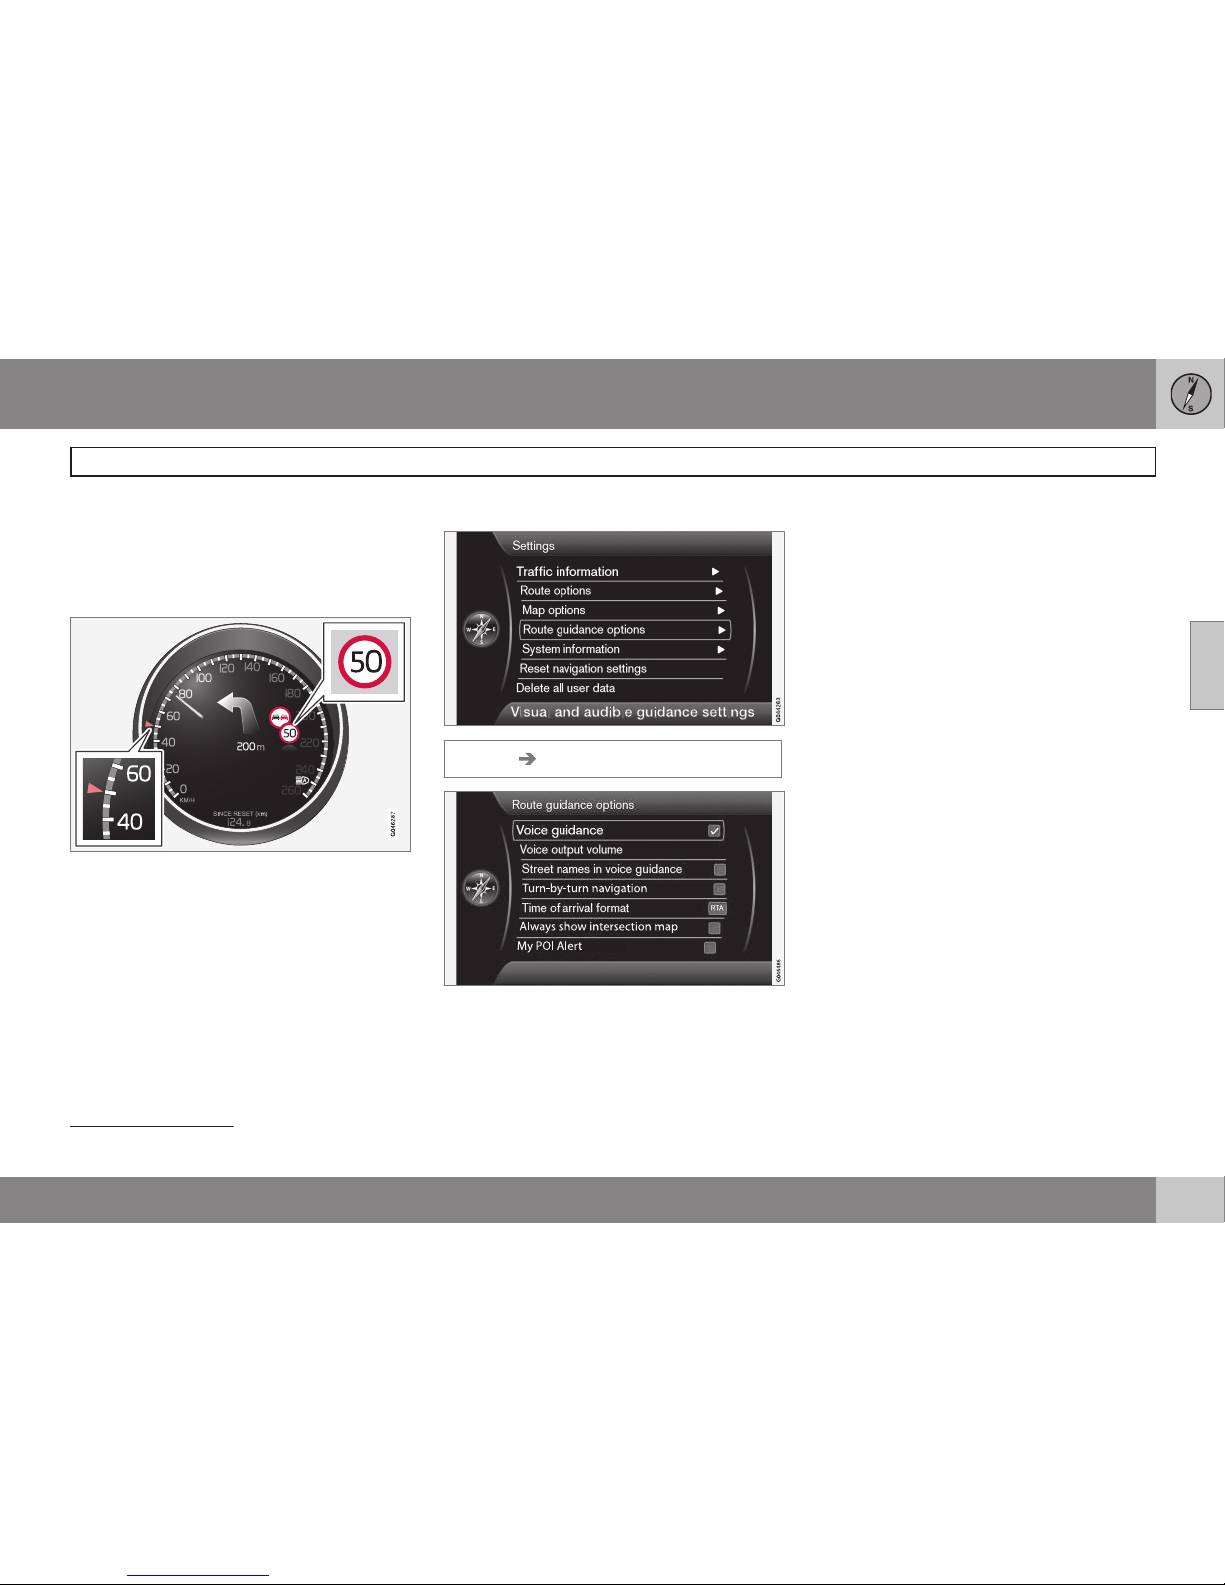
Show speed limits
Page 57
03 Planning your trip
Settings
03
}}
55
Cursor on
Show speed limits + OK ticks the
function that shows a traffic sign with the current speed limit in the top right-hand corner
of the display screen.
Cars with Road Sign Information - RSI
In cars with the function for identifying road
signs (Road Sign Information) the current
speed limit is only shown on the combined
instrument panel - the option to select the
display of the speed limit on the map image is
not available in these cars.
See the normal owner's manual for the car for
more information on RSI.
Guiding options
Settings Guidance options
Voice guidance
Voice guidance
If you want voice guidance - tick option
Voice guidance. See more information on
page 31.
Voice output volume
Voice output volume
The option shows a volume control on the
screen that can be used to adjust the Voice
guidance volume.
•
Adjust using the TUNE knob + OK.
See more information on page 17.
Street names in voice guidance
3
Cursor on Street names in voice guidance
+ OK ticks the function that enables voice
guidance information about distance and
direction to be complemented with spoken
names of streets and roads.
3
Certain markets and languages.
Page 58
03 Planning your trip
Settings
03
56
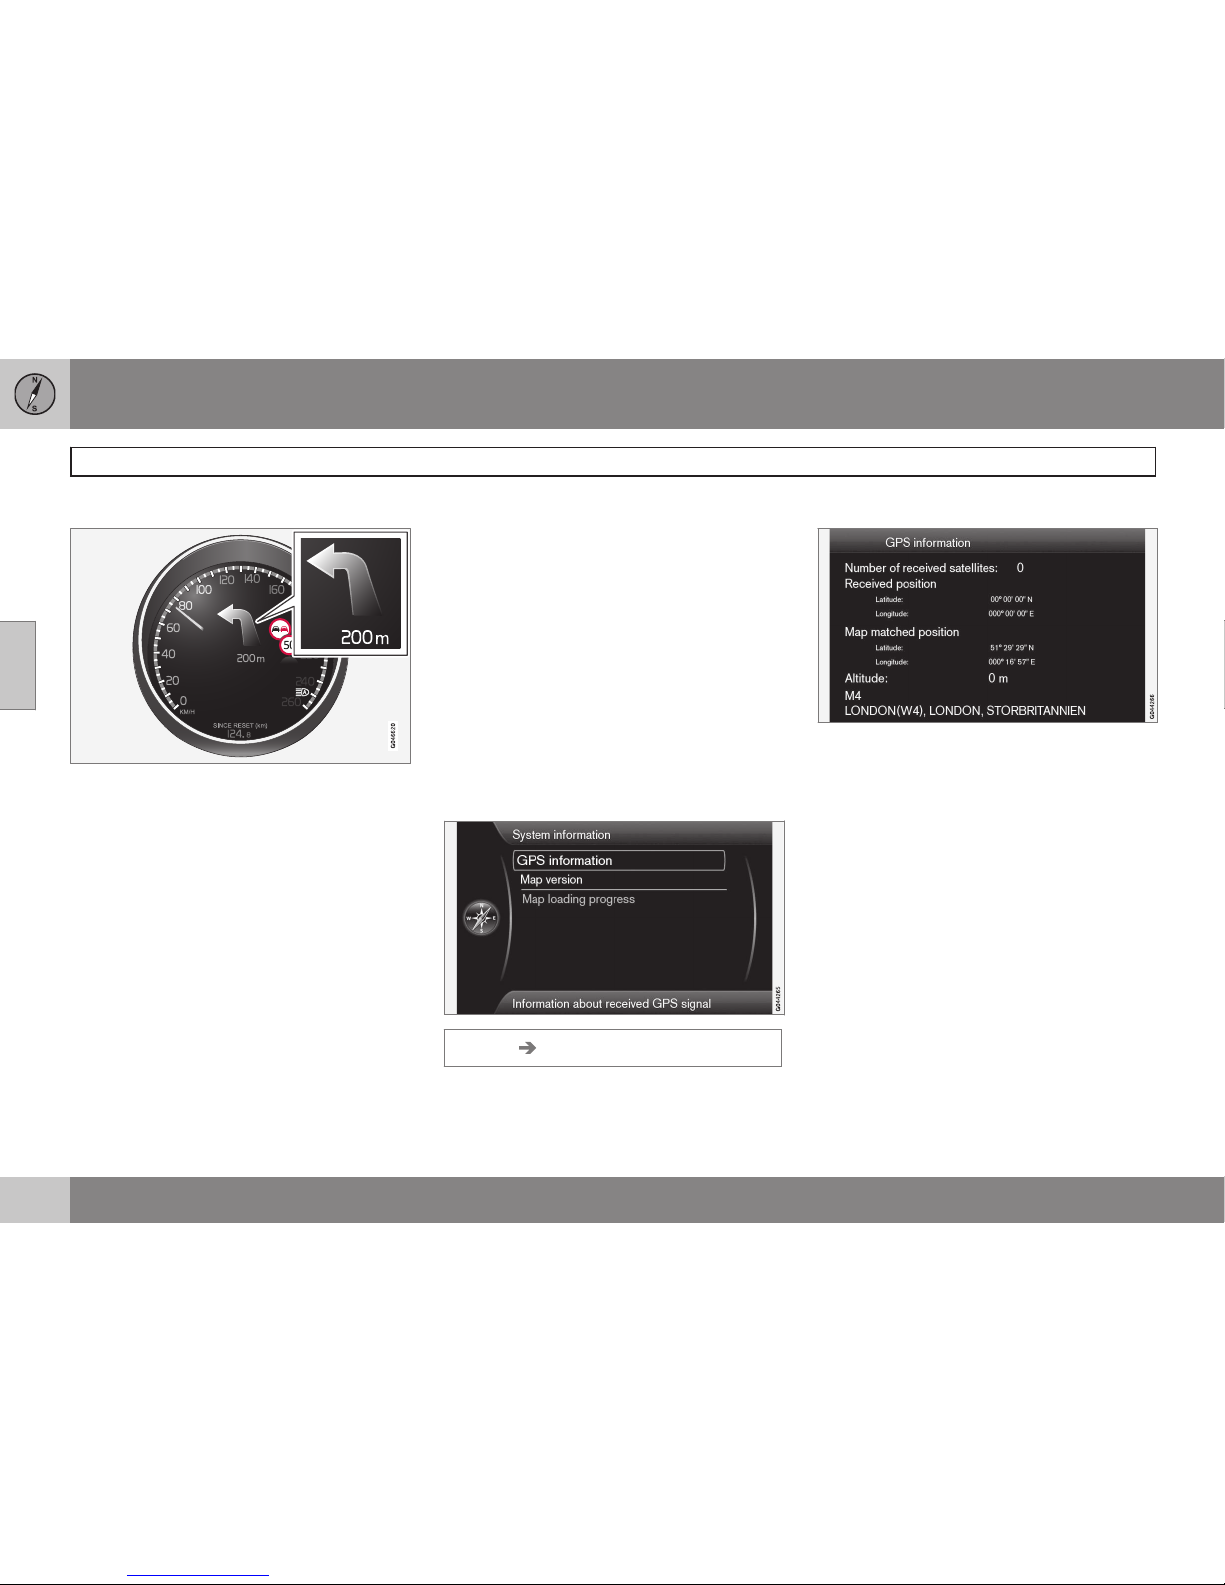
Navigation with Turn-by-turn
Cursor on Turn-by-turn navigation + OK
ticks the function which means that the next
manoeuvre in the itinerary, as well as the distance to it, is shown in the combined instrument panel.
Time of arrival format
Time of arrival format
Select the time to appear on the screen:
•
ETA - shows the estimated arrival time
•
RTA - shows the remaining time until
arrival.
Show junction map in other program
The navigation system can work in the background while at the same time the display
screen shows a different program source,
e.g. Radio or Phone.
Cursor on
Always show intersection map +
OK ticks the function that also shows
detailed junction maps on half of the display
screen when other sources/programs are in
use - see page 31.
Alarm for My POI
Cursor on MyPOI Alert + OK ticks the function that enables a preset warning sound to
alert when the car approaches a My POI position - see page 57.
System information
Settings System information
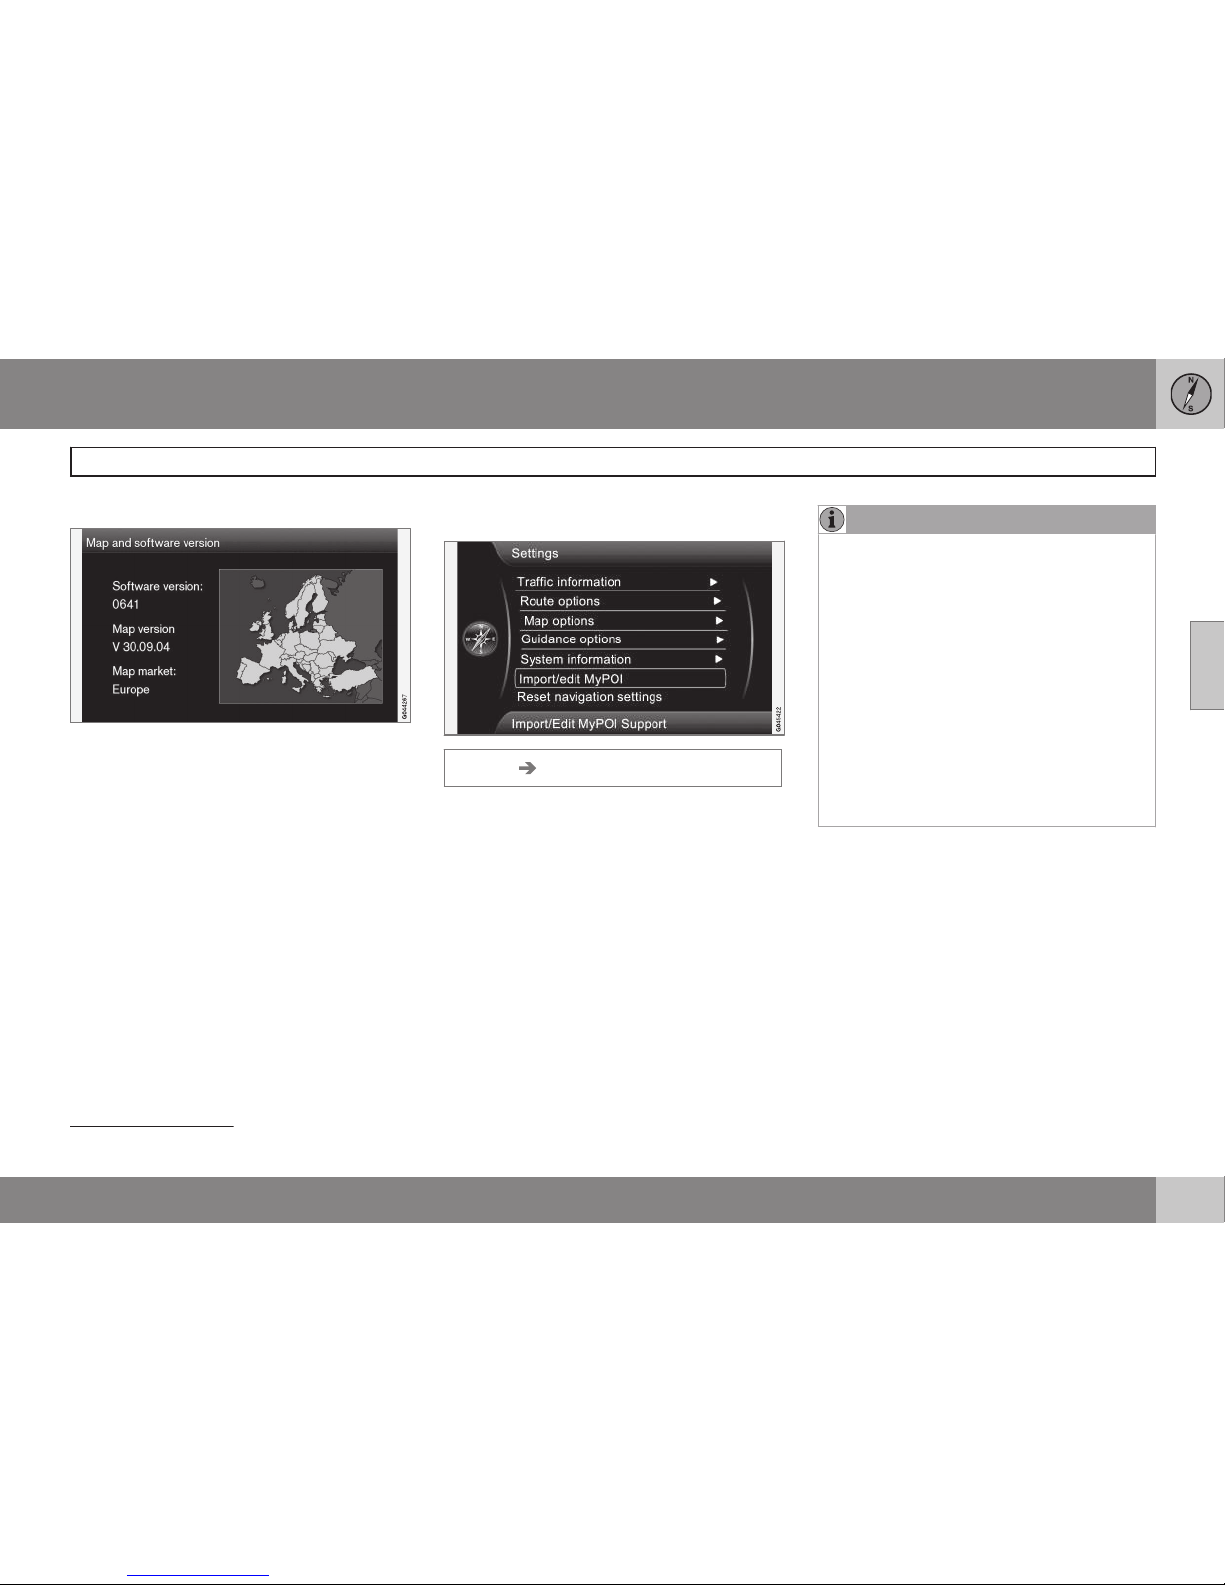
GPS information
GPS information
The screen shows:
•
Number of received satellites:
•
Received position
•
Map-matched position
•
Altitude:
•
The geographic name of the current position.
Page 59
03 Planning your trip
Settings
03
}}
57
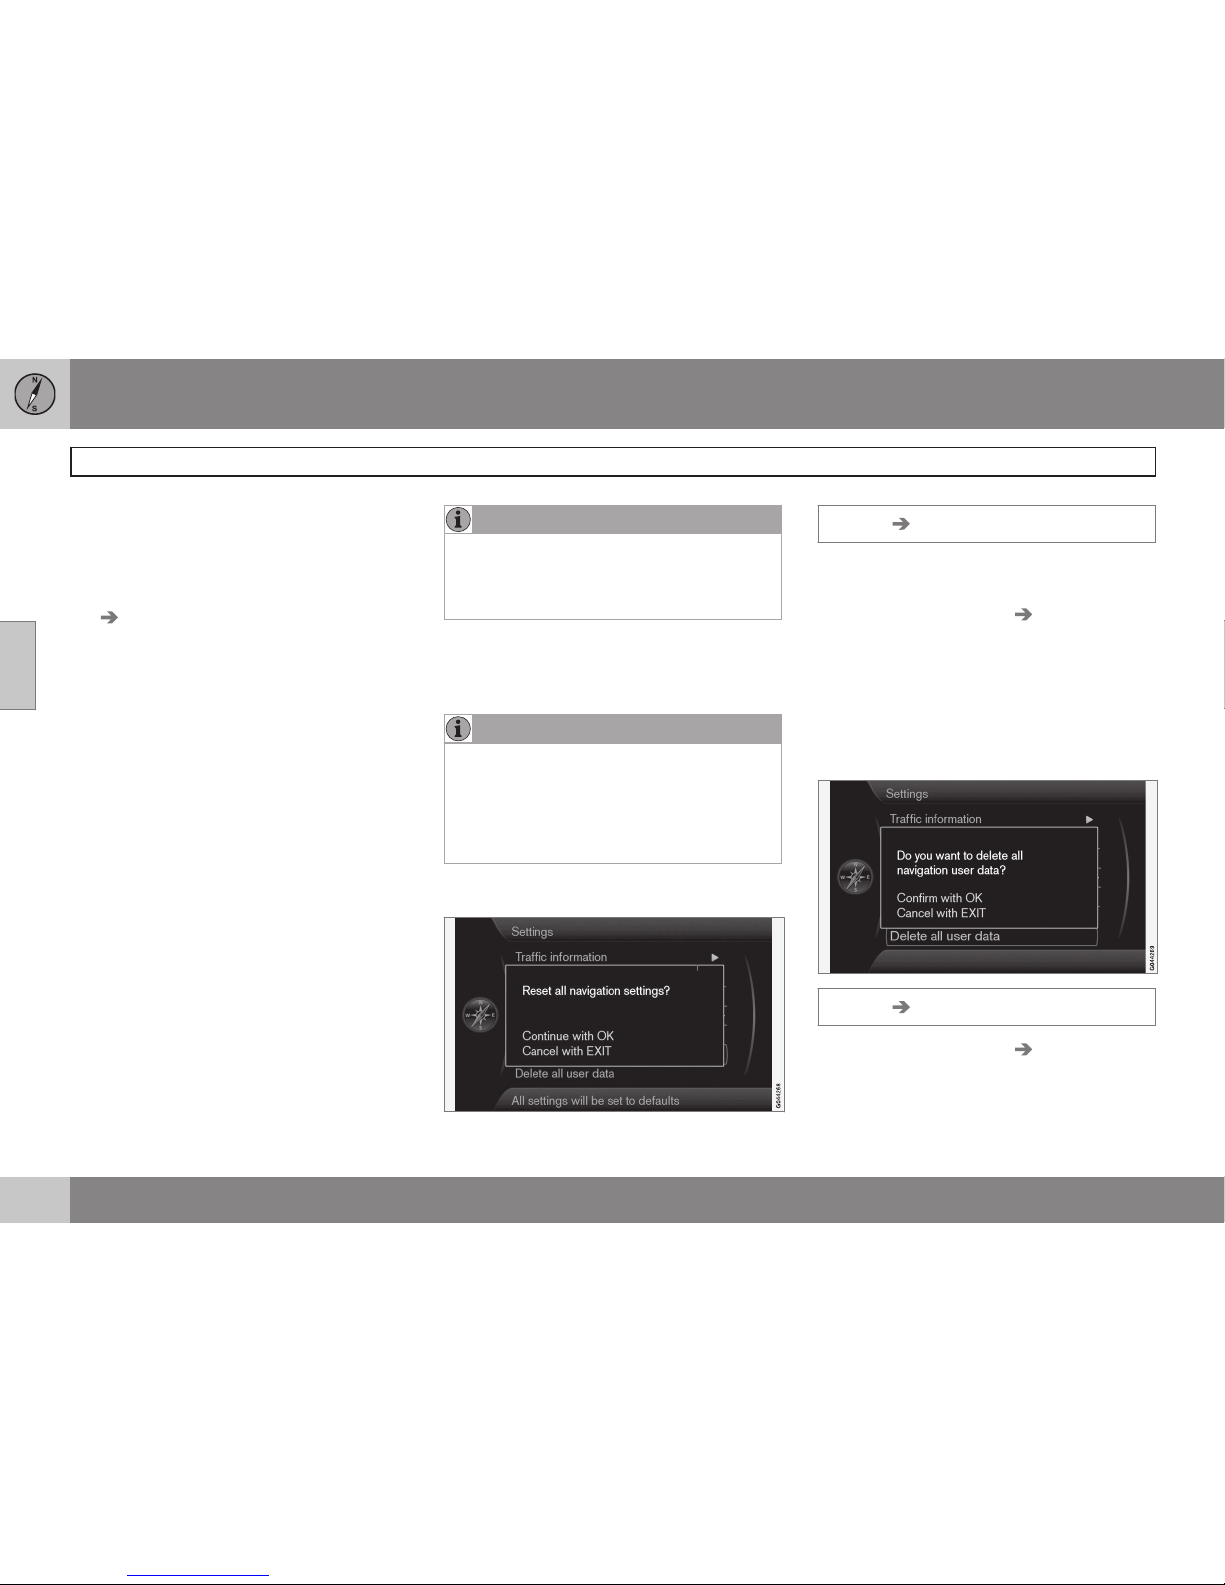
Map version
Map version:
The screen shows:
•
Software version:
•
Map version:
•
Map market:.
Map download status
Map loading progress
When updating the map database, the progress of the update is shown here. See more
information on page 27.
Import/Edit My POI
Settings Import/edit MyPOI
Many companies offer POI files on their Internet pages. Using this function the user can
supplement Volvo's map database with facilities from other suppliers.
NOTE
•
Adding POI files to the map database
requires a certain amount of computer
knowledge!
•
File format for POI files and how the
files are downloaded from the Internet
are determined by the respective manufacturer/distributor. Consequently
there is no standardised process for
downloading the POI files from the
Internet - and for this reason this
owner's manual does not show an
exact step-by-step description.
•
If you have any questions - contact a
Volvo dealer.
In order to show the principle for how to
download a POI file from the Internet, a simple example follows here with the fictitious
company "Department Store" and its stores:
1. Go to the company's page on the Internet
and search for the location with its POI
file.
2. Select a POI file with the "gpx" format
and download it to the computer - if the
format is not available then the POI file
must be converted to the gpx format
4
after downloading.
4
There are freeware conversion programs available for download from the Internet.
Page 60
03 Planning your trip
Settings
03
58
3. Load the POI file "Department Store.gpx"
onto a USB memory stick.
4. Then insert the USB memory stick into
the car's USB port (under the tunnel console's armrest/hatch) and locate
Settings
Import/edit MyPOI in the menu sys-
tem.
5.
Select
Import + OK and follow the
onscreen instructions.
When the import is complete, some settings
can be made for the new My POI group
"Department Store":
•
the name can be changed
•
the map image My POI icon can be
replaced (if an icon is included in the
imported POI file it automatically
becomes the default)
•
one of 3 sounds can be selected (to get a
warning when the car approaches the My
POI icon - see page 56)
•
choose whether or not the My POI icon is
to be shown on the map.
When all selections have been made, select
Store + OK to finish, or a new POI group can
be imported/edited.
All facilities added are grouped under the
heading "My POI".
NOTE
The type of information permissible for
inclusion on the map is stipulated in
national legislation. For current information, see www.volvocars.com/navi.
The map database can be complemented
with 100 My POI groups or 50 000 My POI
locations in GPX 1.1 format.
NOTE
In addition to all the variants of POI files
that can be downloaded from the Internet,
Volvo can offer supplementary files for certain markets - contact your local Volvo
dealer for information on any possible
options.
Reset navigation settings
Settings Reset navigation settings
This function resets the system to default settings.
The menu option
Settings Reset
navigation settings
+ OK gives a screen
image with the question
Reset all navigation
settings?, Continue with OK Cancel with
EXIT - press OK to reset the settings to
default settings or undo with EXIT.
Erase all user information
Settings Delete all user data
The menu option Settings Delete all user
data
+ OK gives a screen image with the
question
Do you want to delete all
navigation user data?, Continue with OK
Page 61
03 Planning your trip
Settings
03
59
Cancel with EXIT - press OK to delete or
undo with EXIT.
The following settings are deleted with OK:
•
all stored locations
•
history for
Last 5
•
previous destinations
•
route learning
•
imported My POI data
•
changed default settings.
Page 62
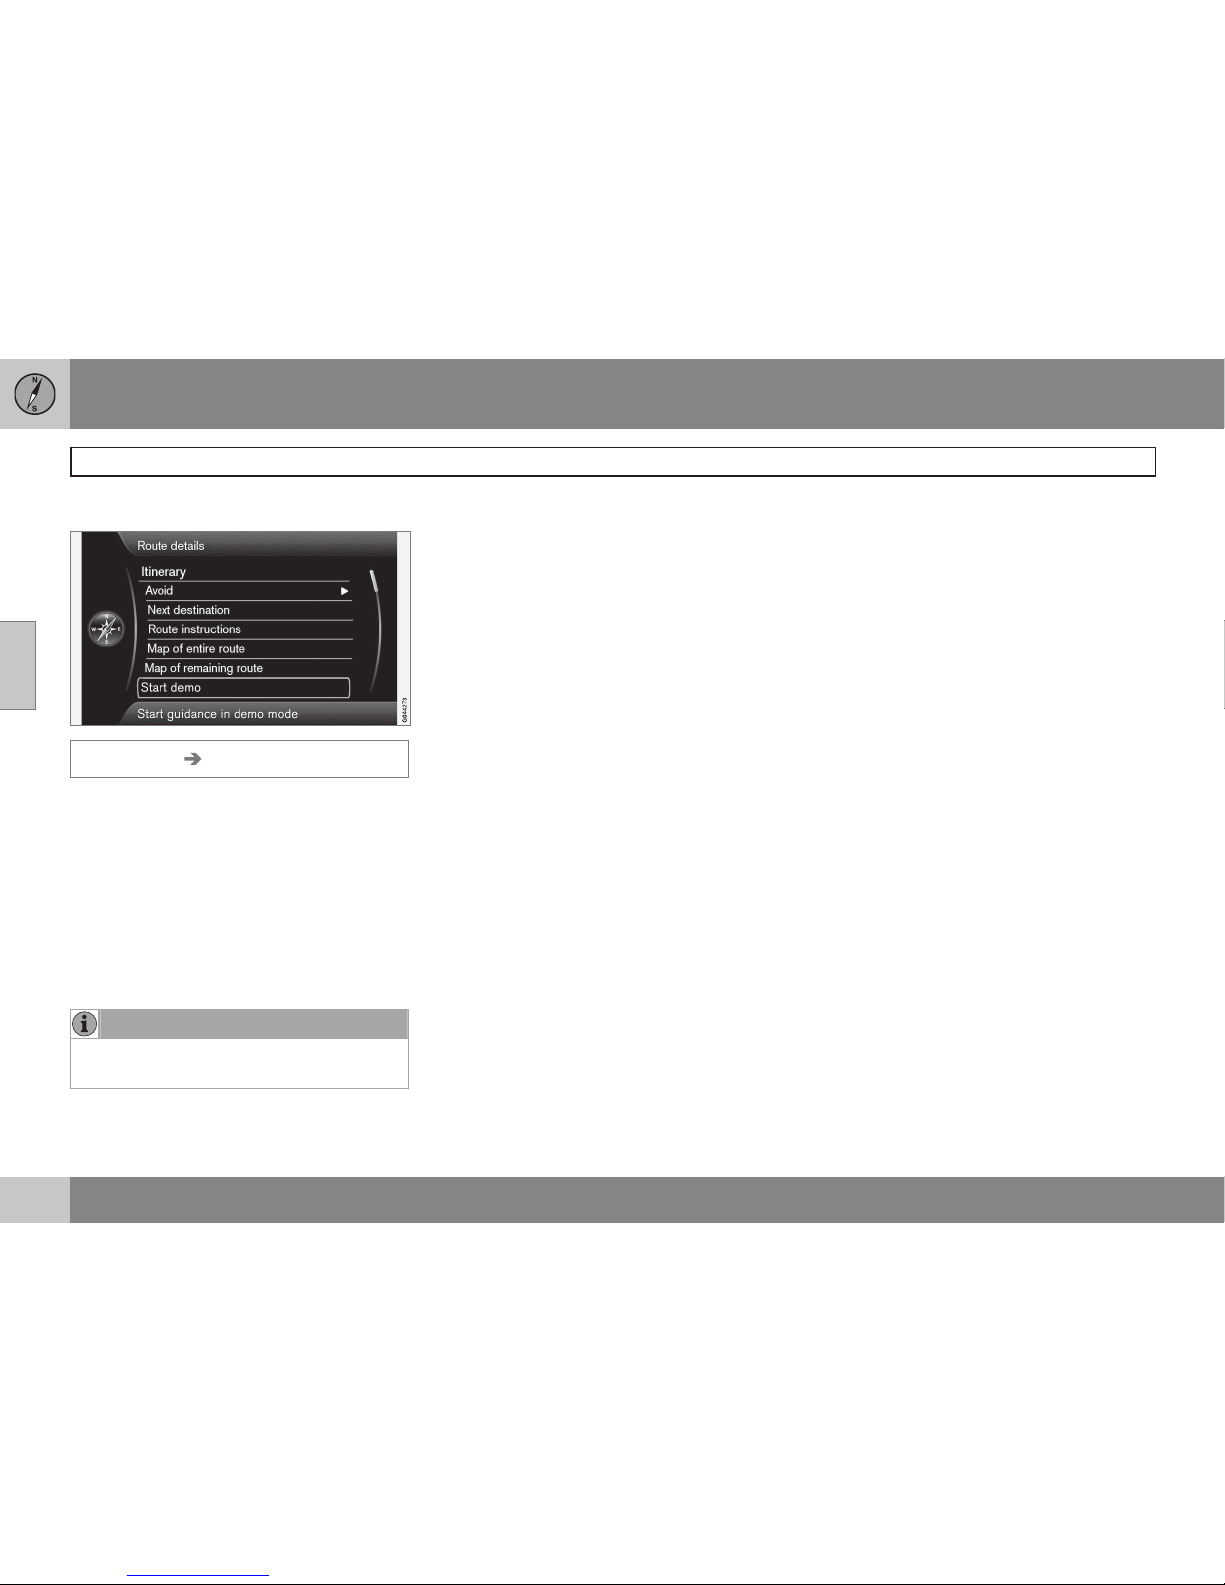
03 Planning your trip
Simulation
03
60
Start demo
Route details Start demo
The journey specified in the itinerary is simulated here.
The system shows how the journey to the
itinerary's specified destination will be carried
out.
To exit the demo run:
•
The previous menu option
Start demo
has switched to Stop demo - Select +
OK.
NOTE
A destination must be entered in order for
the demo to work.
Page 63
03 Planning your trip
03
61
Page 64

G000000
62
General.................................................................................................... 64
Reading information................................................................................ 66
Handling traffic problems........................................................................ 68
Page 65

T R A F F I C I N F O R M A TION
Page 66
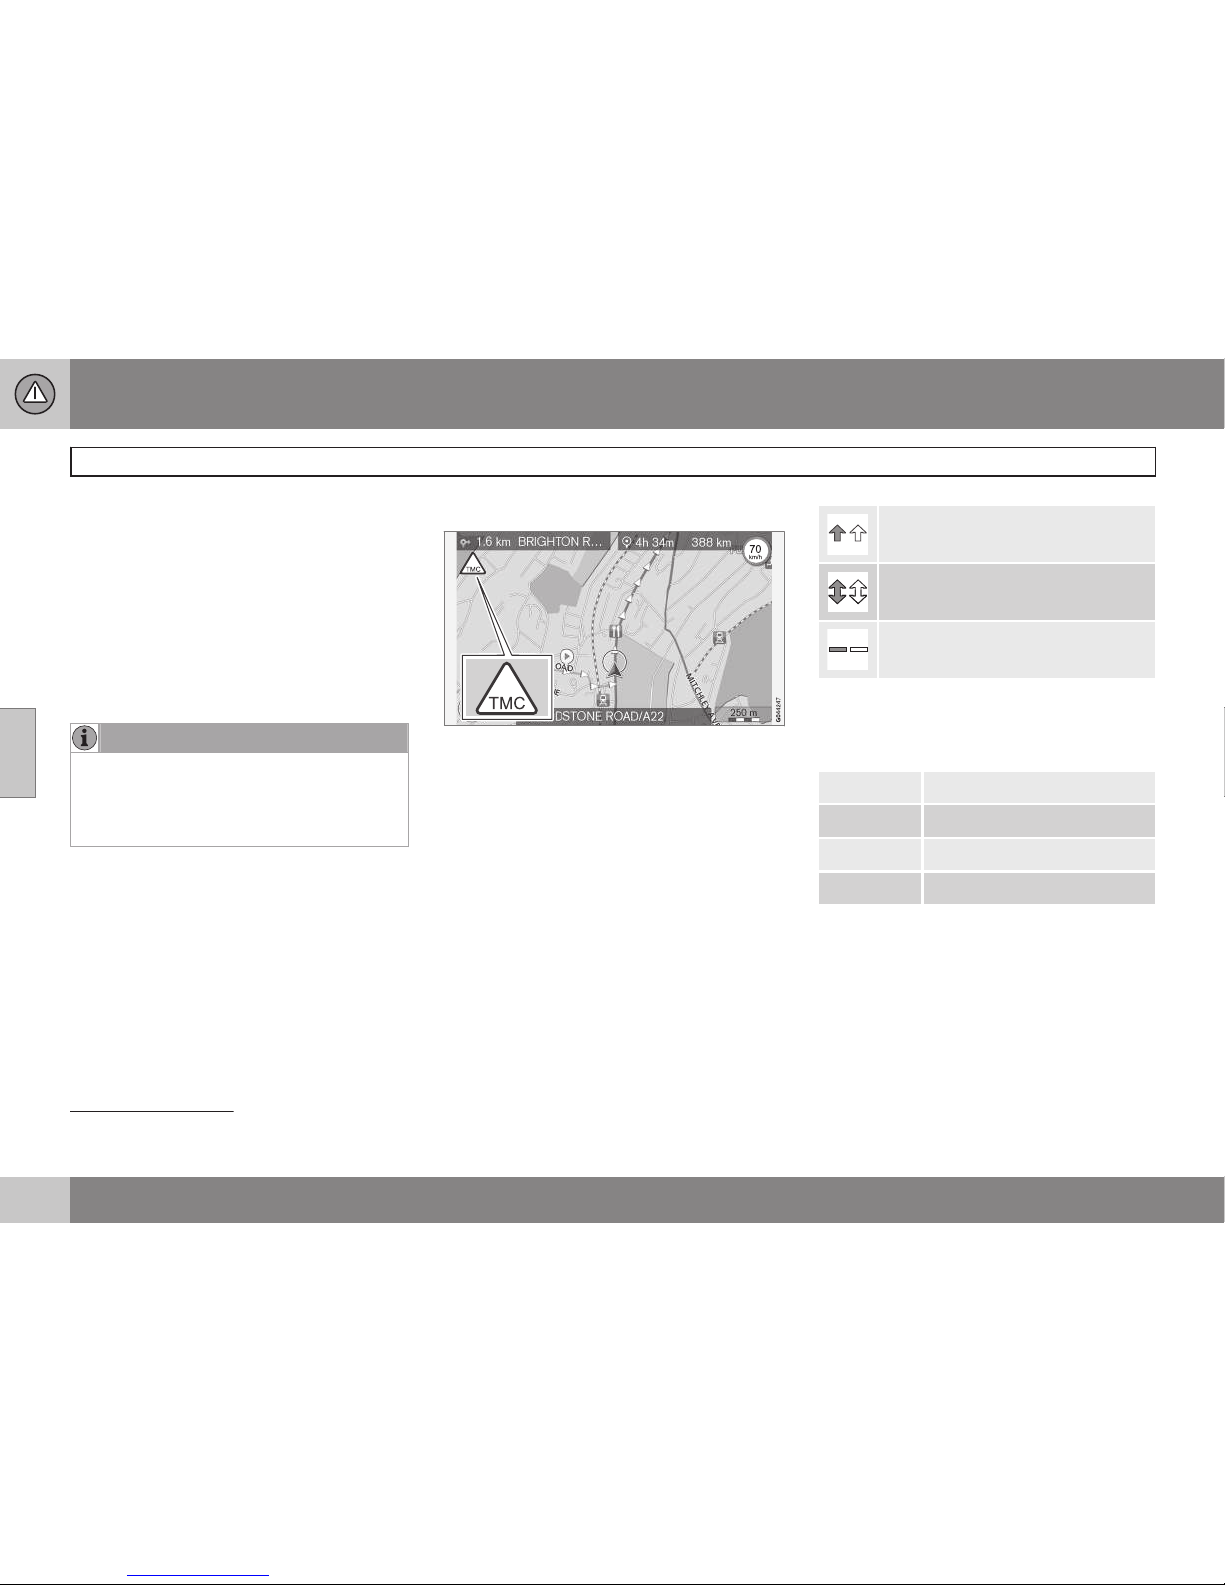
04 Traffic information
General
04
64
Display and reception
Transmitted traffic information is always
received and presented - even if no destinations are given.
How traffic information should be presented
can be set and changed in
Settings, see
page 51.
The presentation of traffic information also
depends on how it is transmitted.
NOTE
Traffic information is not available in all
areas/countries.
The traffic information transmission areas
are constantly being expanded.
Traffic symbols on the map
Symbol for traffic message/problems.
When there is at least one traffic message
along the itinerary route, a TMC symbol
1
appears in the map's upper left-hand corner.
The scroll function (see page 32) can be
used to scroll through the traffic problem to
see its precise position and nature.
Point on map
Traffic problems are marked with arrows,
lines and frames:
Traffic with disruption
Traffic with disruptions in both
directions
Extent
Marking's colour
Colour of arrows, lines and frames indicates
the degree of the disruption:
Black Closed road
Red Stationary traffic
Orange Slow traffic
Yellow General information
Type of traffic disruption
Shown here are examples of map symbols
2
that can mark different disruptions in the traffic:
1
Traffic Message Channel
2
Map symbols may vary between different markets/states.
Page 67
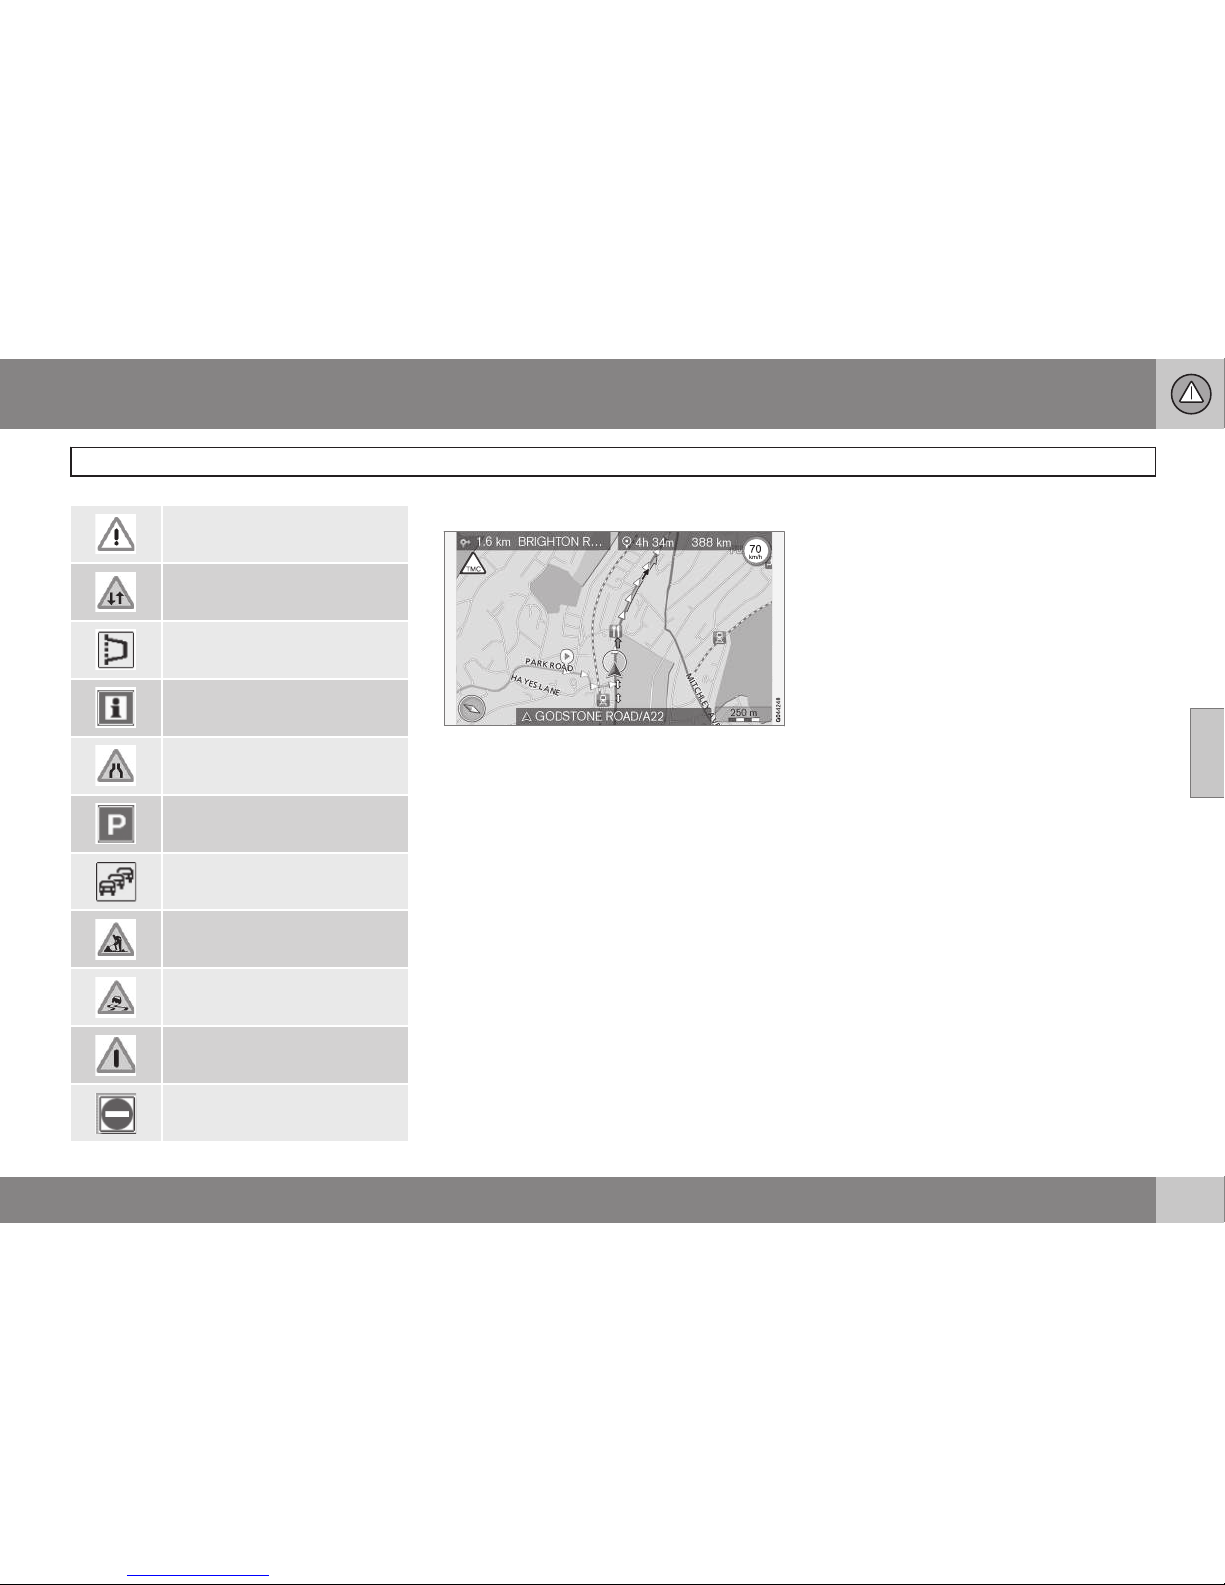
04 Traffic information
General
04
65
Accident
Contraflow
Diversion
Information
Narrow road
Parking information
Congestion
Roadwork
Slippery road
Other hazard
Closed road
Extent
Certain traffic messages also contain information on the extent of the traffic obstruction.
On all scales up to 5 km - except the traffic
message symbol, a line the same colour as
the direction arrow is shown along the affected route. The length of the line is corresponds to the extent (distance) of the traffic
problem.
Size of area for traffic information
The scale of the map determines how great a
quantity of traffic information can be shown the larger the map area shown on the screen,
the more information can be displayed.
Page 68
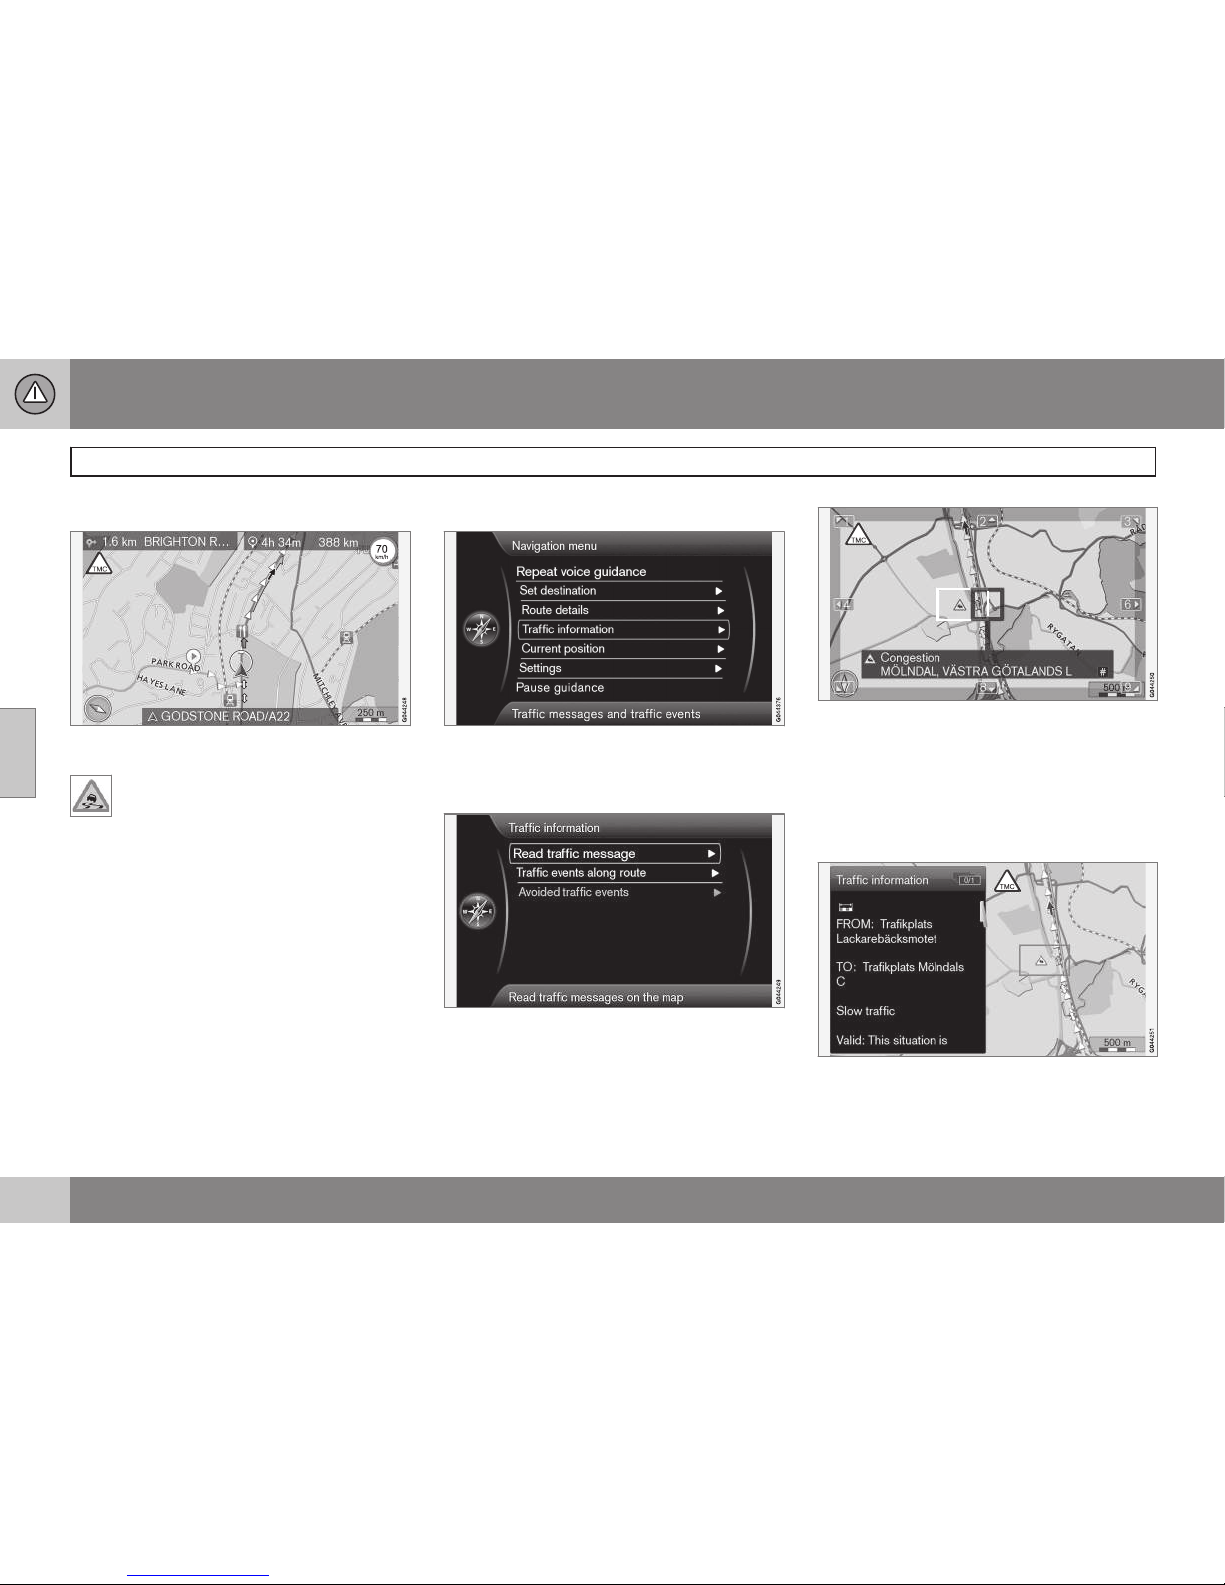
04 Traffic information
Reading information
04
66
Message
Examples of, with arrows, selected traffic problems and their extent.
When the crosshair is placed over a
traffic problem (indicated by an arrow
along the road) you'll see a flashing
frame with a traffic disruption symbol (e.g.
slippery road) on the map.
To take advantage of the symbol's traffic
information:
•
Press OK and select
Traffic information
+ OK.
Traffic information
Main menu.
Traffic information
Read traffic message
Read traffic message
With the cursor on Read traffic message +
OK the following view is shown:
1. Scroll the crosshair to the traffic incident
(coloured line/arrow parallel to the affected road section) about which information
is required - a road sign with frame starts
to flash out on the map.
2. Press OK - Following which, information
like this is shown:
Detailed information on the traffic problem is
linked to the symbol, and to the extent that
Page 69
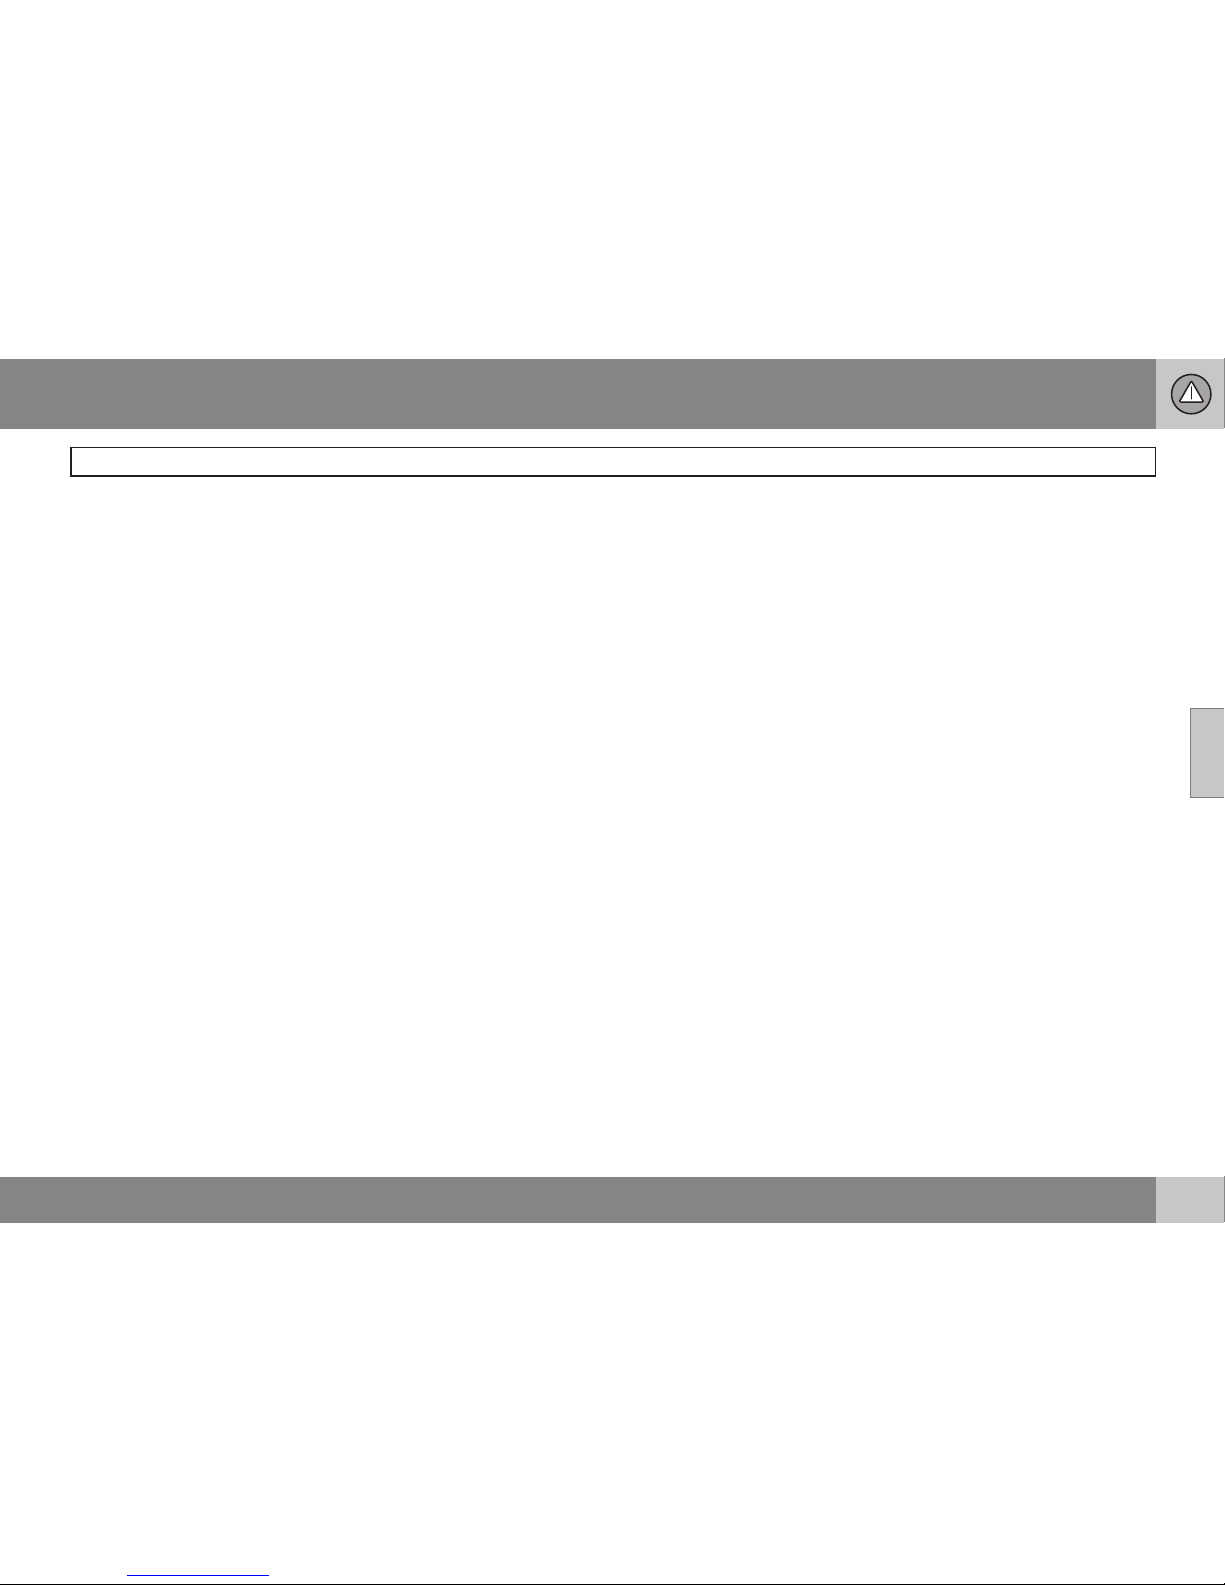
04 Traffic information
Reading information
04
67
information is available the following is also
displayed:
•
duration
•
restrictions on speed, vehicle width and
height
•
roads affected.
If there are several traffic problems in the
crosshair frame, then the problem closest to
the centre of the crosshair is shown first after
a pressing OK once.
The upper section of the display screen can
show e.g. "
2/5" which means that the current
information is number 2 of a total of 5 messages in the crosshair - the remaining messages can be scrolled to using short presses
on OK.
•
Return to map display with EXIT.
Page 70
04 Traffic information
Handling traffic problems
04
68
To avoid traffic problems
Traffic problems ahead
Menu bar 2 without itinerary added.
Traffic events ahead
Press OK on Traffic events ahead to list the
current traffic problems.
Traffic problems along the route
Menu bar 2 with itinerary added.
Traffic events on route
This is the same menu bar as in the previous
section, but with an activated itinerary - the
menu bar now instead reads
Traffic events
on route. Here the system can be made to
guide past the traffic disruption using a different route.
Press OK on the selected menu bar to list the
traffic problems along the route:
List with 1 disruption on the itinerary's route.
The driver can avoid traffic problems by
allowing the system to determine a different
route. Proceed as follows:
1. Select/highlight the traffic obstacle to be
avoided + OK - the traffic problem is
ticked.
2. If several obstacles need to be avoided tick these too. A maximum of 15 can be
selected.
3.
Then select
Calculate new route + OK.
The system then calculates a route that leads
past the ticked traffic disruptions.
To obtain detailed information about a listed
traffic problem:
•
Select/highlight a traffic problem +
# INFO - information about the traffic
problem is shown.
Avoided traffic problems
Avoided traffic events
Ticked traffic problems from the previous
section are listed here.
Page 71
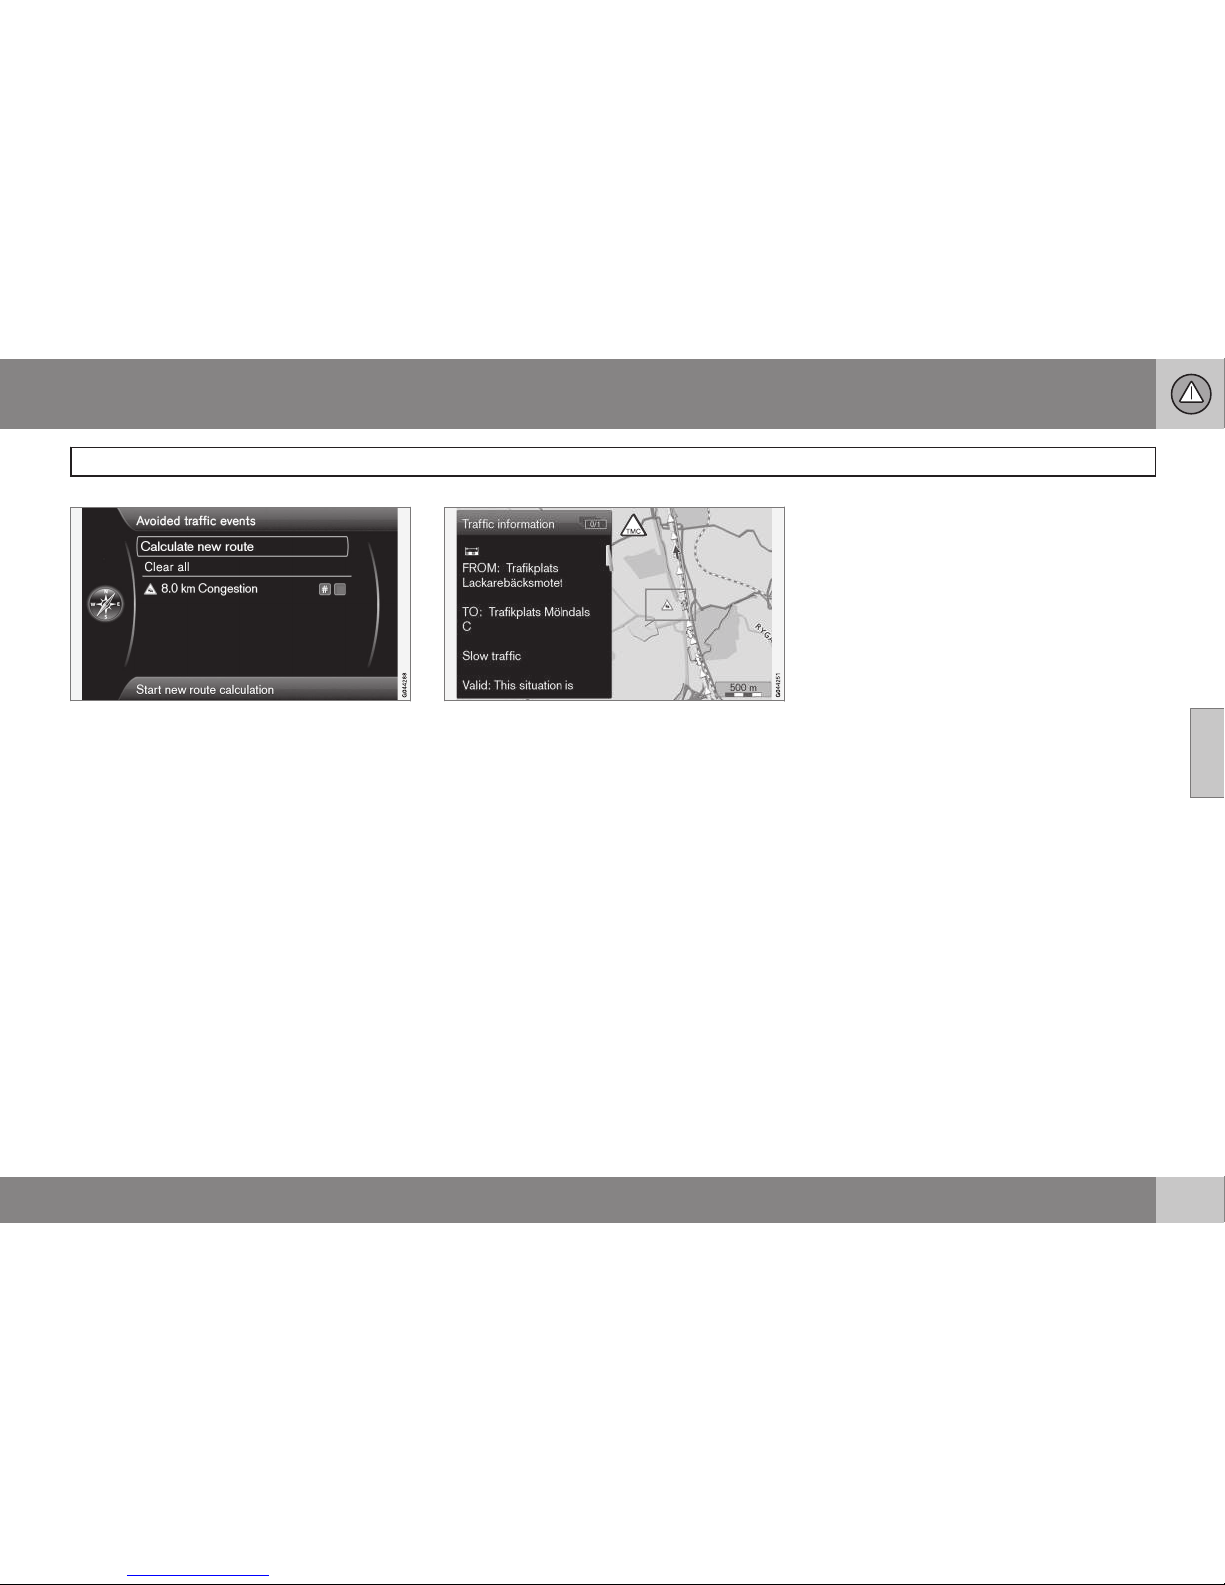
04 Traffic information
Handling traffic problems
04
69
List with 1 editable traffic problem.
The following can be performed:
•
Clear all - unticks all traffic problems.
•
Select/highlight one of the traffic problems + OK - the traffic problem is
unticked.
•
Select/highlight one of the traffic problems + # INFO - detailed information with
map image is shown on the display
screen, see example on next page:
Detailed information - return to the menu using
EXIT.
•
Return to map display with EXIT or select
Calculate new route + OK - the itinerary
is adjusted with regard to the changes
made.
Page 72

70
Facilities.................................................................................................. 72
Page 73
S Y M B O L S O N T H E MAP
Page 74
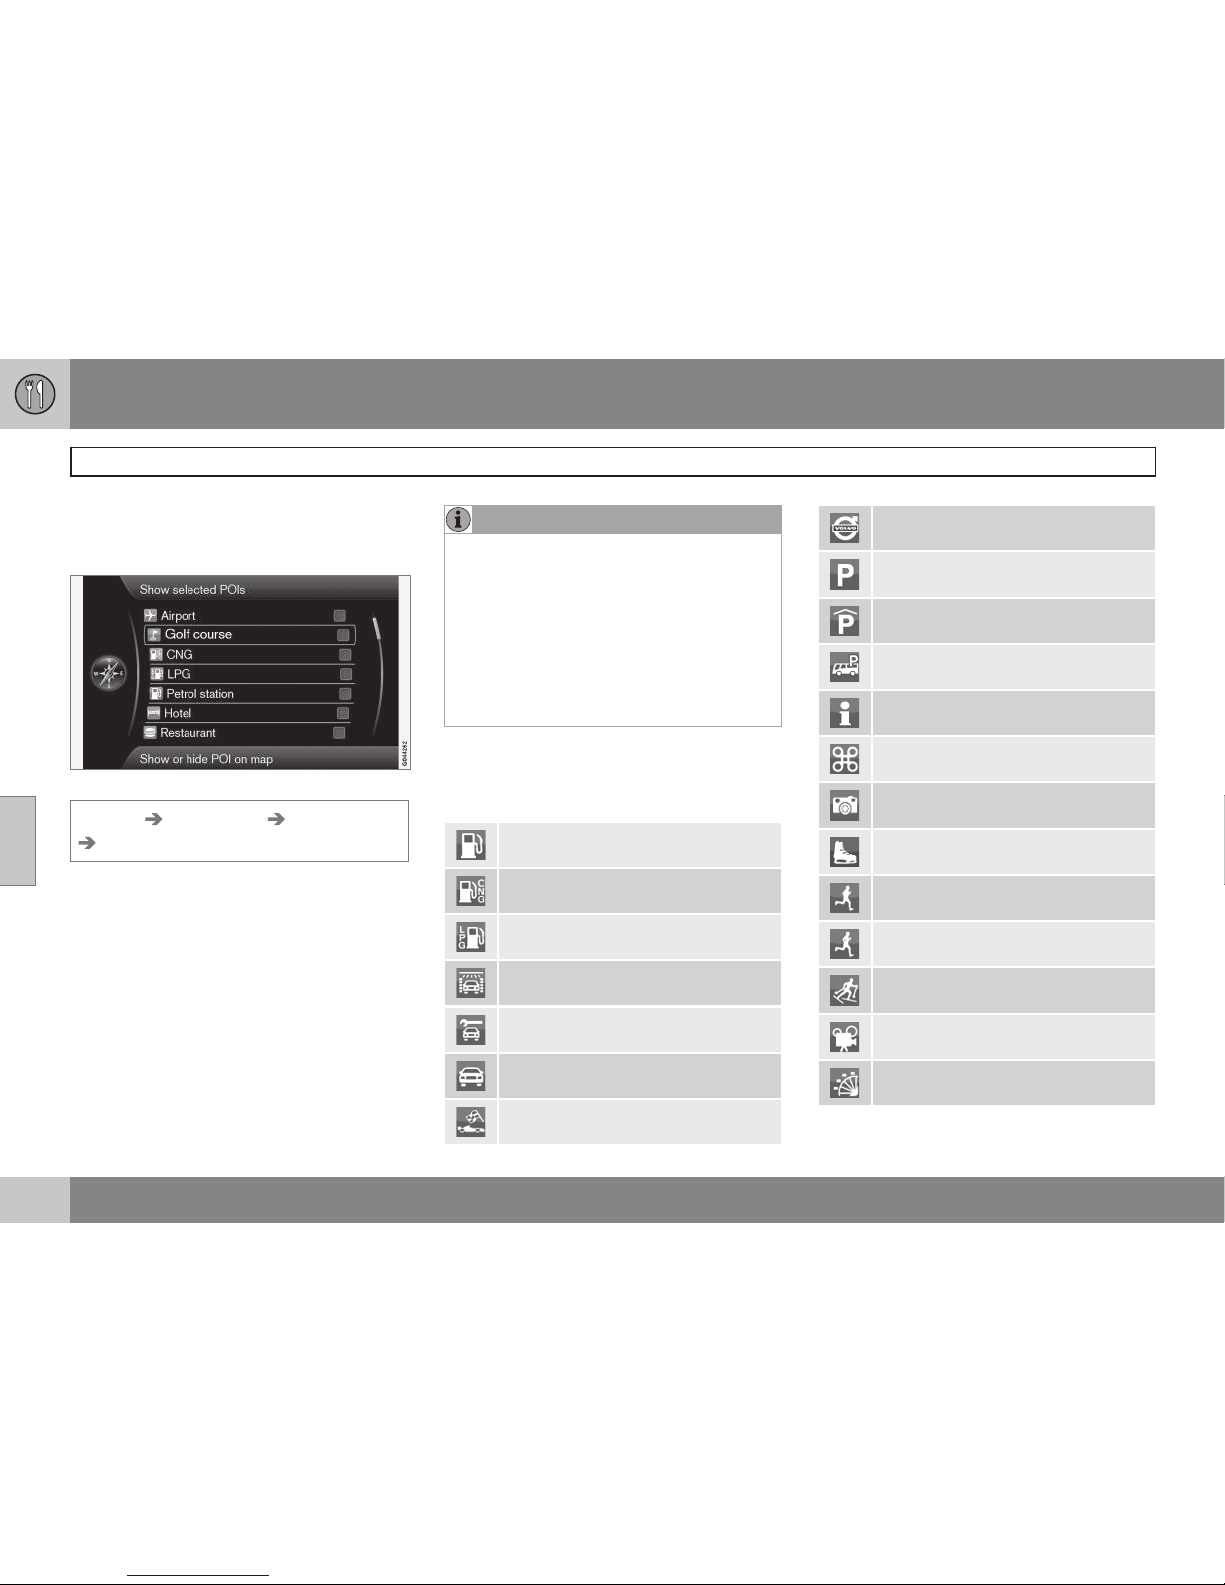
05 Symbols on the map
Facilities
05
72
Specify which facilities are to be shown on
the map or select
All or None are to be
shown - see page 54.
Pre-ticked facilities are shown on the map.
Settings Map options POI on map
Selected
Proceed as follows:
•
Select/mark facility with the TUNE knob tick/untick using OK and close with EXIT.
To avoid making the map image difficult to
read, the number of facilities that can be
viewed simultaneously on the screen is limited - zooming into an area provides an
opportunity to view several facilities.
NOTE
•
The symbol for a facility and the number of facilities may vary between different countries.
•
New symbols may appear and others
disappear in conjunction with updating
the map data - one can scroll through
all the POI symbols for the relevant
map system under
Settings in the
menu system.
Shown here are examples of symbols for different facilities - they are grouped here
according to their function in society:
Petrol station
Petrol station with CNG (biogas)
Petrol station with LPG
Car wash
Car workshop
Car hire
Motorsport facility
Volvo dealer
Parking
Parking garage
Parking, large vehicles
Tourist information
Historical monument
Tourist attraction
Ice skating
Sport facility
Exercise facility
Ski facility
Cinema
Amusement park
Page 75
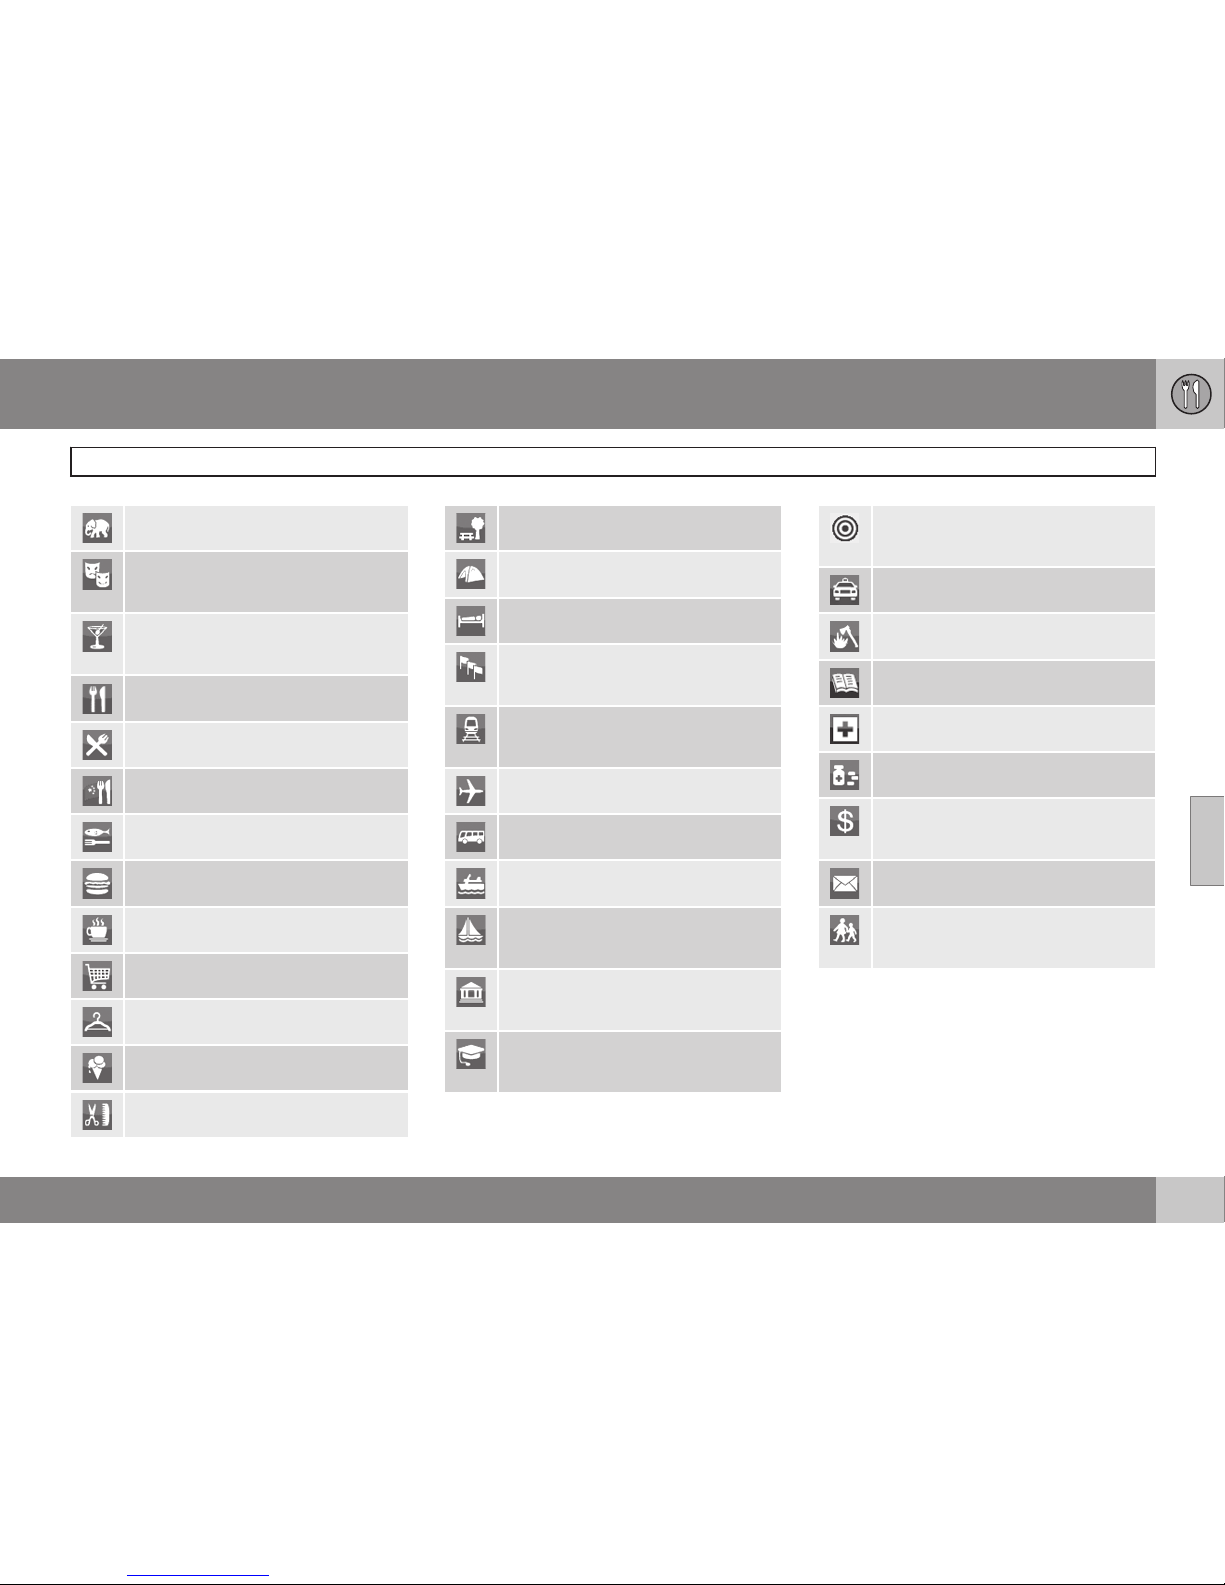
05 Symbols on the map
Facilities
05
73
Animal park
Opera
Theatre
Bar
Nightclub
Restaurant
Restaurant
Restaurant, Chinese
Restaurant, seafood
Fastfood
Coffee shop
Shopping Centre
Dry cleaners
Kiosk
Hairdresser
Rest area
Camp site
Hotel
Conference facility
Exhibition grounds
Train station
Commuter railway station
Airport
Bus station
Ferry
Marina
Marina
Civic building
Authority
University
University
City centre
City centre
Police station
Fire station
Library
Hospital
Pharmacy
Bank
ATM
Post office
Kindergatan
School
Page 76

74
Frequently asked questions.................................................................... 76
EULA - License agreement..................................................................... 78
Copyright................................................................................................ 80
Page 77

Q U E S T I O N S A N D A NSWERS
Page 78
06 Questions and answers
Frequently asked questions
06
76
The position of the car on the map is
wrong
The Navigation system shows the position of
the car to an accuracy of about 20 metres.
There is a greater chance of error when driving on roads lying parallel to another road, on
winding roads, on roads on several levels and
after driving a long distance without making
any distinctive turns.
High mountains, buildings, tunnels, viaducts,
over/underpasses etc. also have a negative
affect on the reception of GPS signals, which
means that accuracy in calculating the position of the car may decrease.
The system does not always calculate
the fastest/shortest route
When calculating a route outline, distance,
width of road, type of road, number of right or
left turns, roundabouts etc. are all taken into
account in order to produce the best theoretical route. A more efficient selection of route
may be possible based on experience and
knowledge of the area.
The system uses toll roads, motorways
and ferries even though I chose to avoid
them
For technical reasons, the system can only
use major roads when calculating a route outline extending over a long distance.
If you selected to avoid toll roads and motorways, then they are avoided to the greatest
possible extent and are only used if there is
no other reasonable alternative available.
The position of the car on the map is
incorrect after transportation
If the car is transported, for example by ferry
or train, or in such a way as to impede the
reception of GPS signals, it can take up to
5 minutes before the position of the car is
correctly calculated.
The position of the car on the map is
incorrect after the car battery has been
disconnected
If power has been cut from the GPS antenna,
it can take more than 5 minutes for the GPS
signals to be received correctly and the position of the car to be calculated.
The car symbol on screen behaves erratically after a tyre change
In addition to the GPS receiver, the car's
speed sensor and a gyro assist in calculating
the current position and direction of travel of
the car. After fitting the spare wheel or changing between summer and winter tyres the
system needs to "learn" the size of the new
wheels.
In order for the system to work optimally it is
recommended to turn the steering wheel to
full lock a few times while driving, in a suitable location.
The map image does not correspond
with the real situation
Factors such as the constant expansion and
rebuilding of the road network, new traffic
regulations constantly being introduced etc.
mean that the map database is not always
complete.
Continuous development and updating of
map data is underway - a Volvo dealer can
provide more information.
See also www.volvocars.com/navi for further
information on maps etc.
The scale of the map sometimes
changes
There is no detailed map information in certain areas. The system then automatically
changes the degree of magnification.
The expected menu option is missing
Check the settings that have been made.
Select Reset navigation settings to restore
the original settings.
If this does not help, select
Delete all user
data
.
Page 79
06 Questions and answers
Frequently asked questions
06
77
The car symbol on screen jumps
forwards or spins
The system may need a few seconds to
sense the position and movement of the car
before driving off.
Switch off both the system and the engine.
Start again, but remain stationary for a while
before starting to drive.
I shall go on a long trip but do not want
specify a particular route outline to the
cities I plan to travel through - How do I
most simply create an itinerary?
Specify the destination directly on the map
using the hairline cross. The system automatically guides you to the final destination even
though you are driving beside the intermediate destinations.
My map information is not up-to-date
Contact your nearest Volvo Dealer regarding
the updating of map data.
See also www.volvocars.com/navi
How can I easily check which map
version is used?
See Settings System information Map
version:
for information on version and geo-
graphic area covered.
Page 80
06 Questions and answers
EULA - License agreement
06
78
Notice to the user
PLEASE READ THIS END USER LICENSE
AGREEMENT CAREFULLY BEFORE USING
THE NAVTEQ DATABASE.
THIS IS A LICENSE AGREEMENT - AND NOT
AN AGREEMENT FOR SALE – BETWEEN
YOU AND NAVTEQ EUROPE B.V. FOR YOUR
COPY OF THE NAVTEQ NAVIGABLE MAP
DATABASE, INCLUDING ASSOCIATED
COMPUTER SOFTWARE, MEDIA AND
EXPLANATORY PRINTED DOCUMENTATION
PUBLISHED BY NAVTEQ (JOINTLY "THE
DATABASE"). BY USING THE DATABASE,
YOU ACCEPT AND AGREE TO ALL TERMS
AND CONDITIONS OF THIS END USER
LICENSE AGREEMENT ("AGREEMENT"). IF
YOU DO NOT AGREE TO THE TERMS OF
THIS AGREEMENT, PROMPTLY RETURN
THE DATABASE, ALONG WITH ALL OTHER
ACCOMPANYING ITEMS, TO YOUR SUPPLIER FOR A REFUND.
OWNERSHIP
The Database and the copyrights and intellectual property or neighbouring rights therein
are owned by NAVTEQ or its licensors. Ownership of the media on which the Database is
contained is retained by NAVTEQ and/or your
supplier until after you have paid in full any
amounts due to NAVTEQ and/or your supplier
pursuant to this Agreement or similar agree-
ment(s) under which goods are provided to
you.
LICENSE GRANT
NAVTEQ grants you a non-exclusive license
to use the Database for your personal use or,
if applicable, for use in your business' internal
operations. This license does not include the
right to grant sub-licenses.
LIMITATIONS ON USE
The Database is restricted for use in the specific system for which it was created. Except
to the extent explicitly permitted by mandatory laws (e.g. national laws based on the
European Software Directive (91/250) and the
Database Directive (96/9)), you may not
extract or reutilise substantial parts of the
contents of the Database nor reproduce,
copy, modify, adapt, translate, disassemble,
decompile, reverse engineer any portion of
the Database. If you wish to obtain interoperability information as meant in (the national
laws based on) the European Software Directive, you shall grant NAVTEQ reasonable
opportunity to provide said information on
reasonable terms, including costs, to be
determined by NAVTEQ.
TRANSFER OF LICENSE
You may not transfer the Database to third
parties, except when installed in the system
for which it was created or when you do not
retain any copy of the Database, and provided that the transferee agrees to all terms
and conditions of this Agreement and confirms this in writing to NAVTEQ. Multi-disc
sets may only be transferred or sold as a
complete set as provided by NAVTEQ and
not as subset thereof.
LIMITED WARRANTY
NAVTEQ warrants that, subject to the warnings set out below, for a period of 12 months
after acquisition of your copy of the Database, it will perform substantially in accordance with NAVTEQ's Criteria for Accuracy
and Completeness existing on the date you
acquired the Database; these criteria are
available from NAVTEQ at your request. If the
Database does not perform in accordance
with this limited warranty, NAVTEQ will use
reasonable efforts to repair or replace your
non-conforming copy of the Database. If
these efforts do not lead to performance of
the Database in accordance with the warranties set out herein, you will have the option to
either receive a reasonable refund of the price
you paid for the Database or to rescind this
Agreement. This shall be NAVTEQ's entire liability and your sole remedy against NAVTEQ.
Except as expressly provided in this section,
NAVTEQ does not warrant nor make any representations regarding the use of results of
the use of the Database in terms of its cor-
Page 81
06 Questions and answers
EULA - License agreement
06
79
rectness, accuracy, reliability, or otherwise.
NAVTEQ does not warrant that the Database
is or will be error free. No oral or written information or advice provided by NAVTEQ, your
supplier or any other person shall create a
warranty or in any way increase the scope of
the limited warranty described above. The
limited warranty set forth in this Agreement
does not affect or prejudice any statutory
legal rights that you may have under the legal
warranty against hidden defects.
If you did not acquire the Database from
NAVTEQ directly, you may have statutory
rights against the person from whom you
have acquired the Database in addition to the
rights granted by NAVTEQ hereunder according to the law of your jurisdiction. The above
warranty of NAVTEQ shall not affect such
statutory rights and you may assert such
rights in addition to the warranty rights granted herein.
LIMITATION OF LIABILITY
The price of the Database does not include
any consideration for assumption of risk of
consequential, indirect or unlimited direct
damages which may arise in connection with
your use of the Database. Accordingly, in no
event shall NAVTEQ be liable for any consequential or indirect damages, including without limitation, loss of revenue, data, or use,
incurred by you or any third party arising out
of your use of the Database, whether in an
action in contract or tort or based on a warranty, even if NAVTEQ has been advised of
the possibility of such damages. In any event
NAVTEQ's liability for direct damages is limited to the price of your copy of the Database.
THE LIMITED WARRANTY AND LIMITATION
OF LIABILITY, SET FORTH IN THIS AGREEMENT, DO NOT AFFECT OR PREJUDICE
YOUR STATUTORY RIGHTS WHERE YOU
HAVE ACQUIRED THE DATABASE OTHERWISE THAN IN THE COURSE OF A BUSINESS.
WARNINGS
The Database may contain inaccurate or
incomplete information due to the passage of
time, changing circumstances, sources used
and the nature of collecting comprehensive
geographic data, any of which may lead to
incorrect results. The Database does not
include or reflect information on - inter alia neighbourhood safety; law enforcement;
emergency assistance; construction work;
road or lane closures; vehicle or speed
restrictions; road slope or grade; bridge
height, weight or other limits; road or traffic
conditions; special events; traffic congestion;
or travel time.
GOVERNING LAW
This Agreement shall be governed by the
laws of the jurisdiction, in which you reside at
the date of acquisition of the Database.
Should you at that moment reside outside the
European Union or Switzerland, the law of the
jurisdiction within the European Union or
Switzerland where you acquired the Database
shall apply. In all other cases, or if the jurisdiction where you acquired the Database
cannot be defined, the laws of the Netherlands shall apply. The courts competent at
your place of residence at the time you
acquired the Database shall have jurisdiction
over any dispute arising out of, or relating to
this Agreement, without prejudice to NAVTEQ's right to bring claims at your then current place of residence.
Page 82
06 Questions and answers
Copyright
06
80
Austria
© Bundesamt für Eich- und Vermessungswesen.
France
Source Géoroute® IGN France & BD Carto®
IGN France.
Germany
Die Grundlagendaten wurden mit Genehmigung der zuständigen Behörden entnommen.
Great Britain
© Based upon Crown Copyright material.
Greece
Copyright Geomatics Ltd.
Hungary
Copyright Top-Map Ltd.
Italy
La Banca Dati Italiana è stata prodotta
usando quale riferimento anche cartografia
numerica ed al tratto prodotta e fornita dalla
Regione Toscana.
Norway
Copyright © Norwegian Mapping Authority.
Poland
© EuroGeographics.
Portugal
Source: IgeoE - Portugal.
Spain
Información geográfica propiedad del CNIG.
Sweden
Based upon electronic data © National Land
Survey Sweden.
Switzerland
Topografische Grundlage: © Bundesamt für
Landestopographie.
NOTE
Australia is not covered by this agreement;
see special information.
© 2005 - 2014 NAVTEQ All rights reserved.
Denso
Hereby, DENSO CORPORATION
declares that this DN-NS-020 is in
compliance with the essential requirements and other relevant provisions of Directive 1999/5/EC.
Page 83
06 Questions and answers
06
81
Page 84

07 Alphabetical Index
07
82
A
About
information on the map disc................. 57
Acoustic signal
Stored location..................................... 44
Additional information................................ 20
Address
enter...................................................... 40
Aerial
location................................................. 17
Arrow keys................................................. 20
Audible signal
stored location...................................... 44
Automatic notification................................ 51
Avoid
ferries.................................................... 52
motorways............................................ 52
toll roads............................................... 52
Avoid stretch of road................................. 48
B
Back to starting point................................ 45
Basic functions.......................................... 19
Basic settings............................................ 14
Battery
remote control...................................... 20
Brackets with English text......................... 12
C
Change scale for traffic information.......... 65
Changes in the manual.............................. 13
Compass................................................... 31
Component positioning, overview............. 16
Crosshair................................................... 32
Current position on map............................ 50
D
Delete itinerary........................................... 48
Demo......................................................... 60
Destination
set......................................................... 40
Distance unit
ETA....................................................... 56
RTA....................................................... 56
DVD disc
care....................................................... 28
changing............................................... 27
E
English text in brackets............................. 12
Enter an itinerary........................................ 47
Erase user information............................... 58
ETA, distance unit...................................... 56
F
Facilities
Symbols................................................ 72
Facilities as destination............................. 41
Factory settings......................................... 14
Functions
keypad and remote control.................. 20
Page 85
07 Alphabetical Index
07
83
G
GPS information........................................ 56
GPS receiver.............................................. 17
Guidance................................................... 47
quick guide............................................. 8
Guiding options......................................... 51
I
IR receiver and remote control.................. 20
J
Junction..................................................... 40
K
Keypad....................................................... 20
location........................................... 17, 18
L
Licence code............................................. 27
Loudspeaker
location................................................. 18
M
Main unit
location................................................. 17
Map
point on................................................. 46
Map areas.................................................. 27
Map colour................................................. 53
Map image................................................. 30
Map mode................................................. 14
Map options............................................... 53
Map scroll.................................................. 32
Map version............................................... 57
Map view................................................... 53
Menus/functions........................................ 34
My POI........................................... 43, 56, 57
N
Next destination in itinerary....................... 48
O
On/Off........................................................ 14
Overview component location................... 16
P
Pause route guidance................................ 33
POIs on the map........................................ 54
Post code
search................................................... 45
Propagation............................................... 65
R
Read traffic message........................... 51, 66
Reset navigation settings.......................... 58
Return to default settings.......................... 58
Return trip.................................................. 45
Page 86

07 Alphabetical Index
07
84
Road sign information............................... 55
Route options...................................... 52, 55
RSI - Road Sign Information...................... 55
RTA, distance unit..................................... 56
S
Save a location.......................................... 43
Saved destinations.................................... 44
Scale
change............................................ 46, 65
Scrolling..................................................... 32
Search
post code.............................................. 45
via point on map................................... 46
Search paths described in the manual...... 12
Set destination........................................... 40
Simulation.................................................. 60
Start guidance........................................... 47
Store a location.......................................... 43
Stored location
Acoustic signal..................................... 44
add information.................................... 44
Stored locations......................................... 43
Symbols
facilities................................................. 72
System activation........................................ 8
System options.......................................... 56
System settings......................................... 14
T
TMC receiver............................................. 17
Traffic information................................ 17, 51
broadcast.............................................. 64
Traffic information selection...................... 51
Traffic symbols on the map....................... 64
Transport of car......................................... 76
TV screen
care....................................................... 28
V
Voice commands (Voice control)............... 22
Voice control.............................................. 22
Voice guidance.......................................... 31
Volume control of voice messages............ 17
W
Waypoint.................................................... 48
Page 87

Page 88

Volvo Car Corporation TP 17159 (English) AT 1346, Printed in Sweden, Göteborg 2013, Copyright © 2000-2013 Volvo Car Corporation
 Loading...