

Page 1

ENGLISH
Operator’s Manual
English, Spanish, French
THERMAL CIRCULATOR
40868
40861
Item Description Voltage Watts Amps Plug
40868 Sous Vide - Immersion Circulator (Head Only) 120V 1100 11 Amps 5-15P
40861 Sous Vide - Immersion Circulator, Head, Bath, and Cover 120V 1100 11 Amps 5-15P
Thank you for purchasing this Vollrath equipment. Before operating the equipment, read and familiarize yourself with the following operating
and safety instructions. SAVE THESE INSTRUCTIONS FOR FUTURE REFERENCE. Save the original box and packaging. Use this
packaging to ship the equipment if repairs are needed.
Item No. 2350162-1 ml Rev 06/14
Page 2
saFety PreCautions
To ensure safe operation, read the following statements and
understand their meaning. Please read carefully.
WARNING
Warning is used to indicate the presence of a hazard that can cause
severe personal injury, death, or substantial property damage if the
warning is ignored.
CAUTION
Caution is used to indicate the presence of a hazard that will or can
cause minor personal injury or property damage if the caution is
ignored.
NOTE
Note is used to notify people of installation, operation, or
maintenance information that is important but not hazard-related.
For Your Safety!
These precautions should be followed at all times. Failure to follow
these precautions could result in injury to yourself and others.
To reduce risk of injury or damage to the equipment:
Use only grounded electrical outlets matching the nameplate rated
voltage.
Have equipment installed by a qualied personnel in accordance with
local codes and ordinances.
Use equipment in a at, level position.
ENGLISH
Do not use an extension cord with this equipment. Do not plug this
equipment into a power strip or multi-outlet power cord.
Unplug equipment and turn off before cleaning or moving.
Do not spray controls or outside of equipment with liquids or cleaning
agents.
Do not clean the equipment with steel wool.
Keep equipment and power cord away from open ames, electric
burners or excessive heat.
Do not operate equipment in public areas and/or around children.
Do not operate if equipment has been damaged or is malfunctioning in
any way.
FunCtion and PurPose
2. Clean any glue residue left over from the plastic or tape.
3. Place the equipment on a at stable surface.
4. Plug the equipment into a properly grounded electrical supply matching
the nameplate rating voltage. Damage to the equipment can occur if
incorrect power is supplied to equipment.
Note:
Using a voltage other than the nameplate rated voltage will cause
damage to the unit. Incorrect voltage, modication to the power cord or
electrical components can damage unit and will void the warranty.
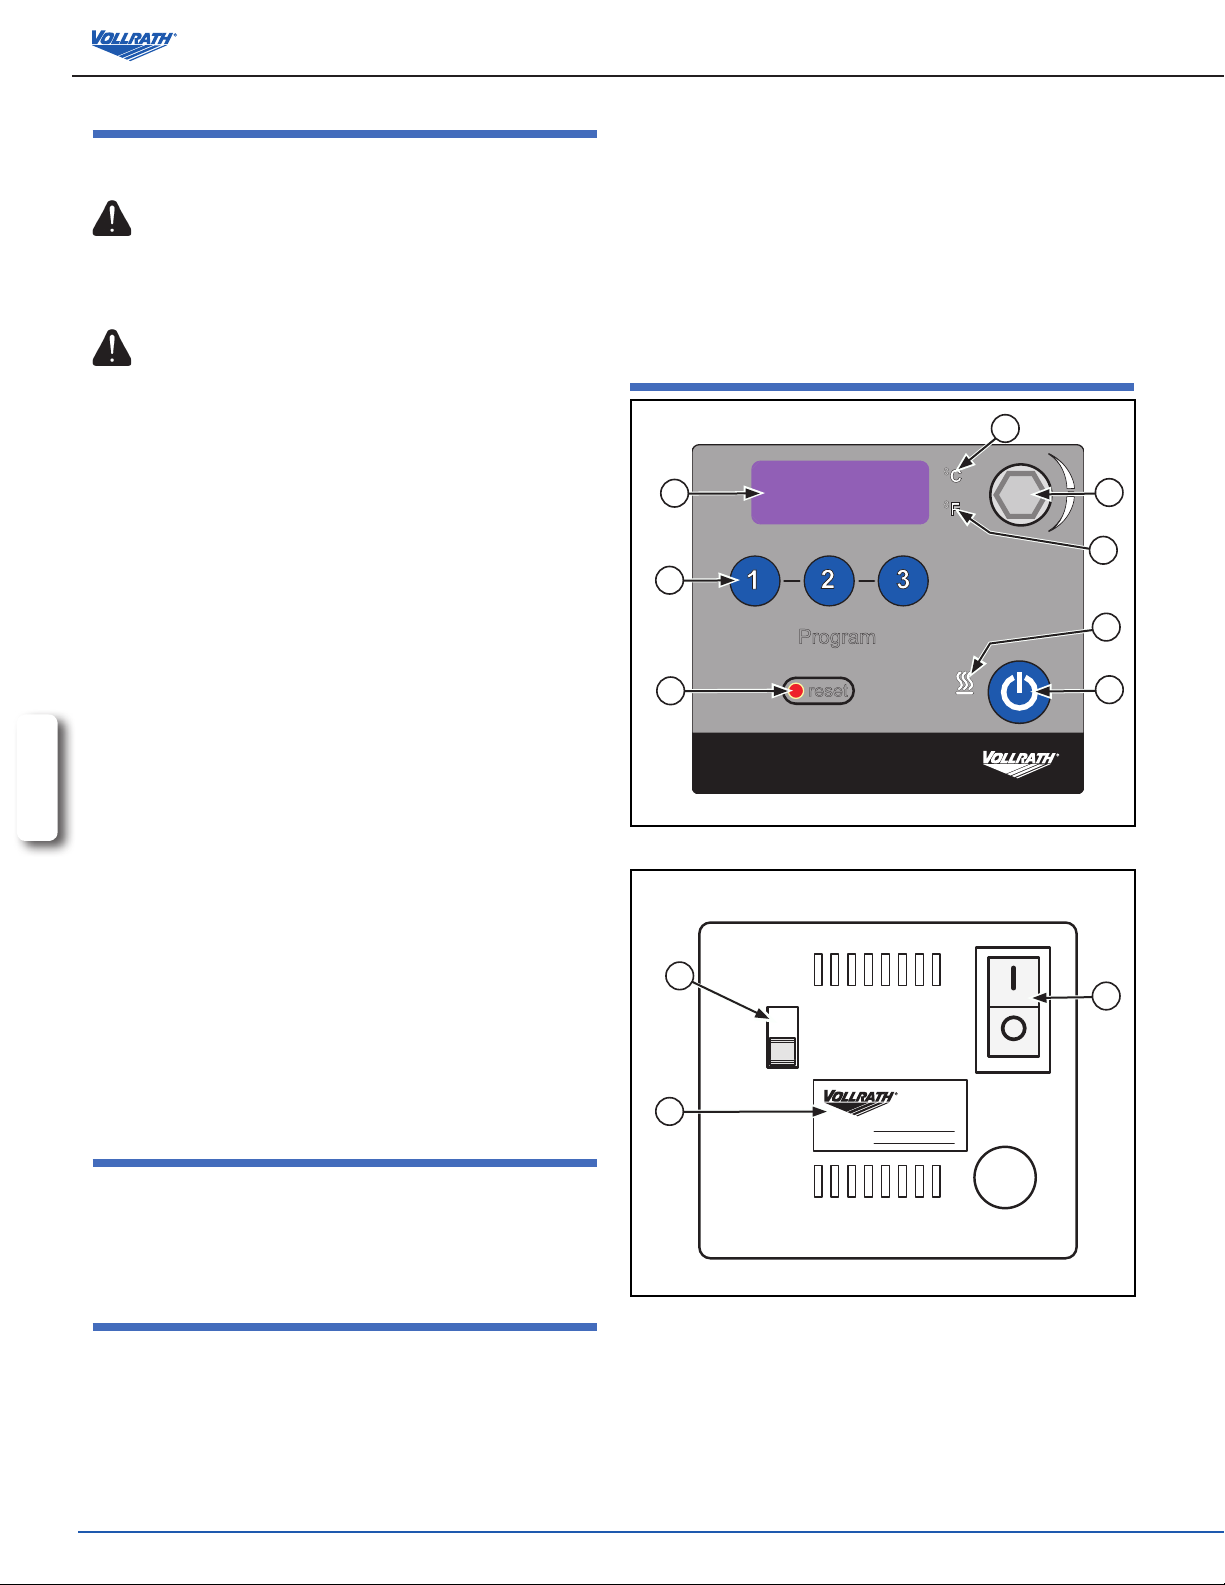
Features and Controls
C
B
A
Program
P
reset
Figure 1. Front of Control Panel.
I
HIGH
PUMP
SPEED
LOW
H
Serial #
Model #
D
E
F
G
J
2
Vollrath Thermal Circulators are designed provide precise temperature
control of water for closed loop circulation. This unit is intended for indoor
use at commercial food service establishments. It is not intended for
household, industrial or laboratory use.
unPaCking the equiPment and initial setuP
Figure 2. Back of Control Panel.
When no longer needed, dispose of all packaging and materials in an
environmentally responsible manner.
1. Remove all packing material and tape, as well as any protective plastic
from the equipment.
OperatOr’s Manual
Made in USA
Page 3
oPeration
K
L
WARNING
Burn Hazard.
M
Hot surfaces and food can burn skin. Allow the hot surfaces to cool
N
before handling.
Do not touch hot food, liquid or heating surfaces
while equipment is heating or operating.
O
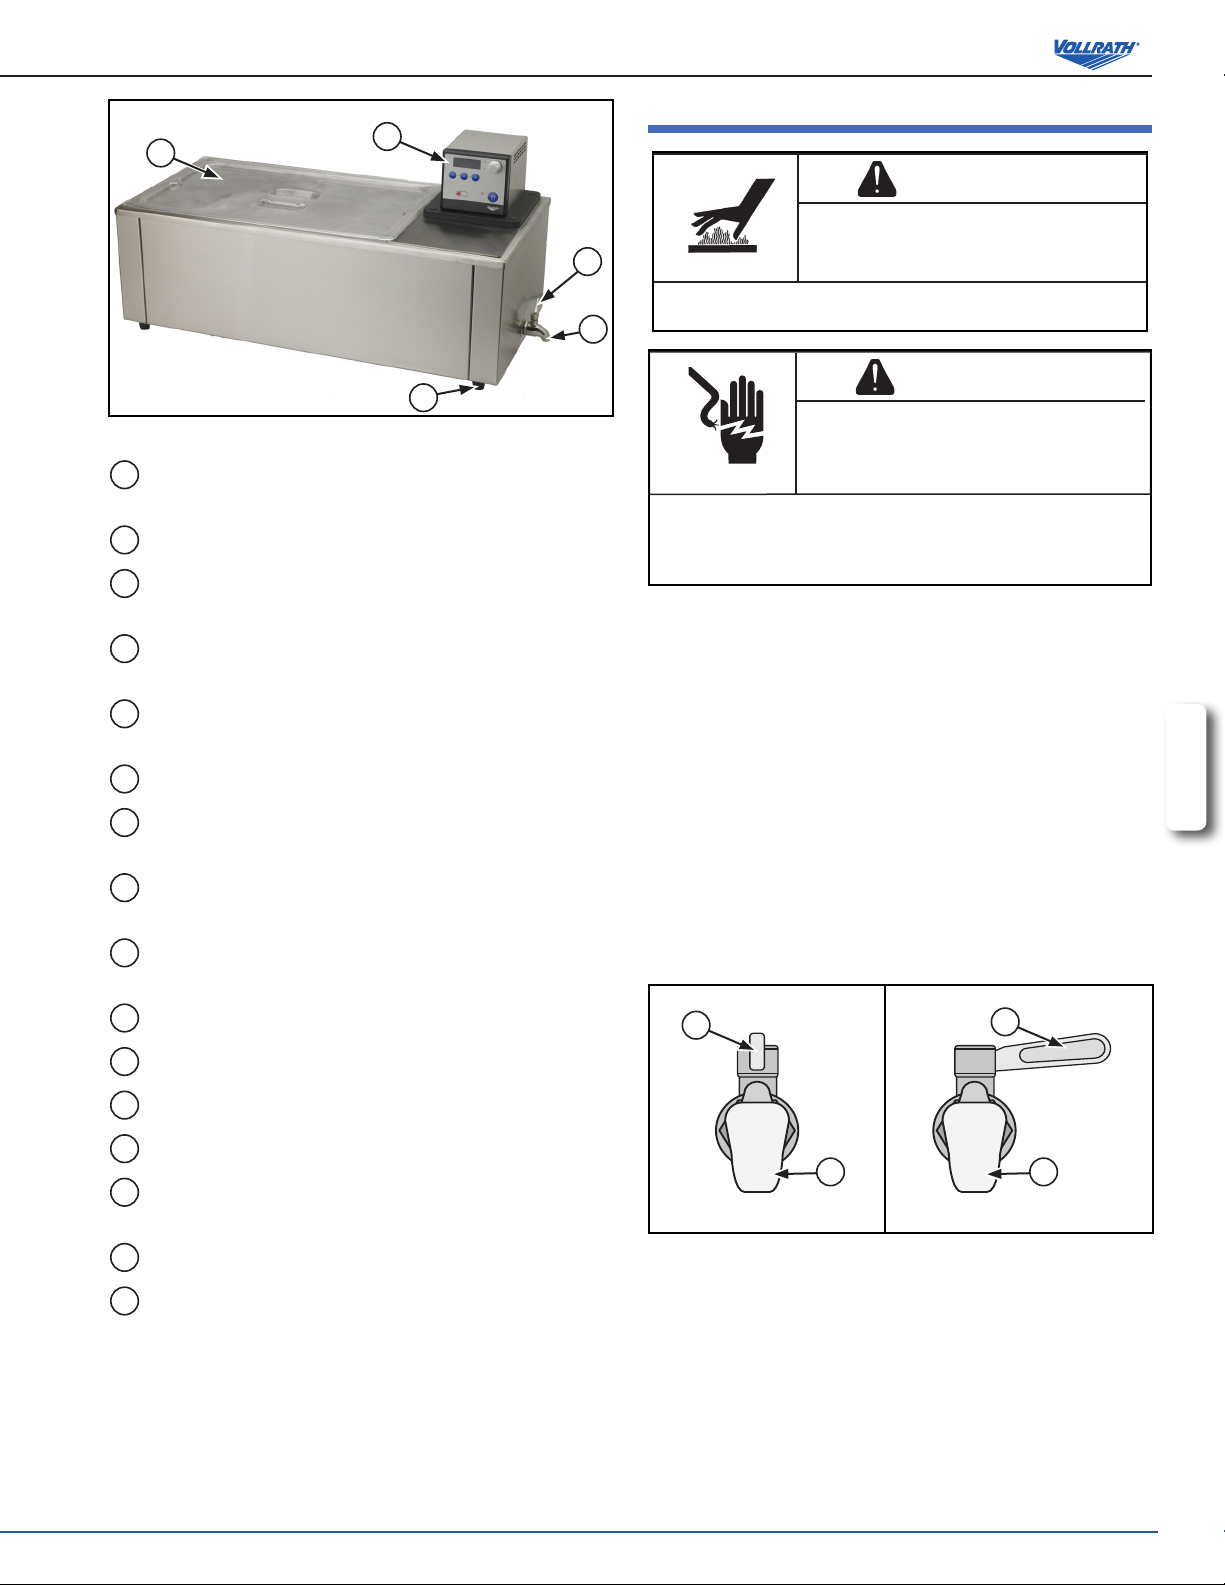
Figure 3. Cover, Drain, and Drain Lever (shown in the “Open” Position).
A
PRESET TEMPERATURE. Sets the unit to preset temperatures when
pressed.
B
DISPLAY. Displays the temperature being set or in the well.
C
C° TEMPERATURE LIGHT. When illuminated the display shows
temperature in C°.
D
SELECT/SET KNOB (Part Number 23623-1). Turn to adjust the
temperature
E
F° TEMPERATURE LIGHT. When illuminated the display shows
Do not spray water or cleaning products. Liquid could contact the
electrical components and cause a short circuit or an electrical
shock. Do not use equipment if power cord is damaged or has been
modied
Before using this equipment clean as described in the CLEANING section of
this document.
NOTE:
Monitor food temperature closely for food safety. The United States
Public Health Service recommends that hot food be heated and held at
a minimum of 140 ºF (60 ºC) to help prevent bacteria growth.
temperature in F°.
Heat water only. Do not use this unit to heat oil, grease or other liquid.
F
HEATING LIGHT. Illuminated when the unit is heating.
G
CONTROLLER ON/OFF BUTTON. Switches the controller “ON” or
“OFF”.
H
DATA TAG. Shows the unit information such as Model and Serial
Number.
I
PUMP SPEED SWITCH. Switches the pump speed between low and
Other liquids may become unstable and become hazardous.
Vacuum packed food creates a low oxygen environment. With improper
handling or preparation bacteria can grow. We recommend that a
HCAPP program be put in place. Check with the U.S. Food and Drug
Administration for details.
1. For units with baths check that the drain valve lever (M) is in the closed
high.
WARNING
Electrical Shock Hazard.
Keep water and other liquids from entering the
inside of the electrical compartment. Liquid inside
the equipment could cause an electrical shock.
ENGLISH
position. See Figure 4. Or, clamp the circulator to a vessel that is 5.3 qt
(5L) to 31.7 qt (30L) in volume.
J
POWER ON/OFF SWITCH. Switches the unit “ON” or “OFF”.
K
COVER. Covers the well.
L
CONTROLLER. Used to program the thermal circulator.
M
DRAIN VALVE LEVER. Controls the ow of water out of the drain valve.
N
DRAIN VALVE (Part Number 21696-1). Used to empty water from the
well(s).
P
RESET BUTTON. Used to reset unit if water level drops below element.
O
FOOT (Part Number 23754-1). Four placed on bottom corners of unit.
M
“Open”
N
“Closed”
M
N
Figure 4. Drain and Drain Lever Positions.
2. Fill the bath or vessel with clean fresh water so that it is about 2” (50 mm)
from the top. The water level may need to be adjusted after food product
is introduced.
3. Plug electrical power cord into a grounded outlet matching the nameplate
rated voltage.
4. Switch the power switch (J) to the “ON” position. See Figure 2.
5. Set the pump speed switch (I) to the desired setting.
6. Press the controller button On/Off button (G). See Figure 1.
OperatOr’s Manual
3
Page 4
To Change the Display to °F:
1. Switch the power switch (J) to the “OFF” position. See Figure 2.
2. Press and hold the “2” preset temperature (A) while switching the power
switch (J) to the “ON” position. See Figures 1 and 2.
2. Rotate the select/set knob (D) until the desired temperature is
To Change the Display to °C:
1. Switch the power switch (J) to the “OFF” position. See Figure 2.
2. Press and hold the “3” preset temperature (A) while switching the power
switch (J) to the “ON” position. See Figures 1 and 2.
3. Allow the water to preheat before adding food product.
4. Monitor water level when adding, removing and heating food product.
Setting the Set Point Temperature:
1. To set the temperature press and release the select/set knob (D). The
decimal point in the display (B) will ash.
2. Rotate the select/set knob (D) to reach desired temperature is displayed.
Rotating clockwise increases the setting, rotating counterclockwise
decreases the setting. Once the desired setting is reached press the
select/set knob (D) a second time. Note: the unit will automatically accept
the displayed set point approximately 10 seconds of inactivity, even if the
select/set knob was not pressed.
3. Allow the water to preheat completely before adding food product.
Control Lockout Feature:
This feature enables the user to lock all controls on the controller. While the
feature is activated, the unit will remain running at the current settings.
1. Press and hold the select/set knob (D) until display (B) shows “LLo”
2. Press and hold the select/set knob (D) again, until the display (B) shows
Reset Button:
Should the water level drop below the heater the safety thermostat will
activate and disconnect power from the heater and pump. The display (B)
will show “FLt 3”. Allow to cool and press the reset button (P). See Figure 1.
A
When Finished with the Unit:
desired preset temperature (A) button, 1, 2, or 3. A decimal on the
display (B) begins to blink and recalls the previous setting. See Figure
1.
displayed. Once the desired setting is reached press the select/set knob
(D) a second time. Press the desired preset temperature (A) button to
save the temperature to that button.
The water level should be between 1” and 2” (25 mm - 50 mm) from the
top of the bath or vessel.
(about 10 seconds) then let go. See Figure 1. When locked, the setpoint
decimal point will not ash.
“LLo” (about 10 seconds) then let go, to unlock the controls. Once
unlocked, the display (B) will show “CAn”.
1. Press the control on/off button (G) and switch the power switch (J) to
the “OFF” position. See Figures 1 and 2.
ENGLISH
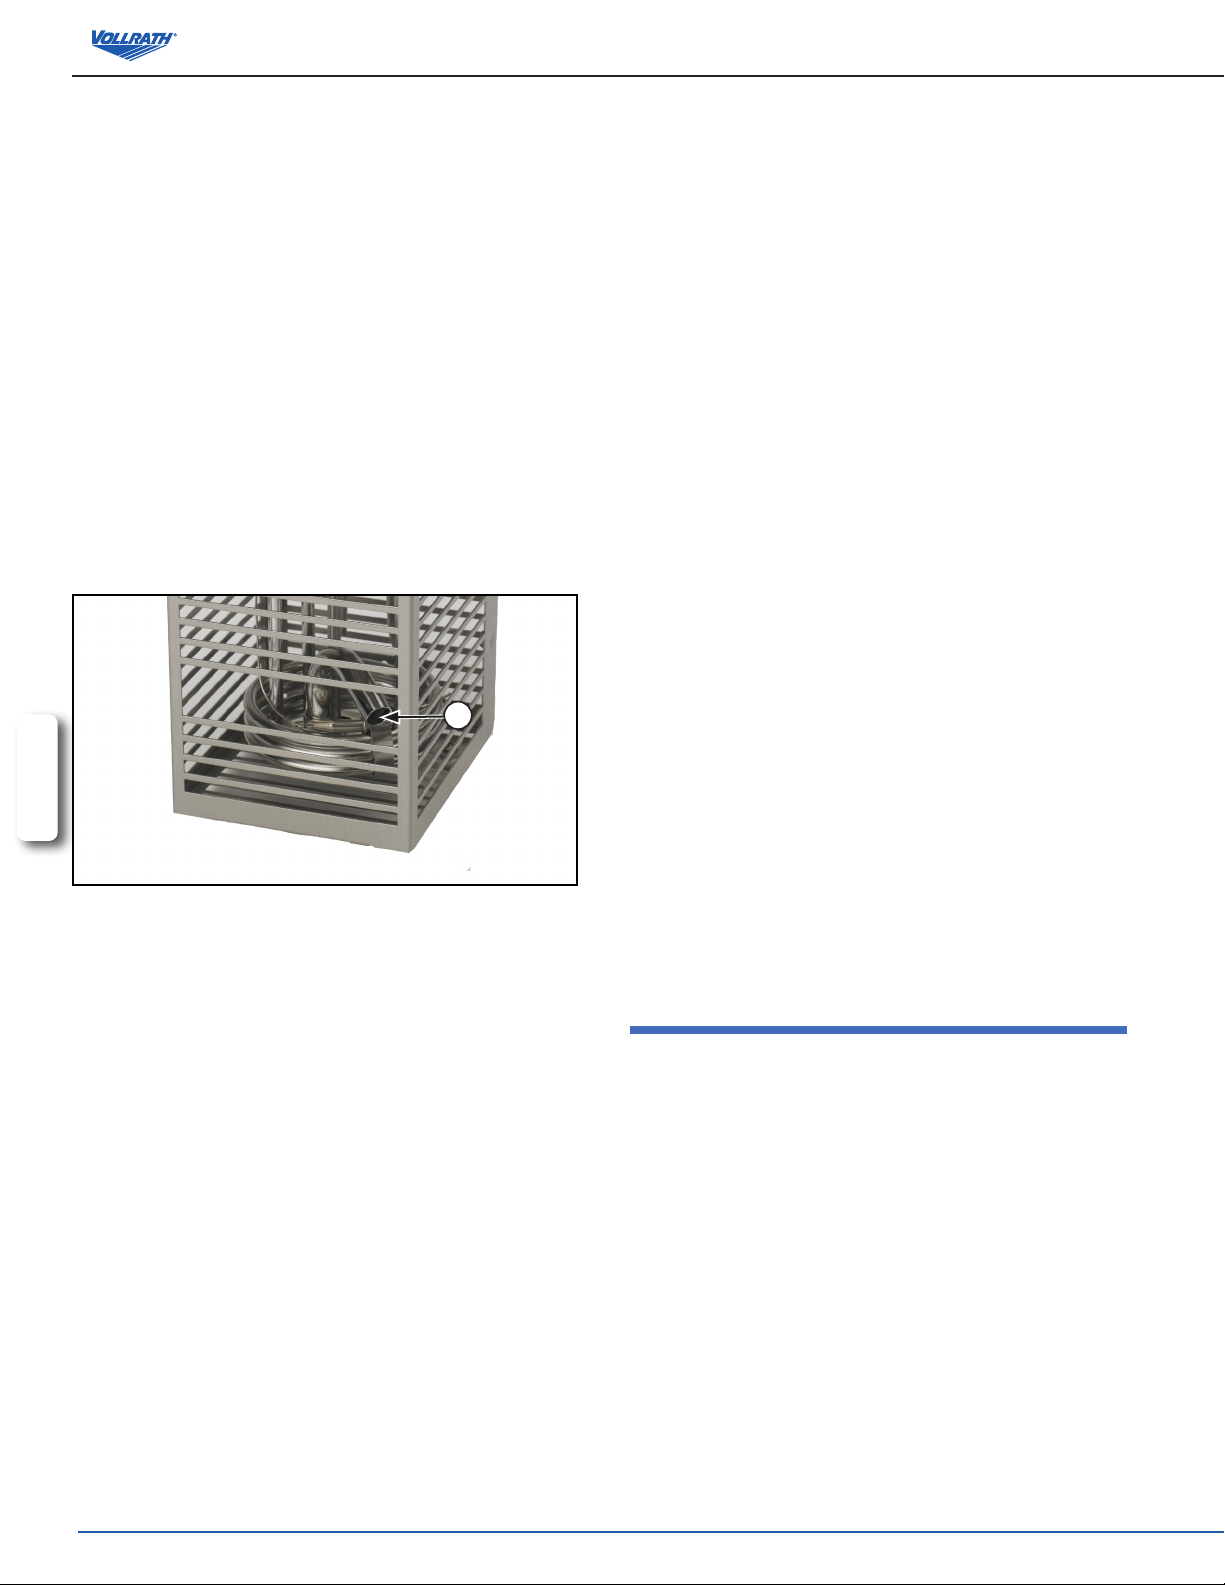
Figure 5. Water Pump Outlet.
4. Monitor water level when adding, removing and heating food product. The
water level should be between 1” and 2” (25 mm - 50 mm) from the top
of the bath or vessel. Never allow the water level to drop below the water
pump outlet (A) during operation. See Figure 5.
User-Dened Preset Temperature:
1. To set user dened preset temperatures: With the unit “ON” press the
NOTE:
Do not immerse the cord, plug or equipment in water or any other liquid. Do not use a hose to clean this equipment.
1. Add a few capfuls of white vinegar to the bath or vessel and operate the unit for 20 minutes at 75°F (23°C). If a deeper cleaning is needed mix a solution
that is 1/2 white vinegar and 1/2 water and ll and operate the unit for 20 minutes at 75°F (23°C)
2. Allow the equipment to cool completely before emptying the liquid.
3. Empty the liquid and rinse thoroughly.
4. Completely dry the equipment.
2. Allow the unit and water to cool completely.
3. Place a suitable container directly under the drain valve (N). See
Figures 3 and 4. Turn the drain valve lever (M) to the open position
monitoring the ow of liquid going into the container. Use caution to
avoid spills that may create a slippery condition. Turn drain valve lever
(M) to the closed position before the container is full. Dispose of the
drained water. This procedure may need to be repeated.
Cleaning
To maintain the appearance and increase the service life, clean your
equipment daily.
4
OperatOr’s Manual
Page 5

notes
ENGLISH
OperatOr’s Manual
5
Page 6
troubleshooting
Problem It might be caused by Course of Action
No power to the unit. Unit not plugged on or switched on. Plug unit in and turn the power switch to the on position
Unable to set or change the
temperature and display reads “LLo”.
No longer heating and the pump has
stopped circulating reads “FLt 3”
Local lockout feature has been activated.
Low water
See Operator’s Manual to deactivate the Control Lockout
Feature.
Allow unit to cool and ll the bath or vessel with clean fresh
water so that it is about 2” (50 mm) from the top
serviCe and rePair
There are no user serviceable parts within this unit. To avoid serious injury or damage, never attempt to repair the equipment or replace a damaged power cord
yourself. Do not send equipment directly to the Vollrath Company. Please contact the qualied professional repair service listed below.
VOLLRATH Technical Service • 1-800-628-0832 • Email: techservicereps@vollrathco.com
When contacting the Authorized Professional Service Center, please be ready with the item number, model number (if applicable), serial number, and proof of
purchase showing the date the unit was purchased
Warranty statement For the vollrath Co. l.l.C.
This warranty does not apply to products purchased for personal, family or household use, and The Vollrath Company LLC does not offer a written warranty to
purchasers for such uses.
The Vollrath Company LLC warrants the products it manufactures or distributes against defects in materials and workmanship for a period of one year, except as
specically described in our full warranty statement. In all cases, the warranty runs from the date of the end user’s original purchase date found on the receipt.
Replacement parts – The warranty period is 90 days.
For complete warranty information, product registration and new product announcement, visit www.vollrath.com.
www.vollrath.com
The Vollrath Company, L.L.C.
1236 North 18th Street
Sheboygan, WI 53081-3201
U.S.A.
Main Tel: 800.628.0830
Fax: 800.752.5620
Technical Services: 800.628.0832
Service Fax: 920.459.5462
Canada Service: 800.695.8560
© 2014 The Vollrath Company, L.L.C.
Item No. 2350162-1 en Rev 6/14
Page 7

ESPAÑOL
Manual del operador
CIRCULADOR TÉRMICO
40868
40861
Artículo
40868 Circulador de inmersión al vacío (cabeza solamente) 120V 1100
40861 Circulador de inmersión al vacío, cabeza, cubeta y tapa 120V 1100
Gracias por comprar este equipo Vollrath para el procesamiento de alimentos. Antes de usar el equipo, lea y familiarícese con las siguientes
instrucciones de operación y seguridad. CONSERVE ESTAS INSTRUCCIONES COMO REFERENCIA PARA EL FUTURO. Conserve la caja y
embalado originales. Deberá utilizarlos para devolver el equipo en caso de que requiera reparaciones.
Descripción Voltaje Vatios Amperios Enchufe
11
amperios
11
amperios
5-15P
5-15P
Núm. art. 2350162-1 es Mod 06/14
Page 8

PreCauCiones de seguridad
Para garantizar una operación segura, lea las siguientes
armaciones y comprenda su signicado. Este manual contiene
precauciones de seguridad que se explican a continuación. Léalas
atentamente.
ADVERTENCIA
Advertencia se usa para indicar la presencia de un peligro que puede
provocar lesiones personales graves, muerte o daños materiales
considerables si se ignora el aviso.
PRECAUCIÓN
Precaución se usa para indicar la presencia de un peligro que
provocará o puede provocar lesiones personales o daños materiales
leves si se ignora el aviso.
NOTA
Nota se utiliza para indicar información sobre instalación,
funcionamiento o mantenimiento que es importante, pero que no
reviste peligros.
¡Por su propia seguridad!
Debe acatar estas precauciones en todo momento, ya que si no lo
hace podría lesionarse a sí mismo y a otras personas.
Para disminuir el riesgo de lesiones personales o daños al equipo:
Enchúfelo sólo en tomacorrientes con puesta a tierra cuyo voltaje
nominal sea el indicado en la placa identicatoria.
Haga que personal calicado instale el equipo en cumplimento con los
ESPAÑOL
códigos y ordenanzas locales.
Use el equipo en posición plana y nivelada.
No use un cable de extensión con este equipo. No enchufe este equipo
en una regleta eléctrica ni cable de múltiples tomas.
Desenchufe el equipo y apáguelo antes de limpiarlo o moverlo.
No rocíe con líquidos ni agentes de limpieza los controles ni la parte
externa del equipo.
No limpie el equipo con lana de acero.
Mantenga el equipo y el cable eléctrico lejos de llamas expuestas,
quemadores eléctricos o calor excesivo.
No opere el equipo en áreas públicas ni cerca de los niños.
No opere el equipo si se ha dañado o si funciona defectuosamente de
algún modo.
FunCión y ProPósito
1. Retire del equipo todo el material y cinta de embalado, así como el
plástico protector.
2. Limpie todo residuo adhesivo que haya quedado del plástico o la cinta.
3. Coloque el equipo en una supercie plana y estable.
4. Enchúfelo en un suministro eléctrico correctamente puesto a tierra cuyo
voltaje nominal corresponda al indicado en la placa identicatoria. El
equipo puede resultar dañado si recibe suministro eléctrico incorrecto.
Nota:
Usar un voltaje distinto del indicado en la placa identicatoria dañará
la unidad. Usar un voltaje incorrecto, o modicar el cable eléctrico
o componentes electrónicos puede dañar la unidad e invalidará la
garantía.
CaraCterístiCas y Controles
C
B
A
Program
P
reset
Figura 1. Parte delantera del panel de control.
I
HIGH
PUMP
SPEED
LOW
H
Serial #
Model #
D
E
F
G
J
2
Los circuladores térmicos de Vollrath han sido diseñados con el objeto de
brindar un control preciso de la temperatura del agua para su circulación en
circuito cerrado. Esta unidad está diseñada para usarse en interiores, en
establecimientos comerciales de servicio de comidas. No está diseñada para
uso doméstico, industrial ni de laboratorio.
desembalado del equiPo y ConFiguraCión iniCial
Figura 2. Parte trasera del panel de control.
Cuando ya no los necesite, deseche todos los materiales de embalado de
una manera ambientalmente responsable.
Manual del operador
Made in USA
Page 9

oPeraCión
K
L
ADVERTENCIA
Peligro de quemaduras.
No toque los alimentos, líquidos ni las supercies
M
Las supercies y alimentos calientes pueden quemar la piel. Deje
N
que las supercies calientes se enfríen antes de manipularlas.
de calentamiento cuando el equipo esté calentando
o funcionando.
ADVERTENCIA
O
Fig. 3. Tapa, drenaje y palanca del drenaje (aparece en posición
abierta).
A
TEMPERATURA PREFIJADA. Al pulsarse ja la unidad en las
temperaturas prejadas.
B
VISOR. Muestra la temperatura que se jó o la del receptáculo.
C
LUZ DE TEMPERATURA EN C°. Cuando se ilumina el visor muestra
la temperatura en C°.
D
PERILLA DE SELECCIÓN/AJUSTE (Número de pieza 23623-1).
Gírela para ajustar temperatura
E
LUZ DE TEMPERATURA EN F°. Cuando se ilumina el visor muestra
la temperatura en F°.
F
LUZ INDICADORA DE CALENTAMIENTO. Se ilumina cuando
la unidad está calentando.
G
BOTÓN DE ENCENDIDO/APAGADO DEL CONTROLADOR.
ENCIENDE O APAGA el controlador.
H
ETIQUETA DE DATOS. Muestra la información de la unidad como el
modelo y el número de serie.
I
INTERRUPTOR DE VELOCIDAD DE LA BOMBA. Cambia la
velocidad de la bomba entre baja y alta.
J
INTERRUPTOR DE ENCENDIDO/APAGADO. ENCIENDE o APAGA
la unidad.
K
TAPA. Cubre el receptáculo.
L
CONTROLADOR. Se usa para programar el circulador térmico.
M
PALANCA DE LA VÁLVULA DE DRENAJE. Controla el ujo de agua
que sale de la válvula de drenaje.
N
VÁLVULA DE DRENAJE (Número de pieza 21696-1). Se usa para
vaciar el agua del o los receptáculos.
P
BOTÓN DE REINICIO. Se usa para reiniciar la unidad si el nivel del
agua desciende por debajo del elemento.
O
PIE (Número de pieza 23754-1).
Peligro de descarga eléctrica.
Evite que ingrese agua o cualquier otro tipo de
líquido al interior del compartimiento eléctrico, ya
que ello podría causar una descarga eléctrica.
No rocíe agua ni agentes de limpieza. El líquido podría hacer
contacto con los componentes electrónicos y causar un cortocircuito
o descarga eléctrica. No use el equipo si el cable eléctrico está
dañado o se ha modicado.
Antes de usar este equipo, límpielo tal como se describe en la sección
LIMPIEZA de este documento.
NOTA:
Supervise estrechamente la temperatura de los alimentos para
mantenerlos seguros. El Servicio de Salud Pública de los Estados
Unidos (United States Public Health Service) recomienda mantener los
alimentos a un mínimo de 140 ºF (60 ºC) para prevenir el crecimiento de
ESPAÑOL
bacterias.
Caliente agua solamente. No use esta unidad para calentar aceite,
grasa u otro tipo de líquidos. Los demás líquidos pueden tornarse
inestables y peligrosos.
Los alimentos empacados al vacío crean un entorno bajo en oxígeno.
Con la manipulación o preparación inadecuada, pueden crecer
bacterias. Recomendamos poner en práctica el programa HCAPP
(análisis de riesgos y control de puntos críticos). Consulte los detalles
a la Administración de Drogas y Alimentos de EE. UU. (FDA)
1. Para las unidades con cubeta verique que la palanca (M) de la válvula
de drenaje esté en posición cerrada. Consulte la Figura 4. O bien,
aance el circulador a un recipiente que tenga un volumen entre 5.3 ct.
gal. (5L) y 31.7 ct. gal. (30L).
M
“Abierta”
N
“Cerrada”
M
N
Figura 4. Posiciones del drenaje y su palanca.
2. Llene la cubeta o el recipiente con agua fresca de modo que quede a
aproximadamente 2” (50 mm) de la parte superior. Es posible que deba
ajustar el nivel del agua tras introducir el producto.
3. Enchufe el cable eléctrico en un tomacorriente con puesta a tierra cuyo
voltaje nominal corresponda al indicado en la placa identicatoria.
4. Coloque el interruptor de suministro (J) en la posición de encendido
“ON”. Consulte la Figura 2.
5. Fije el interruptor de velocidad (I) de la bomba en el ajuste deseado.
6. Pulse el botón (G) de encen./apaga. del controlador. Consulte la Fig. 1.
Manual del operador
3
Page 10

Para cambiar el visor a °F:
1. Coloque el interruptor de suministro (J) en la posición de apagado “OFF”.
Consulte la Figura 2.
2. Mantenga pulsada la temperatura prejada “2” (A) mientras coloca el
interruptor de suministro (J) en la posición de encendido “ON”. Consulte
las Figuras 1 y 2.
Para cambiar el visor a °C:
1. Coloque el interruptor de suministro (J) en la posición de apagado “OFF”.
Consulte la Figura 2.
2. Mantenga pulsada la temperatura prejada “3” (A) mientras coloca el
interruptor suministro (J) en la posición de encendido “ON” (Figs. 1 y 2.)
Fije la temperatura predeterminada:
1. Para jar la temperatura pulse y suelte la perilla de selección/ajuste (D).
Destellará el punto decimal en el visor (B).
2. Gire la perilla de selección/ajuste (D) para llegar a la temperatura
deseada que se muestra. Al girar la perilla en sentido horario o
antihorario, aumenta o disminuye el ajuste respectivamente. Tras llegar
al ajuste deseado pulse la perilla de selección/ajuste (D) por segunda
vez. Nota: la unidad aceptará automáticamente el valor predeterminado
que aparece en el visor durante aproximadamente 10 segundos de
inactividad, incluso si la perilla no se pulsó.
3. Deje que agua se precaliente completamente antes de agregar producto.
A
ESPAÑOL
Figura 5. Toma de la bomba de agua.
4. Supervise el nivel del agua cuando agregue, retire y caliente el producto.
Dicho nivel debe estar entre 25 mm - 50 mm de la parte superior de la
cubeta o recipiente. Durante la operación nunca deje que el nivel del
agua descienda por debajo de la toma de la bomba (A). Consulte Fig. 5.
Temperatura prejada denida por el usuario:
1. Para ajustar las temperaturas prejadas denidas por el usuario: Con la
unidad encendida pulse el botón (A) de la temperatura prejada deseada,
1, 2 o 3. En el visor (B) comenzará a parpadear un número decimal y
aparecerá el ajuste anterior. Consulte la Figura 1.
2. Gire la perilla de selección/ajuste (D) hasta llegar a la temperatura
deseada que se muestra. Tras llegar al ajuste deseado pulse la
perilla de selección/ajuste (D) por segunda vez. Pulse el botón (A)
de la temperatura prejada deseada para guardar la temperatura
correspondiente a dicho botón.
3. Deje que el agua se precaliente antes de agregar el producto.
4. Supervise el nivel del agua cuando agregue, retire y caliente el
producto. Dicho nivel debe estar entre 1” y 2” (25 mm - 50 mm) de la
parte superior de la cubeta o recipiente.
Función de bloqueo del control:
Esta función permite al usuario bloquear todos los controles en el
controlador. Mientras la función esté activada, la unidad permanecerá
funcionando en los ajustes actuales.
1. Mantenga pulsada la perilla de selección/ajuste (D) hasta que el visor
(B) muestre “LLo” (unos 10 segundos) luego suéltela. Consulte la
Figura 1. Durante el bloqueo, el punto decimal del valor predeterminado
no destella.
2. Mantenga pulsada la perilla de selección/ajuste (D) hasta que el visor
(B) muestre “LLo” (unos 10 segundos) luego suéltela para desbloquear
los controles. Al estar desbloqueados, el visor (B) muestra “CAn”.
Botón de reinicio:
Si el nivel del agua desciende por debajo del calentador, el termostato
de seguridad se activará y desconectará el suministro proveniente del
calentador y la bomba. El visor (B) mostrará “FLt 3”. Deje que se enfríe y
pulse el botón de reinicio (P). Consulte la Figura 1.
Cuando termine de usar la unidad:
1. Pulse el botón (G) de encendido/apagado del control y coloque el
interruptor de suministro (J) en la posición de apagado “OFF”. Consulte
las Figuras 1 y 2.
2. Deje que la unidad y el agua se enfríen totalmente.
3. Coloque un recipiente adecuado directamente debajo de la válvula
de drenaje (N). Consulte las Figuras 3 y 4. Gire la palanca (M) de
la válvula de drenaje hasta la posición abierta supervisando el ujo
de líquido que va a ingresar al recipiente. Tenga cuidado de evitar
derrames que puedan crear una condición resbalosa. Gire la palanca
(M) de la válvula de drenaje hasta la posición cerrada antes de que
el recipiente se llene. Deseche el agua drenada. Es posible que deba
repetir este procedimiento.
limPieza
Para conservar su aspecto hermoso y prolongar su vida útil, limpie
diariamente el equipo.
NOTA:
No sumerja el cable, el enchufe ni el equipo en agua ni en
ningún otro líquido. No use una manguera para limpiar
este equipo.
1. Agregue dos tapas de vinagre blanco en la cubeta o recipiente y haga
funcionar la unidad durante 20 minutos a 75°F (23°C). Si es preciso
realizar una limpieza más profunda mezcle una solución que contenga
1/2 porción de vinagre blanco y 1/2 porción de agua, luego llene y haga
funcionar la unidad durante 20 minutos a 75°F (23°C)
2. Deje que el equipo se enfríe totalmente antes de vaciar el líquido.
3. Vacíe el líquido y enjuague totalmente el equipo.
4. Seque completamente el equipo.
4
Manual del operador
Page 11

notas
ESPAÑOL
Manual del operador
5
Page 12

soluCión de Problemas
Problema Podría deberse a Solución
Unidad sin suministro. La unidad no está enchufada o encendida.
No se puede jar ni cambiar la
temperatura y el visor muestra “LLo”.
La unidad no calienta, la bomba no hace
circular el agua y el visor muestra “FLt 3”
Se activó la función de bloqueo local.
Bajo nivel de agua
Enchúfela o coloque el interruptor de suministro en la
posición de encendido
Consulte el manual del operador para desactivar la función
de bloqueo del control.
Deje que la unidad se enfríe y llene la cubeta o el recipiente
con agua fresca de modo que quede a aproximadamente 2”
(50 mm) de la parte superior.
serviCio y reParaCión
Esta unidad no tiene piezas que puedan ser reparadas por el usuario. Para evitar lesiones o daños materiales graves, no trate de reparar el equipo ni reemplazar
un cable eléctrico por su cuenta. No envíe el equipo directamente a The Vollrath Company. Comuníquese con el servicio de reparación profesional calicado que se
menciona a continuación.
Servicio de reparación de productos de VOLLRATH • 1-800-628-0832 (EE. UU.) • E-mail: techservicereps@vollrathco.com
Al comunicarse con el centro de servicio de reparación profesional autorizado, esté listo para proporcionar el número de modelo, número de serie y el comprobante
de compra que muestre la fecha en que adquirió la unidad.
Cláusula de garantía de the vollrath Co. l.l.C.
Esta garantía no se aplica a los productos adquiridos para uso personal, familiar ni doméstico, y The Vollrath Company LLC no ofrece una garantía por escrito a los
compradores para dichos usos.
The Vollrath Company L.L.C. garantiza los productos que fabrica o distribuye contra defectos en materiales y fabricación por un período de un año, salvo según
se especica en nuestra cláusula de garantía completa. En todos los casos, la garantía rige desde la fecha de compra original del usuario nal que aparece en el
recibo.
Repuestos – período de garantía de 90 días
Para obtener información de garantía, inscripción de productos y anuncios de productos nuevos, visite www.vollrath.com.
www.vollrath.com
The Vollrath Company, L.L.C.
1236 North 18th Street
Sheboygan, WI 53081-3201
U.S.A.
Main Tel: 800.628.0830
Fax: 800.752.5620
Technical Services: 800.628.0832
Service Fax: 920.459.5462
Canada Service: 800.695.8560
© 2014 The Vollrath Company, L.L.C.
Núm. art. 2350162-1 es Mod 06/14
Page 13

FRANÇAIS
Manuel d’utilisation
CIRCULATEUR THERMIQUE
40868
40861
Article Description Tension Watts A Fiche
40868 Sous Vide - Thermostat d’immersion (tête seulement) 120V 1100 11 A 5-15P
40861 Sous Vide - Thermostat d’immersion, tête, bain et couvercle 120V 1100 11 A 5-15P
Merci d’avoir acheté cet appareil de transformation des aliments Vollrath. Avant d’utiliser cet appareil, lisez et familiarisez-vous avec le mode
d’emploi et les consignes d’utilisation qui suivent. CONSERVEZ CES INSTRUCTIONS POUR RÉFÉRENCE ULTÉRIEURE. Conservez
l’emballage et le carton d’origine. L’emballage devra être réutilisé pour expédier l’appareil si une réparation est nécessaire.
Article. 2350162-1 fr Rev 06/14
Page 14

Consignes de séCurité
Pour garantir un fonctionnement sûr, lisez les avertissements
suivants et comprenez leur signication. Ce manuel contient
des consignes de sécurité, présentées ci-dessous. Lisez-les
attentivement.
AVERTISSEMENT
Un avertissement indique la présence d’un danger qui peut causer
des blessures graves, un décès ou des dégâts matériels importants
s’il est ignoré.
ATTENTION
Une mise en garde indique la présence d’un danger qui causera ou
pourra causer des blessures mineures ou des dégâts matériels si elle
est ignorée.
REMARQUE
Une remarque signale des informations importantes sur l’installation,
l’utilisation et la maintenance mais ne présentant pas de danger.
Pour votre sécurité !
Ces consignes de sécurité doivent être suivies à tout moment sous
peine de blessures.
Pour réduire le risque de blessures et d’endommagement de l’appareil :
Utilisez l’appareil uniquement sur une prise de terre correspondant à la
tension nominale de la plaque signalétique.
L’appareil doit être installé par un personnel qualié conformément à
FRANÇAIS
tous les décrets locaux.
Utilisez l’appareil à l’horizontale sur une surface plane.
N’utilisez pas de rallonge électrique avec cet appareil. Ne branchez pas
cet appareil sur une barrette d’alimentation ou un cordon d’alimentation
à prises multiples.
Débranchez l’appareil et éteignez-le avant de le nettoyer ou de le
déplacer.
Ne vaporisez pas les commandes ou l’extérieur de l’appareil avec des
liquides ou des produits nettoyants.
Ne nettoyez pas l’appareil à la laine d’acier.
Tenez l’appareil et son cordon d’alimentation à l’écart des ammes
nues, des brûleurs électriques ou d’une chaleur excessive.
N’utilisez pas l’appareil dans des lieux publics et/ou à proximité
d’enfants.
N’utilisez pas l’appareil s’il a été endommagé ou s’il fonctionne mal.
FonCtion et objet
Les circulateurs thermiques Vollrath sont destinés à fournir une régulation
précise de la température de l’eau pour une circulation en circuit fermé.
Cet appareil est destiné à une utilisation intérieure dans un établissement
de restauration commerciale. Non prévu pour une utilisation ménagère,
industrielle ou en laboratoire.
Lorsque vous n’en avez plus besoin, jetez tout le matériel d’emballage en
respectant l’environnement.
1. Enlevez tout le matériel d’emballage et le ruban adhésif, ainsi que le
plastique de protection.
2. Nettoyez les résidus de colle du plastique ou du ruban adhésif.
3. Placez l’appareil sur une surface stable et plane.
4. Branchez l’appareil sur une prise électrique correctement mise à la terre
correspondant à la tension nominale indiquée sur la plaque signalétique.
L’appareil risque d’être abîmé s’il est alimenté par une alimentation non
conforme.
Remarque :
L’utilisation d’une tension différente de la tension nominale indiquée
sur la plaque signalétique endommagera l’appareil. Une tension
incorrecte, la modication du cordon d’alimentation ou les composants
électriques risquent d’endommager l’appareil et d’annuler la garantie.
CaraCtéristiques et Commandes
C
B
A
Program
P
reset
Figure 1. Avant du panneau de commande.
I
HIGH
PUMP
SPEED
LOW
H
Made in USA
Serial #
Model #
D
E
F
G
J
2
déballage et installation initiale
Figure 2. Arrière du panneau de commande.
OperatOr’s Manual
Page 15

K
L
M
N
Avant d’utiliser cet appareil, nettoyez-le comme décrit à la section
NETTOYAGE de ce document.
O
Figure 3. Couvercle, robinet de vidange et manette de vidange (en
position ouverte.
A
PRÉRÉGLAGE DE TEMPÉRATURE. Règle l’appareil à des
températures prédénies lorsque vous appuyez dessus.
B
AFFICHAGE. Afche la température en cours de réglage ou dans le
compartiment.
C
VOYANT DE TEMPÉRATURE °C. Lorsque ce voyant s’allume,
l’afchage indique la température en °C.
D
BOUTON SÉLECTION/RÉGLAGE (Numéro de pièce 23623-1).
Tournez pour régler la température.
E
VOYANT DE TEMPÉRATURE °F. Lorsque ce voyant s’allume,
REMARQUE :
Surveillez de près la température des aliments pour maintenir la
sécurité des aliments. Les services d’hygiène publique des États-Unis
préconisent le maintien des aliments chauds à 140 ºF (60 ºC) minimum
pour éviter la prolifération des bactéries.
Chauffez uniquement l’eau. N’utilisez pas cet appareil pour faire
chauffer de l’huile, de la graisse ou un autre liquide. Les autres liquide
risquent de devenir instables et dangereux.
Les aliments sous vide crée un environnement pauvre en oxygène.
S’ils sont mal manipulés ou préparés, une croissance bactérienne
est possible. Nous recommandons la mise en place d’un programme
HCAPP. Pour des détails, renseignez-vous auprès de la Food and Drug
Administration.
1. Pour les appareils comportant un bain, assurez-vous que la manette
l’afchage indique la température en °F.
F
VOYANT DE CHAUFFE. S’allume quand l’appareil est en train de
chauffer.
G
BOUTON MARCHE/ARRÊT DU CONTRÔLEUR . Permet de mettre en
marche ou d’arrêter le contrôleur.
H
PLAQUE SIGNALÉTIQUE. Afche des informations telles que le modèle
et le numéro de série de l’appareil.
I
SÉLECTEUR DE VITESSE DE LA POMPE. Permute la pompe entre
haut et bas régime.
J
INTERRUPTEUR DE MARCHE/ARRÊT. Permet de mettre en marche
ou d’arrêter l’appareil.
K
COUVERCLE. Couvre le compartiment.
L
CONTRÔLEUR. Permet de programmer le circulateur thermique.
M
MANETTE DU ROBINET DE VIDANGE. Régule le débit d’eau qui sort
du robinet de vidange.
N
ROBINET DE VIDANGE (Numéro de pièce 21696-1). Permet de vider
Figure 4. Robinet de vidange et positions de la manette.
1. Remplissez le bain ou la cuve d’eau fraîche et propre pour atteindre un
l’eau du ou des compartiments.
P
BOUTON RESET. Permet de réarmer l’appareil si le niveau d’eau chute
2. Branchez le cordon d’alimentation sur une prise de terre indiquant la
en dessous de l’élément chauffant.
3. Placez l’interrupteur d’alimentation (J) en position Marche. (Figure 2).
O
PIED (Numéro de pièce 23754-1).
4. Réglez le sélecteur de vitesse de la pompe (I) au réglage souhaité.
5. Appuyez sur le bouton de marche/arrêt du contrôleur (G). (Figure 1).
mode d’emploi
AVERTISSEMENT
Risque de brûlure.
Ne touchez pas les aliments chauds, le liquide ou
les surfaces de chauffe quand l’appareil chauffe ou
fonctionne.
Les surfaces et aliments chauds peuvent causer des brûlures.
Laissez refroidir les surfaces chaudes avant manipulation.
Pour basculer l’afchage aux °F :
1. Placez l’interrupteur d’alimentation (J) en position Arrêt (Figure 2).
2. Appuyez sur la température de consigne 2 (A) tout en plaçant
Pour basculer l’afchage aux °C :
1. Placez l’interrupteur d’alimentation (J) en position Arrêt (Figure 2).
2. Appuyez sur la température de consigne 3 (A) tout en plaçant
AVERTISSEMENT
Risque d’électrocution.
Empêchez toute inltration d’eau et d’autres
liquides dans le compartiment électrique.
L’inltration de liquide dans l’appareil risque de
causer une électrocution.
Ne vaporisez pas d’eau ou de produits nettoyants. Du liquide risque
d’entrer en contact avec les composants électriques et de causer un
court-circuit ou une décharge électrique. N’utilisez pas l’appareil si le
cordon d’alimentation est abîmé ou a été modié.
du robinet de vidange (M) est en position fermée (Figure 4). Ou bien,
attachez le circulateur à une cuve de 5,3 qt (5 l) à 31,7 qt (30 l) de
volume.
M
N
“Ouvert”
“Fermé”
niveau environ égal à 2 po (50 mm) du haut. Le niveau d’eau devra peutêtre ajusté après l’introduction du produit alimentaire.
tension nominale de la plaque signalétique.
l’interrupteur d’alimentation (J) en position Marche (Figures 1 et 2).
l’interrupteur d’alimentation (J) en position Marche (Figures 1 et 2).
M
N
FRANÇAIS
OperatOr’s Manual
3
Page 16

Dénition de la température de consigne :
1. Pour dénir la température de consigne, appuyez brièvement sur le
bouton Sélection/Réglage (D). Le point décimal sur l’afchage (B)
clignote.
2. Tournez le bouton Sélection/Réglage (D) jusqu’à ce que s’afche la
température souhaitée. Une rotation dans le sens des aiguilles d’une
montre augmente le réglage et inversement. Une fois le réglage souhaité
atteint, appuyez une seconde fois sur le bouton Sélection/Réglage (D).
Remarque : L’appareil acceptera automatiquement la température de
consigne afchée après 10 secondes d’inactivité environ, même sans
appuyer sur le bouton Sélection/Réglage.
3. Laissez l’eau préchauffer complètement avant d’ajouter le produit
alimentaire.
A
Figure 5. Sortie de la pompe à eau.
4. Surveillez le niveau d’eau en ajoutant, enlevant et chauffant le produit
alimentaire. Il doit se situer entre 1 et 2 po (25 et 50 mm) du haut du bain
ou de la cuve. Ne laissez jamais le niveau d’eau chuter en dessous de la
sortie de la pompe à eau (A) en cours de fonctionnement (Figure 5).
Température prédénie par l’utilisateur :
FRANÇAIS
1. Pour programmer des températures : Avec l’appareil en marche, appuyez
sur le bouton de préréglage de température (A) 1, 2 ou 3. Un point
décimal sur l’afchage (B) commence à clignoter et rappelle le réglage
précédent (Figure 1).
2. Tournez le bouton Sélection/Réglage (D) jusqu’à ce que s’afche la
température souhaitée. Une fois le réglage souhaité atteint, appuyez
une seconde fois sur le bouton Sélection/Réglage (D). Appuyez sur le
bouton de préréglage de température (A) souhaité pour enregistrer la
température sur ce bouton.
3. Laissez l’eau préchauffer avant d’ajouter le produit alimentaire.
4. Surveillez le niveau d’eau en ajoutant, enlevant et chauffant le produit
alimentaire. Il doit se situer entre 1 et 2 po (25 et 50 mm) du haut du bain
ou de la cuve.
Fonction de verrouillage des commandes :
Cette fonction permet à l’utilisateur de verrouiller toutes les commandes
sur le contrôleur. Lorsque cette fonction est activée, l’appareil continue à
fonctionner aux réglages en cours.
1. Appuyez sur le bouton Sélection/Réglage (D) jusqu’à ce que l’afchage
(B) indique LLo (10 secondes environ), puis relâchez-le (Figure 1). Une
fois les commandes verrouillées, le point décimal de la température de
consigne ne clignotera pas.
2. Rappuyez sur le bouton Sélection/Réglage (D) jusqu’à ce que
l’afchage (B) indique LLo (10 secondes environ), puis relâchez-le pour
déverrouiller les commandes. Une fois les commandes déverrouillées,
l’afchage (B) indique CAn”.
Bouton Reset :
Si le niveau d’eau chute en dessous de l’élément chauffant, le thermostat
de sécurité s’activera et coupera l’alimentation de l’élément chauffant et de
la pompe. L’afchage (B) indiquera FLt 3. Laissez refroidir et appuyez sur le
bouton Reset (P) (Figure 1).
Quand vous aurez ni d’utiliser l’appareil :
1. Appuyez sur le bouton de marche/arrêt du contrôleur (G) et mettez
l’interrupteur de marche/arrêt (J) en position Arrêt (Figures 1 et 2).
2. Laissez complètement refroidir l’appareil et l’eau.
3. Placez un récipient adapté juste en dessous du robinet de vidange
(N) (Figures 3 et 4). Tournez la manette du robinet de vidange (M)
en position ouverte en surveillant le débit de liquide qui nit dans le
récipient. Usez de prudence pour éviter les déversements pouvant
causer des glissades. Tournez la manette du robinet de vidange (M)
en position fermée avant que le récipient ne soit plein. Jetez l’eau de
vidange. Cette procédure devra peut-être être répétée.
nettoyage
Pour maintenir l’apparence et augmenter la durée de service, nettoyez
chaque jour l’appareil.
REMARQUE :
Ne plongez pas le cordon, la che ou l’appareil dans
l’eau ou un autre liquide. Ne nettoyez pas l’appareil au jet
d’eau.
1. Ajoutez quelques capuchons remplis de vinaigre blanc au bain ou à la
cuve et faites fonctionner l’appareil pendant 20 minutes à 75 °F (23 °C).
Si un nettoyage plus approfondi est nécessaire, mélangez une solution
50/50 de vinaigre blanc et d’eau, remplissez et faites fonctionner
l’appareil pendant 20 minutes à 75 °F (23 °C)
2. Laissez complètement refroidir l’appareil avant de le vider.
3. Videz le liquide et rincez minutieusement.
4. Essuyez complètement l’appareil
4
dépannage
Problème La cause en est peut-être..... Mesure corrective
L’appareil n’est pas alimenté. L’appareil n’est pas branché ou pas en marche.
Impossible de régler ou de modier la
température et l’afchage indique “LLo”.
L’appareil ne chauffe plus et la pompe a
arrêté la circulation ; l’afchage indique
“FLt 3”.
La fonction de verrouillage local a été activée.
Bas niveau d’eau
OperatOr’s Manual
Branchez l’appareil et placez l’interrupteur d’alimentation en
position Marche.
Pour désactiver la fonction de verrouillage des commandes,
voir le manuel d’utilisation.
Laissez refroidir l’appareil et remplissez le bain ou la cuve
d’eau fraîche et propre pour atteindre un niveau environ égal
à 2 po (50 mm) du haut.
Page 17

notes
FRANÇAIS
OperatOr’s Manual
5
Page 18

saV et réparations
Cet appareil ne contient aucune pièce réparable par l’utilisateur. Pour éviter toute blessure grave ou tout dommage sévère, n’essayez jamais de réparer la ou
remplacer vous-même un cordon d’alimentation endommagé. N’envoyez aucun appareil directement à la Vollrath Company. Contactez le service de réparation
professionnel qualié indiqué ci-dessous.
Service de retournez VOLLRATH • 1-800-628-0832 (États-Unis) • E-mail: techservicereps@vollrathco.com
Lorsque vous contacterez le service de réparation professionnel, tenez-vous prêt à fournir le numéro de modèle, le numéro de série et le justicatif d’achat indiquant
la date d’achat de l’appareil.
garantie de la Vollrath Co. l.l.C.
Cette garantie ne s’applique pas aux produits achetés pour un usage personnel, familial ou ménager, et la Vollrath Company LLC ne propose aucune garantie écrite
aux acheteurs pour de telles utilisations.
La Vollrath Company L.L.C. garantit que les produits qu’elle fabrique et distribue seront dépourvus de vices de matériaux et de malfaçons pendant une période
d’un an, sauf indication contraire dans notre déclaration complète de garantie. Dans tous les cas, la garantie entre en vigueur à la date d’achat par l’utilisateur initial
indiquée sur le reçu.
Pièces détachées – La période de garantie est de 90 jours
Pour des informations complètes sur la garantie, l’enregistrement des produits et l’annonce de nouveaux produits, consultez www.vollrath.com.
www.vollrath.com
The Vollrath Company, L.L.C.
1236 North 18th Street
Sheboygan, WI 53081-3201
U.S.A.
Main Tel: 800.628.0830
Fax: 800.752.5620
Technical Services: 800.628.0832
Service Fax: 920.459.5462
Canada Service: 800.695.8560
© 2014 The Vollrath Company, L.L.C.
Article. 2350162-1 fr Rev 6/14
 Loading...