

Vollrath 40834 Installation Manual
Operator’s Manual
Vacuum Packing Machine with Dual 16" Sealing Bars and Advanced Control System (ACS)
Thank you for purchasing this Vollrath equipment. Before operating the
equipment, read and familiarize yourself with the following operating
and safety instructions. SAVE THESE INSTRUCTIONS FOR FUTURE
REFERENCE. Save the original box and packaging. Use this packaging
to ship the equipment if repairs are needed.
SAFETY PRECAUTIONS
To ensure safe operation, read the following statements and understand
their meaning. This manual contains safety precautions which are
explained below. Please read carefully.
WARNING
Warning is used to indicate the presence of a hazard that will or can
cause severe personal injury or death.
CAUTION
Caution is used to indicate the presence of a hazard that will or can
cause minor or major personal injury if the caution is ignored.
NOTICE: Notice is used to note information that is important but not
hazard-related.
To reduce risk of injury or damage to the equipment:
• Unplug when not in use.
• Keep unit and power cord away from open flames, electric burners
or excessive heat.
• Do not operate unattended.
• Do not operate if unit has been damaged or is malfunctioning in
any way.
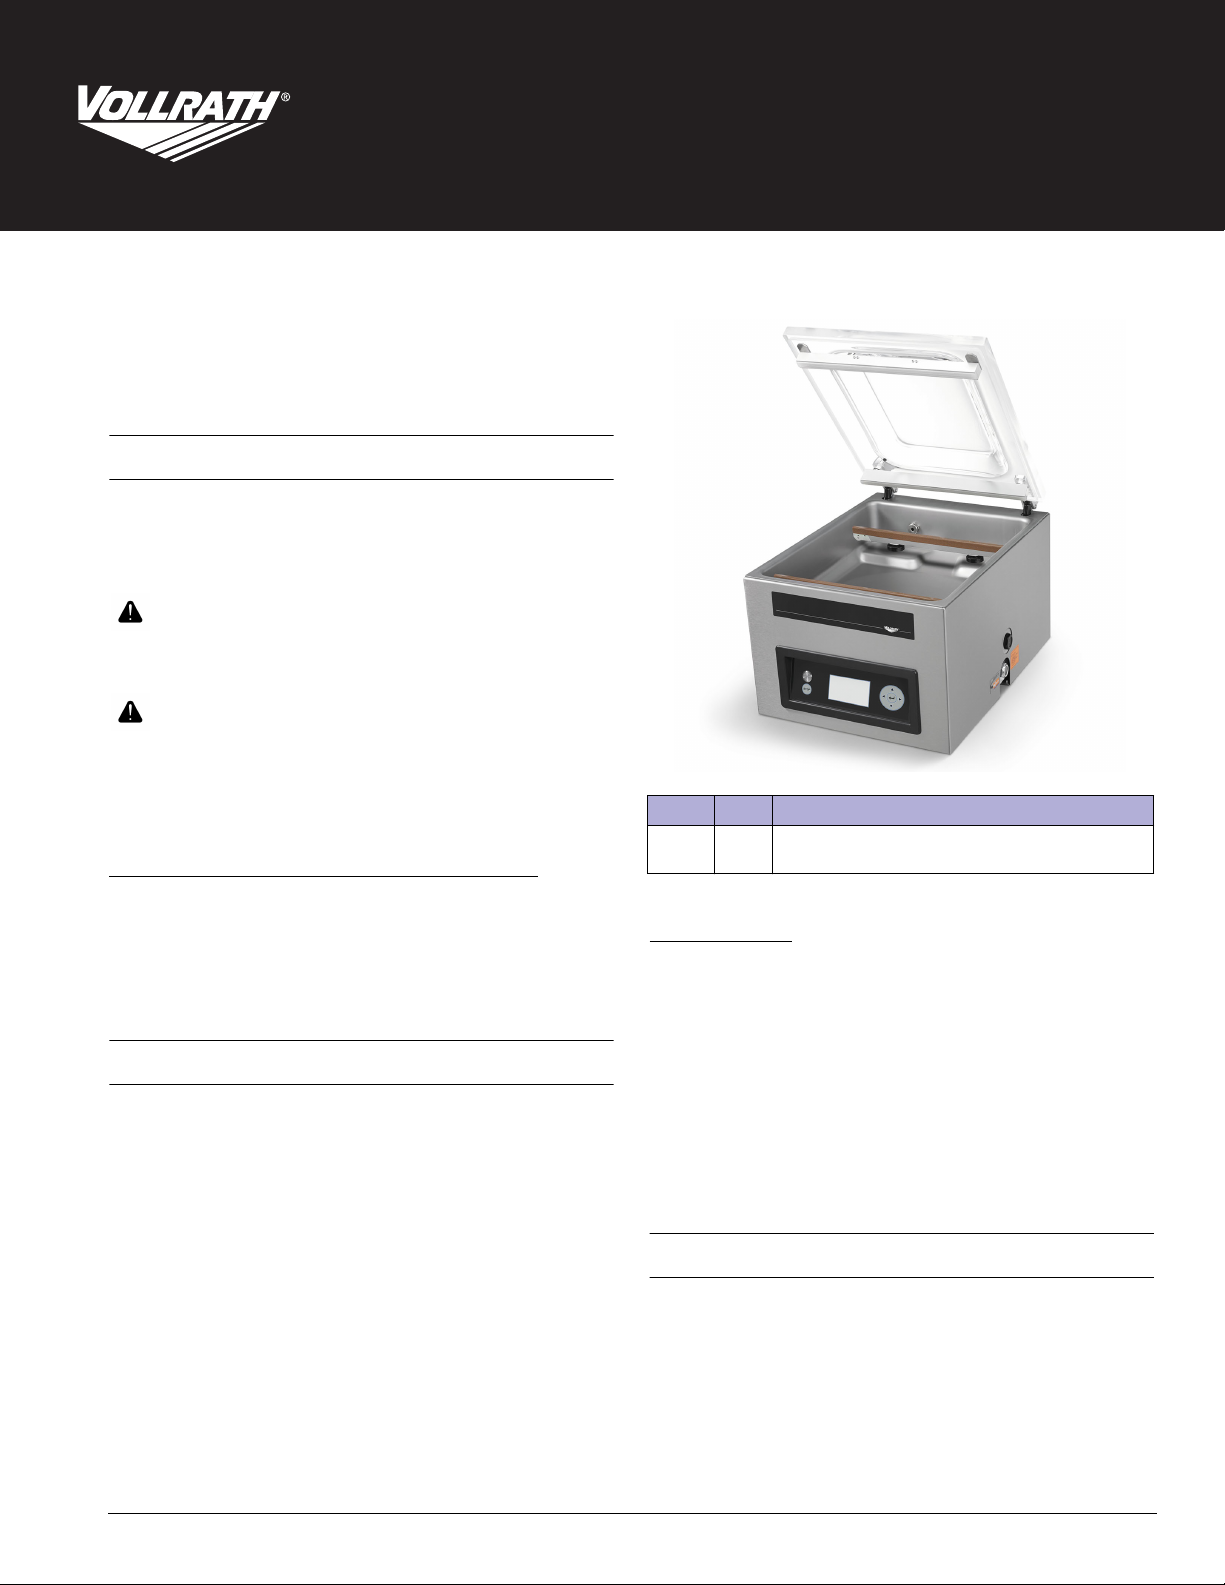
FUNCTION AND PURPOSE
This unit is intended to vacuum seal food products in a commercial
kitchen environment. It is not intended for household, industrial or
laboratory use.
Item No. Model Description
40834 VPP16 Vacuum Packing Machine with Dual 16" Sealing Bars
and Advanced Control System (ACS)
Table of Contents
Features and Controls .................................................. page 2
Password-Controlled Access ...................................... page 2
Installation ..................................................................page 2
Operation ..................................................................... page 3
Create Custom Programs and Labels........................... page 4
HACCP Data Log .........................................................page 7
Cleaning ...................................................................... page 7
Maintenance................................................................. page 8
Troubleshooting...........................................................page 10
Maintenance Log.......................................................... page 11
CLEARANCE REQUIREMENTS
• Requires 6" (15 cm) clearance on all sides and 15½" (39.4 cm)
above the machine for the lid to fully open.
• Ambient temperature must be between 41-86 °F (5-30 °C).
NOTICE: Never place the machine near a heat source. This can
damage the lid.
©
2020 The Vollrath Company L.L.C. Part No. 26134-1 ml 2/27/20
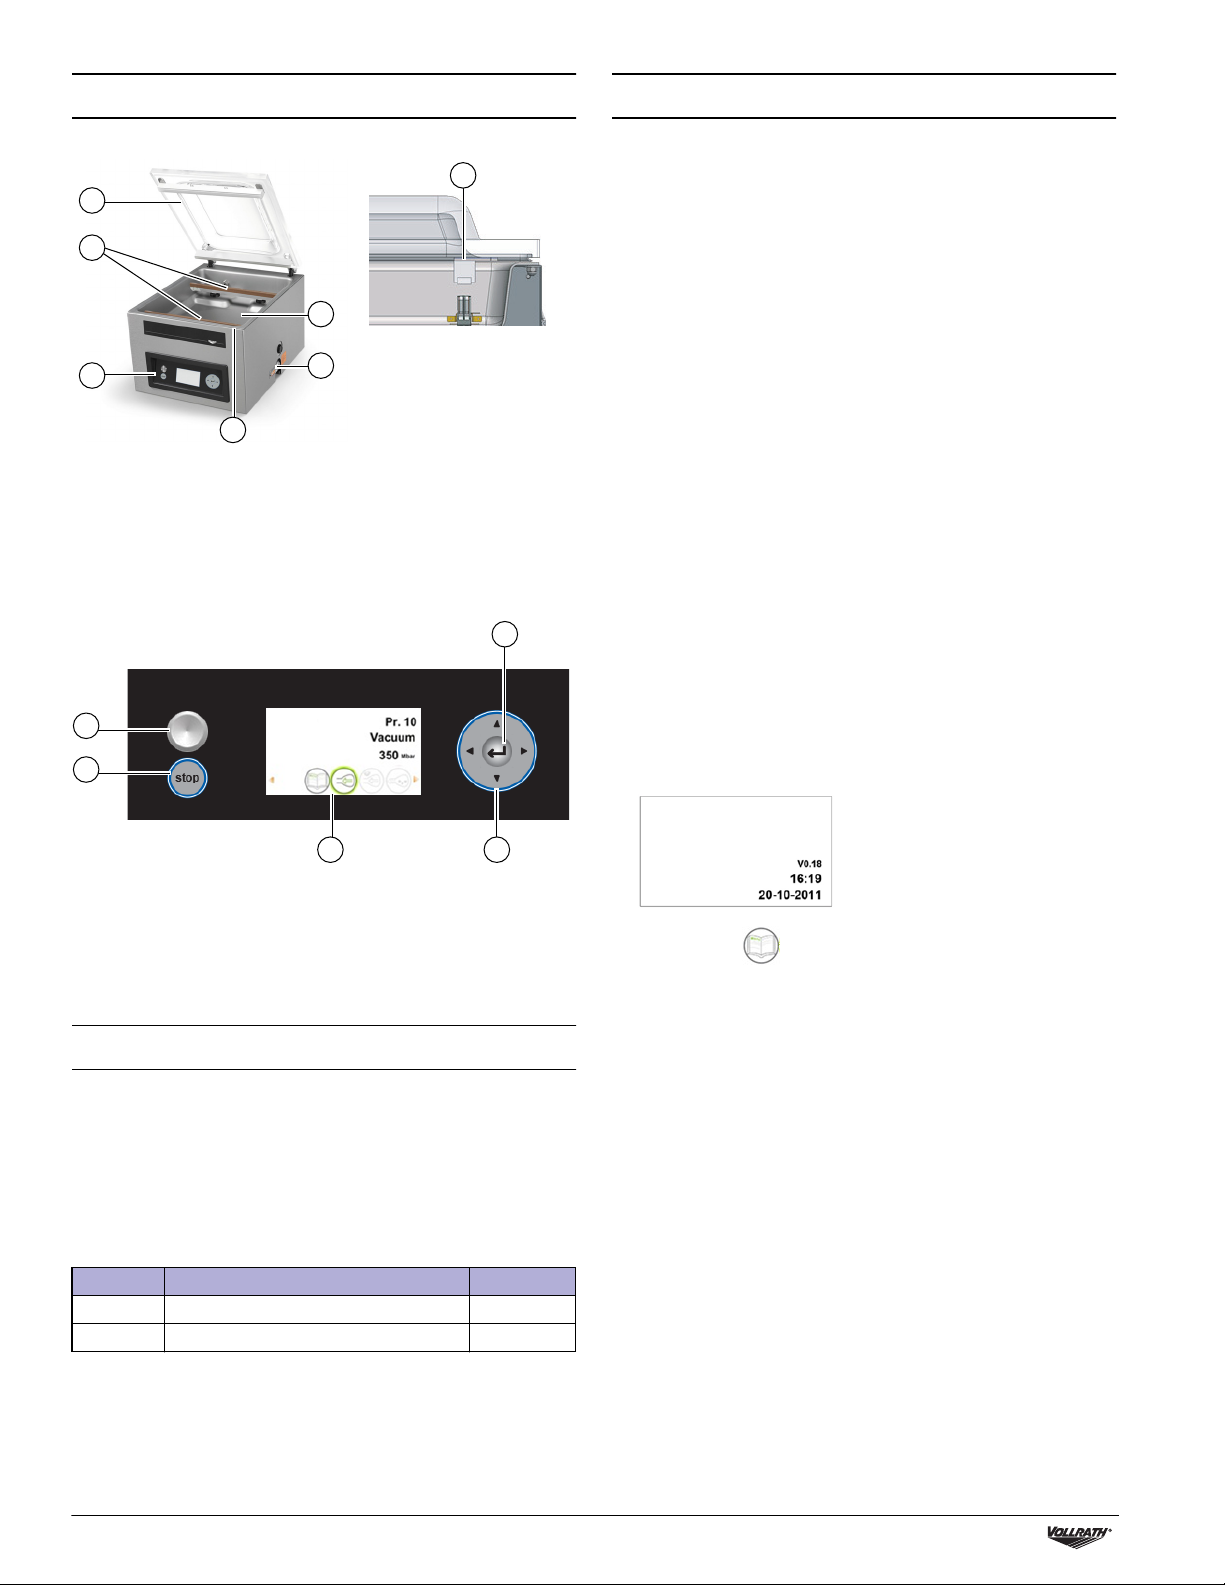
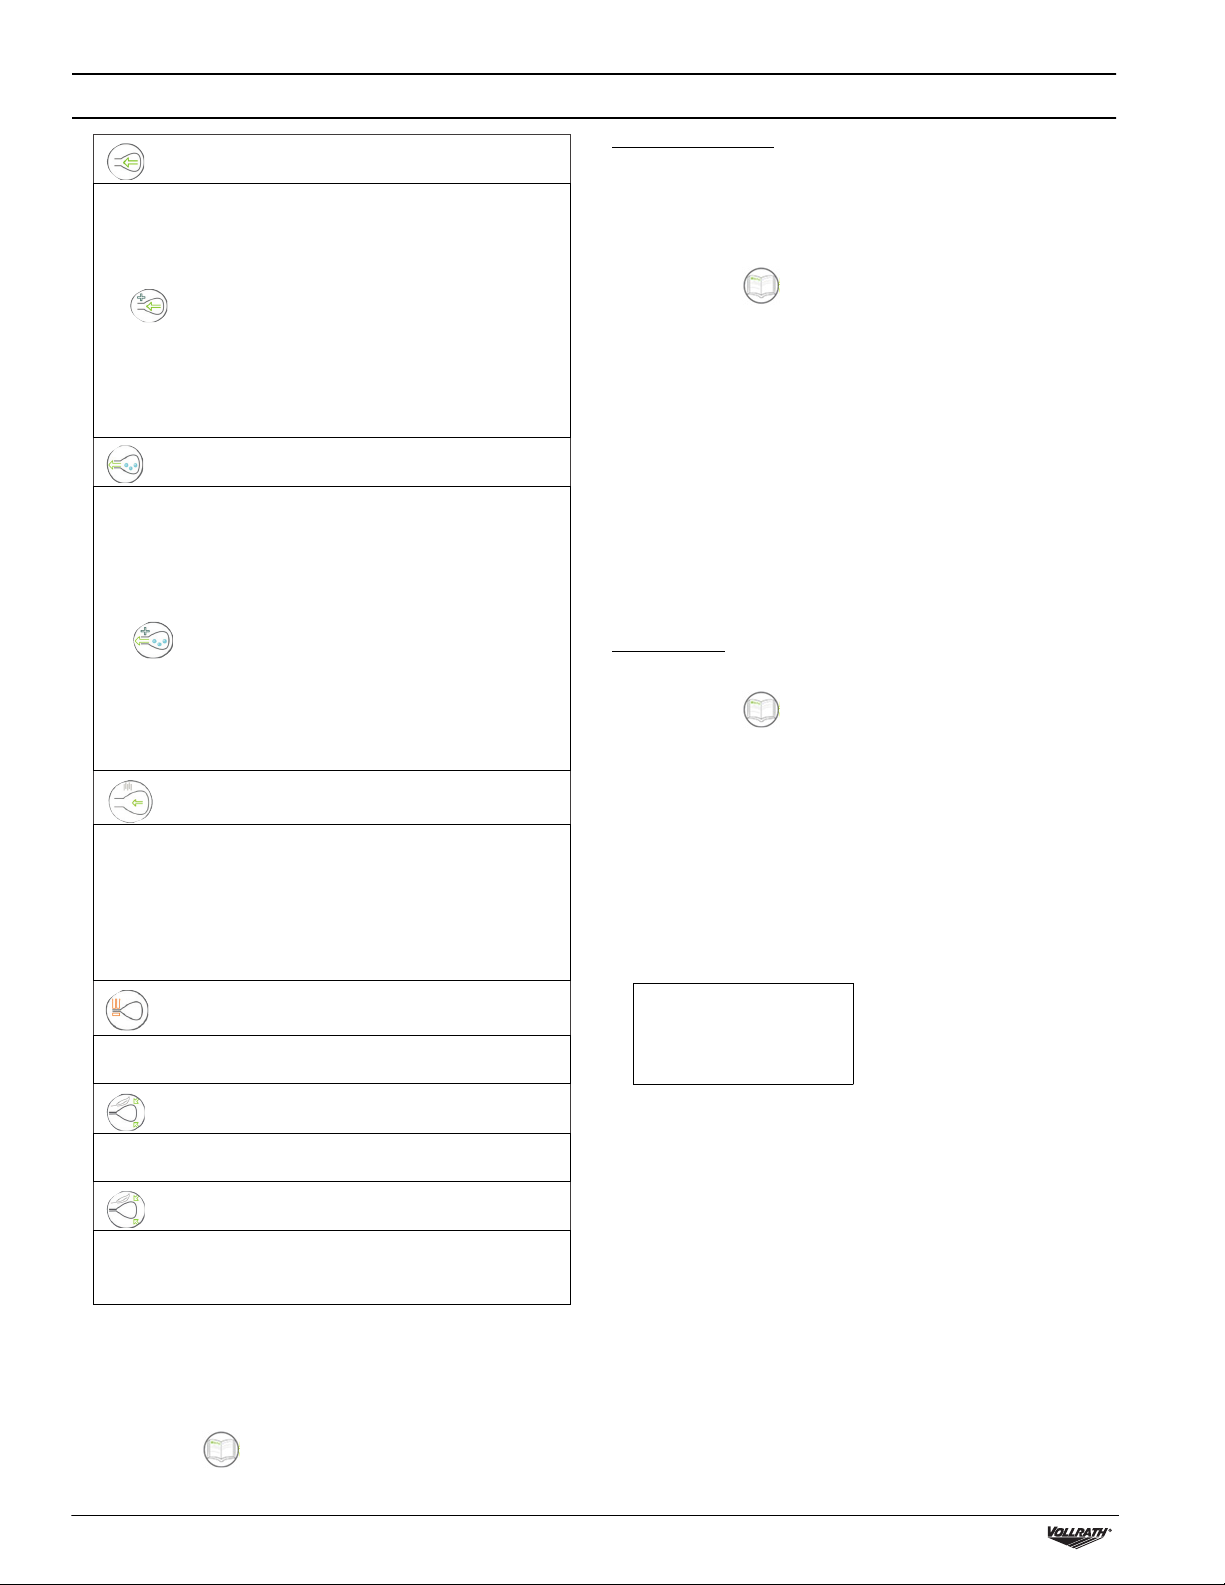
FEATURES AND CONTROLS
INSTALLATION
G
A
B
F
C
D
A Lid E Oil Inspection Window
B Seal Bars F Chamber
C Control Panel G Seal Pad
D Lid Retainer
(not pictured)
A
B
E
NOTICE: Do NOT tilt the machine. Tilting could allow oil to flow out
NOTICE: Using a voltage other than the nameplate rated voltage will
NOTICE: Running the machine without oil or insufficient oil will
1. Remove all packing material and tape, as well as any protective
2. Clean any glue residue left by the plastic or tape.
3. Place the vacuum pack machine on a flat, level surface.
4. Install the included 4" (10.2 cm) legs. ETL Sanitation requires
5. Check the oil gauge window at the back of the machine. Verify the
6. Plug the power cord into a grounded electrical outlet that matches
7. Run the Pump Conditioning program. See Daily Cleaning on
of the pump and cause damage to the machine.
cause damage to the unit. Incorrect voltage, modification
to the power cord or electrical components can damage
unit and will void the warranty.
damage the machine and void the warranty.
plastic from the equipment.
machine to be used with included legs.
oil level is between the minimum and maximum fill lines.
the nameplate rated voltage.
page 7.
Set the Time and Date
E
The default time on the machine may not match your local time. If you
plan to use HACCP logging, it is important to set the correct time. There
are also several date formats from which to choose. Both of these can
be changed in the Settings menu.
1. Turn on the machine.
Press and release the On/Off button. Allow approximately 7-10
seconds for the display to load. The start-up screen will display
information about the software, time and date. For example:
C D
A On/Off Button D Navigation Buttons
B Stop Button E Enter Button
C Display
PASSWORD-CONTROLLED ACCESS
NOTICE: The machine remembers the last password used. To
prevent unauthorized changes, login as User after you
change settings.
The machine has two levels of password-controlled access – owner
mode and user mode. The machine arrives in owner mode. This allows
full-access to all settings and programs. User mode locks the settings
and programs so they cannot be changed. To switch to user mode,
login to the machine using the user code.
Login As Access To Password
User Run programs and adjust printer settings 0000
Owner Change settings and edit programs 1324
2. Press until is highlighted. Press .
3. Enter the owner password 1324. Press .
(Press to select a number. Press to enter to the next number.)
4. Press to enter the Settings menu.
5. Press to 1.3 Date and Time. Press .
2 Vacuum Packing Machine with Dual 16" Sealing Bars and Advanced Control System (ACS) Operator’s Manual
OPERATION
The machine includes 20 default programs. These programs can be
named and the settings customized for specific needs. See Create
Custom Programs and Labels on page 4 for instructions.
NOTICE: Never pack products that can be damaged by vacuum
packaging.
NOTICE: To reduce condensation and corrosion risk for the pump,
cool products before packing.
NOTICE: When packing food, always select a program that includes
Liquid Sensor Control.
NOTICE: Special instructions apply for packing liquid products. See
Packing Liquid Products on page 3.
NOTICE: The machine is designed for a maximum use of five hours
per day.
NOTICE: This machine is not designed for continuous use. Allow 15
seconds between packing cycles.
NOTICE: If the machine has been in use for one hour, stop the
machine and allow it to cool to ambient temperature.
NOTICE: Do NOT tilt the machine. Tilting could enable oil to flow out
of the pump and cause damage to the machine.
Turn On the Machine
1. Rotate the lid retainer so it is not covering the lid. The lid retainer is
used only for securing the lid when the machine is not in use.
2. Press and release the On/Off button and allow approximately 7-10
seconds for the display to load.
3. If the machine has not been used for a while, run the Pump
Conditioning Program. See page 7.
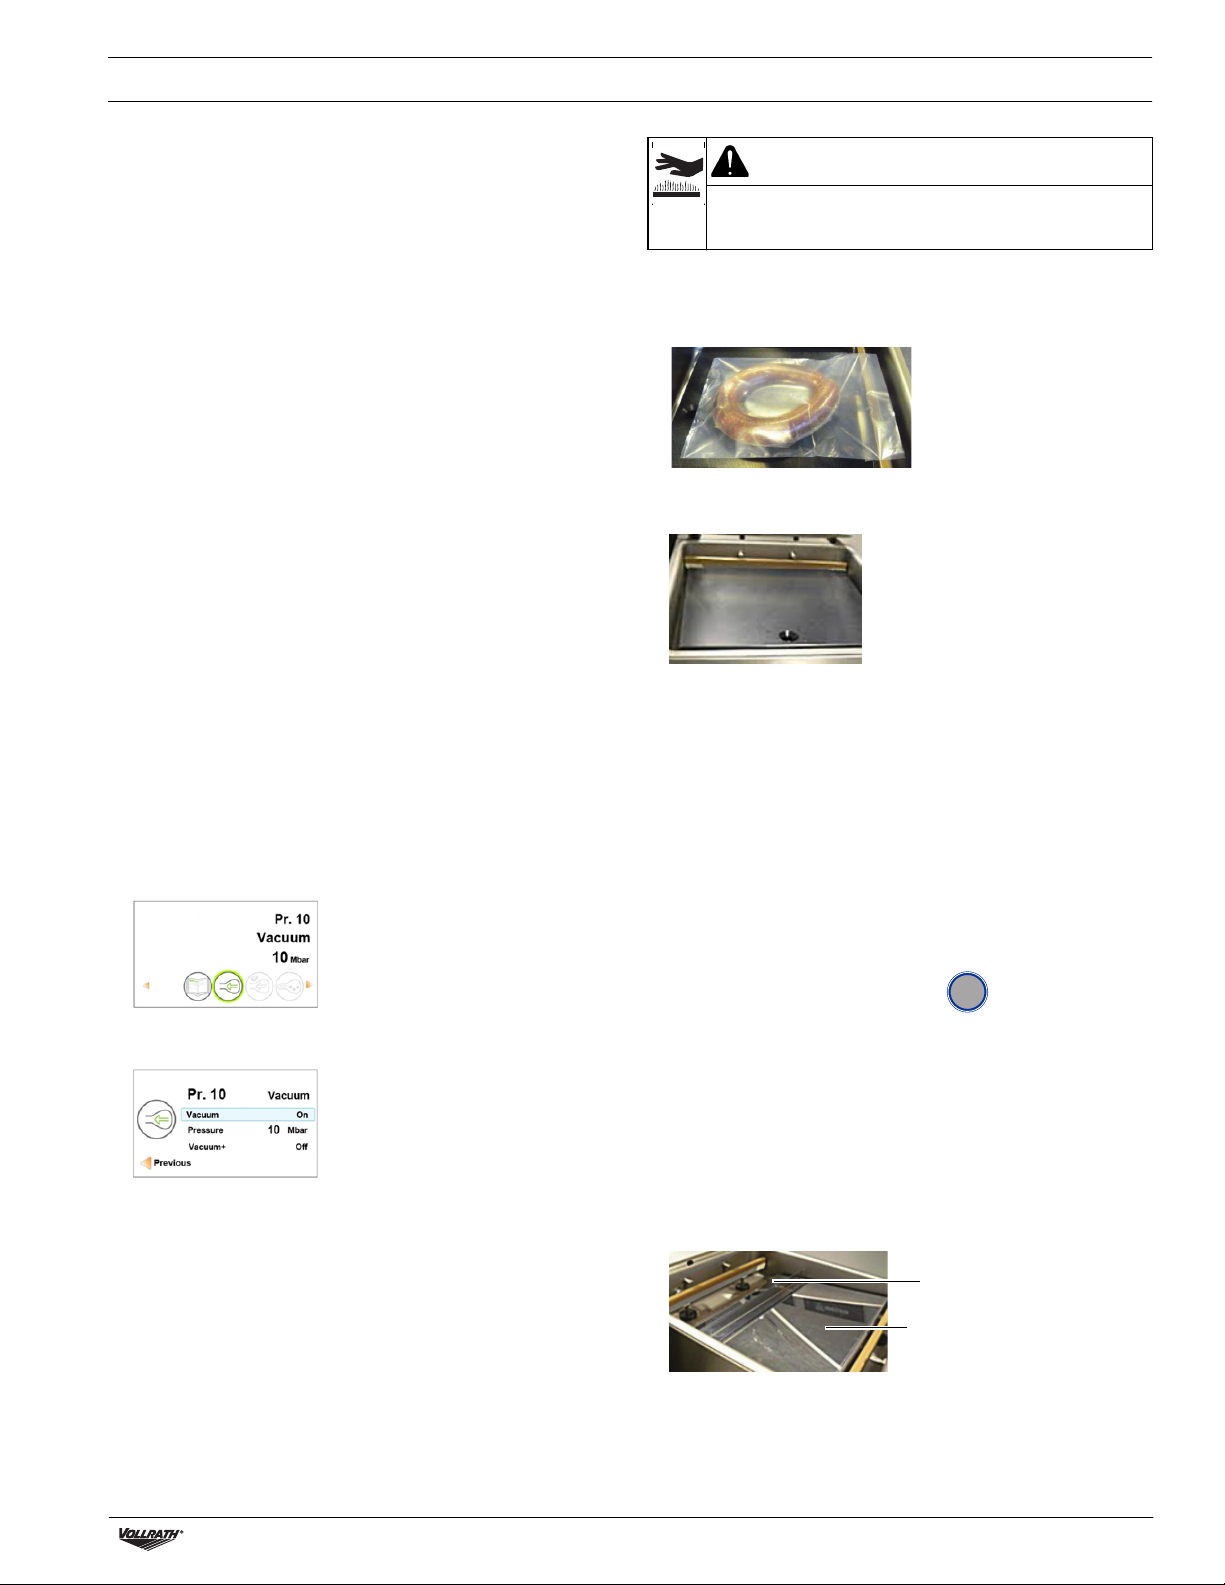
Place the Product in the Chamber
CAUTION
Burn Hazard
Sealing bar may become hot after repeated use. Do not touch
the sealing bar when placing vacuum bags in the chamber.
1. Place the food product in a vacuum sealing bag that fits completely
within the chamber.
2. Place the bag in the chamber with the open end over the sealing
bar. Make sure the bag is smooth, without wrinkles or folds.
3. For small products, place one or more insert plates under the
product. This fills empty space in the chamber, which reduces the
cycle time.
4. Multiple vacuum bags can be placed over the sealing bars. Do NOT
overlap vacuum bags.
Select a Program
Packing a Food Product: Select a program that includes Liquid Sensor
Control.
Packing a Liquid Product: See important information under Packing
Liquid Products on page 3.
1. Press or to select a program.
Press or to view the functions in the program.
2. Press to view the settings of a function. For descriptions of the
functions, please see page 4
.
Run the Program
1. Close the lid. Do NOT use the lid retainer. Using the lid retainer
during a packing cycle will interfere with the cycle.
2. The program automatically starts.
3. The lid opens when the last function is complete.
4. Remove the packed product.
5. Wait 15 seconds before packing another product.
Stop a Cycle
• Stop the vacuum function and continue to the next function,
press .
• Stop and cancel the entire cycle Press
stop
Packing Liquid Products
Special care needs to be taken when vacuum packing liquid or moist
products.
• Cool foods before packing. Hot food quickly reaches the boiling
point, which can lead to an insufficient seal.
NOTICE: Hot products create condensation, which can damage
1. Use the included incline plate and magnetic positioning bars to
the pump.
position the bag so the liquid is below the sealing bar. Magnetic
bars are shipped attached to the underside of the incline plate.
Magnetic bar
Incline plate
2. Use a program that includes the Liquid Sensor Control function.
This will prevent the product from boiling.
NOTICE: Boiling will increase the amount of moisture that enters
3. Run the Pump Conditioning Program at the end of the work day.
Vacuum Packing Machine with Dual 16" Sealing Bars and Advanced Control System (ACS) Operator’s Manual 3
the pump, which can lead to corrosion.
See page 7.
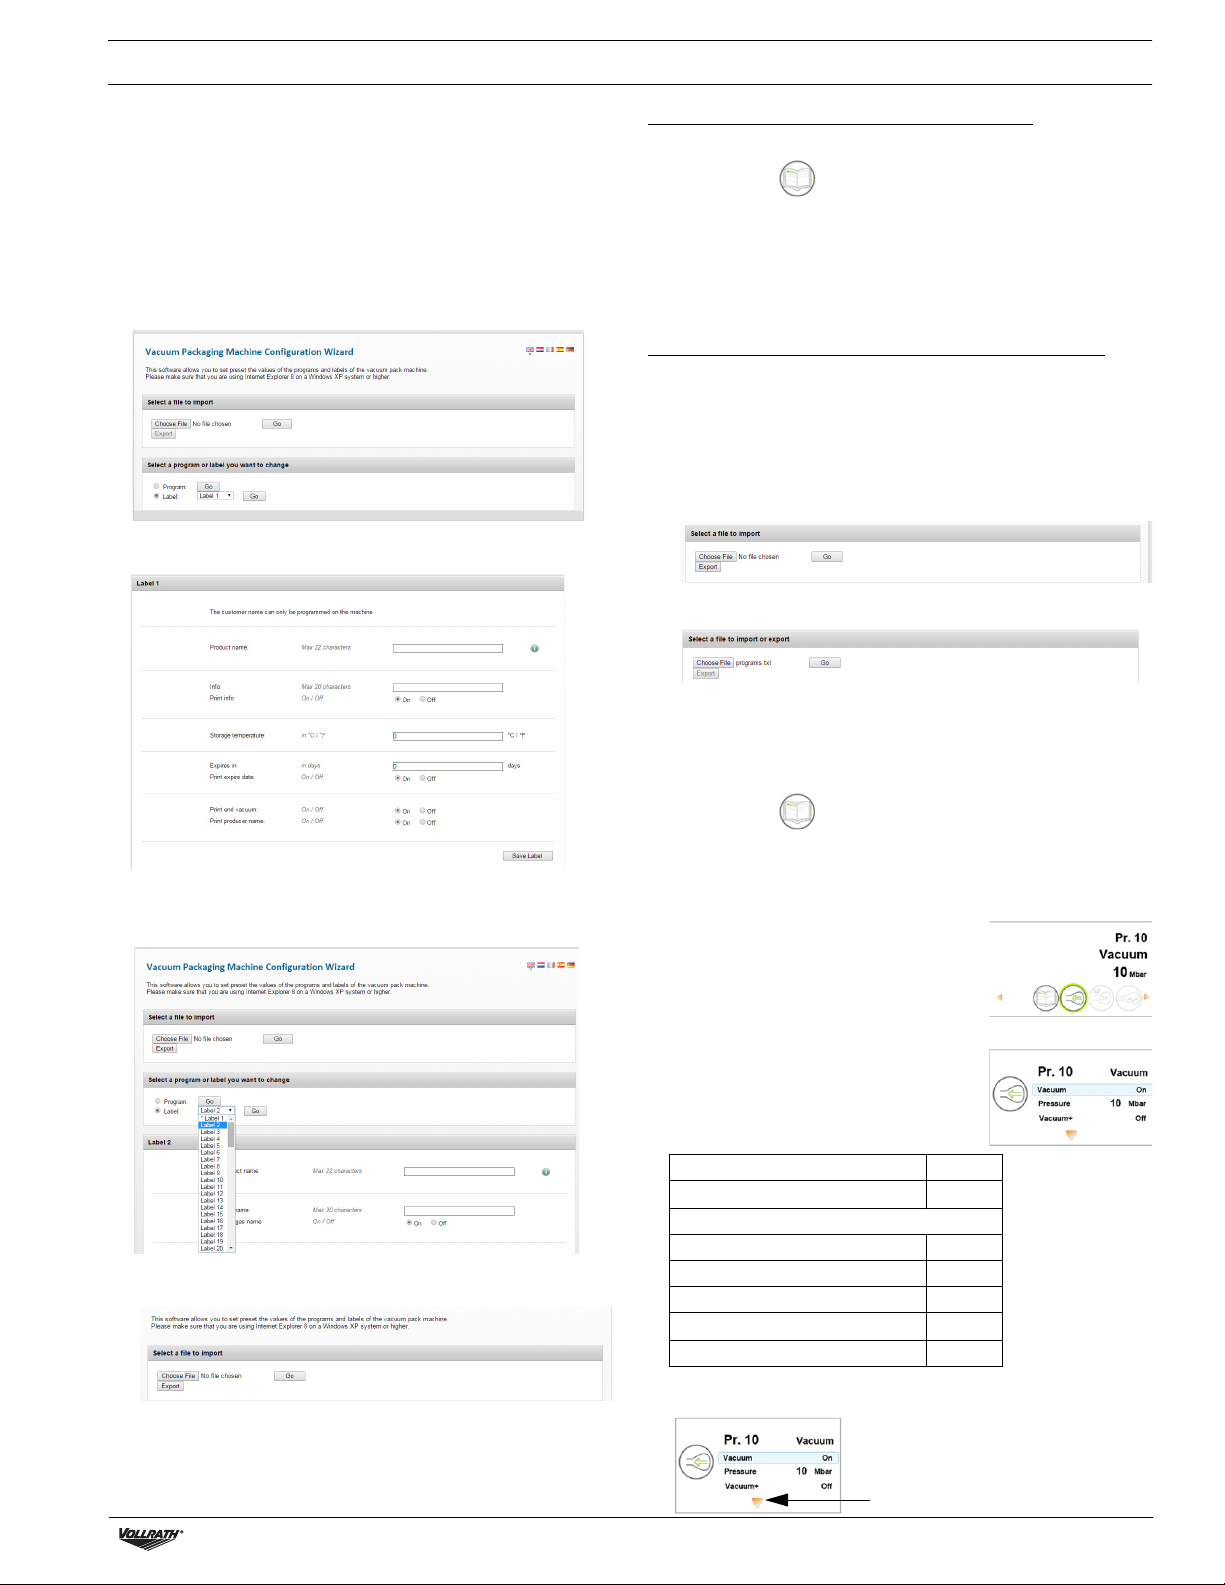
CREATE CUSTOM PROGRAMS AND LABELS
The default programs can be customized to fit your specific needs.
• If you have access to a computer, use the online ACS Configurator
Tool to create your custom programs and labels.
• If you do not have access to a computer, use the control panel on the
machine to create programs. See Create Programs Using the Control
Panel on page 5.
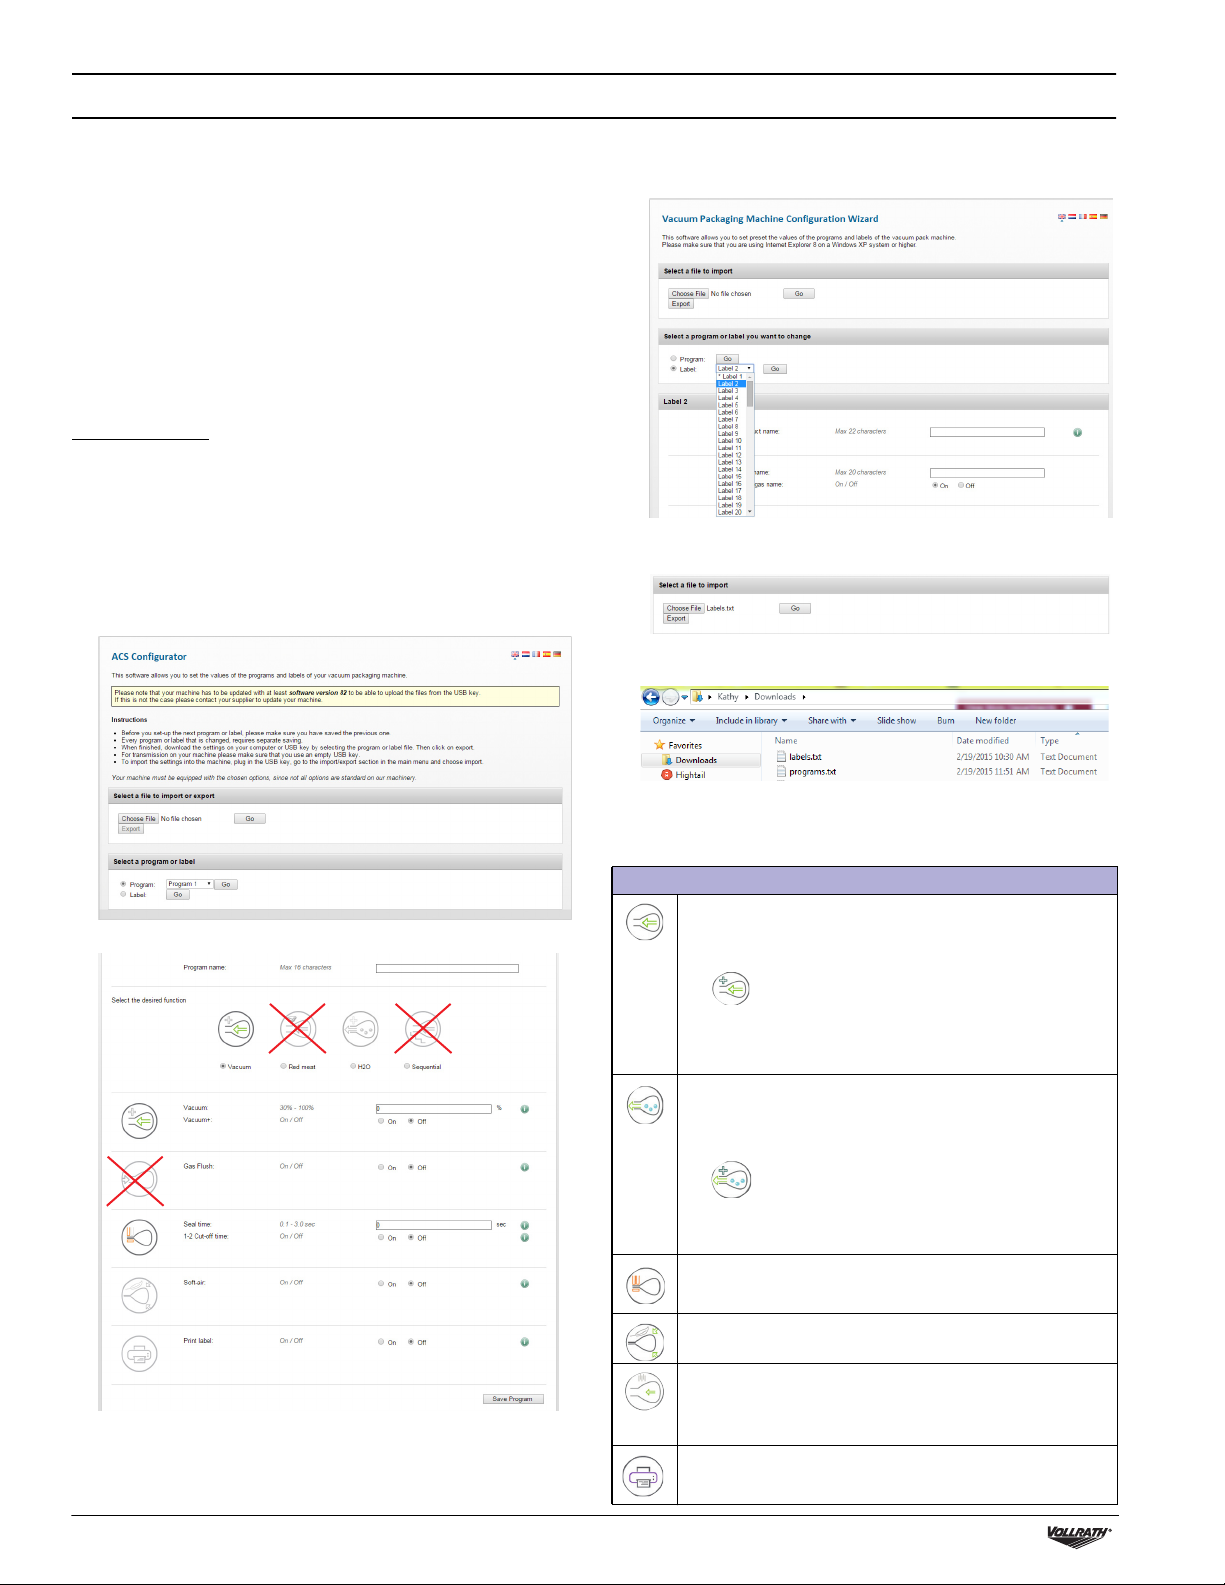
Create Programs and Labels with ACS Configurator
• A USB stick (not included) is required.
The ACS Configurator provides an easy-to-use interface for creating
custom programs and labels. Download and save the programs and
labels to a USB stick for transferring to the machine.
Create Programs
You can create new programs or edit the default programs on the
machine. To edit the default programs, you must first download the
programs from the machine. See Edit Programs or Label Data Using
the ACS Configurator on page 5. To create new programs, continue
below.
1. Start a web browser such as Internet Explorer or Chrome.
2. Go to http://www.acs-configurator.com
3. Select Program and Program 1. Click Go.
5. Click Save. An asterisk in front of the program indicates it has been
saved.
6. To create another program select Program 2. Press Go.
7. Enter and save data for each program.
8. Click Export to save the programs to your computer.
9. The file “programs.txt” will be saved to the downloads folder on
your computer.
4. Edit functions in Program 1.
NOTICE: The Red Meat, Gas Flush, Sequential Vacuum and Cut-
off functions are not available on this Vacuum Packing
Machine. Settings for these functions are not used when
the program is loaded into the machine.
10. Copy the file “programs.txt” to a USB stick.
NOTICE: Do not rename “programs.txt.” Programs will not load
into the machine if the name has been changed.
Function Descriptions
Final Vacuum Pressure % – Sets vacuum to reach a set
pressure.
• Recommended minimum is 50%.
Vacuum + – Extends the vacuum cycle to enable air
trapped in the product to escape the bag.
• To use this function, Final Vacuum Pressure must be
set to 99.8%.
Liquid Control – Use when packing food. Detects the boiling
point, stops the vacuum and advances to the next step to
produce a better quality product and prevents damage to the
pump from moisture in the product.
Liquid Control + – Similar to Vacuum +.
Extends the vacuum cycle to enable air trapped in the
product to escape the vacuum bag.
Sealing Time – Sets the seal time.
• 2.0 to 2.5 seconds recommended for most bags.
Soft-Air – Gently forms the bag to protect delicate products or
prevent damage to the bag from sharp edges on product.
Tenderize – Uses vacuum pressure to quickly marinate food.
Set pressure and marinate time. Can only be programmed
through the control panel. Not available in the ACS
Configurator.
Print – Select a label to print with a program.
4 Vacuum Packing Machine with Dual 16" Sealing Bars and Advanced Control System (ACS) Operator’s Manual
CREATE CUSTOM PROGRAMS AND LABELS (CONTINUED)
Create Label Data
• Label printer, USB cable and labels are required to print labels, but
are not included.
Use the online configurator tool to enter data for labels. Download and
save label data to a USB stick for loading into the machine. Label data
can include: product name, description, storage temperature, expiration
date, vacuum pressure and the name of person who packed the
product.
1. Start a web browser such as Internet Explorer or Chrome.
2. Go to http://www.acs-configurator.com
3. Select Label and Label 1. Click Go.
4. Enter the data for Label 1.
Load Program and Label Data into the Machine
1. Insert the USB stick into the USB port at the back of the machine.
2. Press until is highlighted. Press .
3. Enter the owner password 1324. Press to select a number.
Press to enter to the next number. Press .
4. Select Import/Export. Press .
5. Select Import Data from USB to copy the programs and labels into
the machine. Press .
Edit Programs or Label Data Using the ACS Configurator
• You can use the ACS Configurator to edit existing programs or
labels. If the programs or labels are in the machine, export the
information to a USB stick. Reverse the procedure for Loading
Programs and Label Data into the Machine.
1. Start a web browser such as Internet Explorer or Chrome.
2. Go to http://www.acs-configurator.com
3. Click Choose File.
4. Navigate to the location of the “programs.txt” or “labels.txt” file
containing the label data. Click Open.
5. Click Save. An asterisk in front of the label indicates the data has
been saved.
6. To enter data for another label, select
7. Enter and save data for each label.
8. Click Export to save the labels to your computer.
9. The file “labels.txt” will be saved to your computer.
10. Save “labels.txt” to a USB stick.
NOTICE: Do not rename “labels.txt.” The labels will not load into
the machine if the file has a different name.
Label 2. Press Go.
5. Click Go to load your label data into the configurator.
Create Programs Using the Control Panel
1. Enter programming mode.
Press until is highlighted. Press .
Enter the owner password 1324.
(Press to select a number. Press to enter to the next number.)
Press .
2. Select a program to edit.
Press or to scroll through
programs.
Press to select the program.
Confirm the owner password.
3. Select a function to edit.
Press or to view functions.
Press to select the function.
4. Edit the settings in a function.
Select a setting or
Edit the selected setting
Change the setting
Increase
Decrease
Go to previous or next character
Confirm the change
Go back
A downward pointing arrow at the bottom of a screen indicates
more options. Press to see the options.
or
More options
Vacuum Packing Machine with Dual 16" Sealing Bars and Advanced Control System (ACS) Operator’s Manual 5
CREATE CUSTOM PROGRAMS AND LABELS (CONTINUED)
Name the Programs
Vacuum Pressure
1. Set the vacuum pressure.
• Recommended minimum is 50%.
• To use Vacuum+, vacuum pressure must be set to 99.8%.
2. To edit the Vacuum + function, continue below.
Vacuum +
1. Turn on Vacuum Plus.
2. Set the time.
When Vacuum + is selected the plus sign in the program ICON is
highlighted blue.
Liquid Control
Settings in Liquid Control override any settings in Vacuum
function.
1. Turn Liquid Control On.
2. Set the vacuum pressure.
3. To edit the Liquid Control + function, continue below.
The default programs are named Pr. 1 through Pr. 20. You can change
the program names to be more descriptive. For example, Fish, Soup,
Steak, Cheese, Vacuum 85%, etc. The new program names display at
the program select level. But the default name displays when viewing
the details of the functions in the program.
1. Press until is highlighted. Press .
2. Enter the owner password 1324.
3. Press to enter the Settings menu.
4. Press to 1.7 Program Names. Press .
5. Press to Select a Program. Press .
6. Press or to select a program number. Press .
7. Press to Name. Press .
8. Use arrow buttons to enter a name.
9. Press .
10. To name another program, press .
11. Login using the user password 0000 to prevent unauthorized
(Press to select a number. Press to enter to the next number.)
changes to the machine.
Liquid Control +
1. Turn on Liquid Control +.
2. Set the Liquid Control + Time.
When Liquid Control + is selected the plus sign in the program
ICON is highlighted blue.
Tenderize (Marinate)
NOTICE: When using the Tenderize function you must also turn
on Liquid Control.
Tenderize will vacuum to the pressure set in the Tenderize function
or until Liquid Control detects boiling.
1. Turn Tenderize On.
2. Set a vacuum pressure.
3. Set the time.
Sealing Time
1. Set the number of seconds.
• 2.0 -2.5 seconds recommended for most bags.
Soft Air
1. Turn Soft Air On or OFF.
2. Set the time.
Print
1. Turn label print On or Off.
2. Select which label to print.
3. Set the number of labels to print per cycle.
Create Labels
Enter the data you wish to print on labels.
1. Press until is highlighted. Press .
2. Enter the owner password 1324.
(Press to select a number. Press to enter to the next number.)
3. Press Enter to enter the Settings menu.
4. Press to 1.1 Printer. Press .
5. Press to Set Labels.
6. Enter the label data.
7. To create another label, press .
8. Login using the user password 0000 to prevent unauthorized
changes to the machine.
Tip:
To enter: Press
Lowercase letter
Uppercase letter
5. Edit another function in the current program.
Press .
6. Exit owner mode and return to user mode.
This will prevent unauthorized changes to settings and programs.
Press until is highlighted. Press .
Enter the user password 0000 and press .
6 Vacuum Packing Machine with Dual 16" Sealing Bars and Advanced Control System (ACS) Operator’s Manual
HACCP DATA LOG
The machine can log HACCP information. Each entry in the log
contains: date, time, user, selected programs and settings, selected
label and number of cycles.
• HACCP can only be turned On or Off by the owner. Once it is turned
on, data can be logged by logging into the machine using the
following codes: owner: 1324, user 2: 3821, user 3: 5718, user 4:
6982, user 5: 9217. The generic user code 0000 cannot be used.
• A new entry is started each time a different user logs in or when
programs and program settings are changed.
• The HACCP log can hold up to 100 entries.
• Log data is saved as a .txt file and can be exported to a USB stick.
• After exporting the data, the log will automatically be cleared.
C E F G
D
B
User:hm started 28-3-2013 16:42
Program 2=, Vac:98%, Seal:0.3 sec, Labelnr.:1, Amount of cycles:2
A
User:he started 28-3-2013 16:43
Program 1=, Vac:99.8% Seal:0.4 sec, Labelnr.:1, Amount of cycles:1
User:hm started 28-3-2013 16:44
Program 3=, Vac:90%, Seal:2.5 sec, Labelnr.:1, Amount of cycles:2
User: started 28-3-2013 16:45
Program 3=, Vac:95% Seal:2.5 sec, Labelnr.:1, Amount of cycles:1
A The program number used.
B The initials of the person who has logged in.
If no initials are entered in the settings, nothing is displayed here
(see the last entry of the sample log).
C Start time and date of the production.
D The maximum vacuum reached for the package.
E The seal time used.
F The label printed with this package.
G The total number of operating cycles.
Turn On HACCP Logging
Use the control panel to turn on HACCP. Before logging HACCP data,
set your machine to your local time and preferred date format.
1. Press until is highlighted. Press .
2. Enter the owner password 1324.
(Press to select a number. Press to enter to the next number.)
3. Press to enter the Settings menu.
4. Turn on HACCP.
5. Assign user initials to each User (Pin Code) (optional).
Select a User (Pin Code).
Press to Name to enter user initials.
6. Log into the machine as owner or with one of the HACCP PINs.
CLEANING
Daily
Run the Pump Conditioning Program
The Pump Conditioning Program removes any moisture that may have
accumulated in the pump. During the program, the pump and oil reach
operating temperature, which evaporates any moisture in the pump.
1. Press .
2. The display shows .
3. Close the lid.
4. The program starts. Moving dots appear on the display.
5. The program runs for approximately 15 minutes. Do not interrupt
the program. If the program is interrupted, it must be run again to
ensure completion.
Clean the exterior and interior
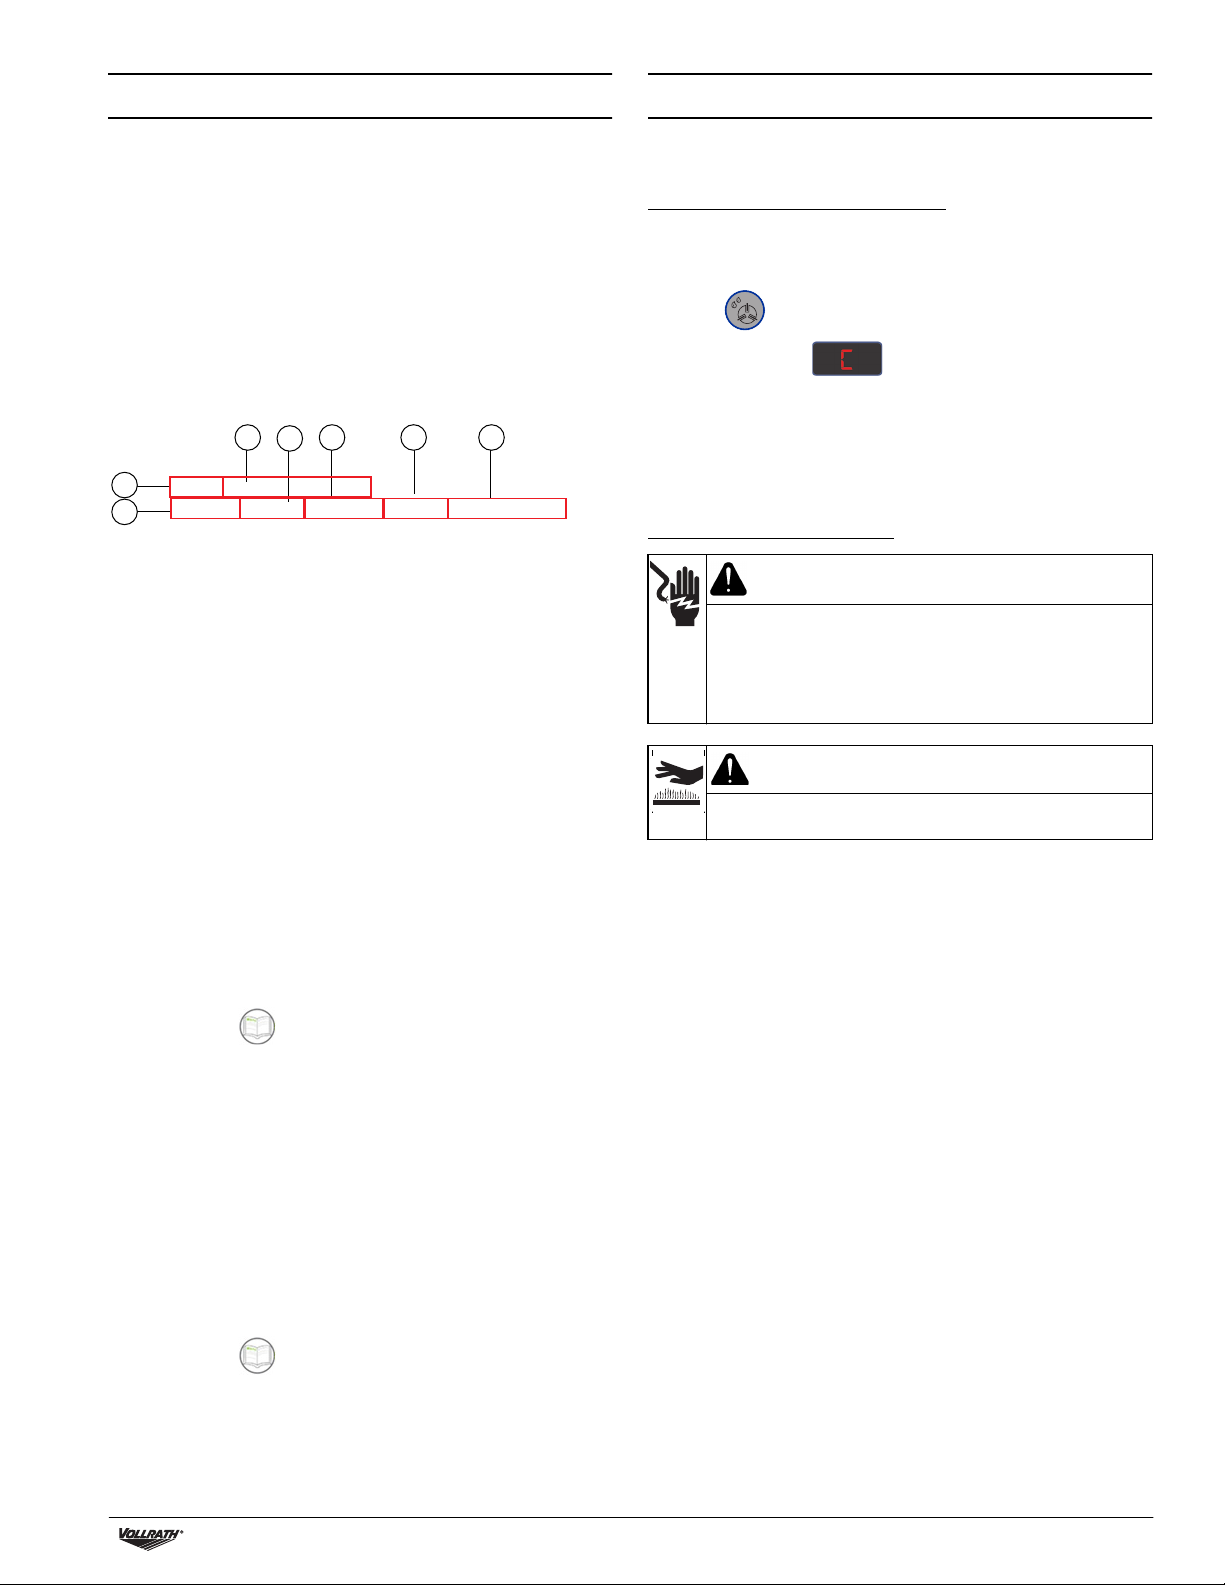
WARNING
Electrical Shock Hazard
Keep water and other liquids from entering the inside of the
equipment. Liquid inside the equipment could cause an
electrical shock. Do not spray water or cleaning products.
Liquid could contact the electrical components and cause a
short circuit or an electrical shock.
CAUTION
Burn Hazard
Allow equipment to cool before moving or cleaning.
NOTICE: Do not use cleaners containing ammonia, alcohol, acetone
NOTICE: Do not use paper towels, abrasive materials, scratching
NOTICE: Do not use WD-40
1. Unplug the machine. Allow it to cool.
2. Wipe the vacuum chamber, lid, sealing bar, silicone holder and
3. Thoroughly wipe off any mild soap or chemical cleaners. Residue
or dry cleaning products. Cleaners with these chemicals
will damage Plexiglas
will damage the finish.
cleansers, razor blades, brushes, steel wool or scouring
pads, such as Scotch Brite™ pads.These will damage the
finish.
cleaning products. These will damage the finish.
exterior with a soft, lint free or microfiber cloth and warm water, or
a mixture of warm water and a small amount of mild dish
detergent.
could corrode the surface of the unit.
®
, acrylic and other plastics. These
®
or petroleum, industrial or commercial
Export HACCP Data
1. Insert a USB stick into the USB port on the back of the machine.
2. Press until is highlighted. Press .
3. Enter the owner password 1324.
(Press to select a number. Press to enter to the next number.)
4. Press to enter the Settings menu.
5. Select Import/Export menu. Press .
6. Select Export data.
Vacuum Packing Machine with Dual 16" Sealing Bars and Advanced Control System (ACS) Operator’s Manual 7
MAINTENANCE
WARNING
Electrical Shock Hazard
Unplug unit before servicing.
3. Remove the screws on the bottom side of the seal bar.
NOTICE: The machine must be moved or transported in an upright
NOTICE: Do NOT tilt the machine. Tilting could enable oil to flow out
The following maintenance schedule is only a guideline. Actual
maintenance needs will vary depending on machine use. Inspect your
machine regularly.
Interval Procedure
Weekly Check the oil by viewing the Oil Inspection Window.
Every six
months
Yearly Inspect the oil exhaust filter. Contact Vollrath Technical
Every four
years
position.
of the pump and cause damage to the machine.
Inspect the seal bar for wear.
Inspect the seal pad under the lid for wear.
Inspect the lid gasket and lid.
Replace the oil in the vacuum pump. Contact Vollrath
Technical Services.
®
Replace the sealing wires and Teflon
Replace the seal pad under the lid.
Replace the lid gasket.
Services.
Replace the lid, gas springs and seal cylinder
membranes. Contact Vollrath Technical Services.
tape.
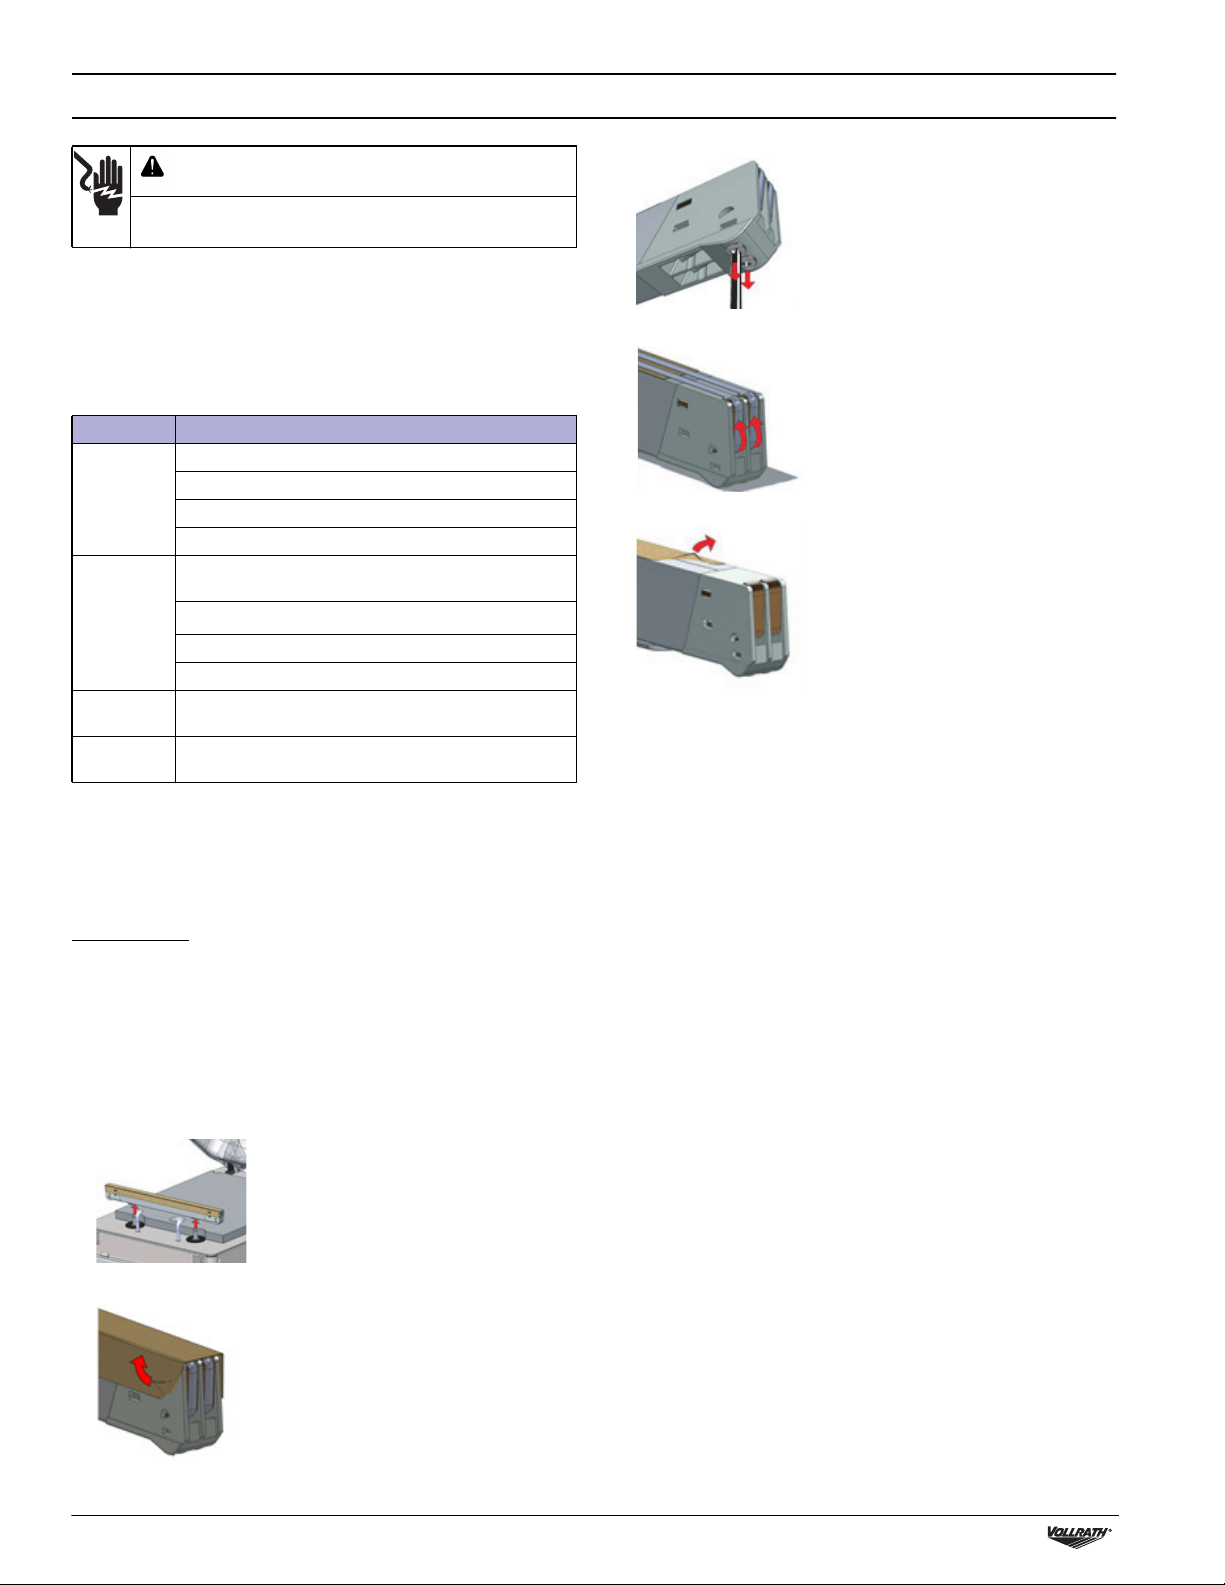
Replace the Sealing Wires and Teflon®Tape
Check the sealing bar for damage. Replace the Teflon tape or sealing
wires if the seal quality is no longer sufficient or if the Teflon tape or
seal wires are worn.
4. Remove the sealing wires.
5. Remove the Teflon tape from the sealing bar.
6. Clean the sealing bar with a lint-free cloth.
Tools Needed:
• Phillips screwdriver
• Tensioning tool or pliers
• Scissors
• Lint-free cleaning cloth
• Replacement Teflon tape
• Replacement sealing wire
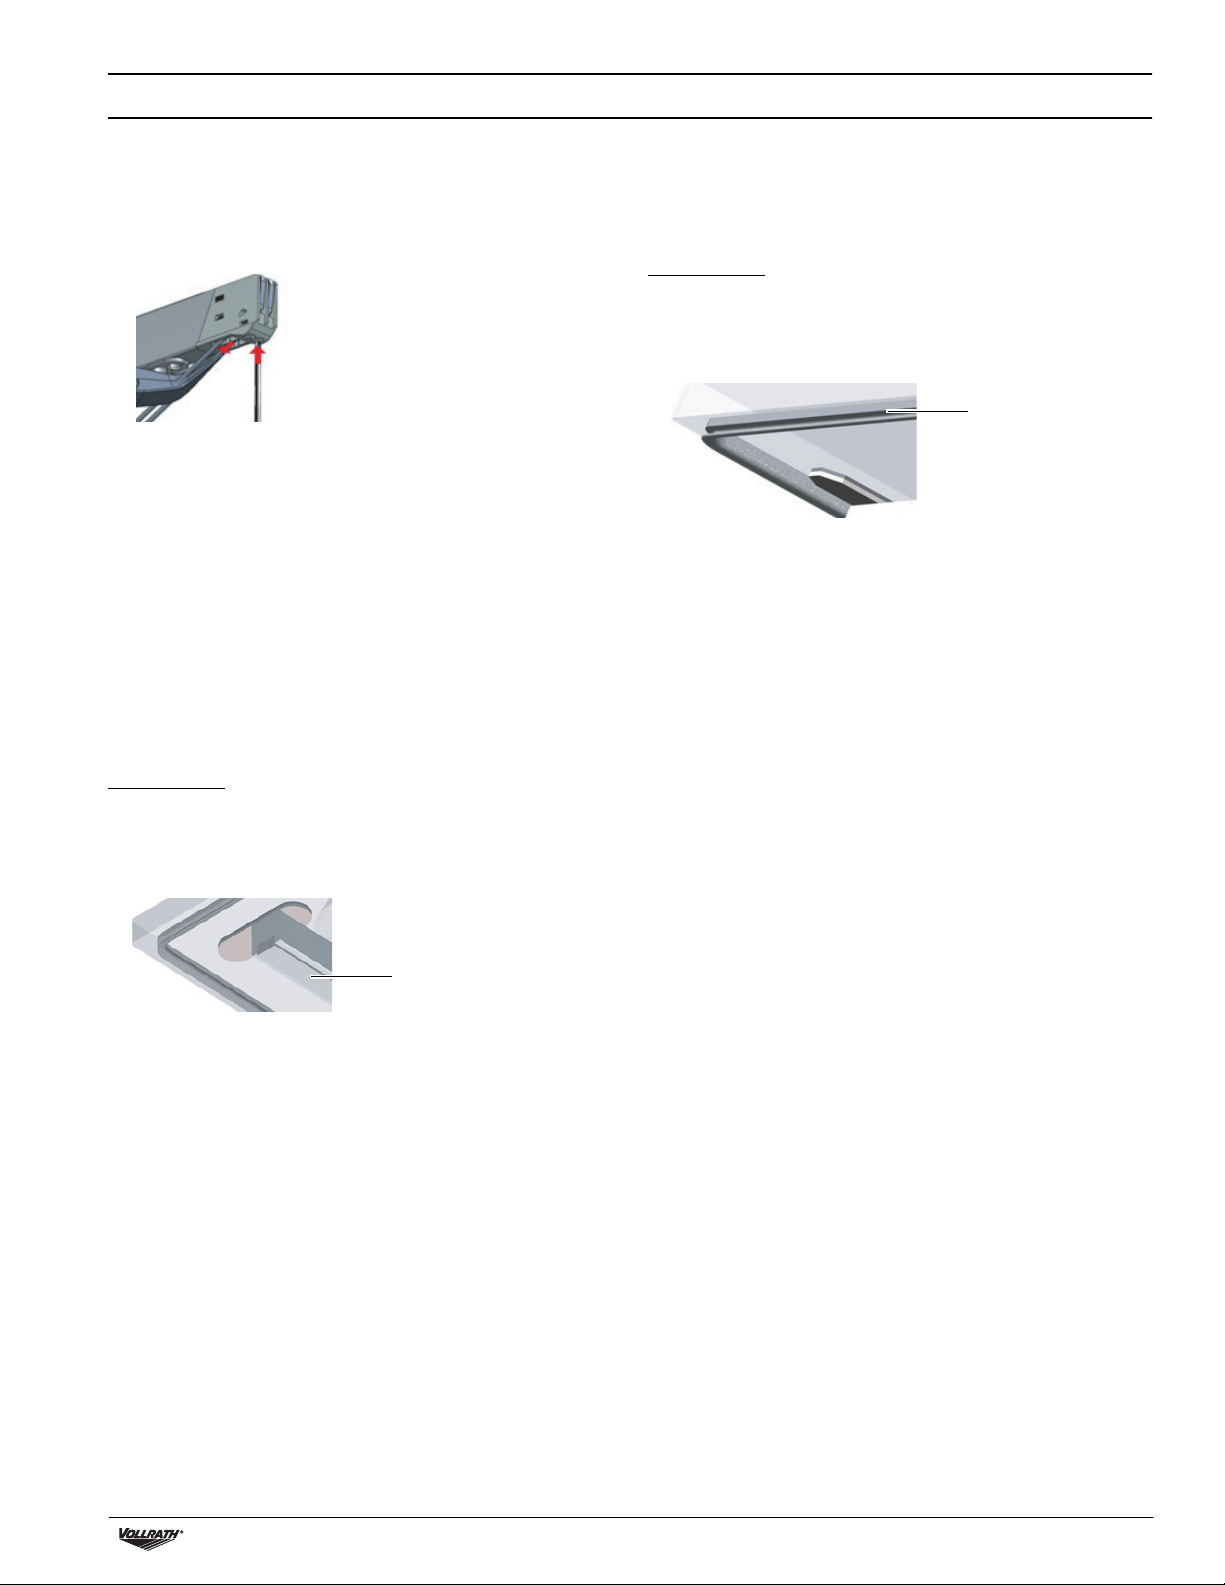
1. Pull up on the sealing bar to remove it from the machine.
2. Remove the Teflon tape that protects the sealing wires.
8 Vacuum Packing Machine with Dual 16" Sealing Bars and Advanced Control System (ACS) Operator’s Manual
MAINTENANCE (CONTINUED)
7. Cut a piece of replacement Teflon tape to the same length as the
sealing bar.
8. Apply the replacement tape to the sealing bar.
9. Cut new sealing wires to the length of the sealing bar, plus about 6"
(15 cm).
10. Attach one wire to one side of the seal bar by tightening the screw.
11. Pull the wire across the sealing bar straight and tight.
12. Attach it by tightening the screw.
13. Repeat steps 10 through 12 for the second wire.
14. Trim the wires.
15. Cut a piece of Teflon tape the same length of the sealing bar, plus
about 2" (5 cm).
16. Apply the tape smoothly over the sealing wires on the sealing bar.
17. Trim the tape.
18. Place the sealing bar back in the machine. Verify that the sealing
bar is properly snapped into the holder.
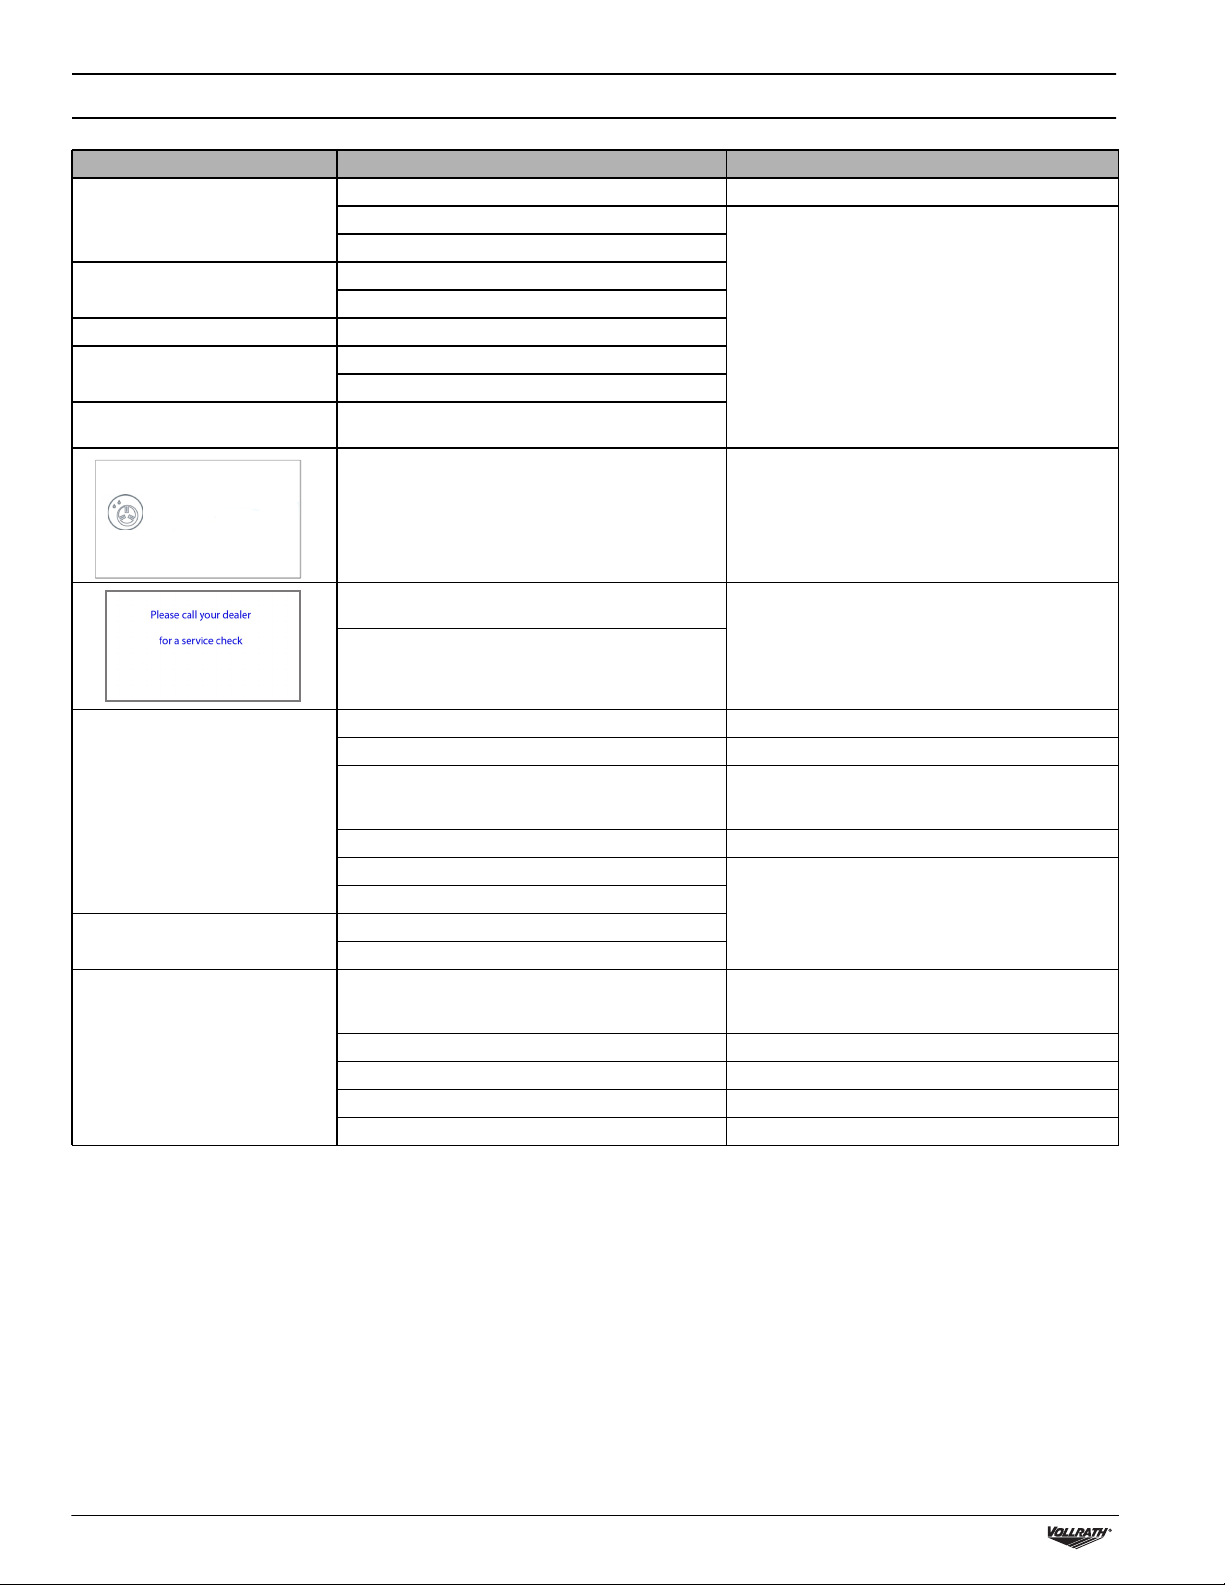
Replace the Lid Gasket
The lid gasket ensures the vacuum chamber is completely sealed
during the packing cycle. This is essential to achieve maximum
vacuum. The lid gasket wears due to the extreme pressure differences
and must be replaced regularly.
Tools Needed:
• Replacement gasket
• Scissors
1. Remove the worn gasket.
Lid gasket
2. Cut a new piece of gasket slightly longer than the old one. Position
the new gasket so the lip faces downward and outward.
3. Press the gasket into the slot evenly.
4. Trim the gasket so the ends come tightly together to prevent
leakage. The ends must be cut off straight. If the lid gasket is too
short or too long, it can cause problems when closing the lid or
leakage may occur.
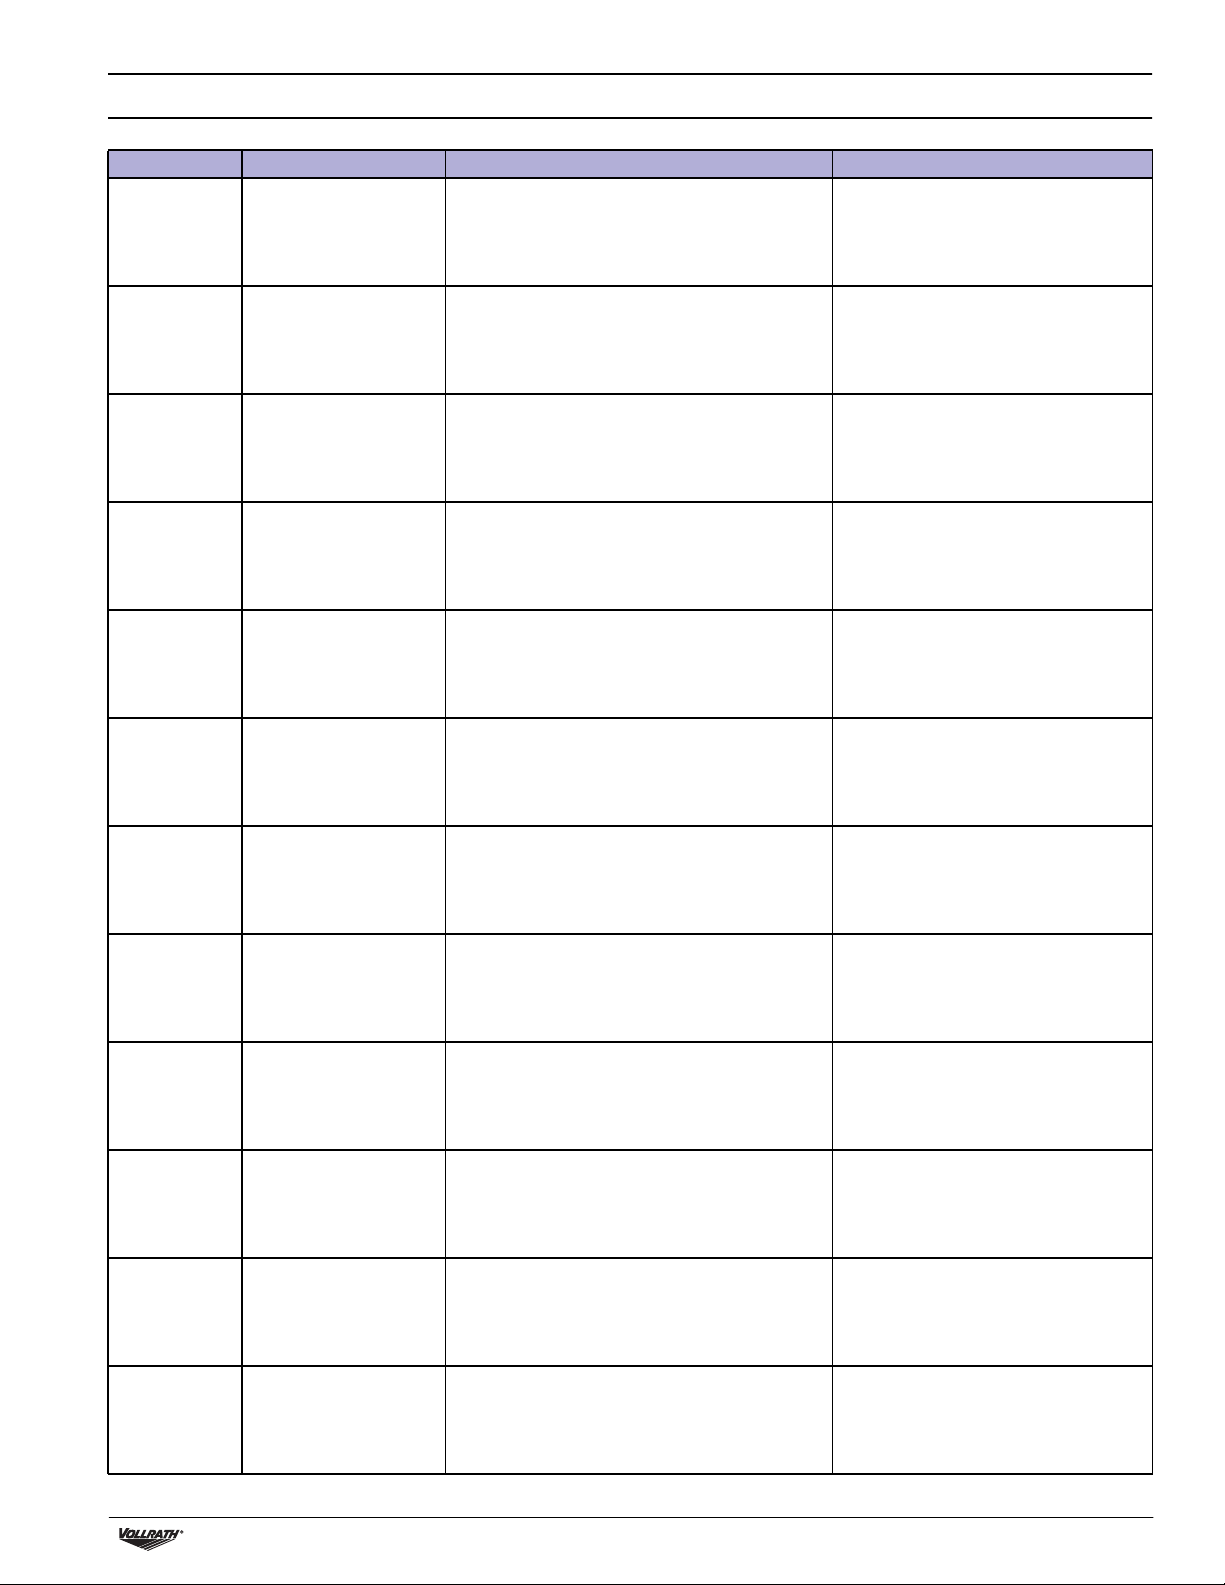
Replace the Seal Pad
Inspect the pad for roughness. Replace if areas of the pad are rough.
Tools Needed:
• Replacement seal pad
• Scissors
1. Remove the worn pad from the holder.
Seal pad
2. Cut a new piece of seal pad the same length as the old one. A pad
that is too short or too long will cause sealing problems.
3. Place the new pad in the holder. Ensure that the pad is completely
and evenly placed in the groove.
4. Place the new piece in the silicone holder. Ensure that the silicone
rubber is completely and evenly placed in the groove.
Vacuum Packing Machine with Dual 16" Sealing Bars and Advanced Control System (ACS) Operator’s Manual 9
TROUBLESHOOTING
Problem Might be Caused By Course of Action
The control panel does not
illuminate.
The control panel is on but there is
no activity after closing the lid.
The lid does not open automatically. The gas spring is damaged.
F1 in display The lid micro switch may need adjusting.
F2 in display The printed circuit board or liquid control sensor has
The machine is not connected to an electrical outlet. Connect the machine to the power supply.
The main fuse is burned out.
The circuit board fuse is burned out.
The lid micro switch may need to be adjusted.
The control transformer fuse is burned out.
The pump may require technical services.
malfunctioned.
Contact Vollrath Technical Services.
The pump conditioning program needs to be run.
Use the pump cleaning program
The oil in the pump needs to be checked and or needs
to be changed.
Machine usage has reached a scheduled maintenance
point.
Final vacuum is not sufficient. The set vacuum time is too short. Extend the vacuum time.
There is too little oil in the vacuum pump. Contact Vollrath Technical Services.
The extraction hole at the back of the vacuum
chamber is partially covered by the vacuum bag
during extraction.
The lid gasket is worn. Replace the lid gasket.
The oil is contaminated.
The oil exhaust filter is saturated.
The machine extracts air too slowly. The oil exhaust filter is saturated.
The pump’s extraction filter is blocked.
Vacuum bag is not sealed correctly.
The vacuum bag is being placed incorrectly on the
sealing bar.
The sealing time is too long or too short. Adjust the sealing time longer or shorter.
The seal pad under the lid is damaged or worn. Replace the seal pad.
The Teflon tape is damaged. Replace the Teflon tape.
The vacuum bag opening is not clean. Clean the vacuum bag’s opening.
Run the pump conditioning program. See “Pump
Conditioning Program” on page 7.
Contact Vollrath Technical Services.
Place the vacuum bag closer to the sealing bar.
Contact Vollrath Technical Services.
Place the vacuum bag neatly and smoothly on the
sealing bar. Ensure that the opening of the bag is
always within the vacuum chamber.
10 Vacuum Packing Machine with Dual 16" Sealing Bars and Advanced Control System (ACS) Operator’s Manual
MAINTENANCE LOG
Date Company Maintenance Performed Comments
Vacuum Packing Machine with Dual 16" Sealing Bars and Advanced Control System (ACS) Operator’s Manual 11
 Loading...