

Page 1
Operator’s Manual
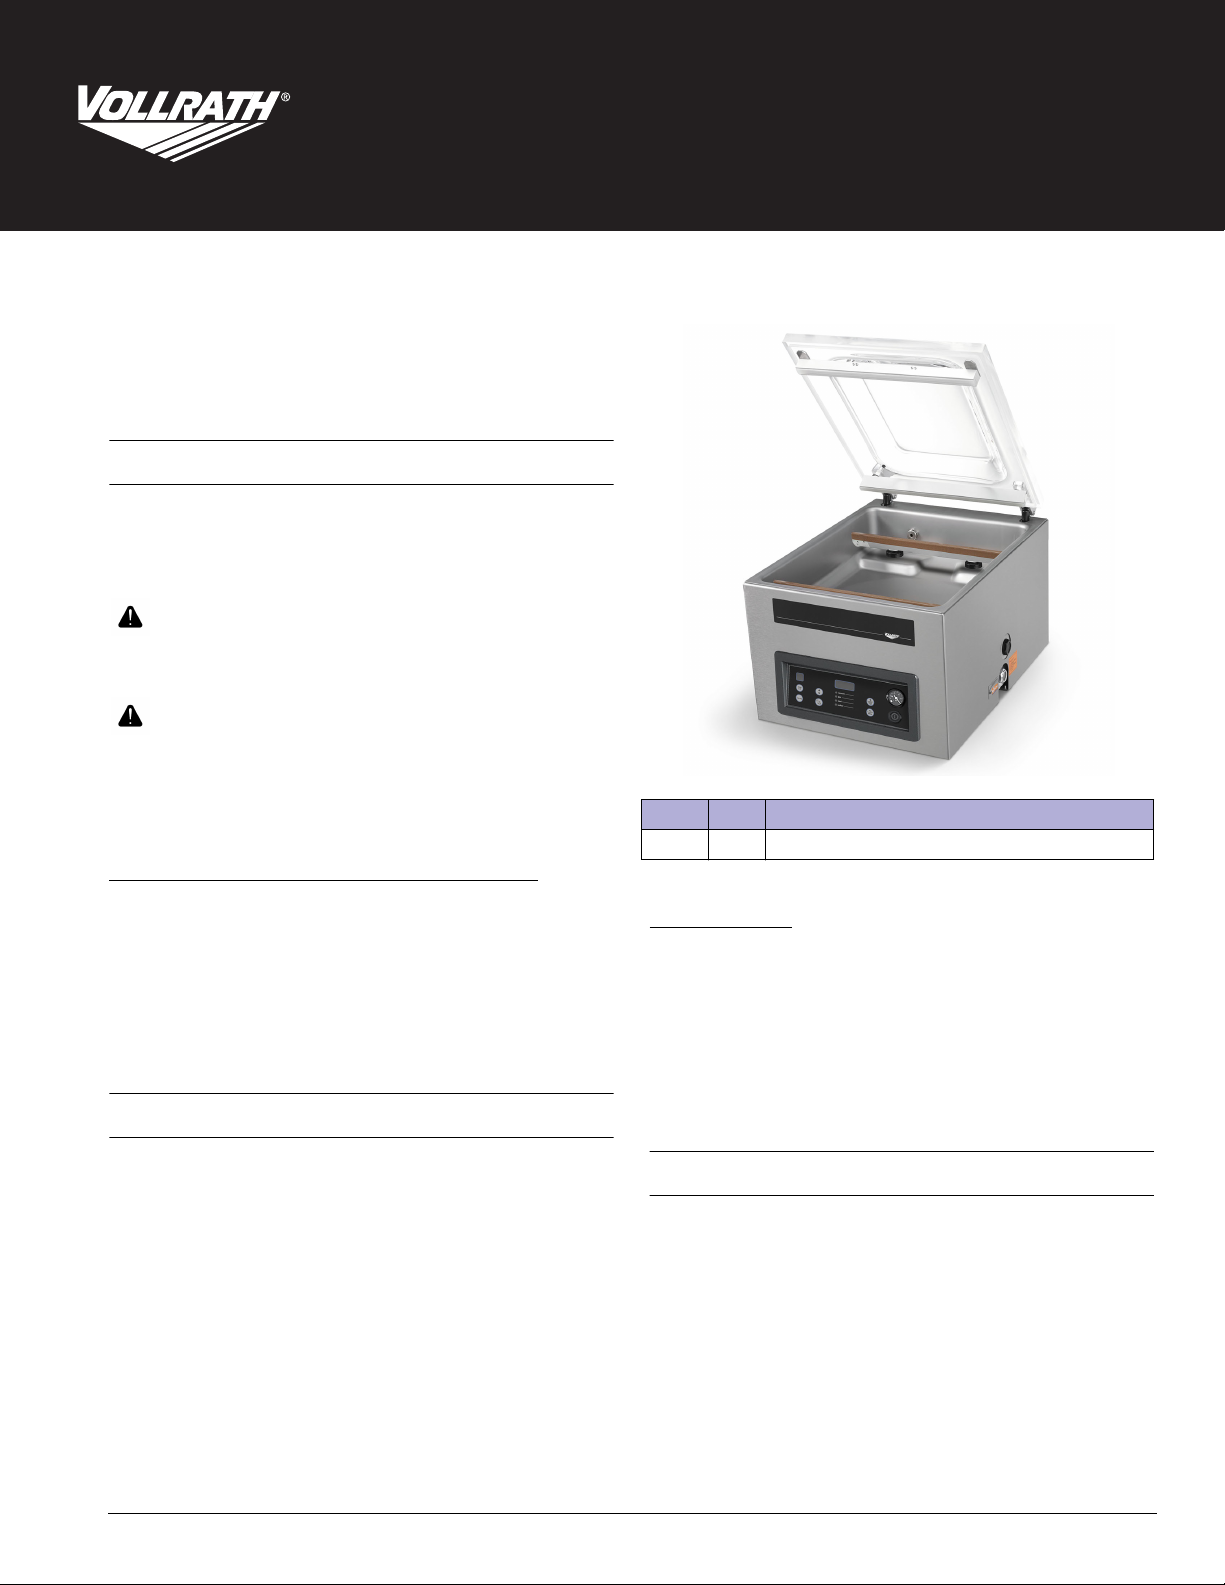
Vacuum Packing Machine with Dual 16" Sealing Bars
Thank you for purchasing this Vollrath equipment. Before operating the
equipment, read and familiarize yourself with the following operating
and safety instructions. SAVE THESE INSTRUCTIONS FOR FUTURE
REFERENCE. Save the original box and packaging. Use this packaging
to ship the equipment if repairs are needed.
SAFETY PRECAUTIONS
To ensure safe operation, read the following statements and understand
their meaning. This manual contains safety precautions which are
explained below. Please read carefully.
WARNING
Warning is used to indicate the presence of a hazard that will or can
cause severe personal injury or death.
CAUTION
Caution is used to indicate the presence of a hazard that will or can
cause minor or major personal injury if the caution is ignored.
NOTICE: Notice is used to note information that is important but not
hazard-related.
To reduce risk of injury or damage to the equipment:
• Unplug when not in use.
• Keep unit and power cord away from open flames, electric burners
or excessive heat.
• Do not operate unattended.
• Do not operate if unit has been damaged or is malfunctioning in any
way.
FUNCTION AND PURPOSE
This unit is intended to vacuum seal food products in a commercial
kitchen environment. It is not intended for household, industrial or
laboratory use.
Item No. Model Description
40833 VP16 Vacuum Packing Machine with Dual 16" Sealing Bars
Table of Contents
Installation ................................................................... page 2
Operation ..................................................................... page 3
Packing Liquid Products ............................................. page 5
Cleaning....................................................................... page 6
Maintenance ................................................................ page 6
Troubleshooting .......................................................... page 8
CLEARANCE AND ENVIRONMENT REQUIREMENTS
NOTICE: Never place the machine near a heat source. This can
damage the lid.
• 6" (15 cm) clearance on all sides and 15½" (39.4 cm) above the
machine for the lid to fully open.
• Ambient temperature must be between 41-86 °F (5-30 °C).
©
2020 The Vollrath Company L.L.C. Part No. 26133-1 ml 2/27/20
Page 2
INSTALLATION
NOTICE: Do NOT tilt the machine. Tilting could allow oil to flow out
of the pump and cause damage to the machine.
NOTICE: Using a voltage other than the nameplate rated voltage will
cause damage to the unit. Incorrect voltage, modification
to the power cord or electrical components can damage
unit and will void the warranty.
NOTICE: Running the machine without oil or insufficient oil will
damage the machine and void the warranty.
1. Remove all packing material and tape, as well as any protective
plastic from the equipment.
2. Clean any glue residue left by the plastic or tape.
3. Place the vacuum pack machine on a flat, level surface.
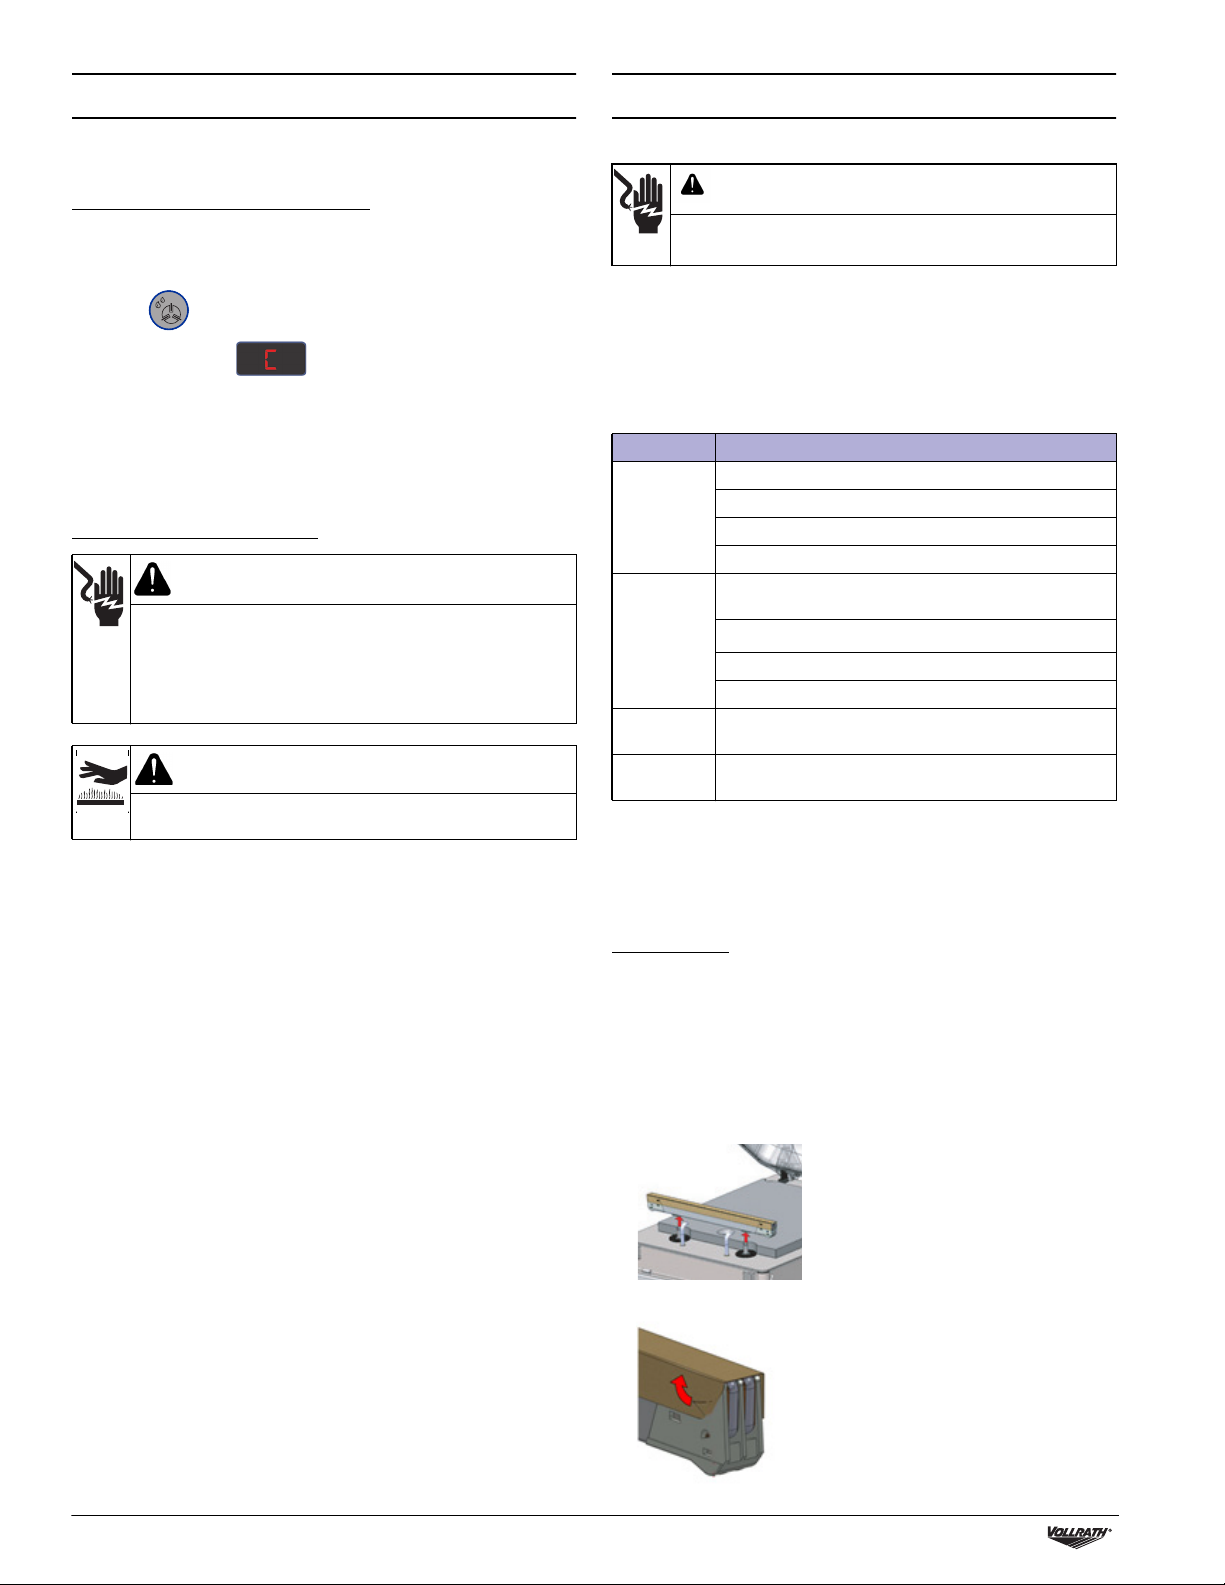
4. Install the included 4" (10.2 cm) legs. ETL Sanitation requires
machine to be used with included legs.
5. Check the oil gauge window at the back of the machine. Verify the oil
level is between the minimum and maximum fill lines.
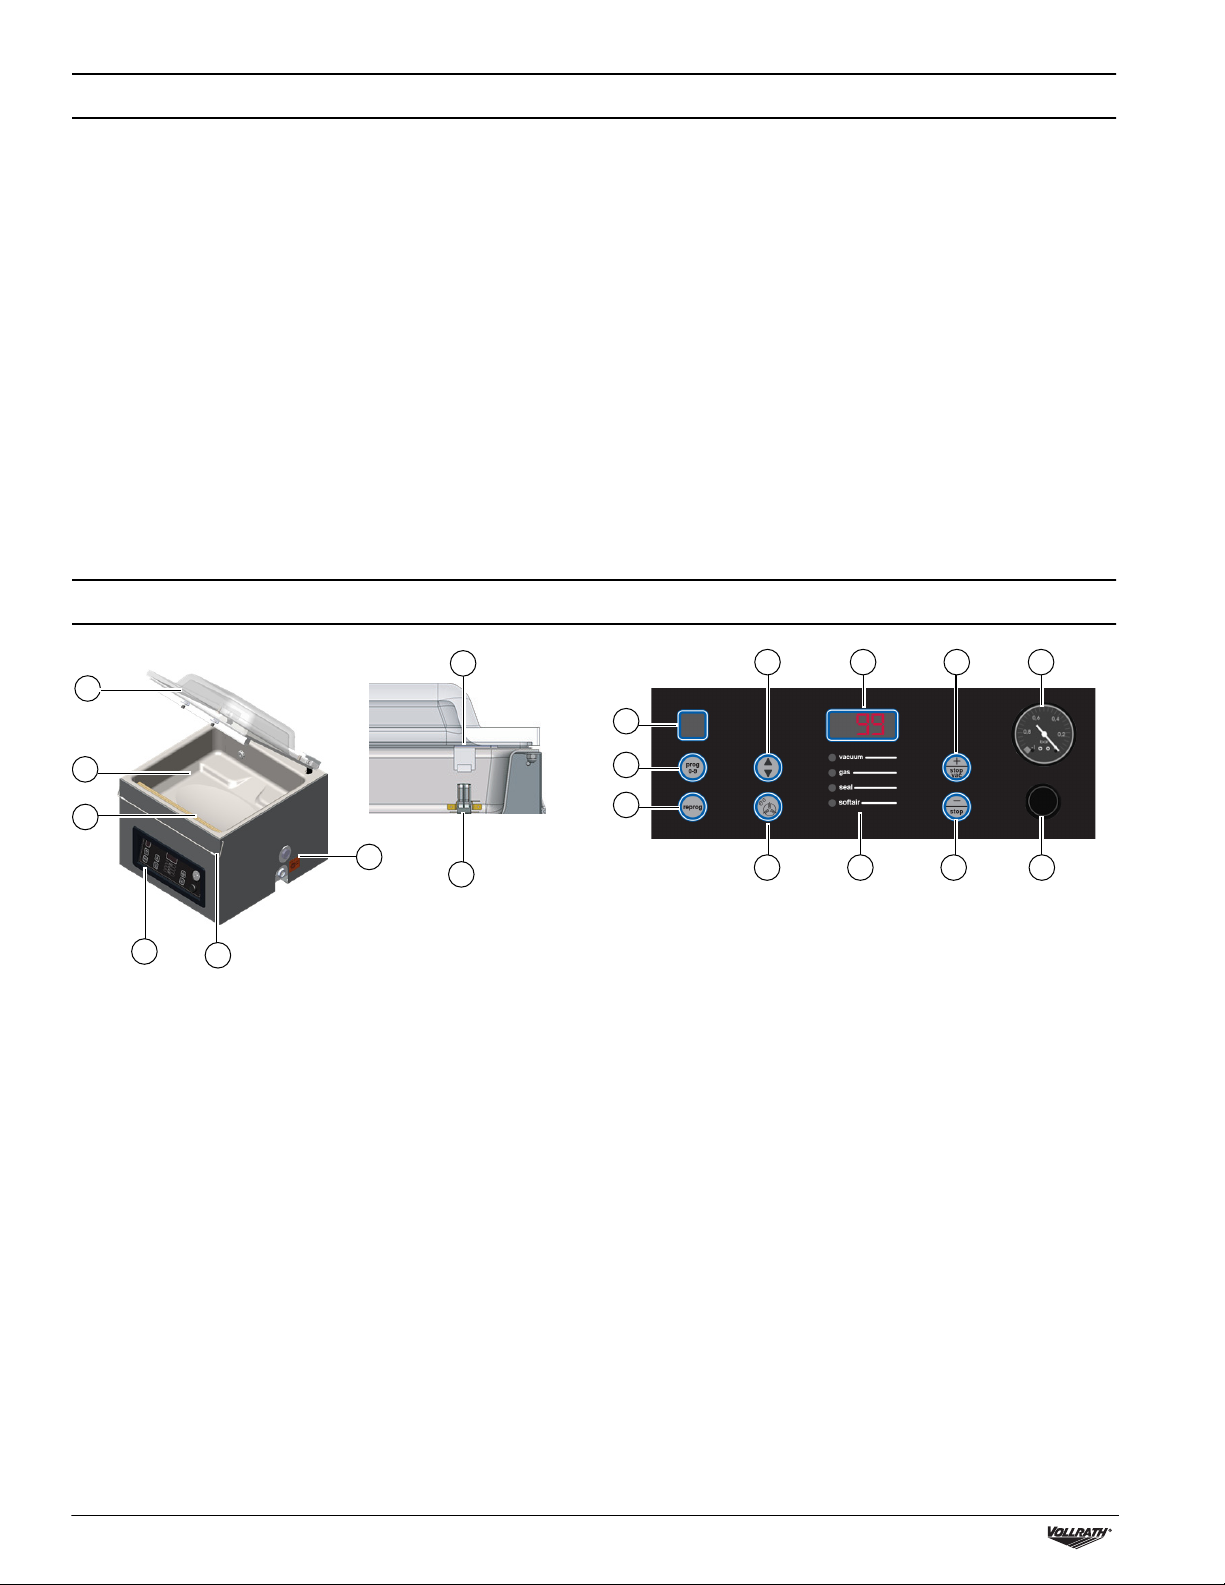
FEATURES AND CONTROLS
6. Plug the power cord into a grounded electrical outlet that matches
the nameplate rated voltage.
7. Run the Pump Conditioning program. See Run the Pump
Conditioning Program on page 6.
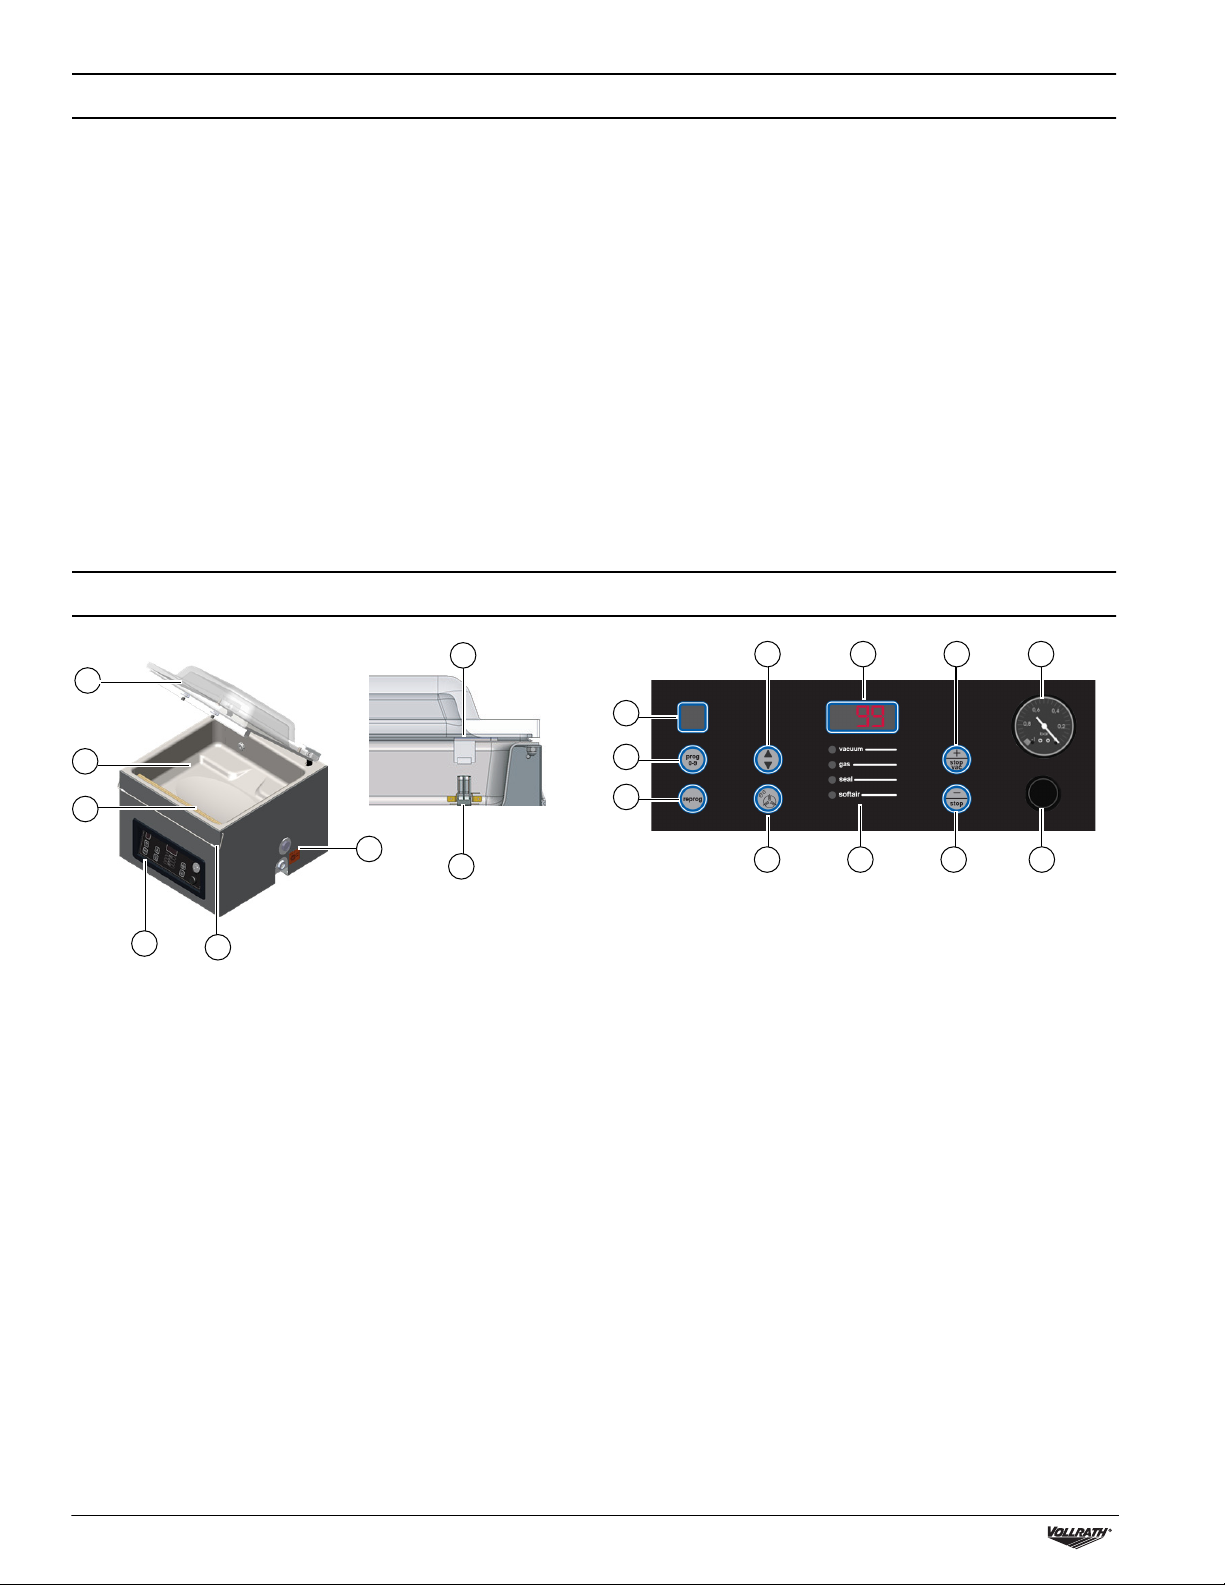
A
B
C
D
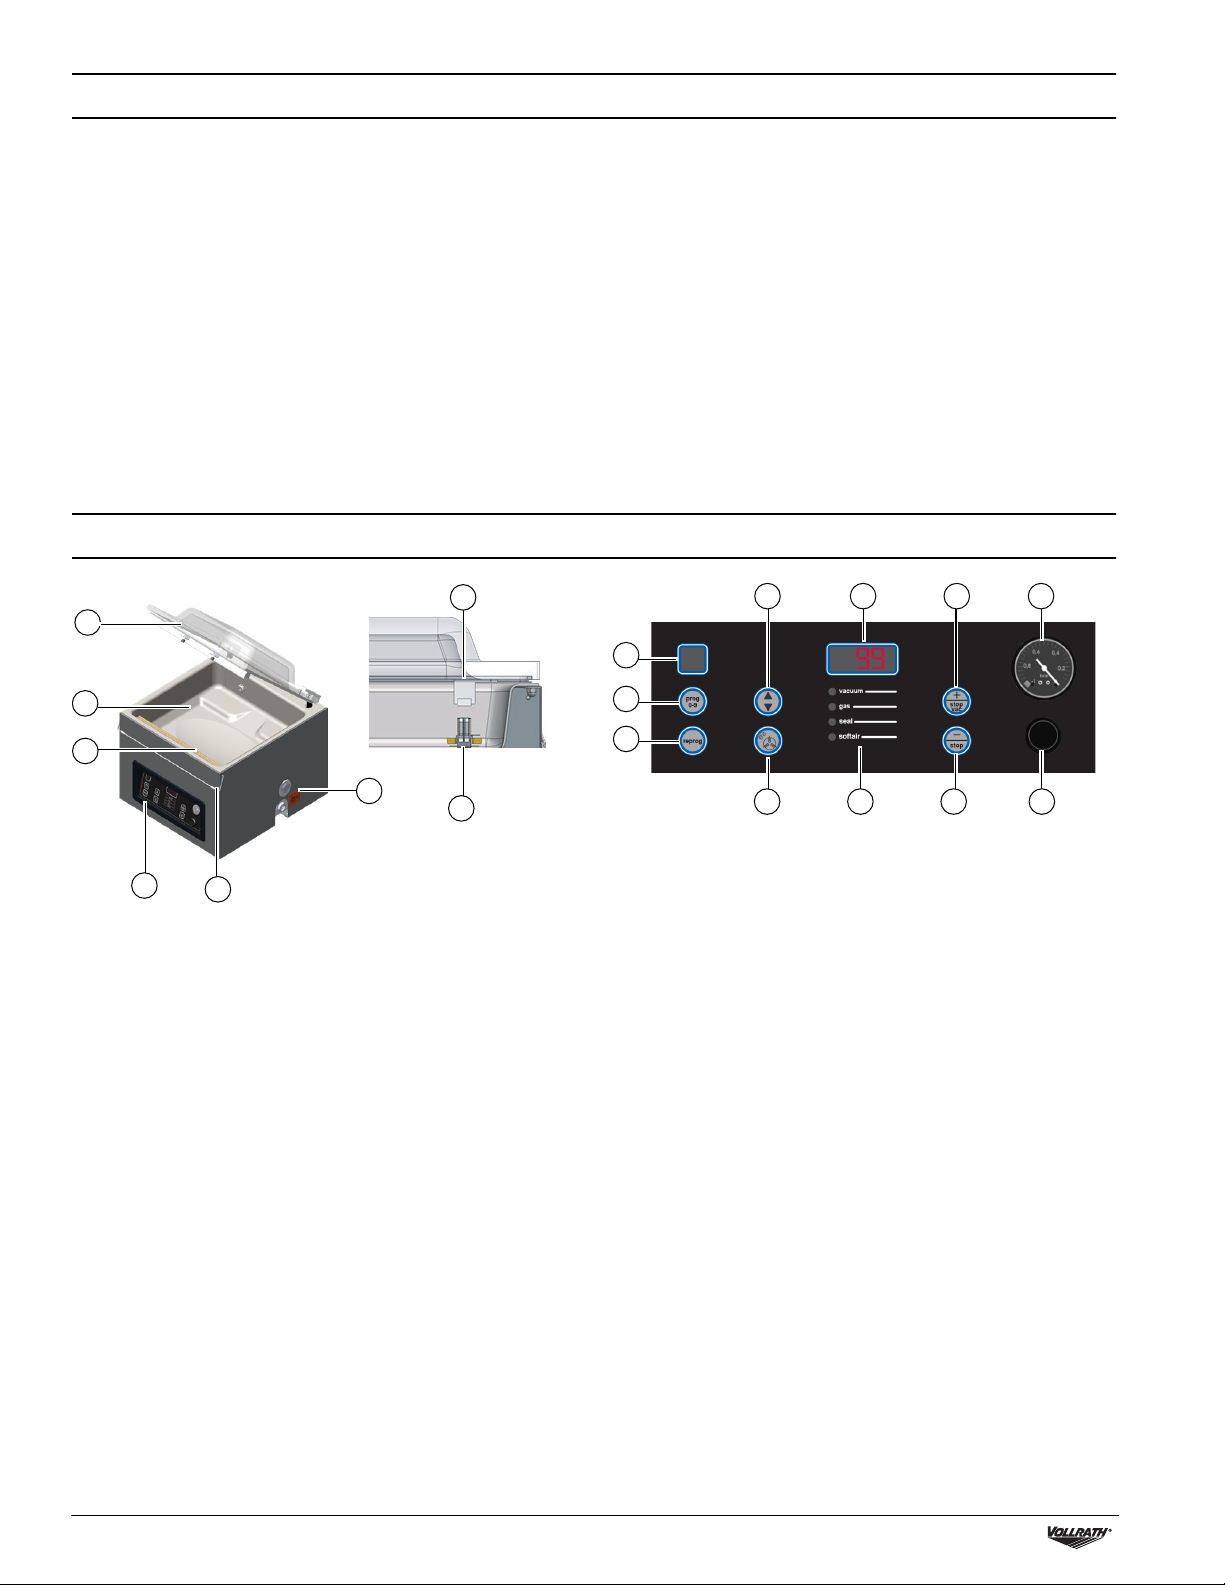
A Lid
B Chamber
C Seal Bar
D Control Panel
E Lid Retainer
F Oil Inspection Window
G Seal Pad
E
G
A
B
C
F
H
A Program Display
B Program Button
C Reprogram Button
D Pump Conditioning Program Button
E Function LEDs
F Decrease/Cancel Button. Decreases vacuum pressure, vacuum
plus or seal time. Also cancels the cycle.
G On/Off Button
H Vacuum Gauge
I Increase/Stop Button. Increases vacuum pressure, vacuum plus
or seal time. Also stops the vacuum.
J Display
K Function Select Button
D E GF
HIJK
2 Vacuum Packing Machine with Dual 16" Sealing Bars Operator’s Manual
Page 3
OPERATION
NOTICE: Never pack products that can be damaged by vacuum
packaging.
To reduce condensation and corrosion risk for the pump,
cool products before packing.
When packing food, always select a program that includes
Liquid Sensor Control.
Special instructions apply for packing liquid products. See
Edit Programs on See “Packing Liquid Products” on
page 5.
The machine is designed for a maximum use of five hours
per day.
This machine is not designed for continuous use. Allow 15
seconds between packing cycles.
Do NOT exceed a vacuum time of 60 seconds.
If the machine has been in use for one hour, stop the
machine and allow it to cool to ambient temperature.
Do NOT tilt the machine. Tilting could enable oil to flow out
of the pump and cause damage to the machine.
Place the Product in the Chamber
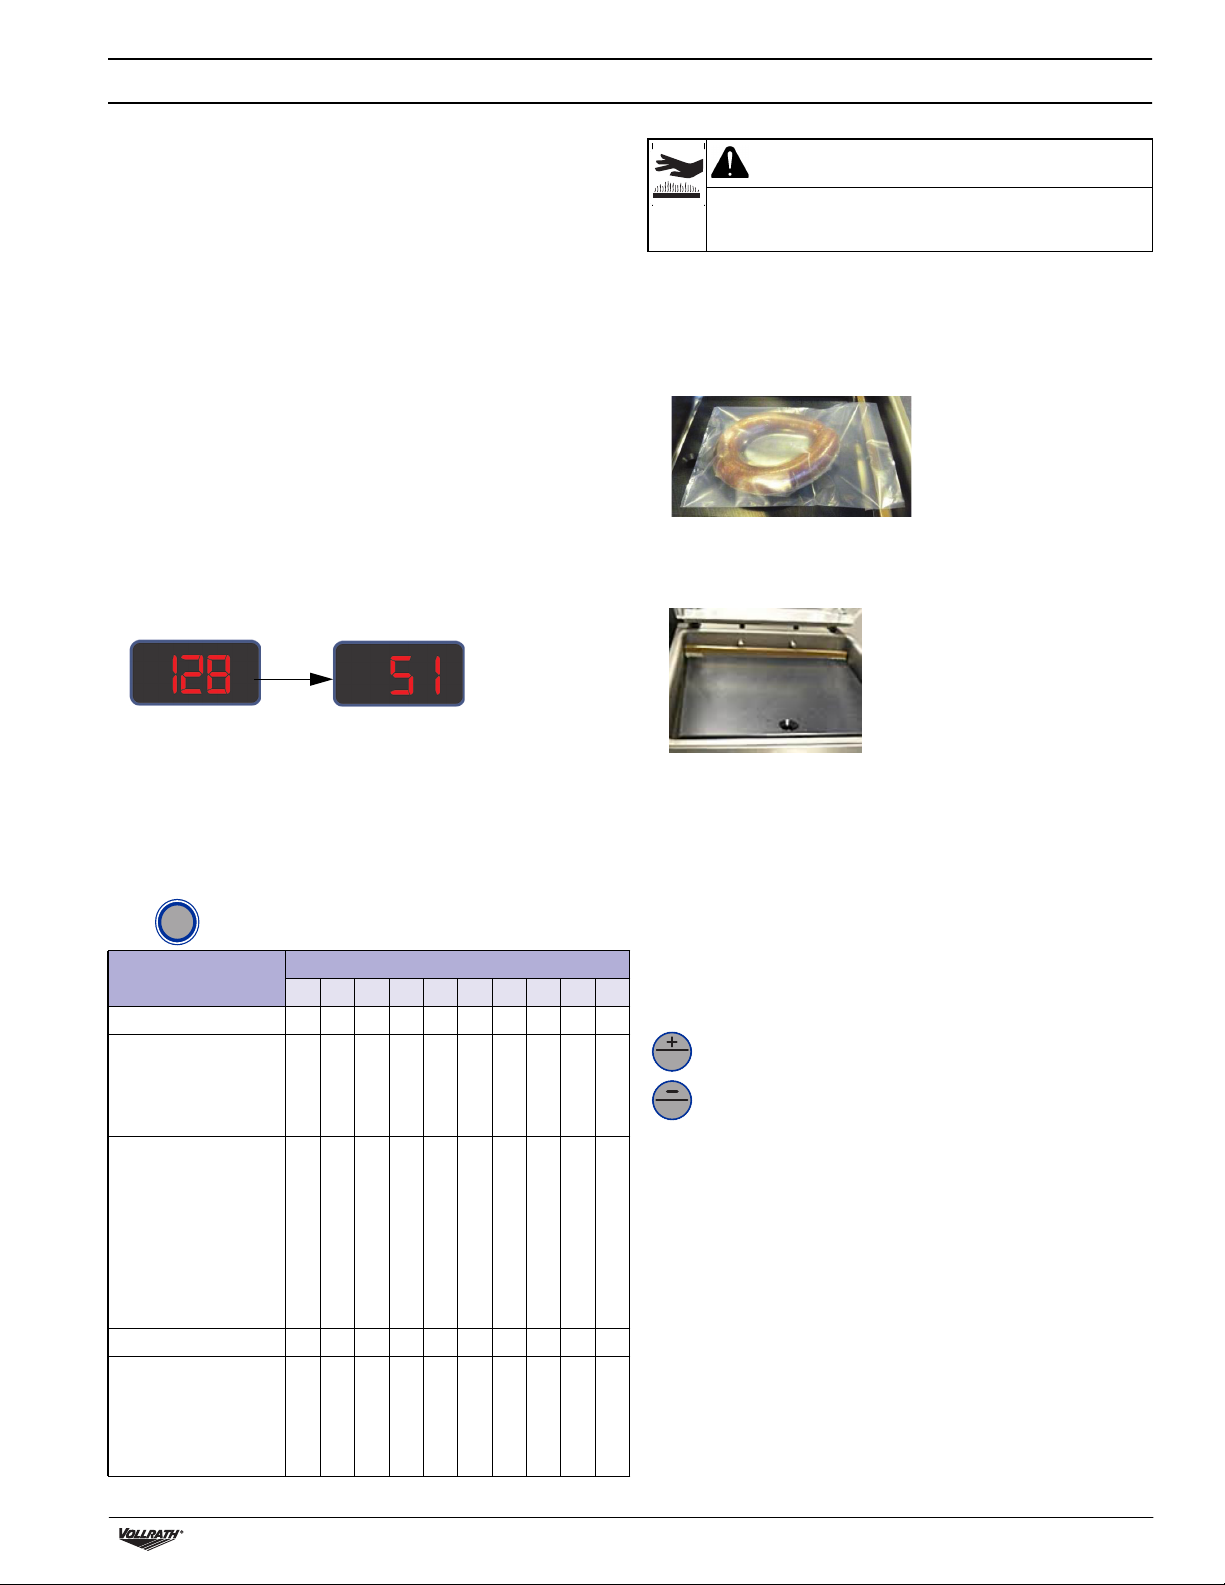
CAUTION
Burn Hazard
Sealing bar may become hot after repeated use. Do not touch
the sealing bar when placing vacuum bags in the chamber.
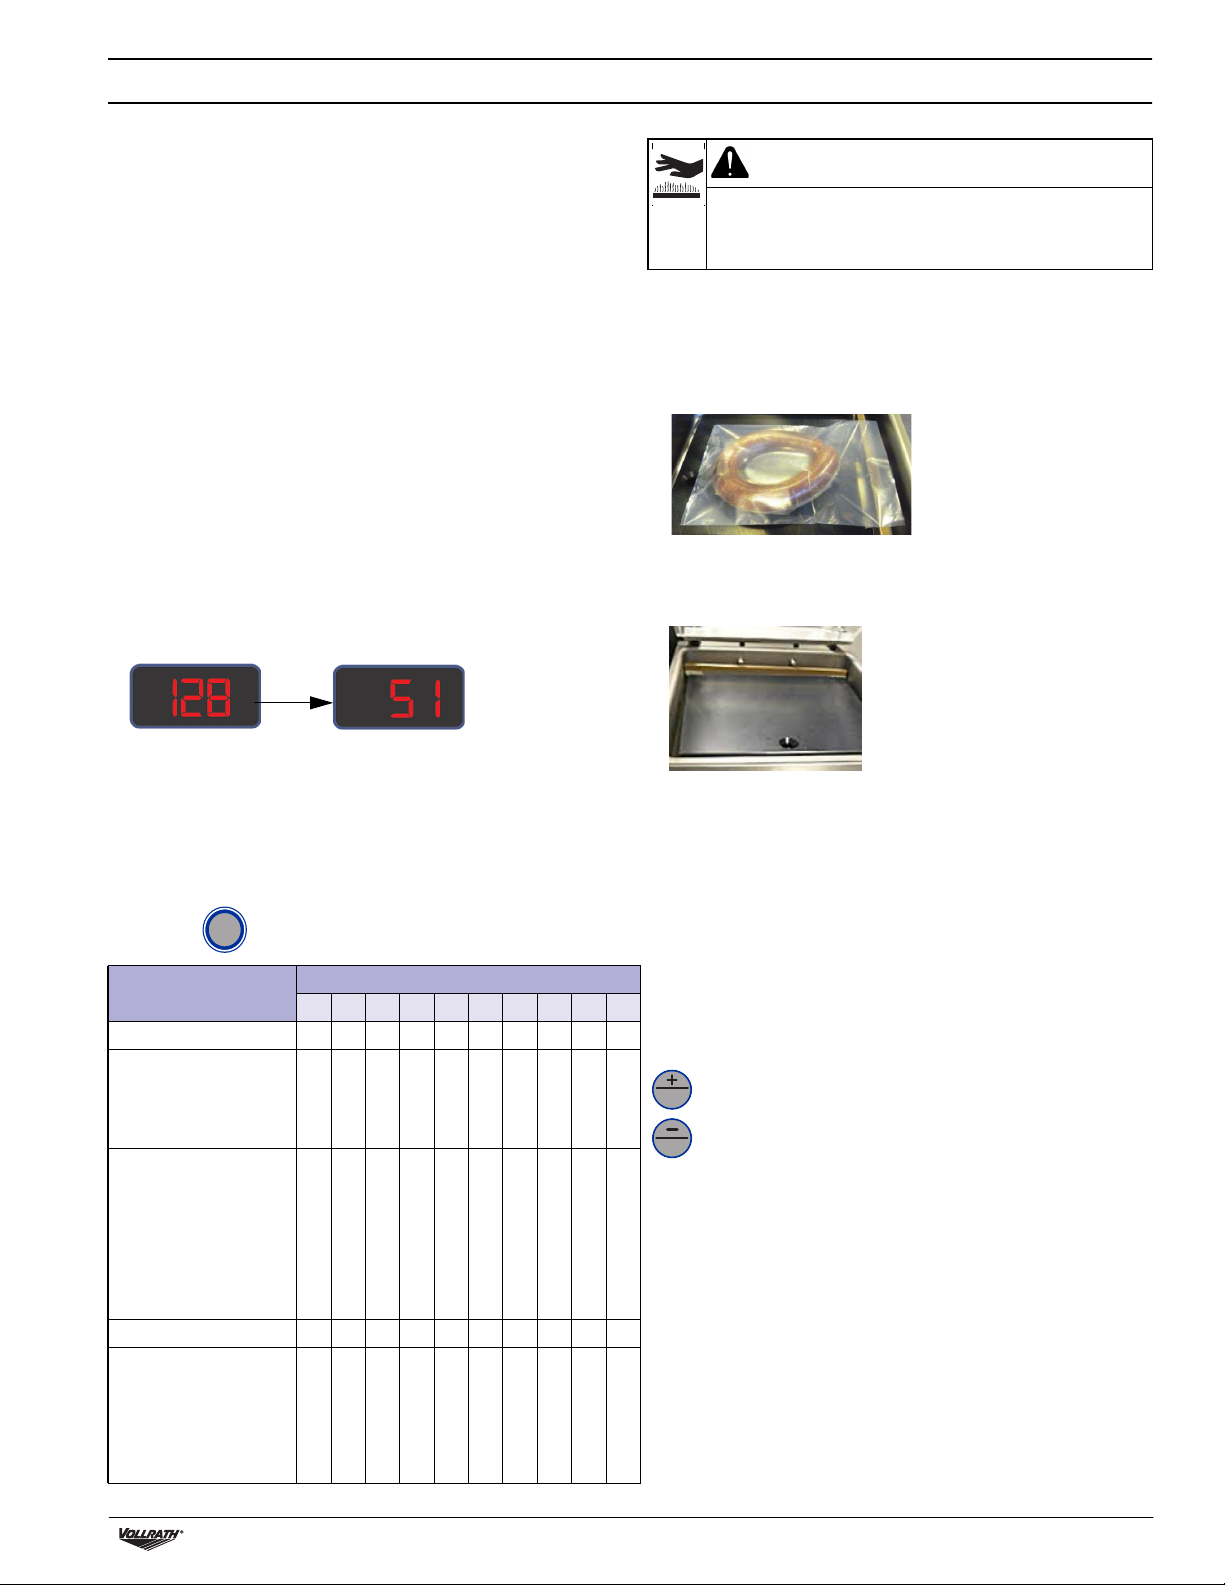
1. Place the food product in a vacuum sealing bag that fits completely
within the chamber.
2. Place the bag in the chamber with the open end over the sealing bar.
Make sure the bag is smooth, without wrinkles or folds. Multiple
vacuum bags can be placed over the sealing bars. Do NOT overlap
vacuum bags.
Turn On the Machine
1. Rotate the lid retainer so it is not covering the lid. The lid retainer is
used only for securing the lid when the machine is not in use.
2. Press the On/Off button.The function display shows codes for the
software revision. For example:
3. If the machine has not been used for a while, run the Pump
Conditioning Program. See page 6.
Select a Program
Packing a Food Product: Select a program that includes Liquid Sensor
Control.
Packing a Liquid Product: See important information under Packing
Liquid Products on page 5.
prog
Press until the desired program number shows in the display.
Function
0-9
Program
0 1 2 3 4 5 6 7 8 9
Vacuum Pressure % 99 90 99 99 99 80 90 50 90 60
Vacuum Plus
Extends the vacuum
cycle to enable air
trapped in the product
to escape the bag.
H2O Liquid Sensor
Control
Use when packing food.
Detects the boiling
point, stops the vacuum
and advances to the next
step to produce a better
quality product and
prevent the pump from
taking on liquids.
Sealing (seconds) 2.5 2.5 2.5 2.5 2.5 2.5 2.5 2.5 2.5 2.5
Soft-Air (seconds)
Gently forms the bag to
protect delicate
products or prevent
damage to the bag from
sharp edges on product.
15 OFF 15 10 10 OFF OFF OFF OFF OFF
OFF ON OFF OFF OFF OFF OFF OFF OFF OFF
3 3 2 2 2 OFF OFF 2 OFF OFF
3. For small products, place one or more insert plates under the
product. This fills empty space in the chamber, which reduces the
cycle time.
Run the Program
1. Close the lid. Do not use the lid retainer. Using the lid retainer during
a packing cycle will interfere with the cycle. The cycle automatically
starts.
2. The lid opens when the cycle is complete.
3. Remove the packed product.
4. Wait 15 seconds before packing another product.
Stop a Cycle
The machine can be stopped before a packing cycle is complete.
stop
Stops the vacuum function and continues to the next function.
vac
Stops and cancels the program.
stop
Vacuum Packing Machine with Dual 16" Sealing Bars Operator’s Manual 3
Page 4
OPERATIONS (CONTINUED)
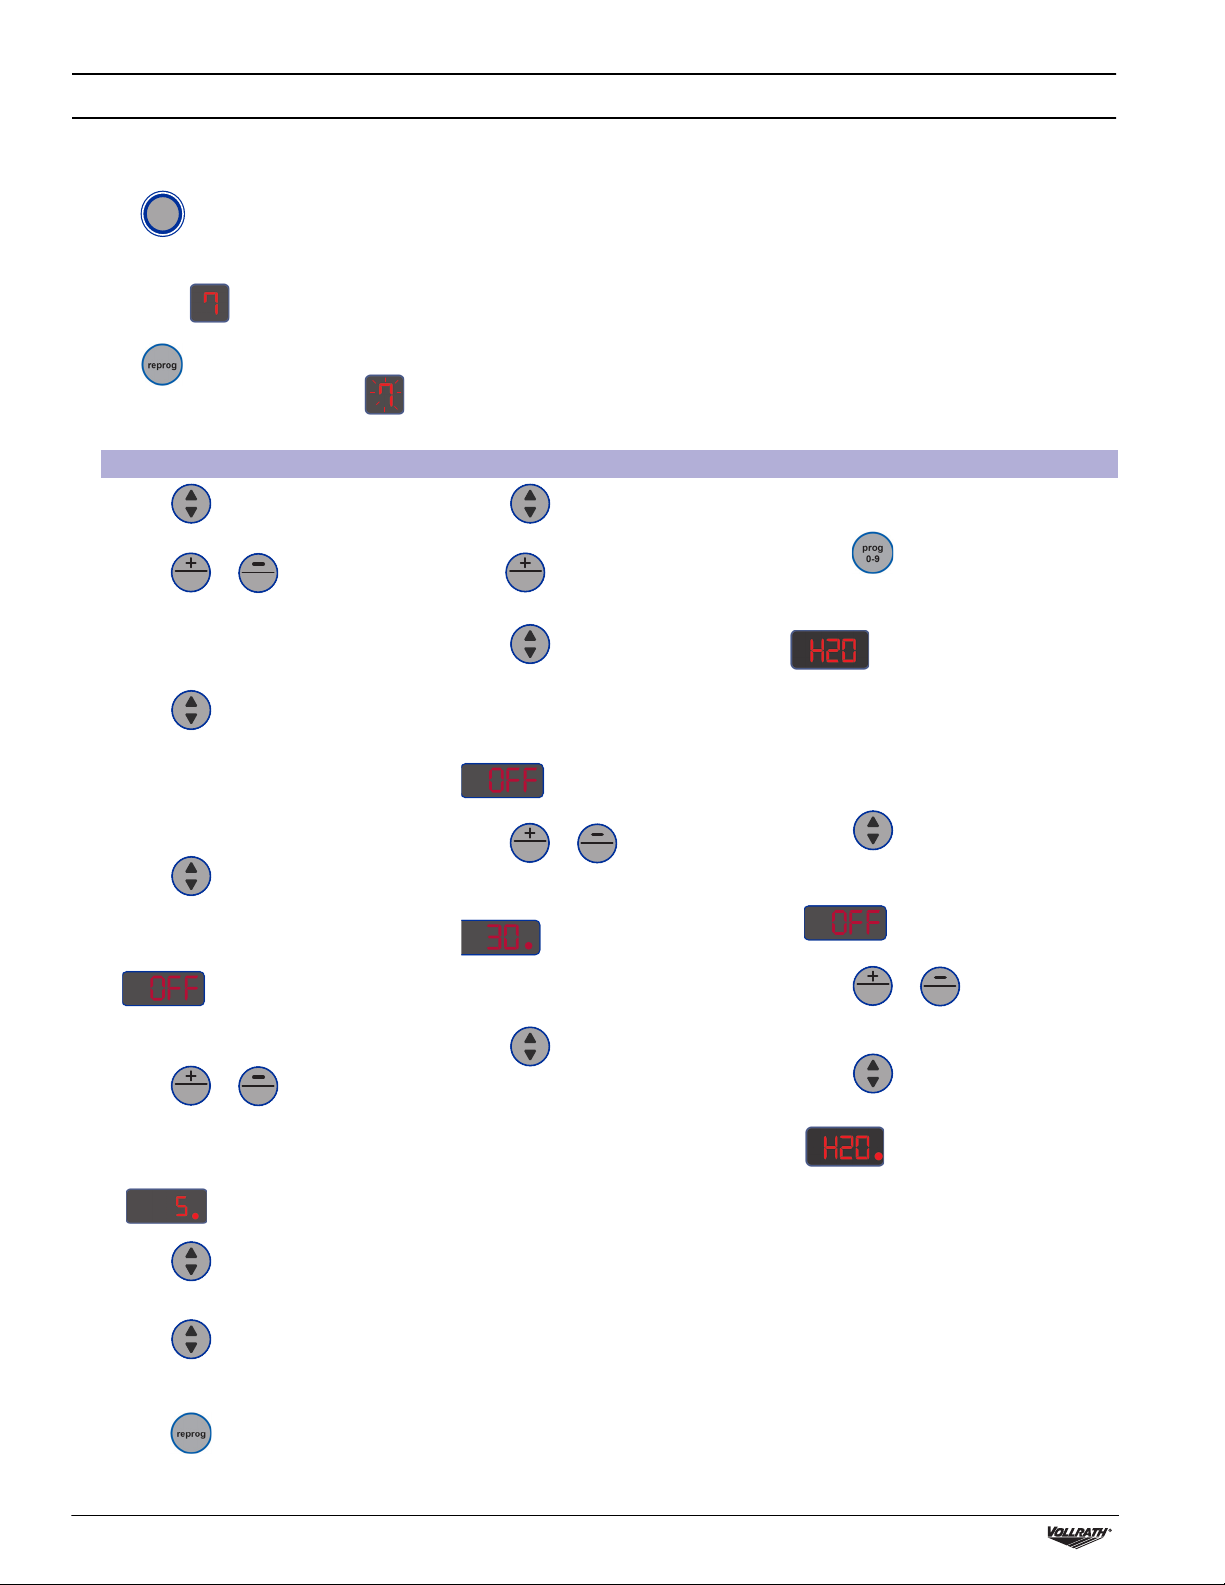
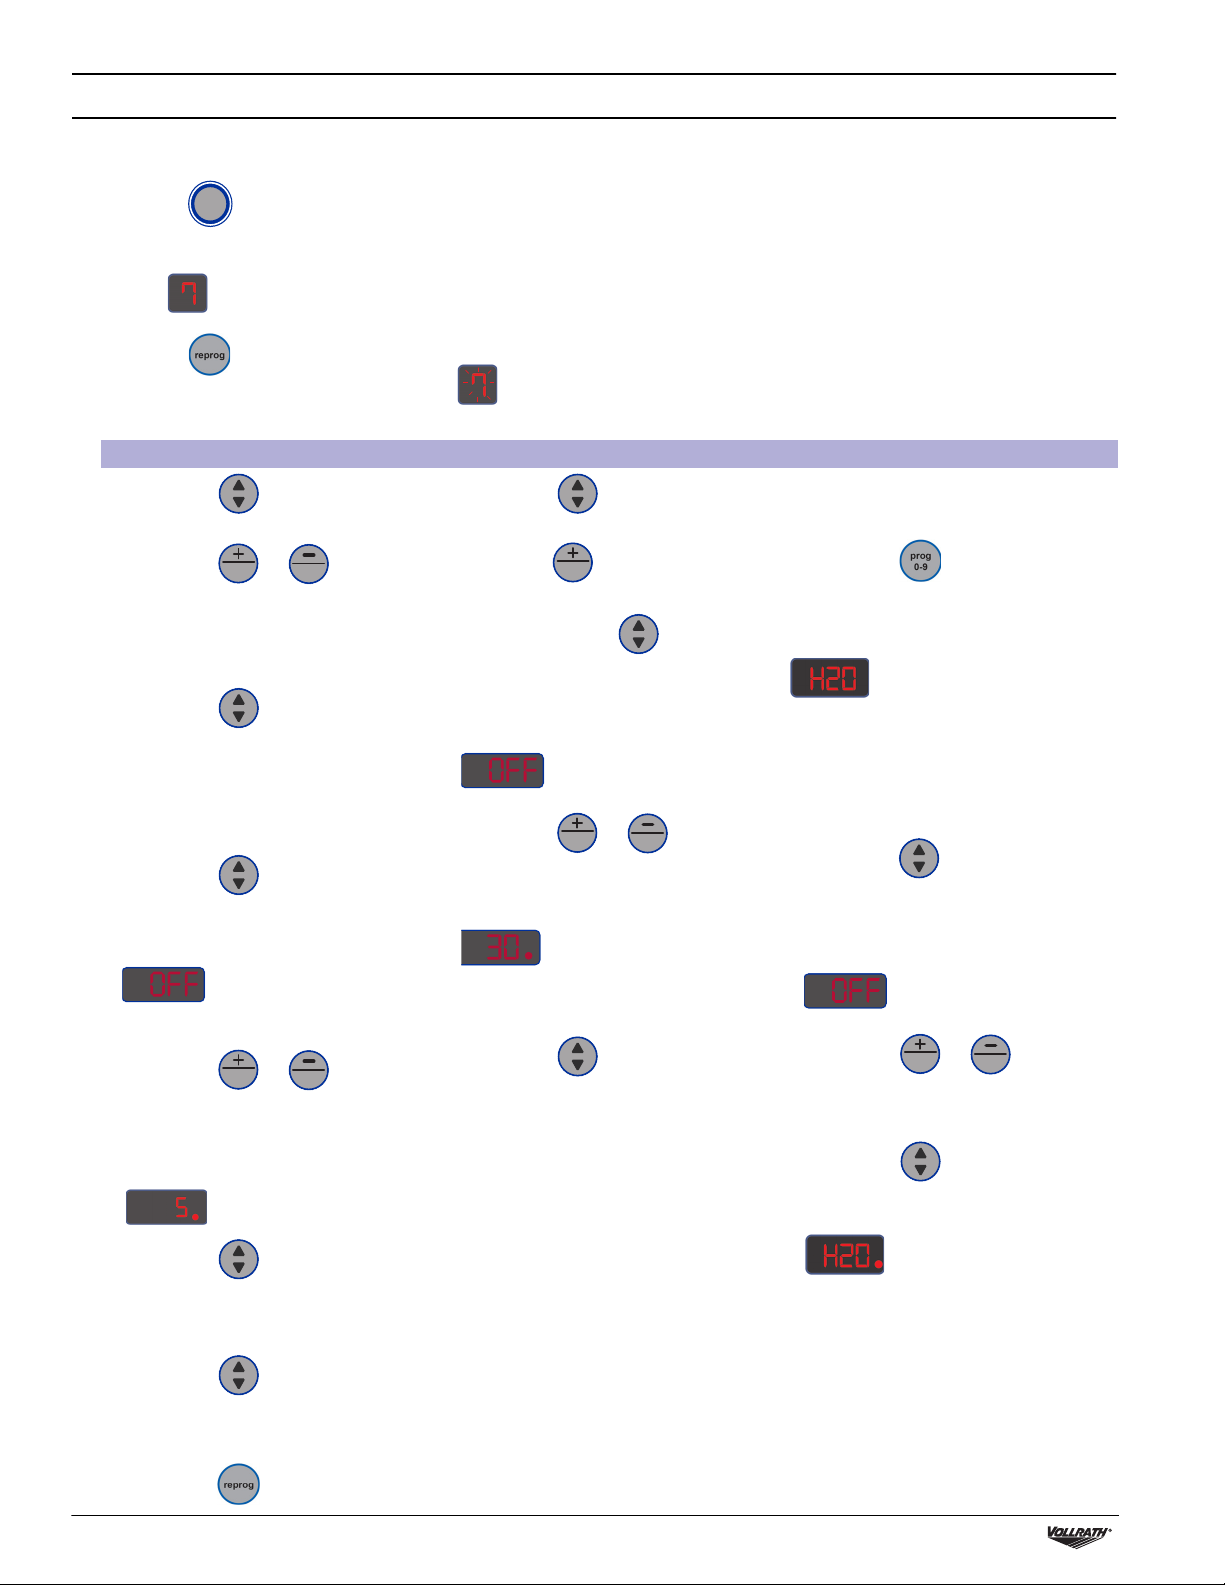
Edit Programs
1. Select a program to edit. Programs 1 through 9 can be customized. Program 0 cannot be changed.
prog
Press
until the number of the program to be edited is shown in the program display.
For example:
2. Reprogram.
Press to edit the program.
The program number begins to flash:
3. Select a function to edit (continues onto next page).
0-9
Vacuum Pressure Percentage Vacuum Time H2O Liquid Sensor Control
1. Press until the Vacuum LED
illuminates.
1. Press until the Vacuum LED
illuminates.
Use this function when packing liquid.
1. Turn on H2O Liquid Sensor Control.
Press to turn the function on or off.
2. Press or to set a vacuum
stop
vac
stop
pressure.
2. Press to reduce the vacuum pressure
to OFF.
stop
vac
When H2O is turned on the function display
shows:
• The recommended minimum is 50%.
• To use Vacuum Plus, Vacuum Pressure
must be set to 99%.
3. Press to confirm the setting.
4. To edit the Vacuum Plus function, continue
with the steps for Vacuum Plus.
3. Press once to enter Vacuum Time
function.
The Vacuum LED remains illuminated. The
function display shows:
2. To edit the H2O Plus function, continue with
the steps for H2O Plus.
H2O Plus
1. Turn on H2O Plus.
Vacuum Plus
1. Turn on Vacuum Plus.
Press
4. Press or to set the number of
stop
vac
stop
seconds. A red dot indicates Vacuum Time is
active.
Press until the Vacuum LED
illuminates and the function display shows:
until the Vacuum LED illuminates and the
function display shows:
2. Set the time.
stop
Press or
vac
stop
• The recommended maximum is 60 seconds.
5. Press to confirm the setting.
2. Press to confirm the setting. A red
stop
Press or to set the time,
vac
stop
in tenths of a second.
dot after H2O indicates H2O Plus is active.
to set the number of seconds.
A red dot indicates Vacuum Plus is active.
3. Press to confirm the setting.
4. Edit another function in the current program.
Press .
5. Save changes and exit the current program.
Press .
4 Vacuum Packing Machine with Dual 16" Sealing Bars Operator’s Manual
Page 5
Sealing Time Soft-Air Time
1. Press until the Seal LED
illuminates.
2. Press or to set the
stop
vac
stop
number of seconds.
1. Press until the Soft -Air
LED illuminates.
2. Press or to set the
stop
vac
stop
number of seconds.
• 2.0 to 2.5 seconds is recommended for most bags.
3. Press to confirm the
setting.
3. Press to confirm the
setting.
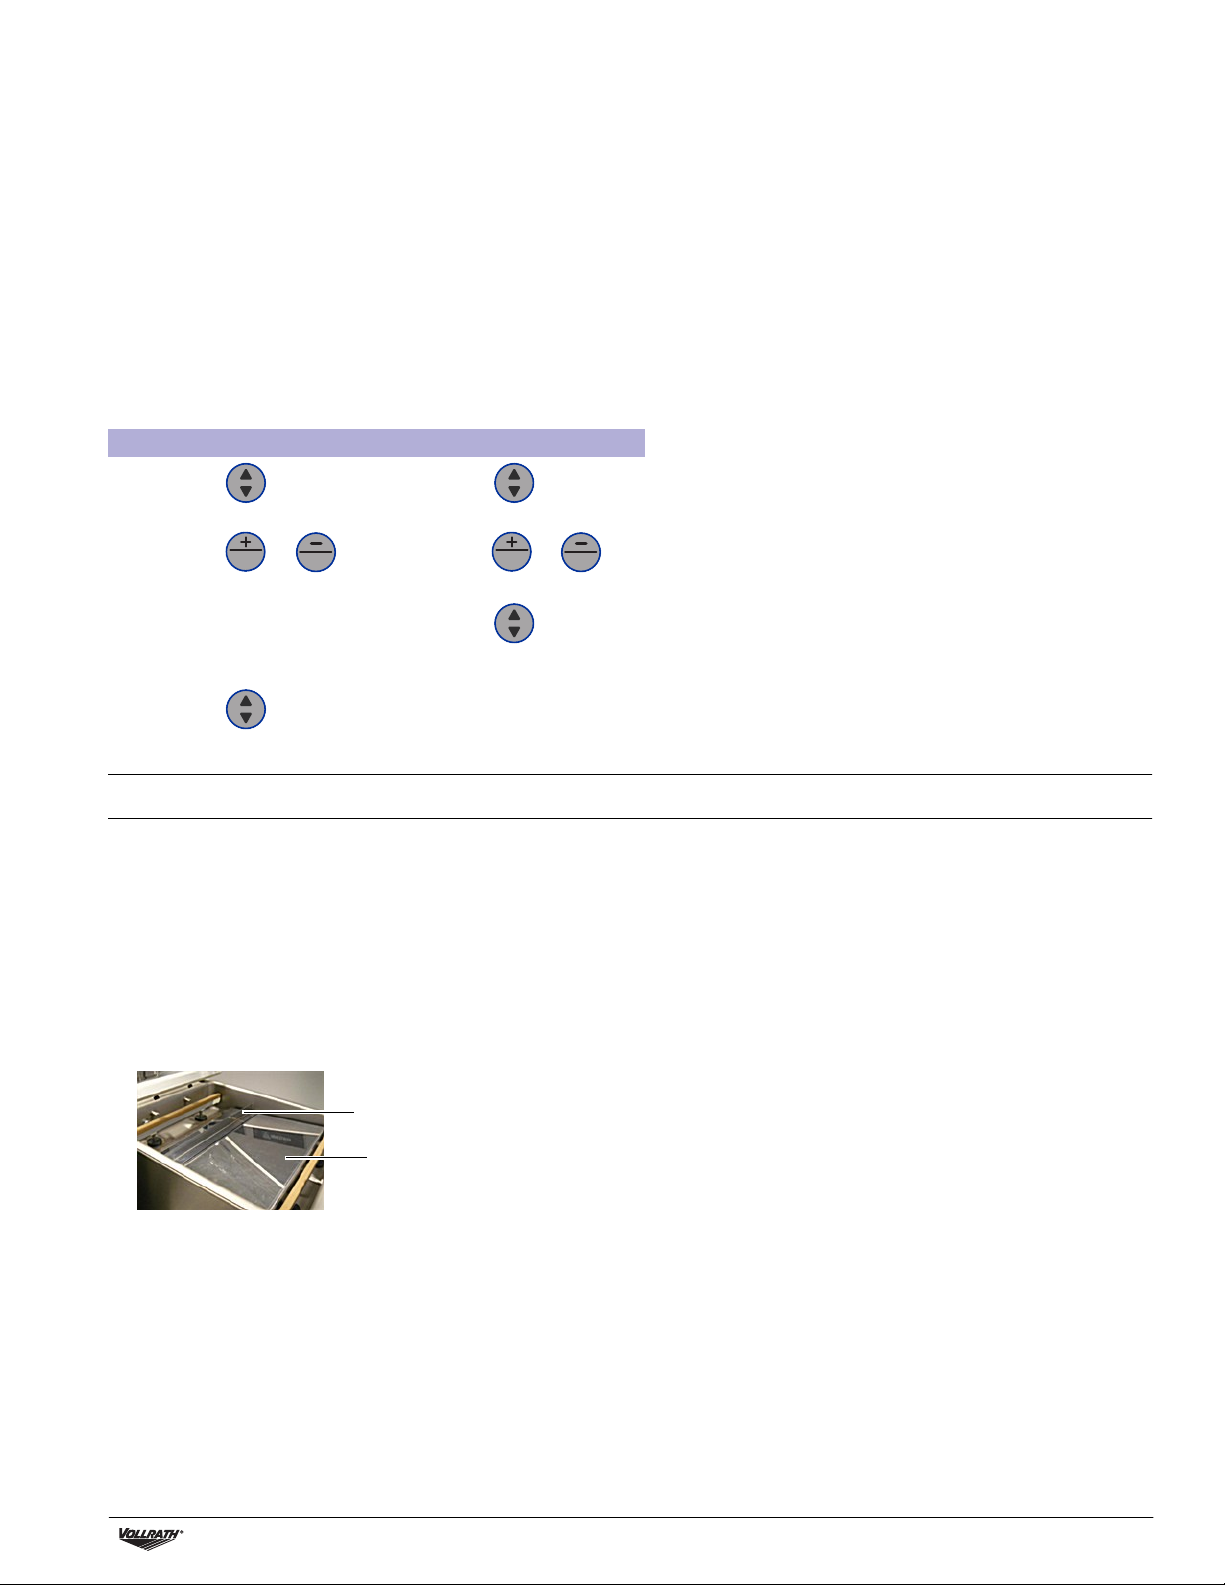
PACKING LIQUID PRODUCTS
Special care needs to be taken when vacuum packing liquid or moist
products.
1. Cool foods before packing. Hot food quickly reaches the boiling
point, which can lead to an insufficient seal.
NOTICE: Hot products create condensation, which can damage
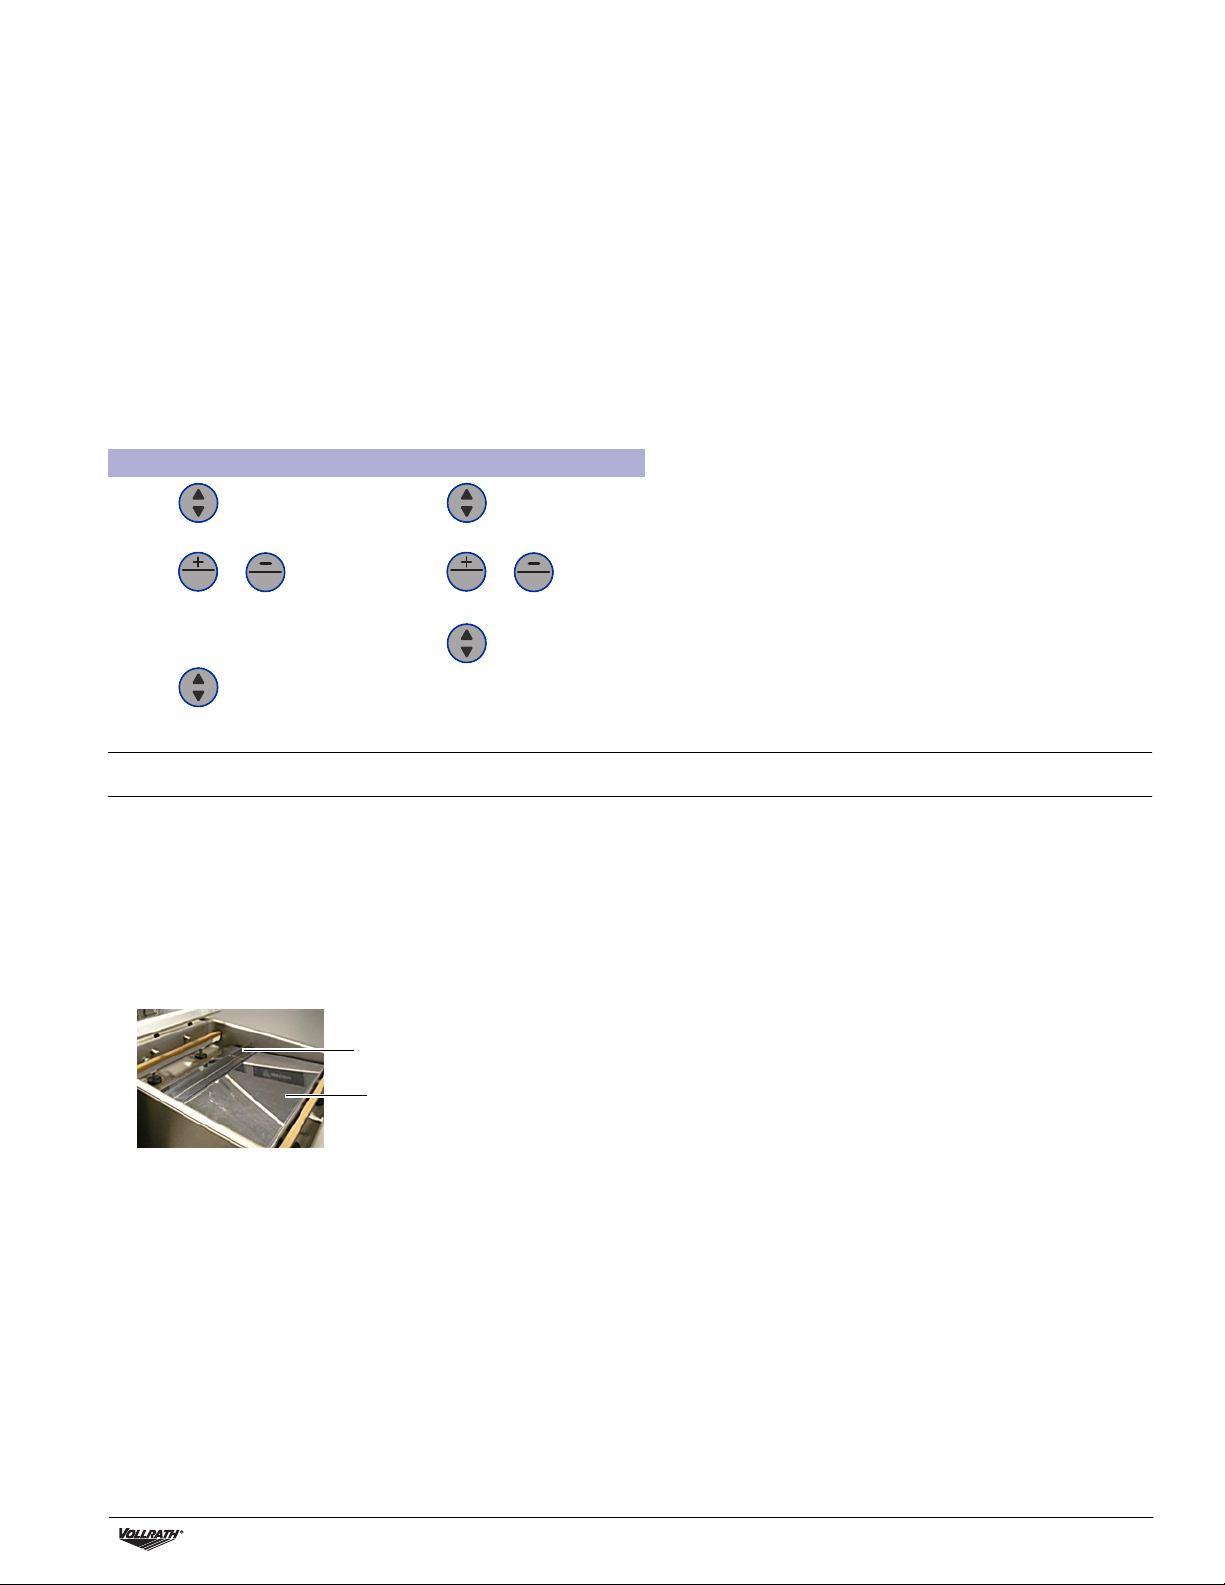
2. Use the included incline plate and magnetic positioning bars to
position the bag so the liquid is below the sealing bar. Magnetic bars
are shipped attached to the underside of the incline plate.
the pump.
Magnetic positioning bar
Incline plate
3. Use a program that includes the Liquid Sensor Control function. This
will prevent the product from boiling.
NOTICE: Boiling will increase the amount of moisture that enters
the pump, which can lead to corrosion.
Vacuum Packing Machine with Dual 16" Sealing Bars Operator’s Manual 5
Page 6
CLEANING
Daily
Run the Pump Conditioning Program
The Pump Conditioning Program removes any moisture that may have
accumulated in the pump. During the program, the pump and oil reach
operating temperature, which evaporates any moisture in the pump.
1. Press .
2. The display shows .
3. Close the lid.
4. The program starts. Moving dots appear on the display.
5. The program runs for approximately 15 minutes. Do not interrupt
the program. If the program is interrupted, it must be run again to
ensure completion.
Clean the exterior and interior
WARNING
Electrical Shock Hazard
Keep water and other liquids from entering the inside of the
equipment. Liquid inside the equipment could cause an
electrical shock. Do not spray water or cleaning products.
Liquid could contact the electrical components and cause a
short circuit or an electrical shock.
CAUTION
Burn Hazard
Allow equipment to cool before moving or cleaning.
NOTICE: Do not use cleaners containing ammonia, alcohol, acetone
NOTICE: Do not use paper towels, abrasive materials, scratching
NOTICE: Do not use WD-40
1. Unplug the machine. Allow it to cool.
2. Wipe the vacuum chamber, lid, sealing bar, silicone holder and
3. Thoroughly wipe off any mild soap or chemical cleaners. Residue
or dry cleaning products. Cleaners with these chemicals
will damage Plexiglas
will damage the finish.
cleansers, razor blades, brushes, steel wool or scouring
pads, such as Scotch Brite™ pads.These will damage the
finish.
cleaning products. These will damage the finish.
exterior with a soft, lint free or microfiber cloth and warm water, or
a mixture of warm water and a small amount of mild dish
detergent.
could corrode the surface of the unit.
®
, acrylic and other plastics. These
®
or petroleum, industrial or commercial
MAINTENANCE
WARNING
Electrical Shock Hazard
Unplug unit before servicing.
NOTICE: All maintenance must be performed by a qualified service
NOTICE: Do NOT tilt the machine. Tilting could enable oil to flow out
The following maintenance schedule is only a guideline. Actual
maintenance needs will vary depending on machine use. Inspect your
machine regularly.
Interval Procedure
Weekly Check the oil by viewing the Oil Inspection Window.
Every six
months
Yearly Inspect the oil exhaust filter. Contact Vollrath Technical
Every four
years
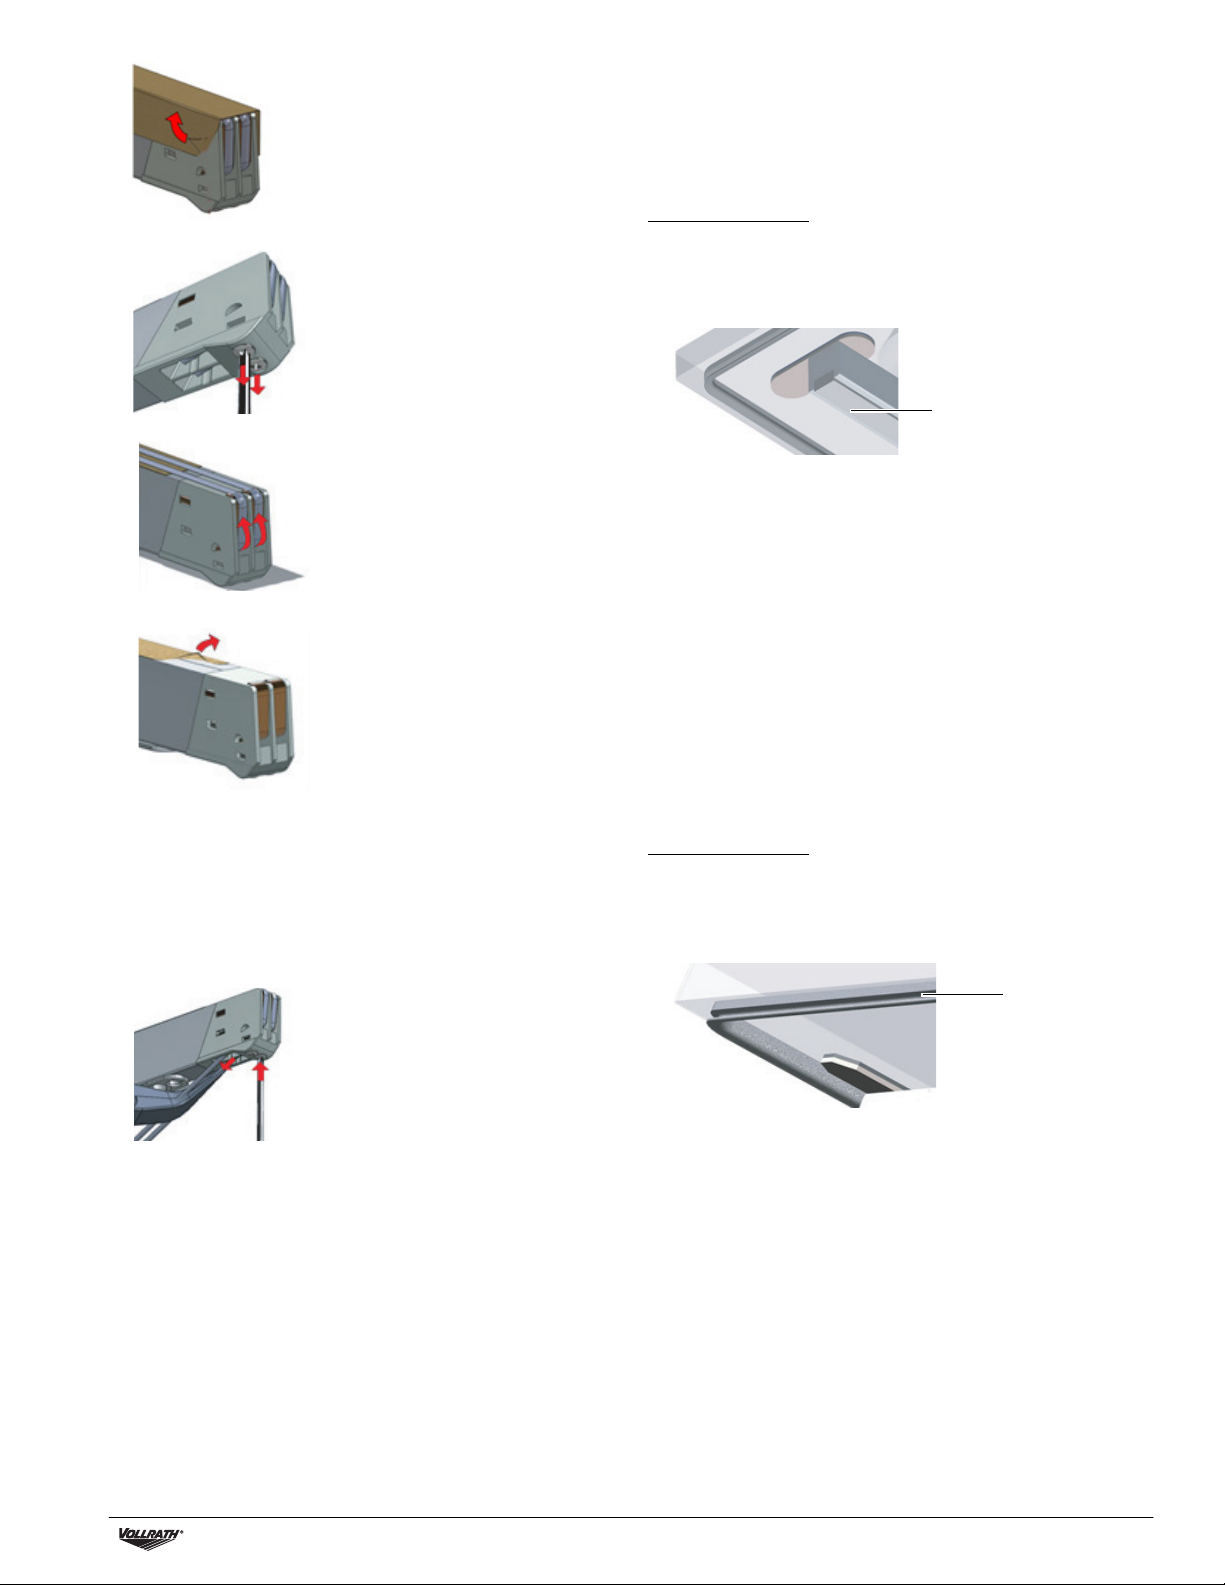
Replace the Sealing Wires and Teflon® Tape
Check the sealing bar for damage. Replace the Teflon tape or sealing
wires if the seal quality is no longer sufficient or if the Teflon tape or
seal wires are worn.
Tools Needed:
• Phillips screwdriver
• Tensioning tool or pliers
• Scissors
• Lint-free cleaning cloth
• Replacement Teflon tape
• Replacement sealing wire
1. Pull up on the sealing bar to remove it from the machine.
technician.
of the pump and cause damage to the machine.
Inspect the seal bar for wear.
Inspect the seal pad under the lid for wear.
Inspect the lid gasket and lid.
Replace the oil in the vacuum pump. Contact Vollrath
Technical Services.
®
Replace the sealing wires and Teflon
Replace the seal pad under the lid.
Replace the lid gasket.
Services.
Replace the lid, gas springs and seal cylinder
membranes. Contact Vollrath Technical Services.
tape.
2. Remove the Teflon tape that protects the sealing wires.
6 Vacuum Packing Machine with Dual 16" Sealing Bars Operator’s Manual
Page 7
MAINTENANCE (CONTINUED)
3. Remove the screws on the bottom side of the seal bar.
4. Remove the sealing wires.
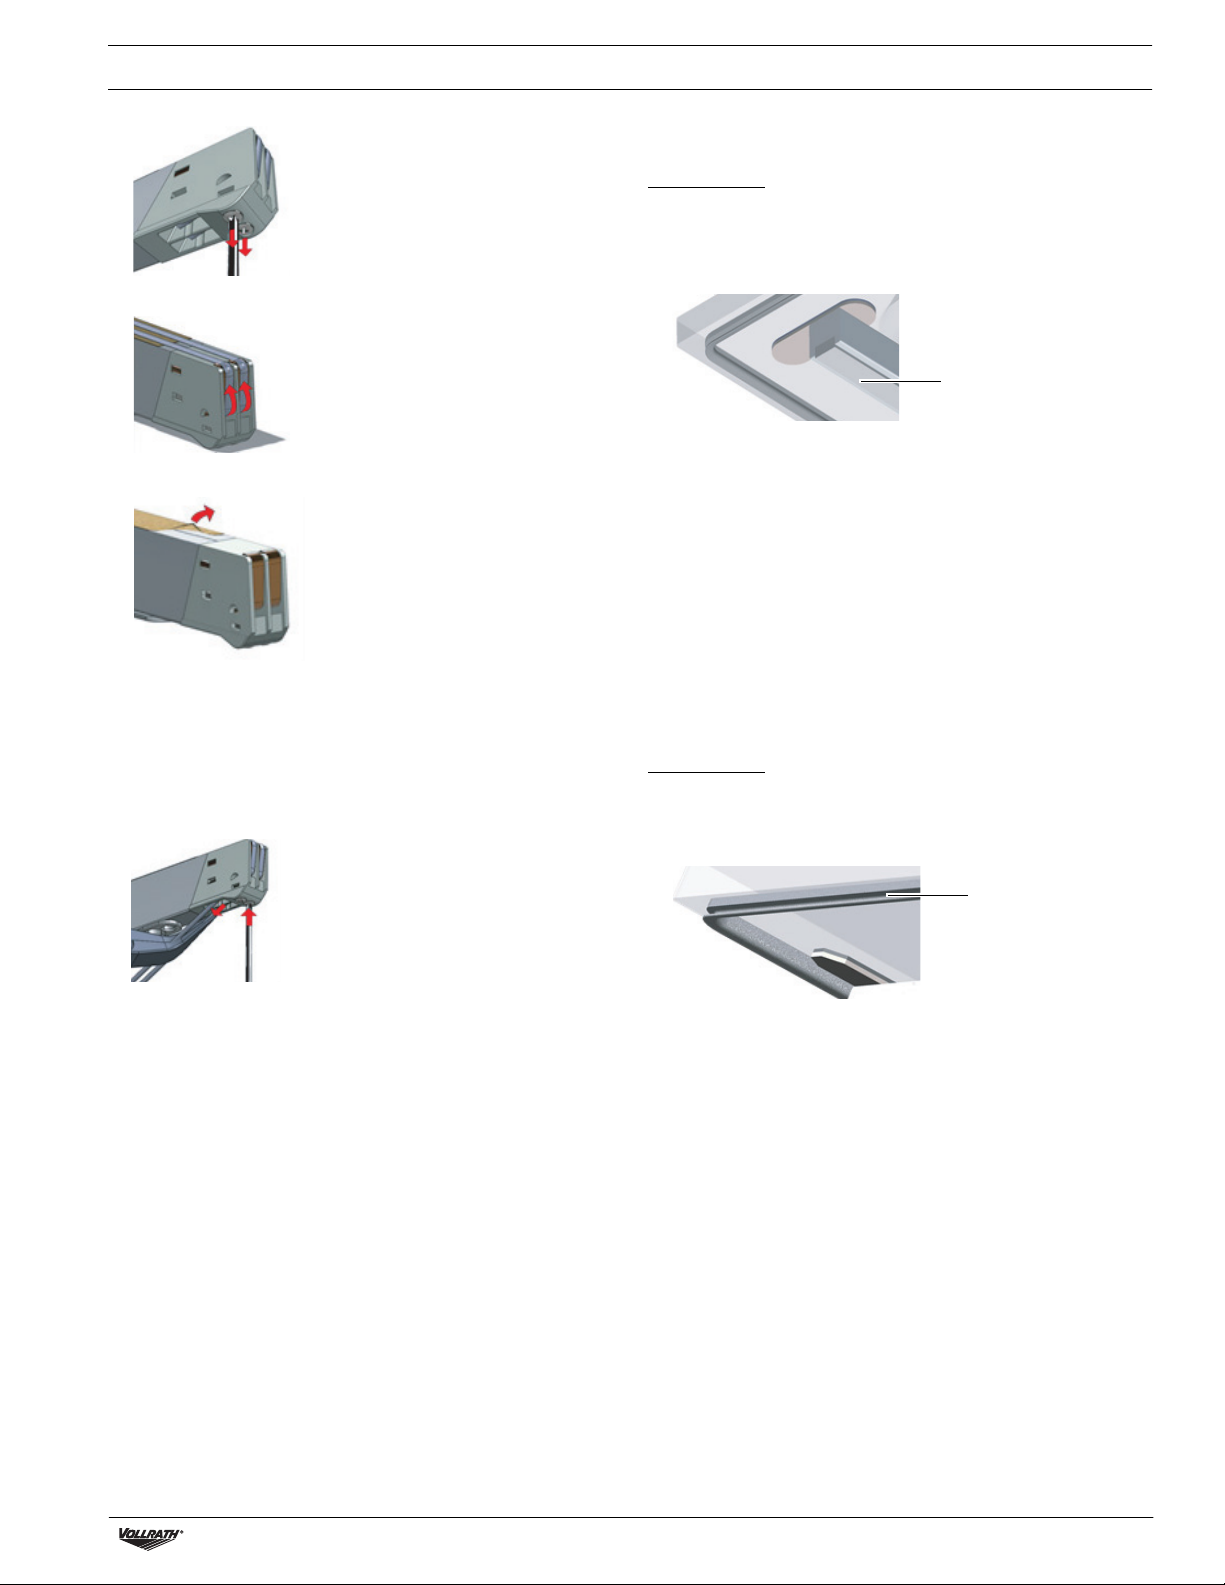
Replace the Seal Pad
Inspect the pad for roughness. Replace if areas of the pad are rough.
Tools Needed:
• Replacement seal pad
• Scissors
1. Remove the worn pad from the holder.
Seal pad
5. Remove the Teflon tape from the sealing bar.
6. Clean the sealing bar with a lint-free cloth.
7. Cut a piece of replacement Teflon tape to the same length as the
sealing bar.
8. Apply the replacement tape to the sealing bar.
9. Cut new sealing wires to the length of the sealing bar, plus about 6"
(15 cm).
10.Attach one wire to one side of the seal bar by tightening the screw.
11.Pull the wire across the sealing bar straight and tight.
12.Attach it by tightening the screw.
13.Repeat steps 10 through 12 for the second wire.
14.Trim the wires.
15.Cut a piece of Teflon tape the same length of the sealing bar, plus
about 2" (5 cm).
16.Apply the tape smoothly over the sealing wires on the sealing bar.
17.Trim the tape.
18.Place the sealing bar back in the machine. Verify that the sealing bar
is properly snapped into the holder.
2. Cut a new piece of seal pad the same length as the old one. A pad
that is too short or too long will cause sealing problems.
3. Place the new pad in the holder. Ensure that the pad is completely
and evenly placed in the groove.
4. Place the new piece in the silicone holder. Ensure that the silicone
rubber is completely and evenly placed in the groove.
Replace the Lid Gasket
The lid gasket ensures the vacuum chamber is completely sealed
during the packing cycle. This is essential to achieve maximum
vacuum. The lid gasket wears due to the extreme pressure differences
and must be replaced regularly.
Tools Needed:
• Replacement gasket
• Scissors
1. Remove the worn gasket.
Lid gasket
2. Cut a new piece of gasket slightly longer than the old one. Position
the new gasket so the lip faces downward and outward.
3. Press the gasket into the slot evenly.
4. Trim the gasket so the ends come tightly together to prevent
leakage. The ends must be cut off straight. If the lid gasket is too
short or too long, it can cause problems when closing the lid or
leakage may occur.
Vacuum Packing Machine with Dual 16" Sealing Bars Operator’s Manual 7
Page 8
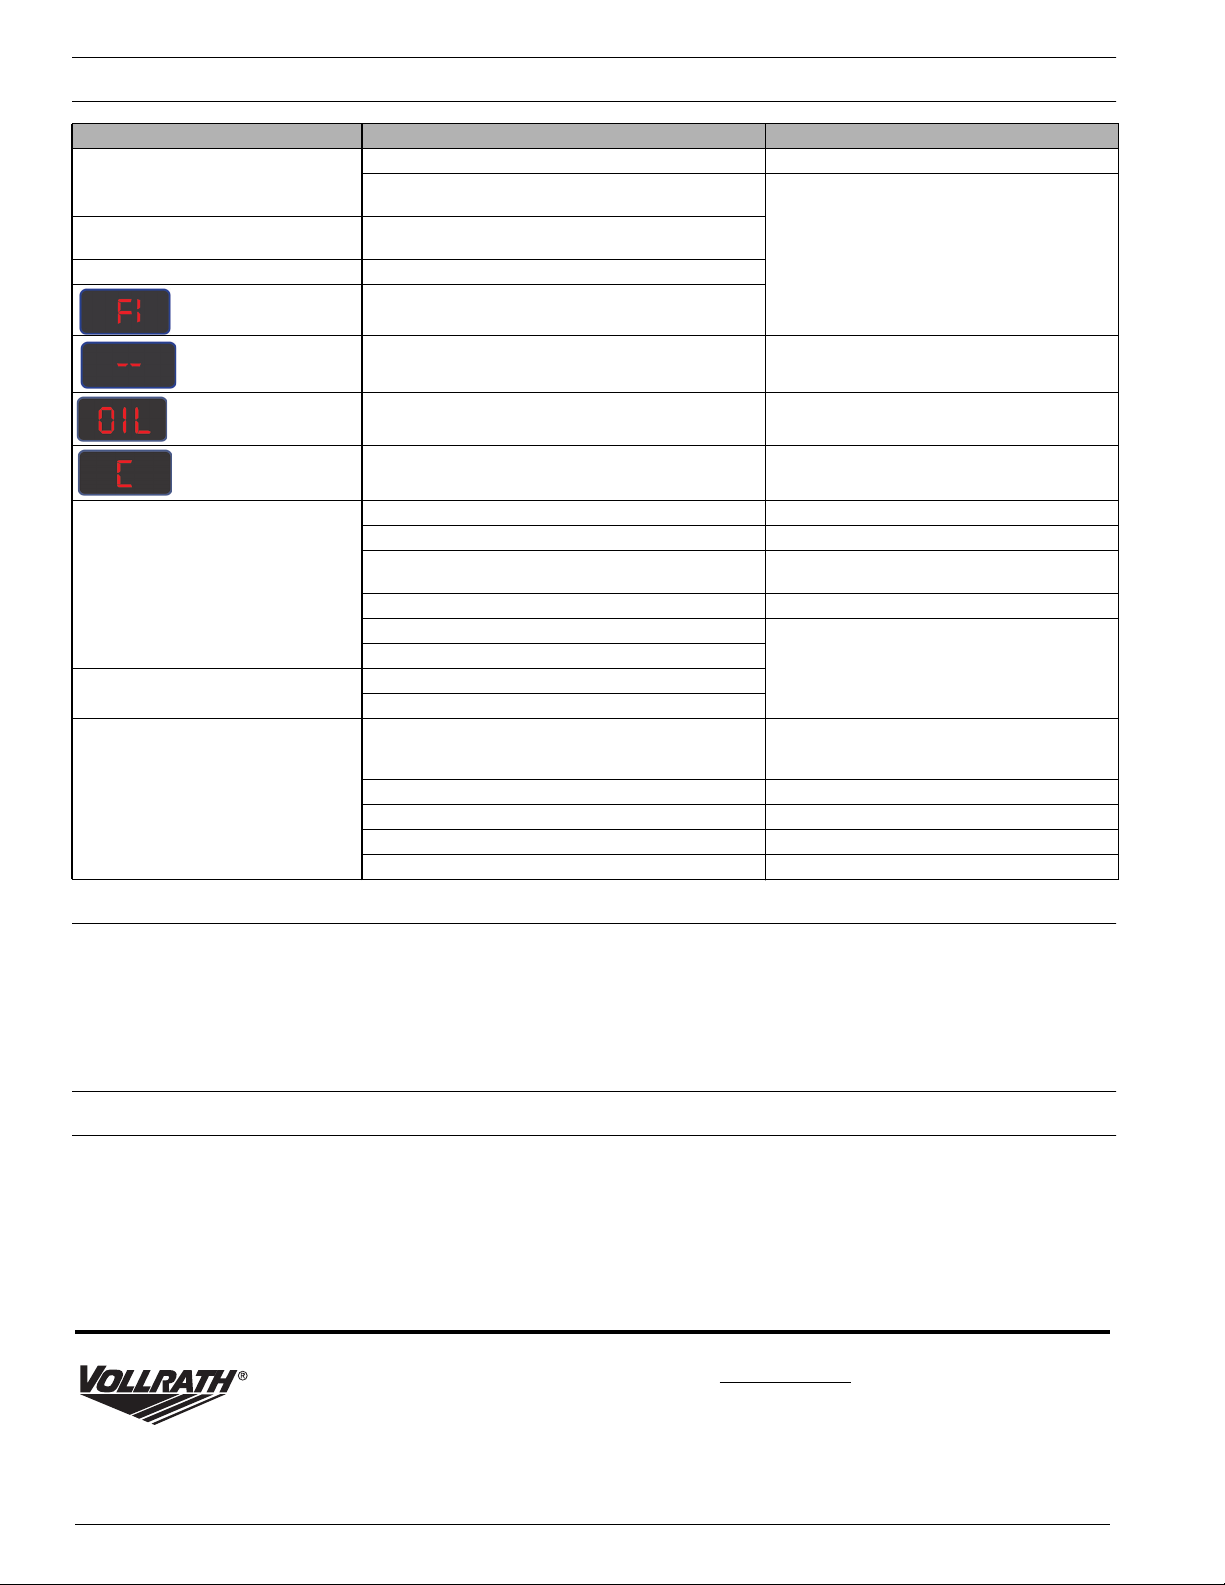
TROUBLESHOOTING
Problem Might be Caused By Course of Action
The control panel does not illuminate. The machine is not connected to an electrical outlet. Connect the machine to the power supply.
• The main fuse is burned out.
• The circuit board fuse is burned out.
The control panel is on but there is no
activity after closing the lid.
The lid does not open automatically. The gas spring is damaged.
Final vacuum is not sufficient. The set vacuum time is too short. Extend the vacuum time.
The machine extracts air too slowly. The oil exhaust filter is saturated.
Vacuum bag is not sealed correctly. The vacuum bag is placed incorrectly on the sealing bar. Place the vacuum bag neatly and smoothly on
• The lid micro switch may need to be adjusted.
• The control transformer fuse is burned out.
• The lid micro switch may need adjusting.
• The pump may require technical services.
The lid may have not opened correctly. Check the lid.
The machine use has reached a scheduled oil change. Contact Vollrath Technical Services.
The pump conditioning program needs to be run. See the instructions on page 6.
There is too little oil in the vacuum pump. Contact Vollrath Technical Services.
The extraction hole at the back of the vacuum chamber
is partially covered by the vacuum bag during extraction.
The lid gasket is worn. Replace the lid gasket.
The oil is contaminated. Contact Vollrath Technical Services.
The oil exhaust filter is saturated.
The pump’s extraction filter is blocked.
The sealing time is too long or too short. Adjust the sealing time longer or shorter.
The seal pad under the lid is damaged or worn. Replace the seal pad.
The Teflon tape is damaged. Replace the Teflon tape.
The vacuum bag opening is not clean. Clean the vacuum bag’s opening.
Contact Vollrath Technical Services.
Place the vacuum bag closer to the sealing bar.
the sealing bar. Ensure that the opening of the
bag is always within the vacuum chamber.
SERVICE AND REPAIR
Serviceable parts are available on Vollrath.com.
To avoid serious injury or damage, never attempt to repair the unit or replace a damaged power cord yourself. Do not send units directly to
The Vollrath Company LLC. Please contact Vollrath Technical Services for instructions.
When contacting Vollrath Technical Services, please be ready with the item number, model number (if applicable), serial number, and proof of
purchase showing the date the unit was purchased.
WARRANTY STATEMENT FOR THE VOLLRATH CO. L.L.C.
This warranty does not apply to products purchased for personal, family or household use, and The Vollrath Company LLC does not offer a written
warranty to purchasers for such uses.
The Vollrath Company LLC warrants the products it manufactures or distributes against defects in materials and workmanship as specifically
described in our full warranty statement. In all cases, the warranty runs from the date of the end user’s original purchase date found on the receipt.
Any damages from improper use, abuse, modification or damage resulting from improper packaging during return shipment for warranty repair will
not be covered under warranty.
For complete warranty information, product registration and new product announcement, visit www.vollrath.com.
The Vollrath Company, L.L.C.
Technical Services
techservicereps@vollrathco.com
Induction Products: 800.825.6036
Countertop Warming Products: 800.354.1970
Toasters: 800-309-2250
All Other Products: 800.628.0832
www.vollrath.com
1236 North 18th Street
Sheboygan, WI 53081-3201 U.S.A.
Main Tel: 800.624.2051 or 920.457.4851
Main Fax: 800.752.5620 or 920.459.6573
Customer Service: 800.628.0830
Canada Customer Service: 800.695.8560
©
2020 The Vollrath Company L.L.C. Part No. 26133-1 ml 2/27/20
Page 9

Appareil à emballer sous vide avec deux barres de soudage 16" (40,6 cm)
Merci d’avoir acheté cet appareil Vollrath. Avant d’utiliser cet appareil,
lisez et familiarisez-vous avec le mode d’emploi et les consignes
d’utilisation qui suiven. CONSERVEZ CES INSTRUCTIONS POUR
RÉFÉRENCE ULTÉRIEURE. Conservez l’emballage et le carton d’origine.
L'emballage devra être réutilisé pour expédier l’appareil si une
réparation est nécessaire.
CONSIGNES DE SÉCURITÉ
Pour garantir un fonctionnement sûr, lisez les avertissements suivants
et comprenez leur signification. Ce manuel contient des consignes de
sécurité, présentées ci-dessous. Lisez-les attentivement.
AVERTISSEMENT
Un avertissement permet d'indiquer la présence d'un danger qui
causera ou peut causer des blessures personnelles graves ou la mort.
Manuel d'utilisation
ATTENTION
Une mise en garde indique la présence d'un danger qui causera ou
pourra causer des blessures mineures ou majeures si elle est ignorée.
Un avis met en évidence des informations qui sont importantes mais
sans rapport avec un danger.
Pour réduire le risque de blessures et d'endommagement
de l'appareil :
• Débranchez l’appareil lorsque vous ne comptez pas l’utiliser.
• Tenez les plaques à induction et leur cordon d’alimentation à l’écart
des flammes nues, des brûleurs électriques ou d’une chaleur
excessive.
• N'utilisez pas l'appareil sans surveillance.
• N’utilisez pas l’appareil s’il a été endommagé ou s’il fonctionne mal.
FONCTION ET OBJET
Cet appareil est destiné à l'emballage sous vide des produits
alimentaires dans une cuisine commerciale. Il n'est pas destiné à une
utilisation domestique, industrielle ou en laboratoire.
Num. d’art. Modelé Description
40833 VP16 Appareil à emballer sous vide avec deux barres
de soudage 16" (40.6 cm)
Table des matières
Installation ................................................................... page 2
Mode d'emploi ............................................................. page 3
Emballage de produits liquides ................................... page 5
Nettoyage.....................................................................page 6
Maintenenance.............................................................page 6
Dépannage .................................................................. page 8
EXIGENCES EN MATIÈRE DE DÉGAGEMENT
ET DE CONDITIONS AMBIANTES
AVIS : Ne placez jamais l'appareil près d'une source de
chaleur sous peine d'endommager le couvercle.
• Laissez un dégagement de 6" (15 cm) sur tous les côtés et
de 15½" (39,4 cm) au-dessus de l'appareil pour permettre
l'ouverture complète du couvercle.
• La température ambiante doit être comprise entre
41 et 86 °F (5 et 30 °C).
©
2020 The Vollrath Company L.L.C. Num. d’art. 26133-1 ml 2/27/20
Page 10
INSTALLATION
AVIS : NE BASCULEZ PAS l'appareil. Son inclinaison risque
d'entraîner l'écoulement d'huile de la pompe et
d'endommager l'appareil.
AVIS : L’utilisation d’une tension différente de la tension
nominale indiquée sur la plaque signalétique
endommagera l’appareil. Une tension incorrecte, la
modification du cordon d'alimentation ou les composants
électriques risquent d'endommager l'appareil et d'annuler
la garantie.
AVIS : Le fonctionnement de la machine sans huile ou avec de
l'huile en quantité insuffisante endommagera l'appareil
et annulera la garantie.
1. Enlevez tout le matériel d'emballage et le ruban adhésif, ainsi que le
plastique de protection.
2. Nettoyez les résidus de colle du plastique ou du ruban adhésif.
3. Placez l'appareil à emballer sous vide sur une surface horizontale
et plane.
4. Installez les pieds de 4" (10,2 cm) inclus. La marque ETL Sanitation
exige l'utilisation de l'appareil avec les pieds fournis.
FONCTIONS ET COMMANDES
5. Vérifiez la jauge d'huile à l'arrière de la machine. Vérifiez que le
niveau d'huile se situe entre les lignes de remplissage minimum
et maximum.
6. Branchez l'appareil sur une prise de terre correspondant à la
tension nominale indiquée sur la plaque signalétique.
7. Exécutez le programme de conditionnement de la pompe.
Voir « Exécutez le programme de conditionnement de la pompe »
à la page 6 dans ce manuel.
A
B
C
D
A Couvercle
B Chambre
C Barre de soudage
D Panneau de commande
E Dispositif de retenue du couvercle
F Regard d'huile
G Protection de barre de soudage
E
G
A
B
C
F
H
A Affichage du programme
B Touche Programme
C Touche Reprogrammer
D Touche Programme de conditionnement de la pompe
E Voyants de fonction
F Touche Moins/Annuler. Permet de diminuer la dépression,
le temps de mode Vide Plus ou le temps de soudage.
Permet aussi d'annuler le cycle.
G Touche Marche/Arrêt
H Vacuomètre
I Touche Plus/Arrêt. Permet d'augmenter la dépression,
le temps de mode Vide Plus ou le temps de soudage.
Permet aussi d'arrêter le vide.
J Affichage de fonction
K Touche de sélection de fonction
D E GF
HIJK
2 Manuel d'utilisation de l'appareil à emballer sous vide avec deux barres de soudage 16" (40,6 cm)
Page 11
MODE D'EMPLOI
AVIS : N'emballez jamais des produits pouvant être abîmés par
l'emballage sous vide.
Pour réduire la condensation et le risque de corrosion pour
la pompe, faites refroidir les produits avant d'emballer.
Pour emballer des aliments, sélectionnez toujours un
programme incluant la fonction Capteur de liquide.
Des instructions spéciales s'appliquent pour l'emballage
de produits liquides. Référez-vous à « Emballage de
produits liquides»àlaVoir « Emballage de produits
liquides », à la page 5.
L'appareil est conçu pour une utilisation de cinq heures
maximum par jour.
Cet appareil n'est pas destiné à une utilisation continue.
Comptez 15 secondes entre les cycles d'emballage.
Ne dépassez pas un temps de mise sous vide de
60 secondes.
Si l'appareil est utilisé depuis une heure, arrêtez-le
et laissez-le refroidir à température ambiante.
NE BASCULEZ PAS l'appareil. Son inclinaison risque
d'entraîner l'écoulement d'huile de la pompe et
d'endommager l'appareil.
Mise en marche de l'appareil
1. Tournez le dispositif de retenue du couvercle de manière à ce qu'il ne
couvre pas le couvercle. Le dispositif de retenue du couvercle sert
seulement à fixer le couvercle lorsque l'appareil n'est pas utilisé.
2. Appuyez sur la touche Marche/Arrêt.L'affichage de la fonction
indique le numéro de version du logiciel. Exemple :
Mise en place du produit dans la chambre
ATTENTION
Risque de brûlure
La barre de soudage peut surchauffer après une utilisation
répétée. Ne la touchez pas en mettant les sacs en place dans la
chambre.
1. Placez le produit alimentaire dans un sac d'emballage sous vide qui
tient complètement dans la chambre.
2. Placez le sac dans la chambre en plaçant le côté ouvert pardessus la
barre de soudage. Assurez-vous que le sac est lisse, sans froissures
ou plis. Plusieurs sacs sous vide peuvent être placés sur la barre de
soudage. NE CHEVAUCHEZ PAS les sacs sous vide.
3. Pour les petits produits, placez une ou plusieurs assiettes sous le
produit. Ceci permet de combler le vide dans la chambre et donc de
réduire le temps de cycle.
3. Si l'appareil reste inutilisé pendant un certain temps, exécutez le
programme de conditionnement de la pompe. Voir page 6.
Sélection d'un programme
Emballage d'un produit alimentaire : sélectionnez un programme
incluant la fonction Capteur de liquide.
Emballage d'un produit liquide : lisez les informations importantes
de la section Emballage de produits liquides, à la page 5.
prog
Appuyez sur jusqu'à ce que le numéro de programme souhaité
s'affiche.
Fonction
Dépression (%)
Vide Plus
Prolonge le cycle de vide
pour permettre à l'air
piégé dans le produit
de s'échapper du sac.
Capteur de liquide H2O
S'utilise pour
l'emballage d'aliments.
Détecte le point
d'ébullition, arrête le vide
et passe à l'étape suivante
pour produire un produit
de meilleure qualité et
empêcher la pompe
d'aspirer des liquides.
Soudage (secondes)
Soft-Air (secondes)
Moule doucement le
sac pour protéger les
produits fragiles ou éviter
l'endommagement du sac
causé par les bords
coupants du produit.
0-9
Programme
0 1 2 3 4 5 6 7 8 9
99 90 99 99 99 80 90 50 90 60
15 ARR 15 10 10 ARR ARR ARR ARR ARR
ARR MAR ARR ARR ARR ARR ARR ARR ARR ARR
2,5 2,5 2,5 2,5 2,5 2,5 2,5 2,5 2,5 2,5
3 3 2 2 2 ARR ARR 2 ARR ARR
Exécution du programme
1. Fermez le couvercle. N'utilisez pas le dispositif de retenue du
couvercle. L'utilisation du dispositif de retenue du couvercle durant
un cycle d'emballage interférera avec le cycle. Le cycle démarre
automatiquement.
2. Le couvercle s'ouvre une fois le cycle terminé.
3. Enlevez le produit emballé.
4. Attendez 15 secondes avant d'emballer un autre produit.
Arrêt d'un cycle
L'appareil peut être arrêté avant la fin d'un cycle d'emballage.
stop
Arrête la fonction de vide et passe à la fonction suivante.
vac
Arrête et annule le programme.
stop
Manuel d'utilisation de l'appareil à emballer sous vide avec deux barres de soudage 16" (40,6 cm) 3
Page 12
MODE D'EMPLOI (SUITE)
Modification de programmes
1. Sélectionnez un programme à modifier. Les programmes1à9peuvent être personnalisés. Le programme 0 ne peut pas être modifié.
prog
Appuyez sur
jusqu'à ce que le numéro du programme à modifier s'affiche dans l'affichage du programme.
Exemple :
2. Reprogrammez.
Appuyez sur pour modifier le programme.
Le numéro du programme commence à clignoter :
3. Sélectionnez une fonction à modifier (suite à la page suivante).
Pourcentage de dépression Temps de vide Capteur de liquide H2O
1. Appuyez sur jusqu'à ce que
le voyant vacuum s'allume.
0-9
1. Appuyez sur jusqu'à ce que le
voyant vacuum s'allume.
Utilisez cette fonction pour emballer un
liquide.
1. Activez le capteur de liquide H2O.
2. Appuyez sur ou pour définir
stop
vac
stop
la dépression.
• Le minimum recommandé est de 50 %.
• Pour utiliser le mode Vide Plus, la
dépression doit être réglée à 99 %.
3. Appuyez sur pour confirmer le
réglage.
4. Pour modifier la fonction Vide Plus,
passez à la procédure pour Vide Plus.
Vide Plus
1. Activez le mode Vide Plus.
Appuyez sur
jusqu'à ce que le voyant vacuum s'allume
et que l'affichage de la fonction indique :
2. Réglez le temps.
Appuyez sur ou
stop
vac
stop
pour définir le nombre de secondes.
2. Appuyez sur pour couper la
stop
vac
dépression.
3. Appuyez une fois sur pour accéder
à la fonction Temps de vide.
Le voyant vacuum reste allumé.
L'affichage de la fonction indique :
4. Appuyez sur ou pour définir
stop
vac
stop
le nombre de secondes. Un point rouge
indique que la fonction Temps de vide
est activée.
• Le temps maximum recommandé est
de 60 secondes.
5. Appuyez sur pour confirmer
le réglage.
Appuyez sur pour activer ou
désactiver la fonction.
Lorsque le capteur de liquide H2O est activé,
l'affichage de la fonction indique :
2. Pour modifier la fonction H2O Plus,
passez à la procédure pour H2O Plus.
H2O Plus
1. Activez le mode H2O Plus.
Appuyez sur jusqu'à ce que le voyant
vacuum
s'allume et que l'affichage de la fonction
indique :
Appuyez sur ou pour définir
le temps
stop
vac
stop
en dixièmes de seconde.
Un point rouge indique que le mode
Vide Plus est activé.
2. Appuyez sur pour confirmer le
réglage. Un point rouge après H2O indique
que le mode H2O Plus est activé.
3. Appuyez sur pour confirmer le
réglage.
4. Modifiez une autre fonction dans le
programme en cours.
Appuyez sur .
5. Enregistrez les modifications et quittez
le programme en cours.
Appuyez sur .
4 Manuel d'utilisation de l'appareil à emballer sous vide avec deux barres de soudage 16" (40,6 cm)
Page 13
Temps de soudage Temps Soft-Air
1. Appuyez sur jusqu'à ce
que le voyant seal s'allume.
2. Appuyez sur ou
stop
vac
stop
pour définir le nombre de
1. Appuyez sur jusqu'à ce
que le voyant softair s'allume.
2. Appuyez sur ou pour
stop
vac
stop
définir le nombre de secondes.
secondes.
• Un temps de 2 à 2,5 secondes
est recommandé pour la
3. Appuyez sur pour
confirmer le réglage.
plupart des sacs.
3. Appuyez sur pour
confirmer le réglage.
EMBALLAGE DE PRODUITS LIQUIDES
Il faut faire tout particulièrement attention lors de l'emballage sous vide
de liquides ou de produits humides.
1. Laissez refroidir les aliments avant de les emballer. Les aliments
chauds atteignent rapidement le point d'ébullition, ce qui peut se
solder par un soudage insuffisant.
AVIS : Les produits chauds créent de la condensation, ce qui
2. Utilisez la plaque inclinée fournie et les barres de positionnement
aimantées pour positionner le sac de sorte que le niveau de liquide
soit en dessous de la barre de soudage. Les barres aimantées sont
expédiée attachées sous la plaque inclinée.
peut endommager la pompe.
Barre de positionnement aimantée
Plaque inclinée
3. Utilisez un programme incluant la fonction Capteur de liquide. Ceci
empêchera le produit de bouillir.
AVIS : L'ébullition augmentera la quantité d'humidité qui entre
dans la pompe, ce qui peut entraîner la formation de
rouille.
Manuel d'utilisation de l'appareil à emballer sous vide avec deux barres de soudage 16" (40,6 cm) 5
Page 14

NETTOYAGE
MAINTENANCE
AVIS : NE BASCULEZ PAS l'appareil. Son inclinaison risque
d'entraîner l'écoulement d'huile de la pompe et
d'endommager l'appareil.
AVIS : Si l'appareil est inutilisé pendant plus d'un mois, la pompe
doit être vidée de son huile. L'humidité dans l'huile risque
de corroder la pompe.
Une fois par jour
Exécutez le programme de conditionnement de la pompe
Le programme de conditionnement de la pompe élimine toute humidité
ayant pu s'accumuler dans la pompe. Durant le programme, la pompe
et l'huile atteignent la température de fonctionnement ce qui entraîne
l'évaporation de l'humidité dans la pompe.
1. Appuyez sur .
2. apparaît sur l'affichage.
3. Fermez le couvercle.
4. Le programme démarre. Des points en mouvement apparaissent
sur l'affichage.
5. Le programme s'exécute pendant 15 minutes environ.
N'interrompez pas le programme. Si le programme est interrompu,
il devra être réexécuté pour arriver jusqu'à son terme.
Nettoyez l'extérieur et l'intérieur
AVERTISSEMENT
Risque d’électrocution
Empêchez toute infiltration d'eau et d'autres liquides dans
l'appareil. L'infiltration de liquide dans l'appareil risque de
causer une électrocution. Ne vaporisez pas d'eau ou de
produits nettoyants. Du liquide risque d’entrer en contact avec
les composants électriques et de causer un court-circuit ou
une décharge électrique.
AVERTISSEMENT
Risque d’électrocution
Débranchez l'appareil avant toute maintenance.
AVIS : Toute la maintenance doit être effectuée par un agent
AVIS : NE BASCULEZ PAS l'appareil. Son inclinaison risque
Le calendrier de maintenance suivant est seulement fourni à titre de
référence. Les besoins de maintenance réels varient selon l'utilisation
de l'appareil. Inspectez régulièrement votre appareil.
Fréquence Procédure
Une fois
par semaine
Tous les
six mois
Une fois
par an
Tous les
quatre ans
Remplacement des fils de soudure et du ruban
en Teflon®
technique qualifié.
d'entraîner l'écoulement d'huile de la pompe et
d'endommager l'appareil.
Vérifiez le niveau d'huile par le regard.
Inspectez l'usure de la barre de soudage.
Inspectez l'usure de la protection de la barre de
soudage sous le couvercle.
Inspectez le joint du couvercle et le couvercle.
Remplacez l'huile dans la pompe à vide. Contactez
le support technique Vollrath.
Remplacez les fils de soudure et le ruban en Teflon
Remplacez la protection de la barre de soudage sous
le couvercle.
Remplacez le joint du couvercle.
Inspectez le filtre à huile. Contactez le support
technique Vollrath.
Remplacez le couvercle, les ressorts à gaz et les
membranes du cylindre de soudage. Contactez le
support technique Vollrath.
®
.
ATTENTION
Risque de brûlure
Laissez refroidir l'appareil avant de le manipuler ou de le laver.
AVIS : Ne pas utiliser de nettoyants contenant de l'ammoniaque,
AVIS : Ne pas utiliser d'essuie-tout, de matériaux abrasifs,
AVIS : Ne pas utiliser de WD-40
1. Débranchez l'appareil. Laissez-le refroidir.
2. Essuyez la chambre à vide, le couvercle, la barre de soudage, le
3. Essuyez bien tout résidu de savon doux ou de nettoyants
6 Manuel d'utilisation de l'appareil à emballer sous vide avec deux barres de soudage 16" (40,6 cm)
de l'alcool, de l'acétone ou des produits de nettoyage à
sec. Les nettoyants contenant ces agents chimiques
abîmeront le Plexiglas
sous peine d'endommager le fini.
nettoyants qui rayent, lames de rasoir, brosses, laine
d'acier ou tampons à récurer, comme du Scotch Brite™,
sous peine d'endommager le fini.
de pétrole, industriel ou commercial sous peine
d'endommager le fini.
support en silicone et l'extérieur avec un chiffon microfibre non
pelucheux doux et de l'eau chaude, ou un mélange d'eau chaude et
d'une petite quantité de liquide vaisselle doux.
chimiques. Les résidus risquent de corroder la surface de
l’appareil.
®
, l'acrylique et autres plastiques
®
ou un produit nettoyant à base
Vérifiez l'état de la barre de soudage. Remplacez le ruban en Teflon et
les fils de soudage si la qualité de la soudure n'est plus suffisante ou si
le ruban en Teflon ou les fils de soudage sont usés.
Outils nécessaires :
• Tournevis cruciforme
• Outils de tension ou pinces
• Ciseaux
• Chiffon de nettoyage non pelucheux
• Ruban en Teflon de rechange
• Fil de soudage de rechange
1. Tirez la barre de soudage vers le haut pour l'enlever de l'appareil.
Page 15
2. Enlevez le ruban en Teflon qui protège les fils de soudage.
3. Enlevez les vis sous la barre de soudage.
4. Enlevez les fils de soudage.
5. Enlevez le ruban en Teflon de la barre de soudage.
Remplacement de la protection
de la barre de soudage
Inspectez la rugosité de la protection de la barre de soudage.
Remplacez si des zones de la protection de la barre de soudage
sont rugueuses.
Outils nécessaires :
• Protection de la barre de soudage de rechange
• Ciseaux
1. Enlevez la protection usée du support.
Protection de barre
2. Coupez un bout de protection de barre de soudage neuve à la
même longueur que l'ancien. Un bout trop court ou trop long
causera des problèmes de soudage.
3. Placez la protection neuve dans le support. Assurez-vous qu'elle
est complètement et uniformément placée dans la rainure.
4. Placez le bout neuf dans le support en silicone. Assurez-vous que
le caoutchouc de silicone est complètement et uniformément
placée dans la rainure.
6. Nettoyez la barre de soudage avec un chiffon non pelucheux.
7. Coupez un bout de ruban en Teflon de rechange à la même
longueur de la barre de soudage.
8. Appliquez le ruban de rechange à la barre de soudage.
9. Coupez le fils de soudage neufs à la longueur de la barre de
soudage, plus 6" (15 cm) environ.
10. Attachez un fil à une extrémité de la barre de soudage en serrant
la vis.
11. Tirez le fil à travers la barre de soudage bien droit et tendu.
12. Attachez-le en serrant la vis.
13. Répétez les étapes 10 à 12 pour le second fil.
14. Élaguez les fils.
15. Coupez un bout de ruban en Teflon à la longueur de la barre de
soudage, plus 2" (5 cm) environ.
16. Appliquez le ruban en le lissant bien sur les fils de soudage sur la
barre de soudage.
17. Élaguez le ruban.
18. Remettez la barre de soudage dans l'appareil. Assurez-vous que la
barre de soudage s'est correctement enclenchée dans le support.
Remplacement du joint du couvercle
Le joint du couvercle garantit que la chambre à vide est complètement
soudée durant le cycle d'emballage. Ceci est essentiel pour atteindre le
vide maximum. Le joint du couvercle s'use en raison des différences de
pression extrêmes et doit être régulièrement remplacé.
Outils nécessaires :
• Joint de rechange
• Ciseaux
1. Enlevez le joint usé.
Joint du couvercle
2. Coupez un nouveau bout de joint légèrement plus long que l'ancien.
Positionnez le nouveau joint de sorte à tourner le rebord vers le bas
et l'extérieur.
3. Pressez le joint uniformément dans la fente.
4. Élaguez le joint pour que les bouts serrent bien au point de contact
afin d'empêcher les fuites. Les bouts doivent être coupés droit.
Le joint du couvercle est trop court ou trop long, ce qui peut causer
des problèmes lors de la fermeture du couvercle ou des fuites.
Manuel d'utilisation de l'appareil à emballer sous vide avec deux barres de soudage 16" (40,6 cm) 7
Page 16

DÉPANNAGE
Problème Cause possible Mesure corrective
Le panneau de commande ne
s'allume pas.
Le panneau de commande est
allumé, mais il n'y a pas d'activité
après la fermeture du couvercle.
Le couvercle ne s'ouvre pas
automatiquement.
L'appareil n'est pas branché sur une prise électrique. Branchez l'appareil sur une prise électrique.
• Le fusible principal a grillé.
• Le fusible de la carte de circuits a grillé.
• Le réglage du microcommutateur est peut-être
nécessaire.
• Le fusible du transformateur de commande a grillé.
Le ressort à gaz est endommagé.
• Le réglage du microcommutateur est peut-être
nécessaire.
• La pompe exige peut-être une réparation.
Le couvercle ne s'est peut-être pas ouvert correctement. Vérifiez le couvercle.
Contactez le support technique Vollrath.
L'utilisation de l'appareil a atteint la vidange d'huile
programmée.
Le programme de conditionnement de la pompe doit être
exécuté.
Le vide final n'est pas suffisant. Le temps de vide défini est trop court. Prolongez le temps de vide.
Il n'y a pas assez d'huile dans la pompe à vide. Contactez le support technique Vollrath.
Le trou d'extraction à l'arrière de la chambre à vide est
partiellement couvert par le sac sous vide durant
l'extraction.
Le joint du couvercle est usé. Remplacez le joint du couvercle.
L'huile est contaminée. Contactez le support technique Vollrath.
Le filtre à huile est saturé.
La machine extrait l'air trop
lentement.
Le sac sous vide est mal soudé. Le sac sous vide est mal placé sur la barre de soudage. Placez correctement le sac sous vide sur la barre de
Le filtre à huile est saturé.
Le filtre d'extraction de la pompe est bouché.
Le temps de soudage est trop long ou trop court. Ajustez le temps de soudage.
La protection de la barre de soudage sous le couvercle est
abîmée ou usée.
Le ruban en Teflon est abîmé. Remplacez le ruban en Teflon.
L'ouverture du sac sous vide n'est pas propre. Nettoyez l'ouverture du sac sous vide.
Contactez le support technique Vollrath.
Voir les instructions à la page 6.
Rapprochez le sac sous vide de la barre de soudage.
soudage, sans plis. Assurez-vous que l'ouverture du
sac est toujours dans la chambre à vide.
Remplacez-la.
SAV ET RÉPARATIONS
Des pièces détachées sont disponibles sur Vollrath.com.
Pour éviter toute blessure grave ou tout dommage sévère, n’essayez jamais de réparer l'appareil ou de remplacer vous-même un cordon
d’alimentation endommagé. N’envoyez aucun appareil directement à la Vollrath Company LLC. Pour des instructions, contactez les services
techniques de Vollrath.
Lorsque vous contacterez les services techniques de Vollrath, tenez-vous prêt à fournir le numéro d'article, le numéro de modèle (s'il y a lieu),
le numéro de série et le justificatif d’achat indiquant la date d’achat de l’appareil.
GARANTIE DE THE VOLLRATH CO. L.L.C.
Cette garantie ne s'applique pas aux produits achetés pour un usage personnel, familial ou ménager, et The Vollrath Company LLC ne propose
aucune garantie écrite aux acheteurs pour de telles utilisations.
The Vollrath Company L.L.C. garantit que les produits qu'elle fabrique et distribue seront dépourvus de vices de matériaux et de malfaçons,
comme indiqué dans notre déclaration complète de garantie. Dans tous les cas, la garantie entre en vigueur à la date d'achat par l'utilisateur
initial indiquée sur le reçu. Tous les dommages subis lors d’une utilisation impropre ou abusive, ou résultant d’une modification ou d'un emballage
inadapté lors d’un renvoi du produit pour une réparation sous garantie ne seront pas couverts par la garantie.
Pour des informations complètes sur la garantie, l'enregistrement des produits et l'annonce de nouveaux produits, consultez www.vollrath.com.
The Vollrath Company, L.L.C.
Services techniques
techservicereps@vollrathco.com
Produits à induction : 800.825.6036
Réchauds de comptoir : 800.354.1970
Tous les autres produits : 800.628.0832
www.vollrath.com
1236 North 18th Street
Sheboygan, Wi 53081-3201 États-Unis
Standard : 800.624.2051 ou 920.457.4851
Télécopieur : 800.752.5620 ou 920.459.6573
Service clientèle : 800.628.0830
Service clientèle Canada : 800.695.8560
©
2020 The Vollrath Company L.L.C. Num. d’art. 26133-1 ml 2/27/20
Page 17

Manual para operadores
Máquina de envasado al vacío con barras de sellado dobles de 16" (40,6 cm)
Gracias por comprar este equipo Vollrath. Antes de usar el equipo, lea y
familiarícese con las siguientes instrucciones de operación y seguridad.
CONSERVE ESTAS INSTRUCCIONES COMO REFERENCIA PARA EL
FUTURO. Conserve la caja y embalado originales. Deberá utilizarlos
para devolver el equipo en caso de que requiera reparaciones.
PRECAUCIONES DE SEGURIDAD
Para garantizar una operación segura, lea las siguientes afirmaciones y
comprenda su significado. Este manual contiene precauciones de
seguridad que se explican a continuación. Léalas atentamente.
ADVERTENCIA
Advertencia se usa para indicar la presencia de un peligro que
provocará o puede provocar lesiones graves o letales.
PRECAUCIÓN
Precaución se usa para indicar la presencia de un peligro que provocará
o puede provocar lesiones personales o daños materiales leves si se
ignora el aviso.
AVISO: Aviso se usa para señalar información importante
no relacionada con peligros.
Para disminuir el riesgo de lesiones personales o daños
al equipo:
• Desenchúfelo cuando no esté en uso.
• Mantenga la unidad y el cable eléctrico lejos de llamas expuestas,
quemadores eléctricos o calor excesivo.
• No lo deje funcionando solo.
• No opere la unidad si se ha dañado o si funciona defectuosamente
de algún modo.
FUNCIÓN Y PROPÓSITO
Esta unidad está diseñada para sellar al vacío alimentos en un entorno
de cocina comercial. No está diseñada para uso doméstico, industrial ni
de laboratorio.
Núm. art. Modelo Descripción
40833 VP16 Máquina de envasado al vacío con barras
de sellado dobles de 16" (40,6 cm)
Contenido
Instalación ................................................................... página 2
Funcionamientos.......................................................... página 3
Envasado de productos líquidos ................................. página 5
Limpieza....................................................................... página 6
Mantenimiento ............................................................ página 6
Solución de problemas ............................................... página 8
REQUISITOS AMBIENTALES Y DISTANCIADO
AVISO: Nunca coloque la máquina cerca de una fuente de calor,
ya que puede dañar la tapa.
• Espacio libre de 6" (15 cm) en todos los lados y 15½" (39,4 cm)
sobre la máquina para que la tapa se abra completamente.
• La temperatura ambiente debe estar entre 41-86 °F (5-30 °C).
©
2020 The Vollrath Company L.L.C. Núm. pieza 26133-1 ml 2/27/20
Page 18
INSTALACIÓN
AVISO: NO incline demasiado la máquina, ya que el aceite podría
salirse de bomba y dañar la máquina.
AVISO: Usar un voltaje distinto del indicado en la placa
identificatoria dañará la unidad. Usar un voltaje
incorrecto, o modificar el cable eléctrico o los
componentes electrónicos puede dañar la unidad e
invalidará la garantía.
AVISO: Hacerfuncionar la máquina sin aceite o aceite insuficiente
dañará la máquina y anulará la garantía.
1. Retire del equipo todo el material y cinta de embalado, así como el
plástico protector.
2. Limpie todo residuo adhesivo que haya quedado del plástico o la
cinta.
3. Coloque la máquina de envasado al vacío en una superficie plana y
nivelada.
4. Instale las patas de 4" (10,2 cm) que se incluyen. La higienización
ETL exige que la máquina se use con las patas incluidas.
5. Revise la mirilla de aceite en la parte posterior de la máquina.
Verifique que el nivel de aceite esté entre las líneas de llenado
mínimo y máximo.
CARACTERÍSTICAS Y CONTROLES
6. Enchufe el cable eléctrico en un tomacorriente con puesta a tierra
cuyo voltaje nominal corresponda al indicado en la placa
identificatoria.
7. Ejecute el programa de acondicionamiento de la bomba. Consulte la
sección Ejecute el programa de acondicionamiento de la bomba
página 4 en este manual.
A
B
C
D
A Tapa
B Cámara
C Barra de sellado
D Panel de control
E Retén de la tapa
F Mirilla de aceite
G Almohadilla de sellado
E
G
A
B
C
F
H
A Visor de programas
B Botón de programas
C Botón de reprogramar
D Botón del programa de acondicionamiento de la bomba
E Indicadores LED de funciones
F Botón de disminuir/cancelar. Disminuye la presión de vacío,
vacío adicional o tiempo de sellado. También cancela el ciclo.
G Botón de encendido/apagado
H Vacuómetro
I Botón de aumentar/detener. Aumenta la presión de vacío, vacío
adicional o tiempo de sellado. También detiene el vacío.
J Visor
K Botón para seleccionar funciones
D E GF
HIJK
2 Manual para operadores de máquinas de envasado al vacío con barras de sellado dobles de 16" (40,6 cm)
Page 19

FUNCIONAMIENTO
AVISO: Nunca empaquete productos que puedan ser dañados por
el envasado al vacío.
Para reducir el riesgo de condensación y corrosión de la
bomba, enfríe los productos antes de envasarlos.
Al envasar alimentos, siempre seleccione un programa
que incluya el control del sensor de líquido.
Hay instrucciones especiales para el envasado de
productos líquidos. Consulte “Envasado de productos
líquidos” en la página 5.
La máquina está diseñada para un uso máximo de cinco
horas al día.
No está diseñada para uso continuo. Permita 15 segundos
entre los ciclos de envasado.
NO exceda un período de vacío de 60 segundos.
Si la máquina ha estado en uso durante una hora,
deténgala y deje que se enfríe a temperatura ambiente.
NO incline demasiado la máquina, ya que el aceite podría
salirse de bomba y dañar la máquina.
Encender la máquina
1. Gire el retén de la tapa de modo que este no la cubra. El retén se usa
solo para asegurar la tapa cuando la máquina no está en uso.
2. Pulse el botón de encendido/apagado.El visor de funciones muestra
los códigos de la revisión del software. Por ejemplo:
Colocar el alimento en la cámara
PRECAUCIÓN
Peligro de quemaduras
La barra de sellado puede calentarse después del uso repetido.
No toque la barra cuando coloque bolsas de vacío en la
cámara.
1. Coloque el alimento en una bolsa de sellado al vacío que calce
completamente dentro de la cámara.
2. Coloque la bolsa en la cámara con el extremo abierto sobre la barra
de sellado. Cerciórese de que la bolsa esté lisa, sin arrugas ni
pliegues. Se pueden colocar múltiples bolsas de vacío sobre las
barras de sellado. NO traslape las bolsas de vacío.
3. Para productos pequeños, coloque una o más placas de inserción
debajo del producto. Esto llena el espacio vacío en la cámara, lo cual
agiliza los ciclos.
3. Si la máquina no se ha utilizado durante un tiempo, ejecute el
programa de acondicionamiento de la bomba. Consulte la sección
página 6Limpieza.
Seleccionar un programa
Envasado de alimentos: Seleccione un programa que incluya el control
del sensor de líquido.
Envasado de un producto líquido: Encontrará información importante
en la sección Envasado de productos líquidos en la página 5.
prog
Pulse hasta que en el visor aparezca el número del programa
deseado. [APA = Apagado (OFF), ENC = Encendido (ON)]
Función
0-9
Vacuum Pressure %
Vacuum Plus
Extiende el ciclo de vacío
para permitir que el aire
atrapado en el producto
escape de la bolsa.
H2O Liquid Sensor
Control
Úselo al envasar
alimentos.
punto de ebullición,
detiene el vacío y avanza
al siguiente paso para
producir un producto de
mejor calidad y evitar que a
la bomba ingresen líquidos.
Detecta el
Sealing (segundos)
Soft-Air (segundos)
Forma la bolsa con
suavidad para proteger
productos delicados o
evitar dañar la bolsa con
los bordes afilados del
producto.
Programa
0 1 2 3 4 5 6 7 8 9
99 90 99 99 99 80 90 50 90 60
15 APA 15 10 10 APA APA APA APA APA
APA ENC APA APA APA APA APA APA APA APA
2,5 2,5 2,5 2,5 2,5 2,5 2,5 2,5 2,5 2,5
33222
APA APA
2
APA APA
Ejecutar el programa
1. Cierre la tapa. No use el retén de la tapa. Si lo usa durante un ciclo
de envasado interferirá con el ciclo. El ciclo se inicia
automáticamente.
2. La tapa se abre cuando se completa el ciclo.
3. Retire el producto envasado.
4. Espere 15 segundos antes de envasar otro producto.
Detener un ciclo
La máquina se puede detener antes de que se complete un ciclo de
empaque.
stop
Detiene la función de vacío y continúa con la función siguiente.
vac
Detiene y cancela el programa.
stop
Manual para operadores de máquinas de envasado al vacío con barras de sellado dobles de 16" (40,6 cm) 3
Page 20

FUNCIONAMIENTO (CONTINUACIÓN)
Editar programas
1. Seleccionar un programa para editar. Los programas del 1 al 9 se pueden personalizar. El programa 0 no se puede cambiar.
prog
Pulse
hasta que en el visor de programas aparezca el número del programa que se va a editar.
Por ejemplo:
2. Reprogramar.
Pulse para editar el programa.
El número del programa comienza a destellar:
3. Seleccione una función para editar (continúa en la página siguiente).
0-9
Porcentaje de presión de vacío Tiempo de vacío Control del sensor de líquido H2O
1. Pulse hasta que se ilumine el LED
de vacío.
1. Pulse hasta que se ilumine el LED de
vacío.
Use esta función al envasar líquidos.
1. Encienda el control del sensor de líquido
H2O
2. Pulse o para fijar una presión
stop
vac
stop
de vacío.
• El mínimo recomendado es 50%.
• Para utilizar el vacío adicional, la presión
de vacío debe fijarse en 99%.
3. Pulse para confirmar el ajuste.
4. Para editar la función Vacío adicional,
continúe con los pasos para el vacío
adicional.
Vacío adicional
1. Encienda la función Vacío adicional.
Pulse
hasta que el LED de vacío se ilumine y el
visor de funciones muestre:
2. Fije el tiempo.
stop
Pulse o
vac
stop
para fijar la cantidad de segundos.
Un punto rojo indica que está activa la
función Vacío adicional.
2. Pulse para reducir la presión de vacío
stop
vac
a fin de apagarla.
3. Pulse una vez para ingresar a la
función Tiempo de vacío.
El LED de vacío permanece iluminado. El
visor de funciones muestra:
4. Pulse o para fijar la cantidad
stop
vac
stop
de segundos. Un punto rojo indica que está
activa la función Tiempo de vacío.
• El máximo recomendado es de 60
segundos.
5. Pulse para confirmar el ajuste.
Pulse para encender o apagar la
función.
Cuando se enciende H2O, el visor de
funciones muestra:
2. Para editar la función H2O adicional,
continúe con los pasos para H2O adicional.
H2O adicional
1. Encienda la función H2O adicional.
Pulse hasta que se ilumine el LED de
vacío
y el visor de funciones muestre:
stop
Pulse o para fijar el tiempo
vac
stop
en décimas de segundo.
2. Pulse para confirmar el ajuste. Un
punto rojo después de H2O indica que está
activa la función de H2O adicional.
3. Pulse para confirmar el ajuste.
4. Editar otra función en el programa actual.
Pulse .
5. Guarde los cambios y salga del programa
actual.
Pulse .
4 Manual para operadores de máquinas de envasado al vacío con barras de sellado dobles de 16" (40,6 cm)
Page 21

Tiempo de sellado Tiempo de aire suave
1. Pulse hasta que se ilumine
el LED de sellado.
2. Pulse o para fijar
stop
vac
stop
la cantidad de segundos.
1. Pulse hasta que se ilumine
el LED de aire suave.
2. Pulse o para fijar
stop
vac
stop
la cantidad de segundos.
• Se recomiendan 2.0 a 2.5
segundos para la mayoría de
las bolsas.
3. Pulse para confirmar
el ajuste.
3. Pulse para confirmar el
ajuste.
ENVASADO DE PRODUCTOS LÍQUIDOS
Se debe tener especial cuidado al envasar al vacío productos líquidos o
húmedos.
1. Enfríe los alimentos antes de envasarlos. Los alimentos calientes
alcanzan rápidamente el punto de ebullición, lo que puede dar lugar
a un sellado insuficiente.
AVISO: Los productos calientes crean condensación,
2. Use la placa de inclinación y las barras de posicionamiento
magnéticas que se incluyen para colocar la bolsa de modo que el
líquido esté debajo de la barra de sellado. Las barras magnéticas se
envían unidas al lado inferior de la placa de inclinación.
lo cual puede dañar la bomba.
Barra magnética de posicionamiento
Placa de inclinación
3. Use un programa que incluya la función de control del sensor de
líquido. Ello evitará que hierva el producto.
AVISO: La ebullición aumentará la cantidad de humedad que
entra en la bomba, lo cual puede dar lugar a la
corrosión.
Manual para operadores de máquinas de envasado al vacío con barras de sellado dobles de 16" (40,6 cm) 5
Page 22

LIMPIEZA
MANTENIMIENTO
AVISO: NO incline demasiado la máquina, ya que el aceite podría
AVISO: Si la máquina estará inactiva durante más de un mes, el
salirse de la bomba y dañar la máquina.
aceite debe drenarse de la bomba. La humedad en el
aceite podría corroer la bomba.
Diariamente
Ejecute el programa de acondicionamiento de la bomba
El programa de acondicionamiento elimina la humedad que pueda
haberse acumulado en la bomba. Durante el programa, la bomba y el
aceite alcanzan la temperatura de funcionamiento, lo cual evapora la
humedad de la bomba.
1. Pulse .
2. El visor muestra .
3. Cierre la tapa.
4. Se inicia el programa. Aparecen puntos en movimiento en el visor.
5. El programa se ejecuta durante aproximadamente 15 minutos. No
interrumpa el programa, ya que deberá ejecutarlo nuevamente para
garantizar su finalización.
Limpie el exterior e interior
ADVERTENCIA
Peligro de descarga eléctrica
Evite que ingrese agua o cualquier otro tipo de líquido al
interior del equipo, ya que ello podría causar una descarga
eléctrica. No lo rocíe con agua ni productos de limpieza. El
líquido podría hacer contacto con los componentes eléctricos
y causar un cortocircuito o una descarga eléctrica.
PRECAUCIÓN
Peligro de quemaduras
Deje que el equipo se enfríe antes de moverlo o limpiarlo.
AVISO: No use limpiadores que contengan amoniaco, alcohol,
AVISO: No use toallas de papel, materiales abrasivos,
AVISO: No use WD-40
1. Desenchufe la máquina. Deje que se enfríe.
2. Limpie la cámara de vacío, la tapa, la barra de sellado, el soporte de
3. Elimine totalmente los restos de detergente o limpiadores químicos
acetona o productos de limpieza en seco. Los limpiadores
con estos químicos dañarán el Plexiglas
otros plásticos, y dañarán el acabado.
limpiadores que rayen, hojas de afeitar, cepillos, lana de
acero ni esponjas metálicas, tales como almohadillas
Scotch Brite™, ya que dañarán el acabado.
®
industriales o comerciales, ya que dañarán el acabado.
silicona y el exterior con un paño suave, sin pelusas o de microfibra
y agua tibia, o con una mezcla de agua tibia y una pequeña cantidad
de detergente suave para loza.
suaves, ya que los residuos podrían corroer la superficie de la
unidad.
ni petróleo, ni productos de limpieza
®
, el acrílico y
ADVERTENCIA
Peligro de descarga eléctrica
Desenchufe la unidad antes de darle servicio.
AVISO: Todo el mantenimiento debe ser realizado por un técnico
AVISO: NO incline demasiado la máquina, ya que el aceite podría
El siguiente programa de mantenimiento es solo una pauta. Las
necesidades reales de mantenimiento variarán según el uso de la
máquina. Inspeccione su máquina regularmente.
Intervalo Procedimiento
Semanalmente
Semestralmente
Anualmente
Cada cuatro
años
Reemplace los alambres de sellado
y la cinta Teflon
Inspeccione la barra de sellado por si está dañada. Reemplace la cinta
de teflón o los alambres de sellado si la calidad del sello ya no es
suficiente o si la cinta de teflón o los alambres de sellado están
desgastados.
Herramientas necesarias:
• Destornillador Phillips
• Herramienta tensora o alicates
• Tijeras
• Paño de limpieza sin pelusa
• Cinta de teflón de repuesto
• Alambre de sellado de repuesto
1. Tire hacia arriba de la barra de sellado para extraerla de la máquina.
de servicio calificado.
salirse de bomba y dañar la máquina.
Verifique el nivel de aceite observando por
la mirilla de aceite.
Inspeccione la barra de sellado por si está
desgastada.
Inspeccione la almohadilla de sellado debajo
de la tapa por si está desgastada.
Inspeccione la tapa y su junta.
Reemplace el aceite en la bomba de vacío.
Comuníquese con los Servicios de asistencia
técnica de Vollrath.
Reemplace los alambres de sellado y la cinta
®
Teflon
.
Reemplace la almohadilla de sellado debajo
de la tapa.
Reemplace la junta de la tapa.
Inspeccione el filtro de escape de aceite.
Comuníquese con los Servicios de asistencia
técnica de Vollrath.
Reemplace la tapa, los resortes de gas y las
membranas del cilindro de sellado. Comuníquese
con los Servicios de asistencia técnica de Vollrath.
®
6 Manual para operadores de máquinas de envasado al vacío con barras de sellado dobles de 16" (40,6 cm)
Page 23

2. Retire la cinta de teflón que protege los alambres de sellado.
Reemplace la almohadilla de sellado
Inspeccione las almohadillas por si están rugosas. Reemplace la
almohadilla si tiene áreas rugosas.
Herramientas necesarias:
• Almohadilla de sellado de repuesto
• Tijeras
3. Retire los tornillos en la parte inferior de la barra de sellado.
4. Retire los alambres de sellado.
5. Retire la cinta de teflón de la barra de sellado.
6. Limpie la barra de sellado con un paño sin pelusa.
7. Corte un pedazo de cinta de teflón de repuesto a la misma longitud
que la barra de sellado.
8. Coloque la cinta de repuesto en la barra de sellado.
9. Corte alambres de sellado nuevos según el largo de la barra de
sellado, más unas 6" (15 cm).
10. Fije un alambre a un lado de la barra de sellado apretando el
tornillo.
1. Retire del soporte la almohadilla desgastada.
Almohadilla de sellado
2. Corte una almohadilla de sellado nueva del mismo largo que la
anterior. Una almohadilla demasiado corta o excesivamente larga
causará problemas de sellado.
3. Coloque la almohadilla nueva en el soporte. Cerciórese de que la
almohadilla esté colocada completa y uniformemente en la ranura.
4. Coloque la pieza nueva en el soporte de silicona. Cerciórese de que
la goma de silicona esté colocada completa y uniformemente en la
ranura.
Reemplace la junta de la tapa
La junta de la tapa garantiza que la cámara de vacío esté
completamente sellada durante el ciclo de envasado. Esto es esencial
para lograr el vacío máximo. La junta de la tapa se desgasta debido a
las diferencias extremas de presión y debe reemplazarse regularmente.
Herramientas necesarias:
• Junta de repuesto
• Tijeras
1. Retire la junta desgastada.
Junta de la tapa
11. Tire del alambre por la barra de sellado en forma recta y firme.
12. Fíjelo apretando el tornillo.
13. Repita los pasos 10 al 12 para el segundo alambre.
14. Corte los alambres.
15. Corte un trozo de cinta de teflón del mismo largo de la barra de
sellado, más unas 2" (5 cm).
16. Aplique la cinta suavemente sobre los alambres de sellado en la
barra de sellado.
17. Corte la cinta.
18. Vuelva a colocar la barra de sellado en la máquina. Verifique que la
barra de sellado esté encajada correctamente en el soporte.
Manual para operadores de máquinas de envasado al vacío con barras de sellado dobles de 16" (40,6 cm) 7
2. Corte una junta nueva un poco más larga que la anterior. Coloque la
junta nueva de manera que el reborde quede hacia abajo y afuera.
3. Presione uniformemente la junta en el surco.
4. Recorte la junta de modo que los extremos se junten
herméticamente para evitar fugas. Los extremos deben cortarse
rectos. Si la junta de la tapa es demasiado corta o larga, puede
causar problemas al cerrarse la tapa o pueden producirse fugas.
Page 24

SOLUCIÓN DE PROBLEMAS
Problema Podría deberse a Curso de acción
El panel de control no se ilumina. La máquina no está conectada a un tomacorriente. Conéctela al suministro eléctrico.
• El fusible principal está fundido.
• El fusible del tablero de circuitos está fundido.
El panel de control está encendido pero
no hay actividad tras cerrarse la tapa.
La tapa no se abre automáticamente. El resorte de gas está dañado.
• Es posible que deba ajustarse el microinterruptor de la tapa.
• El fusible del transformador de control está fundido.
• Es posible que deba ajustarse el microinterruptor de la tapa.
• Es posible que la bomba requiera servicios técnicos.
Es posible que la tapa no se haya abierto correctamente. Revise la tapa.
Comuníquese con los Servicios de
asistencia técnica de Vollrath.
El uso de la máquina ha alcanzado un cambio de aceite
programado.
Debe ejecutarse el programa de acondicionamiento de la bomba. Consulte las instrucciones en la página 6.
El vacío final no es suficiente. El tiempo de vacío fijado es demasiado corto. Extienda el tiempo de vacío.
Hay muy poco aceite en la bomba de vacío.
El orificio de extracción en la parte posterior de la cámara de
vacío está parcialmente cubierto por la bolsa de vacío durante la
extracción.
La junta de la tapa está desgastada. Reemplace la junta.
El aceite está contaminado. Comuníquese con los Servicios de
El filtro de escape de aceite está saturado.
La máquina extrae el aire muy
lentamente.
La bolsa de vacío no está sellada
correctamente.
El filtro de escape de aceite está saturado.
El filtro de extracción de la bomba está bloqueado.
La bolsa de vacío está colocada incorrectamente en la barra de
sellado.
El tiempo de sellado es demasiado largo o demasiado corto. Aumente o disminuya el tiempo de sellado.
La almohadilla de sellado debajo de la tapa está dañada o
desgastada.
La cinta de teflón está dañada. Reemplácela.
La abertura de la bolsa de vacío no está limpia. Limpie la abertura.
Comuníquese con los Servicios de
asistencia técnica de Vollrath.
Comuníquese con los Servicios de
asistencia técnica de Vollrath.
Coloque la bolsa de vacío más cerca de la
barra de sellado.
asistencia técnica de Vollrath.
Coloque la bolsa de vacío ordenada y
suavemente en la barra de sellado.
Cerciórese de que la abertura de la bolsa
esté siempre dentro de la cámara de vacío.
Reemplace la almohadilla de sellado.
SERVICIO Y REPARACIÓN
En Vollrath.com encontrará las piezas que puedan ser reparadas.
Para evitar lesiones o daños materiales graves, no trate de reparar la unidad ni reemplazar un cable eléctrico por su cuenta. No envíe las unidades
directamente a The Vollrath Company LLC. Pida instrucciones a los Servicios de asistencia técnica de Vollrath.
Al comunicarse con los servicios, esté listo para proporcionar el número de artículo, número de modelo (si corresponde), número de serie y el
comprobante de compra que muestre la fecha en que adquirió la unidad.
CLÁUSULA DE GARANTÍA DE THE VOLLRATH CO. L.L.C.
El período de garantía para las estufas de inducción serie Ultra es de 2 años.
Esta garantía no se aplica a los productos adquiridos para uso personal, familiar ni doméstico, y The Vollrath Company LLC no ofrece una garantía
por escrito a los compradores para dichos usos.
The Vollrath Company LLC garantiza los productos que fabrica o distribuye contra defectos en materiales y fabricación, según se especifica en
nuestra cláusula de garantía completa. En todos los casos, la garantía rige desde la fecha de compra original del usuario final que aparece en el
recibo. La garantía no cubrirá ningún daño que resulte del uso indebido, abuso, modificación o daños causados por el embalado incorrecto durante
la devolución para obtener servicio de reparación dentro del período de vigencia de la garantía.
Para obtener información de garantía, inscripción de productos y anuncios de productos nuevos, visite www.vollrath.com.
The Vollrath Company, L.L.C.
Servicios de asistencia técnica:
techservicereps@vollrathco.com
Productos de inducción: 800.825.6036
Productos de calentamiento para mostrador:
800.354.1970
Todos los demás productos: 800.628.0832
www.vollrath.com
1236 North 18th Street
Sheboygan, WI 53081-3201 EE. UU.
Tel. principal: 800.624.2051 ó 920.457.4851
Fax principal: 800.752.5620 ó 920.459.6573
Servicio al cliente: 800.628.0830
Servicio al cliente en Canadá: 800.695.8560
©
2020 The Vollrath Company L.L.C. Núm. pieza 26133-1 ml 2/27/20
 Loading...