

Page 1
ENGLISH
Operator’s Manual
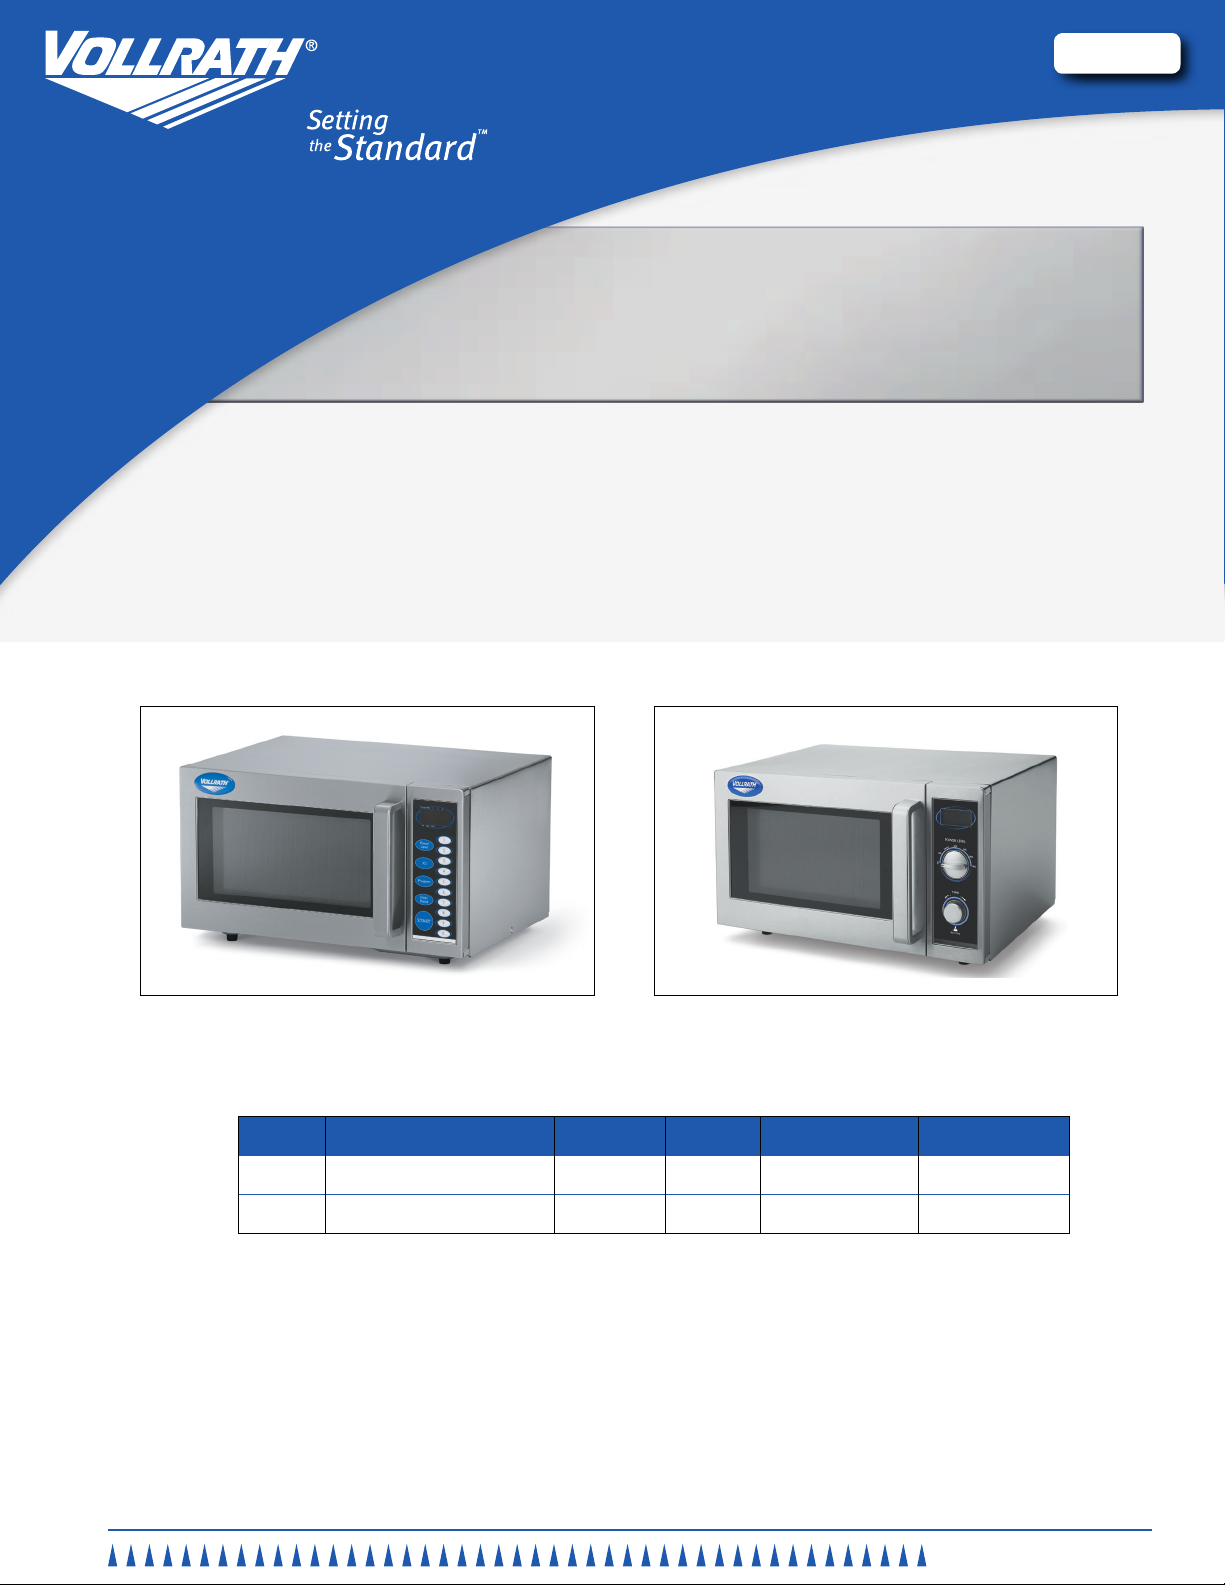
HEAVY DUTY COMMERCIAL MICROWAVE OVENS
Item Description Voltage Hz Watts Plug
40819 Microwave Oven 120V 60 1,000 (output) 5-15P
40830 Microwave Oven, Dial 120V 60 1,000 (output) 5-15P
Thank you for purchasing this Vollrath Counter Top Cooking Equipment. Before operating the equipment, read and familiarize yourself with
the following operating and safety instructions. SAVE THESE INSTRUCTIONS FOR FUTURE REFERENCE. Save the original box and
packaging. Use this packaging to ship the equipment if repairs are needed.
Item No. 2350044-1 Rev 09/10
Page 2

Countertop Cooking equipment
Safety PrecautionS
To ensure safe operation, read the following statements and understand
their meaning. Please read carefully.
WARNING
Warning is used to indicate the presence of a hazard that can cause
severe personal injury, death, or substantial property damage if the
warning is ignored.
CAUTION
Caution is used to indicate the presence of a hazard that will or can
cause minor personal injury or property damage if the caution is
ignored.
NOTE
Note is used to notify people of installation, operation, or maintenance
information that is important but not hazard-related.
For Your Safety!
These precautions should be followed at all times. Failure to follow
these precautions could result in injury to yourself and others.
WARNING
Fire and burn injuries or death can occur if this equipment is not used
properly.
To reduce the risk of burns, electric shock, re, and injury to persons or
exposure to excessive microwave energy:
Important Safety Instructions
To reduce risk of injury or damage to the equipment:
1. Read all instructions before using the appliance.
2. Read and follow the specic section : PRECAUTIONS TO AVOID
POSSIBLE EXPOSURE TO EXCESSIVE MICROWAVE ENERGY.
3. This appliance must be grounded. Connect only to properly grounded
outlet. Read and follow the section: UNPACKING THE EQUIPMENT AND
INITIAL SETUP.
4. Install or locate this appliance only in accordance with the provided
installation instructions.
5. Some products such as whole eggs and sealed containers – for example,
closed glass jars – are able to explode and should not be heated in this
oven.
6. Use this appliance only for its intended use as described in this manual. Do
not use corrosive chemicals or vapors in this appliance. This type of oven is
specically designed to heat, cook, or dry food.
7. Do not operate unattended. Closely supervise units operating in public
areas and/or around children.
8. Do not operate this appliance if it has a damaged cord or a plug, if it is not
working properly or if it has been damaged or dropped.
9. This appliance should be serviced only by qualied service personnel,
contact nearest authorized service facility for examination, repair, or
adjustment.
10. Do not cover or block any openings on the appliance.
11. Do not store or use this appliance outdoors. Do not use this product
near water, for example, near a kitchen sink, in a wet basement, near a
swimming pool, or similar locations.
12. Do not immerse cord or plug in water. Keep cord away from heated surface.
Do not let cord hang over edge of table or counter.
13. When cleaning surfaces of door and oven that comes together on closing
the door, use only mild, nonabrasive soaps, or detergents applied with a
sponge or soft cloth.
14. To reduce the risk of re in the oven cavity:
a. Do not overcook food. Carefully attend appliance when paper, plastic,
or other combustible materials are placed inside the oven to facilitate
cooking.
b. Remove wire twist-ties from paper or plastic bags before placing bag
in oven.
c. If materials inside the oven should ignite, keep oven door closed, turn
oven off, and disconnect the power cord or shut off power at the fuse or
circuit breaker panel.
d. Do not use the cavity for storage purposes. Do not leave paper
products, cooking utensils or food in the cavity when not in use.
15. Liquids, such as water, coffee, or tea are able to be overheated beyond
the boiling point without appearing to be boiling due to surface tension of
the liquid. Visible bubbling or boiling when the container is removed from
the microwave oven is not always present. This could result in very hot
liquids suddenly boiling over when the container is disturbed or a utensil
is inserted into the liquid. To reduce the risk of injury to person:
a. Do not overheat the liquid.
b. Stir the liquid both before and halfway through heating it.
c. Do not use straight-sided containers with narrow necks.
d. After heating, allow the container to stand in the microwave oven for a
short time before removing the container.
e. Use extreme care when inserting a spoon or other utensil into the
container.
16. Do not use an extension cord with this equipment. Do not plug this
equipment into a power strip or multi-outlet power cord.
17. Have equipment installed by a qualied personnel in accordance with
local codes and ordinances.
18. Use equipment in a at, level position.
19. Turn off and unplug equipment, let it cool before cleaning or moving.
20. Do not spray controls or outside of equipment with liquids or cleaning
agents.
21. Do not clean the equipment with steel wool.
22. Keep equipment and power cord away from open ames, electric
burners or excessive heat.
23. Pierce foods with heavy skins such as potatoes, whole squash, apples,
chestnuts and etc., before cooking.
24. The contents of feeding bottles and baby jars should be stirred or shaken
and the temperature should be checked before serving, in order to avoid
burns.
25. Cooking utensils may become hot because of heat transferred from the
heated food. Pot holders may be needed to handle the utensil.
26. Use only thermometers which are specically designed for use in
microwave ovens.
27. SAVE THESE INSTRUCTIONS.
PrecautionS to avoid PoSSible exPoSure to exceSSive
Microwave energy
1. Do not attempt to operate this oven with the door-open, since, open-door
operation can result in harmful exposure to microwave energy. Do not to
modify or tamper with the safety interlocks.
2. Do not place any object between the oven front face and the door or
allow soil or cleaner residue to accumulate on sealing surfaces.
2
OperatOr’s Manual
Page 3
Countertop Cooking equipment
3. Do not operate the oven if it is damaged. It is important that the oven
door closes properly and that there is no damage to the:
featureS and controlS
a. Door (bent).
b. Hinges and latches (broken or loosened).
c. Door seals and sealing surfaces.
4. The oven should not be adjusted or repaired by anyone except properly
qualied service personnel.
C
function and PurPoSe
This unit is intended to be used for heating/cooking fresh or frozen foods
in commercial foodservice operations only. It is not intended for household,
commercial, or laboratory use.
unPacking the equiPMent and initial SetuP
When no longer needed, dispose of all packaging and materials in an
environmentally responsible manner.
Before using this equipment it must be cleaned thoroughly. Clean all surfaces
before use. Failure to clean surfaces before using the unit could cause food
contamination.
1. Remove all packing material and tape, as well as any protective plastic
from the unit. Clean any glue residue left over from the plastic or tape.
2. Check the oven for any damage, such as misaligned or bent door,
damaged door seals and sealing surface, broken or loose door hinges
and latches and dents inside the cavity or on the door. If there is any
damage, do not operate the oven but contact qualied service personnel.
3. This microwave oven must be placed on a at, level, and stable surface
to hold its weight and the heaviest food likely to be heated/cooked in the
oven.
4. Do not place the oven where heat, moisture, or high humidity are
generated, or near combustible materials.
5. For correct operation, the oven must have sufcient airow. Allow 8”
(20 cm) of space above the oven, 4” (10 cm) at the back and 2” (5 cm)
on each side. Do not cover or block any openings on the appliance. Do
not remove feet on which oven stands.
6. Make sure that the power supply cord is undamaged and does not run
under the oven or over any hot or sharp surface.
7. The electrical plug must be readily accessible so that it can be easily
unplugged in an emergency.
8. Plug equipment into a properly grounded electrical supply matching the
nameplate rating. Damage to the equipment can occur if incorrect power
is supplied to equipment. After the oven is plugged in, beeping and blue
background light indicates the oven is ready for input.
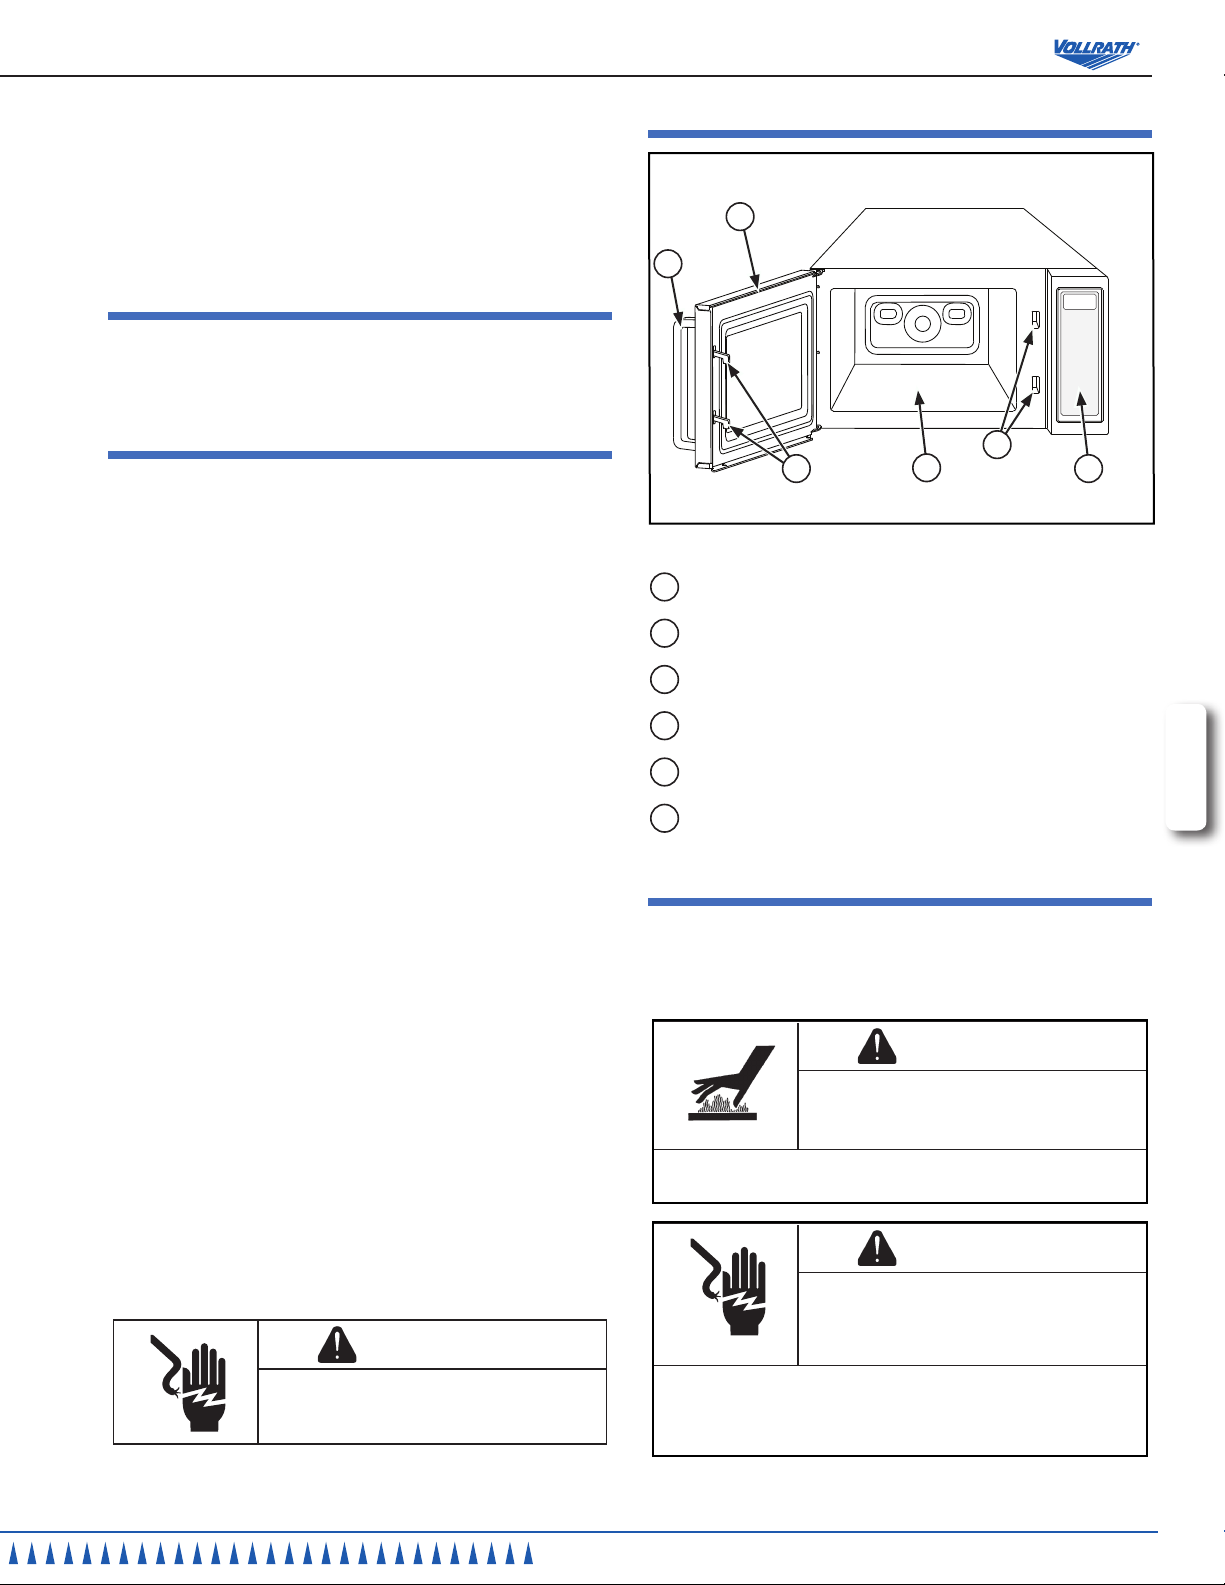
Figure 1. Features and Controls.
A
CONTROL PANEL
B
OVEN FLOOR
C
DOOR HANDLE
D
DOOR
E
DOOR SAFETY LATCH
F
DOOR LATCH OPENINGS
oPeration
There are two microwave ovens covered by this manual. The manual control
model features a manual power selection knob, a manual time/start/stop
knob and a digital display. The digital control model features push-button
controls and a digital display.
D
F
E
B
A
ENGLISH
WARNING
Burn Hazard.
Do not touch hot food, liquid or heating containers
with bare hands after heating or cooking.
grounding instruCtions
Hot surfaces, steam and food can burn skin. Use gloves, mitts or
pot holders when removing or handling containers from oven.
This appliance must be grounded. In the event of an electrical short circuit,
grounding reduces the risk of electric shock by providing an escape wire
for the electric current. This appliance is equipped with a cord having a
grounding wire with a grounding plug. The plug must be plugged into an
outlet that is properly installed and grounded.
WARNING
Electrical Shock Hazard.
Improper grounding can result in a risk of electric
shock.
Do not spray water or cleaning products. Liquid could contact the
electrical components and cause a short circuit or an electrical
shock. Do not use equipment if power cord is damaged or has been
modied.
WARNING
Electrical Shock Hazard.
Keep water and other liquids from entering the
inside of the equipment. Liquid inside the equipment
could cause an electrical shock.
OperatOr’s Manual
3
Page 4
Countertop Cooking equipment
Manual control Model
The control panel consists of two manual function controls and a digital display.
One is a timer control knob, and another a power control knob.
A
B
Time Control Adjustment Increments
10 second increment from 0 minutes to 5 minutes
30 second increment from 5 minutes to 10 minutes
1 minute increment from 10 minutes to 30 minutes
5 minute increment from 30 minutes to 60 minutes
NOTE:
Pressing the Time Control repeatedly will set the time up
to 12 minutes. During the operation the power and time
may be changed.
To begin a heating/cooking session:
1. Place the food product in oven and close the door.
2. Turn the Power Selector Control to select a power level.
3. Use the Time Control to set a cooking time
4. Press the TIME Control to start.
digital control Model
The control panel consists digital control buttons and a digital display.
C
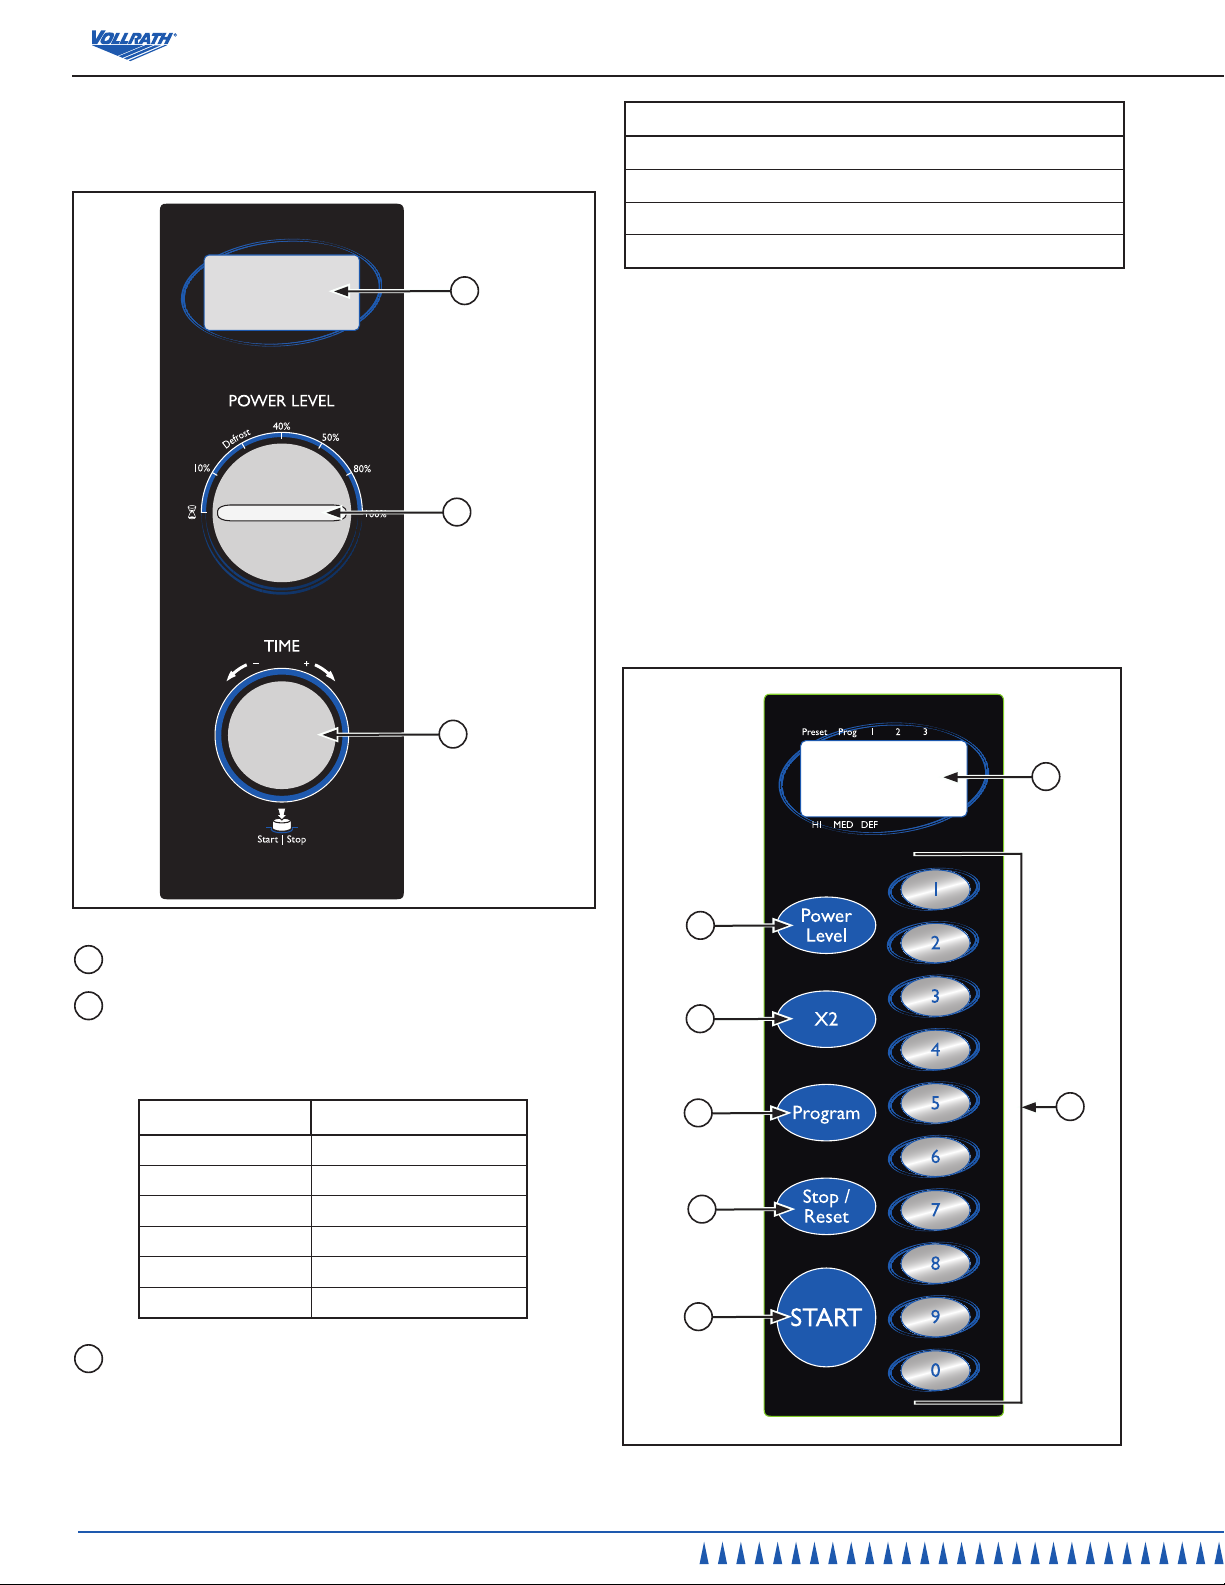
Figure 2. Manual Control Model Control Panel.
A
CONTROL PANEL. Displays the power level, time and program.
B
POWER SELECTOR CONTROL. Rotate the dial to select the level of
power. Use this control to choose a power level. There are 6 power levels
to choose from. Power level increases by turning the knob clockwise. The
power levels can be classied as the following:
Power Output Description
100% High
80% Medium High
50% Medium
40% Medium Low
Defrost (30%) Defrost
10% Low
A
D
E
F
G
C
B
4
C
TIME SET/START/STOP CONTROL. Rotate the dial to set the time for
heating/cooking. Turn the time knob to select a desired heating/cooking
time up to 60 minutes per cooking session. Pressing the time knob will
start a heating/cooking session. During cooking, press the time knob
once to stop heating/cooking and press it again to restart the heating/
cooking cycle.
OperatOr’s Manual
Figure 3. Digital Control Model Control Panel.
Page 5

Countertop Cooking equipment
A
CONTROL PANEL. Displays the power level, time and program.
B
NUMBER BUTTONS. Used to set the heating/cooking time and select
program(s).
C
START BUTTON. Press once to start the heating/cooking cycle.
D
POWER LEVEL BUTTON. Used to select the power level. The power
To begin a heating/cooking session using preset X2 power level and
time programs:
1. In ready mode, press X2 and then one of the ten number buttons to
recall the X2 preset cooking program. The following are the default
settings for the X2 number key programs:
Number Button Preset Time Preset Power Level
level is indicated in the digital display.
Press Power Level Button Power Level
1 Time High
2 Times Medium
3 Times Defrost
E
X2 BUTTON. Used to recall or save a cooking program to a number
key.
F
PROGRAM BUTTON. Used to set a heating/cooking program.
G
STOP/RESET BUTTON. Used to stop or reset a heating/cooking
session. Pressing this button once during heating/cooking will stop the
session, pressing this button twice will end the session.
To begin a heating/cooking session manually programming the time
and power level:
1. Place the food product in oven and close the door.
2. Press the Power Level Button and select a power level. Press the
Number Button(s) to set cooking time; maximum 99 minutes and 99
seconds.
3. Press the Start Button to start.
2. Press the Start Button to start.
Creating and Recalling Programs
You can save frequently used cooking programs to a number key and recall
at a later time. While each number key is factory preset, the user is able to
reset the cooking program stored under each of the ten number keys. Each
program may contain up to three stages of consecutive cooking periods
with different power levels. To designate a number key to a user dened
program, take the following steps:
Example: To set a cooking program and save it to number button 1.
1. In ready mode, press Program Button once.
2. Press the number “1” Number Button.
3. Use Power Level Button to set the desired cooking power.
To begin a heating/cooking session using preset power level and time
programs:
Each of the number keys is factory preset with a heating/cooking program.
1. In ready mode, press one of the ten number buttons for a preset
program, power level and time:
Number Button Preset Time Preset Power Level
1 :10 High
4. Use Number Buttons to set desired cooking time.
5. Press Program Button to save.
You can set a two or three stage cooking program by repeating steps 3 and 4
once or twice again before pressing Program Button, step 5. When complete,
the screen will display the total cooking time by pressing Start Button.
NOTE:
To start program immediately after you press any of the number keys,
press and hold down the Start Button for 5 seconds.
2 :20 High
3 :30 High
4 :45 High
5 1:00 High
6 1:30 High
7 2:00 High
8 2:30 High
9 3:00 High
0 3:30 High
2. Press the Start Button to start.
Recall Cycles of Operation
You can read the count of how many times the oven has been used. To do
this:
1. Open the door.
2. Press and hold the Stop/Reset Button and press the Power Level Button.
The number on the display shows how many times the oven has been
used.
This function can be useful for the operator to analyze the usage of the oven
and the trafc ow at a particular location where the oven is being used
commercially.
1 :20 High
2 :40 High
3 1:00 High
4 1:30 High
5 2:00 High
6 3:00 High
7 4:00 High
8 5:00 High
9 6:00 High
0 7:00 High
ENGLISH
OperatOr’s Manual
5
Page 6

Countertop Cooking equipment
Control Panel Lock
In ready mode, press and hold the Program Button for 5 seconds. The panel is
locked and intermittent pressing of the buttons will have no effect.
To release the panel lock:
In ready mode, press and hold Program for 5 seconds, the oven returns to
normal operation.
6. Breads, pastries and pies are drier than typical foods and therefore
7. Do not overheat your food: 99% of the food quality complaints of
heating/cooking tiPS
The Following Items are NOT RECOMMEND for use in the Microwave
Oven:
Glass jars and bottles — Regular glass is too thin to be used in a
microwave. It can shatter and cause damage and injury.
Paper bags — Paper and paper bags are a re hazard, except for
popcorn bags that are designed for microwave use.
Styrofoam plates and cups — Styrofoam can melt and leave an unhealthy
residue on the food.
Plastic storage and food containers — Containers not specically
designed and intended for microwaves, such as margarine tubs, can melt
in the microwave.
Metal utensils — Metal can damage your oven. Remove all metal and foil
before cooking.
Metal food containers – Metal containers will not allow proper cooking in
the microwave and can also damage the appliance.
8. Factors determine the success of microwave food preparation include:
cleaning
temperatures continue to rise slightly in foods heated in this oven.
Always verify the food has been cooked to required temperatures with
a food thermometer.
may heat slower. They also tend to be overheated with resulting poor
quality therefore, baked foods should only be heated until the crust is
warm to the touch, 113°F - 131°F (45°C - 55°C).
microwave heated foods can be traced to overheating.
a) Temperature of foods: frozen or refrigerated food items require
longer heating times to reach a desired serving temperature than foods
from room temperature.
b) Food components: foods high in sugar, salt, fats and moisture
content heat faster because these properties attract microwave energy.
Denser foods high in protein and ber absorb microwave energy slower
which means a lengthier heating time.
c) Bulk/volume: the greater the mass of food, the longer it takes to heat.
d) Containers: Heating foods with either high sugar or high fat content
should be done only in high temperature resistant containers since
these foods get very hot. Low temperature restaurant glass or plastic
platters may crack or warp under similar conditions. Do not heat food in
a sealed container or bag. Foods expand when heated and can break
the container or bag.
e) Heated liquids can erupt if not mixed with air. Do not heat liquids in
your microwave oven without rst stirring.
DEFROSTING FROZEN FOODS
1. If you try to completely defrost frozen foods in the microwave oven, uneven
defrosting may occur due to the differences in the thickness and shape of
the food. Drippings may also result, and sometimes a part of the food cooks
although other parts still remain frozen. In actual usage of frozen foods, you
should not normally completely defrost food, but 70% defrosting in the oven
may be helpful for the next step of preparing the food for cooking.
2. To defrost evenly, turn over or rearrange the food during defrosting.
3. To defrost fatty meat, heat for a short time in the oven and leave it to stand
at room temperature, or heat it intermittently until defrosted.
4. When you defrost a whole chicken, or any frozen food of irregular shape,
wrap legs or thin parts with aluminum foil. Otherwise thin parts will be
defrosted faster and sometimes cooked before other parts have properly
defrosted. For big pieces of meat, wrap the sides with aluminum foil so that
they will be uniformly thawed by vertical microwaves only.
5. Ice should be removed at times during defrosting.
FOR BEST RESULTS
1. When determining time for particular foods, always consider the minimum
cooking time and check occasionally during cooking for progress. The
microwave oven cooks quickly, therefore it is easy to overcook your foods.
2. Be careful of the cooking time for small quantities of foods, or foods with
low water content. Food may burn if cooked too long.
3. Do not use the oven for drying kitchen towels or napkins. Items may burn if
heated too long.
4. Open the door and give the dish a half turn, or turn the food over during
cooking. This helps to achieve more even cooking. When you cook chicken
the legs cook faster than other parts. Wrap the legs with aluminum foil
during cooking to reect the microwave energy in order to create even
cooking.
5. Remember that after the heating cycle has been completed, internal food
To maintain the appearance and increase the service life, clean your
equipment daily.
Hot surfaces, steam and food can burn skin. Use gloves, mitts or
pot holders when removing or handling containers from oven.
Do not spray water or cleaning products. Liquid could contact the
electrical components and cause a short circuit or an electrical
shock. Do not use equipment if power cord is damaged or has been
modied.
NOTE:
Do not clean the equipment with steel wool.
1. Turn off the oven and unplug before cleaning.
2. Do not immerse cord, plug or unit in water or any other liquid.
3. Keep the inside of the oven clean using a damp cloth.
4. For stubborn splatters or spills, mild soap and water can be used.
WARNING
Burn Hazard.
Do not touch hot food, liquid or heating containers
with bare hands after heating or cooking.
WARNING
Electrical Shock Hazard.
Keep water and other liquids from entering the
inside of the equipment. Liquid inside the equipment
could cause an electrical shock.
6
OperatOr’s Manual
Page 7

Countertop Cooking equipment
Avoid the use of harsh cleaners as they can damage the surface of the
oven.
5. The outside surfaces should be cleaned with a damp cloth. Do NOT
allow water to seep into ventilation openings.
6. Do NOT allow control panel to get wet. Use a damp cloth and keep door
open to prevent the unit from accidentally turning on.
Service and rePair
There are no user serviceable parts within this appliance. To avoid serious
injury or damage, never attempt to repair the equipment or replace a
damaged power cord yourself. Do not send equipment directly to the Vollrath
Company. Please contact the qualied professional repair service listed
below.
VOLLRATH Technical Service • 1-800-628-0832
warranty StateMent for the vollrath co. l.l.c.
The Vollrath Company LLC warrants the products it manufactures and distributes against defects in materials and workmanship for a period of one year, except as specically
provided below. The warranty runs 12 months from the date of original installation. (End user receipt)
1. Refrigeration compressors – The warranty period is 5 years.
2. Replacement parts – The warranty period is 90 days.
3. Fry pans and coated cookware – The warranty period is 90 days
4. EverTite™ Riveting System – The warranty covers loose rivets
only, forever.
5. Cayenne® Heat Strips – The warranty period is 1 year plus an
additional 1 year period on heating element parts only.
6. Ultra and Professional Induction Ranges – The warranty period
is 2 years.
7. Mirage and Commercial Induction ranges - The warranty period
is 1 year.
8. ServeWell® Induction Workstations – The warranty period is one
year on the workstation table and 2 years on induction hobs.
9. Slicers – The warranty period is 10 years on gears and 5 years
on belts.
10. Mixers – The warranty period is 2 years.
11. Extended warranties are available at the time of sale.
12. Boxer Mixers – 1 Year exchange Warranty.
13. Vollrath – Redco products – The warranty period is 2 years.
14. Optio / Arkadia product lines – The warranty period is 90 days.
15. All non-stick products (i.e. fry pans and surfaces) are 90 days for
the non stick surfaces.
THIS WARRANTY IS IN LIEU OF ANY OTHER WARRANTIES, EXPRESS OR IMPLIED, INCLUDING ANY IMPLIED WARRANTY OF
MERCHANTABILITY OR FITNESS FOR A PARTICULAR PURPOSE
All products in the Jacob’s Pride® collection, including
the following, have a lifetime warranty:
• NSF Certied One-Piece Dishers
• NSF Certied Spoodle® Utensils
• NSF Certied Heavy-Duty Spoons with
Ergonomic Handle
• NSF Certied Heavy-Duty Basting Spoons
• Heavy duty Turners with Ergonomic handle
• One-Piece Tongs*
• Heavy-Duty One-Piece Ladles*
• Nylon Handle Whips
• One-Piece Skimmers
• Tribute®, Intrigue®, and Classic Select®
Cookware*
*Jacob’s Pride® warranty does not cover Kool-Touch®,
non stick coatings and silicone handles.
Items sold having no warranty:
• Meat Grinder Knives
• Light Bulbs in Convection Ovens and
Hot Food Merchandiser
• Oven Door Seals
• Oven Door Glass
• Hot Food Merchandisers / Display Case
Glass
• Calibration and set up of gas equipment
• Slicer / Dicer blades (table top food
prep) – Redco and Vollrath
ENGLISH
As The Vollrath Company LLC’s only responsibility and the purchaser’s only remedy, for any breach of warranty, The Vollrath Company LLC will repair or, at its option, replace the
defective product or part without charge, except as otherwise provided below:
• For refrigeration compressors and the second year of the warranty on Cayenne® Heat Strips and mixers, The Vollrath Company LLC will provide the repaired
or replacement part only; and the buyer will be responsible for all labor charges incurred in performing the repair or replacement.
• To obtain warranty service, the buyer will be responsible to return to The Vollrath Company LLC any product (other than gas equipment that is permanently
installed) weighing less than 110 lbs. or located outside of a 50-mile radius of a certied technician designated by The Vollrath Company LLC to perform
warranty repairs. If a Vollrath Technician cannot be contacted check the website for service contact points. (Please refer to the Product Catalogue for weights
and sizes of product)
• No remedy will be available for products that have been damaged by accident, carelessness, improper installation, lack of proper setup or supervision
when required, neglect, improper use, installation or operation contrary to installation and operating instructions or other causes not arising out of defects in
materials or workmanship. At the buyer’s request, The Vollrath Company LLC will repair and or replace such products at a reasonable cost.
• No remedy will be available for slicers where blade has not been sharpened (Refer to owner’s manual for sharpening instructions)
• No remedy will be available for mixers damaged by changing gears while unit is running or overloading, in either case as determined by a Vollrath Certied
Technician
• Warranty work must be authorized in advance by The Vollrath Company LLC. See the operating and safety instructions for each product for detailed
warranty claim procedures.
• No remedy will be available for product returned and found to be acceptable to the product specication.
• No remedy will be available under any warranty not registered as required below.
LIMITATION OF LIABILITY:
THE VOLLRATH COMPANY LLC SHALL HAVE NO LIABILITY FOR INCIDENTAL OR CONSEQUENTIAL DAMAGES OF ANY KIND,
WHETHER BASED UPON NEGLIGENCE OR OTHER TORT, BREACH OF WARRANTY, OR ANY OTHER THEORY.
OperatOr’s Manual
7
Page 8

Warranty proCedure
On all warranty calls, the following process and information is required:
• All warranty claims will start with a call to Vollrath Technical Service support line.(800-628-0832).
• A technical support professional will work to diagnose the issues, and provide the details for the service solution.
• Name and phone number of person calling
• Business name, street address, city, state and zip
• Model and serial number
• Date of purchase and proof of purchase (Receipt)
• Name of dealer where unit was purchased
NOTE: Vollrath will not accept products sent without the proper procedure being followed.
Important:
TO MAKE A CLAIM FOR ANY REMEDY UNDER THIS WARRANTY, YOU MUST REGISTER YOUR WARRANTY.
register today
ONLINE: Register your warranty on-line now at www.Vollrathco.com
NO WEB ACCESS: If you do not have access to the web, kindly register by completing the warranty registration form and faxing it to The Vollrath Co. LLC ofce in the country of
purchase.
warranty regiStration
Business name
key ContaCt name email
street address
City state Zip Code
Country phone Fax
model item numBer
serial numBer - -
operation type
R Limited Service Restaurant R Full Service Restaurant R Bars and Taverns R Supermarket
R Convenience Store R Recreation R Hotel/Lodging R Airlines
R Business/Industry R Primary/Secondary School R Colleges/University R Hospitals
R Long-Term Care R Senior Living R Military R Corrections
reason For seleCting our produCt
R Appearance R Full Service Restaurant R Availability R Sellers Recommendation
R Ease of Operation R Versatility of Use R Price R Brand
Would you like to reCeive our Full-line Catalog and remain on our mailing list? R Yes R No
www.vollrathco.com
The Vollrath Company, L.L.C.
1236 North 18th Street
Sheboygan, WI 53081-3201
U.S.A.
Main Tel: 800.628.0830
Fax: 800.752.5620
Technical Services: 800.628.0832
Service Fax: 920.459.5462
Canada Service: 800.695.8560
© 2010 The Vollrath Company, L.L.C.
 Loading...