

Page 1
Owner's manual
Publication -
By purchasing this Volkswagen, you have become the owner of a vehicle fitted with the most up-to-date
technology and a multitude of convenience functions for your use and enjoyment.
Before using your vehicle for the first time, please read and observe the information in this owner's
manual. It will quickly help you to become familiar with your vehicle and all of its functions as well as
making you aware of dangers to yourself and others and of how these dangers can be avoided.
If you have any further questions about your vehicle, or if you think that the vehicle wallet has not
covered everything, please get in touch with your Volkswagen dealership. They will always be happy to
deal with your questions, suggestions or problems.
We hope you enjoy driving your new vehicle. Happy motoring.
Volkswagen AG
WARNING
Please observe the important safety instructions for use of child restraint systems on the front passenger
seat
(→ Child seats)
Thank you for choosing Volkswagen
10.03.2020
Page 2

This owner's manual is valid for all model types and versions of your Volkswagen. The owner's manual
describes all equipment and models without indicating whether the equipment is optional or specific to the
model type. This means that your vehicle may not have some of the equipment described, or it may only be
available in certain markets. The scope of equipment fitted in your vehicle can be found in the sales
documentation and you can contact your Volkswagen dealership for further information.
A passenger car is described in this owner’s manual.
Depending on the market-specific vehicle approval, the model version may also be a light commercial
vehicle.
All data in this owner's manual correspond to the information available at the time of going to print.
Because the vehicle is constantly being developed and further improved, there may be differences between
your vehicle and the data in this owner's manual. No discrepancy in data, illustrations or descriptions shall
form the basis for any legal claim.
Please ensure that the complete vehicle wallet is always in the vehicle if you lend or sell the vehicle to
someone else.
— An alphabetical index is included at the end of this manual.
— A list of abbreviations at the end of the manual explains the abbreviations used.
— Directions and positions such as left, right, front and rear are normally relative to the vehicle's direction
of travel, unless otherwise indicated.
— Illustrations help with orientation and should be regarded as a general guide.
— This owner's manual was written for left-hand drive vehicles. In right-hand drive vehicles the controls
may sometimes differ from those displayed in illustrations or described in the text.
— Values given in miles instead of kilometres or mph instead km/h refer to the country-specific instrument
clusters or Infotainment systems.
— Short definitions appear in a different colour before some sections of this manual. They provide a
summary of the function and use of a system or feature. More detailed information about the features,
conditions and limitations of systems and equipment can be found in the relevant sections.
— Any technical changes that may be made to the vehicle after publication of this booklet are contained in a
supplement that is included with the vehicle wallet.
Booklets in the vehicle wallet:
— Owner's manual
— Supplement (optional)
—
Other supplements
About this owner's manual
Page 3
Refers to a section within a chapter that contains important information and safety notes that
should always be observed.
Indicates the end of a section.
Indicates situations in which the vehicle must be stopped as quickly as possible.
The symbol indicates a registered trademark. However, the absence of this symbol does not
constitute a waiver of the rights concerning any term.
→
Symbols like these refer you to warnings within the same section or on a given page. They draw your
attention to possible risks of accident or injury and explain how they can be avoided.
→
→
→
Cross reference to potential risks of damage to property in the same section or on the page specified.
DANGER
Texts with this symbol indicate dangerous situations which will lead to fatal or severe injuries if you do not
observe the warning.
WARNING
Texts with this symbol indicate dangerous situations which could lead to fatal or severe injuries if you do
not observe the warning.
CAUTION
Texts with this symbol indicate dangerous situations which could lead to slight or medium injuries if you
do not observe the warning.
NOTICE
Texts with this symbol indicate situations which could cause vehicle damage if you do not observe the
warning.
Texts with this symbol contain additional information on the protection of the environment.
Texts with this symbol contain additional information.
Description of symbols
Page 4
Vehicle overviews
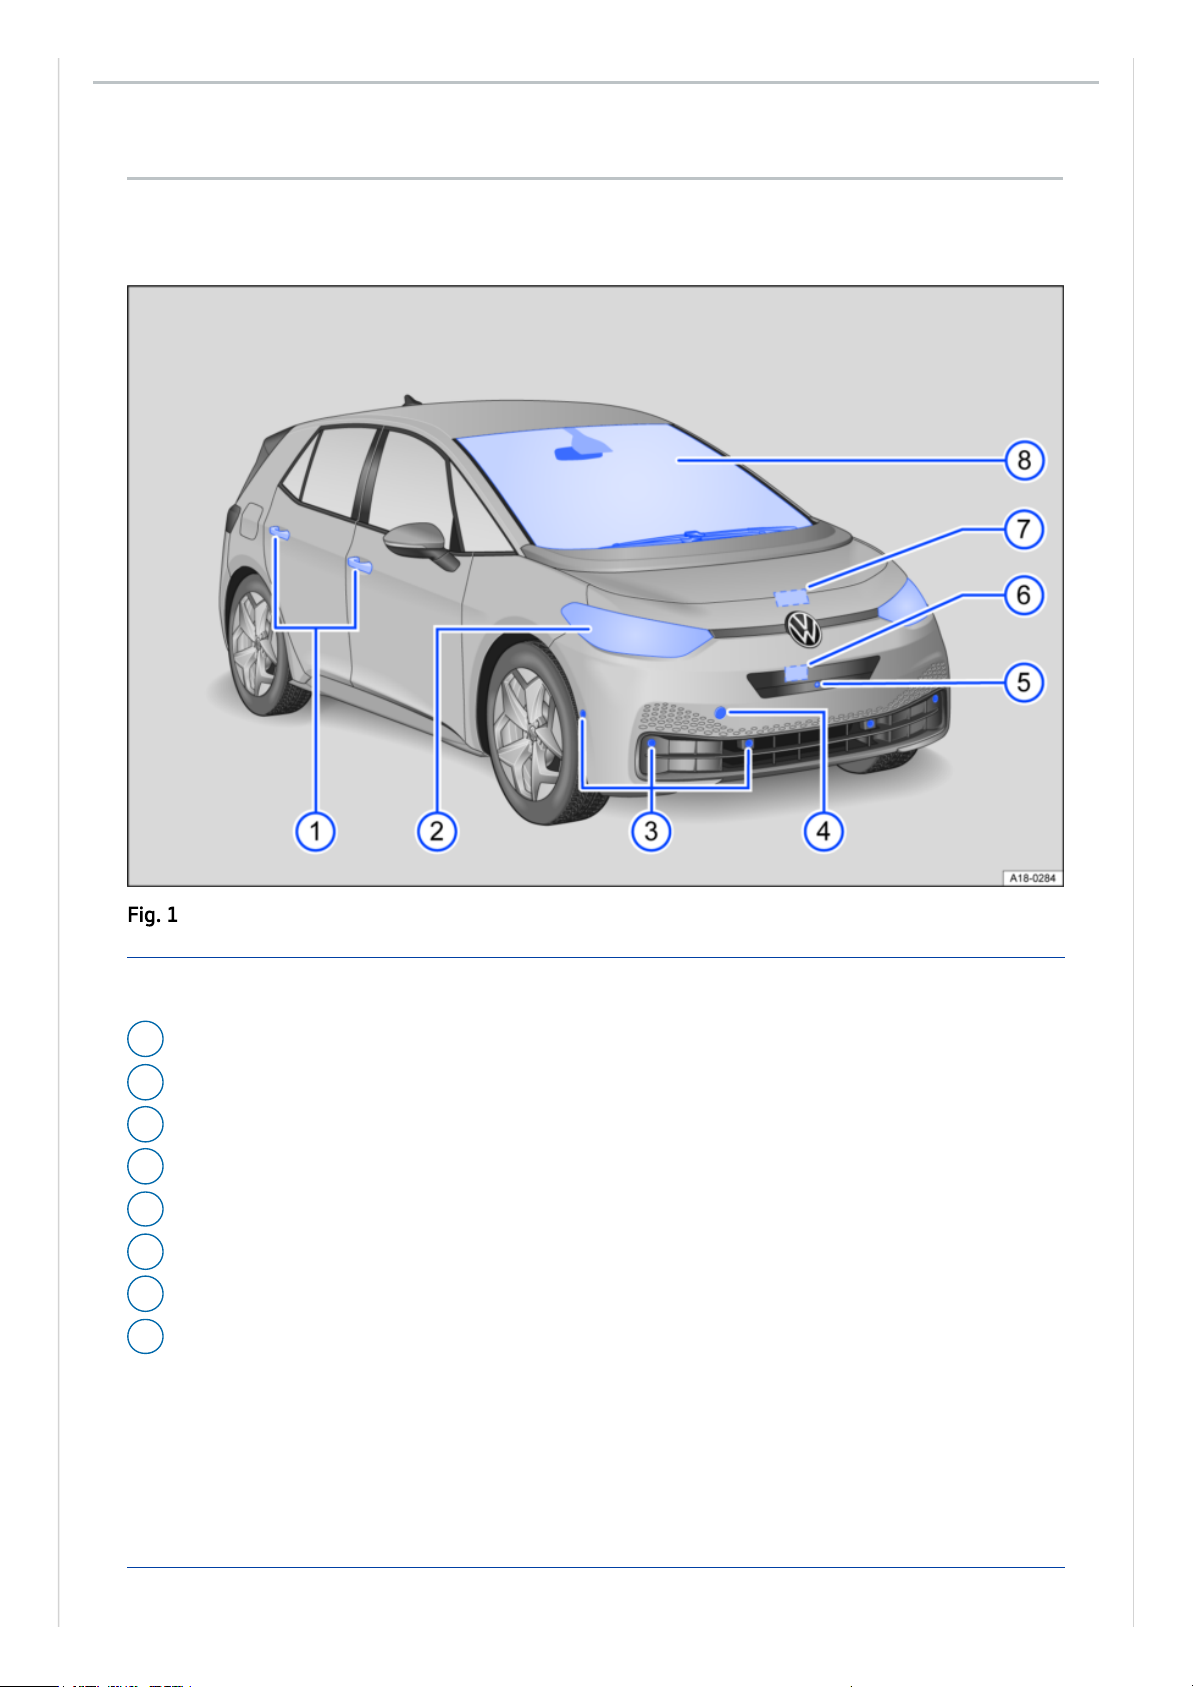
Front view
Fig.1Overview of vehicle from front.
Key to
Fig.1
:
1 Door release lever
(→ Doors)
2 Headlights
(→ Exterior lighting)
3 Sensors for assist systems
(→ Vehicle care, exterior)
4 Behind a cover: mounting for towing eye
(→ Tow-starting or towing)
5
Behind a cover: camera for assist systems
(→ Vehicle care, exterior)
6 Behind a cover: radar sensor for assist systems
(→ Vehicle care, exterior)
7 Bonnet release lever with front compartment underneath
(→ In the engine compartment)
8
Windscreen:
— with vehicle identification number
(→ Technical data)
— with windscreen wiper
(→ Wipers)
— with camera window for assist systems
(→ Vehicle care, exterior)
— with rain/light sensor positioned near the interior mirror
(→ Rain and light sensor), (→
Vehicle care, exterior)
Page 5
Rear view
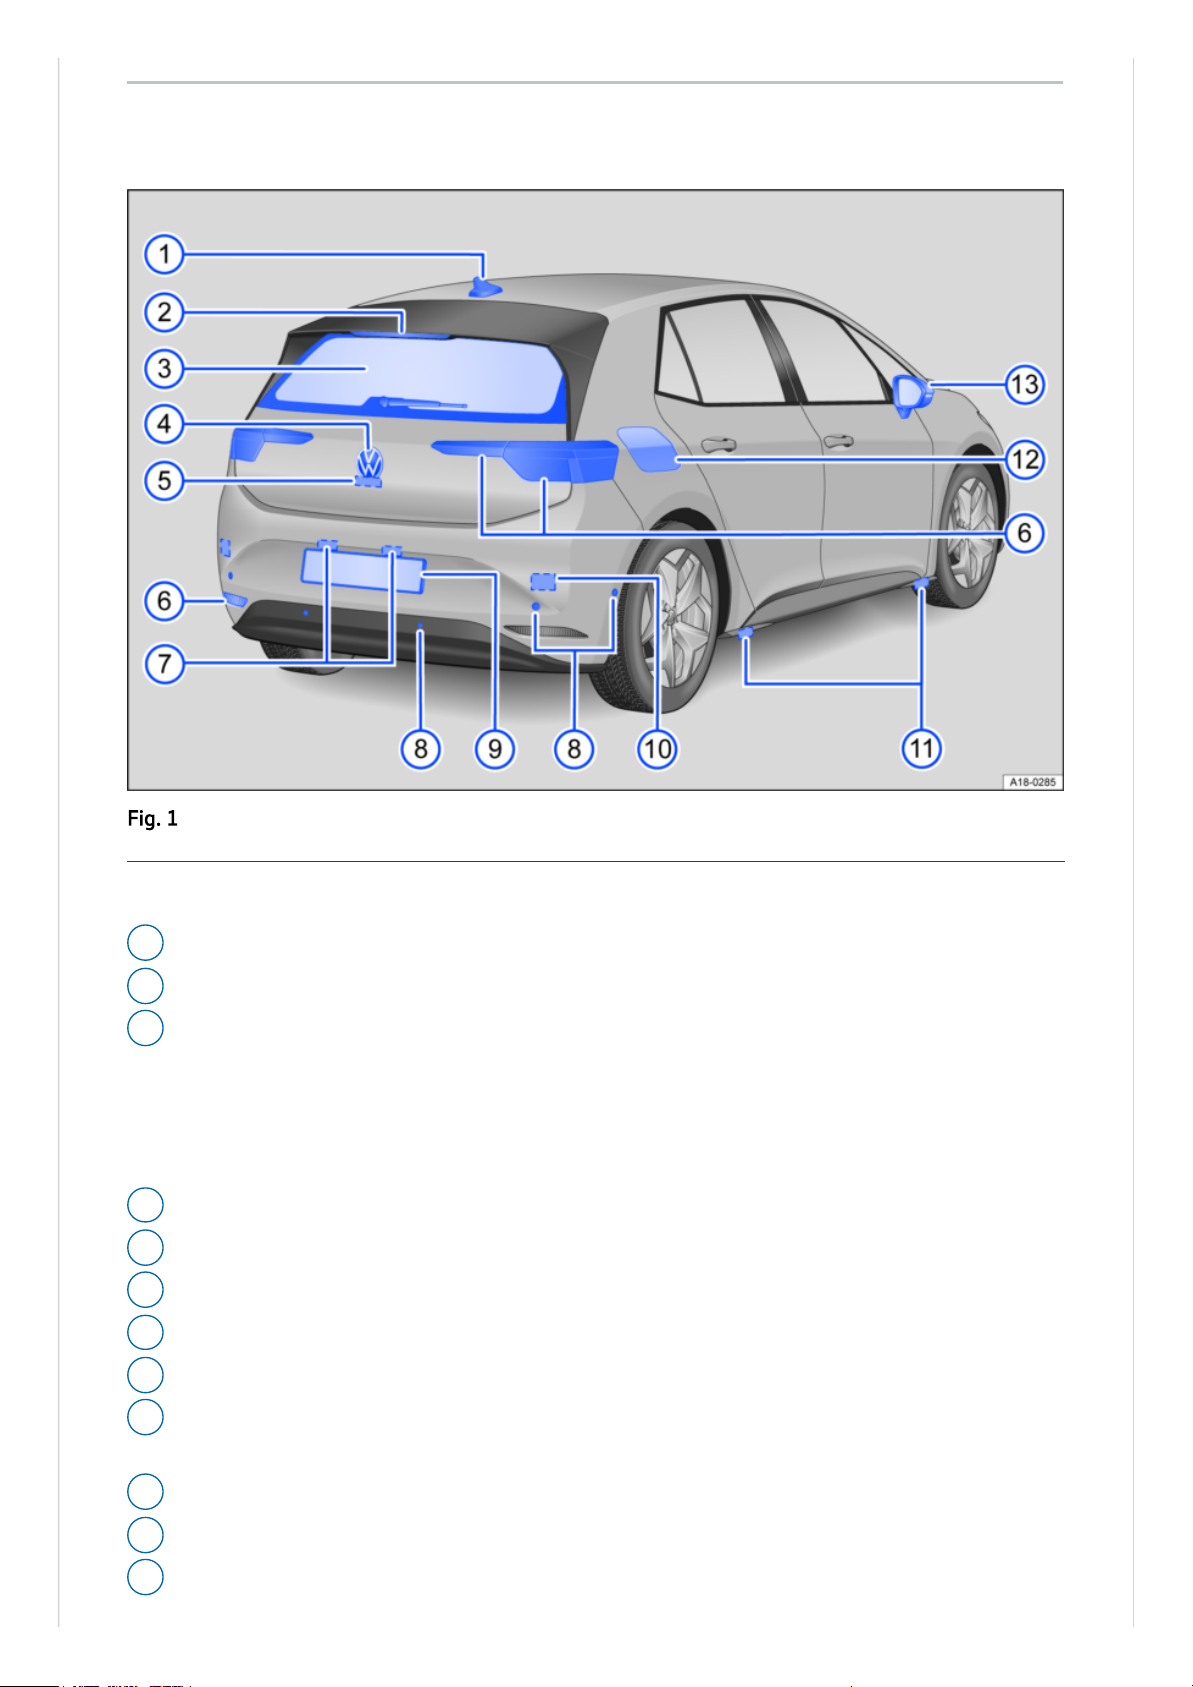
Fig.1Overview of vehicle from rear.
Key to
Fig.1
:
1 Roof aerial
(→ Radio reception and aerials)
2 High-level brake light
3 Rear window:
— with rear window heating
(→ Heating, ventilation, cooling)
— with rear window wiper
(→ Wipers)
— with window aerial
(→ Radio reception and aerials)
4
Volkswagen badge for opening the boot lid
(→ Boot lid)
5 Camera area for parking systems
(→ Rear view camera system), (→ Vehicle care, exterior)
6 Tail light clusters and reflectors
(→ Exterior lighting)
7
Number plate light
(→ Exterior lighting)
8 Sensors for assist systems
(→ Vehicle care, exterior)
9 Behind the hinged number plate holder: bicycle carrier preparation
(→ Provision for bicycle
carrier)
10 Behind the bumper: radar sensor for assist systems
(→ Vehicle care, exterior)
11 Jacking points
(→ Changing a wheel)
12 Charging socket flap
(→ Charging operations)
Page 6

13 Exterior mirrors
(→ Exterior mirrors)
— with “lane change system” display
(→ Lane change system (Side Assist))
Page 7
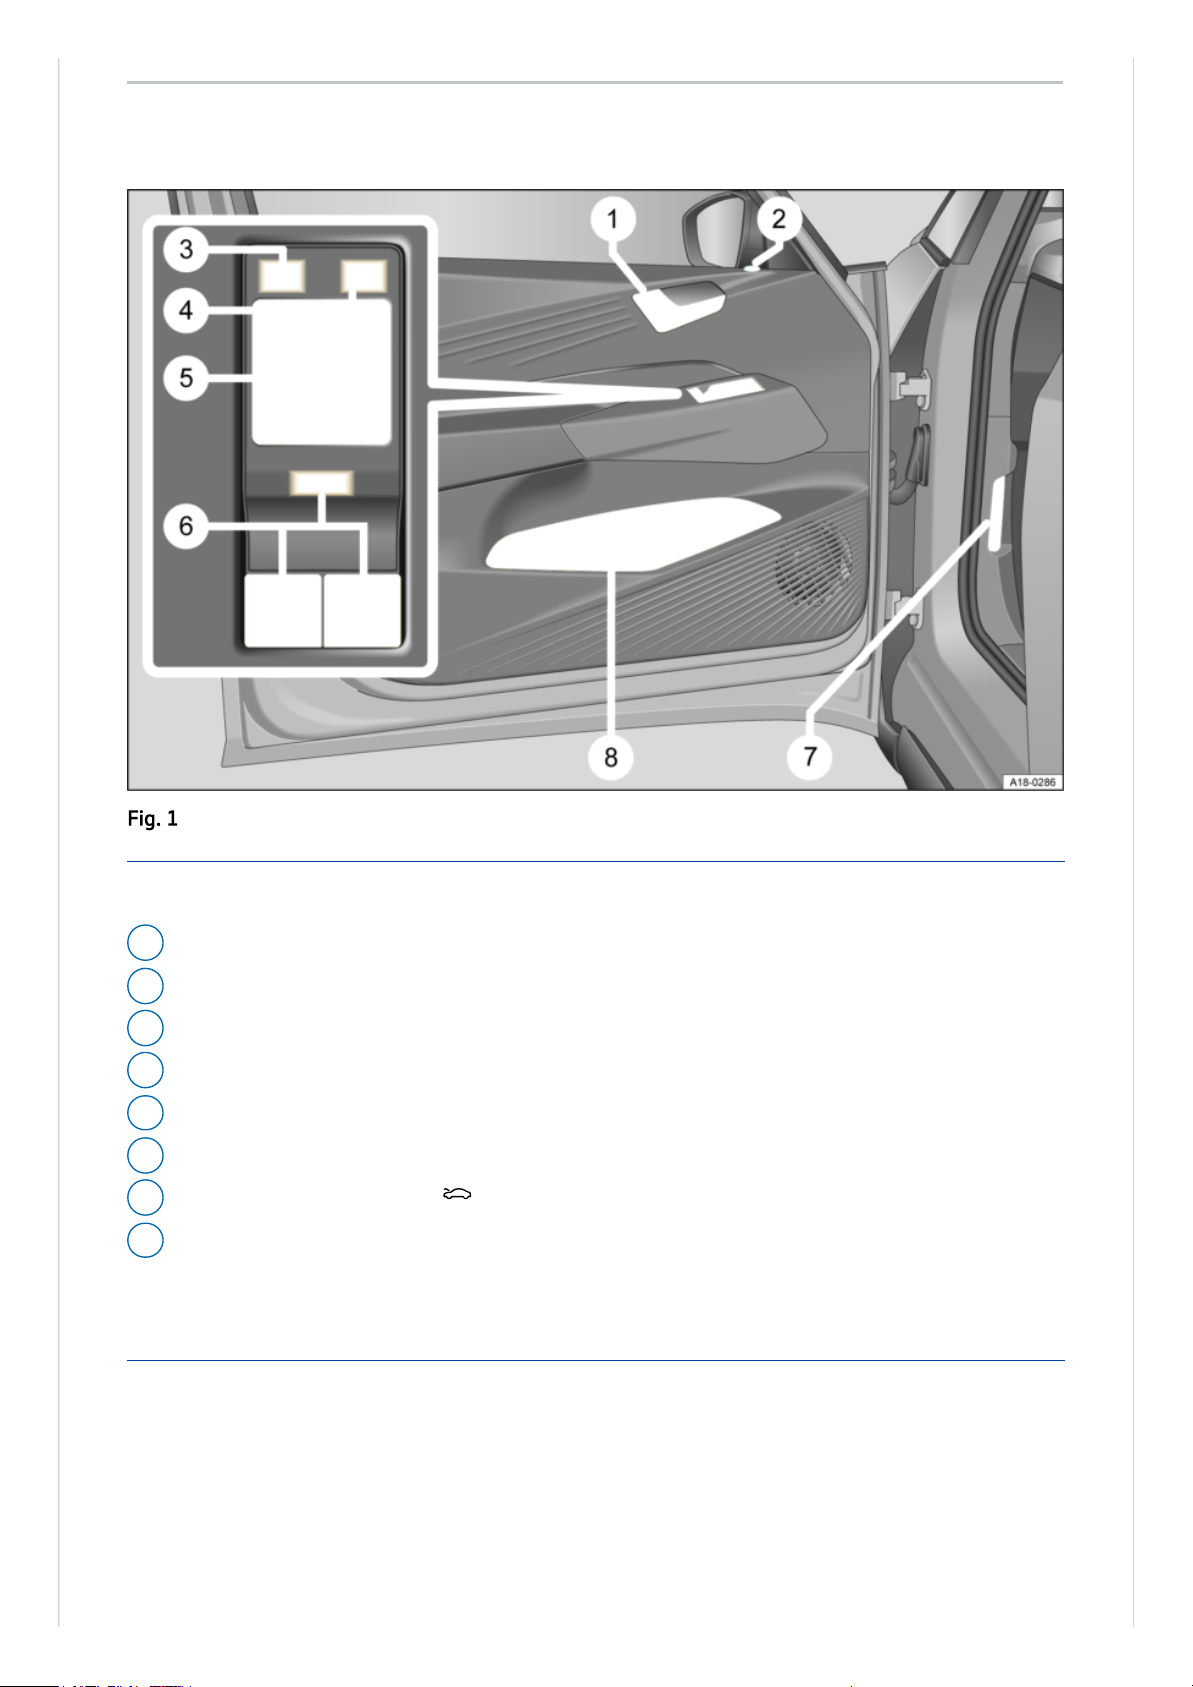
Driver door
Fig.1Driver door (left-hand drive vehicles): controls (mirrored for right-hand drive vehicles).
Key to
Fig.1
:
1 Door release lever
2 Central locking system indicator lamp
(→ Indicator lamp in the driver door)
3 Control field for deactivating the rear electric window buttons
(→ Windows)
4 Control field for locking and unlocking the vehicle
(→ Central locking button)
5
Rotary knob for exterior mirror adjustment and functions
(→ Exterior mirrors)
6 Buttons for operating the electric windows
(→ Windows)
7 Release lever for the bonnet
(→ In the engine compartment)
8
Stowage compartment:
— with bottle holder
— with stowage facility for high-visibility waistcoat
(→ Emergency equipment)
Page 8
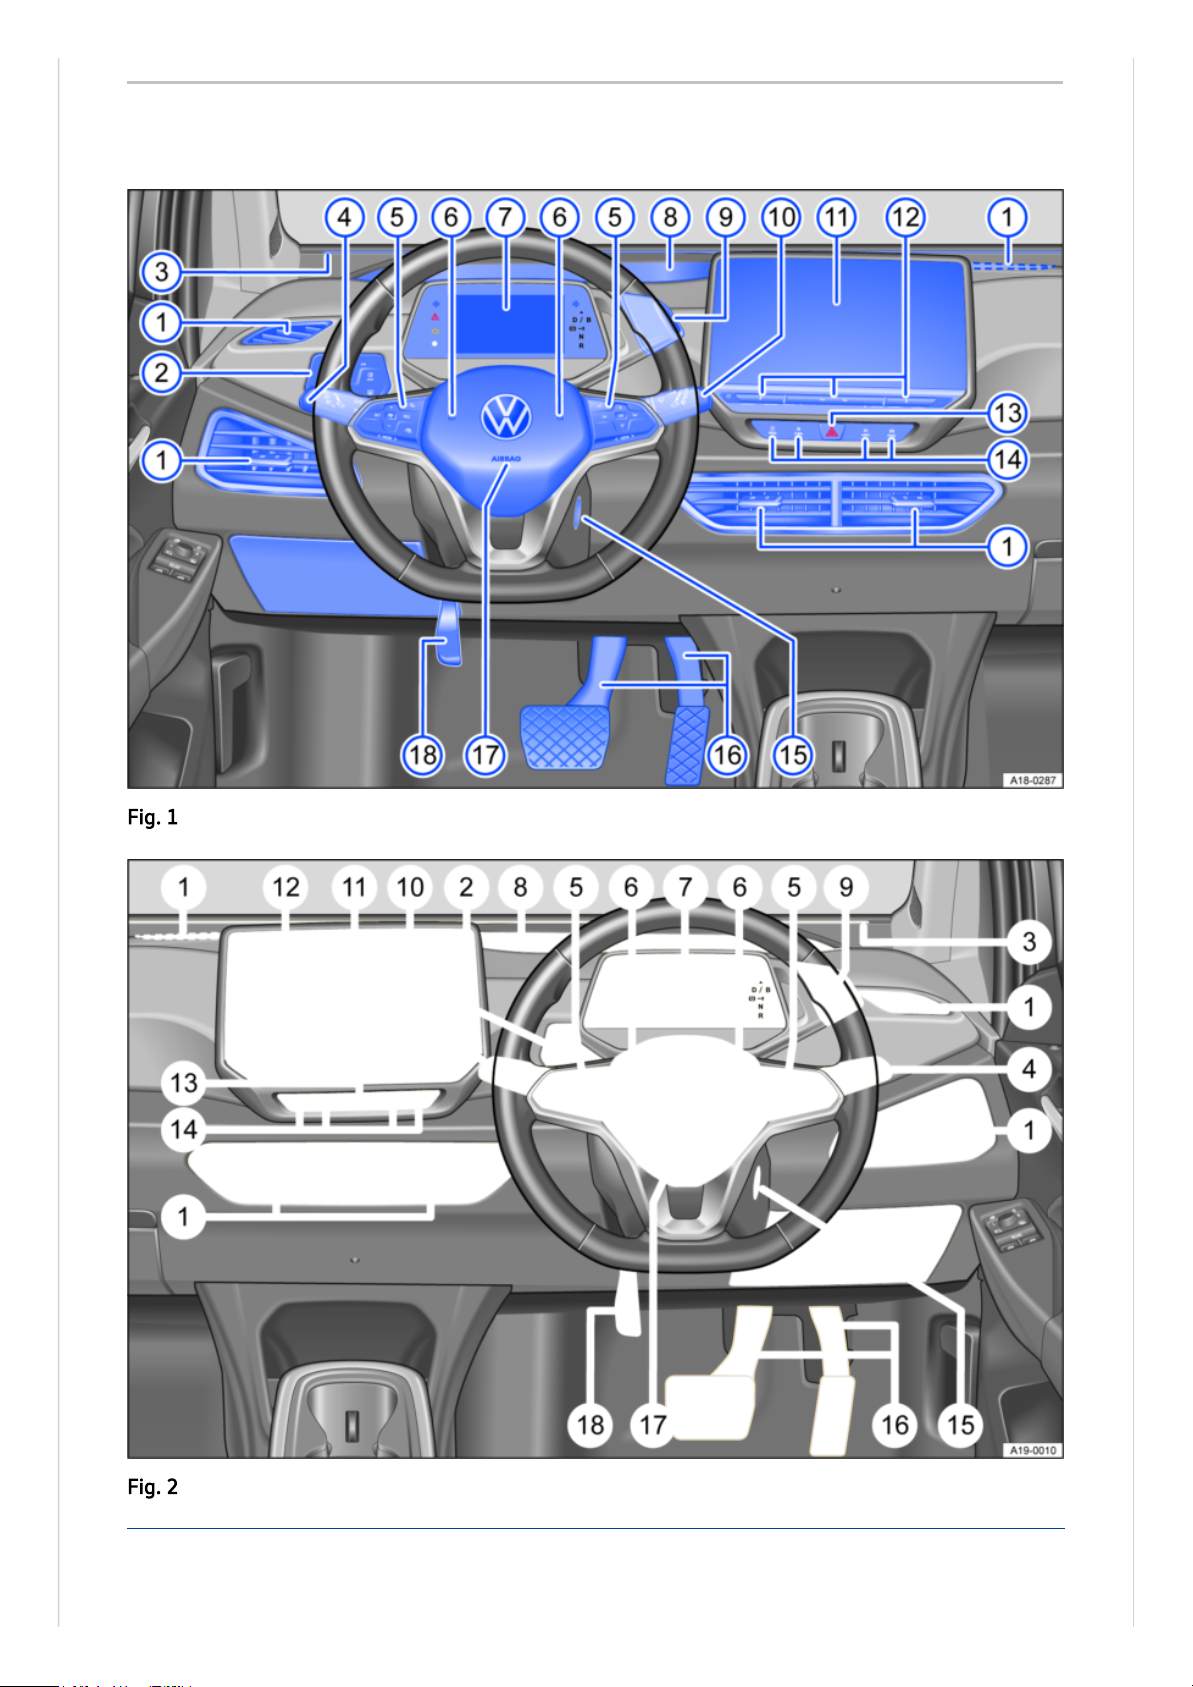
Driver side
Fig.1Overview of the driver side (left-hand drive vehicles).
Fig.2Overview of the driver side (right-hand drive vehicles).
Key to
Fig.1
and
Fig.2
:
Page 9

1 Vent
(→ Heating, ventilation, cooling)
2 Control panel:
— for light functions
(→ Exterior drive lighting)
— for window heating and ventilation
(→ Heating, ventilation, cooling)
3 Interactive Light
(→ Driver information)
4 Turn signal and main beam lever
(→ Turn signals), (→ Main beam)
5 Control panels of the multifunction steering wheel:
— for driver assist systems
(→ Driver assist systems)
— for audio, navigation
— for volume adjustment
— for activating voice control (function may not be available depending on vehicle
equipment)
— for switching between the views of the ID.Display
(→ Digital instrument cluster (AID))
6 Horn
7 ID.Display
(→ Digital instrument cluster (AID)), (→ Instrument cluster)
— with warning and indicator lamps
(→ Symbols in the instrument cluster)
8 Head-updisplay
(→ Head-up display)
9 Position switch
(→ Driving mode selection for electric vehicles)
— with button for electronic parking brake
(→ Electronic parking brake)
10 Lever for wipers and washers
(→ Wipers)
11 Infotainment system
(→ Vehicle settings menu)
12
Control panel:
— for setting temperature of air conditioning system or heating and fresh air system
(→
Heating, ventilation, cooling)
— for volume adjustment
13 Control area for switching the hazard warning lights on and off
(→ In an emergency)
14 Control panel:
— for the air conditioning system, heating and fresh air system
(→ Heating, ventilation,
cooling)
— for driving profile selection
(→ Driving profile selection)
— for driver assist systems
(→ Driver assist systems)
— for assist systems for parking and manoeuvring
(→ Parking and manoeuvring)
15 Starter button
(→ Starter button)
16 Pedals
(→ Pedals)
17 Location of the driver front airbag
(→ Airbag system)
18 Lever for adjusting the steering column position (→ Steering wheel)
Page 10

Page 11
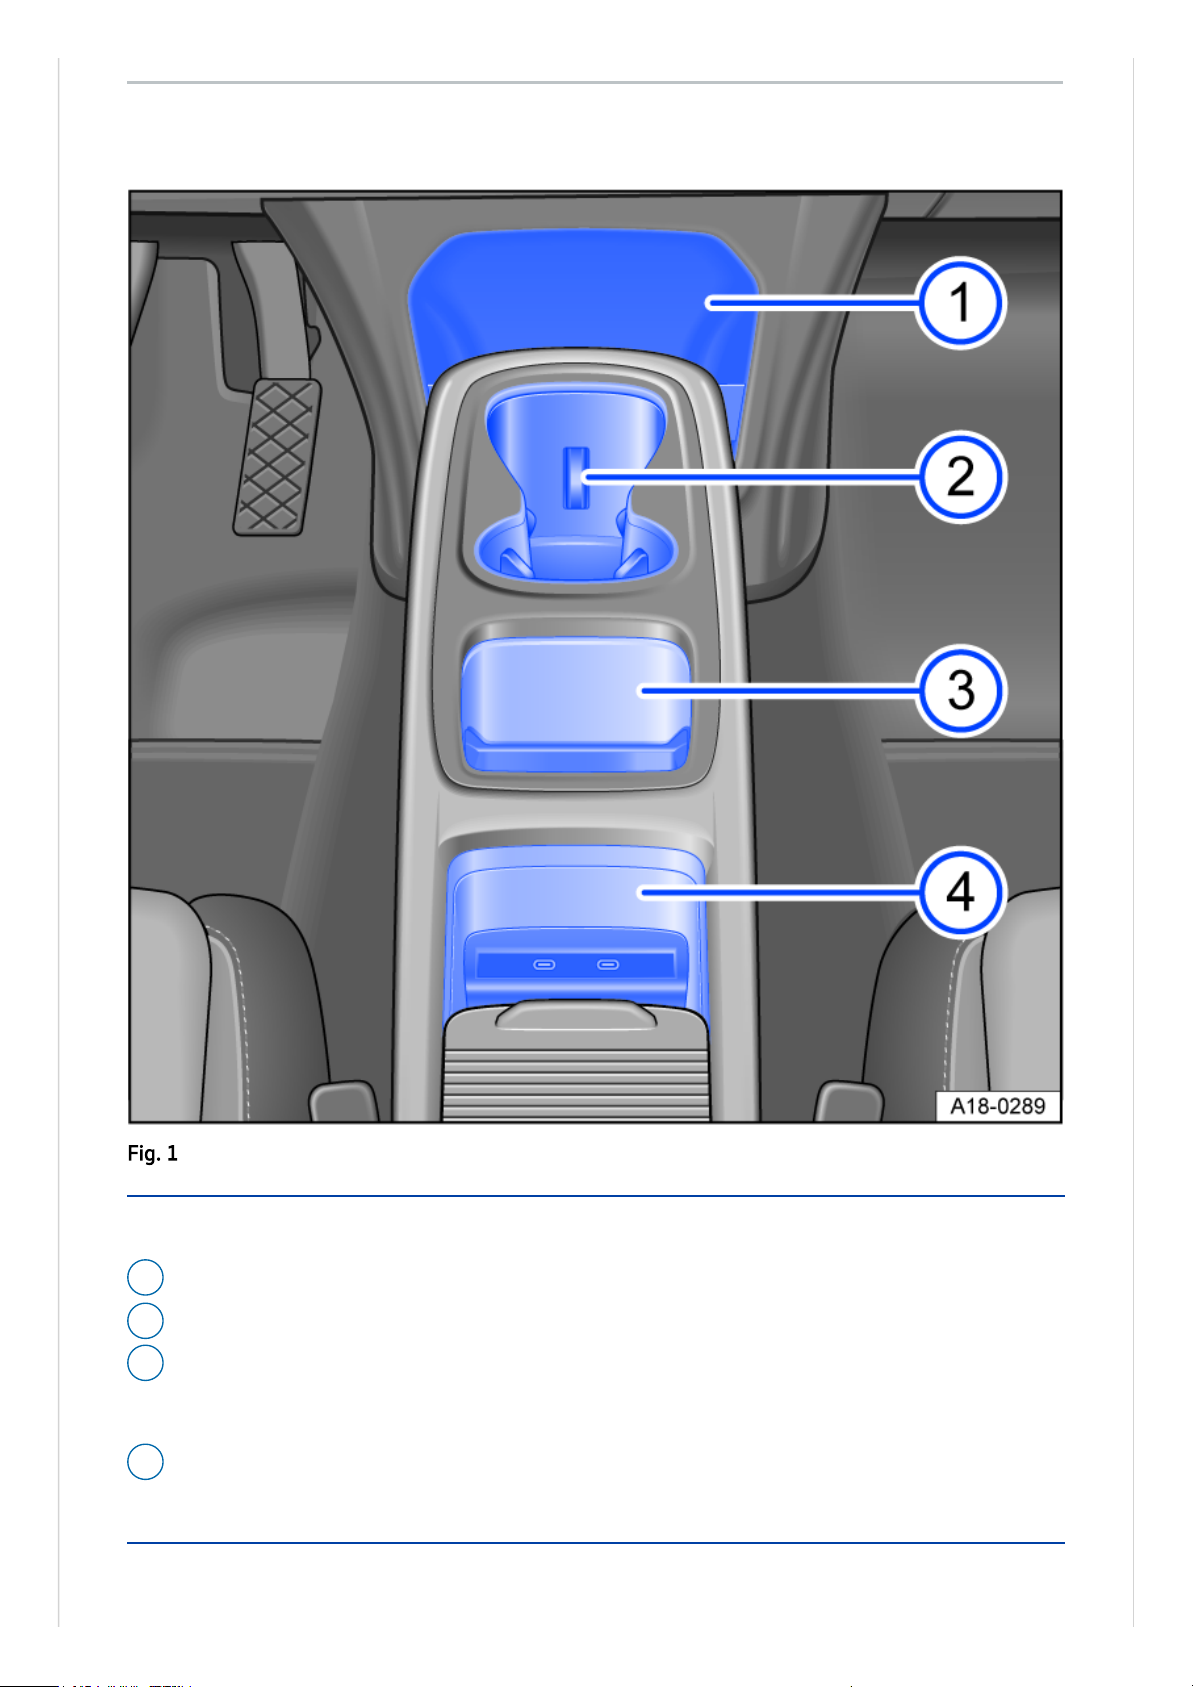
Centre console
Fig.1Overview of the lower section of the centre console (left-hand drive vehicles).
Key to
Fig.1
:
1 Stowage compartment
2 Drink holders
3 Stowage compartment
— With phone interface
(→ Mobile phone interface)
4 Under a cover: stowage compartment
— with USB ports
(→ Media connection)
Page 12
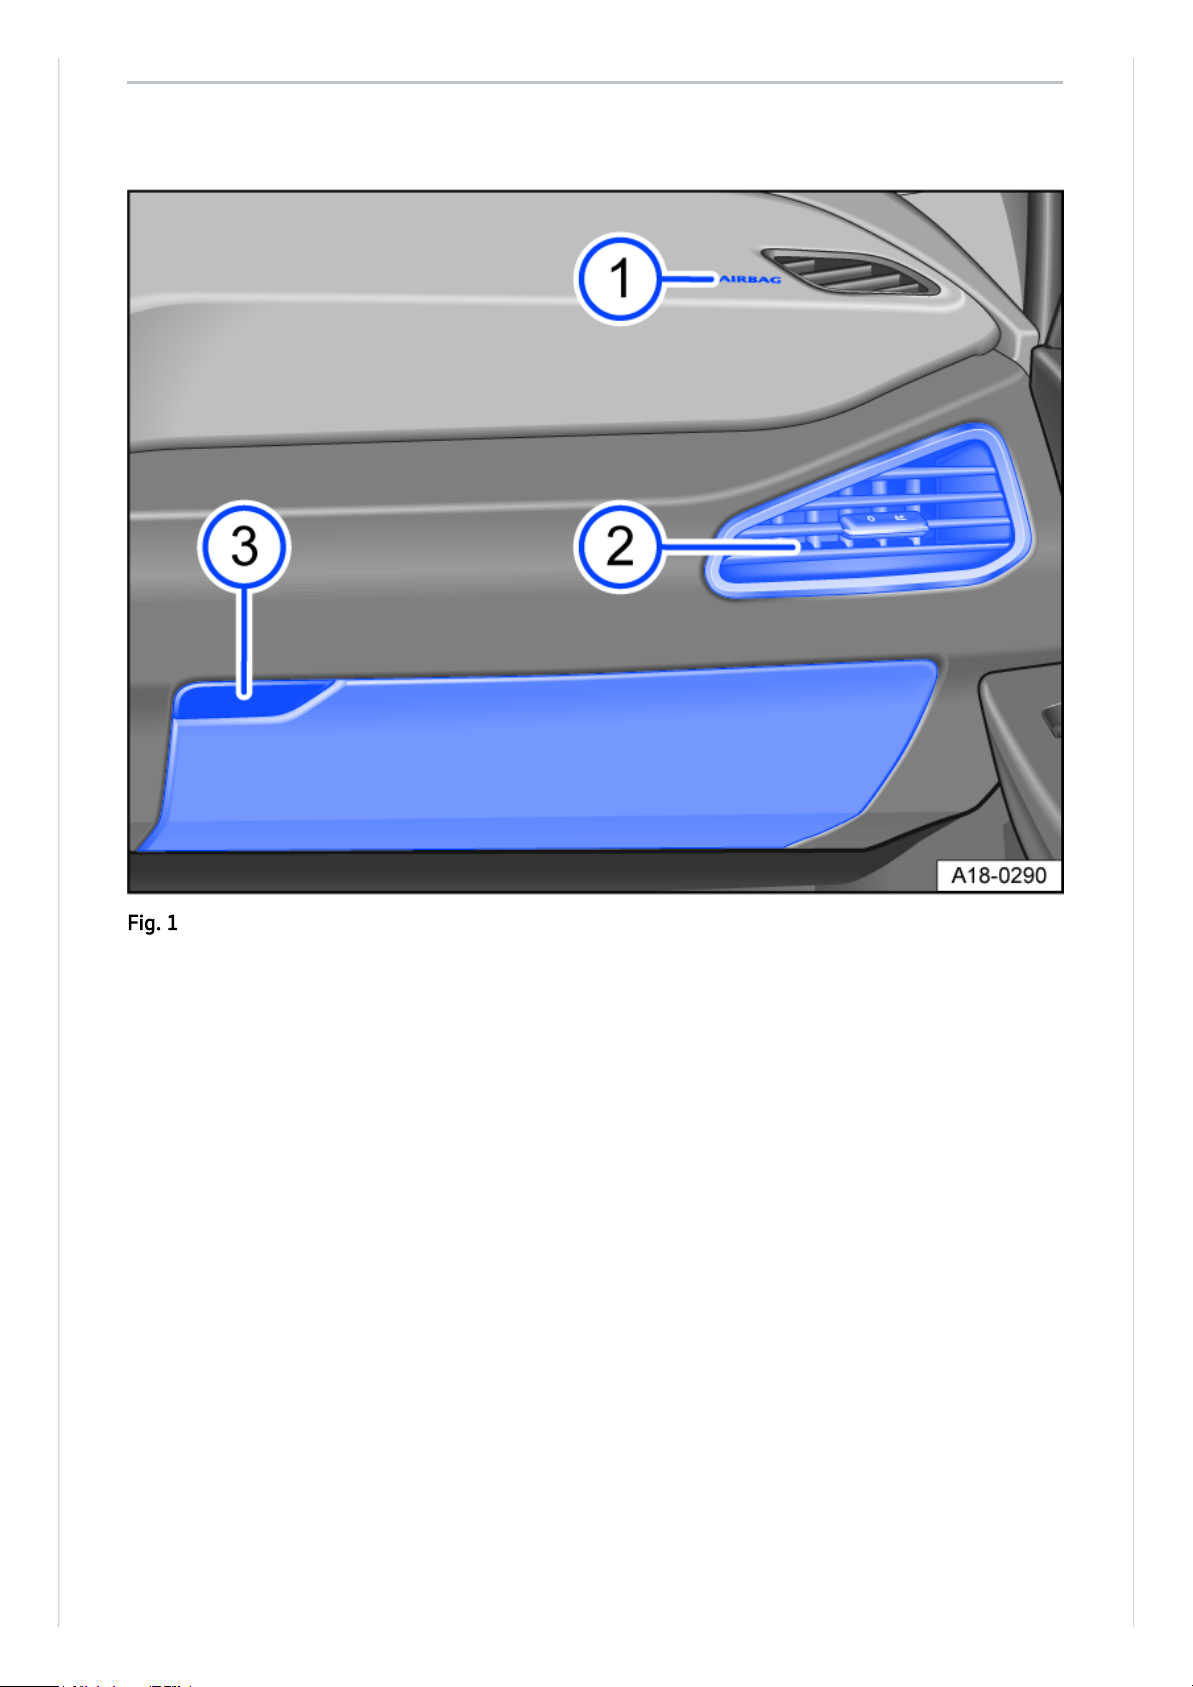
Front passenger side
Fig.1Front passenger side (left-hand drive vehicles): overview of dash panel (mirrored for righthand drive vehicles).
Page 13
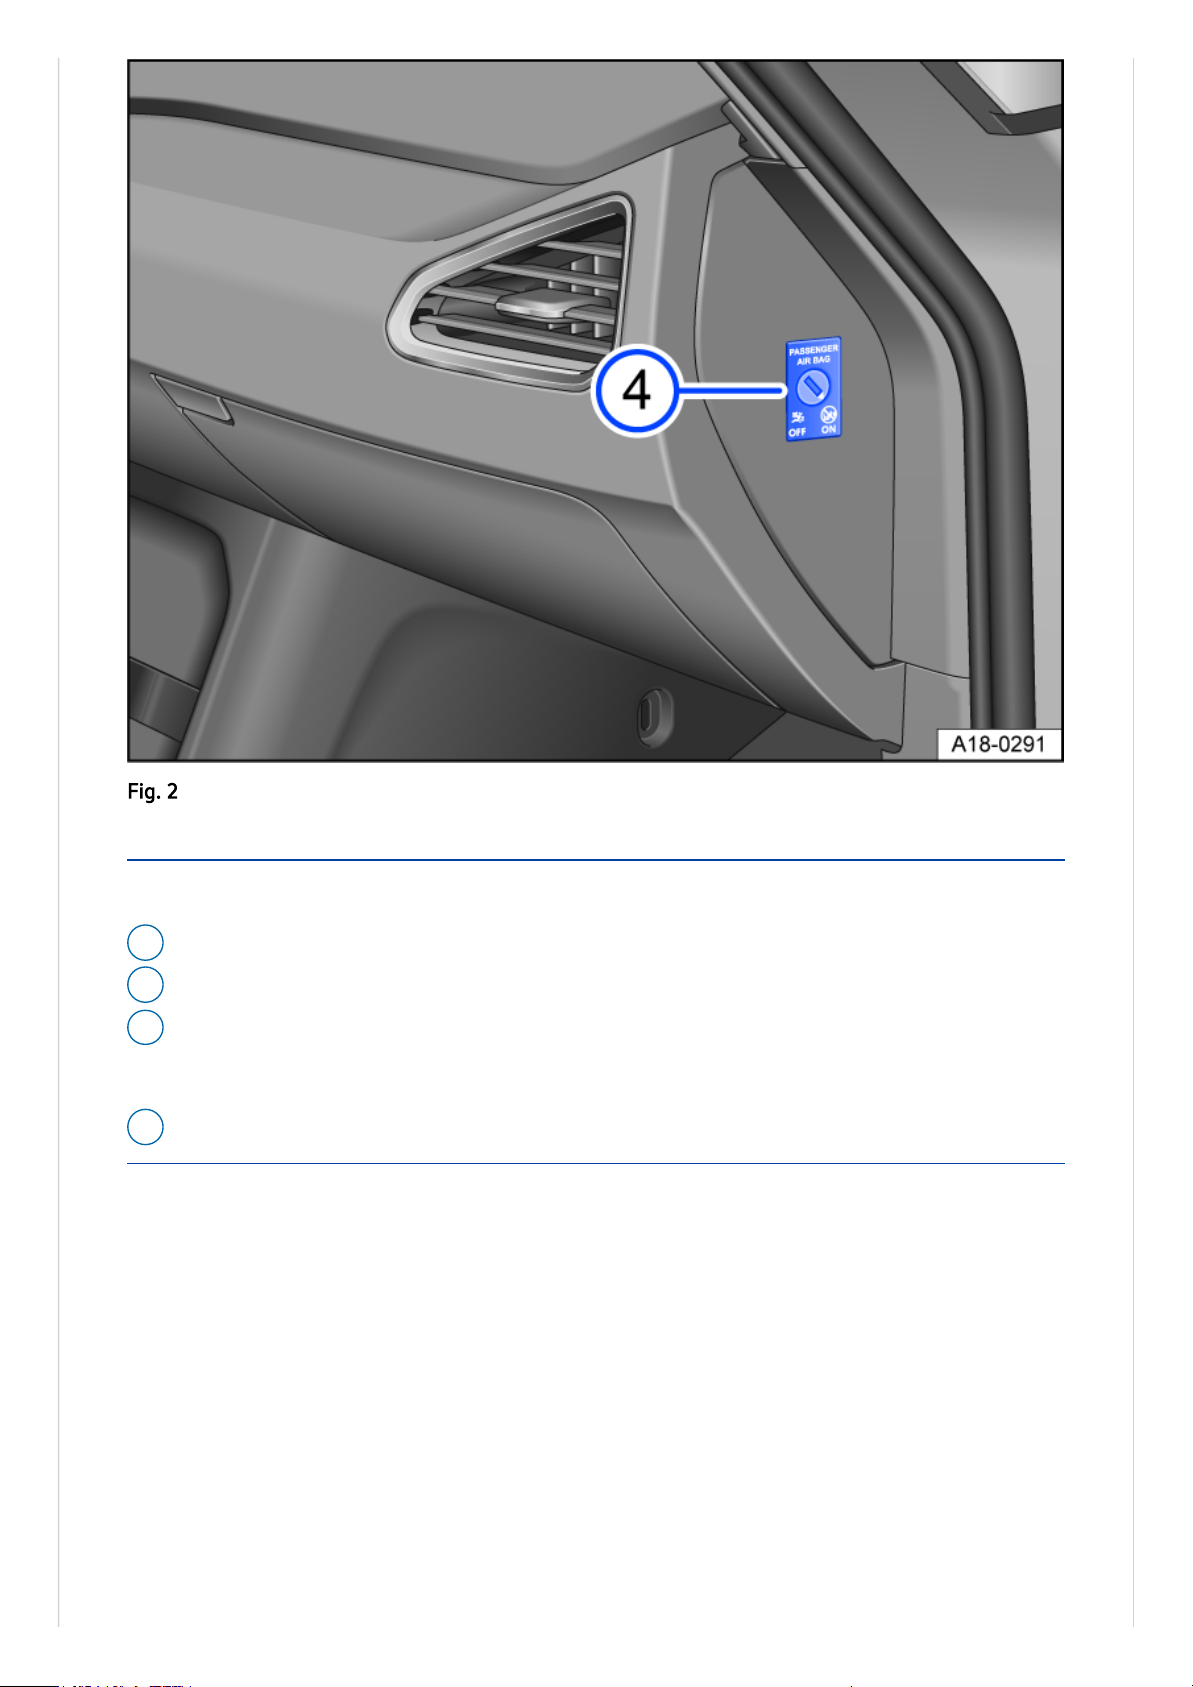
Fig.2With open front passenger door (left-hand drive vehicles): key-operated switch in the dash
panel (mirrored for right-hand drive vehicles).
Key to
Fig.1
and
Fig.2
:
1 Location of front passenger front airbag in the dash panel
(→ Airbag system)
2 Vent
(→ Heating, ventilation, cooling)
3
Glove box:
— with button for opening
4 Key switch for switching off the front passenger front airbag
(→ Airbag system)
Page 14
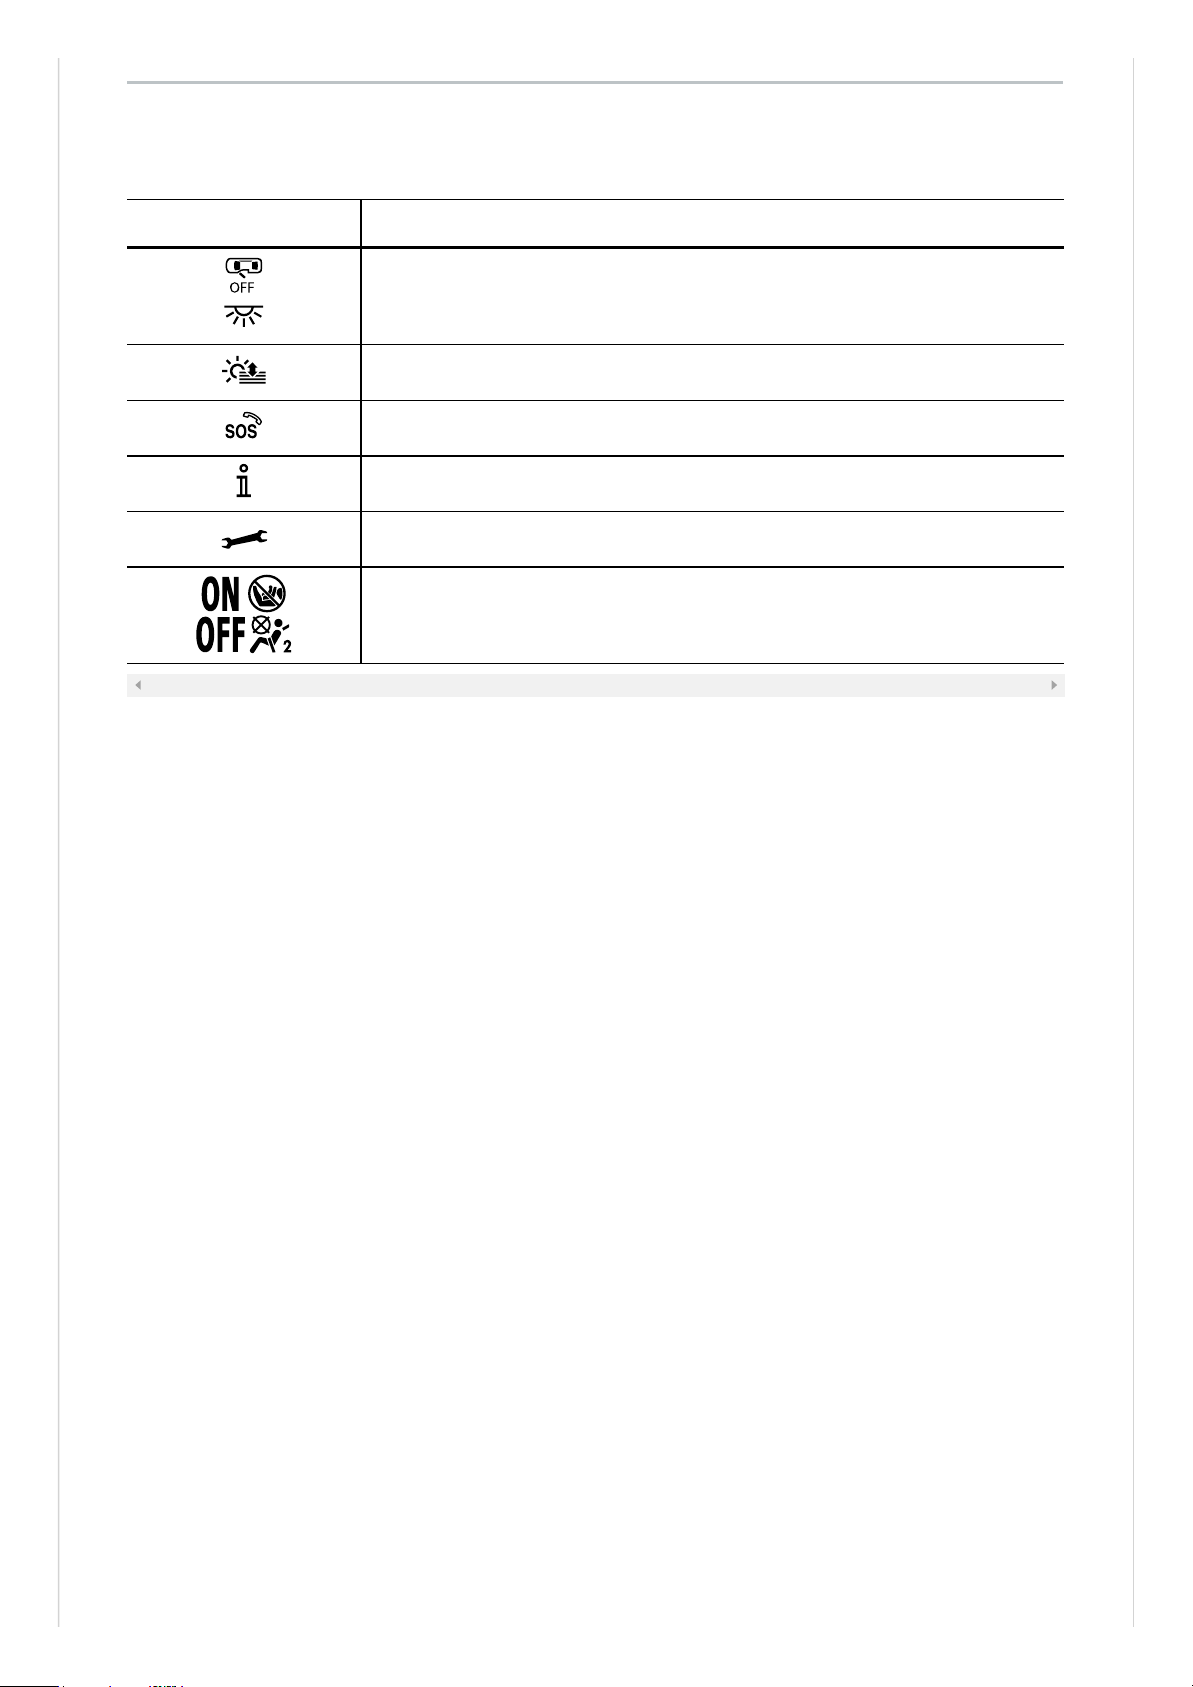
Symbol Meaning
Buttons for interior and reading lights
(→ Interior lighting)
.
Switch for sun blind in the glass roof
(→ Sun blind in the glass roof)
.
Button for emergency call service
(→ eCall Emergency System)
.
Information Call
(→ Emergency Call Service (private))
Breakdown Call
(→ Emergency Call Service (private))
Indicator lamp for the front passenger front airbag switch-off function
(→ Airbag system)
.
Controls and displays in the roof
Page 15
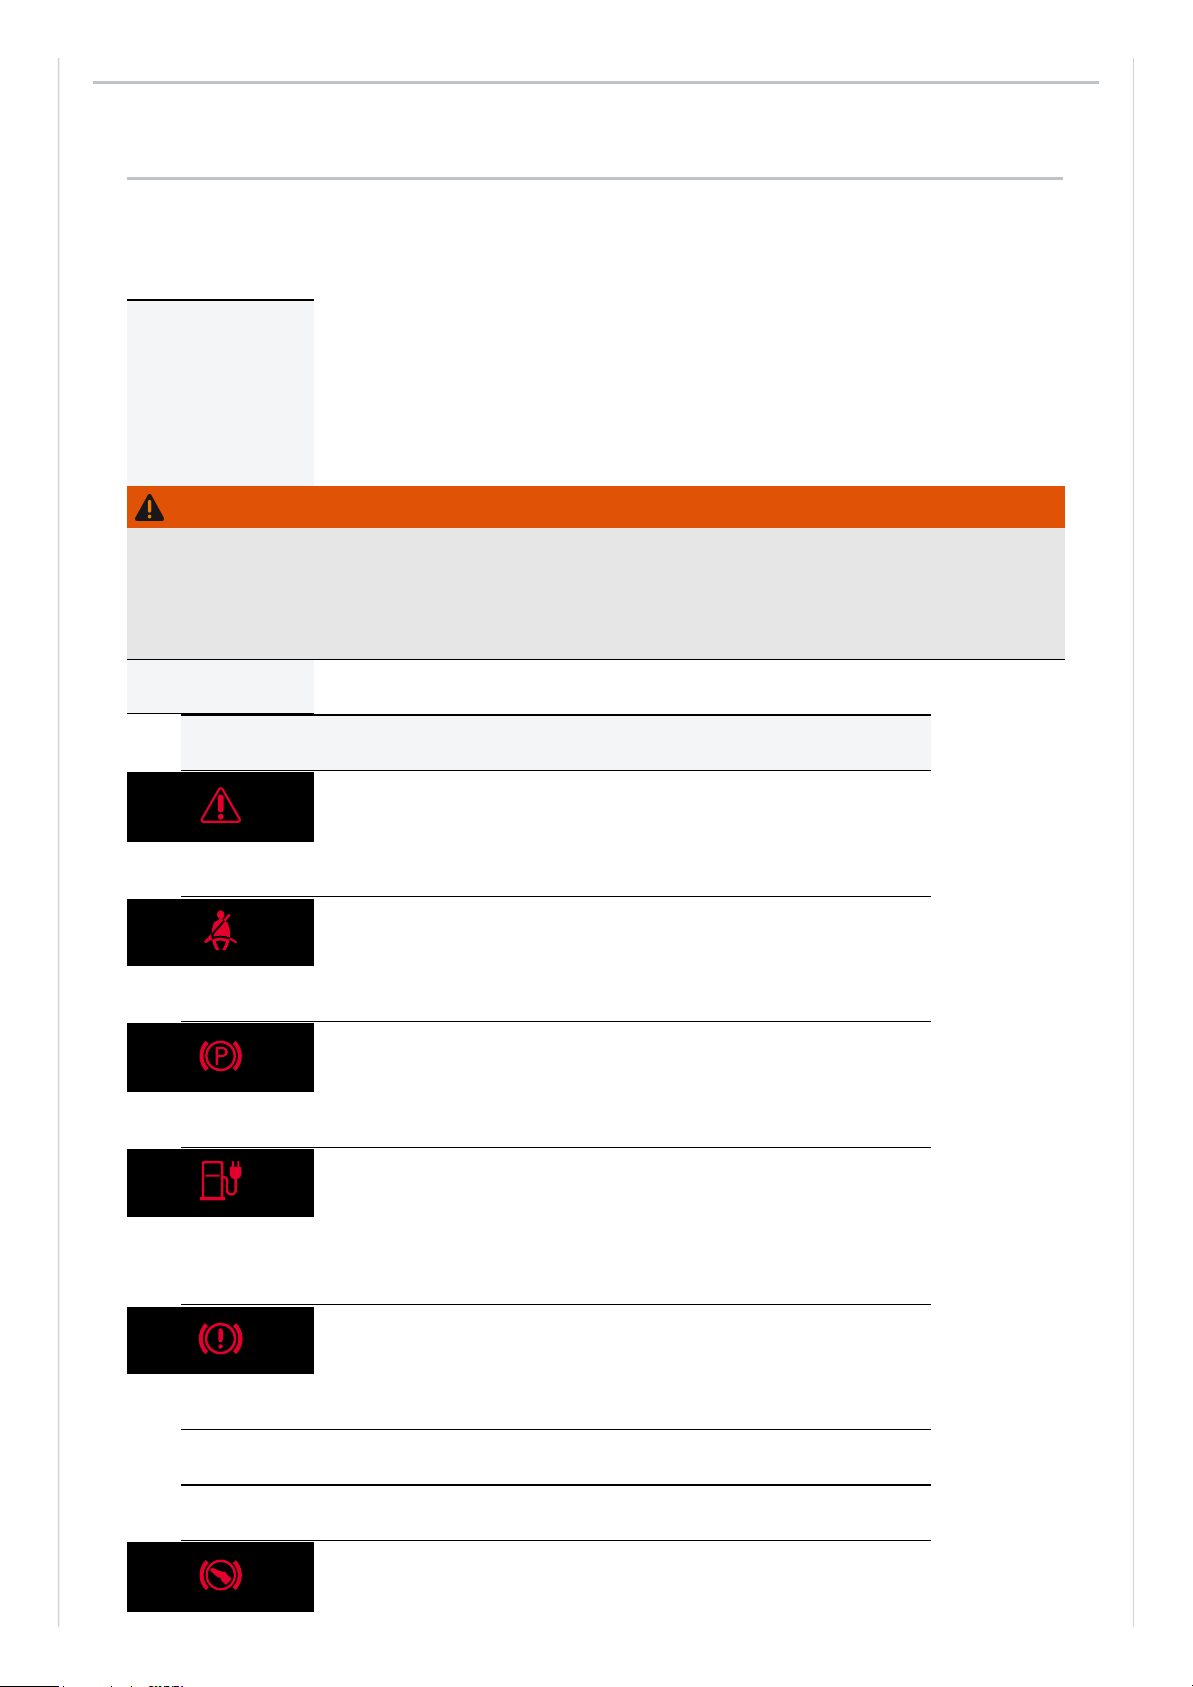
The warning and indicator lamps indicate various warnings, faults or certain functions. Some
warning and indicator lamps light up when the ignition is switched on and should go out once the
engine is running or the vehicle is in motion.
For details on indicator lamps that light up in the light switch, see Chapter “Lights”
(→ Dipped
beam)
.
WARNING
Failure to observe illuminated warning lamps and text messages can lead to your vehicle breaking
down in traffic, and can cause accidents and serious injury.
●
Never ignore any illuminated warning lamps or text messages.
●
Stop the vehicle as soon as possible and when safe to do so.
Driver information
Symbols in the instrument cluster
Symbol
Meaning
Central warning lamp
→ Priority 1 warning
Fasten seat belt
→Warning lamp
Electronic parking brake
→Operating the electronic parking brake
Exhaustive discharge of the high-voltage battery
→ Exhaustive discharge of
the high-voltage battery due to long standing time
Brake system fault
→ Brake system fault
Electromechanical brake servo failure
→ Electromechanical brake servo failure
Low brake fluid level
→ Brake fluid level
Page 16
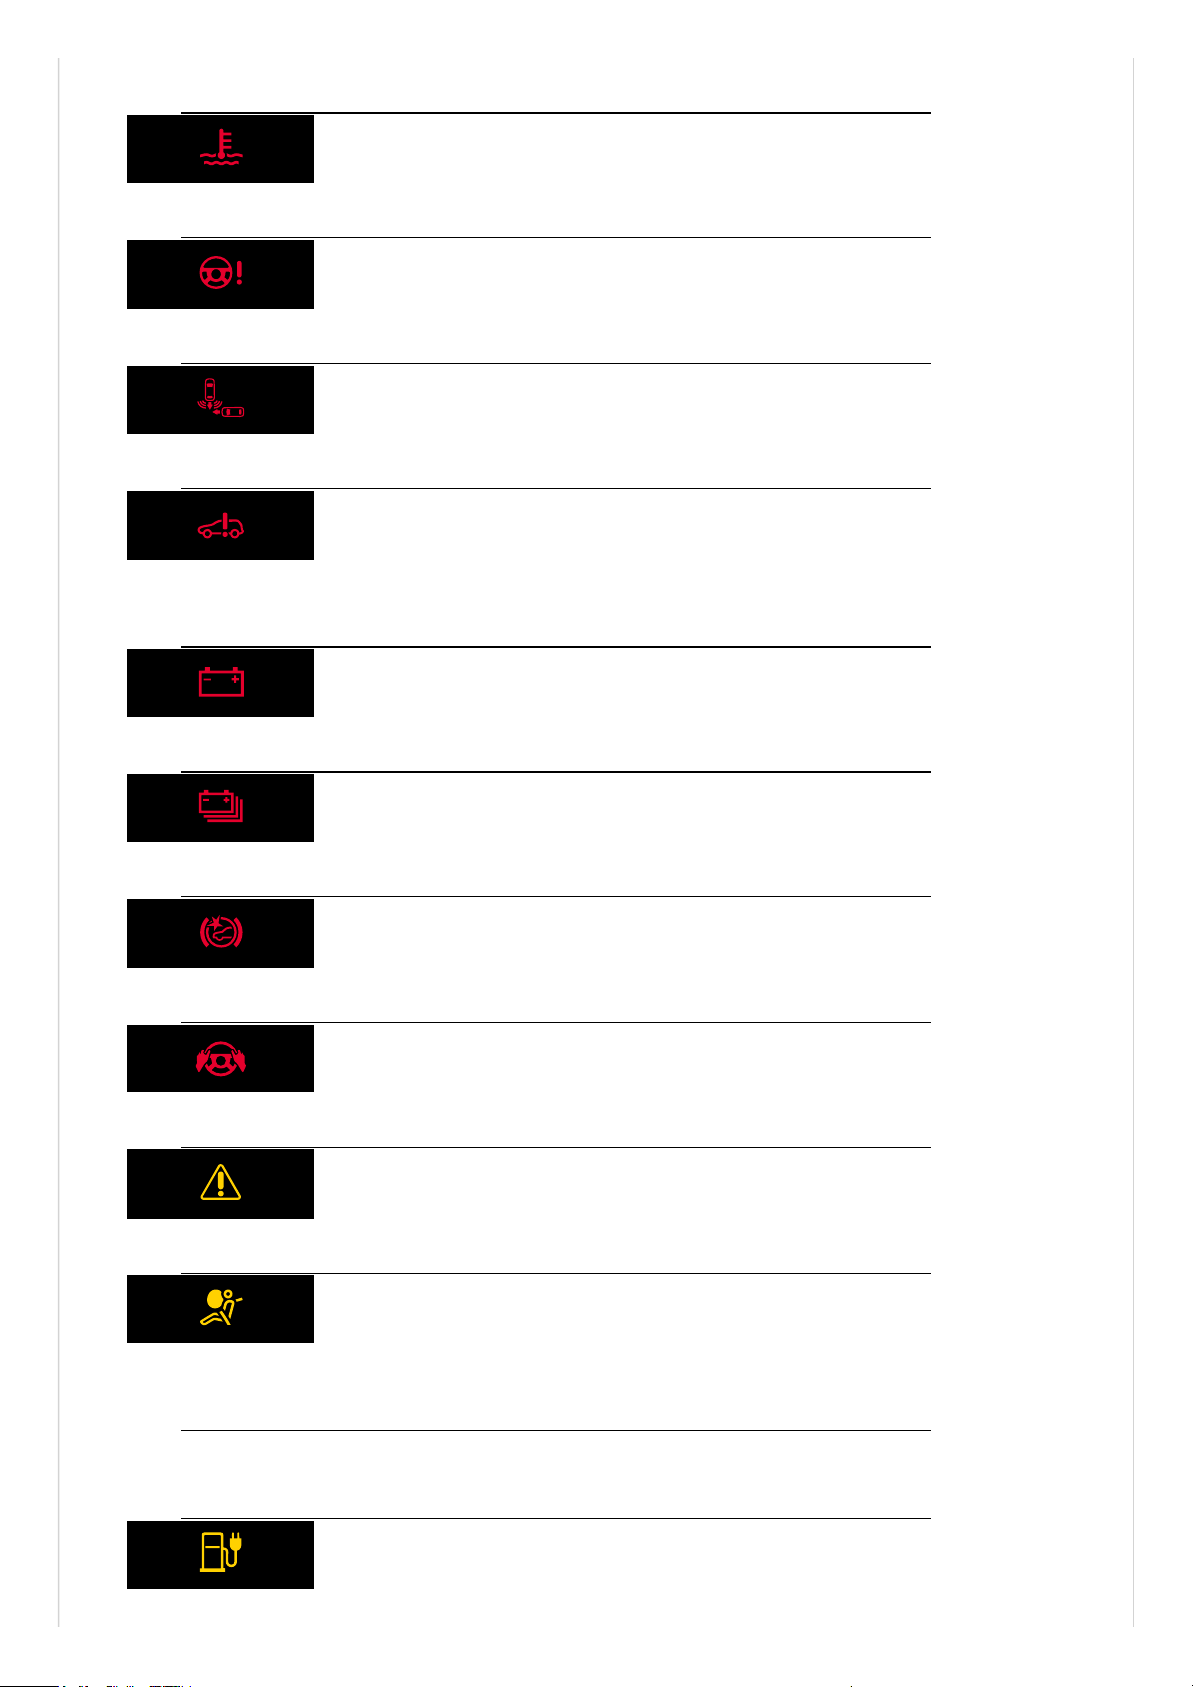
Depress the brake pedal.
→Brake request
Fault in the engine coolant system
→
Fault in steering
→ Fault in steering
Rear Traffic Alert has detected an obstacle at the rear
→Rear Traffic Alert
Fault in electric drive system
→ Fault in electric drive, → lights up together
with
12-volt vehicle battery
→ 12-volt vehicle battery
High-voltage battery empty
→ High-voltage battery is empty
Collision warning
→Advance warning
Take over steering!
→ or Take over steering.
Central warning lamp
→ Priority 2 warning
Fault in airbag or belt tensioner system
→Fault in airbag or belt tensioner
system
Airbag or belt tensioner system switched off with diagnostic tool
→Airbag or
belt tensioner system switched off with diagnostic tool
Page 17
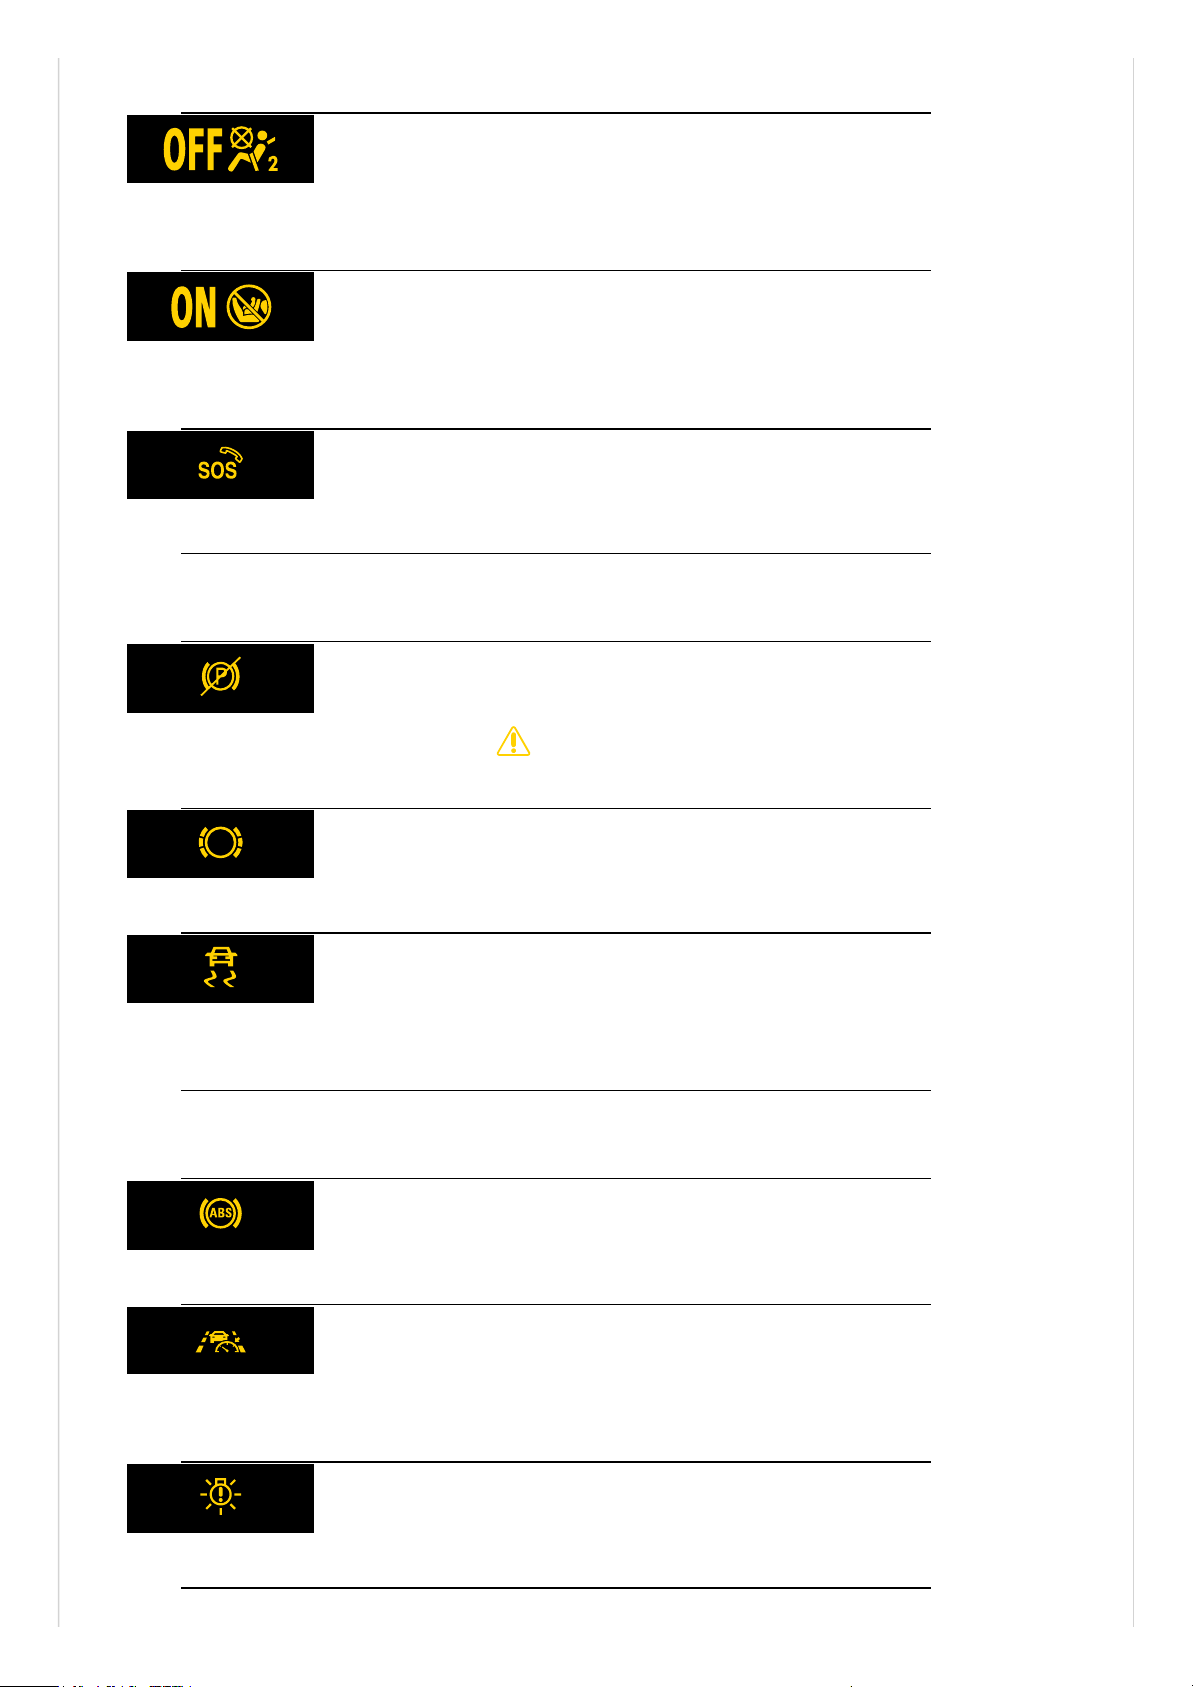
Range calculation fault
→ Fault in range calculation
Front passenger front airbag switched off
→Front passenger front airbag
switched off
Front passenger front airbag switched on
→Front passenger front airbag
switched on
Emergency call system fault
→ Legal emergency call system eCall error
Emergency call system operation restricted
→ Legal emergency call system
eCall restricted
Electronic parking brake fault
→ together with Electronic parking brake
fault
Check the brake pads
→ Brake pad wear indicator
Flashes: Electronic Stability Control (ESC) or traction control system (TCS)
regulating
→ ESC or ASR regulating
Lit up: Electronic Stability Control (ESC) switched off for system reasons
→ ESC
switched off for system reasons
Anti-lock brake system (ABS) fault
→ ABS failure or fault
Travel Assist fault
→ Travel Assist is not available or does not function as
expected., → Auto lane changing not available.
Vehicle lighting failure
→ Vehicle lighting fault
Page 18
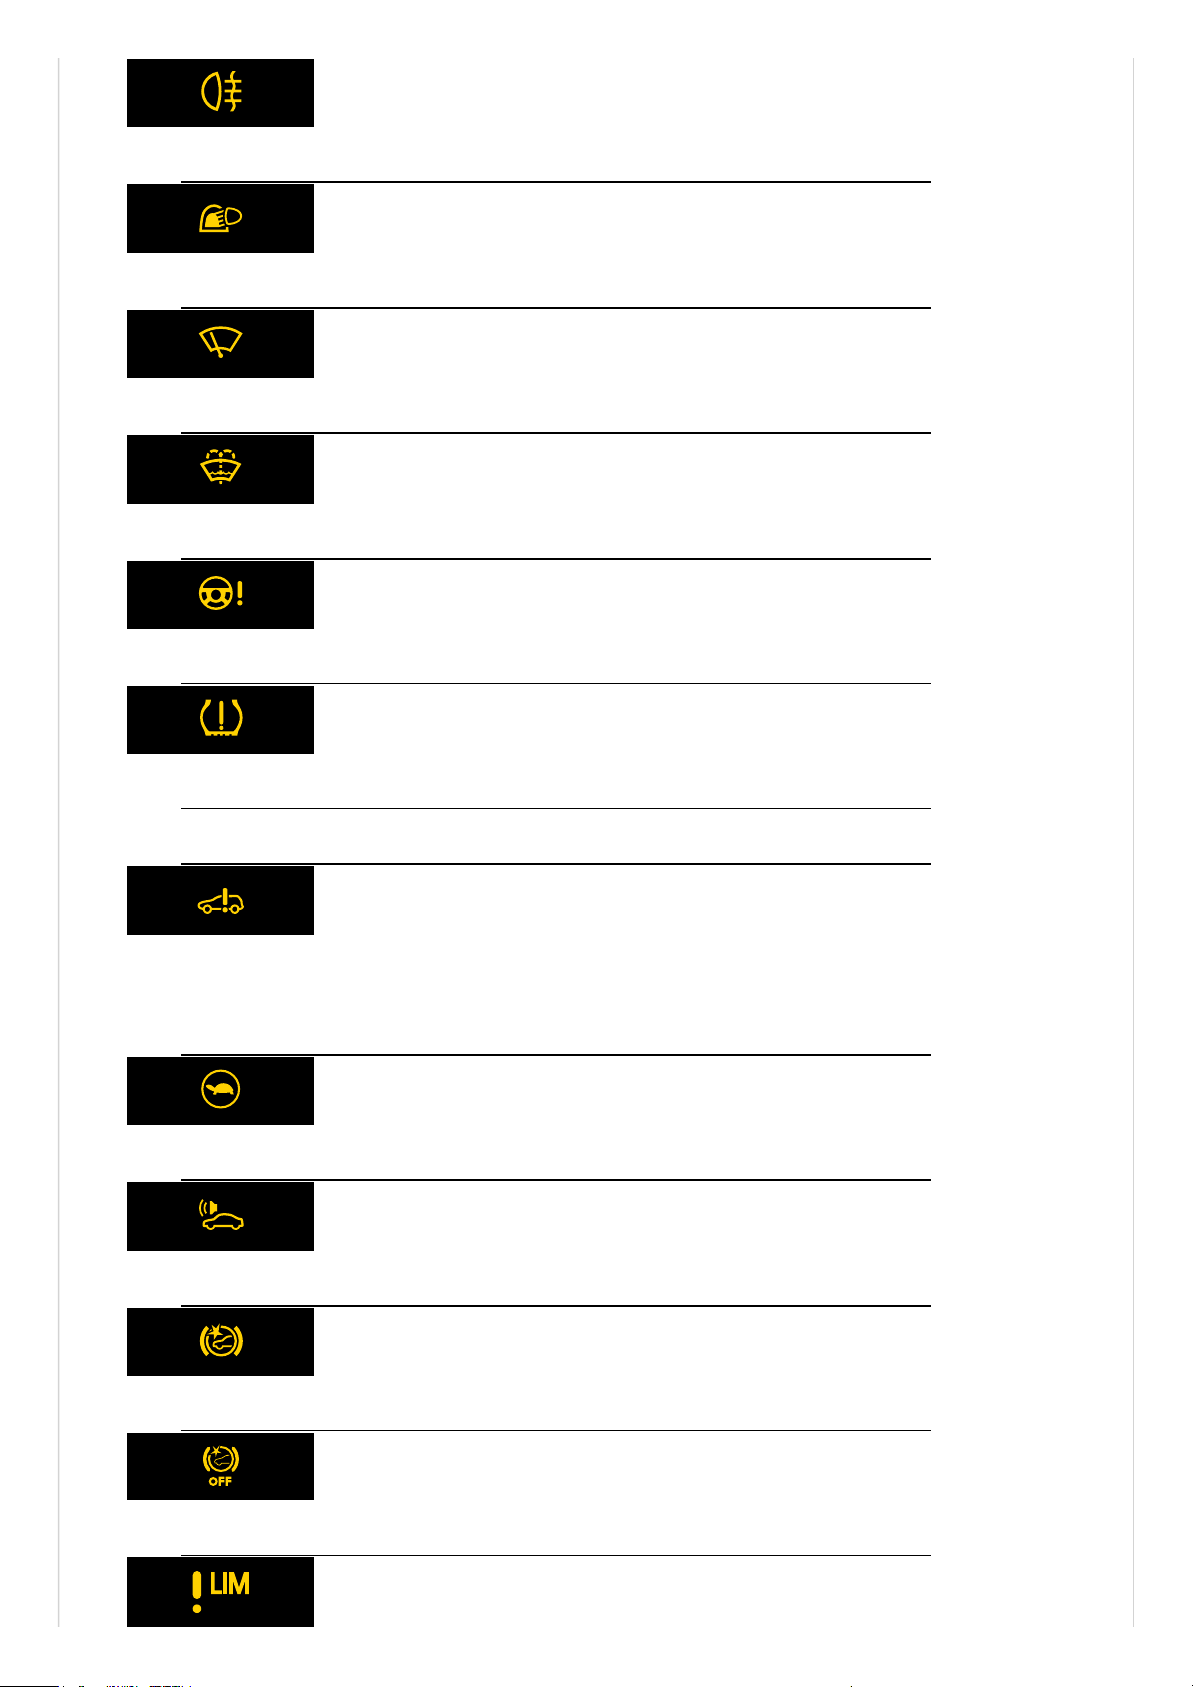
Rear fog light switched on
→Switching the rear fog light on and off
Rain/light sensor fault
→ Fault in rain and light sensor
Fault in wipers
→ Fault in wipers
Washer fluid level too low
→ Washer fluid level too low
Fault in steering
→ Fault in steering
Low tyre pressure
→ Low tyre pressure
Fault in the tyre monitoring system
→ Fault in the Tyre Pressure Loss Indicator
Error in the electrical drive system
→ There is a fault in the electric drive or
high-voltage vehicle electrical system, → and No brake energy recuperation
possible
Reduced power
→Reduced power
Electronic engine sound fault
→ Electronic engine sound is not working
Front Assist not available
→ Front Assist not available or functions restricted
Collision warning is deactivated.
→Switching on and off
Page 19
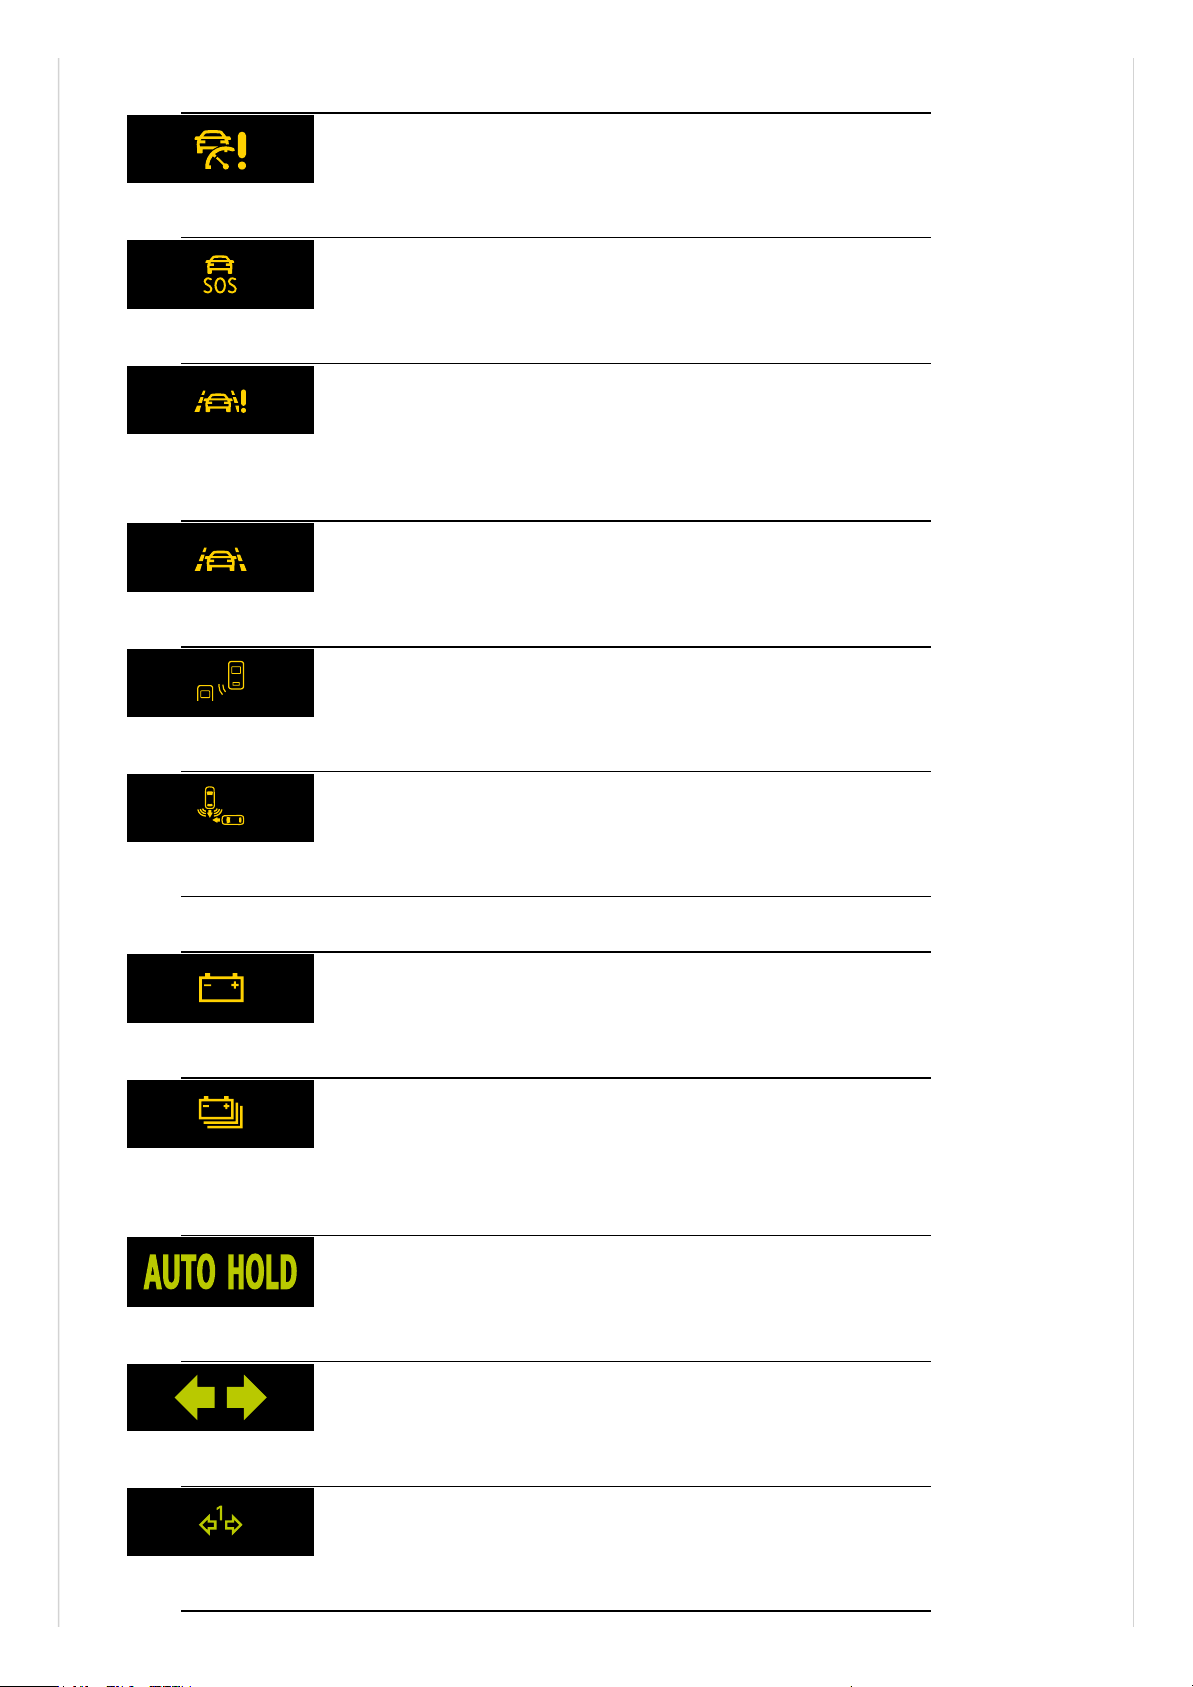
Speed limiter not available
→ Speed limiter not available.
Adaptive Cruise Control (ACC) is not available
→ ACC not available.
Emergency Assist not available
→ Emergency Assist not available
Lane keeping system (Lane Assist) not available
→ Lane keeping system not
available
Lane keeping system (Lane Assist) is regulating
→Displays
Fault in the lane change system (Side Assist)
→ Lane change system fault
Rear Traffic Alert braking intervention
→Rear Traffic Alert
Rear Traffic Alert fault
→Rear Traffic Alert
12-volt vehicle battery
→ 12-volt vehicle battery
Low charge level of the high-voltage battery
→ Low charge level of the high-
voltage battery
Auto Hold function active
→Auto Hold function
Turn signals
→ Turn signal indicator lamp
Bicycle carrier turn signal
→ Indicator lamp for bicycle carrier turn signal
Page 20
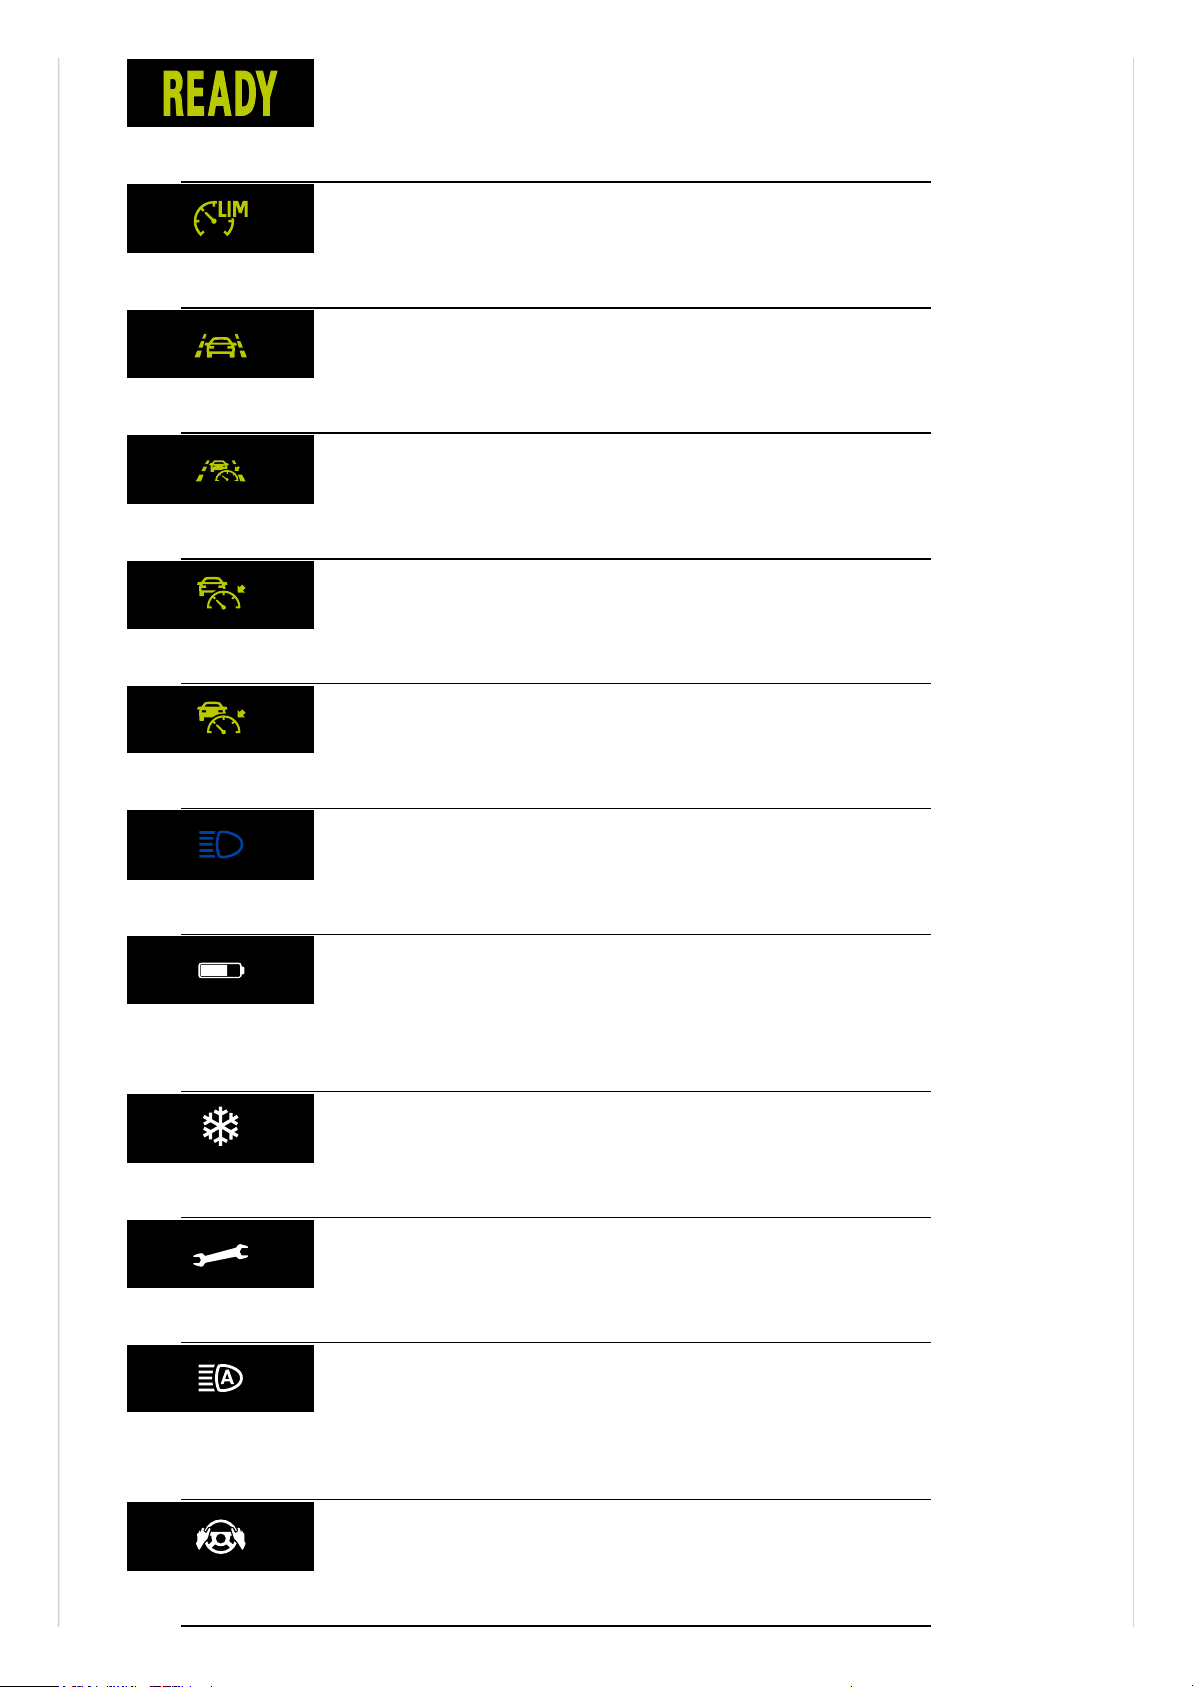
Vehicle's drive system
→Switching the ignition on and off
Speed limiter active
→Introduction to the topic
Lane Assist active
→Displays
Travel Assist active
→Displays
The ACC is regulating, no vehicle detected in front
→Starting control
The ACC is regulating, vehicle in front detected
→Starting control
Main beam or headlight flasher
→Switching main beam on and off
Charge level of high-voltage battery
→Charge level and range in the digital
instrument cluster
Outside temperature colder than +4°C (+39°F)
→Displays
Service due
→Service interval display
Main-beam control active
→ Switching on main-beam control, → Switching
on advanced main-beam control
Take over steering!
→ or Take over steering.
Page 21
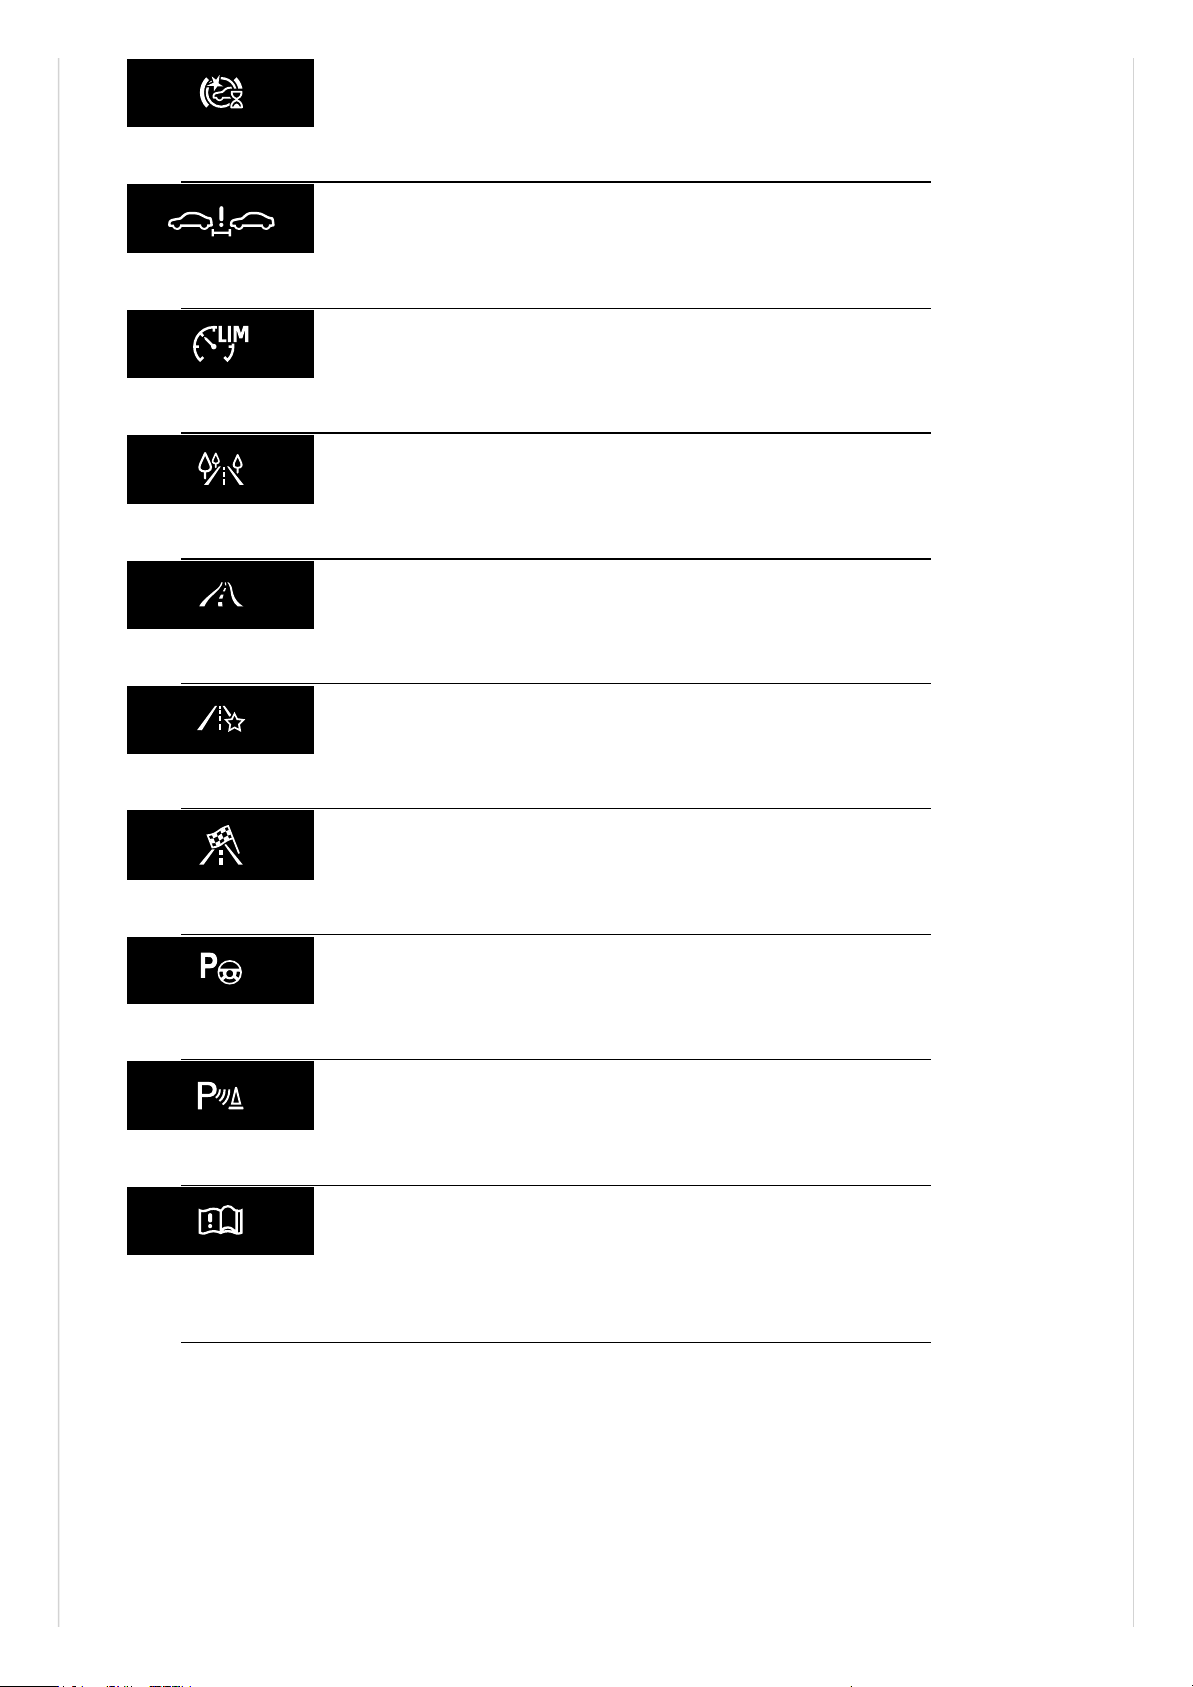
Front Assist is starting up
→ Front Assist is starting up.
Distance warning
→ Distance warning
Speed limiter active .
→Introduction to the topic
Eco driving profile
→Characteristics of the driving profiles
Comfort mode
→Characteristics of the driving profiles
Individual mode
→Characteristics of the driving profiles
Sport mode
→Characteristics of the driving profiles
Park Assist (Park Assist Plus)
→Indicator lamp in the Infotainment system
Switching Park Distance Control on and off
→Parking system displays
Note about information in the vehicle wallet
→ Note about information in the
owner's manual
Page 22

When you activate the vehicle’s drive system after the 12-volt vehicle battery has been totally
discharged or replaced, system settings (e.g. personal convenience settings and programming)
may have been changed or deleted. Check and correct the settings as necessary once the 12-volt
vehicle battery has been sufficiently charged.
WARNING
Accidents and injuries can occur if the driver is distracted.
●
Never operate the instrument cluster while the vehicle is in motion.
●
Any settings for the instrument cluster display and displays in the Infotainment system
should be made only when the vehicle is stationary in order to reduce the risk of accidents
and serious injuries.
Instrument cluster
Introduction to the topic
Page 23
Views in the display area
The digital instrument cluster can display the following views:
Summary
Before activation of the vehicle’s drive system: display with information on mileage, charge
level and range.
Basic
Driving displays with information on driver assist system, speed and navigation.
Driver assist systems
Display of active driver assist system and speed. Navigation context hidden.
Navigation
Navigation map with route guidance and speed information. Driver assist systems hidden.
The upper display area shows navigation information or situation-dependent pop-ups, for
example.
The amount and scope of the displayed information may differ depending on the vehicle
equipment.
Setting views
ID.Display
Fig.1ID.Display in the dash panel (illustration).
The ID.Display is a digital instrument cluster with a high-resolution LC colour display. By
selecting different information profiles, displays from the driver assist systems and other
displays can be shown in addition to the digital speedometer. The term digital instrument
cluster is used below for the ID.Display.
Page 24
The different views provide a better overview of the driving data, navigation or information on
the driver assist systems.
The driver assist systems view and the navigation view can be selected with the button on
the multifunction steering wheel.
— Touch the button and swipe to the left to change to the navigation view.
— Touch the button and swipe to the right to change to the driver assist systems view.
Event in the digital instrument cluster
Information and warnings are shown as an event in the digital instrument cluster. The event
display appears in the digital instrument cluster from above and is hidden again after some time.
WARNING
Accidents and injuries can occur if the driver is distracted.
Page 25
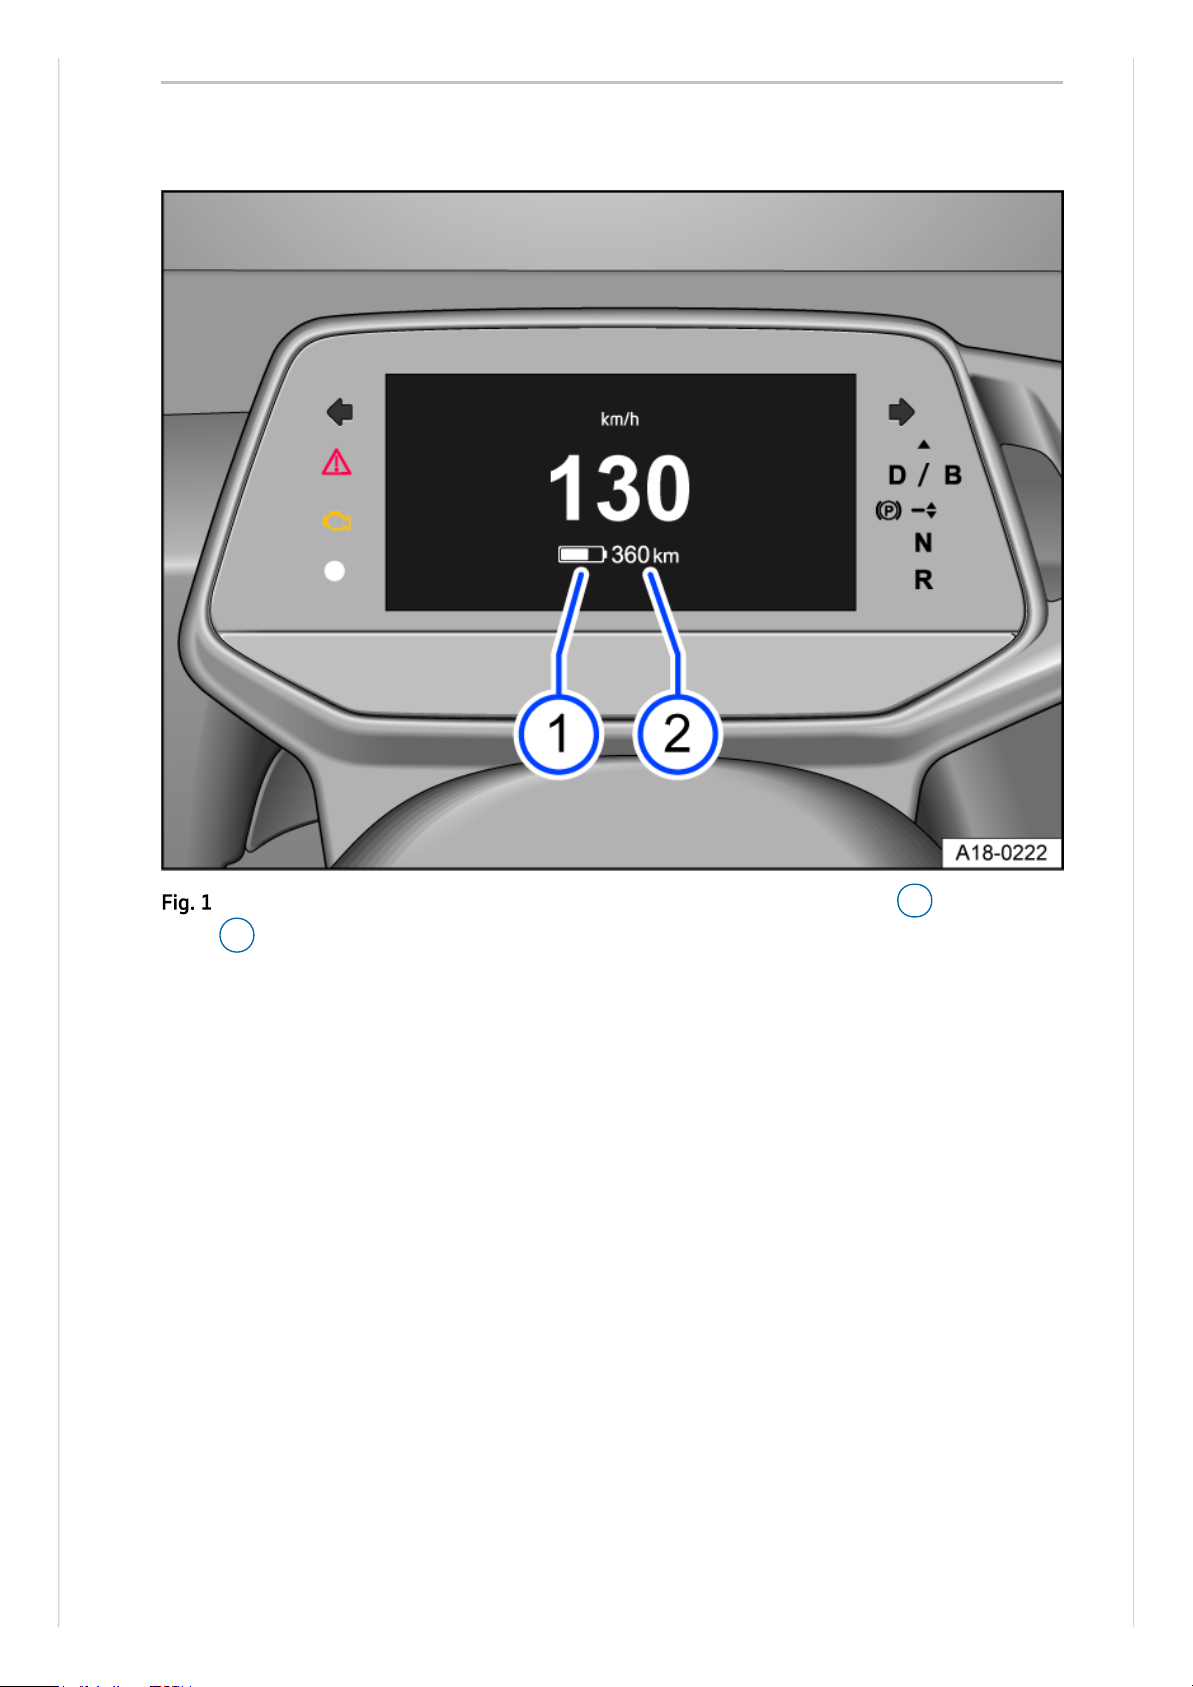
Charge level and range in the digital instrument cluster
Fig.1In the digital instrument cluster: charge level of the high-voltage battery 1 and vehicle
range 2 .
Page 26
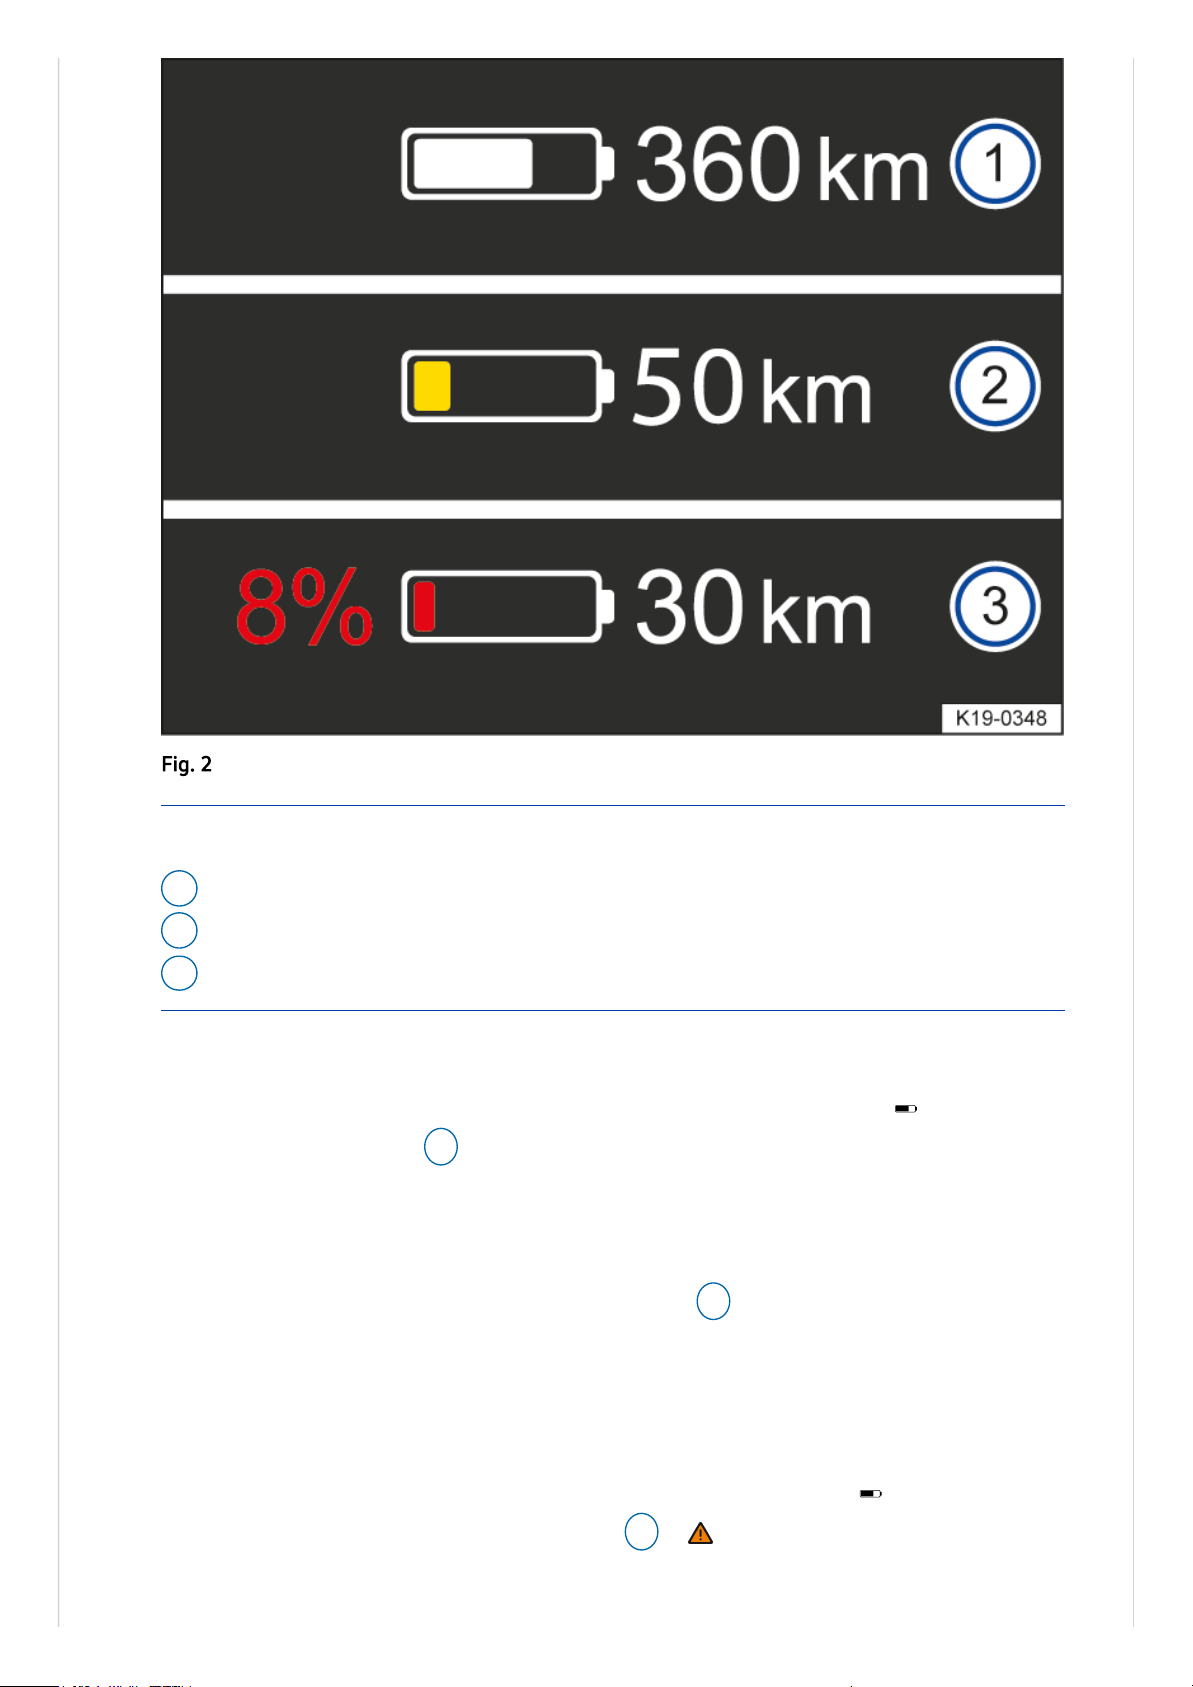
Charge level display
The current charge level of the high-voltage battery is indicated by the symbol in the digital
instrument cluster
→Fig.2
1 . The fill level of the battery symbol changes with the charge
level.
Range display
The vehicle range is specified in kilometres (km)
→Fig.2
2 .
The displayed value is calculated and updated depending on the driving style and ambient
conditions. The range can therefore also vary even for a fully charged high-voltage battery.
Reserve range
When the reserve range of the high-voltage battery is reached, the symbol is displayed
together with a colour percentage value
→Fig.2
3
→
.
Warning levels for the reserve range:
Fig.2In the digital instrument cluster: range and reserve capacity display.
Key to
→Fig.2
:
1 Charge level and range.
2 Reserve capacity warning level 1 and range.
3
Reserve capacity warning level 2 and range.
Page 27
Yellow
The charge level is less than 20%.
Red
The charge level is less than 10 %. The remaining range is also always displayed.
Charge the high-voltage battery as soon as possible to prevent the vehicle from breaking down
→
.
WARNING
Driving when the charge level of the high-voltage battery is too low can lead to the vehicle
breaking down when in traffic, and can lead to accidents and serious injuries.
●
Always make sure the high-voltage battery has sufficient charge!
WARNING
When the charge level of the high-voltage battery reaches the reserve range, this may result in
changed vehicle handling, e.g. different acceleration response of the vehicle.
●
Always adapt your speed and driving style to suit visibility, weather, road and traffic
conditions as well as the charge level of the high-voltage battery.
NOTICE
Self-discharge of the high-voltage battery, e.g. due to the vehicle standing for periods of
several months, can lead to the high-voltage battery being damaged if ambient temperatures
are high and the high-voltage battery has a low charge level.
●
Always make sure the high-voltage battery has sufficient charge!
The range for electric driving may be reduced at very low outside temperatures when the
high-voltage battery is consequently very cold.
Page 28
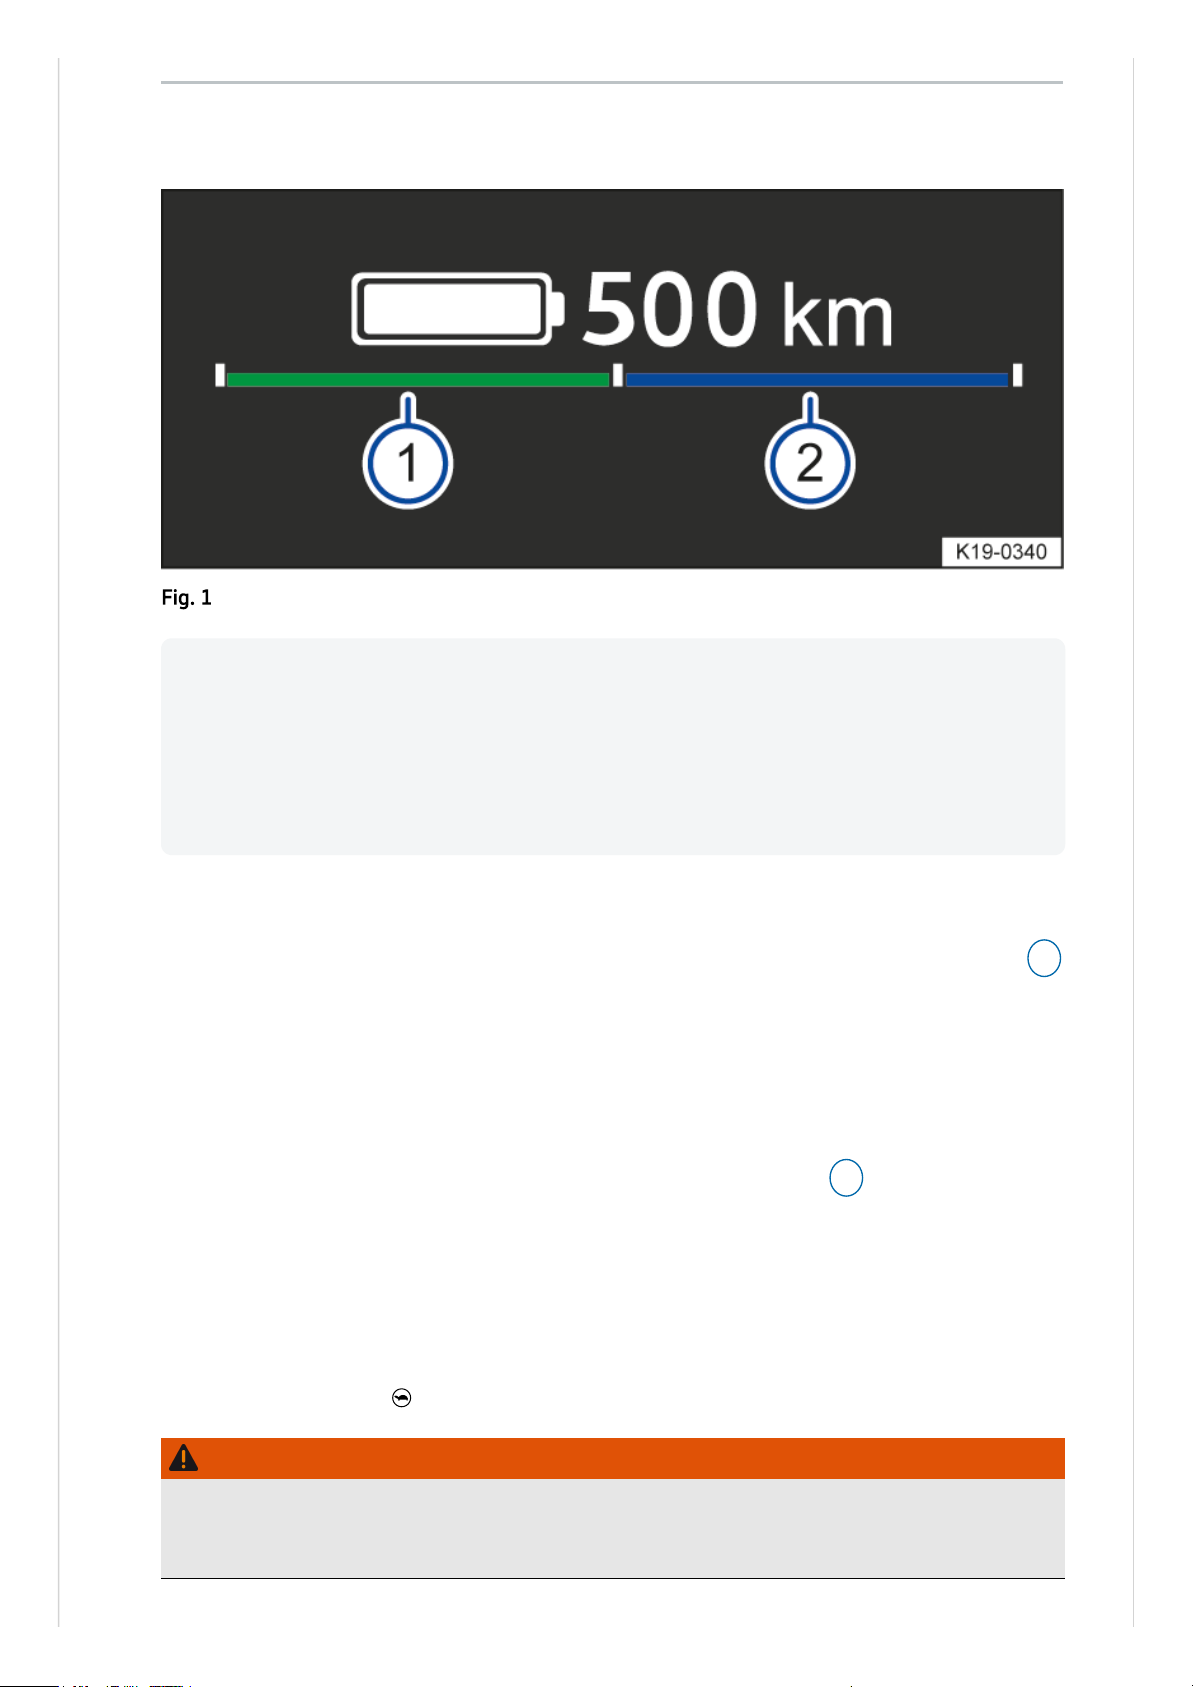
Display of available brake energy recuperation
The maximum brake energy recuperation of the electric drive is available when the green bar 1
has its full length. For brake energy recuperation, kinetic energy is converted into electrical
energy by the electric drive and stored in the high-voltage battery
→Energy recovery (brake
energy recuperation)
.
Available power display
The maximum power of the electric drive is available when the blue bar 2 has its full length.
High power availability is required, for example, to accelerate the vehicle quickly to overtake
safely.
If the length of the blue bar shortens, the maximum power of the electric drive is no longer
available.
If the blue bar is significantly shortened, the currently available drive power is greatly restricted
→Troubleshooting
. The symbol is then also displayed in the digital instrument cluster.
WARNING
Driving when the charge level of the high-voltage battery is too low can lead to the vehicle
battery discharging when in traffic, and can lead to accidents and serious injuries.
●
Always make sure that the high-voltage battery is sufficiently charged.
Power meter
Fig.1Power meter in the digital instrument cluster.
While driving, the power meter displays the available brake energy recuperation (green) and
power (blue) for the electric drive in abstracted form. The current value for brake energy
recuperation and drive is displayed dynamically by means of brighter bars. The power meter is
a bar that is divided in the middle which changes in length depending on availability and
current value. If the available brake energy recuperation and power no longer correspond to
the maximum values, these bars are shortened accordingly.
Page 29

WARNING
If the maximum power reserve is not available or the charge level of the high-voltage battery
has reached the “reserve range”, the driving characteristics can change, e.g. the acceleration
performance of the vehicle.
●
Always adapt your speed and driving style to suit visibility, weather, road and traffic
conditions as well as the charge level of the high-voltage battery.
Page 30
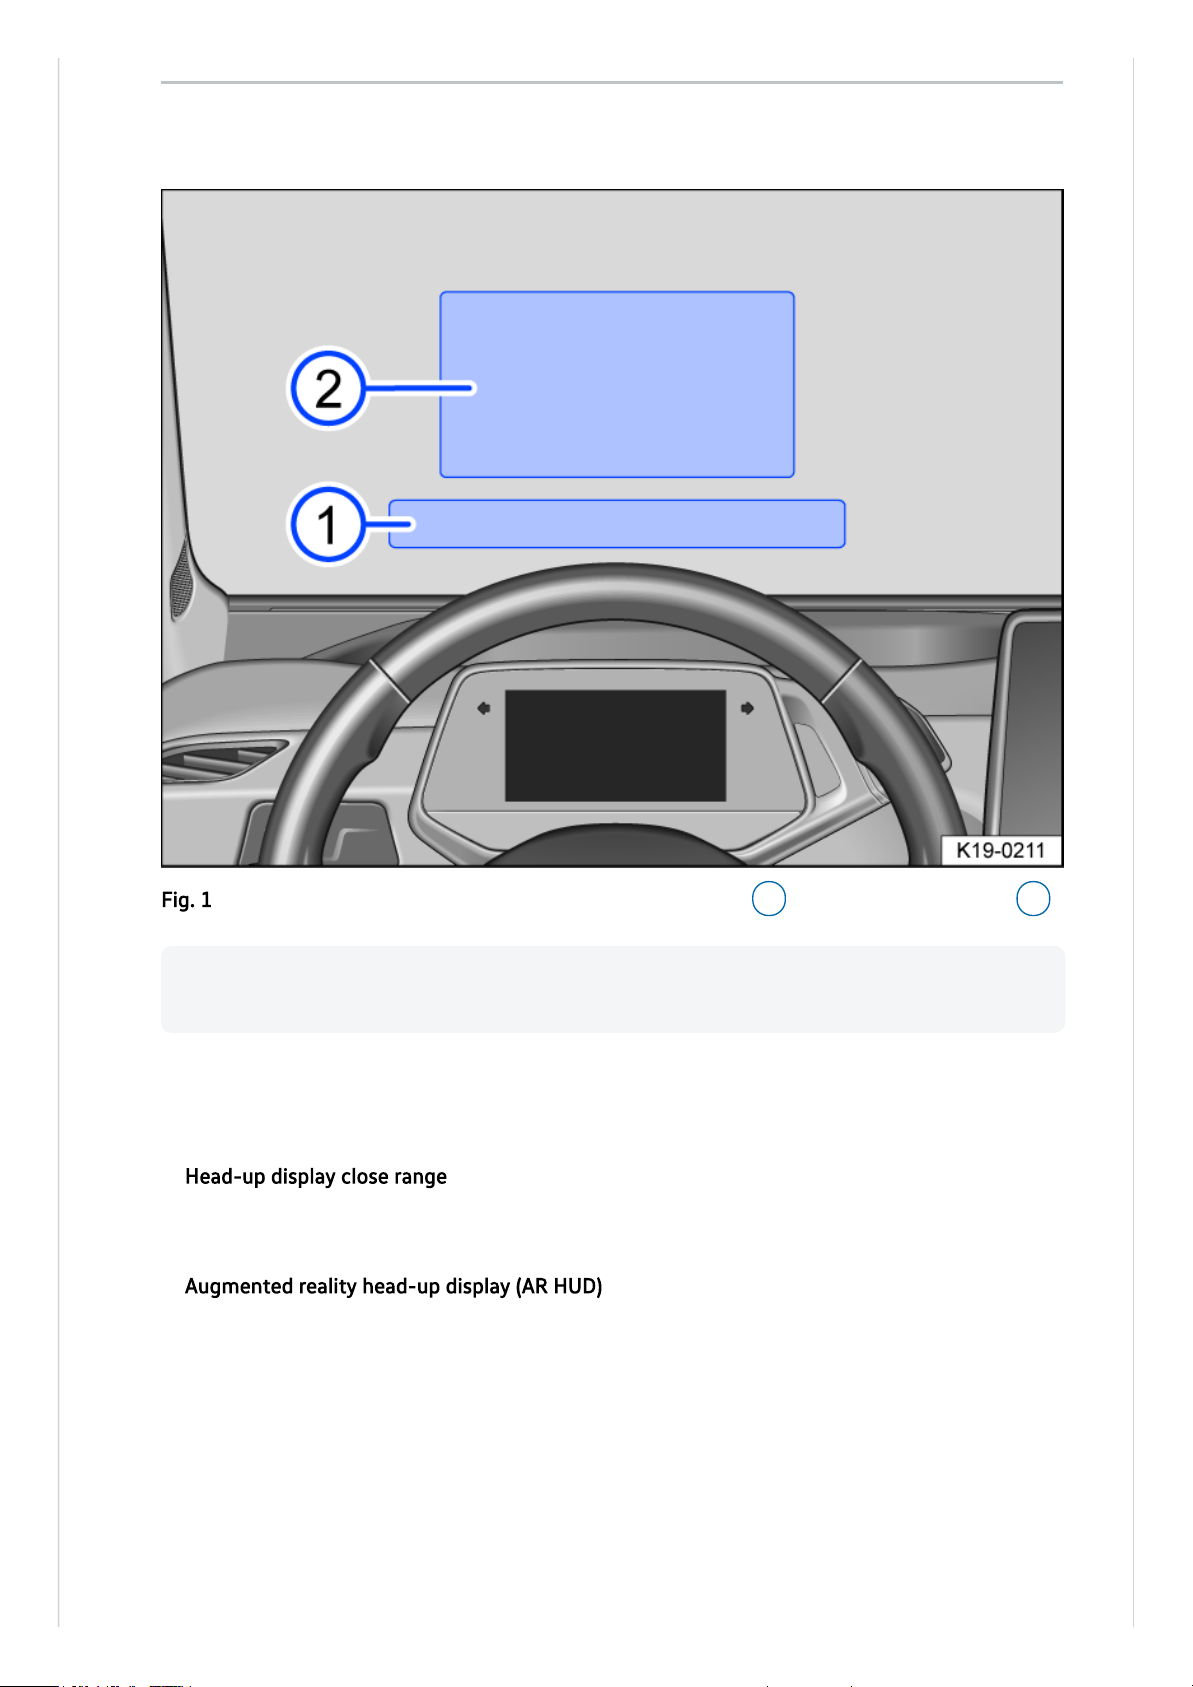
Display areas
Explanations of the areas shown in the head-up display
→Fig.1
:
— Head-up display close range
Information on speed, navigation and driver assist systems in displayed in the head-up display
close range.
— Augmented reality head-up display (AR HUD)
In the augmented reality head-up display, information can be projected directly onto objects
in the driver's field of vision depending on the situation. This takes place for the driver assist
systems and navigation, for example.
The amount and scope of the displayed information may differ depending on the vehicle
equipment.
Switching the head-updisplay on and off
Head-up display
Fig.1In the driver’s field of vision: head-up display close range 1 and AR head-up display 2 .
The head-updisplay (HUD) projects selected information or warning messages from the assist
systems or the Infotainment system into the driver's field of vision.
Page 31

The head-up display can be switched on and off in the vehicle settings in the Infotainment
system.
— Touch the Vehicle function button.
— In the Settings menu, choose the view Interior and touch the Head-up display function
button.
— Switch the head-updisplay on or off as desired. The activated functions are highlighted in
colour.
Adjusting the height
In order to individually set the viewing angle, the head-up display can be adjusted in the
corresponding menu in the vehicle settings of the Infotainment system.
— Assume the correct sitting position.
— Adjust the desired position and angle of the head-up display with the function buttons.
— The rotation can also be adjusted in the vehicle settings in the Infotainment system.
Settings in the Infotainment system
You can configure additional settings for the Head-upDisplay in the vehicle settings in the
Infotainment system.
The following settings are available:
In theHUD Settings submenu:
— Adjustment of the head-updisplay brightness and colour scheme. If the surroundings become
darker, the display brightness is automatically dimmed. The basic brightness level is adjusted
together with the instrument lighting
(→ Instrument and switch lighting)
.
— Selection of the display contents for the head-up display, e.g. displays of the driver assist
systems or the Infotainment system. Some content cannot be deactivated, e.g.warning
messages.
— Alternative colour scheme of the head-up display for poor weather conditions (e.g. snowfall).
Sunglasses with polarising filters can negatively affect the readability of the display.
Reflections can occur if the incident sunlight strikes the display at an unfavourable
angle.
The ideal position to read the Head-upDisplay depends on your seat position and the
height setting of the Head-up Display.
Page 32

Possible displays in the digital instrument cluster
Depending on the vehicle equipment, various kinds of information can be shown as overlays in
the digital instrument cluster:
— Open doors, bonnet and boot lid.
— Warning and information messages
(→ Warning and information messages)
.
— Mileage displays.
— Navigation information
→ Infotainment system
.
— Black ice warning.
— Service interval display.
— Range display.
— Speed warning function.
— Speed warning for winter tyres.
— Road signs detected by the Dynamic Road Sign Display system
(→ Dynamic Road Sign
Display)
.
— Remaining charging time during charging of the high-voltage battery.
Open doors, bonnet and boot lid
The digital instrument cluster indicates if any doors, the bonnet or boot lid are open once the
vehicle has been unlocked and while the vehicle is in motion. In some cases, an acoustic warning
is also given.
Black ice warning
If the outside temperature falls below approximately +4°C (+39°F), the digital instrument cluster
shows a snowflake symbol as an overlay display from above . This symbol remains lit up until
the outside temperature rises above+6°C (+43°F)
→Event in the digital instrument cluster
.
Mileage displays
The
odometer
registers the total distance travelled by the car.
Speed warning for winter tyres
A display in the digital instrument cluster indicates when you have exceeded the set maximum
speed.
Speed warning settings can be made in the vehicle settings in the Infotainment system
(→
Vehicle settings menu)
.
Range display
Displays
Page 33

Approximate calculation of the distance in km that can still be travelled with the current battery
charge level under the current driving conditions and with the same consumption. This distance
is calculated using factors that include the current energy consumption.
WARNING
Streets and bridges can be iced over at outside temperatures above freezing point.
●
The snowflake symbol indicates that there is a risk of black ice.
●
There may also be black ice on the road at outside temperatures above +4°C (+39°F) when
the snowflake symbol is not displayed.
Some displays in the digital instrument cluster may be overridden by sudden events, e.g.
navigation information.
Depending on the vehicle equipment level, some settings and displays may also appear
in the Infotainment system.
If several warnings are present, the symbols will appear at the bottom in the middle of
the display for several seconds, one after another. The symbols will continue to appear
until the faults are rectified.
If warnings about malfunctions are displayed when the ignition is switched on, it may
not be possible to adjust some settings as described, or the information display may
appear differently. If this is the case, take the vehicle to a qualified workshop to have the
malfunctions rectified.
Page 34
The system runs a check on certain components and functions in the vehicle when the ignition is
switched on or while the vehicle is in motion. Malfunctions are indicated by red and yellow
warning symbols with information messages on the instrument cluster display. An acoustic
warning is also given in certain cases. The appearance of the text messages and symbols can vary
depending on the version of the instrument cluster.
In addition, a list of current malfunctions can be opened manually. To do so, choose Vehicle
status or Vehicle in the menu (→ Menus and information displays).
Priority 1 warning
The red central warning lamp flashes or lights up, in some cases together with acoustic warnings
or additional symbols. Do not drive on! Danger. Check the fault and correct the cause. Seek
expert assistance if necessary.
Priority 2 warning
The yellow central warning lamp flashes or lights up, in some cases together with acoustic
warnings or additional symbols. Malfunctions and insufficient service fluids can damage the
vehicle and cause it to break down. Check the fault as soon as possible. Seek expert assistance if
necessary.
Note about information in the owner's manual
You will find further information on the warning in the owner's manual.
Information message
Information about various procedures within the vehicle.
If several warnings are present, the symbols will appear for several seconds, one after
another. The symbols will continue to appear until the faults are rectified.
If warnings about malfunctions are displayed when the ignition is switched on, it may
not be possible to adjust some settings as described, or the information display may
appear differently. If this is the case, take the vehicle to a qualified workshop to have the
malfunctions rectified.
Warning and information messages
Page 35
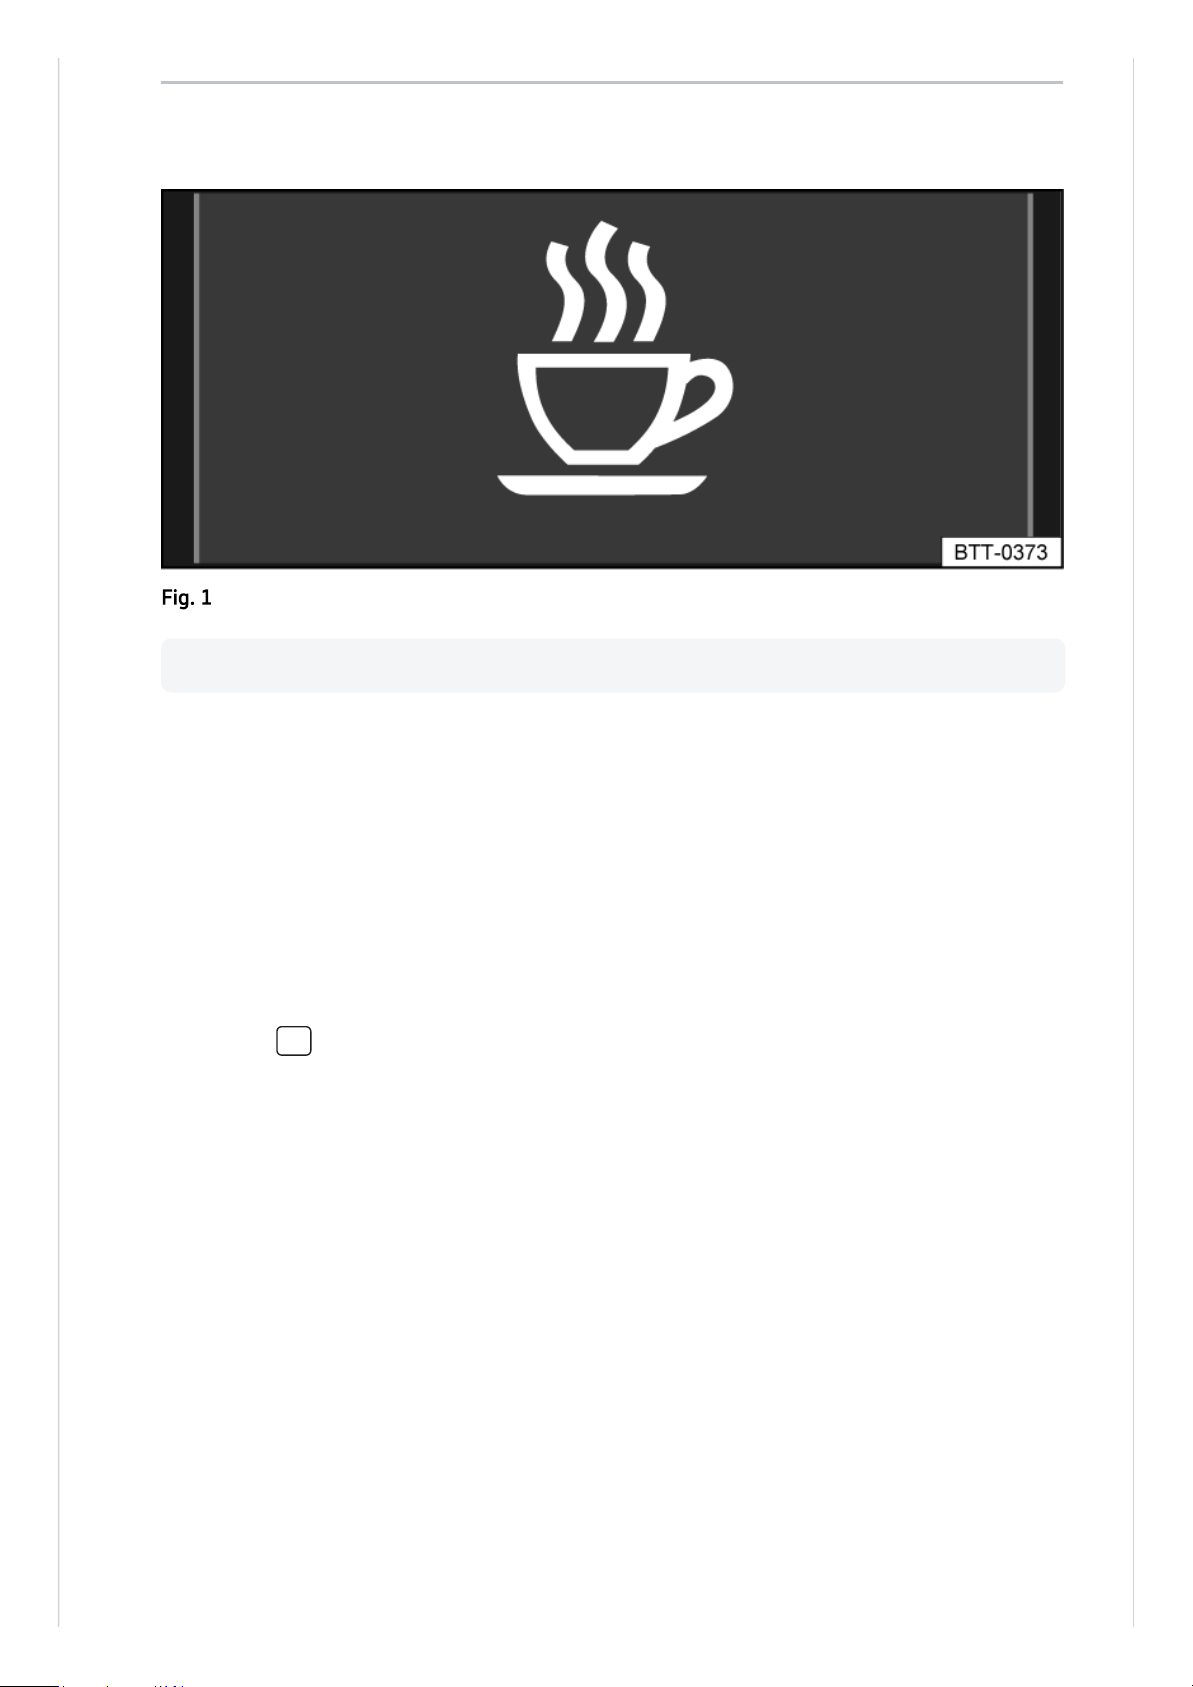
Function and operation
The Driver Alert System determines the driving behaviour at the beginning of a journey and uses
it to evaluate the tiredness of the driver. This is compared to the behaviour of the driver while
actually driving. If the system detects driver fatigue, an acoustic warning signal will sound and a
symbol will be displayed on the instrument cluster display together with a supplementary text
message
→Fig.1
. The message in the instrument cluster display is displayed for about five
seconds and may be repeated once. The last displayed message is saved by the system.
The message on instrument cluster display can be deactivated as follows:
— Press the OK button on the multifunction steering wheel.
Function conditions
The driving behaviour can be evaluated only when the speed is above 60 km/h (37mph) up to
approximately 200km/h (125mph).
Switching on and off
The Driver Alert System is always active when the vehicle’s drive system is activated. You can
deactivate the Driver Alert System in the Assist systems menu in the Infotainment system
(→
Vehicle settings menu)
.
Function limitations
The Driver Alert System has system-related limitations. The following conditions can limit the
function of the Driver Alert System, or prevent it from working altogether:
— Speeds less than 60km/h (37mph).
Driver Alert System (recommendation for rest breaks)
Fig.1On the instrument cluster display: Driver Alert System symbol.
The Driver Alert System informs the driver if their driving shows signs of tiredness.
Page 36
— Speeds of more than 200km/h (125mph).
— Twisting roads.
— Road works.
— Poor roads.
— Adverse weather conditions.
— Sporty driving style.
— The driver is distracted.
The Driver Alert System is reset in the following situations:
— The ignition is switched off.
— The driver seat belt is unfastened and the driver door is open.
— The vehicle has been stationary for longer than 15minutes.
The Driver Alert System is automatically reset in the event of an extended period of slow driving
(speed less than 60km/h (37mph)). If the speed is increased again, the system evaluates the
driving behaviour once more.
WARNING
The intelligent technology used in the Driver Alert System cannot overcome the laws of
physics, and functions only within the limits of the system. Do not let the extra convenience
afforded by the Driver Alert System tempt you into taking any risks when driving. During a long
trip, plan regular and sufficient breaks.
●
The driver is responsible at all times for their fitness to drive.
●
Never drive a vehicle when you are tired.
●
The system cannot always detect the driver's level of alertness. Observe the information in
the section “Function limitations”.
●
In certain situations, the system may wrongly interpret intentional driving manoeuvres as a
lack of alertness from the driver.
●
No urgent warning will be given in the event of the phenomenon known as “microsleep”.
●
Observe the information in the instrument cluster display and respond according to the
commands.
The Driver Alert System has been developed for use only while driving on motorways and
good roads.
If there is a system fault, proceed to a qualified workshop immediately to have the
system checked.
Page 37
The Dynamic Road Sign Display is always active when the ignition is switched on. The system
uses a camera in the base of the interior mirror to monitor standard road signs and informs the
driver of any detected speed limits, overtaking restrictions and danger signs. Within the limits of
the system, the system also displays a generic additional sign in order to provide further
information such as time restrictions or restrictions in wet or foggy conditions. These additional
signs are displayed in the head-up display
→Head-up display
. In some cases the system can also
display the current speed limits on non-signposted routes.
Displays
In addition to speed limits and overtaking restrictions, Dynamic Road Sign Display also detects
the road sign which indicates that all restrictions have been lifted on motorways and main roads
in Germany. In all other countries in which the system is operated, the current speed limit is
displayed instead.
The road signs detected by the Dynamic Road Sign Display system are displayed on the
instrument cluster. Road signs may also be displayed in the Infotainment system, depending on
the system installed in the vehicle.
With some equipment levels, a display is also shown on the Head-up Display.
No road signs available.
The system is in the initialisation phase. OR: the camera has not detected any regulatory or
warning signs.
Error: Dynamic Road Sign Display
System fault. Go to a qualified workshop.
Dynamic Road Sign Display
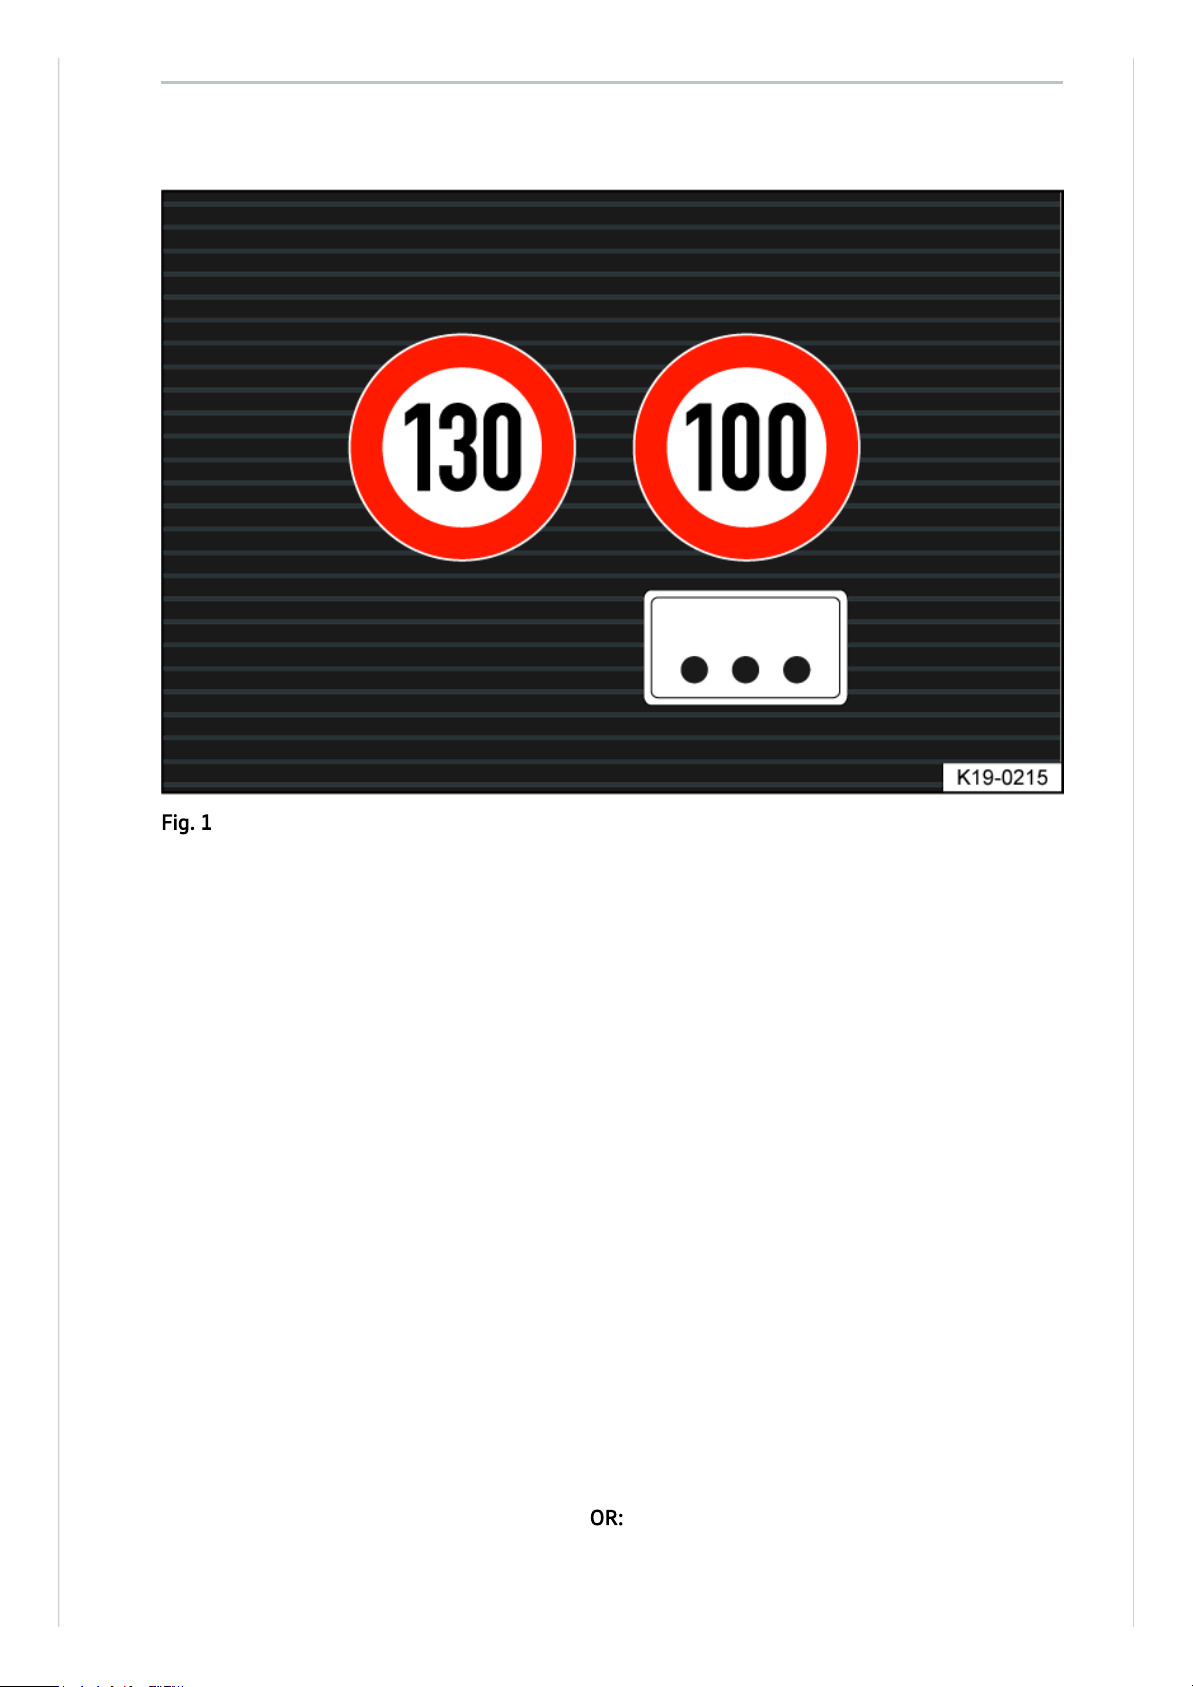
Fig.1In the instrument cluster display: example of recognised speed limits with generic
additional sign.
Page 38

Speed warning currently not available.
Fault in the Dynamic Road Sign Display system speed warning. Go to a qualified workshop.
Dynamic Road Sign Display: Clean the windscreen!
The windscreen is dirty in the area of the camera or the camera view is impaired due to the
weather conditions. Clean the windscreen.
Dynamic Road Sign Display is currently restricted.
No data transmission from the Infotainment system. Check whether valid map data is
loaded in the Infotainment system. OR: the vehicle is located in an area that is not covered
by the map stored in the Infotainment system.
No data available.
Dynamic Road Sign Display is not supported in the country in which you are currently
travelling.
Display of road signs
After validation and evaluation of the information from the camera, the Infotainment system and
the current vehicle data, the Dynamic Road Sign Display shows up to two valid road signs and
one generic additional sign
→Fig.1
:
1st position:
The road sign that currently applies for the driver is shown on the left-hand side of the
display, e.g.a speed limit of 130km/h (80mph)
→Fig.1
.
2nd position:
A further road sign may be displayed in second position, e.g. a danger sign, no overtaking
sign or an alternative speed limit.
Additional sign:
A generic additional sign is displayed if the windscreen wipers are active when driving, for
example. The valid road sign is supplemented with the corresponding additional sign in the
head-up display.
The display of danger signs is not available in all countries and the system may not be able to
recognise all danger signs.
Speed warning
If the Dynamic Road Sign Display detects that an applicable speed limit has been exceeded, it can
issue an acoustic warning signal or display a message on the instrument cluster display.
The speed warning can be set or completely deactivated in the vehicle settings in the
Infotainment system
(→ Vehicle settings menu)
. The speed warning can be set to a value of
0km/h (mph), 5km/h (3mph) or 10km/h (5mph) above the permitted speed.
No-entry warning
If the Dynamic Road Sign Display detects a no-entry sign on a one-way road or motorway
entrance, it will issue an acoustic warning signal or display a message on the instrument cluster
display.
Function limitations
Dynamic Road Sign Display is subject to system-related limitations. The following conditions can
restrict the function of Dynamic Road Sign Display, or prevent it from working altogether:
— Poor visibility, e.g.due to snow, rain, fog or heavy spray.
— Glare, e.g. from oncoming traffic or sunlight.
Page 39

— High speeds.
— A covered or dirty camera.
— Road signs located outside of the camera's field of view.
— Partially or fully hidden road signs, e.g.by trees, snow, dirt or other vehicles.
— Non-standard road signs.
— Damaged or bent road signs.
— Variable road signs on gantries (changeable road sign display using LEDs or other light
sources).
— Out-of-date map material in the Infotainment system.
— Vehicles with road sign stickers, e.g. speed restrictions on trucks.
WARNING
The intelligent road sign recognition system technology cannot overcome the laws of physics,
and functions only within the limits of the system. Do not let the extra convenience afforded by
Dynamic Road Sign Display tempt you into taking any risks when driving. The system is not a
substitute for the full concentration of the driver.
●
Always adapt your speed and driving style to suit visibility, weather, road and traffic
conditions.
●
Poor visibility, darkness, snow, rain and fog can cause traffic signs to be not displayed or be
incorrectly displayed by the system.
●
If the camera's field of view is dirty, covered or damaged, the function of the Dynamic Road
Sign Display system may be impaired.
WARNING
Driving recommendations and traffic symbols displayed by the Dynamic Road Sign Display
system may differ from the current traffic situation.
●
Not all road signs can be recognised by the system and displayed correctly.
●
Road signs on the road and traffic regulations have priority over the recommendations and
displays provided by the Dynamic Road Sign Display system.
Page 40
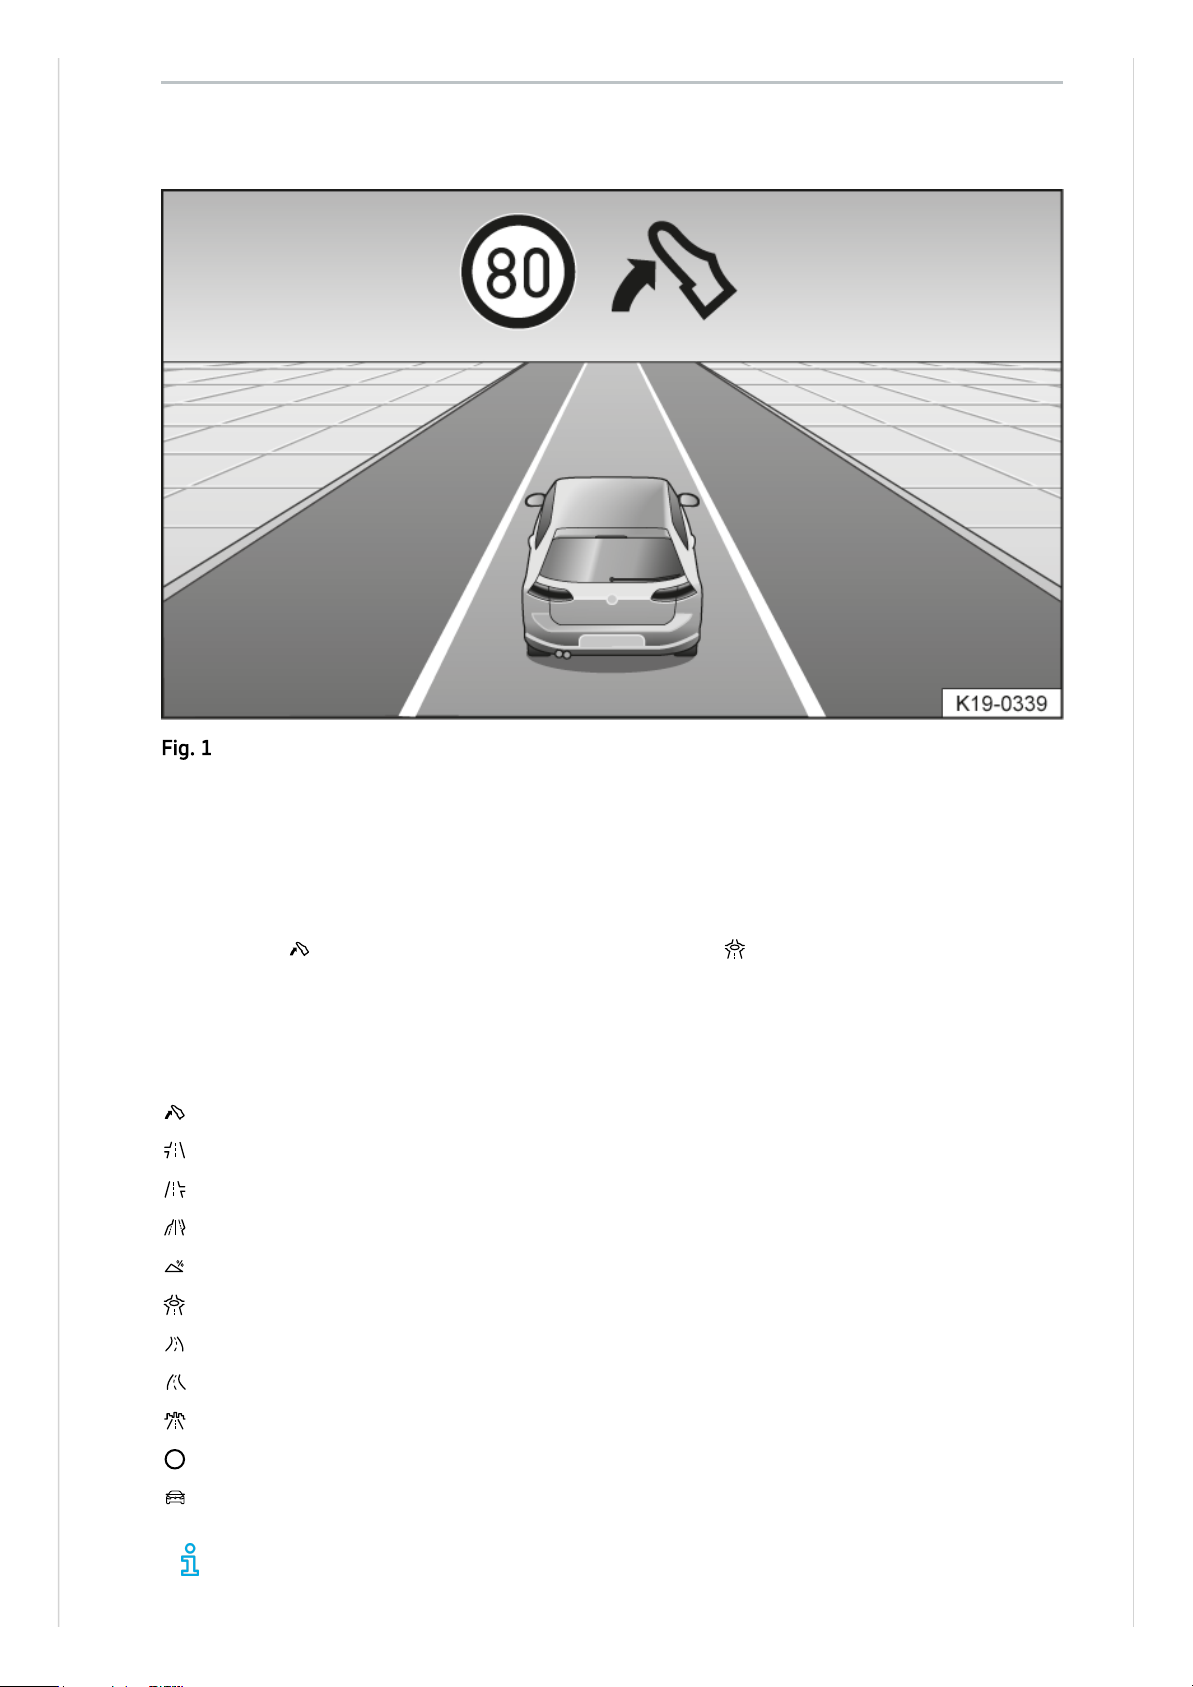
The Eco assistance function supports you with situation-dependent displays in the digital
instrument cluster for predictive and energy-saving driving
→Use energy recovery
(recuperation)
.
If your vehicle is approaching a junction, roundabout or a route section with a speed limit, for
example, the symbol is displayed together with an event in the digital instrument cluster
→Event in the digital instrument cluster
.
Overview of displayed symbols
Take your foot off the accelerator.
Left turn.
Right turn.
Motorway entrance and exit.
Caution gradient.
Roundabout ahead.
Left-hand bend.
Right-hand bend.
Town entrance.
Speed limit with dynamic speed display.
Vehicle ahead.
The symbols displayed may differ slightly depending on vehicle equipment and model.
Symbols may be changed or extended by a system update.
Eco assistance
Fig.1Eco assistance display (illustration).
Page 41
As soon as you follow the instruction and take your foot off the accelerator, the vehicle will adapt
brake energy recuperation and the driving speed depending on the selected driving profile and
distance to the event
(→ Brake energy recuperation)
.
When the system is active, Eco assistance can also increase brake energy recuperation
without displaying a message. This may be the case if you take your foot off the
accelerator when there is a vehicle in front, for example. Here, brake energy recuperation
is adapted to the vehicle in front without any message being displayed.
The Eco assistance function uses the route data of the Infotainment system and the sensors of
some assist systems. The most probable route is used if the route guidance function is not active.
You can override the intervention of the Eco assistance function at any time by pressing the
accelerator.
The Eco assistance function can be activated and deactivated in the assist system settings in the
Infotainment system
(→ Assist systems menu)
.
The Eco assistance function is automatically temporarily deactivated in the following cases:
— Position B.
— Sport gearbox program.
— Driving with Adaptive Cruise Control (ACC) or cruise control system.
Eco assistance will be activated again when you leave these conditions if the function is
activated in the assist system settings as default.
The Eco assistance function is dependent on the equipment level and is not available in all
countries.
WARNING
The system is not a substitute for the full concentration of the driver.
●
Always adapt your speed and driving style to suit visibility, weather, road and traffic
conditions.
●
Road signs on the road and traffic regulations have priority over driving recommendations.
Page 42

Setting the time and date on the Infotainment system
— Touch the Settings function button.
(→ Vehicle settings menu)
.
— Select the Time and date menu option to set the time and date.
— Select the time source:
— Automatic.
— Manual.
The time and date are displayed only on the Infotainment system.
Time and date
Page 43

Button for driver assist systems
You can open the Driver assist systems menu in the Infotainment system using the button for
driver assist systems. The button for the driver assist systems is located on the centre console
control panel.
In the assist systems menu, you can switch individual driver assist systems on and off and also
make individual settings
(→ Vehicle settings menu)
.
— Press the button.
— Select 3D or list view.
— Open the corresponding driver assist system and make your desired setting. Activated
functions are highlighted in colour.
Button for driver assist systems
Page 44

Settings can be made in the Service menu in the Infotainment system depending on the vehicle
equipment.
Opening the Service menu
— Touch the Vehicle function button in the Infotainment system.
— In the Vehicle menu, touch the Status function button.
— Select the Status view.
Open the desired menu and make the desired setting. Activated functions are highlighted in
colour.
— HOME button: touch to return to the previous menu.
Resetting the service interval display
Select the Service menu and follow the instructions on the Infotainment system.
Resetting the trip recorder
In the Status view, select the Trip recorder menu. Then touch the 0.0 function button to reset
the value.
Displaying the vehicle identification number
In the Status view, select the Service menu. The vehicle identification number is displayed.
Service menu
Page 45
Service events are displayed on the instrument cluster and in the Infotainment system.
Versions and displays can vary as different versions of the instrument cluster and Infotainment
system are available.
Service notification
If a service or inspection is due soon, a service alert will appear when the ignition is switched on.
The number of kilometres or amount of time shown correspond to the maximum number of
kilometres or maximum time that can still be driven before the next service.
Service event
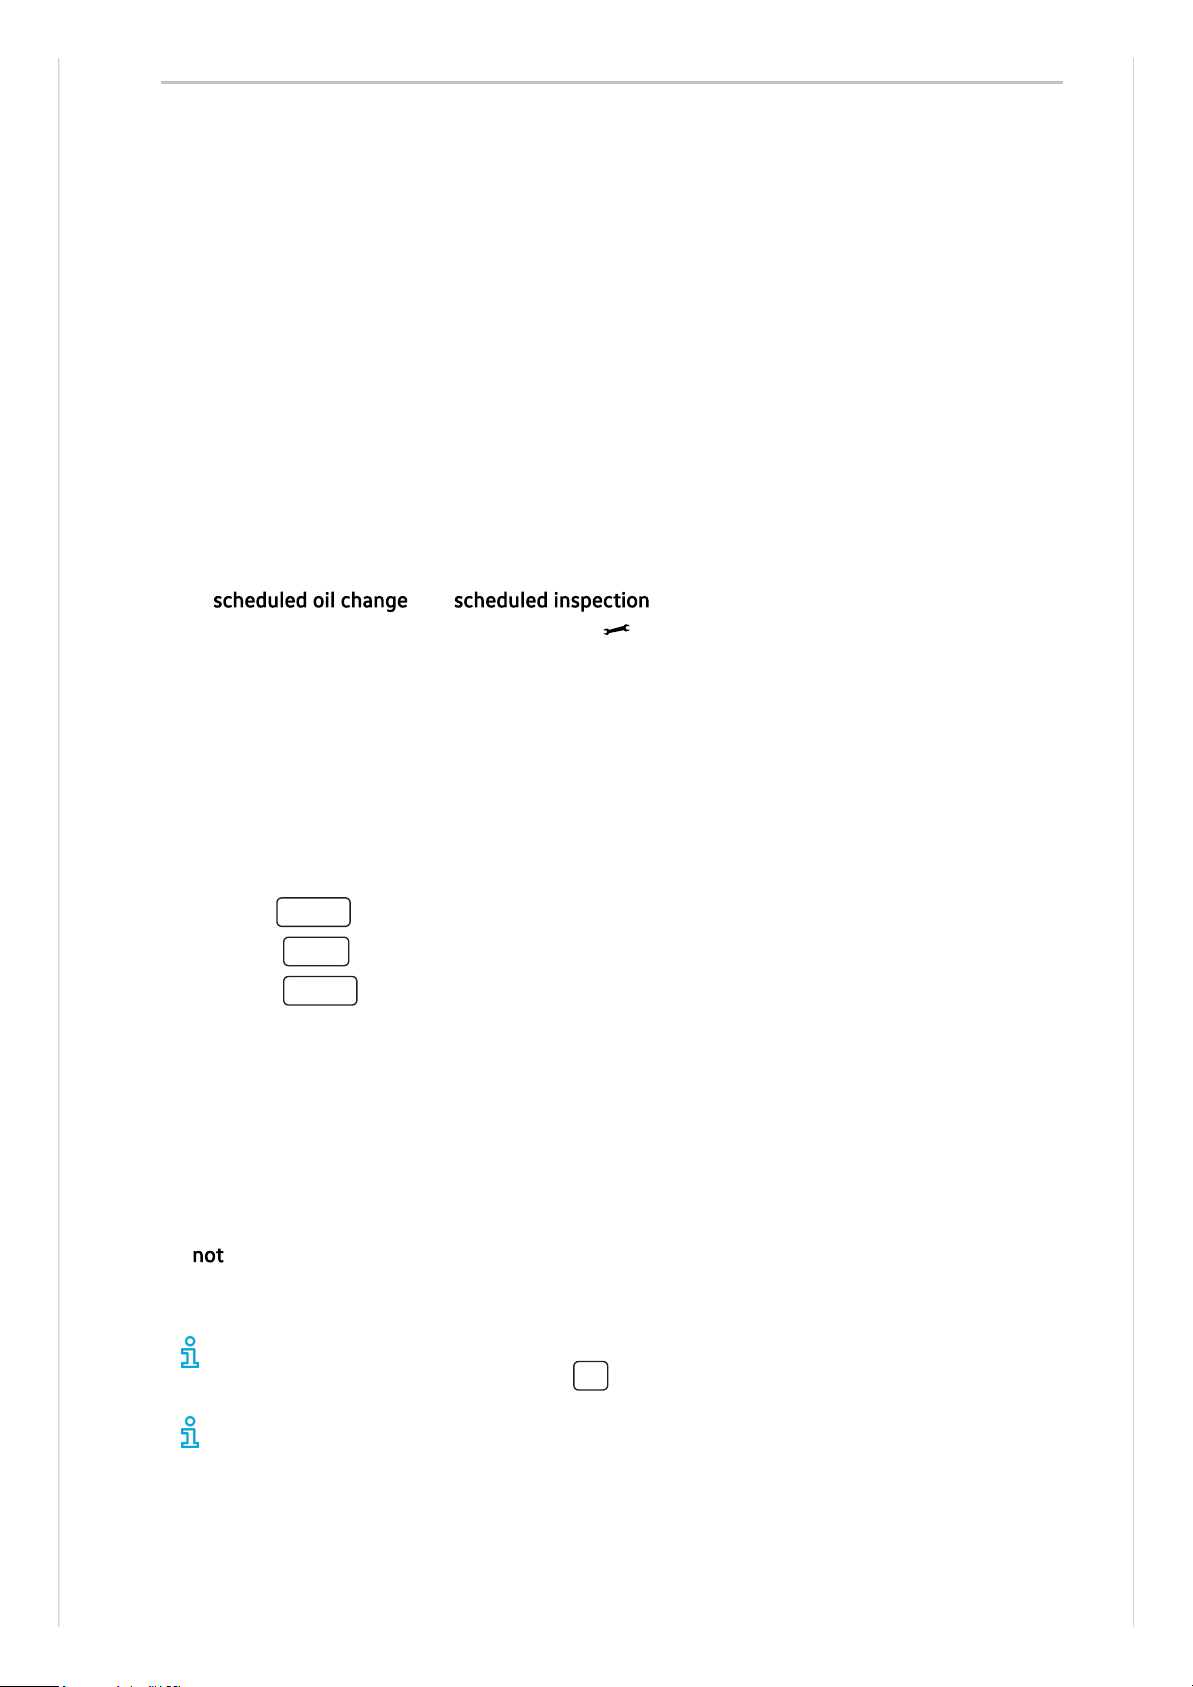
For a scheduled oil change or a scheduled inspection an acoustic signal will sound when the
ignition is switched on and the spanner symbol will be displayed for several seconds on the
digital instrument cluster display. One of the following displays will also appear:
— Inspection now!
Accessing service schedules
You can access the current service schedule when the ignition is switched on and the vehicle is
stationary:
— Press the Vehicle function button.
— Select the Status function button and the Status view.
— Select the Service menu option to display the service information.
Resetting the service interval display
If the service or the inspection was not performed by a Volkswagen dealership, the display can be
reset as follows:
— The service interval display can be reset only via the Service menu.
Do not reset the service interval display between service intervals otherwise incorrect data may
be shown.
The service message goes out after a few seconds when the vehicle's drive system has
been activated or after pressing theOK button in the multifunction steering wheel.
If the 12-volt vehicle battery was disconnected for long periods in vehicles with flexible
service, the system cannot calculate the time at which the next service is due. The
information shown in the service interval display may therefore be incorrect. In this case,
observe the maximum permissible maintenance interval.
Service interval display
Page 46

Opening the Vehicle settings menu
— Switch on the ignition.
— Switch on Infotainment system if necessary.
— Touch the Vehicle function button.
— Touch the corresponding function buttons to open additional submenus in the Vehicle menu
or to make settings in the menu options.
Open the desired menu and make the desired setting. Activated functions are highlighted in
colour.
HOME button: touch to return to the start screen.
Infotainment system controls and displays
Vehicle settings menu
You can switch individual functions and systems on and off and adjust the settings in the
vehicle settings of the Infotainment system.
Page 47

The charging manager allows you to make settings for charging the high-voltage battery. The
charging manager is started automatically when the vehicle is unlocked and the charging
connector is plugged in. Alternatively, it can be accessed via the vehicle settings in the
Infotainment system. Further information is provided in the chapter on the high-voltage battery
(→ Timer-controlled charging)
.
Charging menu
— Switch on the ignition.
— Switch on Infotainment system if necessary.
— Touch the Vehicle function button.
— Touch the Charging function button.
— Make the desired charging settings. The activated functions are highlighted in colour.
Charging locations
New charging locations can be defined or existing charging locations configured and selected in
the Charging locations menu.
It is also possible to make settings for charging times and air conditioning.
Charging manager
Page 48

Displayed information
— Locking and unlocking.
— Welcome and goodbye animation.
— Charging operations.
— Voice control.
— Phone call.
— Navigation.
— Reduced power.
— Front Assist braking request
The displayed information may be changed and extended by a system update.
Adjusting the brightness
Touch theBrightness function button in the drop-down menu.
— Adjust the brightness by means of the touch slider.
HOME button: touch to return to the previous menu.
Settings in the Infotainment system
Touch the Vehicle function button
(→ Vehicle settings menu)
.
— Select display content for the interior. Then touch theDisplays function button.
— Set the functions for ID.Light as desired. The activated functions are highlighted in colour.
Certain ID.Light functions can be optionally activated or deactivated in the vehicle settings in the
Infotainment system.
HOME button: touch to return to the previous menu.
ID.Light
The ID.Light is a light concept that displays additional information on the vehicle status. When the
vehicle’s drive system is activated and while driving, supporting information on the current driving
situation is provided via ID.Light.
Page 49

Preparing for a journey and driving safety
Observe the following information both before and during every journey to ensure your own safety,
and the safety of all passengers and other road users
→General notes
:
✓ Check that all lights and turn signals are working properly.
✓ Check the tyre pressure and charge level
(→ Tyre pressure), (→ Charging process display)
.
✓ Check the washer fluid level
(→ Washer fluid)
.
✓ Make sure that you have a good, clear view through all of the windows
(→ Vehicle care, exterior)
.
✓ Air intake to the electric drive must not be obstructed, and the electric drive must not be covered
by blankets or insulating materials
(→ In the engine compartment)
.
✓ Secure any objects and luggage in the stowage compartments, the luggage compartment or on
the roof
(→ Transporting items)
.
✓ Ensure that you are able to operate the pedals freely at all times.
✓ Secure any children travelling in the vehicle in a restraint system suitable for their weight and size
(→ Child seats)
.
✓ Adjust the front seats, head restraints and mirrors properly in accordance with the size of the
occupants
(→ Sitting position), (→ Mirrors)
.
✓ Wear shoes that provide good grip for your feet when using the pedals.
✓ The floor mat in the footwell on the driver side must leave the pedal area free and must be
securely fastened.
✓ Assume a correct sitting position before setting off and maintain this position while driving. This
also applies to all passengers
(→ Sitting position)
.
✓ Fasten your seat belt correctly before setting off and keep it properly fastened throughout the
journey. This also applies to all passengers
(→ Seat belts)
.
✓ Each vehicle occupant must sit in a seat of their own and must have their own seat belt.
✓ Never drive if your driving ability is impaired, e.g. by medication, alcohol or drugs.
✓ Do not allow yourself to be distracted from the traffic, e.g. by passengers, telephone calls,
opening menus and making adjustments to settings.
✓ Always adapt your speed and driving style to suit visibility, weather, road and traffic conditions.
✓ Observe traffic regulations and speed limits.
✓ Take regular breaks when travelling long distances – at least every twohours.
✓ Secure animals in the vehicle using a system that is suitable for their weight and size.
Driving abroad
Safety
General notes
Page 50

In some countries, special safety standards and regulations apply that the vehicle may not comply
with. Volkswagen recommends that you visit your Volkswagen dealership before travelling abroad to
find out about any legal requirements and the following issues at your destination:
✓ Does the vehicle need any technical modifications for driving abroad, e.g.masking or switching
the headlights over?
✓ Are the necessary tools, diagnostic equipment and spare parts available for service and repair
work?
✓ Are there any Volkswagen dealerships in the destination country?
✓ Are the correct service fluids that comply with Volkswagen specifications available in the
destination country
(→ Service fluids)
?
✓ Does the navigation function in the factory-fitted Infotainment system work with the navigation
data available in the destination country?
✓ Are special tyres necessary for travelling in the destination country?
✓ Is a fire extinguisher a requirement in your destination country?
✓ Which requirements must be observed regarding high-visibility waistcoats?
✓ Are special charging cables necessary for charging at mains sockets in the destination country?
Checks when charging
Do not perform any work on the electric motor or in the front compartment unless you know exactly
how to carry out the tasks, are aware of the general safety procedures and have the correct
equipment, service fluids and suitable tools to hand
(→ In the engine compartment)
. In any other
case, all work must be carried out by a qualified workshop. Make sure that the following are checked
regularly:
✓ Washer fluid level
(→ Washer fluid)
.
✓ Coolant level
(→ Coolant)
.
✓ Brake fluid level
(→ Brake fluid)
.
✓ Tyre pressure
(→ Tyre pressure)
.
✓ Vehicle lighting
(→ Exterior drive lighting)
necessary for traffic safety:
— Turn signals.
— Side lights, dipped beam headlights and main beam headlights.
— Tail light clusters.
— Brake lights.
— Rear fog light.
— Number plate light.
Information on changing bulbs
(→ Exterior lighting)
.
DANGER
Please observe important safety information about the front passenger front airbag
(→ Child
seats)
.
Page 51
DANGER
The vehicle's high-voltage network and the high-voltage battery are dangerous and can cause
burns or other injuries and even lead to a fatal electric shock.
●
Please observe the important safety information about the high-voltage system and the highvoltage battery
(→ High-voltage battery)
.
WARNING
Driving under the influence of alcohol, drugs, medication or narcotics can cause serious accidents
and fatal injuries.
●
Alcohol, drugs, medication and narcotics can severely impair perception, reaction times and
driving safety. This could cause you to lose control of the vehicle.
WARNING
Always observe current traffic regulations and speed limits, and think ahead when driving. Correct
interpretation of a driving situation can make the difference between reaching your destination
safely and having an accident with serious injuries.
NOTICE
Volkswagen is not responsible for any vehicle damage caused by inadequate servicing work or lack
of Genuine Parts.
Please observe the notes and information for vehicles with N1 approval
(→ N1 approval)
.
Servicing the vehicle regularly is not only about vehicle maintenance – it also ensures that
your vehicle remains roadworthy and in perfect working order. You should therefore have
your vehicle serviced according to the Volkswagen guidelines. Some work may have to be
carried out before the due date of the next service if the vehicle is subjected to heavy-duty
operating conditions. Heavy-duty conditions are, for example, regular stop and go driving or
driving in areas with high levels of dust. Further information can be obtained from your
Volkswagen dealership or qualified workshop.
Page 52
Number of seats
Depending on the model, the vehicle has a total of four or five seats.
4-seater 5-seater
Seats at the front 2 2
Seats in 2nd row of
seats
2 3
Each seat is equipped with a seat belt.
WARNING
Assuming an incorrect sitting position in the vehicle can increase the risk of severe or fatal
injuries during a sudden driving or braking manoeuvre, in the event of a collision or accident, or
if the airbags are triggered.
●
All vehicle occupants must assume a correct sitting position before setting off and maintain
this position throughout the trip. This also applies to the fastening of seat belts.
●
The number of vehicle occupants must never exceed the number of seats with seat belts in
the vehicle.
●
Always secure children in the vehicle in an authorised child restraint system which is
suitable for their height and weight
(→ Child seats)
and
(→ Airbag system)
(→ Advanced
airbag system) .
●
Always keep your feet in the footwell while the vehicle is in motion. Never place your feet
on the seat or dash panel, for example, and never ride with your feet out of the window. If
you sit like this, the airbag and seat belt cannot provide optimal protection and could
actually increase the risk of injury during an accident.
Sitting position
Introduction to the topic
Page 53

If the seat belts are not worn or are worn incorrectly, the risk of severe or fatal injuries increases.
Seat belts can only provide optimal protection if the seat belt routing is correct. Assuming an
incorrect sitting position considerably impairs the level of protection provided by a seat belt. This
could lead to severe or even fatal injuries. The risk of severe or fatal injuries is especially
increased when a deploying airbag strikes a vehicle occupant who has assumed an incorrect
sitting position. The driver is responsible for all occupants transported in the vehicle, especially
children.
The following list contains examples of sitting positions that can be dangerous for all vehicle
occupants.
Whenever the vehicle is in motion:
— Never stand in the vehicle.
— Never stand on the seats.
— Never kneel on the seats.
— Never tilt the backrest too far to the rear.
— Never lean against the dash panel.
— Never lie on the seats in the passenger compartment and on the rear bench seat.
— Never sit on the front edge of a seat.
— Never sit sideways.
— Never lean out of a window.
— Never put your feet out of a window.
— Never put your feet on the dash panel.
— Never place your feet on the seat cushion or seat backrest.
— Never travel in a footwell.
— Never sit on the armrests.
— Never travel on a seat without wearing the seat belt.
— Never travel in the luggage compartment.
WARNING
Every incorrect sitting position in the vehicle increases the risk of severe or fatal injuries in the
event of an accident or sudden driving or braking manoeuvre.
●
All vehicle occupants must maintain a correct sitting position and wear their seat belt
properly while the vehicle is in motion.
●
Sitting in an incorrect position, not fastening the seat belt, or not leaving adequate space
between the occupants and the airbags could result in critical or fatal injuries, especially if
the airbags deploy and strike an occupant who has assumed an incorrect sitting position.
The dangers of assuming an incorrect sitting position
Page 54
The following describes the correct sitting positions for the driver and passengers.
If any vehicle occupants cannot assume a correct sitting position due to their physical build, they
should contact a qualified workshop to find out about possible special modifications. The seat
belts and airbags can only provide a maximum level of protection if a correct sitting position is
assumed. Volkswagen recommends using a Volkswagen dealership for this purpose.
Volkswagen recommends the following seating position for your own safety and to reduce the
level of injury in the event of a sudden braking manoeuvre or an accident:
The following applies to all vehicle occupants:
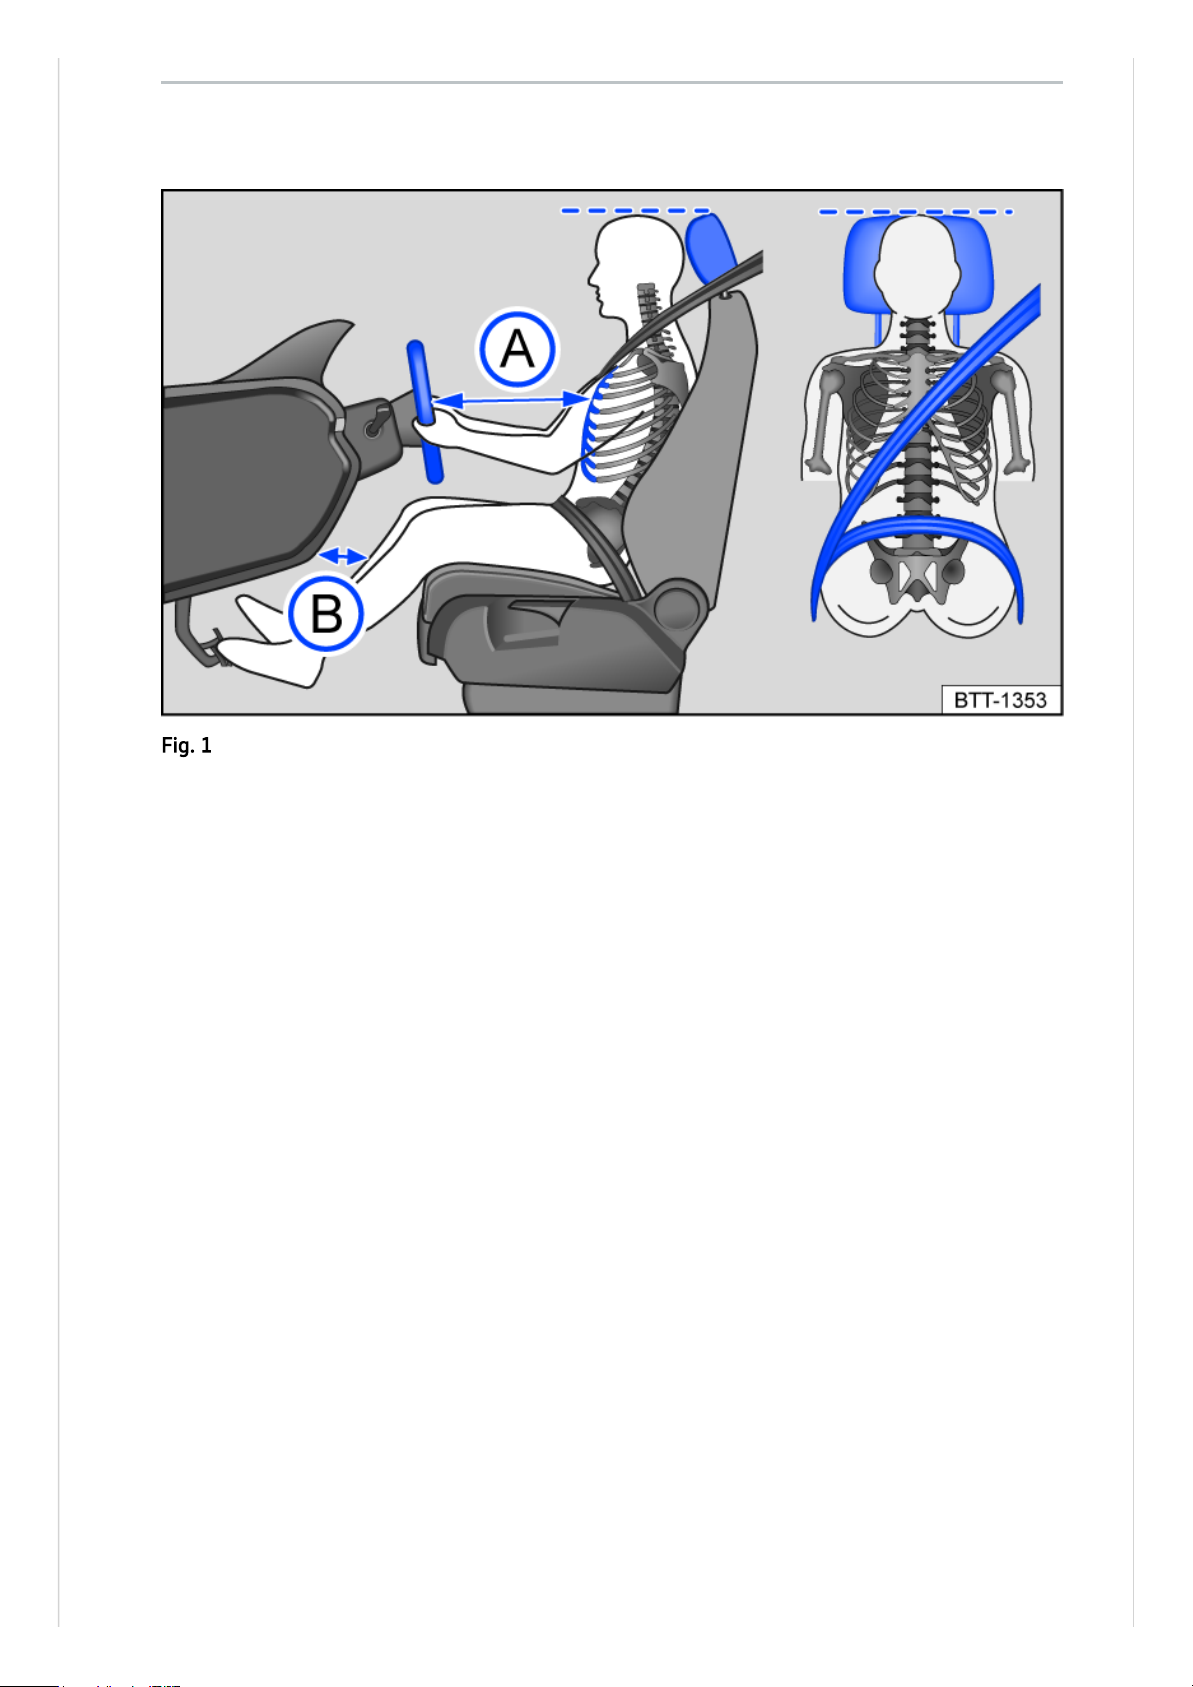
— Adjust the head restraint so that its upper edge is at the same height as the top of the head,
but not lower than eye level. Position the back of your head as close to the head restraint as
possible at all times
→Fig.1
.
— For small people, push the head restraint all the way down, even if the head is then located
underneath the top edge of the head restraint.
— For tall people, push the head restraint up as far as it will go.
— Keep both feet in the footwell while the vehicle is in motion.
— Adjust and fasten seat belts properly
(→ Seat belts)
.
Additional points for the driver:
Correct sitting position
Fig.1Illustration: correct distance between the driver and the steering wheel, correct seat belt
routing and correct head restraint adjustment.
Page 55

— Adjust the steering wheel so that the distance between the steering wheel and your
breastbone is at least 25cm
→Fig.1 A
and the circumference of the steering wheel can be
held at the sides with both hands and your arms slightly bent.
— The steering wheel must always point towards the breastbone and not towards the face.
— Move the backrest into an upright position so that your back rests fully against it.
— Adjust the driver seat by moving it forwards or backwards so that you are able to press the
pedals to the floor with your knees still slightly bent and so that the distance from the dash
panel to your knees is at least 10cm
→Fig.1 B
.
— Adjust the height so that you can reach the highest point of the steering wheel.
— Always leave both feet in the footwell to help ensure you maintain control of the vehicle at all
times.
Additional points for the front passenger:
— Move the backrest into an upright position so that your back rests fully against it.
— Push the front passenger seat as far back as possible so that the airbag can provide maximum
protection if it is deployed.
Page 56

Check the condition of all seat belts regularly. If the belt webbing, belt connections, belt
retractor or seat belt buckle become damaged, the seat belt in question should be replaced
immediately by a qualified workshop
→
. The qualified workshop must use correct spare parts
that are compatible with the vehicle, equipment level and model year. Volkswagen recommends
using a Volkswagen dealership for this purpose.
WARNING
Incorrectly fastened or unfastened seat belts increase the risk of severe or fatal injuries. Seat
belts will only offer the optimum level of protection when they are fastened and used properly.
●
Seat belts are the most effective means of reducing the risk of serious and fatal injuries in
the event of an accident. Seat belts must always be fastened properly when the vehicle is in
motion to protect the driver and all vehicle occupants.
●
Before every trip, each vehicle occupant must adopt the correct sitting position, correctly
fasten the seat belt belonging to their seat and keep it fastened properly throughout the
trip. This applies to all vehicle occupants and also in urban traffic.
●
While the vehicle is in motion, secure all children travelling in the vehicle in a restraint
system suitable for their weight and height. They must also wear correctly fastened seat
belts
(→ Child seats)
.
●
Only start driving when all passengers have correctly fastened their seat belts.
●
Always insert the latch plate only into the buckle of the associated seat, and ensure that it
engages properly. Using a buckle that does not belong to the seat that you are occupying
reduces the level of protection and can lead to severe injuries.
●
Avoid allowing foreign bodies or liquids to enter the slot for the seat belt buckle. This could
prevent the belt buckle and seat belt from working properly.
●
Never unfasten the seat belt while the vehicle is in motion.
●
Never allow more than one person to share the same seat belt.
●
Never travel when children or babies are being carried on somebody's lap and fastened with
the same belt.
●
Never travel wearing loose, bulky clothing (such as an overcoat over a jacket). This could
prevent the seat belts from fitting and functioning properly.
WARNING
Damaged seat belts are very dangerous and can cause severe or fatal injuries.
●
Never damage the belt by trapping it in the door or in the seat mechanism.
●
If the belt webbing or any other part of the seat belt becomes damaged, the seat belt may
tear during an accident or sudden braking manoeuvre.
●
Have damaged seat belts immediately replaced by new seat belts that have been approved
by Volkswagen for the vehicle. Seat belts subjected to stress and stretched during an
accident must be replaced by a qualified workshop. Renewal may be necessary even if there
is no apparent damage. The belt anchorages should also be checked.
●
Never try to repair, modify or remove the seat belts yourself. All repairs to the seat belts,
belt retractors and buckles must be carried out by a qualified workshop.
Seat belts
Introduction to the topic
Page 57
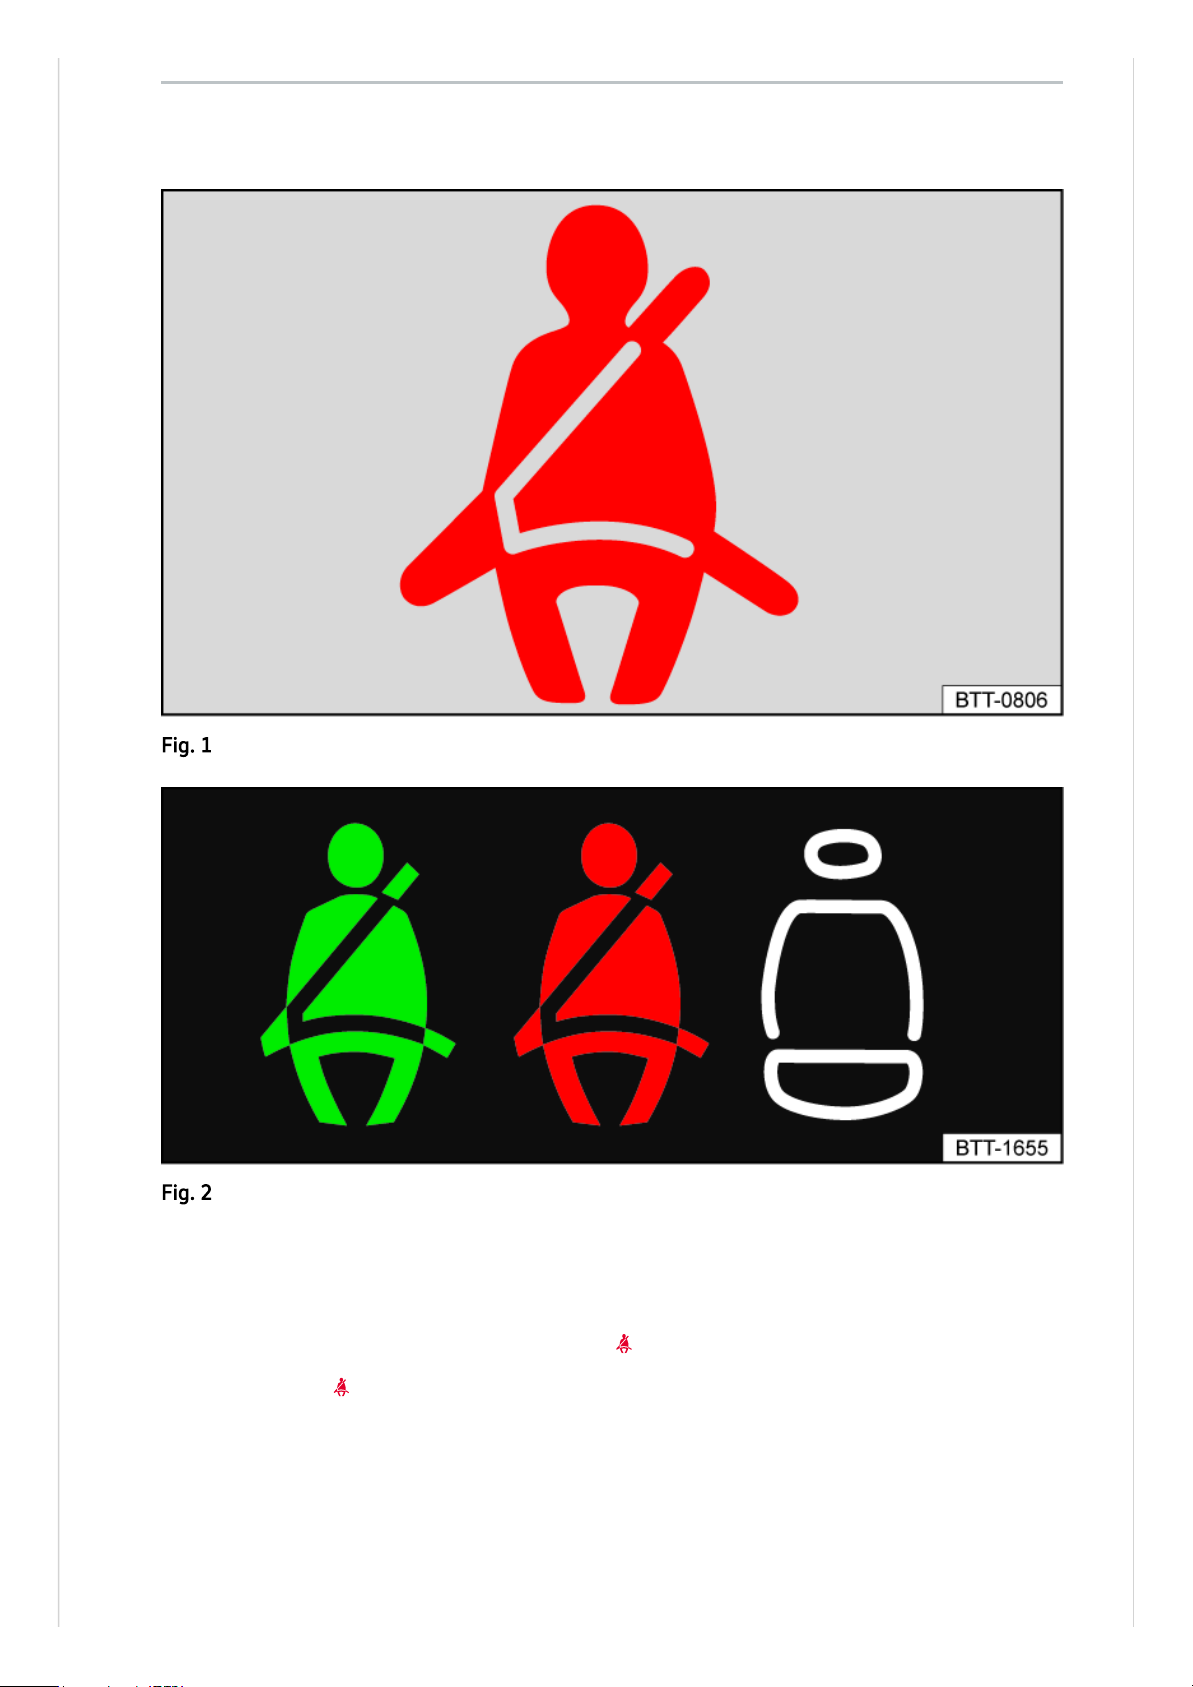
If the driver or front passenger seat are occupied by an adult, an acoustic warning will be emitted
for a few seconds if the seat belts are not fastened at the start of a journey and the vehicle
reaches a speed of more than approximately 25km/h (15mph) or if the seat belts are unfastened
while the vehicle is in motion. The warning lamp also flashes
→Fig.1
.
The warning lamp will not go out until all occupants have fastened their seat belts when the
ignition is switched on.
Belt status display for the rear seats
After the ignition has been switched on, the belt status display
→Fig.2
on the instrument
cluster display shows the driver whether the adult rear seat passengers have fastened their seat
belts.
Warning lamp
Fig.1On the instrument cluster display: warning lamp.
Fig.2On the instrument cluster display: seat belt status for the rear seats.
Page 58
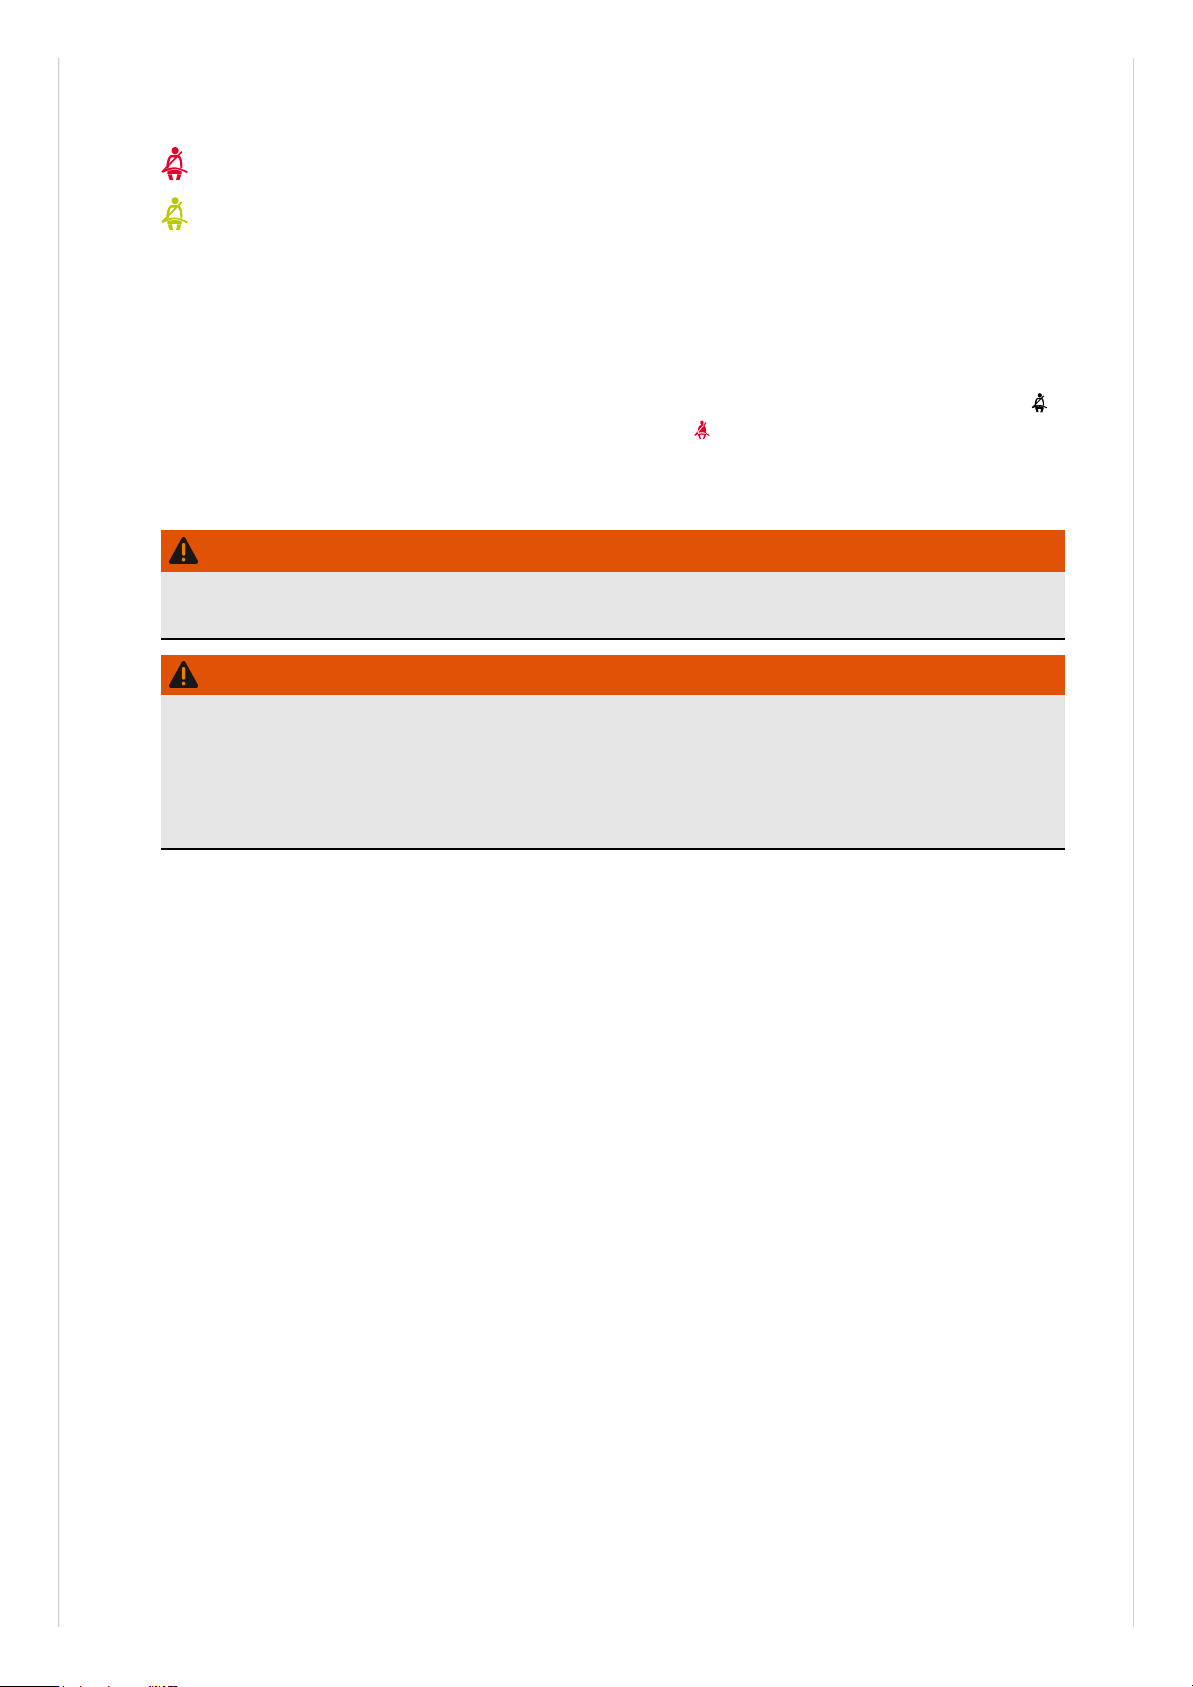
The following symbols light up in different colours depending on whether seats are occupied and
on the belt status:
The red symbol indicates that the passenger on this seat has not fastened their seat belt.
The green symbol indicates that the passenger on this seat has fastened their seat belt.
The white symbol indicates that this seat is not occupied.
Buckle-up request for the rear seats
If a seat belt for one of the rear seats is unfastened while the vehicle is in motion, the symbol
will light up continuously for this seat. The warning lamp will also flash on the instrument
cluster display
→Fig.1
. If the vehicle is travelling faster than approximately 25km/h (15mph)
an acoustic signal will also be given.
WARNING
Incorrectly fastened or unfastened seat belts increase the risk of severe or fatal injuries. Seat
belts will only offer the optimum level of protection when they are fastened and used properly.
WARNING
The buckle-up request is designed to detect adult persons. If a seat is occupied by lighter
persons, in particular children, the detection will not be reliable. The buckle-up request also
does not respond or only in a limited way if child seats and seat supports are used.
●
Always ensure that all vehicle occupants, especially children, have fastened their seat belts
properly.
Page 59
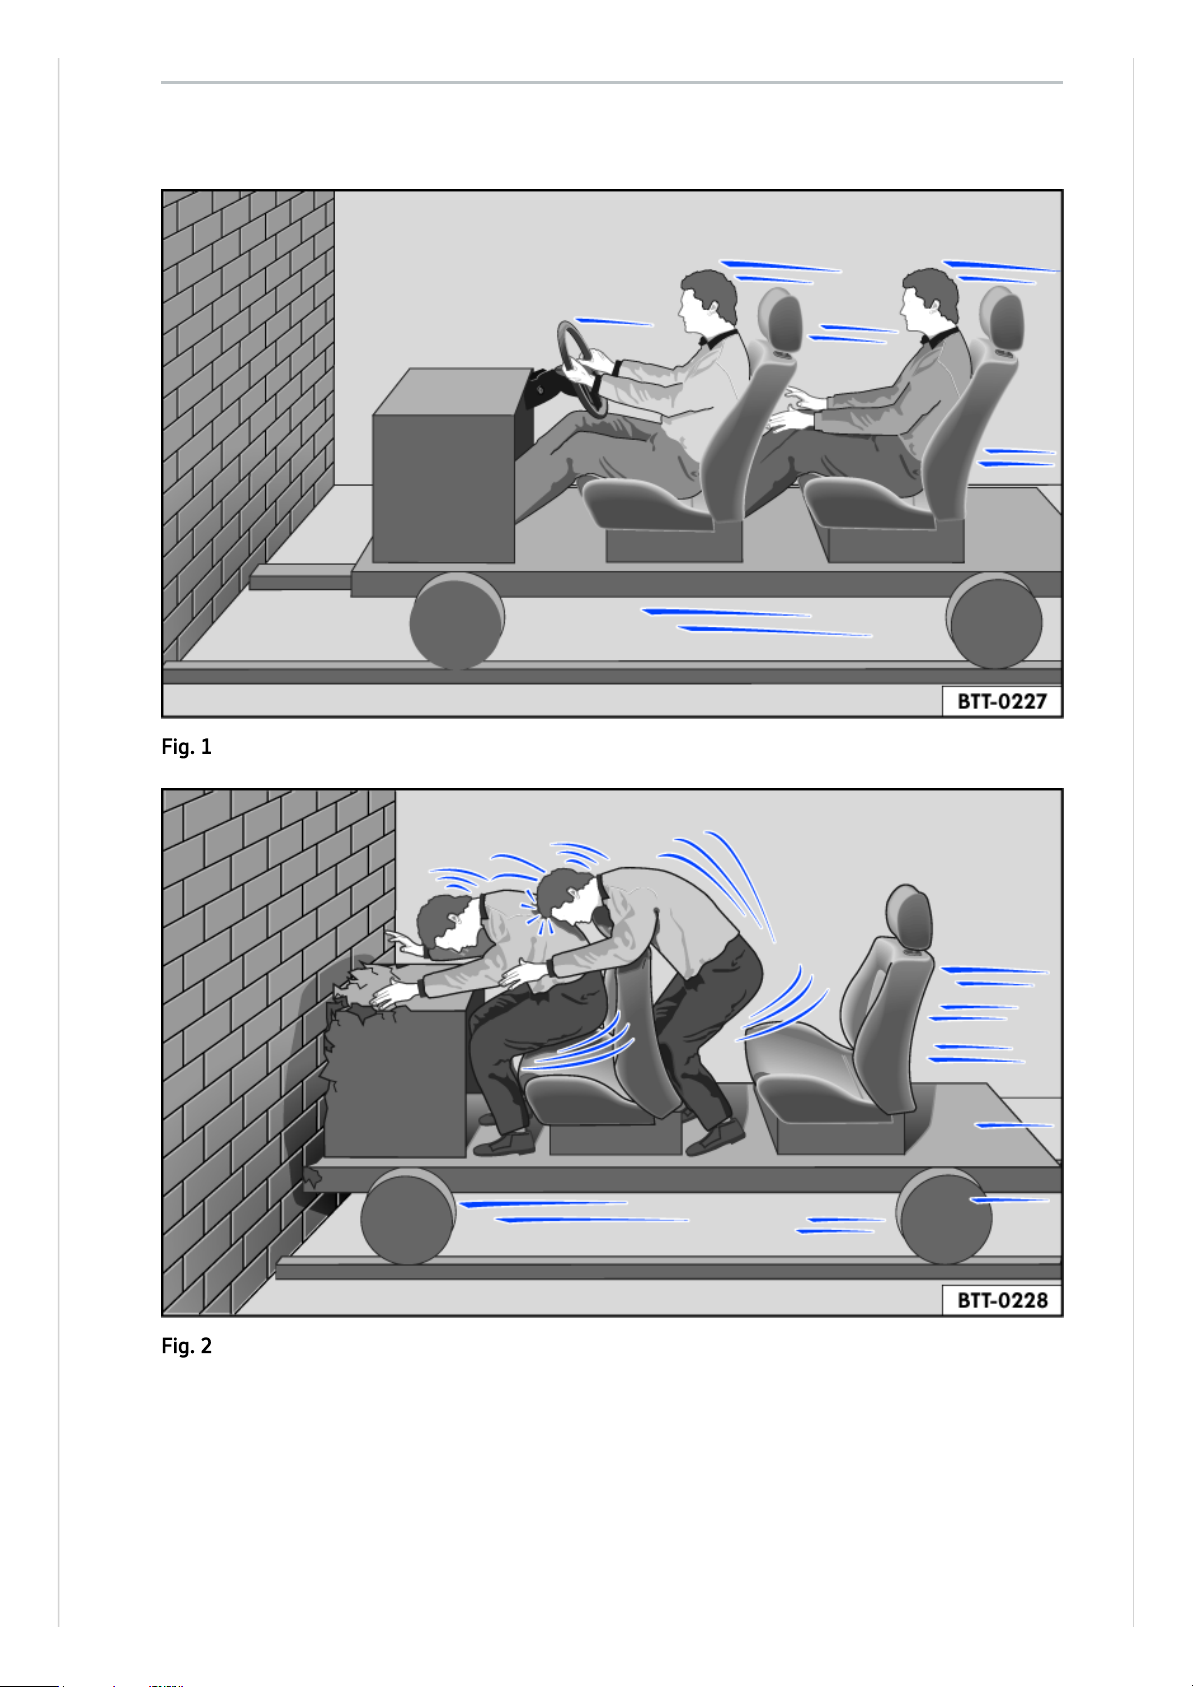
The physical principles involved in a frontal collision are relatively simple. As soon as the vehicle
is in motion, both the moving vehicle and its occupants gain “kinetic energy”
→Fig.1
.
The higher the vehicle speed and the heavier the weight of the vehicle, the greater the amount
of energy that will be released in the event of an accident.
Frontal collisions and the laws of physics
Fig.1Unbelted occupants in a vehicle heading for a brick wall.
Fig.2Unbelted occupants in a vehicle heading for a brick wall.
Page 60

However, the most significant factor is the speed of the vehicle. For example, if the speed
doubles from around 25km/h to around 50km/h (15mph to 31mph), the kinetic energy
increases by a factor of four.
The amount of kinetic energy depends on the speed of the vehicle and the weight of the vehicle
and passengers. The higher the speed and the heavier the weight, the greater the amount of
energy that will be released in the event of an accident.
Passengers not wearing seat belts are not “connected” to the vehicle. In the event of a frontal
collision, they will continue to move forwards at the same speed at which the vehicle was
travelling before impact, until something stops them. Because the passengers in our example are
not restrained by seat belts, the entire amount of kinetic energy will only be released at the point
of impact against the wall
→Fig.2
.
At speeds of approximately 30km/h (19mph) to approximately 50km/h (31mph), the forces
acting on bodies in a collision can easily exceed one tonne (1,000kg). These forces are even
greater at higher speeds.
This example applies not only to frontal collisions, but to all accidents and collisions.
Page 61
What happens to vehicle occupants who have not fastened
their seat belts
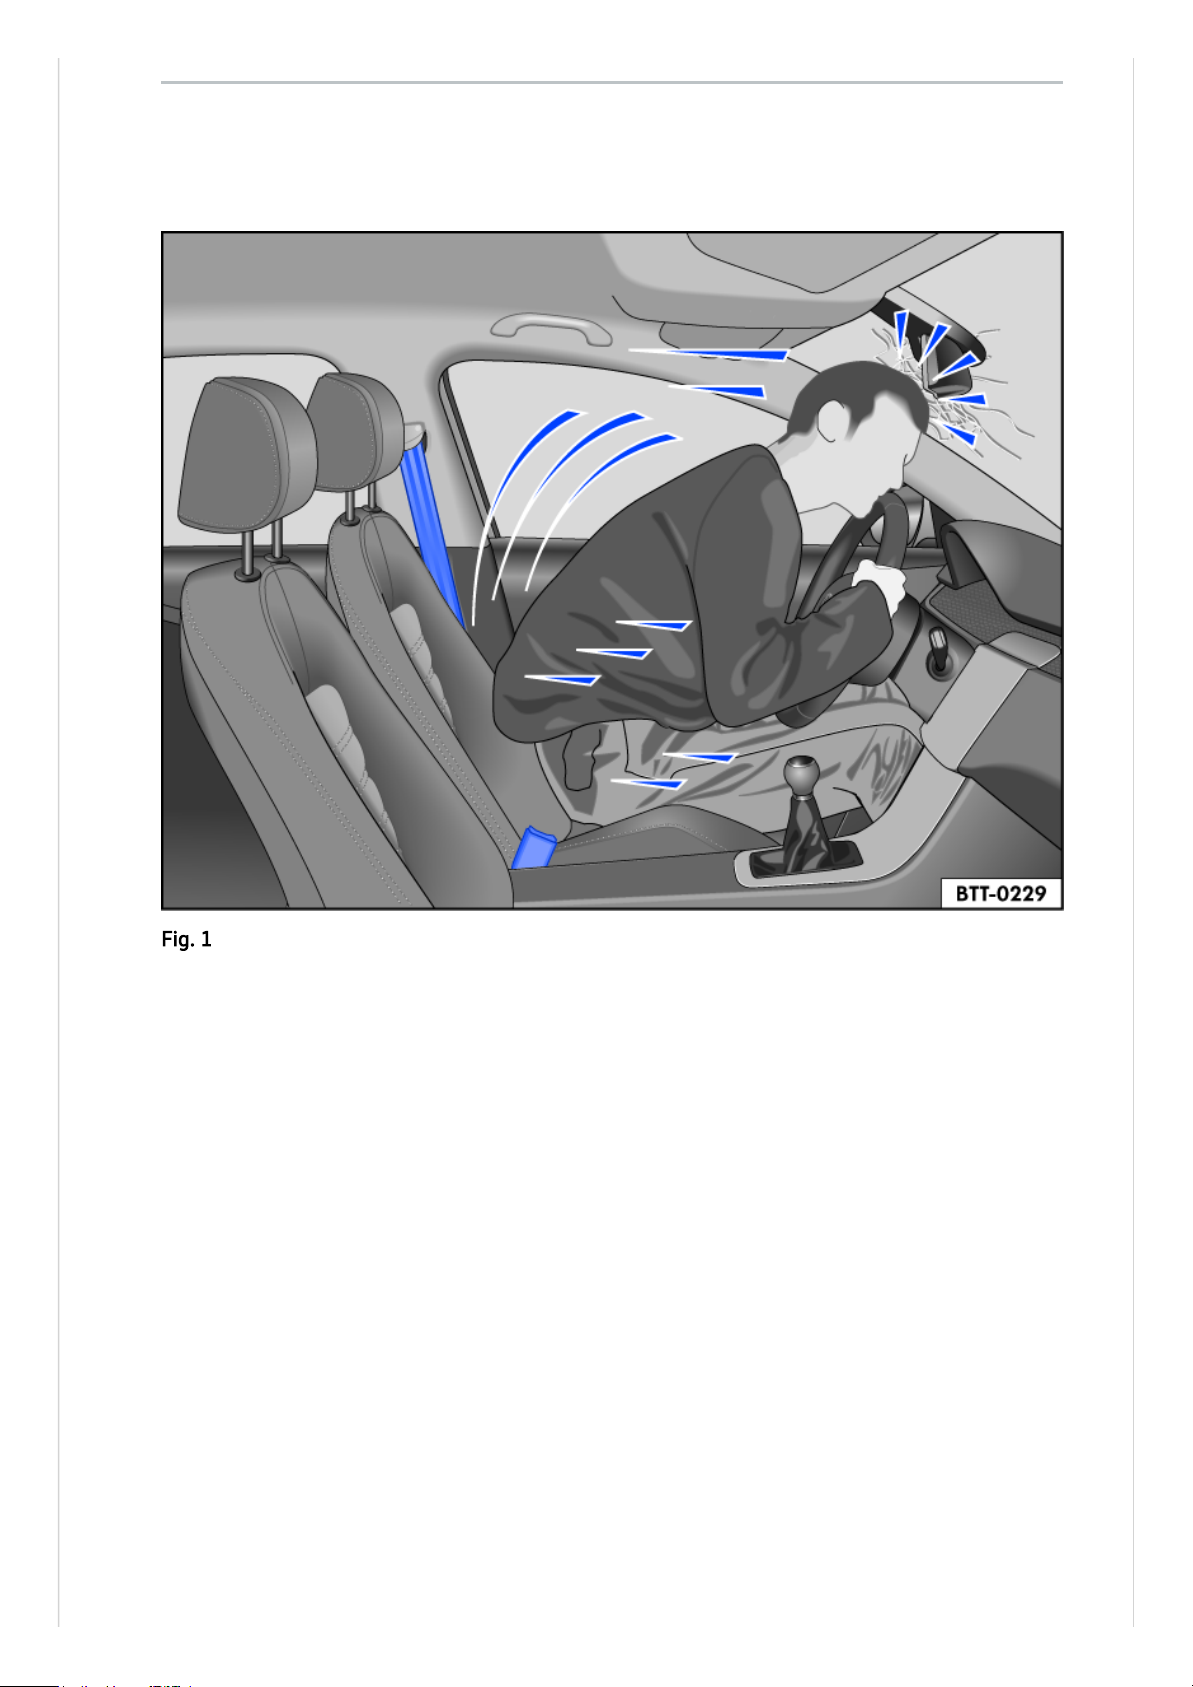
Fig.1An unbelted driver is thrown forwards.
Page 62
Many people believe that they can brace their weight with their hands in a minor collision. This is
not true.
Even at low speeds, the forces acting on the body in a collision are so great that it is not possible
to brace oneself with arms and hands. In a frontal collision, vehicle occupants who have not
fastened their seat belts will be thrown forward and will make unchecked contact with parts of
the vehicle interior, e.g. the steering wheel, dash panel, or windscreen
→Fig.1
.
The airbag system is not a substitute for the seat belts. When triggered, the airbags only provide
additional protection. Airbags are not triggered in all kinds of accidents. Even if the vehicle is
equipped with an airbag system, all vehicle occupants, including the driver, must fasten their
seat belt and wear it correctly while the vehicle is in motion. This reduces the risk of severe or
fatal injuries in the event of an accident – regardless of whether an airbag is fitted for the seat.
Each airbag can only be triggered once. To achieve best possible protection, seat belts must
always be worn properly. This also ensures that protection is provided in accidents in which the
airbag is not triggered. Any vehicle occupants not wearing a seat belt can be thrown out of the
vehicle and sustain more severe or even fatal injuries as a result.
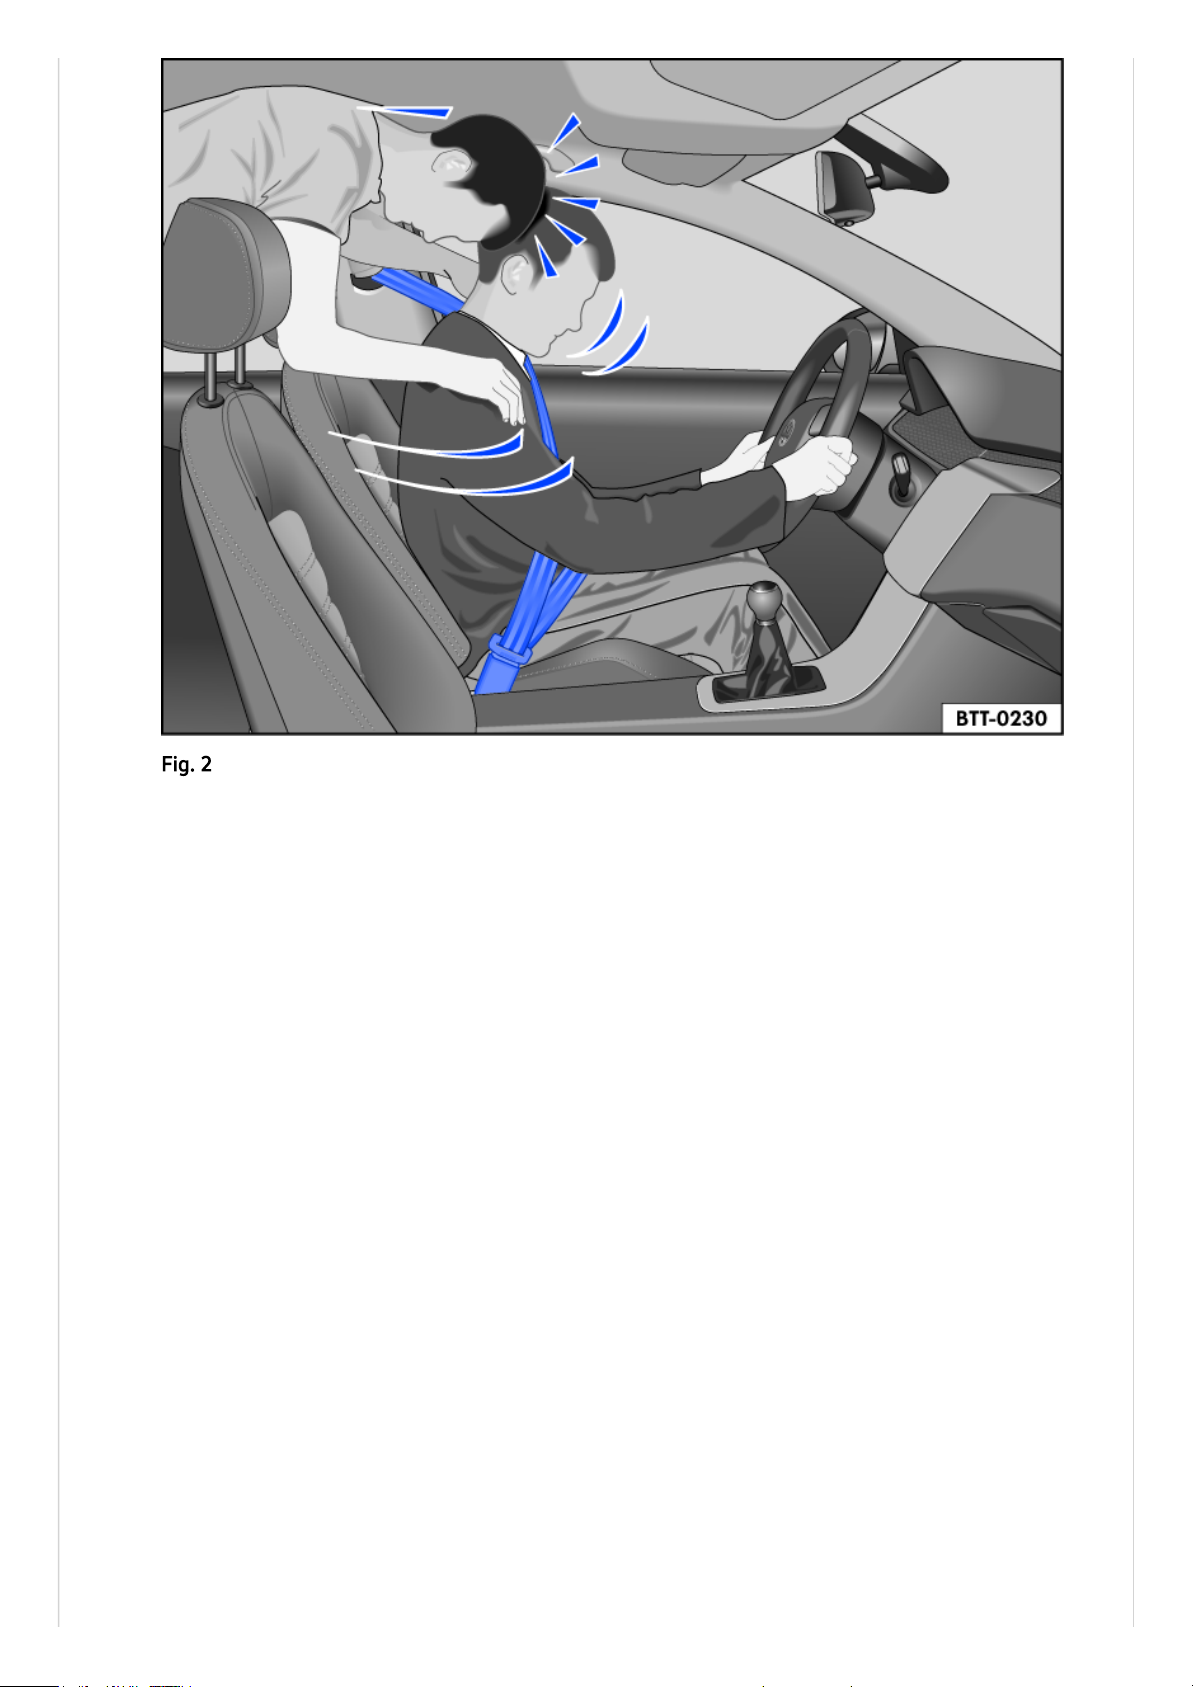
It is also important for the rear seat occupants to wear seat belts properly, as they could
otherwise be thrown forwards violently in an accident. Rear passengers who are not wearing
seat belts endanger not only themselves and the driver, but also other people in the vehicle
→Fig.2
.
Fig.2The unbelted rear passenger is thrown forwards, hitting the belted driver.
Page 63
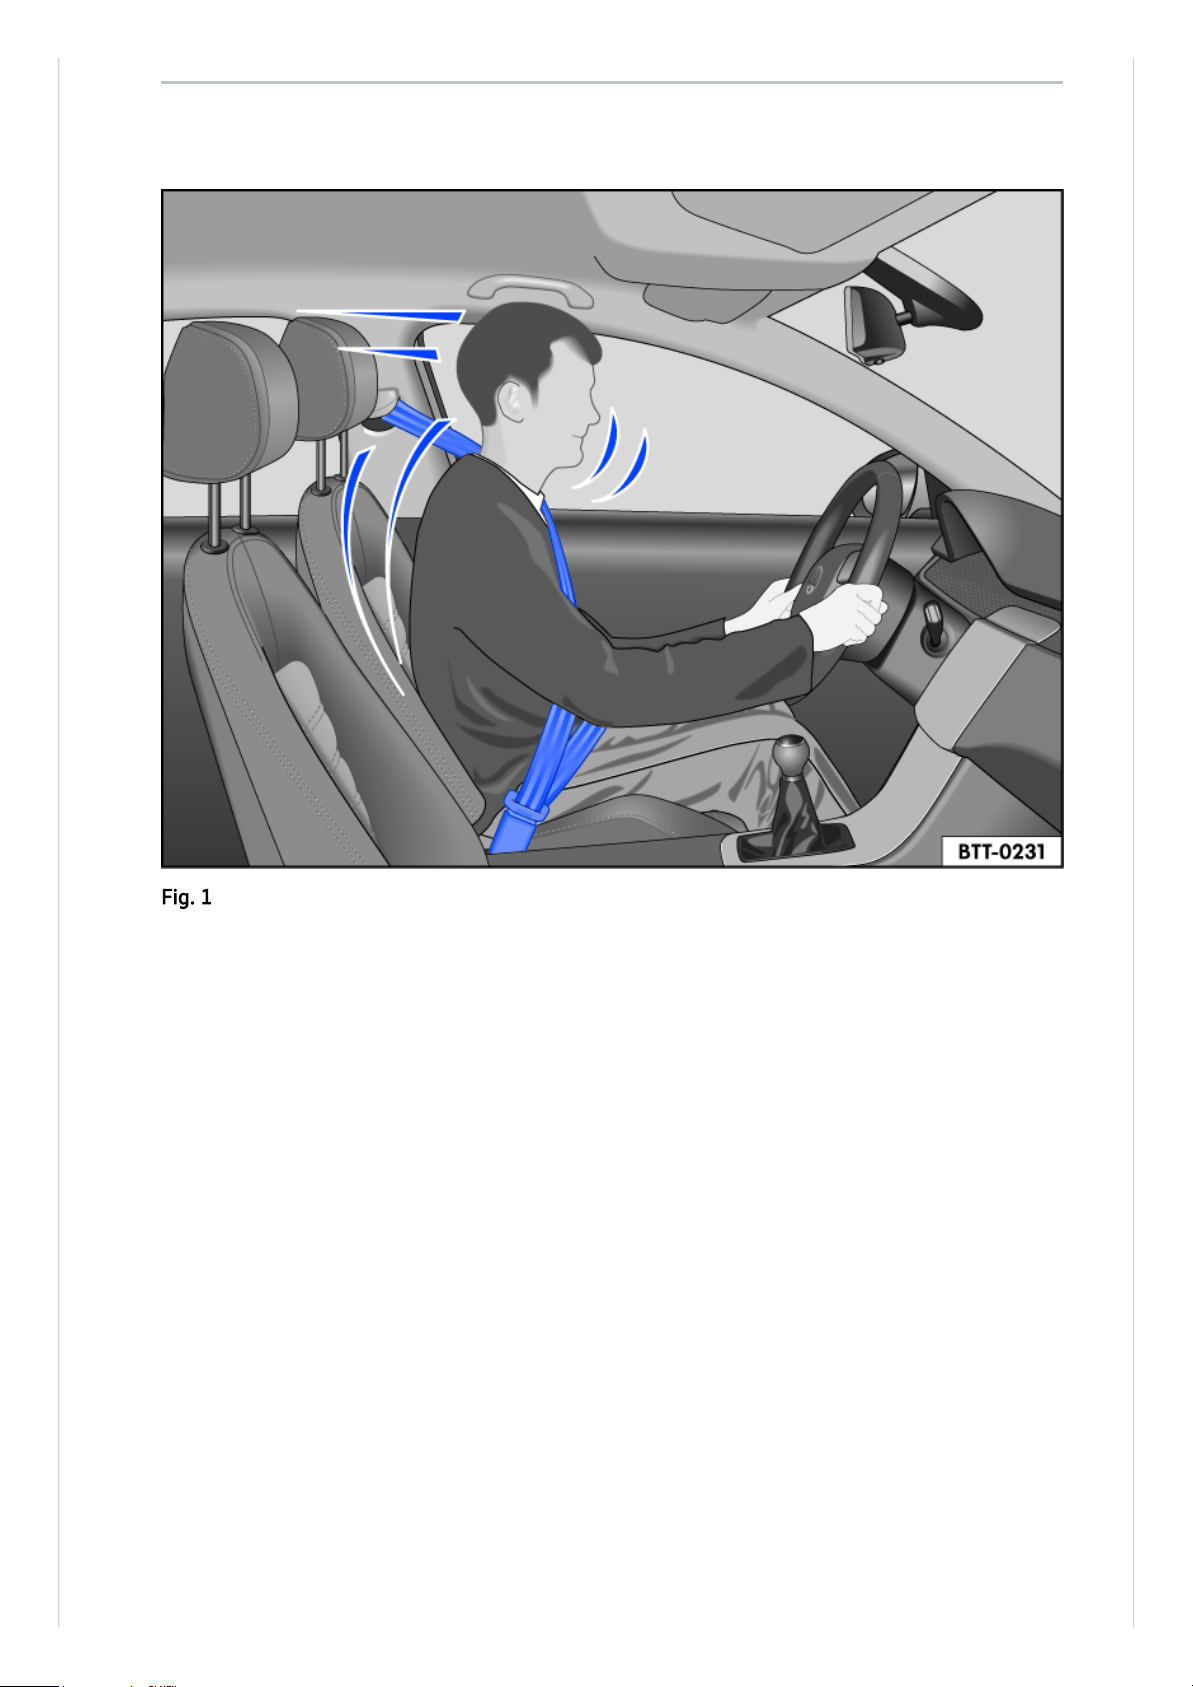
Correctly fastened seat belts can make a major difference. When fastened properly, seat belts
hold the vehicle occupants in the correct sitting positions and considerably reduce the kinetic
energy in the event of an accident. Seat belts also help to prevent uncontrolled movements that
could lead to severe injuries. In addition, wearing seat belts properly reduces the risk of being
thrown from the vehicle
→Fig.1
.
Passengers wearing seat belts correctly benefit greatly from the ability of the belts to reduce the
kinetic energy. The front crumple zones and other passive safety features (such as the airbag
system) are also designed to reduce kinetic energy. The amount of energy generated will thus
decrease, thereby reducing the risk of injury.
The examples describe frontal collisions. Of course, properly worn seat belts substantially reduce
the risk of injury in all other types of accidents. This is why seat belts must be fastened before
every trip – even if you are only planning to drive a very short distance. Ensure that all
passengers also wear their seat belts properly.
Accident statistics have shown properly worn seat belts to be an effective means of substantially
reducing the risk of injury and improving the chances of survival in a serious accident.
Furthermore, properly worn seat belts improve the protection provided by airbags in the event of
an accident. This is why wearing a seat belt is a legal requirement in most countries.
Seat belt protection
Fig.1Driver restrained by a properly positioned seat belt during a sudden braking manoeuvre.
Page 64

Although the vehicle is equipped with airbags, the seat belts must be fastened and worn. For
example, the front airbags will be triggered only in certain types of frontal collision. The front
airbags will not be triggered during minor frontal collisions, minor side collisions, rear collisions,
rolls or accidents in which the airbag trigger threshold in the control unit is not exceeded. The
same applies to the other airbags in the vehicle.
Therefore, always wear your seat belt and ensure that your passengers have fastened their seat
belts properly before you drive off.
Page 65

Checklist
Using the seat belts
→
:
✓ Check the condition of all seat belts regularly.
✓ Keep the seat belts clean.
✓ Avoid allowing any foreign bodies or fluids to get on to the seat belt or latch plate or into the
slot for the seat belt buckle.
✓ Do not trap or damage the seat belt and latch plate, for example when closing the door.
✓ Never remove, modify or repair the seat belt or any part of the belt fixture system.
✓ Always fasten the seat belt correctly before every journey and keep it fastened while the
vehicle is in motion.
Twisted seat belt
If it is difficult to remove the seat belt from the belt guide, the seat belt may have become
twisted if it was returned too quickly into the side trim:
— Take hold of the latch plate then slowly and carefully pull out the seat belt.
— Untwist the seat belt and guide it back slowly by hand.
Fasten the seat belt even if you are unable to undo the twist. However, the twist should not be in
part of the seat belt that comes into direct contact with the body. The twist should be corrected
immediately by a qualified workshop.
WARNING
Using seat belts incorrectly increases the risk of severe or fatal injuries.
●
Regularly check to see if the seat belt and its related parts are in perfect condition.
●
Always keep the seat belt clean.
●
Do not allow the belt webbing to become jammed, damaged or to rub on any sharp edges.
●
Always keep the latch plate and slot in the buckle free from foreign bodies and liquids.
Using seat belts
Page 66
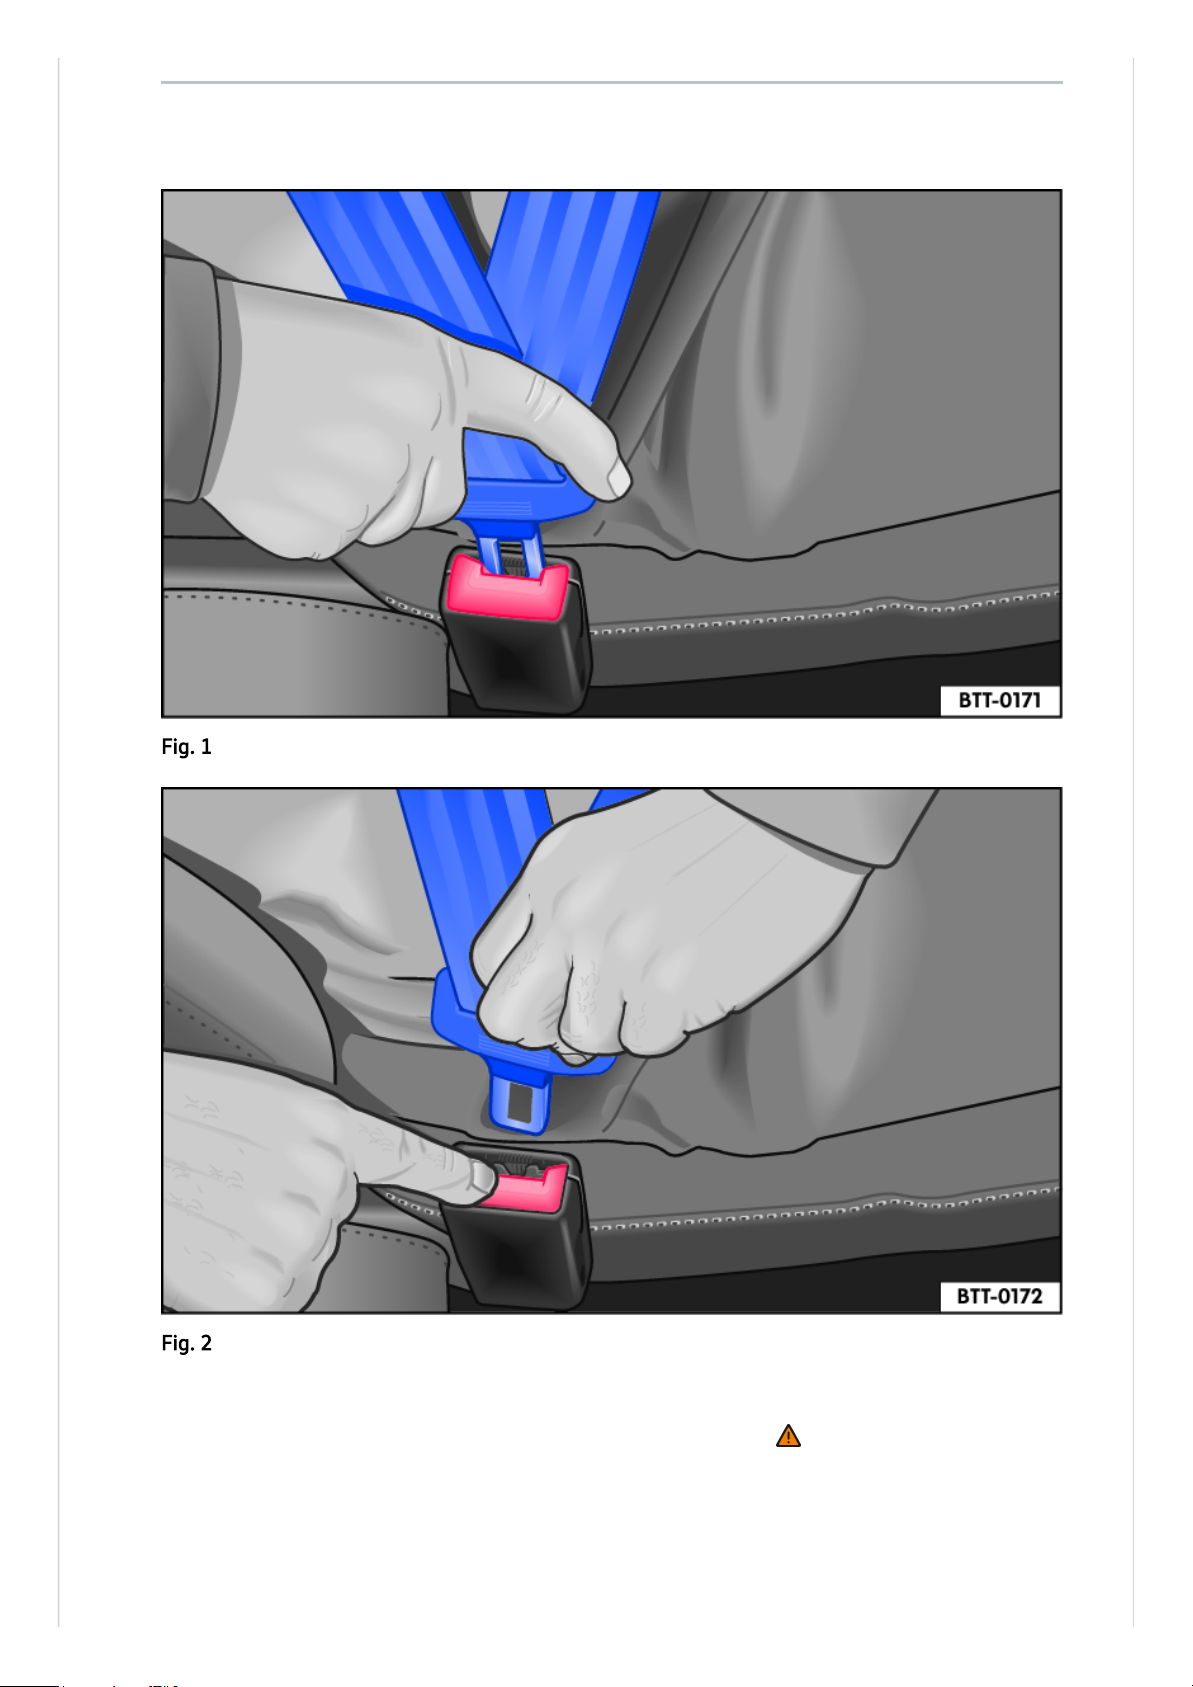
If worn properly, seat belts hold the vehicle occupants in the correct sitting position during an
accident or braking manoeuvre, providing maximum protection
→
.
In vehicles with a proactive occupant protection system, the driver and front passenger seat
belts are automatically tensioned in certain situations
(→ Proactive occupant protection system)
.
Fastening the seat belts
Fastening and unfastening seat belts
Fig.1Inserting the seat belt latch plate into the buckle.
Fig.2Removing the latch plate from the buckle.
Page 67

Fasten seat belts before every trip.
— Adjust the front seat and head restraint correctly
(→ Sitting position)
.
— Engage the seat backrest in an upright position
→
.
— Take hold of the belt and pull it evenly across your chest and pelvis. Do not twist the belt in
the process
→
.
— Insert the latch plate securely into the buckle belonging to the occupied seat
→Fig.1
.
— Pull on the seat belt to ensure that the latch plate is securely locked in the buckle.
Unfastening the seat belts
Unfasten seat belts only when the vehicle is stationary
→
.
— Press the red button in the buckle
→Fig.2
. The latch plate is released and springs out.
— Guide the belt back by hand so that it rolls up easily, without twisting the seat belt and
without damaging the trim.
WARNING
Incorrect seat belt routing can cause severe or fatal injuries in the event of an accident.
●
The seat belts only offer best protection when the backrests are in an upright position and
the seat belts have been fastened properly according to the occupant's height.
●
Unfastening seat belts while the vehicle is in motion can lead to severe or fatal injuries in
the event of an accident or sudden braking manoeuvre.
Page 68
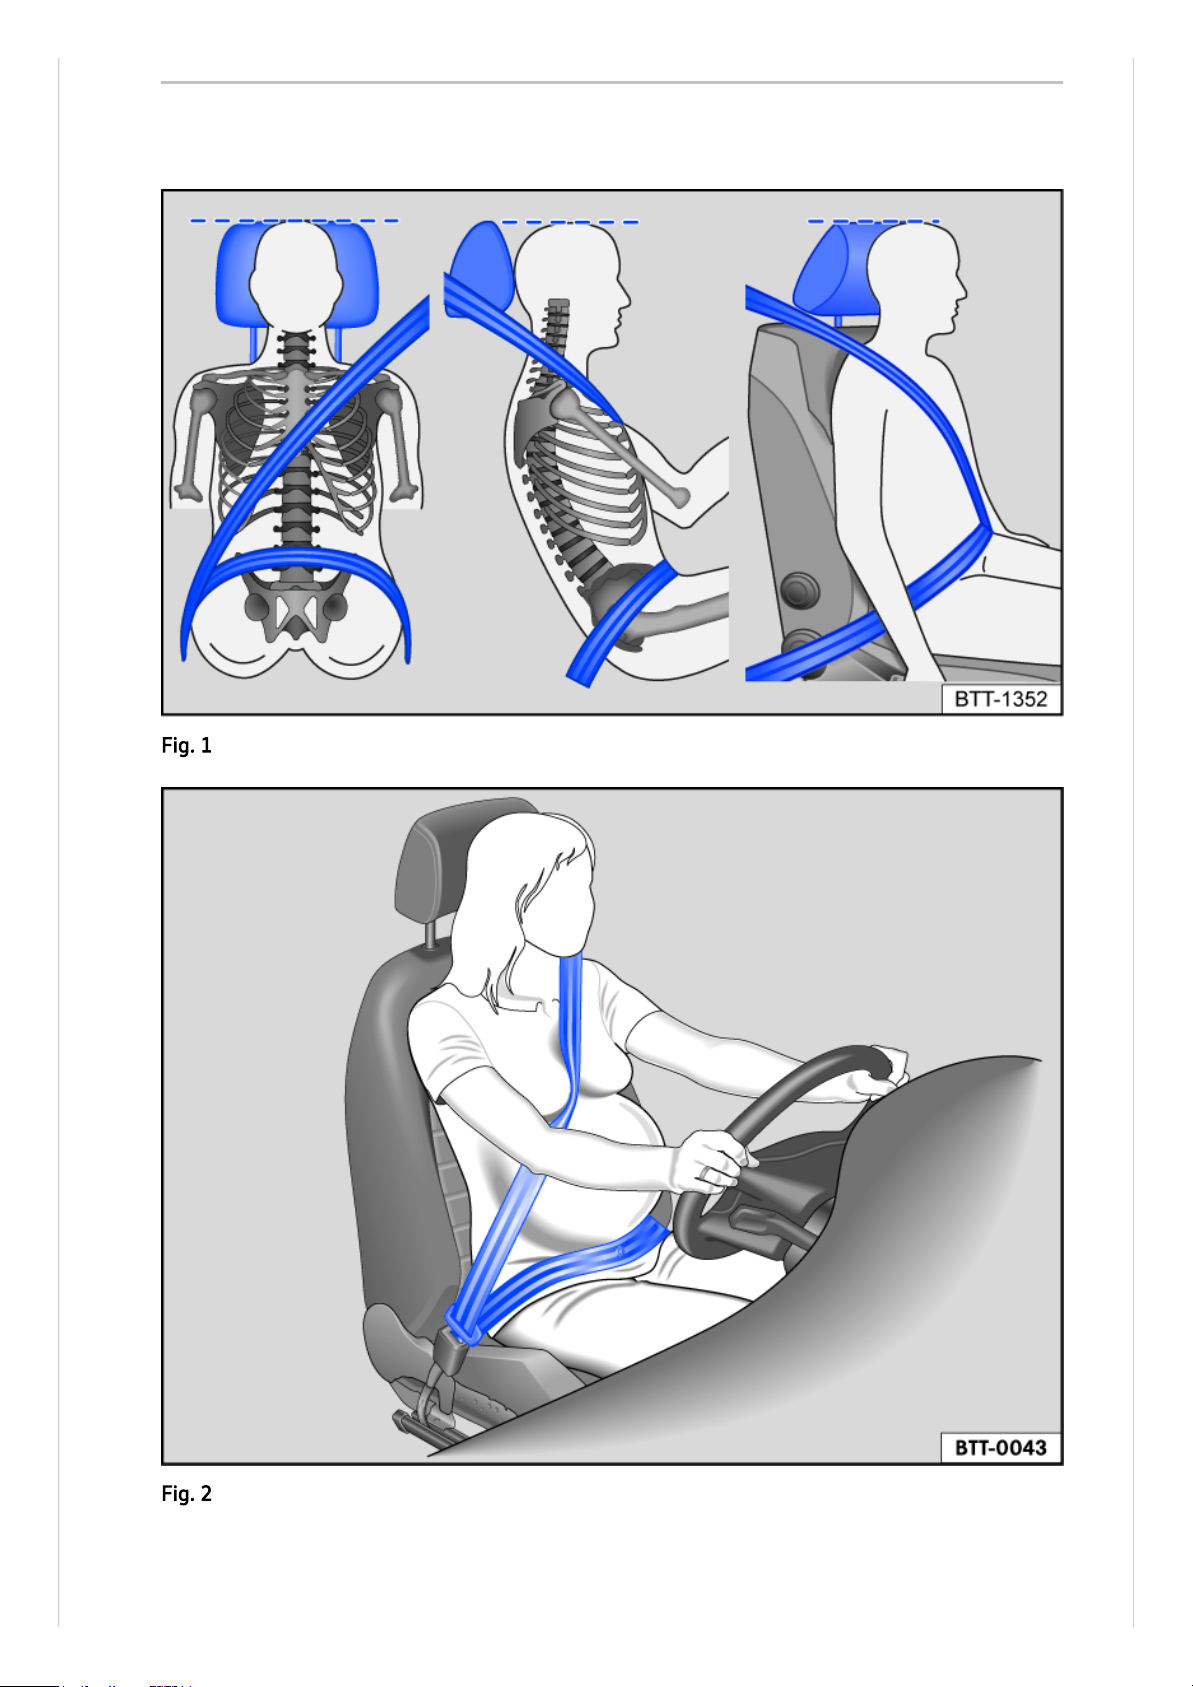
Seat belt routing
Fig.1Correct seat belt routing and head restraint adjustment.
Fig.2Correct seat belt routing during pregnancy.
Page 69
Seat belts only provide an optimum level of protection during an accident when they are routed
correctly. Correct seat belt routing reduces the risk of severe or fatal injuries. Correct seat belt
routing also holds the vehicle occupants in position so that an inflating airbag can offer the
maximum level of protection. Therefore you must always fasten your seat belt and ensure that
the seat belt routing is correct
→Fig.1
.
Assuming an incorrect sitting position can cause severe or fatal injuries
(→ Sitting position)
.
Correct seat belt routing
— The shoulder part of the seat belt must always lie on the centre of the shoulder, never across
the neck, over or under the arm or behind the back.
— The lap part of the seat belt must always lie across the pelvis, never across the stomach.
— The seat belt must always lie flat and snugly on the body. Tighten the belt if necessary.
For pregnant women the seat belt must be positioned evenly over the chest and as low as
possible over the pelvis. It must lie flat so that no pressure is exerted on the lower body – this
applies in every stage of pregnancy
→Fig.2
.
Correct seat belt routing according to height
The following equipment can be used to adjust the seat belt routing:
— Height-adjustable front seats
(→ Sitting position)
.
WARNING
Incorrect seat belt routing can cause severe injuries in the event of an accident or a sudden
braking or driving manoeuvre.
●
The seat belts only offer best protection when the backrests are in an upright position and
the seat belts have been fastened properly.
●
The seat belt itself or a loose seat belt can cause serious injuries if the seat belt shifts from
harder body parts in the direction of softer body parts (e.g. stomach).
●
The shoulder part of the seat belt must lie on the centre of the shoulder and never under the
arm or across the neck.
●
The seat belt must lie flat and snugly on the chest.
●
The lap part of the seat belt must lie across the pelvis and never across the stomach. The
seat belt must lie flat and snugly on the pelvis. Tighten the belt if necessary.
●
For pregnant women, the lap part of the seat belt must be as low as possible over the pelvis
and lie flat around the “bulge” of the belly.
●
Do not twist the belt webbing while the seat belt is being worn.
●
Never hold the seat belt away from the body by hand.
●
The belt webbing should not lie over hard or fragile objects, such as glasses, pens or keys.
●
Never use seat belt clips, retaining rings or similar items to alter the seat belt routing.
If a person's physical build prevents them from routing the seat belt properly, contact a
qualified workshop to find out about any special modifications so that the seat belts and
airbags can provide the optimum level of protection. Volkswagen recommends using a
Volkswagen dealership for this purpose.
Page 70

The seat belts in the vehicle are part of the vehicle safety concept
(→ Airbag system)
(→
Advanced airbag system) and include the following important functions:
Belt retractor
Every seat belt is equipped with an automatic belt retractor on the shoulder part of the belt. Full
freedom of movement is ensured when the shoulder belt is pulled slowly or when the vehicle is
travelling at normal speeds. However, if the belt is pulled out quickly or during sudden braking,
during travel in mountains or bends and during acceleration, the belt retractor blocks the seat
belt.
Fastened seat belts on the front seats may be tensioned automatically by the proactive occupant
protection system in critical situations, for example during an emergency stop or in the event of
oversteering or understeering. Both seat belts are slackened again if the accident does not
happen, or when the critical situation has passed. The proactive occupant protection system is
ready to be triggered again
(→ Proactive occupant protection system)
.
Belt tensioners
The seat belts for the front seat vehicle occupants, and in some cases those on the outer rear
seats, are equipped with belt tensioners.
The belt tensioners are activated by sensors during severe frontal, side and rear collisions. They
tighten the seat belts against the direction in which they are pulled. Any slack in the seat belt is
retracted, which can reduce the forward movement of the vehicle occupants and their
movement in the direction of the impact. The belt tensioner works together with the airbag
system. If the vehicle rolls over, the belt tensioners will not be activated if the side airbags are
not triggered.
A fine dust may be produced when the airbags are triggered. This is quite normal and does not
mean that there is a fire in the vehicle.
Reversible belt tensioning (proactive occupant protection system)
Reversible belt tensioning may trigger in certain driving situations
(→ Proactive occupant
protection system)
. Examples include:
— Strong braking.
— Oversteer or understeer.
— Minor collisions.
Belt tension limiter
The belt tension limiter reduces the pressure exerted by the seat belt on the body during an
accident.
Belt retractor, belt tensioner, belt tension limiter
Page 71

All safety requirements must be observed when the vehicle or components of the
system are scrapped. Qualified workshops are familiar with these requirements
(→
Proactive occupant protection system)
.
Page 72

Seat belts may become damaged during any work on the belt tensioners or while removing or
refitting any vehicle parts in conjunction with any other repair work. This damage will not always
be noticeable. The consequence may be that the belt tensioners could function incorrectly, or not
function at all, in the event of an accident.
Regulations must be observed to ensure that the effectiveness of the belt tensioner is not
reduced and that removed parts do not cause any injuries or environmental pollution. Qualified
workshops are familiar with these requirements.
WARNING
The risk of severe or fatal injuries may be increased if the seat belts, automatic belt retractors
and belt tensioners are not used correctly, or if they are repaired by a non-professional. As a
result, the belt tensioners may not be triggered when they should, or they may be triggered
unexpectedly.
●
Any repairs, adjustments or removal and refitting of parts in the belt tensioners or seat belts
should always be carried out by a qualified workshop and never by you yourself
(→
Accessories, modifications, repairs and renewal of parts)
.
●
Belt tensioners and automatic belt retractors cannot be repaired. They must be replaced.
The airbag modules and belt tensioners may contain perchlorate. Please comply with
legislation regarding disposal.
Service and disposal of belt tensioners
Page 73

The proactive occupant protection system is an assistance system that initiates action to protect
vehicle occupants in dangerous situations. However, the system cannot prevent a collision.
The full functional range of the proactive occupant protection system is only available if there is
no malfunction.
Basic functions
Depending on country-specific legal requirements and also on the vehicle equipment level, the
following functions may be initiated, either singularly or jointly, in critical situations (e.g.
emergency braking or over or understeering) as of a speed of approximately 30km/h(19mph):
— Reversible belt tensioning of the fastened driver and front passenger seat belts.
— Automatic closing of the glass roof and side windows down to a gap, depending on the vehicle
equipment.
— Activation of the hazard warning lights.
The belts may be tensioned individually or together depending on the respective critical driving
situations.
In the event of an intervention by the proactive occupant protection system, the message
Proactive occupant protection intervention will appear on the instrument cluster display.
Additionally for vehicles with emergency braking system (Front Assist)
For vehicles with emergency braking system (Front Assist), the system limits also include
calculation of the probability of a rear-end collision with the vehicle in front. If the system
detects that a rear-end collision is likely, or initiates severe braking, it can trigger the proactive
occupant protection system.
Additional information for vehicles with Emergency Assist
The proactive occupant protection system may be triggered in vehicles with Emergency Assist if
no driver activity is detected.
Depending on the activation level, the following functions are triggered:
— Reversible belt tensioning of the driver's fastened seat belt for a brief or extended period of
time.
— Automatic closing of the glass roof and side windows down to a gap, depending on the vehicle
equipment.
Setting in driving profile selection
In vehicles with driving profile selection, the proactive occupant protection system is adapted to
the special vehicle setup of the respective driving profile.
Proactive occupant protection system
Page 74

Function limitations
The proactive occupant protection system will not be available, or will only be available to a
limited extent, in the following situations:
— If there is a fault in the ESC, belt tensioner
(→ Seat belts)
or airbag control unit
(→ Airbag
system)
(→ Advanced airbag system).
— When the TCS or ESC are switched off, and when the vehicle is reversing
(→ Brake support
systems)
.
— In the event of a system fault or restriction of Autonomous Emergency Braking (Front Assist)
Troubleshooting
If there is a fault in the proactive occupant protection system, the message Proactive occupant
protection unavailable or Proactive occupant protection: function restricted will be continuously
shown in the instrument cluster display.
Go to a qualified workshop and have the system checked.
WARNING
The intelligent proactive occupant protection system cannot overcome the laws of physics, and
functions only within the limits of the system. Never let the extra convenience afforded by the
proactive occupant protection system tempt you into taking any risks when driving. The system
cannot prevent a collision. The system is not a substitute for the full concentration of the
driver.
●
Adapt your speed and distance from the vehicles ahead to suit visibility, weather, road and
traffic conditions.
●
The system cannot detect objects in all situations.
●
The proactive occupant protection system does not react to animals or poorly visible
objects.
●
Reflective objects such as safety barriers, tunnel entrances, heavy rain and ice can impair the
performance of the proactive occupant protection system and thus prevent it from
detecting a collision risk.
●
The system may be falsely triggered.
Page 75
The vehicle is equipped with a front airbag for the driver and front passenger. The front airbags
can provide front seat occupants with additional chest and head protection if the seat, seat belts,
head restraints and, in the case of the driver, steering wheel are adjusted and used correctly.
Airbags are meant only for additional protection. The airbags are not a substitute for seat belts.
Seat belts must always be worn, even when the front seats are equipped with front airbags.
WARNING
Never rely solely on the airbag system for your protection.
●
Even if an airbag is triggered, it only offers auxiliary protection.
●
The airbag system offers the best level of protection, and reduces the risk of injury, when
seat belts are properly worn
(→ Seat belts)
.
●
Before every trip, each vehicle occupant must adopt the correct sitting position, correctly
fasten the seat belt belonging to their seat and keep it fastened properly throughout the
trip. This applies to all vehicle occupants and also in urban traffic.
WARNING
The risk of injury increases if there are any objects between the vehicle occupants and the
deployment area of the airbag when it is triggered. This will alter the deployment zone of the
airbag, or the objects will be flung against the body.
●
Never hold any objects in your hand or on your lap while the vehicle is in motion.
●
Never transport any objects on the front passenger seat. The objects could enter the
deployment zone of the airbag during sudden braking or driving manoeuvres and then be
flung dangerously through the vehicle interior if the airbag is activated.
●
There must be no other persons, animals or objects between the vehicle occupants sitting
on the front seats and rear outer seats and the deployment zones of the airbags. Ensure that
children and passengers keep to this rule.
WARNING
The airbag system can only be triggered once. The system will have to be replaced if the
airbags have been triggered.
●
Airbags that have been triggered, and any affected system parts, must immediately be
replaced with new parts that are approved by Volkswagen for the vehicle.
●
Repairs and modifications to your vehicle should only be carried out by a qualified
workshop. Qualified workshops have the necessary tools, diagnostic equipment, repair
information and qualified personnel.
●
Never use recycled airbag components or components that have been taken from end-oflife vehicles in your vehicle.
●
Never alter any components of the airbag system.
Airbag system
Introduction to the topic
Page 76

WARNING
Fine dust particles or steam may be released when the airbags are triggered. This is normal and
does not mean that there is a fire in the vehicle.
●
The fine dust can cause irritation to the skin and eye membranes and cause breathing
difficulties, particularly for people suffering from asthma or people who have (had) other
respiratory problems. To help reduce breathing difficulties, get out of the vehicle or open the
windows or doors for more fresh air.
●
If you come into contact with the dust, you should wash your hands and face with a mild
soap and water before eating.
●
Do not let the dust get into your eyes or into open wounds.
●
If dust has entered your eyes, rinse them with water.
WARNING
Cleaning agents that contain solvents cause the surface of the airbag modules to become
porous. In an accident that triggers the airbag, loose plastic parts can cause serious injury.
●
Never clean the dash panel or the airbag covers with cleaning agents that contain solvents.
Page 77
Volkswagen offers two different front passenger front airbag systems.
Depending on the vehicle equipment, an airbag system or an airbag system with front passenger
front airbag deactivation may be installed.
Airbag system
The front passenger front airbag can be deactivated only by a qualified workshop.
Characteristics of the airbag system:
— Front passenger front airbag in the dash panel.
— Indicator lamp in the instrument cluster display.
Airbag system with front passenger front airbag deactivation
The front passenger front airbag can be deactivated manually by means of a key-operated switch
(→ Airbag system)
.
Characteristics of the airbag system with front passenger front airbag deactivation:
— Front passenger front airbag in the dash panel.
— Indicator lamp in the instrument cluster display.
— PASSENGER AIRBAG indicator lamp in the roof console.
— PASSENGER AIRBAG indicator lamp in the roof console.
— Key-operated switch in the side of the dash panel on the passenger side (only visible when the
front passenger door is open).
Type of front passenger front airbag system
Page 78
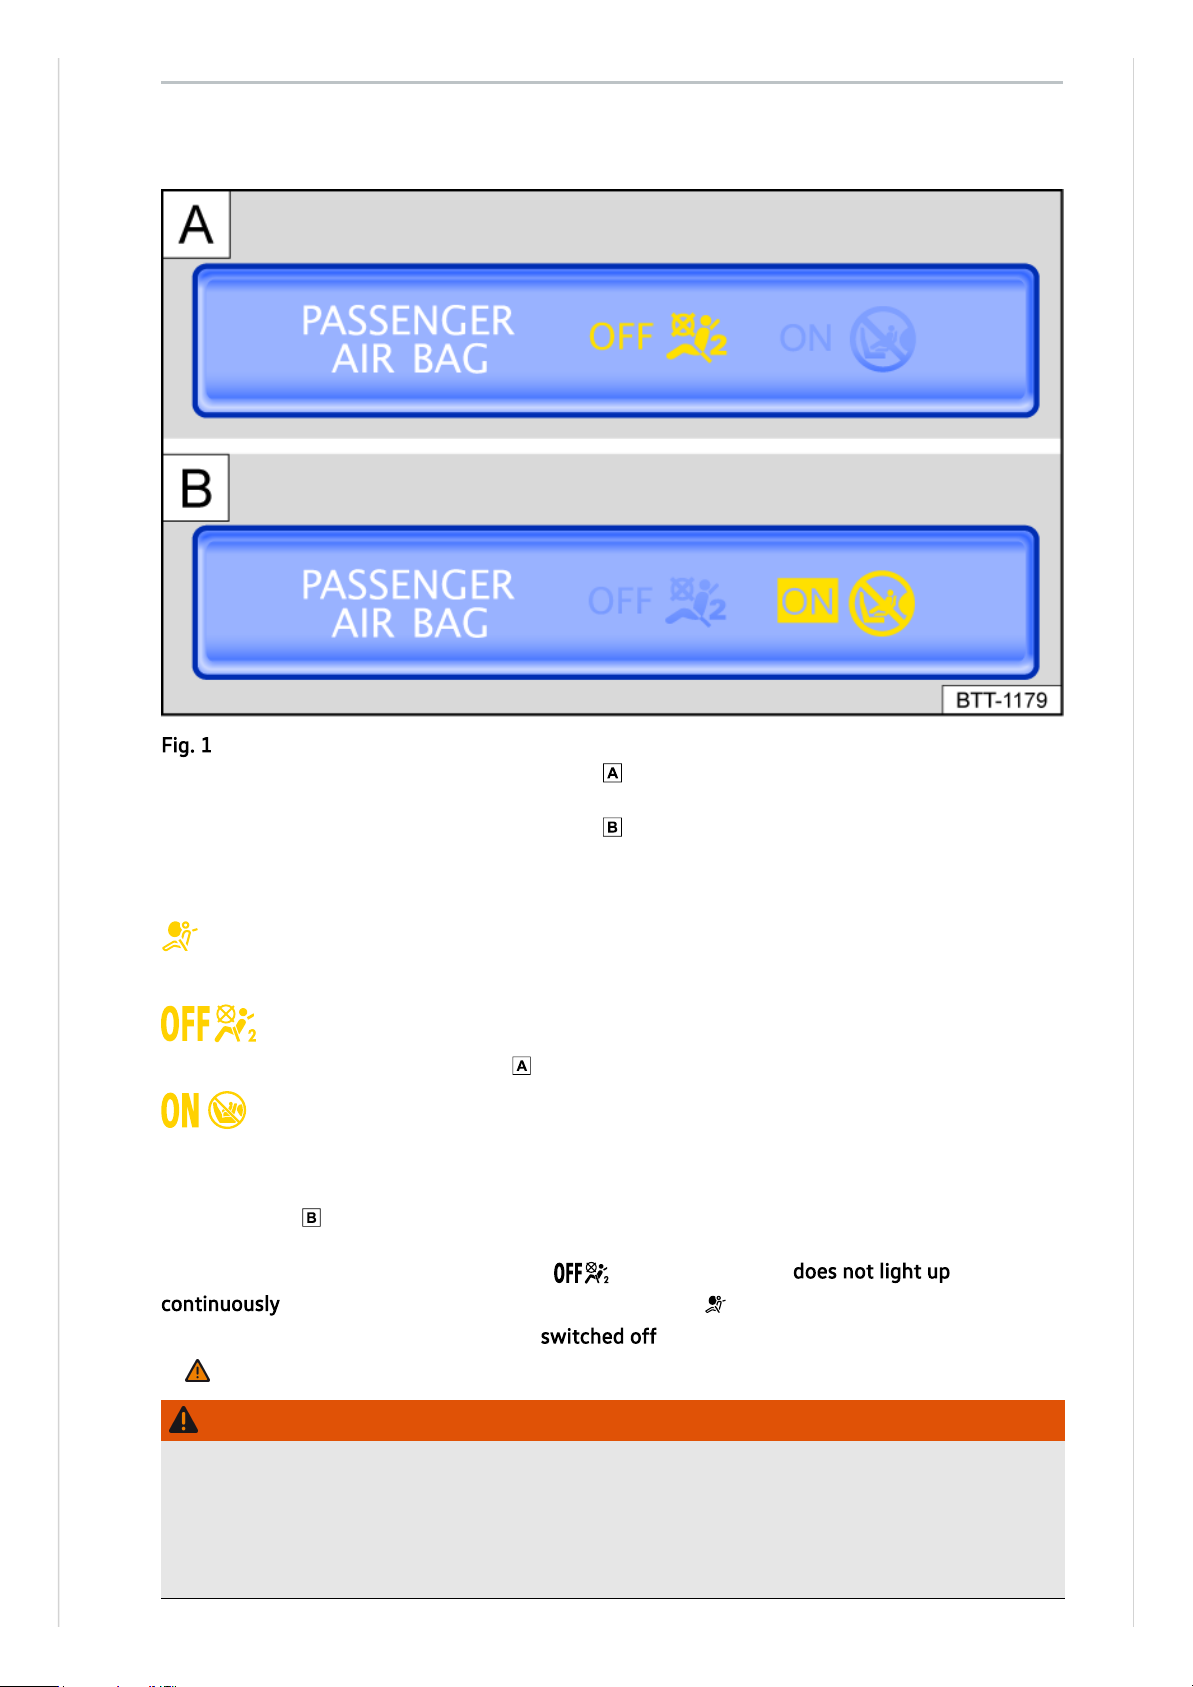
The yellow indicator lamp in the instrument cluster display lights up briefly as a functional
check when the ignition is switched on and goes out after a few seconds.
Front passenger front airbag switched off. The yellow indicator lamp in the roof console
lights up continuously
→Fig.1
.
Front passenger front airbag switched on. The yellow indicator lamp in the roof console
will go out automatically approximately 60seconds after the ignition is switched on or
after the front passenger front airbag is switched on using the key-operated switch
→Fig.1
.
If the PASSENGERAIRBAG indicator lamp in the roof console does not light up
continuously or lights up together with theindicator lamp in the instrument cluster display
when the front passenger front airbag is switched off, there may be a fault in the airbag system
→
.
WARNING
If there is a fault in the airbag system, the airbag may not trigger correctly, may not trigger at
all or may trigger unexpectedly. This can cause severe or fatal injuries.
●
The airbag system should be checked by a qualified workshop as soon as possible.
●
Never fit a child seat on the front passenger seat. Remove a fitted child seat! The front
passenger front airbag may trigger during an accident in spite of the fault.
Indicator lamp
Fig.1In the roof console:
indicator lamp (illustration) for front passenger airbag switched off or
front passenger front airbag switched on.
Page 79

Fault in airbag or belt tensioner system
The yellow indicator lamp lights up continuously. In addition, a message may be displayed in the
instrument cluster.
A malfunction has been detected in at least one airbag or belt tensioner.
— Go to a qualified workshop.
— Have the airbag system and belt tensioner checked.
Airbag or belt tensioner system switched off with diagnostic tool
The yellow indicator lamp lights up for around four seconds when the ignition is switched on and
then flashes for around twelve seconds. In addition, a message may be displayed in the
instrument cluster.
At least one airbag or belt tensioner was deactivated with a diagnostic tool.
— Go to a qualified workshop.
— Have a check carried out to establish whether the airbag system or belt tensioners must
remain switched off.
Front passenger front airbag switched off
The yellow indicator lamp for the deactivated front passenger front airbag lights up continuously.
The front passenger front airbag has been switched off.
— Check whether the front passenger front airbag must remain switched off, e.g. when using a
child seat on the front passenger seat.
Front passenger front airbag switched on
The yellow indicator lamp for the activated front passenger front airbag lights up for around
60seconds after the ignition has been switched on or after switching on the front passenger
front airbag with the key-operated switch.
The front passenger front airbag has been switched on.
— Check whether the front passenger front airbag must remain switched on.
Troubleshooting
Page 80

The airbags can protect vehicle occupants during frontal and side collisions by reducing their
movement in the direction of the collision.
When an airbag is triggered, it is inflated by a gas generator. This causes the airbag covers to
break, and the airbags inflate forcefully to cover their deployment zones within milliseconds.
Once a vehicle occupant wearing a seat belt starts to sink into the inflated airbag, the gas inside
the airbag starts to escape to cushion the occupant and slow down their movement. This can
reduce the risk of severe and fatal injuries. A triggered airbag will not always prevent other
injuries from occurring, such as swelling, bruising, burning and grazing. The deployment of the
airbag can also produce frictional heat.
Airbags provide no protection for the arms or lower body.
The most important factors for triggering the airbag are the type of accident, the angle of
impact, the vehicle speed and the type of object with which the vehicle collides. Therefore,
visible damage to the vehicle does not always mean that the airbag should have been triggered.
Whether or not the airbag triggers is determined by the vehicle deceleration rate caused by the
collision and registered by the electronic control unit. If this rate is below the reference value
programmed into the control unit, the airbags will not be triggered, even though the vehicle may
be badly damaged as a result of the collision. Vehicle damage, repair costs or even the lack of
vehicle damage in an accident do not necessarily give an indication of whether an airbag should
inflate or not. It is not possible to define a range of vehicle speeds and reference values, since the
circumstances will vary considerably between one collision and another. It is therefore
impossible to cover every possible kind and angle of impact that would trigger the airbags.
Important factors in the triggering of the airbag include the nature (hard or soft) of the object
that the vehicle hits, the angle of impact, and the vehicle speed.
Airbags only serve as a supplement to the three-point seat belt in some accident situations when
the vehicle deceleration is sufficient to trigger the airbags. Airbags can only be triggered once
and only in certain situations. The seat belts are always there to provide protection in situations
in which the airbags are not triggered or have already been triggered. For example, if the vehicle
collides with a further vehicle following the initial collision, or is hit by another vehicle.
The airbag system is part of the vehicle's overall passive safety concept. The airbag system can
work effectively only when the occupants are wearing their seat belts correctly and have
assumed a proper sitting position
(→ Sitting position)
.
Components of the vehicle safety concept
The following vehicle safety equipment makes up the vehicle's safety concept to reduce the risk
of severe and fatal injuries. Some of this equipment may not be fitted in your particular vehicle. It
may not be available at all in some countries.
— Optimised seat belts for all seats.
— Belt tensioners for the driver and front passenger and also on the rear outer seats if in
conjunction with side airbags.
— Belt tension limiter for the driver, front passenger and, if applicable, for the rear outer seats.
Description and function of the airbags
Page 81

— Warning lamp and, where applicable, belt status display.
— Front airbags for driver and front passenger.
— Side airbags for driver and front passenger.
— Curtain airbags on the left and right.
— Central airbag between driver and front passenger.
— Airbag indicator lamp .
— PASSENGERAIRBAG indicator lamp in the roof console.
— PASSENGERAIRBAG indicator lamp in the roof console.
— Control units and sensors.
— Safety-optimised and height-adjustable head restraints.
— Adjustable steering column.
— If applicable, anchor points for child seats on the rear outer seats and on the front passenger
seat.
— If fitted, mounting points for the top tether for child seats.
Situations when the front, side, curtain and central airbags will not be
triggered:
— The ignition is switched off in a collision.
— The deceleration rate measured in a frontal collision is too low for the control unit.
— Minor side collision.
— Rear collision.
— Vehicle rolls over.
— The collision speed is lower than the required reference value in the control unit.
Page 82
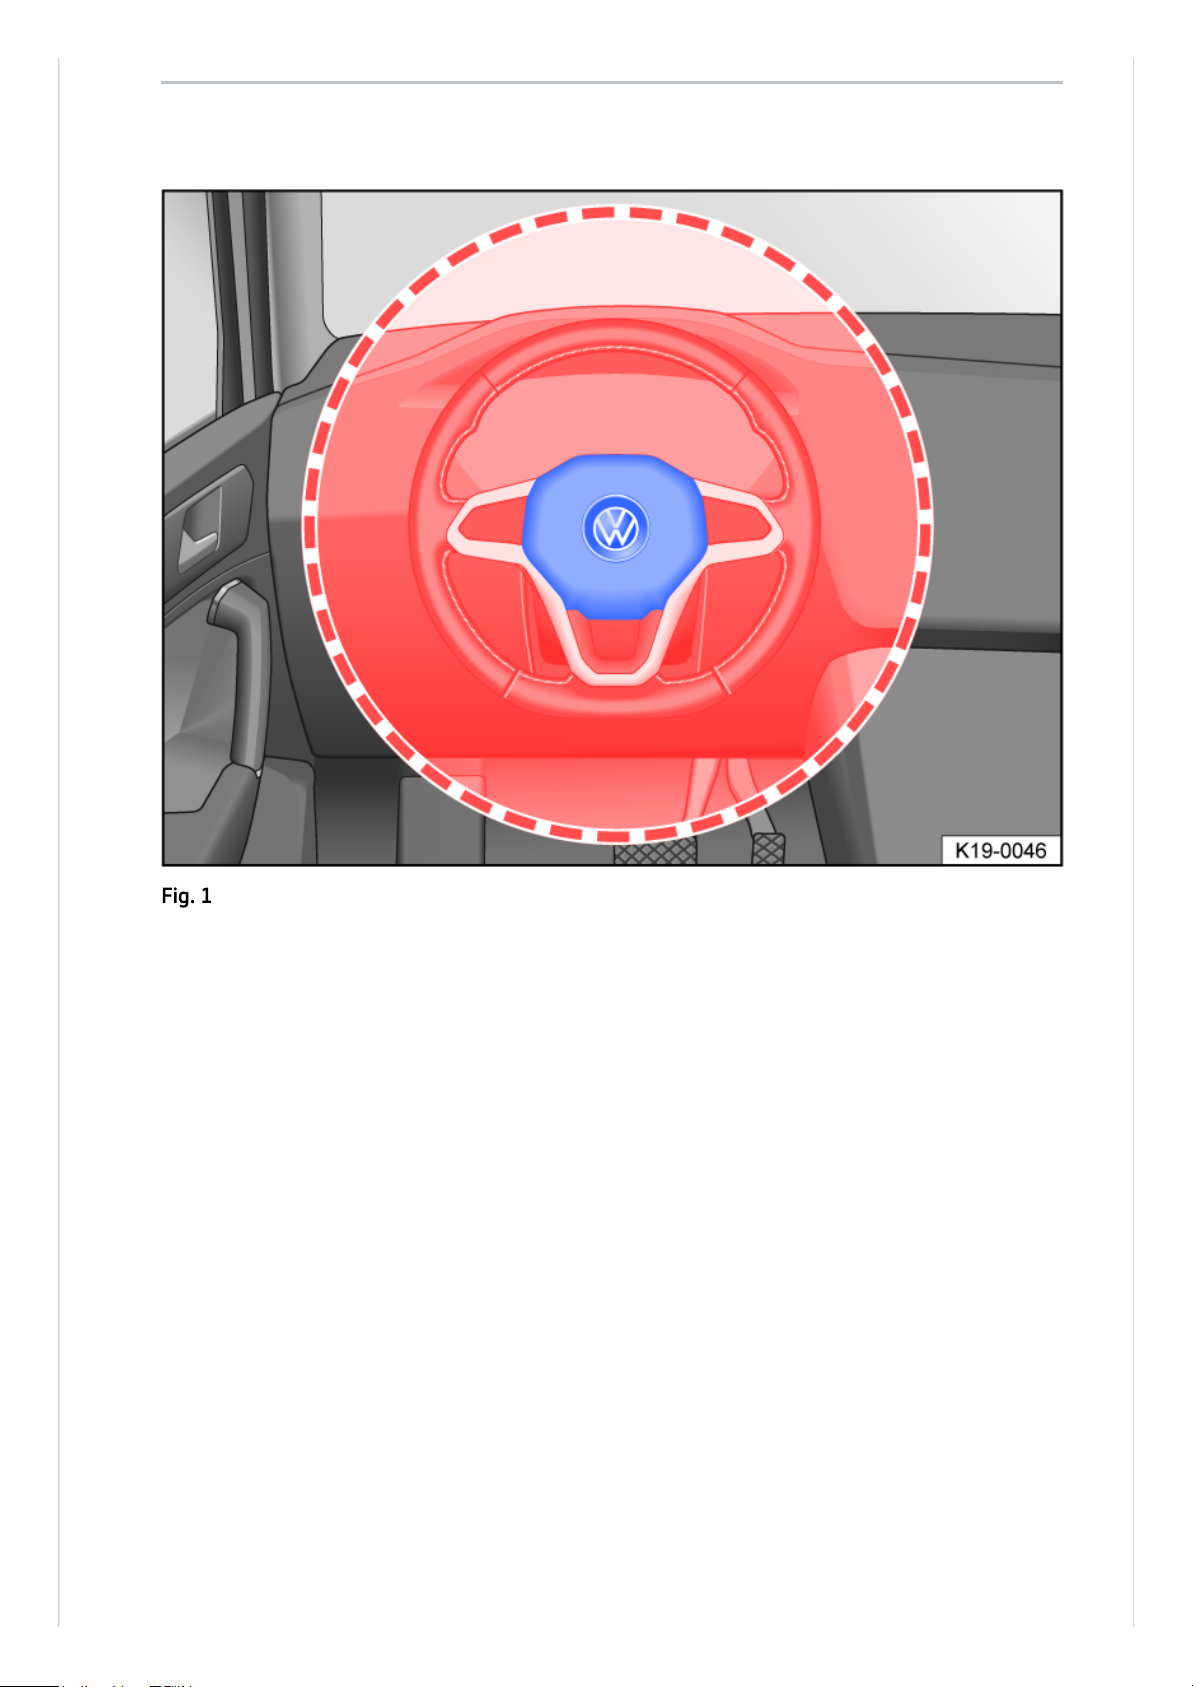
Front airbags
Fig.1Location and deployment zone of the driver front airbag.
Page 83
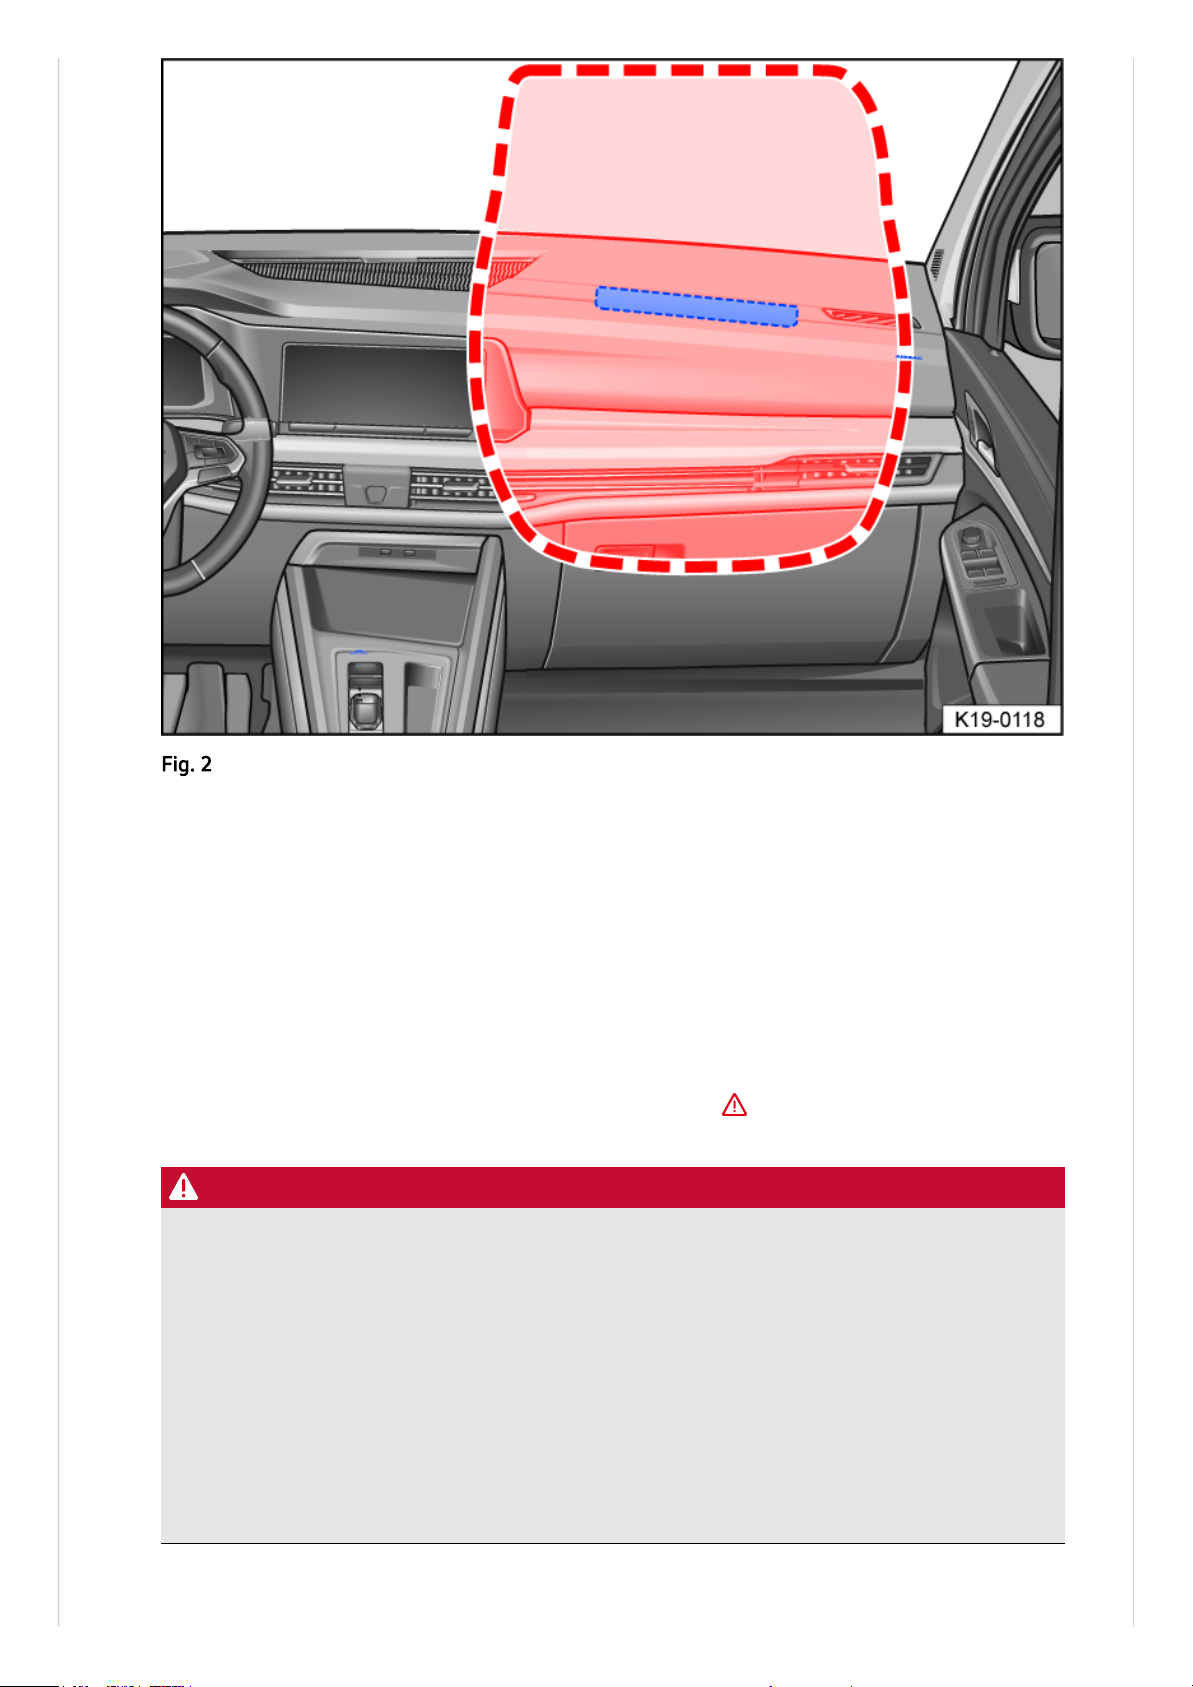
In conjunction with the seat belts, the front airbag system gives the front occupants additional
protection for the head and chest in the event of a severe frontal collision. Always keep as far
away from the front airbag as possible
(→ Sitting position)
. This allows the front airbags to
inflate fully when triggered, thus providing maximum protection.
The front airbag for the driver is located in the steering wheel
→Fig.1
and the front airbag for
the front passenger is located in the dash panel
→Fig.2
. The airbag locations are identified by
the text “AIRBAG”.
The areas inside the red lines are covered by the front airbags when deployed (deployment zone).
You must never leave or attach any objects in these areas
→
. Any factory-fitted accessories
will not be struck if the driver and front passenger front airbags are deployed.
DANGER
Once triggered, the airbag inflates in fractions of a second at very high speed.
●
Always leave the deployment zones of the front airbags clear.
●
Never attach any objects, such as drink or telephone holders, to the covers of the airbags or
anywhere in the airbag deployment zone.
●
There must be no other people, animals or objects between the occupants of the front seats
and the airbag deployment zones. Ensure that children and passengers keep to this rule.
●
Do not attach any objects, e.g. mobile navigation devices, to the windscreen above the front
airbag on the front passenger side.
●
Do not cover or stick anything on the steering wheel hub or the soft plastic surface of the
airbag unit in the dash panel on the front passenger side, and do not modify them in any
way.
Fig.2Location and deployment zone of the front passenger front airbag.
Page 84

WARNING
The front airbags are deployed in front of the steering wheel
→Fig.1
and dash panel
→Fig.2
.
●
When driving, always hold the steering wheel with both hands on the outside of the ring at
the 9o'clock and 3o'clock positions.
●
Adjust the driver seat so that there is at least 25cm between your breastbone and the hub
of the steering wheel. Contact a qualified workshop if your physical build makes this
impracticable.
●
Adjust the front passenger seat so that the distance between the passenger and the dash
panel is as large as possible.
Page 85
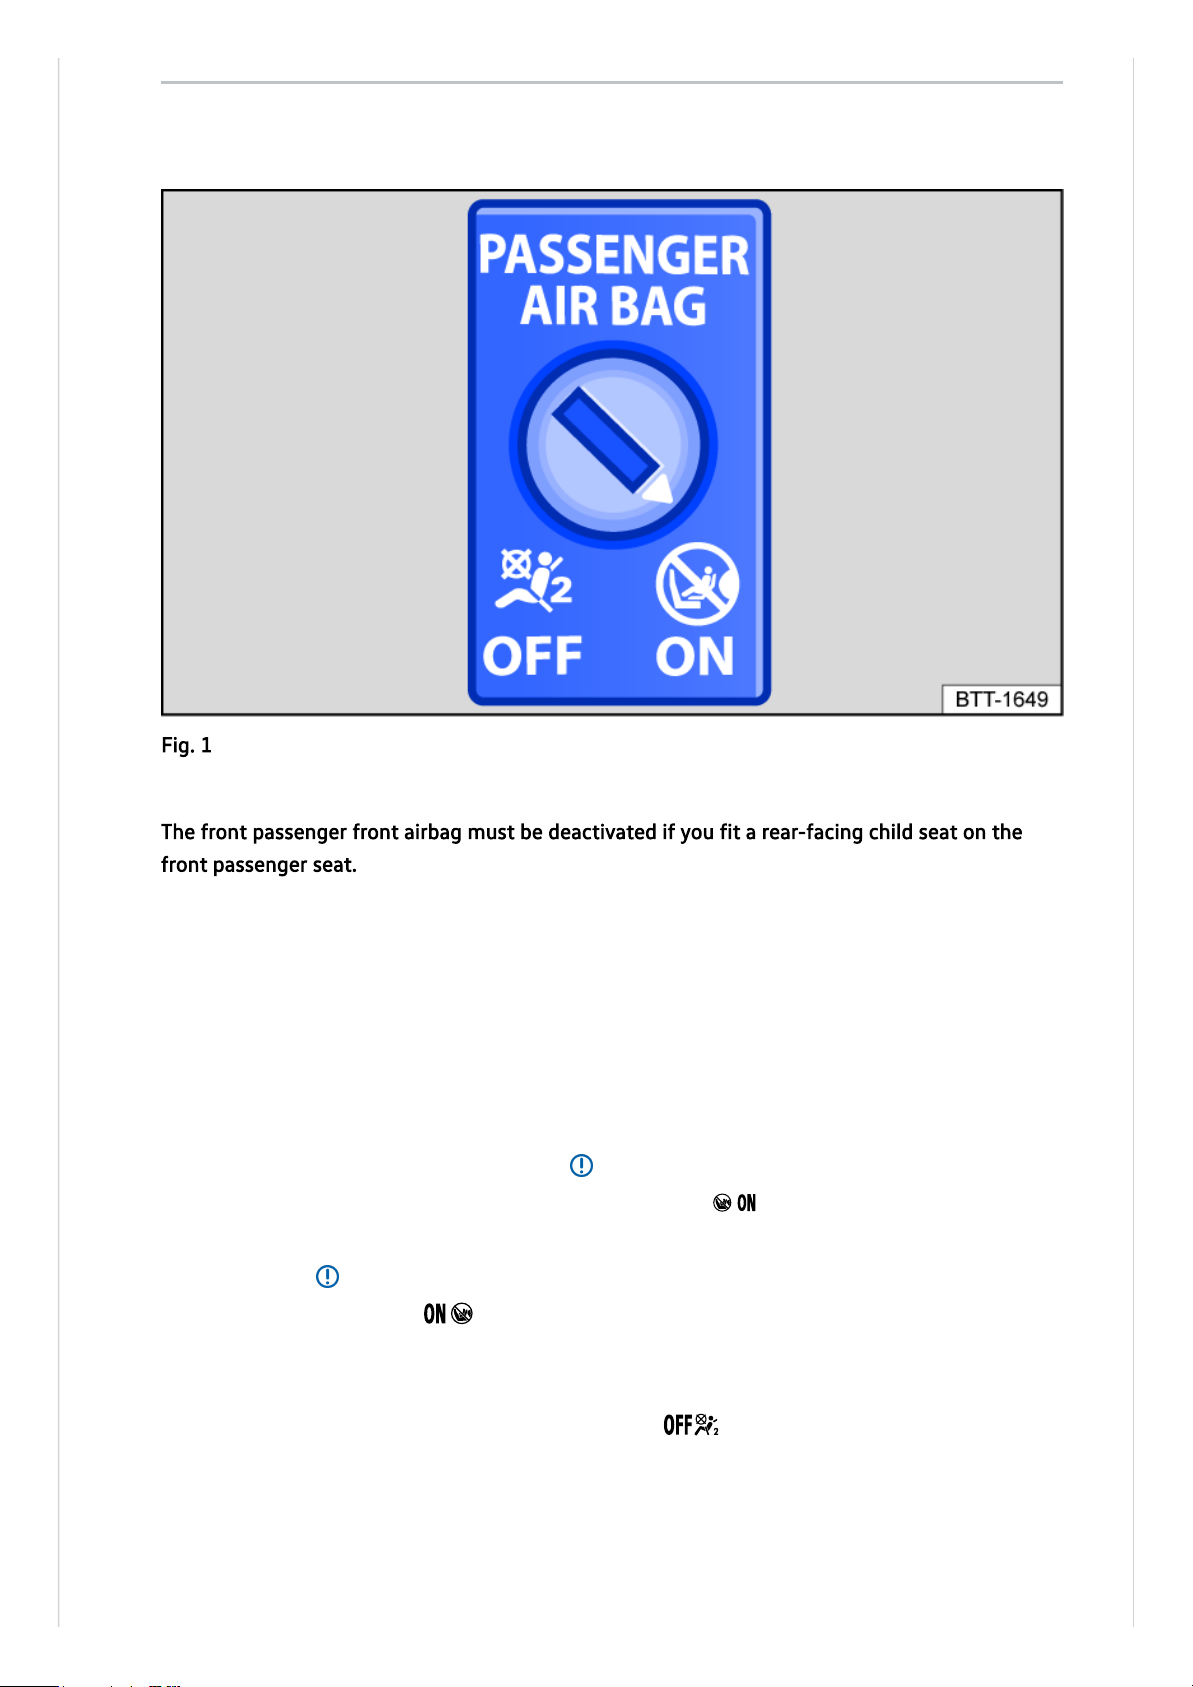
The front passenger front airbag must be deactivated if you fit a rear-facing child seat on the
front passenger seat.
Switching on the front passenger front airbag
— Deactivate the vehicle’s drive system.
— Open the door on the front passenger side.
— Remove the spare key from the vehicle key.
— Insert the key bit of the spare key into the key-operated switch on the dash panel until you
feel the second point of resistance
→Fig.1
. Around three quarters of the key bit should be
inserted in the key switch at this point
→
.
— Turn the vehicle key, without using force, to the position .
— Remove the vehicle key from the key-operated switch and reinsert the spare key into the
vehicle key
→
.
— ThePASSENGERAIRBAG indicator lamp in the roof console lights up and goes out after
approximately 60seconds
(→ Indicator lamp for standard airbag system)
.
— Close the door on the front passenger side.
— Check that thePASSENGERAIRBAG indicator lamp in the roof console
does not
light up
(→ Indicator lamp for standard airbag system)
.
Deactivating the front passenger front airbag
— Switch off the ignition.
Switching the front passenger front airbag on and off
Fig.1In the dash panel on the front passenger side: key-operated switch for deactivating and
activating the front airbag on the front passenger side
Page 86
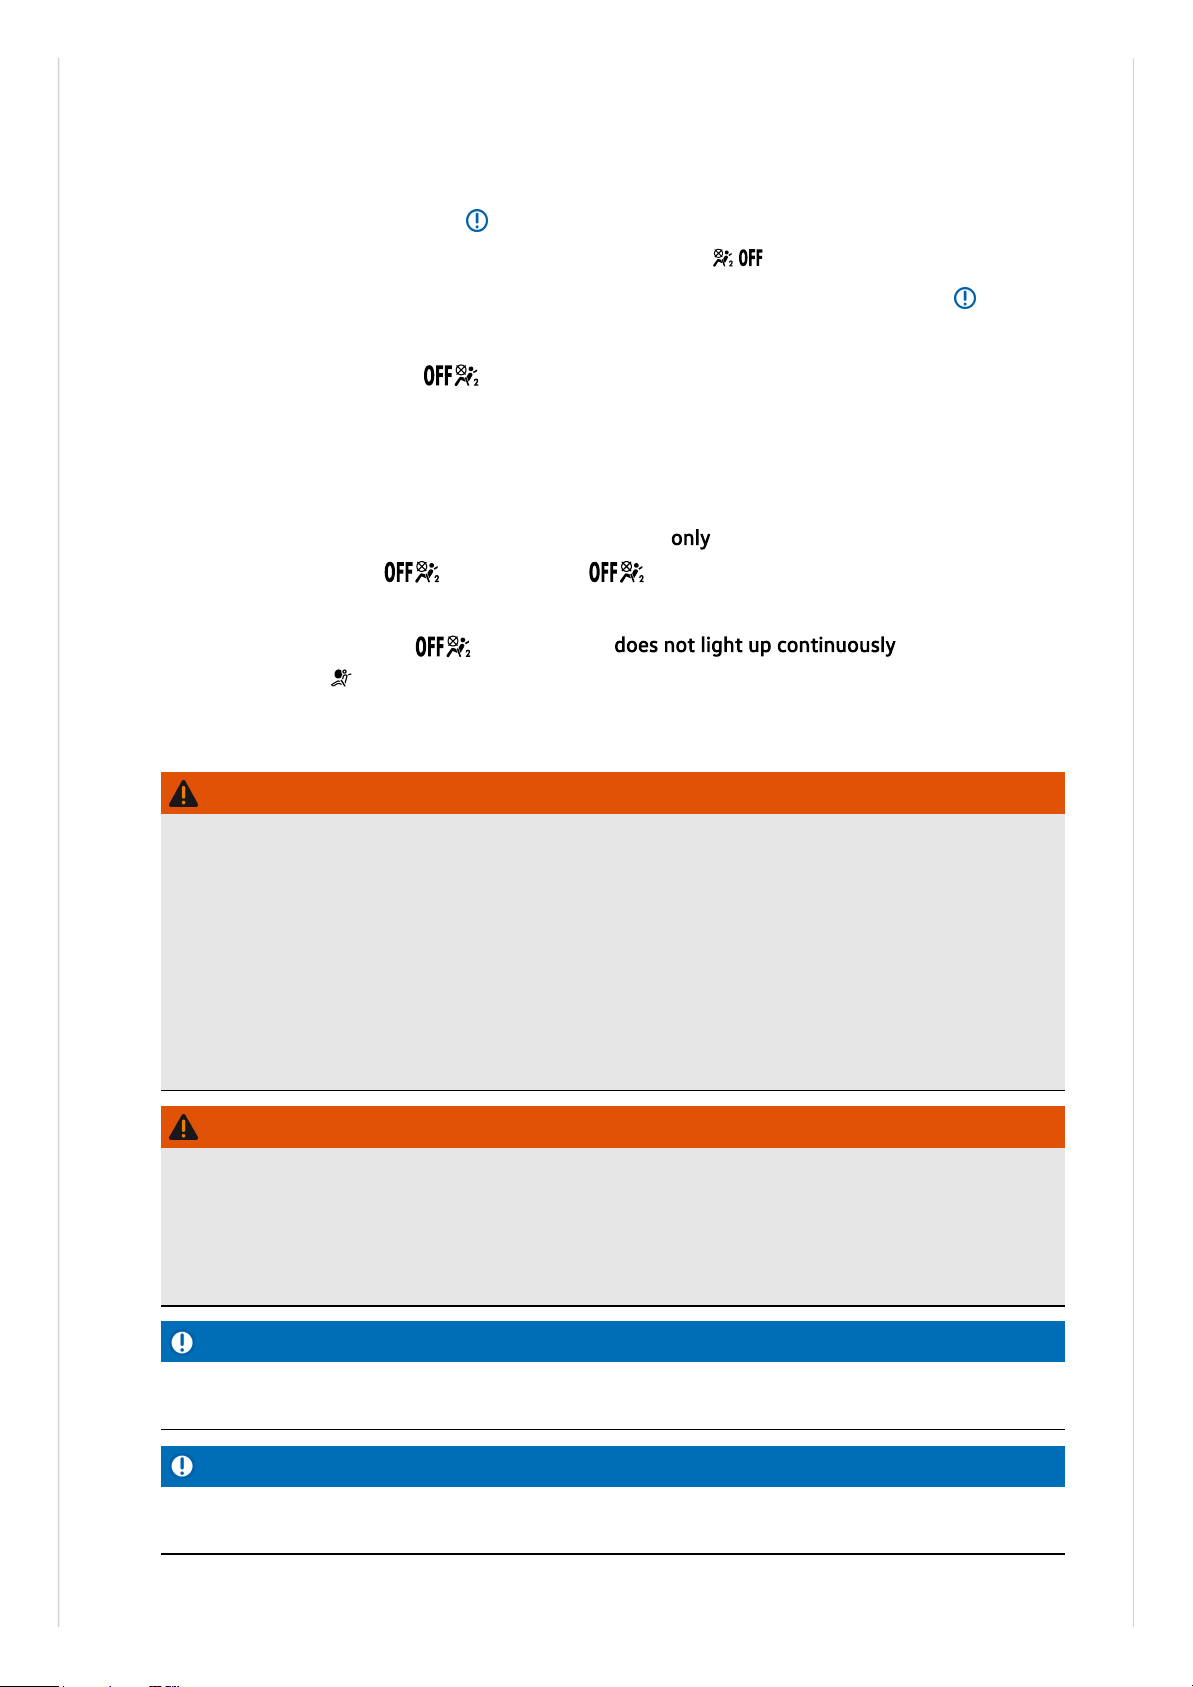
— Open the door on the front passenger side.
— Fold the key bit of the vehicle key all the way out.
— Insert the fully folded-out key bit into the key-operated switch in the dash panel up to the
second point of resistance
→Fig.1
. Around three quarters of the key bit should be inserted in
the key switch at this point
→
.
— Turn the vehicle key, without using force, to the position .
— Remove the vehicle key from the key-operated switch and fold away the key bit
→
.
— Close the door on the front passenger side.
— The PASSENGERAIRBAG indicator lamp in the roof console lights up continuously when
the ignition is switched on
(→ Indicator lamp for standard airbag system)
.
Confirmation that the front passenger front airbag has been deactivated
A deactivated front passenger front airbag is indicated only by a continuously
litPASSENGERAIRBAG indicator lamp( lights up yellow continuously)
(→ Indicator
lamp for standard airbag system)
.
If thePASSENGERAIRBAG indicator lamp does not light up continuously or lights up
together with the indicator lamp in the instrument cluster display, no child restraint system
must be fitted on the front passenger seat for safety reasons. The front passenger front airbag
may trigger during an accident.
WARNING
The front passenger front airbag should only be switched off in exceptional circumstances.
●
To prevent damage to the airbag system, only switch the front passenger front airbag on
and off when the ignition is switched off.
●
It is the driver's responsibility to ensure that the key-operated switch is set to the correct
position.
●
Only switch the front passenger front airbag off if, in exceptional circumstances, a child seat
has to be attached to the front passenger seat.
●
Switch the front passenger front airbag back on again as soon as the child seat on the front
passenger seat is no longer being used.
WARNING
Do not leave the vehicle key in the key switch while driving.
●
Strong vibrations may cause the vehicle key to turn in the key switch, which could cause the
front passenger front airbag to be activated.
●
The front passenger front airbag could then accidentally inflate, leading to serious or fatal
injuries.
NOTICE
If the key bit is not inserted far enough, the key switch could be damaged when the key is
turned.
NOTICE
Do not leave the vehicle key in the key switch, as this could result in damage to the door trim,
dash panel, key switch or vehicle key when the front passenger door is closed.
Page 87
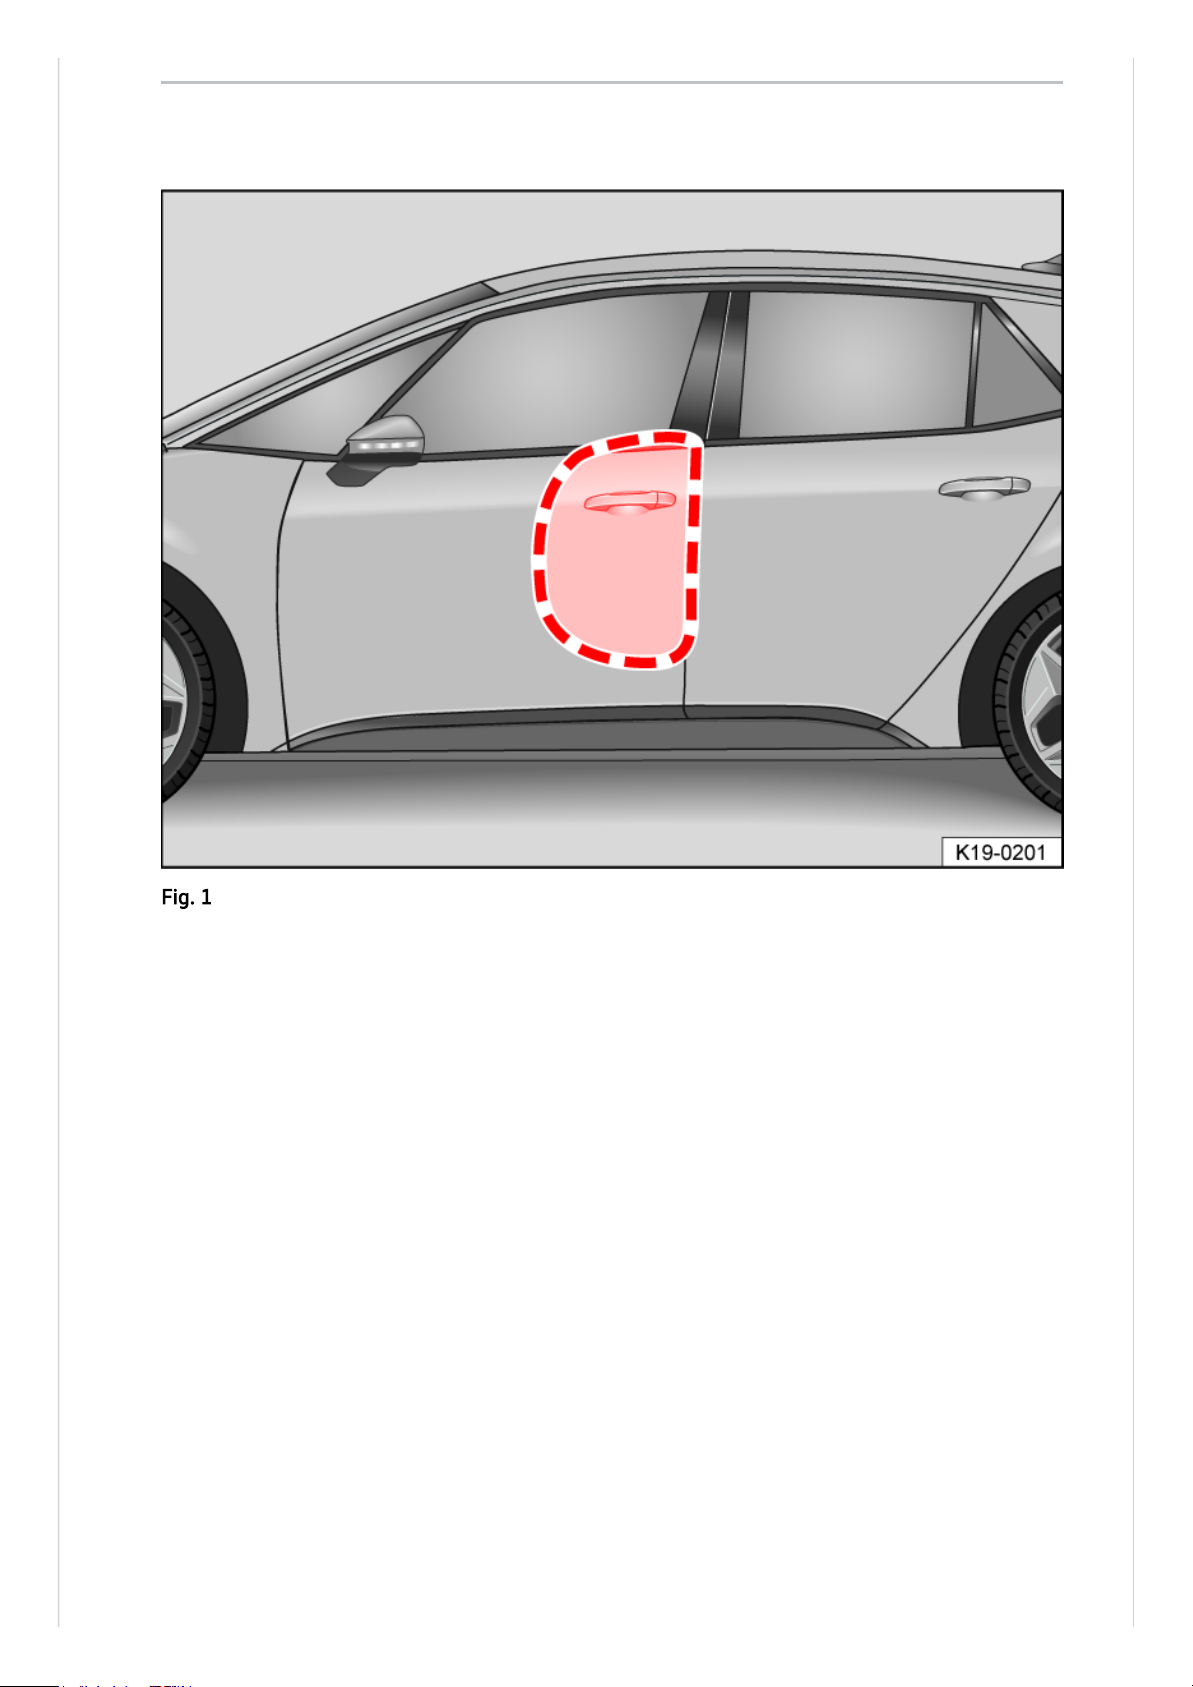
Side airbags
Fig.1On the left-hand side of vehicle: deployment zone of the side airbag.
Page 88
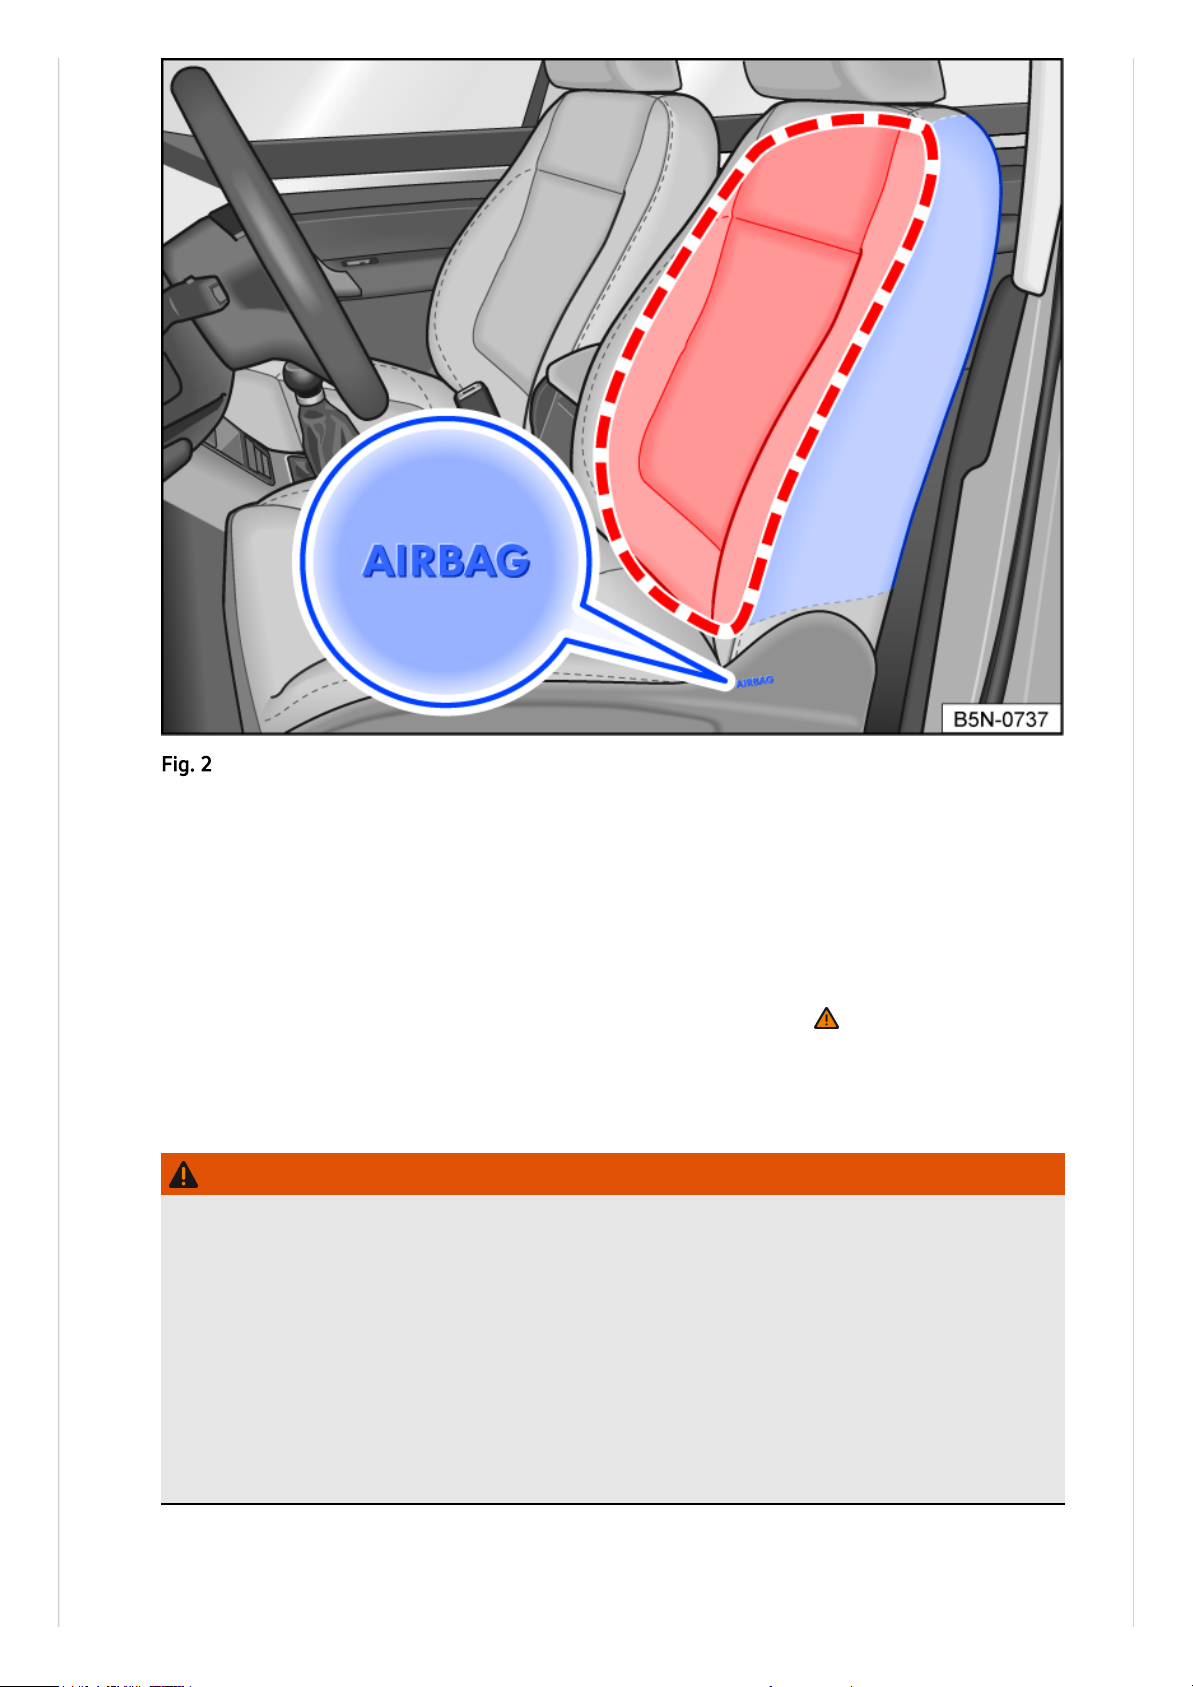
Depending on the equipment level, side airbags are installed for the front seats
→Fig.1
.
The side airbags for the front seats are located in the outer seat backrest cushions of the driver
seat and front passenger seat
→Fig.2
.
The locations of the side airbags are indicated by the “AIRBAG” label.
The areas outlined in red are inside the deployment area of the side airbags
→Fig.1
and
→Fig.2
. You must never leave or attach any objects in these areas
→
.
In the event of a side collision, the side airbags will be deployed on the side of the vehicle which
is impacted, thus reducing the risk of injury to the areas of the occupants' bodies facing the
impact.
WARNING
Once triggered, the airbag inflates in fractions of a second at very high speed.
●
Always leave the deployment zones of the side airbags clear.
●
There must be no other people, animals or objects between the occupants of the front seats
and the airbag deployment zones. Ensure that children and passengers keep to this rule.
●
The coat hooks in the vehicle should only be used for lightweight clothing. Do not leave any
heavy or sharp objects in the pockets.
●
Do not fit any accessories to the doors.
●
Do not fit seat covers or protective covers over the seats unless they have been expressly
approved for use in the vehicle. Otherwise the side airbag may not be able to inflate once
triggered.
Fig.2On the side of the front seat: location and deployment zone of the side airbag.
Page 89

WARNING
Incorrect use of the driver and front passenger seat could hinder the proper function of the side
airbag and cause serious injury.
●
Never remove the front seats from the vehicle or alter any components of these seats.
●
If too much pressure is applied to the backrest side bolsters, the side airbags may not be
triggered correctly, may not trigger at all, or may trigger accidentally.
●
Any damage to the original seat upholstery or around the seams of the side airbag units
must be repaired immediately by a qualified workshop.
Page 90
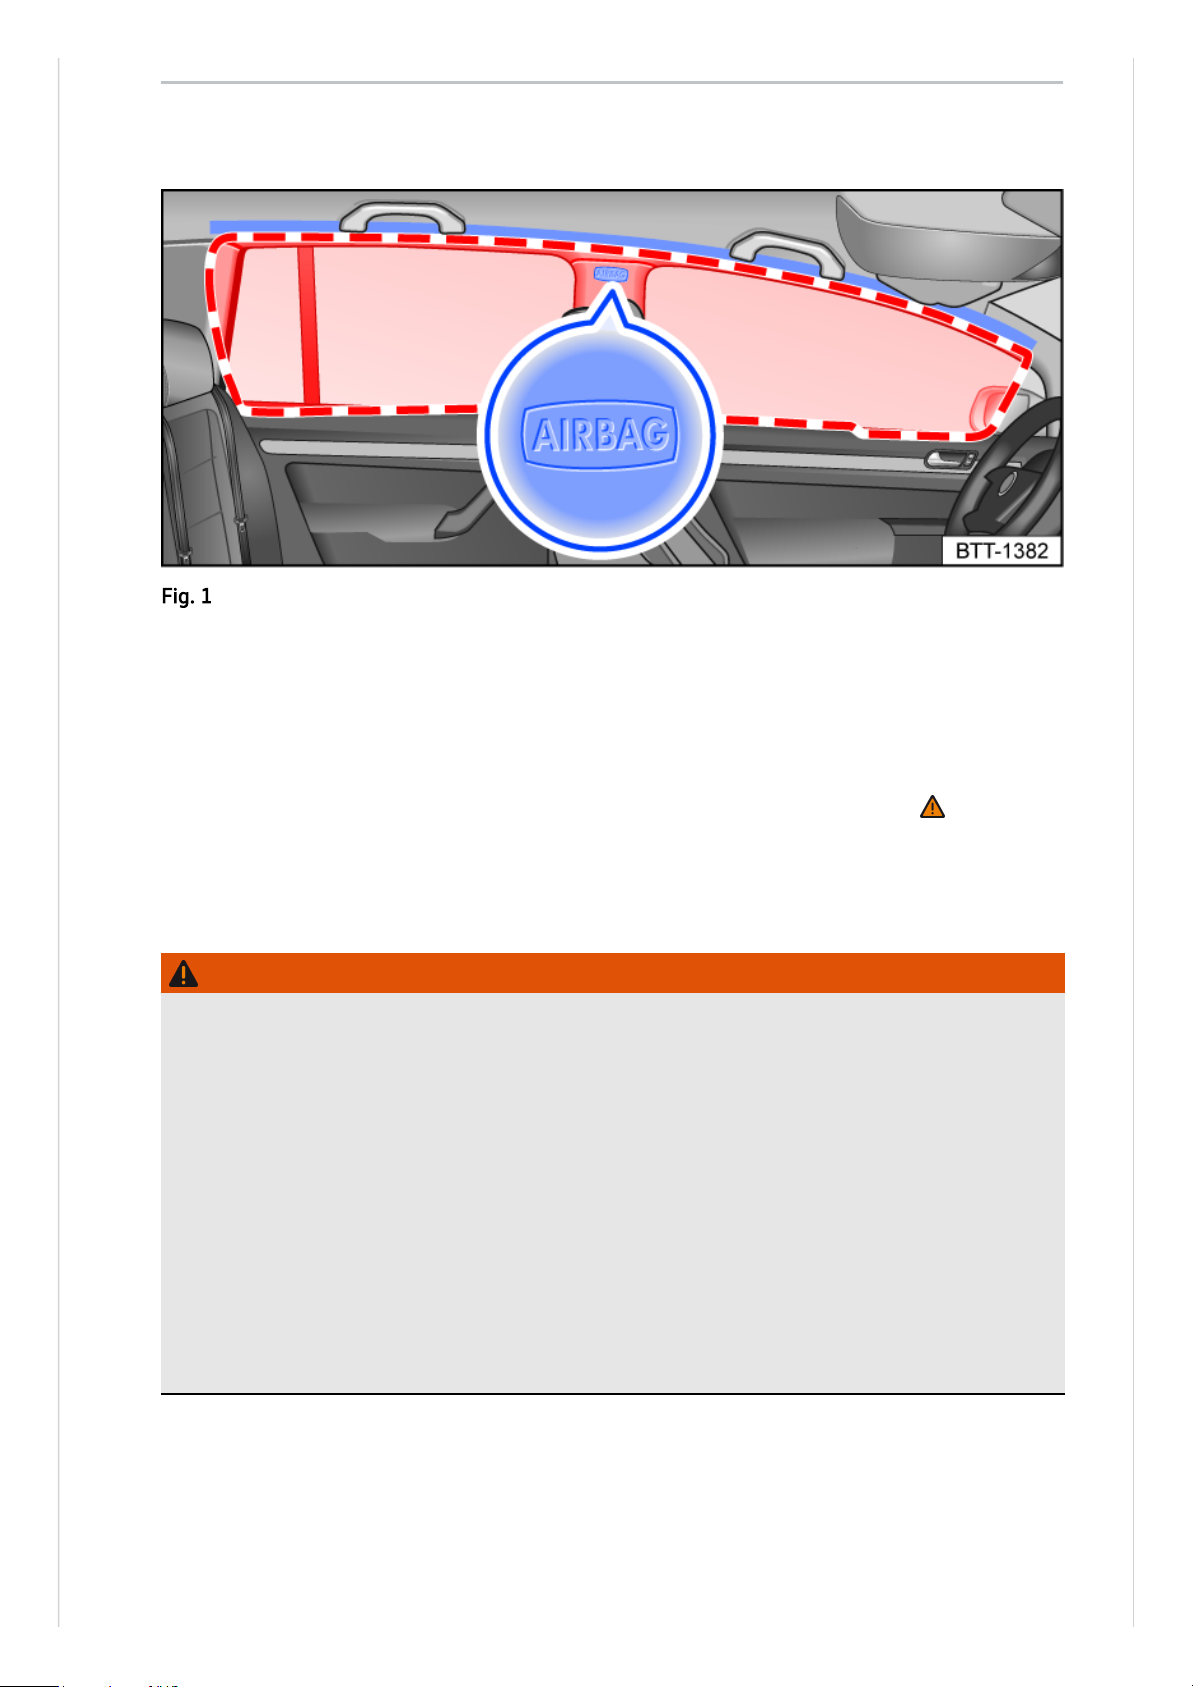
Curtain airbags are installed in the vehicle interior above the doors on the driver and front
passenger sides
→Fig.1
.
The locations of the curtain airbags are indicated by the “AIRBAG” label.
The area in the red frame is covered by the curtain airbag when triggered (deployment zone)
→Fig.1
. For this reason, you must never leave or attach any items in this area
→
.
The curtain airbags are triggered on both sides in the event of a frontal or side collision.
In a frontal and side collision, the curtain airbags reduce the risk of injury for the vehicle
occupants on the front seats and rear outer seats.
WARNING
Once triggered, the airbag inflates in fractions of a second at very high speed.
●
Always leave the deployment zones of the curtain airbags clear.
●
Never secure any items to the cover or in the deployment zone of the curtain airbag.
●
There must be no other persons, animals or objects between the vehicle occupants sitting
on the front seats and rear outer seats and the deployment zones of the airbags. Ensure that
children and passengers keep to this rule.
●
The coat hooks in the vehicle should only be used for lightweight clothing. Do not leave any
heavy or sharp objects in the pockets.
●
Do not fit any accessories to the doors.
●
Do not install any sun blinds onto the side windows unless they have been expressly
approved for use in your vehicle.
●
Only push the sun visors over to the side windows if no items are attached to the visors (e.g.
pens or a garage door opener).
Curtain airbags
Fig.1On the left-hand side of the vehicle: location and deployment zone of the curtain airbag.
Page 91
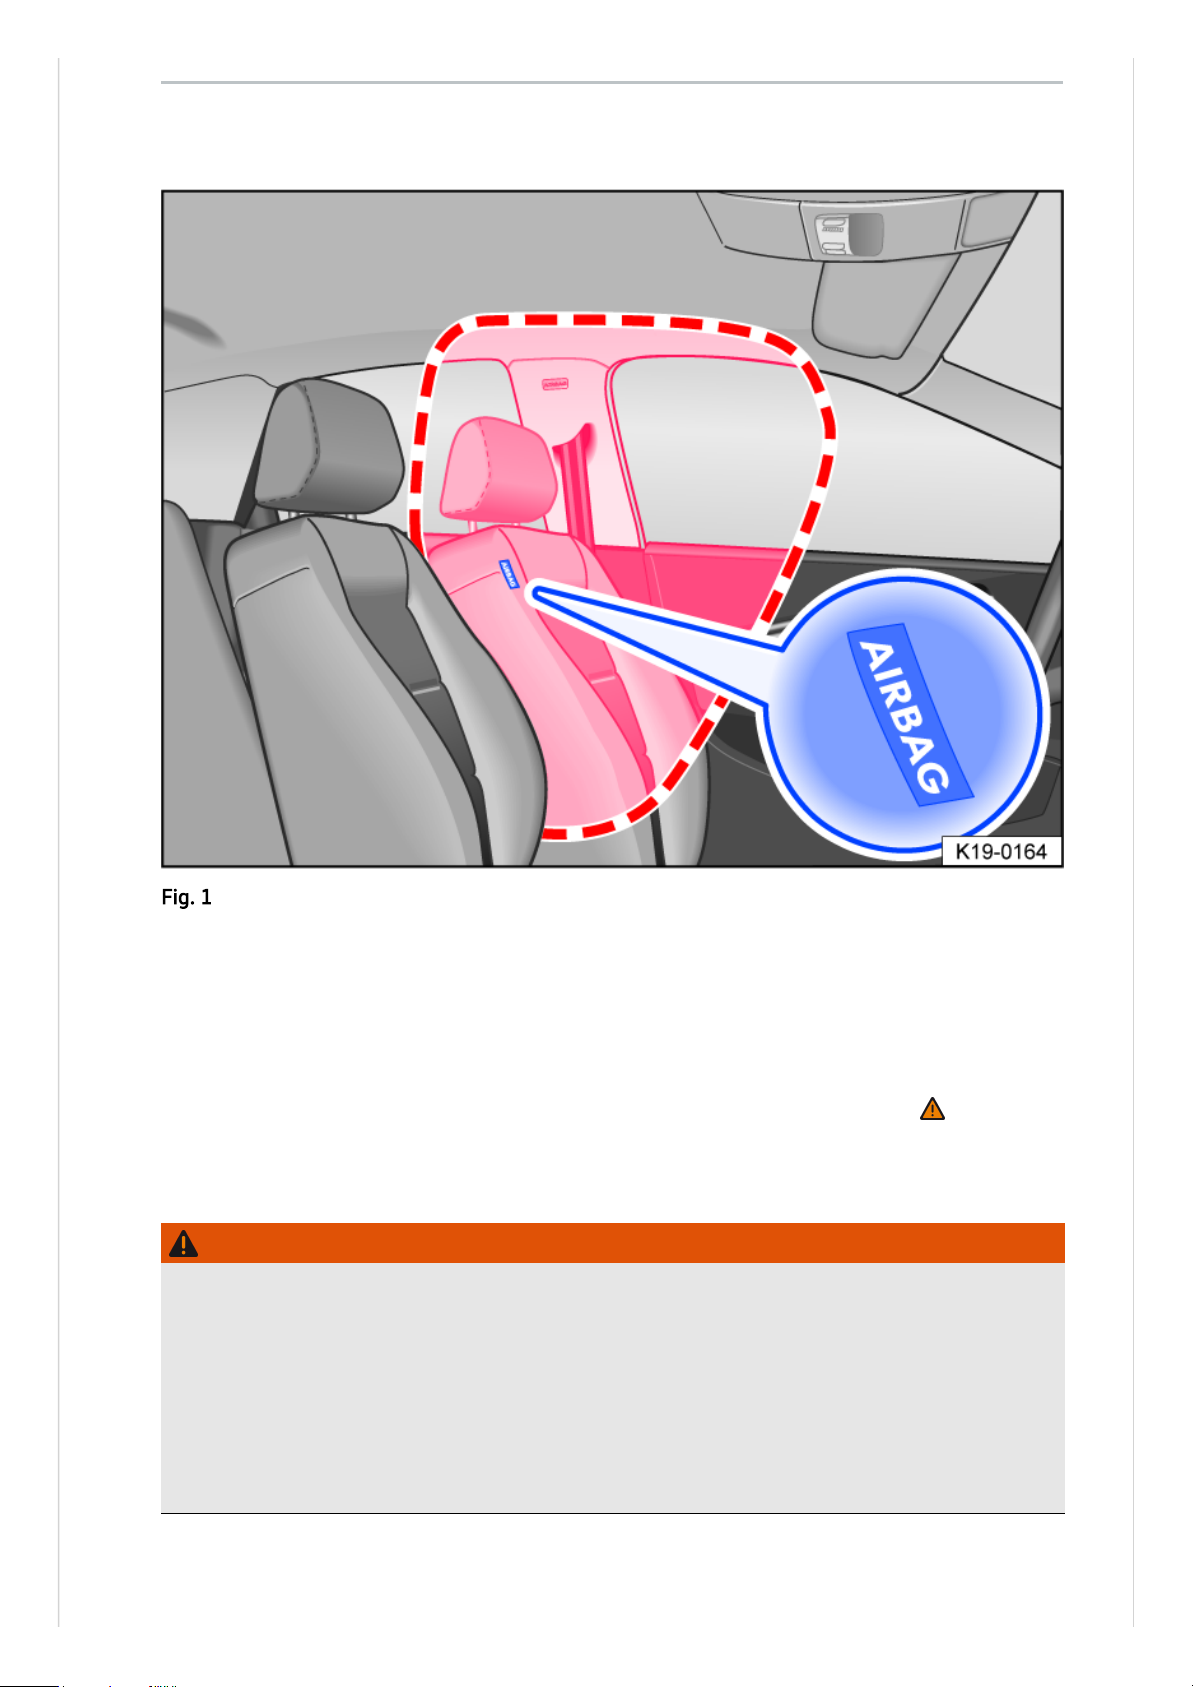
The central airbag is installed for the front seats and is located in the inner backrest padding of
the driver seat.
The location of the central airbag is indicated by the “AIRBAG” label
→Fig.1
.
The area in the red frame is covered by the central airbag when triggered (deployment zone)
→Fig.1
. For this reason, you must never leave or attach any items in this area
→
.
The central airbag is triggered in the event of a side collision and vehicle rollover and thus
reduces the risk of injury to the vehicle occupants.
WARNING
Once triggered, the airbag inflates in fractions of a second at very high speed.
●
Always leave the deployment zones of the central airbag clear.
●
Never secure any items on the cover or in the deployment zone of the central airbag.
●
There must be no other people, animals or objects between the occupants of the front seats
and the airbag deployment zones. Ensure that children and passengers keep to this rule.
●
Do not fit seat covers or protective covers over the seats unless they have been expressly
approved for use in the vehicle. Otherwise the central airbag may not be able to inflate once
triggered.
Central airbag
Fig.1In the inner backrest padding of the driver seat: central airbag.
Page 92

WARNING
Incorrect use of the driver and front passenger seat could hinder the proper function of the
central airbag and cause serious injury.
●
Never remove the front seats from the vehicle or alter any components of these seats.
●
If too much pressure is applied to the backrest side bolsters, the central airbag may not be
triggered correctly, may not trigger at all, or may trigger accidentally.
●
Any damage to the original seat covers or around the seams of the central airbag unit must
be repaired immediately by a qualified workshop.
Page 93
Using child seats can reduce the risk of injury to the child if there is an accident. Always use child
seats when driving with children.
Note the following:
— Child seats are classified into groups depending on the size, age and weight of child for which
they are designed.
— Various securing systems are used to secure child seats in the vehicle.
For safety reasons, child seats must always be fitted to the rear seats
(→ Child seats)
.
Volkswagen recommends child seats from the Volkswagen range of accessories. These child
seats have been developed and approved for use in Volkswagen vehicles.
WARNING
If children are not secured or are inadequately secured, they are at greater risk of serious or
even fatal injury. Please note the following:
●
Children who are either under 12 years of age or less than 150cm tall must not be carried in
the vehicle unless they are secured in a suitable child seat while the vehicle is in motion.
Regulations in some countries may differ and must be complied with.
●
Always secure children in the vehicle in a suitable child seat. The seat used must be
appropriate to the child's height, weight and age.
●
Never fasten more than one child into one child seat.
●
Under no circumstances should children or babies be held in a passenger's or drivers lap
while driving.
●
Never leave a child unsupervised in a child seat.
●
Never allow a child to be carried in a vehicle without being properly secured, and never
allow a child to stand up or to kneel on a seat, or to sit incorrectly while the car is in motion.
This is particularly important for children carried on the front passenger seat. In an accident,
children may sustain serious injuries to themselves and others.
●
The child seat can only provide maximum protection if the seat belt is routed correctly
around it. Always ensure that the seat belt is routed as specified in the instructions provided
by the child seat manufacturer. If the seat belt is routed incorrectly it may cause injuries
even in a minor accident.
●
After an accident, it is vital to replace any child seats that were in use during the accident, as
they could have sustained non-visible damage.
NOTICE
Please observe the notes and information for vehicles with N1 approval
(→ N1 approval)
.
Safe transport of children
Introduction to the topic
Page 94
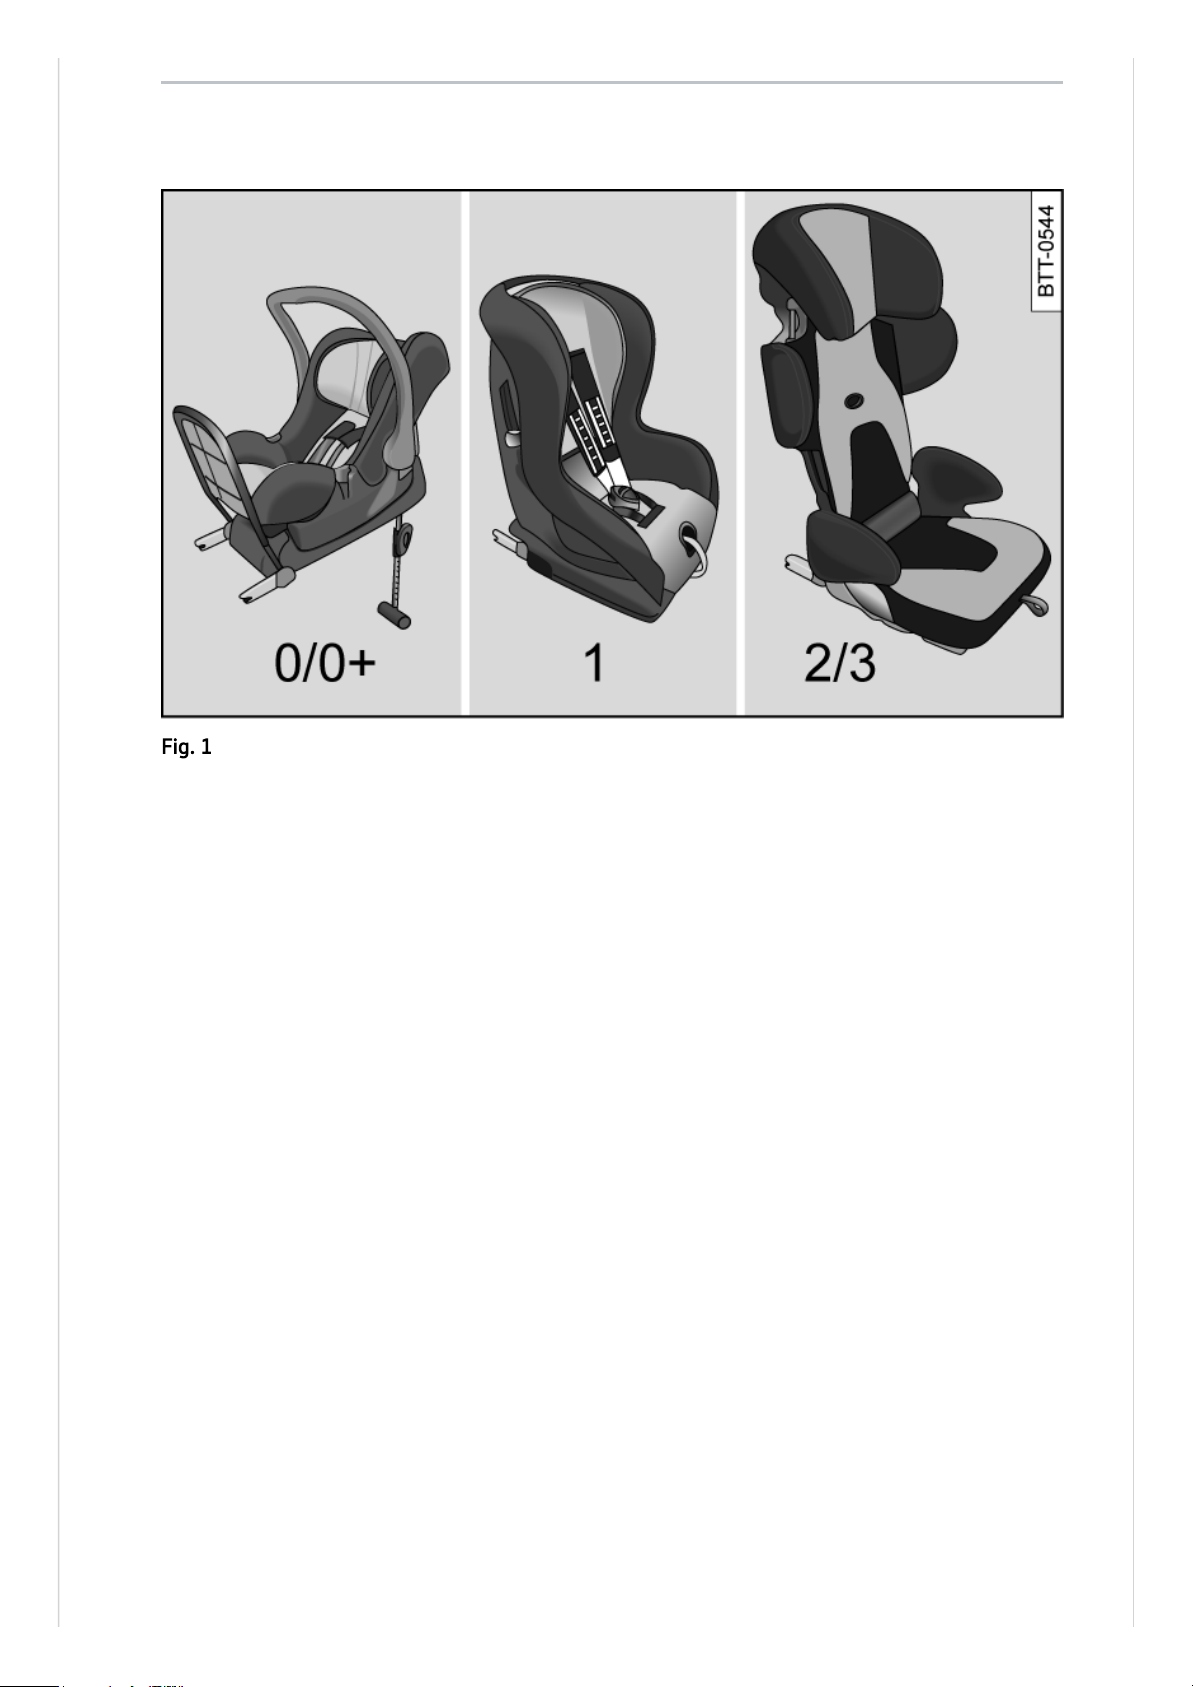
Only use child seats that have been officially approved and are suitable for the child.
Standards for child seats
Regulations ECE-R44 or ECE-R129
→Standards for child seats
apply to child seats in the user
states. Both regulations apply simultaneously. Child seats which have been tested in accordance
with these standards carry an orange ECE approval label. This ECE approval label may include the
following information on the child seat:
— Weight class.
— Size class.
— Approval category (universal, semi-universal, vehicle-specific or i-Size).
— Approval number.
On child seats that are approved under regulation ECE-R44, the eight-digit approval number on
the ECE approval label must begin with 03 or 04. This shows that the seat is admissible for use.
Older child seats with an approval number beginning with 01 or 02 are not admissible.
Child seat weight classes
Types of child seat
Fig.1Example illustrations of child seats.
Page 95
Class Child's weight
Group 0 up to 10 kg
Group0+ up to 13kg
Group 1 9 to 18 kg
Group 2 15 to 25kg
Group 3 22 to 36kg
— Weight class 0/0+: group 0/0+ or 0/1 rear-facing infant carriers
→Fig.1
are the best option
for the period from birth to about 18 months.
— Weight class 1: group 1 (up to about fouryears old) and group 1/2 (up to about sevenyears
old) with an integral belt system are best for children over the relevant weight limit.
— Weight classes 2/3: groups 2 and 3 include child seats with a backrest, and booster seats with
no backrest. Child seats with a backrest have integrated seat routing and side padding, and so
provide better protection than booster seats with no backrest. Volkswagen therefore
recommends the use of child seats with a backrest. Group 2 child seats are for children up to
the age of about seven, group 3 child seats for those older than seven.
Not every child will fit in the child seat specified for their weight group. Likewise, not every seat
will fit in every vehicle. Therefore it is vital to check that the child fits properly in their child seat
and that the child seat can be securely fastened in the vehicle.
Child seat approval categories
Child seats can be classified as “universal”, “semi-universal” “or vehicle-specific” (all in
accordance with regulation ECE-R44) or “i-Size” (in accordance with regulation ECE-R129).
— Universal: child seats with “universal” approval are approved for use in all vehicles. No type list
is required. ISOFIX child seats with universal approval must be additionally secured using a
strap over the top of the vehicle seat (top tether).
— Semi-universal: “semi-universal” approval requires other safety devices for attaching the seat
(that require additional testing) in addition to the standard requirements for universal
approval. Child seats with “semi-universal” approval come with a type list. The seats should
only be used in vehicles that are included on this list.
— Vehicle-specific: child seats with vehicle specific approval must have undergone dynamic
testing in each model of vehicle for which it is approved. These child seats also come with a
type list.
— i-Size: child seats classified as “i-Size” must conform to the installation and safety
requirements prescribed in regulation ECE-R129. Contact the child seat manufacturer to find
out whether child seats are approved for this vehicle, and if so which ones, in accordance with
i-Size.
Page 96
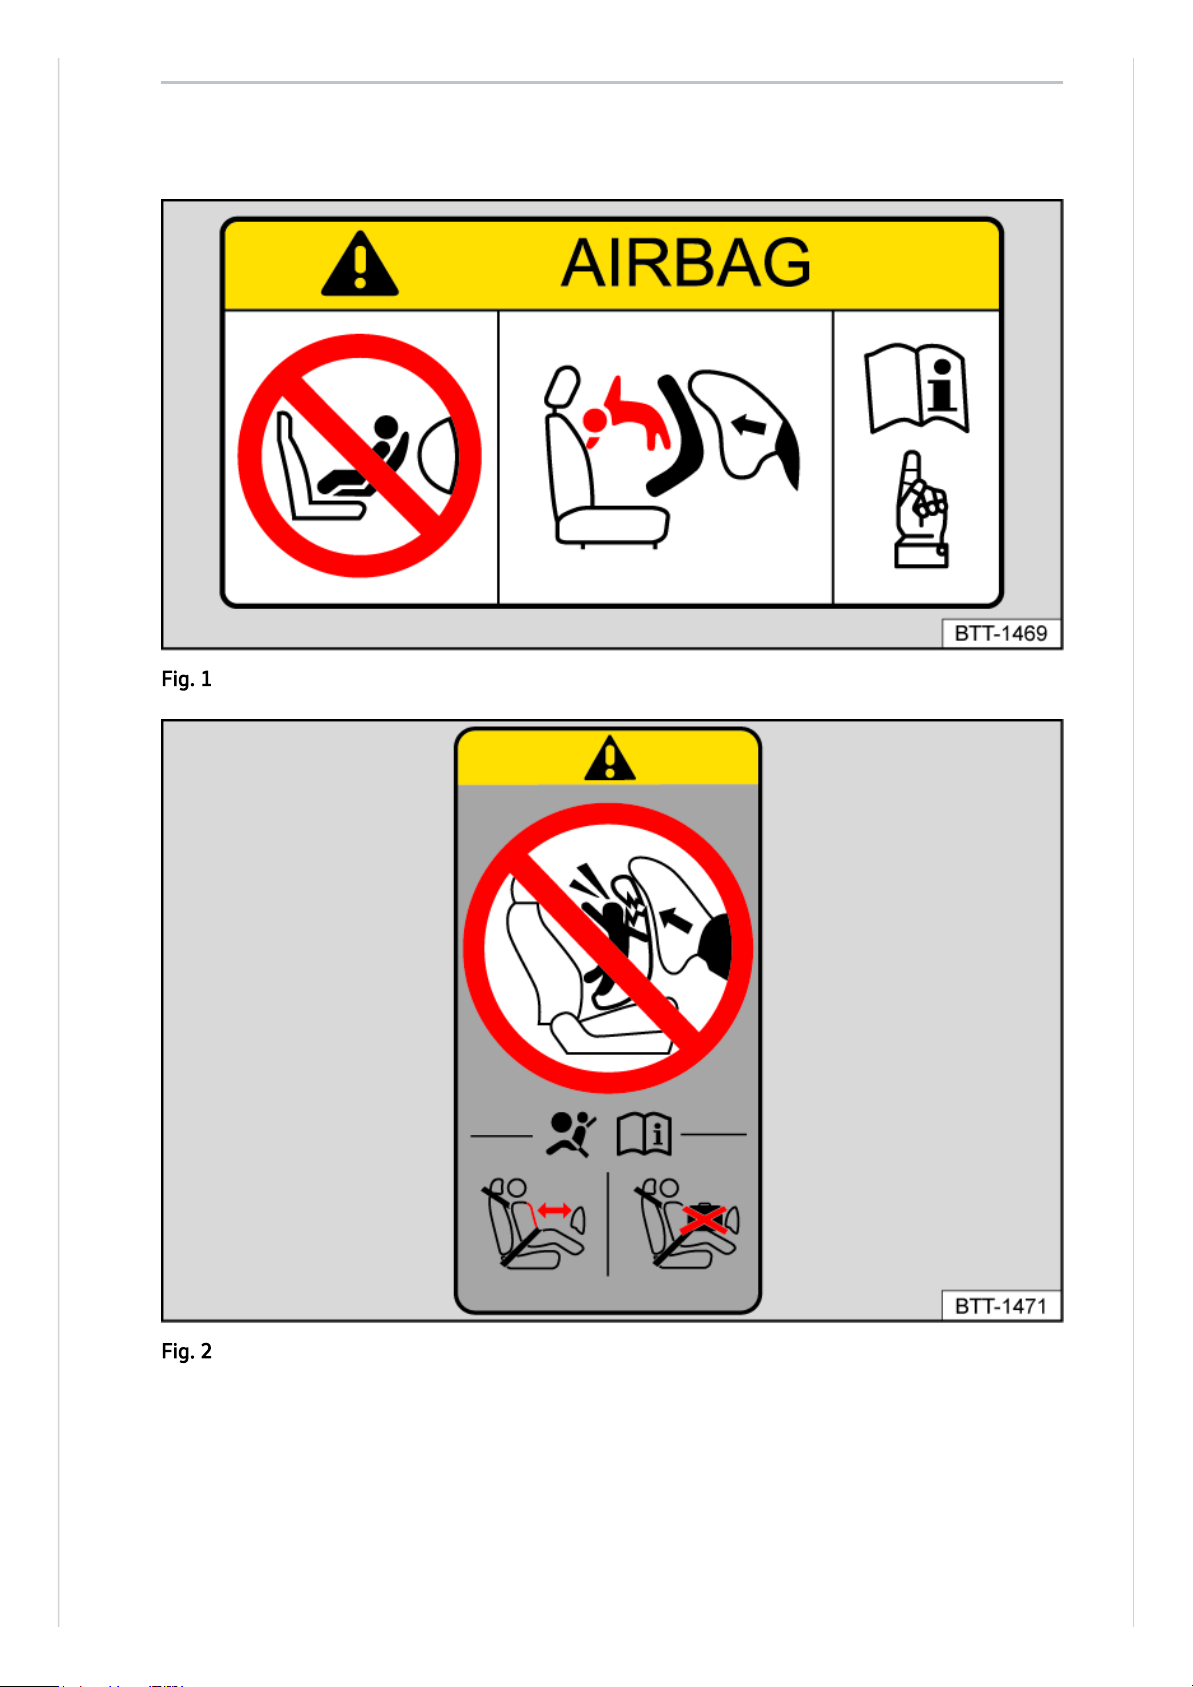
Fig.1Illustration: airbag label on the sun visor.
Fig.2Illustration: airbag label on the B-pillar.
Country-specific regulations
The standards and regulations governing the use of child seats and child seat securing
mechanisms differ from country to country. Not all countries allow you to transport children on
the front passenger seat. Regulations and legal requirements take precedence over the
information given in this owner's manual.
Installing and using child seats
Page 97

Information on fitting a child seat
Observe the following general information when fitting a child seat. This information is relevant
whatever child seat securing system is being used.
— Read and follow the instructions provided by the child seat manufacturer .
— Whenever possible, fit all child seats to the rear seat behind the front passenger seat so that
children can exit the vehicle on the kerb side.
— Deactivate the front passenger front airbag if fitting a rear-facing child seat on the front
passenger seat.
— When fitting on the front passenger seat, push the front passenger seat back fully and adjust
the seat to the highest position. Adjust the backrest to an upright position
(→ Sitting position)
.
— Always ensure that there is enough space around the child seat. If necessary, adjust the
position of the seat in front. When doing so, ensure that the driver or front passenger can still
maintain a correct sitting position
(→ Sitting position)
.
— The backrest of the child seat must lay as flat as possible against the vehicle seat backrest. If
required, adjust the seat backrest angle so that the child seat lies flush against the backrest.
Once it has been installed, if the child seat is touching the head restraint and therefore cannot
be positioned flush against the backrest, push the head restraint all the way up, or remove and
stow safely in the vehicle
(→ Sitting position)
.
Airbag sticker
The vehicle may be provided with stickers giving important information about the front
passenger front airbag. The information on these stickers may vary from country to country. The
stickers may be found:
— On the driver sun visor and in some cases on the front passenger sun visor .
— On the B-pillar on the front passenger side .
It is essential to observe the warning information shown on these stickers before installing a
rear-facing child seat .
Risks involved in carrying children on the front passenger seat
If you are using a rear-facing child seat, the front passenger front airbag can cause critical or
potentially fatal injuries when it inflates .
Rear-facing child seats may be used on the front passenger seat only if the front passenger front
airbag has been deactivated
(→ Airbag system)
(→ Advanced airbag system). A deactivated
front passenger front airbag is indicated by the continuously litPASSENGERAIRBAG
indicator lamp in the driver’s field of vision
(→ Indicator lamp for standard airbag system)
.
If using a front-facing child seat, do not deactivate the front passenger front airbag. When fitting
the child seat, ensure that it is as far away as possible from the front passenger front airbag. The
front passenger front airbag can cause severe injuries when it inflates .
Some child seats are not suitable for use on the front passenger seat. The child seat must be
specially authorised by the manufacturer for use on the front passenger seat in vehicles with
front and side airbags. Volkswagen dealerships keep an up-to-date list of authorised child seats.
Page 98
DANGER
If you use a rear-facing child seat on the front passenger seat, the child in it is at increased risk
of sustaining critical or fatal injuries in the event of an accident.
●
Deactivate the front passenger front airbag. If the front passenger front airbag cannot be
deactivated no rear-facing child seat may be used.
●
Move the front passenger seat as far back and as high as it can be adjusted to create the
largest possible distance between the child seat and the front passenger front airbag.
●
Move the backrest to the upright position.
●
Only use child seats that have been approved by the child seat manufacturer for use on a
front passenger seat with front and side airbag.
WARNING
Child seats present a risk of injury if incorrectly installed.
●
Always read and follow the installation instructions and warning information provided by
the child seat manufacturer.
WARNING
Using a front-facing child seat on the front passenger seat presents a risk of injury.
●
Move the front passenger seat as far back and as high as it can be adjusted to create the
largest possible distance between the child seat and the front passenger front airbag.
●
Move the backrest to the upright position.
●
Only use child seats that have been approved by the child seat manufacturer for use on a
front passenger seat with front and side airbag.
WARNING
To avoid injuries caused by inflation of a head airbag or side airbag:
●
Ensure that no children are seated within the airbag deployment zones
(→ Airbag system)
(→ Advanced airbag system).
●
Do not place any objects in the side airbag deployment zones.
Page 99
Different countries use different securing systems for safely fitting child seats in the vehicle.
Overview of securing systems
— ISOFIX: ISOFIX is a standardised securing system for fitting child seats in the vehicle quickly
and safely. The ISOFIX attachment system creates a rigid connection between the child seat
and the car body.
The seat has two rigid attachment arms. The attachment arms engage in ISOFIX attachment
points between the seat and the backrest (→ Child seat with ISOFIX)
(→ Child seat with ISOFIX
or i-Size)
. An upper strap (top tether) or a support foot may sometimes have to be used in
addition to the ISOFIX anchor points described above.
— Three-point automatic seat belt. It is better to secure child seats using the ISOFIX system, if
available, rather than with a three-point automatic seat belt
(→ Child seat with seat belt)
.
Additional securing points:
— Top tether: the strap at the top of the child seat is routed over the rear seat backrest and
hooked to an anchor ring on the back of the rear seats
(→ Child seat with top tether)
. Top
tether anchor points are marked with an anchor symbol.
— Support foot: some child seats are supported by a support foot resting on the floor of the
vehicle. This support foot helps prevent the child seat tipping forward in a crash. Child seats
with a support foot can only be used on the front passenger seat and the outer rear seats
→
.
Recommended child seat securing systems
Volkswagen recommends that child seats are secured as follows:
— Infant carrier or rear-facing child seat: ISOFIX
and
support foot.
— Front-facing child seat: ISOFIX
and
top tether and possibly also support foot.
WARNING
Incorrect use of the support foot can cause severe or fatal injuries.
●
Ensure that the support foot is always correctly and safely installed.
Securing systems
Page 100
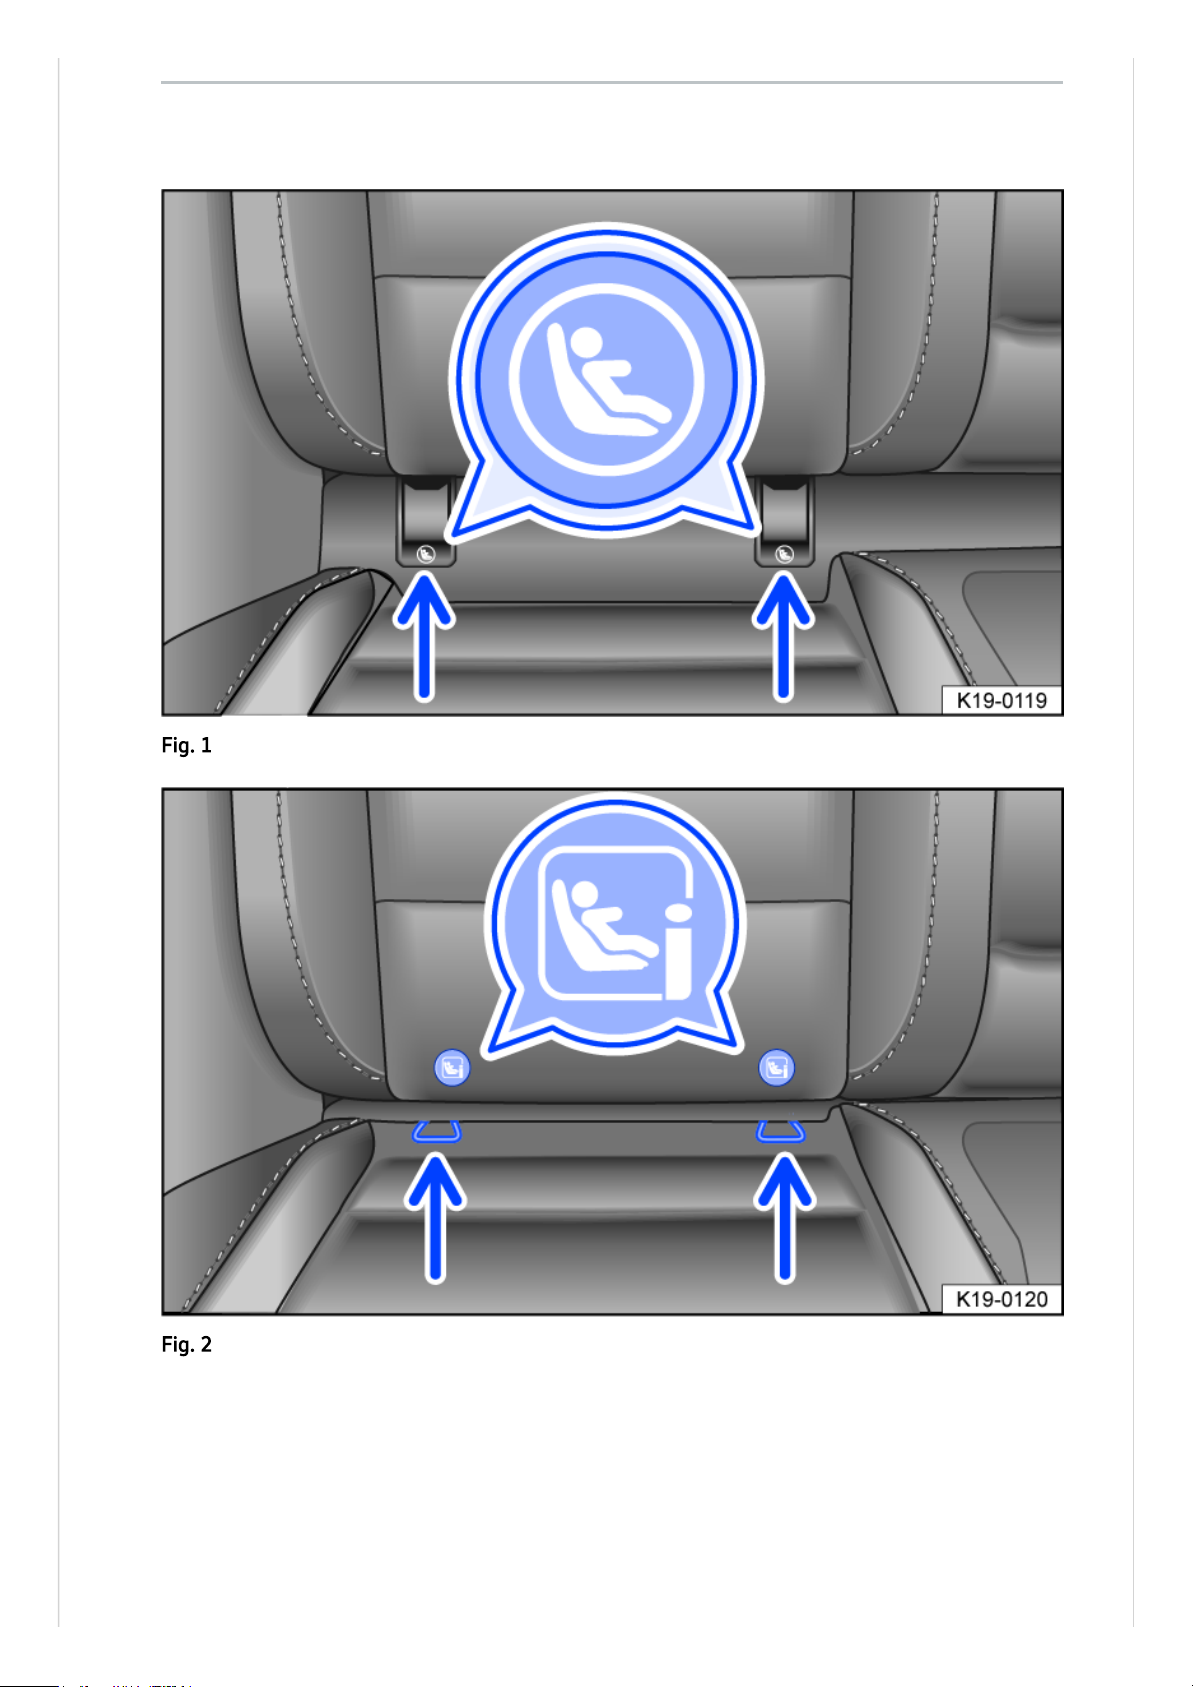
Securing a child seat with ISOFIX/i-Size
Fig.1Markings identifying the ISOFIX anchor points for child seats.
Fig.2Markings identifying the i-size anchorage points for child seats.
 Loading...