


Vodafone MachineLink 3G (NWL-10)
www.netcommwireless.com / m2m.vodafone.com
UM-00022 v2.2
2 of 203
Important Notice
This device, like any wireless device, operates using radio signals which cannot guarantee the transmission and reception of data in
all conditions. While the delay or loss of signal is rare, you should not rely solely on any wireless device for emergency
communications or otherwise use the device in situations where the interruption of data connectivity could lead to death, personal
injury, property damage, data loss, or other loss. NetComm Wireless and Vodafone accept no responsibility for any loss or damage
resulting from errors or delays in transmission or reception, or the failure of the Vodafone MachineLink 3G (NWL-10) to transmit or
receive such data.
Safety and Hazards
Do not connect or disconnect cables or devices to or from the SIM card tray, Ethernet port or the terminals of the Molex power
connector in hazardous locations such as those in which flammable gases or vapours may be present, but normally are confined
within closed systems; are prevented from accumulating by adequate ventilation; or the location is adjacent to a location from which
ignitable concentrations might occasionally be communicated.
Copyright
Copyright© 2017 NetComm Wireless Limited. All rights reserved.
Copyright© 2017 Vodafone Group Plc. All rights reserved.
The information contained herein is proprietary to NetComm Wireless and Vodafone. No part of this document may be translated,
transcribed, reproduced, in any form, or by any means without prior written consent of NetComm Wireless and Vodafone.
Trademarks and registered trademarks are the property of NetComm Wireless Limited or Vodafone Group or their respective
owners. Specifications are subject to change without notice. Images shown may vary slightly from the actual product.
Note – This document is subject to change without notice.
Save our environment
When this equipment has reached the end of its useful life, it must be taken to a recycling centre and processed separately from
domestic waste.
The cardboard box, the plastic contained in the packaging, and the parts that make up this device can be recycled in accordance
with regionally established regulations. Never dispose of this electronic equipment along with domestic waste. You may be subject
to penalties or sanctions under the law. Instead, ask for disposal instructions from your municipal government.
Please be responsible and protect our environment.
www.netcommwireless.com / m2m.vodafone.com
Vodafone MachineLink 3G (NWL-10)
UM-00022 v2.2
3 of 203
Document History
This guide covers the following products:
Vodafone MachineLink 3G (NWL-10)
Ver.
Document Description
Date
v1.0
Initial document release
9 April 2013
v1.1
Cosmetic fixes
17 May 2013
v1.2
Aligned to firmware version 1.10.16.X. Added description of Data usage button
and Ethernet port LED indicators
12 June 2013
v1.3
Aligned to firmware version 1.10.32.X. Added Vodafone GDSP roaming settings
page, hostname description on LAN settings page and updated Administration
settings screenshot and descriptions.
20 September 2013
v1.4
Updated “Setting timers for dial up and disconnection” and “Configuring a
periodic reboot” descriptions
15 November 2013
v1.5
Updated LED signal strength table
28 February 2014
v1.6
Updated for Maintenance Release 2
10 November 2014
v2.0
Updated for Maintenance Release 3
16 February 2017
v2.1
Updated device weight
13 April 2017
v2.2
Corrected IPSec VPN with SCEP certificate description and an SCEP Client
screenshot
26 June 2017
Table i. - Document Revision History
Note – Before performing the instructions in this guide, please ensure that you have the latest firmware version installed on your
router.
Visit https://vodafone.netcommwireless.com to download the latest firmware.
Note – The functions described in this document require that the router is assigned with a publicly routable IP address.
Please ensure that your mobile carrier has provided you with a publicly routable IP address before performing the instructions in this
document.

Vodafone MachineLink 3G (NWL-10)
www.netcommwireless.com / m2m.vodafone.com
UM-00022 v2.2
4 of 203

www.netcommwireless.com / m2m.vodafone.com
Vodafone MachineLink 3G (NWL-10)
UM-00022 v2.2
5 of 203
Table of contents
Overview ............................................................................................................................................................................................. 7
Introduction ...................................................................................................................................................................................................................... 7
Target audience ................................................................................................................................................................................................................ 7
Prerequisites ..................................................................................................................................................................................................................... 7
Notation ............................................................................................................................................................................................................................ 7
Product introduction ........................................................................................................................................................................... 8
Product overview .............................................................................................................................................................................................................. 8
Package contents .............................................................................................................................................................................................................. 8
Product features ............................................................................................................................................................................................................... 8
Physical dimensions and indicators.................................................................................................................................................... 10
Physical dimensions ........................................................................................................................................................................................................ 10
LED indicators ................................................................................................................................................................................................................. 11
Ethernet port LED indicators ........................................................................................................................................................................................... 13
Interfaces ........................................................................................................................................................................................................................ 15
Placement of the MachineLink 3G router ........................................................................................................................................... 17
Mounting options ........................................................................................................................................................................................................... 17
Installation and configuration of the Vodafone MachineLink 3G ........................................................................................................ 24
Powering the router ....................................................................................................................................................................................................... 24
Power consumption ........................................................................................................................................................................................................ 26
Installing the router ........................................................................................................................................................................................................ 26
Advanced configuration ..................................................................................................................................................................... 28
Configuring a strong password ....................................................................................................................................................................................... 30
Status ................................................................................................................................................................................................ 31
Networking ....................................................................................................................................................................................... 35
Wireless WAN ................................................................................................................................................................................................................. 35
LAN ................................................................................................................................................................................................................................. 62
Routing ........................................................................................................................................................................................................................... 68
VPN ................................................................................................................................................................................................................................. 83
Services ........................................................................................................................................................................................... 107
Dynamic DNS ................................................................................................................................................................................................................ 107
Network time (NTP) ...................................................................................................................................................................................................... 109
SNMP ............................................................................................................................................................................................................................ 111
TR-069........................................................................................................................................................................................................................... 115
Event notification ......................................................................................................................................................................................................... 117
Email settings ................................................................................................................................................................................................................ 123
SMS messaging ............................................................................................................................................................................................................. 125
Network quality ............................................................................................................................................................................................................ 147
System ............................................................................................................................................................................................ 148
Log ................................................................................................................................................................................................................................ 148
Ping watchdog .............................................................................................................................................................................................................. 154
System configuration .................................................................................................................................................................................................... 157
Administration .............................................................................................................................................................................................................. 163

Vodafone MachineLink 3G (NWL-10)
www.netcommwireless.com / m2m.vodafone.com
UM-00022 v2.2
6 of 203
Appendix A: Tables .......................................................................................................................................................................... 178
Appendix B: Device Mounting Dimensions ...................................................................................................................................... 180
Appendix C: Mounting Bracket ........................................................................................................................................................ 181
Appendix D: Default Settings ........................................................................................................................................................... 182
Restoring factory default settings ................................................................................................................................................................................. 183
Appendix E: Recovery mode ............................................................................................................................................................ 184
Accessing recovery mode ............................................................................................................................................................................................. 184
Status ............................................................................................................................................................................................................................ 185
Log ................................................................................................................................................................................................................................ 185
Application Installer ...................................................................................................................................................................................................... 187
Settings ......................................................................................................................................................................................................................... 187
Reboot .......................................................................................................................................................................................................................... 188
Appendix F: HTTPS - Uploading a self-signed certificate ................................................................................................................... 189
Appendix G: RJ-45 connector ........................................................................................................................................................... 192
Appendix H: Obtaining a list of RDB variables .................................................................................................................................. 193
Open Source Disclaimer ................................................................................................................................................................... 195
Safety and product care ................................................................................................................................................................... 195
Regulatory compliance .................................................................................................................................................................... 199

www.netcommwireless.com / m2m.vodafone.com
Vodafone MachineLink 3G (NWL-10)
UM-00022 v2.2
7 of 203
Overview
Introduction
This document provides you all the information you need to set up, configure and use the Vodafone MachineLink 3G (NWL-10)
router.
Target audience
This document is intended for system integrators or experienced hardware installers who understand telecommunications
terminology and concepts.
Prerequisites
Before continuing with the installation of your Vodafone MachineLink 3G (NWL-10) router, please confirm that you have the
following:
• A device with a working Ethernet network adapter.
• A web browser such as Internet Explorer, Mozilla Firefox or Google Chrome.
• A working SIM card if your router was not shipped with one pre-inserted.
• A flathead screwdriver (No. 3) if field terminated power is required.
Notation
The following symbols are used in this user guide:
The following note requires attention.
The following note provides a warning.
The following note provides useful information.

Vodafone MachineLink 3G (NWL-10)
www.netcommwireless.com / m2m.vodafone.com
UM-00022 v2.2
8 of 203
Product introduction
Product overview
• HSPA+ up to 14.4Mbps downstream
• Penta-band 3G with quad-band 2G auto-fallback
• Internal diversity antennae with option for external main antenna (auto-sensing)
• Ethernet port with full passive Power over Ethernet (PoE) support (802.3af)
• Intelligent tri-colour LED display for clear, easy-to-read modem status information
• Integration with Vodafone GDSP back end
• Roaming algorithm with prioritisation for cost effective, flawless network connection across the globe
• Extensive device management with support for TR-069, web configuration and full feature management with SMS
• Optimised web configuration
• Flexible mounting suitable for in-home use or industrial applications with built-in wall mount, DIN and C-Rail mounting
options
Package contents
The Vodafone MachineLink 3G package consists of:
• 1x Vodafone MachineLink 3G router
• 1x 1.5m yellow Ethernet cable 8P8C
• 1x DIN rail mounting bracket
• 1x quick start guide and safety manual
If any of these items are missing or damaged, please contact your Vodafone sales representative immediately.
Product features
The Vodafone MachineLink 3G is a feature-packed wireless M2M device designed by Vodafone to address the rapid growth in M2M
deployments. The first M2M device of its kind, it is designed to deliver state of the art features, versatility and ease of use at an
affordable price. Compatible with Vodafone networks worldwide, Vodafone MachineLink 3G is managed by Vodafone's global M2M
platform enabling remote management and support wherever you are. The open management system also allows you to customise
your own software applications for scalability, large scale compatibility and an easy path to large deployments across a broad range
of industries.

www.netcommwireless.com / m2m.vodafone.com
Vodafone MachineLink 3G (NWL-10)
UM-00022 v2.2
9 of 203
The Vodafone MachineLink 3G meets the global demand for a reliable and cost-effective M2M device that successfully caters to
mass deployment across businesses.
Vodafone MachineLink 3G (NWL-10)
www.netcommwireless.com / m2m.vodafone.com
UM-00022 v2.2
10 of 203
Physical dimensions and indicators
Physical dimensions
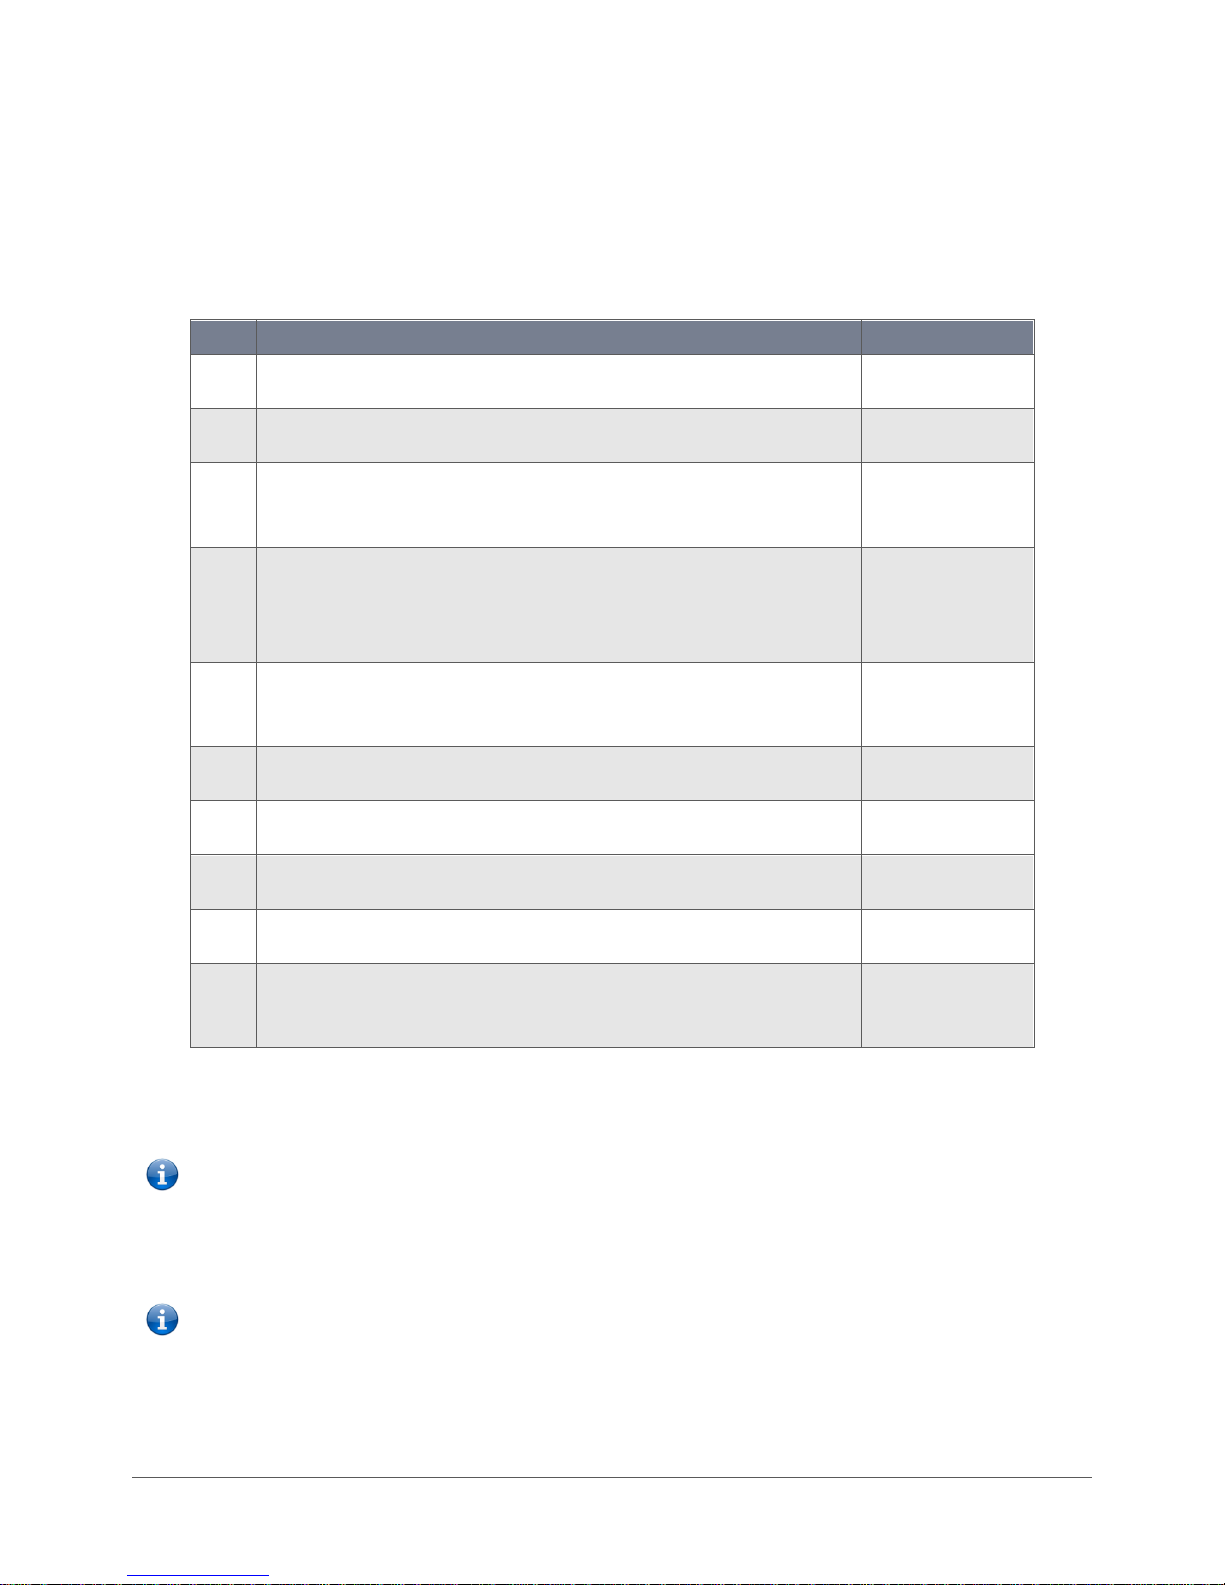
Below is a list of the physical dimensions of the Vodafone MachineLink 3G.
Figure 1 – Vodafone MachineLink 3G Dimensions
Vodafone MachineLink 3G
(without external antenna attached)
Length
140 mm
Depth
103 mm
Height
30 mm
Weight
187g
Table 1 - Device Dimensions
103 mm
30 mm
140 mm
www.netcommwireless.com / m2m.vodafone.com
Vodafone MachineLink 3G (NWL-10)
UM-00022 v2.2
11 of 203
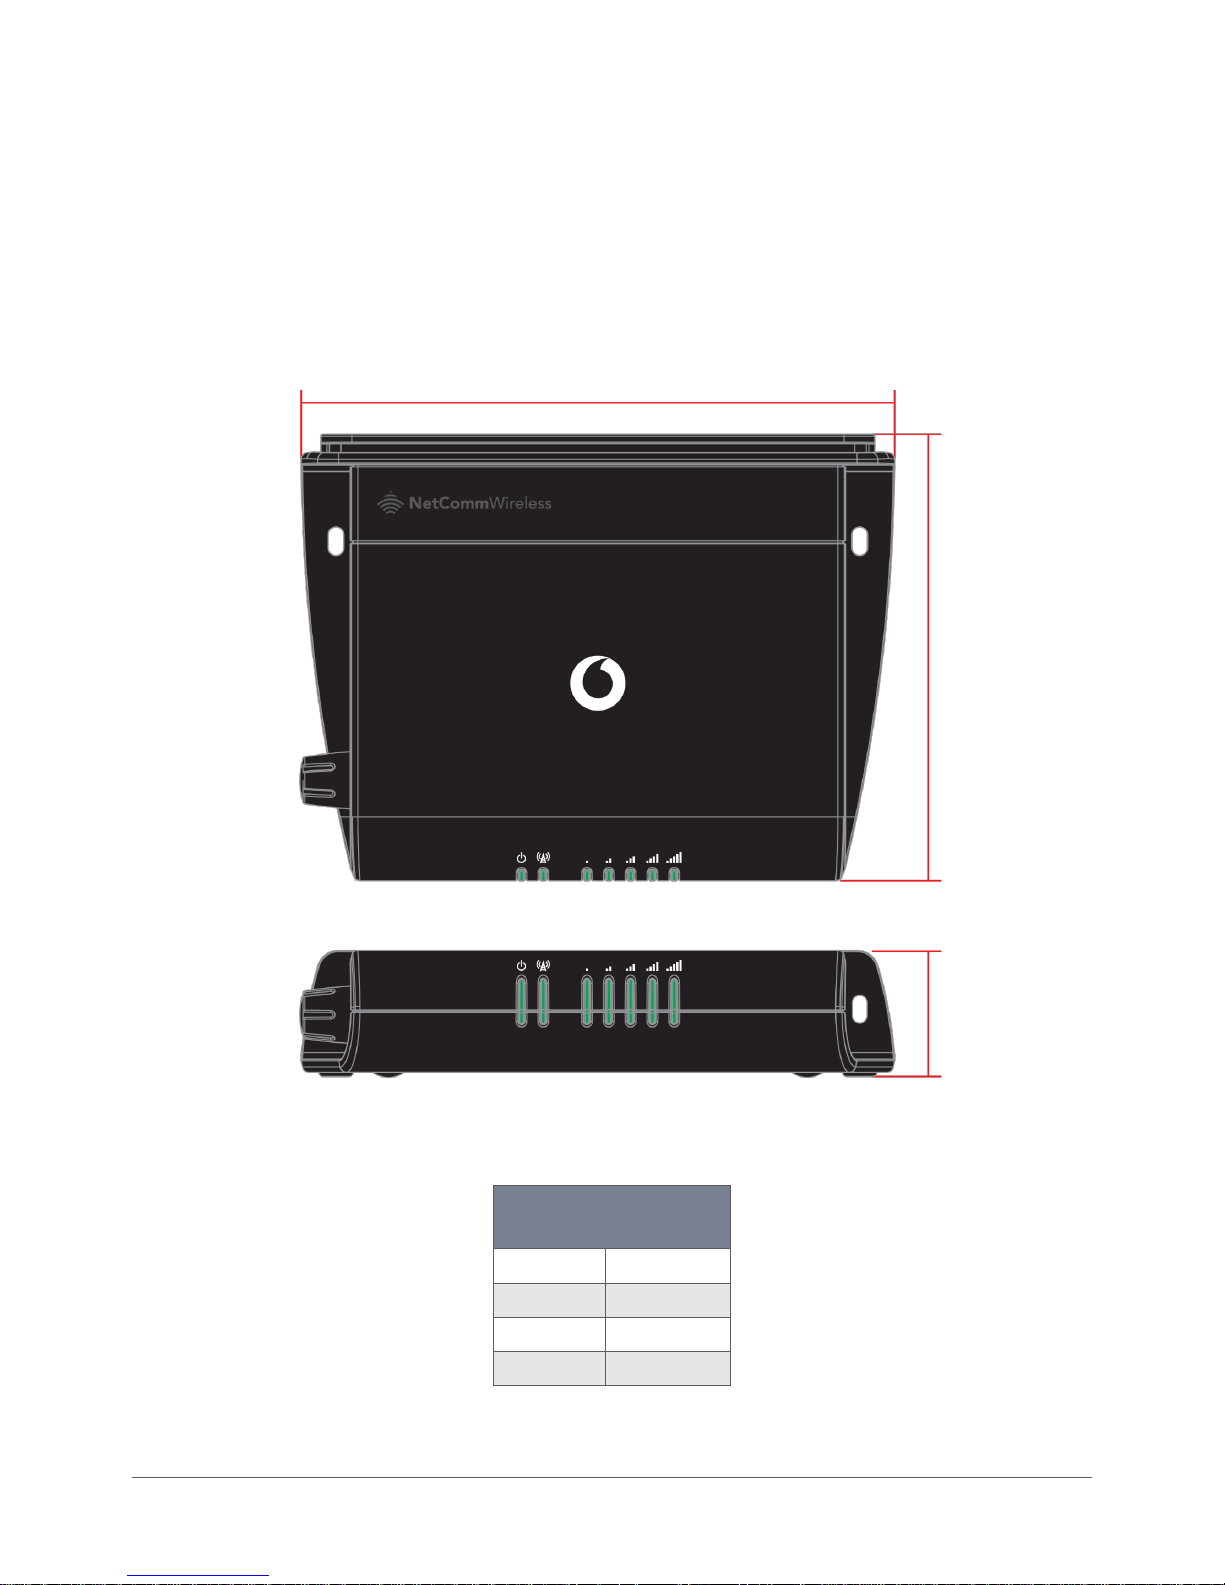
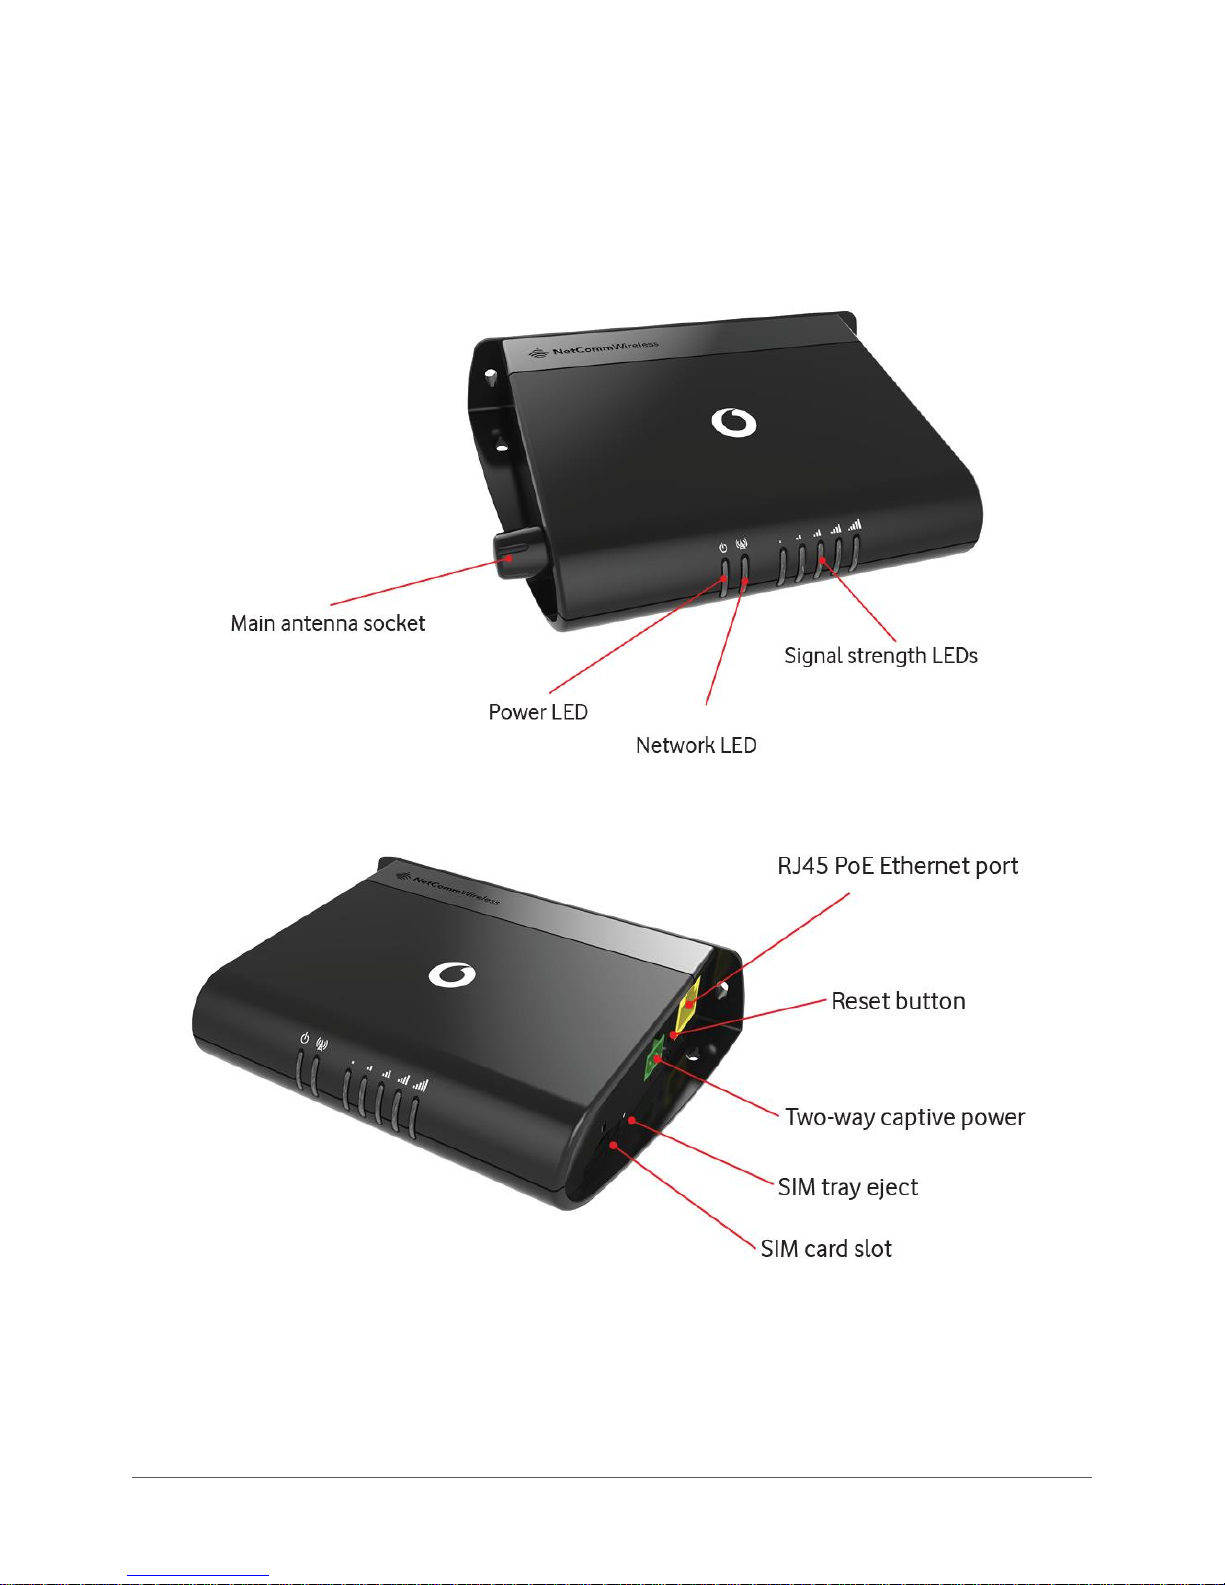
LED indicators
The Vodafone MachineLink 3G uses seven LEDs to display the current system and connection status.
Figure 2 - Vodafone MachineLink 3G LED Indicators
LED Icon
Name
Colour
State
Description
Power
Off
Power off
Double flash
Powering up
On
Power on
On
Power on in recovery mode
Slow flashing
Hardware error
Network
On
Connected via WWAN
Blinking1
Traffic via WWAN
Slow flashing
Connecting PDP
On
Registered network
Slow flashing
Registering network
Slow flashing
SIM PIN locked
Fast flashing
SIM PUK locked
On
Can’t connect
Signal strength
On
3G
On
2G GPRS
On
GSM only (no GPRS)
1
The term “blinking” means that the LED may pulse, with the intervals that the LED is on and off not being equal. The term “flashing” means that the LED
turns on and off at equal intervals.

Vodafone MachineLink 3G (NWL-10)
www.netcommwireless.com / m2m.vodafone.com
UM-00022 v2.2
12 of 203
Table 2 - LED Indicators
www.netcommwireless.com / m2m.vodafone.com
Vodafone MachineLink 3G (NWL-10)
UM-00022 v2.2
13 of 203
Signal strength LEDs
The following table lists the signal strength range corresponding with the number of lit signal strength LEDs.
Number of lit LEDs
Signal Strength
All LEDs unlit
< -109 dBm
1
-109 dBm to -102dBm
2
-101 dBm to -92 dBm
3
-91 dBm to -86 dBm
4
-85 dBm to -78 dBm
5
≥ -77 dBm
Table 3 - Signal strength LED descriptions
LED update interval
The signal strength LEDs update within a few seconds with a rolling average signal strength reading. When selecting a location for
the router or connecting or positioning an external antenna, please allow up to 20 seconds for the signal strength LEDs to update
before repositioning.
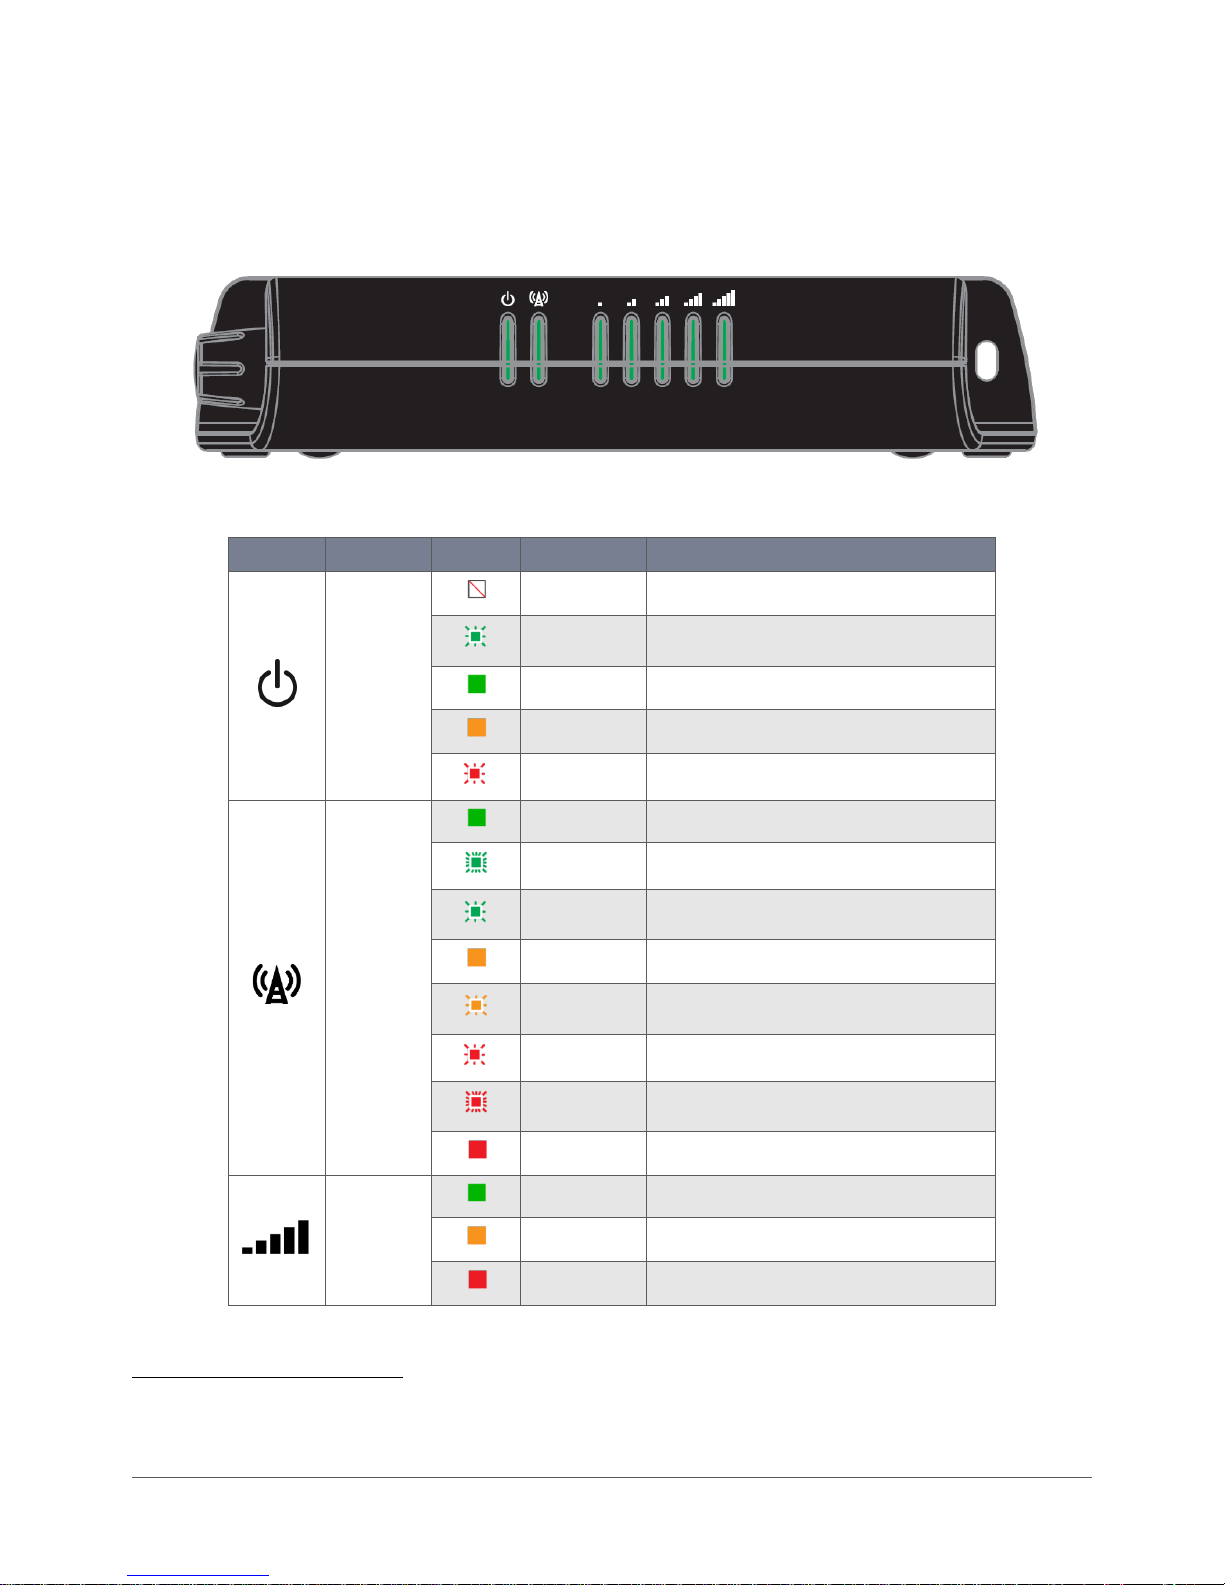
Ethernet port LED indicators
The Ethernet port of the Vodafone MachineLink 3G router has two LED indicators on it.
Figure 3 - Ethernet port LED indicators
The table below describes the statuses of each light and their meanings.
LED
Status
Description
Green
On
There is a valid network link.
Blinking
There is activity on the network link.
Off
No valid network link detected.
Amber
On
The Ethernet port is operating at a speed of 100Mbps.
Off
The Ethernet port is operating at a speed of 10Mbps or no Ethernet cable is connected.

Vodafone MachineLink 3G (NWL-10)
www.netcommwireless.com / m2m.vodafone.com
UM-00022 v2.2
14 of 203
Table 4 - Ethernet port LED indicators description
www.netcommwireless.com / m2m.vodafone.com
Vodafone MachineLink 3G (NWL-10)
UM-00022 v2.2
15 of 203
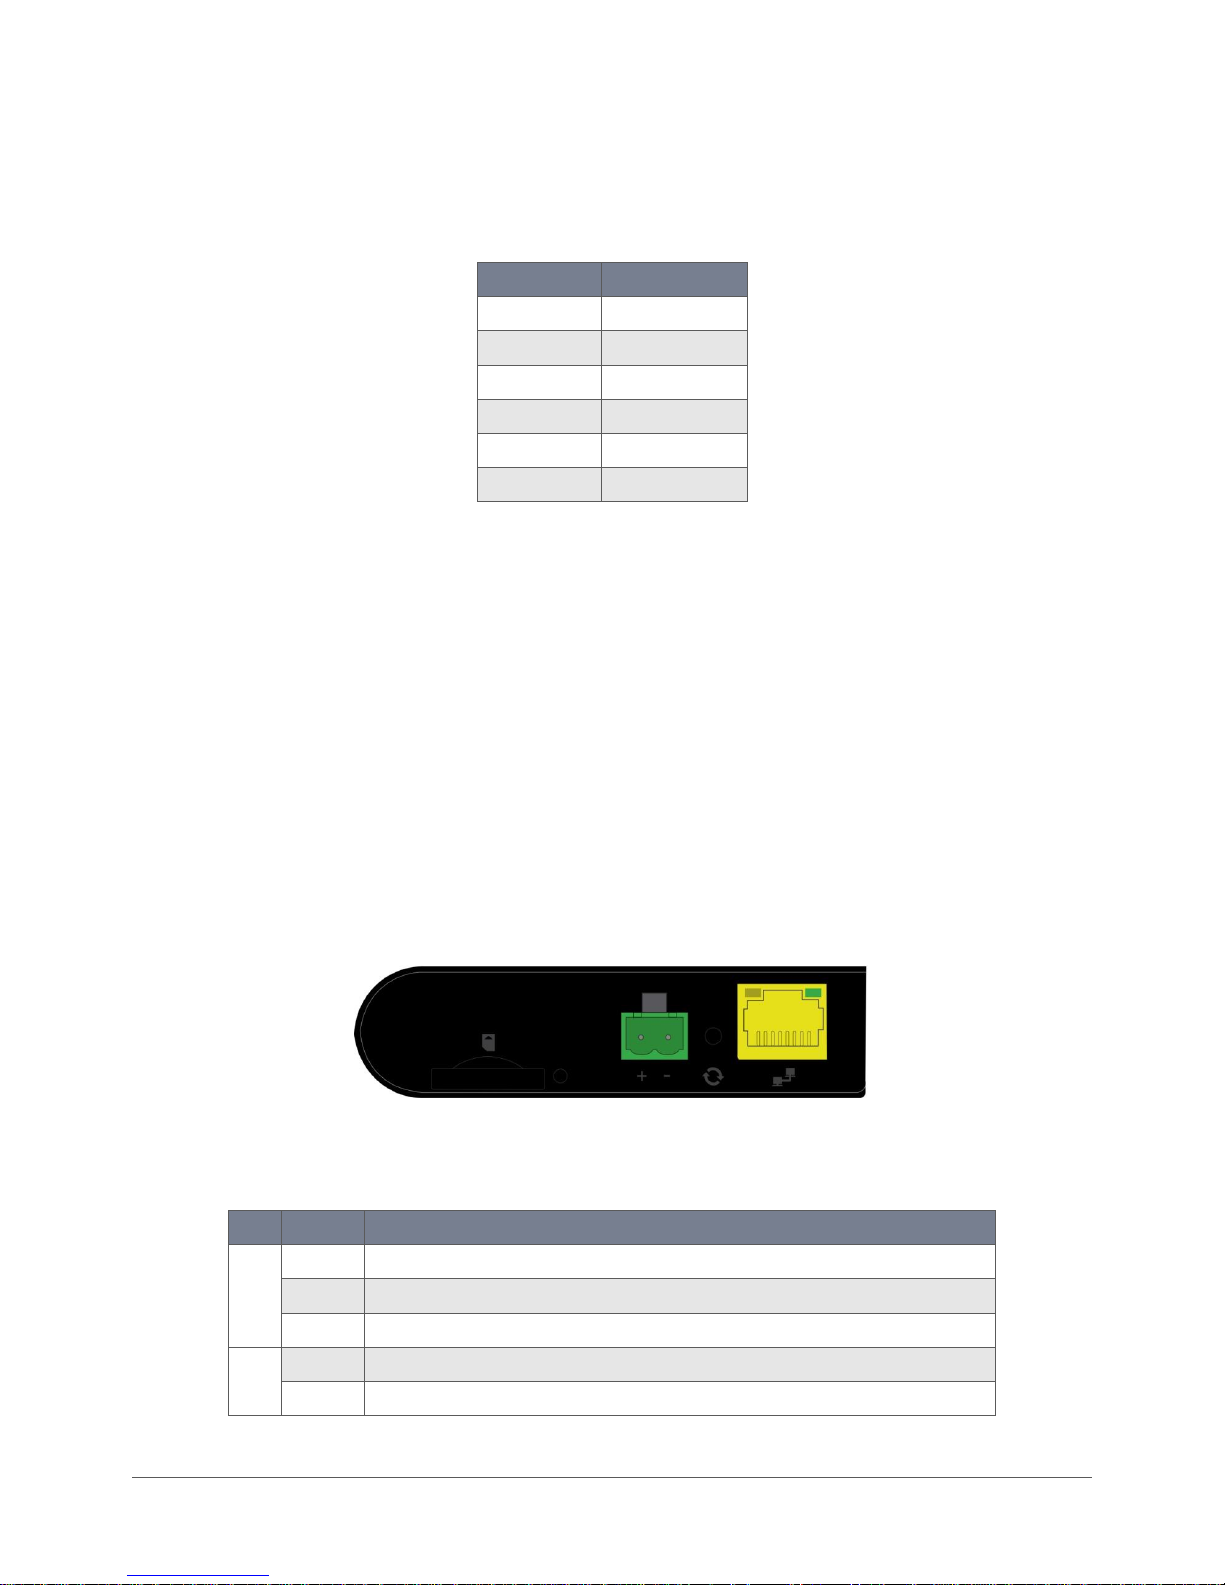
Interfaces
The following interfaces are available on the Vodafone MachineLink 3G:
Figure 4 - Interfaces
Vodafone MachineLink 3G (NWL-10)
www.netcommwireless.com / m2m.vodafone.com
UM-00022 v2.2
16 of 203
Item
Description
External main
antenna socket
SMA female connector for an optional external antenna (not supplied). The main internal antenna is disabled when an external
antenna is connected but the auxiliary antenna remains active to provide (where possible) diversity assistance.
Power LED
Indicates the power status of the device and whether the device is in recovery mode.
Network LED
Indicates the network and SIM status.
Signal strength
LEDs
Indicates the signal strength and network type.
RJ45 PoE Ethernet
port
Connect one or several devices via a network switch here. This port can also optionally receive Power over Ethernet (802.3af PoE) in
which case the DC power supply can serve as backup power source if required.
Reset button
Press and hold for less than 5 seconds to reboot to normal mode. The LEDs are green and extinguish in sequence to indicate that the
router will reboot normally if the button is released during this period.
Press and hold for 5 to 15 seconds to reboot to recovery mode. The LEDs are amber and extinguish in sequence to indicate that the
router will reboot to recovery mode if the button is released during this period.
Press and hold for 15 to 20 seconds to reset the router to factory default settings. The LEDs are red and extinguish in sequence to
indicate that the router will reset to factory default settings if the button is released during this period.
Two-way captive
power
Connect power source here. Power wires may be terminated on optional terminal block and connected to DC input jack. Operates in
the 8-35V DC range.
SIM tray eject
Insert a pencil or paper clip here to eject the SIM card tray.
SIM card slot
Insert SIM card here.
Table 5 - Interfaces

www.netcommwireless.com / m2m.vodafone.com
Vodafone MachineLink 3G (NWL-10)
UM-00022 v2.2
17 of 203
Placement of the MachineLink 3G
router
When selecting a location to mount the MachineLink 3G router, keep in mind that it houses two high performance internal
antennas designed to provide optimum signal strength in a wide range of environments. If you find the signal strength is weak, try
moving the router to a different place or mounting it differently. If signal strength doesn’t improve, you may need to attach an
external antenna (not included) to the router’s female SMA connector.
Note: If you connect an external antenna to the female SMA connector, the main internal antenna disables automatically but
the auxiliary internal antenna remains connected to provide (where possible) diversity assistance.
Note: When selecting a location for the router, allow at least 20 seconds for the signal strength LEDs to update before trying a
different location or connecting an external antenna.
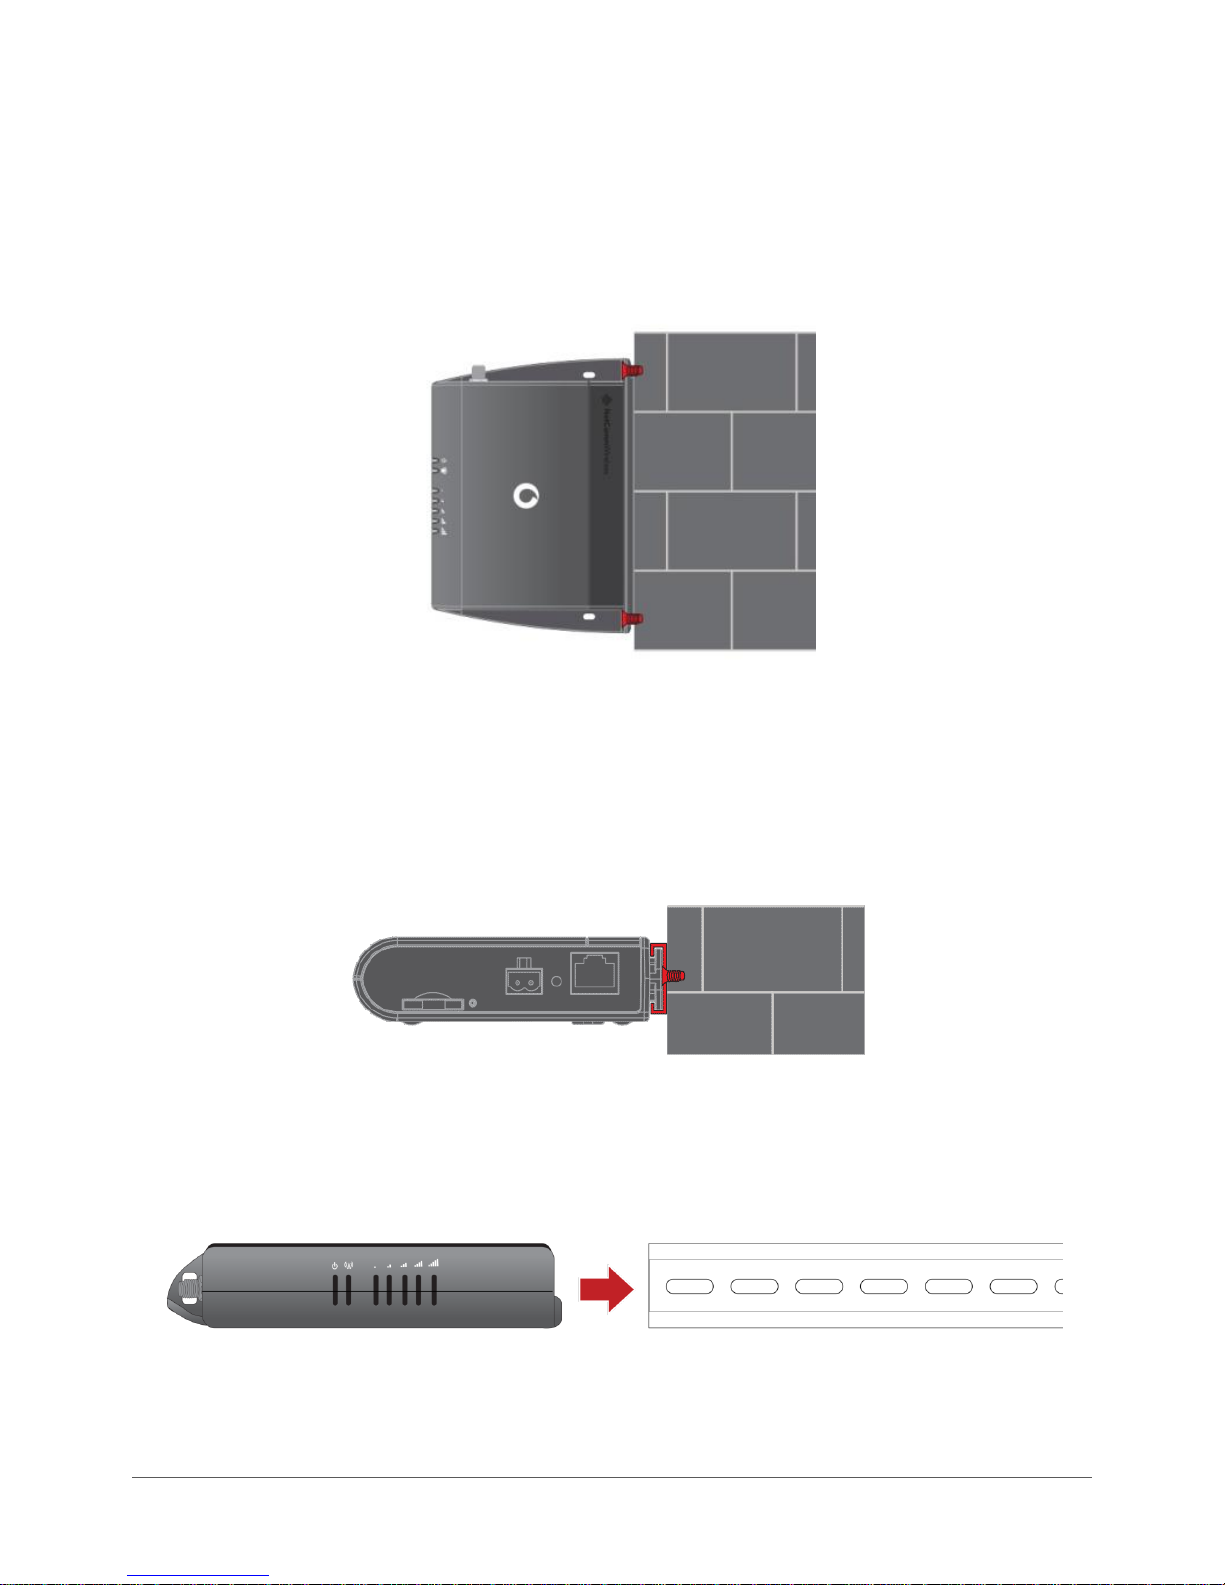
Mounting options
The Vodafone MachineLink 3G router can be quickly and easily mounted in a variety of locations.
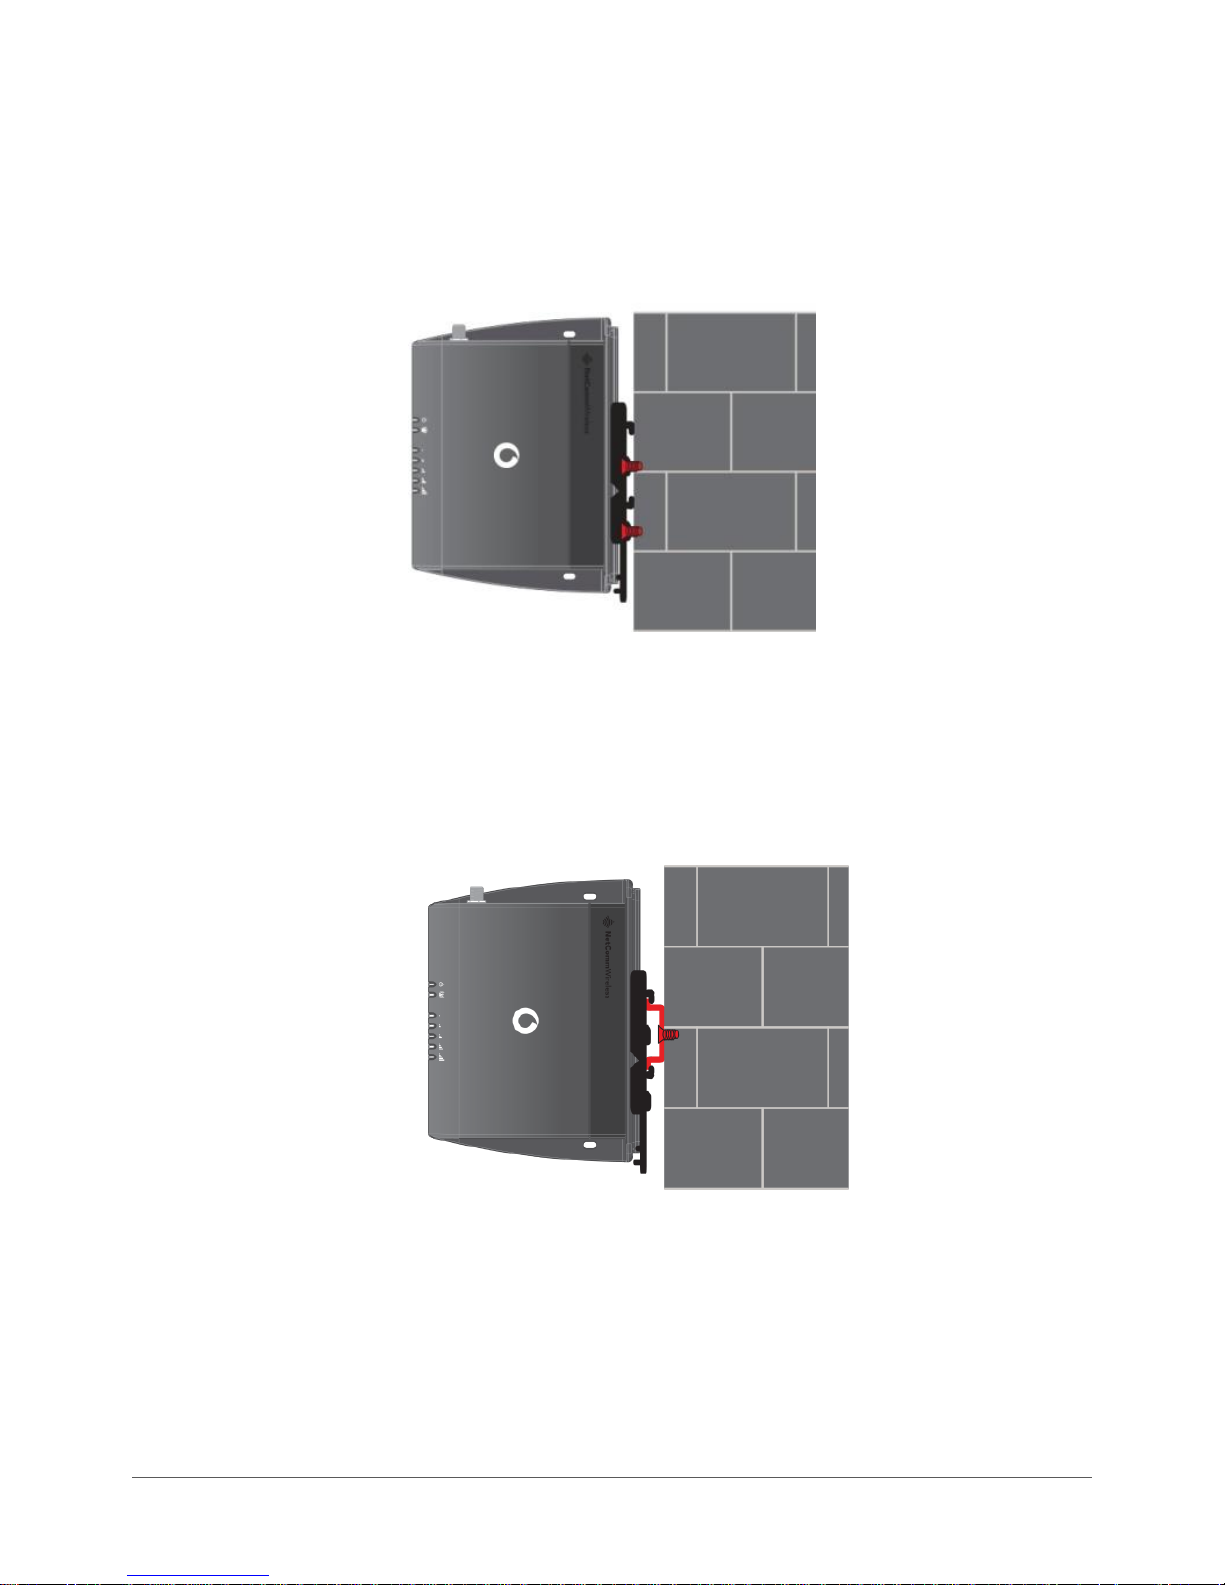
Mounted flat against the wall
When mounted flat against the wall, the MachineLink 3G router has a slimline form factor. Use appropriately sized screws in the
mounting holes provided on the base of the unit.
Figure 5 - Wall mount - Flat against the wall

Vodafone MachineLink 3G (NWL-10)
www.netcommwireless.com / m2m.vodafone.com
UM-00022 v2.2
18 of 203
www.netcommwireless.com / m2m.vodafone.com
Vodafone MachineLink 3G (NWL-10)
UM-00022 v2.2
19 of 203
Perpendicular to the wall
If a large surface area is not available, there is the option of mounting the router perpendicular to the wall. This gives the router a
small wall footprint while remaining securely attached. Use appropriately sized screws in the mounting holes provided on the back
of the unit.
Figure 6 - Wall mount - Perpendicular to the wall
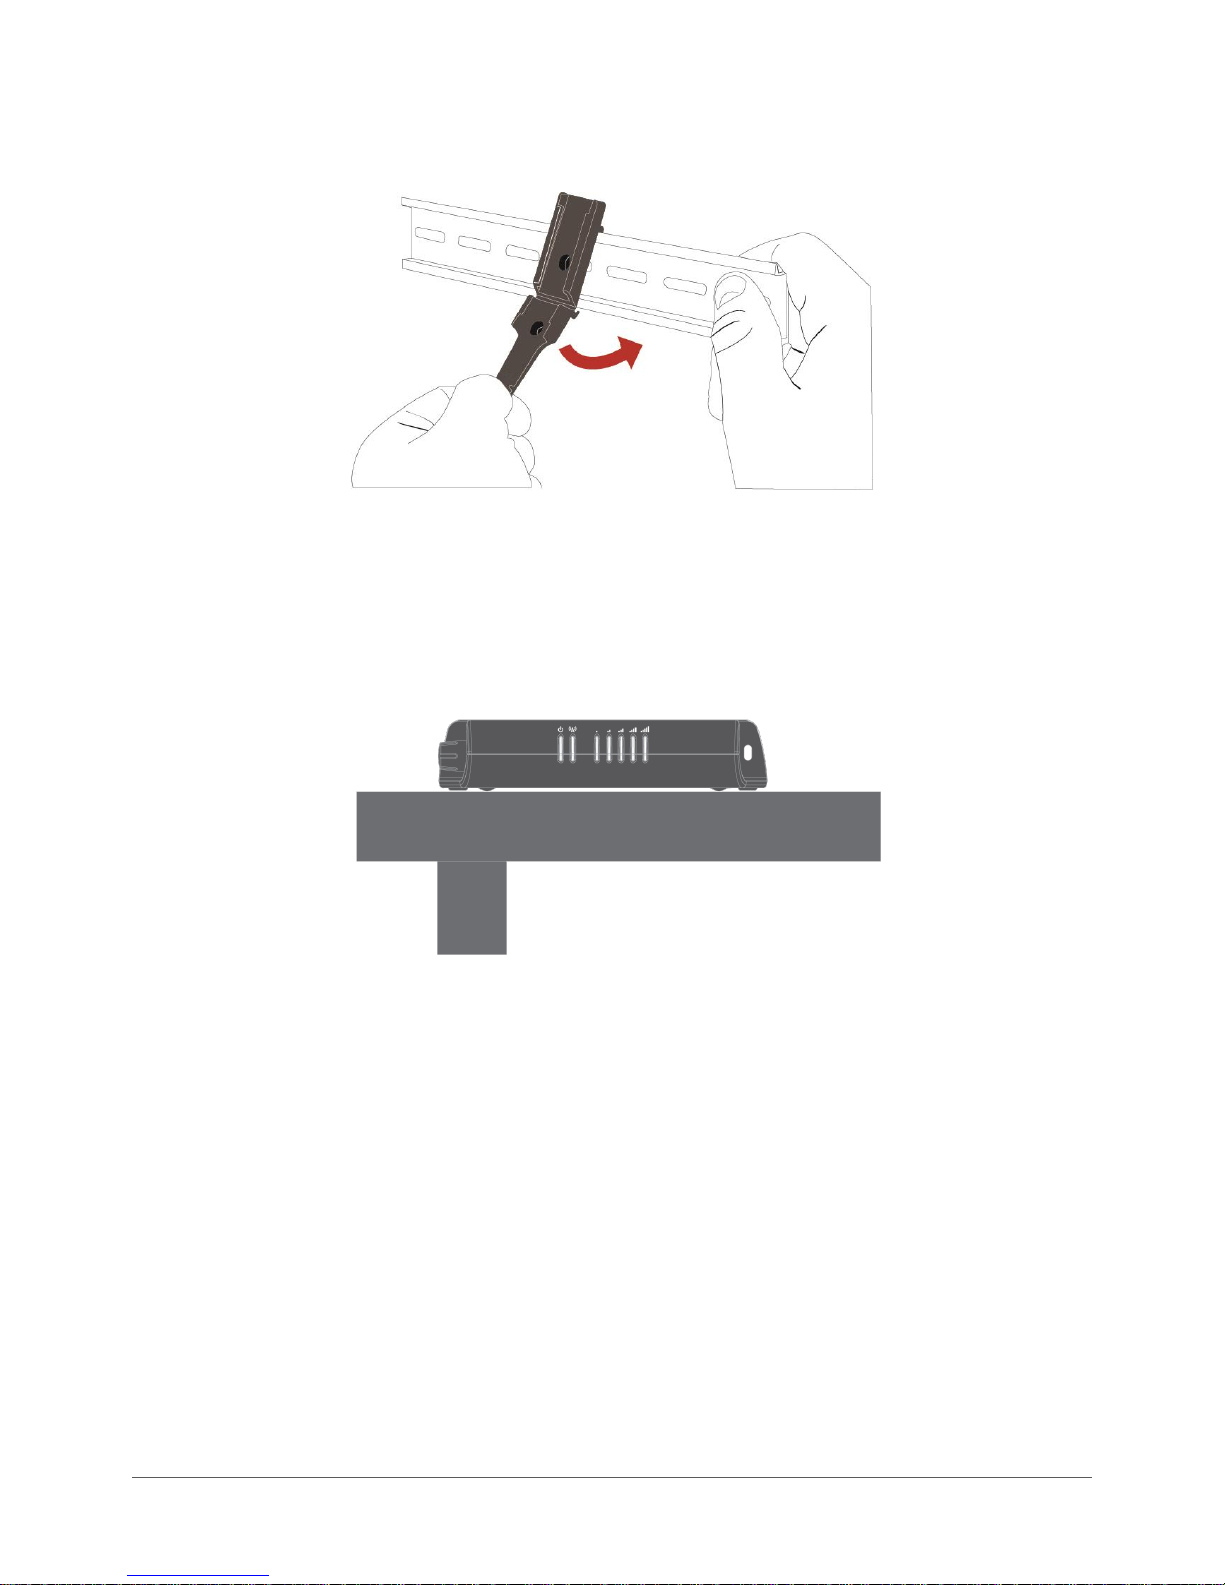
C Section DIN Rail mount
The Vodafone MachineLink 3G router easily slides onto a C Section DIN rail so that it is horizontally mounted. The DIN Rail mounting
bracket is not required for C Section DIN rail mounting.
Figure 7 - C Section DIN rail mount
To mount the unit on a C-Section DIN rail, slide it on as illustrated below:
Figure 8 - Mounting the unit on a DIN rail

Vodafone MachineLink 3G (NWL-10)
www.netcommwireless.com / m2m.vodafone.com
UM-00022 v2.2
20 of 203
www.netcommwireless.com / m2m.vodafone.com
Vodafone MachineLink 3G (NWL-10)
UM-00022 v2.2
21 of 203
Mounting bracket
The provided mounting bracket provides additional methods of mounting the Vodafone MachineLink 3G Router.
To attach the mounting bracket, slide it onto the rear of the router as shown in the diagram below:
Figure 9 - Sliding on the mounting bracket
To remove the bracket, press the PUSH button and slide the router off the bracket:
Figure 10 - Removing the mounting bracket
Vodafone MachineLink 3G (NWL-10)
www.netcommwireless.com / m2m.vodafone.com
UM-00022 v2.2
22 of 203
Using the mounting bracket for wall mounting
By first attaching the DIN rail bracket to the wall, the Vodafone MachineLink 3G can be easily attached and removed from the
bracket.
Figure 11 – Wall mount - Mounted via DIN rail bracket
Using the mounting bracket for Top hat DIN rail mounting
The Vodafone MachineLink 3G Router may be vertically mounted to the wall with the bracket by sliding the bracket onto a top hat
DIN rail.
Figure 12 - Top hat DIN rail mount
www.netcommwireless.com / m2m.vodafone.com
Vodafone MachineLink 3G (NWL-10)
UM-00022 v2.2
23 of 203
Alternatively, you can attach it to the DIN Rail by using the V bend in the bracket as illustrated below:
Figure 13 - Attaching the mounting bracket to the DIN rail using the V bend
Desk mount
In situations where wall mounts and DIN rails are not required, you can simply place the MachineLink 3G router on a desk using its
rubber feet to prevent it from slipping.
Figure 14 - Desk mount

Vodafone MachineLink 3G (NWL-10)
www.netcommwireless.com / m2m.vodafone.com
UM-00022 v2.2
24 of 203
Installation and configuration of the
Vodafone MachineLink 3G
Powering the router
The MachineLink 3G Router can be powered in one of three ways:
1 Power over Ethernet (802.3af PoE)
2 DC power input via 2-pin connector (8-35V DC)
3 DC power input via field terminated power source (8-35V DC)
The green power LED on the router lights up when a power source is connected.
Power over Ethernet (802.3af PoE)
Power over Ethernet (PoE) is a method of connecting network devices through Ethernet cable where power and data are passed
along a single cable. This may be a desirable method of powering the device if PoE is available, or if it’s most convenient in the
desired installation environment to only have a single cable running to the MachineLink 3G device.
There are 5 power classes defined in the IEEE 802.3-2005 standard, of which the Vodafone MachineLink 3G is a class 3 device.
Class
Classification current
Power range
Class description
3
26-30 mA
6.49 – 12.95 W
Mid power
Table 6 - PoE power classes
To use PoE to power the MachineLink 3G, simply connect your router to a PoE injector or PoE network switch using the bundled
yellow Ethernet cable 8P8C.
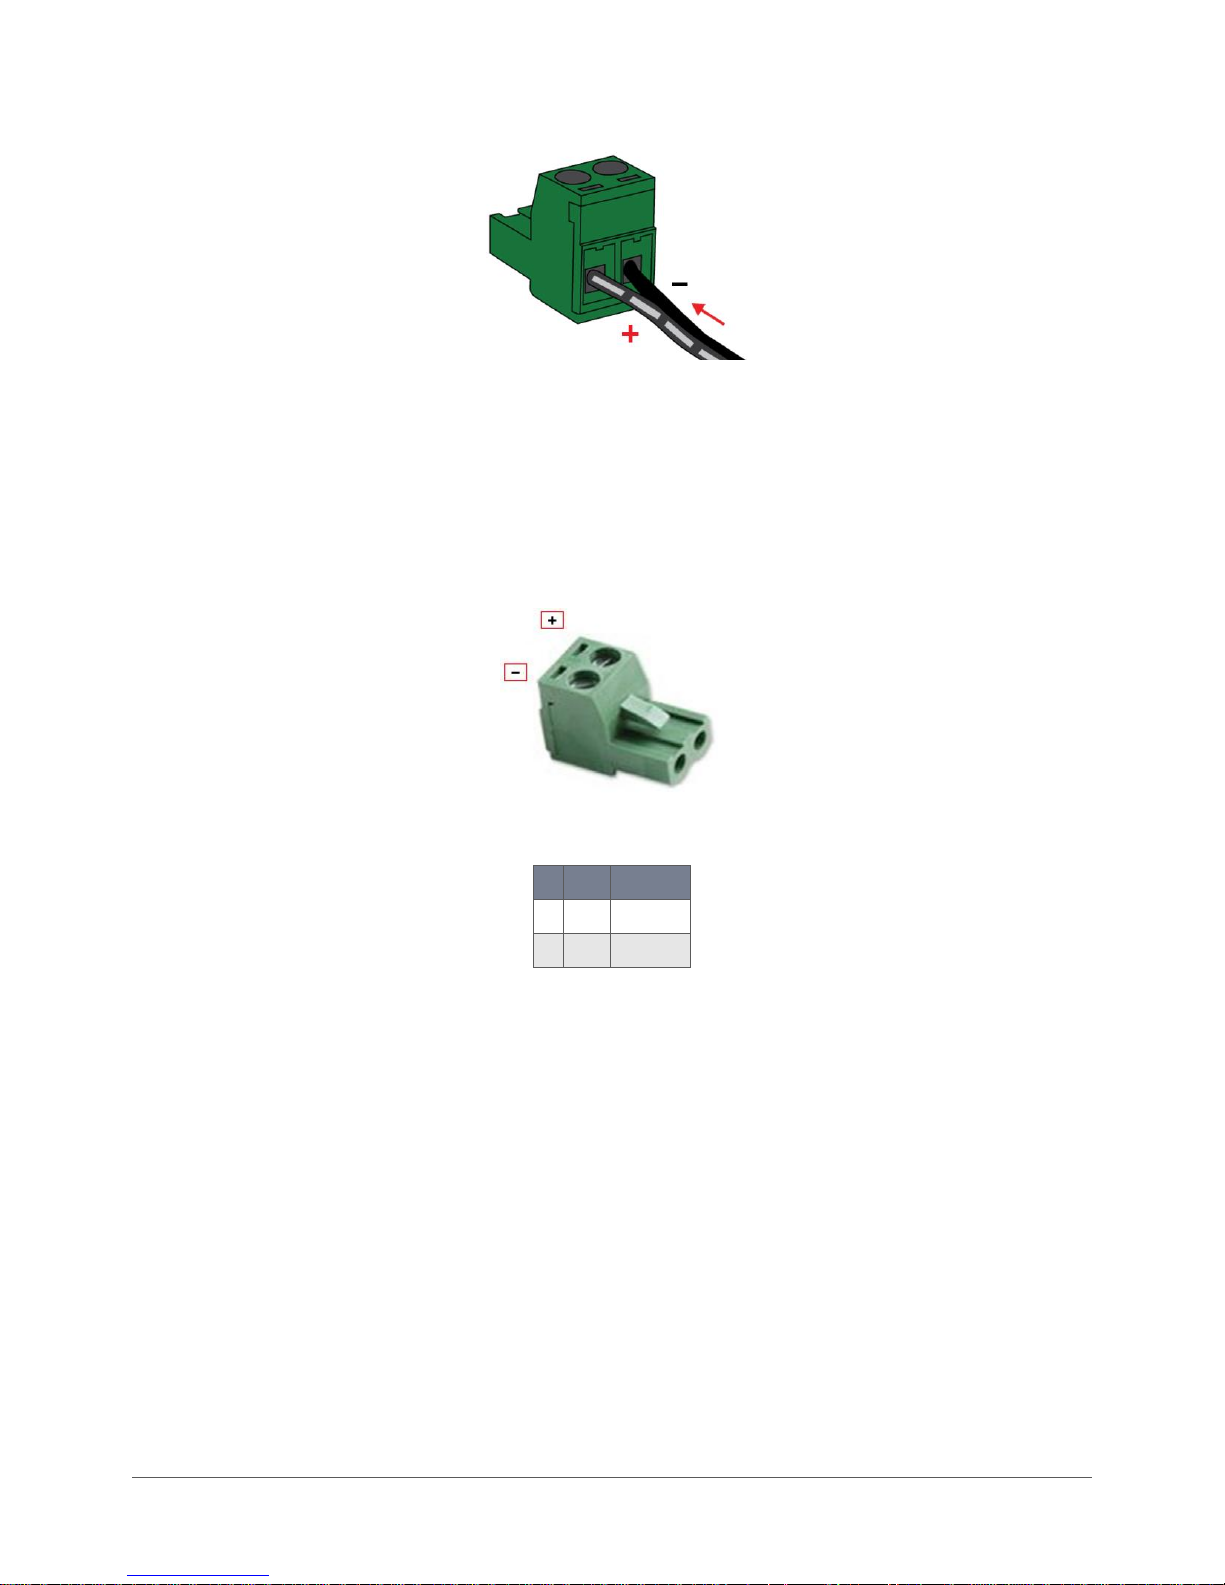
DC power via 2-pin connector
The positive and ground terminals on the 2-pin connector can accept power from a separately sold DC power supply. Both a
standard temperature range DC power supply and an extended temperature range DC power supply are available to purchase as
accessories.
If you have purchased an optional DC power supply, first remove the terminal block from the connector. The terminal block
connector uses rising cage clamps to secure the wires and ships with the cages lowered and ready for wire insertion. Inspect the
cage clamps and use a flathead screwdriver to lower the cage clamps if they have moved during transportation. Insert the wires into
the terminal block as shown below, noting the polarity of the wires, then use a flathead screwdriver to raise the cage clamp to
secure the wires in the terminal block. Insert the wired terminal block into the terminal block connector of the router and then
connect the adapter to a wall socket.
www.netcommwireless.com / m2m.vodafone.com
Vodafone MachineLink 3G (NWL-10)
UM-00022 v2.2
25 of 203
Figure 15 - Terminal block wiring diagram
DC power via field terminated power source
If an existing 8-35V DC power supply is available, you can insert the wires into the supplied terminal block to power your router. Use
a No. 3 flathead screwdriver to tighten the terminal block screws and secure the power wires, making sure the polarity of the wires
are correctly matched, as illustrated below.
Figure 16 - Locking Power Terminal Block
Pin
Signal
Description
+
V+
Voltage +
-
V-
Ground
Table 7 - Locking power block pin outs
Failover power support
The MachineLink 3G Router includes support for connection of two power sources at the same time. When a PoE Ethernet cable is
connected and DC power is also supplied to the DC input jack of the router, the router will source power exclusively from the PoE
source. In the event that power from the PoE cable is lost, the router will automatically switch to source power from the DC input
jack, without affecting the router’s operation. When PoE power is restored, the router automatically switches back to receive power
from the PoE input source.
Viewing power source information
You can view the current power input mode in the Advanced status section of the device’s Web user interface. This is useful for
remotely monitoring the device. You can also use the Software Development Kit to access this information for advanced purposes
(e.g. configuring SMS alerts to inform you of the power status of the router).
Vodafone MachineLink 3G (NWL-10)
www.netcommwireless.com / m2m.vodafone.com
UM-00022 v2.2
26 of 203
To view the router’s power source information, log in to the router and expand the Advanced status box on the status page. See
the Status section of this manual for more information on the status page.
Power consumption
To assist with power consumption planning, the following table summarises average power consumption during the various states
of the MachineLink 3G under normal usage conditions. It’s important to note that this table serves as an indication only as the
power consumed by the device is affected by many variables including signal strength, network type, and network activity.
Average power consumption figures
State
Power consumption
Powered on, idle and connected to packet data
1.2W
Powered on, connected to packet data with average load
2.0W
Powered on, connected to packet data with heavy traffic
4.0W
Peak power draw at maximum 3G module transmission power
5.0W
Table 8 - Average power consumption figures
Installing the router
After you have mounted the router and connected a power source, follow these steps to complete the installation process.
1 Connect equipment that requires network access to the Ethernet port of your router. This may be your computer for
advanced configuration purposes, or your end equipment which requires data access via the MachineLink 3G. You can
connect one device directly, or several devices using a network switch. If you’re using PoE as the power source, you need to
connect any devices via an available data Ethernet port on your PoE power source (be it a PoE network switch or PoE power
injector).
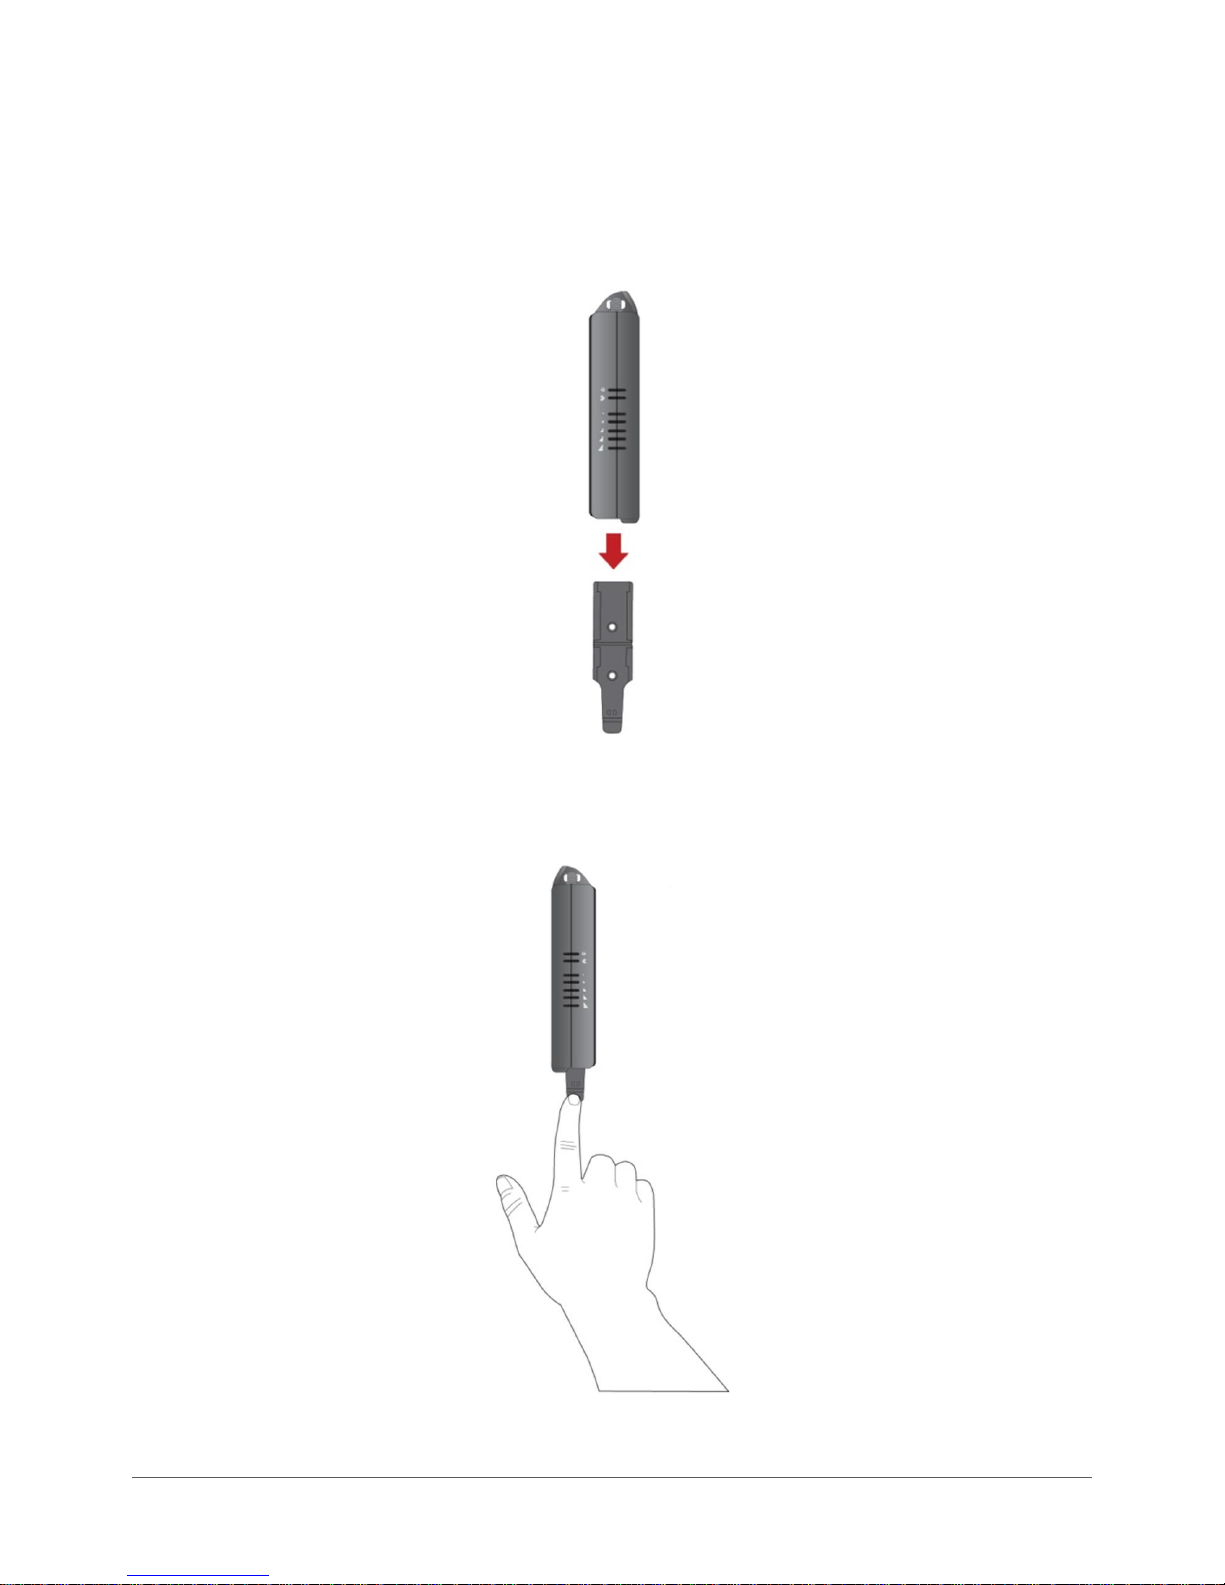
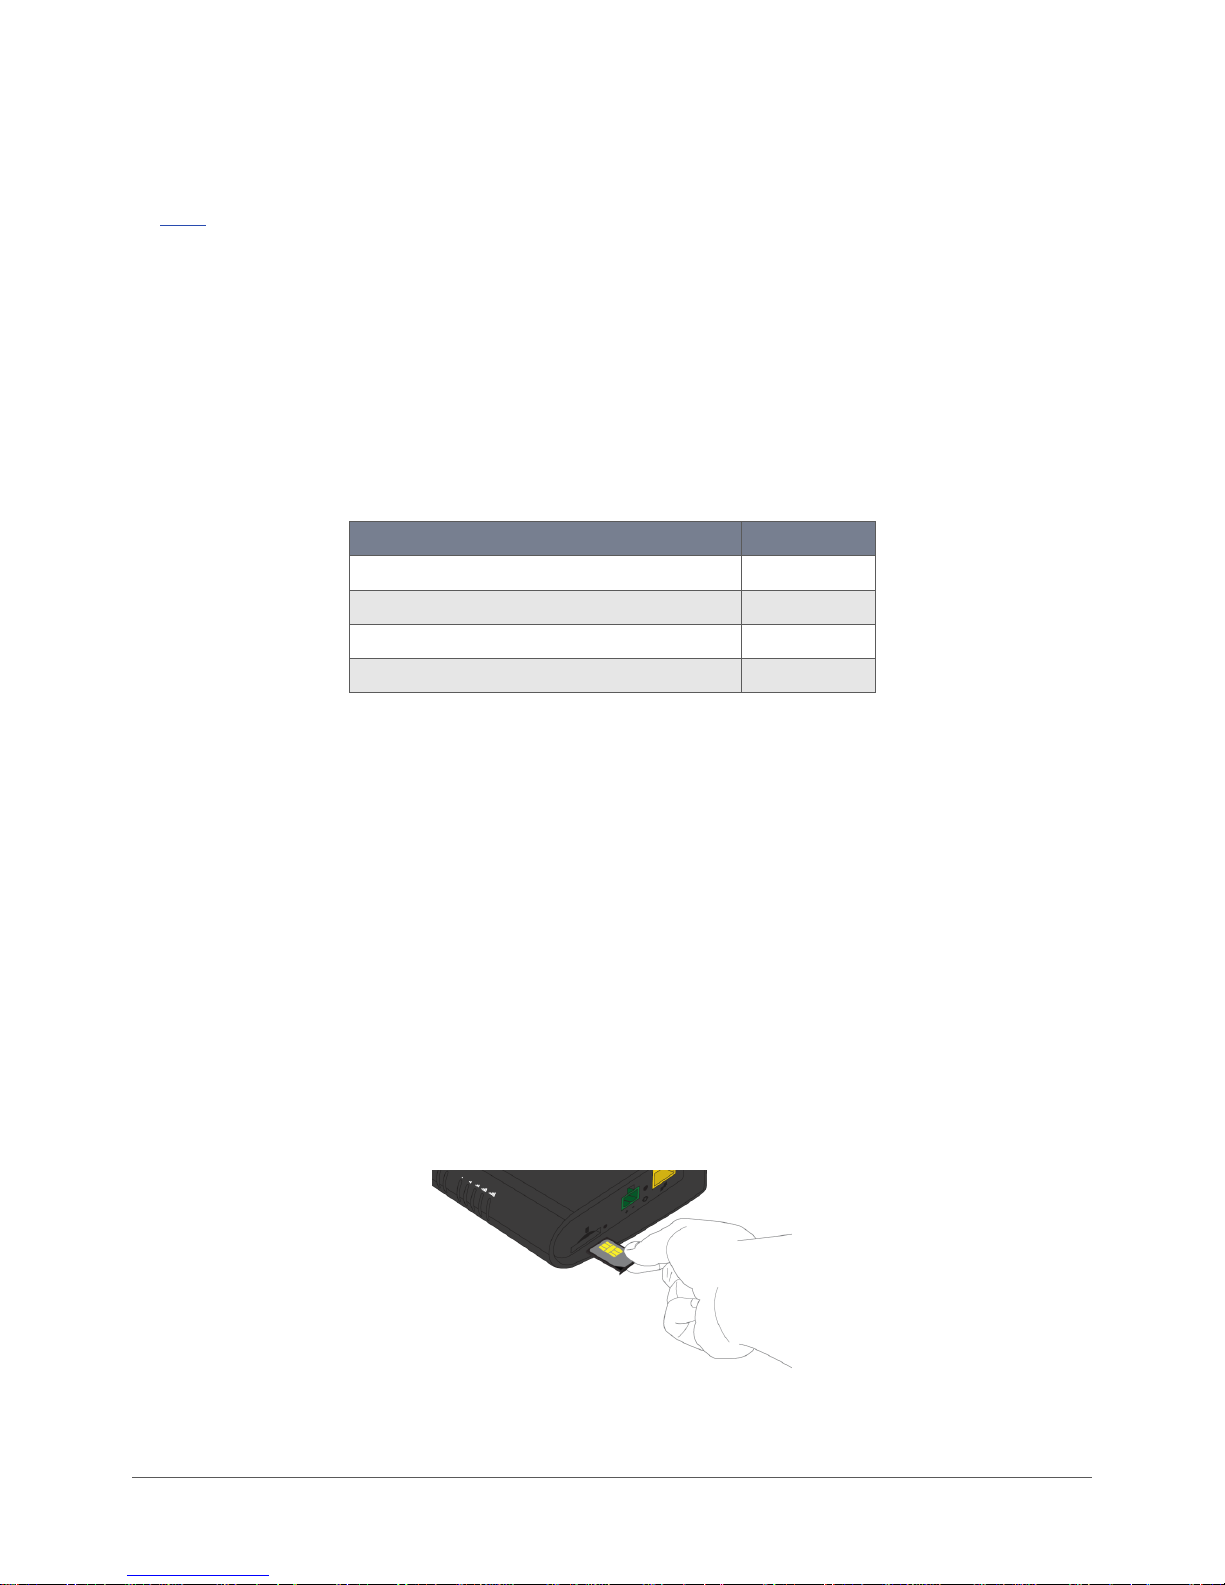
2 If your router does not come with a SIM pre-installed, insert a SIM card into the SIM card slot by pressing the SIM Eject
button to eject the SIM card tray. Place the SIM card in the tray and then insert the loaded tray into the SIM slot with the
gold side facing up, as shown below.
Figure 17 – Inserting the SIM card

www.netcommwireless.com / m2m.vodafone.com
Vodafone MachineLink 3G (NWL-10)
UM-00022 v2.2
27 of 203
3 Ensure the external power source is switched on and wait 2 minutes for your Vodafone MachineLink 3G to start up and
connect to the mobile network. Your router arrives with preconfigured settings that should suit most customers. Your router
is now connected. To check the status of your router, compare the LED indicators on the device with those listed in the LED
indicators table.
Vodafone MachineLink 3G (NWL-10)
www.netcommwireless.com / m2m.vodafone.com
UM-00022 v2.2
28 of 203
Advanced configuration
The Vodafone MachineLink 3G Router comes with preconfigured settings that should suit most customers. For advanced
configuration, login to the web-based user interface of the router.
To log in to the web-based user interface:
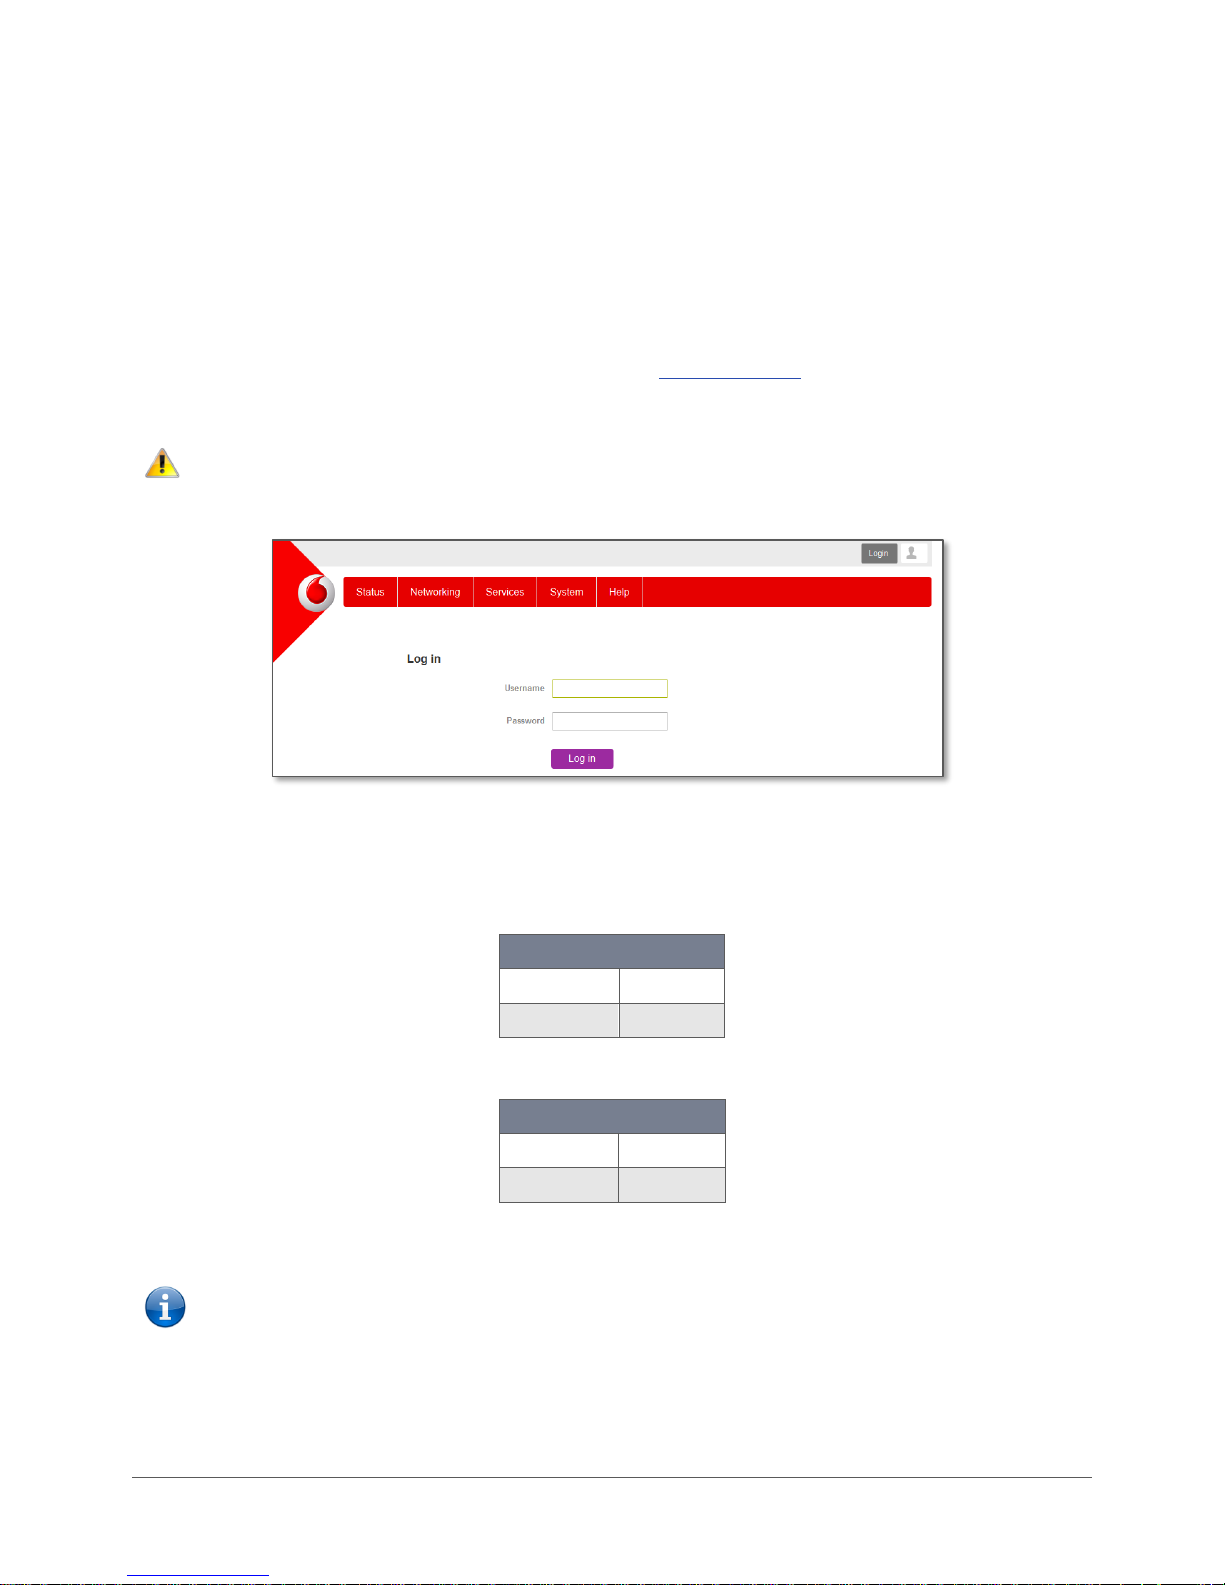
1 Open a web browser (e.g. Internet Explorer, Firefox, Safari), type https://192.168.1.1 into the address bar and press Enter.
The web-based user interface login screen is displayed.
Note – The HTTP protocol is disabled by default, secure HTTP (HTTPS) is the default protocol.
HTTP access is available, but must be manually enabled.
Figure 18 – Log in prompt for the web-based user interface
2 Enter the login username and password. If this is the first time you are logging in or you have not previously configured the
password for the “root” or “user” accounts, you can use one of the default account details to log in.
Root manager account
Username
root
Password
admin
Table 9 - Management account login details – Root manager account
User account
Username
user
Password
admin
Table 10 - Management account login details –User account
Note – The user account allows you to manage all settings of the router except functions such as firmware upgrade, device
configuration backup and restore and reset to factory default settings, which are privileged only to the root manager account.
For security reasons, we highly recommend that you change the passwords for the root and user accounts upon initial installation.
You can do so by navigating to the System and then Administration page.
Whenever the root account logs in with the default password, the Administration page is displayed.

www.netcommwireless.com / m2m.vodafone.com
Vodafone MachineLink 3G (NWL-10)
UM-00022 v2.2
29 of 203
Vodafone MachineLink 3G (NWL-10)
www.netcommwireless.com / m2m.vodafone.com
UM-00022 v2.2
30 of 203
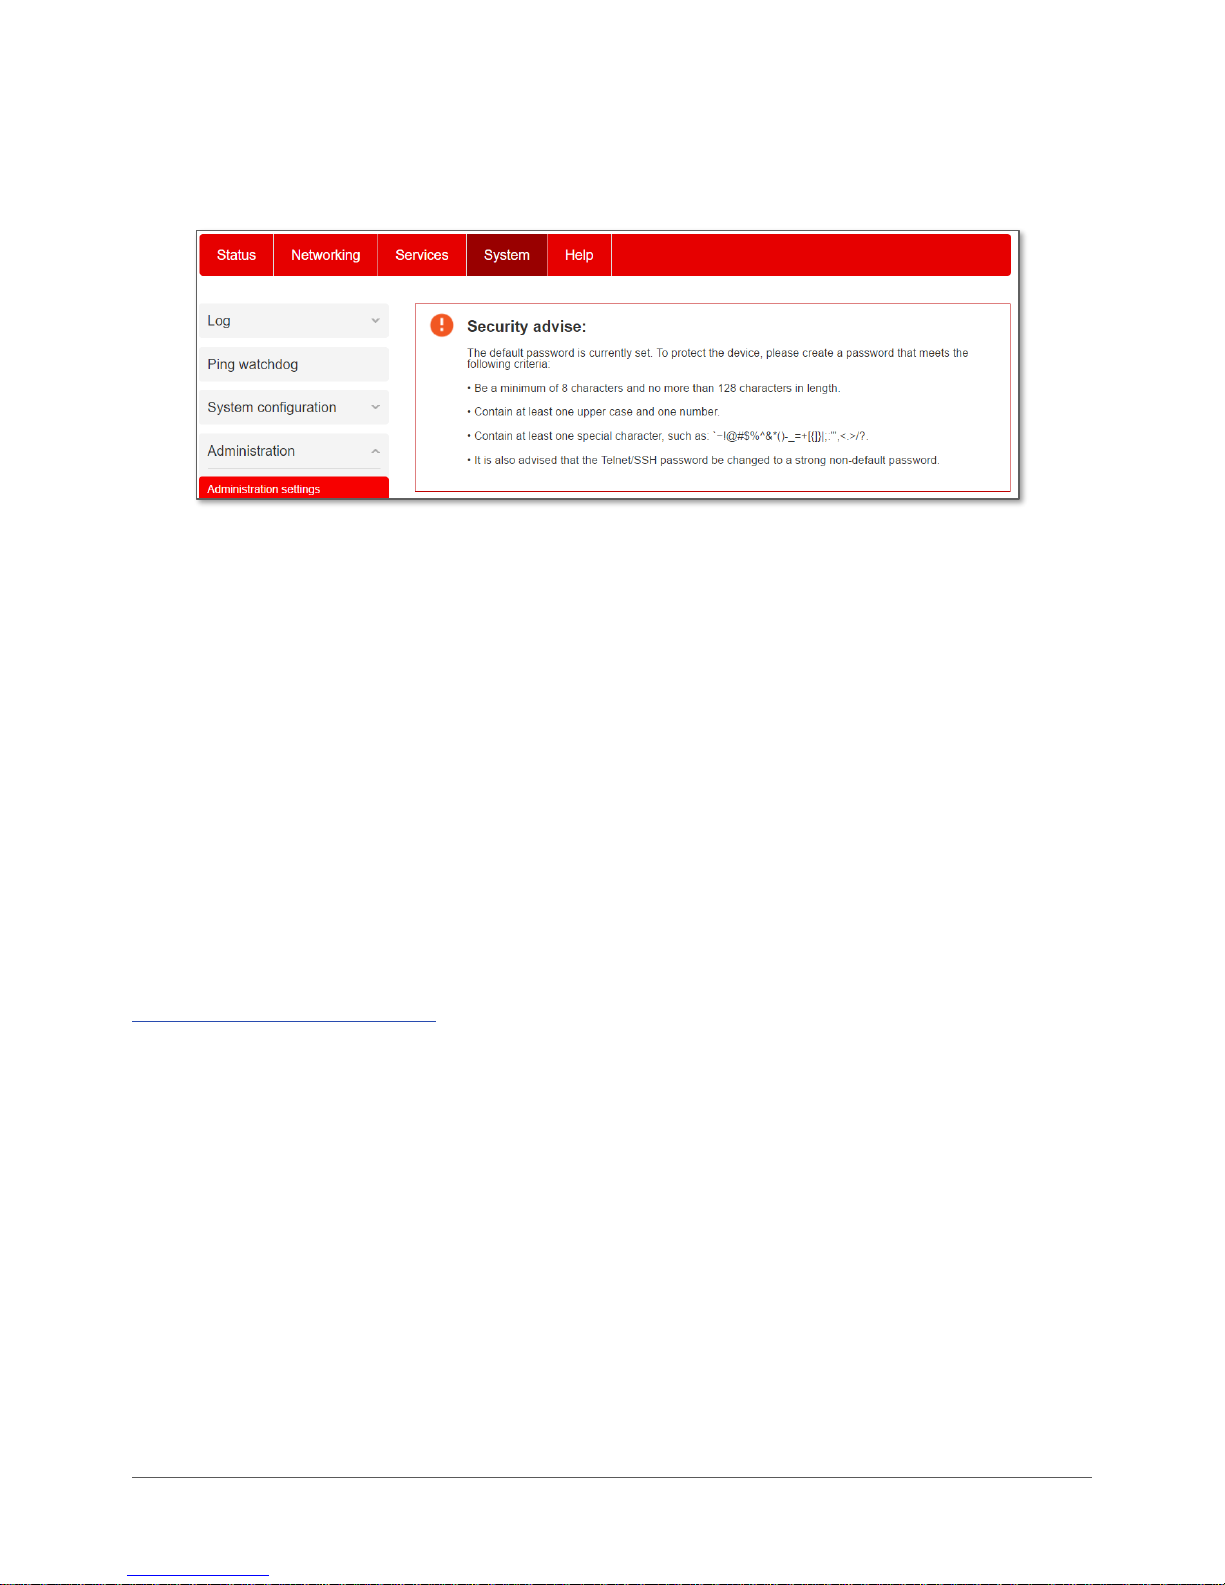
If the router is configured with the default password, each time that you log in to the web user interface, you are re-directed to the
Administration settings page to set a secure password for the root account.
Figure 19 – Security advise at log in.
It is mandatory that a strong password be configured to use certain features of the router, such as Administration settings, IPSec
VPN Pre-shared key and SMS Diagnostics. In any case, we highly recommend that you change the default password as soon as
possible. After changing the default password, the Status page is displayed when you log in. See the next section for notes on
setting a strong password.
Configuring a strong password
The root manager account, IPSec VPN Pre-shared key and SMS white list passwords must now meet the following criteria:
• Be a minimum of eight characters and no more than 128 characters in length.
• Contain at least one upper case, one lower case character and one number.
• Contain at least one special character, such as: ` ~ ! @ # $ % ^ & * ( ) - _ = + [ { ] } \ | ; : ' " , < > / ?
The password requirements for the SMS Diagnostics feature differ slightly due to the smaller supported character set. Refer to the
White list for diagnostic or execution SMS section for more information.
Additionally, the password must also satisfy an algorithm which analyses the characters as you type them, searching for commonly
used patterns, passwords, names and surnames according to US census data, popular English words from Wikipedia and US
television and movies and other common patterns such as dates, repeated characters (aaa), sequences (abcd), keyboard patterns
(qwertyuiop) and substitution of numbers for letters.
 Loading...