

Page 1

VMware vFabric Data Director
Administrator and User Guide
vFabric Data Director 1.0
This document supports the version of each product listed and
supports all subsequent versions until the document is replaced
by a new edition. To check for more recent editions of this
document, see http://www.vmware.com/support/pubs.
EN-000709-01
Page 2

VMware vFabric Data Director Administrator and User Guide
You can find the most up-to-date technical documentation on the VMware Web site at:
http://www.vmware.com/support/
The VMware Web site also provides the latest product updates.
If you have comments about this documentation, submit your feedback to:
docfeedback@vmware.com
Copyright © 2012 VMware, Inc. All rights reserved. This product is protected by U.S. and international copyright and intellectual
property laws. VMware products are covered by one or more patents listed at http://www.vmware.com/go/patents.
VMware is a registered trademark or trademark of VMware, Inc. in the United States and/or other jurisdictions. All other marks
and names mentioned herein may be trademarks of their respective companies.
VMware, Inc.
3401 Hillview Ave.
Palo Alto, CA 94304
www.vmware.com
2 VMware, Inc.
Page 3

Contents
About VMware vFabric Data Director 7
Updated Information 9
VMware vFabric Data Director and vFabric Postgres Overview 11
1
VMware vFabric Data Director System Architecture 11
VMware vFabric Data Director Components 11
Data Director User Management Modes 12
About Data Director Administration 13
vFabric Postgres Databases 14
Managing Data Director Resources 15
2
Resource Management Overview 15
Resource Bundles and Resource Pools 16
Resource Assignment 17
vSphere Resource Pools and Data Director 18
Viewing Resource Information 19
Monitor Resource Usage 20
Create a Resource Pool 20
Create a Resource Bundle 21
Assign a Resource Bundle to an Organization 22
Perform Advanced Cluster Configuration 22
Managing Users and Roles 25
3
User Management Overview 25
Authenticating Users 26
Role-Based Access Control 27
Predefined Roles 28
Privileges 29
Propagation of Permissions and Roles 30
Organization Privileges and Permissions 30
Add Users to Your Organization 31
Add Roles to an Organization 31
Grant a Permission to a User 32
Modify Organization Security Settings 32
VMware, Inc.
Managing Organizations 35
4
Organization Structure 35
Operating Organizations 36
Managing Resources For Organizations 37
Managing Organization Users 38
3
Page 4

VMware vFabric Data Director Administrator and User Guide
Create an Organization 38
Managing Database Groups 41
5
Database Group Management Overview 41
Managing Resources for Database Groups 42
Database Groups and Security 43
Create a Database Group 43
Managing Database Templates 45
6
Introduction to Database Templates 45
Create a Database Configuration Template 46
Modify a Database Configuration Template 47
Create a Backup Template 48
Modify a Backup Template 49
Managing Databases 51
7
Database Lifecycle 51
Requirements for Creating Databases 52
Create a Database 53
Using Tags 54
Cloning Databases 57
8
Clone Types 57
Cloning Customizations 59
Clone a Database 59
Managing Database Entities 65
9
Database Entity Management 66
Database Administration 70
SQL Management 75
Safeguarding Data 77
10
Backup Strategies 78
Backup Types 78
Backup Template Settings 80
Preconfigured Backup Templates 81
Select a Database Backup Template 81
Schedule Regular Database Backups 82
Recover a Database 83
Import Backups 84
Use VMware Data Recovery for Backups 84
Database End of Life and Backups 87
Monitoring the Data Director Environment 89
11
Explore Monitoring Customization and Filtering 89
Monitoring for System Administrators 90
Monitoring for Organization Administrators 95
Explore Database Monitoring 99
4 VMware, Inc.
Page 5

Working with Alarms 100
Contents
Managing Licenses 103
12
License Management Overview 103
Counting Data Director Licenses 104
About Evaluation Licenses 105
Add License Keys 105
View License Information 106
Change the Database Usage Type 106
Remove License Keys 107
Reconfiguring Data Director Networks 109
13
Change the vCenter IP Address 109
Reconfigure the Web Console Network Mapping or Network Adapter 110
Reconfigure the vCenter Network Mapping 111
Reconfigure the vCenter Network Adapter Settings 111
Reconfigure the DB Name Service Network or DB Name Service Network Adapter 112
Reconfigure the Internal Network or Internal Network Adapter Mapping 113
Verify Network Settings in Data Director 113
Data Director Troubleshooting 115
14
vCenter Server Stops Responding 115
Resource Bundles Become Unusable Because DRS Is Disabled 116
Missing Resource Pool 116
Index 119
VMware, Inc. 5
Page 6

VMware vFabric Data Director Administrator and User Guide
6 VMware, Inc.
Page 7

About VMware vFabric Data Director
The VMware vFabric Data Director Administrator and User Guide provides information about administering
VMware® vFabric Data Director. Administration tasks include creating organizations and database groups,
managing users and roles, resource allocation, database and backup configuration, cloning databases,
safeguarding data, and monitoring your system.
The Data Director software solution provides on-site self-service database provisioning and automation to
database administrators and application developers, including the following.
n
Self-service database creation and resource allocation.
n
Flexible, policy-based resource management.
n
Resource isolation within organizations and within databases.
n
Security policy implementation through role-based access control.
n
Delegating and granting customizable roles and privileges to specify users' allowed actions.
Self-service database lifecycle management enables application developers to create new databases, manage
schemas, configure backups, perform restores, clone databases for testing and development, scale up database
sizes, and decommission databases. Customizable database configuration and backup templates enable
administrators to control database parameters and enforce resource allocation policies, and provide application
developers with simplified database creation and resource allocation.
Intended Audience
This document is for administrators and application developers.
n
System administrators use this document to learn about managing and monitoring a Data Director
environment. System administrators create organizations, allocate resources to them, and perform other
high-level tasks.
n
Organization administrators use this document to learn about managing and monitoring database groups
and databases. Organization administrators can use and customize database templates, can assign
resources, and can monitor their organization.
n
Application developers use this document to learn about creating, managing and monitoring databases.
VMware, Inc.
7
Page 8

VMware vFabric Data Director Administrator and User Guide
8 VMware, Inc.
Page 9

Updated Information
This vFabric Data Director Administrator and User Guide is updated with each release of the product or when
necessary.
This table provides the update history of the vFabric Data Director Administrator and User Guide.
Revision Description
EN-000709-01
EN-000709-00 Initial release.
n
The topic Chapter 1, “VMware vFabric Data Director and vFabric Postgres Overview,” on page 11
clarifies information about user management modes.
n
The topic Chapter 8, “Cloning Databases,” on page 57 clarifies clone point information.
n
The topic Chapter 12, “Managing Licenses,” on page 103 clarifies information about license types and
database usage types.
n
Minor revisions.
VMware, Inc. 9
Page 10

VMware vFabric Data Director Administrator and User Guide
10 VMware, Inc.
Page 11

VMware vFabric Data Director and
vFabric Postgres Overview 1
The VMware vFabric Data Director and vFabric Postgres software solutions enable you to provide on-site selfservice database provisioning and automation to database administrators and application developers.
This chapter includes the following topics:
n
“VMware vFabric Data Director System Architecture,” on page 11
n
“VMware vFabric Data Director Components,” on page 11
n
“Data Director User Management Modes,” on page 12
n
“About Data Director Administration,” on page 13
n
“vFabric Postgres Databases,” on page 14
VMware vFabric Data Director System Architecture
The Data Director architecture provides database as a service (DBaaS) to application developers with security
and resource isolation as well as flexible, policy-based resource management and role-based access control for
system administrators. Data Director is optimized for VMware vSphere.
At the system level, Data Director supports flexible, policy-based resource management and provides resource
isolation between organizations and databases. As a Data Director system administrator, you can implement
security policies through role-based access control, controlling users' allowed actions with customizable roles
and privileges that you delegate and grant as required.
Within organizations, Data Director offers self-service database lifecycle management for VMware vFabric
Postgres (vPostgres) databases. You control database parameters with customizable database configuration
and database backup templates. These templates simplify database creation and provisioning for application
developers. Developers can create databases and allocate resources for them, manage schemas, set up backups
and perform restores, clone databases for testing and development, scale database sizes up, and decommission
databases without assistance.
The vPostgres database is based on the open source Postgres database, an ACID-compliant, ANSI-SQLcompliant transactional relational database. The database optimized for vSphere and is compatible with
Postgres client tools and drivers.
VMware vFabric Data Director Components
VMware vFabric Data Director consists of the database lifecycle management platform and vFabric Postgres
(vPostgres).
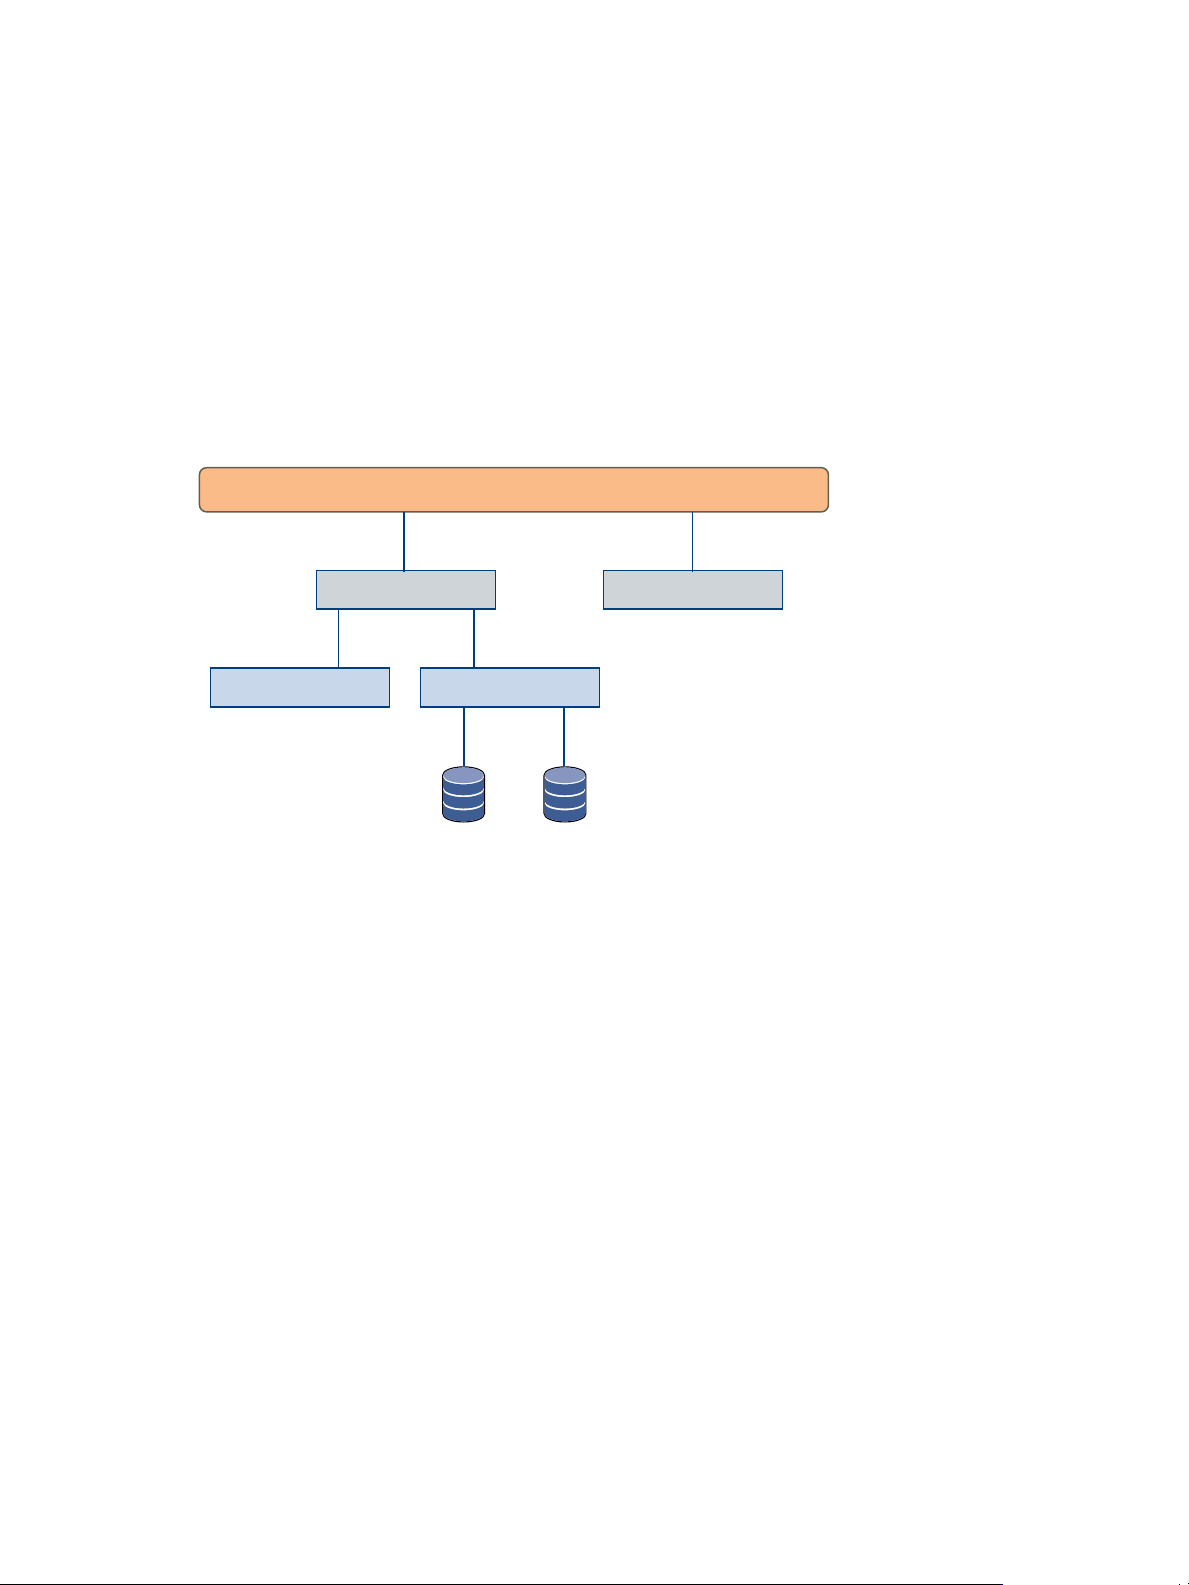
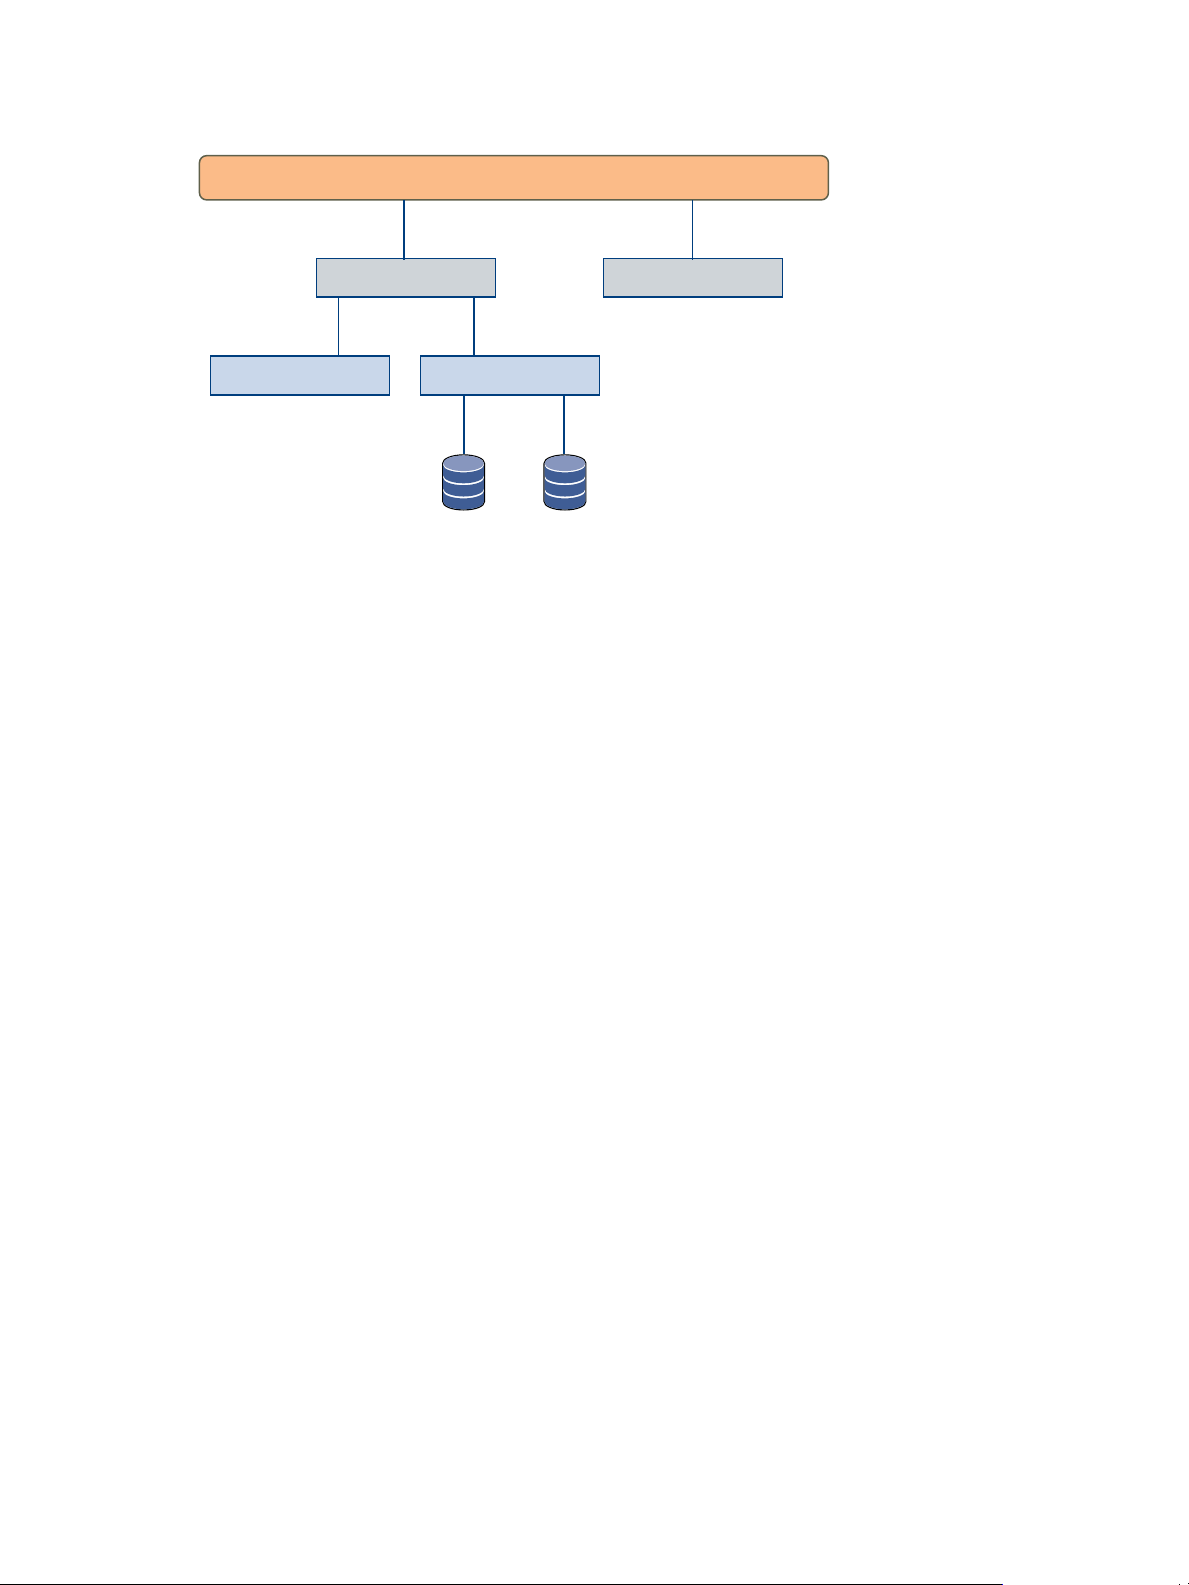
The Data Director hierarchy has the following levels.
n
System (the database lifecycle management platform)
VMware, Inc.
11
Page 12
organization organization
database database
database group database group
system
VMware vFabric Data Director Administrator and User Guide
n
Organizations
n
Database groups
n
Databases (vPostgres databases)
System administrators perform management tasks at the system level, which is the top level of the hierarchy.
To edit system-level settings you must have system privileges, but having system privileges does not allow
you to make changes to the other levels.
A system can contain multiple organizations. An organization can contain multiple database groups. A
database group can contain multiple databases. You cannot create database groups at the system level. They
can exist only within organizations. Databases can exist only within database groups.
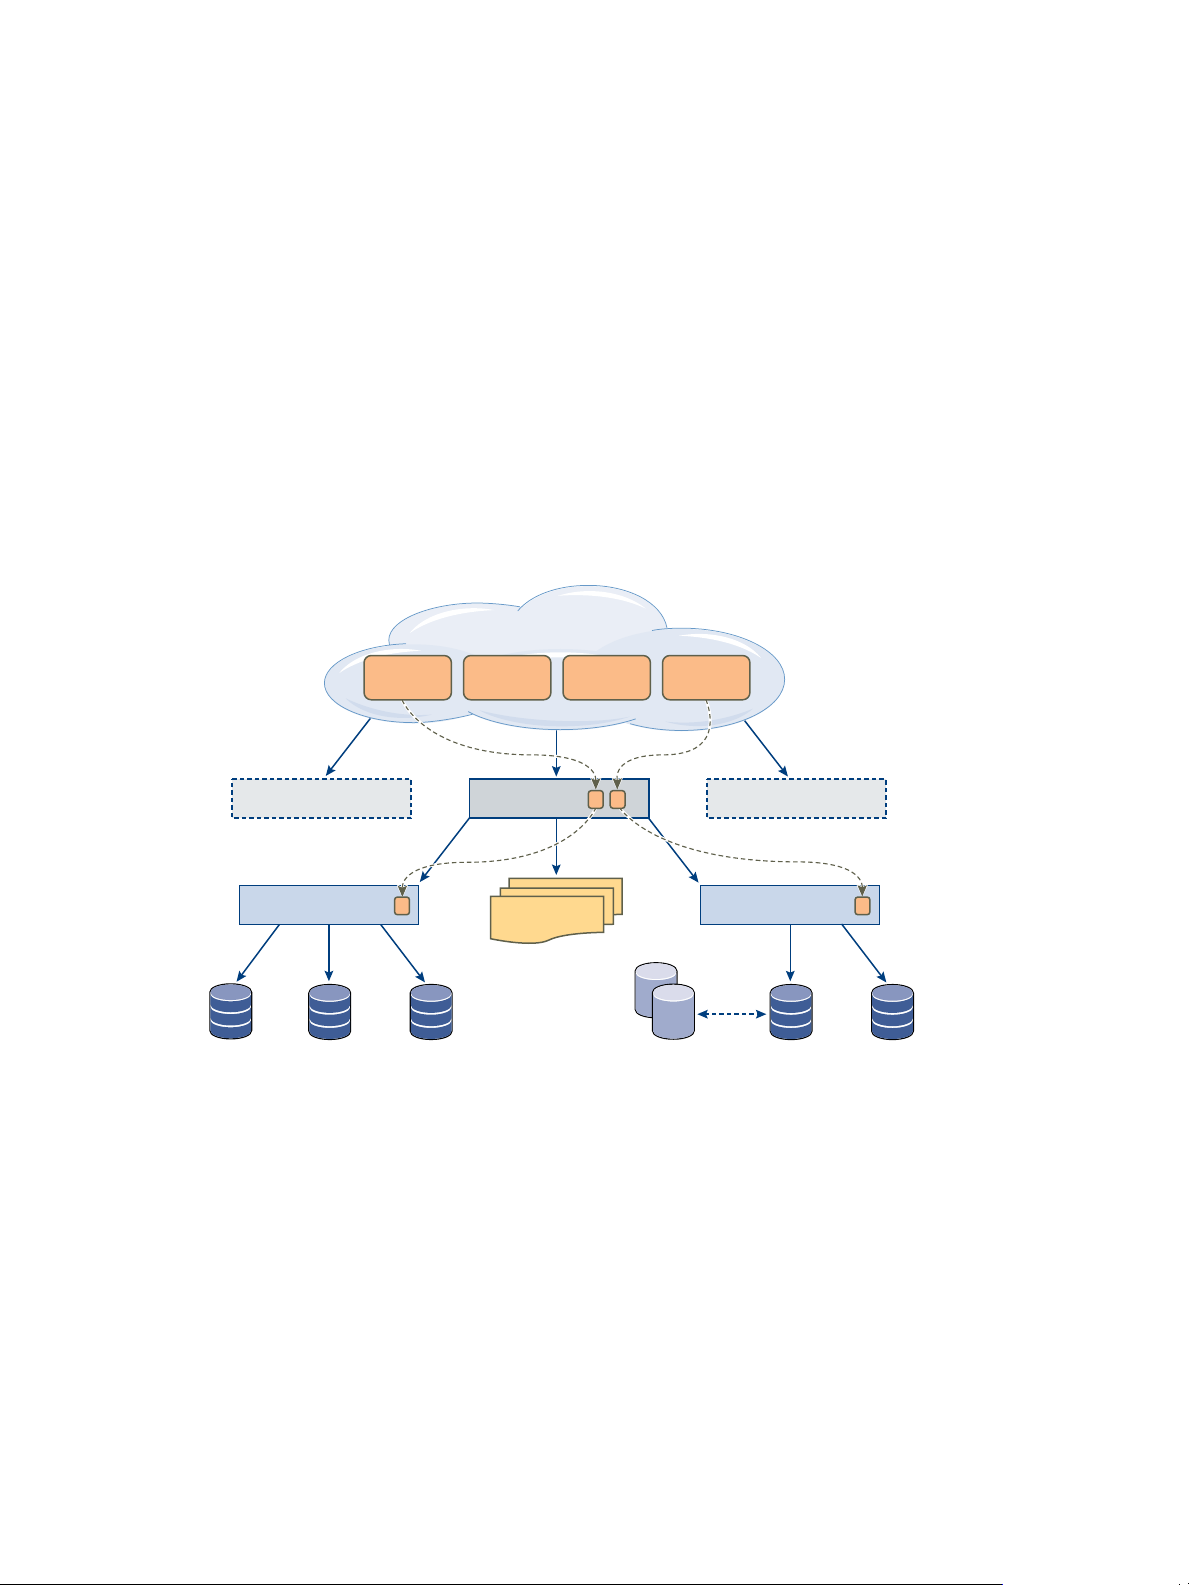
The following figure shows the Data Director system hierarchy.
Figure 1-1. Data Director System Hierarchy
System administrators manage Data Director resources at the system, organization, and database group levels.
System administrators create resource bundles from vSphere resource pools (CPU and memory resources) and
networking and storage resources, and allocate one or more resource bundles to each organization.
Organization administrators assign resources from their resource bundles to database groups for consumption
by databases.
Data Director User Management Modes
Data Director user management modes control how users are assigned and managed among different
organizations. Data Director has two user management modes: Global mode (for enterprises) and By
Organization mode (for service providers). Global user management mode is the default.
By Organization user management mode has the following characteristics.
n
Organizations are set up as separate, isolated enterprises with no visibility into other organizations.
n
The Data Director system user list is not visible to organizations.
n
No organization can see another organization's user list.
n
Organization administrators send email to invite users to join their organization, or users can navigate to
the Data Director application URL and click an email link to request access to an organization.
Global user management mode has the following characteristics.
n
Organizations are set up as separate departments, business units, or groups within one enterprise, such
as a corporation's HR and Finance departments.
12 VMware, Inc.
Page 13

n
All Data Director users are visible to all organizations within Data Director.
n
Organization administrators contact users to invite them to the organization or grant access directly from
the system user list.
You configure the Data Director user management modes during installation. User management mode cannot
be changed. In both Global and By Organization user management modes, organization administrators must
grant users access to their organization.
About Data Director Administration
Data Director system administrators perform Data Director administration on the system level. Organization
administrators perform Data Director administration on the organization level.
You create the initial Data Director system administrator account during Data Director setup. That system
administrator creates other Data Director users, including other system administrators and organization
administrators, and performs administration tasks at the system level.
By default, users do not have roles or permissions and cannot access any organizations. Organization
administrators assign roles and permissions to users and grant them access to specific organizations.
System administrators perform system-level operations for Data Director or for an entire organization. System
administrators perform the following tasks.
Table 1-1. System-level Operations
Operation Type Examples
Resource management operations
User and organization
management operations
n
Creating resource bundles.
n
Assigning resource bundles to organizations.
n
Creating users.
n
Creating organizations.
n
Creating organization administrators.
n
Designating existing users as organization administrators.
Chapter 1 VMware vFabric Data Director and vFabric Postgres Overview
Organization administrators perform organization-level operations within their organizations. Organization
administrators perform the following tasks.
Table 1-2. Organization-level Operations
Operation Type Examples
Resource management operations
User management operations
n
Creating database groups.
n
Creating database configuration templates.
n
Creating database backup templates.
n
Allocating resources to database groups within the
organization.
n
Creating organization users.
n
Granting organization access to existing Data Director
users.
n
Assigning organization roles to users in the
organization.
n
Creating organization roles and granting roles to
organization user.
n
Defining organization permissions and granting
permissions to organization users.
VMware, Inc. 13
Page 14

VMware vFabric Data Director Administrator and User Guide
By default, Data Director system administrators do not have access to organizations. Organization
administrators have access only to their own organization, can create organization users, and can grant access
to existing Data Director users.
Data Director system administrators can create users, but only organization administrators can grant those
users access to organizations.
vFabric Postgres Databases
Data Director provides self-service database provisioning and automation with vFabric Postgres (vPostgres).
vPostgres is built on the open source Postgres database. It is compatible with pSQL and the PostgreSQL tools
and client drivers. vPostgres databases are fully ACID and ANSI SQL-compliant. The ACID properties
(Atomicity, Consistency, Isolation, and Durability) guarantee that database transactions are processed reliably.
Database administrators and application developers administer databases within their organizations.
Database administration includes the following tasks.
n
Creating databases and allocating resources to them.
n
Cloning databases.
n
Managing database users, roles, privileges, and permissions.
n
Maintenance, including backups, restores, and removing old and unused data.
n
Scaling databases up.
n
Monitoring database usage and performance.
n
Monitoring database alarms.
n
Decommissioning databases.
See the vFabric Postgres Standard Edition User Guide for information about the Postgres database features for
Data Director.
14 VMware, Inc.
Page 15

Managing Data Director Resources 2
System administrators manage CPU, memory, storage, and networking resources for different organizations.
Organization administrators manage resources for database groups and for databases.
This chapter includes the following topics:
n
“Resource Management Overview,” on page 15
n
“Resource Bundles and Resource Pools,” on page 16
n
“Resource Assignment,” on page 17
n
“vSphere Resource Pools and Data Director,” on page 18
n
“Viewing Resource Information,” on page 19
n
“Monitor Resource Usage,” on page 20
n
“Create a Resource Pool,” on page 20
n
“Create a Resource Bundle,” on page 21
n
“Assign a Resource Bundle to an Organization,” on page 22
n
“Perform Advanced Cluster Configuration,” on page 22
Resource Management Overview
System administrators allocate resources to organizations. These virtual resources come directly from the
physical resources of the cluster on which Data Director runs. Organization administrators assign organization
resources to database groups and databases.
A vSphere cluster consists of several ESXi hosts that provide the physical CPU and memory resources for the
databases managed by Data Director. As part of installation, you create the cluster and enable vSphere High
Availability (HA) and vSphere Distributed Resource Management (DRS) for the cluster. Data Director can take
advantage of the vSphere HA and vSphere DRS functionality because Data Director runs on top of the cluster.
See the vSphere Availability and the vSphere Resource Management documentation for details.
A Data Director resource bundle includes CPU, memory, storage, and networking resources. The CPU and
memory resources come from a resource pool in the vSphere cluster. The storage and networking resources
are assigned to Data Director during installation or at a later time. Data Director includes a set of VLANs to
carry different types of network traffic.
When system administrators create an organization, they can assign virtual resources to the organization as
resource bundles. When organization administrators create a database group, they assign virtual resources to
the database group. These virtual resources are backed by the physical resources of one or more clusters.
vSphere clusters provide failover protection and support efficient use of physical resources.
VMware, Inc.
15
Page 16

VMware vFabric Data Director Administrator and User Guide
System administrators can assign resources when they create an organization (see “Create an Organization,”
on page 38) or assign resources to an existing organization (see “Assign a Resource Bundle to an
Organization,” on page 22). Organization administrators can assign resources when they create a database
group or assign resources to existing database groups.
To help you specify the resources associated with a database template, Data Director includes a calculator that
computes the optimum resource configuration based on the anticipated usage patterns. When you create
databases from the template, the specified resources are allocated.
Resource Bundles and Resource Pools
A resource bundle is a set of compatible IT resources for provisioning databases. A resource bundle includes
CPU and memory resources as vSphere resource pools, and storage and networking resources.
To assign the appropriate amount of resources to each organization, system administrators create resource
bundles and assign them to organizations. System administrators specify a resource pool and storage and
networking resources when they create a resource bundle.
Resource Pool
Storage Resources
DB Access Networks
The following figure shows how Data Director resources come from vSphere resource pools, datastores, and
port groups. When administrators create a resource bundle, the resources are always coming from the
underlying vSphere environment.
All CPU and memory resources of a resource bundle come from a vSphere
resource pool that is created in the vSphere Client with reservation equal to
limit. See “Create a Resource Pool,” on page 20.
Each resource bundle includes storage resources for data and storage resources
for backup. The storage resources must be visible to all hosts that use the
resource bundle.
DB Access Networks provide communication for databases. A DB Access
Network corresponds to a vSphere port group. Each network must be visible
to all hosts that use the resource bundle. DHCP is required.
Selecting one or more DB Access Networks allows you to isolate different
database groups from one another, for example, to isolate a QA database group
from a Production database group. When no DB Access Networks have been
assigned in the environment, select the network that is mapped to the Web
Console Network. Do not select internal networks for DB Access Network
traffic.
16 VMware, Inc.
Page 17
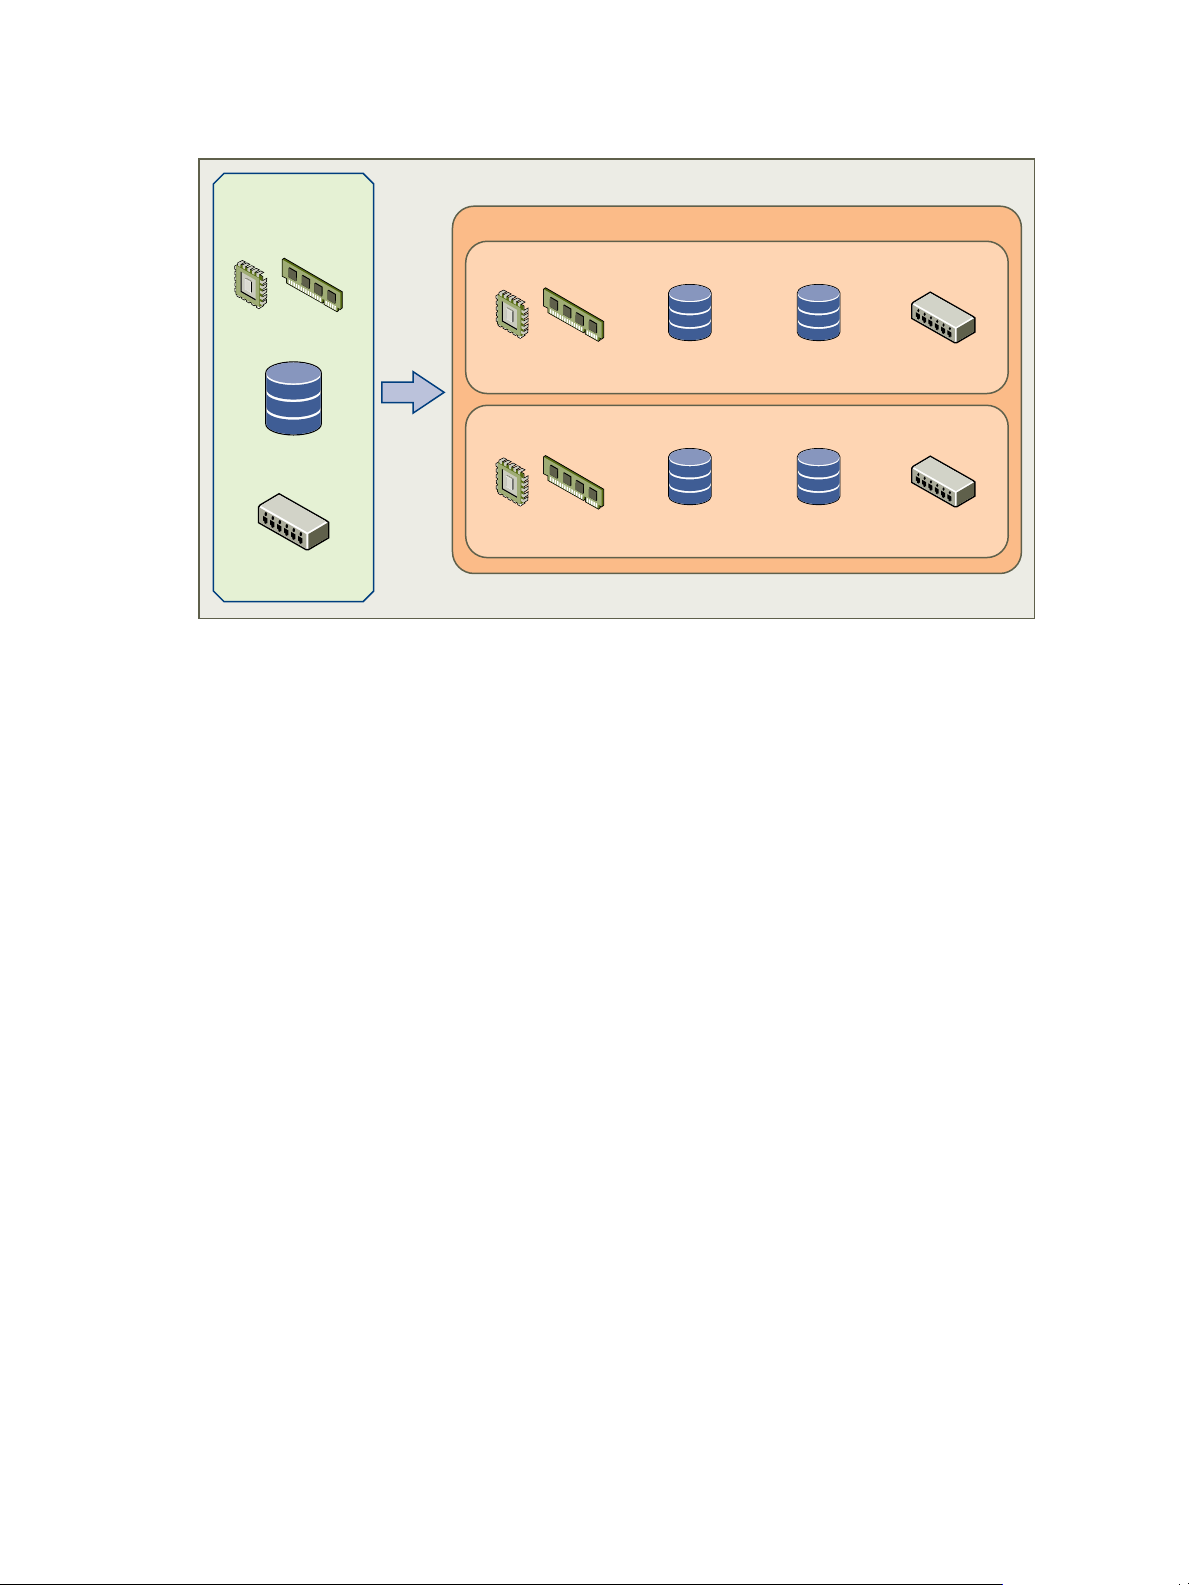
Figure 2-1. Resources in vSphere and Data Director
vSphere
source RPs
source datastores
source port groups
CPU & memory
database
storage
network
backup
storage
resource bundle
CPU & memory
database
storage
network
backup
storage
Data Director
resource bundle
Chapter 2 Managing Data Director Resources
“Resource Assignment,” on page 17 explains how resource assignment differs for the different levels of the
hierarchy.
Resource Assignment
Resource assignment differs for organizations, database groups, and databases.
Resource Assignment for Organizations
System administrators can assign multiple resource bundles to each organization. Organization administrators
allocate the resource bundles to database groups. When databases are created, they can only draw on the
resources assigned to the database group. This resource isolation guarantees that different organizations and
different database groups have control over their resources.
Resource Assignment for Database Groups
When you create a database group, you assign a resource bundle that specifies the resources for that group.
You cannot assign more than one resource bundle to one database group. Multiple database groups can share
one resource bundle.
When you assign a resource bundle to a database group, you can specify how to allocate each resource.
n
CPU priority or reservation.
n
Memory priority or reservation.
n
Storage allocation.
VMware, Inc. 17
n
A network for the database group. You cannot divide the network. You can select only one network during
database group creation even if several networks are associated with the resource bundle.
If you do not explicitly specify the CPU or memory allocation, Data Director sets the reservation to zero but
sets expandable reservations to true. If expandable reservations is set to true, the CPU or memory can expand
beyond the specified value.
Page 18

VMware vFabric Data Director Administrator and User Guide
Resource Assignment for Databases
A database consumes the resources assigned to its database group.
n
You can specify the number of virtual CPUs, the memory size, and CPU and memory priority for each
database that you create.
n
You cannot specify storage allocation. All databases consume the data and the backup storage allocated
to their parent database group.
n
Each database uses the network assigned to the database group.
vSphere Resource Pools and Data Director
A vSphere resource pool is a logical abstraction for flexible management of CPU and memory resources. You
add CPU and memory resources to Data Director resource bundles by adding a vSphere resource pool to the
bundle.
CAUTION Data Director can only use resource pools if the corresponding cluster is enabled for DRS and HA.
Do not disable DRS. If you do, Data Director can no longer use the resource pools even if you reenable DRS.
See “Resource Bundles Become Unusable Because DRS Is Disabled,” on page 116.
Resource pools allow you to group available CPU and memory resources. You can allocate resources explicitly,
or use the resource pool share mechanism. You can hierarchically partition available CPU and memory
resources by grouping resource pools into hierarchies. You can then allow different organization access to
different resource pools. For example, a QA department might need large amounts of CPU and memory for
running tests while the marketing department might require smaller amounts.
Data Director expects you to group the hosts that provide the CPU and memory resources into clusters. Each
cluster owns the resources of all hosts. You can create one or more resource pools for the cluster, which has an
invisible root resource pool. Each resource pool owns some of the cluster's resources. If necessary, you can
create child resource pools. Child resource pools represent successively smaller amounts of CPU and memory.
How you allocate CPU and memory resources to database groups differs from how you allocate those resources
to databases.
Creating Resource Pools
You create resource pools by using a vSphere Client connected to a vCenter Server system. Specify the following
resource pool settings to ensure that Data Director always receives all of its allocated resources and does not
have different amounts of CPU and memory available if the cluster is experiencing a light or a heavy load.
NOTE If you do not configure your resource pool with these settings, problems with resource bundle creation
or other Data Director tasks might result. The primary problem is that resource pools with incorrect settins do
not appear in the list of available resource pools when you create a resource bundle.
Set the Limit equal to the
Reservation.
If the system never allocates more resources than you reserved, you do not
experience resource fluctuations.
Set Expandable
Reservation to checked
or unchecked.
Set Unlimited to
unchecked.
After you create the resource pool, you create resource bundles. Each resource bundle uses one resource pool.
18 VMware, Inc.
If the system does not attempt to allocate more resources than you reserved,
you do not experience resource fluctuations.
Data Director requires this setting to avoid that a resource bundle takes more
than its share.
Page 19

Chapter 2 Managing Data Director Resources
See “Create a Resource Pool,” on page 20 and “Create a Resource Bundle,” on page 21.
Allocating CPU and Memory Resources to Database Groups
When you create a database group and set its CPU and memory allocation, Data Director creates a child
resource pool of the resource pool you select. Data Director configures the resource pool with the allocation
you specify. Having a different resource pool for each database group isolates the database group's allocation
and makes different groups independent.
n
If you specify the CPU and memory allocation, Data Director uses the following settings for the resource
pool it creates.
n
Reservation is set to the value you specify.
n
Expandable reservation is set to False.
n
Limit is set to unlimited.
n
If you do not specify CPU or memory allocation, Data Director uses the following settings for the resource
pool it creates.
n
Reservation is set to 0.
n
Expandable reservation is set to True, allowing the database group to consume resources as they are
available.
n
Limit is set to unlimited.
Allocating CPU and Memory Resources to Databases
In the Data Director environment, a database is a virtual machine that consumes resources from the database
group. You can specify the CPU and memory allocation for the database. Data Director always sets the limit
to unlimited.
Viewing Resource Information
Data Director system administrators can view resource usage information for an organization from the Data
Director Manage & Monitor tab.
When you log in to Data Director as a system administrator, you can view information about the resource
usage of the different database groups and about the resource bundle or resource bundles that are being used
by each database group.
n
The Organizations pane allows you to manage organizations. You can view organization information,
assign and unassign resource bundles, delete the organization, and view the organization's properties.
n
The Resource Bundles pane allows you to view all resource bundles currently created for this instance of
Data Director. You can display either allocation information or vCenter Server Object information.
n
You can click on an item in the heading, such as Organization, to re-sort the table based on that
column. Right-click any resource bundle name and choose Properties to see detailed information
about each resource bundle.
n
If you select vCenter Server Objects, Data Director displays the names of resource pools, datastores,
and networks that you see in the vSphere Client UI.
n
The Datastore Usage pane shows datastore usage for the main datastore and the backup datastore. You
can see how resource bundles map to datastores and examine storage allocation information for each
datastore.
See Chapter 11, “Monitoring the Data Director Environment,” on page 89 for details on using the monitoring
interface.
VMware, Inc. 19
Page 20

VMware vFabric Data Director Administrator and User Guide
Monitor Resource Usage
System administrators can view usage information for resource bundles and datastores and can reassign
resource bundles from the Manage & Monitor tab.
The focus of this task is on monitoring, not on changing current settings.
Prerequisites
n
Log in to Data Director as a user with system administrator privileges.
n
Verify that one or more organizations exist in your environment.
n
Verify that resource bundles and datastores have been assigned to the organizations.
Procedure
1 In Data Director, click the System tab, and click the Manage & Monitor tab.
The Organizations panel displays resource allocation information about each organization.
2 Click one of the columns, for example Total Memory, to reorder the rows of the table.
3 Click one of the organizations to display resource bundle information for the selected organization.
4 Click Resource Bundles to display the Resource Bundles pane.
5 Click Datastore Usage to display information about available datastores, their capacity, and the allocated
and unallocated storage for each.
6 Click one of the datastores to display the associated resource bundles and their storage allocation.
What to do next
You can change the resource bundle information by clicking the Actions icon and selecting Properties. If
properties are dimmed, you do not have permissions to change them.
Create a Resource Pool
You allocate CPU and memory resources to Data Director by creating one or more resource pools from a
vSphere Client connected to a vCenter Server system. From the Data Director user interface, you can then
assign the resources from those resource pools to database groups and databases.
Before you create the resource pools, you must prepare a cluster. Enable the cluster for HA and DRS, and add
all Data Director hosts to the cluster. See the vFabric Data Director Installation Guide for information.
Prerequisites
n
Connect to the vCenter Server system by using a vSphere Client. You cannot create resource pools if the
client is connected directly to a host.
n
Verify that you have permissions sufficient to create a resource pool.
n
Choose a location for the resource pool. Data Director cannot use resource pools at the vApp top level.
n
See the vSphere Resource Management documentation for information about resource pools.
Procedure
1 In the vSphere Client, select Home > Inventory > Hosts and Clusters.
2 Select the cluster to which all Data Director hosts have been assigned.
20 VMware, Inc.
Page 21

Chapter 2 Managing Data Director Resources
3 Specify the settings in the following table for the resource pool.
Option Description
Name
CPU Shares
CPU Reservation
Expandable Reservation
CPU Limit
Unlimited
Memory Shares
Memory Reservation
Expandable Reservation
Memory Limit
Unlimited
Name of the resource pool.
Do not specify CPU shares. Instead, specify the CPU reservation.
CPU resources to allocate to this resource pool.
Checked or unchecked.
Maximum CPU resources available to this resource pool. Set Limit to be equal
to CPU Reservation.
Unchecked.
Do not specify memory shares. Instead, specify a memory reservation.
Memory resources to allocate to this resource pool.
Checked or Unchecked.
Maximum memory resources available to this resource pool. Set Limit to be
equal to Memory Reservation.
Unchecked.
After the resource pool is set up, you can point to the resource pool when you create the Data Director resource
bundle.
What to do next
Create a resource bundle. See “Create a Resource Bundle,” on page 21.
Create a Resource Bundle
Resource bundles allow you to bundle CPU, memory, storage, and networking resources. You create resource
bundles using the Data Director user interface.
When you create a resource bundle, the wizard displays only resource pools with a parent cluster that meets
the following requirements.
n
vSphere DRS and vSphere HA are enabled.
n
VM Monitoring is set to VM and Application Monitoring.
n
VM Restart Priority is not disabled for any of the virtual machines.
n
Host monitoring is enabled.
See “Perform Advanced Cluster Configuration,” on page 22 for details on recommended settings.
Prerequisites
n
Create a resource pool to use for allocating CPU and memory resources. See “Create a Resource Pool,” on
page 20.
n
Decide on the storage resources that you want to include in the resource bundle. Plan for storage resources
for database storage and resources for backup storage.
n
Decide on the networking resources that you want to include in the resource bundle. The resource bundle's
networking resources are used for the public network for databases in an organization.
NOTE If you do not configure your resource pool with these settings, problems with resource bundle creation
or other Data Director tasks might result.
Procedure
1 Log in to Data Director with system administrator privileges.
VMware, Inc. 21
Page 22

VMware vFabric Data Director Administrator and User Guide
2 Select System, and click Manage & Monitor.
3 Click Resource Bundles in the left pane.
4 Click the plus (+) icon.
5 Specify the following information about the resource bundle in the wizard.
Wizard screen Action
Name and Description
CPU and Memory
Storage
Networks
What to do next
System administrators can allocate the resource bundles to organizations, and organization administrators can
assign resources to their database groups.
Type a name and optional description and click Next.
Select the resource pool from which you want to assign CPU and memory
resources and click Next.
Click Edit to select a datastore, and allocate the number of GB to use with
Data Director, or allocate all unallocated space. Repeat the process for backup
storage.
NOTE Do not select a datastore that is in a datastore cluster.
Select the networks that you want to have available to this resource bundle.
These networks provide the public network for the organization's databases.
Resource bundles must use a database network when available.
Assign a Resource Bundle to an Organization
System administrators can assign a resource bundle to an organization when they create an organization. You
can also assign a resource bundle to an organization at a later time.
Prerequisites
Log in to Data Director as a system administrator or a user who can assign resource bundles to organizations.
Procedure
1 Click the Manage & Monitor tab and, click Organizations.
2 Right-click the organization that you want to assign a resource bundle to, and select Assign Resource
Bundle.
3 Select the resource bundle that you want to assign from the list of resource bundles and click OK.
What to do next
You can create one or more database groups and databases. See “Create a Database,” on page 53 and “Create
a Database Group,” on page 43.
Perform Advanced Cluster Configuration
During installation, you configure the Data Director cluster with vSphere DRS and vSphere HA enabled, and
with certain monitoring settings. You can later edit the Data Director cluster configuration to change the
monitoring sensitivity for virtual machines.
As part of the installation process, you configure the Data Director cluster. See the vFabric Data Director
Installation Guide. After installation, you can customize the cluster to work in your environment. See the vSphere
Availability documentation and the vSphere Resource Management documentation for background information.
22 VMware, Inc.
Page 23

Chapter 2 Managing Data Director Resources
Not all changes that you can make to a vSphere cluster are compatible with Data Director. You must make
sure that the cluster settings remain compatible with Data Director. Data Director checks the following settings.
n
DRS must be enabled. DRS automation level can be any of the supported options. Partially automated
works best with Data Director in most situations.
n
Admission control must be enabled.
If cluster settings are not compatible with Data Director, and if you create a resource pool in the cluster, you
cannot import the resource pool into a Data Director resource bundle.
If you change cluster settings from Data Director compatible to Data director incompatible, Data Director
displays alerts but does not revert the settings. You must revert the settings to make the cluster compatible
again.
CAUTION Do not disable DRS because you lose all resource pools. Reenabling DRS does not resolve the issue.
See “Resource Bundles Become Unusable Because DRS Is Disabled,” on page 116.
If you customize the HA settings for a virtual machine, and if those settings are not compatible with Data
Director, an alert appears. You are responsible to make the cluster compatible again.
Prerequisites
Verify that you have log-in privileges and privileges for cluster modification for the vCenter Server system on
which the Data Director cluster runs.
Procedure
1 Log in to a vSphere Client that is connected to the vCenter Server on which the Data Director cluster runs.
2 Right-click the cluster and click Edit Settings.
3 Click VM Monitoring.
4 Select the Custom check box and specify custom settings.
The following are the lowest acceptable settings, values can be higher.
Option Description
Failure interval
Minimum uptime
Maximum Per-VM resets
Maximum resets time window
30 seconds
120 seconds
3
Within 1 hour
5 Click OK.
VMware, Inc. 23
Page 24

VMware vFabric Data Director Administrator and User Guide
24 VMware, Inc.
Page 25

Managing Users and Roles 3
User management controls the users that can log in to Data Director and what they can see and do after they
log in.
This chapter includes the following topics:
n
“User Management Overview,” on page 25
n
“Authenticating Users,” on page 26
n
“Role-Based Access Control,” on page 27
n
“Predefined Roles,” on page 28
n
“Privileges,” on page 29
n
“Propagation of Permissions and Roles,” on page 30
n
“Organization Privileges and Permissions,” on page 30
n
“Add Users to Your Organization,” on page 31
n
“Add Roles to an Organization,” on page 31
n
“Grant a Permission to a User,” on page 32
n
“Modify Organization Security Settings,” on page 32
User Management Overview
System and organization administrators use a combination of user logins, privileges, permissions, and roles
(role-based access control) to manage Data Director users. Role-based access control provides management of
users and the tasks that they can perform on objects. You can grant and revoke roles and permissions at the
system level, on organizations, and on database groups, databases, and templates within organizations.
Roles are sets of permissions required to perform particular jobs. Jobs are sets of tasks that a user with a
particular role is responsible for performing, such as the set of tasks that are the responsibility of a database
administrator. System and organization administrators define roles as part of defining security policies, and
grant the roles to users. To change the permissions and tasks associated with a particular job, the system or
organization administrator updates the role settings. The updated settings take effect for all users associated
with the role.
n
To add a user to a job, the system or organization administrator grants the role to the user.
n
To remove a user from a job, the system or organization administrator revokes the role from the user.
Changes are effective immediately.
VMware, Inc.
25
Page 26
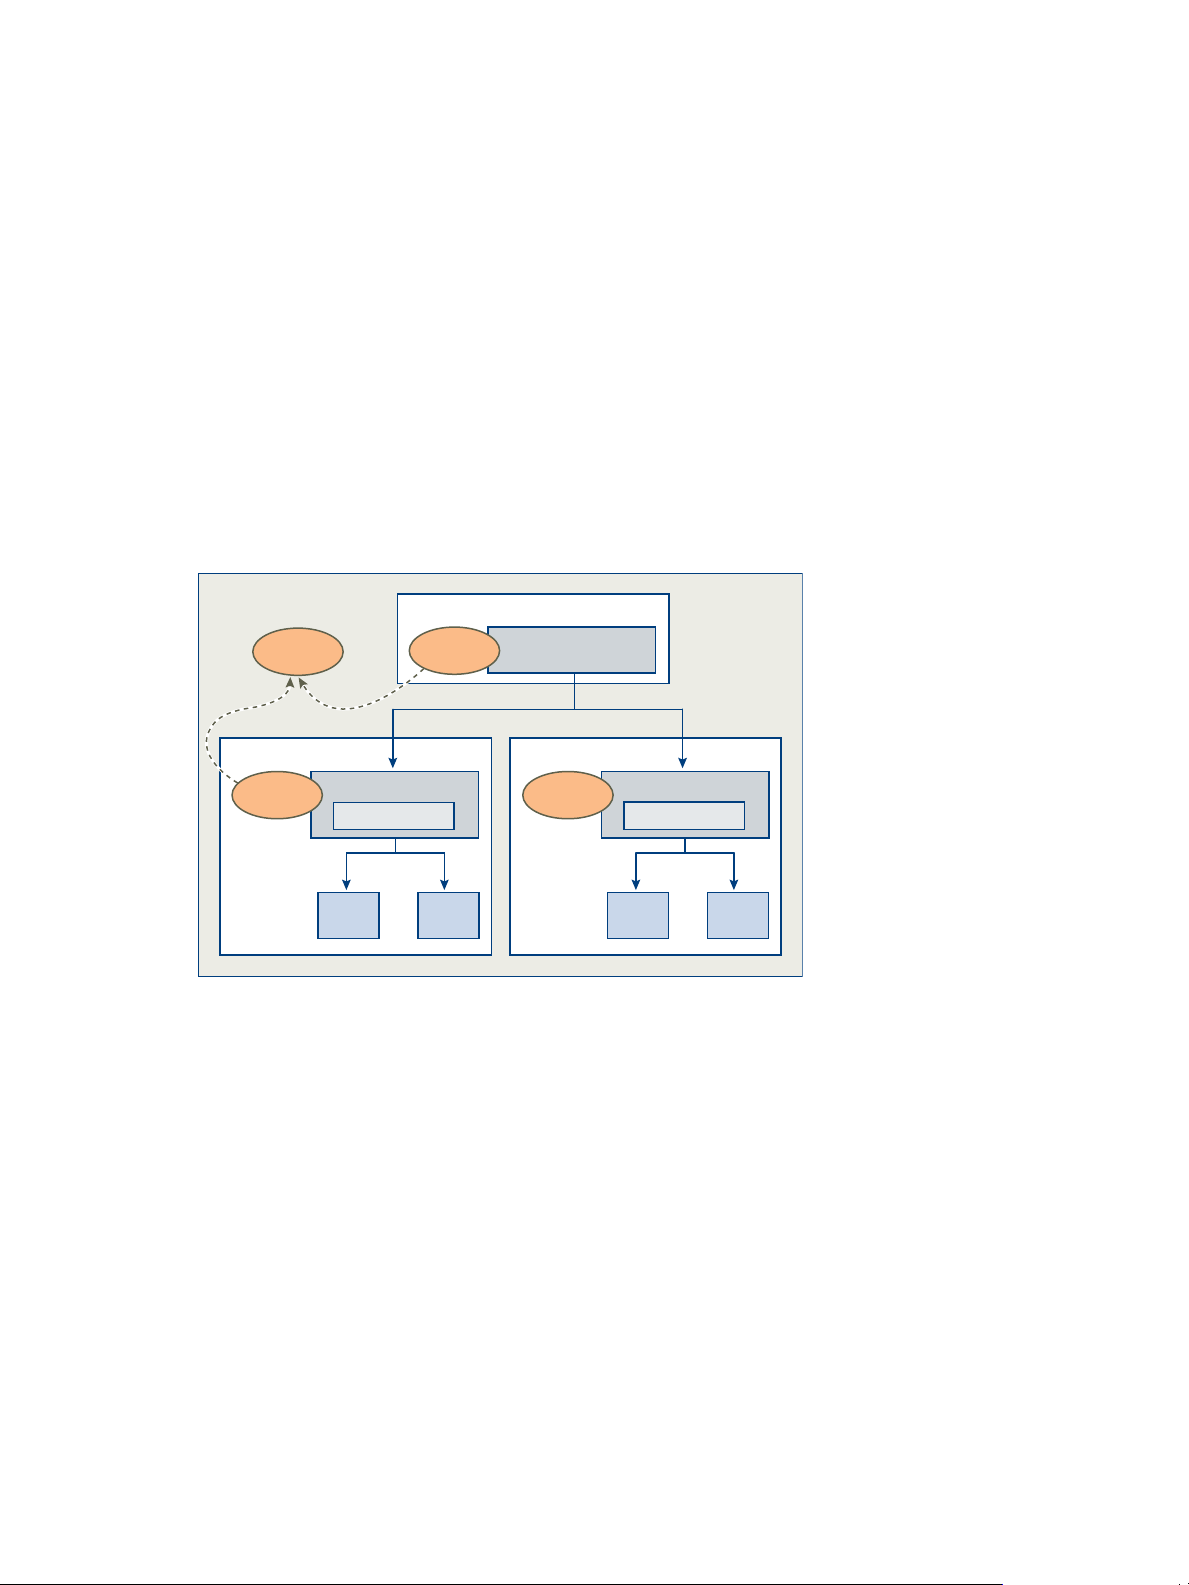
User Namespace
Bob
role domain
System
(user) Alliance
DBG DBGDBGDBG
role domain role domain
(user) Benefits
DBAdmin
SysAdmin
DBAdmin
Organization
Organization
VMware vFabric Data Director Administrator and User Guide
Roles apply only to the organization in which they are created. For example, an organization administrator
creates a database administrator role that includes permission to add and remove database users, start and
stop databases, and perform backups for a specific database in that organization. Users that are granted the
database administrator role in that organization can perform database administrator tasks only within that
organization.
Organization administrators usually manage role and permission assignments for their organizations.
However, any user that has the permission to grant and revoke permissions on an object can grant all
permissions on that object to any user or any role. Organization administrators can also grant permissions
directly to users.
Each user's login account is unique in the system. Managing access, roles, and permissions for each user is
based on their user login account. The organization administrator can grant users access to one or more
organizations. Within those organizations, each user can be granted multiple roles and permissions.
Users who cannot view or access certain objects or cannot perform certain operations were not granted the
permissions to do so.
The following figure illustrates the scope of users and roles in Data Director.
Figure 3-1. Scope of users and roles in Data Director
In the figure, user Bob is logged in to Data Director and has been granted access to the system and to the
organization Alliance. Bob is also granted the SysAdmin role at the system level, and the DBAdmin role in the
organization Alliance. Bob's SysAdmin role applies to the system level. The SysAdmin role does not propagate
to any organizations. The role DBAdmin in organization Alliance and the role DBAdmin in organization
Benefits are separate roles that apply only within their organizations. Bob has the DBAdmin role in the Alliance
organization but does not have access to the Benefits organization.
Authenticating Users
26 VMware, Inc.
User authentication is based on user login and password.
User login accounts and credentials are unique in Data Director. This enables managing credentials, roles,
permissions, and privileges for each user based on the user login account.
Create users and passwords in the following ways.
n
A system or organization administrator creates the user account and assigns a password.
n
A user registers for a Data Director account and specifies a password as part of the registration request.
Page 27

Data Director encrypts the password and stores it with the user information. When the user logs in, that user's
credentials are stored in an HTTP session. Data Director uses the credentials to validate that the user is
authorized to view organization objects (database groups and databases) and to perform tasks.
Role-Based Access Control
Role-based access control enables system and organization administrators to control user access to Data
Director and to control what users can do after they log in. To implement role-based access control, system
and organization administrators associate (or revoke) privileges, permissions, and roles with (or from) user
login accounts.
Chapter 3 Managing Users and Roles
Users
Privileges
Permissions
Roles
User logins (users) are unique accounts that enable users to access Data
Director. They include a password and identifying information such as name,
email address, and phone number. Because user login accounts are unique,
system and organization administrators can control each user's access and
actions by granting or revoking privileges, permissions, and roles to or from
the user's login account.
Users can be active or inactive. Inactive users cannot log in.
Privileges control all actions in Data Director. They define the allowable actions
within an organization. Privileges apply to particular types of Data Director
objects. For example, you can apply the Stop Database privilege to
organizations, database groups, and databases and apply the Create
Database privilege to organizations and database groups. Privileges by
themselves are not associated with specific objects within an organization.
Permissions associate a user and privilege pair with an object in Data Director.
Examples are granting a user permission to start or stop a specific database, to
modify an organization's backup templates, or to create other users in an
organization.
You can grant permissions to users by assigning a role to a user, or by granting
permissions directly to the user.
Roles are collections of permissions that can be associated with or granted to
users. Roles provide a convenient way to package all the permissions required
to perform a job, such as that of database administrator. Roles apply only to
the entity in which they are created. If you create a role at the system level, it
applies only to the system. If you create a role in an organization, it applies only
to the organization. Organizations have no visibility into each others' roles. If
two organizations in the same Data Director data cloud each have a role that
has the same name, those roles are distinct within each organization.
One user can have multiple roles within an organization. Users can have access
to multiple organizations and can have multiple roles in each organization.
A user can have different roles for different objects. For example, if you have
two database groups in your organization, DBG1 and DBG2, you can grant the
Database Admin role to a particular user on DBG1 and grant that user the DB
User role on DBG2. These assignments might allow the user to perform
administrative tasks in DBG1, but not in DBG2.
VMware, Inc. 27
Page 28

VMware vFabric Data Director Administrator and User Guide
Predefined Roles
Data Director provides the predefined roles of system administrator, user administrator, and organization
administrator. Predefined roles provide a starting point for administering Data Director users and roles and
for defining custom roles. You can also create custom roles.
Organization
administrator role
Organization adminstrators manage their organizations. They control which
users can access the organizations, how users request access to the
organizations, and what those users can see and do within the organization.
This role has all privileges on the organization for which it is created.
Organization administrators invite users to join the organization, grant access,
roles, and permissions to users in the organization, create database groups, and
can create databases. You can choose to create an administrator user when you
create a new organization, or you can select an existing user as the new
organization administrator.
Organization administrators perform all user management tasks within their
organizations, including the following.
n
Add users to organizations, database groups, and databases.
n
Modify user settings.
n
Remove users from organizations, database groups, and databases.
n
Create roles.
n
Grant privileges and permissions to roles and to individual users.
n
View users, roles, and permissions granted to users and roles.
Organization administrators can view, grant, and revoke privileges on all
objects within their organizations, including database groups, databases, and
templates. Privileges include Create Database Groups and Modify Database
Configuration Templates.
System administrator
role
User administrator role
System administrators operate Data Director. The first system administrator
user is created during Data Director installation. This role has all system-level
privileges, including managing resources for the system and for organizations.
System administrators can see, grant, and revoke permissions at the system
level. The first system administrator configures Data Director, creates other
system administrators and system-level users, and creates initial organizations.
System administrators manage users at the system level. By default they do not
have access to organizations unless an organization administrator grants access
to them.
The User administrator role manages users at the system level, including
creating, editing settings for, and deleting system users.
28 VMware, Inc.
Page 29

Privileges
Privileges define the allowable actions on objects in vFabric Data Director. You associate privileges with a user
login and a Data Director object to define permissions.
For example, the Start and Stop Database privilege indicates that in general, Data Director users can start and
stop databases. But the privilege by itself does not indicate which users can start and stop databases, or the
databases that they can start and stop. To provide context, you associate the privilege with a user login and a
Data Director object. The combination of privilege, user login, and Data Director object is a permission. You
can group related permissions into roles to package all the permissions required to perform a job, such as that
of database administrator.
Chapter 3 Managing Users and Roles
System
Organizations
Database group
Databases
System privileges relate to Data Director management, such as Manage
Resources and Manage System Settings. These privileges apply only to the
system. System privileges do not propagate to organizations.
Privileges on organizations relate to organization management, such as
Manage Organization Settings and Manage Registration. Organization
privileges apply only to organizations. They do not propagate beyond
organization boundaries.
Privileges on database groups relate to database group management, such as
Create Databases and Import Backups. Database group privileges apply only
within the organization and to the organization's database groups.
Organization administrators and users with database group management
privileges grant and revoke privileges on database groups, and enable users to
access a database group by adding the database group to the user's account.
Privileges on databases relate to database management, such as Start and Stop
Database and Edit Database Info. Database privileges apply only to databases,
database groups, and organizations. If a database-related privilege is on a
database group, that privilege applies to all databases within that database
group. If the database-related privilege is on an organization, it applies to every
database group and database in the organization.
Organization administrators and users with database management privileges
grant and revoke these privileges and permissions on databases. To gain access
to databases, the databases must be added to a user's account.
Database configuration
and database backup
templates
VMware, Inc. 29
Privileges on templates relate to template management, such as edit template
and view and user template. Edit template applies only to the organization.
View and user template applies to individual templates or to the organization.
If a template privilege is on an organization, it applies to all templates within
that organization.
Organization administrators and users with template management privileges
grant and revoke template privileges and permissions. To gain access to
templates, the templates must be added to a user's account.
Page 30

VMware vFabric Data Director Administrator and User Guide
Propagation of Permissions and Roles
How permissions and roles propagate through an organization depends on where and on what types of objects
they are granted. Understanding how permissions and roles propagate can help you to assign them to users
appropriately.
Permission and role propagation stops at the organization boundary. Permissions granted within an
organization propagate only within that organization. Permissions granted at the system level do not
propagate to organizations.
Permissions (and their associated privileges) that apply to an organization are inherited by that organization's
database groups and databases. Users or roles can have permissions on specific database groups, and those
permissions propagate to databases within the database groups.
Roles apply only to the organization in which they are defined. If a role is defined at the system level, it applies
only to the system and is not visible to organizations. If a role is defined within an organization, it applies only
to that organization and is not visible to the system or to other organizations.
You can grant permissions and roles on objects within an organization, such as on a database group, on a
database, or on a template. For example, granting the Start/Stop Database permission on a database group
means that the user or role has the Start/Stop Database permission on all databases within that database group.
If a user is granted the Start/Stop Database permission on a database group, that user can start and stop any
databases within that database group. However, permissions that apply only to certain types of objects do not
propagate to other objects. For example, granting the database group permission Create Database on a database
is meaningless.
Organization Privileges and Permissions
Organization administrators grant privileges and permissions to users and roles in their organizations. Those
privileges and permissions propagate to database groups and databases in the organization.
You can grant the following types of privileges and permissions to users and roles on organizations.
n
User and permission management, such as manage roles and registration and grant/revoke permissions.
n
Organization management, such as manage organization settings, database configuration and backup
templates, and import databases.
n
Database group management, such as manage database groups, create databases, and import backups.
n
Database management, such as edit database information, resource, and backup settings, modify database
users, upgrade databases.
n
Database operations, such as enable/disable databases, delete databases, start and stop databases, and
restart databases.
n
Database backup and recovery, such as create and delete snapshots, create and delete external backups,
clone databases, and recover databases.
n
Templates, such as use templates.
n
View and monitor, such as viewing reports and monitoring resource usage.
30 VMware, Inc.
Page 31

Add Users to Your Organization
Users can self-register to login to Data Director, but cannot access Data Director organizations, database groups,
or databases until organization administrators grant access to them. You must add the users to your
organization to grant them access.
Prerequisites
n
Verify that you have Manage Registration permission for the organization.
n
Verify that the system setting Allow Public Registration is on.
Procedure
1 Log in as an organization administrator.
2 Click the Administration tab, expand Users and Roles, and click Users.
3 Click the plus (+) icon.
4 Complete the user information in the Credentials and Contact Information sections.
5 Grant roles and permissions now or choose to grant roles and permissions later.
6 Click OK.
Chapter 3 Managing Users and Roles
If the Email Validation system setting is on, users receive an activation email that contains a link that they click
to activate their account. The new users' status is Pending and the users cannot log in until they activate the
account.
The new user appears in the Users list.
Add Roles to an Organization
Roles enable you to group the permissions required to perform tasks associated with a job, such as the job of
database administrator. You can then grant the role to users rather than granting individual permissions
needed for each task. You can add custom roles to your organization and grant them to the users who are
responsible for performing particular jobs.
Prerequisites
n
You are logged in to Data Director.
n
You have the OrgAdmin role with permissions on all objects in the organization, or permissions for the
organization in which to create the role.
n
You have grant and revoke permissions on objects.
Procedure
1 Click the Administration tab.
2 Expand Users and Roles and click Roles.
The OrgAdmin role appears in the list.
3 Click the plus (+) icon.
4 Type a name for the role.
5 (Optional) Enter a description
VMware, Inc. 31
Page 32

VMware vFabric Data Director Administrator and User Guide
6 Right-click Status.
n
Select Enable to activate the role.
n
Select Disable to deactivate the role.
7 In the Permissions section, select the permissions to grant to this role.
You can grant permissions to the role on the organization, database groups within the organization,
databases within the organization's database groups, and on organization templates.
8 Click OK.
The new role appears in the Roles list.
What to do next
Grant this role to organization users.
Create other roles and grant permissions to them.
Grant a Permission to a User
If a user requires only limited privileges in your organization, you can grant just those privileges to the user
instead of granting a role to that user.
Prerequisites
You are logged in to a Data Director organization as an organization administrator.
Procedure
1 Click the Administration tab, then click Users.
2 Select a user name.
3 Use one of the following methods to access the Edit Permissions window.
n
Select the user name, click the gear icon, and select Edit Direct User Permissions.
n
Right-click the user name and select Edit Direct User Permissions.
n
Left-click the user name, select Grant direct user permissions now, then click Edit.
4 Grant privileges to the user.
n
To grant a category of privileges to the user, click the All privileges check box.
n
To grant a specific privilege to the user, click the privilege's check box.
5 Click OK.
What to do next
Use the Edit Permissions window to grant the user access to database groups, databases, and templates within
the organization.
Modify Organization Security Settings
Organization security settings determine whether your organization allows open registration or users must
be invited to register, and whether or not the system administrator can access your organization. You can
change the security settings at any time.
Prerequisites
Log in as organization administrator or as a user with the Manage Organization Settings permission.
32 VMware, Inc.
Page 33

Chapter 3 Managing Users and Roles
Procedure
1 Click the Administration tab.
2 Click Settings, then click Security.
3 Choose one of the following Allow public registration settings.
Setting Description
No
Yes
User registration is by invitation only.
Users can see the organization and register themselves.
4 Choose one of the following Allow System Administrator to log into Org settings.
Setting Description
No
Yes
Do not allow the system addministrator to log into the organization.
Allow the system administrator to log into the organization.
5 Click Apply to accept the settings.
VMware, Inc. 33
Page 34

VMware vFabric Data Director Administrator and User Guide
34 VMware, Inc.
Page 35

Managing Organizations 4
The basic component of Data Director is the organization. Data Director system administrators create
organizations, assign the initial organization administrator, and allocate resources to the organization.
This chapter includes the following topics:
n
“Organization Structure,” on page 35
n
“Operating Organizations,” on page 36
n
“Managing Resources For Organizations,” on page 37
n
“Managing Organization Users,” on page 38
n
“Create an Organization,” on page 38
Organization Structure
The structure of organizations depends on the operating mode: Global mode or By Organization mode.
Global Mode
By Organization Mode
Organizations contain one or more database groups (DBGs) that in turn contain one or more databases, as
shown in the following figure.
In Global mode, all users in the Data Director system are visible to all
organizations. Global mode is best for operating Data Director for a single
enterprise in which organizations represent business units or departments
within the enterprise. Organization administrators can see the global user list
and grant access to any user to their organization.
In By Organization mode, Data Director operates as a service and each
organization is a distinct enterprise. Organizations are not visible to each other
in By Organization mode. Each organization has its own distinct user list that
is not visible to any other organization. Users must either send a request to
register to an organization and be approved by the organization administrator,
or the organization administrator can invite a user to join the organization.
VMware, Inc.
35
Page 36
organization organization
database database
database group database group
system
VMware vFabric Data Director Administrator and User Guide
Figure 4-1. Data Director Organization Structure
Organization names must be unique within Data Director. Organizations cannot be nested.
Organization roles, policies, and templates apply only within that organization. Resources allocated to an
organization are reserved for that organization and cannot be shared among multiple organizations, whether
in Global or By Organization mode. This restriction enhances security and ensures resource isolation among
organizations.
See Chapter 2, “Managing Data Director Resources,” on page 15 for details about resource management in
Data Director.
Operating Organizations
Organization operations include system-level tasks such as creating and assigning resources to organizations,
and organization-level tasks such as managing organization users, defining and granting roles, and creating
database groups.
System administrators perform system-level organization tasks such as the following.
n
Create an organization. See “Create an Organization,” on page 38.
n
View all organizations within Data Director
n
Create organization administrators
n
Allocate resources to organizations
n
Revoke resource bundles from existing organizations
n
Implement user authorization and authentication rules (security policies)
n
Edit organization properties such as the organization name and description
n
Delete disabled organizations
By default, system administrators cannot access organizations. Organization administrators can grant access
to system administrators by modifying a security setting for their organization.
Organization administrators perform organization-level, day-to-day tasks such as the following.
n
36 VMware, Inc.
Manage organization users, roles, privileges, and permissions
n
Create other organization administrators
n
Grant access to the organization to existing users
n
Allocate organization resources to database groups
Page 37
n
database
backup
database database
resource
bundle
resource
bundle
Cloud
org org org
database group database group
templates
database database
resource
bundle
resource
bundle
Implement organization security and backup policies
n
Define roles
n
Define database configuration and database backup templates
n
Monitor organization performance, resource usage, and alarms
Managing Resources For Organizations
Organizations get their resources from vSphere resource pools and from networking and storage resources.
These resources are allocated to the organization by Data Director system administrators.
Organizations manage resource bundles on behalf of their database groups and databases. Resource bundles
are composed of vSphere resource pools (CPU and memory), storage, and networking resources, and provide
the resources used to provision databases.
Resource pools initially created in vSphere are allocated to the Data Director system, where Data Director
system administrators use them to create resource bundles. System administrators allocate resource bundles
to organizations, and organization administrators can then assign resources to their database groups.
Figure 4-2. Resource Bundles, Organizations, and Database Groups
Chapter 4 Managing Organizations
One or more resource bundles can be assigned to an organization, but a resource bundle cannot be shared
across organizations. This restriction provides resource isolation and enhances security. Organizations do not
compete for available resources and do not have access to each others' CPU, memory, storage, and network
resources.
Storage resources are the datastores and allocation amounts for database data and backups. Network resources
are the network or networks that are available to the resource bundle and that provide the network(s) for
vFabric RelationalDB databases. Data Director system administrators can set up separate networks to provide
database isolation.
Organization administrators can subdivide resource bundles across several database groups within their
organization.
Databases draw their resources from their parent database groups, which draw their resources from their
parent organizations. Organizations draw their resources from the Data Director system.
VMware, Inc. 37
Page 38

VMware vFabric Data Director Administrator and User Guide
Managing Organization Users
Organization administrators control user access, roles, permissions, and privileges within their organizations.
Organization administrators control which users can access their organizations and what those users can do.
Only organization administrators can grant access to their organizations and assign roles to users within their
organizations.
Users can belong to multiple organizations and can be granted multiple roles within those organizations in
either By Organization or Global mode systems.
n
In a By Organization system, each organization has a distinct user list that is not visible to other
organizations. To join an organization, users send a request to the organization administrator, or the
organization administrator can invite a user to join.
n
In a Global system, the user list for the system is visible to all organizations. All users belong to all
organizations. Organization administrators grant roles to users to enable them to perform tasks in the
organization.
Organization administrators can grant any roles defined within their organizations to organization users. In
By Organization mode, the user must be on the organization's user list.
Organization administrators control what users can do in their organizations by defining roles, privileges, and
permissions within their organizations, then granting them to organization users. Roles are specific to the
organization in which they are created and are not visible to other organizations.
See Chapter 3, “Managing Users and Roles,” on page 25.
Create an Organization
The Data Director system administrator creates organizations to allow organization administrators
independent management of their database groups and databases.
Prerequisites
n
Resource bundle(s) must be created and available for allocation.
n
You are logged in as a Data Director system administrator.
Procedure
1 With System selected, click Manage & Monitor.
2 Click Organizations in the left pane.
38 VMware, Inc.
Page 39

Chapter 4 Managing Organizations
3 Click the plus (+) icon to create an organization and specify the organization information in the wizard.
Wizard screen Action
Name and Description
Organization Administrator
Resource Bundles
Specify a name and optional description and click Next.
To create a new organization administrator user, perform the following
tasks.
a Click Create a new user.
b Specify the user name, password, first and last name, and optionally,
phone number.
c Click Next.
To use an existing user, perform the following tasks.
a Click Choose an existing user.
b Select the user from the list.
c Click Next.
You can assign resource bundles at any time after creating the organization.
To skip the assign resource bundles step, click Assign resource bundles
later. To select a resource bundle now, click Choose an existing resource
bundle and select a resource bundle from the list. Click Finish.
The new organization appears in the Organizations list.
What to do next
Create resource bundles and assign them to the organization. See “Create a Resource Bundle,” on page 21.
VMware, Inc. 39
Page 40

VMware vFabric Data Director Administrator and User Guide
40 VMware, Inc.
Page 41

Managing Database Groups 5
Database groups contain sets of databases within organizations. Database groups allow organization
administrators to provide the resources for operating and provisioning databases and to apply access and
authorization rules (security policies) to those databases. Grouping databases enables subdivision of resources
from the organization's allocated resources.
This chapter includes the following topics:
n
“Database Group Management Overview,” on page 41
n
“Managing Resources for Database Groups,” on page 42
n
“Database Groups and Security,” on page 43
n
“Create a Database Group,” on page 43
Database Group Management Overview
Organization administrators create database groups to enable efficient management of databases and database
templates. Administrators also allocate the resources required to provision, operate, and control database
groups.
The databases within a database group are usually related. For example, in Global user management mode,
where organizations represent business units in a single enterprise, database groups can group databases for
departments within the business unit. In By Organization user management mode, where each organization
represents a unique enterprise, database groups can group databases for business units within that enterprise.
VMware, Inc.
Each database group can contain one or more databases. Databases must reside in one database group and
cannot be divided among database groups.
Database groups must reside in one organization and cannot be nested.
The following figure shows the relationship between organizations and database groups.
41
Page 42

database
backup
database database
resource
bundle
resource
bundle
Cloud
org org org
database group database group
templates
database database
resource
bundle
resource
bundle
VMware vFabric Data Director Administrator and User Guide
Figure 5-1. Database Groups in the Data Director Architecture
Managing Resources for Database Groups
Database groups require CPU, memory, storage, and networking resources to enable database operation,
provisioning, and backup. To provide database groups with the required resources, organization
administrators create resource bundles and allocate those resource bundles to their database groups.
Resource bundles consist of CPU, memory, storage, and networking resources. An administrator can share a
resource bundle among multiple database groups. The administrator allocates part of the resource bundle to
each database group. An administrator can also assign a resource bundle exclusively to one database group.
Organization administrators assign resources when they create database groups and can add or expand
resources as required. Each database group has exclusive use of its assigned resources to ensure resource
isolation. Resource isolation ensures that database groups and the databases that they contain do not compete
for resources or have visibility into the resources of other organizations. When organization administrators
create database groups, they optionally specify how much unused CPU and memory to reserve for the database
groups. The administrator also assigns the database group's priority for distribution of unreserved resources.
The priority options are high, medium, or low.
Because administrators allocate resources to organizations and then assign resources to that organization's
database groups, each RelationalDB database must be contained within one database group. You cannot split
databases among database groups, and you cannot move a database to a different database group after the
database is created.
Use the following guidelines to estimate the resources that you need for a database group.
n
Calculate the storage allocation based on the expected number of databases that the database group will
contain, the amount of storage allocated for each of those databases, and room for growth:
(number of DBs) X (storage for those DBs) + (room for growth)
n
42 VMware, Inc.
Determine the size of the backup storage allocation to support the external backups for each database in
the database group plus the Point-in-Time Recovery allocation for each database.
Page 43

Database Groups and Security
Role-based access control and direct user permissions form the security policies that determine which users
can access particular database groups and the actions that the users can perform. Database groups inherit
security policies from their organizations.
Organization administrators define the security policies for their organization, including user roles,
permissions, and privileges.
For example, an organization administrator creates a user role with permissions on database groups. These
permissions include create database, take database snapshots, and start or stop database. Those roles and their
associated permissions apply to each database group within the organization, and to each database within
each database group.
Chapter 3, “Managing Users and Roles,” on page 25 discusses the Data Director security model and explains
how you can use roles for fine-grained permission management.
Create a Database Group
Database groups contain sets of databases within an organization. Database groups enable grouping related
databases and provide efficient use of resources needed to provision and operate databases.
Chapter 5 Managing Database Groups
Prerequisites
n
Verify that at least one resource bundle is allocated to the database group's organization. See “Create a
Resource Bundle,” on page 21 if no resource bundle is available.
n
You must be logged in as an organization administrator or have permissions to create or modify database
groups.
Procedure
1 Click the Manage & Monitor tab.
2 Click the Database Groups tab.
3 Click the plus (+) icon to create a database group.
4 Specify the following information in the Create Database Group wizard.
Wizard screen Action
Name and Description
Resource Bundle
Resources
Type a name and optional description and click Next.
Select a resource bundle from the list and click Next.
Specify the resources for this database group.
Network
CPU & Memory
Storage
Select the network from the drop-down menu.
n
Assign the priority (High, Medium, or Low).
n
(Optional) Check the Reserve resources for this
database group check box and enter the
reservation amounts for CPU and memory.
Enter the amount of database and backup storage in
the Database storage and Backup storage fields.
5 Click Finish.
The new database group appears in the database group list.
VMware, Inc. 43
Page 44

VMware vFabric Data Director Administrator and User Guide
What to do next
Click the database group name to open the database group and view and edit its properties.
44 VMware, Inc.
Page 45

Managing Database Templates 6
Data Director database templates allow organization administrators to standardize databases and their backup
policies. Templates also impose limits on resource consumption. Database administrators can create and back
up databases consistently by using templates and can create, clone, and customize templates.
This chapter includes the following topics:
n
“Introduction to Database Templates,” on page 45
n
“Create a Database Configuration Template,” on page 46
n
“Modify a Database Configuration Template,” on page 47
n
“Create a Backup Template,” on page 48
n
“Modify a Backup Template,” on page 49
Introduction to Database Templates
Data Director includes database templates to help administrators streamline resource allocation and
standardize database setup and backup setup. Templates help database administrators to quickly provision a
database and to select a backup process.
Data Director supports database configuration templates and backup templates. Included with Data Director
are several optimized templates. When you create an organization, Data Director copies the system-defined
templates to the new organization. Organization administrators can modify the organization-specific template
instances or configure new templates.
You can create database templates and publish them immediately or publish them later. When a template is
not published, it can be viewed or managed, but cannot be used for provisioning or other purposes.
Database Configuration Templates
Database configuration templates define the computing and storage resources for creating a database, the
database settings, and the high availability settings. Each template defines resource settings and database
settings.
Resource Settings
VMware, Inc. 45
When you create a template, you can specify the number of virtual CPUs,
memory size, and recommended database storage allocation. You can enable
high availability for the template and all corresponding databases. You can also
choose the CPU and memory priority, which affects the allocation of resources
for all databases in the database group. The levels (high, medium, and low)
give certain databases higher priority than other databases in the same
database group. The CPU reservation and Memory reservation fields let you
explicitly reserve resources for each database you create from the template.
Page 46

VMware vFabric Data Director Administrator and User Guide
If you make changes to a template, databases that are already created from the
template are not affected.
Database Settings
Specify connection, memory, IO, WAL, checkpoint, logging, and other
information. When you create a template, the wizard includes defaults for each
value. The wizard also includes a database settings calculator. The calculator
prompts for usage information and changes the default based on that
information and the resource settings you specified on the first wizard pane.
You can create different templates for different situations. For example, you can define a configuration template
for engineering with a small memory size and have high availability disabled. The configuration template for
QA can be defined with a larger memory size and with high availability enabled.
Backup Templates
Backup templates define backup settings for databases. You can associate a backup template with a database
when you create the database, or you can associate a backup template with a database at a later time. See
“Select a Database Backup Template,” on page 81.
You can use one of the predefined backup templates for consistency across your organization. See “Backup
Template Settings,” on page 80.
You can also clone and customize an existing template and associate the custom template with your database.
You can customize frequency, start time, and retention for snapshots and for external backup. You can also
enable and customize point-in-time recovery, and you can specify a backup label. See “Create a Backup
Template,” on page 48.
Create a Database Configuration Template
You can create a database configuration template by cloning a template or by configuring a new template. In
both cases, you can specify the resource settings and the database settings for the template.
Only organization administrators or users with Manage Database Configuration Templates or Manage
Backup Templates privileges can create, edit, and delete templates.
Prerequisites
Log in to Data Director as an organization administrator or as an administrator with privileges to create and
modify templates.
Procedure
1 Click the Administration tab.
2 Click Templates, and click Database Configuration Templates.
3 Create a template or clone a template.
Creation Method Action
New template
Cloning
Click the green plus icon above the menu bar on the left.
Right-click an existing template and choose Clone.
4 In the Create Database Configuration Template wizard, type a name and description.
5 Specify whether you want to publish the template, and click Next.
When a template is not published, you can view or manage it, but you cannot use it for provisioning or
other purposes.
46 VMware, Inc.
Page 47

Chapter 6 Managing Database Templates
6 Enter resource settings for the template and click Next.
Option Description
vCPUs
High availability
Memory size
Recommended database storage
allocation
CPU and memory priority
Explicitly reserve resources for
databases created by this template
CPU reservation
Memory reservation
Number of virtual CPUs the database virtual machine will use.
Select Enable to protect the database with vSphere High Availability. See the
vSphere Availability documentation.
Amount of memory the database virtual machine will use.
Recommended storage allocation for this database.
Select Automatic to allow the vCenter Server system to allocate CPU and
memory to the virtual machine. If you select another value, the CPU priority
determines how unreserved CPU and memory resources are assigned to this
database as compared to other databases in this database group.
If checked, you can reserve resources for running databases. Reservations
guarantee that the database has the specified amount of CPU and memory
available.
Number of MHz to reserve for this database.
Number of MB to reserve for this database.
7 Specify the database settings by accepting the default settings, by using the Database Settings Calculator,
or by entering values explicitly, and click Finish.
Modify a Database Configuration Template
If the requirements for resources or other aspects of your environment change, you can modify existing
database configuration templates. Databases that you create from the new template will use the new settings.
Prerequisites
Log in to Data Director as an organization administrator or as an administrator with privileges to modify a
configuration template.
Procedure
1 Click the Administration tab.
2 Click Templates, and click Default Database Configuration Templates.
3 Right-click the template that you want to modify, and perform one of the supported actions.
Action Description
Clone
Delete
Unpublish
Edit Permissions
Properties
Creates a copy of this template. When you clone a template, the Create
Database Configuration Template wizard appears and you can configure the
resource settings and database settings for the clone.
Deletes the selected template.
Disables provisioning and other capabilities for this template. When a
template is not published, it can be viewed or managed, but cannot be used
for provisioning or other purposes.
Allows you to specify who can use this template, and what each user can do.
You can change the permissions for an existing user, remove an existing user,
and add a role. Users who can create a database from the template do not
automatically have permissions to modify the template.
Allows you to modify the settings that you specified when you created the
template. See “Create a Database Configuration Template,” on page 46 for a
discussion of the properties you can change.
VMware, Inc. 47
Page 48

VMware vFabric Data Director Administrator and User Guide
You can create databases with the new settings from the modified template. Databases you previously created
from the template do not change.
Create a Backup Template
Backup templates include frequently used backup settings. You can use one of the existing templates, clone
and customize a template, or create a template. You can then associate the backup template with a database
that you create.
The system-defined backup templates use recommended settings for different situations.
Prerequisites
Log in to Data Director as an organization administrator or as an administrator with privileges to create and
modify a backup template. See “Backup Template Settings,” on page 80 for information about system-defined
templates.
Procedure
1 Click the Administration tab.
2 Click Templates, and click Backup Templates.
3 Create a template or clone a template.
Creation Method Action
New template
Cloning
Click the green plus sign above the menu bar on the left.
Right-click one of the existing templates and select Clone.
4 In the Backup Template wizard, type a name and description for the template and click Next.
5 In the Backup Settings panel, specify the snapshot settings.
Option Action
Frequency
Start Time
Retention
Select one of the options from the menu. Select Never if you do not want
backups for databases that use this backup template.
Select Automatic to allow the system to control the start time, or enter a start
time. The system initiates a backup within two hours of the target start time,
depending on system load.
Select one of the available prespecified durations.
6 Specify the external backup settings.
Option Action
Frequency
Start Time
Retention
Select one of the options from the menu. Select Never if you do not want
backups for databases that use this backup template.
Select Automatic to allow the system to control the start time, or enter a start
time. The system initiates a backup within two hours of the target start time,
depending on system load.
Enter the number of hours or the number of copies to retain.
48 VMware, Inc.
Page 49

7 Specify the general backup settings.
Option Action
Point in time recovery
Backup label
Enable or disable point-in-time recovery.
Point-in-time recovery ensures that each database transaction is recorded
and enables you to revert the database to any point in time within a certain
time range.
The start time for point-in-time recovery is right after point-in-time recovery
is enabled, when the system creates a baseline backup or snapshot. You
cannot remove the baseline backup. If you do, the start time for point-in-time
recovery changes.
The time range for point-in-time recovery is from the time of your oldest
automatic backup to the present. The oldest backup can be an external
backup or a snapshot. Backups with extended retention are not supported
as oldest backups.
Point-in-time recovery consumes space in the backup storage area.
Depending on database load and retention lengths, this feature might require
a significant amount of storage.
Type the first part of the name of the backup.
Defaults to user-specified label-date_and_time-dbname. For your database
named db1, if you entered testbackup as the label and the backup starts at
12:30:45 on May 30, 2011, the full name is
testbackup-2011-05-30-12-30-45-db1.
If you do not specify a label, the system uses the date, time, and database
name.
8 Click Finish to complete creating the template.
Chapter 6 Managing Database Templates
What to do next
You can assign the template to databases.
Modify a Backup Template
If the requirements for backups in your environment change, you can modify existing backup templates.
Prerequisites
Log in to Data Director as an organization administrator or as an administrator with privileges to modify a
backup template.
Procedure
1 Click the Administration tab.
2 Click Templates, and click Backup Templates.
3 Right-click the template that you want to modify and perform one of the supported actions.
Action Description
Clone
Delete
Unpublish
Creates a copy of this template. When you clone a template, the Create
Backup Template wizard appears and you can configure the backup settings
for the clone.
Deletes the selected template.
Disables provisioning and other capabilities for this template. When a
template is not published, it can be viewed or managed, but cannot be used
for provisioning or other purpose.
VMware, Inc. 49
Page 50

VMware vFabric Data Director Administrator and User Guide
Action Description
Edit Permissions
Properties
You can create databases with the new settings from the modified template. Databases you previously created
from the template do not change.
Allows you to change the permissions for an existing user, to remove an
existing user, and to add a role.
Allows you to modify the settings you specified when you created the
template.
50 VMware, Inc.
Page 51

Managing Databases 7
Database administrators and application developers manage databases from creation to decommissioning and
deletion. The tasks include managing database entities and data, scheduling backups, and performing
recovery.
This chapter includes the following topics:
n
“Database Lifecycle,” on page 51
n
“Requirements for Creating Databases,” on page 52
n
“Create a Database,” on page 53
n
“Using Tags,” on page 54
Database Lifecycle
The database lifecycle includes database creation and resource allocation, managing the database schema and
data, performing backup and recovery tasks, and decommissioning databases. Database administrators and
application developers perform the database lifecycle tasks.
Create
Manage schema
Backup and restore
Clone
Scale up
Create and allocate resources to a new database using database configuration
templates. Database templates specify sets of database parameters, including
resource limits. Application developers can perform do-it-yourself database
creation using the templates. See “Requirements for Creating Databases,” on
page 52.
Administrators can grant permissions to their users that enable the users to
create databases from templates, but do not allow them to modify the templates
or change the default resource allocations. This restriction provides resource
limit enforcement and allows administrators to retain control of resource and
security policies. See Chapter 6, “Managing Database Templates,” on page 45.
Manage the database schema and add data. You can create tables, designate
primary and foreign keys and indexes, and create views, sequences, triggers,
and other database entities.
Safeguard your data by taking regular backups and testing your backups. See
Chapter 10, “Safeguarding Data,” on page 77.
Ensure access to consistent, yet isolated databases by cloning the database for
specific purposes such as development or quality assurance. See Chapter 8,
“Cloning Databases,” on page 57.
Dynamically increase the database size as required, during the development,
test, and production phases.
VMware, Inc. 51
Page 52

VMware vFabric Data Director Administrator and User Guide
Monitor performance
and usage
Stop and restart the
Use the Data Director user interface to monitor tasks and events. See
Chapter 11, “Monitoring the Data Director Environment,” on page 89.
Stop and restart, for example, to perform maintenance tasks.
database
Decommission the
database
Disable and then delete databases. Free up the resources when they are no
longer needed.
Every database requires a database owner account that can perform all schema management operations. This
account is specific to the database and cannot log in to Data Director. You can add database owner accounts
after database creation. Data Director users must log in with their database-specific credentials to view the
database, its entities, and its data or to perform database management tasks.
Database administrators and application developers can manage databases only if they have appropriate
permissions and roles granted to them by the organization administrator. The permissions and roles must be
granted on the database group or on the database, and apply only within the organization in which they are
granted.
Requirements for Creating Databases
You must have certain permissions to create databases, and you must calculate the storage needed for database
and related data.
Permissions Required for Creating Databases
To create databases, you need Create Databases permission on the database group that will contain the
database and Use Template permission on at least one database configuration template.
It is useful to have the following permissions on the database group and on the database.
n
Create snapshots.
n
Create external backups.
n
Delete snapshots and manage their retention time.
n
Clone the database.
n
Recover the database from a backup or snapshot.
The organization administrator can create a role with these permissions and assign users in the organization
to the role.
Calculating Database Storage Allocation
During the database creation process, you specify database storage allocation, point-in-time recovery storage
allocation, and the database group for the database. The database group provides the CPU, memory, storage,
and network resources required to run the database. The storage and point-in-time recovery allocations specify
how much of the database group's resources to use for this database.
When you calculate the amount of storage to allocate to the database, proceed as follows.
n
Estimate how much data will be stored in the database.
n
Consider the number of users and average expected number of transactions in a particular time period
and include room for growth.
n
If you plan to enable point-in-time recovery, calculate additional storage to accommodate the point-intime recovery write-ahead logs (WALs). The size of the allocation depends on the expected volume of
transactions on the database.
52 VMware, Inc.
Page 53

Chapter 7 Managing Databases
Database storage allocation is for the database data only. It does not include overhead for the operating system,
database software, swap space, or snapshots. You must have enough resources available to cover both the
database allocation and to cover any overhead. Even if the database group has enough free space for creating
a database, database creation does not complete if you do not have enough resources for the overhead.
Database Creator Permissions
After database creation finishes, the following permissions on the new database are granted to the database
creator.
Edit Database Info
Modify Database Users
Restart Database
View Database
Create a Database
When you need a database for a new application, you can create it with a database configuration template.
The template is configured to allocate resources to the database.
Prerequisites
n
Verify that you have access to the organization and database group in which to create the new database.
n
Verify that you have Create Databases permission on the database group in which you create the new
database.
n
Verify that you have Use Template permission on at least one database configuration template.
Procedure
1 Navigate to the organization and to the database group in which to create the database.
Enables the database creator to edit database properties such as the name,
description, and size of the database.
Enables the database creator to add or modify database users for this database.
Database users are granted full permission on this database.
Enables the database creator to add or modify database users for this database.
The database users are granted full permission on this database.
Enables the database creator to view the database.
2 Click the Manage & Monitor tab.
3 Click the Databases tab.
4 Click the plus (+) icon and specify the following information in the Create Database dialog box.
Text Box Action
Name and Description
Owner Account
Password
DB config template
Storage allocation
Backup template
VMware, Inc. 53
Enter a name and optionally, a description of the database.
Enter an owner account for the database. Each database requires an owner
who can perform all schema management operations. The owner account is
specific to the database and cannot log in to Data Director.
Enter and confirm the owner account password.
Select a database configuration template from the drop-down menu.
Database templates determine the initial size of databases and other
parameters, such as resources the database can consume. The create database
process calculates the default storage allocation values based on the
resources defined in the database template.
Select the storage allocation for this database. The minimum is 1GB. The
recommended (and default) value is 5GB.
(Optional) Select a backup template from the drop-down menu. You can
select a backup template for specific purposes, such as development, or select
no backups.
Page 54

VMware vFabric Data Director Administrator and User Guide
Text Box Action
Point-in-Time Recovery allocation
Encoding
Tags
Database group
5 Click OK.
The database appears in the Databases List with a status of Creating. The process can take a few minutes. The
status changes to Running when creation finishes successfully.
The following permissions are granted to the database creator after database creation finishes.
n
Edit Database Info
n
Modify Database Users
n
Restart Database
Select the number of gigabytes to allocate for point-in-time recovery
operations. The minimum is 1GB.
Select the encoding for the database from the drop-down menu. The default
is UTF8.
(Optional) Select one or more tags for this database. Use tags to filter the list
of databases that you view in an organization's Databases tab, for example,
all your customer relationship databases can have a tag called CRM.
Select the database group in which to create this database. Databases must
reside in one and only one database group.
n
View Databases
What to do next
You can load the database data and use the database.
Using Tags
Tags are text labels that users create and associate with databases. Users can create tags on any databases that
are visible to them. Tags provide a simple way to search for databases in a particular database group or
organization.
Users can see only the tags that they create.
Tags enable filtering the list of databases that appear in an organization's Databases tab. For example, a user
can create a tag called HR and associate the tag with all the HR databases in an organization. When that user
views the Databases tab, filtering on the HR tag displays only the databases with that tag.
You can associate a tag with a database during database creation. See “Create a Database,” on page 53. You
can also associate tags with an existing database.
Create a Tag
Tags provide a simple way to search for databases in a database group or organization.
Procedure
1 Log in to Data Director as an organization administrator.
2 Click the Manage & Monitor tab.
3 Click the Tags tab.
4 Click the plus (+) icon.
5 Type the name of the tag in the Create Tag dialog box and click OK.
54 VMware, Inc.
Page 55

Chapter 7 Managing Databases
Associate a Tag with an Existing Database
Tags support searches for databases. You can associate a tag with a database to help with searches for databases.
Procedure
1 Log in to Data Director as an organization administrator or as a user with Edit Database Info permission.
2 Click the Manage & Monitor tab.
3 Click the Databases tab.
4 Right-click a database to display the Actions menu and select Properties.
5 Click the Basic tab, select a tag in the Tags field, and click Edit.
6 Click the check box for the tag or tags to associate with the database and click OK.
VMware, Inc. 55
Page 56

VMware vFabric Data Director Administrator and User Guide
56 VMware, Inc.
Page 57

Cloning Databases 8
In Data Director, cloning a database is easy to configure and to perform. You have a choice of cloning operations
that include full database clone, linked database clone, and schema only clone. You can customize the clone's
database settings and backup settings during clone creation.
This chapter includes the following topics:
n
“Clone Types,” on page 57
n
“Cloning Customizations,” on page 59
n
“Clone a Database,” on page 59
Clone Types
Data Director allows you to clone databases and supports several clone types with different contents, storage
requirements, and performance characteristics.
You can create different types of clones depending on whether you need schema only, schema and data, full
database clones, or clones that take advantage of the linked clone technology. You can also create a clone that
includes neither schema nor data but includes the database settings and backup settings.
Schema Only Clone and Schema and Data Clone
If you create a schema only clone, none of the data in your database is cloned. If you create a schema and data
clone, the complete set of schema and data is included in the clone. In that case, you might have to run a script
over the clone to remove confidential data.
You can also clone only the configuration. In that case, the clone includes neither the schema nor the data.
Full Database Clones and Linked Database Clones
When administrators clone a database they can choose a full database clone or a linked database clone.
Full Database Clones
VMware, Inc. 57
A full database clone is a complete copy of the source database. Full clones
allow you to isolate the source and the clone. The isolation might be useful, for
example, if the source database cannot tolerate any performance degradation.
Creating a full clone is typically more time consuming than creating a linked
clone.
Page 58

staging
production
full database
clone
dev QA perf
staging
linked database
clones
VMware vFabric Data Director Administrator and User Guide
Figure 8-1. Full Database Clone
Linked Clones
Linked clones are two or more databases that share storage. The linked clone
technology supports efficient sharing of duplicate data. Linked clones use delta
disk backings. A delta disk backing is a virtual disk file that is located on top
of a standard virtual disk backing file. When one of the databases writes to disk,
the data is written to that database's delta disk. When one of the databases reads
from disk, the read process first checks the delta disk. If the data is not in the
delta disk, the database retrieves the information from the parent disk.
You can create a linked clone from a snapshot or from the current running point
but not from an earlier backup or from a specific point in the past. If you use
linked clones, the clone and the source database cannot change data disk size.
Figure 8-2. Linked Database Clone
Choosing a Full Clone or a Linked Clone
To choose the clone type most appropriate for your situation, consider these points:
n
n
n
VMware best practice is to first create a full clone of a production database to use it as a staging clone. Next,
58 VMware, Inc.
you create linked clones of the production system full clone, the staging system in the illustration. In this
scenario, potential performance degradation affects only the staging system clone and not the production
database.
Full clones require a longer time to create than linked clones.
Linked clones are much faster to create.
Linked clones do not support storage isolation. Having several linked clones can affect the performance
of the source database and the performance of the linked clones.
Page 59

Figure 8-3. Using a Full Clone as a Staging Clone
dev QA perf
staging
production
full database
clone
linked database
clones
Chapter 8 Cloning Databases
Cloning Customizations
You can customize a clone when you create it. You can specify new database configuration settings and backup
settings for the clone, choose the clone point, set an immediate backup, and set an expiration date for the clone.
When you clone an existing database, you can customize the clone to suit your needs. For example, start with
a staging database that requires frequent backups, a sizable storage allocation, and point-in-time recovery. For
developers, you can create a clone of the staging database that uses a development backup template.
The cloning process also allows you to choose the clone point, which is the point in time at which the clone is
created from the source database. You have the following choices.
n
Clone the current state of the source database.
n
Clone the source database as it was at a certain point in time. You can specify the date and time for this
operation.
n
Clone one of the backups of the source database.
Clone a Database
You clone a database to create an exact copy that you can use for testing or other purposes. When you start the
database cloning process, the Clone Database wizard prompts you for clone type and clone customization
information.
Prerequisites
Log in to Data Director as an administrator or as a user with Clone Database privileges.
Procedure
1 Configure the Clone Type on page 60
The clone type allows you to specify which data are cloned. You can also choose custom configuration
VMware, Inc. 59
settings and backup settings for the clone.
Page 60

VMware vFabric Data Director Administrator and User Guide
2 Configure the Database Settings of the Clone on page 61
When you clone a database, you can customize database attributes for the clone as part of clone creation.
3 Configure the Clone Point Settings on page 61
Data Director allows you to clone the current state of the database, clone a specific point in time, or clone
a backup of the database.
4 Configure Recovery Point and Expiration for the Clone on page 62
You can specify an expiration date and time for a clone if you anticipate that the clone will no longer be
useful at a certain date and time. Data Director displays an alarm when the clone expires. You can
configure clone expiration to also send an email to the administrator when the clone expires. Expiration
does not mean that Data Director stops or deletes the clone.
Configure the Clone Type
The clone type allows you to specify which data are cloned. You can also choose custom configuration settings
and backup settings for the clone.
As part of the cloning process, you decide whether to create a full clone or a linked clone. See “Clone
Types,” on page 57 for a discussion of the differences.
Prerequisites
Log in to Data Director as an administrator or as a user with Clone Database privileges.
Procedure
1 Right-click an existing database and select Clone to start the Clone Database wizard.
2 In the Clone Type panel, select the data to clone and the type of cloning process to use.
Option Description
Clone schema and data
Clone schema only
Do not clone schema or data
Clones both the database schema and all data. If you clone both schema and
data, you can select a full clone or a linked clone.
Clones the database schema. Does not clone the data.
Clones only the database settings and database backup settings. Does not
clone the schema, and does not clone the data.
3 Select the database configuration settings to use for the clone.
Option Description
Clone from source database
Choose a new template
Uses the current database settings of the source database. Click Customize
Settings to modify the source settings.
Allows you to select one of the available database templates. Select
Advanced selection to override one or more values of the existing template.
4 Select the backup settings to use for the clone.
Option Description
Clone from source database
Choose a new template
Uses the backup settings of the source database. Click Customize Settings
to modify the source settings.
Allows you to select one of the available templates. Select Advanced
selection to override one or more values of the existing template.
5 Click Next to continue to the Database Settings panel.
60 VMware, Inc.
Page 61

Chapter 8 Cloning Databases
What to do next
Specify the database settings information, or click Back to return to the Clone Type panel for modifications.
Configure the Database Settings of the Clone
When you clone a database, you can customize database attributes for the clone as part of clone creation.
Prerequisites
Complete the Clone Type panel of the Clone Database wizard described in “Configure the Clone Type,” on
page 60.
Procedure
1 In the Database Settings panel, specify a name for the clone database, or leave the default.
2 Type a description of the clone database.
3 If you specified Do not clone schema or data earlier, specify storage allocation or leave the default.
a Estimate the storage required for the data you expect to store in the database and enter that value for
storage allocation, or leave the default.
Database storage allocation is for the database data and does not include storage for operating system,
database software, swap allocation, or snapshots. The default is based on the size of the source
database.
b Specify the point-in-time-recovery storage allocation, which depends on the volume of transactions
that you expect.
The point-in-time-recovery allocation stores the WAL (write-ahead logs).
For other clone types, you cannot change storage allocation.
4 Select tags for the clone.
Tags support a mechanism for finding multiple databases that share the same tag. See “Using Tags,” on
page 54.
5 If you are creating a full clone or you are cloning the database settings, choose the database group to add
the clone to.
You cannot change the database group for linked clones.
6 Click Next to continue to the Clone Point panel.
What to do next
Specify the settings in the Clone Point panel, or click Back to return to the Clone Type panel for modifications.
Configure the Clone Point Settings
Data Director allows you to clone the current state of the database, clone a specific point in time, or clone a
backup of the database.
The available options for the clone point depend on the type of clone. For a clone of only database settings,
clone points are not supported.
The following table summarizes the available clone point options.
VMware, Inc. 61
Page 62

VMware vFabric Data Director Administrator and User Guide
Table 8-1. Clone Point Options
Clone Type Now Specific Point In Time (Snapshot) From Backup
Full Yes Yes Yes
Linked Yes Yes No
Schema only Yes No No
If you create a schema only clone, the database must be powered on. If you clone from a backup, see Chapter 10,
“Safeguarding Data,” on page 77.
Prerequisites
Complete the Clone Type and Database Settings panels of the Clone Database wizard.
Procedure
1 In the Clone Point Settings panel, specify the point from which to create the clone.
Option Description
Now
Specific point in time
Select a backup
Clones the current state of the database.
Clones the source database at a point in time based on the point-in-time
recovery settings for your database.
Clones the backup that you select. You can select the backup based on its
attributes.
Type
Retention
Backup label
Snapshot or External.
How long to keep the backup.
A unique label for the backup.
2 Click Next to continue to the Options panel.
What to do next
Specify the recovery point and expiration for the clone, or click Back to return to the Database Settings panel
for modifications.
Configure Recovery Point and Expiration for the Clone
You can specify an expiration date and time for a clone if you anticipate that the clone will no longer be useful
at a certain date and time. Data Director displays an alarm when the clone expires. You can configure clone
expiration to also send an email to the administrator when the clone expires. Expiration does not mean that
Data Director stops or deletes the clone.
Prerequisites
Complete the Clone Type, Database Settings, and Clone Point panels of the Clone Database wizard.
Procedure
1 (Optional) Specify an expiration time and behavior.
When a clone expires, Data Director displays an alarm. You can also set up Data Director to send an email
to the administrator. The administrator can then delete the clone.
2 Click Finish to complete clone setup.
Data Director creates a clone of the current database using the settings you specify.
62 VMware, Inc.
Page 63

Chapter 8 Cloning Databases
What to do next
Monitor the creation progress in the task bar on the right, or check the database list for the database group to
verify that the clone is created.
VMware, Inc. 63
Page 64

VMware vFabric Data Director Administrator and User Guide
64 VMware, Inc.
Page 65

Managing Database Entities 9
Managing vFabric Postgres database entities includes managing schemas and tables, administering the
database, and performing SQL management tasks.
To manage databases, you need database management and database operations permissions on the database.
Your organization administrator can create a role that grants the necessary permissions, and grant that role to
you.
See “Requirements for Creating Databases,” on page 52 and “Create a Database,” on page 53 for information
about creating vPostgres databases.
The following are database management and database operations-related privileges.
n
Edit Database Info
n
Edit Database Settings
n
Edit Database Resource Settings
n
Edit Database Backup Settings
n
Enable, Disable, and Delete Database
n
Start and Stop Database
n
Restart Database
n
Modify Database Users
n
Upgrade Databases
Permissions that you have on the organization apply to all database groups and databases in the organization.
Permissions on a database group apply to all databases in the database group.
Data Director supports the following types of management tasks.
Database Entity
Management
Database entity management includes creating, replacing, updating, and
deleting database entities. These database entities include schemas, tables,
views, indexes, functions, sequences, triggers, constraints, and users.
Database
Administration
VMware, Inc. 65
Database administration includes the following tasks.
n
Monitoring resource usage and database status.
n
Analyzing usage statistics and performance tuning.
n
Cleaning up stale data (vacuuming old data).
n
Migrating data to vPostgres databases.
Page 66

VMware vFabric Data Director Administrator and User Guide
n
Backing up databases.
SQL Management
SQL management tasks include SQL profiling, query plan analysis, running
ad-hoc queries or SQL scripts.
After you log in to an organization in Data Director, click the Manage & Monitor tab to view your database
groups and databases. You see a list of database groups to which you have access and the list of databases
within that database group. To view a database and its entities, double-click the database in the middle pane.
The database appears under the database group in the left pane. You can expand the database to view its
entities and the objects those entities contain, such as schemas and the number of tables, views, and other
objects.
You can perform administrative and SQL management tasks.
n
Monitoring database status and resource usage.
n
Alarms.
n
Status of tasks and events.
n
Viewing reports.
n
Checking the database logs.
n
Entering SQL queries.
n
Obtaining the JDBC connection string.
To manage a specific database entity or object, click the entity or object in the left pane. The entity or object
appears in the middle pane and you can perform management tasks.
This chapter includes the following topics:
n
“Database Entity Management,” on page 66
n
“Database Administration,” on page 70
n
“SQL Management,” on page 75
Database Entity Management
You can manage database entities such as databases, schemas, users, and roles from the Data Director Manage
& Monitor tab.
Managing database entities includes creating, altering, dropping, and browsing database entities such as the
following.
n
Schemas
n
Tables
n
Views
n
Columns
n
Indexes
n
Sequences
n
Constraints (primary, foreign, and unique key)
n
Users
Click any of the schema objects in the left pane to view a list of the objects in the middle pane. You can manage
individual objects from the middle pane.
66 VMware, Inc.
Page 67

Chapter 9 Managing Database Entities
Create a Schema
After you create a database, you set up its entities, starting with the database schema. You create vPostgres
database schemas from the Data Director Manage & Monitor tab.
Prerequisites
n
Verify that a database exists in which you can create schema.
n
Log in to Data Director as a user with database privileges.
Procedure
1 Click the Manage & Monitor tab.
2 Click your database group.
3 Double-click your database to select it.
4 Right-click the database name in the left pane, and select Create > Schema.
5 If a login prompt appears, enter the database login.
The database login is different from your Data Director login and might be, for example, the database
owner login name and password. This login is for database security purposes.
6 Enter the schema information.
Data Director creates the database schema.
What to do next
Create schema entities such as tables, triggers, users, and so on.
Create a Table
After you create a schema, you create tables to contain the schema's data. Create tables from the Data Director
Manage & Monitor tab.
You are a DBA or application developer setting up a database.
Prerequisites
You created a database and a schema.
Procedure
1 Log in to Data Director as a user with database privileges and click the Manage & Monitor tab.
2 In the left pane, click the arrow next to your database name to expand it.
3 Right-click the schema and select Create > Table.
The following tabs appear.
n
Basic Settings
n
Columns
n
Constraints
n
Auto Vacuum Settings
4 In the Basic Settings tab, enter information such as the table name, whether the name is case-sensitive,
and fill factor.
VMware, Inc. 67
Page 68

VMware vFabric Data Director Administrator and User Guide
5 You can now configure columns or exit the wizard.
n
Click Next to configure columns.
n
Click Finish to create the table.
6 (Optional) In the Columns tab, click Add to add a column, and complete the column fields.
a Type the column name.
b Select the column type.
Depending on the column type, you can specify a length or precision, and you can specify a default
value for the column.
c If users must enter a value for the column, select the Not Null check box.
d If the column is a primary key, select the Primary Keycheck box.
e Click Next to continue, or click Finish to create the column.
7 (Optional) In the Constraints tab, specify constraints that apply to the new column.
a Use the drop-down menu to select the type of constraint: Foreign key, Unique, or Check.
You can create foreign key constraints only if the schema has more than one table.
b Click Create to specify the constraint.
c Enter the conditions for the constraint, and click OK.
Data Director creates the constraint.
d Click Next to continue, or click Finish to create the column.
8 (Optional) In the Auto Vacuum Settings tab, specify settings for removing stale data from your table,
The default settings work well for most environments. For information about auto vacuum, see the
documentation on the Postgres.org site.
9 Click Finish to finish table creation.
Data Director creates the table.
Create a View
A view is a subset of related table data. For example, if you have a table that contains the locations of all
corporate offices throughout the world, you can create a view of all the offices in Europe, in California, or
Brazil. You create views from the Views tab in the schema pane.
Prerequisites
Verify that the table on which to create the view exists.
Procedure
1 Log in to Data Director as an organization administrator or user with database privileges and select a
database.
2 Click the Views tab.
3 Click the plus icon to create a view.
68 VMware, Inc.
Page 69

Chapter 9 Managing Database Entities
4 Enter the view properties.
a Enter a unique name in the Name field. If the name is case-sensitive, select the Case sensitive check
box.
b (Optional) To restrict who can modify the view, use the drop-down menu to select an owner for the
view definition.
c Enter a SQL query to define the view.
For example, if you are creating a view of your office_locations table named China Offices, you might
enter a query similar to the following to select all the office locations in China.
select office_name, addr1, addr2, addr3 from office_locations where country="China"
5 Click OK.
The view appears in the left pane under the Views icon.
What to do next
Examine the data in the view. See “Examine View Data,” on page 69.
Examine View Data
A view is a subset of related table data. After you create a view, you can examine the data in the view.
Prerequisites
Verify that a view is available. See “Create a View,” on page 68.
Procedure
1 Log in to Data Director as an organization administrator or user with database privileges.
2 In the Manage & Monitor tab, navigate to your schema, and click to select it.
3 Click the Views tab.
4 Double-click a view to select it.
5 Click the View Data tab.
Create a Constraint
Constraints enable you to reduce data entry errors by verifying data before inserting it into a table. Define
constraints on schema tables and columns from the Manage & Monitor tab.
You can create constraints when you create a table, or you can add them later. You can create the following
types of constraints.
n
Check constraint. Limits the values or value range that can be inserted in a column.
n
Unique constraint. Ensures that a column or set of columns is unique.
n
Primary key constraint. Uniquely identifies each row in a table. There can be only one primary key per
table.
n
Foreign key constraint. Points to a primary key in another table.
You enter SQL fragments to define a constraint.
Prerequisites
n
You are logged in to your organization as an organization administrator or user with database privileges.
n
The table on which to create the constraint already exists.
VMware, Inc. 69
Page 70

VMware vFabric Data Director Administrator and User Guide
n
You expanded the schema in the left pane, then selected Tables.
n
The middle pane shows the Tables pane.
Procedure
1 In the left navigation pane, expand the schema that contains the table for which you want to create a
constraint.
2 Click Tables. The Tables page appears in the middle pane with a list of the schema's tables.
3 Click the table to select it, then click the gear icon. The Actions drop-down menu appears.
4 Select Create > Constraint. The Constraint drop-down menu appears.
5 Click the type of constraint you want to create. A Constraint dialog appears.
6 Complete the dialog as appropriate for the constraint you're creating, then click OK.
Data Director creates the constraint.
Example: Create a Check Constraint
Check constraints evaluate to a Boolean value. Use check constraints to check whether or not a value entered
for a column meets a specific truth-type requirement. For example, suppose that you create a column that must
be a positive integer, such as a product price. You can create a check constraint to return TRUE when the
product price is greater than 0, and to return FALSE when the product price is less than 0. The check constraint
ensures that if a user tries to enter a negative product price, the data entry operation fails with a SQL error.
Enter a check constraint as follows.
1 In the Constraints tab, select Check from the drop-down menu, and click Create.
2 Enter a name for the constraint, such as check_positive_price, in the Name field.
3 Enter the constraint in the Check field. The constraint should be a simple equation; you do not have to
enter SQL. For example, product_price > 0.
4 Optionally enter a comment that describes the constraint.
5 Click OK. Data Director creates the constraint.
Database Administration
Database administration involves performing routine maintenance for vPostgres databases to ensure efficient
use of resources and to achieve optimum database performance. Users with appropriate roles and permissions
perform administrative tasks from the Data Director user interface.
Database administration tasks include the following.
n
Manage database properties to tune database performance.
n
Monitor database statistics such as resource utilization and database performance.
n
Manage database backup and restore operations.
n
Re-index data as databases change.
n
Cluster table data according to an index.
n
Recover unused space from tables and indexes (vacuum).
See Chapter 10, “Safeguarding Data,” on page 77 for information about backing up and restoring data. See
Chapter 6, “Managing Database Templates,” on page 45 for information about managing database
configuration templates and database backup templates.
70 VMware, Inc.
Page 71

Chapter 9 Managing Database Entities
Manage Database Properties
DBAs and application developers with appropriate privileges manage database properties such as storage
allocation, database name, and backup and configuration templates, and manage settings such as autovacuum, write-ahead log (WAL), and checkpoint frequency.
Database properties and settings control how the database operates. You can manage and adjust certain
settings, such as resource allocation, database connection limits, and whether and how often to perform
automatic tasks such as checkpoints and data vacuuming. You can view, but cannot change, database
properties such as the UUID and connection string.
Right-click the database name and select Properties. The dialog box contains the following tabs.
Basic
The Basic tab contains basic information about the database, including its
name, JDBC connection string, UUID, storage and point-in-time recovery
allocation, version, and tags. You cannot change the database name, JDBC
connection string, or the UUID. You can add a new dbowner account from the
Basic tab.
DB Configuration
The DB Configuration tab shows the database configuration settings and their
values, such as the number of vCPUs, CPU memory, priority, and reservation,
connection limits, IO and WAL settings, and checkpoint and auto-vacuum
settings. If you have appropriate privileges, you adjust the database
configuration settings from the DB Configuration tab.
Backup
The Backup tab shows the database backup settings and their values. When
you create a database, you choose a backup template. If you have appropriate
privileges, you can adjust or override the backup settings from the Backup tab.
View or Change Basic Database Properties
Basic database properties include the database name, its UUID, JDBC connection string, storage allocation, its
version, and database owner account. You can view and change the values for these properties.
Prerequisites
n
You are logged in to your organization as a DBA or application developer with appropriate privileges on
the database.
n
The database is running.
Procedure
1 Click the organization's Manage & Monitor tab and select the database group.
2 Right-click the database name, and select Properties.
3 Click the Basic tab and view the properties, using the scroll bar as necessary.
You cannot change the database name, UUID, or JDBC connection string.
4 To change the storage allocation for the database or point-in-time recovery, enter new values in the
Basic tab text boxes.
5 Add or change tags for the database.
a Click Edit next to the Tags text box.
b Enter tags, one per line.
c Click OK.
VMware, Inc. 71
Page 72

VMware vFabric Data Director Administrator and User Guide
6 To add a new database owner account, select the New owner account checkbox, and click Edit.
a Type the database owner account name and password .
b Type the password in the Confirm password field.
c Click OK to accept the new owner account.
7 Click OK to accept your changes.
Upgrade a Database
Upgrade your database to benefit from enhancements to vPostgres.
Prerequisites
n
You are logged in to your organization as a DBA or application developer with appropriate privileges on
the database.
n
The database is running.
Procedure
1 Click the organization's Manage & Monitor tab and select the database group.
2 Right-click the database name, and select Properties.
3 Click the Basic tab.
4 Click Edit in the Version text box.
If your database is already the latest version, the Upgrade text boxes are dim.
5 Select the Upgrade to latest version check box.
6 Specify a start time.
Start now is the default.
7 Click OK.
The upgrade proceeds.
Change Database Configuration Settings
When your database expands or when usage patterns change, you can adjust database configuration settings
to improve performance, provide more storage, and so on.
Prerequisites
n
You are logged in to your organization as a DBA or application developer with appropriate privileges on
the database.
n
The database is running.
Procedure
1 In the organization's Manage & Monitor pane, select the database group.
2 Right-click the database name, and select Properties.
3 Click the DB Configuration tab and view the current settings, using the scroll bar as necessary.
72 VMware, Inc.
Page 73

Chapter 9 Managing Database Entities
4 Click Edit.
The top section of the dialog box shows the database configuration templates. Some settings have dropdown menus from which you select new values, while others allow you to enter new values in text fields.
A restart icon marks the settings that require restarting the database to take effect.
n
To change resource settings, click the Resource Settings tab, and select the check box in the
Override column.
n
To change database settings, click the Database Settings tab, and select the check box in the
Override column.
You can use the Database Calculator to calculate new settings based on the current database usage
and requirements.
5 When you finish, click OK to close the DB Configuration dialog box.
6 Click OK to accept your changes.
7 If you changed settings that require a database restart, right-click the database name, and select Power >
Restart.
Change Database Backup Settings
As your database usage or backup requirements change, you can adjust your database's backup settings to
suit current usage patterns and database recovery requirements.
Prerequisites
n
You are logged in to your organization as a DBA or application developer with appropriate privileges on
the database.
n
The database is running.
Procedure
1 In the organization's Manage & Monitor pane, select the database group.
2 Right-click the database name, and select Properties.
3 Click the Backup tab and view the current backup settings, using the scroll bar as necessary.
4 Click Edit.
The top section of the Backup Settings dialog box lists the available database backup templates. The
bottom section shows the template settings and their current values.
5 Click the backup template that you want to adjust.
6 To adjust the backup template settings, select the check box in the Override column and adjust the settings.
7 When you finish, click OK to accept your changes.
8 Click OK to close the Properties dialog box.
Monitor Database Group and Database Statistics
Monitoring database statistics helps you to ensure that your databases run efficiently. The statistics enable you
to identify and troubleshoot problem areas, such as running low on resources, that might affect the ability to
meet service goals. You monitor database statistics by viewing resource usage and performance data in the
Manage & Monitor tab.
Data Director keeps statistics for database groups and for the databases within those groups. You must have
appropriate permissions on the organization, database group, or database to monitor statistics, run reports, or
assign permissions.
VMware, Inc. 73
Page 74

VMware vFabric Data Director Administrator and User Guide
Monitor Database Group Statistics
You can view resource usage, allocation, alarms, tasks and events, get reports, view permissions, and view a
statistics breakdown for databases within the database group. Monitoring database group statistics helps to
ensure that your database groups run efficiently, and lets you identify and troubleshoot problems that can
affect performance, such as resource availability. Monitor database group statistics from the Manage &
Monitor tab.
Prerequisites
n
You are logged in to the organization as an organization administrator or user with appropriate
permissions on the database group you want to monitor.
n
You are in your organization's Manage & Monitor tab.
Procedure
1 Click the database group in the left pane.
2 Click the appropriate tab to view the database group statistics you want.
n
In the Dashboard tab, view graphical representations of resource usage statistics for the database
group.
n
In the Alarms tab, view triggered alarms.
n
In the Tasks & Events tab, view tasks, events, and their status.
n
In the Permissions tab, view roles, assign roles, or grant permissions.
n
In the Reports tab, view database statistics reports or revise settings such as sampling intervals.
3 Click the Databases tab.
4 Click the database to select it.
5 Click the drop-down menu next to View, and select the statistics you want.
Resource Usage
Includes how much memory is in use, how much storage the database's
data, backups, and point-in-time recovery log use, the amount of storage
available to the database, any tags the database has, and the current
database status.
Resource Allocation
(Default) Includes the amount of storage allocated to this database for data
and point-in-time recovery, any tags in use, and the current database status.
Performance Statistics
Version
Includes average read/write times and transactions per second.
Includes whether upgrades or patches are needed and the vPostgres and
Data Director versions currently running.
Monitor Database Statistics
You can view statistics and access your database activity logs from the Databases tab.
Prerequisites
n
You are logged in to the organization as an organization administrator or user with appropriate
permissions on the database you want to monitor.
n
You are in your organization's Manage & Monitor tab.
Procedure
1 Click the database group that contains the database you want to monitor.
74 VMware, Inc.
Page 75

2 Click the Databases tab, and click the database you want.
3 Click the appropriate tab to view database-specific statistics.
n
In the Backup & Recovery tab, monitor backups and perform recovery operations.
n
In the Alarms tab, view warnings and alarms, such as health check and application status alarms.
n
In the Tasks & Events tab, view tasks, events, and their status.
n
In the Reports tab, view statistics reports or revise settings such as sampling intervals.
n
In the Logs tab, view the database activity log. You can also download the log from this tab.
n
In the Permissions tab, view roles, assign roles, or grant permissions.
SQL Management
Managing SQL includes developing and testing SQL queries and monitoring and tuning query performance.
You must have appropriate permissions on the schema and database to develop and manage SQL queries. You
can manage SQL from the schema page.
Enter and Run a SQL Query
Create and modify SQL queries.
Chapter 9 Managing Database Entities
Prerequisites
You are logged in to Data Director as a user with appropriate privileges on the database or schema.
Procedure
1 Click the Manage & Monitor tab and select the schema for which you want to manage SQL queries.
2 Click Enter SQL.
The SQL dialog box has the following sections.
n
Entry pane.
n
Output pane. Allows you to examine query output, examine the query's actual run time and cost,
view any output messages, and examine query run history.
3 Enter a query in the entry pane.
You can type or modify a SQL query, test the query, and analyze the query's execution plan before running
it.
n
Type the query in the entry pane.
n
Click Open to open a SQL script file.
4 Click Execute to run the query.
If the query runs successfully, data appears in the Output pane.
If the query does not run successfully, Data Director shows the error message in the Messages tab.
To cancel the query, click Cancel.
VMware, Inc. 75
Page 76

VMware vFabric Data Director Administrator and User Guide
View a Query Plan
Viewing a SQL query execution plan enables you to analyze query run time and cost to ensure that your queries
run as efficiently as possible.
Prerequisites
n
You are logged in to Data Director as a user with appropriate privileges on the database or schema.
n
You know how to enter and run a SQL query. See “Enter and Run a SQL Query,” on page 75.
Procedure
1 Click the Manage & Monitor tab and select the schema for which you want to view a query pane.
2 Select the schema, and click Enter SQL.
3 Enter a SQL query in the entry pane, or click Open to open a SQL script file.
4 Click Execute to run the query.
5 Click Explain to view the query plan, run time, and CPU cost.
What to do next
Adjust the SQL query, rerun, and reexamine the query plan as necessary to tune performance.
76 VMware, Inc.
Page 77

Safeguarding Data 10
Data Director provides several options for managing backups and recovering databases.
Taking regular backups of your databases is essential to safeguarding your data. Data Director tracks and
stores changes for each database on a virtual disk associated with that database. Back up your database to
capture the changes, preserves the database, and enables recovering the database and restoring its data after
a failure. You can also restore the database to its state at a particular time and replay changes to troubleshoot
a problem.
Data Director offers the following features for safeguarding data:
n
Manual and automated external and snapshot backups.
n
Database recovery from external and snapshot backups.
n
Point-in-time recovery
You can define backup retention time and storage allocation. You can use one of the predefined backup
templates or create custom backup templates to ensure consistent backups of your databases and to enforce
resource limitations.
This chapter includes the following topics:
n
“Backup Strategies,” on page 78
VMware, Inc.
n
“Backup Types,” on page 78
n
“Backup Template Settings,” on page 80
n
“Preconfigured Backup Templates,” on page 81
n
“Select a Database Backup Template,” on page 81
n
“Schedule Regular Database Backups,” on page 82
n
“Recover a Database,” on page 83
n
“Import Backups,” on page 84
n
“Use VMware Data Recovery for Backups,” on page 84
n
“Database End of Life and Backups,” on page 87
77
Page 78

VMware vFabric Data Director Administrator and User Guide
Backup Strategies
Backup strategies center on your business requirements for protecting your data. Database backup strategies
vary according to business requirements and the database environment, such as production, development, or
QA.
For example, for a production database with a high transaction volume and business rules that require the
highest possible database resiliency, you might define the following backups:
n
Take full external backups twice a day.
n
Take database snapshots every hour.
n
Enable point-in-time recovery to keep a continuous log of all transactions as they occur on the running
database.
n
Retain your full backups for a month or more.
If your business rules state that you must preserve every transaction, you can specify that the database must
shut down if the point-in-time recovery's write-ahead log runs out of space. For a development database where
data loss is not a concern, you might take full external backups every week with daily snapshot backups and
point-in-time recovery disabled.
You can initiate backups manually (one-time backups) or automatically (recurring backups). Backup methods
are snapshots and external (full database backup). You can enable point-in-time recovery. Depending on your
business rules, you can set up automated backups and use a combination of backup methods to safeguard
data.
You set up automated backups by attaching a database backup template to your database. Backup templates
contain backup and recovery settings. You can select a database backup template during database creation or
attach a template at a later time. You can also attach a different backup template at any time. If you have
sufficient privileges, you can modify the template settings or create custom backup templates. The backup
process picks up the latest settings the next time it runs. The modified settings do not affect backups that are
in progress.
Using database backup templates ensures that you can take consistent database backups, meet recovery goals,
and enforce your business rules. Data Director provides preconfigured database backup templates that provide
a range of backup and recovery settings. If you are not sure how much storage your backups will require, start
with the most conservative settings. You cannot decrease the backup storage allocation, but you can increase
it. Monitor the database activity and the backup size until you have a good idea of the workload and backup
space needed, and then adjust the storage amount.
Backup Types
You manage backups and recover data using Data Director snapshot backups, external backups, and pointin-time recovery.
n
External Backups on page 79
External backups are full copies of the database saved to a datastore separate from the database. This
section describes the pros and cons of using external backups.
n
Snapshot Backups on page 79
Snapshot backups capture the changes to the database after the snapshot is taken. Snapshots initially use
less storage than external backup files and take just a few minutes regardless of database size.
n
Point-In-Time Recovery on page 79
If point-in-time recovery (PITR) is enabled, a write-ahead log (WAL) continuously records every change
made to the database while the database is running. In the event of a failure, you can replay the WAL to
restore the database to its state at a point in time within the retention period of the database backups.
78 VMware, Inc.
Page 79

Chapter 10 Safeguarding Data
External Backups
External backups are full copies of the database saved to a datastore separate from the database. This section
describes the pros and cons of using external backups.
External backups use about the same amount of storage as the database itself. Because they reside on a separate
disk from the database, external backups provide resiliency and benefits such as the following.
n
External backups protect against data loss due to failure of the primary data storage device.
n
External backup storage is more cost effective than using the primary data storage for backups.
n
You can extend the data disk as needed.
The following are points to consider about using external backups.
n
External backups can take a long time. Large amounts of data must be copied across devices.
n
Each backup uses the full size of the data disk on the backup storage device.
Snapshot Backups
Snapshot backups capture the changes to the database after the snapshot is taken. Snapshots initially use less
storage than external backup files and take just a few minutes regardless of database size.
Snapshot backups are stored in files called delta files or delta disks on the same data store as the database.
The following are points to consider about using Snapshot backups.
n
Because snapshots reside on the same data store as the database, they do not protect against data loss due
to failure of the data storage.
n
As the database changes, the changes require more and more space on the virtual disk. That space is
generally more expensive than backup storage.
n
The recovery process from snapshots is not faster than the recovery process from an external backup.
n
If you have snapshots, you cannot extend the data disk.
Point-In-Time Recovery
If point-in-time recovery (PITR) is enabled, a write-ahead log (WAL) continuously records every change made
to the database while the database is running. In the event of a failure, you can replay the WAL to restore the
database to its state at a point in time within the retention period of the database backups.
The WAL logs are archived and are subject to a retention period that you set. The time range for point-in-time
recovery is from the time of your oldest backup to the present. The oldest backup can be an external backup
or a snapshot.
By default, PITR is disabled. If you enable PITR, consider the following points.
n
Because every change to the database is recorded, PITR requires additional storage. Depending on how
large your database is and how many transactions occur during the WAL archive retention time, the
amount of storage needed can be large.
n
PITR has a performance impact on the database and on Data Director as a whole. The impact depends on
the size of the database and the volume of database activity.
Start with a conservative storage allocation. You cannot decrease the storage allocation, but you can increase
it. Monitor the size of the PITR logs until you understand the workload and storage needed, and adjust the
storage amount.
You can specify whether to suspend the database or automatically increase the log retention period if PITR
runs out of space.
VMware, Inc. 79
Page 80

VMware vFabric Data Director Administrator and User Guide
When you enable PITR, Data Director creates a baseline external backup. The default retention period is
forever. You can change the baseline backup's retention period from the database Properties dialog box's
Backup tab.
Backup Template Settings
Data Director backup templates contain backup settings that use a combination of methods to safeguard data,
provide consistent database backups, and enforce limits on resource consumption. You can use the default
backup template settings or adjust the settings to suit your business requirements.
Each database backup template contains settings for snapshot backups, external backups, and point-in-time
recovery.
External Backup Settings
Frequency
Start time
Retention
Snapshot Backup Settings
Frequency
Start time
Retention
How often to take backups. Settings are every 12 hours, daily, weekly, monthly,
or never.
Automatic means the system controls the backup start time. If you specify a
start time, each external backup will be initiated within two hours of the target
start time depending on system load.
How long to keep the external backup. Retention time settings are 1 day, 1
week, 2 weeks, 1 month, 6 months, or 1 year.
How often to take backups. Settings are every 4, 8, 12, or 24 hours, or never.
Automatic means the system controls the backup start time. If you specify a
start time, each snapshot backup will be initiated within 10 minutes of the target
start time depending on system load.
Select how long to keep the snapshot backup, or select how many copies of
snapshot backups to keep.
n
You can retain snapshot backups for 4, 8, 12, 24, or 48 hours.
n
The number of copies of snapshot backups that you can keep varies
according to the Frequency setting. You can keep from one copy up to as
many copies of snapshot backups as are taken in a 24-hour period.
Table 10-1. Snapshot Backup Copies to Keep per Backup Frequency Setting
Take Snapshot Backups
Every.... Copies to Keep
4 hours 1-12 copies
8 hours 1-6 copies
12 hours 1-4 copies
24 hours 1-2 copies
80 VMware, Inc.
Page 81

Point-In-Time Recovery (PITR) Settings
Chapter 10 Safeguarding Data
Enabled or disabled
Recommended point-intime recovery storage
allocation
If storage runs out
Enable point-in-time recovery to continuously record each change to the
database in a write-ahead log (WAL) while the database is running. In the event
of a failure, you can replay the WAL to restore the database to its state at a point
in time within the retention period of the database backups.
The recommended storage amount is based on the database size and storage
allocation. You can accept the recommendation or enter a different amount.
Select whether to suspend the database or adjust the point-in-time WAL
retention period.
Backup Label
The backup label can be any text that helps you identify the backup. The format is backup labelyyyy:mm:dd:hh:mm:ss-dbname.
Preconfigured Backup Templates
The preconfigured backup templates enable you to standardize your database backups and enforce resource
limitations. Organization administrators and organization users with sufficient privileges can modify the
templates' default settings or create custom backup templates.
For more information, see Chapter 6, “Managing Database Templates,” on page 45.
Data Director includes the following preconfigured backup templates. Each template has system-controlled
start times.
Disabled.
Development.
Auto.
Standard.
Maximum.
No backups are taken.
Schedules snapshot backups every 24 hours and external backups each week.
PITR is disabled.
Schedules snapshot backups every 12 hours with retention period of 24 hours
and external backups each day. External backup retention time is 1 month. PITR
is enabled. If PITR storage runs out, the available PITR timeline is adjusted and
the oldest archived WAL segments are deleted automatically.
Same settings as Auto. If PITR storage runs out, the database is suspended.
Schedules snapshots every 4 hours with retention period of 48 hours, and
external backups taken every 12 hours with retention time of 1 month. PITR is
enabled. If PITR storage runs out, the database is suspended.
Select a Database Backup Template
You can associate a backup template with your database as part of database creation, or you can select a backup
template later. Databases must be associated with a backup template to enable scheduling regular backups.
See “Preconfigured Backup Templates,” on page 81 and “Backup Template Settings,” on page 80 for
information on the settings in the preconfigured templates.
Prerequisites
Log in to your organization as a user with at least the following privileges.
n
Use Templates
VMware, Inc. 81
Page 82

VMware vFabric Data Director Administrator and User Guide
n
Create Snapshots
n
Create External Backups
Procedure
1 Navigate to your database's Properties window.
a In your organization, click the Manage & Monitor tab.
b Select your database group, and click the down arrow to display the list of databases.
c Right-click your database name and select Properties.
2 Click the Backup tab, and click Edit.
3 Click the name of the backup template to associate it with your database.
What to do next
Schedule regular database backups in the Details - Current Backup Configuration pane.
Schedule Regular Database Backups
To set up an automated schedule of backups of your database, you can specify the backup settings in the
database's Properties window. You protect your data when you set up an automated database backup
schedule.
Prerequisites
Verify that your database is associated with a database backup template. See “Select a Database Backup
Template,” on page 81.
Log in to your organization as a user with at least the following privileges.
n
Use Templates
n
Create Snapshots
n
Create External Backups
n
Use Template
Procedure
1 Navigate to your database's Properties window.
a Click the Manage & Monitor tab.
b Select your database group, and click the down arrow to display the list of databases.
c Right-click your database name, and select Properties.
2 Click the Backup tab and click Edit.
3 To view the backup templates' configuration settings, click the backup template's name in the Backup
Templates pane.
The backup template configuration settings appear in the Details pane, and <Current Backup
Configuration> is replaced with the name of the template. If you have the Manage Backup Templates
privilege, you can override the template settings.
a Select the check box in the Override column.
b Adjust the settings for each type of backup.
82 VMware, Inc.
Page 83

c (Optional) Enable or disable point-in-time recovery.
d (Optional) Specify a backup label.
4 Review your backup settings and click OK to confirm.
What to do next
To view a list of backups and the status of each backup, open the database by double-clicking the database
name in the Manage & Monitor tab. Click the Backup & Recovery tab in the middle pane. The list of database
backups appears in the Backup List section.
To review the backup schedule, click the Backup Schedule link.
To take a one-time manual backup, right-click the database name in the navigation pane and select Take
Manual Backup.
Recover a Database
Your ability to recover databases depends on scheduling regular backups. You can recover databases from
backups taken using Data Director or from external backups taken using utilities such as VMware Virtual Data
Recovery (VDR).
Regularly scheduled backups ensure that you can recover your databases and restore your data in the event
of system failure or data corruption. See “Schedule Regular Database Backups,” on page 82.
Chapter 10 Safeguarding Data
The recovered database is a full copy that is independent from any previously taken snapshot backup or clone
database. A side-effect of this process is that you have a database that can be resized. Databases with snapshot
backups or linked clones cannot be resized.
Prerequisites
Log in to Data Director as a user with appropriate privileges.
n
Create Snapshots
n
Create External Backups
n
Delete Snapshots
n
Delete External Backups
n
Recover
Procedure
1 In Data Director, select the organization and click the Manage & Monitor tab.
2 In the navigation pane, select your database group, and click the down arrow to show the list of databases.
3 Right-click your database name and select Recover.
4 In the Recover dialog, select recovery options, depending on your setup.
5 Click OK to start the recovery process.
The database is unavailable while the recovery operation is in progress.
Data Director takes a complete backup of your restored database after database recovery finishes. This postrestore backup becomes your baseline backup.
VMware, Inc. 83
Page 84

VMware vFabric Data Director Administrator and User Guide
Import Backups
If the retention period of a backup set has expired, the backup set is no longer in the Data Director backup
storage archive. Data Director has no record of such a backup set and does not recognize it. To use an expired
backup set, you must import it into Data Director and associate it with a database.
For example, suppose that you archive backup sets to tape just before they expire as part of your disaster
recovery policies. You can later restore the archived backup sets from tape to your active system. Use the import
backups feature to locate and import the backup sets, and use the imported backup sets to restore your
database. The imported backup sets have a retention policy of Forever.
You can use the import database backup feature with a VMware backup solution such as VDR to implement
an extended backup and restore solution. See “Use VMware Data Recovery for Backups,” on page 84.
Prerequisites
Log in to Data Director as a user with the appropriate privileges.
n
Create Snapshots
n
Create External Backups
n
Delete Snapshots
n
Delete External Backups
n
Recover
Procedure
1 In Data Director, click the organization's tab and in the navigation pane, expand the relevant database
group to view the databases.
2 Right-click the database for which to import the backup, and select Import Backups.
3 Select the backup to import from the list and click OK.
The imported backup appears in the list of database backups when the import finishes.
Use VMware Data Recovery for Backups
Data Director packages external database backups as virtual machines. You can use any VMware virtual
machine backup technology as an extended backup solution. One of the choices for backups is the extended
backup process supported by the VMware Data Recovery (VDR) appliance.
VDR is available as an appliance for VMware vSphere and operates on vSphere resources. See the vSphere
Documentation Center for VMware Data Recovery documentation.
You can configure VDR to backup the database group's entire Backup resource pool so that VDR backs up
newly created backups. When you add a new database group, manually configure VDR to backup the new
database group's backup resource pool.
Procedure
1 Install and Connect to the VMware Data Recovery (VDR) Appliance on page 85
The VDR appliance is an optional appliance that may not be installed in your vSphere system. Verify the
VDR appliance installation, install the appliance if necessary, and then connect to VDR.
2 Take External Backups with VMware Data Recovery on page 85
You can use VMware Data Recovery (VDR) to take external backups of your Data Director virtual
machines.
84 VMware, Inc.
Page 85

Chapter 10 Safeguarding Data
3 Restore a VMware Data Recovery Backup on page 86
Before you can import a VMware Data Recovery (VDR) backup, you must restore the backup in vSphere
Client.
4 Import VMware Data Recovery Backups on page 86
After you restore a VMware Data Recovery backup, you can import that backup into Data Director.
Install and Connect to the VMware Data Recovery (VDR) Appliance
The VDR appliance is an optional appliance that may not be installed in your vSphere system. Verify the VDR
appliance installation, install the appliance if necessary, and then connect to VDR.
You plan to take external backups of the Data Director virtual machines using VDR.
Procedure
1 Log in to vSphere Client as an administrator.
2 Verify that VDR is installed.
a Click Home.
b Check the Solutions and Applications section for the VMware Data Recovery icon.
If VDR is not installed, follow the instructions in the vSphere Documentation Center. You must install the
client plugin and the appliance.
3 Connect to the VDR appliance.
a Click Home.
b In the Solutions and Applications section, click the VMware Data Recovery icon.
c In the Welcome page, click Connect to connect to VDR.
Take External Backups with VMware Data Recovery
You can use VMware Data Recovery (VDR) to take external backups of your Data Director virtual machines.
Prerequisites
Log in to the vSphere Client with administrator privileges and connect to the vCenter Server system where
you installed VDR.
Procedure
1 On the VMware Data Recovery main page, click the VDR Backup tab and click New.
2 Enter a unique name for the backup in the Name text box and click Next.
3 Select the backup datastore associated with the database group's resource bundle.
4 Select a backup storage location for your backup from the list of storage devices and click Next
5 In the calender, select or deselect days and hours during which the backup can run and click Next.
6 Select the retention period for the backup and click Next.
7 Review the backup settings and click Finish to start the backup.
The backup begins. The process can take some time to complete. When the process finishes, you can see the
backup virtual machine in your database group's backup resource pool.
VMware, Inc. 85
Page 86

VMware vFabric Data Director Administrator and User Guide
Restore a VMware Data Recovery Backup
Before you can import a VMware Data Recovery (VDR) backup, you must restore the backup in vSphere Client.
Prerequisites
Log in to the vSphere Client with administrator privileges and connect to the vCenter Server system where
you installed VDR.
Procedure
1 In vSphere Client, connect to VDR and click the VDR Restore tab.
2 Click the Restore link.
3 Select the database backup to restore.
a Expand your database group's resource pool.
b Expand the Backup resource pool.
c Select the check box next to the backup to be restored.
d Click Next.
4 Click through the inventory list to select the location for the restored backup (the datastore of the virtual
machine and the data.vmdk file that you want to restore), and click Next.
5 Review the restore settings, and click Restore.
The restore begins. The process can take some time to complete. When the process finishes, you can see the
restored backup virtual machine in the vSphere inventory.
Import VMware Data Recovery Backups
After you restore a VMware Data Recovery backup, you can import that backup into Data Director.
Prerequisites
Restore a VDR backup.
Procedure
1 In vSphere Client, power off the backup virtual machine.
2 Log into Data Director as an organization user with database backup and restore privileges for the database
that you want to restore.
3 In the Manage & Monitor tab, expand the database group, then select the database to restore.
4 Right-click the database name and select Import Backups.
5 Select the backup to import.
Data Director imports the backup.
86 VMware, Inc.
Page 87

Database End of Life and Backups
When you decommission and delete a database, you decide whether to retain its backup files. The decision is
based on your site's policies and whether you might need the database in the future.
When you delete a database, you can retain all external backups. The backups expire at the end of the normal
retention period. It is good practice to take a final backup of a database and specify the final backup's retention
period before you delete a database. If you retain the external backups, the snapshots and the executable
instance of the database are deleted. If the deleted database had point-in-time recovery enabled, all the archived
write-ahead log (WAL) segments are deleted as well. This means that the only way to recover the database is
by using the external backups. You cannot recover the database using snapshots or point-in-time recovery.
If you do not retain the external backups, the database and its associated backups, snapshots, and WALs are
deleted. In addition, the database resources are released, and the database cannot be restored.
Chapter 10 Safeguarding Data
VMware, Inc. 87
Page 88

VMware vFabric Data Director Administrator and User Guide
88 VMware, Inc.
Page 89

Monitoring the Data Director
Environment 11
System administrators can examine current resource usage, monitor events and alarms, view and download
reports about their environment, and create diagnostic packages for individual databases and for the system
itself. Organization administrators can examine how different database groups and databases use resources,
and can view and monitor events and alarms for their organization.
This chapter includes the following topics:
n
“Explore Monitoring Customization and Filtering,” on page 89
n
“Monitoring for System Administrators,” on page 90
n
“Monitoring for Organization Administrators,” on page 95
n
“Explore Database Monitoring,” on page 99
n
“Working with Alarms,” on page 100
Explore Monitoring Customization and Filtering
Customize your monitoring setup to find information quickly. Some of the customization and filtering tasks
are the same for both system administrators and organization administrators.
You can explore how to optimize screen areas and how you can quickly find information by using filters.
Filtering is not supported in all panels.
Prerequisites
Log in to Data Director, as the system administrator or as an organization administrator.
Procedure
1 Click the Manage & Monitor tab and click Reports.
2 Click Summary Reports or Time Interval Reports to display only one type of report and view the icons
above the filter options.
Icon Description
The gear-shaped Action icon lets you choose an action. Available actions
differ for different panels. For example, the Reports panel lets you download
all reports or to download a selected report.
The blue Reload icon lets you redisplay the current page.
VMware, Inc.
89
Page 90

VMware vFabric Data Director Administrator and User Guide
3 Explore the Filter text box in the right corner.
a Type a search term to search the current items.
For example, search all tasks for the term Delete.
The search includes the currently displayed items and the list of available items.
b To filter which columns are searched, click the down-triangle, deselect checked boxes for columns
you do not want to search, and click OK.
When you perform the next search, only the selected columns are searched.
4 Explore how to view a panel.
Action Action
To reduce a panel
To expand and shrink a panel
To close a panel
To open a closed panel
5 Explore the sidebar.
Click the down-facing triangle to the left of the panel name to reduce the
panel to its title.
Click the expand icon to expand a panel, and click the shrink icon to
return the panel to its original size and position.
Click the X icon ( ).
Click the Customize button in the dashboard's top right corner to select the
panel's check box.
The sidebar can include a panel for tasks, a panel for alarms and, in certain contexts, an SQL window.
Task and alarm information is limited to the most recent tasks and alarms. You can collapse the side bar
with the right-facing triangles and expand it with the left-facing triangles .
What to do next
System administrators can see “Monitoring for System Administrators,” on page 90. Organization
administrators can see “Monitoring for Organization Administrators,” on page 95.
Monitoring for System Administrators
The vFabric Data Director interface includes a set of monitoring and diagnostic tools for system administrators.
Administrators can see system health information; explore how organizations use resources; view system-level
events, alarms, and reports; and generate diagnostic packages for individual databases and for the system
itself.
The information Data Director displays for system administrators differs from the information available to
organization administrators. System administrators can use the following resources for monitoring overall
system health.
Dashboard Tab
In the Dashboard tab, system administrators can see system health information
and a system overview. Overview information includes the number of users,
number of resource bundles, and number of organizations. Administrators can
also see the total CPU and memory capacity and the total database storage and
backup storage allocation for this instance of vFabric Data Director. The
90 VMware, Inc.
Page 91

Chapter 11 Monitoring the Data Director Environment
dashboard includes information about the top five consumers of resources.
Administrators can customize the Dashboard to change the sampling and to
add or remove the information displayed. See “Explore System Dashboard
Customizations,” on page 91.
Manage & Monitor Tab
In the Manage & Monitor tab, system administrators can view alarms and
define new alarms, view tasks and events, and configure, display, and
download reports. System administrators can display reports for the
organization or for a resource bundle and filter the sampling interval, time
range, and other fields. See “Explore Monitoring Customizations for System
Administrators,” on page 92.
Administration Tab
In the Administration tab, system administrators can create a diagnostic
package for one or more databases and for the system itself. Diagnostics
packages are for use by VMware Support.
Tasks and Alarms Side
Bar
The tasks and alarms side bar, in the right panel of the main page by default,
displays recent tasks and alarms. The Manage & Monitor tab includes more
details about tasks and alarms.
Explore System Dashboard Customizations
Exploring system dashboard customizations allows you to see available options. You can customize the
dashboard to suit your needs.
The system administrator dashboard differs from the organization administrator dashboard. See “Explore
Organization Administrator Dashboard Customization,” on page 96 if you are an organization administrator.
Prerequisites
Log in to Data Director as a user with system administrator privileges.
Procedure
1 Click the Dashboard tab.
2 Click the link for Organization Stats or Resource Bundle Stats.
n
Click Organization Stats to evaluate resource usage for the top five organizations.
n
Click Resource Bundle Stats to evaluate resource usage for the top five resource bundles.
3 Review the Overview panel.
The panel displays information about all items in the system, about the total CPU and memory capacity,
and about database storage and backup storage allocation. You can click an object to display it.
4 Review the System Health panel below the Overview panel.
The System Health panel gives you access to the status of the different servers, systems, and networks.
n
A green icon indicates no problems exist.
n
A yellow icon warns of potential problems.
n
A red icon indicates that a problem exists. vSphere services such as HA remedy the problem but
certain tasks cannot be performed while the icon is red.
5 View the Top 5 CPU Usage panel.
You can customize the view to show information for 24 hours, 3 days, or 1 week.
6 To see the organization or resource bundle for which the information is displayed, click the name of the
organization or resource bundle.
VMware, Inc. 91
Page 92

VMware vFabric Data Director Administrator and User Guide
7 Change the sampling by choosing from the Sampling drop-down menu.
Option Description
Average
Minimum
Maximum
Average value for the sampling period.
Minimum value for the sampling period.
Maximum value for the sampling period.
What to do next
Customize the dashboard to meet your needs.
Explore Monitoring Customizations for System Administrators
Explore monitoring customizations to learn about available options. You can then customize the Manage &
Monitor tab.
The system administrator Manage & Monitor tab differs from the organization administrator Manage &
Monitor tab. See “Explore Monitoring Customizations for Organization Administrators,” on page 97 if you
are an organization administrator.
Prerequisites
Log in to vFabric Data Director with system administrator privileges.
Procedure
1 Click the Manage & Monitor tab in the Data Director client.
2 Click Organizations to display all organizations and the resource allocation for each organization.
You can click an organization name to display details about the organization.
3 Click Alarms in the panel on the left, and select either the Triggered alarms tab or the Definitions tab.
Option Description
Triggered alarms
Definitions
Includes alarm severity, description, definition, and the target object. To
acknowledge an alarm, right-click the Acknowledged By text box and select
Acknowledge. If more than one system administrator monitors Data
Director, the acknowledgement mechanism allows them to communicate
that someone knows about the alarm.
Includes the trigger type (event or performance), the alarm name and alarm
trigger, where the alarm was define, the object the alarm is monitoring, who
defined the alarm, and the alarm status. You can create custom alarms from
this tab. See “Create a Custom Alarm,” on page 100.
92 VMware, Inc.
Page 93

Chapter 11 Monitoring the Data Director Environment
4 Click Tasks & Events in the panel on the left, and click either Tasks or Events.
Option Description
Tasks
Events
Tasks are scheduled system activities requested by the system or a user, for
example, Create database and Repair database. A task can succeed or fail.
The Tasks tab includes information about the target and the user who
initiated the task.
Information such as related events appear in the Details panel below the
Tasks table. A task can have no related event or one or more related events.
Click the event in the Details panel to view the event in the Tasks &
Events tab.
For certain tasks, a right-button menu allows you to cancel or retry the task.
Events are records of user actions or system actions. For example, the system
logs when a user logs in to Data Director, or when a database is repaired.
Events can be of type info, error, or warning. Use Hide Info Events to limit
the choices. You can filter the Events pane to show only some of the columns.
Information such as related tasks appear in the Details panel below the
Events table. An event can have no related tasks, or one related tasks. Click
the task in the Details panel to view the task in the Tasks & Events pane.
5 Click Reports, and click Summary Reports or Time Interval Reports.
6 Use the filter options below the Action and Reload icon to customize what the system displays.
The customization steps depend on the report type.
Report type Action
Summary Report
Interval Reports
a Select Resource bundle or Organization from the Type drop-down
menu and click Browse.
b Select the specific resource bundles or organizations for which you want
to generate a report. By default, no objects are selected.
c Select a time range, or click Customize to configure a custom time range.
d Select Compute & Network or Storage to focus the report.
e Click the Filter button to filter the report.
f Click the Action icon and select Download to download the report.
a Select Resource bundle or Organization from the Type drop-down
menu and click Browse.
b Select the resource bundles or organizations for which you want to
generate a report.
c Select a sampling interval.
d Select a time range or click Customize to configure a custom time range.
e Select Compute & Network or Storage to focus the report.
f Select the sampling mechanism from the Sampling drop-down menu.
g Click the Filter button to filter the report.
h Click the Action icon and select Download to download the report.
7 Click Resource Bundles or Datastore Usage to display all resource panels or all data stores and
corresponding usage information.
What to do next
Customize the Manage & Monitor options, or customize and download reports.
VMware, Inc. 93
Page 94

VMware vFabric Data Director Administrator and User Guide
Create, Download, and Delete Diagnostics Packages
Diagnostic packages are sometimes requested by VMware Support to help resolve a problem. System
administrators can create diagnostics packages, download them for analysis, and delete them to save storage
space.
Prerequisites
Log in to Data Director with system administrator privileges.
Procedure
1 Click the Administration tab and click Diagnostics.
By default, the diagnostics page is empty. Diagnostic packages are created on demand.
2 Click the green plus sign and select Create.
3 Provide information about the diagnostics package and click OK.
Option Action
Database
Include system diagnostics
Time range
Data Director creates the package displays it.
Click Add and select the database for which you want to generate a
diagnostics package.
Select the check box to include system diagnostics. You can select just the
system diagnostics without selecting a database.
Select a time range from the drop-down menu.
4 To download a package, select Download from the Actions menu, and specify the download location
when prompted.
5 To delete one or more packages, select the package or packages and select Delete from the Actions menu.
What to do next
Send the diagnostic package to VMware Support for analysis.
Understanding Cluster Alarms
The vSphere Cluster on which Data Director is installed must meet several configuration requirements. If the
requirements are not met, or if a compatible cluster is modified to no longer be compatible, Data Director
displays one or more alarms.
When you create a resource bundle, you can use resource pools only if the cluster in which you create the
resource pools is compatible with Data Director. See the Data Director Installation documentation for initial
cluster setup. After installation, you can customize the cluster. However, only certain customizations are
compatible with Data Director. See vFabric Data Director Installation Guide.
Data Director requires the following settings and generates an alarm if you change them.
n
vSphere DRS and vSphere HA are enabled.
CAUTION If you disable vSphere DRS, all resource pools in your environment become unusable. You must
recreate the resource pools.
n
Host monitoring is enabled
n
VM Monitoring is set to Virtual Machine and vApp Monitoring.
n
Default VM Restart Priority is not disabled.
94 VMware, Inc.
Page 95

Data Director also generates an alarm if a vSphere administrator makes the following changes to the cluster.
n
Admission control for the cluster is disabled.
n
The cluster's default VM monitoring settings are changed to be too low.
n
Heartbeat failure time less than 30 seconds.
n
Minimum uptime less than 120 seconds.
n
Maximum number of resets less than 3.
n
Time window for maximum number of resets less than 3600 seconds (1 hour).
If you encounter a cluster-related alarm, contact the vSphere system administrator and show them this
information to resolve the problem.
Monitoring for Organization Administrators
The vFabric Data Director interface allows organization administrators to view CPU and memory utilization
across the organization and to view database storage breakdown and utilization. Administrators can also
monitor the databases and database groups, see events and alarms, create alarms, and generate and download
reports.
The information that Data Director displays for organization administrators differs from the information
available to system administrators. The panel on the left displays a hierarchy.
Chapter 11 Monitoring the Data Director Environment
n
Organizations are the top level.
n
Expand an organization to display its database groups.
n
Expand a database group to display its databases.
When you select an item in the hierarchy, the right panel displays information about it if you have permission
to view the information.
Organization administrators use the following tabs and panels to monitor the organization.
Dashboard Tab
In the Dashboard tab, organization administrators can customize the resource
usage information displayed to them. Administrators close any of the panels,
and click Customize to include the panel in the dashboard again. See “Explore
Monitoring Customizations for Organization Administrators,” on page 97.
Manage and Monitor Tab
In the Manage & Monitor tab, organization administrators select tabs to
manage and monitor parts of the organization.
Table 11-1. Manage and Monitor Tab
Tab Description
Databases tab View existing databases and their
attribute and status. Create databases.
Database Groups tab View existing database groups and their
attributes. Create database groups.
Alarms tab Includes a list of all alarms triggered so
far. The system displays alarms for certain
events. Administrators can create custom
alarms, which are then included in the
Alarms panes. See “Create a Custom
Alarm,” on page 100.
VMware, Inc. 95
Page 96

VMware vFabric Data Director Administrator and User Guide
Table 11-1. Manage and Monitor Tab (Continued)
Tab Description
Tasks and Events tab Allows organization administrators to
Tags tab Users can create tags and use them to tag
Reports tab Allows organization administrators to
Permissions tab Allows organization administrators to
display information about all tasks and
information about all events.
You can display events of only a certain
type, and you can filter tasks and events
to drill down to information you really
need. See “Explore Monitoring
Customizations for Organization
Administrators,” on page 97.
the databases. Tags categorize databases
and make search easier.
customize the reports pane and to create
and download custom reports.
view currently defined users and roles
and the privileges granted to a selected
role.
Which alarms, events, and tasks the system displays depends on the current
selection in the left panel. For example, with a database group selected, clicking
the Events tab displays events in that database group and its databases.
Tasks and Alarms Side
Bar
The Tasks and Alarms side bar, in the right panel of each tab, displays recent
tasks and alarms. “Explore Monitoring Customization and Filtering,” on
page 89 explains how you can collapse and expand the side bar.
Explore Organization Administrator Dashboard Customization
Exploring organization administrator dashboard customizations allows you to see available options. You can
then customize the dashboard to suit your needs.
The organization administrator dashboard differs from the system administrator dashboard. See “Explore
System Dashboard Customizations,” on page 91 if you are a system administrator.
Organization administrators can use the main dashboard to monitor the organization and its database groups.
Organization administrators can use the Database dashboard available from the Manage & Monitor tab to
monitor databases. See “Explore Database Monitoring,” on page 99.
Prerequisites
Log in to Data Director as a user with organization administrator privileges.
Procedure
1 Click the Dashboard tab.
2 Explore the Resource Bundles panel.
The panel displays information about each resource bundle that has been assigned to the organization
and lets you see CPU and memory allocation and reservation, database and backup storage, and the
number of database groups that use the resource bundle.
96 VMware, Inc.
Page 97

Chapter 11 Monitoring the Data Director Environment
3 Explore one of the panels that includes lines or histogram bars, for example the %CPU Utilization panel
or the Database Storage Breakdown panel.
a Customize the view to show information for 1 hour, 24 hours, 3 days, or 1 week.
b Move the cursor over a histogram bar or a line to view information, and click the item for details.
What to do next
Customize the dashboard to meet your needs.
Explore Monitoring Customizations for Organization Administrators
Organization administrators can customize the monitoring pane to view information relevant for their current
needs.
Prerequisites
Log in to Data Director with organization administrator privileges.
Procedure
1 Click the Manage & Monitor tab in the Data Director client.
2 In the left panel, select the item you want to monitor.
Option Description
Selecting a database group
Selecting a database
Displays resource information for that database group.
Displays resource information for that database.
3 Click the Databases tab and select Database list or Statistic breakdown.
Option Description
Database list
Statistic breakdown
Displays information about each database in the organization.
Displays the top resource or top performance database. You can customize
the view .
You can select a database and add it to Favorites, but you will be prompted for the owner user name and
password to make changes to the database.
4 Click the Dashboard tab to display the Organization Resource Usage dashboard.
You can customize the dashboard by clicking the Customize button, or customize individual panels on
the dashboard. By default, the following information is included.
Panel Description
Resource Bundles
Recent Alarms
CPU Utilization, Memory Utilization
Displays the databases, associated resource bundles, currently allocated
CPU and memory reservations, and currently allocated and free storage.
This panel allows administrators to evaluate whether they have additional
resources to allocate to a new or existing database group or database.
Displays recent system alarms and user-defined alarms.
Displays the CPU and memory utilization, allowing the administrator to see
usage and usage patterns. The view can be set to display the last 1 hour, 24
hours, 3 days, or 1 week.
VMware, Inc. 97
Page 98

VMware vFabric Data Director Administrator and User Guide
Panel Description
Database Storage Breakdown,
Backup Storage Breakdown
Database Storage Utilization,
Backup Storage Utilization
5 Click Tasks & Events, and click either Tasks or Events.
Option Description
Tasks
Events
6 Click Reports, click Summary Reports, and customize the pane by using the filter options.
Pie charts that show the current state of storage and backup storage,
including storage that is allocated, storage that is used, and storage that is
allocated but not used. Placing the cursor inside a field of the pie chart
displays information about that field.
Charts that show storage utilization over the selected amount of time (1 hour,
24 hours, 3 days, or 1 week). Placing the cursor over a line displays
information about that line.
Tasks are scheduled system activities requested by the system or a user, for
example, Create database and Repair database. A task can succeed or fail.
The Tasks tab includes information about the target and the user who
initiated the task. You can filter the Tasks panel to show only some of the
columns.
Events are records of user actions or system actions. For example, the system
logs when a user logs in to Data Director, or when a database is repaired.
Events can be of type info, error, or warning. Use the Type drop-down menu
to display the type of event you are interested in. You can filter the Events
column to show only some of the columns.
a Select Database or Database Group from the Type drop-down menu and click Browse to select a
database or database group.
By default, no objects are selected. You can select more than one object.
b Select a time range or click Customize to configure a custom time range.
c Select Compute & Network or Storage to focus the report on networking or storage information.
d Select the sampling mechanism from the Sampling drop-down menu.
e Click the Filter button to filter the report.
Click the Action icon and select Download to download the report.
Customizing the pane does not customize the report itself.
7 Click Reports, click Time Interval Reports, and customize the pane by using the filter options.
a Select Organization, Database Group, or Database from the Type drop-down menu and click
Browse to select the object you want to generate a report for.
You can select more than one object.
b Select a sampling interval.
c Select a time range or click Customize to configure a custom time range.
d Select Compute & Network or Storage to focus the report on networking or storage information.
e Click the Filter button to filter the report.
f Click the Action icon and select Download to download the report.
8 Click Resource Bundles or Datastore Usage to display all resource panels or all data stores and
corresponding usage information.
What to do next
To monitor specific databases, see “Explore Database Monitoring,” on page 99.
98 VMware, Inc.
Page 99

Explore Database Monitoring
The main organization dashboard allows administrators and other privileged users to monitor the organization
and its database groups. Administrators can also monitor databases from the Manage & Monitor tab.
Database information provided by Data Director allows administrators to check whether a database is in use,
check on the backup status of the database, see errors and alarms, and check resource allocation. Database
administrators might find that backups or other tasks do not finish and can alert the organization administrator,
who can allocate more resources. Organization administrators can allocate or remove resources, schedule
backups, and perform other database-specific tasks.
Review tasks that administrators can perform on databases that cannot be performed on database groups and
organization. For a general exploration of managing and monitoring for organization administrators, see
“Explore Monitoring Customizations for Organization Administrators,” on page 97.
Prerequisites
Log in to Data Director with monitor privileges on the database. You do not need login privileges for a database
to monitor the database. You do need database login privileges to view information in the Processes and
Locks tab, to see uptime information, and to see schemas, tables, DB login users, and user data size in the
overview.
Procedure
Chapter 11 Monitoring the Data Director Environment
1 Click the Manage & Monitor tab.
2 Open the organization and the database group, and select a database.
The right panel displays database information.
3 Click the Dashboard tab to examine the Overview panel.
The information includes details about the database contents, external backups and snapshots, recent
alarms, and any clones that administrators might have created for the database.
4 Click Resource Usage to view and customize resource usage information.
5 Click Database Stats to display database information such as transactions per second, total IO per second,
and so on.
By default, the information is updated in real time. You can change individual panels to use a less frequent
update cycle.
6 Click Processes and Locks to view database processes and database locks.
You can show details about processes and locks and kill processes if you have permissions to do so.
NOTE You are prompted for database credentials if you select Processes and Locks.
7 Click Custom, and click the Customize button to create a custom dashboard for this database.
8 Click the Logs tab to display the postgresql log for the database.
You can show the next or previous 100 lines, search the log, and add a filter to search only the specified
columns in the log. Filters can be added only if the database is running.
9 Click the Action icon and choose Download File.
10 Use the Alarms tab to view alarms and the Tasks & Events tabs to view tasks and events.
The information in the tabs is more detailed than the information in the side bar.
What to do next
Manage databases as discussed in Chapter 7, “Managing Databases,” on page 51.
VMware, Inc. 99
Page 100

VMware vFabric Data Director Administrator and User Guide
Working with Alarms
Data Director displays system-defined alarms to system administrators and organization administrators. Data
Director also allows administrators to create custom alarms and to delete and disable alarms.
Create a Custom Alarm
Custom alarms allow you to display information in the Alarms panel or to send email if certain conditions are
met. For each alarm, you can specify a name and description and a trigger.
You can create a custom alarm for the items below the selected item in the hierarchy. For example, if you create
an alarm at the organization level, you can monitor database groups and databases. If you create an alarm at
the database group level, you can monitor databases.
Prerequisites
Verify that you have permissions to create alarms for the object in which you create the alarm.
Procedure
1 Click the Manage & Monitor tab, click Alarms in the left pane, and click Definitions, and click the plus
sign to start the Create Alarm Definition wizard.
2 Type a name and description.
3 (Optional) Change the status to Disabled so that the alarm is not enable immediately and click Next.
4 Select the trigger, which is defined by the following options, and click Next.
Option Description
Object type
Trigger type
Trigger
Severity
Condition
Warning threshold
Repetition frequency
The object to monitor. The alarm is triggered when trigger conditions on the
monitored object are reached.
Select Performance to trigger an alarm when the object moves beyond a
specified warning or critical threshold. Select Event to trigger an alarm when
a system event occurs.
Select from the available options. Options differ depending on the trigger
type (Performance or Event).
Select Warning to have a yellow warning icon associated with the alarm.
Select Critical to have a red critical icon associated with the alarm. The icon
appears in all displays.
For performance triggers, specifies whether the alarm is triggered when the
value is below the current threshold or above the current threshold. For
example, you might want a warning if Aborted transactions per second is
more than (above) a specified number, or if Committed transactions per
second is less than (below) a specified number.
Threshold at which you want warning actions to take place. You can specify
different actions for warning and critical threshold problems.
Available only for performance alarms. When the condition that triggers the
alarm remains true, a second alarm is generated based on the repetition
frequency. If alarm actions such as sending an email are specified, the actions
are performed again.
5 Select Send email to send an email when the alarm is triggered.
The email is sent only if the SMTP parameters were set correctly during Data Director setup.
6 Click Finish to complete definition of the alarm.
The alarm appears in the Alarms panel when it is triggered even if you leave Do nothing selected. If you
selected Send email, an email is sent as well.
100 VMware, Inc.
 Loading...