

Page 1

vCloud Air - Virtual Private Cloud
OnDemand Getting Started
vCloud Air
This document supports the version of each product listed and
supports all subsequent versions until the document is
replaced by a new edition. To check for more recent editions
of this document, see http://www.vmware.com/support/pubs.
EN-001709-00
Page 2

vCloud Air - Virtual Private Cloud OnDemand Getting Started
You can find the most up-to-date technical documentation on the VMware Web site at:
http://www.vmware.com/support/
The VMware Web site also provides the latest product updates.
If you have comments about this documentation, submit your feedback to:
docfeedback@vmware.com
Copyright © 2015 VMware, Inc. All rights reserved. Copyright and trademark information.
VMware, Inc.
3401 Hillview Ave.
Palo Alto, CA 94304
www.vmware.com
2 VMware, Inc.
Page 3

Contents
About Virtual Private Cloud OnDemand 5
1
Create Your Account 6
Using Virtual Private Cloud OnDemand 7
Supported Browsers 8
Create Your First Virtual Machine 8
Gateways and Networks 11
Resource Usage and Pricing 13
About Virtual Data Centers 15
Account Support 17
How to Cancel Your Service 17
Index 19
VMware, Inc. 3
Page 4

vCloud Air - Virtual Private Cloud OnDemand Getting Started
4 VMware, Inc.
Page 5

About Virtual Private Cloud
OnDemand 1
VMware vCloud Air – Virtual Private Cloud OnDemand (hereafter, known as
Virtual Private Cloud OnDemand) is a secure, pay-as-you-go, cloud compute service offered by VMware
that gives IT organizations a VMware compatible platform to create virtual machines, dynamically scale
virtual machines and resources up or down, and pay only for resources allocated.
Virtual Private Cloud OnDemand provides on-demand resources with granular metering and usage-
n
based billing.
Resources are pool-based allowing deployment of virtual machines with customized configurations.
n
Costs are billed monthly only for the aggregate amount of resources consumed across all your virtual
n
machines.
The on-demand resources complement the subscription services for vCloud Air.
n
NOTE Virtual Private Cloud OnDemand runs from three regions: UK - Slough, US - California and US Virginia.
Intended Audience
This guide provides a quick reference to all new users of Virtual Private Cloud OnDemand.
Related Documentation
In addition to this guide, see the following documentation for Virtual Private Cloud OnDemand:
vCloud Air – Virtual Private Cloud OnDemand User's Guide
n
vCloud Air – Virtual Private Cloud OnDemand Networking Guide
n
vCloud Air – Virtual Private Cloud OnDemand Release Notes
n
VMware Technical Publications Glossary
VMware Technical Publications provides a glossary of terms that might be unfamiliar to you. For definitions
of terms as they are used in VMware technical documentation, go to
http://www.vmware.com/support/pubs.
This chapter includes the following topics:
“Create Your Account,” on page 6
n
“Using Virtual Private Cloud OnDemand,” on page 7
n
“Supported Browsers,” on page 8
n
VMware, Inc.
5
Page 6
vCloud Air - Virtual Private Cloud OnDemand Getting Started
“Create Your First Virtual Machine,” on page 8
n
“Gateways and Networks,” on page 11
n
“Resource Usage and Pricing,” on page 13
n
“About Virtual Data Centers,” on page 15
n
“Account Support,” on page 17
n
“How to Cancel Your Service,” on page 17
n
Create Your Account
You can register online and sign-up for a Virtual Private Cloud OnDemand account by using a valid credit
card.
Prerequisites
Ensure you have a valid email address.
Procedure
1 If you are a new user interested in the Virtual Private Cloud OnDemand service, go to
http://vcloud.vmware.com/service-offering/virtual-private-cloud-ondemand.
2 Click Sign up Now.
A short questionnaire that helps VMware better assess your needs appears.
3 Enter the required information and click Submit.
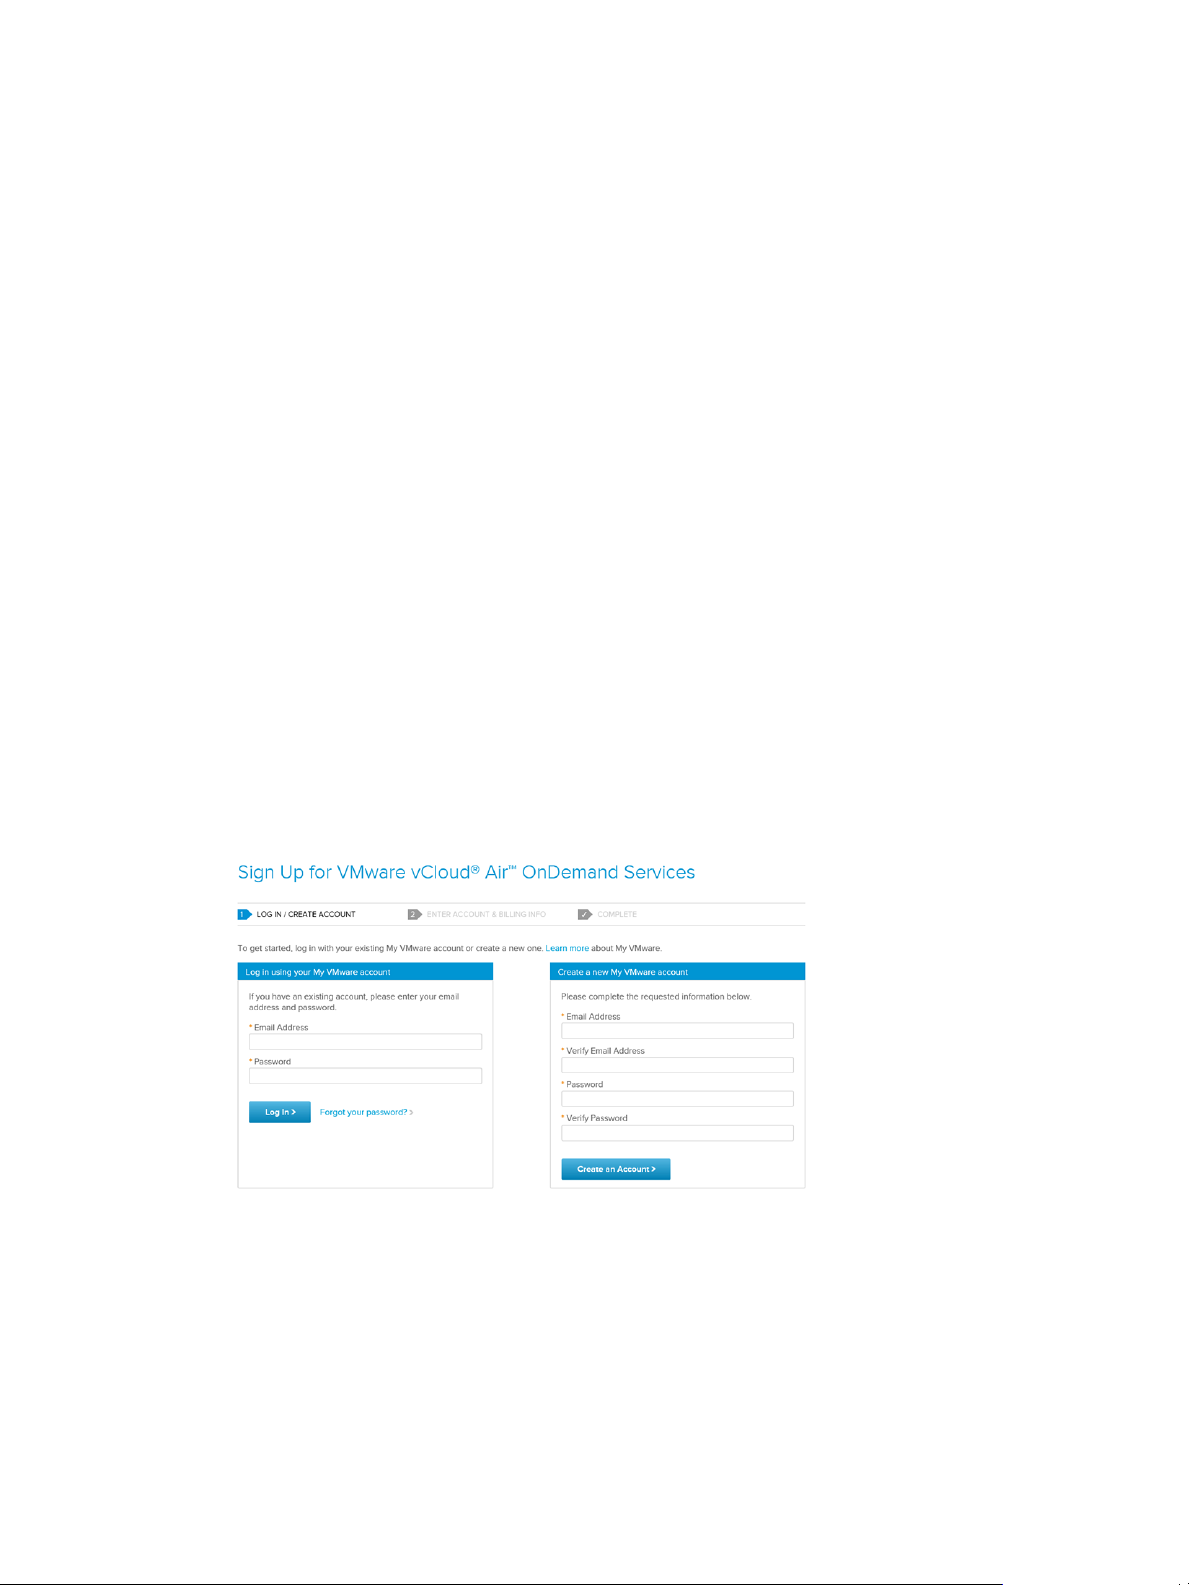
You will receive an email (at the email address you provided during sign up) from VMware with
further instructions. The email provides a link and temporary password to create an account for
Virtual Private Cloud OnDemand. Clicking the link displays the first step of the sign-up process;
specifically, 1 Login / Create Account:
4 Complete the first step in setting up your account in one of the following ways:
If you already have a My VMware account, enter your email address and password, and click Log
n
In.
If you do not have a My VMware account, enter your email address and a password (and verify
n
both), and click Create an Account.
The second step of the sign-up process appears; specifically, 2 Enter Account & Billing Info.
5 Enter your credit card and billing information.
6 VMware, Inc.
Page 7

Chapter 1 About Virtual Private Cloud OnDemand
6 Select the level of Support (pricing varies):
Online support - 24/7 Email only support
n
Production support - 24/7 Phone and Email support
n
NOTE You can also change the support level later by signing in to your My VMware account and going
to Manage Service > Change Support Level.
7 Click Complete Sign-Up.
After VMware validates and approves your account information, a confirmation page appears. You will
receive an email from VMware that includes the Virtual Private Cloud OnDemand URL and your
account activation instructions.
8 To finalize your account, click the link provided in the email, set your password, click the “I accept”
checkbox, and click Continue. The vCloud Air page appears. Click Submit to accept. You can read the
details by clicking the Terms of Service text.
The VMware vCloud Air Sign in page appears.
9 Enter your user name (the email address you entered during the sign-up process) and the password
you created.
The Virtual Private Cloud OnDemand Web user interface (UI) appears.
10 For subsequent logins, go to https://vca.vmware.com and log in using your user name and password.
What to do next
Existing Virtual Private Cloud OnDemand EAP users will also be redirected to the new URL.
NOTE All new users receive a $300 promotional credit, which is available for use until it is exhausted or
until five months from the sign-up date, whichever occurs first. The credit received by the EAP users during
the EAP program is available for use until it is exhausted or until General Availability (GA), whichever
occurs first.
Using Virtual Private Cloud OnDemand
After you sign in, click the Virtual Private Cloud OnDemand tile for vCloud Air (formerly known as vCloud
Hybrid Service).
You can set a region as the default region or you can select a region each time you sign in. To switch from
one region to another, select another region in the drop-down menu at the top of the page after you sign in.
Click Continue and an instance (Virtual Data Center - VDC1) is created with a default gateway and a routed
network. This process usually takes about 2-3 minutes. After the instance is created, you can create your first
virtual machine as described in “Create Your First Virtual Machine,” on page 8.
NOTE The virtual data center default size is 50 GHz vCPU, 100 GB RAM, and 2 TB Storage (Standard or
SSD-Accelerated). You can create up to 50 virtual machines per virtual data center.
VMware, Inc. 7
Page 8

vCloud Air - Virtual Private Cloud OnDemand Getting Started
Supported Browsers
The following browsers are supported for the Virtual Private Cloud OnDemand console:
Chrome 27 and later
n
Firefox 3.6 and later
n
Internet Explorer 10 and later
n
Safari 4 and later
n
Create Your First Virtual Machine
After you click the Virtual Private Cloud OnDemand tile the first time, the Virtual Machines tab opens.
Here you can create your first virtual machine.
Prerequisites
Verify you have signed up for the service and have a valid user account.
Procedure
1 Click Create your first virtual machine.
2 You can select a pre-defined template from the VMware Catalog tab or from your own catalog (My
Catalog tab). You can create your own templates in vCloud Director by clicking Create My Virtual
Machine from Scratch. For information, see Manage Catalogs in vCloud Director in the vCloud Air –
Virtual Private Cloud OnDemand User's Guide.
8 VMware, Inc.
Page 9

Chapter 1 About Virtual Private Cloud OnDemand
3 You can select a licensed template, such as Windows 2008R2 Standard or a free template, such as 32 Bit
CentOS 6.3. The licensed templates have a $ sign next to them and you need to click Confirm Purchase
before you click Continue.
4 Edit the virtual machine's name, add a description, or change the template.
5 Select the CPU, memory size, and the storage tier (Standard or SSD-Accelerated) and create the virtual
machine by clicking Create Virtual Machine.
NOTE
VMware recommends specific CPU-Memory ratios for resource allocation to the virtual machine
n
that work best in this environment. However, you can click the link to unlink them and set the size
to your specifications by using the corresponding sliders.
You can add only one disk (storage) while creating a virtual machine. However, once the virtual
n
machine is created you can add additional disks by going to Actions > Edit Resources.
Specifying a network at this stage is optional. However, you are required to do so later.
n
VMware, Inc. 9
Page 10

vCloud Air - Virtual Private Cloud OnDemand Getting Started
6 After your Virtual Machine is created, you can click the name of the virtual machine to review its
settings.
7 To change the virtual machine ownership or edit resource usage, select the checkbox next to the virtual
machine name and click Actions.
8 From the Action menu, click Edit Resources to adjust resources for the virtual machine to
accommodate changing requirements. You can change the CPU, memory requirements, add another
disk, or adjust the storage tier for an existing disk. Click Save to save your changes.
9 Click the Networks tab to view the network that this particular virtual machine connects to.
NOTE
Before assigning the virtual machine to a different network, you must create it by using the global
n
Networks tab. For information, see About Managing Gateways and Networks in the vCloud Air –
Virtual Private Cloud OnDemand Networking Guide.
Network assignment is disabled if the virtual machine is powered-on. Before assigning a different
n
network, power-off the virtual machine from the Virtual Machines tab.
10 VMware, Inc.
Page 11

Chapter 1 About Virtual Private Cloud OnDemand
10 Click Edit Network Assignment to assign the virtual machine to a network. Click Save when you are
done assigning the new network.
11 Click the Monitoring tab to view the virtual machine's CPU and memory usage.
For information about managing virtual machines, see Working with Virtual Machines in the
vCloud Air– Virtual Private Cloud OnDemand User's Guide.
12 Click the Resource Usage tab to view the resources used by that virtual machine in the past hour, past
24 hours, or month to date.
13 Click View detailed report to view the detailed resource usage report. The detailed report is available
only after the first bill is generated.
For information, see “Resource Usage and Pricing,” on page 13.
Gateways and Networks
Virtual Private Cloud OnDemand networking replicates traditional network technologies and design.
Networking in Virtual Private Cloud OnDemand is based on the software-defined networking (SDN)
technologies used by VMware products, including VMware vSphere, VXLAN, vCloud Networking and
Security, and vCloud Director.
1 When you created your first virtual machine, a Virtual Data Center named "VDC1" was automatically
created and a routed network and gateway were added.
2 Click the Gateways tab to view the default gateway.
NOTE You can add NAT rules for the gateway only after adding a public IP address.
VMware, Inc. 11
Page 12

vCloud Air - Virtual Private Cloud OnDemand Getting Started
3 If the gateway cannot route external traffic to virtual machines on the internal interface, you can create
a NAT rule to route this traffic. Click the Gateway tile to configure NAT rules.
4 Once the NAT rule is successfully added, you can disable, edit, or delete it.
5 Check the firewall rules to determine if Internet traffic is allowed to the virtual machines on this
network. If it is blocked, create a rule to allow Internet traffic. Click Add Firewall Rule to add a
Firewall Rule.
6 You can also add more IP addresses. Allocating public IP addresses is limited to routed networks.
7 Click Add Network to add networks (routed or isolated).
8 You can also add and manage gateways and networks in the vCloud Director portal by clicking
Manage in vCloud Director.
NOTE For information about configuring networks and gateways, see vCloud Air - Virtual Private Cloud
OnDemand Networking Guide.
12 VMware, Inc.
Page 13

Resource Usage and Pricing
The CPU and Memory resources allocated to your virtual machines are metered on a per-minute basis when
powered on, and storage on a per-minute basis from the time of allocation to a virtual machine. The Public
IP addresses are metered per-minute upon initial allocation to Gateways.
The Resource Usage tab displays the aggregated resource usage for a particular virtual data center. You can
choose to view resources used in the Past Hour, Past 24 Hours, or Month-to-date. You can access the
detailed report by clicking "View detailed report". This detailed report displays the resource breakdown on
a monthly basis right down to the virtual machine level. These are updated on an hourly basis.
Chapter 1 About Virtual Private Cloud OnDemand
VMware, Inc. 13
Page 14

vCloud Air - Virtual Private Cloud OnDemand Getting Started
After you have created additional virtual data centers, you can see the resource usage for all the virtual data
centers.
NOTE If you need additional resources to be available for a virtual data center, contact VMware support
and VMware will make the required changes.
1 For more granular pricing details, go to Tools > Billing and Payments.
2 The My VMware page opens. Go to the My VMware All Services page and click on your Service Name
to see your Subscription Service Details as well as the associated costs.
3 From here you can Manage your Service, for example issue a service cancellation, change the service
owner, change the support level, edit the payment method, see the usage spend notification for which
you can set to receive an email when usage has reached a certain dollar threshold, and see current and
past statements.
4 The lower portion shows the current costing and usage (you can see usage on the left and dollar value
on the right ). The carousel rotates every 10 seconds and you can select a specific resource to see the
usage and the cost associated.
14 VMware, Inc.
Page 15

5 You can also go back and see past consumption for a particular resource. You can toggle between past
years and can also download your billing statement.
NOTE For more information on pricing, see the Pricing Calculator.
About Virtual Data Centers
The first virtual data center (VDC1) is created by default. You can create more virtual data centers.
Prerequisites
There are some size limitations for virtual data centers, which are displayed in the template. It is limited to
50 GHz CPU, 100 GB RAM, 2 TB Storage, and 50 virtual machines per virtual data center.
Procedure
1 Click the arrow button to expand the list.
Chapter 1 About Virtual Private Cloud OnDemand
2 Click the add (+) icon located next to Virtual Data Centers to add a virtual data center.
VMware, Inc. 15
Page 16

vCloud Air - Virtual Private Cloud OnDemand Getting Started
3 Specify a name and click Create Virtual Data Center.
The virtual data center appears in the list.
4 Right-click the virtual data center to edit its name, delete it, or manage it in vCloud Director.
For information about managing virtual data centers, see the vCloud Air – Virtual Private Cloud
OnDemand User's Guide.
16 VMware, Inc.
Page 17

Account Support
Knowledge base articles and additional documentation are available at the Support Center. For accountrelated help or to access knowledge base articles and additional documentation, select Support Center from
the Tools menu in the Virtual Private Cloud OnDemand console.
If you encounter problems while creating your account or at any other time, file a support request.
NOTE You must be a member of the Account Administrative role in Virtual Private Cloud OnDemand to
access your account information in My VMware. See Role-based User Account Management in the
Virtual Private Cloud OnDemand User's Guide for information.
File a support request in one of the following ways:
From Virtual Private Cloud OnDemand, select File Service Request from the Tools menu. The
n
My VMware page opens. Enter your My VMware user name and password and login.
Go directly to My VMware and log in with your user name and password.
n
From the My VMware main navigation, select Support > Get Support. The Get Support page appears. Select
the type of support you require.
Chapter 1 About Virtual Private Cloud OnDemand
For assistance with your account, select an option under Product Licensing or Account.
To file a technical support request, from the Technical drop-down list, select vCloud Air > VMware Virtual
Private Cloud OnDemand > your service ID (only one is displayed).
NOTE When completing the technical support request, leave the Enter terms related to this issue field
blank because it is not required.
How to Cancel Your Service
My VMware provides options to manage your Virtual Private Cloud OnDemand account, including
cancelling your service.
Prerequisites
You must be a member of the Account Administrative role in Virtual Private Cloud OnDemand to access
your account information in My VMware. See Role-based User Account Management in the
Virtual Private Cloud OnDemand User's Guide for information.
Procedure
1 Log into your My VMware account.
VMware, Inc. 17
Page 18

vCloud Air - Virtual Private Cloud OnDemand Getting Started
2 Navigate to your Virtual Private Cloud OnDemand account (Accounts > Services > All Services).
Under Subscription Service, click the service name link.
The Subscription Service Details page appears.
3 From the Manage Service drop-down list, select Cancel Service.
A notice appears prompting you to confirm that you want to cancel your service.
4 Check that you have read the notice and click Confirm.
Your access to the Virtual Private Cloud OnDemand Web UI is revoked; however, you continue to have
access to billing statements in My VMware.
VMware will send you a final billing statement for unbilled usage.
18 VMware, Inc.
Page 19

Index
A
account
billing 6
register 6
service request 17
support 17
B
browsers 8
F
firewall 11
G
gateways 11
N
networks 11
R
regions 5
resource usage 13
S
service, cancel 17
virtual data center
add 15
delete 15
edit 15
manage in vCloud Director 15
size 15
T
tools
billing 13
myvmware 13
service credits 13
V
VDC1
default gateway 7
routed network 7
virtual private cloud ondemand 7
virtual machine
create new 8
edit 8
monitoring 8
networks 8
resource usage 8
settings 8
snapshot 8
virtual private cloud ondemand 5
VMware, Inc. 19
Page 20

vCloud Air - Virtual Private Cloud OnDemand Getting Started
20 VMware, Inc.
 Loading...