

Page 1

vCloud Air Advanced Networking
Services Guide
vCloud Air
This document supports the version of each product listed and
supports all subsequent versions until the document is
replaced by a new edition. To check for more recent editions
of this document, see http://www.vmware.com/support/pubs.
EN----00
Page 2

vCloud Air Advanced Networking Services Guide
You can find the most up-to-date technical documentation on the VMware Web site at:
http://www.vmware.com/support/
The VMware Web site also provides the latest product updates.
If you have comments about this documentation, submit your feedback to:
docfeedback@vmware.com
Copyright © 2015 VMware, Inc. All rights reserved. Copyright and trademark information.
VMware, Inc.
3401 Hillview Ave.
Palo Alto, CA 94304
www.vmware.com
2 VMware, Inc.
Page 3

Contents
Preface 5
Introducing Advanced Networking Services for vCloud Air 7
1
Upgrade an Edge Gateway to Advanced Networking Services 7
Log In and Navigate to Advanced Networking Services 9
Statistics and Logs for Advanced Networking Services 11
Advanced Routing for vCloud Air 15
2
Specify Global Configuration 15
Add a Static Route 16
Configure BGP 17
Configure OSPF 18
Configure Route Redistribution 20
Certificate and Security Group Management 23
3
Certificate Management in vCloud Air 23
Generate a Certificate Signing Request 23
Configure a CA Signed Certificate 24
Configure a Self-Signed Certificate 25
Add a Certificate 25
Add a Certificate Revocation List 26
Security Objects in vCloud Air 26
Create an IP Address Group 26
Create a Service 27
Create a Service Group 27
VMware, Inc.
Network Security and Isolation 29
4
Types of Firewalls in vCloud Air 29
Edge Gateway Firewall 29
Firewall for Trust Groups 30
Manage Edge Gateway Firewall Rules 30
Add an Edge Gateway Firewall Rule 31
Edit an Edge Gateway Firewall Rule 33
Change the Order of a Gateway Firewall Rule 34
Manage Trust Groups Firewall Rules 35
Add a Trust Groups Firewall Rule 35
Edit a Trust Groups Firewall Rule 38
Load Balancing 39
5
Set Up Load Balancing 39
Configure the Load Balancer Service 40
3
Page 4

vCloud Air Advanced Networking Services Guide
Create an Application Profile 40
Create a Service Monitor 43
Add a Server Pool 45
Add a Virtual Server 46
Add an Application Rule 47
Secure Access Using Virtual Private Networks 49
6
SSL VPN-Plus Overview 49
About Configuring SSL VPN-Plus 50
Configure Server Settings 51
Add an IP Pool 52
Add a Private Network 53
Add an Authentication Server 54
Add an Installation Package 56
Add an SSL VPN-Plus User 57
Add a Web Resource for SSL VPN-Plus Access 58
Edit Client Configuration 59
Add a Script 60
Edit the Default SSL VPN-Plus Settings 60
Customize the Portal Design 61
IPsec VPN Overview 61
About Setting up an IPsec VPN Connection 62
Specify Global IPsec VPN Configuration 62
Set up an IPsec VPN Connection to a Remote Site 63
IP Service Management: NAT and DHCP 67
7
Network Address Translation (NAT) 67
Add an SNAT or DNAT Rule 68
DHCP Service 69
Add a DHCP IP Pool 70
Add a DHCP Static Binding 70
Index 73
4 VMware, Inc.
Page 5

Preface
The vCloud Air Advanced Networking Services Guide provides information about configuring networking for
VMware® vCloud Air Advanced Networking Services, including how to configure dynamic routing,
firewall rules, load balancing, and VPN access.
Intended Audience
This guide is intended for network administrators and virtual administrators who will be configuring
networking in vCloud Air. The information is written for experienced administrators who are familiar with
virtual machine technology and networking concepts.
Related Documentation
Configuring networking for vCloud Air includes configuring basic and advanced networking features. See
the vCloud Air Networking Guide for a description of the default network setup, how to add networks to
vCloud Air, how to add gateways to your Dedicated Cloud subscription service, and how to add virtual
machines to networks.
See also the vCloud Air User's Guide for information about the features available for your vCloud Air
Dedicated Cloud subscription service and Virtual Private Cloud subscription service.
VMware Technical Publications Glossary
VMware Technical Publications provides a glossary of terms that might be unfamiliar to you. For definitions
of terms as they are used in VMware technical documentation, go to
http://www.vmware.com/support/pubs.
VMware, Inc.
5
Page 6

vCloud Air Advanced Networking Services Guide
6 VMware, Inc.
Page 7

Introducing
Advanced Networking Services for
vCloud Air 1
VMware vCloud™ Air® Advanced Networking Services, powered by the VMware NSX™ network
virtualization platform, offer enhanced security controls and routing, and network scaling capabilities in the
cloud.
vCloud Air Advanced Networking Services allow customers to achieve unprecedented security and
isolation in a public cloud. Advanced Networking Services deliver the following benefits:
Dynamic Routing: Support routing protocols such as Border Gateway Protocol (BGP) and Open
n
Shortest Path First (OSPF) to simplify network integration between on-premises and cloud-based
environment, allowing for redundancy and continuity in cloud-hosted application deployment.
Fine-grained network security and isolation: Support the use of object-based rule definitions to provide
n
stateful network traffic isolation without requiring multiple virtual networks. Unique in the public
cloud market, this "zero trust" security model prevents intruders from gaining full network access if an
application or virtual machine is compromised. Advanced Networking Services dramatically simplify
network configuration by leveraging the same network security policies to protect applications onpremises and in the cloud and extend your zero trust security model for portable security no matter
where an application is deployed.
Additional Advanced Networking Services: Enhanced VPN support for point-to-site (IPsec VPN) and
n
user (SSL VPN) connectivity, enhanced load balancing for HTTPS, and expanded network scalability.
This chapter includes the following topics:
“Upgrade an Edge Gateway to Advanced Networking Services,” on page 7
n
“Log In and Navigate to Advanced Networking Services,” on page 9
n
“Statistics and Logs for Advanced Networking Services,” on page 11
n
Upgrade an Edge Gateway to Advanced Networking Services
Upgrade an edge gateway in your vCloud Air deployment to leverage the new
Advanced Networking Services features and functionality.
You upgrade to Advanced Networking Services on a gateway-by-gateway basis. Meaning, you select which
edge gateways to upgrade and during the upgrade process, you can continue to operate edge gateways
leveraging the existing VMware network technology. See the vCloud Air Networking Guide for
information.
VMware, Inc.
7
Page 8

vCloud Air Advanced Networking Services Guide
When you upgrade an edge gateway to Advanced Networking Services, the edge gateway configuration is
maintained through the upgrade; for example, if you configured firewall rules or load balancing, the edge
gateway will maintain the firewall settings and be configured for load balancing after the upgrade.
NOTE After upgrading an edge gateway, you cannot revert the edge gateway to its previous state.
Additionally, if you are an API user, the APIs change post-upgrade to enable the new features and
functionality.
Prerequisites
To upgrade an edge gateway to Advanced Networking Services, you must meet these prerequisites:
You have a license for Advanced Networking Services. Contact your VMware Customer Success Team
n
representative for information. If you have not obtained a license, upgrading an edge gateway will not
succeed.
You have subscribed to a vCloud Air Virtual Private Cloud or Dedicated Cloud subscription service
n
and have configured networking using the basic networking features.
Procedure
1 Go to https://vca.vmware.com and log in to vCloud Air using your user name and password.
The VMware vCloud Air services page appears.
2 Click the My Subscriptions tile.
The VMware vCloud Air Dashboard appears.
3 Click the Gateways tab and click the tile for the gateway you want to upgrade.
4 Click Manage in vCloud Director.
vCloud Director opens in a new browser tab and the Org VDC Networks tab is displayed.
5 Click the Edge Gateways tab.
The gateways located in the virtual data center appear.
6 Click the gateway that you want to upgrade, right click and select Convert to Advanced Networking.
The Convert to advanced networking dialog box appears. The dialog box provides information about
upgrading to the new APIs for Advanced Networking Services.
NOTE If the option Convert to Advanced Networking is unavailable, this means that the edge gateway
has already been upgraded or you do not have a license for this operation.
7 Click Yes to proceed with the upgrade.
The upgrade can take a few minutes to complete in vCloud Director.
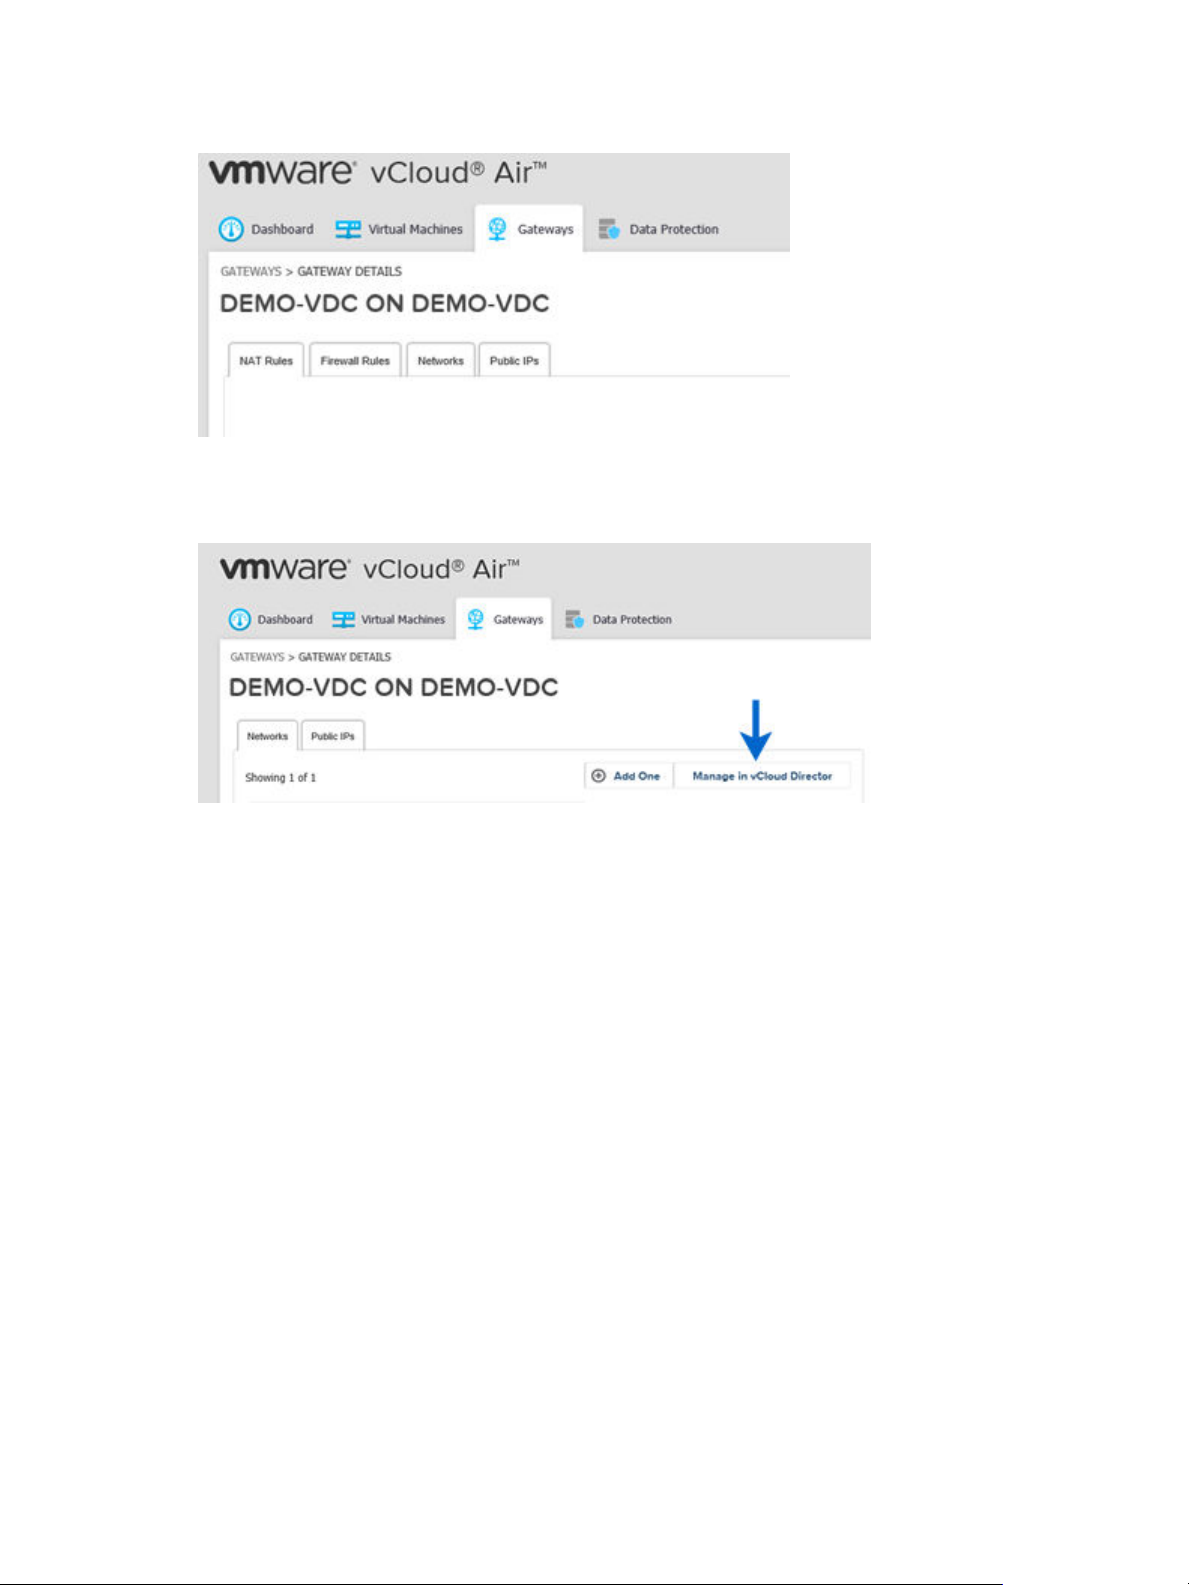
Before you upgrade an edge gateway, the vCloud Air Web UI has the following functionality available for
you to configure these basic networking functions:
8 VMware, Inc.
Page 9
Chapter 1 Introducing Advanced Networking Services for vCloud Air
Figure 1‑1. vCloud Air Air Gateway Before Upgrade
After you upgrade an edge gateway, the networking functionality available in the vCloud Air Web UI
changes.
Figure 1‑2. vCloud Air Gateway After Upgrade
After an upgrade, the tabs for configuring NAT and firewall rules are moved to thevCloud Director Web UI
to match the NSX user experience. Click Manage in vCloud Director to navigate to the
Advanced Networking Services UI where you configure those functions (and others) for your vCloud Air
environment.
vCloud Air maintains your existing, pre-upgrade network configuration after the upgrade.
Log In and Navigate to Advanced Networking Services
You access the Advanced Networking Services Web UI on a per edge gateway basis. After you upgrade an
edge gateway to Advanced Networking Services, have access to all the advanced networking features for
that edge gateway.
You can still use the VMware vCloud Air Web UI to configure basic networking features for your VMware
vCloud Air environment, such as creating networks, assigning virtual machines to networks, and allocating
IP addresses to your edge gateways. See the vCloud Air Networking Guide for information about using the
basic network features.
Prerequisites
To access Advanced Networking Services for an edge gateway, you must meet these prerequisites:
Sign into your vCloud Air subscription service by using a supported browser. See Supported Browsers
n
for vCloud Air in the vCloud Air User's Guide for information.
Have upgraded the edge gateway that you want to access to Advanced Networking Services. See
n
“Upgrade an Edge Gateway to Advanced Networking Services,” on page 7 for information.
VMware, Inc. 9
Page 10
vCloud Air Advanced Networking Services Guide
Procedure
1 Go to https://vca.vmware.com and log in to vCloud Air using your user name and password.
If you are logging in to vCloud Air for the first time, see Sign In to vCloud Air in the vCloud Air User's
Guide for information.
The VMware vCloud Air services page appears.
2 Click the My Subscriptions tile.
The VMware vCloud Air Dashboard appears.
3 Click the Gateways tab and click the tile for the gateway you want to mange.
4 Click Manage in vCloud Director.
vCloud Director opens in a new browser tab and the Org VDC Networks tab is displayed.
5 Click the Edge Gateways tab.
The gateways located in the virtual data center appear.
6 Select the gateway, right click and select Edge Gateway Services.
VMware vCloud Edge Gateway Services appears in a new browser tab. By default, the Dashboard tab
is selected.
NOTE If the edge gateway has not been upgraded, selecting Edge Gateway Services displays the
vCloud Director edge gateway UI. Additionally, when you right click and display the edge gateway
menu, you see that the option Convert to Advanced Networking is available, indicating that the edge
gateway has not been upgraded to Advanced Networking Services.
7 Select a tab to configure that advanced networking feature.
NOTE To access the Trust Group feature, navigate to the virtual data center and manage the firewall
settings. See “Add a Trust Groups Firewall Rule,” on page 35 for information.
10 VMware, Inc.
Page 11
Chapter 1 Introducing Advanced Networking Services for vCloud Air
Statistics and Logs for Advanced Networking Services
You can view statistics and access logs for the edge gateways deployed for Advanced Networking Services.
Statistics
Navigate to an edge gateway in vCloud Director, right click and select Edge Gateway Services. VMware
vCloud Edge Gateway Services appears in a new browser tab. By default the Dashboard tab is selected.
Statistics and status information are accessible from the following areas of Advanced Networking Services:
Dashboard
n
SSL VPN-Plus
n
IPsec VPN
n
Firewall Rules—Edge Gateway and Trust Groups
n
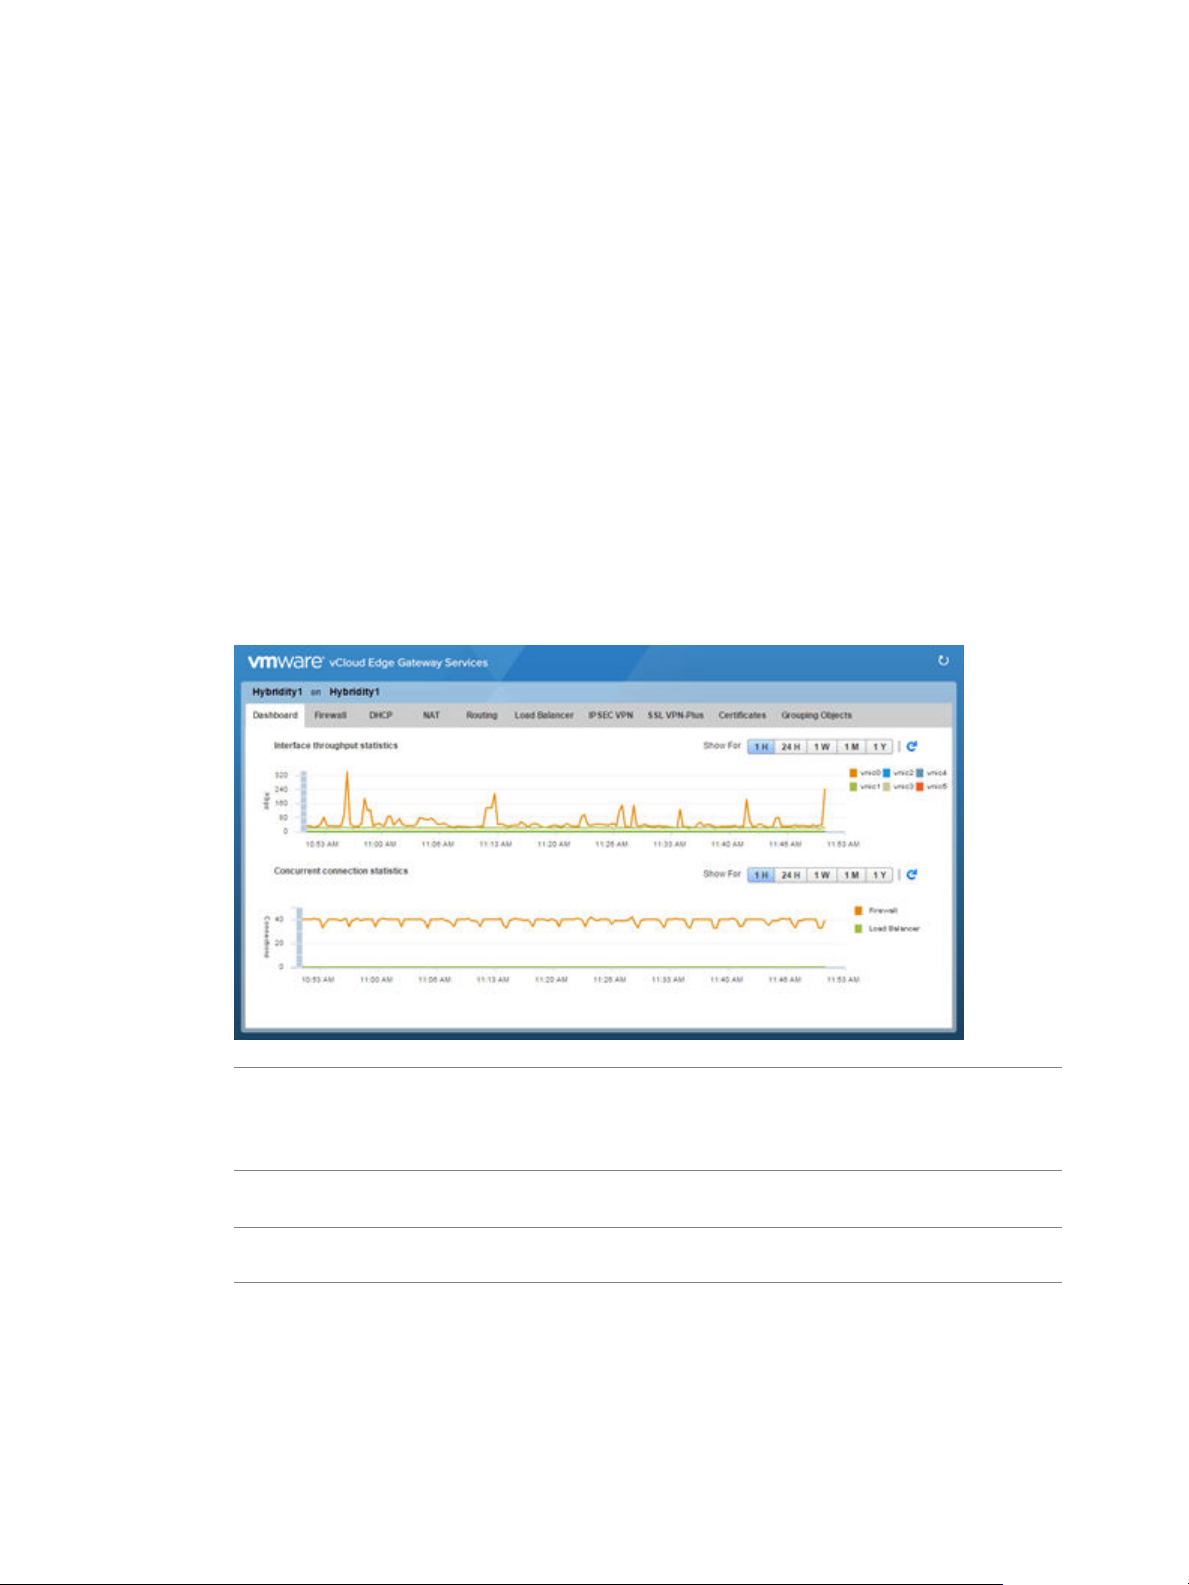
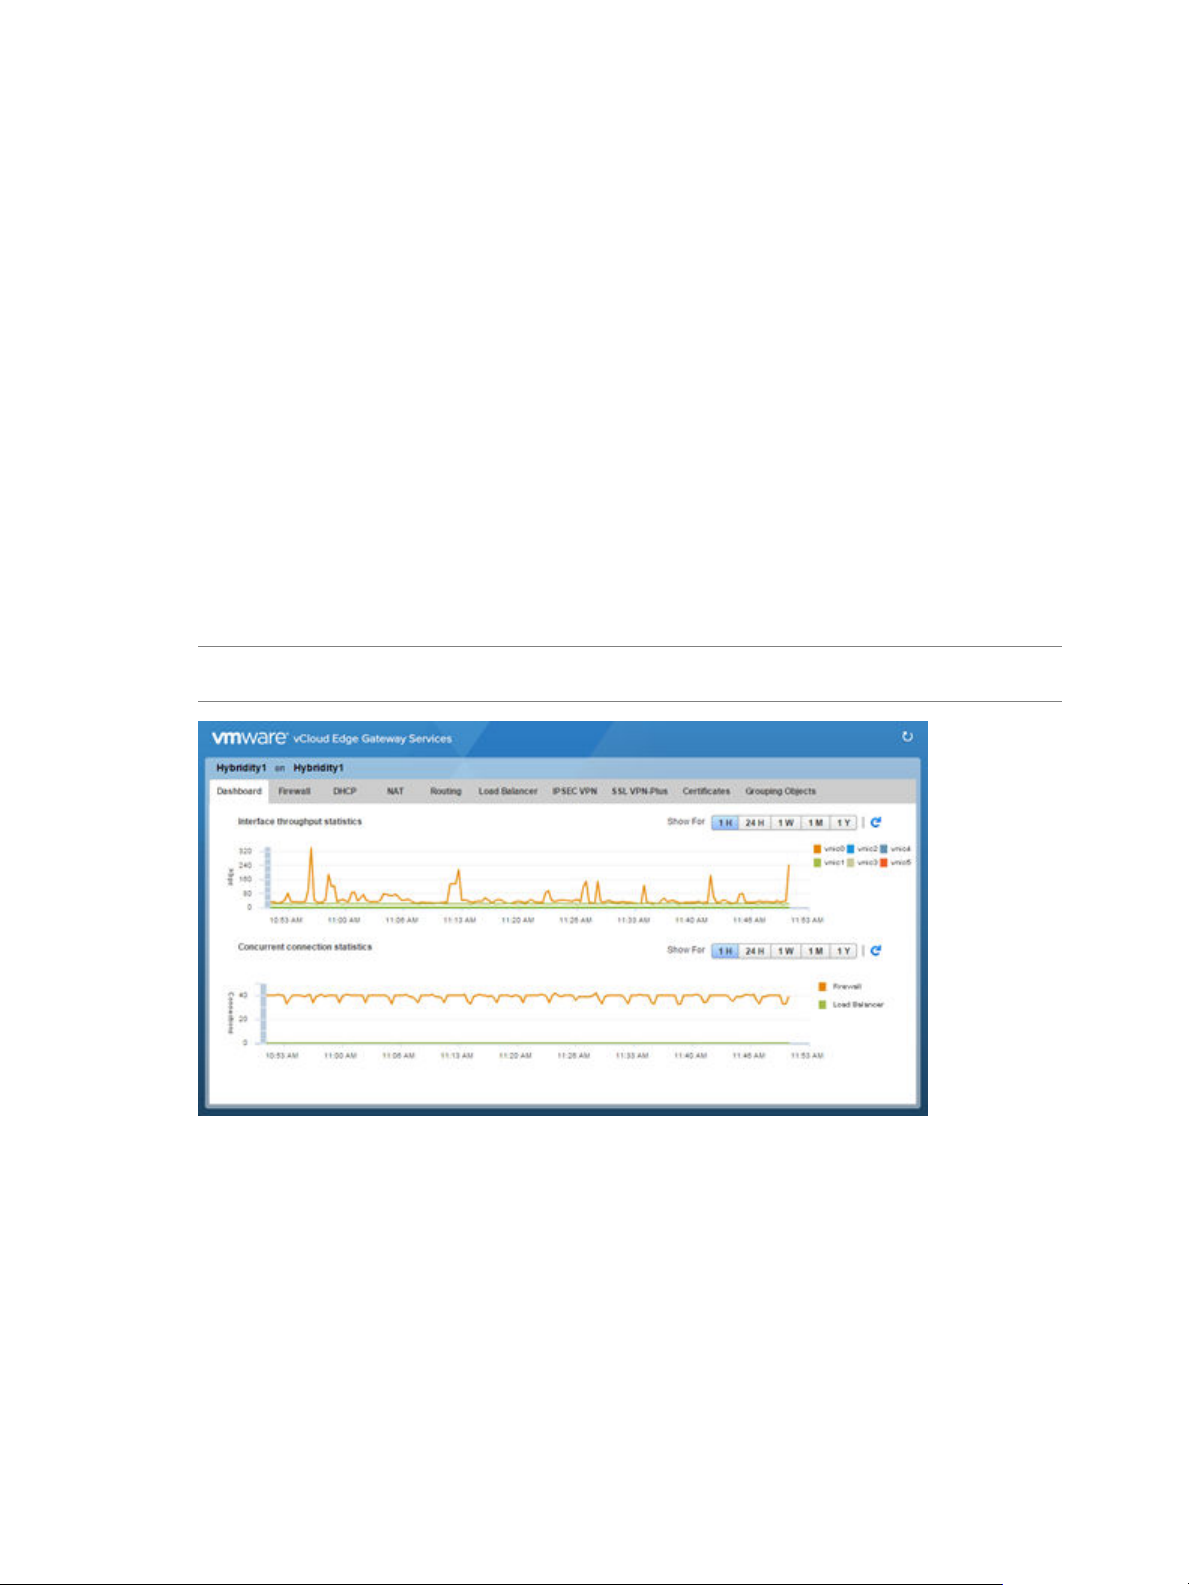
Dashboard
The Dashboard provides operational visibility for Advanced Networking Services. The Dashboard displays
graphs for the traffic flowing through the interfaces of the selected edge gateway and connection statistics
for the firewall and load balancer services.
NOTE For additional statistics and historical data, you can configure vRealize Operations to query more
advanced data and historical metrics.
Select the period for which you want to view the statistics.
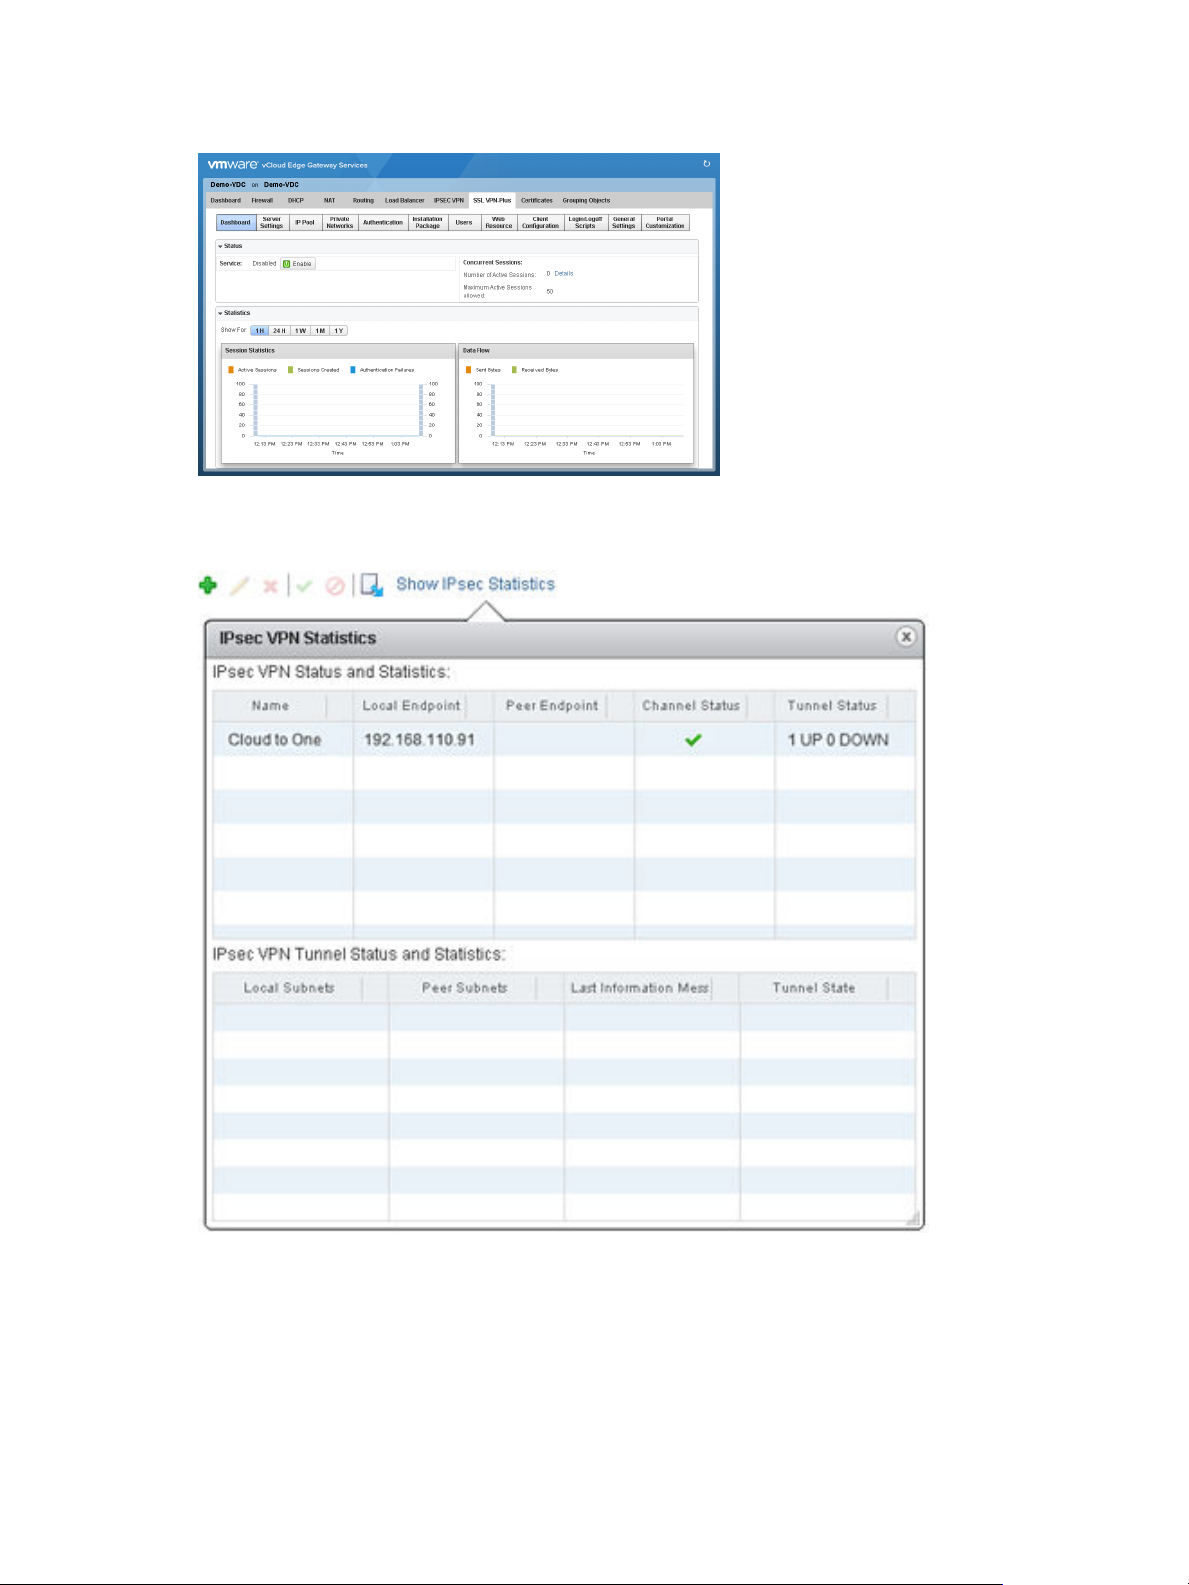
SSL VPN-Plus Dashboard
The dashboard displays the status of the service, number of active SSL VPN sessions, and session statistics
and data flow details. Click Details next to Number of Active Sessions to view information about the
concurrent connections to private networks behind the edge gateway.
VMware, Inc. 11
Page 12
vCloud Air Advanced Networking Services Guide
Figure 1‑3. Statistics on the SSL VPN-Plus Dashboard
IPsec VPN
Click the IPSEC VPN tab > Show IPsec Statistics to display the status of the tunnel.
Firewall Rules
You can view statistics for edge gateway firewall rules and Trust Group firewall rules in the following ways:
1 Navigate to a Firewall tab:
For an edge gateway firewall rule, see “Log In and Navigate to Advanced Networking Services,”
n
on page 9.
For a Trust Group firewall rule, see “Add a Trust Groups Firewall Rule,” on page 35.
n
12 VMware, Inc.
Page 13
Chapter 1 Introducing Advanced Networking Services for vCloud Air
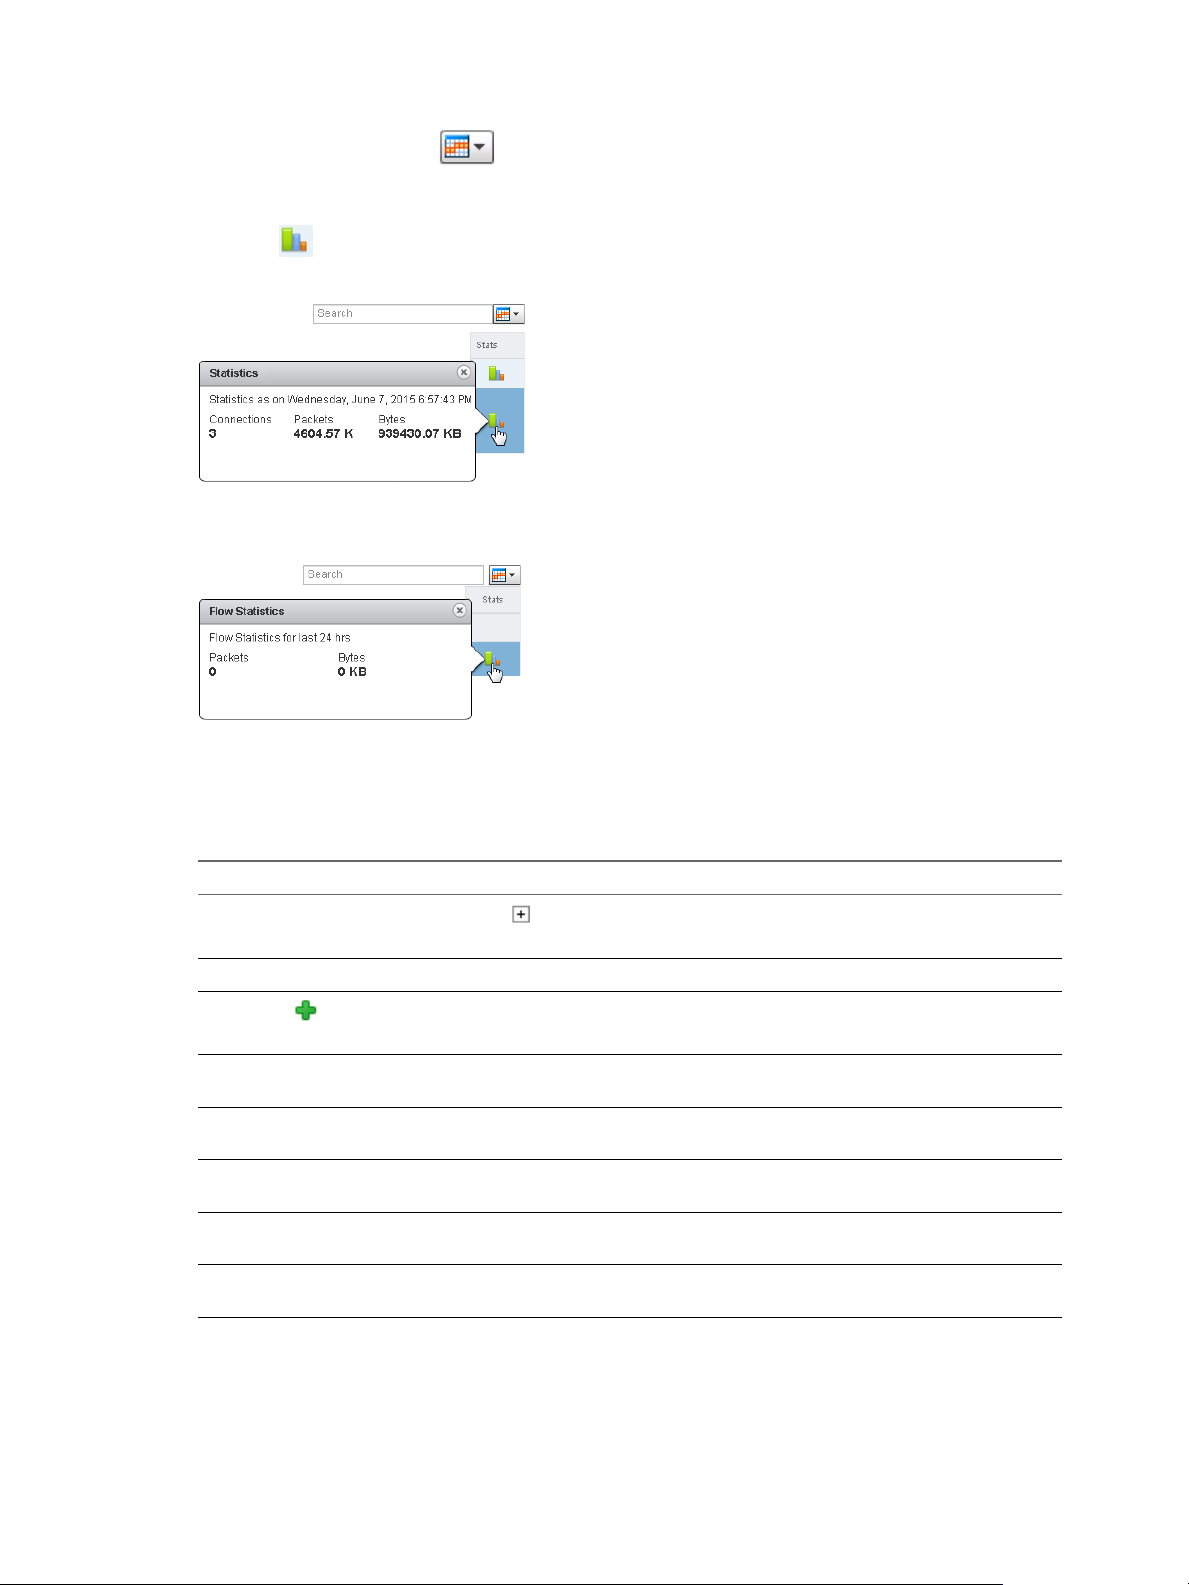
2
On the Firewall tab, click
(column display icon) and select the Stats check box.
The page refreshes and the Stats column appears in the table.
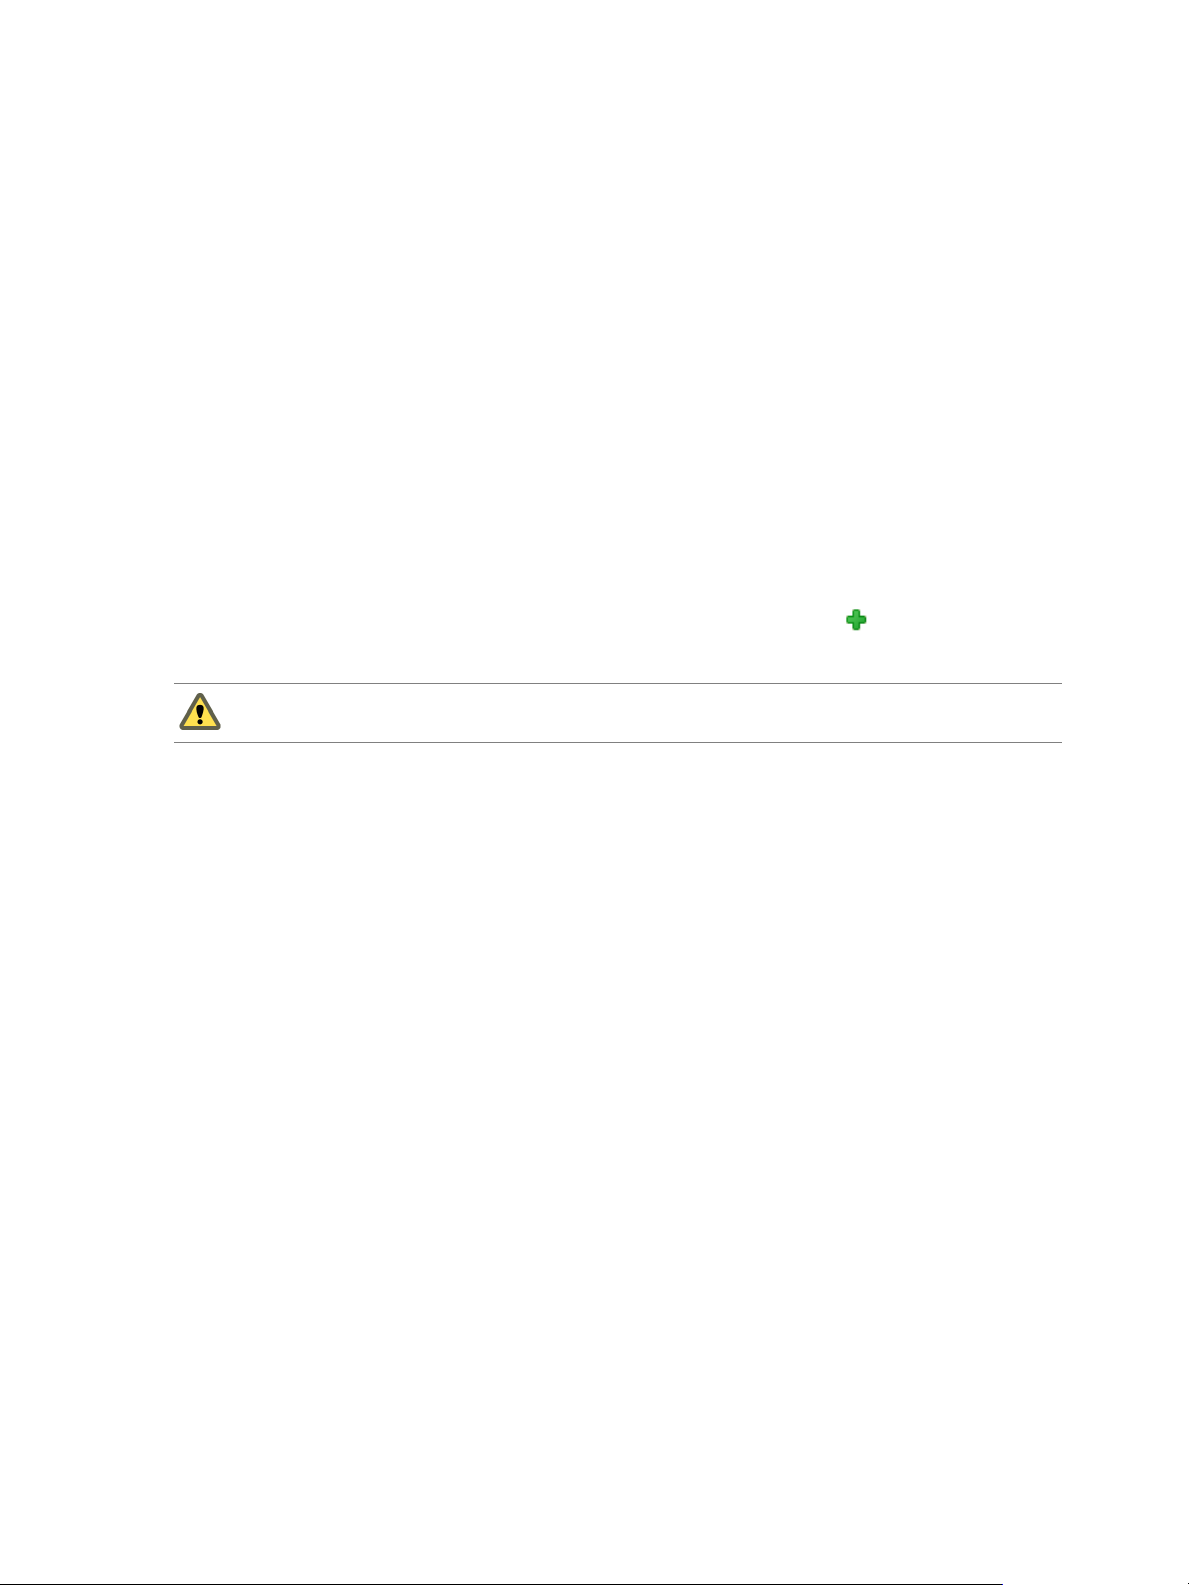
3
Click (the stats icon) for a rule.
Figure 1‑4. Statistics for an Edge Gateway Firewall Rule
You can view the traffic related to the rule—traffic packets and size.
Figure 1‑5. Statistics for a Trust Group firewall rule
Logs
You can enable logging an edge gateway for all the major features in Advanced Networking Services:
Table 1‑1. How To Enable Logging Per Feature
Navigation for Feature Description
Firewall tab > Action cell of a rule and click ] > Log
option
DHCP > DHCP Service Status > Enable logging check box
NAT > Add ( ) icon > Add DNAT Rule or Add SNAT
Rule > Enable logging check box
Routing tab > Global Configuration > Dynamic Routing
Configuration > Edit > Enable Logging check box
Load Balancer tab > Global Configuration > Edit > Logging
check box
IPSEC VPN tab > Logging Policy section > Enable logging
check box
SSL VPN-Plus tab > Server Settings > Logging Policy >
Change > Enable logging check box
SSL VPN-Plus tab > General Settings > Change > Enable
logging check box
Logs all sessions matching this rule.
Logs the address translation.
Logs the traffic flow between the local subnet and peer
subnet.
Maintains a log of the traffic passing through the SSL VPN
gateway.
Collecting log data is a multi-step process:
1 Enable logging for the features for which you need log data as described in the table above.
VMware, Inc. 13
Page 14

vCloud Air Advanced Networking Services Guide
2 Configure a syslog server to receive the log data. See Capturing vCloud Air Edge Gateway Data with
Syslog in the VMware vCloud Blog.
The logged data is accessible via your configured syslog server.
14 VMware, Inc.
Page 15

Advanced Routing for vCloud Air 2
You can specify static and dynamic routing for each edge gateway in vCloud Air.
To enable dynamic routing, you can configure an edge gateway using the Border Gateway Protocol (BGP) or
the Open Shortest Path First (OSPF) protocol.
This chapter includes the following topics:
“Specify Global Configuration,” on page 15
n
“Add a Static Route,” on page 16
n
“Configure BGP,” on page 17
n
“Configure OSPF,” on page 18
n
“Configure Route Redistribution,” on page 20
n
Specify Global Configuration
You can configure the default edge gateway for static routes and specify dynamic routing details for an edge
gateway.
Procedure
VMware, Inc.
1 Log in to vCloud Air and navigate to the vCloud Edge Gateway Services UI.
See “Log In and Navigate to Advanced Networking Services,” on page 9 for information.
2 Click the Routing tab and Global Configuration.
3 To enable Equal-cost multi-path routing (ECMP), click Enable next to ECMP.
ECMP is a routing strategy that allows next-hop packet forwarding to a single destination can occur
over multiple best paths. These best paths can be added statically or as a result of metric calculations by
dynamic routing protocols like OSPF or BGP. Multiple paths for static routes can be added by
providing multiple next hops separated by commas in the Static Routes dialog box.
See “Add a Static Route,” on page 16 for information.
The edge gateway utilizes Linux network stack implementation, a roundrobin algorithm with a
randomness component. After a next hop is selected for a particular source and destination IP address
pair, the route cache stores the selected next hop. All packets for that flow go to the selected next hop.
The default IPv4 route cache timeout is 300 seconds (gc_timeout). When an entry is inactive for this
time, it is eligible to be removed from the route cache. The actual removal happens when the garbage
collection timer activates (gc_interval = 60 seconds).
15
Page 16

vCloud Air Advanced Networking Services Guide
4 To specify the default gateway, click Edit next to Default Gateway.
a Select an interface from which the next hop towards the destination network can be reached.
b Type the gateway IP address if required.
c Edit the MTU if required and type a description.
d Click Save.
5 To configure dynamic routing, click Edit next to Dynamic Routing Configuration.
NOTE If you have IPsec VPN configured in your environment, you should not use dynamic routing.
a Select the router ID.
The Router ID list displays the first uplink IP address of the edge gateway that pushes routes to the
kernel for dynamic routing.
b Select Enable Logging to save logging information and select the log level.
c Click OK.
6 Click Publish Changes.
What to do next
To delete routing configuration, click Reset. This deletes all routing configurations (default, static, OSPF,
and BGP configurations, as well as route redistribution).
Configure route redistribution. See “Configure Route Redistribution,” on page 20.
Configure dynamic routing. See the following topics:
“Configure BGP,” on page 17
n
“Configure OSPF,” on page 18
n
Add a Static Route
You can add a static route for a destination subnet or host.
Procedure
1 Log in to vCloud Air and navigate to the vCloud Edge Gateway Services UI.
See “Log In and Navigate to Advanced Networking Services,” on page 9 for information.
2 Click the Routing tab and Static Routes.
3
Click the Add (
The Add Static Route dialog box appears.
4 Configure the following options for the static route:
Option Description
Network
Next Hop
Interface
) icon.
Type the Network in CIDR notation.
Type the IP address of the Next Hop.
The router must be able to directly reach the next hop.
When ECMP is enabled, you can type multiple next hops. See “Specify
Global Configuration,” on page 15 for information.
Select the interface on which you want to add a static route.
16 VMware, Inc.
Page 17

Option Description
MTU
Description
5 Click OK.
What to do next
Configure a NAT rule for the static route. See “Add an SNAT or DNAT Rule,” on page 68 .
Add a firewall rule to allow traffic to traverse the static route. See the following topics:
“Add an Edge Gateway Firewall Rule,” on page 31
n
“Add a Trust Groups Firewall Rule,” on page 35
n
Configure BGP
You can configure Border Gateway Protocol for vCloud Air to exchange routes between your on-premises
border devices and vCloud Air. BGP makes core routing decisions by using a table of IP networks or
prefixes, which designate network reachability among multiple autonomous systems.
Chapter 2 Advanced Routing for vCloud Air
Edit the maximum transmission value for the data packets if required.
The MTU value cannot be higher than the MTU value set on the edge
gateway interface. See “Specify Global Configuration,” on page 15 for
information about he MTU set for the default edge gateway.
(Optional) Type a description for the static route.
The BGP border devices established a connection before any routing information is exchanged. After
establishing the connection, the border devices exchange routes and synchronize their tables. Each border
device sends keepalive messages to keep this relationship alive.
Procedure
1 Log in to vCloud Air and navigate to the vCloud Edge Gateway Services UI.
See “Log In and Navigate to Advanced Networking Services,” on page 9 for information.
2 Click the Routing tab and BGP.
3 In BGP Configuration, complete the BGP options:
a Click Edit next to BGP Configuration.
b Click Enable BGP.
c For packet forwarding to be uninterrupted during restart of BGP services, select Enable Graceful
Restart.
d To allow the edge gateway to advertise itself as a default gateway to its peers, select Enable
Default Originate.
e Type a value (a globally unique number between 1-65534) for the Local AS.
vCloud Air assigns the local autonomous system (AS) number to the edge gateway you are
configuring and advertises the local AS when the edge gateway peers with routers in other
autonomous systems. The path of ASs that a route traverses is used as one metric when selecting
the best path to a destination.
f Click OK.
4 In Neighbors, configure the routing neighbors:
a
Click the Add ( ) icon.
b Type the IP address of your on-premises border device that vCloud Air connect to.
VMware, Inc. 17
Page 18
vCloud Air Advanced Networking Services Guide
c Type a value (a globally unique number between 1-65534) for the Remote AS.
vCloud Air assigns the remote AS number to the border device you are creating the connection for.
d If necessary, edit the default weight for the neighbor connection.
e If necessary, edit the default interval for the Keep Alive Time.
f If necessary, edit the default interval for the Hold Down Time.
The edge gateway uses the standard, default values for the keep alive timer (60 seconds) and the
hold down timer. The default value for the hold down timer is 3xkeepalive or 180 seconds. Once
peering between two neighbors is achieved, the edge gateway starts a hold down timer. Every
keep alive message it receives from the neighbor resets the hold down timer to 0. If the edge
gateway fails to receive three consecutive keep alive messages, so that the hold down timer reaches
180 seconds, the edge gateway considers the neighbor down and deletes the routes from this
neighbor.
g In Password, type the authentication password.
Each segment sent on the connection between the neighbors is verified. MD5 authentication must
be configured with the same password on both BGP neighbors, otherwise, the connection between
them will not be made.
5
To specify route filtering from a neighbor using an prefix list, click the Add (
area and configure the following options:
) icon in the BGP Filters
CAUTION A "block all" rule is enforced at the end of the filters.
a Select the direction to indicate whether you are filtering traffic to or from the neighbor.
b Select the action to indicate whether you are allowing or denying traffic.
c Type the network in CIDR format that you want to filter to or from the neighbor.
d Type the IP prefixes that are to be filtered and click OK.
6 Click Publish Changes.
What to do next
Add a firewall rule that allows traffic to and from the remote border device in your on-premises data center.
See “Add an Edge Gateway Firewall Rule,” on page 31 for information.
Configure BGP in your on-premises data center for the remote border device that vCloud Air is connecting
to using the AS values and password you set in vCloud Air. These values must match on both sides of the
connection.
Configure OSPF
The edge gateway supports OSPF, an interior gateway protocol that routes IP packets only within a single
routing domain. Configure OSPF in vCloud Air to exchange routing information between edge gateways in
vCloud Air.
Use OSPF to gather link state information from available routers and construct a topology map of the
network. The topology determines the routing table presented to the Internet layer, which makes routing
decisions based on the destination IP address found in IP packets.
OSPF routing policies provide a dynamic process of traffic load balancing between routes of equal cost. An
OSPF network is divided into routing areas to optimize traffic flow and limit the size of routing tables. An
area is a logical collection of OSPF networks, routers, and links that have the same area identification. Areas
are identified by an Area ID.
18 VMware, Inc.
Page 19

Chapter 2 Advanced Routing for vCloud Air
Prerequisites
A Router ID must have been selected. “Specify Global Configuration,” on page 15
Procedure
1 Log in to vCloud Air and navigate to the vCloud Edge Gateway Services UI.
See “Log In and Navigate to Advanced Networking Services,” on page 9 for information.
2 Click the Routing tab and OSPF.
3 In OSPF Configuration, complete the OSPF options:
a Click Edit next to OSPF Configuration.
b Select Enable OSPF.
c For packet forwarding to be uninterrupted during restart of OSPF services, select Enable Graceful
Restart.
d To allow the edge gateway to advertise itself as a default gateway to its peers, select Enable
Default Originate.
e Click OK.
4 In Area Definitions, configure the OSPF areas:
a Delete the not-so-stubby area (NSSA) 51 that is configured by default.
b
Click the Add (
) icon.
c Type an area ID.
The edge gateway supports an area ID in the form of an IP address or decimal number.
d In Type, select Normal or NSSA.
NSSAs prevent the flooding of AS-external link-state advertisements (LSAs) into NSSAs. They rely
on default routing to external destinations. Hence, NSSAs must be placed at the edge of an OSPF
routing domain. NSSA can import external routes into the OSPF routing domain, thereby
providing transit service to small routing domains that are not part of the OSPF routing domain.
e In Authentication, select Password or MD5 and type the password or MD5 key, respectively, for
the value.
Password: In this method of authentication, a password is included in the transmitted packet.
n
MD5: This authentication method uses MD5 (Message Digest type 5 ) encryption. An MD5
n
checksum is included in the transmitted packet.
5 In Area to Interface Mapping, map interfaces to areas by completing the following steps:
a
In Area Definitions, click the Add ( ) icon.
b From the vNIC drop-down list, select the interface that you want to map to the OSPF area. The
interface specifies the external network that both edge gateways are connected to.
c Type an Area ID. The edge gateway supports an area ID in the form of an IP address or decimal
number.
VMware, Inc. 19
Page 20

vCloud Air Advanced Networking Services Guide
d (Optional) Select Ignore Interface MTU Settings to disable MTU mismatch detection on received
Database Descriptor (DBD) packets.
When configuring OSPF, routers connected to the same shared subnet should have the same MTU
setting. However, you can force OSPF neighbors to establish a session even when their interface
MTU settings do not match. Use caution when selecting this setting because it can lead to packet
drops and cause the adjacency to reset repeatedly.
e (Optional) Expand the Advanced section and complete the following options.
NOTE vCloud Air provides a default value for each option. You can accept these default values or
edit them for your environment.
Option Description
Hello Interval
Dead Interval
Priority
Cost
6 Click Publish Changes.
Specifies the default interval between hello packets that are sent on the
interface.
Specifies the default interval during which at least one hello packet
must be received from a neighbor before the router declares that
neighbor down.
Specifies the default priority of the interface. The interface with the
highest priority is the designated router.
Specifies the default overhead required to send packets across that
interface. The cost of an interface is inversely proportional to the
bandwidth of that interface. The larger the bandwidth, the smaller the
cost.
What to do next
Add a firewall rule that allows traffic between the edge gateways in vCloud Air that you are configuring
OSPF routing for. See “Add an Edge Gateway Firewall Rule,” on page 31 for information.
Configure OSPF on the other edge gateways in vCloud Air that you want to exchange routing information
with.
Configure Route Redistribution
By default, routers share routes with other routers running the same protocol. In a multi-protocol
environment, you must configure route redistribution for cross-protocol route sharing.
Procedure
1 Log in to vCloud Air and navigate to the vCloud Edge Gateway Services UI.
See “Log In and Navigate to Advanced Networking Services,” on page 9 for information.
2 Click the Routing tab and Route Redistribution.
3 Click Edit next to Route Redistribution Status.
4 Select the protocols for which you want to enable route redistribution and click OK.
5 To add an IP prefix, perform the following steps:
a
Click the Add (
b Type a name and the IP address of the network.
) icon in IP Prefixes.
c Click OK.
20 VMware, Inc.
Page 21

Chapter 2 Advanced Routing for vCloud Air
6 To specify redistribution criteria for the IP prefix, complete the following steps:
a
Click the Add ( ) icon in Route Redistribution table.
b In Learner Protocol, select the protocol that learns routes from other protocols.
c In Allow Learning from, select the types of networks from which routes can be learned.
d In Action, select whether to permit or deny redistribution from the selected types of networks.
e Click OK.
7 Click Publish Changes.
VMware, Inc. 21
Page 22

vCloud Air Advanced Networking Services Guide
22 VMware, Inc.
Page 23

Certificate and Security Group
Management 3
Advanced Networking Services provides functionality to manage certificates for use with SSL VPN-Plus
and IPsec VPN tunnels.
Additionally, Advanced Networking Services enables use of grouping objects for use in creating firewall
rules and load balancer server pools.
This chapter includes the following topics:
“Certificate Management in vCloud Air,” on page 23
n
“Security Objects in vCloud Air,” on page 26
n
Certificate Management in vCloud Air
The edge gateway in vCloud Air supports self-signed certificates, certificates signed by a Certification
Authority (CA), and certificates generated and signed by a CA.
About Using Certificates with vCloud Air
In Advanced Networking Services, you can manage certificates for the following vCloud Air features:
IPsec VPN tunnels from your on-premises data center to vCloud Air
n
SSL VPN-Plus connections to private networks and web resources deployed in vCloud Air
n
The virtual servers and pools servers configured for load balancing in vCloud Air
n
How to Use Client Certificates
You can create a client certificate through a CAI command or REST call. You can then distribute this
certificate to your remote users, who can install the certificate on their web browser.
The main benefit of implementing client certificates is that a reference client certificate for each remote user
can be stored and checked against the client certificate presented by the remote user. To prevent future
connections from a certain user, you can delete the reference certificate from the security server's list of
client certificates. Deleting the certificate denies connections from that user.
Generate a Certificate Signing Request
Before you can order a signed certificate from a CA or create a self-signed certificate, you must generate a
Certificate Signing Request (CSR) for your edge gateway.
A CSR is an encoded file that you need to generate on an edge gateway that needs an SSL certificate. Using a
CSR standardizes the way that companies send their public keys along with information that identifies their
company names and domain names.
VMware, Inc.
23
Page 24

vCloud Air Advanced Networking Services Guide
You generate a CSR with a matching private-key file that must remain on the edge gateway. The CSR
contains the matching public key and other information such as your organization's name, location, and
domain name.
Procedure
1 Log in to vCloud Air and navigate to the vCloud Edge Gateway Services UI.
See “Log In and Navigate to Advanced Networking Services,” on page 9 for information.
2 Click the Certificates tab and Actions > Generate CSR.
The Generate CSR dialog box appears.
3 Configure the following options for the CSR:
Option Description
Common Name
Organization Name
Organization Unit
Locality
State
Country
Message Algorithm
Key Size
Description
4 Click OK.
Type the fully-qualified domain name (FQDN) for the organization that
you will be using the certificate for (for example,
www.exampledomain.com). Do not include the http:// or https://
prefixes in your common name.
Type name under which your company is legally registered. The listed
organization must be the legal registrant of the domain name in the
certificate request.
Use this field to differentiate between divisions within a company; for
example, AMEA or East Coast Operations. If applicable, you can enter the
DBA (doing business as) name in this field.
Type the city or locality where your company is legally registered.
Type the full name (do not abbreviate) of the state, province, region, or
territory where your company is legally registered.
Select the country where your company is legally registered.
The drop-down menu displays country names along with their two-letter
International Organization for Standardization (ISO-) format country
codes.
(Optional) Select the key type (typically RSA) for the certificate. The key
type defines the encryption algorithm for communication between the
hosts.
NOTE SSL VPN-Plus supports RSA certificates only.
(Optional) Type the key size (2048 bit minimum).
(Optional) Enter a description for the certificate.
The CSR is generated and displayed in the certificates list.
What to do next
Transmit the CSR to a certificate authority to obtain your signed certificate. Import the signed certificate into
Advanced Networking Services. See “Add a Certificate,” on page 25 for information.
Configure a CA Signed Certificate
Before you can order an SSL certificate from a CA, you must generate a CSR for your edge gateway.
Procedure
1 Log in to vCloud Air and navigate to the vCloud Edge Gateway Services UI.
See “Log In and Navigate to Advanced Networking Services,” on page 9 for information.
24 VMware, Inc.
Page 25

Chapter 3 Certificate and Security Group Management
2 Generate a CSR. See “Generate a Certificate Signing Request,” on page 23 for information.
The CSR is generated and displayed in the certificates list.
3 Have an online CA sign this CSR.
4 Import the signed certificate by performing the following steps:
a From the Certificates tab, select Actions > Import Certificate.
b In the Import Certificate dialog box, paste the contents of the signed certificate.
c Click OK.
The CA signed certificate appears in the certificates list.
What to do next
Attach the CA signed certificate to the SSL VPN-Plus or IPsec VPN tunnels as required. See “Configure
Server Settings,” on page 51 and “Specify Global IPsec VPN Configuration,” on page 62 for information.
Configure a Self-Signed Certificate
You can create, install, and manage self-signed server certificates.
Prerequisites
Verify that you have a CA certificate so that you can sign your own certificates.
Procedure
1 Log in to vCloud Air and navigate to the vCloud Edge Gateway Services UI.
See “Log In and Navigate to Advanced Networking Services,” on page 9 for information.
2 Generate a CSR. See “Generate a Certificate Signing Request,” on page 23 for information.
The CSR is generated and displayed in the certificates list.
3 Select the CSR in the list and select Actions > Self Sign Certificate.
4 Type the number of days that the self-signed certificate is valid for.
5 Click OK.
Add a Certificate
By adding a CA certificate, you can become an interim CA for your company. You then have the authority
for signing your own certificates.
Procedure
1 Log in to vCloud Air and navigate to the vCloud Edge Gateway Services UI.
See “Log In and Navigate to Advanced Networking Services,” on page 9 for information.
2 Click the Certificates tab.
3
Click the Add (
Certificate
n
CA Certificate
n
4 Paste the certificate contents in the Certificate contents text box.
5 (Optional) Type a description for the certificate.
VMware, Inc. 25
) icon and select one of the following options:
Page 26

vCloud Air Advanced Networking Services Guide
6 If you are adding a Certificate, configure the following options:
Private Key—required for enabling public key/private key encryption
n
Password
n
Retype Password
n
7 Click OK.
You can now sign your own certificates.
Add a Certificate Revocation List
A Certificate Revocation List (CRL) is a list of subscribers and their status, which is provided and signed by
Microsoft.
The list contains the following items:
The revoked certificates and the reasons for revocation
n
The dates that the certificates are issued
n
The entities that issued the certificates
n
A proposed date for the next release
n
When a potential user attempts to access a server, the server allows or denies access based on the CRL entry
for that particular user.
Procedure
1 Log in to vCloud Air and navigate to the vCloud Edge Gateway Services UI. See “Log In and Navigate
to Advanced Networking Services,” on page 9 for information.
2 Click the Certificates tab.
3
Click the Add (
The Add CRL dialog box appears.
4 In Certificate contents, paste the list.
5 (Optional) Type a description.
6 Click OK.
) icon and then CLR.
Security Objects in vCloud Air
This section describes custom network and security containers.
Advanced Networking Services includes functionality to create grouping objects for use when configuring
the edge gateway firewall and the firewall for Trust Groups. Additionally, you can use grouping objects
when configuring the server pool for the load balancer.
Create an IP Address Group
You can create an IP address group and then add this group as the source or destination in a firewall rule.
Such a rule can help protect physical machines from virtual machines or vice versa.
Procedure
1 Log in to vCloud Air and navigate to the vCloud Edge Gateway Services UI.
See “Log In and Navigate to Advanced Networking Services,” on page 9 for information.
26 VMware, Inc.
Page 27

Chapter 3 Certificate and Security Group Management
2 Click the Grouping Objects tab and IP Sets.
3
Click the Add ( ) icon.
The Add IP Addresses dialog box appears.
4 Type a name for the group.
5 (Optional) Type a description for the group.
6 Type the IP addresses to be included in the group.
7 Click OK.
Create a Service
You can create a service and then define rules for that service.
Procedure
1 Log in to vCloud Air and navigate to the vCloud Edge Gateway Services UI.
See “Log In and Navigate to Advanced Networking Services,” on page 9 for information.
2 Click the Grouping Objects tab and Service.
3
Click the Add (
) icon.
4 Type a name for the service.
5 (Optional) Type a description for the service.
6 Select a protocol for which you want to add a non-standard port.
Create a Service Group
You can create a service group and then define rules for that service group.
Procedure
1 Log in to vCloud Air and navigate to the vCloud Edge Gateway Services UI.
See “Log In and Navigate to Advanced Networking Services,” on page 9 for information.
2 Click the Grouping Objects tab and Service Group.
3
Click the Add ( ) icon.
The Add service group dialog box appears.
4 Type a name for the group.
5 (Optional) Type a description for the group.
6 In Members, select the services or service groups that you want to add to the group.
7 Click OK.
VMware, Inc. 27
Page 28

vCloud Air Advanced Networking Services Guide
28 VMware, Inc.
Page 29

Network Security and Isolation 4
Advanced Networking Services provides functionality to create robust firewalls to protect your virtual
machines deployed in vCloud Air from outside network traffic as well as to create internal firewalls to
isolate virtual machines from each other.
This chapter includes the following topics:
“Types of Firewalls in vCloud Air,” on page 29
n
“Manage Edge Gateway Firewall Rules,” on page 30
n
“Manage Trust Groups Firewall Rules,” on page 35
n
Types of Firewalls in vCloud Air
You can create firewall rules to establish Trust Groups and firewall rules to apply to an edge gateway to
protect your virtual machines from outside network traffic.
Rules defined on the centralized level are referred to as pre rules. Tenants can then add rules at an
individual edge gateway level, which are referred to as local rules.
Each traffic session is checked against the top rule in the Firewall table before moving down the subsequent
rules in the table. The first rule in the table that matches the traffic parameters is enforced. Rules are
displayed in the following order:
1 User-defined pre rules have the highest priority, and are enforced in top-to-bottom ordering with a per-
virtual NIC level precedence.
2 Auto-plumbed rules (rules that enable control traffic to flow for edge gateway services).
3 Local rules defined at an edge gateway level.
4 Default Trust Group firewall rule
Edge Gateway Firewall
The firewall for the edge gateway helps you meet key perimeter security requirements, such as building
DMZs based on IP/VLAN constructs, tenant-to-tenant isolation in multi-tenant virtual data centers,
Network Address Translation (NAT), partner (extranet) VPNs, and user-based SSL VPNs.
The Edge Gateway Firewall monitors North-South traffic to provide perimeter security functionality
including firewall, Network Address Translation (NAT) as well as site-to-site IPSec and SSL VPN
functionality. This solution is available in the virtual machine form factor and can be deployed in a High
Availability mode.
VMware, Inc.
29
Page 30

vCloud Air Advanced Networking Services Guide
Firewall for Trust Groups
The Trust Group firewall allows you to segment virtual data center entities like virtual machines based on
virtual machine names and attributes.
The Trust Groups firewall is a hyper visor kernel-embedded firewall that provides visibility and control for
virtualized workloads and networks. You can create access control policies based on objects like data centers
and virtual machine names; and network constructs like IP addresses or IP set addresses. Firewall rules are
enforced at the vNIC level of each virtual machine to provide consistent access control even when the
virtual machine gets motioned. The hyper visor-embedded nature of the firewall delivers close to line rate
throughput to enable higher workload consolidation on physical servers. The distributed nature of the
firewall provides a scale-out architecture that automatically extends firewall capacity when additional hosts
are added to a data center.
For L2 packets, the Trust Groups firewall creates a cache for performance boost. L3 packets are processed in
the following sequence:
1 All packets are checked for an existing state. This is done for SANS too so that bogus or retransmitted
SANS for existing sessions can be detected.
2 When a state match is found, the packets are processed.
3 When a state match is not found, the packets are processed through the rules until a match is found.
For TCP packets, a state is set only for packets with a SYN flag. However, rules that do not specify a
n
protocol (service ANY), can match TCP packets with any combination of flags.
For UDP packets, 5-tuple details are extracted from the packet. When a state does not exist in the state
n
table, a new state is created using the extracted 5-tuple details. Subsequently received packets are
matched against the state that was just created.
For ICMP packets, ICMP type, code, and packet direction are used to create a state.
n
The Trust Group firewall can help in creating identity-based rules as well. Administrators can enforce access
control based on the user's group membership as defined in the enterprise Active Directory. The following
scenarios show ways to use identity-based firewall rules:
User accessing virtual applications using a laptop or mobile device where AD is used for user
n
authentication
User accessing virtual applications using VDI infrastructure where the virtual machines are Microsoft
n
Windows based
If you have a third-party vendor firewall solution deployed in your environment, see Redirecting Traffic to
a Vendor Solution through Logical Firewall in the NSX Administration Guide.
Running open VMware Tools on guest or workload virtual machines has not been validated with the Trust
Groups firewall.
Manage Edge Gateway Firewall Rules
You can navigate to an edge gateway to see the rules that apply to it.
Firewall rules applied to an edge gateway router only protect traffic to and from the router. They do not
protect traffic traveling between virtual machines within a virtual data center. To protect intra-virtual data
center traffic, create Trust Groups firewall rules for East-West protection.
Rules created on the firewall user interface applicable to an edge gateway are displayed in a read-only
mode.
Rules are displayed and enforced in the following order:
1 User-defined rules from the Firewall user interface (Read Only).
30 VMware, Inc.
Page 31

Chapter 4 Network Security and Isolation
2 Auto-plumbed rules (rules that enable control traffic to flow for edge gateway services).
3 User-defined rules on Firewall user interface.
4 Default rule.
Add an Edge Gateway Firewall Rule
The Firewall tab displays rules created on the centralized Firewall tab in a read-only mode. Any rules that
you add here are not displayed on the centralized Firewall tab. You can add multiple edge gateway
interfaces and IP address groups as the source and destination for firewall rules.
When you select vNIC Group and vse as an object for a source or destination, the rule applies to traffic
generated by the edge gateway. When you select internal or external, the rule applies to traffic coming from
any internal or uplink interface of the selected edge gateway instance.
NOTE Edge gateway firewall rules on internal interfaces do not work when you configure dynamic routing
for the edge gateway.
Procedure
1 Log in to vCloud Air and navigate to the vCloud Edge Gateway Services UI.
See “Log In and Navigate to Advanced Networking Services,” on page 9 for information.
2 Click the Firewall tab.
3 Perform one of the following actions:
Option Description
To add a rule at a specific place in
the firewall table
To add a rule by copying a rule
To add a rule anywhere in the
firewall table
a Select a rule.
b
A new any any allow rule is added below the selected rule. When the
system defined rule is the only rule in the firewall table, the new rule is
added above the default rule.
a Select a rule.
b
c Select a rule.
d
a
A new any any allow rule is added below the selected rule. When the
system defined rule is the only rule in the firewall table, the new rule is
added above the default rule.
The new rule is enabled by default.
4
Point to the Name cell of the new rule and click
In the No. column, click
Click the Copy ( ) icon.
In the No. column, click and select Paste Above or Paste Below.
Click the Add (
and select Add Above or Add Below.
) icon.
. Enter a name for the rule.
VMware, Inc. 31
Page 32

vCloud Air Advanced Networking Services Guide
5 Point to the Source cell of the new rule. Perform one of the following options:
Option Description
Click
Click
6 Point to the Destination cell of the new rule. Perform one of the following options:
Type the source IP address. The firewall supports both IPv4 and IPv6
formats.
To specify the source as an object other than a specific IP address:
a
Select one or more objects and click
You can create a new IP Set. Once you create the new object, it is
added to the source column by default.
b To exclude a source from the rule, click Advance options.
c Select Negate Source to exclude this source from the rule.
When Negate Source is selected, the rule is applied to traffic coming
from all sources except for the source you specified in the previous
step.
When Negate Source is not selected, the rule applies to traffic coming
from the source you specified in the previous step.
d Click OK.
.
Option Description
Click
Click
Type the destination IP address. The firewall supports both IPv4 and IPv6
formats.
To specify the destination as an object other than a specific IP address:
a
Select one or more objects and click
You can create a new IP Set. Once you create the new object, it is
added to the Destination column by default.
b To exclude a destination port, click Advance options.
c Select Negate Destination to exclude this destination from the rule.
When Negate Destination is selected, the rule is applied to traffic
going to all destinations except for the destination you specified in the
previous step.
When Negate Destination is not selected, the rule applies to traffic
going to the destination you specified in the previous step.
d Click OK.
.
32 VMware, Inc.
Page 33

Chapter 4 Network Security and Isolation
7 Point to the Service cell of the new rule. Perform one of the following options:
Option Description
Click
Click
To specify the service as a port–protocol combination:
a Select the service protocol.
NOTE The edge gateway supports ALG for FTP only.
b Under Advanced options, type the port number.
c Click OK.
To select a pre-defined service or service group, or define a new one:
a
Select one or more objects and click
You can create a new service or service group. Once you create the
new object, it is added to the Selected Objects column by default.
b Click OK.
.
In order to protect your network from ACK or SYN floods, you can set the service to TCP-all_ports or
UDP-all_ports and set the action to Block for the default rule.
8
Point to the Action cell of the new rule and click
Action Results in
Accept
Deny
Reject
Log
Do not log
Advanced options > Match on
Translated
Enable Rule Direction
Allows traffic from or to the specified sources, destinations, and services.
Blocks traffic from or to the specified sources, destinations, and services.
Sends reject message for unaccepted packets.
RST packets are sent for TCP connections.
ICMP messages with administratively prohibited code are sent for UDP,
ICMP, and other IP connections.
Logs all sessions matching this rule. Enabling logging can affect
performance.
Does not log sessions.
Applies the rule to the translated IP address and services for a NAT rule
Indicates whether the rule is incoming or outgoing.
NOTE VMware does not recommend specifying the direction for firewall
rules.
. Select the required actions and click OK.
9 Click Publish.
After a few moments, a message indicating whether the publish operation was successful appears. In
case of any failures, the hosts on which the rule was not applied are listed. When you click Publish, the
firewall configuration is automatically saved.
Edit an Edge Gateway Firewall Rule
You can edit and delete only the user-defined firewall rules that were added to an edge gateway. You
cannot edit or delete an auto-generated rule or the default rule.
Procedure
1 Log in to vCloud Air and navigate to the vCloud Edge Gateway Services UI.
See “Log In and Navigate to Advanced Networking Services,” on page 9 for information.
VMware, Inc. 33
Page 34

vCloud Air Advanced Networking Services Guide
2 Click the Firewall tab.
The table of configured rules for the edge gateway firewall appears.
n
Disable a rule by clicking , or enable a rule by clicking .
n
Edit a rule by clicking .
NOTE The default firewall rule for an edge gateway blocks all incoming traffic. You can change the
default action and logging settings. Default firewall settings apply to traffic that does not match
any of the user-defined firewall rules.
n
Delete a rule by clicking
Move a rule up or down in the Firewall table. See “Change the Order of a Gateway Firewall Rule,”
n
on page 34.
Hide generated rules or pre rules (rules added on the centralized Firewall tab) by clicking Hide
n
Generated rules or Hide Pre rules.
Search for rules by typing text in the Search field.
n
n
Display additional columns in the rule table by clicking and selecting the appropriate
columns.
.
Column Name Information Displayed
Rule Tag Unique system generated ID for each rule
Log Whether traffic for this rule is being logged
Stats
Comments Comments for the rule
Clicking shows the traffic related to this rule (traffic packets and size)
3 Click Publish Changes.
Change the Order of a Gateway Firewall Rule
You can move a custom rule up or down in the table. The default rule is always at the bottom of the table
and cannot be moved.
Rules are displayed (and enforced) in the following order:
1 User-defined pre rules have the highest priority and are enforced in top-to-bottom ordering with a per-
virtual NIC level precedence.
2 Auto-plumbed rules.
3 Local rules defined at an edge gateway level.
4 Default firewall rule for Trust Groups.
Procedure
1 Log in to vCloud Air and navigate to the vCloud Edge Gateway Services UI.
See “Log In and Navigate to Advanced Networking Services,” on page 9 for information.
2 In the Firewall tab, select the rule that you want to move.
3
Move a rule up or down in the Firewall table by clicking Move rule up (
) or Move rule down ( )
icon.
34 VMware, Inc.
Page 35

4 Click Publish Changes.
Manage Trust Groups Firewall Rules
Default firewall settings apply to traffic that does not match any of the user-defined firewall rules. The
default firewall rule for Trust Groups is displayed on the centralized firewall user interface, and the default
rule for each edge gateway is displayed at the edge gateway level.
The default Trust Group rule allows all L3 and L2 traffic to pass through all prepared clusters in your
infrastructure. The default rule is always at the bottom of the rules table and cannot be deleted or added to.
However, you can change the Action element of the rule from Allow to Block or Reject, add comments for
the rule, and indicate whether traffic for that rule should be logged.
Add a Trust Groups Firewall Rule
You add firewall rules at the global scope. Using the Applied To field, you can then narrow down the scope
at which you want to apply the rule. The firewall allows you to add multiple objects at the source and
destination levels for each rule, which helps reduce the total number of firewall rules to be added.
Procedure
1 From the Dashboard tab in the vCloud Air Web UI, click the virtual data center to configure a Trust
Groups firewall rule.
Chapter 4 Network Security and Isolation
The Virtual Data Center Details page appears.
2 Click the Gateways tab > Manage in vCloud Director.
vCloud Director opens in a new browser tab and displays the Administration page for the gateways in
the selected virtual data center.
3 Under Cloud Resources in the left navigation panel, click Virtual Datacenters.
The page refreshes and displays the virtual data center in the table.
4 Select the virtual data center, right-click and select Manage Firewall.
The vCloud Security Services page appears.
5 Select the type of rule you want to create. You have the option to create a general rule or an Ethernet
rule.
To add an L3 rule, click the General tab. To add an L2 rule, click the Ethernet tab.
6 Expand the section where you want to add a rule.
By default, the edge gateway is provisioned with the section Default Section Layer3.
7
To add a rule at a specific place in the firewall table, in the No. column, click
or Add Below.
A new any any allow rule is added above or below the selected rule. When the system defined rule is
the only rule in the firewall table, the new rule is added above the default rule.
8
Point to the Name cell, click and enter a name.
and select Add Above
VMware, Inc. 35
Page 36

vCloud Air Advanced Networking Services Guide
9 Point to the Source cell and perform one of the following options:
Option Description
Click
Click
10 Point to the Destination cell and perform one of the following options:
Type the source IP address. The Trust Groups firewall supports IPv4
format only.
To specify the source as an object other than a specific IP address:
a
Select one or more objects and click
You can create a new IP Set. Once you create the new object, it is
added to the source column by default.
b To exclude a source from the rule, click Advance options.
c Select Negate Source to exclude this source from the rule.
When Negate Source is selected, the rule is applied to traffic coming
from all sources except for the source you specified in the previous
step.
When Negate Source is not selected, the rule applies to traffic coming
from the source you specified in the previous step.
d Click OK.
.
Option Description
Click
Click
Type the destination IP address. The Trust Groups firewall supports IPv4
format only.
To specify destination as an object other than a specific IP address:
a
Select one or more objects and click
You can create a new IP Set. Once you create the new object, it is
added to the Destination column by default.
b To exclude a destination port, click Advance options.
c Select Negate Destination to exclude this destination from the rule.
When Negate Destination is selected, the rule is applied to traffic
going to all destinations except for the destination you specified in the
previous step.
When Negate Destination is not selected, the rule applies to traffic
going to the destination you specified in the previous step.
d Click OK.
.
36 VMware, Inc.
Page 37

Chapter 4 Network Security and Isolation
11 Point to the Service cell of the new rule and perform one of the following options:
Option Description
Click
Click
To specify the service as a port–protocol combination:
a Select the service protocol.
NOTE The Trust Groups firewall supports Application Level Gateway
(ALG) for the following protocols: FTP, CIFS, ORACLE TNS, MS-RPC,
and SUN-RPC.
b Type the port number and click OK.
To select a pre-defined service or service group, or define a new one:
a
Select one or more objects and click
You can create a new service or service group. Once you create the
new object, it is added to the Selected Objects column by default.
b Click OK.
.
NOTE To protect your network from ACK or SYN floods, set the service to TCP-all_ports or UDPall_ports and set the action to Block for the default rule.
12
Point to the Action cell, click
to configure the action for the rule, and click OK.
Action Results in
Accept
Deny
Reject
Log
Do not log
Advanced options > Match on
Translated
Enable Rule Direction
Allows traffic from or to the specified sources, destinations, and services.
Blocks traffic from or to the specified sources, destinations, and services.
Sends a reject message for unaccepted packets.
RST packets are sent for TCP connections.
ICMP messages with administratively prohibited codes are sent for UDP,
ICMP, and other IP connections.
Logs all sessions matching this rule. Enabling logging can affect
performance.
Does not log sessions.
Applies the rule to the translated IP address and services for a NAT rule.
Indicates whether the rule is incoming or outgoing.
VMware does not recommend specifying the direction for Trust Groups
firewall rules.
13
Point to the Applied To cell, click to define the scope at which this rule is applicable, then click OK.
To apply a rule to Do this
All edge gateways in your environment Select Apply this rule on all Edge gateways. After you
click OK, the Applied To column for this rule displays
All Edges.
When the option for all edge gateways in the virtual data
center is selected, the Applied To column displays Any.
One or more data centers, edge gateways, networks, or
virtual machines
1 In Container type, select the appropriate object.
2 In the Available list, select one or more objects and
click
.
NOTE When the rule contains virtual machines in the source and destination fields, you must add both
the source and destination virtual machines to Applied To for the rule to work correctly.
VMware, Inc. 37
Page 38

vCloud Air Advanced Networking Services Guide
14 Click Publish Changes.
Edit a Trust Groups Firewall Rule
Firewall rules for Trust Groups are added to a virtual data center in vCloud Air.
You can edit and delete only the user-defined firewall rules that were added to a virtual data center. You
cannot edit or delete an auto-generated rule or the default rule.
Procedure
1 To edit a Trust Groups firewall rule, navigate to the virtual data center in vCloud Director where a
Trust Groups firewall is configured.
See “Add a Trust Groups Firewall Rule,” on page 35 for information.
The table of configured Trust Groups firewall rules for the virtual data center appears.
2 Perform any of the following actions to manage the Trust Groups firewall rule:
n
Disable a rule by clicking , or enable a rule by clicking .
n
Edit a rule by clicking .
n
Delete a rule by clicking
.
n
Move a rule up or down in the Firewall table by clicking
NOTE You can move a custom rule up or down in the table. The default rule is always at the
bottom of the table and cannot be moved.
Search for rules by typing text in the Search field.
n
n
Display additional columns in the rule table by clicking and selecting the appropriate
columns.
Column Name Information Displayed
Rule Tag Unique system generated ID for each rule
Log Whether traffic for this rule is being logged
Stats
Comments Comments for the rule
Clicking shows the traffic related to this rule (traffic packets and size)
3 Click Publish Changes.
) or .
38 VMware, Inc.
Page 39

Load Balancing 5
The load balancer enables network traffic to follow multiple paths to a specific destination. It distributes
incoming service requests evenly among multiple servers in such a way that the load distribution is
transparent to users. Load balancing helps achieve optimal resource utilization, maximizing throughput,
minimizing response time, and avoiding overload.
Set Up Load Balancing
The load balancer distributes network traffic across multiple servers to achieve optimal resource utilization.
You map an external, or public, IP address to a set of internal servers for load balancing. The load balancer
accepts TCP, HTTP, or HTTPS requests on the external IP address and decides which internal server to use.
The edge gateway provides load balancing up to Layer 7.
Setting up load balancing in vCloud Air consists of the following workflow:
1 You begin by setting global options for the load balancer.
2 You then create an application profile to define the behavior of a particular type of network traffic.
3 Next, you create a service monitor to define health check parameters for the load balancer.
4 You now create a server pool consisting of backend server members and associate a service monitor
with the pool to manage and share the backend servers flexibly and efficiently.
VMware, Inc.
When the virtual server receives a request, it chooses the appropriate pool to distribute the traffic
comprising one or more members based on the associated algorithm. Each pool is monitored by the
associated service monitor. When the load balancer detects a problem with a pool member, it is marked
as down.
5 Finally, create a firewall rule to permit traffic to the new virtual server (the destination IP address). See
“Add an Edge Gateway Firewall Rule,” on page 31 for information.
Port 8090 is the default listening port for TCP, port 80 is the default port for HTTP, and port 443 is the
default port for HTTPs.
Load balancing for an edge gateway is configured on the external interface because the edge gateway load
balances incoming traffic from the external network. When configuring the virtual server for load balancing,
specify one of the available IP addresses you have in your vCloud Air service. See Allocation of Public IP
Addresses in the vCloud Air Networking Guide.
39
Page 40

vCloud Air Advanced Networking Services Guide
Configure the Load Balancer Service
You can specify global load balancer configuration parameters.
Procedure
1 Log in to vCloud Air and navigate to the vCloud Edge Gateway Services UI.
See “Log In and Navigate to Advanced Networking Services,” on page 9 for information.
2 Click the Load Balancer tab and Global Configuration.
3 Click Edit next to Load balancer global configuration.
4 Select the options you want to enable:
Option Description
Enable Load Balancer
Acceleration Enabled
Logging
5 Click OK.
Allows the load balancer to distribute traffic to internal servers for load
balancing.
When enabled, the load balancer uses the faster L4 engine rather than L7
engine. The L4 TCP VIP is processed before the edge gateway firewall so
no Allow firewall rule is required.
L7 HTTP/HTTPS VIPs are processed after the firewall. Therefore, when
Acceleration Enabled is not selected, an edge gateway firewall rule must
exist to allow access to the L7 HTTP/HTTPS VIP.
When Acceleration Enabled is selected and the server pool is in nontransparent mode, an SNAT rule is added. Therefore, ensure that the
firewall is enabled on the edge gateway.
The edge gateway load balancer collects traffic logs. You can choose the
log level.
What to do next
Configure application profiles for the load balancer. See “Create an Application Profile,” on page 40.
Create an Application Profile
You create an application profile to define the behavior of a particular type of network traffic. After
configuring a profile, you associate the profile with a virtual server. The virtual server then processes traffic
according to the values specified in the profile. Using profiles enhances your control over managing
network traffic, and makes traffic-management tasks easier and more efficient.
When you create a profile for HTTPS traffic, the following HTTPS traffic patterns are allowed:
Client -> HTTPS -> LB (terminate SSL) -> HTTP -> servers
n
Client -> HTTPS -> LB (terminate SSL) -> HTTPS -> servers
n
Client -> HTTPS-> LB (SSL passthrough) -> HTTPS -> servers
n
Client -> HTTP-> LB -> HTTP -> servers
n
Procedure
1 Log in to vCloud Air and navigate to the vCloud Edge Gateway Services UI.
See “Log In and Navigate to Advanced Networking Services,” on page 9 for information.
2 Click the Load Balancer tab and Application Profiles.
40 VMware, Inc.
Page 41

3
Click the Add ( ) icon.
The New Profile dialog box appears.
4 Type a name for the profile.
5 (Optional) Configure the following options for the application profile:
Option Description
Type
HTTP Redirect URL
Persistence
Cookie Name
Select the way in which you want to send requests to the server—HTTP,
HTTPS, TCP, or UDP.
By default, HTTP is selected for the traffic type.
Depending on the type selected, the remaining options in the New Profile
dialog are enabled or disabled.
(HTTP and HTTPS) Type the URL to which you want to re-direct HTTP
traffic. For example, you can direct traffic from http://myweb.com to
https://myweb.com.
Specify persistence for the profile. Persistence tracks and stores session
data, such as the specific pool member that serviced a client request. This
ensures that client requests are directed to the same pool member
throughout the life of a session or during subsequent sessions.
NOTE The persistence options refresh depending on the type selected.
SOURCEIP persistence tracks sessions based on the source IP address.
When a client requests a connection to a virtual server that supports source
address affinity persistence, the load balancer checks to see if that client
previously connected, and if so, returns the client to the same pool
member.
(TPC Only) Microsoft Remote Desktop Protocol (MSRDP) persistence
maintains persistent sessions between Windows clients and servers that
are running the Microsoft Remote Desktop Protocol (RDP) service. The
recommended scenario for enabling MSRDP persistence is to create a load
balancing pool that consists of members running Windows Server 2003 or
Windows Server 2008, where all members belong to a Windows cluster
and participate in a Windows session directory.
(HTTP and HTTPS) Type the cookie name. Cookie persistence inserts a
cookie to uniquely identify the session the first time a client accessed the
site and then refers to that cookie in subsequent requests to persist the
connection to the appropriate server.
NOTE A cookie name is required when you select cookie persistence.
Chapter 5 Load Balancing
VMware, Inc. 41
Page 42

vCloud Air Advanced Networking Services Guide
Option Description
Mode
Expires in
Insert X-Forwarded-For HTTP
header
Enable Pool Side SSL
6 (HTTPS Only) Configure the certificates to be used with the application profile:
Select the mode by which the cookie should be inserted. The following
cookie insertion modes are supported:
Insert
n
The edge gateway sends a cookie. When the server sends one or more
cookies, the client will receive one extra cookie (the server cookies plus
the edge gateway cookie). When the server does not send any cookies,
the client will receive the edge gateway cookie only.
Prefix
n
Select this option when your client does not support more than one
cookie.
NOTE All browsers accept multiple cookies. But you might have a
proprietary application using a proprietary client that supports only
one cookie. The Web server sends its cookie as usual. The edge
gateway injects (as a prefix) its cookie information in the server cookie
value. This cookie added information is removed when the edge
gateway sends it to the server.
App Session
n
For this option, the server does not send a cookie; instead, it sends the
user session information as a URL. For example,
http://mysite.com/admin/UpdateUserServlet;jsessionid=OI2
4B9ASD7BSSD, where jsessionid is the user session information and
is used for the persistence. It is not possible to see the App Session
persistence table for troubleshooting.
Enter a length of time in seconds that persistence stays in effect.
(HTTP and HTTPS) Select Insert X-Forwarded-For HTTP header for
identifying the originating IP address of a client connecting to a Web
server through the load balancer.
(HTTPS Only) Select Enable Pool Side SSL to define the certificate, CAs,
or CRLs used to authenticate the load balancer from the server side in the
Pool Certificates tab.
Option Description
Virtual Server Certificates
Pool Certificates
Cipher
Client Authentication
Select the certificate, CAs, or CRLs used to decrypt HTTPS traffic.
Define the certificate, CAs, or CRLs used to authenticate the load balancer
from the server side.
NOTE Select Enable Pool Side SSL to enable this tab.
Select the cipher algorithms (or cipher suite) negotiated during the
SSL/TLS handshake.
Specify whether client authentication is to be ignored or required.
NOTE When set to required, the client must provide a certificate after the
request or the handshake is canceled.
What to do next
Add service monitors for the load balancer to define health checks for different types of network traffic. See
“Create a Service Monitor,” on page 43.
42 VMware, Inc.
Page 43

Chapter 5 Load Balancing
Create a Service Monitor
You create a service monitor to define health check parameters for a particular type of network traffic. When
you associate a service monitor with a pool, the pool members are monitored according to the service
monitor parameters.
Procedure
1 Log in to vCloud Air and navigate to the vCloud Edge Gateway Services UI.
See “Log In and Navigate to Advanced Networking Services,” on page 9 for information.
2 Click the Load Balancer tab and Service Monitoring.
3
Click the Add (
The New Service Monitor dialog box appears.
4 Type a name for the service monitor.
5 (Optional) Configure the following options for the service monitor:
Option Description
Interval
Timeout
Max Retries
Type
Expected
Method
URL
Send
Receive
Extension
6 Click OK.
) icon.
Type the interval at which a server is to be pinged.
Type the maximum time in seconds within which a response from the
server must be received.
Type the number of times the server must be pinged before it is declared
down.
Select the way in which you want to send the health check request to the
server—HTTP, HTTPS, TCP, ICMP, or UDP.
Depending on the type selected, the remaining options in the New Service
Monitor dialog are enabled or disabled.
(HTTP and HTTPS only) Type the string that the monitor expects to match
in the status line of the HTTP or HTTPS response (for example, HTTP/1.1).
(HTTP and HTTPS only) Select the method to be used to detect server
status.
(HTTP and HTTPS only) Type the URL to be used in the sample request.
NOTE When you select the POST method, you must specify a URL.
(HTTP, HTTPS, and UDP only) Type the data to be sent.
(HTTP, HTTPS, and UDP only) Type the string to be matched in the
response content.
NOTE When Expected is not matched, the monitor does not try to match
the Receive content.
(ALL) Type advanced monitor parameters as key=value pairs. For
example, warning=10 indicates that when a server does not respond within
10 seconds, its status is set as warning. All extension items should be
separated with a carriage return character. For example:
<extension>delay=2
critical=3
escape</extension>
VMware, Inc. 43
Page 44

vCloud Air Advanced Networking Services Guide
Example: Extensions Supported for Each Protocol
Table 5‑1. Extensions for HTTP/HTTPS Protocols
Monitor Extension Description
no-body Does not wait for a document body and stops reading after
max-age=SECONDS Warns when a document is more than SECONDS old. The
content-type=STRING Specifies a Content-Type header media type in POST calls.
linespan Allows regex to span newlines (must precede -r or -R).
regex=STRING or ereg=STRING Searches the page for regex STRING.
eregi=STRING Searches the page for case-insensitive regex STRING.
invert-regex Returns CRITICAL when found and OK when not found.
proxy-authorization=AUTH_PAIR Specifies the username:password on proxy servers with
useragent=STRING
header=STRING Sends any other tags in the HTTP header. Use multiple
onredirect=ok|warning|critical|follow|sticky|stickyport Indicates how to handle redirected pages.
pagesize=INTEGER:INTEGER Specifies the minimum and maximum page sizes required
warning=DOUBLE Specifies the response time in seconds to result in a
critical=DOUBLE Specifies the response time in seconds to result in a critical
the HTTP/HTTPS header.
NOTE An HTTP GET or HTTP POST is still sent; not a
HEAD method.
number can be in the form 10m for minutes, 10h for hours,
or 10d for days.
basic authentication.
Sends the string in the HTTP header as User Agent.
times for additional headers.
sticky is like follow but stick to the specified IP address.
stickyport ensures the port stays the same.
in bytes.
warning status.
status.
Table 5‑2. Extensions for HTTPS Protocol Only
Monitor Extension Description
sni Enables SSL/TLS hostname extension support (SNI).
certificate=INTEGER Specifies the minimum number of days a certificate has to
be valid. The port defaults to 443. When this option is used,
the URL is not checked.
authorization=AUTH_PAIR Specifies the username:password on sites with basic
authentication.
Table 5‑3. Extensions for TCP Protocol
Monitor Extension Description
escape
all Specifies all expect strings need to occur in a server
44 VMware, Inc.
Allows for the use of \n, \r, \t, or \ in a send or quit
string. Must come before a send or quit option. By default,
nothing is added to send and \r\n is added to the end of
quit.
response. By default, any is used.
Page 45

Chapter 5 Load Balancing
Table 5‑3. Extensions for TCP Protocol (Continued)
Monitor Extension Description
quit=STRING Sends a string to the server to cleanly close the connection.
refuse=ok|warn|crit
mismatch=ok|warn|crit
jail Hides output from the TCP socket.
maxbytes=INTEGER Closes the connection when more than the specified
delay=INTEGER Waits the specified number of seconds between sending
certificate=INTEGER[,INTEGER] Specifies the minimum number of days a certificate has to
ssl Uses SSL for the connection.
warning=DOUBLE Specifies the response time in seconds to result in a
critical=DOUBLE Specifies the response time in seconds to result in a critical
Accepts TCP refusals with states ok, warn, or criti. By
default, uses state crit.
Accepts expected string mismatches with states ok, warn,
or crit. By default, uses state warn.
number of bytes are received.
the string and polling for a response.
be valid. The first value is #days for warning and the
second value is critical (if not specified - 0).
warning status.
status.
What to do next
Add server pools for your load balancer. See “Add a Server Pool,” on page 45.
Add a Server Pool
You can add a server pool to manage and share backend servers flexibly and efficiently. A pool manages
load balancer distribution methods and has a service monitor attached to it for health check parameters.
Procedure
1 Log in to vCloud Air and navigate to the vCloud Edge Gateway Services UI.
See “Log In and Navigate to Advanced Networking Services,” on page 9 for information.
2 Click the Load Balancer tab and Pools.
3 Type a name and description for the load balancer pool.
4 Select a balancing method for the service from the Algorithm drop-down menu:
Option Description
ROUND-ROBIN
IP-HASH
LEASTCONN
URI
Each server is used in turn according to the weight assigned to it. This is
the smoothest and fairest algorithm when the server processing time
remains equally distributed.
Selects a server based on a hash of the source and destination IP address of
each packet.
Distributes client requests to multiple servers based on the number of
connections already on the server. New connections are sent to the server
with the fewest connections.
The left part of the URI (before the question mark) is hashed and divided
by the total weight of the running servers. The result designates which
server will receive the request. This option ensures that a URI is always
directed to the same server as long as no server goes up or down
VMware, Inc. 45
Page 46

vCloud Air Advanced Networking Services Guide
Option Description
HTTPHEADER
URL
5 Add members to the pool.
a
Click the Add ( ) icon.
b Type the name and IP address of the server member.
c Type the port where the member is to receive traffic on and the monitor port where the member is
to receive health monitor pings.
d In Weight, type the proportion of traffic this member is to handle.
e Type the maximum number of concurrent connections the member can handle.
When the incoming requests are higher than the maximum, they will be queued and the load
balancer will wait for a connection to be released.
f Type the minimum number of concurrent connections a member must always accept.
g Click OK.
6 (Optional) To make client IP addresses visible to the backend servers, select Transparent.
When Transparent is not selected (the default value), backend servers see the IP address of the traffic
source as the internal IP address of the load balancer.
When Transparent is selected, the source IP address is the actual IP address of the client and the edge
gateway must be set as the default gateway to ensure that return packets go through the edge gateway.
7 Click OK.
What to do next
Add virtual servers for your load balancer. A virtual server has a public IP address and services all
incoming client requests. See “Add a Virtual Server,” on page 46.
Add a Virtual Server
Add an edge gateway internal or uplink interface as a virtual server. A virtual server has a public IP address
and services all incoming client requests.
By default, the load balancer closes the server TCP connection after each client request.
Procedure
1 Log in to vCloud Air and navigate to the vCloud Edge Gateway Services UI.
See “Log In and Navigate to Advanced Networking Services,” on page 9 for information.
2 Click the Load Balancer tab and Virtual Servers.
3
Click the Add (
) icon.
The New Virtual Server dialog appears.
4 Configure the following options for the service server:
Option Description
Enable Virtual Server
Enable Acceleration
46 VMware, Inc.
(Optional)
(Optional)
Page 47

Chapter 5 Load Balancing
Option Description
Application Profile
Name
Description
IP Address
Protocol
Port
Default Pool
Connection Limit
Connection Rate Limit (CPS)
Select the application profile to be associated with the virtual server. You
can associate only an application profile with the same protocol as the
virtual server that you are adding.
Type a name for the virtual server.
(Optional) Type a description for the virtual server.
Type the IP address that the load balancer is listening on.
(Optional) Select the protocol from the drop-down menu—HTTP, HTTPS,
TCP, UDP.
Type the port number that the load balancer will listen on.
(Optional)
(Optional) Type the maximum concurrent connections that the virtual
server can process.
(Optional) Type the maximum incoming new connection requests per
second.
5 (Optional) To associate application rules with the virtual server, click the Advanced tab and complete
the following steps:
a
Click the Add ( ) icon.
The application rules created for the load balancer appear. If necessary, add application rules for
the load balancer. See “Add an Application Rule,” on page 47.
b
6 Click OK.
What to do next
Create an edge gateway firewall rule to permit traffic to the new virtual server (the destination IP address).
See “Add an Edge Gateway Firewall Rule,” on page 31.
Add an Application Rule
You can write an application rule to directly manipulate and manage IP application traffic.
Procedure
1 Log in to vCloud Air and navigate to the vCloud Edge Gateway Services UI.
See “Log In and Navigate to Advanced Networking Services,” on page 9 for information.
2 Click the Load Balancer tab and Application Rules.
3
Click the Add ( ) icon.
The Add Application Rule dialog box appears.
4 Type the name for the application rule.
5 Type the script for the application rule.
For information on the application rule syntax, see
http://cbonte.github.io/haproxy-dconv/configuration-1.5.html.
For more information about creating application rules for load balancing in vCloud Air, see Application
Rule Examples in the NSX Administration Guide.
VMware, Inc. 47
Page 48

vCloud Air Advanced Networking Services Guide
What to do next
Associate the new application rule to a virtual server added for the load balancer. Click the Load Balancer
tab > Virtual Servers and the Edit ( ) icon. Associate applications rules by clicking the Advanced tab.
See “Add a Virtual Server,” on page 46 for the steps to associate applications rules with a virtual server.
48 VMware, Inc.
Page 49

Secure Access Using Virtual Private
Networks 6
You can connect to vCloud Air by using the following secure methods—an SSL VPN-Plus tunnel or an IPsec
VPN tunnel. Use Advanced Networking Services to configure these tunnels.
After configuring your VPN tunnels, use a VPN client from your remote location to log into vCloud Air and
manage your Infrastructure-as-a-Service resources.
This chapter includes the following topics:
“SSL VPN-Plus Overview,” on page 49
n
“About Configuring SSL VPN-Plus,” on page 50
n
“IPsec VPN Overview,” on page 61
n
“About Setting up an IPsec VPN Connection,” on page 62
n
SSL VPN-Plus Overview
With SSL VPN-Plus, you can use Advanced Networking Services to achieve the following goals:
Connect remotely to private networks behind an edge gateway to access servers and applications.
n
Securely access virtual machines deployed in vCloud Air without having to connect to your corporate
n
data center first and establish an IPsec VPN tunnel to vCloud Air.
Using SSL VPN-Plus essentially eliminates segment from the network connection.
VMware, Inc.
49
Page 50

Remote users connecting
vCloud Air
edge gateway
Admin
Corporate LAN
Windows
Server
through web access mode
Remote users connecting
through SSL client
Internet
Edge SSL VPN
external
vCloud Air Advanced Networking Services Guide
Figure 6‑1. SSL VPN-Plus Interaction
About Configuring SSL VPN-Plus
SSL VPN-Plus supports VPN clients on the following operating systems:
Windows XP and above
n
NOTE Windows 8 is supported.
Mac OS X Tiger, Leopard, Snow Leopard, Lion, Mountain Lion, and Maverick
n
These clients can be installed manually or by using the Java installer.
(Required) Linux - TCL-TK
n
If not installed locally, the Linux client can be accessed using the CLI.
Configuring SSL VPN-Plus for vCloud Air is a multi-step process.
NOTE After configuring SSL VPN-Plus in Advanced Networking Services, vCloud Air users must
download and install a VPN client on their local systems.
Remote uses download the SSL client from vCloud Air and connect to vCloud Air over SSL VPN.
1 Configure Server Settings on page 51
You must add SSL VPN server settings to enable SSL on an edge gateway interface.
2 Add an IP Pool on page 52
The remote user is assigned a virtual IP address from the IP pool that you add.
3 Add a Private Network on page 53
Add the network that you want the remote user to be able to access.
4 Add an Authentication Server on page 54
Instead of a local user, you can add an external authentication server (AD, LDAP, RADIUS, or RSA)
which is bound to the SSL gateway. All users with accounts on the bound authentication server will be
authenticated.
50 VMware, Inc.
Page 51

Chapter 6 Secure Access Using Virtual Private Networks
5 Add an Installation Package on page 56
Create an installation package of the SSL VPN-Plus client for the remote user.
6 Add an SSL VPN-Plus User on page 57
Add a remote user to the local database.
7 Add a Web Resource for SSL VPN-Plus Access on page 58
Add a server that the remote user can connect to via a Web browser.
8 Edit Client Configuration on page 59
You can change the way the SSL VPN client tunnel responds when the remote user logs in to SSL
VPN.
9 Add a Script on page 60
You can add multiple login or logoff scripts. For example, you can bind a login script for starting
Internet Explorer with gmail.com; when a remote user logs in to the SSL client, Internet Explorer
opens gmail.com.
10 Edit the Default SSL VPN-Plus Settings on page 60
You can edit the default VPN settings.
11 Customize the Portal Design on page 61
You can edit the client banner bound to the SSL VPN client.
Configure Server Settings
You must add SSL VPN server settings to enable SSL on an edge gateway interface.
To connect to the edge gateway in vCloud Air, remote users specify the IP address and port number you set
in this procedure.
If your edge gateway is configured with multiple, overlay IP address networks on its external interface, the
IP address you select might be different from the default external interface of the edge gateway.
While configuring server settings, you must choose which encryption algorithms to use for the SSL VPN
tunnel. You can choose one or multiple ciphers to support; VMware recommends you be aware of the
strength and weakness of the ciphers you select.
Specify an identity certificate for the SSL VPN tunnel. You can choose to use the default, self-signed
certificate that the Advanced Networking Services generates for each edge gateway or you can specify an
externally-generated digital certificate.
Prerequisites
If you choose to use a certificate other than the default certificate, import the required certificate into
vCloud Air. See “Add a Certificate,” on page 25 for information.
Procedure
1 Log in to vCloud Air and navigate to the vCloud Edge Gateway Services UI.
See “Log In and Navigate to Advanced Networking Services,” on page 9 for information.
2 Click the SSL VPN-Plus tab and Server Settings.
3 Click Change next to Server Settings.
The Change Service Settings dialog box appears.
4 Select an IPv4 or an IPv6 address.
VMware, Inc. 51
Page 52

vCloud Air Advanced Networking Services Guide
5 (Optional) Change the port number.
By default, Advanced Networking Services use port 443, which is the default port for HTTPS/SSL
traffic. A port number is required to configure the installation package; however, you can set any TCP
port for communications.
6 Select the encryption method.
7 (Optional) From the Server Certificate table, select the server certificate that you want to add.
Or
Select Use Default Certificate.
8 Click OK.
What to do next
NOTE The edge gateway IP address and the TCP port number you set must be reachable by your remote
users. Add an edge gateway firewall rule that allows access to the SSL VPN-Plus IP address and port
configured in this procedure. See “Add an Edge Gateway Firewall Rule,” on page 31 for information.
Add an IP pool so that remote users are assigned IP addresses when they connect using SSL VPN-Plus. See
“Add an IP Pool,” on page 52 for information.
Add an IP Pool
The remote user is assigned a virtual IP address from the IP pool that you add.
Procedure
1 Log in to vCloud Air and navigate to the vCloud Edge Gateway Services UI.
See “Log In and Navigate to Advanced Networking Services,” on page 9 for information.
2 Click the SSL VPN-Plus tab and IP Pools.
3
Click the Add (
The Add IP Pool dialog box appears.
4 Configure the following options for the IP pool:
Options Description
IP Range
Netmask
Gateway
Description
Status
Primary DNS
Secondary DNS
DNS Suffix
WINS Server
5 Click OK.
) icon.
Type the begin and end IP address for the IP pool.
Type the netmask of the IP pool.
Type the IP address to add the routing interface for the edge gateway.
(Optional) Type a description for the IP pool.
Select whether to enable or disable the IP pool.
(Optional) In the Advanced section, type the DNS name.
(Optional) Type the secondary DNS name.
(Optional) Type the connection-specific DNS suffix for domain based host
name resolution.
(Optional) Type the WINS server address.
What to do next
Add private networks that you want accessible to your remote users connecting with SSL VPN-Plus. See
“Add a Private Network,” on page 53.
52 VMware, Inc.
Page 53

Chapter 6 Secure Access Using Virtual Private Networks
Add a Private Network
Add the network that you want the remote user to be able to access.
Each private network that requires access through a VPN tunnel must be added as a separate entry. If
necessary, use Route Summarization to limit the number of entries in the Private Network table.
Procedure
1 Log in to vCloud Air and navigate to the vCloud Edge Gateway Services UI.
See “Log In and Navigate to Advanced Networking Services,” on page 9 for information.
2 Click the SSL VPN-Plus tab and Private Networks.
3
Click the Add (
The Add Private Network dialog box appears.
4 Configure the following options for the private network:
Options Description
Network
Description
Send Traffic
Enable TCP Optimization
Ports
Status
5 Click OK.
) icon.
Type the private network IP address.
(Optional) Type a description for the network.
Specify whether you want to send private network and Internet traffic
over the SSL VPN-Plus enabled edge gateway or directly to the private
server by bypassing the edge gateway.
(Optional) When you select Send Traffic Over Tunnel, VMware
recommends selecting Enable TCP Optimization to optimize the Internet
speed.
Selecting this option enhances the performance of TCP packets within the
VPN tunnel but does not improve performance of UDP traffic.
Conventional full-access SSL VPNs tunnel sends TCP/IP data in a second
TCP/IP stack for encryption over the Internet. Selecting this options
encapsulates application layer data in two separate TCP streams. When
packet loss occurs (which happens even under optimal Internet
conditions), a performance degradation effect called TCP-over-TCP
meltdown occurs. Two TCP instruments correct a single packet of IP data,
undermining network throughput and causing connection timeouts. TCP
Optimization eliminates this TCP-over-TCP problem.
Type the port numbers that you want to open for the remote user to access
the corporate internal servers; for example, 3389 for RDP, 20/21 for FTP,
and 80 for HTTP.
To give unrestricted access to users, leave the Ports field blank.
Specify whether you want to enable or disable the private network.
What to do next
Add authentication servers for your SSL VPN-Plus configuration. See “Add an Authentication Server,” on
page 54.
If necessary, add Web resources that remote users can access in addition to private networks. See “Add a
Web Resource for SSL VPN-Plus Access,” on page 58.
IMPORTANT Add a corresponding firewall rule to allow network traffic to the private network. See “Add an
Edge Gateway Firewall Rule,” on page 31 for information.
VMware, Inc. 53
Page 54

vCloud Air Advanced Networking Services Guide
Add an Authentication Server
Instead of a local user, you can add an external authentication server (AD, LDAP, RADIUS, or RSA) which
is bound to the SSL gateway. All users with accounts on the bound authentication server will be
authenticated.
The maximum time to authenticate over SSL VPN is 3 minutes. This maximum is set because the nonauthentication timeout is 3 minutes; the non-authentication timeout value is not configurable.
NOTE Users will not be authenticated when either of the following conditions occur:
The AD authentication timeout is set to more than 3 minutes.
n
The environment has multiple authentication servers in chain authorization and user authentication
n
takes more than 3 minutes.
Procedure
1 Log in to vCloud Air and navigate to the vCloud Edge Gateway Services UI.
See “Log In and Navigate to Advanced Networking Services,” on page 9 for information.
2 Click the SSL VPN-Plus tab and Authentication.
3
Click the Add (
) icon.
The Add Authentication Server dialog box appears.
4 Select the type of authentication server—AD, LDAP, RADIUS, RSA-ACE, or LOCAL.
5 Depending on the type of authentication server you selected, complete the following fields.
AD and LDAP authentication servers
n
Table 6‑1. AD and LDAP Authentication Server Options
Option Description
Enable SSL Establishes an encrypted link between a Web server and a browser.
IP Address The IP address of the authentication server.
Port Displays the default port name. Edit if required.
Timeout The time in seconds within which the AD server must respond.
Status Enables or disables the server.
Search base Part of the external directory tree to search. The search base can be equivalent to the
organization, group, or domain name (AD) of the external directory.
Bind DN Permits users on the external AD server to search the AD within the defined search
base. Typically, the bind DN option permits users to search the entire directory. The
bind DN option allows users to query the directory using the query filter and search
base for the DN (distinguished name) of authenticating AD users. When the DN is
returned, the DN and password are used to authenticate the AD user.
Bind Password The password to authenticate the AD user.
Retype Bind
Password
Login Attribute
Name
Search Filter Filters the values used to limit the search. The search filter format is attribute operator
Verifies the password to authenticate the AD user.
The name against which the user ID entered by the remote user is matched. For Active
Directory, the login attribute name is sAMAccountName.
value.
54 VMware, Inc.
Page 55

Chapter 6 Secure Access Using Virtual Private Networks
Table 6‑1. AD and LDAP Authentication Server Options (Continued)
Option Description
Use this server for
secondary
authentication
Terminate Session if
authentication fails
RADIUS authentication server
n
Whether to use the server as the second level of authentication.
Ends the session when authentication fails.
Table 6‑2. RADIUS authentication server options
Option Description
IP Address The IP address of the external server.
Port Displays the default port name. Edit if required.
Timeout The time in seconds within which the AD server must respond.
Status Enables or disables the server.
Secret Specifies the shared secret when adding an authentication agent in the RSA security
console.
Retype secret Verifies the password to authenticate the AD user.
NAS IP Address Configures the IP address used as the RADIUS attribute 4 without changing the source
IP address in the IP header of the RADIUS packets.
Retry Count The number of times to contact the RADIUS server when it does not respond before
the authentication fails.
Use this server for
secondary
authentication
Terminate Session if
authentication fails
Whether to use the server as the second level of authentication.
Ends the session when authentication fails.
RSA-ACE authentication server
n
Table 6‑3. RSA-ACE authentication server options
Option Description
Timeout The time in seconds within which the AD server must respond.
Configuration File
Status Enables or disables the server.
Source IP Address The IP address of the edge gateway interface through which the RSA server is
Click Browse to select the sdconf.rec file that you downloaded from the RSA
Authentication Manager.
accessible.
VMware, Inc. 55
Page 56

vCloud Air Advanced Networking Services Guide
Table 6‑3. RSA-ACE authentication server options (Continued)
Option Description
Use this server for
secondary
authentication
Terminate Session if
authentication fails
NOTE Adding a user for SSL VPN-Plus automatically adds a local authentication server in the SSL
VPN-Plus > Authentication page and configures the default values. If necessary, select Enable
password policy and Enable account lockout policy to view and edit the default values. See “Add
an SSL VPN-Plus User,” on page 57 for information.
Local authentication server
n
Table 6‑4. Local authentication server options
Option Description
Enable password
policy
Enable account
lockout policy
Status Enables or disables the server.
Use this server for
secondary
authentication
Terminate Session if
authentication fails
Whether to use the server as the second level of authentication.
Ends the session when authentication fails.
Defines a password policy. Specify the required values.
You must set a minimum length, the time until expiration, and when users are notified
of expiration. All other fields are optional.
(Optional) Defines an account lockout policy. Specify the required values.
1 In Retry Count, type the number of times a remote user can try to access his or her
account after entering an incorrect password.
2 In Retry Duration, type the time period in which the remote user's account gets
locked on unsuccessful login attempts.
For example, if you specify the Retry Count as 5 and Retry Duration as 1 minute,
the remote user's account will be locked if he makes 5 unsuccessful login attempts
within 1 minute.
3 In Lockout Duration, type the time period for which the user account remains
locked. After this time, the account is automatically unlocked.
(Optional) Whether to use the server as the second level of authentication.
(Optional) Ends the session when authentication fails.
6 Click OK.
What to do next
Create an installation package containing the SSL Client so remote users can install it on their local systems.
See “Add an Installation Package,” on page 56
If necessary, add local users who are not members of external authentication servers so that they can
connect with SSL VPN-Plus. See “Add an SSL VPN-Plus User,” on page 57.
Add an Installation Package
Create an installation package of the SSL VPN-Plus client for the remote user.
If you require different installation parameters per operating system (Windows, Linux, and Mac), add an
installation package for each operating system. The installation packages you add for SSL VPN-Plus are
downloadable from the SSL VPN-Plus portal. New users are prompted to download and install a package
when they log in for the first time.
56 VMware, Inc.
Page 57

Chapter 6 Secure Access Using Virtual Private Networks
Procedure
1 Log in to vCloud Air and navigate to the vCloud Edge Gateway Services UI.
See “Log In and Navigate to Advanced Networking Services,” on page 9 for information.
2 Click the SSL VPN-Plus tab and Installation Package.
3
Click the Add (
) icon.
The Add Installation Package dialog box appears.
4 Type a profile name for the installation package.
5 In Gateway, type the IP address or FQDN of the public interface of the edge gateway.
This IP address or FQDN is bound to the SSL client. When the client is installed, this IP address or
FQDN is displayed on the SSL client.
6 Type the port number that you specified in the server settings for SSL VPN-Plus.
7 (Optional) To bind additional edge gateway uplink interfaces to the SSL client:
a
Click the Add ( ) icon.
b Type the IP address and port number.
c Click OK.
8 The installation package is created for Windows operating system by default. Select Linux or Mac to
create an installation package for Linux or Mac operating systems as well.
9 (Optional) Enter a description for the installation package.
10 Select Enable to display the installation package on the Installation Package page.
11 Select the following options as required:
Option Description
Start client on logon
Allow remember password
Enable silent mode installation
Hide SSL client network adapter
Hide client system tray icon
Create desktop icon
Enable silent mode operation
Server security certificate validation
Starts the SSL VPN client when the remote user logs on to the system.
Enables the option.
Hides installation commands from remote users.
Hides the VMware SSL VPN-Plus Adapter, which is installed on the
remote user's computer along with the SSL VPN installation package.
Hides the SSL VPN tray icon which indicates whether the VPN connection
is active or not.
Creates an icon to invoke the SSL client on the user's desktop.
Hides the pop-up that indicates that installation is complete.
The SSL VPN client validates the SSL VPN server certificate before
establishing the secure connection.
12 Click OK.
Add an SSL VPN-Plus User
Add a remote user to the local database.
Adding a user for SSL VPN-Plus automatically adds a local authentication server in the SSL VPN-Plus >
Authentication page. See “Add an Authentication Server,” on page 54 for information about authentication
server settings.
VMware, Inc. 57
Page 58

vCloud Air Advanced Networking Services Guide
Procedure
1 Log in to vCloud Air and navigate to the vCloud Edge Gateway Services UI.
See “Log In and Navigate to Advanced Networking Services,” on page 9 for information.
2 Click the SSL VPN-Plus tab and Users.
3
Click the Add (
) icon.
The Add User dialog box appears.
4 Configure the following options for the user:
Option Description
User ID
Password
Re-type Password
First Name
Last Name
Description
Password never expires
Allow change password
Change password on next login
Status
5 Click OK.
Type the user ID.
Type the password.
Retype the password.
(Optional) Type the first name of the user.
(Optional) Type the last name of the user.
(Optional) Type a description for the user.
In Password Details, select Password never expires to always keep the
same password for the user.
Select Allow change password to let the user change the password.
Select Change password on next login when you want users to change
their passwords the next time they log in.
Set the user status.
Add a Web Resource for SSL VPN-Plus Access
Add a server that the remote user can connect to via a Web browser.
Configuring a Web resource allows a user to access the published Web resource without the need to install
an SSL client locally. Web access in SSL VPN-Plus is a way to share internal resources (such as CRM,
Sharepoint data, and other Web applications) through the SSL VPN-Plus interface.
Prerequisites
Adding a Web resource to your SSL VPN-Plus configuration is optional. You can configure SSL VPN-Plus
so that remote users only have access to specified private networks. However, if you choose to provide
direct access (through a Web browser) to a Web resource, you must complete all SSL VPN-Plus
configuration steps. See “About Configuring SSL VPN-Plus,” on page 50 for information.
Procedure
1 Log in to vCloud Air and navigate to the vCloud Edge Gateway Services UI.
See “Log In and Navigate to Advanced Networking Services,” on page 9 for information.
2 Click the SSL VPN-Plus tab and Web Resource.
3
Click the Add ( ) icon.
The Add Web Resource dialog box appears.
58 VMware, Inc.
Page 59

Chapter 6 Secure Access Using Virtual Private Networks
4 Configure the following options as required:
Option Description
Name
URL
HTTP Method
HTTP Query
Description
Status
Type the name for the Web resource.
Type the URL of the Web resource that you want the remote user to access.
(Optional) Depending on whether the remote user wants to read from or
write to the Web resource, select the HTTP method.
(Optional) Type the GET or POST query parameters.
(Optional) Type a description for the Web resource. This description is
displayed on the Web portal when the remote user accesses the Web
resource.
(Optional) Select Enable to enable the Web resource. The Web resource
must be enabled for the remote user to access it.
5 Click OK.
Edit Client Configuration
You can change the way the SSL VPN client tunnel responds when the remote user logs in to SSL VPN.
Procedure
1 Log in to vCloud Air and navigate to the vCloud Edge Gateway Services UI.
See “Log In and Navigate to Advanced Networking Services,” on page 9 for information.
2 Click the SSL VPN-Plus tab and Client Configuration.
3 Next to Client Configuration, click Change.
The Change Client Configuration dialog box appears.
4 Select the Tunneling Mode.
In split tunnel mode, only the VPN traffic flows through the edge gateway.
n
In full tunnel mode, the edge gateway becomes the remote user's default gateway and all traffic
n
(VPN, local, and Internet) flows through the edge gateway.
5 If you selected full tunnel mode, specify the following options:
a To exclude local traffic from flowing through the VPN tunnel, select Exclude local subnets .
b Type the IP address for the default gateway of the remote user's system.
6 To automatically reconnect remote users to the SSL VPN client when they get disconnected, select
Enable auto reconnect.
7 To send remote users notices when an upgrade for the client is available, select Client upgrade
notification.
Remote users can choose to install the upgrade.
8 Click OK.
What to do next
If necessary, scripts to control the way that remote users log in to and log out of the SSL VPN client tunnel.
See “Add a Script,” on page 60.
VMware, Inc. 59
Page 60

vCloud Air Advanced Networking Services Guide
Add a Script
You can add multiple login or logoff scripts. For example, you can bind a login script for starting Internet
Explorer with gmail.com; when a remote user logs in to the SSL client, Internet Explorer opens gmail.com.
Procedure
1 Log in to vCloud Air and navigate to the vCloud Edge Gateway Services UI.
See “Log In and Navigate to Advanced Networking Services,” on page 9 for information.
2 Click the SSL VPN-Plus tab and Login/Logoff Scripts.
3
Click the Add (
The Add Login-Logoff script dialog box appears.
4 Configure the following options for the script:
Option Description
Script
Type
Description
Status
5 Click OK.
) icon.
In Script, click Browse and select the script you want to bind to the edge
gateway.
Select the type of script:
Login: Performs the script action when the remote user logs in to SSL
n
VPN.
Logoff: Performs the script action when the remote user logs out of
n
SSL VPN.
Both: Performs the script action both when the remote user logs in and
n
logs out of SSL VPN.
(Optional) Type a description for the script.
Select Enabled to enable the script.
Edit the Default SSL VPN-Plus Settings
You can edit the default VPN settings.
Procedure
1 Log in to vCloud Air and navigate to the vCloud Edge Gateway Services UI.
See “Log In and Navigate to Advanced Networking Services,” on page 9 for information.
2 Click the SSL VPN-Plus tab and General Settings.
3 Next to General Settings, click Change.
The Change General Settings dialog box appears.
4 Modify the following options as required:
Select To
Prevent multiple logon using same
username
Enable compression
Enable logging
Force virtual keyboard
Allow remote users to login only once with their user names.
Enable TCP based intelligent data compression and improve data transfer
speed.
Maintain a log of the traffic passing through the SSL VPN gateway.
Allow remote users to enter Web or client login information only via the
virtual keyboard.
60 VMware, Inc.
Page 61

Chapter 6 Secure Access Using Virtual Private Networks
Select To
Randomize keys of virtual keyboard
Enable forced timeout
Session idle timeout
User notification
Enable public URL access
Make the virtual keyboard keys random.
Disconnect remote users after the specified timeout period is over. Type
the timeout period in minutes.
When there is no activity on a user's session for the specified period, end
the user session after that period is over.
Type a message to be displayed to remote users after they log in.
Allow remote users to access any site which is not configured (and not
listed on Web portal) by the administrator.
5 Click OK.
Customize the Portal Design
You can edit the client banner bound to the SSL VPN client.
Procedure
1 Log in to vCloud Air and navigate to the vCloud Edge Gateway Services UI.
See “Log In and Navigate to Advanced Networking Services,” on page 9 for information.
2 Click the SSL VPN-Plus tab and Portal Customization.
3 Next to Web Portal Design, click Change.
The Change Web Portal Design dialog box appears.
4 To customize the banner that appears when a user logs in to the SSL VPN client, modify the following
options:
Option Description
Portal Title
Company Name
Logo
Colors
5 Click OK.
6 To change the client banner, click Change next to Full Access Client Design.
The Change Full Access Client Design dialog box appears.
7 Change the image for the banner and images for the status icons as desired and click OK.
IPsec VPN Overview
Internet Protocol Security (IPsec) is a protocol suite for securing the IP packets of a communication session.
vCloud Air supports using IPsec to create a secure VPN connection between your vCloud Air service and a
remote site, such as your on-premises data center.
Type the portal title.
Type the remote user's company name.
In Logo, click Change and select the image file for the remote user's logo.
In Colors, click the color box next to numbered item for which you want to
change the color, and select the desired color.
The edge gateway supports site-to-site IPsec VPN between an edge gateway instance and remote sites.
Additionally, the edge gateway supports certificate authentication, preshared key mode, and IP unicast
traffic between itself and remote VPN routers.
Using an IPsec tunnel, you can configure multiple subnets to connect to the internal network behind an edge
gateway. These subnets and the internal network behind an edge gateway must have address ranges that do
not overlap.
VMware, Inc. 61
Page 62

vCloud Air Advanced Networking Services Guide
You can deploy an edge gateway agent behind a NAT device. In this deployment, the NAT device translates
the VPN address of an edge gateway instance to a publicly accessible address facing the Internet. Remote
VPN routers use this public address to access the edge gateway instance. You can place remote VPN routers
behind a NAT device as well. You must provide the VPN native address and the VPN Gateway ID to set up
the tunnel. On both ends, static one-to-one NAT is required for the VPN address.
You can have a maximum of 64 tunnels across a maximum of 10 sites.
NOTE When you configure an IPsec VPN tunnel between a vCloud Air edge gateway and a physical
gateway VPN at a remote site, you cannot configure dynamic routing using BGP for that connection.
The following IPsec VPN algorithms are supported:
3DES192-CBC
n
AES128-CBC
n
AES128-CBC
n
AES128-CBC
n
AES128-CBC
n
DH-2
n
DH-5
n
For IPsec VPN configuration examples, see NSX Edge VPN Configuration Examples in the NSX
Administration Guide.
See also About Setting up an IPsec VPN Connection in the vCloud Air Networking Guide.
About Setting up an IPsec VPN Connection
Using the edge gateway, you can set up a tunnel between a local subnet and a peer subnet.
NOTE If you connect to a remote site via IPsec VPN, the IP address of that site cannot be learned by
Dynamic Routing on the uplink of the edge gateway.
1 Specify Global IPsec VPN Configuration on page 62
You can specify on a global level how your IPsec VPN connection to vCloud Air uses certificate
authentication and a pre-shared key.
2 Set up an IPsec VPN Connection to a Remote Site on page 63
This procedure provides the steps to create an IPsec VPN connection between vCloud Air and a
remote site. In this procedure, you configure the vCloud Air side of the connection.
Specify Global IPsec VPN Configuration
You can specify on a global level how your IPsec VPN connection to vCloud Air uses certificate
authentication and a pre-shared key.
vCloud Air uses a pre-shared key with an IPsec VPN connection to authenticate the other peer. Even when
the connection is encrypted, you need to know that the peer you are establishing a connection with is the
one it should be. Encrypting the connection ensures confidentiality in the connection and a pre-shared key
authenticates the other party.
Prerequisites
You must import server certificates, CA certificates, or CRLs before you can enable certificate authentication.
62 VMware, Inc.
Page 63

Chapter 6 Secure Access Using Virtual Private Networks
Procedure
1 Log in to vCloud Air and navigate to the vCloud Edge Gateway Services UI.
See “Log In and Navigate to Advanced Networking Services,” on page 9 for information.
2 Click the Routing tab and IPSEC VPN.
3 Next to Global configuration status, click Change.
The Global Configuration dialog box appears.
4 Type a global pre-shared key for those sites whose peer endpoint is set to any and select Display
shared key to display the key.
5 In the Extension text box, type one of the following options:
securelocaltrafficbyip=IPAddress to re-direct the edge gateway local traffic over the IPsec VPN
n
tunnel. This is the default value.
passthroughSubnets=PeerSubnetIPAddress to support overlapping subnets.
n
6 Select Enable certificate authentication and select the appropriate certificate.
7 Click OK.
What to do next
Configure the IPsec VPN connection to the remote site. See “Set up an IPsec VPN Connection to a Remote
Site,” on page 63.
Set up an IPsec VPN Connection to a Remote Site
This procedure provides the steps to create an IPsec VPN connection between vCloud Air and a remote site.
In this procedure, you configure the vCloud Air side of the connection.
For an explanation of each part of an IPsec VPN connection, such as peer networks, local endpoints, peer
IDs, peer IPs, and local IDs, see About Setting up an IPsec VPN Connection in the vCloud Air Networking
Guide.
Procedure
1 Log in to vCloud Air and navigate to the vCloud Edge Gateway Services UI. See “Log In and Navigate
to Advanced Networking Services,” on page 9 for information.
2 Click the Routing tab and IPSEC VPN.
3
Click the Add (
The Add IPsec VPN dialog box appears.
) icon.
VMware, Inc. 63
Page 64

vCloud Air Advanced Networking Services Guide
4 Complete the following settings for the IPsec VPN connection:
Option Description
Enabled
Enable perfect forward secrecy
(PFS)
Name
Local Id
Local Endpoint
Local Subnets
Peer Id
Peer Endpoint
Peer Subnets
Encryption Algorithm
Authentication
Select the checkbox to enable the connection between the two VPN
endpoints.
Select to generate unique public keys for all sessions your users initiate.
Enabling PFS ensures that vCloud Air does not create a link between the
edge gateways private key and each session key.
The compromise of a session key will not affect data other than that
exchanged in the specific session protected by that particular key.
Compromise of the server's private key cannot be used to decrypt archived
sessions or future sessions.
When PFS is enabled, IPsec VPN connections to vCloud Air experience a
slight processing overhead.
IMPORTANT The unique session keys must not be used to derive any
additional keys. Additionally, both sides of the IPsec VPN tunnel must
support PFS for it to work.
(Optional) Enter a name for the connection.
Type the external IP address of the edge gateway instance, which is the
public IP address of the edge gateway.
This will be the peer Id on the remote site.
Type the network that is the local endpoint for the connection. The local
endpoint specifies the network in vCloud Air on which the edge gateway
transmits. Typically, the external network is the local endpoint.
NOTE If you are adding an IP-to-IP tunnel using a pre-shared key, the
local Id and local endpoint IP can be the same.
Type the networks to share between the sites. Use a comma separator to
type multiple subnets.
NOTE Enter a network range (not a specific IP address) by entering the IP
address using CIDR format; for example, 192.168.99.0/24.
Type the peer ID to uniquely identify the peer site. The peer ID is the
public IP address of the remote device terminating the VPN connection.
For peers using certificate authentication, this ID must be the common
name in the peer's certificate. For PSK peers, this ID can be any string.
VMware recommends that you use the public IP address of the VPN or a
FQDN for the VPN service as the peer ID.
When the peer IP address is from another organization VDC network,
enter the native IP address of the peer. When NAT is configured for the
peer, enter the private IP address of the peer.
Type the IP address of the peer site, which is the public IP address of the
remote device to which you are connecting. When you leave this option
blank, the edge gateway waits for the peer device to request a connection.
NOTE When NAT is configured for the peer, enter the public IP address
that the device uses for NAT.
Enter the remote network to which the VPN connects. Use a comma
separator to type multiple subnets.
NOTE Enter a network range (not a specific IP address) by entering the IP
address using CIDR format; for example, 192.168.99.0/24.
Select the encryption type from the drop-down list.
NOTE The encryption type you select must match the encryption type
configured on the remote site VPN device.
Select one of the following options:
PSK (Pre Shared Key)—Indicates that the secret key shared between
n
vCloud Air and the peer site is to be used for authentication.
Certificate—Indicates that the certificate defined at the global level is
n
to be used for authentication.
64 VMware, Inc.
Page 65

Option Description
Pre-Shared Key
Display shared key
Diffie-Hellman Group
Extension
If you selected PSK as the authentication type, type an alphanumeric string
between 32 and 128 characters, which includes at least one uppercase
letter, one lowercase letter, and one number.
Indicates that the secret key shared between vCloud Air and the peer site
is to be used for authentication.
NOTE The shared key must match the key that is configured on the remote
site VPN device.
IMPORTANT VMware recommends that you configure a shared key when
anonymous sites will connect to the VPN service.
(Optional) Select to display the shared key on the peer site.
If you selected PSK as the authentication type, select the cryptography
scheme that will allow the peer site and the edge gateway in vCloud Air to
establish a shared secret over an insecure communications channel.
NOTE The Diffie-Hellman Group must match what is configured on the
remote site VPN device.
(Optional) Type one of the following options:
n
n
5 Click OK.
Chapter 6 Secure Access Using Virtual Private Networks
securelocaltrafficbyip=IPAddress to re-direct the edge gateway
local traffic over the IPsec VPN tunnel. This is the default value.
passthroughSubnets=PeerSubnetIPAddress to support overlapping
subnets.
The VPN configuration appears in the table.
What to do next
You must configure the IPsec VPN connection from both sides of the connection—vCloud Air and your onpremises facility. This procedure details how to configure the connection for vCloud Air. Configure the
connection for your on-premises facility.
VMware, Inc. 65
Page 66

vCloud Air Advanced Networking Services Guide
66 VMware, Inc.
Page 67

IP Service Management: NAT and
DHCP 7
Advanced Networking Services provides functionality to manage Network Address Translation for the
virtual machines deployed in vCloud Air and to configure the DHCP server for an edge gateway.
You can manage these services by using Advanced Networking Services or by using the networking
features in the vCloud Air UI and vCloud Director UI. See the vCloud Air Networking Guide for
information.
This chapter includes the following topics:
“Network Address Translation (NAT),” on page 67
n
“DHCP Service,” on page 69
n
Network Address Translation (NAT)
The edge gateway provides a network address translation (NAT) service to assign a public address to a
virtual machine or group of virtual machines in a private network.
Using this technology limits the number of public IP addresses that an organization or company must use,
for economy and security purposes. You must configure NAT rules to provide access to services running on
privately addressed virtual machines.
VMware, Inc.
The NAT service configuration is separated into source NAT (SNAT) and destination NAT (DNAT) rules.
When you configure an SNAT or a DNAT rule, you always configure the rule from the perspective of
vCloud Air. Specifically, that means you configure the rules in the following ways:
SNAT: the traffic is traveling from a virtual machine on an internal network in vCloud Air (the source)
n
through the Internet to the external network (the destination).
DNAT: the traffic is traveling from the Internet (the source) to a virtual machine inside vCloud Air (the
n
destination).
You can configure NAT rules to create a private IP address space inside vCloud Air to port your private IP
address space from your enterprise into the cloud. Configuring NAT rules in vCloud Air allows you to use
the same private IP addresses for your virtual machines in vCloud Air that were used on premises in your
local data center.
NAT rules in vCloud Air include the following support:
Creating subnets within the private IP address space
n
Creating multiple private IP address spaces for an edge gateway
n
67
Page 68

vCloud Air Advanced Networking Services Guide
Configuring multiple NAT rules on multiple edge gateway interfaces
n
IMPORTANT By default, edge gateways are deployed with firewall rules configured to deny all network
traffic to and from the virtual machines on the edge gateway networks. Also, NAT is disabled by default so
that edge gateways are unable to translate the IP addresses of the incoming and outgoing traffic. You must
configure both firewall and NAT rules on an edge gateway for the virtual machines on an edge gateway
network to be accessible. Attempting to ping a virtual machine on a network after configuring a NAT rule
will fail without adding a firewall rule to allow the corresponding traffic.
Add an SNAT or DNAT Rule
You can create a source NAT (SNAT) or rule to change the source IP address from a public to private IP
address or the reverse. You can create a destination NAT (DNAT) rule to change the destination IP address
from a public to private IP address or the reverse.
When creating NAT rules, you can specify the original and translated IP addresses by using the following
formats:
IP address; for example, 192.0.2.0
n
IP address range; for example, 192.0.2.0-192.0.2.24
n
IP address/subnet mask; for example, 192.0.2.0/24
n
any
n
Prerequisites
The translated (public) IP address must have been added to the edge gateway interface on which you want
to add the rule.
Procedure
1 Log in to vCloud Air and navigate to the vCloud Edge Gateway Services UI.
See “Log In and Navigate to Advanced Networking Services,” on page 9 for information.
2 Click the SSL VPN-Plus tab and NAT.
3
Click the Add (
Option Description
Add DNAT Rule
Add SNAT Rule
) icon and choose one of the following options:
A DNAT rule changes the destination IP address and, optionally, port of
inbound packets.
An SNAT rule changes the source IP address and, optionally, port of
outgoing packets.
4 Select the interface on which to apply the rule.
5 Depending on which type of NAT rule you are creating, complete the following options:
Destination NAT (DNAT) (outside -> inside)
Option Description
Original IP/Range
Protocol
Original Port/Range
68 VMware, Inc.
Specifies the destination IP address to which the rule applies; this address
is always the public IP address of the edge gateway for which you are
configuring the DNAT rule. Type the required IP address.
Select the protocol to which the rule applies.
(Optional) Select the port or port range that the incoming traffic uses on
the edge gateway to connect to the internal network on which the virtual
machines are connected.
Page 69

Option Description
ICMP Type
Translated IP/Range
Translated Port/Range
When you select ICMP (an error reporting and a diagnostic utility used
between devices to communicate error information) in the Protocol field,
select the ICMP Type from the drop-down menu. ICMP messages are
identified by the “type” field. By default, the ICMP type is set to “any.”
Type the IP address or a range of IP addresses to which destination
addresses on inbound packets will be translated.
These addresses are the IP addresses of the virtual machine (or machines)
for which you are configuring DNAT so that they can receive traffic from
the external network.
(Optional) Select the port or port range that traffic connects to on the
virtual machines on the internal network.
Source NAT (SNAT) (inside -> outside)
Option Description
Original Source IP/Range
Translated Source IP/Range
Type the original IP address or range of IP addresses to apply to this rule.
These addresses are the IP addresses of the virtual machine (or machines)
for which you are configuring SNAT so that they can send traffic to the
external network.
Type the required IP address. Specifies the IP address to which source
addresses (the virtual machines) on outbound packets are translated to
when they send traffic to the external network.
This address is always the public IP address of the gateway for which you
are configuring the SNAT rule.
6 (Optional) Type a description for the rule.
Chapter 7 IP Service Management: NAT and DHCP
7 Select Enabled to enable the rule.
8 Select Enable logging to log the address translation.
9 Click OK to save the rule.
What to do next
Add a corresponding edge gateway firewall rule for the SNAT or DNAT rule you just configured. See “Add
an Edge Gateway Firewall Rule,” on page 31.
DHCP Service
The edge gateway supports IP address pooling and one-to-one static IP address allocation. Static IP address
binding is based on the managed object ID and interface ID of the requesting client.
The DHCP service for the edge gateway adheres to the following guidelines:
Listens on the edge gateway internal interface for DHCP discovery.
n
Uses the IP address of the internal interface on the edge gateway as the default gateway address for all
n
clients, and the broadcast and subnet mask values of the internal interface for the container network.
You must restart the DHCP service on client virtual machines in the following situations:
You changed or deleted a DHCP pool, default gateway, or DNS server.
n
You changed the internal IP address of the edge gateway instance.
n
VMware, Inc. 69
Page 70

vCloud Air Advanced Networking Services Guide
Add a DHCP IP Pool
The DHCP service requires a pool of IP addresses. An IP pool is a sequential range of IP addresses within
the network. Virtual machines protected by the edge gateway that do not have an address binding are
allocated an IP address from this pool. An IP pool's range cannot intersect one another, thus one IP address
can belong to only one IP pool.
Procedure
1 Log in to vCloud Air and navigate to the vCloud Edge Gateway Services UI.
See “Log In and Navigate to Advanced Networking Services,” on page 9 for information.
2 Click the DHCP tab and Pools.
3
Click the Add (
The Add DHCP Pool dialog box appears.
4 Configure the following options for the DHCP pool:
Option Action
Auto Configure DNS
Lease never expires
Start IP
End IP
Domain Name
Primary Name Server
Secondary Name Server
Default Gateway
Lease Time
5 Click OK.
) icon.
Select to use the DNS service configuration for the DHCP binding.
Select to bind the address to the MAC address of the virtual machine
forever. When you select this option, Lease Time is disabled.
Type the starting IP address for the pool.
Type the ending IP address for the pool.
(Optional) Type the domain name of the DNS server.
(Optional) When you do not select Auto Configure DNS, type the Primary
Nameserver for the DNS service. You must enter the IP address of a DNS
server for hostname-to-IP address resolution.
(Optional) When you select Auto Configure DNS, type the Secondary
Nameserver for the DNS service. You must enter the IP address of a DNS
server for hostname-to-IP address resolution.
(Optional) Type the default gateway address. When you do not specify the
default gateway IP address, the internal interface of the edge gateway
instance is taken as the default gateway.
(Optional) Select whether to lease the address to the client for the default
time (1 day), or type a value in seconds.
NOTE You cannot specify the lease time when you select Lease never
expires.
Add a DHCP Static Binding
If you have services running on a virtual machine and do not want the IP address to be changed, you can
bind an IP address to the MAC address of a virtual machine. The IP address you bind must not overlap an
IP pool.
Procedure
1 Log in to vCloud Air and navigate to the vCloud Edge Gateway Services UI.
See “Log In and Navigate to Advanced Networking Services,” on page 9 for information.
2 Click the DHCP tab and Bindings.
70 VMware, Inc.
Page 71

3
Click the Add ( ) icon.
The Add DHCP Binding dialog box appears.
4 Configure the following options for the DHCP bindings:
Option Action
Auto Configure DNS
Lease never expires
Interface
VM Name
VM vNIC Index
Host Name
IP Address
Domain Name
Primary Name Server
Secondary Name Server
Default Gateway
Lease Time
Select to use the DNS service configuration for the DHCP binding.
Select to bind the address to the MAC address of the virtual machine
forever.
Select the edge gateway interface to bind.
Select the virtual machine to bind.
Select the virtual machine NIC to bind to the IP address.
Type the host name of the DHCP client virtual machine.
Type the address to which to bind the MAC address of the selected virtual
machine.
Type the domain name of the DNS server.
When you do not select Auto Configure DNS, type the Primary Name
Server for the DNS service. You must enter the IP address of a DNS server
for hostname-to-IP address resolution.
When you select Auto Configure DNS, type the Secondary Name Server
for the DNS service. You must enter the IP address of a DNS server for
hostname-to-IP address resolution.
Type the default gateway address. If you do not specify the default
gateway IP address, the internal interface of the edge gateway instance is
taken as the default gateway.
When you do not select Lease never expires, select whether to lease the
address to the client for the default time (1 day), or type a value in seconds.
5 Click OK.
Chapter 7 IP Service Management: NAT and DHCP
VMware, Inc. 71
Page 72

vCloud Air Advanced Networking Services Guide
72 VMware, Inc.
Page 73

Index
G
glossary 5
I
intended audience 5
VMware, Inc. 73
Page 74

vCloud Air Advanced Networking Services Guide
74 VMware, Inc.
 Loading...