

Page 1

Administrator Guide
vCenter Server Heartbeat 6.5
This document supports the version of each product listed and
supports all subsequent versions until the document is replaced
by a new edition. To check for more recent editions of this
document, see http://www.vmware.com/support/pubs.
EN-000948-00
Page 2

Administrator Guide
You can find the most up-to-date technical documentation on the VMware Web site at:
http://www.vmware.com/support/
The VMware Web site also provides the latest product updates.
If you have comments about this documentation, submit your feedback to:
docfeedback@vmware.com
Copyright © 2012 VMware, Inc. All rights reserved. This product is protected by U.S. and international copyright and intellectual
property laws. VMware products are covered by one or more patents listed at http://www.vmware.com/go/patents.
VMware is a registered trademark or trademark of VMware, Inc. in the United States and/or other jurisdictions. All other marks
and names mentioned herein may be trademarks of their respective companies.
VMware, Inc.
3401 Hillview Ave.
Palo Alto, CA 94304
www.vmware.com
2 VMware, Inc.
Page 3

Contents
About This Book 5
Introduction 9
1
vCenter Server Heartbeat Concepts 9
vCenter Server Heartbeat Protection Levels 10
vCenter Server Heartbeat Communications 13
vCenter Server Heartbeat Switchover and Failover Processes 15
Conguring vCenter Server Heartbeat 19
2
Launching the Congure Server Wizard 20
Conguring the Machine 21
Conguring the VMware Channel 22
Conguring Public IP Addressing 24
Managing vCenter Server Heartbeat License Keys 26
Conguring the Logs 27
Server Protection 29
3
Checking the Server Pair Status 29
Monitoring the Status of Servers 31
Conguring Heartbeat Settings 31
Network Protection 41
4
Communications Status 41
Reviewing the VMware Channel Status 41
Conguring Public Network Connection Checks 42
Enabling Automatic Switchover in a WAN 42
Setting Max Server Time Dierence 43
Application Protection 45
5
Applications: Summary Tab 45
Applications: Services Tab 48
Applications: Tasks Tab 51
Applications: Plug-ins Tab 53
VMware, Inc. 3
Page 4

Administrator Guide
Status and Control 55
6
About vCenter Server Heartbeat Console 55
Working with Groups 57
Working with Pairs in vCenter Server Heartbeat Groups 57
Reviewing the Status of vCenter Server Heartbeat Groups and Pairs 60
Exiting vCenter Server Heartbeat Console 60
Shutting Down Windows Without Stopping vCenter Server Heartbeat 60
Controlled Shutdown 61
vSphere Web Client Plug-in 61
Uninstalling vCenter Server Heartbeat 63
Performance Protection 65
7
Applications: Rules Tab 65
Data Protection 69
8
Replication 69
File Filters 74
Automatic Filter Discovery 75
Alerts and Events 77
9
Conguring Alerts 77
Conguring Event Log Files 79
Reviewing Event Logs 81
Troubleshooting 83
10
Two Active or Two Passive Servers 83
Synchronization Failures 86
Registry Status is Out-of-Sync 88
Channel Drops 89
Subnet or Routing Issues 93
MaxDiskUsage Errors 94
Application Slowdown 97
Glossary 101
4 VMware, Inc.
Page 5

About This Book
The Administrator Guide provides information about conguring VMware vCenter Server Heartbeat server
network protection, application protection, data protection, Split-brain Avoidance, and more. To help you
protect your VMware vCenter Server, this book provides an overview of the protection oered by vCenter
Server Heartbeat and the actions that vCenter Server Heartbeat can take in the event of a network, hardware,
or application failure.
Intended Audience
This guide assumes the reader has a working knowledge of networks including the conguration of TCP/IP
protocols and domain administration on the Windows™ 2003 and 2008 platforms, notably in Active Directory
and DNS.
VMware Technical Publications Glossary
VMware Technical Publications provides a glossary of terms that might be unfamiliar to you. For denitions
of terms as they are used in VMware technical documentation go to www.vmware.com/support/pubs.
Overview of Content
This book is designed to provide guidance on the conguration and administration of vCenter Server Heartbeat,
and is organized into the following sections:
Preface — About This Book (this chapter) provides an overview of this guide and the conventions used
■
throughout.
Chapter 1 — Introduction presents an overview of vCenter Server Heartbeat concepts including the
■
Switchover and Failover processes.
Chapter 2 — Conguring vCenter Server Heartbeat shows you how to use the Server Conguration wizard
■
to congure your new installation of vCenter Server Heartbeat.
Chapter 3 — Server Protection presents an overview of how vCenter Server Heartbeat provides protection
■
against server system crash or server hardware failure, shows you how to check the server pair status,
and explains how to congure settings, shutdown options, and Split-Brain Avoidance.
VMware, Inc. 5
Page 6

Administrator Guide
Chapter 4 — Network Protection describes how vCenter Server Heartbeat protects against network failure
■
and provides a way to monitor communication status. It also explains how to congure public network
connection checks and maximum server time dierence.
Chapter 5 — Application Protection discusses how vCenter Server Heartbeat maintains the protected
■
application environment ensuring that applications and services stay alive on the network.
Chapter 6 — Status and Control introduces you to the vCenter Server Heartbeat Console and shows you
■
how to congure its look and feel.
Chapter 7 — Performance Protection describes how vCenter Server Heartbeat monitors system and application
■
attributes to prevent an unexpected system or application failure.
Chapter 8 — Data Protection discusses how vCenter Server Heartbeat intercepts all data written by users
■
and protected applications and maintains a copy of this data for use in case of failure.
Chapter 9 — Alerts and Events discusses additional tasks for the administrator to congure system logging
■
and alerting functions.
Chapter 10 — Troubleshootingprovides techniques to troubleshoot common issues and unexpected behaviors.
■
Document Feedback
VMware welcomes your suggestions for improving our documentation and invites you to send your feedback
to docfeedback@vmware.com.
Abbreviations Used in Figures
DescriptionAbbreviation
VMware ChannelChannel
Network Interface CardNIC
Physical to PhysicalP2P
Physical to VirtualP2V
Virtual to VirtualV2V
Technical Support and Educational Resources
The following sections describe the technical support resources available to you. To access the current version
of this book and other books, go to www.vmware.com/support/pubs.
Online and Telephone Support
Go to www.vmware.com/support to use online support to submit technical support requests, view your
product and contract information, and register your products.
Go to www.vmware.com/support/phone_support.html to nd out how to use telephone support for the fastest
response on priority 1 issues (applies to customers with appropriate support contracts).
6 VMware, Inc.
Page 7

About This Book
Support Offerings
Go to www.vmware.com/support/services to nd out how VMware support oerings can help meet your
business needs.
VMware Professional Services
Go to www.vmware.com/services to access information about educational classes, certication programs, and
consulting services. VMware Education Services courses oer extensive hands-on labs, case study examples,
and course materials designed for use as on-the-job reference tools. Courses are available onsite, in the classroom,
and live online. For onsite pilot programs and implementation best practices, VMware Consulting Services
provides oerings to help you assess, plan, build, and manage your virtual environment.
VMware, Inc. 7
Page 8

Administrator Guide
8 VMware, Inc.
Page 9

This chapter includes the following topics:
“vCenter Server Heartbeat Concepts,” on page 9
■
“vCenter Server Heartbeat Protection Levels,” on page 10
■
“vCenter Server Heartbeat Communications,” on page 13
■
“vCenter Server Heartbeat Switchover and Failover Processes,” on page 15
■
vCenter Server Heartbeat Concepts
vCenter Server Heartbeat is a Windows based service specically designed to provide high availability protection
for vCenter Server congurations without requiring any specialized hardware.
Architecture Overview
1Introduction
vCenter Server Heartbeat uses an “Active–Passive” architecture which enables it to provide “High Availability
(HA)” in a Local Area Network (LAN) or “Disaster Recovery (DR)” in a Wide Area Network (WAN) for
vCenter Server, View Composer and SQL Server. The vCenter Server Heartbeat software is installed on an
existing production server known as the “Primary” server running the protected applications (vCenter Server,
View and SQL Server). An additional server, known as the “Secondary” server, operates as a ready standby
server to provide service in the event of an application, system, or hardware failure, or when the Administrator
needs to perform system maintenance. The terms Primary and Secondary refer to the “Identity” of each server
instance, and these identities do not change.
Active / Passive Roles
The applications protected by vCenter Server Heartbeat will run on the “Active” server. Only one server can
be active at any one time and the active server will host the “Principal (Public) IP Address” which is used by
clients to access the application. The “Passive” server is only accessible on the network via its assigned
“Management IP Address”. Active and passive refer to the “Role” that the server is performing. The role can
be changed by a “Failover” or when the administrator performs a “Switchover”. To ensure the servers can
provide a seamless switchover / failover experience for clients, the servers need to be symmetrical. To ensure
that the Secondary server has all the programs and components installed in the same location, the install process
includes a cloning procedure. Clients will continue to connect to vCenter Server or SQL Server using the original
and unique fully qualied domain name that was used previously by clients. During installation, a service
name is congured in vCenter Server Heartbeat which will continue to resolve in DNS to the Principal (Public)
IP address regardless of which server is hosting the Principal (Public) IP address.
VMware, Inc. 9
Page 10

Administrator Guide
Managing the Primary and Secondary Servers
To allow management of vCenter Server Heartbeat server pairs using standard network, domain policy, and
domain management procedures, vCenter Server Heartbeat is deployed so that Primary and Secondary servers
use unique domain names. Each domain name must dier from the fully qualied domain name used by the
original vCenter or SQL Servers. A Management IP address on each server ensures that the Administrator can
access the server even when it is passive. This allows monitoring with 3rd party monitoring tools and
maintenance operations such as updating anti-malware denition les, operating system hot-xes and updates.
Switchover/Failover in a LAN
When deployed in a LAN environment, the Principal (Public) IP address is moved between the Primary and
Secondary servers as the roles change from active to passive so that vCenter Server or SQL Server are available
to clients only when the server assumes the active role. vCenter Server Heartbeat does not require updates to
DNS during the switchover / failover, however the DNS server must be precongured with the Management
IP addresses. Adjacent IP addresses should be reserved and used for the Principal (Public) IP address and the
Management IP addresses for the Primary and Secondary Servers when installing vCenter Server Heartbeat
on servers running Windows Server 2008. When vCenter Server Heartbeat is started, the Principal (Public) IP
address is added to the active server. When a switchover is requested the Principal (Public) IP address is
removed from the active server as it becomes passive and then added to the passive server which is being
made active.
Additionally, vCenter Server Heartbeat can be deployed in a stretched VLAN using the same subnet for the
production and the disaster recovery site. Similar to a LAN installation, this conguration requires that both
the Primary and Secondary servers share the Principal (Public) IP address with the active server revealing the
Principal (Public) IP address while the passive server is hidden from the network. This means that vCenter
Server Heartbeat can be deployed without any changes to DNS during switchover or failover operations.
Switchover/ Failover in a WAN
vCenter Server Heartbeat can be deployed in a WAN where each site uses dierent subnets. When deployed
in this manner, each site will have a dierent Principal (Public) IP address. When a switchover or failover
occurs, vCenter Server Heartbeat will update the DNS server with the Principal (Public) IP address of the new
site thereby allowing clients to connect to the new site.
vCenter Server Heartbeat Protection Levels
vCenter Server Heartbeat provides the following protection levels:
Server Protection — vCenter Server Heartbeat provides continuous availability to end users through a
■
hardware failure scenario or operating system crash. Additionally, vCenter Server Heartbeat ensures users
are provided with a replica server should the production server fail.
Network Protection — vCenter Server Heartbeat proactively monitors the network by polling up to three
■
predened nodes to ensure that the active server is visible on the network.
Application Protection — vCenter Server Heartbeat maintains the application environment ensuring that
■
applications and services stay alive and are available on the network.
Performance Protection — vCenter Server Heartbeat proactively monitors system performance attributes
■
to ensure the system administrator is notied of problems. Additionally, it can be congured to take
pre-emptive action to prevent an outage.
Data Protection — vCenter Server Heartbeat intercepts all data written by users and applications, and
■
maintains a copy of the data on the passive server that can be used in the event of a failure.
10 VMware, Inc.
Page 11
Chapter 1 Introduction
vCenter Server Heartbeat provides all ve protection levels continuously, ensuring all facets of the user
environment are maintained at all times, and that vCenter Server continues to operate through as many failure
scenarios as possible.
Server Protection
vCenter Server Heartbeat provides continuous availability to end users through a hardware failure scenario
or operating system crash and ensures users are provided with a replica server and its IP address on the failure
of the production server.
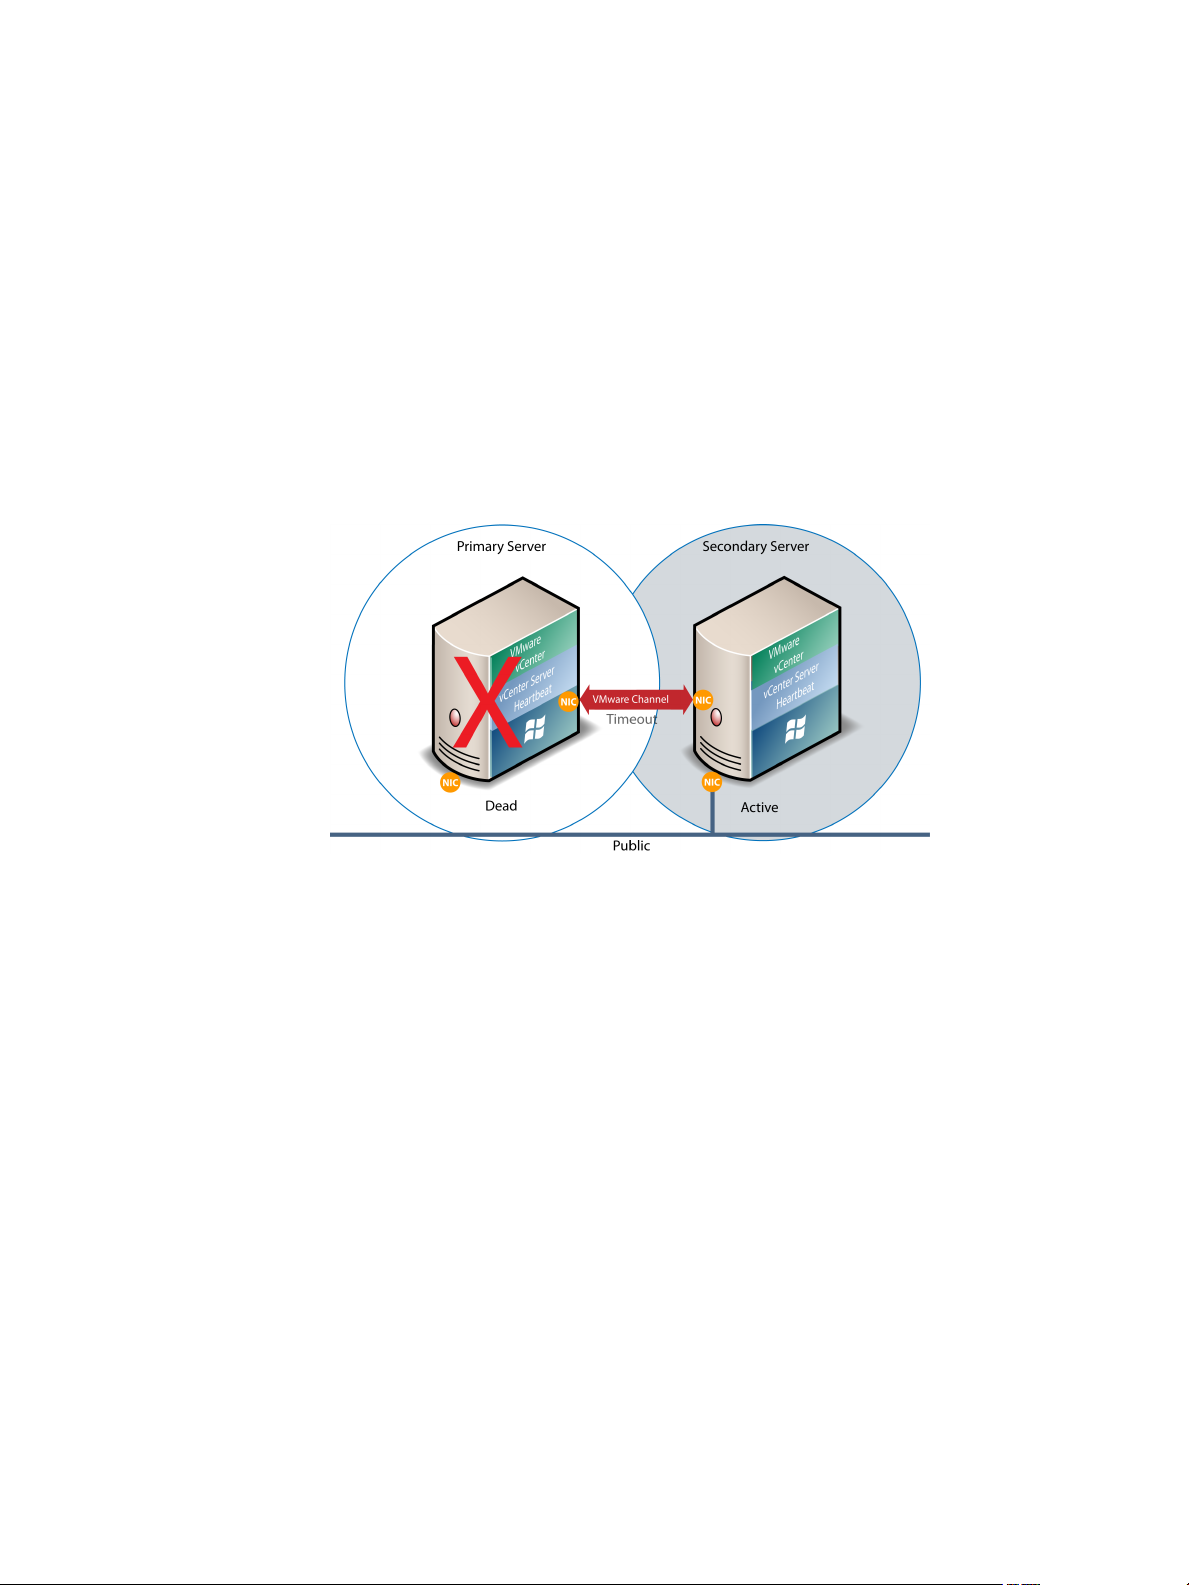
Two instances of vCenter Server Heartbeat regularly send “I’m alive” messages and message acknowledgments
to one another over a dedicated network connection referred to as the “VMware Channel” to detect interruptions
in responsiveness. If the passive server detects that this monitoring process (referred to as the “Heartbeat”)
has failed, it initiates a failover as illustrated in Figure 1-1.
Figure 1- 1. Failover
A failover occurs when the passive server detects that the active server is no longer responding. This can occur
when the active server hardware fails, loses its network connections, or otherwise becomes unavailable. Rather
than the active server gracefully closing, the passive server determines that the active server has failed and
requires no further operations. In a failover, the passive server immediately assumes the active server role.
The failover process is discussed in detail later in this guide.
Network Protection
vCenter Server Heartbeat proactively monitors the network by polling up to three predened nodes to ensure
that the active server is visible on the network. vCenter Server Heartbeat polls by default the primary DNS
server, the default gateway, and the global catalog server at regular intervals. If all three nodes fail to respond,
for example in the case of a network card or local switch failure, vCenter Server Heartbeat can initiate a
switchover, allowing the Secondary server to assume the active role and service clients.
Application Protection
vCenter Server Heartbeat running on the active server locally monitors vCenter Server and its services (through
the use of plug-ins) to verify that vCenter Server is operational and not in an unresponsive or stopped state.
This level of monitoring is fundamental in ensuring that vCenter Server remains available to users.
VMware, Inc. 11
Page 12
Administrator Guide
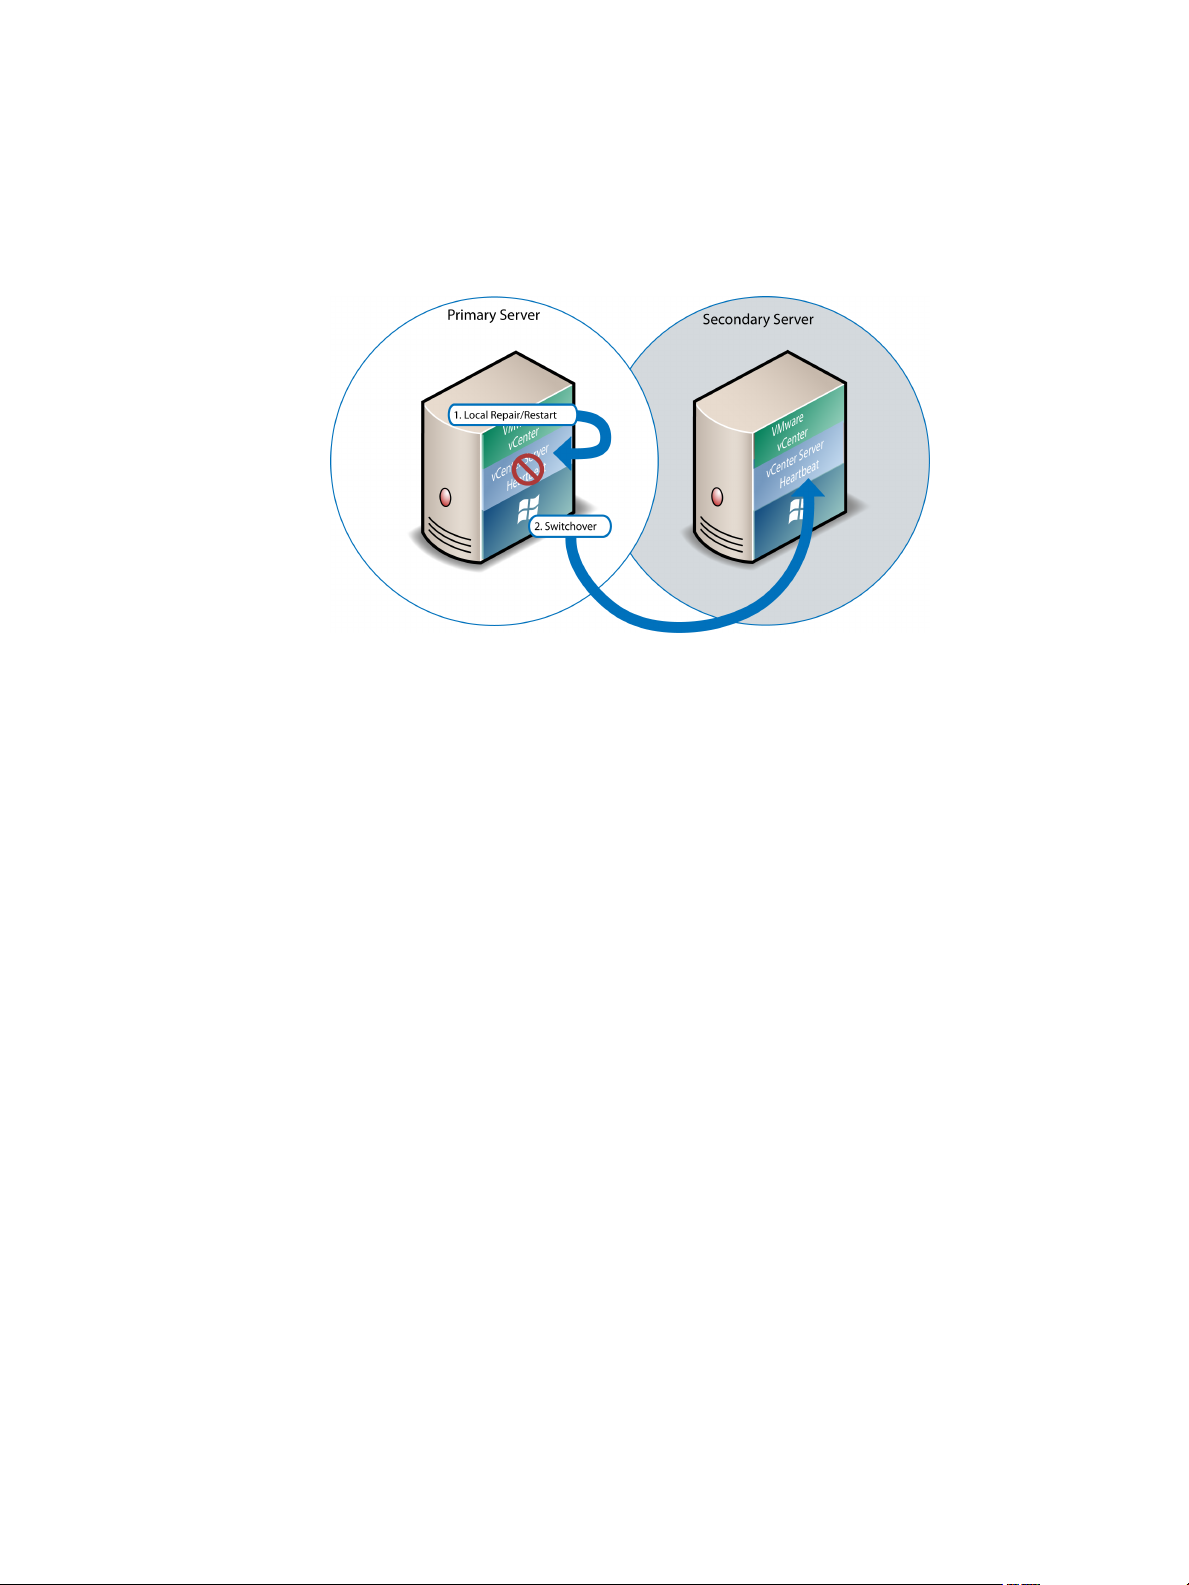
If vCenter Server should fail, vCenter Server Heartbeat rst tries to restart the application on the active server
(1) in Figure 1-2.
If the application does not successfully restart, vCenter Server Heartbeat initiates a switchover (2) in Figure
1-2. Refer to “vCenter Server Heartbeat Switchover and Failover Processes,” on page 15 for further information
about the switchover process.
Figure 1- 2. Switchover
A switchover gracefully closes vCenter Server running on the active server and restarts it on the passive server,
including the component or service that caused the failure. For example, if the Primary server is active and
the Secondary server is passive, the Primary server is demoted to a passive role and is hidden from the network
when the Secondary server is promoted to an active role and is made visible to the network. The mechanics
of switchovers are discussed in more detail later in this guide.
Performance Protection
Ensuring that vCenter Server is operational and providing service at an adequate level of performance to meet
user demands is important. The vCenter Server Heartbeat plug-in provides these monitoring and pre-emptive
repair capabilities.
vCenter Server Heartbeat proactively monitors system performance attributes and can notify the system
administrator in the event of a problem. Additionally, it can be congured to take pre-emptive action to prevent
an outage.
In addition to monitoring vCenter Server services, vCenter Server Heartbeat can monitor specic attributes to
ensure that they remain within normal operating ranges. Similar to application monitoring, various rules can
be congured to trigger specic corrective actions whenever these attributes fall outside of their respective
ranges.
vCenter Server Heartbeat provides the same level of exibility to dene and perform multiple corrective actions
in the event of problems on a service by service or even attribute by attribute basis.
Data Protection
You can congure vCenter Server Heartbeat to protect the application environment. All data les that users
or the vCenter Server requires in the application environment are made available should a failure occur. After
installation, vCenter Server Heartbeat congures itself to protect les, folders, and registry settings for vCenter
Server on the active server by mirroring them in real time to the passive server. If a failover occurs, all les
protected on the failed server are available to users after the failover, hosted on the Secondary server.
12 VMware, Inc.
Page 13
Chapter 1 Introduction
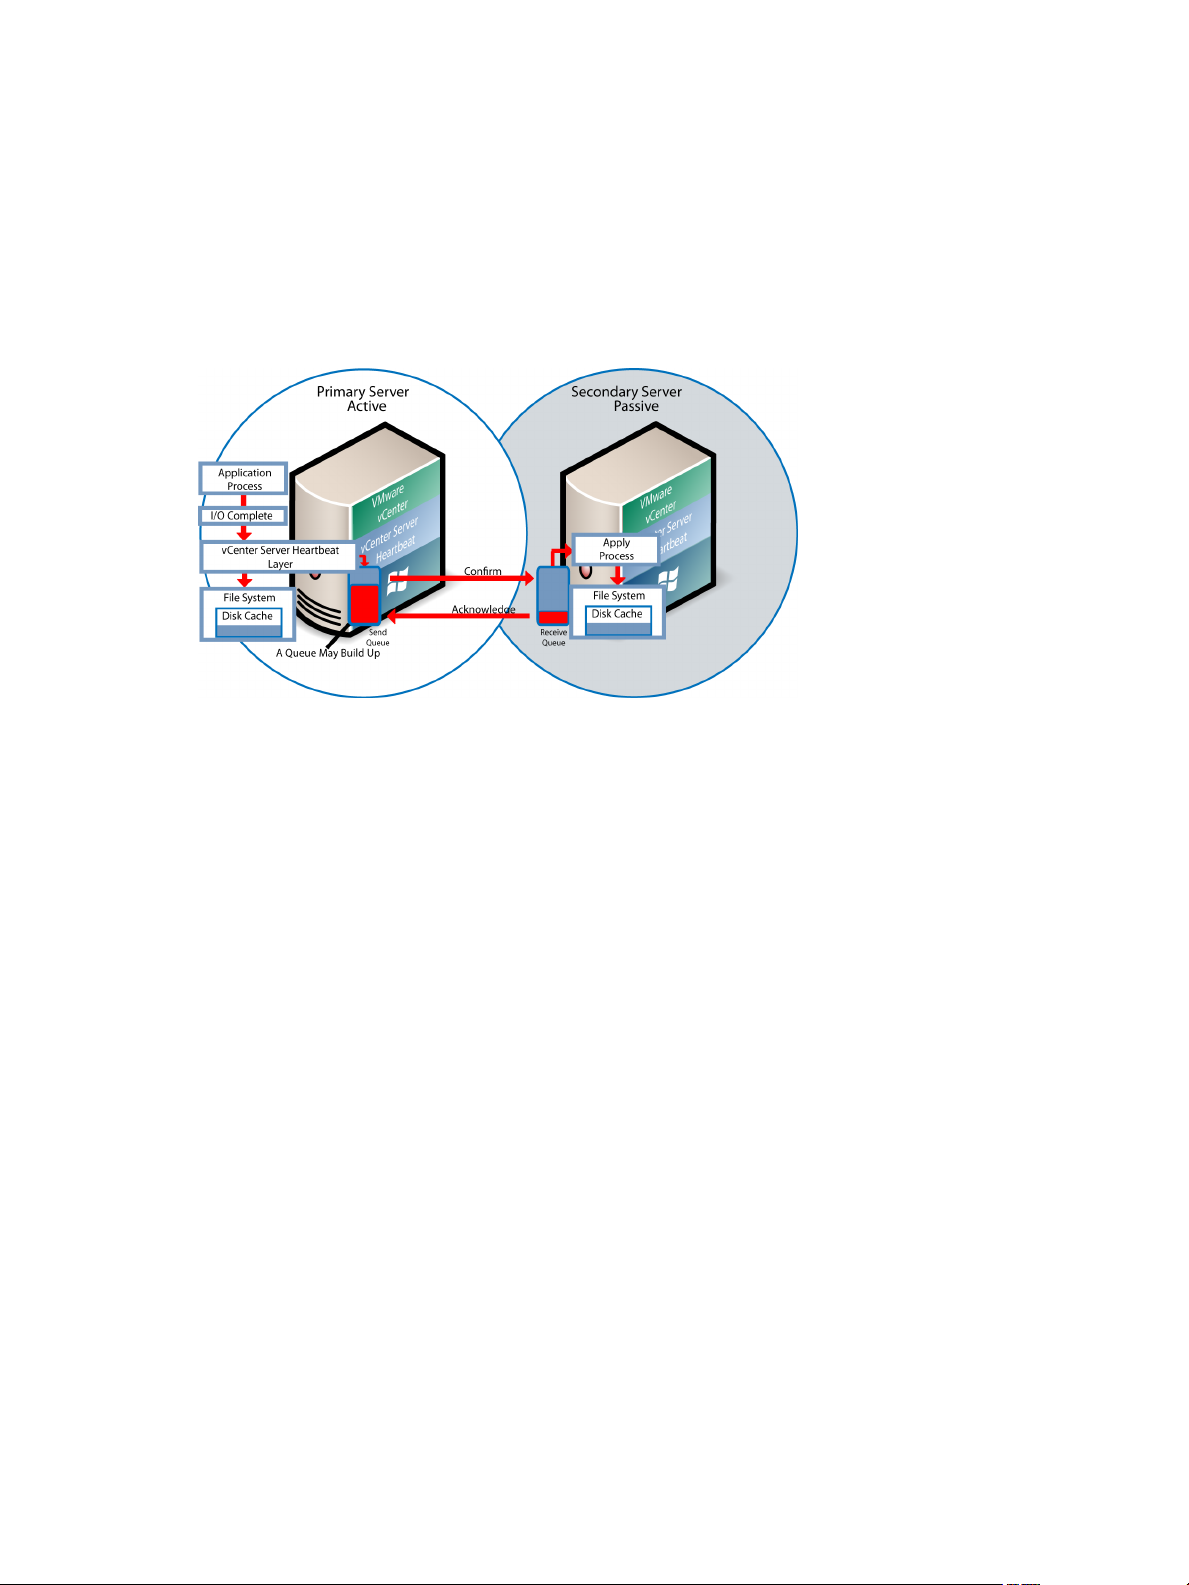
vCenter Server Heartbeat intercepts all le system I/O operations on the active server. If the intercepted write
and update operations are within the protected set, these are placed in a queue on the active server referred
to as the active server’s “Send Queue”, pending transmission to the passive server. Each request is numbered
to maintain its order in the queue. With the request in the active server’s send queue, vCenter Server Heartbeat
allows the disk I/O to continue with the requested disk operation.
If the channel is connected, the active server’s send queue is transferred to the passive server, which places all
the requests in the passive server’s “Receive Queue”. The passive server conrms the changes were logged by
sending the active server an acknowledgment. The active server then clears the data from its queue.
Figure 1- 3. Apply Process
The apply process running on the passive server’s receive queue applies all updates in strict sequence,
duplicating an identical set of le operations on the passive server as illustrated in Figure 1-3.
vCenter Server Heartbeat Communications
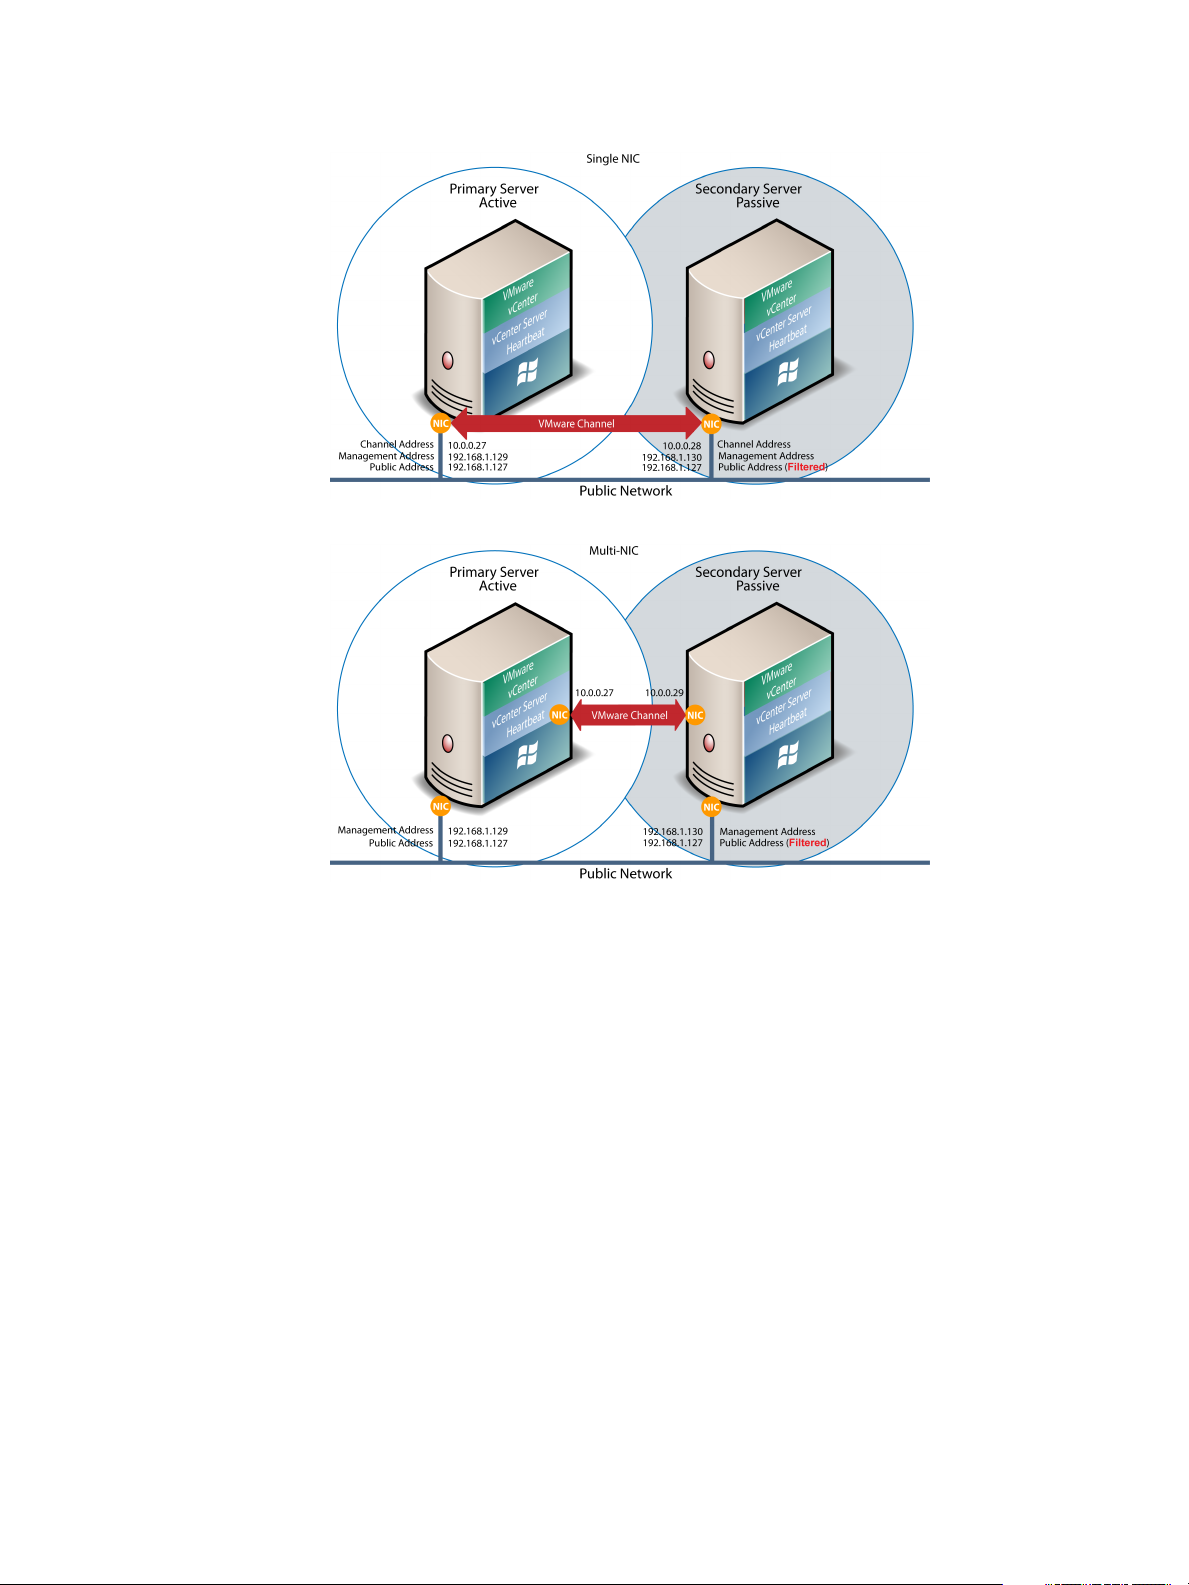
The VMware Channel is a crucial component of the setup and can be congured in a number of ways.
vCenter Server Heartbeat supports installation using either multiple network interface connections (NICs), (1
congured for the VMware Channel) and (1 congured with the Principal(Public) and Management IP
addresses), or a single NIC congured with the VMware Channel IP, Principal (Public) IP, and Management
IP. Both the Primary and Secondary servers must have the same number of NICs. The Principal (Public) IP
address provides client access and the Management IP address provides administrative access, while the
VMware Channel provides for data transfer and control.
A second pair of NICs for the VMware Channel can be used to provide a degree of redundancy. In this
conguration, the VMware Channel has a dual channel if more than one dedicated NIC is provided for the
VMware Channel on each server. To provide added resilience, the communications for the second channel
should be completely independent from the rst channel. They should not share any switches, virtual switches,
routers or the same WAN connection.
VMware, Inc. 13
Page 14
Administrator Guide
Figure 1- 4. Single NIC Configuration
Figure 1- 5. Multi-NIC Configuration
The IP address a client uses to connect to the active server (the Principal (Public) IP address) must be congured
as a static IP address and not DHCP (Dynamic Host Conguration Protocol) enabled. In Figure 1-4 and Figure
1-5, the Principal (Public) IP address is congured as 192.168.1.127.
LAN Deployment
When deployed in a LAN, the Principal (Public) NIC on the active server is congured with both a unique
permanently assigned Management IP address for administrative access and the Principal (Public) IP address
which allows trac from clients. The Principal (Public) NIC on the passive server is congured to use its
unique permanently assigned Management IP address. When a switchover or failover occurs, the Principal
(Public) IP address assigned to the currently active server is removed and reassigned to the new active server.
The new passive server remains accessible to administrators via the Management IP address but is not visible
to clients. The newly active server then starts accepting trac from clients.
The NICs on the active and passive servers used for the VMware Channel are congured so that their IP
addresses are outside of the subnet range of the Principal (Public) network. These addresses are referred to as
VMware Channel addresses.
During installation, setup will switch o NetBIOS for the VMware Channel(s) on the active and passive servers
as this connection remains live and both the passive and active machines have the same NetBIOS name.
Following vCenter Server Heartbeat installation (runtime), NetBIOS is disabled across the channel(s).
14 VMware, Inc.
Page 15
The NICs that support connectivity across the VMware Channel can be standard 100BaseT Ethernet cards
providing a throughput of 100 Mbits per second across standard Cat-5 cabling. In its most basic form, a dedicated
channel requires no hubs or routers, but the direct connection requires crossover cabling.
WAN Deployment
When congured for a WAN deployment, congure the VMware Channel to use static routes over switches
and routers to maintain continuous communications independent from corporate or public trac.
vCenter Server Heartbeat Switchover and Failover Processes
vCenter Server Heartbeat uses four dierent procedures — managed switchover, automatic switchover,
automatic failover, and managed failover — to change the role of the active and passive servers depending on
the status of the active server.
Managed Switchover
Chapter 1 Introduction
You can click Make Active on the vCenter Server Heartbeat Console Server: Summary page to manually initiate
a managed switchover. When a managed switchover is triggered, the running of protected applications is
transferred from the active machine to the passive machine in the server pair. The server roles are reversed.
Figure 1- 6. Switchover
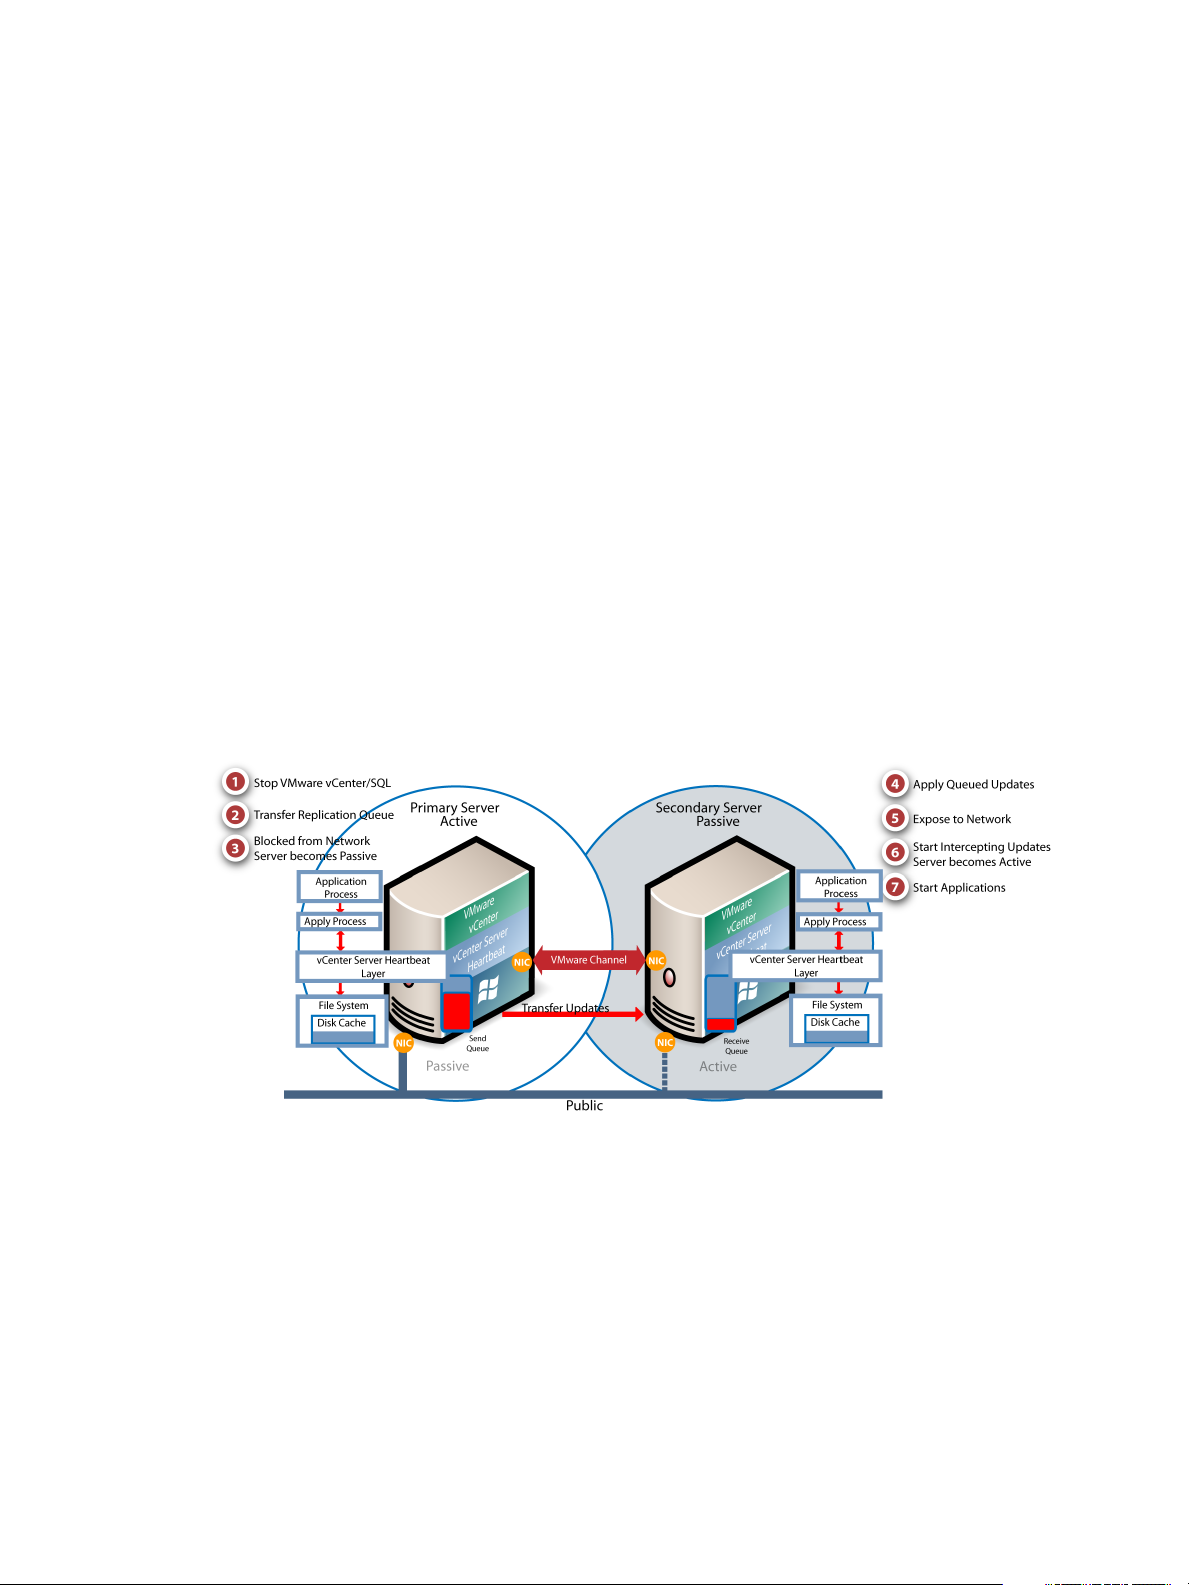
A managed switchover performs the following steps:
1 Stop the protected applications on the active server. After the protected applications stop, no more disk
updates are generated.
2 Send all updates that are still queued on the active server to the passive server. After this step, all updates
are available on the passive server.
3 Re-designate the Secondary server as the new active server. After this step, vCenter Server Heartbeat:
Reassigns the Principal (Public) IP address to the Secondary server.
■
Makes the newly active server visible on the network. The newly active server begins to intercept
■
and queue disk I/O operations for the newly passive server.
VMware, Inc. 15
Page 16
Administrator Guide
4 vCenter Server Heartbeat causes the newly passive server to begin accepting updates from the active
server.
5 vCenter Server Heartbeat starts the same protected applications on the new active server. The protected
applications become accessible to users. The managed switchover is complete
Automatic Switchover
Automatic switchover (auto-switchover) is similar to failover (discussed in the next section) but is triggered
automatically when system monitoring detects failure of a protected application.
Like managed switchover, auto-switchover changes the server roles but then stops vCenter Server Heartbeat
on the previously active server to allow the administrator to investigate the cause of the auto-switchover and
verify the integrity of the data.
After the cause for the auto-switchover is determined and problems are corrected, the administrator can use
vCenter Server Heartbeat Console to return the server roles to their original state.
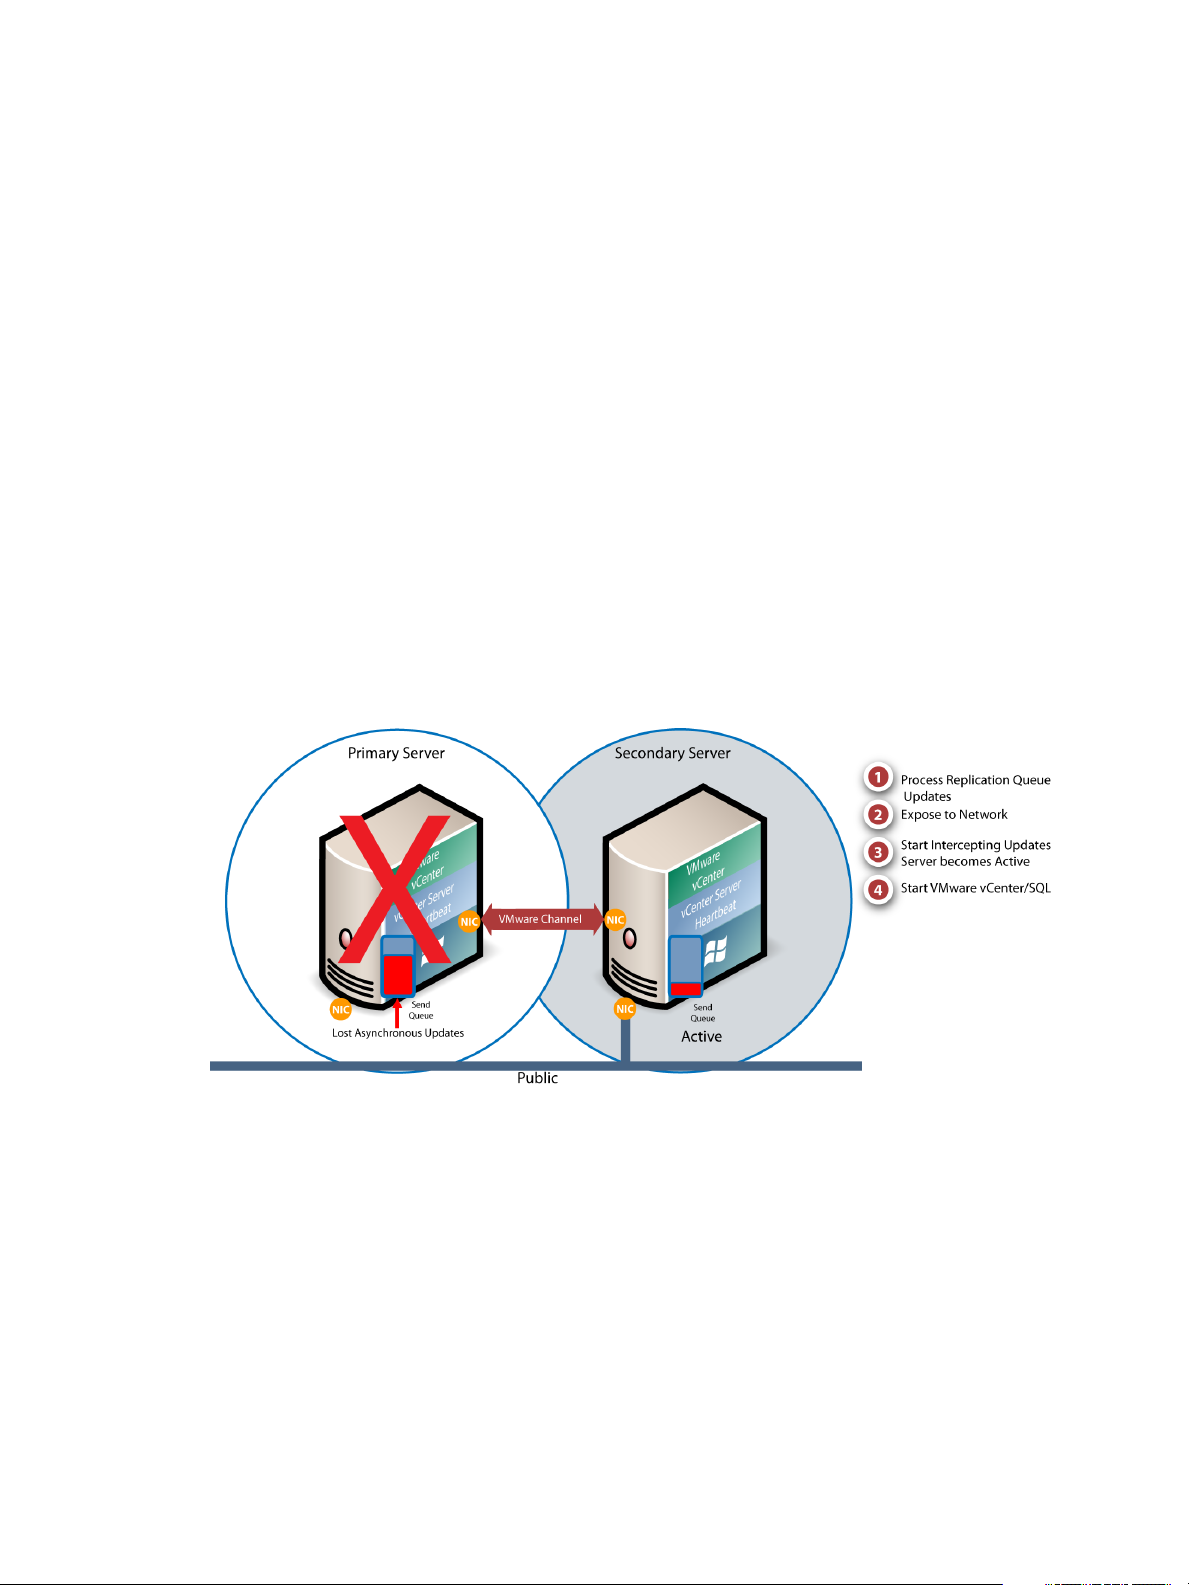
Automatic Failover
Automatic failover is similar to automatic switchover (discussed above) but is triggered when the passive
server detects that the active server is no longer running properly and assumes the role of the active server.
Figure 1- 7. Automatic Failover
16 VMware, Inc.
Page 17

Chapter 1 Introduction
During the automatic failover, the passive server performs the following steps:
1 Apply any intercepted updates currently in the passive server’s receive queue as identied by the log of
update records that are saved on the passive server but not yet applied to the replicated les.
The amount of data in the passive server’s receive queue aects the time required to complete the failover
process. If the passive server’s receive queue is long, the system must wait for all updates to the passive
server to complete before the rest of the process can take place. An update record can be applied only if
all earlier update records are applied, and the completion status for the update is in the passive server’s
receive queue. When no more update records can be applied, any update records that cannot be applied
are discarded.
2 Switch mode of operation from passive to active.
This enables the public identity of the server. The unique Management IP address is removed from the
passive server and the shared Principal (Public) IP address is assigned. The passive server becomes active
and available to clients that were connected to the previously active server before the automatic failover
and clients are able to reconnect.
3 Start intercepting updates to protected data. Any updates to the protected data are saved in the send queue
on the local server.
4 Start all protected applications. The applications use the replicated application data to recover, and then
accept re-connections from any clients. Any updates that the applications make to the protected data are
intercepted and logged.
At this point, the originally active server is oine and the originally passive server is lling the active role
and running the protected applications. Any updates that completed before the failover are retained.
Application clients can reconnect to the application and continue running as before.
Managed Failover
Managed failover is similar to automatic failover in that the passive server automatically determines that the
active server has failed and can warn the system administrator about the failure; but no failover actually occurs
until the system administrator manually triggers this operation.
Automatic Switchover and Failover in a WAN Environment
Automatic switchover and failover in a WAN environment dier from an automatic switchover and failover
in a LAN environment due to the nature of the WAN connection. In a WAN environment, automatic switchover
and failover are disabled by default in the event that the WAN connection is lost.
Should a condition arise that would normally trigger an automatic switchover or failover, the administrator
will receive vCenter Server Heartbeat alerts. The administrator must manually click the Make Active button
on the Server: Summary page of the vCenter Server Heartbeat Console or vSphere Client to allow the roles of
the servers to switch over the WAN.
VMware, Inc. 17
Page 18

Administrator Guide
18 VMware, Inc.
Page 19

2Configuring vCenter Server Heartbeat
After installation of vCenter Server Heartbeat, initial operational conguration is performed using the vCenter
Server Heartbeat Console. The VMware vCenter Server Heartbeat – Server Conguration wizard (Congure
Server wizard) sets up and maintains communications between the vCenter Server Heartbeat servers. After
the system is set up and is functioning correctly, you do not normally need to recongure the system. The
Congure Server wizard becomes redundant during daily operations of the software.
This chapter includes the following topics:
“Launching the Congure Server Wizard,” on page 20
■
“Conguring the Machine,” on page 21
■
“Conguring the VMware Channel,” on page 22
■
“Conguring Public IP Addressing,” on page 24
■
“Managing vCenter Server Heartbeat License Keys,” on page 26
■
“Conguring the Logs,” on page 27
■
VMware, Inc. 19
Page 20
Administrator Guide
Launching the Configure Server Wizard
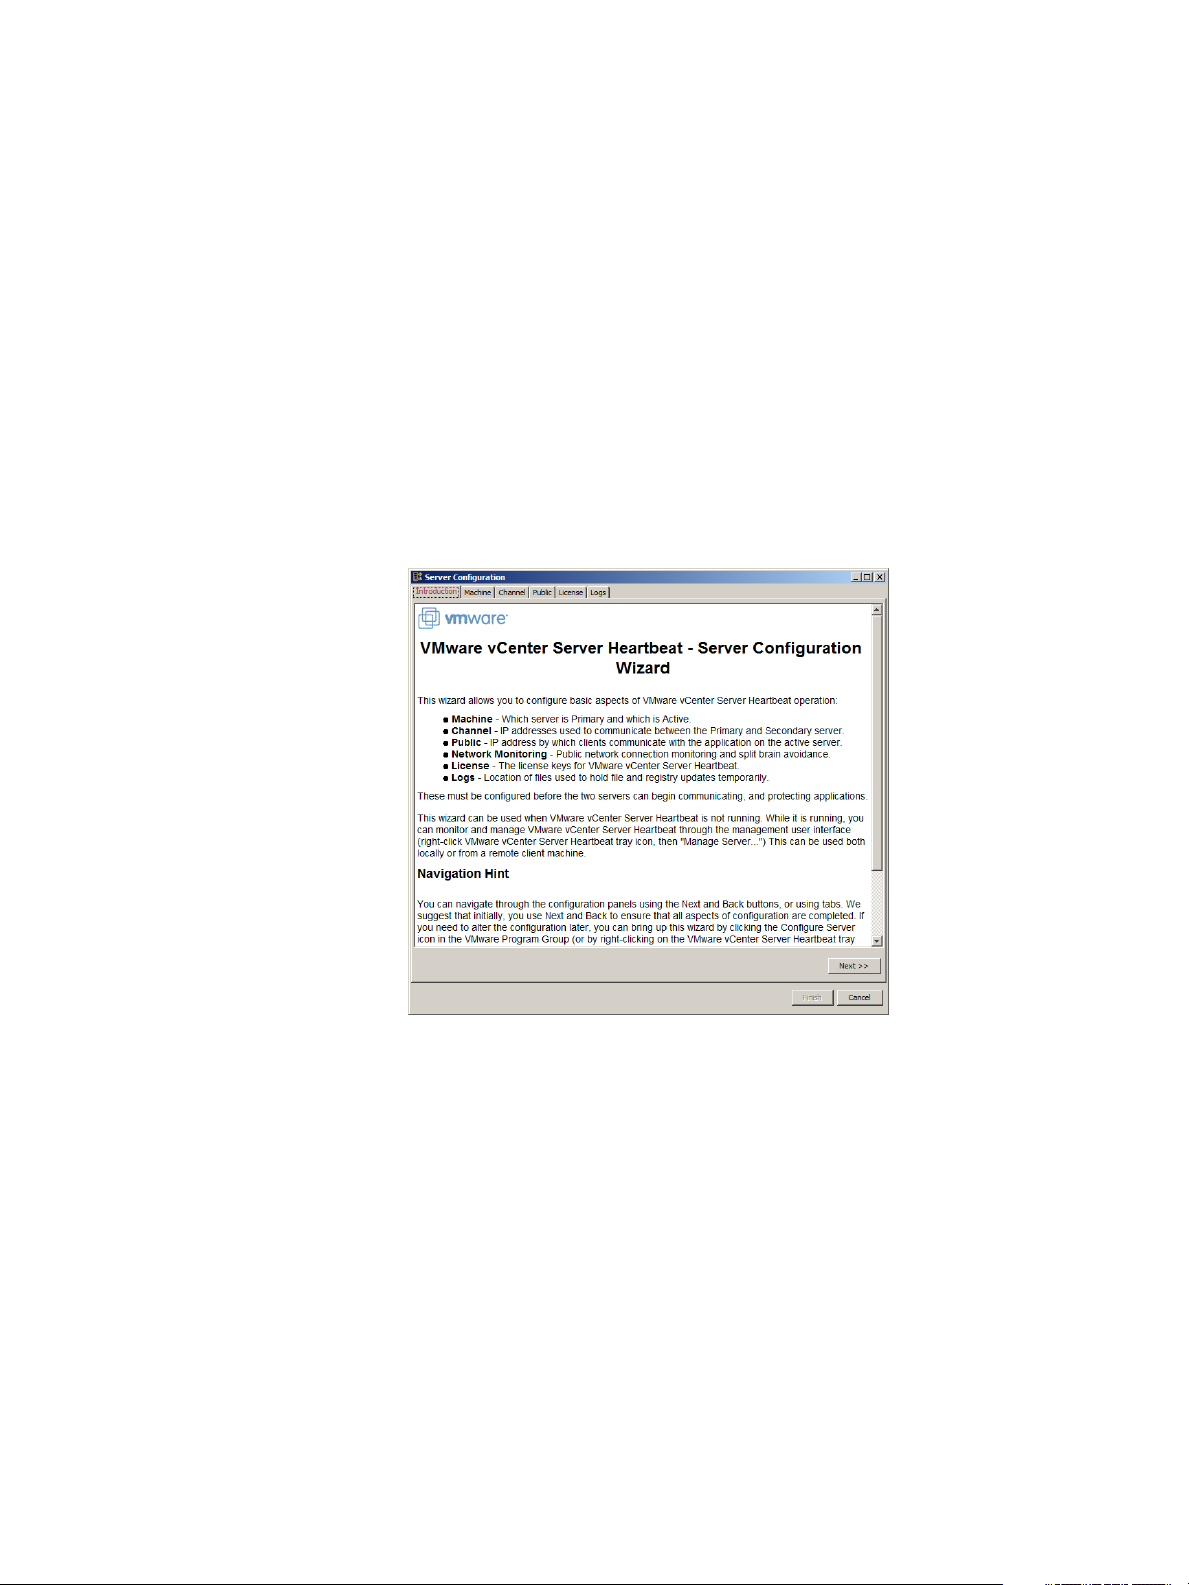
The VMware vCenter Server Heartbeat - Server Conguration wizard (Congure Server wizard) is used to
modify the communications between the Primary and Secondary servers and recongure other components
of vCenter Server Heartbeat. When using the Congure Server wizard, vCenter Server Heartbeat must not be
running.
Procedure
1 Stop vCenter Server Heartbeat.
2 Click the Congure Server icon on the desktop or navigate to Start > All Programs > VMware > VMware
vCenter Server Heartbeat > Congure Server to launch the Congure Server wizard.
The Congure Server wizard is displayed. If vCenter Server Heartbeat was not stopped before launching
the Congure Server wizard, a message stating that changes made in the Congure Server wizard will not
be saved is displayed.
Figure 2- 1. Configure Server Wizard Introduction
20 VMware, Inc.
Page 21
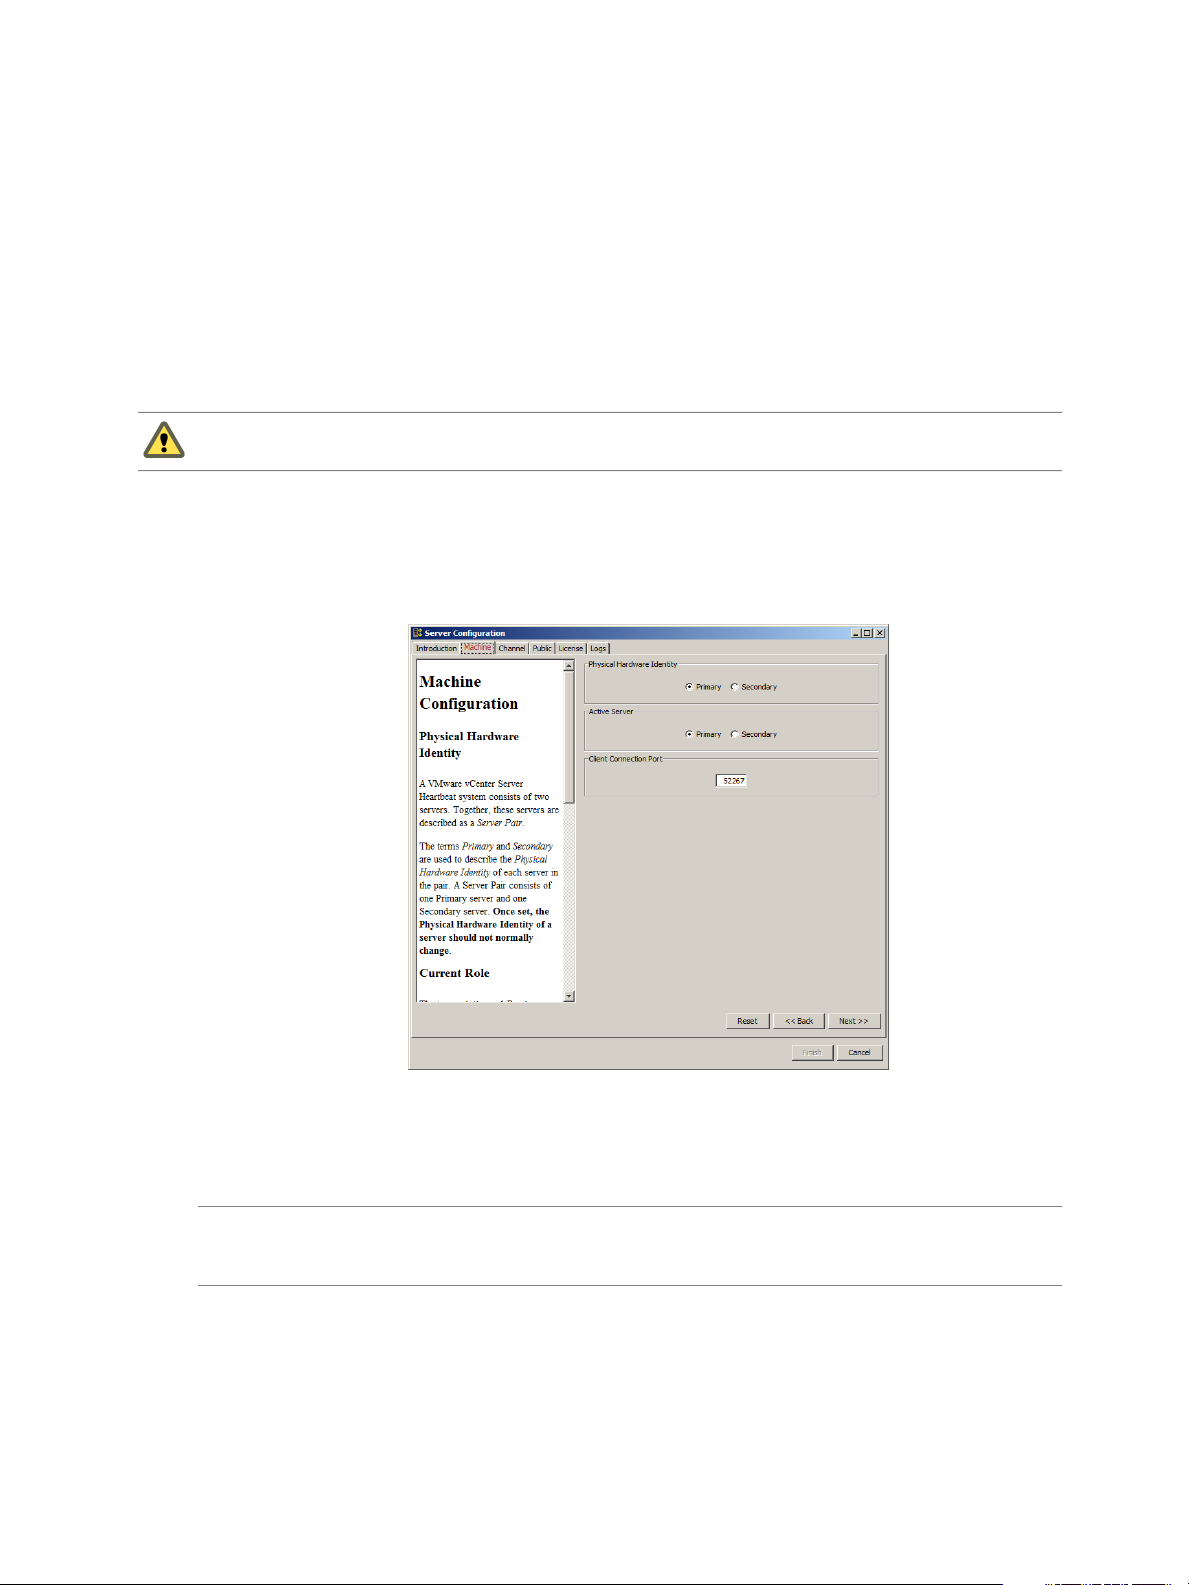
Configuring the Machine
The Machine tab is used to set the Server Identity, Active Server, and Client Connection Port.
Configuring the Machine Identity
The machine identity is either Primary or Secondary and once assigned does not change during the life of the
server.
Caution The machine Identity should only be changed when directed to do so by VMware Support or when
instructed to do so by a knowledge base article.
Procedure
1 Click the Machine tab and select a Physical Hardware Identity for the local machine.
2 Click either Next or Finish.
Figure 2- 2. Configure Server wizard Machine Tab
Chapter 2 Configuring vCenter Server Heartbeat
Configuring the Server Role
Note Before changing the role of the local server, verify that the other (remote) server in the pair is not already
performing the same role. vCenter Server Heartbeat is designed not to allow two passive or two active servers
to connect.
Procedure
To change the server role, click the Machine tab, select the server that is currently active (Primary or
◆
Secondary), and click Next or Finish.
VMware, Inc. 21
Page 22
Administrator Guide
Configuring the Client Connection Port
Clients such as the vCenter Server Heartbeat Console use the Client Connection Port to connect to vCenter Server
Heartbeat. Do not change this port unless another application is using it.
Procedure
To change the Client Connection Port, click the Machine tab, edit the default entry (52267) and click Next
◆
or Finish.
Configuring the VMware Channel
The Congure Server wizard Channel tab is used to congure the Channel Routing, Default Channel Port, and
Low Bandwidth Optimization.
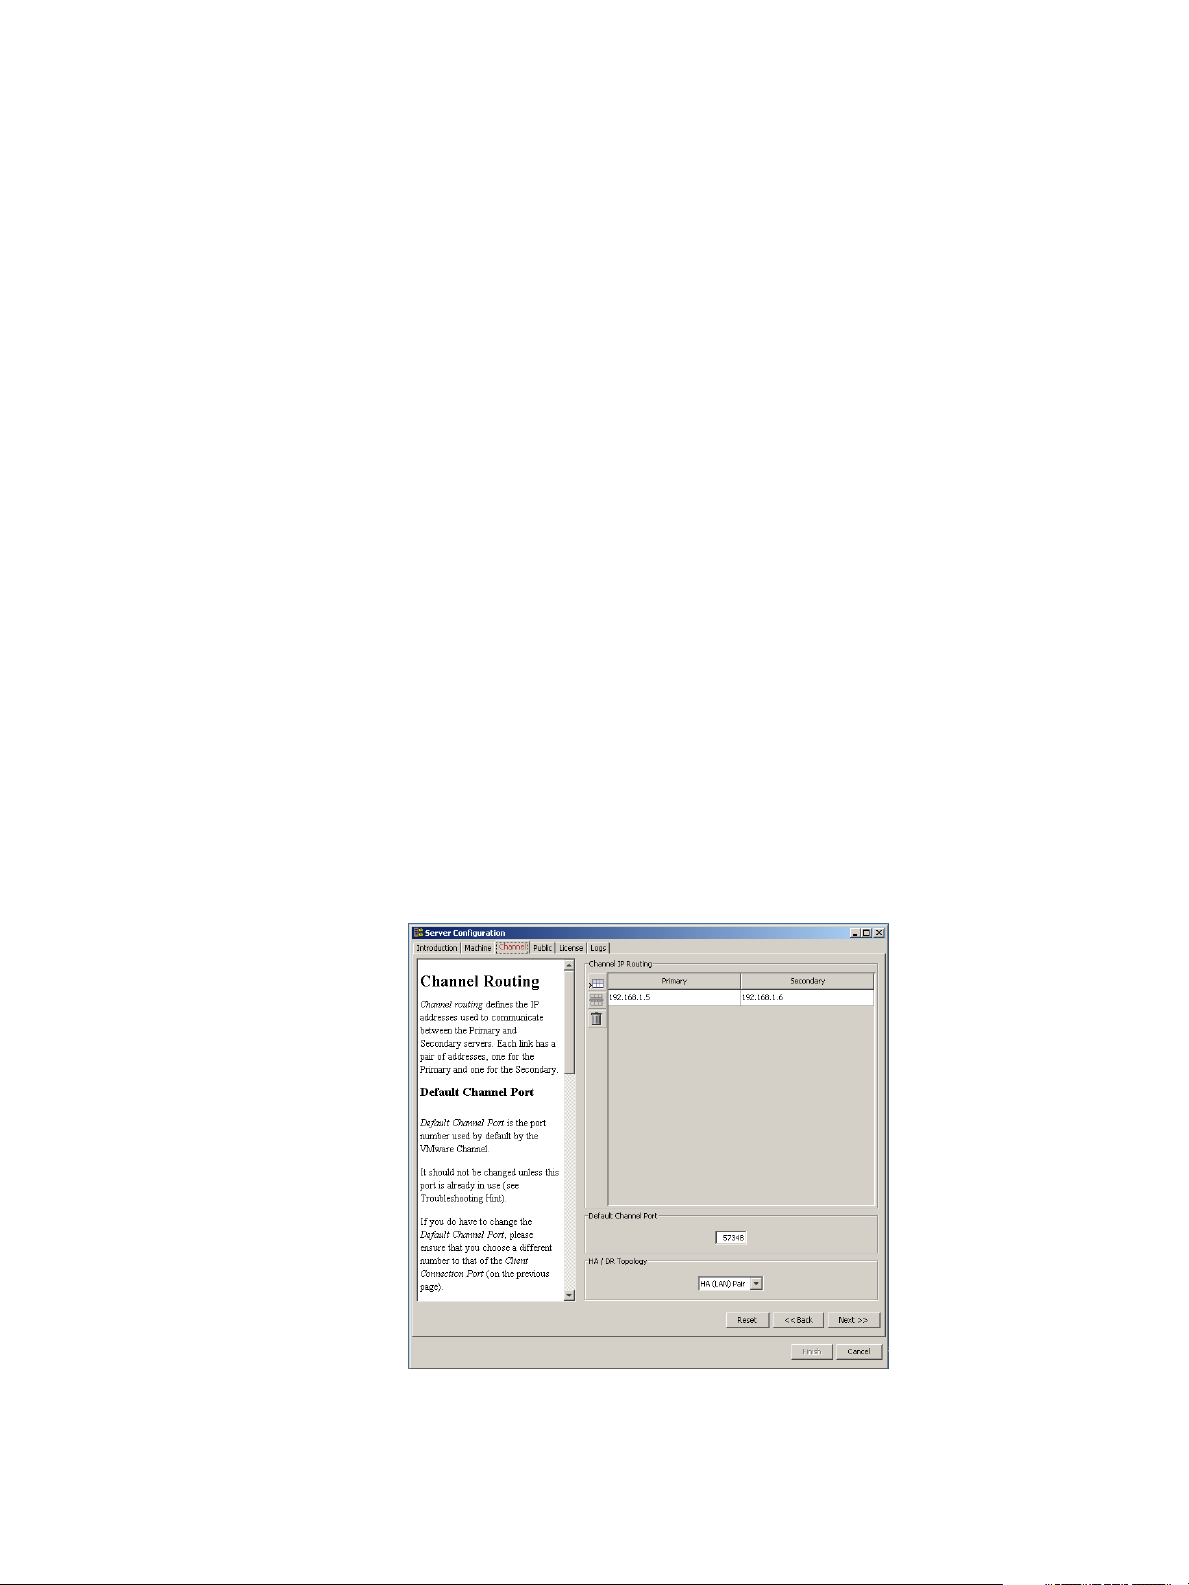
Configuring Channel Routing
Channel IP routing denes the IP addresses used to communicate between the Primary and Secondary servers.
Each link has a pair of addresses, one for the Primary, and one for the Secondary.
To add an additional VMware Channel after installing the NICs and conguring them:
Procedure
1 Click the Channel tab. Click Add Row to add the new IP addresses for both the Primary and Secondary
server to the VMware Channel IP Routing table.
2 Use the drop-down menu to view a list of available IP addresses on the local server.
3 Type the remote server IP address.
Figure 2- 3. Configure Server wizard — Channel Tab
22 VMware, Inc.
Page 23

Chapter 2 Configuring vCenter Server Heartbeat
4 To change the VMware Channel IP addresses, select and edit the entry in the table.
5 Click Next or Finish.
Configuring the Default Channel Port
VMware Channel uses the Default Channel Port to communicate between the Primary and Secondary server.
Do not change this port unless another application is using it.
Procedure
To change the Default Channel Port, click the Channel tab, edit the default entry (57348), and click Next or
◆
Finish.
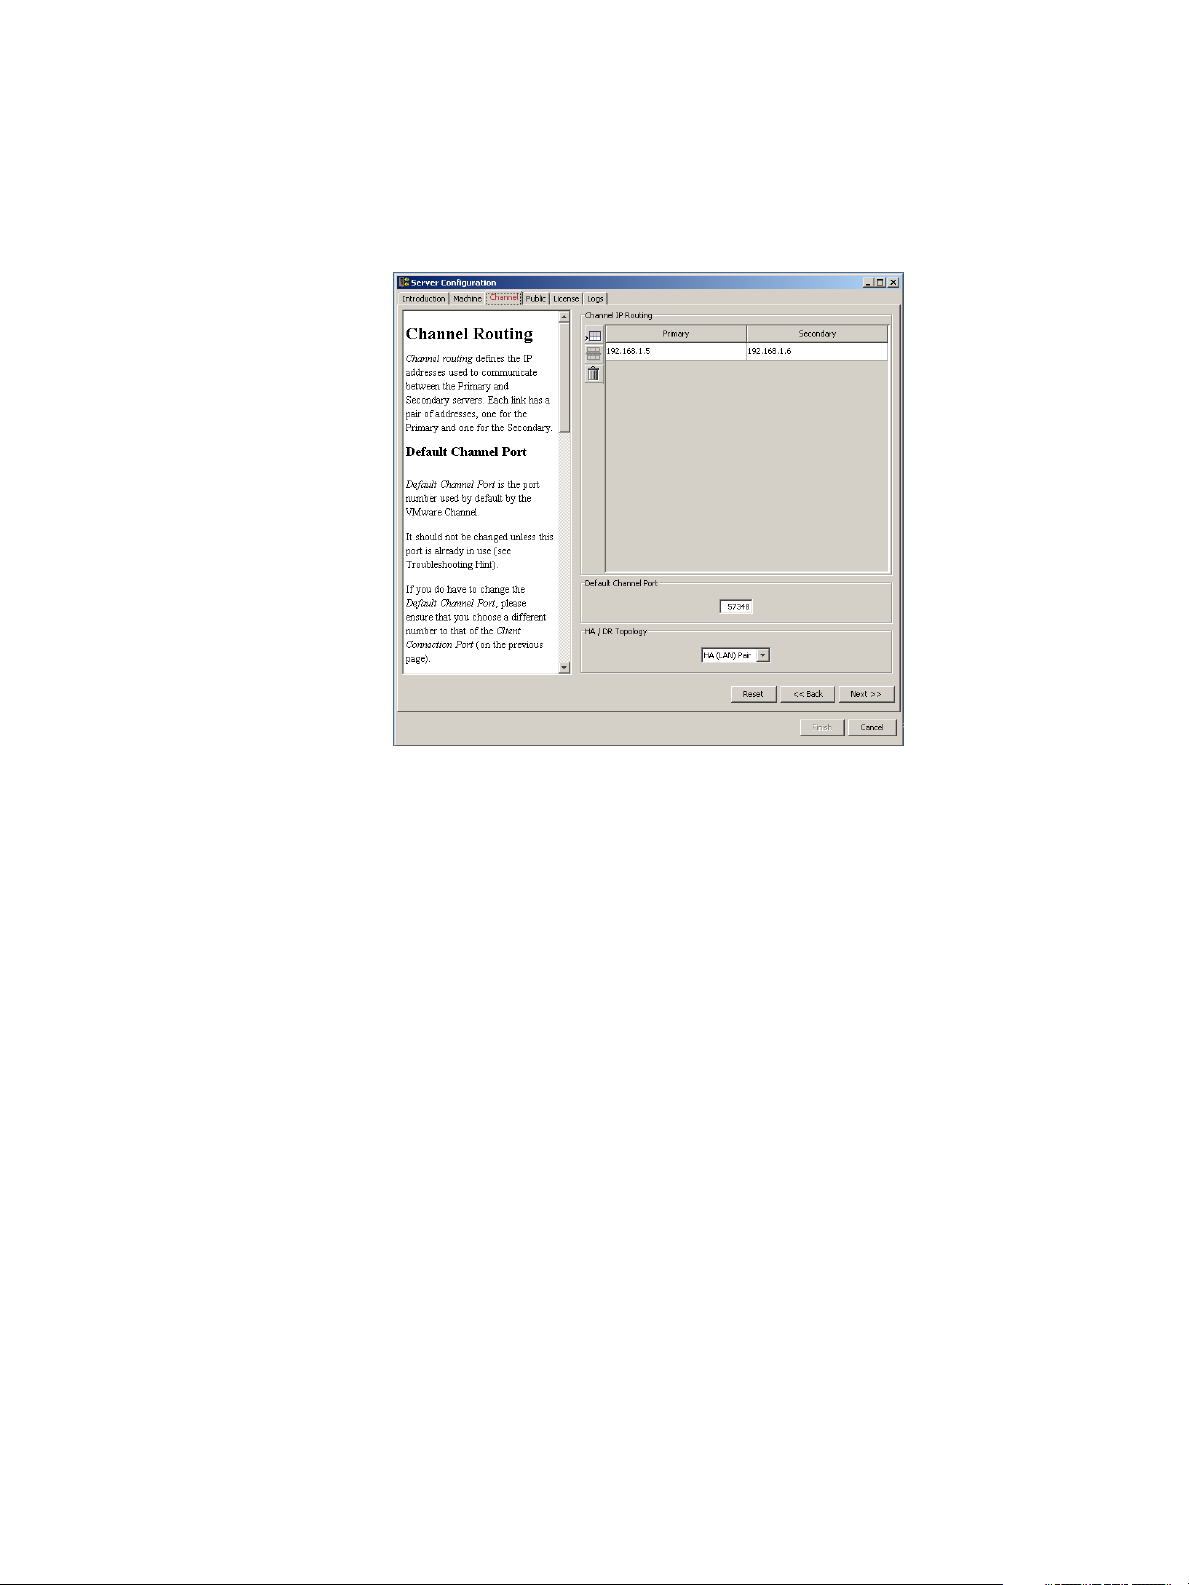
Configure Low Bandwidth Optimization
Low Bandwidth Optimization is congured automatically during installation based upon the conguration
options selected during Setup. Low Bandwidth Optimization can be congured for: High Availability (HA)
when deployed as a pair in a LAN or Disaster Recovery (DR) when deployed over a WAN.
In a High Availability (HA) server pair, the queues and buers are optimized for a high-speed local area
network (LAN) connection, compression is disabled, and automatic failover between servers is enabled.
In a Disaster Recovery (DR) pair, the queues and buers are optimized for a low-bandwidth wide area network
(WAN) connection, compression may be used, and automatic failover between servers is disabled.
In a vCenter Server Heartbeat server pair you can choose the HA or DR topology. However, if you have
manually congured a non-standard topology, for example, by changing the Auto-Failover setting, then
Non-Standard will appear in the menu and you can choose to leave the non-standard topology option as it is,
or reset it to one of the standard topologies.
Note The same HA/DR conguration must be set on both servers in the pair.
VMware, Inc. 23
Page 24
Administrator Guide
Procedure
◆
To change Low Bandwidth Optimization after installation, select the Channel tab of the Congure Server
wizard and use the HA/DR Topology drop-down to select the appropriate topology. Click Next or Finish
to accept changes.
Figure 2- 4. Configure Server wizard - Channel tab
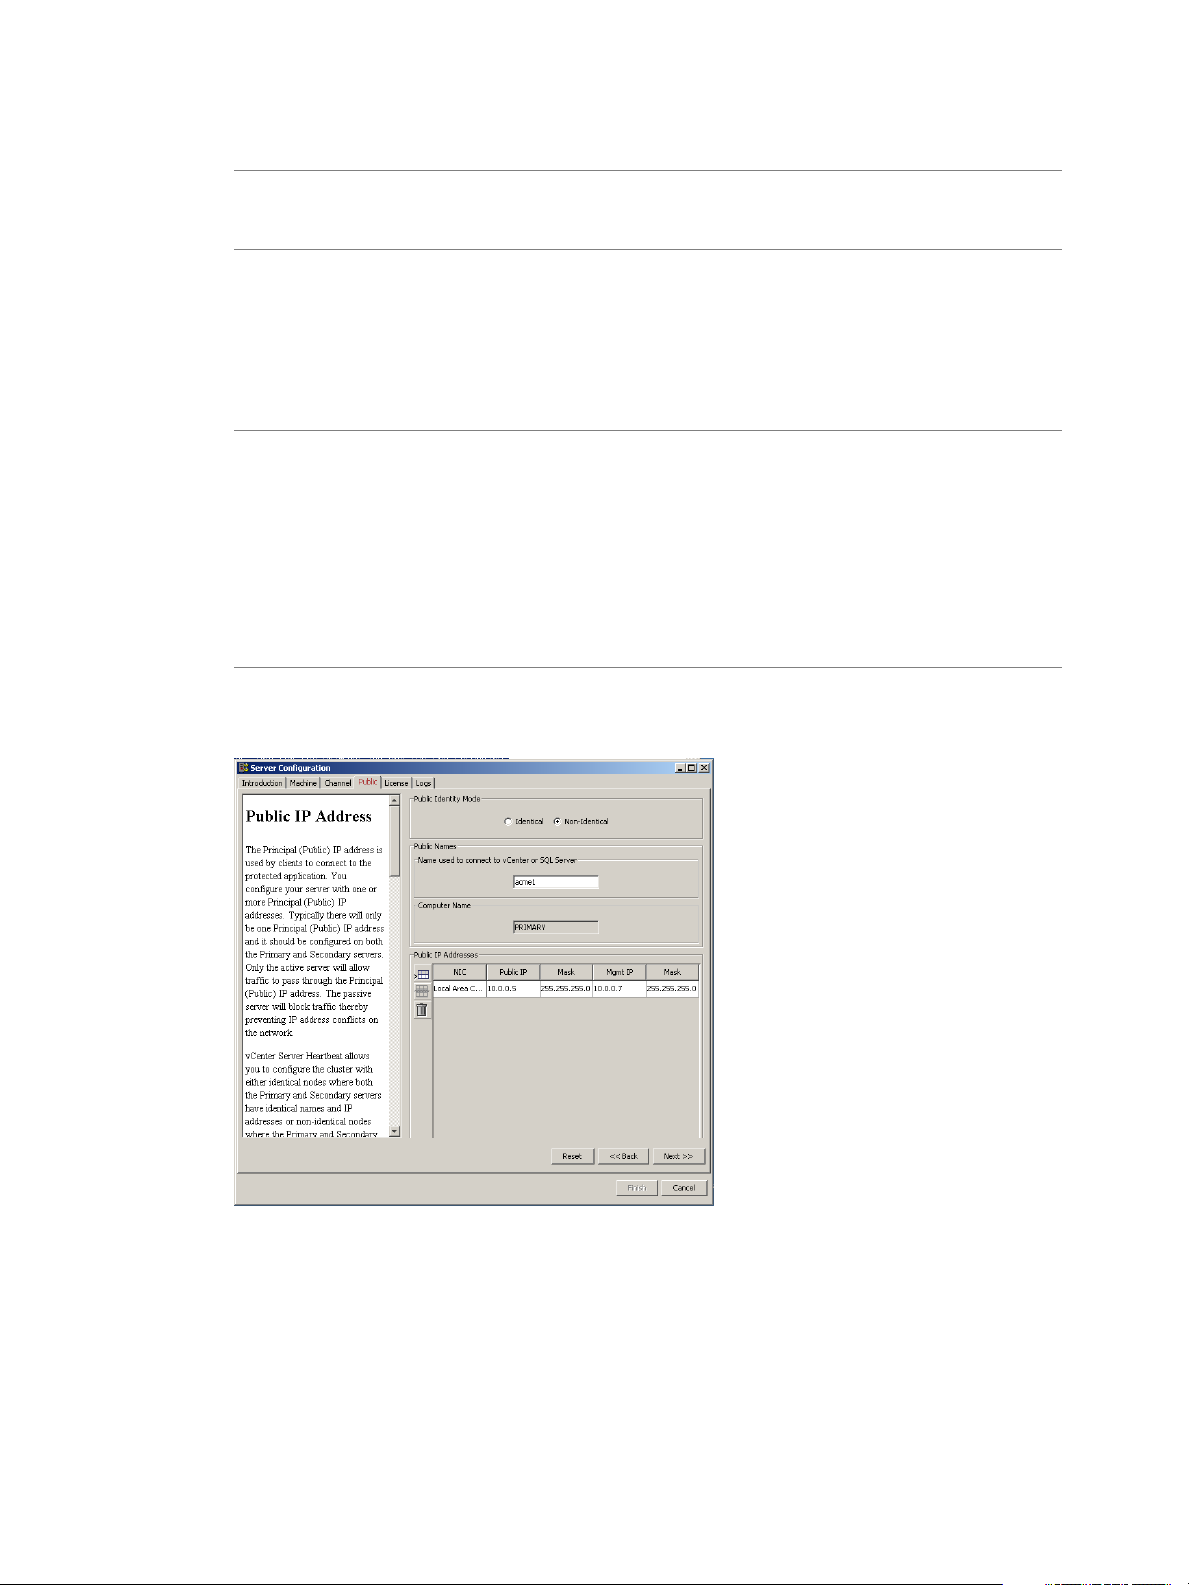
Configuring Public IP Addressing
vCenter Server Heartbeat servers are typically congured with one shared Principal (Public) IP address in a
LAN or two Principal (Public) IP address in a WAN. These are the addresses used by clients to connect to the
protected application.
During installation, vCenter Server Heartbeat congures the Principal (Public) IP address(s) and further
conguration is not normally necessary.
In the event that you must add a Management IP address or Principal (Public) IP address for your environment,
vCenter Server Heartbeat allows you to add these addresses using the Congure Server wizard.
Configuring Principal (Public) IP Addressing
vCenter Server Heartbeat's Congure Server wizard is used to add or modify Management IP and Principal
(Public) IP addresses when required by your environment such as during a migration from a LAN deployment
to WAN deployment.
Procedure
1 Select the Public tab of the Congure Server wizard and verify that Non-Identical is selected in the Public
Identity Mode pane.
2 Verify the vCenter Server or SQL Server Public name in the Name used to connect to vCenter or SQL Server
eld.
24 VMware, Inc.
Page 25
Chapter 2 Configuring vCenter Server Heartbeat
3 In the NIC eld, select the Principal (Public) network connection in the drop-down.
Note Adjacent IP addresses should be reserved and used for the Principal (Public) IP address and the
management IP addresses for the Primary and Secondary servers when installing vCenter Server Heartbeat
on servers running Windows Server 2008.
4 Enter the Principal (Public) IP address in the Public IP eld.
5 Enter the Principal (Public) IP address Subnet Mask in the rst Mask eld.
6 Enter the reserved Management IP address in the Mgmt IP eld.
7 Enter the reserved Management IP address Subnet Mask in the second Mask eld.
Note The Public IP Addresses table allows multiple entries. The table also allows you to congure Public
(Public IP)and Management (Mgmt IP) IPs for the same network adapter on separate lines to accommodate
multiple Public IPs in the same or dierent subnets and multiple Mgmt IPs in the same or dierent subnets.
The following rules apply to the table:
Each row must identify a network adapter
■
Each row must identify either a Public IP/subnet mask or Mgmt IP/subnet mask
■
For each network adapter listed, you must have at least 1 Public IP/subnet and 1 Mgmt IP/subnet,
■
however these may be congured on separate rows
8 Click Next or Finish.
Figure 2- 5. Configure Server wizard — Public tab
VMware, Inc. 25
Page 26
Administrator Guide
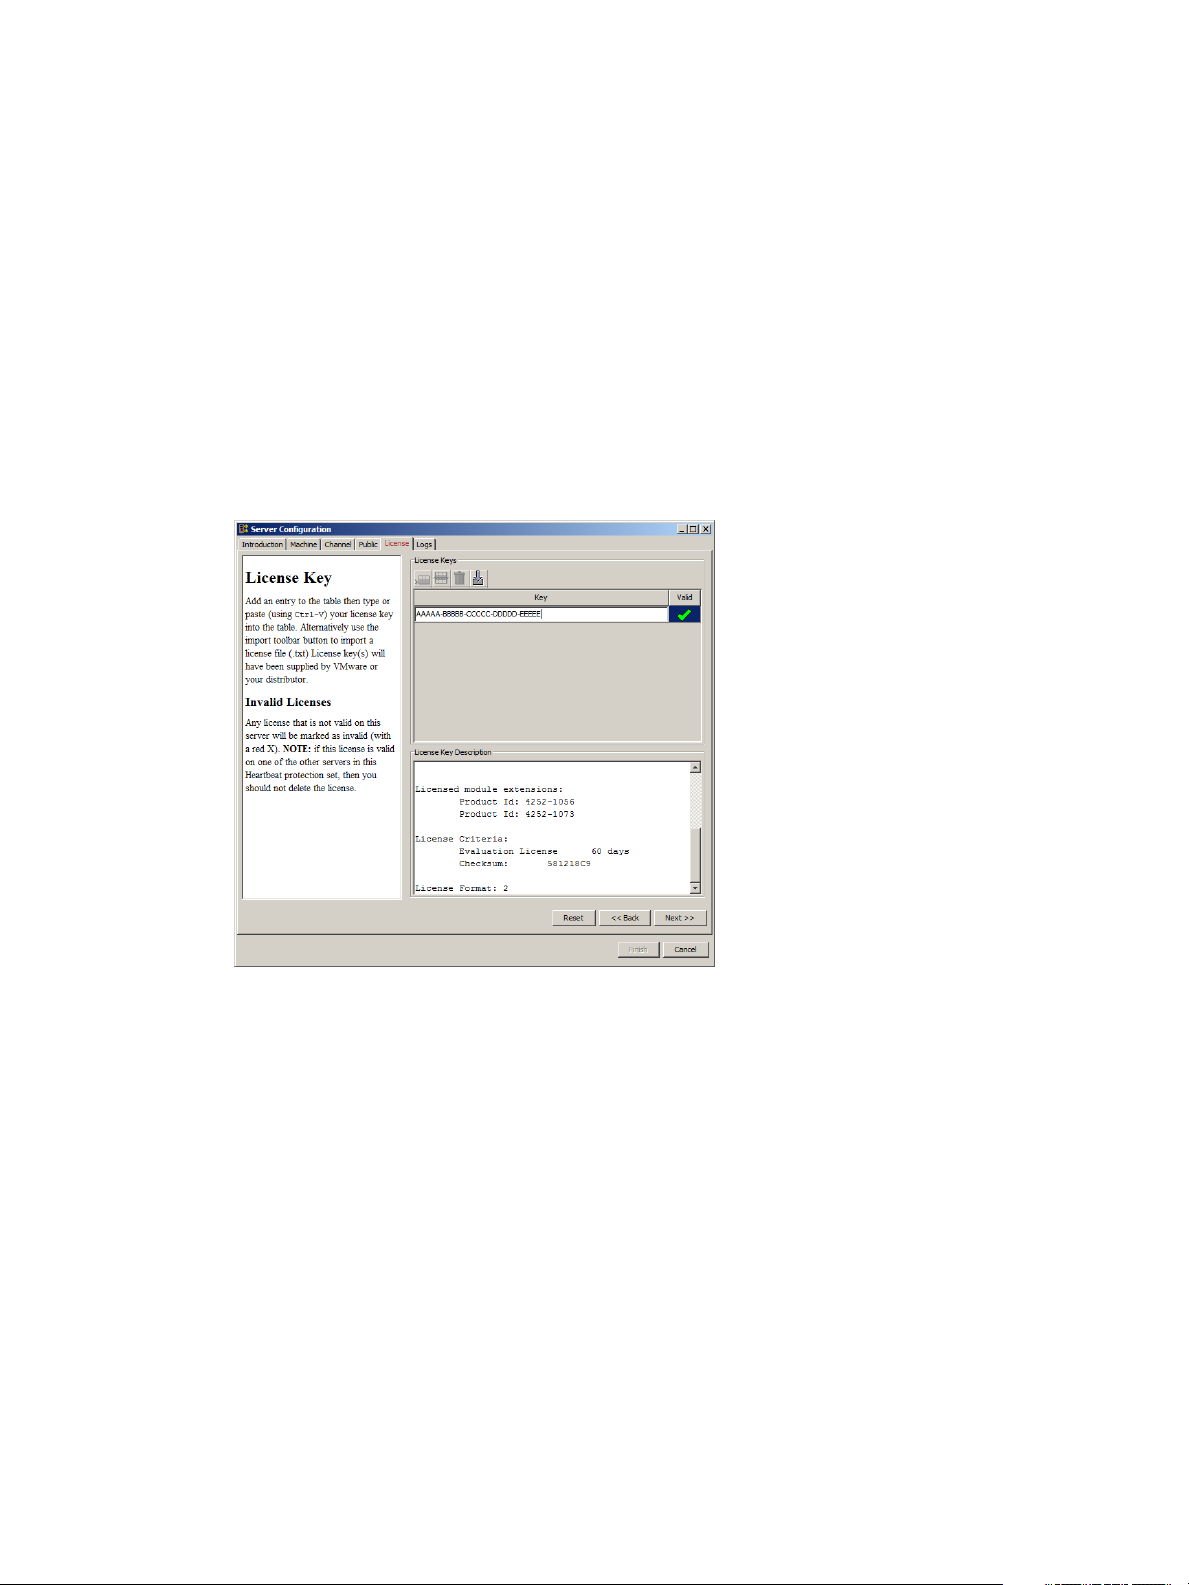
Managing vCenter Server Heartbeat License Keys
To manage vCenter Server Heartbeat license keys, select the License tab of the Congure Server wizard.
Adding an Entry to the License Keys Table
Procedure
1 Click the Add Row icon and enter your VMware vCenter Server Heartbeat serial number.
2 Manually type or paste (using Ctrl-V) your license key into the table.
3 Click Next or Finish.
Figure 2- 6. Configure Server wizard — License tab
26 VMware, Inc.
Page 27
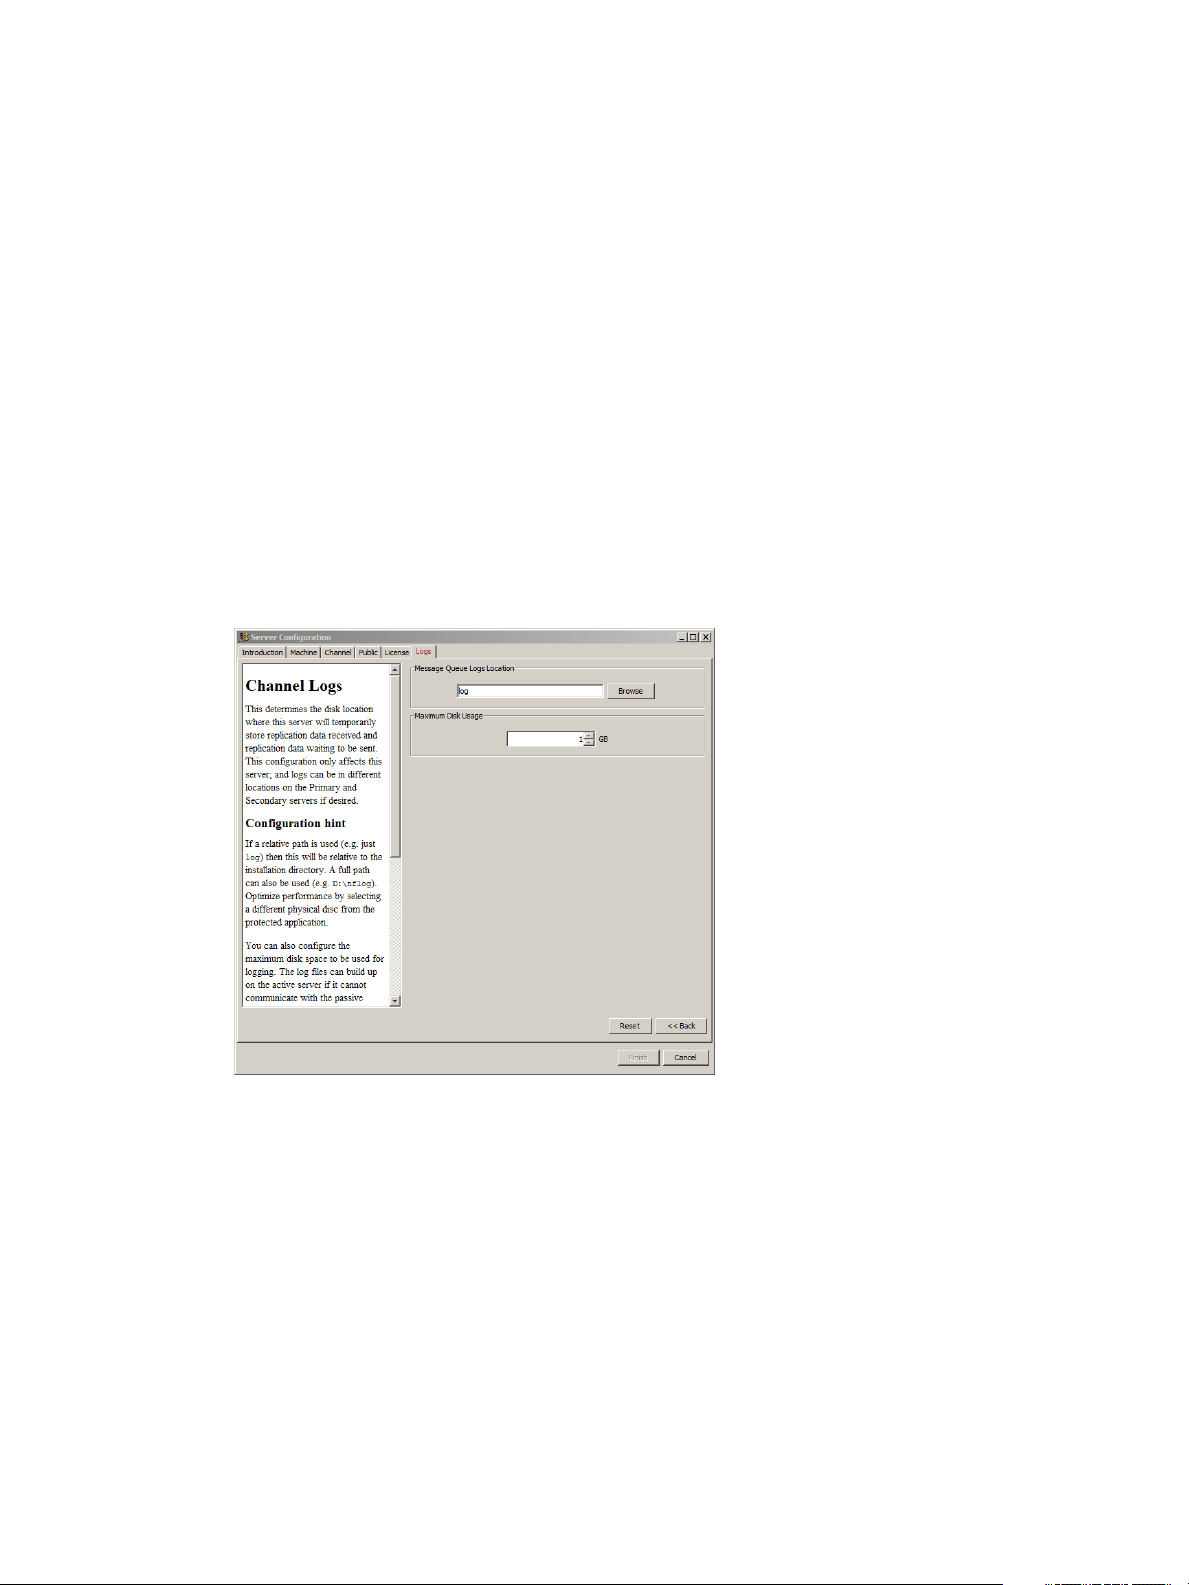
Configuring the Logs
vCenter Server Heartbeat allows you to change the default location for the logs used for storing data in the
queue.
Configuring Message Queue Logs
The server temporarily stores replication data received in the passive server’s receive queue and the replication
data waiting in the active server’s send queue in message queue logs. This conguration only aects the local
server. Logs can be in dierent locations on the Primary and Secondary servers.
Procedure
1 Click the Logs tab.
2 Click Browse to navigate to the folder to store the message queue logs.
3 Select the folder and click Next or Finish.
Figure 2- 7. Configure Server Wizard — Logs
Chapter 2 Configuring vCenter Server Heartbeat
Configuring the Maximum Disk Usage
The Congure Server wizard allows you to congure the maximum disk space allocated for logging.
Log les can increase in size on the active server under the following conditions:
If the active server cannot communicate with the passive server
■
Certain operations on the passive server
■
If the server is under heavy load
■
When the disk reaches quota, replication stops and the system is no longer protected.
VMware, Inc. 27
Page 28

Administrator Guide
If using a dedicated disk for log les, consider disabling the quota. To do this, set the quota to zero. If vCenter
Server Heartbeat runs out of disk space, it must be shut down before it can resume replication. Set the quota
with sucient overow space so vCenter Server Heartbeat can stop replicating gracefully.
Procedure
◆
To congure Maximum Disk Usage, click the Logs tab, type the maximum dedicated disk space allocated
for message queue log les, and click Finish.
28 VMware, Inc.
Page 29

Protection against operating system or hardware failure aecting the active server is facilitated by two instances
of the vCenter Server Heartbeat that monitor one another by sending “I’m alive” messages and reciprocating
with acknowledgments over the VMware Channel. If the passive server detects that this process (the heartbeat)
has failed, an automatic switchover is initiated.
Additionally, vCenter Server Heartbeat proactively monitors the capability of the active and passive servers
to communicate with the rest of the network by polling dened nodes around the network, including by
default, the primary DNS server, default gateway, and the Global Catalog server at regular intervals. If all
three nodes fail to respond, for example, due to a network card or local switch failure, vCenter Server Heartbeat
can initiate an automatic switchover, allowing the passive server to assume the role of the active server.
This chapter includes the following topics:
“Checking the Server Pair Status,” on page 29
■
“Monitoring the Status of Servers,” on page 31
■
“Conguring Heartbeat Settings,” on page 31
■
Checking the Server Pair Status
3Server Protection
The Server: Summary page is the default page that opens when administering a pair of servers. The Server:
Summary page allows you to view the roles that the servers are performing (active or passive), the actions that
the servers are currently performing, and summary information on the status of communications and data
replication between servers. The lower pane displays status information for each server in the pair.
Note To change the currently displayed server, click the server graphical representation in the upper pane,
or select the server Identity tab (Primary or Secondary Server) in the bottom pane.
The following table lists the possible system statuses and their meanings.
Table 3- 1. System Status
DescriptionIconStatus
The Heartbeat service is shut down.Heartbeat service
shutdown
The Heartbeat service is starting up.Initializing
Replicating
VMware, Inc. 29
(Normal status) File and registry changes on the active server are intercepted and
replicated to the passive server. The protected applications are monitored.
Page 30
Administrator Guide
Table 3- 1. System Status
Not replicating
server
server
Stopping replication
DescriptionIconStatus
File and registry replication is in the process of stopping and all protected
applications may be closing down.
The system is in the process of performing a switchover.Switching active server
VMware Channel connections have been established between the two servers.Connecting to peer
VMware Channel connections have been lost between the two servers.Disconnecting from peer
File replication is in the process of being stopped and, optionally, all protected
applications may be closing down.
The replication process is starting and protected applications are optionally starting.Starting replication
Starting as active server
Heartbeat service
shutting down
Lost active server
The Heartbeat service is initializing on the active server and starting protected
applications.
The Heartbeat service is stopping. The Heartbeat service is shutting down, and will
no longer participate in replication. Optionally, protected applications may be
stopped.
The passive server has lost connection to the active server. If this condition persists
for the failover timeout, and failover is permitted between the pair of servers, then
a failover will occur.
A failover has occurred,Active following failover
The Heartbeat service cannot be contacted on the server.Server not responding
When viewing the status of the passive server, the status of the le system and registry are displayed graphically.
The following tables list possible synchronization statuses and their meanings.
Table 3- 2. File System and Registry Status
DescriptionIconStatus
Fully synchronized.Synchronized
There are les that are currently unchecked. A full system check did not complete.Unchecked
Not synchronized.Out-of-Sync
Displayed when the Heartbeat service is starting up or shutting down.Uninitialized
The registry is currently in the process of synchronization.Checking
Not synchronized.Error
When the vCenter Server Heartbeat pair establishes a connection, it triggers a le synchronization and
verication process to ensure all protected les on both servers are identical. The process checks each 64K
block of each protected le and performs a checksum to determine whether the blocks dier. If the blocks are
the same, the block is marked as synchronized. If the blocks dier, then the block is replicated to the passive
server and then marked as synchronized. The le verication and synchronization process is nished after all
blocks of all stipulated les are marked as synchronized.
30 VMware, Inc.
Page 31

Monitoring the Status of Servers
The Server: Monitoring page provides additional information about the status of communications between the
servers within the pair. The graphical representation provides an overview of the status of communications
between the servers. A green channel icon indicates that the channel is connected and healthy while a yellow
dashed channel icon indicates that communications are not operational between the indicated servers. In
addition to the heartbeat sent between the servers, vCenter Server Heartbeat also sends a ping to ensure that
the servers remain visible to one another.
Configuring Heartbeat Settings
The Server: Monitoring page provides three conguration features: Congure Pings, Congure Failover, and
Congure Response Times.
Configuring Pings
IP addresses of all NICs used for the VMware Channel and congured Management IP addresses are, by
default, automatically added during startup of vCenter Server Heartbeat. The Server: Monitoring Ping
Conguration dialog allows you to add additional ping targets. This conguration allows vCenter Server
Heartbeat to send pings across the VMware Channel in addition to the heartbeat (“I’m alive” messages) and
to the other server in the pair over the Public network via the Management IP address to conrm that the
server is still operational and providing service.
Chapter 3 Server Protection
To add additional ping targets:
Procedure
1 Click Congure Pings to open the Server Monitoring: Ping Conguration dialog.
2 Select the Ping Settings tab to congure the Ping Interval.
3 Select the Ping Routing tab to add additional ping targets.
Configuring Failover and Active Server Isolation
vCenter Server Heartbeat continuously monitors the servers in the pair and the network to ensure availability
and uses native logic and a combination of elapsed time, administrator congured rules, current server network
status, and congured ping routing to determine if failover or isolation of the active server is warranted should
the servers experience missed heartbeats.
To congure failover:
Note For information on conguring ping routing, see “Conguring Pings,” on page 31 and Conguring
Public Network Connection Checks.
VMware, Inc. 31
Page 32

Administrator Guide
Procedure
1 Navigate to Server: Monitoring > Congure Failover to open the Server Monitoring: Failover
2 The Failover timeout can be customized by changing the default value (60 seconds) to a custom value. Type
3 Select or clear check boxes for the items listed below to select the actions to take if the specied Failover
Conguration dialog.
a new numeric value (seconds) in the Failover timeout text box or use the arrow buttons to congure how
long vCenter Server Heartbeat waits for a missed heartbeat before it takes a pre-congured action to
failover or isolate the active server from the network.
timeout is exceeded.
When the congured Failover timeout value has elapsed, vCenter Server Heartbeat will evaluate, in order,
the following pre-congured rules before taking action:
Failover from Primary server to Secondary server if channel heartbeat is lost for failover timeout
■
Failover from Secondary server to Primary server if channel heartbeat is lost for failover timeout
■
Prevent failover or auto switchover while not synchronized
■
Prevent Failover if channel heartbeat is lost but Active server is still visible to other servers
■
Make the server passive if the Channel and Public networks are lost for the congured failover timeout
■
Note If a rule is not selected, vCenter Server Heartbeat will skip the rule and move to the next rule in
the list. After all selected rules have been evaluated vCenter Server Heartbeat will take action.
4 Click OK.
Important If either Server: Monitoring Ping Routing or Network Monitoring Ping Routing is miscongured,
unpredictable behavior can occur.
Typical Failover and Active Server Isolation Scenarios
The following scenarios assume that vCenter Server Heartbeat is deployed in a LAN with all rules selected in
the Server: Monitoring > Congure Failover > Failover Conguration dialog.
Failover
The following scenario assumes the active server has failed and is no longer available.
Upon detection of missed heartbeats, vCenter Server Heartbeat on the passive server performs the following
steps:
1 As soon as the passive server detects that the VMware Channel is experiencing missed heartbeats. It will
attempt to ping the active server's Management IP address via the Public network using the passive server's
NIC congured with the Management IP address. If the ping is successful, the passive server will veto
the failover. If the ping is unsuccessful, it will continue to the next step.
Note Since the passive server assumes that active server has failed, the passive server will not attempt
to verify synchronization with the active server.
2 At this point, the passive server checks the congured value of the Failover timeout and starts a "Heartbeat
lost" countdown The passive server continues with the next step.
32 VMware, Inc.
Page 33

Chapter 3 Server Protection
3 The passive server attempts to ping the congured waypoints on the Public network to determine if the
it is still visible on the Public network. If pings to the waypoints on the Public network are unsuccessful,
the passive server will remain passive and take no action. If the pings to the waypoints on the Public
network are successful, the passive server will continue to the next step.
4 At this point, failover to the passive server is postponed until the value of the Failover timeout has elapsed.
5 The passive server changes its role to active, removes the packet lter, and starts all services.
6 As the new active server, it will begin accepting trac from clients.
Active Server Isolation
The gure below illustrates a scenario where the active server has lost connection with the passive server via
the VMware Channel.
Figure 3- 1. Network Isolation Workflow Diagram
VMware, Inc. 33
Page 34

Administrator Guide
Upon detection of missed heartbeats vCenter Server Heartbeat performs the following steps:
1 As soon as the active server detects that the VMware Channel is experiencing missed heartbeats, it will
2 Next, the active server will determine if it is synchronized with the failover target (the passive server). If
3 At this point, both the active and passive servers check the congured value of the Failover timeout and
4 Failover or isolation of the active server is postponed until the congured Failover timeout value (in seconds)
5 Once the congured Failover timeout period has elapsed, the active server assumes the VMware Channel
determine if a valid failover target (the passive server) is present.
Simultaneously, once the passive server detects missed heartbeats, it will determine if it is a valid failover
target.
synchronized, it will continue to the next step. If it is not synchronized, it will veto a failover.
Simultaneously, the passive server checks to see if it is synchronized with the active server.If synchronized,
it will continue to the next step. If it is not synchronized, it will veto a failover.
start a "Heartbeat lost" countdown. Both servers should start the countdown at approximately the same
time.
has elapsed and it is during this period that both servers accomplish steps 1 & 2.
is lost and will attempt to ping the failover target (passive server) via the Public network. If the ping is
successful, active server isolation is vetoed. If the attempt to ping the failover target is unsuccessful, the
active server will proceed to the next step.
Simultaneously, the passive server assumes the VMware Channel is lost and attempts to ping the active
server via the Public network. If the ping is successful, failover is vetoed. If the ping attempt is unsuccessful,
the passive server proceeds to the next step.
Note If the servers have reached this point, then neither server can see the other server.
6 Both the active and passive servers will check their connectivity to the Public network. If the active server
has lost connectivity to the Public network, it will isolate itself by making itself passive (potential active).
Should the active server reconnect with the passive, it will become active again. Otherwise, it will remain
passive. If the passive server has lost connectivity to the Public network, it will veto a failover.
Configuring Response Times
vCenter Server Heartbeat also allows you to congure the time to wait following a channel connection before
starting replication and the time to wait following channel disconnection before stopping replication.
Procedure
1 Click Congure Response Times to open the Server Monitoring: Response Times dialog.
2 Type new numeric values (seconds) into the text boxes or use the arrow buttons to select new values.
3 Click OK.
34 VMware, Inc.
Page 35

Chapter 3 Server Protection
Configuring Split-brain Avoidance
Split-brain Avoidance ensures that only one server becomes active if the VMware Channel connection is lost,
but both servers remain connected to the Principal (Public) network. Split-brain Avoidance works by pinging
from the passive server to the active server across the Principal (Public) network. If the active server responds,
the passive server does not failover, even if the VMware Channel connection is lost. WAN installations require
dierent IP addresses on the Principal (Public) network for the local and remote servers.
Procedure
1 Toenable Split-brain Avoidance, open the Server: Monitoring page in the vCenter Server Heartbeat Console.
2 Click Congure Failover.
3 Select Prevent failover if channel heartbeat is lost but Active server is still visible to other servers (recommended).
Common Administrative Tasks in vCenter Server Heartbeat
The Server: Summary page provides the following buttons that allow you to quickly perform common
administrative tasks:
Make Active — Prompts to verify that you want to make the passive server in the pair active. Click Yes.
■
Shutdown — Prompts you to select the server(s) to shut down. If you select the active server, additional
■
options to stop or not stop protected applications appear in the dialog. Click OK.
Start Replication — Opens the Start Replication Options dialog. Select to start or not start the protected
■
applications and click OK. By default, all protection modes start when vCenter Server Heartbeat starts
and a manual start is not required unless the system stopped in response to an automated stop.
Stop Replication — Opens the Stop Replication Options dialog. Use this method to stop replication, such
■
as to contain a malware infection or to upgrade a protected application. Select whether to stop or not stop
protected applications and click OK. Replication of data les stops and, if selected, protected applications
also stop.
Note The vCenter Server Heartbeat service continues to run on the servers, providing heartbeats and protecting
the system and network facets of the active server.
Start Applications — Click to start the protected applications on the active server.
■
Stop Applications — Click to stop the protected applications on the active server.
■
Congure — Click to open the Congure dialog. Select the radio button corresponding to whether you
■
want to stop or leave the protected applications running when vCenter Server Heartbeat is shut down.
You can select whether to leave protected applications running upon shutdown when a net stop command
is issued, and to start protected applications upon startup when a net start command is issued. Type a
number (seconds) or use the arrow buttons to select an alert threshold value for time dierence between
servers, which is checked at handshake following startup. Click OK.
Forcing a Switchover
After conguring vCenter Server Heartbeat to protect all the required applications and data, the Secondary
server can take over from the Primary server in a managed and seamless manner called a managed switchover.
This is particularly useful when maintenance work performed on the Primary server requires rebooting the
server.
VMware, Inc. 35
Page 36

Administrator Guide
Since a managed switchover cannot be performed during synchronization, it is important to review the queue
information prior to attempting a managed switchover. If the queues are large, le operations on the active
server are high and for this reason it may be prudent to delay a managed switchover due to the length of time
required to completely clear the queue. Queue lengths can be viewed in the Data: Trac/Queues page of the
vCenter Server Heartbeat Console.
Prior to performing work on the Primary server, a managed switchover can be triggered by selecting the
Secondary server and clicking Make Active on the Server: Summary page. This changes the server roles such
that the active server becomes passive and the passive server becomes active. This means users are able to
work continuously while the Primary server is o line.
When the Primary server is back up and running, the managed switchover can be triggered again so that the
passive server becomes active and the previously active server becomes passive.
Note The managed switchover process may be performed at any time as long as the systems are fully
synchronized with respect to data les and registry replication. Switchovers cannot be performed if either server
is in an unsynchronized or unknown state.
Recovering From a Failover
A failover diers from a switchover. A switchover is a controlled switch (initiated manually from the vCenter
Server Heartbeat Console, or initiated by vCenter Server Heartbeat when precongured) between the active
and passive servers. A failover happens when any of the following fail on the active server: power, hardware,
or VMware Channel communications. The passive server waits a precongured time after the rst missed
heartbeat before initiating a failover. When this period expires, the passive server automatically assumes the
active role and starts the protected applications.
The following recovery scenario is based on a vCenter Server Heartbeat conguration with the Primary server
as active and the Secondary server as passive. A failover has occurred and the Secondary server is now running
as the active server.
Note When failover conditions, such as a power failure, cause failures in both active and passive servers, a
condition may result that causes both servers to restart in passive mode. In this situation, manual intervention
is required. See “Two Passive Servers,” on page 85.
Procedure
1 Review event logs on both servers to determine the cause of the failover.For assistance, use the Log Collector
(launched from the Taskbar icon) tool to collect information and send the output to VMware Support.
2 If any of the following issues exist on the Primary server, performing a switchback to the Primary server
may not be possible until other important actions are carried out. Do not restart vCenter Server Heartbeat
until the following issues have been resolved:
Hard Disk Failure – Replace the defective hard disk.
■
Power Failure – Restore power to the Primary server.
■
Malware – Clean the server of all malware.
■
Communications – Replace or repair the physical network hardware.
■
Blue Screen – Determine cause and resolve. As required, submit the dump le to VMware Support
■
(www.vmware.com/support) for analysis.
3 Run the Congure Server wizard and verify the server identity is set to Primary and the Active Server is
set to Secondary. Click Finish to accept the changes.
4 Disconnect the VMware Channel network cables or disable the network card.
36 VMware, Inc.
Page 37

Chapter 3 Server Protection
5 Resolve the list of possible failures.
6 Restart this server and reconnect or enable the network card again.
7 After restart, check that the Taskbar icon now reects the changes by showing P / – (Primary and passive).
8 On the Secondary active server or from a remote client, launch vCenter Server Heartbeat Console and
conrm that the Secondary server is reporting as active. If the Secondary server is not displaying as active,
perform the following steps:
a If the vCenter Server Heartbeat Console is unable to connect remotely, try running it locally. If you
are still unable to connect locally, use the Service Control Manager to verify that the service is running.
If the service is not running, review the event logs for a cause.
b Run the Congure Server wizard and conrm that the server identity is set to Secondary and the Active
Server is set to Secondary.
Note If vCenter Server Heartbeat is running, you can run the Congure Server wizard but any changes
made will not be saved.
c Verify that the protected application is accessible from clients. If accessible, start vCenter Server
Heartbeat on the Secondary server. If the application is not accessible, review the application logs to
determine why the application is not running.
d Start vCenter Server Heartbeat on the Secondary active server.
Note At this point, the data on the Secondary (active) server should be the most up to date and this
server should also be the live server on your network. When vCenter Server Heartbeat starts, it
overwrites all the protected data (congured in the File Filter list) on the Primary passive server. If
you are not sure that the data on the active server is the most current and up to date, contact VMware
Support (www.vmware.com/support). Go on to the next step only if you are sure that you want to
overwrite the protected data on the passive server.
e Start vCenter Server Heartbeat on the Secondary active server and check that the Taskbar icon now
reects the correct status by showing S / A (Secondary and active).
Applying Patches with vCenter Server Heartbeat Installed
If the Secondary server is the active server, skip step 1.
Procedure
1 Using the vCenter Server Heartbeat Console, select the Secondary server and clickMake Active. Wait for
Secondary server to become active.
2 Shutdown the vCenter Server Heartbeat Group, leaving the protected applications running on the Secondary
(active) server.
3 Using the Service Control Manager, congure VMware vCenter Server Heartbeat service Startup Type to
Manual on both Primary and Secondary servers.
VMware, Inc. 37
Page 38

Administrator Guide
On the Secondary Server
Procedure
1 Start VMware vCenter Installer for the version you want to upgrade to and select vCenter Server from the
2 When asked, select Do not overwrite, leave the existing database in place.
3 Continue with vCenter Server installation and record all conguration settings used.
4 Once the vCenter Server upgrade process successfully completes, upgrade the existing extensions on the
5 If asked, do not reboot the server.
list.
Note Before proceeding with the database upgrade, perform a backup of the database.
Note On the VMware vCenter Server service account information page, VMware recommends providing
the same credentials used for the current service (open the Service Control Manager and check the Logon
As Account for VMware VirtualCenter Server service).
server.
6 Verify that vCenter Server and all upgraded extensions are operational.
If the Upgrade on the Secondary Fails, research the cause of the upgrade failure. If the issue can be resolved
then it is safe to proceed with upgrade procedure. Otherwise, go to “If the Upgrade on the Secondary
Server Fails,” on page 38.
7 Change the Role of the server to Secondary/passive:
a Launch the vCenter Server Heartbeat Congure Server wizard and click the Machine tab. In the Active
server section select Primary.
b Reboot Secondary server.
If the Upgrade on the Secondary Server Fails
If the upgrade on the Secondary server fails and the issue cannot be resolved, revert to a previous version.
Procedure
1 Uninstall the upgraded components.
2 On the Secondary server, launch the vCenter Server Heartbeat Congure Server wizard and click the
Machine tab. In the Active server section select Primary.
3 Reboot the server. vCenter Server Heartbeat starts and vCenter Server is stopped.
4 On the Primary server, launch the vCenter Server Heartbeat Congure Server wizard and click the Machine
tab. In the Active server section select Primary.
5 Restart vCenter Server Heartbeat on the Primary Server and allow the system to synchronize.
6 Start the vCenter Server Heartbeat Console and verify that the system completes the Full System Check.
On the Primary Server
Note Continuationof the upgrade process assumes the upgrade of the Secondary server completed successfully.
38 VMware, Inc.
Page 39

Chapter 3 Server Protection
Procedure
1 Change the Role of the server to Primary/active:
a Launch the vCenter Server Heartbeat Congure Server wizard and click the Machine tab. In the Active
server section select Primary.
b Using the Service Control Manager, start the VMware vCenter Server Heartbeat service.
c Wait until all protected services are started.
d Using the Service Control Manager, stop the VMware vCenter Server Heartbeat service.
2 Start VMware vCenter Installer for the version you want to upgrade to and select vCenter Server from the
list.
3 On the Database re-initialization warning page, select Do not overwrite, leave my existing database in place
option and proceed with the installation process.
4 Continue with vCenter Server installation, using the same conguration settings used for installation on
the Secondary server.
5 Once the vCenter Server upgrade process successfully completes, upgrade the existing extensions on the
server.
6 Verify that vCenter Server and all upgraded extensions are operational on Primary Server.
7 Using the Service Control Manager, congure VMware vCenter Server Heartbeat service Startup Type to
Automatic on both Primary and Secondary servers.
8 Start vCenter Server Heartbeat on both servers.
9 Launch the vCenter Server Heartbeat Console and connect to the server pair.
10 Verify that the Full System Check has completed and that the system replicating.
If vCenter Server fails to start on the Secondary Server following a switchover
Procedure
1 Shutdown vCenter Server Heartbeat.
2 Launch the Congure Server wizard and set the Secondary server Role to passive.
3 Start vCenter Server Heartbeat on the Secondary server.
4 Start the Congure Server wizard on the Primary server and set the server Role to active.
5 Start vCenter Server Heartbeat on the Primary server.
6 Launch the vCenter Server Heartbeat Console and verify that the system completes the Full System Check.
7 Investigate the cause of the vCenter Server failure on the Secondary server.
VMware, Inc. 39
Page 40

Administrator Guide
40 VMware, Inc.
Page 41

vCenter Server Heartbeat proactively monitors the network by polling up to three predened nodes to ensure
that the active server is visible on the network.
This chapter includes the following topics:
“Communications Status,” on page 41
■
“Reviewing the VMware Channel Status,” on page 41
■
“Conguring Public Network Connection Checks,” on page 42
■
“Enabling Automatic Switchover in a WAN,” on page 42
■
“Setting Max Server Time Dierence,” on page 43
■
Communications Status
Use the Data: Trac/Queues page to check the status of the VMware Channel, the active server’s send, and
passive server’s receive queues.
4Network Protection
Reviewing the VMware Channel Status
The Data: Trac/Queues page displays the VMware Channel status.
The status can be displayed as:
Connected - A green solid arrow icon
■
Waiting - An orange solid icon is displayed when the channel has just disconnected. vCenter Server
■
Heartbeat will wait for a congured amount of time before deciding the channel is disconnected.
Not connected - A red broken line icon)
■
The statistics of the connection with regards to the data sent by either server, and the size and age of the oldest
entry in the active server’s send queue and passive server’s receive queue are displayed on this page. The
Channel Connection tab in the lower pane displays the IP addresses used by the VMware Channel for the Primary
to Secondary connections and the port that the communications are using.
VMware, Inc. 41
Page 42

Administrator Guide
Configuring Public Network Connection Checks
The Network Monitoring page allows you to view the status of the network and make adjustments to the IP
addresses used to ping multiple servers within the network.
The Principal (Public) network monitoring feature, previously discussed, is enabled by default during the
installation of VMware vCenter Server Heartbeat. This feature integrates the polling of designated waypoints
around the network through the active server’s Principal (Public) connection to ensure connectivity with the
Principal (Public) network is operational. By default, the IP addresses of the default gateway, the primary DNS
server, and the global catalog server are all selected. When one or more of the automatically discovered
waypoints are co-located on a physical machine (leading to duplication of IP addresses), the ability to override
existing settings and specify additional waypoints manually becomes an advantage.
Procedure
To specify a manual target for Principal (Public) network checking, click Congure Pings to invoke the
◆
Ping Conguration dialog. Select the Ping Routing tab to modify the existing target IP addresses for each
server to ping.
Note If IP address values are added to the Network Monitoring > Ping Conguration > Ping Routing
dialog, the new values added will replace the default ping targets of the global catalog, primary DNS
server, and default gateway.
In a WAN environment, the target addresses for Principal (Public) network monitoring on the Secondary
server may be dierent to those automatically selected on the Primary server. Again, the ability to override
automatically discovered selections is provided by manually specifying the target address.
Principal (Public) Network Monitoring is carried out by the active server eectively pinging the target
addresses at regular time intervals. The time interval is set by default to every 10 seconds but the frequency
may be increased or decreased as required. Each target is allowed 5 seconds (default) to respond. On
slower networks where latency and network collisions are high, increase this interval by changing the
Ping echo timeout value.
The failure of all three targets to respond is allowed up to the Auto-switchover if client network is lost for
threshold value. If the failure count of all three targets exceeds this value, vCenter Server Heartbeat initiates
an auto-switchover.
Enabling Automatic Switchover in a WAN
By default, when deployed in a WAN environment, auto-switchover is disabled. To enable auto-switchover
in a WAN environment, follow the steps below.
Procedure
1 In the vCenter Server Heartbeat Console, select the Network tab to display the Network Monitoring page.
2 Click Congure Auto-switchover.
3 Select the Auto-switchover if client network connectivity lost for check box.
4 Congure the number of pings to wait before performing the auto-switchover.
5 Click OK.
42 VMware, Inc.
Page 43

Setting Max Server Time Difference
vCenter Server Heartbeat generates a warning if the Primary and Secondary server system clocks are not
synchronized. The threshold for time dierence can be congured on the Server: Summary page.
Procedure
1 Select the Server: Summary tab and click Congure to display the Server: Summary Congure dialog.
2 Type a number (seconds) or use the arrow buttons to select an alert threshold value for time dierence
between servers, which is checked at handshake following startup.
3 Click OK.
Chapter 4 Network Protection
VMware, Inc. 43
Page 44

Administrator Guide
44 VMware, Inc.
Page 45

5Application Protection
vCenter Server Heartbeat incorporates an Application Management Framework (AMFx) to manage vCenter
Server Heartbeat plug-ins.
The AMFx provides additional functions while maintaining the traditional stability of VMware software. Use
the AMFx to install and remove plug-ins on the y while vCenter Server Heartbeat continues to provide
protection to currently installed applications.
The AMFx also employs sponsorship for protected application les and services. With sponsorship, multiple
plug-ins can share les or services. When removing a plug-in, sponsorship prevents removal of a shared le
or service that is still required by a remaining plug-in.
vCenter Server Heartbeat uses the System plug-in to monitor the server performance. With the System plug-in,
you can congure a variety of counters and assign actions when associated rules are exceeded.
This chapter includes the following topics:
“Applications: Summary Tab,” on page 45
■
“Applications: Services Tab,” on page 48
■
“Applications: Tasks Tab,” on page 51
■
“Applications: Plug-ins Tab,” on page 53
■
Applications: Summary Tab
The Applications: Summary page displays the identity of the active server, the application state and health, details
of application types and their corresponding running status and health. From this page, you can start, stop,
and congure all protected applications. The lower pane provides an Applications Log that allows viewing of
application events as they occur. This page also provides controls to edit, remove, start, and stop applications,
and to congure and edit the conguration of all protected applications.
Resetting the Application Health Status
If a problem occurs (for example, a failed service or rule), the Application Health status becomes Degraded. Even
if vCenter Server Heartbeat corrects the problem (for example, restarts the failed service) or the user corrects
the problem, the Degraded status remains until manually cleared. In this state, the Service Discovery Task will
not run.
To reset the Application Health status
VMware, Inc. 45
Page 46

Administrator Guide
Procedure
After acknowledging the problem and solving it, click Clear in the Application Health pane of the Applications:
◆
Summary page to reset the Application Health status.
The status updates to provide the actual current Application Health status.
Viewing Application Status
After an application starts and is running, you can view its status in the Applications pane of the Applications:
Summary page.
Setting the Application Timeout Exception
vCenter Server Heartbeat can alert the Administrator if the time taken to start or stop the entire application
exceeds the expected time during the following operations:
vCenter Heartbeat startup
■
Shutdown with protected applications
■
Switchover
■
Failover
■
When the Administrator selects Start Application
■
When the Administrator selects Stop Application
■
Note If there are multiple applications installed, vCenter Server Heartbeat will total the individual timeouts
set for each application and issue a single Application Timeout Exception alert.
Configuring Timeout Settings
Note The Start Timeout value should be congured according to vCenter inventory size and the Stop Timeout
values according to inventory size and operational load. For example, if the inventory is large (more than 500
hosts and 15K Virtual machines, the Start time can be 20-30 minutes. Use the Start Timeout experienced as a
guide to assist in determining the Stop Timeout value.
Procedure
1 Right-click on the application and select Edit from the menu or select the application and click Edit at the
top of the pane to invoke the Edit Application dialog.
2 Enter new values into the Stop Timeout and Start Timeout text boxes or use the arrow buttons to adjust the
values (seconds).
3 ClickOK.
Remove an Application
Procedure
To remove an application, select the application in the Applications pane of the Applications: Summary page
◆
and click Remove at the top of the pane.
46 VMware, Inc.
Page 47

Chapter 5 Application Protection
Manually Stop and Start Applications
Procedure
To stop all protected applications or start the stopped applications, at the top of the Applications: Summary
◆
page, click the appropriate button.
DescriptionOption
Stop Applications
Start Applications
The protected applications set stops. You can view the progress of the
stopping in the Applications Log pane.
The applications start. Youcan view the progress of starting in the Applications
Log pane.
Configuring Applications
Use the Applications: Summary page to congure protected applications, enable, and disable protection and
monitoring. You can maintain applications without stopping vCenter Server Heartbeat or taking the full server
oine. During installation, vCenter Server Heartbeat sets default settings for application congurations but
accepts modications to the congurations settings.
To congure applications:
Procedure
1 Click Congure on the Applications: Summary page.
Within the Applications Conguration dialog, you can perform the following:
Protect services and start monitoring applications
■
Unprotect currently protected services and stop monitoring currently monitored applications
■
Enable/disable Verbose Plugin logging
■
Enable/disable Discover protected data at startup
■
Congure the rule trigger count reset
■
2 After making modications to the conguration, click OK.
Application Maintenance Mode
Use the Applications: Summary page to disable application protection and service monitoring for maintenance
purposes.
To perform manual maintenance:
Procedure
1 On the Applications: Summary page, click Congure.
2 Select Unprotect services and stop monitoring all applications (for manual application maintenance).
3 Perform the required maintenance.
4 When maintenance is complete, on the Applications: Summary page of vCenter Server Heartbeat Console,
click Congure.
5 Select Protect services and monitor all applications (recommended).
VMware, Inc. 47
Page 48

Administrator Guide
Reviewing the State of an Application
After an application successfully starts and is running, you can view the application state in the Applications:
Summary page. If an application fails, right-click the event in the Applications Log and click on Properties to
invoke the Event Properties dialog and investigate the failure.
Reviewing the Applications Log
The Applications Log helps troubleshoot the protected application environment. The Applications Log provides
information about the behavior of all protected applications and includes events such as task status changes,
rule triggering, task outputs, and application warnings. Use this log to troubleshoot application errors. The
order that entries are displayed can be sorted either ascending or descending by clicking the column title.
Filtering Application Log Entries
vCenter Server Heartbeat can lter Applications Log les to limit the events displayed. By default, all events
are displayed in the Applications Log le.
Procedure
1 Right-click an event in the Applications Log and select Filter or click Filter in the Applications Log pane of
the Applications: Summary page.
The Application Log Filters dialog appears.
2 In the upper section, clear the event types you do not want to view.
3 To limit the date and time range, select Only show events from and edit the date or time range.
4 Click OK.
The Application Log events are ltered to meet the selected criteria.
Applications: Services Tab
The Applications: Services page displays both services that you or plug-ins specify and the services related to
them by dependency (either as dependents or depends-on). The target states of protected services for the
Primary and Secondary server can be specied and are typically Running on the active and Stopped on the
passive. Services are protected if they are set to Running or Automatic, and are otherwise logged as unprotected.
vCenter Server Heartbeat manages services that depend on protected services (started and stopped) but not
monitored (not restarted if stopped by some external agency). vCenter Server Heartbeat monitors protected
services (restarted if stopped) but not managed (not stopped if protected applications are stopped).
48 VMware, Inc.
Page 49

Chapter 5 Application Protection
Adding a Service
To protect a service that was not automatically added by vCenter Server Heartbeat during installation, the
service must be added through the vCenter Server Heartbeat Console and be in a Running state.
Procedure
1 Right-click on a service and select Add from the menu or click Add on Applications: Services page to invoke
the Add Service dialog. The Name drop-down list contains a list of all currently running services.
2 Select the service and set the values for Target State on Active and Target State on Passive. Normally the
Target State on Active is set to Running and the Target State on Passive is set to Stopped.
Note Setting the target state for both the active and passive server to Running can cause the service to
place a lock on some les preventing synchronization from completing.
3 If vCenter Server Heartbeat is to manage the start and stop of the service, select Manage Starting and
Stopping. If vCenter Server Heartbeat is to monitor the state of the service, select Monitor State.
vCenter Server Heartbeat also assigns three sequential tasks to perform in the event of failure. Task options
include Recover Service, Application Restart, Log Warning, Switchover, and any additional user-dened tasks
previously created.
4 Assign a task to each of the three failure options and click OK.
If an application with the failure option set to Application Restart fails, only the services that have failed
are restarted. Dependent services do not stop and restart as a result of the failure.
Editing a Protected Service
Once a protected service has been added and congured, you can change the action to take upon failure and
other options using the Edit Service dialog.
Procedure
1 Select the service and click Edit.
The Edit Service dialog opens to provide a subset of same options available when adding a new service.
2 Make the modications and click OK.
Editing All Protected Services
vCenter Server Heartbeat Console allows you to perform a single operation to congure the actions to take
upon failure for all protected services.
Procedure
1 Click Edit All.
The Edit Services dialog opens to provide the actions to take upon failure for all three instances. Selections
made in the Edit Services dialog will be applied to all protected services.
2 Select the action to take for First, Second, and Third failure and then click OK.
VMware, Inc. 49
Page 50

Administrator Guide
Checking the Status of Services
The Applications: Services page displays the status of all protected services. The status shows both the target
and actual state for both the Primary and Secondary servers and the Failure Counts for both servers.
Unprotecting User Defined Services and Stopping Monitoring
To unprotect and stop monitoring user dened services:
Procedure
1 Navigate to the Applications: Services page and select the user dened service.
2 Click Edit.
3 Clear Manage Starting and Stopping and Monitor State.
4 Click OK.
Changing the Order of Services
The exact order in which services start and stop is inuenced by a number of key factors:
The order of applications specied by plug-ins determines which services are started rst.
■
Services can have dependencies, and these must be respected. For example, if service B is listed after
■
service A under the User-Dened group, and service A depends on Service B, Service B starts rst.
Multiple applications can use the same service (the same service can appear under more than one sponsor).
■
The service starts when the rst application to reference it starts.
The order of stopping services is the reverse for starting services.
■
Procedure
To modify order of in which the services start and stop, use Up and Down arrows.
◆
Remove a Service
Procedure
1 Select the service in the Applications: Services page.
2 Click Remove.
A conrmation message is displayed.
3 Click Yes.
The service is removed from the protected list.
50 VMware, Inc.
Page 51

Applications: Tasks Tab
Tasks are a generalization and extension of start, stop, and monitor scripts. Task types are determined by when
the tasks run, and include the following:
Network Conguration – This is the rst type of task that runs when applications start and is intended to
■
launch dnscmd or DNSUpdate. The task can launch a batch script containing multiple dnscmd commands.
Network Conguration tasks are the only types of task that can vary between Primary and Secondary
servers.
Periodic – These tasks are run at specic congurable intervals.
■
Pre/Post Start – These tasks run before and after services start on the active server.
■
Pre/Post Stop – These tasks run before and after services stop on the active server.
■
Pre/Post Shadow – These tasks run before and after the Data Rollback Module creates a shadow copy on
■
the active server (Not available in this release).
Rule Action – Congure these tasks to run in response to a triggered rule or when a service fails its check.
■
Tasks can be dened and implemented by plug-ins or by the user, or they can be built-in tasks dened by
vCenter Server Heartbeat. User dened tasks are implemented as command lines, which can include launching
a batch script. Examples of built-in tasks include monitoring a protected service state on the active and passive
servers. An example of a plug-in-dened task is the discovery of protected data and services for a particular
application.
Chapter 5 Application Protection
The vCenter Server Heartbeat Applications: Taskspage provides a list of tasks and associated status information,
as well as features to quickly manage tasks.
Adding a Task
To add a task:
Procedure
1 Click Add to invoke the Add Task dialog. Assign a name to the task.
2 Select the task type from the Task Type: drop-down list.
Note If the Task Type is Network Conguration, you must select the identity of the server the task runs on
(Primary or Secondary).
3
In the Command text box, enter the path or Browse to the script, .bat file, or command for the task to
perform.
Note When the Command entry requires specic user credentials, you must select that user from the Run
As drop-down list. To add a user account, click User Accounts (near the top of the pane). See“Viewing,
Adding, and Removing User Accounts,” on page 52.
4 Click OK.
VMware, Inc. 51
Page 52

Administrator Guide
Editing a Task
You can edit the interval of a task or disable a task.
To edit a task:
Procedure
1 Right-click on an existing task and select Edit from the menu or select the task and click Edit at the top of
the pane to invoke the Edit Task dialog.
2 Edit the parameters of the task.
3 Click OK.
Removing a Task
Procedure
1 To remove a task, select the task on the Applications: Task page and click Remove.
A conrmation message is displayed.
2 Click Yes.
Changing the Order of Tasks
Procedure
To change the order of tasks, use the Up and Down arrows (near the top of the pane) or on the right-click
◆
menu to change the order in which the tasks appear in the tasks list.
Starting a Task Manually
vCenter Server Heartbeat provides options to launch a task immediately, to launch a task after a designated
time period elapses, or following the occurrence of a specied event.
To launch the task immediately:
Procedure
1 Select the task from the task list.
2 Right-click on the existing task and select Run Now from the menu or clickRun Now at the top of the
pane.
vCenter Server Heartbeat immediately launches the task.
Viewing, Adding, and Removing User Accounts
vCenter Server Heartbeat Console allows you to view, add, and remove user accounts used to run tasks.
52 VMware, Inc.
Page 53

Chapter 5 Application Protection
Viewing the User Accounts
Procedure
1 On the Applications: Task page, click User Accounts to invoke the User Accounts dialog and view the current
User accounts used to run tasks.
2 Click Close to exit the dialog.
Adding a User Account
Procedure
1 On the Applications: Tasks page, clickUser Accounts to invoke the User Accounts dialog.
2 Click Add to invoke the Add User dialog.
3 Type the name of the User, the associated Domain, and a Password into the corresponding text boxes.
4 Click OK.
Removing a User Account
Procedure
1 To remove a user, click User Accounts on the Applications: Tasks page to invoke the User Accounts dialog.
2 Select the user account from the list in the User Accounts dialog and click Remove.
A conrmation message appears.
3 Click Yes.
Applications: Plug-ins Tab
Plug-ins support specic applications and contain all of the components to protect the designated application.
Plug-ins start and stop the application, monitor the application, and provide all rules necessary to ensure that
application is available in the event of a failure by initiating a auto-switchover when congured.
Installing a Plug-in
vCenter Server Heartbeat allows you to install and upgrade plug-ins as needed to support applications.
Important Plug-ins should be installed only on the active server. Installation of a plug-in on a passive server
may cause an Exception to occur.
Procedure
1 Select the Applications: Plug-ins tab to open the Applications: Plug-ins page.
2 Right-click an existing plug-in and select Install from the menu or click Install at the top of the pane to
invoke the Install Plugin dialog.
VMware, Inc. 53
Page 54

Administrator Guide
3 Type a path to the plug-in location or click Browse to navigate to the plug-in location. The path statement
is case-sensitive.
4 Click OK.
Editing a Plug-in
vCenter Server Heartbeat allows you to edit the conguration of user installed plug-ins.
Procedure
1 On the Applications: Plug-ins page, right-click on an existing plug-in from the Plugins list and select Edit
from the menu or select the plug-in and click Edit at the top of the pane to invoke the Edit Plugin dialog.
2 Review the conguration options before making modications as they are specic to each plug-in.
Note When conguring the SQL Server Plug-in, vCenter Server Heartbeat Console allows you to exclude
specic databases from rule checks to prevent false alarm triggering when databases are intentionally
taken oine.
3 Click OK.
Uninstalling a Plug-in
You can uninstall a plug-in when you upgrade or remove the application the plug-in protects, or when directed
by VMware Support.
Procedure
1 On the Applications: Plug-ins page, right-click an existing plug-in and select Uninstall or select the plug-in
and click Uninstall at the top of the pane.
A conrmation dialog appears.
2 Click OK.
54 VMware, Inc.
Page 55

6Status and Control
vCenter Server Heartbeat operates over a Pair of vCenter Server Heartbeat servers and is administered in these
Pairs. The vCenter Server Heartbeat Console is used to carry out the day-to-day administration of one or more
Pairs of servers.
This chapter includes the following topics:
“About vCenter Server Heartbeat Console,” on page 55
■
“Working with Groups,” on page 57
■
“Working with Pairs in vCenter Server Heartbeat Groups,” on page 57
■
“Reviewing the Status of vCenter Server Heartbeat Groups and Pairs,” on page 60
■
“Exiting vCenter Server Heartbeat Console,” on page 60
■
“Shutting Down Windows Without Stopping vCenter Server Heartbeat,” on page 60
■
“Controlled Shutdown,” on page 61
■
“vSphere Web Client Plug-in,” on page 61
■
“Uninstalling vCenter Server Heartbeat,” on page 63
■
About vCenter Server Heartbeat Console
The vCenter Server Heartbeat Console runs from either of the two servers in the Pair or remotely from another
machine in the same subnet that has vCenter Server Heartbeat or the vCenter Server Heartbeat Client Tools
installed.
Note You can install vCenter Server Heartbeat on a Windows XP and Windows Vista SP1 or later workstation
to act as a client to the server Pair or Windows Server 2003. Download and run Setup similar to vCenter Server
Heartbeat installation on the workstation and select Install Client Tools Only on the Setup Type page.
VMware, Inc. 55
Page 56

Administrator Guide
Starting vCenter Server Heartbeat Console
You can start vCenter Server Heartbeat Console from any server in the vCenter Server Heartbeat Pair.
Procedure
1 Right-click the VMware vCenter Server Heartbeat interactive status icon on the Windows too tray (located
on the right side of the Windows tool bar). The vCenter Server Heartbeat quick access menu opens.
2 Select Manage Server.
The vCenter Server Heartbeat Console opens in a window and shows the Heartbeat Servers (overview)
pane.
Note Alternatively you can start vCenter Server Heartbeat Console from the VMware program group
on the Windows Start menu. This is the only method supported if vCenter Server Heartbeat Console has
been installed on a workstation that is not part of the Pair.
Navigate vCenter Server Heartbeat Console
After vCenter Server Heartbeat Console is running, use the navigation panel on the left of the vCenter Server
Heartbeat Console window to view and select Groups and Pair connections you can manage with vCenter
Server Heartbeat Console.
Note A Group is an arbitrary collection of vCenter Server Heartbeat Pairs used for organization.
A Connection, or Pair Connection allows vCenter Server Heartbeat Console to communicate with a vCenter
Server Heartbeat Pair either on the same machine or remotely.
See “Adding a vCenter Server Group,” on page 57 and “Adding a New Connection,” on page 58 for information
on how to add Groups and Pair Connections to vCenter Server Heartbeat Console.
The selection of Group or Pair you make in the navigation panel “points” the vCenter Server Heartbeat Console
to that Group or Pair and vCenter Server Heartbeat Console provides information related to only the selected
Group or Pair. To avoid confusion, pay particular attention to the selection in the navigation panel when
managing more than one Group or Pair.
Note Groups and Pairs are not automatically detected by vCenter Server Heartbeat Console. Each Group or
Pair you want to manage must be added to vCenter Server Heartbeat Console before you can use it to view
status or change settings for that Group or Pair Connection.
Select a Pair in the navigation panel of vCenter Server Heartbeat to show a set of tabs and sub-tabs that oer
detailed status and control of the associated vCenter Server Heartbeat server in the Pair.
Changing the Font for vCenter Server Heartbeat Console
You can change the font used in the vCenter Server Heartbeat Console interface.
Procedure
1 Select Font Selection from the Preferences menu. The Font Selection dialog opens.
2 In the Style pane, scroll to and click to select a font.
3 In the Size: text box, type a new numeric (point) size or use the arrow buttons to change the font size.
56 VMware, Inc.
Page 57

4 Click OK.
A conrmation message appears.
5 Click Yes to conrm the changes and restart vCenter Server Heartbeat Console to apply the new font
settings. Click No to restart later; the changes will be applied the next time vCenter Server Heartbeat
Console is started.
Working with Groups
vCenter Server Heartbeat allows you to Group server pairs based upon logical organization such as business
function or category.
Adding a vCenter Server Group
The Add Group feature in vCenter Server Heartbeat Console allows you to add new vCenter Server Heartbeat
Groups to manage.
Procedure
Chapter 6 Status and Control
1 Open vCenter Server Heartbeat Console and click Add Group in the tool bar, select Add Group from the
File menu, or right-click an existing group in the navigation panel and select Add Group form the menu.
2 Type the name for the new group into the text box and click OK.
The newly created group appears in the navigation panel on the left of the vCenter Server Center Heartbeat
window.
Removing a vCenter Server Heartbeat Group
The Remove Group feature in vCenter Server Heartbeat allows you to remove existing vCenter Server Heartbeat
Groups from management.
Procedure
1 Select the Group to be removed in the navigation panel of vCenter Server Heartbeat Console. Click Remove
Group in the tool bar or select Remove Group from the File menu.
A conrmation message appears.
2 Click Yes.
Working with Pairs in vCenter Server Heartbeat Groups
When you created a vCenter Server Heartbeat Group using the instructions in “Adding a vCenter Server
Group,” on page 57, you created an empty container. Next you must add the connections to the Pair or Pairs
that make up your new vCenter Server Heartbeat Group.
VMware, Inc. 57
Page 58

Administrator Guide
Adding a New Connection
The Add Connection feature in the vCenter Server Heartbeat Console allows you to add a new Pair Connection
to an existing vCenter Server Heartbeat Group.
Procedure
1 In the navigation panel, select the vCenter Server Heartbeat Group to receive the new connection. Click
Add Connection in the tool bar, select Add Connection from the File menu, or right-click an existing group
in the navigation panel and select Add Connection to invoke the Add Connection dialog.
2 Type the Host Name or IP address for the new connection into the text box, select the Port Number (if dierent
from the default value of 52267), and select a group from the Add to Group drop-down list (to add the
connection to a Group other than the one currently selected).
3 Click the Alternate IPs button to add additional IPs for the server. Click OK.
Note The Add Connection dialog allows you to add additional Management IP addresses to the connection
for the server. In the event that the main IP address becomes unavailable, the vCenter Server Heartbeat
Console will attempt to use the alternate IP addresses to connect to vCenter Server Heartbeat.
The newly created connection appears in the navigation panel on the left of the vCenter Server Heartbeat
Console window and vCenter Server Heartbeat Console attempts to connect to the server. You may be
prompted to accept a secure connection certicate from the server. This allows the communications between
vCenter Server Heartbeat Console and the server to be encrypted. To accept the certicate, click OK.
4 You may be prompted for credentials that allow you to have access to the server. Typically you will be
asked for these credentials the rst time you connect from a particular client system. If so, enter a Username
that has administrator rights on the server that you are connecting to, enter the Password, and click OK.
Once you have connected to a particular server and have a valid secure connection certicate, the next
time you use vCenter Server Heartbeat Console on this client system it will automatically connect to the
server. If the certicate expires or becomes invalid, the connection may be removed from vCenter Server
Heartbeat Console requiring you to reconnect and accept the new certicate. If the IP address of the client
system changes, you may have to re-enter the username and password credentials.
Note The Server: Summary page updates to represent any existing network relationships of the added
server.
5 Enter the remaining connections necessary to dene the new vCenter Server Heartbeat Group.
58 VMware, Inc.
Page 59

Chapter 6 Status and Control
Editing a Connection
The Edit Connection feature in the vCenter Server Heartbeat Console allows you to change the Port Number for
existing connections.
Procedure
1 In the navigation panel, select the connection you want to change and select Edit Connection from the File
menu or right-click an existing connection in the navigation panel and select Edit Connection from the
menu to display the Edit Connection dialog.
Note When a congured connection is not found, an error message may be displayed. Click Edit
Connection to recongure the connection.
2 Type the new value for the Port Number into the text box, or use the Up or Down arrow controls to the
right of the text box to select a new value.
3 Click OK.
Moving a Connection
The Move Connection feature in vCenter Server Heartbeat Console allows you to reassign an existing Pair to a
dierent Group.
Procedure
1 Select the Pair in the navigation panel and click Move Connection in the tool bar, select Move Connection
from the File menu, or right-click on the Connection in the navigation panel and select Move Connection
from the menu to display the Move Connection dialog.
2 Select the destination Group to receive the Connection from the drop-down list.
3 click OK.
Removing a Connection
The Remove Connection feature in vCenter Server Heartbeat allows you to remove an existing Connection.
Procedure
1 Select the Connection in the navigation panel and click Remove Connection in the tool bar, select Remove
Connection from the File menu, or right-click on the connection in the navigation panel and select Remove
Connection from the menu.
A conrmation dialog appears.
2 Click Yes.
VMware, Inc. 59
Page 60

Administrator Guide
Editing User Name and Password Settings
The Edit User Name and Password feature in vCenter Server Heartbeat Console allows you to change the User
Name and Password settings used to connect to a given Pair.
Procedure
1 Select a connection in the navigation panel and select Edit User Name and Password from the File menu or
right-click on the Connection in the navigation panel and select Edit User Name and Password from the
menu to display the Edit User Name and Password dialog.
2 Type new values for User Name and Password into the corresponding text boxes.
3 Click OK.
Reviewing the Status of vCenter Server Heartbeat Groups and Pairs
Click on the top level of the Heartbeat Servers page in the vCenter Server Heartbeat Console to view a list of all
managed Pairs and a quick status of the protected applications, network, les system, and registry settings for
each Group. The status hyperlinks in the overview window links to pages that provide more specic related
information and management controls.
The Server connection name to view the Server: Summary page
■
The Applications status to view the Applications: Summary page
■
The Network status to view the Network Monitoring page
■
The File System or Registry status to view the Data: Replication page
■
Exiting vCenter Server Heartbeat Console
Procedure
1 Click Exit on the File menu.
The Conrm Exit message appears.
2 Click Yes.
Shutting Down Windows Without Stopping vCenter Server Heartbeat
Always stop vCenter Server Heartbeat before attempting to shut down Microsoft Windows. If an attempt is
made to shut down Windows without stopping vCenter Server Heartbeat, a conrmation message is displayed.
When the conrmation message is displayed, click Cancel and stop vCenter Server Heartbeat before attempting
Windows shut down again.
60 VMware, Inc.
Page 61

Controlled Shutdown
A Controlled Shutdown is the process where the VMware vCenter Server Heartbeat service is able to delay a
system shutdown for a sucient period to perform all of the necessary steps required to stop the applications
and replication in a synchronized state. The Controlled Shutdown is intended for situations where an unattended
planned shutdown of the server is necessary. When congured in the vCenter Server Heartbeat Console Data:
Replication page, this feature allows vCenter Server Heartbeat to gracefully shutdown in the absence of the
administrator.
vSphere Web Client Plug-in
During installation of vCenter Server Heartbeat, Setup installs a plug-in for vSphere Web Client that allows
you to view or manage vCenter Server Heartbeat, depending on your user account permissions, from the
integrated vSphere Web Client. The Heartbeat tab of the vSphere Web Client provides the status of vCenter
Server Heartbeat and provides administrators the ability to perform basic vCenter Server Heartbeat management
functions such as perform a switchover or stop and start replication.
Note Use of vCenter Server Heartbeat Plug-in for vSphere Web Client requires that Adobe Flash Player 10.0
or later is installed. If Adobe Flash Player 10.0 or later is not installed prior to installation of vCenter Server
Heartbeat, selecting the Heartbeat tab in vSphere Web Client for the rst time will provide an opportunity to
download Adobe Flash Player 10.0 from the internet and install it.
Chapter 6 Status and Control
When using the Heartbeat Plug-in for the rst time (selecting the Heartbeat tab), you must be connected to the
internet.
Launching the Heartbeat Plug-in for vSphere Web Client
The Heartbeat Plug-in is integrated with vSphere Web Client and allows you to administer your server Pair.
Procedure
1 Login to vSphere Web Client.
2 Select vCenter in the navigation pane of vSphere Web Client.
The vCenter pane is displayed.
3 Under the Inventory Lists, select vCenter Servers.
A list of manageable vCenter Servers is displayed by Fully Qualied Domain Names (FQDN).
4 Select the FQDN of the vCenter Server to be managed.
VMware, Inc. 61
Page 62

Administrator Guide
5 Select the Monitor tab of the vSphere Client.
6 Select the Heartbeat sub-tab of vSphere Web Client.
The Monitor sub-tabs are displayed.
The Heartbeat Plug-in content is displayed.
Figure 6- 1. vSphere Web Client Heartbeat Plug-in
Performing a Switchover Using vSphere Web Client
Procedure
1 Navigate to the Heartbeat sub-tab in the vSphere Web Client.
2 Click either Make Primary Active or Make Secondary Active as appropriate.
A conrmation dialog is displayed.
3 Click Yes to conrm your action.
vCenter Server Heartbeat performs a switchover.
Note After performing a Make Active operation, the Heartbeat tab may fail to display properly. To update
the Heartbeat tab, refresh vSphere Web Client browser.
62 VMware, Inc.
Page 63

Starting or Stopping Replication Using vSphere Web Client
Procedure
1 Select the Heartbeat tab of vSphere Web Client.
2 Click either Stop Replication or Start Replication as appropriate.
Uninstalling vCenter Server Heartbeat
Under normal conditions it is not necessary to uninstall vCenter Server Heartbeat. Should the need arise,
vCenter Server Heartbeat can be uninstalled easily allowing you to retain current log information.
Note To ensure that protected application(s) are available after VMware vCenter Server Heartbeat has been
uninstalled, it is necessary to ensure that only one server (Primary or Secondary) be left on the network. VMware
strongly recommends that only one of the two servers is left on the network. You should leave only the currently
active server on the network. An unstable environment may result if both servers are left connected. If the
passive server is a virtual machine, the image can be deleted and the uninstall procedure applied only to the
active server.
Chapter 6 Status and Control
Procedure
1 From the Windows Start menu, navigate to the VMware vCenter Server Heartbeat program group and
select Uninstall or Modify. The Setup wizard starts and detects the presence of installed components and
provides a means for their removal.
2 Select the Uninstall option and click Next.
3 Follow the instructions provided in the Setup wizard to stop vCenter Server Heartbeat. You can shut
down vCenter Server Heartbeat from the system tray icon or from its console.
4 After the application is stopped, click Next.
5 Verify that all programs associated with VMware vCenter Server Heartbeat are closed. Click Next.
6 The Setup wizard prompts you to select whether to leave the current server on the network. In a typical
uninstall process, the active server remains on the network to continue providing application services to
end users, and the passive server is removed from the network.
7 Select whether to leave the server on the network or to remove it from the network following completion
of the uninstall process.
If you select Leave this server on the network after uninstall and click Next to proceed to the next step,
■
the uninstall process starts and the vCenter Server Heartbeat components are removed.
If you select Leave this server o the network after uninstall, the Rename server to text box becomes active
■
and you can specify the new computer name for the server that will be renamed. Click Next to start
the uninstall process.
Note After the uninstall process completes, you will be notied of any les that could not be removed
and advised to delete them manually. The SupportLogs directory is also left behind. This is intentional
and should not be deleted in the event you need to submit a support request.
8 Click Next.
The Setup wizard noties you that VMware vCenter Server Heartbeat and its associated components have
been uninstalled from the system.
VMware, Inc. 63
Page 64

Administrator Guide
9 Click Finish. A restart is required to nish removing certain components and to apply new settings. When
10
11 Click Content.
12 Click ExtensionManager.
13
14 In the Methods pane, click the UnregisterExtension option.
15
16
17 Close the pop-up window.
18 Refresh the Managed Object Type: ManagedObjectReference:ExtensionManager window and the plug-in should
19 Repeat the entire uninstall procedure on the other server in the pair to uninstall vCenter Server Heartbeat.
you are prompted to perform this restart, click Yes.
After the server has restarted, launch a web browser and navigate to http://<vCenter server name or
IP>/mob
In the Properties pane, identify the values extensionlist[“com.vmware.heartbeat”] and
extensionlist[“com.neverfail.heartbeat”]
A new window will appears.
In the Value eld, type com.vmware.heartbeat and click Invoke Method to remove the plug-in.
In the Value eld, type com.neverfail.heartbeat and click Invoke Method to remove the plug-in.
be removed from the list.
64 VMware, Inc.
Page 65

Performance Protection describes how vCenter Server Heartbeat monitors system and application attributes
to prevent an unexpected system or application failure.
Applications: Rules Tab
Rules are implemented by plug-ins (there are no user-dened rules). Congure rule actions to trigger the rule
that performs specic tasks. Rules have two trigger properties:
Timed – They must evaluate as true continuously for the specied duration to trigger.
■
Latched – They trigger as soon as they evaluate to true.
■
Rules
The Applications: Rules page provides a list of rules with their current status and two ways to edit and check
rules.
7Performance Protection
Checking a Rule Condition
vCenter Server Heartbeat allows you to check the rule conditions of the current conguration against the
attributes of the system or application.
Procedure
Right-click on the intended rule and select Check Now from the menu or click Check Now at the top of the
◆
pane. The rule condition is displayed in the pane.
VMware, Inc. 65
Page 66

Administrator Guide
Editing a Rule
Rules are implemented by plug-ins and cannot be created by users. Each plug-in contains a default set of rules
with options that may be modied by the user.
Procedure
1 Right-click on the rule and select Edit from the menu or click Edit at the top of the pane.
2 Edit the parameters of the rule and click OK.
Rules Installed by vCenter Server Heartbeat Plug-ins
The following plug-ins implement the rules listed.
vCenter Server Plug-in
Check health of Tomcat server
■
Check vCenter License Check Connection to vCenter
■
vCenter SQL Server Plug-in
DiskAvgSecsPerRead
■
DiskAvgSecsPerWrite
■
DiskIO
■
DiskQueueLength
■
DiskReadsPerSec
■
DiskWritesPerSec
■
DiskWriteable
■
FreeDiskSpace
■
FreeDiskSpaceOnDrive
■
MemoryCommittedBytes
■
MemoryCommittedBytesPercent
■
MemoryFreePTEs
■
MemoryPageReadsPerSec
■
MemoryPageWritesPerSec
■
MemoryPagesPerSec
■
MemoryPagingFileUseage
■
PageFaultsPerSec
■
ProcessorIntsPerSec
■
ProcessorLoad
■
ProcessorQueueLength
■
66 VMware, Inc.
Page 67

Chapter 7 Performance Protection
RedirectorBytesTotalPerSec
■
RedirectorNetworkErrorsPerSec
■
ServerBytesTotalPerSec
■
ServerWorkItemShortages >= 3 (if the rule for server work item shortages is triggered, consult Microsoft
■
documentation on setting the registry values for InitWorkItems or MaxWorkItems accordingly)
ServerWorkQueueLength
■
SystemContextSwitches
■
VMware, Inc. 67
Page 68

Administrator Guide
68 VMware, Inc.
Page 69

8Data Protection
vCenter Server Heartbeat can protect many permutations or combinations of le structures on the active server
by the use of custom Inclusion and Exclusion lters congured by the administrator.
The lter driver identies les to protect and disk I/O operations to intercept and replicate to the passive server.
Use this driver to lter les for inclusion in or exclusion from the replication process. By default, vCenter
Server Heartbeat protects a folder called Protected on the system partition.
Note vCenter Server Heartbeat forbids replicating certain les and folders by using a veto. If an Inclusion
lter includes any of those les or folders, the entire lter is vetoed, even if an Exclusion lter is used to prevent
replication of those les and folders. Examples of folders are the vCenter Server Heartbeat installation directory
or the system32 folder. The VMware application folder contains the active server ‘s send and passive server’s
receive queues on the active and passive servers. This folder must be explicitly excluded from le protection.
This chapter includes the following topics:
“Replication,” on page 69
■
“File Filters,” on page 74
■
“Automatic Filter Discovery,” on page 75
■
Replication
You can view replication status and manage data replication using the Data: Replication page.
Registry and File Synchronization Status
Two panes near the top of the Data: Replication page in vCenter Server Heartbeat Console, File System
Synchronization Status and Registry Synchronization Status, provide graphical status information.
The synchronization status for each le or folder can read one three dierent values depending on the verication
and synchronization states as described in Table 8-1.
VMware, Inc. 69
Page 70

Administrator Guide
Table 8- 1. File and Registry Synchronization Status
DescriptionIcon
The le is veried and successfully synchronized.
The le is not synchronized on the active and passive servers. This state often follows a failover and
requires manual synchronization and verication.
The le or folder has not been checked because a full system check has not been performed or the system
check has not yet reached the le or folder.
Initiating a Full Registry Check
The registry check re-scans and synchronizes all registry keys specied in the built-in registry lters between
the servers with the results being displayed in the Registry Synchronization Status pane.
Procedure
Click Full Registry Check in the Registry Synchronization pane.
◆
A full registry check is performed with results of the check being displayed in the Registry Synchronization
Status pane.
70 VMware, Inc.
Page 71

Chapter 8 Data Protection
Initiating a Full System Check
You can verify and synchronize the entire protected le set using the Full System Check feature of vCenter
Server Heartbeat Console. A Full System Check performs the same block level check of all the les set by the
le lters in the initial startup synchronization and verication.
Procedure
1 Click Full System Check in the File Hierarchy pane to initiate a Full System Check.
A conrmation dialog asks you to conrm the request and warns you that depending on the amount of
data under protection, this task can take a long time to complete (for example, a number of hours).
2 Click Yes to perform the check.
Note Once a Full System Check is initiated, allowing it to run to its conclusion is strongly recommended
because canceling leaves the le system status Unchecked. Depending on the amount of data,
resynchronization may take substantial time to complete. Switchover is not permitted until after the task
is complete and the File System Status is Synchronized.
Enabling Fast Check
The Fast Check process is used by vCenter Server Heartbeat to rapidly verify les between servers prior to
starting applications. Fast Check compares le time stamps and attributes rather than the check sums of the
data thereby accelerating the startup and synchronization process. If the time stamp or attribute check fails,
than the normal verication and synchronization process will initiate. Additionally, you can congure the
length of time to wait for Fast Check to complete before starting applications.
Fast Check is benecial after a graceful shutdown where severs were synchronized before shutdown. Fast
Check allows the server to check the le synchronization rapidly and start to service clients. If Fast Check
detects les that are out-of-sync, it initiates the full verify and synchronization process to resynchronize your
data.
Procedure
1 Navigate to Data: Replication.
2 Click Congure.
3 Select the Fast Check tab.
4 Select the Use Fast Check check box.
5 Congure Maximum Application Delay. This is the length of time vCenter Server Heartbeat will delay the
startup of the application while it attempts to establish replication between the active and passive nodes.
6 Click OK.
Note When Fast Check is congured in addition to Controlled Shutdown, vCenter Server Heartbeat can
be congured to perform an unattended restart. For more information about Controlled Shutdown, see
“Controlled Shutdown,” on page 61.
VMware, Inc. 71
Page 72

Administrator Guide
Initiating File Synchronization Manually
The Data: Replication File Hierarchy pane displays les that were detected as out of synchronization.
Procedure
To initiate le synchronization manually, perform one of the following:
◆
To synchronize the specied les, click Synchronize.
■
Select multiple les with the Shift or Ctrl keys and click Synchronize.
■
Select a folder and select Including Subdirectories to synchronize les within folders and click
■
Synchronize.
A progress bar graphically displays the status of the verication or synchronization operation. When
complete, the status displays a green Synchronized icon.
Initiating Verify and Synchronize Manually
A manual or scheduled synchronization and verication request is dened as a task that is queued for processing
after the running task completes. Tasks display in the Pending Tasks pane. You can cancel individual tasks. If
you cancel a scheduled task, you risk an unchecked system. Possible consequences of canceling tasks display
in a warning message.
Procedure
1 Select one or more les and folders from the list in the File Hierarchy pane. Multiple les and folders can
be selected from this le list by using the standard Windows multiple selection techniques, Shift + click
and Ctrl + click.
Note You also can right-click on a folder in the tree view (in the left pane of the File Hierarchy pane) to
quickly select Verify and Synchronize from a menu. This option automatically includes subdirectories.
2 When one or more folders are selected, also select the Including Subdirectories check box to ensure that all
les within the folder(s) are also veried and synchronized.
3 Click Verify and Synchronize.
As verify and synchronization runs, you may see its progress in the Current Task pane at the bottom left
of the Data: Replication page. When the verify and synchronization process successfully completes, a green
icon indicates veried and synchronized status.
Each verication and synchronization request (manually or automatically scheduled) is dened as a task
with subsequent tasks queued for processing after the current task is completed. Each task is listed in the
Pending Tasks list to the right of the Current Tasks frame.
Note Individual tasks can be canceled, but canceling automatically triggered tasks can lead to an Unchecked
system. A warning is presented detailing the possible consequences of canceling tasks.
72 VMware, Inc.
Page 73

Chapter 8 Data Protection
Checking for Orphaned Files
vCenter Server Heartbeat provides the opportunity to check the system for orphaned les and either notify
the administrator or to delete the orphaned les. Orphaned les are those les in a protected set that exist on
the passive server but do not exist in the protected set on the active server in a pair.
Orphaned File Check can either delete or log the orphaned les on the passive server that exist within the protected
set; they were orphaned because vCenter Server Heartbeat was not running when content changes were made
on the active server.
Note Orphaned File Check does not delete les on the passive server if there is no le lter to include the
content as this would be unsafe.
Special Cases
The following special cases apply to Orphaned File Check.
Folder root lters - Orphaned File Check will manage the entire contents of that folder (for example,
■
D:\folder\**). This deletes all passive les within the folder that do not exist on the active server, and
includes content created only on the passive server.
Exclusion le lters - Orphaned File Check will not delete any les excluded from the protected set by
■
exclusion lters. This rule safeguards users and applications.
Filters for les, le types, or other wildcards - Orphaned File Check is not managing the contents of the
■
folder (for example, D:\database\*.log), only the selected les. The golden rule applies; Orphaned File
Check will only process les that match the lter and will not delete les with any other extension within
the folder D:\database.
Orphaned les are those les in a protected set that exist on the passive server but do not exist in the
protected set on the active server in a pair.
Configuring Orphaned Files Check Options
Prior to initiating an Orphaned Files Check, you must congure the actions to take in the event orphaned les
are found. By default, Orphaned Files Check is congured to delete orphaned les. Should you want to log
the les presence rather than delete the orphaned les, follow the steps below.
Procedure
1 Navigate to the Data: Replication page and click Congure.
2 Select the Orphaned Files tab.
3 Select the Detect orphaned les check box.
4 In the On detection, take the following action drop-down, select either Delete to automatically delete the
orphaned les or Log to le to add the list of les to the log le.
5 After selecting the options, click OK to close the dialog.
6 On the Data: Replication page, click Orphaned Files Check.
Orphaned Files Check runs.
VMware, Inc. 73
Page 74

Administrator Guide
File Filters
File lters dictate which les are protected and the disk I/O operations to intercept and replicate to the passive
server. File lters also allow you to customize the inclusion and exclusion of les from the replication process.
The File Filters pane of the Data: File Filters page allows you to set up and manage Inclusion and Exclusion
lters.
The File Filters pane contains three columns:
Table 8- 2. File Filter Pane
State
DescriptionColumn
The Filter column lists the pattern for protecting les and folders on the active server.Filter
The State column identies the lter as Eective, Subset (contained within another lter), or Not Eective (not
contained within another lter). An Eective lter is properly congured and functions to protect (replicate)
the stipulated les to the passive server.
The Detail column describes the le lter details based upon the state of the le lter.Detail
Determining Effective Filters
An Eective Filter is the result of the remainder of the les and folders stipulated in the Inclusion Filter after
removing the les and folders in the Exclusion Filter. Filters are compared with each other, and if one lter is
a superset of another, the superset lter is used. You can congure a single, general lter to replace le servers
with 1000s of individual shares requested by a plug-in.
Adding a User-Defined Inclusion Filter
Inclusion lters create a subset of les to specify items to include for protection.
Procedure
1 In the Data: File Filters pane, click Add Inclusion Filter to display the Add Inclusion Filter dialog.
2 Type the complete path and pattern, specify a pattern containing wildcards, or click Browse to locate the
le or folder.
3 Click OK.
There are two forms of wildcards available, * which matches all les in the folder and **, which matches
all les, subfolders, and the les in the subfolders of the folder. After dening the lter, you can add
additional Inclusion Filters.
74 VMware, Inc.
Page 75

Chapter 8 Data Protection
Adding a User-Defined Exclusion Filter
Exclusion lters create a subset of an Inclusion Filter to specify items to exclude from protection.
Procedure
1 In the Data: File Filters pane, click Add Exclusion Filter to display the Add Exclusion Filter dialog.
2 Type the complete path and pattern, specify a pattern containing wildcards, or click Browse to locate the
le or folder.
3 Click OK.
There are two forms of wildcards available, * which matches all les in the folder and **, which matches
all les, subfolders and the les in the subfolders of the folder.
Editing User Defined Inclusion/Exclusion Filters
Existing Inclusion and Exclusion Filters can be edited using the procedure below.
Procedure
1 Selecting the lter on the Data: File Filters page.
2 Click Edit at the top of the File Filters pane or right-click the lter and select Edit from the menu. Edit the
value in the Pattern: text box by typing over the current le lter denition.
3 Click OK.
Removing User-Defined Filters
When necessary, user dened Inclusion Filters and Exclusion lters can be removed.
Procedure
1 Select the lter in the Data: File Filters list and click Remove, or right-click on the lter in the Data: File
Filters list and select Remove from the menu.
A conrmation message appears.
2 ClickYes to remove the lter.
Automatic Filter Discovery
When Administrators make changes to the conguration, vCenter Server Heartbeat automatically adjusts le
lter protection for protected locations. Additionally, the SQL Server plug-in provides database protection
including changes or additions to the database and log les.
VMware, Inc. 75
Page 76

Administrator Guide
76 VMware, Inc.
Page 77

vCenter Server Heartbeat can notify Administrators of potential problems or when specic events occur by
sending a custom congured predened alerts and route event logs to a remote Administrator as required.
This chapter includes the following topics:
“Conguring Alerts,” on page 77
■
“Conguring Event Log Files,” on page 79
■
“Reviewing Event Logs,” on page 81
■
Configuring Alerts
vCenter Server Heartbeat can send predened alerts to remote administrators via email when congured using
the Logs page.
Procedure
1 Navigate to the Logs page and click Congure Alerts.
9Alerts and Events
You can congure one of three alert states: Red alerts are critical, Yellow alerts are not as serious, and Green
alerts are informational. These alerts are precongured with the recommended alerting levels.
2 To recongure each event to trigger Red, Yellow, Green or not alert, select the appropriate tab and select
the check box(s).
3 Click OK.
Configuring Alert Reporting
vCenter Server Heartbeat can alert the administrators or other personnel and route logs by email when an
Alert condition exists.
Procedure
1 Navigate to the Logs page and click Mail Settings to open the Mail Settings dialog.
2 Type the outgoing SMTP server of both the Primary server (for when active) and the Secondary server
(for when active) in the appropriate elds.
3 Typethe Fully Qualied Domain Name (FQDN) of the mail server. Typean email address that is authorized
to send mail through the SMTP server.
VMware, Inc. 77
Page 78

Administrator Guide
4 If the SMTP servers require authentication to accept and forward SMTP messages, select Mail Server requires
authentication and specify the credentials for an appropriate authenticated user account.
5 Click OK.
Configuring Alert Email Triggers
vCenter Server Heartbeat allows you to congure email recipients in the On Red Alert, On Yellow Alert, and
On Green Alert tabs of the Congure Alerts dialog after conguring the trigger levels and the email server.
Configuring Default Alert Email Triggers
Red, Yellow, or Green alert triggers can email to the same or dierent recipients. The process to add recipients
is the same for all trigger levels.
Procedure
1 Select the On Red Alert, On Yellow Alert, or On Green Alert tab and select Send mail.
2 Select the frequency for the email to be sent.
3 Click Add and type a fully qualied email address for each recipient for the respective trigger level alert.
4 To delete a recipient, select the recipient’s email address in the Mail Recipients pane and click Remove.
Use the precongured subject and content of the alert emails for Red, Yellow, or Green alerts. You can
add content as required. VMware recommends leaving the precongured subject and content and if
necessary, add additional information.
78 VMware, Inc.
Page 79

Chapter 9 Alerts and Events
Configuring Alert Email Triggers (Alternate Method)
vCenter Server Heartbeat allows an alternate method to congure sending an alert notication that allows the
Administrator to create an event in the Application Event Log that can be customized to include vCenter Server
Heartbeat specic information variables.
Procedure
1 Select Run Command under the pertinent alert state.
2 Browse to the script to run or use a command line argument to run on the alert trigger.
The precongured WScript command creates an event in the Application Event Log and can be customized
to include vCenter Server Heartbeat specic informational variables as shown in Table 9-1.
Table 9- 1. Customized Information Variables
ValueVariable
$EventId
$EventName
$EventDetail
$EventTime
Id of event as listed above
Human-readable name of event
Detail message for event
Time at which event occurred
The following command line argument creates an event in the Application Event Log listing the machine
that caused the alert, the time the alert occurred, the name, and details of the alert:
WScript //T:10 $(installdir)\bin\alert.vbs "VMware vCenter Server Heartbeat alert on $EventHost
at $EventTime because $EventName ($EventDetail). Event Id is $EventId"
3 Click OK.
Testing Alert Reporting
vCenter Server Heartbeat allows you to test alert reporting without triggering an actual alert during the
operation of the active server.
Procedure
1 Navigate to the Logs page.
2 Click Test Alert Reporting.
A Test Alert email is sent to the congured email recipients.
Configuring Event Log Files
vCenter Server Heartbeat allows you to congure Event Log les to direct where the log le is stored and the
number of events to be recorded.
Procedure
1 Navigate to the Logs page and click Congure.
2
Select the General tab to dene the lename and path of the exported comma-separated variable (.CSV)
le.
VMware, Inc. 79
Page 80

Administrator Guide
3 Type a path and lename or click Browse and navigate to the le.
4 Adjust the length of the event list to meet your needs by increasing or decreasing the value (the default
is 300 events) in the Record at most eld.
5 Click OK.
Configuring Log File Email Recipients
Use vCenter Server Heartbeat to email the log to specied personnel at predetermined intervals.
Procedure
1 To congure vCenter Server Heartbeat to email a copy of the log le, select the Mail Log File tab.
2 Select the Mail Every check box and congure the day and time to send the log le.
3 To specify the recipients, click Add on the top left of the email recipient eld and type the email address
in the Add Mail Address dialog.
4 To remove a recipient, select the recipient’s email address in the Mail Log File pane and click Remove.
5 Click OK.
80 VMware, Inc.
Page 81

Reviewing Event Logs
The Event Log pane of the Logs page lists events logged chronologically by default. The Event Log shows the
time an event happened, the type, the source, its importance, and its detail. The display order for events can
be sorted either descending or ascending by clicking on the column heading. Since the detail in the data grid
is truncated, it may be necessary to review the log in more detail.
Reviewing Event Log Details
Event Properties displays the full detail and trace of an event that caused an error and the source of the error
to aid in troubleshooting.
Procedure
1 Select an event in the Event Log and double-click the entry in the data grid.
The Event Properties dialog is displayed.
2 Use the Up and Down arrows in this window to review other logs.
This feature is useful where many events have occurred simultaneously and helps to identify the source
of the problem.
Chapter 9 Alerts and Events
3 Click Close to close the Event Properties dialog.
Table 9- 2. Log Events
DescriptionIcon
Errors within the underlying operation of vCenter Server Heartbeat and can be considered critical to
the operation of the system.
Warnings generated for discrepancies within the vCenter Server Heartbeat operational environment
that are not deemed critical to the operation of the system.
System logs are generated following normal vCenter Server Heartbeat operations. You can use these
logs to verify the success of processes such as le synchronization.
Information on operations within the graphical user interface rather than operations on vCenter Server
Heartbeat service, such as Test Alert Reporting.
Filtering Event Logs
The list of events that vCenter Server Heartbeat displays may be ltered to hide less important events and/or
limit the events displayed to a specic date and time range.
Filtering log events by importance
Procedure
1 Click Filters on the Logs page to invoke the Event Log Filters dialog.
2 Select Events of at Least.
3 Select the Show events of at least check box in the Importance group.
4 Select the importance level from the drop-down list and click OK.
Only logs equal to or above the selected severity are displayed.
VMware, Inc. 81
Page 82

Administrator Guide
Filtering log events by date and time range
Procedure
1 Select the Only show events from check box and adjust the start date, end date, and times.
2 Click OK.
Table 9- 3. Event Log Buttons
PurposeIcon
To export the list to a comma-separated variable le, click Export event log at the top left of the Log
Details data grid. You can congure the lename and path to export the data in the Conguration tab.
To immediately email the list, click E-mail.
To clear the list, click Remove all Entries at the top left of the Log Details data grid.
82 VMware, Inc.
Page 83

10Troubleshooting
You can use a variety of procedures for diagnosing and xing problems that you may encounter when using
vCenter Server Heartbeat. You can use troubleshooting procedures to investigate the causes of such problems
and attempt to correct them yourself, or you can obtain assistance from VMware Technical Support. The
following unexpected behaviors illustrate Problems, Causes, and Solutions for a given scenario.
This chapter includes the following topics:
“Two Active or Two Passive Servers,” on page 83
■
“Synchronization Failures,” on page 86
■
“Registry Status is Out-of-Sync,” on page 88
■
“Channel Drops,” on page 89
■
“Subnet or Routing Issues,” on page 93
■
“MaxDiskUsage Errors,” on page 94
■
“Application Slowdown,” on page 97
■
Two Active or Two Passive Servers
When two identical servers become active on the same network or both become passive, this is not by design
and should be addressed immediately.
Two Active Servers
When two active servers are live on the same network, vCenter Server Heartbeat refers to the condition as
Split-brain syndrome. Two active servers live on the same network is critical and must be resolved immediately.
Problem
Split-brain syndrome is identied by the following symptoms:
Both servers in the pair are running and in an active state. The task bar icons display P / A (Primary and
■
active) and S / A (Secondary and active)
An IP address conict occurs on a server pair running vCenter Server Heartbeat on the Principal (Public)
■
IP address
VMware, Inc. 83
Page 84

Administrator Guide
■
■
Cause
The most common causes of two active servers (Split-brain syndrome) are as follows:
■
■
■
You must determine the cause of the Split-brain syndrome and resolve the issue to prevent this condition from
recurring.
Solution
Identifying the server with the most up-to-date data
To resolve Split-brain syndrome, identify the server with the most up-to-date data. If you identify the wrong
server you risk losing data. You must reinstate the correct server.
■
A name conict occurs on a server pair running vCenter Server Heartbeat. In a WAN environment the
Primary and Secondary servers connect to the network using dierent IP addresses. However, if the servers
are running with the same name and are visible to each other across the WAN, a name conict occurs
Clients (for example, VI Client, ESX, etc.) cannot connect to the server running vCenter Server Heartbeat
Loss of the VMware Channel connection (most common in a WAN environment)
The active server is too busy to respond to heartbeats
Incorrect conguration of the vCenter Server Heartbeat software
Check the date and time of les on both servers. Make the most up-to-date server the active server.
From a client PC on a LAN, run nbtstat -A 192.168.1.1 where the IP address is the Principal (Public) IP
■
address of the server. This can help identify the MAC address of the server currently visible to client
machines.
Note If both active servers were servicing clients, perhaps at dierent WAN locations, you can make
only one server active. Both servers contain recent data that cannot be merged using vCenter Server
Heartbeat. To restart replication, make one server active and one server passive. When replication restarts,
the active server overwrites all data on the passive server. You can manually extract the up-to-date data
from the passive server prior to restarting replication. Consult the Microsoft Knowledge Base for information
on various tools for this purpose. For further information, contact your VMware support representative.
Resolving two active servers (Split-brain syndrome)
The following procedure corrects two active servers and results in an active and passive server pair.
1 Identify the server with the most up-to-date data or the server to make active.
2 Shut down vCenter Server Heartbeat on both servers (if running).
3 On the server to make passive, right-click the Task bar icon, and select the Server Conguration wizard.
4 Select the Machine tab and set the server role to passive. Do not change the identity of the server (Primary
or Secondary).
5 Click Finish.
6 Restart this server.
7 Start vCenter Server Heartbeat, if required, and check that the Task bar icon now reects the changes by
showing P / - (Primary and Passive) or S / - (Secondary and Passive).
8 On the active server, right-click the Task bar icon and select the Server Conguration wizard.
9 Select the Machine tab and verify that the server role is set to active. Do not change the identity of the
server (Primary or Secondary).
10 Click Finish.
84 VMware, Inc.
Page 85

Chapter 10 Troubleshooting
11 Restart this server. As the server restarts, it connects to the passive server and starts replication. The active
server overwrites data on the passive server.
12 Start vCenter Server Heartbeat, if required, and check that the Task bar icon now reects the changes by
showing P / A (Primary and active) or S / A (Secondary and active).
13 Start vCenter Server Heartbeat Console.
14 Check that the servers have connected and replication has started.
Two Passive Servers
Primary and Secondary servers are both passive at the same time. This situation is prevents clients from
accessing protected applications and should be resolved immediately.
Problem
You are unable to connect to protected applications, and if you congured alerts, you receive notication that
replication is not functioning properly.
Cause
The condition of two passive servers results from a sudden failure on the active server. Examples:
An unexpected termination of the VMware vCenter Server Heartbeat service
■
A transient power failure
■
A server reset triggered from the Power or Reset button
■
An unclean shutdown. Following an unclean shutdown, an active server assumes the passive role to isolate
■
itself from the network until the failure is investigated
The active server fails before the handshake that establishes the VMware Channel connection. The passive
■
server cannot detect that the active server is not responding when the failure occurs and cannot determine
the condition of the active server. The active server suers a transient failure and the passive server cannot
respond by failing over into the active role, leaving both servers in the passive role
Both Primary and Secondary servers experience a power outage simultaneously, for example, they use
■
the same power source and neither is attached to a UPS. A failover cannot occur and when the servers are
restarted, each displays the following error message:
Cannot start replication because previous run did not shutdown properly. Check configuration.
Note If you attempt to start vCenter Server Heartbeat without reconguring one server in the pair as active,
vCenter Server Heartbeat responds with the following warning:
[U16] Serious configuration mismatch between the two servers. Please reconfigure so there is one
and only one Primary, and one and only one Active.
Solution
Two passive servers prevent users from accessing the protected application and should be resolved immediately.
1 Determine the active server.
2 Shut down vCenter Server Heartbeat on both servers. Leave any protected applications running on the
server to make active.
3 On the server to make active, start the Server Conguration wizard, and select the active role. Do not change
the identity (Primary or Secondary).
VMware, Inc. 85
Page 86

Administrator Guide
4 On the server to make passive, start the Server Conguration wizard, and conrm the passive server. Do
not change the identity (Primary or Secondary).
5 Restart the passive server. All protected application services stop.
6 Start vCenter Server Heartbeat on both servers.
Synchronization Failures
When you start vCenter Server Heartbeat, a full system check occurs to verify the following:
All protected registry keys and values from the active server are present on the passive server
■
All protected le and folder structures from the active server are present on the passive server
■
After the full system check completes, the File System Status and the Registry Status display as Synchronized.
However, the File System Status or the Registry Status can also display as Out of sync or Synchronized and
busy processing. Some typical scenarios are described with possible causes and workarounds.
Services Running on the Passive Server
Services running on a passive server is not normal behavior and can prevent synchronization.
Problem
File System Status is Out-of-sync or Synchronized and busy processing.
Cause
A service running on the passive server opens a protected le for exclusive access. If vCenter Server Heartbeat
attempts to update this opened le, the Apply component logs the following error message:
[N29]The passive VMware vCenter Server Heartbeat server attempted to access the file: {filename}.
This failed because the file was in use by another application. Please ensure that there are no
applications which access protected files running on the passive.
Note This occurs if the vSphere Client is left running on the passive server.
Services that keep les locked on the passive server are:
Protected application services
■
File level anti-malware tool services
■
Note vCenter Server Heartbeat periodically checks for and stops any services running on the passive server.
Solution
Until the le is closed on the passive server, vCenter Server Heartbeat reports the le status and the File System
Status as Out-of-sync.
1 Set Protected Application services to Manual on both servers and verify that they are not running on the
passive server.
2 Set Recovery Actions to Take No Action. You can set this from the Service Control Manager (SCM) for the
Protected Application services. Otherwise, the SCM restarts the Protected Application services.
3 Verify that le level anti-malware protection is not part of the protected set as the le level anti-malware
and the corresponding services are running on both machines.
86 VMware, Inc.
Page 87

Chapter 10 Troubleshooting
VMware Channel Incorrectly Configured
If the VMware Channel is not properly congured, it cannot initiate the handshake to establish communications
through the VMware Channel connection.
Problem
Failure to establish the VMware Channel connection prevents a full system check, thereby leaving the File
System Status and Registry Status as Out-of-sync.
Cause
The most common VMware Channel conguration errors are as follows:
VMware vCenter Server Heartbeat Packet Filter is enabled on one or more VMware Channel NICs
■
VMware Channel IP addresses are congured in dierent subnets
■
In a WAN implementation, no static routes exist between the VMware Channel NICs
■
Solution
The VMware Channel conguration should be reviewed to verify proper conguration.
1 Disable the VMware vCenter Server Heartbeat Packet Filter on VMware Channel NICs.
2 Congure the VMware Channel IP addresses properly.
3 In a WAN implementation, congure static routes between VMware Channel NICs properly.
4 Disable NetBIOS on the VMware Channel NICs.
Incorrect or Mismatched Disk Configuration
When vCenter Server Heartbeat starts, it checks the complete set of le lters for consistency.
Problem
If any of the entries points to a non-existent drive letter or to a non-NTFS partition, the list of le lters resets
to the default value of C:\Protected\**. This is a safety measure as vCenter Server Heartbeat requires the same
drive letter conguration on the Primary and the Secondary servers, and only supports protection of NTFS
partitions.
Cause
Dierent partition structures on Primary and Secondary servers, such that one or more le lters point to
drives that cannot be protected on both servers. For example:
The Primary server has drive G:, a valid NTFS partition, but no corresponding drive exists on the Secondary
■
server.
The Primary server has drive G:, a valid NTFS partition. The equivalent drive on the Secondary server is
■
a CD or DVD drive, or a FAT or FAT32 partition that cannot be protected.
In either scenario, if you congure a le lter to protect a directory on drive G:, the entire lter set is rejected
and the lters are reset to the default value of <Windows drive>\Protected\**.
Solution
Follow the steps documented in knowledge base article 1008458 (vCSHB-Ref-500) Troubleshooting a set of
◆
File Filters that is reset to C:\Protected\**.
VMware, Inc. 87
Page 88

Administrator Guide
Passive Server Has Less Available Space than Active Server
Inadequate available disk space on the passive server can cause replication to cease.
Problem
Replication stops with the following error:
[N27]Failed to write information for the file: {filename} to the disk. Either the disk is full or
the quota (for the SYSTEM account) was exceeded.
Cause
The passive server has less available disk space than the active server, preventing updates from being replicated
to the passive server. The quantity of updates from the active server exceeds the passive server's available disk
space.
Solution
Free up some additional disk space on the passive server. Do not delete data from the protected set to
◆
prevent data loss in the event of a switchover. You could update the disk subsystem on the passive server.
After allocating space, start replication.
Registry Status is Out-of-Sync
The Registry can be reported as Out-of-sync when one or more Registry keys fail to synchronize.
Registry Security Issues
Inability to access the registry prevents replication of the registry.
Problem
vCenter Server Heartbeat is unable to read, sync, or replicate the registry.
Cause
If a protected registry key has permissions that deny Write access to the System account, this can prevent
vCenter Server Heartbeat from synchronizing or replicating it.
Solution
Change the permissions on the aected registry key to grant the System account Full Control.
◆
88 VMware, Inc.
Page 89

Channel Drops
When the VMware Channel loses connection between the servers, the following scenarios can occur.
Performance Issues
Poor performance can be experienced as a result of a channel loss.
Problem
The message java.io.IOException: An existing connection was forcibly closed by the remote host
appears in the active server's NFLog.txt file, and the VMware Channel connection between the servers
is lost.
Cause
This unusual condition points to an application or Windows experiencing a fault on the passive server. A
sudden restart of the passive server can occur due to the following causes:
The server is congured for automatic software update management and some updates force the server
■
to restart
Chapter 10 Troubleshooting
A software or Operating System issue that occasionally fails and requires a system restart
■
The VMware vCenter Server Heartbeat service experiences problems, does not respond, or terminates
■
unexpectedly
Solution
To resolve the issue, perform the following checks.
1 Determine the likely source by examining the Windows event logs.
2 If the server does not display evidence of a system restart or unresponsive application, one or both of the
VMware Channel NICs could be forcing a channel disconnection. See “Hardware or Driver Issues on
VMware Channel NICs,” on page 90 for more information on this topic.
Passive Server Does Not Meet Minimum Hardware Requirements
Inadequate hardware can cause channel drops and result in poor performance.
Problem
The data rate between the servers is very fast during a Full System Check and the VMware Channel drops.
Cause
The passive server does not meet the recommended hardware requirements for vCenter Server Heartbeat or
it meets the requirements, but is much less powerful than the active server. The underpowered server cannot
apply the received replication data from the active server at the rate that the data is sent to the passive server.
Solution
To avoid reinstalling vCenter Server Heartbeat, upgrade the hardware, such as memory or CPU, on the
◆
passive server. Establish the identity (Primary or Secondary) of the aected server before you perform
the upgrade.
VMware, Inc. 89
Page 90

Administrator Guide
Hardware or Driver Issues on VMware Channel NICs
NIC malfunctions and old or incorrect drivers can cause channel drops resulting in poor performance.
Problem
The VMware Channel intermittently drops or disconnects and reconnects.
Cause
The following are common causes of NIC problems.
Old or incorrect VMware Channel NIC drivers
■
Hardware failure of the hub or Ethernet switch used for the VMware Channel connection
■
Defective Ethernet patch or crossover cables
■
Improper conguration of the NICs used for the VMware Channel connection
■
ISP problems in a WAN environment
■
Solution
When a NIC problem is encountered, perform the following checks:
1 Verify that VMware Channel NIC drivers are the correct and latest versions. Known issues are identied
with HP/Compaq ProLiant NC67xx/NC77xx Gigabit Ethernet NICs. Check other NIC types. See knowledge
base article 1008383 (vCSHB-Ref-116) – VMware vCenter Server Heartbeat and Gigabit Ethernet NIC drivers
(NC77XX)
2 Verifyhubs and Ethernet switches are operating properly. Identify and replace any defective components.
3 Test for defective Ethernet patch or crossover cables and replace if defective.
4 Correctly congure the NICs used for the VMware Channel connection.
5 Check the physical link for ISP problems.
Firewall Connection
In a LAN or WAN deployment, the VMware Channel can be connected through one or more Internet rewalls.
Because rewalls block unauthorized network trac, congure rewalls on the route of the VMware Channel
to allow channel trac.
Problem
The VMware Channel cannot connect, or continuously connects and disconnects.
Cause
In a WAN deployment, port 57348 or any other port congured for the VMware Channel is closed on one or
more rewalls on the route between the VMware Channel NIC on the Primary server and its counterpart on
the Secondary server.
Solution
Open port 57348 and any other port congured for the VMware Channel on all rewalls on the route
◆
between the VMware Channel NIC on the Primary server and its counterpart on the Secondary server.
90 VMware, Inc.
Page 91

Chapter 10 Troubleshooting
Channel Fails to Connect After Configuring Firewall Ports
Problem
The VMware Channel fails to connect and does not allow trac to pass between the Primary and Secondary
servers.
Cause
If Microsoft Windows changed the connection type from Private network to Unidentied network after the
user has congured the rewall port to allow channel communications, this may cause the rewall changes
to be reset for the new network type.
Solution
The rewall rules must be recreated to allow trac to pass through for the Client Connection port and the
Default Channel port. VMware recommends that the rewall be congured to allow the Client to connect to
the Client Connection port by process, nfgui.exe, rather than by a specic port. To enable Channel
communications between servers, change the Network List Manager Policy so that the VMware Channel
network is identied as a Private Network, and not the default Unidentied Network, and congure the
rewall to allow trac to pass through on Port 57348, the Default Channel port.
Incorrect VMware Channel Configuration
An incorrectly congured channel connection can prevent proper communication and replication.
Problem
The following problems are experienced:
IP conicts occur on one of the VMware Channel IP addresses
■
The VMware Channel does not connect, or connects and disconnects
■
Cause
The list below provides the most common miscongurations.
Identical IP addresses at each end of the VMware Channel
■
IP addresses in dierent subnets without static routing at each end of the VMware Channel
■
VMware Channel NIC congured for DHCP when a DHCP server is not available
■
During installation, vCenter Server Heartbeat congures the VMware Channel NICs with user-provided
information. Incorrect information or incorrectly modifying the VMware Channel NIC conguration after
installation causes the VMware Channel to fail communicating.
On rare occasions, if the Primary and Secondary servers have NICs of the same type in a dierent order, both
the name and IP address of a VMware Channel NIC on the Primary server can transfer to the Principal (Public)
NIC on the Secondary or the name and IP address of the Principal (Public) NIC can transfer to a VMware
Channel NIC. Similarly, the names of the VMware Channel NICs can reverse on the Secondary server. You
must reconcile the names of the NICs with their physical identities and assign the correct IP address to each
NIC on the Secondary server.
VMware, Inc. 91
Page 92

Administrator Guide
Solution
The installation process manually assigns the correct IP addresses to each NIC on the Secondary server. If no
VMware Channel connection occurs between the servers, verify the conguration of the IP addresses on the
Secondary server's channel NICs. Check the settings for the Principal (Public) NIC. The conguration error
can remain unrecognized until you perform a switchover or a failover occurs.
Tocapture the identities of all of the NICs on the Secondary server prior to installing vCenter Server Heartbeat,
open a Windows Command Prompt on that server and execute the following command:
ipconfig /all > ipconfig.txt
The output of this command saves the name, TCP/IP conguration, and MAC address of each NIC on the
Secondary server to a le called ipcong.txt, which is present on that server after the PnP phase of the vCenter
Server Heartbeat install completes. Compare the pre-install and post-install state of each NIC by running
ipcong /all from a Windows command prompt and compare the output of this command with the content
of ipcong.txt.
The MAC address of each NIC is connected to the physical identity of each card and never changes. You can
identify each NIC by its MAC address and determine its original name and network conguration, even if this
was updated by the PnP process.
VMware vCenter Server Heartbeat Packet Filter Is Enabled on the Channel NIC(s)
Proper conguration requires that the packet lter be disabled on the VMware Channel NIC. When the packet
lter is enabled on the channel NICs, the following symptoms are encountered.
Problem
Interference with network trac across the VMware Channel results in an intermittent channel connection or
no channel connection at all.
Cause
During installation, the VMware vCenter Server Heartbeat Packet Filter is installed and enabled on all NICs
on both the Primary and Secondary servers. The Packet Filter on the VMware Channel NICs on each server is
disabled later in the installation of vCenter Server Heartbeat. If the vCenter Server Heartbeat Packet Filter is
left enabled on one or more channel NICs after installation completes, it can interfere with network trac
across the VMware Channel.
Solution
Click the Properties tab for each Channel NIC on both servers and verify that the check box for vCenter
◆
Server Heartbeat Packet Filter is cleared, so that the Packet Filter is disabled on that NIC.
92 VMware, Inc.
Page 93

Subnet or Routing Issues
In a LAN or WAN deployment, the following connection problems can occur.
LAN Deployment
Incorrectly congured subnets or routing can cause channel problems resulting in poor performance or failure
to connect.
Problem
The Channel disconnects or fails to connect in a LAN deployment.
Cause
The Channel disconnects or fails to connect due to the Principal (Public) NIC and/or one or more channels
sharing the same subnet.
Solution
If vCenter Server Heartbeat is deployed in a LAN environment, the Principal (Public) IP address and the
◆
VMware Channel IP address on a server should be in separate subnets. When multiple redundant channels
are present, each should have its own subnet. Check the network conguration for each NIC on both
servers in the pair and correct any issues.
Chapter 10 Troubleshooting
WAN Deployment
Incorrect routing can prevent the active and passive servers from connecting in a WAN environment.
Problem
The VMware Channel disconnects or fails to connect in a WAN deployment.
Cause
When the VMware Channel disconnects or fails to connect in a WAN deployment, the static route might not
be congured or might be congured incorrectly.
When vCenter Server Heartbeat is deployed in a WAN, the Principal (Public) IP address and the VMware
Channel IP addresses cannot be in dierent subnets, because there usually is a single network path between
the two servers. Congure a static route between the endpoints to route trac in the VMware Channel.
Solution
Refer to knowledge base article 1008451 (vCSHB-Ref-466) - Creating a static route for the VMware Channel
◆
Connection in a WAN Environment for a detailed discussion about WAN channel routing issues, and for
instructions on conguring a static route for the VMware Channel.
VMware, Inc. 93
Page 94

Administrator Guide
MaxDiskUsage Errors
vCenter Server Heartbeat uses queues to buer the ow of replication data from the active server to the passive
server. This conguration provides resilience in the event of user activity spikes, VMware Channel bandwidth
restrictions, or VMware Channel drops across a WANdeployment. Some types of le write activity also require
buering as they can cause a sharp increase in the amount of channel trac. The queues are called the send
queue (on the active server) or the receive queue (on the passive server).
Send Queue
vCenter Server Heartbeat considers the active server’s send queue as unsafe because the data in this queue
has not yet been replicated across the VMware Channel to the passive server and therefore could be lost in the
event of a failover. As a result of failover, some data loss is inevitable, with the exact amount depending on
the relationship between available VMware Channel bandwidth and the required data transmission rate. If
the required data transmission rate exceeds available VMware Channel bandwidth, the send queue lls. If the
available VMware Channel bandwidth exceeds the required data transmission rate, the send queue empties.
This situation is most commonly seen in a WAN environment, where VMware Channel bandwidth is restricted.
In a LAN that normally has high bandwidth on a dedicated channel, the size of the send queue is zero or near
zero most of the time. On a server not protected with vCenter Server Heartbeat, all data is technically unsafe
and subject to loss if the server fails.
Receive Queue
The passive server’s receive queue is considered safe because the data in this queue already was transmitted
across the VMware Channel from the active server, and is not lost in the event of a failover, which applies all
updates to the passive server as part of the process.
Both send and receive queues are stored on disk by default in the <VMware vCenter Server Heartbeat Install
Directory>\R2\log directory, with a quota congured for the maximum permitted queue size (by default, 1GB
on each server). You can congure both the queue location and the quota.
Two methods to set the queue size:
Using vCenter Server Heartbeat Console
■
1 Start vCenter Server Heartbeat
2 Open the vCenter Server Heartbeat Console, and select Data: Trac Queues.
3 Click Congure.
4 Congure the Allow a maximum value and click OK.
5 Shut down and restart vCenter Server Heartbeat to eect the change. Youare not required to stop protected
applications.
Using the Server Conguration wizard
■
1 Shut down vCenter Server Heartbeat.
2 Open the Server Conguration wizard and select the Logs tab.
94 VMware, Inc.
Page 95

Chapter 10 Troubleshooting
3 Congure the Maximum Disk Usage value and click Finish.
4 Start vCenter Server Heartbeat.
Note vCenter Server Heartbeat is a symmetrical system and can operate with either server in the active role.
For this reason, the queue size is always set to the same value for both servers.
MaxDiskUsage Error Messages
The following error messages display when available disk space on the servers is exceeded.
[L9]Exceeded the Maximum Disk Usage (VCChannelExceededMaxDiskUsageException)
This message indicates that you have exceeded the amount of allocated disk space reserved for the queue..
Problem
vCenter Server Heartbeat exceeds its precongured queue size.
Cause
On the active server, the size of the active server queue has exceeded the disk quota allocated for it. On the
passive server, the size of the passive server queue has exceeded the disk quota allocated for it.
Solution
While neither condition is critical, determine the sequence of events that led to the condition.
◆
[L9]Exceeded the Maximum Disk Usage on the ACTIVE Server
This message indicates that you have exceeded the amount of allocated disk space reserved for the active
server’s send queue.
Problem
Replication stops and the vCenter Server Heartbeat Event Log displays the error message originating from the
active server.
Cause
A temporary interruption in the VMware Channel, or insucient VMware Channel bandwidth to support the
volume of replication trac starts lling the active server queue. The size of the queue eventually exceeds the
congured disk quota.
Solution
Assuming no other channel connection issues exist (see knowledge base article 1008551 (vCSHB-Ref-992)
◆
- Troubleshooting VMware vCenter Server Channel Drops), you can increase the amount of disk space allotted
to the queues. The default setting is 1GB, which can be insucient on servers with a large volume of
replication trac and limited VMware Channel bandwidth. If you have sucient disk space, set the queue
size to zero (unlimited) so vCenter Server Heartbeat can use any free disk space to store the queues.
VMware, Inc. 95
Page 96

Administrator Guide
[L9]Exceeded the Maximum Disk Usage on the PASSIVE Server
This message indicates that you have exceeded the amount of allocated disk space reserved for the passive
server’s receive queue.
Problem
Replication stops and the vCenter Server Heartbeat Event Log displays the error message originating from the
passive server.
Cause
Two of the most common causes are shown below:
The bottleneck lies between the VMware Channel NIC and the disk subsystem on the passive server.
■
Replication trac passes across the VMware Channel faster than it can be written to disk on the passive
server. The excess is buered temporarily in the passive server’s receive queue. The size of the queue can
eventually exceed the allotted disk quota.
If the passive server is much less powerful than the active server in terms of processor speed, RAM, or
■
disk performance, it can lag behind the active server during periods of high replication activity. Monitor
one or more Windows performance counters to determine the component experiencing sustained high
activity. Intensive page le use or persistently large disk queue length can indicate a problem. Upgrade
one or more physical components of the server.
Either server can be active or passive. If the Secondary server is more powerful than the Primary server,
hardware-related issues can only occur while the Secondary server is in the active role.
Solution
To resolve this issue:
If you have multiple physical disks on each server, locate the vCenter Server Heartbeat send and receive
■
queues on a separate physical disk, away from the Windows directory, the Windows page le, and any
protected les help to alleviate disk performance issues:
1 Shut down vCenter Server Heartbeat.
2 Open the Server Conguration wizard and select the Logs tab.
96 VMware, Inc.
Page 97

Chapter 10 Troubleshooting
3 Congure the path for Message Queue Logs Location and click Finish.
4 Start vCenter Server Heartbeat on both servers.
Note The selected path is applied to all vCenter Server Heartbeat queues on both servers.
Increase the amount of disk space allotted to the queues. However, if a hardware issue is the root of the
■
problem, correct that problem at the source.
The size of the passive server’s receive queue can increase sharply in response to certain types of le write
■
activity on the active server, such as when vCenter Server Heartbeat is replicating a large number of very
small updates of a few bytes each. The volume of update trac can be far greater than the physical size
of the les on the disk, and the receive queue can become disproportionately large. Youcan see this pattern
of disk activity during the population of Full-Text Catalogs in Microsoft SQL Server. Increase the amount
of disk space available for the queues. Move the queues to their own physical disk, upgrade the memory
or the disk subsystem.
vCenter Server Heartbeat requires a certain amount of system resource for its own basic operations and
■
requires some additional resources for processing replication trac. This is in addition to the resources
used by Windows and other applications running on the server, including critical applications protected
by Heartbeat. Allocate sucient resources for all the applications and services running on such a server
to provide maximum performance, stability, and resilience for changing client, server, and network activity.
[L20]Out of Disk Space (VCChannelOutOfDiskSpaceException)
This message indicates that one of the servers in the pair has run out of disk space without reaching its preset
quota.
Problem
Replication stops and the vCenter Server Heartbeat Event Log displays the error message originating from
either server in the pair.
Cause
One of the queues has exceeded the amount of physical disk space available for it without reaching its quota
limit. For example, if the maximum queue size is set to 5GB, but only 3GB of physical disk space remains, this
error message is reported if one of the queues exceeds 3GB in size.
Solution
Free up more disk space or move the queues to a disk with sucient free space to accommodate queue
◆
sizes up to the limit congured for Maximum Disk Usage.
Application Slowdown
Operations performed by the application can take longer to complete, and in turn, can aect the time required
to log in to a remote client, or to open or save a le. This is true for both servers running vCenter Server
Heartbeat and for servers running any other application. vCenter Server Heartbeat can monitor system
performance counters and display warnings when predened thresholds are exceeded, but it does not actively
manage system resources for other applications. Like any other application, it also requires a nite amount of
resources for its own operations in addition to the resources used by the operating system and the protected
application.
VMware, Inc. 97
Page 98

Administrator Guide
The machines hosting vCenter Server Heartbeat must meet recommended hardware requirements and must
be powerful enough to support the load, the protected applications, and any other critical applications running
on the same server pair.
Poor Application Performance
When applications are competing for resources, one or more applications can perform poorly.
Problem
Neither server in the pair can accommodate the load placed upon it during normal operation.
Cause
The Primary server's resource usage in one or more areas reached close to the maximum before vCenter Server
Heartbeat was installed.
Solution
Heartbeat Diagnostics can report these conditions and issues warnings if CPU usage or memory usage
◆
exceed a certain percentage of the available resource. Information provided by Heartbeat Diagnostics can
minimize the risk of application slowdown by identifying needed hardware upgrades on the Primary
server.
Both Servers Can Accommodate the Initial Load but the Load Has Increased
Any software installed on a server or workstation consumes a nite amount of system resources when it runs
and it must share the resources it uses with any other applications running at the same time. Increased demand
caused by additional user activity can have an impact on the server performance.
Problem
Increased user activity slows application response time.
Cause
The server pair operates normally when vCenter Server Heartbeat is rst installed, but performance decreases
due to increased user activity. For example, users on the SQL Server system increase or the typical usage pattern
becomes more intense. This can be a gradual and sustained increase over time, or transient if a specic event
triggers a temporary surge in user activity.
Solution
If the situation is sporadic, it can correct itself when the load decreases. If the increase is sustained and
◆
permanent, upgrade the server hardware.
One Server Can Provide Adequate Resource Support, but the Other Cannot
If the total resource requirements of the applications exceed the available physical resources, the operating
system attempts to provide resources, but leaves some applications under-resourced. When this situation
occurs, an application cannot obtain enough memory to operate normally, or a process must wait before
accessing the hard disk.
Problem
Applications operate normally when the Primary server is active but operate slowly when the Secondary server
is active (or the reverse).
98 VMware, Inc.
Page 99

Chapter 10 Troubleshooting
Cause
A large discrepancy occurs in the processing power between the Primary and Secondary servers. One server
can handle the operational load while the other cannot. The load on a server is greater while in the active role
when the protected application starts. Applications on the server pair run successfully when the Primary server
is active, but experience performance issues when the Secondary is active (or the reverse). Problems can arise
even when the more powerful server is active.
Solution
Both servers must have approximately equivalent processing power, RAM and disk performance. Upgrade
◆
the hardware on one server in the pair so that the two servers have roughly the same performance.
Scheduled Resource Intensive Tasks
Scheduling multiple resource intensive tasks at the same time can adversely impact server performance and
aect application performance.
Problem
Resource-intense scheduled tasks impact performance at certain times.
Cause
Two or more resource-intense processes run simultaneously or one process performs actions that increase the
load on vCenter Server Heartbeat by triggering additional and sometimes unnecessary replication trac.
Examples: processes such as backups, database maintenance tasks, disk defragmentation, or scheduled
anti-malware scans.
Solution
Schedule operations so that they do not overlap and schedule them outside regular working hours, when
◆
fewer users are accessing the protected application and consequently less load on the server.
VMware, Inc. 99
Page 100

Administrator Guide
100 VMware, Inc.
 Loading...