

Page 1

Using VMware vCenter Orchestrator
Plug-Ins
vCenter Orchestrator 5.5.2
This document supports the version of each product listed and
supports all subsequent versions until the document is
replaced by a new edition. To check for more recent editions
of this document, see http://www.vmware.com/support/pubs.
EN-001511-00
Page 2

Using VMware vCenter Orchestrator Plug-Ins
You can find the most up-to-date technical documentation on the VMware Web site at:
http://www.vmware.com/support/
The VMware Web site also provides the latest product updates.
If you have comments about this documentation, submit your feedback to:
docfeedback@vmware.com
Copyright © 2008–2014 VMware, Inc. All rights reserved. Copyright and trademark information.
VMware, Inc.
3401 Hillview Ave.
Palo Alto, CA 94304
www.vmware.com
2 VMware, Inc.
Page 3

Contents
Using VMware vCenter Orchestrator Plug-Ins 9
Introduction to Orchestrator Plug-Ins 11
1
Orchestrator Architecture 11
Plug-Ins Installed with the Orchestrator Server 12
Access the Orchestrator API Explorer 15
Configure the Orchestrator Plug-Ins 17
2
Using the vCenter Server Plug-In 19
3
Configuring the vCenter Server Plug-In 19
Configuration Workflows 19
Configure the Connection to a vCenter Server Instance 20
vCenter Server Plug-In Scripting API 20
Using the vCenter Server Plug-In Inventory 21
Access the vCenter Server Plug-In Workflow Library 21
vCenter Server Plug-In Workflow Library 21
Batch Workflows 23
Cluster and Compute Resource Workflows 24
Custom Attributes Workflows 25
Datacenter Workflows 25
Datastore and Files Workflows 25
Datacenter Folder Management Workflows 26
Host Folder Management Workflows 26
Virtual Machine Folder Management Workflows 26
Guest Operation Files Workflows 27
Guest Operation Processes Workflows 27
Power Host Management Workflows 28
Basic Host Management Workflows 28
Host Registration Management Workflows 28
Networking Workflows 29
Distributed Virtual Port Group Workflows 29
Distributed Virtual Switch Workflows 29
Standard Virtual Switch Workflows 30
Resource Pool Workflows 30
Storage Workflows 31
Storage DRS Workflows 31
Basic Virtual Machine Management Workflows 32
Clone Workflows 33
Linked Clone Workflows 34
Linux Customization Clone Workflows 34
VMware, Inc.
3
Page 4

Using VMware vCenter Orchestrator Plug-Ins
Tools Clone Workflows 35
Windows Customization Clone Workflows 35
Device Management Workflows 36
Move and Migrate Workflows 36
Other Workflows 37
Power Management Workflows 37
Snapshot Workflows 38
VMware Tools Workflows 38
Using the Configuration Plug-In 41
4
Access the Configuration Plug-In Workflow Library 41
Configuration Plug-In Workflow Library 41
Using the vCO Library Plug-In 45
5
vCO Library Plug-In Workflows 45
Using the SQL Plug-In 47
6
Configuring the SQL Plug-In 47
SQL Plug-In Configuration Workflows 47
Add a Database 48
Add Tables to a Database 48
Update a Database 49
Running the SQL Sample Workflows 50
Generate a JDBC URL 50
Test a JDBC Connection 50
Create a Table by Using JDBC 51
Insert a Row into a JDBC Table 51
Select Rows from a JDBC Table 52
Delete an Entry from a JDBC Table 52
Delete All Entries from a JDBC Table 53
Drop a JDBC Table 53
Run a Complete JDBC Cycle 54
Using the SQL Plug-In Standard Workflows 54
SQL Plug-In Workflow Library 54
Generate CRUD Workflows for a Table 55
Using the SSH Plug-In 57
7
Configure the SSH Plug-In 57
Running the SSH Plug-In Sample Workflows 57
Generate a Key Pair 58
Change the Key Pair Passphrase 59
Register an Orchestrator Public Key on an SSH Host 59
Run an SSH Command 59
Copy a File from an SSH Host 60
Copy a File to an SSH Host 61
4 VMware, Inc.
Page 5

Using the XML Plug-In 63
8
Running the XML Plug-In Sample Workflows 63
Create a Simple XML Document 64
Find an Element in an XML Document 64
Modify an XML Document 65
Create an Example Address Book from XML 65
Contents
Using the Mail Plug-In 67
9
Define the Default SMTP Connection 67
Using the Mail Plug-In Sample Workflows 68
Access the Mail Plug-In Sample Workflows 68
Mail Plug-In Sample Workflows 68
Test an Example Interaction with Email 69
Using the Net Plug-In 71
10
Using the Enumeration Plug-In 73
11
Time Zone Codes 73
Using the Workflow Documentation Plug-In 77
12
Workflow Library for the Workflow Documentation Plug-In 77
Generate Workflow Documentation 77
Using the HTTP-REST Plug-In 79
13
Configuring the HTTP-REST Plug-In 79
Configuration Workflows 79
Configure Kerberos Authentication 80
Add a REST Host 80
Add a REST Operation 81
Add a Schema to a REST Host 82
Generate a New Workflow from a REST Operation 82
Invoke a REST Operation 83
Using the SOAP Plug-In 85
14
Configuring the SOAP Plug-In 85
Configuration Workflows 85
Add a SOAP Host 86
Configure Kerberos Authentication 87
Generate a New Workflow from a SOAP Operation 87
Test a Custom-Generated Workflow 88
Invoke a SOAP Operation 88
Using the AMQP Plug-In 91
15
Configuring the AMQP Plug-In 91
Configuration Workflows 91
Add a Broker 91
Subscribe to Queues 92
Update a Broker 93
VMware, Inc. 5
Page 6

Using VMware vCenter Orchestrator Plug-Ins
Using the AMQP Plug-In Standard Workflows 93
Declare a Binding 93
Declare a Queue 94
Declare an Exchange 95
Send a Text Message 95
Delete a Binding 96
Using the SNMP Plug-In 97
16
Managing SNMP Devices 97
Device Management Workflows 97
Register an SNMP Device 98
Managing SNMP Queries 98
Query Management Workflows 98
Add a Query to an SNMP Device 99
Managing the SNMP Trap Host 99
Trap Host Management Workflows 100
Set the SNMP Trap Port 100
Receiving SNMP Traps 100
Wait for a Trap on an SNMP Device 100
Set a Trap Policy 101
Edit a Trap Policy 101
Generic SNMP Request Workflows 102
Using the Active Directory Plug-In 103
17
Configuring the Active Directory Plug-In 103
Active Directory Configuration Workflows 103
Using the Active Directory Plug-In Workflow Library 103
Using the Active Directory Plug-In Inventory 104
Access the Active Directory Plug-In Workflow Library 104
Active Directory Plug-In Workflows 104
Using the Dynamic Types Plug-In 107
18
Dynamic Types Configuration Workflows 107
Configuring and Using the Multi-Node Plug-In 109
19
Introduction to the vCenter Orchestrator Multi-Node Plug-In 109
Configuring the Multi-Node Plug-In 110
Servers Configuration Workflows 110
Add an Orchestrator Server 110
Enable Orchestrator for Remote Workflow Execution 110
Using Proxy Workflows 111
Synchronous Proxy Workflows 111
Asynchronous Proxy Workflows 112
Remote Execution Workflows 113
Using the Multi-Node Plug-In Inventory 113
Remote Management Workflows 114
Access the Multi-Node Plug-In API 114
6 VMware, Inc.
Page 7

Multi-Node Plug-In Use Cases 115
Create a Multi-Proxy Action 115
Maintenance of Remote and Proxy Workflows 115
Deploy a Package from a Local Server 116
Contents
Using the PowerShell Plug-In 117
20
Using the PowerShell Plug-In Inventory 117
Configuring the PowerShell Plug-In 118
Configuration Workflows 118
Configure Kerberos Authentication 118
Add a PowerShell Host 119
Running PowerShell Scripts 120
Invoke a PowerShell Script 120
Invoke an External Script 120
Generating Actions 121
Generate an Action from a PowerShell Script 121
Generate an Action for a PowerShell Cmdlet 122
Passing Invocation Results Between Actions 123
PowerCLI Integration with the PowerShell Plug-In 123
Converter Workflows 123
Sample Workflows 123
Access the PowerShell Plug-In API 124
Working with PowerShell Results 124
Examples of Scripts for Common PowerShell Tasks 125
Troubleshooting 127
Servers Not Found in Kerberos Database 127
Unable to Obtain a Kerberos Ticket 127
Kerberos Authentication Fails Due to Time Differences 127
Kerberos Authentication Session Mode Fails 128
Unable to Reach a Key Distribution Center for a Realm 128
Index 129
VMware, Inc. 7
Page 8

Using VMware vCenter Orchestrator Plug-Ins
8 VMware, Inc.
Page 9

Using VMware vCenter Orchestrator Plug-Ins
Using VMware vCenter Orchestrator Plug-Ins provides information and instructions about configuring and
using the standard set of plug-ins installed with VMware vCenter® Orchestrator.
Intended Audience
This information is intended for advanced vSphere administrators and experienced system administrators
who are familiar with virtual machine technology and datacenter operations.
VMware, Inc. 9
Page 10

Using VMware vCenter Orchestrator Plug-Ins
10 VMware, Inc.
Page 11

Introduction to Orchestrator Plug-Ins 1
With the Orchestrator plug-ins, you can access and control external technologies and applications. Exposing
an external technology in an Orchestrator plug-in lets you incorporate objects and functions in workflows
and run workflows on the objects of that external technology.
The external technologies that you access by using plug-ins include virtualization management tools, email
systems, databases, directory services, and remote control interfaces.
Orchestrator provides a standard set of preinstalled plug-ins, which expose the VMware vCenter Server
API, email and authentication capabilities, and other technologies. In addition, the Orchestrator open plugin architecture lets you to develop plug-ins to access other applications. Orchestrator implements open
standards to simplify integration with external systems. For information about developing custom content,
see Developing with VMware vCenter Orchestrator.
The standard set of plug-ins is automatically installed with the Orchestrator server. You might need to
configure some of the plug-ins, for example the vCenter Server plug-in, before start using them.
Plug-ins extend the Orchestrator scripting engine with new object types and methods, and plug-ins publish
notification events from the external system that triggers events in Orchestrator and in the plugged-in
technology. Plug-ins provide an inventory of JavaScript objects that you can access on the Inventory tab of
the Orchestrator client. Each plug-in contains packages of workflows and actions that you can run on the
objects in the inventory to automate the typical use cases of the integrated product.
This chapter includes the following topics:
“Orchestrator Architecture,” on page 11
n
“Plug-Ins Installed with the Orchestrator Server,” on page 12
n
“Access the Orchestrator API Explorer,” on page 15
n
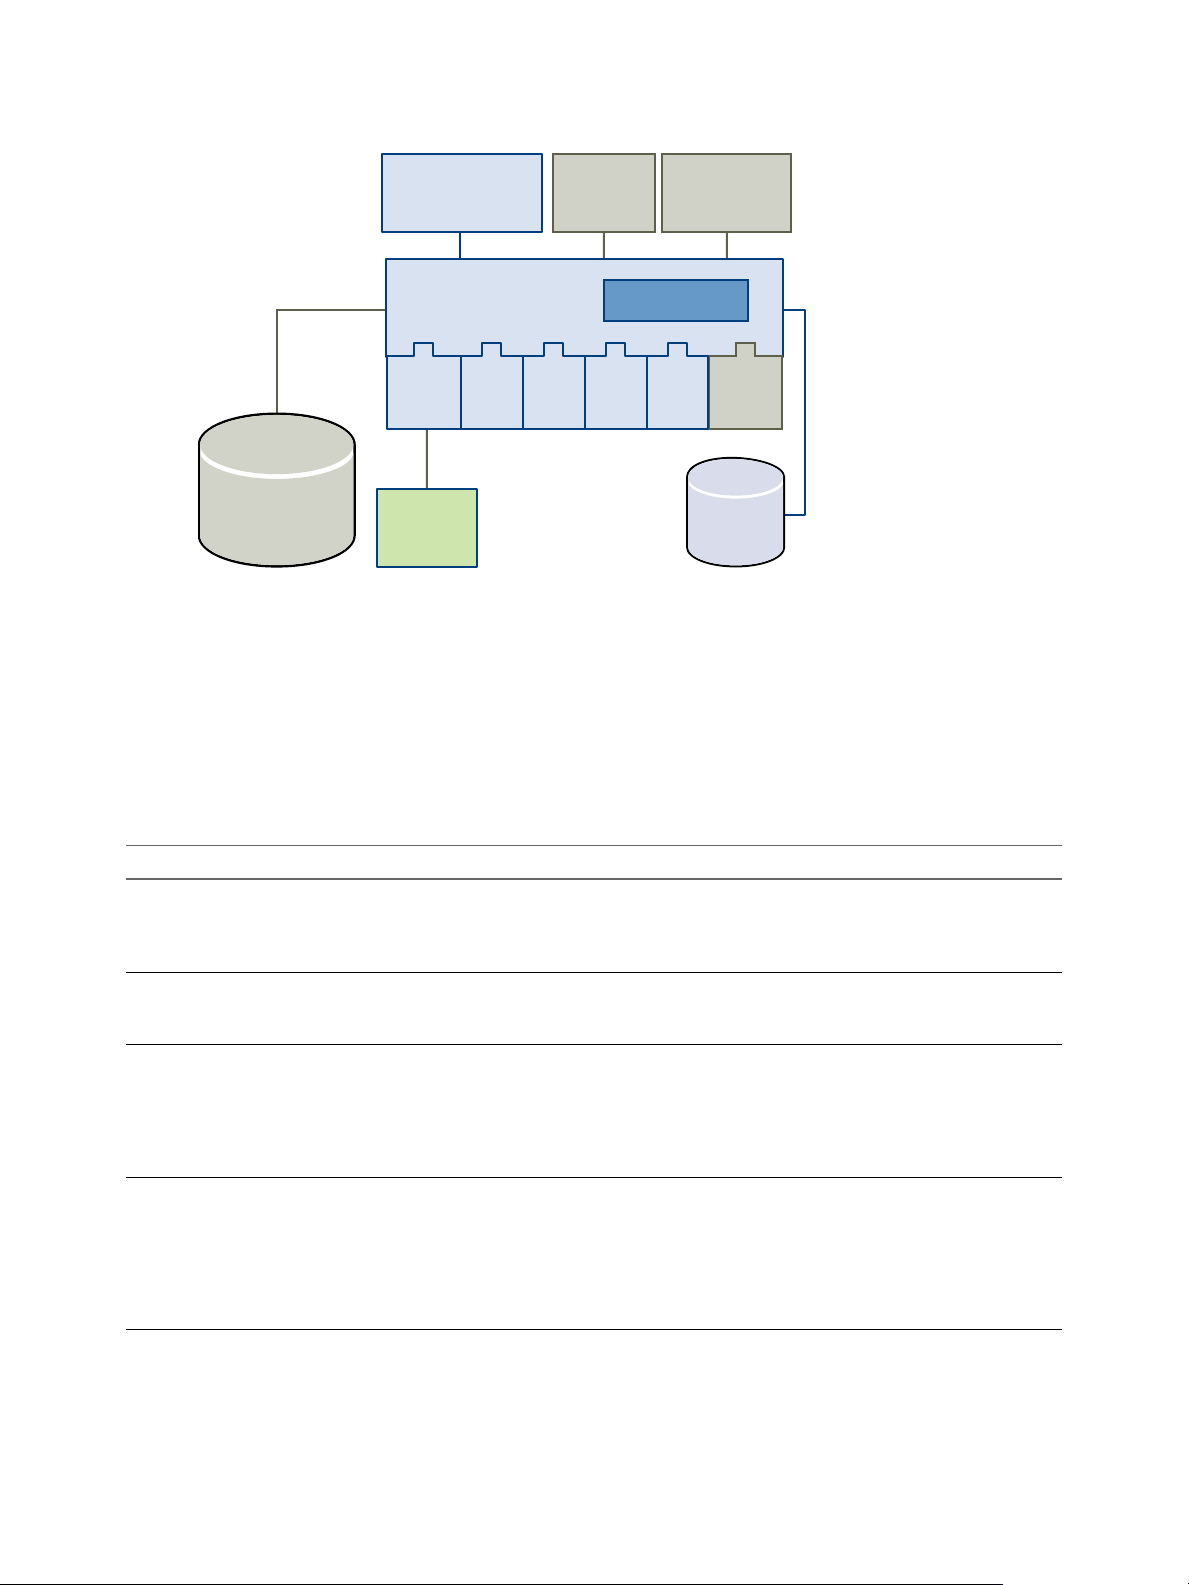
Orchestrator Architecture
Orchestrator contains a workflow library and a workflow engine to allow you to create and run workflows
that automate orchestration processes. You run workflows on the objects of different technologies that
Orchestrator accesses through a series of plug-ins.
Orchestrator provides a standard set of plug-ins, including a plug-in for vCenter Server, to allow you to
orchestrate tasks in the different environments that the plug-ins expose.
Orchestrator also presents an open architecture to allow you to plug in external third-party applications to
the orchestration platform. You can run workflows on the objects of the plugged-in technologies that you
define yourself. Orchestrator connects to a directory services server to manage user accounts, and to a
database to store information from the workflows that it runs. You can access Orchestrator, the Orchestrator
workflows, and the objects it exposes through the Orchestrator client interface, through a Web browser, or
through Web services.
VMware, Inc.
11
Page 12
Orchestrator
database
workflow library
vCenter
Server
XML SSH SQL SMTP
3rd-party
plug-in
workflow engine
browser
access
vCenter
Orchestrator
Client application
vCenter
Server
Directory services
or vCenter
Single Sign On
Web services
REST/SOAP
Using VMware vCenter Orchestrator Plug-Ins
Figure 1‑1. VMware vCenter Orchestrator Architecture
Plug-Ins Installed with the Orchestrator Server
Orchestrator includes a collection of standard plug-ins. Each plug-in exposes an external product API to the
Orchestrator platform. Plug-ins provide inventory classes, extend the scripting engine with new object
types, and publish notification events from the external system. Each plug-in also provides a library of
workflows for automating the typical use cases of the integrated product.
You can see the list of the installed plug-ins on the Plug-ins tab in the Orchestrator configuration interface.
For the plug-ins that require configuration, there are separate tabs in the interface.
Table 1‑1. Plug-Ins Installed with Orchestrator
Plug-In Purpose Configuration
vCenter Server Provides access to the vCenter Server API so that you can
incorporate all of the vCenter Server objects and functions
into the management processes that you automate by
using Orchestrator.
Configuration Provides workflows for configuring the Orchestrator
authentication, database connection, SSL certificates, and
so on.
vCO Library Provides workflows that act as basic building blocks for
customization and automation of client processes. The
workflow library includes templates for lifecycle
management, provisioning, disaster recovery, hot backup,
and other standard processes. You can copy and edit the
templates to modify them according to your needs.
SQL Provides the Java Database Connectivity (JDBC) API,
which is the industry standard for database-independent
connectivity between the Java programming language and
a wide range of databases. The databases include SQL
databases and other tabular data sources, such as
spreadsheets or flat files. The JDBC API provides a calllevel API for SQL-based database access from workflows.
See Configure the vCenter Server
Plug-In.
None
None
None
12 VMware, Inc.
Page 13

Chapter 1 Introduction to Orchestrator Plug-Ins
Table 1‑1. Plug-Ins Installed with Orchestrator (Continued)
Plug-In Purpose Configuration
SSH Provides an implementation of the Secure Shell v2 (SSH-2)
protocol. Allows remote command and file transfer
sessions with password and public key-based
authentication in workflows. Supports keyboardinteractive authentication. Optionally, the SSH plug-in can
provide remote file system browsing directly in the
Orchestrator client inventory.
XML A complete Document Object Model (DOM) XML parser
that you can implement in workflows. Alternatively, you
can use the ECMAScript for XML (E4X) implementation in
the Orchestrator JavaScript API.
Mail Uses Simple Mail Transfer Protocol (SMTP) to send email
from workflows.
Net Wraps the Jakarta Apache Commons Net Library. Provides
implementations of Telnet, FTP, POP3, and IMAP. The
POP3 and IMAP part is used for reading email. In
combination with the Mail plug-in, the Net plug-in
provides complete email sending and receiving capabilities
in workflows.
Workflow documentation Provides workflows that let you generate information in
PDF format about a workflow or a workflow category.
Enumeration Provides common enumerated types that can be used in
workflows by other plug-ins.
HTTP-REST Lets you manage REST Web services by providing
interaction between vCenter Orchestrator and REST hosts.
SOAP Lets you manage SOAP Web services by providing
interaction between vCenter Orchestrator and SOAP hosts.
AMQP Lets you interact with Advanced Message Queuing
Protocol (AMQP) servers also known as brokers.
SNMP Enables vCenter Orchestrator to connect and receive
information from SNMP-enabled systems and devices.
Active Directory Provides interaction between vCenter Orchestrator and
Microsoft Active Directory.
vCO WebOperator A Web view that lets you to access the workflows in the
Orchestrator library and interact with them across a
network by using a Web browser.
Dynamic Types Lets you define dynamic types and create and use objects
of these dynamic types.
Multi-Node Contains workflows for hierarchical orchestration,
management of Orchestrator instances, and scale-out of
Orchestrator activities.
PowerShell Lets you manage PowerShell hosts and run custom
PowerShell operations.
See “Configure the SSH Plug-In,” on
page 57.
None
Set the default values for the
EmailMessage object to use.
See “Define the Default SMTP
Connection,” on page 67.
None
None
None
See “Configuring the HTTP-REST
Plug-In,” on page 79.
See “Configuring the SOAP Plug-
In,” on page 85.
See “Configuring the AMQP Plug-
In,” on page 91.
None
See “Configuring the Active
Directory Plug-In,” on page 103.
None
See Chapter 18, “Using the Dynamic
Types Plug-In,” on page 107.
See Chapter 19, “Configuring and
Using the Multi-Node Plug-In,” on
page 109.
See Chapter 20, “Using the
PowerShell Plug-In,” on page 117.
Plug-In Components
Each plug-in is a DAR file package. The DAR files are stored in Orchestrator_installation_path\app-
server\plugins on the Orchestrator server system. The components of each plug-in, such as workflow
categories and API modules, use different naming conventions.
VMware, Inc. 13
Page 14

Using VMware vCenter Orchestrator Plug-Ins
Table 1‑2. Names of Plug-In Components
Plug-In Name in the
Configuration UI DAR File
vCenter Server
vCO Configuration
vCO Library
SQL
SSH
XML
Mail
Net
Workflow
documentation
Common
enumerated types
Dynamic Types
HTTP-REST Configuration
SOAP
AMQP
SNMP
Active Directory Computer
vCO WebOperator
Orchestrator Servers
PowerShell
o11nplugin-vsphere.dar
o11nplugin-configurator.dar
o11nplugin-library.dar
o11nplugin-database.dar
o11nplugin-ssh.dar
o11nplugin-xml.dar
o11nplugin-mail.dar
o11nplugin-jakartacommonsnet.dar
o11nplugin-wfdocs.dar
o11nplugin-enums.dar
o11n-plugin-dynamictypes.dar
o11n-plugin-soap.dar
o11n-plugin-amqp.dar
o11n-plugin-snmp.dar
o11nplugin-weboperator.dar
o11nplugin-powershell.dar
Workflow
Categories API Module
vCenter
Configuration
Locking
VC
Configurator
Not applicable.
Orchestrator
Troubleshooting
JDBC
SQL
SQL
SSH
XML
Mail
None
Workflow
SSH
XML
Mail
Net
Workflow documentation
documentation
None
Configuration
Enums
DynamicTypes
REST
Configuration
Configuration
Device
SOAP
AMQP
SNMP
Management
Query
Management
Trap Host
Management
AD
Configuration
Organizational
Unit
User
User Group
None N/A
VCO
Configuration
Remote Execution
Remote
Management
Tasks
Workflows
Configuration
PowerShell
Generate
Templates
14 VMware, Inc.
Page 15

Access the Orchestrator API Explorer
Orchestrator provides an API Explorer that you can use to search the Orchestrator API and see the
documentation for JavaScript objects that you can use in scripted elements.
You can consult an online version of the Scripting API for the vCenter Server plug-in on the Orchestrator
documentation home page.
Procedure
1 Log in to the Orchestrator client.
2 Select Tools > API Explorer.
The API Explorer appears. You can use it to search all the objects and functions of the Orchestrator API.
What to do next
Use the API Explorer to write scripts for scriptable elements.
Chapter 1 Introduction to Orchestrator Plug-Ins
VMware, Inc. 15
Page 16

Using VMware vCenter Orchestrator Plug-Ins
16 VMware, Inc.
Page 17

Configure the Orchestrator Plug-Ins 2
To deploy the standard set of plug-ins when the Orchestrator server starts, the Orchestrator system must
authenticate against an LDAP or vCenter Single Sign-On server. You first specify the administrative
credentials that Orchestrator uses with the plug-ins, and enable or disable plug-ins.
If you change the Orchestrator database after configuring and installing the plug-ins, you must click the
Reset current version link on the Troubleshooting tab. This operation deletes the install_directory\app-
server\conf\plugins\_VSOPluginInstallationVersion.xml file, which contains information about the
version of the plug-ins already installed, and forces plug-in reinstallation.
Prerequisites
Set up an LDAP or vCenter Single Sign-On server and configure the Orchestrator authentication settings.
Procedure
1 Log in to the Orchestrator configuration interface as vmware.
2 Click Plug-ins.
3 Type the credentials for a user who is a member of the Orchestrator administrators group that you
specified on the Authentication tab.
When the Orchestrator server starts, the system uses these credentials to set up the plug-ins. The system
checks the enabled plug-ins and performs any necessary internal installations such as package import,
policy run, script launch, and so on.
VMware, Inc.
4 (Optional) To disable a plug-in, deselect the check box next to it.
This action does not remove the plug-in file.
5 Click Apply changes.
The first time the server starts, it installs the selected plug-ins.
What to do next
You can configure the settings for Mail, SSH, and vCenter Server plug-ins.
17
Page 18

Using VMware vCenter Orchestrator Plug-Ins
18 VMware, Inc.
Page 19

Using the vCenter Server Plug-In 3
You can use the vCenter Server plug-in to manage multiple vCenter Server instances. You can create
workflows that use the vCenter Server plug-in API to automate tasks in your vCenter Server environment.
The vCenter Server plug-in maps the vCenter Server API to the JavaScript that you can use in workflows.
The plug-in also provides actions that perform individual vCenter Server tasks that you can include in
workflows.
The vCenter Server plug-in provides a library of standard workflows that automate vCenter Server
operations. For example, you can run workflows that create, clone, migrate, or delete virtual machines.
This chapter includes the following topics:
“Configuring the vCenter Server Plug-In,” on page 19
n
“vCenter Server Plug-In Scripting API,” on page 20
n
“Using the vCenter Server Plug-In Inventory,” on page 21
n
“Access the vCenter Server Plug-In Workflow Library,” on page 21
n
“vCenter Server Plug-In Workflow Library,” on page 21
n
Configuring the vCenter Server Plug-In
Before managing the objects in your vSphere inventory by using Orchestrator and to run workflows on the
objects, you must configure the vCenter Server plug-in and define the connection parameters between
Orchestrator and the vCenter Server instances you want to orchestrate.
You can configure the vCenter Server plug-in by running the vCenter Server configuration workflows from
the Orchestrator client.
To manage the objects in your vSphere inventory by using the vSphere Web Client, make sure that you
configure the Orchestrator server to work with the same vCenter Single Sign-On instance to which both
vCenter Server and vSphere Web Client are pointing. You must also ensure that Orchestrator is registered as
a vCenter Server extension. You register Orchestrator as a vCenter Server extension when you specify a user
(by providing the user name and password), who has the privileges to manage vCenter Server extensions.
Configuration Workflows
The Configuration workflow category of the vCenter Server plug-in contains workflows that let you manage
the connections to vCenter Server instances.
You can access these workflows from Library > vCenter > Configuration in the Workflows view of the
Orchestrator client.
VMware, Inc.
19
Page 20

Using VMware vCenter Orchestrator Plug-Ins
Workflow Name Description
Add a vCenter Server
instance
Remove a vCenter Server
instance
Update a vCenter Server
instance
Configures Orchestrator to connect to a new vCenter Server instance so that you can run
workflows over the objects in the vSphere infrastructure.
Removes a vCenter Server instance from the Orchestrator inventory. You will no longer be
able to orchestrate this vCenter Server instance.
Updates the connection to a vCenter Server instance. For example, if the IP address of your
vCenter Server system changes, you must update the connection parameters to the
vCenter Server instance so that you can manage your vSphere inventory with Orchestrator.
Configure the Connection to a vCenter Server Instance
In addition to configuring the vCenter Server plug-in by using the Orchestrator configuration interface, you
can configure the connections to vCenter Server instances by running the vCenter Server configuration
workflows in the Orchestrator client.
Procedure
1 Log in to the Orchestrator client as an administrator.
2 Click the Workflows view in the Orchestrator client.
3 In the workflows hierarchical list, select Library > vCenter > Configuration and navigate to the Add a
vCenter Server instance workflow.
4 Right-click the Add a vCenter Server instance workflow and select Start workflow.
5 Type the IP address or the DNS name of the machine on which the vCenter Server instance you want to
add is installed.
6 Retain the default port value, 443.
7 Keep the default location of the SDK to use to connect to your vCenter Server instance.
8 Select whether you want to orchestrate the vCenter Server instance, and click Next.
9 Select whether you want to ignore certificates warnings for the vCenter Server instances you want to
add.
If you select Yes, the vCenter Server instance certificate is accepted silently and the certificate is added
to the trusted store.
10 (Optional) Type the user domain.
You must specify the user domain name only when you select to use a shared session.
11 Click Submit to run the workflow.
After the workflow runs successfully, the vCenter Server instance and all vSphere objects that belong to it
appear in the Inventory view.
vCenter Server Plug-In Scripting API
The vCenter Server scripting API contains classes, with their respective attributes, methods, and
constructors that allow interaction between vCenter Orchestrator and vCenter Server. You can use the API
to develop custom workflows.
For a list of available API objects, see
http://www.vmware.com/support/orchestrator/doc/vco_vsphere55_api/index.html.
20 VMware, Inc.
Page 21

Chapter 3 Using the vCenter Server Plug-In
Using the vCenter Server Plug-In Inventory
The vCenter Server plug-in exposes all objects of the connected vCenter Server hosts in the Inventory view.
You can use the Inventory tab to add authorization elements or to run workflows on vCenter Server objects.
If you enable the Use contextual menu in inventory option from the Inventory tab of the User preferences
tool, all of the workflows that you can run on the selected inventory object appear in a pop-up menu.
Access the vCenter Server Plug-In Workflow Library
You must use the Orchestrator client or the vSphere Web Client to access the elements from the
vCenter Server plug-in workflow library.
Prerequisites
Configure the vCenter Server plug-in in the Orchestrator configuration interface.
n
Log in to the Orchestrator client as a user who can run vCenter Server workflows.
n
Procedure
1 Log in to the Orchestrator client and select Design or Run from the drop-down menu in the left upper
corner.
2 Click the Workflows view in the Orchestrator client left pane.
3 Expand the hierarchical list to Library > vCenter.
What to do next
Review the workflow library.
vCenter Server Plug-In Workflow Library
The vCenter Server plug-in workflow library contains workflows that you can use to run automated
processes related to the management of vCenter Server.
Batch Workflows on page 23
n
Batch workflows populate configuration elements or run workflows on a selected vCenter Server
object.
Cluster and Compute Resource Workflows on page 24
n
With cluster and compute resource workflows, you can create, rename or delete a cluster, and enable
or disable high availability, Distributed Resource Scheduler, and vCloud Distributed Storage on a
cluster.
Custom Attributes Workflows on page 25
n
With custom attributes workflows, you can add custom attributes to virtual machines or get a custom
attribute for a virtual machine.
Datacenter Workflows on page 25
n
With datacenter workflows, you can create, delete, reload, rename, or rescan a datacenter.
Datastore and Files Workflows on page 25
n
With datastore and files workflows, you can delete a list of files, find unused files in a datastore, and
so on.
Datacenter Folder Management Workflows on page 26
n
With datacenter folder management workflows, you can create, delete, or rename a datacenter folder.
VMware, Inc. 21
Page 22

Using VMware vCenter Orchestrator Plug-Ins
Host Folder Management Workflows on page 26
n
With host folder management workflows, you can create, delete, or rename a host folder.
Virtual Machine Folder Management Workflows on page 26
n
With virtual machine folder management workflows, you can create, delete, or rename a virtual
machine folder.
Guest Operation Files Workflows on page 27
n
With guest operation files workflows, you can manage files in a guest operating system.
Guest Operation Processes Workflows on page 27
n
With guest operation processes workflows, you can get information and control the running processes
in a guest operating system.
Power Host Management Workflows on page 28
n
With power host management workflows you can reboot or shut down a host.
Basic Host Management Workflows on page 28
n
With basic host management workflows, you can put a host into maintenance mode, make a host exit
maintenance mode, move a host to a folder or a cluster, and reload data from a host.
Host Registration Management Workflows on page 28
n
With host registration management workflows, you can add a host to a cluster, disconnect or
reconnect a host from a cluster, and so on.
Networking Workflows on page 29
n
With networking workflows you can add a port group to distributed virtual switch, create a
distributed virtual switch with a port group, and so on.
Distributed Virtual Port Group Workflows on page 29
n
With distributed virtual port group workflows you can update or delete a port group, and reconfigure
the port group.
Distributed Virtual Switch Workflows on page 29
n
With distributed virtual switch workflows, you can create, update or delete a distributed virtual
switch, and create, delete, or update a private VLAN.
Standard Virtual Switch Workflows on page 30
n
With standard virtual switch workflows you can create, update, or delete a standard virtual switch,
and create, delete, or update port groups in standard virtual switches.
Resource Pool Workflows on page 30
n
With resource pool workflows you can create, rename, reconfigure or delete a resource pool, and get
resource pool information.
Storage Workflows on page 31
n
With storage workflows you can perform storage-related operations.
Storage DRS Workflows on page 31
n
With storage DRS workflows you perform storage-related operations, such as creating and
configuring a datastore cluster, removing a datastore from cluster, adding storage to a cluster, and so
on.
Basic Virtual Machine Management Workflows on page 32
n
With basic virtual machine management workflows you can perform basic operations on virtual
machines, for example, create, rename or delete a virtual machine, upgrade virtual hardware, and so
on.
22 VMware, Inc.
Page 23

Chapter 3 Using the vCenter Server Plug-In
Clone Workflows on page 33
n
With clone workflows you can clone virtual machines with or without customizing the virtual
machine properties.
Linked Clone Workflows on page 34
n
With linked clone workflows, you can perform linked clone operations such as restoring a virtual
machine from a linked clone, creating a linked clone, and so on.
Linux Customization Clone Workflows on page 34
n
With Linux customization workflows you can clone a Linux virtual machine and customize the guest
operating system.
Tools Clone Workflows on page 35
n
With tools clone workflows you can obtain customization information about the operating system of
the virtual machine, information needed to update a virtual device, and so on.
Windows Customization Clone Workflows on page 35
n
With Windows customization clone workflows you can clone Windows virtual machines and
customize the guest operating system.
Device Management Workflows on page 36
n
With device management workflows you can manage the devices that are connected to a virtual
machine or to a host datastore.
Move and Migrate Workflows on page 36
n
With move and migrate workflows, you can migrate virtual machines.
Other Workflows on page 37
n
With other workflows, you can enable and disable Fault Tolerance (FT), extract virtual machine
information, and find orphaned virtual machines.
Power Management Workflows on page 37
n
With power management workflows, you can power on and off virtual machines, reboot the guest
operating system of a virtual machine, suspend a virtual machine, and so on.
Snapshot Workflows on page 38
n
With snapshot workflows, you can perform snapshot-related operations.
VMware Tools Workflows on page 38
n
With VMware Tools workflows, you can perform VMware Tools-related tasks on virtual machines.
Batch Workflows
Batch workflows populate configuration elements or run workflows on a selected vCenter Server object.
You can access the batch workflows from Library > vCenter > Batch in the Workflows view of the
Orchestrator client.
Fill batch configuration
elements
Populates the configuration elements that the Run a workflow on a selection
of objects workflow uses. Performs the following tasks:
Resets the BatchObject and BatchAction configuration elements.
n
Fills the BatchObject configuration element with all of the workflows
n
that have only one input parameter.
VMware, Inc. 23
Page 24

Using VMware vCenter Orchestrator Plug-Ins
Fills the BatchAction configuration element with all of the actions that
n
have no input parameters or one input parameter and that have an array
as the returnType.
Run a workflow on a
selection of objects
Runs a workflow on a selection of vCenter Server objects, taking one action
as input. This is the action that retrieves the list of objects on which to run the
workflow. To return the objects without running the selected workflow, run
the workflow in simulation mode.
Cluster and Compute Resource Workflows
With cluster and compute resource workflows, you can create, rename or delete a cluster, and enable or
disable high availability, Distributed Resource Scheduler, and vCloud Distributed Storage on a cluster.
You can access the cluster and compute resource workflows from Library > vCenter > Cluster and Compute
Resource in the Workflows view of the Orchestrator client.
Add DRS virtual
machine group to
cluster
Add virtual machines to
DRS group
Create cluster
Delete cluster
Disable DRS on cluster
Disable HA on cluster
Adds a DRS virtual machine group to a cluster.
Adds a virtual machine list to an existing DRS virtual machine group.
Creates a new cluster in a host folder.
Deletes a cluster.
Disables DRS on a cluster.
Disables high availability on a cluster.
Disable vCloud
Distributed Storage on
cluster
Enable DRS on cluster
Enable HA on cluster
Enable vCloud
Distributed Storage on
cluster
Remove virtual machine
DRS group from cluster
Remove virtual
machines from DRS
group
Rename cluster
Disables vCloud Distributed Storage on a cluster.
Enables DRS on a cluster.
Enables high availability on a cluster.
Enables vCloud Distributed Storage on a cluster.
Removes a DRS virtual machine group from a cluster.
Removes virtual machines from a cluster DRS group.
Renames a cluster.
24 VMware, Inc.
Page 25

Chapter 3 Using the vCenter Server Plug-In
Custom Attributes Workflows
With custom attributes workflows, you can add custom attributes to virtual machines or get a custom
attribute for a virtual machine.
You can access the custom attributes workflows from Library > vCenter > Custom Attributes in the
Workflows view of the Orchestrator client.
Add custom attribute to
a virtual machine
Add custom attribute to
multiple virtual
machines
Get custom attribute
Adds a custom attribute to a virtual machine.
Adds a custom attribute to a selection of virtual machines.
Gets a custom attribute for a virtual machine in vCenter Server.
Datacenter Workflows
With datacenter workflows, you can create, delete, reload, rename, or rescan a datacenter.
You can access the datacenter workflows from Library > vCenter > Datacenter in the Workflows view of the
Orchestrator client.
Create datacenter
Delete datacenter
Reload datacenter
Rename datacenter
Rescan datacenter
HBAs
Creates a new data center in a data center folder.
Deletes a data center.
Forces vCenter Server to reload data from a data center.
Renames a data center and waits for the task to complete.
Scans the hosts in a data center and initiates a rescan on the host bus
adapters to discover new storage.
Datastore and Files Workflows
With datastore and files workflows, you can delete a list of files, find unused files in a datastore, and so on.
You can access the datastore and files workflows from Library > vCenter > Datastore and Files in the
Workflows view of the Orchestrator client.
Delete all files
Delete all unused
datastore files
Export unused
datastore files
Find unused files in
datastores
Get all configuration,
template, and disk files
from virtual machines
Deletes a list of files.
Searches all datastores in the vCenter Server environment and deletes all
unused files.
Searches all datastores and creates an XML descriptor file that lists all
unused files.
Searches the vCenter Server environment for all unused disks (*.vmdk),
virtual machines (*.vmx), and template (*.vmtx) files that are not associated
with any vCenter Server instances registered with Orchestrator.
Creates a list of all virtual machine descriptor files and a list of all virtual
machine disk files, for all datastores.
VMware, Inc. 25
Page 26

Using VMware vCenter Orchestrator Plug-Ins
Log all datastore files
Log unused datastore
files
Creates a log for every virtual machine configuration file and every virtual
machine file found in all datastores.
Searches the vCenter Server environment for unused files that are registered
on virtual machines and exports a log of the files in a text file.
Datacenter Folder Management Workflows
With datacenter folder management workflows, you can create, delete, or rename a datacenter folder.
You can access the datacenter folder management workflows from Library > vCenter > Folder management
> Datacenter folder in the Workflows view of the Orchestrator client.
Create datacenter folder
Delete datacenter folder
Rename datacenter
folder
Creates a data center folder.
Deletes a data center folder and waits for the task to complete.
Renames a data center folder and waits for the task to complete.
Host Folder Management Workflows
With host folder management workflows, you can create, delete, or rename a host folder.
You can access the host folder management workflows from Library > vCenter > Folder management >
Host folder in the Workflows view of the Orchestrator client.
Create host folder
Delete host folder
Rename host folder
Creates a host folder.
Deletes a host folder and waits for the task to complete.
Renames a host folder and waits for the task to complete.
Virtual Machine Folder Management Workflows
With virtual machine folder management workflows, you can create, delete, or rename a virtual machine
folder.
You can access the virtual machine folder management workflows from Library > vCenter > Folder
management > VM folder in the Workflow view of the Orchestrator client.
Create virtual machine
folder
Delete virtual machine
folder
Rename virtual machine
folder
Creates a virtual machine folder.
Deletes a virtual machine folder and waits for the task to complete.
Renames a virtual machine folder and waits for the task to complete.
26 VMware, Inc.
Page 27

Chapter 3 Using the vCenter Server Plug-In
Guest Operation Files Workflows
With guest operation files workflows, you can manage files in a guest operating system.
You can access the guest operation files workflows from Library > vCenter > Guest operations > Files in the
Workflows view of the Orchestrator client.
Check for directory in
guest
Check for file in guest
Copy file from guest to
Orchestrator
Copy file from
Orchestrator to guest
Create directory in
guest
Create temporary
directory in guest
Create temporary file in
guest
Delete directory in
guest
Delete file in guest
List path in guest
Move directory in guest
Verifies that a directory exists in a guest virtual machine.
Verifies that a file exists in a guest virtual machine.
Copies a specified file from a guest file system to an Orchestrator server.
Copies a specified file from an Orchestrator server to a guest file system.
Creates a directory in a guest virtual machine.
Creates a temporary directory in a guest virtual machine.
Creates a temporary file in a guest virtual machine.
Deletes a directory from a guest virtual machine.
Deletes a file from a guest virtual machine.
Shows a path in a guest virtual machine.
Moves a directory in a guest virtual machine.
Move file in guest
Moves a file in a guest virtual machine.
Guest Operation Processes Workflows
With guest operation processes workflows, you can get information and control the running processes in a
guest operating system.
You can access the guest operation files workflows from Library > vCenter > Guest operations > Processes
in the Workflows view of the Orchestrator client.
Get environment
variables from guest
Get processes from
guest
Run program in guest
Stop process in guest
Returns a list with environmental variables from a guest. An interactive
session returns the variables of the user who is currently logged in.
Returns a list with the processes running in the guest operating system and
the recently completed processes started by the API.
Starts a program in a guest operating system.
Stops a process in a guest operating system.
VMware, Inc. 27
Page 28

Using VMware vCenter Orchestrator Plug-Ins
Power Host Management Workflows
With power host management workflows you can reboot or shut down a host.
You can access the power host management workflows from Library > vCenter > Host management >
Power in the Workflows view of the Orchestrator client.
Reboot host
Shut down host
Reboots a host. If the Orchestrator client is connected directly to the host, it
does not receive an indication of success in the returned task, but rather loses
the connection to the host if the operation succeeds.
Shuts down a host. If the Orchestrator client is connected directly to the host,
it does not receive an indication of success in the returned task, but rather
loses the connection to the host if the operation succeeds.
Basic Host Management Workflows
With basic host management workflows, you can put a host into maintenance mode, make a host exit
maintenance mode, move a host to a folder or a cluster, and reload data from a host.
You can access the basic host management workflows from Library > vCenter > Host management > Basic
in the Workflows view of the Orchestrator client.
Enter maintenance
mode
Exit maintenance mode
Move host to cluster
Move host to folder
Puts the host into maintenance mode. You can cancel the task.
Exits maintenance mode. You can cancel the task.
Moves an existing host into a cluster. The host must be part of the same data
center, and if the host is part of a cluster, the host must be in maintenance
mode.
Moves a host into a folder as a standalone host. The host must be part of a
ClusterComputeResource in the same data center and the host must be in
maintenance mode.
Reload host
Forces vCenter Server to reload data from a host.
Host Registration Management Workflows
With host registration management workflows, you can add a host to a cluster, disconnect or reconnect a
host from a cluster, and so on.
You can access the host management registration workflows from Library > vCenter > Host management >
Registration in the Workflows view of the Orchestrator client.
Add host to cluster
Add standalone host
Disconnect host
Reconnect host
Reconnect host with all
information
Remove host
28 VMware, Inc.
Adds a host to the cluster. This workflow fails if it cannot authenticate the
SSL certificate of the host.
Registers a host as a standalone host.
Disconnects a host from vCenter Server.
Reconnects a disconnected host by providing only the host information.
Reconnects a disconnected host by providing all information about the host.
Removes a host and unregisters it from vCenter Server. If the host is part of a
cluster, you must put it in maintenance mode before attempting to remove it.
Page 29

Chapter 3 Using the vCenter Server Plug-In
Networking Workflows
With networking workflows you can add a port group to distributed virtual switch, create a distributed
virtual switch with a port group, and so on.
You can access the networking workflows from Library > vCenter > Networking in the Workflows view of
the Orchestrator client.
Add port group to
distributed virtual
switch
Attach host system to
distributed virtual
switch
Create distributed
virtual switch with port
group
Adds a new distributed virtual port group to a specified distributed virtual
switch.
Adds a host to a distributed virtual switch.
Creates a new distributed virtual switch with a distributed virtual port
group.
Distributed Virtual Port Group Workflows
With distributed virtual port group workflows you can update or delete a port group, and reconfigure the
port group.
You can access the distributed virtual port group workflows from Library > vCenter > Networking >
Distributed virtual port group in the Workflows view of the Orchestrator client.
Connect virtual machine
NIC number to
distributed virtual port
group
Delete distributed
virtual port group
Reconfigures the network connection of the specified virtual machine NIC
number to connect to the specified distributed virtual port group. If no NIC
number is specified, the number zero is used.
Deletes a specified distributed virtual port group.
Set teaming options
Update distributed
virtual port group
Provides an interface to manage the teaming options for a distributed virtual
port group.
Updates the configuration of a specified distributed virtual port group.
Distributed Virtual Switch Workflows
With distributed virtual switch workflows, you can create, update or delete a distributed virtual switch, and
create, delete, or update a private VLAN.
You can access the distributed virtual switch workflows from Library > vCenter > Networking >
Distributed virtual switch in the Workflows view of the Orchestrator client.
Create distributed
virtual switch
Create private VLAN
Delete distributed
virtual switch
VMware, Inc. 29
Creates a distributed virtual switch in the specified network folder with a
name and uplink port names that you specify. You must specify at least one
uplink port name.
Creates a VLAN on the specified distributed virtual switch.
Deletes a distributed virtual switch and all associated elements.
Page 30

Using VMware vCenter Orchestrator Plug-Ins
Delete private VLAN
Update distributed
virtual switch
Update private VLAN
Deletes a VLAN from a specified distributed virtual switch. If a secondary
VLAN exists, you should first delete the secondary VLAN.
Updates the properties of a distributed virtual switch.
Updates a VLAN on the specified distributed virtual switch.
Standard Virtual Switch Workflows
With standard virtual switch workflows you can create, update, or delete a standard virtual switch, and
create, delete, or update port groups in standard virtual switches.
You can access the standard virtual switch workflows from Library > vCenter > Networking > Standard
virtual switch in the Workflows view of the Orchestrator client.
Add port group in
standard virtual switch
Create standard virtual
switch
Delete port group from
standard virtual switch
Delete standard virtual
switch
Adds a port group in a standard virtual switch.
Creates a standard virtual switch.
Deletes a port group from a standard virtual switch.
Deletes a standard virtual switch from a host's network configuration.
Retrieve all standard
virtual switches
Update port group in
standard virtual switch
Update standard virtual
switch
Update VNIC for port
group in standard
virtual switch
Retrieves all standard virtual switches from a host.
Updates the properties of a port group in a standard virtual switch.
Updates the properties of a standard virtual switch.
Updates a VNIC associated with a port group in a standard virtual switch.
Resource Pool Workflows
With resource pool workflows you can create, rename, reconfigure or delete a resource pool, and get
resource pool information.
You can access the resource pool workflows from Library > vCenter > Resource Pool in the Workflows
view of the Orchestrator client.
Create resource pool
Create resource pool
with specified values
Creates a resource pool with the default CPU and memory allocation values.
To create a resource pool in a cluster, the cluster must have VMware DRS
enabled.
Creates a resource pool with CPU and memory allocation values that you
specify. To create a resource pool in a cluster, the cluster must have VMware
DRS enabled.
Delete resource pool
Get resource pool
information
30 VMware, Inc.
Deletes a resource pool and waits for the task to complete.
Returns CPU and memory information about a given resource pool.
Page 31

Chapter 3 Using the vCenter Server Plug-In
Reconfigure resource
pool
Rename resource pool
Reconfigures CPU and memory allocation configuration for a given resource
pool.
Renames a resource pool and waits for the task to complete.
Storage Workflows
With storage workflows you can perform storage-related operations.
You can access the storage workflows from Library > vCenter > Storage in the Workflows view of the
Orchestrator client.
Add datastore on
iSCSI/FC/local SCSI
Add datastore on NFS
Add iSCSI target
Create VMFS for all
available disks
Delete datastore
Delete iSCSI target
Creates a datastore on a Fibre Channel, iSCSI or local SCSI disk. Only disks
that are not currently in use by an existing VMFS are applicable to new
datastore creation. The new datastore allocates the maximum available space
of the specified disk.
Adds a datastore on an NFS server.
Adds iSCSI targets to a vCenter Server host. The targets can be of the type
Send or Static.
Creates a VMFS volume for all available disks of a specified host.
Deletes datastores from a vCenter Server host.
Deletes already configured iSCSI targets. The targets can be of type Send or
Static.
Disable iSCSI adapter
Display all datastores
and disks
Enable iSCSI adapter
List all storage adapters
Disables the software iSCSI adapter of a specified host.
Displays the existing datastores and available disks on a specified host.
Enables an iSCSI adapter.
Lists all storage adapters of a specified host.
Storage DRS Workflows
With storage DRS workflows you perform storage-related operations, such as creating and configuring a
datastore cluster, removing a datastore from cluster, adding storage to a cluster, and so on.
You can access the storage DRS workflows from Library > vCenter > Storage > Storage DRS in the
Workflows view of the Orchestrator client.
Add datastore to cluster
Change Storage DRS
per virtual machine
configuration
Configure datastore
cluster
Adds datastores to a datastore cluster. Datastores must be able to connect to
all hosts to be included in the datastore cluster. Datastores must have the
same connection type to reside within a datastore cluster.
Sets Storage DRS settings for each virtual machine.
Configures datastore cluster setting values for automation and runtime rules.
Create simple datastore
cluster
VMware, Inc. 31
Creates a simple datastore cluster with default configuration. The new
datastore cluster contains no datastores.
Page 32

Using VMware vCenter Orchestrator Plug-Ins
Create Storage DRS
scheduled task
Create virtual machine
anti-affinity rule
Create VMDK antiaffinity rule
Creates a scheduled task for reconfiguring a datastore cluster. Only
automation and runtime rules can be set.
Creates an anti-affinity rule to indicate that all virtual disks of certain virtual
machines must be kept on different datastores.
Creates a VMDK anti-affinity rule for a virtual machine that indicates which
of its virtual disks must be kept on different datastores. The rule applies to
the virtual disks of the selected virtual machine.
Remove datastore
cluster
Remove datastore from
cluster
Remove Storage DRS
Removes a datastore cluster. Removing a datastore cluster also removes all
of the settings and the alarms for the cluster from the vCenter Server system.
Removes a datastore from a datastore cluster and puts the datastore in a
datastore folder.
Removes a scheduled Storage DRS task.
scheduled task
Remove virtual machine
Removes a virtual machine anti-affinity rule for a given datastore cluster.
anti-affinity rule
Remove VMDK anti-
Removes a VMDK anti-affinity rule for a given datastore cluster.
affinity rule
Basic Virtual Machine Management Workflows
With basic virtual machine management workflows you can perform basic operations on virtual machines,
for example, create, rename or delete a virtual machine, upgrade virtual hardware, and so on.
You can access the basic virtual machine management workflows from Library > vCenter > Virtual
Machine management > Basic in the Workflows view of the Orchestrator client.
Create custom virtual
machine
Create simple
dvPortGroup virtual
Creates a virtual machine with the specified configuration options and
additional devices.
Creates a simple virtual machine. The network used is a Distributed Virtual
Port Group.
machine
Create simple virtual
machine
Delete virtual machine
Get virtual machines by
name
Mark as template
Creates a virtual machine with the most common devices and configuration
options.
Removes a virtual machine from the inventory and datastore.
Returns a list of virtual machines from all registered vCenter Server hosts
that match the provided expression.
Converts an existing virtual machine to a template, not allowing it to start.
You can use templates to create virtual machines.
Mark as virtual machine
Move virtual machine to
Converts an existing template to a virtual machine, allowing it to start.
Moves a virtual machine to a specified virtual machine folder.
folder
Move virtual machine to
resource pool
Move virtual machines
Moves a virtual machine to a resource pool. If the target resource pool is not
in the same cluster, you must use the migrate or relocate workflows.
Moves several virtual machines to a specified virtual machine folder.
to folder
32 VMware, Inc.
Page 33

Chapter 3 Using the vCenter Server Plug-In
Move virtual machines
to resource pool
Register virtual machine
Reload virtual machine
Rename virtual machine
Set virtual machine
performance
Unregister virtual
machine
Upgrade virtual
machine hardware
(force if required)
Upgrade virtual
machine
Wait for task and
answer virtual machine
question
Moves several virtual machines to a resource pool.
Registers a virtual machine. The virtual machine files must be placed in an
existing datastore and must not be already registered.
Forces vCenter Server to reload a virtual machine.
Renames an existing virtual machine on the vCenter Server system or host
and not on the datastore.
Changes performance settings such as shares, minimum and maximum
values, shaping for network, and disk access of a virtual machine.
Removes an existing virtual machine from the inventory.
Upgrades the virtual machine hardware to the latest revision that the host
supports. This workflow forces the upgrade to continue, even if VMware
Tools is out of date. If the VMware Tools is out of date, forcing the upgrade
to continue reverts the guest network settings to the default settings. To
avoid this situation, upgrade VMware Tools before running the workflow.
Upgrades the virtual hardware to the latest revision that the host supports.
An input parameter allows a forced upgrade even if VMware Tools is out of
date.
Waits for a vCenter Server task to complete or for the virtual machine to ask
a question. If the virtual machine requires an answer, accepts user input and
answers the question.
Clone Workflows
With clone workflows you can clone virtual machines with or without customizing the virtual machine
properties.
You can access the clone workflows from Library > vCenter > Virtual Machine management > Clone in the
Workflows view of the Orchestrator client.
Clone virtual machine
from properties
Clone virtual machine,
no customization
Customize virtual
machine from
properties
Clones virtual machines by using properties as input parameters.
Clones a virtual machine without changing anything except the virtual
machine UUID.
Customizes a virtual machine by using properties as input parameters.
VMware, Inc. 33
Page 34

Using VMware vCenter Orchestrator Plug-Ins
Linked Clone Workflows
With linked clone workflows, you can perform linked clone operations such as restoring a virtual machine
from a linked clone, creating a linked clone, and so on.
You can access the linked clone workflows from Library > vCenter > Virtual Machine management > Clone
> Linked Clone folder and its subfolders in the Workflows view of the Orchestrator client.
Restore virtual machine
from linked clone
Set up virtual machine
for linked clone
Create a linked clone of
a Linux machine with
multiple NICs
Create a linked clone of
a Linux machine with a
single NIC
Create a linked clone of
a Windows machine
with multiple NICs and
credential
Create a linked clone of
a Windows machine
with a single NIC and
credential
Create a linked clone
with no customization
Removes a virtual machine from a linked clone setup.
Prepares a virtual machine to be link cloned.
Creates a linked clone of a Linux virtual machine, performs the guest
operating system customization, and configures up to four virtual network
cards.
Creates a linked clone of a Linux virtual machine, performs the guest
operating system customization, and configures one virtual network card.
Creates a linked clone of a Windows virtual machine and performs the guest
operating system customization. Configures up to four virtual network cards
and a local administrator user account.
Creates a linked clone of a Windows virtual machine and performs the guest
operating system customization. Configures one virtual network card and a
local administrator user account.
Creates the specified number of linked clones of a virtual machine.
Linux Customization Clone Workflows
With Linux customization workflows you can clone a Linux virtual machine and customize the guest
operating system.
You can access the Linux customization clone workflows from Library > vCenter > Virtual Machine
management > Clone > Linux Customization in the Workflows view of the Orchestrator client.
Clone a Linux machine
with multiple NICs
Clone a Linux machine
with a single NIC
Clones a Linux virtual machine, performs the guest operating system
customization, and configures up to four virtual network cards.
Clones a Linux virtual machine, performs the guest operating system
customization, and configures one virtual network card.
34 VMware, Inc.
Page 35

Chapter 3 Using the vCenter Server Plug-In
Tools Clone Workflows
With tools clone workflows you can obtain customization information about the operating system of the
virtual machine, information needed to update a virtual device, and so on.
You can access the tools clone workflows from Library > vCenter > Virtual Machine management > Clone >
Tools in the Workflows view of the Orchestrator client.
Get a virtual Ethernet
card to change the
network
Get Linux customization
Get multiple virtual
Ethernet card device
changes
Get NIC setting map
Get Windows
customization for
Sysprep with
credentials
Get Windows
customization for
Sysprep with
Unattended.txt
Get Windows
customization for
Sysprep
Returns a new ethernet card to update a virtual device. Contains only the
device key of the given virtual device and the new network.
Returns the Linux customization preparation.
Returns an array of VirtualDeviceConfigSpec objects for add and remove
operations on VirtualEthernetCard objects.
Returns the setting map for a virtual network card by using
VimAdapterMapping.
Returns customization information about the Microsoft Sysprep process,
with credentials. Workflows for cloning Windows virtual machines use this
workflow.
Returns customization information about the Microsoft Sysprep process by
using an Unattended.txt file. Workflows for cloning Windows virtual
machines use this workflow.
Returns customization information about the Microsoft Sysprep process.
Workflows for cloning Windows virtual machines use this workflow.
Windows Customization Clone Workflows
With Windows customization clone workflows you can clone Windows virtual machines and customize the
guest operating system.
You can access the Windows customization clone workflows from Library > vCenter > Virtual Machine
management > Clone > Windows Customization folder and its subfolder in the Workflows view of the
Orchestrator client.
Customize a Windows
machine with single NIC
and credential
Clone a thin
provisioned Windows
machine with single NIC
and credential
Clone a Windows
machine Sysprep with
single NIC and
credential
Performs guest operating system customization, configures one virtual
network card and a local administrator user account on a Windows virtual
machine.
Clones a Windows virtual machine performing the guest operating system
customization. Specifies virtual disk thin provisioning policy and configures
one virtual network card and a local administrator user account. Sysprep
tools must be available on the vCenter Server system.
Clones a Windows virtual machine performing the guest operating system
customization. Configures one virtual network card and a local
administrator user account. Sysprep tools must be available on vCenter
Server.
VMware, Inc. 35
Page 36

Using VMware vCenter Orchestrator Plug-Ins
Clone a Windows
machine with multiple
NICs and credential
Clone a Windows
machine with single NIC
Clone a Windows
machine with single NIC
and credential
Clones a Windows virtual machine performing the guest operating system
customization. Configures the local administrator user account and up to
four virtual network cards. Sysprep tools must be available on the vCenter
Server system.
Clones a Windows virtual machine performing the guest operating system
customization and configures one virtual network card. Sysprep tools must
be available on the vCenter Server system.
Clones a Windows virtual machine performing the guest operating system
customization. Configures one virtual network card and a local
administrator user account. Sysprep tools must be available on the vCenter
Server system.
Device Management Workflows
With device management workflows you can manage the devices that are connected to a virtual machine or
to a host datastore.
You can access the device management workflows from Library > vCenter > Virtual Machine management
> Device Management in the Workflows view of the Orchestrator client.
Add CD-ROM
Add disk
Adds a virtual CD-ROM to a virtual machine. If the virtual machine has no
IDE controller, the workflow creates one.
Adds a virtual disk to a virtual machine.
Change RAM
Convert disks to thin
provisioning
Convert independent
disks
Disconnect all
detachable devices
from a running virtual
machine
Mount floppy disk drive
Changes the amount of RAM of a virtual machine.
Converts thick-provisioned disks of virtual machines to thin-provisioned
disks.
Converts all independent virtual machine disks to normal disks by removing
the independent flag from the disks.
Disconnects floppy disks, CD-ROM drives, parallel ports, and serial ports
from a running virtual machine.
Mounts a floppy disk drive FLP file from the ESX datastore.
Move and Migrate Workflows
With move and migrate workflows, you can migrate virtual machines.
You can access the move and migrate workflows from Library > vCenter > Virtual Machine management >
Move and Migrate in the Workflows view of the Orchestrator client.
Mass migrate virtual
machines with storage
vMotion
Mass migrate virtual
machines with vMotion
Uses Storage vMotion to migrate a single virtual machine, a selection of
virtual machines, or all available virtual machines.
Uses vMotion, Storage vMotion, or both vMotion and Storage vMotion to
migrate a single virtual machine, a selection of virtual machines, or all
available virtual machines.
Migrate virtual machine
with vMotion
36 VMware, Inc.
Migrates a virtual machine from one host to another by using the
MigrateVM_Task operation from the vSphere API.
Page 37

Chapter 3 Using the vCenter Server Plug-In
Move virtual machine to
another vCenter Server
system
Quick migrate multiple
virtual machines
Quick migrate virtual
machine
Relocate virtual
machine disks
Moves a list of virtual machines to another vCenter Server system.
Suspends the virtual machines if they are powered on and migrates them to
another host using the same storage.
Suspends the virtual machine if it is powered on and migrates it to another
host using the same storage.
Relocates virtual machine disks to another host or datastore while the virtual
machine is powered off by using the RelocateVM_Task operation from the
vSphere API.
Other Workflows
With other workflows, you can enable and disable Fault Tolerance (FT), extract virtual machine information,
and find orphaned virtual machines.
You can access these workflows from Library > vCenter > Virtual Machine management > Others in the
Workflows view of the Orchestrator client.
Disable FT
Enable FT
Extract virtual machine
information
Disables Fault Tolerance for a specified virtual machine.
Enables Fault Tolerance for a specified virtual machine.
Returns the virtual machine folder, host system, resource pool, compute
resource, datastore, hard drive sizes, CPU and memory, network, and IP
address for a given virtual machine. Might require VMware Tools.
Find orphaned virtual
machines
Lists all virtual machines in an orphaned state in the Orchestrator inventory.
Lists the VMDK and VMTX files for all datastores in the Orchestrator
inventory that have no association with any virtual machines in the
Orchestrator inventory. Sends the lists by email (optional).
Power Management Workflows
With power management workflows, you can power on and off virtual machines, reboot the guest
operating system of a virtual machine, suspend a virtual machine, and so on.
You can access the power management workflows from Library > vCenter > Virtual Machine management
> Power Management in the Workflows view of the Orchestrator client.
Power off virtual
machine and wait
Reboot guest OS
Reset virtual machine
and wait
Resume virtual machine
and wait
Set guest OS to standby
mode
Powers off a virtual machine and waits for the process to complete.
Reboots the virtual machine's guest operating system. Does not reset
nonpersistent virtual machines. VMware Tools must be running.
Resets a virtual machine and waits for the process to complete.
Resumes a suspended virtual machine and waits for the process to complete.
Sets the guest operating system to standby mode. VMware Tools must be
running.
Shut down and delete
virtual machine
VMware, Inc. 37
Shuts down a virtual machine and deletes it from the inventory and disk.
Page 38

Using VMware vCenter Orchestrator Plug-Ins
Shut down guest OS
and wait
Start virtual machine
and wait
Suspend virtual
machine and wait
Shuts down a guest operating system and waits for the process to complete.
Starts a virtual machine and waits for VMware Tools to start.
Suspends a virtual machine and waits for the process to complete.
Snapshot Workflows
With snapshot workflows, you can perform snapshot-related operations.
You can access the snapshot workflows from Library > vCenter > Virtual Machine management >
Snapshot in the Workflows view of the Orchestrator client.
Create a snapshot
Create snapshots of all
virtual machines in a
resource pool
Remove all snapshots
Remove excess
snapshots
Remove old snapshots
Creates a snapshot.
Creates a snapshot of each virtual machine in a resource pool.
Removes all existing snapshots without reverting to a previous snapshot.
Finds virtual machines with more than a given number of snapshots and
optionally deletes the oldest snapshots. Sends the results by email.
Gets all snapshots that are older than a given number of days and prompts
the user to select which ones to delete.
Remove snapshots of a
given size
Revert to current
snapshot
Revert to snapshot and
wait
Gets all snapshots that are larger than a given size and prompts the user to
confirm deletion.
Reverts to the current snapshot.
Reverts to a specific snapshot. Does not delete the snapshot.
VMware Tools Workflows
With VMware Tools workflows, you can perform VMware Tools-related tasks on virtual machines.
You can access the VMware Tools workflows from Library > vCenter > Virtual Machine management >
VMware Tools in the Workflows view of the Orchestrator client.
Mount VMware tools
installer
Set console screen
resolution
Turn on time
synchronization
Unmount VMware tools
installer
Mounts the VMware Tools installer on the virtual CD-ROM.
Sets the console window's resolution. The virtual machine must be powered
on.
Turns on time synchronization between the virtual machine and the ESX
server in VMware Tools.
Unmounts the VMware Tools CD-ROM.
38 VMware, Inc.
Page 39

Chapter 3 Using the vCenter Server Plug-In
Upgrade VMware tools
Upgrade VMware tools
at next reboot
Upgrades VMware Tools on a virtual machine.
Upgrades VMware Tools on a virtual machine without performing an
automatic reboot.
VMware, Inc. 39
Page 40

Using VMware vCenter Orchestrator Plug-Ins
40 VMware, Inc.
Page 41

Using the Configuration Plug-In 4
In addition to configuring Orchestrator by using the Orchestrator Web Configuration interface, you can
modify the Orchestrator server configuration settings by running workflows from the Configuration plugin.
With the Configuration plug-in you can configure the Orchestrator server networking, authentication
settings, database, and so on.
This chapter includes the following topics:
“Access the Configuration Plug-In Workflow Library,” on page 41
n
“Configuration Plug-In Workflow Library,” on page 41
n
Access the Configuration Plug-In Workflow Library
You must use the Orchestrator client to access the elements from the Configuration plug-in workflow
library.
Procedure
1 From the drop-down menu in the Orchestrator client, select Run or Design.
2 Click the Workflows view.
3 Expand the hierarchical list to Library > Configuration.
What to do next
Review the workflow library.
Configuration Plug-In Workflow Library
The Configuration plug-in workflow library contains workflows that you can use to run automated
processes related to the configuration of vCenter Orchestrator.
Authentication Workflows
The Authentication category contains workflows related to the LDAP and vCenter Single Sign-On
authentication modes.
VMware, Inc.
41
Page 42

Using VMware vCenter Orchestrator Plug-Ins
You access the workflows related to LDAP configuration from Library > Configuration > Authentication >
LDAP in the Workflows view of the Orchestrator client.
Configure Active
Directory
Configure eDirectory
Configure Embedded
LDAP
Configure OpenLDAP
Configure Sun One
Directory
You access the workflows related to the vCenter Single Sign-On configuration from Library > Configuration
> Authentication > SSO in the Workflows view of the Orchestrator client.
Changes the server authentication mode to LDAP and configures a
connection to an Active Directory LDAP server. If you try to change the
authentication settings and the new configuration is not successful, it does
not override the existing one.
Changes the server authentication mode to LDAP and configures a
connection to an eDirectory LDAP server. If you try to change the
authentication settings and the new configuration is not successful, it does
not override the existing one.
Changes the server authentication mode to LDAP and configures a
connection to an embedded LDAP server. If you try to change the
authentication settings and the new configuration is not successful, it does
not override the existing one.
Changes the server authentication mode to LDAP and configures a
connection to an OpenLDAP LDAP server. If you try to change the
authentication settings and the new configuration is not successful, it does
not override the existing one.
Changes the server authentication mode to LDAP and configures a
connection to a Sun ONE Directory LDAP server. If you try to change the
authentication settings and the new configuration is not successful, it does
not override the existing one.
Configure SSO
Changes the server authentication mode to SSO and configures a connection
to a VMware vCenter Single Sign-On server. If you try to change the
authentication settings and the new configuration is not successful, it does
not override the existing one.
Availability Workflows
The Availability category contains a workflow that configures the Orchestrator server availability mode.
You access this workflow from Library > Configuration > Availability in the Workflows view of the
Orchestrator client.
Configure server
availability
Configures the server availability mode of the Orchestrator server.
Orchestrator can run as a standalone instance or in cluster mode.
Database Workflows
The Database category contains workflows for configuring the Orchestrator database connection.
42 VMware, Inc.
Page 43

Chapter 4 Using the Configuration Plug-In
You access these workflows from Library > Configuration > Database in the Workflows view of the
Orchestrator client.
Embedded database
Microsoft SQL Server
Oracle
PostgreSQL
Changes the database provider to embedded database and configures the
connection to it. If you try to change the database settings and the new
configuration is not successful, it does not override the existing one.
Changes the database provider to Microsoft SQL Server and configures the
connection to it. If you try to change the database settings and the new
configuration is not successful, it does not override the existing one.
Changes the database provider to Oracle Database and configures the
connection to it. If you try to change the database settings and the new
configuration is not successful, it does not override the existing one.
Changes the database provider to PostgreSQL and configures the connection
to it. If you try to change the database settings and the new configuration is
not successful, it does not override the existing one.
Package Signing Certificate Workflows
The Package Signing Certificate category contains a workflow that you can use for creating a certificate
database and inserting a self-signed certificate into it.
You access this workflow from Library > Configuration > Package Signing Certificate in the Workflows
view of the Orchestrator client.
Create a certificate
database and a selfsigned server certificate
Creates a certificate database and inserts a self-signed certificate into it. The
certificate is used to sign the packages created with this server.
SSL Trust Manager Workflows
The SSL Trust Manager category contains workflows that you can use for deleting and importing SSL
certificates.
You access these workflows from Library > Configuration > SSL Trust Manager workflows in the
Workflows view of the Orchestrator client.
Delete trusted
certificate
Import trusted
certificate from a file
Import trusted
certificate from URL
Deletes an SSL certificate from the server trust store.
Imports an SSL certificate from a file into the server trust store.
Imports an SSL certificate from a URL into the server trust store.
Troubleshooting Workflows
You access these workflows from Library > Configuration > Troubleshooting in the Workflows view of the
Orchestrator client.
Delete all workflow runs
Reinstall the plug-ins
when the server starts
Deletes all workflow runs.
Reinstalls the installed plug-ins when the Orchestrator server is restarted.
VMware, Inc. 43
Page 44

Using VMware vCenter Orchestrator Plug-Ins
Network Workflows
You access the Network configuration workflows from Library > Configuration > Network in the
Workflows view of the Orchestrator client.
Configure the network
settings
Configures the network settings of the Orchestrator server.
License Workflows
You access the License configuration workflows from Library > Configuration > License in the Workflows
view of the Orchestrator client.
Enter license key
Use vCenter Server
license
Adds a manually provided license key.
Adds a license key by connecting to a running vCenter Server instance and
using its license.
44 VMware, Inc.
Page 45

Using the vCO Library Plug-In 5
You can use the vCO Library plug-in workflows as templates for customization and automation of client
processes, and to troubleshoot Orchestrator.
vCO Library Plug-In Workflows
The vCO Library plug-in provides workflows in the Locking, Orchestrator, and Troubleshooting workflow
categories.
Locking Workflows
You access these workflows from Library > Locking in the Workflows view of the Orchestrator client.
Display all locks
Locking test
Locking test (x5)
Release all locks
Shows all locks.
A test workflow that creates a lock.
A test workflow that creates five locks.
Releases all locks.
Orchestrator Task Workflows
You access these workflows from Library > Orchestrator > Tasks in the Workflows view of the Orchestrator
client.
Create recurrent task
Create task
Creates a recurrent task an returns the newly created task.
Schedules a workflow to run at a later time and date, as a task.
VMware, Inc. 45
Page 46

Using VMware vCenter Orchestrator Plug-Ins
Orchestrator Workflows
You access these workflows from Library > Orchestrator > Workflows in the Workflows view of the
Orchestrator client.
Start workflows in a
series
Start workflows in
parallel
Runs a workflow multiple times in a series, one instance after the other. You
provide workflow parameters in an array. You also provide a property list,
with one property per workflow input, for each instance of the workflow
that starts. The number of properties in the array define the number of
workflow runs.
Runs a workflow multiple times, with different parameters. You provide
workflow parameters in an array. You also provide a property list, with one
property per workflow input, for each instance of the workflow that starts.
The number of properties in the array define the number of workflow runs.
Troubleshooting Workflows
You access these workflows from Library > Troubleshooting in the Workflows view of the Orchestrator
client.
Export logs and
application settings
Generates a ZIP archive of troubleshooting information that contains
configuration files and server, configuration, wrapper, and installation log
files. The output directory must exist and Orchestrator must have writing
permissions.
Tagging Workflows
You access these workflows from Library > Tagging in the Workflows view of the Orchestrator client.
Find objects by tag
List workflow tags
Tagging example
Tag workflow
Untag workflow
Finds objects by the tags assigned to them. You provide the names and
values of the tags and the workflow returns a list of the objects to which
these tags apply.
Lists the tags assigned to the workflow you specified as an input parameter.
Demonstrates workflow tagging.
Assigns a tag to a workflow. You must specify the workflow you want to tag
and the tag name and value.
Removes a tag from a workflow. You must specify the workflow you want to
untag and the tag you want to remove from the specified workflow.
46 VMware, Inc.
Page 47

Using the SQL Plug-In 6
You can use the API that the SQL plug-in provides to implement connectivity to SQL databases and other
tabular data sources, such as spreadsheets or flat files.
The SQL plug-in API which is based on JDBC, provides a call-level API for SQL-based database access. The
SQL plug-in also provides sample workflows that demonstrate how to use the API in workflows.
This chapter includes the following topics:
“Configuring the SQL Plug-In,” on page 47
n
“Running the SQL Sample Workflows,” on page 50
n
“Using the SQL Plug-In Standard Workflows,” on page 54
n
Configuring the SQL Plug-In
You can use the workflows included in the SQL plug-in and run them from the Orchestrator client to
configure the SQL plug-in and to add, update, or remove a database.
SQL Plug-In Configuration Workflows
The Configuration workflow category of the SQL plug-in contains workflows that allow you to manage
databases and database tables.
You can access these workflows from Library > SQL > Configuration in the Workflows view of the
Orchestrator client.
Workflow Name Description
Add a database Adds a database object to the Database plug-in inventory.
Add tables to a database Adds database tables to a database in the Database plug-in inventory.
Remove a database Removes a database object from the Database plug-in inventory.
Remove a table from a database Removes a database table from a database in the Database plug-in inventory.
Update a database Updates the configuration of a database object in the Database plug-in inventory.
Validate a database Validates a database in the Database plug-in inventory.
VMware, Inc. 47
Page 48

Using VMware vCenter Orchestrator Plug-Ins
Add a Database
You can run a workflow to add a database to the Orchestrator server and configure the host connection
parameters.
When you add a database that requires a secure connection, you must import the database SSL certificate.
You can import the SSL certificate by using the options available in the Network tab in the Orchestrator
configuration interface.
Procedure
1 Log in to the Orchestrator client as an administrator.
2 Click the Workflows view in the Orchestrator client.
3 In the workflows hierarchical list, select Library > SQL > Configuration and navigate to the Add a
database workflow.
4 Right-click the Add a database workflow and select Start workflow.
5 In the Name text box, type the name of the database.
6 Select the type of the database.
7 In the Connection URL text box, type the address of the database.
Database Type Syntax
Oracle
Microsoft SQL (with SQL
authentication)
Microsoft SQL (with Windows
account authentication)
PostgreSQL
MySQL
jdbc:oracle:thin:@database_url:port_number:SID
jdbc:jtds:sqlserver://database_url:port_number/database_nam
e
jdbc:jtds:sqlserver://database_url:port_number/database_nam
e;useNTLMv2=true;domain=domain_name
jdbc:postgresql://database_url:port_number/database_name
jdbc:mysql://database_url:port_number/database_name
8 Select the session mode that the plug-in uses to connect to the database.
Option Description
Shared Session
Session Per User
The plug-in uses shared credentials to connect to the database. You must
provide the database credentials for the shared session.
The Orchestrator client retrieves credentials from the user who is logged
in.
NOTE To use session per user mode, you must authenticate by using a
user name only. You should not use domain\user or user@domain for
authentication.
9 Click Submit to run the workflow.
After the workflow runs successfully, the database and all tables that belong to it appear in the Inventory
view.
Add Tables to a Database
You can run a workflow to add tables to a database that is in the Database plug-in inventory.
Prerequisites
Verify that you are logged in to the Orchestrator client as an administrator.
n
48 VMware, Inc.
Page 49

Chapter 6 Using the SQL Plug-In
Verify that you have a connection to a database from the Inventory view.
n
Procedure
1 Click the Workflows view in the Orchestrator client.
2 In the workflows hierarchical list, select Library > SQL > Configuration and navigate to the Add tables
to a database workflow.
3 Right-click the Add tables to a database workflow and select Start workflow.
4 Select a database to which to add tables.
5 Select the tables that you want to add.
6 Click Submit to run the workflow.
After the workflow runs successfully, the added database tables appear in the Inventory view of the
Orchestrator client.
Update a Database
You can run a workflow to update the configuration of a database that is in the plug-in's inventory.
Procedure
1 Log in to the Orchestrator client as an administrator.
2 Click the Workflows view in the Orchestrator client.
3 In the Workflows hierarchical list, select Library > SQL > Configuration and navigate to the Update a
database workflow.
4 Right-click the Update a database workflow and select Start workflow.
5 Select a database that you want to update.
6 In the Name text box, type the new name of the database.
The database appears in the Inventory view with the name that you specify.
7 Select the type of the database.
8 In the Connection URL text box, type the new address of the database.
9 Select the session mode that the plug-in uses to connect to the database.
Option Description
Shared Session
Session Per User
The plug-in uses shared credentials to connect to the database. You must
provide the database credentials for the shared session.
The Orchestrator client retrieves credentials from the user who is logged
in.
NOTE To use session per user mode, you must authenticate by using a
user name only. You should not use domain\user or user@domain for
authentication.
10 Click Submit to run the workflow.
VMware, Inc. 49
Page 50

Using VMware vCenter Orchestrator Plug-Ins
Running the SQL Sample Workflows
You can run the SQL plug-in workflows to perform JDBC operations such as generating a JDBC URL,
testing a JDBC connection, and managing rows in JDBC tables. You can also run the SQL plug-in workflows
to manage databases and database tables, as well as to run SQL operations.
Generate a JDBC URL
You can run a workflow from the Orchestrator client to generate a JDBC connection URL.
Prerequisites
Log in to the Orchestrator client as a user who can run JDBC workflows.
Procedure
1 Click the Workflows view in the Orchestrator client.
2 In the workflows hierarchical list, open Library > JDBC to navigate to the JDBC URL generator
workflow.
3 Right-click the JDBC URL generator workflow and select Start workflow.
4 Select the type of database for which to generate a URL.
NOTE If you use a Microsoft database, you might have to click Next and to provide the database
instance name and database user domain name.
5 Provide the required information to generate a database URL.
a Type a database server name or IP address.
b Type a database name.
c (Optional) Type a database port number.
If you do not specify a port number, the workflow uses a default port number.
d Type a user name to access the database.
e Type a password to access the database.
6 Click Submit to run the workflow.
Test a JDBC Connection
You can run a workflow from the Orchestrator client to test the connection to a database.
Prerequisites
Log in to the Orchestrator client as a user who can run JDBC workflows.
Procedure
1 Click the Workflows view in the Orchestrator client.
2 In the workflows hierarchical list, open Library > JDBC > JDBC Examples to navigate to the JDBC
connection example workflow.
3 Right-click the JDBC connection example workflow and select Start workflow.
50 VMware, Inc.
Page 51

Chapter 6 Using the SQL Plug-In
4 Provide the required information to test a database connection.
a Type a user name to access the database.
b Type the URL to test.
c Type a password to access the database.
5 Click Submit to run the workflow.
Create a Table by Using JDBC
You can run a workflow from the Orchestrator client to create a database.
Prerequisites
Log in to the Orchestrator client as a user who can run JDBC workflows.
Procedure
1 Click the Workflows view in the Orchestrator client.
2 In the workflows hierarchical list, open Library > JDBC > JDBC Examples to navigate to the JDBC
create table example workflow.
3 Right-click the JDBC create table example workflow and select Start workflow.
4 Provide the required information, and click Next.
a Type a password to access the database.
b Type a database connection URL.
c Type a user name to access the database.
5 Type an SQL create statement.
An example syntax is:
CREATE TABLE "table_name"
("column1" "data_type_for_column1",
"column2" "data_type_for_column2")
6 Click Submit to run the workflow.
Insert a Row into a JDBC Table
You can run a workflow from the Orchestrator client to test the insertion of a row into a JDBC table.
Prerequisites
Log in to the Orchestrator client as a user who can run JDBC workflows.
Procedure
1 Click the Workflows view in the Orchestrator client.
2 In the workflows hierarchical list, open Library > JDBC > JDBC Examples to navigate to the JDBC
insert into table example workflow.
3 Right-click the JDBC insert into table example workflow and select Start workflow.
VMware, Inc. 51
Page 52

Using VMware vCenter Orchestrator Plug-Ins
4 Provide the required information, and click Next.
a Type a database connection URL.
b Type a user name to access the database.
c Type a password to access the database.
5 Type an SQL insert statement, and click Next.
An example syntax is:
INSERT INTO "table_name" ("column1", "column2")
VALUES ("value1", "value2")
6 Type the values to insert into the row.
7 Click Submit to run the workflow.
Select Rows from a JDBC Table
You can run a workflow from the Orchestrator client to select rows from a JDBC table.
Prerequisites
Log in to the Orchestrator client as a user who can run JDBC workflows.
Procedure
1 Click the Workflows view in the Orchestrator client.
2 In the workflows hierarchical list, open Library > JDBC > JDBC Examples to navigate to the JDBC
select from table example workflow.
3 Right-click the JDBC select from table example workflow and select Start workflow.
4 Provide the required information, and click Next.
a Type a database connection URL.
b Type a user name to access the database.
c Type a password to access the database.
5 Type an SQL select statement.
An example syntax is:
SELECT * FROM "table_name"
6 Click Submit to run the workflow.
Delete an Entry from a JDBC Table
You can run a workflow from the Orchestrator client to test the deletion of an entry from a JDBC table.
Prerequisites
Log in to the Orchestrator client as a user who can run JDBC workflows.
Procedure
1 Click the Workflows view in the Orchestrator client.
2 In the workflows hierarchical list, open Library > JDBC > JDBC Examples to navigate to the JDBC
delete entry from table example workflow.
3 Right-click the JDBC delete entry from table example workflow and select Start workflow.
52 VMware, Inc.
Page 53

4 Provide the required information, and click Next.
a Type the first name of the user entry to be deleted.
b Type a user name to access the database.
c Type a JDBC connection URL.
d Type the last name of the user entry to be deleted.
e Type a password to access the database.
5 Type an SQL delete statement.
An example syntax is:
DELETE FROM "table_name" where ("column1" = ?, "column2" = ?)
6 Click Submit to run the workflow.
Delete All Entries from a JDBC Table
You can run a workflow from the Orchestrator client to delete all entries from a JDBC table.
Prerequisites
Log in to the Orchestrator client as a user who can run JDBC workflows.
Chapter 6 Using the SQL Plug-In
Procedure
1 Click the Workflows view in the Orchestrator client.
2 In the workflows hierarchical list, open Library > JDBC > JDBC Examples to navigate to the JDBC
delete all from table example workflow.
3 Right-click the JDBC delete all from table example workflow and select Start workflow.
4 Provide the required information, and click Next.
a Type a database connection URL.
b Type a user name to access the database.
c Type a password to access the database.
5 Type an SQL delete statement.
An example syntax is:
DELETE FROM "table_name"
6 Click Submit to run the workflow.
Drop a JDBC Table
You can run a workflow from the Orchestrator client to test the dropping of a JDBC table.
Prerequisites
Log in to the Orchestrator client as a user who can run JDBC workflows.
Procedure
1 Click the Workflows view in the Orchestrator client.
2 In the workflows hierarchical list, open Library > JDBC > JDBC Examples to navigate to the JDBC drop
table example workflow.
3 Right-click the JDBC drop table example workflow and select Start workflow.
VMware, Inc. 53
Page 54

Using VMware vCenter Orchestrator Plug-Ins
4 Provide the required information, and click Next.
a Type a password to access the database.
b Type a database connection URL.
c Type a user name to access the database.
5 Type an SQL drop statement.
An example syntax is:
DROP TABLE "table_name"
6 Click Submit to run the workflow.
Run a Complete JDBC Cycle
You can run a workflow from the Orchestrator client to test all JDBC example workflows in one full cycle.
Prerequisites
Log in to the Orchestrator client as a user who can run JDBC workflows.
Procedure
1 Click the Workflows view in the Orchestrator client.
2 In the workflows hierarchical list, open Library > JDBC > JDBC Examples to navigate to the Full JDBC
cycle example workflow.
3 Right-click the Full JDBC cycle example workflow and select Start workflow.
4 Provide the required information, and click Next..
a Type a database connection URL.
b Type a user name to access the database.
c Type a password to access the database.
5 Type the values to be used as entries in the database.
6 Click Submit to run the workflow.
Using the SQL Plug-In Standard Workflows
You can use the SQL workflows to run SQL operations.
SQL Plug-In Workflow Library
You can run the SQL plug-in workflows to manage databases and database tables as well as to run SQL
operations.
You can access the database configuration workflows from Library > SQL > Configuration in the
Workflows view of the Orchestrator client.
Add a database
Add tables to a
database
Remove a database
Remove a table from a
database
54 VMware, Inc.
Adds a database object to the plug-in's inventory.
Adds database tables to a database in the plug-in's inventory.
Removes a database object from the plug-in's inventory.
Removes a database table from a database in the plug-in's inventory.
Page 55

Chapter 6 Using the SQL Plug-In
Update a database
Validate a database
Updates the configuration of a database object in the plug-in's inventory.
Validates a database in the plug-in's inventory.
You can access the SQL operations workflows from Library > SQL in the Workflows view of the
Orchestrator client.
Execute a custom query
on a database
Executes a custom query on a specified database and returns the number of
affected rows. You can run the workflow to update, delete, insert, and write
queries
Generate CRUD
Generates Create, Read, Update and Delete workflows for a particular table.
workflows for a table
Read a custom query
from a database
Executes a custom query on a specified database and returns the result in an
array of properties. You can run the workflow to select and read queries.
Generate CRUD Workflows for a Table
You can run a workflow to generate Create, Read, Update, and Delete workflows for a particular table.
Prerequisites
Verify that you are logged in to the Orchestrator client as an administrator.
n
Verify that you have a connection to a database from the Inventory view.
n
Procedure
1 Click the Workflows view in the Orchestrator client.
2 In the workflows hierarchical list, select Library > SQL and navigate to the Generate CRUD workflows
for a table workflow.
3 Right-click the Generate CRUD workflows for a table workflow and select Start workflow.
4 Select a table for which to generate the workflows.
5 Select the workflow folder in which to generate the workflows.
6 Select whether to overwrite any existing workflows.
Option Description
Yes
No
The generated workflows overwrite existing workflows with the same
name.
New workflows are not generated if workflows with the same name exist
in the folder.
7 (Optional) Select columns that should not be populated.
You cannot edit the selected columns with the generated CRUD workflows.
8 Click Submit to run the workflow.
After the workflow runs successfully, the CRUD workflows appear in the selected workflow folder.
What to do next
You can run the generated workflows on the selected database table.
VMware, Inc. 55
Page 56

Using VMware vCenter Orchestrator Plug-Ins
56 VMware, Inc.
Page 57

Using the SSH Plug-In 7
You can use the SSH plug-in workflows to run SSH commands on a remote host that supports SSH and
transfer files between an Orchestrator server and a remote host through a secure connection.
This chapter includes the following topics:
“Configure the SSH Plug-In,” on page 57
n
“Running the SSH Plug-In Sample Workflows,” on page 57
n
Configure the SSH Plug-In
You can set up the SSH plug-in to ensure encrypted connections.
Procedure
1 Log in to the Orchestrator configuration interface as vmware.
2 Click SSH.
3 Click New connection.
4 In the Host name text box, type the host to access with SSH through Orchestrator.
NOTE No username and password are required because Orchestrator uses the credentials of the
currently logged-in user to run SSH commands. You must reproduce the accounts you want to work on
SSH on target hosts from the LDAP server.
5 Click Apply changes.
The host is added to the list of SSH connections.
6 (Optional) Configure an entry path on the server.
a Click New root folder.
b Enter the new path and click Apply changes.
The SSH host is available in the Inventory view of the Orchestrator client.
Running the SSH Plug-In Sample Workflows
You can run the SSH plug-in sample workflows from the Orchestrator client to test the connection between
the Orchestrator server and the SSH host.
Generate a Key Pair on page 58
n
You can run a workflow from the Orchestrator client to generate a key pair. You can use the key pair
to connect to an SSH host without a password.
VMware, Inc.
57
Page 58

Using VMware vCenter Orchestrator Plug-Ins
Change the Key Pair Passphrase on page 59
n
You can run a workflow from the Orchestrator client to change the passphrase for the key pair that
you generated last.
Register an Orchestrator Public Key on an SSH Host on page 59
n
You can use a public key instead of a password. To register an Orchestrator public key on an SSH host,
you can run a workflow from the Orchestrator client.
Run an SSH Command on page 59
n
You can run a workflow from the Orchestrator client to run SSH commands on a remote SSH server.
Copy a File from an SSH Host on page 60
n
You can run a workflow on the Orchestrator client to copy files from an SSH host to the Orchestrator
server.
Copy a File to an SSH Host on page 61
n
You can run a workflow from the Orchestrator client to copy files from the Orchestrator server to an
SSH host.
Generate a Key Pair
You can run a workflow from the Orchestrator client to generate a key pair. You can use the key pair to
connect to an SSH host without a password.
A key pair consists of a public key and a private key. Orchestrator can use the private key to connect to the
public key on an SSH host. You can use a passphrase to improve security.
CAUTION All Orchestrator users with the right set of privileges can read, use, and overwrite your private
key.
Prerequisites
Configure the SSH plug-in in the Orchestrator configuration interface.
n
Log in to the Orchestrator client as a user who can run SSH workflows.
n
Procedure
1 Click the Workflows view in the Orchestrator client.
2 In the workflows hierarchical list, open Library > SSH to navigate to the Generate key pair workflow.
3 Right-click the Generate key pair workflow and select Start workflow.
4 Provide the required information.
a Select the key type.
b Select the key size.
c (Optional) Type a passphrase.
NOTE You can change the passphrase later.
d (Optional) Type a comment.
5 Click Submit to run the workflow.
If a key pair exists, the new key pair overwrites it.
58 VMware, Inc.
Page 59

Chapter 7 Using the SSH Plug-In
Change the Key Pair Passphrase
You can run a workflow from the Orchestrator client to change the passphrase for the key pair that you
generated last.
Prerequisites
Configure the SSH plug-in in the Orchestrator configuration interface.
n
Log in to the Orchestrator client as a user who can run SSH workflows.
n
Procedure
1 Click the Workflows view in the Orchestrator client.
2 In the workflows hierarchical list, open Library > SSH to navigate to the Change key pair passphrase
workflow.
3 Right-click the Change key pair passphrase workflow and select Start workflow.
4 Reset the key pair passphrase.
a Type the current passphrase.
b Type the new passphrase.
5 Click Submit to run the workflow.
Register an Orchestrator Public Key on an SSH Host
You can use a public key instead of a password. To register an Orchestrator public key on an SSH host, you
can run a workflow from the Orchestrator client.
Prerequisites
Configure the SSH plug-in in the Orchestrator configuration interface.
n
Log in to the Orchestrator client as a user who can run SSH workflows.
n
Procedure
1 Click the Workflows view in the Orchestrator client.
2 In the workflows hierarchical list, open Library > SSH to navigate to the Register vCO public key on
host workflow.
3 Right-click the Register vCO public key on host workflow and select Start workflow.
4 Provide the host and authentication information.
NOTE You must provide credentials that are registered on the SSH host.
5 Click Submit to run the workflow.
You can use public key authentication instead of password authentication when you connect to the SSH
host as the registered user.
Run an SSH Command
You can run a workflow from the Orchestrator client to run SSH commands on a remote SSH server.
Prerequisites
Configure the SSH plug-in in the Orchestrator configuration interface.
n
VMware, Inc. 59
Page 60

Using VMware vCenter Orchestrator Plug-Ins
Log in to the Orchestrator client as a user who can run SSH workflows.
n
Procedure
1 Click the Workflows view in the Orchestrator client.
2 In the workflows hierarchical list, open Library > SSH to navigate to the Run SSH command workflow.
3 Right-click the Run SSH command workflow and select Start workflow.
4 Type an SSH host name or IP address, and click Next.
5 Type an SSH command to run, and click Next.
NOTE The default SSH command is uptime. It shows how long the server has been active and the user
load for that period.
6 Select Yes to use password authentication, and click Next.
NOTE The default option is to use key file authentication.
7 Type a user name, and click Next.
8 Type a password if the authentication method requires a password. Otherwise, type the path to the
private key and type the passphrase for the private key.
9 Click Submit to run the workflow.
Copy a File from an SSH Host
You can run a workflow on the Orchestrator client to copy files from an SSH host to the Orchestrator server.
The SSH plug-in uses the Java JCraft library, which implements SFTP. The SCP get command workflow
transfers files by using SFTP.
Prerequisites
Configure the SSH plug-in in the Orchestrator configuration interface.
n
Log in to the Orchestrator client as a user who can run SSH workflows.
n
NOTE Orchestrator must have explicit write permissions in order to write in folders.
Procedure
1 Click the Workflows view in the Orchestrator client.
2 In the workflows hierarchical list, open Library > SSH to navigate to the SCP get command workflow.
3 Right-click the SCP get command workflow and select Start workflow.
4 Provide the required information, and click Next.
a Type an SSH host name or IP address.
b Type the SSH authentication information.
5 Type the file information.
a Type the path to the directory on the Orchestrator server into which to copy the file.
b Type the path to the file to get from the remote SSH host.
6 Click Submit to run the workflow.
60 VMware, Inc.
Page 61

Chapter 7 Using the SSH Plug-In
Copy a File to an SSH Host
You can run a workflow from the Orchestrator client to copy files from the Orchestrator server to an SSH
host.
The SSH plug-in uses the Java JCraft library, which implements SFTP. The SCP put command workflow
transfers files by using SFTP.
Prerequisites
Configure the SSH plug-in in the Orchestrator configuration interface.
n
Log in to the Orchestrator client as a user who can run SSH workflows.
n
Procedure
1 Click the Workflows view in the Orchestrator client.
2 In the workflows hierarchical list, open Library > SSH to navigate to the SCP put command workflow.
3 Right-click the SCP put command workflow and select Start workflow.
4 Provide the required information, and click Next.
a Type an SSH host name or IP address.
b Type the SSH authentication information.
5 Type the file information.
a Type the path to the file that you want to copy from the local Orchestrator server to the remote SSH
host.
b Type the path to the directory on the remote SSH host into which to copy the file.
6 Click Submit to run the workflow.
VMware, Inc. 61
Page 62

Using VMware vCenter Orchestrator Plug-Ins
62 VMware, Inc.
Page 63

Using the XML Plug-In 8
You can use the XML plug-in to run workflows that create and modify XML documents.
The XML plug-in adds an implementation of a Document Object Model (DOM) XML parser to the
Orchestrator JavaScript API. The XML plug-in also provides some sample workflows to demonstrate how
you can create and modify XML documents from workflows.
Alternatively, you can use the ECMAScript for XML (E4X) implementation in the Orchestrator JavaScript
API to process XML documents directly in JavaScript. For an E4X scripting example, see Developing with
VMware vCenter Orchestrator.
For information about E4X, go to the Web site of the organization that maintains the ECMA-357 standard.
Running the XML Plug-In Sample Workflows
You can run the XML plug-in sample workflows from the Orchestrator client to create and modify XML
documents for testing purposes.
Because the workflows can create, read, or modify files, you must have sufficient access rights to the
working directory.
Orchestrator has read, write, and execute rights to a folder named orchestrator, at the root of the server
system. Although workflows have permission to read, write, and execute in this folder, you must create the
folder on the server system.
VMware, Inc.
You can allow access to other folders by changing the settings for server file system access from workflows
and JavaScript. See Installing and Configuring VMware vCenter Orchestrator, Setting Server File System Access
from Workflows and JavaScript.
Create a Simple XML Document on page 64
n
You can run a workflow from the Orchestrator client to create a simple XML document for testing
purposes.
Find an Element in an XML Document on page 64
n
You can run a workflow from the Orchestrator client to find an element in the XML created by the
Create a simple XML document workflow.
Modify an XML Document on page 65
n
You can run a workflow from the Orchestrator client to modify the XML that the Create a simple XML
document workflow creates.
Create an Example Address Book from XML on page 65
n
You can run a workflow from the Orchestrator client to create an address book for testing purposes.
63
Page 64

Using VMware vCenter Orchestrator Plug-Ins
Create a Simple XML Document
You can run a workflow from the Orchestrator client to create a simple XML document for testing purposes.
Prerequisites
Log in to the Orchestrator client as a user who can run XML workflows.
n
Verify that you created the c:/orchestrator folder at the root of the Orchestrator server system or set
n
access rights to another folder.
Procedure
1 Click the Workflows view in the Orchestrator client.
2 In the workflows hierarchical list, open Library > XML > Samples XML (Simple) to navigate to the
Create a simple XML document workflow.
3 Right-click the Create a simple XML document workflow and select Start workflow.
4 Type the filepath to the XML document to create.
For example, c:/orchestrator/filename.xml.
5 Click Submit to run the workflow.
The workflow creates an XML document that contains a list of users. The attributes for each entry are user
ID and name.
Find an Element in an XML Document
You can run a workflow from the Orchestrator client to find an element in the XML created by the Create a
simple XML document workflow.
Prerequisites
Log in to the Orchestrator client as a user who can run XML workflows.
n
Verify that you created the c:/orchestrator folder at the root of the Orchestrator server system or set
n
access rights to another folder.
Procedure
1 Click the Workflows view in the Orchestrator client.
2 In the workflows hierarchical list, open Library > XML > Samples XML (Simple) to navigate to the
Find element in document workflow.
3 Right-click the Find element in document workflow and select Start workflow.
4 Type the filepath to the XML document.
For example, c:/orchestrator/filename.xml.
5 Click Submit to run the workflow.
The workflow searches for an element and displays the result in the system log.
What to do next
To view the result, select the completed workflow run in the Orchestrator client and click Logs on the
Schema tab.
64 VMware, Inc.
Page 65

Chapter 8 Using the XML Plug-In
Modify an XML Document
You can run a workflow from the Orchestrator client to modify the XML that the Create a simple XML
document workflow creates.
Prerequisites
Log in to the Orchestrator client as a user who can run XML workflows.
n
Verify that you created the c:/orchestrator folder at the root of the Orchestrator server system or set
n
access rights to another folder.
Procedure
1 Click the Workflows view in the Orchestrator client.
2 In the workflows hierarchical list, open Library > XML > Samples XML (Simple) to navigate to the
Modify XML document workflow.
3 Right-click the Modify XML document workflow and select Start workflow.
4 Provide the input and output filepaths.
a Type the filepath to the XML document to modify.
For example, c:/orchestrator/filename.xml.
b Type the filepath to the modified XML document.
For example, c:/orchestrator/filename.xml.
NOTE If you type the same filepath in both fields, the workflow overwrites the original file with the
modified file. If you type an output filepath to a file that does not exist, the workflow creates a modified
file.
5 Click Submit to run the workflow.
The workflow searches for an element and modifies the entry where the element is found.
Create an Example Address Book from XML
You can run a workflow from the Orchestrator client to create an address book for testing purposes.
Prerequisites
Log in to the Orchestrator client as a user who can run XML workflows.
n
Verify that you created the c:/orchestrator folder at the root of the Orchestrator server system or set
n
access rights to another folder.
Procedure
1 Click the Workflows view in the Orchestrator client.
2 In the workflows hierarchical list, open Library > XML > Samples XML (Address Book) to navigate to
the Full address book test workflow.
3 Right-click the Full address book test workflow and select Start workflow.
4 Type the path to the address book folder.
For example, c:/orchestrator/foldername.
The workflow automatically creates the folder if it does not exist.
VMware, Inc. 65
Page 66

Using VMware vCenter Orchestrator Plug-Ins
5 Click Submit to run the workflow.
The workflow creates a DTD, an XML, and a CSS file, appends the stylesheet, and stores the files in the
specified folder.
66 VMware, Inc.
Page 67

Using the Mail Plug-In 9
You can send email messages from workflows by using the Mail plug-in, which uses the Simple Mail
Transfer Protocol (SMTP). For example, you can create a workflow to send an email to a given address if the
workflow requires user interaction or when it completes its run.
This chapter includes the following topics:
“Define the Default SMTP Connection,” on page 67
n
“Using the Mail Plug-In Sample Workflows,” on page 68
n
Define the Default SMTP Connection
The Mail plug-in is installed together with the Orchestrator server and is used for email notifications. The
only option available for this plug-in is to use default values for new mail messages. You can set the default
email account.
Avoid load balancers when configuring mail in Orchestrator. You might receive SMTP_HOST_UNREACHABLE
error.
Procedure
1 Log in to the Orchestrator configuration interface as vmware.
VMware, Inc.
2 Click Mail.
3 Select the Define default values check box and fill in the required text boxes.
Text Box Description
SMTP host
SMTP port
User name
Password
From name and address
Enter the IP address or domain name of your SMTP server.
Enter a port number to match your SMTP configuration.
The default SMTP port is 25.
Enter a valid email account.
This is the email account Orchestrator uses to send emails.
Enter the password associated with the user name.
Enter the sender information to appear in all emails sent by Orchestrator.
4 Click Apply changes.
67
Page 68

Using VMware vCenter Orchestrator Plug-Ins
Using the Mail Plug-In Sample Workflows
You can call the sample workflows of the Mail plug-in from custom workflows to implement email
functionality. You can run an example workflow to test interaction with email.
Access the Mail Plug-In Sample Workflows on page 68
n
You must use the Orchestrator client to access the Mail plug-in sample workflows.
Mail Plug-In Sample Workflows on page 68
n
You can enhance your custom workflows by integrating the sample Mail plug-in workflows.
Test an Example Interaction with Email on page 69
n
You can run a workflow from the Orchestrator client to send an email to respond to a query, known as
a user interaction.
Access the Mail Plug-In Sample Workflows
You must use the Orchestrator client to access the Mail plug-in sample workflows.
Prerequisites
Configure the Mail plug-in in the Orchestrator configuration interface.
n
Log in to the Orchestrator client as a user who can run Mail workflows.
n
Procedure
1 Click the Workflows view in the Orchestrator client.
2 Expand the hierarchical list to Library > Mail.
What to do next
Review the sample workflows.
Mail Plug-In Sample Workflows
You can enhance your custom workflows by integrating the sample Mail plug-in workflows.
You can access the Mail workflows from Library > Mail in the Workflows view of the Orchestrator client.
Retrieve messages
Retrieve messages (via
MailClient)
Send interaction
Send notification
Retrieves the messages of a given email account by using the POP3 protocol.
Retrieves the messages of a certain email account, without deleting them, by
using the new scripting API provided by the MailClient class.
Sends an email to answer a user interaction. The email body contains both
the URL to the direct answer, and an interaction URL to process this request.
If optional parameters are not specified, the workflow uses the default values
set in the Orchestrator configuration interface.
Sends an email with specified content to a given email address. If optional
parameters are not specified, the workflow uses the default values set in the
Orchestrator configuration interface.
Send notification to
mailing list
68 VMware, Inc.
Sends an email with specified content to a given email address list, CC list,
and BCC list. If optional parameters are not specified, the workflow uses the
default values set in the Orchestrator configuration interface.
Page 69

Chapter 9 Using the Mail Plug-In
Test an Example Interaction with Email
You can run a workflow from the Orchestrator client to send an email to respond to a query, known as a
user interaction.
The workflow uses the default mail server configuration that you set in the Orchestrator configuration
interface. See “Define the Default SMTP Connection,” on page 67.
Prerequisites
Configure the Mail plug-in in the Orchestrator configuration interface.
n
Log in to the Orchestrator client as a user who can run Mail workflows.
n
Procedure
1 Click the Workflows view in the Orchestrator client.
2 In the workflows hierarchical list, open Library > Mail to navigate to the Example interaction with
email workflow.
3 Right-click the Example interaction with email workflow and select Start workflow.
4 Provide the required information.
a Type a recipient address.
b Select an LDAP group of users who are authorized to answer the query.
5 Click Submit to run the workflow.
The workflow suspends its run and sends an email to the given address. The email body contains a link to
the weboperator Web view. If weboperator is running, the user can answer the request for interaction
directly in weboperator, allowing the workflow to finish its run.
VMware, Inc. 69
Page 70

Using VMware vCenter Orchestrator Plug-Ins
70 VMware, Inc.
Page 71

Using the Net Plug-In 10
You can use the Net plug-in to implement the Telnet, FTP, POP3, and IMAP protocols in workflows. The
POP3 and IMAP implementations allow downloading and reading email. In combination with the Mail
plug-in, the Net plug-in provides full email sending and receiving capabilities in workflows.
VMware, Inc. 71
Page 72

Using VMware vCenter Orchestrator Plug-Ins
72 VMware, Inc.
Page 73

Using the Enumeration Plug-In 11
You can use the Enumeration plug-in to implement common enumerated types in workflows.
Time Zone Codes
You can use the time zone codes as possible values for the Enums:MSTimeZone enumeration.
Time Zone Code Time Zone Name Description
000 Dateline Standard Time (GMT-12:00) International Date Line
West
001 Samoa Standard Time (GMT-11:00) Midway Island, Samoa
002 Hawaiian Standard Time (GMT-10:00) Hawaii
003 Alaskan Standard Time (GMT-09:00) Alaska
004 Pacific Standard Time (GMT-08:00) Pacific Time (US and
Canada); Tijuana
010 Mountain Standard Time (GMT-07:00) Mountain Time (US and
Canada)
013 Mexico Standard Time 2 (GMT-07:00) Chihuahua, La Paz,
Mazatlan
015 U.S. Mountain Standard Time (GMT-07:00) Arizona
020 Central Standard Time (GMT-06:00) Central Time (US and
Canada)
025 Canada Central Standard Time (GMT-06:00) Saskatchewan
030 Mexico Standard Time (GMT-06:00) Guadalajara, Mexico City,
Monterrey
033 Central America Standard Time (GMT-06:00) Central America
035 Eastern Standard Time (GMT-05:00) Eastern Time (US and
Canada)
040 U.S. Eastern Standard Time (GMT-05:00) Indiana (East)
045 S.A. Pacific Standard Time (GMT-05:00) Bogota, Lima, Quito
050 Atlantic Standard Time (GMT-04:00) Atlantic Time (Canada)
055 S.A. Western Standard Time (GMT-04:00) Caracas, La Paz
056 Pacific S.A. Standard Time (GMT-04:00) Santiago
060 Newfoundland and Labrador
Standard Time
065 E. South America Standard Time (GMT-03:00) Brasilia
(GMT-03:30) Newfoundland and
Labrador
VMware, Inc. 73
Page 74

Using VMware vCenter Orchestrator Plug-Ins
Time Zone Code Time Zone Name Description
070 S.A. Eastern Standard Time (GMT-03:00) Buenos Aires,
073 Greenland Standard Time (GMT-03:00) Greenland
075 Mid-Atlantic Standard Time (GMT-02:00) Mid-Atlantic
080 Azores Standard Time (GMT-01:00) Azores
083 Cape Verde Standard Time (GMT-01:00) Cape Verde Islands
085 GMT Standard Time (GMT) Greenwich Mean Time :
090 Greenwich Standard Time (GMT) Casablanca, Monrovia
095 Central Europe Standard Time (GMT+01:00) Belgrade, Bratislava,
100 Central European Standard Time (GMT+01:00) Sarajevo, Skopje,
105 Romance Standard Time (GMT+01:00) Brussels, Copenhagen,
110 W. Europe Standard Time (GMT+01:00) Amsterdam, Berlin, Bern,
113 W. Central Africa Standard Time (GMT+01:00) West Central Africa
115 E. Europe Standard Time (GMT+02:00) Bucharest
120 Egypt Standard Time (GMT+02:00) Cairo
125 FLE Standard Time (GMT+02:00) Helsinki, Kyiv, Riga,
130 GTB Standard Time (GMT+02:00) Athens, Istanbul, Minsk
135 Israel Standard Time (GMT+02:00) Jerusalem
140 South Africa Standard Time (GMT+02:00) Harare, Pretoria
145 Russian Standard Time (GMT+03:00) Moscow, St. Petersburg,
150 Arab Standard Time (GMT+03:00) Kuwait, Riyadh
155 E. Africa Standard Time (GMT+03:00) Nairobi
158 Arabic Standard Time (GMT+03:00) Baghdad
160 Iran Standard Time (GMT+03:30) Tehran
165 Arabian Standard Time (GMT+04:00) Abu Dhabi, Muscat
170 Caucasus Standard Time (GMT+04:00) Baku, Tbilisi, Yerevan
175 Transitional Islamic State of
180 Ekaterinburg Standard Time (GMT+05:00) Ekaterinburg
185 West Asia Standard Time (GMT+05:00) Islamabad, Karachi,
190 India Standard Time (GMT+05:30) Chennai, Kolkata,
193 Nepal Standard Time (GMT+05:45) Kathmandu
195 Central Asia Standard Time (GMT+06:00) Astana, Dhaka
200 Sri Lanka Standard Time (GMT+06:00) Sri Jayawardenepura
201 N. Central Asia Standard Time (GMT+06:00) Almaty, Novosibirsk
Georgetown
Dublin, Edinburgh, Lisbon, London
Budapest, Ljubljana, Prague
Warsaw, Zagreb
Madrid, Paris
Rome, Stockholm, Vienna
Sofia, Tallinn, Vilnius
Volgograd
(GMT+04:30) Kabul
Afghanistan Standard Time
Tashkent
Mumbai, New Delhi
74 VMware, Inc.
Page 75

Chapter 11 Using the Enumeration Plug-In
Time Zone Code Time Zone Name Description
203 Myanmar Standard Time (GMT+06:30) Yangon (Rangoon)
205 S.E. Asia Standard Time (GMT+07:00) Bangkok, Hanoi, Jakarta
207 North Asia Standard Time (GMT+07:00) Krasnoyarsk
210 China Standard Time (GMT+08:00) Beijing, Chongqing,
Hong Kong SAR, Urumqi
215 Singapore Standard Time (GMT+08:00) Kuala Lumpur,
Singapore
220 Taipei Standard Time (GMT+08:00) Taipei
225 W. Australia Standard Time (GMT+08:00) Perth
227 North Asia East Standard Time (GMT+08:00) Irkutsk, Ulaan Bataar
230 Korea Standard Time (GMT+09:00) Seoul
235 Tokyo Standard Time (GMT+09:00) Osaka, Sapporo, Tokyo
240 Yakutsk Standard Time (GMT+09:00) Yakutsk
245 A.U.S. Central Standard Time (GMT+09:30) Darwin
250 Cen. Australia Standard Time (GMT+09:30) Adelaide
255 A.U.S. Eastern Standard Time (GMT+10:00) Canberra, Melbourne,
Sydney
260 E. Australia Standard Time (GMT+10:00) Brisbane
265 Tasmania Standard Time (GMT+10:00) Hobart
270 Vladivostok Standard Time (GMT+10:00) Vladivostok
275 West Pacific Standard Time (GMT+10:00) Guam, Port Moresby
280 Central Pacific Standard Time (GMT+11:00) Magadan, Solomon
Islands, New Caledonia
285 Fiji Islands Standard Time (GMT+12:00) Fiji Islands, Kamchatka,
Marshall Islands
290 New Zealand Standard Time (GMT+12:00) Auckland, Wellington
300 Tonga Standard Time (GMT+13:00) Nuku'alofa
VMware, Inc. 75
Page 76

Using VMware vCenter Orchestrator Plug-Ins
76 VMware, Inc.
Page 77

Using the Workflow Documentation
Plug-In 12
You can use the Workflow Documentation plug-in to generate PDF documentation about a specific
workflow or workflow category.
This chapter includes the following topics:
“Workflow Library for the Workflow Documentation Plug-In,” on page 77
n
“Generate Workflow Documentation,” on page 77
n
Workflow Library for the Workflow Documentation Plug-In
With the Workflow Documentation plug-in workflows you can generate PDF documentation about specific
workflows or workflow categories.
You can access these workflows from Library > Workflow documentation in the Workflows view of the
Orchestrator client.
Get documentation for
workflow
Get documentation for
workflow category
Generates information about a workflow that you select.
Generates information about a workflow category that you select.
Generate Workflow Documentation
You can export documentation in PDF format about a workflow or a workflow folder that you select at any
time.
The exported document contains detailed information about the selected workflow or the workflows in the
folder. The information about each workflow includes name, version history of the workflow, attributes,
parameter presentation, workflow schema, and workflow actions. In addition, the documentation also
provides the source code for the used actions.
Procedure
1 From the drop-down menu in the Orchestrator client, select Run or Design.
2 Click the Workflows view.
3 Navigate to the workflow or workflow folder for which you want to generate documentation and right-
click it.
4 Select Generate documentation.
5 Browse to locate the folder in which to save the PDF file, provide a file name, and click Save.
VMware, Inc.
77
Page 78

Using VMware vCenter Orchestrator Plug-Ins
The PDF file containing the information about the selected workflow, or the workflows in the folder, is
saved on your system.
78 VMware, Inc.
Page 79

Using the HTTP-REST Plug-In 13
The HTTP-REST plug-in allows you to manage REST Web services by providing interaction between
vCenter Orchestrator and REST hosts. You can define REST services and their operations as inventory
objects by running configuration workflows, and perform REST operations on the defined objects.
The plug-in contains a set of standard workflows related to managing REST hosts and invoking REST
operations. You can also generate custom workflows to automate tasks in a REST environment.
This chapter includes the following topics:
“Configuring the HTTP-REST Plug-In,” on page 79
n
“Generate a New Workflow from a REST Operation,” on page 82
n
“Invoke a REST Operation,” on page 83
n
Configuring the HTTP-REST Plug-In
You must use the Orchestrator client to configure the HTTP-REST plug-in.
Configuration Workflows
The Configuration workflow category contains workflows that allow you to manage REST hosts.
You can access these workflows from Library > HTTP-REST > Configuration on the Workflows view in the
Orchestrator client.
Workflow Name Description
Add a REST host Adds a REST host to the plug-in's inventory.
Add a REST operation Adds an operation to a REST host.
Add schema to a REST host Adds an XSD schema to a REST host.
Clone a REST host Creates a clone of a REST host.
Clone a REST operation Creates a clone of a REST operation.
Manage SSL certificates Verifies a host URL, and if required, shows a user interaction message for the
approval of SSL certificates.
Reload plug-in configuration Refreshes the list of REST hosts in the plug-in's inventory.
Remove a REST host Removes a REST host from the plug-in's inventory.
Remove a REST operation Removes an operation from a REST host.
Remove schemas form a REST host Removes all associated XSD schemas from a REST host.
VMware, Inc. 79
Page 80

Using VMware vCenter Orchestrator Plug-Ins
Workflow Name Description
Update a REST host Updates a REST host in the plug-in's inventory.
Update a REST operation Updates an operation on a REST host.
Configure Kerberos Authentication
You can use Kerberos authentication when you add a host.
The krb5.conf file contains the following information:
Kerberos configuration information
n
Locations of Key Distribution Centers (KDC) and administration servers for the Kerberos realms of
n
interest
Default values for the current realm and for Kerberos applications
n
Mappings of host names onto Kerberos realms
n
Procedure
Create a krb5.conf file and save it to the following location.
u
Operating System Path
Windows
Linux
A krb5.conf file has the following structure:
C:\Program Files\Common Files\VMware\VMware vCenter Server
- Java Components\lib\security\
/usr/java/jre-vmware/lib/security/
[libdefaults]
default_realm = YOURDOMAIN.COM
udp_preference_limit = 1
[realms]
YOURDOMAIN.COM = {
kdc = kdc.yourdomain.com
default_domain = yourdomain.com
}
[domain_realms]
.yourdomain.com=YOURDOMAIN.COM
yourdomain.com=YOURDOMAIN.COM
NOTE The Kerberos authentication requires a Fully Qualified Domain Name (FQDN) host address.
IMPORTANT When you add or modify the krb5.conf file, you must restart the Orchestrator server
service.
Add a REST Host
You can run a workflow to add a REST host and configure the host connection parameters.
Procedure
1 Log in to the Orchestrator client as an administrator.
2 Click the Workflows view in the Orchestrator client.
3 In the workflows hierarchical list, select Library > HTTP-REST > Configuration and navigate to the
Add a REST host workflow.
80 VMware, Inc.
Page 81

Chapter 13 Using the HTTP-REST Plug-In
4 Right-click the Add a REST host workflow and select Start workflow.
5 In the Name text box, type the name of the host.
6 In the URL text box, type the address of the host.
NOTE The Kerberos authentication requires a Fully Qualified Domain Name (FQDN) host address.
7 In the Connection timeout text box, type the number of seconds before a connection times out.
8 In the Operation timeout text box, type the number of seconds before an operation times out.
9 Select the authentication type.
Option Description
None
OAuth 1.0
OAuth 2.0
Basic
Digest
Kerberos
No authentication is required.
Provide the required authentication parameters.
Provide the authentication token.
Provides basic access authentication.
Select the session mode.
If you select Shared Session, provide credentials for the shared
n
session.
If you select Per User Session, the Orchestrator client retrieves
n
credentials from the user who is logged in.
Provides digest access authentication that uses encryption.
Select the session mode.
If you select Shared Session, provide credentials for the shared
n
session.
If you select Per User Session, the Orchestrator client retrieves
n
credentials from the user who is logged in.
Provides Kerberos access authentication.
Select the session mode.
If you select Shared Session, provide credentials for the shared
n
session.
If you select Per User Session, the Orchestrator client retrieves
n
credentials from the user who is logged in.
10 Click Submit to run the workflow.
After the workflow runs successfully, the REST host appears in the Inventory view.
What to do next
You can add opearations and XSD schema to the REST host, and run workflows from the Inventory view.
Add a REST Operation
You can run a workflow to add an operation to a REST host from the plug-in's inventory.
Prerequisites
Verify that you are logged in to the Orchestrator client as an administrator.
n
Verify that you have a connection to a REST host from the Inventory view.
n
Procedure
1 Click the Workflows view in the Orchestrator client.
2 In the workflows hierarchical list, select Library > HTTP-REST > Configuration and navigate to the
Add a REST operation workflow.
VMware, Inc. 81
Page 82

Using VMware vCenter Orchestrator Plug-Ins
3 Right-click the Add a REST operation workflow and select Start workflow.
4 Select the host to which you want to add the operation.
5 In the Name text box, type the name of the operation.
6 In the Template URL text box, type only the operation part of the URL.
You can include placeholders for parameters that are provided when you run the operation.
The following is an example URL syntax.
/customer/{id}/orders?date={date}
7 Select the HTTP method that the operation uses.
If you select POST or PUT, you can provide content type for the method.
8 Click Submit to run the workflow.
What to do next
You can run workflows on the operation from the Inventory view.
Add a Schema to a REST Host
You can run a workflow to add an XSD schema to a REST host from the plug-in's inventory.
The XSD schema describes the XML documents that are used as input and output content from Web
services. By associating such a schema with a host, you can specify the XML element that is required as an
input when you are generating a workflow from a REST operation.
Prerequisites
Verify that you are logged in to the Orchestrator client as an administrator.
n
Verify that you have a connection to a REST host from the Inventory view.
n
Procedure
1 Click the Workflows view in the Orchestrator client.
2 In the workflows hierarchical list, select Library > HTTP-REST > Configuration to navigate to the Add
a schema to a REST host workflow.
3 Right-click the Add a schema to a REST host workflow and select Start workflow.
4 Select the host to which you want to add the XSD schema.
5 Select whether to load the schema from URL.
Option Action
Yes
No
Type the URL of the schema.
Provide the schema content.
6 Click Submit to run the workflow.
Generate a New Workflow from a REST Operation
You can create a custom workflow from a REST operation.
You can integrate custom-generated workflows into high-level workflows. For more information about
workflow development, see the vCenter Orchestrator Developer's Guide.
82 VMware, Inc.
Page 83

Chapter 13 Using the HTTP-REST Plug-In
Prerequisites
Verify that you are logged in to the Orchestrator client as an administrator.
n
Verify that you have a connection to a REST host from the Inventory view.
n
Procedure
1 Click the Workflows view in the Orchestrator client.
2 In the workflows hierarchical list, select Library > HTTP-REST and navigate to the Generate a new
workflow from a REST operation workflow.
3 Right-click the Generate a new workflow from a REST operation workflow and select Start workflow.
4 Select the REST operation from the list of available operations.
If the operation takes input and XSD schemas are added to its host, you can specify the request input
type.
5 In the Name text box, type the name of the workflow to generate.
6 Select the workflow folder in which to generate the new workflow.
You can select any existing folder from the worklfow library.
7 Click Submit to run the workflow.
Invoke a REST Operation
You can call a REST operation directly, without generating a new workflow.
Prerequisites
Verify that you are logged in to the Orchestrator client as an administrator.
n
Verify that you have a connection to a REST host from the Inventory view.
n
Procedure
1 Click the Workflows view in the Orchestrator client.
2 In the workflows hierarchical list, select Library > HTTP-REST and navigate to the Invoke a REST
operation workflow.
3 Right-click the Invoke a REST operation workflow and select Start workflow.
4 Select the REST operation from the list of available operations.
5 Provide the input parameters and content that the operation requires.
6 Click Submit to run the workflow.
VMware, Inc. 83
Page 84

Using VMware vCenter Orchestrator Plug-Ins
84 VMware, Inc.
Page 85

Using the SOAP Plug-In 14
The SOAP plug-in allows you to manage SOAP Web services by providing interaction between vCenter
Orchestrator and SOAP hosts. You can define SOAP services as inventory objects by running configuration
workflows, and perform SOAP operations on the defined objects.
The plug-in contains a set of standard workflows related to managing SOAP hosts and invoking SOAP
operations. You can also generate custom workflows to automate tasks in a SOAP environment.
This chapter includes the following topics:
“Configuring the SOAP Plug-In,” on page 85
n
“Generate a New Workflow from a SOAP Operation,” on page 87
n
“Invoke a SOAP Operation,” on page 88
n
Configuring the SOAP Plug-In
You must use the Orchestrator client to configure the SOAP plug-in.
Configuration Workflows
The Configuration workflow category contains workflows that allow you to manage SOAP hosts.
You can access these workflows from Library > SOAP > Configuration on the Workflows view in the
Orchestrator client.
Workflow Name Description
Add a SOAP host Adds a SOAP host to the plug-in's inventory.
Manage SSL certificates Verifies a host URL, and if required, shows a user interaction message for the
approval of SSL certificates.
Reload plug-in configuration Refreshes the list of SOAP hosts in the plug-in's inventory.
Remove a SOAP host Removes a SOAP host from the plug-in's inventory.
CAUTION When you remove a host from the inventory, all workflows generated
from it will stop working.
Update a SOAP host Updates a SOAP host in the plug-in's inventory.
Update a SOAP host with an
endpoint URL
VMware, Inc. 85
Updates a SOAP host with a preferred endpoint address. The new endpoint
address is used for sending and receiving SOAP messages, instead of the endpoint
address defined within the WSDL.
Page 86

Using VMware vCenter Orchestrator Plug-Ins
Add a SOAP Host
You can run a workflow to add a SOAP host and configure the host connection parameters.
Procedure
1 Log in to the Orchestrator client as an administrator.
2 Click the Workflows view in the Orchestrator client.
3 In the workflows hierarchical list, select Library > SOAP > Configuration and navigate to the Add a
SOAP host workflow.
4 Right-click the Add a SOAP host workflow and select Start workflow.
5 In the Name text box, type the name of the host.
6 Select whether to provide the WSDL content as text.
Option Action
Yes
No
7 In the Connection timeout text box, specify the number of seconds before a connection times out.
Copy the text in the WSDL content text box.
Type the correct path in the WSDL URI text box.
8 In the Request timeout text box, specify the number of seconds before a request times out.
9 Select the authentication type.
Option Description
None
Basic
Digest
NTLM
Kerberos
No authentication is required.
Provides basic access authentication.
Select the session mode.
If you select Shared Session, provide credentials for the shared
n
session.
If you select Per User Session, the Orchestrator client retrieves
n
credentials from the user who is logged in.
Provides digest access authentication that uses encryption.
Select the session mode.
If you select Shared Session, provide credentials for the shared
n
session.
If you select Per User Session, the Orchestrator client retrieves
n
credentials from the user who is logged in.
Provides NT LAN Manager (NTLM) access authentication within the
Window Security Support Provider (SSPI) framework.
Select the session mode.
If you select Shared Session, provide credentials for the shared
n
session.
If you select Per User Session, the Orchestrator client retrieves
n
credentials from the user who is logged in.
Provide the NTLM settings.
Provides Kerberos access authentication.
Select the session mode.
If you select Shared Session, provide credentials for the shared
n
session.
If you select Per User Session, the Orchestrator client retrieves
n
credentials from the user who is logged in.
86 VMware, Inc.
Page 87

10 Click Submit to run the workflow.
After the workflow runs successfully, the SOAP host appears in the Inventory view.
What to do next
You can explore the SOAP host objects and run workflows on them from the Inventory view.
Configure Kerberos Authentication
You can use Kerberos authentication when you add a host.
The krb5.conf file contains the following information:
Kerberos configuration information
n
Locations of Key Distribution Centers (KDC) and administration servers for the Kerberos realms of
n
interest
Default values for the current realm and for Kerberos applications
n
Mappings of host names onto Kerberos realms
n
Procedure
Create a krb5.conf file and save it to the following location.
u
Chapter 14 Using the SOAP Plug-In
Operating System Path
Windows
Linux
C:\Program Files\Common Files\VMware\VMware vCenter Server
- Java Components\lib\security\
/usr/java/jre-vmware/lib/security/
A krb5.conf file has the following structure:
[libdefaults]
default_realm = YOURDOMAIN.COM
udp_preference_limit = 1
[realms]
YOURDOMAIN.COM = {
kdc = kdc.yourdomain.com
default_domain = yourdomain.com
}
[domain_realms]
.yourdomain.com=YOURDOMAIN.COM
yourdomain.com=YOURDOMAIN.COM
NOTE The Kerberos authentication requires a Fully Qualified Domain Name (FQDN) host address.
IMPORTANT When you add or modify the krb5.conf file, you must restart the Orchestrator server
service.
Generate a New Workflow from a SOAP Operation
You can create a custom workflow from a SOAP operation.
You can integrate custom-generated workflows into high-level workflows. For more information about
workflow development, see the vCenter Orchestrator Developer's Guide.
Prerequisites
Verify that you are logged in to the Orchestrator client as an administrator.
n
VMware, Inc. 87
Page 88

Using VMware vCenter Orchestrator Plug-Ins
Verify that you have a connection to a SOAP host from the Inventory view.
n
Procedure
1 Click the Workflows view in the Orchestrator client.
2 In the workflows hierarchical list, select Library > SOAP to navigate to the Generate a new workflow
from a SOAP operation workflow.
3 Right-click the Generate a new workflow from a SOAP operation workflow and select Start workflow.
4 Select the SOAP operation from the list of available operations.
5 In the Name text box, type the name of the workflow to generate.
6 Select the workflow folder in which to generate the new workflow.
You can select any existing folder from the workflow library.
7 Click Submit to run the workflow.
What to do next
You can test the generated workflow.
Test a Custom-Generated Workflow
You can run a custom workflow generated from a SOAP operation to get the output parameters of the
operation.
Prerequisites
Verify that you are logged in to the Orchestrator client as an administrator.
n
Verify that you have a connection to a SOAP host from the Inventory view.
n
Procedure
1 Click the Workflows view in the Orchestrator client.
2 Navigate to the workflow location.
3 Right-click the custom workflow and select Start workflow.
4 Provide the input parameters that the SOAP operation requires.
5 Click Submit to run the workflow.
6 (Optional) In the Logs tab, review the list of available output parameters.
Invoke a SOAP Operation
You can call a SOAP operation directly, without generating a new workflow.
Prerequisites
Verify that you are logged in to the Orchestrator client as an administrator.
n
Verify that you have a connection to a SOAP host from the Inventory view.
n
Procedure
1 Click the Workflows view in the Orchestrator client.
2 In the workflows hierarchical list, select Library > SOAP and navigate to the Invoke a SOAP operation
workflow.
3 Right-click the Invoke a SOAP operation workflow and select Start workflow.
88 VMware, Inc.
Page 89

4 Select the SOAP operation from the list of available operations.
5 Provide the input parameters that the SOAP operation requires.
6 Click Submit to run the workflow.
7 (Optional) In the Logs tab, review the list of available output parameters.
Chapter 14 Using the SOAP Plug-In
VMware, Inc. 89
Page 90

Using VMware vCenter Orchestrator Plug-Ins
90 VMware, Inc.
Page 91

Using the AMQP Plug-In 15
The AMQP plug-in allows you to interact with Advanced Message Queuing Protocol (AMQP) servers also
known as brokers. You can define AMQP brokers and queue subscriptions as inventory objects by running
configuration workflows, and perform AMQP operations on defined objects.
The plug-in contains a set of standard workflows related to managing AMQP brokers and calling AMQP
operations.
This chapter includes the following topics:
“Configuring the AMQP Plug-In,” on page 91
n
“Using the AMQP Plug-In Standard Workflows,” on page 93
n
Configuring the AMQP Plug-In
You must use the Orchestrator client to configure the AMQP plug-in.
Configuration Workflows
The Configuration workflow category contains workflows that allow you to manage AMQP brokers.
You can access these workflows from Library > AMQP > Configuration on the Workflows view in the
Orchestrator client.
Workflow Name Description
Add a broker Adds an AMQP broker.
Reload plug-in configuration Reloads the plug-in configuration. You can run the workflow when you import new
Remove a broker Removes an AMQP broker.
Remove a subscription Removes an AMQP message subscription.
Subscribe to queues Creates a new subscription element.
Update a broker Updates broker properties.
Validate a broker Validate a broker by attempting to start a connection.
Add a Broker
You can run a workflow to add an AMQP broker.
Procedure
1 Log in to the Orchestrator client as an administrator.
VMware, Inc.
resources containing new broker definitions handled by the plug-in.
91
Page 92

Using VMware vCenter Orchestrator Plug-Ins
2 Click the Workflows view in the Orchestrator client.
3 In the hierarchical list of workflows, select Library > AMQP > Configuration and navigate to the Add a
broker workflow.
4 Right-click the Add a broker workflow and select Start workflow.
5 Provide the information required for the Add a broker workflow.
Option Action
Name
Host
Port
Virtual host
Use SSL
Accept all certificates
User name
Password
6 Click Submit to run the workflow.
After the workflow runs successfully, the AMQP broker appears in the Inventory view.
Type the name of the broker.
Type the address of the host.
Type the port of the AMQP broker service. The default port is 5672.
Type the address of the virtual host. The default value provided is /.
Select whether to use SSL certificates.
Select whether to accept all SSL certificates without validation.
Type the user name for the broker.
Type the password for the broker.
What to do next
You can run a Validate a broker workflow. If an error occurs, use the Update a broker workflow to change
the broker's properties before validating again.
Subscribe to Queues
You can run a workflow to create a new subscription elements.
Prerequisites
Verify that you are logged in to the Orchestrator client as an administrator.
n
Verify that you have a connection to an AMQP broker from the Inventory view.
n
Verify that the AMQP broker has all queues included in the subscription declared.
n
Procedure
1 Click the Workflows view in the Orchestrator client.
2 In the hierarchical list of workflows, select Library > AMQP > Configuration and navigate to the
Subscribe to queues workflow.
3 Right-click the Subscribe to queues workflow and select Start workflow.
4 In the Name text box, type the name of the queue to display.
5 Select the broker to which you want to add the subscription.
6 Select all the queues for message subscription.
7 Click Submit to run the workflow.
After the workflow runs successfully a child of the broker appears in the Inventory view.
What to do next
You can create a policy.
92 VMware, Inc.
Page 93

Chapter 15 Using the AMQP Plug-In
Update a Broker
You can run a workflow to update the broker properties.
Prerequisites
Verify that you are logged in to the Orchestrator client as an administrator.
n
Verify that you have a connection to an AMQP broker from the Inventory view.
n
Procedure
1 Click the Workflows view in the Orchestrator client.
2 In the hierarchical list of workflows, select Library > AMQP and navigate to the Update a broker
workflow.
3 Right-click the Update a broker workflow and select Start workflow.
4 Select the broker that you want to update.
Current properties of the broker appear.
5 Edit the properties that you want.
6 Click Submit to run the workflow.
Using the AMQP Plug-In Standard Workflows
The AMQP workflow category contains workflows that allow you to run AMQP operations.
You can access these workflows from Library > AMQP on the Workflows view in the Orchestrator client.
Workflow Name Description
Bind Creates a binding in a specified broker.
Declare a queue Adds a queue to a specified broker.
Declare an exchange Adds an exchange to a specified broker.
Delete a queue Deletes a queue from a specified broker.
Delete an exchange Deletes an exchange from a specified broker.
Receive a text message Receives a text message from a specified broker.
Send a test message Sends a text message using a specified broker.
Unbind Unbinds binding in a specified broker.
Declare a Binding
You can run a workflow to create a binding in a specified broker.
Prerequisites
Verify that you are logged in to the Orchestrator client as an administrator.
n
Verify that you have a connection to an AMQP broker from the Inventory view.
n
Procedure
1 Click the Workflows view in the Orchestrator client.
2 In the hierarchical list of workflows, select Library > AMQP and navigate to the Bind workflow.
3 Right-click the Bind workflow and select Start workflow.
VMware, Inc. 93
Page 94

Using VMware vCenter Orchestrator Plug-Ins
4 Select a broker in which you want create a binding.
5 Provide information about the binding.
Option Action
Queue name
Exchange name
Routing key
6 Click Submit to run the workflow.
Declare a Queue
You can run a workflow to add a queue to a specified broker.
Prerequisites
Verify that you are logged in to the Orchestrator client as an administrator.
n
Verify that you have a connection to an AMQP broker from the Inventory view.
n
Procedure
1 Click the Workflows view in the Orchestrator client.
Type the name of the queue.
Type the name of the exchange.
Type the routing key.
2 In the hierarchical list of workflows, select Library > AMQP and navigate to the Declare a queue
workflow.
3 Right-click the Declare a queue workflow and select Start workflow.
4 Select a broker to which you want to add the queue.
5 In the Name text box, type the name of the queue to display.
6 Select whether the queue is durable.
Option Description
Yes
No
The queue is removed after a broker restart.
The queue remains after a broker restart.
7 Select whether an exclusive client is set for the specific queue.
Option Description
Yes
No
Sets one client for this specific queue.
Sets more clients for this specific queue.
8 Select whether to automatically delete the queue with activated subscription.
Option Description
Yes
No
Automatically deletes the queue when no more clients are connected to it.
The queue remains until at least one client subscribes to it.
Does not automatically delete the queue.
9 Click Submit to run the workflow.
94 VMware, Inc.
Page 95

Chapter 15 Using the AMQP Plug-In
Declare an Exchange
You can run a workflow to add an exchange in a specified broker.
Prerequisites
Verify that you are logged in to the Orchestrator client as an administrator.
n
Verify that you have a connection to an AMQP broker from the Inventory view.
n
Procedure
1 Click the Workflows view in the Orchestrator client.
2 In the hierarchical list of workflows, select Library > AMQP and navigate to the Declare an exchange
workflow.
3 Right-click the Declare an exchange workflow and select Start workflow.
4 Select a broker to which you want to add the exchange.
5 In the Name text box, type a name for the exchange.
6 Select the exchange type.
Option Description
direct
fanout
headers
topic
Makes a direct match between the routing key provided in the message
and the routing criteria used when a queue is bound to this exchange.
Forwards any message sent to this exchange to all queues bound to it.
Queues that are bound to this exchange contain no arguments.
Queues are bound to this exchange with a table of arguments that can
contain headers and values. A special argument named x-match
determines the matching algorithm.
Performs a wildcard match between the routing key and the routing
pattern specified in the binding.
7 Select whether the exchange is durable.
Option Description
Yes
No
The exchange remains after a broker restart.
The exchange is removed after a broker restart.
8 Select whether to automatically delete the exchange with activated subscription.
Option Description
Yes
No
Automatically deletes the exchange when no more queues are bound to it.
The exchange remains until at least one queue is bound to it.
Does not automatically delete the exchange.
9 Click Submit to run the workflow.
Send a Text Message
You can run a workflow to send a text message using a specified broker.
Prerequisites
Verify that you are logged in to the Orchestrator client as an administrator.
n
VMware, Inc. 95
Page 96

Using VMware vCenter Orchestrator Plug-Ins
Verify that you have a connection to an AMQP broker from the Inventory view.
n
Procedure
1 Click the Workflows view in the Orchestrator client.
2 In the hierarchical list of workflows, select Library > AMQP and navigate to the Send a text message
workflow.
3 Right-click the Send a text message workflow and select Start workflow.
4 Select a broker from which you want to send a message.
5 In the Exchange name text box, specify the name of the exchange.
6 In the Routing key text box, specify the routing key.
7 In the Content text box, type the message you want to send.
8 Click Submit to run the workflow.
Delete a Binding
You can run a workflow to delete a binding in a specified broker.
Prerequisites
Verify that you are logged in to the Orchestrator client as an administrator.
n
Verify that you have a connection to an AMQP broker from the Inventory view.
n
Procedure
1 Click the Workflows view in the Orchestrator client.
2 In the hierarchical list of workflows, select Library > AMQP and navigate to the Unbind workflow.
3 Right-click the Unbind workflow and select Start workflow.
4 Select a broker to remove the binding from.
5 Provide information about the binding.
Option Action
Queue name
Exchange name
Routing key
Specify the name of the queue.
Specify the name of the exchange.
Specify the routing key.
6 Click Submit to run the workflow.
96 VMware, Inc.
Page 97

Using the SNMP Plug-In 16
The SNMP plug-in allows vCenter Orchestrator to connect and receive information from SNMP-enabled
systems and devices. You can define SNMP devices as inventory objects by running workflows, and
perform SNMP operations on the defined objects.
You can use the plug-in to connect to SNMP devices such as routers, switches, network printers, and UPS
devices. The plug-in can also receive events from vCenter Server over the SNMP protocol.
The SNMP plug-in provides two methods of communication with the SNMP devices.
Queries for the values of specific SNMP variables.
n
Listening for events (SNMP traps) that are generated from the devices and pushed to the registered
n
SNMP managers.
The plug-in contains a set of standard workflows related to managing SNMP devices, queries, the trap host,
and performing SNMP operations. You can also create custom workflows to automate tasks in an SNMP
environment.
This chapter includes the following topics:
“Managing SNMP Devices,” on page 97
n
“Managing SNMP Queries,” on page 98
n
“Managing the SNMP Trap Host,” on page 99
n
“Receiving SNMP Traps,” on page 100
n
“Generic SNMP Request Workflows,” on page 102
n
Managing SNMP Devices
You can run workflows to register SNMP devices with Orchestrator, edit the settings for existing devices,
and unregister devices.
Device Management Workflows
The Device Management workflow category contains workflows that allow you to manage SNMP devices.
You can access these workflows from Library > SNMP > Device Management on the Workflows view in
the Orchestrator client.
VMware, Inc.
97
Page 98

Using VMware vCenter Orchestrator Plug-Ins
Workflow Name Description
Edit an SNMP device Edits the configuration of a registered SNMP device.
Register an SNMP device Registers an SNMP-enabled device to the plug-in's inventory.
Unregister an SNMP device Unregisters an SNMP device from the plug-in's inventory.
Register an SNMP Device
You can run a workflow to register an SNMP device and optionally configure advanced connection
parameters.
Procedure
1 Log in to the Orchestrator client as an administrator.
2 Click the Workflows view in the Orchestrator client.
3 In the workflows hierarchical list, select Library > SNMP > Device Management and navigate to the
Register an SNMP device workflow.
4 Right-click the Register an SNMP device workflow and select Start workflow.
5 In the Device address text box, type the IP address or DNS name of the SNMP device.
NOTE To establish a more reliable connection, you should use IP address.
6 (Optional) In the Name text box, type a name for the device as you want it to appear in the Inventory
view.
If you leave the text box blank, the device address is used to generate a name automatically.
7 (Optional) To configure the advanced connection parameters, select Yes.
a In the Port text box, specify the connection port.
The default port is 161.
b From the Version drop-down menu, select the SNMP version that you want to use and provide the
credentials.
NOTE The support for SNMPv3 is limited to the AuthPriv security level with MD5 authentication.
The DES passphrase is the same as the MD5 password.
8 Click Submit to run the workflow.
After the workflow runs successfully, the SNMP device appears in the Inventory view.
What to do next
You can add queries to the SNMP device and run workflows from the Inventory view.
Managing SNMP Queries
You can add queries to SNMP devices, run, copy, and edit existing queries, and remove queries from SNMP
devices.
Query Management Workflows
The Query Management workflow category contains workflows that allow you to manage SNMP queries.
You can access these workflows from Library > SNMP > Query Management on the Workflows view in the
Orchestrator client.
98 VMware, Inc.
Page 99

Chapter 16 Using the SNMP Plug-In
Workflow Name Description
Add a query to an SNMP device Adds a query to an SNMP device.
Copy an SNMP query Copies an SNMP query from one device to another.
Edit an SNMP query Edits an existing SNMP query.
Remove a query from an SNMP device Removes an SNMP query from a device.
Run an SNMP query Runs a query against an SNMP device.
Add a Query to an SNMP Device
You can run a workflow to add a query to an SNMP device from the plug-in's inventory.
Prerequisites
Verify that you are logged in to the Orchestrator client as an administrator.
n
Verify that you have a connection to an SNMP device from the Inventory view.
n
Procedure
1 Click the Workflows view in the Orchestrator client.
2 In the workflows hierarchical list, select Library > SNMP > Query Management and navigate to the
Add a query to an SNMP device workflow.
3 Right-click the Add a query to an SNMP device workflow and select Start workflow.
4 Select the device to which you want to add the query.
5 From the Type drop-down menu, select the query type.
6 In the OID text box, type the object identifier of the variable that you want to query.
The following are example OID values.
1.3.6.1.2.1.1.5.0
n
.1.3.6.1.2.1.1.5.0
n
iso.3.6.1.2.1.1.5.0
n
NOTE The plug-in supports only OID values that are numerical or that begin with iso and continue
with numbers.
7 (Optional) In the Name text box, type a name for the query.
If you leave the text box blank, the type and OID parameters are used to generate a name automatically.
8 Click Submit to run the workflow.
What to do next
You can run workflows on the query from the Inventory view.
Managing the SNMP Trap Host
You can start and stop the SNMP trap host, and change the port on which Orchestrator listens for SNMP
traps.
The SNMP plug-in supports SNMPv1 and SNMPv2c traps.
VMware, Inc. 99
Page 100

Using VMware vCenter Orchestrator Plug-Ins
Trap Host Management Workflows
The Trap Host Management workflow category contains workflows that allow you to manage the SNMP
trap host.
You can access these workflows from Library > SNMP > Trap Host Management on the Workflows view in
the Orchestrator client.
Workflow Name Description
Set the SNMP trap port Sets the port on which Orchestrator listens for SNMP traps.
Start the trap host Orchestrator starts listening for SNMP traps.
Stop the trap host Orchestrator stops listening for SNMP traps.
Set the SNMP Trap Port
You can run a workflow to set the port on which Orchestrator listens for SNMP traps.
The default port for SNMP traps is 162. However, on Linux systems, you can open ports bellow 1024 only
with superuser privileges. To ensure better compatibility, the default port for listening to SNMP traps in the
SNMP plug-in is set to 4000.
Prerequisites
Verify that you are logged in to the Orchestrator client as an administrator.
n
Verify that you have a connection to an SNMP device from the Inventory view.
n
Procedure
1 Click the Workflows view in the Orchestrator client.
2 In the workflows hierarchical list, select Library > SNMP > Trap Host Management and navigate to the
Set the SNMP trap port workflow.
3 Right-click the Set the SNMP trap port workflow and select Start workflow.
4 In the Port text box, type the port number on which Orchestrator should listen for SNMP traps.
5 Click Submit to run the workflow.
The workflow stops the trap host, sets the new port, and starts the trap host again.
Receiving SNMP Traps
The SNMP plug-in can receive SNMP traps by running a workflow, which waits for a single trap message,
or with a policy, which can handle traps continuously. The plug-in supports SNMPv1 and SNMPv2c traps.
Wait for a Trap on an SNMP Device
You can run a workflow that waits to recieve an SNMP trap from a specified device.
This workflow features a trigger, which stops the run of the workflow and waits for an SNMP trap before
continuing. When a trap is received, the workflow run resumes. You can use the workflow as part of more
complex workflows, or as a sample that you can customize or extend for a specific need.
Prerequisites
Verify that you are logged in to the Orchestrator client as an administrator.
n
Verify that you have a connection to an SNMP device from the Inventory view.
n
100 VMware, Inc.
 Loading...