

VMware vCenter Orchestrator - 4.1.1, vCenter Orchestrator - 4.1, vCenter Orchestrator - 4.1.2 Administrator’s Guide
Page 1

vCenter Orchestrator Administration
Guide
vCenter Orchestrator 4.1
This document supports the version of each product listed and
supports all subsequent versions until the document is replaced
by a new edition. To check for more recent editions of this
document, see http://www.vmware.com/support/pubs.
EN-000322-03
Page 2

vCenter Orchestrator Administration Guide
You can find the most up-to-date technical documentation on the VMware Web site at:
http://www.vmware.com/support/
The VMware Web site also provides the latest product updates.
If you have comments about this documentation, submit your feedback to:
docfeedback@vmware.com
Copyright © 2008–2010 VMware, Inc. All rights reserved. This product is protected by U.S. and international copyright and
intellectual property laws. VMware products are covered by one or more patents listed at
http://www.vmware.com/go/patents.
VMware is a registered trademark or trademark of VMware, Inc. in the United States and/or other jurisdictions. All other marks
and names mentioned herein may be trademarks of their respective companies.
VMware, Inc.
3401 Hillview Ave.
Palo Alto, CA 94304
www.vmware.com
2 VMware, Inc.
Page 3

Contents
Updated Information 7
About This Book 9
Introduction to VMware vCenter Orchestrator 11
1
Key Features of the Orchestrator Platform 11
Orchestrator User Roles and Related Tasks 12
Orchestrator Architecture 13
Deprecated Features in Orchestrator 4.1 14
The Orchestrator Client 15
2
Log in to the Orchestrator Client 15
Access the Orchestrator API Explorer 16
User Preferences 16
My Orchestrator View 18
Configurations View 19
Packages View 19
Scheduler View 20
Workflows View 20
Components of the Workflows View 20
Actions View 21
Resources View 21
Inventory View 22
Web Views View 22
Weboperator Web View 22
Start the Weboperator Web View 22
Policies 23
VMware, Inc.
Managing Workflows 25
3
Standard Workflows in the Workflow Library 25
Workflow Library Additions 26
Key Concepts of Workflows 29
Workflow User Permissions 30
Workflow Credentials 31
Workflow Attributes 31
Workflow Parameters 31
Workflow Schema 32
View Workflow Schema 32
Workflow Tokens 32
Workflow Token States 33
Locking Mechanism 33
Set User Permissions on a Workflow 34
3
Page 4

vCenter Orchestrator Administration Guide
Run a Workflow 34
Respond to a Request for a User Interaction 35
Scheduling Workflows 36
Schedule a Workflow 36
Edit the Workflow Recurrence Pattern 37
Creating Resource Elements 39
4
View a Resource Element 39
Import an External Object to Use as a Resource Element 40
Edit the Resource Element Information and Access Rights 40
Save a Resource Element to a File 41
Update a Resource Element 41
Add a Resource Element to a Workflow 42
Add a Resource Element to a Web View 42
Using Plug-Ins 45
5
Default Orchestrator Plug-Ins 46
Using the SSH Plug-In 48
Generate a Key Pair 48
Change the Key Pair Passphrase 48
Register an Orchestrator Public Key on an SSH Host 49
Run an SSH Command 49
Copy a File from an SSH Host 50
Copy a File to an SSH Host 50
Using the XML Plug-In 51
Running the XML Plug-In Sample Workflows 51
Managing Actions 55
6
Create an Action 55
Duplicate an Action 56
Export an Action 56
Import an Action 57
Move an Action 57
Find Elements That Implement an Action 57
Using Packages 59
7
Create a Package 59
Set User Permissions on a Package 60
Export a Package 61
Import a Package 62
Get and Synchronize a Remote Package 62
Remove a Package 63
Setting System Properties 65
8
Disable Access to the Orchestrator Client By Nonadministrators 65
Disable Access to Workflows from Web Service Clients 66
Setting Server File System Access from Workflows and JavaScript 66
Set Server File System Access for Workflows and JavaScript 67
4 VMware, Inc.
Page 5

Set JavaScript Access to Operating System Commands 68
Set JavaScript Access to Java Classes 69
Set Custom Timeout Property 70
Modify the Number of Objects a Plug-In Search Obtains 70
Modify the Number of Concurrent and Pending Workflows 71
Contents
Maintenance and Recovery 73
9
Orchestrator Server Fails to Start 74
Revert to the Default Password for Orchestrator Configuration 74
Change the Web View SSL Certificate 75
Orchestrator Log Files 76
Logging Persistence 77
Define the Server Log Level 78
Change the Size of Server Logs 79
Export Orchestrator Log Files 79
Loss of Server Logs 80
Maintaining the Orchestrator Database 80
Index 81
VMware, Inc. 5
Page 6

vCenter Orchestrator Administration Guide
6 VMware, Inc.
Page 7

Updated Information
This vCenter Orchestrator Administration Guide is updated with each release of the product or when necessary.
This table provides the update history of the vCenter Orchestrator Administration Guide.
Revision Description
EN-000322-03
EN-000322-02
EN-000322-01
EN-000322-00 Initial release of Orchestrator 4.1.
n
Removed reference to unsupported VMware Infrastructure 3.5 plug-in in “Default Orchestrator Plug-
Ins,” on page 46.
n
Clarified the relation between the com.vmware.js.allow-local-process system property and the
js-io-conf file in “Set JavaScript Access to Operating System Commands,” on page 68.
n
Updated section “Workflow Credentials,” on page 31.
n
Updated section Chapter 6, “Managing Actions,” on page 55.
n
Added troubleshooting information in “Orchestrator Server Fails to Start,” on page 74.
n
Added instructions about changing the server log level in “Define the Server Log Level,” on
page 78.
n
Corrected description of Execute permission in “Set User Permissions on a Package,” on page 60.
n
Removed Web views from “Deprecated Features in Orchestrator 4.1,” on page 14.
n
Removed cross-references before tables and figures.
VMware, Inc. 7
Page 8

vCenter Orchestrator Administration Guide
8 VMware, Inc.
Page 9

About This Book
The VMware vCenter Orchestrator Administration Guide provides information and instructions about using and
maintaining VMware® vCenter Orchestrator. It also describes how to manage workflows, plug-ins, packages,
inventory and policies.
Intended Audience
This book is intended for advanced vCenter administrators and experienced system administrators who are
familiar with virtual machine technology and datacenter operations, as well as anyone who wants to:
n
Automate frequently repeated processes related to the management of the virtual environment.
n
Manage multiple automated processes across and among heterogeneous systems.
n
Provide transparency in IT processes by centralizing automated scripts.
n
React faster to unplanned changes in the virtual environment.
VMware Technical Publications Glossary
VMware Technical Publications provides a glossary of terms that might be unfamiliar to you. For definitions
of the terms as they are used in VMware technical documentation, go to
http://www.vmware.com/support/pubs.
Document Feedback
VMware welcomes your suggestions for improving our documentation. If you have comments, send your
feedback to docfeedback@vmware.com.
Technical Support and Education Resources
The following technical support resources are available to you. To access the current version of this book and
other books, go to http://www.vmware.com/support/pubs.
Online and Telephone
Support
VMware, Inc. 9
To use online support to submit technical support requests, view your product
and contract information, and register your products, go to
http://www.vmware.com/support.
Page 10

vCenter Orchestrator Administration Guide
Customers with appropriate support contracts should use telephone support
for the fastest response on priority 1 issues. Go to
http://www.vmware.com/support/phone_support.html.
Support Offerings
VMware Professional
Services
To find out how VMware support offerings can help meet your business needs,
go to http://www.vmware.com/support/services.
VMware Education Services courses offer extensive hands-on labs, case study
examples, and course materials designed to be used as on-the-job reference
tools. Courses are available onsite, in the classroom, and live online. For onsite
pilot programs and implementation best practices, VMware Consulting
Services provides offerings to help you assess, plan, build, and manage your
virtual environment. To access information about education classes,
certification programs, and consulting services, go to
http://www.vmware.com/services.
10 VMware, Inc.
Page 11

Introduction to VMware vCenter
Orchestrator 1
VMware vCenter Orchestrator is a development and process-automation platform that provides a library of
extensible workflows to allow you to create and run automated, configurable processes to manage the VMware
vCenter infrastructure as well as other VMware and third-party technologies.
Orchestrator exposes every operation in the vCenter Server API, allowing you to integrate all of these
operations into your automated processes. Orchestrator also allows you to integrate with other management
and administration solutions through its open plug-in architecture.
This chapter includes the following topics:
n
“Key Features of the Orchestrator Platform,” on page 11
n
“Orchestrator User Roles and Related Tasks,” on page 12
n
“Orchestrator Architecture,” on page 13
n
“Deprecated Features in Orchestrator 4.1,” on page 14
Key Features of the Orchestrator Platform
Orchestrator is composed of three distinct layers: an orchestration platform that provides the common features
required for an orchestration tool, a plug-in architecture to integrate control of subsystems, and a library of
workflows. Orchestrator is an open platform that can be extended with new plug-ins and libraries, and can be
integrated into larger architectures through a SOAP API.
The following list presents the key Orchestrator features.
Persistence
Central management
Check-pointing
Versioning
Production grade external databases are used to store relevant information,
such as processes, workflow states, and configuration information.
Orchestrator provides a central way to manage your processes. The application
server-based platform, with full version history, allows you to have scripts and
process-related primitives in one place. This way, you can avoid scripts without
versioning and proper change control spread on your servers.
Every step of a workflow is saved in the database, which allows you to restart
the server without losing state and context. This feature is especially useful for
long-running processes.
All Orchestrator Platform objects have an associated version history. This
feature allows basic change management when distributing processes to
different project stages or locations.
VMware, Inc. 11
Page 12

vCenter Orchestrator Administration Guide
Scripting engine
Workflow engine
Policy engine
Web 2.0 front end
The Mozilla Rhino JavaScript engine provides a way to create new building
blocks for Orchestrator Platform. The scripting engine is enhanced with basic
version control, variable type checking, name space management and
exception handling. It can be used in the following building blocks:
n
Actions
n
Workflows
n
Policies
The workflow engine allows you to capture business processes. It uses the
following objects to create a step-by-step process automation in workflows:
n
Workflows and actions that Orchestrator provides.
n
Custom building blocks created by the customer
n
Objects that plug-ins add to Orchestrator
Users, other workflows, a schedule, or a policy can start workflows.
The policy engine allows monitoring and event generation to react to changing
conditions in the Orchestrator server or plugged-in technology. Policies can
aggregate events from the platform or any of the plug-ins, which allows you
to handle changing conditions on any of the integrated technologies.
The Web 2.0 front end allows you to integrate Orchestrator functions into Webbased interfaces, using Web views. For example, you can create Web views that
add buttons to start workflows from a page in your company's Intranet. It
provides a library of user customizable components to access vCO orchestrated
objects and uses Ajax technology to dynamically update content without
reloading complete pages.
Security
Orchestrator provides the following advanced security functions:
n
Public Key Infrastructure (PKI) to sign and encrypt content imported and
exported between servers
n
Digital Rights Management (DRM) to control how exported content might
be viewed, edited and redistributed
n
Secure Sockets Layer (SSL) encrypted communications between the
desktop client and the server and HTTPS access to the Web front end.
n
Advanced access rights management to provide control over access to
processes and the objects manipulated by these processes.
Orchestrator User Roles and Related Tasks
vCenter Orchestrator provides different tools and interfaces based on the specific responsibilities of the two
global user roles: Administrators and End Users.
Administrators
This role has full access to all of the Orchestrator platform capabilities. Basic
administrative tasks include the following items:
n
Installing and configuring Orchestrator
n
Managing access rights for Orchestrator and applications
n
Importing and exporting packages
n
Enabling and disabling Web views
12 VMware, Inc.
Page 13
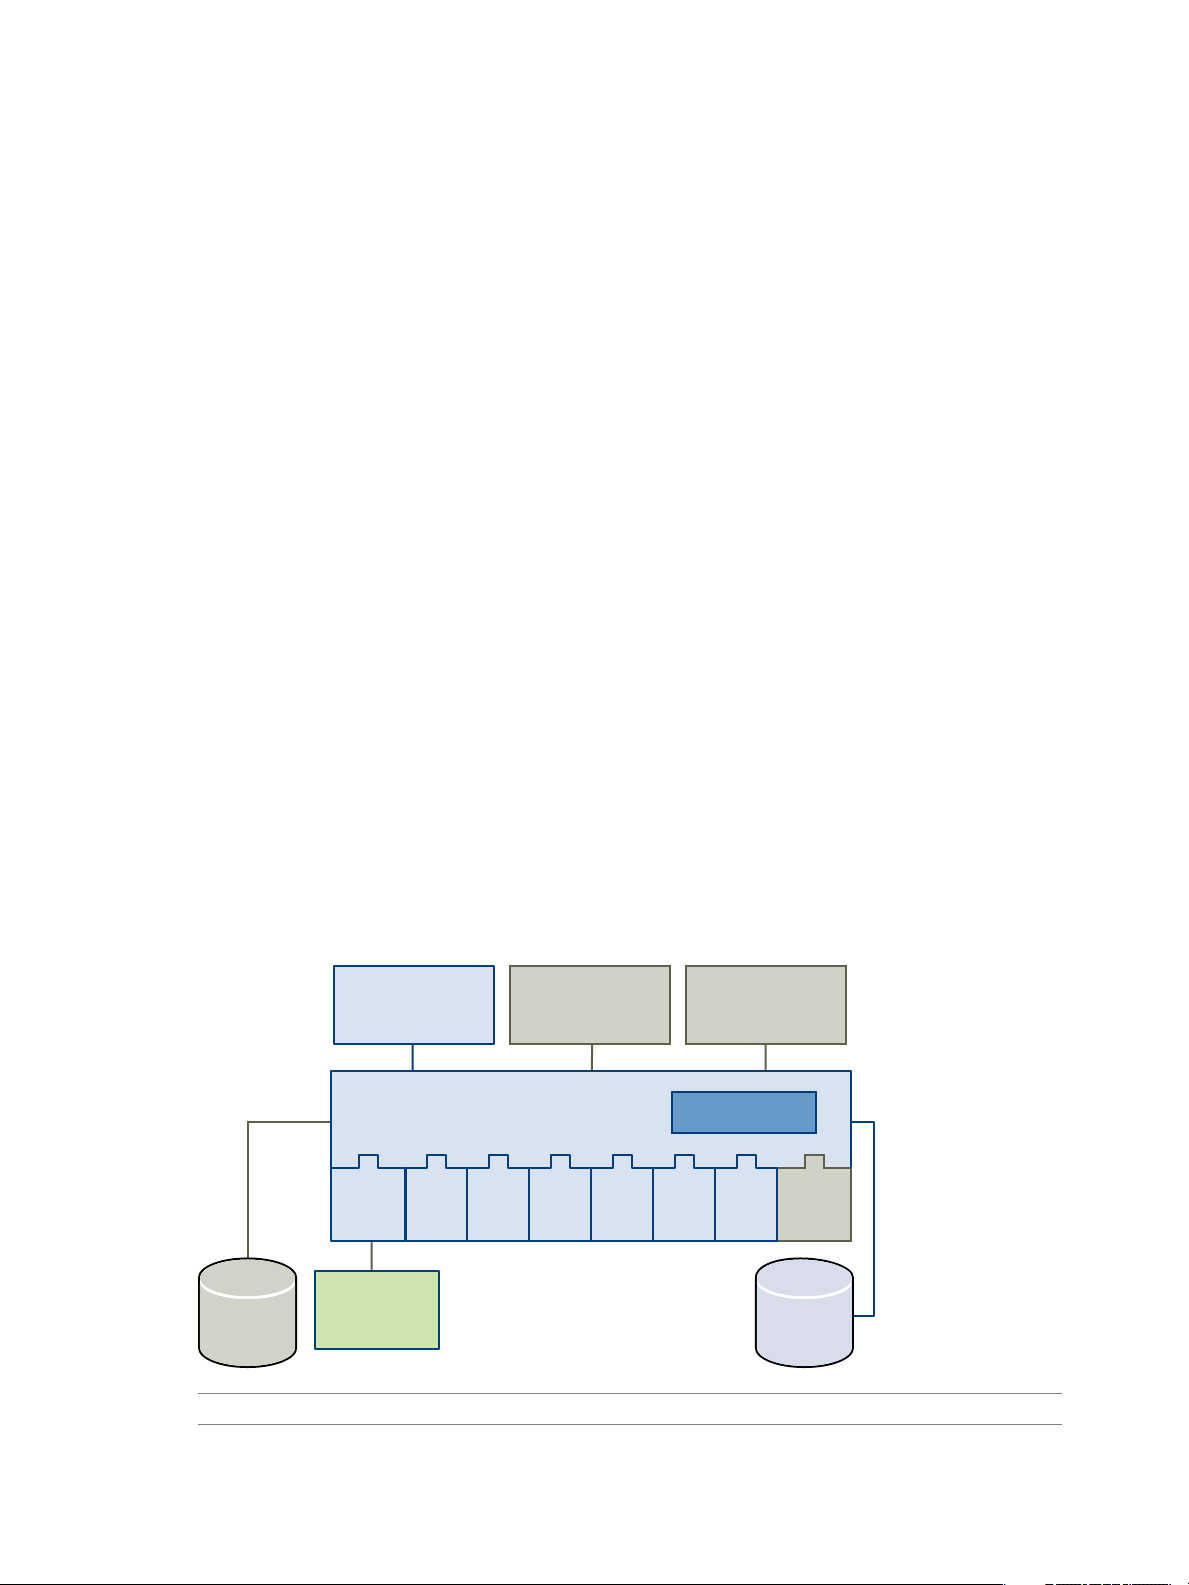
Orchestrator
database
vCenter
Orchestrator
Client application
vCenter
Server
browser access web service
workflow library
vCenter VI3 WMI XML SSH JDBC SMTP
3rd-party
plug-in
directory
services
workflow engine
Chapter 1 Introduction to VMware vCenter Orchestrator
n
Running workflows and scheduling tasks
n
Managing version control of imported elements
n
Creating new workflows and plug-ins
Developers
This role has full access to all of the Orchestrator platform capabilities.
Developers are granted access to the Orchestrator client interface and have the
following responsibilities:
n
n
n
End Users
Users in this role are granted access to only the Web front end. They can run
and schedule workflows and policies that you make available in a browser by
using Web views.
Orchestrator Architecture
Orchestrator contains a workflow library and workflow engine to allow you to create and run workflows that
automate orchestration processes. You run workflows on the objects of different technologies that Orchestrator
accesses through a series of plug-ins.
Orchestrator provides a standard set of plug-ins, including a plug-in to VMware vCenter Server, to allow you
to orchestrate tasks in the different environments that the plug-ins expose.
Orchestrator also presents an open architecture to allow you to plug in external third-party applications to the
orchestration platform. You can run workflows on the objects of the plugged-in technologies that you define
yourself. Orchestrator connects to a directory services server to manage user accounts, and to a database to
store information from the workflows that it runs. You can access Orchestrator and the workflows and objects
it exposes through the Orchestrator client interface, through a Web browser, or through Web services.
Creating applications to extend the Orchestrator platform functionality
Automating processes by customizing existing workflows and creating
new workflows and plug-ins
Customizing Web front ends for these processes, using Web 2.0
Figure 1-1 shows the architecture of Orchestrator.
Figure 1-1. VMware vCenter Orchestrator Architecture
NOTE The VMware Infrastructure 3 and Microsoft plug-ins are not installed by default.
VMware, Inc. 13
Page 14

vCenter Orchestrator Administration Guide
Deprecated Features in Orchestrator 4.1
The following features are deprecated as of Orchestrator 4.1. Development of these features is not supported
in releases of Orchestrator later than 4.1.
n
Authorizations
n
OGNL expressions in workflow presentations
n
Policies
14 VMware, Inc.
Page 15

The Orchestrator Client 2
The Orchestrator client is an easy-to-use desktop application that allows you to perform daily administration
tasks such as importing packages, running and scheduling workflows, and managing user permissions. The
Orchestrator client also serves as an IDE for creating or customizing workflows.
This chapter includes the following topics:
n
“Log in to the Orchestrator Client,” on page 15
n
“Access the Orchestrator API Explorer,” on page 16
n
“User Preferences,” on page 16
n
“My Orchestrator View,” on page 18
n
“Configurations View,” on page 19
n
“Packages View,” on page 19
n
“Scheduler View,” on page 20
n
“Workflows View,” on page 20
n
“Actions View,” on page 21
n
“Resources View,” on page 21
n
“Inventory View,” on page 22
n
“Web Views View,” on page 22
n
“Weboperator Web View,” on page 22
n
“Policies,” on page 23
Log in to the Orchestrator Client
To perform general administration tasks or to edit and create workflows, you must log in to the Orchestrator
client interface.
Prerequisites
All components of the Orchestrator server must be configured and the VMware vCenter Orchestrator Server
service must be running.
VMware, Inc.
15
Page 16

vCenter Orchestrator Administration Guide
Procedure
1 Select Start > Programs > VMware > vCenter Orchestrator Client or run the
vCenter Orchestrator Client.exe file that is located in
2 In the Host name field, type the IP address to which Orchestrator server is bound.
To check the IP address, log in to the Orchestrator configuration interface and check the Network tab.
3 Log in using the Orchestrator user name and password.
To check the credentials, log in to the Orchestrator configuration interface and check the LDAP tab.
The My Orchestrator view appears. This view summarizes the recent activities on the server, shows pending
and running workflows, running policies, scheduled tasks, completed workflows, and elements you recently
edited.
What to do next
You can import a package, start a workflow, or set root access rights on the system.
Access the Orchestrator API Explorer
Orchestrator provides an API Explorer to allow you to search the Orchestrator API and see the documentation
for JavaScript objects that you can use in scripted elements.
install_directory
\Orchestrator\apps.
You can consult an online version of the Scripting API for the vCenter server plug-in on the Orchestrator
documentation home page.
Procedure
u
Access the API Explorer from either the Orchestrator client or from the Scripting tabs of the workflow,
policy, and action editors.
n
To access the API Explorer from the Orchestrator client, click Tools > API Explorer in the Orchestrator
client tool bar.
n
To access the API Explorer from the Scripting tabs of the workflow, policy, and action editors, click
Search API on the left.
The API Explorer appears, allowing you to search all the objects and functions of the Orchestrator API.
What to do next
Use the API Explorer to write scripts for scriptable elements.
User Preferences
You can customize aspects of Orchestrator by using the User preferences tool in the Orchestrator client.
Your preferences are saved on the client side in the C:\Documents and
Settings\
a running Orchestrator server.
To access User preferences, select Tools > User preferences in the Orchestrator client tool bar.
Current_User
\.vmware\vmware-vmo.cfg file. The .vmware folder is created when you first connect to
The User preferences tool presents the following tabs.
16 VMware, Inc.
Page 17

Chapter 2 The Orchestrator Client
General Tab
Table 2-1. Orchestrator Client Customization Options
Option Description
Auto-edit new inserted The new elements that you add automatically open in an editor.
Script compilation delay The frequency of the background task that compiles the scripts and reports
errors in edit mode.
Show decision scripts You can see the decision script of the implemented decision functions.
Delete non empty folder permitted You can delete a folder together with its subfolders and contents.
Size of run logs (number of lines) The maximum number of lines in the system log that the application
displays when you select a workflow run in the Orchestrator client and
click Logs on the Schema tab.
The value must be greater than 0.
Server log fetch limit The maximum number of lines in the server logs that the application
fetches from the database and displays when you click any of the Events
tabs in the Orchestrator client.
The value must be greater than 0.
Finder maximum size The maximum number of results that the searches return when you search
for elements such as actions or workflows.
The value must be greater than 0.
Check usage when deleting an element The application checks if the element you are trying to delete is referenced
by other elements. If the element is used by another workflow, policy, or
action, a warning message appears.
Check OGNL expression The application validates the OGNL expressions in the workflow
presentations.
NOTE The use of OGNL expressions in workflow presentations is
deprecated as of Orchestrator 4.1. Using OGNL expressions in workflow
presentations is not supported in releases of Orchestrator later than 4.1.
Workflows Tab
Table 2-2. Workflow Editor Customization Options
Option Description
Check task/decision IN/OUT parameters The application checks if the input and output parameters of an activity
are correctly bound to the corresponding input or output attribute of the
workflow.
Check error in task's scripts The application validates the script in scriptable task elements.
Check workflow termination The application checks if each terminal transition of a workflow with
different possible outcomes is connected to an End Workflow schema
element.
Check unreachable items The application checks if all activities are reachable.
Check unused workflow's
parameters/attributes
Check unknown types from plug-ins The application checks if all parameters and attributes of a workflow are
Check for legacy 'Action' scripting call (slow) The application detects legacy actions calls and displays a warning
Use direct lines as workflow diagram links The connector tool uses direct lines to link the workflow schema elements.
The application checks if all parameters and attributes of a workflow are
used.
of a known type.
message.
VMware, Inc. 17
Page 18

vCenter Orchestrator Administration Guide
Table 2-2. Workflow Editor Customization Options (Continued)
Option Description
Choose workflow in tree view The workflow selector displays a hierarchical tree viewer instead of the
Validate workflow before running it The application validates each workflow before allowing it to run.
Inventory Tab
You can enable the Use contextual menu in inventory option to display the workflows that are available for
an inventory object. When the option is enabled and you right-click an object in the Orchestrator inventory,
all available workflows for the object type are displayed.
Script Editor Tab
You can customize the scripting engine from the Script Editor tab of the User preferences menu. You can
disable automatic completion of lines, and change the default code formatting options.
My Orchestrator View
The My Orchestrator view in the Orchestrator client interface summarizes the most recent activities on the
Orchestrator server, such as recently modified elements, pending and running workflows, running policies,
completed workflows, and workflows that are waiting for user interaction.
From the My Orchestrator view you can perform common administrative tasks, such as running a workflow,
importing a package, and setting root access rights.
The My Orchestrator view presents the following tabs.
default list panel.
Today
Workflow Tokens
Waiting for Input
Tasks
Permissions
Displays the most recent workflow runs and modified elements.
Provides details about the different workflow runs. This information includes
the workflow's running status, the user who started it, and the time and date
when the workflow started and ended.
Displays a list of the workflows that are waiting for user inputs that you or
members of your user group have permission to provide.
Displays information about the scheduled workflows, including name,
running state, last run, and next run.
Displays the users and user groups who have root access rights to all published
Web views and the workflows in the Orchestrator library. The possible
permissions are View, Execute, Inspect, Edit, and Admin.
18 VMware, Inc.
Page 19

Configurations View
The Configurations view in the Orchestrator client allows you to create configuration elements. Creating
configuration elements allows you to define common attributes across an Orchestrator server.
The Configurations view consists of a set of tabs that show information about a particular configuration
element.
Chapter 2 The Orchestrator Client
General
Attributes
Events
Permissions
Packages View
The Packages view in the Orchestrator client interface allows you to add, import, export, and synchronize
packages.
The Packages view consists of a set of tabs that show different types of information about a particular package.
In Edit Package mode, you can insert and remove elements on each tab.
General
Workflows
Policies
Actions
Displays general information about the configuration element, including its
name and description, its version number, and the user permissions.
Displays the attributes that are added to the configuration element. All
elements that are running in the server can call on the attributes that are set in
a configuration element.
Displays all the events that are associated with this configuration element.
Displays which users and user groups have permission to access the
configuration element.
Displays general information about the package, including its name, its legal
owner, and a description.
Displays all the workflows that the selected package contains.
Displays the policy templates that the selected package contains.
Displays the actions that the selected package contains.
Web View
Configurations
Resources
Used Plug-Ins
Permissions
VMware, Inc. 19
Displays the Web views that the selected package contains.
Displays the configuration elements that the selected package contains.
Displays the external resources embedded in the selected package.
Displays information about the plug-ins associated with the selected package.
Plug-ins can have one or more packages associated with them.
Displays the permissions accorded to users or groups of users to interact with
the package. The possible permissions are View, Execute, Inspect, Edit, and
Admin.
Page 20

vCenter Orchestrator Administration Guide
Scheduler View
The Scheduler view in the Orchestrator client displays a list of all scheduled workflows in the system. The
workflows are sorted by name or date, together with their status. You can use the Scheduler view to create,
edit, suspend, resume, and cancel scheduled workflows.
When you select a scheduled workflow in the list, the Scheduler view presents the following tabs that display
details about a particular workflow.
General
Recurrence
Workflow Runs
Permissions
Workflows View
The Orchestrator client interface features a Workflows view that provides access to the Orchestrator libraries
of workflows.
The Workflows view allows you to view information about each workflow, create, edit, run workflows, and
interact with the workflows.
The Orchestrator client uses the following icon to identify workflows:
Displays general information about the scheduled workflow, including name,
start behavior, description, start date, startup user, the name of the scheduled
workflow, and a list of the input values for the workflow.
Displays details about the recurrence pattern of the scheduled workflow.
Displays details about the different runs of a particular scheduled workflow.
This information includes the workflow's running status, start and end date,
and the user who started it. When you cancel a scheduled workflow, its log
information is removed from the system. When you suspend a workflow, the
log information is kept.
Displays the permissions accorded to users or groups of users to interact with
the workflow. The possible permissions are View, Execute, Inspect, Edit, and
Admin.
Components of the Workflows View
The Workflows view consists of a set of tabs that show information about the selected workflow.
General
Inputs
Outputs
Schema
Presentation
20 VMware, Inc.
Displays general information about the workflow, including its name, its
version number, the permissions, a description, and a list of the workflow's
global attributes.
Lists all the input parameters that the workflow needs when it runs.
Lists the types of values that the workflow returns when it runs.
Shows a graphical representation of the workflow. Clicking an element in the
schema shows information about that element in the bottom half of the
Workflows view.
Constructs the input parameters dialog box that users see when they run a
workflow. You define the groups in which the input parameters appear in the
dialog box and provide descriptions to help users provide the correct
parameters. You also define any parameter properties or constraints.
Page 21

Chapter 2 The Orchestrator Client
Parameters Reference
Workflow Tokens
Events
Permissions
Actions View
The Actions view in the Orchestrator client interface allows you to access the libraries of predefined actions.
In the Actions view, you can duplicate actions, export them to a file, or move them to a different module in
the actions hierarchical list.
By expanding the nodes of the actions hierarchical list, you can browse available actions. When you select an
action in the list, the right pane displays details about that action.
Shows all the input and output parameters in a single view. The tab also
identifies the schema element that consumes or generates a parameter. You can
optionally view the workflow attributes in this tab by clicking Show
Attributes. When you right-click an attribute or a parameter and select Show
in schema, the corresponding schema element is highlighted.
Provides details about the different runs of the selected workflow. This
information includes the workflow's running status, the user who started it,
and the time and date when the workflow started and ended.
Provides information about each event that occurs while the workflow is
running. This information includes the event's running status, the user who
started it, and the time and date when the event was issued. The information
is stored in the VMO_LogEvent table in the Orchestrator database.
Lists the permissions accorded to users or groups of users to interact with the
workflow. The possible permissions are View, Execute, Inspect, Edit, and
Admin.
The Actions view presents the following tabs.
General
Scripting
Events
Permissions
Resources View
The Resources view in the Orchestrator client allows you to import external objects such as images, sysprep
files, custom scripts, and HTML and XML templates and use them as resource elements in workflows and Web
views.
The Resources view consists of a set of tabs that show information about a particular resource element.
General
Viewer
Events
Permissions
Displays general information about the action, including its name, its version
number, the operations the user is allowed to perform, and a description.
Displays the action’s return type, input parameters, and the JavaScript code
that defines the action's function.
Displays all of the events associated with this action.
Displays which users and user groups have permission to access the action.
Displays general information about the resource element, including its name,
MIME type, description, version number, and the user permissions.
Displays the contents of the resource element.
Displays all of the events that are associated with this resource element.
Displays which users and user groups have permission to access the resource
element.
VMware, Inc. 21
Page 22

vCenter Orchestrator Administration Guide
Inventory View
The Inventory view in the Orchestrator client interface displays the objects of the plugged-in applications that
are enabled in Orchestrator. You can use the Inventory view to run workflows on an inventory object.
If the Use contextual menu in inventory option is enabled, all of the workflows that you can run on the selected
inventory object appear in a contextual menu.
Web Views View
The Web Views view in the Orchestrator client allows you to create, publish, and export Web views to a
working folder for modification or as templates from which to create other Web views. You can use Web views
to access Orchestrator functions from a Web browser.
The Web Views view consists of a set of tabs that show information about a particular Web view.
General
Elements
Attributes
Events
Displays general information about the Web view, including its name,
description, version number, the URL on which the Web view is published,
and the user permissions.
Displays the HTML files and Web view components associated with the
selected Web view.
Displays the attributes that direct the Web view to the objects in the
Orchestrator server on which it performs tasks.
Displays all of the events that are associated with the Web view.
Weboperator Web View
Orchestrator provides a standard Web view called weboperator that allows users to run workflows from a
browser.
The weboperator Web view provides an example of the orchestration functions that Web views can provide
to end users in browsers, without requiring that those users use the Orchestrator client.
Start the Weboperator Web View
You start the weboperator Web view from the Orchestrator client.
Procedure
1 Click the Web Views view in the Orchestrator client.
The weboperator Web view and any other Web views that you have imported into Orchestrator appear.
2 Right-click weboperator and select Publish.
3 Open a browser and go to http://
In the URL, orchestrator_server is the DNS name or IP address of the Orchestrator server, and 8280 is the
default port number where Orchestrator publishes Web views.
4 On the Orchestrator home page, click Web View List.
5 Click weboperator.
6 Log in using your Orchestrator user name and password.
7 Expand the hierarchical list of workflows to navigate through the workflows in the Orchestrator library.
22 VMware, Inc.
orchestrator_server
:8280.
Page 23

Chapter 2 The Orchestrator Client
8 Click a workflow in the hierarchical list to display information about the workflow in the right pane.
9 In the right pane, select whether to run the workflow now or at a later time.
Option Action
Run the workflow now
Run the workflow at a later time
a Click Start Workflow to run the workflow.
b Provide the required input parameters and click Submit to run the
workflow.
a Click Schedule Workflow to run the workflow at a later time.
b Provide the time, date, and recurrence information to set when and how
often to run the workflow and click Next.
c Provide the required input parameters and click Submit to schedule the
workflow.
You can use the weboperator Web view to run workflows on objects in your inventory from a Web browser
rather than from the Orchestrator client.
What to do next
If you only need a Web view to access the inventory and run workflows, the standard weboperator Web view
should meet your requirements. If you require more complex functionality from a Web view, you can use the
Web components and default Web view template that Orchestrator provides to develop custom Web views.
Policies
Policies are event triggers that monitor the activity of the system. Policies respond to predefined events issued
by changes in the status or performance of certain defined objects.
Policies are a series of rules, gauges, thresholds and event filters that run certain workflows or scripts when
specific predefined events occur in Orchestrator or in the technologies that Orchestrator accesses through plugins. Orchestrator constantly evaluates the policy rules as long as the policy is running. For instance, you can
implement policy gauges and thresholds that monitor the behavior of vCenter Server objects of the
VC:HostSystem and VC:VirtualMachine types.
NOTE Policies are deprecated as of Orchestrator 4.1. Policy development is not supported in releases of
Orchestrator later than 4.1.
Orchestrator defines the following types of policy:
Policy Templates
Policies
You can organize policy templates into folders, for easier navigation.
Master policies. Policy templates are not linked to real objects. They are abstract
sets of rules that define the behavior to implement if a certain abstract event
occurs. You can see existing policy templates and create templates in the Policy
Templates view in the Orchestrator client.
Policies are instances of a template or standalone event triggers that are linked
to real objects, and that are triggered by real-life events. You can see existing
policies and create policies in the Policies view in the Orchestrator client.
VMware, Inc. 23
Page 24

vCenter Orchestrator Administration Guide
24 VMware, Inc.
Page 25

Managing Workflows 3
A workflow is a succession of actions and decisions that are run sequentially until they arrive at a specific
result. Orchestrator provides a library of workflows that perform common management tasks according to
best practices. Orchestrator also provides libraries of the individual actions that the workflows perform.
Workflows combine actions, decisions, and results that, when performed in a particular order, complete a
specific task or a specific process in a virtual environment. Workflows perform tasks such as provisioning
virtual machines, backing up, performing regular maintenance, sending emails, performing SSH operations,
managing the physical infrastructure, and other general utility operations. Workflows accept inputs according
to their function. You can create workflows that run according to defined schedules, or that run if certain
anticipated events occur. Information can be provided by you, by other users, by another workflow or action,
or by an external process such as a Web service call from an application. Workflows perform some validation
and filtering of information before they run.
Workflows can call upon other workflows. For example, you can reuse in several different workflows a
workflow that starts a virtual machine.
You create workflows by using the Orchestrator client interface’s integrated development environment (IDE),
that provides access to the workflow library and the ability to run workflows on the workflow engine. The
workflow engine can also take objects from external libraries that you plug in to Orchestrator. This ability
allows you to customize processes or implement functions that third-party applications provide.
This chapter includes the following topics:
n
“Standard Workflows in the Workflow Library,” on page 25
n
“Workflow Library Additions,” on page 26
n
“Key Concepts of Workflows,” on page 29
n
“Set User Permissions on a Workflow,” on page 34
n
“Run a Workflow,” on page 34
n
“Respond to a Request for a User Interaction,” on page 35
n
“Scheduling Workflows,” on page 36
Standard Workflows in the Workflow Library
Orchestrator provides a standard library of workflows that you can use to automate operations in the virtual
infrastructure. The workflows in the standard library are locked in the read-only state. To customize a standard
workflow, you must create a duplicate of that workflow. Duplicate workflows or custom workflows that you
create are fully editable.
For information about the different access rights to the Orchestrator Server depending on the type of vCenter
Server license that you apply, see vCenter Orchestrator Installation and Configuration Guide.
VMware, Inc.
25
Page 26

vCenter Orchestrator Administration Guide
The contents of the workflow library is accessible through the Workflows view in the Orchestrator client. The
workflow library provides workflows in the following folders.
JDBC
Locking
Mail
Orchestrator
SSH
Troubleshooting
vCenter
XML
Test the communication between a workflow and a database by using the JDBC
(Java Database Connectivity) plug-in shipped with Orchestrator.
Demonstrates the locking mechanism for automated processes, that allows
workflows to lock the resources they use.
Send and receive emails from workflows.
Automate certain common Orchestrator operations.
Implement the Secure Shell v2 (SSH-2) protocol. These workflows allow you
to issue remote command and file transfer sessions with password and public
key-based authentication. The SSH configuration allows you to specify paths
to objects to expose in the Orchestrator Inventory.
Export application settings and log files to a ZIP archive.
Access the functions of the vCenter Server 4.1 Server API, so that you can
incorporate all of the vCenter Server functions into the management processes
that you automate by using Orchestrator.
A Document Object Model (DOM) XML parser that you can use in automated
processes.
Workflow Library Additions
Orchestrator provides a set of workflows that allow you to run automated processes related to the management
of vCenter Server.
Batch Workflows
You access these workflows from Library > vCenter > Batch.
Fill batch configuration
elements
Run a workflow on a
selection of objects
Populates the configuration elements that the Run a workflow on a selection
of objects workflow uses. Resets the BatchObject and BatchAction
configuration elements. Fills the BatchObject configuration element with all of
the workflows that have only one input parameter. Fills the BatchAction
configuration element with all of the actions that have no input parameters or
one input parameter and that have an array as the returnType.
Runs a workflow on a selection of vCenter objects, taking one action as input.
This is the action that retrieves the list of objects on which to run the workflow.
To return the objects without running the selected workflow, run the workflow
in simulation mode.
Cluster and Compute Resource Workflows
You access these workflows from Library > vCenter > Cluster and Compute Resource.
Disable HA on cluster
Enable HA on cluster
Disables high availability on a given cluster.
Enables high availability on a given cluster.
26 VMware, Inc.
Page 27

Custom Attribute Workflows
You access these workflows from Library > vCenter > Custom Attributes.
Chapter 3 Managing Workflows
Add custom attribute to
a virtual machine
Add custom attribute to
multiple virtual
machines
Adds a custom attribute to a given virtual machine.
Adds a custom attribute to a selection of virtual machines.
Datastore and Files Workflows
You access these workflows from Library > vCenter > Datastore and Files.
Find unused files in
datastores
Searches vCenter Server for all unused disks (*.vmdk), virtual machines
(*.vmx), and template (*.vmtx) files that are not associated with any vCenter
Server instances that are registered with Orchestrator.
Storage Workflows
You access these workflows from Library > vCenter > Storage.
Create VMFS for all
available disks
Creates a VMFS volume for all available disks of a given host.
Basic Virtual Machine Management Workflows
You access these workflows from Library > vCenter > Virtual Machine Management > Basic.
Create simple
dvPortGroup virtual
machine
Upgrade virtual machine
Upgrade virtual machine
hardware (force if
required)
Wait for task and answer
virtual machine question
Creates a simple virtual machine. The network used is a Distributed Virtual
Port Group.
Upgrades the virtual hardware to the latest revision that is supported by the
virtual machine's current host. An input parameter allows a forced upgrade
even if VMware Tools are out of date.
Upgrades the virtual machine's hardware to the latest revision that is
supported by the virtual machine's current host. This workflow forces the
upgrade to continue, even if the VMware Tools are out of date. If the VMware
Tools are out of date, forcing the upgrade to continue reverts the guest network
settings to the default settings. To avoid this, upgrade the VMware Tools before
running the workflow.
Waits for a vCenter task to complete or for the virtual machine to ask a question.
If the virtual machine requires an answer, accepts user input and answers the
question.
VMware, Inc. 27
Page 28

vCenter Orchestrator Administration Guide
Linked Clone Workflows
You access these workflows from Library > vCenter > Virtual Machine Management > Clone > Linked
Clone.
Linked clone, Linux with
multiple NICs
Linked clone, Linux with
single NIC
Linked clone, Windows
with multiple NICs and
credential
Linked clone, Windows
with single NIC and
credential
Linked clone, no
customization
Creates a linked clone of a Linux virtual machine, performs the guest operating
system customization, and configures up to four virtual network cards.
Creates a linked clone of a Linux virtual machine, performs the guest operating
system customization, and configures one virtual network card.
Creates a linked clone of a Windows virtual machine, performing the guest
operating system customization. Configures up to four virtual network cards
and a local administrator user account.
Creates a linked clone of a Windows virtual machine performing the guest
operating system customization. Configures one virtual network card and a
local administrator user account.
Creates the specified number of linked clones of a given virtual machine.
Device Management Workflows
You access these workflows from Library > vCenter > Virtual Machine Management > Device
Management.
Convert disks to thin
provisioning
Convert independent
disks
Converts thick-provisioned disks of virtual machines to thin-provisioned
disks.
Converts all independent virtual machine disks to normal disks by removing
the independent flag from the disks.
Disconnect all
detachable devices from
a running virtual
machine
Disconnects floppy disks, CD-ROM drives, parallel ports, and serial ports from
a running virtual machine.
Move and Migrate Workflows
You access these workflows from Library > vCenter > Virtual Machine Management > Move and Migrate.
Migrate virtual machines
using vMotion/Storage
vMotion
Quick virtual machine
migration
Quick migrate multiple
virtual machines
Uses vMotion, storage vMotion, or both vMotion and Storage vMotion to
migrate a single virtual machine, a selection of virtual machines, or all available
virtual machines.
Suspends the virtual machine if it is powered on and migrates it to another host
using the same storage.
Suspends the virtual machines if they are powered on and migrates them to
another host using the same storage.
28 VMware, Inc.
Page 29

Other Workflows
You access these workflows from Library > vCenter > Virtual Machine Management > Others.
Chapter 3 Managing Workflows
Find orphaned virtual
machines
Lists all virtual machines in an orphaned state in the Orchestrator inventory.
Lists the VMDK and VMTX files for all datastores in the Orchestrator inventory
that have no association with any virtual machines in the Orchestrator
inventory. Sends the lists by email (optional).
Snapshot Workflows
You access these workflows from Library > vCenter > Virtual Machine Management > Snapshot.
Remove excess
snapshots
Remove old snapshots
Remove snapshots of a
given size
Finds virtual machines with more than a given number of snapshots and
optionally deletes the oldest snapshots. Sends the results by email.
Gets all snapshots that are older than a given number of days and prompts the
user to select which ones to delete.
Gets all snapshots that are larger than a given size and prompts the user to
confirm deletion.
VMware Tools Workflows
You access these workflows from Library > vCenter > Virtual Machine Management > VMware Tools.
Turn on time
synchronization
Upgrade tools at next
reboot
Turns on time synchronization between the virtual machine and the ESX server
in VMware Tools.
Upgrades VMware Tools on a virtual machine without performing an
automatic reboot.
Troubleshooting Workflows
You access these workflows from Library > Troubleshooting.
Export logs and
application settings
Generates a ZIP archive of troubleshooting information that contains
configuration files, server, configuration, wrapper, and installation log files.
The output directory must exist and write access must be permitted.
Key Concepts of Workflows
Workflows consist of actions, attributes, parameters, and schema. Orchestrator saves a workflow token every
time a workflow runs, recording the details of that specific run of the workflow.
n
Workflow User Permissions on page 30
Orchestrator defines levels of permissions that you can apply to users or groups to allow or deny them
access to workflows.
n
Workflow Credentials on page 31
Each workflow has a default running credential that the workflow starter issues. The credentials with
which a workflow runs depend on the manner in which the workflow is started.
VMware, Inc. 29
Page 30

vCenter Orchestrator Administration Guide
n
Workflow Attributes on page 31
Workflow attributes act as global constants and global variables throughout a workflow. Workflow
elements process data that they receive as input parameters, and set the resulting output as workflow
attributes or output parameters.
n
Workflow Parameters on page 31
Workflows receive input parameters and generate output parameters when they run.
n
Workflow Schema on page 32
A workflow schema is a graphical representation of a workflow that shows the workflow as a flow
diagram of interconnected workflow elements.
n
View Workflow Schema on page 32
You view a workflow schema in the schema tab for that workflow in the Orchestrator client.
n
Workflow Tokens on page 32
A workflow token represents a workflow that is running or has run.
n
Workflow Token States on page 33
Each time you run a workflow, a workflow token appears under that workflow as a new leaf node in the
workflows hierarchical list. Clicking a workflow token in the hierarchical list shows tabs in the right pane
that show information about the workflow token.
n
Locking Mechanism on page 33
You can modify a workflow schema while it is running. This ability is useful in testing or debugging but
not in production environment.
Workflow User Permissions
Orchestrator defines levels of permissions that you can apply to users or groups to allow or deny them access
to workflows.
View
Inspect
Execute
Edit
Admin
Permissions are not cumulative. For example, to grant a user full permissions, you must set all the permissions,
not just Admin. All the permissions require the View permission.
If you do not set any permissions on a workflow, the workflow inherits the permissions from the folder that
contains it. If you do set permissions on a workflow, those permissions override the permissions of the folder
that contains it, even if the permissions of the folder are more restrictive.
The user can view the elements in the workflow, but cannot view the schema
or scripting.
The user can view the elements in the workflow, including the schema and
scripting.
The user can run the workflow.
The user can edit the workflow.
The user can set permissions on the workflow.
30 VMware, Inc.
Page 31

Chapter 3 Managing Workflows
Workflow Credentials
Each workflow has a default running credential that the workflow starter issues. The credentials with which
a workflow runs depend on the manner in which the workflow is started.
Table 3-1. Workflow Credentials
Workflow Starter Workflow Credential
A user who uses the Java GUI or Web GUI to start the
workflow
A policy The policy's credential
Another workflow The parent workflow can set the credential
A Web view that is using its own credential The Web view can set the credential
The user's credential
To run a workflow by using credentials different than your current credentials, select Start workflow as when
you start the workflow.
Workflow Attributes
Workflow attributes act as global constants and global variables throughout a workflow. Workflow elements
process data that they receive as input parameters, and set the resulting output as workflow attributes or output
parameters.
Read-only workflow attributes act as global constants for a workflow. Writable attributes act as a workflow’s
global variables.
A workflow attribute has the following properties:
n
Read-only flag
n
Name
n
Type
n
Value
n
Linking
n
Description
You use attributes to transfer variables between workflow elements. You can obtain attributes in the following
ways:
n
Define attributes when you create a workflow
n
Set the output parameter of a workflow element as a workflow attribute
n
Inherit attributes from a configuration element
Workflow Parameters
Workflows receive input parameters and generate output parameters when they run.
Input Parameters
An input parameter is a runtime argument that you, an application, or another workflow or action passes to
a workflow or action for it to process when it starts.
VMware, Inc. 31
Page 32

vCenter Orchestrator Administration Guide
Input parameters have the following properties:
n
name
n
type
n
description
After you pass a value for an input parameter to a workflow, you cannot change the parameter's name, type,
or description.
Output Parameters
A workflow's output parameters represent the result of running that workflow. Output parameters can change
when a workflow or workflow element runs. While they run, workflows can receive the output parameters of
other workflows as their input parameters.
Workflow Schema
A workflow schema is a graphical representation of a workflow that shows the workflow as a flow diagram
of interconnected workflow elements.
View Workflow Schema
You view a workflow schema in the schema tab for that workflow in the Orchestrator client.
For information about schema elements and creating and editing workflow schema, see vCenter Orchestrator
Developer's Guide.
Prerequisites
You must be granted the Inspect privilege or higher to view schema and scripting.
Procedure
1 Click the Workflows view in the Orchestrator client.
2 Navigate to a workflow in the workflow hierarchical list.
3 Click the workflow.
Information about that workflow appears in the right pane.
4 Select the Schema tab in the right pane.
You see the graphical representation of the workflow.
What to do next
You can duplicate the workflow and edit the workflow schema by dragging schema elements from the palette
on the left.
Workflow Tokens
A workflow token represents a workflow that is running or has run.
A workflow is an abstract description of a process that defines a generic sequence of steps and a generic set of
required input parameters. When you run a workflow with a set of real input parameters, you receive an
instance of this abstract workflow that behaves according to the specific input parameters you give it. This
specific instance of a completed or a running workflow is called a workflow token.
32 VMware, Inc.
Page 33

Chapter 3 Managing Workflows
Workflow Token Attributes
Workflow token attributes are the specific parameters with which a workflow token runs. The workflow token
attributes are an aggregation of the workflow's global attributes and the specific input and output parameters
with which you run the workflow token.
Workflow Token States
Each time you run a workflow, a workflow token appears under that workflow as a new leaf node in the
workflows hierarchical list. Clicking a workflow token in the hierarchical list shows tabs in the right pane that
show information about the workflow token.
The information shown includes the schema diagram for that workflow, a list of events, the list of the workflow
token attributes, and a log of the specific workflow token run. If you click on a workflow token while it is
running, you can see the information in the tabs updating in real time.
Table 3-2. Workflow Token States
State Icon Description
Running
Waiting for User Interaction
Waiting for Event or Timer
Canceled
Failed
The workflow token is running.
The workflow token is suspended while
it waits for input parameters from a user
interaction or from an external
application. During the waiting period,
the workflow threads become passive.
The workflow token is suspended while
it waits for a signal from an external
trigger or a timer before resuming.
Long-running workflows enter this
state while they wait for the signal to
resume running. During the waiting
period, the workflow threads become
passive.
The workflow token is canceled by the
user, by an external application, or by
another workflow.
The workflow token failed.
Completed
The workflow token ran successfully.
However, a completed workflow token
might have encountered errors when it
ran, if error-handling is part of the
workflow definition.
Locking Mechanism
You can modify a workflow schema while it is running. This ability is useful in testing or debugging but not
in production environment.
Orchestrator features a mechanism that allows you to lock the workflow and prevent other users from editing
it while it is running. To make actions, workflows, or whole packages read-only, use the contextual menus in
the Actions, Workflows, and Packages views of the Orchestrator client.
VMware, Inc. 33
Page 34

vCenter Orchestrator Administration Guide
Set User Permissions on a Workflow
You set levels of permission on a workflow to limit the access that users or user groups can have to that
workflow.
You select the users and user groups for which to set permissions from the users and user groups in the
Orchestrator LDAP server.
Prerequisites
Create a workflow, open it for editing in the workflow editor, and add to it the necessary elements.
Procedure
1 Click the Permissions tab.
2 Click the Add access rights link to define permissions for a new user or user group.
3 Search for a user or user group.
The search results show all of the users and user groups from the Orchestrator LDAP server that match
the search.
4 Select a user or user group and click OK.
5 Right-click the user and select Add access rights.
6 Check the appropriate check boxes to set the level of permissions for this user and click OK.
To allow a user to view the workflow, inspect the schema and scripting, run and edit the workflow, and
change the permissions, you must check all check boxes.
7 Click Save and Close to exit the editor.
You set the appropriate user permissions on a workflow.
Run a Workflow
You can perform automated operations in vCenter Server by running workflows from the standard library or
workflows that you create.
For example, you can create a virtual machine by running the Create simple virtual machine workflow.
Prerequisites
You must have configured the vCenter plug-in. For details, see Installing and Configuring VMware vCenter
Orchestrator.
Procedure
1 Click the Workflows view in the Orchestrator client.
2 In the workflows hierarchical list, open Library > vCenter > Virtual machine management > Basic to
navigate to the Create simple virtual machine workflow.
3 Right-click the Create simple virtual machine workflow and select Start workflow.
34 VMware, Inc.
Page 35

Chapter 3 Managing Workflows
4 Provide the following information into the Start workflow input parameters dialog box to create a virtual
machine in a vCenter Server connected to Orchestrator.
Option Action
Virtual machine name
Virtual machine folder
Size of the new disk in GB
Memory size in MB
Number of virtual CPUs
Virtual machine guest OS
Host on which to create the virtual
machine
Resource pool
The network to connect to
Datastore in which to store the
virtual machine files
Name the virtual machine orchestrator-test.
a Click Not set for the Virtual machine folder value.
b Select a virtual machine folder from the inventory.
The Select button is inactive until you select an object of the correct type,
in this case, VC:VmFolder.
Type an appropriate numeric value.
Type an appropriate numeric value.
Select an appropriate number of CPUs from the Number of virtual CPUs
drop-down menu.
Click the Not Set link and select a guest operating system from the list.
Click Not set for the Host on which to create the virtual machine value and
navigate through the vCenter Server infrastructure hierarchy to a host
machine.
Click Not set for the Resource pool value and navigate through the vCenter
Server infrastructure hierarchy to a resource pool.
Click Not set for the The network to connect to value and select a network.
Press Enter in the Filter text box to see all the available networks.
Click Not set for the Datastore in which to store the virtual machine value
and navigate through the vCenter Server infrastructure hierarchy to a
datastore.
5 Click Submit to run the workflow.
A workflow token appears under the Create simple virtual machine workflow, showing the workflow
running icon.
6 Click the workflow token to view the status of the workflow as it runs.
7 Click the Events tab in the workflow token view to follow the progress of the workflow token until it
completes.
8 In the Orchestrator client, click the Inventory view.
9 Navigate through the vCenter Server infrastructure hierarchy to the resource pool you defined.
If the virtual machine does not appear in the list, click the refresh button to reload the inventory.
The orchestrator-test virtual machine is present in the resource pool.
10 (Optional) Right-click the orchestrator-test virtual machine in the Inventory view to see a contextual
list of the workflows that you can run on the orchestrator-test virtual machine.
The Create simple virtual machine workflow ran successfully.
What to do next
You can log in vSphere Client and manage the new virtual machine.
Respond to a Request for a User Interaction
Workflows that require interactions from users during their run suspend their run either until the user provides
the required information or until the workflow times out.
Workflows that require user interactions define which users can provide the required information and direct
the requests for interaction.
VMware, Inc. 35
Page 36

vCenter Orchestrator Administration Guide
Prerequisites
Log in to the Orchestrator client.
At least one workflow in Waiting for User Interaction state.
Procedure
1 Click the My Orchestrator view in the Orchestrator client.
2 Click the Waiting for Input tab.
The Waiting for Input tab lists the workflows that are waiting for user inputs that you or members of
your user group have permission to provide.
3 Double-click a workflow that is waiting for input.
The workflow token that is waiting for input appears in the Workflows hierarchical list with the following
symbol:
4 Right-click the workflow token and select Answer.
5 Follow the instructions in the input parameters dialog box to provide the information that the workflow
requires.
You provided information to a workflow that was waiting for user input during its run.
.
Scheduling Workflows
You can schedule a workflow to run once, or multiple times using a recurrence pattern.
Schedule a Workflow
You can schedule a workflow from the Orchestrator client Scheduler or Workflows views. The user credential
that starts the workflow is the same as the credential you use to schedule it.
Prerequisites
You must have the Execute privilege to schedule a workflow.
Procedure
1 In the Orchestrator client, click the Scheduler view.
2 From the drop-down menu, select Schedule workflow.
3 (Optional) Select Schedule workflow as to use another user's credentials to schedule a workflow.
4 Search for the workflow to schedule.
5 Right-click the workflow and click Select.
6 Click the Run date and time value's Not set button.
7 Select the start date and time for the workflow and click OK.
8 From the Recurrence drop-down menu, select the workflow recurrence pattern.
9 (Optional) Click the Recurrence end date value’s Not Set button and set an end time and date for the
workflow.
10 Provide the necessary information in the input parameters dialog box.
11 Click Submit to schedule the workflow.
The scheduled workflow is listed on the Scheduler view. An R appears next to the scheduled workflow to
denote that recurrence is set.
36 VMware, Inc.
Page 37

Chapter 3 Managing Workflows
What to do next
You can monitor the scheduled workflow and delete it from the Scheduler view when it is complete.
Edit the Workflow Recurrence Pattern
A recurrence pattern is used to specify the way in which a given workflow is scheduled. You can edit the
recurrence pattern of a workflow from the Scheduler view.
Prerequisites
A recurrent workflow that is scheduled.
Procedure
1 In the Orchestrator client, click the Scheduler view.
2 Right-click the scheduled workflow whose recurrence pattern you want to edit and select Edit.
3 Click the Recurrence tab.
4 From the drop-down menu, select the recurrence pattern.
You can add an unlimited number of entries to the pattern. You can edit each entry.
The display changes according to the selected pattern.
5 Click Save and Close to exit the editor.
The new recurrence pattern for the scheduled workflow appears on the Recurrence tab.
What to do next
You can view details about the different runs of the scheduled workflow on the Workflow Runs tab.
VMware, Inc. 37
Page 38

vCenter Orchestrator Administration Guide
38 VMware, Inc.
Page 39

Creating Resource Elements 4
Workflows and Web views can require as attributes objects that you create independently of Orchestrator. To
use external objects as attributes in workflows or Web views, you import them into the Orchestrator server as
resource elements.
Objects that workflows and Web views can use as resource elements include image files, scripts, XML
templates, HTML files, and so on. Any workflows or Web views that run in the Orchestrator server can use
any resource elements that you import into Orchestrator.
Importing an object into Orchestrator as a resource element allows you to make changes to the object in a single
location, and to propagate those changes automatically to all the workflows or Web views that use this resource
element.
You can organize resource elements into folders. The maximum size for a resource element is 16MB.
This chapter includes the following topics:
n
“View a Resource Element,” on page 39
n
“Import an External Object to Use as a Resource Element,” on page 40
n
“Edit the Resource Element Information and Access Rights,” on page 40
n
“Save a Resource Element to a File,” on page 41
n
“Update a Resource Element,” on page 41
n
“Add a Resource Element to a Workflow,” on page 42
n
“Add a Resource Element to a Web View,” on page 42
View a Resource Element
You can view existing resource elements in the Orchestrator client, to examine their contents and discover
which workflows or Web views use this resource element.
Procedure
1 In the Orchestrator client, click the Resources view.
2 Expand the hierarchical tree viewer to navigate to a resource element.
3 Click a resource element to show information about it in the right pane.
4 Click the Viewer tab to display the contents of the resource element.
5 Right-click the resource element and select Find Elements that Use this Element.
Orchestrator lists all the workflows and Web views that use this resource element.
VMware, Inc.
39
Page 40

vCenter Orchestrator Administration Guide
What to do next
Import and edit a resource element.
Import an External Object to Use as a Resource Element
Workflows and Web views can require as attributes objects that you create independently of Orchestrator. To
use external objects as attributes in workflows or Web views, you import them to the Orchestrator server as
resource elements.
Prerequisites
An image file, script, XML template, HTML file, or other type of object to import.
Procedure
1 In the Orchestrator client, click the Resources view.
2 Right-click a resource folder in the hierarchical list and select New folder to create a folder in which to
store the resource element.
3 Right-click the resource folder in which to import the resource element and select Import resources.
4 Select the resource to import and click Open.
Orchestrator adds the resource element to the folder you selected.
You imported a resource element into the Orchestrator server.
What to do next
Edit the general information of the resource element and set the user access permissions.
Edit the Resource Element Information and Access Rights
After you import an object into the Orchestrator server as a resource element, you can edit the resource
element's details and permissions.
Prerequisites
An image, script, XML, or HTML file, or any other type of object that you imported into Orchestrator as a
resource element.
Procedure
1 Right-click the resource element and select Edit.
2 Click the General tab and set the resource element name, version, and description.
3 Click the Permissions tab and click the Add access rights link to define permissions for a user group.
4 Type a user group name in the Filter text box.
5 Select a user group and click OK.
6 Right-click the user group and select Add access rights.
7 Check the appropriate check boxes to set the level of permissions for this user group and click OK.
Permissions are not cumulative. To allow a user to view the resource element, use it in their workflows
or Web views, and change the permissions, you must check all check boxes.
8 Click Save and Close to exit the editor.
You edited the general information about the resource element and set the user access rights.
40 VMware, Inc.
Page 41

What to do next
Save the resource element to a file to update it, or add the resource element to a workflow or Web view.
Save a Resource Element to a File
You can save a resource element to a file on your local system. Saving the resource element as a file allows you
to edit it.
For example, if the resource element is an XML configuration file or a script, you must save it locally to modify
it. You cannot edit a resource element in the Orchestrator client.
Prerequisites
You must have a resource element in the Orchestrator server to save to a file.
Procedure
1 Right-click the resource element and select Save to file.
2 Make the required modifications to the file.
You saved a resource element to a file.
What to do next
Chapter 4 Creating Resource Elements
Update the resource element in the Orchestrator server.
Update a Resource Element
If a file or object that you have defined as a resource element changes, you can update the resource element in
the Orchestrator server.
Prerequisites
An image, script, XML, or HTML file, or any other type of object that you imported into Orchestrator as a
resource element.
Procedure
1 Modify the source file of the resource element in your local system.
2 In the Orchestrator client, click the Resources view.
3 Navigate through the hierarchical list to the resource element that you have updated.
4 Right-click the resource element and select Update resource.
5 (Optional) Click the Viewer tab to check that Orchestrator has updated the resource element.
You updated a resource element that the Orchestrator server contains.
VMware, Inc. 41
Page 42

vCenter Orchestrator Administration Guide
Add a Resource Element to a Workflow
Resource elements are external objects that you can import to the Orchestrator server for workflows to use as
attributes when they run. For example, a workflow can use an imported XML file that defines a map to convert
one type of data to another, or a script that defines a function, when it runs.
Prerequisites
You must have the following objects in your Orchestrator server:
n
An image, script, XML, or HTML file, or any other type of object that you imported into Orchestrator as
a resource element.
n
A workflow that requires this resource element as an attribute.
Procedure
1 Click the Workflows view in the Orchestrator client.
2 Expand the hierarchical tree viewer to navigate to the workflow that requires the resource element as an
attribute.
3 Right-click the workflow and select Edit.
4 On the General tab, right-click in the attributes pane and select Add attribute.
5 Click the attribute name and type a new name for the attribute.
6 Click Type to set the attribute type.
7 In the Select a type dialog box, type resource in the Filter box to search for an object type.
Option Action
Define a single resource element as
an attribute
Define a folder that contains multiple
resource elements as an attribute
Select ResourceElement from the list.
Select ResourceElementCategory from the list.
8 Click Value and type the name of the resource element or category of resource elements in the Filter text
box.
9 Select the resource element or folder of resource elements from the proposed list and click Select.
10 Click Save and Close to exit the editor.
You added a resource element or folder of resource elements as an attribute in a workflow.
Add a Resource Element to a Web View
Resource elements are external objects that you can import into the Orchestrator server for Web views to use
as Web view attributes. Web view attributes identify objects with which Web view components interact.
Prerequisites
You must have the following objects in your Orchestrator server:
n
An image, script, XML, or HTML file, or any other type of object that you imported into Orchestrator as
a resource element.
n
A Web view that requires this resource element as an attribute.
42 VMware, Inc.
Page 43

Chapter 4 Creating Resource Elements
Procedure
1 In the Orchestrator client, click the Web views view.
2 If the Web view is running, right-click the Web view to which to add the resource element and select
Unpublish.
3 Right-click the Web view and select Edit.
4 Click the Attributes tab.
5 Right-click in the Attributes tab and select Add attribute.
6 Click the attribute name and type a new name for the attribute.
7 Click Type to set the attribute type.
8 In the Select a type dialog box, type resource in the Filter box to search for an object type.
Option Action
Define a single resource element as
an attribute
Define a folder that contains multiple
resource elements as an attribute
Select ResourceElement from the list.
Select ResourceElementCategory from the list.
9 Click Value and type the name of the resource element or category of resource elements in the Filter text
box.
10 Select the resource element or folder of resource elements from the proposed list and click Select.
11 Click Save and Close to exit the editor.
You added a resource element or folder of resource elements as an attribute in a Web view.
VMware, Inc. 43
Page 44

vCenter Orchestrator Administration Guide
44 VMware, Inc.
Page 45

Using Plug-Ins 5
Plug-ins allow you to use Orchestrator to access and control external technologies and applications. Exposing
an external technology in an Orchestrator plug-in allows you to incorporate objects and functions in workflows
that access the objects and functions of that external technology.
The external technologies that you can access by using plug-ins can include virtualization management tools,
email systems, databases, directory services, and remote control interfaces.
Orchestrator provides a set of standard plug-ins to allow you to incorporate such technologies as the VMware
vCenter Server API and email capabilities into workflows. In addition, the Orchestrator open plug-in
architecture allows you to develop plug-ins to access other applications. Orchestrator implements open
standards, to simplify integration with external systems.
Plug-ins extend the Orchestrator scripting engine with new object types and methods, and plug-ins publish
notification events from the external system that trigger events in Orchestrator and in the plugged-in
technology. Plug-ins provide an inventory of JavaScript objects that you can access on the Orchestrator
Inventory tab. Each plug-in can provide one or more packages of workflows and actions that you can run on
the objects in the inventory to automate the typical use cases of the integrated product.
This chapter includes the following topics:
n
“Default Orchestrator Plug-Ins,” on page 46
VMware, Inc.
n
“Using the SSH Plug-In,” on page 48
n
“Using the XML Plug-In,” on page 51
45
Page 46

vCenter Orchestrator Administration Guide
Default Orchestrator Plug-Ins
Orchestrator includes a collection of plug-ins. Each plug-in exposes an external product API to the Orchestrator
platform. Plug-ins provide inventory classes, extend the scripting engine with new object types, and publish
notification events from the external system. Each plug-in also provides a library of workflows that represents
the typical use cases of the integrated product in an automated fashion.
Table 5-1. Plug-Ins Installed with Orchestrator by Default
Plug-In Purpose Configuration Input Types Scripting Objects Inventory
vCenter 4.1 Provides access to the
vCenter 4.1 Server API, so
that you can incorporate all
of the vCenter Server
functions into the
management processes that
you use Orchestrator to
automate.
vCO Library Provides workflows that act
as templates for
customization and
automation of client
processes. The workflow
library includes templates
for lifecycle management,
provisioning, disaster
recovery, hot backup, and
many other standard
processes. Sources of library
processes are accessible and
can be copied and edited.
Mail Uses Simple Mail Transfer
Protocol (SMTP) to send
email.
SSH Provides an implementation
of the Secure Shell v2 (SSH-2)
protocol. Allows remote
command and file transfer
sessions with password and
public key-based
authentication. Optionally,
the SSH plug-in can provide
remote file system browsing
directly in the vCO
Inventory.
WebOperator A demonstration Web
interface that allows you to
access the workflows in the
Orchestrator library and
interact with them across a
network.
See vCenter
Orchestrator
Installation and
Configuration
Guide, Configure
the vCenter 4.1
Plug-In.
None See vCenter
Default values
for the
EmailMessage
object to use.
See vCenter
Orchestrator
Installation and
Configuration
Guide, Define the
Default SMTP
Connection.
See vCenter
Orchestrator
Installation and
Configuration
Guide, Configure
the SSH Plug-In.
None None None Stores
See vCenter
Orchestrator
Developer's Guide,
Using the
Orchestrator API.
Orchestrator
Developer's Guide,
Using the
Orchestrator API.
None EmailMessage Stores
File
Folder
RootFolder
SshConnection
See vCenter Orchestrator
Developer's Guide, Using
the Orchestrator API.
See vCenter Orchestrator
Developer's Guide, Using
the Orchestrator API.
KeyPairManager
SSHCommand
SSHFile
SSHFolder
SSHSession
Returns all
objects.
Stores
nothing in
the
inventory.
nothing in
the
inventory.
Stores
nothing in
the
inventory.
nothing in
the
inventory.
46 VMware, Inc.
Page 47

Chapter 5 Using Plug-Ins
Table 5-1. Plug-Ins Installed with Orchestrator by Default (Continued)
Plug-In Purpose Configuration Input Types Scripting Objects Inventory
Enumeration Allows the creation of
common enumerated types.
Net Wrapper to Jakarta Apache
Commons Net Library.
Provides implementation of
Telnet, FTP, and POP3. The
POP3 part allows reading
email. In combination with
the Mail plug-in, the Net
plug-in provides full email
sending and receiving
capabilities.
XML A complete Document
Object Model (DOM) XML
parser that you can
implement in automated
processes. Alternatively, you
can use the ECMAScript for
XML (E4X) implementation
in the Orchestrator
JavaScript API.
Database Java Database Connectivity
(JDBC) API is the industry
standard for databaseindependent connectivity
between the Java
programming language and
a wide range of databases.
The databases include SQL
databases and other tabular
data sources, such as
spreadsheets or flat files. The
JDBC API provides a calllevel API for SQL-based
database access.
None Enumeration None Stores
None None FTPClient
POP3Client
POP3Message
TelnetClient
None None XMLDocument
XMLElement
XMLManager
XMLNameNodeMap
XMLNode
XMLNodeList
None None Connection
JDBCConnection
PreparedStatement
ResultSet
nothing in
the
inventory.
Stores
nothing in
the
inventory.
Stores
nothing in
the
inventory.
Stores
nothing in
the
inventory.
Table 5-2. Add-ons and Separate Downloads
Plug-In Remark Purpose Configuration Inventory
Microsoft An experimental feature
available as a separate
download.
VMware, Inc. 47
Provides access to
Windows
Management
Instrumentation
(WMI) and reading
and writing to
Microsoft Active
Directory.
In Orchestrator
configuration interface,
import settings from the
LDAP tab or use different
LDAP settings for WMI.
See vCenter Orchestrator
Installation and Configuration
Guide, Configuring LDAP
Settings.
Computers,
ForeignSecurityPrincipals,
Program Data, System,
Users, Domain Controllers
Page 48

vCenter Orchestrator Administration Guide
Using the SSH Plug-In
You can use the SSH plug-in to run SSH commands on a remote host that supports SSH and transfer files
between an Orchestrator server and a remote host through a secure connection.
Generate a Key Pair
You can run a workflow from the Orchestrator client to generate a key pair. You can use the key pair to connect
to an SSH host without a password.
A key pair consists of a public key and a private key. Orchestrator can use the private key to connect to the
public key on an SSH host. You can use a passphrase to improve security.
CAUTION All Orchestrator users with the right set of privileges can read, use, and overwrite your private key.
Prerequisites
n
The SSH plug-in must be enabled and configured in the Orchestrator configuration interface.
n
You must be logged in to the Orchestrator client as a user who can run SSH workflows.
Procedure
1 Click the Workflows view in the Orchestrator client.
2 In the workflows hierarchical list, open Library > SSH to navigate to the Generate key pair workflow.
3 Right-click the Generate key pair workflow and select Start workflow.
4 Provide the required information.
a Select the key type.
b Select the key size.
c (Optional) Type a passphrase.
NOTE You can change the passphrase later.
d (Optional) Type a comment.
5 Click Submit to run the workflow.
If a key pair exists, the new key pair overwrites it.
Change the Key Pair Passphrase
You can run a workflow from the Orchestrator client to change the passphrase for the key pair that you
generated last.
Prerequisites
n
The SSH plug-in must be enabled and configured in the Orchestrator configuration interface.
n
You must be logged in to the Orchestrator client as a user who can run SSH workflows.
Procedure
1 Click the Workflows view in the Orchestrator client.
2 In the workflows hierarchical list, open Library > SSH to navigate to the Change key pair passphrase
workflow.
48 VMware, Inc.
Page 49

Chapter 5 Using Plug-Ins
3 Right-click the Change key pair passphrase workflow and select Start workflow.
4 Reset the key pair passphrase.
a Type the current passphrase.
b Type the new passphrase.
5 Click Submit to run the workflow.
Register an Orchestrator Public Key on an SSH Host
You can use a public key instead of a password. To register an Orchestrator public key on an SSH host, you
can run a workflow from the Orchestrator client.
Prerequisites
n
The SSH plug-in must be enabled and configured in the Orchestrator configuration interface.
n
You must be logged in to the Orchestrator client as a user who can run SSH workflows.
Procedure
1 Click the Workflows view in the Orchestrator client.
2 In the workflows hierarchical list, open Library > SSH to navigate to the Register vCO public key on host
workflow.
3 Right-click the Register vCO public key on host workflow and select Start workflow.
4 Provide the host and authentication information.
NOTE You must provide credentials that are registered on the SSH host.
5 Click Submit to run the workflow.
You can use public key authentication instead of password authentication when you connect to the SSH host
as the registered user.
Run an SSH Command
You can run a workflow from the Orchestrator client to run SSH commands on a remote ESX host.
Prerequisites
n
The SSH plug-in must be enabled and configured in the Orchestrator configuration interface.
n
You must be logged in to the Orchestrator client as a user who can run SSH workflows.
Procedure
1 Click the Workflows view in the Orchestrator client.
2 In the workflows hierarchical list, open Library > SSH to navigate to the Run SSH command workflow.
3 Right-click the Run SSH command workflow and select Start workflow.
VMware, Inc. 49
Page 50

vCenter Orchestrator Administration Guide
4 Provide the required information.
a Type an SSH host name or IP.
b Type an SSH command to run.
NOTE The default SSH command is uptime. It shows how long the server has been active and the
user load for that period.
c (Optional) Select Yes to use password authentication.
NOTE The default option is to use key file authentication.
d Type the authentication information.
5 Click Submit to run the workflow.
Copy a File from an SSH Host
You can run a workflow from the Orchestrator client to copy files from an SSH host to the Orchestrator server.
The SSH plug-in uses the Java JCraft library, which implements SFTP. The SCP get command workflow
transfers files by using SFTP.
Prerequisites
n
The SSH plug-in must be enabled and configured in the Orchestrator configuration interface.
n
You must be logged in to the Orchestrator client as a user who can run SSH workflows.
Procedure
1 Click the Workflows view in the Orchestrator client.
2 In the workflows hierarchical list, open Library > SSH to navigate to the SCP get command workflow.
3 Right-click the SCP get command workflow and select Start workflow.
4 Provide the required information.
a Type an SSH host name or IP address.
b Type the SSH authentication information.
c Type the path to the directory on the Orchestrator server into which to copy the file.
d Type the path to the file to get from the remote SSH host.
5 Click Submit to run the workflow.
Copy a File to an SSH Host
You can run a workflow from the Orchestrator client to copy files from the Orchestrator server to an SSH host.
The SSH plug-in uses the Java JCraft library, which implements SFTP. The SCP put command workflow
transfers files by using SFTP.
Prerequisites
n
The SSH plug-in must be enabled and configured in the Orchestrator configuration interface.
n
You must be logged in to the Orchestrator client as a user who can run SSH workflows.
50 VMware, Inc.
Page 51

Procedure
1 Click the Workflows view in the Orchestrator client.
2 In the workflows hierarchical list, open Library > SSH to navigate to the SCP put command workflow.
3 Right-click the SCP put command workflow and select Start workflow.
4 Provide the required information.
a Type an SSH host name or IP address.
b Type the SSH authentication information.
c Type the path to the file that you want to copy from the local Orchestrator server to the remote SSH
host.
d Type the path to the directory on the remote SSH host into which to copy the file.
5 Click Submit to run the workflow.
Using the XML Plug-In
You can use the XML plug-in to create and modify XML documents from Orchestrator workflows and
scripting.
The XML plug-in adds an implementation of a Document Object Model (DOM) XML parser to the Orchestrator
JavaScript API. The XML plug-in also provides some sample workflows to demonstrate how you can create
and modify XML documents from workflows.
Chapter 5 Using Plug-Ins
Alternatively, you can use the ECMAScript for XML (E4X) implementation in the Orchestrator JavaScript API
to process XML documents directly in JavaScript. For scripting examples, see the vCenter Orchestrator
Developer's Guide.
For information about E4X, consult the Web site of the organization that maintains the ECMA-357 standard.
Running the XML Plug-In Sample Workflows
You can run the XML plug-in sample workflows from the Orchestrator client to create and modify XML
documents for testing purposes.
Because the workflows can create, read, or modify files, you must have sufficient access rights to the working
directory.
Orchestrator has read, write, and execute rights to a folder named orchestrator, at the root of the server system.
Although workflows have permission to read, write, and execute in this folder, you must create the folder on
the server system.
You can allow access to other folders. See “Set Server File System Access for Workflows and JavaScript,” on
page 67.
Create a Simple XML Document
You can run a workflow from the Orchestrator client to create a simple XML document for testing purposes.
Prerequisites
n
The XML plug-in must be enabled from the Orchestrator configuration interface.
n
You must be logged in to the Orchestrator client as a user who can run XML workflows.
n
Verify that you created the c:/orchestrator folder at the root of the Orchestrator server system or set
access rights to another folder.
VMware, Inc. 51
Page 52

vCenter Orchestrator Administration Guide
Procedure
1 Click the Workflows view in the Orchestrator client.
2 In the workflows hierarchical list, open Library > XML > Samples XML (Simple) to navigate to the Create
a simple XML document workflow.
3 Right-click the Create a simple XML document workflow and select Start workflow.
4 Type the filepath to the XML document to create.
For example, c:/orchestrator/
filename
.xml.
5 Click Submit to run the workflow.
The workflow creates an XML document that contains a list of users. The attributes for each entry are user
ID and name.
Find an Element in an XML Document
You can run a workflow from the Orchestrator client to find an element in the XML created by the Create a
simple XML document workflow.
Prerequisites
n
The XML plug-in must be enabled from the Orchestrator configuration interface.
n
You must be logged in to the Orchestrator client as a user who can run XML workflows.
n
Verify that you created the c:/orchestrator folder at the root of the Orchestrator server system or set
access rights to another folder.
Procedure
1 Click the Workflows view in the Orchestrator client.
2 In the workflows hierarchical list, open Library > XML > Samples XML (Simple) to navigate to the Find
element in document workflow.
3 Right-click the Find element in document workflow and select Start workflow.
4 Type the filepath to the XML document.
For example, c:/orchestrator/
filename
.xml.
5 Click Submit to run the workflow.
The workflow searches for an element and displays the result in the system log.
What to do next
To view the result, select the completed workflow run in the Orchestrator client and click Logs on the
Schema tab.
Modify an XML Document
You can run a workflow from the Orchestrator client to modify the XML that the Create a simple XML
document workflow creates.
Prerequisites
n
The XML plug-in must be enabled from the Orchestrator configuration interface.
n
You must be logged in to the Orchestrator client as a user who can run XML workflows.
n
Verify that you created the c:/orchestrator folder at the root of the Orchestrator server system or set
access rights to another folder.
52 VMware, Inc.
Page 53

Chapter 5 Using Plug-Ins
Procedure
1 Click the Workflows view in the Orchestrator client.
2 In the workflows hierarchical list, open Library > XML > Samples XML (Simple) to navigate to the Modify
XML document workflow.
3 Right-click the Modify XML document workflow and select Start workflow.
4 Provide the input and output filepaths.
a Type the filepath to the XML document to modify.
For example, c:/orchestrator/
filename
.xml.
b Type the filepath to the modified XML document.
For example, c:/orchestrator/
filename
.xml.
NOTE If you type the same filepath in both fields, the workflow overwrites the original file with the
modified file. If you type an output filepath to a file that does not exist, the workflow creates a modified
file.
5 Click Submit to run the workflow.
The workflow searches for an element and modifies the entry where the element is found.
VMware, Inc. 53
Page 54

vCenter Orchestrator Administration Guide
54 VMware, Inc.
Page 55

Managing Actions 6
Actions represent individual functions that you use as building blocks in workflows, Web views, and scripts.
Actions are JavaScript functions that take multiple input parameters and have a single return value. Actions
can call on any object or method in the Orchestrator API, or on objects in any API that you import into
Orchestrator by using a plug-in.
When a workflow runs, an action takes its input parameters from the workflow's attributes. These attributes
can be attributes that other elements in the workflow set when they run.
When you define actions independently from the workflows that call upon them, you can update or optimize
the actions more easily. Instead of adding a function as scripting in a workflow, you can define individual
actions and allow other workflows to reuse them.
This chapter includes the following topics:
n
“Create an Action,” on page 55
n
“Duplicate an Action,” on page 56
n
“Export an Action,” on page 56
n
“Import an Action,” on page 57
n
“Move an Action,” on page 57
n
“Find Elements That Implement an Action,” on page 57
Create an Action
When you define an individual function as an action, instead of coding it directly into a scriptable task
workflow element, you can expose it in the library for other workflows to use.
Procedure
1 In the Orchestrator client, click the Actions view.
2 Expand the root of the actions hierarchical list and navigate to the module in which you want to create
the action.
3 Right-click the module and select Add action.
4 Type a name for the action in the text box and click OK.
Your custom action is added to the library of actions.
5 Right-click the action and select Edit.
6 Click the Scripting tab.
7 To change the default return type, click the void link.
VMware, Inc.
55
Page 56

vCenter Orchestrator Administration Guide
8 Add the action input parameters by clicking the arrow icon.
9 Write the action script.
10 Set the action permissions.
11 Click Save and close.
You created a custom action and added the action input parameters.
What to do next
You can use the new custom action in a workflow.
Duplicate an Action
The predefined library of actions is read-only. To customize a standard action, you must create a duplicate of
that action.
Procedure
1 In the Orchestrator client, click the Actions view.
2 Expand the root of the actions hierarchical list and navigate to the action to duplicate.
3 Right-click the action and select Duplicate action.
4 Type a name for the new action.
A number is appended to the name of the action if you do not type a value in this text box.
5 For the value of Action module, select the module to which you want to add the new action.
6 (Optional) Select No if you do not want version history to be copied.
When you import an action, its version is compared to the version of the local content, allowing the
administrator to decide whether to import it or not.
7 Select Duplicate.
The new action is available in the library of actions and you can reuse it in your scripts.
What to do next
You can use the action in a workflow.
Export an Action
You can export an action to other Orchestrator servers to reuse it in other workflows, policies, or Web views.
Procedure
1 In the Orchestrator client, click the Actions view.
2 Expand the root of the actions hierarchical list and navigate to the action to export.
3 Right-click the action and select Export action.
4 (Optional) Select the Encrypt content with name option to encrypt the exported file.
Other systems can import and run the encrypted file, but the importer cannot edit the file. The encrypted
file content is read-only.
5 Select a location in which to save the action file and click Save.
You saved the action to a local file.
56 VMware, Inc.
Page 57

What to do next
You can import the action on a different Orchestrator server and use it in workflows and scripts.
Import an Action
You can import actions and use them as building blocks in workflows, Web views, and scripts.
Procedure
1 In the Orchestrator client, click the Actions view.
2 Expand the root of the actions hierarchical list and navigate to the module in which you want to import
the action.
3 Right-click the module and select Import action.
4 Select a file with the .action extension and click Open.
The imported action appears in the actions library.
What to do next
You can use the action in workflows and scripts.
Chapter 6 Managing Actions
Move an Action
To reorder actions in the actions hierarchical list, or organize your scripts in a different way, move an action
to another module.
Procedure
1 In the Orchestrator client, click the Actions view.
2 Expand the root of the actions hierarchical list and navigate to the action to relocate.
3 Right-click the action and select Move this action.
4 Select a location in which to save the action file and click Save.
The action is moved to the new module.
CAUTION Action referencing is based on the action module name and action name. Make sure that all elements
that reference this action are still valid after you move the action.
What to do next
Find all workflows and packages that implement the relocated action.
Find Elements That Implement an Action
If you edit an action and change its behavior, you might inadvertently break a workflow or application that
implements that action. Orchestrator provides a function to find all of the actions, workflows, or packages that
implement a given element. You can check whether modifying the element affects the operation of other
elements.
IMPORTANT The Find Elements that Use this Element function checks all packages, workflows, and policies,
but it does not check in scripts. Consequently, modifying an action might affect an element that calls this action
in a script that the Find Elements that Use this Element function did not identify.
VMware, Inc. 57
Page 58

vCenter Orchestrator Administration Guide
Procedure
1 In the Orchestrator client, click the Actions view.
2 Expand the nodes of the actions hierarchical list to navigate to a given action.
3 Right-click the action and select Find Elements that Use this Element.
A dialog box shows all of the elements, such as workflows or packages, that implement this action.
4 Double-click an element in the list of results to show that element in the Orchestrator client.
You located all of the elements that implement an action.
What to do next
You can check whether modifying this element affects any other elements.
58 VMware, Inc.
Page 59

Using Packages 7
Packages are the vehicle for transporting content from one Orchestrator server to another. Packages can contain
workflows, actions, policies, Web views, configurations, and resources.
When you add an element to a package, Orchestrator checks for dependencies and adds any dependent
elements to the package. For example, if you add a workflow that uses actions or other workflows, Orchestrator
adds those actions and workflows to the package.
When you import a package, the server compares the versions of the different elements of its content to
matching local elements. The comparison shows the differences in versions between the local and imported
elements. The administrator can decide whether to import the whole package, or choose specific elements to
import.
Packages feature digital rights management to control how the receiving server can use the content of the
package. Orchestrator signs packages and encrypts the packages for data protection. Packages use X509
certificates to monitor which users export and redistribute elements.
This chapter includes the following topics:
n
“Create a Package,” on page 59
n
“Set User Permissions on a Package,” on page 60
n
“Export a Package,” on page 61
n
“Import a Package,” on page 62
n
“Get and Synchronize a Remote Package,” on page 62
n
“Remove a Package,” on page 63
Create a Package
You export workflows, policies, actions, plug-in references, resources, Web views, and configuration elements
in packages. All elements that an element implements are added to the package automatically, to ensure
compatibility between versions. If you don't want to add the referenced elements, you can delete them in the
package editor.
Prerequisites
Elements such as workflows, actions, and policies to add to a package.
Procedure
1 In the Orchestrator client, click the Packages view.
2 Click the menu button in the title bar of the Packages list and select Add package.
VMware, Inc.
59
Page 60

vCenter Orchestrator Administration Guide
3 Name the new package and click OK.
The syntax for package names is
com.vmware.myfolder.mypackage.
domain.your_company.folder.package_name
4 Right-click the package and select Edit.
The package editor opens.
5 Add a description for the package in the General tab.
6 Click the Workflows tab to add workflows to the package.
n
Click Insert Workflows (list search) to search for and select workflows in a selection dialog box.
n
Click Insert Workflows (tree browsing) to browse and select workflows in a hierarchical list.
7 (Optional) Click the Policies, Actions, Web View, Configurations, Resources, and Used Plug-Ins tabs to
add policy templates, actions, Web views, configuration elements, resource elements, and plug-ins to the
package.
You created a package and added elements to it.
What to do next
You must set the user permissions for this package.
Set User Permissions on a Package
You set different levels of permission on a package to limit the access that different users or user groups can
have to the contents of that package.
. For example,
You select the different users and user groups for which to set permissions from the users and user groups in
the Orchestrator LDAP server. Orchestrator defines levels of permissions that you can apply to users or groups.
View
The user can view the elements in the package, but cannot view the schemas
or scripting.
Inspect
The user can view the elements in the package, including the schemas and
scripting.
Execute
Edit
Admin
Not used.
The user can edit the elements in the package.
The user can set permissions on the elements in the package.
Prerequisites
You must have created a package, opened it for editing in the package editor, and added to it the necessary
elements.
Procedure
1 Click the Permissions tab in the package editor.
2 Click the Add access rights link to define permissions for a new user or user group.
3 Search for a user or user group.
The search results show all of the users and user groups from the Orchestrator LDAP server that match
the search.
4 Select a user or user group and click OK.
5 Right-click the user and select Add access rights.
60 VMware, Inc.
Page 61

6 Check the appropriate check boxes to set the level of permissions for this user and click OK.
To allow a user to view the elements, inspect the schema and scripting, run and edit the elements, and
change the permissions, you must check all check boxes.
7 Click Save and Close to exit the package editor.
You created a package and set the appropriate user permissions.
Export a Package
You can export a package and reuse its content on another Orchestrator server. The system adds the certificates
for all of the elements that the exported package contains. When the package is imported into another server,
these certificates are also imported.
Prerequisites
You must have created a package and added to it the necessary elements.
Procedure
1 In the Orchestrator client, click the Packages view.
2 Right-click the package to export and select Export package.
3 Browse to select a location in which to save the package and click Open.
Chapter 7 Using Packages
4 (Optional) Click Add target certificate to sign the package.
a In the list of certificates, select the certificate to use for the exported package.
b Click Select.
5 (Optional) To impose restrictions on the exported package, deselect any of the following options.
Option Description
View contents
Add to package
Edit contents
When selected, the importer of the package is allowed to view the JavaScript
of the elements contained in the package.
When selected, the importer of the package is allowed to redistribute the
elements contained in the package.
When selected, the importer of the package is allowed to modify the elements
contained in the package.
6 (Optional) Deselect the Export version history check box if you do not want to export the version history
of the package.
7 Click Save.
You exported the package.
What to do next
You can use all of the workflows, actions, policies, and Web views from the exported package on the new
Orchestrator server.
VMware, Inc. 61
Page 62

vCenter Orchestrator Administration Guide
Import a Package
To reuse workflows, actions, policies, Web views, and configuration elements from one Orchestrator server
on another server, you can import them as a package.
IMPORTANT Packages that Orchestrator 3.2 generates are upwardly compatible with Orchestrator 4.x. You can
import a package from an Orchestrator 3.2 server to an Orchestrator 4.x server. Packages from Orchestrator
4.x are not backwards compatible with Orchestrator 3.2. You cannot import to an Orchestrator 3.2 server a
package that an Orchestrator 4.x server generates.
Prerequisites
n
Back up any standard Orchestrator elements that you modified. If the imported package contains elements
whose version number is later than the version number of the elements stored in the Orchestrator database,
your changes might be lost.
n
On the remote server, you created a package and added to it the necessary elements.
Procedure
1 In the Orchestrator client, click the Packages view.
2 From the drop-down menu, select Import package.
3 Browse to select the package to import and click Open.
Certificate information about the exporter appears.
4 Review the package import details and select Import or Import and trust provider.
The Import package view appears. If the version of the imported package element is later than the server
version, the system selects the element for import.
5 (Optional) Deselect the elements that you do not want to import.
For example, deselect custom elements for which later versions exist.
6 Click Import checked elements.
The imported package appears in the list of packages.
What to do next
You can use all of the workflows, actions, policies, Web views, and configuration elements from the imported
package as new building blocks on your Orchestrator server.
Get and Synchronize a Remote Package
The Packages view provides a way to synchronize a package on one Orchestrator server with a package on
another server.
If a package already exists on the local server, use the Synchronize option. If you want to retrieve a package
from a remote server, use the Get remote package option.
Synchronizing packages is the only way to be sure to obtain all the elements from the remote server. If you
synchronize individual elements, Orchestrator only synchronizes elements that already exist on the local
server. To obtain any new elements from the remote server, you must synchronize the package that contains
those elements.
62 VMware, Inc.
Page 63

Chapter 7 Using Packages
Procedure
1 In the Orchestrator client, click the Packages view.
2 Right-click the package to synchronize and select Synchronize.
3 Log in to the remote server.
The Orchestrator Synchronization dialog box opens. It displays the differences between the package
elements. To view only elements that are different on the local and remote server, select Hide identical
from the drop-down menu.
4 View the comparison between the local and remote package elements, click Synchronize and select an
option.
Option Description
none
commit
update
merge
Local and remote elements have the same version number. No
synchronization is required.
The version of the local element is later. The remote element is overwritten.
The version of the remote element is later. The local element is updated. If
an element does not exist locally, it is imported from the remote server to the
local server.
The local and remote packages are overwritten with a merged list of
references. The referenced elements remain unchanged.
NOTE If the remote server does not recognize your certificate, you cannot commit elements.
The synchronized package is reloaded.
What to do next
You can use the updated package content in workflows, actions, policies, and Web views.
Remove a Package
Workflows and actions, as well as other resources, can be reused in many packages. This is why, before you
remove a package, you must decide whether to delete the workflows, actions, policies and other resources
contained in the package.
Procedure
1 In the Orchestrator client, click the Packages view.
2 Right-click the package to delete and select one of the deletion options.
Option Description
Delete
Delete element with content
Removes the package only from the Packages view.
Removes all workflows, actions, policies, Web views, configurations, plugin settings or resources that the package contains. Does not remove read-only
elements and the plug-in .dar archive.
CAUTION This action might delete elements that are referenced by other
packages too. To avoid deleting an element that another package needs,
remove any dependencies that you added to the package. To view a list of
all the packages, workflows and policies that reference an element, use the
Find Elements that Use this Element function.
VMware, Inc. 63
Page 64

vCenter Orchestrator Administration Guide
64 VMware, Inc.
Page 65

Setting System Properties 8
You can set system properties to change the default Orchestrator behavior.
This chapter includes the following topics:
n
“Disable Access to the Orchestrator Client By Nonadministrators,” on page 65
n
“Disable Access to Workflows from Web Service Clients,” on page 66
n
“Setting Server File System Access from Workflows and JavaScript,” on page 66
n
“Set JavaScript Access to Operating System Commands,” on page 68
n
“Set JavaScript Access to Java Classes,” on page 69
n
“Set Custom Timeout Property,” on page 70
n
“Modify the Number of Objects a Plug-In Search Obtains,” on page 70
n
“Modify the Number of Concurrent and Pending Workflows,” on page 71
Disable Access to the Orchestrator Client By Nonadministrators
You can configure the Orchestrator server to deny access to the Orchestrator client to all users who are not
members of the Orchestrator administrator LDAP group.
VMware, Inc.
By default, all users who are granted execute permissions can connect to the Orchestrator client. However, you
can limit access to the Orchestrator client to Orchestrator administrators by setting a system property in the
vmo.properties Orchestrator configuration file.
IMPORTANT If the vmo.properties configuration file does not contain this property, or if the property is set to
false, Orchestrator permits access to the Orchestrator client by all users.
Procedure
1 Navigate to the following folder on the Orchestrator server system.
Option Action
If you installed Orchestrator with the
vCenter Server installer
If you installed the standalone
version of Orchestrator
Go to
install_directory
server\server\vmo\conf.
Go to
install_directory
server\server\vmo\conf.
\VMware\Infrastructure\Orchestrator\app-
\VMware\Orchestrator\app-
2 Open the vmo.properties configuration file in a text editor.
65
Page 66

vCenter Orchestrator Administration Guide
3 Add the following line to the vmo.properties configuration file.
#Disable Orchestrator client connection
com.vmware.o11n.smart-client-disabled = true
4 Save the vmo.properties file.
5 Restart the Orchestrator server.
You disabled access to the Orchestrator client to all users other than members of the Orchestrator administrator
LDAP group.
Disable Access to Workflows from Web Service Clients
You can configure the Orchestrator server to deny access to Web service requests, to prevent malicious attempts
from Web service clients to access sensitive servers.
By default, Orchestrator permits access to workflows from Web service clients. You disable access to workflows
from Web service clients by setting a system property in the Orchestrator configuration file, vmo.properties.
IMPORTANT If the vmo.properties configuration file does not contain this property, or if the property is set to
false, Orchestrator permits access to workflows from Web services.
Procedure
1 Navigate to the following folder on the Orchestrator server system.
Option Action
If you installed Orchestrator with the
vCenter Server installer
If you installed the standalone
version of Orchestrator
Go to
install_directory
server\server\vmo\conf.
Go to
install_directory
server\server\vmo\conf.
\VMware\Infrastructure\Orchestrator\app-
\VMware\Orchestrator\app-
2 Open the vmo.properties configuration file in a text editor.
3 Add the following line to the vmo.properties configuration file.
#Disable Web service access
com.vmware.o11n.web-service-disabled = true
4 Save the vmo.properties file.
5 Restart the Orchestrator server.
You disabled access to workflows Web service clients. The Orchestrator server only answers Web service client
calls from the echo() or echoWorkflow() methods, for testing purposes.
Setting Server File System Access from Workflows and JavaScript
Orchestrator limits access to the server file system from workflows and JavaScript to specific directories. You
can extend access to other parts of the server file system by modifying the js-io-rights.conf Orchestrator
configuration file.
The js-io-rights.conf file is created when a workflow tries to access the Orchestrator server file system.
The js-io-rights.conf file contains rules that permit write access to defined directories in the server file
system.
66 VMware, Inc.
Page 67

Chapter 8 Setting System Properties
Each line of the js-io-rights.conf file must contain the following information.
n
A plus (+) or minus (-) sign to indicate whether rights are permitted or denied
n
The read (r), write (w), and execute (x) levels of rights
n
The path on which to apply the rights
Orchestrator resolves access rights in the order they appear in the js-io-rights.conf file. Each line can override
the previous lines. The following code extract shows the default content of the js-io-rights.conf configuration
file:
-rwx c:/
+rwx c:/orchestrator
+rx ../../configuration/jetty/logs/
+rx ../server/vmo/log/
+rx ../bin/
+rx ./boot.properties
+rx ../server/vmo/conf/
+rx ../server/vmo/conf/plugins/
+rx ../server/vmo/deploy/vmo-server/vmo-ds.xml
+rx ../../apps/
+r ../../version.txt
The first two entries in the default js-io-rights.conf configuration file allow the following access rights:
-rxw c:/
+rxw c:/orchestrator
All access to the file system is denied.
Read, write, and execute access is permitted in the c:/orchestrator directory.
In the default js-io-rights.conf configuration file, the second line partially overrides the first line because
c:/orchestrator is after c:/, which allows read, write, and execute access to c:/orchestrator but denies access
to the rest of the file system under c:/. The default configuration allows workflows and the Orchestrator API
to write to the c:/orchestrator directory, but nowhere else.
IMPORTANT You can permit access to all parts of the file system by setting +rxw / in the js-io-rights.conf
file. However, doing so represents a high security risk.
Set Server File System Access for Workflows and JavaScript
To change the parts of the server file system that workflows and the Orchestrator API can access, modify the
js-io-rights.conf configuration file. The js-io-rights.conf file is created when a workflow tries to access
the Orchestrator server file system.
Orchestrator has read, write, and execute rights to a folder named orchestrator, at the root of the server system.
Although workflows have permission to read, write, and execute in this folder, you must create the folder on
the server system.
Procedure
1 Create the c:/orchestrator folder at the root of the Orchestrator server system.
2 Navigate to the following folder on the Orchestrator server system.
Option Action
If you installed Orchestrator with the
vCenter Server installer
If you installed the standalone
version of Orchestrator
Go to
install_directory
server\server\vmo\conf.
Go to
install_directory
server\server\vmo\conf.
\VMware\Infrastructure\Orchestrator\app-
\VMware\Orchestrator\app-
VMware, Inc. 67
Page 68

vCenter Orchestrator Administration Guide
3 Open the js-io-rights.conf configuration file in a text editor.
The following code extract shows the default content of the js-io-rights.conf configuration file:
-rwx c:/
+rwx c:/orchestrator
+rx ../../configuration/jetty/logs/
+rx ../server/vmo/log/
+rx ../bin/
+rx ./boot.properties
+rx ../server/vmo/conf/
+rx ../server/vmo/conf/plugins/
+rx ../server/vmo/deploy/vmo-server/vmo-ds.xml
+rx ../../apps/
+r ../../version.txt
The default settings in the js-io-rights.conf file allow full read, write, and execute access to all of the
file system under c:\orchestrator, but deny all access to the rest of the file system.
4 Add the necessary lines to the js-io-rights.conf file to allow or deny access to parts of the file system.
For example, the following line denies the execution rights in the c:/orchestrator/noexec directory:
-x c:/orchestrator/noexec
By adding the preceding line, c:/orchestrator/foo retains execution rights, but
c:/orchestrator/noexec/bar does not. Both directories remain readable and writable.
You modified the access rights to the file system from workflows and from the Orchestrator API.
Set JavaScript Access to Operating System Commands
The Orchestrator API provides a scripting class, Command, that runs commands in the Orchestrator server host
operating system. To prevent unauthorized access to the Orchestrator server host, by default, Orchestrator
applications do not have permission to run the Command class. If Orchestrator applications require permission
to run commands on the host operating system, you can activate the Command scripting class.
You grant permission to use the Command class by setting a system property in the vmo.properties properties
file.
Procedure
1 Navigate to the following folder on the Orchestrator server system.
Option Action
If you installed Orchestrator with the
vCenter Server installer
If you installed the standalone
version of Orchestrator
2 Open the vmo.properties configuration file in a text editor.
Go to
install_directory
server\server\vmo\conf.
Go to
install_directory
server\server\vmo\conf.
\VMware\Infrastructure\Orchestrator\app-
\VMware\Orchestrator\app-
3 Set the com.vmware.js.allow-local-process system property by adding the following line to the
vmo.properties file.
com.vmware.js.allow-local-process=true
4 Save the vmo.properties file.
5 Restart the Orchestrator server.
68 VMware, Inc.
Page 69

You granted permissions to Orchestrator applications to run local commands in the Orchestrator server host
operating system.
NOTE By setting the com.vmware.js.allow-local-process system property to true, you allow the Command
scripting class to write anywhere in the file system. This property overrides any file system access permissions
that you set in the js-io-rights.conf file for the Command scripting class only. The file system access permissions
that you set in the js-io-rights.conf file still apply to all scripting classes other than Command.
Set JavaScript Access to Java Classes
By default, Orchestrator restricts JavaScript access to a limited set of Java classes. If you require JavaScript
access to a wider range of Java classes, you must set an Orchestrator system property to allow this access.
Allowing the JavaScript engine full access to the Java virtual machine (JVM) presents potential security issues.
Malformed or malicious scripts might have access to all of the system components to which the user who runs
the Orchestrator server has access. Consequently, by default the Orchestrator JavaScript engine can access only
the classes in the java.util.* package.
If you require JavaScript access to classes outside of the java.util.* package, you can list in a configuration
file the Java packages to which to allow JavaScript access. You then set the com.vmware.scripting.rhino-
class-shutter-file system property to point to this file.
Procedure
Chapter 8 Setting System Properties
1 Create a text configuration file to store the list of Java packages to which to allow JavaScript access.
For example, to allow JavaScript access to all the classes in the java.net package and to the
java.lang.Object class, you add the following content to the file.
java.net.*
java.lang.Object
2 Save the configuration file with an appropriate name and in an appropriate place.
3 Navigate to the following folder on the Orchestrator server system.
Option Action
If you installed Orchestrator with the
vCenter Server installer
If you installed the standalone
version of Orchestrator
Go to
install_directory
server\server\vmo\conf.
Go to
install_directory
server\server\vmo\conf.
\VMware\Infrastructure\Orchestrator\app-
\VMware\Orchestrator\app-
4 Open the vmo.properties configuration file in a text editor.
5 Set the com.vmware.scripting.rhino-class-shutter-file system property by adding the following line
to the vmo.properties file.
com.vmware.scripting.rhino-class-shutter-file=
path_to_your_configuration_file
6 Save the vmo.properties file.
7 Restart the Orchestrator server.
The JavaScript engine has access to the Java classes that you specified.
VMware, Inc. 69
Page 70

vCenter Orchestrator Administration Guide
Set Custom Timeout Property
When vCenter is overloaded, it takes more time to return the response to the Orchestrator server than the 20000
milliseconds set by default. To prevent this situation, you must modify the Orchestrator configuration file to
increase the default timeout period.
If the default timeout period expires before the completion of certain operations, the Orchestrator server log
contains errors.
Operation 'getPropertyContent' total time : '5742228' for 1823 calls, mean time : '3149.0', min
time : '0', max time : '32313'
Timeout, unable to get property 'info' com.vmware.vmo.plugin.vi4.model.TimeoutException
Procedure
1 Navigate to the following folder on the Orchestrator server system.
Option Action
If you installed Orchestrator with the
vCenter Server installer
If you installed the standalone
version of Orchestrator
2 Open the vmo.properties configuration file in a text editor.
Go to
install_directory
server\server\vmo\conf.
Go to
install_directory
server\server\vmo\conf.
\VMware\Infrastructure\Orchestrator\app-
\VMware\Orchestrator\app-
3 Set the com.vmware.vmo.plugin.vi4.waitUpdatesTimeout system property by adding the following line to
the vmo.properties file.
com.vmware.vmo.plugin.vi4.waitUpdatesTimeout=
<milliseconds>
4 Save the vmo.properties file.
5 Restart the Orchestrator server.
The value you set overrides the default timeout setting of 20000 milliseconds.
Modify the Number of Objects a Plug-In Search Obtains
By default, using the Orchestrator client to search for objects through a plug-in returns 20 objects at a time.
You can modify the plug-in configuration file to increase the number of objects that are returned.
Prerequisites
You must have installed a plug-in in the Orchestrator server.
70 VMware, Inc.
Page 71

Chapter 8 Setting System Properties
Procedure
1 Navigate to the plug-in configuration folder on the Orchestrator server system.
This folder contains an XML configuration file for each plug-in you have installed in the Orchestrator
server.
Option Action
If you installed Orchestrator with the
vCenter Server installer
If you installed the standalone
version of Orchestrator
Go to
install_directory
server\server\vmo\conf\plugins.
Go to
install_directory
server\server\vmo\conf\plugins.
\VMware\Infrastructure\Orchestrator\app-
\VMware\Orchestrator\app-
2 Open the XML configuration file of the plug-in for which you want to change the number of search results.
3 Add the following line to the XML configuration file for the plug-in.
<entry key="ch.dunes.database.fetch-limit">50</entry>
This line sets the number of search results to return to 50.
4 Save the XML configuration file.
5 (Optional) Repeat Step 2 through Step 4 for each plug-in to modify.
6 Restart the Orchestrator server.
You increased the number of search results Orchestrator displays for a particular plug-in.
Modify the Number of Concurrent and Pending Workflows
By default, Orchestrator permits 300 workflows to run at the same time. When the Orchestrator server has to
run more than 300 concurrent workflows, the pending workflow runs are queued. When an active workflow
run completes, the next workflow in the queue starts to run. If the maximum number of queued workflows is
reached, the next workflow runs fail until one of the pending workflows starts to run.
By setting system properties in the Orchestrator vmo.properties configuration file, you can control the number
of workflows that are running at the same time and the number of pending workflows that are waiting in a
queue.
IMPORTANT If your system is configured with one CPU, the recommended maximum value of the
com.vmware.vco.workflow-engine.executors-count property is 100. If the number of concurrent workflows is
higher than 100, you might reach the maximum number of threads per processor.
Procedure
1 Navigate to the following folder on the Orchestrator server system.
Option Action
If you installed Orchestrator with the
vCenter Server installer
If you installed the standalone
version of Orchestrator
2 Open the vmo.properties configuration file in a text editor.
Go to
install_directory
server\server\vmo\conf.
Go to
install_directory
server\server\vmo\conf.
\VMware\Infrastructure\Orchestrator\app-
\VMware\Orchestrator\app-
VMware, Inc. 71
Page 72

vCenter Orchestrator Administration Guide
3 Set the com.vmware.vco.workflow-engine.executors-count and com.vmware.vco.workflow-
engine.executors-max-queue-size properties by adding the following lines to the vmo.properies file.
com.vmware.vco.workflow-engine.executors-count=
com.vmware.vco.workflow-engine.executors-max-queue-size=
200
5000
4 Save the vmo.properties file.
5 Restart the Orchestrator server.
You set the maximum values for concurrent and pending workflows. You can run up to 200 workflows and
5000 workflows can be queued if the number of actively running workflows is reached.
72 VMware, Inc.
Page 73

Maintenance and Recovery 9
The Troubleshooting tab in the Orchestrator configuration interface allows you to perform several bulk
operations related to workflows and tasks. You can use the Troubleshooting tab to globally reset the server
and remove all traces of previous runs.
NOTE Before you click a troubleshooting option, make sure that the Orchestrator server is stopped.
Table 9-1. Troubleshooting Options
Action Description
Cancel all running
workflows
Delete all workflow runs Deletes all completed workflow tokens from the Orchestrator database.
Suspend all scheduled
tasks
Clean all server temporary
files
Force plug-in reinstallation
when server starts
Marks all running workflows as cancelled in the database, which prevents the server from
restarting the workflows on the next reboot. Allows Orchestrator to exit infinite loops.
Cancels all scheduled tasks, but does not stop or remove its associated workflow runs.
Cleans all temporary files that the JBoss server uses to ensure the server persistency. The JBoss
server is the application server that underlies the Orchestrator server.
Used so that a changed plug-in is correctly updated on the next server start.
NOTE If you change the Orchestrator database after you configure and install the default
plug-ins, you must force plug-in reinstallation. Forcing plug-in reinstallation deletes the
install_directory
server\server\vmo\plugins\_VSOPluginInstallationVersion.xml file, which holds
the version of the plug-ins already installed and forces plug-in reinstallation. The plug-in is
reinstalled with its original content, and any changes are lost.
\app-
This chapter includes the following topics:
n
“Orchestrator Server Fails to Start,” on page 74
n
“Revert to the Default Password for Orchestrator Configuration,” on page 74
n
“Change the Web View SSL Certificate,” on page 75
n
“Orchestrator Log Files,” on page 76
n
“Maintaining the Orchestrator Database,” on page 80
VMware, Inc.
73
Page 74

vCenter Orchestrator Administration Guide
Orchestrator Server Fails to Start
The VMware vCenter Orchestrator Server service might fail to start when not enough RAM is available for the
JVM to start the server.
Problem
The server status appears as Starting in the configuration interface and it is not updated when you refresh
the page. When you select My Computer > Services and Applications > Services, the server fails to start and
you receive a timeout error.
Cause
The Orchestrator server might not start in the following circumstances:
n
Orchestrator runs on a host with less than 2GB of RAM.
n
Orchestrator and vCenter Server run on a shared host with less than 4GB of RAM.
n
The Orchestrator database runs on the same host as Orchestrator.
n
Orchestrator is installed in a directory whose name contains non-ASCII characters.
Solution
If you installed Orchestrator standalone, verify that your system has at least 2GB of RAM.
If you installed Orchestrator silently with vCenter Server, verify that your system has at least 4GB of RAM.
Verify that the Orchestrator database is running on a dedicated server.
Verify that the Orchestrator components are configured properly and that all of the status indicators in the
configuration interface display a green circle.
Revert to the Default Password for Orchestrator Configuration
If the default password for the Orchestrator configuration interface is changed, you cannot retrieve it because
Orchestrator uses encryption to encode passwords. You can revert to the default password vmware if the current
password is not known.
Procedure
1 Navigate to the following folder on the Orchestrator server system.
Option Action
If you installed Orchestrator with the
vCenter Server installer
If you installed the standalone
version of Orchestrator
2 Open the password.properties file in a text editor.
Go to
install_directory
uration\jetty\etc.
Go to
install_directory
tc.
\VMware\Infrastructure\Orchestrator\config
\VMware\Orchestrator\configuration\jetty\e
3 Delete the content of the file.
4 Add the following line to the password.properties file.
vmware=92963abd36c896b93a36b8e296ff3387
74 VMware, Inc.
Page 75

5 Save the password.properties file.
6 Restart the Orchestrator Configuration service.
You can log in to the Orchestrator configuration interface with the default credentials.
n
User name: vmware
n
Password: vmware
Change the Web View SSL Certificate
Orchestrator provides an SSL certificate that controls user access to Web views. You can configure Orchestrator
to use a different SSL certificate to control access to Web views. For example, if your company security policy
requires you to use their SSL certificates.
Procedure
1 Create an SSL certificate by running the keytool Java utility at the command prompt.
keytool -genkey -alias mySslCertificate -keyalg RSA
The keytool utility generates a file called .keystore by using the information and password that you
provide when you run the command.
2 Open the following Orchestrator application server configuration file in an editor.
Chapter 9 Maintenance and Recovery
Option Action
If you installed the standalone
version of Orchestrator
If the vCenter Server installed
Orchestrator
Go to
install_directory
server\server\vmo\deploy\jboss-deploy-tomcat\jbosswebtomcat55.sar\server.xml.
Go to
install_directory
server\server\vmo\deploy\jboss-deploy-tomcat\jbosswebtomcat55.sar\server.xml.
\VMware\Orchestrator\app-
\VMware\Infrastructure\Orchestrator\app-
3 Find the following entry at line 44 in the server.xml file.
<!-- Define a SSL HTTP/1.1 Connector on port ${ch.dunes.https-server.port} -->
<Connector address="${jboss.bind.address}" protocol="HTTP/1.1" SSLEnabled="true"
clientAuth="false" emptySessionPath="true"
keystoreFile="${java.home}/lib/security/jssecacerts"
keystorePass="dunesdunes"
maxHttpHeaderSize="8192" maxThreads="100"
port="${ch.dunes.https-server.port}" scheme="https" secure="true"
sslProtocol="TLS" strategy="ms" />
4 Change the keystoreFile and keystorePass attributes to refer to the .keystore file and the password you
created when you ran the keytool utility.
keystoreFile="/PathToKeystore/.keystore"
keystorePass="NewKeystorePassword"
5 Save the server.xml file and restart the Orchestrator server.
You changed the SSL certificate that the Orchestrator server uses to control access to Web views.
VMware, Inc. 75
Page 76

vCenter Orchestrator Administration Guide
Orchestrator Log Files
VMware Technical Support routinely requests diagnostic information from you when a support request is
handled. This diagnostic information contains product-specific logs and configuration files from the host on
which the product is run. The information is gathered by using a specific script tool for each product.
Table 9-2. Orchestrator Log Files
Filename Location Description
boot.log
boot-state.log
script-logs.log
server.log
vco-configuration.log
vso.log
install_directory
server\server\vmo\log
install_directory
server\server\vmo\log
install_directory
server\server\vmo\log
install_directory
server\server\vmo\log
install_directory
n\jetty\logs
install_directory
\app-
\app-
\app-
\app-
\configuratio
\apps
Provides details about the boot
state of the JBoss server. Check the
boot.log file when a file from
JBoss is missing or the installation
is corrupted.
Provides details about the boot
state of the vCO server. If the
server boots properly, an entry
about the vCO server version is
written. By default, this
information is also included in the
server.log file.
Provides a list of the completed
workflows and actions. The
scripts-logs.log file lets you
isolate workflow runs and actions
runs from normal vCO operations.
This information is also included
in the server.log file.
Provides information about
everything that happens on the
vCO server. It contains the entries
from the boot-state.logfile and
script-logs.log file, as well as
other information. Check the
server.log file when you debug
vCO or any application that runs
on vCO.
Provides information about the
configuration and validation of
each component of vCO. This is the
jetty service running on the vCO
server. The request.log file in the
same folder might be more useful
to view the history of actions taken
during the configuration of vCO.
This is the vCO client log. Use this
log to detect connection issues with
the server and events on the client
side.
76 VMware, Inc.
Page 77

Chapter 9 Maintenance and Recovery
Table 9-2. Orchestrator Log Files (Continued)
Filename Location Description
yyyy-mm-dd.request.log
wrapper.log
vCenter_Orchestrator_InstallLog.log
install_directory
n\jetty\logs
install_directory
server\bin
Check file location in the message. This log is created when you cancel
\configuratio
\app-
This log lists the elements that are
needed to load and display the
pages of the vCO configuration
interface. It keeps a history of the
actions that were taken during the
configuration of vCO and the time
when they were completed. Use
this log to identify changes in the
behavior of the vCO server after a
restart. However, the log does not
display the value of the changed
parameters.
Provides information from the
server.log file. Use this log to
check whether the VMware
vCenter Orchestrator Server
service was started by the wrapper
or by a user.
the vCO installation or when the
installation fails.
Logging Persistence
You can log information in any Orchestrator script (workflow, policy, or action). This information has types
and levels. The type can be either persistent or non-persistent. The level can be DEBUG, INFO, WARNING, and
ERROR.
Table 9-3. Creating Persistent and Non-Persistent Logs
Log Level Persistent Type Non-Persistent Type
DEBUG
INFO
WARNING
ERROR
Persistent Logs
Persistent logs (server logs) track past workflow run logs and are stored in the Orchestrator database. To avoid
increasing the database infinitely, specify the number of logs stored per element (workflows and policies) in
the Orchestrator configuration interface. If you increase the default value of 50MB, the query requires more
space and time. To view server logs, you must select a workflow, a completed workflow run, or policy and
click the Events tab in the Orchestrator client.
Non-Persistent Logs
When you use a non-persistent log (system log) in your scripting, the Orchestrator server notifies all running
Orchestrator applications about this log, but this information is not stored. When the application is restarted,
the log information is lost. Non-persistent logs are used for debugging purposes or for live information. To
view system logs, you must select a completed workflow run in the Orchestrator client and click Logs on the
Schema tab.
Server.debug("short text", "long text"); N/A
Server.log("short text", "long text"); System.log("text");
Server.warn("short text", "long text"); System.warn("text");
Server.error("short text", "long text"); System.error("text");
VMware, Inc. 77
Page 78

vCenter Orchestrator Administration Guide
Define the Server Log Level
In the Orchestrator configuration interface, you can set the level of server log that you require. The default
server log level is INFO. Changing the log level affects any new messages that the server writes to the server
log and the number of active connections to the database.
CAUTION Only set the log level to DEBUG or ALL to debug a problem. Do not use this setting in a production
environment because it can seriously impair performance.
Procedure
1 Log in to the Orchestrator configuration interface as vmware.
2 Click Log.
3 Select an option from the Log level drop-down menu.
Option Description
FATAL
ERROR
WARN
INFO
DEBUG
ALL
OFF
Only fatal errors are written to the log file.
Errors and fatal errors are written to the log file.
Warnings, errors, and fatal errors are written to the log file.
Information, warnings, errors, and fatal errors are written to the log file.
Debug information, information messages, warnings, errors, and fatal errors
are written to the log file.
Events are not filtered. All events are written to the log file.
No entries are written to the log file and no log updates are made.
NOTE The log contains messages of the selected level and all higher levels. If you select the INFO level, all
INFO messages and higher-level messages (INFO, WARN, ERROR, and FATAL) are written to the log file.
4 Click Apply changes.
5 (Optional) Click the Generate log report link to export the log files.
This operation creates a ZIP archive of all log files.
The new log level is applied to any new messages that the server generates, without restarting the server. The
logs are stored in
install_directory
\app-server\server\vmo\log\.
78 VMware, Inc.
Page 79

Chapter 9 Maintenance and Recovery
Change the Size of Server Logs
If a server log regenerates multiple times a day, it becomes difficult to determine what causes problems. To
prevent this, you can change the default size of the server log. The default size of the server log is 5MB.
Procedure
1 Navigate to the following folder on the Orchestrator server system.
Option Action
If you installed Orchestrator with the
vCenter Server installer
If you installed the standalone
version of Orchestrator
2 Open the log4j.xml file in a text editor and locate the following code block:
<appender class="org.jboss.logging.appender.RollingFileAppender" name="FILE">
<errorHandler class="org.jboss.logging.util.OnlyOnceErrorHandler"/>
<param name="File" value="${jboss.server.home.dir}/log/server.log"/>
<param name="Append" value="true"/>
Go to
install_directory
server\server\vmo\conf.
Go to
install_directory
server\server\vmo\conf.
\VMware\Infrastructure\Orchestrator\app-
\VMware\Orchestrator\app-
<!-- Rollover at 5MB and allow 4 rollover files -->
<param name="MaxFileSize" value="5120KB"/>
<param name="MaxBackupIndex" value="4"/>
<layout class="org.apache.log4j.PatternLayout">
<!-- The default pattern: Date Priority [Category] Message\n -->
<param name="ConversionPattern" value="%d{yyyy-MM-dd HH:mm:ss.SSSZ} %-5p [%c{1}] %m%n"/>
</layout>
</appender>
3 Change the following lines:
<param name="MaxFileSize" value="5120KB"/>
<param name="MaxBackupIndex" value="4"/>
The MaxFileSize parameter controls the size of the log file, and the MaxBackupIndex parameter controls
the number of files for the rollover.
NOTE Before you save the file, make sure it does not contain typos. If the file contains typos, the logs will
be lost.
The system reads this file dynamically. You do not need to reboot the server.
Export Orchestrator Log Files
Orchestrator provides a workflow that generates a ZIP archive of troubleshooting information containing
configuration, server, wrapper, and installation log files.
Prerequisites
Verify that you created the c:/orchestrator folder at the root of the Orchestrator server system or set write
access rights to another folder in which to store the generated ZIP archive. See “Set Server File System Access
for Workflows and JavaScript,” on page 67.
You must be logged in to the Orchestrator client as a member of the vCO admin group.
VMware, Inc. 79
Page 80

vCenter Orchestrator Administration Guide
Procedure
1 Click the Workflows view in the Orchestrator client.
2 In the workflows hierarchical list, open Library > Troubleshooting and navigate to the Export logs and
application settings workflow.
3 Right-click the Export logs and application settings workflow and select Start workflow.
4 (Optional) Type the path to the folder on the vCO server in which to store the output ZIP archive.
If you do not type a path, the generated ZIP archive is stored in the c:/orchestrator folder.
5 Click Submit to run the workflow.
The troubleshooting information is stored in a ZIP archive named
vCO_troubleshooting_
Loss of Server Logs
You might experience loss of logs if you use the vmo.bat file to restart the Orchestrator server.
Problem
If you start the Orchestrator server as a service and you then restart the Orchestrator server by running the
vmo.bat file directly, you can experience a potential loss of logs.
dateReference_xxxxxx
.zip.
Cause
Logs can be lost if you start the Orchestrator server as a service and restart it by using the vmo.bat. This behavior
can cause the server to run with different permissions.
Solution
1 Right-click My Computer on your desktop and select Manage.
2 In the Computer Management dialog box, expand Services and Applications and select Services.
3 In the right pane, right-click and select VMware vCenter Orchestrator Server > Restart.
Maintaining the Orchestrator Database
After your Orchestrator database instance and Orchestrator server are installed and operational, perform
standard database maintenance processes.
Maintaining your Orchestrator database involves several tasks:
n
Monitoring the growth of the log file and compacting the database log file, as needed. See the
documentation for the database type that you are using.
n
Scheduling regular backups of the database.
n
Backing up the database before you upgrade Orchestrator. See your database documentation for
information about backing up your database.
80 VMware, Inc.
Page 81

Index
A
actions
adding 55
creating 55
duplicating 56
encrypting 56
exporting 56
finding elements that implement 57
importing 57
moving 57
referencing 57
relocating 57
Actions view 21
API Explorer, accessing 16
attributes 29, 31
authorizations 14
B
batch operations workflows 26
C
check-pointing 11
Command scripting class 68
configuration elements 31
Configurations view 19
contextual menu in inventory 22
D
database maintenance 80
default password 74
deprecated features 14
disable access to Orchestrator client 65
disabling Web service access 66
F
feedback 9
file system
access from workflows 66
set workflow access 67
I
icons, workflow 20
input parameters 31
J
JavaScript 69
js-io-rights.conf file 66, 67
L
logs
non-persistent logs 77
persistent logs 77
M
maximum concurrent workflows 71
maximum pending workflows 71
My Orchestrator view 15
N
new workflows 26
O
OGNL expressions 14
operating system commands, accessing 68
Orchestrator API
file system access 66, 67
js-io-rights.conf file 66, 67
Orchestrator architecture 13
Orchestrator client
credentials 15
customizing 16
disable access 65
login 15
Orchestrator overview 11
output parameters 31
P
packages
create 59
deleting 63
digital rights management 59
exporting 61
getting 62
importing 62
permissions 60
removing 63
restricting reuse 61
signature 59
signing 61
synchronizing 62
VMware, Inc. 81
Page 82

vCenter Orchestrator Administration Guide
Packages view 19
parameters 29
persistence 11
plug-ins
searching 70
usage 45
policies 14, 23
policy engine 11
policy templates 23
R
read-only resources 33
recurrent workflows 37
resource elements
adding to Web views 42
adding to workflows 42
editing 40
importing 40
save to file 41
updating 41
viewing 39
resource locking 33
S
Scheduler view 20
scheduling 36
schema 29, 32
scripting
access to Java classes 69
accessing operating system commands 68
shutter system property 69
scripting engine 11
security 11
server log
exporting 78
log level 78
SFTP 50
SSH commands, running 49
SSH file copy
SCP get command 50
SCP put command 50
SSH plug-in, usage 48
SSH workflows
changing a key pair passphrase 48
generating a key pair 48
registering a public key 49
standard workflows 25
support 9
system properties 65, 69–71
Troubleshooting options
cancel runs 73
clean directories 73
remove runs 73
reset current version 73
suspend tasks 73
U
updated information 7
user interactions, responding 35
user roles 12
V
versioning 11
VMware vCenter Orchestrator Server 74
W
Web service, disabling access 66
Web view
starting 22
weboperator 22
Web views, change SSL certificate 75
weboperator 22
workflow attributes 31
workflow credentials 31
workflow engine 11
workflow parameters 31
workflow schema, viewing 32
workflow token 32
workflow token attributes 32
workflow token states 33
workflows
icon 20
library 25
permissions 30, 34
recurrence 37
running 34
scheduling 20, 36
standard 25
Workflows view 20
X
XML
DOM 51
E4X 51
XML plug-in, usage 51
XML plug-in sample workflows
creating a simple XML document 51
finding an element 52
modifying an XML document 52
T
timeout 70
token 29
82 VMware, Inc.
 Loading...