

Page 1

Lifecycle Manager Installation and
Configuration Guide
vCenter Lifecycle Manager 1.1.0
This document supports the version of each product listed and
supports all subsequent versions until the document is replaced
by a new edition. To check for more recent editions of this
document, see http://www.vmware.com/support/pubs.
EN-000334-01
Page 2

Lifecycle Manager Installation and Configuration Guide
You can find the most up-to-date technical documentation on the VMware Web site at:
http://www.vmware.com/support/
The VMware Web site also provides the latest product updates.
If you have comments about this documentation, submit your feedback to:
docfeedback@vmware.com
Copyright © 2010 VMware, Inc. All rights reserved. This product is protected by U.S. and international copyright and intellectual
property laws. VMware products are covered by one or more patents listed at http://www.vmware.com/go/patents.
VMware is a registered trademark or trademark of VMware, Inc. in the United States and/or other jurisdictions. All other marks
and names mentioned herein may be trademarks of their respective companies.
VMware, Inc.
3401 Hillview Ave.
Palo Alto, CA 94304
www.vmware.com
2 VMware, Inc.
Page 3

Contents
Updated Information 5
About This Book 7
Understanding LCM 9
1
Lifecycle Manager Process 9
Lifecycle Manager Terminology 11
Role-Based User Interface 11
LCM Administrator 12
Lifecycle Manager Architecture 12
LCM Installation Process 15
2
Installing and Configuring Orchestrator
Orchestrator System Requirements 19
3
Hardware Requirements for Orchestrator 19
Operating Systems Supported by Orchestrator 19
Supported Directory Services 20
Supported Browsers 20
Orchestrator Database Requirements 20
Install Orchestrator 21
4
Orchestrator Components Setup Guidelines 23
5
vCenter Server Setup 23
Directory Services Setup 23
Orchestrator Database Setup 23
Orchestrator Configuration Maximums 24
VMware, Inc.
Configuring Orchestrator 25
6
Check Configuration Readiness 26
Log In to the Orchestrator Configuration Interface 26
Change the Default Password 27
Configure the Network Connection 27
Import the vCenter SSL Certificate 29
Configuring LDAP Settings 29
Password Encryption and Hashing Mechanism 34
Configure the Database Connection 34
Server Certificate 36
3
Page 4

Lifecycle Manager Installation and Configuration Guide
Configure the Default Plug-Ins 39
Import the vCenter Server License 40
Start the Orchestrator Server 41
Export the Orchestrator Configuration 42
Import the Orchestrator Configuration 44
Configure the Maximum Number of Events and Runs 44
Change the Web View SSL Certificate 45
Define the Server Log Level 45
Maintenance and Recovery 47
7
Change the Size of Server Logs 48
Maintaining the Orchestrator Database 48
Troubleshooting Orchestrator 49
Controlling Orchestrator Access 51
8
Disable Access to the Orchestrator Client by Nonadministrators 51
Disable Access to Workflows from Web Service Clients 52
Installing and Configuring LCM
Installing LCM 55
9
Installation Prerequisites 55
Install Lifecycle Manager 56
Configuring Plug-Ins 56
Migrating to LCM 1.1 59
10
Supported Migration Paths 59
Backing Up Database Tables 59
Migrating LCM 1.0.1 Configuration to LCM 1.0.2 60
Migrating LCM 1.0.2 Configuration to LCM 1.1 61
Configuring LCM 63
11
Check Configuration Readiness 63
Initial Configuration of Lifecycle Manager 64
Configure the LCM Web View 64
Set Approval Requirements 65
Configure Archiving Settings 65
Change Authorization Groups 65
Change the Naming Convention for Virtual Machines 66
Enable Email Notifications 67
Configure Email Notification Content 67
Configure Currency and Date Formats 68
Uninstall LCM and Orchestrator 69
12
Index 71
4 VMware, Inc.
Page 5

Updated Information
This Lifecycle Manager Installation and Configuration Guide is updated with each release of the product or when
necessary.
This table provides the update history of the Lifecycle Manager Installation and Configuration Guide.
Revision Description
EN-000334-01
EN-000334-00 Initial release.
n
Updated the text in Chapter 2, “LCM Installation Process,” on page 15.
n
Added a caution about a Windows Server 2008 bug in Step 3 in “Install Lifecycle Manager,” on
page 56.
n
Replaced an incorrect reference to LCM 1.1 in “Import the LCM 1.0.1 Configuration into LCM
1.0.2,” on page 60.
VMware, Inc. 5
Page 6

Lifecycle Manager Installation and Configuration Guide
6 VMware, Inc.
Page 7

About This Book
This book, the Lifecycle Manager Installation and Configuration Guide, provides information about installing and
configuring VMware® vCenter Lifecycle Manager (LCM).
Intended Audience
This book is intended for administrators who are installing and configuring LCM. The information in this
guide is written for experienced system administrators who are familiar with virtual machine technology.
Document Feedback
VMware welcomes your suggestions for improving our documentation. If you have comments, send your
feedback to docfeedback@vmware.com.
Technical Support and Education Resources
The following technical support resources are available to you. To access the current version of this book and
other books, go to http://www.vmware.com/support/pubs.
Online and Telephone
Support
Support Offerings
VMware Professional
Services
To use online support to submit technical support requests, view your product
and contract information, and register your products, go to
http://www.vmware.com/support.
Customers with appropriate support contracts should use telephone support
for the fastest response on priority 1 issues. Go to
http://www.vmware.com/support/phone_support.html.
To find out how VMware support offerings can help meet your business needs,
go to http://www.vmware.com/support/services.
VMware Education Services courses offer extensive hands-on labs, case study
examples, and course materials designed to be used as on-the-job reference
tools. Courses are available onsite, in the classroom, and live online. For onsite
pilot programs and implementation best practices, VMware Consulting
Services provides offerings to help you assess, plan, build, and manage your
virtual environment. To access information about education classes,
certification programs, and consulting services, go to
http://www.vmware.com/services.
VMware, Inc. 7
Page 8

Lifecycle Manager Installation and Configuration Guide
8 VMware, Inc.
Page 9

Understanding LCM 1
VMware vCenter Lifecycle Manager (LCM) automates the process of creating virtual machines and removing
them from service at the appropriate time.
Using LCM, you can perform the following tasks:
n
Handle and process virtual machine requests in a Web user interface.
n
Automatically place servers based on their location, organization, environment, service level, or
performance levels. When a solution is found for a set of criteria, the machine is automatically deployed.
n
Enforce automatic deployment and configuration to reduce errors and speed up provisioning processes.
n
Track lifecycle information for requested machines. Tracking helps maintain on-time archiving and
deletion of end-of-life servers and avoids server sprawl.
This chapter includes the following topics:
n
“Lifecycle Manager Process,” on page 9
n
“Lifecycle Manager Terminology,” on page 11
n
“Role-Based User Interface,” on page 11
n
“LCM Administrator,” on page 12
n
“Lifecycle Manager Architecture,” on page 12
Lifecycle Manager Process
LCM automates the process of creating virtual machines and removing them from service at the appropriate
time.
Figure 1-1 provides an overview of the process and the tasks completed by each role.
VMware, Inc.
9
Page 10

request
virtual machine
approve
create
virtual machine
set up
approval
required
placement exception
or conflict manual placement
no approval placement
exception
or conflict
no approval automatic
placement
user decided to
decommission
manually
archive or
delete
configuration
dependent
no approval
use
virtual machine
approve
life extension
or VM
customization
end of life
archive
decommission
delete
best practice path
other possible path
other possible path with approval deactivated
Lifecycle Manager Installation and Configuration Guide
Figure 1-1. Stages in the Lifecycle of a Virtual Machine under LCM
The way that LCM handles requests to create virtual machines depends on how the LCM Administrator has
configured the approval process. If approval is required, an email notification is sent to the LCM Approver.
If approval is not required, and there is no conflict with the request, the virtual machine is created. If there is
a conflict, an LCM IT Staff user receives an email notification that a virtual machine is waiting to be created.
After a virtual machine is created, it can be used until the decommissioning date. Five days before the
decommissioning date, an email notice is sent to the user who requested the virtual machine if email
notifications are enabled. The requester can do one of the following:
n
n
The LCM Administrator can choose to delete the virtual machine request. The LCM Administrator is the only
role that can remove information about a virtual machine. When a request is deleted, no information about
the virtual machine appears in reports, but the virtual machine is not deleted. If a virtual machine request is
accidentally deleted, the LCM Administrator can recover the associated virtual machine.
Request to extend the life of the machine.
If the extension is not approved, the virtual machine is decommissioned and is archived or deleted.
The LCM Administrator determines whether decommissioned virtual machines are archived.
Manually decommission the virtual machine.
10 VMware, Inc.
Page 11

Lifecycle Manager Terminology
LCM uses specific terminology to describe lifecycle events and attributes.
Chapter 1 Understanding LCM
Commission
Decommission
Extension
Infrastructure
Criteria
Template Profile
Customization Template
Placing
The creation of a requested virtual machine. The commission time is submitted
during the request process.
The requested machine reaches the end of its life. A decommission date is
submitted during the request process. The decommissioned machine can be
archived or deleted.
Extending the life of a virtual machine that is to be decommissioned. If approval
is required, the request for extension must be approved before the owner of the
virtual machine can continue to use it.
Attributes such as the network, domain, and datastore affect where the
requested virtual machine is placed in VMware Infrastructure.
Attributes attached to a requested virtual machine that are selected during the
request process, such as location, organization, server environment, service
level, and performance. The LCM Administrator maps this information to the
infrastructure.
The profile that is used when a requested virtual machine is cloned.
The template that determines the resources that the requested virtual machine
uses, such as memory reservation, memory limit, CPU shares, and disk shares.
Only the LCM IT Staff, LCM Tech Requester, and LCM Administrator can
modify the customization template.
The requested virtual machine is created or moved into the infrastructure,
based on the selected criteria and infrastructure.
Role-Based User Interface
LCM has a role-based interface. Users are presented only the options that are relevant to their specific role.
All roles can request a virtual machine.
LCM users can be assigned the following roles:
LCM Administrator
LCM Requester
LCM Tech Requester
LCM Approver
LCM IT Staff
For more information on the tasks that users can perform, see the Lifecycle Manager User's Guide.
Establishes the criteria used for machine placement and determines how the
criteria convert to sizing or placement values. The LCM Administrator
configures LCM and establishes the placement of virtual machines.
Can request to extend the life of a created virtual machine. Requesters can
power virtual machines on and off, as well as delegate this control to other
users.
In addition to doing everything that the requester role can do, the LCM Tech
Requester can customize the settings for the CPU, memory, and shares of the
virtual machine.
Approves virtual machine deployment and extension requests.
Completes manual placement of approved virtual machines. If a machine
cannot be placed based on the provided criteria, a user with the LCM IT Staff
role must manually choose the sizing and placement of the new machine.
VMware, Inc. 11
Page 12

Lifecycle Manager Installation and Configuration Guide
LCM Administrator
The LCM Administrator sets up the LCM environment, and can perform all tasks that other user roles can
perform.
The LCM Administrator is responsible for the following tasks.
n
Configuring LCM
n
Determining the infrastructure, such as the server environment
n
Setting up email notifications, the look and feel of the user interface, and style sheets
n
Specifying who can access elements such as resource pools or datastores
Lifecycle Manager Architecture
LCM is powered by VMware vCenter Orchestrator 4.0.1. Orchestrator is a development and processautomation platform that provides a library of extensible workflows for creating and running automated,
configurable processes to manage the VMware vCenter infrastructure. You can use Orchestrator to create
custom workflows that you can run from LCM.
Orchestrator exposes every operation in the vCenter Server API, allowing users to integrate all these operations
into their automated processes. Orchestrator also allows integration with other management and
administration solutions through its open plug-in architecture.
LCM Compatibility with vCenter
LCM works with vCenter 4.0 and vCenter 4.0 Update 1 through an automatic compatibility mode. Only
VirtualCenter 2.5 features are available in this mode. LCM is also compatible with VirtualCenter 2.5 Update 4
and VirtualCenter 2.5 Update 5.
Before you install LCM, make sure that you have vCenter 4.0 or a compatible version of VirtualCenter 2.5
installed.
Lifecycle Manager Components
You must configure the required components for LCM to function properly.
Service directory
Database
VMware Infrastructure
The components shown in Figure 1-2 must be configured in the Orchestrator configuration interface.
Defines which users can connect to LCM, and also defines their permission
levels. Only users who are members of a directory group can log in.
Stores all information that is related to LCM, such as virtual machine names,
control groups, view groups, commission and decommission dates,
infrastructure elements linked with the virtual machine request (such as
template profile, datastore, resource pool, and so on). The information
necessary to map criteria and the infrastructure is also stored in the database.
Responsible for all communication with VMware vCenter. A Web Service API
is used to connect to VMware Infrastructure 3.5 or vCenter 4.
12 VMware, Inc.
Page 13
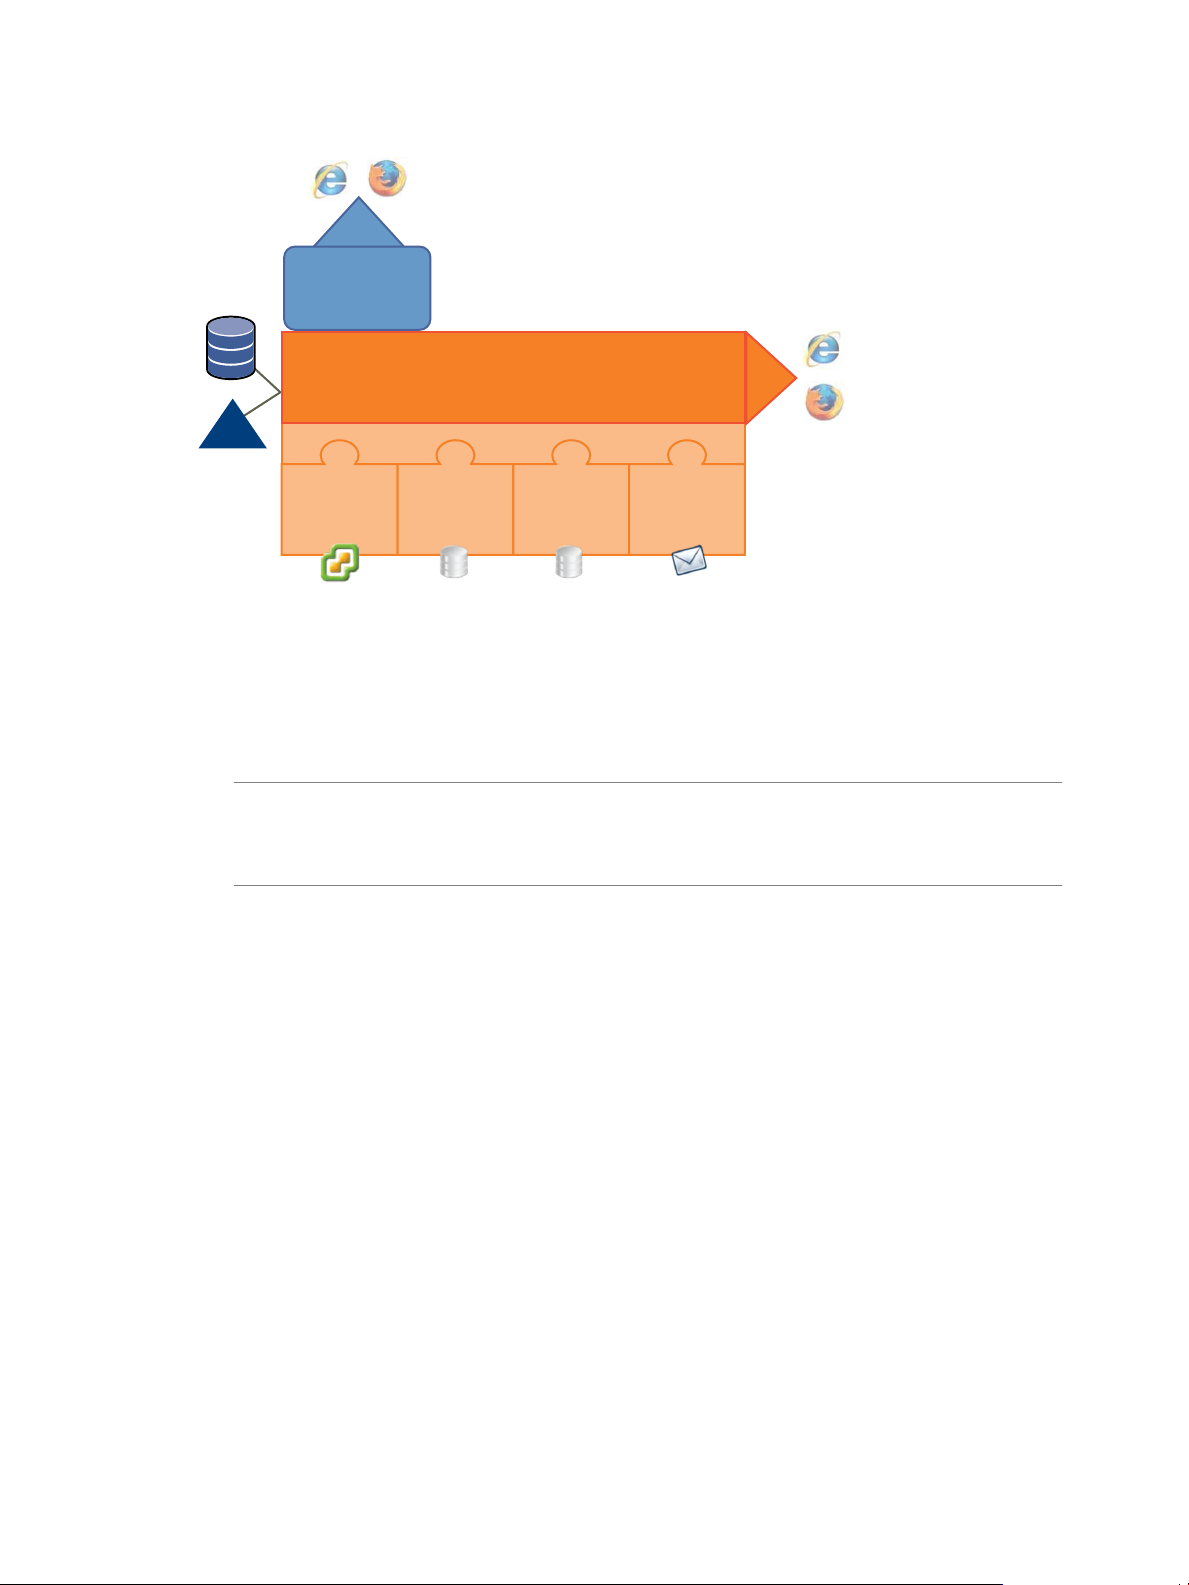
Figure 1-2. Architecture of LCM and Orchestrator
VMware
Infrastructure
3.5
Lifecycle
Manager
database
networking
database
plug-ins
VMware vCenter Orchestrator
Lifecycle
Manager
config
config
email
browser
browser
vCO
database
service
directory
Orchestrator Plug-Ins
Chapter 1 Understanding LCM
After you install LCM, you must configure the following Orchestrator plug-ins:
n
VMware Infrastructure 3.5
For adding VMware Infrastructure 3.5 or vCenter 4 instances.
NOTE Because LCM supports vCenter 4.0 only in compatibility mode, you must configure the VMware
Infrastructure 3.5 plug-in, and add your vCenter 4.0 server to it. LCM can operate only with the vCenter
instances added and configured in the VMware Infrastructure 3.5 plug-in in the Orchestrator configuration
interface.
n
VMware Lifecycle Manager
For configuring the Lifecycle Manager database.
n
Networking
For configuring the networking database.
n
Mail
For configuring email notifications.
VMware, Inc. 13
Page 14

Lifecycle Manager Installation and Configuration Guide
14 VMware, Inc.
Page 15

LCM Installation Process 2
You install and configure LCM by using both the Orchestrator configuration interface and the LCM interface.
Before installing LCM, you must install and configure vCenter Orchestrator. You must use the Orchestrator
configuration interface to configure the components that are related to the engine, such as the database,
network, server certificate, and so on. These components must be configured correctly so that LCM functions
properly.
Table 2-1 lists the interfaces that you use to complete the installation process:
Table 2-1. LCM Installation Interfaces
Installation Task Installation Interface
Install and configure Orchestrator Orchestrator configuration interface
Install LCM and configure LCM plug-ins Orchestrator configuration interface
Configure LCM LCM interface
NOTE LCM 1.0.1 and LCM 1.0.2 users can migrate their existing configuration to LCM 1.1. If you want to
migrate your LCM 1.0.1 or LCM 1.0.2 configuration, see Chapter 10, “Migrating to LCM 1.1,” on page 59,
before proceeding with the LCM 1.1 installation.
VMware, Inc.
15
Page 16

Lifecycle Manager Installation and Configuration Guide
16 VMware, Inc.
Page 17

Installing and Configuring Orchestrator
VMware, Inc.
17
Page 18

Lifecycle Manager Installation and Configuration Guide
18 VMware, Inc.
Page 19

Orchestrator System Requirements 3
Your system must meet the technical requirements that are necessary to install and configure VMware vCenter
Orchestrator. Because LCM runs as an Orchestrator plug-in, the system requirements for the two products are
the same.
This chapter includes the following topics:
n
“Hardware Requirements for Orchestrator,” on page 19
n
“Operating Systems Supported by Orchestrator,” on page 19
n
“Supported Directory Services,” on page 20
n
“Supported Browsers,” on page 20
n
“Orchestrator Database Requirements,” on page 20
Hardware Requirements for Orchestrator
Make sure your system meets the minimum hardware requirements before you install Orchestrator.
n
2.0GHz or faster Intel or AMD x86 processor. Processor requirements might differ if your database runs
on the same hardware.
n
2GB RAM. You might need more RAM if your database runs on the same hardware.
n
2GB disk space. You might need more storage if your database runs on the same hardware.
n
A free static IP address.
Operating Systems Supported by Orchestrator
Orchestrator offers support for several operating systems.
n
Windows Server 2003 R2, 32bit
n
Windows Server 2003 R2, 64bit
n
Windows Server 2008, 32bit
n
Windows Server 2008, 64bit
VMware, Inc.
19
Page 20

Lifecycle Manager Installation and Configuration Guide
Supported Directory Services
Orchestrator requires a working LDAP server on your infrastructure.
Orchestrator supports these directory service types.
n
Windows Server 2003 Active Directory
n
Windows Server 2008 Active Directory
n
Novell eDirectory Server 8.8.3
n
Sun Java Directory Server Enterprise Edition (DSEE) Version 6.3
Supported Browsers
The LCM user interface requires a Web browser.
You must use one of the following browsers to connect to LCM.
n
Microsoft Internet Explorer 6 or 7
n
Mozilla Firefox 3.0.x (where x is 8 or later)
To connect to a virtual machine by using a remote desktop application, you must have Remote Desktop
Protocol (RDP) client software installed on your workstation.
To connect to a virtual machine through your browser, you must use the VMware WebCenter Remote MKS
Plug-in, which is compatible with the following browsers and operating systems:
n
Microsoft Internet Explorer 6 or 7 on Windows XP or Windows Server 2003
n
Mozilla Firefox 3 on Windows XP, Windows Server 2003, or Linux
Orchestrator Database Requirements
Orchestrator requires you to have a database that is separate from the standard vCenter database.
NOTE Because of CPU and memory use, you should consider hosting the Orchestrator database and the
Orchestrator server on different machines from the same datacenter.
The following database types are supported by Orchestrator:
n
Microsoft SQL Server 2008 Enterprise x64 (10.0.1600)
n
Microsoft SQL Server 2005 Enterprise x32 (9.0.3042)
n
Oracle 10g Enterprise Release 2 x32 (10.2.0.1.0)
20 VMware, Inc.
Page 21

Install Orchestrator 4
In production environments, and to enhance the scalability of your vCenter Orchestrator setup, install
Orchestrator on a dedicated Microsoft Windows server.
Prerequisites
Make sure that your hardware meets the Orchestrator system requirements. See “Hardware Requirements for
Orchestrator,” on page 19.
Procedure
1 Download the vCenter Orchestrator installer from the vCenter Lifecycle Manager download page.
2 Double-click the executable file and click Next.
3 Select I accept the terms of the License Agreement and click Next.
4 Select the installation directory and click Next.
The default location is C:\Program Files\VMware\Orchestrator. To install to a different location, click
Choose and browse for the new location.
CAUTION You cannot install Orchestrator in a directory whose name contains non-ASCII characters. If
you are operating in a locale that features non-ACSII characters, you must install Orchestrator in the
default location. This is due to a third party limitation.
VMware, Inc.
5 Select the type of installation and click Next.
Option Description
Client
Server
Client-Server
Installs the Orchestrator client application, which allows you to create and
edit workflows.
Installs the Orchestrator platform.
Installs the Orchestrator client and server.
6 Specify the location for the Orchestrator shortcuts and click Next.
CAUTION The name of the shortcuts directory must not contain non-ASCII characters.
7 Click Install to complete the installation process.
8 Click Done to close the installer.
21
Page 22

Lifecycle Manager Installation and Configuration Guide
What to do next
Log in to the Orchestrator configuration interface form Start > Programs > VMware > vCenter Orchestrator
Web Configuration and change the default password.
22 VMware, Inc.
Page 23

Orchestrator Components Setup
Guidelines 5
To enhance the availability and scalability of your Orchestrator setup, install Orchestrator on a server different
from the server on which vCenter Server runs. Separating Orchestrator from vCenter Server makes it possible
to adjust the operating system to meet the specific recommendations for each service.
This chapter includes the following topics:
n
“vCenter Server Setup,” on page 23
n
“Directory Services Setup,” on page 23
n
“Orchestrator Database Setup,” on page 23
n
“Orchestrator Configuration Maximums,” on page 24
vCenter Server Setup
Increasing the number of vCenter Server instances causes Orchestrator to manage more sessions. Each active
session implies activity on the corresponding vCenter and too many active sessions can cause Orchestrator to
experience timeouts when more than 10 vCenter connections occur.
NOTE Run only one vCenter Server on a virtual machine. You can run multiple vCenter instances on different
virtual machines in your Orchestrator setup if your network has sufficient bandwidth and latency. If you are
using LAN to improve the communication between Orchestrator and vCenter, a 100Mb line is mandatory.
Directory Services Setup
Connect your system to the LDAP server that is physically closest to your Orchestrator server and avoid
connections to remote LDAP servers. Long response times for LDAP queries can lead to slower performance
of the whole system.
To improve the performance of the LDAP queries, keep the user and group lookup base as narrow as possible.
Try to limit the users to targeted groups that are going to need access, rather than to whole organizations with
many users who are not going to need access. Depending on the combination of database and directory service
you choose, the resources you need can vary. For recommendations, see third-party documentation.
Orchestrator Database Setup
Orchestrator requires a database to store workflows and actions.
Orchestrator server supports Oracle and Microsoft SQL Server databases and provides experimental support
for PostgreSQL. You can use PostgreSQL for testing and evaluation purposes.
VMware, Inc.
23
Page 24

Lifecycle Manager Installation and Configuration Guide
The way in which your database is set up can affect Orchestrator performance. Install the database in a virtual
machine other than the one on which Orchestrator is installed. This method avoids the JVM and DB server
having to share CPU, RAM, and IOs.
Storing your database plug-ins in a database separate from the one that Orchestrator uses allows more
modularity when upgrading the system. A dedicated database instance allows you to perform upgrades and
maintenance without impacting other products.
The location of the database is important because almost every activity on the Orchestrator server triggers
operations on the database. To avoid latency in the database connection, connect to the database server that is
closest to your Orchestrator server and that is on the network with the highest bandwidth.
CAUTION Make sure that at least 1GB of free disk space is available
n
on the virtual machine where the database is installed
n
on the virtual machine where the Orchestrator server is installed
Insufficient disk storage space might result in unwanted behavior of the Orchestrator server and client.
Orchestrator Configuration Maximums
When you configure Orchestrator, make sure you stay at or below the supported maximums.
Table 5-1 contains information about he tested and recommended configuration maximums for Orchestrator.
Table 5-1. Orchestrator Configuration Maximums
Item Maximum
Connected vCenter Server systems 10
Connected ESX/ESXi servers 100
Connected virtual machines 3000
Concurrent running workflows 150
24 VMware, Inc.
Page 25

Configuring Orchestrator 6
You must use the Orchestrator Web Configuration tool to configure the components that are related to the
Orchestrator engine, such as network, database, server certificate, and so on. The correct configuration of these
components ensures the proper functioning of Lifecycle Manager or any other applications running on the
Orchestrator platform.
This chapter includes the following topics:
n
“Check Configuration Readiness,” on page 26
n
“Log In to the Orchestrator Configuration Interface,” on page 26
n
“Change the Default Password,” on page 27
n
“Configure the Network Connection,” on page 27
n
“Import the vCenter SSL Certificate,” on page 29
n
“Configuring LDAP Settings,” on page 29
n
“Password Encryption and Hashing Mechanism,” on page 34
n
“Configure the Database Connection,” on page 34
n
“Server Certificate,” on page 36
VMware, Inc.
n
“Configure the Default Plug-Ins,” on page 39
n
“Import the vCenter Server License,” on page 40
n
“Start the Orchestrator Server,” on page 41
n
“Export the Orchestrator Configuration,” on page 42
n
“Import the Orchestrator Configuration,” on page 44
n
“Configure the Maximum Number of Events and Runs,” on page 44
n
“Change the Web View SSL Certificate,” on page 45
n
“Define the Server Log Level,” on page 45
25
Page 26

Lifecycle Manager Installation and Configuration Guide
Check Configuration Readiness
Before you start configuring Orchestrator, you can check whether the Web configuration service is ready.
Procedure
1 In Windows, select Start > Programs > Administrative Tools > Services.
2 Select VMware vCenter Orchestrator Configuration.
3 If the status is not Started, right-click VMware vCenter Orchestrator Configuration and select Start.
Log In to the Orchestrator Configuration Interface
To start the configuration process, you must access the Orchestrator configuration interface.
Prerequisites
The VMware vCenter Orchestrator Configuration service must be running.
Procedure
1 Access the Orchestrator configuration interface.
u
Select Start > Programs > VMware > vCenter Orchestrator Web Configuration.
u
Open a Web browser window and enter the following URL address:
http://
orchestrator_server_DNS_name_or_IP_address
:8282.
8282 is the default HTTP access port reserved for the Web UI of Orchestrator configuration. If you want
to enable HTTPS connection through port 8283, you must configure Jetty to use SSL. For details, see Jetty
Documentation, Configuring SSL.
2 Log in with the default credentials:
n
User name: vmware
n
Password: vmware
CAUTION To avoid potential exploitation of the administrative credentials, change this nonsecure
password when you first access the configuration interface. Retaining the default password might cause
serious security issues in a production environment and is a common cause of data breach.
For more details about changing the default password, see “Change the Default Password,” on
page 27.
You cannot change the vmware default user name.
When you log in to Orchestrator configuration interface for the first time, you see the install path, the
Orchestrator version, and the server status in the Information tab. The status indicators of all tabs on the left
display red triangles, indicating that the components are not configured.
What to do next
Select a tab and follow the links in the inspector on the right, entering the necessary information until a green
circle appears on the selected tab. The green circle indicates that your configuration changes are correct and
that all dependencies are met.
26 VMware, Inc.
Page 27

Change the Default Password
You must change the default password to avoid potential security issues.
Prerequisites
The VMware vCenter Orchestrator Configuration service must be running.
Procedure
1 Log in to the Orchestrator configuration interface as vmware.
2 On the General tab, click Change Password.
3 In the Current password text box, enter vmware.
4 In the New password text box, enter the new password.
5 Reenter the new password to confirm it.
6 Click Apply changes to save the new password.
Configure the Network Connection
Chapter 6 Configuring Orchestrator
When you install Orchestrator, the IP address for your server is set as not set. To change this, you must configure
the network settings used by Orchestrator.
Prerequisites
System administrators must make sure that the network provides a fixed IP, which is obtained by using a
properly configured DHCP server (using reservations) or by setting a static IP. The Orchestrator server requires
that this IP address remain constant while it is running.
Procedure
1 Log in to the Orchestrator configuration interface as vmware.
2 Click Network.
3 From the IP address drop-down menu, select the network interface to which to bind the Orchestrator
server.
Orchestrator discovers the IP address of the machine on which the server is installed.
When an interface is selected, the corresponding DNS name appears. If no network name is found, the IP
address appears in the DNS name text box. Use this IP address to log in to the Orchestrator client interface.
4 Set up the communication ports.
For more information about default ports, see “Default Configuration Ports,” on page 28.
5 Click Apply changes.
What to do next
Click SSL Certificate to load the vCenter SSL certificate in Orchestrator.
VMware, Inc. 27
Page 28

Lifecycle Manager Installation and Configuration Guide
Default Configuration Ports
Orchestrator uses some specific ports that allow communication with the other systems. It is embedded in a
JBoss application server, and benefits from built-in redundancy, high-availability, and high-performance
distributed application services and support for complex database access.
The communication ports you must set are a subset of the standard ports that JBoss uses. The ports are set with
a default value, but you can change these values at any time. When you make the changes, make sure that all
ports are free on your host and, if necessary, open these ports on required firewalls.
For a list of default ports, see Table 6-1.
NOTE Other ports might be required if you are using custom plug-ins.
Table 6-1. VMware vCenter Orchestrator Default Ports
Port
Communication Port
Lookup port 8230 The main port to communicate with the Orchestrator server (JNDI port). All
Command port 8240 The application communication port (RMI container port) used to load
Messaging port 8250 The Java messaging port used to dispatch events. It is part of the Jboss
Data port 8244 The port used to access all Orchestrator data models, such as workflows and
HTTP server port 8280 The port for the HTTP connector used to connect to the Web frontend.
HTTPS server port 8281 The SSL secured HTTP protocol used to connect to the Web frontend and to
Web configuration HTTP
access port
Web configuration HTTPS
access port
LDAP 389 The look up port of your LDAP Authentication server.
LDAP using SSL 636 The look up port of your secure LDAP Authentication server.
LDAP using Global Catalog 3268 The port to which Microsoft Global Catalog server queries are directed.
PostgreSQL 5432 PostgreSQL Server for Orchestrator database.
SQL Server 1433 Microsoft SQL Server for Orchestrator database.
Oracle 1521 Oracle Database for Orchestrator database.
MySQL 3306 MySQL for Orchestrator database.
SMTP Server port 25 Used for email notifications.
vCenter API port 443 vCenter API communication port.
Internal Jboss server ports 3455 RMI server registry invoker.
Number Description
8282 The access port for the Web UI of Orchestrator configuration.
8283 The SSL access port for the Web UI of Orchestrator configuration.
3873 EJB3/AOP remoting connector.
4445 JBoss pooled invoker.
4446 Remoting server service connector.
8083 Dynamic class/resource loader.
other ports communicate with the Orchestrator smart client through this port.
It is part of the Jboss Application server infrastructure.
remotely. It is part of the Jboss Application server infrastructure.
Application server infrastructure.
policies. It is part of the Jboss Application server infrastructure.
communicate with vCenter API.
NOTE To enable the HTTPS connection, configure Jetty to use SSL. For details,
see Jetty Documentation, Configuring SSL.
28 VMware, Inc.
Page 29

Import the vCenter SSL Certificate
The Orchestrator configuration interface uses a secure connection to communicate with vCenter. You can
import the required SSL certificate from a URL or file.
Procedure
1 Log in to the Orchestrator configuration interface as vmware.
2 Click Network.
3 In the right pane, click the SSL Certificate tab.
4 Load the vCenter SSL certificate in Orchestrator from a URL address or file.
Option Description
Import from URL
Import from file
5 Click Import.
Enter URL of the vCenter server:
https://
Obtain the server certificate file. Usual locations are:
n
C:\Documents and Settings\AllUsers\ApplicationData\VMware
\VMware VirtualCenter\SSL\rui.crt
n
/etc/vmware/ssl/rui.crt
Chapter 6 Configuring Orchestrator
your_vcenter_server_IP_address
A message confirming that the import is successful appears.
6 Repeat Step 3 through Step 5 for each vCenter server.
7 Click Startup Options.
8 Click Restart the vCO configuration server to restart the VMware vCenter Orchestrator Configuration
service after adding a new SSL certificate.
The imported certificate appears in the Imported SSL certificates list. On the Network tab, the red triangle
changes to a green circle to indicate that the component is now configured correctly.
What to do next
Each time you want to specify the use of an SSL connection, you must return to the SSL Certificate tab on the
Network tab and import the corresponding vCenter SSL certificate.
Configuring LDAP Settings
Orchestrator requires a connection to a working LDAP server on your infrastructure.
Generate the LDAP Connection URL
The LDAP service provider uses a URL address to configure the connection to the directory server. To generate
the LDAP connection URL, you must specify the LDAP host, port, and root.
Procedure
1 Log in to the Orchestrator configuration interface as vmware.
2 Click LDAP.
VMware, Inc. 29
Page 30

Lifecycle Manager Installation and Configuration Guide
3 From the LDAP client drop-down menu, select the directory server type that you are using as the LDAP
server.
The supported directory service types are: Active Directory, eDirectory, and Sun Java System Directory
Server. OpenLDAP is not supported and can only be used for testing and evaluation purposes.
NOTE If you change the LDAP server or type after you set permissions on Orchestrator objects (such as
access rights on workflows or actions), you must reset these permissions.
If you change the LDAP settings after configuring custom applications that capture and store user
information, the LDAP authentication records created in the database become invalid when used against
the new LDAP database.
4 (Optional) If you use Sun Java System Directory Server you must set objectClass to
groupOfUniqueNames when you add users, create groups, or assign group memberships. The User ID
(uid) attribute is mandatory for every user that can log in to Orchestrator.
Use Java System Directory Service Control Center from Sun Microsystems to set objectClass to
groupOfUniqueNames. When creating a new group, select Entry Type > Static Group >
groupOfUniqueNames in Java System Directory Service Control Center.
5 In the Primary LDAP host text box, enter the IP address or the DNS name of the host on which your
primary LDAP service runs.
This is the first host on which the Orchestrator configuration interface verifies user credentials.
6 (Optional) In the Secondary LDAP host text box, enter the IP address or the DNS name of the host on
which your secondary LDAP service runs.
If the primary LDAP host becomes unavailable, Orchestrator verifies user credentials on the secondary
host.
7 In the Port text box, enter the value for the look up port of your LDAP server.
NOTE Orchestrator supports Active Directory hierarchical domains structure. You can use the default
port 389 to connect to the Global Catalog server.
If your Domain Controller is not configured to use Global Catalog, you must use port 3268.
8 In the Root text box, enter the root element of your LDAP service.
If your domain name is company.org, your root LDAP is dc=company,dc=org.
This is the node used to browse your service directory after entering the appropriate credentials. For large
service directories, specifying a node in the tree narrows the search and improves performance. For
example, rather than searching in the entire directory, you can specify
ou=employees,dc=company,dc=org. This displays all the users in the Employees group.
9 (Optional) Select the Use SSL check box to activate encrypted certification for the connection between
Orchestrator and LDAP.
If your LDAP uses SSL, you must first import the SSL certificate and restart the vCO Configuration Server.
NOTE SSL capabilities are not installed as part of Microsoft Active Directory, eDirectory and Sun Java
Directory Server, and might require additional configuration.
10 (Optional) Select the Use Global Catalog check box to allow LDAP referrals when the LDAP client is
Active Directory.
The LDAP server look up port number changes to 3268. Orchestrator follows the LDAP referrals to find
users and groups in a subdomain that is part of the Active Directory tree to which Orchestrator is
connected. You can add permissions on any groups that can be accessed from your Global Catalog.
30 VMware, Inc.
Page 31

Chapter 6 Configuring Orchestrator
Example 6-1. Example Values and Resulting LDAP Connection URL Addresses
n
LDAP host: DomainController
n
Port: 389
n
Root: ou=employees,dc=company,dc=org
Connection URL: ldap://DomainController:389/ou=employees,dc=company,dc=org
n
LDAP host using Global Catalog: 10.23.90.130
n
Port: 3268
n
Root: dc=company,dc=org
Connection URL: ldap://10.23.90.130:3268/dc=company,dc=org
What to do next
Assign credentials to Orchestrator to ensure its access to the LDAP server.
For more details, see “Specify the Browsing Credentials,” on page 31.
Specify the Browsing Credentials
Orchestrator must read your LDAP structure to inherit its properties. You can specify the credentials that
Orchestrator uses to connect to an LDAP server.
Prerequisites
You must have a working LDAP service on your infrastructure and have generated the LDAP connection URL.
Procedure
1 In the LDAP tab of the Orchestrator configuration interface, enter a valid user name (LDAP string) in the
User name text box for a user on your LDAP who has browsing permissions.
The possible formats in which you can specify the user name in Active Directory are as follows:
n
Bare user name format, for example user.
n
Distinguished name format: cn=user,ou=employees,dc=company,dc=org.
Use this format with OpenLDAP, Sun, and eDirectory. No spaces between the comma and the next
identifier.
n
Principle name format: user@company.org.
n
NetBEUI format: COMPANY\user.
2 In the Password text box, enter the valid password for the user name you entered in Step 1.
Orchestrator uses these credentials to connect to the LDAP server.
What to do next
Define the LDAP containers for Orchestrator to look up users and groups.
Define the LDAP Lookup Paths
You can define the users and groups lookup information.
Two global roles are identified in Orchestrator: Developers and Administrators. The users in the Developers
role have editing privileges on all elements. The users in the Administrators role have unrestricted privileges.
Administrators can manage permissions, or discharge administration duties on a selected set of elements to
any other group or user. These two groups must be contained in the Group lookup base.
VMware, Inc. 31
Page 32

Lifecycle Manager Installation and Configuration Guide
Prerequisites
You must have a working LDAP service on your infrastructure.
Procedure
1 Log in to the Orchestrator configuration interface as vmware.
2 Click LDAP.
3 Define the User lookup base.
This is the LDAP container (the top level domain name) where Orchestrator searches for potential users.
a Click Search and enter the top-level domain name.
Searching for company returns dc=company,dc=org and other common names containing the search
term. If you enter dc=company,dc=org as a search term, no results are found.
b Click the LDAP connection string for the discovered branch to insert it in the User lookup base text
box.
If no matches are found, check your LDAP connection string in the main LDAP page.
NOTE You can connect to the Global Catalog Server through port 389. It issues LDAP referrals which
Orchestrator follows to find the account or group in a subdomain.
4 Define the Group lookup base.
This is the LDAP container where Orchestrator looks up groups.
a Click Search and enter the top-level domain name.
b Click the LDAP string for the discovered branch to insert it in the Group lookup base text box.
5 Define the vCO Admin group.
This must be an LDAP group (like Domain Users) to which you grant administrative privileges for
Orchestrator.
a Click Search and enter the top-level domain name.
b Click the LDAP string for the discovered branch to insert it in the vCO Admin group text box.
IMPORTANT In eDirectory installations, only the eDirectory administrator can see users or user groups that
have administration rights. If you are using an eDirectory LDAP server, and you log into Orchestrator as
a member of the vCO Admin group but you are not the eDirectory administrator, you can create users or
user groups with administration rights, but you cannot see those users using their own rights and
permissions. This issue does not apply to other LDAP servers.
6 Click the Test Login tab and enter credentials for a user to test whether they can access the Orchestrator
smart client.
After a successful login, the system checks if the user is in the Orchestrator Administrator group.
What to do next
Define the LDAP search options and apply your changes.
32 VMware, Inc.
Page 33

Chapter 6 Configuring Orchestrator
Define the LDAP Search Options
You can customize the LDAP search queries and make searching in LDAP more effective.
Procedure
1 Log in to the Orchestrator configuration interface as vmware.
2 Click LDAP.
3 In the Request timeout text box, enter a value in milliseconds.
This value determines the period during which the Orchestrator server sends a query to the service
directory, the directory searches, and sends a reply. If the timeout period elapses, modify this value to
check whether the timeout occurs in the Orchestrator server.
4 (Optional) For all links to be followed before the search operation is performed, select the Dereference
links check box.
Sun Java System Directory Server does not support reference links. If you are using it, you must select the
Dereference links check box.
5 (Optional) To filter the attributes that the search returns, select the Filter attributes check box.
Selecting this check box makes searching in LDAP faster. However, you might need to use some extra
LDAP attributes for automation later.
6 (Optional) Select the Ignore referrals check box to disable referral handling.
When you select the check box, the system does not display any referrals.
7 In the Host reachable timeout text box, enter a value in milliseconds.
This value determines the timeout period for the test checking the status of the destination host.
8 Click Apply changes.
On the LDAP tab, the red triangle changes to a green circle to indicate that the component is now configured
correctly.
What to do next
Proceed with the database configuration.
Common Active Directory LDAP Errors
When you encounter the LDAP:error code 49 error message and experience problems connecting to your LDAP
authentication server, you can check which LDAP function is causing the problem.
Table 6-2 lists the most common Active Directory LDAP authentication errors.
Table 6-2. Common Active Directory LDAP Errors
Error Description
525 The user is not found.
52e The user credentials are not valid.
530 The user is not allowed to log in at this time.
531 The user is not allowed to log in to this workstation.
532 The password has expired.
533 This user account has been disabled.
701 This user account has expired.
VMware, Inc. 33
Page 34

Lifecycle Manager Installation and Configuration Guide
Table 6-2. Common Active Directory LDAP Errors (Continued)
Error Description
773 The user must reset their password.
775 The user account has been locked.
Password Encryption and Hashing Mechanism
Orchestrator utilizes PBE with MD5 and DES encryption mechanism to encode the stored passwords used to
connect to the database, LDAP, and Orchestrator servers.
Table 6-3 shows the password encryption and hashing mechanisms used by Orchestrator.
Table 6-3. Encryption and Hashing Algorithms
Algorithm Description
Password Based Encryption (part of Java 2 SDK 1.4) Generates an encryption key from a password. PBE stores
and checks the hash value of the password. For more
information, see the Java Cryptography Extension Reference
Guide on java.sun.com.
Message Digest 5 algorithm Generates a 128-bit cryptographic message digest value,
usually expressed as a 32 digit hexadecimal number.
Data Encryption Standard Applies a 56-bit key to each 64-bit block of data.
Configure the Database Connection
To establish a connection to the Orchestrator database, you must configure the database connection parameters.
Prerequisites
Set up a new database to use with the Orchestrator server. For more information, see “Orchestrator Database
Setup,” on page 23.
To store characters in the correct format in an Oracle database, set the NLS_CHARACTERSET parameter to
AL32UTF8 before configuring the database connection and building the table structure for Orchestrator. This
setting is crucial for an internationalized environment.
Procedure
1 Log in to the Orchestrator configuration interface as vmware.
2 Click Database.
3 From the Select the database type drop-down menu, select the type of database that you want to use with
Orchestrator server.
NOTE Orchestrator fully supports Oracle and SQL Server databases and provides experimental support
for PostgreSQL. You can use PostgreSQL for testing and evaluation purposes.
4 Specify the database connection parameters.
For a list of connection parameters, see “Database Connection Parameters,” on page 35.
If the specified parameters are correct, a message states that the connection to the database is successful.
NOTE Although Orchestrator has established a connection to the database, the database configuration is
not yet complete. You must install or update the database.
34 VMware, Inc.
Page 35

Chapter 6 Configuring Orchestrator
5 To build or update the table structure for Orchestrator, install or update the database.
Option Description
Install the database
Update the database
Use this option to configure a new database.
Use this option if you want to use the database from your previous
Orchestrator installation.
After the database is populated, you can reset the database access rights to db_dataread and db_datawrite.
6 Click Apply changes.
NOTE If you change the Orchestrator database after configuring and installing the default plug-ins, click
the Troubleshooting tab and force plug-in reinstallation by clicking the Reset current version link. This
operation deletes the
\_VSOPluginInstallationVersion.xml file, which holds the version of the plug-ins already installed, and
Install_Directory
\app-server\server\vmo\plugins
forces plug-in reinstallation.
The database configuration is successfully updated. On the Database tab, the red triangle changes to a green
circle to indicate that the component is now configured correctly.
Database Connection Parameters
To establish a connection to the Orchestrator database, you must specify the database connection parameters.
Depending on the type of database you are connecting to, the required information may vary.
Table 6-4 lists the connection parameters that you must specify.
Table 6-4. Database Connection Parameters
Connection Parameter Description
User name The user name that Orchestrator uses to connect and operate the selected database. The name
you select must be a valid user on the target database with db_owner rights.
Password The valid password for the user name you entered.
Database host IP address or
DNS name
Port The database server port that allows communication to your database.
Database name The full unique name of your database. The database name is specified by the
Instance name The name of the database instance that can be identified by the INSTANCE_NAME parameter
Domain (SQL Server only) To use Windows authentication, enter the Windows domain, for example company.org.
Use Windows
authentication mode
(NTLMv2)
The database server IP address or DNS name.
SERVICE_NAMES parameter in the initialization parameter file.
NOTE PostgreSQL JDBC driver does not support non-ASCII characters in the database name.
in the database initialization parameter file.
To use SQL authentication, leave this text box blank.
Select to send NTLMv2 responses when using Windows authentication.
VMware, Inc. 35
Page 36

Lifecycle Manager Installation and Configuration Guide
Identify the SQL Server Authentication Type
You can identify whether SQL Server is using Windows NT or SQL Server authentication.
Procedure
1 Open the SQL Server Management Studio.
2 Click the Properties tab.
3 Check the connection type.
Server Certificate
The server certificate is a form of digital identification that is used with HTTPS to authenticate Web
applications. Issued for a particular server and containing information about the server’s public key, the
certificate allows you to sign all elements created in Orchestrator and guarantee authenticity. When the client
receives an element from your server (typically this is a package), they verify your identity and decide whether
to trust your signature.
Import a Server Certificate
You can import a server certificate and use it with Orchestrator.
Procedure
1 Log in to the Orchestrator configuration interface as vmware.
2 Click Server Certificate.
3 Click Import certificate database.
4 Browse to select the certificate file to import.
5 Enter the password used to decrypt the content of the imported keystore database.
The details about the imported server certificate appear in the Server Certificate window.
Create a Self-Signed Server Certificate
Installing Orchestrator requires that you create a self-signed certificate. You can create a self-signed certificate
to guarantee encrypted communication and a signature for your packages. However, the recipient cannot be
sure that the self-signed package you are sending is in fact a package issued by your server and not a third
party claiming to be you.
Procedure
1 Log in to the Orchestrator configuration interface as vmware.
2 Click Server Certificate.
3 Click Create certificate database and self-signed server certificate.
4 Enter the relevant information.
5 From the drop-down menu, select a country.
6 Click Create.
Orchestrator generates a server certificate that is unique to your environment. The details about the certificate
public key appear in the Server Certificate window. The certificate private key is stored in the vmo_keystore
table of the Orchestrator database.
36 VMware, Inc.
Page 37

Chapter 6 Configuring Orchestrator
What to do next
For disaster recovery purposes, you can save the certificate private key to a local file.
Obtain a Server Certificate Signed by a Certificate Authority
To provide recipients with an acceptable level of trust that the package was created by your server, certificates
are typically signed by a Certificate Authority (CA). Certificate Authorities guarantee that you are who you
claim to be, and as a token of their verification, they sign your certificate with their own.
Prerequisites
Create a self-signed server certificate or import an existing server certificate.
Procedure
1 Log in to the Orchestrator configuration interface as vmware.
2 Click Server Certificate.
3 Generate a Certificate Signing Request (CSR).
a Click Export certificate signing request.
b Save the VSOcertificate.csr file in your file system when prompted.
4 Send the CSR file to a Certificate Authority, such as Verisign or Thawte.
Procedures might vary from one CA to another, but they all require a valid proof of your identity.
CA returns a Certificate Signing Request that you must import. This is an exact copy of your actual
certificate and the CA signature.
5 Click Import certificate signing request signed by GA and select the file sent by your CA.
Orchestrator uses the server certificate to
n
Sign all packages before they are exported by attaching your certificate’s public key to each one.
n
Display a user prompt on importing a package that contains elements signed by untrusted certificates.
What to do next
You can import this certificate on other servers.
Export a Server Certificate
The server certificate private key is stored in the vmo_keystore table of the Orchestrator database. In case you
lose or delete this key, or if you bind the Orchestrator server to a different database, the content of the exported
packages signed with this certificate will become unavailable. To ensure that packages are decrypted on import,
you must save this key to a local file.
Prerequisites
You must have created or imported a server certificate.
Procedure
1 Log in to the Orchestrator configuration interface as vmware.
2 Click Server Certificate.
3 Click Export certificate database.
4 Enter a password to encrypt the content of the exported keystore database.
You must enter this password again when importing the file.
VMware, Inc. 37
Page 38

Lifecycle Manager Installation and Configuration Guide
5 Click Export.
6 Save the vmo-server.vmokestore file when prompted.
Change a Self-Signed Server Certificate
If you want to sign your packages with a server certificate different from the one you used for the initial
Orchestrator configuration, you need to export all your packages and reinstall the Orchestrator server.
Procedure
1 Export all your packages.
a Click the Packages view in the Orchestrator client.
b Right-click the package to export and select Export package.
c Browse to select a location in which to save the package and click Open.
d Leave the View content, Re-Packageable, and Edit element options selected.
CAUTION Do not sign the package with your current certificate. You must not encrypt the package.
When you delete the certificate database, the private key will be lost and the content of the exported
package will become unavailable.
e (Optional) Deselect the Export version history check box if you do not want to export the version
history.
f Click Save.
2 (Optional) Export the Orchestrator configuration.
3 Uninstall the Orchestrator server.
4 Delete the Orchestrator database, or create a backup if you want to keep old data.
The database you bind Orchestrator to must not contain records in the vmo_keystore table.
5 Reinstall the Orchestrator server.
6 (Optional) Import your Orchestrator configuration.
7 Create a new self-signed certificate or import one.
8 Reimport your packages.
a Click the Packages view in the Orchestrator client.
b From the drop-down menu, select Import package.
c Browse to select the package to import and click Open.
d Click Import or Import and trust provider.
e Click Import checked elements.
The server certificate change is effective at the next package export.
38 VMware, Inc.
Page 39

Configure the Default Plug-Ins
To deploy the default set of plug-ins when the Orchestrator server starts, the system must authenticate against
the LDAP server. You can specify the administrative credentials that Orchestrator uses with plug-ins, and
enable as well as disable plug-ins on the Plug-ins tab.
If you change the Orchestrator database after configuring and installing the default plug-ins, you must click
the Reset current version link in the Troubleshooting tab. This operation deletes the
server\server\vmo\plugins\_VSOPluginInstallationVersion.xml file, which holds the version of the plug-ins
already installed, and forces plug-in reinstallation.
Procedure
1 Log in to the Orchestrator configuration interface as vmware.
2 Click Plug-ins.
3 Enter the credentials for a user who is a member of the Orchestrator Administration group that you
specified on the LDAP tab.
When the Orchestrator server starts, the system uses these credentials to set up the plug-ins. The system
checks the enabled plug-ins and performs any necessary internal installations such as package import,
policy run, script launch, and so on.
Chapter 6 Configuring Orchestrator
Install_Directory
\app-
4 Deselect the check box next to the vCenter 4.0 plug-in to disable it.
This action does not remove the plug-in file.
NOTE LCM does not use the vCenter 4.0 plug-in. Because LCM supports vCenter 4.0 only in compatibility
mode, you must configure the VMware Infrastructure 3.5 plug-in, and add your vCenter 4.0 server in it.
LCM can operate only with the vCenter instances added and configured in the VMware Infrastructure 3.5
plug-in. The plug-in is added to the Orchestrator configuration interface when you install LCM.
5 Click Apply changes.
On the Plug-ins tab, the red triangle changes to a green circle to indicate that the component is now configured
correctly. The first time the server boots, it installs the selected plug-ins.
What to do next
You can now configure the settings for the Mail and SSH plug-ins.
Define the Default SMTP Connection
The Mail plug-in is installed with Orchestrator Server and is used for email notifications. The only option
available for this plug-in is to use default values for new mail messages. You can set the default email account.
Avoid load balancers when configuring mail in Orchestrator. You will get SMTP_HOST_UNREACHABLE.
Procedure
1 Log in to the Orchestrator configuration interface as vmware.
2 Click Mail.
3 Select the Define default values check box and fill in the required text boxes.
Text box Description
SMTP host
SMTP port
VMware, Inc. 39
Enter the IP address or domain name of your SMTP server.
Enter a port number to match your SMTP configuration.
The default SMTP port is 25.
Page 40

Lifecycle Manager Installation and Configuration Guide
Text box Description
User name
Password
From name and address
4 Click Apply changes.
Configure the SSH Plug-In
You can set up the SSH plug-in to ensure encrypted connections.
Procedure
1 Log in to the Orchestrator configuration interface as vmware.
2 Click SSH.
3 Click New connection.
4 In the Host name text box, enter the host to access with SSH through Orchestrator.
NOTE The username and password are not required because Orchestrator uses the credentials of the
currently logged-in user to run SSH commands. You must reproduce the accounts you want to work on
SSH on target hosts from the LDAP server.
Enter a valid email account.
This is the email account Orchestrator uses to send emails.
Enter the password associated with the user name.
Enter the sender information to appear in all emails sent by Orchestrator.
5 Click Apply changes.
The host is added to the list of SSH connections.
6 (Optional) Configure an entry path on the server.
a Click New root folder.
b Enter the new path and click Apply changes.
The SSH host is available in the Inventory view of the Orchestrator smart client.
Import the vCenter Server License
To finish the configuration of the Orchestrator server, you must import the vCenter Server license. The set of
plug-ins delivered with Orchestrator do not require a license. If you add a plug-in that requires a license, you
must import it.
To access the vCenter Server license, you can log in the VMware Web site with the credentials that were used
to order the license.
Procedure
1 Log in to the Orchestrator configuration interface as vmware.
2 Click Licenses.
3 In the Serial number text box, enter your vCenter Server license key.
The serial number is a string of five hyphen-separated groups of five alphanumeric characters each.
4 Click Apply changes and verify that the license is installed.
To view details, click the name of the imported license.
5 Start the Orchestrator server.
The Orchestrator server is now configured correctly.
40 VMware, Inc.
Page 41

Start the Orchestrator Server
You can install the Orchestrator server as a service on the Startup Options tab. When you do this, you can
start, stop, and restart the service from the Configuration interface. This is process is reversible as you can
always use the Uninstall vCO server from service option.
Prerequisites
All of the status indicators must display a green circle. You cannot start the Orchestrator server if any of the
components is not configured properly.
Procedure
1 Log in to the Orchestrator configuration interface as vmware.
2 Click Startup Options.
3 Click Install vCO server as service.
The vCO server is installed as a Windows service.
4 Click Start service.
The Orchestrator server status appears as Service is starting. The first boot can take around 5-10
minutes because it is building the database tables.
Chapter 6 Configuring Orchestrator
A message states that the service is started successfully. The Orchestrator server status appears at the bottom
of each configuration tab and is one of the following:
n
Running
n
Not available
n
Stopped
To see the Orchestrator server status, update the page by clicking the Refresh link.
What to do next
You can save and export the Orchestrator configuration file so that it can be imported later if needed. For more
details, see “Export the Orchestrator Configuration,” on page 42.
Activate the Service Watchdog Utility
Orchestrator provides a watchdog utility that checks for the activity of the Orchestrator server service. The
utility pings the Orchestrator server service periodically, and restarts it if a certain timeout period is exceeded.
By default, the timeout period is set to zero (0), which means that the watchdog utility is deactivated.
You can activate the service watchdog utility by setting the timeout period for the service's response to the
ping from the utility. You can set the timeout period for the response from the Orchestrator server service in
the wrapper.conf configuration file. The wrapper.conf file defines the wrapping of the Orchestrator server in
the host system.
Prerequisites
The Orchestrator server must be running as a Windows service.
VMware, Inc. 41
Page 42

Lifecycle Manager Installation and Configuration Guide
Procedure
1 Navigate to the wrapper.conf wrapper configuration file.
The wrapper configuration file is in the following location:
Install_Directory
2 Open the wrapper.conf file in an editor.
3 Locate the -wrapper.ping.timeout parameter in the wrapper.conf file, or add it to the file if it does not
exist.
4 Set the number of seconds to allow between a ping from the watchdog utility and the response from the
service.
The default timeout is 0 seconds, which means that the utility is deactivated.
For example, you can increase the timeout period to 30 seconds by setting the parameter as -
wrapper.ping.timeout=30
5 Save and close the wrapper.conf file.
6 In the Orchestrator configuration interface, select Startup Options > Restart Service to restart the
Orchestrator server.
You activated the Orchestrator watchdog utility by setting the timeout parameter.
/app-server/bin/wrapper.conf
Unwanted Server Restarts
You might experience unwanted server restarts if you have activated the service watchdog utility.
Problem
In certain circumstances, if the response time exceeds the watchdog timeout period, the watchdog utility can
falsely detect a JVM error, which causes a server restart.
Cause
The problem occurs when the Orchestrator server is running with a heavy load, for example if you have
connected Orchestrator to many vCenter Server instances that are running many virtual machines, or if the
server is performing swapping.
Solution
If you experience this behavior, extend the watchdog timeout period by increasing the timeout parameter in
the wrapper.conf configuration file. If the problem still persists, deactivate the watchdog utility by setting the
timeout parameter back to zero (0).
Export the Orchestrator Configuration
Orchestrator Configuration provides a mechanism to export your system settings to a local file. This mechanism
allows you to take a snapshot of your system configuration at any moment and import this configuration into
a new Orchestrator instance.
VMware recommends that you export and save your configuration settings on a regular basis, especially when
making modifications, performing maintenance, or upgrading the system.
Procedure
1 Log in to the Orchestrator configuration interface as vmware.
2 On the General tab, click Export Configuration.
42 VMware, Inc.
Page 43

3 (Optional) Enter a password to protect the configuration file.
Use the same password when you import the configuration.
4 Click Export.
5 Click Save when prompted.
Chapter 6 Configuring Orchestrator
You can use the vmo_config_
dateReference
.vmoconfig file to clone or to restore the system.
What to do next
For a list of exported configuration settings, see “Orchestrator Configuration Files,” on page 43.
Orchestrator Configuration Files
When you export the system configuration, a vmo_config_
contains all the Orchestrator configuration files.
NOTE Some of the configuration files that are created during the export are empty. For example, the server
file is empty because the startup options for the Orchestrator server are individual for each machine where the
Orchestrator server is installed. These empty files must be reconfigured, even when a working configuration
was previously imported.
Table 6-5 contains a list of the settings that are not saved during configuration export.
Table 6-5. Settings Not Saved During Configuration Export
File Description
certificate Certificates are not exported. Most certificates are stored in
licenses Licenses are not exported. They are stored in the Orchestrator
server The server configuration is reset to Unknown. You must
dateReference
the Orchestrator database. However, the vCenter Server
certificate is not stored in the database. You must store it in
a separate location, or import it again when you import an
Orchestrator configuration.
database.
install the Orchestrator server as a Windows service again.
.vmoconfig file is created locally. It
Table 6-6 contains a list of the settings that are saved during configuration export.
Table 6-6. Settings Saved During Configuration Export
File Description
general The maximum number of completed events and workflows
recorded, and the Web view development and configuration.
network The IP binding address and the TCP ports used by the
different elements of the Orchestrator server.
database The database configuration.
ldap The LDAP server configuration.
log The log settings information.
plug-ins The list of disabled plug-ins and the account name.
mail plug-in The SMTP host, SMTP port, user name, password, sender's
name, sender's address.
vCenter 4.0 plug-in The vCenter 4.0 plug-in configuration.
VMware, Inc. 43
Page 44

Lifecycle Manager Installation and Configuration Guide
Import the Orchestrator Configuration
You can restore the previously exported system configuration if a system failure occurs or when you reinstall
Orchestrator.
Procedure
1 Install a new Orchestrator instance on a new server.
2 Log in to the Orchestrator configuration interface as vmware.
3 On the General tab, click Import Configuration.
4 (Optional) Enter the protective password you used when exporting the configuration.
5 Browse to select the .vmoconfig file you exported from your previous installation.
6 Click Import.
A message states that the configuration is successfully imported. The new system replicates the old
configuration completely.
Configure the Maximum Number of Events and Runs
You can define the maximum number of events stored in the database and the maximum number of workflow
runs.
Each event corresponds to a change in the state of a workflow or policy and is stored in the database. When
the maximum number of events set for a workflow or policy is reached, the database deletes the oldest event
to store the new event.
Each time you run a workflow, a workflow token is created in the database. This token contains all parameters
related to the running of the workflow. For example, if you run the Test workflow three times, three workflow
tokens are created. The three tokens appear in the Orchestrator client above the Test workflow.
Procedure
1 Log in to the Orchestrator configuration interface as vmware.
2 On the General tab, click Advanced Configuration.
3 Fill in the Max number of events text box.
To track every change in your infrastructure, enter 0 (zero=infinite). This means that the server never rolls
over, but it might become unavailable. Database administrators must periodically clean the server and
archive events.
4 Fill in the Max number of runs text box.
After you reach the maximum number of runs, the rollover process starts. If you do not want the rollover
process to start, enter 0 in this text box. If you enter 0, your database continues to extend.
5 (Optional) To set the default login credentials, fill in the User name for automatic Web login and Password
for automatic Web login text boxes.
This feature allows you to generate URLs that enable you to run, answer, schedule, or monitor a workflow
without having to enter your credentials. Use your default operator credentials for these text boxes.
6 Fill in the Web view directory text box.
This is the root folder from which development Web views are loaded. Files for each Web view must be
in a separate subfolder, and the name of this subfolder must be the same as the URL folder defined in the
client.
44 VMware, Inc.
Page 45

7 (Optional) To put the server in Web view development mode, select the Enable Web view
development check box.
In this mode, all elements in the Web view are loaded from the specified Web view directory and not from
the Web view content itself.
8 Click Apply changes.
Change the Web View SSL Certificate
Orchestrator provides an SSL certificate that controls user access to Web views, such as LCM. You can configure
Orchestrator to use a different SSL certificate to control access to Web views. For example, you can change the
LCM SSL certificate if your company security policy requires you to use their SSL certificates.
Procedure
1 Create an SSL certificate by running the keytool Java utility at the command prompt.
keytool -genkey -alias mySslCertificate -keyalg RSA
The keytool utility generates a file called .keystore by using the information and password that you
provide when you run the command.
2 Open the C:\Program Files\VMware\Orchestrator\app-server\server\vmo\deploy\jboss-deploy-tomcat
\jbossweb-tomcat55.sar\server.xml Orchestrator application server configuration file in an editor.
Chapter 6 Configuring Orchestrator
3 Find the following entry at line 44 in the server.xml file.
<!-- Define a SSL HTTP/1.1 Connector on port ${ch.dunes.https-server.port} -->
<Connector address="${jboss.bind.address}" protocol="HTTP/1.1" SSLEnabled="true"
clientAuth="false" emptySessionPath="true"
keystoreFile="${java.home}/lib/security/jssecacerts"
keystorePass="dunesdunes"
maxHttpHeaderSize="8192" maxThreads="100"
port="${ch.dunes.https-server.port}" scheme="https" secure="true"
sslProtocol="TLS" strategy="ms" />
4 Change the keystoreFile and keystorePass attributes to refer to the .keystore file and the password you
created when you ran the keytool utility.
keystoreFile="/PathToKeystore/.keystore"
keystorePass="NewKeystorePassword"
5 Save the server.xml file and restart the Orchestrator server.
You changed the SSL certificate that the Orchestrator server uses to control access to Web views.
Define the Server Log Level
In the Orchestrator configuration interface, you can set the level of server log you require. Changing the log
level affects any new messages that the server writes to the server log.
Procedure
1 Log in to the Orchestrator configuration interface as vmware.
2 Click Log.
VMware, Inc. 45
Page 46

Lifecycle Manager Installation and Configuration Guide
3 Select an option from the Log level drop-down menu.
Option Description
FATAL
ERROR
WARN
DEBUG
INFO
ALL
OFF
NOTE The log displays messages of the selected level and higher. If you select the INFO level, all INFO
messages and higher (INFO, DEBUG, WARN, ERROR, and FATAL) are written to the log file.
4 Click Apply changes.
5 (Optional) Click the Generate log report link to export the log files.
This operation creates a ZIP archive of all logs.
The new log level is applied without server restart to any new messages generated by the server. The logs are
stored in
Install_Directory
\app-server\server\vmo\log\.
Only fatal entries are written to the log file.
Errors and above entries are written to the log file.
Warnings and above entries are written to the log file.
Debug information and above entries are written to the log file.
Information and above entries are written to the log file.
Events are not filtered. All event are written to the log file.
No entries are written to the log file and no log updates are made.
46 VMware, Inc.
Page 47

Maintenance and Recovery 7
The Troubleshooting tab in the Orchestrator configuration interface allows you to perform several bulk
operations related to workflows and tasks. You can use the Troubleshooting tab to globally reset the server
and remove all traces of previous runs.
Table 7-1 lists the possible bulk operations.
IMPORTANT Before you click a troubleshooting option, make sure the vCO server is stopped.
Table 7-1. Troubleshooting Options
Action Description
Cancel all running
workflows
Delete all workflow runs Deletes all tokens with a database script.
Suspend all scheduled
tasks
Clean all server temporary
files
Force plug-in reinstallation
when server starts
Marks all running workflows as cancelled in the database, which prevents the server from
restarting the workflows on the next reboot. Allows Orchestrator to exit infinite loops.
Cancels all scheduled tasks, but does not stop or remove its associated workflow runs.
Cleans all temporary files that the JBoss server uses that ensure the server persistency. The
JBoss server is the application server that underlies the Orchestrator server.
Used when a plug-in is changed to make sure it is correctly updated on the next server start.
NOTE If you change the Orchestrator database after you configure and install the default
plug-ins, you must force plug-in reinstallation. Forcing plug-in reinstallation deletes the
Install_Directory
\_VSOPluginInstallationVersion.xml file that holds the version of the plug-ins already
installed and forces plug-in reinstallation. The plug-in is reinstalled with its original content.
Any changes will be lost.
\app-server\server\vmo\plugins
This chapter includes the following topics:
n
“Change the Size of Server Logs,” on page 48
n
“Maintaining the Orchestrator Database,” on page 48
n
“Troubleshooting Orchestrator,” on page 49
VMware, Inc.
47
Page 48

Lifecycle Manager Installation and Configuration Guide
Change the Size of Server Logs
If a server log regenerates multiple times a day, it becomes difficult to determine what causes problems. To
prevent this, you can change the default size of the server log. The default size of the server log is 5MB.
Procedure
1 Open the log4j.xml file.
The log4j.xml file is in the following location:
\server\vmo\conf
installation_directory
\VMware\Orchestrator\app-server
2 In the lg4j.xml file, locate the following code block:
<appender class="org.jboss.logging.appender.RollingFileAppender" name="FILE">
<errorHandler class="org.jboss.logging.util.OnlyOnceErrorHandler"/>
<param name="File" value="${jboss.server.home.dir}/log/server.log"/>
<param name="Append" value="true"/>
<!-- Rollover at 5MB and allow 4 rollover files -->
<param name="MaxFileSize" value="5120KB"/>
<param name="MaxBackupIndex" value="4"/>
<layout class="org.apache.log4j.PatternLayout">
<!-- The default pattern: Date Priority [Category] Message\n -->
<param name="ConversionPattern" value="%d{yyyy-MM-dd HH:mm:ss.SSSZ} %-5p [%c{1}] %m%n"/>
</layout>
</appender>
3 Change the following lines:
<param name="MaxFileSize" value="5120KB"/>
<param name="MaxBackupIndex" value="4"/>
The MaxFileSize parameter controls the size of the log file, and the MaxBackupIndex parameter controls
the number of files for the rollover.
NOTE Before you save the file, make sure it does not contain typos. If the file contains typos, the logs will
be lost.
The system reads this file dynamically. You do not need to reboot the server.
Maintaining the Orchestrator Database
After your Orchestrator database instance and Orchestrator server are installed and operational, perform
standard database maintenance processes.
Maintaining your Orchestrator database involves several tasks:
n
Monitoring the growth of the log file and compacting the database log file, as needed. See the
documentation for the database type that you are using.
n
Scheduling regular backups of the database.
n
Backing up the database before you upgrade Orchestrator. See your database documentation for
information about backing up your database.
48 VMware, Inc.
Page 49

Troubleshooting Orchestrator
If you are unable to access the Orchestrator configuration interface or a Web view, such as LCM, you can try
restarting the Orchestrator services to troubleshoot the situation.
Restart the Orchestrator Server
You can restart the Orchestrator server if you are unable to access LCM.
Procedure
1 In Windows, select Start > Programs > Administrative Tools > Services.
2 Select VMware vCenter Orchestrator Server.
3 Right-click and select Restart.
Restart the Web Configuration Server
You can restart the Web configuration server if you are unable to access the Orchestrator configuration
interface.
Procedure
Chapter 7 Maintenance and Recovery
1 In Windows, select Start > Programs > Administrative Tools > Services.
2 Select VMware vCenter Orchestrator Configuration.
3 Right-click and select Restart.
VMware, Inc. 49
Page 50

Lifecycle Manager Installation and Configuration Guide
50 VMware, Inc.
Page 51

Controlling Orchestrator Access 8
You can control access to Orchestrator to improve security.
This chapter includes the following topics:
n
“Disable Access to the Orchestrator Client by Nonadministrators,” on page 51
n
“Disable Access to Workflows from Web Service Clients,” on page 52
Disable Access to the Orchestrator Client by Nonadministrators
When using LCM, the best practice is to limit access to the Orchestrator client only to administrators.
By default, all users who are granted execute permissions can connect to the Orchestrator client. However, you
can limit access to the Orchestrator client to Orchestrator administrators by setting a system property in the
vmo.properties Orchestrator configuration file.
IMPORTANT If the vmo.properties configuration file does not contain this property, or if the property is set to
false, Orchestrator permits access to the Orchestrator client by all users.
Procedure
1 Navigate to the following folder on the Orchestrator server system.
VMware, Inc.
installation_directory
2 Open the vmo.properties configuration file in a text editor.
3 Add the following line to the vmo.properties configuration file.
#Disable Orchestrator client connection
com.vmware.o11n.smart-client-disabled = true
4 Save the vmo.properties file.
5 Restart the Orchestrator server.
You disabled access to the Orchestrator client to all users other than members of the Orchestrator administrator
LDAP group.
\VMware\Orchestrator\app-server\server\vmo\conf
51
Page 52

Lifecycle Manager Installation and Configuration Guide
Disable Access to Workflows from Web Service Clients
To prevent malicious attempts from Web service clients to access sensitive servers, you can configure the
Orchestrator server to deny access to Web service requests.
By default, Orchestrator permits access to workflows from Web service clients. You disable access to workflows
from Web service clients by setting a system property in the Orchestrator configuration file, vmo.properties.
IMPORTANT If the vmo.properties configuration file does not contain this property, or if the property is set to
false, Orchestrator permits access to workflows from Web services.
Procedure
1 Navigate to the following folder on the Orchestrator server system.
installation_directory
\VMware\Orchestrator\app-server\server\vmo\conf
2 Open the vmo.properties configuration file in a text editor.
3 Add the following line to the vmo.properties configuration file.
#Disable Web service access
com.vmware.o11n.web-service-disabled = true
4 Save the vmo.properties file.
5 Restart the Orchestrator server.
You disabled access to workflows Web service clients. The Orchestrator server only answers Web service client
calls from the echo() or echoWorkflow() methods, for testing purposes.
52 VMware, Inc.
Page 53

Installing and Configuring LCM
VMware, Inc.
53
Page 54

Lifecycle Manager Installation and Configuration Guide
54 VMware, Inc.
Page 55

Installing LCM 9
After you have installed vCenter Orchestrator, you can install vCenter Lifecycle Manager.
This chapter includes the following topics:
n
“Installation Prerequisites,” on page 55
n
“Install Lifecycle Manager,” on page 56
n
“Configuring Plug-Ins,” on page 56
Installation Prerequisites
Make sure that your system meets the installation prerequisites before you install LCM on Microsoft Windows.
Table 9-1. Installation Prerequisites
Component Description
VMware vCenter Orchestrator 4.0.1
VMware vSphere™ Requirements:
n
vCenter 4.0 in compatibility mode (default)
n
The Sysprep utility for the guest OS must be available in the proper
directory on the vCenter Server.
VMware ESX™ Support for ESX depends on the version of vCenter that you are using. See the
documentation for the relevant version of vCenter.
ActiveDirectory domain
Sample ActiveDirectory groups that
correspond to LCM roles
Appropriate permissions for the LCM
groups
LCM database Choose one of the following approaches:
The roles are:
n
LCM Administrator
n
LCM IT Staff
n
LCM Approver
n
LCM Tech Requester
n
LCM Requester
Include the following permissions:
n
Allow the Orchestrator Administrator to deploy from vCenter templates.
n
RDP access in the guest operating system.
Use xrdp for Linux virtual machines.
n
Use the same database as Orchestrator.
n
Use a separate database for LCM (recommended).
NOTE Because of CPU and memory usage, you should consider hosting the
LCM database and the Orchestrator server on different machines on a local
network with low latency.
VMware, Inc. 55
Page 56

Lifecycle Manager Installation and Configuration Guide
Table 9-1. Installation Prerequisites (Continued)
Component Description
Static account for each vCenter Server that
LCM and Orchestrator can use
DHCP server and fixed range of IP addresses
for new virtual machines
Install Lifecycle Manager
You must install LCM through the Orchestrator configuration interface.
Procedure
1 Log in to the Orchestrator configuration interface.
http://
2 On the General tab, click Install Application.
3 Browse to select the LCM .vmoapp file.
CAUTION If you are running Orchestrator on Windows Server 2008, you must manually rename the file
extension to .vmoapp. When you download the .vmoapp file, Windows Server 2008 automatically renames
the file extension to .zip, which is not supported by the Orchestrator configuration interface.
4 Click Install.
5 On the Licences tab, type the LCM serial number and click Apply changes.
orchestrator_server
Configuring Plug-Ins
You must configure the Orchestrator plug-ins that are installed with LCM to ensure that LCM functions
correctly.
Configure Database Options
You must configure the options for the LCM database table and the networking database table.
The LCM database table contains virtual-machine-specific data that is managed by LCM, such as when the
virtual machine was created, who created it, and other specifications. The networking database table contains
data related to the management of the IP addresses.
:8282
56 VMware, Inc.
Page 57

Procedure
1 Log in to the Orchestrator configuration interface.
Chapter 9 Installing LCM
http://
orchestrator_server
:8282
2 On the vCenter Lifecycle Manager and Networking tabs, select the database connection type.
Option Description
Custom
Same as vCO
Built-in
(Recommended) Select this option to store plug-in-specific data in a database
different from the Orchestrator database.
Depending on the type of database you are connecting to, the required
information might vary. For a list of the connection parameters that you
might be required to specify, see “Database Connection Parameters,” on
page 35.
Select this option to store plug-in specific data in the Orchestrator database.
Not supported.
3 Click Apply changes.
Configure VMware Infrastructure Options
The VMware Infrastructure 3.5 plug-in is responsible for all communication between LCM and VMware
vCenter. A Web service API is used to connect to VMware Infrastructure 3.5 or vCenter 4.
NOTE Because LCM supports vCenter 4.0 only in compatibility mode, you must configure the VMware
Infrastructure 3.5 plug-in, and add your vCenter 4.0 server in it. LCM can operate only with the vCenter
instances added and configured in the VMware Infrastructure 3.5 plug-in.
Prerequisites
You must import the SSL certificates for each VMware Infrastructure or vCenter instance that you define. For
information about importing SSL certificates, see “Import the vCenter SSL Certificate,” on page 29.
Procedure
1 Log in to the Orchestrator configuration interface.
http://
orchestrator_server
:8282
2 On the VMware Infrastructure 3.5 tab, click New VirtualCenter host.
3 From the Available drop-down menu, select Enabled.
4 In the Host text box, enter the IP address or the DNS name of the VMware Infrastructure or vCenter host.
5 In the Port text box, leave the default value 443.
6 (Optional) Select the Secure channel check box to establish a secure connection to your VMware
Infrastructure or vCenter host.
7 In the Path text box, use the default value, /sdk.
This is the location of the SDK that you use to connect to your VMware Infrastructure or vCenter instance.
8 In the User name and Password text boxes, type the credentials that Orchestrator uses to establish the
connection to VMware Infrastructure or vCenter.
VMware, Inc. 57
Page 58

Lifecycle Manager Installation and Configuration Guide
9 Specify the method you use to manage user access on the VMware Infrastructure or vCenter host.
Option Description
Share a unique session
Session per user
10 Click Apply changes.
The URL to the newly configured VMware Infrastructure or vCenter host is added to the list of defined
hosts.
11 Repeat these steps for each VMware Infrastructure or vCenter instance.
What to do next
On the Startup Options tab, click Restart service to apply the plug-in configuration.
Type the credentials of a user who is a VMware Infrastructure or vCenter
administrator.
Select this option if your VMware Infrastructure or vCenter server is in an
Active Directory domain. Make sure that the user has the necessary
permissions to perform the required operations.
CAUTION All users who log in create their own session to VMware
Infrastructure or vCenter. This can rapidly strain CPU, memory and
bandwidth.
58 VMware, Inc.
Page 59

Migrating to LCM 1.1 10
If you are using VMware Lifecycle Manager - Standard 1.0.1 (LCM 1.0.1) or VMware vCenter Lifecycle Manager
1.0.2 (LCM 1.0.2), you can migrate to VMware vCenter Lifecycle Manager 1.1 (LCM 1.1).
This chapter includes the following topics:
n
“Supported Migration Paths,” on page 59
n
“Backing Up Database Tables,” on page 59
n
“Migrating LCM 1.0.1 Configuration to LCM 1.0.2,” on page 60
n
“Migrating LCM 1.0.2 Configuration to LCM 1.1,” on page 61
Supported Migration Paths
The migration process is different for LCM 1.0.1 and LCM 1.0.2.
Table 10-1 lists the differences in the migration process.
Table 10-1. Supported Migration Paths
LCM Version Migration Path
LCM 1.0.1 Phase 1: Migrate to LCM 1.0.2
Phase 2: Migrate from LCM 1.0.2 to LCM 1.1
LCM 1.0.2 Migrate directly to LCM 1.1
Backing Up Database Tables
Before migrating, you should back up your LCM database table and networking database table.
The LCM database table contains virtual-machine-specific data that is managed by LCM, such as when the
virtual machine was created, who created it, and other specifications.
The networking database table contains data related to the management of the IP addresses.
NOTE This procedure is optional, but you should consider using backup for databases in a production
environment. The backup procedure depends on your database vendor.
VMware, Inc.
59
Page 60

Lifecycle Manager Installation and Configuration Guide
Migrating LCM 1.0.1 Configuration to LCM 1.0.2
The migration is performed by running workflows in LCM 1.0.1, which is powered by Orchestrator 3.2.1, and
in LCM 1.0.2, which is powered by Orchestrator 4.0.1.
NOTE You must complete the export procedure in Orchestrator 3.2.1 and LCM 1.0.1 before installing
Orchestrator 4.0.1 and LCM 1.0.2 on the same machine. Orchestrator 4.0.1 overwrites the installation of
Orchestrator 3.2.1.
Export the LCM 1.0.1 Configuration
To migrate to LCM 1.0.2, you must first export your current configuration.You must use Orchestrator 3.2.1 and
LCM 1.0.1 to export the configuration. You must download a migration package file, which is installed in the
Orchestrator configuration interface and executed in LCM.
Procedure
1 Log in to the Orchestrator 3.2.1 configuration interface.
http://
2 On the General tab, click Install Application.
3 Click Browse and select the migration package .vmoapp file.
4 Click Install.
5 On the Server tab, click Restart service.
6 Go to http://
7 Log in to the VMware Lifecycle Manager - Migration Tool - Export Webview.
8 Click Execute Export Data Workflow.
9 Click Submit to start the export process.
10 After the export process is completed successfully, click Download Exported Data to save the data.zip
file.
orchestrator_server
orchestrator_server
:3944
:8080/vmo.
Installing LCM 1.0.2
After you have exported the LCM 1.0.1 configuration, you can install LCM 1.0.2.
The LCM 1.0.2 installation procedure is the same as the LCM 1.1 installation procedure. For information about
installing LCM, see Chapter 2, “LCM Installation Process,” on page 15.
Import the LCM 1.0.1 Configuration into LCM 1.0.2
After exporting the LCM 1.0.1 configuration, you can import it into LCM 1.0.2. The migration is performed
when you log in to LCM 1.0.2 for the first time.
Prerequisites
You must use a new database for LCM 1.0.2.
60 VMware, Inc.
Page 61

Procedure
Chapter 10 Migrating to LCM 1.1
1 Go to http://
orchestrator_server
:8280/vmo/lifecycle to log in to LCM for the first time.
You need to log in with the credentials of a user who is a member of the administrator group that is selected
in Orchestrator.
2 Select Yes for Migrate from old LCM data and click Next.
3 Click Browse and select the data.zip file that you exported from LCM 1.0.1.
4 Click Submit to start the import process.
After the import process is completed successfully, LCM restarts.
What to do next
Migrate your configuration from LCM 1.0.2 to LCM 1.1.
Migrating LCM 1.0.2 Configuration to LCM 1.1
The migration is automatically performed by installing LCM 1.1 on top of your existing LCM 1.0.2 installation.
NOTE You must install LCM 1.1 on Orchestrator 4.0.1.
VMware, Inc. 61
Page 62

Lifecycle Manager Installation and Configuration Guide
62 VMware, Inc.
Page 63

Configuring LCM 11
You must configure LCM before you can use it. The configuration process involves setting up the virtual
machine naming convention, specifying groups, and selecting date and currency formats. You can also
configure role-based attributes.
This chapter includes the following topics:
n
“Check Configuration Readiness,” on page 63
n
“Initial Configuration of Lifecycle Manager,” on page 64
n
“Configure the LCM Web View,” on page 64
n
“Set Approval Requirements,” on page 65
n
“Configure Archiving Settings,” on page 65
n
“Change Authorization Groups,” on page 65
n
“Change the Naming Convention for Virtual Machines,” on page 66
n
“Enable Email Notifications,” on page 67
n
“Configure Email Notification Content,” on page 67
n
“Configure Currency and Date Formats,” on page 68
Check Configuration Readiness
Before you start configuring LCM, you can check whether the configuration service is ready.
Procedure
1 In Windows, select Start > Programs > Administrative Tools > Services.
2 Select VMware vCenter Orchestrator Server.
3 If the status is not Started, right-click VMware vCenter Orchestrator Server and select Start.
VMware, Inc.
63
Page 64

Lifecycle Manager Installation and Configuration Guide
Initial Configuration of Lifecycle Manager
You must complete the initial configuration of LCM when you run LCM for the first time.
Procedure
1 Go to http://
You need to log in with the credentials of a user who is a member of the administrator group that is selected
in Orchestrator.
2 (Optional) Edit the default virtual machine naming convention.
The default is lcm-0001, lcm-0002, and so on.
3 Choose whether to allow approvers and IT staff to manually overwrite the default name.
4 Select a currency from the drop-down menu.
5 Select the date format that you want to use.
6 Accept the default setting for advanced options and click Next.
You can edit the advanced options later.
7 Specify which groups belong to the different roles and click Next when you are done.
You can type the first few letters of the group name and let the LDAP search match the choices, or you
can click Search to browse the LDAP inventory.
8 Accept the approvals, archiving, and notification defaults, and click Submit.
You can change these values later. The LCM Web view is started.
CAUTION Do not change the LDAP settings in Orchestrator after submitting the configuration. This might
result in a serious error that requires using a backup for recovery.
orchestrator_server
:8280/vmo/lifecycle to log in to LCM for the first time.
9 Log in to LCM again as the LCM Administrator.
The LCM Administrator must be a member of the LCM Administrators group that you just configured.
Configure the LCM Web View
The Web UI of an application is called a Web view. For example, the front end of LCM is a Web view. You can
configure the LCM Web view.
Procedure
1 Log in to LCM as an administrator.
2 Click the Configuration view.
3 In the left pane, click Edit Advanced Configuration.
4 Under Display, choose whether to display the details of an execution token after submitting a workflow.
You can also limit the number of elements displayed on a single page.
5 In the URL text box, type a Web view URL.
6 Click Submit.
64 VMware, Inc.
Page 65

Set Approval Requirements
Virtual machines are decommissioned on the date selected by the requester when requesting the machine.
LCM notifies the owner of the virtual machine five days before the decommissioning date with the option to
request an extension. You can specify whether approval is required when virtual machines are requested,
extended, or modified.
Procedure
1 Log in to LCM as an administrator.
2 Click the Configuration view.
3 Click Edit Approval Modes.
4 Under Creation, Extension, and Customization changes, select whether approval is required.
You can change these values later.
5 Click Submit.
If you enable the two approvals under Customization changes, an LCM Approver and an LCM IT Staff user
must approve each request for customization changes.
Chapter 11 Configuring LCM
Configure Archiving Settings
Virtual machines can be archived instead of deleted when they are decommissioned.
Procedure
1 Log in to LCM as an administrator.
2 Click the Configuration view.
3 Click Edit Archiving.
4 Under Archive Configuration, choose whether to archive by default.
5 Under Archive folder, in Destination Datastores, select a datastore or an array of datastores to store the
archive.
The datastore must be accessible from the ESX host running the virtual machine to be archived. The archive
is placed in the first available datastore from the array. If no datastore has sufficient space, the archive
process fails.
6 Click Submit.
Change Authorization Groups
You can modify the types of changes that each role can make.
For information about role-to-task mapping, see “User Roles and Permitted Tasks,” on page 66.
CAUTION Changing authorization groups can be a risk for existing users. Existing users might be unable to
access their virtual machine requests as a result of such changes.
Procedure
1 Log in to LCM as an administrator.
2 Click the Configuration view.
3 Click Edit Authorization Groups.
VMware, Inc. 65
Page 66

Lifecycle Manager Installation and Configuration Guide
4 Under Management Groups, select or type appropriate values for the groups.
5 Under Requester Groups, select or type appropriate values for the groups.
6 Click Submit.
User Roles and Permitted Tasks
Every LCM user role can perform a certain set of tasks. The LCM Administrator can perform all tasks.
Table 11-1 describes how roles are mapped to tasks. Tasks marked with an O can be performed only by the
owner of the request.
Table 11-1. Roles and Permitted Tasks
Create infrastructure elements X
Map infrastructure elements with criteria X
Configure email notifications X
Generate reports X X X
Request virtual machines X X X X X
Approve virtual machine requests X X
Set up virtual machines X X
Request extensions X O O O O
Approve extensions X X
Choose customization templates X O O
Approve customization templates X X
Approve customization change requests X X X
Decommission virtual machines X O O O O
Delete a request or a token X
LCM
Admin
LCM IT
Staff
LCM
Approver
LCM Tech
Requester
LCM
Requester
Change the Naming Convention for Virtual Machines
You can change the naming convention for a virtual machine. The default is lcm-####.
Procedure
1 Log in to LCM as an administrator.
2 Click the Configuration view.
3 Click Edit Base Name.
4 Under VM Naming Convention, in the Name text box, type the naming convention.
5 Choose whether to allow an LCM Approver or an LCM IT Staff user to change the virtual machine name
when approving a request.
6 Click Submit.
66 VMware, Inc.
Page 67

Enable Email Notifications
LCM users can be sent emails when they are required to perform an action. For example, an LCM Approver
can receive an email when required to approve or reject a virtual machine request. You can enable email
notifications.
Procedure
1 Log in to LCM as an administrator.
2 Click the Configuration view.
If the Mail icon ( ) does not appear next to the Configuration icon ( ), email notifications are disabled.
3 To enable email notifications, click Edit Email Notifications in the left pane.
4 Under Activation, click Yes.
5 Type the email addresses for the LCM Administrator, LCM IT Staff, and LCM Approver roles.
6 Click Submit.
You can configure email notification content the next time you log in to LCM as an administrator.
Chapter 11 Configuring LCM
Configure Email Notification Content
If you have email options configured in Orchestrator, you can configure the content of LCM email notifications.
For information about setting up email options in Orchestrator, see “Define the Default SMTP Connection,”
on page 39.
Procedure
1 Log in to LCM as an administrator.
2 Click the Configuration view.
3
Click the Mail icon ( ).
A list of actions for which you can set up notifications appears. You can also activate or deactivate all
notifications.
4
Click a notification ( ) in the left pane.
The details about the notification appear in the right pane.
5 Click Edit.
6 For each notification, specify whether to enable it, who the recipients are, what appears in the Subject field,
and a default email body text.
You can use the following variables in the email body:
n
#vmName - Virtual machine name
n
#decommissionDate - Date that the virtual machine request is set to be decommissioned
n
#error - Error message
n
#requester - Name of the requester
n
#ipAddress - IP address of the virtual machine, if the request is available and the virtual machine is
powered on
n
#webviewUrl - URL of the LCM Web view
These variables are changed to their corresponding values when the email is generated.
VMware, Inc. 67
Page 68

Lifecycle Manager Installation and Configuration Guide
7 Click Submit.
8 Repeat these steps for each email notification that you want to create.
Configure Currency and Date Formats
You can configure the currency and date formats.The price of a virtual machine is estimated in the currency
that you select.
Procedure
1 Log in to LCM as an administrator.
2 Click the Configuration view.
3 Click Edit Format (Currency, Date).
4 Select a currency format.
5 Select a date format.
6 Click Submit.
68 VMware, Inc.
Page 69

Uninstall LCM and Orchestrator 12
You can remove LCM from your system by uninstalling Orchestrator. You can remove the Orchestrator client
and server components from your system by using the Windows Add or Remove Programs utility from the
Control Panel.
Prerequisites
Save the Orchestrator system settings to a local file. For details, see “Export the Orchestrator Configuration,”
on page 42.
Procedure
1 From the Windows Start menu, select Settings > Control Panel > Add or Remove Programs.
2 Select vCenter Orchestrator and click Remove.
3 Click Uninstall in the Uninstall vCenter Orchestrator dialog.
A message confirming that all items were successfully removed appears.
4 Click Done to close the uninstaller.
Orchestrator and LCM are uninstalled from your system.
VMware, Inc.
69
Page 70

Lifecycle Manager Installation and Configuration Guide
70 VMware, Inc.
Page 71

Index
A
administrator tasks 12
approval modes 65
architecture 12
archiving settings 65
authorization groups 65
availability 23
B
base name 66
C
certificate database 37, 38
configuration
config files 43
database connection 34, 35
default plug-ins 39
export configuration settings 42
import configuration settings 44
LDAP settings 31
network connection 27
plug-ins 56
configuration maximums 24
configuring
LCM 63
Orchestrator 25
D
database
connection parameters 34, 35
installation 23
Oracle 23
PostgreSQL 23
server size 23
setup 23
SQL Server 23
database maintenance 48
database usage 12
date and currency format 68
default ports
command port 28
data port 28
HTTP port 28
HTTPS port 28
Jboss server ports 28
LDAP port 28
LDAP with Global Catalog 28
LDAP with SSL 28
lookup port 28
messaging port 28
Oracle port 28
PostgreSQL port 28
SMTP port 28
SQL Server port 28
vCenter API port 28
Web configuration HTTP access port 28
Web configuration HTTPS access port 28
dereference links 33
DES 34
E
email notification content, configuring 67
enable email notifications 67
encryption 34
events 44
F
feedback 7
filter attributes 33
H
hashing 34
I
ignore referrals 33
initial configuration 64
installation process 15
installing LCM, Windows prerequisites 55
installing Orchestrator 21
L
LCM
check configuration readiness 63
components 12
configuration 63
LCM Administrator 12
LCM Approver 11
LCM IT Staff 11
LCM overview 9
LCM Requester 11
VMware, Inc.
71
Page 72

Lifecycle Manager Installation and Configuration Guide
LCM Tech Requester 11
LCM Web view, configuration 64
LDAP
browsing credentials 31
connection URL 29
lookup paths 31
LDAP errors
525 33
52e 33
530 33
531 33
532 33
533 33
701 33
773 33
775 33
license, importing vCenter Server license 40
lifecycle process overview 9
load balancing 39
login 26
M
MD5 34
migrating to LCM 1.1 59
migration
backing up database 59
export LCM 1.0.1 configuration 60
import LCM 1.0.1 configuration into LCM
1.0.2 60
installing LCM 1.0.2 60
LCM 1.0.1 60
LCM 1.0.2 61
paths 59
N
non-ASCII characters 21, 34
O
Orchestrator
check configuration readiness 26
configuration 25
control access 51
disable access to workflows 52
disable non-admin access 51
plug-ins 12
troubleshooting 49
Orchestrator server, restarting 49
P
password 27
PBE 34
plug-ins
database 56
Mail plug-in 39
SSH plug-in 40
VMware Infrastructure 3.5 plug-in 57
R
RDP client, system requirements 20
roles 11
roles and tasks mapping 66
runs 44
S
scalability 23
server certificate
CA-signed 36, 37
exporting 36, 37
importing 36
removing 38
self-signed 36
server log
exporting 45
log level 45
service directory 12
service watchdog utility
timeout parameter 41
troubleshooting server restarts 42
services
starting 41
VMware vCenter Orchestrator Server 41
setup guidelines
directory services 23
LDAP server 23
vCenter Server 23
SMTP connection 39
SQL authentication type 36
SSL certificate 29
support 7
system requirements
directory services 20
hardware 19
operating systems 19
supported databases 20
T
terminology 11
timeouts 33
Troubleshooting options
cancel executions 47
clean directories 47
remove executions 47
reset current version 47
suspend tasks 47
72 VMware, Inc.
Page 73

Index
U
uninstalling 69
updated information 5
V
vCenter compatibility 12
VMware Infrastructure 12
VMware vCenter Orchestrator Server, installing
as Windows service 41
VMware WebCenter Remote MKS Plug-in 20
W
watchdog utility 41
Web browsers, supported 20
Web configuration server, restarting 49
Web view 64
Web views, change SSL certificate 45
VMware, Inc. 73
Page 74

Lifecycle Manager Installation and Configuration Guide
74 VMware, Inc.
 Loading...