

Page 1

Lifecycle Manager Administration Guide
vCenter Lifecycle Manager 1.1.0
This document supports the version of each product listed and
supports all subsequent versions until the document is replaced
by a new edition. To check for more recent editions of this
document, see http://www.vmware.com/support/pubs.
EN-000336-00
Page 2

Lifecycle Manager Administration Guide
You can find the most up-to-date technical documentation on the VMware Web site at:
http://www.vmware.com/support/
The VMware Web site also provides the latest product updates.
If you have comments about this documentation, submit your feedback to:
docfeedback@vmware.com
Copyright © 2010 VMware, Inc. All rights reserved. This product is protected by U.S. and international copyright and intellectual
property laws. VMware products are covered by one or more patents listed at http://www.vmware.com/go/patents.
VMware is a registered trademark or trademark of VMware, Inc. in the United States and/or other jurisdictions. All other marks
and names mentioned herein may be trademarks of their respective companies.
VMware, Inc.
3401 Hillview Ave.
Palo Alto, CA 94304
www.vmware.com
2 VMware, Inc.
Page 3

Contents
About This Book 5
Understanding LCM 7
1
Lifecycle Manager Process 7
Lifecycle Manager Terminology 9
Role-Based User Interface 9
LCM Administrator 10
Lifecycle Manager Architecture 10
Setting Up the Virtual Machine Environment 13
2
Configuring the Infrastructure for Requested Virtual Machines 13
Configuring the Criteria for Requested Virtual Machines 19
Using LCM 21
3
Request a Virtual Machine 21
Display Requested Virtual Machines 23
Modify Request Options 25
Check the Power State of a Virtual Machine 26
Power a Virtual Machine On or Off 26
Suspend a Virtual Machine 26
Connecting to a Virtual Machine 26
Create a Snapshot 27
Revert to a Snapshot 28
Generate Reports 28
Registering Virtual Machines with LCM 28
Activate Web View Debug Mode 30
Relink Tokens to Virtual Machines 30
Check Licensing Status 31
Export Logs and Application Settings 31
Troubleshooting LCM 31
Customizing LCM 33
4
Customizing the User Interface 33
Callback Workflows 36
Index 39
VMware, Inc. 3
Page 4

Lifecycle Manager Administration Guide
4 VMware, Inc.
Page 5

About This Book
This book, the Lifecycle Manager Administration Guide, provides information about managing VMware® vCenter
Lifecycle Manager (LCM).
Intended Audience
This book is intended for administrators who are managing LCM. The information in this guide is written for
experienced system administrators who are familiar with virtual machine technology.
Document Feedback
VMware welcomes your suggestions for improving our documentation. If you have comments, send your
feedback to docfeedback@vmware.com.
Technical Support and Education Resources
The following technical support resources are available to you. To access the current version of this book and
other books, go to http://www.vmware.com/support/pubs.
Online and Telephone
Support
Support Offerings
VMware Professional
Services
To use online support to submit technical support requests, view your product
and contract information, and register your products, go to
http://www.vmware.com/support.
Customers with appropriate support contracts should use telephone support
for the fastest response on priority 1 issues. Go to
http://www.vmware.com/support/phone_support.html.
To find out how VMware support offerings can help meet your business needs,
go to http://www.vmware.com/support/services.
VMware Education Services courses offer extensive hands-on labs, case study
examples, and course materials designed to be used as on-the-job reference
tools. Courses are available onsite, in the classroom, and live online. For onsite
pilot programs and implementation best practices, VMware Consulting
Services provides offerings to help you assess, plan, build, and manage your
virtual environment. To access information about education classes,
certification programs, and consulting services, go to
http://www.vmware.com/services.
VMware, Inc. 5
Page 6

Lifecycle Manager Administration Guide
6 VMware, Inc.
Page 7

Understanding LCM 1
VMware vCenter Lifecycle Manager (LCM) automates the process of creating virtual machines and removing
them from service at the appropriate time.
Using LCM, you can perform the following tasks:
n
Handle and process virtual machine requests in a Web user interface.
n
Automatically place servers based on their location, organization, environment, service level, or
performance levels. When a solution is found for a set of criteria, the machine is automatically deployed.
n
Enforce automatic deployment and configuration to reduce errors and speed up provisioning processes.
n
Track lifecycle information for requested machines. Tracking helps maintain on-time archiving and
deletion of end-of-life servers and avoids server sprawl.
This chapter includes the following topics:
n
“Lifecycle Manager Process,” on page 7
n
“Lifecycle Manager Terminology,” on page 9
n
“Role-Based User Interface,” on page 9
n
“LCM Administrator,” on page 10
n
“Lifecycle Manager Architecture,” on page 10
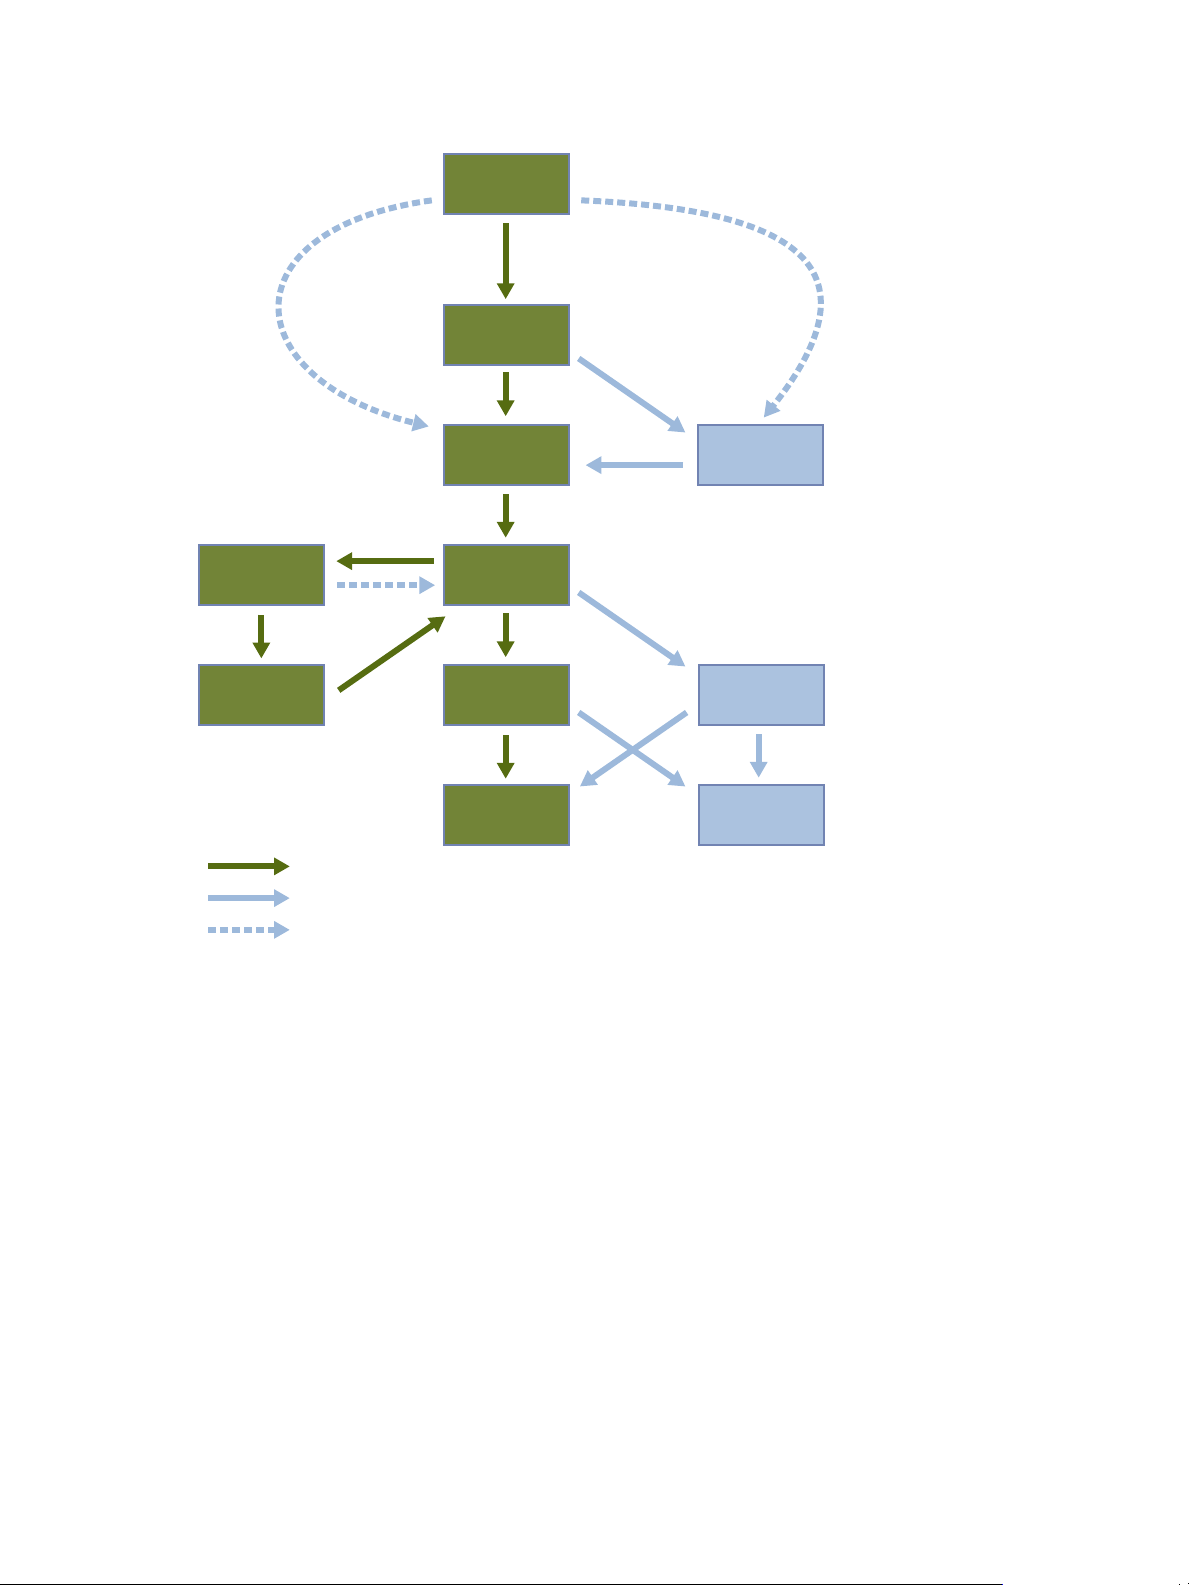
Lifecycle Manager Process
LCM automates the process of creating virtual machines and removing them from service at the appropriate
time.
Figure 1-1 provides an overview of the process and the tasks completed by each role.
VMware, Inc.
7
Page 8
request
virtual machine
approve
create
virtual machine
set up
approval
required
placement exception
or conflict manual placement
no approval placement
exception
or conflict
no approval automatic
placement
user decided to
decommission
manually
archive or
delete
configuration
dependent
no approval
use
virtual machine
approve
life extension
or VM
customization
end of life
archive
decommission
delete
best practice path
other possible path
other possible path with approval deactivated
Lifecycle Manager Administration Guide
Figure 1-1. Stages in the Lifecycle of a Virtual Machine under LCM
The way that LCM handles requests to create virtual machines depends on how the LCM Administrator has
configured the approval process. If approval is required, an email notification is sent to the LCM Approver.
If approval is not required, and there is no conflict with the request, the virtual machine is created. If there is
a conflict, an LCM IT Staff user receives an email notification that a virtual machine is waiting to be created.
After a virtual machine is created, it can be used until the decommissioning date. Five days before the
decommissioning date, an email notice is sent to the user who requested the virtual machine if email
notifications are enabled. The requester can do one of the following:
n
n
The LCM Administrator can choose to delete the virtual machine request. The LCM Administrator is the only
role that can remove information about a virtual machine. When a request is deleted, no information about
the virtual machine appears in reports, but the virtual machine is not deleted. If a virtual machine request is
accidentally deleted, the LCM Administrator can recover the associated virtual machine.
Request to extend the life of the machine.
If the extension is not approved, the virtual machine is decommissioned and is archived or deleted.
The LCM Administrator determines whether decommissioned virtual machines are archived.
Manually decommission the virtual machine.
8 VMware, Inc.
Page 9

Lifecycle Manager Terminology
LCM uses specific terminology to describe lifecycle events and attributes.
Chapter 1 Understanding LCM
Commission
Decommission
Extension
Infrastructure
Criteria
Template Profile
Customization Template
Placing
The creation of a requested virtual machine. The commission time is submitted
during the request process.
The requested machine reaches the end of its life. A decommission date is
submitted during the request process. The decommissioned machine can be
archived or deleted.
Extending the life of a virtual machine that is to be decommissioned. If approval
is required, the request for extension must be approved before the owner of the
virtual machine can continue to use it.
Attributes such as the network, domain, and datastore affect where the
requested virtual machine is placed in VMware Infrastructure.
Attributes attached to a requested virtual machine that are selected during the
request process, such as location, organization, server environment, service
level, and performance. The LCM Administrator maps this information to the
infrastructure.
The profile that is used when a requested virtual machine is cloned.
The template that determines the resources that the requested virtual machine
uses, such as memory reservation, memory limit, CPU shares, and disk shares.
Only the LCM IT Staff, LCM Tech Requester, and LCM Administrator can
modify the customization template.
The requested virtual machine is created or moved into the infrastructure,
based on the selected criteria and infrastructure.
Role-Based User Interface
LCM has a role-based interface. Users are presented only the options that are relevant to their specific role.
All roles can request a virtual machine.
LCM users can be assigned the following roles:
LCM Administrator
LCM Requester
LCM Tech Requester
LCM Approver
LCM IT Staff
For more information on the tasks that users can perform, see the Lifecycle Manager User's Guide.
Establishes the criteria used for machine placement and determines how the
criteria convert to sizing or placement values. The LCM Administrator
configures LCM and establishes the placement of virtual machines.
Can request to extend the life of a created virtual machine. Requesters can
power virtual machines on and off, as well as delegate this control to other
users.
In addition to doing everything that the requester role can do, the LCM Tech
Requester can customize the settings for the CPU, memory, and shares of the
virtual machine.
Approves virtual machine deployment and extension requests.
Completes manual placement of approved virtual machines. If a machine
cannot be placed based on the provided criteria, a user with the LCM IT Staff
role must manually choose the sizing and placement of the new machine.
VMware, Inc. 9
Page 10

Lifecycle Manager Administration Guide
LCM Administrator
The LCM Administrator sets up the LCM environment, and can perform all tasks that other user roles can
perform.
The LCM Administrator is responsible for the following tasks.
n
Configuring LCM
n
Determining the infrastructure, such as the server environment
n
Setting up email notifications, the look and feel of the user interface, and style sheets
n
Specifying who can access elements such as resource pools or datastores
Lifecycle Manager Architecture
LCM is powered by VMware vCenter Orchestrator 4.0.1. Orchestrator is a development and processautomation platform that provides a library of extensible workflows for creating and running automated,
configurable processes to manage the VMware vCenter infrastructure. You can use Orchestrator to create
custom workflows that you can run from LCM.
Orchestrator exposes every operation in the vCenter Server API, allowing users to integrate all these operations
into their automated processes. Orchestrator also allows integration with other management and
administration solutions through its open plug-in architecture.
LCM Compatibility with vCenter
LCM works with vCenter 4.0 and vCenter 4.0 Update 1 through an automatic compatibility mode. Only
VirtualCenter 2.5 features are available in this mode. LCM is also compatible with VirtualCenter 2.5 Update 4
and VirtualCenter 2.5 Update 5.
Before you install LCM, make sure that you have vCenter 4.0 or a compatible version of VirtualCenter 2.5
installed.
Lifecycle Manager Components
You must configure the required components for LCM to function properly.
Service directory
Database
VMware Infrastructure
The components shown in Figure 1-2 must be configured in the Orchestrator configuration interface.
Defines which users can connect to LCM, and also defines their permission
levels. Only users who are members of a directory group can log in.
Stores all information that is related to LCM, such as virtual machine names,
control groups, view groups, commission and decommission dates,
infrastructure elements linked with the virtual machine request (such as
template profile, datastore, resource pool, and so on). The information
necessary to map criteria and the infrastructure is also stored in the database.
Responsible for all communication with VMware vCenter. A Web Service API
is used to connect to VMware Infrastructure 3.5 or vCenter 4.
10 VMware, Inc.
Page 11
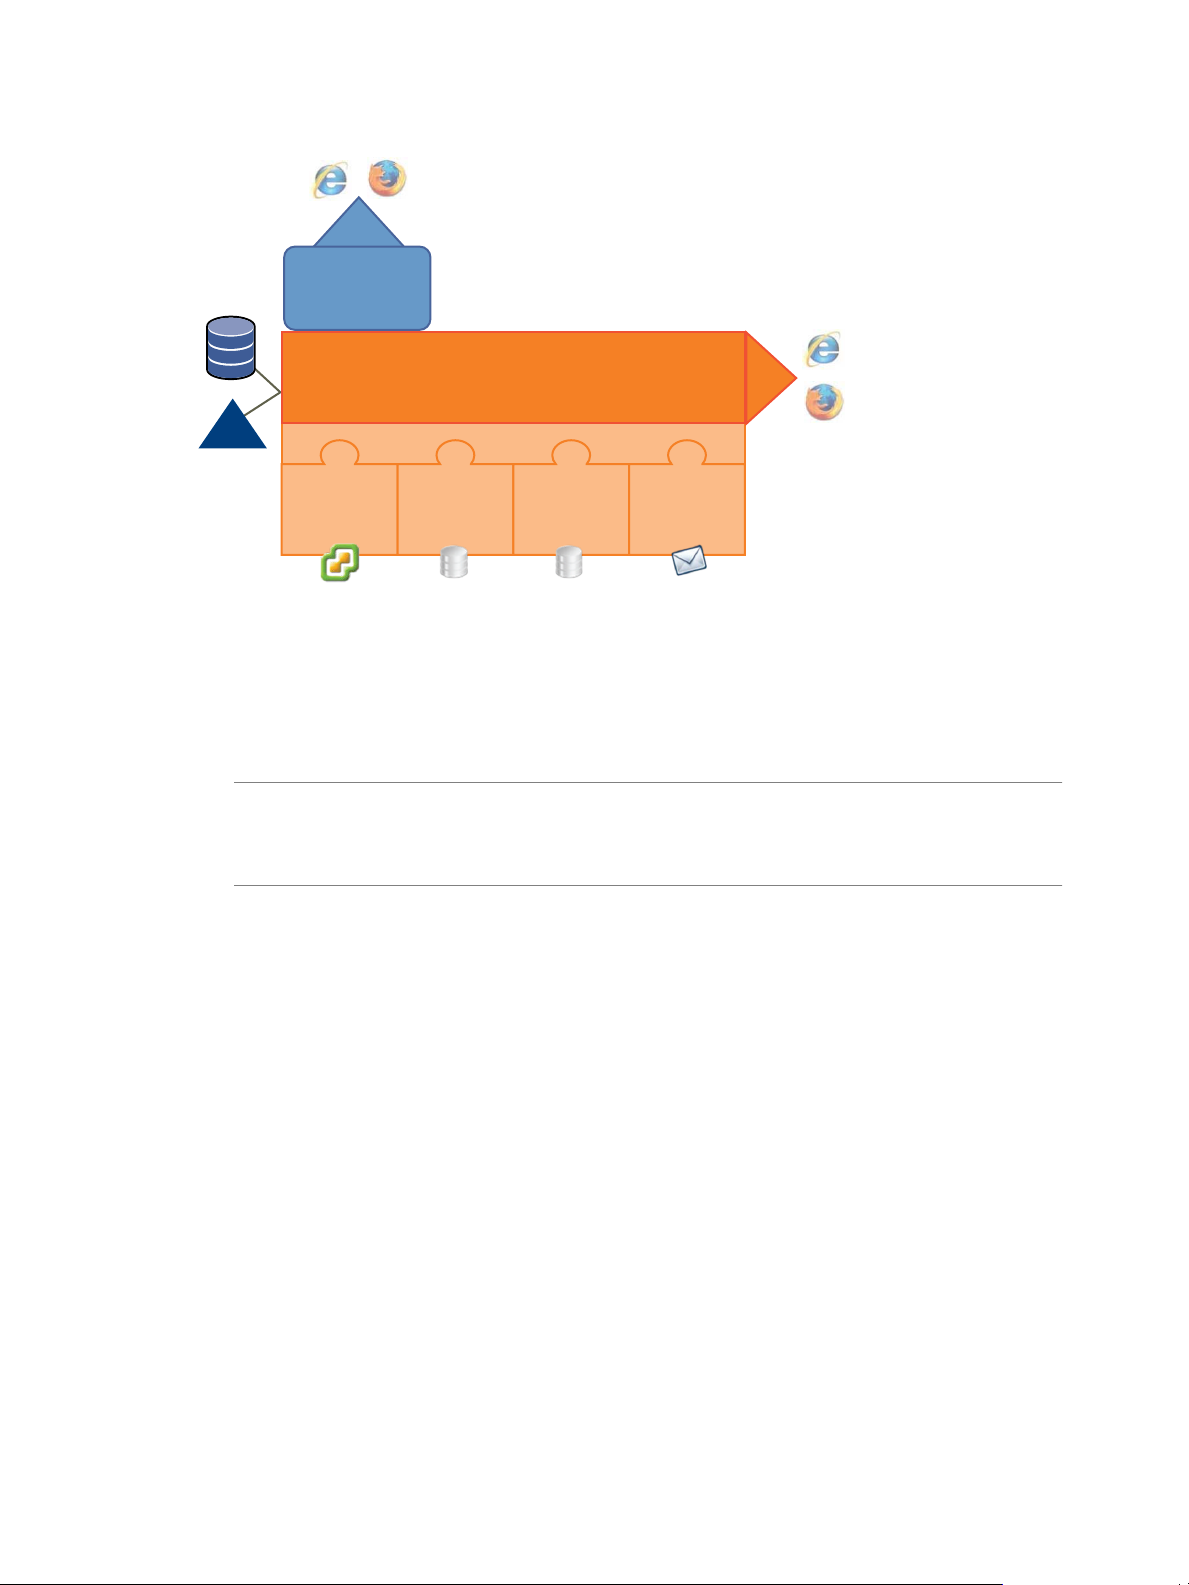
Figure 1-2. Architecture of LCM and Orchestrator
VMware
Infrastructure
3.5
Lifecycle
Manager
database
networking
database
plug-ins
VMware vCenter Orchestrator
Lifecycle
Manager
config
config
email
browser
browser
vCO
database
service
directory
Orchestrator Plug-Ins
Chapter 1 Understanding LCM
After you install LCM, you must configure the following Orchestrator plug-ins:
n
VMware Infrastructure 3.5
For adding VMware Infrastructure 3.5 or vCenter 4 instances.
NOTE Because LCM supports vCenter 4.0 only in compatibility mode, you must configure the VMware
Infrastructure 3.5 plug-in, and add your vCenter 4.0 server to it. LCM can operate only with the vCenter
instances added and configured in the VMware Infrastructure 3.5 plug-in in the Orchestrator configuration
interface.
n
VMware Lifecycle Manager
For configuring the Lifecycle Manager database.
n
Networking
For configuring the networking database.
n
Mail
For configuring email notifications.
VMware, Inc. 11
Page 12

Lifecycle Manager Administration Guide
12 VMware, Inc.
Page 13

Setting Up the Virtual Machine
Environment 2
Before users can request virtual machines, the LCM Administrator must configure the infrastructure and
criteria.
This chapter includes the following topics:
n
“Configuring the Infrastructure for Requested Virtual Machines,” on page 13
n
“Configuring the Criteria for Requested Virtual Machines,” on page 19
Configuring the Infrastructure for Requested Virtual Machines
The infrastructure defines the resources for requested virtual machines.
To set up the infrastructure for requested virtual machines, you must define the following elements.
Resource Pool
Datastore
Virtual Machine Folder
Network
Template Profile
Domain
Customization Template
If multiple infrastructure elements are mapped to the same criterion, LCM is unable to use any element
automatically, and notifies the IT Staff that an element must be selected on the Placement view.
You can use an existing resource pool in vCenter or create a new one.
You can choose which datastore to use. The datastore must exist.
You can categorize items in vCenter folders, based on different organizations.
You can associate a new network instance with vCenter or your ESX host.
You can create a template profile for virtual machines. An example of a
template profile is a virtual machine running Windows XP.
You can specify the domain or workgroup that the requested virtual machine
can join.
You can create a customization template that defines the computer resources
available to the virtual machine. LCM uses the template to apply the correct
levels of the resources.
VMware, Inc.
13
Page 14

Lifecycle Manager Administration Guide
Automatic Placement
When a virtual machine request is approved, the system tries to place the virtual machine automatically.
If automatic placement is successful, the virtual machine is created and the state of the request changes to
Available. If the automatic placement fails, the state of the request changes to Waiting for Placement. During
automatic placement, one of the following events might occur.
n
If one path is found, the virtual machine is placed.
n
If an exception occurs, the automatic placement fails. Information about the exception is displayed. The
user is prompted to contact the LCM Administrator.
n
If a conflict occurs, for example, if several solutions are found, or if the datastore is full, automatic
placement fails. Information about the conflict and solution is displayed. The LCM IT Staff user can enter
the new placement if several solutions exist.
Register a Resource Pool
You can use an existing resource pool for requested virtual machines. LCM automatically maps the request to
the resource pool. If you map more than one resource pool to the server environment, the LCM IT Staff user
can select which one to use.
Procedure
1 Log in to LCM as an administrator.
2 Click the Infrastructure view.
3
Click the Resource Pool icon ( ).
4 Click Register.
5 Type the name of the resource pool that you want to register.
6 Choose whether you want to automatically register all child resource pools and click Submit.
7 Select the criteria options and click Submit.
Create a Resource Pool
You can create a resource pool for requested virtual machines. LCM automatically maps the request to the
resource pool. If you map more than one resource pool to the server environment, the LCM IT Staff user can
select which one to use.
Procedure
1 Log in to LCM as an administrator.
2 Click the Infrastructure view.
3
Click the Resource Pool icon ( ).
4 Click Create.
5 Type or select the name of the parent in the new resource pool.
6 Type the name of the new resource pool and click Next.
7 Type or select the CPU allocation information and click Next.
8 Type or select the memory allocation information and click Submit.
9 Select the criteria options and click Submit.
14 VMware, Inc.
Page 15

Chapter 2 Setting Up the Virtual Machine Environment
Register a Datastore
You must use an existing datastore for the requested virtual machines. LCM cannot create a datastore.
Procedure
1 Log in to LCM as an administrator.
2 Click the Infrastructure view.
3
Click the Datastore icon ( ).
4 Click Register.
5 Select a datastore from the vCenter or ESX host that you want to register and click Submit.
6 Select the criteria options and click Submit.
Register a Virtual Machine Folder
You can register an existing virtual machine folder.
Procedure
1 Log in to LCM as an administrator.
2 Click the Infrastructure view.
3
Click the Virtual Machine Folder icon ( ).
4 Click Register.
5 Type or search for the name of the virtual machine folder that you want to register.
6 Choose whether you want to automatically register all child virtual machine folders and click Submit.
7 Select the criteria options and click Submit.
Create a Virtual Machine Folder
You can create a new virtual machine folder.
Procedure
1 Log in to LCM as an administrator.
2 Click the Infrastructure view.
3
Click the Virtual Machine Folder icon (
4 Click Create.
5 Type or search for the name of the parent folder.
6 Type the name of the new folder and click Submit.
7 Select the criteria options and click Submit.
).
VMware, Inc. 15
Page 16

Lifecycle Manager Administration Guide
Register a Network
LCM automatically maps the request to the network. If you map more than one network to the server
environment, the LCM IT Staff user can select which one to use.
Procedure
1 Log in to LCM as an administrator.
2 Click the Infrastructure view.
3
Click the Network icon ( ).
4 Click Register.
5 Type or search for a network and click Next.
6 Type the network domain name and click Next.
7 On the IP Configuration view, under Network, type the information and click Submit.
If you select No for Use DHCP, you must create a range or a subnet for the IP addresses in the network.
8 Select the criteria options and click Submit.
Create an IP Address Range
You can create an IP address range for the requested virtual machines.
Procedure
1 Log in to LCM as an administrator.
2 Click the Infrastructure view.
3
Click the Network icon ( ).
4 Click the name of a network.
5 Click Create Range.
6 Type a description.
7 Type the first and final IP addresses in your range.
Each time the virtual machine is provisioned, LCM allocates an IP address from the defined range. You
can set up multiple ranges for each network.
8 Click Submit.
Create Subnets
You can create subnets that are associated with a network.
Procedure
1 Log in to LCM as an administrator.
2 Click the Infrastructure view.
3
Click the Network icon (
4 Click the name of a network.
5 Click Create Subnet.
16 VMware, Inc.
).
Page 17

Chapter 2 Setting Up the Virtual Machine Environment
6 Type the information in the text boxes.
7 Click Submit.
Create a Template Profile
You can create a template profile. You can select an operating system, and specify the estimated cost for a
virtual machine.
NOTE For a list of guest operating systems that support image customization, see the VMware Infrastructure
Compatibility Matrixes.
Procedure
1 Log in to LCM as an administrator.
2 Click the Infrastructure view.
3
Click the Template Profile icon ( ).
4 Click Create.
5 Type the information in the text boxes and click Next.
Option Description
Display name
Description
State
Template to clone
Ongoing monthly cost (currency)
Initial setup cost (currency)
Do customization
Use the currency entries to charge back through template profiles.
The name of the template profile.
A description of the template profile.
The state of the template profile.
The source template from vCenter or ESX host.
The monthly cost of creating future virtual machines.
The cost associated with setting up each virtual machine that uses this
template.
Type Yes to clone and customize the template.
Type No to clone the template.
NOTE Do not customize empty virtual machine templates.
6 (Optional) If you are using a Windows template and you have selected to customize the template, click
Next and enter information about the operating system.
Option Description
Full Name
Organization name
Local administrator password
Time zone
Windows license key
Server licensing mode
Number of licenses
Your name.
The name of your organization (for example, vmware).
If the template that you are registering has a local administrator password
set, the password you enter here is ignored. If the template you registered
does not have a local administrator password, the one you enter here is
applied.
The time zone in which the virtual machine is located.
The license key.
NOTE If the template uses a volume license key or a license server, you can
leave this field blank.
Select either perServer or perSeat.
Minimum number of licenses per server is 5.
VMware, Inc. 17
Page 18

Lifecycle Manager Administration Guide
7 Click Submit.
8 Select the criteria options and click Submit.
Join a Domain or a Workgroup
You can join a domain or a workgroup.
Procedure
1 Log in to LCM as an administrator.
2 Click the Infrastructure view.
3
Click the Domain icon ( ).
4 Click Create.
5 Choose whether to join a domain.
n
If you selected Yes, type the necessary information.
n
If you selected No, type a workgroup name.
6 If you joined a domain, select a network or an array of networks.
The networks are defined on the Network view.
7 Click Submit.
8 Select the criteria options and click Submit.
Create a Customization Template
A customization template defines the computer resources available to the virtual machine.
Procedure
1 Log in to LCM as an administrator.
2 Click the Infrastructure view.
3
Click the Customization Template icon ( ).
4 Click Create.
5 Type a template name and click Next.
This is the name that the requester sees, so create an easily identifiable name.
6 Select the memory information and click Next.
7 Select the CPU information and click Next.
8 Select the disk shares and click Submit.
9 Select the criteria options and click Submit.
Relink Unlinked Elements
You can relink unlinked infrastructure elements automatically or manually. Elements become unlinked if they
have been removed from vCenter, or if their ESX host has been removed from vCenter.
Procedure
1 Log in to LCM as an administrator.
2 Click the Infrastructure view.
18 VMware, Inc.
Page 19

Chapter 2 Setting Up the Virtual Machine Environment
3
Click the Unlinked Elements icon ( ).
4 (Optional) Click Relink All to try to relink all unlinked elements automatically.
5 Relink an unlinked element manually.
a Click an element in the left pane.
b Click Relink in the right pane.
c Under Action on unlinked element, select Relink.
d Select the element and click Submit.
Configuring the Criteria for Requested Virtual Machines
When users request virtual machines, they can specify criteria such as the location, organization, server
environment, service level, and performance.
For example, a user can request a virtual machine and Palo Alto as the location, Administrative as the
organization, Production as the server environment, select a comprehensive service level, and high
performance. As an LCM Administrator, you can modify these criteria if, for example, the needs of the company
change or resources change.
You can rename or delete existing elements or reconfigure mapping options. If you reconfigure these options,
you are modifying the elements that comprise the criteria for a virtual machine. To create a criterion, at least
one criterion of a type must currently exist. You can edit the mapping option for any element.
Rename Criteria Elements
You can modify the name and the description of criteria elements.
Procedure
1 Log in to LCM as an administrator.
2 Click the Criteria view.
3 Click an element and click Edit.
4 Modify the name and description.
5 Click Submit.
Reconfigure Mapping Objects
You can modify the mapping options for criteria elements.
Procedure
1 Log in to LCM as an administrator.
2 Click the Criteria view.
3 Click an element and click Edit Objects for Mapping.
4 Modify the mapping objects.
5 Click Submit.
VMware, Inc. 19
Page 20

Lifecycle Manager Administration Guide
Delete Elements
You can delete criteria elements.
Prerequisites
You must delete all tokens associated with a criterion element before you can delete the element.
Procedure
1 Log in to LCM as an administrator.
2 Click the Criteria view.
3 Click an element and click Delete.
4 Click Submit.
20 VMware, Inc.
Page 21

Using LCM 3
After you have configured Lifecycle Manager, you can perform administration tasks, such as approving virtual
machine requests, importing virtual machines, decommissioning virtual machines, and so on. Some tasks, such
as requesting a virtual machine, can be performed by all LCM user roles. Most tasks, however, can only be
performed by the LCM Administrator.
This chapter includes the following topics:
n
“Request a Virtual Machine,” on page 21
n
“Display Requested Virtual Machines,” on page 23
n
“Modify Request Options,” on page 25
n
“Check the Power State of a Virtual Machine,” on page 26
n
“Power a Virtual Machine On or Off,” on page 26
n
“Suspend a Virtual Machine,” on page 26
n
“Connecting to a Virtual Machine,” on page 26
n
“Create a Snapshot,” on page 27
n
“Revert to a Snapshot,” on page 28
n
“Generate Reports,” on page 28
n
“Registering Virtual Machines with LCM,” on page 28
n
“Activate Web View Debug Mode,” on page 30
n
“Relink Tokens to Virtual Machines,” on page 30
n
“Check Licensing Status,” on page 31
n
“Export Logs and Application Settings,” on page 31
n
“Troubleshooting LCM,” on page 31
Request a Virtual Machine
To obtain a virtual machine, you must submit a request. You can request a specific start date or accept the first
available date.
By default, virtual machines are decommissioned at midnight. For changing the decommissioning time, see
“Modify the Decommissioning Time,” on page 23.
You can modify virtual machine parameters like CPU, memory, and shares, when you request the virtual
machine. The modifications affect only the virtual machine that you are requesting at the time.
VMware, Inc.
21
Page 22

Lifecycle Manager Administration Guide
Prerequisites
Review the customization template attributes to verify that you understand the default values. For more
information, see “Customization Template Attributes,” on page 23.
Procedure
1 Log in to LCM and click the Requests view.
2 Click Request.
3 (Optional) To specify a commissioning date, select Yes for Set commissioning date? and select a date.
If you do not specify a commissioning date, the virtual machine is created at the first available opportunity
after approval.
4 (Optional) To specify a decommissioning date, select Yes for Set decommissioning date? and select a date.
If you do not specify a decommissioning date, the virtual machine remains in service until it is
decommissioned manually.
5 (Optional) Specify who can control the virtual machine request.
If you do not specify a user or group, only you have control.
a From the Virtual machine control by drop-down menu, select Group or User.
b Type the name of the user or group, or search from a list of available group or user names and
descriptions.
c Type the email address for the user or group if email notifications are enabled.
6 (Optional) Specify who can connect to and view the virtual machine when it is running.
If you do not specify a user or group, only you can view the virtual machine.
a From the Virtual machine view by drop-down menu, select Group or User.
b Type the name of the user or group, or search from a list of available group or user names and
descriptions.
c Type the email address for the user or group if email notifications are enabled.
7 Click Next.
8 Select settings for the Location, Organization, Server Environment, Service Level, and Performance
options.
9 Type the requester email and click Next.
10 Select the server type.
11 (Optional) To start the virtual machine as soon as it is provisioned, select Yes for Start virtual machine.
12 Select the customization template.
13 (Optional) To modify the customization template, select Yes for Would you like to customize the
attributes of this template? and change the attribute values as needed.
14 Click Next.
15 Type comments about the virtual machine, which are viewed in the approval process.
16 Click Submit.
The virtual machine is deleted on the decommissioning date. You cannot get it back, unless LCM is configured
to archive the virtual machines.
22 VMware, Inc.
Page 23

Customization Template Attributes
You can assign custom values for template attributes.
Table 3-1. Customization Template Attributes
Attribute Values
Memory reservation (MB) Minimum is 0 (default is 256)
Memory limit/size (MB) Minimum is -1; must be a multiple of 4 (default is 1024); must be greater than the
Memory reservation value
Selecting -1 maintains the same memory as the vCenter template.
Memory share low, normal, or high (default is normal)
CPU reservation (MHz) Minimum is 0 (default is 200)
CPU limit (MHz) Minimum is -1 (default is 2000); must be greater than the CPU reservation value
Selecting -1 maintains the same CPU number as the vCenter template.
CPU count 1, 2, 3, or 4 (default is 1)
NOTE You can use 3 CPUs only with vCenter 4.0 or later.
CPU shares low, normal, or high (default is normal)
Disk shares low, normal, or high (default is normal)
Chapter 3 Using LCM
Modify the Decommissioning Time
You can change the decommissioning time in the Orchestrator Client.
Procedure
1 Select Start > Programs > vCenter Orchestrator > vCenter Orchestrator Client.
2 Log in as an administrator.
3 Click the Policies view.
4 Right-click the Lifecycle Scheduler policy and select Stop policy.
5 Right-click the Lifecycle Scheduler policy and select Edit.
6 Click the Scripting tab in the right pane.
7 Select Midnight - Delete VMs.
8 On the General view underneath, type the new decommissioning time.
9 Click Save and close.
10 Right-click the Lifecycle Scheduler policy and select Start policy.
The new decommissioning time is now applied.
Display Requested Virtual Machines
You can display the requested virtual machines according to their status, such as available or rejected.
For information about possible virtual machine request states, see “Virtual Machine Request Status Icons,” on
page 24.
VMware, Inc. 23
Page 24

Lifecycle Manager Administration Guide
Procedure
1 Log in to LCM as an administrator.
2 Click the Catalog view.
3 Select a filter from the drop-down menu.
Option Description
All
Creating
Available VM
Rejected
Decommissioned
Canceled
Errors
Waiting For Approval
Waiting For Placement
End Of Life
All Except End Of Life
Displays all the requested virtual machines requested by users.
Displays the virtual machines that are being created.
Displays the available virtual machines created by users.
Displays all the rejected virtual machines that were requested by users.
Displays all the decommissioned virtual machines that were created by
users.
Displays all the canceled virtual machines that were created by users.
Displays all the virtual machines that were created by users with errors.
Displays all the requested virtual machines requested by users that are
waiting for approval.
Displays all the requested virtual machines requested by users that are
waiting to be correctly placed.
Displays the requested virtual machines that are decommissioned, archived,
rejected, or canceled by users.
Displays the requested virtual machines that are not decommissioned,
archived, rejected, or canceled by users.
Virtual Machine Request Status Icons
The icon next to a virtual machine request gives you an indication about the state of the request.
Table 3-2 lists the status icons and the corresponding virtual machine request status.
Table 3-2. Virtual Machine Request Status Icons
Icon State
The virtual machine is powered on.
The virtual machine is powered off.
The virtual machine is suspended.
The virtual machine is available.
The virtual machine is being archived.
The virtual machine is archived.
The virtual machine request is canceled.
The virtual machine is being deleted.
The virtual machine request is in an end of life state.
The virtual machine request has errors.
The virtual machine request is rejected.
The virtual machine request is waiting for approval.
24 VMware, Inc.
Page 25

Table 3-2. Virtual Machine Request Status Icons (Continued)
Icon State
The virtual machine is waiting for creation.
The virtual machine is waiting to be deployed by an LCM IT Staff user.
The virtual machine is being created.
The virtual machine is created.
An error occured during the virtual machine creation.
An error occured during the virtual machine archiving.
An error occured during the virtual machine deletion.
A request to prolong the request time is submitted.
A request to extend the provisioning time is submitted.
A request to change an attribute of the virtual machine is submitted.
A request to change a financial attribute of the virtual machine is submitted.
Chapter 3 Using LCM
A request to change a customization attribute of the virtual machine is submitted.
A change is applied - the virtual machine is updated with a new configuration.
The virtual machine is provisioned.
The virtual machine can operate.
The virtual machine is unavailable.
The virtual machine is decommissioned.
The virtual machine request is finished.
Modify Request Options
You can change the attributes of a virtual machine request.
Procedure
1 Log in to LCM as an administrator.
2 Click the Catalog view.
3 Select a requested virtual machine in the left pane.
4 Select an option from the right pane.
Option Description
Decommission
Extension
Change Request
Edit
VMware, Inc. 25
Decommission the virtual machine.
Request an extension for the virtual machine.
Modify request resources.
Modify provisioning and decommissioning dates.
Page 26

Lifecycle Manager Administration Guide
Option Description
Change State
Change Rights
Delete Request
Move virtual machine requests across different processes in the lifecycle.
Used by VMware support to help with troubleshooting.
CAUTION Changing a state can move the request to an undesirable state.
Virtual machine requests might become unusable.
Change which groups or users can access, control, or view virtual machines.
Delete the request and all associated reports and other elements. This does
not delete the virtual machine. To delete the virtual machine, select a virtual
machine that is in an available state, and click the Decommission button.
Check the Power State of a Virtual Machine
You can check whether a virtual machine is powered on or off or suspended.
Procedure
1 Log in to LCM as an administrator.
2 Click the Catalog view.
The icon to the left of the virtual machine indicates its power state.
n
A green triangle indicates that the virtual machine is powered on.
n
A red square indicates that the virtual machine is powered off.
n
Two parallel yellow bars indicate that the virtual machine is suspended.
Power a Virtual Machine On or Off
You can power any virtual machine on and off.
Procedure
1 Log in to LCM as an administrator.
2 Click the Catalog view.
3 In the catalog list, click a virtual machine name.
4 In the right pane, click Commands.
5 Click Power on or Shut down.
Suspend a Virtual Machine
You can suspend any virtual machine.
Procedure
1 Log in to LCM as an administrator.
2 Click the Catalog view.
3 In the catalog list, click a virtual machine name.
4 In the right pane, click Commands.
5 Click Suspend.
Connecting to a Virtual Machine
You can connect to a virtual machine from your Web browser or using an RDP client application.
26 VMware, Inc.
Page 27

Chapter 3 Using LCM
Open a Virtual Machine in a Web Browser
From your Web browser, you can connect to a virtual machine running any guest operating system.
Prerequisites
To connect via your browser, you must have the VMware WebCenter Remote MKS Plug-in installed in your
browser.
Procedure
1 Log in to LCM as an administrator.
2 Click the Catalog view.
3 In the catalog list, click a virtual machine name.
4 In the right pane, click Commands.
5 Click Open console.
The virtual machine’s desktop appears in a new browser window.
Use Remote Desktop to Connect to a Virtual Machine
You can open a Windows virtual machine using an RDP client application.
Prerequisites
The client software must be installed on your computer.
Procedure
1 Log in to LCM as an administrator.
2 Click the Catalog view.
3 In the catalog list, click a virtual machine name.
4 In the right pane, click Commands.
5 Click Connect.
Your RDP application opens and the virtual machine’s desktop appears in the RDP client.
Create a Snapshot
A snapshot captures the states of a virtual machine’s hard drives. A snapshot does not capture the virtual
machine's memory and power state.
Procedure
1 Log in to LCM as an administrator.
2 Click the Catalog view.
3 In the catalog list, click a virtual machine name.
4 In the right pane, click Commands.
5 Click Snapshot.
VMware, Inc. 27
Page 28

Lifecycle Manager Administration Guide
Revert to a Snapshot
You can use the snapshot to return to the saved state.
Procedure
1 Log in to LCM as an administrator.
2 Click the Catalog view.
3 In the catalog list, click a virtual machine name.
4 In the right pane, click Commands.
5 Click Revert to snapshot.
The virtual machine returns to the state it was in when the snapshot was taken.
Generate Reports
You can generate reports for various LCM events. For example, reports can display approved and rejected
requests, decommissioned virtual machines, error events, and so on.
Procedure
1 Log in to LCM as an administrator.
2 Click the Reports view.
3 Select the type of report.
4 (Optional) Define the report period.
5 Click Submit.
The report appears in the right pane. You can save the report as an .xml file.
Registering Virtual Machines with LCM
You can register existing virtual machines with LCM so that they can be more efficiently managed.
Register a Virtual Machine Manually
You can register a virtual machine manually.
Procedure
1 Log in to LCM as an administrator.
2 Click the Administration view.
3 Click Import Virtual Machine.
4 Type or search for the name of the virtual machine that you want to import.
NOTE You cannot import virtual machine templates.
5 Type a comment and click Next.
6 Specify whether you want to set a decommissioning date.
7 (Optional) Specify who can control or view the virtual machine. If you do not specify a user or group, only
you have control.
8 Click Next.
28 VMware, Inc.
Page 29

9 Specify whether you want to link the virtual machine with criteria.
If you select Yes, select entries for Location, Organization, Server Environment, Service Level, and
Performance.
10 Type the contact email and click Next.
11 Specify whether you want to use the virtual machine name as the request name.
12 Select an existing template profile for the virtual machine.
13 Click Submit.
Import Virtual Machines From a Resource Pool
You can import multiple machines from a resource pool.
Procedure
1 Log in to LCM as an administrator.
2 Click the Administration view.
3 Click Import Virtual Machine from Resource Pool.
4 Select one or more resource pools of the virtual machines that you want to import.
Chapter 3 Using LCM
5 Type a comment and click Next.
6 Specify whether you want to set a decommissioning date.
7 (Optional) Specify who can control or view the virtual machine. If you do not specify a user or group, only
you have control.
8 Click Next.
9 Specify whether you want to link the virtual machines with criteria.
If you select Yes, select entries for Location, Organization, Server Environment, Service Level, and
Performance. Also, specify whether you want to link the same criteria for all virtual machines or different
criteria for each machine. If you want to select one criteria for all virtual machines, you must manually
enter the criteria. Otherwise, the workflow prompts you to enter the criteria for each virtual machine that
is imported.
10 Type the contact email and click Next.
11 Specify whether you want to use the virtual machine name as the request name.
12 Specify whether you want to use the same template profile for all requests.
If you select Yes, select an existing template profile for all virtual machines. Otherwise, the workflow
prompts you to enter the template profile for each virtual machine that is imported.
13 Click Submit.
Import Virtual Machines From a Virtual Machine Folder
You can import multiple machines from a virtual machine folder.
Procedure
1 Log in to LCM as an administrator.
2 Click the Administration view.
3 Click Import Virtual Machines from VM folder.
4 Select one or more virtual machine folders that you want to import.
VMware, Inc. 29
Page 30

Lifecycle Manager Administration Guide
5 Type a comment and click Next.
6 Specify whether you want to set a decommissioning date.
7 (Optional) Specify who can control or view the virtual machine. If you do not specify a user or group, only
you have control.
8 Click Next.
9 Specify whether you want to link the virtual machines with criteria.
If you select Yes, select entries for Location, Organization, Server Environment, Service Level, and
Performance. Also, specify whether you want to link the same criteria for all virtual machines or different
criteria for each machine. If you want to select one criteria for all virtual machines, you must manually
enter the criteria. Otherwise, the workflow prompts you to enter the criteria for each virtual machine that
is imported.
10 Type the contact email and click Next.
11 Specify whether you want to use the virtual machine name as the request name.
12 Specify whether you want to use the same template profile for all requests.
If you select Yes, select an existing template profile for all virtual machines. Otherwise, the workflow
prompts you to enter the template profile for each virtual machine that is imported.
13 Click Submit.
Activate Web View Debug Mode
You can switch the Web view debug mode on or off.
Procedure
1 Log in to LCM as an administrator.
2 Click the Administration view.
3 Click Activate webview debug mode.
4 Select Yes.
5 Click Submit.
Relink Tokens to Virtual Machines
If a provisioning request is available with a virtual machine but the virtual machine is unregistered in vCenter,
the token loses its link to the virtual machine. The workflow can only connect to the virtual machine after it is
registered again. You can try to relink the tokens.
Procedure
1 Log in to LCM as an administrator.
2 Click the Administration view.
3 Click Relink Requests That Lost the Link With its Virtual Machine.
4 Confirm that you want to proceed.
5 Click Submit.
30 VMware, Inc.
Page 31

Check Licensing Status
You can review the licensing status of LCM to check the number of used CPUs.
Procedure
1 Log in to LCM as an administrator.
2 Click the Administration view.
3 Click Licensing status.
4 Select whether you want to proceed.
5 Click Submit.
Export Logs and Application Settings
You can export logs and application settings for analysis purposes.
Procedure
1 Log in to LCM as an administrator.
2 Click the Administration view.
Chapter 3 Using LCM
3
Click the Export icon ( ).
4 Click Export Logs and Application Settings.
A log file that you can download is automatically generated.
Troubleshooting LCM
If you encounter problems, you can try certain procedures to troubleshoot the situation.
Cache Plug-In Errors
Cache plug-in errors might cause an LCM operation, such as an auto placement check, to fail.
Problem
A task fails, and an error message containing the following text appears:
(ReferenceError: 'CacheManager' is not defined.)
Cause
The Cache plug-in is missing or not enabled.
Solution
1 Log in to the Orchestrator configuration interface.
http://
orchestrator_server
:8282
2 On the Plug-ins tab, check whether the Cache 1.1.0 plug-in is missing or is not enabled.
n
If the plug-in is not enabled, select the check box to enable it and click Apply changes.
n
If the plug-in is missing, re-install LCM.
VMware, Inc. 31
Page 32

Lifecycle Manager Administration Guide
Networking Plug-In Errors
Networking plug-in errors might cause an LCM operation, such as registering a network, to fail.
Problem
A task from the Network view in the Infrastructure tab fails.
Cause
The Networking plug-in is missing or not enabled.
Solution
1 Log in to the Orchestrator configuration interface.
http://
orchestrator_server
:8282
2 On the Plug-ins tab, check whether the Networking 1.1.0 plug-in is missing or is not enabled.
n
If the plug-in is not enabled, select the check box to enable it and click Apply changes.
n
If the plug-in is missing, re-install LCM.
32 VMware, Inc.
Page 33

Customizing LCM 4
LCM is highly customizable. You can change the look of the UI, or create custom workflows to modify the
functionality of LCM.
This chapter includes the following topics:
n
“Customizing the User Interface,” on page 33
n
“Callback Workflows,” on page 36
Customizing the User Interface
You can customize certain elements of the user interface. For example, you can add buttons to link to a
particular workflow, or you can add your company logo.
Create a Custom Style Sheet
You can create a new custom style sheet. With custom style sheets, you can change the look and feel of the UI.
Procedure
1 Log in to LCM as an administrator.
2 Click the Configuration view.
3
Click the Custom Element icon (
4 Click New.
5 From the Location drop-down menu, select Custom style sheet and click Next.
6 Upload a custom style sheet to modify or create a new custom style sheet.
7 Click Submit.
8 Click Reset Cache to apply the changes.
Modify a Custom Style Sheet
After you have created a custom style sheet, you can modify it.
Procedure
1 Log in to LCM as an administrator.
2 Click the Configuration view.
3
Click the Custom Element icon ( ).
VMware, Inc.
).
33
Page 34

Lifecycle Manager Administration Guide
4
Click the Custom style sheet ( ) that you want to modify to display its contents.
n
To modify the content of the custom style sheet, click Edit.
n
To upload a different style sheet, click Upload.
n
To download the existing style sheet, click Download.
n
To remove the existing style sheet, click Remove.
5 Click Submit.
6 Click Reset Cache to apply the changes.
Modify an RDP Template
You can modify the RDP template that is used to connect to a virtual machine. This changes the RDP settings
when the LCM UI starts an RDP session from the Catalog view. For example, you can modify the screen and
audio settings for RDP sessions.
Procedure
1 Log in to LCM as an administrator.
2 Click the Configuration view.
3
Click the Custom Element icon ( ).
4
Click Rdp template (
n
To modify the content of the RDP template, click Edit.
n
To upload a different RDP template, click Upload.
n
To download the existing RDP template, click Download.
n
To revert to the default RDP template, click Reinitialize.
).
5 Click Submit.
6 Click Reset Cache to apply the changes.
Change the Application Logo
You can replace the application logo with your own to make the interface look more like your corporate
intranet.
Procedure
1 Log in to LCM as an administrator.
2 Click the Configuration view.
3
Click the Custom Element icon ( ).
4
Click Application logo ( ).
n
To upload a new logo, click Upload.
n
To download the existing logo, click Download.
n
To revert to the default logo, click Reinitialize.
5 Click Reset Cache to apply the changes.
34 VMware, Inc.
Page 35

Change a Navigation Element
You can add a link to the navigation bar in the LCM UI. This link can point to a custom URL.
Procedure
1 Log in to LCM as an administrator.
2 Click the Configuration view.
3
Click the Custom Element icon ( ).
4
Click Navigation Items ( ).
n
Click Edit to modify the label of the link and the URL.
n
Click Reinitialize to remove the link from the navigation bar.
5 Click Submit.
6 Click Reset Cache to apply the changes.
Add a Custom Element
Chapter 4 Customizing LCM
You can add custom elements such as additional buttons that are linked to workflows. You can use standard
workflows or use custom workflows created in the Orchestrator Client.
For information about developing workflows, see the vCenter Orchestrator Developer’s Guide.
Procedure
1 Log in to LCM as an administrator.
2 Click the Configuration view.
3
Click the Custom Element icon (
4 Click New.
5 From the Location drop-down menu, select a custom element and click Next.
6 Type the information needed to point to the custom elements that you want to add.
7 Click Submit.
8 Click Reset Cache to apply the changes.
).
Allow All Users Access to Custom Workflows
By default LCM Requester and LCM Tech Requester users do not have access to custom workflows. You can
allow users with these roles to access workflows stored in custom categories.
Members of the LCM Requester and LCM Tech Requester groups have permissions to run workflows only
from the Applications\Lifecycle manager\User workflow category. If you're adding a custom element
pointing to a custom workflow, you can use the Applications\Lifecycle manager\User\Custom workflow
category for storing the workflows.
If you want members of the LCM Requester and LCM Tech Requester groups to have permissions to run
workflows from other categories, you must perform the following steps to give them permissions.
Procedure
1 Select Start > Programs > vCenter Orchestrator > vCenter Orchestrator Client.
2 Log in as an administrator.
VMware, Inc. 35
Page 36

Lifecycle Manager Administration Guide
3 Click the Web views view.
4 Right-click vCenter Lifecycle Manager and select Unpublish.
5 Right-click vCenter Lifecycle Manager and select Edit.
6 On the Attributes tab, select the userAllowedWorkflowPaths attribute.
7 Click the entry in the Value column and add the category where the workflows are stored.
8 Click Save and close.
9 Right-click vCenter Lifecycle Manager and select Publish.
Callback Workflows
You can use callback workflows to modify or expand the functionality of LCM.
NOTE You must not modify standard LCM workflows.
Callback Workflow Operation
Every request that you make in the LCM interface runs a workflow or series of workflows in the underlying
Orchestrator server. LCM requests are passed to the workflows as workflow input parameters.
The workflows that perform LCM operations include references to empty callback workflows. The callback
workflows run as part of the standard LCM workflow, but they do not do anything unless you adapt them.
Callback workflows take input parameters from the LCM workflows that call them. If you have not modified
a callback workflow, the input parameters pass through the callback workflow without any processing.
However, you can adapt the callback workflow so that it performs additional processing on the input
parameters that it receives, thus customizing the way in which LCM handles the request.
For information about how to modify workflows, see the vCenter Orchestrator Developer's Guide.
Callback Workflows that Add a Custom Operation to the LCM Request
Many LCM workflows take an input parameter named token. The token input parameter represents the LCM
request that starts the workflow in the Orchestrator server. For example, the token input parameter contains
the details of a provisioning request for a new virtual machine, including the memory, performance, and
operating system requirements. The workflow can then create a virtual machine according to those
requirements.
Most callback workflows contain only a start element and an end element. These callback workflows take the
token input parameter and do not define any output parameter. They allow you to add new functions to the
LCM request, by taking the provisioning information from the request and using it to perform additional
operations that the standard LCM workflow does not provide.
Callback Workflows that Customize the Result of an LCM Request
Certain callback workflows contain a start element, an end element, and a scripted task element named in =
out.
Callback workflows that contain an in = out element take an input parameter cloneProperties and return an
output parameter outCloneProperties.
36 VMware, Inc.
Page 37

Chapter 4 Customizing LCM
Callback workflows that contain an in = out element perform the following tasks:
n
Clone the properties of the LCM workflow that calls the callback workflow.
n
Optionally perform processing on the cloned properties in the callback workflow to modify them.
n
Pass the modified properties as the outCloneProperties output parameter to the next element in the LCM
workflow, thus changing the result of the request.
The in = out element contains the following scripting code:
cloneProperties= outCloneProperties;
If you do not modify the callback workflow, the value of the outCloneProperties output parameter it returns
is identical to the cloneProperties input parameter it received. However, you can modify the callback workflow
so that it results in a outCloneProperties output parameter with a value different from the initial
cloneProperties value.
By modifying the properties of the LCM workflow that calls the callback workflow, the callback workflow
changes the result of the LCM request.
Callback Workflow Categories
LCM installs five default callback workflow categories.
Table 4-1 lists the default callback workflow categories and the type of workflows that they contain.
Table 4-1. Default Callback Workflow Categories
Category Content
Create Virtual machine creation events
Decommission Virtual machine decommissioning events
End date range Virtual machine request extension events
Provision Virtual machine provisioning events
Shaping change Virtual machine customization change events
Find Related Workflows
You can search for standard workflows that use callback workflows as a part of their execution procedure.
Procedure
1 Select Start > Programs > vCenter Orchestrator > vCenter Orchestrator Client.
2 Log in as an administrator.
3 Click the Workflows view.
4 Expand the hierarchichal tree to Applications > Lifecycle manager > Callback.
5 Expand a workflow category.
6 Right-click a callback workflow and select References > Find Elements that Use this Element.
VMware, Inc. 37
Page 38

Lifecycle Manager Administration Guide
38 VMware, Inc.
Page 39

Index
A
administrator tasks 10
application logo, changing 34
architecture 10
automatic placement 14
C
cache plug-in errors 31
callback workflows
adding an operation 36
categories 37
cloneProperties 36
finding related workflows 37
input parameters 36
modifying request results 36
token 36
checking power state 26
commands
Connect 27
Open console 27
Power on 26
Revert to snapshot 28
Snapshot 27
Suspend 26
connecting to virtual machines 26
CPU usage 23
creating reports 28
creating snapshots 27
criteria 19
criteria elements
deleting 20
modifying mapping options 19
renaming 19
custom element, adding 35
custom style sheet
creating 33
modifying 33
custom workflows, allowing access 35
customization template
creating 18
modifying 23
customizing 33
D
database usage 10
datastore, registering 15
decommissioning time, modifying 23
disk shares 23
displaying virtual machines 23
domain, joining 18
E
exporting logs and application settings 31
F
feedback 5
G
generating reports 28
I
infrastructure 13
IP address range, creating 16
L
LCM, components 10
LCM Administrator, tasks 21
LCM Approver 9
LCM IT Staff 9
LCM overview 7
LCM Requester 9
LCM Tech Requester 9
licensing status, checking 31
lifecycle process overview 7
M
memory usage 23
modifying customization templates 23
N
navigation element, changing 35
network, registering 16
networking plug-in errors 32
O
Orchestrator, plug-ins 10
P
power state, checking 26
powering on virtual machines 26
VMware, Inc.
39
Page 40

Lifecycle Manager Administration Guide
R
RDP client, opening virtual machines 27
RDP template, modifying 34
reports, generating 28
request options, modifying 25
requesting virtual machines 21
resource pool
creating 14
registering 14
reverting to snapshots 28
roles 9
S
service directory 10
snapshots
creating 27
reverting 28
subnets, creating 16
support 5
suspending virtual machines 26
T
template profile, creating 17
terminology 9
tokens, relinking 30
troubleshooting 31
U
UI customization 33
unlinked elements, relinking 18
V
vCenter compatibility 10
virtual machine environment 13
virtual machine folder
creating 15
registering 15
virtual machines
checking power state 26
connecting 26
displaying 23
importing 28
importing from a resource pool 29
importing from a virtual machine folder 29
opening in RDP client 27
opening in Web browser 27
powering on 26
registering 28
registering manually 28
requesting 21
snapshot 27, 28
status icons 24
suspending 26
VMware Infrastructure 10
VMware WebCenter Remote MKS Plug-in 27
W
Web browsers, opening virtual machines 27
Web view debugging 30
workgroup, joining 18
40 VMware, Inc.
 Loading...