

VMware PACKAGE MANAGER 1.1, Software Repository for Windows 1.1 Installation And User Manual
Page 1

vCenter Configuration Manager
Software Provisioning Components
Installation and User's Guide
Package Studio 1.1
Software Repository for Windows 1.1
Package Manager 1.1
This document supports the version of each product listed and supports all
subsequent versions until the document is replaced by a new edition. To
check for more recent editions of this document, see
http://www.vmware.com/support/pubs.
EN-000455-00
Page 2

You can find the most up-to-date technical documentation on the VMware Web site at:
http://www.vmware.com/support/
The VMware Web site also provides the latest product updates.
If you have comments about this documentation, submit your feedback to:
docfeedback@vmware.com
© 2006-2010 VMware, Inc. All rights reserved. This product is protected by U.S. and international copyright and
intellectual property laws. VMware products are covered by one or more patents listed at
http://www.vmware.com/go/patents.
VMware is a registered trademark or trademark of VMware, Inc. in the United States and/or other jurisdictions. All
other marks and names mentioned herein may be trademarks of their respective companies.
VMware, Inc.
3401 Hillview Ave.
Palo Alto, CA 94304
www.vmware.com
vCenter Configuration Manager Software Provisioning Components Installation and User's Guide
2 VMware, Inc.
Page 3

Contents
About This Book 5
Introduction to VCM Software Provisioning 7
VMware vCenter Configuration Manager Package Studio 7
Software Repository for Windows 7
Package Manager for Windows 7
Overview of Component Relationships 8
Installing the Software Provisioning Components 9
Software Provisioning Requirements 9
Software Provisioning Component Software Requirements 9
Software Provisioning on Guests 10
Install Software Repository for Windows 10
Software Repository Structure 11
Manually Uninstall the Repository 11
Manually Configure Repositories 11
Configure Mirrored Repositories 14
Install Package Studio 17
Manually Uninstall Package Studio 19
Installing Package Manager for Windows 19
Manually Uninstall the Package Manager for Windows 20
Using Package Studio to Create Software Packages and Publish to Repositories 21
About Package Naming and Versioning 21
Correct Naming Practices 21
Correct Versioning Practices 22
How Package Names and Versions Are Processed by Package Manager 23
Creating Packages 23
Create Packages with Dependencies 25
Create Packages as Dependency Containers 26
Specify Package Conflicts 27
Specify Provides for Packages 29
Add Commands, Arguments, and Scripts to Packages 30
Using Signing Certificates with Software Packages 32
About Signing Certificates and Installing Software Packages 32
Sign Packages with Certificates 32
Editing Packages 34
Edit Published Packages 34
Create New Package from Existing Projects or Packages 36
Using Software Repository for Windows 39
About Repository Platforms and Sections 39
Platforms 39
Sections 40
Sample Platforms and Sections 40
Add Platforms and Sections to Repositories 40
Publish Packages to Repositories 41
Using External Software 43
VMware, Inc. 3
Page 4

vCenter Configuration Manager Software Provisioning Components Installation and User's Guide
About External Software 43
Best Practices 43
Adding Applications to an External Software List 44
Managing External Software Lists 44
Naming External Software Packages 44
Defining Attributes 44
How Package Manager Processes External Software during Installation 44
Define External Software Attributes 46
Using Package Manager for Windows 49
Processing Dependencies 49
Security 49
Add Repository Sources 49
Remove Repository Sources 50
Install Packages 50
Remove Packages 51
Package Manager for WindowsCommand Line Options 51
Requirements and Considerations 52
Wasp Command Line Options 52
Maintain Package Manager for Windows Data 62
Package Manager Maintenance 62
Repository Source Maintenance 62
4 VMware, Inc.
Page 5

About This Book
This manual, vCenter Configuration Manager Software Provisioning Components Installation and User's Guide,
describes how to install the components, use the components to create software packages, publish
packages to repositories, and install software on target machines.
Intended Audience
To use the information in this guide effectively, you must have a basic understanding of how to configure
network resources, install software, and administer operating systems. You also need to fully understand
your network’s topology and resource naming conventions.
Document Feedback
VMware welcomes your suggestions for improving our documentation. If you have comments, send
your feedback to docfeedback@vmware.com.
Technical Support and Education Resources
The following technical support resources are available to you. To access the current version of this book
and other books, go to http://www.vmware.com/support/pubs.
Online and Telephone
Support
To use online support to submit technical support requests, view your product
and contract information, and register your products, go to
http://www.vmware.com/support.
Customers with appropriate support contracts should use telephone support for
priority 1 issues. Go to http://www.vmware.com/support/phone_support.html.
Support Offerings To find out how VMware support offerings can help meet your business needs,
go to http://www.vmware.com/support/services.
VMware Professional
Services
VMware Education Services courses offer extensive hands-on labs, case study
examples, and course materials designed to be used as on-the-job reference tools.
Courses are available onsite, in the classroom, and live online. For onsite pilot
programs and implementation best practices, VMware Consulting Services
provides offerings to help you assess, plan, build, and manage your virtual
environment. To access information about education classes, certification
programs, and consulting services, go to http://www.vmware.com/services.
VMware, Inc. 5
Page 6

vCenter Configuration Manager Software Provisioning Components Installation and User's Guide
6 VMware, Inc.
Page 7

Introduction to VCM Software Provisioning
1
The VCM Software Provisioning components consist of VMware vCenter Configuration Manager
Package Studio, software package repositories, and Package Manager.
VMware vCenter Configuration Manager Package Studio
Package Studio is the application used to build software packages for installation on target Windows
servers and workstations.
A software package provides the files and metadata necessary to install and remove programs. One of the
most useful features of a package is the metadata regarding dependencies, conflicts, and other
relationships that are not represented by software installation files. This metadata is used to determine if
the necessary dependencies are in place so that an installation is successful, and if not, what is necessary to
make the installation successful. This use of metadata is similar to rpm on Linux.
Packages support commercial and custom software that may be installed using any installation
technology, including .msi, .exe, or scripts (Python, VBScript, PowerShell, and others).
Once a package is created and ready for distribution, it is published to a software repository. You use
Package Manager to download the package from the repository to the local machine and install it on your
Windows systems.
Software Repository for Windows
Software Repository for Windows is the shared location to which packages are published by Package
Studio and the location from which Package Manager downloads packages for installation.
Package Manager for Windows
Package Manager is the application installed on each machine to manage the installation and removal of
the software contained in packages. Package Manager is configured to use one or more repositories as
sources for packages.
If you are using the software provisioning components in conjunction with VMware vCenter
Configuration Manager (VCM), you can use VCM to add and remove sources, and to install and remove
packages.
VMware, Inc. 7
Page 8

Overview of Component Relationships
The following diagram displays the general relationship between Package Studio, repositories, and
Package Manager in a working environment.
vCenter Configuration Manager Software Provisioning Components Installation and User's Guide
8 VMware, Inc.
Page 9

Installing the Software Provisioning Components
2
The software provisioning components should be installed on machines with the following relationships:
n
Software Repository for Windows: Installed on at least one Windows machine in your environment,
and installed on the same machine with Package Studio. Install the repository before installing Package
Studio.
n
VMware vCenter Configuration Manager Package Studio: Installed on the same machine as your
software repository.
n
Package Manager: Installed on all Windows machines on which you are managing software
provisioning.
To uninstall the above applications using a script at a later date, you should save a copy of each of the .msi
files in an archive location. To uninstall using the .msi, you must have the same version used to install the
application.
Software Provisioning Requirements
VCM Software Provisioning provides the components to create software provisioning packages, publish
the packages to repositories, and then install and remove software packages on target machines.
The following operating systems are supported platforms:
Supp orted Operating System Supp orted Hardware Platform
Microsoft Windows 7 x86, x64
Microsoft Windows Server 2008 R2 x64
Microsoft Windows Server 2008 SP2 x86, x64
Windows Vista SP2 x86, x64
Microsoft Windows XP SP3 x86
Microsoft Windows XP SP2 x64
Microsoft Windows Server 2003 R2 SP2 x86, x64
Microsoft Windows Server 2003 SP2 x86, x64
Table 2-1 Software Provisioning Operating System and Hardware Requirements
Software Provisioning Component Software Requirements
The following are the VCM Software Provisioning components and their software requirements:
VMware, Inc. 9
Page 10

n
VMware vCenter Configuration Manager Package Studio: The application used to the create the
software packages. Requires .NET 3.5.1.
n
Software Repositories: The file system used to store the shared software packages. Requires .NET 3.5.1
and IIS 6, 7, or 7.5.
n
Package Manager: The application on each managed machine that downloads packages from
repositories, and then installs and removes the software contained in the packages. Requires .NET 3.5.1.
Software Provisioning on Guests
Any virtual machine guest on VMware ESX 3.5 and vSphere 4 (both i and non-i versions) meeting the
above requirements can be used for any of the VCM Software Provisioning components.
Install Software Repository for Windows
The Software Repository for Windows and the VMware vCenter Configuration Manager Package Studio
should be installed on the same machine. The process installs the Repository folders and subfolders, and
configures the virtual directory. The virtual directory is used by Package Manager to access the repository.
Prerequisit es
Target machine meets the supported hardware requirements, operating system, and software
requirements. See "Software Provisioning Requirements" on page 9 for currently supported platforms and
requirements.
Access to the Repository.msi, which is available on the VMware website or in the vCenter Configuration
Manager application files.The default location in the VCMapplication files is C:\Program
Files\VMware\VCM\AgentFiles\Products.
Procedu re
1. Double-click Repository.msi.
The Welcome page appears.
2. Click Next.
The License Agreement page appears.
3. Review the agreement, and then select I accept the terms of the License Agreement to continue. The
other options become available.
4. Select I am an authorized agent and/or representative of the customer/end-user and I have read the
terms and conditions stated above.
5. Click Next.
The Installation Folder page appears.
6. Use the default path or click Change to modify the path. When the path is correct, click Next.
The Virtual Directory page appears.
7. Use the default name or type a new name in the text box.
8. Click Next.
vCenter Configuration Manager Software Provisioning Components Installation and User's Guide
10 VMware, Inc.
Page 11

The Ready to Install page appears.
9. Click Install.
When the installation is completed, the Setup Complete page appears.
10. Click Finish.
The repository and the virtual directory are added to the locations specified during installation. The default
location for the repository is C:\Program Files\VMware\VCM\Tools\Repository (on 32-bit
machines) or C:\Program Files (x86)\VMware\VCM\Tools\Repository (on 64-bit machines). The
default virtual directory SoftwareRepository is added to Internet Information Services (IIS) | Web Sites
| Default Web Site.
Procedu re (u nat ten ded using .msi)
1. On your Collector, navigate to C:\Program Files\VMware\VCM\AgentFiles\Products.
2. Locate the Repository.msi file, and then copy it to the target machine. You can also run it from a
shared location.
3. On the target machine, run the .msi file using the following command line syntax.
msiexec /i [path]\Repository.msi /qn /l*v %temp%\Repository.log
You can add the following arguments if you want to specify locations other than the default
directories:
REPOSITORY_ROOT="C:\Program Files\VMware\VCM\Tools\Repository\" (defaults to this path)
VIRTUAL_DIR_NAME_REPOSITORY=SoftwareRepository (defaults to this value)
Software Repository Structure
The files for a repository consist of the main folder (for example, SoftwareRepository). In this file are the
following:
n
.hive: Contains the repository management files, including such files as repository.index and
repository.toc.
n
crates: Contains alphabetical sub folders. It is to this location that the packages (.crate files) are
published.
n
dists: Contains crates.gz files. These files are metadata about the .crate files.
Manually Uninstall the Repository
Use the following script to run an unattended uninstall the software repository. To uninstall the
application, you must use the version of the Repository.msi that was used to install the application.
Procedu re
1. Copy the Repository.msi to the machine on which you are uninstalling the application or point to the
file in a shared directory.
2. Run the .msi file using the following command line syntax:
msiexec /x [path]\Repository.msi /l*v %temp%\Repository.log
Manually Configure Repositories
Although you can use an installation file to install a repository on a machine, it may be necessary to
manually create one.
Installing the Software Provisioning Components
VMware, Inc. 11
Page 12

The repository and the VMware vCenter Configuration Manager Package Studio should be installed on
the same machine.
Prerequisites
Target machine meets the supported hardware requirements, operating system, and software
requirements. See "Software Provisioning Requirements" on page 9 for currently supported platforms and
requirements.
Procedure for IIS 6
NOTE The steps for configuring a repository on Windows Vista, Windows 7, and Windows 2008 are
different from the ones provided here. See below.
1. Create a repository directory on your desired drive. For example, C:\WindowsRepository.
2. Open Internet Information Services (IIS) Manager.
3. Expand <machine name> >Web Sites.
4. Right-click Default Web Site, and then select New > Virtual Directory. The Welcome to the Virtual
Directory Creation Wizard appears.
5. Click Next. The Virtual Directory Alias page appears.
6. Type a name in the Alias text box. For example, SoftwareRepository.
7. Click Next. The Web Site Content Directory page appears.
8. Click Browse and locate the repository directory you previously created. For example,
C:\WindowsRepository.
9. Click Next. The Virtual Directory Access Permissions page appears.
10. Select Read, Run scripts, and Browse.
11. Click Next. The You have successfully completed the Virtual Directory Creation Wizard page
appears.
12. Click Finish. The new repository virtual directory alias is added to the Default Web Sites list.
13. Right-click the new repository directory, and then select Properties.
The <directory name> Properties dialog box appears.
14. Click the Virtual Directory tab, and then click Remove, located to the right of Application name text
box. Application name and Application pool are disabled.
15. Click the HTTP Headers tab, and then click MIME Types. The MIME Types dialog box appears.
16. Click New. The MIME Type dialog box appears.
17. Add the following MIME types with these names and settings:
n
Extension: .crate and MIME type: application/octet-stream
n
Extension: .index and MIME type: application/octet-stream
n
Extension: .gz and MIME type: application/octet-stream
n
Extension: .options and MIME type:application/octet-stream
n
Extension: .info and MIME type:application/octet-stream
18. Click OK to save your settings and close the MIME Types dialog box.
19. On the Properties dialog box, click OK to close the dialog box.
vCenter Configuration Manager Software Provisioning Components Installation and User's Guide
12 VMware, Inc.
Page 13

20. Open a Command Prompt window, and then browse to the repository folder you previously created.
21. At the command prompt, type mkdir .hive, and then press Enter.
22. At the command prompt, type mkdir dists, and then press Enter.
23. Open a blank document in a text editing application, such as Notepad, and then add
<RepositoryIndex></RepositoryIndex> to the contents.
24. Click File > Save As. The Save As dialog box appears.
25. Change the file name to repository.index, and then save the file in the previously created .hive folder.
26. Open a blank document in a text editing application, such as Notepad. Do not add any text.
27. Click File > Save As. The Save As dialog box appears.
28. Change the file name to repository.info, and then save the empty file in the previously created .hive
folder.
29. Open an Internet Explorer window, and then browse to your virtual directory. For example,
http://<machinename>/SoftwareRepository. The web page should display the .hive and dists folders.
After you publish packages using the VMware vCenter Configuration Manager Package Studio, a
crates folder is added.
Procedure for IIS 7 and later
1. Create a repository directory on your desired drive. For example, C:\WindowsRepository.
2. Open Internet Information Services (IIS) Manager.
3. Expand <machine name> > Sites.
4. Right-click Default Web Site, and then select Add Virtual Directory. The Add Virtual Directory
dialog box appears.
5. Type a name in the Alias text box. For example, SoftwareRepository.
6. Click the Physical path ellipsis button. The Browse for Folder dialog box appears.
7. Browse for and select the repository directory you previously created. For example,
C:\WindowsRepository.
8. Click OK to close the Browse for Folder dialog box.
9. Click OK to close the Add Virtual Directory dialog box.
10. Select the new virtual directory you just added, and then double-click Directory Browsing in
<yourdirectoryname> Home pane. The pane displays Directory Browsing.
11. In the Actions pane, click Enable.
12. Click Back until you are again on the <yourdirectoryname> Home pane, and then click on MIME
Types. The pane displays MIME Types.
13. In the Actions pane, click Add. The Add MIME Type dialog box appears.
14. Add the following MIME types with these names and settings:
n
File name extension: .crate and MIME type: application/octet-stream
n
File name extension: .index andMIME type: application/octet-stream
n
File name extension: .options and MIME type:application/octet-stream
n
File name extension: .info and MIME type:application/octet-stream
15. Close IIS.
Installing the Software Provisioning Components
VMware, Inc. 13
Page 14

16. Open a Command Prompt window, and then browse to the repository folder you previously created.
17. At the command prompt, type mkdir .hive, and then press Enter.
18. At the command prompt, type mkdir dists, and then press Enter.
19. Open a blank document in a text editing application, such as Notepad, and then add
<RepositoryIndex></RepositoryIndex> to the contents.
20. Click File > Save As. The Save As dialog box appears.
21. Change the file name to repository.index.
22. Change the Save as type to All Files, and then save the file in the previously created .hive folder.
23. Open a blank document in a text editing application, such as Notepad. Do not add any text.
24. Click File > Save As. The Save As dialog box appears.
25. Change the file name to repository.info.
26. Change the Save as type to All Files, and then save the file in the previously created .hive folder.
27. Open an Internet Explorer window, and then browse to your virtual directory. For example,
http://<machinename>/SoftwareRepository. The web page should display the .hive and dists folders.
After you publish packages using the VMware vCenter Configuration Manager Package Studio, a
crates folder is added.
Configure Mirrored Repositories
Mirrored repositories are configured where one repository is mirrored from another.
The most common use of mirrored repositories is if you have a repository in your main office and one in
your satellite office. You do not want to install packages to machines in the satellite office across your wide
area network. Configuring a mirrored repository will reduce the strain on your WAN, allowing the
satellite office machines to install packages from a local repository.
Prerequisites
Target machine meets the supported hardware requirements, operating system, and software
requirements. See "Software Provisioning Requirements" on page 9 for currently supported platforms and
requirements.
Procedure for IIS 6
NOTE The steps for configuring a repository on Windows Vista, Windows 7, and Windows 2008 are
different from the ones provided here. See below.
1. Create a repository directory on your desired drive. For example, C:\WindowsRepository.
2. Open Internet Information Services (IIS) Manager.
3. Expand <machine name> >Web Sites.
4. Right-click Default Web Site, and then select New > Virtual Directory. The Welcome to the Virtual
Directory Creation Wizard appears.
5. Click Next. The Virtual Directory Alias page appears.
6. Type a name in the Alias text box. For example, SoftwareRepository.
7. Click Next. The Web Site Content Directory page appears.
vCenter Configuration Manager Software Provisioning Components Installation and User's Guide
14 VMware, Inc.
Page 15

8. Click Browse and locate the repository directory you previously created. For example,
C:\WindowsRepository.
9. Click Next. The Virtual Directory Access Permissions page appears.
10. Select Read, Run scripts, and Browse.
11. Click Next. The You have successfully completed the Virtual Directory Creation Wizard page
appears.
12. Click Finish. The new repository virtual directory alias is added to the Default Web Sites list.
13. Right-click the new repository directory, and then select Properties.
The <directory name> Properties dialog box appears.
14. Click the Virtual Directory tab, and then click Remove, located to the right of Application name text
box. Application name and Application pool are disabled.
15. Click the HTTP Headers tab, and then click MIME Types. The MIME Types dialog box appears.
16. Click New. The MIME Type dialog box appears.
17. Add the following MIME types with these names and settings:
n
Extension: .crate and MIME type: application/octet-stream
n
Extension: .index and MIME type: application/octet-stream
n
Extension: .gz and MIME type: application/octet-stream
n
Extension: .options and MIME type:application/octet-stream
n
Extension: .info and MIME type:application/octet-stream
18. Click OK to save your settings and close the MIME Types dialog box.
19. On the Properties dialog box, click OK to close the dialog box.
20. Copy and paste the contents of the original Repository folder, the .hive folder, the dist folder, and
the crates folder, to the new repository location.
21. Add the new repository entry to the machine registry. On a 64-bit machine, go to HKEY_LOCAL_
MACHINE\SOFTWARE\Wow6432Node\VMware, Inc.\LocalRepositories. On a 32-bit machine, go
to HKEY_LOCAL_MACHINE\SOFTWARE\VMware, Inc.\LocalRepositories.
22. Right-click LocalRepositories, and then select New | String Value.
23. Right-click the new value, and the select Rename. Type the name of your new repository.
24. Right-click the new repository name, and then select Modify. The Edit String dialog box appears.
25. In the Data Value text box, type the fully qualified URIfor the repository. For example,
http://<machinename>/NewRepository.
26. Click OK.
27. Open an Internet Explorer window, and then browse to your new virtual directory. For example,
http://<machinename>/NewRepository. The web page should display the .hive,dists, and crates
folders. The crates folder contains any copied packages (*.crate files).
28. To keep the new repository synchronized with the original repository, you must continue to copy the
files from the original repository to the new repository. You can use one of the following methods:
Installing the Software Provisioning Components
VMware, Inc. 15
Page 16

n
Manually copy the files from the original repository to the new repository.
n
Create a VBScript to copy IIS metabase and schema from on machine to another. The following
article assumes both machines are running Windows Server 2003:
http://www.microsoft.com/technet/prodtechnol/WindowsServer2003/Library/IIS/81f04967-f02f4845-9795-bad2fe1a1687.mspx?mfr=true.
n
Use a commercial mirroring application.
n
If you are using VCM, you configure the Remote Command Package Mirroring template to copy
packages between repositories, or write you own VBScript to run as a remote command to copy
the files specified in the configuration steps above from the old repository to the new repository.
Procedure for IIS 7 and later
1. Create a repository directory on your desired drive. For example, C:\WindowsRepository.
2. Open Internet Information Services (IIS) Manager.
3. Expand <machine name> > Sites.
4. Right-click Default Web Site, and then select Add Virtual Directory. The Add Virtual Directory
dialog box appears.
5. Type a name in the Alias text box. For example, SoftwareRepository.
6. Click the Physical path ellipsis button. The Browse for Folder dialog box appears.
7. Browse for and select the repository directory you previously created. For example,
C:\WindowsRepository.
8. Click OK to close the Browse for Folder dialog box.
9. Click OK to close the Add Virtual Directory dialog box.
10. Select the new virtual directory you just added, and then double-click Directory Browsing in
<yourdirectoryname> Home pane. The pane displays Directory Browsing.
11. In the Actions pane, click Enable.
12. Click Back until you are again on the <yourdirectoryname> Home pane, and then click on MIME
Types. The pane displays MIME Types.
13. In the Actions pane, click Add. The Add MIME Type dialog box appears.
14. Add the following MIME types with these names and settings:
n
File name extension: .crate and MIME type: application/octet-stream
n
File name extension: .index andMIME type: application/octet-stream
n
File name extension: .options and MIME type:application/octet-stream
n
File name extension: .info and MIME type:application/octet-stream
15. Close IIS.
16. Copy and paste the contents of the original Repository folder, the .hive folder, the dist folder, and
the crates folder, to the new repository location.
17. Add the new repository entry to the machine registry. On a 64-bit machine, go to HKEY_LOCAL_
MACHINE\SOFTWARE\Wow6432Node\VMware, Inc.\LocalRepositories. On a 32-bit machine, go
to HKEY_LOCAL_MACHINE\SOFTWARE\VMware, Inc.\LocalRepositories.
18. Right-click LocalRepositories, and then select New | String Value.
19. Right-click the new value, and the select Rename. Type the name of your new repository.
vCenter Configuration Manager Software Provisioning Components Installation and User's Guide
16 VMware, Inc.
Page 17

20. Right-click the new repository name, and then select Modify. The Edit String dialog box appears.
21. In the Data Value text box, type the fully qualified URIfor the repository. For example,
http://<machinename>/NewRepository.
22. Click OK.
23. Open an Internet Explorer window, and then browse to your new virtual directory. For example,
http://<machinename>/NewRepository. The web page should display the .hive,dists, and crates
folders. The crates folder contains any copied packages (*.crate files).
24. To keep the new repository synchronized with the original repository, you must continue to copy the
files from the original repository to the new repository. You can use one of the following methods:
n
Manually copy the files from the original repository to the new repository.
n
Use a commercial mirroring application.
n
If you are using VCM, you configure the Remote Command Package Mirroring template to copy
packages between repositories, or write you own VBScript to run as a remote command to copy
the files specified in the configuration steps above from the old repository to the new repository.
Install Package Studio
The VMware vCenter Configuration Manager Package Studio and the repository must be installed on the
same machine. The process installs the application files and specifies the repository to which Package
Studio will publish packages.
NOTE When Package Studio is uninstalled from a machine, the locally saved projects and .crate files
remain on the machine, allowing you to copy them to another machine or to delete them manually if they
are not needed.
Prerequisit es
Target machine meets the supported hardware requirements, operating system, and software
requirements. See "Software Provisioning Requirements" on page 9 for currently supported platforms and
requirements.
Access to the PackageStudio.msi, which is available on the VMware website or in the vCenter
Configuration Manager application files. The default location in the VCMapplication files is C:\Program
Files\VMware\VCM\AgentFiles\Products.
(Recommended) Software Repository for Windows is installed. Installing the repository before installing
Package Studio will reduce the manual configuration steps.
Installing the Software Provisioning Components
VMware, Inc. 17
Page 18

Procedu re
1. Double-click PackageStudio.msi.
The Welcome page appears.
2. Click Next.
The License Agreement page appears.
3. Review the agreement, and then select I accept the terms of the License Agreement to continue. The
other options become available.
4. Select I am an authorized agent and/or representative of the customer/end-user and I have read the
terms and conditions stated above.
5. Click Next.
The Installation Folder page appears.
6. Use the default path or click Change to modify the path. When the path is correct, click Next.
The Repository Root Folder page appears.
7. Verify the path is to your installed repository files. To modify, click Change. When the path is correct,
click Next.
The Ready to Install page appears.
8. Click Install.
When the installation is completed, the Setup Complete page appears.
9. Click Finish.
The Package Studio is installed to the location specified during installation. The default location is
C:\Program Files\VMware\VCM\Tools\Package Studio (on 32-bit machines) or C:\Program
Files (x86)\VMware\VCM\Tools\Package Studio (on 64-bit machines). To start Package Studio,
select Start | All Programs | VMware vCenter Configuration Manager | Tools | Package Studio, or
open the Package Studio folder and double-click PackageStudio.exe.
Procedu re (u nat ten ded using .msi)
1. On your Collector, navigate to C:\Program Files\VMware\VCM\AgentFiles\Products.
2. Locate the PackageStudio.msi file, and then copy it to the target machine. You can also run it from
a shared location.
3. On the target machine, run the .msi file using the following command line syntax.
msiexec /i [path]\PackageStudio.msi /qn /l*v %temp%\PackageStudio.log
You can add the following arguments if you want to specify locations other than the default
directories:
REPOSITORY_ROOT=C:\Program Files\VMware\VCM\Tools\Repository\ (Defaults to this or uses
the Repository’s value if it is already installed)
PACKAGESTUDIO_DIR="C:\Program Files\VMware\VCM\Tools\Package Studio\" (defaults to this
path)
vCenter Configuration Manager Software Provisioning Components Installation and User's Guide
18 VMware, Inc.
Page 19

Manually Uninstall Package Studio
Use the following script to run an unattended uninstall the Package Manager. To uninstall the application,
you must use the version of the PackageStudio.msi that was used to install the application.
Procedu re
1. Copy the PackageStudio.msi to the machine on which you are uninstalling the application. You can
also run it from a shared location.
2. Run the .msi file using the following command line syntax:
msiexec /x [path]\PackageStudio.msi /l*v %temp%\PackageStudio.log
Installing Package Manager for Windows
The Package Manager for Windows must be installed on all Windows machines on which you are
managing software provisioning. The process installs Package Manager application files and the cratecache
folder.
Package Manager can be run using command line options or using VMware vCenter Configuration
Manager. Cratecache is the local folder to which software packages are downloaded before they are
installed.
NOTE If you are using the Software Provisioning Components in conjunction with VMware vCenter
Configuration Manager (VCM), you should not install the Package Manager using the following
instructions, it is installed as part of the VCM Agent.
Prerequisites
Target machine meets the supported hardware requirements, operating system, and software
requirements. See "Software Provisioning Requirements" on page 9 for currently supported platforms and
requirements.
Access to the PackageManager.msi, which is available on the VMware website.
Procedure
1. Double-click PackageManager.msi.
The Welcome page appears.
2. Click Next.
The License Agreement page appears.
3. Review the agreement, and then select I accept the terms of the License Agreement to continue. The
other options become available.
4. Select I am an authorized agent and/or representative of the customer/end-user and I have read the
terms and conditions stated above.
5. Click Next.
The Installation Folder page appears.
6. Use the default path or click Change to modify the path. When the path is correct, click Next.
7. Click Next.
The Cache Folder page appears.
Installing the Software Provisioning Components
VMware, Inc. 19
Page 20

8. Use the default path or click Change to modify the path where downloaded packages are saved. When
the path is correct, click Next.
The Ready to Install page appears.
9. Click Install.
When the installation is completed, the Setup Complete page appears.
10. Click Finish.
The Package Manager and the cratecache folder are installed to the locations specified during installation.
The default location is C:\Program Files\VMware\VCM\Tools.
Procedure (unattended using .msi)
1. On your Collector, navigate to C:\Program Files\VMware\VCM\AgentFiles\Products.
2. Locate the PackageManager.msi file, and then copy it to the target machine.
3. On the target machine, run the .msi file using the following command line syntax.
msiexec /i PackageManager.msi /qn /l*v %temp%\PackageManager.log
You can add the following arguments if you want to specify locations other than the default
directories:
PACKAGEMANAGER_DIR="C:\Program Files\VMware\VCM\Tools\Package Manager for
Windows\" (defaults to this path)
LOCAL_CRATE_CACHE="C:\Program Files\VMware\VCM\Tools\cratecache" (defaults to this
path)
Manually Uninstall the Package Manager for Windows
Use the following script to run an unattended uninstall the Package Manager. To uninstall using the .msi,
you must use the version of PackageManager.msi that was used to install the application.
Procedure
1. Copy the PackageManager.msi to the machine on which you are uninstalling the application
2. Run the .msi file using the following command line syntax:
msiexec /x PackageManager.msi /l*v %temp%\PackageManager.log
vCenter Configuration Manager Software Provisioning Components Installation and User's Guide
20 VMware, Inc.
Page 21

Using Package Studio to Create Software
Packages and Publish to Repositories
3
Package Studio is the application used to build software packages for installation on target Windows
servers and workstations.
Windows packages can include in-house and commercial software installation files, including .msi, .exe,
VBScripts, python, PowerShell.
To add a software installer to a package, it must be able to install and uninstall unmanned or quietly using
command line options, response files, or other similar methods.
About Package Naming and Versioning
The name and version assigned to a software package has significant impact on package management
when you are installing and uninstalling the package. When creating packages, you should have a clear
understanding of how package names and versions are used by the Package Manager when running
install and uninstall actions.
Managers of Windows software commonly work with installation files designed to install a specific
publisher-provided version; however, a software package usually contains much more. In addition to the
installation files, a software package can include command arguments, pre- and post-command scripts,
and an assigned software signing certificate, any of which can be modified to optimize the process or to
meet changing requirements. To account for all these variations in content, you must properly name and
version your software packages.
Correct Naming Practices
When, as a system administrator, you create a package to install an application, for example, SQL Server
2005, you will begin by creating a project (*.prj), and then configuring a package (*.crate file) that is
generated locally and can be published to a repository. The name of the project does not need to adhere to
the stricter naming conventions you should use for a published package. The name of the package is
determined by the value in the Name text box located on the Properties tab.
When you are ready to make a package available by publishing it to a repository, carefully consider the
package name to ensure correct package management. The package name should not include the software
version. For example, you should name the package containing SQL Server 2005 (version 9.00.1399.06)
something like sqlserver, not sqlserver2k5. Instead, you should specify the primary version in the Version
field when you build the package in Package Studio. Additionally, you must specify the architecture on
which the package may be installed in the Architecture field. When the package is generated or published
using the recommended naming (sqlserver), with Version and Architecture specified in the required fields,
the file name is sqlserver_9.00.1399.06_x86.crate. Package Manager uses the specified version when
checking if a package is installed, when checking if a dependency is installed, and when uninstalling a
package.
VMware, Inc. 21
Page 22

If you find you need to modify a package, for example, to update a command argument to optimize
installation, you should then add a value to the package version number rather than to the package name,
for example, 9.00.1399.06-b, to enable Package Manager to identify and process the revised version.
Correct Versioning Practices
The version is added to the file name when the .crate file is generated. For example, sqlserver_
9.00.4035.00_x86.crate, where 9.00.4035.00 is the software publisher's assigned version number and is
considered the UpstreamVersion as described below.
You should carefully determine the version of the package. The processing of dependencies will not work
if you incorrectly version a package.
You can also assign more detailed version numbers. The format is Epoch;UpstreamVersion-Version.
n
Epoch: (Optional) Provided to allow you to leave behind version numbering mistakes in older versions
of the package or to leave behind previous versioning schemes. Valid value is a single (small) integer. If
omitted, the value is assumed to be zero. Epoch can contain only integers. In the Epoch, 9 is a lower
version than 10.
n
UpstreamVersion: (Required) The primary version number. It is usually the version of the application
the package contains. The format is usually that of the package authors; however, it may need to be
reformatted to fit your package management systems format and comparison scheme. Valid
UpsteamVersion characters are 0-9, a-z, A-Z, ; (semicolon), . (period), - (dash), + (plus), and ~ (tilde). If
there is no Epoch, semicolons are not allowed. If there is no Version, hyphens are not allowed.
In the upstream version, you can use the publisher's version number. The following is an example of
how version numbers are processed by Package Manager, lowest version to highest version:
9 (earlier version)
9A
9AA
9Aa
9a
9+
9.0
9.0.0.0
9.00.0.0
9~
90
90.0
900 (later version)
Notice the order in which non-numeric characters are processed. Non-numeric characters are processed
as a string based on their ASCIIvalue. You should only use them if you know the ASCIIvalue and
understand the impact on the value of the version.
The easiest format to manage is the publisher's version.
n
Version: (Optional) Provided to allow you to add package versions to the UpstreamVersion based on
changes or edits to the base package. For example, you need to modify a command parameter to
improve the installation process. Valid Version characters are 0-9, a-z, A-Z, . (period), - (dash), + (plus),
and ~ (tilde).
vCenter Configuration Manager Software Provisioning Components Installation and User's Guide
22 VMware, Inc.
Page 23

When you modify a package, perhaps to apply a new signing certificate, you should add a value to the
version number, for example, -b (9.00.1399.06-b) to indicate this is a later package version than the
9.00.1399.06 version.
Add this version with the same care you use with the UpstreamVersion. If you use non-numeric
characters, they are processed as a string as described in the UpstreamVersion. The following list is an
example, lowest to highest version.
9.00.1399.06-A (earlier version)
9.00.1399.06-B
9.00.1399.06-a
9.00.1399.06-b (later version)
A full version may look like the following example: 10;10.0.1600.22-b, where 10 is the Epoch,10.0.1600.22 is
the UpstreamVersion, and b is the Version (a package version rather than an application version).
How Package Names and Versions Are Processed by Package Manager
When the command to install a package is issued to Package Manager, it evaluates packages for the name
and for the version based on the operator (=; <; >; <=; >=). The Package Manager checks the Control.xml
file in the *.crate file for the Crate Name and the Version.
For example, a package identified as sqlserver, version 8.0-a, has been installed by the Package Manager.
You issue a command to install "sqlserver >= 9.00.1399.06". Package Manager reviews its list of known
software packages and determines that sqlserver, version 8.0-a is already installed. It then reviews the
known repository sources and identifies available packages sqlserver, version 9.00.1399.06, and sqlserver,
version 9.00.1399.06-b. It installs the highest version of which it is aware, in this example, sqlserver version
9.00.1399.06-b.
Project Naming, Package Naming, and Package File Naming
It is possible to have the published package file name (.crate) be different from the suggested package file
name, which is the package name as it appears on the package Properties tab, along with the version and
architecture. This is usually as the result of the user changing the name of the package file from the
suggested name when generating in Package Studio.
For example, you begin creating a new sqlserver package for 10.0.1600.22 (SQLServer 2008), where the
Properties tab Name is sqlserver, and you save the project as sqlserver2008.prj. You continue working on
the project, adding command arguments and pre- and post-command scripts. When it is ready to go into
production, you Generate the package, changing the suggested file name, as it appears in the Generate
Software Package for Windows dialog box to prod-sqlserver_10.0.1600.22_x86.crate so you can identify
the production-ready version. The next day you are publishing this and other production-ready packages
to a repository. You click Publish > Existing and select your existing prod-sqlserver_10.0.1600.22_x86.crate
file. You then complete the process of publishing it to the repository. The file is published to the
repository\crates\s folder, but with a file name of prod-sqlserver_10.0.1600.22_x86.crate. However, the
control.xml file contains the correct Crate Name, sqlserver, and the package is still processed by Package
Manager as sqlserver, version 10.0.1600.22, x86 architecture.
Creating Packages
A software package provides the files and metadata necessary to install and remove programs. One of the
most useful features of a package is the metadata regarding dependencies, conflicts, and other
relationships that are not represented by software installation files. This metadata is used to determine if
the necessary dependencies are in place so that an installation is successful, and if not, what is necessary to
make the installation successful. This use of metadata is similar to rpm on Linux.
Using Package Studio to Create Software Packages and Publish to Repositories
VMware, Inc. 23
Page 24

Packages support commercial and custom software that may be installed using any installation
technology, including .msi, .exe, or scripts (Python, VBScript, PowerShell, and others).
Once a package is created and ready for distribution, it is published to a software repository. You use
Package Manager to download the package from the repository to the local machine and install it on your
Windows systems.
Creating a software package includes creating and saving a project. Projects can be used to create
variations based on platform or version that can then be published as separate packages.
General Process
1. Start the VMware vCenter Configuration Manager Package Studio. Select Start | All Programs All |
VMware vCenter Configuration Manager | Tools | Package Studio.
2. Click Manage Packages. Configure the package contents based on the options on the following tabs:
a. Click Properties. Type a Name, Version, and Description. Select the Architecture. These are
required fields. You have the option to update the other fields, depending on you requirements.
Configuring the package with Depends, Conflicts, Provides, and adding and configuring the
installation and removal files.
See the following for more information:
n
"Create Packages with Dependencies" on page 25
n
"Create Packages as Dependency Containers" on page 26
n
"Specify Package Conflicts" on page 27
n
"Specify Provides for Packages" on page 29
b. Click Files. Import the installation files, add pre-command files, configure the commands and
arguments, and add post-command files. See "Add Commands, Arguments, and Scripts to
Packages" on page 30 for more information.
c. Click Save to save the setting and files as a Project (*.prj).
d. Click Generate to save the project as a package (*.crate).
3. Click Package Signing. Sign the package with a signing certificate. See "Sign Packages with
Certificates" on page 32 for more information.
a. Click Open to select a package (*.crate file).
b. Click Sign. Select a certificate from the certificate store or from a file.
4. Click Manage Repositories. Select the platforms and sections to which you are publishing the package.
a. Click Add Platforms to add a platform. See "Add Platforms and Sections to Repositories" on page
40 for more information.
b. Select a platform, and then click Add Sections.
c. Select a section, and then click Publish Package. See "Publish Packages to Repositories " on page 41
for more information.
d. Select the package (.crate), and then click Open. The Publish Package dialog box appears.
e. (Optional) Select additional platforms and sections to which to publish the package.
f. Click Publish. The package is published to the software repository.
5. Click External Software. Add externally managed software, especially any packages specified as
vCenter Configuration Manager Software Provisioning Components Installation and User's Guide
24 VMware, Inc.
Page 25

depends or conflicts in any of your packages.
a. Click New External Package and replace the text with the name you will use as an external
software package name.
b. Type a version number in the Version text box.
c. Select the Architecture in the drop-down list.
d. Click Select Attribute Name and select a registry property or WMI attribute in the drop-down list.
e. Add attributes. See "Define External Software Attributes" on page 46 for more information.
f. To save a copy locally, click Save .
g. Click Publish External SW to publish to the repository.
Create Packages with Dependencies
Package dependencies are a way to specify prerequisites for the installation of the current package or to
install several packages with one action.
Dependencies can be used to identify and install prerequisite packages that must be installed before the
software package you are configuring can be installed. The packages on which a package is dependent on
are specified on the Depends tab, located on the Properties tab, when you create the package.
For example, you need to install SQL Server 2005 SP3 on your servers with SQL Server 2005 in order to
meet system requirements. You create a package for the service pack (sqlserversp) and include sqlserver
>= 9.00.1399.068 as a dependency for the sqlserversp installation. When the sqlserversp package is
installed, Package Manager checks for dependencies. In this example,sqlserver >= 9.00.1399.06 is a
dependency. It then checks the installed packages on the target machine for sqlserver >= 9.00.1399.06 as an
installed package. If Package Manager determines that the prerequisite package, sqlserver, is not installed,
it downloads this package from the software repository and installs it. After the dependency is installed,
package manager installs the files contained in the sqlserversp package.
You can also specify dependencies on applications that are not managed as packages and not installed
using Package Manager by using External Software. If you added sqlserver, version 9.00.1399.06, to your
external software application list, then the check for a dependency will begin with installed packages. If
sqlserver is not found as an installed package, Package Manager then checks the external software list for
an entry for sqlserver >= 9.00.1399.06. If it finds one, checks the attributes, verifies the application is
installed, it considers the dependency met and continues with the installation of sqlserversp.
A best practice is to add any package you use as a dependency to the External Software list. This ensures
that even externally installed software is processed by Package Manager at installation time. See "About
External Software" on page 43 for more information.
Prerequisite
To use the dependency packages at installation time, they must exist in the repositories. If the specified
dependency packages do not exist in the repositories, the current package is not installed on the target
machines.
Procedure
1. Start the VMware vCenter Configuration Manager Package Studio.
2. Click Manage Packages.
The package configuration tabs appear.
3. On the Properties tab, click the Depends sub-tab.
Using Package Studio to Create Software Packages and Publish to Repositories
VMware, Inc. 25
Page 26
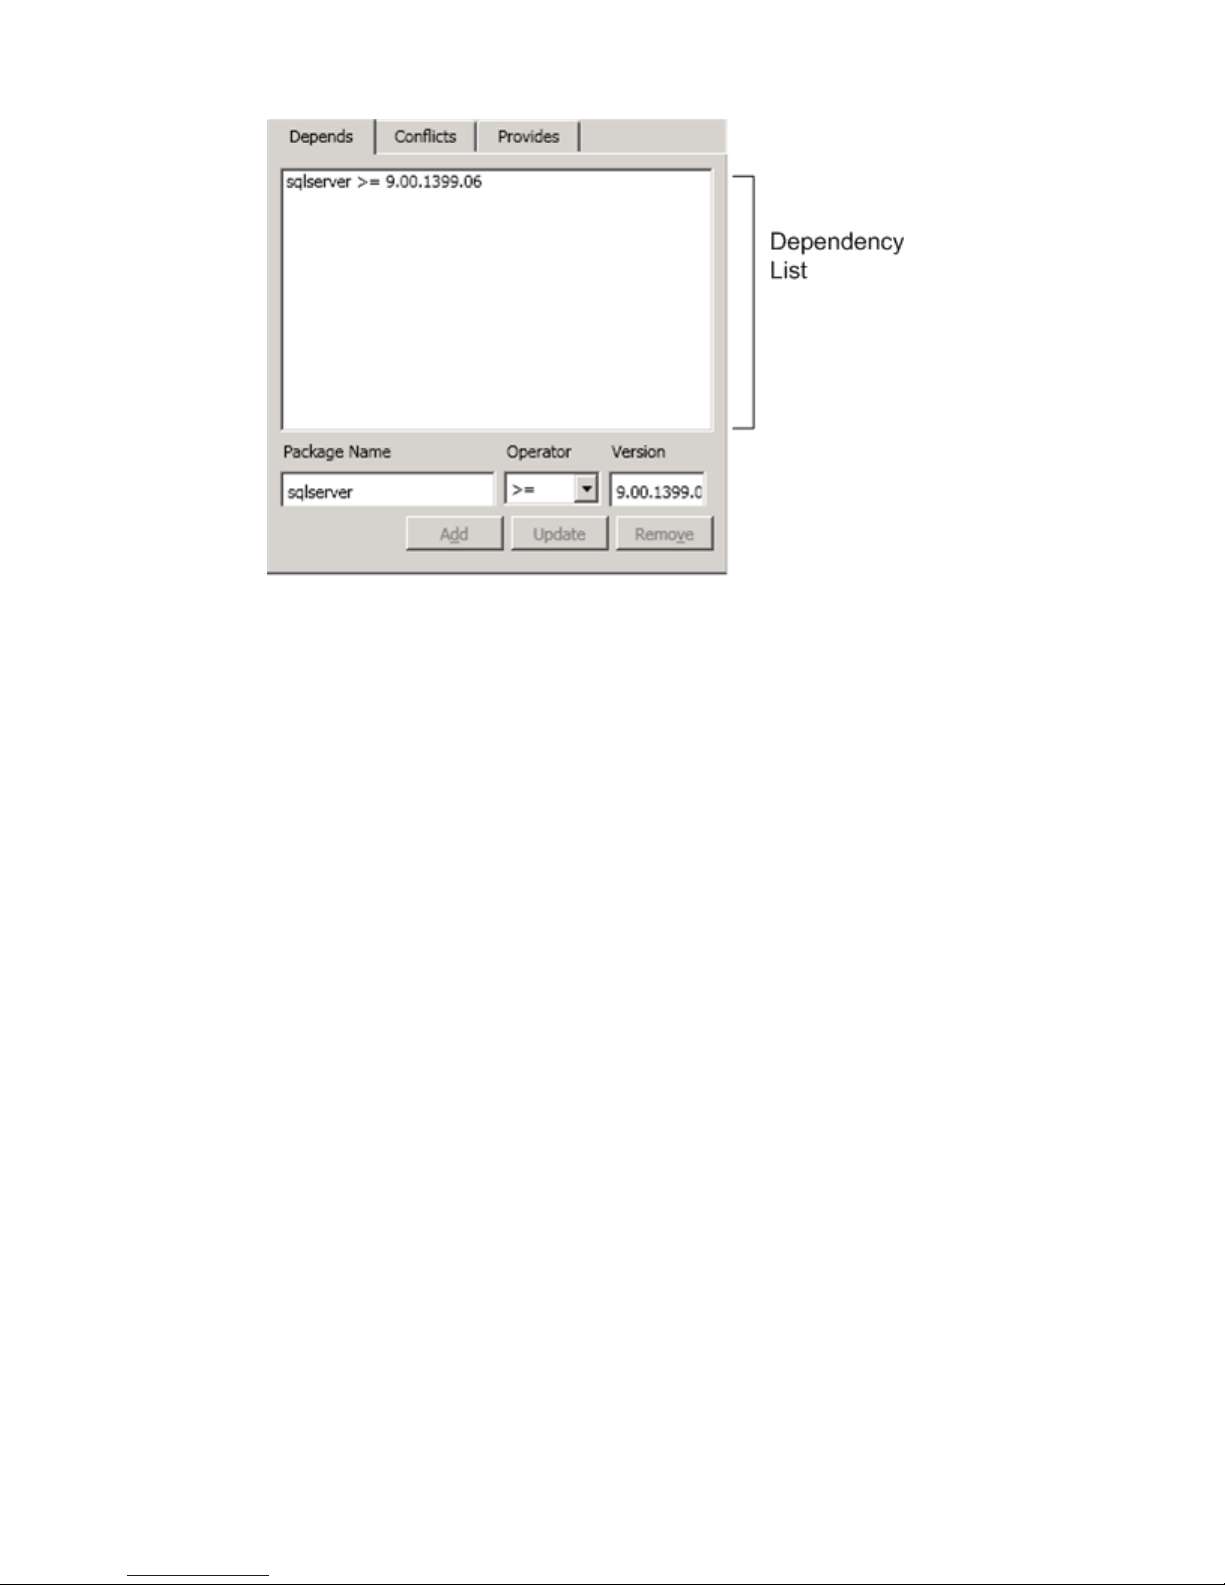
4. In the Package Name text box, type the name of the package. The package name typed in the text box
must match the name of the package as it exists in the software repositories. For example, if you create
a dependency for a sqlserver >= 9.00.1399.06, a package with the name sqlserver must exist in the
repositories in order for the dependency to be met.
5. In the Operator drop-down list, select the operator used to specify the required version.
6. In the Version text box, type the version of the dependency package that must be installed before the
current package is installed.
7. Click Add.
Create Packages as Dependency Containers
You can use package dependencies as a way to install several packages with one action. You can create
packages without any installation files but containing multiple dependencies for all the software packages
you want to install. This package serves as the container for multiple package dependencies.
The packages are specified on the Depends tab when you create the package. At the time of installation the
Package Manager will review the installed packages it knows to be installed on the machine, identify any
packages that are not yet installed, look through the repository, locate the candidate packages, and then
install the files.
During installation, the dependencies are not processed in the order they appear in the list. If you need
packages to install in a particular order, you should "chain" the packages. For example, if antivirus must be
installed before backuptools, you should make antivirus a dependency of backuptools rather than
including it as a dependency in the current package, as displayed in the example.
In the following procedure, a collection of packages are added to one package to install on a newly
configured server. The dependency packages are backuptools, sqlserver, and antivirus.
vCenter Configuration Manager Software Provisioning Components Installation and User's Guide
26 VMware, Inc.
Page 27
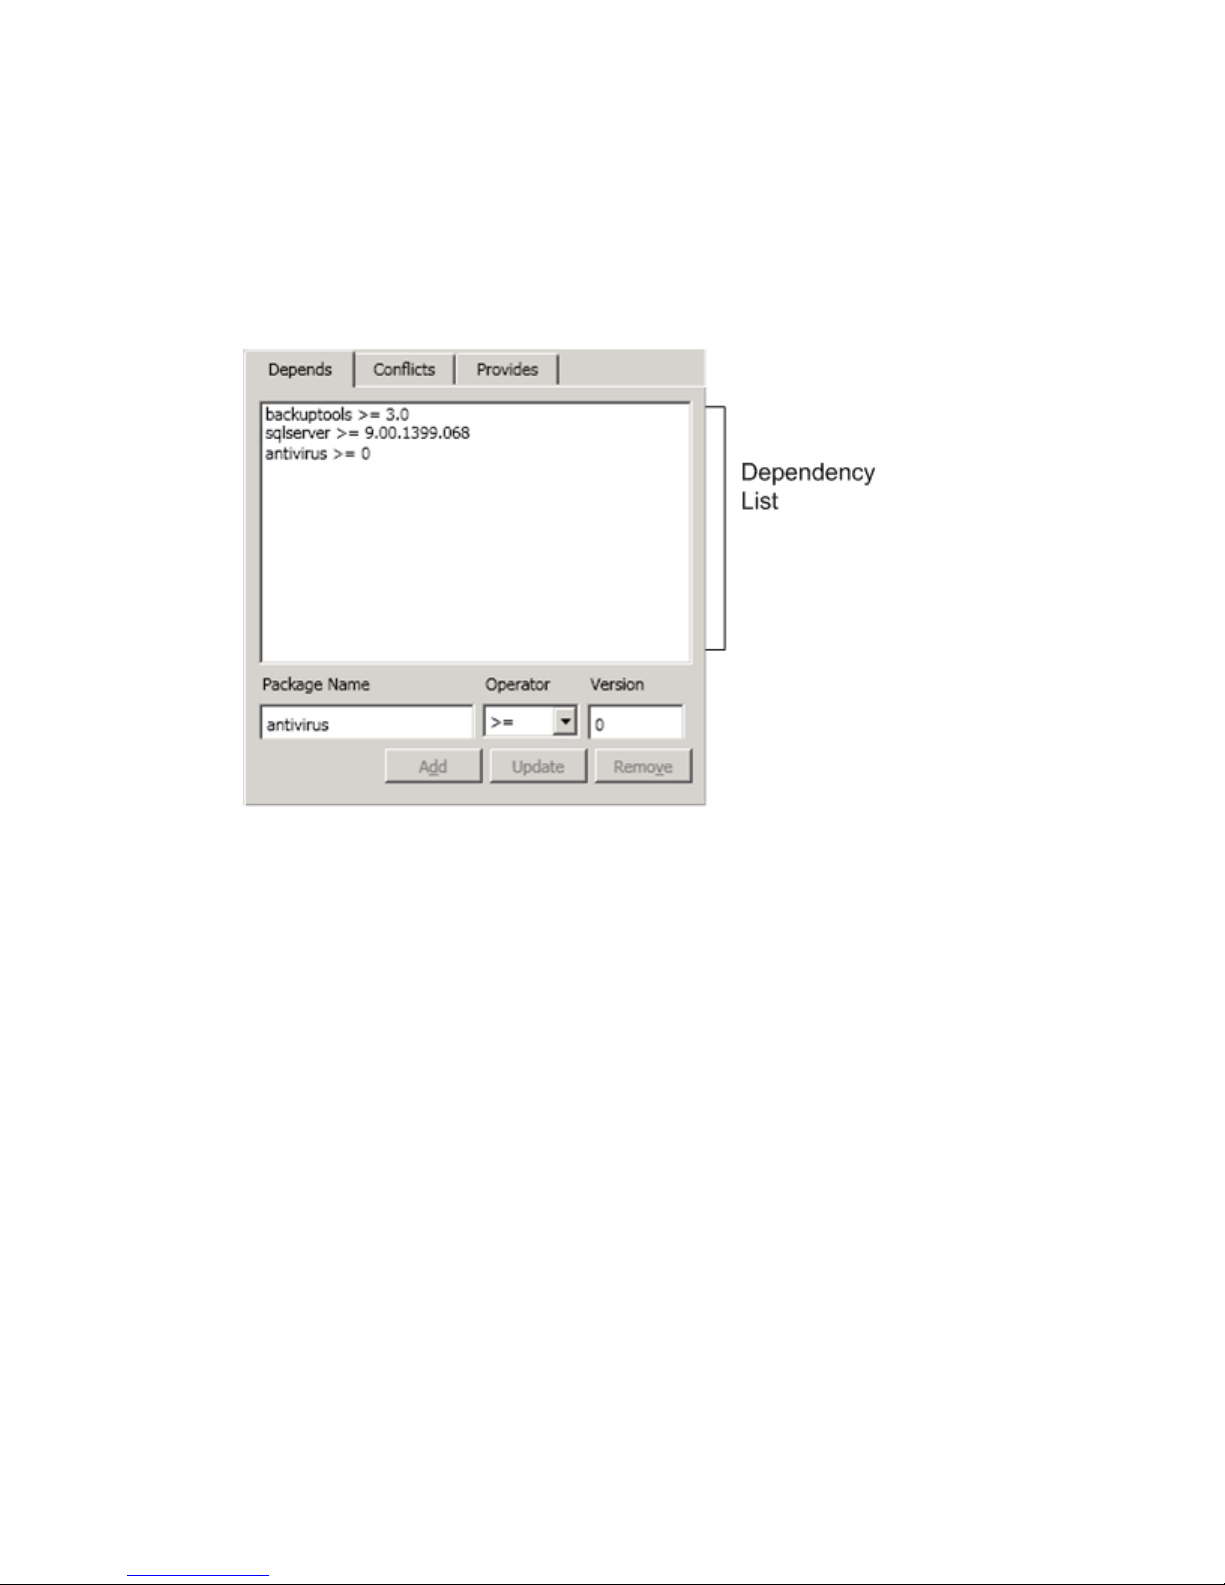
Procedure
1. Start the VMware vCenter Configuration Manager Package Studio.
2. Click Manage Packages.
The package configuration tabs appear.
3. On the Properties tab, click the Depends sub-tab. (Examples of other dependencies, such as Conflicts
or Provides are described later and in the online Help.)
4. In the Package Name text box, type the name of the package. The package name must match the
name of the package as it exists in the repositories. For example, if you create a dependency for a
backuptools>= 3.0, a package with the file name backuptools_<version equal or later than value>_
<architecture> must exist in the repositories in order for the dependency to be met.
5. In the Operator drop-down list, select the operator used to specify the required version.
6. In the Version text box, type the number of the version required to calculate the dependent version.
7. Add other dependencies as needed.
Specify Package Conflicts
Some software packages adversely affect other software packages when they are installed on the same
machine. When creating a software package, you can specify the names of packages that conflict with the
package you are creating. Then, during installation, if a conflicting package is found on the target machine,
the current package is not installed.
For example, installing McAfee and Norton antivirus on the same machine is known to cause conflicts in
your environment. When creating a software package for each, you can specify the opposing package
name on the Conflicts tab of each package. Then, when installing the mcafee package, Package Manager
looks at the specified conflicts for the package. If norton is listed, it reviews the installed software package
list to determine if norton is installed. If norton is installed, mcafee is not installed. If norton is not installed,
the mcafee installation proceeds.
Using Package Studio to Create Software Packages and Publish to Repositories
VMware, Inc. 27
Page 28

You can also specify conflicts on applications that are not managed as packages and not installed using
Package Manager by using External Software. Then, when installing the mcafee package, Package
Manager looks at the specified conflicts for the package. If norton is listed as a conflict, it reviews the
installed software package list to determine if norton is installed. If norton is not installed, it then checks
the external software application list and determines if it is installed. If norton appears as installed as either
an installed package or as an installed external software application, mcafee is not installed. If it is
determined that norton is not installed, the mcafee installation proceeds.
A best practice is to add any package you specify as a conflicts to the External Software list. This ensures
that even externally installed software is processed by Package Manager at installation time. See "About
External Software" on page 43 for more information.
Depending on the application, it is possible to install multiple versions of the software on a machine with
no ill effects, while other applications will not work properly if there is more than one version installed.
Using conflicts, you can specify that a package should not be installed if a previous version is installed. For
example, you currently have version 2 of a package installed, and you want to install version 3. You
specify in the version 3 package that it conflicts with version 2. During the installation of version 3 you are
informed that version 2 conflicts with version 3. You uninstall version 2, and then run the version 3
installation again. This time, not finding the conflicting package, it will install version 3. When version 4 is
released, you specify in the version 4 package that it conflicts with version 2 and version 3. Then, if either
version 2 or 3 is currently installed, you are notified of the conflict and can then uninstall the older package
before installing version 4.
Procedure
1. On the Properties tab, click the Conflicts sub-tab.
2. In the Package Name text box, type the name of the package. The package name type in the text box
must match the name of the package as it exists in the software repositories.
3. Click Add. The value is added to the dependency list.
4. Add other dependencies as needed.
vCenter Configuration Manager Software Provisioning Components Installation and User's Guide
28 VMware, Inc.
Page 29

Specify Provides for Packages
Specifying what a package Provides works in two ways.
Provides the Application
The package you are creating also installs another application; it provides the other application.
For example, SQL Server 2008 (sqlserver) installs .Net 3.5.1, so you can add dotnet to the package
properties Provides tab. Assuming that sqlserver is then installed on a machine, and you later install a
package where a dependency on dotnet => 3.0 was configured, Package Manager first looks to see if a
dotnet => 0 was installed. If not found, it checks installed packages to determine if any provide dotnet. If it
finds the sqlserver package is installed with a Provides value of dotnet, it considers the dependency met
and installs the package.
Provides a Type of Functionality
You want to classify the package you are creating as an general application type; it provides a type of
functionality.
When using Provides to specify a type of functionality you are specifying that it provides a logical package
rather than a concrete package. This logical package name is a generic name applied to any one of a group
of packages, all of which provide similar functionality.
For example, you create a package for McAfee (mcafee) where the Provides tab is configured with the
logical package name of antivirus and the Conflicts is configured with norton. You then create a package
for Norton (norton) where the Provides tab is configured with the logical package name of antivirus and
the Conflicts tab is configured with mcafee.
You now have two packages configured to provide anitvirus as a logical package. Now, when you create a
Cisco VPN package (cisco-vpn), which requires some form of antivirus be installed first, you specify
antivirus >= 0 on the Depends tab.
During the installation of the cisco-vpn package, the process first checks dependencies. It sees a
dependency for antivirus =>0. It reviews the installed packages. If no antivirus package is identified, it
checks installed packages to determine if any provide antivirus. If found, it considers the antivirus
Depends criteria has been met and installs. If not found in any installed packages, it reviews the repository
packages for a package named antivirus. If not found, the installation stops and a message tells you that
cisco-vpn depends on antivirus, and antivirus could not be found. You install mcaffee or norton, and then
retry the install of cisco-vpn. This time the cisco-vpn install will find the provided antivirus and the
installation will continue.
Using Package Studio to Create Software Packages and Publish to Repositories
VMware, Inc. 29
Page 30

Procedure
1. On the Properties tab, click the Provides sub-tab.
2. In the Package or Logical Package text box, type the name of the package or functionality type. Use
lower case. Although the text box allows you to use mixed case, the dependencies and conflicts will
process only lower-case names.
3. Click Add. The value is added to the Provides list.
4. Add other Provides as needed.
Add Commands, Arguments, and Scripts to Packages
To use Package Manager to install and remove packages, you must configure the Files tab with the
appropriate commands, arguments, and optional pre- and post-command scripts to be run before and
after the installation command.
Every application has unique command and script requirements. Consult the documentation issued for the
application for which you are creating a package when configuring the Files tab options.
Referencing Response Files Using System Environment Variables
Some software installations require a response file during the install process. To accommodate the need
for a response file you can add the %CrateWorkingDirectory% system variable to your arguments when
you configure the installation and removal options.
For example, you are creating a package where the .msi requires a response file named settings.ini. You
include the settings.ini file in your Project Data Directory files, and then configure the Arguments with the
correct reference. In this example, the Argument is /q
settings="%CrateWorkingDirectory%\Data\settings.ini".
The value %CrateWorkingDirectory%\Data\ is required, after this value you add any subdirectories that
exist in your Project Data Directory. For example, the settings.ini may be in a folder named InstallSettings,
in which case the argument is /q settings="%CrateWorkingDirectory%\Data\InstallSetting\settings.ini".
vCenter Configuration Manager Software Provisioning Components Installation and User's Guide
30 VMware, Inc.
Page 31

When the package begins installing, the referenced files are downloaded to the target machine's TEMP
directory, and then processed by the .msi.
Referencing License Files
The use of license files in the package command line options varies between applications. Some can be
referenced in a shared location, using the system environment variables described above, or included in a
.bat file, while others may be applied on a user-by-user basis. Consult the product publisher's
documentation for the application for which you are creating a package to determine how you can include
the information in the package.
Prerequisites
Installation and removal files are accessible to Package Studio users.
Optional pre- and post-command scripts are accessible to Package Studio users.
Procedure
1. Click the Files tab.
2. In the Select Files to Import area, click Select Folder. The Browse for Folder dialog box appears.
3. Browse to the folder containing the files to include in the package. Click OK. The file path is added to
the text box.
4. Click Import Files Into Project. The contents of the folder specified in the file path text box are added
to the project and the file and sub-folders are displayed in the Project Data Directory area.
5. In the Project Data Directory area, you may have the following options:
n
To add, remove, or rename the files in the folder, click the Folder button. The folder contents are
displayed. When the folder contents are properly organized, close the window.
n
To update the displayed files, click the Refresh button.
6. Configure the commands and arguments for installing the package. In the process type drop-down
list, located above the Pre-Command File label, select Installation.
7. (Optional) To specify a script to run before installation, for example, to shut down a service, click Add
on the Pre-Command File line. Browse to the location of the pre-command executable file type. The
file required by Package Studio begins preinst*.*. To see all files, type *.* in the File name text box.
Click Open to select the file. The file is renamed preinst.<extension> and is displayed after the Pre-
Command File label.
8. If the command used to run the installation is displayed in the Project Data Directory, select the .exe or
.msi, and then click Set Command. You may also type the command in the text box. The Command
text box must display the name of the command to be run, it does not have to be a command from the
file list.
9. In the Arguments text box, type the arguments you want to apply to the installation process when it is
run. Separating the arguments from the command allows for consistent behavior and better tracking
of results.
10. (Optional) To specify a script to run after installation, for example, to restart a service, click Add on the
Post-Command File line. Browse to the location of the post-command executable file type. The file
required by Package Studio begins postinst*.*. To see all files, type *.* in the File name text box. Click
Open to select the file. The file is renamed postinst.<extension> and is displayed after the Post-
Command File label.
Using Package Studio to Create Software Packages and Publish to Repositories
VMware, Inc. 31
Page 32

11. (Optional) Select Force Reboot after command if the package requires a reboot after installation.
IMPORTANT If you select this option, the target machines will reboot after installation of the current
package without regard to time of day, state of the machine, or other factors.
12. To configure the associated removal command, repeat the above process after selecting Removal in
the drop-down list. The files, commands, arguments, and pre- and post-command options may all be
different for each of the actions.
Using Signing Certificates with Software Packages
When creating packages, you have the option to sign the package with a software signing certificate.
Signing a package ensures that package is from an authorized source and has not been altered since it was
published before it are installed on your machines.
About Signing Certificates and Installing Software Packages
Signing packages is an optional function; however, signing software packages is commonly part of the
best practice for proper network security. If you are unfamiliar with certificates, you should have a
network administrator who is familiar with certificate management assign you one with a private key.
You can publish unsigned packages to repositories, but this is not recommended.
If you are familiar with certificates, and decide to sign packages, you must be able to meet the following
prerequisites in order to sign and install packages:
n
The signing certificate must be a trusted certificate.
n
The signing certificate has a private key.
n
The user signing the packages has access to the signing certificate's private key when signing a package.
Access can be to the Certificate Store containing the certificate, an exported .pfx file of the certificate, or
an exported .pvk file of the certificate.
n
The public key of the signing certificate you used to sign a package is available on all the machines on
which you are installing packages.
Using a certificate with an expiration time will require you to generate and publish revised packages after
the certificate expires. If the certificate passes the expiration time, the packages must be individually edited
to point to a different and valid certificate, or new packages must be created.
Sign Packages with Certificates
You have the option to use a certificate to sign the packages you create. For more information about
certificates, see "About Signing Certificates and Installing Software Packages" on page 32.
Signing packages is an optional function; however, signing software packages is commonly part of the
best practice for proper network security. If you are unfamiliar with certificates, you should have a
network administrator who is familiar with certificate management assign you one with a private key.
You can publish unsigned packages to repositories, but this is not recommended.
vCenter Configuration Manager Software Provisioning Components Installation and User's Guide
32 VMware, Inc.
Page 33

Prerequisites
To successfully create and install signed packages, you must have the following:
n
The signing certificate must be a trusted certificate.
n
The signing certificate has a private key.
n
The user signing the packages has access to the signing certificate's private key when signing a package.
Access can be to the Certificate Store containing the certificate, an exported .pfx file of the certificate, or
an exported .pvk file of the certificate.
n
The public key of the signing certificate you used to sign a package is available on all the machines on
which you are installing packages.
Procedure
1. Click Package Signing.
2. If you do not have a package open, click Open.
The Browse for Package dialog box appears.
3. Locate the *.crate file you are signing, and then click Open.
The path and file name are displayed after Package, located below the toolbar.
4. Click Sign.
The Select Signing Certificate dialog box appears.
5. Select one of the following options, and then click Browse:
n
Select signing Certificate from Windows Certificate Store
a. The Browse for Signing Certificate dialog box appears, displaying the contents of the
Windows Certificate Store.
b. Locate the appropriate signing certificate in the store. It must have a private key. To limit the
displayed certificates to only those with private keys, click the top nodes in each of the displayed
trees, Current User and Local Machine. Only the certificates with private keys are displayed.
c. Click Select.
The certificate is added to the text box on the Select Signing Certificate dialog box.
n
Select signing certificate from file (.pfx, .pvk)
a. The Browse for Signing Certificate dialog box appears, displaying certificate files.
b. Locate the exported certificate *.pvk or *.pfx file.
c. Click Open.
The certificate is added to the text box on the Select Signing Certificate dialog box.
6. Clear or select the Requires Password check box, depending on whether the selected certificate file has
a password.
If you select the check box, type the password in the text box.
7. Click Select.
8. Review the Package Signature and Security Status area. The following values indicate a successfully
Using Package Studio to Create Software Packages and Publish to Repositories
VMware, Inc. 33
Page 34

signed package:
n
Package Signing: Signed
n
Signature Validation: Valid
n
Package Validation: Valid
Editing Packages
You can either edit the project (*.prj) from which you originally created a package (*.crate) file or create a
new project based on an existing package (*.crate) file.
You cannot directly edit a package, you can only edit a project. When the project contains your changes,
you first generate a package (*.crate), and then you publish it to the your repositories; however, you must
be careful to properly version the new package to ensure that Package Manager can process it correctly
when installing or uninstalling the package.
Edit Published Packages
After publishing a package, you may need to modify one or more of the settings to improve performance
or to adapt the package to changing system needs. For example, the dependencies or arguments for
installation must change in order to accommodate new company requirements.
To edit, either open an existing project or create a new project from an existing .crate file, generate the
revised .crate file, and then publish the revised version of the package to the repositories.
Best Practices
When editing a project, you should use the following best practices:
n
When you generate a new package from a project, you should modify the version, located after the
UpstreamVersion in the version format. For example, if the previous version was 3.5.1-a where "-a" is
the local package version, change the version to 3.5.1-b, indicating this is a revision of the package
rather than the version of the application you are installing.
n
Never unpublish a package from a live repository. Unpublishing disables Package Manager ability to
run removal actions. Unpublish also disables Package Manager's awareness of version changes.
Prerequisites
The package to be used as the base package is saved as a project (*.prj) or as a generated package (*.crate)
saved locally, and the files are available to Package Studio user.
Procedure
1. Click Manage Packages.
2. Use one of the following methods, depending on the type of file with which you want to work:
n
Project (*.prj):
a. Click Open. The Choose a project dialog box appears.
b. Select the project (*.prj).
c. Click Open. The Properties, Files, and Signing tabs now display the settings of the source
project.
vCenter Configuration Manager Software Provisioning Components Installation and User's Guide
34 VMware, Inc.
Page 35

n
Package (*.crate):
a. Select New | Project from Package. The New Project dialog box appears.
b. In the Project Name text box, type a name that will be saved as a .prj file.
c. Specify the Project Directory.
d. Click OK. The Choose a package dialog box appears. Browse to the location of the .crate file
you are editing. You can use a local copy or browse to a repository if there is not a copy save
locally.
e. Click Open. The Properties, Files, and Signing tabs now display the settings of the source
package.
3. Make any necessary changes, for example, add a command line argument or post install script.
4. On the Properties tab, update the Version. The best practice is to add or modify the package version,
after the UpstreamVersion in the version format. For example, if the previous version was 3.5.1-a
where "-a" is the local package version, change the version to 3.5.1-b, indicating this is a revision of the
package rather than the version of the application you are installing.
5. Click Save. Saving the .prj file provides a backup of the package settings. In the Save project dialog
box, browse to the location of your project files (*.prj files), and then click Save.
6. Click Generate.
Generating the .crate file provides a copy of the package that you can publish now or later, and edit
again if necessary.
7. In the Generate Software Package for Windows dialog box, browse to the location of your saved
packages (*.crate files), and then click Save. The new version and architecture are automatically
appended to the file name.
8. Click the Manage Repositories tab.
9. Select a section in a platform to which you are publishing the package.
10. Click Publish Package.
The Choose a Package dialog box appears.
11. Select the .crate file to publish, and then click Open.
The Publish a Package dialog box appears.
12. Select the platforms and sections where you want the package categorized. See "About Repository
Platforms and Sections" on page 39 for more information.
13. Click Publish.
The package is added to the repository. If it published to repository source already added to Package
Manager, the package is immediately available for installation.
Using Package Studio to Create Software Packages and Publish to Repositories
VMware, Inc. 35
Page 36

Create New Package from Existing Projects or Packages
It is sometimes easier to create a new package from an existing project or package, allowing you to
leverage existing configuration settings. For example, a new software version is issued. When researching
the changes, you determine that the installation command information is the same for new software as it
was for the previous version. In this case it may be faster to use the previous package as the base for the
new package. You would need to change the version, the description, and the installation files, but you can
use all the dependencies, and the pre- and post-commands.
Prerequisites
The package to be used as the base package is saved as a project (*.prj) or as a generated package (*.crate)
saved locally, and the files are available to Package Studio user.
Procedure
1. Click Manage Packages.
2. Use one of the following methods, depending on the type of file with which you want to work:
n
Project (*.prj):
a. Click Open. The Choose a project dialog box appears.
b. Select the project (*.prj).
c. Click Open. The Properties, Files, and Signing tabs now display the settings of the source
project.
n
Package (*.crate):
a. Select New | Project from Package. The New Project dialog box appears.
b. In the Project Name text box, type a name that will be saved as a .prj file.
c. Specify the Project Directory.
d. Click OK. The Choose a package dialog box appears. Browse to the location of the .crate file
you are editing. You can use a local copy or browse to a repository if there is not a copy save
locally.
e. Click Open. The Properties, Files, and Signing tabs now display the settings of the source
package.
3. On the Properties tab, update the Version and the Description so you can continue to track the
changes to the package. Edit any other settings as needed.
4. On the Files tab, modify files, commands, and scripts as needed.
5. Click Save. Saving the .prj file provides a backup of the package settings. In the Save project dialog
box, browse to the location of your project files (*.prj files), and then click Save.
6. Click Generate.
Generating the .crate file provides a copy of the package that you can publish now or later, and edit
again if necessary.
7. In the Generate Software Package for Windows dialog box, browse to the location of your saved
packages (*.crate files), and then click Save. The new version and architecture are automatically
appended to the file name.
8. Click the Manage Repositories tab.
9. Select a section in a platform to which you are publishing the package.
vCenter Configuration Manager Software Provisioning Components Installation and User's Guide
36 VMware, Inc.
Page 37

10. Click Publish Package.
The Choose a Package dialog box appears.
11. Select the .crate file to publish, and then click Open.
The Publish a Package dialog box appears.
12. Select the platforms and sections where you want the package categorized. See "About Repository
Platforms and Sections" on page 39 for more information.
13. Click Publish.
The package is added to the repository. If it published to repository source already added to Package
Manager, the package is immediately available for installation.
Using Package Studio to Create Software Packages and Publish to Repositories
VMware, Inc. 37
Page 38

vCenter Configuration Manager Software Provisioning Components Installation and User's Guide
38 VMware, Inc.
Page 39

Using Software Repository for Windows
4
Software Repository for Windows is the shared location to which packages are published by Package
Studio and the location from which Package Manager downloads packages for installation.
You manage the contents of repositories with Package Studio and specify the repository sources, the
platforms and sections, from which to install or remove software packages using Package Manager.
About Repository Platforms and Sections
When you publish a package to a repository, you specify one or more platforms and sections. Platforms
and sections are the hierarchy used to organize software in repositories.
To publish packages to a repository, you must define at least one platform. Each platform must include at
least one section.
Platforms
The platform value can be used to define the operating system architecture on which the package can be
installed. In other repository systems, such rpm, it is common for the platform to represent the operating
system architecture.
Package Manager does not detect the architecture of the operating system on which it is running and it is
therefore unable to automatically identify the platform version required for installation on the target
machine. It is up to you to specify the packages based on well-defined platforms in repositories.
Create and use platforms to help manage your software package distribution based on the operating
system platforms on which they can be installed. When you use a greater level of specificity, it will result in
smaller groups of packages and will increase the predictability of what packages are installed.
Providing consistent naming across all repositories is important to successfully managing multiple
repositories and installing packages.
For example, you may specify platforms as follows:
n
Any
n
Any_32
n
Any_64
n
Win2k3
n
Win2k3_32
n
Win2k3_64
VMware, Inc. 39
Page 40

By including the 32- and 64-bit references in the platform names, you will be better able to ensure the
correct version of package is installed on target machines.
Sections
Sections are used to further refine how your packages are organized in each platform. Sections are used to
specify the repository sources for Package Manager, allowing you to control which packages are available
to which machines.
How you use sections can be adapted to your particular business needs. The following are examples of
how you can use sections:
n
Business Groups: Marketing, sales, front office, back office, research and development.
n
Development State: In development, testing, production.
n
Traditional IT Software Management Structure: Software publisher, department (business groups),
license type (limited or site license).
Sample Platforms and Sections
The following example uses the suggested platform organization and a version of the traditional IT
software management structure.
In VMware vCenter Configuration Manager Package Studio, the platforms and sections displayed on the
Manage Repositories tab are based on your [path]\<your repository name>\.hive\repository.toc file. You
can edit the file contents directly if you are configuring an initial repository with detailed structure.
Add Platforms and Sections to Repositories
Using the Manage Repositories tab you can add platforms and sections, and then publish packages to the
repository sections. See "About Repository Platforms and Sections" on page 39 for more information
regarding best practices when creating platforms and sections.
vCenter Configuration Manager Software Provisioning Components Installation and User's Guide
40 VMware, Inc.
Page 41

Procedure
1. Start the VMware vCenter Configuration Manager Package Studio.
2. Click the Manage Repositories tab.
3. Select your Repository Host in the drop-down list.
4. Select the Repository in the drop-down list.
If you previously added platforms and sections to the repository, the tree view pane will display the
names in a tree view. If this it the first time you have worked with this repository, the left-hand pane is
blank.
5. Click Add Platform.
The Add Platform dialog box appears.
6. Type a name, and then click OK.
The platform is added to the tree view.
7. Select the platform, and then click Add Section.
The Add Section dialog box appears.
8. Type a name, and then click OK.
The section is added below the selected platform in the tree view.
9. Continue adding sections to a platform, or add more platforms and sections.
After creating the platforms and sections, you can now publish your packages.
Publish Packages to Repositories
Publishing packages to a repository makes the packages available to the Package Manager to add as a
source. The Package Manager is the application that manages the installation and removal of packages on
target machines.
Prerequisites
You have generated one or more packages (*.crate) that you are ready to publish to your repository. See
"Creating Packages" on page 23 for information about creating and generating packages.
Procedure
1. Start the VMware vCenter Configuration Manager Package Studio.
2. Click the Manage Repositories tab.
3. Select your Repository Host in the drop-down list.
4. Select the Repository in the drop-down list.
If you previously added platforms and sections to the repository, the tree view pane will display the
names in a tree view. If this is the first time you have worked with this repository, the left-hand pane is
blank. For more information about adding platforms and sections, see "Add Platforms and Sections to
Repositories" on page 40.
5. Select a section to which you are adding a package.
6. Click Publish Package.
The Choose a package dialog box appears.
Using Software Repository for Windows
VMware, Inc. 41
Page 42

7. Select the .crate file to add to the section.
8. Click Open.
The Publish Package dialog box appears, allowing you to select additional platforms and sections to
which you can publish the package.
9. Select the check boxes for additional platforms and sections, and then click Publish.
The package is added to the selected platforms and sections, and the package information is displayed in
the packages list.
If the section is identified as a source to the Package Manager or in VCM, the new package is now
available. To add sources, see "Add Repository Sources " on page 49.
vCenter Configuration Manager Software Provisioning Components Installation and User's Guide
42 VMware, Inc.
Page 43

Using External Software
5
External Software is software not installed and managed by the Package Manager. It is either already
installed before you begin managing software with Package Manager, or it is software you choose to
install individually.
About External Software
External Software is used to define the attributes by which software that was not installed by Package
Manager as part of a package is identified on target machines.
Identifying externally managed software is required to ensure the proper processing of dependencies and
conflicts when a package is installed on a machine where software was not installed by Package Manager.
If external software is not properly identified, you may install a second copy of an application because it
was specified as a dependency in a package, or you may install a package on a machine where externally
installed software was identified as conflicting with the package.
When adding entries to the external software list, the naming of the applications follows the same naming
conventions as a regular package (<externalpackagename>_<version>_<architecture>), but each one
contains one or more user-defined attributes rather than files. Once added to the list, the entries are
referred to in this documentation as external software packages.
External software package attributes serve as external package definitions. Each attribute consists of an
attribute name and value. The name is selected from the drop-down list, and the value is added to the text
box.
When the external software list is published to the repository, the file name is Repository.options. The file
is published to the .hive folder in the repository files. Each repository can contain only one
Repository.options file. Therefore, the published Repository.options file list should contain definitions of
all the applications you are using as dependencies and specifying as conflicts for software packages
managed by the repository.
Best Practices
When you add a dependency or specify a conflict in any package, you should define the external software
attributes for each depends or conflicts package. This practice ensures that machines where applications
are already installed will be properly processed by Package Manager at installation time.
If an application has not been defined in the external software list and it was not installed by Package
Manager, the following may occur:
VMware, Inc. 43
Page 44

n
Depends: Package Manager will install a second copy of an application when it is specified as a
dependency.
n
Conflicts: Package Manager will install a package even though an externally installed application exists
on the machine that is specified as conflicting with the package being installed.
To avoid these undesirable results, you should add all externally managed software to the External
Software list, paying particular attention to packages specified as depends or conflicts in your packages,
and continue to publish updated versions to the repository to ensure Package Manager has the most
current list to reference when processing dependencies and conflicts during installation.
Adding Applications to an External Software List
Consider adding existing applications to your External Software list under the following circumstances:
n
You begin using software provisioning to install packages on machines already in use. Adding
previously installed applications to the External Software list and then publishing it to the repository
provides the mechanism by which Package Manager can verify the existence of the application on the
target machine. It makes applications not installed as packages visible to Package Manager, reducing
the need to re-install applications installed outside Package Manager.
n
You add dependencies to applications installed outside Package Manager. Even on a machine on which
only the basic operating system is installed, you will have certain applications that are already installed,
for example, Internet Explorer. Identify the applications, add them to the External Software list, and
publish the list to the repository used by the machines.
Managing External Software Lists
You can publish only one version of the list to a repository. After creating an initial list, add to the existing
list rather than publishing a new list. If you publish a new list to a repository, it overwrites the existing list.
Naming External Software Packages
When creating the name for the external software package (<New External Package>), apply the same
naming considerations you used when naming packages. By using the same naming conventions, you
ensure that Package Manager can process the defined external software "packages" as if they were actual
packages, even though they contain only attributes to check rather than installation files.
See "About Package Naming and Versioning" on page 21 for more information.
Defining Attributes
The list of attributes displayed in the Attribute Name drop-down list is based on values in the uninstall
registry keys, located in HKEY_LOCAL_
MACHINE\SOFTWARE\Microsoft\Windows\CurrentVersion\Uninstall (on 32-bit machines) or HKEY_
LOCAL_MACHINE\SOFTWARE\Wow6432Node\Microsoft\Windows\CurrentVersion\Uninstall (on
64-bit) and on properties defined in Windows Management Instrumentation (WMI)for installed software.
When creating attributes, make certain that the value entered in the Value text box correctly matches the
expected value for the application on the target machines.
How Package Manager Processes External Software during Installation
When instructed to install a package, Package Manager processes the request in the order described
below.
vCenter Configuration Manager Software Provisioning Components Installation and User's Guide
44 VMware, Inc.
Page 45

In the following example it is assumed that some of your target machines have SQL Server 2005 SP3
already installed. As you begin using software provisioning to manage software on your machines, you
should define a new external software package for sqlserver, using the appropriate version number to
represent the service pack. This external software package name matches the name of the other sqlserver
packages containing installation files for various versions.
Prerequisites for the Example
n
You added the following application definition to the External Software list and published it to your
repository (as an entry in Repository.options) based on the following example:
n
Application name = sqlserver
n
Version = 9.3.4035.00
n
Architecture = x86
n
Attributes and Values are:
n
InstallLocation = C:\Program Files\Microsoft SQL Server\
n
VersionMajor = 9
n
Using Package Manager, create a package (named serversetup in this example) containing a
dependency for sqlserver >= 9.0
n
The Repository.options file is published to repositories
Example Process Flow
Package Manager processes the content in the following workflow:
1. Package Manager receives a command to install serversetup.
2. Package Manager checks the dependencies in the serversetup package and determines that there is a
dependency on sqlserver equal to or later than version 9.0.
3. Package Manager checks the installed packages list to determine if a package meeting the criteria has
been installed.
n
If yes, it considers the dependency met and proceeds with the other serversetup installation
requirements.
n
If no, it checks the external software list as defined in the Repository.options.
4. Package Manager checks the external software package list.
If the name sqlserver, version 9.0 or later entry is found in Repository.options, Package Manager then
checks the specified attributes on the machine. In this example, it checks that HKEY_LOCAL_
MACHINE\SOFTWARE\Microsoft\Windows\CurrentVersion\Uninstall contain a registry key with
properties where InstallLocation = c:\Program Files\Microsoft SQL Server\ and VersionMajor = 9.
n
If the two attributes match, it considers the dependency met and proceeds with the other
serversetup installation requirements.
n
If one or more the attributes do not match, it checks the assigned repository sources for an
available package meeting the criteria.
5. Package Manager checks the available package list for a managed software package.
Using External Software
VMware, Inc. 45
Page 46

n
If it locates an available package meeting the criteria, sqlserver equal to or later than version 9, it
installs the package and considers the dependency met. Package Manager then proceeds with the
other serversetup installation requirements.
n
If it does not locate a package meeting the criteria, the serversetup package will not install. It cannot
be installed until the dependency for sqlserver equal to or later than version 9.0 is met.
Define External Software Attributes
External Software is used to define the attributes by which software that was not installed by Package
Manager as part of a package is identified on target machines.
Identifying externally managed software is required to ensure the proper processing of dependencies and
conflicts when a package is installed on a machine where software was not installed by Package Manager.
If external software is not properly identified, you may install a second copy of an application because it
was specified as a dependency in a package, or you may install a package on a machine where externally
installed software was identified as conflicting with the package.
When adding entries to the external software list, the naming of the applications follows the same naming
conventions as a regular package (<externalpackagename>_<version>_<architecture>), but each one
contains one or more user-defined attributes rather than files. Once added to the list, the entries are
referred to in this documentation as external software packages.
External software package attributes serve as external package definitions. Each attribute consists of an
attribute name and value. The name is selected from the drop-down list, and the value is added to the text
box.
When the external software list is published to the repository, the file name is Repository.options. The file
is published to the .hive folder in the repository files. Each repository can contain only one
Repository.options file. Therefore, the published Repository.options file list should contain definitions of
all the applications you are using as dependencies and specifying as conflicts for software packages
managed by the repository.
You will either be creating a new list or opening and adding to an existing list.
Prerequisites
You have identified software already installed using the publishers installer, not Package Manager, on one
or more machines in your network, and you have determined the attributes Package Manager uses to
determine if the application is installed. See "About External Software" on page 43 for more information
about naming and attributes.
Procedure
1. Start the VMware vCenter Configuration Manager Package Studio. The default location on the
Collector is C:\[installation location]\VMware\VCM\Tools\Package Studio\PackageStudio.exe.
2. Click External Software.
By default, a blank list appears. If you are adding to an existing list, click Open and browse to the
existing list you are editing. The saved file is <filename>.options.
3. Click <New External Software> and replace the text with the name you want to be treated as the
external software package name using the same conventions used for all package names. For example
adobeacrobatereader.
4. Type the version number in the Version text box.
5. Select the application architecture in the Architecture drop-down list.
6. Click <Select Attribute Name> and select a registry property or WMI attribute in the drop-down list.
vCenter Configuration Manager Software Provisioning Components Installation and User's Guide
46 VMware, Inc.
Page 47

7. Replace <New Attribute Value> with the exact string to match when verifying the value exists.
8. To add another attribute, click the green plus button. A new attribute row is added.
Continue defining as many attributes as required to verify presence of the application on the target
machine.
9. To define another application, click Add (located below the list), and repeat the process.
10. To save a copy locally, click Save.
The Save Repository Options dialog box appears. You can save it with a locally unique name
provided you do not change the .options extension.
11. Click Save.
The default save location is My Documents/Package Studio.
12. To publish the list to a repository, click Publish External SW.
The Publish Options dialog box appears.
13. Select a Repository Host name in the drop-down list.
14. Select a Repository name in the drop-down list.
15. Click Publish.
The file is published to your repository in the .hive folder as Repository.options.
Using External Software
VMware, Inc. 47
Page 48

vCenter Configuration Manager Software Provisioning Components Installation and User's Guide
48 VMware, Inc.
Page 49

Using Package Manager for Windows
6
Package Manager is the application installed on each machine to manage the installation and removal of
the software contained in packages. Package Manager is configured to use one or more repositories as
sources for packages.
The key components in the effective use of Package Manager is the proper creation of packages and
deploying the packages to repositories to which target machine has the necessary access.
Processing Dependencies
Working with packages, Package Manager is able to process the dependencies, Depends, Conflicts,
Provides, ensuring you do not install software on a machine that has negative results for the machine
users or affects the processes it runs.
For example, you have a machine where Package A is installed. You use Package Manager to install
Package B. The processing of the package includes checking the dependencies. In this example, Package B
is configured with a Conflicts with Package A. The installation does not proceed and the Package Manager
informs you of the conflict.
Security
As a standard security measure, Package Manager assumes that all packages must be signed with a private
key before they are installed or uninstalled. To accommodate organizations that do not use software
signing or where the immediate circumstances require you to ignore that signature, override options are
provided.
Add Repository Sources
A repository source is a section under a platform in a repository. Adding platforms and sections to the
repository allows you to control which repository sources the Package Manager for Windows uses when
installing and removing software. For example, a repository may contain platforms with both test sections
and release sections, but by making Package Manager aware of only the release sections, you ensure that
packages still in the testing phase are not added to the repository list and are therefore not available for
installation.
Additionally, you can add sources from more than one repository, and you can specify the order in which
the repository sources are queried.
The repository source list to which you are adding sources is repository.xml, located in C:\Documents
and Settings\All Users\Application Data\VMware\Wasp on each managed machine.
Prerequisites
The platforms and sections are defined in the repositories for which you are adding sources.
VMware, Inc. 49
Page 50

Procedure
1. At the Package Manager command prompt, type wasp listrepository. The currently defined sources
are displayed in a list.
2. Use one of the following methods to add repository sources:
n
To add repository sources to the end of the existing list, type wasp addrepository bin
<repositoryUri> <platformname> <sectionname> .
n
To add a repository and assign it a particular place in the list, type wasp insertrepository bin
<repositoryUri> <platformname> <sectionname> <indexnumber>. When using insertrepository, the
number specifies where the source is inserted in the repository source in the list, and therefore the
order in which the repository is processed when determining if a package is available for
download. A value of 0 (zero) puts the repository source at the top of the list.
See "Package Manager for WindowsCommand Line Options" on page 51 for more information about
other arguments related repositories.
3. Press Enter. The entry is added to the repository list.
4. Type wasp listrepository. The format (bin) and URI are displayed in the list along with the platform
and section.
Remove Repository Sources
A source is the combination of a platform and section in a repository. Removing repository platforms and
sections to the repository list allows you to control which repository sources the Package Manager for
Windows uses when installing and removing software.
CAUTION If you remove a repository source from which a particular package was installed, and the
package is no longer available in the local cratecache folder, you will not be able to uninstall the package.
Prerequisites
The repository entries exist in repository.xml, located in C:\Documents and Settings\All
Users\Application Data\VMware\Wasp.
Procedure
1. At the Package Manager command prompt, type wasp listrepository. The currently defined sources
are displayed in a list.
2. To remove a repository source, type wasp removerepository bin <repositoryUri> <platformname>
<sectionname>. See "Package Manager for WindowsCommand Line Options" on page 51 for more
information about other arguments related repositories.
3. Press Enter. The entry is removed from the repository list.
4. Type wasp listrepository. Verify that the repository source has been removed.
Install Packages
The installation of packages is run as a command line function. Installing a published package includes
processing dependencies.
Prerequisites
The package is listed as a repository source in Package Manager for Windows. See "Add Repository
Sources " on page 49 for more information.
vCenter Configuration Manager Software Provisioning Components Installation and User's Guide
50 VMware, Inc.
Page 51

Procedure
1. At the Package Manager command prompt, type wasp list all. The available packages are displayed in
a table.
2. Type wasp <switches> install "<packagename> <arguments>". See "Package Manager for
WindowsCommand Line Options" on page 51 for more information about the switches and
arguments related to installing packages.
3. Press Enter. The package is downloaded from the repository to the [path]\cratecache\ location. If
you did not use the /q=y switch, the command requires a response from you after downloading the
package. Type Y to install now. Type N if you want to install later.
4. Type wasp list. The package is displayed in the list as installed.
Remove Packages
Uninstalls the software included in the selected packages. Optionally, you can also uninstall any
dependencies not used by other software packages. The removal of packages is run as a command line
function.
Prerequisites
The package includes uninstall files and commands.
The package is located in the local cratecache folder or listed as a repository source in Package Manager for
Windows.
Procedure
1. At the Package Manager command prompt, type wasp list. The installed packages are displayed in a
table.
2. Type wasp <switches> remove "<packagename> <arguments>" . See "Package Manager for
WindowsCommand Line Options" on page 51 for more information about the switches and
arguments related to removing packages.
3. Press Enter.
4. If you did not use the /q=y switch, the command requires a response from you before running the
uninstall in the package. Type Y to uninstall now. Type N to cancel the uninstall process.
5. Type wasp list. The package is displayed in the list as installed.
Package Manager for WindowsCommand Line Options
Package Manager for Windows to installs and removes packages from the machines on which it is
installed. The following are the command line options that can be run on each machine where Package
Manager is installed.
Using the command line options, you can manage only one machine at a time.
To use the command line options, you must run the commands from the folder where wasp.exe is
installed. The default location is C:\Program Files\VMware\VCM\Tools\Package Manager for Windows.
Using Package Manager for Windows
VMware, Inc. 51
Page 52

Requirements and Considerations
n
Each command is preceded by wasp. For example, wasp update.
n
The switches and arguments are added in the following order:
1. wasp (the command)
2. switches (in any order)
3. command
4. arguments (use double quotes around the argument (for example, "sqlserver >= 9.00.1399.06-b"))
Example: wasp /q=y /AllowUnsigned=y install "sqlserver >= 9.00.1399.06-b"
Wasp Command Line Options
The commands, including arguments and switches, are described below:
vCenter Configuration Manager Software Provisioning Components Installation and User's Guide
52 VMware, Inc.
Page 53

Install Package
Command
Command Line
Arguments Command Line Switches Comments
install Install new packages.
package name Name of the package without the
.crate extension.
version Use <; >; =; <=; >= to specify
version. Include quotes around
the entire argument, for example,
"sqlserver >= 9.00.1399.06-b".
/LoginName For unattended installs requiring
reboot you can call install with
LoginName, LoginPassword, and
LoginNetwork.
/LoginPassword For unattended installs requiring
reboot you can call install with
LoginName, LoginPassword, and
LoginNetwork
/LoginDomain For unattended installs requiring
reboot you can call install with
LoginName, LoginPassword, and
LoginNetwork.
/d Download packages from
repository. If no arguments are
added, it only downloads the
packages to the local cratecache.
n
all: Downloads all packages
before installing any of them.
n
each: Downloads and then
installs each package before
downloading and installing the
next package.
n
none: Does not download any
packages, instead only uses the
local cratecache copy.
Example: /d=each install notepad .
/q Default value =n. If you use =y,
does not stop and prompt after
displaying the installation plan.
Table 6-1 Install Command Line Switches and Arguments
Using Package Manager for Windows
VMware, Inc. 53
Page 54

Command
Command Line
Arguments Command Line Switches Comments
/AllowUnsigned Default value =n. If you use =y,
the package is installed even if the
package is unsigned.
Example: /AllowUnsigned=y
install notepad.
/NoSignature Default value =n. If you use =y,
the package is installed without
attempting to verify the
signature.
/ContinueOnInsufficientSpace Default value =n. If you use =y,
the installation proceeds even if
the system drive does not have
enough space for the package
contents.
/overwrite Default value =n. If you use =y,
the removal process overwrites
any unfinished tasks from the
previous command. The value is
used only in conjunction with the
/q=y value.
vCenter Configuration Manager Software Provisioning Components Installation and User's Guide
54 VMware, Inc.
Page 55

Remove Package
Commands
Command Line
Arguments Command Line Switches Comments
remove Remove installed software
package.
package name Name of the package without the
.crate extension.
version Use <; >; =; <=; >= to specify
version. Include quotes around
the entire argument, for example,
"sqlserver >= 9.00.1399.06-b".
/LoginName For unattended uninstalls
requiring reboot you can call with
LoginName, LoginPassword, and
LoginNetwork.
/LoginPassword For unattended uninstalls
requiring reboot you can call with
LoginName, LoginPassword, and
LoginNetwork .
/LoginDomain For unattended uninstalls
requiring reboot you can call with
LoginName, LoginPassword, and
LoginNetwork.
/d Download packages from
repository. If no arguments
added, it only downloads the
packages to the local cratecache.
n
all: Downloads all packages
before uninstalling any of
them.
n
each: Downloads and then
uninstalls each package before
downloading and uninstalling
the next package.
n
none: Does not download any
packages, instead only uses the
local cratecache copy.
Example: /d=all remove notepad
/q Default value =n. If you use =y,
Table 6-2 Remove Command Line Switches and Arguments
Using Package Manager for Windows
VMware, Inc. 55
Page 56

Commands
Command Line
Arguments Command Line Switches Comments
does not stop and prompt after
displaying the removal plan.
/AllowUnsigned Default value =n. If you use =y,
the package is uninstalled even if
the package is unsigned.
Example: /AllowUnsigned=y
remove notepad.
/NoSignature Default value =n. If you use =y,
the package is uninstalled without
attempting to verify the
signature.
/overwrite Default value =n. If you use =y,
the removal process overwrites
any unfinished tasks from the
previous command. The value is
used only in conjunction with the
/q=y value.
vCenter Configuration Manager Software Provisioning Components Installation and User's Guide
56 VMware, Inc.
Page 57

Autoremove Packages
Commands
Command Line
Arguments Command Line Switches Comments
autoremove Identify and remove packages
that were installed as
dependencies but that are no long
depended upon by any packages.
/LoginName For unattended upgrades
requiring reboot you can call with
LoginName, LoginPassword, and
LoginNetwork
/LoginPassword For unattended upgrades
requiring reboot you can call with
LoginName, LoginPassword, and
LoginNetwork
/LoginDomain For unattended uninstalls
requiring reboot you can call with
LoginName, LoginPassword, and
LoginNetwork.
/d Download packages from
repository. If no arguments
added, it only downloads the
packages to the local cratecache.
n
all: Downloads all packages
before uninstalling any of
them.
n
each: Downloads and then
uninstalls each package before
downloading and uninstalling
the next package.
n
none: Does not download any
packages, instead only uses the
local cratecache copy.
Example: /d=all autoremove
notepad
/q Default value =n. If you use =y,
does not stop and prompt after
displaying the removal plan.
/AllowUnsigned Default value =n. If you use =y,
the package is uninstalled even if
Table 6-3 Autoremove Command Line Switches and Arguments
Using Package Manager for Windows
VMware, Inc. 57
Page 58

Commands
Command Line
Arguments Command Line Switches Comments
the package is unsigned.
Example: /AllowUnsigned=y
remove notepad.
/NoSignature Default value =n. If you use =y,
the package is uninstalled without
attempting to verify the
signature.
/overwrite Default value =n. If you use =y,
the removal process overwrites
any unfinished tasks from the
previous command. The value is
used only in conjunction with the
/q=y value.
List Installed Packages
Commands
Command Line
Arguments Command Line Switches Comments
list List of installed packages.
all List of known packages.
Possible status values:
n
Candidate: Package Manager
is aware of the package in at
least one repository.
n
Installed: Package is installed.
/v Verbose output.
Example: wasp /v list all.
/x Output in XML
Table 6-4 List Command Line Switches and Arguments
Updated Package Information
Commands
Command Line
Arguments Command Line Switches Comments
update Retrieve updated package
information from source
repositories. No data is displayed
after the command.
Table 6-5 Update Command Line Switches and Arguments
vCenter Configuration Manager Software Provisioning Components Installation and User's Guide
58 VMware, Inc.
Page 59

Status
Commands
Command Line
Arguments Command Line Switches Comments
status package name Provides a list of running tasks or,
if given a package name, provides
the state of the package.
Format is wasp status notepad or
wasp status "notepad=2.0"
Table 6-6 Status Command Line Switches and Arguments
Clear Status
Commands
Command Line
Arguments Command Line Switches Comments
clear status package name Given a package name, the
command clears the state of the
first matching package.
Format is wasp clear status
notepad or wasp clear status
"notepad=2.0"
Table 6-7 Clear Status Command Line Switches and Arguments
Resume Execution of Commands
Commands
Command Line
Arguments Command Line Switches Comments
resume Continues the execution of a list
of commands in order to support
reboots during a set of
commands. Runs off of a file
named tls.tls. The file's default
location is %APPDATA%.
Table 6-8 Resume Command Line Switches and Arguments
List Repositories
Commands
Command Line
Arguments Command Line Switches Comments
listrepository Lists all entries in repository.xml.
Table 6-9 Listrepository Command Line Switches and Arguments
Using Package Manager for Windows
VMware, Inc. 59
Page 60

Add Repository
Commands
Command Line
Arguments Command Line Switches Comments
addrepository Adds an entry to the end of the
list in repository.xml. Default
location is C:\Documents and
Settings\All Users\Application
Data\VMware\Wasp.
RepositoryEntry Format is addrepository bin
<repositoryUri> <platformname>
<sectionname> where bin specifies
the format. Use single or double
quotes around the repositoryUri
if it contains spaces.
Example: wasp addrepository bin
http://server/softwarerepository
Win7 Release. In this example, the
wasp command is also displayed.
Table 6-10 Addrepository Command Line Switches and Arguments
vCenter Configuration Manager Software Provisioning Components Installation and User's Guide
60 VMware, Inc.
Page 61

Insert Repository
Commands
Command Line
Arguments Command Line Switches Comments
insertrepository Adds an entry to repository.xml
at the specified index point.
RepositoryEntry Format is insertrepository bin
<repositoryUri> <platformname>
<sectionname> <indexnumber>
Example: wasp insertrepository
bin
http://server/softwarerepository
Win7 Release 0. In this example,
the wasp command is also
displayed and the index insertion
point is at the beginning of the
existing list.
index 0-based index of the position to
insert the record into
Example: wasp insertrepository
bin
http://server/softwarerepository
Win7 Release 2. In this example,
the wasp command is also
displayed and the index insertion
point is third in the existing list. 0
is first.
Table 6-11 Insertrepository Command Line Switches and Arguments
Remove Repository
Commands
Command Line
Arguments Command Line Switches Comments
removerepository Removes an entry from
repository.xml
RepositoryEntry Format is removerepository bin
<repositoryUri> <platformname>
<sectionname>
Table 6-12 Removerepository Command Line Switches and Arguments
Using Package Manager for Windows
VMware, Inc. 61
Page 62

List Local Cratecache
Commands
Command Line
Arguments Command Line Switches Comments
listlocalcratecache Displays the cratecache location.
Table 6-13 Listlocalcratecache Command Line Switches and Arguments
Clean Cratecache
Commands
Command Line
Arguments Command Line Switches Comments
clean Erase downloaded archive files in
the cratecache folder.
Table 6-14 Clean Command Line Switches and Arguments
Maintain Package Manager for Windows Data
In addition to the tasks of installing and removing packages, and adding and removing repository sources,
you can use wasp commands to check package status and to keep your machines current.
The following are only a few suggested commands. For a complete list of commands and switches, see
"Package Manager for WindowsCommand Line Options" on page 51
Package Manager Maintenance
When working in Package Manager, data may become out of date if you are performing many actions at
one. Use wasp update to refresh the data regarding repository sources, cratecache files, and external
software.
To view a list of installed packages, type wasp list.
To view a list of all packages, including installed, preinstalled, and candidates, type wasp list all. Installed
packages have been installed on the machine, candidates are packages in source repositories that are
eligible for installation but not installed on the machine.
The cratecache folder stores the local copies of packages installation/removal files. To determine to location
of the cratecache, type wasp listlocalcratecache.
You may delete files from the cratecache; however, when you issue a remove command for the package,
the file will be downloaded from the repository in order to run the remove commands. You should only
remove a package from the cratecache if you know it is still available in a repository. If it is not in the
cratecache nor is it in the repository, you will not be able to remove the software. To delete the files from
the folder, type wasp clean.
Repository Source Maintenance
Viewing a list of all repository sources of which Package Manager is aware helps to ensure that you install
packages only from approved sources. Type wasp listrepository.
If, when reviewing the list, you need to remove a repository source from the list, type wasp
removerepository bin <repositoryUri> <platformname> <sectionname>. See "Remove Repository Sources"
on page 50 for more information.
vCenter Configuration Manager Software Provisioning Components Installation and User's Guide
62 VMware, Inc.
Page 63

CAUTION If you remove a repository source from which a particular package was installed, and the
package is no longer available in the local cratecache folder, you will not be able to uninstall the package.
Some packages are installed as dependencies for other packages. You can remove unused dependencies
using wasp autoremove. See "Package Manager for WindowsCommand Line Options" on page 51 for
more about the associated switches.
Using Package Manager for Windows
VMware, Inc. 63
Page 64

vCenter Configuration Manager Software Provisioning Components Installation and User's Guide
64 VMware, Inc.
Page 65

A
about this book 5
adding
certificates 32
repository sources 49
arguments
package 30
C
certificates
package 32
command line options
Package Manager for Windows 51
commands
package 30
conflicts
package 27
cratecache 19
D
dependencies
package 25-26
depends
package 25-26
E
external software
attributes 44, 46
F
files tab 30
I
install files
package 30
installing
Package Manager for Windows 19
Package Studio 17
packages 50
repositories 10
manual installation 11
N
naming
package 21
P
Package Manager for Windows
command line options 51
installing 19
Package Studio
installing 17
reponse file 30
packages
arguments 30
certificates 32
commands 30
conflicts 27
dependencies 25
dependency contaner 26
external software 44, 46
installing 50
naming 21
provides 29
publishing 41
removing 51
scripts 30
siging certificates 32
versioning 21
platforms
repositories 39-40
properties tab
conflicts 27
depends 25-26
provides 29
provides
packages 29
publishing packages 41
R
removing
packages 51
repository sources 50
repositories
installing 10
manual installation 11
platforms 39-40
sections 39-40
repository sources
adding 49
removing 50
response file;Package Studio 30
S
scripts
package 30
sections
repositories 39-40
signing certificates
package 32
Index
VMware, Inc. 65
Page 66

software signing certificates
package 32
sources, repository
adding 49
removing 50
U
uninstall files
package 30
V
versioning
package 21
66 VMware, Inc.
vCenter Configuration Manager Software Provisioning Components Installation and User's Guide
 Loading...