

Page 1

VAXCARE
Please register your warranty. Send in your completed Warranty Card.
If you require any further assistance or advice about any
VAX please call VAXCARE on
1300 36 4040 (Australia - cost of a local call)
and 0800 800 900 (NZ)
Vaxcare:
AUST: 1300 36 4040
NZ: 0800 800 900
www.vax.com.au
2000 WATT
VAX Appliances (Australia) Pty Ltd
A.C.N. 009099736
296 Victoria Road Malaga Western Australia 6090.
EMAIL: vaxcare@vax.com.au
WEBSITE: www.vax.com.au
AUST. & NZ BRANCHES
• NSW/ACT
Unit 2, 239 Beaconsfield St,
Milperra, NSW 2214
Telephone: (02) 9792 8900
Facsimile: (02) 9792 8911
• VICTORIA/TASMANIA
Unit 3, 46 Burgess Road,
Bayswater North, VIC 3153
Telephone: (03) 9761 7160
Facsimile: (03) 9761 7175
• SOUTH AUSTRALIA/
NORTHERN TERRITORY
Unit 3, 75-77 Grange Road,
Welland, SA 5007
Telephone: (08) 8340 2222
Facsimile: (08) 8346 7933
MODIFI ED APRIL 2006 P/N 73410
• QUEENSLAND
186 Kerry Road,
Archerfield, QLD 4108
Telephone: (07) 3216 7350
Facsimile: (07) 3216 7375
• WESTERN AUSTRALIA
296 Victoria Road,
Malaga, WA 6090
Telephone: (08) 9247 8100
Facsimile: (08) 9247 8192
• VAX APPLIANCES
NEW ZEALAND
27 Clemow Drive
Mt Wellington, Auckland
Telephone: (09) 5736220
Facsimile: (09) 5736224
Email: vaxnz@vax.co.nz
Please read carefully before using your VS-03R.
Always fully extend mains cable before use.
Instruction Manual
Page 2
Operating Instructions
Congratulations on the purchase of your
VAX VS-03R cylinder cleaner. To get the best
performance from this product please read
and retain these instructions.
Check whether the voltage indicted on the
rating plate is the same as the voltage of
your local mains. This product is intended for
home use only.
When using electrical appliances, in order to
reduce the risk of fire, electric shock, and/or
injury to persons, basic safety precautions
should be followed. These include:
1. This vacuum cleaner is not intended for
cleaning wet or damp flooring. Water
entering the motor unit can cause
permanent damage putting the cleaner
out of operation. This is not covered by
the warranty.
2. To avoid damage to the dust bag or the
cleaner mechanics, never use your VAX
to remove sharp articles such as broken
glass or hot, volatile or explosive articles
such as ash, burning cigarette butts,
etc.
3. In case the cleaner is used to remove very
fine particles such as fine sand, cement
or other like substances, the pores of the
dust bag can become clogged. In that
case, replace the dust bag and the filters
even if the dust bag is only partly filled
4. If your VAX fails to operate, never attempt
to repair it yourself as repairs carried out
by an unauthorised or inexperienced
person may cause injury to you or
damage to your VAX.
5. Have your VAX serviced by an authorised
VAX Service Agent using only genuine
VAX replacement parts.
6. The manufacturer shall not be held liable
for any damage caused by incorrect use
of the cleaner.
7. Never put the hose or nozzle near your
eyes or ears.
8. Never operate your VAX with wet hands
or feet.
9. Never leave the appliance running
unattended.
10. This appliance is not intended for use
by young or infirm persons unless they
have been adequately supervised by a
responsible person to ensure that they
can use the appliance safely.
Young children should be supervised
to ensure that they do not play with the
appliance.
11. Never use your VAX without a dust bag.
12. Never alter the specification or modify
your VAX in any way.
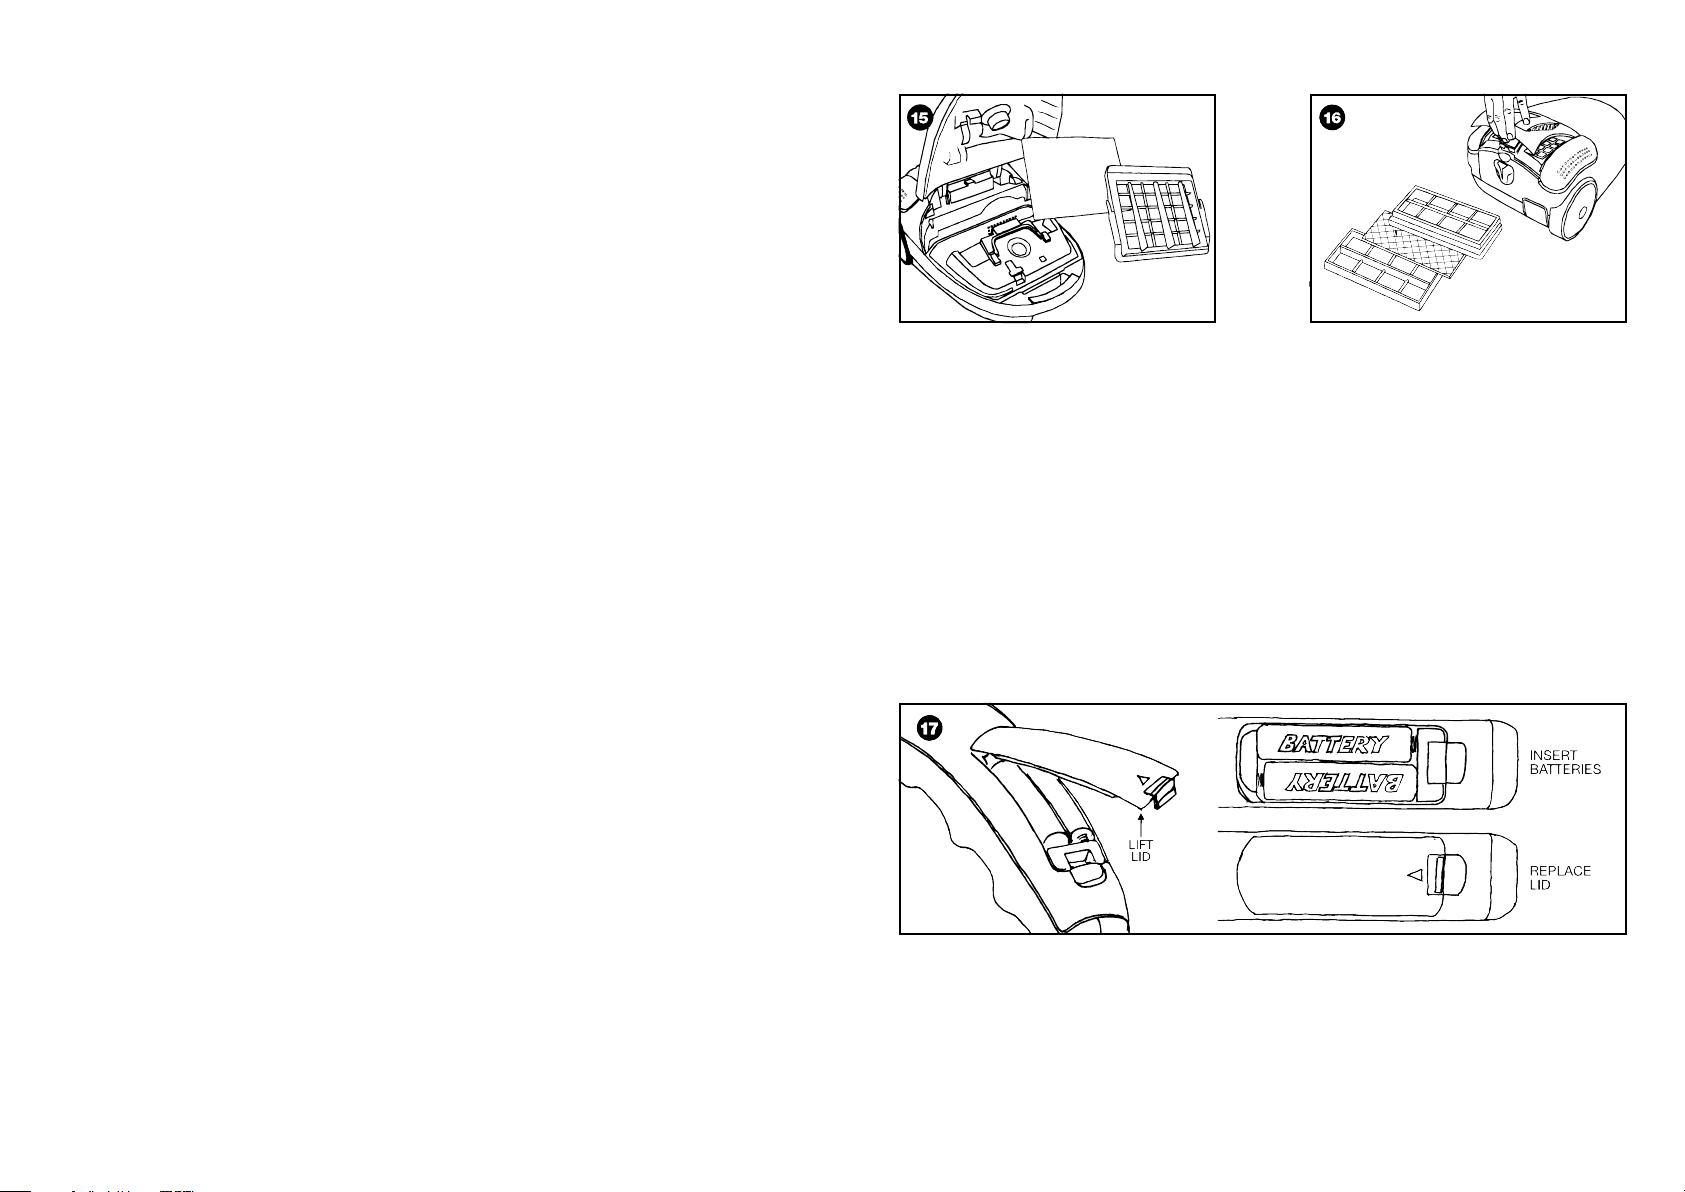
To Change the Filters
Motor Protection Filter
Fig.15 The filter is located in the dust bag compartment and protects the motor from dust. To
reach this filter, lift up the grill which secures it and replace it with a new one.
We recommend changing the filter after 5 bag changes or when it appears soiled.
Attention: Do not use the vacuum cleaner without the motor protection filter.
Air outlet filters
Fig.16 To remove the filters first remove the filter cover. Remove both filter cartridges.
On each individual cartridge remove holding bracket. Replace used filter medium with
new - the gauze side first. Reassemble and replace filter cover.
We recommend replacing the air outlet filters after one month’s use. Thereafter,
replace every 4-6 months, after 5 bag changes, when appearance is soiled or if a loss
of suction is experienced (whichever is sooner).
Remote Control Battery
The remote control on the handle is powered by 2 AAA batteries. To change the batteries,
•
remove battery cover, pull out old batteries (fig.17) and replace with new ones. Replace
battery cover.
2 7
Page 3

Looking After Your Vax
IMPORTANT: The Vax VS-03R is a very powerful vacuum cleaner. It will collect an extraordinary
amount of dust and dirt, especially during the first few applications of use, which will quickly
fill a paper dust bag or block the pores of a cloth dust bag. Excessive dust and dirt will also
contaminate the motor protection and air outlet filters.
Any of these conditions usually result in a noticeable drop-off in suction, or a possible motor
shut down due to thermostat activation.
On such occasions, it will be necessary to replace the paper dust bag or wash and thoroughly dry
a cloth dust bag before reusing, and renew all filters to regain peak suction and performance.
Your appliance is equipped with a dust bag. If you notice that the vacuum cleaner seems to be
less efficient than usual, check the dust indicator by selecting the maximum power and lifting
the cleaner tool off the floor. If the indicator turns red, change the bag.
To change the dustbag
Turn off the appliance and unplug it. Lift up the catch to gain access to the dustbag compartment
and raise the cover (fig.13). Pull the handle up to remove the bag holder (fig.13a). The bag can
then be unclipped and disposed of hygienically (fig.14). Do not forget to regularly change the
dust bag and filter. The efficiency of your cleaner and the life of the motor depends on it.
Dustbag Indicator
When the indicator light comes on or when the suction power reduces substantially, this
indicates that you should change/empty the dust bag.
Attention: If after inserting a new dust bag, the indicator light stays on, this could be
for several reasons:
Suction passages may be blocked - check flexible hose and extension tubes, suction
•
inlet, floor brushes and nozzles for obstruction.
Check motor protection filter
•
Check to see if air outlet filter is dirty
•
Check carefully which of these causes is making the light go on and correct it so that the
vacuum cleaner can work normally.
Do not work the vacuum cleaner with this indicator light on, as this could cause
irreparable damage to the motor.
Motor Thermostat
IMPORTANT: The motor is equipped with a
thermal cut-out. If for any reason, the vacuum
cleaner should over-heat, the thermostat will
automatically turn the unit off. Should this
occur, unplug the vacuum cleaner from the
electrical outlet and turn the unit off. Remove
the dirt container and empty. Clean the filters.
Allow the cleaner to cool for approximately
one (1) hour. To re-start, plug into an electrical
outlet and switch back on.
Replacement Bags & Filters
Replacement bags and filters are available
from your Vax stockist or Vax direct. Phone
Vaxcare or visit: www.vax.com.au
VAXCARE Service & Help
AUSTRALIA 1300 36 4040
NEW ZEALAND 0800 800 900
Any queries or concerns about using the
Vax, call VAXCARE.
Please make a note of the serial number
and model number of the appliance before
calling.
(Aust only: Mon-Fri. 10.00am to 6.00pm. EST)
Calls are charged at the local rate.
An answerphone is available out of these
hours.
There are over 300 approved Vax Service
Agents in Australia and New Zealand. For
the nearest Service Agent, please refer to
your Vax warranty or call VAXCARE or visit
www.vax.com.au
Technical Specification
Voltage: 220-240V~50Hz
Wattage: 2000W
Capacity: 3.5 litres
Filters: Motor protection filter
Air outlet filter
Cord length: 5 metres
Weight: 10kg
Part No: 73000
Subject to technical change without notice.
6
3
Page 4

How to Use Your Vax VS-03R
Assembling the Appliance
Fig.1 The telescopic extension tubes can be lengthened by pressing the button & sliding the
inner tube to required length.
Fig.2 To attach the flexible hose to the vacuum cleaner, push the connecting end of the flexible
hose into the attachment point on the vacuum cleaner.
Adjusting the cleaning tool for carpets & hard floors
Fig.3 Hard floor position (tiles, parquet floors, etc.) - The cleaning tools brush must be in the
lower position. Press on the rocker switch to lower it.
Fig.4 Carpet or rug position - The cleaning tools brush should be raised.
Press the rocker switch to lift the brush up.
Fig.5 Press the foot pedal to start the vacuum cleaner. To stop it press the pedal again.
Fig.6
Press the foot pedal to recoil the power lead. NOTE: Guide power cord with one hand.
Rewind 1-1
1
/2 metres of cord at a time. This will prevent the cord from whipping
which could cause damage or injury.
Fig.7 The hose grip has buttons for control of suction power.
Fig.8 Vacuum power can be adjusted electronically by pressing one of the buttons on the
handle (fig.7).
Auto - for normal vacuuming of carpets and hardfloors.
Min - for curtains - soft furnishings.
Max - for very dirty carpets or carpet with high pile.
Using the accessories
Fig.9 Open the accessory storage compartment (fig. 9a). These accessories can be fitted
directly to the tubes or onto the end of the flexible hose handle. The small cleaning tool
is used for upholstered furniture. The crevice nozzle is ideal for cleaning awkward places
such as behind radiators, skirting boards and hard to reach areas. The brush attachment
is designed for dusting.
ON/OFF
MAX
MIN
AUTO
Fig.10 If you wish to pause briefly during vacuuming i.e. to move a piece of furniture or
a rug, use the special parking position on your vacuum cleaner. Slide the hook
attached to the large cleaning tool into the slot on the rear of the appliance. When
you have finished vacuuming, press pedal to stop the appliance then unplug it at
the mains. Press the pedal to automatically rewind the cord (See note fig.6).
Getting started
Fully extend the mains cable but not beyond the yellow marker and plug it into a
standard domestic outlet
4 5
Fig.11 & 12 You can move or store your appliance in a vertical position by sliding the hook on
extension tube into the clip on the underside of the appliance.
This practical system allows you to carry the vacuum cleaner around in one hand
and provides minimum storage space.
 Loading...