

Page 1

VIZIO M320NV and M370NV User Manual
U!Z!
Dear VIZIO Customer,
Congratulations on your new VIZIO M320NV or M370NV television purchase. To get the most out of your
new VIZIO HDTV, read these instructions before making any adjustments, and retain them for future
reference. We hope you will experience many years of enjoyment from your new VIZIO HDTV High
Definition Television.
For assistance, call 877-MYVIZIO (877-698-4946) or e-mail us at www.VIZIO.com.
To purchase or inquire about accessories and installation services for your VIZIO HDTV, visit our website
at www.VIZIO.com or call toll free at 888-849-4623.
We recommend you register your VIZIO HDTV either at our website www.VIZIO.com or fill out and mail
your registration card. For peace of mind and to protect your investment beyond the standard warranty,
VIZIO offers on-site extended warranty service plans. These plans give additional coverage during the
standard warranty period. Visit our website or call us to purchase a plan.
Write down the serial number located on the back of your HDTV for easy reference when obtaining
warranty support:
Serial #: Purchase Date
VIZIO is a registered trademark of VIZIO, Inc. dba V, Inc.
HOMI logo and “High Definition Multimedia Interface” are registered trademarks of HDMI Licensing LLC.
Manufactured under license from Dolby Laboratories.
Dolby and the double-D symbol are trademarks of Dolby Laboratories.
srs^ srs^
TruSurround HD and TtuVoiume are trademarks of SRS Labs, Inc.
TruSurround HD and TruVolume technologies are incorporated under license from SRS Labs, Inc.
"his product qualifies for ENERGY STAR in the “factory default (Home Use)" setting and this is the setting in which
I power savings will be achieved. Changing the factory default picture setting or enabling other features will increase
power consumption that could exceed the limits necessary to quaiify for Energy Star rating.
ARE FOR ILLUSTRATION PURPOSES ONLY. VIZIO, THE V LOGO, WHERE VISION MEETS VALUE AND OTHER VIZIO
TRADEMARKS ARE THE INTELLECTUAL PROPERTY OF VIZIO INC. PRODUCT SPECIFICATIONS ARE SUBJECT TO
CHANGE WITHOUT NOTICE. © 2010 VIZIO INC. ALL RIGHTS RESERVED.
THE TRADEMARKS SHOWN HEREIN ARE THE PROPERTY OF THEIR RESPECTIVE OWNERS; IMAGES USED
Version 3/24/2010 1
www.VIZIO.com
Page 2
VIZIO M320NV and M370NV User Manual
Important Safety Instructions
Your HDTV is designed and manufactured to operate within defined design limits. Misuse may
result in electric shock or fire. To prevent your HDTV from being damaged, the following rules
should be observed for the installation, use, and maintenance of your HDTV. Read the following
safety instructions before operating your HDTV. Keep these instructions in a safe place for future
reference.
• To reduce the risk of electric shock or component damage, switch off the power before
connecting other components to your HDTV.
• Unplug the power cord before cleaning your HDTV. A damp doth is sufficient for cleaning your
HDTV. Do not use a liquid or a spray cleaner for cleaning your HDTV. Do not use abrasive
cleaners.
• Always use the accessories recommended by the manufacturer to insure compatibility.
• When moving your HDTV from an area of low temperature to an area of high
temperature, condensation may form in the housing. Wait before turning on
your HDTV to avoid causing fire, eiectric shock, or component damage.
• Use only with the cart, stand, tripod, bracket, or table specified by
manufacturer or sold with your HDTV. When a cart is used, use caution when
moving the cart/HDTV combination to avoid injury from tip-over. Do not place
your HDTV on an unstable cart, stand, or table. If your HDTV falls, it can injure a person and
cause serious damage to your HDTV. Use only a cart or stand recommended by the
manufacturer or sold with your HDTV.
• A distance of at ieast three feet should be maintained between your HDTV and any heat source,
such as a radiator, heater, oven, amplifier etc. Do not install your HDTV close to smoke.
Operating your HDTV close to smoke or moisture may cause fire or electric shock.
• Slots and openings in the back and bottom of the cabinet are provided for ventilation. To ensure
reiiable operation of your HDTV and to protect it from overheating, be sure these openings are
not blocked or covered. Do not place your HDTV in a bookcase or cabinet unless proper
ventilation is provided.
• Never push any object into the slots and openings on your HDTV cabinet. Do not place any
objects on the top of your HDTV. Doing so could short circuit parts causing a fire or electric shock.
Never spill liquids on your HDTV.
• Your HDTV should be operated only from the type of power source indicated on the label. If you
are not sure of the type of power supplied to your home, consult your dealer or local power
company.
• Do not apply pressure or throw objects at your HDTV. This may compromise the integrity of the
display. The manufacturer’s warranty does not cover user abuse or improper installations.
• The power cord must be replaced when using different voltage than the voltage specified. For
more information, contact your dealer.
• Your HDTV is equipped with a three-pronged grounded plug (a plug with a third grounding
pin). This plug will fit only into a grounded power outiet. This is a safety feature. If your outlet
does not accommodate the three-pronged, have an electrician install the correct outlet, or use an
adapter to ground your HDTV safely.
• When connected to a power outlet, power is always flowing into your HDTV. To totally disconnect
power, unplug the power cord.
• The lightning flash with arrowhead symbol within an equilateral triangle is
intended to alert the user to the presence of un-isolated, dangerous
voltage within the inside of your HDTV that may be of
sufficient magnitude to constitute a risk of electric shock to
persons.
The exciamation point within an equilateral triangle is intended to alert the user to
the presence of important operating and servicing instructions in the iiterature
accompanying your HDTV.
Do not overload power strips and extension cords. Overloading can result in fire or electric shock.
Do not defeat the safety purpose of the grounded plug.
www.VIZIO.com
Page 3

VIZIO M320NV and M370NV User Manual
The wall socket should be installed near your HDTV and easily accessible.
Only power of the marked voltage can be used for your HDTV. Any other voltage than the
specified voltage may cause fire or electric shock.
Do not touch the power cord during iightning. To avoid electric shock, avoid handling the power
cord during electrical storms.
Unplug your HDTV during a lightning storm or when it will not be used for long period of time.
This will protect your HDTV from damage due to power surges.
Do not attempt to repair or service your HDTV yourself. Opening or removing the back cover may
expose you to high voltages, electric shock, and other hazards. If repair is required, contact your
dealer and refer all servicing to qualified service personnel.
Keep your HDTV away from moisture. Do not expose your HDTV to rain or moisture. If water
penetrates into your HDTV, unplug the power cord and contact your dealer. Continuous use in
this case may result in fire or electric shock.
Do not use your HDTV if any abnormality occurs. If any smoke or odor becomes apparent, unplug
the power cord and contact your dealer immediately. Do not try to repair your HDTV yourself.
Avoid using dropped or damaged appliances. If your HDTV is dropped and the housing is
damaged, the internal components may function abnormally. Unplug the power cord immediately
and contact your dealer for repair. Continued use of your HDTV may cause fire or electric shock.
Do not install your HDTV in an area with heavy dust or high humidity. Operating your HDTV in
environments with heavy dust or high humidity may cause fire or electric shock.
Follow instructions for moving your HDTV. Ensure that the power cord and any other cables are
unplugged before moving your HDTV.
When unplugging your HDTV, hold the power plug, not the cord. Pulling on the power cord may
damage the wires inside the cord and cause fire or electric shock. When your HDTV will not be
used for an extended period of time, unplug the power cord.
To reduce risk of electric shock, do not touch the connector with wet hands.
Insert batteries in accordance with instructions. Incorrect polarities may cause the batteries to
ieak which can damage the remote control or injure the operator.
If any of the following occurs, contact the dealer:
o
The power cord fails or frays.
o
Liquid sprays or any object drops into your HDTV.
o
Your HDTV is exposed to rain or other moisture.
o
Your HDTV is dropped or damaged in any way.
o
The performance of your HDTV changes substantially.
Version 3/24/2010
www.VIZIO.com
Page 4
VIZIO M320NV and M370NV User Manual
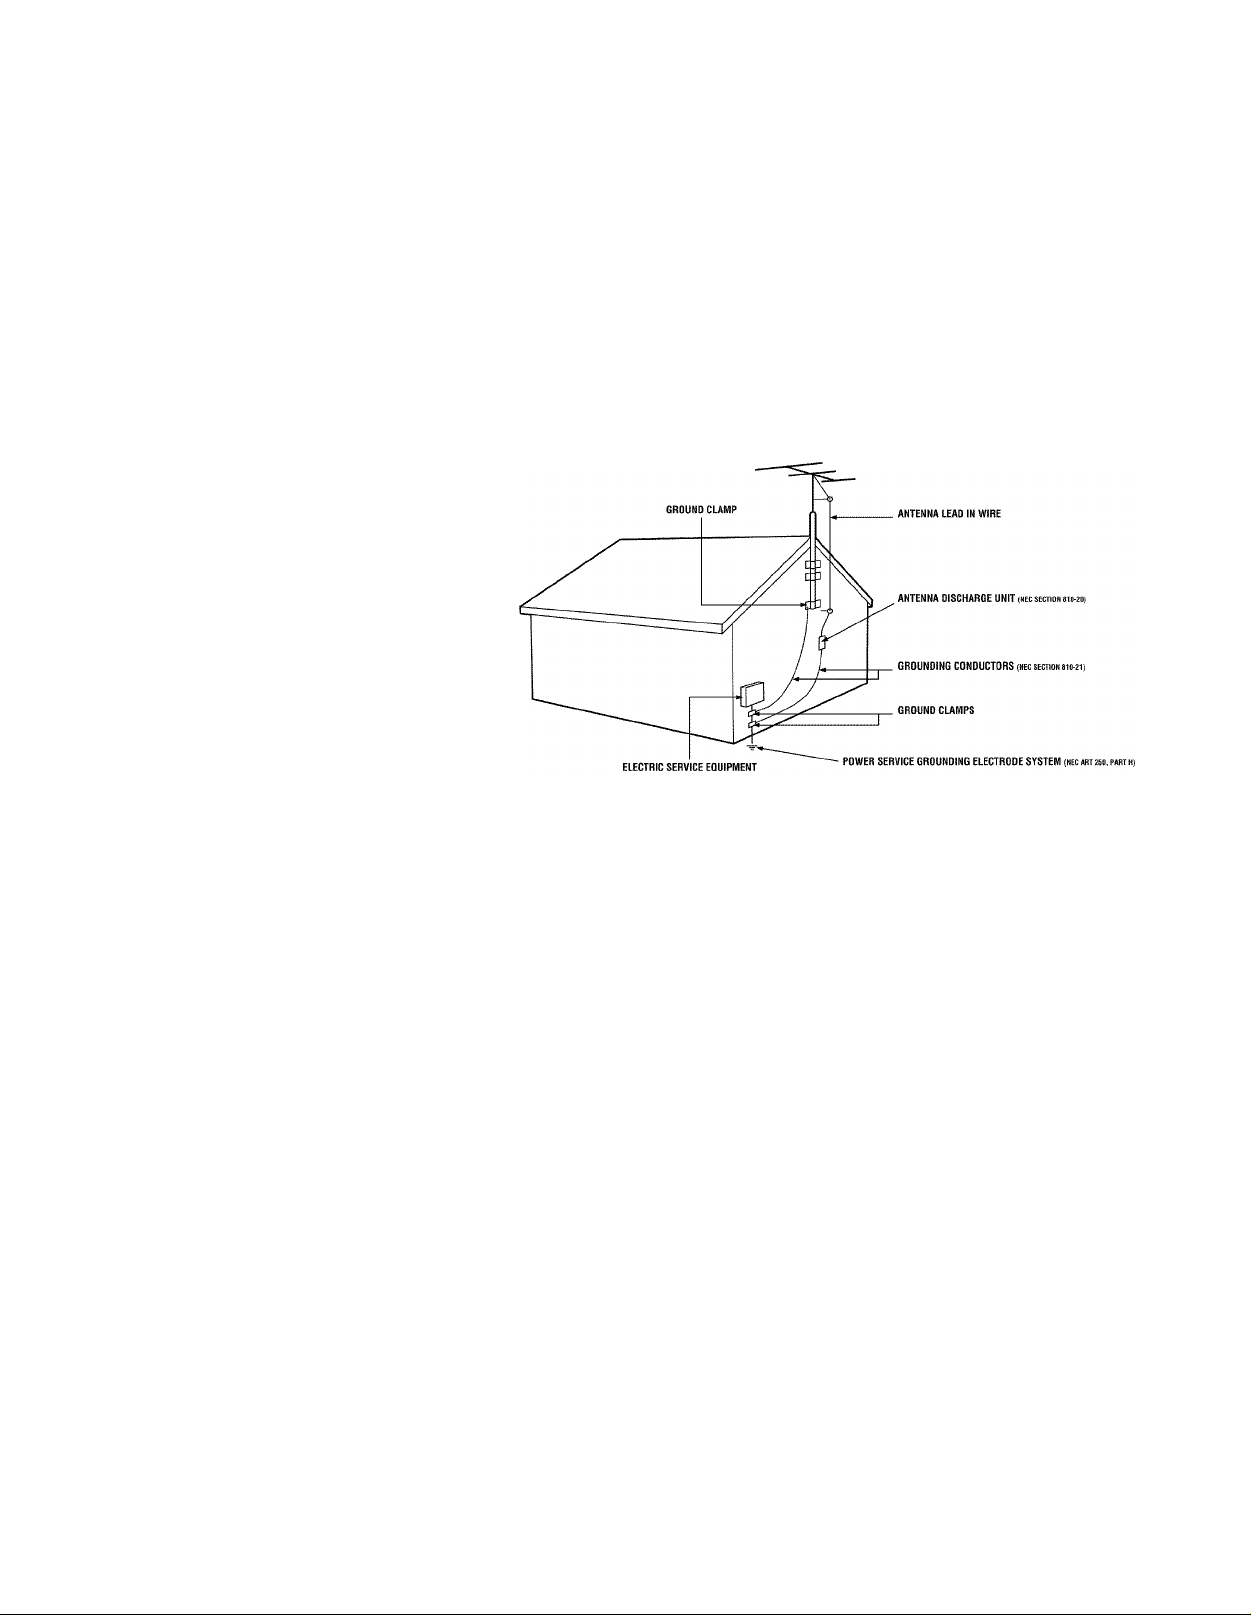
Television Antenna Connection Protection
External Television Antenna Grounding
If an outside antenna/satellite dish or cable system is to be connected to the TV, make sure that the
antenna or cable system is electrically grounded to provide some protection against voltage surges and
static charges.
Article 810 of the National Electrical Code, ANSI/NFPSA 70, provides information with regard to proper
grounding of the mast and supporting structure, grounding of the lead-in wire to an antenna discharge
unit, size of the grounding conductors, location of antenna discharge unit, connection to grounding
electrodes, and requirements of the grounding electrode.
Lightning Protection
For added protection of the TV during
a lightning storm or when it is left
unattended or unused for long periods
of time, unplug the TV from the wall
outlet and disconnect the antenna or
cable system.
Power Lines
Do not locate the antenna near
overhead light or power circuits, or
where it could fall into such power
lines or circuits.
Remember, the screen of the coaxial cable is intended to be connected to earth in the building
installation.
www.VIZIO.com
Page 5

VIZIO M320NV and M370NV User Manual
Advisory of the DTV Transition
The nationwide switch to digital television broadcasting will be complete on June 12, 2009, but your local
television stations may switch sooner. After the switch, analog-only television sets that receive TV
programming through an antenna will need a converter box to continue to receive over-the-air TV. Watch
your local stations to find out when they will turn off their analog signal and switch to digital-only
broadcasting. Analog-only TVs should continue to work as before to receive low power. Class A or
translator television stations and with cable and satellite TV services, gaming consoles, VCRs, DVD
players, and similar products.
For additional information, contact the parties listed below, as appropriate:
FCC (US Federal Communications Commission)
http://www.fcc.gov/
Phone: 1-888-CALL-FCC (1-888-225-5322)
TTY: 1-888-TELL-FCC (1-888-835-5322)
Fax: 1-866-418-0232
E-mail:
NTIA (National Telecommunications and Information Administration)
http://www.ntia.doc.gov/
1-888-DTV-2009
fccinfo@fcc.gov
Listings of US Television Stations
http://www.high-techproductions.com/usTVstations.htm
Your VIZIO HDTV is capable of receiving Digital Broadcasts, and no Digital Converter Box is
required.
Version 3/24/2010
www.VIZIO.com
Page 6

VIZIO M320NV and M370NV User Manual
Table of Contents
Important Safety Instructions...................................................................................................................2
Television Antenna Connection Protection..............................................................................................4
Advisory of the DTV Transition................................................................................................................ 5
CHAPTER 1 SETTING UP YOUR HDTV.................................................................................10
Finding a Location for Your HDTV.........................................................................................................10
Attaching the TV Stand..........................................................................................................................11
Wall Mounting your HDTV......................................................................................................................12
CHAPTER 2 BASIC CONTROLS AND CONNECTIONS
Front Panel.............................................................................................................................................13
Jag Wheel Control..................................................................................................................................13
Side Panel Connections.........................................................................................................................14
Rear Panel Connections........................................................................................................................14
........................................................
13
CHAPTER 3 VIZIO REMOTE CONTROL.................................................................................15
Installing the Batteries............................................................................................................................15
Remote Control Range.......................................................................................................................... 15
VIZIC Remote Control Precautions........................................................................................................15
Remote Control Buttons.........................................................................................................................16
CHAPTER 4 GETTING STARTED...........................................................................................17
CHAPTER 5 USING YOUR HDTV FOR THE FIRST TIME......................................................18
Select an Input Source...........................................................................................................................18
Watching a TV Program.........................................................................................................................18
Viewing Digital TV Program Information................................................................................................19
CHAPTER 6 CONNECTING EQUIPMENT
Which Video Connection Should I Use?................................................................................................20
Connecting Your Cable or Satellite Box................................................................................................21
Using HDMI (Best).............................................................................................................................21
HDMI Connections for Cable or Satellite Boxes with DVI
Using Component Video (Better).......................................................................................................22
Using Composite Video (Good)..........................................................................................................22
Using Coaxial (Antenna) (Good)........................................................................................................22
Connecting Your DVD Player................................................................................................................ 23
Using HDMI (Best)..............................................................................................................................23
HDMI Connections for DVD Players with DVI....................................................................................23
Using Component Video (Better).......................................................................................................24
Using Composite (AV) Video (Good).................................................................................................24
Connecting Coaxial (RF)........................................................................................................................25
Using Your Antenna or Digital Cable for Standard or Digital TV
Connecting Your VCR or Video Camera...............................................................................................25
Connecting a Home Theater System.....................................................................................................26
Using RCA.............................................................................................................................................26
Connecting the cables........................................................................................................................26
Turning TV speakers off.....................................................................................................................26
Using Cptical (S/PDIF)...........................................................................................................................26
Connecting a Computer.........................................................................................................................27
RGB (VGA).........................................................................................................................................27
Using HDMI........................................................................................................................................27
..............................................................................
.................................................................
.......................................................
20
21
25
www.VIZIO.com
Page 7

VIZIO M320NV and M370NV User Manual
CHAPTER 7 VIEWING PICTURES.......................................................................................... 28
Viewing Pictures.....................................................................................................................................28
Adjusting Photo Settings........................................................................................................................28
Adjusting Photo Settings........................................................................................................................29
Slideshow Mode.................................................................................................................................29
Repeat................................................................................................................................................29
Sort By................................................................................................................................................29
Duration..............................................................................................................................................29
Slideshow Effect.................................................................................................................................29
Thumbnail Size...................................................................................................................................29
Info......................................................................................................................................................29
CHAPTER 8 ADJUSTING YOUR HDTV SETTINGS...............................................................30
Using the On-screen Display (OSD)......................................................................................................30
Input Menu.............................................................................................................................................30
Wide Menu.............................................................................................................................................31
Normal................................................................................................................................................31
Wide................................................................................................................................................... 31
Panoramic..........................................................................................................................................31
Stretch................................................................................................................................................31
CO (Closed Caption) Menu....................................................................................................................32
Adjust closed caption options.................................................................................................................32
Analog Closed Caption.......................................................................................................................32
Digital Closed Caption........................................................................................................................32
Digital CC Style.................................................................................................................................. 32
Sleep Timer Menu..................................................................................................................................32
Picture Menu..........................................................................................................................................32
Picture Mode...................................................................................................................................... 32
Backlight.............................................................................................................................................32
Brightness...........................................................................................................................................32
Contrast..............................................................................................................................................33
Color...................................................................................................................................................33
Tint......................................................................................................................................................33
Sharpness...........................................................................................................................................33
More....................................................................................................................................................33
Audio Menu............................................................................................................................................35
Audio Mode.........................................................................................................................................35
Balance...............................................................................................................................................35
Lip Sync..............................................................................................................................................35
TV Speakers.......................................................................................................................................35
Advanced Audio..................................................................................................................................35
Equalizer Settings.............................................................................................................................. 36
Reset Audio Mode..............................................................................................................................36
Settings Menu........................................................................................................................................36
Tuner...................................................................................................................................................36
Partial Channel Search......................................................................................................................36
Name Input.........................................................................................................................................37
Parental Controls................................................................................................................................38
Menu Language..................................................................................................................................40
Time & Local Settings.........................................................................................................................40
CEC....................................................................................................................................................40
Media Menu...........................................................................................................................................41
Slideshow Mode.................................................................................................................................41
Repeat................................................................................................................................................41
Version 3/24/2010
www.VIZIO.com
Page 8

VIZIO M320NV and M370NV User Manual
Sort By................................................................................................................................................41
Duration..............................................................................................................................................41
Slideshow Effect.................................................................................................................................41
Thumbnail Size...................................................................................................................................41
Info.....................................................................................................................................................41
Help Menu..............................................................................................................................................42
System Info.........................................................................................................................................42
Reset TV Settings...............................................................................................................................42
Clear Memory (Factory Default).........................................................................................................42
CHAPTER 9 MAINTENANCE AND TROUBLESHOOTING....................................................43
Cleaning the TV and Remote Control....................................................................................................43
Troubleshooting Guide...........................................................................................................................43
Telephone & Technical Support.............................................................................................................46
Compliance............................................................................................................................................46
FCC Class B Radio Interference Statement..........................................................................................46
CHAPTER 10 SPECIFICATIONS.............................................................................................47
Preset PC Resolutions...........................................................................................................................50
Resolution through RGB Input...............................................................................................................50
CHAPTER 11 PROGRAMMING THE VIZIO UNIVERSAL REMOTE CONTROL
Using a Cable or Satellite Box Remote.................................................................................................51
Programming other devices...............................................................................................................51
Programming your Blu-Ray or DVD Piayer
Programming your Home Theater System.........................................................................................51
Programming your Cable or Satellite Set-Top Box..............................................................................52
Searching for Device Codes................................................................................................................52
Reset Remote to Factory Settings.........................................................................................................52
Remote Control Codes...........................................................................................................................53
Television Codes................................................................................................................................53
Cable Box Codes................................................................................................................................55
Converters..........................................................................................................................................55
Decoders............................................................................................................................................55
IPTV....................................................................................................................................................55
Satellite Receiver Codes....................................................................................................................55
PVR Codes.........................................................................................................................................56
Blue-Ray DVD Codes.........................................................................................................................56
DVD / VCR Player Codes...................................................................................................................56
DVD Player Codes............................................................................................................................. 56
Amplifier / Receiver /Tuner Codes......................................................................................................57
Game Console Codes........................................................................................................................58
Audio Accessory Codes......................................................................................................................58
Video Accessory Codes......................................................................................................................59
VCR Codes.........................................................................................................................................59
.......................................................................................
...................
51
51
WARRANTY.............................................................................................................................61
Index...................................................................................................................................................62
8
www.VIZIO.com
Page 9
VIZIO M320NV and M370NV User Manual
Opening the Package
Your HDTV and its accompanying accessories are carefully packed in a cardboard carton that has been
designed to protect it from transportation damage. After you have opened the carton, check that your
HDTV is in good condition and that all of the contents are included.
The glass surface can easily be scratched or broken, so handle your HDTV gently and never place your
HDTV with the glass facing downwards on a surface without protective padding.
IMPORTANT: Save the carton and packing material for future shipping.
Package Contents
VIZIO M320NV or M370NV
VIZIO remote control VUR12M
AAA batteries for the remote control (2)
Power cord
Detachable base with thumbscrew
Cleaning cloth
This user manual
Quick Setup Guide
Registration Card
HDTV Accessories and Services
Additional certified accessories for your HDTV are sold separately, including:
Wall mounts
High Definition cables
Extra or replacement remote controls
Sound Bars
Blu-ray DVD Players
VIZIO also offers installation services and extended warranty services for your HDTV.
To purchase or inquire about additional accessories and services for your VIZIO HDTV, visit our website
at www.VIZIO.com or call us toll free at 877-MYVIZIO (877-698-4946).
Ye\.i?ruf Do not apply pressure or throw objects at your HDTV (including game controllers).
This may compromise the integrity of the display. The manufacturer’s warranty does not cover
user abuse or improper installations.
Version 3/24/2010
www.VIZIO.com
Page 10

VIZIO M320NV and M370NV User Manual
Chapter 1 Setting Up Your HDTV
Finding a Location for Your HDTV
Here are some things you should consider when deciding on a proper location for your HDTV:
• The power consumption of your HDTV is about 57.1W (M320NV) and 56W (M370NV) (AVG
o Use the included power cord.
o When an extension cord is required, use one with the correct power rating. The 3
pronged cord must be grounded and the grounding feature (3'^'^ prong) must not be
compromised.
• Install your HDTV on a flat surface to avoid tipping.
• For proper ventilation, you must allow space between the back of your HDTV and the wall.
• Avoid installing your HDTV in places with high humidity, dust, or smoke so you do not shorten the
service iife of the electronic components.
• Install your HDTV in a level, landscape orientation, with the VIZIO logo at the bottom to prevent
poor ventilation and excessive component damage.
• If you want to mount your HDTV on the wall, see below for additional information.
• Read this user manual carefully before installing your HDTV.
VIZIO offers professional installation services including home networking. Contact VIZIO for more
information on these services at 877-MYVIZIO (877-698-4946) or www.VIZIO.com.
10
www.VIZIO.com
Page 11
VIZIO M320NV and M370NV User Manual
Attaching the TV Stand
Note: We strongly recommend that two people perform the setup and assembly due to the weight and
size of the TV.
Unpack the TV and stand base:
1. Remove the two top foam end caps.
2. Remove the stand base and accessory box from packaging.
3. Remove the TV from the box and lay it face down on a clean, padded, flat surface.
Note: Make sure that the surface is free of debris to prevent the TV screen from getting scratched.
Attach the TV stand base:
1. Align the stand base to the back of the TV.
2. Insert the four screws provided and tighten.
Version 3/24/2010 11
www.VIZIO.com
Page 12
VIZIO M320NV and M370NV User Manual
Wall Mounting your HDTV
Your HDTV can be mounted on the wall for viewing. If you choose to mount your HDTV on the wall, follow
the instructions below.
1. Write down the serial number located on the back of your HDTV in the space provided on page 1 to
have it handy if you need to call for support.
2. Remove the stand base and neck:
a. Disconnect the cables from your HDTV.
b. Place your HDTV face down on a soft, flat surface to prevent damage to the screen.
c. Remove the four (4) screws holding the stand neck, and then remove the neck and base.
To remove the base from the neck, unscrew thumbscrew on bottom.
3. Mount your HDTV on the wall:
a. Attach your HDTV to a wall mount (sold
separately) using the mounting holes in the
back panel of your HDTV.
b. Read the instructions that came with your
specific wall mount to properly hang your
HDTV.
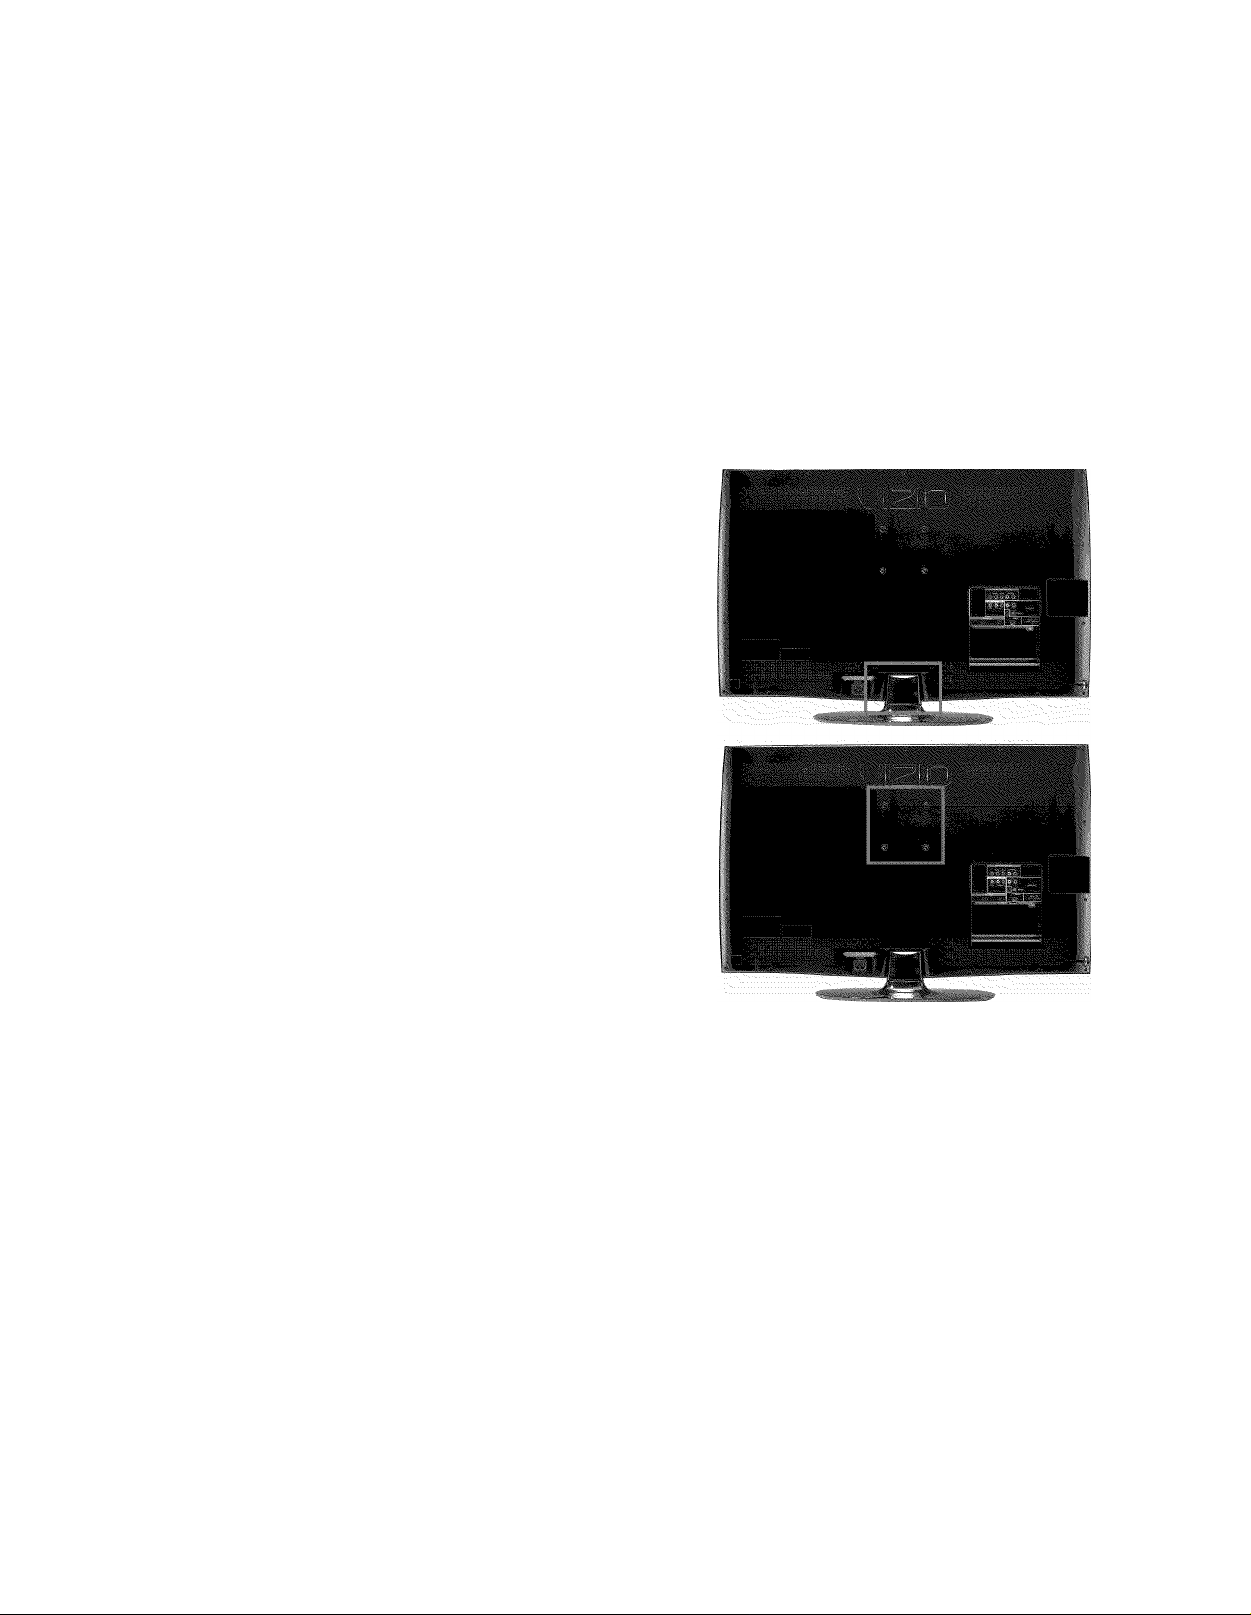
Wall Mounting Specifications
Screw Size M4
Screw Length 18.0 mm
Screw Pitch 0.7 mm
Hole Pattern VESA standard 100 x 100
I II mm spacing
12
www.VIZIO.com
Page 13
VIZIO M320NV and M370NV User Manual
Chapter 2 Basic Controls and Connections
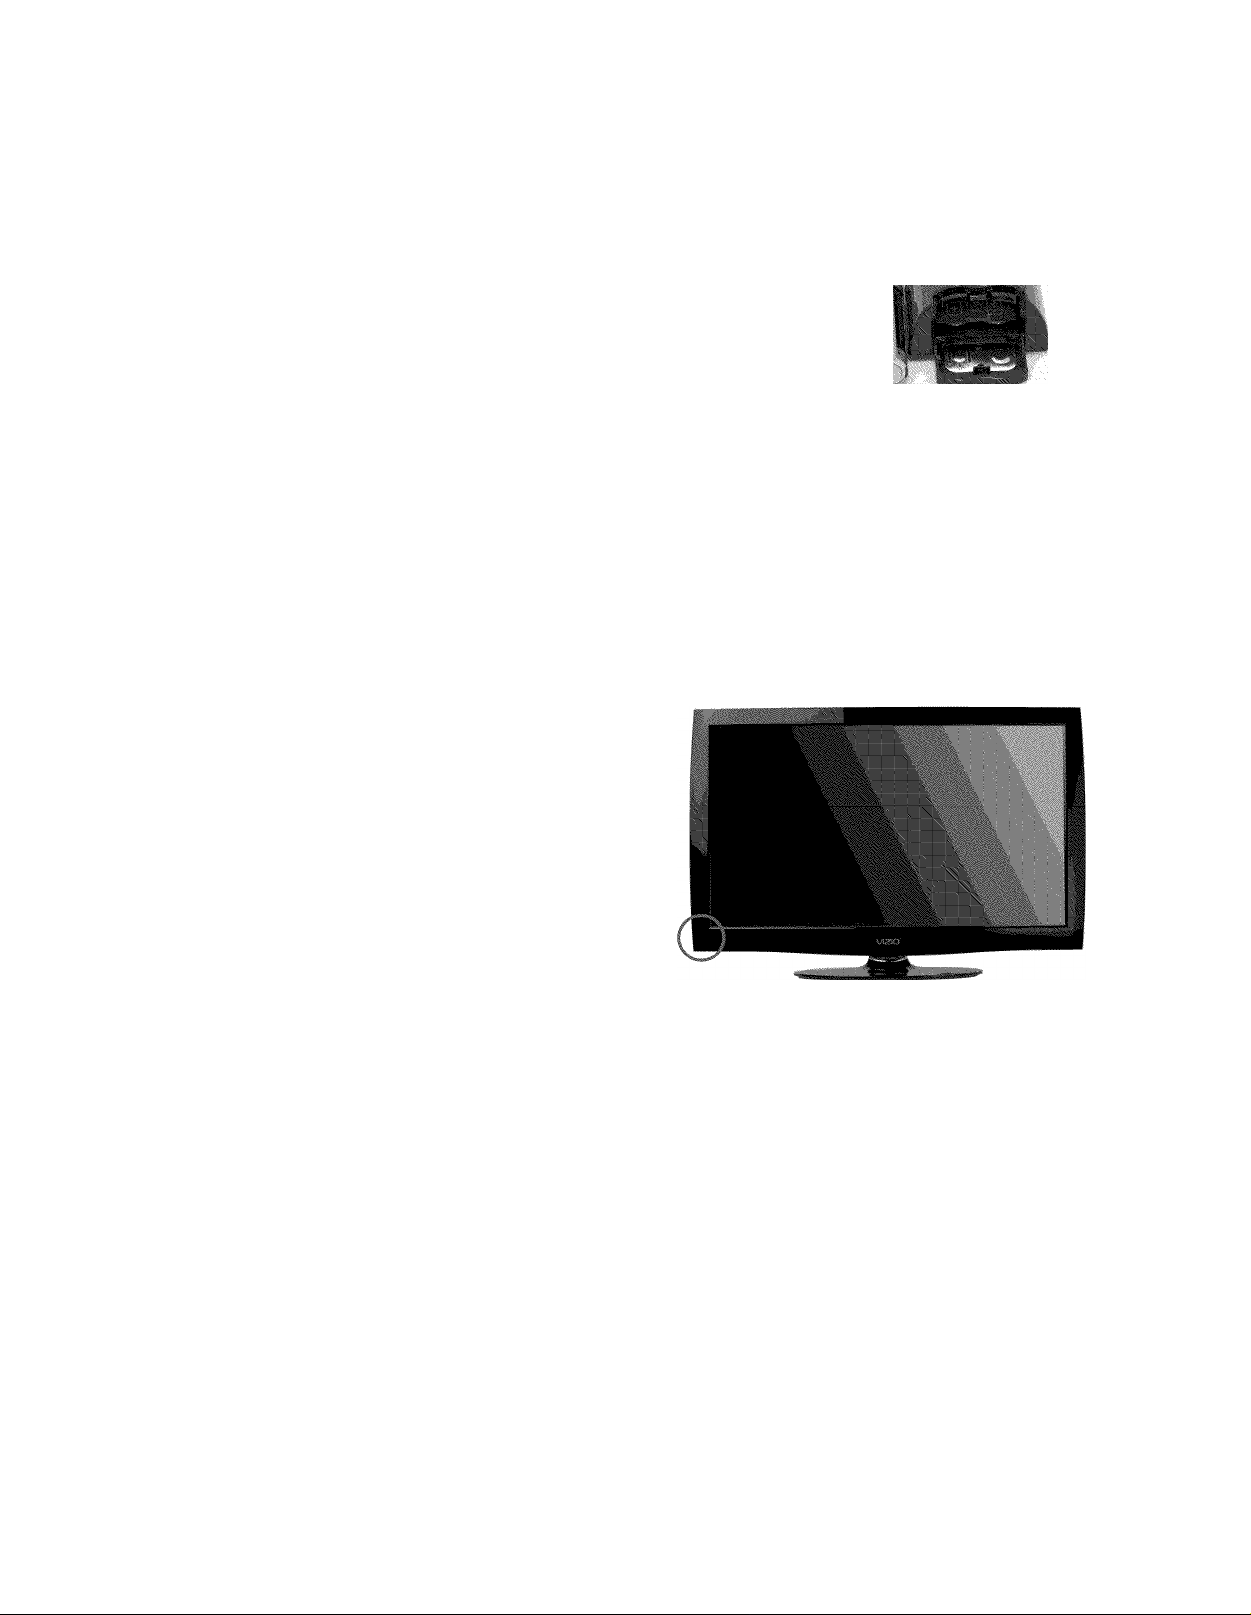
Front Panel
1. Remote Control Sensor—Point the remote
control directly at this window on the lower left
corner of your HDTV for the best response to the
remote signal.
2. POWER ‘VIZIO’ LIGHT—The VIZIO name lights
white when powered on and orange when
powered off.
Jag Wheel Control
The Jag wheel on the side of your HDTV performs all of
the same functions you might see as buttons on other TVs, including volume, power, and channel change.
All of these functions have been combined into a single wheel on your M320NV or M370NV.
Press the Jag wheel once to turn your HDTV on.
Press and hold the Jag wheel for three seconds to turn your HDTV off.
When watching TV, scroll the Jag wheel up and down to turn the volume up and down.
To open the Quick Menu, press the Jag wheel for two seconds, scroll the wheel up and down to
highlight an option, and then press in the wheel again to confirm your selection. If you do not press
anything, the menu will automatically close after 10 seconds.
o Volume—Press to increase or decrease the speaker
volume.
o Channel—Press to open a channel list. Choose the channel
with the wheel and then press the wheel to go to that
channel.
o Input Source—Press to
cycle through the various
devices connected to your TV
(called Inputs). The inputs
cycle in the following
sequence: TV, AV, Comp,
HDMI-1, HDMI-2, HDMI SIDE,
RGB, and Media. After you
have stepped through the
entire sequence, you will
return to the beginning,
o Exit—Press to close the
Quick Menu.
o Power Off—Press to turn your HDTV off.
The Jag wheel does not operate in the QSD menu. Please use your remote control to change your
HDTV settings.
Quick Menu
Version 3/24/2010 13
www.VIZIO.com
Page 14
VIZIO M320NV and M370NV User Manual
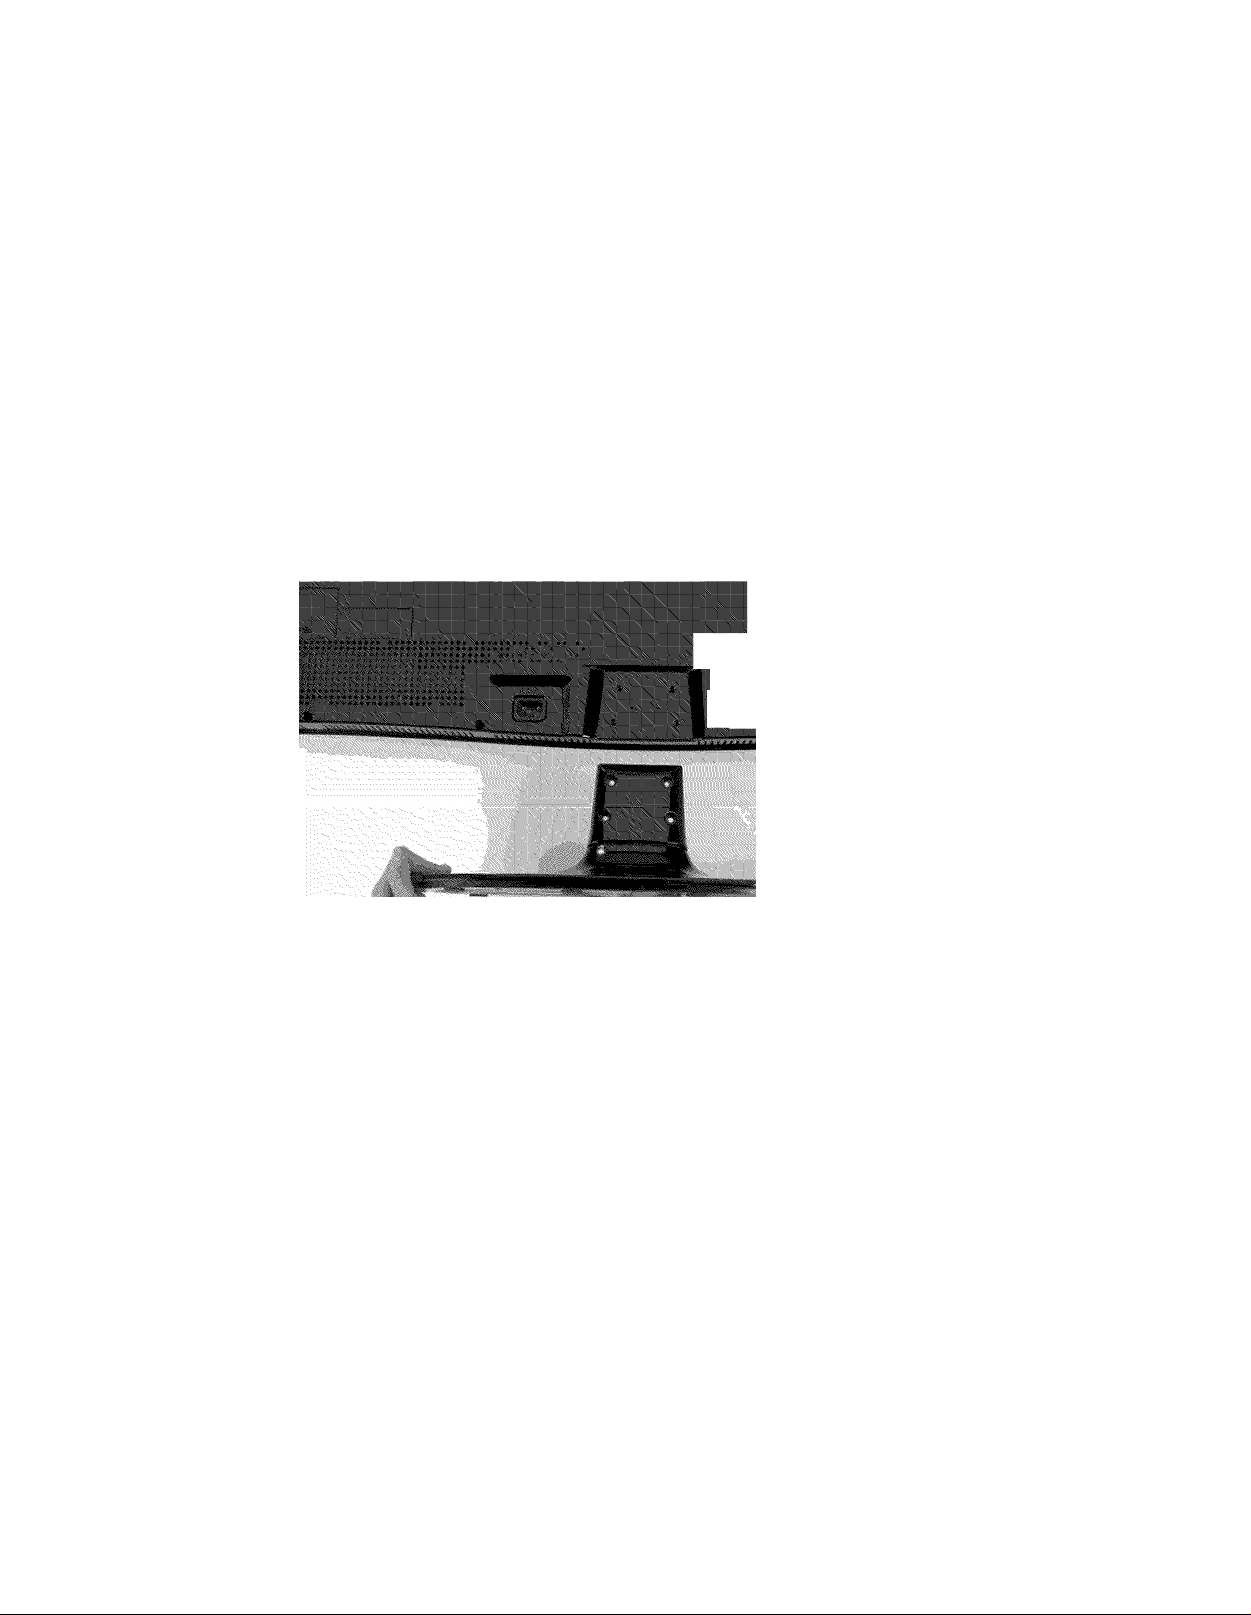
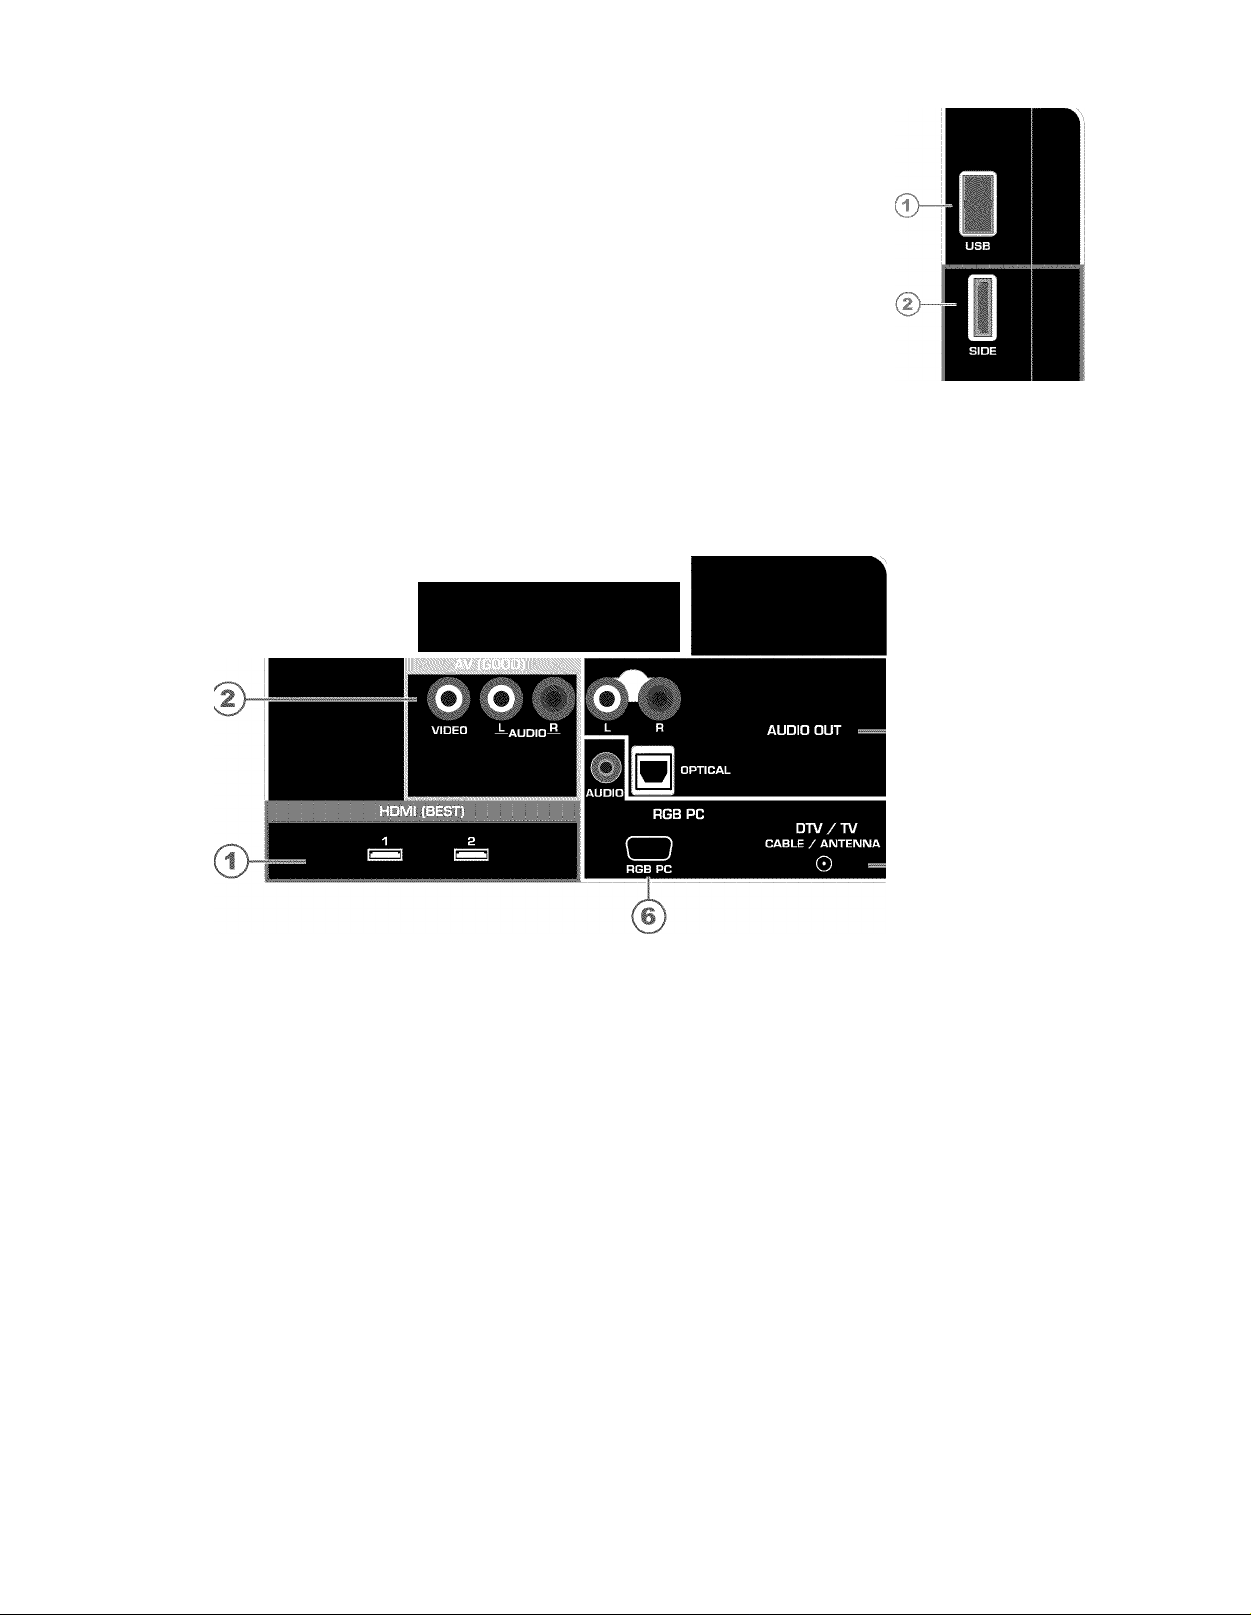
Side Panel Connections
1. USB:
• Insert a FAT/FAT32 formatted USB drive to view pictures.
• Service port for use by a professional service technician.
2. HDMI SIDE—Connect digital video devices such as a DVD player or Set-Top
Box through this all digital connector. There are additional HDMI connectors
on the back.
Rear Panel Connections
Y Pli c:h Pi- [;i I audio
^ о
1. HDM11 and 2 —Connect digital video devices such as a DVD player or Set-Top Box
through this all digital connector. There is an additional HDMI connector on the side.
2. AV—Connect Composite video devices, such as a VCR or game console. Use the white
and red connectors to connect the external audio from the same source.
3. COMPONENT (Y Pb/Cb Pr/Cr with L/R Audio)—Connect Component video devices such
as a DVD Player or Set Top Box here.
4. AUDIO OUT:
• OPTICAL—When digital TV is selected for viewing, the audio associated with the
programming will be available on the S/PDIF Optical connector for connection to a
VIZIO Sound Bar or your Home Theater system.
• ANALOG L/R—Connect the audio from the HDTV to an external device, such as a
Home Theater System, external amplifier, or stereo. Speakers cannot be
connected directly here.
5. DTV/TV— Connect to an antenna or digital cable source. For digital TV stations in your area
visit www.antennaweb.org. For Cable and Satellite Set Top Boxes, we recommend that you
use a HDMI or Component cable connection for high definition image quality.
6. RGB PC—Connect the video and audio from a computer here. Connect a 1/8” mini plug
stereo connector from the computer to the TV if you want the sound to come from the HDTV
speakers.
14
www.VIZIO.com
Page 15
VIZIO M320NV and M370NV User Manual
Chapter 3 VIZIO Remote Control
Installing the Batteries
1. Remove the battery cover.
2. Insert two AAA batteries into the remote control. Make sure
that you match the (+) and (-) symbols on the batteries with the
(+) and (-) symbols inside the battery compartment.
3. Replace the battery cover.
Precautionary Tips for Inserting the Batteries:
• Only use AAA batteries.
• Do not mix new and old batteries. This may result in cracking or leakage that may cause a fire or
iead to personal injury.
• Inserting the batteries incorrectiy may also result in cracking or leakage that may cause a fire or
iead to personal injury.
• Dispose of batteries according to local hazardous waste regulations.
• Keep the batteries away from children and pets.
Remote Control Range
• Point the remote control directly at this sensor for
the best response to the remote signal.
• Do not place any obstacles between the remote
control and the remote control sensor.
• The effective range of the remote control is
approximateiy 22 feet (7 meters) from the front of
the remote control sensor, 30° to the left and
right, 20° up and down.
VIZIO Remote Control Precautions
• The remote control should be kept dry and away
from heat sources. Avoid humidity.
• If the TV responds erratically to the remote control or does not respond at all, check the batteries.
If the batteries are iow or exhausted, replace them with fresh batteries.
• When not using the remote control for a long period of time, remove the batteries.
• Do not take the batteries apart, heat them, or throw them into a fire.
• Do not subject the remote control to undue physical stress, such as striking or dropping it.
• Do not attempt to clean the remote control with a volatile solvent. Wipe it with a clean, damp
cloth.
Version 3/24/2010 15
www.VIZIO.com
Page 16
VIZIO M320NV and M370NV User Manual
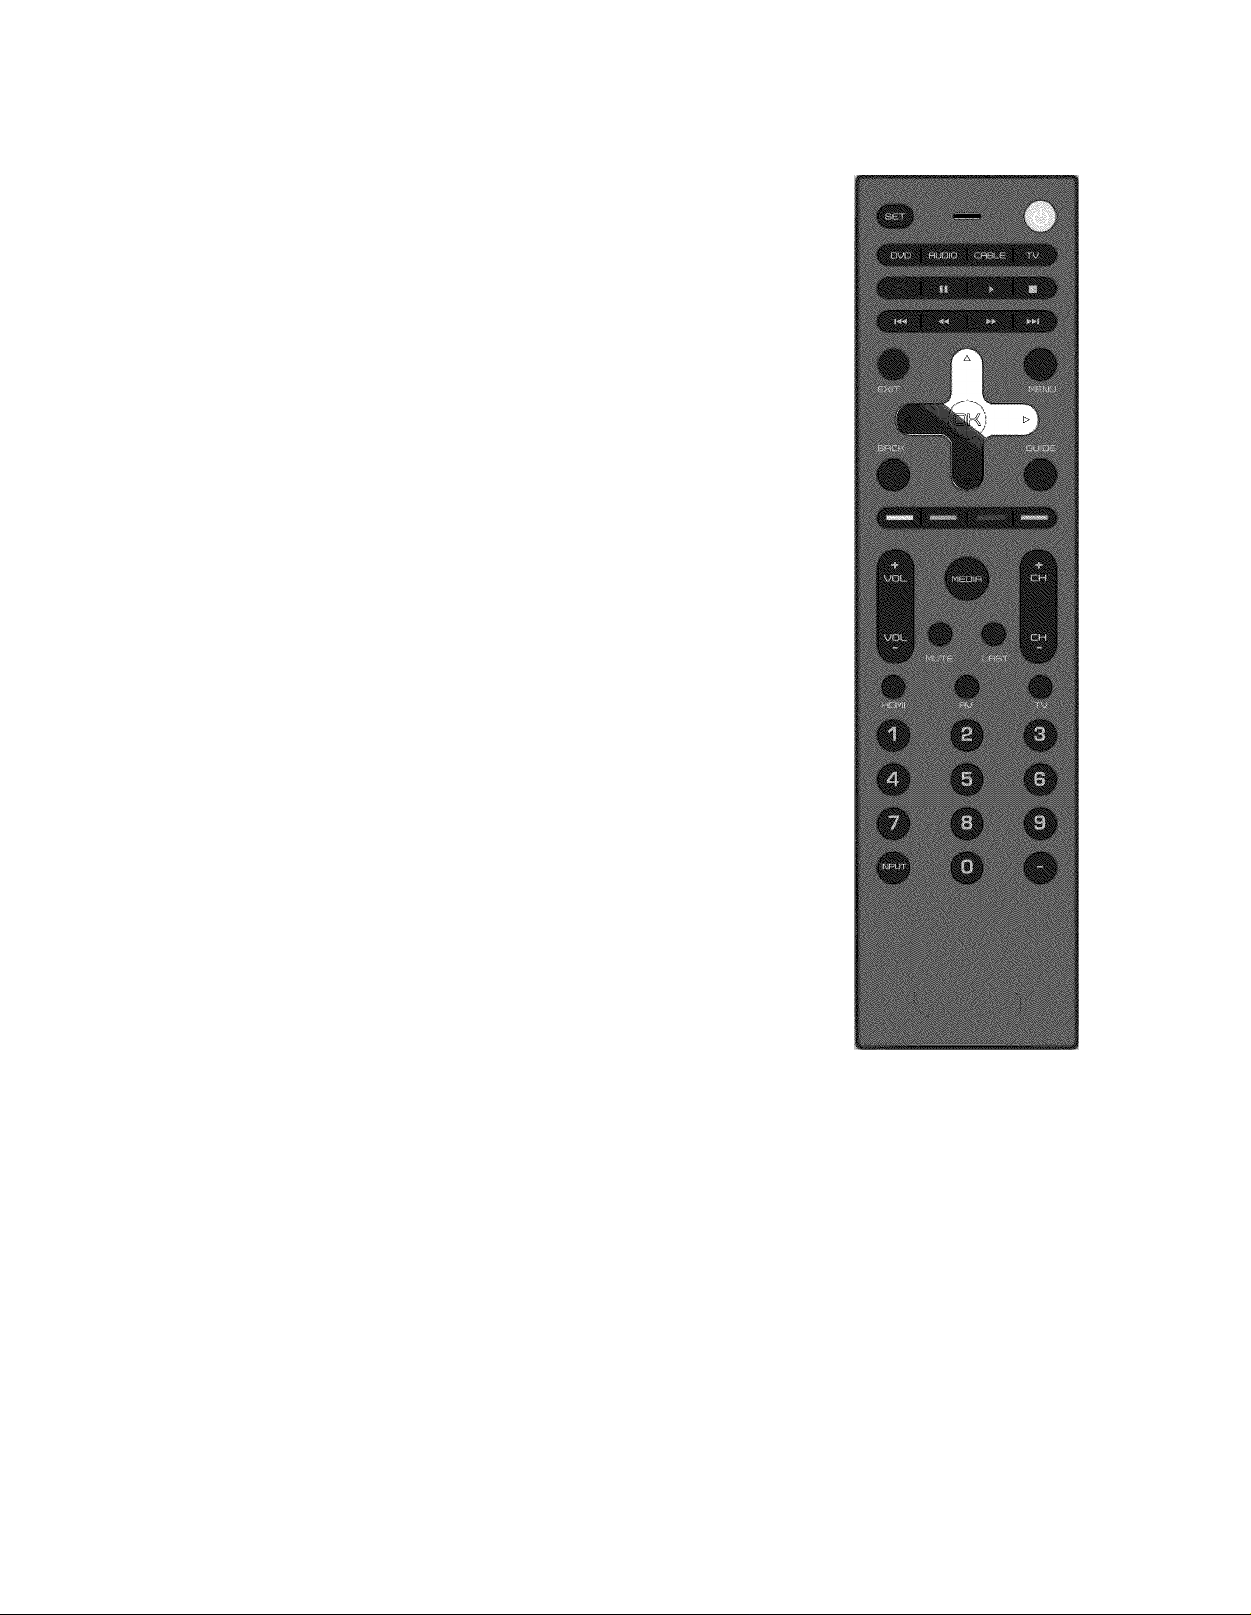
Remote Control Buttons
POWER ( ^ )—Press to turn the TV on from the Standby mode. Press it
again to return to the Standby mode.
Device Buttons:
• DVD—Press to select a DVD player that has been programmed to
work with this remote.
• AUDIO—Press to select a Home Theater System or Audio
Amplifier that has been programmed to work with this remote.
• CABLE—Press to select a Cable or Satellite Set Top Box that has
been programmed to work with this remote.
• TV—Press to return to TV mode. If the remote is not working,
press this button to return the functions back to TV.
CEC-Supported Buttons:
CEC needs to be set up and enabled for these buttons to work. See CEC
section on page 40 for more information.
• (Record)—Press to begin recording on your CEC-supported
device.
II (Pause)—Press to pause playback on your CEC-supported
device.
► (Play)—Press to start Playback on your CEC-supported device.
■ (Stop)—Press to stop playback/recording on your CEC-
supported device.
(Previous)—Press to skip the previous track on your CEC-
supported device.
◄◄ (Reverse)—Press to reverses playback on your CEC-supported
device.
►► (Fast Forward)—Press to fast forward playback on your CEC-
supported device.
►M (Next)—Press to skip to the next chapter on your CEC-
supported device.
EXIT—Press to exit from open menus.
MENU—Press to open the On-Screen Display (OSD) menu.
OK—Press this button to display the Channel List. Press to confirm
selections for On-Screen Display (OSD) menus.
A T ◄ ►—Press to navigate the OSD menu. They will also be used as value settings when the slide bar
is shown on the screen and option settings to turn a feature off or on.
BACK—Press to return to a previous OSD menu. Press repeatedly to close the OSD.
GUIDE—Press to display detailed program information when viewing a digital TV program.
Color Buttons (Yellow, Blue, Red, & Green):
• Yellow—This button performs the same function as the “A” button on your Cable or Satellite box
when using the remote to control your pre-programmed Cable/Satellite Box DVR.
• Blue—This button performs the same function as the “B” button on your Cable or Satellite box
when using the remote to control your pre-programmed Cable/Satellite Box DVR.
• Red—This button performs the same function as the “C” button on your Cable or Satellite box
when using the remote to control your pre-programmed Cable/Satellite Box DVR.
• Green—This button performs the same function as the “D” button on your Cable or Satellite box
when using the remote to control your pre-programmed Cable/Satellite Box DVR.
16
www.VIZIO.com
Page 17
VIZIO M320NV and M370NV User Manual
VOL +/—Press to turn the volume up or down.
MEDIA - Use this button to access the USB drive to view your pictures.
MUTE—Press to turn the sound on and off.
LAST— Press to recall the previously viewed channel.
CH +/—Press to change the channels up or down.
HDMI—Press to select the HDMI input. Press repeatedly to cycle between
both HDMI inputs.
AV—Press to select the AV input.
TV—Press to select the TV input.
Number Button Pad—Press to select a channel or enter a password.
INPUT—Press to cycle through the various devices connected to your TV
(called Inputs). The inputs cycle in the following sequence: TV, AV, Comp,
HDMI-1, HDMI-2, HDMI SIDE, RGB, and Media. After you have stepped
through the entire sequence, you will return to the beginning.
- (DASH)—Press to insert a dash between the main and sub-channels. For
example, channel 28-2 would be selected by the button sequence 2, 8,
DASH, 2.
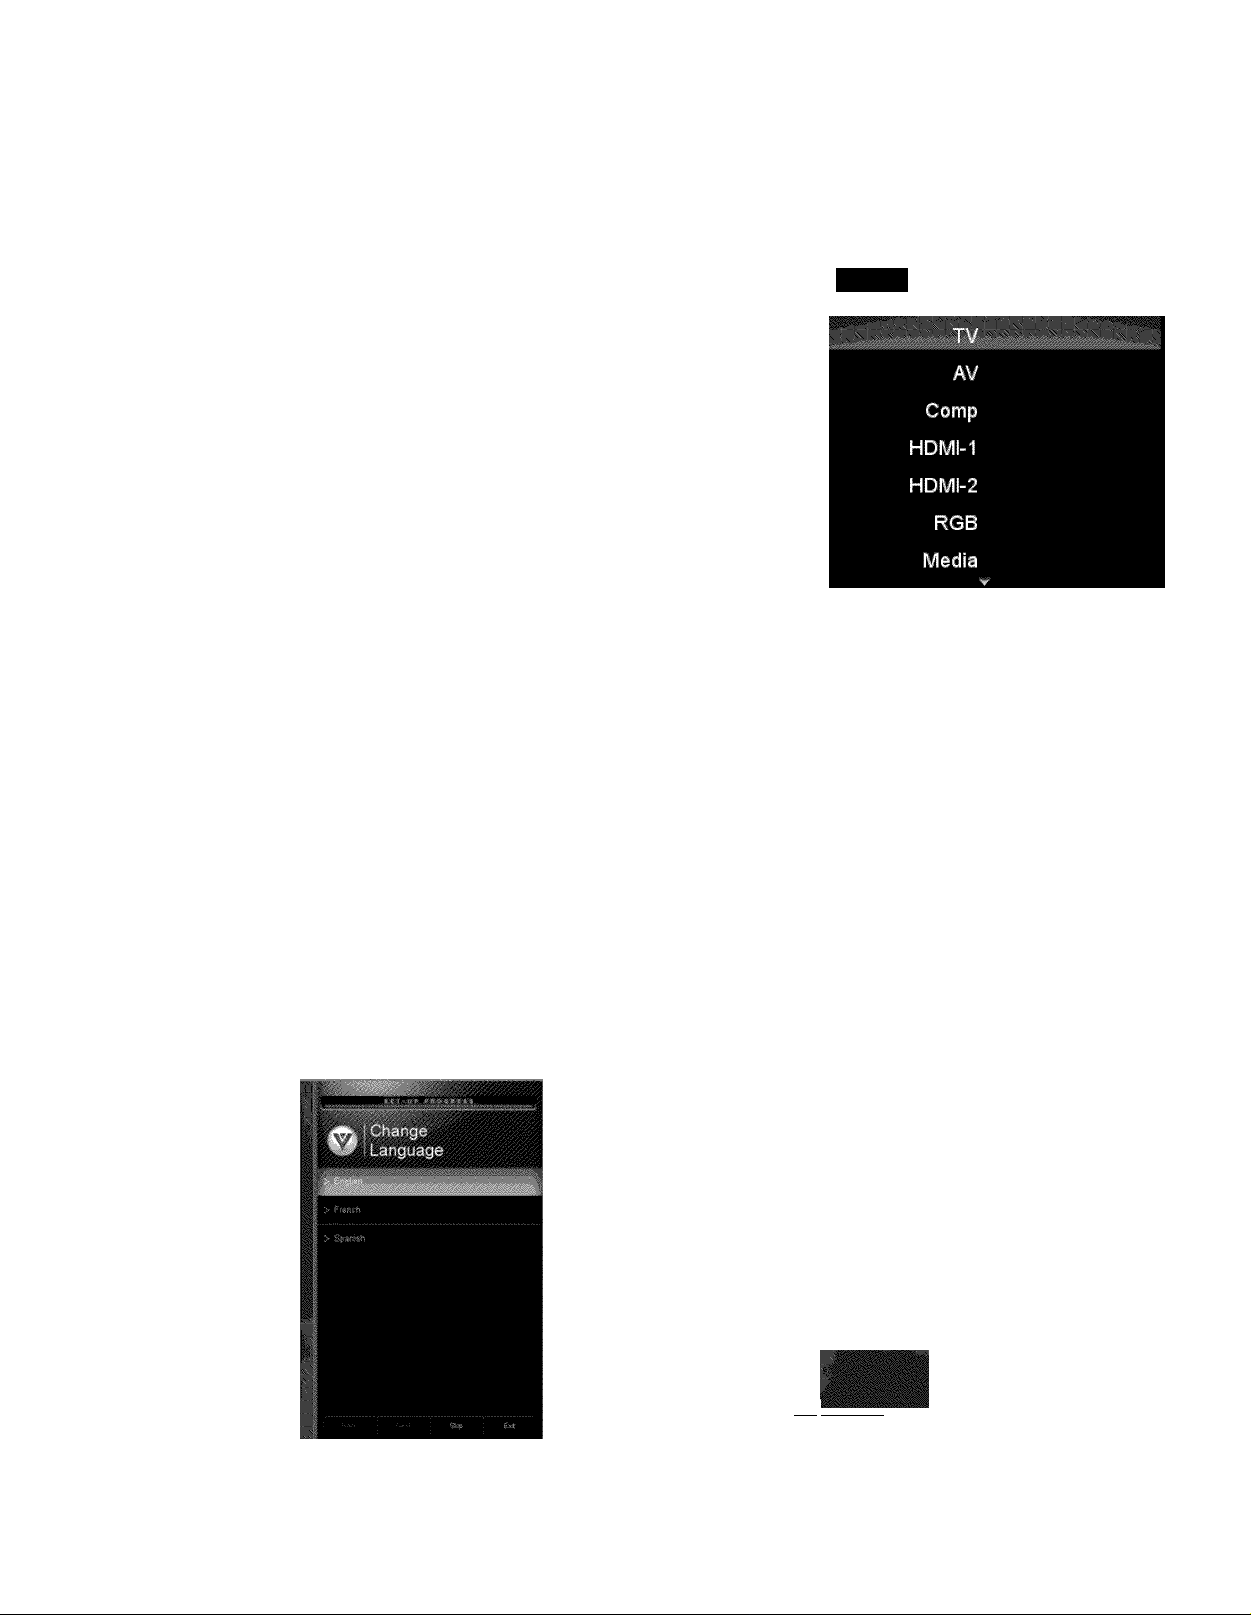
Inputs
Chapter 4 Getting Started
Your HDTV has a built-in setup App that runs when you turn on your TV for the first time. Follow the on
screen directions to easily setup your new HDTV.
1. Insert the batteries into the remote control.
2. Connect the power cord to the power cord connector on the back of your HDTV, and then plug
the power cord into an AC wall socket.
3. Connect your devices to your HDTV (see Chapter 2 for detailed steps).
4. Turn on your TV. The Setup App will automatically play and guide your thru the initial setup of
your HDTV. Use the Arrow and OK buttons to navigate through the setup App. During the setup
process you will:
• Choose your Menu language
• Set the TV to Home Mode for the best picture and most efficient energy usage.
• Set your Time Zone and Daylight Savings preferences
• Add your TV channels (unless you have a Cable/Satellite Set-Top Box)
Version 3/24/2010 17
www.VIZIO.com
mm
mmmmmmaaams№№№
Page 18

VIZIO M320NV and M370NV User Manual
Chapter 5 Using your HDTV for the first time
Select an Input Source
Select the input source for your HDTV by pressing the INPUT button on the
remote control or the front of your TV. Pressing this button will cycle you
through the following options: TV, AV, Comp, HDMI-1, HDMI-2, RGB, and
Media.
Turn on your device and you will see a picture on your HDTV. If there is no
picture, make sure you have selected the correct input on your HDTV.
If the selected device is RF connected, your HDTV needs to be in TV
mode and on either channel 3 or channel 4 matching the channel which has
been selected on the back of the VCR, Cable Box, External TV Tuner or
Satellite Receiver. Refer to Cwner or User’s Manual of such equipment for
details.
Watching a TV Program
Before you start watching TV, make sure that any cable, satellite or off-air antenna connections are
secure. Also, verify that the AC/DC power adapter is plugged into a correctly grounded electrical outlet or
surge protector.
Watch TV from your Antenna or Cable
out-of-the-wall.
1. Press the power button on the remote control. The VIZIC logo on the front will light up white.
2. Select the input to which your device is connected that provides TV programming (i.e. TV, HDMI,
CCMP).
You should be able to see a picture. If you do not, make sure that all of your HDTV connections
are secure and you have selected the correct video input source. Each press of the INPUT button on the
remote control will cycle through the available inputs. Press the button until the input associated with the
device you want to view is shown.
3. When using the TV input, press the channel buttons on the remote control or the TV to change
the channel. The channel buttons will not work if you are watching a program using HDMI,
Component, or AV inputs.
18
www.VIZIO.com
Page 19
VIZIO M320NV and M370NV User Manual
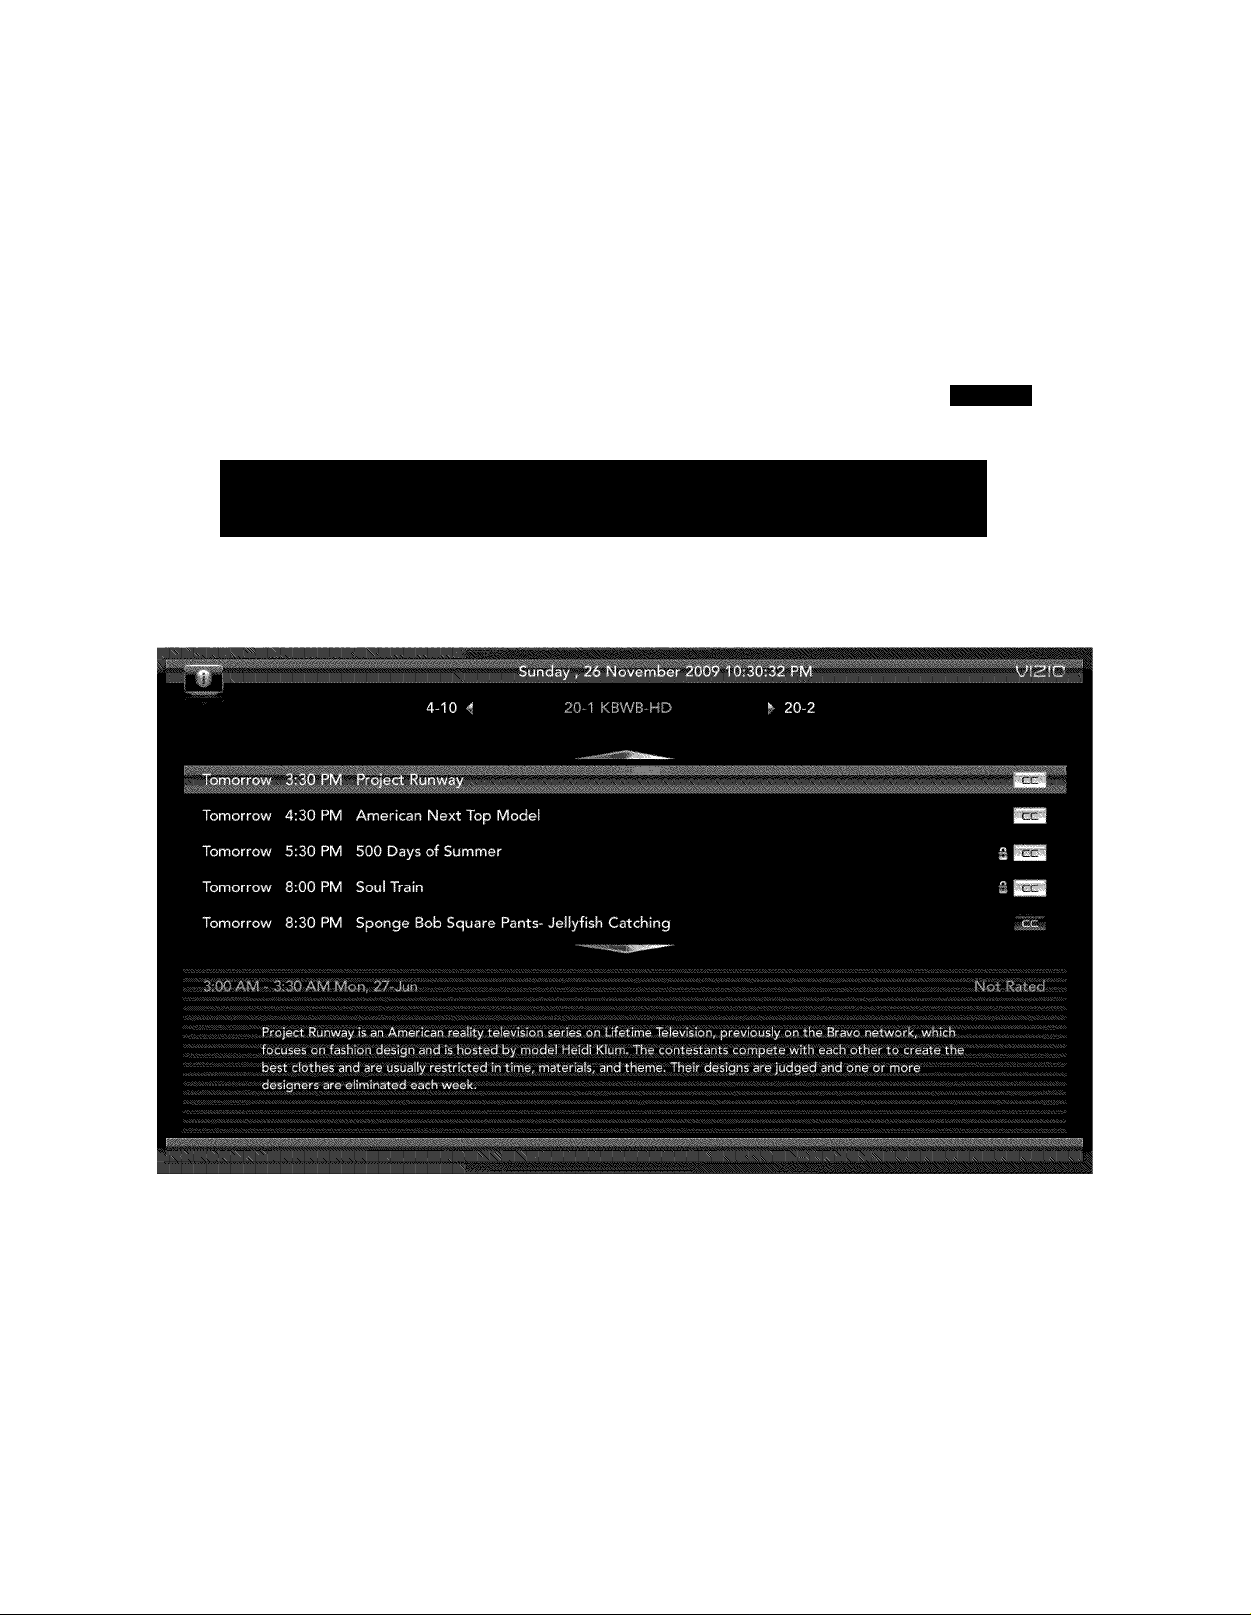
Viewing Digitai TV Program information
When the channel is changed or when you press the GUIDE button, an information header is shown over
the picture for a few seconds. Each press of the GUIDE button will display more information about the
program:
CABLE
in tr is tiou.' icng speciiii. t’lc Time Warp team nji-s o:f to join tiie : rcuS wim 'rao iestmt
Rev iomny Gvon anc with fegneiyi.-ig C-roue do Save:; evolora tne r stuntir.en
ar'd DU' everything bat wood ;n a chipper.
Version 3/24/2010 19
www.VIZIO.com
Page 20

VIZIO M320NV and M370NV User Manual
Chapter 6 Connecting Equipment
Which Video Connection Shouid i Use?
You have six options for connecting your video equipment box to your HDTV from a basic connection to
the most advanced for digital displays. Based on your Home Theater configuration, you can decide which
option is the right one for you.
HDMI delivers the best image quality of any of the cable types available
Best
(digital) HL,Vi
Best
(digital)
....................... ^
Good
(analog)
o
and it’s all done over one cable. You get a great picture and cut down on
your cable clutter. HDMI provides digital quality and amazing sound so if
your TV has HDMI, this is the connection type you should be using.
Connect your antenna or coaxial cable to watch TV programming. This
cable usually comes from your cable box or right out of the wall.
The RGB (VGA) port allows you to connect your computer so you can
(analog)
Better
(analog)
'
Pr
Good
(analog)
To maintain the display quality, use a VIZIO certified HDMI cable. This cable is available in 6, 8,
and 12 foot lengths. Visit www.vizio.com or call 1-888-VIZIOCE (1-888-849-4623) for details.
use the TV as your monitor.
Component consists of three cables for transmitting video and two
cables for transmitting audio: one red and one white. Component video
provides a sharper image than Composite video and should be used
instead of composite when possible. However, because it is still an
analog connection, it won’t provide the high-quality video and audio that
HDMI can produce.
Composite consists of one yellow cable for transmitting video and two
cables for transmitting audio: one red and one white. It is capable of
transmitting stereo sound and standard definition video (4801). While it
provides a good image, it has lower image quality than HDMI or
Composite. So try to use one of those connections first.
20
www.VIZIO.com
Page 21

Connecting Your Cable or Satellite Box
Using HOMI (Best)
VIZIO M320NV and M370NV User Manual
1 1
Cable/Satellite Box
] 0 0|
Cable and Satellite Boxes that have a HDMI digital interface should be connected using HDMI for optimal
results. To maintain image quality, use a VIZIO certified HDMI cable. This cable is available in 6, 15, and
30 foot lengths. Visit
1.
Turn off your HDTV and Cable/Satellite box.
2.
Connect an HDMI cable to the HDMI output of your Cable/Satellite box and the other end to the
www.VIZIO.com or call 877-MYVIZIO (877-698-4946) for details.
HDM11,2, or HDMI SIDE jack on your HDTV.
3.
Turn on the power to your HDTV and your Cable/Satellite box.
4.
Select HDMI-1, HDMI-2, or HDMI SIDE using the INPUT button on the remote control or side of
the TV.
The HDMI input on your HDTV supports High-bandwidth Digital Content Protection (HDCP).
HDCP encrypts the transmission between the video source and the digital display for added
security and protection.
Refer to your Cable/Satellite Set Top Box user manual for more information about the video
output requirements of the product or consult your Cable or Satellite operator.
HDMI Connections for Cable or Satellite Boxes with DVI
1 1
Cable/Satellite Box
1. Turn off your HDTV and Cable/Satellite box.
2. Using a HDMI-DVI cable, connect the DVI end to your Cable/Satellite box and the HDMI end to
the HDM11,2, or HDMI SIDE jack on your HDTV.
3. Turn on the power to your HDTV and your Cable/Satellite box.
4. Select HDMI-1, HDMI-2, or HDMI SIDE using the INPUT button on the remote control or side of
the TV.
There are no dedicated audio ports for HDMI so there may or may not be audio from the TV with
this connection.
] Oo|
Version 3/24/2010 21
www.VIZIO.com
Page 22

VIZIO M320NV and M370NV User Manual
Using Component Video (Better)
I I
]
Cable/Satellite Box
©
R
Pb
o
Pr
1. Turn off your HDTV and Cable/Satellite box.
2. Connect the Component cables (green, blue, and red) from your Cable/Satellite box to the
COMPONENT jacks on your HDTV.
3. Connect the audio cables (white and red) from your Set Top Box to the COMPONENT L and R
AUDIO jacks on your HDTV.
4. Turn on your HDTV and Cable/Sateilite box.
5. Seiect Comp using the INPUT button on the remote control or side of the TV.
Using Composite Video (Good)
VIDEO —AUDIO-p i
I I
Cable/Satellite Box
] Oo|
@@o
VIDEO L
] 0 0|
1. Turn off your HDTV and Set Top Box.
2. Connect the video cable (yellow) from your Set Top Box to the AV jack (yellow) on your HDTV.
3. Connect the audio cables (white and red) on your Set Top Box to the AV L and R AUDIO jacks
on your HDTV.
4. Turn on your HDTV and Set Top Box.
5. Seiect AV using the INPUT button on the remote control or side of the TV.
Using Coaxial (Antenna) (Good)
DTV/TV
CABLE / ANTENNA
I I
Cable/Satellite Box
] Oo|
o
COAXIAL
1. Turn off the power to your HDTV.
2. Connect the coaxial (RF) connector from your antenna or digital cable to the DTV/TV
CABLE/ANTENNA connector on your HDTV.
3. Turn on the power to your HDTV.
4. Select TV using the INPUT button on the remote control or side of the TV.
5. Search for new channels. See Auto Channel Search on page 36 for more information on
scanning for channeis.
22
www.VIZIO.com
Page 23

Connecting Your DVD Player
Using HOMI (Best)
VIZIO M320NV and M370NV User Manual
DVD
DVD players that have a HDMI digital interface should be connected using HDMI for optimal results. To
maintain image quality, use a VIZIO certified HDMI cable. This cable is available in 6, 15, and 30 foot
lengths. Visit www.VIZIO.com or call 877-MYVIZIO (877-698-4946) for details.
1. Turn off your HDTV and DVD player.
2. Connect a HDMI cable to the HDMI output of your DVD player and the other end to the HDMI 1, 2,
or HDMI SIDE jack on your HDTV.
3. Turn on the power to your HDTV and your DVD player.
4. Select HDMI-1, HDMI-2, or HDMI SIDE using the INPUT button on the remote control or side of
the TV.
The HDMI input on your HDTV supports High-bandwidth Digital Content Protection (HDCP).
HDCP encrypts the transmission between the video source and the digital display for added
security and protection.
Refer to your DVD player user manual for more information about the video output requirements.
OO
HDMI Connections for DVD Players with DVI
DVD
1. Turn off your HDTV and DVD player.
2. Using a HDMI-DVI cable, connect the DVI end to your DVD player and the HDMI end to the
HDM11,2, or HDMI SIDE jack on your HDTV.
3. Turn on the power to your HDTV and your DVD player.
4. Select HDMI-1, HDMI-2, or HDMI SIDE using the INPUT button on the remote control or side of
the TV.
Note: There are no dedicated audio ports for HDMI so there may or may not be audio from the TV with
this connection.
Version 3/24/2010 23
www.VIZIO.com
OO
Page 24

VIZIO M320NV and M370NV User Manual
Using Component Video (Better)
1 1
Pr
'_• O'
L R
DVD
1. Turn off the power to your HDTV and DVD player.
2. Connect the Component cable (green, blue, and red) from your DVD player to the COMPONENT
jacks on your HDTV.
3. Connect the audio cables (white and red) from your DVD player to the COMPONENT L and R
AUDIO jacks on your HDTV.
4. Turn on the power to your HDTV and DVD player.
5. Select COMP using the INPUT button on the remote control or side of the TV.
Using Composite (AV) Video (Good)
VIDEO —AUDIO-p I
DVD
OO
@@o
VIDEO L
1. Turn off the power to your HDTV and DVD player.
2. Connect the Video cable (yellow) from your DVD player to the AV jack on your HDTV.
3. Connect the audio cables (white and red) on your DVD player to the AV L and R AUDIO jacks on
your HDTV.
4. Turn on the power to your HDTV and DVD Player.
5. Select AV using the INPUT button on the remote control or side of the TV.
OO
24
www.VIZIO.com
Page 25

VIZIO M320NV and M370NV User Manual
Connecting Coaxial (RF)
Using Your Antenna or Digital Cable for Standard or Digital TV
.........i
...O.
DTV/TV
CABLE / ANTENNA
o o i. ' 7' ’
CABLE BOX
.........
o'
o
COAXIAL
1. Turn off the power to your HDTV.
2. Connect the coaxial (RF) connector from your antenna or cable to the DTV/TV
CABLE/ANTENNA connector on your HDTV.
3. Turn on the power to your HDTV.
4. Select TV using the INPUT button on the remote control or side of the TV.
5. Search for new channels. See Channel Search instruction on page 36 for more information on
scanning for channels.
Connecting Your VCR or Video Camera
VIDEO —AUDIO-=-
L H
O o
i
VCR
O O
@@)
Vi/ vy'
VIDEO L
Note: Refer to your VCR or Video Camera user manual for more information about the video output
requirements of the product.
1. Turn off the power to your HDTV and VCR or video camera.
2. Connect the yellow AV cable from your VCR or video camera to the AV jack on your HDTV.
3. Connect the audio cables on your VCR or video camera to the corresponding L and R AUDIO
jacks on your HDTV.
4. Turn on the power to your HDTV and VCR or video camera.
5. Select AV using the INPUT button on the remote control or side of the TV.
Version 3/24/2010 25
www.VIZIO.com
Page 26

VIZIO M320NV and M370NV User Manual
Connecting a Home Theater System
Using RCA
Connecting the cables
1.
Turn off the power to the HDTV and Receiver/Amp.
2.
Using an audio cable (white and red connectors), connect the cable to the audio input connectors
on the Receiver/Amp and connect the other end to the AUDIO OUT audio connectors on the
back of the HDTV.
3.
Turn on the power to the HDTV and Receiver/Amp.
Turning TV speakers off
1.
Press MENU to open the OSD.
2.
Press T to highlight Settings, and then press OK to select.
3.
Press OK to select Audio, and then press T to select TV SPEAKERS.
4.
Press ► to select OFF so the sound from the HDTV will be routed
through your Receiver/Amp system.
Advanced Audio
Equalizer Settings
Refer to your Receiver/Amp user manual to select the corresponding
audio input.
The audio output is not amplified and cannot be connected directly to
external speakers.
Select Audio Mode; Flat, Rock, Pop etc.,
Using Opticai (S/PDiF)
S/PDIF
(OPTICAL)
If your sound system has a S/PDIF (optical) digital audio input you can connect it from your sound system
to the OPTICAL digital audio out on your HDTV. This is active when receiving audio with the programs
being viewed no matter what input is being used.
1. Connect one end of the optical cable to optical connectors on the Home Theater and the other
end to the OPTICAL jack on your HDTV.
2. Turn on the power to your HDTV and home theater.
3. Change the input on your Home Theater to optical. See your Home Theater user manual for more
information.
26
www.VIZIO.com
Page 27

VIZIO M320NV and M370NV User Manual
Connecting a Computer
RGB (VGA)
AUDIO
RGB PC
RGB PC
1. Set computer to a resolution supported by your HDTV (see Preset PC Resolutions on page 50). If
your computer supports it, we recommend 1920x1080.
2. Turn off the power to your HDTV and computer.
3. Connect the RGB (VGA) cable from your computer to the RGB PC jack on of your HDTV.
4. Connect the 1/8-inch audio cable from your computer to the RGB PC Audio jack on your HDTV.
This step is optional and only needed if you want to transmit audio from the computer through the
TV.
5. Turn on the power to your HDTV and computer.
6. Select RGB (VGA) using the INPUT button on the remote control or side of the TV.
Note: Refer to your PC computer user manual for more information about the video output requirements.
Using HDMI
1. Turn off your HDTV and computer.
2. Connect a HDMI cable to the HDMI output of your computer and the other end to the HDM11,2,
or HDMI SIDE jack on your HDTV.
3. Connect the 1/8-inch audio cable from your computer to the RGB PC Audio jack on your HDTV.
This step is optional and only needed if you want to transmit audio from the computer through the
TV.
4. Turn on the power to your HDTV and your computer.
5. Select HDMI-1, HDMI-2, or HDMI SIDE using the INPUT button on the remote control or side of
the TV.
Version 3/24/2010 27
www.VIZIO.com
Page 28

VIZIO M320NV and M370NV User Manual
Chapter 7 Viewing Pictures
Connect a USB flash drive to the USB port on your HDTV to view pictures.
• USB drives that are USB 2.0 and FAT or FAT32 are supported. The USB Port does not support
external hard drives or USB hubs.
• If your USB drive is oversized and does not physically fit in the USB port, use a USB extension
cable. Connect one end of the cable to your USB drive and the other end to the USB port.
• Supported file extensions inciude .jpg and .jpeg.
Even the supported format files listed above may or may not play properly or completely,
depending on the USB device, bit rate stream, and other content characteristics, as weil as other factors.
Viewing Pictures
1. Insert a USB device with digital content such as photos, music, and movies into the Multimedia
port on the side of your HDTV. If a USB device is already connected, press MENU on the remote
control and select Media. A message will appear asking if you want to play multimedia content.
2. Press ◄ or ► to highlight OK, and then press OK to seiect it. The Picture folder will be displayed.
3. Press OK to select it. A menu will be displayed showing the folders and files that are on your USB
device.
4. Press ◄ or ► to highlight the folder or file you want to play, and then press OK to select it. The
file will play. See Adjusting Photo Settings on page 29 below to adjust various settings inciuding
setting up a slideshow and setting picture duration.
5. When finished, press EXIT once to return to the previous screen or repeatedly to return to the
main menu.
[
_______
Do you want to play
multimedia content?
■
28
www.VIZIO.com
Page 29

VIZIO M320NV and M370NV User Manual
Adjusting Photo Settings
When viewing pictures you can adjust various settings, including slideshow, picture duration, etc.
1. Insert a USB device containing pictures and select the folder or files that you want to play.
2. Press MENU. The Picture menu will be displayed.
3. Press A or T on the remote control to highlight a Picture menu option, and then press ◄ or ►
to adjust the setting.
4. Press MENU once to close the menu.
Slideshow Mode
Choose from Shuffle, Single, and Sequence to set the slideshow mode.
Press OK to begin the slideshow. Press OK to stop the slideshow.
• Single will display one picture selected from the thumbnails for the
interval set in the Duration option and return to the thumbnails. If the
Repeat option is set to On, the selected picture will be displayed until
you press EXIT.
• Sequence will show your pictures in the order they are iisted on your
USB device until you stop the slideshow.
• Shuffle will show your pictures in random order until you stop the
slideshow.
Repeat
Choose from On or Off to repeat the slideshow.
Sort By
You can choose to sort the pictures on the USB device by Photo Date, File
Date, or alphabetically (File A-Z).
Duration
Set the amount of time the picture will remain on the screen during the slideshow. Choose a time
between 5 seconds and 32 seconds.
Slideshow Effect
Choose from Random, Dissolve, Wipe Right, Wipe Left, Wipe Up, Wipe Down, Box In, or Box Out to
set the transition type when changing from one picture to another during a slideshow.
Thumbnail Size
Set the size of the preview pictures (thumbnails) in the menu. Choose from Small, Medium, or Large.
Info
When set to On, information about the picture briefly appears on your HDTV.
Version 3/24/2010 29
www.VIZIO.com
Page 30

VIZIO M320NV and M370NV User Manual
Chapter 8 Adjusting Your HDTV Settings
Using the On-screen Display (OSD)
The remote control or the control buttons on the side of the TV can control all the function settings. The
OSD allows you to adjust contrast, brightness and other settings. The TV will save changes made to the
settings, even if the TV is turned off.
The OSD consists of several menu options. The main menu options may vary depending on your
selected input source.
Note: Some of the main menu options may have additional submenus, for example, the TV Rating
submenu for Parental Controls.
1. Press MENU. The OSD opens.
2. Press ◄, ►, A, or T on the remote control to select one of the menu options:
Input
Wide
CO
Sleep Timer
Picture
Audio
Settings
Media
Help
3. Press OK to select the option or feature you want to adjust.
4. After the menu option is displayed, press A or T on the remote
control to select one of the items to adjust.
5. Press OK to select it, and then press ◄, ►, A, or T to adjust the
selection.
6. Press BACK once to return to the previous screen. To return to
your program once adjustments have been completed, press the
EXIT button on the remote control.
Settings Media Help
elect input source
EXIT ©
Picture Audio
Input Menu
Select the Input Source for your HDTV. Choose from TV, AV, Comp,
HDMI-1, HDMI-2, HDMI SIDE, RGB, and Media.
30
www.VIZIO.com
HDMi SiDE
Watch TV from your Antenna or Cable
out-of-the-wall.
Page 31

VIZIO M320NV and M370NV User Manual
Wide Menu
Select how the picture displays on the screen. As you select an option, you will see the screen adjusting
to the different sizes. The options vary depending on the selected input and the TV program:
Normal
The original 4:3 aspect ratio (1.33:1 source) is preserved, so black bars are
added to the left and right of the display image. Standard TV broadcasts are
displayed with a 4:3 Aspect Ratio. Movies in 4:3 Aspect Ratio may be referred
to as pan-and-scan or full frame. These movies were originally filmed in 16:9
(widescreen), and then modified to fit a traditional TV screen (4:3).
Wide
Wide mode allows you to view the entire picture. Recommended for HDMI and RGB / Computer viewing
so you can see the complete picture without the image overstretching beyond the viewing area. If you
experience “noise” along the border switch to Zoom 1. For 720p, lOSOi, lOSOp only.
Panoramic
When watching a standard broadcast or full frame movie in this mode,
the 4:3 Aspect Ratio (1.33:1 source) display image is stretched
horizontally on the left and right sides to fill the TV screen. The center
of the image is not stretched.
Stretch
When watching a widescreen program (1.78:1 source) with black bars on
the sides, the display image will stretch to fill the TV screen. People will
appear wider than they really are. If you are watching a widescreen
(1.85:1 or 2.35:1 source) program or movie, there will still be black bars
at the top and bottom. This mode is available only when watching a
widescreen program.
Version 3/24/2010 31
www.VIZIO.com
Page 32

VIZIO M320NV and M370NV User Manual
CC (Closed Caption) Menu
Adjust closed caption options.
Analog Closed Caption
The CC feature is available when watching regular analog TV.
Select from Off, CC1, CC2, CCS, and CC4. Closed Caption for
regular TV is usually CC1 or CC2.
Digital Closed Caption
The CC feature is available when watching digital TV. Select from
CC1, CC2, CCS, CC4, or CS1, CS2, CSS, CS4, CSS, CS6, or Off.
Digital CC Style
The Digital CC Style feature is available when watching digital TV.
• Caption Style: Select either As Broadcaster or Custom.
If Custom is selected you can customize the way Closed
Caption is displayed. The options available are:
Text Size: Make CC text larger or smaller.
Color: Choose a text color for CC display.
Opacity: Make text more or less transparent.
BG Color: Choose a background color for CC text.
BG Opacity: Make the background for CC text more or less transparent.
Window Color: Choose a text frame color for CC text.
Window Opacity: Make the text frame for CC text more or less transparent
Sleep Timer Menu
Select the timer to turn off the TV in 30, 60, 90,120 or 180 minutes.
X iì
- Clciwcl C^apìlon
Digital Closed Caption Off
Digital CC Style As Broadcast
Select Analog Closed Caption modes
Picture Menu
Adjust picture options including brightness, contrast, and advanced picture settings.
Picture Mode
Choose from Standard, Movie, Game, Vivid, or Custom. Each input (i.e.
HDMI, CCMP, etc) remembers the custom setting you created. Select
Custom to manually adjust Backlight, Brightness, Contrast, Color, Tint,
Sharpness, and to access the More menu where further adjustments can
be made.
Backlight
Adjust the LED brightness to affect the overall brilliance of the picture not
the Brightness (black level) or Contrast (white ievel) of the picture.
Backlight is only available when Picture Mode is set to Custom.
Brightness
Adjust black levels in the picture. If the brightness is too low you will not be
able to see the detail in darker parts of the picture and if the brightness is
too high the picture will look washed out.
Brightness is only available when Picture Mode is set to Custom.
Sharpness
Select Picture Mode; Custom, Standard,
Movie, Golf etc...
..
More
......
>
32
www.VIZIO.com
Page 33

VIZIO M320NV and M370NV User Manual
Contrast
Adjust the white levels in the picture. If the contrast is too low the picture will look washed out and if the
contrast is too high you will not be able to see any detail in the bright parts of a picture.
Note: Contrast is only available when Picture Mode is set to Custom.
Color
Adjust the amount of color in the picture.
Note: Color is only available when Picture Mode is set to Custom.
Tint
Adjust the hue of the picture. The easiest way to set tint is to look at flesh tones and adjust for a realistic
appearance. In most cases, the default middle position is correct. If people’s faces look too orange try
reducing the level of color first.
Note: Tint is only available when Picture Mode is set to Custom.
Sharpness
Adjust the sharpness of the edges of elements in the picture. It does not produce detail that otherwise
does not exist. This adjustment is helpful when viewing Standard Definition sources.
Sharpness is only available when Picture Mode is set to Custom.
More
Select More to adjust advanced options for fine tuning the picture.
The More menu is only available when Picture Mode is set to Custom.
Size & Position
To select the options in the Size & Position sub-menu, press the
MENU button or the ► button. A new menu will be displayed
showing the following Size & Position settings:
• Horiz. Position
Adjust the horizontal position of the picture.
• Vertical Position
Adjust the vertical position of the picture.
• Horizontal Size
Adjust the horizontal size of the picture.
• Vertical Size
Adjust the vertical size of the picture.
• Auto Phase (for Component input only)
The TV will automatically look for the phase of the signal to fine
tune the picture.
Note: The Size & Position function is only available in HDMI, Component, or RGB modes.
ESEHH
Reset Picture Mode
Adjust Verticai and Horizontal Size and
Postion
Version 3/24/2010 33
www.VIZIO.com
Page 34

VIZIO M320NV and M370NV User Manual
Color Temperature
Color Temperature is the “warmness” or “coolness” of the white areas of the picture. Choose from
Custom, Cool, Normal, or PC. Normal is the setting for television broadcasting. Custom allows
you to set a preset calibrated for a white point to suit individual preferences. Cool produces a
blue-hued image. PC sets the white point at the established setting for a computer display
(9300K). Each preset may also be adjusted for a customized setting.
Advanced Picture
To select the options in the Advanced Picture sub-menu, press OK. A new menu will be
displayed showing the advanced functions available for fine tuning of the picture.
• Noise Reduction
This feature diminishes picture artifacts caused by the
digitizing of image motion content that may be present in
the picture. Choose from Off, Low, Medium, or High.
• Color Enhancement
This feature increases the picture reproduction
performance of the picture by reducing oversaturation of
certain colors and improving flesh tones. Choose from Off,
Normal, Rich Color, Green/Flesh, and Green/Blue.
• Adaptive Luma
Large areas of brightness in the picture will result in a
higher Average Picture Level (APL) and the overall picture
will look too light. This feature will lower the APL to
counteract this effect. Choose from Off, Low, Medium,
Strong, or Extend.
• Film Mode
Choose from Off or Auto. When set to Off it will stay at 60
fps. When set to Auto, the TV will detect the cadence (for
example at 24 frames/second for film, or normal video at 60 fps).
• Backlight Control
Set this feature to OFF, DCR, or OPC. DCR (Dynamic Contrast Ratio) improves the black
level performance and increases contrast ratio. OPC (Optimum Power Control) Reduces
power consumption while maintaining the same picture brightness.
• Ambient Light Sensor
Choose Off, Low, Medium, or High. When set to on, your HDTV will automatically adjust
to light changes in the room.
Color Enhancement
Adaptive Luma
Film Mode
Reset Picture Mode
Return all Picture settings to factory default. A screen will come up to confirm your selection or to
cancel it. Press ◄ or ► to make the selection, and then press OK to accept it.
Only settings under the Picture will be reset.
34
www.VIZIO.com
Page 35

VIZIO M320NV and M370NV User Manual
Audio Menu
Adjust audio options including balance, equalizer, and advanced audio
settings.
Audio Mode
Choose from Flat, Rock, Pop, Classic or Jazz.
Balance
Adjust the sound to the left or the right.
Lip Sync
Lip Sync is designed to adjust the audio of the program being viewed so
that it matches the movement of the lips of someone talking on the screen.
Lip Sync
TV Speakers
Advanced Audio
Equaiizer Settings
Reset Audio Mode
TV Speakers
Select Audio Mode; Flat, Rock, Pop etc..
Turn the internal speakers Cn or Cff. You may want to turn the internal
speakers off when listening to the audio through your Home Theater
System.
Advanced Audio
To select the options in the Advanced Audio sub-menu, press ►. A new menu will be displayed showing
the advanced functions available for fine tuning of the audio.
_
______________
__
SRS TruSurround HD™ When watching TV or a movie,
TruSurround HD™ creates an immersive surround sound experience
from only two speakers and provides rich bass, clear dialog and high I
frequency detail.
Note: When SRS TruSurround HD™ is CN, Equalizer adjustments
SRS TruVolume
Digital Audio Out
Analog Audio Out Variable
are not available.
SRS TruVolume
When the programming switches to a commercial or when
changing from channel to channel, volume fluctuations occur.
When turned CN, SRS TruVolume™'provides the listener with a
comfortable and consistent volume level. Turn this option Cff
when listening to music.
Turn SRS TruSurround HD On or Off
Digital Audio Out
This option allows selection of the type of processing for the
S/PDIF (Cptical connector) when used with a
Receiver/Amplifier/Home Theater system. Select to choose
from CFF, Dolby Digital or PCM.
Analog Audio Out
This option sets the volume control properties when using the RCA (white and red)
connectors as audio line out to connect a Receiver/Amplifier/Home Theater system. Choose
from Fixed or Variable. When set to Variable, volume from the external speakers will change
according to the volume setting on the TV. If it is set to Fixed, the volume can only be
changed by the settings on the external stereo system.
Version 3/24/2010 35
www.VIZIO.com
Page 36

VIZIO M320NV and M370NV User Manual
Equalizer Settings
To select the options in the Equalizer sub-menu, press OK. A new menu
will be displayed showing the volumes of different frequencies.
Starting from lowest to the highest, they are 120Hz, 500Hz, 1.5kHz, 5kHz
and 10kHz.
1. Press ◄ or ► to select the frequency to be adjusted.
2. Use A or T to adjust the selected frequency to your
preference. Values above 0 will boost the frequency and
values below 0 will attenuate the frequency.
Note: The Equalizer adjustment will only be available when SRS TSHD is
set to Off.
Reset Audio Mode
Return all Audio settings to factory default. A screen will come up
to confirm your selection or to cancel it. Press ◄ or ► to make the
selection, and then press OK to accept it.
Only settings under the Audio menu will be reset.
Settings Menu
Tuner
Note: The tuner option can only be selected when your HDTV is in TV input mode.
Tuner Mode
Select Cable or Antenna depending upon which you have attached
to the DTV / TV Input.
Auto Channel Search
Automatically search for TV channels that are available in your
area. Be sure to first select the correct tuner mode above. The TV
will search for analog and digital channels. When the search is
Menu Language English
kiRmwn^TiiiiTr
done, press OK to begin watching your programs.
Partial Channel Search
If you believe channels are missed from the auto search, you can
do a partial channel search to look for channel in a certain channel
range again. Select to scan for Analog, Digital, or both
Analog/Digital channels, then press the T button to highlight the
“From” and “To” selection. Press the ► button to select the range
of channel numbers you want to start searching in. Press OK to
start channel search.
Tuner Menu including Channel Search,
.Add, Skip and MTS Audio controls
36
www.VIZIO.com
Page 37

VIZIO M320NV and M370NV User Manual
Skip Channel
After the TV has stored all of the available digital channels in
memory you will find that some channels are too weak to watch
comfortably or they may be channels you do not want to see. Press
to select the channel to be skipped when using the CH+ or CH-
OK
button. An X will appear in channels you have selected to skip. You
will still be able to select this channel using the number buttons on
the remote controi.
MTS
This feature allows you to select the different languages the
broadcaster is transmitting the audio with the program you are
watching. This signal is usually Spanish. Choose from Mono,
Stereo, or SAP.
Name Input
This feature makes it easier for you to recognize the devices you have
connected to your HDTV when you press INPUT. For example, if you have
a Blu-Ray DVD player connected to the HDMI-1 input, you can have the
input iabel read HDMI-1 BluRay instead of just HDMI-1. You can select
from 10 preset labels.
To use one of the 10 preset labels:
1. Select Input Source, and then press OK to show the list of
inputs.
2. Press T to select the input label you want to change, and
then press OK.
3. Press T to select Input Labels, and then press OK to
show the list of 10 preset labels.
4. Press T to select the new input label name, and then
press OK.
Version 3/24/2010 37
www.VIZIO.com
Page 38

VIZIO M320NV and M370NV User Manual
Parental Controls
If you want to restrict certain channei and program viewing, you can do
this by turning on the Parentai Control. Selected programs, movies, and
channeis can then be made availabie only after an authorized password
has been entered and accepted by the TV.
The Parental Controls are divided into LOCK and UNLOCK
menus. To activate or lock parental controls, use the LOCK menu. To
deactivate or unlock parental controls, use the UNLOCK menu.
Navigating Lock and Unlock Menus
To access or navigate the LOCK menu, you must use the Jag Wheel
Control on the side of the TV. Turn the wheei forward or backward to
highiight a menu option, then press the wheei to seiect. The remote
control buttons do not control the LOCK menu.
To access or navigate the UNLOCK menu, you can use the Arrow and
OK buttons on the remote. Enter your PIN when prompted.
Lock and Unlock Menu Functions
Rating Enable
Select ON or OFF. If set to OFF, you will not be able to set the US
TV, US Movie, Canadian Engiish, or Canadian French Ratings.
Channel Locks
Block individual channels from being dispiayed.
USA-TV
Note: When Rating Enable is OFF, the USA-TV Rating
adjustments are not availabie.
TV-Y-AII children
TV-Y7 - Older children
TV-G - General audience
TV-PG - Guidance suggested
TV-14 - Strongiy cautioned
TV-MA - Mature audience
You can also customize the TV ratings for the following content:
A - All sub-ratings
FV - Fantasy violence
D - Sexual dialog
L - Adult language
S - Sexual situations
V - Violence
CAI^J - Engiish
CAN - French
Alt Rating Region
Channel Lochs
LJc.A - Movis
CAN - English
CAN - French
Alt Rating Region
38
www.VIZIO.com
Page 39

VIZIO M320MV and M370NV User Manual
USA-Movie
Note: When Rating Enable is OFF, USA-Movie Rating adjustments are not available.
G - General audience
PG - Parental guidance suggested
PG-13 - Recommended for children 13 years of age or older
R - Mature audience
NC-17 - No one under 17 years of age
X - No one under 17 years of age
CAN-English
Note: When Rating Enable is OFF, Canadian Engiish Rating adjustments are not
available.
C - Children
C8+ - Children 8 years or older
G - General Programming, suitable for all audiences
PG - Parental guidance
14+ - Viewers 14 years or older
18+ - Adult programming
CAN-French
Note: When Rating Enable is OFF, Canadian French Rating adjustments are not
available.
G - General audience
8 ans+ - General - not recommended for young children
13 ans+ - Not suitable for children under 13 years of age
16 ans+ - Not suitable for under 16 years of age
18 ans+ - Adults only
Alt Rating Region
This setting is not used. It is reserved for future rating systems.
Block Unrated TV
Block programming that does not have a rating.
Change PIN (UNLOCK Menu Only)
Enter a new, 4-digit password using the number buttons on the remote control. Enter it a
second time to confirm you entered it correctly.
Note: Make sure you write down and store the new password in a secure place. The
Reset Locks feature does NOT reset the password.
RESET LOCKS (UNLOCK Menu Only)
Return all Parental Control lock settings to factory default. A screen will come up to
confirm your selection or to cancel it. Press ◄ or ► to make the selection, and then
press OK to accept it.
Version 3/24/2010 39
www.VIZIO.com
Page 40

VIZIO M320NV and M370NV User Manual
Change PIN (Password)
Enter a new, 4-digit password using the number buttons on the remote control. Enter it a second
time to confirm you entered it correctly.
Note: Make sure you write down and store the new password in a secure place. The Reset Locks
feature does NOT reset the password.
RESET LOCKS
Return all Parental Control lock settings to factory default. A screen will come up to confirm your
selection or to cancel it. Press ◄ or ► to make the selection, and then press OK to accept it.
Are you sure you want to RESET ALL
LOCKS SETTINGS to the factory
defaults?
Menu Language
Select to change the language of the menu. The default is English. You can also select French or
Spanish.
Time & Local Settings
Time Zone
Setting the correct Time Zone for your area will ensure that the correct time is shown after
pressing the GUIDE button on the remote control.
Daylight Saving
Setting the daylight saving time for your area will ensure that the correct time is shown after
pressing the GUIDE button on the remote control.
CEC
Consumer Electronics Control allows you to control other devices using your HDTV remote control when
those devices are connected via HDMI. For example, if a CEC-supported Blu-ray DVD player is
connected to your HDTV through HDMI-2 and that player is powered on, your HDTV will automatically
change to the HDMI-2 input. Similarly, if your HDTV is powered on first and
your change the input to HDMI-2, your Blu-ray player will automatically
power on.
Also, you can control your CEC-supported device using the transport keys
on your HDTV remote control (e.g. Play, Stop, Prev, etc.). When you press
Device Discovery
one of the buttons on your HDTV, the action will occur on your device.
Contact your devices’ user manual or manufacturer to check whether your
device supports CEC.
CEC Function
Turn CEC Cn or Cff. When set to Cff, your HDTV will not send or
receive any CEC commands.
Device Discovery
Register device with TV. Before CEC will work, perform a Device
Discovery to see if there are any CEC supported devices
connected to your HDTV.
40
www.VIZIO.com
Turn connected device control On or Off
EXIT ®
Page 41

VIZIO M320NV and M370NV User Manual
Media Menu
When viewing pictures you can adjust various settings, including slideshow, picture duration, etc.
1. Insert a USB device containing pictures and select the folder or files that you want to play.
2. Press MENU. The Picture menu will be displayed.
3. Press A or T on the remote control to highlight a Picture menu option, and then press ◄ or ►
to adjust the setting.
4. Press MENU once to close the menu.
Slideshow Mode
Choose from Shuffle, Single, and Sequence to set the slideshow mode.
Press OK to begin the slideshow. Press EXIT to stop the slideshow.
• Single will display one picture selected from the thumbnails for the
interval set in the Duration option and return to the thumbnails. If the
Repeat option is set to On, the selected picture will be displayed until
you press EXIT.
• Sequence will show your pictures in the order they are iisted on your
USB device until you stop the slideshow.
• Shuffle will show your pictures in random order until you stop the
slideshow.
Repeat
Choose from On or Off to repeat the slideshow.
Sort By
You can choose to sort the pictures on the USB device by Photo Date, File
Date, or alphabetically (File A-Z).
Duration
Set the amount of time the picture will remain on the screen during the slideshow. Choose a time
between 5 seconds and 32 seconds.
Slideshow Effect
Choose from Random, Dissolve, Wipe Right, Wipe Left, Wipe Up, Wipe Down, Box In, or Box Out to
set the transition type when changing from one picture to another during a slideshow.
Thumbnail Size
Set the size of the preview pictures (thumbnails) in the menu. Choose from Small, Medium, or Large.
Info
When set to On, information about the picture briefly appears on your HDTV.
Version 3/24/2010 41
www.VIZIO.com
Page 42

VIZIO M320NV and M370NV User Manual
Help Menu
System Info
Display the technical information including model name, version and
revision of firmware, source type, and resolution.
Reset TV Settings
Return all Picture and Audio settings to factory default. A screen will come
Reset TV Settings
Clear MemoryiFactory Default;
up to confirm your selection or to cancel it. Press Left or Right Navigation
buttons to make the selection, and then press OK to accept it.
This does NOT reset the Parental Control Password.
Clear Memory (Factory Default)
Use this function to reset the TV to the default factory settings. The screen
will display a message to confirm that you want to reset the values to
factory settings. Press ◄ or ► to make the selection, and then press OK to
accept it.
This does NOT reset the Parental Control Password.
Start Setup Wizard
Use this function to return to the Initial Setup menu. Use this function if you want to have a guided setup
when you move your TV. Refer to Chapter 3 for more information.
Previously scanned channels will be removed.
42
www.VIZIO.com
Page 43

VIZIO M320NV and M370NV User Manual
Chapters Maintenance and Troubleshooting
Cleaning the TV and Remote Control
1. Remove the power adapter cable from the TV.
2. Use a soft cloth moistened with diluted neutral cleaner to clean the TV and remote control. VIZIO
recommends using an HDTV cleaning solution which can be purchased at any major retailer.
3. Wring iiquid out of the cloth before cleaning to prevent water from penetrating into the housing.
4. Wipe the TV and remote control with a dry cloth after cleaning.
• Do not use volatile solvent (such as toluene, rosin and alcohol). Such chemicals may damage the
housing, screen glass, and remote control, and cause labeling to peel.
• The screen glass is very fragile. Do not scrape it with any sharp object.
• Do not press or tap the screen to avoid cracking.
Troubleshooting Guide
If the TV fails or the performance changes dramatically, check the following troubleshooting guide for
possible solutions. Remember to check the peripherals to pinpoint the source of the failure. If the display
still fails to perform as expected, contact the VIZIO for assistance by calling 1-877-MYVIZIO (698-4946)
or e-mail us at techsupport(gvizio.com.
General TV Problems Solution
Receive the error message
“No Signal.”
No power.
No sound.
If the screen is black.
• Press the INPUT button on the remote control to select a different input source.
• If you are using cable connected directly to the TV or an antenna, scan for
channels from the Tuner menu in the OSD.
• Press the TV button on the top of the remote to return to the TV mode.
• Make sure the power button is ON (VIZIO logo glows white).
• Make sure the AC power cord is securely connected to the AC socket.
• Plug another electrical device to the power outlet to verify that the outlet is working.
• Press Volume + (Up) on the remote control.
• Press MUTE on the remote control to make sure that MUTE is not ON.
• Check your audio settings. The audio may be set to SAP, or the speakers are set
to off.
• Check the audio connections of external devices that may be connected to the
HDTV.
• If you are using an antenna, the signal strength of the channel may be low. Make
sure your antenna is connected securely to the TV and move the antenna around
the room or close to a window.
• Make sure the power button is CN (VIZIC Logo glows white).
• Press the INPUT button on the remote control to select a different input source.
• Check the connections of external devices that may be connected to the HDTV.
• Press the TV button on the top of the remote to return to the TV mode.
Version 3/24/2010 43
www.VIZIO.com
Page 44

VIZIO M320NV and M370NV User Manual
General TV Problems Solution
Power is ON but there is no
image on the screen.
Wrong or abnormal colors
appear.
Control buttons do not work.
Remote control does not
work.
There appear to be image
quality issues.
You cannot see a picture.
You see a distorted picture or
hear unusual sound.
The picture has abnormal
patterns.
• Make sure all cables attached to the HDTV are connected to the correct output on
the external device.
• Adjust brightness, contrast or backlight.
• Press the INPUT button on the remote control to select a different input source.
• Press the TV button on the top of the remote to return to the TV mode.
• Check Color and Tint settings in Picture Menu.
• Reset Picture settings.
• Check the video cables to make sure they are securely connected.
• If you are using an antenna, the signal strength of the channel may be low. Make
sure your antenna is connected securely to the TV and move the antenna around
the room or close to a window.
• Press only one button at a time.
• Press the TV button on the top of the remote to return to the TV mode.
• Point the remote control directly at the remote sensor on your TV.
• Remove any obstacles between the remote control and the remote sensor.
• Replace dead batteries with new ones.
• Press the TV button on the top of the remote to return to the TV mode.
• If you are using an antenna, the signal strength of the channel may be low. Make
sure your antenna is connected securely to the TV and move the antenna around
the room or close to a window.
• For best image quality, view HD wide-screen programs where possible.
• If HD content is not available view “Standard Definition” from a digital source.
• Standard, analog TV will always be noticeably inferior to HD because your digital
flat panel TV has video that is many times better than old TV so you will see
interference and deficiencies you did not know you had.
• Make sure the power button is ON (VIZIO logo glows white).
• Make sure the AC power cord is securely connected to the AC socket.
• Press the INPUT button on the remote control to select a different input source.
• Press the TV button on the top of the remote to return to the TV mode.
• Check the connections of external devices that may be connected to the HDTV.
• If your HDTV is connected to a computer, press any button on your keyboard to
“wake” your computer.
• If you are using an antenna, the signal strength of the channel may be low. Make
sure your antenna is connected securely to the TV and move the antenna around
the room or close to a window.
• You may be getting interference from electrical appliances, cars, motorcycles, or
fluorescent lights. If you have not mounted it on the wall, try moving your HDTV to
another location to see if this is the cause of the problem.
• Check the connections of external devices that may be connected to the HDTV.
• Make sure the specifications of external devices meet the specifications of your
HDTV (like resolution).
• If you are using an antenna, the signal strength of the channel may be low. Make
sure your antenna is connected securely to the TV and move the antenna around
the room or close to a window.
44
www.VIZIO.com
Page 45

General TV Problems Solution
VIZIO M320NV and M370NV User Manual
The display image does not
cover the entire screen.
You can see a picture but y
cannot hear sound.
The TV has pixels (dots) that
are always dark or colored.
You see “noise” or “trash” on
the screen.
You switch to a different input
and the volume changes.
You switch to a different input
and the screen size changes.
• If you are in RGB mode (Computer), make sure that H-Size and V-Position in the
On Screen Display (OSD) are set correctly.
• If you are using TV, AVI, AV2 or Component with 480i input, press the WIDE
button on the remote control to scroll through various screen modes.
• Press Volume + (Up) on the remote control.
• Press MUTE on the remote control to make sure that MUTE is not ON.
• Check your audio settings. The audio may be set to SAP, or the speakers are set
to off.
• Check the audio connections of external devices that may be connected to the
HDTV.
• Your HDTV is manufactured using an extremely high level of precision technology,
however, sometimes some pixels of your HDTV may not display. Pixel defects
within industry specifications are inherent to this type of product and do not
constitute a defective product.
• When your HDTV’s digital capabilities exceed a digital broadcast signal, the signal
is up-converted (increased) to match your TV’s display capabilities. Up-converting
can cause noise or trash.
• If you are using an antenna, the signal strength of the channel may be low. Make
sure your antenna is connected securely to the TV and move the antenna around
the room or close to a window.
• The TV remembers the volume level from the last time you adjusted it. If the
sound level is higher or lower from another source, then the volume will change.
• The TV remembers the viewing mode from the last time you used a particular input
(AV-1, AV-2, Component, HDMI and TV).
Tips for High-Definition Users.
Tips for Letterbox Content
Users.
USB device is not recognized.
Image or sound is interrupted
or distorted.
Slideshow doesn’t start.
• Your HDTV is an ideal platform for viewing High Definition Content.
• Best image quality will be achieved by HDMI. The next best is Component,
followed by Composite.
• Due to variances in broadcast practices, it is possible some image distortions can
occur.
• Some Letterboxed (or “Widescreen”) versions of DVD movies are formatted for
standard 4:3 Televisions. Your HDTV has the ability to expand this content so the
entire screen is filled at the expense of image accuracy. To use this function, press
ZOOM on the remote control to cycle among the options.
• Make sure the device is correctly inserted.
• Make sure the device is FAT or FAT32.
• Make sure it contains the supported files.
• Make sure the device is correctly inserted.
• Make sure that the file complies with the supported format, bit rate and/or profile.
Also check the file for damage.
• Some files that comply with the supported format may not play back or display
properly.
• Make sure the viewer isn’t in pause, rotation, or zoom mode.
Version 3/24/2010 45
www.VIZIO.com
Page 46

VIZIO M320NV and M370NV User Manual
Telephone & Technical Support
Products are often returned due to a technical problem rather than a defective product that may result in
unnecessary shipping charges billed to you. Our trained support personnel can often resolve the problem
over the phone. For more information on warranty service or repair, after the warranty period, contact our
Support Department at the number below.
Customer support and quality service are integral parts of VIZIO’s commitment to service excellence.
For technical assistance contact our VIZIO Technical Support Department via email or phone.
Email: techsupport@VIZIO.com
(877) 698-4946 Fax: (949) 585-9563
Hours of operation: Monday - Friday: 6 am to 9 pm
Saturday - Sunday: 8 am to 4 pm
Have your VIZIO model number, serial number, and date of purchase available before you call.
VIZIO
Address:
39 Tesla
Irvine, CA 92618, USA
Telephone: (888) 849-4623 (949) 428-2525 Fax: (949) 585-9514
Web:
www.yiZIO.com
Compliance
Caution: Always use a power cable that is properly grounded. Use the AC cords listed below for each
area.
USA: UL Canada: CSA
Germany: VDE UK: BASE/BS
Japan: Electric Appliance Control Act
FCC Class B Radio Interference Statement
NOTE: This equipment has been tested and found to comply with the limits for a Class B digital device,
pursuant to Part 15 of the FCC Rules. These limits are designed to provide reasonable protection against
harmful interference in a residential installation. This equipment generates, uses and can radiate radio
frequency energy, and if not installed and used in accordance with the instructions, may cause harmful
interference to radio communications. However, there is no guarantee that interference will not occur in a
particular installation. If this equipment does cause harmful interference to radio or television reception,
which can be determined by turning the equipment off and on, the user is encouraged to try to correct the
interference by one or more of the following measures:
1. Reorient or relocate the receiving antenna.
2. Increase the separation between the equipment and receiver.
3. Connect the equipment into an outlet on a circuit different from that to which the receiver is
connected.
4. Consult the dealer or an experienced radio/TV technician for help.
Notice:
1. The changes or modifications not expressly approved by the party responsible for compliance
could void the user’s authority to operate the equipment.
2. Shielded interface cables and AC AC/DC power adapter, if any, must be used in order to
comply with the emission limits.
3. The manufacturer is not responsible for any radio or TV interference caused by unauthorized
modification to this equipment. It is the responsibilities of the user to correct such
interference.
46
www.VIZIO.com
Page 47

VIZIO M320NV and M370NV User Manual
Chapter 10 Specifications
Product specifications may change without notice or obligation.
M320NV
Panel 31.55” Diagonal, 16:9 Aspect Ratio
Resolution 1920 X 1080 pixels
Pixel (Dot) Pitch 0.363mm(H) x 0.363mm(V)
Display Compatibility 1080P (FHDTV)
Colors 16.7 million
Brightness
cd/m2 (typical)
Contrast 1300:1
Response Time 5ms (typical)
Viewing Angle 178° (horizontal/vertical)
Inputs 3 X HDMI with HDCP (2 back, 1 side)
Outputs lx 5.1 S/PDIF Optical Digital Audio, lx Stereo Audio
Features 60 Hz E-LED panel, 1080P FHDTV, HDMI v1.3, 3D Comb Filter, Digital Audio Amplifier, Dolby
Technical Features ATSC/Clear QAM tuner, NTSC video decoding, 3:2 or 2:2 reverse pull-down. Motion adaptive
450nits
1 X RF
lx Composite Video and Stereo Audio
lx Component YPbPr plus Stereo Audio
lx Computer RGB plus Stereo Audio
lx USB (side)
Digital for ATSC/QAM, Signal Compatibility: 480I(SDTV), 480P(EDTV), 720P(HDTV),
1080I(HDTV), 1080P(FHDTV), Channel Skip/Add, VIDEO/INPUT Naming Capability, Closed
Caption, Parental Control/V-CHIP 2.0, Programmable Timer, PIP/POP, SRS TSHD,SRS
TruVolume ,HD Game Port, Noise Reduction, MTS Stereo Decoder, Dolby Digital for
ATSC/QAM, VESA Mount Compatabile,Multimedia(JPG only)
de-interlace. Progressive video scan via Component/VGA/HDMI, FHDTV via HDMI or
Component, Color temperature adjustments of 6500K/9300K/11000K, Independent
Red/Green/Blue adjustments for color temperature fine tuning. Signal Compatibility 480i
(SDTV), 480P (EDTV), 720P (HDTV), 1080i (HDTV), 1080P (FHDTV), Computer support at
640x480/800x600/1024x768/ 1920x1080 via VGA/HDMI
Special Features
Speakers 2xBuilt-in, low Speakers
Panel Life 30,000 hours to half the original brightness
Input 1 lEC Connector for direct power line connection
Voltage Range 100-240 Vac at 50/60Hz
Power Consumption 57.1W (Avg), 0.29W standby
• Multimedia: support JPG only • Light Sensor
• Jag Wheel Key • Detachable Base
. HDMI CEC
Version 3/24/2010 47
www.VIZIO.com
Page 48

VIZIO M320NV and M370NV User Manual
M320NV
tnvironmsntal Conditu
Dimensions 31.63” W X 21.96” H X 7.87” D with stand; 31.63” W x 20.07” H x 1.69” D without stand
803.4 X 558 X 200mm with stand; 803.4 x 510 x 43mm without stand
Net Weight 21.61 lbs without stand; 23.81 lbs with stand
9.8 kg without stand; 10.8 kg with stand
Gross Weight 30.42 lbs; 13.8 kg
Certifications CSA, CSA-US, FCC Class B
Compliances Energy Star 4.0. ATSC Spec A/65, EIA/CEA-766-A
M370NV
Panel 1 37” Diagonal, 16:9 Aspect Ratio
Resolution 1920 X 1080 pixels
Pixel (Dot) Pitch 0.426mm(H) x 0.426mm(V)
Display Compatibility 1080P (FHDTV)
Colors 16.7 million
Brightness
cd/m2 (typical)
Contrast 1400:1
450nits
Response Time 5ms (typical)
Viewing Angle 178° (horizontal/vertical)
Inputs 3 X HDMI with HDCP (2 back, 1 side)
1 X RF
lx Composite Video and Stereo Audio
lx Component YPbPr plus Stereo Audio
lx Computer RGB plus Stereo Audio
lx USB (side)
Outputs lx 5.1 S/PDIF Optical Digital Audio, lx Stereo Audio
Features 60 Hz E-LED panel, 1080P FHDTV, HDMI v1.3, 3D Comb Filter, Digital Audio Amplifier, Dolby
Digital for ATSC/QAM, Signal Compatibility: 480I(SDTV), 480P(EDTV), 720P(HDTV),
1080I(HDTV), 1080P(FHDTV), Channel Skip/Add, VIDEO/INPUT Naming Capability, Closed
Caption, Parental Control/V-CHIP 2.0, Programmable Timer, PIP/POP, SRS TSHD,SRS
TruVolume ,HD Game Port, Noise Reduction, MTS Stereo Decoder, Dolby Digital for
ATSC/QAM, VESA Mount Compatabile,Multimedia(JPG only)
Technical Features ATSC/Clear QAM tuner, NTSC video decoding, 3:2 or 2:2 reverse pull-down. Motion adaptive
de-interlace. Progressive video scan via Component/VGA/HDMI, FHDTV via HDMI or
Component, Color temperature adjustments of 6500K/9300K/11000K, Independent
Red/Green/Blue adjustments for color temperature fine tuning. Signal Compatibility 480i
(SDTV), 480P (EDTV), 720P (HDTV), 1080i (HDTV), 1080P (FHDTV), Computer support at
640x480/800x600/1024x768/ 1920x1080 via VGA/HDMI
Special Features
• Multimedia: support JPG only • Light Sensor
• Jag Wheel Key • Detachable Base
. HDMI CEC
48
www.VIZIO.com
Page 49

VIZIO M320NV and M370NV User Manual
M370NV
Speakers 2xBuilt-in, low Speakers
Panel Life 30,000 hours to half the original brightness
Input lEC Connector for direct power line connection
Voltage Range 100-240 Vac at 50/60Hz
Power Consumption 56W (Avg), 0.29W standby
Dimensions 1 36.39” W X 24.58” H x 8.26” D with stand; 36.39” W x 22.75” H x 1.69” D without stand
1 924 X 624 X 210mm with stand; 924 x 578 x 43mm without stand
Net Weight 1 26.59 lbs without stand; 29.23 lbs with stand
112.06 kg without stand; 13.26 kg with stand
Gross Weight 35.94 lbs; 16.3 kg
Certifications CSA, CSA-US, FCC Class B
Compliances Energy Star 4.0. ATSC Spec A/65, EIA/CEA-766-A
The Federal Communications Commission (FCC), the Consumer Electronics Association (CEA)
and the Consumer Electronics Retailers Coalition (CERC) have made a new tip sheet available for digital
television (DTV) retailers to reproduce and distribute to consumers on the sales floor. The file may be
downloaded online at
is making available to consumers interested in learning more about the analog to digital transition.
www.dtv.gov. While you’re there, check out the other useful information in the FCC
Version 3/24/2010 49
www.VIZIO.com
Page 50

VIZIO M320NV and M370NV User Manual
Preset PC Resolutions
If connecting to a PC through the RGB PC input, set the TV timing mode to VESA 1920x1080 at 60Hz for
best picture quality (refer to the graphic card’s user guide for questions on how to set this timing mode).
See the table below for the factory preset resolutions.
Refresh Horizontal Vertical L L Pixel
Mode No. Resolution Rate Frequency Frequency ^ , . :Rate Remark
i(Hz) i(KHz) (Hz) (TTL) (TTg ^
1 640 X 480 60 31.469 59.941 N N 25.175 Windows
2 640 X 480 75 37.500 75.000 N N 31.500 Windows
3 800 X 600 60 37.879 60.317 P P 40.000 Windows
4 800 X 600 72 48.077 72.188 P P 50.000 Windows
5 800 X 600 75 46.875 75.000 P P 49.500 Windows
6 1024x768 60 48.363 60.004 N N 65.000 Windows
7 1024x768 70 56.476 70.069 N N 75.000 Windows
8 1024x768 75 60.023 75.029 P P 78.750 Windows
9 720 X 400 70 31.469 70.087 N P 28.322 DCS
10
Note: P: positive, N: negative, (S): Primary mode
@1920 X 1080
60 66.587 59.934 P N 138.50 Windows
- .1 , w t Horizontal Vertical L. ,
Resolution through RGB Input
If your PC supports VESA Reduce Blanking timing via the VGA card drive program (usually offered by the
VGA Card Manufacturer), your TV set is equipped to have the 1920x1080 resolution display through this
connection using the following timing 138.5MHz. The following parameters are often the values required
by the software or programs to set up the display:
1 Parameters Horizontal Values (Pixels) Vertical Values (Lines)
Address 1920 1080
Front Porch 48 3
Sync Width 32 5
Back Porch 80 23
Total 2080 1111
Frequency 66.587 KHz 59.934 Hz
Sync Polarity P N
Pixel Rate (MHz) 138.5
Refresh Rate (Hz) 60
50
www.VIZIO.com
Page 51

Chapter 11 Programming the VIZIO Universal Remote Control
Using a Cable or Satellite Box Remote
Your VIZIO remote uses codes 000, 047, 050, 067, 329, 331 and 339 to work your HDTV. To use a Cable
or Satellite remote to work the HDTV, refer to your Cable or Satellite remote user guide for more
information on how to program the remote.
If your Cable or Satellite remote uses a 5-digit code (like most Direct TV units), first try 11758 and then, if
that does network, 10178. If your Cable or Satellite remote uses a 4-digit code, try 1758 and then 0178
as an alternative. If your Cable or Satellite remote uses a 3-digit code (EchoStar or Dish Network for
example), use code 627.
Note: Some buttons may not function as expected on your Cable or Satellite remote. Typically power,
volume and mute will work.
Programming other devices
Your remote control is programmable and supports up to three different devices. Listed below are the
steps for programming your DVD player. Home Theater System, and a Cable or Satellite box. After you
find your codes, write them in the table provided.
Programming your Blu-Ray or DVD Player
1.
Turn on the DVD player.
2.
Press and release the DVD button on your VIZIO universal remote control.
3.
Press and hold the SET button until the LED flashes twice.
4.
Find the programming code for your DVD player in the code list below and enter it using the
number buttons. If the code is accepted, the LED flashes twice after the last digit is entered. If the
LED does not flash twice, repeat Steps 2 through 4 with the next code listed.
5.
Point the remote control at the DVD player and press POWER. The DVD player will turn off. If the
DVD player does not turn off, repeat Steps 2 through 4 with the next code listed for the
component and manufacturer.
If the codes do not work or your brand is not listed, see Searching for Device Codes on page 2.
Sometimes a code listed will only include limited functions. Try other codes that may include
more functionality.
Programming your Home Theater System
1.
Turn on the Home Theater System.
2.
Press and release the AUDIO button on your VIZIO universal remote control.
3.
Press and hold the SET button until the LED flashes twice.
4.
Find the programming code for your Home Theater System and enter it using the number buttons.
If the code is accepted, the LED flashes twice after the last digit is entered. If the LED does not
flash twice, repeat Steps 2 through 4 with the next code listed.
5.
Point the remote control at the Home Theater System and press POWER. The Home Theater
System will turn off. If the Home Theater System does not turn off, repeat Steps 2 through 4 with
the next code listed for the component and manufacturer.
If the codes do not work or your brand is not listed, see Searching for Device Codes on page 2.
Sometimes a code listed will only include limited functions. Try other codes that may include
more functionality.
Version 8/20/2010 51
www.VIZIO.com
Page 52

Programming your Cable or Satellite Set-Top Box
1.
Turn on the Cable or Satellite Set-Top Box.
2.
Press and release the CABLE button on your VIZIO universal remote control.
3.
Press and hold the SET button until the
LED flashes twice.
4.
Find the programming code for your Cable
or Satellite Set-Top Box and enter it using
the number buttons. If the code is accepted,
the LED flashes twice after the last digit is
entered. If the LED does not flash twice,
repeat Steps 2 through 4 with the next code
listed.
5.
Point the remote control at the Cable or
Satellite Set-Top Box and press POWER.
The Cable or Satellite Set-Top Box will turn
off. If the Cable or Satellite Set-Top Box
does not turn off, repeat Steps 2 through 4
with the next code listed for the component
and manufacturer.
• If the codes do not work or your brand is not listed, see Searching for Device Codes on page 2.
• Sometimes a code listed will only include limited functions. Try other codes that may include
more functionality.
DVD Player
Home Theater
Cable Box
Satellite Box
VCR
Other
Other
Other
Searching for Device Codes
If you cannot find the manufacturer in the list or the program code does not work, you can use the remote
control to search for the correct device code.
1. Turn on the device.
2. Press the matching device button on your VIZIO universal remote control.
3. Press and hold SET until the LED flashes twice.
4. Press 9 9 1. The LED flashes twice.
5. Point the remote control at the device and then press and hold POWER until the device turns off.
Reset Remote Control to Factory Settings
1. Press and hold SET until the LED flashes twice.
2. Press 9 19 19. The LED flashes twice.
52
www.VIZIO.com
Page 53

Remote Control Codes
Television Codes
(Including TV/DVD,
TV/VCR, and
TV/DVDA/CR)
3M 1655
Admiral 0093, 0463
Advent 0761, 0783, 0815,
0817, 0842
Aiko 0092
Akai 0812, 1675, 0702, 0030
0672, 1207, 1935, 2232,
0143, 0695, 2439
Albatron 0700, 0843
America Action 0180, 0278
Anam 0180
AOC 0030, 1365, 1589,
1590, 2014, 2087, 2402
Aomni 1623
Apex Digital 0748, 0879,
0765, 0767, 0890, 1217,
2397
Astar 1531, 1548, 1738
Asus 2175
Audiovox 0451, 0180, 0092,
0623, 0802, 0846, 0875,
1284, 1937, 1951, 1952,
0278, 1071, 1121, 1122
AUO 1591
Aventura 0171
Axion 1937, 1071
Bell & Howell 0154
BenQ 1032, 1715, 1853
Boxiight 0893
Bradford 0180
Brandt Plus 1851
Brillian 1007
Broksonic 0236, 0463, 1929,
1935, 1938, 0002, 0479,
1479, 0695, 0868
byd:sign 1309
Candle 0030
Canon 1396
Carnivaie 0030
Carver 0054
Celebrity 0000
Cetera 0765
Changhong 0765
Chimei 1837, 1852, 2072
Chun Yun 0706, 1687,
1756, 1834, 2230
Citizen 0060, 0030, 0092,
1669, 1671, 1672, 1935,
0695
Clarion 0180
Coby 1538, 1634, 2017,
2306, 2315, 2338, 2340,
2343, 2344, 2345, 2347,
2348, 2350, 2495, 2535,
2536, 2537, 2538, 2540
Colt 0072
Commercial Solutions 1447,
0047
Contec 0180
Craig 0180
Crosley 0000, 0054
Crown 0180
Curtis 2352, 2466, 2660
Curtis Mathes 0047, 0054,
0154, 0451, 0093, 0060,
0702, 0030, 0145, 0166,
1661,1147, 1347
CXC0180
Daewoo 0154, 0451, 0092,
1661,0623, 0661, 0672
Dell 1264, 1080, 1178,
1403, 1863
Delta 1369
Denon 0145
Diamond Vision 1996, 1609
Digisonic 1826
Digital Lifestyles 1765,
1822
Digital Projection Inc. 1750
DirecTV 1501
Disney 2152, 2356
Dream Vision 1297
Dumont 0017
Durabrand 0463, 0180,
0178, 0171, 1034
Dynex 1463, 1780, 1785,
1810, 2049, 2184, 2255,
2388
Electroband 0000
Electrograph 1755, 1623
Electrohome 0463, 1670,
1672, 1607
Element 1687, 2183
Emerson 1864, 0154,
0451, 0236, 0463, 0180,
0178, 0171, 1661, 0623,
1394, 1913, 1929, 1944,
1963, 0002, 0479, 0593,
1479, 0675, 1268, 2212,
0821
Emprex 1422, 1546, 1765
Envision 0030, 0813,
1365, 1589, 2014, 2087
Epson 0833, 0840, 1122
ESA 0812, 0171, 1944,
1963, 1268, 0821
Esonic 2221,2229, 2234
Fisher 0154
Frigidaire 1597, 1826,
2231
Fujimaru 1687
Fujitsu 0809, 0683, 0853
Funai 0000, 0180, 0171,
1271, 1904, 1963, 1268
Futuretech 0180
Gateway 1755, 1756
GE 1447, 0047, 0051,
0451, 0178, 1347, 1922,
2359, 0240, 1060
GFM 0171, 1963, 2167,
1268
Gibraltar 0017, 0030
Gibson 1597, 1826, 1834,
2305
Go Video 0886, 1823,
1831
Go Vision 1071
GoldStar 0178, 0030
Goodmans 0360, 2274
Grundig 0683
Grunpy 0180
Hater 1034, 1748, 1749,
1753, 2309, 2099, 2500
Hallmark 0178
Hanns.G 1783
Hannspree 1348, 1351,
1745, 1783, 1826
Harley Davidson 0000,
1904
Harman/Kardon 0054
Harsper 1206
Harvard 0180
Havermy 0093
Helios 0865
Hello Kitty 0451
Heran 1826, 1852,
2305, 2356
Herosonic 1826
Hewlett Packard 1642,
1494,1502
HiPlus 1420, 1435,
2113, 2224, 2225,
2226, 2230, 2235
Hisense 0748, 1314,
1660, 2098, 2183,
2355, 2419
Hitachi 1643, 1145,
0145, 1445, 1904,
0000
HP 1642, 1494, 1502
Humax 1501
Hyundai 0849
l-Inc 1746
iLo 1286, 1603, 1684,
1990,1472
Infinity 0054
InFocus 2024, 2199
Initial 1603, 1990,
1472
Insignia 1423, 1564,
0171, 1204, 1517,
1641, 1660, 1710,
1780, 1892, 1963,
2002, 2049, 2088,
2417, 1013, 1268,
2255, 2620
Inteq 0017
iRIS2189
JBL 0054
JCB 0000
Jensen 0761, 0815,
0817, 1299
JVC 0463, 0053, 0650,
0731, 1253, 1601,
1774, 1923, 2271,
1067, 2472
KDS 1498, 1687
KEC 0180
Kenwood 0030
KLH 0765, 0767
Kolin 1610, 1755,
0150, 1240, 1837
Konka 0748, 1831
KTV0180, 0030
Version 8/20/2010 53
www.VIZIO.com
Page 54

LG 1423, 0017, 1265, 0178,
0700, 0856, 1178, 1768,
1934, 1993, 2358, 2424,
0480, 1037, 2485
Lloyd's 1904, 0000
Loewe 0136
LXI 0047, 0054, 0154, 0156,
0178
MAG 1498, 1687
Magnasonic 1913, 0593
Magnavox 1454, 1866, 0054,
0051, 0030, 0706, 0802,
1012, 1198, 1254, 1365,
1525, 1904, 1913, 1931,
1944, 1963, 1990, 2372,
0000, 0593, 1781, 1268,
1472, 2229, 2632, 0821
Magnin 0240
Marantz 1454, 0054, 0030,
0704, 0855, 1154, 1398,
2445, 2447
Matsushita 0250, 0650
Maxent 1755, 1714, 1757
Megapower 0700
Megatron 0178, 0145
Memorex 0154, 0463, 0150,
0178, 1670, 1892, 1924,
0162, 1037, 1162, 1262,
1607
MGA0150, 0178, 0030,
0240
Midland 0047, 0017, 0051
Mintek 1603, 1990, 1472
Mitsubishi 1250, 0093, 0150,
0178, 0836, 0868, 1522,
2010
Monivision 0700, 0843
Motorola 0093
MTC 0060, 0030
Multitech 0180
NAD 0156, 0178, 0866,
1156
NEC 0030, 0497, 0704,
0882, 1398, 1546, 1704,
1797, 1852, 2026, 2144
NetTV 1755
NewSonic 1826
Nexus Electronics 2183
Nikko0178, 0030, 0092
Niko 1581, 1618
Norcent 0748, 0824, 1365,
1589, 1590, 1591,2110
Norwood Micro 1286, 1303
NIC 0092
NuVision 1657, 2158
Olevia 1610, 1144, 1240,
1331
Onwa 0180
Optimus 0250, 0154, 0166,
0650, 1913, 1924, 0162,
0593,1162, 1262
Optoma 0887, 1348, 1622,
2161
Optonica 0093
Orion 0236, 0463, 1463,
1929, 0002, 0479, 1479
Panasonic 1480, 0250,
1457, 0051, 0650, 1271,
1291, 1410, 1924, 1941,
1946, 1947, 0162, 1162,
1262,1490,1362,1462
PARK 2104, 2194, 2202
Penney 0047, 0156, 0051,
0060, 0178, 0030, 1347,
0240
Petters 1523
Philco0054, 0030, 0171,
1271, 1394, 1963
Philips 1454, 1866, 0054,
0690, 1154, 1744, 1850,
1867, 1961,2227, 2372,
2374, 1260
Pilot 0030
Pioneer 1457, 0166, 0679,
0866, 1260, 1398
Polaroid 1523, 0765, 2425,
2121,2120, 2119, 2063,
2002, 1992, 1769, 1767,
1766, 1687, 1538, 1498,
1314, 1286, 1276, 0865,
1013, 2110, 2140, 1482
Polyvision 0889, 1144
Portland 0451,0092, 1661
Prima 0761, 0783, 0815,
0817, 1785
Princeton 0700
Prism 0051
Projectiondesign 1750
Prosean 1447, 0047, 0030,
1347, 1922, 2147, 2256,
2450
Proton 0178, 1546, 1834,
1874
Proview 1498, 1687
Próxima 1896
Pulsar 0017
Puneet1546
Quasar 0250, 0051,0650,
1924, 0162, 1162
Radio Shack 0047, 0154,
0180, 0178, 0030, 1904,
0000, 1037
RCA 1547, 1447, 0047,
0051, 0093, 0090, 0679,
1047, 1147, 1247, 1347,
1781, 1922, 1953, 2002,
2187, 2247, 2434, 0240,
1060, 1013, 2392, 1132
Realistic 0154, 0180,
0178, 0030
Relon 1826
RevolutionHD 1623
Runco0017, 0030, 0497,
0603, 1398, 1629, 2444
Sampo 1755, 0030, 1597,
1618,2238
Samsung 0812, 0060,
0702, 0178, 0030, 0587,
0650, 0766, 0814, 1060,
1618, 1632, 1959, 2051,
1014
Sansui 0463, 0171, 1409,
1670, 1892, 1904, 1929,
1935, 0000, 0479, 1479,
0695, 1607
Sanyo 0054, 0154, 0088,
0799, 0842, 0893, 1142,
2115, 2236, 2237, 2238,
2448, 2452, 0240
Sceptre 0878, 1217, 1360,
1599
Scotch 0178
Scott 0236, 0180, 0178,
1711
Sears 0047, 0054, 0154,
0156, 0178, 0171, 1007,
1904, 0000
Seleco 1297, 1351
Sharp 0818, 0093, 0491,
0688, 0851, 1602, 2360,
2561,0630
Sheng Chia 0093
Sherwood 1399
SIM2 Multimedia 1297
Sole 1623, 2075, 2076
Sony 0810, 0000, 0834,
1685, 1904, 1925, 2054,
1232
Soundesign 0180, 0178
Sova 1952, 1122
SOYO 1520, 1546,
1746, 1826, 1828,
1829, 1830, 1831,
1832,1834
Spectroniq 1498, 1687
Squareview 0171
SSS 0180
Starlite 0180
Studio Experience
0843
SunBrite 1420, 1435,
2337
SuperScan 0093,
0864, 1944, 0821
Supreme 0000
SVA0748, 0587, 0865,
0870, 0871, 0872,
1963
Sylvania 1864, 0054,
0030, 0171, 0587,
1271, 1314, 1394,
1886, 1913, 1931,
1944, 1963, 1781,
0675, 1268, 2194,
2212, 0821
Symphonic 0180,
0171, 1904, 1913,
1944, 0000, 0593,
0821
Synco 1755, 1826
Syntax 1610, 1144,
1240, 1331
Tandy 0093
Tatung 1156, 1254,
1286, 1687, 1719,
1756,1839, 1857
Technics 0250, 0051
Techview 0847, 2004
Techwood 0051
Teco 0053, 0092,
1687, 1834, 1838,
2114
Teknika 0054, 0180,
0150, 0060, 0092
Telefunken 0702
Thomas 1904, 0000
TMK0178
TNCi 0017
54
www.VIZIO.com
Page 55

Toshiba 1524, 0154, 0156,
1256, 1265, 0060, 2233,
2006, 1945, 1936, 1935,
1704, 1656, 1635, 1369,
1356, 1156, 0845, 0832,
0650, 1145, 0695, 1606,
2165, 1045
Trutech 1723, 2066, 2264
TVS 0463
US Logic 1286, 1303
UTI Technology 2244
Vector Research 0030
Venturer 1865, 2195
VEOS 1007
Victor 0053
Vidikron 0054, 1398, 1629
Vidtech 0178
Viore 1207, 1684, 1811,
2104, 2352, 2154, 2300,
2580
Vision 1826, 2305
Vistron 2142
Vito 1852, 2365, 2375, 2376,
2377, 2378, 2379, 2380,
2381
Vizio 1758, 0864, 0885,
1756,2116
Wards 0054, 0178, 0030,
0866, 1156
Waycon 0156
Westinghouse 1712, 1755,
0451, 0885, 0889, 0890,
1282, 1300, 1577, 1597,
1826, 1834, 2293, 2305,
2513
White Westinghouse 0463,
1661, 0623
Wyse 1365
Yamaha 0030, 0769, 0833,
0839
Zenith 0000, 1423, 0047,
0017, 0463, 1265, 0178,
0030, 1145, 0145, 0092,
1661, 1904, 1929, 0479,
1479
Zinwell 2116, 2281
Cable Box Codes
(Including Cable / PVR
Boxes)
Amino 1602, 1822
Bright House 1376, 1877
Cable One 1376, 1877
Cablevision 1376, 1877,
1006
Charter 1376, 1877, 2187
Cisco 1877, 0877, 1982
CNS 2350
Comcast 1376, 1877, 1982,
2576
Cox 1376, 1877
Digeo 1187, 2187
Director 0476
General Instrument 0476
Homecast 2301
i3 Micro 1602
Insight 1376, 1877
Jerrold 0476
Knology 1877
Mediacom 1376, 1877
Motorola 1376, 0476, 1187,
1982
Myrio 1602, 1822
Pace 1376, 1877, 1982
Panasonic 1982
Pioneer 1877, 0877
Prime 2340
Rogers 1877
Scientific Atlanta 1877,
0877
Sejin 1602
Shaw 1376
Sony 1006
Suddenlink 1376, 1877
Thomson 1982
Time Warner 1376, 1877,
2187
Tivo 2576
WideOpenWest 1877
Converters
(Including Digital-toAnalog and HDTV)
Access HD 2185
Airlink 101 2491
Alpha Digital 2185
AMTC2185
Apex Digital 2478
Artec 2490
CAST! 2305
Channel Master 2365
Coby 2667
Coship 2487
Daewoo 2338
Daytek 2305
Digital Stream 2303
Dish Network 0775, 2470
EchoStar 2470
GE 2360, 2450
Goodmind 2450
Gridlink 2348
Insignia 1415
Lasonic 2348
Magnavox 1563
Memorex 2486
MicroGEM 2489
Motorola 1982
Pace 1982
Philco 1563
RCA 2325, 2454
Samsung 2592
Sansonic 2348
Sunkey 2695
Sylvania 1563
Thomson 1982
Tivax 2185
Ventura 2454
Venturer 2454
Winegard 2454
Zenith 1415
Zentech 2491
Zinwell 2488
Decoders
(Including Digital-toAnalog and HDTV)
DirecTV 0392
Dish Network 0775
Epson 1563
LG 1414,1415
Panasonic 1120, 1190,
1490
Samsung 1190, 1276,
1490
Sylvania 1563
Sony 1006
Tivo 0739
Zenith 1856
IPTV
Motorola 1376, 0476
ADB 2254
Amino 1481, 1615,
1673, 2482
AT&T 0858
Chunghwa 1917
Cisco 2345, 2517
Motorola 0858, 2378
Scientific Atlan ta 0858,
2345, 2517
SetaBox 1917
Verizon 2378
Satellite Receiver
Codes
(Including Sat / PVR
Boxes)
Amino 1615
Bell ExpressVu 0775,
1170
Coolsat 2147
Crossdigital 1109
DirecTV 1377, 0392,
0566, 0639, 1639,
1142, 0247, 0749,
1749, 1856, 1076,
1109, 1414, 1442,
1443, 1444, 1609,
0739, 0740
Dish Network System
0775, 1505, 1170,
1775
Dishpro 0775, 1505,
1775
EchoStar 0775, 1505,
1170,1775
Version 8/20/2010 55
www.VIZIO.com
Page 56

Expressvu 0775, 1775
Fortec Star 1948
GE 0566
General Instrument 0869
GOI 0775, 1775
HTS 0775, 1775
Hughes Network 1142, 0749,
1749, 1442, 1443, 1444,
0740
Jerrold 0869
JVC 0775, 1170, 1775
LG 1414
Mitsubishi 0749
Motorola 0869
Next Level 0869
Panasonic 0247, 0701
Pansat 1807
Philips 1142, 0749, 1749,
1076, 1442
ProScan 0392, 0566
RadioShack 0869
RCA 0392, 0566, 0855,
0143
Samsung 1377, 1276, 1109,
1442, 1609
Sonicview 2373, 2374
Sony 0639, 1639
Star Choice 0869
Tivo 1142, 1442, 1443, 1444,
0740
Toshiba 0749, 1749, 0790
Viewsat 1994
Voom 0869
Zenith 1856
PVR Codes
Amino 1673
ABS 1972
Alienware 1972
CyberPower 1972
Dell 1972
DirecTV 0739, 0740
Gateway 1972
Go Video 0614
Hewlett Packard 1972
Howard Computers 1972
HP 1972
Hughes Network Systems
0740
Humax 0739, 1797, 1988
Hush 1972
iBUYPOWER 1972
Linksys 1972
Media Center PC 1972
Microsoft 1972
Mind 1972
Niveus Media 1972
Northgate 1972
Panasonic 0614, 0616,
1807, 1777
Philips 0739, 0618, 1818
Pioneer 1803
RCA 0880
ReplayTV0614, 0616
Sharp 1893
Sonic Blue 0614, 0616
Sony 0636, 1886, 1972
Stack9 1972
Sylvania 0000
Systemax 1972
Tagar Systems 1972
Tivo 0739, 0618, 0636,
0740
Toshiba 1008, 1972, 1988,
1996
Touch 1972
ViewSonic 1972
Voodoo 1972
ZT Group 1972
Blu-Ray DVD Codes
Denon 2258
Insignia 0675, 2428, 2596
Integra 1769, 2147
JVC 2365
LG 0741,1602
Magnavox 0675
Marantz 2414
Microsoft 2083
NAD 2572
Olevia 2331
Onkyo 1769, 2147
Oppo 2545, 2546, 2547
Panasonic 1641,2518
Philips 2084, 2434
Pioneer 0142, 2442
RCA 1769
Samsung 0199, 0298
Sharp 2250, 2561
Sony 1516, 2504
Sylvania 0675, 2194
Toshiba 1769, 1515, 2705
Viore 2553
Vizio 2563
Xbox 2083
Yamaha 2298
DVDA/CR Player
Codes
Accurian 0000, 0675
Allegro 0869
Apex Digital 1061
Broksonic 0695
CineVision 0869
Daewoo 0869
Emerson 1593, 0675
Funai 1593, 0675
GFM 1593, 0675
Go Video 0744, 0715,
0741, 0869, 1044, 1075
GoldStar 0741
Hitachi 0000, 0664
JVC 1707, 0867, 1164,
1550, 1602
LG 0741
LiteOn 1656
Magnavox 0000, 1593,
0675
Memorex 0695
Panasonic 1762
Philips 0675, 1267
Pioneer 1460
Polaroid 1061
Presidian 0000, 1593,
0675
RCA 0060, 0522, 0822
Rio 2002
Samsung 0820, 1044,
1075, 2489
Sansui 0695
Sanyo 0104, 0670, 0873
Sharp 0848, 1893, 0630
Sonic Blue 2002
Sony 1702, 1896, 0864,
1033, 1070, 1431
Sylvania 0000, 0593,
1593, 0675
Symphonic 0000, 1593,
0675
Toshiba 0503, 1854
Zenith 0741, 0869
DVD Player
Codes
Accurian 0675, 0675
Aiwa 0641, 1912
Akai 0143, 0695, 0770,
1975, 2439
Alco 0790
Allegro 0869
Amphion Media Works
2001,2016
AMW 2001, 2016
Anam1913
Apex Digital 0672,
0755, 0794, 0796,
0797, 1004, 1020,
1056, 1061, 1100,
1833, 1915, 1937
Arrgo 1023
Audio Authority 2555
Audiovox 0790, 1041,
1071,1121,1122
Axion 1071
B & K 0662
BBK 1224
Bel Canto Design
1571
Blue Parade 0571
Bose 1895, 2023
Boston Acoustics
1856
Broksonic 0695, 0868
California Audio Labs
0490
Cambridge Sound
Works 1916
Cinea 0831
CineVision 0869
Citizen 0695, 2116
Classic 1917
Coby 0778, 0852,
1086, 1107, 1165,
1177, 1351, 1628,
1923, 2495, 2535,
2536, 2537, 2538,
2540
Craig 0831
Criterion 2007
Curtis 2660
Curtis Mathes 1087
CyberHome 0816,
1023, 1024, 1129,
1502
56
www.VIZIO.com
Page 57

Daewoo 0784, 0869, 1169,
1172,1918
Denon 0490, 0634, 1634,
2258, 2270
Diamond Vision 1609
DigitalMax 1738
Disney 0675, 1270,2356
Durabrand 1023, 1127
DVD2000 0521
Dynex 2255, 2388
Electrohome 1607, 1729,
2116
Emerson 0591, 0675, 0821,
1268, 2212
Enterprise 0591
ESA 0821, 1268
Fisher 0670, 1919
Funai 0675, 1268
Gateway 1077
GE 0522, 0815
GFM 0675, 1268
Go Video 0744, 0715, 0741,
0869, 1044, 1075, 1970
Go Vision 1071
GoldStar 0741, 0869
Goodmans 2274
Grundig 0539
Haier 2099, 2500
Harman/Kardon 0582, 0702,
1229
Helios 2080, 2192
Hello Kitty 0831
Hitachi 0573, 0664, 1919
Hiteker 0672
Humax 1500, 1588
iLo 1348, 1472
Initial 1472, 1931
Insignia 0675, 1013, 1268,
1712, 1830, 2095, 2150,
2255, 2428, 2596, 2620
Integra 0571, 1769, 0627,
1634, 1924, 2147
iSymphony 1792
JBL0702, 1926
JVC 0558, 0623, 0867, 1164,
1275, 1550, 1602, 1863,
1901, 1940, 2365, 2472
Kawasaki 0790
Kenwood 0490, 0534
KLH 0790, 1020, 1149, 1939
Konka 0711
Koss1980
Lenoxx 1127, 1938
LG 0591,0741, 0869, 1602,
1906, 2002, 2485, 2568
Liquid Video 1980
LiteOn 1058, 1656, 1738
Logitech 2639
Magnavox 0503,0539,
0646, 0675, 0821, 1177,
1268, 1354, 1472, 1506,
1914, 1976, 2229, 2632
Marantz 0539, 2414
McIntosh 1273
Memorex 0695, 0831, 1270,
1607, 2213
Messiah Entertainment
2396
Microsoft 0522, 2083
Mintek 1472
Mitsubishi 1521,0521
NAD 0741,2572
NexxTech 1830
Norcent 1107, 1830, 1923
Nova 1923
Nyko 2340
Olevia 2331
Onkyo 0503, 1769, 0627,
1924, 1985, 2147
Oppo 0575, 1224, 1525,
2185, 2545, 2546, 2547
Oritron 1980
Panasonic 0490, 0503,
2967, 2518, 2017, 1990,
1925, 1909, 1908, 1907,
1762, 1641, 1579, 1490,
1462, 1362, 0703, 0632,
0458
Philco 0675
Philips 0503, 0539, 2056,
2084, 0646, 2531,2526,
2434, 1914, 1911, 1846,
1506, 1354, 1340, 1267,
1260, 0675
PianoDisc 1024
Pioneer 0525, 0571,0142,
0631,0632, 1460, 1512,
1531, 1571, 1902, 1965,
2442
Polaroid 1013, 1020, 1061,
1086, 1482, 1998, 2110,
2140
Polk Audio 0539
Portland 0770
Presidian 0675, 1738
Proceed 0672
ProScan 0522, 2450
Provision 0778
RCA 0522, 0571, 1769,
0790, 0822, 1013, 1132,
1913, 1965, 1974, 2213,
2392
Regent 1938
Rio 0869, 2002
Rotel 0623
Saba 1977
Sampo 0752
Samsung 0490, 0573,
0199, 0298, 0820, 1044,
1075, 1470, 1932, 1979,
2069, 2329, 2369, 2489,
2556
Sansui 0695, 1607
Sanyo 0670, 0695, 0873,
1919, 1967
Schmartz 2367
Schneider 0646
Sharp 1893, 0630, 0675,
0752, 1256, 2250, 2561
Sherwood 0633, 0770,
1043, 1077, 1889
Sherwood Newcastle
1077
Shinsonic 0533, 1931
Sonic Blue 0869, 1970,
2002
Sony 1702, 1896, 1633,
0533, 0864, 0772, 1033,
1070, 1431, 1516, 1536,
1824, 1903, 1904, 1934,
1981,2020, 2132, 2504
Sova 1122
Superscan 0821
Sylvania 0675, 0821,
1268, 2194, 2212
Symphonic 0675, 0821
Teac0790, 1984
Technics 0490, 0703
Terapin 1031
Theta Digital 0571
Tivo 1503, 1512
Toshiba 0503, 1769, 0695,
1045, 1154, 1503, 1510,
1515, 1588, 1606, 1608,
1854, 2006, 2165, 2277,
2705
Trutech 2264
Urban Concepts 0503
Venturer 0790, 2195
Viore2154, 2300,
2553, 2580
Vizio 1064, 1226,
2563
Westinghouse 2513
Xbox 0522, 2083
Yamaha 0490, 0539,
0646, 0545, 0497,
0817, 1840, 2298,
2558
Zenith 0503, 0591,
0741,0869, 1906
Amplifier/
Receiver / Tuner
Codes
Adeem 1100
Aiwa 1405, 1388,
1641,2298
Akai 1512
Alco 1390
AMC 1077
Amphion Media Works
1563, 1615
AMW 1563, 1615
Anam 1609, 1074
Anthem 2220
Apex Digital 1257,
1430, 1774
Arcam 1189
Audiotronic 1189
Audiovox 1390, 1627
В & К 0820
Bose 1229, 0639,
1253, 1629, 1841,
1933
Boston Acoustics
1840, 1847, 2162,
2232
Brix 1602
Cambridge
Soundworks 1370,
2297
Cary Audio Design
1879
Carver 1189
Classic 1352
Coby 1389, 2127
Cox Cable 1517
Criterion 1420
Curtis 1596
Version 8/20/2010 57
www.VIZIO.com
Page 58

Daewoo 1250
Delphi 1414, 1846
Denon 2134, 2857, 1360,
1142, 2230, 2263, 2279,
2861, 2862
DirecTV 1517
Dish Network 1517
Electrohome 2026
Emerson 1659
Fisher 1801
Flextronics 1879
Gateway 1517
Go Video 1532
GPX 2319
Halcro 1934
Harman/Kardon 0892
Harman/Kardon 0891, 1304,
1306, 2241,2443
Hitachi 1801
iHome 2435
iLive 2013
Initial 1426
Insignia 1030, 1077, 1751,
1893, 2126, 2169, 2175,
2472, 2474, 2545
Integra 1298, 1320, 1805,
2989, 2993
iSymphony 2018, 2258,
2442
Jamo 2160
JBL 1306
JVC 1374, 1495, 1534, 1560,
1643, 1676, 1811, 1871,
1894, 2040, 2161,2239,
2299, 2331,2456
Kenwood 1313, 1570, 1569,
1770
KLH 1390, 1412, 1428
Koss 1366, 1497
Krell 1837, 2463
Lasonic 1798
Lenoxx 1437
LG 1293, 2197, 2284
Liquid Video 1497
Logitech 2217
Left Coast 0892
Magnavox 1189,1269, 1514
Marantz 0892, 1189, 1269,
1289, 1892, 2114, 2117,
2118, 2138
Mark Levinson 2405
McIntosh 1289
Memorex 1596
Micromega 1189
Mitsubishi 1393
Myryad 1189
NAD 1989, 1995, 2457
Nakamichi 1313
NexxTech 1751
Norcent 1389, 1751
Nova 1389
Onkyo 0842, 1298, 1320,
1531, 1805, 2259, 2451,
2989, 2993
Optimus 1023, 1074
Oritron 1366, 1497
Panasonic 1308, 1518,
1275, 1288, 1316, 1548,
1633, 1763, 1764, 1807,
2221,2452, 2549, 2967,
2968
Parasound 1934, 2245
Philips 0892, 1189, 1269,
0891, 1266, 1538, 1831,
2029, 2311, 2459, 2461
Pioneer 1023, 1384, 1459,
1935
Polaroid 1508
Polk Audio 0892, 1289,
1414, 1988, 2115, 2242,
2244, 2270
Primare 1851,2479
ProScan 1254
RCA 1023, 1609, 1254,
1074, 1390, 1459, 1511,
2041
Regent 1437
Rio 1869
Rotel 2003
Saba 1519
Samsung 1295, 1304, 1 500,
1868
Sangean 1888, 2165, 2296
Sanyo 1251, 1469, 1801
Sharp 1286
Sherwood 1077, 1517,
1653, 1905, 2169
Sherwood Newcastle 2169
Shinsonic 1426
Sirius 1602, 1627, 1770,
1811, 1987, 1988, 2124
Sonic Blue 1532, 1869
Sony 1759, 1058, 1441,
1258, 1622, 2522, 2320,
2216, 2172, 1858, 1822,
1758, 1658, 1558, 1547,
1529, 1406
Stereophonies 1023
Sunfire 1313, 1521, 1931
Super Atlas 1517
Teac 1074, 1390, 1528,
2261,2363
Technics 1308, 1518
Thorens 1189
Thule Audio 1851
Toshiba 1788
Venturer 1390
Vizio 1517
XACT2124
XM 1406, 1414, 1846
Yamaha 0176, 0376,
1176, 1276, 1331, 1375,
1376, 1476, 1815, 2061,
2455, 2467, 2469, 2471
Zenith 1293
ZVOX 2332
Game Console
Codes
Audio Authority 2555
Logitech 2639
Messiah Entertainment
2396
Microsoft 0522, 2083
Nyko 2340
Schmartz 2367
Sony 0533, 0772
Xbox 0522, 2083
Audio Accessory
Codes
(Including CD Players
and Soundbars)
Accurian 1106
Acoustic Research 2226
Aiwa 0157
Altec Lansing 0607, 1056,
2251
Apple 1115
Arcam 0157
ASI2454
B&W 2441
Bryston 2368
Burmester 0420
California Audio Labs
0029, 0303
Cambridge Audio
1731
Carver 0157, 0179
Classe 2046
Creative 2288
D-Link 1522
Denon 0003, 0034,
2502, 2815
DKK 0000
DLO1155
DMX Electronics 0157
Fisher 0179
Garrard 0393, 0420
Genexxa 0032
GPX 2113
Griffin 1891
Harman/Kardon 0157
Hitachi 0032
iDeck 1106
iHome 2152
iLive 2113
Integra 0101
JVC 0072, 1294
Kenwood 0626, 0028,
0190
KLH 1318, 1372, 1373,
1711
Klipsch 2553
Krell 0157, 2464
Linn 0157
Logitech 2182
Magnavox 0157,0038
Marantz 0626, 0029,
0157, 0038, 0180,
0435
Mark Levinson 1484
McIntosh 0256, 0290,
0660, 1703
MCS 0029
Memorex 2119
Miro 0000
Mission 0157
Monitor Audio 1106
MTC0420
Myryad 0157
NAD 2096
Netgear 1785
NSM 0157
58
www.VIZIO.com
Page 59

Nyko 2231
Onkyo 1327, 0101
Optimus 0000, 0032, 0087,
0179, 0420, 0468
Panasonic 0029, 0303, 0388,
0752
Parasound 0420
Philips 0626, 0157, 0274
Pioneer 1062, 0032, 1087,
0468, 2327
Polk Audio 0157, 2228
Primare 2480
Proceed 0420
Proton 0157
QED 0157
Quad 0157
Quasar 0029
RCA 1062, 0032, 0053,
0179, 0420, 0468
Realistic 0179, 0180, 0420
Rotel 0157, 0420, 2046
Roku1828
SAE 0157
Sansui 0157
Sanyo 0087, 0179
Sharp 0180
Sherwood 0180, 1950
Sonic Frontiers 0157
Sony 0490, 0000, 0100,
1364, 0185
SSI 1522
TAG McLaren 0157
Tascam 0420
Teac0180, 0378, 0393,
0420
Technics 0029, 0303
Tivoli Audio 1553, 2158
Victor 0072
Vizio 2454
Wards 0157, 0053
Yamaha 0490, 0036, 1292,
1797, 2021,2116, 2458
Video Accessory
Codes
Access HD 2185
ADB 2254
Airlink 101 2491
Alpha Digital 2185
Amino 1481, 1615, 1673,
2482
AMTC2185
Apex Digital 2478
Artec 2490
AT&T 0858
CASTi 2305
Channel Master 2365
Chunghwa 1917
Cisco 2345, 2517
Coby 2667
Coship 2487
Daewoo 2338
Daytek 2305
Digital Stream 2303
Dish Network 2470
EchoStar 2470
Epson 1563
GE 2360, 2450
Goodmind 2450
Gridlink 2348
Insignia 1415
KoolConnect 1481
Lasonic 2348
LG 1415
Magnavox 1563
Memorex 2486
MicroGEM 2489
Motorola 0858, 2378
Panasonic 1120
Philco 1563
RCA 2325, 2454
Samsung 1190, 1490, 2592
Sansonic 2348
Scientific Atlanta 0858,
2345, 2517
SetaBox 1917
Sunkey 2695
SureWest 1481
Sylvania 1563
Tivax 2185
Ventura 2454
Venturer 2454
Verizon 2378
Winegard 2454
Zenith 1415
Zentech 2491
Zinwell 2488
VCR Codes
ABS 1972
Accurian 0000
Admiral 0048, 0209, 0020,
0479
Adventura 0000
Aiko 0278
Aiwa 0037, 0000, 0307
Akai 0041, 0061,0106
Alienware 1972
Allegro 0039
America Action 0278
American High 0035
Asha 0240
Audiovox 0037, 0278
Beaumark 0240
Bell & Howell 0104
Broksonic 0184, 0121,
0209, 0002, 0479, 1479
Calix 0037
Canon 0035
Capehart 0020
Carver 0081
CCE 0072, 0278
Citizen 0037, 0278
Colt 0072
Craig 0037, 0047, 0240,
0072, 0271
Crosley 0081, 0000
Curtis Mathes 0060, 0035,
0162, 0240, 0041, 0278,
0760
Cybernex 0240
CyberPower 1972
Daewoo 0045, 0278,
0020, 0561
Daytron 0020
Dell 1972
Denon 0042
DIRECTV 0739, 0740
Durabrand 0039, 0038
Dynatech 0000
Electrohome 0037, 0043
Electrophonic 0037
Emerex 0032
Emerson 0037, 0184,
0000, 0121, 0043, 0209,
0002, 0278, 0061, 0208,
0479, 0561, 0593, 1479,
1593
Fisher 0047, 0104
Fuji 0035, 0033
Funai 0000, 0593,
1593
Garrard 0000
Gateway 1972
GE 0060, 0035, 0240,
0202, 0760, 0761,
1060
GFM 1593
Go Video 0240, 0432,
0526, 0614
GoldStar 0037, 0038,
0480
Harley Davidson 0000
Harman/Kardon 0081,
0038
Harwood 0072
Headquarter 0046
Hewlett Packard 1972
Hl-Q 0047
Hitachi 0000, 0042,
0041,0105
Howard Computers
1972
HP 1972
Hughes Network
Systems 0042, 0740
Humax 0739, 1797,
1988
Hush 1972
iBUYPQWER 1972
Instant Replay 0035
Jensen 0041
JVC 0067, 0041, 0008,
1067, 1707
KEC 0037, 0278
Kenwood 0067, 0041,
0038
KLH 0072
Kodak 0035, 0037
LG 0480,1037, 1720
Linksys 1972
Lloyd's 0000, 0208
Logik 0072
LXI 0037
Magnasonic 0593
Magnavox 0035, 0039,
0081,0000, 0149,
0563, 0593, 1593,
1781
Magnin 0240
Version 8/20/2010
59
www.VIZIO.com
Page 60

Marantz 0035, 0081, 0062
Marta 0037
Matsushita 0035, 0162, 1162
Media Center PC 1972
MEI 0035
Memorex 0035, 0162, 0037,
0048, 0039, 0047, 0240,
0000, 0104, 0209, 0046,
0307, 0479, 1037, 1162,
1262
MGA 0240, 0043, 0061
MGN Technology 0240
Microsoft 1972
Mind 1972
Minolta 0042, 0105
Mitsubishi 0067, 0043, 0061
Motorola 0035, 0048
MTC 0240, 0000
Multitech 0000, 0072
NEC 0104, 0067, 0041,
0038
Nikko 0037
Niveus Media 1972
Noblex 0240
Northgate 1972
Olympus 0035
Optimus 1062, 0162, 0037,
0048, 0104, 0432, 0593,
1048, 1162, 1262
Optonica 0062
Orion 0184, 0209, 0002,
0479, 1479
Panasonic 1062, 0035, 0162,
0614, 0616, 1162, 1262,
1807, 1777
Penney 0035, 0037, 0240,
0042, 0038
Pentax 0042, 0105
Philco 0035
Philips 0739, 0035, 0081,
0062, 0618, 1081, 1181,
1818
Pilot 0037
Pioneer 0067, 1803
Polk Audio 0081
Portland 0278, 0020
Presidian 1593
Profitronic 0240
ProScan 0060, 0202, 0760,
0761, 1060
Protec 0072
Pulsar 0039
Quarter 0046
Quartz 0046
Quasar 0035, 0162, 1162
RadioShack 0000, 1037
Radix 0037
Randex 0037
RCA 0060, 0240, 0042,
0149, 0105, 0106, 0202,
0760, 0761, 0880, 1060
Realistic 0035, 0037, 0048,
0047, 0000, 0104, 0046,
0062
ReplayTV0614, 0616
Ricavision 1972
Runco 0039
Samsung 0240, 0045, 1014
Sanky 0048, 0039
Sansui 0000, 0067, 0209,
0041,0271, 0479, 1479
Sanyo 0047, 0240, 0104,
0046
Sceptre 0104
Scott 0184, 0045, 0121,
0043
Sears 0035, 0037, 0047,
0000, 0042, 0104, 0046,
0105
Sharp 0048, 0062, 0848,
1893
Shintom 0072
Shogun 0240
Singer 0072
Sonic Blue 0614, 0616
Sony 1232, 0032, 0035,
0033, 0000, 0636, 1032,
1702, 1886, 1896, 1972
Stack9 1972
STS 0042
Sylvania 0035, 0081, 0000,
0043, 0593, 1593, 1781
Symphonic 0000, 0593,
1593
Systemax 1972
Totevision 0037, 0240
Touch 1972
Tagar Systems 1972
Tashiko 0037
Tatung 0041
Teac 0000, 0041
Technics 0035, 0162
Teknika 0035, 0037, 0000
Thomas 0000
Tivo 0739, 0618, 0636,
0740, 1996
TMK 0240, 0208
Toshiba 0045, 0043, 0209,
0041, 1008, 1145, 1972,
1988, 1996
Unitech 0240
Vector 0045
Vector Research 0038
Video Concepts 0045,
0061
Videomagic 0037
Videosonic 0240
ViewSonic 1972
Voodoo 1972
Wards 0060, 0035, 0048,
0047, 0081, 0240, 0000,
0042, 0072, 0149, 0062,
0760
White Westinghouse
0209, 0072
XR-1000 0035, 0000,
0072
Yamaha 0038
Zenith 0037, 0039, 0033,
0000, 0209, 0479, 1139,
1479
ZT Group 1972
60
www.VIZIO.com
Page 61

VIZIO M320NV and M370NV User Manual
Warranty
ONE-YEAR LIMITED WARRANTY ON PARTS AND LABOR
(C overs units purchased as new in United States and Puerto Rico O nly)
VIZIO provides a warranty to the original purchaser of its products against defects in materials and workmanship
for a period of one year of non-commercial usage and ninety (90) days of commercial use. If a VIZIO product is
defective within the warranty period, VIZIO will either repair or replace the unit at its sole option and discretion.
To obtain warranty service, contact VIZIO Technical Support via email: TechSupport@VIZIO.com or via phone at
877 MY VIZIO (877.698.4946) from 6:00AM to 9:00PM Monday through Friday and 8:00AM to 4:00PM Saturday
and Sunday, Pacific Time, or visit
thereof is required.
Parts and Labor
There will be no charge for parts or labor during the warranty period. Replacement parts and units may be new or
recertified at VIZIO’s option and sole discretion. Replacement parts and units are warranted for the remaining
portion of the original warranty or for ninety (90) days from warranty service or replacement, whichever is later.
Types of Service
Units 30” or larger will usually be serviced in-home. In-home service requires complete and easy access to the unit
and does not include de-installation or re-installation of the product. However, in some cases, it may be necessary
to send the unit to a VIZIO service center. VIZIO will cover the transportation charges to and from the same
customer location.
Units less than 30” must be sent to a VIZIO service center. VIZIO is not responsible for transportation costs to the
service center, but VIZIO will cover return shipping to the customer. PRE-AUTHORIZATION IS REQUIRED
BEFORE SENDING ANY UNIT IN FOR SERVICE.
Any returns to VIZIO’s service centers must utilize either the original carton box and shipping material or a
replacement box and material provided by VIZIO. VIZIO technical support will provide instructions for packing and
shipping the unit to the VIZIO service center.
Limitations and Exclusions
VIZIO’s one-year limited warranty only covers defects in materials and workmanship. Items not covered include but
are not limited to cosmetic damage, normal wear and tear, misuse, signal issues, power surges, and damages
from shipping, acts of God, any sort of customer misuse, installation, customer modifications, adjustments, and
set-up issues. Units with unreadable or removed serial numbers, “image burn-in”, and routine maintenance are not
covered. This warranty does not cover products sold “AS IS”, “FACTORY RECERTIFIED”, or by a non-authorized
reseller.
THERE ARE NO EXPRESS WARRANTIES OTHER THAN THOSE LISTED OR DESCRIBED ABOVE. ANY
IMPLIED WARRANTIES, INCLUDING ANY IMPLIED WARRANTY OF MERCHANTABILITY AND FITNESS FOR
A PARTICULAR PURPOSE, SHALL BE LIMITED IN DURATION TO THE PERIOD OF TIME SET FORTH
ABOVE. VIZIO'S TOTAL LIABILITY FOR ANY AND ALL LOSSES AND DAMAGES RESULTING FROM ANY
CAUSE WHATSOEVER SHALL IN NO EVENT EXCEED THE PURCHASE PRICE OF THE DISPLAY. VIZIO
SHALL NOT BE RESPONSIBLE FOR LOSS OF USE, COMMERCIAL LOSS, LOST REVENUE OR LOST
PROFITS, OR OTHER INCIDENTAL OR CONSEQUENTIAL DAMAGES. SOME STATES DO NOT ALLOW
LIMITATIONS ON HOW LONG AN IMPLIED WARRANTY LASTS OR THE EXCLUSION OF INCIDENTAL OR
CONSEQUENTIAL DAMAGES, SO THE ABOVE LIMITATIONS OR EXCLUSIONS MAY NOT APPLY TO YOU.
THIS WARRANTY GIVES YOU SPECIFIC LEGAL RIGHTS, AND YOU MAY ALSO HAVE OTHER RIGHTS,
WHICH VARY FROM STATE TO STATE. THIS WARRANTY IS SUBJECT TO CHANGE WITHOUT NOTICE.
CHECK
www.VIZIO.com FOR THE MOST CURRENT VERSION.
Personal Data
If your VIZIO product is capable of storing personal data and other information, ALL CON TENTS AND
INFO RMATION WILL BE DELETED IN THE COUR SE OF SOME IN-HOME AND ALL SHIP-IN WARANTY
SE RVICE . If this occurs, your product will be restored to you configured as originally p urchased. You will be
responsible for restoring all applicable data and passwords. Recovery and reinstallation of user data is not
covered under this Limited Warranty. In order to protect your personal information, VIZIO recommends that
you always clear all personal information from the unit before it is serviced, regardless of the servicer.
ZERO BRIGHT PIXEL DEFECT GUARANTEE
This policy covers “zero bright pixel” defects for the duration of the limited “ONE YEAR WARRANTY” on select
new product purchases. To determine if this guarantee applies to your product, refer to the “DETAILS” tab of the
model’s product information page (
www.VIZIO.com. Proof of purchase in the form of a purchase receipt or copy
www.VIZIO.com) or look for the “zero bright pixel” guarantee on the box.
Version 3/24/2010 61
www.VIZIO.com
Page 62

VIZIO VF551XVT User Manual
Index
16:9.............................................................................31
4:3
...............................................................................
Accessories
Adjustments
Advanced.................................................................30
Advanced Adjustments
Ambient Light Sensor
Antenna
Aspect Ratio................................................................31
Audio Menu
Advanced Audio
Analog Audio Out adjustments
Audio Mode adjustments.........................................35
Balance adjustments...............................................35
Digital Audio Out
Equalizer adjustments.............................................36
Lip Sync adjustments
Reset Audio Mode...................................................36
Speaker adjustments...............................................35
SRS TruVoiume
SRS TSHD (surround sound) adjustments
AV connector
Blackbars
Blocking Channels.......................................................38
Brightness....................................................................32
Cable Box
Connecting..............................................................21
CC Closed Caption......................................................32
CEC.............................................................................40
Cleaning.......................................................................43
Coaxial connection
Satellite box.............................................................25
Coaxial Connection
Cable TV
Color............................................................................33
Component Connector
Composite Connector..................................................20
Computer
Connecting
Preset Resolutions
Resolution through RGB
Connecting
Computer.................................................................27
RGB.........................................................................27
VGA.........................................................................27
Connecting Equipment
Cable.......................................................................21
DVD.........................................................................23
Home Theater
Rear Panel Connections
Satellite Box............................................................21
Sound system..........................................................26
Stereo......................................................................26
VCR.........................................................................25
Video Camera..........................................................25
Contents
Contrast.......................................................................33
Controls
Front Panel..............................................................13
Jag Wheel................................................................13
Daylight Savings setting
...................................................................
................................................
..................................................
.......................................................................
......................................................
................................
.....................................................
..............................................
......................................................
.............
...............................................................
....................................................................
.................................................................
................................................
..............................................................
..................................................
.........................................
.........................................................
.........................................
........................................................................
..............................................
31
30
34
20
35
35
35
35
35
35
20
31
25
20
27
50
50
26
14
40
DTV T ransition...............................................................5
DVD Player
9
9
Connecting
DVI
Cable Box
Satellite Box............................................................21
EPG.............................................................................19
Getting Started
Grounding......................................................................4
GUIDE Button..............................................................19
HDMI
...........................................................................
HDTV Location
Help Menu
Reset All Settings....................................................42
Setup Wizard...........................................................42
System Info
Help Menu
Home Theater
Connecting
Horizontal/Vertical Position adjustments
Input Source
Choosing
Inputs
Antenna.....................................................................4
Connectors..............................................................20
Jag Wheel....................................................................13
Maintenance of TV
Media Menu
Duration...............................................................29, 41
Info
Repeat.................................................................29, 41
Slideshow
Slideshow Effect..................................................29, 41
Sort By.................................................................29, 41
Thumbnail Size....................................................29, 41
Media Menu
Menu Language...........................................................40
Name Input..................................................................37
CSD
.............................................................................
CC Menu
Help Menu...............................................................42
Input Menu
Media Menu............................................................41
Picture Menu
Settings Menu
Sleep Timer Menu...................................................32
Wide Menu..............................................................31
Parental Controls
Alt Rating Region
Block Unrated TV
Canadian English Rating.........................................39
Canadian French Rating
Change the Password.............................................40
Channel Block
Reset Locks.............................................................40
USA Movie Rating...................................................39
USA TV Rating........................................................38
Parental Controls.........................................................38
Password.....................................................................40
Photos
Adjusting Settings....................................................29
..............................................................
...............................................................
............................................................
............................................................
.............................................................
...................................................................
..............................................................
.....................
.................................................................
......................................................
......................................................................
............................................................
................................................................
.................................................................
..............................................................
...........................................................
.........................................................
....................................................
....................................................
.........................................
.........................................................
23
21
17
20
10
42
42
26
33
18
43
29, 41
29, 41
41
30
32
30
32
36
39
39
39
38
62
www.VIZIO.com
Page 63

VIZIO VF551XVT User Manual
Viewing....................................................................28
Picture
Reset Picture Mode.................................................34
Picture Menu
Adaptive Luma
Advanced Video
Ambient Light Sensor
Backlight..................................................................32
Backlight Control
Brightness
Color........................................................................33
Color Enhancement.................................................34
Color Temperature
Contrast...................................................................33
Film Mode................................................................34
Noise Reduction......................................................34
Picture Mode
Sharpness
Tint...........................................................................33
Pictures
Adjusting Settings....................................................29
Create Slideshow.....................................................29, 41
Info...........................................................................29, 41
Sort
Thumbnail Size
Viewing....................................................................28
Remote Control
Batteries..................................................................15
Buttons
Precautions
Range......................................................................15
RGB.............................................................................20
Safety Instructions
Satellite Box
Connecting..............................................................21
Search for channels.....................................................36
Setting Up....................................................................10
Settings Menu
Audio
CEC.........................................................................40
...............................................................
........................................................
......................................................
..............................................
.....................................................
...............................................................
..................................................
...........................................................
...............................................................
..........................................................................
........................................................
...........................................................
....................................................................
.............................................................
.........................................................
........................................................................
32
34
34
34
34
32
34
32
33
15
16
15
29, 41
29, 41
2
35, 37
Menu Language
Parental Controls Menu
Time & Local Settings
Tuner.......................................................................36
Setup Wizard...............................................................17
Sharpness....................................................................33
Skip Channel
Slideshow
Duration
Effect........................................................................29, 41
Mode........................................................................29, 41
Repeat
.....................................................................
Specifications...............................................................47
Stereo
Connecting
Technical Support........................................................46
Time Zone setting........................................................40
Tint...............................................................................33
Troubleshooting...........................................................43
Tuner Menu
Analog MTS.............................................................37
Auto Search.............................................................36
Skip Channel...........................................................37
Tuner Mode
TV Menu
TV Stand
USB Port......................................................................28
VCR
Video Camera
Wall mounting..............................................................12
Warranty......................................................................51
Watching TV
Wide............................................................................31
Wizard..........................................................................42
......................................................................
Partial Channel Search
Attaching.................................................................11
Connecting
Connecting
Getting your Programs
Program Information
......................................................
..........................................
.............................................
...............................................................
...................................................................
..............................................................
.............................................................
...........................................
..............................................................
..............................................................
............................................
...............................................
40
38
40
37
29, 41
29, 41
26
36
30
36
25
25
18
19
Version 3/24/2010 63
www.VIZIO.com
 Loading...