

Page 1
Thank you for purchasing TOA's Remote Controller. Please carefully follow the instructions in this
manual to ensure long, trouble-free use of your equipment.
REMOTE CONTROLLER C-RM1000 CU
OPERATING INSTRUCTIONS
Page 2

2
TABLE OF CONTENTS
1. SAFETY PRECAUTIONS .................................................................................. 5
2. GENERAL DESCRIPTION ............................................................................... 7
3. FUNCTIONS .......................................................................................................... 7
4. HANDLING PRECAUTIONS ............................................................................ 8
5. CONNECTABLE EQUIPMENT AND THEIR MAXIMUM NUMBERS
5.1. Equipment that can be controlled by the Remote Controller ............................... 8
6. NOMENCLATURE AND FUNCTIONS
[ Top Panel ] ............................................................................................................. 10
[ Rear Panel ] ........................................................................................................... 12
7. EQUIPMENT SELECTION
7.1. Digital Video Recorder Selection ...................................................................... 13
7.1.1. Group selection (cascade connection only) ............................................ 13
7.2. Monitor Selection .............................................................................................. 13
7.3. Camera Selection .............................................................................................. 14
7.3.1. Quick group camera selection
(available only when cascade-connected) ............................................. 14
8. MONITOR DISPLAY
8.1. Full Screen Display ........................................................................................... 15
8.2. Multi-Screen Display ......................................................................................... 16
8.3. 4-Segment Split-Screen Display ....................................................................... 16
8.4. 9-Segment Split-Screen Display ....................................................................... 17
8.5. 16-Segment Split-Screen Display (When the 16-channel only) ........................ 17
8.6. Changing the Multi-Screen Display Position ..................................................... 18
8.7. Sequential Display ............................................................................................ 18
8.8. Group Sequential Display ................................................................................. 19
8.9. Zoom Display (Electronic zoom) ....................................................................... 20
9. COMBINATION CAMERA OPERATION
9.1. Camera Rotation and Zoom Operation Using the Joystick ............................... 21
9.2. Focus Adjustment ............................................................................................. 21
9.3. Iris Operation (Communication method: Type B only) ...................................... 22
9.4. Auto-Function Operation ................................................................................... 22
9.5. Camera Position Selection ................................................................................ 22
9.6. Focus Speed Settings ....................................................................................... 23
9.7. Utilization of the Abbreviation Number Function ............................................... 23
SETTINGS
GENERAL DESCRIPTION
Page 3

3
9.8. Combination Camera Menu Display ................................................................. 23
9.9. Storing the Preset Positions .............................................................................. 24
9.10. Deleting Preset Position Data (Communication method: Type B only) ........... 24
10. DIGITAL VIDEO RECORDER OPERATION
10.1. Video Recording ................................................................................................ 25
10.1.1. LED indication during recording ............................................................ 25
10.1.2. Priority recording operation ................................................................... 25
10.1.3. Resetting alarm event recording ........................................................... 26
10.1.4. Making normal recording ...................................................................... 26
10.2. Playback Operation
10.2.1. Playback mode settings ........................................................................ 26
10.2.2. Reverse playback ................................................................................. 26
10.2.3. Stop operation ....................................................................................... 27
10.2.4. Forward/reverse quick playback ........................................................... 27
10.2.5. Time skip forward/reverse playback ..................................................... 27
10.2.6. Pause operation .................................................................................... 27
10.2.7. Frame advance/reverse playback ......................................................... 28
10.2.8. Instant event access playback .............................................................. 28
10.2.9. Earliest image playback ........................................................................ 28
10.2.10. Lastest image revers playback .............................................................. 28
10.3. Search Operation .............................................................................................. 29
10.4. Digital Video Recorder Menu Display ................................................................ 29
10.5. Motion Detection Area Settings ......................................................................... 30
10.6. Archiving ............................................................................................................ 30
10.7. Triplex Settings .................................................................................................. 31
10.8. Entering the Digital Video Recorder Password
10.8.1. Log-in .................................................................................................... 32
10.8.2. Log-out .................................................................................................. 32
11. OTHER OPERATIONS
11.1. Log-In and Log-Out ........................................................................................... 33
11.1.1. Log-in .................................................................................................... 33
11.1.2. Log-out .................................................................................................. 33
11.2. Abbreviation Number ......................................................................................... 34
11.3. Alarm Operations
11.3.1. When alarm is triggered ........................................................................ 34
11.3.2. To stop a buzzer tone ........................................................................... 35
11.3.3. To reset alarm ....................................................................................... 35
11.3.4. Putting screen switching on hold when an alarm occurs ...................... 35
11.4. Joystick Position Adjustment ............................................................................. 35
12. SETTINGS
12.1. Setting Item Summaries .................................................................................... 36
12.1.1. Remote controller menu list .................................................................. 37
12.2. Setting Keys and Display Screen ...................................................................... 38
12.3. Basic Setting Operations ................................................................................... 39
12.3.1. Displaying the menu ............................................................................. 39
12.3.2. Operation during menu display ............................................................. 39
OPERATION
Page 4

4
12.3.3. Closing the menu .................................................................................. 39
12.4. Function Settings ............................................................................................... 40
12.4.1. Group settings ....................................................................................... 40
12.4.2. Abbreviation .......................................................................................... 41
12.4.3. Abbreviation (Quick display function) .................................................... 42
12.4.4. Abbreviation (Function programming) ................................................... 43
12.4.5. Camera protocol ................................................................................... 45
12.4.6. Password .............................................................................................. 46
12.4.7. Focus speed ......................................................................................... 48
12.4.8. Buzzer tone ........................................................................................... 48
12.4.9. Key operation tone ................................................................................ 49
12.4.10. I/O speed ............................................................................................... 49
12.4.11. DVR check ............................................................................................ 49
12.4.12. Monitor lock ........................................................................................... 50
12.4.13. Language .............................................................................................. 51
12.4.14. Initial status ........................................................................................... 51
12.4.15. Expansion .............................................................................................. 51
13. CONNECTIONS
13.1. Equipment Connections .................................................................................... 52
13.1.1. Combination camera ............................................................................. 52
13.1.2. Digital video recorder ............................................................................ 52
13.1.3. Interface unit ......................................................................................... 52
13.2. System Example
13.2.1. Basic system ......................................................................................... 53
13.2.2. Expanded Digital video recorder system (Cascade-connection) .......... 54
13.2.3. Connections between the Remote controller
and the Digital video recorder ...................................... 55
14. DIGITAL VIDEO RECORDER FAILURE INDICATION
14.1. Remote Controller Indication and Status ........................................................... 56
14.1.1. Stopping the buzzer tone ...................................................................... 56
15. TROUBLESHOOTING ..................................................................................... 57
16. OPERATION GUIDE ......................................................................................... 58
17. SPECIFICATIONS ............................................................................................. 60
Accessories .............................................................................................................. 60
Optional products ..................................................................................................... 60
WHEN YOU NEED HELP
CONNECTIONS
Page 5
5
1. SAFETY PRECAUTIONS
• Before installation or use, be sure to carefully read all the instructions in this section for correct and safe
operation.
• Make sure to observe the instructions in this manual as the conventions of safety symbols and messages
regarded as very important precautions are included.
• We also recommend you keep this instruction manual handy for future reference.
Safety Symbol and Message Conventions
Safety symbols and messages described below are used in this manual to prevent bodily injury and property
damage which could result from mishandling. Before operating your product, read this manual first and
understand the safety symbols and messages so you are thoroughly aware of the potential safety hazards.
Indicates a potentially hazardous situation which, if mishandled, could
result in death or serious personal injury.
WARNING
When Installing the Unit
• This is a class A product. In a domestic environment this product may cause radio interference in which case
the user may be required to take adequate measures.
• Use the unit only with the voltage specified on the unit. Using a voltage higher than that which is specified
may result in fire or electric shock.
• Do not cut, kink, otherwise damage nor modify the power supply cord. In addition, avoid using the power
cord in close proximity to heaters, and never place heavy objects -- including the unit itself -- on the power
cord, as doing so may result in fire or electric shock.
• Avoid installing or mounting the unit in unstable locations, such as on a rickety table or a slanted surface.
Doing so may result in the unit falling down and causing personal injury and/or property damage.
When the Unit is in Use
• If any of the following irregularities occurs, immediately switch off the power, disconnect the power supply
plug from the AC outlet and inform the shop from where the unit was purchased. Further using the unit may
result in fire or electric shock.
· If you detect smoke or a strange smell coming form the unit
· If water or any metallic object gets into the unit
· If the unit falls, or the unit case breaks
· If the power supply cord is damaged (exposure of the core, disconnection, etc.)
· If no audio signal outputs
· If no image appears
• To prevent a fire or electric shock, never open the unit case nor modify the unit as there are high voltage
components inside the unit. Refer all servicing to your nearest TOA dealer.
• Do not place cups, bowls, or other containers of liquid or metallic objects on top of the unit. If they
accidentally spill into the unit, this may cause a fire or electric shock.
• Do not touch the power supply plug or control line during thunder and lightning, as this may result in electric
shock.
Do not expose the unit to rain or an environment where it may be
splashed by water or other liquids, as doing so may result in fire or
electric shock.
WARNING
Page 6
6
Indicates a potentially hazardous situation which, if mishandled, could
result in moderate or minor personal injury, and/or property damage.
CAUTION
When Installing the Unit
• Never plug in nor remove the power supply plug with wet hands, as doing so may cause electric shock.
• When unplugging the power supply cord, be sure to grasp the power supply plug; never pull on the cord
itself. Operating the unit with a damaged power supply cord may cause a fire or electric shock.When
removing the power cord, be sure to hold its plug to pull.
• When moving the unit, be sure to remove its power supply cord from the wall outlet. Moving the unit with the
power supply cord connected to the outlet may cause damage to the power supply cord, resulting in fire or
electric shock.
• Avoid installing the unit in humid or dusty locations, in locations exposed to the direct sunlight, near the
heaters, or in locations generating sooty smoke or steam as doing otherwise may result in fire or electric
shock.
• Do not connect a network terminal exposed to excessive voltage to the DVR control output terminal A, as
doing so may result in fire or electric shock.
When the Unit is in Use
• Do not place heavy objects on the unit as this may cause it to fall or break which may result in personal
injury and/or property damage. In addition, the object itself may fall off and cause injury and/or damage.
• Use the dedicated AC adapter for the unit. Note that the use of other adapter may cause a fire.
• Clean the unit periodically. Contact your TOA dealer regarding the cleaning. If dust is allowed to accumulate
in the unit over a long period of time, a fire may result.
• If dust accumulates on the power supply plug or in the wall AC outlet, a fire may result. Clean it periodically.
In addition, insert the plug in the wall outlet securely.
• Switch off the power, and disconnect the power supply plug from the AC outlet when cleaning or leaving the
unit unused for long periods of time. Doing otherwise may cause a fire or electric shock.
Note
This equipment has been tested and found to comply with the limits for a Class A digital device,
pursuant to Part 15 of the FCC Rules. These limits are designed to provide reasonable protection
against harmful interference when the equipment is operated in a commercial environment. This
equipment generates, uses, and can radiate radio frequency energy and, if not installed and used in
accordance with the instruction manual, may cause harmful interference to radio communications.
Operation of this equipment in a residential area is likely to cause harmful interference in which case the
user will be required to correct the interference at his own expense.
Modifications
Any modifications made to this device that are not approved by TOA Corporation may void the authority
granted to the user by the FCC to operate this equipment.
CU version complies with Part 15 of the FCC Rules.
Page 7

7
2. GENERAL DESCRIPTION
TOA's C-RM1000 Remote Controller is used to remotely control TOA's 9-channel (C-DR091 series) or 16channel (C-DR161 series) Digital Video Recorders. It can also remotely control operation of Combination
cameras connected to the Digital Video Recorder. The C-RM1000 is equipped with a 3-axis joystick that
permits main operation to be performed with one hand.
3. FUNCTIONS
Digital Video Recorder Control
Digital Video Recorder's recording and playback operation can be remotely controlled by the Remote
Controller. It is also possible to display the Digital Video Recorder's menu to change settings.
Screen Display Operation
Camera images can be viewed in full-screen, 4-segment, 9-segment, or 16-segment (When the 16-channel
only) split screen displays or in sequential displays. (Monitor 2 output can provide only full-screen, 4-segment
split screen, and sequential displays.)
Combination Camera Operation
The Combination Camera's pan, tilt, and zoom operation, as well as focus and iris adjustments can be
remotely controlled. It is also possible to display the Combination Camera's menu to change settings.
Preset Position Programming and Playback
The Combination Camera's preset positions can be easily programmed. Images set to the preset position can
also be displayed on the monitor screen.
Abbreviation Number Function (Quick Display Function)
Digital video recorder numbers, camera numbers, and position numbers can be programmed into a function
key (F1 - F4) or number (1 - 508). Pressing the programmed key or number permits the corresponding
camera image to be displayed on the full screen.
Abbreviation Number Function (Function Programming)
Functions, such as Auto-focus, Auto operation, and electronic zoom, can be programmed into a function key
(F1 - F4) or number (1 - 508).
Digital Video Recorder Grouping
Two or more cascade-connected Digital Video Recorders can be grouped, allowing images of all Digital Video
Recorders in the group to be displayed on one master monitor. Further, multiple Digital Video Recorders can
be viewed in sequential order through group sequence.
Password Setting
Accessible functions can be restricted by setting a password. There are 3 operation levels and different
passwords can be set for each level.
Monitor Lock
Restricts operable monitors connected to the digital video recorder’s monitor outputs 1 and 2. This eliminates
the necessity of operation for switching the monitors and prevents malfunctions.
Page 8

8
4. HANDLING PRECAUTIONS
• Do not connect the AC adapter when using the supplied modular cable since the power is supplied from the
Digital Video Recorder.
• Do not connect the DVR Control Output Terminal A (RJ-11) to the telephone line.
• Do not lift the Remote Controller by joystick or subject the Controller to strong shocks. Damage may be
caused to the Controller.
• To clean the front panel, wipe with a soft cloth. Do not use thinner or alcohol.
• The Remote Controller is designed for indoor use, and cannot be used outdoors.
5. CONNECTABLE EQUIPMENT AND THEIR MAXIMUM NUMBERS
5.1. Equipment that can be controlled by the Remote Controller
The following equipment can be controlled by the Remote Controller.
Communication method
Communications method Type A: C-CC501, C-CC504, C-CC551, and C-CC554
Communications method Type A/B: C-CC514, C-CC564, C-CC714, and C-CC764
Up to 16 cameras (9 cameras when the 9-channel Digital Video Recorder is used) can be connected per
Digital Video Recorder for remote control.
Notes
• The Digital Video Recorder is required to perform control. Cameras cannot be connected directly to the
Remote Controller for remote control.
• Avoid connecting more cameras than the number of Digital Video Recorder channels to the camera's control
line. Any connected cameras exceeding the maximum number of available channels cannot be controlled.
• The combination camera available for Type A and B is factory preset to Type B (TOA-B). Use the DIP switch
to change to Type A, as required. (Refer to p. 45; Camera Protocol.)
• Multiple combination cameras using different communication methods cannot be connected to a single
digital video recorder. Match the communication methods of all connected cameras.
C-DR091 and C-DR161 Series Digital Video Recorders
Up to 8 C-DR091 or C-DR161 Series Digital Video Recorders can be connected to the Remote Controller to
remotely control cameras. The Digital Video Recorder's Camera Protocol is factory-preset to Type B (TOA-B).
C-RF1000 Interface Unit
Connecting the C-RF1000 Interface Unit to the Digital Video Recorder permits up to 4 Remote Controllers to
be connected. Connected remote controllers are operated on the last-in-first-out basis.
Page 9

9
Digital Video Recorder number (DVR):
Refers to the DVR-ID number when the Digital Video Recorders are cascadeconnected.
Monitor number (MON): Refers to the Digital Video Recorder's monitor output number.
There are two monitor outputs: Monitor outputs 1 and 2.
Camera number (CAM): Refers to the camera video input terminal number connected to the Digital
Video Recorder.
Position number (POS): The Combination Camera's orientation can be programmed into a number (1 –
255).
Group number (G): Multiple cascade-connected Digital Video Recorders can be grouped. Up to 8
groups can be set.
Group sequence: A sequence of images from multiple Digital Video Recorders in the same group
can be displayed on the master monitor.
Cascade connection: Images of up to 8 Digital Video Recorders can be monitored on a single
monitor. Images of up to 8 Digital Video Recorders can be switched and
cameras can be controlled by a single Remote Controller. (Refer to p.54;
Expanded Digital Video Recorder system, (Cascade-connection.))
Priority Recording: Refers to the highest Priority Recording mode. Press the unit's Priority
Recording key to start recording.
Alarm Event Recording: Refers to the Alarm Recording and Motion-detected Recording.
Alarm Recording starts when an alarm signal enters an alarm input terminal of
the Digital Video Recorder or Combination Camera. Motion-detected Recording
starts when the Digital Video Recorder detects the movement of the camera
images.
Alarm hold: The monitor display automatically switches when an alarm signal is received.
The Alarm Hold refers to the mode that prevents the screen from being
switched. Digital Video Recorder's Alarm Event Recording is performed even in
Alarm Hold mode.
Multi-segment split screen display:
Refers to the 4-segment, 9-segment, or 16-segment split screen.
Live mode: Refers to the mode that displays the current camera images.
Playback mode: Refers to the mode that displays images recorded on a hard disk.
Triplex mode: Refer to the mode that simultaneously displays both playback and live screens.
Playback, live display, and video recording can be simultaneously performed.
Communication method: There are two types, A (TOA-A) and B (TOA-B). Operable functions differ
depending on the type. The camera, Digital Video Recorder and Remote
Controller must be identical in communication method. (Refer to p. 45; Camera
Protocol.)
Auto-function: Auto-pan, Auto-trace, Preset sequence, and Tour. (Refer to p. 22; Auto-function
Operation.)
Monitor Lock: Restricts operable monitors connected to the digital video recorder’s monitor
outputs 1 and 2. This eliminates the necessity of operation for switching the
monitors and prevents malfunctions.
Definition
Page 10
10
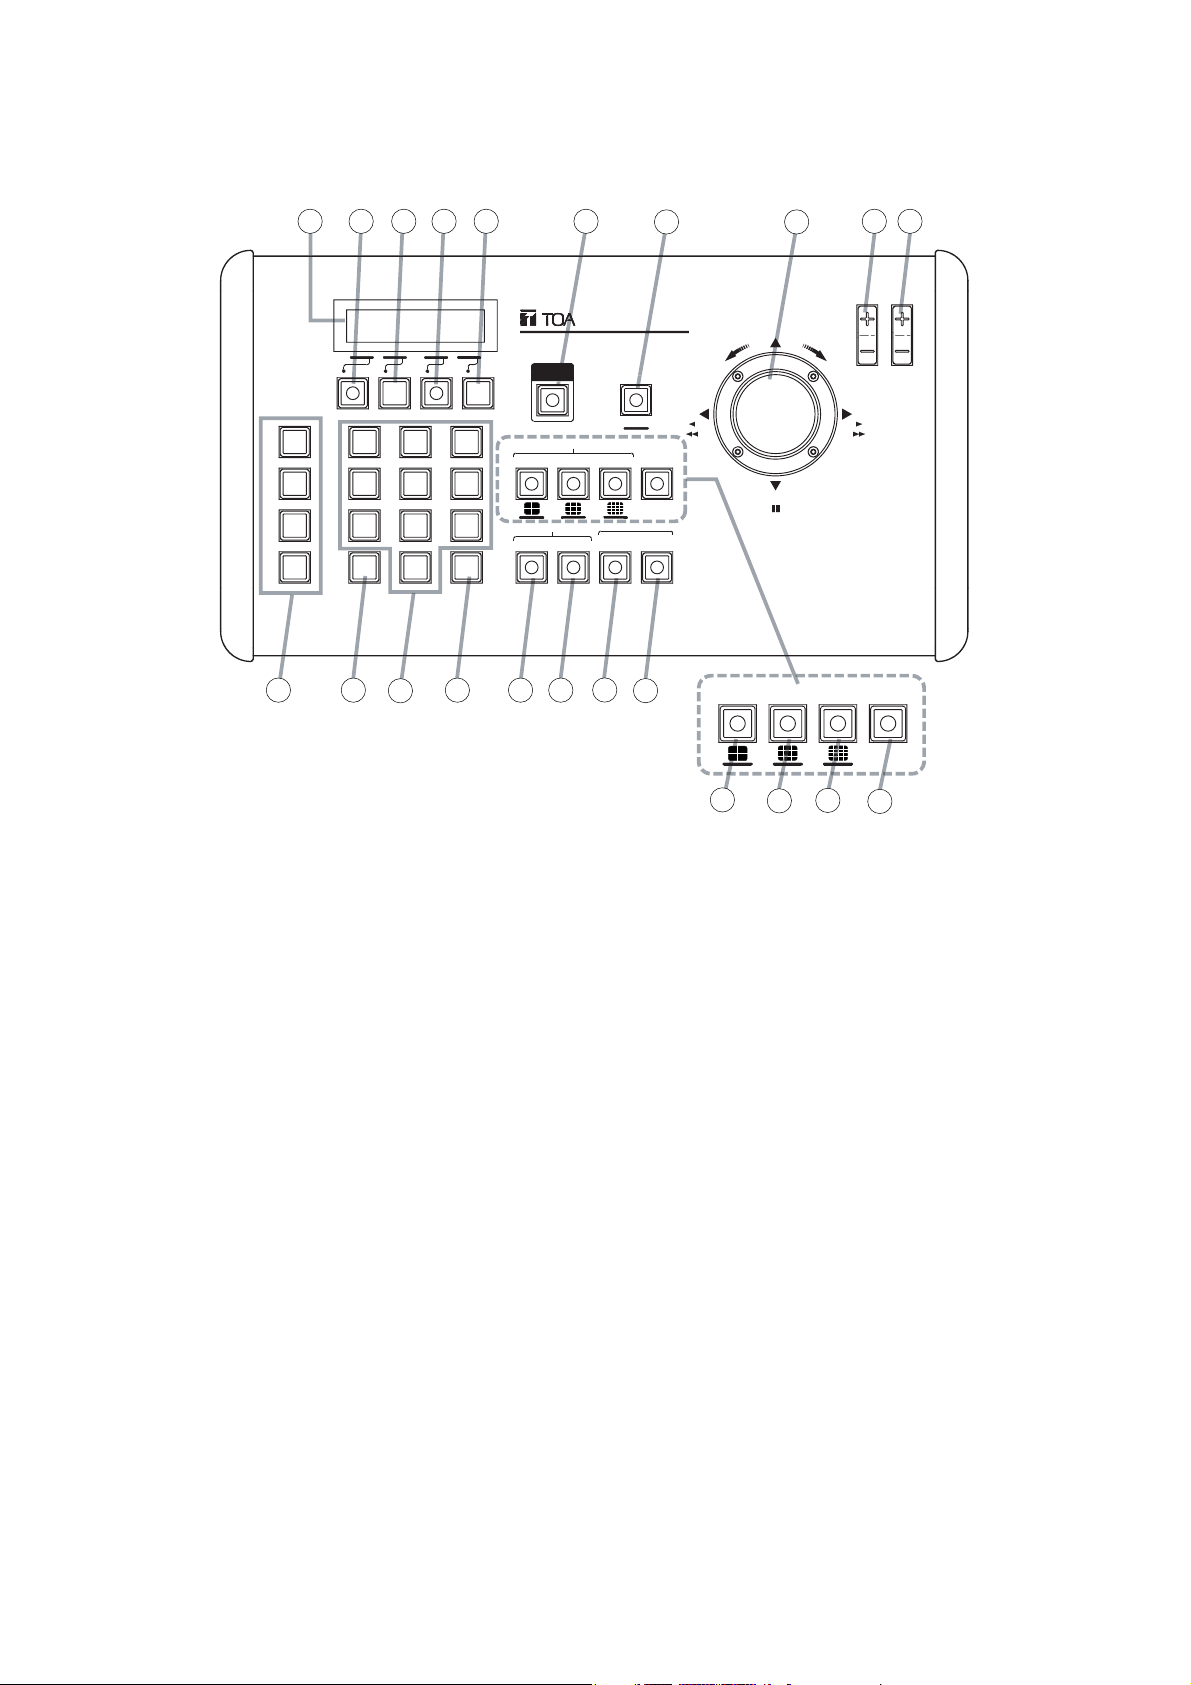
6. NOMENCLATURE AND FUNCTIONS
[ Top Panel ]
N
(1) LCD Screen
Displays the setting menu and data of operation
status, etc. using characters.
(2) Digital Video Recorder Key [DVR/DVR MENU]
Selects the Digital Video Recorder to be
controlled, and the DVR group number. Holding
down this key for 2 seconds or more displays
the menu of the Digital Video Recorder being
selected. This key lights red when the selected
Digital Video Recorder is in recording mode.
(3) Monitor Key [MON]
Switches the monitor to be operated by the
Remote Controller. The monitor toggles
between Monitor 1 and Monitor 2 each time the
Monitor key is pressed.
(4) Camera Key [CAM/CAM MENU]
Selects the camera number. Selected cameras
can be operated if they are Combination
Cameras. Holding down this key for 2 seconds
or more displays the menu of the Combination
Camera being selected.
(5) Position Key [POS]
Use this key to play back or program the
Combination Camera's preset positions.
(6) Priority Recording Key [PRIORITY REC]
Perform priority recording. This key flashes
during priority recording. Holding down this key
for 2 seconds or more stops priority recording,
causing the key to remain unlit. (Refer to p. 25;
Video Recording.)
(7)Menu/Shift Key [MENU/SHIFT]
Menu
Holding down this key for 2 seconds or more
displays the menu screen on the LCD screen.
(Refer to p. 36; Settings.)
Shift
Use this key when viewing camera images in
multi-segment split screen displays of (19), (20)
and (21) or when selecting the DVR group
number
Password
When passwords are valid, holding down this
key for 2 seconds or more displays the password
entry screen.
1
2 3 4 5 6
REMOTE CONTROLLER C-RM1000
DVR MON CAM POS
PRIORITY
REC
7 8
MENU
9
10
IRISFOCUS
UP
TELEWIDE
CAM MENUDVR MENU
F1
F2
F3
F4
11 12
1
4
7
C
13
23
6
5
9
8
SET
0
14 15 16
DVR
SEARCH
RIGHTLEFT
SEQUENCE
21
AUTO
22
SCREEN
MULTIFULL
PLAY / LIVE
SEQUENCE
BUZZER STOP
RESET
17
SHIFT
ALARM
18
AUTO
HOLD
19
DOWN
MULTIFULL
20
Page 11

11
(8) Joystick
In live mode
Performs pan, tilt, and zoom operation of
connected Combination Cameras.
In playback mode
Performs playback, reverse playback, fast
forward playback, and pause operation.
In menu display mode
Moves the cursor (lever position: up, down, left,
or right) and confirms (clockwise lever rotation)
or cancels (counterclockwise lever rotation) the
setting.
Note
Settings cannot be confirmed (clockwise lever
rotation) or cancelled (counterclockwise rotation)
while the camera menu is displayed. Use the
SET key or C key for confirmation or cancellation.
(9) Focus Key [FOCUS]
In live mode
Adjusts the Combination Camera's focus.
In playback mode
(only when temporarily stopped)
Performs instant event access playback.
In Digital video recorder's menu display mode
Changes set values.
(10) Iris Key [IRIS]
In live mode
Adjusts the camera iris.
Note
This key cannot be used when the communication method is set to Type A. (Refer to p. 45;
Camera Protocol.)
In playback mode
Performs playback from the earliest image, or
reverses playback from the latest image.
(11) Function Keys [F1
-
F4]
Abbreviation numbers are assigned to these
keys to perform quick display or function
programming.
(Refer to p. 42; Abbreviation Quick display
function, Refer to p. 43; Abbreviation Function
programming.)
(12) Clear Key [C]
Use this key to correct the wrong entry of a tenkey numerical pad. While the menu is displayed,
this key is used to cancel settings.
(13) Ten-Key Numerical Pad [0
-
9]
Use this key to enter the DVR number, DVR
group number, camera number, position
number, or abbreviated number.
(14) Set Key [SET]
Use this key in conjunction with a ten-key
numerical pad to enter abbreviation numbers.
This key does not work even when pressed
without designating the abbreviated number.
While the menu is displayed, this key is used to
confirm settings.
(15) Search Key [SEARCH]
Displays the search menu.
(16) Playback/Live Key [PLAY/LIVE]
In playback mode
Switches playback to live mode.
The key remains lit while in playback mode.
In live mode
Switches live to playback mode, and playback
begins.
(17) Alarm Reset Key [BUZZER STOP/RESET]
Stops the buzzer tone. Holding down this key for
2 seconds or more stops alarm event recording.
The key flashes during alarm event recording or
when the Digital Video Recorder fails.
(18) Alarm Hold Key [HOLD]
Prevents the Digital Video Recorder from
changing the screen when it receives an alarm
signal. The key lights while in alarm hold mode.
(19) Full-Screen [FULL] /
4-Segment Split-Screen Key
Displays the designated camera output on the
full screen. Pressing this key while the Shift key
continuously lights switches the screen to 4segment split -screen display.
(20) Multi-Screen [MULTI] /
9-Segment Split-Screen Key
Displays connected camera outputs on the
multi-split monitor screen. The multi-split screen
display changes in sequence whenever this key
is pressed. Pressing this key while the Shift key
continuously lights switches the screen to 9segment split-screen display.
(21) Sequence [SEQUENCE] /
16-Segment Split-Screen Key
Executes the sequential switching operation set
at the Digital Video Recorder. This key remains
lit during sequence operation. Pressing this key
while the Shift key continuously lights switches
the screen to 16-segment split-screen display.
(When the 16-channel only)
(22) Auto Key [AUTO]
Sets the Combination Camera's auto function to
ON or OFF. This key continuously lights while
the camera is in auto operation mode.
Note
Operation differs depending on the communications method. (Refer to p. 22; Auto-function
Operation.)
Page 12
12
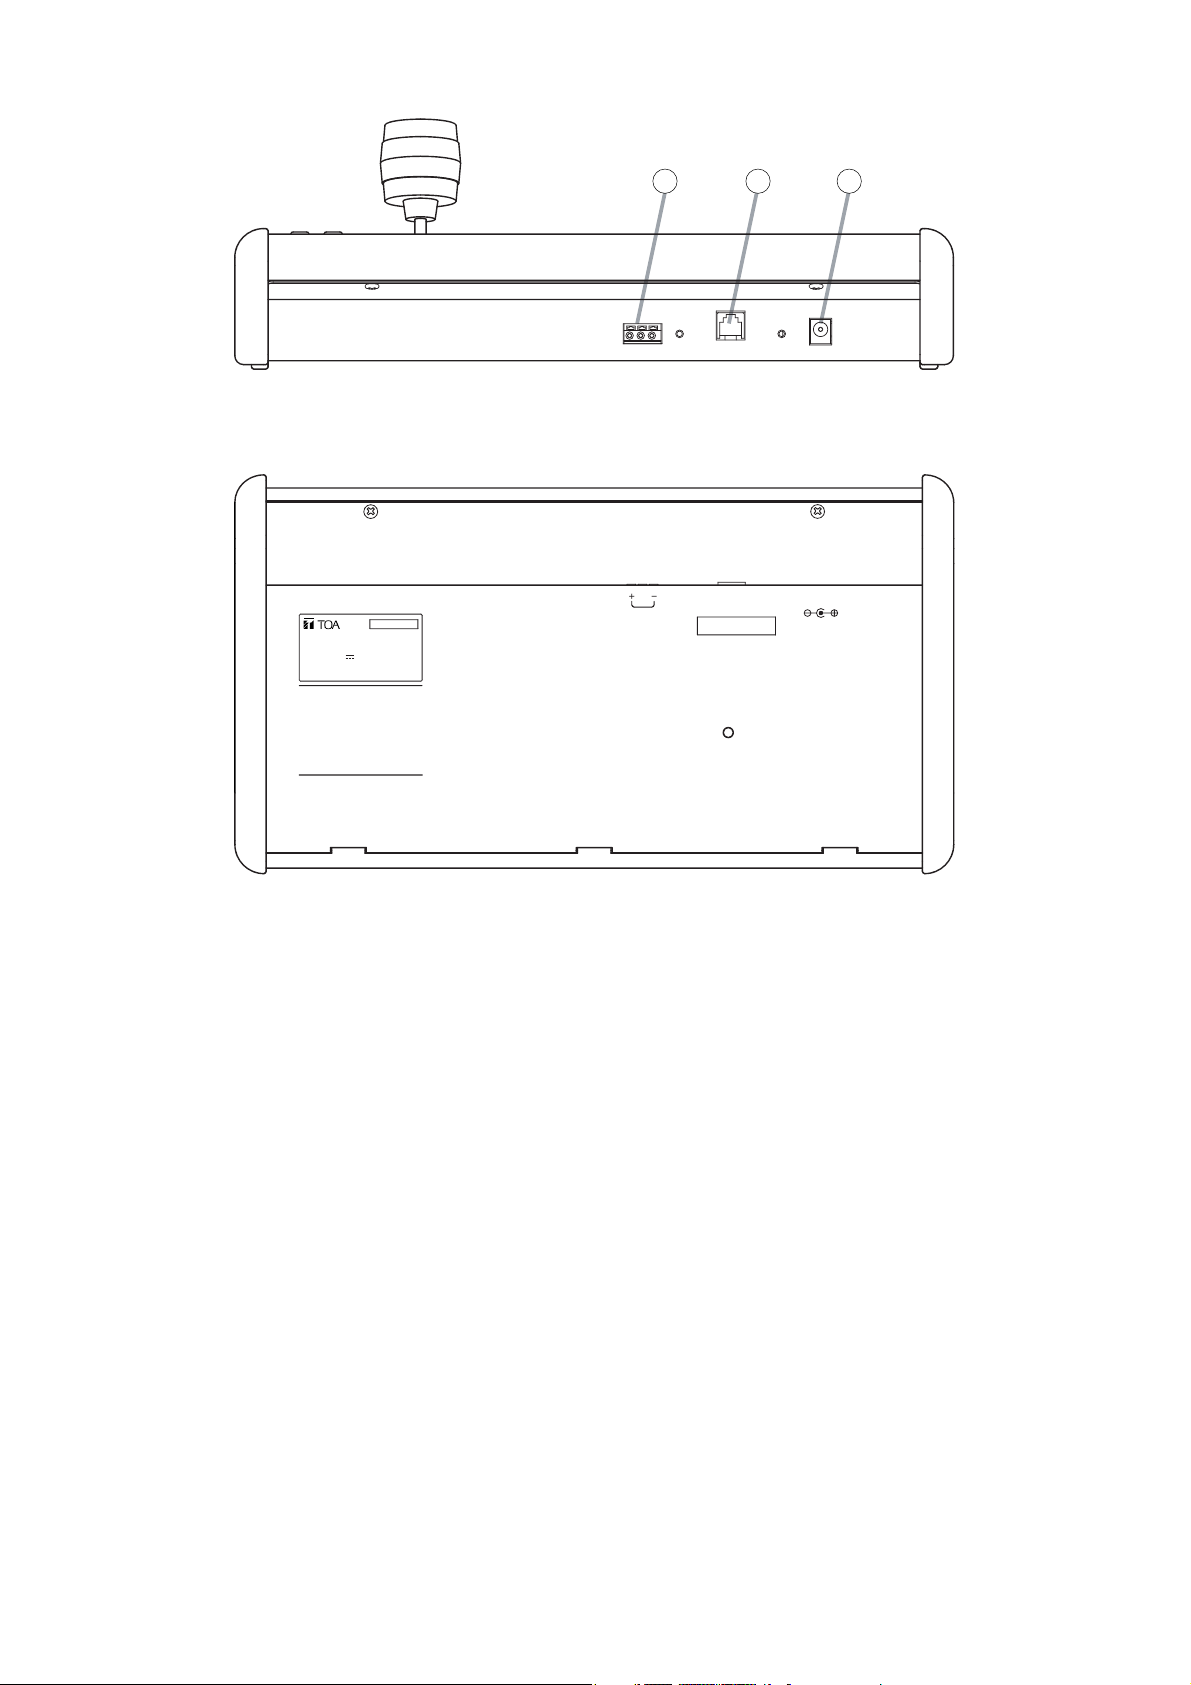
[ Rear Panel ]
[ Bottom Surface Indications ]
(23) DVR Control Output Terminal B
(screwless type)
Use this terminal when the supplied modular
cable cannot be used or when connecting the
Remote Controller to the interface unit. The
supplied AC adapter is required when using this
terminal.
(24) DVR Control Output Terminal A (RJ-11)
Use this terminal when connecting a single
Remote Controller to the Digital Video Recorder
within the distance of 3 meters (9.8 ft). Use the
supplied modular cable for connection.
(25) AC Adapter Power Input Terminal
[ DC IN ]
Connect the DC plug of the dedicated AC
adapter to this terminal. Connect the AC adapter
when using the DVR Control Output Terminal B
(23).
23 24 25
SER.
REMOTE CONTROLLER
model C-RM1000 CU
12/13.8V 250mA
TOA Corporation
MADE IN JAPAN
GND
DVR CONTROL
OUTPUT-B
DVR CONTROL
OUTPUT-A
Do not connect this jack
to telephone line.
DC IN
Page 13
13
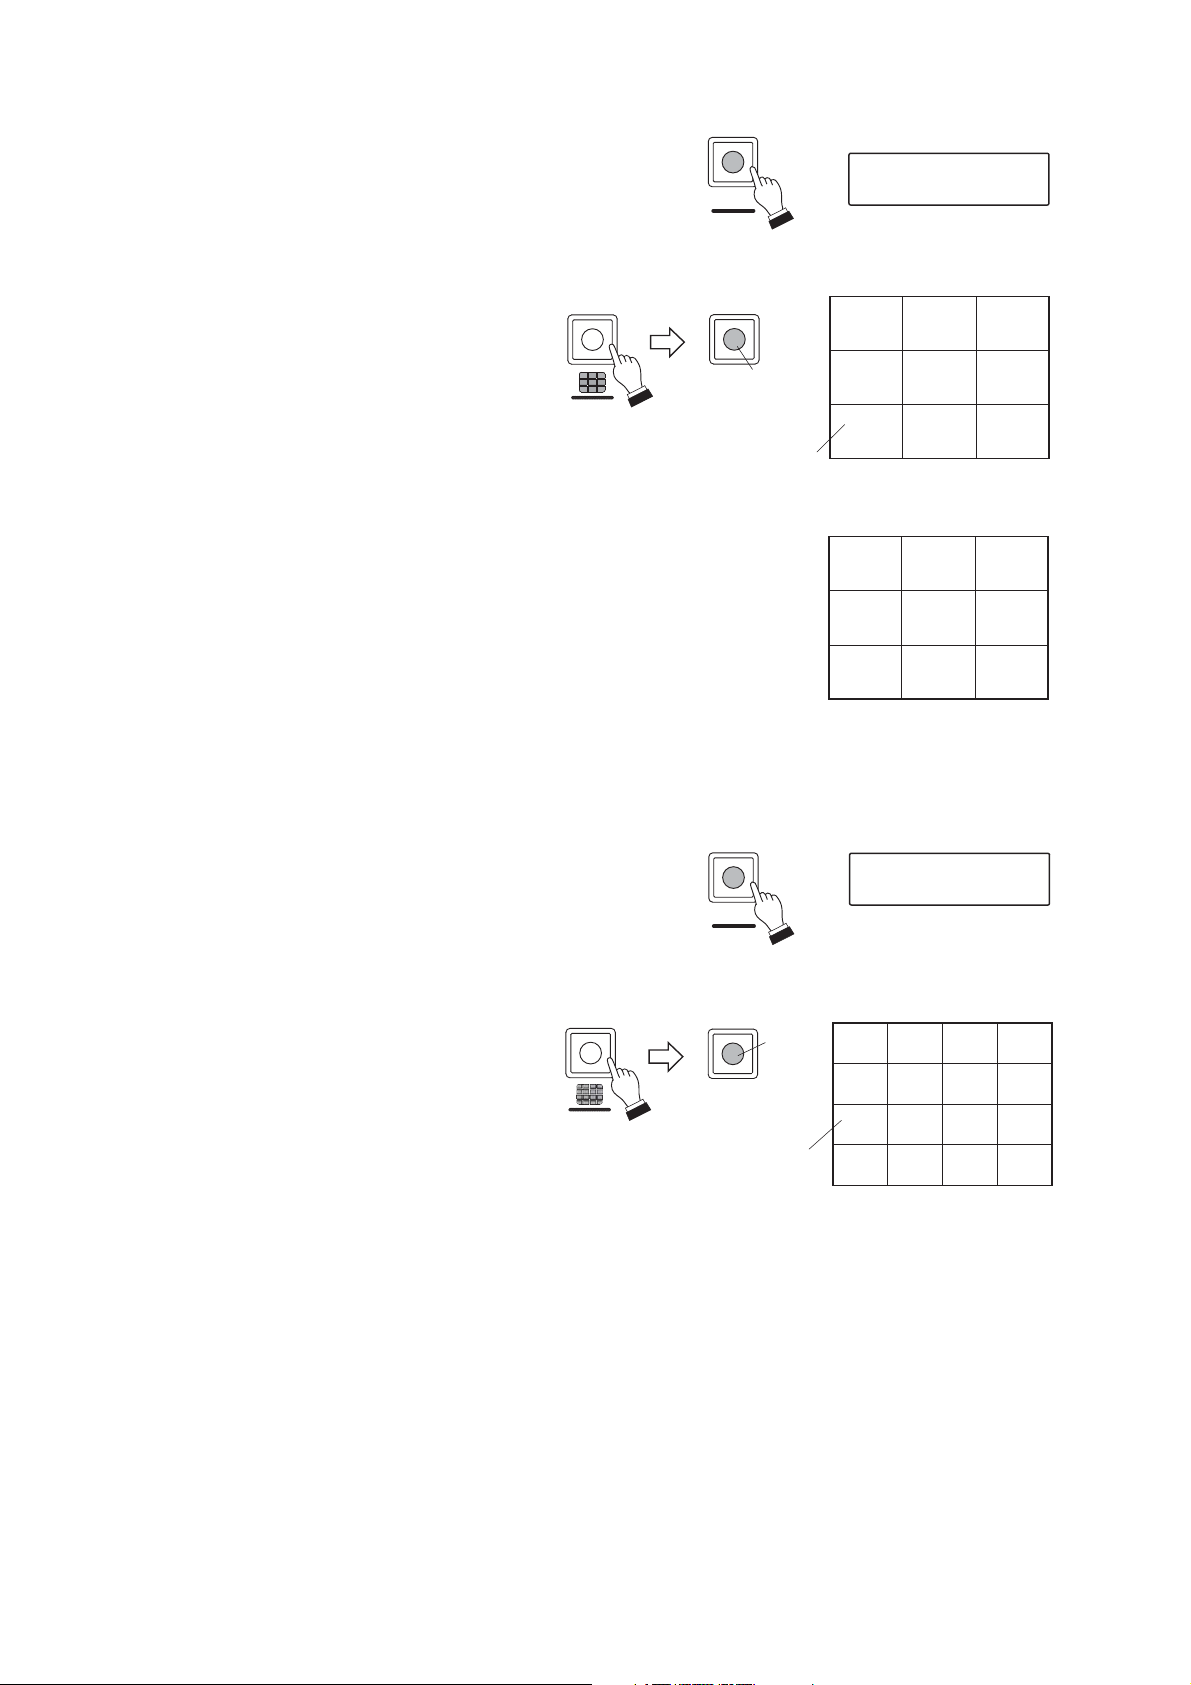
7.1.1. Group Selection (cascade connection only)
Notes
• Group settings must be performed in advance. (Refer to p. 40; Group Settings.)
• Screens are not switched during group selection even when an alarm signal is received or the priority
recording button is pressed.
1. Press the Shift key.
2. Press the desired Digital Video Recorder group number.
3. Press the DVR key.
The indication "G_Group No." is displayed in the DVR
section of the LCD screen.
7. EQUIPMENT SELECTION
7.1. Digital Video Recorder Selection
1. Press the desired Digital Video Recorder number using a
ten-key numerical pad.
2. Press the DVR key.
The selected Digital Video Recorder number is displayed
on the LCD screen. (The key cannot be used if the Digital
Video Recorder is not connected.) For monitors and
cameras, Monitor 1 and Camera 1 are automatically
selected.
[Example]
7.2. Monitor Selection
Functions that can be displayed differ depending on the monitor output. (Refer to p. 15; Monitor display.)
Press the MON key.
The monitor output alternates between 1 and 2 each time the MON key is pressed, and the monitor number is
displayed on the LCD screen.
Note
For the system using two or more Remote Controllers, perform Monitor Lock setting when operable monitors
have been restricted. (Refer to p.50; Monitor Lock.)
[Example]
7
DVR
DVR MENU
MENU
SHIFT
LCD screen
71 1
DVR MON CAM POS
MENU
2
SHIFT
DVR
LCD screen
DVR MENU
G2 1 1
DVR MON CAM POS
MON MON
LCD screen
71 1
DVR MON CAM POS DVR MON CAM POS
LCD screen
72 1
Page 14

14
7.3. Camera Selection
Select the camera to be displayed or operated.
1. Press the camera number to be selected using the ten-key
numerical pad.
2. Press the CAM key.
The selected camera number is displayed on the LCD
screen (CAM section).
[Example]
7.3.1. Quick group camera selection (available only when cascade-connected)
Specified cameras within the group can be selected using straight number entry. The selected camera images
are displayed in full-screen through the Monitor Output 1. Select the camera's serial number referring to the
system example below.
Note: Group settings must be performed in advance. (Refer to p. 40; Group Settings.)
1. Enter the serial number for the camera you want to select
using the ten-key numerical pad during group selection.
Select the 10th camera connected to the Digital Video
Recorder 2 as in the system example. In a serial
numbering system, the 10th camera connected to the
Digital Video Recorder 2 becomes No. 26 by counting 16
cameras connected to the Digital Video Recorder 1 and 10
cameras connected to the Digital Video Recorder 2 (16 +
10 = 26).
2. Press the CAM key.
The selected number is displayed on the LCD screen
(CAM).
[Example]
CAM
51
LCD screen
7115
CAM MENU
DVR MON CAM POS
Camera No.
displayed on the full screen
( System example )
Group 1
1-16
16-channel DVR 1
10th
Combination Camera
10
16-channel DVR 2
Remote Controller
CAM
CAM MENU
62
LCD screen
G1 1 26
DVR MON CAM POS
Page 15
15
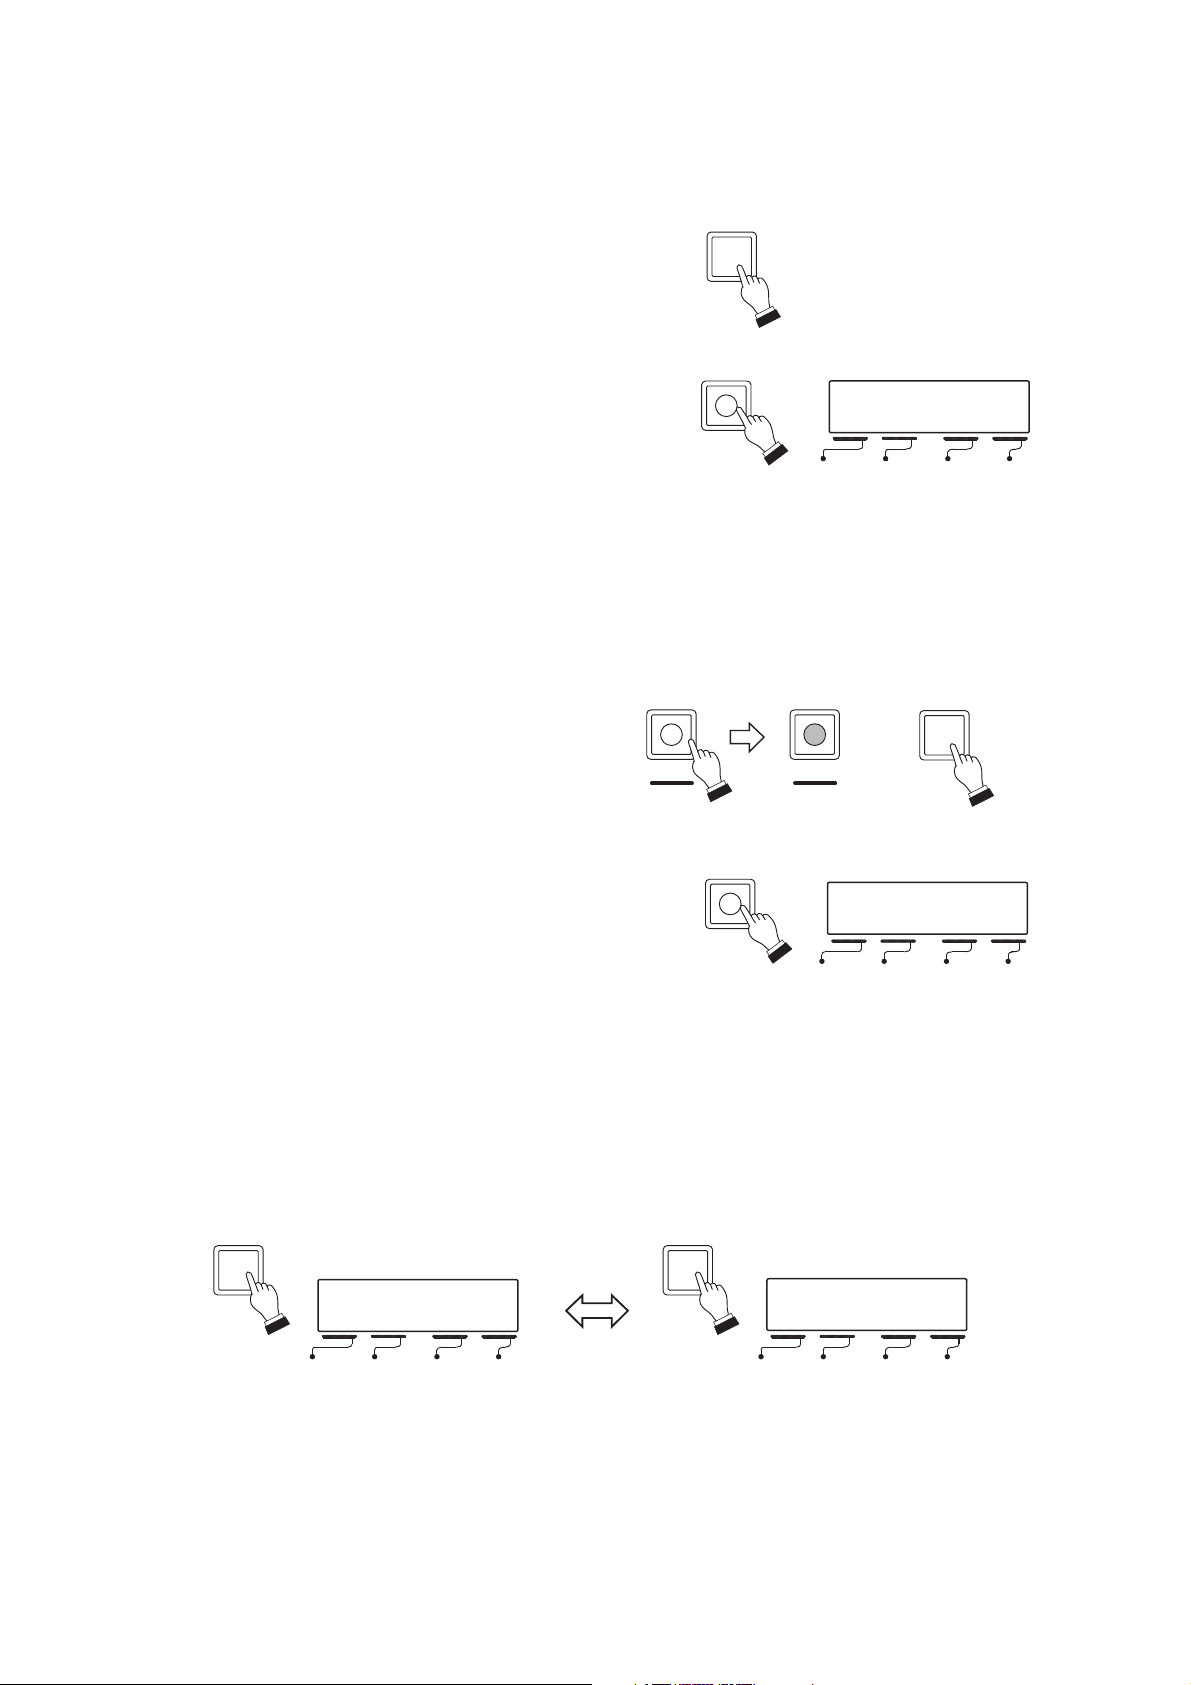
8.1. Full Screen Display
1. After selecting the Digital Video Recorder, enter the
camera number to be displayed.
2. Press the FULL key.
The designated camera's image is displayed on the
full screen and the FULL key lights. The camera
number is displayed on the LCD screen.
Note
If only the FULL key is pressed, the camera image corresponding to the number shown in the CAM section of
the LCD screen is displayed on the full screen.
8. MONITOR DISPLAY
Functions that can be displayed differ between Monitor outputs 1 and 2.
[Example]
Note
Perform the monitor lock setting for the system using two or more remote controllers .This eliminates the
necessity of operation for switching the monitors and prevents malfunctions. (Refer to p.50; Monitor Lock)
Function
Monitor output 1
Monitor output 2
Function
Monitor output 1
Monitor output 2
* Only the C-DR161 Series (16-channel versions) can display.
Full
4 Seg
Digital Recorder
menu
Live mode
9 Seg
Search
menu
16 Seg* Sequence
Display position
setting screen
Full 9 Seg
Playback mode
4 Seg
Triplex setting
screen
16 Seg*
Archive
menu
Electronic
Zoom
Combination Camera
Cascade
output
menu
LCD screen
51
15
71 1
DVR MON CAM POS
FULL
FULL
Lights
LCD screen
FULL
7115
DVR MON CAM POS
Camera number
displayed on the full screen
Page 16
16
1. Press the MULTI key after selecting the Digital
Video Recorder.
The MULTI key lights and camera Nos. 1
-
4
(4-segment split-screen A) are displayed on
the monitor.
2. Press the MULTI key.
Camera Nos. 5-8 (4-segment split-screen B)
are displayed on the monitor.
3. Repeat Step 2 to display the camera numbers
to be monitored.
The display cycles through multi-segment split
screens with each depression of the MULTI
key.
Monitor screen
(4-segment split-screen A)
4 3
2 1
Camera No.
8.2. Multi-Screen Display
The screen switches as follows each time the MULTI key is pressed while in live or playback mode.
8.3. 4-Segment Split-Screen Display
1. Press the SHIFT key.
The key lights.
2. Press the FULL (4-Split-Screen) key.
The MULTI key lights and camera Nos. 1
-
4
(4-segment split-screen A) are displayed on
the monitor.
3. Repeat Steps 1 and 2 to display the camera
number to be monitored.
The display cycles through individual 4segment split screens each time both the
SHIFT key and the FULL key are pressed.
Monitor screen
(4-segment split-screen A)
4 3
2 1
Camera No.
Note: Monitor output 2 can display only live images in full-screen and 4-segment split-screen displays.
9-channel recorder
4 Seg A 4 Seg B
9 Seg 4 Seg C
4 Seg A 4 Seg B 4 Seg C 4 Seg D
16-channel recorder
16 Seg 9 Seg B 9 Seg A
MULTI
MULTI
Lights
MULTI
Monitor screen
(4-segment split-screen B)
6 5
FULL
MENU
SHIFT
MULTI
8 7
LCD screen
4-SEGMENT
7115
Lights
Page 17
17
8.4. 9-Segment Split Screen Display
1. Press the SHIFT key.
The SHIFT key lights.
2. Press the MULTI (9-Split-Screen) key.
The MULTI key lights and Camera Nos. 1-9
(9-segment split screen A) are displayed on
the monitor.
2-1. When the 16-channel recorder is used
Repeat Steps 1 and 2 to display the camera
numbers to be monitored. The display cycles
through individual multi-segment split
screens each time both the SHIFT key and
the MULTI key are pressed.
8.5. 16-Segment Split-Screen Display (When the 16-channel only)
1. Press the SHIFT key .
The SHIFT key lights.
2. Press the SEQUENCE (16-Split-Screen) key.
The MULTI key lights, displaying all connected
cameras on the monitor screen.
MULTI
MENU
SHIFT
MULTI
Lights
Camera No.
LCD screen
9-SEGMENT
7115
Monitor screen
(9-segment split screen A)
1 2 3
4 5 6
7 8 9
SEQUENCE
MENU
SHIFT
MULTI
Lights
Monitor screen
(9-segment split screen B)
10 11 12
13 14 15
16
LCD screen
1 2
16-SEGMENT
7115
Monitor screen
1 2 3 4
6 5 7 8
Camera No.
9101112
1413 15 16
Page 18
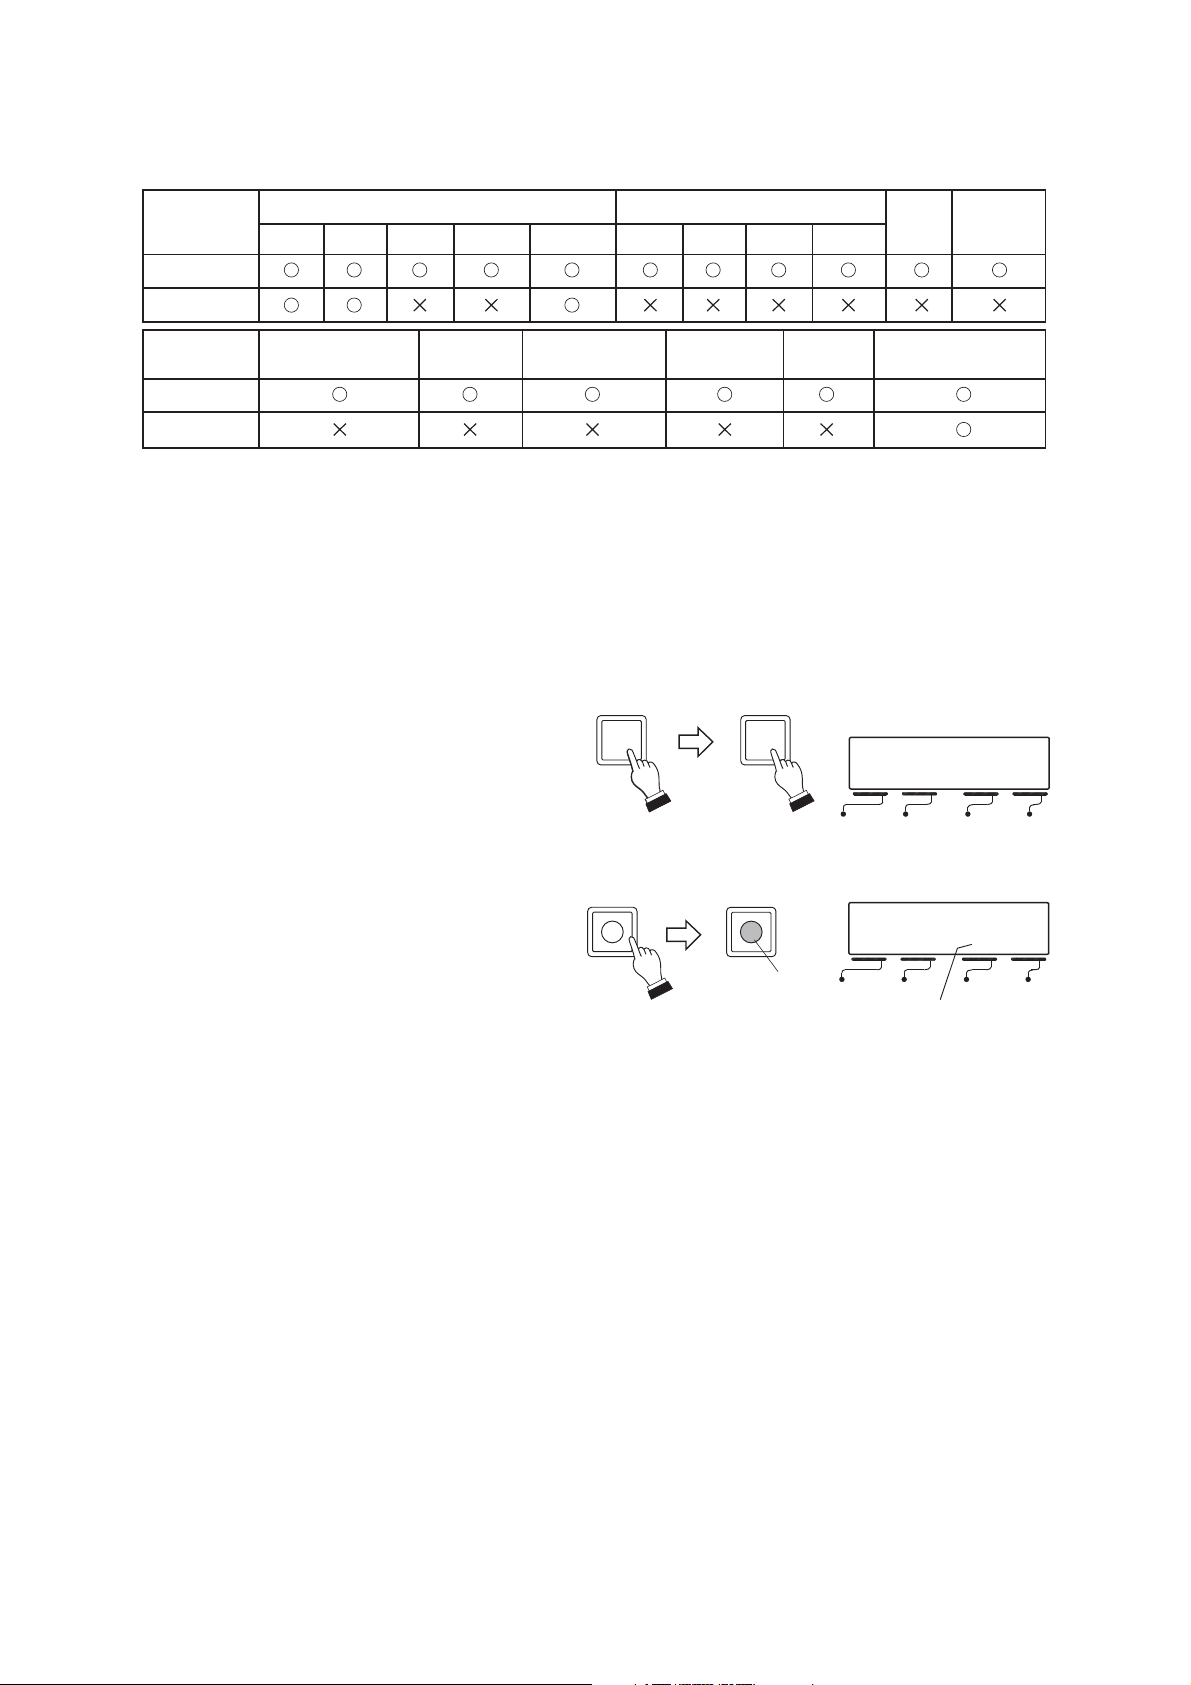
8.7. Sequential Display
Note
Sequential display settings must be performed for the Digital
Video Recorder in advance. Please refer to the instruction
manual enclosed with the Digital Video Recorder for more
information.
Press the SEQUENCE key after selecting the Digital Video
Recorder.
The SEQUENCE key lights, commencing sequential screen
switching programmed into the Digital Video Recorder.
18
8.6. Changing the Multi-Screen Display Position
Live and recorded images can be set to be displayed on user-specified split screen segments, and the display
position of the multi-segment split screen can be freely changed. For more information, please read the Digital
Video Recorder's instruction manual.
1. With the display mode set to live mode, display the multi-
segment split screen to be changed. (Refer to p. 16: MultiScreen Display.)
2. Hold down the MULTI key for 2 seconds or more.
The display position setting screen is displayed.
3. Move the cursor to the desired display position by tilting the
joystick up, down, left or right.
4. Enter the camera number using the ten-key numerical pad,
then press the FULL key.
5. Rotate the joystick counterclockwise or press the C key to exit the
position setting screen.
Notes
• If a live camera image is assigned to a split-screen segment
that has already been set to display another camera live
image, the original camera image will be replaced with the new
camera image.
• Display positions cannot be changed for Monitor output 2
images.
L1 L2
L3 L4
In multi-screen
display mode
MULTI
L1 L2
POSITION SETTING
L3 L4
[Example] Monitor screen
Camera No. 1
1
Camera No. 2
2
Camera No. 16
16
SEQUENCE SEQUENCE
Lights
LCD screen
SEQUENCE
71 15
Page 19

19
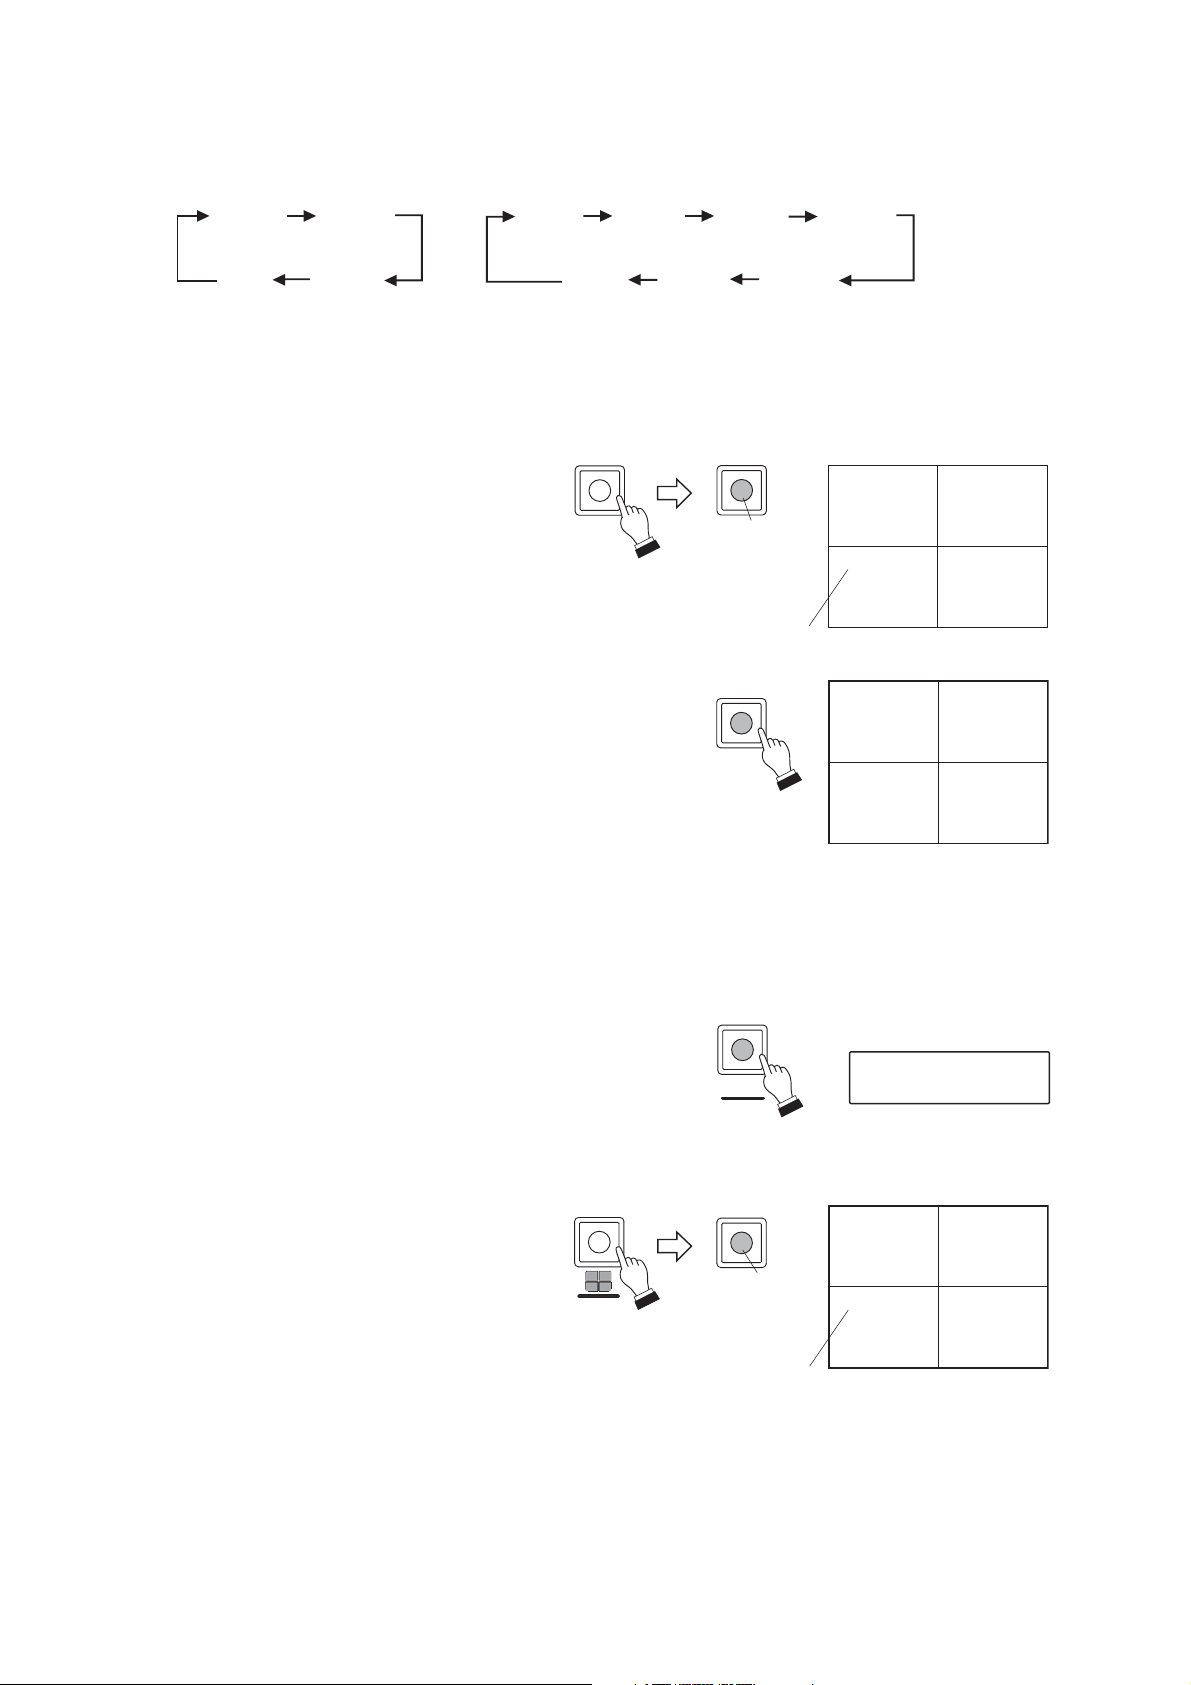
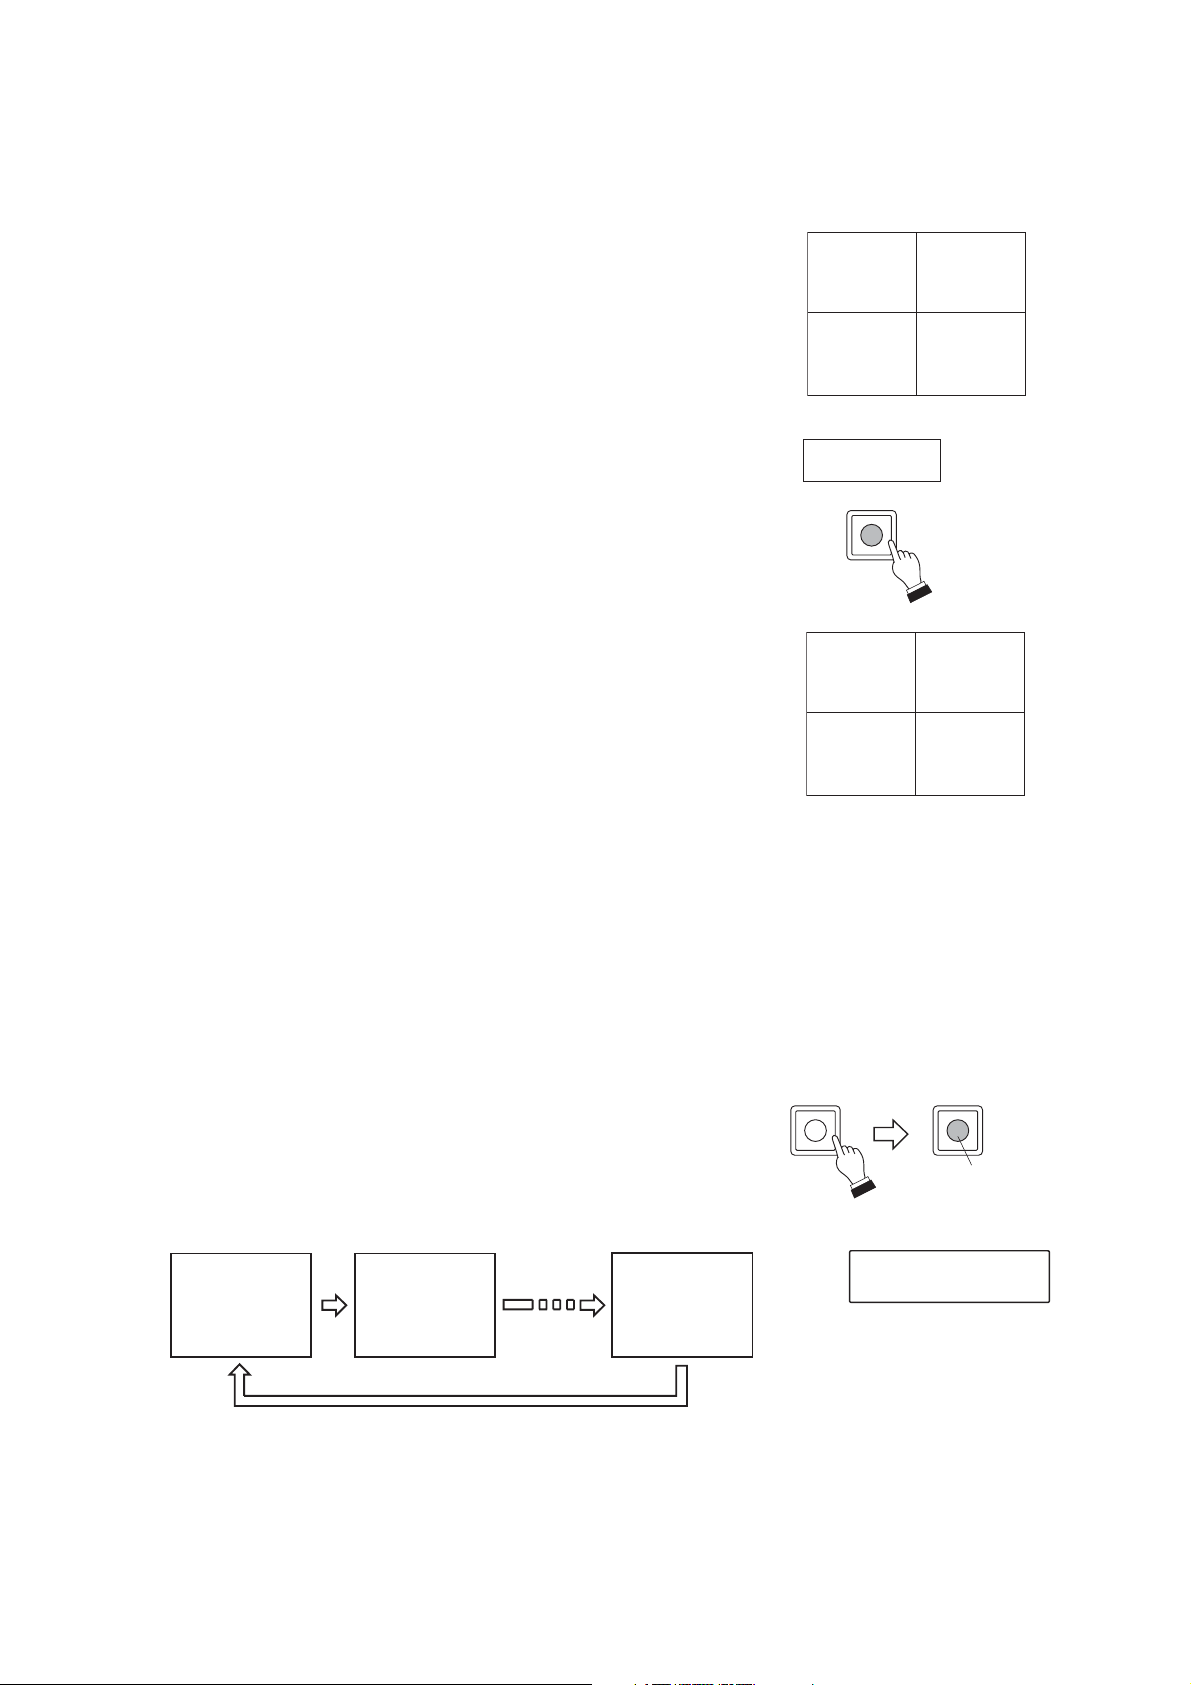
8.8. Group Sequential Display
Group sequential displays can be performed if "Group" has been selected in the Cascade Connection setting.
The Monitor 1 sequential display setting is used for the group sequence function.
Notes
• Sequential display settings must be performed in advance for the Digital Video Recorder. For the sequence
setting method, please refer to the instruction manual enclosed with the Digital Video Recorder.
• If the operation level of a digital video recorder within the group is set to "full-lock," the group sequence
function cannot be operated when the "Remote access limit" is set to ON in the digital video recorder's
security settings.
• Do not turn off the power to the digital video recorder or remote controller while the group sequence function
is in operation. If power is switched off, reactivate the power to all equipment components within the system.
Press the SEQUENCE key after selecting "Group."
The SEQUENCE key lights, commencing the group sequence.
Group sequence operation is shown below.
(1) DVR 1 performs its sequence.
(2) DVR 2 begins its sequence when DVR 1's sequence is completed.
(3) After the group’s last DVR’s sequence is completed, operation
returns to DVR 1, allowing the sequence to cycle through all
DVRs in the group.
SEQUENCE SEQUENCE
[Example]
When DVR 1-4 are assigned to Group 1;
Group sequence (Master Monitor 1’s display oder
DVR 1
Monitor 1
sequence setting
DVR 2
Monitor 1
sequence setting
1
1
2
2
Lights
LCD screen
SEQUENCE
G1 1 15
)
16
End
16
DVR 4
Monitor 1
sequence setting
End
1
2
"DVR" represents the Digital Video Recorder.
16
End
Page 20

20
8.9. Zoom Display (Electronic zoom)
Live or recorded full-screen images can be viewed in 2X zoom display. Multiple-segment split-screens cannot
be zoomed.
Note
"Zoom ON" and "Zoom OFF" must be preprogrammed into a function key or abbreviation number.
(Refer to p. 43; Abbreviation (Function programming).)
1. Press the "Zoom ON"-preprogrammed function key or
abbreviation number.
The arrow is displayed in the center of the screen.
2. Using the joystick, move the pointer arrow to the center of the
area to be zoomed.
3. Press the SET key.
The screen can be viewed in 2X zoom display with the pointer
arrow as a center.
Note
Operating the joystick still permits the zoomed position to be
moved even after being zoomed.
4. Press the "Zoom OFF"-preprogrammed function key or
abbreviation number to cancel the zoom display.
7
SET
F1
OR
SET
F2
OR
8
SET
Page 21

21
9.2. Focus Adjustment
When the Combination camera is connected, the lens focus can be adjusted using the FOCUS key.
After selecting the camera, press the FOCUS (+) or (-) key.
Focus operation continues as long as the key is pressed.
Pressing the (+) key focuses the lens on distant objects, and
pressing the (-) key focuses on near objects.
9. COMBINATION CAMERA OPERATION
The following camera operations can be performed when the Digital Video Recorder is in live mode and the
Combination camera is selected.
9.1. Camera Rotation and Zoom Operation Using the Joystick
Connected Combination cameras can be rotated in the desired direction and their zoom lenses operated
using the joystick.
After selecting the camera, tilt the joystick in the desired direction of movement. The camera moves in the
direction in which the joystick has been tilted.
[Example] Clockwise camera rotation
After selecting the camera, rotate the joystick.
Clockwise rotation selects the telephoto lens and counterclockwise rotation selects the wide-angle lens.
LCD screen
MANUAL
7115
DVR MON CAM POS
Joystick
Wide angle Telephoto
FOCUS
Page 22

22
9.3. Iris Operation (Communication method: Type B only)
This iris can be adjusted using the IRIS key when the Combination camera is connected.
After selecting the camera, press the IRIS (+) or (
-
) key. Iris
operation continues as long as the key is pressed. The (+) key
opens the iris, and the (-) key closes the iris.
9.4. Auto-Function Operation
Auto-functions can be operated using the AUTO key when the Combination camera is connected.
Note
Auto-functions operated with the AUTO key differ depending on the Combination camera's communication
method and setting contents. The auto function cannot be used for Type B (TOA-B) combination cameras,
even when “Auto key” is selected in the camera menu.
Auto-pan function: Automatically pans the Combination cameras.
Auto-trace function: Play back camera operations set at the Combination Camera.
Preset sequence function: Automatically displays camera images in preset sequential order set at the
Combination Camera.
Tour: Plays back the images in conjunction with Preset Positions and Trace.
(C-CC514, C-CC564, C-CC714 and C-CC764 only)
9.5. Camera Position Selection
1 After selecting the camera, press the position number
using the ten-key numerical pad.
2. Press the Position Selector key.
The selected camera position image is displayed.
Note
If the communication method is Type B, pressing only the Position key (or Position 0) displays the home
position image.
[Example]
The AUTO key remains lit during auto operation, and extinguishes when auto operation is completed.
IRIS
Press the AUTO key.
Hold down the AUTO key
for 2 seconds or more.
Press the abbreviation
number or function key.
Type A
(TOA-A)
Type B
(TOA-B)
Commences auto-pan, auto-trace or
preset sequence operation. (depending on the Combination camera's
AUTO key function setting.)
Commences auto-pan operation.
Terminates auto operation.
Commences auto-pan, auto-trace
or preset sequence operations.
(Auto functions can be programmed
into an abbreviation number in the
Remote Controller abbreviation
number setting.)
2
POS
LCD screen
7115255
DVR MON CAM POS
55
Page 23

23
9.6. Focus Speed Settings
Camera focus speed can be set. (Refer to p. 48; Focus Speed.)
9.7. Utilization of the Abbreviation Number Function
By pressing the SET key after entering the preprogrammed abbreviation number using the ten-key numerical
pad, or by simply pressing the function key, the following camera operations can be performed:
(Refer to p. 34; Abbreviation (Function programming).) (Refer to p. 41; Abbreviation.)
• Display of the set camera image (DVR No., Camera No. and Position No.) on the monitor.
• Display of Digital Video Recorder number on the monitor.
• Auto-focus operation.
• Auto function operation.
• Camera’s auxiliary contact control.
• Electronic zooming.
9.8. Combination Camera Menu Display
The Combination Camera's menu screen can be displayed to perform preset position programming and other
settings. For details, please refer to the instruction manual enclosed with the camera.
Note
The menu screen can be displayed for the following camera model: C-CC501, C-CC504, C-CC514, C-CC551,
C-CC554, C-CC564, C-CC714 and C-CC764.
1. Select the camera for menu display. (Refer to p. 13; Equipment
Selection.)
2. Hold down the CAM MENU key for 2 seconds or more to display
the menu screen.
Operate the Remote Controller as follows while the camera menu
is displayed:
• To change the setting contents, tilt the joystick up, down, left or
right.
• To select the setting item, tilt the joystick up, down, left or right.
• To set the setting item, press the SET key.
• To return to the previous screen, press the C key.
• To clear numbers, press the C key.
• To enter position numbers, use a ten-key numerical pad, then
press the SET key.
• To set zoom, rotate the joystick clockwise or counterclockwise.
• To set focus, use the FOCUS (+) or (
-
) key.
Notes
• Settings cannot be cancelled or confirmed by rotating the joystick clockwise or counterclockwise while
the camera menu is displayed. Use either the C or Set key.
• When the camera’s communication system is set to Type B, if the cursor does not stop at each item in
the camera menu, but instead moves past, press the SHIFT key and operate the joystick while the
SHIFT key indicator is illuminated. This allows the cursor to stop at each item. When setting preset
positions or storing camera movement for a trace function, press the SHIFT key again to extinguish the
indicator first before performing such settings.
3. Hold down the CAM MENU key for 2 seconds or more to exit the menu screen.
CAM
CAM MENU
C A M E R A M E N U
P R E S E T
I D S E T T I N G
C A M E R A S E T T I N G
A U T O M O D E
A L A R M
A U X
T I M E R
M A N U A L
M A I N T E N A N C E
C A M
Page 24

24
9.9. Storing the Preset Positions
The preset position can be stored on the camera menu, however it can be easily stored by performing the
following operation;
1. Select the camera for which the preset position is
programmed. (Refer to p. 13; Equipment Selection.)
2. Rotate the Combination camera to set it to the desired
angle of view.
3. Enter a preset position number using the ten-key numerical
pad.
4. Press the SHIFT key.
The key lights.
5. Hold down the POS key for 2 seconds or more.
The “PRESET MEMORY” indication is displayed on the
LCD screen.
9.10. Deleting Preset Position Data (Communication method: Type B only)
Preset position data can be deleted by performing the following operations.
1. Enter the preset position number to be deleted using the
ten-key numerical pad.
2. Press the SHIFT key.
The key lights.
3. Hold down the C key for 2 seconds or more.
The “PRESET ERASE” indication is displayed on the LCD
screen.
[Example]
3
LCD screen
3
7115
MENU
MENU
SHIFT
POS
SHIFT
LCD screen
PRESET MEMORY
[Example]
3
MENU
LCD screen
3
7115
MENU
Lights
Lights
SHIFT
C
SHIFT
LCD screen
PRESET ERASE
Page 25

25
10.1.2. Priority recording operation
For details, please refer to the instruction manual enclosed
with the Digital Video Recorder.
1. Press the PRIORITY REC key.
The PRIORITY REC key flashes and the buzzer tone
sounds, commencing Priority recording.
2. Hold down the PRIORITY REC key for 2 seconds or more.
The key extinguishes, terminating Priority recording.
Notes
• Press the Alarm reset key to stop a buzzer during Priority
recording.
• The PRIORITY REC key continuously lights when Priority
recording is terminated by the Digital Video Recorder. To
extinguish it, hold down the PRIORITY REC key for 2
seconds or more.
10. DIGITAL VIDEO RECORDER OPERATION
The following Digital Video Recorder operations can be performed using the Remote Controller:
10.1. Video Recording
Priority recording and auto-recording (Alarm event recording and Normal recording) modes are made
available to the Digital Video Recorder. For details, please refer to the instruction manual enclosed with the
Digital Video Recorder.
10.1.1. LED indication during recording
: Lights red: Lights green : Flashes red : Remains unlit
DVR key
* 1
PRIORITY
REC key
RESET key
ALARM
* 2
Status
Normal recording in progress.
Priority recording in progress.
• Priority recording has been terminated by other Remote Controller
connected to the same system.
• Priority recording has been terminated by the Digital Video Recorder.
• Termination by the Digital Video Recorder's front panel-mounted Priority
recording key.
• Termination due a lapse of the Priority recording time preset at the Digital
Video Recorder.
Alarm event recording in progress. (The Digital Video Recorder in alarm
event recording mode is displayed on the LCD screen.)
• Alarm event recording has been terminated by other Remote Controller
connected to the same system.
• Alarm event recording has been terminated by the Digital Video Recorder.
• Termination by the Digital Video Recorder's front panel-mounted Alarm
* 1
* 1
Continuously lights red during auto-recording.
* 2
The Alarm reset key also flashes red when the Digital Video Recorder fails. (Refer to p. 56 : Digital Video Recorder failure indication.)
reset key.
• Termination due a lapse of the alarm recording time preset at the Digital
Video Recorder.
PRIORITY
REC
PRIORITY
REC
Flashes
PRIORITY
REC
Flashes
PRIORITY
REC
Extinguishes
Page 26

26
10.1.3. Resetting alarm event recording
The Alarm reset key flashes and the buzzer tone sounds during Alarm event recording. Alarm event recording
cannot be initiated by the Remote Controller. For the method of starting the Alarm event recording, refer to the
instruction manual enclosed with the Digital Video Recorder. For the operations of the unit while in alarm
mode, refer to p. 34; Alarm Operations.
Hold down the Alarm reset key for 2 seconds or more.
The Alarm reset key extinguishes and the buzzer stops, terminating
Alarm event recording.
Notes
• Press the Alarm reset key to stop a buzzer during Alarm event
recording.
• The Alarm reset key lights when Alarm recording is terminated by
the Digital Video Recorder. To extinguish it, hold down the Alarm
reset key for 2 seconds or more.
10.1.4. Making normal recording
By performing the menu setting for the Digital Video Recorder, the schedule of Normal recording can be set.
Using the Remote Controller, display the Digital Video Recorder menu to set it. For details, please refer to the
instruction manual enclosed with the Digital Video Recorder.
10.2. Playback Operation
10.2.1. Playback mode settings
Press the PLAY/LIVE key.
Live mode is switched to the playback mode, commencing
playback.
The PLAY/LIVE key remains lit while in playback mode. Pressing
the PLAY/LIVE key again switches playback to live mode.
Notes
• Tilting the joystick to the right while in playback
mode also permits playback to begin.
• Playback begins from the position at which
playback last stopped.
10.2.2. Reverse playback
Tilt the joystick to the left while in playback mode. Reverse playback begins.
BUZZER STOP
RESET
BUZZER STOP
RESET
Live mode Playback mode
L4 L5
L6 L7
"L" stands for the live screen while "PB" stands
for the playback screen.
PLAY / LIVE
PLAY / LIVE
Lights
PB4 PB5
PB6 PB7
Page 27

27
10.2.3. Stop operation
Press the PLAY/LIVE key while in playback mode.
Playback stops, switching to live mode. The
PLAY/LIVE key remains unlit while in live mode.
10.2.4. Forward/reverse quick playback
Leave the joystick tilted to the left or right during
playback. The left-tilt position permits fast reverse
playback and the right-tilt position permits fast
forward playback. Depending on the angle of
joystick tilt, playback speed varies 2-fold (2X), 4-fold
(4X), or 8-fold (8X). Returning the joystick to the
central position causes playback to progress at
normal speed.
Note
Playback speed can be fixed by pressing the SET
key during 2-fold (4-fold or 8-fold) playback. To
reset, tilt the joystick to the left or right.
10.2.6. Pause operation
To temporarily stop playback, tilt the joystick down
during playback. Tilting the joystick up while playback is
temporarily stopped cancels pause mode, commencing
playback (reverse playback).
10.2.5. Time skip forward/reverse playback
Rotate the joystick clockwise. Playback skips
forward in 1-minute/10-minute segments.
Rotate the joystick counterclockwise. Playback skips
backward in 1-minute/10-minute segments.
Note
Pressing the SET key during time skip (1 or 10
minutes) playback causes time skip playback to
continue even if the joystick is returned to the
central position. To reset, tilt the joystick to the left
or right.
PLAY / LIVE
Lights
PLAY / LIVE
Extinguishes
Playback mode
PB4 PB5
PB6 PB7
Reverse playback Playback
8-fold 4-fold 2-fold Standard Standard 2-fold 4-fold 8-fold
Live mode
L4 L5
L6 L7
Reverse playback
1-minute
skip reverse
10-minute
skip reverse
Playback
1-minute
skip advance
10-minute
skip advance
Cancels pause mode.
Pause mode
Page 28

28
10.2.7. Frame advance/reverse playback
Tilt the joystick to the left or right while playback is
temporarily stopped.
The left-tilt position permits frame reverse playback,
and the right-tilt position permits frame forward
playback.
10.2.8. Instant event access playback
Press the FOCUS (+) key while playback is temporarily
stopped. Playback temporarily stops at the beginning of
the next event.
Press the FOCUS (-) key while playback is temporarily
stopped. Playback temporarily stops at the beginning of
the previous event.
In pause
10.2.9. Earliest image playback
Press the IRIS (+) key. Playback is started with the earliest
recorded image.
Note
Earliest image playback cannot be operated during
recording if the Digital Video Recorder's mode is set to
Overwrite.
10.2.10. Latest image revers playback
Press the IRIS (-) key. Reverse playback is started with
the latest recorded image.
Frame reverse Frame advance
In pause
FOCUS
In pause
FOCUS
In pause
IRIS
IRIS
Page 29

29
10.3. Search Operation
It is possible to search recorded images by date, time, or event. For
details, please refer to the instruction manual enclosed with the Digital
Video Recorder.
1. Press the Search key. The search menu is displayed
Operate the Remote Controller as follows while the search menu is
being displayed:
• To move the cursor, tilt the joystick up, down, left, or right.
• To confirm settings, rotate the joystick clockwise or press the SET
key.
• To cancel settings, rotate the joystick counterclockwise or press the
C key.
• To change settings, use the FOCUS (+) or (
-
) key.
Note
Executing a search places the display in playback mode, causing
playback to temporarily stop at the searched position.
2. Tilt the joystick to the left to exit the search menu. It is also possible
to search the search menu by rotating the joystick counterclockwise
or pressing the C key.
10.4. Digital Video Recorder Menu Display
Display the Digital Video Recorder's menu and perform various settings
for the Digital Video Recorder.
1. Select the Digital Video Recorder for menu display.
(Refer to p. 13; Equipment Selection.)
2. Hold down the Menu key for 2 seconds or more to display the Digital
Video Recorder's menu.
The menu is displayed on the monitor.
Operate the Remote Controller as follows while the menu is being
displayed:
• To move the cursor, tilt the joystick up, down, left, or right.
• To confirm the setting, rotate the joystick clockwise or press the
SET key.
• To cancel the setting, rotate the joystick counterclockwise or press
the C key.
• To change the setting, use the FOCUS (+) or (
-
) key.
3. Tilt the joystick to the left to exit the menu.
It is also possible to exit the menu by rotating the joystick
counterclockwise or pressing the C key. If any change has been
made to the settings, save the changed setting before exiting the
menu.
SEARCH SEARCH
DVR
DVR MENU
Page 30

30
10.6. Archiving
Images recorded on the Digital Video Recorder can be archived to a
DVD-R disk or USB flash drive. For details, please refer to the
instruction manual enclosed with the Digital Video Recorder.
1. Hold down the Menu key for 2 seconds or more during a playback
pause.
The archive menu is displayed.
Operate the Remote Controller as follows while the archive menu is
being displayed:
• To move the cursor, tilt the joystick up, down, left, or right.
• To set the start (end) position, rotate the joystick clockwise or press
the SET key.
• To change the setting, use the FOCUS (+) or (
-
) key.
• To transfer files, rotate the joystick clockwise or press the SET key.
Note
The pause time is entered for the start (end) position time. To
change the time, use the FOCUS key, or return to playback mode,
temporarily stop at the desired time, and then display the archive
menu again.
2. Tilt the joystick to the left. The archive menu is closed, returning the
display to playback mode. It is also possible to exist the archive
menu by rotating the joystick counterclockwise or pressing the C key.
Notes
• Recorded images cannot be played back during archiving.
• To stop archiving, press the SHIFT key, then press the ALARM RESET key after the LED has lit.
10.5. Motion Detection Area Settings
Motion detection areas can be set on the digital video recorder menu. For more information, please refer to
the digital video recorder’s instruction manual.
1. Display the motion detection area setting screen using the digital
video recorder menu.
Operate the Remote Controller as follows while the menu is being
displayed:
• To move the cursor, tilt the joystick up, down, left, or right.
• To select or cancel an area plotting square, rotate the joystick
clockwise or press the SET key. (ON: Green; OFF: Nothing
displayed.)
• To select or cancel a wide range detection areas diagonally, rotate
the joystick clockwise or press the SET key at a starting point.
Move the cursor to an ending point. Then, press the SEARCH key,
or rotate the joystick clockwise after lighting the SHIFT key.
(ON: Green; OFF: Nothing displayed.)
• To change the sensitivity, press the FOCUS (+) key.
• To change the motion activation mode, press the FOCUS (–) key.
2. Rotate the joystick counterclockwise or press the C key.
The message to confirm if set data is saved is displayed and the
display returns to the previous screen.
In pause
MENU
SHIFT
Page 31

31
10.7. Triplex Settings
Live images can be assigned to any segment of the screen while recorded images are played back on the
multi-segment split screen. For details, please read the instruction manual enclosed with the Digital Video
Recorder.
1 Hold down the MULTI key for 2 seconds or more while recorded
images are played back on the multi-segment split screen.
The Triplex setting screen is displayed.
Operate the Remote Controller as follows while the Triplex setting
screen is being displayed:
• To move the cursor, tilt the joystick up, down, left or right.
• To view live images, enter the camera number for live display using
the ten-key numerical pad, then press the FULL key.
• To return to recorded image playback, select the live image, then
press the SEQUENCE key.
2. Rotate the joystick counterclockwise or press the C key to exit the
Triplex setting screen.
Note
Reset all live images to recorded images on the Triplex setting screen
in order to switch Triplex mode to playback mode.
In multi-screen
display mode
MULTI
Page 32

32
10.8.2. Log-out
1. Hold down the DVR MENU key for 2 seconds or more.
The “LOGOUT”/”LOGIN” selection screen is displayed on the
monitor.
Note
When the operation level is set to Level1, holding down the DVR
MENU key for 2 seconds or more displays the screen for selecting
either LOGOUT or MENU.
2. Select LOGOUT using the joystick, then press the SET key.
Operation level changes to the lowest set operation level.
C
C
10.8. Entering the Digital Video Recorder Password
When “Remote access restriction” is set to ON in the Digital Video Recorder’s security settings and a
password is valid, only the Digital Video Recorder’s current operation level can be accessed. To change the
Digital Video Recorder’s operation level, perform the following procedure. For the Remote Controller’s login
and logout method, refer to p.33; Login and Logout.
Note
When “Remote access restriction” is set to OFF, the Remote Controller can operate the Digital Video
Recorder.
10.8.1. Log-in
1. Hold down the DVR MENU key for 2 seconds or more.
The “LOGOUT”/”LOGIN” selection screen is displayed on the
monitor.
Note
If full-lock, the password entry screen is immediately displayed when
the DVR MENU key is continuously pressed for 2 seconds or more.
2. Select “LOGIN” using the joystick and press the SET key.
The password entry screen is displayed.
3. Select [_ _ _ _ _ _] using the joystick, enter a password, and press
the SET key.
When entering the password, press the FULL key after entering each
numeral for confirmation. The [ ] mark is displayed for each entered
numeral.
C
C
___
DVR
DVR MENU
LOGOUT LOGI N CANCEL
[Example] When the password is “123456”.
FULL FULL FULL FULL FULL
123456
DVR
DVR MENU
PLEASE PASSWORD ENTRY.
___ CLEAR CANCEL
FULL
SET
LOGOUT MENU CANCEL
Page 33

33
11. OTHER OPERATIONS
11.1. Log-In and Log-Out
If a password has been set, it is possible to log in to or log out of each operation level by following the
procedures below. For password settings, please refer to p. 46; Password. For the Digital Video Recorder’s
login and logout method, refer to p. 32; Entering the Digital Video Recorder Password.
11.1.1. Log-in
1. Hold down the Menu key for 2 seconds or more.
The “PASSWORD” indication is displayed on the LCD screen.
Note
Holding down the Menu key for 2 seconds or more when set to
the lowest operation level immediately displays the password
entry screen.
2. Select LOGIN using the joystick and press the SET key.
The password entry screen is displayed.
3. Enter one of password 1
-
3, and press the SET key.
Access is given to the operation level corresponding to the
entered password. (Refer to p. 46; Password.)
11.1.2. Log-out
1. Hold down the Menu key for 2 seconds or more.
The “PASSWORD” indication is displayed on the LCD screen.
Note
Holding down the Menu key for 2 seconds or more when the
operation level is set to Level 1 displays the screen for selecting
either “LOGOUT” or “RM MENU”.
2. Using the joystick, select LOGOUT, then press the SET key.
The system logs out to the lowest set operation level. (Refer to p.
46; Password.)
_
MENU
SHIFT
PASSWORD
LOG I N
PASSWORD
_
PASSWORD
MENU
SHIFT
PASSWORD
LOGOU T
Page 34

34
11.2. Abbreviation Number
This function permits quick dialing preprogrammed into a number. Camera images (DVR No., monitor No.,
camera No., and position No.) and the functions of the Combination Camera and Digital Video Recorder can
be programmed into a number. (Refer to p. 43; Abbreviation (Function programming).)
1. Enter the abbreviation number using the tenkey numerical pad.
2. Press the SET key. Operation preprogrammed
into the selected number is executed.
Note
Abbreviated numbers are assigned by default.
(Refer to p. 44; Default abbreviation number
settings.)
[Example]
11.3. Alarm Operations
11.3.1. When alarm is triggered
The Alarm Reset key flashes red and a buzzer tone sounds, causing the alarm-activated Digital Video
Recorder number to be displayed on the LCD screen. The Digital Video Recorder begins alarm event
recording and displays the alarm-activated camera image on the full screen through Monitor Output 1.
Note
The number of the camera displayed full-screen on the monitor is not displayed on the remote controller’s
liquid crystal display. To display it in order to operate that camera, change the camera number displayed on
the remote controller’s LCD.
Notes
• For Monitor Output 2 images, the screen display is not switched even when an alarm signal is received.
• When digital video recorders are connected to remote controllers in cascade, the digital video recorder
currently in alarm mode is displayed on the master monitor screen. However, it is not automatically
displayed when the digital video recorder group has been selected for the remote controller.
51
LCD screen
15
LCD screen
SET
AUTO FOCUS
BUZZER STOP
RESET
• Normal display • Indicates the number of the
LCD screen
11 1
BUZZER STOP
RESET
Flashes
Digital Recorder recording
an alarm event
1 second 1 second
ALARM
DVR 1
• Alarm type indication
Digital Recorder’s alarm input terminal
received an alarm signal.
ALM TM
Digital Recorder’s motion detector
activated.
ALM MD
Combination Camera’s alarm input
terminal received an alarm signal.
ALM CM
1 second
Page 35

35
11.3.3. To reset alarm
Hold down the RESET key for 2 seconds or more while alarm
is being activated.
The RESET key extinguishes, canceling the alarm mode.
11.3.4. Putting screen switching on hold when an alarm occurs
When an alarm occurs, the screen display is automatically switched from the camera images through Monitor
Output 1 to the alarm triggered camera images in full-screen. Press the HOLD key to put the current screen
display on hold, disabling automatic screen switching.
Notes
• Camera shift to the preset position programmed on the Digital Video Recorder is also put on hold. Alarm
action programmed on the Combination Camera cannot be put on hold.
• When digital video recorders are connected to remote controllers in cascade, the display on the master
monitor cannot be retained.
1. Press the HOLD key.
The HOLD key lights, putting the automatic screen
switching to the alarm-triggered screen display on hold.
Note
The screen cannot be switched due to alarm signal
reception, alarm reset nor elapse of Digital Video
Recorder's pre-set time while the Hold key lights.
2. Hold down the HOLD key for 2 seconds or more.
The HOLD key extinguishes, enabling automatic screen
switching when an alarm signal is received.
11.3.2. To stop a buzzer tone
Press the RESET key to stop the buzzer tone.
11.4. Joystick Position Adjustment
Adjusts the joystick's central position.
1. Switch off the remote controller's power.
2. Press the power switch to turn on the power while holding down both the "Full Screen" and "Auto" keys.
The remote controller judges the current joystick's position as center.
Note: Avoid turning the power switch to on with the joystick tilted.
BUZZER STOP
RESET
BUZZER STOP
RESET
BUZZER STOP
RESET
HOLD
HOLD
Lights
HOLD
HOLD
Extinguishes
Page 36

36
12. SETTINGS
12.1. Setting Item Summaries
Remote Controller Menu Display (Hold down the Menu key for 2 seconds or more.)
Setting Item Description
Group
1. Setting
Two or more cascade-connected Digital Recorders can be assigned to a group.
It is also possible to restrict access to operation of the Remote Controllers in each group.
2. Transfer Transfers data to copy already programmed group settings to two or more Remote Controllers
3. Erase Deletes all group settings at a time.
Abbreviation
Camera Protocol
Password
Focus Speed
Buzzer The buzzer tone can be set to ON or OFF.
Key Operation Tone
I/O Speed
1. Setting
2. Transfer
3. Erase Deletes all abbreviation settings at a time.
1. Operation Level 1 Permits access to all function operations. Menus can be displayed, settings can be performed,
2. Operation Level 2
3. Operation Level 3 Permits only live image screen viewing.
4. Log-out time.
5. Priority recording
operator Level 3
via the C-RF1000 Interface Unit.
Operations and functions can be programmed into a function key (F1-F4) and a number (1-508).
Transfers data to copy already programmed abbreviation settings to two or more Remote
Controllers via the C-RF1000 Interface Unit.
Selecting the Camera protocol converts the data programmed into F1 - F4 keys and
abbreviation number settings into the data for the selected protocol.
and data can bearchived to a USB flash drive or DVD.
Access is restricted to live mode and playback mode operations, camera operations, and alarm
reset. Menus cannot be displayed, settings cannot be changed nor can data be archived to the
USB flash drive or DVD.
The interval from log-in to log-out can be set. If no operations areperformed for a pre-set period
of time after log-in, the systemautomatically logs out, moving to the lowest set operation level.
Either “Valid” (ON) or “Invalid” (OFF) can be selected for authorization of access to the
Priority Recording key.
Lens speed when using the Focus key can be adjusted in 4 steps.
The key operation tone can be set to ON or OFF.
Sets the transfer rate of data from the control output terminal.
DVR Check Confirms whether or not the Digital Recorder is connected to the Remote Controller.
Hold
Monitor Lock
Language
Initial Status
Expansion
1. Key Permits the current screen to be held or switched to an alarm screen by key operation when
2. Always Continues to retain the screen displayed before alarm activation without switching when alarm
1. English
2. French
alarm is activated.
is activated.
Multiple Remote Controllers can be individually set to enable ordisable remote operation
of the Digital Recorder's connected monitor.
Selects the language to be displayed on the LCD screen.
Returns settings to default conditions.
Cannot be used.
Page 37
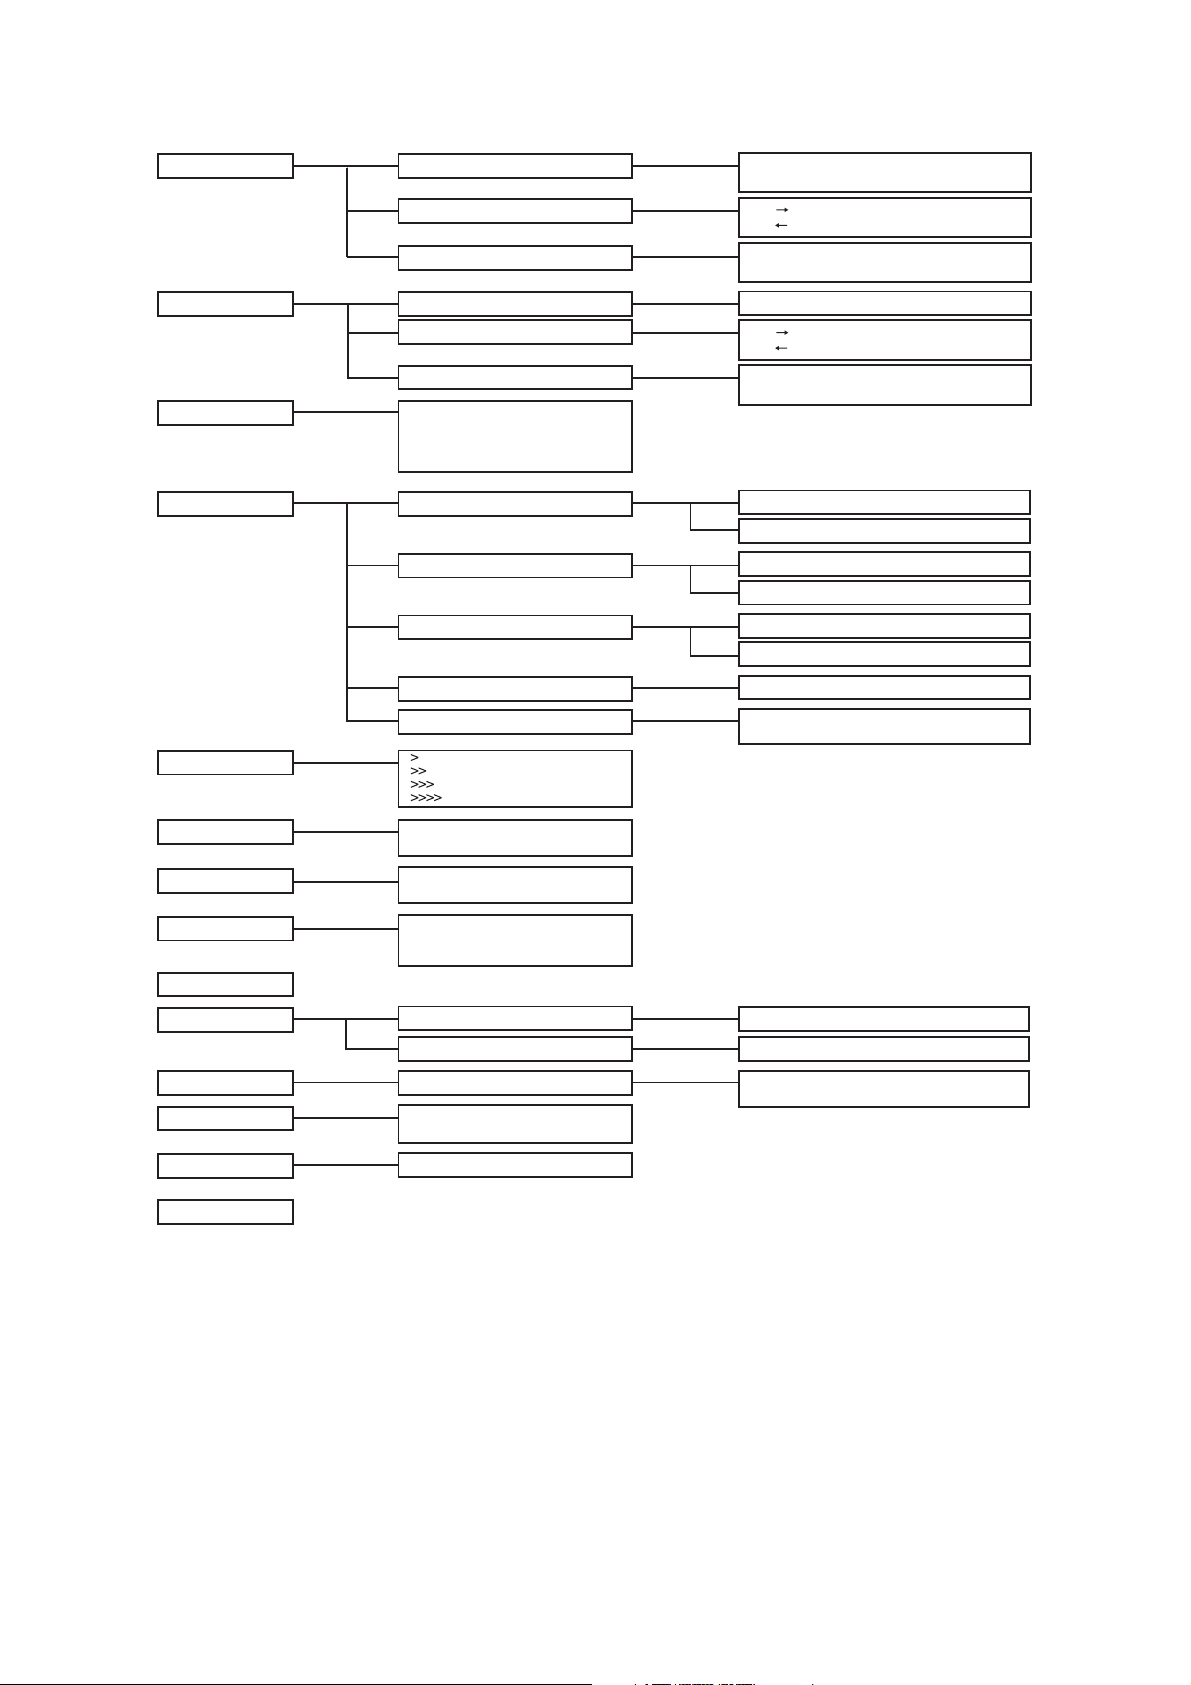
37
12.1.1. Remote controller menu list
Group 1. Setting
2. Transfer
3. Erase
Abbreviation 1. Setting
2. Transfer
3. Erase
Camera Protocol
Password Menu 1. Level 1
Focus Speed
TOA-A
TOA-B
BOSCH
PELCO-D
2. Level 2
3. Level 3
4. Log-out time
5. Priority recording operator level 3
Group No. – Control ON/OFF
DVR No.– Channel No. selection
RM RF
RM RF
NO
YES
Abbreviation No. – Quick display settings
RM RF
RM RF
NO
YES
Invalid
Valid – Password entry
Invalid
Valid – Password entry
Invalid
Valid – Password entry
OFF/ 1MIN / 5MIN/ 10MIN/ 30MIN/ 60MIN
1. ON
2. OFF
Buzzer
Key Operation Tone
I / O Speed
DVR Check
Hold 1. Key
Monitor Lock DVR No. – MON No. entry
Language
Initial Status
Expansion
(Cannot be used.)
1. ON
2. OFF
1. ON
2. OFF
9600
19200
36400
2. Always
1. English
2. French
Execution
DVR No. entry — ON/OFF
DVR No. entry — ON/OFF
LOCK
UNLOCK
Page 38

38
12.2. Setting Keys and Display Screen
[Keys to be used for settings]
[ LCD screen display ]
LCD screen
Displays setting items and contents.
REMOTE CONTROLLER C-RM1000
SEARCH
PRIORITY
REC
SCREEN
MULTIFULL
PLAY / LIVE
SEQUENCE
BUZZER STOP
RESET
MENU
SHIFT
ALARMDVR
AUTO
HOLD
DVR MON CAM POS
CAM MENUDVR MENU
F1
F2
F3
F4
1
4
7
C
23
6
5
9
8
SET
0
UP
DOWN
Shift/ Menu key
Displays the Remote Controller
menu on the LCD screen or
IRISFOCUS
TELEWIDE
RIGHTLEFT
closes the menu. (Refer to p. 33;
Log-In and Log-Out.)
Joystick
Moves the cursor or selects
the setting items or contents.
Clear Key
Cancels the setting items
or contents or numerical
values entered with a
numerical keypad.
Set Key
Confirms the setting items or contents.
Ten-Key Numerical Pad
Used to enter a number.
Setting item
GROUP
1.SET
Setting content
Page 39

39
12.3. Basic Setting Operations
Here, basic operating procedures for each setting item are described. Enter a password to log in to Operation
Level 1 and display the Remote Controller’s menu. Refer to p. 33; Log-in and Log-out for the log-in method.
12.3.1. Displaying the menu
Note
While the digital video recorder is displaying each menu (Search Menu, Triplex Menu, or Archive Menu) or
while the combination camera’s camera menu is being displayed by the remote controller, the remote
controller’s menu cannot be activated even if the remote controller’s menu key is pressed.
1. Hold down the Menu key for 2 seconds or more. If no
password has been set, the Remote Controller’s
menu screen is displayed.
2. Select “RM MENU” using the joystick.
3. Rotate the joystick clockwise or press the SET key to
confirm the selection.
The menu screen is displayed.
12.3.2. Operation during menu display
1. Select the setting item using the joystick.
2. Confirm the selected setting item by rotating the
joystick clockwise or using the SET key. Rotate the
joystick counterclockwise or press the C key to
cancel the selection.
3. Select the setting contents using the joystick.
4. Press the SET key to confirm the selected setting
contents.
5. To continue settings of other items, repeat Steps 2-5.
Hold down the Menu key again for 2 seconds or
more to return to the normal screen after setting
completion.
Note
Numerals can be entered using the joystick or
numerical keypad. The joystick cannot be used to enter
numbers on the password-setting screen.
12.3.3. Closing the menu
Hold down the Menu key for 2 seconds or more while the menu is displayed. The display reverts to the screen
shown before the menu was displayed.
MENU
SHIFT
SET
SET
PASSWORD
LOGOUT
PASSWORD
RM MENU
GROUP
(Example)
BUZ ZER
1.ON
BUZ ZER
1.ON
BUZ ZER
2.OFF
SET
BUZ ZER
2.OFF
Page 40

40
When selecting “Setting” …
1. Select [GROUP] while the menu is displayed and press the
SET key. The setting content is displayed on the second
line.
2. Select [1. SET] and Press the SET key. The group number
flashes, permitting the current group setting contents to be
checked.
3. Press the SET key to perform settings in succession from
Group 1.
4. Select Control ON or OFF and press the SET key.
ON: The group being set can be operated.
OFF: The group being set cannot be operated.
5. Select the DVR number and press the SET key.
6. Set the number of DVR channels by selecting either 9 or
16 and press the SET key.
7. To continue to assign the next DVR to the group, select the
DVR number and press the SET key.
Repeat Steps 5 and 6 to perform settings.
8. To set the next group, select [NEXT] and press the SET
key.
The next group number is displayed, and the Control
ON/OFF selection screen appears. Repeat Steps 4-6.
9. Assign all of DVRs 1-8 to any group, then press the SET
key.
[ Setting contents ]
1. Setting Performs settings of the Digital Video Recorder groups and their control.
2. Transfer
Transfers group setting data to other Remote Controller via the C-RF1000
Interface Unit.
3. Erase Deletes all group settings.
12.4. Function Settings
Follow the instructions in p. 39; Basic Setting Operations to perform the following menu displays and
operations.
12.4.1. Group settings
Assigning two or more Digital Video Recorders to the same group permits their images to be viewed on a
single monitor. Up to 8 groups can be set.
Notes
• The group setting can only be performed in DVR ID numerical order, and can only be performed in
consecutive numbers.
• When multiple Remote Controllers are connected, match the group settings of each Remote controller.
Otherwise, the camera images cannot be displayed correctly on the monitor.
1
6
O
1
Group No.
SET 1 ON
DVR 2 16
No. of DVR channels
DVR No. or “Next”
GROUP
1.SET
2
SET 1
1
3
SET 1 ON
4
SET 1 ON
DVR 1
5
SET 1 ON
DVR 1 1 6
6
SET 1 ON
DVR NEXT
Control
[ON] [OFF]
8
SET 3 ON
DVR 8 1 6
Page 41

41
2
1
When selecting “Transfer”…
1. Select [GROUP] while the menu is displayed and press the SET key.
The setting content is displayed on the second line.
2. Select [2. TRANSFER] and press the SET key.
3. Select EITHER [RM RF] or [RM RF] and press the SET key.
The “TRANSFERRING...” indication is displayed while data is being
transferred, and the “TRANSFER COMPLET” indication is displayed
when the transfer is completed.
[RM RF] : Transmits data to the interface unit.
[RM RF] : Receives data from the interface unit.
When selecting “Erase”…
1. Select [GROUP] while the menu is displayed and press the SET key.
The setting content is displayed on the second line.
2. Select [ERASE] and press the SET key.
3. Select [YES] or [NO] and press the SET key.
[YES] : Deletes the setting and resets to default conditions.
[NO] : Does not delete the setting.
Note
Default settings: Group: 1, DVR: 1 - 8, Control: ON, Number of the Channels: 16
3
Note
Abbreviation settings programmed into a single Remote Controller can be easily transferred to multiple
Remote Controllers.
Follow the procedures below to perform settings.
1. Set monitor lock for the Remote Controller.(Refer to p.50; Monitor Lock)
When restricting monitors to be operated by the Remote Controller, set Monitor Lock for each Remote
Controller. If an abbreviation (quick display function)-set monitor is locked, camera images are quickly
displayed on an unlocked Monitor instead when the abbreviation-set monitor is called. So, you do not need
to change the abbreviation (quick display function) -set monitor number.
2. Program the abbreviation number setting into one Remote Controller.
(Refer to p.42; Abbreviation, "Quick Display function."), (Refer to p.43; Abbreviation (Function programming).
3. Transfer the abbreviation number settings to each Remote Controller.
(Refer to p.41; When selecting "Transfer"...)
[ Setting contents ]
1. Setting
Programs the abbreviation numbers into the Remote Controller. The following two
functions can be assigned to abbreviation settings: Quick display function and
Function programming.
2. Transfer
Transfers Abbreviation settings to other Remote Controllers via the C-RF1000
Interface unit. Transfer method is the same as that of group settings.
3. Erase
Erases all abbreviation settings. Function programming settings return to the
default setting.
12.4.2. Abbreviation
GROUP
2.TRANSFER
TRANSFER
1.RM RF
GROUP
3.ERASE
Page 42

12.4.3. Abbreviation (Quick display function)
Camera images (DVR, monitor, camera and position numbers) can be displayed in the full screen on the
monitor by simply pressing a preprogrammed abbreviation number (numerical keypad entry and the SET key).
The abbreviation numbers that can be used for this function are Nos. 1
-
508 and functions keys F1-F4,
totaling 512 possible selections.
1. Select [ABBREVIATION] while the menu is displayed
and press the SET key.
2. Select [1. SET] and press the SET key.
3. Enter an abbreviation number and press the SET
key.
Numbers from 1-508 can be entered, and function
keys F1
-
F4 can be selected with the joystick.
Pressing the SET key moves the flashing cursor to
the second line.
4. Display the quick display setting screen and press
the SET key.
5. Enter a DVR number and press the SET key.
Use numbers 1-8. The flashing cursor moves to the
monitor number indication.
6. Enter a monitor number and press the SET key.
The flashing cursor moves to the camera number
indication.
Note
If the entered monitor number is the number of the
monitor locked, the camera images are quickly
displayed on the unlocked monitor.
7. Enter a camera number and press the SET key.
Use numbers 1-16. The flashing cursor moves to
the position number indication.
8. Enter a position number and press the SET key.
Use numbers 0-255.
Notes
• Do not enter the position number for cameras for
which no camera position has been set.
• Pressing “0” sets the Combination Camera to the
home position.
9. To continue abbreviation number settings, repeat
Steps 3
-
8. Press the C key to return to the setting
item display.
Note
To delete the displayed abbreviation setting, hold on
the C key for 2 seconds or more.
42
1
1
8
Quick display setting screen
SET 1
Abbreviation Nos.
-
508 and F1-F4
1
DM CP
DVR No.
Monitor No.
Camera No.
SET 1
DM CP
(Example)
3
4
SET 18
DM CP
(Example)
5
SET 18
D7M C P
(Example)
6
SET 18
D7M1 C P
(Example)
7
Position No.
81
SET
SET
7
SET
1
1
1
SET
SET
SET 18
D7M1 C11P
(Example)
8
SET 18
D7M1 C11P25
52
SET
Page 43

43
12.4.4. Abbreviation (Function programming)
The functions of the Combination Camera and Digital Video Recorder can be programmed into an
abbreviation number (1-508 and F1-F4 keys).
Note
The Combination Camera's protocol must be selected before performing abbreviation number settings. If the
protocol is selected, this permits the available functions to be selected for the camera.
1. Select [ABBREVIATION] while the menu is
displayed and press the SET key.
2. Select [1. SET] and press the SET key.
3. Enter an abbreviation number and press the SET
key.
Use numbers 1
-
508. The F1-F4 keys can be
selected with the joystick. Pressing the SET key
moves the flashing cursor to the second line.
4. Tilt the joystick to the left or right to select the
function to be programmed and press the SET
key.
Functions that can be set are as shown in the
table below.
5. To continue to set abbreviation numbers, repeat
Steps 3 and 4. To return to the setting item
display, press the C key.
1
When the camera's protocol is TOA-A (Type A)...
Function programming screen
SET 1
AUTO FOCUS
Function name
Abbreviation Nos.
1
-
508 and F1-F4
Function Name Function Name
D M C P
DVR NAME DISPLAY
DVR NAME HIDE
ZOOM ON
ZOOM OFF
AUTO FOCUS
AUX1 ON
Description Description
Quick display setting screen
DVR Name display
DVR Name hide
Zoom ON
Zoom OFF
Auto focus
Contact 1 ON
AUX1 OFF
AUX2 ON
AUX2 OFF
AUTO PAN
PRESET SEQUENCE
AUTO TRACE
FUNCTION A-Z
Contact 1 OFF
Contact 2 ON
Contact 2 OFF
Auto pan start
Preset sequence start
Trace start
Cannot be used
Page 44

44
Default abbreviation number settings
Functions are assigned to abbreviation numbers by the factory as shown below. Each function can be
performed by entering the corresponding number using the ten-key numerical pad, and pressing the SET key.
When the camera's protocol is TOA-B (Type B)...
Function Name Function Name
D M C P
DVR NAME DISPLAY
DVR NAME HIDE
ZOOM ON
ZOOM OFF
AUTO FOCUS
AUX1 ON
AUX1 OFF
AUX2 ON
AUX2 OFF
AUTO PAN DEF
AUTO PAN INV
AUTO PAN SKIP
AUTO PAN RANDOM
Description Description
Quick display setting screen
DVR Name display
DVR Name hide
Zoom ON
Zoom OFF
Auto focus
Contact 1 ON
Contact 1 OFF
Contact 2 ON
Contact 2 OFF
Auto pan (preprogrammed) start
Auto pan (reverse) start
Auto pan (skip) start
Auto pan (random) start
AUTO PAN PIVOT
SET PAN LEFT
SET PAN RIGHT
PRESET SEQ NUM
PRESET SEQ RND
PRESET SEQ TEST
AUTO TRACE 1
AUTO TRACE 2
MEMORY TRACE 1
MEMORY TRACE 2
FINISH MEM TRACE
TOUR 1 - 16
ALARM ACT PERMIT
FUNCTION A
-
Z
Auto pan (pivot) start
Auto pan end point setting (left)
Auto pan end point setting (right)
Preset sequence (numerical order) start
Preset sequence (random) start
Preset sequence (test) start
Trace 1 start
Trace 2 start
Trace 1 memory start
Trace 2 memory start
Trace memory end
Tours 1-16 start
Alarm action allowed
Cannot be used
Abbreviation
Default Setting Description Description
No.
For TOA-A (Type A)
F1
AUTO FOCUS
F2
AUTO PAN
F3
PRESET SEQUENCE
F4
AUTO TRACE
251
DVR NAME DISPLAY
252
DVR NAME HIDE
253
ZOOM ON
254
ZOOM OFF
255
AUTO FOCUS
256
AUX1 ON
257
AUX1 OFF
258
AUX2 ON
259
AUX2 OFF
260
AUTO PAN
261
PRESET SEQUENCE
262
AUTO TRACE
For TOA-B (Type B)
F1
AUTO FOCUS
F2
PRESET SEQ NUM
F3
TOUR 1
F4
TOUR 2
301
DVR NAME DISPLAY
302
DVR NAME HIDE
303
ZOOM ON
304
ZOOM OFF
305
AUTO FOCUS
306
AUX1 ON
307
AUX1 OFF
308
AUX2 ON
309
AUX2 OFF
310
PRESET SEQ NUM
Auto focus
Auto pan start
Preset sequence start
Trace start
DVR Name display
DVR Name hide
Zoom ON
Zoom OFF
Auto focus
Contact 1 ON
Contact 1 OFF
Contact 2 ON
Contact 2 OFF
Auto pan start
Preset sequence start
Trace start
Auto focus
Preset sequence (numerical order) start
Tour 1 start
Tour 2 start
DVR Name display
DVR Name hide
Zoom ON
Zoom OFF
Auto focus
Contact 1 ON
Contact 1 OFF
Contact 2 ON
Contact 2 OFF
Preset sequence (numerical order) start
Abbreviation
Default Setting
No.
For TOA-B (Type B)
311
PRESET SEQ RND
312
PRESET SEQ TEST
313
AUTO PAN DEF
314
AUTO PAN INV
315
AUTO PAN SKIP
316
AUTO PAN RANDOM
317
AUTO PAN PIVOT
318
SET PAN LEFT
319
SET PAN RIGHT
320
AUTO TRACE 1
321
AUTO TRACE 2
322
MEMORY TRACE 1
323
MEMORY TRACE 2
324
FINISH MEM TRACE
325
TOUR 1
326
TOUR 2
327
TOUR 3
328
TOUR 4
329
TOUR 5
330
TOUR 6
331
TOUR 7
332
TOUR 8
333
TOUR 9
334
TOUR 10
335
TOUR 11
336
TOUR 12
337
TOUR 13
338
TOUR 14
339
TOUR 15
340
TOUR 16
341
ALARM ACT PERMIT
Preset sequence (random) start
Preset sequence (test) start
Auto pan (preprogrammed)
Auto pan (reverse) start
Auto pan (skip) start
Auto pan (random) start
Auto pan (pivot) start
Auto pan end point setting (left)
Auto pan end point setting (right)
Trace 1 start
Trace 2 start
Trace 1 memory start
Trace 2 memory start
Trace memory end
Tour 1 start
Tour 2 start
Tour 3 start
Tour 4 start
Tour 5 start
Tour 6 start
Tour 7 start
Tour 8 start
Tour 9 start
Tour 10 start
Tour 11 start
Tour 12 start
Tour 13 start
Tour 14 start
Tour 15 start
Tour 16 start
Alarm action allowed
Page 45

45
12.4.5. Camera Protocol
Selecting protocol of the Combination Camera connected to the Digital Video Recorder only displays the
abbreviation function that can be used for each protocol. The abbreviation function table is factory-preset to
those for the model of TOA-B.
Note
Multiple combination cameras using different communication methods cannot be connected to a single digital
video recorder. Match the communication methods of all connected cameras.
TOA-A : Select this model when connecting TOA’s Combination Camera to the Digital Video
Recorder using Type A communications method. (The Digital Video Recorder’s Camera
Protocol: TOA-A)
TOA-B : Select this model when connecting TOA’s Combination Camera to the Digital Video
Recorder using Type B communications method. (The Digital Video Recorder’s Camera
Protocol: TOA-B)
BOSCH : Select this model when using BOSCH’s Combination Camera in conjunction with the Digital
Video Recorder.
PELCO-D : Select this model when using PELCO’s Combination Camera in conjunction with the Digital
Video Recorder.
Some functions or operations are not available depending on the communications method. Determine the
communications method referring to the following table.
Note
As shown below, TOA’s Combination Cameras are divided into two groups: one using the Type A (TOA-A)
communications method and the other using the communications method of both Types A and B (selectable
by DIP switch). The communications method is factory-preset to Type B (TOA-B).
For the DIP switch position and settings, refer to the setup manual enclosed with the Combination Camera.
TOA-A (Type A) : C-CC501, C-CC504, C-CC551, and C-CC554
TOA-A/B (Types A/B selectable) : C-CC514, C-CC564, C-CC714, and C-CC764
Iris key Position 0 *
TOA
-
A
(Type A)
-
B
TOA
(Type B)
1
Operation for returning the camera to home position. Enter 0, then press the POS key.
*
2
Begins and terminates operations set in the Combination Camera’ s “Auto Function”
*
settings with each depression of the key. (Refer to p. 22 ; Auto Function Operations.)
3
Begins auto pan operation when pressed, and terminates all auto operations when
*
pressed again during auto pan operation.
1
AUTO key
2
*
3
*
Page 46

46
12.4.6. Password
The Remote Controller's operation level can be set using passwords. The table below shows the available and
unavailable functions of each operation level. Please set the appropriate operation level referring to this table.
High Low
Menu Setting
Archive
Recording/Playback
Priority Recording
Triplex
Camera Operation
Live Screen Operation
Alarm Reset
Buzzer Reset
Operation Level 1 Operation Level 2 Operation Level 3
1
(*
)
2
(*
)
Full-Lock
Operation Level 1
All functions available, including setting changes and archiving. Entering the corresponding password
gives access to Operation Level 1 from any other operation level.
Operation Level 2
Live and recorded images can be monitored, however setting changes and archiving cannot be
operated. Entering a password for operation level 2 allows login to operation level 2.
Operation Level 3
Full-Lock
Only recorded images can be monitored. The Priority Recording key can be used if settings are
performed(*
1
). Entering a password for operation level 3 allows login to operation level 3.
No operation possible. If Operation Level 3 is valid (Password #3 has been set), the system
automatically switches to “Full-Lock” mode when the user logs out of Operation Level 3 or when the
log-out interval elapses.
Log-Out Time Can be set to 1, 5, 10, 30 or 60 minutes or OFF.
If no operations areperformed for a pre-set period of time after log-in, the systemautomatically logs
out, moving to the lowest set operation level.
[Example] When Operation Levels 1 and 2 are valid (Passwords 1 and 2 have been set),
the operation level after log-out is Level 3.
Priority recording
operator Level 3
Selecting ON permits the Priority Recording key to be used even when Operation Level 3 is valid.
If OFF is selected, the Priority Recording key cannot be used when Operation Level 3 is valid.
Regardless of this ON/OFF setting, the Priority Recording key can always be used at Operation
Levels 1 and 2, and cannot be used when in Full-Lock mode.
(Factory-preset to OFF.)
1
(*
) Whether or not to make the Priority Recording key usable at Operation Level 3 can be set in the “Priority Recording
Operation Level 3” settings.
2
(*
) The Camera menu cannot be displayed.
Page 47

47
[ Passwords and operation levels ]
If no passwords have been set, Operation Level is “1.”
Refer to the table below if a password has been set.
Enter the password corresponding to the desired operation level.
Operation levels after log-out are shown enclosed in a bold rectangle.
Password 1
Password 2 Password 3
Set Password
Pattern
1
Password 1
2
Password 2
3
Password 3
4
Password 1 and 2
5
Password 2 and 3
6
Password 1 and 3
7
Password 1, 2, and 3
Operation Level 1 Operation Level 2 Operation Level 3
Full-Lock
: Level after log-out.
: No operation level exists since no password has been set.
• Pattern 1
Operation
Level 2
Password 1
entered
Operation
Level 1
• Pattern 3
Full-lock
Password 3
entered
Operation
Level 1
• Pattern 4
Operation
Level 3
• Pattern 7
Full-lock
Password 2
entered
P
as
sw
e
o
n
rd
te
1
re
d
Password 3
entered
Password 2
entered
Password 1 entered
Operation
Level 2
Password 1
Operation
Level 1
Operation
Level 3
Password 2
Operation
Level 2
Password 1
Operation
Level 1
entered
entered
entered
Password 1
entered
• Pattern 6
Full-lock
Password 3
entered
Password
e
ntere
Operation
Level 2
1
d
Password 1
entered
Operation
Level 1
Page 48

48
12.4.8. Buzzer tone
The buzzer tone can be set to ON or OFF.
1. Select [BUZZER] while the menu is displayed and press the SET
key.
The setting content is displayed on the second line.
2. Tilt the joystick to the left or right to select the setting content and
press the SET key.
[Setting contents]
1
1. ON
The buzzer tone is sounded when alarm is triggered, when priority recording is
performed, or when the Digital Video Recorder fails.
2. OFF
The buzzer tone is not sounded when alarm is triggered, when priority recording is
performed, or when the Digital Video Recorder fails.
(Factory-preset to ON.)
12.4.7. Focus speed
Lens speed when the FOCUS key is pressed can be adjusted in 4 steps.
1. Select [FOCUS SPEED] while the menu is displayed and press
the SET key.
2. Tilt the joystick to the left or right to select the desired speed and
press the SET key.
(Factory-preset to [>>>>], maximum.)
[ Password Settings ]
1. Select [PASSWORD] while the menu is displayed and press the
SET key.
2. Tilt the joystick to the left or right to select the operation level and
press the SET key.
3. Tilt the joystick to the left or right to select [ON] and press the
SET key.
4. Enter a password (6-digit number) using the ten-key numerical
pad.
5. To continue to set Operation Levels 2 and 3, repeat Steps 2-4.
PASSWORD
1.LEVEL1 ON
PASSWORD
1.LEVEL1
FOCUS SPEED
>>>>
BUZ ZER
1.ON
Page 49

49
12.4.9. Key operation tone
The tone generated whenever the key is pressed can be set to
sound or not to sound.
1. Tilt the joystick to the left or right to select [KEY CLICK ON/OFF]
while the menu is displayed and press the SET key.
The setting content is displayed on the second line.
2. Select the setting content and press the SET key.
[Setting Contents]
1
1. ON The key operation tone is sounded when the key is pressed.
2. OFF The key operation tone is not sounded when the key is pressed.
(Factory-preset to ON.)
12.4.10. I/O Speed
Set the DVR control output terminal's transmission rate. (Factory-preset to [38400].)
1. Select [I/O SPEED] while the menu is displayed and press the
SET key.
2. Tilt the joystick to the left or right to select the transmission rate:
[9600], [19200] or [38400].
Note
Set the same transmission rate for the components connected to
the control terminal. The Digital Video Recorder (C-DR091 and CDR161 Series) and the C-RF1000 Interface Unit are factory
preset to 38400 bps.
3. Press the SET key to confirm the selected transmission rate.
1
12.4.11. DVR check
Check the Digital Video Recorder connected to the control terminal.
Select [DVR CHECK] while the menu is displayed and press the
SET key.
The connected Digital Video Recorder number is displayed.
Note
Performing the DVR check during cascade connection displays all
connected Digital Video Recorder numbers. If the number of the
connected Digital Video Recorder is not displayed, communications
may not have been established. In such cases, check to see if:
• The connection terminal is correctly connected.
• The Remote Controller’s transmission rate matches that of the Digital Video Recorder.
• The Digital Video Recorder’s DVR-ID number is correctly set.
KEY CL I CK ON / OFF
1.ON
I/O SPEED
38400
I/O SPEED
19200
DVR CHECK
Page 50

50
12.4.12. Monitor lock
If the Monitor Lock function is set for the system in which multiple Remote Controllers are connected, allowing
the operable monitors to be restricted. This eliminates the necessity for switching monitors, allowing
malfunctions to be avoided. Using the Monitor lock function in combination with the abbreviation number
function makes the abbreviation number settings simple. (Refer to p.41; Abbreviation. )
Set Monitor Lock, as shown in the system example below.
1. Select [MONITOR LOCK] while the menu is displayed and press
the SET key.
A DVR number option is displayed on the second line.
2. Select the [DVR NO.] and press the SET key.
A monitor number (MON No.) option is displayed on the second
line.
3. Select the [MON NO.] and press the SET key.
4. Select the setting content and press the SET key.
[Setting Contents]
1
1. LOCK Images are displayed, however set monitors cannot be operated or selected.
2. UNLOCK Set monitors can be operated and selected.
(Factory-preset to 2. UNLOCK.)
1
1
[ Setting example ]
MON I T OR L OCK
DVR NO . 1
MON I T OR L OCK
MON NO . 1
MON I T OR L OCK
1.LOCK
[ System Example ]
DVR : Digital Video Recorder
RM : Remote Controller
RF : Interface Unit
: Monitor Output 1
: Monitor Output 2
: Remote Controller control line
DVR3
DVR2
Monitor 2
Monitor 2
RM4
3F
RM3
Remote
controller
Digital
Video
Recorder
DVR1
DVR2
DVR3
1
To operate the master monitor, do not set the Monitor Lock to "LOCK” for any cascade-connected
*
Digital Video Recorders’ (DVR1
2
Set the Monitor lock to "UNLOCK” for only the monitors to be operated and "LOCK” for other
*
monitors not to be operated.
Caretaker's room
Master
monitor
RM1
RM1
LOCK
Monitor 2
Monitor 2
Monitor 2
*
UNLOCK
Monitor 1
Monitor 1
Monitor 1
-
DVR1
1
LOCK
Monitor 1
Monitor
Monitor
3) Monitor 1.
RF
RM2
UNLOCK
Monitor 2 Monitor
1, 2
1, 2
2
*
Monitor 2
LOCK
Monitor 1
Monitor
RM3
1, 2
1, 2
*
UNLOCK
Monitor 2
RM2
2
Monitor
Monitor
RM4
LOCK
1, 2
1, 2
Monitor 1 Monitor 2
2F
1F
UNLOCK
2
*
Page 51

51
12.4.15. Expansion
Cannot be used.
12.4.13. Language
Set the language to be displayed on the LCD screen.
1. Select [LANGUAGE] while the menu is displayed and press the
SET key.
The setting content is displayed on the second line.
2. Tilt the joystick to the left or right to select the setting content and
press the SET key.
[Setting Contents]
12.4.14. Initial status
Returns settings to default conditions.
Note: Abbreviation number contents are not erased even if the settings are returned to their initial status.
1. Select [SET TO DEFAULT] while the menu is displayed, and
press the SET key.
2. Press the SET key to confirm the selection.
To cancel the selection, press the C key.
1
(Factory-preset to 1. ENGLISH.)
1. ENGLISH The English language is displayed on the LCD screen.
2. FRENCH The French language is displayed on the LCD screen.
LANGUAGE
1.ENGLISH
SET TO DEFAULT
EXECUT I ON
E
Page 52

52
13. CONNECTIONS
13.1. Equipment Connections
• Use the CPEV-S cable (twisted pair shielded cable) with diameter larger than 0.65 mm (AWG22) for
connection between control terminals. Be sure to connect the shielded cable to the GND terminal.
• The control cable length between the Remote Controller and the farthest Digital Video Recorder must be
shorter than 1.2 km (3,937 ft).
• All connected components must be identical in transmission rate.
• When using the supplied modular cable (3 m (9.8 ft)) for connection to the Digital Video Recorder, the
supplied AC adapter is not required since the power is supplied from the Digital Video Recorder. When
using the Remote Controller’s screwless terminal, connect the supplied AC adapter to supply the power.
13.1.1. Combination camera
• Up to 16 Combination Cameras can be operated per Digital Video Recorder (up to 9 cameras per 9-channel
Digital Video Recorder). Avoid connecting more cameras than the number of Digital Video Recorder
channels to the Digital Video Recorder’s camera control terminal.
• The Digital Video Recorder must be used to control the Combination Camera. It is impossible to control the
camera by connecting the Remote Controller directly to the camera.
• There are two communications methods of the Combination Camera: Type A and Type B.(Refer to p. 45;
Camera Protocol.) Multiple combination cameras using different communication methods cannot be
connected to a single digital video recorder. Match the communication methods of all connected cameras.
• Match the transmission rate among the combination camera, digital video recorder, and remote controller.
(Refer to p. 49; I/O Speed.)
• Match the Combination Camera’s address to the Digital Video Recorder’s video input number. The camera
number entered at the Remote Controller is the Combination Camera’s address number.
13.1.2. Digital video recorder
• Up to 8 Digital Video Recorders can be cascade-connected and controlled by the Remote Controller.
• When cascade-connecting the Digital Video Recorder, set the termination switch of the last connected
Digital Connector to ON.
• Be sure to select “ON” in the digital video recorder’s controller response setting.
• The Digital Video Recorder’s “DVR-ID” settings must be performed when cascade-connecting the recorder.
For more information, please read the Digital Video Recorder’s instruction manual.
Note
Two setting methods are available: one from the Digital Video Recorder's menu and the other using the
Digital Video Recorder's front-mounted keys. For more information, refer to the operation manual enclosed
with the Digital Video Recorder.
• Do not connect 2 Remote Controllers simultaneously to each Remote Controller Input Terminals A and B, as
they could not be operated correctly. Use the Interface Unit when connecting multiple Remote controllers to
the Digital Video Recorder.
13.1.3. Interface unit
• Up to 4 Remote Controllers can be expanded with the use of the Interface Unit. (Up to 3 controllers when
the RS-232C terminal is in use.) For the system using two or more Remote Controllers, perform Monitor
Lock setting to restrict operable monitors. (Refer to p.50; Monitor Lock.)
• When multiple connected remote controllers are operated simultaneously, the most recently operated
remote controller takes precedence.
• The transmission rate between the Interface Unit and the Digital Video Recorder is fixed to 38,400 bps.
When using the Interface Unit, set the Digital Video Recorder’s remote control transmission rate to 38,400
bps.
• Make sure to match the transmission rate of all components connected to the Interface Unit. Also, match the
Interface Unit’s DIP switching settings to the Remote Controller’s transmission rate settings.
• When the Interface Unit is used, the power to the Remote Controller is supplied from the supplied AC
adapter.
Page 53

53
13.2. System Example
13.2.1. Basic system
Color camera
Combination
Camera
1
*
1
*
To AC Mains
RS-485
Digital Video Recorder
C-DR091 or
C-DR161 Series
1
1ARCHIVE
KEY LOCK
16
RS-485
1681571461351241131029
RM IN-A
Termination: ON
REC
FAILURE
HD FULL
DIGITAL VIDEO RECORDER C-DR161
DISK
ARRAY
10BASE-T
100BASE-TX
DVR CONTROL
OUTPUT-A
LAN
Remote Controller
C-RM1000
Monitor 1
Live display
only
Monitor 2
Disk Array
C-DA1000 Series
1
Match the Combination Camera’ s address to the Digital Video
*
Recorder’ s video input number.
PC
: Coaxial cable (video signal)
: CPEV-S 0.65-2C (RS-485 control line)
: Modular cable, 3 m (9.8 ft)
(supplied with the C-RM1000)
: Modular cable, 1 m (3.3 ft)
(supplied with Disk Array)
: eSATA cable, 1 m (3.3 ft)
(supplied with Disk Array)
Page 54

54
13.2.2. Expanded Digital video recorder system (Cascade-connection)
REMOTE
POWER/DVR4321
DIGITAL VIDEO RECORDER C-DR161
To LAN
DIGITAL VIDEO RECORDER C-DR161
REC
FAILURE
HD FULL
CONTROLLER
LINK
REC
FAILURE
HD FULL
INPUT-B
Monitor
output 1
Monitor
output 2
Monitor
output 1
Monitor
output 2
Live display
Live display
Group 1
Combination Camera
1
*
To AC Main
1
*
RS-485
1-16
RS-485
1-16
Interface Unit C-RF1000
DVR CONTROL
OUTPUT-A
Digital Video Recorder 1
C-DR091 or
C-DR161 Series
1ARCHIVE
KEY LOCK
RM
OUT-B
RS-485
Digital Video Recorder 2
1ARCHIVE
KEY LOCK
RM
OUT-B
REMOTE CONTROLLER
INTERFACE UNIT C-RF1000
Supplied modular cable (3 m (9.8 ft))
RM IN-A
Termination: OFF
1681571461351241131029
RM IN-B
Termination: OFF
1681571461351241131029
Group 1
Master
monitor
DVR 1
only
DVR 2
only
Remote
Controller 1
C-RM1000
AC adapter
Remote
Controller 2
DVR CONTROL
OUTPUT-B
Group 2
1
*
1
*
1-16
1-16
RS-485
RS-485
RS-485
Digital Video Recorder 3
1ARCHIVE
KEY LOCK
RM
OUT-B
Digital Video Recorder 8
1ARCHIVE
KEY LOCK
RM IN-B
Termination: OFF
1681571461351241131029
RM IN-B
Termination: ON
1681571461351241131029
To LAN
REC
FAILURE
HD FULL
DIGITAL VIDEO RECORDER C-DR161
To LAN
REC
FAILURE
HD FULL
DIGITAL VIDEO RECORDER C-DR161
To LAN
LINK
Monitor
output 1
Monitor
output 2
Monitor
output 1
Monitor
output 2
Group 2
Master
monitor
DVR 3
Live display
only
DVR 8
Live display
only
Remote
Controller 3
Remote
Controller 4
: Coaxial cable (video signal)
: CPEV-S 0.65-2C (RS-485 control line)
: Modular cable, 3 m (9.8 ft).
(supplied with the C-RM1000)
*1 Match the Combination Camera’s address to the Digital Video Recorder’ s video input number.
PC
LAN
Page 55

55
[Remote Controller connections using the dedicated cable]
13.2.3. Connections between the Remote controller and the Digital video recorder
Note: Do not connect the AC adapter.
[C-RF1000 Interface Unit Connections]
The maximum cable length is 1.2 km (3,937 ft) for each distance between the Remote Controller and the
Interface Unit and between the Interface Unit and the farthest Digital Video Recorder.
Notes
*1. Match the transmission rate of all components connected to the Interface Unit. The Interface Unit's DIP
switch settings must also be identical with the Remote Controller's bit rate settings.
*2. Remote Controller Input Terminal 4 cannot be used simultaneously with the RS-232C port. Connect
either.
The maximum cable length is 1.2 km (3,937 ft) for each distance between
the Remote Controller and the Interface Unit.
Interface unit
C-RF1000
Remote controller 1
Screwless terminal
1234
Remote controller 2
Remote controller 3
*1
Remote controller 4
Screwless terminal
Screwless terminal
Screwless terminal
(Screwless terminal)
REMOTE CONTROLLER INPUT-B
*2
RS-232C
PC
The maximum cable length is 1.2 km (3,937 ft) for distance between the Remote Controller
and the Digital Video Recorder of which termination switch is set to ON.
No AC adapter required
Remote
Controller
RJ-11
terminal
Power supply
Supplied modular cable (3 m (9.8 ft))
Termination switch: OFF Termination switch: OFF Termination switch: ON
RJ-11
terminal
Digital Video
Recorder
Screwless
terminal
Screwless
terminal
Digital Video
Recorder
Screwless
terminal
Digital Video
Recorder
Screwless
terminal
CPEV-S larger than AWG22 (Ø0.65 mm)
Page 56

56
14. DIGITAL VIDEO RECORDER FAILURE INDICATION
The Digital Video Recorder's failures can be confirmed at the Remote Controller.
14.1. Remote Controller Indication and Status
Note
When the Digital Video Recorder recovers from the failure, the Alarm Reset key lights to indicate the
occurrence of an error. Hold down the key for 2 seconds or more to extinguish it.
14.1.1. Stopping the buzzer tone
Press the Alarm Reset key to stop the buzzer tone.
[Cable length extension between the Remote Controller and Digital Video Recorder]
Power to the Remote Controller is supplied from the AC adapter.
The maximum cable length is 1.2 km (3,937 ft) for distance between the Remote Controller
and the Digital Video Recorder of which termination switch is set to ON.
Termination switch: OFF Termination switch: OFF Termination switch: ON
Remote
Controller
Digital Video
Recorder
Digital Video
Recorder
Digital Video
Recorder
AC adapter
required
Screwless
terminal
Screwless
terminal
Screwless
terminal
Screwless
terminal
CPEV-S larger than AWG22 (Ø0.65 mm)
Screwless
terminal
LCD Screen
FA I LURE
DVR 1
HD F UL L
DVR 1
* Available when the Remote Controller’s buzzer settings are set to ON.
ALARM RESET
Key
Buzzer *
Digital VideoRecorder Failure Status
A hard disk error, video loss or fan failure has occurred at the Digital Video
Recorder number displayed on the LCD screen. Check the Digital Video
Recorder’s failure log to take appropriate steps. For details, please read the
Digital Video Recorder’s instruction manual.
The hard disk of the Digital Video Recorder number displayed on the LCD
screen is full. Check the Digital Video Recorder’s failure log to take
appropriate steps. For details, please read the Digital Video Recorder’s
instruction manual.
Screwless
terminal
: Flashes red
BUZZER STOP
RESET
Page 57

57
15. TROUBLESHOOTING
Remedy
• Connect correctly.
• Connect to the AC outlet. (The Digital
Video Recorder supplies power to the
Remote Controller even when in standby
mode.)
• Connect correctly.
• Switch on the power.
• Connect equipment correctly. (Refer to p.
13; Equipment Selection.)
• Enter the password and log in to the
desired operation level. (Refer to p. 33;
Log-In and Log-Out.)
• Enter the password and log in to the
desired operation level. (Refer to p. 32;
Entering the Digital Video Recorder
Password.)
• Insert the USB key.
• Set “Control” in the group settings to ON.
(Refer to p. 40; Group Settings.)
• Set the Monitor lock settings to [UNLOCK].
(Refer to p. 50; Monitor Lock.)
• Perform DVR check to confirm that the
Digital Video Recorder to be operated is
recognized. (Refer to p. 49; DVR Check.)
• Select equipment correctly. (Refer to p.
13; Equipment Selection.)
• Match the camera address and the Digital
Video Recorder’s video input number.
(Refer to p. 52; Equipment Connections.)
• Match the transmission rate. (Refer to p.
45; Camera Protocol.)
Symptom
Power not supplied to
the Remote Controller.
Cannot operate the
Digital Video Recorder
from the Remote Controller.
Cannot operate the
Combination Camera
from the Remote Controller.
Possible Cause
[If the supplied modular cable is used]
• The Remote Controller is not
correctly connected to the Digital
Video Recorder using the supplied
modular cable.
• The Digital Video Recorder’s power
source is not connected to the wall
AC outlet.
[If the AC adapter is used]
• AC adapter not correctly connected.
• The Digital Video Recorder’s power
not switched on.
• The Digital Video Recorder to be
operated not selected.
• Password for the Remote Controller
not set.
• Password for the Digital Video
Recorder not set.
• The Digital Video Recorder’s USB
key detached.
• Access to the Digital Video Recorder
to be operated not allowed.
• Monitor lock function enabled.
• Communications not performed
between the Remote Controller and
Digital Video Recorder.
• The Combination Camera to be
operated not selected.
• Camera address not matched.
• Transmission rate not matched.
Page 58

58
16. OPERATION GUIDE
Operation Item
Operation Method
(Key Operation)
Display Status
Remark
Reference
• Equipment selection
Digital Video recorder
selection
Camera selection
Group selection Shift + Numerical keypad
Numerical keypad (DVR No.) + DVR
MON
Numerical keypad (camera No.)
+ CAM
(group No.) + DVR
DVR No. displayed on the LCD and
DVR lights.
Monitor No. displayed on the LCD.
Camera No. displayed on the LCD and
CAM lights.
Group No. (G_) displayed on the LCD. Only when setting groups P. 13
Monitor alternates between
1 and 2 as the key is pressed.
• Monitor display
Full-screen display
Multi-screen display MULTI MULTI lights. P. 16
4-segment split screen display
9-segment split screen display
16-segment split screen display
Display position change
Sequential display SEQUENCE SEQUENCE lights. P. 18
Numerical keypad (camera No.)
+ FULL
SHIFT + FULL MULTI lights. P. 16
SHIFT + MULTI MULTI lights. P. 17
SHIFT + SEQUENCE MULTI lights. P. 17
Live mode + Multi-screen display
+ continuous depression of MULTI
FULL light.
Multi-segment split screen
switches as the key is
pressed.
Split screen segment switches with repetition of the
same operation.
Performs sequential display
as set at the Digital Video
Recorder.
• Combination Camera operation (available only while the live screen is displayed)
Full-screen camera operation
Multi-screen camera operation
Camera rotation
Camera telephoto (wide angle)
operation
Numerical keypad (camera No.)
+ FULL
keypad (camera No.) + CAM
Camera selection + Up, Down,
Left or Right
Camera selection + TELE (WIDE)
Camera selection + FOCUS (+) or (–)
Camera selection + IRIS (+) or (–)
Camera selection + numerical
keypad (position No.) + SHIFT
+ POS (continuous depression)
Camera selection + numerical keypad (position No.) + SHIFT + C
(continuous depression)
keypad (position No.) + POS
CAM MENU key
FULL light.
MULTI light.Multi-screen display + Numerical
PRESET MEMORY indication displayed
on the LCD.
PRESET CLEAR indication displayed
on the LCD.
Position number displayed on the LCD.
Camera menu displayed on Monitor 1.
Combination Camera only
Combination Camera
type B only
Auto operation terminated
by continuously pressing
the AUTO key.
Combination Camera only
Camera menu closed by
continuously pressing the
CAM MENU key again.
• Digital Video Recorder operation
Priority recording PRIORITY REC PRIORITY REC flashes. P. 25
Stopping a buzzer tone
Playback PLAY/LIVE
Reverse playback Playback + LEFT
ALARM RESET
PLAY/LIVEStopping playback
Monitor 1 PLAY
PLAY/LIVE extinguishes.
Monitor 1 REV
Priority recording stopped by
continuously pressing the
PRIORITY REC
Switches to playback mode.
Switches to live mode.
key again.
Page
P. 13
P. 14Monitor selection
P. 14
P. 15
P. 18
P. 15
P. 16
P. 21
P. 21
P. 21Focus adjustment
P. 22Iris adjustment
P. 22Auto-pan operation Camera selection + AUTO Auto lights.
P. 24Preset position storing
P. 24Preset position erasure
P. 22Preset position selection Camera selection + numerical
P. 23Camera menu display Continuous depression of the
P. 35
P. 26
P. 27
P. 26
Page 59

59
Operation Item
Operation Method
(Key Operation)
Display Status
Remark
Reference
• Digital Video Recorder operation
Forward quick playback Playback + RIGHT P. 27
Reverse quick playback Playback + LEFT
1-minute/10-minute skip
forward playback
1-minute/10-minute skip
reverse playback
Pause Playback + DOWN
Pause reset Pause mode + UP
Instant event access (forward)
Instant event access (reverse)
Lastest image reverse
playback
Digital Video Recorder menu
display
Archive menu display
Triplex settings
Digital Recorder's password
entry
TELE P. 27
WIDE
Pause mode + FOCUS (+)
Pause mode + FOCUS (–)
IRIS (–)
SEARCH Search menu displayed on Monitor 1.Search
Continuous depression of
DVR MENU
Pause mode + continuous
depression of MENU
Playback mode + multi-screen
display + continuous depression
of MULTI
Login screen display + Numerical
keypad + FULL (Repeat) + SET
Monitor 1 PLAYX2 (X4, X8)
Monitor 1 REVX2 (X4, X8)
Monitor 1 PLAYX1M (X10M)
Monitor 1 REVX1M (X10M)
Monitor 1 PAUSE
Digital Video Recorder menu displayed
on Monitor 1.
Archive menu displayed on Monitor 1.
The [
entered numeral.
] mark is displayed for
******
Speed changes as the
joystick is tilted. (Can be
fixed with the SET key.)
Skip time changes depending on the joystick rotation
angle. (Can be fixed with
the SET key.)
Cannot be used during
recording in overwrite mode.
Select search method and
confirm the method using
TELE.
Page
P. 27
P. 27
P. 27
P. 27
P. 28Frame advance playback Pause mode + RIGHT
P. 28Frame reverse playback Pause mode + LEFT
P. 28
P. 28
P. 28Earliest image playback IRIS (+)
P. 28
P. 29
P. 29
P. 30
P. 31
P. 32
• Other operations
Log-in
Log-out Continuous depression of MENU
Abbreviation
Alarm reset
Continuous depression of MENU
Select LOGIN and enter password.
Select LOGOUT.
Numerical keypad (abbreviation
number) + SET
Alarm mode + continuous
depression of RESET
HOLDAlarm hold
Continuous depression of HOLDAlarm Hold reset
• Settings and basic operations
Menu display Continuous depression of MENU
Selection item movement
Setting confirmation Menu display + TELE or SET
Setting cancellation Menu display + WIDE or C P. 39
Continuous depression: Hold down the key for 2 seconds or more.
Note:
Menu display + UP, DOWN,
LEFT or RIGHT
Continuous depression of MENU
Can be displayed only for
Operation Level 1 when a
password has been set.
Only the
SET
used while the camera menu
is displayed.
Only the C key can be used
while the camera menu is
displayed.
key can be
P. 33
P. 33
P. 34
P. 35
P. 35
P. 35
P. 39
P. 39
P. 39
P. 39Exiting the menu
Page 60

133-12-992-4B
17. SPECIFICATIONS
* Applies to the system where the unit and digital video recorder are connected in a matched pair. Represents
the total of connected cable distances if multiple Digital video recorders or Interface units are connected in
the system.
Note: The design and specifications are subject to change without notice for improvement.
• Accessories
AC adapter (1.8 m (5.9 ft)) ...................... 1
Modular cable (3 m (9.8 ft)) ..................... 1
• Optional products
Digital video recorder: C-DR091/C-DR161 Series
Interface unit: C-RF1000
Power Source 12 V AC, 60 Hz (use of the supplied AC adapter)
or 12 V DC (supplied from the digital video recorder)
Current Consumption 80 mA (use of the supplied AC adapter)
Digital Video Recorder RS-485, RJ11 (6P 6C)
Control (when the included 3-meters (9.8 ft) modular cable is used)
RS-485, screwless connector (3 pins)
(with cable length of 3-meters (9.8 ft) and more, or when C-RF1000 (option) is used)
Alarm Signal Continuous alarm tone (can be turned on and off through the menu)
Maximum Cable Distance 1.2 km (3,937 ft) *
Function Password setting, DVR Group setting, Abbreviation function (512 types),
Preset position setting, Language choice (English/French)
Operating Temperature 0°C to +40°C (32°F to 104°F)
Operating Humidity Under 80%RH (no condensation)
Finish Panel: Surface-treated steel plate, silver, paint
Sides: Rubber
Dimensions 323.6 (W) x 112.7 (H) x 181 (D) mm (12.7 (W) x 4.4 (H) x 7.1 (D) inch)
Weight 1.6 kg (3.5 lb) (excluding AC adapter)
 Loading...