

Page 1
VIZIO
QUICK START GUIDE
Co-Star™ LT Stream Player
Page 2
IMPORTANT SAFETY INSTRUCTIONS
Your Player is designed and manufactured to operate within defined design limits. Misuse
may result in electric shock or fire. To prevent your Player from being damaged, the
following instructions should be observed for the installation, use, and maintenance of
your Player. Read the following safety instructions before operating your Player. Keep these
instructions in a safe place for future reference.
To reduce the risk of electric shock or component damage, switch off the power before
connecting other components to your Player.
• Read these instructions.
• Keep these instructions.
• Heed all warnings.
• Follow all instructions.
• Do not use this apparatus near water.
• Clean only with a dry cloth.
• Do not block any ventilation openings. Install in accordance with the manufacturer’s
instructions.
• Do not install near any heat sources such as radiators, heat registers, stoves, or other
apparatus (including amplifiers) that produce heat.
• Do not defeat the safety purpose of the polarized or grounding-type plug. A polarized
plug has two blades and a third grounding prong. The wide blade or the third prong
are provided for your safety. If the provided plug does not fit into your outlet, consult an
electrician for replacement of the obsolete outlet.
• Protect the power cord from being walked on or pinched, particularly at plugs,
convenience receptacles, and the point where they exit from the apparatus.
• Only use attachments/accessories specified by the manufacturer.
• Use only with the cart, stand, tripod, bracket, or table specified by the
manufacturer, or sold with the apparatus. When a cart is used, use caution
when moving the cart/apparatus combination to avoid injury from tip-over.
• Unplug this apparatus during lightning storms or when unused for long periods of time.
• Refer all servicing to qualified service personnel. Servicing is required when the
apparatus has been damaged in any way, such as when the power-supply cord or
plug is damaged, liquid has been spilled or objects have fallen into the apparatus, the
apparatus has been exposed to rain or moisture, does not operate normally or has
been dropped.
• Unplug the power cord before cleaning your Player.
• When moving your Player from an area of low temperature to an area of high
temperature, condensation may form in the housing. Wait before turning on your Player
to avoid causing fire, electric shock, or component damage.
• A distance of at least three feet should be maintained between your Player and any
heat source, such as a radiator, heater, oven, amplifier etc. Do not install your Player
close to smoke. Operating your Player close to smoke or moisture may cause fire or
electric shock.
• Slots and openings in the back and bottom of the cabinet are provided for ventilation.
To ensure reliable operation of your Player and to protect it from overheating, be sure
these openings are not blocked or covered. Do not place your Player in a bookcase or
cabinet unless proper ventilation is provided.
• Never push any object into the slots and openings on your Player cabinet. Do not place
any objects on the top of your Player. Doing so could short circuit parts causing a fire or
electric shock. Never spill liquids on your Player.
• Your Player should be operated only from the type of power source indicated on the
label. If you are not sure of the type of power supplied to your home, consult your dealer
or local power company.
• Do not apply pressure or throw objects at your Player. This may compromise the integrity
of the display. The manufacturer’s warranty does not cover user abuse or improper
installations.
• The power cord must be replaced when using different voltage than the voltage
specified. For more information, contact your dealer.
• When connected to a power outlet, power is always flowing into your Player. To totally
disconnect power, unplug the power cord.
• The lightning flash with arrowhead symbol within an equilateral triangle is intended to
alert the user to the presence of un-isolated, dangerous voltage within the inside of
your Player that may be of sufficient magnitude to constitute a risk of electric shock to
persons.
• Do not overload power strips and extension cords. Overloading can result in fire or
electric shock.
• The wall socket should be installed near your Player and easily accessible.
• Only power of the marked voltage can be used for your Player. Any other voltage than
the specified voltage may cause fire or electric shock.
• Do not touch the power cord during lightning. To avoid electric shock, avoid handling
the power cord during electrical storms.
• Unplug your Player during a lightning storm or when it will not be used for long period of
time. This will protect your Player from damage due to power surges.
• Do not attempt to repair or service your Player yourself. Opening or removing the back
cover may expose you to high voltages, electric shock, and other hazards. If repair is
required, contact your dealer and refer all servicing to qualified service personnel.
• WARNING: Keep your Player away from moisture. Do not expose your Player to rain or
moisture. If water penetrates into your Player, unplug the power cord and contact your
dealer. Continuous use in this case may result in fire or electric shock.
• Do not use your Player if any abnormality occurs. If any smoke or odor becomes
apparent, unplug the power cord and contact your dealer immediately. Do not try to
repair your Player yourself.
• Avoid using dropped or damaged appliances. If your Player is dropped and the
housing is damaged, the internal components may function abnormally. Unplug the
power cord immediately and contact your dealer for repair. Continued use of your
Player may cause fire or electric shock.
• Do not install your Player in an area with heavy dust or high humidity. Operating your
Player in environments with heavy dust or high humidity may cause fire or electric shock.
• Follow instructions for moving your Player. Ensure that the power cord and any other
cables are unplugged before moving your Player.
• When unplugging your Player, hold the AC/DC power adapter, not the cord. Pulling on
the power cord may damage the wires inside the cord and cause fire or electric shock.
When your Player will not be used for an extended period of time, unplug the power
cord.
• To reduce risk of electric shock, do not touch the connector with wet hands.
• Insert batteries in accordance with instructions. Incorrect polarities may cause the
batteries to leak which can damage the remote control or injure the operator. Do not
expose batteries to excessive heat such as sunshine, fire or the like.
• If any of the following occurs, contact the dealer:
- The power cord fails or frays.
- Liquid sprays or any object drops into your Player.
- Your Player is exposed to rain or other moisture.
- Your Player is dropped or damaged in any way.
- The performance of your Player changes substantially.
• This apparatus shall not be exposed to dripping or splashing and no objects filled with
liquids, such as vases, shall be placed on the apparatus.
• The mains plug or appliance coupler is used as the disconnect device, the disconnect
device shall remain readily operable.
• CAUTION - These servicing instructions are for use by qualified service personnel only. To
reduce the risk of electric shock, do not perform any servicing other than that contained
in the operating instructions unless you are qualified to do so.
The lightning flash with arrowhead symbol within an equilateral triangle is
intended to alert the user to the presence of uninsulated DANGEROUS
VOLTAGE within the product’s enclosure that may be of sufficient
h
magnitude to constitute a risk of electrical shock to persons.
The exclamation point within an equilateral triangle is intended to alert
the user to the presence of important operating and maintenance
(servicing) instructions in the literature accompanying the product.
Page 3

TABLE OF CONTENTS
Package Contents ................................................................................................. 2
You Will Need ......................................................................................................... 3
Getting to Know Your Stream Player ...................................................................... 4
Before You Begin ..................................................................................................... 6
Connecting Your Stream Player ............................................................................. 7
First-Time Setup ...................................................................................................... 12
Using VIZIO Internet Apps Plus™ (V.I.A. Plus) ........................................................... 16
Opening the V.I.A. Plus App Dock .................................................................................................16
Using the Fullscreen V.I.A. Apps Window ....................................................................................... 17
Fullscreen V.I.A. Apps Window Overview ....................................................................................... 18
Adding Apps to Your Stream Player ..............................................................................................19
Deleting an App from Your Stream Player ..................................................................................... 20
Moving Apps on the Stream Player ...............................................................................................21
Using the On-Screen Menu .................................................................................... 22
Navigating the On-Screen Menu ..................................................................................................22
Adjusting the Audio Settings ......................................................................................................... 23
Using the Network Connection Menu ...........................................................................................24
Connecting to a Wireless Network .............................................................................................24
Changing the Manual Setup Settings ....................................................................................... 25
Connecting to a Hidden Network ..............................................................................................26
Testing Your Network Connection ..............................................................................................26
Changing the Stream Player System Settings ...............................................................................27
Displaying System Information ...................................................................................................27
Changing the On-Screen Menu Language ..............................................................................28
Setting the Time and Local Settings: .......................................................................................... 28
Change the Output Video Resolution .......................................................................................29
Setting the Screen Saver Settings ..............................................................................................29
Resetting the Stream Player to Factory Default Settings ............................................................ 30
Using the Guided Setup Menu .....................................................................................................31
Viewing the On-Screen User Manual ............................................................................................ 32
Setting the Stream Player to Standby Mode ................................................................................. 32
Playing USB Media ................................................................................................. 33
Troubleshooting...................................................................................................... 34
Legal / Compliance .............................................................................................. 35
Limited Warranty & Specifications .......................................................................... 37
1
Page 4
PACKAGE CONTENTS
OK
VIZIO Co-Star™ LT Stream Player
Remote with Batteries Power Adapter This Quick Start
Guide
2
Page 5
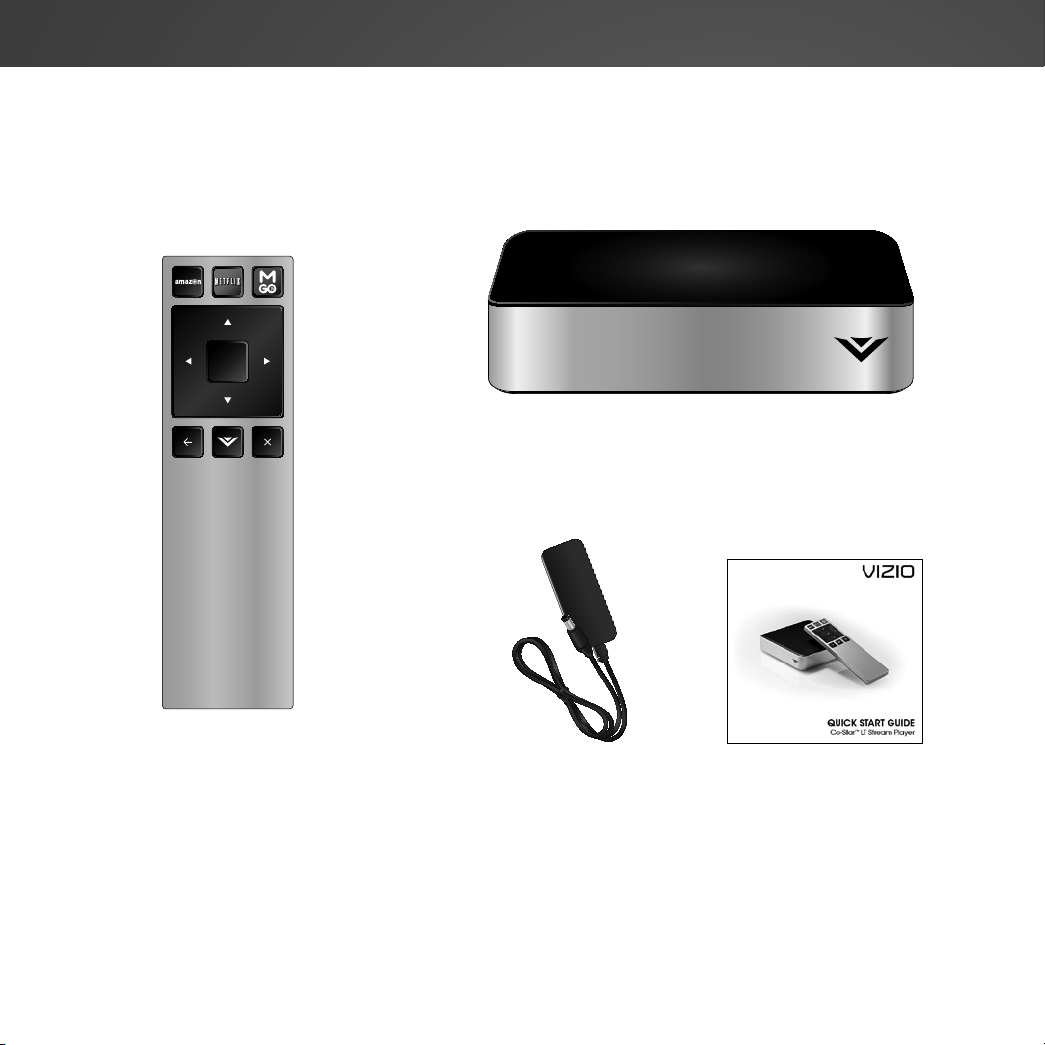
YOU WILL NEED
HDTV with an available
HDMI input port
HDMI Cable Internet connection
(Wi-Fi)
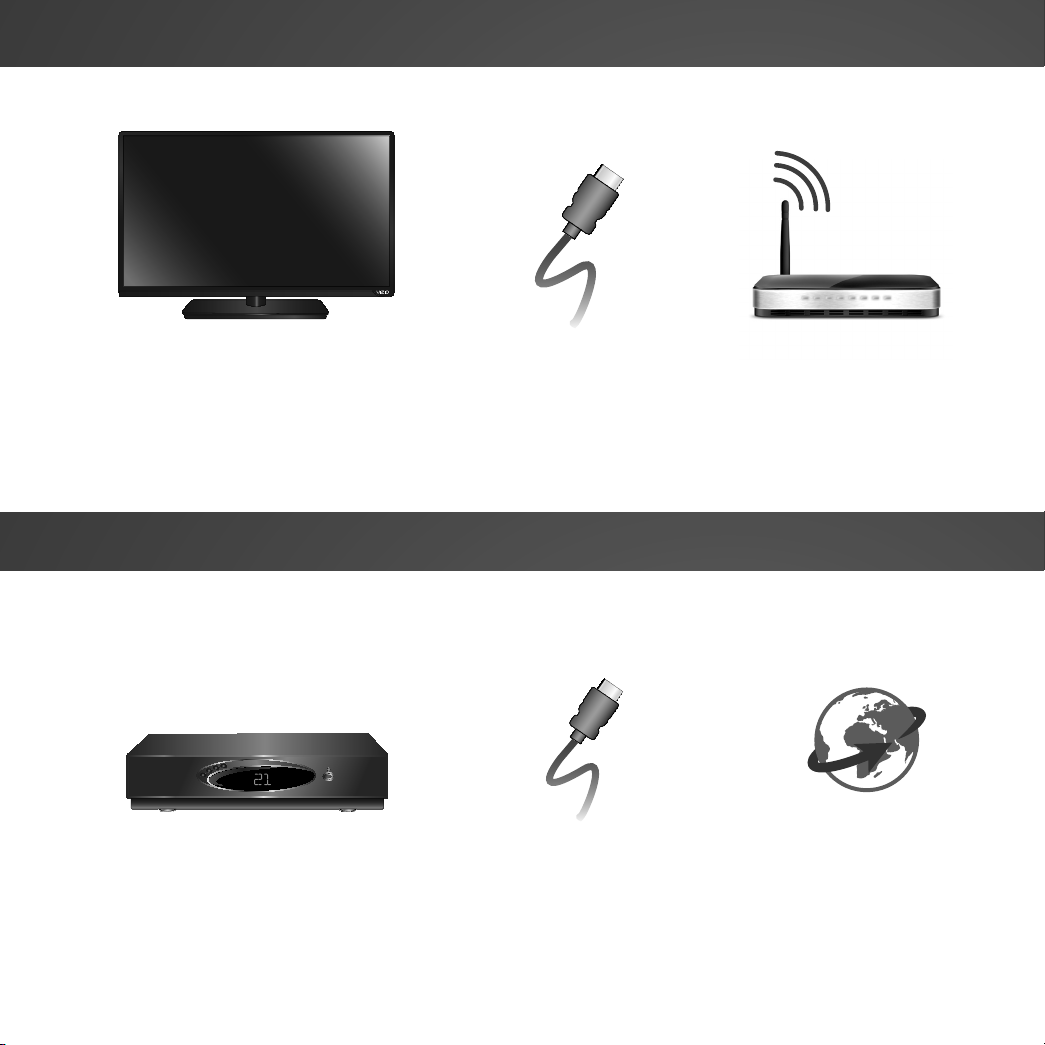
FOR THE BEST EXPERIENCE, YOU SHOULD HAVE
HD Cable or Satellite Box
with an available HDMI port
A second
HDMI Cable
High-Speed Internet
connection*
*For the best online experience, you should have a high-speed internet connection with speeds of 1Mbps or higher.
3
Page 6
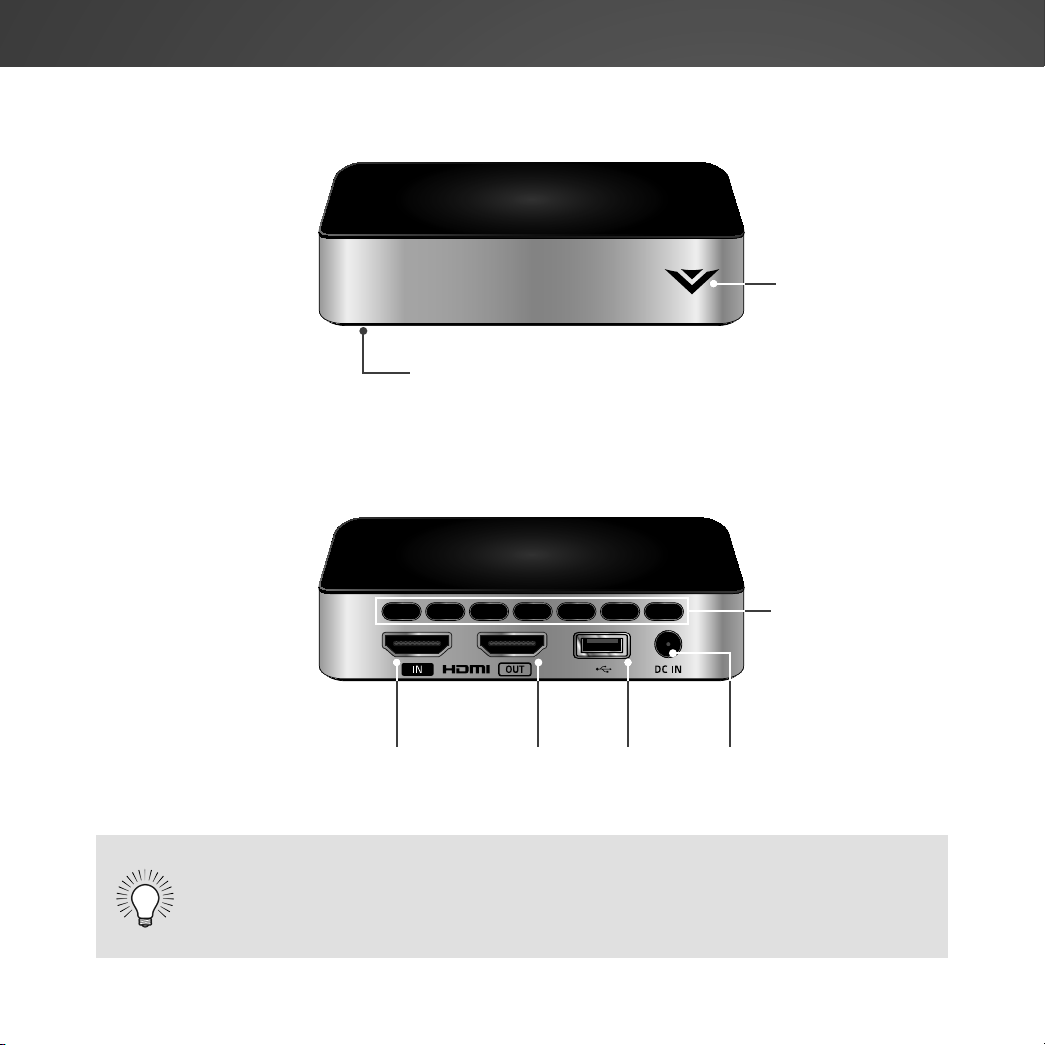
GETTING TO KNOW YOUR STREAM PLAYER
FRONT
IR Receiver
LED Indicator
(On bottom)
BACK
Ventilation Slots
HDMI In HDMI Out USB DC In
Did you notice that the Co-Star™ Stream player does not have
a power button? Leave it plugged in to receive automatic
software updates. See
Power Mode
4
on page 13 for more options.
Page 7
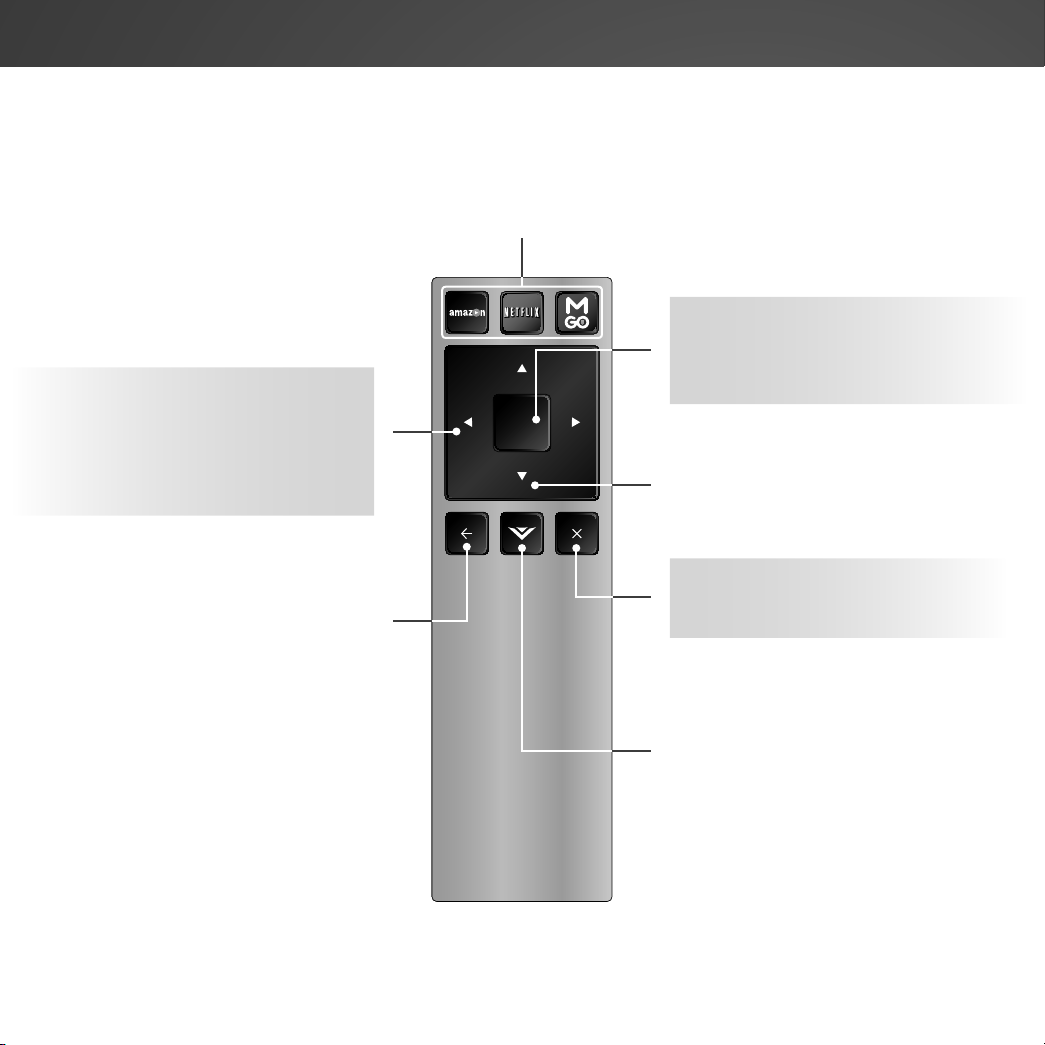
LEFT/RIGHT ARROW
Navigate menus
Hold left arrow to rewind
Hold right arrow to fast forward
BACK
Go to previous screen or menu
(Function may vary by app)
APP SHORTCUTS
Press to quickly open
the selected app
OK/PLAY/PAUSE
Select the highlighted option
or Play/Pause media playback
OK
UP/DOWN ARROW
Navigate menus
(Functions may vary by app)
EXIT
Close the on-screen menu
or app
V BUTTON
Press once to open the
VIZIO Internet Apps™
(V.I.A. Plus) dock
Press twice to open the
Full Screen App Window
5
Page 8
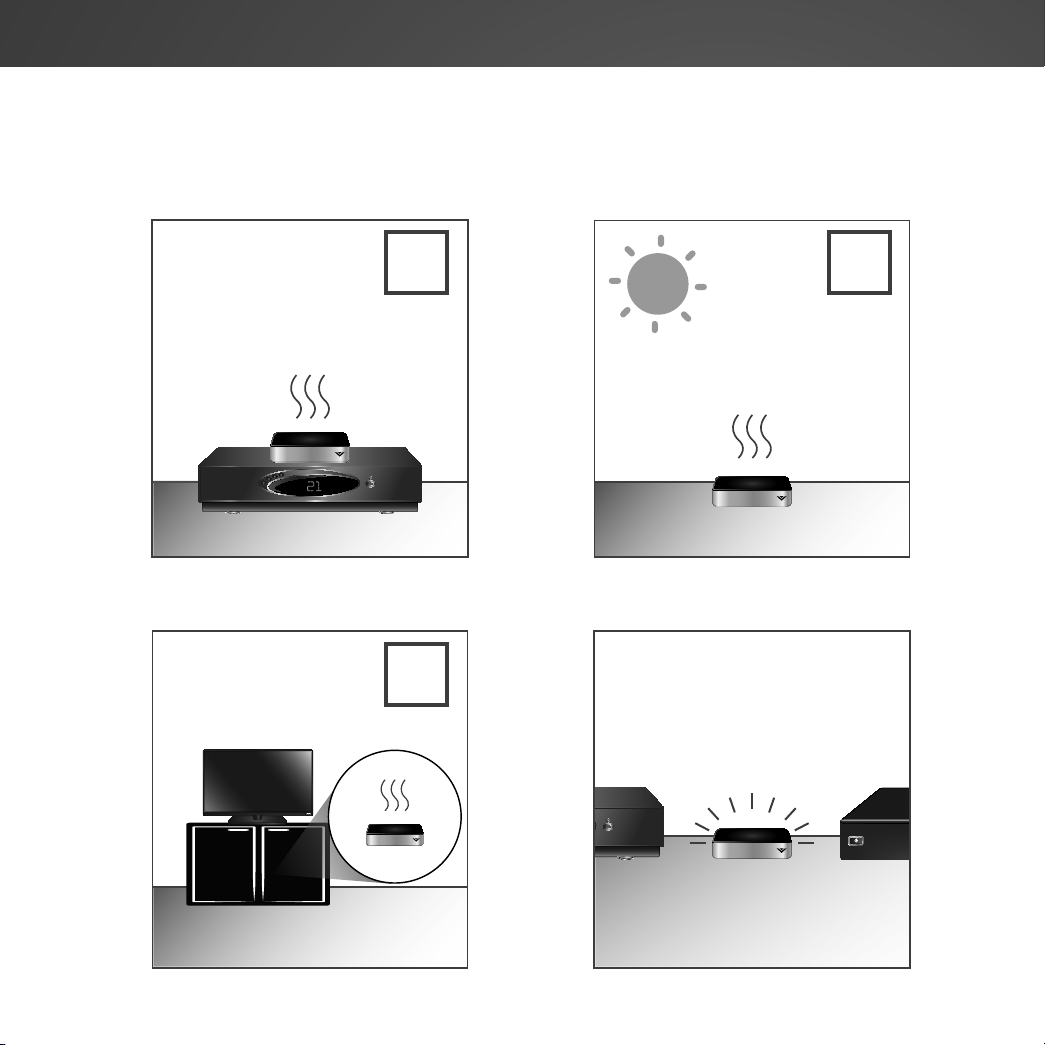
BEFORE YOU BEGIN
Be sure to give your Stream Player room to breathe. Place it in a well-ventilated area,
away from direct sunlight and heat sources.
Î Î
Do not place on other devices. Do not place in direct sunlight.
Î
Do not place in enclosed spaces. Place in well-ventilated area.
6
R
Page 9

CONNECTING YOUR STREAM PLAYER
Connect your cable or satellite box to the Stream Player with an HDMI cable.*
1
HDMI Cable*HD Cable/Satellite Box
Connect to
HDMI IN
If you do not have a Cable/Satellite Box, you can skip this step,
but you will not be able to enjoy the easy access to menus
displayed over your main TV source.
*HDMI cable sold separately.
7
Page 10
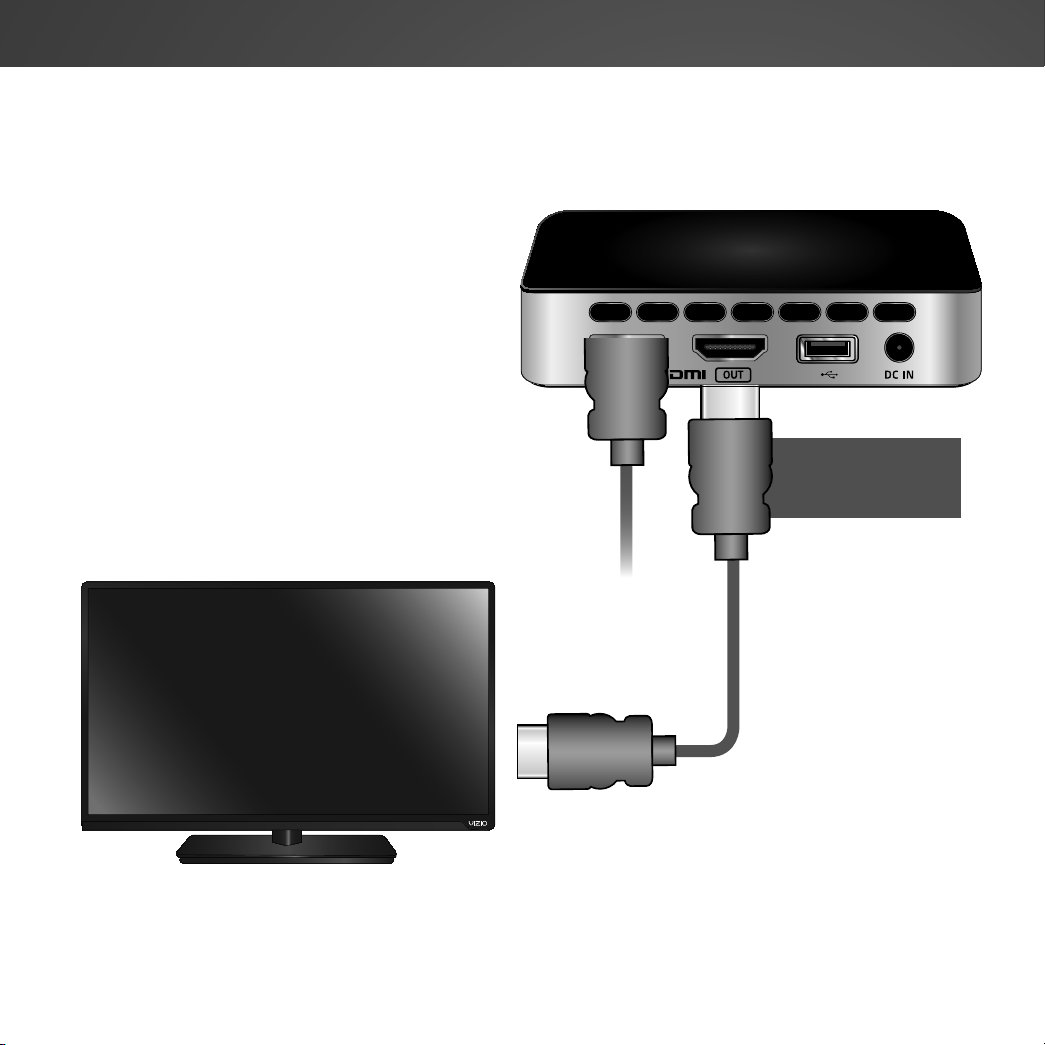
2
Connect the Stream Player to your TV with an HDMI cable.*
Connect to
HDMI OUT
*HDMI cable sold separately.
HDMI Cable*
8
Page 11
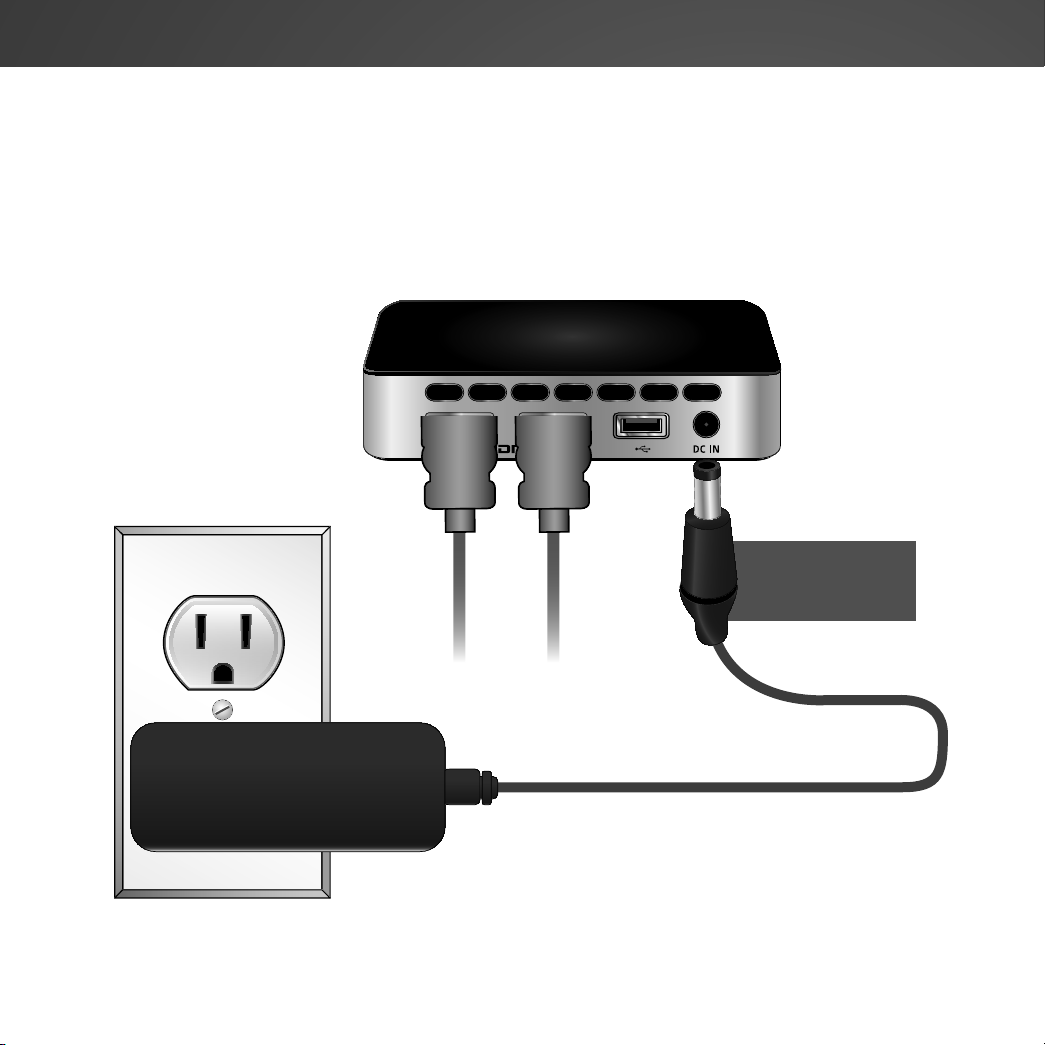
3
Connect the power adapter to the Stream Player to DC IN as shown.
Plug the power adapter into an electrical outlet. The Stream Player
automatically powers on.
Connect to
DC IN
9
Page 12
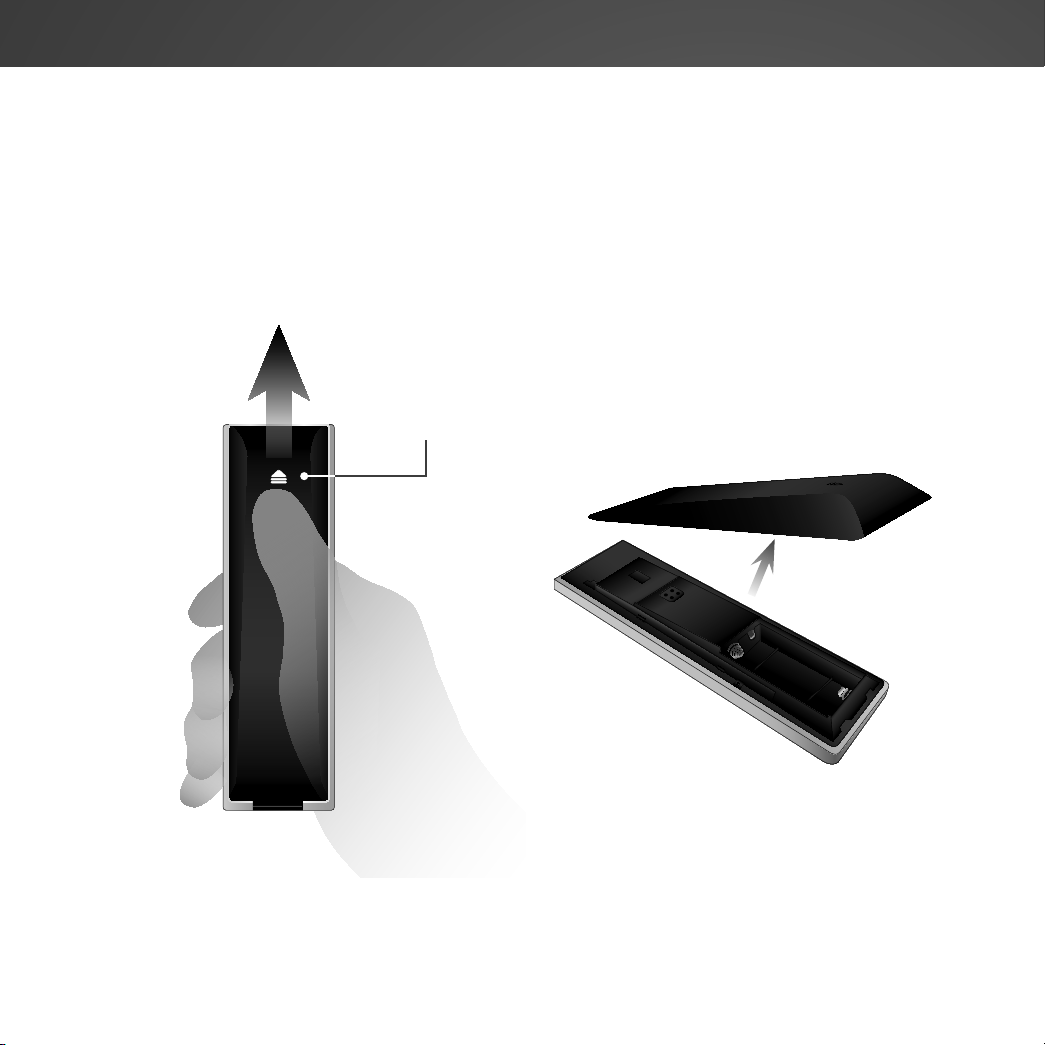
4
Locate the arrow on the battery cover and gently slide it away from the
remote with your thumb. Insert the included AAA batteries matching the
+ and — symbols. Gently slide the battery cover back into place.
Arrow
10
Page 13

5
If you connected a Cable/Satellite Box, turn it on. Then turn on your TV
and set the TV input to the correct HDMI port. The diagram below shows
the path of the TV signal when all devices are correctly connected.
HDMI Cable
11
HDMI Cable
Page 14

FIRST-TIME SETUP
Use the Arrow buttons on the remote control to highlight your preferred
1
2
language. Press the OK button to continue.
Use the Arrow buttons on the remote control to highlight your country.
Press the OK button to continue.
12
Page 15

3
Use the Arrow buttons on the remote control to highlight your preferred
power mode. Press the OK button to continue.
Power
Mode
Quick Start
Eco Mode
*HDTVs with HDMI-CEC function enabled will automatically send a standby signal.
HDMI-CEC function naming may vary by TV manufacturer. See your TV's user manual.
The Co-Star LT™ Stream Player is always on, instantly ready
to start streaming and receive automatic updates.
The Co-Star LT™ Stream Player automatically enters
a low-power standby mode if a compatible TV* is
powered off. Press any button on the stream player’s
remote control to exit the standby mode.
Description
13
Page 16

4
5
Adjust the picture size to best fit your TV. Press and hold the Arrow
buttons on the remote control until the white space disappears. Press
the OK button to continue.
Use the Arrow buttons on the remote control to highlight your wireless
network. Press the OK button to continue.
14
Page 17

6
7
Use the Arrow buttons on the remote control to enter your wireless
network password. When you are finished, highlight Connect and press
the OK button to continue.
Use the Arrow buttons on the remote control to highlight I Accept to
accept the terms of service and press OK. Use the on-screen keyboard
to register your Co-Star LT™. First-time setup is complete.
15
Page 18

USING VIZIO INTERNET APPS PLUS
OPENING THE V.I.A. PLUS APP DOCK
™
(V.I.A. PLUS)
VIZIO Internet Apps™ (V.I.A.) Plus delivers
popular online content to your Co-Star
LT™. V.I.A. features a selection of Apps
that allow you to watch movies and
TV shows, listen to music, get weather
and news information, and more–all on
demand.
OK
To open the V.I.A. Plus Dock and launch
an app:
1. Press the V Button on the remote.
2. Highlight a V.I.A. App by scrolling left
and right using the Left/Right Arrow
buttons on the remote. (The highlighted
App is at the center of the dock.)
3. Press the OK button on the remote
to launch the app.
V Button
V.I.A. Dock
16
Page 19

USING THE FULLSCREEN V.I.A. APPS WINDOW
The fullscreen V.I.A. apps window allows you
to add apps. The apps on the first page are
displayed in the V.I.A. apps dock. Apps on
other pages can be moved to the dock.
To use the V.I.A. Plus Fullscreen Apps
Window:
1. Press the V Button on the remote
twice.
2. Highlight a V.I.A. App by using the
Left/Right Arrow buttons on the
remote.
3. Launch a V.I.A. App by highlighting
it and pressing the OK button on the
remote.
4. To exit the V.I.A. Plus Apps dock,
press the Exit button on the remote.
Note: Apps displayed are for demonstration purposes only. Availability, amount, and position of apps may vary.
17
Page 20

FULLSCREEN V.I.A. APPS WINDOW OVERVIEW
The fullscreen apps window allows you
to add, delete, and move your apps. The
My Apps tab displays apps that are already
installed on your Stream Player. The first four
rows of apps on the page are featured in
the V.I.A. Plus App Dock.
The following tabs are located at the top
of your Fullscreen V.I.A. Apps Window:
• My Apps - Displays apps that are
installed on your Stream Player.
• Featured - Displays apps that are
recommended by Yahoo!
• Latest - Displays apps that were
most recently added to the library
of apps.
• All Apps - Displays every app
that is available for download.
• Categories - Displays apps
sorted into categories: Spotlight,
Yahoo!, Weather, News and
Finance, Movies and TV, Photos
and Video, Sports, and Music.
• App Info - Displays app
software information and
development settings.
Apps with a small lock icon in
the right-hand corner cannot
be deleted.
18
Page 21

ADDING APPS TO YOUR STREAM PLAYER
You can add, delete, and move Apps on
your My Apps tab for a custom look and feel.
To add an App to your stream player:
1. Use the Arrow buttons on the remote
to highlight the app you want to
add.
2. Press and hold the OK button.
When the App is installed, a star is
displayed in the top right-hand corner
of the App icon as shown below along
with a text confirmation.
App Installed
19
Page 22

DELETING AN APP FROM YOUR STREAM PLAYER
1. While in My Apps, use the Arrow buttons
on the remote to highlight the app you
want to add.
2. Press and hold the OK button until the
following options are displayed:
3. Press OK to delete the app. A dialog box
is displayed:
4. Use the Left/Right Arrow buttons to select
Delete and press OK.The app is removed
from your My Apps tab.
20
Page 23

MOVING APPS ON THE STREAM PLAYER
1. Use the Arrow buttons on the remote to
highlight the app you want to add.
2. Press and hold the OK button until the
following options appear:
3. Use the Arrow buttons to move the app to
the desired location and press OK to
place the app.
You can also preview apps
without installing them.
Highlight the app you wish
to preview and press OK
to open.
21
Page 24

Help
Network
Sleep
Timer
Input CC
ABC
Audio
Wide
Normal
Picture
Settings
PanoramicWide Zoom
2D 3DExit
USING THE ON-SCREEN MENU
Your Stream Player features an easy-to-use
on-screen settings menu.
From this menu, you can:
• Adjust the Audio Settings
• Adjust the Network Settings
• Adjust System Settings
• Access the Guided Setup
• Access the User Manual
• Place the stream player into
standby mode
NAVIGATING THE ON-SCREEN MENU
To open the on-screen settings menu:
1. Press the V button on the remote control. The
VIZIO Internet Apps Plus™ dock displays.
VIZIO
SETTINGS
Audio
Network
System
Guided Setup
User Manual
Standyby Now
2. Use the Left/Right Arrow buttons to highlight
Settings and press OK. The on-screen
settings menu is displayed.
While navigating the onscreen menu, you can
press the Back button at
any time to return to the
previous menu screen. The
Exit button will close the
on-screen menu.
22
Page 25

ADJUSTING THE AUDIO SETTINGS
Help
Network
Sleep
Timer
Input CC
ABC
Audio
Wide
Normal
Picture
Settings
PanoramicWide Zoom
2D 3DExit
To adjust the audio settings:
1. Press the V button on the remote control. The
VIZIO Internet Apps Plus™ dock displays.
2. Use the Left/Right Arrow buttons to highlight
Settings and press OK. The on-screen settings
menu is displayed.
3. Highlight Audio and press OK. The Audio
Menu is displayed.
4. Highlight the setting you wish to adjust, then
press the Left/Right Arrow buttons to change
the setting:
• Lip Sync - Adjusts the synchronization
between the display image and the
accompanying audio track.
VIZIO
AUDIO
Lip Sync 0
-
+
23
Page 26

USING THE NETWORK CONNECTION MENU
Help
Network
Sleep
Timer
Input CC
ABC
Audio
Wide
Normal
Picture
Settings
PanoramicWide Zoom
2D 3DExit
Your Stream Player features a built-in wireless network
connection.
Connecting to a Wireless Network
To connect to a wireless network whose network
name (SSID) is being broadcast:
1. Press the V button on the remote control. The
VIZIO Internet Apps Plus™ dock displays.
VIZIO
WI-FI
Wireless Networks
2. Use the Left/Right Arrow buttons to highlight
Settings and press OK. The on-screen settings
menu is displayed.
3. Highlight Network and press OK. The Network
Menu is displayed.
4. Highlight Wi-Fi and press OK. The Wi-Fi Menu
is displayed.
5. If you do not see your wireless network
displayed, highlight More Networks and press
OK. The More Networks menu, which is a list
of available wireless networks, is displayed.
6. Highlight the name of your wireless network
(this is the network’s SSID) and press OK.
7. Using the on-screen keyboard, enter your network’s
password, then highlight Connect and press OK.
8. Press the Exit button on the remote.
More Networks
WPS
Manual Setup
Enter Network Name
Test Connection
24
Page 27

Changing the Manual Setup Settings
Help
Network
Sleep
Timer
Input CC
ABC
Audio
Wide
Normal
Picture
Settings
PanoramicWide Zoom
2D 3DExit
x
Advanced users can fine-tune the network settings
using the Manual Setup feature.
To change advanced network settings:
1. From the Wi-Fi menu, highlight Manual Setup
and press OK. The Manual Setup menu is
displayed.
2. Use the Arrow buttons to highlight a setting
and press OK to enter a value using the
on-screen number pad. To delete a value,
highlight the button and press OK.
When you are finished entering a value, highlight
OK on the number pad and press OK. Use the
Arrow buttons to highlight another setting or if
you are finished press the Exit button.
• DHCP - (Dynamic Host Configuration
Protocol) This setting must be turned Off to
change any of the other settings.
• IP Address - The IP address assigned to the TV.
• Subnet Mask - The subnet mask.
VIZIO
MANUAL SETUP
DHCP Off
IP Address ____.____.____.____
Subnet Mask ____.____.____.____
Default Gateway ____.____.____.____
Pref. DNS Server ____.____.____.____
Alt. DNS Server ____.____.____.____
Wireless MAC FF:FF:FF:FF:FF:FF
1 2 3
4 5 6
7 8 9
x
0OK
CANCEL
• Default Gateway - Your network’s default
gateway address.
• Pref. DNS Server - Your preferred domain
name server address.
• Alt. DNS Server - Your alternate domain name
server address.
3. Press the Exit button on the remote.
25
Page 28

Connecting to a Hidden Network
Help
Network
Sleep
Timer
Input CC
ABC
Audio
Wide
Normal
Picture
Settings
PanoramicWide Zoom
2D 3DExit
To connect to a wireless network whose
network name (SSID) is not being broadcast:
1. From the Wi-Fi menu, highlight Enter
Network Name and press OK. Th e
Hidden Network menu is displayed.
2. Using the on-screen keyboard, enter
your network’s name (SSID), then highlight
Connect and press OK.
3. Using the on-screen keyboard, enter
your network’s password, then highlight
Connect and press OK.
4. Press the Exit button on the remote.
Testing Your Network Connection
To test your network connection:
1. From the Wi-Fi menu, highlight Test
Connection and press OK.
2. The Test Connection screen displays the
connection method, network name, signal
strength, and download speed of your
network connection.
VIZIO
ENTER ACCESS POINT NAME
Please enter your access point name. This is
used for locating an access point with a hidden
SSID.
a b c d e f g h i
j k l m n o p q r
s t u v w x y z 0
1 2 3 4 5 6 7 8 9
.@# .com space backshift
Connect
3. Press the Exit button on the remote.
26
Page 29

CHANGING THE STREAM PLAYER SYSTEM SETTINGS
Help
Network
Sleep
Timer
Input CC
ABC
Audio
Wide
Normal
Picture
Settings
PanoramicWide Zoom
2D 3DExit
Using the system settings menu, you can:
• View the System Information
• Change the on-screen menu language
• Set the time
• Set the output video resolution
• Reset Stream Player
Displaying System Information
To display a summary of the Stream Player settings:
1. Press the V button on the remote control.
The VIZIO Internet Apps Plus™ dock displays.
2. Use the Up/Down Arrow buttons to
highlight Settings and press OK. Th e
on-screen settings menu is displayed.
3. Highlight System and press OK. The System
Menu is displayed.
4. Highlight System Information and press OK.
The System Information menu is displayed.
5. Use the Up/Down Arrow buttons to scroll
through the system information.
VIZIO
SYSTEM
System Information
Language English
Time & Local Settings
Output Video Resolution Auto
Screen Saver Off
Reset
6. When you are finished reviewing the system
information, press the Exit button on the
remote.
27
Page 30

Changing the On-Screen Menu Language
VIZIO
Normal
PanoramicWide Zoom
2D 3DExit
VIZIO
Normal
PanoramicWide Zoom
2D 3DExit
Your Stream Player can display the on-screen
menu in different languages.
To change the on-screen menu language:
1. From the System Menu, highlight Language
and press OK. The Language menu displays.
2. Highlight your preferred language (English,
French, or Spanish) and press OK.
3. Press the Exit button on the remote.
Setting the Time and Local Settings:
To set the Stream Player’s time and local settings:
1. From the System Menu, highlight Time &
Local Settings and press OK. The Time &
Local Settings menu displays.
2. Highlight Time Zone and use the Left/Right
Arrow buttons to select your preffered time zone.
3. Highlight Daylight Savings use the Left/
Right Arrow buttons to turn On or Off
daylight savings.
LANGUAGE
English
French
Spanish
June 12, 2013 05:12PM
Time Zone Pacific
Daylight Savings Off
Zip Code 92620
Country USA
4. Highlight Zip Code and press OK. Use the
on-screen keyboard to enter your preffered Zip code.
5. Highlight Country and use the Left/Right Arrow
buttons to select your preffered country.
6. Press the Exit button on the remote.
28
Page 31

Change the Output Video Resolution
VIZIO
ABC
Normal
PanoramicWide Zoom
2D 3DExit
VIZIO
ABC
Normal
PanoramicWide Zoom
2D 3DExit
You can adjust the output video resolution of the
Stream Player.
To change the output video resolution:
1. From the System Menu, highlight Output Video
Resolution and press OK. The Output video
Resolution menu displays.
2. Highlight the resolution you wish to use and press
OK:
• Auto: The Stream Player will auto detect the
output resolution of the content being played.
• 720p: The Stream Player will output content at
720p.
• 1080p: The Stream Player will output content at
1080p.
Setting the Screen Saver Settings
You can adjust the screen saver settings of the Stream Player.
To change the screen saver settings:
1. From the System Menu, highlight Screen Saver
and press OK. The Screen Saver menu displays.
2. Highlight Off, 10 minutes, 30 minutes, 1 hour, 2
hours, or 3 hours. The screen saver will appear
after the period of inactivity selected.
OUTPUT VIDEO RESOLUTION
Auto
720p
1080p
SCREEN SAVER
Off
10 minutes
30 minutes
1 hours
2 hours
3 hours
29
Page 32

Resetting the Stream Player to Factory Default Settings
Help
Network
Sleep
Timer
Input CC
ABC
Audio
Wide
Normal
Picture
Settings
PanoramicWide Zoom
2D 3DExit
All of the on-screen menu settings can be
reset to the factory defaults. If you restore the
Stream Player to the factory default settings, all
changes you have made to the settings will be
lost.
VIZIO
RESET
Reset Co-Star LT to Factory Settings
To restore the Stream Player to its factory default
settings:
1. From the System Menu, highlight Reset and
press OK. The Reset menu displays.
2. Highlight Reset Co-Star LT to Factory
Settings and press OK.
3. The Stream Player will display: “Select Reset
to return to default factory settings”
4. Highlight Reset and press OK.
5. Wait for the Stream Player to turn off and the
TV screen will go blank. The Stream Player
will turn back on shortly afterward and the
Setup App will begin.
Clear memory and reset all Co-Star LT settings to
factory defaults. This will also clear all account
information in your VIA apps.
30
Page 33

USING THE GUIDED SETUP MENU
Help
Network
Sleep
Timer
Input CC
ABC
Audio
Wide
Normal
Picture
Settings
PanoramicWide Zoom
2D 3DExit
The Stream Player's Setup App can be used
to easily adjust the screen size, connect the
Stream Player with your network, or set up the
preferred power mode.
Using Guided Setup
To access guided setup:
1. Press the V button on the remote control.
The VIZIO Internet Apps Plus™ dock displays.
2. Use the Left/Right Arrow buttons to
highlight Settings and press OK. Th e
on-screen settings menu is displayed.
VIZIO
GUIDED SETUP
Screen Size
Network Setup
Power Mode
3. Use the Up/Down Arrow buttons to
highlight Guided Setup and press OK. Th e
Guided Setup menu is displayed.
4. Highlight the guided setup you want to
access and press OK:
• Screen Size: Adjust the picture size to
best fit your TV.
• Network Setup: Connect the Stream
Player to your network.
• Power Mode: Select a preferred power
mode for your Stream Player.
31
Page 34

VIEWING THE ON-SCREEN USER MANUAL
VIZIO
ABC
Normal
PanoramicWide Zoom
2D 3DExit
VIZIO
ABC
Normal
PanoramicWide Zoom
2D 3DExit
A copy of the Stream Player's user manual is
included on the Stream Player itself.
To view the on-screen user manual:
1. From the Settings Menu, highlight User Manual
and press OK. The User Manual displays.
2. Use the remote to navigate the user manual:
• Use the Up and Down Arrow Buttons to
select the chapter you want to view.
• Use the Left and Right Arrow Buttons to
browse through the pages in each chapter.
SETTING THE STREAM PLAYER TO STANDBY MODE
You can set the Stream Player to standby mode
to conserve energy.
To set the stream player to standby mode:
1. From the System Menu, highlight Settings
and press OK. The Settings menu displays.
2. Use the Up/Down Arrow buttons to highlight
Standby now and press OK. The stream
player goes to standby mode.
3. To wake the stream player from standby
mode, press any button on the remote control.
Note: When in standby mode, no content from the
HDMI input will be displayed. (For example, video
passthrough)
32
SETTINGS
Audio
Network
System
Guided Setup
User Manual
Standyby now
SETTINGS
Audio
Network
System
Guided Setup
User Manual
Standyby now
Page 35

PLAYING USB MEDIA
To play USB media, you must first save your music,
images, and videos onto a USB thumb drive.
Remember:
• The USB thumb drive must be formatted
as FAT32.
• The player is not designed to play media
from external hard drives or mp3 players.
To play your USB media:
1. Connect your USB thumb drive to the USB
port on the back of the Stream Player.
2. Press the V button on the remote control. The
VIZIO Internet Apps Plus™ dock displays.
3. Use the Left/Right Arrow buttons to
highlight Multimedia and press OK. Th e
Media App launches.
4. Highlight your USB device in the list and
press OK.
5. Highlight the type of media you wish to
display: Music, Photo, or Video. Press OK.
6. Use the Arrow buttons to highlight the file you
want to display. Press OK. The file plays.
You can display your photos in
fullscreen. Select the photo, press
OK, then highlight Fullscreen and
press OK.
33
Page 36

TROUBLESHOOTING
I am having trouble connecting to my network.
• Try repositioning the Stream Player or your router/modem for the best wireless connection.
• Turn all devices off. Restart your router/modem.
• Try to use another internet-connected device. If it is not working correctly, call your internet service
provider (ISP).
There is no picture on the TV.
• Ensure all devices are plugged in. Turn all devices on.
• Set your TV input to the HDMI port the Stream Player is connected to.
• Ensure the HDMI cable connected to your TV is connected to the OUT port on the Stream Player.
See page 8.
• The Stream Player may be in Standby mode. Ensure the power LED is on and press any button on
the stream player's remote control. The Stream Player takes a few seconds to resume from Standby.
• Unplug the power cable from the Stream Player and plug it back in. The Stream Player restarts.
There is a picture but no sound.
• Ensure your TV is not set to MUTE.
• Increase the volume on your TV.
• If you are using a cable or satellite box, increase the volume on that device.
• If the issue only happens with one app, try restarting that app or checking the in-app settings.
The remote control is not working.
• Ensure the batteries are inserted properly. See
• Place new batteries into the remote.
My Stream Player is not responding.
• Unplug the power cable from the Stream Player and plug it back in. The Stream Player restarts.
• If your Stream Player still does not respond, you can manually restore the Stream Player to its
factory default settings.
Warning: All changes you have made to the settings will be lost.
1. Ensure the Stream Player is plugged into the power outlet.
2. Use a paper clip to press the reset button located on the bottom of the Stream Player for 5 seconds.
3. The Stream Player resets and the first-time setup starts.
Remote Control
34
on page 10.
Page 37

LEGAL / COMPLIANCE
FCC Class B Radio Interference Statement
NOTE: This equipment has been tested and found to comply with the limits for a Class B digital device, pursuant to Part 15 of the FCC Rules. These limits are designed to provide reasonable protection against
harmful interference in a residential installation. This equipment generates, uses and can radiate radio frequency energy, and if not installed and used in accordance with the instructions, may cause harmful
interference to radio communications. However, there is no guarantee that interference will not occur in a particular installation. If this equipment does cause harmful interference to radio or television reception,
which can be determined by turning the equipment off and on, the user is encouraged to try to correct the interference by one or more of the following measures:
1. Reorient or relocate the receiving antenna.
2. Increase the separation between the equipment and receiver.
3. Connect the equipment into an outlet on a circuit different from that to which the receiver is connected.
4. Consult the dealer or an experienced radio/Player technician for help.
Notice:
1. The changes or modifications not expressly approved by the party responsible for compliance could void the user’s authority to operate the equipment.
2. Shielded interface cables and AC power cord, if any, must be used in order to comply with the emission limits.
3. The manufacturer is not responsible for any radio or Player interference caused by unauthorized modification to this equipment. It is the responsibilities of the user to correct such interference.
RF Exposure Information
This device meets the government’s requirements for exposure to radio waves. This device is designed and manufactured not to exceed the emission limits for exposure to radio frequency (RF) energy set by the
Federal Communications Commission of the U.S. Government. This device complies with FCC radiation exposure limits set forth for an uncontrolled environment.
IC Statement
Operation is subject to the following two conditions:
1. This device may not cause interference, and
2. This device must accept any interference, including interference that may cause undesired operation of the device.
This Class B digital apparatus complies with Canadian ICES-003.
Cet appareil numérique de la classe B est conforme à la norme NMB-003 du Canada.
IC Radiation Exposure Statement
This equipment complies with IC RSS-102 radiation exposure limits set forth for an uncontrolled environment. This equipment should be installed and operated with minimum distance 20cm between the radiator
& your body.
Internet Connectivity
High speed internet connectively required and sold separately. Network conditions, environmental and other factors may negatively affect connectivity and the resulting video quality.
VIZIO Internet Applications (V.I.A.) Policy
VIZIO Internet Applications (“VIA”) affords the opportunity to access third party Internet product offerings or services (“VIA Services”) on certain VIZIO devices incorporating the VIA functionality. The VIA Services
accessible herein are provided as per our agreement with these third parties. These agreements are subject to change, interruption, suspension (including termination) at any time and for various reasons.
VIZIO makes no warranties or representations that any particular VIA Service will be accessible, available, function in any particular manner or function at all. This Policy, the VIZIO Privacy Policy and the V.I.A.
Software License Agreement apply equally to V.I.A. devices and V.I.A. Plus devices.
Internet Access Required for VIA Services; Updates:
To use these VIA Services, you must obtain high-speed/broadband access to the Internet (such as DSL, cable or T1 lines), either directly or through devices that access the Internet and pay any service fees
associated with such access. In addition, you must provide all equipment necessary to make such connection to the Internet including a modem or other Internet access device. Each individual third party
Internet product may require different minimum Internet connection speed. The usability and availably of a functional VIA device and its Internet connected feature may highly be dependent and varied based
on high-speed/broadband internet access, connection speed, bandwidth, other equipment(s), third party applications, firmware updates and other factors outside of VIZIO’s control and/or responsibility
which may also be independent of the actual operation of the device. It is further understood that VIA enabled devices are integrated with sophisticated technologies (software and hardware) which may
exhibit delayed boot-up/shutdown time and/or interrupted services. You further understand that the VIA Services specifications and functionality are constantly evolving and that we may directly, or indirectly
via third parties, update or change the VIA Services, in whole or in par t, at any time and without notice to you. Such updates may be required for you to use certain aspects of the VIA services or to continue
to connect to the VIA Services.
Availability of Content on VIA Services:
VIZIO or said third parties providing VIA Services reserve the right to delete data from their servers, or prevent access to their servers or to change data categories, product offerings or service levels for any reason
that VIZIO or said third parties deem sufficient in their sole discretion at any time, without notice. VIZIO may also impose additional or different limits on the use of or access to certain VIA Services, in any case
35
Page 38

and without notice or liability. Some or all of the data or functionality of VIA Services may require additional payment and/or subscription by you. However, in no event will you be charged for any VIA Services
unless those charges are made known to you in advance. VIZIO makes no warranties or representations of any kind as to the accuracy, currency, or completeness of any information contained on the data
servers of such third party providers of any VIA Services. Furthermore, we do not review, control, or endorse the content, products or services of VIA Services or their data servers.
VIA SERVICES ARE PROVIDED “AS IS” AND “AS AVAILABLE,” WITHOUT WARRANTY OF ANY KIND (INCLUDING ANY IMPLIED WARRANTY OF MERCHANT¬ABILITY, NON-INFRINGEMENT, OR FITNESS FOR A PARTICULAR
PURPOSE), TO THE MAXIMUM EXTENT PERMITTED BY LAW. USE OF THE VIA SERVICES IS AT YOUR SOLE RISK. THIS MEANS, FOR EXAMPLE, THAT VIZIO DOES NOT GUARANTEE THAT THE VIA SERVICES WILL ALWAYS WORK
PROPERLY OR WORK AT ALL. THIS ALSO MEANS WE DO NOT GUARANTEE THAT THE VIA SERVICES, CONTENT OR PRODUCTS WILL BE FREE FROM VIRUSES, HACKS, OR OTHER POTENTIALLY HARMFUL INTR USIONS. PLEASE
NOTE THAT SOME STATES DO NOT ALLOW SUCH WARRANTY LIMITATIONS, SO THESE LIMITATIONS MAY NOT APPLY TO YOU.
VIA Services Content Disclaimer:
Certain VIA Services may include materials from third parties or links to certain third party data servers. You acknowledge and agree that VIZIO is not responsible for examining or evaluating the content or
accuracy of any VIA Services, their data servers or related third-party materials. VIZIO does not warrant or endorse and does not assume and will not have any liability or responsibility for any third-party materials
or web sites, or for any other materials, products, or services of third parties. Links to VIA Services and any associated links to other data servers are provided solely as a convenience to you. To the extent provided,
content types or descriptions of VIA Services are provided for convenience, and you acknowledge and agree that VIZIO does not guarantee their accuracy. You understand that by using any of the VIA Services,
you may encounter content that may be deemed offensive, indecent, or objectionable, which content may or may not be identified as having explicit language. Nevertheless, you agree to use the VIA Services
at your sole risk and that VIZIO shall have no liability to you for content that may be found to be offensive, indecent, or objectionable.
You agree that you will not use any third-party materials in a manner that would infringe or violate the rights of any other party, and that VIZIO is not in any way responsible for any such use by you.
VIZIO Privacy Policy; VIA Software License Agreement:
Your right to use links to access VIA Services is also governed by VIZIO’s Privacy Policy and the VIZIO Internet Applications Software License Agreement (“VIA Software License Agreement”), the terms of which are
incorporated herein by this reference. The terms of both the Privacy Policy and VIA Software License Agreement may be found in your Product Guide and on VIZIO’s website. In the event of a conflict between
the VIZIO Internet Applications (VIA) Policy and the VIA Software License Agreement, the VIA Software License Agreement shall control. BY YOUR USE OF THE VIA SERVICES, YOU EXPRESSLY AGREE TO ALL THE TERMS
AND CONDITIONS OF THE FOREGOING POLICIES AND AGREEMENT.
VIZIO may change the terms and conditions of this VIA Policy, the VIZIO Privacy Policy and/or the VIA Software License Agreement, at any time and without prior notice. The most up to date versions are available
on the Internet at: www.vizio.com. If you do not have Internet access, you should periodically contact our customer service department and we will mail you a current version, free of charge. IF YOU DO NOT
AGREE TO ALL OF THE TERMS AND CONDITIONS OF THE VIA POLICY, THE VIZIO PRIVACY POLICY AND/OR THE VIA SOFTWARE LICENSE AGREEMENT OR ANY CHANGES THERETO, YOU MUST IMMEDIATELY CEASE USE OF
THE VIA SERVICES.
TECHNICAL SUPPORT
All VIZIO products include FREE lifetime technical support. The VIZIO
support team is highly trained and is based in the United States.
We can help with:
• Product Setup
• Technical Problems
• Warranty Questions
• And More
Phone:
Email:
Web :
(877) 698-4946 (TOLL-FREE)
techsupport@VIZIO.com
www.VIZIO.com/support
Hours of operation:
Monday - Friday: 5 AM TO 7 PM (PST)
Saturday - Sunday: 8 AM TO 4 PM (PST)
36
Page 39

LIMITED WARRANTY
ON PARTS AND LABOR
Covers units purchased as new in United States and Puerto Rico Only
VIZIO provides a warranty to the original purchaser of a new Product against defects in materials and workmanship for a period of one year of non-commercial usage and
ninety (90) days of commercial use. If a Product covered by this warranty is determined to be defective within the warranty period, VIZIO will either repair or replace the Product
at its sole option and discretion.
To obtain warranty service, contact VIZIO Technical Support via e-mail: TechSupport@VIZIO.com or via phone at 877 MY VIZIO (877.698.4946) from 5:00AM to 9:00PM Monday
through Friday and 8:00AM to 4:00PM Saturday and Sunday, Pacific Time, or visit www.VIZIO.com. PRE-AUTHORIZATION MUST BE OBTAINED BEFORE SENDING ANY PRODUCT TO A
VIZIO SERVICE CENTER. Proof of purchase in the form of a purchase receipt or copy thereof is required to show that a Product is within the warranty period.
Parts and Labor
There will be no charge for parts or labor during the warranty period. Replacement parts and Products may be new or recertified at VIZIO’s option and sole discretion.
Replacement parts and Products are warranted for the remaining portion of the original warranty or for ninety (90) days from warranty service or replacement, whichever is
greater.
Type of Service
Defective Products must be sent to a VIZIO service center to obtain warranty service. VIZIO is not responsible for transportation costs to the service center, but VIZIO will cover return
shipping to the customer. PRE-AUTHORIZATION IS REQUIRED BEFORE SENDING ANY PRODUCT TO A VIZIO SERVICE CENTER FOR WARRANTY SERVICE.
Product returns to VIZIO’s service centers must utilize either the original carton box and shipping material or packaging that affords an equal degree of protection. VIZIO Technical
Support will provide instructions for packing and shipping the covered Product to the VIZIO service center.
Limitations and Exclusions
VIZIO’s one-year limited warranty only covers defects in materials and workmanship. This warranty does not cover, for example: cosmetic damage, normal wear and tear,
improper operation, improper voltage supply or power surges, signal issues, damages from shipping, acts of God, any type of customer misuse, modifications or adjustments, as
well as installation and set-up issues or any repairs attempted by anyone other than by a VIZIO authorized service center. Products with unreadable or removed serial numbers,
or requiring routine maintenance are not covered. This one year limited warranty does not cover Products sold “AS IS”, “FACTORY RECERTIFIED”, or by a non-authorized reseller.
THERE ARE NO EXPRESS WARRANTIES OTHER THAN THOSE LISTED OR DESCRIBED ABOVE. ANY IMPLIED WARRANTIES, INCLUDING ANY IMPLIED WARRANTY OF MERCHANTABILITY AND
FITNESS FOR A PARTICULAR PURPOSE, SHALL BE LIMITED IN DURATION TO THE PERIOD OF TIME SET FORTH ABOVE. VIZIO’S TOTAL LIABILITY FOR ANY AND ALL LOSSES AND DAMAGES
RESULTING FROM ANY CAUSE WHATSOEVER INCLUDING VIZIO’S NEGLIGENCE, ALLEGED DAMAGE, OR DEFECTIVE GOODS, WHETHER SUCH DEFECTS ARE DISCOVERABLE OR LATENT,
SHALL IN NO EVENT EXCEED THE PURCHASE PRICE OF THE PRODUCT. VIZIO SHALL NOT BE RESPONSIBLE FOR LOSS OF USE, LOSS OF INFORMATION OR DATA, COMMERCIAL LOSS, LOST
REVENUE OR LOST PROFITS, OR OTHER INCIDENTAL OR CONSEQUENTIAL DAMAGES. SOME STATES DO NOT ALLOW LIMITATIONS ON HOW LONG AN IMPLIED WARRANTY LASTS OR THE
EXCLUSION OF INCIDENTAL OR CONSEQUENTIAL DAMAGES, SO THE ABOVE LIMITATIONS OR EXCLUSIONS MAY NOT APPLY TO YOU. THIS WARRANTY GIVES YOU SPECIFIC LEGAL RIGHTS,
AND YOU MAY ALSO HAVE OTHER RIGHTS, WHICH VARY FROM STATE TO STATE. THIS WARRANTY IS SUBJECT TO CHANGE WITHOUT NOTICE.
CHECK www.VIZIO.com FOR THE MOST CURRENT VERSION.
SPECIFICATIONS
FEATURES
Co-Star™ LT TV Platform VIZIO Internet Apps Plus™ (V.I.A. Plus)
VIDEO
Resolution Supported 720p, 1080p
3D Support Pass-through
Video Playback H.263, H.264, AVC, MP4, VP8 WMV9/VC-1
TV Compatibility HDTV with HDMI-HDCP port
AUDIO
Music Playback MP3, WMA
Audio Features Up to 5.1 surround sound Pass-through
This product qualifies for ENERGY STAR in the “factory default”
setting and this is the setting in which power savings will be
achieved. Changing the factory default settings or enabling
other features will increase power consumption that could
exceed the limits necessary to qualify for ENERGY STAR rating.
We want to help you save energy.
DIMENSIONS (WxHxD)
Dimensions 3.97" x 3.97" x .96"
CONNECTIONS
NETWORKING
WARRANTY
37
Weight .36 lbs
HDMI In 1
HDMI Out 1
USB 2.0 1
WiFi 802.11 n/g/b
1 Year
HDMI, the HDMI logo and High-Definition Multimedia Interface
are trademarks or registered trademarks of HDMI Licensing LLC.
Page 40

© 2013 VIZIO INC. ALL RIGHTS RESERVED.
130716OC-NC
 Loading...