

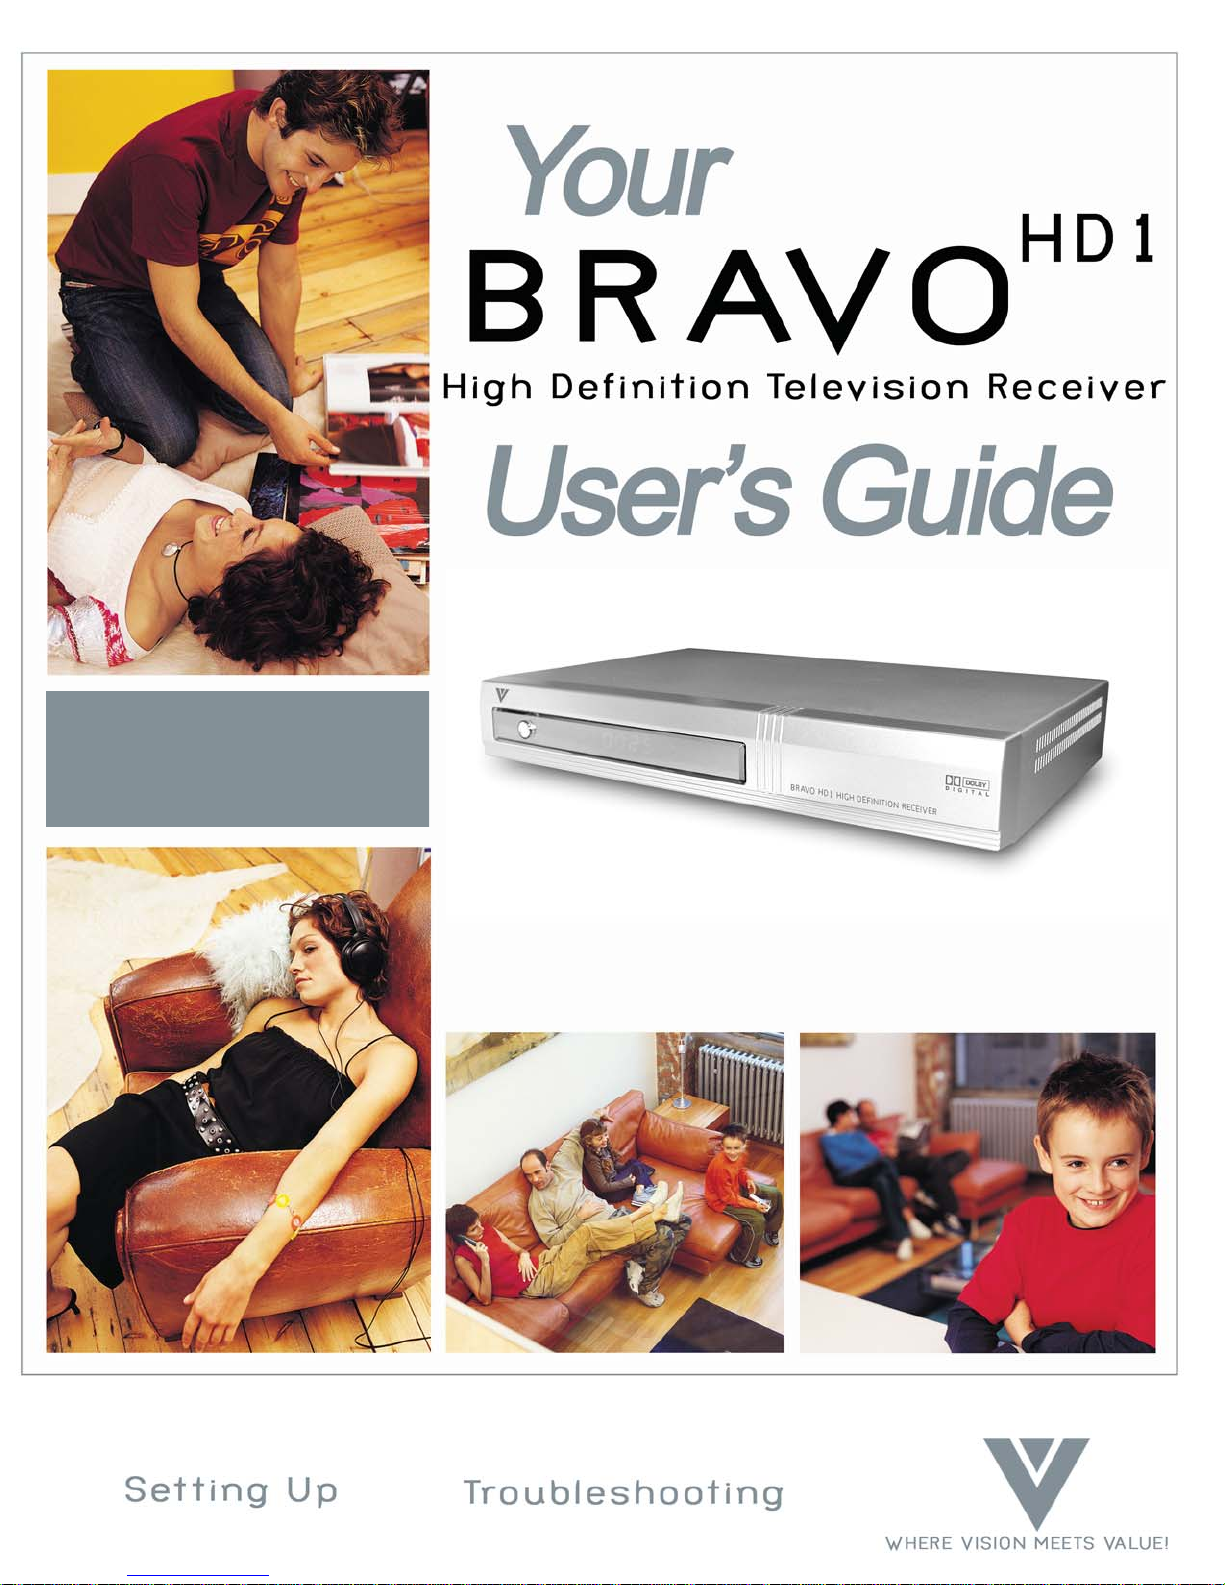
Page 1
Page 2
Safety First
Please review the following safety precautions. If this is first time to use a terrestrial TV receiver, then read this manual
before installing or using the terrestrial TV receiver. If the receiver is not functioning properly, please contact your local
distributor or system installer.
The lightening symbol in a triangle is used to alert you to the presence of dangerous voltage inside the receiver that
may be sufficient to constitute a risk of electric shock to anyone opening the case. It is also used to indicate improper
installation or handling of the receiver that could damage the electrical system in the receiver or in other equipment
attached to the receiver.
The exclamation point in a triangle is used to alert you to important operating and maintenance instructions.
Failure to follow these instructions could result in injury to you or damage to the receiver.
Be careful with electricity:
Power outlet: To prevent electric shock be sure the electrical plug used on the receiver’s power cord matches the
electrical outlet used to supply power to the receiver. Connect the power cord only to a power
source that operates at 90~260 Volts AC, 50/60 Hz.
Power plug: If a three-prong power plug is provided with the receiver, be sure it is used with a properly grounded
three-wire power socket.
Power cord: Be sure the power cord is routed so that it will not be stepped on or pinched by heavy items.
Power overloading: Avoid overloading electrical outlets or extension cords, which otherwise could result in
electric shock or fire.
Lightening: For protection from lightening, or when the receiver is left unattended for a long period, disconnect it
from the power source.
Protect other equipment: Unplug the receiver before connecting any other equipment, especially the TV antenna
Connect all equipment to the receiver before plugging any power cords to the power source.
Power line: Be sure your TV antenna is not located near overhead power lines, or where it might fall into
any power lines. Also be careful to avoid touching any such power lines when installing the
TV antenna.
Antenna Grounding: Be sure that antenna is grounded to provide protection from Lightening and build-up
of static electricity .
WARNING!
RISK OF ELECTRICAL SHOCK
DO NOT OPEN
WARNING:
TO REDUCE THE RISK OF ELECTRICAL SHOCK
DO NOT REMOVE THE COVER
NO USER-SERVICEABLE P ARTS ARE INSIDE
REFER SERVICING TO QUALIFIED PERSONNEL
Page 3

Also follow these precautions:
Ventilation: Do not block the ventilation slots on the receiver, or place any heavy object on top of it.
Blocking the air flow could damage the receiver. Arrange components so that air can flow freely around the receiver.
Ensure that there is adequate ventilation if the receiver is placed in a stand. Put the receiver in a properly ventilated
area, away from direct sunlight or any source of heat.
Overheating: Avoid stacking the receiver on top of a hot component such as a power amplifier.
Risk Of Fire: Do not place the receiver on top of any easily combustible material, such as carpet or fabric.
Proper Connections: Be sure all cables an equipment are connected to the receiver as described in this manual.
Object Entry: To avoid electric shock, never stick anything in the slots on the case or remove the cover.
Water Exposure: To reduce the risk of fire or electric shock, do not expose the receiver to rain or moisture.
EMI (Electro Magnetic Interference) tested
Page 4

TABLE OF CONTENT
INTRODUCTION………………………………………………………………………….…. . 1
RECEIVER FUNCTIONS……..……………………………………………………………... . 1
SUMMARY OF FEATURES…………………………………………………………………. . 2
BEGIN TO SET UP RECEPTION SYSTEM……………………………………………….…. 3
FRONT PANEL……………………………………………………………………………….. . 4
REAR PANEL……………………………….…………………………………………………. 4
REMOTE CONTROL………………………………………………………………………… . 5
MENU MAP.……………………………………………………………………………… . 6
CONNECTING TO AUDIO VIDEO DEVICES.……………………………………………… . 7
CONNECTING TO HDTV DISPLAY AND HOME THEATER………………... …….,…… 8
CONNECTING TO SDTV DISPLAY AND AUDIO/VIDEO DEVICES…………………… 9
INSTALLATION….……………………………………………………….…………………… 10
AUTOMATIC INSTALLATION….……………………………………………………….… . 10
MANUAL INSTALLATION ………………………………………………………………….. 11
PROGRAM…. ………………………………………………………………………………… 11
ELECTRONIC PROGRAM GUIDE………………………………………………………….. 12
SYSTEM…………….. ……………………………………………………………………….. 12
PASSWORD ………………………………………………………………………………….. 12
VIDEO SETUP ….……………………………………………………………………………. 13
AUDIO SETUP ….…………………………………………………………………………… . 13
S/W UPDATE ………..……………………………………………………………………….. 13
EDIT CHANNEL……………………………………………………………………………… 15
PROFILE ……… ….………………………………………………………………….…….. 15
TRANSPARENCY ………………………………………………………………………….... 15
MULTILINGUAL …………..……………………………………………………………………... . 16
INFORMATION ………………………………………………………………………………. 16
I-PLATE ……………………………………………………………………………………….. 16
AUX IN ………………………………………………………………………………………. 17
PIP ……………………….…………………………………………………………………….. 17
CLOSED CAPTION / TELETEXT………………………………………………………….. . 18
FAVORITE CHANNEL LIST ……………………………………………………………….. 18
APPENDIX 1 DTV CHANNEL TABLE ………………………………………………….. 19
APPENDIX 2 TROUBLE SHOOTING ……………………………………………………. 23
APPENDIX 3 GLOSSARY…………………………………………………………….…... 25
APPENDIX 4 TECHNICAL SPECIFICATION ………………………………………….. 26
Page 5

A Brief Look at Terrestrial Television
Terrestrial broadcast is a traditional way of watching TV program, simply by installing an outdoor YAGI antenna or indoor
rabbit ear antenna, plugging it into the TV set’s tuner, tuning channel, then you can enjoying watching the programs.
However, they are all so called “analog TV”
In recent years, “digital TV” arises and most countries’ governments begin to mandate a Digital TV Transition from the old
analog TV broadcast system. Digital TV brings viewer greater entertainment in terms of not only a noise free High
Definition picture quality and Dolby AC-3 sound effect, but also the handy “EPG” (electronic program guide). 16:9 video
format gives a wider view of the same program compared with traditional 4:3 format. In the near future terrestrial data
broadcast will create a complete digitized world in every family. Many terrestrial TV broadcasts at this moment are
delivering digital TV programs, when the time of government mandated transition deadline comes, all the analog TV
transmissions have to give way to digital, which makes the Bravo series digital terrestrial HDTV receivers a wise investment
now.
Digital TV programs are broadcasted on both VHF and UHF radio frequency bands. Traditional analog TV transmission uses
one radio frequency channel for carrying one TV station’s programs, in the digital TV transmission one radio frequency
channel can carry up to four more TV station’s programs. For instance, the original analog channel CBS you used to watch
now may have become 2-1,2-2,2-3,2-4 when it’s broadcasted in digital, here we call 2 as the major channel and -1, -2, -3 and
-4 are subchannel numbers. These four sub channels usually come from the same TV station and show four different
programs at the same time.
Digital TV signals are transmitted in either Free-to-Air (FTA) mode or Pay-per-View (PPV) mode. FTA signals can be
received for free by anyone with a MPEG 2 – DVB compliant digital terrestrial receiver, such of the Bravo series, Whereas
the PPV programs can only be received by paying an access fee to the broadcaster and using a Digital receiver incorporating
compatible conditional access system.
The BRAVO HD1 receiver allows you to watch both HDTV, EDTV and SDTV digital TV programs.
*HDTV stands for High Definition Television, its common video formats are “1920 x 1080 interlaced” or “1280 x 720
progressive”.
*EDTV stands for Enhanced Definition Television, its common video format is “720 x 480 progressive)
*SDTV stands for Standard Definition Television, its common video format is “720 x 480 interlaced)
The BRAVO HD1 Digital Terrestrial HDTV Receiver opens up a new world of free-to-air terrestrial HDTV and SDTV
programming. The receiver can receive channels from both VHF band and UHF band TV station’s signals. All the major
terrestrial free-to-air station numbers currently available in your area are listed in the on-screen menu. To watch the
channel simply by selecting the channel number and you will be accessing a wide range of local high quality digital
programming.
The receiver is fully ATSC / MPEG-2 (digital video broadcast-terrestrial) compliant, delivering High Definition
crystal-sharp video and Dolby AC-3 sound. It supports a radio signal range from 50-860 MHz, so can be easily
programmed for all the channels within the VHF and UHF frequency bands. It can receive major and subchannels
containing both video and audio programs.
These receivers have the capability of receiving hundreds of channels simply by selecting alternate TV channel frequencies
in your area. To find out the specific digital TV services available to you, please contact your local service provider or log
onto the website “http://www.antennaweb.org”. With the wide range of features and terrestrial HDTV programming opened
up to you by Bravo series digital terrestrial receivers, prepare yourself for a new era in home theater entertainment.
1
INTRODUCTION
RECEIVER FUNCTIONS
Page 6

The receiver support digital functions that are fully ATSC / MPEG-2 compliant, can store up to 1,500 digital channels and
receive Free-to-Air digital TV programs transmitted from all the available VHF and UHF Band terrestrial signals in your
area. Just follow the friendly On-Screen Display (OSD) to guide you through all the steps necessary to configure your
receiver; then begin enjoying all the video and audio channels with crisp picture quality and the crystal clear sound.
The key features of the Bravo HD1 receiver series are described below.
Front Panel There is a Power On/Off Button on the Front Panel of the receiver and a display which shows the channel
selected while the receiver is powered on, and as a clock, shows the time when the receiver is powered off.
Remote Control The remote control provides access to full range of system features. In addition to providing access
to terrestrial TV programs with channel and volume controls, it can be used to operate all the system
menus. In particular, the remote control must be used to configure the channel settings, and select the
channels you want to include in the program list, as well as to access many other configuration options.
System Menus All the receiver’s features can be accessed through the system menus. These menus can be used simply
by pointing and clicking, you can navigate through all the options in the menu and press "Select" button on
the remote control or "Enter" button on the front panel.
The menus include items such as channel configuration ,channel list, electronic program guide, audio
options, and parental lock.
Audio Options The receiver includes standard audio options such as stereo or mono sound to match the broadcast signal or
your home entertainment stereo system.
Other audio options may be supported by your service provider or TV broadcaster, such as selecting
alternate languages, or different commentators for sports events.
Parental Locks Access to certain channels with content that might not be suitable for younger viewers can be controlled
by password set up by adult people. Program rating is shown on the I-Plate which can be activated by
pressing “Info” key on the remote control, press “Info” twice you can access the extended program
information of the current channel.
2
SUMMARY OF FEATURES
Page 7

If your service provider or system installer has already set up the TV antenna and connected it to the receiver, then you may
want to skip this section. However, if you are setting up the system by yourself, please read this section through
"Connecting To Audio Video Devices" on page 9 and 10, and be sure you follow all the precautions listed under “Safety
First”.
Note: Installation procedures for TV antenna and related equipments are not covered in this manual
Package Contents
Unpack the receiver and verify that all of the following items are included. Remember to keep the packaging in case you
need to return the receiver for repair or upgrade. Examine all the items to ensure that nothing has been damaged during
shipment. If any of the items is damaged, please contact your service provider or local distributor before continuing with
installation.
BRAVO HD1 Terrestrial HDTV Receiver
Remote Control (with 2AA batteries)
Audio/Video cable with RCA jacks
Component Video cable (Y/Pb/Pr)
AC Adaptor.
Power Cable.
This user’s manual
Description of Equipment
BRAVO HD1 digital terrestrial receiver series is designed to receive free-to-air or pay TV access programs from both VHF
band and UHF band terrestrial TV channels. The receiver is operated via the remote control or directly from front panel as
indicated in the following pages. The receiver also provides a wide variety of options for attaching to your TV and other
home entertainment equipment by connector of Component Video Y/Pb/Pr, Composite Video (RCA), S-Video, Audio L/R
(RCA) and Fiber Optic SPDIF.
3
Begin To Set Up Reception System
Page 8

BRAVO HD1 HIGH DEFINITION RECEIVER
Power on/off
POWER CONNECTOR S-VIDEO
POWER CONNECTOR DC input from AC Adaptor Connect it with TV Display’s S-Video
S-Video input connector
OUT VIDEO / L / R OPTICAL
Connect them with TV Display’s Connect it with SPDIF out Coaxial output
Input RCA jacks
Y/Pb/Pr IN VIDEO/ L/R
Connect it with HD or Widescreen TV Connect them with DVD or VCR’s Video
Display’s Y/Pb/Pr video inputs L / R Output RCA jacks
RS-232 ANT IN
Connect it with the PC for software Connect it with UHF/VHF antenna
upgrade for terrestrial Digital TV signal input
4
FRONT PANEL
REAR PANEL
Page 9
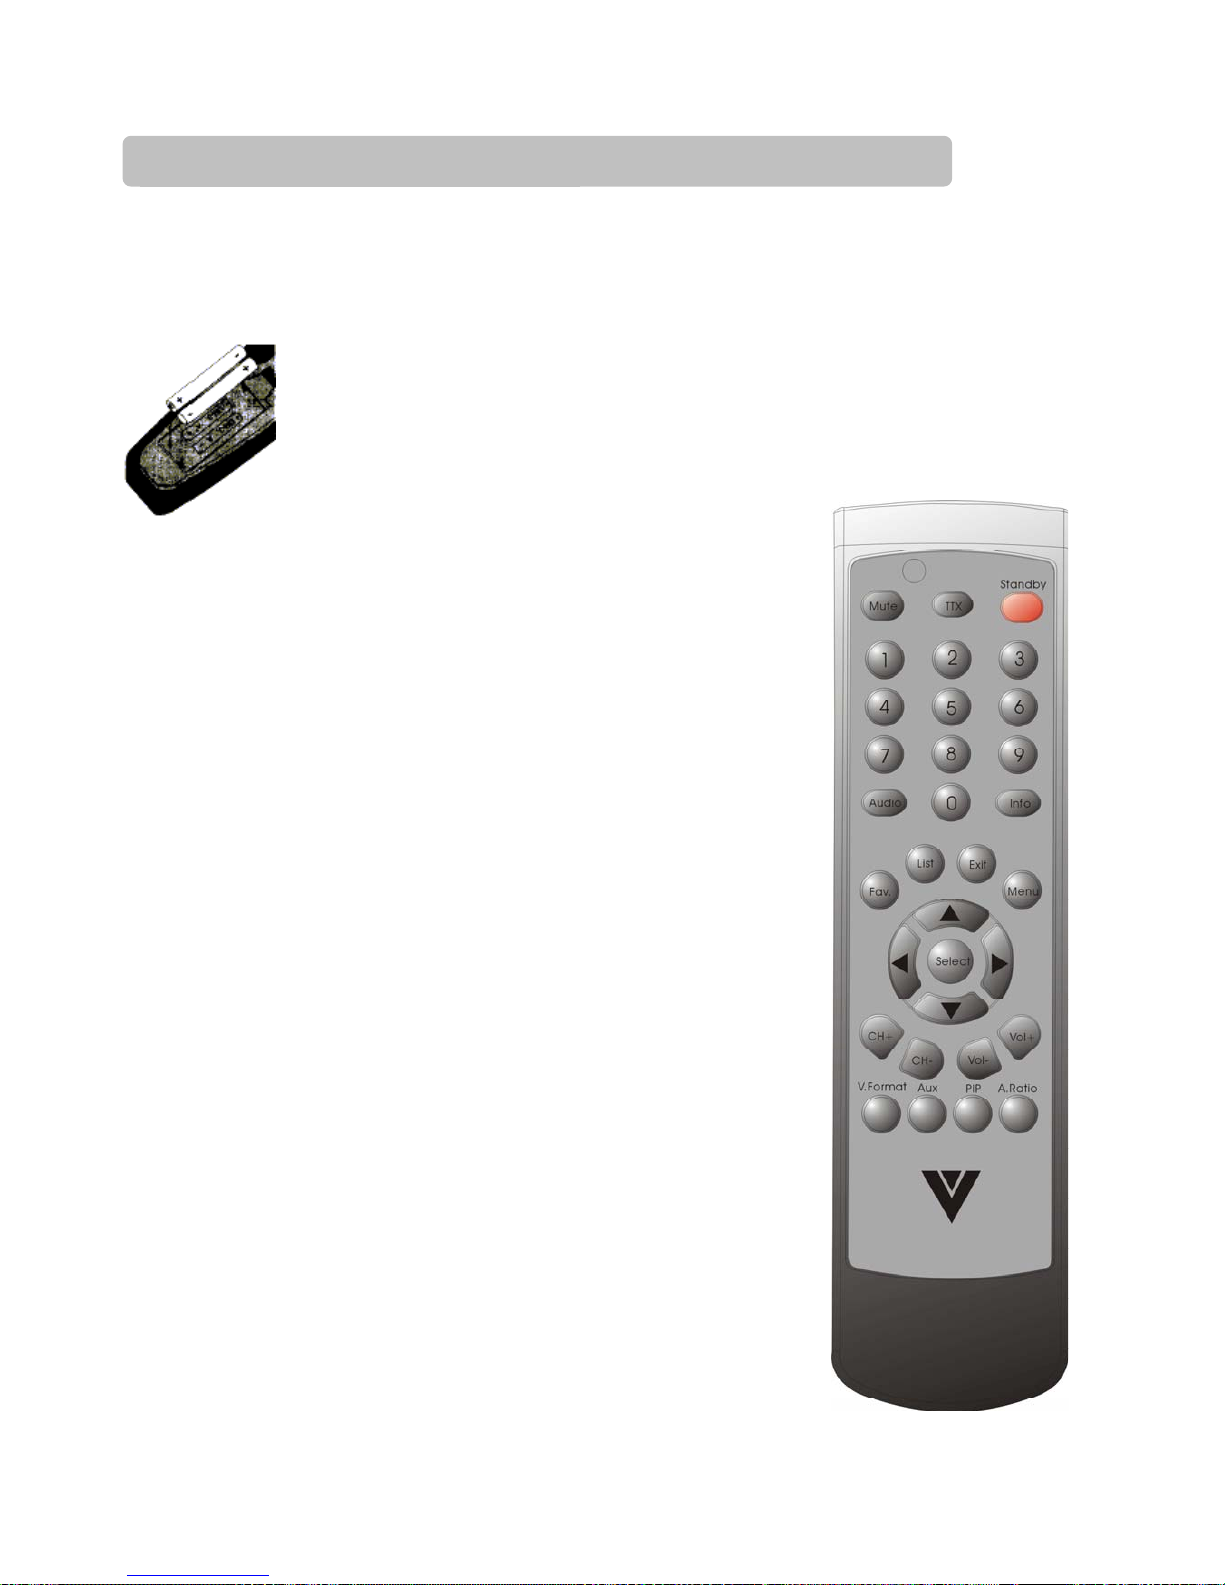
The remote control provides easy access to all of the receiver’s functions, including selecting channels and using the menus.
It uses infrared signals, and must be operated within three to four meters from the receiver.
When using the remote control, be sure there is a direct line of sight to the receiver. Also note that although the receiver
can be operated from the buttons on the front panel, some of the receiver’s functions can only be accessed using the remote
control. The batteries for remote control are packaged separately, please install these batteries in the remote control before
using the receiver. And check battery +/-is correct.
To avoid damaging the remote control, discard any depleted or old
batteries.
The buttons on the remote control are described as follows
• Numeric Buttons For entering channel number or password
• STANDBY Switches the receiver between ON and STANDBY modes
• INFO Displays I-Plate providing information about the current channel
• AUDIO Toggles between multi-lingual Audio soundtracks
• MENU Activates the On-Screen Menu
• LIST Displays the complete channel/program list
• FAV Displays the Favorite channel list
• Direction buttons To move through menus or submenus
• SELECT Selects the highlighted menu or submenu item
• CH+/CH- Provides channel up and down functions
• VOL+/VOL- Increases or decreases audio volume
• A.RATIO Adjusts the aspects ratio between 16:9 and 4:3
- Wide Vision : to display 16:9 program on 16:9 TV screen
to display 4:3 program on 4:3 TV screen
- Wideview Normal : to display 16:9 program on 4:3 TV screen in
letterbox
- Normal Vision : to display 16:9 program cropped on 4:3 TV screen
• PIP Shows the multiple programs list in the same DTV Network
the receiver is tuned to and allows displaying the second program
on the TV screen
• AUX Selects between ANT.IN (DTV signal) and AUX (DVD or
VCR) inputs
• V.Format Toggle between 576i, 576p, 720p and 1080i video format
through Y/Pb/Pr video format connector
5
REMOTE CONTROL
Page 10
5
6
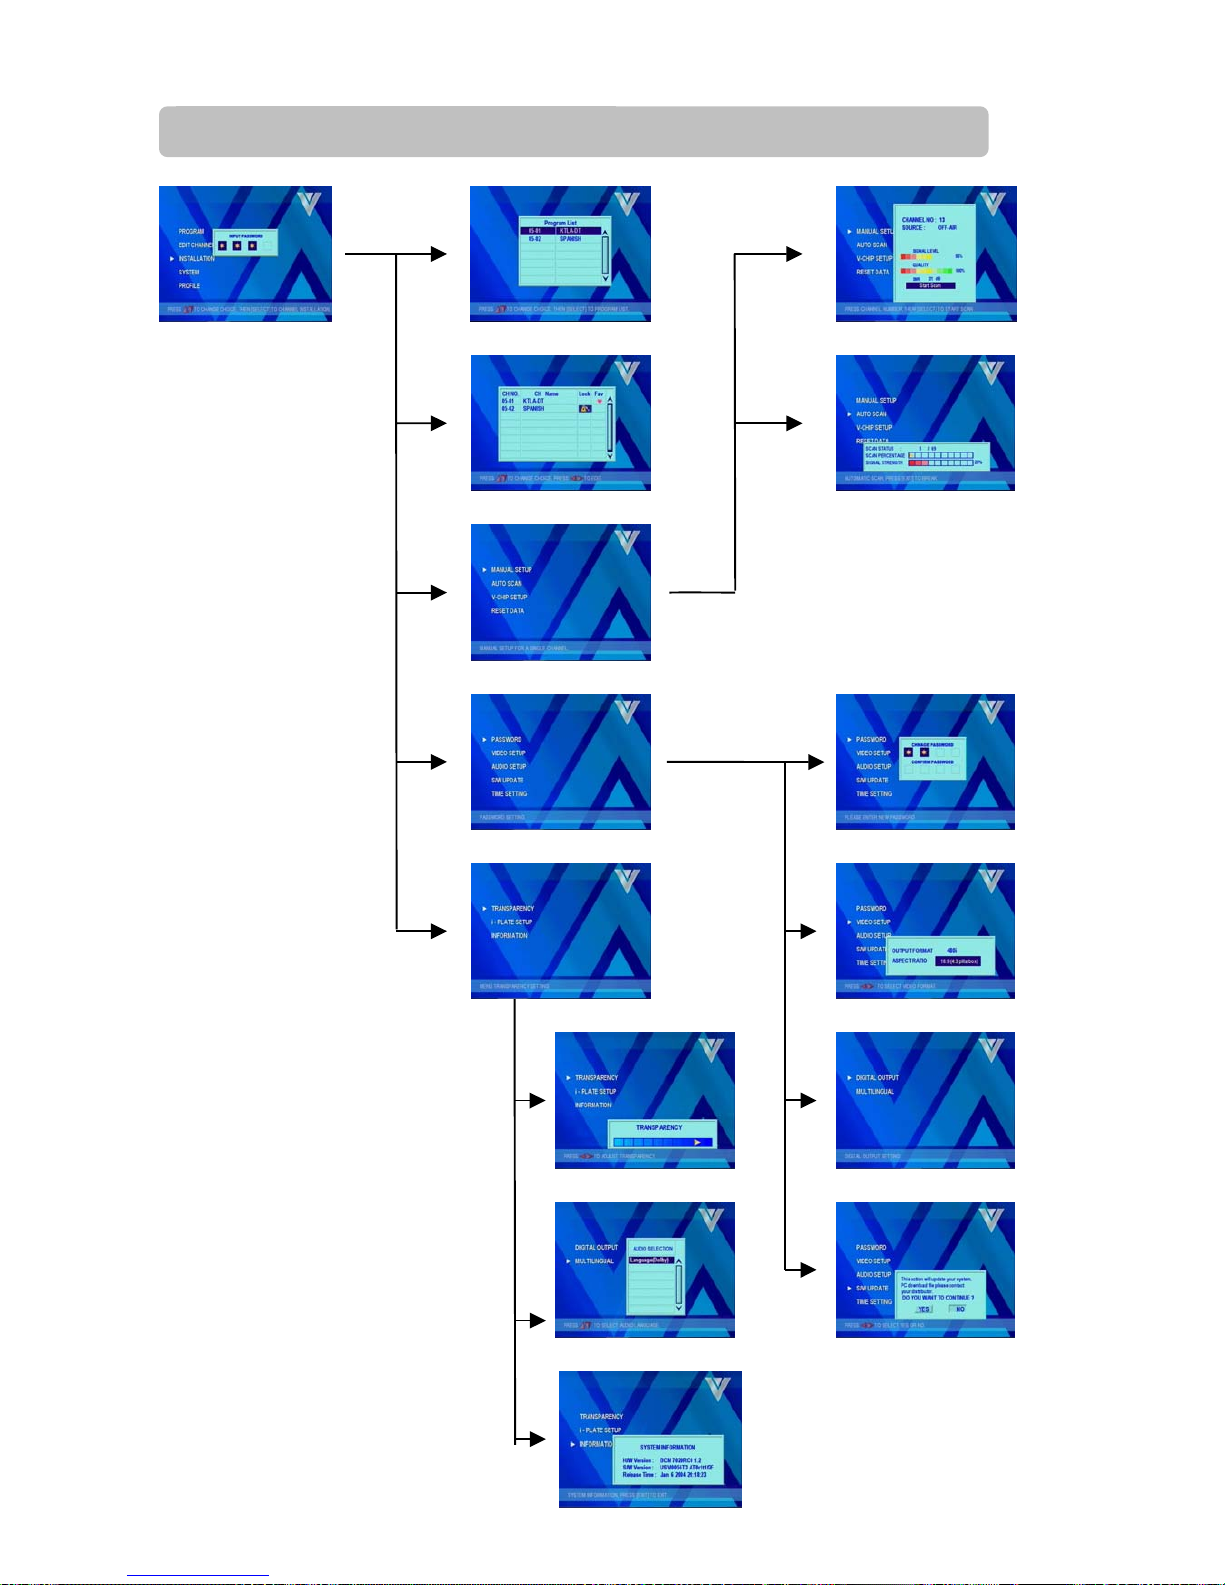
MENU MAP
MAIN MENU PROGRAM MANUAL SETUP
AUTO SCAN EDIT CHANNEL
INSTALLATION
SYSTEM
PROFILE
PASSWORD
VIDEO SETUP
AUDIO SETUP TRANSPARENCY
MULTILINGUAL
INFORMATION
S/W UPDATE
Page 11

Physical Installation
There are many ways to connect the terrestrial receiver to your home entertainment system, depending on the
equipment and connection types you have. However, for the best video/audio quality, use the higher quality
Y/Pr/Pr or S-Video connections if available. And always remember to disconnect the the receiver from the power
source prior to connecting or after disconnecting the cable to the UHF/VHF antenna
Video Cable Types
RF connector and coaxial cable – provides good picture and mono sound.
If you connect the Off – Air broadcast to the receiver, you must use the RF
connector for the signal input.
Audio/Video (RCA) connector and cables – provide better picture quality and
stereo sound. These cables are commonly grouped with three connectors on
both ends, and are color coded as yellow –video signal, white – left signal,
and red – right audio signal.
S-Video (super-video) connector and cable – provides even better picture
quality – When using this cable type, you still need to use the RCA audio
connection(s) for sound.
SPDIF connector (Fiber Optic) – deliver on decoded audio AC-3 signal
to your sound amplifier.
Notes:
(a) If your TV Display supports 1080i / 720p / 480p / 480i video input formats, please use the receiver’s Y/Pb/Pr
video output connectors to connect with the TV Display
Then use the FORMAT key on the remote control to switch between four video output formats 1080i / 720p /
480p / 480i
(b) If your TV Display supports 480p/ 480i video input formats, you can also follow (a) above for connection
(c) If your TV Display supports 480i video input format, please use the receiver’s S-VIDEO or VIDEO output
connectors to connect with the TV Display
Before Connecting to other devices
!
When the receiver is connected to the antenna attached with a signal amplifier which requires
power supply, be sure the amplifier doesn't have power leakage before connecting the coaxial cable to
the receiver. You can find connections between the receiver and all the related devices in graphics on
the next page.
7
CONNECTING TO AUDIO VIDEO DEVICES
Page 12

Connecting to HDTV Display or Wide Screen Display with Y/Pb/Pr Inputs
Connecting the receiver’s Y/Pb/Pr with HDTV Display
You can choose to connect OUT L/R (audio) connectors to HDTV Display for Dolby AC-3
downmixed two channels or connect the S/PDIF OUT with the Dobly Surround AC-3 Amplifier
Connecting to UHF/VHF antenna
Connecting the receiver’s ANT A IN with the UHF/VHF antenna
Connecting to DVD Player or VCR
Connecting the receiver’s IN VIDEO/L/R RCA jacks with DVD’s or VCR’s video/audio output
This input can accept SD Video only ( 480i )
Connecting to Dolby Surround AC-3 Amplifier
Connecting the receiver’s S/PDIF with Dolby Surround AC-3 Amplifier
8
CONNECTING TO HDTV Monitor and Home Theater
Page 13

Connecting to SDTV Display with Composite Video / Audio Two Channels Inputs
Connecting the receiver’s OUT VIDEO with SDTV Display
You can choose to connect OUT L/R (audio) connectors to SDTV Display for Dolby AC-3
downmixed two channels or connect the S/PDIF OUT with the Dobly Surround AC-3 Amplifier
Connecting to UHF/VHF antenna
Connecting the receiver’s ANT.IN with the UHF/VHF antenna
Connecting to Dolby Surround AC-3 Amplifier
Connecting the receiver’s S/PDIF with Dolby Surround AC-3 Amplifier
This input can accept SD Video only ( 480i )
Connecting to DVD Player or VCR
Connecting the receiver’s IN VIDEO/L/R RCA jacks with DVD’s or VCR’s video/audio output
9
CONNECTING TO SDTV Display and other Audio/Video Devices
Page 14

If your service provider or antenna installer has already installed your TV system to receive terrestrial TV and Analog Cable
TV, services do not change any of the connections of those devices or installation settings unless it’s absolutely necessary.
If your receiver has not been configured by your service provider or system installer, then it will not be set up for any
specific channel or frequency when powered on for the first time.
● Initial Screen –
The first time the receiver is powered on, it will
display the asic “MENU” and background.
● Use the arrow keys ▼▲ to move through
the menu, the SELECT button to choose specific
item, and EXIT button to return to the main menu
from submenus or leave the main menu.
The steps required to automatically program the receiver
are outlined as below:
● Select “INSTALLATION” and enter into
Installation page.
● Select the “AUTO SCAN” to start automatic
scanning function
● The receiver starts scanning from channel 2 to
channel 69. The percentage bar shows the progress
being made.
● Once the digital TV signal is scanned, the channel
number and program name will be shown on the
Program List above the percentage bar.
● It takes about four minutes to complete the whole
scanning process.
● Scanning will end up on channel 69,when it is
complete you can press “exit” key to leave this
window and enjoy watching DTV programs.
10
INSTALLATION
AUTO SCAN
Page 15

● On the Installation page, select “MANUAL SETUP”.
● Select channel number. Be sure you know the
channel number and its RF frequency. You can refer
to terrestrial Digital TV channel table on page 20,
21,22,23 for information
● Press “▼” key to highlight “Start to Scan” and press
SELECT button to start scanning
● If the signal is locked, the wording “Start Scan” will
change to “Get Channel Success”. Then you can
press “EXIT” twice to leave the Installation page and
watch the program or go ahead scanning the other
channels.
● If the signal is not locked, “Start Scan” will
show “Time out error”. You can scan the signal again
or refer to the signal level bar “LVL” and bit error
rate counter “BER” for aligning the direction of
the antenna to get the signal.
● When the signal is locked and the receiver is
on the channel, you can enter into this
“MANUAL SETUP” page to check
the signal level and bit error rate.
Note : We suggest you to contact the antenna
Installer when you have to trouble of locking
the signal.
● Under the main menu, select “PROGRAM” to start
list scanned TV programs.
If you connect your receiver with external
video/audio source like DVD player, you can select
AUX to switch the signal input source to DVD
player.
● Use “▲” and “▼” keys to browse through the
channel numbers and names
11
PROGRAM
MANUAL SETUP
Page 16

● If you want to know the program guide of the
specific channel, just highlight the channel and
press “SELECT” key, the electronic program
guide will pop up.
● Use “
▲” and “▼” keys to select the specific
event you want to learn its details, and press
select key, the event details will pop up
● Under the main menu, when you select “SYSTEM”
and enter into its sub-menu.
● Use “
▲” and “▼” keys to highlight the options
- PASSWORD
- VIDEO SETUP
- AUDIO SETUP
- S/W UPDATE
● Highlight “PASSWORD” and press “SELECT”,
you will be asked to enter into NEW PASSWORD
● Enter the password again to CONFIRM it
12
PASSWORD
Electronic Program Guide
SYSTEM
Page 17
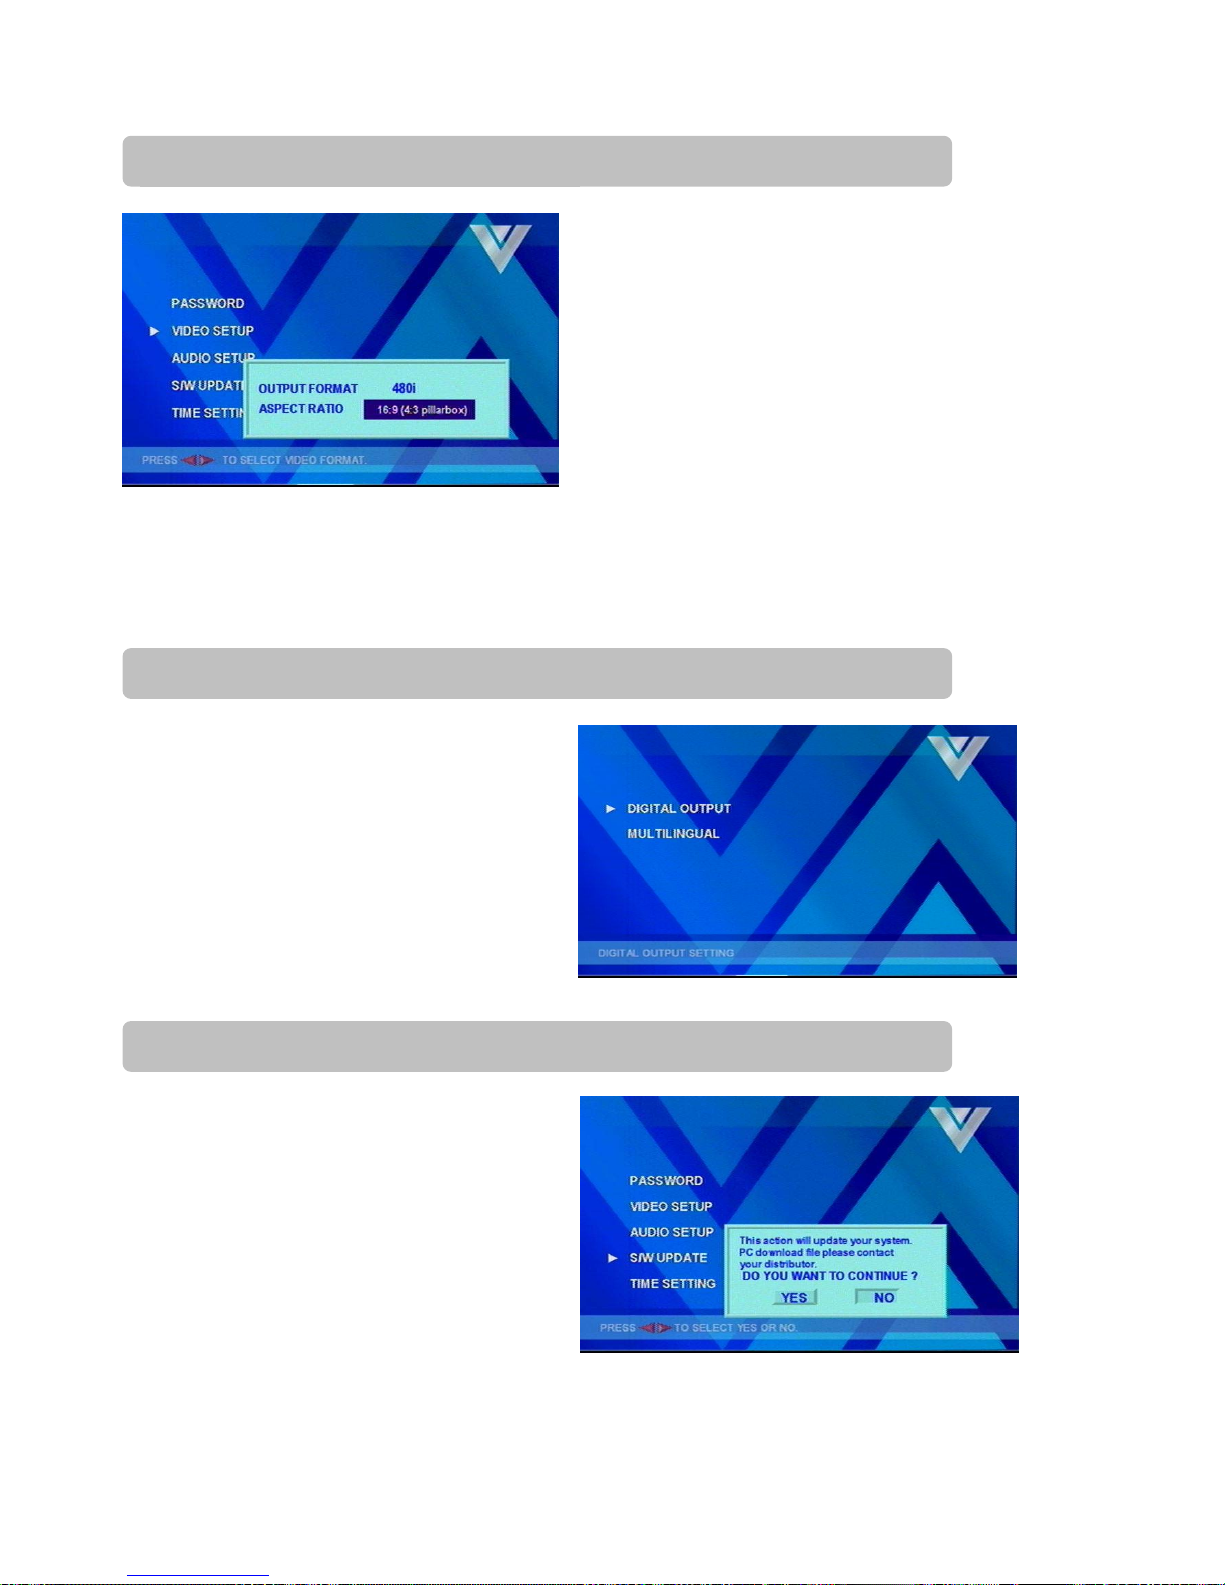
● Under SYSTEM sub-menu, you can select
VIDEO SETUP
● Use “
◄” and “►” keys to switch between
“4:3” and “16:9” picture formats
- Wide Vision :
to display 16:9 program on 16:9 TV screen
to display 4:3 program on 4:3 TV screen
- Wide view Normal :
to display 16:9 program on 4:3 TV screen in
letterbox
- Normal Vision :
to display 16:9 program cropped on 4:3 TV
screen
● Under SYSTEM sub-menu, you can select
AUDIO SETUP
● Use “
▲” and “▼” keys to switch between
“PCM” and “AC3” Audio output systems
Note : PCM means MPEG 1 Layer I and II compliant
audio signal or analog audio signal
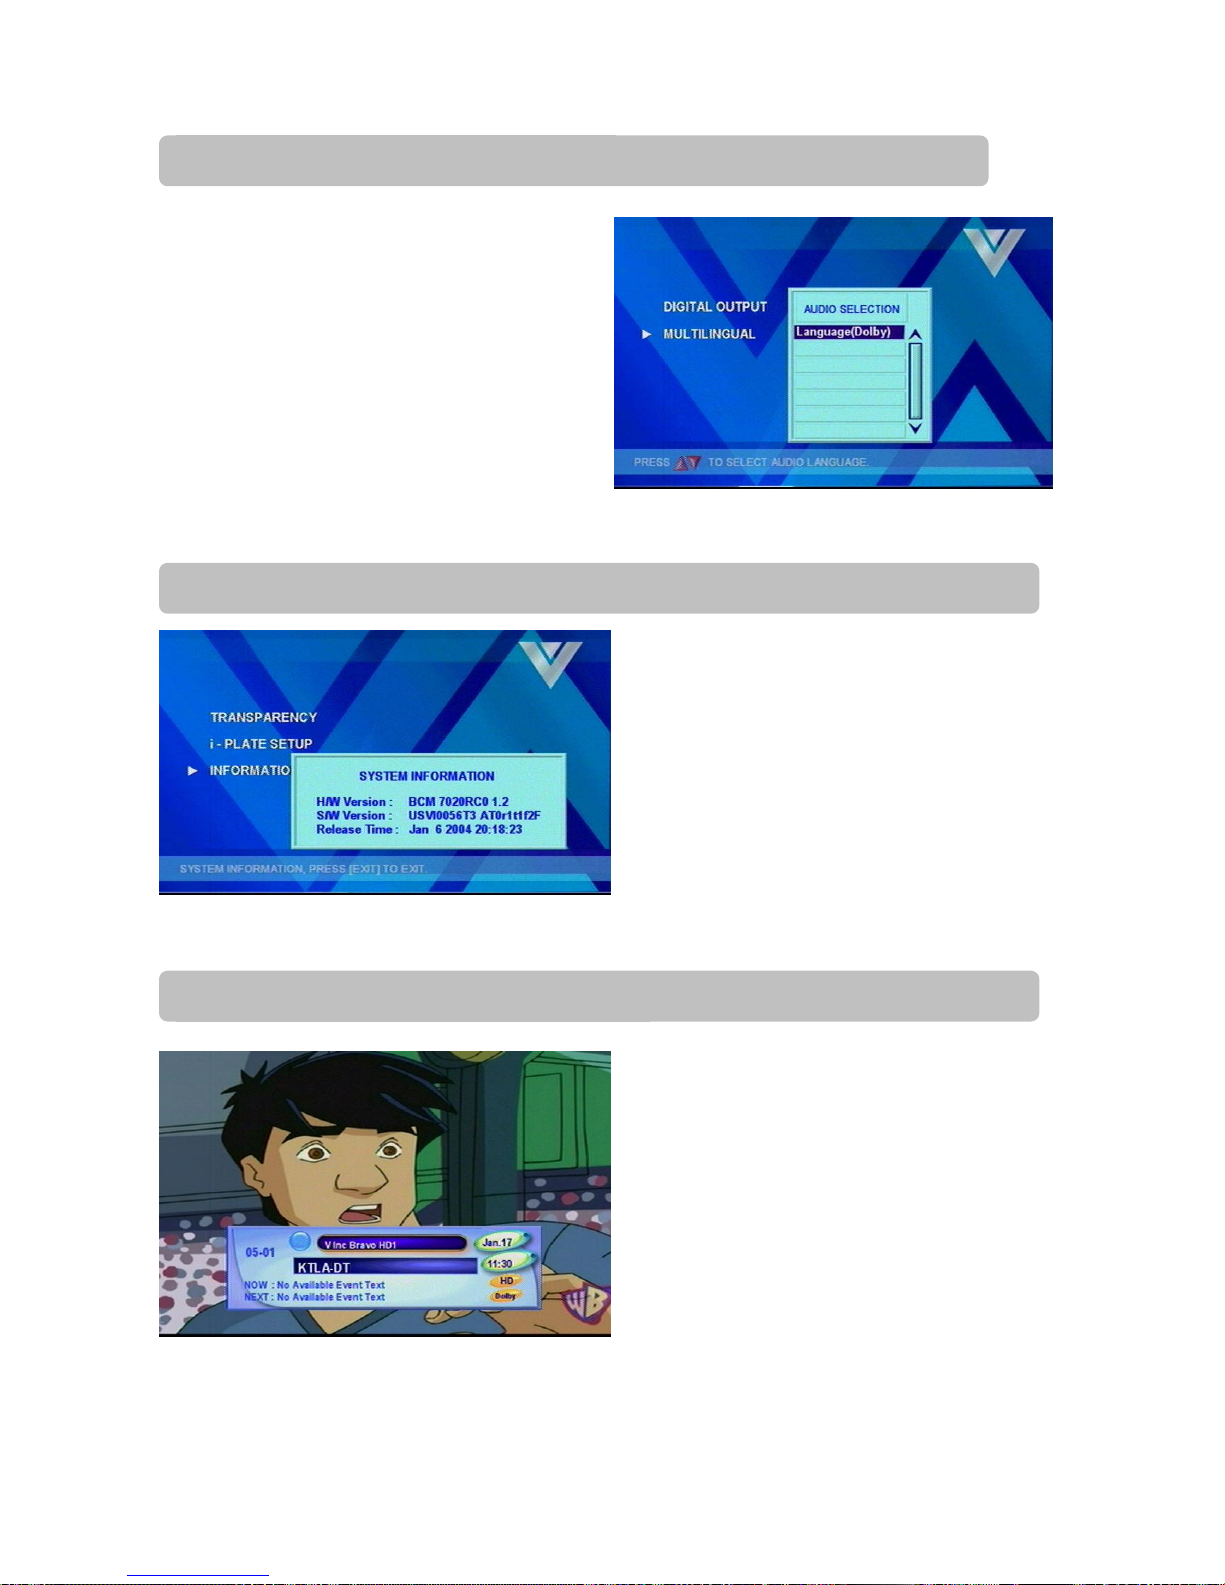
● Under SYSTEM sub-menu, the fourth option is
S/W UPDATE. However, we suggest you consult
your local dealer first and know how to operate MS
Windows HyperTerminal on your PC before updating
The software.
● On selecting this option, a window will pop up
asking you whether you want to update and firmware
● If the receiver is not well connected to the PC with
the RS-232 port and new download files are not stored
on the PC, please select “NO”.
Or you can refer to the following steps to get your
PC ready for the software update:
-Continue to the next page -
13
VIDEO SETUP
AUDIO SETUP
SOFTWARE UPDATE
Page 18

(a) Connect PC and BRAVO HD1 with cross-over
RS232 cable (cable for null modem)
(b) ON the PC side : Launch MS Windows
HyperTerminal
- Name the connection
- Select the correct Com Port – usually Com 1
- Comport setting :
baud rate: 115200
data:8
parity:none
stop bit:1
flow control: none
- Select HyperTerminal’s basic function “Transfer”
- Select “Send File”
- Browse to select the updated software file
Protocol is “1K Xmodem”
DON’T click on the “Send” button at this time
Then on the receiver side you can select YES
● On the receiver side, After you select YES, a new
message will show in the window telling you the
current
software version and its size, make sure this software
version is different from the version of the updated
software file stored on your PC. Then select YES to
proceed the download, on selecting YES, a new
message
will show up saying the software update is in progress.
● On the PC side you have to click on the Send button to
start uploading the new software.
● On the receiver side you can see the window with a
bar showing you the download progress
● When download is complete, the TV screen will go
blank. On the PC side, the message flow stops. At this
moment please disconnect the receiver’s main lead,
then
connect the main lead to cycle the receiver’s power
● A window will pop up telling you the receiver’s data
base is empty. Please press MENU key on the remote
control, select PROFILE option, then select
INFORMATION to check the new software version
is changed to the new one. Then follow instructions on
page 10 and 11 to scan digital TV channels.
14
Page 19
● Under INSTALLATION sub-menu, you can select
“EDIT” to “LOCK” or set “FAVORITE” channels/
programs from terrestrial TV channels.
● Use “
▲” and “▼” keys to select the channel,
use “
◄” and “►” keys to select “LOCK” or “FAV”
● When you highlight LOCK, press “SELECT” key
the lock icon will show. When you highlight “FAV”,
the deletion icon will show.
● After you have made all the selections, press
“SELECT” key to confirm them.
● Under Main Menu, you can select “PROFILE” to
set up TRANSPARENCY and menu LANGUAGE.
● Use “
▲” and “▼” keys to select the option
● When you select TRANSPARENCY, you can press
“
◄” and “►” keys to change the transparency of the
On Screen Display’s background color
15
PROFILE
TTRRAANNSSPPAARREENNCCYY
EDIT CHANNEL
Page 20
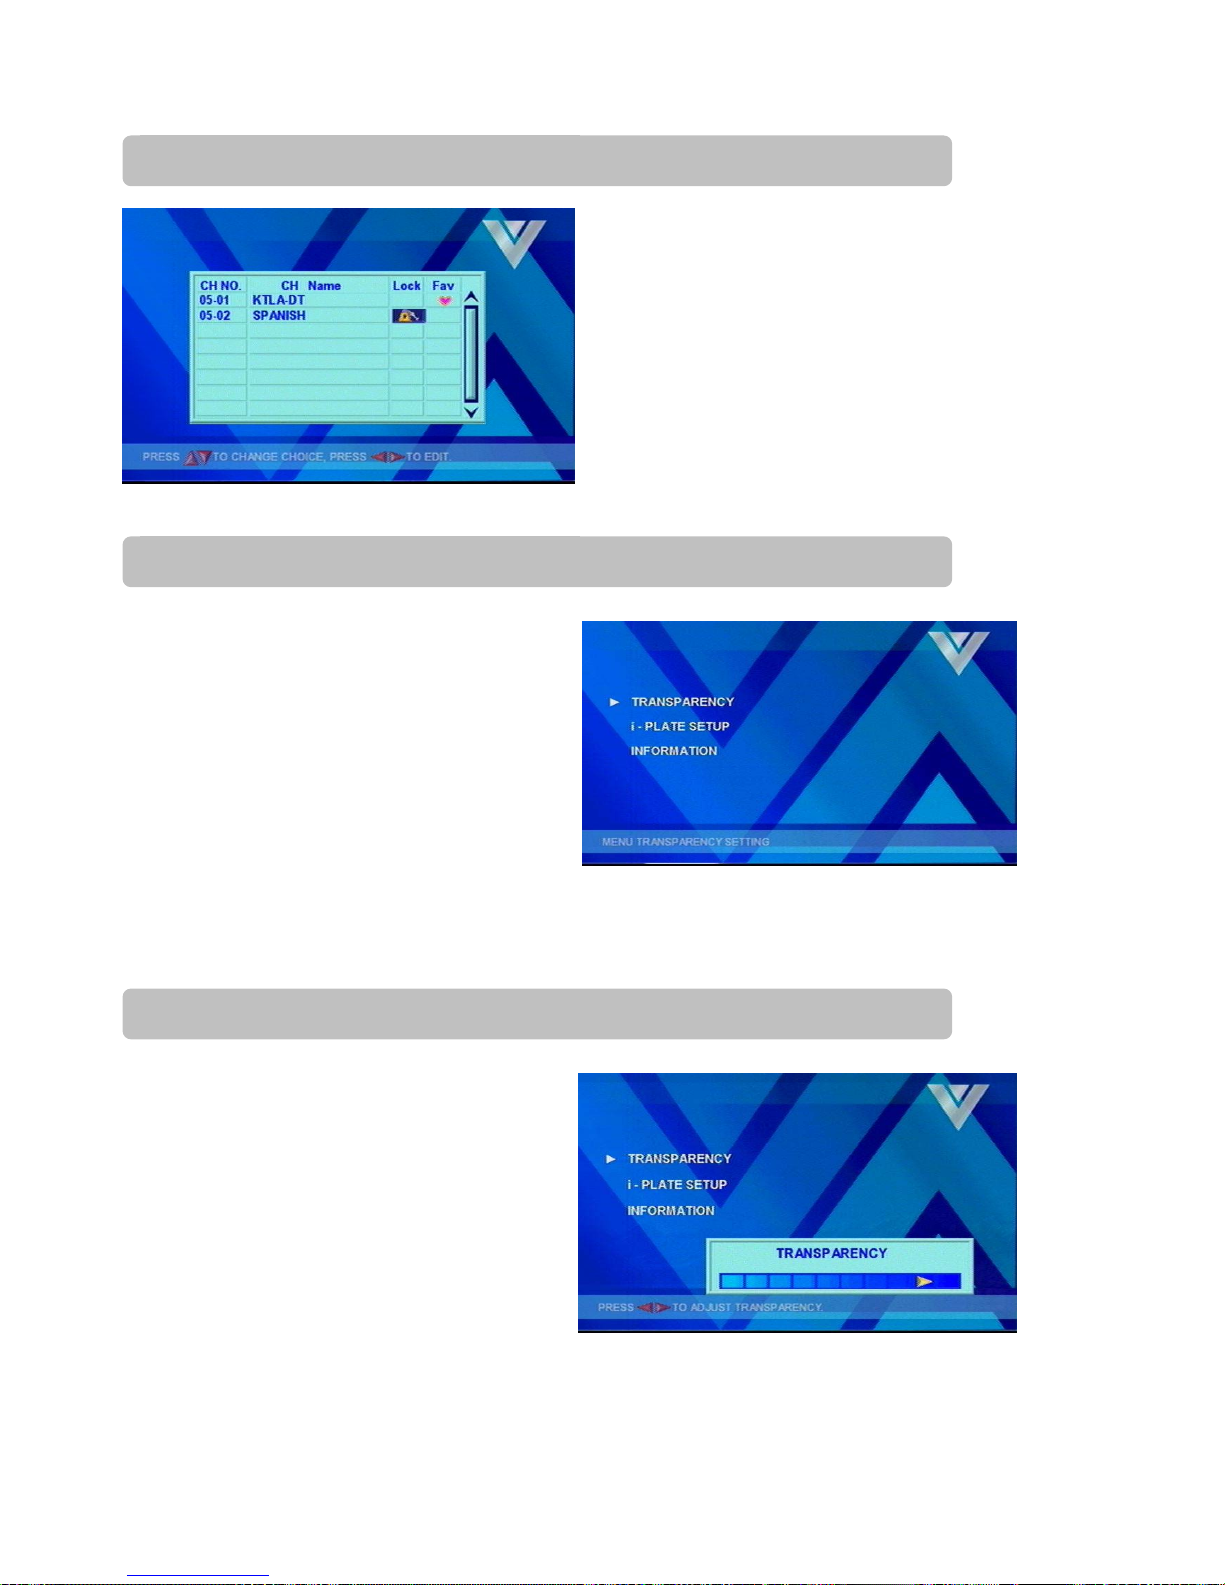
● When you select MULTILINGUAL, you can choose to
display all on-screen messages and configuration
menus in either of the following languages
- English
- Chinese
● Use “▼” and “▲” keys to highlight the language you
want and press SELECT button to change it.
● Under PROFILE’s sub-menu, you can select item
“INFORMATION” to check the hardware version
and software version.
● When you are watching the DTV channels and want
to learn the current program name and relevant
information, you can press “INFO” button.
● After pressing INFO button, the I-PLATE will pop up
including information as follows,
- Current Channel Number
- Network Name
- Program Name
- Audio System (AC-3 or MPEG)
- Digital / Analog TV signal
- Teletext
- Current Local Time
- Date and Month
Note : Be sure the receiver leaves the main menu of
On Screen Display and is tuned to a TV channel
when you press “INFO”.
-Continue to the next page - 16
MULTILINGUAL
I-PLATE (INFORMATION PLATE)
INFORMATION
Page 21

● When the I-Plate is still on the TV screen, you can
press “INFO” button again to call up the extended
program information of the current TV channel
.
● You can highlight the specific program and press
“SELECT” button on the remote control to obtain
detailed program information.
● To leave these windows you can press “EXIT” button
● When you are watching DVD programs from AUX IN
(Video In and Audio In connectors on the receiver’s
back panel), you can press “V.FORMAT” button on
the remote control to upscale the picture resolution to
1080i or 720p.
● Press “PIP” button on the remote control, you can get
the PIP PROGRAM list containing all digital TV
programs within the same RF channel (for instance,
Channel Ten), select the Digital TV program, press
SELECT button , then you can watch this Digital TV
program by PIP, which is in the small screen on the
right bottom side of the screen. .
Note : HD Digital TV program cannot be shown on the
small screen, only SD Digital TV programs are
good for PIP when the receiver is in AUX IN mode
● When you are watching the terrestrial TV programs
(not in Main Menu), you can press PIP button on the
remote control to show the multiple programs on
TV screen
● Use “
▲” and “▼” keys to browse through the
program lists
● Highlight the program and press “SELECT” key
and leave the menu, you will get Picture in Picture –
two programs on the TV screen at the same time.
● To close the small screen you can enter into PIP
again and select “PIP OFF”.
Note : when you are watching terrestrial TV channels and
calling up the PIP PROGRAM window, you can also
select AUX to view external video source such as
DVD player on the small picture window
When you watch terrestrial TV channel, press “
INPUT key
17
PIP (To watch two channels at the same time)
AUX IN (External Video/Audio Input)
Page 22
● When you learn from the I-PLATE that there is
Closed Caption / Teletext data on the current channel,
you can press “TEXT” button on the remote control
to display it on the TV screen
● When you are watching terrestrial TV channels, you
can press “FAV” button on the remote control to call
up the Favorite List.
● Use “
▲” and “▼” keys to browse through the
program lists and highlight the program you want
to watch, then press “SELECT” button
18
CLOSED CAPTION / TELETEXT
FAVORITE CHANNEL LIST
Page 23
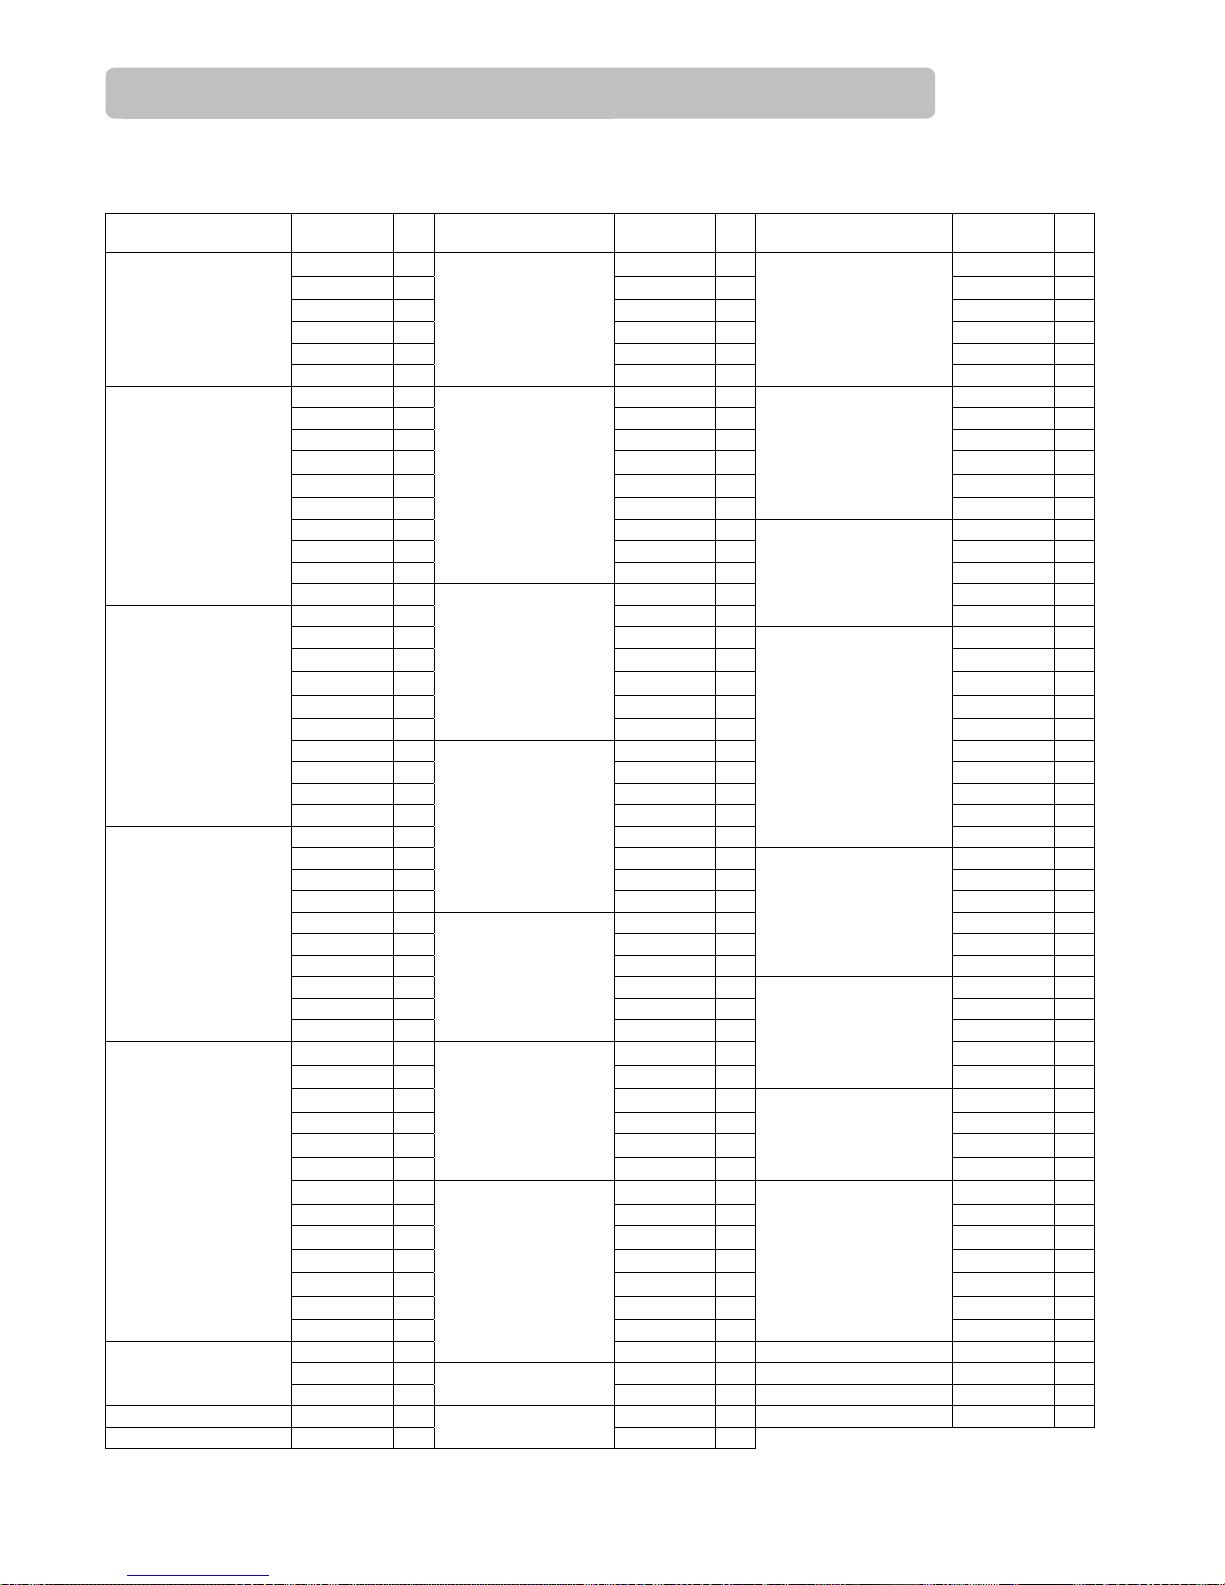
This Channel Table is for reference only,
“DTV Ch” means the Station’s RF (Radiated Frequency) channel number.
City Name Station DTV
Ch
City Name Station DTV
Ch
City Name Station DTV
Ch
WCBS-TV 56 WGBX-TV 43 WFTC 21
WNYW 44 WUTF 23 KSTC-TV 44
WLNY 57 WFXT 31 KARE-TV 35
WFME-TV 29 WCVB-TV 20 KMSP-TV 26
WNYE-TV 24 WMUR-TV 59 KTCI-TV 16
New York
WNET 61
Boston, MA
(Manchester, NH)
WBZ -TV 30
Minneapolis-St.
Paul, MN
KMWB 22
KNBC 36 KTVT 19 WEDU 54
KCET 59 WFAA-TV 9 WTOG 59
KCOP 66 KDFW 35 WFLA-TV 7
KTLA 31 KFWD 51 WTVT 12
KWHY-TV 42 KDFI-TV 36 WTSP-TV 24
KSCI 61 KXAS-TV 41
Tampa-St.
Petersburg
(Sarasota), FL
WFTS 29
KCAL-TV 43 KERA-TV 14 WPLG 9
KTTV 65 KTXA 18 WFOR-TV 22
KCBS-TV 60
Dallas-Ft. Worth,
TX
KDAF 32 WSVN-TV 8
Los Angeles, CA
KABC-TV 53 WETA-TV 27 WPBT 18
WBBM-TV 3 WRC-TV 48
Miami-Ft.
Lauderdale, FL
WBZL 19
WLS -TV 52 WWPX 12 KUTP 26
WFLD 31 WPXW 43 KAET 29
WSNS-TV 45 WTTG-TV 36 KASW 49
WJYS 36 WJLA-TV 39 KPNX-TV 36
WPWR-TV 51
Washington, DC
(Hagerstown,
MD)
WUSA TV 34 KSAZ-TV 31
WGN -TV 19 WGCL 19 KPHO-TV 17
WMAQ-TV 29 WSB -TV 39 KCFG 32
WTTW 47 WAGA 27 KTVK-TV 24
Chicago, IL
WCPX 43 WXIA-TV 10 KTVW-TV 34
WNJN 51 WTBS 20
Phoenix, AZ
KNXV 56
WNJT 43 WPXA 51 WEWS 15
WLVT-TV 62 WUPA 43 WOIO 10
WHYY-TV 55
Atlanta, GA
WATL 25 WMFD-TV 12
WCAU 67 WKBD-TV 14 WJW 31
WFMZ-TV 46 WTVS 43 WKYC-TV 2
WWSI 49 WDIV 45
Cleveland-Akron
(Canton), OH
WUAB 28
WTXF-TV 42 WJBK 58 KRMA-TV 18
WPVI-TV 64 WXYZ-TV 41 KFCT 21
Philadelphia, PA
KYW -TV 26
Detroit, MI
WWJ-TV 44 KCNC-TV 35
KGO -TV 24 KTRK-TV 32 KDVR 32
KTVU 56 KHOU-TV 31
Denver, CO
KMGH-TV 17
KPIX 29 KRIV 27 KXTV 61
KSTS 49 KPRC-TV 35 KOVR-TV 25
KCNS-TV 39 KTXH 19 KTXL 55
KICU-TV 52
Houston, TX
KUHT 9
SacramentoStocktonModesto, CA
KCRA-TV 35
KTSF 27 KCTS-TV 41 WESH 11
KRON-TV 57 KSTW 36 WOPX 48
KTLN-TV 47 KTWB-TV 25 WRBW 41
KNTV-TV 12 KING-TV 48 WKCF 17
KBHK-TV 45 KCPQ 18 WOFL 22
KQED 30 KONG-TV 31 WFTV 39
San FranciscoOakland-San Jose,
CA
KBWB 19 KIRO-TV 39
Orlando-Daytona
Beach-Melbourne,
FL
WKMG-TV 58
WGBH-TV 19
Seattle-Tacoma,
WA
KOMO-TV 38 San Angelo, TX KLST 11
WENH 57 KSTP-TV 50 Victoria, TX KVCT 34
Boston, MA
(Manchester, NH)
WHDH 42
Minneapolis-St.
Paul, MN
WCCO-TV 32
KAVU-TV 15
Billings, MT KULR-TV 11 WXVT 17 Butte-Bozeman, MT KTVM 2
Harrisonburg, VA WVPT 11
Greenwood
-Greenville, MS
19
APPENDIX 1 DTV CHANNEL TABLE
Page 24

City Name Station DTV
Ch
City Name Station DTV
Ch
City Name Station DTV
Ch
WTAE-TV 51 KCWE 31 WGHP 35
WPGH-TV 43
Kansas City, MO
KSMO-TV 47 WUNL-TV 32
KDKA-TV 25 WLWT 35
Greensboro-High
Point-Winston
Salem, NC
WUPN-TV 33
WPXI 48 WXIX-TV 29 New Orleans, LA WWL -TV 36
Pittsburgh, PA
WCWB-TV 42 WCPO-TV 10 KFOR-TV 27
KSDK 35
Cincinnati, OH
WKRC-TV 31
Oklahoma City, OK
KSBI 51
KTVI-TV 43 WDJT-TV 46 WHP -TV 4
WHSL 47 WITI 33 WGAL-TV 58
KMOV 56 WTMJ-TV 28 WITF-TV 36
St. Louis, MO
KDNL-TV 31
Milwaukee, WI
WMVS 8
HarrisburgLancasterLebanon-York, PA
WLYH-TV 23
KATU 43 WSFJ 24 WGRZ-TV 33
KOIN 40
Columbus, OH
WBNS-TV 21
Buffalo, NY
WIVB-TV 39
KPDX 48 KUTV 34 KRQE 16
KGW -TV 46 KTVX 40 KOAT-TV 21
KPTV 30 KSTU 28 KASA-TV 27
Portland, OR
KOPB-TV 27 KUPX 29 KOBR-TV 38
WUTB 41 KSL -TV 38 KOB -TV 26
WBAL -TV 59 KUWB 48
AlbuquerqueSanta Fe, NM
KNME-TV 35
WMPT 42 KBYU-TV 44 WKPC-TV 17
WBFF 46
Salt Lake City, UT
KUED 42
Louisville, KY
WHAS-TV 55
WJZ -TV 38 WUNE-TV 54 KTNV-TV 12
Baltimore, MD
WMAR-TV 52 WASV-TV 45 KLAS-TV 7
WRTV 25 WYFF-TV 59
Las Vegas, NV
KLVX 11
WISH-TV
GreenvilleSpartanburg, SC
-Asheville, NCAnderson, SC
WSPA-TV 53 WVIA-TV 41
WXIN 45 KSAT-TV 48
Wilkes BarreScranton, PA
WNEP-TV 49
Indianapolis, IN
WTHR 46 KENS-TV 55 WJXX 10
KFMB-TV 55
San Antonio, TX
KMOL-TV 58 WJXT 42
KGTV 25 WZPX 44 WTLV 1
KNSD 40 WOOD-TV 7
Jacksonville, FL
WJWB 34
KSWB-TV 19 WZZM-TV 39 KXAN-TV 21
San Diego, CA
KPBS 30
Grand RapidsKalamazooBattle Creek, MI
WWMT 2
Austin, TX
KTBC 56
WCNC-TV 22 WPXH 45 KGMC 44
WTVI 11
Fresno-Visalia, CA
KFSN-TV 9
WUNG-TV 44
Birmingham
(Anniston,
Tuscaloosa), AL
KLRT 30
WSOC-TV 34 WPBF 16 KTHV 12
WBTV 23 WHDT-DT 59
Little Rock-Pine
Bluff, AR
KARK-TV 32
WCCB 27
West Palm
Beach
-Ft. Pierce, FL
WFLX 28 WWBT 54
WAXN 50 WHBQ-TV 53
RichmondPetersburg, VA
Charlotte, NC
WHKY-TV 40 WPTY-TV 25 KOTV-TV 55
WFSB 33 WREG-TV 28 KJRH 56
WTNH-TV 10 WPXX 51
Tulsa, OK
KTPX 28
Hartford & New
Haven, CT
WHPX 34 WMC -TV 52 WKEF 51
WRPX 15
Memphis, TN
WLMT 31 WRGT-TV 30
WUNP-TV 39 WGNT 50
Dayton, OH
WHIO-TV 41
WUNC-TV 59 WTVZ 38 WLPX-TV 39
Raleigh-Durham
(Fayetteville), NC
WTVD 52 WPXV 46
CharlestonHuntington, WV
WPBY-TV 34
WRAL-TV 53 WHRO-TV 16 WPXK 23
WRAZ 49 WTKR-TV 40 WBIR-TV 31
WNCN-TV 55 WVEC-TV 41
Knoxville, TN
WATE-TV 26
Nashville, TN WTVF 56 WVBT 29 WKRG-TV 27
WKRN-TV 27
NorfolkPortsmouthNewport News, VA
WAVY-TV 31 WALA-TV 9
Kansas City, MO KMBC-TV 7 WFMY-TV 51 WPMI 47
WDAF-TV 34 WXLV-TV 31
Mobile, ALPensacola (Ft.
Walton Beach),
FL
WSRE 31
KCPT 18
Greensboro-High
Point-Winston
Salem, NC
WXII 31 Presque Isle, ME WMEM-TV 20
WKGB-TV 48 Great Falls, MT KFBB-TV 8 Puerto Rico WKAQ-TV 28Bowling Green, KY
Lafayette, IN WLFI-TV 11
20
Page 25

City Name Station DTV
Ch
City Name Station DTV
Ch
City Name Station DTV
Ch
WJRT-TV 36 WMTV 19 WWTV 40Flint-Saginaw-
Bay City, MI
WHA -TV 20
Traverse CityCadillac, MI
WWUP-TV 49
KWCV 31 WKOW-TV 26 KTAS 34Wichita-Hutchin
son, KS Plus
Madison, WI
WISC-TV 50
WCVN 24 WDEF-TV 47
Santa BarbaraSanta Maria-San
Luis Obispo, CA
WKSO-TV 14
Chattanooga, TN
WRCB-TV 13 KBCI-TV 28
WKZT-TV 43 WNDU-TV 42 KIVI 24
WKPI 24
South BendElkhart, IN
WSBT-TV 30 KTVB 26
WKOH 30 WJTV 52
Boise, ID
KAID 21
WKON 44
Jackson, MS
WMPN-TV 20 KOAC-TV 39
WKLE 42 KPXR 47 KVAL-TV 25
WKMA 42 KWWL 55 KCBY-TV 21
WKMR 15 KWKB 25
Eugene, OR
KPIC 19
WKAS 26
Cedar RapidsWaterlooIowa City &
Dubuque, IA
Lafayette, LA KLFY-TV 56
WKHA 16 WVTA 24 KEPR-TV 18
Lexington, KY
WTVQ-TV 40
Burlington, VTPlattsburgh, NY
WLED-TV 48 KIMA-TV 33
WDBJ 18 WQAD-TV 38
Yakima-Pasco
-RichlandKennewick, WA
WJPR 20
WXTX 49
WSLS-TV 30
Davenport, IARockIslandMoline, IL
Columbus, GA
WL TZ 35
RoanokeLynchburg, VA
WPXR 36 WKPT-TV 27 WEAU-TV 39
WNWO-TV 49 WJHL-TV 58
La CrosseEau Claire, WI
Toledo, OH
WTOL-TV 17
Tri-Cities, TN-VA
WCYB-TV 28 Rockford, IL WREX-TV 54
WFRV-TV 5 KWTX- T V 53 KMCT-TV 38
WBAY-TV 23
Waco-TempleBryan, TX
Monroe, LAEl Dorado, AR
KNOE-TV 7
WGBA 41 WBRZ 13 WAOW-TV 29
Green BayAppleton, WI
WACY 59
Baton Rouge, LA
WLPB-TV 25
WausauRhinelander, WI
WTPX 46
KDIN-TV 50 WLTX 17 KOMU-TV 36
WHO -TV 19 WOLO-TV 8
Columbia-Jeff
erson City, MO
Des MoinesAmes, IA
KDSM-TV 16
Columbia, SC
WRLK-TV 32 WICU-TV 52
KITV 40 WFIE-TV 46
Erie, PA
WQLN 50
KMAU 29 WAZE-TV 20 WVVA 46
Honolulu, HI
KHVO 18
Evansville, IN
WEHT-TV 59
Bluefield-Beckley
-Oak Hill, WV
Springfield, MO KYTV 44 Savannah, GA WTOC-TV 15 KIMT 42
WFTX 35 WGBY-TV 58 KTTC 36Ft. Myers-
Naples, FL
SpringfieldHolyoke, MA
Rochester,
MN-Mason City,
IA-Austin, MN
KFVS-TV 57 WUNK-TV 23 KBME-TV 22
WPSD-TV 32 WUND-TV 20 KXMB-TV 23
WKMU 36
GreenvilleNew BernWashington, NC
WCTI 48
Minot-Bismarck
-Dickinson
(Williston), ND
Paducah, KYCape Girardeau,
MO-HarrisburgMt Vernon, IL
WKPD 41 KHBS 21 Salisbury, MD WBOC-TV 21
KLEW-TV 32
KOSA- TV 31Spokane, WA
KXLY-TV 13
Odessa-Midland,
TX
Shreveport, LA KSLA-TV 17
Ft. Smith –
FayettevilleSpringdaleRogers, AR
WABI-TV 19
WGME-TV 38 WBTW 56 WLBZ 25
WCSH 44
Florence-Myrtle
Beach, SC
WUNU 25
Bangor, ME
WMEB-TV 9
PortlandAuburn, ME
WCBB 17 KNPB 15 WGEM-TV 54
WCFN 53
Reno, NV
KAME-TV 20
WCIA 48 Lansing, MI WLNS-TV 59
Quincy, ILHannibal, MOKeokuk, IA
Champaign &
SpringfieldDecatur, IL
WAND 18 WRDW- TV 31 Palm Springs, CA KMIR-TV 46
WHNT-TV 59
Augusta, GA
WFXG 51 Missoula, MT KCFW-TV 38
WZDX 41 WTVP 46 KIDK 36
HuntsvilleDecatur
(Florence), AL
Peoria-Bloom
ington, IL
Idaho FallsPocatello, ID
WFSG 38 KXII 20 WDAM-TV 28Panama City, FL
WMBB 19
Sherman, TXAda, OK
HattiesburgLaurel, MS
Note : This channel table is updated on August 8
th
2002, you can refer to the information including
websites on the next page for instant updates.
21
Page 26

You can receive all sorts of HDTV and EDTV programs with the receiver, including “Prime Time
Series”, “Sports (NFL, Golf, Tennis)”, “Late night shows”, “Concerts and Symphony Orchestra” and
“Educational Programs”
EDTV stands for Enhanced Digital Television, It uses 704 x 480 progressive, one of the 18 ATSC
formats. Both EDTV and HDTV are categories of DTV (Digital Television)
Five major Networks offering HDTV and EDTV programs
*CBS :
It has 18 prime time series and movies in HDTV, weekdays from 7 to 10 pm, and HDTV sports
events. For program schedules, log on to their website at http://www.cbs.com/hdtv
*PBS :
It has educational programs on nature, travel, wildlife and courses in HDTV.
For program schedules, log on to their website at http://www.pbs.org/digitaltv/
*NBC :
It has “The Tonight Show With Jay Leno” in HDTV
For program schedules, log on to their website at http://www.nbc.com
*FOX :
It has prime time shows such as “Titus”, “Dark Angel” and Fox Sports in EDTV
For program schedules, log on to their website at http://www.fox.com/frameset.html
*ABC :
It has Home Box Office movies in EDTV or HDTV
For program schedules, log on to their website at http://www.abc.com
*Log on to the website http://www.antennaweb.org and select “Choose An Antenna”,
enter your address and find the DTV stations airing the EDTV/HDTV signal you can receive.
Then visit the local station’s website for program schedules. Usually the website name is the same as
the station’s name. For example, DTV station WCBS (channel 56) New York’s website is
http://www.wcbs.com and KCET (UHF channel 59) Los Angeles’s website is http://www.kcet.org
.
However, the most accurate method for locating the local station’s website is through their original
network, for example, to find WCBS New York through the associated network CBS’s website. You
can also contact the network services center for detailed information about their local DTV program
package.
Note :
(a) By utilizing the website AntennaWeb you can also get information on choosing the correct antenna
type and its positioning to the DTV station you want to watch.
(b) NAB (National Association of Broadcasters) has updates on the local DTV stations in operation at
http://www.nab.org/Newsroom/Issues/digitaltv/DTVstations.asp
22
Page 27

Problem Solution
(1) The receiver front panel power indicator
doesn't light up, and no message on the
front panel
(a) Check the main lead and make sure the power plug is well plugged
into a stable power outlet
(b) Press "Power" button on the front panel to see if the green light
(power indicator) is on.
(c) Check the set top box is in "Standby" mode or not by pressing
"Standby" button on the remote control
(2) Has message on the front panel but no
picture on your TV screen
(a) Press button "Menu" on the remote control or front panel to call up
On Screen Display
(b) Make sure the connector type between set top box and your TV set
matches each other. For instance, if you use RCA or Y/Pb/Pr
connector you may choose the same external video input RCA or
Y/Pb/Pr mode in TV set..
(c) Check the brightness level of your TV is high enough
(3) Poor picture quality (a) Check the antenna and make sure it is aligned to the correct direction.
Use receiver's "Manual Setup" page to check the signal's BER
and RF Level when aligning the antenna.
(b) If you use any kind of amplifier to boost the signal level, please
check whether it works well, and ask help from the antenna installer.
(c) Refer to solutions in item (2) above
(4) No audio service (a) Check the receiver and your TV's volume are properly set and not in
"mute" mode.
(b) Check the audio connectors are correctly and firmly connected
(c) Make sure the receiver switch to the correct Audio mode : AC-3
or PCM (MPEG/Analog Audio).
(d) Check the left and right audio channel. Sometimes the preferred
audio service is set in only left or right channel. Please refer to
"Audio setting" in user's manual.
(e) Scan this channel again by using "Manual Setup" and see if the
audio service will come back.
(f) Check with the local TV stations. Sometimes they are just testing
new services on their TV or Radio channels
.
(5) No video service (a) Check the receiver and your TV's volume are properly set and
not in "mute" mode.
(b) Check the audio connectors are correctly and firmly connected
(c) Scan this channel again by using "Manual Installation" and see if the
video service will come back.
(d) Check with the local TV stations. Sometimes they are just testing
new video services on their channels the video service may stop
every once in a while.
(6) Does not have all the channels available
after using "Auto Scan” when first time
installing the receiver.
(a) Try "Manual Setup" to scan these missing channels.
This is caused by unexpected frequency offset, for instance, if the
Digital TV signal is transmitted on channel 34,but with frequency
Offset 125KHz from the original 593KHz, which becomes
593.135KHz, BRAVO HD1 can receive this channel by Auto
Installation most of the times, however, we suggest you to use
Manual Installation when first time installing the receiver. Once the
signal is picked up by the receiver, all the transmission parameters
will be stored in receiver's memory so next time you can scan these
channels by Auto Installation without any problem.
23
APPENDIX 2 TROUBLE SHOOTING
Page 28

Problem Solution
(7) Cannot lock signal by using "Manual
Setup”
(a) Check the channel number is correct according to the channel table and
updated channel table information on Appendix 1
(b) Refer to solutions in item (3) on page 24.
(8) No Closed Caption (a) Make sure the channel you are watching carries closed caption
information.
(b) Press TTX button on the remote control to double check there’s closed
caption data output
(9) Cannot receive channels after moving
the receiver between cities
(for instance from New York to Los
Angeles)
(a) Enter into Service Mode Menu and use "Delete All Channels" clear the
channel memory, then use "Auto Installation" or "Manual Installation" to
scan through all the channels again. Please consult your local dealer for
how to entering into the Service Mode Menu
* On Screen Error Message
Message Solution
(1) Bad Signal
(a) Check the antenna is connected correctly and firmly to the tuner input A
(ANT A IN ) of the receiver or cable TV is connected to tuner input B
(ANT B IN) of the receiver.
(b) Refer to solutions in Item (3) on page 24.
(c) Check the digital channel whether it is out of service or not
.
(2) Non Support HD Format (a) This message suggests when you are watching the program from AUX
input you cannot show HDTV digital channel on the small PIP screen
(3) Scrambled Channel (a) The message suggests the program you are watching is scrambled by
the TV station, which cannot be decoded by BRAVO HD1
.
24
APPENDIX 2 TROUBLE SHOOTING
Page 29

* Aspect Ratio : It is the ratio of the width of the screen to the height. The two relevant digit al TV formats are
16:9 (widescreen) or 4:3 (the traditional screen ratio). 16:9 is more ergonomically suitable for human's eye.
* Bandwidth : Frequency range allows for carrying a certain radio signal. The speed of data transmission
depends on the available bandwidth of the transmission channel.
* Coaxial Cable : A type of cable used to transmit high frequency signals e.g. from the VHF/UHF antenna to the
terrestrial Digital TV receiver.
* Composite Video : There are three elements of the video system : First - the " active video" which means the
picture to be displayed on the screen and its associated colors. Second - the " sync" decides where to place
each pixel on the screen. Third - the " blanking" tells the display when to turn off the electron beam so no
retrace across the screen. These three elements combined together is called " composite video" when
connecting to a display through connectors.
* ATSC: Abbreviation for "Advanced Television System Committee". The Advanced Television Systems
Committee, Inc. (ATSC), is an international, non-profit membership organization developing voluntary
standards for the entire spectrum of advanced television systems. They stipulate the standard for terrestrial
Digital TV broadcast which is also called ATSC.
* EPG : Abbreviation for "Electronic Program Guide". A software that enable viewers to navigate through the
large number of channels offered by digital TV broadcaster and select the desired services.
* Frequency : The property of a signal which is measured in cycles per second(=Hertz).
* Letterbox : The picture with aspect ratio 16:9 in a 4:3 TV screen with blank lines on top and bottom. It is the
means to watch a wide screen TV program on a 4:3 TV screen.
* Megahertz (MHz) : Millions of cycles per second, which describes frequencies of radio wave or electric current.
* OSD : Abbreviation of "On Screen Display", used in digital set top box. OSD is comprised of a main menu and
many submenu with lots of options of functions inside.
* NTSC : Stands for "National Television System Committee", the U.S. video standard which includes the image
format of 4: 3, 525 horizontal lines (only 480 lines active among them, 60 Hz and a total 6 MHz channel width.
* PID : Stands for "Packet Identifier". It is a code used for identifying video, audio PCR and other element s that
form a particular service in the transport stream.
* RF Channel : Radiated Frequency Channel, one RF channel may carry 4 to 6 subchannels 2-1,2-2,2-3.etc.
* S-Video (also called Y/C) : The standard for the way a video signal is carried on the cable. Y represents
brightness and C represents color. S-Video cables have separate wires for the color and brightness so it offers
a better picture quality than the composite video.
* VHF : Stands for "Very High Frequency", starts from 30 to 300 MHz corresponding to channels 5-12,including
Bands I, II and III.
* UHF : Stands for "Ultra High Frequency", starts from 300 to 3000 MHz corresponding to channels 28-69,
including Bands IV and V.
* Y/Pb/Pr : Component Video Output. It is better than S-Video and Composite Video output in terms of picture
quality. Y/Pb/Pr is the standard HDTV connector.
25
APPENDIX 3 GLOSSARY
Page 30

Standards Compliance
Compliant Standard ATSC
Tuner Input
Frequency 50~806 MHz
Bandwidth 6 MHz
Connector F-Type Female
Demodulator 8-VSB
Video Output
Formats MP @ ML & MP @ HL
Aspect Ratio 4:3 , 16:9
Picture Resolution 1920 X 1080i; 1280 x 720p; 720 x 480p,; PAL: 720 x 480i
Output System
ATSC HDTV/ NTSC
Socket Y/Pb/Pr/ S-Video/ RCA
Video Input
Format Composite Video
Connector RCA jack
Audio Output
Formats Dolby AC-3; MPEG ( 1 & II)
Sample Rate 32 / 44.1 / 48 KHz
Mode Mono / Stereo / Dual
Connector S/PDIF Optical; RCA
Audio Input
Sample Rate 32 / 44.1 / 48 KHz
Connector RCA jack
OSD
Number of Color 256
Front Panel
IR Receiver Yes
Channel Display 4 Digits / 7-segment display
Rear Panel
Tuner input Yes
1 set of RCA audio port - input
(L/R)
Ye s
1 set of RCA audio port – output
(L/R)
Ye s
1 set of RCA Video port - input Yes
1 set of RCA Video port - output Yes
1 set of Y/Pb/Pr Video ports Yes
Power Supply
Input Voltage 90~260 V
AC, 50/60 Hz
Consumption (max.) 30 W
Dimension
Size (W x D x H)
189× 265 × 43 mm
Weight 2 Kg (Unpacked)
Environmental Data
Operating Temperature
5∘~ 40℃
Storage Temperature
-40∘~ 65℃
*Specifications are subject to change without notice.
P/N:
26
APPENDIX 4 TECHNICAL SPECIFICATIONS
Page 31

V INCORPORATED LIMITED WARRANTY
For BRAVO Consumer Electronic Devices
Welcome to the V, Inc. Digital Family! Please read this warranty carefully, it is a “ONE-YEAR LIMITED WARRANTY” on parts and labor.
V, Inc.’s Responsibility
V, Inc. BRAVO Products purchased in the United States are warranted to be free from defects in materials or workmanship for a period
of one (1) year from the date of their original retail purchase. If the unit fails to conform to this warranty, we will service the monitor using
new or refurbished parts.
Service Labor
During a period of one year from the effective warranty date, V, Inc. will provide, when needed, service labor to repair a
manufacturing defect at its designated Service Center. To obtain warranty service in the Untied States, you must first call our
Customer Support at (714) 668-0588, 9:00am-5pm PST. The determination of service will be made by V, Inc. Customer Support. .
PLEASE DO NOT RETURN YOUR UNIT TO V, INC. WITHOUT PRIOR AUTHORIZATION.
Parts
New or remanufactured replacements for defective parts will be used for repairs by V, Inc. at its designated Service Center for one
(1) year from the effective warranty date. Such replacement parts are warranted for the remaining portion of the original warranty
period.
Service
During the one (1) year warranty period, V, Inc. will, at its option and sole discretion, repair or replace defective parts, including
replacement of the entire unit. The Customer will be required to ship the unit to the Service Center indicated at the time Customer
Support is contacted to make the necessary repairs. You are responsible for all transportation charges to and from the service
facility. V, Inc. is not responsible for the de-installation or re-installation of the unit.
Packaging and Shipping Instructions
When you send the product to an authorized V, Inc. service facility you must use the original carton box and packing material or an
equivalent as approved by V, Inc.
Not Covered
This warranty does not cover defects, malfunctions or failures resulting from shipping or transit accidents, abuse, misuse, operation
contrary to furnished instructions, operation on incorrect power supplies, operation with faulty associated equipment, modification,
alteration, improper servicing, tampering or normal wear and tear or products on which the serial number has been removed or
defaced. Image Sticking caused by operating at excessive brightness levels for extended periods or mishandling are not covered by
this warranty.
ANY IMPLIED WARRANTIES, INCLUDING ANY IMPLIED WARRANTY OF MERCHANTABILITY AND FITNESS FOR A
PARTICULAR PURPOSE SHALL BE LIMITED IN DURATION TO THE PERIOD OF TIME SET FORTH ABOVE. OUR LIABILITY
FOR ANY AND ALL LOSSES AND DAMAGES RESULTING FROM ANY CAUSE WHATSOEVER, INCLUDING OUR
NEGLIGENCE, ALLEGED DAMAGE OR DEFECTIVE GOODS, WHETHER SUCH DEFECTS ARE DISCOVERABLE OR LATENT,
SHALL IN NO EVENT EXCEED THE PURCHASE PRICE OF THE DISPLAY. WE SHALL NOT BE RESPONSIBLE FOR LOSS OF
USE, COMMERCIAL LOSS OR OTHER INCIDENTAL OR CONSEQUENTIAL DAMAGES. SOME STATES DO NOT ALLOW
LIMITATIONS ON HOW LONG AN IMPLIED WARRANTY LASTS OR THE EXCLUSION OR LIMITATION OF INCIDENTAL OR
CONSEQUENTIAL DAMAGES, SO THE ABOVE LIMITATIONS OR EXCLUSIONS MAY NOT APPLY TO YOU. This warranty
gives you specific legal rights, and you may also have other rights which vary from state to state. This is the only warranty
applicable; no one is authorized to extend or modify it or to grant any other warranty.
V, Inc. retains the right to assess all warranty claims and to determine if damages are covered by the warranty. In case of a claim
that is not covered by the warranty, you will be contacted to determine whether V, Inc. should repair the damage for a fee or whether
Owner’s Responsibility
the product should be returned to you as received by the repair center.
Effective Warranty Date
Warranty begins on the date of sale to the end user. To ensure warranty service, keep the dated bill or sale receipt as evidence of
the purchase date.
User Manual
Read your User Manual carefully so that you will understand the operation of your BRAVO product and how to adjust the user
controls.
Warranty Service
For warranty service information, contact V, Inc. Customer Support at (714) 668-0588, 9:00am-5pm PST. Parts and service labor
that are V, Inc.’s responsibility (see above) will be provided without charge. Other service is at the owner’s expense. You must
provide the model, serial number and date of purchase. Before you ask for warranty service, read your User Manual. You might
avoid a service call.
For Technical Support, visit WWW.VINC.COM, Call (714) 668.0588
or E-mail Techsupp@vinc.com
Page 32

 Loading...