

Page 1

Page 2

BRAVO D1 User Guide
PAGE
Table of Contents
Table of Contents ........................................................................................................................... i
Warning .......................................................................................................................................... 1
General Information ...................................................................................................................... 2
Caring for Discs ....................................................................................................................................... 2
DVD Regional Codes................................................................................................................................ 2
DVD and Other Disc Features ................................................................................................................. 3
Getting Started............................................................................................................................... 4
Package Contents .................................................................................................................................... 4
Remote Control Battery Installation ....................................................................................................... 4
Panel Descriptions ........................................................................................................................ 5
Front Panel ............................................................................................................................................... 5
Rear Panel................................................................................................................................................. 5
Remote Control ........................................................................................................................................ 6
System Connections ..................................................................................................................... 7
TV Connections........................................................................................................................................ 7
Composite ............................................................................................................................................. 7
S-Video.................................................................................................................................................. 8
Component (YPbPr) .............................................................................................................................. 8
DVI (Digital Video)................................................................................................................................. 9
Audio System Connections....................................................................................................................10
Amplifier with two-channel analog stereo or Dolby Surround ...............................................................10
Amplifier with two channel digital stereo (PCM) or A/V receiver with multi-channel decoder (Dolby
Digital/MPEG-2/DTS) ...........................................................................................................................10
TV System Setup ......................................................................................................................... 11
Sound Output Setup.................................................................................................................... 12
Playing Discs ............................................................................................................................... 13
Power On .................................................................................................................................................13
DVD and System Settings ......................................................................................................................13
Disc Loading............................................................................................................................................13
Automatic Play ........................................................................................................................................13
Manual Play .............................................................................................................................................13
General Operation ....................................................................................................................... 14
Main Setup Menu.....................................................................................................................................14
Audio Setup Menu...................................................................................................................................15
Video Setup Menu ...................................................................................................................................16
Initial Setup Menu ...................................................................................................................................18
Video CD playback control (PBC) ........................................................................................................18
Parental control (DVD only)..................................................................................................................19
TV Type (Screen Format).....................................................................................................................20
Change Password ................................................................................................................................21
Troubleshooting .......................................................................................................................... 22
General Issues.........................................................................................................................................22
Audio Issues............................................................................................................................................22
Video Issues ............................................................................................................................................23
Specifications .............................................................................................................................. 23
Media Format Specifications...................................................................................................... 24
Digital TV (DTV) .......................................................................................................................................24
Divx Format Definition............................................................................................................................24
NOTE: Read this guide before installation and use
Page i
Page 3

BRAVO D1 User Guide
Warning
TO REDUCE THE RISK OF FIRE AND ELECTRIC SHOCK, DO NOT EXPOSE THIS
UNIT TO RAIN OR MOISTURE.
CAUTION: To reduce the risk of fire and electric shock, do not
remove the cover of this product. Refer all maintenance requests
to authorized personnel only.
This lighting flash symbol in a triangle alerts users to the
presence of non-insulated high voltage within the product's
enclosure that presents an electrical shock hazard.
The exclamation point symbol in a triangle alerts users to the
presence of important operating and maintenance instructions in
the literature accompanying this product.
The mark, displayed on the rear panel of the unit, indicates that
the unit is a Class 1 device that uses lasers. No radiation hazard
exists.
Read through this User Guide before installing and using the Bravo D1.
Only qualified personnel should service the Bravo D1.
Do not touch the power plug with wet hands.
Pull the plug, not the cord, to disconnect the Bravo D1 from an electrical outlet.
Turn the main power off when the Bravo D1 is not in use. Disconnect the power
plug if you do not intend to use the Bravo D1 for a long period of time.
Before moving the Bravo D1, first remove the disc from the unit's tray.
Do not open the cover or touch any of the components inside the unit.
Do not install or operate the unit when it is directly exposed to sunlight or other
objects that radiate heat -- the Bravo D1 may overheat and malfunction.
Install the Bravo D1 in a cool, dry location. High moisture and humidity may
damage the laser head.
Install the Bravo D1 on a flat surface with good air circulation. Do not cover or
obstruct the ventilation holes on the unit in any way -- the Bravo D1 may
overheat.
Clean the Bravo D1 by wiping the panel and case with a soft dry cloth. Do not
apply any kind of thinner, alcohol or sprays.
Page 1
.
VINC.COM
Page 4

General Information
This unit plays the following types of discs:
BRAVO D1 User Guide
DVD (single or double sided, single or double
layer)
SVCD CD-DA
CDI-FMV MP3
AUDIO CD CD-R
CD-RW DVD-R
VCD (versions 1.0/1.1/2.0)
Caring for Discs
Video discs contain high-density compressed data and
require care when handling.
Hold the disc by the edges, and/or the hole in the center.
Do not touch the disc surface.
Do not bend or scratch the disc. Do not expose it to direct
heat sources, such as sunlight.
Store discs vertically in a cool dry place to avoid moisture
and humidity.
Clean discs with a soft dry cloth. Wipe gently, from the
center of a disc to its edge. Do not apply thinner, alcohol or sprays to discs.
DVD Regional Codes
DVD discs and DVD players are manufactured under the DVD Regional Code System, a worldwide
standard. DVD players only play discs possessing the same Regional Code as the player.
Regional Code Region
1 Canada, USA.
2
3 East Asia (incl. Hong Kong, Taiwan, South Korea), Southeast Asia.
4
5
6 China.
Europe (incl. Poland, Romania, The Czech republic), Japan, Middle
east (incl. Saudi Arabia, Egypt, Iran, South Africa).
Australia, Caribbean, Central & South America, Mexico, New
Zealand.
Africa, Former Soviet Union, India, North Korea, Pakistan,
Turkmenistan.
Page 2
.
VINC.COM
Page 5

BRAVO D1 User Guide
DVD and Other Disc Features
Some Bravo D1 features rely on DVD software. Make sure that desired software features are
available and enabled on the disc, and follow the on-screen menu to access these features.
Disc types DVD VCD SVCD/CVD CD LD
Recording
method
Capacity
Disc size 8 cm or 12 cm 12 cm 12 cm
Horizontal
resolution
Subtitles 32 8 16
Soundtracks 8 2 4 2
Symbol
Each DVD disc contains different combinations of features depending on the design and
production of the disc. The following symbols represent some of these DVD features:
Digital MPEG-2
Single-layer
Single-sided
4.7GB =2hr
Single-layer
Doublesided 8.5GB
=4hr
500 lines 240 lines 350 lines 430 lines
Double-layer
Single-sided
9.4GB
=4.5hr
Double-layer
Doublesided 17GB
=8hr
Digital
MPEG-1
650MB
74 min
Digital
MPEG-2
650MB
45 min
Digital Analog
650MB
74 min
8 cm or
12 cm
Single-sided
1 hour
Double-sided
2 hours
20 cm or
30 cm
DTS Digital Surround
Number of Audio Tracks
Screen Modes
Child Lock
Dolby Digital Surround
Number of Subtitles
Number of Camera Angles
Regional Code/Video Output System
Page 3
.
VINC.COM
Page 6

BRAVO D1 User Guide
Getting Started
1. Read through this User Guide.
2. Unpack the unit.
3. Load batteries into the Remote Control.
4. Connect the Bravo D1 to your Audio/Video system.
5. Plug the Bravo D1 (and other connected A/V devices) into an electrical outlet and turn on
all of the devices.
6. Verify that the settings of the Bravo D1, TV and Amplifier match.
Package Contents
The standard Bravo D1 package contains the following:
Bravo D1 DVD player
Remote Control (with batteries)
AC power cord
AV cables
This User Guide
Remote Control Battery Installation
The batteries are packaged separately from the Remote Control. To load them into the remote:
• Remove the battery compartment cover.
• Load the two AAA batteries into the battery compartment. Position the + and –
symbols on the batteries in the same orientation as the image of the batteries on
the compartment.
• When replacing batteries, always replace both batteries. Mixing new and used
batteries reduces battery life.
• Remove the batteries if the Remote Control will not be used for a long time.
Setting up your Bravo D1 video output configuration
The Bravo D1 includes a series of different video output options including DVI, Component, SVideo, and Composite outputs. To assist in the setup process, the default setting for video
output is the Composite Video setting. To adjust this setting, please be prepared to do the
following:
Connect the Bravo D1 to the display using the Composite Video Output
connector AND the secondary video output source.
Refer to the instructions on pages 11 & 16 for changing the video output
modes.
Once a new video output mode has been configured, the composite video
connections can be removed if desired.
Page 4
.
VINC.COM
Page 7

Panel Descriptions
Front Panel
BRAVO D1 User Guide
Rear Panel
Output Connectors
1. DVI, Digital Video
2. RCA, Composite Analog Video
3. 4-Pin Din, S-Video Analog Video
4. 3x RCA, Component YPbPr/YCbCr Analog Video
5. Coaxial, Digital Audio
6. Optical, Digital Audio
7. 2x RCA, Analog Audio (1)
8. 2x RCA, Analog Audio (2)
Page 5
.
VINC.COM
Page 8

Remote Control
BRAVO D1 User Guide
1. Setup
2. Open/Close Disc Tray
3. Number Keys
4. Clear
5. Menu
6. Up/Down/Left/Right Keys
7. Enter
8. Return
9. Title
10. Zoom
11. Search
12. Angle/Rotate
13. Mode
14. Power On/Off
15. A-B Selection
16. Repeat
17. Display Info
18. Select
19. PBC – Playback Control
20. Info
21. Mute
22. Subtitle
23. Increase Volume
24. Audio
25. Decrease Volume
26. Previous Chapter/Track
27. Play
28. Reverse
29. Stop
30. Slow Reverse
31. Pause/Step
32. Shuffle Play
33. Next Chapter/Track
34. Fast Forward
35. Slow Forward
36. Program
Page 6
.
VINC.COM
Page 9

BRAVO D1 User Guide
System Connections
Caution: Do NOT connect the AC power plug to the wall outlet before
completing system connections.
Do not connect the Bravo D1 Audio Out jack to the Phono In jack of your
audio system.
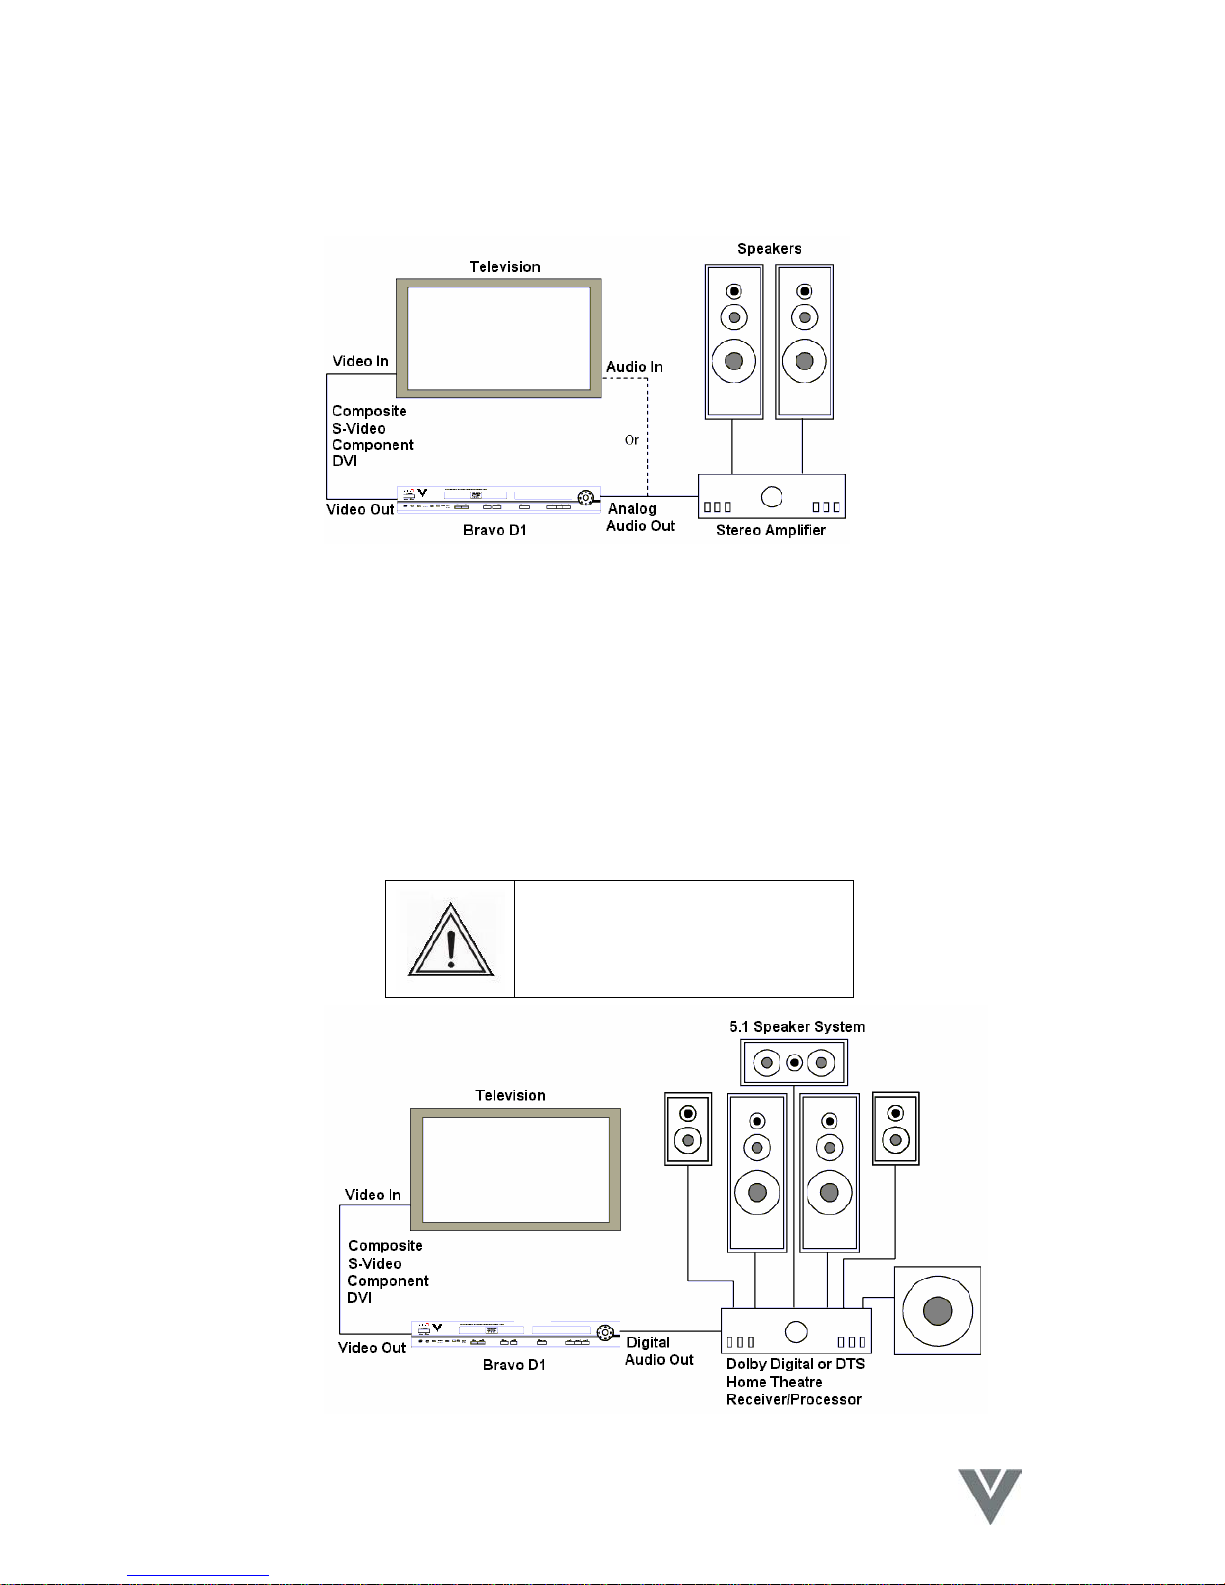
There are a number of ways to connect the Bravo D1 to an AV system, depending on the type of
TV and other components in the system. Whichever method you use, be sure to set the TV to
the correct video input type and channel (if required).
Refer to the manuals of your TV, VCR, stereo system and other devices as necessary to make the
best connections. For the best possible sound reproduction, connect the Bravo D1 Audio Out
jacks to the Audio In jacks of your amplifier, receiver, stereo or audio/video equipment. See the
section entitled, “Connecting to Optional Equipment”.
Connect the video output of the Bravo D1 directly to your TV. Connecting the Bravo D1 to your
TV via a VCR may result in distorted images because of DVD copy protection systems.
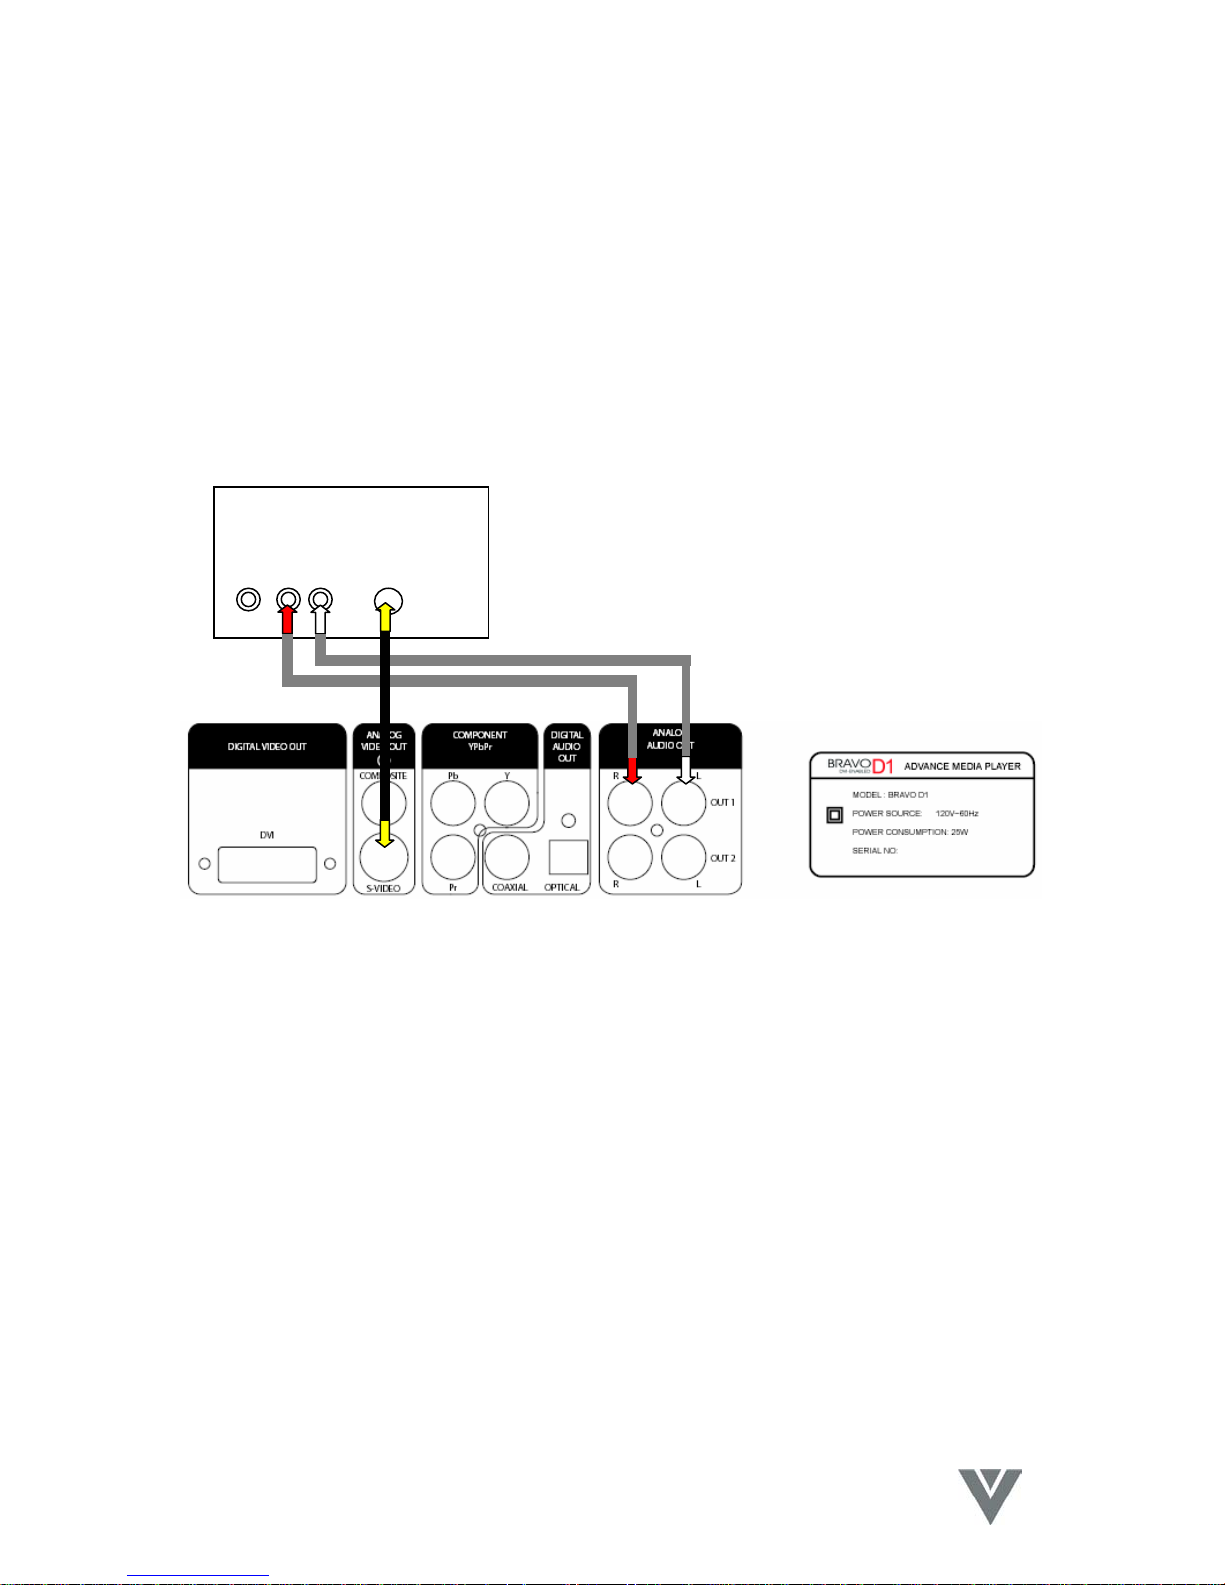
TV Connections
Composite
1. Using the Composite Video cable with the yellow RCA plug on each end, connect one
RCA plug to the Composite Video Out (yellow) connector on the Bravo D1 and the other
RCA plug to the Video In connector (A) on the TV.
2. Using the Audio cable with one red and one white RCA plug on each end, at one end of
the cable connect the red RCA plug to the Right Audio Out (red) connector and connect
the white RCA plug to the Left Audio Out (white) connector of the Bravo D1. Connect the
opposite end of the cable to the Right and Left (red and white) Audio In connectors on
the TV.
TV
Video Audio S-Video
R L
Page 7
.
VINC.COM
Page 10
BRAVO D1 User Guide
S-Video
1. Using the S-Video cable connect one 4-Pin Din plug to the S-Video out connector on the
Bravo D1 and the other 4-Pin DIN to the S-Video in on the TV.
2. Using the Audio cable with one red and one white RCA plug on each end, at one end of
the cable connect the red RCA plug to the Right Audio Out (red) connector and connect
the white RCA plug to the Left Audio Out (white) connector of the Bravo D1. Connect the
opposite end of the cable to the Right and Left (red and white) Audio In connectors on
the TV.
TV
Video Audio S-Video
R L
Component (YPbPr)
Component video (YPbPr) is used for Progressive Scan output and this gives a flicker-free
image that gives the most significant improvement with the film-based and video-based
content that is on a DVD. To enjoy the full potential possible with this Progressive Scan
DVD player, a Progressive Scan TV is required.
This DVD player has Progressive Scan conversion with 3:2 pull down for film-based
content making it possible to double the vertical resolution of the picture to 480 lines
(480p) every time the picture is refreshed (1/60th of a second). This 3:2 pull down
removes the “jerkiness” that is seen with simple scan doubling and so greatly improves
the smooth transition of moving images, especially during slow motion mode.
Page 8
.
VINC.COM
Page 11

BRAVO D1 User Guide
1. Use a Component Video cable that has 3x RCA plugs at each end, one for Y (green), one
for Pb (blue) and one for Pr (red). At one end of the cable connect one Y RCA plug to
the Y (green) connector on the Bravo D1, one Pb RCA plug to the Pb (blue) connector on
the Bravo D1 and one Pr RCA plug to the Pr (red) connector on the Bravo D1. Take the
other end of the cable and connect the Y (green), Pb (blue) and Pr (red) plugs to the
corresponding Progressive Scan inputs on the TV.
2. Using the Audio cable with one red and one white RCA plug on each end, at one end of
the cable connect the red RCA plug to the Right Audio Out (red) connector and connect
the white RCA plug to the Left Audio Out (white) connector of the Bravo D1. Connect the
opposite end of the cable to the Right and Left (red and white) Audio In connectors on
the TV.
TV
Video Audio S-Video Component Audio
R L Y Pb Pr R L
Note: Copy protection on some PAL DVDs may prevent progressive scan output.
DVI (Digital Video)
The DVD contains the information in the digital domain and this digital information is read from
the disc by the Bravo D1, processed in the digital domain and output to the DVI connector in the
digital domain. There is no point in the process where the information is converted to the analog
domain, making available on the DVI output the display signal that is essentially the same as that
contained on the DVD. DVI is used for the true digital output and this gives the purest digital
picture on a true digital display such as the Vizio P4, 46” Plasma TV from V, Inc.
Using a DVI cable plug one end into the DVI connector on the Bravo D1 making sure it is
properly oriented. If you attempt the force the DVI plug into the connector incorrectly, you may
damage the plug and/or the connector. Take the other end of the cable and plug it into the DVI
connector on your display.
Page 9
.
VINC.COM
Page 12
BRAVO D1 User Guide
Audio System Connections
Amplifier with two-channel analog stereo or Dolby Surround
Amplifier with two channel digital stereo (PCM) or
A/V receiver with multi-channel decoder (Dolby Digital/MPEG-2/DTS)
The digital multi-channel connection provides the best sound quality. It requires a multi-channel
A/V receiver that supports one or more of the audio formats supported by the Bravo D1 (MPEG2, Dolby Digital and DTS). Check the receiver manual and the logos on the front of the receiver
for compatibility with these formats.
Six channel Digital Surround Sound via the digital connection is possible only if your receiver has
a digital multi-channel decoder.
To see the selected audio format of the current DVD press Audio key on the Remote Control.
If the digital output’s audio format does not match receiver capabilities, the receiver produces a
strong, distorted sound or no sound at all.
Caution: Selecting the DTS audio
stream automatically enables DTS
digital video output due to licensing
restrictions.
Page 10
.
VINC.COM
Page 13
BRAVO D1 User Guide
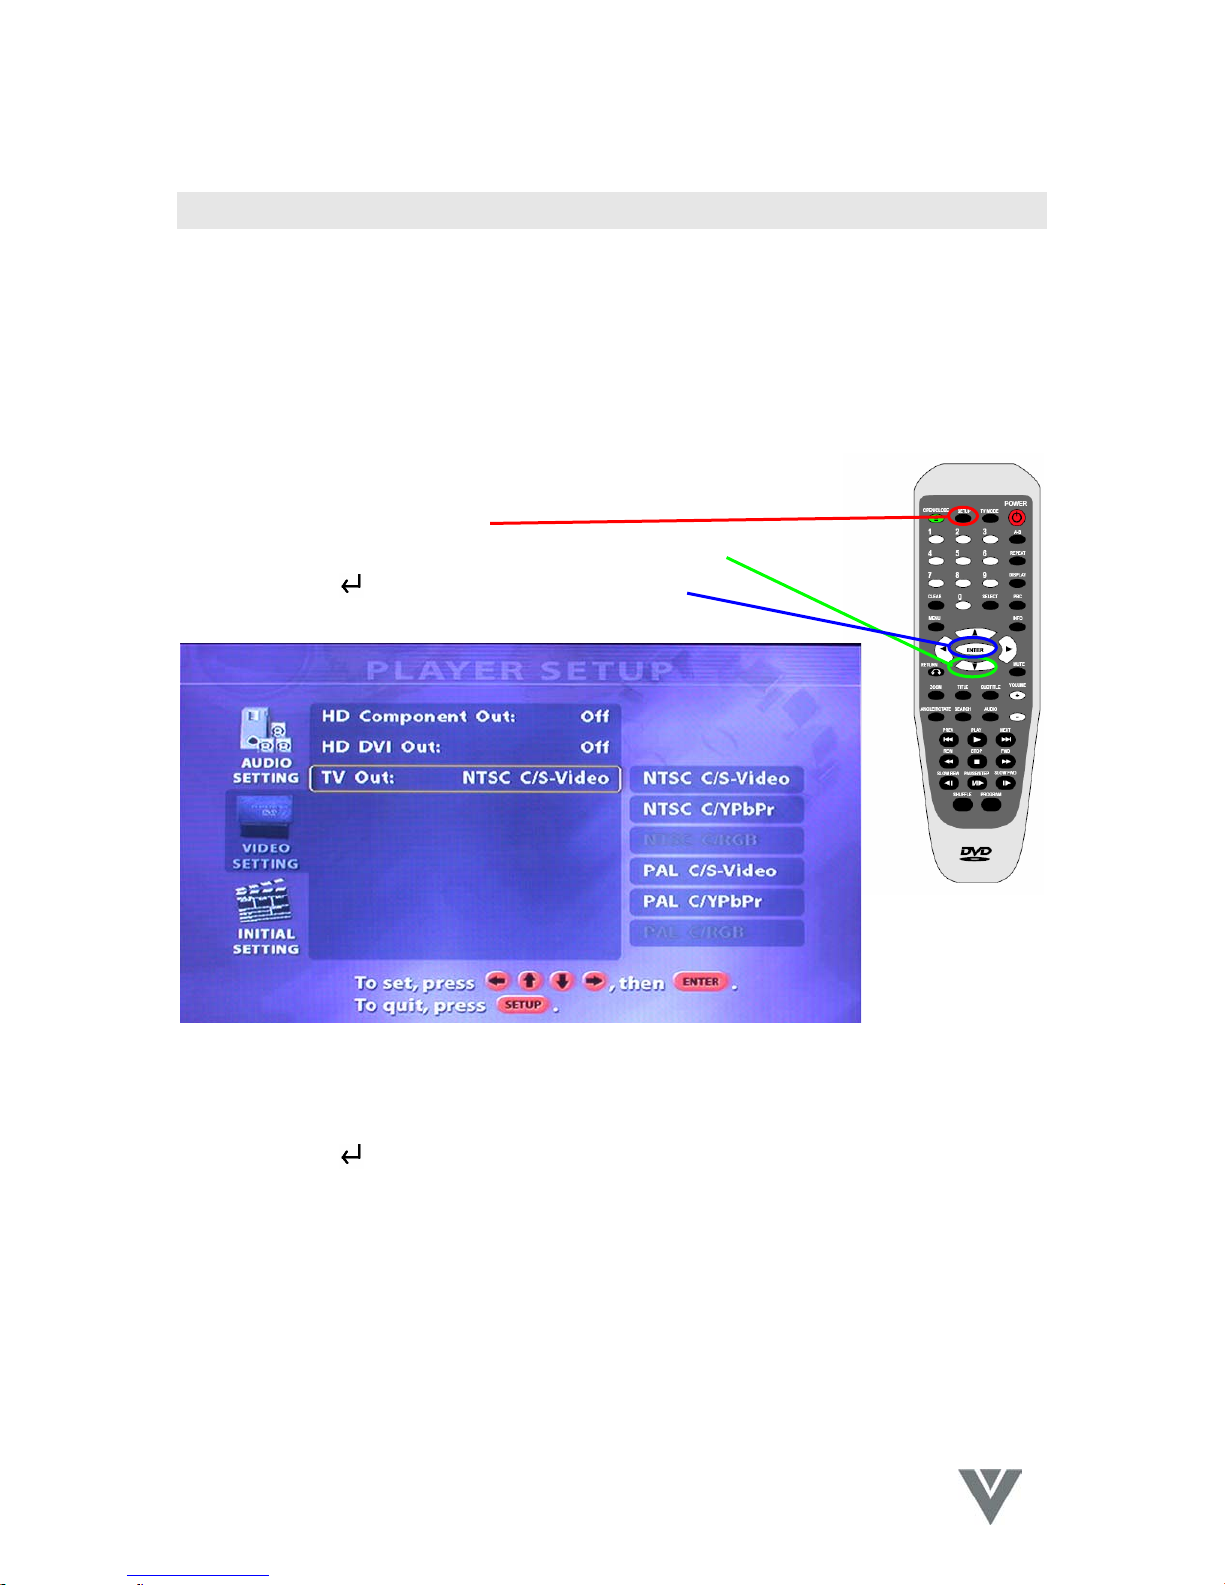
TV System Setup
Either a PAL or NTSC signal can be selected for the Bravo D1 output. Select the TV output option
that matches the requirements of your TV
If your TV is NOT a multi-system version the following symptoms may indicate that the incorrect
output setting has been selected for the Bravo D1:
Picture is distorted.
Picture is black and white only.
Picture is not full screen, or part of the border is not visible.
To correct the above problem, change the Bravo D1’s TV output setting
to PAL or NTSC using the Remote Control as follows:
1. Press the Setup button.
2. Press the d button to navigate to the Video setting.
3. Press the
Enter button to reveal this screen.
4. Press the d button to highlight TV OUT.
5. Press the f button to highlight the TV system submenu.
6. Press the d button to highlight the system and output type for your TV.
7. Press the
8. Press the SETUP button to exit the setup menu.
When setting the TV system to PAL or NTSC output, set the HD component/DVI outputs to Off.
ENTER button to confirm the selection.
Page 11
.
VINC.COM
Page 14

BRAVO D1 User Guide
Sound Output Setup
The Bravo D1 is equipped with the following audio outputs:
AC-3/DTS digital output (optical and coaxial)
Mix audio output – Left & Right
For AC-3 surround output, connect the Bravo D1 digital output (optical or coaxial) to an amplifier
with a built-in AC-3 decoder.
For DTS surround output, connect the Bravo D1 digital output (optical or coaxial) to an amplifier
with built-in DTS decoder
When the AC-3/ DTS digital output option is selected, an AC-3/DTS
decoding-capable amplifier is required. The Audio Setup – Digital Output
option in the Setup menu should be set to Encoded Digital, NOT
Analog/DPCM. To change this setting when necessary,
1. Press the Setup button to bring up the Setup menu.
2. Use the f button to navigate to the Audio Setting option.
3. Press the f button, and then press the d button to select the
Encoded Digital option.
4. Press
Enter to confirm.
Page 12
.
VINC.COM
Page 15

BRAVO D1 User Guide
Playing Discs
Power On
Activate the Bravo D1 using the main power switch on the front panel, turn on the TV set and
amplifier (if connected).
DVD and System Settings
Select the correct Bravo D1, TV, and amplifier settings (AV1, AV2, S video, etc.) to display the
DVD output. The DVD Player power-on screen will appear on the TV when the correct settings
are selected.
Disc Loading
Press the Eject button on the front panel or Remote Control to open the disc tray. Load a
disc into the tray -- label side up -- and press the Eject button
again to close the disc tray.
Do not push the tray to close it, as this can damage the player.
Automatic Play
The unit takes several seconds to read disc data, display the disc format in the upper right corner
of the TV screen, and start playing automatically. MP3 discs normally take longer to load data
before playing.
Manual Play
If a disc menu (which varies according to disc format and production design) appears on the
screen and the disc does not automatically play, manual play control may be required.
Press the button to start playing, or
Press the
Enter button
button on the Remote Control to select other options; press the
to confirm the selected option.
Page 13
.
VINC.COM
Page 16

BRAVO D1 User Guide
General Operation
If the Bravo D1 is correctly connected to your system and turned on, a menu appears on your
TV. This menu controls important audio, video, and disc format, and initial setting options.
Main Setup Menu
When an ISO disc is placed in the Bravo D1, the following screen appears:
This menu only appears for ISO discs, such as MP3 audio, DIVX MPEG-4 (video and audio), and
JPEG photo/picture disks. Standard audio discs, VCDs, and DVDs generally play automatically.
Press c and d to choose the media format to be played.
Press
When the disc contents menu appears, available commands are highlighted on the left side of
the screen. Use these commands to navigate through and play disc content. When video or
image content is playing, Stop will bring you back to the contents menu screen.
to confirm your selection.
Page 14
.
VINC.COM
Page 17

BRAVO D1 User Guide
Audio Setup Menu
For analog audio output, choose the Analog/DPCM audio option, and make sure that a pair of the
Bravo D1’s analog Audio Out connectors is connected to the analog Audio Input of your AV
system.
For digital audio output, choose the Encoded Digital option, and make sure the Bravo D1’s optical
or coaxial Audio Out jack is connected to the Digital Audio input (optical or coaxial) of your AV
system.
Page 15
.
VINC.COM
Page 18

BRAVO D1 User Guide
Video Setup Menu
For Component (YPbPr) analog video output, choose the appropriate/desired HD Component
resolution option.
For DVI digital video output, choose the appropriate/desired HD DVI resolution option.
Page 16
.
VINC.COM
Page 19

BRAVO D1 User Guide
For composite video and S-Video output, make sure the HD Component and HD DVI options are
Off. Choose the TV system output (NTSC/PAL) that matches your TV’s capabilities.
If you turn the HD Component/DVI On with the TV hooked up via S-Video or composite video
connections, the on-screen menu will no longer be visible. If this happens, unplug the Bravo D1,
plug it back in, turn it on, and enter the following Remote Control command sequence:
5. Press Setup to display the Setup menu.
6. Press d for the Video Settings option.
7. Press f once and then press d once to select the HD DVI Out
option.
8. Press f once and then d to select OFF.
9. Press
This should turn the HD Component/DVI option Off, and you will be able
to see the menu again.
Alternatively, you can select the output by using the TV Mode toggle.
Look at the display on the Bravo D1 and press the TV Mode button
repeatedly until the NTSC selection is lit.
to confirm.
Page 17
.
VINC.COM
Page 20

BRAVO D1 User Guide
Initial Setup Menu
4:3 (Non-anamorphic) Encoded DVD Playback
Some DVDs may be encoded in a 4:3 (Non-anamorphic or "not enhanced for widescreen
playback") format and may not display the correct aspect ratio on your TV. To compensate for
this, press the Bravo D1's Remote Control Zoom button once. The Bravo D1's internal scaler will
zoom the video image to the correct proportions.
Video CD playback control (PBC)
Some Video CDs incorporate features such as content navigation through on-screen menus. To
enable these features, turn on the VCD PBC option in the Initial Setup menu.
1. Press Setup to display the Setup menu.
2. Press d twice for the Initial Settings option.
3. Press
4. Press f to select ON or OFF.
5. Press
Enter to select the VCD PBC option.
to confirm.
Page 18
.
VINC.COM
Page 21

BRAVO D1 User Guide
Parental control (DVD only)
DVD movies may contain scenes unsuitable for viewing by children. Such discs may contain
“Parental Control” information that applies to the complete disc or to certain scenes on the disc.
Scenes are rated from 1 to 8; the ratings are country dependent. Alternative scenes with
different ratings may be available on the disc. When set correctly, Parental Control prevents
discs from being played and/or enables the alternative scenes that may be more appropriate for
viewing by children.
To change the parental control settings:
1. Press Setup to display the Setup menu.
2. Press d twice, to navigate to the Initial Settings options.
3. Press f and then press d button to highlight the DVD Parental
Level.
4. Press f to select a rating level (1 - 8) or Off.
5. Press
Disclaimer
The Bravo D1 features the Parental Control system which supports DVDs with Parental Control
options. Parental Controls operate according to technical standards established by industry
manufacturers. Two important considerations exist:
to confirm.
When the Bravo D1 was released, certain aspects of the technical standard had
not yet been settled between the set makers and the disc industries.
The Parental Control system only works with discs that include the appropriate
software.
Under these circumstances, we cannot guarantee the function and reliability of the Parental
Control system. Please take responsibility to make sure your disks respond to the Parental
Control settings before allowing children access to the Bravo D1. Parental Controls are not a
substitute for responsible supervision of minors.
Page 19
.
VINC.COM
Page 22

BRAVO D1 User Guide
TV Type (Screen Format)
The Bravo D1 provides three possible TV output formats:
4:3 Letterbox
4:3 Pan and Scan
16:9 Widescreen
The following image shows the effects of the TV screen format settings, depending on the actual
type of video being delivered to the TV.
To choose between these formats:
1. Press Setup to display the Setup menu.
2. Press d twice for the Initial Settings option.
3. Press f once and then d twice for the TV Type option.
4. Press f and d to select 4:3 Letterbox, 4:3 Pan and Scan or
16:9.
5. Press
button to confirm your selection.
Page 20
.
VINC.COM
Page 23

BRAVO D1 User Guide
Change Password
6. Press Setup to display the Setup menu.
7. Press d twice for the Initial Settings option.
8. Press f once and then d five times for the Change Password
option.
9. Press
button go to the Set password.
Page 21
.
VINC.COM
Page 24

BRAVO D1 User Guide
Troubleshooting
The following are a list of difficulties you may experience when using the Bravo D1. Attempt the
most common solutions provided below before contacting for customer service.
General Issues
Symptom Possible solutions
No power
Bravo D1 does not
respond to the Remote
Control
Panel buttons do not
work
Disc does not play
correctly, or does not
play at all
Bravo D1 does not
respond to some
operating commands
during playback
Verify that the power cord is firmly plugged into a working electrical
outlet.
Verify that the Bravo D1 main power switch is turned on.
Aim the Remote Control directly at the front panel sensor.
Remove any obstacles between the player and the Remote Control.
Install new batteries in the Remote Control.
Verify that the Bravo D1 is not in initial Setup mode. Reset the player
by unplugging the AC cord from the electrical outlet.
Verify that the disc label is facing up. Clean the disc if necessary.
Try a different disc; the disc in question may be defective. Check for
scratches or warps.
The disc may not enable certain operations.
Refer to the disc manual for its capabilities.
Audio Issues
Symptom Possible solutions
No sound or
incomplete sound
output
Check audio connections and audio setup.
Verify that the TV and amplifier/receiver connections are secure and
that they are powered on and set to the correct audio format.
Press the Audio button to select other audio tracks. The disc or track
may be defective.
Verify that the Mute function of the Bravo D1, TV or amplifier is not
active. Check the player volume setting on the Remote Control.
The following operations disable sound output: reverse play, pause,
step, slow, and search. This is normal.
No audio at the digital
output
Verify that the digital connections are secure, and that the Settings
menu shows that digital output is set to DPCM.
Verify that the audio format of the selected audio matches your
amplifier/receiver capabilities.
Not applicable for MP3
Page 22
.
VINC.COM
Page 25

BRAVO D1 User Guide
Video Issues
Symptom Possible solutions
No picture
Completely distorted
picture or no color
with menu
Distorted or black/
white picture with DVD
or Video CD
Verify that the TV is turned on and set to the correct video
mode/format.
Verify that the system connections are secure. Plug in all connections
firmly, and check for damaged cables.
Verify that the disc is undamaged and in the player. Your disc may be
defective; try a different disc.
If the picture is completely distorted or if the picture rolls vertically,
make sure the Bravo D1’s NTSC/PAL setting matches the TV’s video
system.
See TV System Setup for instructions on setting the NTSC/PAL option.
Verify that your TV is capable of processing the video signal
(PAL/NTSC) recorded on the disc.
See TV System Setup for instructions on setting the NTSC/PAL option.
Specifications
Symptom Possible solutions
Supported disc types DVD/DVD-R, VCD/ SVCD, CD-DA/CDI-FMV, CD, MP-3, CD-R/CD-RW
Supported video
formats
MPEG-1, MPEG-2, MPEG-4,JPEG PICTURE FILE, DIVX
Supported display
outputs
Output terminals
Power input 120VAC 60Hz
Dimensions Body size: W16.9” X D12.2” X H2.6” (W430 X D310 X H66 mm
HDTV monitor/TV handling resolutions of 480p, 720p, or 1080i
(p=progressive scan, i=interlaced)
Component or DVI output with EDTV, DVI only with HDTV resolutions
(YUV or RGB format)
Component, Composite and S-Video for NTSC or PAL resolutions
Video DVI Digital Video Output x 1
S-Video Output x 1
Composite AV x 1
Component (Pr/Pb/Y) x 1 set
Audio RCA AV x 2 set (L&R)
Optical digital output x 1
Coaxial digital output x1
35W
Packing size: W19.7” X D14.6” X H4.5” (W500 X D370 X H115 mm)
Weight (N.W.:5.5lb/G.W.:6.6lb) (N.W.:2.5kg/G.W.:3kg)
Page 23
.
VINC.COM
Page 26

BRAVO D1 User Guide
Media Format Specifications
Digital TV (DTV)
Digital TV is a broadcast video and audio standard that uses digital signals. It provides
significant advantages and improvements over conventional analog technology.
There are three versions of DTV: standard (SDTV) enhanced (EDTV) and high definition (HDTV).
SDTV allows stations to broadcast multiple programs within the same bandwidth. EDTV delivers
signals superior to that of SDTV, but HDTV is a magnitude of quality beyond it, displaying sound
and images surpassing anything available in today’s home systems.
Format Scan
Lines
SDTV 480 active
525 total EDTV
480 active
HDTV
750 total
720 active
1125 total
1080 active
Scan
Range
15.75KHz
(60i)
31.5 kHz
(60p)
45 kHz (60p) 1080x720
33.75 kHz
(60i)
Pixel
Format
60i
640x480
1920x1080
Frame Rate Aspect
Ratio
24p, 30p, 60p, or
60i
24p, 30p, 60p 16:9
4:3 or 16:9
Divx Format Definition
DivX is a digital video compression technology based on MPEG-4 and developed by
DivXNetworks,Inc.; do not confuse this acronym with DIVX (digital video express ),a DVD-ROM
format endorsed by major movie studios that tracks and enforces strict copy protection
standards.
Page 24
.
VINC.COM
Page 27

V INCORPORATED LIMITED WARRANTY
For BRAVO DVD Players
Welcome to the V, Inc. Digital Family! Please read this warranty carefully, it is a “ONE-YEAR LIMITED WARRANTY” on parts and labor.
V, Inc.’s Responsibility
V, Inc. DVD Players purchased in the United States are warranted to be free from defects in materials or workmanship for a period of
one (1) year from the date of their original retail purchase. If the unit fails to conform to this warranty, we will service the monitor using
new or refurbished parts.
Service Labor
During a period of ninety (90) days from the effective warranty date, V, Inc. will provide, when needed, service labor to repair a
manufacturing defect at its designated Service Center. To obtain warranty service in the Untied States, you must first call our
Customer Support at (714) 962-4388, 9:30am-6pm EST. The determination of service will be made by V, Inc. Customer Support. .
PLEASE DO NOT RETURN YOUR UNIT TO V, INC. WITHOUT PRIOR AUTHORIZATION.
Parts
New or remanufactured replacements for defective parts will be used for repairs by V, Inc. at its designated Service Center for one
(1) year from the effective warranty date. Such replacement parts are warranted for the remaining portion of the original warranty
period.
Service
During the one (1) year warranty period, V, Inc. will, at its option and sole discretion, repair or replace defective parts, including
replacement of the entire DVD Player. The Customer will be required to ship the unit to the Service Center indicated at the time
Customer Support is contacted to make the necessary repairs. You are responsible for all transportation charges to and from the
service facility. V, Inc. is not responsible for the de-installation or re-installation of the unit.
Packaging and Shipping Instructions
When you send the product to an authorized V, Inc. service facility you must use the original carton box and packing material or an
equivalent as approved by V, Inc.
Not Covered
This warranty does not cover defects, malfunctions or failures resulting from shipping or transit accidents, abuse, misuse, operation
contrary to furnished instructions, operation on incorrect power supplies, operation with faulty associated equipment, modification,
alteration, improper servicing, tampering or normal wear and tear or TVs on which the serial number has been removed or defaced.
Image Sticking caused by operating at excessive brightness levels for extended periods or mishandling are not covered by this
warranty.
ANY IMPLIED WARRANTIES, INCLUDING ANY IMPLIED WARRANTY OF MERCHANTABILITY AND FITNESS FOR A
PARTICULAR PURPOSE SHALL BE LIMITED IN DURATION TO THE PERIOD OF TIME SET FORTH ABOVE. OUR LIABILITY
FOR ANY AND ALL LOSSES AND DAMAGES RESULTING FROM ANY CAUSE WHATSOEVER, INCLUDING OUR
NEGLIGENCE, ALLEGED DAMAGE OR DEFECTIVE GOODS, WHETHER SUCH DEFECTS ARE DISCOVERABLE OR LATENT,
SHALL IN NO EVENT EXCEED THE PURCHASE PRICE OF THE DISPLAY. WE SHALL NOT BE RESPONSIBLE FOR LOSS OF
USE, COMMERCIAL LOSS OR OTHER INCIDENTAL OR CONSEQUENTIAL DAMAGES. SOME STATES DO NOT ALLOW
LIMITATIONS ON HOW LONG AN IMPLIED WARRANTY LASTS OR THE EXCLUSION OR LIMITATION OF INCIDENTAL OR
CONSEQUENTIAL DAMAGES, SO THE ABOVE LIMITATIONS OR EXCLUSIONS MAY NOT APPLY TO YOU. This warranty
gives you specific legal rights, and you may also have other rights which vary from state to state. This is the only warranty
applicable; no one is authorized to extend or modify it or to grant any other warranty.
V, Inc. retains the right to assess all warranty claims and to determine if damages are covered by the warranty. In case of a claim
that is not covered by the warranty, you will be contacted to determine whether V, Inc. should repair the damage for a fee or whether
Owner’s Responsibility
the product should be returned to you as received by the repair center.
Effective Warranty Date
Warranty begins on the date of sale to the end user. To ensure warranty service, keep the dated bill or sale receipt as evidence of
the purchase date.
User Manual
Read your User Manual carefully so that you will understand the operation of your DVD Player and how to adjust the user controls.
Warranty Service
For warranty service information, contact V, Inc. Customer Support at (714) 962-4388, 9:30am-6pm EST. Parts and service labor
that are V, Inc.’s responsibility (see above) will be provided without charge. Other service is at the owner’s expense. You must
provide the model, serial number and date of purchase. Before you ask for warranty service, read your User Manual. You might
avoid a service call.
For Technical Support Call (714)962-4388 or E-mail Techsupp@vinc.us
Page 28

 Loading...