

Page 1
VC8201
Dual-head
Network Camera
Quick Installation Guide
繁中 日本語
English
Nederlands
Dansk
簡中
Français
Indonesia
Deutsch
Español Português
Split Camera System • Recess Mount •
Fisheye Lens •
WDR
Italiano
Türkçe
Русский Česky Svenska
Polski
Page 2
Warning Before Installation / Warnung vor der Installation /
5
0
0
0
2
4
7
0
1
G
Waarschuwing voor installatie
Power off the Network Camera as soon as
smoke or unusual odors are detected.
Netzwerkkamera bei Rauchentwicklung oder
ungewöhnlichem Geruch sofort abschalten.
Schakel de Netwerk Camera uit zodra u rook
of ongebruikelijke geuren waarneemt.
Do not place the Network Camera on
unsteady surfaces.
Netzwerkkamera nur auf feste Unterlagen
abstellen.
Plaats de Netwerk Camera niet op een
instabiel oppervlak
Do not place the Network Camera in high
humidity environments..
Stellen Sie die Netzwerkkamera nicht in
feuchter Umgebung auf.
Placér ikke netværkskameraet i fugtige
områder.
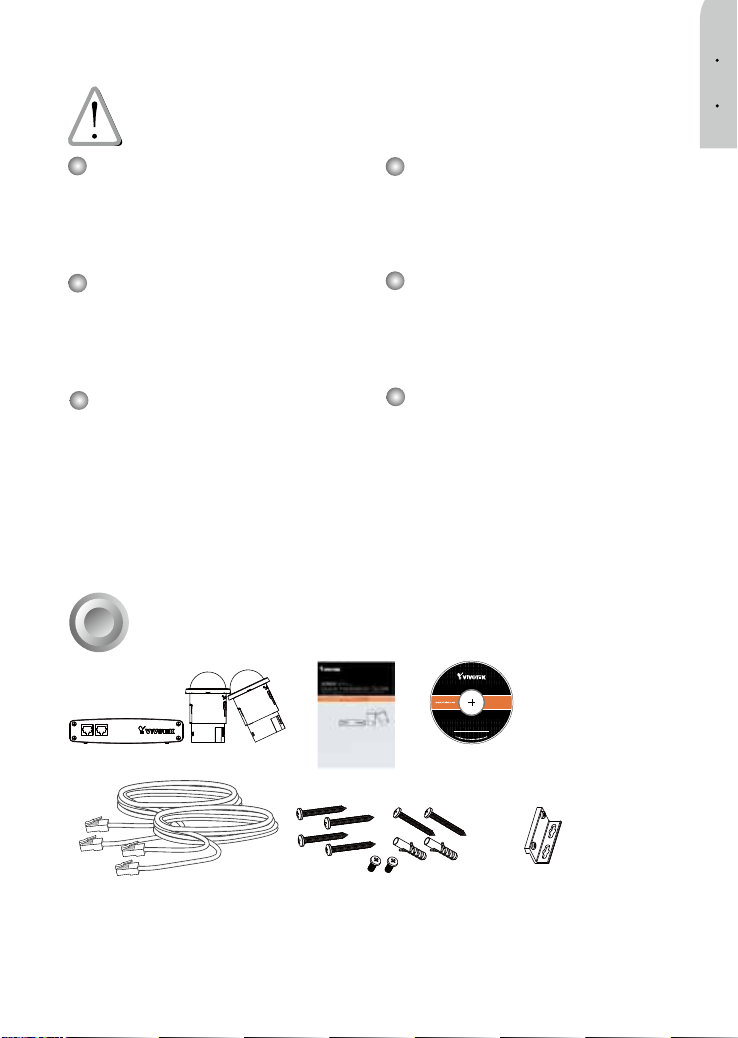
Package Contents / Packungsinhalt kontrollieren /
1
Inhoud van de verpakking
Refer to your user’s manual for the
operating temperature.
Hinweise zur Betriebstemperatur siehe
Benutzeranleitung.
Zie de gebruikershandleiding voor informatie
over de gebruikstemperatuur.
Do not touch the Network Camera during
a lightning storm.
Netzwerkkamera bei Gewittern nicht anfassen.
Raak de Netwerk Camera niet aan tijdens
onweer.
Do not drop the Network Camera.
Netzwerkkamera nicht fallen lassen.
Laat de Netwerk Camera niet vallen.
Nederlands
Deutsch
English
1
Page 3
Introduction / Einleitung / Introductie
2
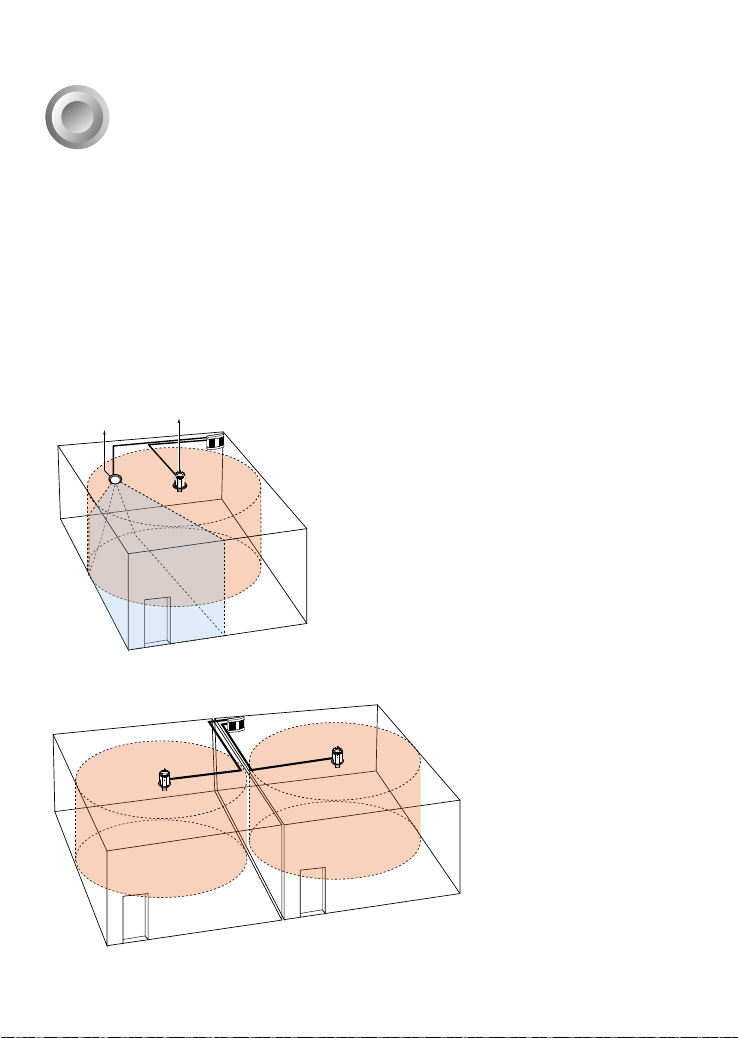
The two sensor modules can be installed in the same or different rooms/mounting positions. A
sheye lens can be used to cover an entire space, while a xed focal lens a specic eld of view.
Die zwei Sensormodule können in denselben oder in verschiedenen Röumen/Montagepositionen montiert
werden. Ein Fischaugen-Objektiv kann verwendet werden, um einen ganzen Raum abzudecken,
wöhrend eine Festbrennweite ein bestimmtes Sichtfeld abdeckt.
De twee sensormodules kunnen in dezelfde of verschillende ruimtes/bevestigingspunten worden
gemonteerd. Met een visooglens kan een complete ruimte worden afgedekt. Met een lens met een
vaste focus kan een specifiek plek worden afgedekt.
Fixed lens module
FestbrennweiteObjektivmodul
Vaste lensmodule
Fisheye lens module
Fischaugen-Objektivmodul
Visooglensmodule
Fisheye lens module
Fischaugen-Objektivmodul
Visooglensmodule
Fisheye lens module
Fischaugen-Objektivmodul
Visooglensmodule
2
Page 4
Hardware Installation / Hardwareinstallation /
3
Hardware installeren
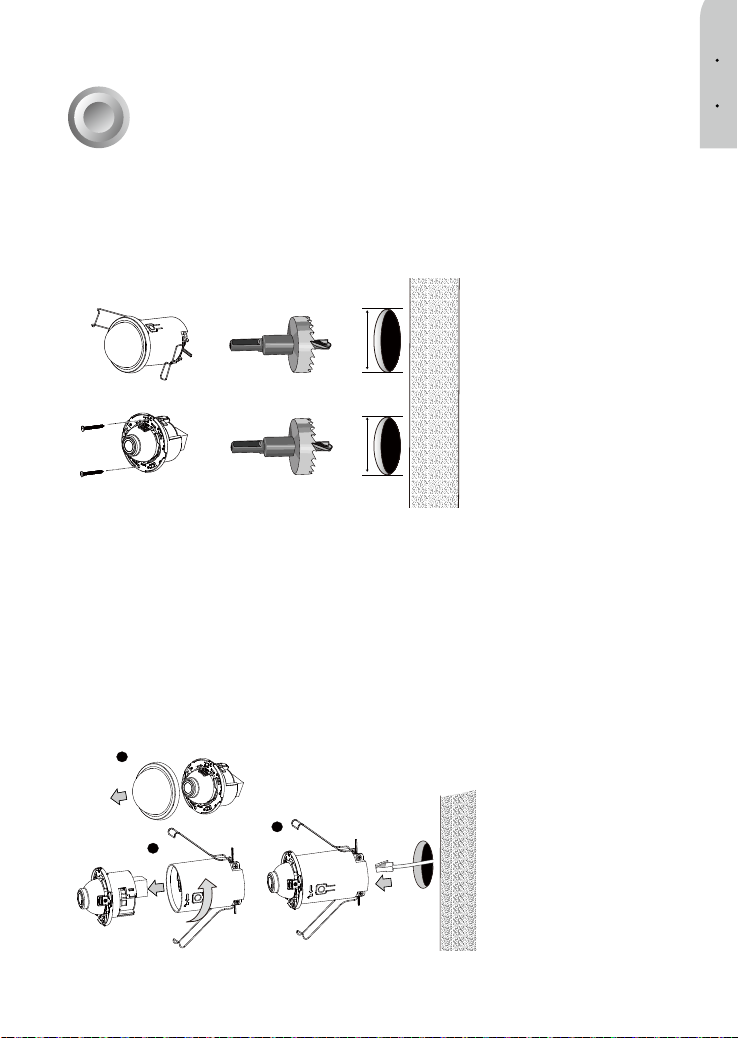
Drill a hole on ceiling or wall. The diameters for the installations with or without the retention
tube are different.
Bohren Sie ein Loch an der Decke oder Wand. Die Durchmesser der Installationen mit oder ohne
Halterohr sind unterschiedlich.
Boor een gat in plafond of muur. Als de bevestigingspijp wordt gebruikt, wijkt de diameter van het
bevestigingsgat af.
w/ the retention tube
mit Halterohr
met bevestigingspijp
w/o the retention tube
ohne Halterohr
zonder bevestigingspijp
Use the M3 self tapping screws if installed without the retention tube. Note that this type of installation does not apply
to hard surfaces, such as a concrete wall.
Verwenden Sie die M3 Schneidschrauben, wenn ohne das Rückhalterohr installiert wird. Beachten Sie, dass diese
Art der Montage nicht auf harten Oberächen, wie beispielsweise einer Betonwand, ausgeführt werden sollte.
Indien de bevestigingspijp niet wordt gebruikt, gebruikt u de M3 zelfborgende schroeven. Let op dat deze vorm van
bevestigen niet geschikt is voor harde oppervlakken, zoals een betonnen muur.
1. Detach the top cover.
Lösen Sie die obere Abdeckung.
Verwijder de bedekking aan de bovenkant.
2. Install the retention tube.
Installieren Sie das Halterohr.
Monteer de bevestigingspijp.
3. Route the sensor cable through the hole, and then connect to the lens module.
Verlegen Sie das Sensorkabel durch das Loch und schließen Sie es danach an das Objektiv-Modul an.
Leg de sensorkabel door het gat en sluit de lensmodule aan.
1
50mm
45mm
Nederlands
Deutsch
English
3
2
3
Page 5

Pull the retention clips to the back of the module, and then insert the module into the wall.
Ziehen Sie die Halteklammern an der Rückseite des Moduls, und setzen Sie das Modul
anschließend in die Wand ein.
Trek aan de bevestigingsklemmen aan de achterzijde van de module en plaats de module in de wand.
4
Extension tube
Verlängerungsrohr
Verlengstuk
Use an extension tube if the wall is thicker
than 6cm.
Verwenden Sie ein Verlängerungsrohr, wenn die
Wand dicker als 6 cm ist.
Gebruik een verlengstuk als de wand dikker is
dan 6 cm.
The retention clips will hold the module in place.
Die Halteklammern werden das Modul in Position zu halten.
De bevestigingsklemmen houden de module op zijn plek.
Note that the shooting angle of a xed lens can only
be vertically adjusted. This mark should be on top.
Beachten Sie, dass der Aufnahmewinkel von einem
festen Objektiv nur vertikal eingestellt werden kann.
Diese Marke sollte oben sein.
Let op dat de opnamehoek van een vaste lens
uitsluitend in verticale richting kan worden
aangepast. Deze markering komt boven.
4
Page 6

Route and connect the R12 sensor cables.
Verlegen und verbinden Sie die R12-Sensorkabel.
Leg de R12-sensorkabels en sluit ze aan.
Nederlands
Deutsch
English
Up to 8 meters.
Bis zu 8 Meter.
Maximaal 8 meter.
RJ12
Install the camera main assembly to wall. Secure the mount bracket to the sides of the assembly,
and use the screw holes on the bracket as the drilling template. Drill holes, hammer in the anchors,
and install the main assembly to a wall.
Montieren Sie die Kamerahauptbaugruppe an der Wand. Befestigen Sie die Montagehalterung
an den Seiten der Baugruppe, und verwenden Sie die Schraubenlöcher als Halterung
der Bohrschablone. Bohren Sie Löcher, bringen Sie die Dübel an, und installieren Sie die
Hauptbaugruppe an einer Wand.
Monteer de hoofdconstructie van de camera aan een wand. Bevestig de montagebeugel aan de
zijkanten van de constructie. Gebruik de schroefgaten op de beugel als boorsjabloon. Boor gaten,
timmer de pluggen in de wand en bevestig de constructie aan een wand.
5
Page 7

1. Connect 12V DC power and an Ethernet cable to the network. The camera can also be powered
by a PoE connection (up to 11.5W).
Schließen Sie den 12V Gleichstrom und ein Ethernet-Kabel an das Netzwerk an. Die Kamera
kann auch mit einer PoE-Verbindung (bis zu 11,5 W) betrieben werden.
Sluit 12 V gelijkstroom aan en sluit een Ethernetkabel aan op het netwerk. De camera kan ook
van stroom worden voorzien via een PoE-verbinding (maximaal 11,5 W).
2. If preferred, install an SD/SDHC/SDXC card.
Falls gewünscht, installieren Sie eine SD/SDHC/SDXC-Karte.
Indien gewenst, plaatst u een SD/SDHC/SDXC-kaart.
3. Connect DI and DO devices. The max. load on a DO pin is 50mA.
Schließen Sie DI und DO-Geräte an. Die maximale Last an einem DO Pin beträgt 50mA.
Sluit DI- en DO-apparatuur aan. De max. belasting op een DO-pin is 50 mA.
Reset
Zurücksetzen
Reset
DI/DO
SD
DI/DO
DI/DO
LEDs
LEDs
LED’s
LAN / WAN
6
Page 8

1. Use a small-size Phillips screwdriver to change the shooting angle of a xed focal lens.
Verwenden Sie einen kleinen Kreuzschlitzschraubendreher, um die Aufnahmewinkel einer
Festbrennweite zu ändern.
Gebruik een kleine kruiskopschoevendraaier om de opnamehoek van een lens met vaste
focus aan te passen.
2. Remove the protective cap from a sheye lens.
Entfernen Sie die Schutzkappe von einem Fischauge-Objektiv.
Verwijder de beschermingskap van een visooglens.
3. Attach the top cover to lens module by aligning the notch. The magnets will hold the cover
in place.
Bringen Sie die obere Abdeckung an das Objektivmodul durch Ausrichten an der Kerbe
an. Die Magnete werden die Abdeckung in Position halten.
Bevestig de bedekking van de bovenkant op de lensmodule door de inkeping correct te
richten. De magneten houden de bedekking op zijn plek.
Nederlands
Deutsch
English
Fixed lens module
Festbrennweite-Objektivmodul
Vaste lensmodule
Fisheye lens module
Fischaugen-Objektivmodul
Visooglensmodule
7
Page 9

Assigning an IP Address / IP-Adresse zuweisen /
4
Een ip-adres toekennen
1. Install the "Installation Wizard 2."
Installieren Sie den “Installationsassistenten 2”.
Installeer “Installatiewizard 2”.
2. The program will search for VIVOTEK Video Receivers, Video Servers or Network
Cameras on the same LAN.
Das Programm sucht nach VIVOTEK Videoempfängern, Videoservern oder
Netzwerkkameras in demselben LAN.
Het programma zoekt videoreceivers, videoservers en Netwerk Camera's van
VIVOTEK op hetzelfde lan.
3. Double-click on the camera's MAC address to open a browser management session
with the camera.
Klicken Sie doppelt auf die MAC-Adresse, um eine Verwaltungssitzung mit der
Netzwerkkamera im Browser zu öffnen.
Dubbelklik op het MAC-adres van de camera om een browsermanagementsessie
met de camera te openen.
Ready to Use / Betriebsfertig / Klaar voor gebruik
5
A browser session with the Network Camera should prompt as shown below.
Uma sessão do navegador com a Câmera de Rede aparecerá como mostrado abaixo.
Een browsersessie met de Netwerk Camera verschijnt zoals hieronder is aangegeven.
8
Page 10

Page 11

P/N:625025600G Rev. 1.0
All specications are subject to change without notice.
c
Copyright 2014 VIVOTEK INC. All rights reserved.
VIVOTEK INC.
6F, No.192, Lien-Cheng Rd., Chung-Ho, New Taipei City, 235, Taiwan, R.O.C.
|T: +886-2-82455282| F: +886-2-82455532| E: sales@vivotek.com
VIVOTEK Netherlands B.V.
Busplein 36, 1315KV, Almere, The Netherlands
|T: +31 (0)36 5389 149| F: +31 (0)36 5389 111| E: saleseurope@vivotek.com
VIVOTEK USA, INC.
2050 Ringwood Avenue, San Jose, CA 95131
|T: 408-773-8686| F: 408-773-8298|E : salesusa@vivotek.com
 Loading...