

Page 1

VAST Central Management Software
Quick Installation Guide
Table of Contents
VAST Installation ��������������������������������������������������������������������������������2
Installing the VAST Software ���������������������������������������������������������2
VAST LiveClient Conguration �����������������������������������������������������������4
Activating VAST LiveClient ������������������������������������������������������������4
VAST LiveClient User Interface �����������������������������������������������������4
How to Add Devices ����������������������������������������������������������������������5
How to Add Sub-stations ���������������������������������������������������������������7
VAST Playback Conguration ������������������������������������������������������������9
Activating VAST Playback ������������������������������������������������������������9
VAST Playback User Interface ������������������������������������������������������9
How to View Recorded Video ������������������������������������������������������10
English
EN - 1
Page 2
VAST Installation
Installing the VAST Software
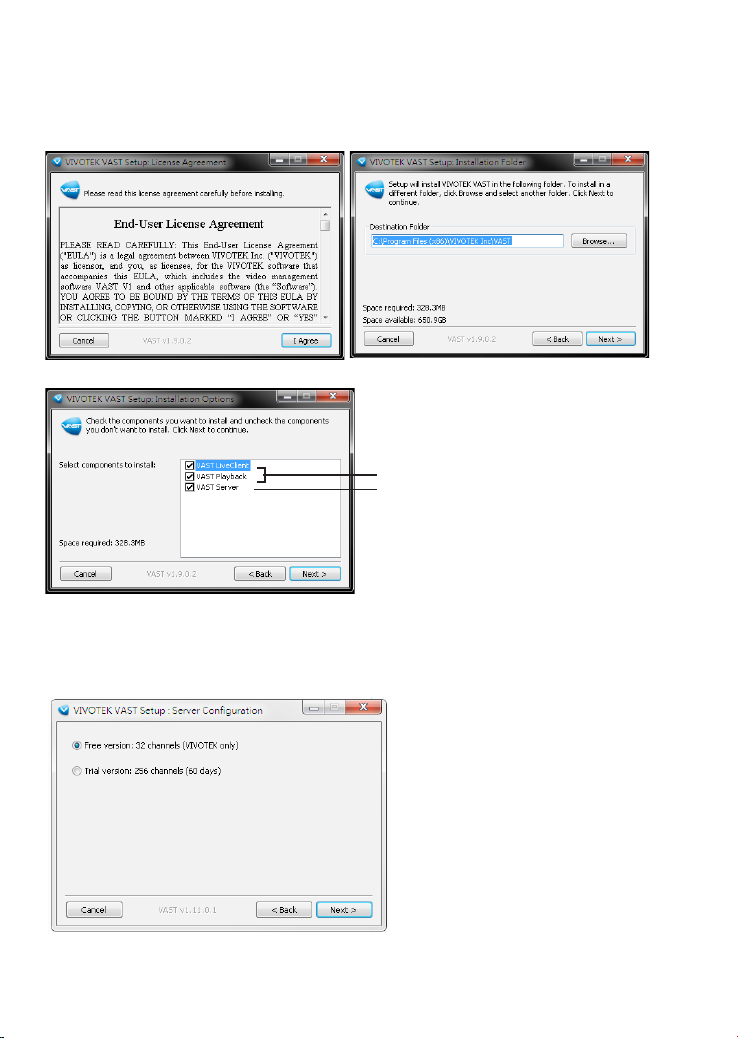
1� Run VAST_Setup.exe on your computer, and specify a location to install the program�
2�
Select the items you want to install, then click Next to
Client applications
Server application
3� You can install the free 32 CH version, or, select the Trial 256 CH version, then click
Next to continue�
The trial version will expire after 60 days� You can then contact VIVOTEK's sales
representatives to purchase the ofcial software license to continue using the software.
continue�
In the LiveClient window, you can go to
Help > License, and click on Generate
License Update Request� You can
send the request le to VIVOTEK's sales
representatives to facilitate the purchase
process�
EN - 2
Page 3
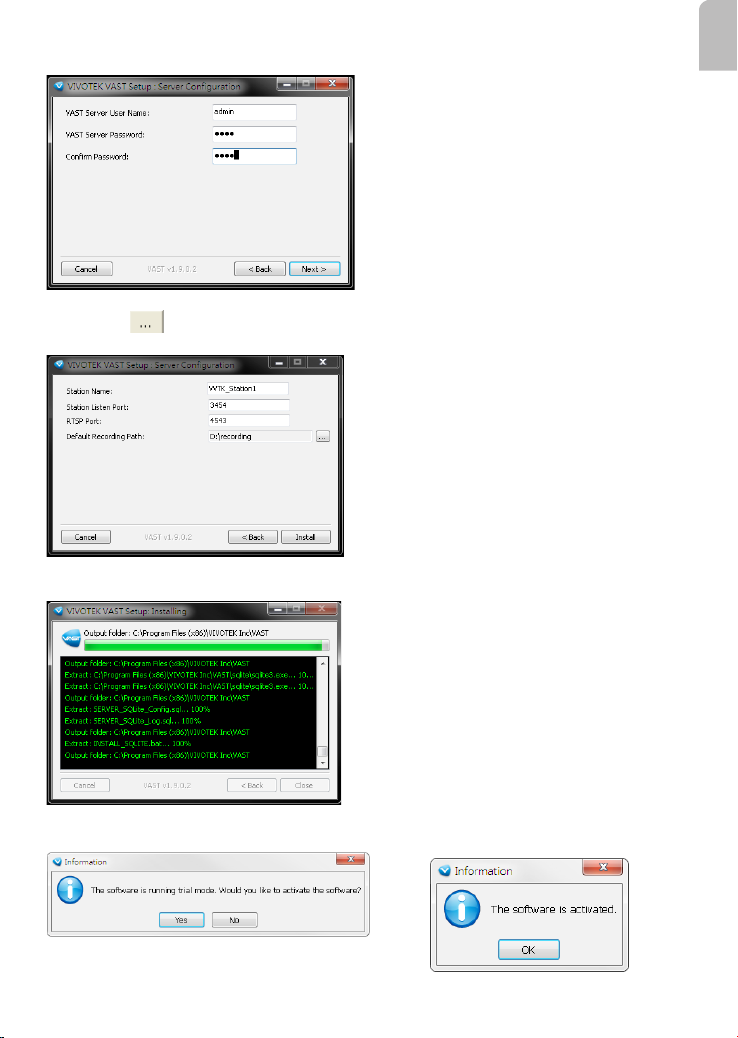
4� Assign a username and password for the VAST Server�
a. VAST server will by default store the recorded media le under c:\Recording. Click
Browse to change the path if you plan to store the data under another path� Then
click Next to continue�
b� Wait for the installation process to complete, then click Close to exit the installation
program�
English
If you installed the trial version, you will be prompted to activate the trial license� Click
Yes to start�
EN - 3
Page 4
VAST LiveClient Configuration
Activating VAST LiveClient
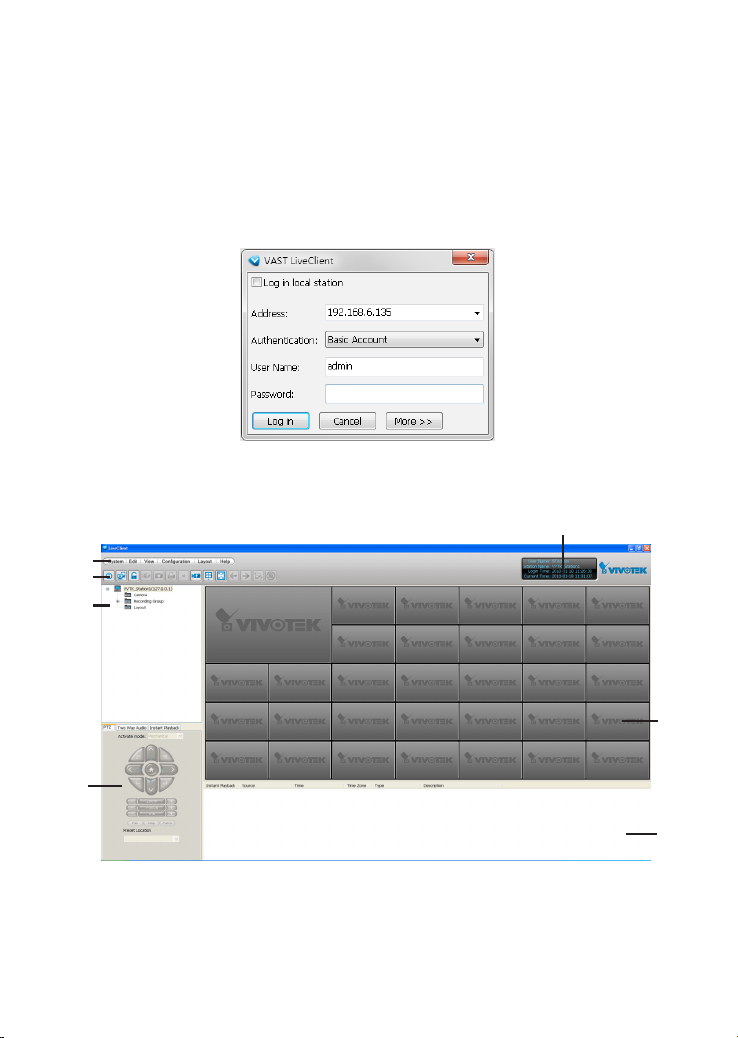
1� After installation, run the VAST LiveClient program�
2� Enter the IP Address, User Name, Password and Communication Port of the VAST
Server�
3� Click Login, the monitoring window will be displayed�
VAST LiveClient User Interface
E
A
B
C
D
A� Menu bar B� Quick access bar C� Hierarchical management tree
D� Camera control panel E� Status panel F� Live video monitoring window G� Event window
EN - 4
F
G
Page 5

How to Add Devices
Select a station from the hierarchical management tree; click Conguration > Camera
Management > Batch insert camera on the menu bar (or right-click the target station,
then select Camera Management > Batch insert camera)� The Batch Insert window will
pop up�
a
English
a� Click Search to open the Search Camera window�
b� You can select to search for "all cameras" or
"cameras which are not inserted" using the
checkcircles on top�
c� You may also specify the search condition
using the following criteria:
IP Range: Enter a range of IP addresses (in
Classs C dotted-decimal notation) to narrow
down the list;
IP with prex: Type in the prex of the IP
address to narrow down the list�
Model with prex: The user can type in part
of the model name or the complete model
name of the cameras to narrow down the
search�
c
EN - 5
b
d
Page 6

MAC with prex: You can key in the prex of the MAC address of the cameras to narrow
down the search�
d� When search is filtered, you can select the cameras each by a single click or check
Select All to add them in the batch insert list� Then click OK to nish searching.
e� All selected cameras will be displayed on the batch insert list with the associated
information and the connection status� When you click on a camera, a live view will
display on the right side for you to identify the cameras on the list� If you want to remove
a camera from the list, click the trash can icon to delete it�
e
f
f� At the bottom of the window, there is a eld for you to alter the camera settings including
Connection Settings and Recording Settings� You can apply the new settings to each
camera on the list, or click Apply to All to apply the same configurations to all the
cameras� For more information about Connection Settings and Recording Settings,
please refer to your User Manual�
EN - 6
Page 7

g� Click Exit to close the camera management window and return to the monitoring
window�
h. Back to the main window, you will nd the newly-inserted devices displayed under the
station and the live video in the video cell�
How to Add Sub-stations
The VAST server allows you to construct a hierarchical management system by adding
more sub-stations to the root station�
Relay Settings
Before adding a sub-station, please follow the instruction below to enable the Relay
Settings on the sub-station rst.
English
The Relay Settings window will pop up� Check Allow Relay Connection and enter a
Password� Then click OK to enable the settings�
EN - 7
Page 8

Insert Sub-stations
Select the station from the hierarchical management tree; click
Management on the menu bar (or right-click the target station, then select Station
Management)� The station management window will pop up�
Conguration > Station
a
d
c
b
d
f
a. Enter the IP Address and Password (dened in Relay Settings)�
b� You can also click Search Station to detect all VAST and ST7501 servers on the LAN�
c� Click List Sub-station Hierarchial button to know if there is any sub-station under it�
d� Click Insert to add the sub-station to the target station� The sub-station will be displayed
under the hierarchical management tree�
e� To insert additional sub-stations to the target station, repeat the above steps�
f� When completed, click Close to exit the Station Management window and return to the
main window�
g. Back to the main window, you will nd the newly-inserted stations displayed under the
hierarchical management tree�
EN - 8
Page 9

VAST Playback Configuration
Activating VAST Playback
1� After installation, run the VAST Playback program�
2� Enter the IP Address, User Name, Password and Communication Port of the VAST
Server�
3� Click Login, the playback window will be displayed�
VAST Playback User Interface
D
A
B
C
English
E
F
G
A� Menu bar B� Quick access bar C� Query panel (Browsing/ Time search/ Event search/ Log
viewer) D� Status panel E� Recorded video playback window F� Playback control panel
G� Video clips list
EN - 9
Page 10

How to View Recorded Video
1� On the Browsing page, right-click a station, device, or date item and click Refresh to
display the recorded video clips�
You can also use the tabbed menus to
search for recorded videos via Time, Event,
Bookmark menus, and so on�
2� Click a date item on the hierarchical management tree� The corresponding recorded
video clips will be listed on the video clip list� Double-click a video clip or drag-and-
drop it to one of the video cells�
EN - 10
Page 11

3� If you want to review all clips recorded on the same date, select a date then drag-and-
drop it to one of the video cells�
English
EN - 11
 Loading...