

Page 1

Page 2

Preface
Copyright
©2011 Vivitek Corporation. is a trademark of Vivitek Corporation. Other
trademarks are the properties of their respective owners. Values, weights and dimensions
are approximate. Specications are subject to change without prior notice.
Disclaimer
The information in this document is subject to change without notice. The manufacturer
makes no representations or warranties with respect to the contents hereof and specically
disclaims any implied warranties of merchantability or tness for any particular purpose.
The manufacturer reserves the right to revise this publication and to make changes from
time to time in the content hereof without obligation of the manufacturer to notify any
person of such revision or changes.
Trademark Recognition
HDMI, the HDMI Logo, and High-Denition Multimedia Interface are trademarks or
registered trademarks of HDMI Licensing LLC in the United States and other countries.
All other product names used in this manual are the properties of their respective owners
and are acknowledged.
ii
Page 3

Important Safety Information
Important:
It is strongly recommended that you read this section carefully before using the
Qumi. These safety and usage instructions will ensure that you enjoy the Qumi.
Keep this manual for future reference.
Symbols Used
Warning symbols that are used on the projector and in this manual are to alert you of potential
hazardous situations.
The following styles are used in this manual to alert you to important information.
Note:
Provides additional information on the topic at hand.
Important:
Provides additional information that should not be overlooked.
Caution:
Alerts you to situations that may damage the unit.
Warning:
Alerts you to situations that may damage the unit, create a hazardous environment,
or cause personal injury.
Throughout this manual, component parts and items in the OSD (On-Screen Display)
menus are denoted in bold, for example:
“Press the Menu button on the remote control to open the Main menu.”
General Safety Information
• Do not open the unit case. There are no user-serviceable parts in the unit. For
servicing, contact qualified service personnel.
• Follow all warnings and cautions in this manual and on the unit case.
• The projection light source is extremely bright by design. To avoid damage to eyes,
do not look into the lens when the LED illumination is on.
• Do not place the unit on an unstable surface or stand.
• Avoid using the system near water, in direct sunlight, or near a heating device.
• Do not place heavy objects on the unit.
iii
Page 4
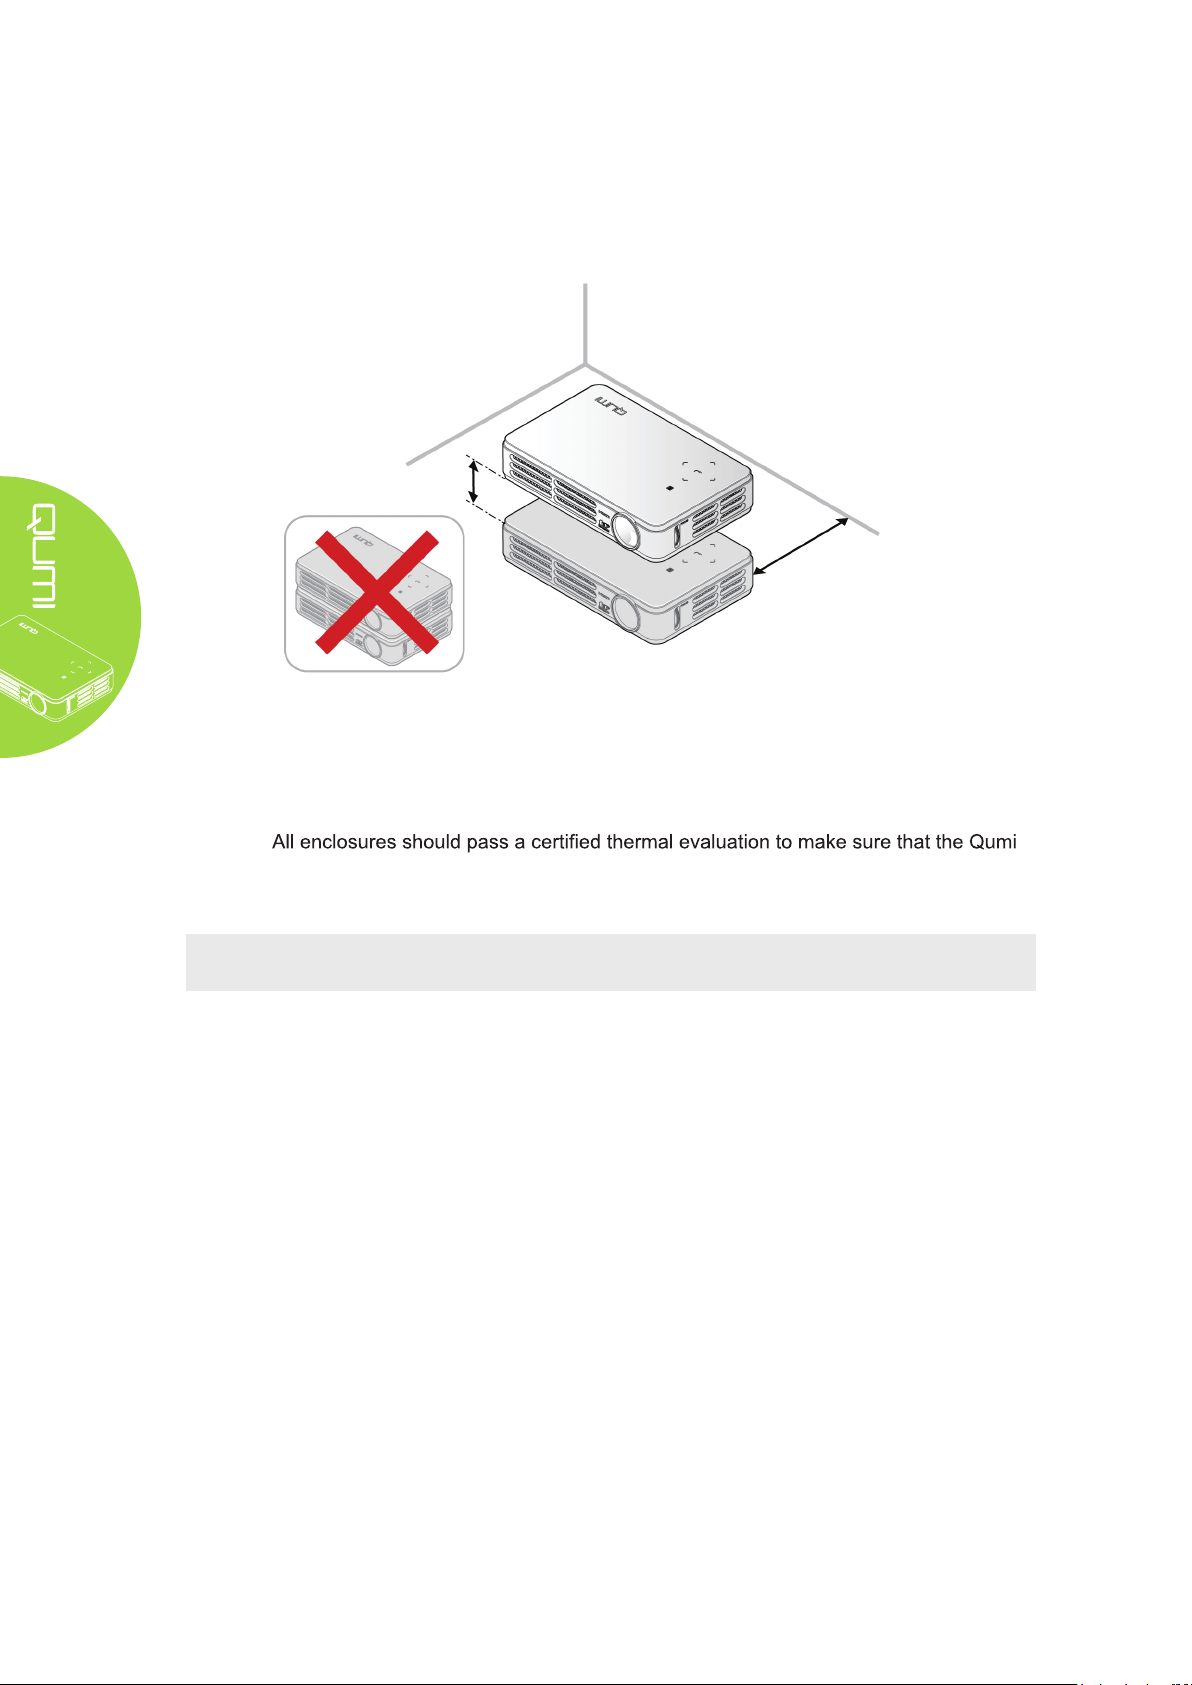
Qumi Installation Notice
• Allow at least a 20-inch (50cm) clearance around the exhaust vent.
Minimum 4 inches (100mm)
• Make sure that the intake vents do not recycle hot air from the exhaust vent.
• When operating the Qumi in an enclosed space, make sure that the surrounding air
temperature within the enclosure does not exceed operating temperature while the
Qumi is running, and the air intake and exhaust vents are unobstructed.
Minimum 20 inches (500mm)
•
does not recycle exhaust air, as this may cause the device to shutdown even if the
enclosure temperature is with the acceptable operating temperature range.
Caution:
Avoid using the Qumi in dusty environments.
iv
Page 5
Power Safety
• Only use the supplied adapter.
• Do not place anything on the cord. Place the cord where it will not be in the way of
foot traffic.
• Remove the battery from the remote control when storing or not in use for a prolonged period.
Cleaning the Qumi
• Unplug the cord before cleaning. See Cleaning the Qumi on page 36.
Note:
The Qumi will be warm after usage. Allow the Qumi to cool down before storing.
Regulatory Warnings
Before installing and using the Qumi, read the regulatory notices in the Regulatory
Compliance on page 45.
Symbol Explanations
DISPOSAL: Do not use household or municipal waste collection services
for disposal of electrical and electronic equipment. EU countries require the
use of separate recycling collection services.
Main Features
• Lightweight unit, easy to pack away and transport.
• Compatible with all major video standards including NTSC, PAL, and SECAM.
• A high brightness rating allows for presentations in lit rooms.
• Supports data resolution up to UXGA at 16.7 million colors to deliver crisp, clear im-
ages.
• Flexible setup allows for front, rear, ceiling and rear ceiling projection.
• Line-of-vision projections remain square, with advanced keystone correction for an-
gled projections.
• Input source automatically detected.
About this manual
This manual is intended for end users and describes how to install and operate the Qumi.
Wherever possible, relevant information—such as an illustration and its description—has
been kept on one page. This printer-friendly format is both for your convenience and to
help save paper, thereby protecting the environment. It is suggested that you only print
sections that are relevant to your needs.
v
Page 6

Table of Contents
Preface ��������������������������������������������������������������������������������������������������������������������� ii
Chapter 1 At a Glance ������������������������������������������������������������1
Overview ������������������������������������������������������������������������������������������������������������������ 1
Accessories ������������������������������������������������������������������������������������������������������������� 3
Remote Control ������������������������������������������������������������������������������������������������������� 4
Qumi and Remote Control Buttons ����������������������������������������������������������������������� 4
Media Player Screen ����������������������������������������������������������������������������������������������� 4
Chapter 2 Getting Started ������������������������������������������������������5
What You Need �������������������������������������������������������������������������������������������������������� 5
Setting Up Qumi ������������������������������������������������������������������������������������������������������ 6
Setting Up the Remote ����������������������������������������������������������������������������������������� 12
Chapter 3 Qumi Media Suite ������������������������������������������������13
Overview ���������������������������������������������������������������������������������������������������������������� 13
Movies �������������������������������������������������������������������������������������������������������������������� 14
Photos �������������������������������������������������������������������������������������������������������������������� 15
Music ���������������������������������������������������������������������������������������������������������������������� 16
Ofce Viewer ��������������������������������������������������������������������������������������������������������� 18
Settings ������������������������������������������������������������������������������������������������������������������ 19
Chapter 4 On-Screen Display (OSD) Settings��������������������20
OSD Menu Controls ���������������������������������������������������������������������������������������������� 20
Setting the OSD Language����������������������������������������������������������������������������������� 21
OSD Menu Overview ��������������������������������������������������������������������������������������������� 22
OSD Sub-Menu Overview ������������������������������������������������������������������������������������� 23
Image Menu ���������������������������������������������������������������������������������������������������������� 24
Computer Menu����������������������������������������������������������������������������������������������������� 26
Video/Audio Menu ������������������������������������������������������������������������������������������������� 27
Installation I Menu ����������������������������������������������������������������������������������������������� 29
Installation II Menu ���������������������������������������������������������������������������������������������� 31
Chapter 5 Taking Care of Your Qumi ����������������������������������36
Cleaning the Qumi ������������������������������������������������������������������������������������������������ 36
Cleaning the Lens ������������������������������������������������������������������������������������������������� 36
Troubleshooting ���������������������������������������������������������������������������������������������������� 37
Vivitek Support Site ���������������������������������������������������������������������������������������������� 40
Specications ������������������������������������������������������������������������������������������������������� 41
Projection Distance vs� Projection Size ������������������������������������������������������������� 42
Projection Distance and Size Table ��������������������������������������������������������������������� 42
Timing Mode Table ������������������������������������������������������������������������������������������������ 43
Qumi Dimensions ������������������������������������������������������������������������������������������������� 44
Regulatory Compliance ���������������������������������������������������������������������������������������� 45
Safety Certications ��������������������������������������������������������������������������������������������� 45
Disposal and Recycling ��������������������������������������������������������������������������������������� 45
vi
Page 7
Chapter 1 At a Glance
Overview
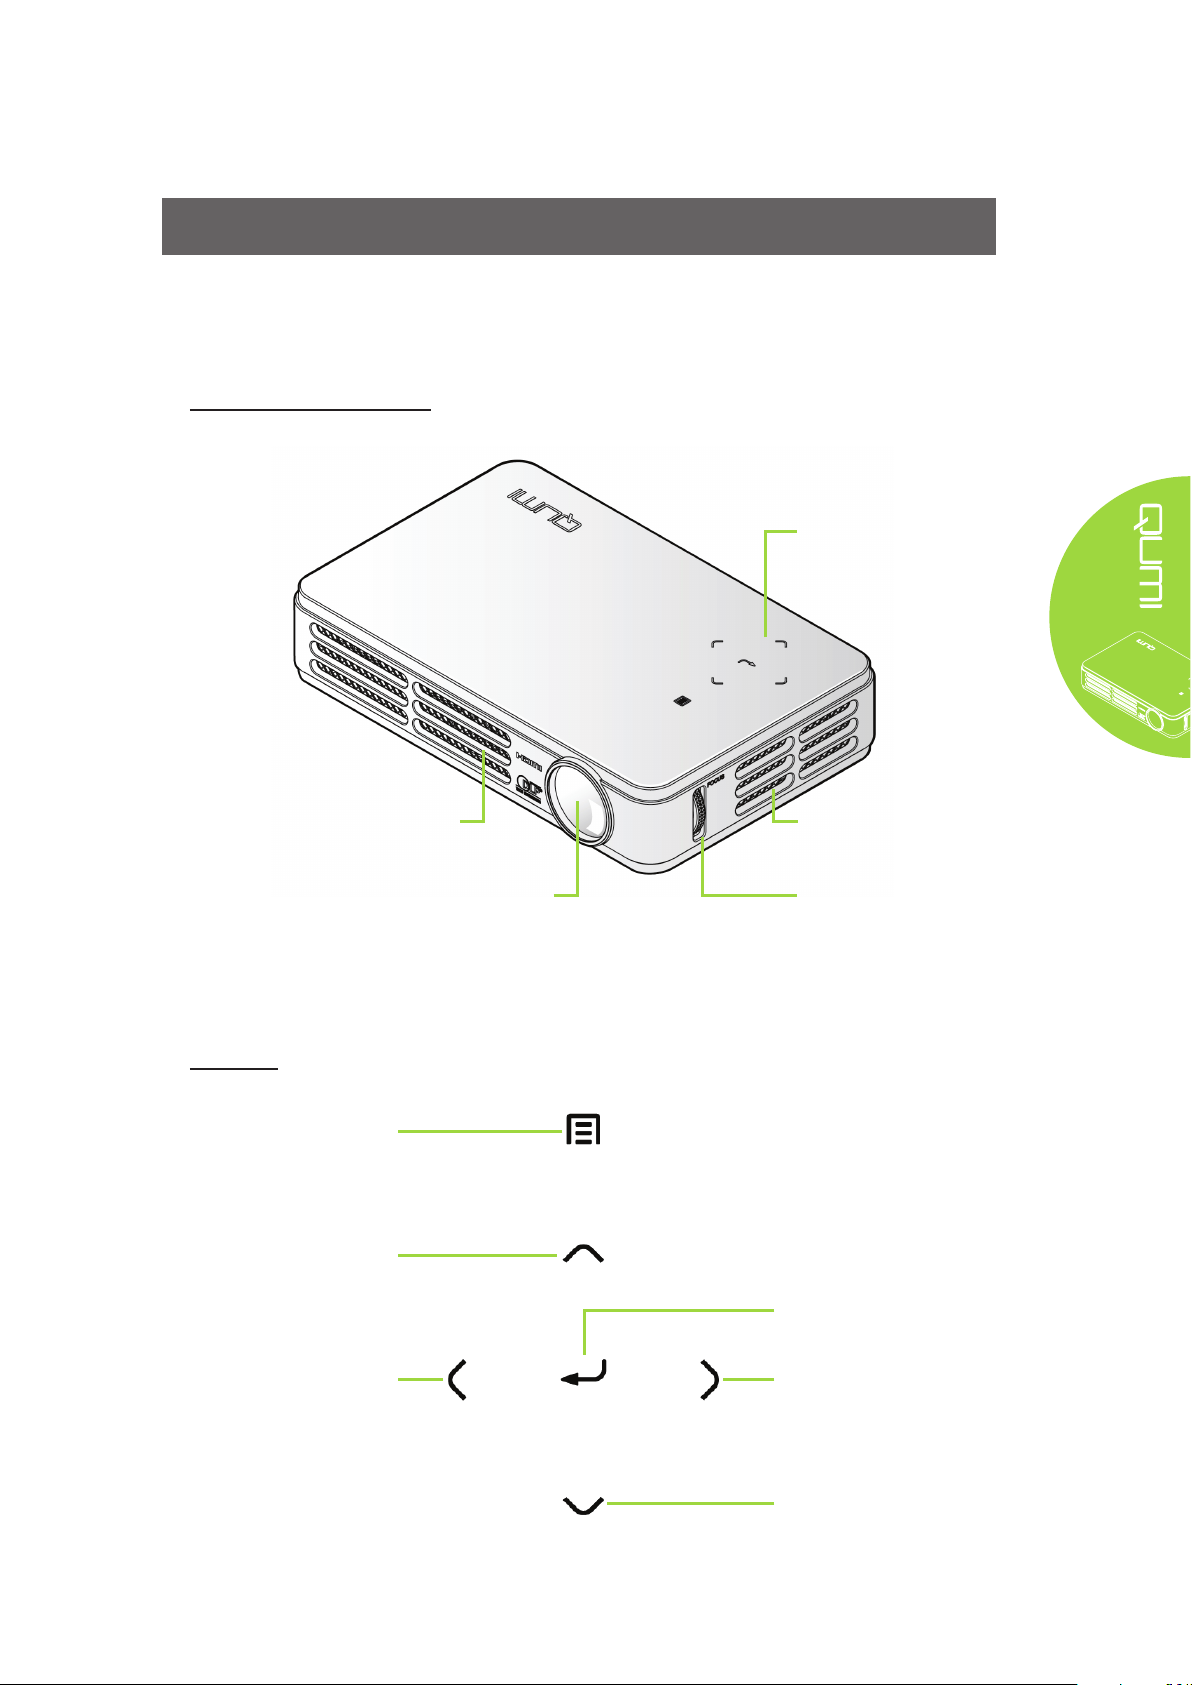
Front/Top/Right View
Keypad
See Keypad - On-Screen
Display (OSD) buttons
Keypad
Open and exit the OSD
Up Cursor
Navigate and change
settings in the OSD
Left Cursor
Navigate and change
settings in the OSD
Cooling Vent
Do not cover
Projection Lens
Menu
buttons
Lens
Cooling Vent
Do not cover
Focus Ring
Focus the projected image
Enter Cursor
Change settings in the OSD
Right Cursor
Navigate and change
settings in the OSD
Down Cursor
Navigate and change
settings in the OSD
1
Page 8
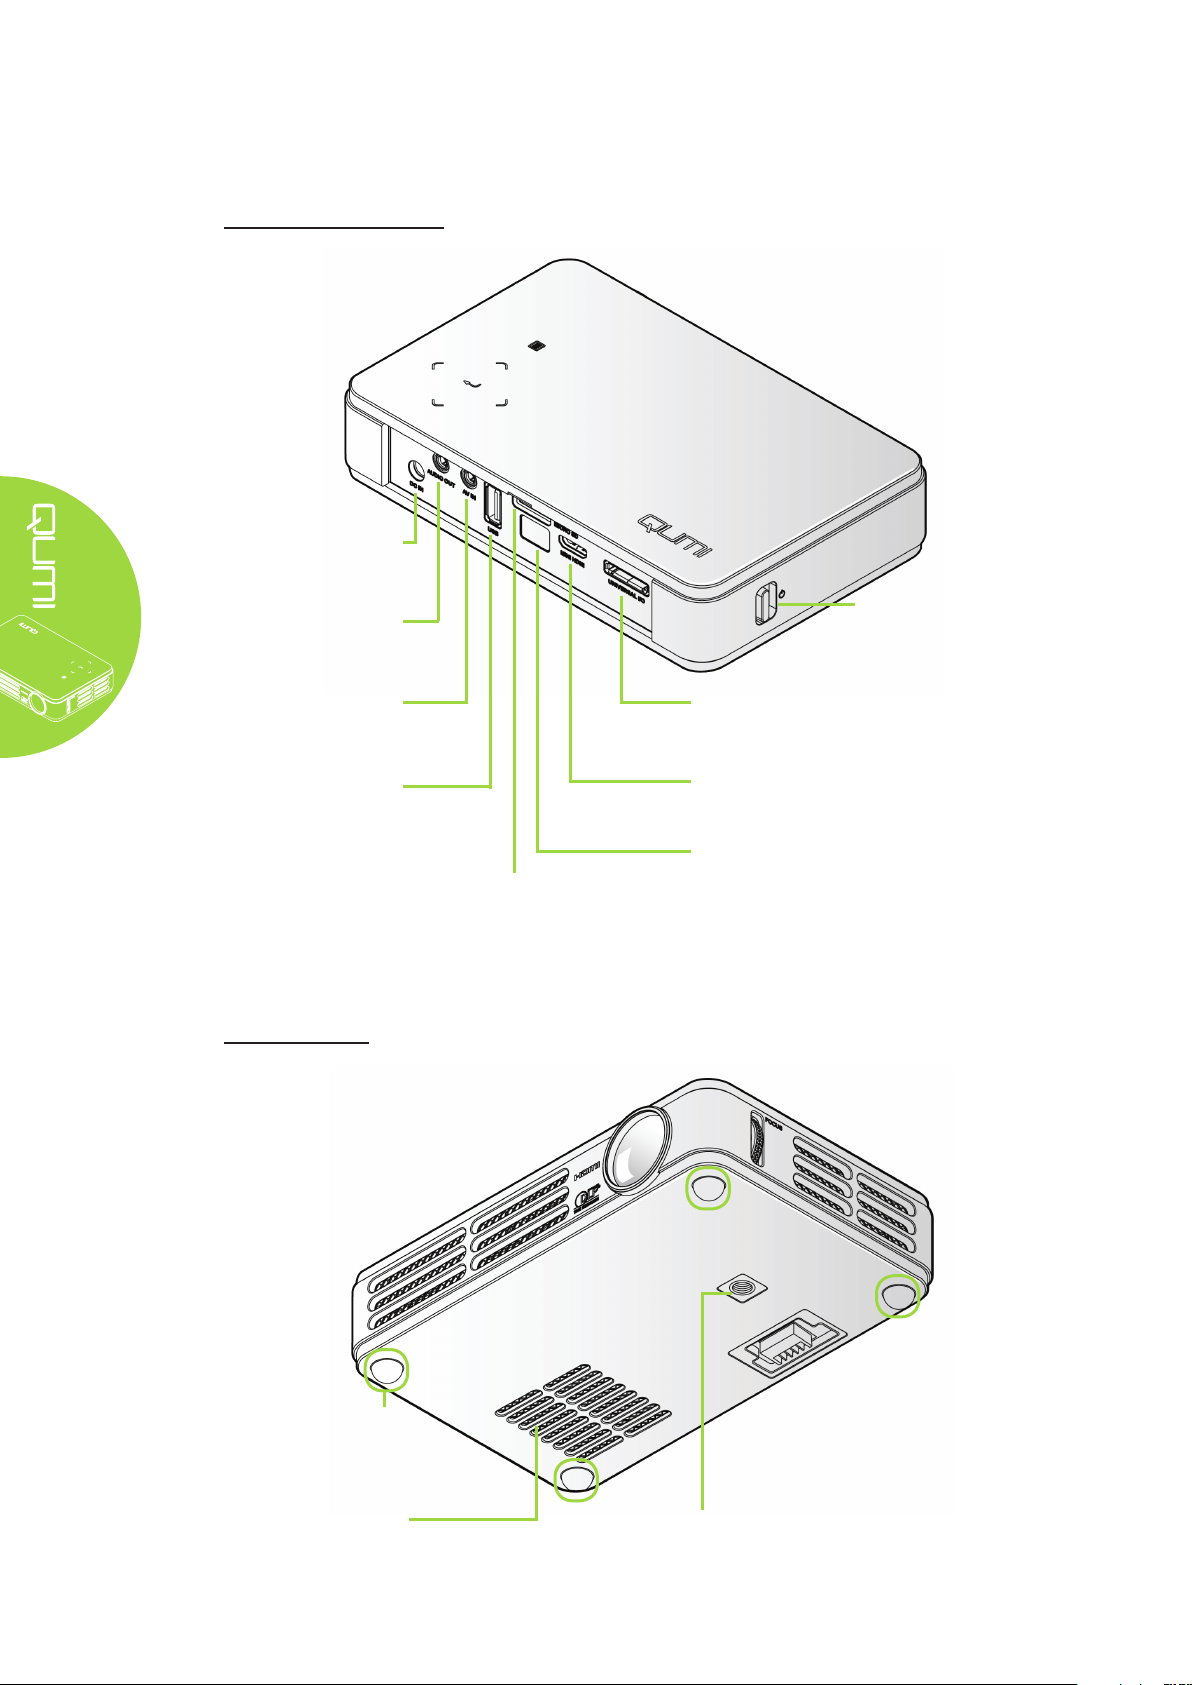
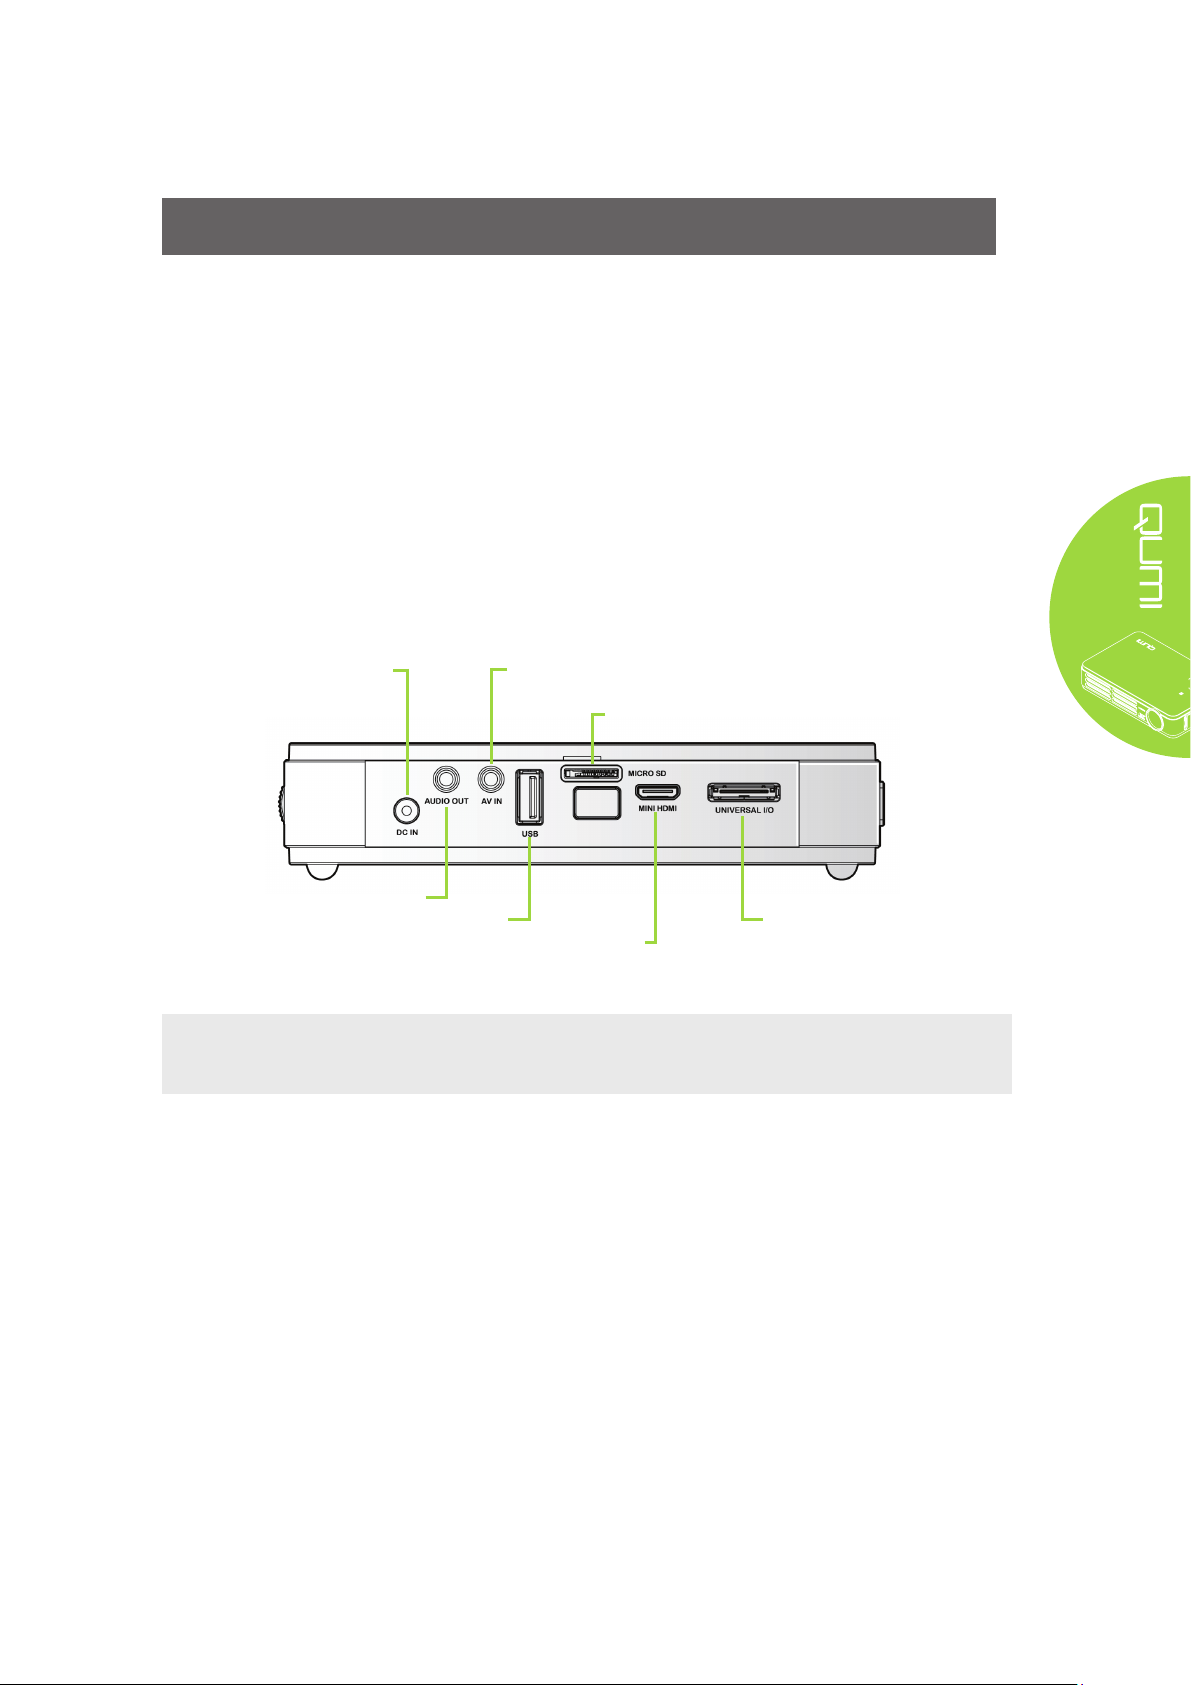
Rear/Top/Left View
DC IN
Connect the supplied power
adapter
AUDIO OUT
Connect an audio cable to
speakers or headphones
AV IN
Connect the AV IN cable
from a video device
USB
Connect an USB drive or
device
microSD
Insert a microSD card
Power Switch
Turn on/off the Qumi
UNIVERSAL I/O
Connect a RGB or component
cable from a device
MINI HDMI
Connect a MINI HDMI cable
from a HDMI device
IR Receiver
Receive IR signal from the
remote control
Bottom View
Rubber Foot Pad
Stability and maintain cooling
ventilation
Cooling Vent
Do not cover
Tripod Connecting Slot
Tripod not included
2
Page 9
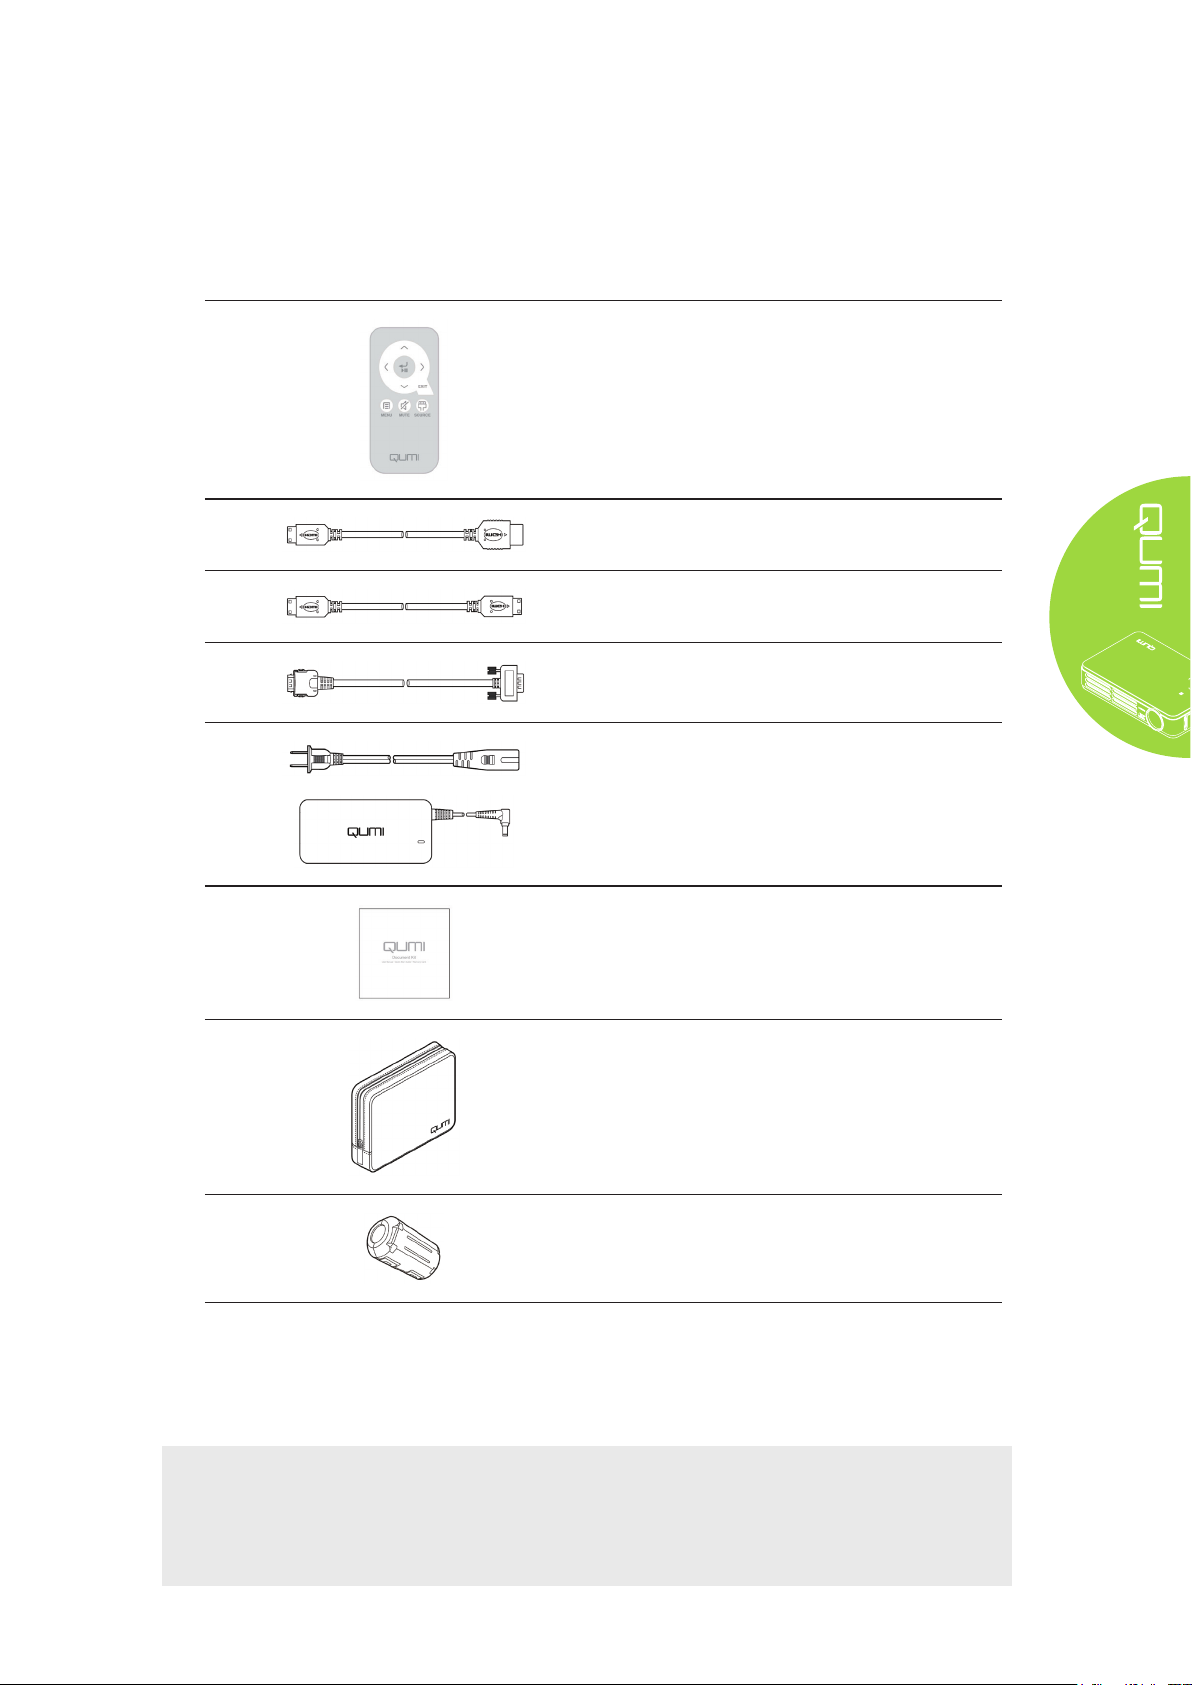
Accessories
Along with the Qumi, the following accessories are included:
Remote Control
(With one 3V CR2025 battery)
Mini to Standard HDMI Cable
Mini to Mini HDMI Cable
VGA Cable
Regional Power Cord and Power Adapter
Documentation Kit (Warranty Card)
Carrying Case
Cable Cores (x2)*
Contact your dealer immediately if any items are missing, appear damaged, or if the unit does
not work. It is recommended that you keep the original packing material should you ever need
to return the equipment for warranty service.
Note:
Accessories will vary from model to model.
* To ensure a high quality performance from your projector and to prevent
electromagnetic interference (EMI), equip the VGA or HDMI video source cable with
the included cable cores.
3
Page 10
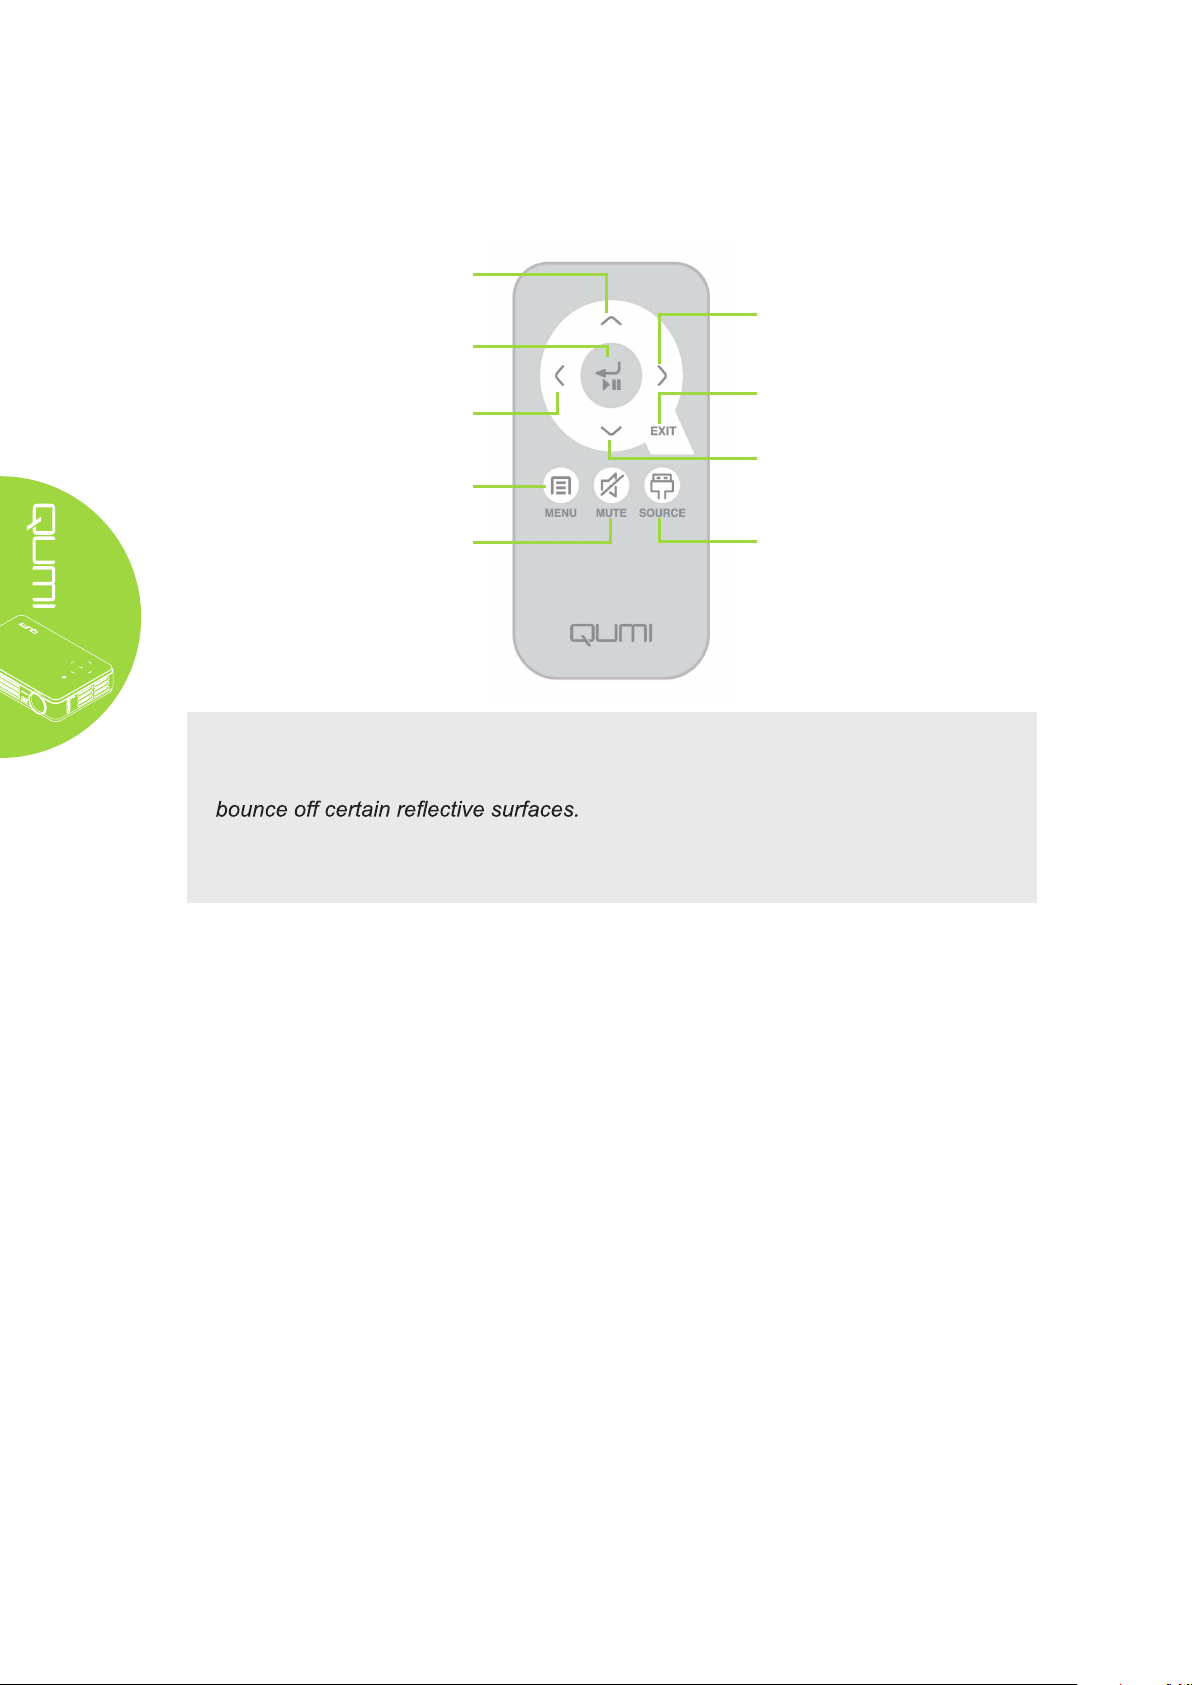
Remote Control
Up Cursor
Navigate and change settings
in the OSD
Enter
Change settings in the OSD
Left Cursor
Navigate and change settings
in the OSD
Menu
Open and exit the OSD
Mute
Mute the built-in speaker
Important:
1. Be sure nothing obstructs the path between the remote control and the Qumi.
If the path between the remote control and the Qumi is obstructed, the signal can
2. The buttons and keys on the Qumi have the same layout and similar functions as
the corresponding buttons on the remote control. This user’s manual describes the
functions based on the remote control.
Right Cursor
Navigate and change settings
in the OSD
Exit
Close the OSD
Down Cursor
Navigate and change settings
in the OSD
Source
Change the input source
Qumi and Remote Control Buttons
The Qumi can be used with the remote control or the keypad that is located on top of the
projector. All operations can be carried out with the remote control and a combination of
keys from the keypad.
The remote control is not only used to navigate the cursor in the menus, but can also be
used to control the media functions (music and video playback). For more details about
how to control the media functions with the remote control, please refer to 13.
Media Player Screen
The media player screen is the main interface for the Qumi Q2 Series. If a USB or
MicroSD card is plugged in when powering on the Qumi, the media player screen appears.
In the media player screen, you can choose the type of media to display by selecting:
• Movie – A movie player that displays multiple movie formats.
• Photo – A photo viewer that contains slide show functionality.
•
Music – A music player that supports many types of audio files.
•
Office viewer – A document viewer that displays documents.
• Settings – The settings of the Qumi can be adjusted in this menu.
4
Page 11
Chapter 2 Getting Started
What You Need
Many types of external devices and peripherals can be connected to the Qumi. External
or portable music players can be connected to play music. DVD, VCD and VHS players
can be connected to play movies. Camcorders and digital cameras can also be used to
play videos and display photos. Computers, as well as peripherals such as MicroSD
cards and USB flash drives, can be connected to the Qumi to display documents and
other types of content.
These devices can be connected to the Qumi by using an appropriate cable. Make sure
that the connecting device has an appropriate output connector.
Connect AC power adapter
Connect audio
Insert USB device
Connect video or
®
Apple
devices
Insert microSD card
Connect HDMI
peripherals
Connect personal
computers or Apple
Warning:
As a safety precaution, disconnect all power to the Qumi and connecting devices before making
connections.
®
devices
5
Page 12
Setting Up Qumi
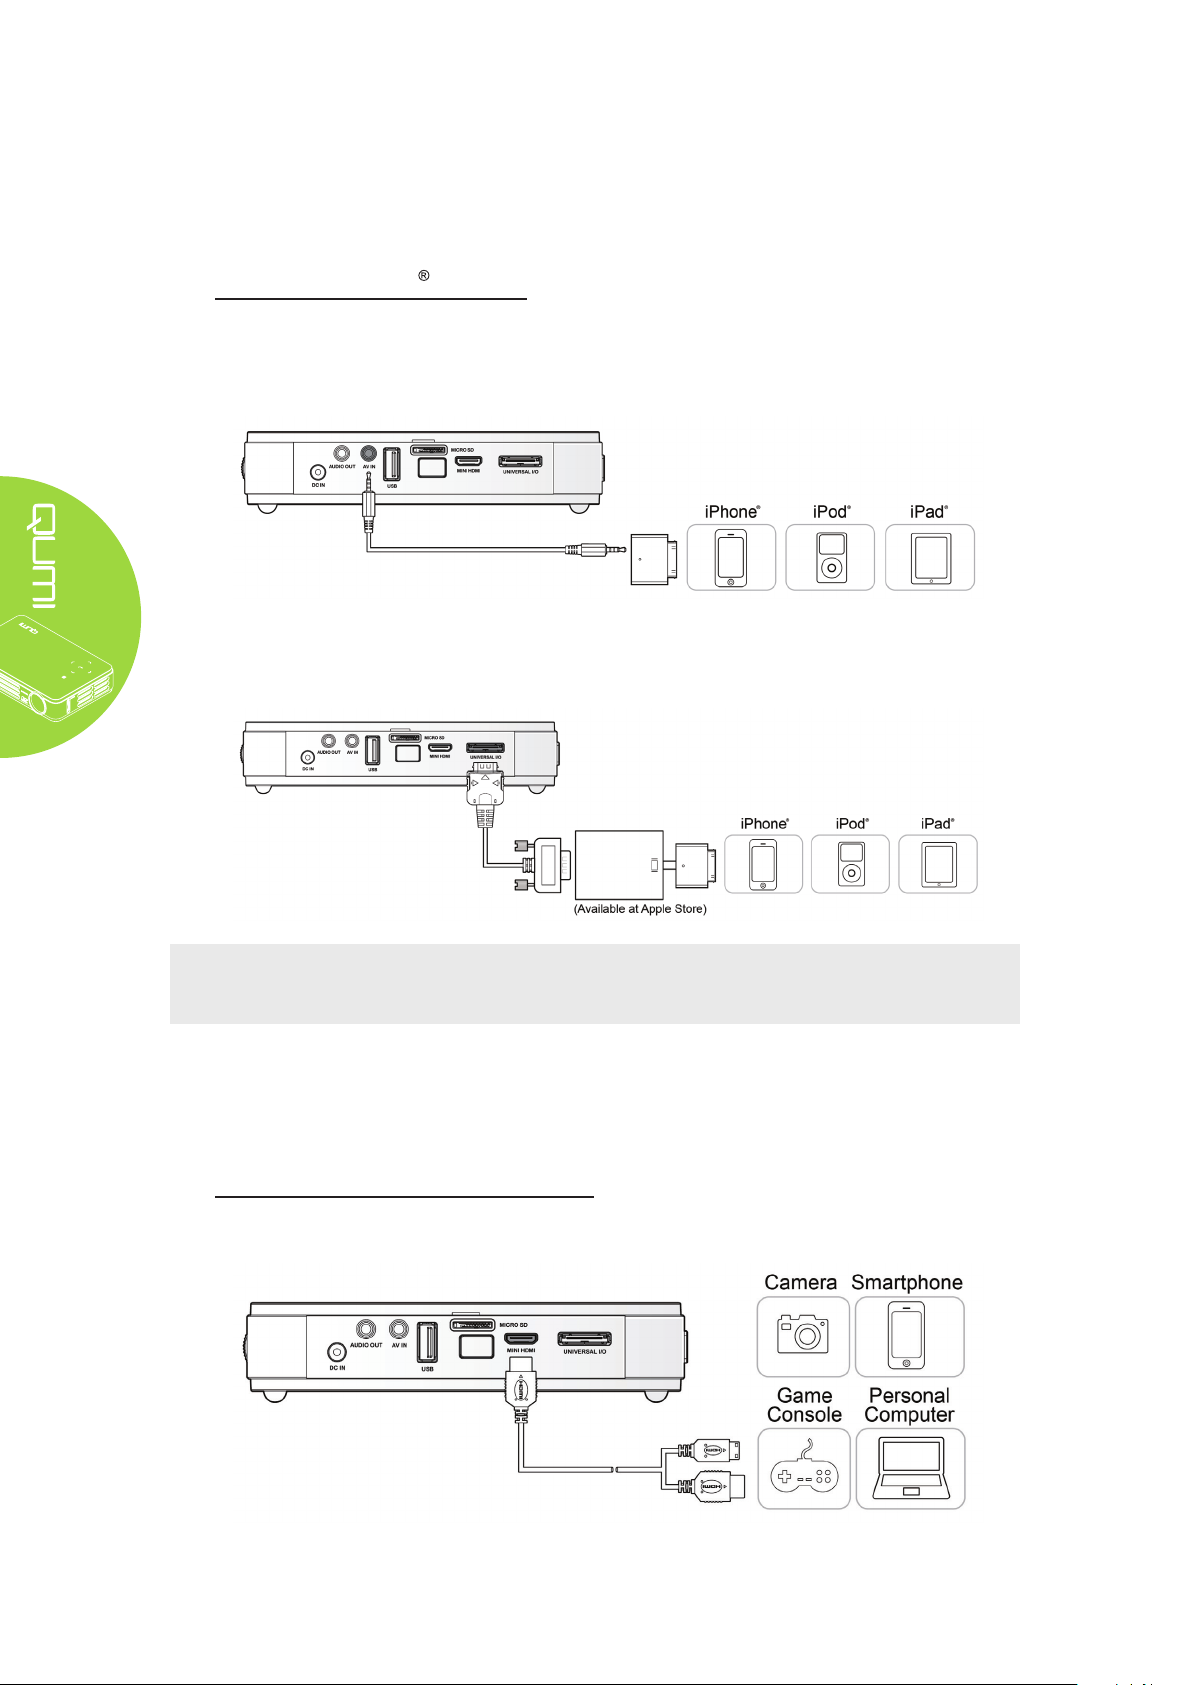
Connecting Apple Devices
Connect an Apple® device to the Qumi by using the following:
Apple® Connection Kit
VGA to Apple® Video Adapter (Optional)
NOTE:
Connectors for Apple products sold separately.
Connecting Peripherals by HDMI
Connect HDMI-compatible peripherals to the Qumi using the Mini to Standard HDMI cable.
6
Page 13
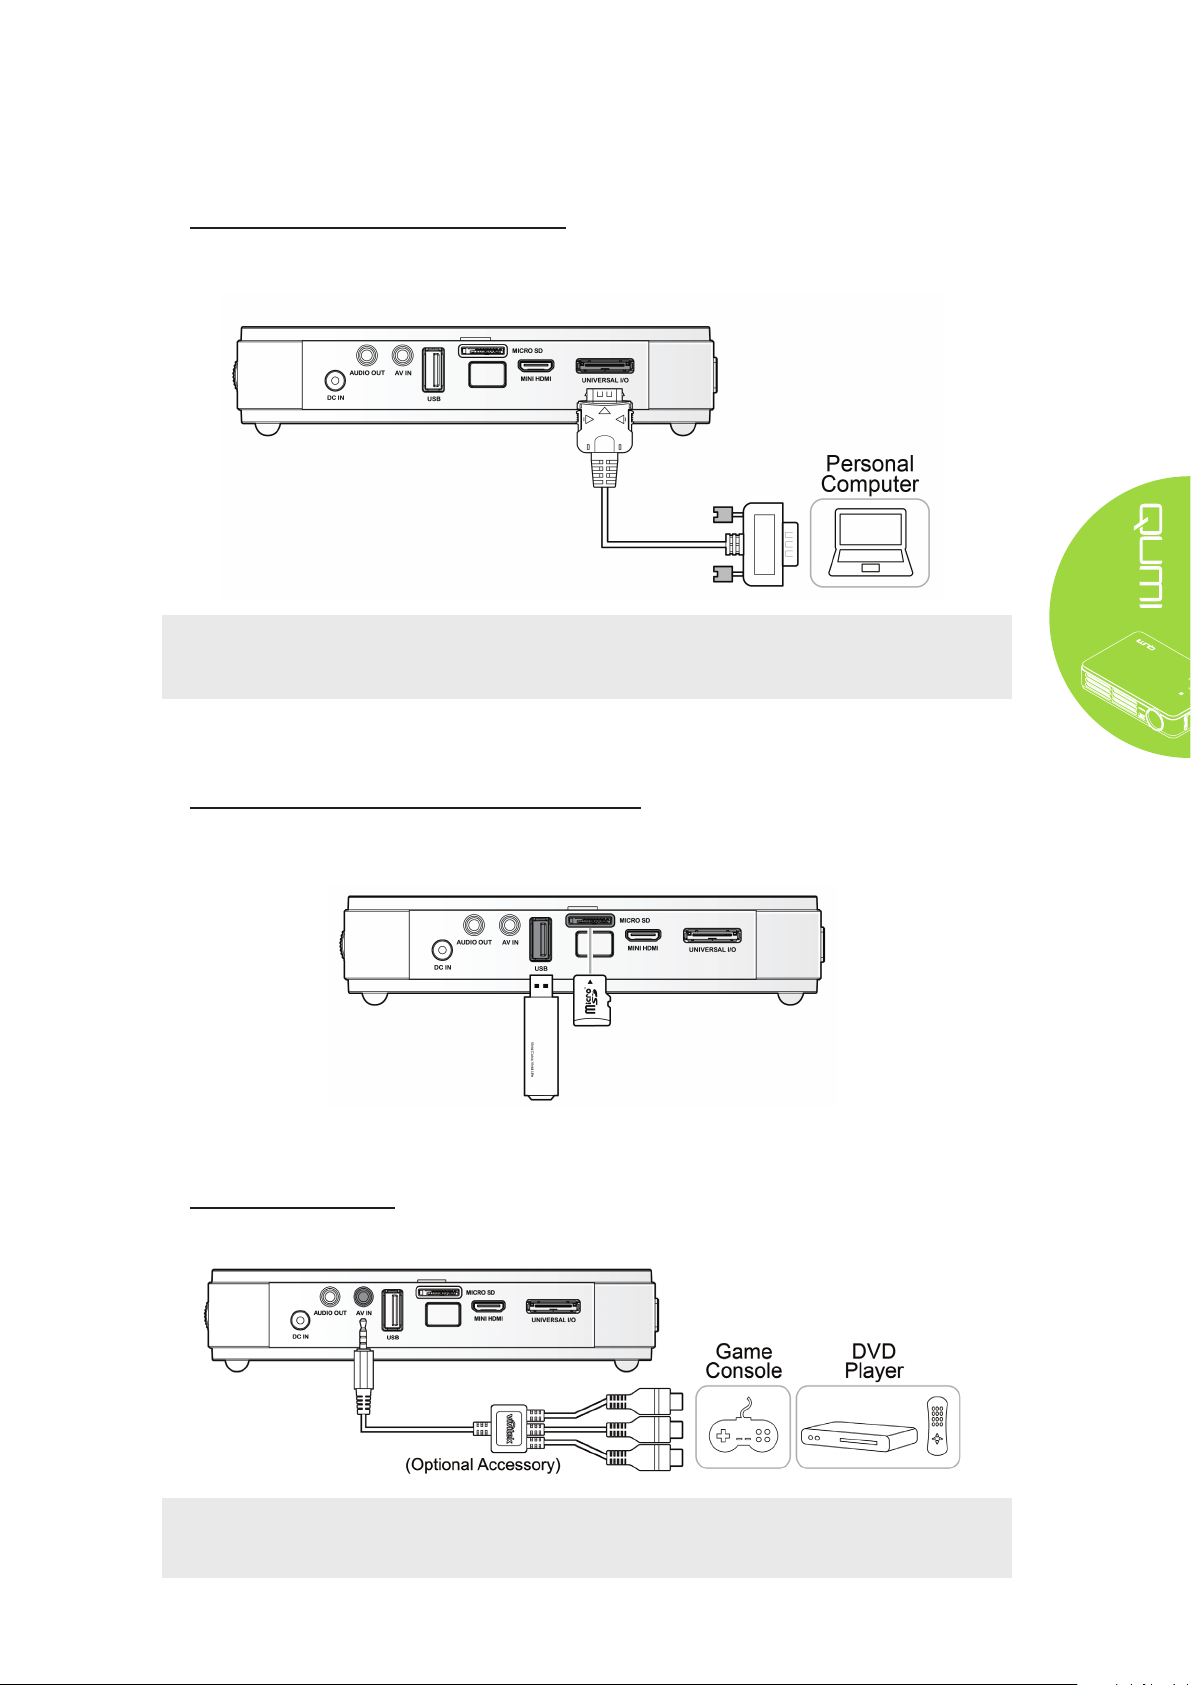
Connecting Personal Computers
Connect a personal computer to the Qumi by using the VGA cable.
Note:
The personal computer must have a VGA output port to use the VGA cable to
connect to the Qumi.
Inserting a microSD Card or USB Drive
Connect a USB drive or microSD card to the Qumi by inserting the storage device(s) into
the appropriate port.
Connecting Video
Connect video devices to the Qumi by using the audio/video cable (optional accessory).
NOTE:
Some cables sold separately.
7
Page 14
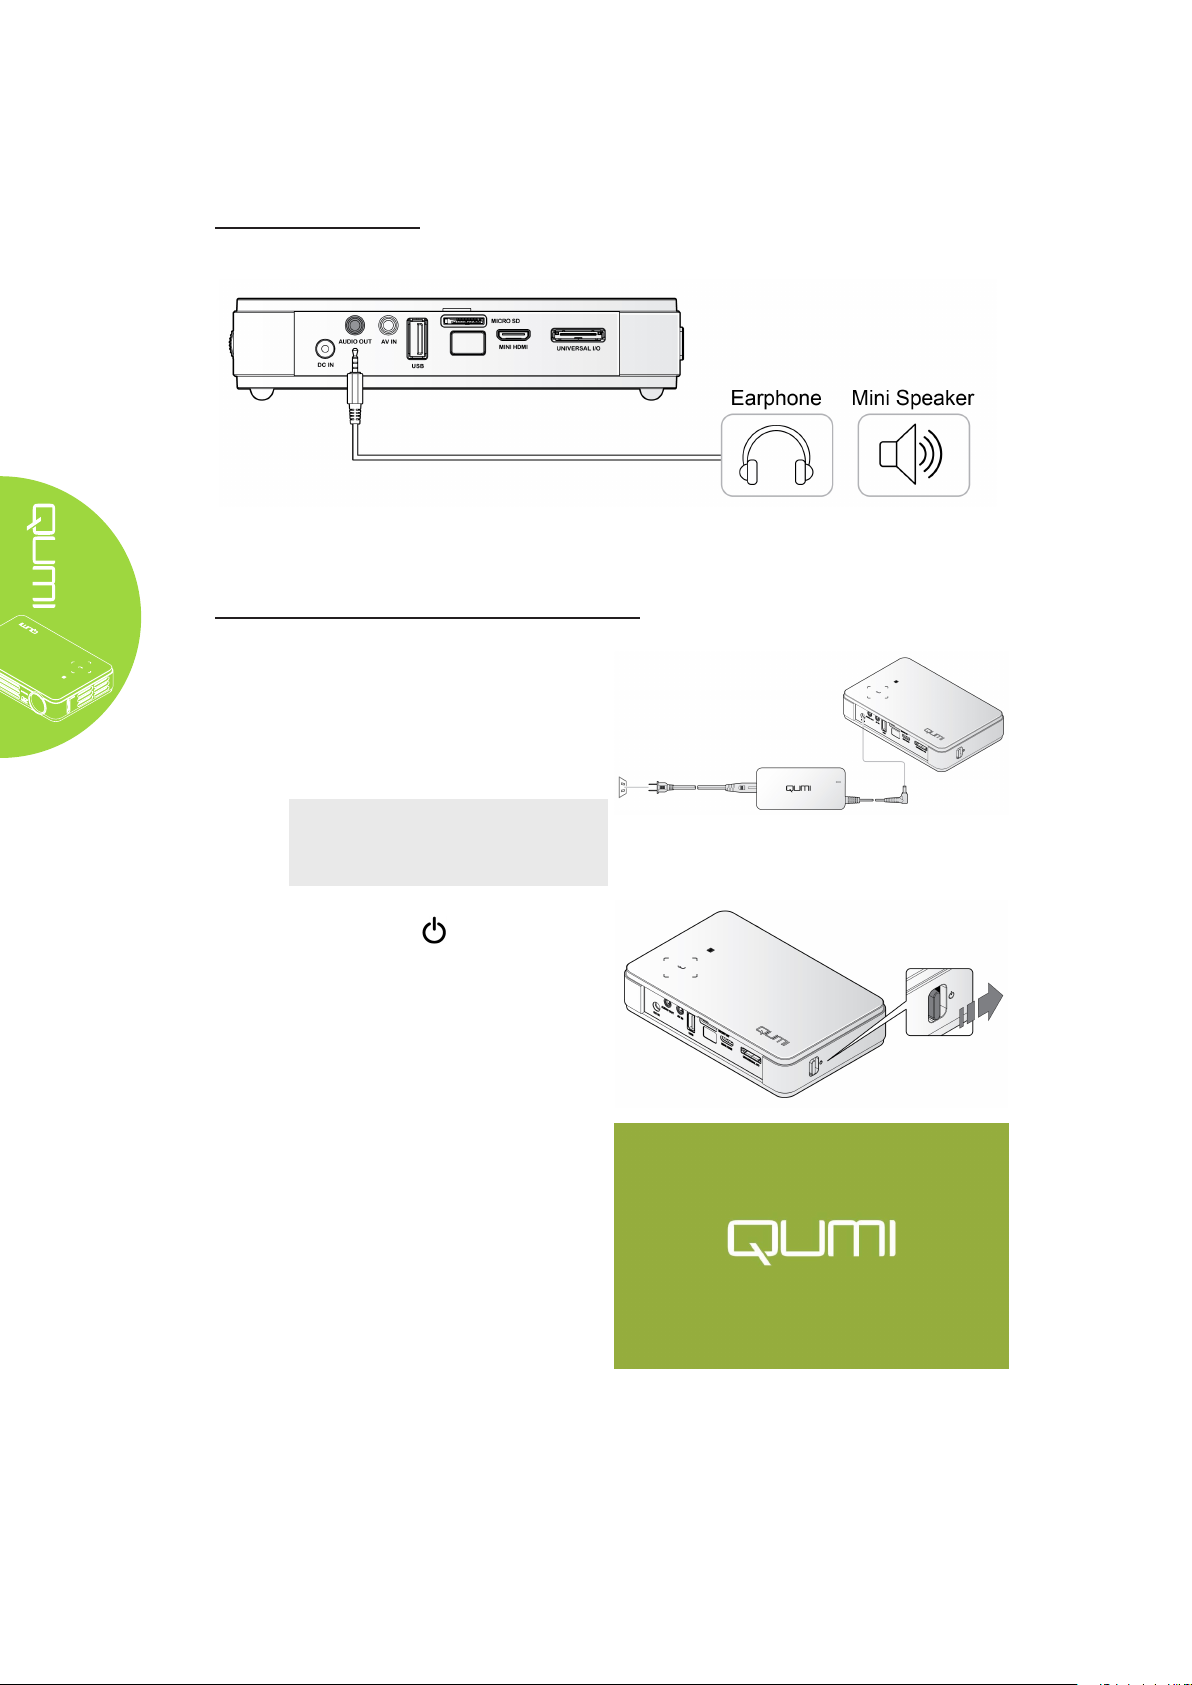
Connecting Audio
Connect earphones or mini speakers to the Qumi by inserting into the Audio Out port.
Starting and Shutting down the Qumi
1�
Connect the AC power adapter to
the Qumi. Connect the other end
of the AC power adapter to a wall
outlet.
Note:
Adapter models may vary
between regions.
2�
Then slide the POWER switch
to turn on the Qumi.
The Qumi splash screen displays
and connected devices are
detected.
See Setting an Access Password
(Security Lock) on page 10 if
security lock is enabled.
8
Page 15
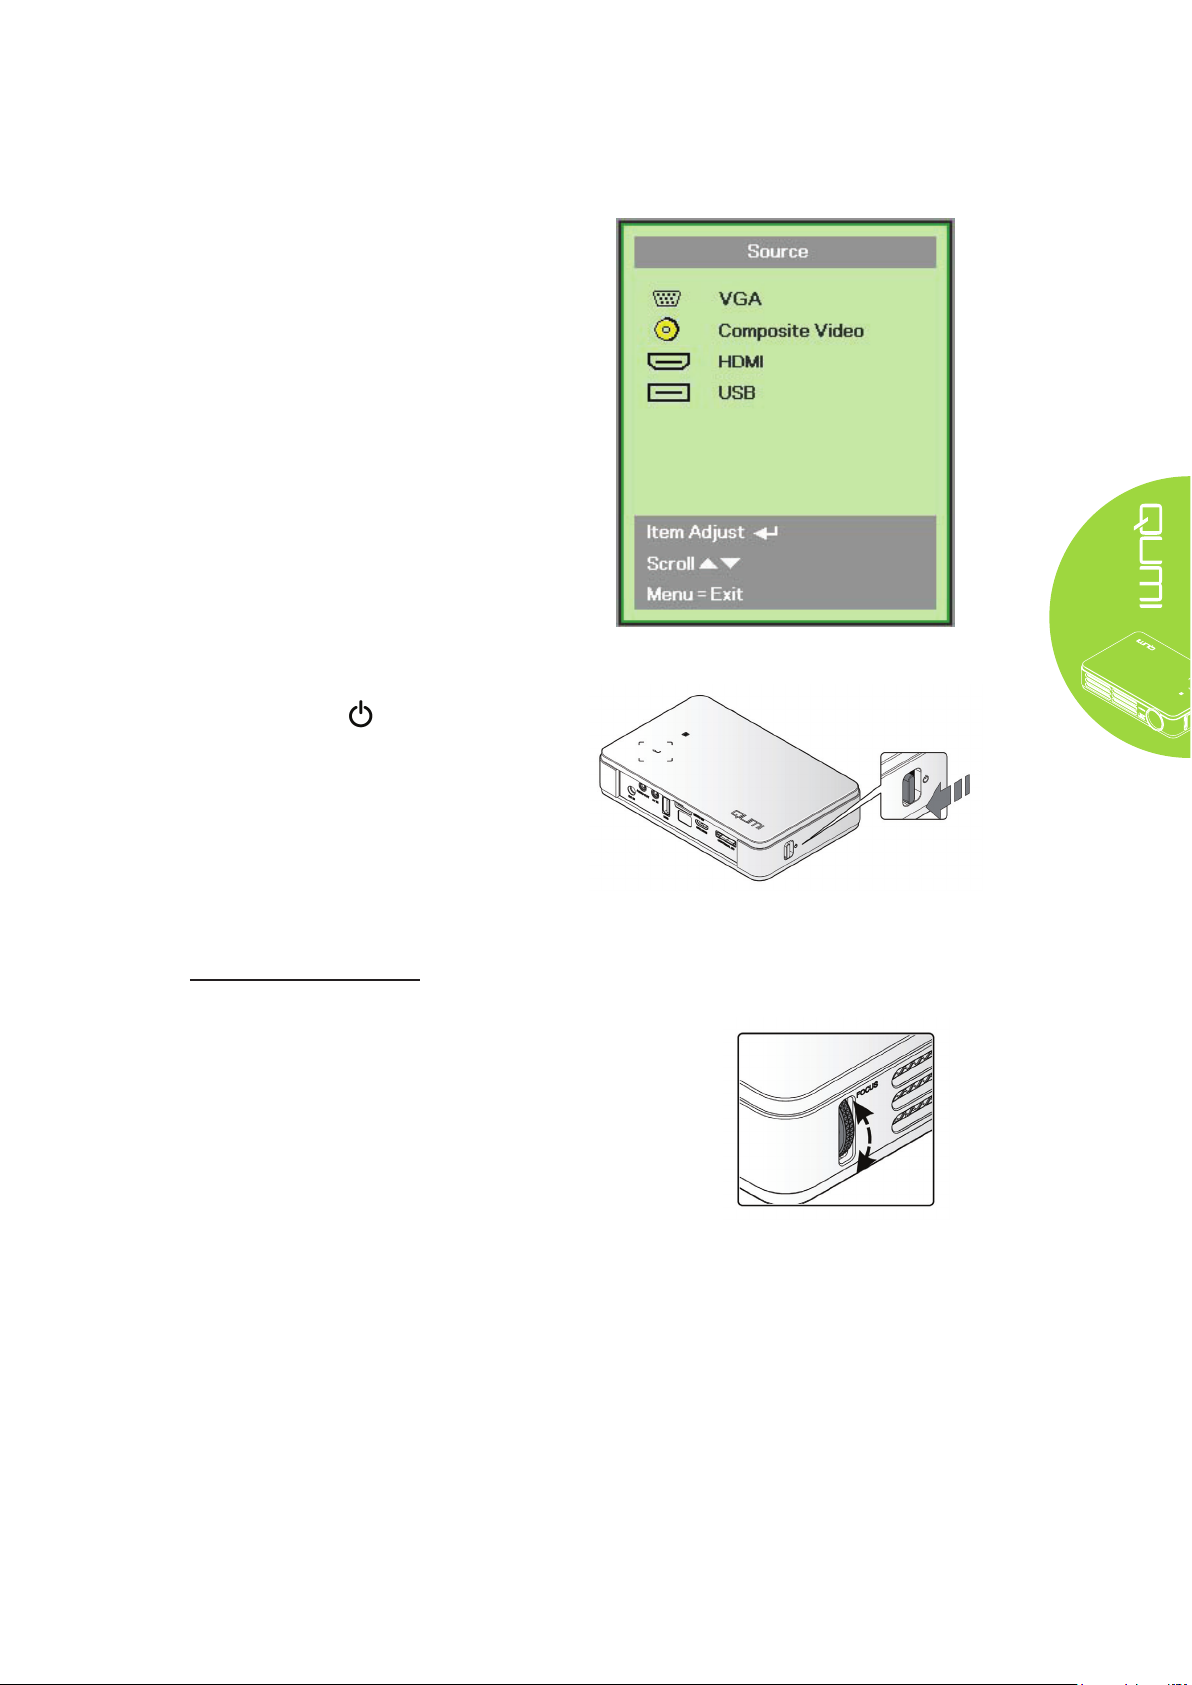
3.
If more than one input device is
connected, press the SOURCE
button on the remote control and
use the ▲ or ▼ buttons to select
the applicable device or press ▲
and ▼ or ◄ and ► at the same
time on the keypad on the Qumi.
• VGA: Analog RGB
• Component: DVD input YCbCr /
YPbPr, or HDTV input YPbPr
• Composite Video: Traditional
composite video
• HDMI: HDMI / DVI
• USB: microSD card / USB disc
4.
Slide the POWER switch to
turn off the Qumi.
Adjusting the Image
If the projected image is not in focus, the image
can be adjusted by moving the focus ring up or
down until the image is focused.
9
Page 16
Setting an Access Password (Security Lock)
To prevent unauthorized use of the Qumi, you can create a password. When the access
password function is enabled, the password must be entered after the Qumi has been
turned on.
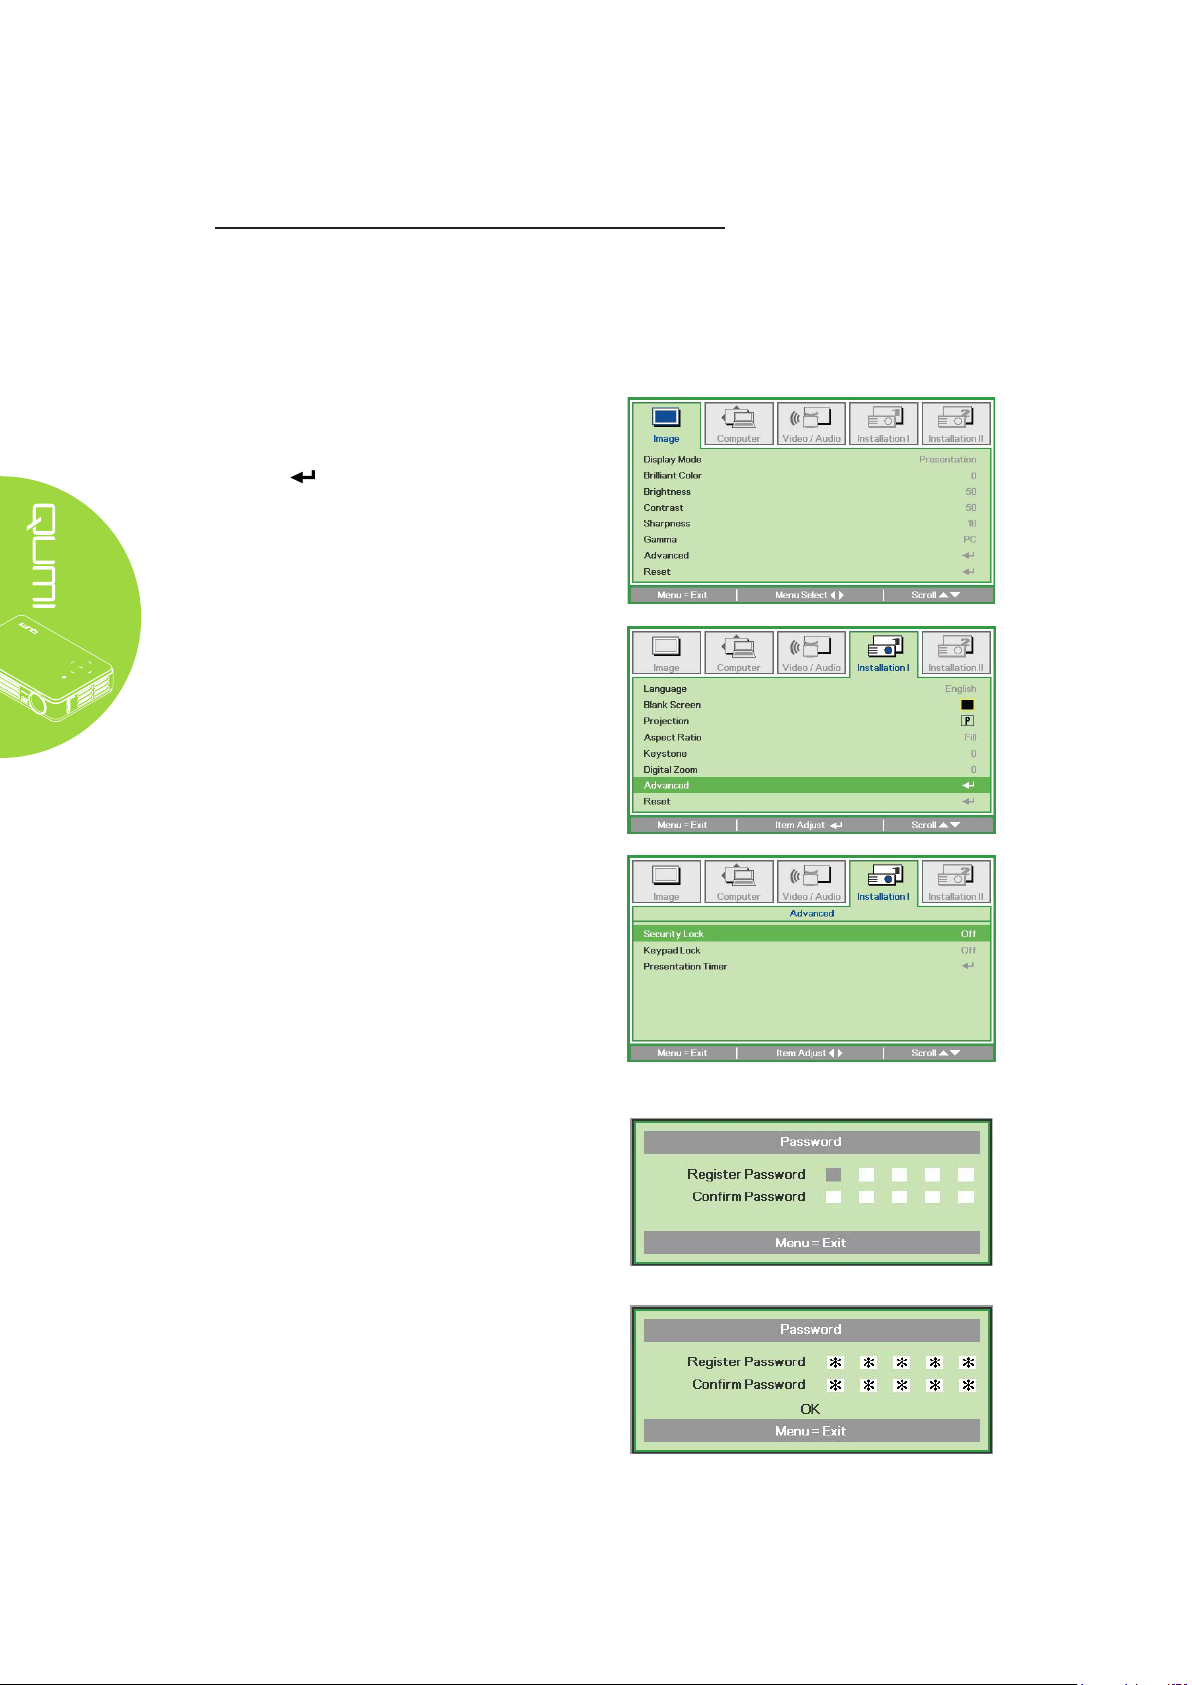
Creating a password can be done by performing the following steps:
1�
Press the MENU button on the
remote control or press MENU and
on the keypad simultaneously
to open the On-Screen Display
(OSD) menu.
2�
Move the cursor to the Installation
I tab and scroll down to select
Advanced.
3�
Press the ▲ or ▼ button to select
Security Lock.
4�
Press the ◄ or ► button to
enable or disable the security lock
function.
A password dialog box
automatically appears.
5�
You can use the ▲▼◄► buttons
located either on top of the Qumi
or on the remote control to enter
the password. Any combination
of the navigation buttons can be
used (ve must be chosen).
Press the navigation buttons in
any order to set the password.
Then press the MENU button to
exit the dialog box.
10
Page 17

6.
appears when you power on the
Qumi when the Security Lock is
enabled.
Enter the password that was
created in step 5.
Important:
Keep the password in a safe place. Without the password, you will not be able to
use the Qumi. If you lose the password, contact your reseller for information on
resetting the password.
Using a Tripod
The Qumi can be used with a tripod by connecting
the tripod to the bottom of the Qumi. Many typical
tripods can be connected.
• Type: Mini tripod
• Thread size: 1/4 - 20
11
Page 18

Setting Up the Remote
The remote control comes with one (1) 3V lithium
battery (CR2025). The battery is pre-installed in the
remote control.
To begin using the remote control, remove the plastic
tab (A) from the battery compartment.
Replacing the Remote Control Batteries
1.
Remove the battery
compartment cover
by sliding the cover
towards the arrow (A).
Then pull out the cover
towards the arrow (B).
Caution:
1. Only use a 3V lithium battery (CR2025).
2. Dispose of used batteries according to local ordinance regulations.
3. Remove the battery when not using the Qumi for prolonged periods.
2.
Remove the old battery
and insert the new
battery with the positive
side facing up.
3.
Install the cover.
Operating Range
The remote control uses infrared (IR) transmission to control the Qumi. It is not necessary
to point the remote directly at the Qumi.
The remote control functions properly within a radius of approximately 23 feet (7 meters)
and 15 degrees above or below the Qumi level (if the remote is not held perpendicular to
the sides or rear of the Qumi).
If the Qumi is unresponsive to the remote control, move closer towards the Qumi.
12
Page 19

Chapter 3 Qumi Media Suite
Overview
microSD card or USB drive. Music, movies, pictures and documents can be displayed.
The media suite menu contains five (5) applications that can be accessed:
• Movie – An easy to use movie player that displays multiple movie formats.
• Photo – A photo viewer that contains slide show functionality.
Music – A music player that supports many types of audio files.
•
Office viewer – A document viewer that displays documents.
•
• Settings – The settings of the Qumi can be adjusted in this menu.
13
Page 20

Movies
Supported Formats
The following video formats are supported:
• AAC-LC
• MPEG-4 video up to 2.5 Mbps, 640 by 480 pixels at 30 frames per second; Simple
• Motion JPEG (M-JPEG) up to 35 Mbps, 1280 by 720 pixels, 30 frames per second,
Watching Your Movie
To open a list of movies, perform the following:
1. Press the ◄ or ► key to select the Movie icon in the media suite menu.
2. Press
3.
4. Press
While a movie is playing, the control interface can be hidden. To hide the control interface,
press the ▲ key. Press the ▲ key again to show the control interface.
The control interface will automatically disappear if there is no user input for five (5) seconds.
Control Interface
The following playback functions are controlled by the remote control, which are shown in
the table below:
ACTION DESCRIPTION
Pause/Resume Press
Forward speed
Press the ◄ or ► key to change the speed (2X, 4X, 8X,
16X, 32X)
to pause or resume a movie
14
Page 21

Photos
Supported Formats
• BMP (up to 4000 x 3000 pixels)
• PNG (up to 4000 x 3000 pixels)
• JPG (up to 4000 x 3000 pixels)
Viewing Your Photo
When a USB flash drive and/or a microSD card is inserted, the storage card folder icon
To open a photo in photo viewer, perform the following:
1. Press the ◄ or ► key to select the Photo icon in the media suite menu.
2. Press
3. Select the folder containing the desired photo.
4. Press to display the desired photo.
To view the details of the photos, navigate to a photo. The details of the photo will appear
on the bottom of the screen.
To view photos in full screen mode, perform the following:
1. Navigate to a photo.
2. Press
To utilize the Zoom-In tool, press . (2X, 4X, 8X, 16X).
In order to zoom out to the default size of the image, press the Exit key.
While a photo is displayed, the control interface can be hidden. To hide the control
interface, press the ▲ key. Press the ▲ key again to show the control interface.
to view the photo in full screen mode.
Control Interface
The photo viewer contains the following controls:
ICON DESCRIPTION
Return to the previous menu
Sets the Slide Show interval
View photos in Slide Show mode
Rotate the photo in a counter-clockwise position
Rotate the photo in a clockwise position
15
Page 22

Music
Supported Formats:
• MP3 (up to 256Kbps bit-rate)
• WMA, MID, MIDI, MP1, MP2, OGG, AAC, AMR, WAV, AC3, M4A, AWB, APE
Playing your Track
To open the music list, perform the following:
1. Press the ◄ or ► key to select the Music icon in the media suite menu.
2. Press
3. Select the folder containing the desired song.
4. Press to play the desired song.
A song can be played or paused by selecting the Pause/Play button in the music
player interface.
When the cursor is selecting the progress bar, a song can be paused or can be
played by pressing
.
Control Interface
The music player interface contains the following controls:
16
Page 23

The music player provides controls to navigate through a song playlist. The following table
provides a description the controls.
ICON DESCRIPTION
/ / Toggle speaker output to Left/Right/Stereo
/ Return to previous/Forward to next track
/ Pause/Play track
Stop playback
Return to the previous menu
The order of songs and playback mode can be adjusted. The following table provides a
description of the playback modes.
ICON DESCRIPTION
Songs in the playlist will play in a continuous
order
All songs in the playlist will repeat
Only the current song playing will repeat
All songs in the playlist will be shufed during
playback
The music player contains many preset equalizer settings that can be applied. The
following table provides a description of the different equalizer settings.
ICON DESCRIPTION
Normal
Classical
Jazz
Pop
Rock
Bass
17
Page 24

Ofce Viewer
Supported Formats
The document viewer in the Qumi Media Suite can open the following types of documents:
• Microsoft® Word (97-2007, .doc/.docx)
• Microsoft® PowerPoint (97-2007, .ppt/.pptx)
• Microsoft® Excel (97-2007, .xls/.xlsx)
• Adobe® PDF (.pdf)
• Text (.txt)
Selecting Your Document
To open a le in document viewer, perform the following:
1. Press the ◄ or ► key to select the ofce viewer icon in the media suite menu.
2. Press to open the le directory.
3. Select the folder containing the desired le.
4. Press to display the desired le.
Once a le is open, press to zoom in for a larger view of the le. Files can be zoomed
in 2X, 4X, 8X and 16X views. Use the navigation keys to move the view of the le.
To proceed to the next page or return to a previous page, press the ▲ or ▼ keys.
Note:
You cannot move to the previous or next page if the view is zoomed in.
Control Interface
The ofce viewer does not contain a dedicated control interface.
18
Page 25

Settings
System Options
The Information
menu provides details about the software version.
Play Mode
The play mode menu displays settings for both video and music player options. The
following settings are available:
• Repeat None – The videos or music tracks will not repeat after it is completed.
•
• Repeat One – A selected video or music track will continuously repeat after it is
completed.
•
the playlist have been completed.
Note:
The Qumi media suite will always output 1280x800 resolution to the system,
therefore the OSD will be displayed in this resolution as its received signal.This
does not indicate the actual resolution of the actual multimedia files.
USB Options
The USB Mass Storage option allows you to connect a personal computer with a
supported USB flash device to transfer files between the Qumi and personal computer.
Note:
The Qumi media suite only supports input from USB drives and MicroSD memory
devices.
19
Page 26

Chapter 4 On-Screen Display (OSD) Settings
OSD Menu Controls
The Qumi has an On-Screen Display (OSD) settings menu that allows you to make
adjustments and changes to settings, such as display and audio. There are five (5)
menus within the OSD menu:
• Image – Various aspects of the image quality
• Computer – Settings for personal computers
• Video/Audio – Many settings for video and audio
• Installation I – Default language and other settings
• Installation II – Factory reset and other settings
If the interface is set on AV-IN, MINI HDMI or Universal I/O, the OSD menu can be
accessed by pressing the MENU button on the remote control or keypad.
If the interface is set on the Qumi Media Suite menu, the OSD menu can be accessed by
pressing the MENU button on the remote control or by simultaneously pressing MENU
and on the keypad.
Note:
If the OSD menu is inactive for 15 seconds, the OSD menu will close.
Navigating the OSD
The remote control cursor buttons or the buttons on the top of the Qumi can be used to
navigate and make changes to the OSD settings.
1. Enter the OSD menu.
2. Press the ◄ or ► button
to move through the 5
menus.
3. Press the ▲ or ▼ button
to move the cursor up
and down within in a
menu.
4. Press ◄ or ► to change
settings.
5. Press MENU button or
Exit on the remote
control to close the OSD
or close a submenu.
Note:
example, the Horizontal/Vertical Position items in the Computer menu can only
.
20
Page 27

Setting the OSD Language
The language that is displayed in the OSD can be changed. To change the language in
the OSD, perform the following steps:
1. Enter the OSD menu. Press the ◄ or ► button to select the Installation I menu.
2. Press the ▲ or ▼ button until the cursor highlights the Language setting.
3. Press the ◄ or ► button until the language you want is shown in the cursor.
4. Press the EXIT button or MENU button twice to close the OSD.
21
Page 28

OSD Menu Overview
Use the following illustration to quickly nd a setting or determine the range for a setting.
22
Page 29

OSD Sub-Menu Overview
23
Page 30

Image Menu
To access the Image menu and adjust the settings, perform the following steps:
1. Enter the OSD menu.
2. Press the ◄ or ► button to select the Image menu.
3. Press the ▲ or ▼ button to move the cursor up or down in the Image menu.
4. Press the ◄ or ► button to change values for each applicable setting.
ITEM DESCRIPTION
Display Mode Press the ◄ or ► button to set the Display Mode.
Brilliant Color Press the ◄ or ► button to adjust the Brilliant Color value.
Brightness Press the ◄ or ► button to adjust the display brightness.
Contrast Press the ◄ or ► button to adjust the display contrast.
Sharpness Press the ◄ or ► button to adjust the display sharpness level.
Gamma
Advanced
Reset Press
Press the ◄ or ► button to adjust the gamma correction of the
display.
Press
on page 25.
to enter the Advanced menu. See Advanced Feature
to reset all settings to default values.
Note:
The settings for BrilliantColor, Brightness, Contrast, Sharpness, Gamma and
Advanced modes are only adjustable when the Display Mode is set to User.
24
Page 31

Advanced Feature
To access the Advanced menu and adjust the settings, perform the following steps:
1. Enter the OSD menu.
2. Press the ◄ or ► button to select the Image menu.
3. Press the ▼ or ▲ button to move to the Advanced menu and then press .
4. Press the ▼ or ▲ button to move the cursor up or down in the Advanced menu.
ITEM DESCRIPTION
Color Space Press the ◄ or ► button to adjust the color space.
Color Temperature Press the ◄ or ► button to adjust the color temperature.
25
Page 32

Computer Menu
To access the Computer menu and adjust the settings, perform the following steps:
1. Enter the OSD menu.
2. Press the ◄ or ► button to select the Computer menu.
3. Press the ▲ or ▼ button to move the cursor up or down in the Computer menu.
4. Press the ◄ or ► button to change values for each applicable setting.
ITEM DESCRIPTION
Horizontal Position
Vertical Position
Frequency Press the ◄ or ► button to adjust the A/D sampling clock.
Tracking Press the ◄ or ► button to adjust the A/D sampling dot.
Auto Image
Press the ◄ or ► button to adjust the display position to left or
right.
Press the ◄ or ► button to adjust the display position to up or
down.
Press to automatically adjustment for phase, tracking, size
and position.
Note:
Items in the Computer menu can only be modied when the Qumi is connected to
a PC through a VGA cable. Settings that are not enabled or that cannot be modied
are gray in color.
26
Page 33

Video/Audio Menu
To access the Video/Audio menu and adjust the settings, perform the following steps:
1. Enter the OSD menu.
2. Press the ◄ or ► button to select the Video/Audio menu.
3. Press the ▲ or ▼ button to move the cursor up and down in the Video/Audio menu.
4. Press the ◄ or ► button to change values for each applicable setting.
ITEM DESCRIPTION
Video AGC
Video Saturation Press the ◄ or ► button to adjust the video saturation.
Video Tint Press the ◄ or ► button to adjust the video tint/hue.
Video Overscan Press the ◄ or ► button to enable or disable video over scan.
Closed Captioning Press the ◄ or ► button to enable or disable Closed Captioning.
Audio Press to enter the Audio menu. See Audio on page 28.
Reset Press to reset all settings to default values.
Press the ◄ or ► button to enable or disable the Automatic Gain
Control for video source.
Note:
Video AGC, Video Saturation, Video Tint and Closed Caption settings are
adjustable only when the source is from composite video. The Video Overscan
settings are adjustable only when the source is from composite, component and
HDMI video.
27
Page 34

Audio
To adjust the audio settings, press to enter the Audio sub menu.
ITEM DESCRIPTION
Volume Press the ◄ or ► button to adjust the audio volume.
Mute Press the ◄ or ► button to turn on or off the speaker.
Audio Input Press the ◄ or ► button to select audio input.
28
Page 35

Installation I Menu
To access the Installation I menu and adjust the settings, perform the following steps:
1. Enter the OSD menu.
2. Press the ◄ or ► button to select the Installation I menu.
3. Press the ▲ or ▼ button to move the cursor up or down in the Installation I menu.
4. Press the ◄ or ► button to change values for each applicable setting.
ITEM DESCRIPTION
Language Press the ◄ or ► button to select a different localization menu.
Blank Screen
Projection
Aspect Ratio Press the ◄ or ► button to adjust the video aspect ratio.
Keystone Press the ◄ or ► button to adjust the display keystone.
Digital Zoom Press the ◄ or ► button to adjust the Digital Zoom menu.
Advanced
Reset
Press the ◄ or ► button to select different color to blank the
screen.
Press the ◄ or ► button to choose from four projection methods:
Front, Rear, Ceiling-Front, Ceiling-Rear.
Press to enter the Advanced menu. See Advanced on page
30.
Press to reset all settings to default values
(expect Language and Security Lock).
29
Page 36

Advanced
To adjust the advanced settings, press to enter the Advanced sub menu.
ITEM DESCRIPTION
Security Lock
Keypad Lock
Presentation Timer Press to enter the Presentation menu.
Press the ◄ or ► button to enable or disable security lock
function.
Press the ◄ or ► button to enable or disable keypad lock
function.
Presentation Timer
To adjust the presentation timer settings, press to enter the Presentation Timer sub
menu.
ITEM DESCRIPTION
Timer
Timer Period Press the ◄ or ► button to adjust the display timer period.
Timer Reset Press to reset presentation timer counter.
Press the ◄ or ► button to enable or disable presentation timer
function.
30
Page 37

Installation II Menu
To access the Installation II menu and adjust the settings, perform the following steps:
1. Enter the OSD menu.
2. Press the ◄ or ► button to select the Installation II menu.
3. Press the ▲ or ▼ button to move the cursor up or down in the Installation II menu.
ITEM DESCRIPTION
Auto Source
LED Mode
Advanced
Factory Reset Press to reset all items to factory preset values.
Status
Press the ◄ or ► button to enable or disable automatic source
detection.
Press the ◄ or ► button to select the LED mode for higher
brightness or lower brightness to save LED life.
Press to enter the Advanced menu. See Advanced Feature
on page 32.
Press to enter the Status menu. See page 35 for more
information on Status.
31
Page 38

Advanced Feature
To access the Advanced menu and adjust the settings, perform the following steps:
1. Enter the OSD menu.
2. Press the ◄ or ► button to select the Installation II menu.
3. Press the ▲ or ▼ button to select the Advanced menu and then press .
4. Press the ▲ or ▼ button to move the cursor up or down in the Advanced menu.
5. Press the ◄ or ► button to change values for each applicable setting.
ITEM DESCRIPTION
OSD Menu Setting
Peripheral Test
3D Press
Note:
Press to enter the OSD setting menu. See page 33 for
more information on OSD Menu Setting.
Press
more information on Peripheral Test.
to enter the Peripheral Test menu. See page 33 for
to enter the 3D menu. See 3D on page 34.
3D functionality works when the input source supports 120Hz.
32
Page 39

OSD Menu Setting
ITEM DESCRIPTION
Menu Position Press the ◄ or ► button to select different OSD location.
Translucent Menu
Menu Display Press the ◄ or ► button to select OSD timeout delay.
Press the ◄ or ► button to select OSD background translucent
level.
Peripheral Test
ITEM DESCRIPTION
Remote Control
Test
Color Test Press to select different colors on screen.
Button Test Press to test the button on keypad.
Press to test the IR remote controller for diagnostic.
33
Page 40

3D
ITEM DESCRIPTION
3D Press the ◄ or ► to select Off, DLP-Link or IR.
3D Sync Invert Press the ◄ or ► to turn 3D Sync Invert On or Off.
Factory Reset
To reset all of the menu items to the factory default values (except Language and Security
Lock), perform the following steps:
1. Press the ▲ or ▼ button to move the cursor up or down in the Installation II menu.
2. Select the Factory Reset sub menu.
3. Press .
34
Page 41

Status
To see the status of the Qumi, perform the following steps:
1. Press the ▲ or ▼ button to move the cursor up or down in the Installation II menu.
2. Select the Installation II sub menu
3. Press to enter the Status sub menu.
ITEM DESCRIPTION
Active Source Displays the activated source.
Video Information
LED Hours
Displays resolution/video information for RGB source and color
standard for Video source.
LED use information is displayed (in hours). Eco and Normal
counters are separated.
35
Page 42

Chapter 5 Taking Care of Your Qumi
Cleaning the Qumi
Cleaning the Qumi to remove dust and grime will help provide trouble-free operation.
Warning:
1. The Qumi should be turned off and unplugged before cleaning. Failure to do so
may result in injury or damage to the system.
2. Use only a dampened cloth when cleaning. Do not allow water to enter the
ventilation openings on the Qumi.
3. If a small amount of water gets into the interior of the Qumi while cleaning,
unplug the Qumi and set in a well ventilated area for several hours before using.
4. If a large amount of water gets into the interior of the Qumi when cleaning,
unplug the Qumi and have it serviced.
Cleaning the Lens
Optical lens cleaning solutions can be purchased from most camera and other retail
stores. To clean the Qumi lens, perform the following steps:
1. Apply a small amount of the optic lens cleaning solution to a clean and soft cloth. (Do
not apply the cleaning solution directly to the lens.)
2. Gently wipe the lens in a circular motion.
Caution:
1. Do not use abrasive cleaners or solvents.
2. To prevent discoloration or fading, do not allow the cleaning solution to contact
the Qumi case.
36
Page 43

Troubleshooting
Common Problems and Solutions
These guidelines provide tips to deal with problems you may encounter while using the
Qumi. If the problem remains unresolved, contact your dealer for assistance.
The problem sometimes can be as simple as a wire that is not completely connected.
•
• Make sure that the Qumi is turned on.
• Make sure all connections are securely connected.
• Make sure the connected device is turned on; also make sure that the
device is not in suspend or sleep mode.
Make sure the connected device is properly configured for an external
•
display (as needed)
Tips for Troubleshooting
help solve the problem more quickly.
For example, if you replace batteries and the problem remains, put the original batteries
back and move to the next step.
Keep a record of the steps you take when troubleshooting. The information may be useful
for reference when calling technical support or for bringing the Qumi to service personnel.
LED Error Messages
ERROR CODE MESSAGES
Over temperature error (Inlet air ) 3 OFF
LED over temperature (Red) 3 1
LED over temperature (Green) 3 2
LED over temperature (Blue) 3 3
Fan 1 (Blower) error 6 1
Fan 2 (System) error 6 2
Red LED Thermistor error 8 1
Green LED Thermistor error 8 2
Blue LED Thermistor error 8 3
LEFT KEY
BLUE BLINK
RIGHT KEY
BLUE BLINK
In the event of an LED error, disconnect the AC power cord and wait for one (1) minute
before restarting the Qumi.
If there is any other situation that isn’t listed in the chart above, please contact your service
center.
37
Page 44

Image Problems
Problem: No image appears on the screen
1. Verify that the settings on your personal computer are properly congured.
2. Turn off all of the equipment and power up the equipment again in the correct order.
Problem: The image is blurred
1. Adjust the Focus on the Qumi.
2. Make sure the Qumi-to-screen distance is within the specied range.
3. Clean the Qumi lens with optical lens cleaning cloth if it is dirty.
Problem: The image is wider at the top or bottom (trapezoid effect)
1. Position the Qumi so that it is perpendicular to the screen as much as possible.
2. Adjust the Keystone settings in the OSD to correct the problem.
Problem: The image is reversed
Check the orientation of the Projection setting in the Installation I menu in the OSD.
Problem: The image is streaked
1. Set the Frequency and Tracking settings on the Computer menu in the OSD to the
default settings.
2. Connect the Qumi to another computer to make sure that the problem is not caused
by a computer’s video card.
Problem: The image is at with no contrast
Adjust the Contrast setting in the Image menu in the OSD.
Problem: The color of the projected image does not match the source image
Adjust the Color Temperature and Gamma settings in the Image menu in the OSD.
Remote Control Problems
Problem: The Qumi does not respond to the remote control
1. Aim the remote control towards remote sensor on the Qumi.
2. Make sure the path between remote and sensor is not obstructed.
3. Turn off any uorescent lights in the room.
4. Check to see if the battery polarity is correct.
5. Replace the batteries.
6. Turn off other Infrared-enabled devices in the vicinity.
7. Have the remote control serviced.
38
Page 45

Audio Problems
Problem: There is no sound
1. Adjust the volume of the audio source.
2. Check the audio cable connection.
3. Test the output of the audio source with other speakers.
4. Have the Qumi serviced.
Problem: The sound is distorted
1. Check the audio cable connection.
2. Test the output of the audio source with other speakers.
3. Have the Qumi serviced.
FAQs
1� Does Qumi work with a personal computer, notebook or netbook?
Yes. Use the provided VGA cable or HDMI cable. The Qumi can connect to a PC,
notebook or netbook if they have an appropriate HDMI or VGA port. To play audio,
a separate 3.5mm stereo mini-jack audio cable is required to connect to the Qumi’s
audio port.
2� Is it possible to connect the Qumi to a game console, such as a Microsoft®
Xbox or Sony® PS3?
Yes. The Qumi can be used to display content from an Xbox or PS3 console. This can
be done by connecting the HDMI cable from the game console to the Qumi.
3� Can the Qumi project content from a television?
Watching television content can be done by connecting a cable box, digital set-topbox or satellite receiver because televisions are only able to produce images on its
own screen. For example, if a cable box is used, it can be connected by an HDMI
cable to the Qumi.
4� How can an iPad® connect to the Qumi?
An Apple® iPad to VGA converter cable is required. To connect it to the Qumi, connect
the cable from the iPad to the converter. The VGA converter can then be connected
to the Qumi. The output of the iPad will be properly resized to t the Qumi’s native
resolution and full screen view.
39
Page 46

5. How are images from a digital camera or a USB storage device displayed?
Images and other content can be displayed by connecting the following devices to the
Qumi:
•
• Digital camera
• Smart phone
• microSD card
• Multimedia storage viewer
Once the devices are connected, images can be displayed by using the Qumi Media
Suite.
6. Which cable is required to video devices to the Qumi?
Video devices can be connected to the Qumi by using an Audio/Video or HDMI cable
if the devices contain the appropriate ports. To play audio, a separate stereo mini-jack
adapter cable (3.5mm mini plug and two RCA plugs). An RCA cable connected can
also be connected to the Qumi.
7. What type of video formats does the Qumi support?
H.264, MPEG-4, VC-1, WMV9, DivX(Xvid), Real Video, AVS and MJPEG.
8. What type of audio formats does the Qumi support?
MP3 and WMA.
9. What type of document formats does the QUMI support?
Microsoft
Adobe
® ® ®
®
, PowerPoint®),
10. What type of photo formats does the QUMI support?
JPEG, PNG and BMP.
11. How long will the LED light source in the Qumi last and can it be replaced?
The Qumi does not use a typical projector lamp. It uses a set of Light Emitting
Diodes (LED) to illuminate and project images. LED's have a greater lifespan
than conventional lamps; the Qumi is estimated to last 20,000 to 30,000 hours.
The lifespan of the LED depends on factors such as brightness, usage and
environmental conditions; however, LED brightness can decrease over time.
Please note that the LED modules are not replaceable.
Vivitek Support Site
Please visit www.vivitekcorp.com for more information, support and product registration.
40
Page 47

Model
Brightness
Native Resolution
Max. Resolution
Contrast Ratio
Lamp Life and Type
Display Type
Throw Ratio
Image Size (Diagonal)
Projection Distance
Zoom Ratio
Aspect Ratio
Offset
Keystone Correction
Color Spectrum
Horizontal Scan Rate
Vertical Scan Rate
Speaker
Projection Method
Uniformity
File Compatibility
Computer Compatibility
Video Compatibility
I/O Connection Ports
Weight
Dimensions (W x H x D)
Noise Level
Power
Operating Temperature
Safety Certification
Qumi Q2
Up to 300 Lumens
HD 720p (1280x800)
UXGA (1600 x 1200)
2,500:1 (Full On/Full Off)
≈30,000 Hours, LED
HD Pico DLP® Technology by Texas Instruments
1.55:1 (Distance/Width)
30" to 90" (0.8 to 2.3 m)
3.28' to 9.84' (1 to 3m)
Fixed Lens
16:10 Native, 4:3 & 16:9 Compatible
102.5%
± 15° Vertical
1.07 Billion
15, 30 to 90 KHz
43 to 85 Hz
1W Mono
Table Top, Tripod (¼ - 20) or Ceiling (Front or Rear)
85%
JPEG, Office Viewer (Doc, XLS, PDF)
UXGA, WXGA, SXGA+, SXGA, XGA, SVGA, VGA Resized;
VESA Standards; PC and Macintosh Compatible
SDTV (480i), EDTV (480p), HDTV (720p, 1080i/p),
NTSC/NTSC 4.43, PAL B/G/H/I/M/N 60, SECAM
Mini-HDMI, Universal I/O (24-Pin Connector for
VGA/Component Input), AV Mini-Jack, Mini-Jack Audio-Out,
USB, MicroSD
21.7 oz (1.4 lbs)
6.3” x 1.3” x 4.0” (162 x 32 x 102 mm)
28dB/32dB (Standard / Boost Mode)
Supply: AC 100-240V, 50/60Hz
Consumption: 85W (Boost Mode), <0.5W (Standby)
41 to 104°F (5 to 40°C)
FCC-B, UL, CCC, CE, C-Tick, KC, CB, SASO, NOM, PCT,
RoHS, PSB, ICES-003(Canada)
Note:
.
41
Page 48

Projection Distance vs� Projection Size
Projection Distance and Size Table
IMAGE DIAGONAL
(MM/INCHES)
762/30 646/25.43 404/15.91 1000/39.37 10/0.40
1016/40 862/33.94 538/21.18 1340/52.76 13/0.51
1143/45 969/38.15 606/23.86 1500/59.06 15/0.59
1270/50 1077/42.40 673/26.50 1670/65.75 17/0.66
1524/60 1292/50.87 808/31.81 2000/78.74 20/0.79
1778/70 1508/59.37 942/37.09 2340/92.13 24/0.92
2032/80 1723/67.83 1077/42.40 2670/105.12 27/1.06
2286/90 1939/76.34 1212/47.72 3000/118.11 30/1.18
IMAGE WIDTH
(MM/INCHES)
IMAGE HIGH
(MM/INCHES)
PROJECTION
DISTANCE
(MM/INCHES)
OFFSET-A
(MM/INCHES)
42
Page 49

Timing Mode Table
SIGNAL RESOLUTION
NTSC
PAL/SECAM
VESA
Apple® Mac
SDTV
EDTV
HDTV
—
—
720 x 400 37.9 85.0
640 x 480 31.5 60.0
640 x 480 37.9 72.0
640 x 480 37.5 75.0
640 x 480 43.3 85.0
800 x 600 35.2 56.0
800 x 600 37.9 60.0
800 x 600 48.1 72.0
800 x 600 46.9 75.0
800 x 600 53.7 85.0
1024 x 768 48.4 60.0
1024 x 768 56.5 70.0
1024 x 768 60.0 75.0
1024 x 768 68.7 85.0
1280 x 800 49.7 59.8
1280 x 800 62.8 74.9
1280 x 800 71.6 84.8
1280 x 1024 63.98 60.0
1280 x 1024 79.98 75.0
1280 x 1024 91.10 85.0
1280 x 960 60.0 60.0
1280 x 960 85.9 85.0
1400 x 1050 65.3 60.0
1440 x 900 70.6 75.0
1440 x 900 55.6 60.0
1600 x 1200 75.0 60.0
640 x 480 35.0 66.68
832 x 624 49.725 74.55
1024 x 768 60.24 75.0
1152 x 870 68.68 75.06
480i 15.734 60.0
576i 15.625 50.0
480p 31.469 60.0
576p 31.25 50.0
720p 37.5 50.0
720p 45.0 60.0
1080i 33.8 60.0
1080i 28.1 50.0
1080p 67.5 60.0
1080p 56.3 50.0
H-SYNC
(KHZ)
15.734 60.0
15.625 50.0
V-SYNC
(HZ)
COMPOSITE /
S-VIDEO
COMPONENT RGB DVI/HDMI
O — — —
O — — —
— — O O
— — O O
— — O O
— — O O
— — O O
— — O O
— — O O
— — O O
— — O O
— — O O
— — O O
— — O O
— — O O
— — O O
— — O O
— — O O
— — O O
— — O O
— — O O
— — O O
— — O O
— — O O
— — O O
— — O O
— — O O
— — O —
— — O O
— — O O
— — O O
— — O O
—
—
—
—
O
O
O
O
— O — O
— O — O
— O — O
— O — O
— O — O
— O — O
— O
— O
— O
— O
O: Frequency supported
—: Frequency not supported
*: Displayable level
43
Page 50

Qumi Dimensions
44
Page 51

Regulatory Compliance
FCC Warning
This equipment has been tested and found to comply with the limits for a Class B digital
device pursuant to Part 15 of the FCC Rules. These limits are designed to provide
reasonable protection against harmful interference when the equipment is operated in a
commercial environment.
This equipment generates, uses, and can radiate radio frequency energy and, if not
installed and used in accordance with the instruction manual, may cause harmful
interference to radio communications. Operation of this equipment in a residential area is
likely to cause harmful interference in which case the user will be required to correct the
interference at his/her own expense.
Changes or modications not expressly approved by the parties responsible for
compliance could void the user’s authority to operate the equipment.
Canada
This class B digital apparatus complies with Canadian ICES-003.
Safety Certications
FCC-B, UL, CCC, CE, C-Tick, KC, CB, SASO, NOM, PCT, RoHS, PSB,
ICES-003 (Canada)
Disposal and Recycling
This product may contain other electronic waste that can be hazardous if not disposed of
properly. Recycle or dispose in accordance with local, state, or federal Laws. For more
information, contact the Electronic Industries Alliance at www.eiae.org.
45
 Loading...