

Vivitek NovoDS 200 Series User Manual
Ultra-High Definition Digital Signage Player
User’s Manual
Copyright © 2016 DELTA Electronics, Inc. All rights reserved.
User’s Manual
DS200 Series
Version 2.1

User’s Manual
Table of Contents
1. GETTING STARTED ............................................................................ 4
1.1 Key Features ............................................................................................. 4
1.2 Hardware setup ........................................................................................ 4
1.3 Configuring the NovoDS ............................................................................ 5
1.3.1 Display Options ...............................................................................................................5
1.3.2 Settings ............................................................................................................................6
1.3.3 Reset ................................................................................................................................7
1.4 Modes of Operation .................................................................................. 7
1.4.1 Stand-Alone Mode ..........................................................................................................7
1.4.2 Network Mode ................................................................................................................7
1.5 Software Download and Installation ......................................................... 9
2. NOVODS SOFTWARE OVERVIEW ............................................. 11
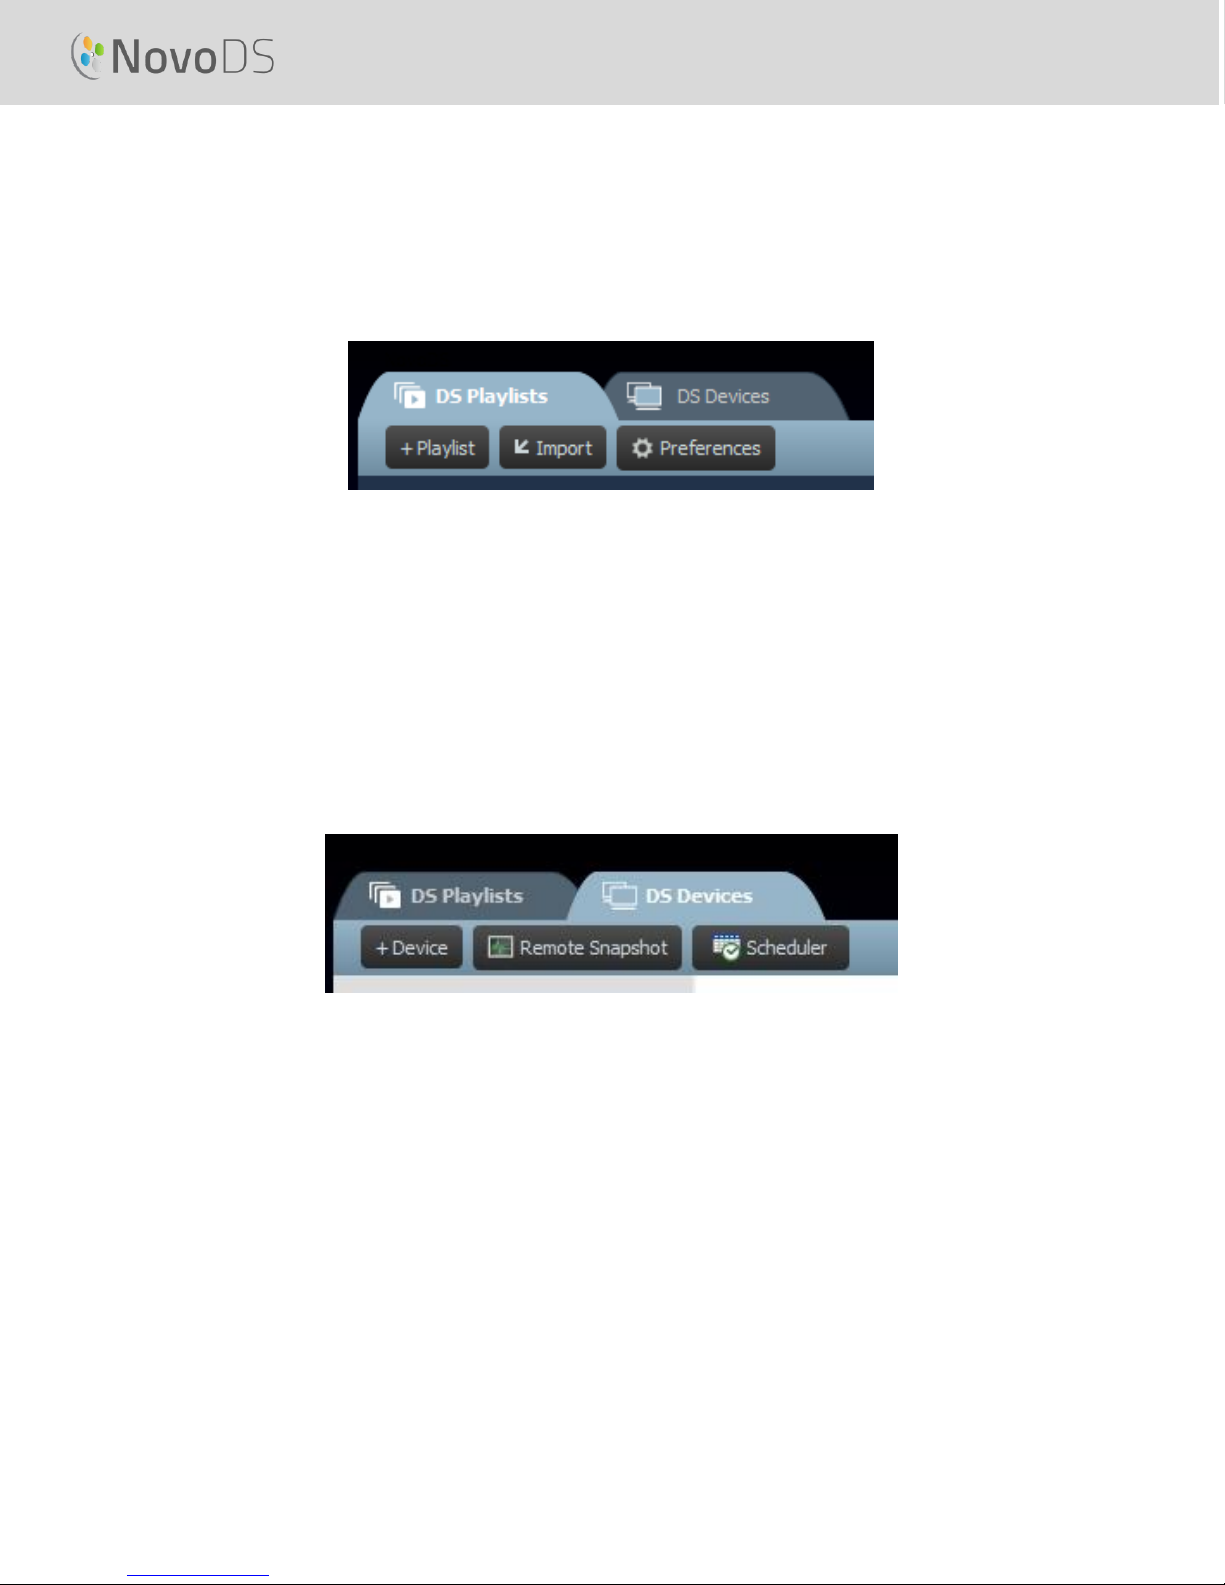
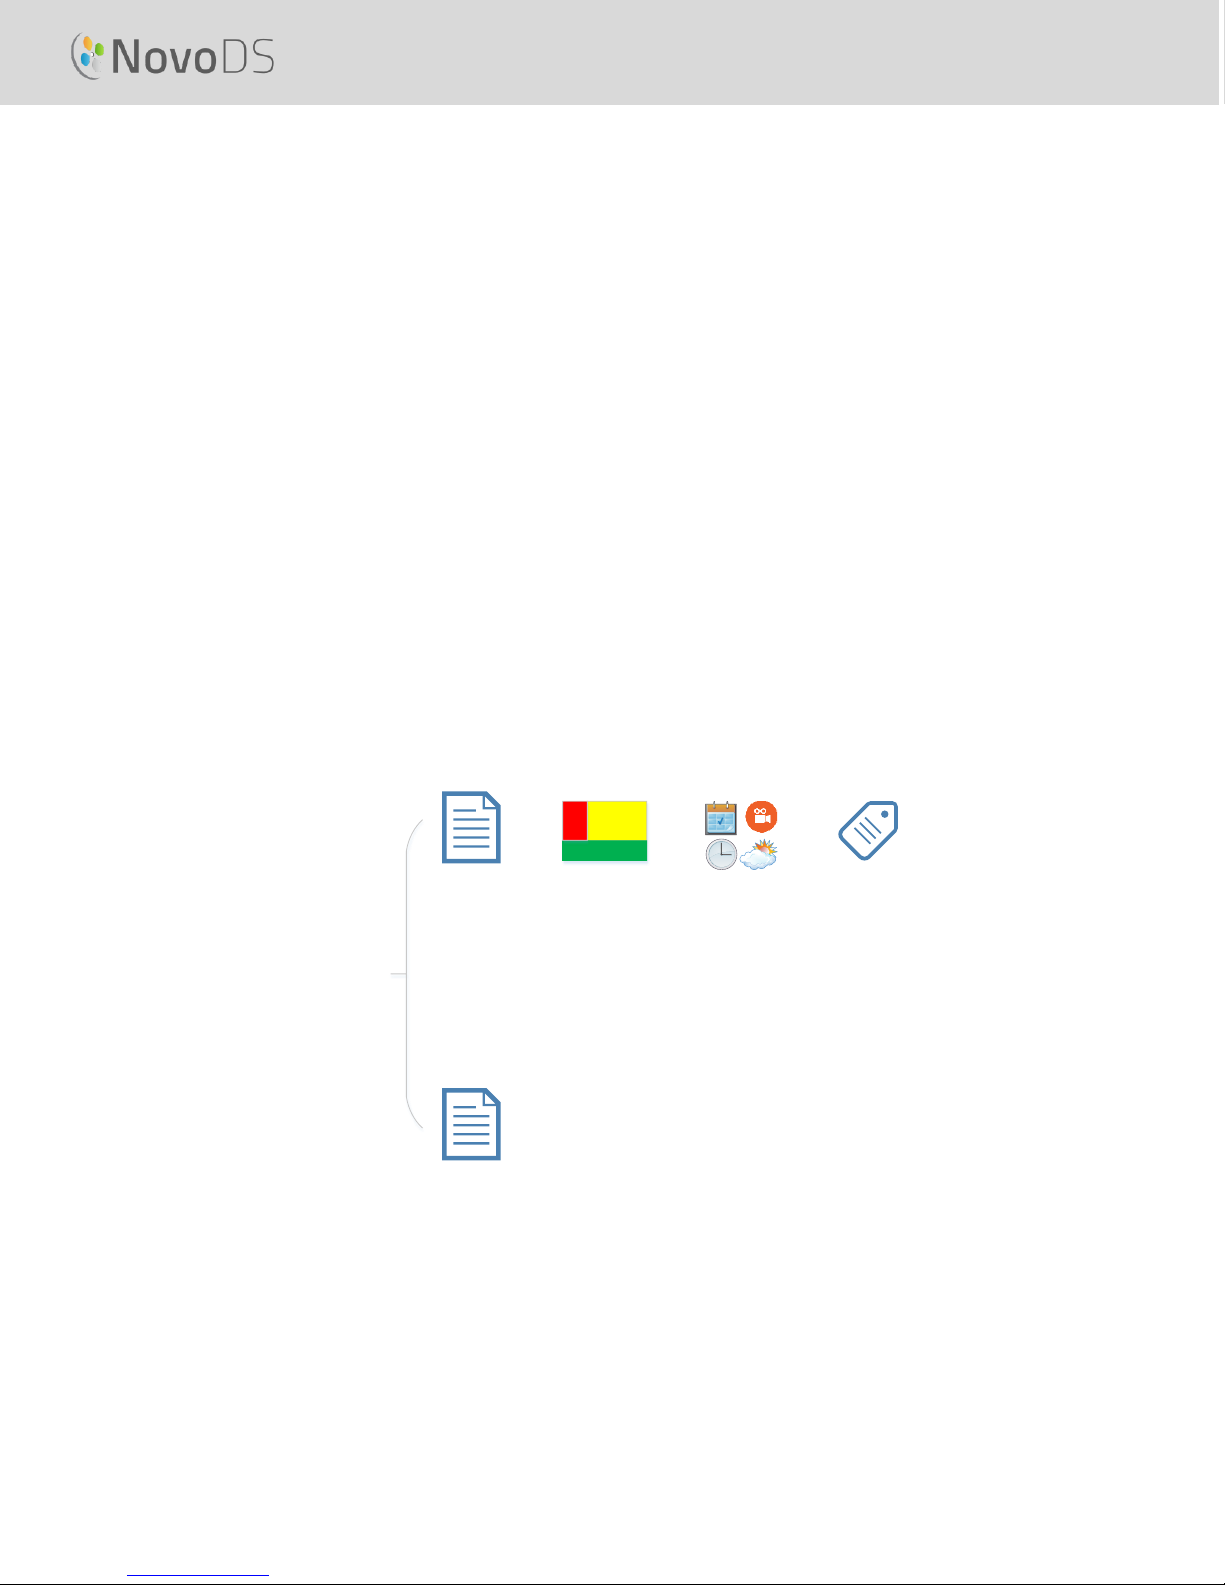
2.1 DS Playlists .............................................................................................. 11
2.2 DS Devices ............................................................................................... 11
3. DS PLAYLISTS (PLAYLIST EDITING) ....................................... 12
3.1 Terminology Definition ................................................................................ 12
3.2 Creating a Playlist ........................................................................................ 13
3.2.1 Selecting a Template .....................................................................................................13
3.2.2 Creating a Custom Template ........................................................................................14
3.2.3 Editing a Playlist ............................................................................................................16
3.2.4 Adding Content to a Playlist ..........................................................................................17
3.2.4.1 Importing from an Existing Playlist Region ........................................................................................ 17
3.2.4.2 Adding Media (Image or Video files) .................................................................................................. 18
3.2.4.3 Adding Web Page ............................................................................................................................... 20
3.2.4.4 Adding Text ........................................................................................................................................ 21
3.2.4.5 Adding an IP Stream ........................................................................................................................... 21
3.2.4.6 Adding a Twitter Feed ........................................................................................................................ 22
3.2.4.7 Adding a USB Camera Feed ................................................................................................................ 23
Copyright © 2016 DELTA Electronics, Inc. All rights reserved. Page 2

User’s Manual
3.2.4.8 Adding a Clock .................................................................................................................................... 23
3.2.4.9 Adding a 5-day Weather Report ........................................................................................................ 24
3.2.4.10 Adding Google Calendar .................................................................................................................. 25
3.2.4.11 Adding a RSS Feed ............................................................................................................................ 25
3.3 Editing Pages ............................................................................................... 26
3.3.1 Adding Pages to Playlists ...............................................................................................27
3.3.2 Managing Pages within a Playlist ..................................................................................27
3.3.3 Importing a Page from another Playlist ........................................................................28
3.4 Previewing a Playlist .................................................................................... 28
3.5 Exporting a Playlist ...................................................................................... 30
3.6 Importing a Playlist ...................................................................................... 31
3.7 Configuring Preferences .............................................................................. 31
4. DS DEVICES (DEVICE MANAGEMENT) .................................... 33
4.1 Adding a Device ........................................................................................... 33
4.1.1 Adding a Device Manually .............................................................................................33
4.1.2 Adding a Device Through Auto Discovery .....................................................................34
4.2 Editing a Device List ..................................................................................... 35
4.2.1 Device Setting ...............................................................................................................35
4.3 Creating a Group ......................................................................................... 39
4.3.1 Synchronized Playback ..................................................................................................40
4.4 Schedule ...................................................................................................... 41
4.4.1 Creating a Schedule ......................................................................................................41
4.4.2 Importing a Schedule ....................................................................................................42
4.4.3 Assigning a Schedule .....................................................................................................43
4.5 Remote Snapshot ........................................................................................ 43
4.6 Overlaying a Message .................................................................................. 44
5. NETWORK CONFIGURATION ....................................................... 46
6. DEVICE SPECIFICATIONS .............................................................. 47
7. COPYRIGHT INFORMATION ......................................................... 48
Copyright © 2016 DELTA Electronics, Inc. All rights reserved. Page 3
User’s Manual
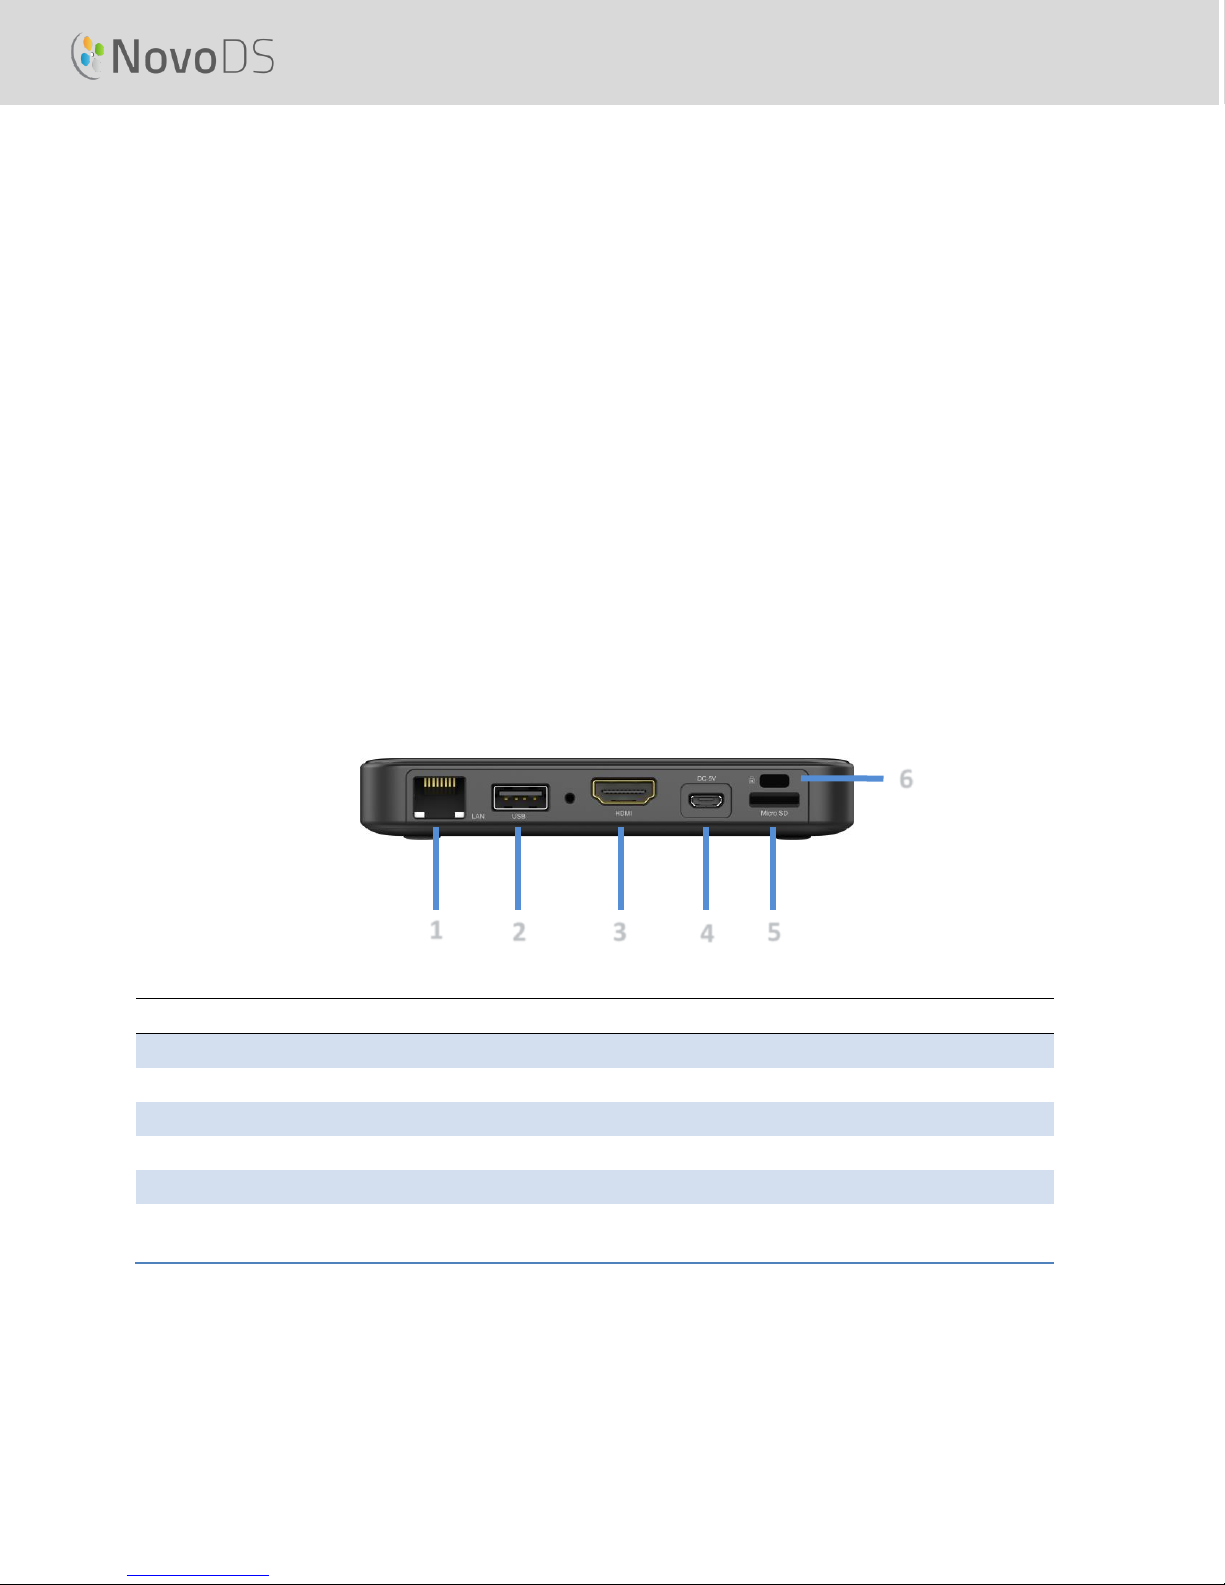
Component
Function
1
RJ45 Port
Ethernet connection
2
USB Port
USB mouse/keyboard and USB thumb drive
3
HDMI Port
Display output
4
DC 5V Power Jack
Power input
5
microSD Card Slot
microSD card for additional storage
6
Kensington® Security
Slot
Secure lock
5 4 3 1 2
6
1. Getting Started
1.1 Key Features
NovoDS is an easy-to-manage digital signage solution for creating dynamic multimedia content for
a variety of large-scale corporate and educational applications. Designed with a user-friendly
interface, the NovoDS allows users to generate signage content without the need of any
programming skills. Its features include
Support 4K display resolution;
Built-in WiFi and built-in internal storage
Intuitive playlist creation;
Scheduled playback;
Network-based management;
Remote monitoring
1.2 Hardware setup
Copyright © 2016 DELTA Electronics, Inc. All rights reserved. Page 4
User’s Manual
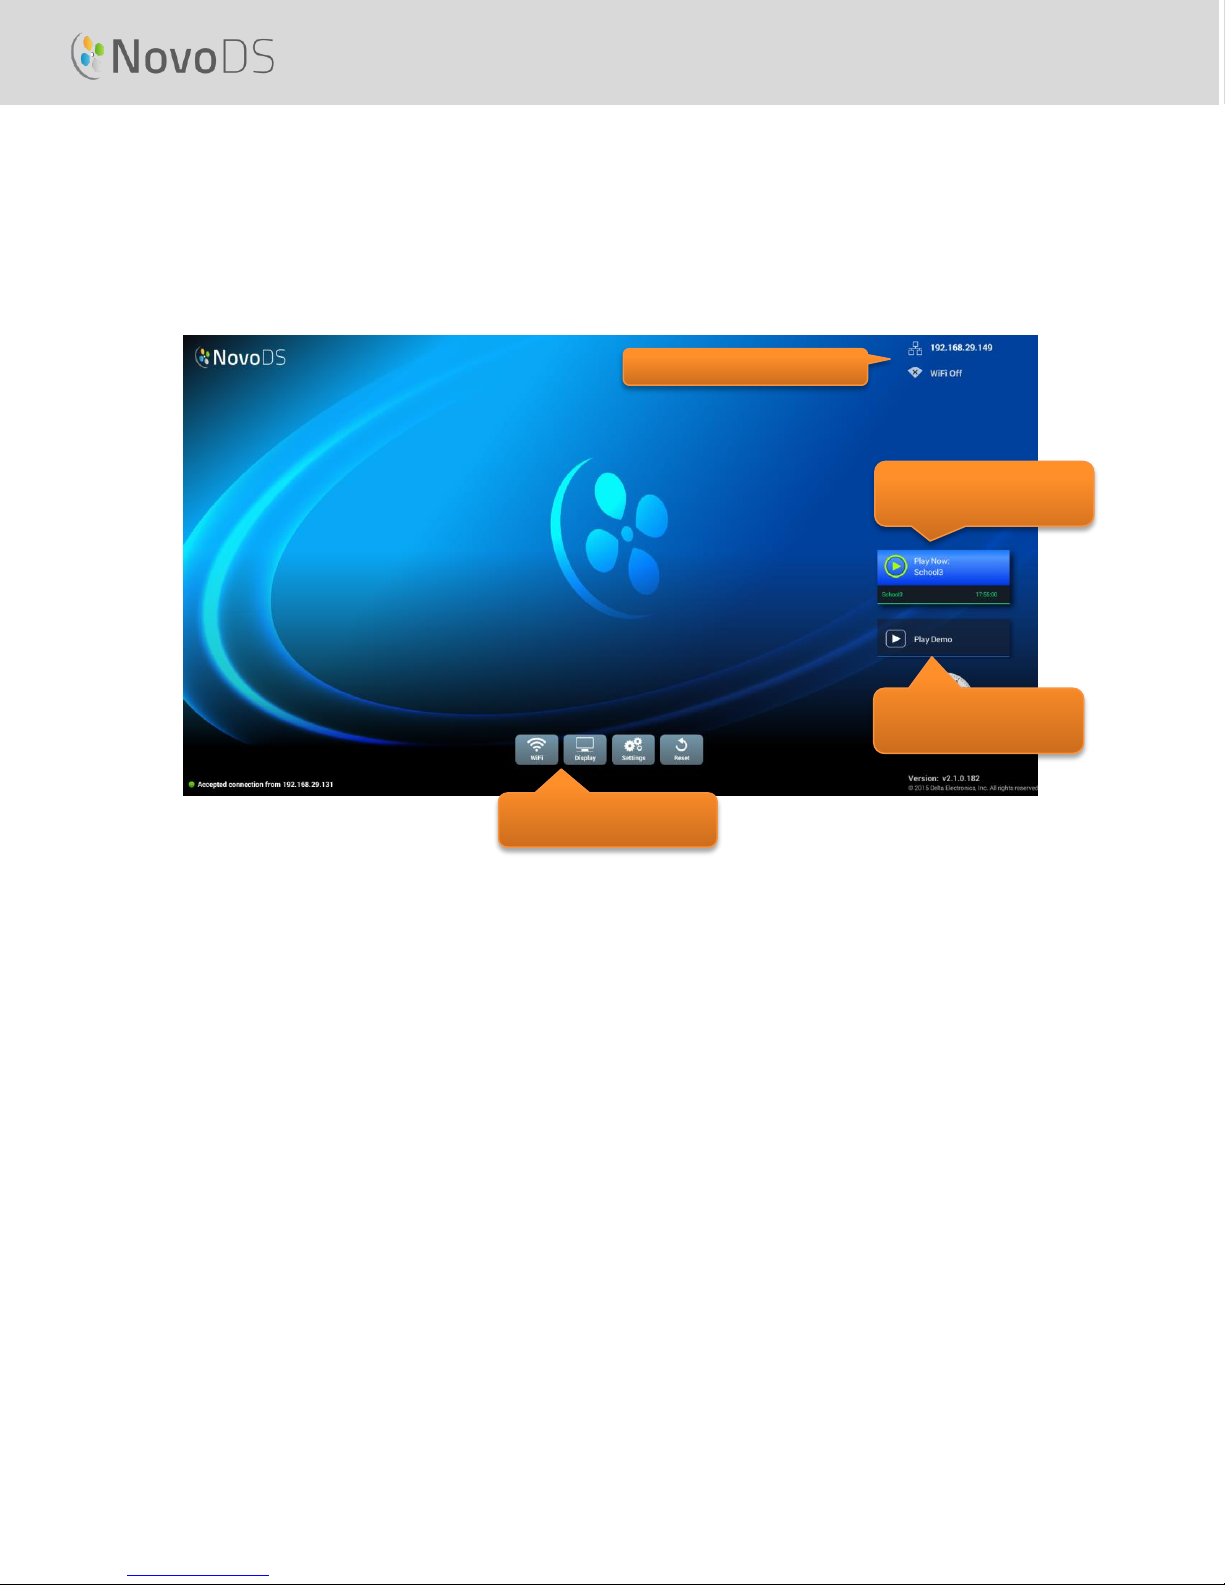
Device Configuration buttons
Click this button to start playing
the upcoming playlist
immediately
Click this button to start
playing the built-in “Demo”
playlist immediately
Network connection information
1.3 Configuring the NovoDS
There are several buttons available at NovoDS’ home-screen for device configuration, such as
display resolution, WiFi settings, etc. The following figure illustrates the key functionalities and
Information shown on the home-screen after power-up.
1.3.1 Display Options
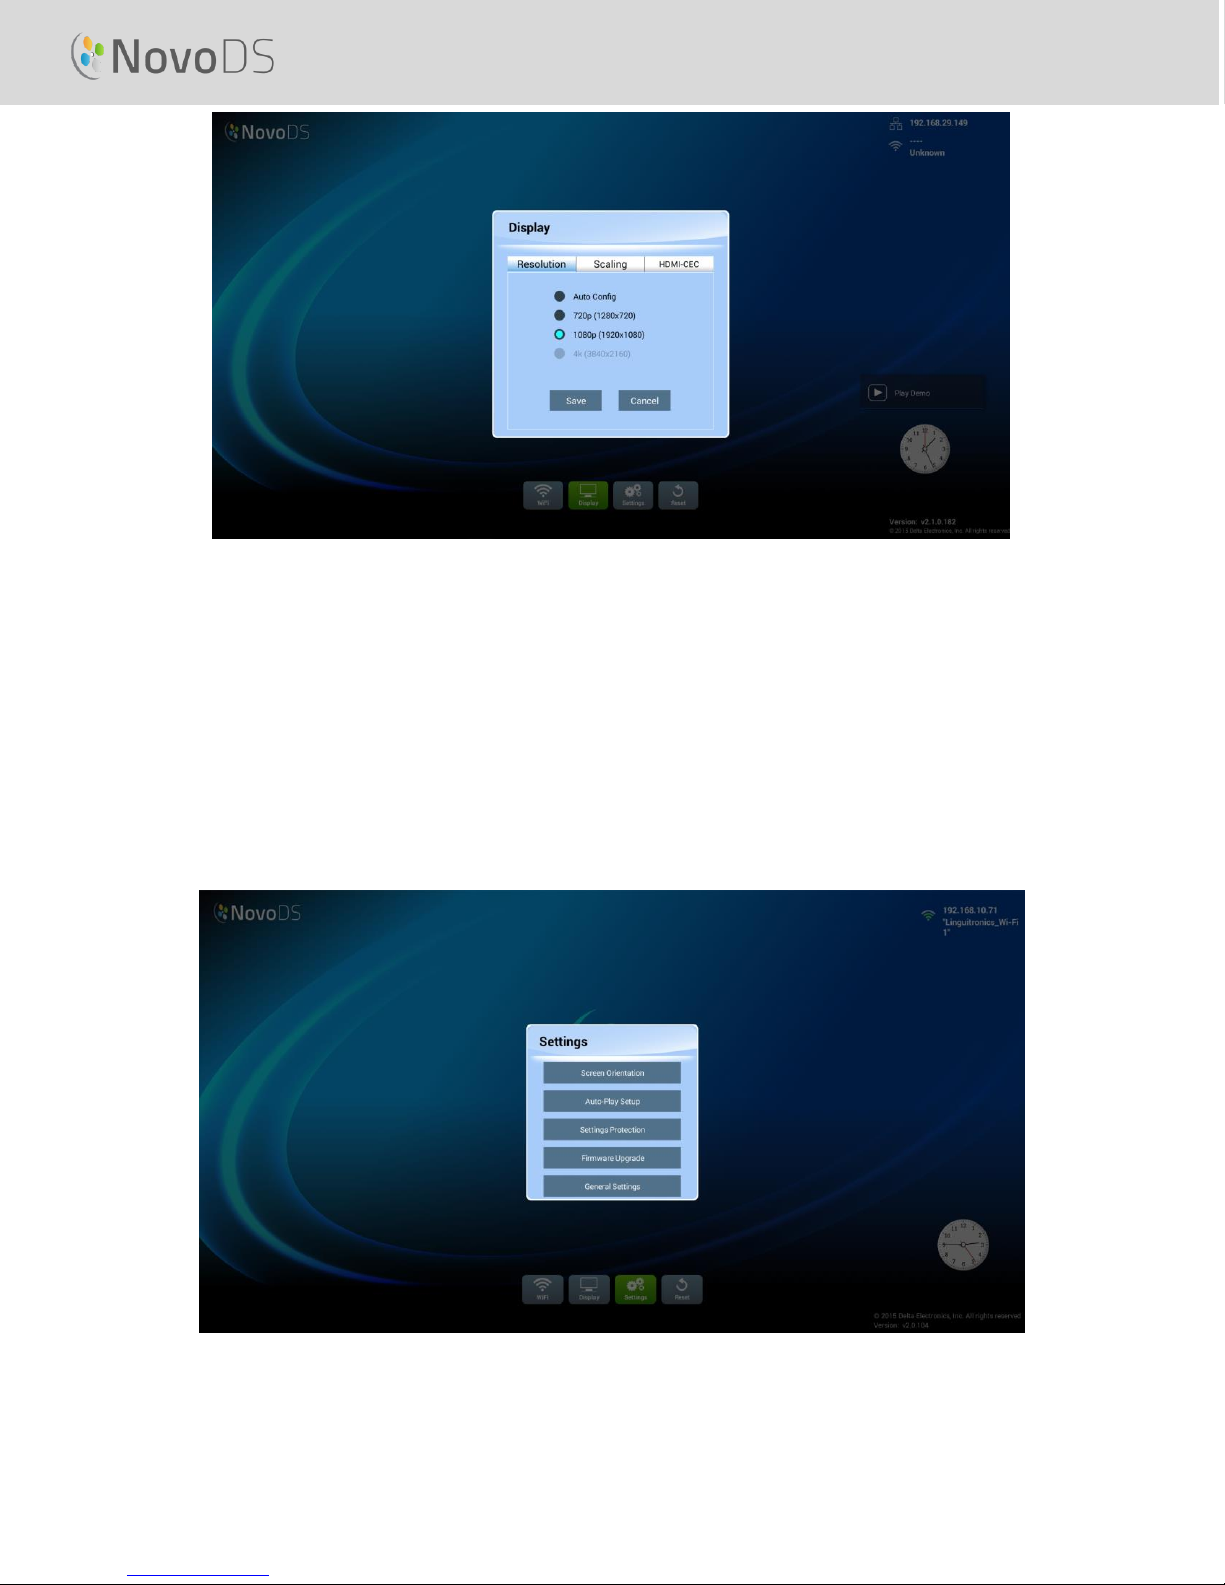
Button “Display” allows you to select the proper display resolution through tab “Resolution”, and
to resize the display output dimension through tab “Scaling”. It is worth mentioning that
unsupported display resolutions will become inactive. For example, if you connect a non-4K
monitor to NovoDS, the “4K” resolution will be greyed out, as shown in the figure below. “HDMI-
CEC” tab allows you to enable/disable HDMI-CEC feature. Once it is enabled, you can use TV
remote control to control NovoDS device as well.
Copyright © 2016 DELTA Electronics, Inc. All rights reserved. Page 5
User’s Manual
1.3.2 Settings
There are several actions you can take under button “Settings”.
(1) “Screen Orientation” – Configure the display output in “Landscape” or “Portrait” mode
(2) “Auto-Play Setup” – Configure auto-playback after device’s boot-up and upon microSD card
insertion.
(3) “Settings Protection” – Lock or unlock device settings with a password.
(4) “Firmware Upgrade” – Check for firmware upgrade from our Internet server.
(5) “General Settings” – Set regional language, date & time, etc.
Copyright © 2016 DELTA Electronics, Inc. All rights reserved. Page 6
User’s Manual
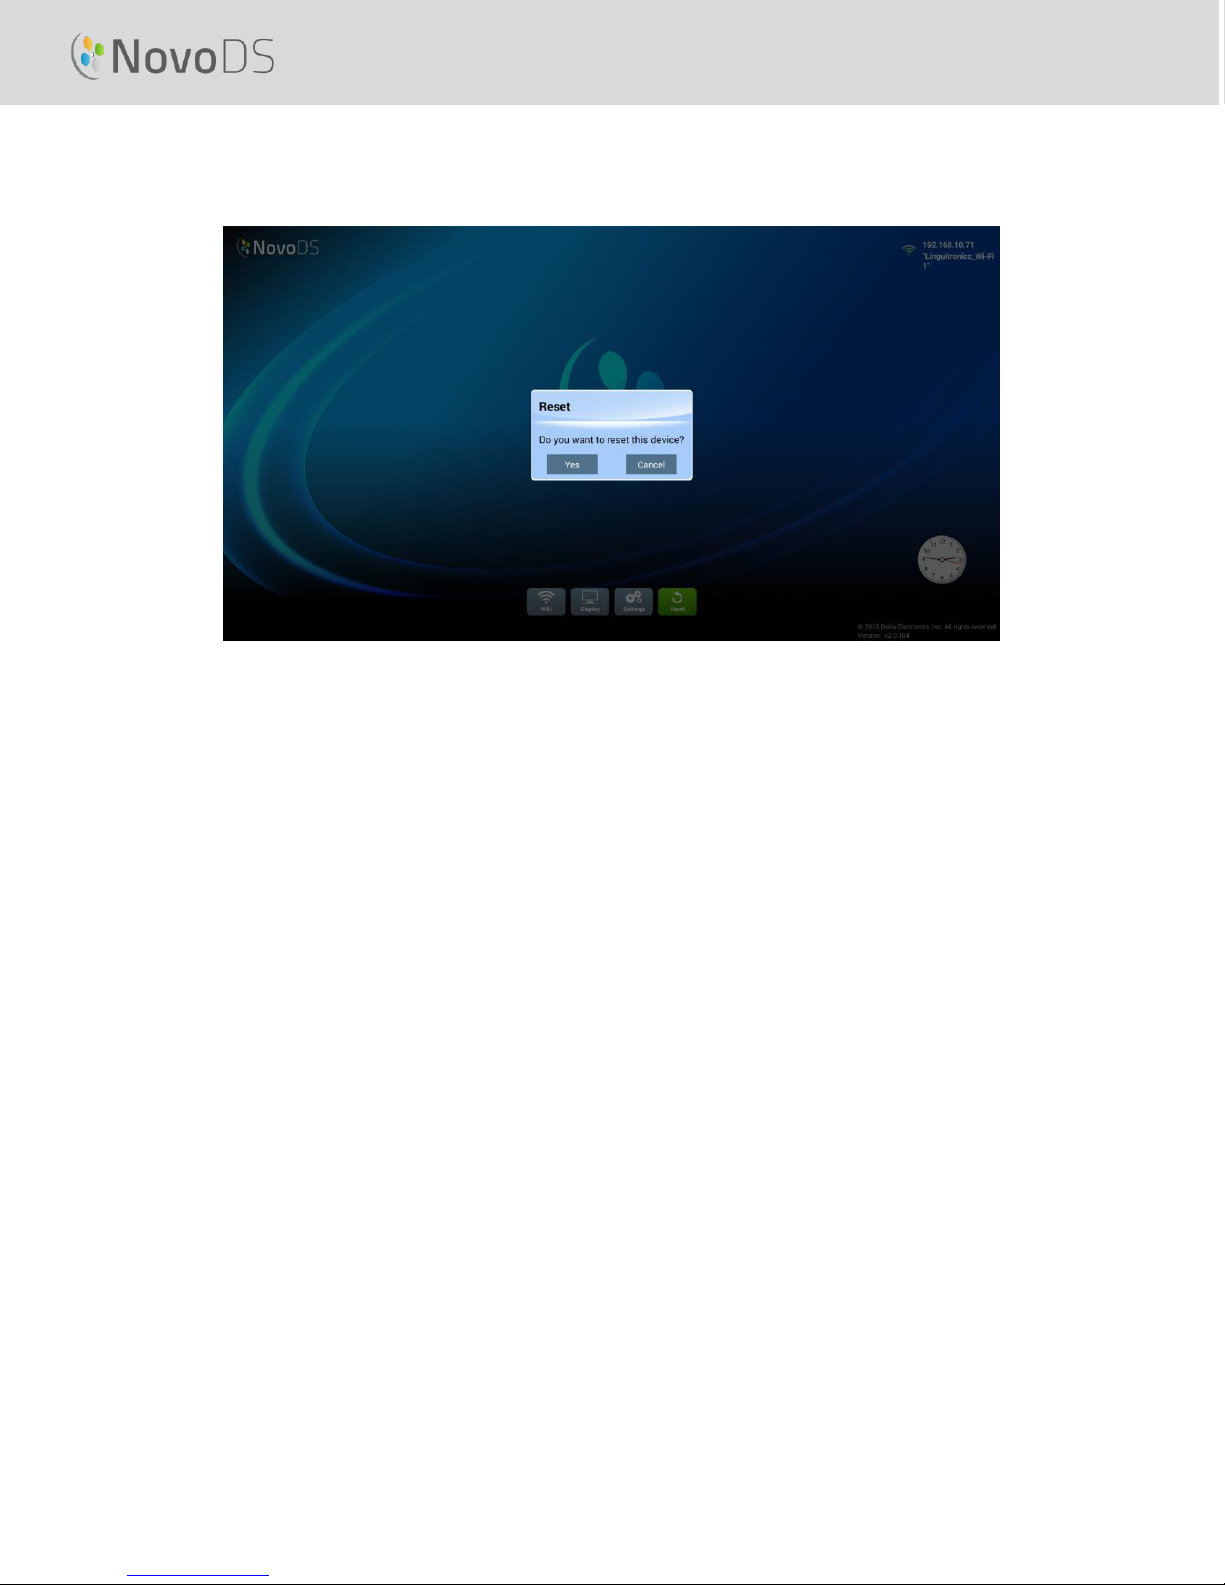
1.3.3 Reset
Click on button “Reset” to restart the NovoDS device.
1.4 Modes of Operation
Users can manage content via two ways,
(1) Stand-Alone mode (by using a microSD card)
(2) Network mode (via the network)
1.4.1 Stand-Alone Mode
Stand-alone mode is simple plug-and-play operation and requires no direct management of the
NovoDS device, which is suitable for single-device deployment.
To run NovoDS in Stand-Alone mode:
a. Create the desired playlist on your computer using the NovoDS software (See section 3.1 ).
b. Save and export the playlist to a microSD card (See section
c. 3.5 Exporting a Playlist ).
d. Launch the NovoDS device.
e. Optionally, disable WiFi function through button “WiFi” at NovoDS’ home-screen.
f. Insert the microSD card into the NovoDS device. Then, the device will start playback
automatically.
1.4.2 Network Mode
Network mode allows users to synchronize playlists to multiple devices from a computer via WiFi
or Ethernet connection.
Copyright © 2016 DELTA Electronics, Inc. All rights reserved. Page 7
User’s Manual
To run NovoDS in Network mode:
a. Power on your NovoDS devices.
b. You have a choice of using Ethernet or WiFi.
To use Ethernet, simply plug in an Ethernet cable.
To use WiFi connection, the configuration will take a few more steps, described as
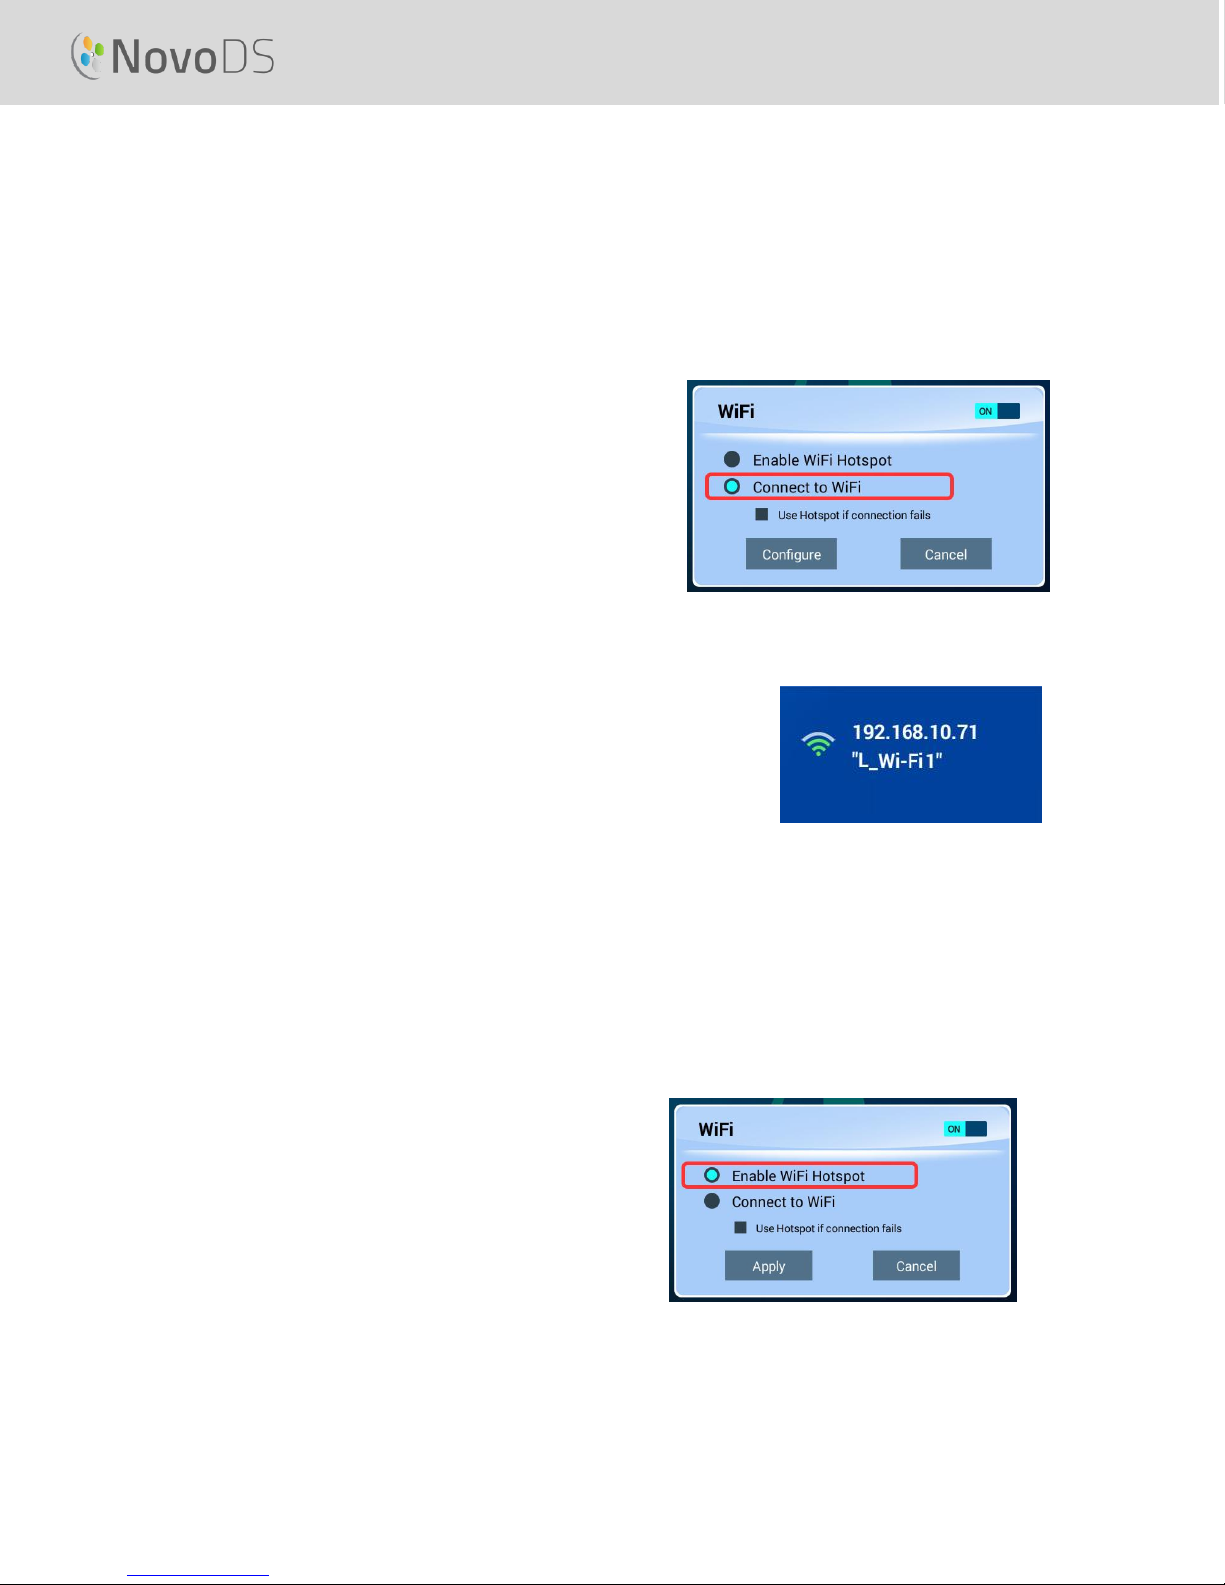
follows.
i. Click on button “WiFi” in NovoDS’ home-screen
ii. Select “Connect to Wi-Fi” and
then click on button “Configure”.
This will bring you to a WiFi
configuration page, where you
can select the desired WiFi
network. You may require to
enter network credentials when
necessary.
iii. Once this is completed successfully, the
network SSID and IP address will be
displayed in the top-right corner of the
screen.
c. Connect your PC to the same network (Ethernet or WiFi) as the one used by your NovoDS
devices.
d. From this point onwards, you can use NovoDS software on your computer to manage your
NovoDS devices.
WiFi Hotspot
NovoDS can function as a WiFi hotspot which can be
convenient for small-scale deployment or product
evaluation. To connect via Hotspot Mode:
a. In the WiFi configuration screen, select
“Enable Wi-Fi Hotspot” and then click on
button “Apply”
Copyright © 2016 DELTA Electronics, Inc. All rights reserved. Page 8
User’s Manual
IMPORTANT: To enable successful operation of a NovoDS device, specific TCP and UDP ports should not be blocked by
your network’s firewall. If you are operating behind a network firewall ensure that the TCP and UDP ports used by
NovoDS are open. For details on the ports used by NovoDS see Section 5.Error! Reference source not found.. For
nformation on how to open specific ports, consult your router’s user’s manual.
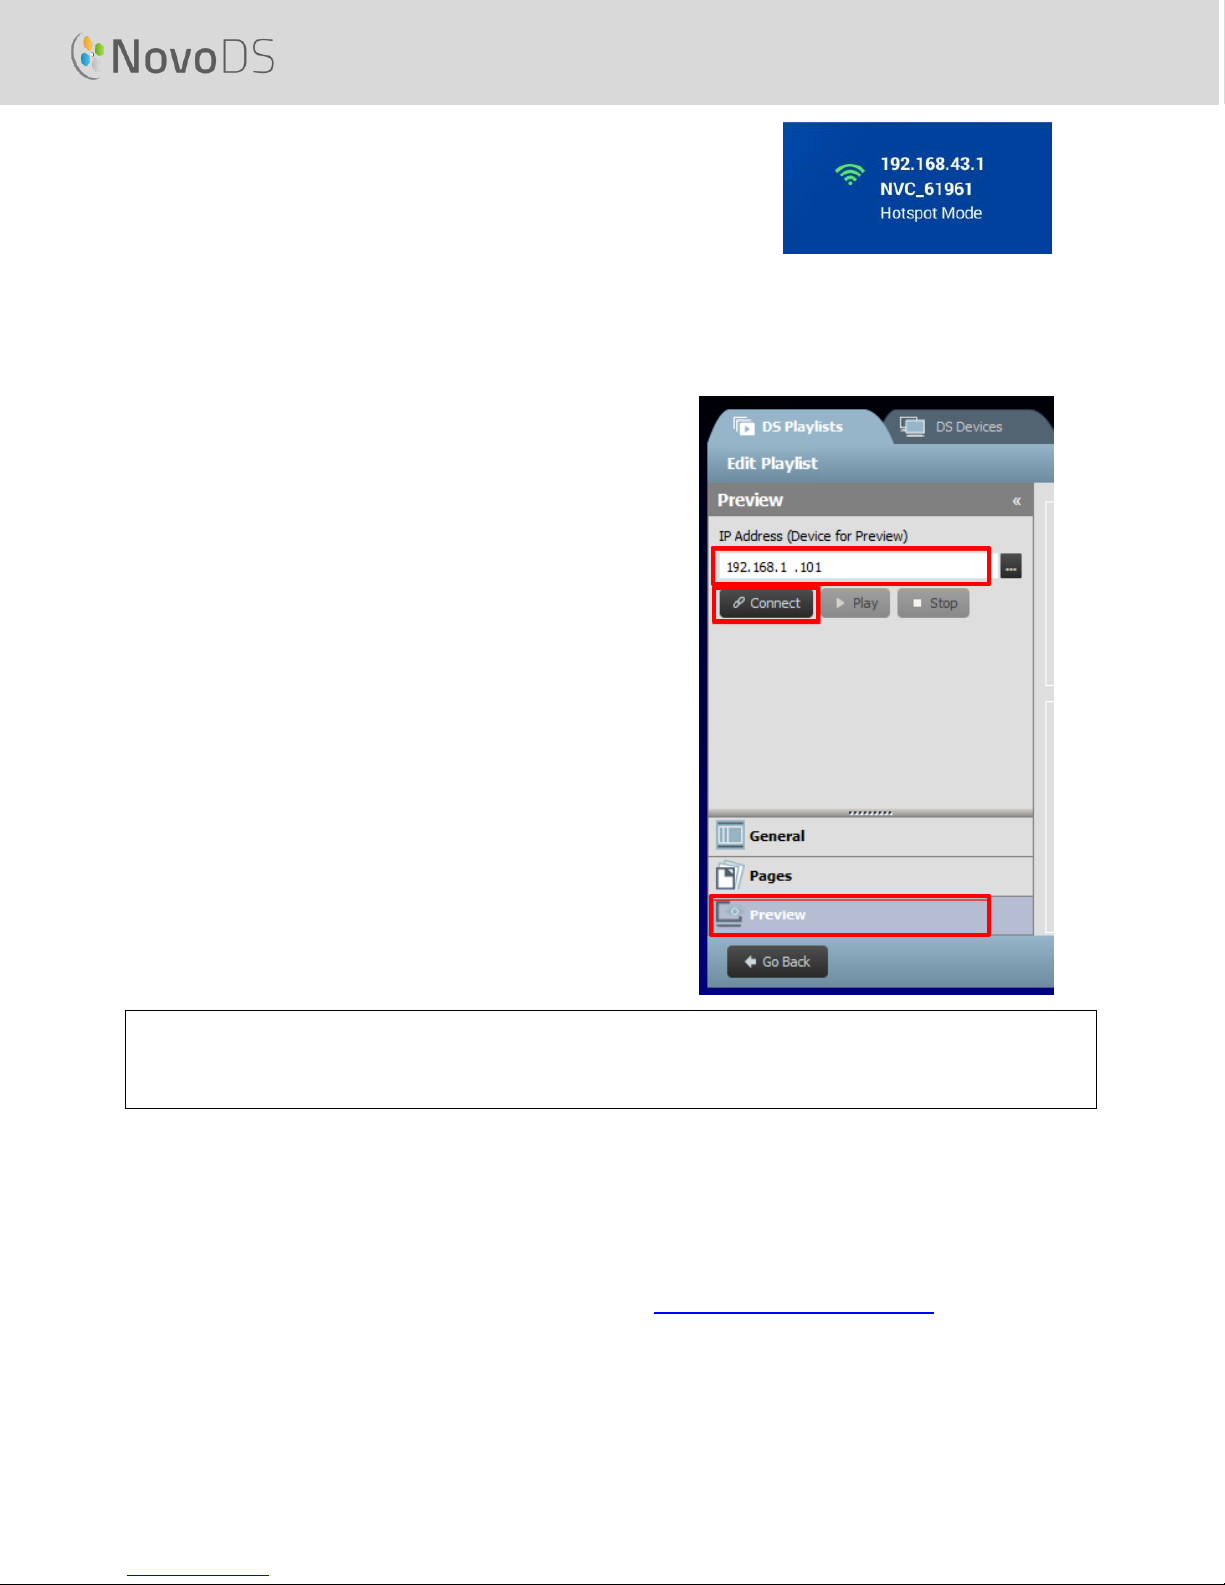
b. An IP address and its SSID will be displayed for the
NovoDS device in the top-right corner. (In the figure
below, the IP address is 192.168.43.1 and the SSID is
“NVC_61961.”)
c. Now you can connect your computer to this WiFi Hotspot and start managing this NovoDS
device.
To test the connection
We can use “Preview” feature to test the network
connection.
a. Open NovoDS software and select a playlist
b. Click on “Preview” tab on the left pane, and then,
enter the corresponding IP address of the
NovoDS device.
c. Click on button “Connect” to connect to the
device. If the network configuration is done
properly, the connection will be established
successfully.
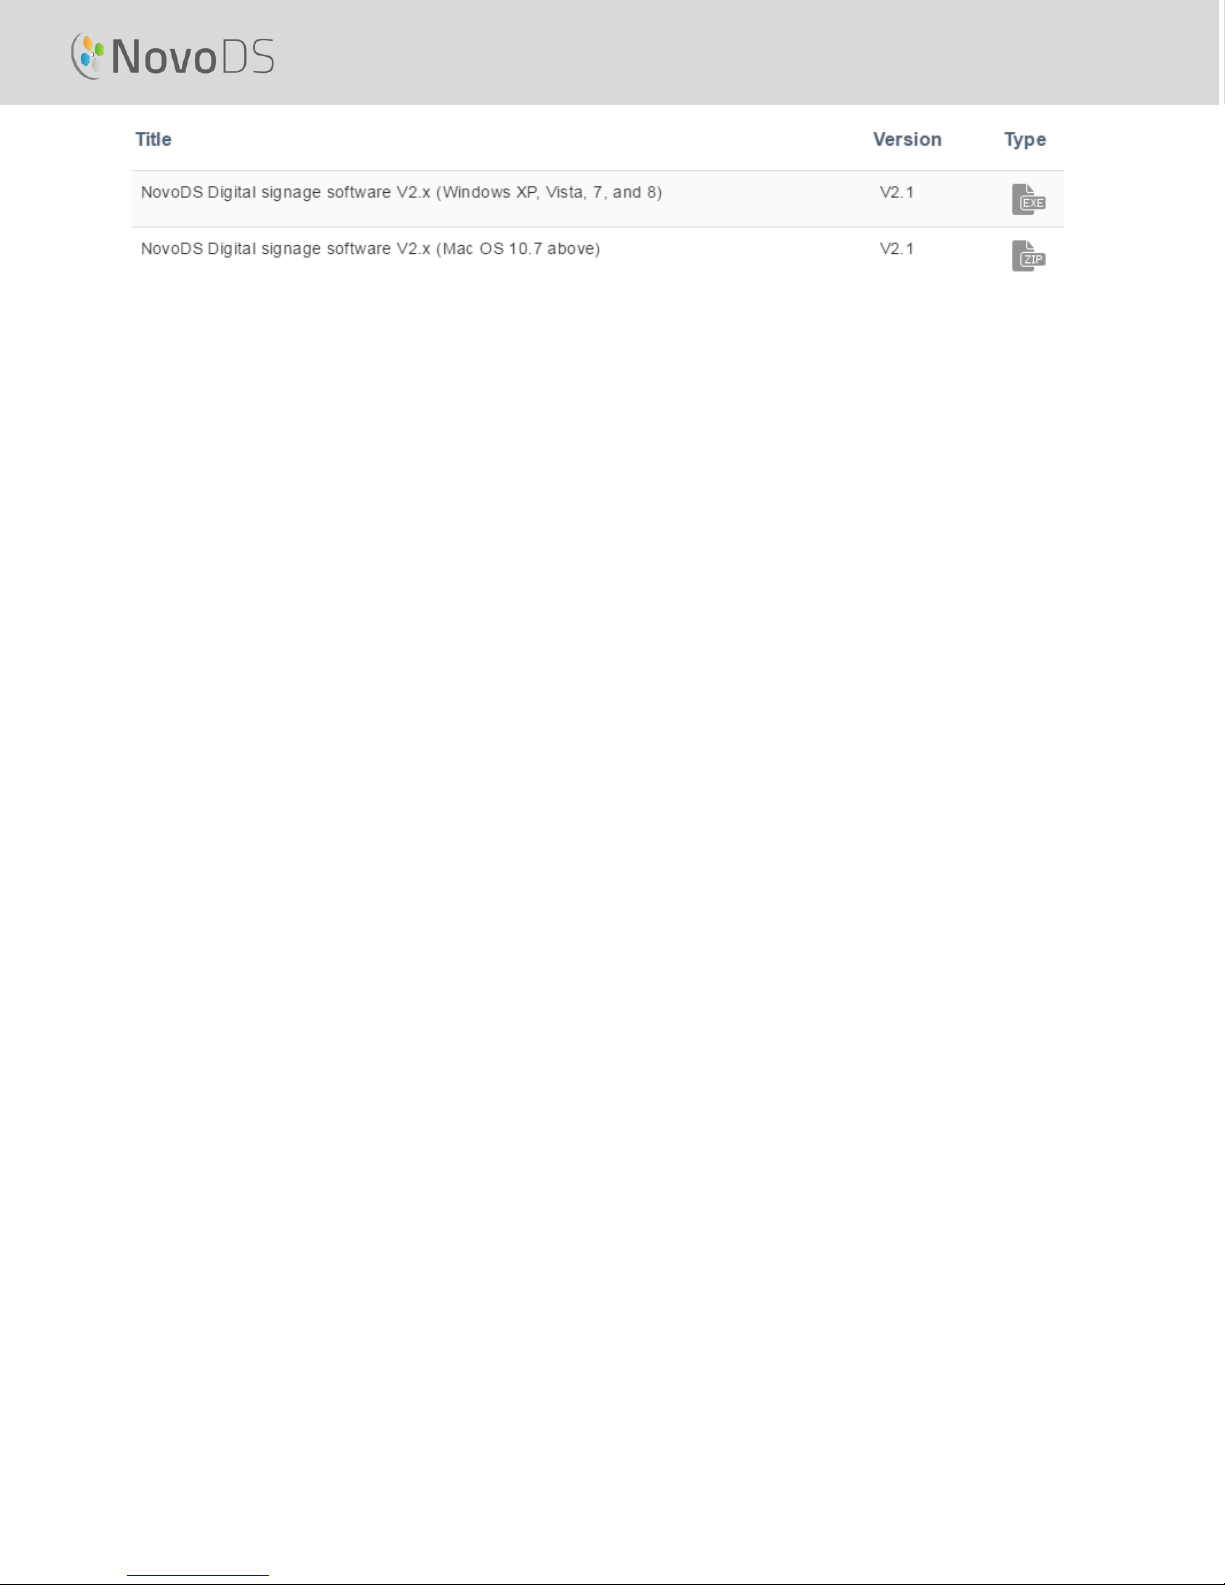
1.5 Software Download and Installation
NovoDS comes with playlist editing and device management software available for both Windows
and Mac computers. Please go to the Vivitek website (http://www.vivitekcorp.com) to download
the latest version.
Copyright © 2016 DELTA Electronics, Inc. All rights reserved. Page 9
User’s Manual
Copyright © 2016 DELTA Electronics, Inc. All rights reserved. Page 10
User’s Manual
2. NovoDS Software Overview
There are two tabs available in the software, DS Playlists and DS Devices.
2.1 DS Playlists
This tab allows users to create and organize playlists for your digital signage, including
Creating a Playlist
Selecting or customizing a template
Placing and editing your content
Testing your Playlist
Setting user preferences, including language and playlist path
2.2 DS Devices
This tab enables users to control and manage NovoDS devices over the network. Key features
include
Adding/Deleting NovoDS devices
Grouping multiple devices, and synchronizing their playback
Setting a specific playlist for a device or group
Setting a schedule for different devices or groups
Monitoring playback status of each NovoDS device
Copyright © 2016 DELTA Electronics, Inc. All rights reserved. Page 11
User’s Manual
Playlist
. . . .
Page
Page
= + +
Template AttributeContent
3. DS Playlists (Playlist Editing)
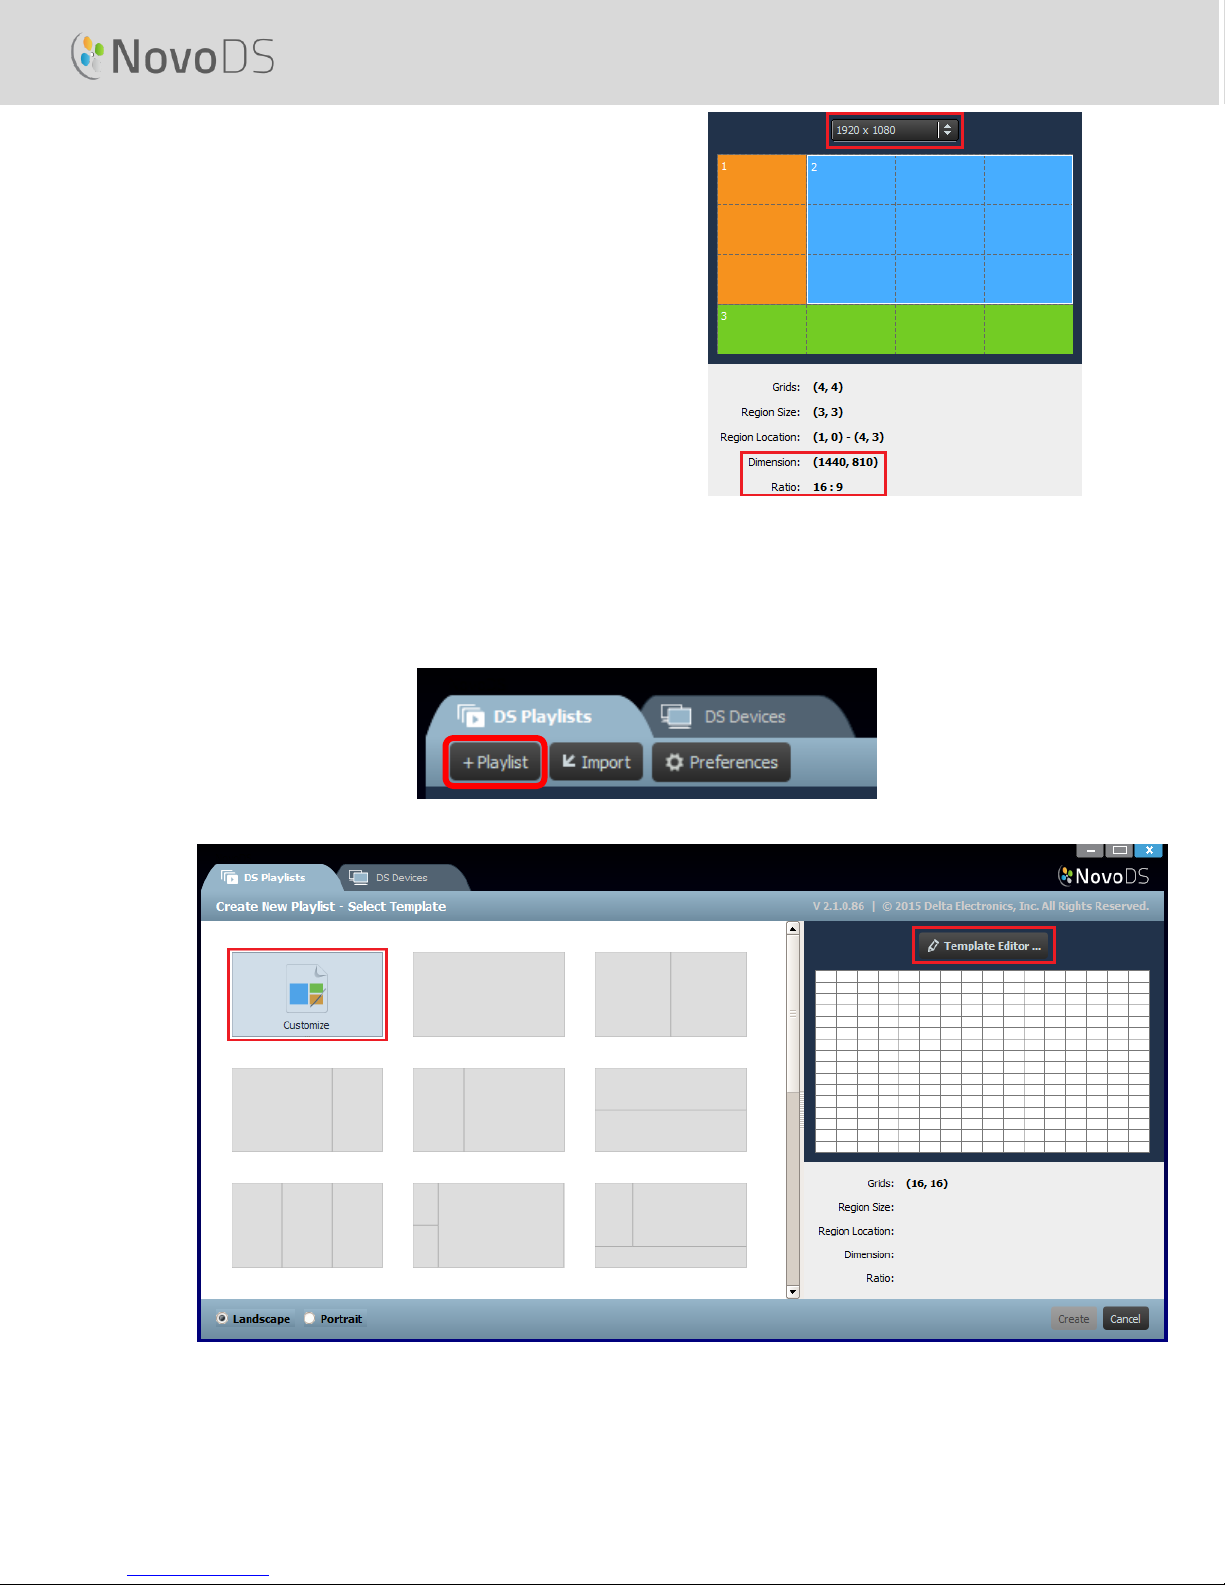
3.1 Terminology Definition
“Playlist” is the key concept in NovoDS software. Before we describe how to create a playlist, let’s
start with some terminology definitions.
Playlist: a multi-media content package designed to be played on NovoDS devices,
consisting of one or multiple pages.
Page: a screen layout that is filled with content.
Template: a screen layout that consists of one or multiple “regions”, and, can be applied to
any “page”.
Content: resources that can be placed in a “page”, including text, images, music/audio,
video, web pages, video streaming over IP, Twitter and RSS feeds, as well as weather, clock
and Google Calendar.
Attribute: mainly refers to associated playback characteristics such as duration, rendering
effect, etc.
The following figure illustrates their relationship.
Copyright © 2016 DELTA Electronics, Inc. All rights reserved. Page 12

User’s Manual
3.2 Creating a Playlist
3.2.1 Selecting a Template
NovoDS has 40 built-in templates in both landscape and portrait orientation.
a. To select a template, open the DS Playlists tab and select the +Playlist button from the Edit
Playlist screen. You will be given the option of creating a custom configuration or choosing
one of the 40 built-in templates.
b. Check ‘Landscape’ or ‘Portrait’ to match your screen orientation. Then select a template
from by clicking on the desired one.
a. Click on button “Create” to create this playlist.
b. Click on button “Cancel” to discard the playlist creation.
Copyright © 2016 DELTA Electronics, Inc. All rights reserved. Page 13
User’s Manual
On the right side of the window,
You can adjust display resolution
You can find out each region’s geometry by
mouse-over.
3.2.2 Creating a Custom Template
You also have the option of creating your own display configuration for your playlist.
a. Open the DS Playlists tab and select the +Playlist button from the Edit Playlist screen.
b. Click on “Customize” and then “Template Editor” to open an editor dialog.
c. The editor dialog shows a table grid, which will be used to defined regions within this
customized template. You can adjust its column and row numbers through the two spinners
Copyright © 2016 DELTA Electronics, Inc. All rights reserved. Page 14
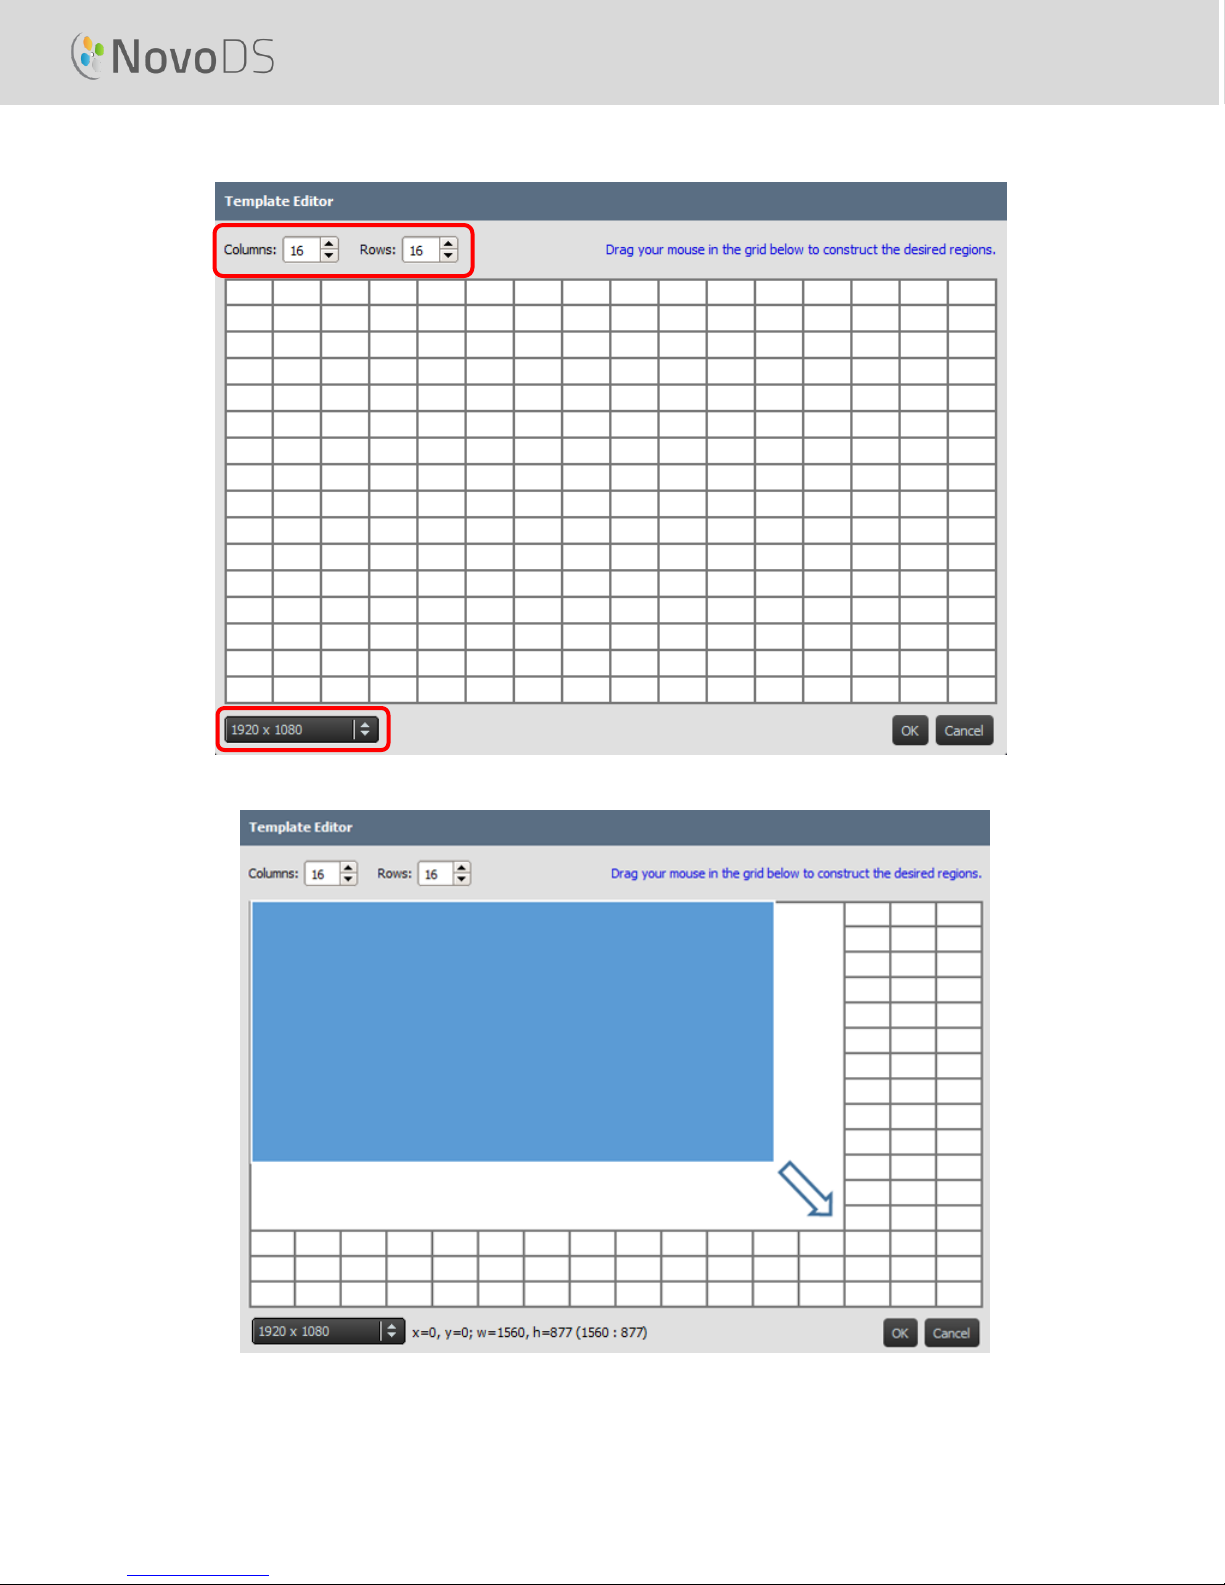
User’s Manual
at the top-left corner. You also can change your desired resolution at the bottom-left
corner.
d. Left-click your mouse and drag over grids to form the regions you desire.
Copyright © 2016 DELTA Electronics, Inc. All rights reserved. Page 15
 Loading...