

Page 1

22863 VOIP SET
1
“Webphone Set” Webcam
Users Guide
Bedienungsanleitung
Notice d'emploi
Instrucciones de uso
Istruzioni per l'uso
Gebruiksaanwijzing
Instruções de uso
Instrukcja obsługi
Brugermanualer
Bruksanvisning
EDV Nr. 22863
VOIP SET
Page 2

22863 VOIP SET
2
GB
Introduction
Thank you for purchasing the Vivanco webcam.
You have made an excellent choice by deciding in favour of this WebCam, giving you innovative
technology with unique benefits.
We grant a warranty of 2 years on this product. Please take a few minutes to read this instruction
manual carefully. It will help you to understand the different functions.
System Requirements
• 500 MHz processor or higher
• Free USB 1.1 port, compatible with USB 2.0
• Windows 98SE / ME / 2000 / XP / Vista
• CD ROM drive
• 24bit colour display adapter
Package Contents
• Webcam
• Quick installation guide
• CD including software and manual
Installation
1. Insert the software CD into the CD-ROM drive of your computer.
2. The installation program will run automatically. If the installation does not auto play, please run
“Setup.exe” from the CD-ROM’s root directory to install. Please follow the steps below to install.
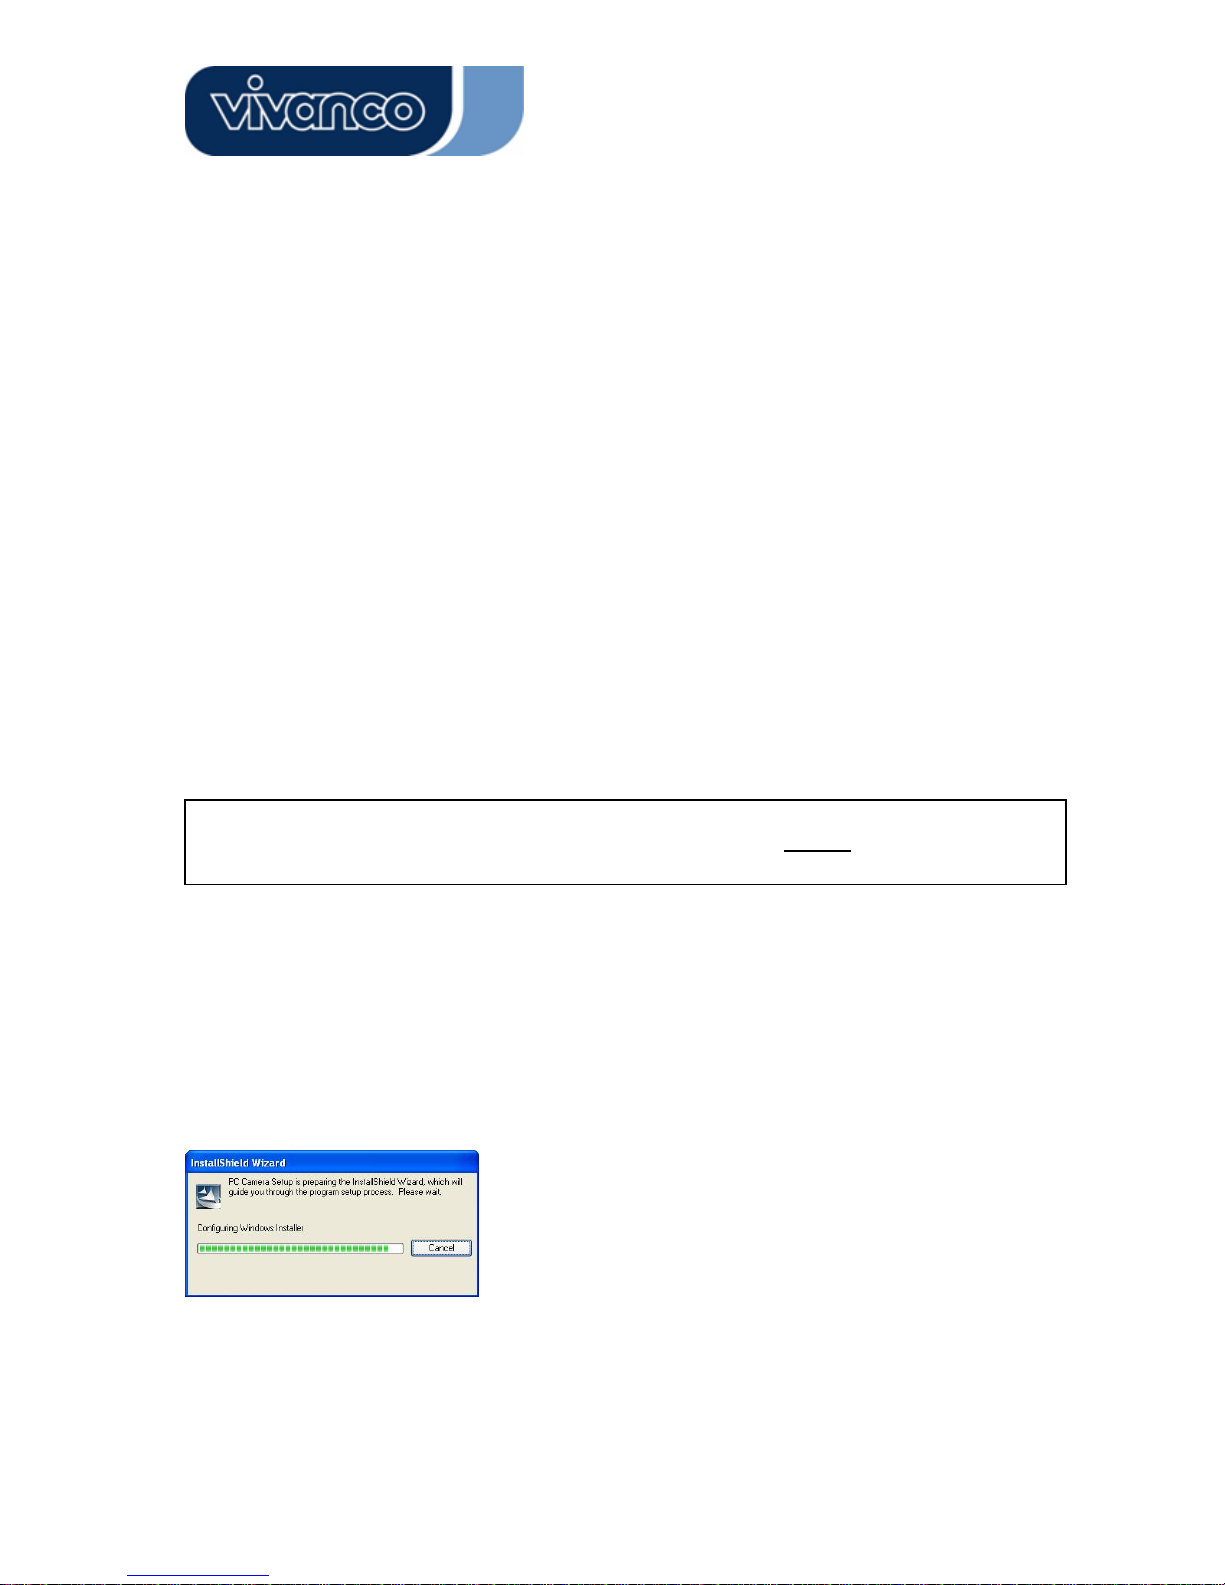
Software installation – Driver
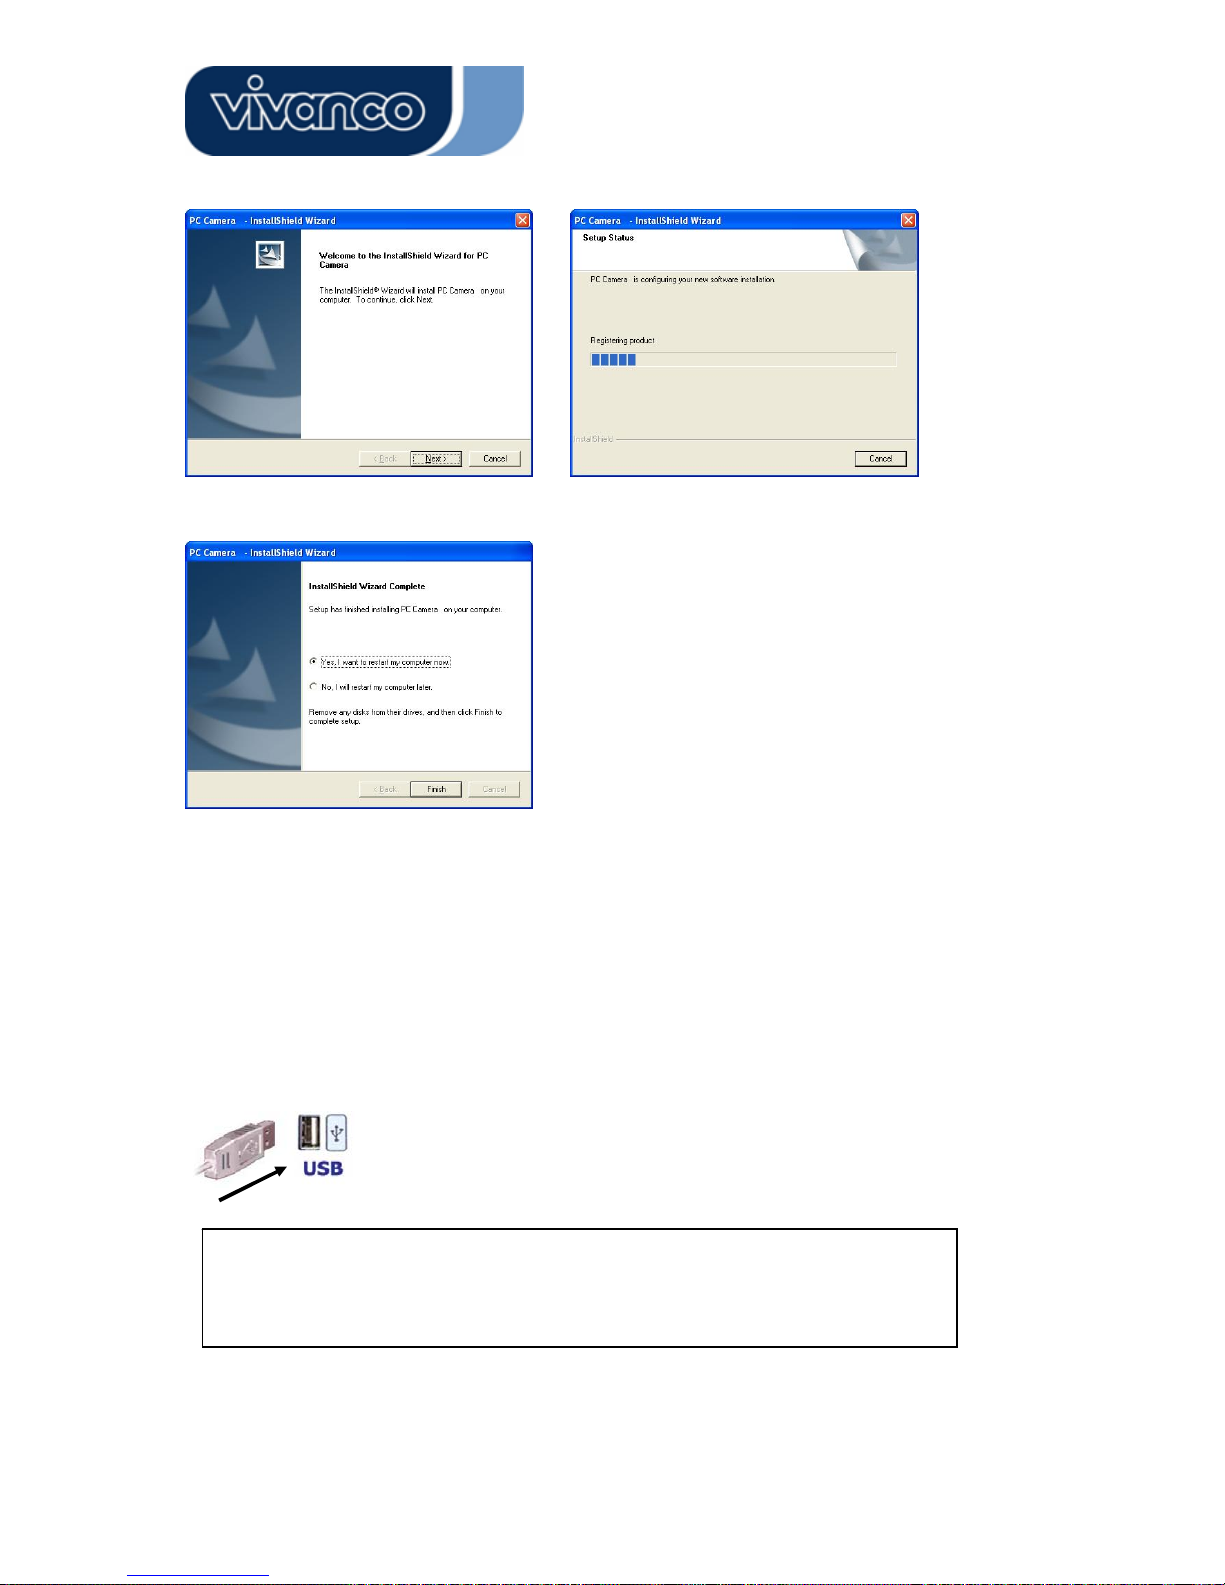
The InstallShield Wizard will run Webcam Driver setup.
Attention:
Make sure to install the software and driver BEFORE
plugging the camera into USB port.
Page 3

22863 VOIP SET
3
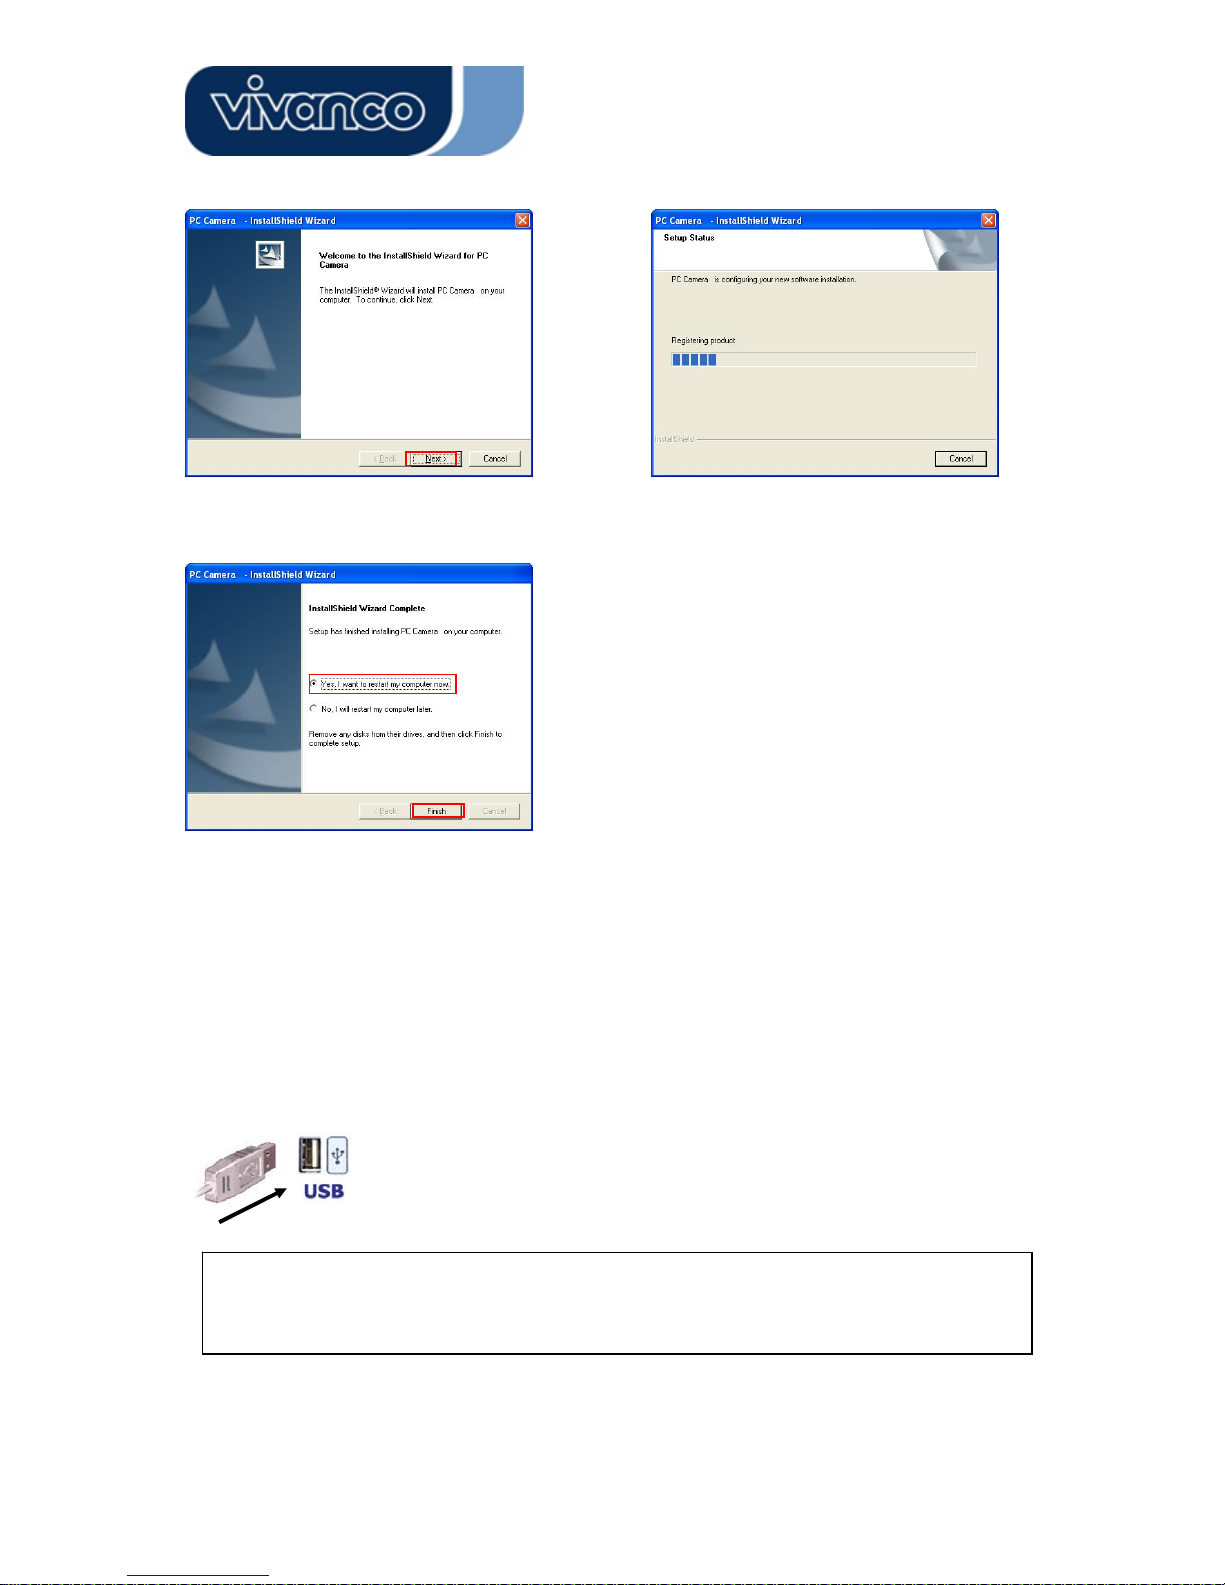
Click “Next” to continue.
Driver installation completed:
When Driver installation is completed, restart the PC, click “Finish”, then plug the Webcam into the
USB port.
Hardware installation
Webcam Connection
Plug the Webcam to the PC after you installed the software and drivers before. The Webcam’s LED
indicator will light up when it is successfully connected.
Attention:
If a dialog box pops up and requests to have the language setting file replaced after plugging
the camera into USB port, please simply click “Yes” to continue.
Page 4
22863 VOIP SET
4
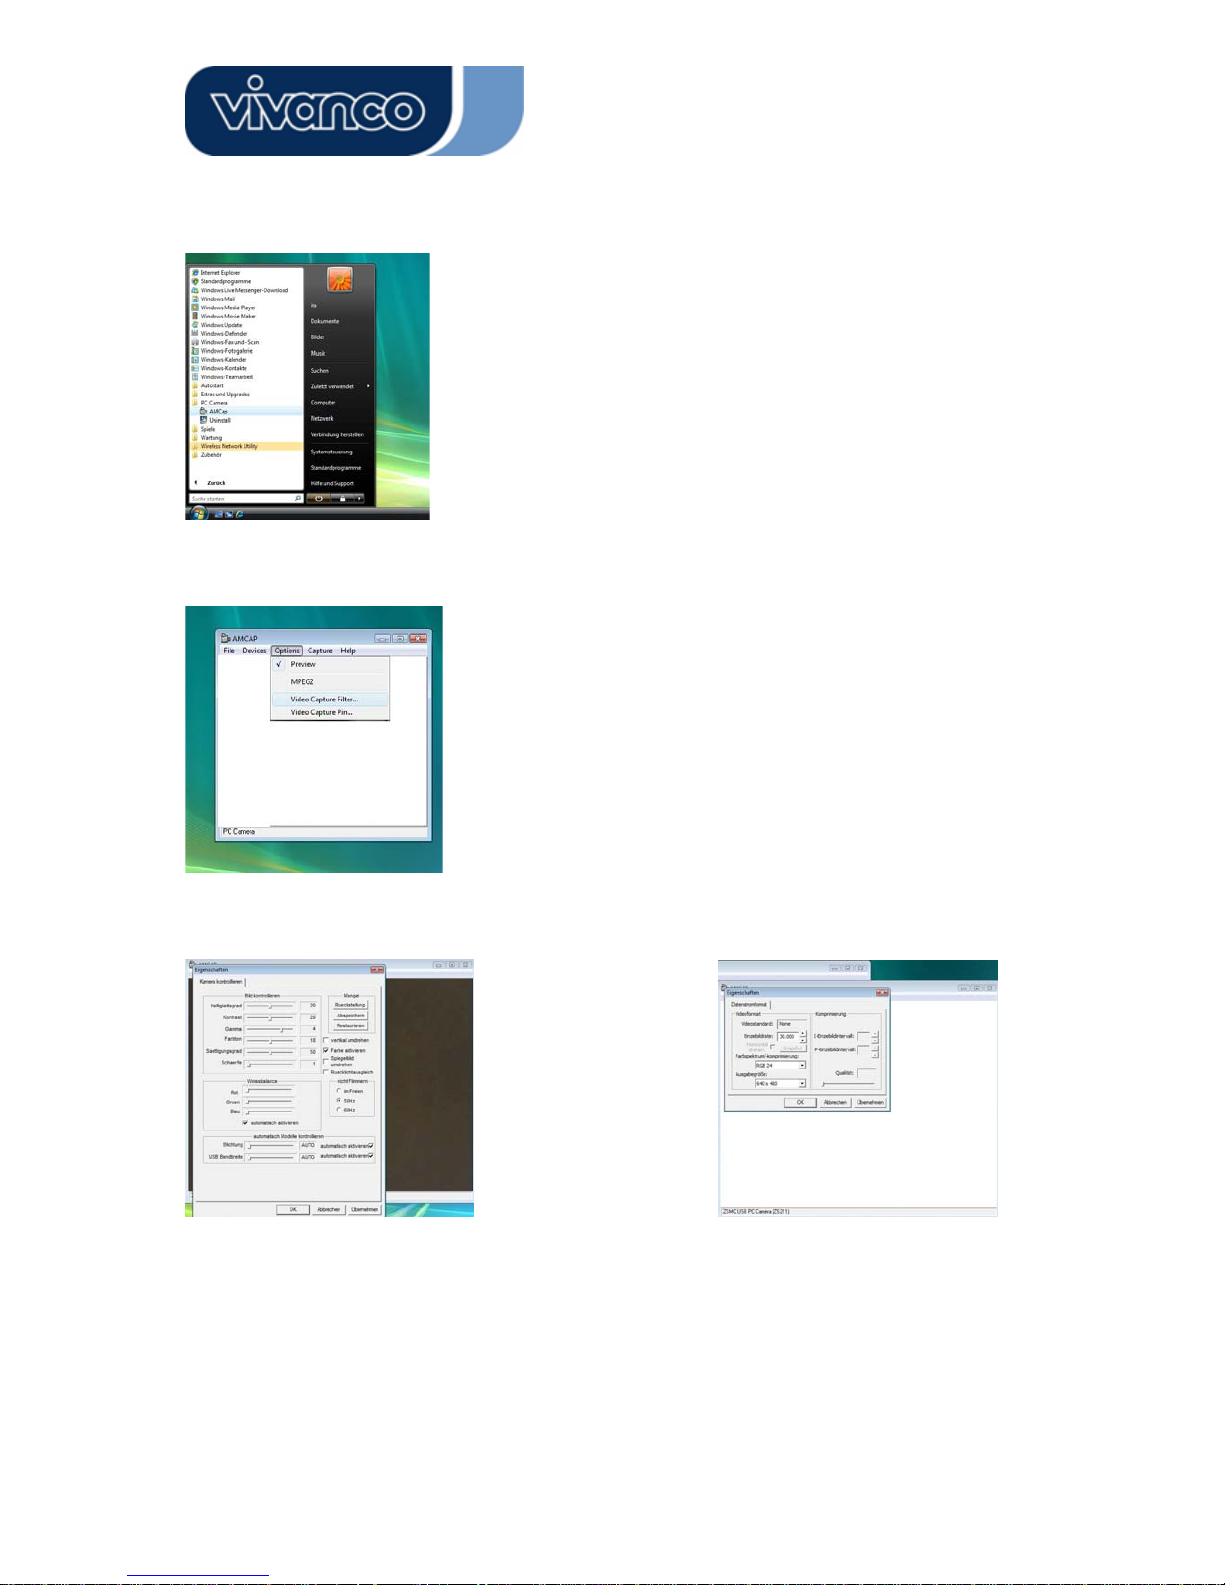
Adjusting camera settings:
Start AMCap software
Select Options
*Depends on your camera model
- Video Capture Filter
Depending on your webcam model you can
adjust your camera settings like
- Contrast
- Colour
- White balance
- Sharpness
- Optional settings* like Zoom or Facetracking
- Video Capture Pin
Depending on your webcam model you
can adjust the framerate settings and
resolution
Page 5
22863 VOIP SET
5
D
Einleitung
Vielen Dank für den Erwerb der Vivanco Webcam.
Mit der Entscheidung für diese, mit innovativer Technologie ausgestattete Webcam, die einzigartige
Vorzüge besitzt, haben Sie eine hervorragende Wahl getroffen. Wir gewähren Ihnen eine Garantie
von 2 Jahren auf dieses Produkt.
Bitte nehmen Sie sich ein paar Minuten Zeit, um dieses Handbuch aufmerksam zu lesen. Dies wird
Ihnen helfen, die verschiedenen Funktionen zu verstehen und zu beherrschen.
Systemvoraussetzungen
• 500 MHz Prozessor oder besser
• Freier USB 1.1 Anschluß, kompatibel mit USB 2.0
• Windows 98SE / ME / 2000 / XP / Vista
• CD ROM Laufwerk
• 24bit Grafikadapter
Packungsinhalt
• Webcam
• Schnellanleitung
• CD inclusive Software und Anleitung
Installation
1. Legen Sie die Software CD in das CD-ROM-Laufwerk Ihres Computers ein.
2. Das Installationsprogram startet automatisch. Falls bei Ihrem Computer die Autorun-Funktion
deaktiviert ist und das Programm daher nicht automatisch startet, führen Sie bitte „Setup.exe”
vom CD-ROM Stammverzeichnis direkt aus. Bitte folgen Sie den folgenden Schritten zur
Installation.
Software Installation – Treiber
Der Installations-Assistent startet die Treiberinstallation.
Achtung:
Bitte stellen Sie sicher, dass Sie die Software und Treiber installieren, BEVOR
Sie die Kamera mit
dem USB-Anschluß verbinden.
Page 6
22863 VOIP SET
6
Klicken Sie „Weiter”, um fortzufahren
Abschluss der Treiberinstallation:
Klicken Sie auf „Beenden“ und starten Sie den Computer neu. Verbinden Sie erst nach dem Neustart
die Webcam mit einem freien USB-Anschluss Ihres Computers.
Hardware Installation
Anschluß der Webcam:
Schließen Sie die Webcam erst an den Computer an, nachdem die Software und die Treiber zuvor
installiert wurden. Die LED der Webcam leuchtet, nach erfolgreicher Installation.
Achtung:
Falls nach dem Anschluss der Webcam eine Dialogbox erscheint und Sie auffordert die
Sprachdateien zu ersetzen, bestätigen Sie dieses mit „Ja”, um dann fortzufahren.
Page 7
22863 VOIP SET
7
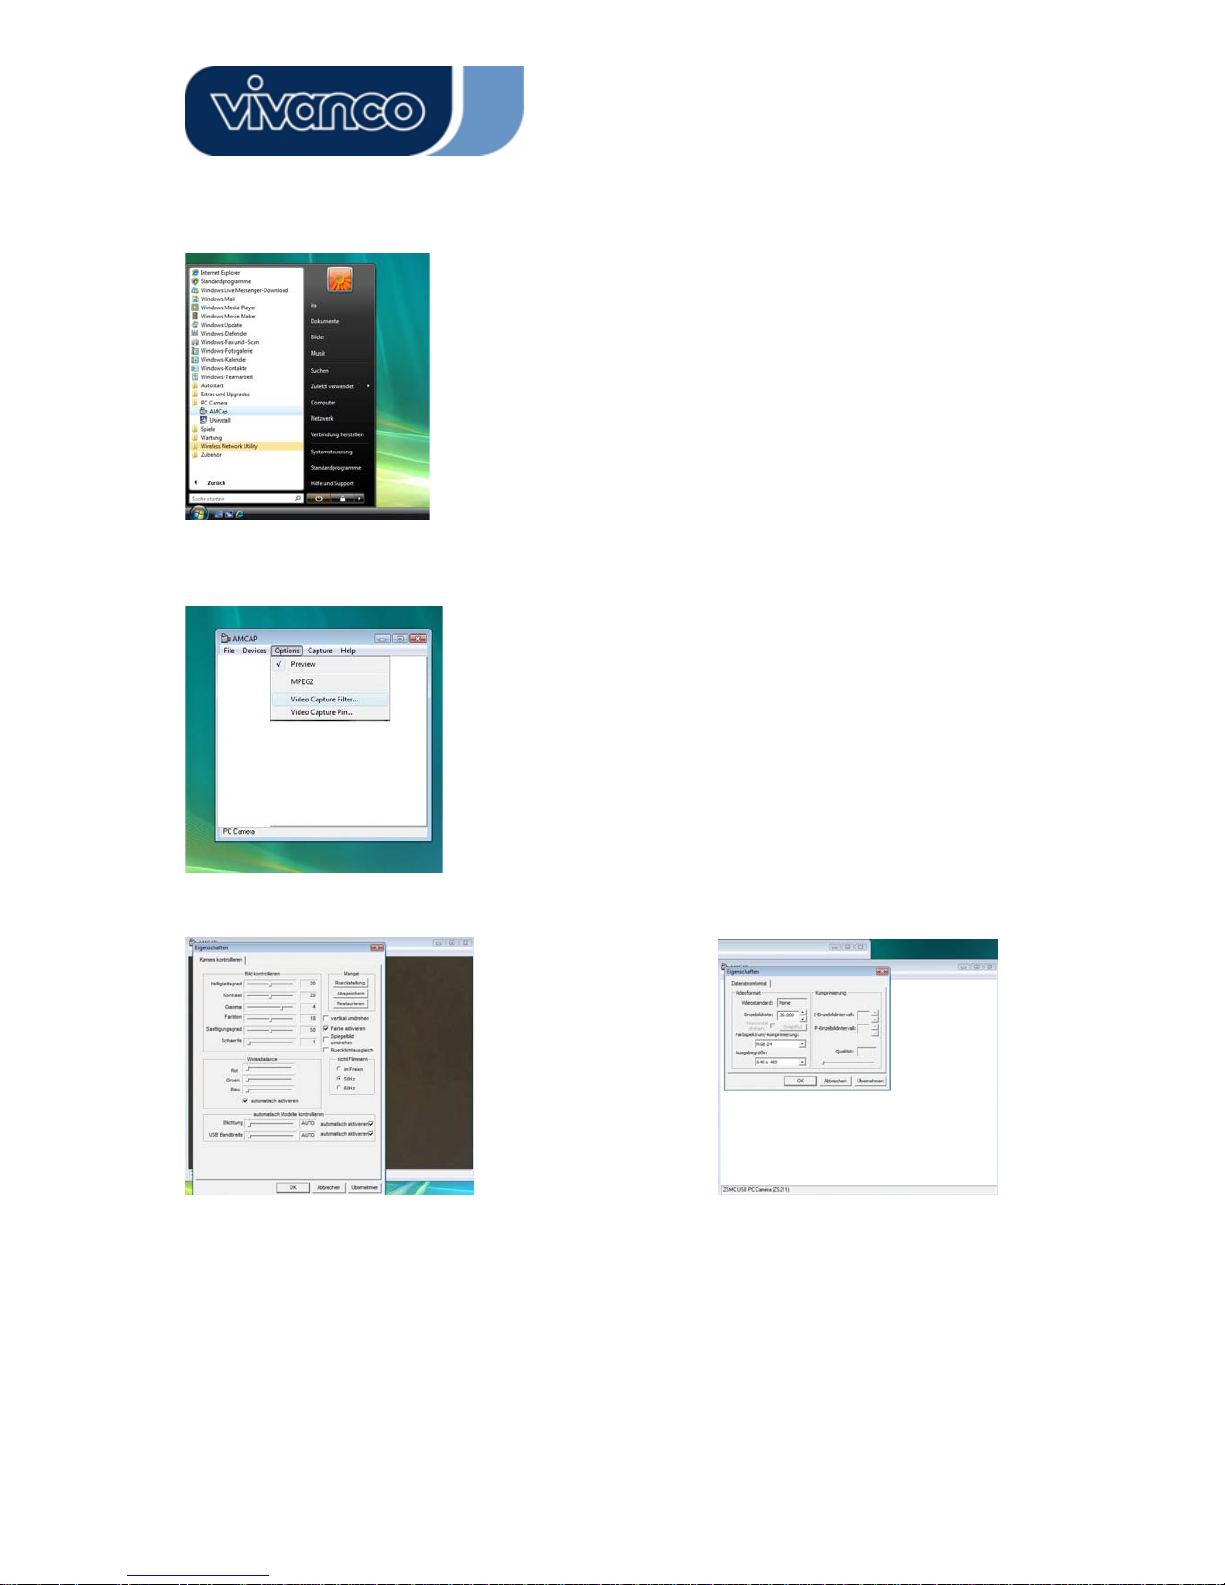
Softwareeinstellungen der Kamera:
Starten Sie die AMCap Software
Wählen Sie Options – Video Capture Filter
*Abhängig von Ihrem Kameramodell
- Video Capture Filter
Je nach Ihrem vorhandenen Kameramodell können
Sie hier die Einstellungen Ihrer Webcam
vornehmen. Z.B.:
- Kontrast
- Farbe
- Weißabgleich
- Schärfe
- Optionale Einstellungen* wie Zoom oder
Facetracking
- Video Capture Pin
Hier lassen sich je nach Unterstützung
durch Ihre Kamera die Einstellugene zur
Bildrate und der Auflösung vornehmen.
Page 8

22863 VOIP SET
8
F
Introduction
Merci d’avoir acheté la webcaméra Vivanco.
Vous avez fait là un choix judicieux en choisissant cette webcaméra qui présente une technologie
innovatrice et des avantages uniques.
Nous accordons une garantie de 2 ans sur cet appareil. Veuillez prendre quelques minutes pour lire
cette notice d’emploi attentivement. Cela vous permettra d’en comprendre les différentes fonctions.
Exigences du système
• Processeur 500 MHz ou plus
• Port USB 1.1 libre, compatible avec USB 2.0
• Windows 98SE/ME/2000 /XP/Vista
• Lecteur de CD-ROM
• Adaptateur écran couleur 24 bits
Contenu
• Webcaméra
• Guide d’installation rapide
• CD comprenant logiciel et manuel
Installation
1. Insérez le CD dans le lecteur de CD-ROM de votre ordinateur.
2. L’installation du programme s’effectue automatiquement. Si l’installation n’est pas lancée
automatiquement, veuillez exécuter « Setup.exe » à partir du répertoire racine du CD-ROM pour
installer. Veuillez suivre les étapes suivantes pour l’installation.
Installation du logiciel - pilote
L’assistant d’installation démarre l’installation des pilotes.
Attention :
Assurez-vous d’installer le logiciel et le pilote AVANT
de raccorder la caméra au port
USB !
Page 9
22863 VOIP SET
9
Cliquez « Continuer... ».
Installation du pilote complétée :
Lorsque l’installation du pilote est complétée, redémarrez votre ordinateur, cliquez « Terminer », puis
connectez la webcaméra.
Installation du matériel
Connexion de la webcaméra
Connectez la webcaméra à l’ordinateur après avoir installé le logiciel et le pilote. Le voyant DEL de la
webcaméra s’allume lorsqu’il est connecté avec succès.
Attention :
Si, après avoir connecté la webcaméra, une boîte de dialogue apparaît et vous
demande de remplacer les fichiers de langue, confirmez avec « oui » pour continuer.
Page 10

22863 VOIP SET
10
Réglages du logiciel de la caméra :
Lancez le logiciel AMCap
Sélectionnez les options - Video Capture Filter
*En fonction du modèle de votre caméra
- Filtre de capture vidéo (Video Capture Filter)
En fonction du modèle de votre caméra, vous
pouvez effectuer ici des réglages pour votre
webcam, comme par ex. :
- le contraste
- la couleur
- la balance des blancs
- la netteté
- des réglages optionnels* comme le zoom ou le
suivi du visage (« Facetracking »)
- Propriétés de capture vidéo (Video
Capture Pin)
Vous pouvez régler ici le nombre
d’images par seconde et la résolution en
fonction des caractéristiques de votre
caméra.
Page 11

22863 VOIP SET
11
E
Introducción
Le estamos muy agradecidos por haber adquirido la cámara web Vivanco.
Al elegir esta cámara web con tecnología innovadora y ventajas únicas en su género, ha tomado una
decisión excelente. Le ofrecemos una garantía de 2 años en este producto.
Le rogamos que emplee unos minutos para leer atentamente este manual. Le ayudará a comprender
y manejar con soltura las diversas funciones.
Requisitos del sistema
• Procesador de 500 MHz o superior
• Conexión USB 1.1 libre, compatible con USB 2.0
• Windows 98SE / ME / 2000 / XP / Vista
• Unidad de CD ROM
• Adaptador gráfico de 24 bit
Contenido del paquete
• Cámara web
• Guía rápida
• CD con software e instrucciones
Instalación
1. Introduzca el CD en la unidad de CD ROM de su ordenador.
2. El programa de instalación arrancará automáticamente. En caso de que su ordenador tenga
desactivada la función autorun (ejecución automática), y debido a ello no se inicie el programa
automáticamente, ejecute directamente “Setup.exe” en el directorio raíz del CD-ROM Para la
instalación ha de llevar a cabo los siguientes pasos.
Instalación del software - Controladores
El asistente de la instalación inicia la instalación del controlador.
Atención:
Por favor, asegúrese de haber instalado el software y los controladores ANTES
de conectar la
cámara a la toma USB.
Page 12

22863 VOIP SET
12
Para continuar, haga clic en “seguir”
Finalización de la instalación de los controladores:
Haga clic en “finalizar” y reinicie el ordenador. Una vez reiniciado el sistema, y sólo entonces, conecte
la cámara web a una conexión USB libre de su ordenador.
Instalación del hardware
Conexión de la cámara web:
No conecte la cámara web al ordenador hasta que estén instalados el software y los controladores. El
LED de la cámara web se ilumina una vez ha finalizado con éxito la instalación.
Atención:
En caso de que aparezca una ventana de diálogo tras la conexión de la cámara y se le pida
que sustituta los archivos de idioma, confírmelo con “sí” y continúe.
Page 13

22863 VOIP SET
13
El asistente de la instalación inicia la instalación del controlador.
Inicie el software AMCap
Seleccione Options – Video Capture Filter
*Depende de su modelo de cámara
- Filtro de captura de vídeo
Dependiendo del modelo que haya obtenido, aquí
podrá configurar ajustes en su cámara web, por
ejemplo:
- Contraste
- Color
- Balance de blancos
- Nitidez
- Configuraciones opcionales*, como zoom o
seguimiento de cara (facetracking)
- Pin de captura de vídeo
- Aquí podrá configurar, con ayuda de la
cámara, la frecuencia de imágenes y la
resolución.
Page 14

22863 VOIP SET
14
I
Introduzione
Grazie per avere acquistato questa webcam Vivanco.
La webcam 23478 PROCAM è un’ottima scelta. Questo apparecchio, infatti, è dotato di caratteristiche
tecniche innovative e offre vantaggi straordinari. Su questo prodotto viene riconosciuta una garanzia
di 2 anni.
Dedicate qualche minuto alla lettura di questo manuale. In questo modo comprenderete le varie
funzioni dell'apparecchio e sarete in grado di utilizzarle senza problemi.
Requisiti di sistema
• Processore 500 MHz o più potente
• Porta USB 1.1 libera, compatibile con USB 2.0
• Windows 98SE / ME / 2000 / XP / Vista
• Unità CD-ROM
• Adattatore grafico 24 bit
Contenuto della confezione
• Webcam
• Guida rapida
• CD comprendente software e istruzioni d'uso
Installazione
1. Inserire il CD nell'unità CD-ROM del computer.
2. Il programma di installazione si avvia automaticamente. Se la funzione autorun del computer è
stata disattivata e quindi non avviene l'avvio automatico, basta selezionare il comando
"Setup.exe” nella directory del CD-ROM. Per l'installazione eseguire le seguenti operazioni.
Installazione driver
L'assistente all'installazione avvia l'installazione del driver.
Attenzione:
Installare software e driver, PRIMA
di collegare la webcam alla porta USB.
Page 15

22863 VOIP SET
15
Fare clic su "Avanti” per proseguire.
Conclusione dell'installazione del driver
Fare clic su "Finito“ e riavviare il computer. Dopo il riavvio collegare la webcam con una porta USB
libera del computer.
Installazione hardware
Collegamento della webcam:
Collegare la webcam al computer solo dopo aver installato il software e il driver. Il LED della webcam
si illumina dopo l'avvenuta installazione.
Attenzione:
Se dopo il collegamento della webcam al computer, compare una finestra di dialogo che chiede
di sostituire i file vocali, fare clic su "Sì” per confermare e proseguire.
Page 16

22863 VOIP SET
16
Impostazioni software della videocamera:
Avviare il software AMCap.
Selezionare l’opzione Video Capture Filter.
*In funzione del modello di videocamera
- Video Capture Filter
Per effettuare le impostazioni della webcam in
funzione del modello di videocamera. Es.:
- contrasto
- colore
- bilanciamento del bianco
- definizione
- impostazioni opzionali* come zoom o facetracking
- Video Capture Pin
Per impostare la velocità di trasmissione
delle immagini e la risoluzione nella
misura in cui tali funzioni sono supportate
dalla videocamera.
Page 17

22863 VOIP SET
17
NL
INLEIDING
Dank u voor de aankoop van de webcam van Vivanco.
U hebt een uitstekende keuze gemaakt door voor deze WebCam te kiezen die u een innovatieve
technologie met unieke voordelen biedt.
Wij garanderen dit product gedurende 2 jaar. Neem een paar minuten de tijd om deze handleiding
zorgvuldig te lezen. Hierdoor leert u de verschillende functies kennen.
Systeemeisen
• 500 MHz processor of hoger
• Vrije USB 1.1 poort, compatibel met USB 2.0
• Windows 98SE / ME / 2000 / XP / Vista
• Cd-com-station
• 24 bits videokaart
Inhoud verpakking
• Webcam
• Gids voor snelle installatie
• CD met software en handleiding
Installatie
1. Leg de cd in het cd-rom-station van uw computer.
2. Het installatieprogramma start automatisch. Als het installatieprogramma niet automatisch start,
start u 'Setup.exe' in de basismap van de cd-rom om de installatie te starten. Volg de
onderstaande stappen om de installatie af te ronden.
Installatie software - stuurprogramma
De installatieassistent start de installatie van het stuurprogramma.
Let op:
Installeer EERST
de software en het stuurprogramma voordat u de camera op de USB-poort aansluit.
Page 18

22863 VOIP SET
18
Klik op 'Volgende' om door te gaan.
Installatie van het stuurprogramma is voltooid:
Herstart de pc nadat het stuurprogramma is geïnstalleerd, klik op "Voltooien" en sluit de Webcam aan.
Installatie hardware
De Webcam aansluiten
Sluit de Webcam op de pc aan nadat u de software en stuurprogramma's hebt geïnstalleerd. De LEDindicator van de webcam licht op als de aansluiting is geslaagd.
Let op:
Als een dialoogvenster verschijnt met de vraag om het bestand met taalinstellingen te
vervangen nadat u de camera op de USB-
p
oort hebt aangesloten, klikt u op "Ja" om door te
gaa
n.
Page 19

22863 VOIP SET
19
Software-instellingen van de camera:
Start het programma AMCap
Selecteer Opties – Video Capture Filter
* Afhankelijk van uw cameramodel
- Video Capture Filter
Afhankelijk van het cameramodel dat u heeft, kunt
u hier de instellingen voor uw webcam verrichten.
Bijv.:
- Contrast
- Kleur
- Witbalans
- Scherpte
- Optionele instellingen* zoals zoom of facetracking
- Video Capture Pin
Hier kun afhankelijk van de
ondersteuning door uw camera de
instellingen voor beeldsnelheid en
resolutie verricht worden.
Page 20

22863 VOIP SET
20
P
Introdução
Muito obrigado por ter adquirido a Webcam Vivanco.
A sua decisão por esta Webcam com qualidades extraordinárias, equipada com uma tecnologia
inovadora, é uma escolha excelente. Nós concedemos uma garantia de 2 anos sobre este produto.
Por favor tome alguns minutos de tempo para ler atentamente este manual, o que o ajudará a
compreender e dominar as diversas funções.
Pré-requisitos do sistema
• Processador de 500 MHz ou mais
• Porta USB 1.1 livre, compatível com USB 2.0
• Windows 98SE / ME / 2000 / XP / Vista
• Unidade de CD-ROM
• Adaptador gráfico 24 bit
Conteúdo da embalagem
• Webcam
• Manual breve
• CD inclusive software e manual
Instalação
1. Insira o CD na unidade de CD-ROM do seu computador.
2. O programa de instalação é iniciado automaticamente. Se a função de Autorun estiver
desactivada no seu computador e o programa não iniciar automaticamente por causa disso, por
favor execute “Setup.exe” directamente a partir do directório de raiz do CD-ROM. Por favor siga
os seguintes passos para proceder à instalação.
Instalação do software – driver
O assistente de instalação inicia a instalação do controlador.
Atenção:
Por favor assegure-se de que instala o software e o driver ANTES
de ligar a câmara à porta USB.
Page 21

22863 VOIP SET
21
Clique em “Continuar” para prosseguir
Concluir a instalação do driver:
Clique em “Concluir” e reinicie o computador. Ligue a Webcam a uma porta USB livre do seu
computador só após o reinício.
Instalação do hardware
Ligação da Webcam:
Ligue a Webcam ao computador só depois de o software e o driver terem sido instalados. O LED da
Webcam acende após uma instalação bem sucedida.
Atenção:
Se a seguir à ligação da Webcam aparecer uma caixa de diálogo e lhe for solicitado que
substitua os ficheiros de língua, confirme a mensagem com “Sim” para prosseguir.
Page 22

22863 VOIP SET
22
Ajustes de software da câmara:
Inicie o software AMCap
Seleccione Options – Video Capture Filter
*Consoante o modelo da sua câmara
- Filtro de captação de vídeo
Consoante o seu modelo de câmara existente,
pode efectuar aqui os ajustes da sua webcam, p.
ex.,:
- Contraste
- Cor
- Balanço de cores
- Nitidez
- Ajustes opcionais*, tais como o zoom ou Face
Tracking
- Pin de captação de vídeo
Neste caso, consoante o apoio da sua
câmara, é possível efectuar os ajustes
relativos à frequência de imagens e à
resolu
ç
ão.
Page 23

22863 VOIP SET
23
PL
Wstęp
Dziękujemy za zakup kamery internetowej Vivanco.
Decydując się na nią dokonali Państwo wyboru innowacyjnej technologii wyposażenia kamery
internetowej posiadającej niepowtarzalne zalety. Zapewniamy Państwu 2-letnią gwarancję na nasz
produkt.
Prosimy poświecić parę minut czasu na uważne przeczytanie tej instrukcji. Pomoże ona Państwu
zrozumienie i opanowanie różnych funkcji swej nowej kamery.
Warunki wstępne wobec systemu
• Procesor 500 MHz lub lepszy
• Wolne przyłącze USB, kompatybilne z USB 2.0
• Windows 98SE / ME / 2000 / XP / Vista
• Napęd CD ROM
• Przystawka grafiki 24bit
Zawartość opakowania
• Kamera internetowa
• Szybka instrukcja
• CD wraz z oprogramowaniem i instrukcją
Instalowanie
1. Włożyć płytę CD z oprogramowaniem do napędu swego komputera.
2. Program instalujący uruchamia się automatycznie. Jeśli w Państwa komputerze funkcja Autorun
jest zdezaktywowana, a wię
c program automatycznie nie wystartuje, prosimy bezpośrednio
wprowadzić „Setup.exe” ze oryginalnego katalogu CD-ROM. Prosimy postępować zgodnie z
podanymi tu krokami działania mających na celu zainstalowanie.
Instalowanie oprogramowania - napęd
Asystent instalacji rozpoczyna instalację sterowników.
Uwaga:
Prosimy zapewnić, aby zainstalować oprogramowanie i napęd ZANIM podłączą Państwo kamerę do
przyłącza USB.
Page 24

22863 VOIP SET
24
Kliknąć na „dalej“, celem kontynuacji
Zakończenie instalowania napędu:
Kliknąć na „zakończ“ i uruchomić ponownie komputer. Dopiero po ponownym uruchomieniu połączyć
kamerę z wolnym przyłączem USB swego komputera.
Instalowanie osprzętu
Przyłącze kamery internetowej:
Podłączyć kamerę do komputera dopiero wtedy, gdy uprzednio zainstalowane zostało
oprogramowanie i napęd. Po prawidłowym zainstalowaniu zapalą się diody kamery.
Uwaga:
Jeśli po podłączeniu kamery internetowej pokaże się okno dialogowe i trzeba będzie zmienić
pliki językowe to prosimy potwierdzić to poprzez „Tak“ i kontynuować czynności.
Page 25

22863 VOIP SET
25
Ustawienia programowe kamery:
Uruchomić oprogramowanie AMCap
Wybrać opcje filtra przechwytywania wideo – Video Capture Filter
*W zależności od posiadanego modelu kamery.
- Video Capture Filter
W zależności od posiadanego modelu kamery
internetowej, można tu skonfigurować jej
ustawienia. Np.:
- Kontrast
- Kolor
- Balans bieli
- Ostrość
- Ustawienia opcjonalne*, takie jak Przybliżenie lub
Facetracking (Śledzenie twarzy)
Video Capture Pin
W zależności od posiadanego modelu
kamery, można tu zmienić częstotliwość
obrazu i rozdzielczość.
Page 26

22863 VOIP SET
26
DK
Indledning
Mange tak for købet af et Vivanco webcam.
Med beslutningen for dette, med innovativ teknologi udstyrede webcam, der har enestående fortrin,
har du truffet et fremragende valg. På dette produkt yder vi en garanti på 2 år.
Brug et par minutter på at læse denne håndbog grundigt igennem. Det vil hjælpe dig med at forstå og
beherske de forskellige funktioner.
Systemforudsætninger
• 500 MHz processor eller bedre
• Fri USB 1.1 tilslutning, kompatibel med USB 2.0
• Windows 98/ME/2000/XP
• CD ROM drev
• 24bit grafikadapter
Pakkeindhold
• Webcam
• Hurtigvejledning
• CD inklusiv software og vejledning
Installation
1. Læg software CD'en i CD-ROM-drevet på din computer.
2. Installationsprogrammet starter automatisk. Skulle autorun-funktionen være deaktiveret på din
computer og skulle programmet derfor ikke starte automatisk, skal du udføre „Setup.exe” direkte
fra CD-ROM stamregisteret. Følg de efterfølgende installationspunkter.
Software installation – driver
Installationsguiden starter driverinstallationen.
OBS:
Vær sikker på, at du har installeret software og driver, INDEN
du tilslutter kameraet til USB-
tilslutningen.
Page 27

22863 VOIP SET
27
Klik på „Videre”, for at forsætte
Afslutning af driverinstallation:
Klik på „Afslut“ og start computeren igen. Tilslut først webcamen til den frie USB-tilslutning på din
computer efter genstarten.
Hardware installation
Tilslutning af webcam:
Tilslut først webcamen til computeren, når du forinden har installeret software og driver. Efter vellykket
installation, lyser LED lampen på webcamen.
OBS:
Hvis der efter tlslutning af webcamen skulle blive vist en dialogboks og opfordrer dig til at
erstatte sprogfilerne, skal du bekræfte dette med „Ja”, for at forsætte.
Page 28

22863 VOIP SET
28
Softwareindstillinger på kameraet:
Start AMCap softwaren
Vælg option – Video Capture Filter
*Afhængigt af kameramodellen
- Videooptagelsesfilter
Her kan du afhængigt af kameramodellen foretage
indstillingerne for dit webcam. f.eks.:
- Kontrast
- Farve
- Hvidjustering
- Skarphed
- Valgfri indstillinger* såsom Zoom eller
Ansigtssporing
- Videooptagelsespin
Her kan du afhængigt af understøttelsen
på dit kamera foretage indstillinger for
billedhastighed og opløsning.
Page 29

22863 VOIP SET
29
SE
Introduktion
Tach för ditt köp av Vivanco Webcam.
Med ditt köp av denna webcam med innovativ teknik och unika fördelar har du träffat ett utmärkt val. Vi
beviljar en garanti på 2 år för denna produkt.
Ge dig lite tid att läsa genom denna manual noga. Manualen hjälper dig att förstå och behärska de
olika funktionerna.
Systemförutsättningar
• 500 MHz processor eller större
• Fri USB 1.1 anslutning, kompatibel med USB 2.0
• Windows 98SE / ME / 2000 / XP / Vista
• CD-ROM-enhet
• 24bit grafikadapter
Innehåll i förpackning
• Webcam
• Snabbinstruktion
• CD inklusive programvara och anvisningar
Installation
1. Lägg i Software CD:n i CD-ROM-enheten på din dator.
2. Installationsprogrammet startar automatiskt. Om Autorun-funktionen i din dator är avaktiverad
och programmet därför inte startar automatiskt ska du köra ”Setup.exe” direkt från din CD-ROM
huvudkatalog. För installationen utför du följande steg.
Programvaruinstallation - Drivrutin
Installationsassistenten startar installationen av drivrutinerna.
Obs!
Se till att du installerar programvara och drivrutiner, innan
du ansluter kameran med USB-
anslutningen.
Page 30

22863 VOIP SET
30
Klicka på ”Fortsätt“ för att gå vidare
Avsluta installationen av drivrutinen:
Klicka på ”Fortsätt“ och starta datorn på nytt. Efter återstarten kan du ansluta din webcam till en fri
USB-anslutning på din dator.
Installation av hårdvara
Anslutning av din webcam:
Anslut din webcam först till datorn när programvaran och drivrutinerna har färdiginstallerats. Webcamkamerans LED-lampa tänds efter slutförd installation.
Observera:
Om efter anslutning av webcam-kameran en dialogruta visas som meddelar att du ska byta
språkfil bekräftar du detta med ”Ja” för att sedan fortsätta.
Page 31

22863 VOIP SET
31
Kamerans programinställningar:
Starta AMCap programvaran
Välj Options – Video Capture Filter
*Beroende på kameramodellen
- Video Capture filter
Beroende på vilken kameramodell du har kan du
här ställa in din webcam. Till exempel:
- Kontrast
- Färg
- Ljusstyrka
- Kontrast
- Andra tillvalsinställningar*, såsom Zoom eller
Facetracking
- Video Capture Pin
Beroende på om funktionerna stöds av
din kamera kan bildhastigheten och
upplösningen ställas in här.
Page 32

22863 VOIP SET
32
Disclaimer
Information in this document is subject to change without notice. The manufacturer does not make any
representations or warranties (implied or otherwise) regarding the accuracy and completeness of this
document and shall in no event be liable for any loss of profit or any commercial damages, including
but not limited to special, incidental, consequential, or other damages. No part of this document may
be reproduced or transmitted in any form, electronic or mechanical, by any means, including
photocopying, recording or information recording and retrieval systems without the expressed written
permission of the manufacturer. All brand names and product names mentioned in this document are
trademarks, or registered trademarks of their respective holders.
 Loading...