

Page 1

ENGLISH
www.vitek-aus.com
INSTRUCTION MANUAL
RADIO CASSETTE RECORDER
WITH CD/MP3 PLAYER
MODEL VT-3960 BK
UZ
4
14
25
36
48
3960IM.indd 1 12.10.2007 15:50:36
Page 2
Pic. 1
3960IM.indd 2 12.10.2007 15:50:36
Page 3
Pic. 2
3960IM.indd 3 12.10.2007 15:50:36
Page 4
ENGLISH
CD/MP3 player with radio VT-3960BK
INSTRUCTION MANUAL
Please read these instructions carefully before connecting, operating or adjusting the appliance.
Follow all warnings and operating recommendations in this manual.
Keep this manual for future reference.
ATTENTION!
Risk of electric shock!
DO NOT OPEN!
Warning: To prevent fire or shock hazard do not expose the appliance to rain or moisture.
To prevent shock hazard do not remove the cover yourself.
Apply to a service centre for repair and maintenance.
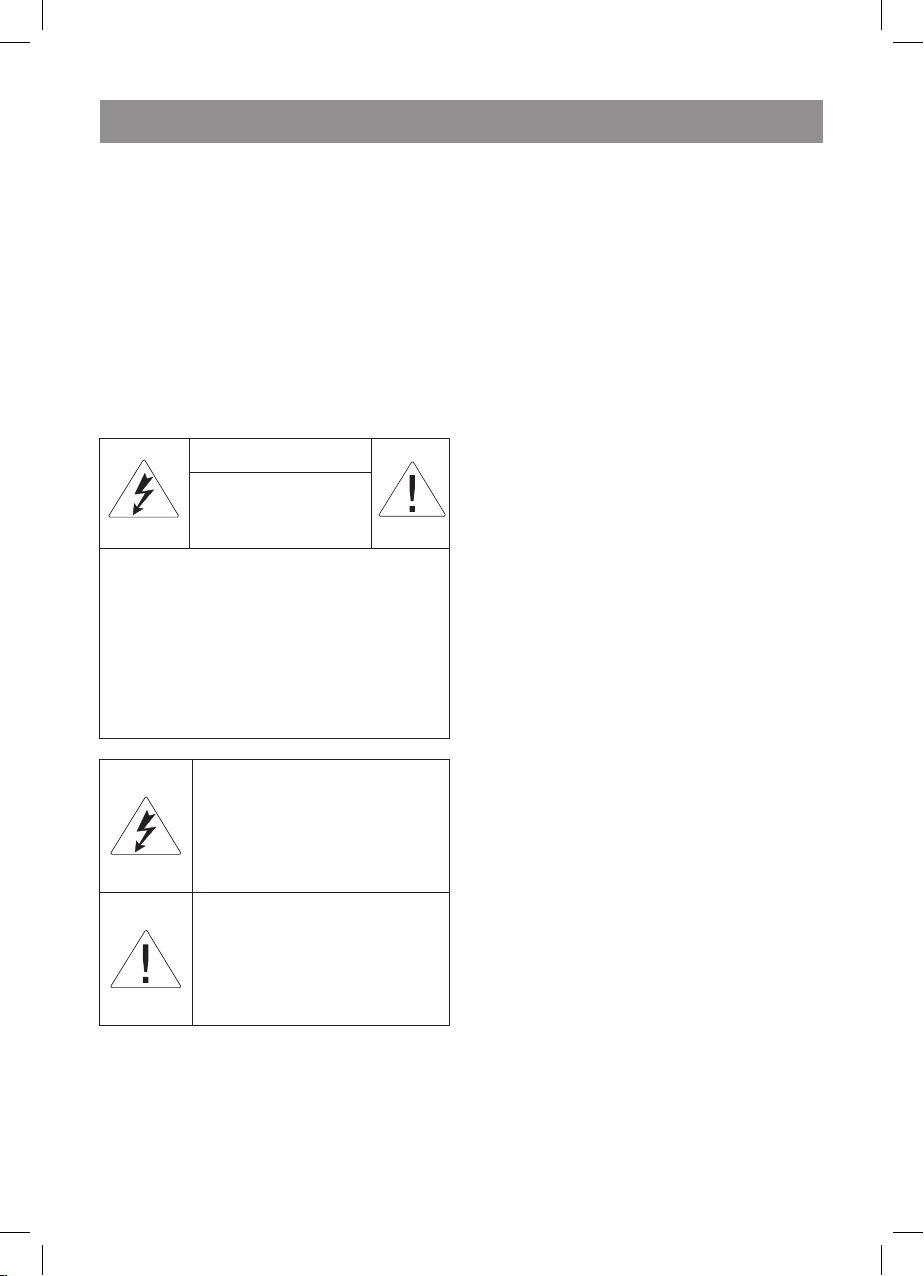
This lightning flash with arrowhead symbol, within an equilateral triangle, is
intended to alert the user to the presence of uninsulated “dangerous voltage”
within the product’s enclosure that may be of sufficient magnitude to constitute
a risk of electric shock to human beings.
The exclamation point within an equilateral triangle is intended to alert the user
to the presence of important operating and maintenance (servicing) instructions in the manual accompanying the appliance.
CLASS 1 LASER PRODUCT
This appliance is classified as Class Laser Product. The corresponding mark is on the rear panel of
the appliance and it means that the appliance employs a beam system. Do not attempt to disassemble the appliance. REFER TO QUALIFIED SERVICE PERSONNEL FOR REPAIR.
Precautions
Connecting to power sources
Make sure the voltage at power supply line meets the operating voltage of the unit.
It is forbidden to immerse the unit into water. Do not install this unit at the places with high humidity
(near baths, reservoirs filled with water, kitchen sinks, washing machines, close to swimming pool,
in moist basements, and so on) to avoid electric shock. Do not allow drops or splashes falling on the
unit. It is forbidden to place any objects filled with water (vases, for example) on the unit.
Do not overload outlets or adapters; this would cause fire or electric shock.
The unit should be installed so the plug could be disconnected from the wall outlet immediately in
case of malfunction. Make sure power cords are not strained near the places they go out of the unit.
Run the cords in the way to avoid meshing, and also avoid putting any objects on them.
Do not use extension cords not approved by manufacturer of this unit, as they could be dangerous.
In order to provide the additional protection of the unit during a thunderstorms and also if you are
not going to use the appliance for a long time, switch the unit off and disconnect power cord from
the wall outlet. These actions protect the unit from being broken because of lightning strokes or
power surges.
To disconnect power cord from the wall outlet hold the plug, in no case pull the cord.
3960IM.indd 4 12.10.2007 15:50:36
Page 5

Do not lubricate moving parts of the unit.
Do not open the housing of the unit by yourself
to avoid electric shock. Do not try to repair or
modify the unit. Servicing should be undertaken
only by qualified professionals at service center.
Unit installation
Install the unit at the place where the sufficient
ventilation is provided. This unit should not be
placed inside any fitted furniture (book shelves
or built-in closets) if sufficient ventilation is not
provided.
In case of placing the unit on a bed, divan, sofa,
carpet or any other similar objects watch the
ventilation slits and openings are not closed as
they provide safe performance of the unit and
protect the unit from overheating.
Do not place the unit near the heat sources, for
example radiators, electric heaters, stoves and
other heat sources (including amplifiers), and
also at the places exposed to direct sun light or
opened for excessive dusting and mechanical
strokes. Do not expose the unit to the temperature above 3ºС.
The unit should be installed on firm, level surface, as far as possible from the appliances inducing strong magnetic field, for example video
or audio players, radio tuners or large speakers,
as magnetic field fluxes could induce the noise.
Do not put heavy objects on the unit.
Special care is required when used by or near
children or invalids, do not leave them unattended.
Foreign objects
Do not allow any foreign objects falling inside
the unit through the opening in the housing, as
this could cause fire and electric shock. If this
happens disconnect the unit from the wall outlet
and apply to service center for examination before using the unit again.
Damages requiring repair
In the situations described below the unit should
be switched off and disconnected from the wall
outlet immediately, after that you should apply
to a qualified professional for repair:
a) Power cord of plug is damaged.
b) Foreign object has fallen inside the unit.
c) The unit was exposed to rain or water was
shed on the unit.
d) The unit malfunctions.
e) The unit was dropped or was damaged in
any other way.
f) There are obvious changes in performance
on the unit.
Notice: unstable performance of the unit is possible in case of energy saving lamps presence in
the room the unit is placed in.
Cleaning the unit
Disconnect the unit from wall outlet before
cleaning. Use damp soft cloth to clean the
unit. Front panel could be wiped by soft cloth
damped with soap solution. It is forbidden to
use liquid or aerosol-like cleansers.
Cleaning disks
Do not use cracked or deformed disk, doing so
would cause damage of the unit.
Hold disk by its edges only. Do not touch its
operating surface. Dust, scratches and finger
prints on disk operating surface could cause its
eternal damage.
Do not expose your disks to direct sun light,
heat radiation, high temperature and humidity.
Put disk into case for storage after use.
Periodically wipe operating surface of disk with
soft cloth periodically, from center to edges.
Do not use common cleansers.
DESCRIPTION
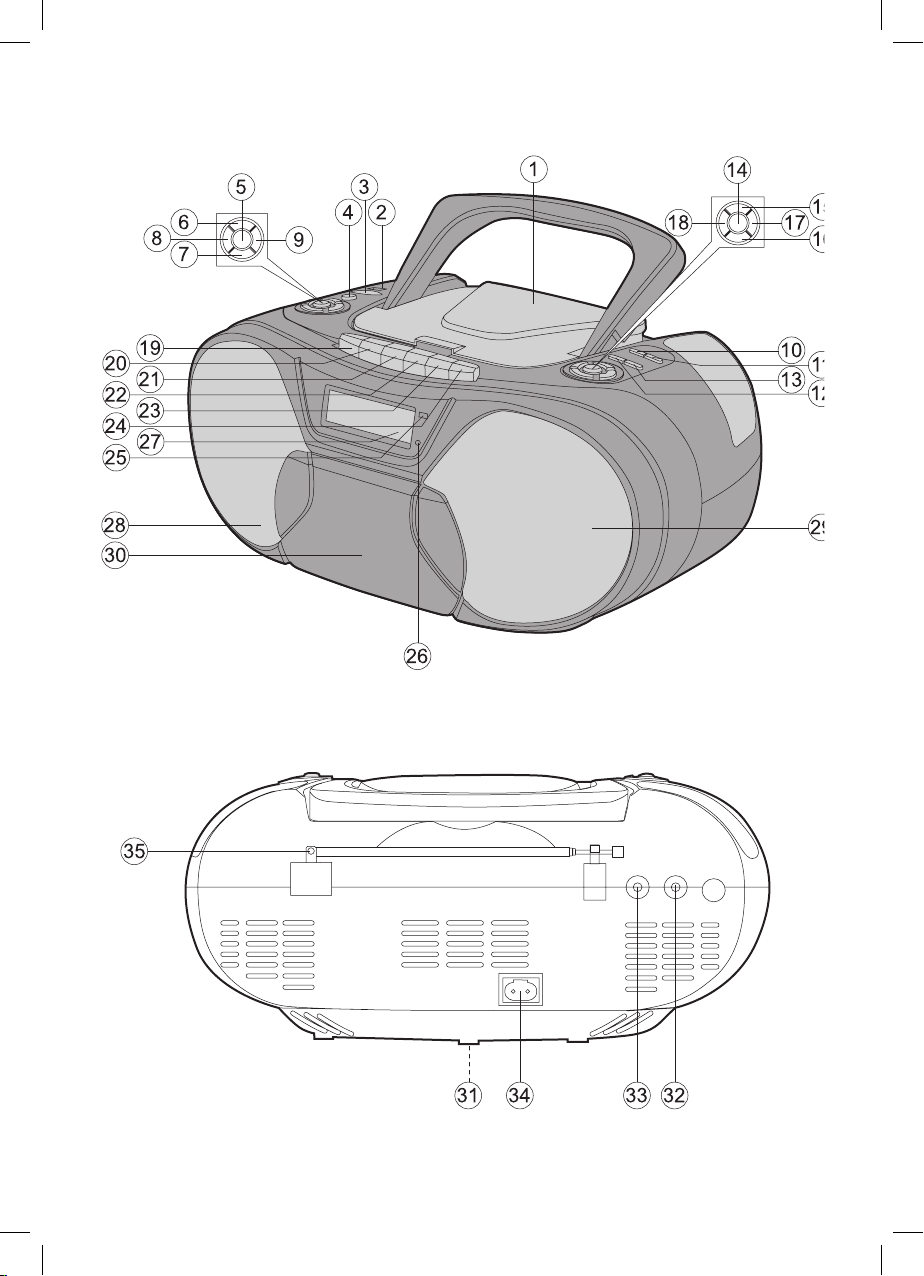
Cassette recorder (Pic. )
. Discs compartment
2. USB-jack
3. SD/MMC jack
. STANDBY button
. STOP button
6. VOLUME button
7. VOLUME button
8. FUNCTION button
9. TIMER button
0. MEMORY/CLK-ADJ button
. REPEAT/MONO-ST button
2. TUNING /SKIP button
3. TUNING /SKIP button
. PLAY/PAUSE button
ENGLISH
3960IM.indd 5 12.10.2007 15:50:36
Page 6
ENGLISH
6
, 6. PRESET/FOLDER and button
7. EQ/BBS button
8. BAND/ID3 button
9. PAUSE button
20. STOP/EJ button
2. F.FWD button
22. REWIND button
23. PLAY button
2. RECORD button
2. SENSOR button
26. STANDBY indicator
27. LCD-display
28. Left speaker
29. Right speaker
30. Cassette deck
3. Battery compartment lid
32. Stereo earphone jack
33. AUX in jack
3. Power supply jack
3. FM –antenna
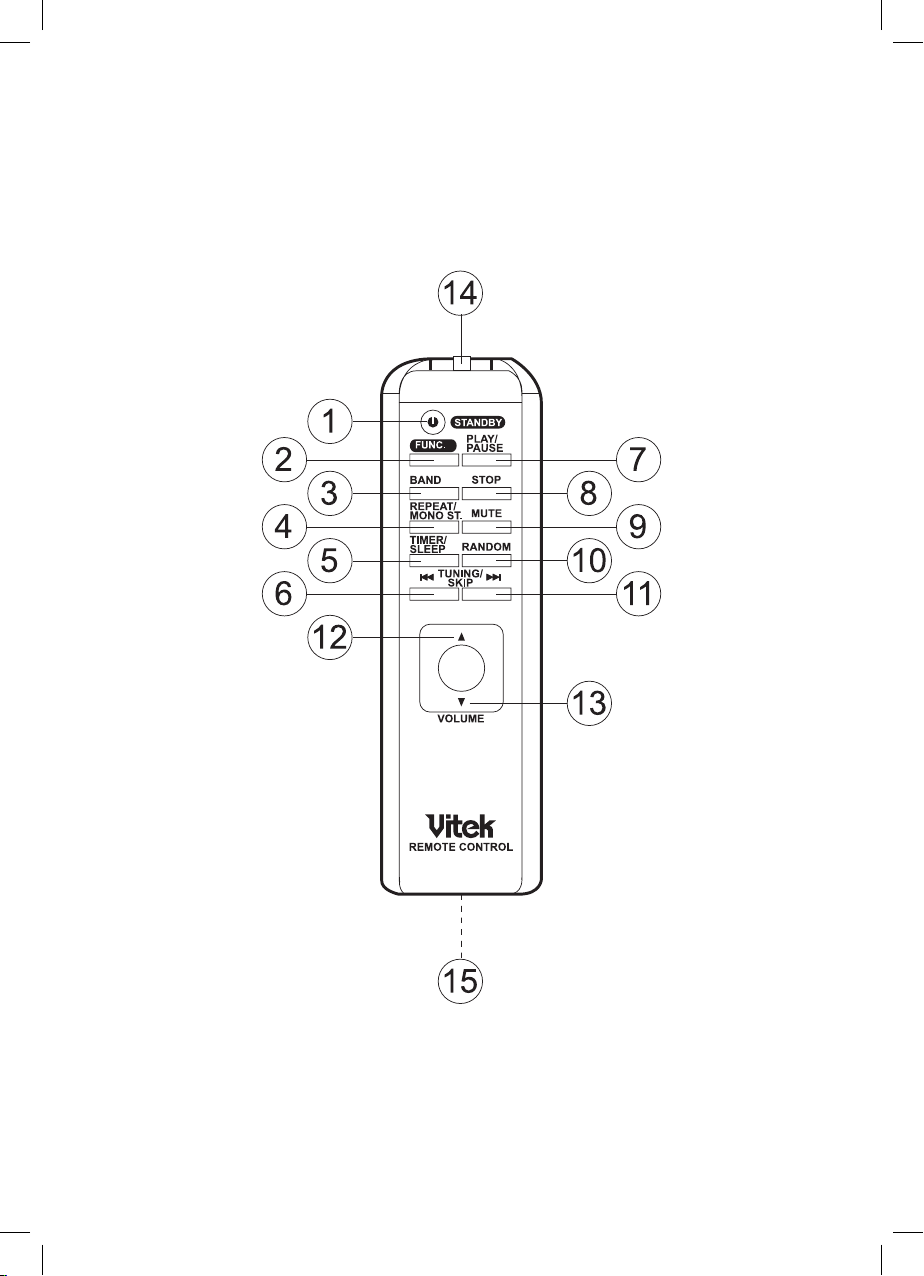
Remote control (Pic. 2)
. STANDBY button
During operation press the STANDBY
button. The cassette recorder will switch to
the standby mode. The STANDBY indication
will be red.
To return to normal playback press the
STANDBY button once again.
2. FUNC button
3. BAND button
. REPEAT/MONO ST button
. TIMER/SLEEP button
6. TUNING /SKIP button
7. PLAY/PAUSE button
8. STOP button
9. MUTE button
a. Press the button to mute sound.
b. Press the button again to cancel the mute
mode.
0. RANDOM button
. TUNING /SKIP button
2. Volume (▲) button
3. Volume (▼)button
. IR emitter
. Battery compartment
POWER CONNECTION
Line supply
Before connecting the unit, make sure that your
home electricity supply corresponds to the voltage specified on the unit.
. To connect the unit, insert one end of the
power cord in the jack (3, pic. ) and the
other one – in the socket. The STANDBY
indication will light up.
2 To switch on the unit press the STANDBY
button, the LCD-display will light up, and the
STANDBY indicator will be off.
Note: Static electricity can lead to interferences
in the operation of the unit. In this case disconnect the unit, and then connect again. If the
problem does not disappear, apply to the service center.
Battery supply
. Disconnect the cassette recorder.
2. Open the main battery compartment lid (3,
pic. ) on the rear of the unit, by pressing
two catches following the arrow.
3. Insert 2 UM-3/AA batteries (not supplied)
in the battery compartment to support
memory of the unit.
Insert 8 UM-2/C batteries (not supplied) in
the main battery compartment.
. Close the battery compartment lid.
USING THE REMOTE CONTROL
Insert 2 UM-/АAA batteries (not supplied) in
the battery compartment of the remote control.
When using the remote control direct it to infrared SENSOR on the cassette recorder. If the
remote controller does not work, check the batteries and replace them if necessary.
Do not expose the remote control to high temperature and direct sunlight; it can influence the
operation of the unit.
Attention!
Battery leakage can lead to injuries and damages of the unit. To avoid damages of batteries
follow the instructions below:
- Place the batteries properly, following the
polarity marked inside the unit.
- Do not use old and new batteries or
batteries of different types together.
- Take the batteries out if you are not going to
use the unit for a long time.
- Replace the batteries in time.
TIME SETTING
You can set time when the cassette recorder is
in the standby mode.
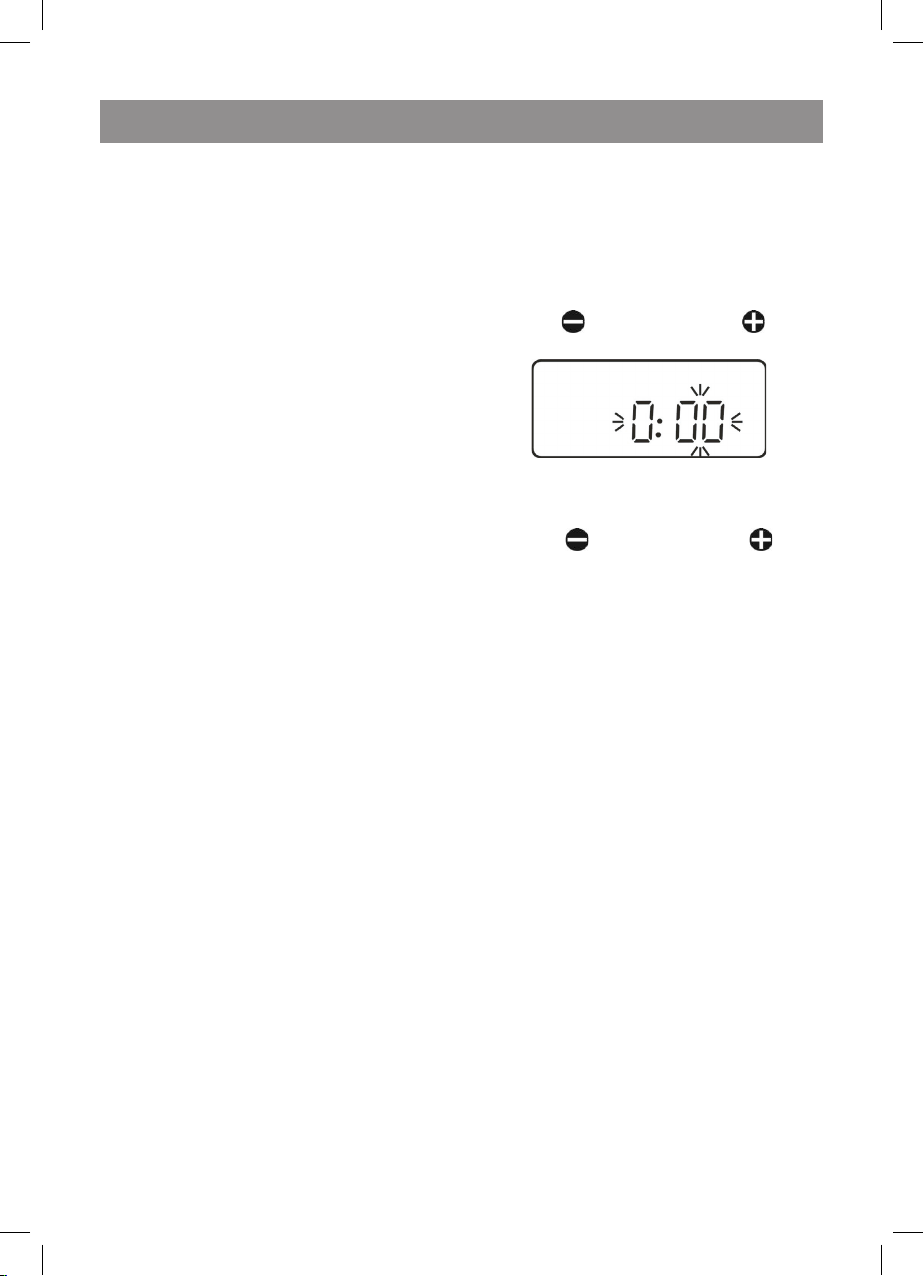
. Press the MEMORY/CLK-ADJ button once.
3960IM.indd 6 12.10.2007 15:50:36
Page 7
ENGLISH
7
Time indication will start flashing on the
LCD-display. Use the TUNING /SKIP
and TUNING /SKIP button to adjust
hours.
2. Press the MEMORY/CLK-ADJ button once
again. Minute’s indication will start flashing
on the LCD-display. Use the TUNING
/SKIP and TUNING /SKIP button to
adjust minutes.
3. Press the MEMORY/CLK-ADJ button again
to store the preset value.
Note: When the unit is disconnected or battery
charge of reserve supply is low, current time indications will be reset. When power is supplied
again, time indication will be constantly flashing.
In this case you will need to set time again.
ALARM SETTING
You can adjust your cassette recorder in a way
that the alarm will switch on and automatically
switch off at preset time every day. As a sound
signal you can use a disc, radio, a cassette, USB
and SD/MMC devices.
Note: if a cassette is chosen as a sound source,
press the PLAY button at first (23, pic. ).
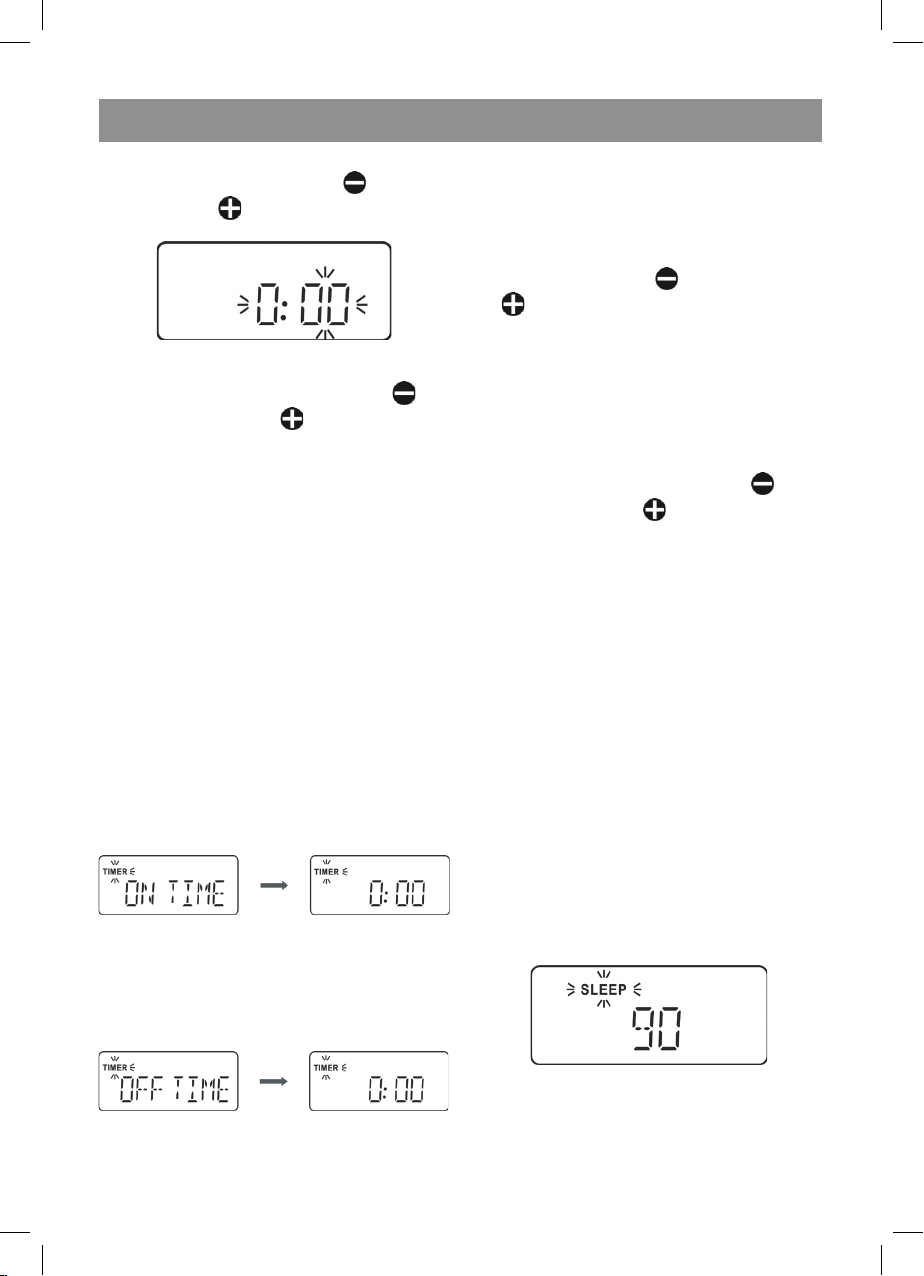
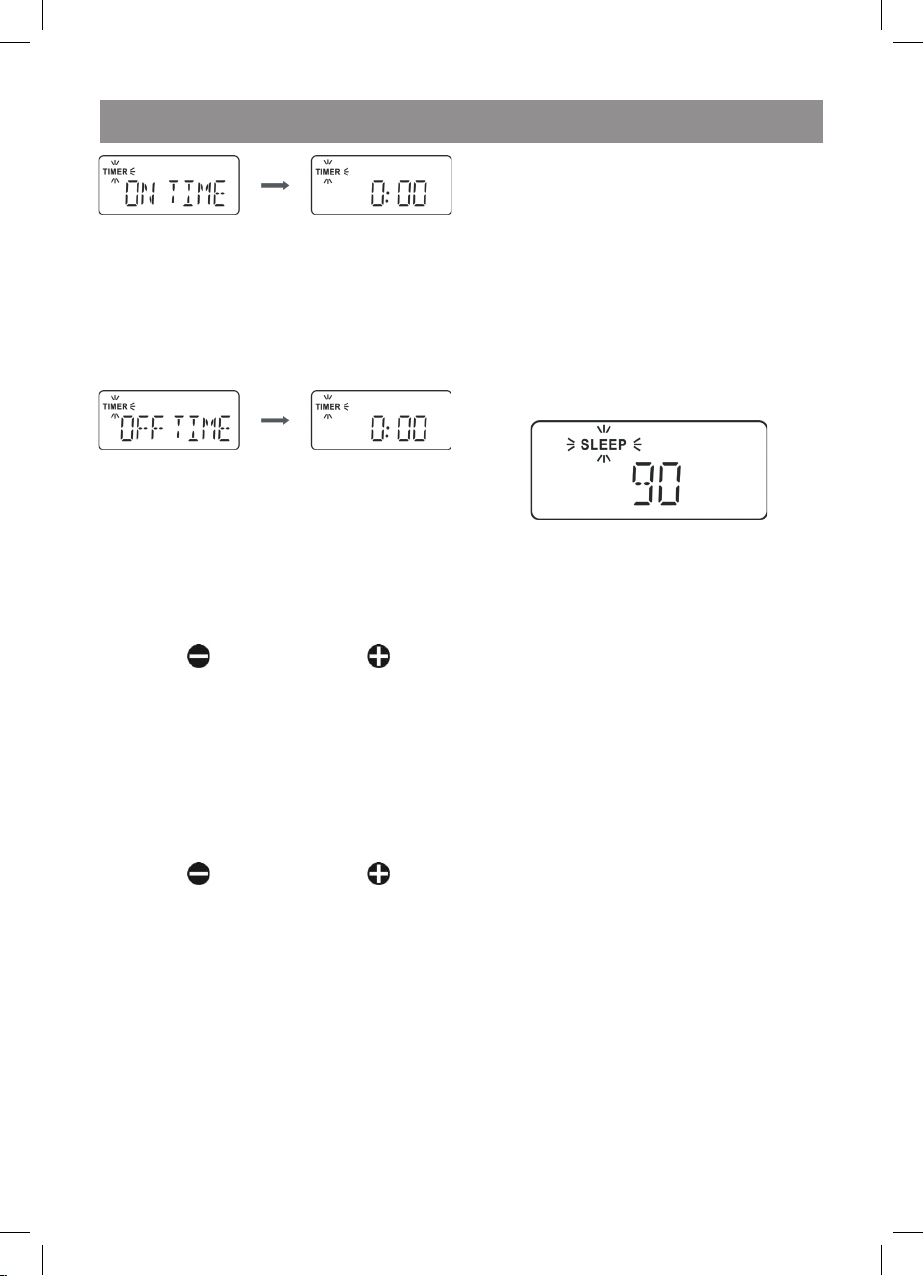
. Alarm switching on time.
In the current time mode press the TIMER
button once. The “ON TIME” indication will
appear on the LCD-display, and the “TIMER”
indication will be constantly flashing.
Set the time for the alarm to switch on, as
described in the TIME SETTING chapter.
2. Alarm switching off time.
Press the TIMER button once again. The
“OFF TIME” indication will appear on the
LCD-display, and the “TIMER” indication will
be constantly flashing.
Set the time for the alarm to switch on, as
described in the TIME SETTING chapter.
3. Sound source setting.
Press the TIMER button again. The current
mode will appear on the LCD-display (for
instance: TUNER).
Press the MEMORY/CLK-ADJ button first,
then select the sound source, successively
pressing the TUNING /SKIP or TUNING
/SKIP button. Press the MEMORY/
CLK-ADJ button again to store the selected
sound source.
. Alarm volume setting.
Press the TIMER button again. The previous
volume level will appear on the LCD-display
(for instance: VOL 20).
Press the MEMORY/CLK-ADJ button
first, then set the desired volume level,
successively pressing the TUNING
/SKIP or TUNING /SKIP button. To
enter the preset volume level, press the
MEMORY/CLK-ADJ button again.
Note: you can change volume level in the
range of 0-0.
. Switching on the alarm.
Press the TIMER/SLEEP button. “TIMER”
will appear on the LCD-display.
When the preset time is reached, the alarm
will automatically switch on. To switch off
the alarm press the STANDBY button.
6. Switching off the alarm.
Press the TIMER/SLEEP button again. The
“TIMER” indication will disappear.
SETTING TIME FOR THE CASSETTE RECORDER TO SWITCH OFF
(Only using the buttons on the remote control)
You can set time for the cassette recorder to
switch off (max. 90 minutes).
. In the radio/cassette mode press the
TIMER/SLEEP button. The “90” minutes
indication will appear on the LCD-display,
and the “SLEEP” indication will be flashing.
2. To change the time press and hold the
TIMER/SLEEP button on the remote control.
You can set time for the cassette recorder to
switch off in the range of 0-90 minutes with
0 minutes step.
3960IM.indd 7 12.10.2007 15:50:38
Page 8
ENGLISH
8
3. When the preset time is reached, the
cassette recorder will automatically switch
off.
. To cancel the timer mode press the TIMER/
SLEEP button again. The “SLEEP” indication
will disappear. To switch off the cassette
recorder press the STANDBY button.
SETTING EQUALIZER/BASS
You can set one of the five preset modes of the
equalizer: FLAT, JAZZ, ROCK, CLASSIC and
POP.
. In a playback mode select the desired
mode, successively pressing the EQ/BBS
button. The following indications will
successively appear on the LCD-display:
FLAT, JAZZ, ROCK, CLASSIC and POP.
2. In order to amplify bass signals press and
hold the EQ/BBS button at least for 2
seconds. “X BAS ON’’ will appear on the
LCD-display.
To cancel low frequency amplification mode
press the EQ/BBS button again at least for
2 seconds. “X BAS OFF’’ will appear on the
LCD-display.
MUTE
(Only using the buttons on the remote control)
To mute sound, press the MUTE button on the
remote control.
Earphones jack
For individual listening to music through the
earphones (not supplied) connect them to the
earphones jack (32, pic. ). Use the VOLUME
or button to adjust volume. The speakers will automatically turn off when headphones
are connected.
USING THE RADIO
This cassette recorder is equipped with electrical digital tuning system. Besides that, you can
tune and store 20 radio station in each band FM
and MW (AM).
Radio reception
. Switch on the cassette recorder, pressing
the STANDBY button.
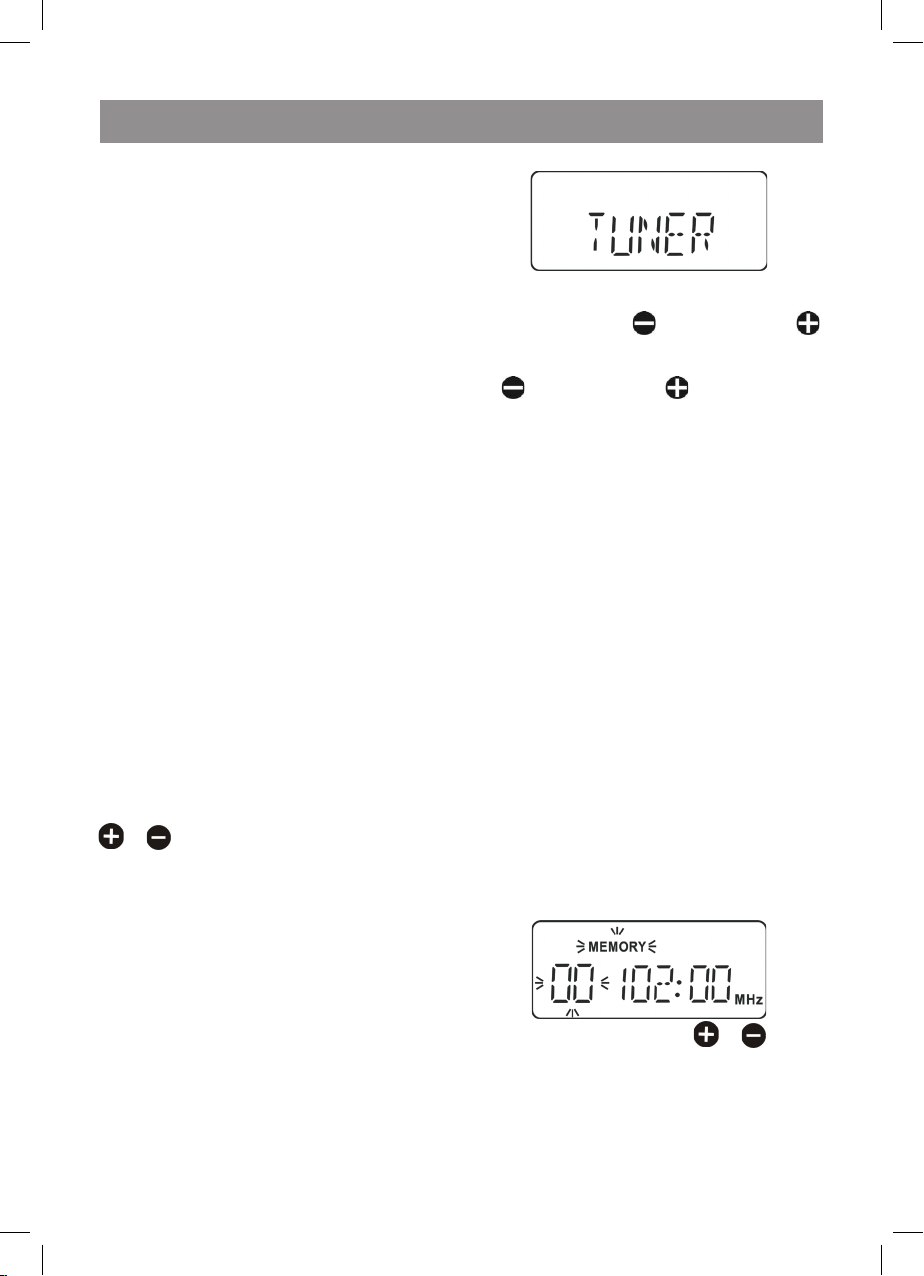
2. To select the TUNER mode press the
FUNCTION button successively. The
“TUNER’’ indication will appear on the LCDdisplay.
3. To select FM or MW (AM) band press the
BAND button on the remote control.
. Tune to the desired radio station.
Manually: to select the desired station
press the TUNING /SKIP or TUNING
/SKIP buttons successively.
Automatically: Press and hold the TUNING
/SKIP or TUNING /SKIP button
for more than second; tuner will start
scanning and will stop it automatically when
a strong signal from the radio station is
found.
. Switch the MONO/STEREO mode. If the
stereo signal from FM radio stations is weak,
press the REPEAT/MONO-ST button to
improve sound quality, to switch on to the
MONO mode.
ANTENNA
For the best FM reception, completely extend
the FM ANTENNA (3, pic.) and direct it at the
desired angle. The device has a built-in antenna
in order to receive AM signals. Turn the device
left or right in order to achieve the best signal
reception.
PROGRAMMING RADIO STATIONS
You can tune and store 20 stations in each band
FM and MW (AM).
. Select the band and tune to the station,
which you want to program.
2. Press the MEMORY/CLK-ADJ button. The
“MEMORY” indication and the “00” station
indication will be flashing on the LCDdisplay for 3 minutes.
3. Use the PRESET/FOLDER or
buttons to select the station umber from to
20, under which you want to store the radio
station.
. Press the MEMORY/CLK-ADJ button again,
to store the settings.
. Repeat steps – for all radio stations,
3960IM.indd 8 12.10.2007 15:50:39
Page 9
ENGLISH
9
which you want to store in memory.
Note: you must select the station number while
the MEMORY indication is flashing, otherwise
the station will not be stored in the memory. If
the indication disappears before you select the
number of the station, repeat steps -.
PROGRAMMED RADIO STATIONS RECALL
To recall the programmed radio stations select
the corresponding frequency band (FM or MW
(AW)) and press the PRESET/FOLDER or
buttons successively to select the desired
radio station.
Note: the preset stations are stored in memory,
while the device is plugged in and the battery is
not low. When the power is off or the battery is
low the preset radio stations will be erased from
memory. You will need to program them again.
CD PLAYBACK
Loading – open the CD compartment lid. Insert
a CD disc and close the CD compartment lid.
Ejecting – after the playback stops open the CD
compartment lid and eject the disc. Put the disc
in the case for storage.
Always close the CD compartment lid in order
to prevent it from getting dust. Always eject a
disc from the CD compartment if it is not being
played back.
. Switch on the cassette recorder by pressing
the STANDBY button.
2. Select the CD playback mode. To select it
press the FUNCTION button successively
until the “CD” indication appears on the
LCD-display.
3. Open the CD compartment. Insert a CD disc
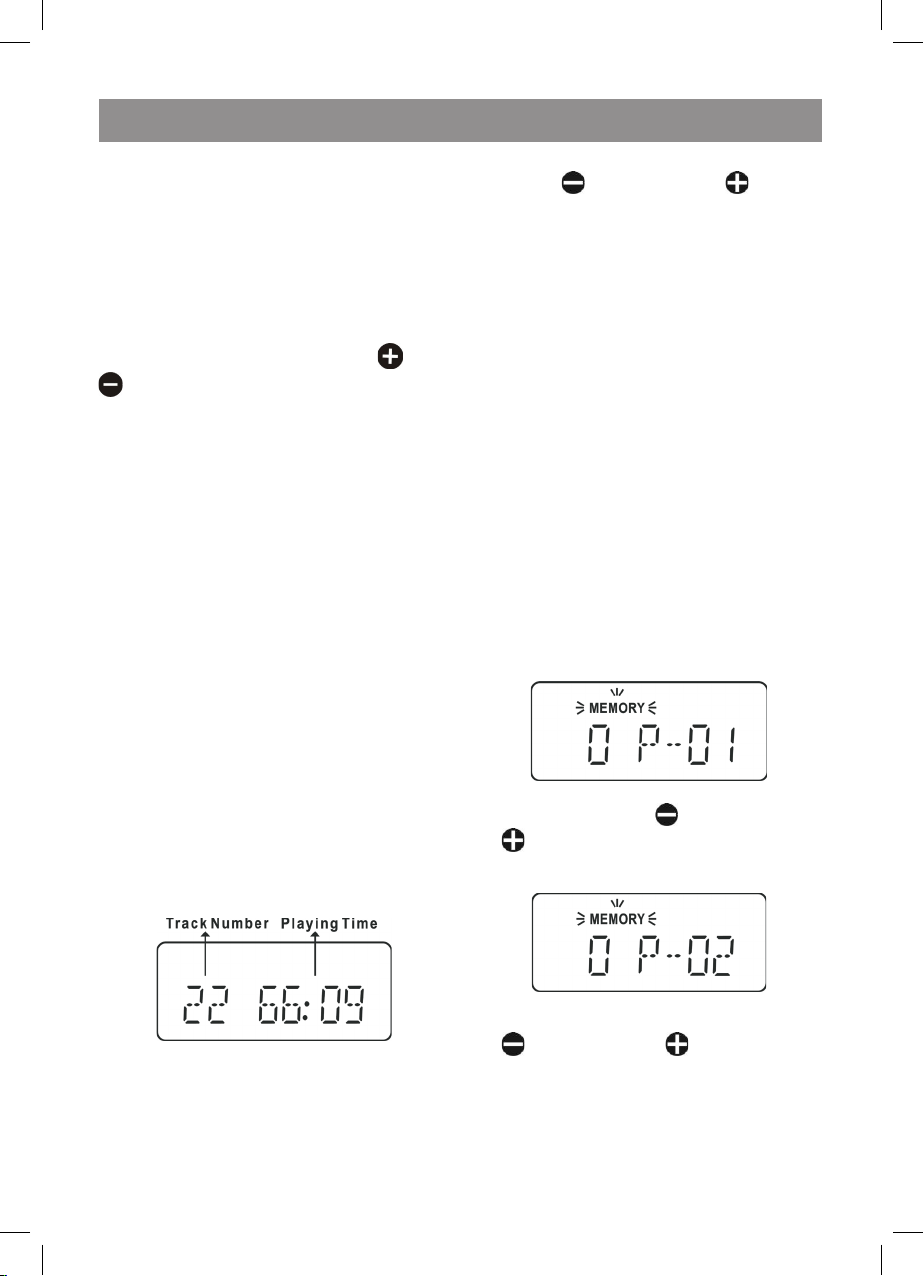
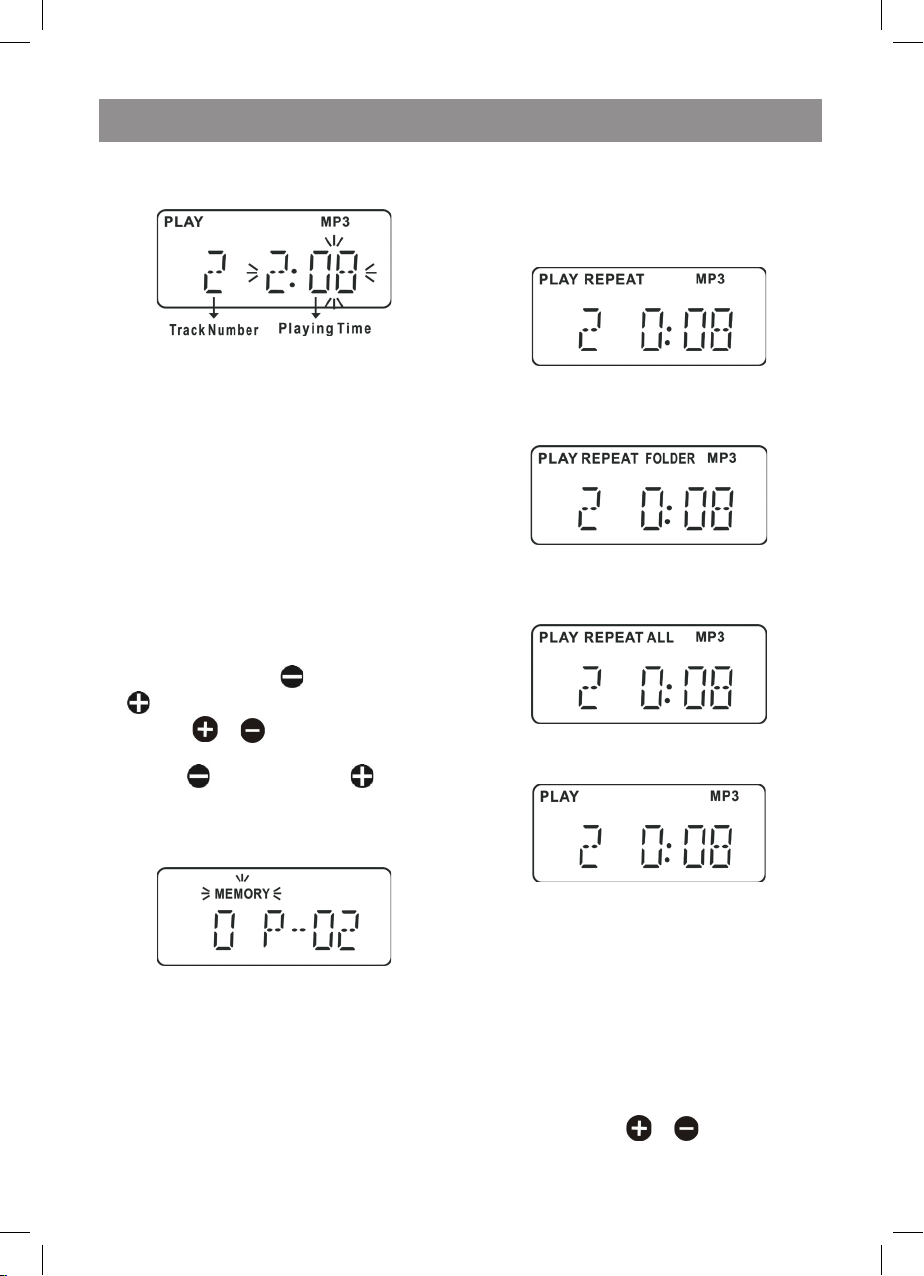
and close the CD compartment. “READING”
will appear on the LCD display. Then number
of tracks and total playback time will appear
on the LCD-display.
If after a CD disc have been inserted the “NO
DISC” indication appears on the LCD-display,
check whether the disc is inserted properly. The
disc should be inserted with the label up.
. To playback the disc from the first track
press the PLAY/PAUSE button.
You can select a track, which will be played
back first. To do it, select a track using the
TUNING /SKIP or TUNING /SKIP
buttons, and then press the PLAY/PAUSE
button.
. To pause the playback, press the PLAY/
PAUSE button again. The “PLAY” indication
and the playback time will be constantly
flashing. To resume to playback mode press
the button once again.
6. To stop the playback, press the STOP
button.
Note: if the CD compartment lid is open, the
“OPEN” indication will appear on the LCDdisplay.
PROGRAMMED PLAYBACK
You can program playback of tracks (max. 60
tracks) in a desired sequence.
. Switch on the cassette recorder by pressing
the STANDBY button.
2. Open the CD compartment. Insert a CD disc
and close the CD compartment.
3. When the CD playback is stopped, press the
MEMORY/CLK-ADJ button. The “MEMORY”
indication will be flashing on the LCDdisplay, and track number “0” on the disc
and its programmed number “P-0” will be
displayed.
Select the desired track, successively
pressing the TUNING /SKIP or TUNING
/SKIP buttons. To store the selected
track press the MEMORY/CLK-ADJ button.
Programming indication will switch to “Р-2”.
. Programming the next track: select the next
track, successively pressing the TUNING
/SKIP or TUNING /SKIP buttons.
Then press the MEMORY/CLK-ADJ button
to store the selected track in memory. You
can program up to 60 tracks.
Press the MEMORY/CLK-ADJ button
successively to look through the list of
programmed tracks.
3960IM.indd 9 12.10.2007 15:50:40
Page 10
ENGLISH
0
To playback press the PLAY/PAUSE button. To
stop the playback, press the STOP button.
To erase programmed playback press the STOP
button, when the playback stops, open the CD
compartment lid.
REPEAT PLAYBACK
This function allows repeating all tracks on the
disc or programmed discs.
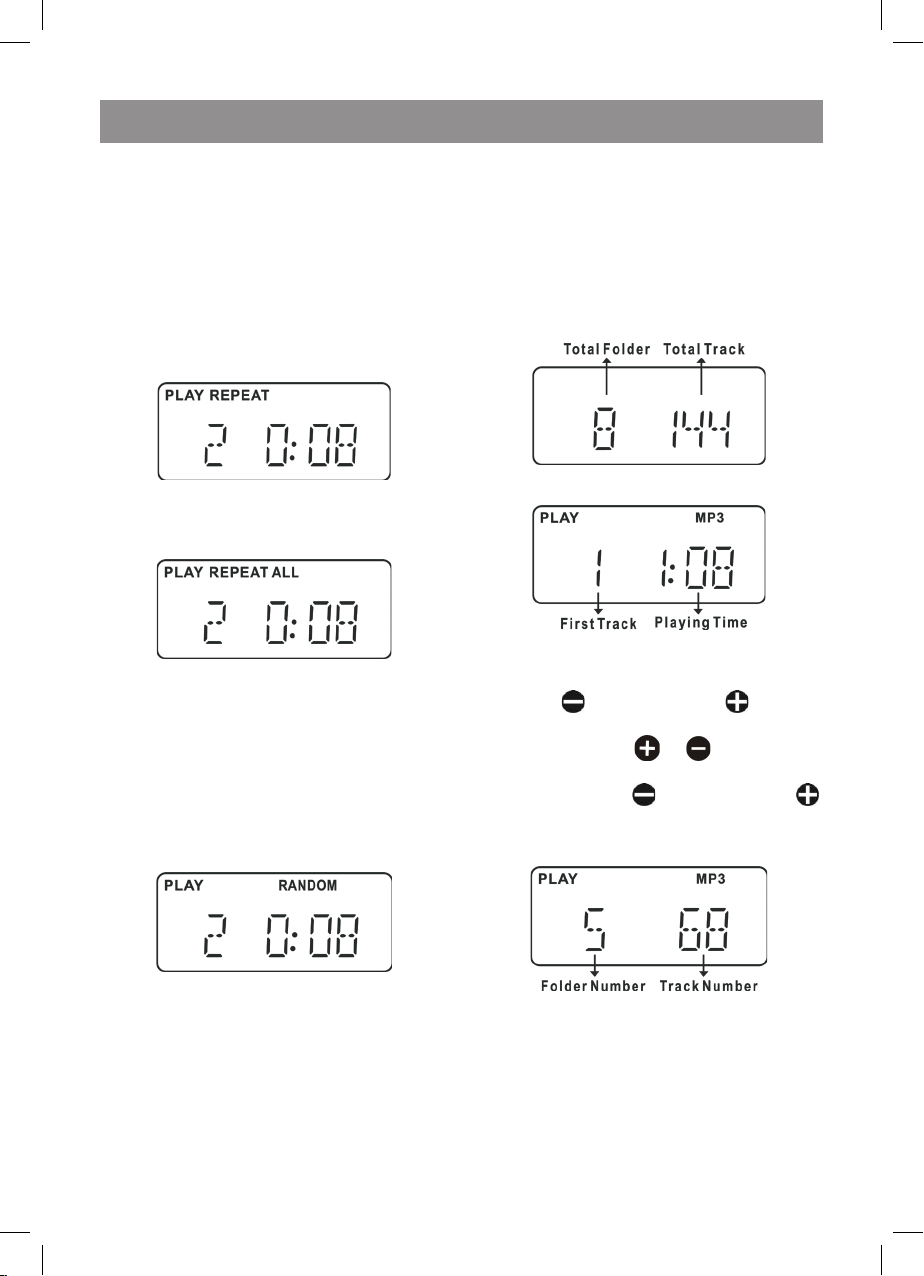
. To repeat one track press the REPEAT/
MONO-ST button once, the “REPEAT”
indication will appear on the LCD-display.
2. To repeat all tracks on the disc press the
REPEAT/MONO-ST button twice, The
“REPEAT ALL” indication will appear on the
LCD-display.
3. To cancel the repeat mode press the
REPEAT/MONO-ST button until the repeat
indication disappears.
RANDOM PLAYBACK
This function allows you to playback tracks in
random order.
. Press the RANDOM button on the remote
control once, the “RANDOM” indication
will appear on the LCD-display, random
playback will start.
2. To cancel the random playback mode,
press the RANDOM button on the remote
control again, the “RANDOM” indication will
disappear.
PLAYING МР3 DISCS
This unit can playback most of MP3 discs but
there are cases when the disc is not played back
due to the settings of the software used for recording this disc.
. Switch on the cassette recorder by pressing
the STANDBY button.
2. Select discs playback mode. To select it
press the FUNCTION button successively
until the
“CD” indication appears on the LCD-display.
3. Open the compartment. Insert an MP3 disc
and close the compartment. Number of
folders and tracks will appear on the LCDdisplay.
. To start playback from the first track press
the PLAY/PAUSE button.
. You can select a track, which will be played
back first. To do it, select a track using the
TUNING /SKIP or TUNING /SKIP
button, when the playback stops press the
PRESET/FOLDER or buttons to
select the desired folder, then select a track
using the TUNING /SKIP or TUNING
/SKIP button.
Press the PLAY/PAUSE button to start play
back.
6. Press the ID3 button during an MP3 disc
playback. Track title and album title will
appear on the LCD-display. Press the ID3
button twice to display scrolling text.
Information on the LCD-display can be
different from the software settings. Tags in
Russian can be displayed incorrect.
7. To pause the playback, press the PLAY/
PAUSE button. The “PLAY” indication and
3960IM.indd 10 12.10.2007 15:50:42
Page 11
ENGLISH
playback time will be constantly flashing.
To resume to the playback mode press this
button once again.
8. To stop the playback, press the STOP
button. Number of folders and tracks will
appear on the LCD-display.
PROGRAMMED PLAYBACK
You can program playback of tracks (max. 60
tracks) in a desired sequence.
. Switch on the cassette recorder by
pressing the STANDBY button. Open the
compartment. Insert an MP3 disc and close
the compartment. When the CD playback
is stopped, press the MEMORY/CLK-ADJ
button. The “MEMORY” indication will
be flashing on the LCD-display, and track
number on the “0” disc and its programmed
number “P-0” will be displayed.
2. Select the desired track, successively
pressing the TUNING /SKIP or TUNING
/SKIP buttons or press the PRESET/
FOLDER or buttons to select the
desired folder, then select a track using the
TUNING /SKIP or TUNING /SKIP
button.
3. To store the selected track press the
MEMORY/CLK-ADJ button. Programming
indication will switch to “Р-2”.
. Repeat steps -3 to program the next track.
You can program up to 60 tracks.
. Press the MEMORY/CLK-ADJ button
successively to look through the list of
programmed tracks.
6. To playback press the PLAY/PAUSE button.
7. To stop playback press the STOP button.
To erase programmed playback press the
STOP button, when the playback stops,
open the CD compartment lid.
REPEAT PLAYBACK
This function allows repeating tracks on the МР3
disc.
. To repeat one track press the REPEAT/
MONO-ST button once, the “REPEAT”
indication will appear on the LCD-display.
2. To repeat the whole folder on the disc press
the REPEAT/MONO-ST button twice, The
“REPEAT FOLDER” indication will appear on
the LCD-display.
3. To repeat all tracks on the МР3 disc press
the REPEAT/MONO-ST button thrice, the
“REPEAT ALL” indication will appear on the
LCD-display.
. To cancel the repeat mode press the
REPEAT/MONO-ST button until the repeat
indication disappears.
CASSETTE PLAYBACK
. Switch on the cassette recorder by pressing
the STANDBY button. Successively press the
FUNCTION button to select the TAPE mode,
until the “TAPE” indication appears on the
LCD-display.
2. Press the STOP/EJ button and insert a
cassette in the cassette deck.
3. Close the cassette deck.
. To playback the cassette, press the PLAY
button.
. Use the VOLUME or buttons to adjust
volume.
3960IM.indd 11 12.10.2007 15:50:44
Page 12
ENGLISH
2
6. To pause the playback, press the PAUSE
button.
7. Press the STOP/EJ button to stop the
playback.
8. To fast forward and rewind use the F.FWD/
REW buttons correspondingly.
9. When the playback is finished it will stop
automatically.
0. Press the STOP/EJ button to eject the
cassette, eject the cassette.
WARNING! In order not to damage the cassette
mechanism or the tape press the STOP/EJ
button after each operation.
RECORDING FROM RADIO
. Tune to the desired radio station; follow the
instructions in the RADIO chapter.
2. Insert a cassette without record on it in a
cassette deck.
3. Press the PAUSE button.
. Press the RECORD button, the PLAY button
will be pressed automatically. You can adjust
volume level without being afraid to make
sound quality worse.
. Press the PAUSE button to start recording.
6. To pause press the PAUSE button. To
resume to recording mode press this button
once again.
7. To stop press the STOP/EJ button. When the
cassette is recorded completely, the record
will stop automatically.
RECORD FROM OTHER SOURCES
You can record from other sources, for instance
from CD disc or USB device. Switch on the desired source and follow instructions in the chapter RECORD FROM RADIO.
USB DEVICES
. Switch on the cassette recorder, by pressing
the STANDBY button.
2. To select the USB mode, press successively
the FUNCTION button, until the “USB”
indication appears on the LCD-display.
3. Insert the USB device (for example, portable
МРЗ player or flash memory) into the USB
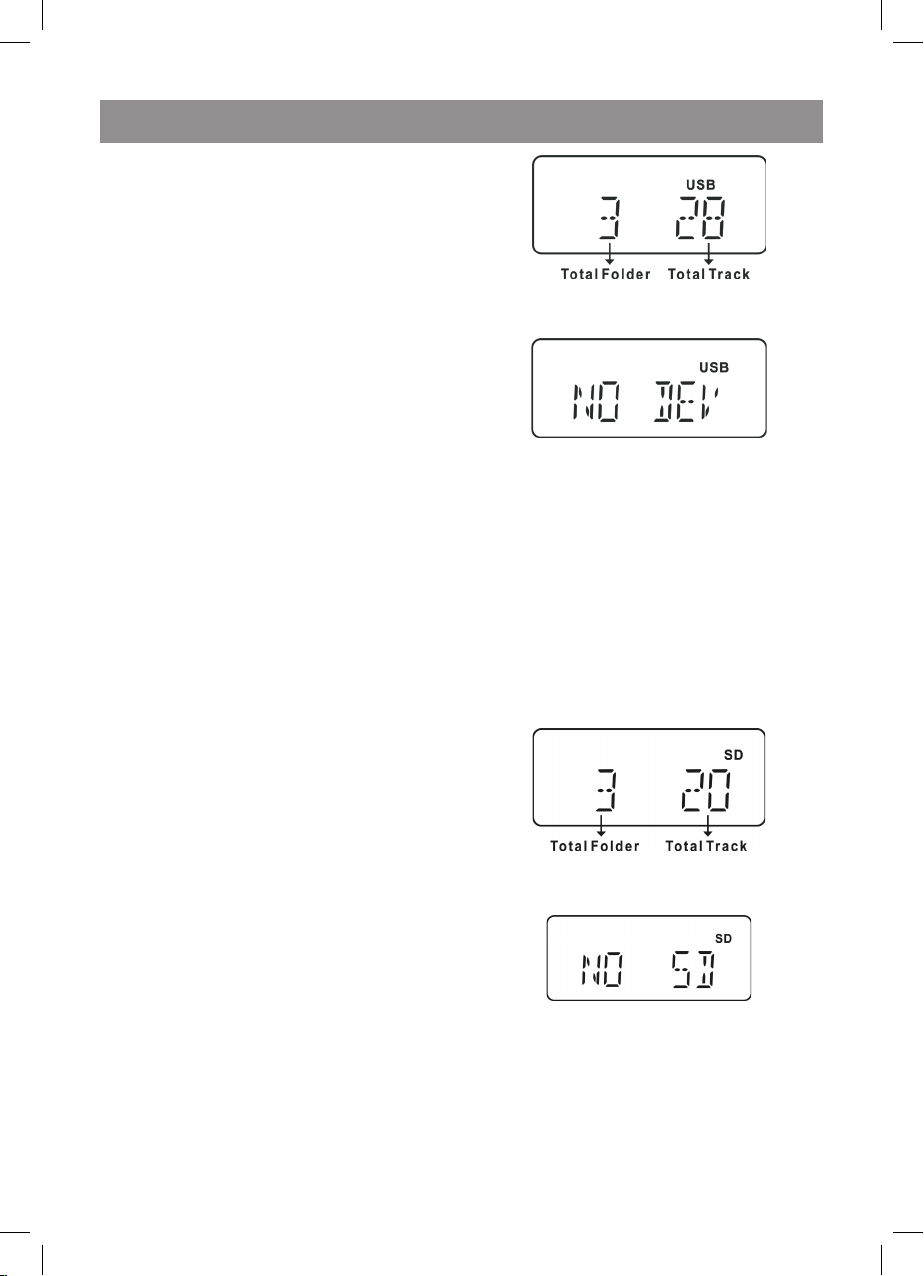
jack (2, pic. ). Number of folders and
tracks will appear on the LCD-display.
Note: if neither portable MP3 player nor flash
memory device is connected to the USB “NO
DEV” will appear on the LCD-display.
. To playback press the PLAY/PAUSE button.
. Control buttons and order of operations
while using USB are the same as those of
a МР3 disc. Follow the instructions in the
chapter PLAYING MP3 DISCS.
SD memory cards
. Switch on the cassette recorder by pressing
the STANDBY button.
2. To select the SD mode, press successively
the FUNCTION button, until the “SD”
indication appears on the LCD-display.
3. Insert a SD/MMC card into the jack (3, pic.
). Number of folders and tracks will appear
on the LCD-display.
Note: if no card SD/MMC is connected to the
jack (3, pic. ) “NO SD” will appear on the LCDdisplay.
. To playback press the PLAY/PAUSE button.
. Control buttons and order of operations
while using memory card are the same as
those of a МР3 disc. Follow the instructions
in the chapter PLAYING MP3 DISCS.
3960IM.indd 12 12.10.2007 15:50:44
Page 13
ENGLISH
3
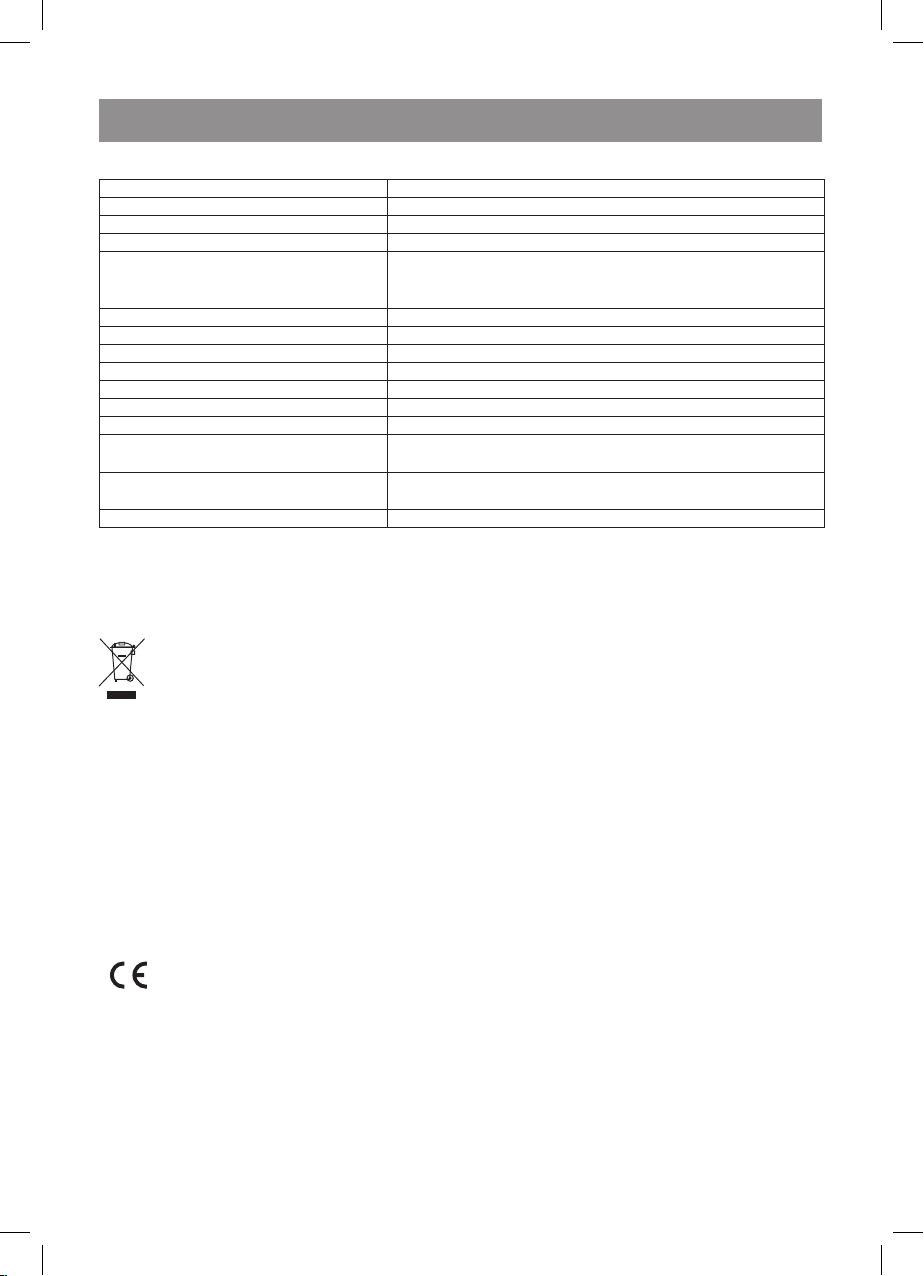
Specifications
Input power AC 230V/0Hz
Weight 2.7Kg
Dimensions L 30 x W 239 x H 6 (mm)
Output power 2 x 2W RMS/ channel
Speakers Two-way:
. 3'' 8 Ohms 3W x2pcs (middle)
2. 2'' 8 Ohms 0.W x2pcs (Tweeter)
Battery operation time 8 Hours
CD formats CD,CD-R ,CD-RW, MP3
Frequency response 20Hz ~20KHz
Signal-to-noise ratio dB
Total harmonic distortion <%
FM/MW (AM) FM: 6~08 MHz
Frequency range AM : 22~620 KHz
Intermediate frequency FM: 0.7MHz
AM: 0 kHz
Antenna FM: telescopic antenna
AM: built in ferrite antenna
Cassette 6 keys; DC bias; One touch recording
The manufacturer reserves the right to change the design and specifications of the unit without preliminary notice.
Service life period of this unit is no less then tree years.
Recycling of electronic and electrical appliances
(Used in the EU countries and other countries in Europe with selective sorting system)
This product is marked by the symbol of the selective sorting, relating to the electrical and electronic
component scrap. That means that the product must be taken by a selective system of collection in
order to reduce any environmental impact. The electronic products not having been the subject of
a selective sorting are potentially dangerous for the environment and human health because of the
potential presence of dangerous substances. For details apply to the service dealing with recycling
or to the shop where you bought the product.
Guarantee
Details regarding guarantee conditions can be obtained from the dealer from whom the appliance
was purchased. The bill of sale or receipt must be produced when making any claim under the terms
of this guarantee.
This product conforms to the EMC-Requirements as laid down by the Council Directive
89/336/EEC and to the Law Voltage Regulation (73/23 EEC)
3960IM.indd 13 12.10.2007 15:50:44
Page 14
РУССКИЙ
Магнитола c CD/МР3-проигрывателем VT-3960 BK
ИНСТРУКЦИЯ ПО ЭКСПЛУАТАЦИИ
Перед подключением, использованием или
настройкой устройства внимательно прочитайте инструкцию. Необходимо соблюдать
все предупреждения и рекомендации по эксплуатации устройства, приведенные в этом
руководстве.
Сохраните руководство, используйте его в
дальнейшем в качестве справочного материала.
ВНИМАНИЕ!
Опасность удара
электрическим
током! НЕ
ВСКРЫВАТЬ!
Предупреждение: во избежание
возникновения пожара или поражения
электрическим током не подвергайте
устройство воздействию дождя или влаги.
Чтобы избежать удара электрическим
током, не открывайте корпус устройства
самостоятельно. Сервисное обслуживание
должно осуществляться только
квалифицированными специалистами
сервисных центров.
Значок молнии в равностороннем
треугольнике указывает
пользователю на наличие
опасного напряжения внутри
корпуса устройства, которое
может привести к поражению
электрическим током.
Значок восклицательного знака
в равностороннем треугольнике
указывает пользователю на
наличие важных рекомендаций
по эксплуатации и техническому
обслуживанию в инструкции по
эксплуатации.
CLASS 1 LASER PRODUCT
Данный продукт классифицируется как
ЛАЗЕРНОЕ УСТРОЙСТВО КЛАССА . Соответствующая этикетка находится на задней
панели устройства и означает, что устройство использует лазерные лучи. Возможность
лазерного облучения отсутствует, если прибор не вскрывается. ОБСЛУЖИВАНИЕ УСТРОЙСТВА ДОЛЖНО ВЫПОЛНЯТЬСЯ ТОЛЬКО
КВАЛИФИЦИРОВАННЫМИ СПЕЦИАЛИСТАМИ СЕРВИСНОГО ЦЕНТРА.
МЕРЫ ПРЕДОСТОРОЖНОСТИ
Подключение к источникам питания
Проверьте, соответствует ли напряжение в
электрической сети рабочему напряжению
устройства.
Запрещается погружать прибор в воду. Во
избежание возникновения пожара или поражения электрическим током не размещайте
это устройство в условиях повышенной влажности (около ванн, тазов с водой, кухонных
раковин, стиральных машин, рядом с плавательным бассейном, в сырых подвалах и
т.д.). Не допускайте попадания на устройство
капель или брызг. Запрещается ставить на
устройство заполненные жидкостью емкости
(например, вазы).
Не допускайте перегрузки розеток или удлинителей, так как это может привести к пожару или поражению электрическим током.
Устанавливайте это устройство таким образом, чтобы в случае неисправности вилку
сетевого провода можно было немедленно
вынуть из розетки. Сетевые провода не
должны быть натянуты там, где они выходят
из устройства; их необходимо прокладывать
так, чтобы они не запутывались, чтобы на них
не были установлены какие-либо предметы
мебели.
Не используйте сетевые удлинители, которые не разрешены изготовителем устройства, так как это может быть опасным.
Для дополнительной защиты устройства во
время грозы, а также в тех случаях, когда вы
не собираетесь использовать его в течение
длительного времени, отключите его от розетки электросети. Это исключит выход устройства из строя из-за ударов молнии или
скачков напряжения в электросети.
Для отсоединения сетевого шнура беритесь
непосредственно за сетевую вилку, ни в коем
случае не тяните за шнур. Не смазывайте
подвижные части устройства.
3960IM.indd 14 12.10.2007 15:50:45
Page 15

РУССКИЙ
Во избежание удара электрическим током не
открывайте корпус устройства самостоятельно. Не ремонтируйте прибор и не вносите в
него изменения. Сервисное обслуживание
должно осуществляться только квалифицированными специалистами сервисных
центров.
Установка устройства
Устанавливайте устройство в местах с достаточной вентиляцией. Это устройство не
следует размещать во встроенной мебели (в
книжных полках или стенных шкафах), если
нельзя обеспечить достаточной вентиляции.
При размещении устройства на кровати,
диване, софе, ковре или на других подобных
предметах обстановки необходимо проследить за тем, чтобы вентиляционные щели и
отверстия не были закрыты, поскольку они
обеспечивают надежную работу устройства и
защищают его от перегрева.
Не размещайте устройство вблизи источников тепла (радиаторов, электрообогревателей, духовок и т.п.) либо являющихся источниками тепла (в том числе и усилителей), а
также в местах, где возможны прямые солнечные лучи или чрезмерное запыление.
Устройство необходимо разместить на
ровной устойчивой поверхности, подальше
от оборудования с сильными магнитными
полями (например, от видео-, аудиомагнитофонов, радиоприемников или больших
колонок), так как силовые линии магнитного
поля от этих устройств могут вызвать помехи
в звуке.
Не кладите на устройство тяжелые предметы.
Будьте особенно внимательны, если рядом
с включенным прибором находятся дети или
лица с ограниченными возможностями.
Посторонние предметы
Не допускайте попадания каких-либо предметов через отверстия в корпусе устройства,
это может повлечь за собой возгорание устройства и поражение электрическим током.
Если это все-таки произошло, немедленно
отсоедините устройство от сети и обратитесь
в сервисный центр.
Примечание: если в помещении, где эксплуатируется устройство, находятся энергосберегающие лампы, возможна нестабильная работа устройства.
Повреждения, требующие ремонта
Если возникла одна из описанных ниже ситуаций, необходимо выключить устройство из
розетки и обратиться к квалифицированному
специалисту для ремонта устройства:
a) Сетевой провод или вилка повреждены.
b) В устройство попали посторонние пред-
меты.
c) Устройство попало под дождь или на него
разлили воду.
d) Устройство не работает нормально.
e) Устройство упало или было повреждено
каким-либо другим образом.
f) Заметны явные изменения в работе уст-
ройства.
Уход за устройством
Перед чисткой выключите устройство из
розетки. Для чистки прибора используйте
влажную мягкую ткань. Запрещается использовать для этих целей жидкие или аэрозольные чистящие средства.
Уход за дисками
Не используйте треснутые или деформированные диски, это может вызвать поломку
устройства.
Берите диск только за края. Не прикасайтесь к рабочей поверхности диска. Пыль,
царапины или отпечатки пальцев на рабочей
поверхности диска могут привести к выходу
его из строя.
Не подвергайте диски воздействию прямых
солнечных лучей, источников тепла, высокой
температуры и влажности.
После использования уберите диск в футляр
на хранение.
Периодически протирайте рабочую поверхность диска мягкой тканью от центра к краям.
Не пользуйтесь обычными моющими средствами.
3960IM.indd 15 12.10.2007 15:50:45
Page 16
РУССКИЙ
6
Описание
Магнитола (Рис. 1)
. отсек для дисков
2. USB-разъем
3. разъем для SD/MMC-карты
. кнопка STANDBY
. кнопка остановки воспроизведения STOP
6. кнопка увеличения уровня громкости
VOLUME +
7. кнопка уменьшения уровня громкости
VOLUME -
8. кнопка переключения функций FUNCTION
9. кнопка включения таймера TIMER
0. кнопка запоминания установленных ра-
диостанций/настройки часов MEMORY/
CLK-ADJ
. кнопка повтора воспроизведения/выбора
режима моно-стерео REPEAT/MONO-ST
2. кнопка настройки тюнера/перехода к
предыдущему треку TUNING /SKIP
3. кнопка настройки тюнера/перехода к
следующему треку TUNING /SKIP
. кнопка воспроизведения/приостановки
PLAY/PAUSE
, 6. кнопки предварительных установок/
переключения папок PRESET/FOLDER
и
7. кнопка установки режимов эквалайзера/
усиления низких частот EQ/BBS
8. кнопка переключения диапазонов/отоб-
ражения текстовой информации о файле
BAND/ID3
9. кнопка приостановки воспроизведения
кассеты PAUSE
20. кнопка остановки/извлечения кассеты
STOP/EJ
2. кнопка ускоренной перемотки кассеты
вперед F.FWD
22. кнопка ускоренной перемотки кассеты
назад REWIND
23. кнопка воспроизведения кассеты PLAY
2. кнопка записи RECORD
2. местоположение фотоприемника сигна-
лов от пульта дистанционного управления
SENSOR
26. индикатор режима ожидания STANDBY
27. LCD-дисплей
28. левый динамик
29. правый динамик
30. кассетоприемник
3. крышка батарейного отсека
32. гнездо для подключения стереонаушников
33. разъем AUX in
3. гнездо для подключения к электросети
3. FM-антенна
Пульт дистанционного управления (Рис. 2)
. кнопка STANDBY
Во время работы магнитолы нажмите
кнопку STANDBY. Магнитола перейдет
в режим ожидания, индикатор режима
ожидания STANDBY загорится красным
цветом.
Для возврата к нормальному режиму ра-
боты нажмите кнопку STANDBY еще раз.
2. кнопка переключения функций FUNC
3. кнопка переключения диапазонов BAND
. кнопка повтора воспроизведения/выбора
режима моно-стерео REPEAT/MONO-ST
. кнопка включения будильника/таймера
TIMER/SLEEP
6. кнопка настройки тюнера/перехода к
предыдущему треку TUNING /SKIP
7. кнопка остановки/приостановки воспроизведения PLAY/PAUSE
8. кнопка остановки воспроизведения STOP
9. кнопка выключения звука MUTE:
a. нажмите кнопку для выключения звука,
b. для включения звука нажмите кнопку еще
раз
0. кнопка воспроизведения треков в произ-
вольном порядке RANDOM
. кнопка настройки тюнера/перехода к
следующему треку TUNING /SKIP
2. кнопка увеличения уровня громкости (▲)
3. кнопка уменьшения уровня громкости
(▼)
. инфракрасный (ИК) излучатель
. батарейный отсек
ПОДКЛЮЧЕНИЕ ПИТАНИЯ
Питание от сети
Перед подключением устройства к сети
убедитесь, что напряжение в электрической
сети соответствует рабочему напряжению
устройства.
. Для подключения магнитолы к сети
вставьте один конец сетевого шнура в
гнездо (3, Рис. ) а другой – в розетку.
Загорится индикатор режима ожидания
STANDBY.
2. Чтобы включить магнитолу, нажмите
3960IM.indd 16 12.10.2007 15:50:45
Page 17
РУССКИЙ
7
кнопку STANDBY, при этом загорится
LCD-дисплей, а индикатор режима ожи-
дания STANDBY погаснет.
Примечание: статическое электричество может привести к помехам в работе устройства.
В этом случае отключите устройство от источников питания, а затем подключите снова.
Если проблема не исчезнет, обратитесь в
ближайший сервисный центр.
Питание от батареек
. Отключите магнитолу от сети.
2. Откройте крышку батарейного отсека (3,
Рис. ) сзади магнитолы, нажав на две
защелки в направлении по стрелке.
3. Вставьте 2 батарейки UM-3/«AA» (не вхо-
дят в комплект поставки) в батарейный
отсек для поддержки памяти устройства.
Вставьте 8 батареек UM-2/«С» (не входят
в комплект поставки) в батарейный отсек
основного питания устройства.
. Закройте крышку батарейного отсека.
Использование пульта дистанционного
управления
Вставьте 2 батарейки UM-/«AAA» (не входят
в комплект поставки) в батарейный отсек
пульта дистанционного управления.
При использовании пульта дистанционного
управления направляйте его на инфракрасный датчик на вашей магнитоле SENSOR.
Если пульт дистанционного управления перестал работать, проверьте батарейки, и при
необходимости замените их.
Не подвергайте пульт дистанционного управления воздействию повышенной температуры и прямого солнечного света, это может
негативно сказаться на его работе.
Внимание!
Протечка батареек питания может стать причиной травм или повреждения устройства.
Чтобы избежать повреждения батареек, следуйте приведенным ниже инструкциям:
- устанавливайте батарейки правильно,
соблюдая полярность в соответствии с
обозначениями на устройстве;
- не используйте вместе разные батарейки
(старые и новые, разных типов и т.п.);
- вынимайте батарейки, если устройство
не будет использоваться в течение дли-
тельного времени;
- своевременно меняйте батарейки.
УСТАНОВКА ВРЕМЕНИ
Вы можете установить время, когда магнитола находится в режиме ожидания.
. Нажмите один раз кнопку MEMORY/CLK-
ADJ. На LCD-дисплее начнет мигать
индикация часов. При помощи кнопки
TUNING /SKIP или TUNING /SKIP
установите часы.
2. Нажмите еще раз кнопку MEMORY/CLKADJ. На LCD-дисплее начнет мигать
индикация минут. При помощи кнопки
TUNING /SKIP или TUNING
/SKIP установите минуты.
3. Нажмите кнопку MEMORY/CLK-ADJ еще
раз для сохранения установленного значения.
Примечание: при отключении питания или
разрядке (или отсутствия) батареек резервного питания показания текущего времени
будут сброшены. При возобновлении подачи
электричества индикация времени будет
постоянно мигать. В этом случае требуется
повторная установка текущего времени.
УСТАНОВКА БУДИЛЬНИКА
Вы можете настроить вашу магнитолу таким
образом, чтобы каждый день в установленное время включался и автоматически
выключался будильник, в качестве источника
звуковых сигналов которого можно использовать диск, радио или кассету, а также устройства, подключаемые к разъемам USB и
SD/MMC.
Примечание: если в качестве источника
звукового сигнала выбрана кассета, сначала
нужно нажать кнопку PLAY (23, Рис ).
. Установка времени включения будильника.
В режиме текущего времени нажмите
один раз кнопку TIMER на магнитоле. На
LCD-дисплее появится индикация «ON
TIME», а символы «TIMER» будут постоянно мигать.
3960IM.indd 17 12.10.2007 15:50:45
Page 18
РУССКИЙ
8
Установите время включения будильника,
как описано в разделе УСТАНОВКА ВРЕМЕНИ.
2. Установка времени выключения будильника.
Нажмите еще раз кнопку TIMER. На LCDдисплее появится индикация «OFF TIME»,
а символы «TIMER» будут постоянно мигать.
Установите время выключения будильника, как описано в разделе УСТАНОВКА
ВРЕМЕНИ.
3. Установка источника звукового сигнала.
Нажмите еще раз кнопку TIMER. На LCDдисплее отобразятся символы текущего
режима (например, TUNER).
Нажмите сначала кнопку MEMORY/CLKADJ, затем выберите источник звукового
сигнала, последовательно нажимая
TUNING /SKIP или TUNING /SKIP
. Нажмите кнопку MEMORY/CLK-ADJ
еще раз для сохранения выбранного источника звукового сигнала.
. Установка уровня громкости будильника.
Нажмите еще раз кнопку TIMER. На LCDдисплее появится предыдущий уровень
громкости (например, VOL 20).
Нажмите сначала кнопку MEMORY/CLKADJ, затем установите желаемый уровень
громкости, последовательно нажимая
TUNING /SKIP или TUNING /SKIP
. Для ввода установленного уровня
громкости нажмите еще раз кнопку
MEMORY/CLK-ADJ.
Примечание: уровень громкости можно
изменять в диапазоне от 0 до 0.
. Включение будильника.
Нажмите кнопку TIMER/SLEEP на пульте
дистанционного управления. На LCDдисплее отобразятся символы «TIMER».
По достижении установленного времени
будильник автоматически включится. Для
выключения будильника нажмите кнопку
STANDBY.
6. Отключение будильника.
Нажмите еще раз кнопку TIMER/SLEEP на
пульте дистанционного управления. Символы «TIMER» исчезнут.
Установка времени выключения магнитолы
(только при помощи кнопок на пульте дистанционного управления)
Вы можете установить время выключения
магнитолы (максимум 90 минут).
. В режиме прослушивания радио/вос-
произведения музыки нажмите кнопку
TIMER/SLEEP на пульте дистанционного
управления. На LCD-дисплее появится индикация минут «90», а индикатор
«SLEEP» будет мигать.
2. Для изменения времени нажмите и удерживайте кнопку TIMER/SLEEP на пульте
дистанционного управления. Вы можете
установить время выключения магнитолы
в интервале от 0 до 90 минут с шагом 0
минут.
3. По достижении установленного времени
магнитола автоматически выключится.
. Для отключения таймера нажмите еще
раз кнопку TIMER/SLEEP на пульте
дистанционного управления. Символы
«SLEEP» исчезнут. Для выключения магнитолы нажмите кнопку STANBY.
Установка эквалайзера/усиления низких
частот
Вы можете выбрать один из пяти предварительно запрограммированных режимов эквалайзера: FLAT, JAZZ, ROCK, CLASSIC или POP.
. При прослушивании музыки выберите
желаемый режим, последовательно нажимая кнопку EQ/BBS. На LCD-дисплее
будут последовательно отображаться
символы режимов: FLAT, JAZZ, ROCK,
CLASSIC, POP.
2. Для усиления низких частот нажмите и
удерживайте кнопку EQ/BBS не менее
двух секунд. На LCD-дисплее отобразятся символы «X BAS ON».
Для отключения усиления низких частот
нажмите и удерживайте кнопку EQ/BBS
не менее двух секунд. На LCD-дисплее
отобразятся символы «X BAS OFF».
3960IM.indd 18 12.10.2007 15:50:46
Page 19

РУССКИЙ
9
Выключение звука
(только при помощи кнопок на пульте дистанционного управления)
Для выключения звука нажмите кнопку MUTE
на пульте дистанционного управления.
Гнездо для наушников
Для прослушивания музыки через наушники
(в комплект поставки не входят) подключите
их к гнезду (32, Рис ). При помощи кнопки
VOLUME или отрегулируйте уровень
громкости. При подключении наушников
динамики магнитолы отключатся автоматически.
Радиоприемник
Данная магнитола имеет систему электронной цифровой настройки. Кроме этого, вы
можете настроить и сохранить 20 станций в
каждом из диапазонов FM и MW (AM).
Прием радиостанций
. Включите магнитолу, нажав кнопку
STANDBY.
2. Для выбора режима TUNER последовательно нажимайте кнопку FUNCTION.
На LCD-дисплее отобразятся символы
«TUNER».
3. Для выбора диапазона FM или MW (AM)
нажмите кнопку BAND на пульте дистанционного управления.
. Настройте радиостанцию.
Вручную: для выбора желаемой радиостанции последовательно нажимайте
кнопку TUNING /SKIP или TUNING
/SKIP .
Автоматически: удерживайте нажатой
кнопку TUNING /SKIP или TUNING
/SKIP более одной секунды; тюнер
начнет сканирование и автоматически
остановит сканирование при нахождении
сильного сигнала от радиостанции.
. Переключение режимов MONO/STEREO.
Если стереосигнал, получаемый от FMрадиостанции, слабый, то для улучшения качества звучания нажмите кнопку
REPEAT/MONO-ST, и магнитола переключится в режим моно.
АНТЕННА
Для наилучшего приема в диапазоне FM
выдвиньте полностью антенну (3, Рис ) и
сориентируйте ее под нужным углом. Для
приема в диапазоне AM магнитола имеет
встроенную антенну, для наилучшего приема
в диапазоне AM попробуйте несколько вариантов размещения магнитолы.
ПРОГРАММИРОВАНИЕ Радиостанций
Вы можете настроить и сохранить 20 станций
в каждом из диапазонов FM и MW (AM).
. Выберите частотный диапазон и настрой-
те станцию, которую вы хотите запрограммировать.
2. Нажмите кнопку MEMORY/CLK-ADJ. В течение трех секунд на LCD-дисплее будут
мигать символы «MEMORY» и индикатор
канала «00».
3. При помощи кнопки PRESET/FOLDER
или выберите номер канала от до
20, под которым вы хотите сохранить радиостанцию.
. Нажмите кнопку MEMORY/CLK-ADJ еще раз,
чтобы сохранить сделанные установки.
. Повторите пункты - для всех радио-
станций, частоты которых вы хотите сохранить в памяти магнитолы.
Примечание: вы должны выбрать номер
канала, пока мигают символы MEMORY,
иначе станция не сохранится в памяти
магнитолы. Если индикатор погаснет до
того, как вы выберите номер канала, повторите пункты -.
ВЫЗОВ из памяти ПРЕДВАРИТЕЛЬНО ЗАПРОГРАММИРОВАННЫХ РАДИОСТАНЦИЙ
Для вызова предварительно запрограммированных радиостанций выберите соответствующий частотный диапазон - FM или MW
(AW) - и последовательно нажимайте кнопку
PRESET/FOLDER или для выбора нужной радиостанции.
3960IM.indd 19 12.10.2007 15:50:46
Page 20

РУССКИЙ
20
Примечание: предварительно запрограммированные станции хранятся в памяти магнитолы, пока она включена в сеть или не разрядятся батареи резервного питания. В случае
отключения питания или разрядки (или
отсутствия) батареек резервного питания
предварительно установленные радиостанции будут удалены из памяти. Необходимо
запрограммировать их заново.
ВОСПРОИЗВЕДЕНИЕ CD-дисков
Загрузка – откройте отсек для дисков. Установите CD-диск и закройте крышку отсека.
Извлечение – после остановки воспроизведения откройте крышку отсека для диска и
извлеките диск. Уберите диск в футляр.
Всегда закрывайте крышку отсека для дисков
для предотвращения попадания в него пыли.
Всегда извлекайте диск из отсека, если он не
воспроизводится.
. Включите магнитолу, нажав кнопку
STANDBY.
2. Выберите режим воспроизведения CDдисков. Для этого последовательно нажимайте кнопку FUNCTION, пока на LCDдисплее не отобразятся символы «CD».
3. Откройте отсек для CD. Установите
CD-диск и закройте крышку отсека. Устройство начнет чтение диска, при этом
на LCD-дисплее отобразятся символы.
«READING». Затем на LCD-дисплее отобразится число треков и общее время воспроизведения.
Track Number – число треков, Playing Time
– время воспроизведения
Если после установки CD-диска в отсек на
LCD-дисплее отобразятся индикаторы «NO
DISC», проверьте правильность установки
диска. Диск должен быть установлен этикеткой вверх.
. Для воспроизведения диска с первого
трека нажмите кнопку PLAY/PAUSE.
Вы можете выбрать трек, который будет
воспроизводиться первым. Для этого выберите трек при помощи кнопки TUNING
/SKIP или TUNING /SKIP , затем
нажмите кнопку PLAY/PAUSE.
. Для приостановки воспроизведения
нажмите кнопку PLAY/PAUSE. Символы
«PLAY» и время воспроизведения будут
постоянно мигать. Для возврата к режиму
воспроизведения нажмите данную кнопку еще раз.
6. Для остановки воспроизведения нажмите
кнопку STOP.
Примечание: если крышка отсека для дисков
открыта, на LCD-дисплее будут отображаться
символы «OPEN».
ПРОГРАММИРОВАНИЕ ВОСПРОИЗВЕДЕНИЯ
Вы можете запрограммировать воспроизведение треков (максимум 60) в желаемом
порядке.
. Включите магнитолу, нажав кнопку
STANDBY.
2. Откройте отсек для дисков. Установите
диск и закройте крышку отсека.
3. Когда воспроизведение диска остановлено, нажмите кнопку MEMORY/CLK-ADJ.
На LCD-дисплее будут мигать символы
«MEMORY», а на дисплее будут отображаться номер трека на диске «0» и его
номер при программировании «P-0».
Выберите желаемый трек, последовательно нажимая кнопку TUNING /SKIP
или TUNING /SKIP . Для сохране-
ния выбранного трека нажмите кнопку
MEMORY/CLK-ADJ. Индикатор программирования изменится на «Р-2».
. Программирование следующего трека:
выберите следующий трек, последовательно нажимая кнопку TUNING /SKIP
или TUNING /SKIP . Затем нажмите
кнопку MEMORY/CLK-ADJ для сохранения
выбранного трека в памяти. Вы можете
запрограммировать максимум 60 треков
Последовательно нажимая кнопку
3960IM.indd 20 12.10.2007 15:50:47
Page 21

РУССКИЙ
2
MEMORY/CLK-ADJ, вы можете просмотреть список запрограммированных треков.
Для воспроизведения нажмите кнопку
PLAY/PAUSE. Для остановки воспроизведения нажмите кнопку STOP.
Для отмены запрограммированного воспроизведения нажмите кнопку STOP, когда воспроизведение диска остановлено,
или откройте крышку отсека для дисков.
ПОВТОР ВОСПРОИЗВЕДЕНИЯ
Данная функция позволяет повторять все
треки на диске или запрограммированные
треки.
. Для повтора одного трека нажмите один
раз кнопку REPEAT/MONO-ST, на LCDдисплее отобразятся символы «REPEAT».
2. Для повтора всех треков нажмите два раз
кнопку REPEAT/MONO-ST, на LCD-дисплее отобразятся символы «REPEAT ALL».
3. Для отмены повтора воспроизведения
нажимайте кнопку REPEAT/MONO-ST до
тех пор, пока символы повтора не исчезнут.
ВОСПРОИЗВЕДЕНИЕ В ПРОИЗВОЛЬНОМ
ПОРЯДКЕ
Вы можете воспроизводить все треки на диске в произвольном порядке.
. Нажмите один раз кнопку RANDOM на
пульте дистанционного управления,
на LCD-дисплее отобразятся символы
«RANDOM», начнется воспроизведение
треков в произвольном порядке.
2. Для отмены воспроизведения в произвольном порядке нажмите еще раз кнопку RANDOM на пульте дистанционного
управления, символы «RANDOM» исчезнут.
ВОСПРОИЗВЕДЕНИЕ МР3-ДИСКА
Данное устройство может воспроизводить
большинство дисков, записанных в формате
MP3, но бывают случаи, когда диск не воспроизводится из-за настроек программного
обеспечения, которое использовалось при
записи диска.
. Включите магнитолу, нажав кнопку
STANDBY.
2. Выберите режим воспроизведения
дисков. Для этого последовательно нажимайте кнопку FUNCTION, пока на LCDдисплее не отобразятся символы «CD».
3. Откройте отсек для дисков. Установите
MP3-диск и закройте крышку отсека. Устройство начнет чтение диска, при этом
на LCD-дисплее отобразятся символы
«READING». Затем на LCD-дисплее отобразится число папок и треков на диске.
TotalFolder – всего папок, Total Track – всего
треков
. Для воспроизведения диска с первого
трека нажмите кнопку PLAY/PAUSE.
First Track – первый трек, Playing Time – время воспроизведения
. Вы можете выбрать трек, который будет
воспроизводиться первым. Для этого выберите трек при помощи кнопки TUNING
/SKIP или TUNING /SKIP
либо, когда воспроизведение диска
остановлено, нажмите кнопку PRESET/
FOLDER или для выбора нужной
папки, затем выберите трек при помощи
кнопки TUNING /SKIP или TUNING
/SKIP .
Нажмите кнопку PLAY/PAUSE для воспроизведения.
3960IM.indd 21 12.10.2007 15:50:48
Page 22

РУССКИЙ
22
Folder Number – номер папки, Track Number
– номер трека
6. Нажмите кнопку ID3 во время воспроизведения MP3-диска. На LCD-дисплее
отобразится название песни и альбома.
При нажатии два раза на кнопку ID3 на
дисплее будет отображаться информация в виде бегущей строки.
Информация, отображаемая на LCD-дисплее, может отличаться из-за различных
настроек программного обеспечения.
Теги на русском языке могут отображаться некорректно.
7. Для приостановки воспроизведения
нажмите кнопку PLAY/PAUSE. Символы
«PLAY» и время воспроизведения будут
постоянно мигать. Для возврата к режиму
воспроизведения нажмите данную кнопку еще раз.
Track Number – номер трека, PlayingTime
– время воспроизведения
8. Для остановки воспроизведения нажмите
кнопку STOP. На LCD-дисплее отобразится число папок и треков на диске.
ПРОГРАММИРОВАНИЕ ВОСПРОИЗВЕДЕНИЯ
Вы можете запрограммировать воспроизведение треков (максимум 60) в желаемом
порядке.
. Включите магнитолу, нажав кнопку
STANDBY. Откройте отсек для дисков.
Установите МР3-диск и закройте крышку
отсека. Когда воспроизведение диска
остановлено, нажмите кнопку MEMORY/
CLK-ADJ. На LCD-дисплее будут мигать
символы «MEMORY», а на дисплее будут
отображаться номер трека на диске «0» и
его номер при программировании «P-0».
2. Выберите желаемый трек, последова-
тельно нажимая кнопку TUNING /SKIP
или TUNING /SKIP , либо нажмите
кнопку PRESET/FOLDER или для
выбора нужной папки, затем выберите
трек при помощи кнопки UNING /SKIP
или TUNING /SKIP .
3. Для сохранения выбранного трека нажмите кнопку MEMORY/CLK-ADJ. Индикатор программирования изменится на
«Р-2».
. Повторите пункты -3 для программи-
рования следующего трека. Вы можете
запрограммировать максимум 60 треков.
. Последовательно нажимая кнопку
MEMORY/CLK-ADJ, вы можете просмотреть список запрограммированных треков.
6. Для воспроизведения нажмите кнопку
PLAY/PAUSE. Для приостановки воспроизведения нажмите данную кнопку еще
раз.
7. Для остановки воспроизведения нажмите
кнопку STOP.
Для отмены запрограммированного вос-
произведения нажмите кнопку STOP, когда воспроизведение диска остановлено,
или откройте крышку отсека для дисков.
ПОВТОР ВОСПРОИЗВЕДЕНИЯ
Данная функция позволяет повторять треки
на МР3-диске.
. Для повтора одного трека нажмите один
раз кнопку REPEAT/MONO-ST, на LCDдисплее отобразятся символы «REPEAT».
2. Для повтора всей папки нажмите два
раз кнопку REPEAT/MONO-ST, на LCDдисплее отобразятся символы «REPEAT
FOLDER».
3960IM.indd 22 12.10.2007 15:50:48
Page 23

РУССКИЙ
23
3. Для повтора всех треков на МР3-диске
нажмите три раз кнопку REPEAT/MONOST, на LCD-дисплее отобразятся символы
«REPEAT ALL».
. Для отмены повтора воспроизведения
нажимайте кнопку REPEAT/MONO-ST,
пока символы повтора не исчезнут.
ВОСПРОИЗВЕДЕНИЕ КАССЕТЫ
. Включите магнитолу, нажав кнопку
STANDBY. Для выбора режима TAPE
последовательно нажимайте кнопку
FUNCTION, пока на LCD-дисплее не отобразятся символы «TAPE».
2. Нажмите кнопку STOP/EJ и вставьте кассету в кассетоприемник.
3. Закройте кассетоприемник.
. Для воспроизведения кассеты нажмите
кнопку PLAY.
. При помощи кнопки VOLUME или
отрегулируйте уровень громкости.
6. Для приостановки воспроизведения используйте кнопку PAUSE.
7. Для остановки воспроизведения нажмите
кнопку STOP/EJ.
8. Для ускоренной перемотки вперед/назад
используйте кнопки F.FWD/REWIND соответственно.
9. По окончании проигрывания кассеты
воспроизведение кассеты автоматически
прекратится.
0. Для извлечения кассеты нажмите кнопку
STOP/EJ, извлеките кассету из кассетоприемника.
Предупреждение! Чтобы избежать повреждения кассетного механизма или ленты, пос-
ле каждой операции обязательно нажимайте
кнопку STOP/EJ.
ЗАПИСЬ С РАДИОПРИЕМНИКА
. Настройтесь на желаемую радиостан-
цию, следуя инструкциям в разделе РАДИОПРИЕМНИК.
2. Вставьте чистую кассету в кассетоприемник.
3. Нажмите кнопку PAUSE.
. Нажмите кнопку RECORD, автоматически
будет нажата кнопка PLAY. Вы можете
регулировать уровень громкости, не опасаясь испортить качество записи.
. Нажмите кнопку PAUSE для начала запи-
си.
6. Для временной приостановки записи нажмите кнопку PAUSE. Для возобновления
записи нажмите данную кнопку еще раз.
7. Для остановки записи нажмите кнопку
STOP/EJ. Когда кассета будет записана
до конца, запись автоматически прекратится.
Запись с других музыкальных источников
Вы можете записывать с других музыкальных источников, например с CD-диска или
USB-устройства. Включите желаемый музыкальный источник и следуйте инструкциям в
разделе ЗАПИСЬ С РАДИОПРИЕМНИКА.
USB-устройства
. Включите магнитолу, нажав кнопку
STANDBY.
2. Для выбора режима работы с USB-устройством последовательно нажимайте
кнопку FUNCTION, пока на LCD-дисплее
не отобразятся символы «USB».
3. Вставьте USB-устройство (например,
портативный МРЗ-плейер или флэшноситель) в USB-разъем (2, Рис. ). На
LCD-дисплее отобразится число папок и
треков.
Total Folder – всего папок, Total Track – всего
треков
Примечание: если к USB-разъему не подключен ни портативный МРЗ-плейер, ни флэш-
3960IM.indd 23 12.10.2007 15:50:49
Page 24

РУССКИЙ
2
носитель, на LCD-дисплее отобразятся символы «NO DEV».
. Для воспроизведения нажмите кнопку
PLAY/PAUSE.
. Кнопки управления и последовательность
действий при работе с USB-устройством
аналогичны кнопкам управления и последовательности действий при работе с МР3диском. Следуйте инструкциям в разделе
ВОСПРОИЗВЕДЕНИЕ МР3-ДИСКА.
Карты памяти SD
. Включите магнитолу, нажав кнопку
STANDBY.
2. Для выбора режима работы с картой
памяти SD последовательно нажимайте
кнопку FUNCTION, пока на LCD-дисплее
не отобразятся символы «SD».
3. Вставьте карту памяти SD/MMC в разъем
(3, Рис ). На LCD-дисплее отобразится
число папок и треков.
Total Folder – всего папок, Total Track – всего
треков
Примечание: если к разъему (3, рис. ) не
подключено никакой карты SD/MMC, на LCDдисплее отобразятся символы «NO SD».
. Для воспроизведения нажмите кнопку
PLAY/PAUSE.
. Кнопки управления и последовательность
действий при работе с картой памяти
аналогичны кнопкам управления и последовательности действий при работе с МР3диском. Следуйте инструкциям в разделе
ВОСПРОИЗВЕДЕНИЕ МР3-ДИСКА.
Технические характеристики
Потребляемая
мощность
AC 230V/0Hz
Масса 2.7Kg
Габариты Д 30 x Ш 239 x В6мм
Выходная мощность 2 x 2Вт RMS/ канал
Динамики 2-х полосные:
. 3’’ 8 Ohms 3W x2pcs
(средние)
2. 2’’ 8 Ohms 0.W x2pcs
(твитер)
Время работы от
элементов питания
8 часов
Форматы CD CD,CD-R ,CD-RW, MP3
Диапазон
воспроизводимых
частот
20Hz ~20KHz
Отношение сигнал/
шум
дБ
Коэффициент
нелинейных искажений
<%
FM/MW (AM) FM: 6~08 MHz
Диапазон частот AM : 22~620 KHz
Промежуточная
частота
FM: 0.7MHz
AM: 0 kHz
Антенна FM: телескоп. антенна
AM: встроенная
ферритовая антенна
Кассетная дека 6 клавиш; запись одной
кнопкой
Производитель сохраняет за собой право изменять
дизайн и технические характеристики прибора без
предварительного уведомления.
Срок службы устройства не менее 3-х лет
Утилизация электронных и электрических устройств (применяется в странах Евросоюза и других
странах Европы, в которых существует система
разделения отходов)
Данный символ обозначает, что электрические и электронные устройства должны
утилизироваться по истечению срока служ-
бы отдельно от другого бытового мусора.
Правильная утилизация старого оборудования
может предотвратить вредное воздействие на окружающую среду. Для получения более подробных
сведений обратитесь в службу, занимающуюся
утилизацией, или в магазин, где был приобретен
продукт.
Данное изделие соответствует всем требуемым европейским и российским
стандартам безопасности и гигиены.
Производитель: АН-ДЕР ПРОДАКТС ГмбХ, Австрия
Нойбаугюртель 38/7А, 070 Вена, Австрия
3960IM.indd 24 12.10.2007 15:50:49
Page 25

УКРАЇНЬСКИЙ
2
МАГНІТОЛА З CD/МР3 ПРОГРАВАЧЕМ VT-3960BK
ІНСТРУКЦІЯ З ЕКСПЛУАТАЦІЇ
Перед увімкненням, використанням та налаштуванням пристрою уважно прочитайте інструкцію. Необхідно дотримуватися всіх попереджень і рекомендацій з експлуатації приладу, наведених у цьому посібнику.
Збережіть посібник, використовуйте його надалі як довідковий матеріал.
УВАГА!
ження електричним струмом! НЕ РОЗКРИВАТИ!
Застереження: Для уникнення ризику виникнення пожежі чи ураження електричним струмом
не піддавайте пристрій впливу дощу або вологи.
Щоб запобігти удару електричним струмом не відкривайте корпус приладу самостійно.
Сервісне обслуговування має здійснюватися тільки кваліфікованими фахівцями сервісних
центрів.
Позначка із зображенням блискавки в рівносторонньому трикутнику застерігає
користувача про наявність небезпечної напруги всередині корпусу пристрою, що
може призвести до ураження електричним струмом.
Зображення знака оклику в рівносторонньому трикутнику звертає увагу
користувача на наявність важливих рекомендацій щодо експлуатації та технічного
обслуговування в інструкції з експлуатації.
CLASS 1 LASER PRODUCT
Цей продукт класифікується як ЛАЗЕРНИЙ ПРИСТРІЙ КЛАСУ . Відповідна етикетка знаходиться на задній панелі приладу та означає, що пристрій використовує лазерні промені.
Імовірність лазерного опромінення відсутня без розкриття приладу. ОБСЛУГОВУВАННЯ ПРИСТРОЮ ПОВИННЕ ПРОВОДИТИСЯ ВИКЛЮЧНО КВАЛІФІКОВАНИМИ ФАХІВЦЯМИ СЕРВІСНОГО ЦЕНТРУ.
ЗАХОДИ БЕЗПЕКИ
Підключення до джерел живлення
Перевірте, чи відповідає напруга в електричній мережі робочій напрузі пристрою.
Забороняється занурювати прилад у воду. Щоб уникнути виникнення пожежі або ураження
електричним струмом не розміщайте цей пристрій в умовах підвищеної вологості (біля ванн,
тазів з водою, кухонних раковин, пральних машин, поруч із плавальним басейном, у сирих
підвалах і т.д.) Не допускайте попадання на пристрої крапель або бризок. Забороняється ставити на пристрій заповнені рідиною предмети (наприклад, вази).
Не допускайте перевантаження розеток або подовжувачів, тому що це може спричинити пожежу або ураження електричним струмом.
Встановіть цей пристрій таким чином, щоб у випадку несправності вилку мережевого шнуру
можна було негайно вийняти з розетки. Мережеві шнури не повинні бути натягнуті там, де
вони виходять із пристрою; їх необхідно прокладати так, щоб вони не заплутувалися, щоб на
3960IM.indd 25 12.10.2007 15:50:50
Page 26

УКРАЇНЬСКИЙ
26
них не були встановлені які-небудь предмети.
Не використовуйте мережевих подовжувачів,
які не дозволені виробником пристрою, тому
що це може бути небезпечним.
Для додаткового захисту пристрою під час
грози, а також у тих випадках, коли ви не збираєтеся використовувати його протягом тривалого часу, відключіть його від розетки електромережі. Це виключить вихід пристрою
з ладу через удари блискавки або стрибки
напруги в електромережі.
Для від'єднання мережевого шнуру беріться
безпосередньо за мережеву вилку, у жодному разі не тягніть за шнур
Не змазуйте рухливі частини пристрою
Задля уникнення ураження електричним
струмом не відкривайте корпус пристрою самостійно. Не ремонтуйте прилад і не вносьте
в нього змін. Сервісне обслуговування повинне здійснюватися тільки кваліфікованими
фахівцями сервісних центрів.
Установка пристрою
Установіть пристрій у місцях з достатньою
вентиляцією. Цей пристрій не слід розміщати
у вбудованих меблях (у книжкових полицях
або стінних шафах), якщо в них не можна забезпечити достатньої вентиляції.
При розміщенні пристрою на ліжку, дивані,
софі, килимі або на інших подібних предметах обстановки необхідно простежити за тим,
щоб вентиляційні щілини й отвори не були
закриті, оскільки вони забезпечують надійну
роботу пристрою й захищають його від перегріву.
Не розміщайте пристрій поблизу джерел тепла, наприклад, радіаторів, електрообігрівачів,
духовок чи інших пристроїв, що є джерелами
тепла (у тому числі й підсилювачів), а також у
місцях, що перебувають під впливом прямих
сонячних променів, надмірного запилення
або механічних ударів. Не піддавайте прилад
впливу температури вище 3ºС.
Пристрій необхідно розмістити на рівній
стійкій поверхні, подалі від устаткування із
сильними магнітними полями, наприклад від
відео-, аудіомагнітофонів, радіоприймачів
або великих колонок, тому що силові лінії
магнітного поля від цих пристроїв можуть
викликати шуми у звуці.
Не кладіть на пристрій важкі предмети.
Будьте особливо уважні, якщо поруч із
увімкненим приладом перебувають діти або
особи з обмеженими можливостями, не залишайте їх без нагляду.
Сторонні предмети
Не допускайте потрапляння яких-небудь
сторонніх предметів через отвори в корпусі
пристрою, це може викликати займання
пристрою й ураження електричним струмом.
Якщо це відбулося, від’єднайте пристрій від
мережі і для подальшого його використання
зверніться до сервісного центру.
Ушкодження, що вимагають ремонту
В описаних нижче ситуаціях необхідно
вимкнути пристрій з розетки й звернутися
до кваліфікованого персоналу для ремонту
пристрою:
a) Мережевий шнур або вилка ушкоджені.
b) У пристрій потрапили сторонні предмети.
c) Пристрій потрапив під дощ або на нього
розлили воду.
d) Пристрій не працює нормально.
e) Пристрій упав або був ушкоджений яким-
небудь іншим чином.
f) Помітні явні зміни в роботі пристрою.
Примітка: Якщо в приміщенні, де експлуатується пристрій, перебувають енергозберігаючі лампи, можлива нестабільна робота
пристрою
Догляд за пристроєм
Перед чищенням вимкніть пристрій з розетки. Для чищення пристрою використовуйте
вологу м'яку тканину. Передню панель можна
протирати вологою м'якою тканиною, змоченою в мильному розчині. Забороняється
використовувати для цих цілей рідкі або аерозольні засоби для чищення
Догляд за дисками
Не використовуйте тріснуті або деформовані
диски, це може викликати поломку при-
3960IM.indd 26 12.10.2007 15:50:50
Page 27

УКРАЇНЬСКИЙ
27
строю.
Беріть диск тільки за краї. Не доторкайтеся
до робочої поверхні диска. Пил, подряпини
або відбитки пальців на робочій поверхні диска можуть призвести до виходу його з ладу.
Не піддавайте диски впливу прямих сонячних
променів, джерел тепла, високої температури й вологості.
Після використання приберіть диск у футляр
на зберігання
Періодично протирайте робочу поверхню
диска м'якою тканиною від центру до країв.
Не користуйтеся звичайними мийними засобами
ОПИС
Магнітола (Рис. 1)
. відсік для дисків
2. USB-роз’єм
3. роз'єм для SD/MMC карти
. кнопка STANDBY
. кнопка зупинки програвання STOP
6. кнопка збільшення рівня гучності
VOLUME
7. кнопка зменшення рівня гучності
VOLUME
8. кнопка перемикання функцій FUNCTION
9. кнопка увімкнення таймера TIMER
0. кнопка запам'ятовування встановлених
радіостанцій/ налаштування годинника
MEMORY/CLK-ADJ
. кнопка повторення програвання /вибору
режиму моно-стерео REPEAT/MONO-ST
2. кнопка налаштування тюнера/переходу
до попереднього треку TUNING /SKIP
3. кнопка налаштування тюнера/переходу
до наступного треку TUNING /SKIP
. кнопка програвання/призупинення PLAY/
PAUSE
, 6. кнопки попередніх налаштувань/
перемикання папок PRESET/FOLDER
і
7. кнопка встановлення режимів
еквалайзера/підсилення низьких частот
EQ/BBS
8. кнопка перемикання діапазонів/
відображення текстової інформації про
файл BAND/ID3
9. кнопка призупинення програвання касети
PAUSE
20. кнопка зупинки/вилучення касети STOP/EJ
2. кнопка прискореного перемотування
касети вперед F.FWD
22. кнопка прискореного перемотування
касети назад REWIND
23. кнопка програвання касети PLAY
2. кнопка запису RECORD
2. місце розташування фотоприймача
сигналів від пульта дистанційного
керування SENSOR
26. індикатор режиму очікування STANDBY
27. LCD-дисплей
28. лівий динамік
29. правий динамік
30. касетоприйомник
3. кришка батарейного відсіку
32. гніздо для підключення стереонавушників
33. роз'єм AUX in
3. гніздо для підключення до електромережі
3. FM -антена
Пульт дистанційного керування (рис. 2)
. кнопка STANDBY
Під час роботи магнітоли натисніть на
кнопку STANDBY. Магнітола перейде в
режим очікування, індикатор режиму очікування STANDBY загориться червоним
кольором.
Для повернення до нормального режиму
роботи натисніть кнопку STANDBY ще раз
2. кнопка перемикання функцій FUNC
3. кнопка перемикання діапазонів BAND
. кнопка повторення програвання/вибору
режиму моно-стерео REPEAT/MONO ST
. кнопка увімкнення будильника/таймера
TIMER/SLEEP
6. кнопка налаштування тюнера/переходу
до попереднього треку TUNING /SKIP
7. кнопка зупинки/призупинення програвання PLAY/PAUSE
8. кнопка зупинки програвання STOP
9. кнопка вимкнення звуку MUTE
a. Натисніть кнопку для вимкнення звуку
b. Для увімкнення звуку натисніть кнопку ще
раз
0. кнопка програвання треків у довільному
порядку RANDOM
. кнопка налаштування тюнера/переходу
до наступного треку TUNING /SKIP
2. кнопка збільшення рівня гучності (▲)
3. кнопка зменшення рівня гучності (▼)
. інфрачервоний (ІЧ) випромінювач
. батарейний відсік
3960IM.indd 27 12.10.2007 15:50:50
Page 28

УКРАЇНЬСКИЙ
28
ПІДКЛЮЧЕННЯ ЖИВЛЕННЯ
Живлення від мережі
Перед підключенням пристрою до мережі
переконаєтеся, що напруга в електричній
мережі відповідає робочій напрузі пристрою.
. Для підключення магнітоли до мережі
вставте один кінець мережевого шнуру
в гніздо (3, рис. ) а інший – в розетку.
Загориться індикатор режиму очікування
STANDBY.
2 Для увімкнення магнітоли натисніть кноп-
ку STANDBY, при цьому загориться LCDдисплей, а індикатор режиму очікування
STANDBY погасне.
Примітка: Статична електрика може привести
до перешкод у роботі пристрою. У цьому
випадку відключіть пристрій від джерел
живлення, а потім підключіть знову. Якщо
проблема не вирішиться, зверніться до
найближчого сервісного центру.
Живлення від батарейок
. Відключіть магнітолу від мережі
2. Відкрийте кришку батарейного відсіку (3,
рис. ) позад магнітоли, натиснувши на
дві клямки у напрямку за стрілкою.
3. Вставте 2 батарейки UM-3/”AA” (не входять до комплекту поставки) в батарейний відсік для підтримання пам'яті пристрою.
Вставте 8 батарейок UM-2/”С” (не входять до комплекту поставки) в батарейний відсік основного живлення пристрою.
. Закрийте кришку батарейного відсіку.
ВИКОРИСТАННЯ ПУЛЬТА ДИСТАНЦІЙНОГО КЕРУВАННЯ
Вставте 2 батарейки UM-/”АAA” (не входять
до комплекту поставки) в батарейний відсік
пульта дистанційного керування.
При використанні пульта дистанційного керування направляйте його на інфрачервоний
датчик на вашій магнітолі SENSOR. У випадку,
якщо пульт дистанційного керування перестав працювати, перевірте батарейки, і за
необхідності замініть їх.
Не піддавайте пульт дистанційного управління впливу підвищеної температури і прямого
сонячного світла, це може негативно позначитись на його роботі.
УВАГА!
Протікання батарейок живлення может стати
причиною травм або пошкоджень пристрою.
Задля уникнення пошкоджень батарейок,
дотримуйтесь наведених нижче інструкцій:
- встановлюйте батарейки правильно,
дотримуючись полярності відповідно до
позначень на пристрої;
- не використовуйте разом різні батарейки
(старі та нові, різних типів і т.п.);
- діставайте батарейки, якщо пристрій не
буде використовуватися протягом тривалого часу;
- вчасно замінюйте батарейки.
ВСТАНОВЛЕННЯ ЧАСУ
Ви можете встановити час, коли магнітола
перебуває в режимі очікування.
. Натисніть один раз кнопку MEMORY/CLK-
ADJ. На LCD-дисплеї почне блимати
індикація годин. За допомогою кнопок
TUNING /SKIP або TUNING /SKIP
встановіть години.
2. Натисніть ще раз кнопку MEMORY/CLKADJ. На LCD-дисплеї почне блимати
індикація хвилин. За допомогою кнопок
TUNING /SKIP або TUNING /SKIP
встановіть хвилини.
3. Натисніть кнопку MEMORY/CLK-ADJ ще
раз для збереження встановленого значення.
Примітка: У випадку відключення живлення і
розрядки (або відсутності) батарейок резервного живлення показники поточного часу
будуть скинуті. При відновленні подачі електрики індикація часу буде постійно блимати. У
цьому випадку потрібно повторно встановити
поточний час.
ВСТАНОВЛЕННЯ БУДИЛЬНИКА
Ви можете налаштувати Вашу магнітолу
таким чином, щоб щодня у встановлений
час вмикався і автоматично вимикався будильник, як джерело звукових сигналів якого
можна використовувати диск, радіо, чи касету, а також пристрої, що підключаються до
роз'ємів USB та SD/MMC.
3960IM.indd 28 12.10.2007 15:50:50
Page 29

УКРАЇНЬСКИЙ
29
Примітка: якщо як джерело звукового сигналу вибрана касета, спочатку потрібно натиснути кнопку PLAY (23, рис ).
. Встановлення часу увімкнення будильника.
В режимі поточного часу натисніть один
раз кнопку TIMER на магнітолі. На LCDдисплеї з'явиться індикація «ON TIME»,
а символи “TIMER” будуть постійно блимати.
Встановіть час увімкнення будильника, як
описано у рззділі ВСТАНОВЛЕННЯ ЧАСУ.
2. Встановлення часу вимкнення будильника.
Натисніть ще раз кнопку TIMER. На LCDдисплеї з'явиться індикація «OFF TIME»,
а символи “TIMER” будуть постійно блимати.
Встановіть час вимкнення будильника, як
описано у розділі ВСТАНОВЛЕННЯ ЧАСУ.
3. Встановлення джерела звукового сигналу.
Натисніть ще раз кнопку TIMER. На LCDдисплеї відобразяться символи поточного режиму (наприклад: TUNER).
Натисніть спочатку кнопку MEMORY/CLKADJ, потім виберіть джерело звукового
сигналу, послідовно натискаючи TUNING
/SKIP або TUNING /SKIP. Натисніть кнопку MEMORY/CLK-ADJ ще раз для
збереження вибраного джерела сигналу.
. Встановлення рівня гучності будильника.
Натисніть ще раз кнопку TIMER. На LCDдисплеї з'явиться попередній рівень гучності (наприклад: VOL 20).
Натисніть спочатку кнопку MEMORY/CLKADJ, потім установіть бажаний рівень
гучності, послідовно натискаючи TUNING
/SKIP або TUNING /SKIP. Для
введення встановленого рівня гучності
натисніть ще раз кнопку MEMORY/CLKADJ.
Примітка: Рівень гучності можна змінювати в діапазоні від 0 до 0.
. Увімкнення будильника.
Натисніть кнопку TIMER/SLEEP на пульті
дистанційного керування. На LCD-дисплеї
відобразяться символи “TIMER”.
Після досягнення встановленого часу
будильник автоматично увімкнеться. Для
вимкнення будильника натисніть кнопку
STANDBY
6. Відключення будильника.
Натисніть ще раз кнопку TIMER/SLEEP на
пульті дистанційного керування. Символи
“TIMER” зникнуть.
Встановлення часу вимкнення магнітоли
(тільки за допомогою кнопок на пульті дистанційного керування)
Ви можете встановити час вимкнення магнітоли (максимум 90 хвилин).
. В режимі прослуховування радіо/програ-
вання музики натисніть кнопку TIMER/
SLEEP на пульті дистанційного керування.
На LCD-дисплеї з'явиться індикація хвилин«90», а індикатор “SLEEP” буде блимати.
2. Для змінення часу утримуйте натиснутою
кнопку TIMER/SLEEP на пульті дистанційного керування. Ви можете встановити
час вимкнення магнітоли в інтервалі від 0
до 90 хвилин з кроком 0 хвилин.
3. Після досягнення встановленого часу
магнітола автоматично вимкнеться.
. Для відключення таймеру натисніть ще
раз кнопку TIMER/SLEEP на пульті дистанційного керування. Символи “SLEEP”
зникнуть. Для вимкнення магнітоли натисніть кнопку STANBY.
Встановлення еквалайзеру/підсилення
низьких частот
Ви можете вибрати один з п'яти попередньо
запрограмованих режимів еквалайзеру: FLAT,
JAZZ, ROCK, CLASSIC або POP.
. Під час прослуховування музики виберіть
бажаний режим, послідовно натискаючи
кнопку EQ/BBS. На LCD-дисплеї будуть
послідовно відображатись символи режимів FLAT, JAZZ, ROCK, CLASSIC або
POP.
2. Для підсилення низьких частот натисніть
і утримуйте кнопку EQ/BBS не менше 2
секунд. На LCD-дисплеї відобразяться
символи «X BAS ON».
Для відключення підсилення низьких час-
3960IM.indd 29 12.10.2007 15:50:50
Page 30

УКРАЇНЬСКИЙ
30
тот натисніть і утримуйте кнопку EQ/BBS
не менше 2 секунд. На LCD-дисплеї відобразяться символи «X BAS OFF».
Вимкнення звуку
(тільки за допомогою кнопок на пульті дистанційного керування)
Для вимкнення звуку натисніть кнопку MUTE
на пульті дистанційного керування.
Гніздо для навушників
Для прослуховування музики через навушники (до комплекту поставки не входять) підключіть їх до гнізда (32, рис ). За допомогою
кнопок VOLUME або відрегулюйте
рівень гучності. При підключенні навушників
динаміки магнітоли відключаться автоматично
Радіоприймач
Ця магнітола має систему електронного
цифрового налаштування. Окрім цього, ви
можете налаштувати і зберегти 20 станцій в
кожному з діапазонів FM і MW (AM).
Прийом радіостанцій
. Увімкніть магнітолу, натиснувши кнопку
STANDBY.
2. Для вибору режиму TUNER послідовно
натискайте кнопку FUNCTION. На LCDдисплеї відобразяться символи «TUNER».
3. Для вибору діапазону частот FM або MW
(AM) натисніть кнопку BAND на пульті
дистанційного керування.
. Налаштуйте радіостанцію.
Вручну: Для вибору бажаної радіостанції
послідовно натискайте кнопки TUNING
/SKIP або TUNING /SKIP.
Автоматично: Утримуйте натиснутою
кнопку TUNING /SKIP або TUNING
/SKIP більше секунди, тюнер почне
сканування і автоматично зупинить сканування при знаходженні сильного сигналу
від радіостанції.
. Перемикання режимів MONO/STEREO.
Якщо стереосигнал, що отримується від
FM радіостанції слабкий, для покращення
якості звучання натисніть кнопку REPEAT/
MONO-ST, магнітола переключиться в
режим моно.
АНТЕНА
Для найкращого прийому в діапазоні FM
висуньте повністю антену (3, рис ) і зорієнтуйте її під потрібним кутом. Для прийому в
діапазоні AM магнітола має вбудовану антену, для найкращого прийому в діапазоні AM
спробуйте декілька варіантів розміщення
магнітоли.
ПРОГРАМУВАННЯ Радіостанцій
Ви можете налаштувати і зберегти 20 станцій
в кожному з діапазонів FM і MW (AM).
. Виберіть частотний діапазон і налаштуйте
станцію, яку ви хочете запрограмувати.
2. Натисніть кнопку MEMORY/CLK-ADJ.
Протягом 3 секунд на LCD-дисплеї будуть
блимати символи «MEMORY» та індикатор
каналу «00».
3. За допомогою кнопок PRESET/FOLDER
або виберіть номер каналу від
до 20, під яким Ви хочете зберегти
радіостанцію.
. Натисніть кнопку ще раз MEMORY/CLK-
ADJ, щоб зберегти зроблені налаштування.
. Повторіть пункти – для всіх радіостан-
цій, частоти яких ви хочете зберегти в
пам'яті магнітоли.
Примітка: Ви повинні вибрати номер каналу
поки блимають символи MEMORY, інакше
станція не збережеться в пам'яті магнітоли.
Якщо індикатор погасне до того, як ви виберете номер каналу, повторіть пункти -.
ВИКЛИК з пам'яті ПОПЕРЕДНЬО ЗАПРОГРАМОВАНИХ РАДІОСТАНЦІЙ
Для виклику попередньо запрограмованих
радіостанцій виберіть відповідний частотний
діапазон (FM або MW (AW)) і послідовно на-
тискайте кнопки PRESET/FOLDER або
для вибору потрібної радіостанції.
Примітка: Попередньо запрограмовані станції зберігаються в пам'яті магнітоли, поки
3960IM.indd 30 12.10.2007 15:50:51
Page 31

УКРАЇНЬСКИЙ
3
вона увімкнена в мережу або не розрядяться
батареї резервного живлення. У випадку
відключення живлення і розрядження (або
відсутності) батарейок резервного живлення,
попередньо встановлені радіостанції будуть
видалені з пам'яті. Їх буде необхідно запрограмувати заново
Програвання CD дисків
Завантаження – Відкрийте відсік для дисків.
Встановіть CD диск і закрийте кришку відсіку.
Діставання - Після зупинки програвання відкрийте кришку відсіку для диску й вийміть
диск. Заховайте диск у футляр.
Завжди закривайте кришку відсіку для дисків
для запобігання потрапляння у нього пилу.
Завжди діставайте диск із відсіку, якщо він не
програється.
. Увімкніть магнітолу, натиснувши кнопку
STANDBY.
2. Виберіть режим програвання CD дисків.
Для цього послідовно натискайте кнопку
FUNCTION поки на LCD-дисплеї не відобразяться символи «СD».
3. Відкрийте відсік для CD. Встановіть CD
диск і закрийте кришку відсіку. Пристрій почне читання диску, при цьому
на LCD-дисплеї відобразяться символи.
«READING». Потім на LCD-дисплеї відобразиться число треків і загальний час
програвання.
Track number – число треків, Playing time
– Час програвання
якщо після встановлення CD диску у відсік на
LCD-дисплеї відобразяться індикатори «NO
DISC», перевірте правильність встановлення
диска. Диск повинен бути встановлений етикеткою догори.
. Для програвання диска з першого треку
натисніть кнопку PLAY/PAUSE.
Ви можете вибрати трек, який буде програватися першим. Для цього виберіть
трек за допомогою кнопок TUNING
/SKIP або TUNING /SKIP, потім на-
тисніть кнопку PLAY/PAUSE.
. Для призупинення програвання натисніть
кнопку PLAY/PAUSE. Символи “PLAY” і час
програвання будуть постійно блимати.
Для повернення до режиму програвання
натисніть цю кнопку ще раз.
6. Для зупинки програвання натисніть кнопку STOP.
Примітка: Якщо кришка відсіку для дисків відкрита, на LCD-дисплеї будуть відображатися
символи «OPEN».
Програмування програвання
Ви можете запрограмувати програвання
треків (максимум 60) у бажаному порядку.
. Увімкніть магнітолу, натиснувши кнопку
STANDBY.
2. Відкрийте відсік для дисків. Встановіть
диск і закрийте кришку відсіку.
3. Коли програвання диска зупинено, натисніть кнопку MEMORY/CLK-ADJ. На
LCD-дисплеї будуть блимати символи
«MEMORY», а на дисплеї будуть відображатись номер треку на диску «0» і його
номер при програмуванні «P-0».
Виберіть бажаний трек, послідовно натискаючи кнопки TUNING /SKIP або
TUNING /SKIP. Для збереження виб-
раного треку натисніть кнопку MEMORY/
CLK-ADJ. Індикатор програмування зміниться на «Р-2».
. Програмування наступного треку: ви-
беріть наступний трек, послідовно
натискаючи кнопки TUNING /SKIP
або TUNING /SKIP. Потім натисніть
кнопку MEMORY/CLK-ADJ для збереження вибраного треку в пам'яті. Ви можете
запрограмувати максимум 60 треків
Послідовно натискаючи кнопку MEMORY/
CLK-ADJ, ви можете переглянути список
запрограмованих треків.
Для програвання натисніть кнопку PLAY/
PAUSE. Для зупинки програвання натис-
3960IM.indd 31 12.10.2007 15:50:51
Page 32

УКРАЇНЬСКИЙ
32
ніть кнопку STOP.
Для скасування запрограмованого програвання натисніть кнопку STOP, коли
програвання диска зупинено, або відкрийте кришку відсіку для дисків.
ПОВТОРЕННЯ ПРОГРАВАННЯ
Ця функція дозволяє повторювати всі треки
на диску або запрограмовані треки.
. Для повторення одного треку натисніть
один раз кнопку REPEAT/MONO-ST, на
LCD-дисплеї відобразяться символи
«REPEAT».
2. Для повторення всіх треків на диску натисніть два рази кнопку REPEAT/MONOST, на LCD-дисплеї відобразяться символи «REPEAT ALL»
3. Для скасування повторення програвання
натискайте кнопку REPEAT/MONO-ST,
поки символи повторення не зникнуть.
Програвання в довільному порядку
Ви можете програвати всі треки на диску в
довільному порядку.
. Натисніть один раз кнопку RANDOM
на пульті дистанційного керування, на
LCD-дисплеї відобразяться символи
«RANDOM», почнеться програвання
треків у довільному порядку.
2. Для скасування програвання у довільному порядку натисніть ще раз кнопку
RANDOM на пульті дистанційного керування, символи «RANDOM» зникнуть.
ПРОГРАВАННЯ МР3 ДИСКА
Даний пристрій може програвати більшість
дисків, записаних у форматі MP3, але бува-
ють випадки, коли диск не програється через
налаштування програмного забезпечення,
що використовувалось при записі диска.
. Увімкніть магнітолу, натиснувши кнопку
STANDBY.
2. Виберіть режим програвання дисків.
Для цього послідовно натискайте кнопку
FUNCTION, поки на LCD-дисплеї не відобразяться символи «СD».
3. Відкрийте відсік для дисків. Встановіть
MP3 диск і закрийте кришку відсіку. Пристрій почне читання диску, при цьому
на LCD-дисплеї відобразяться символи
«READING». Потім на LCD-дисплеї відобразиться число папок і треків на диску.
Total folder – всього папок, Total track – всього
треків
. Для програвання диску з першого треку
натисніть кнопку PLAY/PAUSE.
First track – перший трек, Playing time – Час
програвання
. Ви можете вибрати трек, який буде про-
граватися першим. Для цього виберіть
трек за допомогою кнопок TUNING
/SKIP або TUNING /SKIP,
або коли програвання диску зупинено,
натисніть кнопки PRESET/FOLDER
або для вибору потрібної папки,
потім виберіть трек за допомогою кнопок
TUNING /SKIP або TUNING /SKIP.
Натисніть кнопку PLAY/PAUSE для
програвання.
3960IM.indd 32 12.10.2007 15:50:52
Page 33

УКРАЇНЬСКИЙ
33
Folder number – номер папки, Track number
– номер треку
6. Натисніть кнопку ID3 під час програвання
MP3 диску. На LCD-дисплеї відобразиться назва пісні та альбому. При натисканні
два рази на кнопку ID3 на дисплеї буде
відображатися інформація у вигляді біжного рядка.
Інформація, що відображається на LCDдисплеї, може відрізнятись із-за різних
налаштувань програмного забезпечення.
Теги російською мовою можуть відображатись некоректно.
7. Для призупинення програвання натисніть
кнопку PLAY/PAUSE. Символи “PLAY” і час
програвання будуть постійно блимати.
Для повернення до режиму програвання
натисніть цю кнопку ще раз.
Track number – номер треку, Playing time
– Час програвання
8. Для зупинки програвання натисніть кнопку STOP. На LCD-дисплеї відобразиться
число папок і треків на диску.
Програмування програвання
Ви можете запрограмувати програвання
треків (максимум 60) у бажаному порядку.
. Увімкніть магнітолу, натиснувши кнопку
STANDBY. Відкрийте відсік для дисків.
Встановіть МР3 диск і закрийте кришку
відсіку. Коли програвання диска зупинено, натисніть кнопку MEMORY/CLK-ADJ.
На LCD-дисплеї будуть блимати символи
«MEMORY», а на дисплеї будуть відображатись номер треку на диску «0» і його
номер при програмуванні «P-0».
2. Виберіть бажаний трек, послідовно на-
тискаючи кнопки TUNING /SKIP або
TUNING /SKIP або натисніть кнопки
PRESET/FOLDER або для вибору
потрібної папки, потім виберіть трек за
допомогою кнопок TUNING /SKIP або
TUNING /SKIP.
3. Для збереження вибраного треку натисніть кнопку MEMORY/CLK-ADJ. Індикатор
програмування зміниться на «Р-2».
. Повторіть пункти -3 для програмування
наступного треку. Ви можете запрограмувати максимум 60 треків
. Послідовно натискаючи кнопку MEMORY/
CLK-ADJ, ви можете переглянути список
запрограмованих треків.
6. Для програвання натисніть кнопку PLAY/
PAUSE. Для призупинення програвання
натисніть цю кнопку ще раз.
7. Для зупинки програвання натисніть кнопку STOP.
Для скасування запрограмованого про-
гравання натисніть кнопку STOP, коли
програвання диска зупинено, або відкрийте кришку відсіку для дисків.
ПОВТОРЕННЯ ПРОГРАВАННЯ
Ця функція дозволяє повторювати треки на
МР3 диску.
. Для повторення одного треку натисніть
один раз кнопку REPEAT/MONO-ST, на
LCD-дисплеї відобразяться символи
«REPEAT».
2. Для повторення всієї папки натисніть два
рази кнопку REPEAT/MONO-ST, на LCDдисплеї відобразяться символи «REPEAT
FOLDER».
3960IM.indd 33 12.10.2007 15:50:53
Page 34

УКРАЇНЬСКИЙ
3
3. Для повторення всіх треків на МР3 диску натисніть три рази кнопку REPEAT/
MONO-ST, на LCD-дисплеї відобразяться
символи «REPEAT ALL»
. Для скасування повторення програвання
натискайте кнопку REPEAT/MONO-ST,
поки символи повторення не зникнуть.
ПРОГРАВАННЯ КАСЕТИ
. Увімкніть магнітолу, натиснувши кнопку
STANDBY. Для вибору режиму TAPE послідовно натискайте кнопку FUNCTION, поки
на LCD-дисплеї не відобразяться символи «TAPE».
2. Натисніть кнопку STOP/EJ і вставте касету
в касетоприйомник.
3. Закрийте касеторийомник.
. Для програвання касети натисніть кнопку
PLAY.
. За допомогою кнопок VOLUME або
відрегулюйте рівень гучності.
6. Для призупинення програвання використовуйте кнопку PAUSE.
7. Для зупинки програвання натисніть кнопку STOP/EJ.
8. Для прискореного перемотування вперед/назад використовуйте кнопки F.FWD/
REWIND відповідно.
9. Після закінчення програвання касети відтворення касети автоматично припиниться.
0. Щоб дістати касету, натисніть кнопку
STOP/EJ, дістаньте касету з касетоприйомника.
Попередження! Задля уникнення пошкодження касетного механізму або стрічки після
кожної операції обов'язково натискайте кнопку STOP/EJ.
ЗАПИС З РАДІОПРИЙМАЧА
. Налаштуйтесь на бажану радіостан-
цію, дотримуючись інструкцій у розділі
РАДІОПРИЙМАЧ.
2. Вставте чисту касету в касетоприйомник.
3. Натисніть кнопку PAUSE.
. Натисніть кнопку RECORD, автоматично
натиснеться кнопка PLAY. Ви можете регулювати рівень гучності, не побоюючись
зіпсувати якість запису.
. Натисніть кнопку PAUSE для початку за-
пису.
6. Для тимчасового призупинення запису
натисніть кнопку PAUSE. Для відновлення
запису натисніть дану кнопку ще раз.
7. Для зупинення запису натисніть кнопку
STOP/EJ. Коли касета буде записана до
кінця, запис автоматично припиниться.
Запис з інших музичних джерел
Ви можете записувати з інших музичних
джерел, наприклад з CD диска або USB пристрою. Увімкніть бажане музичне джерело і
дотримуйтесь інструкцій у розділі ЗАПИС З
РАДІОПРИЙМАЧА.
USB пристрої
. Увімкніть магнітолу, натиснувши кнопку
STANDBY.
2. Для вибору режиму роботи з USB-пристроєм послідовно натискайте кнопку
FUNCTION, поки на LCD-дисплеї не відобразяться символи «USB».
3. Вставте USB пристрій (наприклад, портативний МРЗ плейер або флеш-носій)
в USB роз'єм (2, рис. ). На LCD-дисплеї
відобразиться кількість папок і треків.
Total Folder – всього папок, Total Track
– всього треків
Примітка: Якщо до USB роз'єму не підключений ні портативний МРЗ плейер або флешносій, на LCD-дисплеї відобразяться символи «NO DEV».
3960IM.indd 34 12.10.2007 15:50:54
Page 35

УКРАЇНЬСКИЙ
3
. Для програвання натисніть кнопку PLAY/
PAUSE.
. Кнопки керування і послідовність дій
при роботі з USB-пристроєм, аналогічні
кнопкам керування і послідовності дій
при роботі з МР3 диском. Дотримуйтесь
інструкцій у розділі ПРОГРАВАННЯ МР3
ДИСКУ
Карти пам'яті SD
. Увімкніть магнітолу, натиснувши кнопку
STANDBY.
2. Для вибору режиму роботи з картою
пам'яті SD послідовно натискайте кнопку
FUNCTION, поки на LCD-дисплеї не відобразяться символи «SD».
3. Вставте карту пам'яті SD/MMC в роз'єм
(3, рис ). На LCD-дисплеї відобразиться
кількість папок і треків.
Total Folder – всього папок Total Track – всього треків
Примітка: Якщо до роз'єму (3, рис. ) не підключено ніякої карти SD/MMC, на LCD-дисплеї відобразяться символи «NO SD».
. Для програвання натисніть кнопку PLAY/
PAUSE.
. Кнопки керування і послідовність дій під
час роботи з картою пам'яті, аналогічні
кнопкам керування і послідовності дій під
час роботи з МР3 диском. Дотримуйтесь
інструкцій у розділі ПРОГРАВАННЯ МР3
ДИСКУ
Технічні характеристики
Споживана
потужність
AC 230V/0Hz
Маса 2.7Kg
Габарити L 30 x W 239 x H 6
(mm)
Вихідна потужність 2 x 2W RMS/ channel
Динаміки Two-way:
. 3'' 8 Ohms 3W
x2pcs (middle)
2. 2'' 8 Ohms 0.W
x2pcs (Tweeter)
Час роботи від
елементів живлення
8 Hours
Формати CD CD,CD-R ,CD-RW, MP3
Діапазон
відтворюваних частот
20Hz ~20KHz
Відношення сигнал/
шум
dB
Коефіцієнт нелінійних
викривлень
<%
FM/MW (AM) FM: 6~08 MHz
Діапазон частот AM : 22~620 KHz
Проміжна частота FM: 0.7MHz
AM: 0 kHz
Антена FM:telescopic antenna
AM: built in ferrite antenna
Касетна дека 6 keys; DC bias; One
touch recording
Виробник зберігає за собою право змінювати
дизайн і технічні характеристики приладу без
попереднього повідомлення.
Термін служіння пристрою не менш 3 років.
Утилізація електронних та електричних
пристроїв
(Застосовується в країнах Євросоюзу та
інших країнах Європи, у яких існує система
розподілу відходів). Цей символ означає,
що електричні й електронні пристрої повинні утилізуватися після завершення терміну служби окремо від іншого побутового сміття. Правильна
утилізація старого устаткування може запобігти
шкідливому впливу на навколишнє середовище.
Для отримання детальнішої інформації зверніться
до служби, котра опікується утилізацією, або до
магазину, де був придбаний продукт.
Гарантія
Докладні умови гарантії можна отримати
в дилера, що продав дану апаратуру. При
пред’явленні будь-якої претензії протягом
терміну дії даної гарантії варто пред’явити
чек або квитанцію про покупку.
Даний виріб відповідає вимогам до
електромагнітної сумісності, що
пред’являються директивою 89/336/
ЄЕС Ради Європий розпорядженням 73/23
ЄЕС по низьковольтних апаратурах.
3960IM.indd 35 12.10.2007 15:50:54
Page 36

ҚАЗАҚ
36
VT-3960BK CD/МР3 ОЙНАТҚЫШЫ БАР Магнитола
ПАЙДАЛАНУ ЖӨНІНДЕГІ НҰСҚАУЛЫҚ
Құрылғыны қосудың, пайдаланудың және баптаудың алдында нұсқаулықпен мұқият танысып
шығыңыз. Осы нұсқаулықта берілген құрылғыны пайдалану жөніндегі барлық ескертулерді және
нұсқауларды орындау қажет.
Нұсқаулықты сақтап қойыңыз, оны бұдан былай анықтамалық материал ретінде пайдаланыңыз.
НАЗАР АУДАРЫҢЫЗ!
Электр тогына түсу қаупі бар! АШУҒА
БОЛМАЙДЫ!
Ескерту: Өрт туындау немесе электр тогына түсу қатеріне жол бермеу үшін құрылғыны
жаңбырдың немесе ылғалдылықтың әсеріне ұшыратпаңыз.
Электр тогына түсу қатеріне жол бермеу үшін құрылғының корпусын өз бетіңізше ашпаңыз.
Сервистік қызметті тек сервис орталықтарының білікті мамандары ғана көрсетуі қажет.
Тең қабырғалы үшбұрыштағы найзағай пайдаланушыға құрылғы корпусының
ішінде электр тогына түсуге алып келуі мүмкін қауіпті кернеудің бар екендігін
білдіреді.
Тең қабырғалы үшбұрыштың ішіндегі леп белгісі пайдалану жөніндегі
нұсқаулықта пайдалану және техникалық қызмет көрсету бойынша маңызды
нұсқаулардың бар екендігін білдіреді.
CLASS 1 LASER PRODUCT
Осы өнім 1-СЫНЫПТАҒЫ ЛАЗЕРЛІК ҚҰРЫЛҒЫ ретінде сыныпталады. Сәйкесінше
затбелгі құрылғының артқы панелінде орналасқан және құрылғыда лазерлік сәулелер
пайдаланылатынын білдіреді. Лазерлік сәулелену аспапты ашпағанда мүмкін болмайды.
ҚҰРЫЛҒЫҒА ҚЫЗМЕТ КӨРСЕТУ СЕРВИС ОРТАЛЫҒЫНЫҢ БІЛІКТІ МАМАНДАРЫМЕН ҒАНА
ЖҮРГІЗІЛУІ ҚАЖЕТ.
САҚТЫҚ ШАРАЛАРЫ
Қорек көздеріне қосу
Электр желісіндегі кернеу құрылғының жұмыс кернеуіне сәйкес келетінін тексеріңіз.
Өрт туындау немесе электр тогына түсу қатеріне жол бермеу үшін осы құрылғыны ылғалдылығы
жоғары жерлерге (жуынатын бөлме, суы бар шара, асхана раковиналары, кір жуу машиналары,
жүзу бассейні, ылғал жертөле) орнатпаңыз. Құрылғыға тамшылар мен шашырандылардың
түсуіне жол бермеңіз. Құрылғының үстіне сұйықтық толы ыдыстарды қоюға тыйым салынады
(мысалы гүл құмыралары).
Розеткалар мен ұзартқыштарға көп күш түсірмеңіз, бұл өрт туындау немесе электр тогына түсу
қатеріне алып келуі мүмкін.
Осы құрылғыны ақаулық туындаған жағдайда бірден розеткадан шығаруға мүмкін болатындай
етіп орнатыңыз. Желілік сымдар құрылғыдан шығып тұратын жерлерде тым қатты тартылып
тұрмауы қажет; сымдарды олар шатасып қалмайтындай, олардың үстінде заттар тұрмайтындай
етіп салу қажет.
3960IM.indd 36 12.10.2007 15:50:54
Page 37

ҚАЗАҚ
37
Құрылғы өндірушісі рұқсат етпейтін желілік
ұзартқыштарды пайдаланбаңыз, өйткені олар
өте қауіпті болуы мүмкін.
Найзағай кезінде құрылғыны қосымша
қорғау үшін, сонымен қатар оны ұзақ мерзім
бойы пайдаланбайтын жағдайда оны
электр желісінің розеткасынан ажыратыңыз.
Бұл найзағай соққыларынан және электр
желісіндегі кернеудің кенет өзгерісінен
құрылғының істен шығуына жол бермейді.
Желілік сымды ажырату үшін желілік ашадан
тартыңыз, ешбір жағдайда желілік сымнан
тартпаңыз.
Құрылғының қозғалмалы бөлшектерін
майламаңыз.
Электр тогына түсу қаупіне жол бермеу үшін
құрылғы корпусын өз бетіңізше ашпаңыз.
Аспапты жөндемеңіз және оның құрымына
өзгерістер енгізбеңіз. Сервистік қызмет сервис
орталықтарының білікті мамандарымен ғана
жүргізілуі қажет.
Құрылғыны орнату
Құрылғыны жақсы желдетілетін жерде
орнатыңыз. Осы құрылғыны жақсы желдету
болмайтын жиһаздың сөрелеріне (кітап
сөрелері немесе қабырға шкафтары) орнатуға
болмайды.
Құрылғыны төсекке, диванға, софаға,
кілемге немесе басқа осыған ұқсас заттарға
орнатудың алдында желдету тесіктері және
саңылаулары жабық болмауын қадағалаңыз,
өйткені олар құрылғының сенімді жұмысын
қамтамасыз етеді және оны қызып кетуден
сақтайды.
Құрылғыны жылу көздерінің маңында, атап
айтқанда: радиаторлар, электр жылытқыштар,
духовкалар немесе жылу шығаратын
басқа құрылғылардың маңында (сонымен
қатар күшейткіштер), сондай-ақ тікелей күн
сәулесі түсетін, қатты шаң-тозаңды немесе
механикалық соққының әсеріне ұшырауы
мүмкін жерлерге орнатпаңыз. Аспапты
температурасы 35ºС жоғары жерлерге
орнатпаңыз.
Құрылғыны магниттік өрісі күшті жабдықтардан
алшақ тегіс тұрақты бетке орнату қажет,
мысалы видео-, аудиомагнитофондар,
радиоқабылдағыштар немесе үлкен дауыс
зорайтқыштар, өйткені ондай құрылғылардан
шығатын магниттік өрістің ықпалы
дыбысталуда кедергілер тудыруы мүмкін.
Құрылғының үстіне ауыр заттар қоймаңыз.
Егер қосылған аспаптың жанында балалар
немесе мүмкіндігі шектеулі адамдар
болса, аса сақ болыңыз, оларды қараусыз
қалдырмаңыз.
Бөтен заттар
Құрылғы корпусының тесіктері арқылы
құрылғының ішіне бөтен заттардың түсуіне
жол бермеңіз, бұл құрылғының күйіп кетуіне
және электр тогына түсу қатеріне алып келуі
мүмкін. Егер бұндай жағдай орын алса,
құрылғыны желіден ажыратыңыз және сервис
орталығына хабарласыңыз.
Жөндеуді қажет ететін зақымданулар
Төменде сипатталған жағдайларда құрылғыны
розеткадан ажырату қажет және құрылғыны
жөндеу үшін білікті маманға хабарласу керек:
a) Желілік сым немесе аша зақымданса.
b) Құрылғының ішіне бөтен заттар түсіп
кетсе.
c) Құрылғы жаңбырдың астында қалып қойса
немесе үстіне су құйылып кетсе.
d) Құрылғы дұрыс жұмыс істемесе.
e) Құрылғы құлап кетсе не болмаса басқа
жолмен зақымданса.
f) Құрылғының жұмысында үлкен өзгерістер
байқалса.
Ескерту: Егер құрылғы пайдаланылатын
жерде энергия үнемдейтін шам болса,
құрылғы дұрыс жұмыс істемеуі мүмкін.
Құрылғыға күтім жасау
Тазалаудың алдында құрылғыны розеткадан
ажыратыңыз. Құрылғыны тазалау үшін ылғал
жұмсақ шүберекті пайдаланыңыз. Алдыңғы
панельді сабынды суға малынған ылғал
жұмсақ шүберекпен сүртуге болады. Тазалау
үшін сұйық немесе аэрозольді тазалау
құралдарын пайдалануға тыйым салынады.
Дискілердің күтімі
Сынған немесе жарылған дискілерді
3960IM.indd 37 12.10.2007 15:50:54
Page 38

ҚАЗАҚ
38
пайдаланбаңыз, бұл құрылғының бұзылуына
алып келуі мүмкін.
Дискінің шеттерінен ғана ұстаңыз. Дискінің
жұмыс бетінен ұстамаңыз. Дискінің жұмыс
бетіндегі шаң, сызаттар немесе бармақтардың
іздері оны істен шығаруы мүмкін.
Дискіні тікелей күн сәулелерінің, жылу
көздерінің, жоғары температураның және
ылғалдылықтың әсеріне ұшыратпаңыз.
Пайдаланып болғаннан кейін дискіні сақтау
үшін қабына салып қойыңыз.
Дискінің жұмыс бетін үнемі орталықтан
шетіне қарай сүртіп отырыңыз. Кәдімгі жуу
құралдарын пайдаланбаңыз.
СИПАТТАМАСЫ
Магнитола (1-сурет)
1. дискілерге арналған бөлім
2. USB-ағытпа
3. SD/MMC картаға арналған ағытпа
4. STANDBY батырмасы
5. STOP ойнатуды тоқтату батырмасы
6. VOLUME дыбыс қаттылығын ұлғайту
батырмасы
7. VOLUME дыбыс қаттылығын азайту
батырмасы
8. FUNCTION функцияларды ауыстырып
қосу батырмасы
9. TIMER таймерді қосу батырмасы
10. MEMORY/CLK-ADJ орнатылған
радиостанцияларды есте сақтау/сағатты
баптау батырмасы
11. REPEAT/MONO-ST ойнатуды қайталау/
моно-стерео режимін таңдау батырмасы
12. TUNING /SKIP тюнерді баптау/
алдыңғы трекке өту батырмасы
13. TUNING /SKIP тюнерді баптау/келесі
трекке өту батырмасы
14. PLAY/PAUSE дискіні ойнату/уақытша
тоқтату батырмасы
15,16. PRESET/FOLDER және
алдын ала орнату/папкаларды ауыстыру
батырмалары
17. EQ/BBS эквалайзер режимдерін орнату
/төмен жиіліктерді күшейту батырмасы
18. BAND/ID3 диапазондарды ауыстырып
қосу/файл туралы мәтіндік ақпаратты
бейнелеу батырмасы
19. PAUSE кассетаны ойнатуды уақытша
тоқтату батырмасы
20. STOP/EJ кассетаны тоқтату/шығару
батырмасы
21. F.FWD кассетаны жылдам алдыға
айналдыру батырмасы
22. REWIND кассетаны жылдам артқа
айналдыру батырмасы
23. PLAY кассетаны ойнату батырмасы
24. RECORD жазып алу батырмасы
25. SENSOR қашықтықтан басқару пультінен
келіп түсетін сигналдарды қабылдағыш
26. STANDBY күту режимінің индикаторы
27. LCD-дисплей
28. сол жақ динамик
29. оң жақ динамик
30. кассета салғыш
31. батарея бөлімінің қақпағы
32. стерео құлақаспапты қосуға арналған
ұяшық
33. AUX in ағытпасы
34. электр желісіне қосуға арналған ұяшық
35. FM –антенна
Қашықтықтан басқару пульті (2-сурет)
1. STANDBY батырмасы
Магнитола жұмыс істеп тұрған кезде
STANDBY батырмасын басыңыз.
Магнитола күту режиміне өтеді, STANDBY
күту режимінің индикаторы қызыл түсті
болып жанады.
Қалыпты жұмыс істеу режиміне оралу
үшін STANDBY батырмасын тағы бір рет
басыңыз.
2. FUNC функцияларды ауыстырып қосу
батырмасы
3. BAND диапазондарды ауыстырып қосу
батырмасы
4. REPEAT/MONO ST ойнатуды қайталау/
режимді таңдау батырмасы
5. TIMER/SLEEP будильникті/таймерді қосу
батырмасы
6. TUNING /SKIP тюнерді баптау/
алдыңғы трекке өту батырмасы
7. PLAY/PAUSE ойнатуды тоқтату/уақытша
тоқтату батырмасы
8. STOP ойнатуды тоқтату батырмасы
9. MUTE дыбысты өшіру батырмасы
a. Дыбысты өшіру үшін батырманы басыңыз.
b. Дыбысты қосу үшін батырманы тағы бір
рет басыңыз.
10. RANDOM тректерді ерікті түрде ойнату
батырмасы
11. TUNING /SKIP тюнерді баптау/келесі
трекке өту батырмасы
3960IM.indd 38 12.10.2007 15:50:54
Page 39

ҚАЗАҚ
39
12. дыбыс қаттылығын ұлғайту батырмасы
(▲)
13. дыбыс қаттылығын азайту батырмасы
(▼)
14. инфрақызыл (ИҚ) сәуле таратқыш
15. батарея бөлімі
ҚОРЕКТІ ҚОСУ
Желіден жұмыс істеу
Құрылғыны желіге қосудың алдында электр
желідегі кернеу құрылғының жұмыс кернеуіне
сәйкес келетініне көз жеткізіңіз.
1. Магнитоланы желіге қосу үшін желілік
сымның бір ұшын ұяшыққа (34, 1-сурет),
ал екінші ұшын розеткаға қосыңыз.
STANDBY күту режимінің индикаторы
жанады.
2. Магнитоланы қосу үшін STANDBY
батырмасын басыңыз, бұл жағдайда
LCD-дисплей жанады, ал STANDBY күту
режимінің индикаторы сөнеді.
Ескерту: Статикалық электр қуаты құрылғының
жұмысында іркілістерге алып келуі мүмкін.
Бұл жағдайда құрылғыны қорек көздерінен
өшіріңіз, ал содан кейін қайта қосыңыз. Егер
проблема шешілмесе, сервис орталығына
хабарласыңыз.
Батареялардан жұмыс істеу
1. Магнитоланы желіден ажыратыңыз.
2. Екі ілмекке стрелка бағытында басып,
магнитоланың артындағы батарея
бөлімінің қақпағын ашыңыз (31, 1-сурет).
3. Құрылғы жадын қолдау үшін батарея
бөліміне UM-3/AA типіндегі 2 батареяны
салыңыз (жеткізу топтамасына кірмейді).
Құрылғының негізгі қорек көзінің батарея
бөліміне UM-2/”С” типіндегі 8 батареяны
салыңыз (жеткізу топтамасына кірмейді).
4. Батарея бөлімінің қақпағын жабыңыз.
Қашықтықтан басқару пультін пайдалану
Қашықтықтан басқару пультінің батарея
бөліміне UM-4/АAA типіндегі екі батареяны
салыңыз (жеткізу топтамасына кірмейді).
Қашықтықтан басқару пультін пайдалану
кезінде оны өзіңіздің магнитолаңыздағы
SENSOR инфрақызыл датчикке бағыттаңыз.
Егер пульттің жұмысы нашарласа,
батареяларды тексеріңіз, қажет болса
айырбастаңыз.
Қашықтықтан басқару пультін жоғары
температура және тікелей күн сәулесінің
әсеріне ұшыратпаңыз, бұл оның жұмысына
кері әсер етуі мүмкін.
Назар аударыңыз!
Батареялардың ағып кетуі жарақат алуға
немесе аспап зақымдануына алып келуі
мүмкін. Батареялардың зақымдануына жол
бермеу үшін төменде берілген нұсқауларды
орындаңыз:
- Құрылғыда көрсетілген белгілерге сәйкес
батареяларды полярлықты сақтап
орнатыңыз.
- Әр түрлі батареяларды қатар
пайдаланбаңыз (ескі және жаңа, әр түрлі
типті және т.б.).
- Егер құрылғы ұзақ уақыт бойы
пайдаланылмайтын болса, батареяларды
шығарыңыз.
- батареяларды уақытылы айырбастаңыз.
УАҚЫТТЫ ОРНАТУ
Магнитола күту режимінде болған кезде Сіз
уақытты орната аласыз.
1. MEMORY/CLK-ADJ батырмасын бір
рет басыңыз. LCD-дисплейде сағат
белгісі жыпылықтай бастайды. TUNING
/SKIP немесе TUNING /SKIP
батырмаларының көмегімен сағатты
орнатыңыз.
2. MEMORY/CLK-ADJ батырмасын тағы
бір рет басыңыз. LCD-дисплейде минут
белгісі жыпылықтай бастайды. TUNING
/SKIP немесе TUNING /SKIP
батырмаларының көмегімен минутты
орнатыңыз.
3. Белгіленген мәнді сақтау үшін MEMORY/
CLK-ADJ батырмасын тағы бір рет
басыңыз.
Ескерту: Қоректі өшірген жағдайда және
батареялар разрядталған кезде (батареялар
болмағанда) ағымдағы уақыттың мәндері
өшеді. Электр тогына қайта қосылғаннан
кейін уақыт индикациясы үнемі жыпылықтап
тұратын болады. Бұл жағдайда ағымдағы
уақытты қайта орнату қажет.
3960IM.indd 39 12.10.2007 15:50:54
Page 40

ҚАЗАҚ
0
ОЯТҚЫШ САҒАТТЫ ОРНАТУ
Сіз өз магнитолаңызды күн сайын белгіленген
уақытта оятқыш сағат қосылатындай және
өшірілетіндей орната аласыз. Бұл жағдайда
дыбыстық сигнал көзі ретінде дискіні,
радионы немесе кассетаны, сонымен қатар
USB және SD/MMC ағытпаларға қосылатын
құрылғыларды пайдалана аласыз.
Ескерту: егер дыбыстық сигнал ретінде
кассета таңдалса, алдымен PLAY батырмасын
басу қажет (23, 1-сурет).
1. Оятқыш сағатты қосу уақытын орнату.
Ағымдағы уақыт режимінде магнитоладағы
TIMER батырмасын бір рет басыңыз. LCDдисплейде «ON TIME» индикациясы пайда
болады, ал “TIMER” индикаторы үнемі
жыпылықтайтын болады.
УАҚЫТТЫ ОРНАТУ тарауында
сипатталғандай оятқыш сағатты қосу
уақытын орнатыңыз.
2. Оятқыш сағатты өшіру уақытын орнату.
TIMER батырмасын тағы бір рет басыңыз.
LCD-дисплейде «OFF TIME» индикациясы
пайда болады, ал “TIMER” индикаторы
үнемі жыпылықтайтын болады.
УАҚЫТТЫ ОРНАТУ тарауында
сипатталғандай оятқыш сағатты өшіру
уақытын орнатыңыз.
3. Дыбыстық сигнал көзін таңдау.
TIMER батырмасын тағы бір рет басыңыз.
LCD-дисплейде ағымдағы режим пайда
болады (мысалы: TUNER).
Алдымен MEMORY/CLK-ADJ батырмасын
басыңыз, содан кейін TUNING /SKIP
немесе TUNING /SKIP кезекпен баса
отырып, дыбыстық сигнал көзін таңдаңыз.
Таңдалған дыбыстық сигнал көзін таңдау
үшін MEMORY/CLK-ADJ батырмасын
басыңыз.
4. Оятқыш сағаттың дыбыс қаттылығының
деңгейін орнату.
TIMER батырмасын тағы бір рет басыңыз.
LCD-дисплейде ағымдағы дыбыс
қаттылығының деңгейі пайда болады
(мысалы: VOL 20).
Алдымен MEMORY/CLK-ADJ батырмасын
басыңыз, содан кейін TUNING /SKIP
немесе TUNING /SKIP кезекпен баса
отырып, қалаған дыбыс қаттылығының
деңгейін орнатыңыз. Орнатылған дыбыс
қаттылығының деңгейін енгізу үшін
MEMORY/CLK-ADJ батырмасын тағы бір
рет басыңыз.
Ескерту: Дыбыс қаттылығын 0-ден 40
дейінгі диапазон аралығында өзгертуге
болады.
5. Оятқыш сағатты қосу.
Қашықтықтан басқару пультіндегі TIMER/
SLEEP батырмасын басыңыз. LCDдисплейде “TIMER” индикаторы пайда
болады.
Белгіленген уақытқа жеткеннен кейін
оятқыш сағат автоматты түрде қосылады.
Оятқыш сағатты өшіру үшін STANDBY
батырмасын басыңыз.
6. Оятқыш сағатты өшіру.
Қашықтықтан басқару пультіндегі TIMER/
SLEEP батырмасын тағы бір рет басыңыз.
“TIMER” индикаторы сөнеді.
магнитолАНЫ ӨШІРУ УАҚЫТЫН ОРНАТУ
(тек қашықтықтан басқару пультінде
орналасқан батырмалардың көмегімен)
Сіз магнитоланы өшіру уақытын орната
аласыз (максимум 90 минут).
1. Радионы тыңдау/ музыканы ойнату
режимінде қашықтықтан басқару
пультіндегі TIMER/SLEEP батырмасын
басыңыз. LCD-дисплейде «90» минут
индикациясы пайда болады, ал “SLEEP”
индикаторы жыпылықтайтын болады.
2. Уақытты өзгерту үшін қашықтықтан
басқару пультіндегі TIMER/SLEEP
батырмасын басып, ұстап тұрыңыз. Сіз
магнитоланы өшіру уақытын 10 минуттық
қадаммен 0-ден 90 минут аралығында
орната аласыз.
3. Белгіленген уақытқа жеткеннен кейін
магнитола автоматты түрде сөнеді.
4. Таймерді өшіру үшін қашықтықтан басқару
пультіндегі TIMER/SLEEP батырмасын
тағы бір рет басыңыз. “SLEEP” индикаторы
сөнеді. Магнитоланы өшіру үшін STANBY
батырмасын басыңыз.
3960IM.indd 40 12.10.2007 15:50:55
Page 41

ҚАЗАҚ
эквалайзерДІ ОРНАТУ/ТӨМЕН ЖИІЛІКТЕРДІ
КҮШЕЙТУ
Сіз эквалайзердің алдын ала
бағдарламаланған бес режимінің бірін таңдай
аласыз: FLAT, JAZZ, ROCK, CLASSIC және
POP.
1. Музыканы тыңдау кезінде EQ/BBS
батырмасын кезекпен басып, қалаған
режиміңізді таңдаңыз. LCD-дисплейде
FLAT, JAZZ, ROCK, CLASSIC және POP
режимдерінің индикаторлары кезекпен
пайда болатын болады.
2. Төмен жиіліктерді күшейту үшін EQ/BBS
батырмасын кем дегенде 2 секунд басып,
ұстап тұрыңыз. LCD-дисплейде «X BAS
ON» индикаторы пайда болады.
Төмен жиіліктерді күшейтуді өшіру үшін
EQ/BBS батырмасын кем дегенде 2 секунд
басып, ұстап тұрыңыз. LCD-дисплейде «X
BAS OFF» индикаторы пайда болады.
ДЫБЫСТЫ ӨШІРУ
(тек қашықтықтан басқару пультінде
орналасқан батырмалардың көмегімен)
Дыбысты өшіру үшін қашықтықтан басқару
пультіндегі MUTE батырмасын басыңыз.
құлақаспапқа арналған ұяшық
Құлақаспап арқылы музыка тыңдау үшін
(жеткізу топтамасына кірмейді) оларды
ұяшыққа қосыңыз (32, 1-сурет). VOLUME
немесе батырмаларының көмегімен
дыбыс қаттылығының деңгейін реттеңіз.
Құлақаспапты қосқан кезде магнитоланың
динамиктері автоматты түрде сөнеді.
РадиоҚАБЫЛДАҒЫШ
Осы магнитола электрондық сандық баптау
жүйесіне ие. Бұдан басқа Сіз FM және MW
(AM) диапазондарының әрқайсысында 20
станцияны баптап, сақтай аласыз.
радиостанциЯЛАРДЫ ҚАБЫЛДАУ
1. STANDBY батырмасын басып,
магнитоланы қосыңыз.
2. TUNER режимін таңдау үшін FUNCTION
батырмасын кезекпен басыңыз. LCDдисплейде «TUNER» индикаторы пайда
болады.
3. FM немесе MW (AM) жиіліктер диапазонын
таңдау үшін қашықтықтан басқару
пультіндегі BAND батырмасын басыңыз.
4. Радиостанцияны баптаңыз.
Қолмен: Қалаған радиостанцияны таңдау
үшін TUNING /SKIP немесе TUNING
/SKIP батырмаларын кезекпен
басыңыз.
Автоматты: TUNING /SKIP немесе
TUNING /SKIP батырмасын 1
секундтан артық басып ұстап тұрыңыз,
тюнер сканерлеуді бастайды және
радиостанциядан күшті сигнал
қабылданған жағдайда сканерлеуді
автоматты түрде тоқтатады.
5. MONO/STEREO режимдерін ауыстыру.
Егер FM радиостанциядан алынатын
стереосигнал әлсіз болса, дыбысталу
сапасын жақсарту үшін REPEAT/MONO-ST
батырмасын басыңыз, магнитола моно
режиміне ауысады.
АНТЕННА
FM диапазонында жақсы қабылдау үшін
антеннаны толық жазыңыз (35, 1-сурет)
және оны қажетті бұрышқа келтіріңіз. AM
диапазонында қабылдау үшін магнитоланың
ішіне антенна орнатылған, AM диапазонында
жақсы қабылдау үшін магнитоланың орнын
ауыстырып көріңіз.
РадиостанциЯНЫ БАҒДАРЛАМАЛАУ
Сіз FM және MW (AM) диапазондарының
әрқайсысында 20 станцияны баптап, сақтай
аласыз.
1. Жиілікті диапазонды таңдаңыз және
бағдарламалағыңыз келетін станцияны
баптаңыз.
2. MEMORY/CLK-ADJ батырмасын басыңыз.
3 секунд бойы LCD-дисплейде «MEMORY»
индикаторы және «00» арна индикаторы
жыпылықтайтын болады.
3. PRESET/FOLDER немесе
3960IM.indd 41 12.10.2007 15:50:55
Page 42

ҚАЗАҚ
2
батырмаларының көмегімен
радиостанцияны сақтағыңыз келетін 1-ден
20 дейін арна нөмірін таңдаңыз.
4. Жасалған орнатуларды сақтау үшін
MEMORY/CLK-ADJ батырмасын тағы бір
рет басыңыз.
5. Жиілігін магнитола жадында сақтағыңыз
келетін барлық радиостанциялар үшін 1
– 4 қадамдарды қайталаңыз .
Ескерту: Сіз MEMORY индикаторы
жыпылықтағанға дейін арна нөмірін
таңдауыңыз қажет, әйтпесе станция
магнитола жадында сақталмайды. Егер
индикатор Сіз арна нөмірін таңдағанға
дейін сөніп қалатын болса, 1-4
қадамдарды қайталаңыз.
ЖАДТАН АЛДЫН АЛА БАҒДАРЛАМАЛАНҒАН
РАДИОСТАНЦИЯЛАРДЫ ШАҚЫРУ
Алдын ала бағдарламаланған
радиостанцияларды шақыру үшін сәйкесінше
жиілікті диапазонды (FM немесе MW (AW))
таңдаңыз және қажетті радиостанцияны
таңдау үшін PRESET/FOLDER немесе
батырмаларын кезекпен басыңыз.
Ескерту: Алдын ала бағдарламаланған
станциялар магнитола желіден өшкенге
дейін немесе резервтік қоректің батареялары
разрядталғанға дейін магнитоланың жадында
сақталады. Қоректі өшірген кезде немесе
батареяларды алып тастаған жағдайда алдын
ала орнатылған радиостанциялар жадтан өшіп
қалады. Оларды қайтадан бағдарламалау
қажет.
CD дискІЛЕРДІ ОЙНАТУ
Салу – Дискілерге арналған бөлімді ашыңыз.
CD дискіні салыңыз және бөлім қақпағын
жабыңыз.
Шығару – Ойнатуды тоқтатқаннан кейін дискіге
арналған бөлімнің қақпағын ашыңыз және
дискіні шығарыңыз. Дискіні қабына салыңыз.
Дискіге арналған бөлімге шаң түспеу үшін
оның қақпағын үнемі жауып жүріңіз. Егер
диск ойнатылмайтын болса, әрқашан дискіні
бөлімнен шығарыңыз.
1. STANDBY батырмасын басып,
магнитоланы қосыңыз.
2. CD дискілерді ойнату режимін таңдаңыз.
Ол үшін LCD-дисплейде «СD» индикаторы
пайда болғанға дейін FUNCTION
батырмасын кезекпен басыңыз.
3. CD арналған бөлімді ашыңыз. CD дискіні
орнатыңыз және бөлім қақпағын жабыңыз.
Құрылғы дискіні ойната бастайды, бұл
жағдайда LCD-дисплейде «READING»
белгісі пайда болады. Содан кейін LCDдисплейде тректердің саны және жалпы
ойнату уақыты бейнеленеді.
Track number – тректердің саны, Playing time
– Ойнату уақыты
CD дискіні бөлімге салғаннан кейін LCDдисплейде «NO DISC» индикаторы пайда
болатын болса, дискінің дұрыс салынғанын
тексеріңіз. Диск затбелгісімен жоғары қарап
салынуы қажет.
4. Дискіні бірінші тректен бастап ойнату үшін
PLAY/PAUSE батырмасын басыңыз.
Сіз бірінші болып ойнатылатын тректі
таңдай аласыз. Ол үшін TUNING
/SKIP немесе TUNING /SKIP
батырмаларының көмегімен тректі
таңдаңыз, содан кейін PLAY/PAUSE
батырмасын басыңыз.
5. Ойнатуды уақытша тоқтату үшін PLAY/
PAUSE батырмасын басыңыз. “PLAY”
индикаторы және ойнату уақыты үнемі
жыпылықтап тұратын болады. Ойнату
режиміне оралу үшін осы батырманы тағы
бір рет басыңыз.
6. Ойнатуды тоқтату үшін STOP батырмасын
басыңыз.
Ескерту: Егер дискілерге арналған бөлім
қақпағы ашық болса, LCD-дисплейде
«OPEN» индикаторы бейнеленеді.
ОЙНАТУДЫ БАҒДАРЛАМАЛАУ
Сіз қалаған тәртіпте тректерді ойнатуды
бағдарламалай аласыз (максимум 60).
1. STANDBY батырмасын басып,
магнитоланы қосыңыз.
2. Дискілерге арналған бөлімді ашыңыз.
CD дискіні салыңыз және бөлім қақпағын
жабыңыз.
3. Дискіні ойнату тоқтап тұрған кезде
MEMORY/CLK-ADJ батырмасын басыңыз.
LCD-дисплейде «MEMORY» индикаторы
жыпылықтайтын болады, ал дисплейде
3960IM.indd 42 12.10.2007 15:50:56
Page 43

ҚАЗАҚ
3
дискідегі «0» трек нөмірі және оның
бағдарламалау кезіндегі «P-01» нөмірі
бейнеленетін болады.
TUNING /SKIP немесе TUNING
/SKIP батырмаларын кезекпен басып,
қалаған трегіңізді таңдаңыз. Таңдалған
тректі сақтау үшін MEMORY/CLK-ADJ
батырмасын басыңыз. Бағдарламалау
индикаторы «Р-2» өзгереді.
4. Келесі тректі бағдарламалау: TUNING
/SKIP немесе TUNING /SKIP
батырмаларын кезекпен басып, келесі
тректі таңдаңыз. Таңдалған тректі
жадта сақтау үшін MEMORY/CLK-ADJ
батырмасын басыңыз. Сіз барлығы 60
тректі бағдарламалай аласыз.
MEMORY/CLK-ADJ батырмасын кезекпен
басып, Сіз бағдарламаланған тректердің
тізімін қарай аласыз.
Ойнату үшін PLAY/PAUSE батырмасын
басыңыз. Ойнатуды тоқтату үшін STOP
батырмасын басыңыз.
Бағдарламаланған ойнатуды тоқтату
үшін, дискіні ойнату тоқтап тұрғанда
STOP батырмасын басыңыз не болмаса
дискілерге арналған бөлімнің қақпағын
ашыңыз.
ОЙНАТУДЫ ҚАЙТАЛАУ
Осы функция дискідегі барлық тректерді
немесе бағдарламаланған тректерді
қайталауға мүмкіндік береді.
1. Бір тректі қайталау үшін REPEAT/MONO-
ST батырмасын бір рет басыңыз, LCDдисплейде «REPEAT» индикаторы пайда
болады.
2. Дискідегі барлық тректерді қайталау үшін
REPEAT/MONO-ST батырмасын екі рет
басыңыз, LCD-дисплейде «REPEAT ALL»
индикаторы пайда болады.
3. Ойнатуды қайталауды тоқтату үшін
қайталау индикаторы сөнгенге дейін
REPEAT/MONO-ST батырмасын баса
беріңіз.
ЕРІКТІ ТӘРТІПТЕ ОЙНАТУ
Сіз дискідегі барлық тректерді ерікті түрде
ойната аласыз.
1. Қашықтықтан басқару пультіндегі
RANDOM батырмасын бір рет басыңыз,
LCD-дисплейде «RANDOM» индикаторы
пайда болады, тректерді ерікті түрде
ойнату басталады.
2. Ерікті түрде ойнатуды тоқтату үшін
қашықтықтан басқару пультіндегі RANDOM
батырмасын тағы бір рет басыңыз,
«RANDOM» индикаторы өшеді.
МР3 ДИСКІНІ ОЙНАТУ
Осы құрылғы MP3 форматында жазылған
көптеген дискілерді ойната алады, алайда
дискіні жазып алу кезінде қолданылған
бағдарламалық жасақтаманың баптауына
байланысты диск ойнатылмайтын кездер
болады.
1. STANDBY батырмасын басып,
магнитоланы қосыңыз.
2. Дискілерді ойнату режимін таңдаңыз. Ол
үшін LCD-дисплейде «СD» индикаторы
пайда болғанға дейін FUNCTION
батырмасын кезекпен басыңыз.
3. Дискілерге арналған бөлімді ашыңыз.
MP3 дискіні салыңыз және бөлім қақпағын
жабыңыз. Құрылғы дискіні ойната
бастайды, бұл жағдайда LCD-дисплейде
«READING» белгісі пайда болады.
LCD-дисплейде дискідегі папкалар мен
тректердің саны бейнеленеді.
3960IM.indd 43 12.10.2007 15:50:56
Page 44

ҚАЗАҚ
Total folder – барлық папкалар, Total track
– барлық тректер
4. Дискіні бірінші тректен бастап ойнатуды
бастау үшін PLAY/PAUSE батырмасын
басыңыз.
First track – бірінші трек, Playing time – Ойнату
уақыты
5. Сіз бірінші болып ойнатылатын тректі
таңдай аласыз. Ол үшін TUNING
/SKIP немесе TUNING /SKIP
батырмаларының көмегімен тректі
таңдаңыз, немесе дискіні ойнату
тоқтатылған кезде, қажетті папканы таңдау
үшін PRESET/FOLDER немесе
батырмаларын басыңыз, содан кейін
TUNING /SKIP немесе TUNING
/SKIP батырмаларының көмегімен тректі
таңдаңыз.
Ойнату үшін PLAY/PAUSE батырмасын
басыңыз.
(Folder number – папка нөмірі, Track number
– трек нөмірі)
6. MP3 дискіні ойнату кезінде ID3
батырмасын басыңыз. LCD-дисплейде
өлең және альбом атауы бейнеленеді.
ID3 батырмасын екі рет басқан жағдайда
дисплейде қозғалмалы жол түріндегі ақпарат
пайда болады.
LCD-дисплейде бейнеленетін ақпарат
бағдарламалық жасақтаманың әр түрлі
баптауларының себебінен ерекшеленуі
мүмкін. Орыс тіліндегі жазулар қате берілуі
мүмкін.
7. Ойнатуды тоқтату үшін PLAY/PAUSE
батырмасын басыңыз. “PLAY” индикаторы
және ойнату уақыты үнемі жыпылықтайтын
болады. Ойнату режиміне оралу үшін осы
батырманы тағы бір рет басыңыз.
Track number – трек нөмірі, Playing time
– Ойнату уақыты
8. Ойнатуды тоқтату үшін STOP батырмасын
басыңыз. LCD-дисплейде дискідегі
папкалардың және тректердің саны
бейнеленеді.
ОЙНАТУДЫ БАҒДАРЛАМАЛАУ
Сіз қалаған тәртіпте тректерді ойнатуды
бағдарламалай аласыз (максимум 60).
1. STANDBY батырмасын басып,
магнитоланы қосыңыз. Дискілерге
арналған бөлімді ашыңыз. МР3 дискіні
салыңыз және бөлім қақпағын жабыңыз.
Дискіні ойнату тоқтап тұрған кезде
MEMORY/CLK-ADJ батырмасын басыңыз.
LCD-дисплейде «MEMORY» индикаторы
жыпылықтайтын болады, ал дисплейде
дискідегі «0» трек нөмірі және оның
бағдарламалау кезіндегі «P-01» нөмірі
бейнеленетін болады.
2. TUNING /SKIP немесе TUNING
/SKIP батырмаларын кезекпен басып,
қалаған трегіңізді таңдаңыз
немесе
қажетті папканы таңдау үшін PRESET/
FOLDER немесе батырмаларын
басыңыз, содан кейін TUNING
/SKIP немесе TUNING /SKIP
батырмаларының көмегімен тректі
таңдаңыз.
3. Таңдалған тректі сақтау үшін MEMORY/
CLK-ADJ батырмасын басыңыз.
Бағдарламалау индикаторы «Р-2»
өзгереді.
3960IM.indd 44 12.10.2007 15:50:57
Page 45

ҚАЗАҚ
4. Келесі тректі бағдарламалау үшін 1-3
қадамдарды қайталаңыз. Сіз барлығы 60
тректі бағдарламалай аласыз.
5. MEMORY/CLK-ADJ батырмасын кезекпен
басып, Сіз бағдарламаланған тректердің
тізімін қарай аласыз.
6. Ойнату үшін PLAY/PAUSE батырмасын
басыңыз. Ойнатуды уақытша тоқтату үшін
осы батырманы тағы бір рет басыңыз.
7. Ойнатуды тоқтату үшін STOP батырмасын
басыңыз .
Бағдарламаланған ойнатуды тоқтату
үшін, дискіні ойнату тоқтап тұрғанда
STOP батырмасын басыңыз не болмаса
дискілерге арналған бөлімнің қақпағын
ашыңыз.
ОЙНАТУДЫ ҚАЙТАЛАУ
Осы функция МР3 дискідегі тректерді
қайталауға мүмкіндік береді.
1. Бір тректі қайталау үшін REPEAT/MONOST батырмасын бір рет басыңыз, LCDдисплейде «REPEAT» индикаторы пайда
болады.
2. Барлық папканы қайталау үшін REPEAT/
MONO-ST батырмасын екі рет басыңыз,
LCD-дисплейде «REPEAT FOLDER»
индикаторы пайда болады.
3. МР3 дискідегі барлық тректерді қайталау
үшін REPEAT/MONO-ST батырмасын үш
рет басыңыз, LCD-дисплейде «REPEAT
ALL» индикаторы пайда болады.
4. Ойнатуды қайталауды тоқтату үшін
қайталау индикаторы сөнгенге дейін
REPEAT/MONO-ST батырмасын баса
беріңіз.
КАССЕТАНЫ ОЙНАТУ
1. STANDBY батырмасын басып,
магнитоланы қосыңыз. TAPE режимін
таңдау үшін LCD-дисплейде «TAPE»
индикаторы пайда болғанға дейін
FUNCTION батырмасын кезекпен
басыңыз.
2. STOP/EJ батырмасын басыңыз және
кассетаны кассета салғышқа салыңыз.
3. Кассета салғышты жабыңыз.
4. Кассетаны ойнату үшін PLAY батырмасын
басыңыз.
5. VOLUME немесе батырмаларының
көмегімен дыбыс қаттылығының деңгейін
реттеңіз.
6. Ойнатуды сәл тоқтату үшін PAUSE
батырмасын басыңыз.
7. Ойнатуды тоқтату үшін STOP/EJ
батырмасын басыңыз.
8. Алдыға/артқа жылдам айналдыру үшін
сәйкесінше F.FWD/REW батырмаларын
пайдаланыңыз.
9. Кассетаның таспасы біткен жағдайда
кассетаның ойнатылуы автоматты
тоқтайды.
10. Кассетаны шығару үшін STOP/EJ
батырмасын басыңыз, кассетаны кассета
салғыштан шығарыңыз.
Ескерту! Кассета механизмінің немесе
таспаның зақымдануына жол бермеу үшін
әрбір операциядан кейін міндетті түрде
STOP/EJ батырмасын басыңыз.
РАДИОҚАБЫЛДАҒЫШТАН ЖАЗЫП АЛУ
1. РАДИОҚАБЫЛДАҒЫШ тарауындағы
нұсқауларды орындап, қажетті
радиостанцияны ұстаңыз.
2. Кассета салғышқа таза кассетаны
салыңыз.
3. PAUSE батырмасын басыңыз.
4. RECORD батырмасын басыңыз, PLAY
батырмасы автоматты басылады. Сіз
3960IM.indd 45 12.10.2007 15:50:58
Page 46

ҚАЗАҚ
6
жазып алу сапасын құртып алудан
қорықпай, дыбыс қаттылығының деңгейін
реттей аласыз.
5. Жазып алуды бастау үшін PAUSE
батырмасын басыңыз.
6. Жазып алуды уақытша тоқтату үшін
PAUSE батырмасын басыңыз. Жазып
алуды қалпына келтіру үшін осы
батырманы тағы бір рет басыңыз.
7. Жазып алуды тоқтату үшін STOP/EJ
батырмасын басыңыз. Кассета аяғына
дейін жазылғаннан кейін жазып алу
автоматты түрде тоқтайды.
БАСҚА МУЗЫКАЛЫҚ ҚҰРЫЛҒЫЛАРДАН
ЖАЗЫП АЛУ
Сіз басқа музыкалық құрылғылардан
жазып ала аласыз, мысалы CD дискіден
немесе USB құрылғыдан. Қалаған
музыкалық құрылғыңызды қосыңыз және
РАДИОҚАБЫЛДАҒЫШТАН ЖАЗЫП АЛУ
тарауындағы нұсқауларды орындаңыз.
USB ҚҰРЫЛҒЫ
1. POWER батырмасын басып, магнитоланы
қосыңыз.
2. USB-құрылғымен жұмыс істеу режимін
таңдау үшін LCD-дисплейде «USB»
индикаторы пайда болғанға дейін
FUNCTION батырмасын кезекпен
басыңыз.
3. USB құрылғыны (мысалы, шағын МРЗ
плейер немесе флэш-тасығыш) USB
ағытпаға (39, 1-сурет) салыңыз. LCDдисплейде папкалар мен тректердің саны
бейнеленеді.
Total Folder – барлық папкалар, Total Track
– барлық тректер
Ескерту: Егер USB ағытпаға не шағын МРЗ
плейер, не флэш-тасығыш қосылмаса, LCDдисплейде «NO DEV» индикаторы пайда
болады.
4. Ойнату үшін PLAY/PAUSE батырмасын
басыңыз.
5. USB-құрылғымен жұмыс істеу кезінде
басқару батырмалары және іс-әрекеттер
жүйелігі МР3 дискімен жұмыс істеу
кезіндегі басқару батырмаларына және
іс-әрекеттер жүйелігіне ұқсас келеді.
МР3 ДИСКІНІ ОЙНАТУ тарауындағы
нұсқауларды басшылыққа алыңыз.
SD ЖАД КАРТАСЫ
1. POWER батырмасын басып, магнитоланы
қосыңыз.
2. SD жад картасымен жұмыс істеу
режимін таңдау үшін LCD-дисплейде
«SD» индикаторы пайда болғанға
дейін FUNCTION батырмасын кезекпен
басыңыз.
3. Жад картасын SD/MMC ағытпаға (3, 1сурет) салыңыз. LCD-дисплейде папкалар
мен тректердің саны бейнеленеді.
Total Folder – барлық папкалар Total Track
– барлық тректер
Ескерту: Егер ағытпаға (3, 1-сурет) ешқандай
SD/MMC карта қосылмаса, LCD-дисплейде
«NO SD» индикаторы пайда болады.
4. Ойнату үшін PLAY/PAUSE батырмасын
басыңыз .
5. Жад картасымен жұмыс істеу кезінде
басқару батырмалары және іс-әрекеттер
жүйелігі МР3 дискімен жұмыс істеу
кезіндегі басқару батырмаларына және
іс-әрекеттер жүйелігіне ұқсас келеді.
МР3 ДИСКІНІ ОЙНАТУ тарауындағы
нұсқауларды басшылыққа алыңыз.
3960IM.indd 46 12.10.2007 15:50:58
Page 47

ҚАЗАҚ
7
Техникалық сипаттамалары
Тұтынылатын қуат AC 230V/50Hz
Салмағы 2.7Kg
Өлшемдері L 350 x W 239 x H 161 (mm)
Шығыс қуаты 2 x 2W RMS/ channel
Динамиктер Two-way:
1. 3'' 8 Ohms 3W x2pcs (middle)
2. 2'' 8 Ohms 0.5W x2pcs (Tweeter)
Қорек элементтерінен жұмыс істеу
уақыты
8 ч.
CD форматтары CD,CD-R ,CD-RW, MP3
Ойнатылатын жиіліктердің
диапазоны
20Hz ~20KHz
Сигнал/шуыл қатынасы 55dB
Желілік емес бұрмаланулар
коэффициенті
<1%
FM/MW (AM) FM: 65~108 MHz
Жиіліктер диапазоны AM : 522~1620 KHz
Аралық жиілік FM: 10.7MHz
AM: 450 kHz
Антенна FM: telescopic antenna
AM: built in ferrite antenna
Кассета салатын бөлім 6 keys; DC bias; One touch recording
Өндіруші алдын ала ескертпестен аспаптың дизайнын және техникалық сипаттамаларын
өзгертуге құқылы.
Аспаптың қызмет мерзімі 3 жылдан кем емес
Электрондық және электр құрылғыларды жою
(Евроодақ және қалдықтарды бөлу жүйесі қолданылатын басқа Еуропа елдерінде
қолданылады)
Осы белгі электр және электрондық құрылғылар қызмет мерзімі біткеннен кейін басқа
тұрмыстық қоқыстардан бөлек жойылу керектігін білдіреді. Ескі жабдықты дұрыс жою
қоршаған ортаға зиян тигізбеуге мүмкіндік береді. Толық ақпарат алу үшін ескі жабдықтарды
жоюмен айналысатын қызметке немесе бұйым сатып алынған дүкенге хабарласыңыз.
Гарантиялық мiндеттiлiгi
Гарантиялық жағдайдағы қаралып жатқан бөлшектер дилерден тек сатып алынған адамға
ғана берiледi. Осы гарантиялық мiндеттiлiгiндегi шағымдалған жағдайда төлеген чек немесе
квитанциясын көрсетуi қажет.
Бұл тауар ЕМС – жағдайларға сәйкес келедi негiзгi Мiндеттемелер
89/336/EEC Дерективаның ережелерiне енгiзiлген Төменгi
Ережелердiң Реттелуi (73/23 EEC)
3960IM.indd 47 12.10.2007 15:50:59
Page 48

ЎЗБЕК
8
CD/МР3 дискларини ЎҚувчи VT-3960BK магнитоласи
фойдаланиш Қоидалари
электрга улашдан, ишлатишдан ва тўғрилашдан олдин ушбу қўлланмани диққат билан ўқиб
чиқинг. Қўлланмада айтилган огоҳлантиришлар, жиҳозни ишлатиш борасидаги тавсияларнинг
барчасига амал қилиш лозим бўлади.
Кейинчалик бирор савол пайдо бўлганда олиб ишлатиш учун ушбу қўлланмани сақлаб олиб
қўйинг.
ВНИМАНИЕ!
Опасность удара электрическим током! НЕ
ВСКРЫВАТЬ!
Огоҳлантириш: ёнғин чиқмаслиги ёки электр токи урмаслиги учун жиҳозни ёмғирда ёки сув
тегадиган жойда қолдирманг.
Электр токи урмаслиги учун жиҳоз корпусини ўзингиз очишга ҳаракат қилманг. Жиҳозни фақат
хизмат марказларида ишлайдиган малакали усталар таъмирлашлари, кўриб чиқишлари лозим
Томонлари тенг бўлган учбурчак ичига чизилган чақмоқ сурати фойдаланувчига
жиҳоз корпуси ичида ток уришига сабаб бўлиши мумкин бўлган электр кучланиши
борлигини билдиради.
Томонлари тенг бўлган учбурчак ичидаги ундов белгиси фойдаланувчига
фойдаланиш қўллманмасида ишлатиш ва техник хизмат борасида айниқса муҳим
бўлган кўрсатма ва тавсиялар борлигини билдиради.
CLASS 1 LASER PRODUCT
Ушбу маҳсулот 1-ТОИФАДАГИ ЛАЗЕР ИШЛАТИЛАДИГАН ЖИҲОЗЛАР сирасига киради. Ушбуни
кўрсатувчи ёрлиқ жиҳознинг орқа панелига қўйилган ва жиҳозда лазер нури ишлатилишини
билдиради. Жиҳоз очилмаса лазер нури таъсир қилмайди. Жиҳозни фақат хизмат марказларида
ишлайдиган малакали усталар таъмирлашлари, кўриб чиқишлари лозим
Хафвсизлик қоидалари
Электр токига улаш
Ишлатишдан олдин электр тармоғидаги кучланиш жиҳоз ишлайдиган кучланишга мос келишини
текшириб кўринг.
Жиҳозни сувга солиш таъқиқланади. Электр токи урмаслиги ёки ёнғин чиқмаслиги учун жиҳозни
намлик даражаси баланд бўлган жойларга (ванна,сув солинган тоғора, ошхонадаги идиш ювгич,
кир машиналари, сузиш хавзалари, зах ертўлалар ва шунга ўхшаш бошқа жойларда) қўйманг.
Жиҳозга томчи тушиши ёки сув сачрашига йўл қўйманг. Жиҳознинг устига ичига бирор суюқлик
солинган идиш (мисол учун, гулдон) қўйиш таъқиқланади.
Электр узайтиргичлар ёки розеткаларга кўп куч тушишига йўл қўйманг. Акс ҳолда бу электр токи
уришига сабаб бўлиши мумкин.
Жиҳозни шундай қилиб қўйингки, электр вилкаси носоз бўлганда уни тез розеткадан чиқариб
олиш мумкин бўлсин. Жиҳозга уланадиган кабеллар уланиш жойида тортилиб қолмаслиги
керак ва уларни шундай қилиб ўтказиш лозимки, оёққа ўралиб қолмасин, устига бирор нарса
қўйилмаган бўлсин.
3960IM.indd 48 12.10.2007 15:50:59
Page 49

ЎЗБЕК
9
Ишлаб чиқарувчи рухсат бермаган электр
узайтиргичларни ишлатманг. Акс ҳолда бу
хавфли ҳолатларга сабаб бўлиши мумкин.
Чақмоқ чақаётган вақтда жиҳозни
қўшимча химоя қилиш учун ҳамда кўп вақт
ишлатилмаганда вилкасини розеткадан
чиқариб қўйинг. Шундай қилинганда чақмоқ
чаққанда жиҳоз яшин ургандан ёки электр
тармоғида электр токи кўпайиб кетиши
сабабли бузилишидан сақланган бўлади.
Жиҳозни электрдан узганда вилкани ушлаб
тортинг ва ҳеч қачон уни шнуридан тортиб
суғуриб олишга ҳаракат қилманг.
Жиҳознинг қўзғолувчан қисмларини
мойламанг.
Электр токи урмаслиги учун жиҳоз корпусини
ўзингиз очишга ҳаракат қилманг. Жиҳозни
таъмирламанг ва уни ўзгартиришга
уринманг. Жиҳозни таъмирлаш фақат
хизмат марказларининг малакали усталари
томонидан амалга оширилиши керак.
Жиҳозни ўрнатиш
Жиҳозни шамол тегиб турадиган, ҳаво яхши
айланадиган жойга қўйинг. Агар ҳаво етарли
даражада айланмайдиган бўлса ушбу жиҳозни
йиғма мебел (китоб жовонлари ёки девор
шкафлари) ичига қўйиш мумкин эмас.
Жиҳоз кроват, диван, софа, гиламнинг
устига ёки шунга ўхшаш бошқа жойларга
қўйилганда унинг ҳаво кирадиган йўллари
беркилиб қолмаслигига қараб туринг.
Нимагаки жиҳознинг ишлончли ишлаши, қизиб
кетмаслиги ҳаво йўлларининг очиқ бўлишига
боғлиқ бўлади.
Жиҳозни иссиқ чиқарадиган буюмлар,
масалан, радиаторлар, электр иситгичлар,
духовка ва шунга ўхшаш бошқа нарсаларнинг
(шу жумладан овоз кучайтиргичларнинг ҳам)
яқинига қўйманг. Бундан ташқари уни қуёш
нури тўғри тушиб турадиган, чанг кўп бўлган
ёки тушиб кетиши, урилиши мумкин бўлган
жойларга ҳам қўйманг. Жиҳозни ҳарорат 35ºС
даражадан ошадиган жойда қолдирманг.
Жиҳозни текис ва қўзғолмайдиган, магнит
майдони кучли бўлган мосламалар,
масалан видео, аудио магнитафонлар,
радио жиҳозлари, катта колонкалар яқинига
қўймаслик керак. Нимагаки ушбу жиҳозлар
магнит майдонининг кучланиш йўли товуш
чиқишига ҳалақит бериши мумкин.
Жиҳоз устига оғир нарсаларни қўйманг.
Ишлаб турган жиҳоз яқинида болалар ва
имкониятлари чегараланган инсонлар
бўлганда айниқса эҳтиёт бўлиш керак ва
уларни қаровсиз қолдирмаслик лозим.
Ёт жисмлар
Жиҳоздаги тешикларда корпус ичига бирор ёт
жисм тушмаслигига қараб туринг. Акс ҳолда
бу жиҳознинг ёниб кетишига ёки электр токи
уришига сабаб бўлиши мумкин. Мободо агар
шундай ҳол юз берса жиҳозни тез электрдан
узинг ва уни яна ишлатишдан олдин хизмат
марказига олиб бориб кўрсатинг.
Таъмирлатиш лозим бўлган ҳоллар
Қуйида айтилган ҳолларнинг бирортаси юз
берса жиҳозни электрдан узиб тузаттириш
учун малакали усталарга мурожаат қилинг:
a) Электр шнури ёки вилка шикатланганда;
b) Жиҳознинг ичига бирор ёт жисм тушиб
қолганда;
c) Жиҳоз ёмғирда қолди ёки устига сув
тўкилиб кетганда;
d) Жиҳоз меёрида ишламаганда;
e) Жиҳоз тушиб кетганда ёки бирор бошқа
усулда шикастланганда;
f) Жиҳоз қандайдир носозлик борлиги
сезилганда.
Эслатма: агар жиҳоз ишлатиладиган хонада
электр қувватини тежайдиган лампалар
қўйилган бўлса, жиҳоз нобарқарор ишлаши
мумкин.
Жиҳозни тозалаш
Жиҳозни тозалашдан олдин уни электр
токидан узиб қўйинг. Жиҳозни нам мато
биан тозаланг. Тозалаш учун суюқ ёки
пуркаладиган тозалаш воситаларини ишлатиш
таъқиқланади.
Дискни тўғри тутиш ва тозалаш
Дарз кетган ёки қийшайган дискларни
ишлатманг, акс ҳолда бу жиҳоз бузилишига
сабаб бўлиши мумкин.
3960IM.indd 49 12.10.2007 15:50:59
Page 50

ЎЗБЕК
0
Дискни фақат четидан тутиб ушланг. Дискнинг
юзига қўл теккизманг. Диск юзасидаги бармоқ
изи, чанг, тирналган жой уни ишдан чиқишига
сабаб бўлиши мумкин.
Дискка қуёш нури туширманг, иссиқ жойлар
яқинига қўйманг, ҳарорат баланд бўладиган
жойларда, намлик баланд жойларда
сақламанг.
Ишлатиб бўлгандан сўнг дискни ғилофига
солиб олиб қўйинг.
Вақти-вақти билан диск юзасини ўртасидан
четига қараб юмшоқ мато билан артиб туринг.
Тозалаш учун ювиш воситаларини ишлатманг.
ТАВСИФИ
Магнитола (1-расм)
1. диск қўйиш бўлмаси
2. USB улаш ўрни
3. SD/MMC карталарни жойлаш ўрни
4. кутиб туриш индикатори STANDBY
5. эшитишни тўхтатиш тугмаси STOP
6. овоз баландлигини кўтариш тугмаси
VOLUME
7. овоз баландлигини пасайтириш тугмаси
VOLUME
8. бошқа функцияга ўтиш тугмаси FUNCTION
9. таймерни ишлатиш тугмаси TIMER
10. белгиланган радиостанцияларни хотирада
сақлаш/соатни тўғрилаш тугмаси
MEMORY/CLK-ADJ
10. қайтариш/моно ёки стрео усулда эшитишга
ўтказиш тугмаси REPEAT/MONO-ST
11. тюнер /олдинги треккка ўтказиш тугмаси
TUNING /SKIP
12. тюнер /кейинги трекка ўтказиш тугмаси
TUNING /SKIP
13. дискни эшиттириш/тўхтатиб туриш тугмаси
PLAY/PAUSE
15. 16. олдиндан белгилаб қўйиш/бошқа
папкага ўтиш тугмаси PRESET/FOLDER
ва
17. эквалайзер режимини белгилаш/паст
частоталарни кучайтириш тугмаси EQ/BBS
18. диапазонни ўзгартириш/файл ҳақидаги
маълумотни дисплейга чиқариш тугмаси
BAND/ID3
19. касетадаги қўшиқни тўхтатиб туриш
тугмаси PAUSE
20. кассетани тўхтатиш/чиқариш тугмаси
STOP/EJ
21. кассетани олдинга тез ўтказиш тугмаси
F.FWD
22. кассетани орқага тез айлантириш тугмаси
REWIND
23. кассетани эшиттириш тугмаси PLAY
24. овоз ёзиш тугмаси RECORD
25. олисдан бошқариш пултидан келадиган
сигнални қабул қилиш ўрни SENSOR
26. жиҳоз кутиш ҳолатида эканлиги
билдирувчи индикатор STANDBY
27. Суюқ кристалли экран
28. ўнг динамик
29. чап динамик
30. кассета қўйиш жойи
31. батарея қўйиш жойи қопқоғи
32. стерео қулоққа тутиш воситасини улаш
жойи
33. AUX in улаш ўрни
34. электрга улаш ўрни
35. FM антенна
Олисдан бошқариш пулти (2-расм)
1. STANDBY тугмаси
Магнитола ишлаётган вақтда STANDBY
тугмасини босинг. Магнитола кутиб туриш
режимига ўтиб ишлай бошлайди ва
STANDBY режимининг индикатори ёнади.
Одатдаги режимга қайтиш учун STANDBY
тугмасини яна бир марта босинг.
2. функцияларни ўзгартириш тугмаси FUNC
3. диапазонларни ўзгартириш тугмаси BAND
4. қайта эшиттириш тугмаси/моно-стерео
режимларидан бирини танлаш тугмаси
REPEAT/MONO-ST
5. қўнғироқли соатни/таймерни ишлатиш
тугмаси TIMER/SLEEP
6. тюнер /олдинги треккка ўтказиш тугмаси
TUNING /SKIP
7. эшттириш/тўхтатиб туриш тугмаси PLAY/
PAUSE
8. эшиттиришни тўхтатиш тугмаси STOP
9. овозни ўчириб қўйиш тугмаси MUTE
a. овозни ўчириш учун тугмани босинг
b. овозни чиқариш учун тугмани яна бир
марта босинг
10. трекларни аралаштириб эшиттириш
тугмаси RANDOM
11. кейинги трекка ўтиш тугмаси TUNING
/SKIP
12. овозни кўтариш тугмаси (▲)
13. овозни пасайтириш тугмаси (▼)
14. инфрақизил (ИҚ) нур чиқаргич
15. батарея бўлмаси қопқоғи
3960IM.indd 50 12.10.2007 15:50:59
Page 51

ЎЗБЕК
Электрга улаш
Электр тармоғига улаш
Жиҳозни электр тармоғига улашдан олдин
электр тармоғидаги кучланиш жиҳоз
ишлайдиган кучланишга тўғри келишкелмаслигини текшириб кўринг.
1. Магнитолани электрга улаш учун электр
шнурининг бир учини улаш жойига (34,
1-расм) иккинчи учидаги вилкани эса
розеткага уланг. STANDBY режимининг
индикатори ёнади.
2. Магнитолани ишлатиш учун STANDBY
тугмасини босинг. Шунда суюқ кристалл
дисплей ёниб кутиш ҳолатида эканлигини
кўрсатувчи STANDBY индикатори ўчади.
Эслатма: статик электр кучи жиҳоз ишлашига
ҳалақит берадиган қувват пайдо бўлишига
сабаб бўлиши мумкин. Бундай ҳолларда
жиҳозни электрдан узинг ва шундан сўнг уни
яна электрга уланг. Агар шунда ҳам муаммо
бартараф бўлмаса яқинроқдаги хизмат
марказига мурожаат қилинг.
Батареялардан қувват олиб ишлатиш
1. Магнитолани электрдан узинг.
2. Кўрсатгич томондаги иккита ёпгични босиб
магнитола орқасидаги асосий батареялар
бўлмаси қопқоғини очинг (31, 1-расм).
3. Жиҳоз хотирасидаги маълумот сақланиши
учун 2 дона UM-3/AA батареясини қўйинг
(жиҳоз билан қўшиб берилмайди).
4. Асосий батарея солинадиган бўлмага 8
дона UM-2/С батареясини жойланг (жиҳоз
билан бирга қўшиб берилмайди).
5. Батарея бўлмаси қопқоғини ёпинг
Олисдан бошқариш пултини ишлатиш
Олисдан бошқариш пултининг батарея
солинадиган бўлмасига 2 дона UM-4/АAA
батареясини жойланг (жиҳоз билан бирга
қўшиб берилмайди)
Олисдан бошқариш пултини ишлатганда унинг
инфрақизил датчигини магнитолангиздаги
SENSORга тўғрилаб қаратинг. Олисдан
бошқариш пулти ишламаса батареяларини
текшириб кўринг ва зарур бўлганда уларни
алмаштиринг.
Олисдан бошқариш пултини иссиқдан, қуёш
нури тўғри тушишидан сақланг. Нимагаки
булар унинг ишлашига салбий таъсир қилиши
мумкин.
Диққат.
Батареяларнинг оқиб кетиши жиҳоз
бузилишига, шикастланишига сабаб бўлиши
мумкин. Батареялар сабабли жиҳоз
шикастланмаслиги учун қуйида айтилган
кўрсатмаларга амал қилиб ишланг:
− Батареяларни жиҳозда кўрсатилган
манфий ва мусбат томонларга тўғрилаб
жойланг;
− Ҳар хил батареяларни бирга ишлатманг
(эскиси билан янгисини, ҳар хил
турдагиларини ва ҳокозо);
− Агар кўп вақт ишлатмасангиз
батареяларни бўлмадан олиб қўйинг.
ВАҚТНИ БЕЛГИЛАШ
Магнитола кутиш режимида турганда керакли
вақтни белгилаб қуйишингиз мумкин бўлади.
1. MEMORY/CLK-ADJ тугмасини бир
марта босинг. Суюқ кристалл экранли
дисплейдаги соат ўчиб-ёна бошлайди.
TUNING /SKIP ёки TUNING /SKIP
тугмаларидан бирини босиб соатни
тўғриланг.
2. MEMORY/CLK-ADJ тугмасини яна бир
марта босинг. Суюқ кристалл экранли
дисплейда дақиқа ўчиб-ёна бошлайди.
TUNING /SKIP ёки TUNING /SKIP
тугмаларидан бирини босиб дақиқани
қўйинг
Эслатма: Электрдан узиб қўйилганда
ва қўшимча батареяларнинг қуввати
қолмаганда (ёки улар қўйилмаган бўлса)
соат вақтни кўрсатмай қўяди. Электр
қувватига яна уланганда соат кўрсатгичи
ўчиб-ёна бошлайди. Шундай ҳолларда
саоатни яна қайтадан тўғрилаш лозим
бўлади.
СОАТ ҚЎНҒИРОҒИНИ ҚЎЙИШ
Магнитолани ҳар куни бир вақтда соат
қўнғироғи чалинадиган қилиб тўғрилаш
мумкин. Қўнғироқ чалинадиган қилиб
қуйилганда қўнғироқ ўрнига диск, радио,
кассета ва шунингдек USB ва SD/MMC улаш
жойларига уланган жиҳозлар ишлаб кетиши
3960IM.indd 51 12.10.2007 15:50:59
Page 52

ЎЗБЕК
2
мумкин.
Эслатма: агар қўнғироқ манбаи кассета
бўладиган бўлса олдин PLAY (23, 1-расм)
тугмасини босиш керак бўлади.
1. Қўнғироқ чалинадиган вақтни белгилаш.
Жорий вақтни кўрсатиш режимида
магнитоладаги TIMER тугмасини бир
марта босинг. LCD дисплейда «ON TIME»
ёзуви кўринади “TIMER” ёзуви эса ўчибёна бошлайди.
Вақтни белгилаш бўлимида айтилган тартиб
билан қўнғироқ чалинадиган вақтни қўйинг.
2. Қўнғироқ чалиниши тўхтайдиган вақтни
белгилаш.
TIMER тугмасини яна бир марта босинг.
LCD дисплейда «OFF TIME» ёзуви пайдо
бўлади «TIMER» ёзуви эса ўчиб-ёна
бошлайди.
Вақтни белгилаш бўлимида
кўрсатилгандек қилиб қўнғироқ ўчадиган
вақтни белгилаб қўйинг.
3. Қўнғироқ манбаасини белгилаш
TIMER тугмасини яна бир марта босинг ва
LCD дисплейда ҳозирги ишлаш режими
кўринади (масалан, TUNER).
Олдин MEMORY/CLK-ADJ тугмасини
босинг ва сўнг TUNING /SKIP
ёки TUNING /SKIP тугмаларидан
бирини босиб қўнғироқ қайси манбаадан
олинишини танланг. Белгиланган
манбаани сақлаб қўйиш учун MEMORY/
CLK-ADJ тугмасини босинг
4. Қўнғироқ овози баландлигини белгилаш.
TIMER тугмасини яна бир марта босинг ва
LCD дисплейда олдинги овоз баландлиги
кўринади (масалан, VOL 20).
Олдин MEMORY/CLK-ADJ тугмасини
босинг ва шундан сўнг TUNING /SKIP
ёки TUNING /SKIP тугмасини босиб
керакли овоз баландлигини танланг.
Белгиланган овоз баландлиги даражасини
киритиш учун яна бир марта MEMORY/
CLK-ADJ тугмасини босинг.
Эслатма: овоз баландлиги 0 дан 40 га
қадар ўзгартирилиши мумкин.
5. Қўнғироқни ишлатиш.
Олдисдан бошқариш пултидаги TIMER/
SLEEP тугмасини босинг ва LCD
дисплейда “TIMER” ёзуви пайдо бўлади.
Белгиланган вақтга келганда қўнғироқ
автоматик равишда чалинади.
6. Қўнғироқни ўчириш.
Олисдан бошқариш пултидаги TIMER/
SLEEP тугмасини яна бир марта босинг.
“TIMER” ёзуви ўчади.
МАГНИТОЛА ЎЧАДИГАН ВАҚТНИ
БЕЛГИЛАШ
(фақат олисдан бошқариш пултидаги тугмани
босиб ишлатиш мумкин)
Магнитола ўчадиган вақтни ҳам
белгилашингиз мумкин (кўпи билан 90 дақиқа
бўлади).
1. Радио/мусиқа эшитиш режимида олисдан
бошқариш пултидаги TIMER/SLEEP
тугмасини босинг. LCD дисплейда «90»
дақиқа ёзуви пайдо бўлади, “SLEEP” ёзуви
эса ўчиб-ёна бошлайди.
2. Вақтни ўзгартириш учун олисдан
бошқариш пултидаги TIMER/SLEEP
тугмасини босиб ушлаб туринг. Магнитола
ўчадиган вақтни 10 дақиқа оралатиб
0 дақиқадан 90 дақиқагача қилиб
белгилашингиз мумкин.
3. Белгиланган вақт ўтгандан сўнг магнитола
автоматик равишда ўчиб қолади.
4. Таймерни ўчириш учун олисдан бошқариш
пултидаги TIMER/SLEEP тугмасини яна
бир марта босинг. “SLEEP” ёзуви ўчади.
Магнитолани ўчириш учун эса POWER.
тугмасини босинг.
Эквалайзерни МОСЛАШ/паст частоталарНИ
кучайтиш
Эквалайзерни олдиндан дастурланган
қуйидаги бешта усулдан бирига қуйишингиз
мумкин: FLAT, JAZZ, ROCK, CLASSIC ва POP.
1. Мусиқа эшитаётган вақтингизда EQ/
BBS тугмасини босиб керакли режимни
танланг. LCD дисплейда кетма-кет FLAT,
JAZZ, ROCK, CLASSIC ва POP ёзувлари
пайдо бўлади.
2. Паст частоталарни кучайтириш учун EQ/
3960IM.indd 52 12.10.2007 15:51:00
Page 53

ЎЗБЕК
3
BBS тугмасини камида 2 секунд босиб
ушлаб туринг. LCD дисплейда «X BAS ON»
ёзуви пайдо бўлади.
Паст частоталар кучайтирилишини ўчириш
учун хам EQ/BBS тугмасини камида 2 секунд
босиб ушлаб туринг. LCD дисплейда «X BAS
OҒҒ» ёзуви пайдо бўлади.
Овозни ўчириш
(фақат олисдан бошқариш пултидаги тугмани
босиб ишлатиш мумкин)
Овозни ўчириб қўйиш учун олисдан бошқариш
пултидаги MUTE тугмасини босинг.
Қулоққа тақиб эшитиш воситасини улаш жойи
Мусиқани қулоққа тақиш воситаси
билан эшитиш учун (жиҳоз билан қўшиб
берилмайди) уни улаш жойига киритинг (32, 1-
расм). VOLUME ёки тугмалари билан
овоз баландлигини ўгартиринг. Кулоққа тақиш
воситаси уланганда динамиклар автоматик
равишда ўчади.
РАДИО
Ушбу магнитола электрон рақамли усул билан
тўғриланади. Бундан ташқари FM ва MW (AM)
диапазонидаги 20 станцияни топиб, хотирага
киритиб қўйишингиз мумкин.
РАДИОСТАНЦИЯЛАРНИ ҚАБУЛ ҚИЛИШ
1. STANDBY тугмасини босиб магнитолани
ишлатинг.
2. TUNER режимини танлаш учун FUNCTION
тугмасини босиб туринг. LCD дисплейда
«TUNER» ёзуви кўринади.
3. FM ва MW (AM) диапазонларидан бирини
танлаш учун BAND тугмасини босинг.
4. Радиостанцияни топиш.
Қўл билан топилганда: керакли
радиостанцияни топиш учун TUNING
/SKIP ёки TUNING /SKIP тугмасини
кетма-кет босиб турасиз.
Автоматик равишда: TUNING /SKIP
ёки TUNING /SKIP тугмасини
1 секунддан ортиқ босинг ва тюнер
автоматик равишда станцияни қидириб,
кучли сигналли радиостанцияни топган
вақтида қидиришдан тўхтайди.
5. MONO/STEREO режимларидан бирига
ўтинг. Агар ҒМ радиостанциядан келаётган
сигнал кучсиз бўлса, овоз сифатини
ошириш ва моно режимига ўтиш учун
REPEAT/MONO-ST тугмасини босинг ва
магнитола моно режимига ўтиб ишлай
бошлайди.
АНТЕННА
ҒМ диапазонида сигнални яхшироқ қабул
қилиш учун антеннани тўлиқ чиқариб
қўйинг (35, 1-расм) ва уни керакли томонга
қараб эгинг. АМ диапазонида тўлқин қабул
қилиш учун магнитоланинг ичига антенна
ўрнатилган ва шунинг учун АМ диапазонида
келаётган тўлқинларни яхшироқ қабул қилиш
учун магнитоланинг ўрнини алмаштиринг,
бошқачароқ қилиб буриб кўринг.
РАДИОСТАНЦИЯЛАРНИ ДАСТУРЛАШ
FM ва MW (AM) диапазонларининг ҳар
бирида 20 станцияни топиб хотирага киритиб
қўйишингиз мумкин.
1. Дастурга киритиш учун керакли
диапазондаги частотани топинг.
2. MEMORY/CLK-ADJ тугмасини босинг. LCD
дисплейда 3 секунд «MEMORY» ёзуви
ва каналнинг «00» кўрсатгичи ёниб-ўчиб
туради.
3. PRESET/FOLDER ёки тугмаларини
босиб сақламоқчи бўлган каналга 1 дан
бошлаб 20 га қадар рақам қўйинг.
4. Белгиланган рақам билан хотирада сақлаб
қўйиш учун MEMORY/CLK-ADJ тугмасини
яна бир марта босинг.
5. Бошқа радиостанцияларни ҳам хотирага
киритиб сақлаб қўйиш учун 1-билан 4бандда кўрсатилган тартибдаги ишни
қайтаринг.
Эслатма: канал рақамини MEMORY ёзувчи
ўчиб-ёнаётган вақтда теришингиз керак
бўлади. Акс ҳолда станция магнитоланинг
хотирасида сақланмайди. Агар индикатор
станцияни сақлагунингизга қадар ўчиб қолса
1-банддан 4-бандгача кўрсатилган тартибдаги
ишни қайтаришингиз керак бўлади.
3960IM.indd 53 12.10.2007 15:51:00
Page 54

ЎЗБЕК
ХОТИРАДАГИ ДАСТУРЛАНГАН
РАДИОСТАНЦИЯЛАРНИ ЭШИТИШ
Хотирага дастурлаб киритилган
радиостанцияларни чиқариш учун олдин
керакли диапазонни танланг (FM ёки MW
(AW)) ва керакли станцияни тажнлаш учун
PRESET/FOLDER ёки тугмаларини
босинг.
Эслатма: хотирага дастурланиб киритилган
станция магнитоланинг хотирасида
электрга уланиб турган вақтда ёки қўшимча
батареяларнинг қуввати қолмагунга қадар
сақланиб туради. Электр токидан узилганда ва
қўшимча батареяларнинг қуввати қолмаганда
(ёки қуйилмаган бўлса) хотирага киритилган
радиостанциялар ўчиб кетади. Бундай
ҳолларда уларни яна қайтадан хотирага
киритиш лозим бўлади.
CD ДИСКЛАРНИ ЎҚИШ
Дискни қўйиш – диск солинадиган бўлмани
очинг. CD диск қўйиб бўлма қопқоғини ёпинг.
Чиқариб олиш – ўқиб бўлингандан сўнг диск
солинадиган бўлма қопқоғини очиб дискни
чиқариб олинг. Дискни ғилофга солиб олиб
қўйинг.
Чанг тушмаслиги учун диск солинадиган
бўлма қопқоғини дойим ёпиқ сақланг. Агар
ўқилмаётган бўлса дискни дойим бўлмадан
чиқариб олиб қўйинг.
1. STANDBY тугмасини босиб магнитолани
ишатинг.
2. CD дискларни эшитиш режимига ўтинг.
Бунинг учун LCD дисплейда «CD»
ёзуви пайдо бўлгунга қадар FUNCTION
тугмасини босиб туринг.
3. CD солинадиган бўлма қопқоғини очинг,
CD ни солинг ва бўлма қопқоғини ёпинг.
Жиҳоз дискни ўқий бошлайди ва суюқ
кристалл дисплейда «READING» ёзуви
кўринади. LCD дисплейда треклар сони
билан умумий эшиттириш вақти кўринади.
Track number – трек рақами, Playing time
– ўқилиш вақти)CD диск қўйилгандан сўнг LCD
дисплейда «NO DISC» ёзуви кўринса диск
тўғри қўйилганлигини текшириб кўринг. Диск
ёрлиқ томони юқорига қилиб қўйилиши лозим.
4. Биринчи трекдан бошлаб дискни эшитиш
учун PLAY/PAUSE тугмасини босинг.
Биринчи булиб ўқиладиган трекни ҳам
танлашингиз мумкин. Бунинг учун TUNING
/SKIP ёки TUNING /SKIP
тугмалари билан трекни танлаб, шундан
сўнг PLAY/PAUSE тугмасини босинг.
5. Диск ўқилишини тўхтатиб туриш учун
PLAY/PAUSE тугмасини босинг. Диск
ўқилаётган вақтда “PLAY” ёзуви ёнибўчиб туради. Диск яна ўқилиши учун ушбу
тугмани яна бир марта босасиз.
6. Диск ўқилишини тўхтатиш учун STOР
тугмасини босинг.
Эслатма: Диск қўйиладиган бўлма қопқоғи
очиқ бўлса LCD дисплейда «OPEN» ёзуви
кўриниб туради.
ТРЕКЛАР ЎҚИЛИШИНИ ДАСТУРЛАШ
Треклар ўқилишини хохлаган тартибда
дастурлашингиз мумкин (кўпи билан 60
та бўлади). Бунинг учун қуйидаги амални
бажариш лозим бўлади:
1. STANDBY тугмасини босиб магнитолани
ишлатинг.
2. Диск солинадиган бўлма қопқоғини очинг.
CD диск солиб бўлма қопқоғини ёпинг.
3. Диск ўқилиши тўхтаганда MEMORY/CLKADJ тугмасини босинг. LCD дисплейда
«MEMORY» ёзуви ёниб-ўча бошлайди
ва дисплейда шунингдек трекнинг
дискдаги рақами «0» кўринади, унинг
дастурлашдаги рақами «P-01» пайдо
бўлади.
SKIP TUNING ёки тугмаларини босиб
керакли трекни танланг. Танланган режимни
сақлаб қўйиш учун MEMORY/CLK-ADJ
тугмасини босинг. Дастурлаш кўрсатгичи «Р-2»
бўлиб ўзгаради.
4. Кейинги трекни дастурлаш учун: TUNING
3960IM.indd 54 12.10.2007 15:51:01
Page 55

ЎЗБЕК
/SKIP ёки TUNING /SKIP
тугмасини босиб кейинги трекни танланг.
Шундан сўнг танланган трекни хотирада
сақлаш учун MEMORY/CLK-ADJ тугмасини
босинг. Энг кўпи билан 60 трекни хотирада
сақлаб қўйишингиз мумкин.
MEMORY/CLK-ADJ тугмасини босиб
дастурга киритилган трекларни кўриб
чиқишиниз мумкин.
Танланган трекни эшитиш учун PLAY/
PAUSE тугмасини босинг. Диск ўқилишини
тўхтатиш учун эса STOP тугмасини
босасиз.
Дастурга киритилган трек ўқилишини
бекор қилиш учун диск ўқишдан
тўхтаганда STOP тугмасини босинг ёки
диск солинадиган бўлма қопқоғини очинг.
Қайта ўқиш
Ушбу функция дискдаги барча треклар ёки
дастурга киритилган трекларни қайтариб ўқиш
имконини беради.
1. Битта трекни қайтариш учун REPEAT/
MONO-ST тугмасини босинг ва LCD
дисплейда «REPEAT» ёзуви пайдо бўлади.
2. Дискдаги барча трекларни қайтариш учун
REPEAT/MONO-ST тугмасини икки марта
босинг ва LCD дисплейда «REPEAT ALL»
ёзуви пайдо бўлади.
3. Қайтариб ўқишни бекор қилиш учун
қайтариш ёзуви ўчгунга қадар REPEAT/
MONO-ST тугмасини босиб туринг.
ИХТИЁРИЙ ТАРТИБДА ЎҚИШ
Дискдаги трекларни ихтиёрий тартибда
эшитишингиз мумкин. Бунинг учун
қуйидагиларни бажариш лозим бўлади:
1. Олисдан бошқариш пултидаги RANDOM
тугмасини бир марта босинг ва LCD
дисплейда «RANDOM» ёзуви пайдо бўлиб
треклар ихтиёрий тартиб билан ўқила
бошлайди.
2. Ихтиёрий тартибда ўқишни бекор қилиш
учун олисдан бошқариш пултидаги
RANDOM тугмасини яна бир марта босинг
ва ва «RANDOM» ёзуви ўчади.
МР3 ДИСКЛАРНИ ЎҚИШ
Ушбу жиҳоз MP3 форматида ёзилган кўп
дискларни ўқийди, бироқ диск ёзилаётганда
ишлатилган дастур сабаб бўлиб диск
ўқилмайдиган ҳолатлар ҳам бўлиши мумкин.
1. STANDBY тугмасини босиб магнитолани
ишлатинг.
2. Дискларни ўқиш режимин танланг. Бунинг
учун LCD дисплейда «СD» ёзуви пайдо
бўлгунга қадар FUNCTION тугмасини
босиб туринг
3. Диск солинадиган бўлма қопқоғини очинг,
MP3 дискини солиб бўлма қопқоғини ёпинг.
Жиҳоз дискни ўқишга ўтиб LCD дисплейда
папкалар ва треклар сони кўринади.
Total folder – умумий папкалар, Total track
– умумий треклар
4. Дискни биричи трекдан бошлаб эшитиш
учун PLAY/PAUSE тугмасини босинг.
First track – биринчи трек, Playing time – ижро
вақти
5. Биринчи бўлиб ўқиладиган трекни
танлашингиз ҳам мумкин. Бунинг учун диск
ўқилмаётган вақтда TUNING /SKIP
ёки TUNING /SKIP тугмасини босиб
керакли трекка ўтинг ёки PRESET/FOLDER
ёки тугмаларини босиб керакли
3960IM.indd 55 12.10.2007 15:51:01
Page 56

ЎЗБЕК
6
папкани танланг
PLAY/PAUSE тугмасини босиб трекни
эшитишга ўтинг.
Folder number – папка рақами, Track number
– трек рақами
6. MP3 диск ўқилаётган вақтда ID3 тугмасини
босинг. LCD дисплейда қўшиқ номи билан
албом номи кўринади. ID3 тугмаси икки
марта босилганда дисплейда ўтадиган
сатр кўринишидаги ахборот акс эта
бошлайди.
LCD дисплейда акс этадиган ахборот
дастур белгилашларига қараб турлича
бўлиши мумкин. Рус тилида бериладиган
ахборотда хато бўлиши мумкин.
7. Диск ўқилишини тўхтатиб туриш учун
PLAY/PAUSE тугмасини босинг. Диск
ўқилиши тўхтатилган вақтда “PLAY” ёзуви
ўчиб-ёниб туради. Диск ўқилиши режимига
қайтиш учун ушбу тугмани яна бир марта
босасиз.
Track number – трек рақами, Playing time
– ўқилиш вақти
8. Диск ўқилишини тўхтатиш учун STOP
тугмасини босинг. LCD дисплейда
папкалар ва треклар сони кўринади
ТРЕКЛАР ЎҚИЛИШИНИ ДАСТУРЛАШ
Треклар ўқилишини хохлаган кетма-кетликда
дастурлашингиз мумкин (кўпи билан 60
та бўлади). Бунинг учун қуйидаги амални
бажариш лозим бўлади:
1. STANDBY тугмасини босиб магнитолани
ишлатинг.
Диск солинадиган бўлма қопқоғини очинг.
МР3 диск солиб бўлма қопқоғини ёпинг.
Диск ўқилиши тўхтаганда MEMORY/CLK-
ADJ тугмасини босинг. LCD дисплейда
«MEMORY» ёзуви ёниб-ўча бошлайди
ва дисплейда шунингдек трекнинг
дискдаги рақами «0» кўринади, унинг
дастурлашдаги рақами «P-01» пайдо
бўлади.
2. TUNING /SKIP ёки TUNING /SKIP
тугмасини босиб трекни танланг ёки
PRESET/FOLDER ёки керакли
папкани танлаш учун тугмасини босиб
папкани танланг ва шундан сўнг TUNING
/SKIP ёки TUNING /SKIP тугмаси
билан керакли трекни танланг.
3. Танланган трекни сақлаб қўйиш учун
MEMORY/CLK-ADJ тугмасини босинг.
Дастурлаш кўрсатгичи «Р-2» бўлиб
ўзгаради.
4. Кейинги трекни дастурлаш учун 1-3
ҳаракатларни такрорланг. Энг кўпи билан
60 трекни хотирада сақлаб қўйишингиз
мумкин.
5. MEMORY/CLK-ADJ тугмасини кетма-кет
босиб дастурга киритилган трекларни
кўриб чиқишиниз мумкин.
6. Танланган трекни эшитиш учун PLAY/
PAUSE тугмасини босинг. Диск ўқилишини
тўхтатиш учун эса STOP тугмасини
босасиз.
Дастурга киритилган трек ўқилишини бекор
қилиш учун диск ўқишдан тўхтаганда STOP
тугмасини босинг ёки диск солинадиган бўлма
қопқоғини очинг.
Қайта ўқиш
Ушбу функция МР3 дискдаги барча трекларни
қайтариб ўқиш имконини беради.
1. Битта трекни қайтариш учун REPEAT/
MONO-ST тугмасини босинг ва LCD
дисплейда «REPEAT» ёзуви пайдо бўлади.
2. Папка ичидаги барча трекларни қайтариш
учун REPEAT/MONO-ST тугмасини икки
марта босинг ва LCD дисплейда «REPEAT
FOLDER» ёзуви пайдо бўлади.
3960IM.indd 56 12.10.2007 15:51:02
Page 57

ЎЗБЕК
7
3. МР3 дискдаги барча трекларни қайтариш
учун эса REPEAT/MONO-ST тугмасини уч
марта босинг ва LCD дисплейда «REPEAT
ALL» ёзуви пайдо бўлади.
4. Қайтариб ўқишни бекор қилиш учун
қайтариш индикатори ўчгунга қадар
REPEAT/MONO-ST тугмасини босиб
туринг.
КАССЕТА ЭШИТИШ
1. STANDBY тугмасини босиб магнитолани
ишатинг. TAPE режимига ўтиш учун LCD
дисплейда «TAPE» ёзуви пайдо бўлгунга
қадар FUNCTION тугмасини босиб туринг.
2. STOP/EJ тугмасини босинг ва кассетани
кассета қўйиш жойига қўйинг.
3. Кассета қўйиш жойини ёпинг.
4. Кассетани эшитиш учун PLAY тугмасини
босинг
5. VOLUME ёки тугмалари билан
овоз баландлигини кераклича қилиб
ўзгартиринг.
6. Кассета айланишини тўхтатиб туриш учун
PAUSE тугмасини босинг.
7. Кассета айланишини бутунлай тўхтатиш
учун эса STOP/EJ тугмасини босинг.
8. Олдинга/орқага тез айлантириш учун
F.FWD/REW тугмаларининг керагини
босинг.
9. Кассета лентаси охирига етганда жиҳоз
автоматик равишда ўчади.
10. Кассетани чиқариб олиш учун STOP/EJ
тугмасини босинг.
Огоҳлантириш: кассета механизми ва
лента шикастланмаслиги учун ҳар бир
операциядан сўнг албатта STOP/EJ
тугмасини босинг.
РАДИОДАН ЁЗИШ
1. РАДИО бўлимида кўрсатилган тартибда
керакли радиостанцияни топинг.
2. Кассета қўйиш жойига тоза кассета қўйинг
3. PAUSE тугмасини босинг.
4. RECORD тугмасини боссангиз PLAY
тугмаси ҳам автоматик равишда босилади.
Овоз баландлиги даражасини хохлаган
тарзда ўзгартиришингиз мумкин ва бу ёзув
сифатига таъсир қилмайди.
5. Ёзишни бошлаш учун PAUSE тугмасини
босинг.
6. Ёзишни вақтинчалик тўхтатиб туриш учун
PAUSE тугмасини босинг. Ёзишни давом
эттириш учун ушбу тугмани яна бир марта
босасиз.
7. Ёзишни тўхтатиш учун STOP/EJ тугмасини
босинг. Кассета охиригача ёзилганда ёзиш
автоматик равишда тўхтайди.
БОШҚА МУСИҚА МАНБААЛАРИДАН ЁЗИШ
Кассетага бошқа мусиқа манбаалари, масалан
CD диск ёки USB воситасидан ёзиб олишингиз
мумкин. Бунинг учун керакли мусиқа
манбаасини ишлатинг ва РАДИОДАН ЁЗИШ
бўлимида кўрсатилган қоидаларга амал қилиб
ёзишга ўтинг
USB ВОСИТА
1. STANDBY тугмасини босиб магнитолани
ишлатинг
2. USB восита режимига ўтиш учун LCD
дисплейда «USB» ёзуви кўрингунга қадар
FUNCTION тугмасини босиб туринг.
3. USB воситасини (масалан кичик МРЗ
плейер ёки флэш хотирани) USB
улаш ўрнига киритинг (2, 1-расм). LCD
дисплейда папкалар ва треклар сони
кўринади.
Total Folder – барча папкалар сони, Total Track
– барча треклар сони
Эслатма: агар USB улаш жойига кичик МРЗ
плейер ёки флэш хотира уланмаса LCD
дисплейда «NO DEV» ёзуви кўринади.
3960IM.indd 57 12.10.2007 15:51:03
Page 58

ЎЗБЕК
8
4. Эшитиш учун PLAY/PAUSE тугмасини
босинг.
5. USB воситасини улаб эшитганда
бошқариш тугмалари ва ишлаш тартиби
МР3 дискники билан бир хил бўлади.
Шунинг учун МР3 ДИСКЛАРНИ ЎҚИШ
бўлимидаги қоидаларга амал қилинг.
SD ХОТИРА КАРТАЛАРИ
1. STANDBY тугмасини босиб магнитолани
ишлатинг
2. SD режимига ўтиш учун LCD дисплейда
«SD» ёзуви кўрингунга қадар FUNCTION
тугмасини босиб туринг.
3. SD/MMC хотира картасини (3, 1-расм)
ўрнига киритинг. LCD дисплейда папкалар
ва треклар сони кўринади.
Total Folder – барча папкалар сони, Total Track
– барча треклар сони
Эслатма: агар улаш жойига (3, 1-расм)
SD/MMC хотира картаси уланмаса LCD
дисплейда «NO SD»ёзуви кўринади.
4. Эшитиш учун PLAY/PAUSE тугмасини
босинг.
5. Хотира картасини улаб эшитганда
бошқариш тугмалари ва ишлаш тартиби
МР3 дискники билан бир хил бўлади.
Шунинг учун МР3 ДИСКЛАРНИ ЎҚИШ
бўлимидаги қоидаларга амал қилинг.
Техник хусусиятлари
Лозим бўладиган
электр қуввати
AC 230V/50Hz
Оғирлиги 2.7Kg
Ўлчами L 350 x W 239 x H 161
(mm)
Чиқиш қуввати 2 x 2W RMS/ channel
Динамиклари Two-way:
1. 3'' 8 Ohms 3W
x2pcs (middle)
2. 2'' 8 Ohms 0.5W
x2pcs (Tweeter)
Батареялардан
ишлаши
8 соат
СD форматлари CD,CD-R ,CD-RW, MP3
Қабул қиладиган
частоталар доираси
20Hz ~20KHz
Сигнал/шовқин
нисбати
55dB
Линиядан
ташқаридаги
бузилишлар
коэффициенти
<1%
FM/MW (AM): FM: 65~108 MHz
Частота диапазони AM : 522~1620 KHz
Оралиқ частота FM: 10.7MHz
AM: 450 kHz
Антенна FM: телескопсимон
антенна
AM: ферритли ички
антенна
Кассета декаси 6 keys; DC bias; One
touch recording
Ишлаб чиқарувчи жиҳоз дизайни ва
хусусиятларини олдиндан огоҳлантирмасдан
ўзгартириш ҳуқуқини сақлаб қолади.
Жиҳознинг ишлаш муддати 3 йилдан кам эмас
Электрон ва электр техникаси жиҳозларини
чиқитга чиқариш қоидалари (Чиқиндиларни
ажратиш тизими ишлайдиган Европа
Иттифоқи ва бошқа Европа давлатларида
амал қилади).
Ушбу аломат электрон ва электр техникаси
буюмлари ишлаш муддати тугаганидан
сўнг бошқа маиший ахлатдан алоҳида қилиб
чиқитга чиқарилиши кераклигини билдиради. Эски
жиҳозларни тўғри чиқитга чиқариш атроф муҳитга
етадиган зарар олдини олади. Бу борада тўлароқ
маълумот олиш учун чиқитга чиқариш ишлари
билан шуғулланадиган ташкилот ёки маҳсулот сотиб
олинган дўконга мурожаат қилинг.
Кафолат шартлари
Ушбу жиҳозга кафолат бериш масаласида
худудий дилер ёки ушбу жиҳоз харид қилинган
компанияга мурожаат қилинг. Касса чеки ёки
харидни тасдиқловчи бошқа бир молиявий
ҳужжат кафолат хизматини бериш шарти
ҳисобланади.
Ушбу жиҳоз 89/336/ЯЕC Кўрсатмаси
асосида белгиланган ва Қувват
кучини белгилаш Қонунида (73/23
ЕЭС) айтилган ЯХС талабларига
мувофиқ келади.
3960IM.indd 58 12.10.2007 15:51:03
Page 59

GB
A production date of the item is indicated in the serial number on the technical data plate. A serial
number is an eleven-unit number, with the first four figures indicating the production date. For example, serial number 0606ххххххх means that the item was manufactured in June (the sixth month)
2006.
RUS
Дата производства изделия указана в серийном номере на табличке с техническими данными.
Серийный номер представляет собой одиннадцатизначное число, первые четыре цифры
которого обозначают дату производства. Например, серийный номер 0606ххххххх означает,
что изделие было произведено в июне (шестой месяц) 2006 года.
KZ
Бұйымның шығарылған мерзімі техникалық деректері бар кестедегі сериялық нөмірде көрсетілген.
Сериялық нөмір он бір саннан тұрады, оның бірінші төрт саны шығару мерзімін білдіреді. Мысалы,
сериялық нөмір 0606ххххххх болса, бұл бұйым 2006 жылдың маусым айында (алтыншы ай)
жасалғанын білдіреді.
UA
Дата виробництва виробу вказана в серійному номері на табличці з технічними даними. Серійний
номер представляє собою одинадцятизначне число, перші чотири цифри якого означають дату
виробництва. Наприклад, серійний номер 0606ххххххх означає, що виріб був виготовлений в
червні (шостий місяць) 2006 року.
UZ
Жиҳоз ишлаб чиқарилган муддат техник хусусиятлар кўрсатилган лавҳачадаги серия рақамида
кўрсатилган. Серия рақами ўн битта сондан иборат бўлиб уларнинг биринчи тўрттаси ишлаб
чиқарилган вақтни ифода этади. Мисол учун 0606ххххххх серия рақами жиҳоз 2006 йилнинг июн
ойида (олтинчи ойда) ишлаб чиқарилганлигини билдиради.
3960IM.indd 59 12.10.2007 15:51:03
Page 60

3960IM.indd 60 12.10.2007 15:51:03
 Loading...